

Samsung P2370HD - Full 1080p HDTV LCD Monitor, SyncMaster P2570HD, SyncMaster P2370HD User Manual [es, en]
Page 1
Contact SAMSUNG WORLDWIDE
If you have any questions or comments relating to Samsung products, please contact the SAMSUNG customer
care center.
Contacte con SAMSUNG WORLDWIDE
Si tiene cualquier comentario o pregunta referentes a los productos Samsung, póngase en contacto con el centro
de atención al cliente de SAMSUNG.
Country
Customer Care
Center
Web Site Address
U.S.A
1-800SAMSUNG
(726-7864)
www.samsung.com/us
Samsung Electronics America, Inc.
105 Challenger Road Ridgeeld Park, NJ
07660-0511
CANADA
1-800SAMSUNG
(726-7864)
www.samsung.com/ca
Samsung Electronics Canada Inc.,
Customer Service 55 Standish Court
Mississauga, Ontario L5R 4B2 Canada
Samsung Electronique Canada Inc.,
Service à la Clientèle 55 Standish Court
Mississauga, Ontario L5R 4B2 Canada
LCD TV MONITOR
user manual
imagine the possibilities
Thank you for purchasing this Samsung product.
To receive more complete service, please
register your product at
Model Serial No.
BN68-02280C-04
SyncMaster P2370HD P2570HD
For more information on the operating procedures,
refer to the CD manual.
www.samsung.com/register
Page 2
Important Warranty Information Regarding Television Format Viewing ❑
See the warranty card for more information on warranty terms. N
Wide screen format LCD Displays (16:9, the aspect ratio of the screen width to height) are primarily
designed to view wide screen format full-motion video. The images displayed on them should
primarily be in the wide screen 16:9 ratio format, or expanded to ll the screen if your model offers
this feature and the images are constantly moving. Displaying stationary graphics and images
on screen, such as the dark sidebars on nonexpanded standard format television video and
programming, should be limited to no more than 5% of the total television viewing per week.
Additionally, viewing other stationary images and text such as stock market reports, video game
displays, station logos, web sites or computer graphics and patterns, should be limited as described
above for all televisions. Displaying stationary images that exceed the above guidelines can cause
uneven aging of LCD Displays that leave subtle, but permanent burned-in ghost images in the LCD
picture. To avoid this, vary the programming and images, and primarily display full screen moving
images, not stationary patterns or dark bars.
On LCD models that offer picture sizing features, use these controls to view different formats as a
full screen picture.
Be careful in the selection and duration of television formats used for viewing. Uneven LCD aging
as a result of format selection and use, as well as burned-in images, are not covered by your
Samsung limited warranty.
Precautions When Displaying a Still Image ❑
A still image may cause permanent damage to the TV screen
Do not display a still image on the LCD panel for more than 2 hours as it can cause screen
●
image retention. This image retention is also known as “screen burn”. To avoid such image
retention, reduce the degree of brightness and contrast of the screen when displaying a still
image.
● Watching the LCD TV in 4:3 format for a long period of time may leave traces
of borders displayed on the left, right and center of the screen caused by the
difference of light emission on the screen.
Playing a DVD or a game console may cause a similar effect to the screen.
Damages caused by the above effect are not covered by the Warranty.
Displaying still images from Video games and PC for longer than a certain period of time may ●
produce partial after-images.
To prevent this effect, reduce the ‘brightness’ and ‘contrast’ when displaying still images.
© 2009 Samsung Electronics Co., Ltd. All rights reserved.
Page 3
English - 1
English
License ❑
TruSurround HD, SRS and Symbol are trademarks of SRS Labs, Inc.
TruSurround HD technology is incorporated under license from SRS Labs, Inc.
Manufactured under license from Dolby Laboratories. Dolby and the double-D symbol are trademarks
of Dolby Laboratories.
Symbol ❑
N O T
Note One-Touch Button TOOL Button
CONTENTS
GENERAL INFORMATION
Accessories ■ ................................................. 2
Viewing the Control Panel
■ ........................... 2
Viewing the Connection Panel
■ ..................... 3
Remote Control
■ ........................................... 4
Installing Batteries in the Remote Control ■
........... 4
CONNECTIONS
Connecting VHF and UHF Antennas ■ ........... 5
Connecting Cable TV
■ .................................. 6
Connecting a DVD / Blu-Ray player / Satellite ■
receiver (Set-Top Box) via HDMI
....................... 7
Connecting a DVD / Blu-Ray player / Satellite ■
receiver (Set-Top Box) via DVI
.......................... 8
Connecting a DVD / Blu-Ray player / Satellite ■
receiver (Set-Top Box) via Component cables
..... 8
Connecting a Digital Audio System ■ ............. 9
Connecting a PC
■ ......................................... 9
OPERATION
Turning the TV On and Off ■ .........................11
Plug & Play Feature
■ ....................................11
CHANNEL CONTROL
Conguring the Channel Menu ■ .................. 12
Managing Channels
■ .................................. 13
Channel List Option Menu (in All Channels /
■
Added Channels / Favorite)
....................... 13
Channel List Option Menu (in Programmed) ■ ......
14
PICTURE CONTROL
Conguring the Picture Menu (TV / AV / ■
Component / HDMI ).................................. 15
Using Your TV as a Computer (PC) Display ■
...... 17
Setting up the TV with your PC
■ ................. 18
SOUND CONTROL
Conguring the Sound Menu ■ ..................... 20
SETUP
Conguring the Setup Menu ■ ...................... 21
INPUT / SUPPORT
Conguring the Input Menu ■ ....................... 26
Conguring the Support Menu
■ ................... 27
ANYNET
+
Connecting Anynet ■
+
Devices .................... 28
Setting Up Anynet
■
+
.................................... 30
Switching between Anynet
■
+
Devices ......... 30
Troubleshooting for Anynet
■
+
...................... 32
APPENDIX
Troubleshooting ■ ......................................... 33
Wall Mount Kit Specications (VESA)
■ ....... 35
Using the Anti-Theft Kensington Lock
■ ....... 35
Specications ■ ............................................ 36
Page 4
English - 2
GENERAL INFORMATION
Accessories ¦
Please make sure the following items are included with your LCD TV. If any items are missing,
contact your dealer.
Remote Control & Batteries (AAA x 2) (Not available in all locations) / Power Cord / Cleaning
Cloth / User Manual (CD, Book) / Quick Setup Guide / Warranty Card (Not available in all
locations) / Cable holding ring / Stand Body / Stand Base
The items color and shape may vary depending on the model.
N
Cleaning Cloth is only provided for highly polished black products as a product feature.
N
Viewing the Control Panel ¦
The product color an shape may vary depending on the model. N
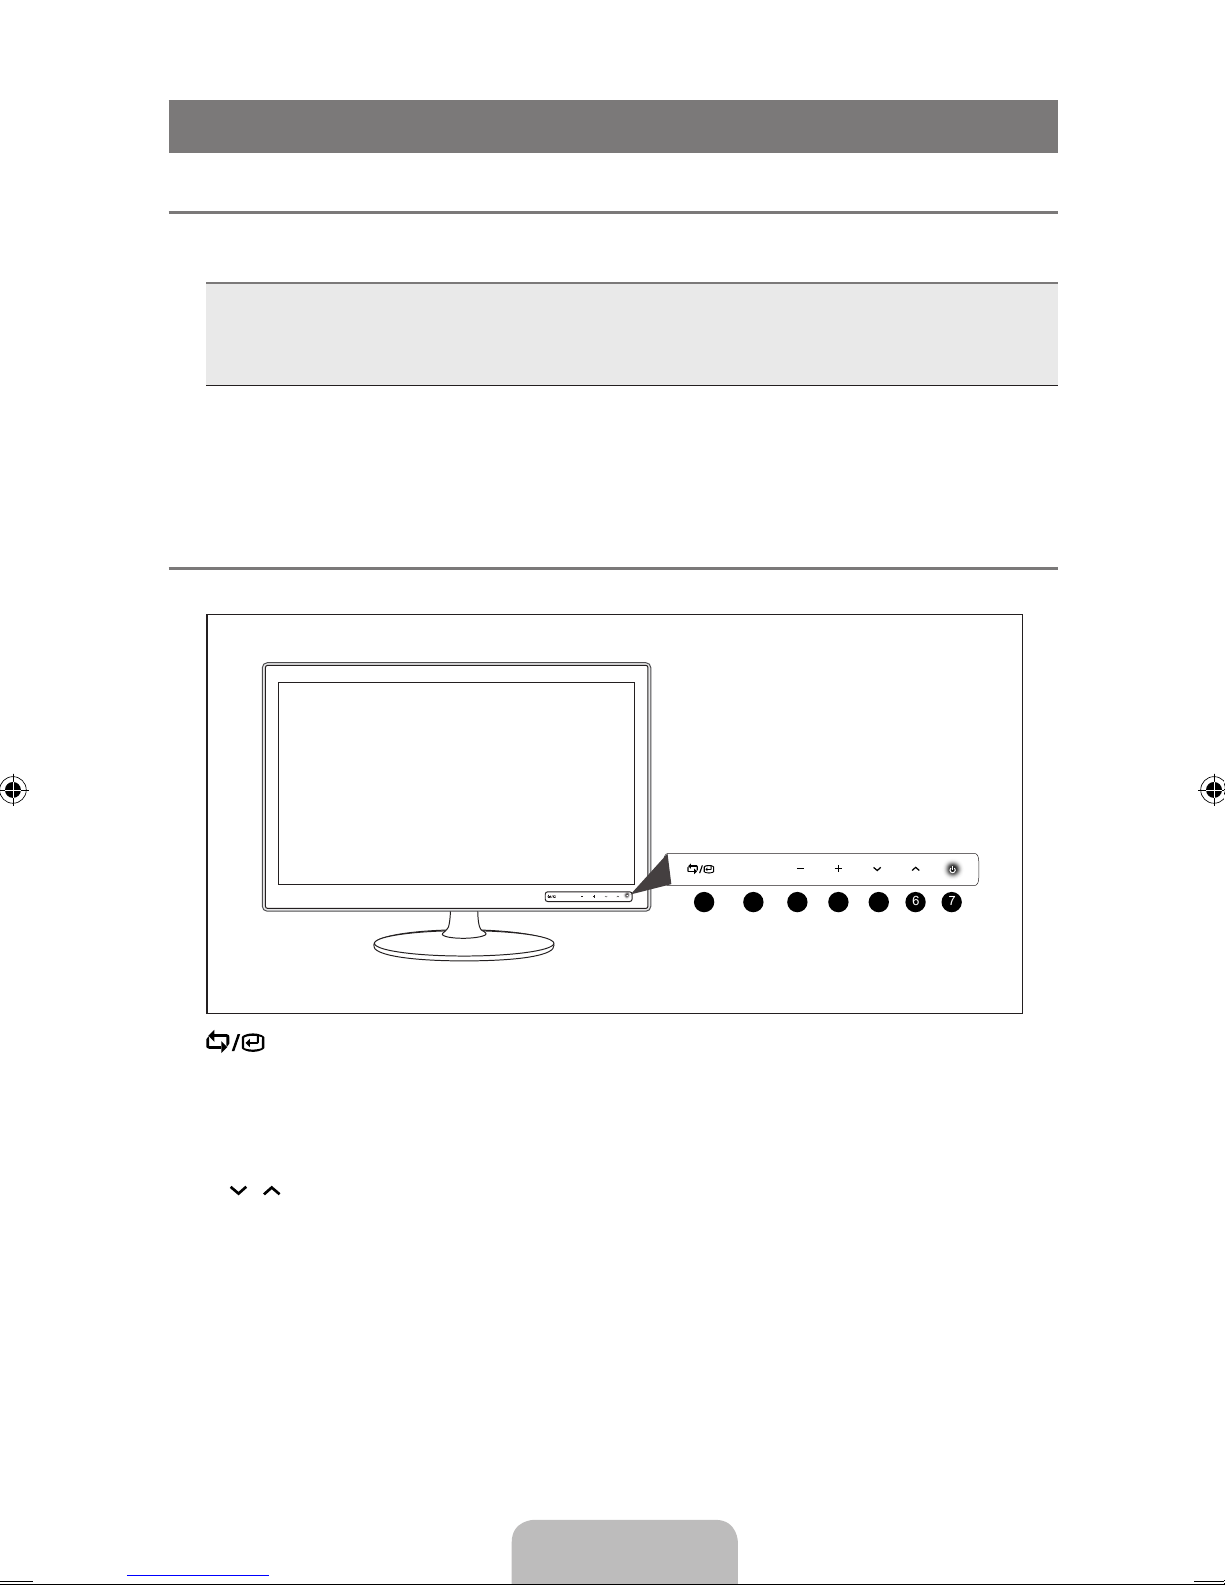
1
: Toggles between all the available input sources. In the on-screen menu, use this
E button as you use the button on the remote control.
2
MENU : Press to see an on-screen menu of your TV’s features.
3,4
- /+ : Moves from one menu item to another horizontally or adjusts selected menu values
Adjusts the audio volume.
5,6
, : Moves from one menu item to another vertically or adjusts selected menu values. In TV
mode, selects TV channels.
7 P
(POWER): Press to turn the TV on and off.
POWER INDICATOR: Blinks and turns off when the power is on and lights up in stand-by mode.
1 2 3 4 5 6 7
MENU
MENU
Page 5
English - 3
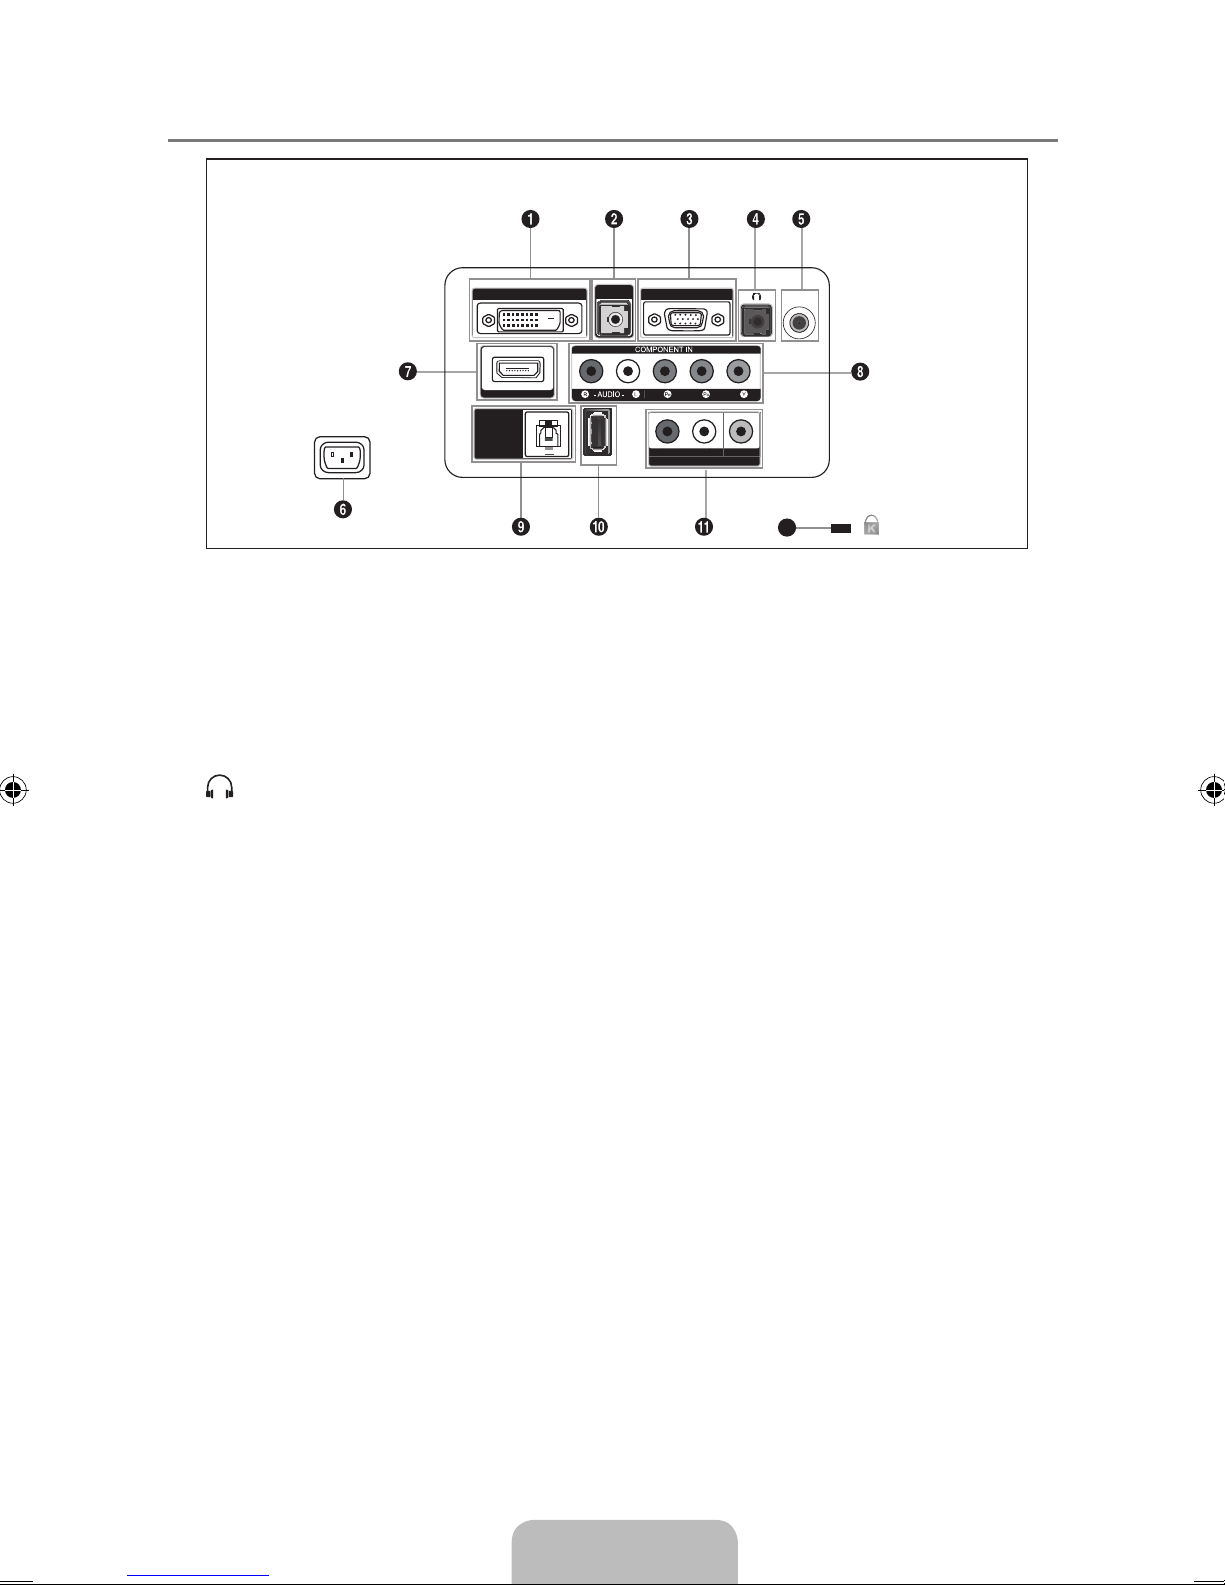
Viewing the Connection Panel ¦
The product color and shape may vary depending on the model. N
1
DVI-D IN
Connects to the video jacks on your PC.
–
2
HDMI/PC/DVI-D AUDIO IN
Connect the HDMI/PC/DVI-D AUDIO IN terminal at the back of your product to your
–
computer’s sound card.
3
PC IN
Connects to the video jacks on your PC.
–
4
Connect your headphones to the Headphone connection terminal. –
5
ANT IN
Connects to an antenna or cable TV system.
–
6
POWER INPUT
Connects the supplied power cord. –
7
HDMI IN
Connects to the HDMI jack of a device with an HDMI output.
–
No sound connection is needed for an HDMI to HDMI connection.
N
8
COMPONENT IN
Connect the port of the DVD, VCR (DVD / DTV Set-Top Box) to the [ R - AUDIO - L] port of
–
the product. Connect the VIDEO OUT port of the DVD / DTV Set-Top Box to the [ PR, PB,Y ]
input ports using a component video cable ( PR, PB, Y ).
9
DIGITAL AUDIO OUT (OPTICAL)
Connects to a Digital Audio component.
–
0
SERVICE
Connector for service only.
–
!
AV IN
Video and audio inputs for external devices, such as a camcorder or VCR.
–
@
KENSINGTON LOCK
The Kensington Lock (optional) is a device used to physically x the system when used in
–
a public place. If you want to use a locking device, contact the dealer where you purchased
the TV.
The location of the Kensington Lock may be different depending on its model.
N
[TV Rear Panel]
ANT IN
HDMI IN
SERVICE
HDMI/PC
/DVI-D
AUDIO IN
AV IN
- AUDIO -
R
L
VIDEO
DVI-D IN
PC IN
DIGITAL
AUDIO OUT
(OPTICAL)
12
Page 6
English - 4
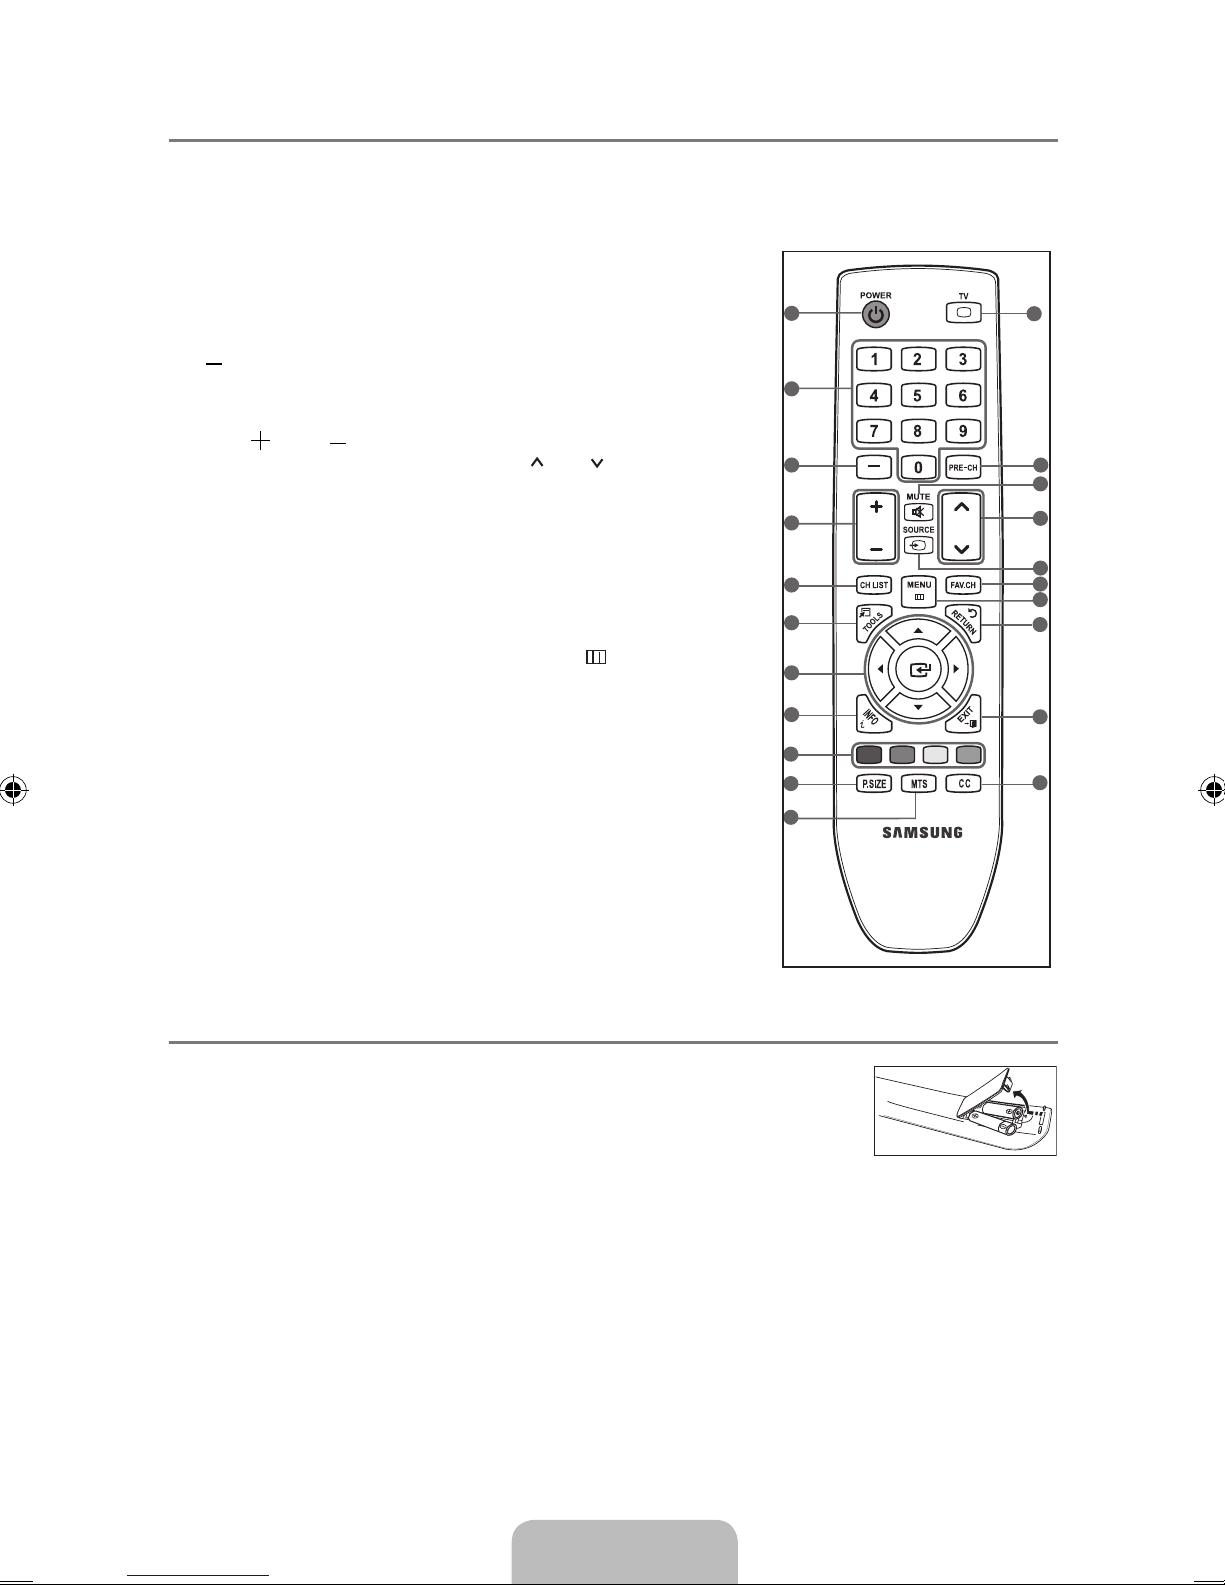
Remote Control ¦
You can use the remote control up to a distance of about 23 feet from the TV. N
The performance of the remote control may be affected by bright light.
N
The product color an shape may vary depending on the model.
N
1
POWER:Turns the TV on and
off.
2
NUMERIC BUTTONS: Press to
change the channel.
3
: The “-” button operates only
for TV. It is used to select MMS
(multi-channel) for a TV.
4
VOL / VOL : Press to
increase or decrease the
volume.
5
CH LIST: Used to display
Channel Lists on the screen.
6
TOOLS: Use to quickly select
frequently used functions.
7
UP▲/DOWN▼/LEFT◄/
RIGHT►/E: Use to select on-
screen menu items and change
menu values.
8
INFO: Press to display
information on the TV screen.
9
COLOR BUTTONS: Use these
buttons in the Channel list, etc.
0
P.SIZE:Picture size selection.
!
MTS:Press to choose stereo,
mono or Separate Audio
Program (SAP broadcast).
@
TV: Selects the TV mode
directly.
#
PRE-CH: This button
is used to return to the
previous channel viewed.
$
MUTE M: Press to
temporarily cut off the
sound.
%
CH : Press to change
channels.
^
SOURCE: Press to display
and select the available
video sources.
&
FAV.CH: Press to switch to
your favorite channels.
*
MENU : Displays the
main on-screen menu.
(
RETURN: Returns to the
previous menu.
)
EXIT:Press to exit the
menu.
a
CC:Controls the caption
decoder.
Installing Batteries in the Remote Control ¦
1. Lift the cover at the back of the remote control upward as shown in the gure.
2. Install two AAA size batteries.
Make sure to match the “+” and “–” ends of the batteries with the diagram
N
inside the compartment.
3. Replace the cover.
Remove the batteries and store them in a cool, dry place if you won’t be using the remote control
N
for a long time. (Assuming typical TV usage, the batteries should last for about one year.)
If the remote control doesn’t work, check the following:
N
Is the TV power on?
●
Are the plus and minus ends of the batteries reversed? ●
Are the batteries drained? ●
Is there a power outage or is the power cord unplugged? ●
Is there a special uorescent light or neon sign nearby? ●
CHVOL
17
18
19
20
21
15
14
13
1
2
3
4
6
5
7
8
9
10
1 1
12
16
Page 7
English - 5
CONNECTIONS
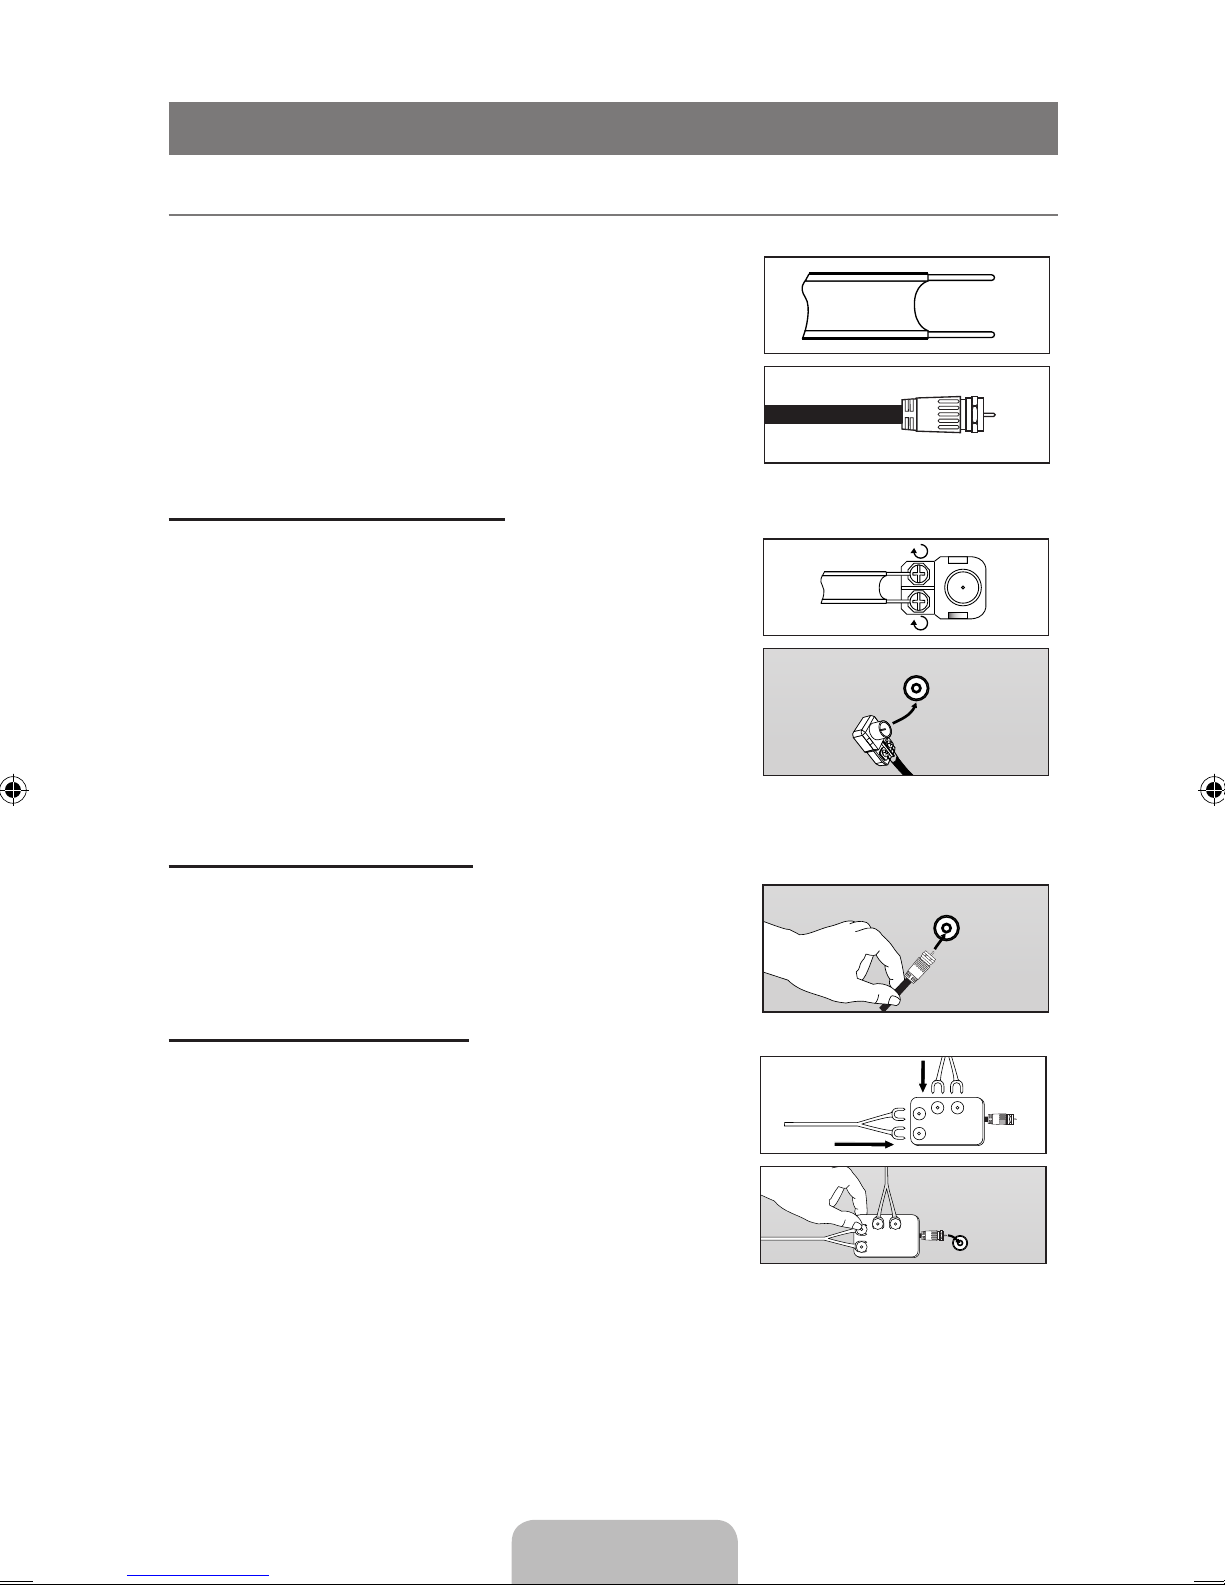
Connecting VHF and UHF Antennas ¦
If your antenna has a set of leads that look like the diagram to the right, see ‘Antennas with 300 Ω
Flat Twin Leads’ below.
If your antenna has one lead that looks like the diagram to the
right, see ‘Antennas with 75 Ω Round Leads’.
If you have two antennas, see ‘Separate VHF and UHF
Antennas’.
Antennaswith300ΩFlatTwinLeads
If you are using an off-air antenna (such as a roof antenna or
‘rabbit ears’) that has 300Ω twin at leads, follow the directions
below.
1. Place the wires from the twin leads under the screws on a 300-
75 Ω adapter (not supplied). Use a screwdriver to tighten the
screws.
2. Plug the adaptor into the ANT IN terminal on the back of the TV.
Antennaswith75ΩRoundLeads
Plug the antenna lead into the ANT IN terminal on the back of
the TV.
Separate VHF and UHF Antennas
If you have two separate antennas for your TV (one VHF and
one UHF), you must combine the two antenna signals before
connecting the antennas to the TV. This procedure requires
an optional combiner-adaptor (available at most electronics
shops).
1. Connect both antenna leads to the combiner.
2. Plug the combiner into the ANT IN terminal on the bottom of
the rear panel.
ANT IN
ANT IN
UHF
VHF
ANT IN
UHF
VHF
Page 8
English - 6
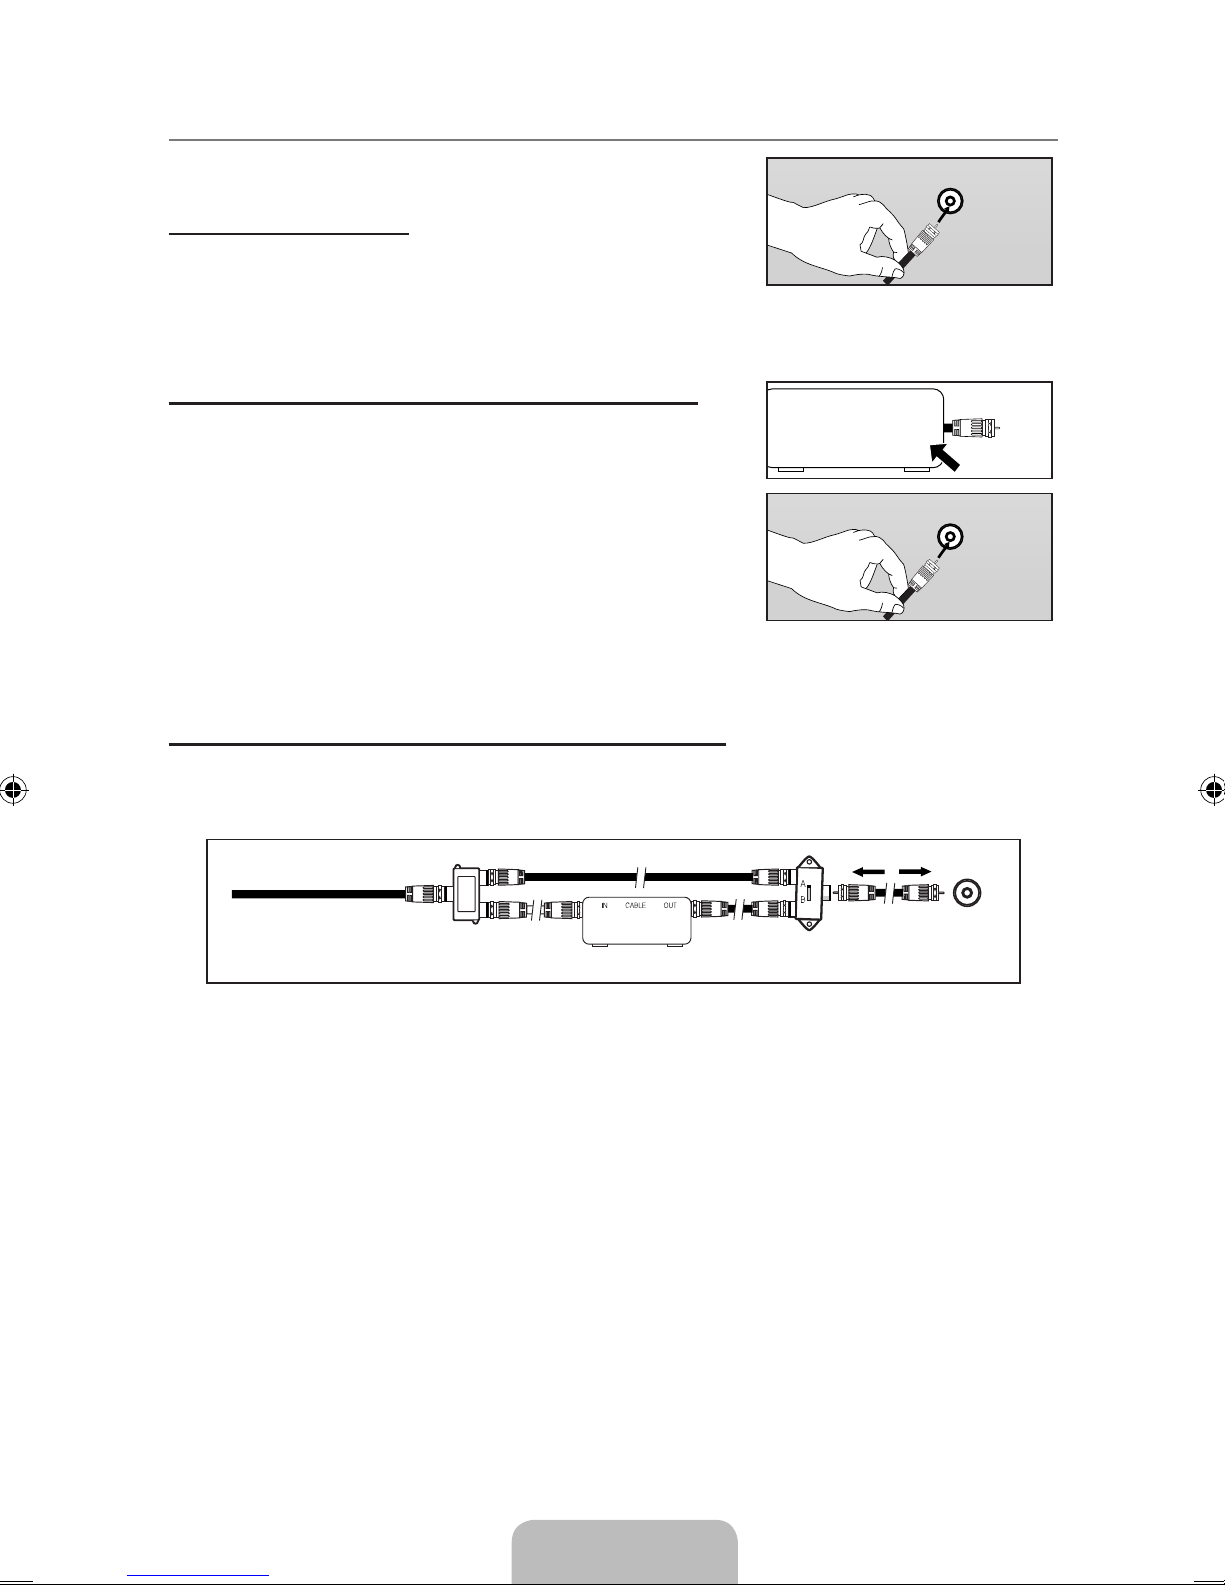
Connecting Cable TV ¦
To connect to a cable TV system, follow the instructions below.
Cable without a Cable Box
Plug the incoming cable into the ANT IN terminal on the back of
the TV.
Because this TV is cable-ready, you do not need a cable box
N
to view unscrambled cable channels.
Connecting to a Cable Box that Descrambles All Channels
1. Find the cable that is connected to the ANT OUT terminal on
your cable box.
This terminal might be labeled ‘ANT OUT’, ‘VHF OUT’ or
N
simply, ‘OUT’.
2. Connect the other end of this cable to the ANT IN terminal on
the back of the TV.
Connecting to a Cable Box that Descrambles Some Channels
If your cable box descrambles only some channels (such as premium channels), follow the
instructions below. You will need a two-way splitter, an RF (A/B) switch and four lengths of RF cable.
(These items are available at most electronics stores.)
Splitter
Cable Box
Incoming cable
TV Rear
ANT IN
RF (A/B) Switch
1. Find and disconnect the cable that is connected to the ANT IN terminal on your cable box.
This terminal might be labeled ‘ANT IN’, ‘VHF IN’ or simply, ‘IN’.
N
2. Connect this cable to a two-way splitter.
3. Connect an RF cable between the OUTPUT terminal on the splitter and the IN terminal on
the cable box.
4. Connect an RF cable between the ANT OUT terminal on the cable box and the B–IN terminal
on the RF(A/B) switch.
5. Connect another cable between the other OUT terminal on the splitter and the A–IN terminal
on the RF (A/B) switch.
6. Connect the last RF cable between the OUT terminal on the RF (A/B) switch and the ANT IN
terminal on the rear of the TV.
After you have made this connection, set the A/B switch to the ‘A’ position for normal viewing. Set
the A/B switch to the ‘B’ position to view scrambled channels. (When you set the A/B switch to ‘B’,
you will need to tune your TV to the cable box’s output channel, which is usually channel 3 or 4.)
ANT IN
ANT IN ANT OUT
ANT IN
Page 9

English - 7
Connecting a DVD / Blu-Ray player / Satellite receiver (Set-Top Box) via HDMI ¦
This connection can only be made if there is an HDMI Output connector on the external device.
TV Rear Panel
DVD / Blu-Ray player / Satellite receiver
(Set-Top Box) Rear Panel
ANT IN
HDMI IN
SERVICE
HDMI/PC
/DVI-D
AUDIO IN
AV IN
- AUDIO -
R
L
VIDEO
DVI-D IN
PC IN
DIGITAL
AUDIO OUT
(OPTICAL)
SEVICE
HDMI/P
C
/
DVI-D
A
UDIO IN
A
V IN
AUDIO
-
VIDE
O
D
VI-D IN
PC I
N
DIGI
T
A
L
AUDIO OU
T
(O
PTICAL
)
1
HDMI Cable (Not supplied)
What is HDMI? N
HDMI(High-Denition Multimedia Interface), is an interface that enables the transmission of
●
digital audio and video signals using a single cable.
The difference between HDMI and DVI is that the HDMI device is smaller in size and has the ●
HDCP (High Bandwidth Digital Copy Protection) coding feature installed.
Each DVD / Blu-Ray player / Satellite receiver (Set-Top Box) has a different back panel N
conguration.
The TV may not output sound and pictures may be displayed with abnormal color when DVD /
N
Blu-Ray player / Satellite receiver (Set-Top Box) supporting HDMI versions older than 1.3 are
connected. When connecting an older HDMI cable and there is no sound, connect the HDMI
cable to the HDMI IN jack and the audio cables to the DVI-D IN jacks on the back of the TV. If
this happens, contact the company that provided the DVD / Blu-Ray player / Satellite receiver
(Set-Top Box) to conrm the HDMI version, then request an upgrade.
HDMI cables that are not 1.3 may cause annoying icker or no screen display.
N
Page 10
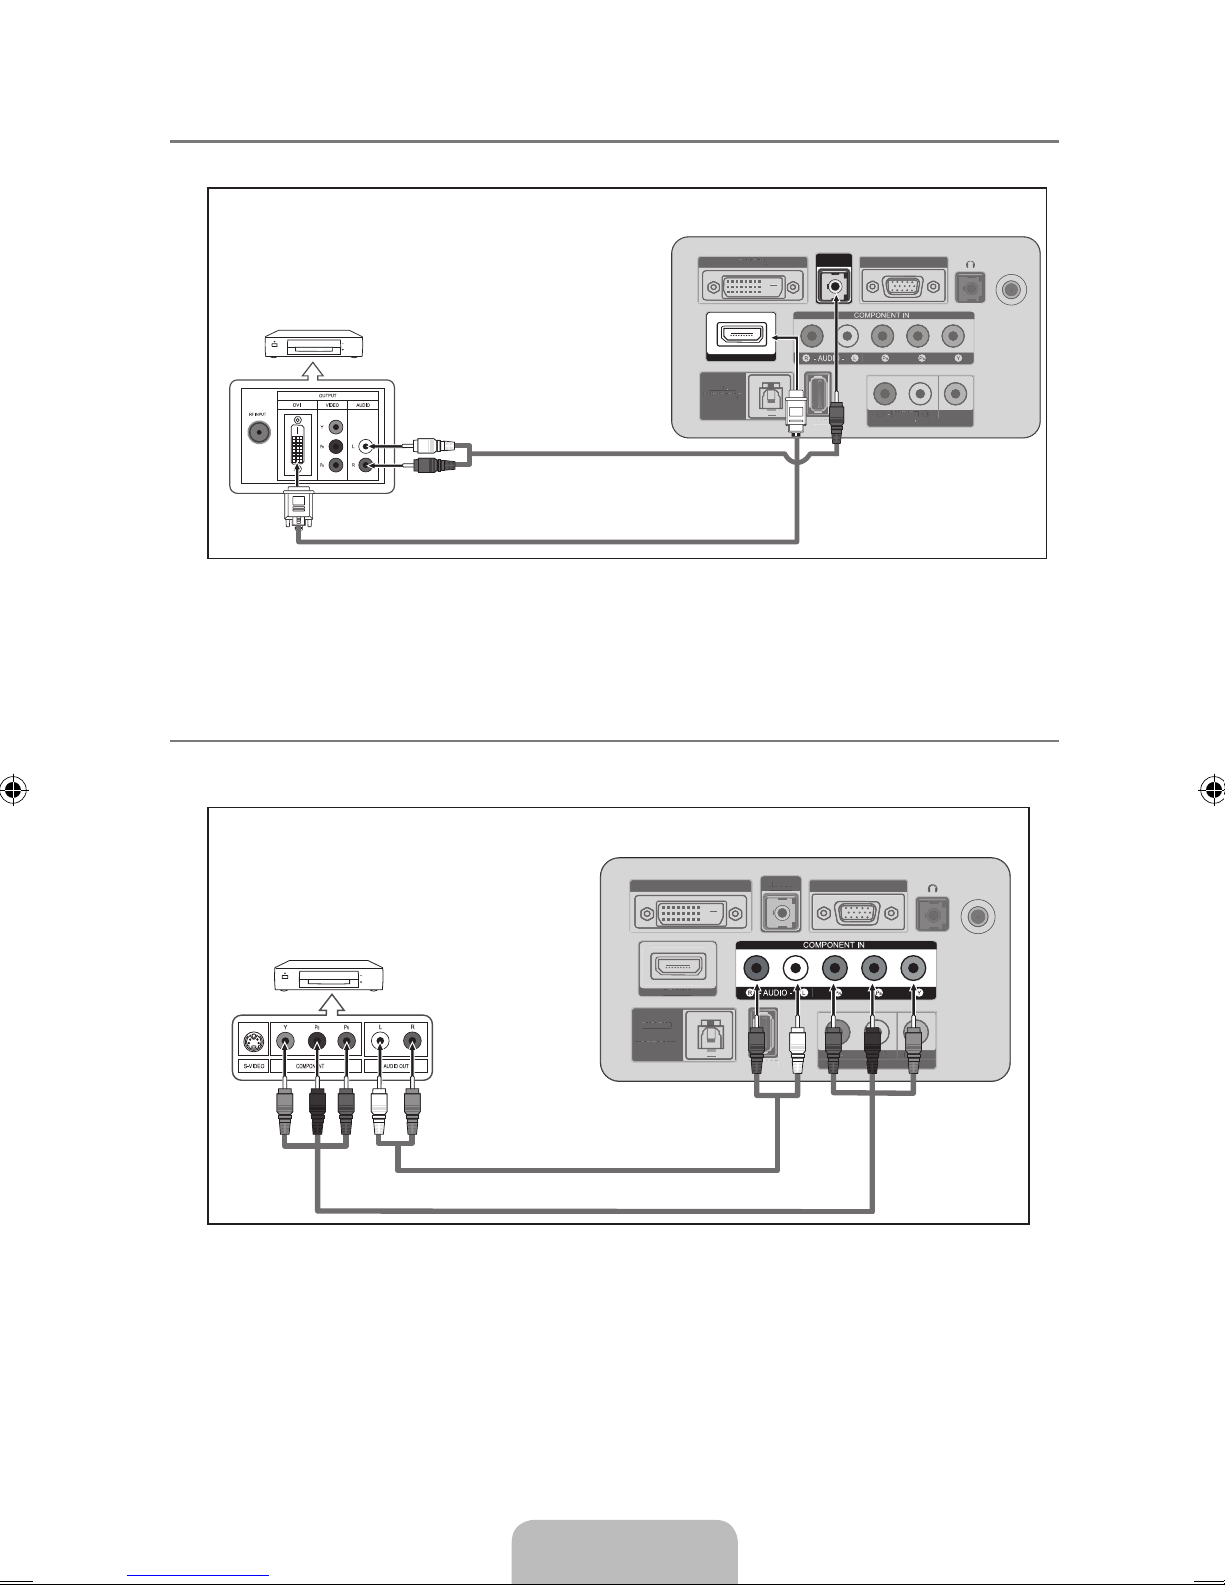
English - 8
Connecting a DVD / Blu-Ray player / Satellite receiver (Set-Top Box) via DVI ¦
This connection can only be made if there is a DVI Output connector on the external device.
ANT IN
HDMI IN
SERVICE
HDMI/PC
/DVI-D
AUDIO IN
AV IN
- AUDIO -
R
L
VIDEO
DVI-D IN
PC IN
DIGITAL
AUDIO OUT
(OPTICAL)
ANT I
N
SERVICE
AUDIO
-
V
IDE
O
DVI-D I
N
P
C IN
D
IGI
TAL
A
UDIO O
U
T
(OPTICAL
)
1
DVI to HDMI Cable (Not supplied)
2
RCA to stereo Cable (Not supplied)
DVD / Blu-Ray player /
Satellite receiver
(Set-Top Box)
TV Rear Panel
Each DVD / Blu-Ray player / Satellite receiver (Set-Top Box) has a different back panel N
conguration.
When connecting a DVD / Blu-Ray player / Satellite receiver (Set-Top Box), match the
N
color of the connection terminal to the cable.
Connecting a DVD / Blu-Ray player / Satellite receiver (Set-Top Box) via Component cables ¦
The rear panel jacks on your TV make it easy to connect a DVD / Blu-Ray player / Satellite receiver
(Set-Top Box) to your TV.
ANT IN
HDMI IN
SERVICE
HDMI/PC
/DVI-D
AUDIO IN
AV IN
- AUDIO -
R
L
VIDEO
DVI-D IN
PC IN
DIGITAL
AUDIO OUT
(OPTICAL)
S
ERVICE
HDMI/P
C
/
DVI-
D
AUDIO IN
A
V I
N
AUDIO -
V
IDE
O
D
VI-D IN
P
C I
N
D
IGITA
L
A
UDIO OUT
(OPTICAL
)
TV Rear Panel
2
Audio Cable (Not supplied)
1
Component Cable (Not supplied)
DVD / Blu-Ray player /
Satellite receiver
(Set-Top Box)
Component video separates the video into Y (Luminance (brightness)), Pb (Blue) and Pr (Red) N
for enhanced video quality. Be sure to match the component video and audio connections. For
example, if connecting a Component video cable to COMPONENT IN , connect the audio cable
to COMPONENT IN also.
Each DVD / Blu-Ray player / Satellite receiver (Set-Top Box) has a different back panel
N
conguration.
When connecting a DVD / Blu-Ray player / Satellite receiver (Set-Top Box), match the
N
color of the connection terminal to the cable.
Page 11
English - 9
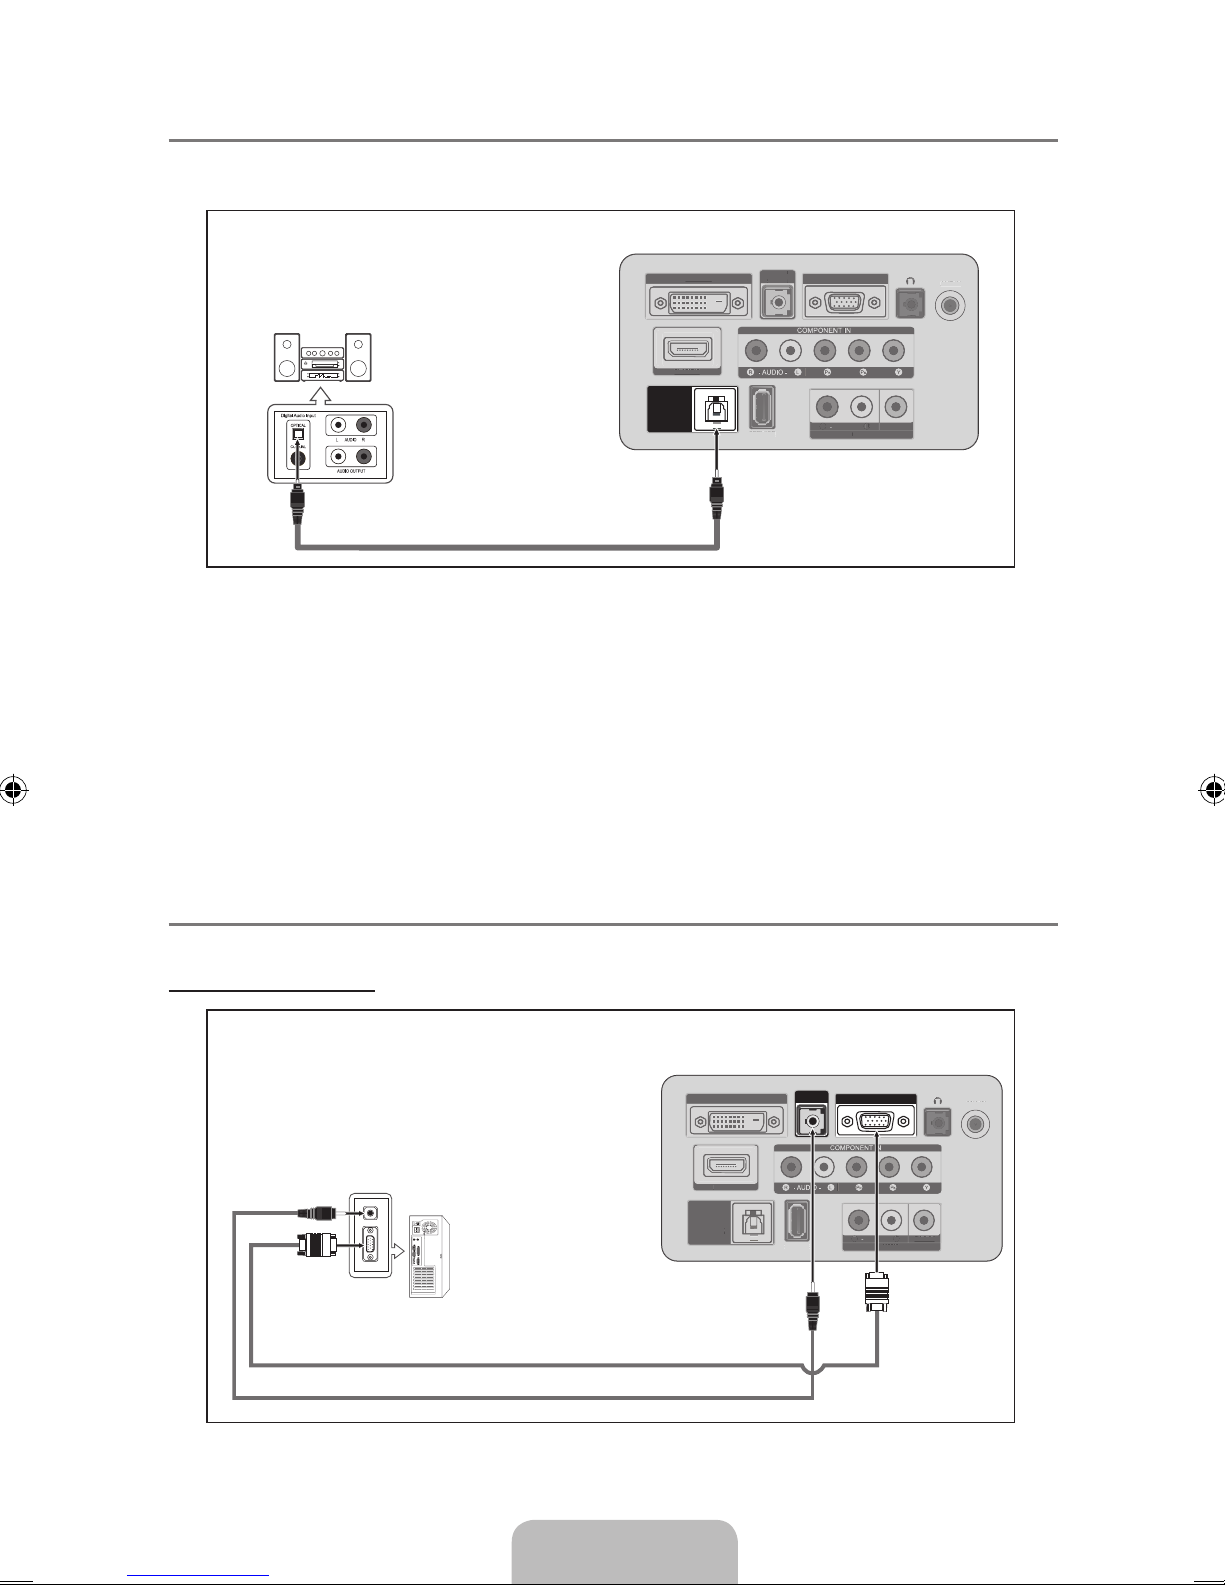
Connecting a Digital Audio System ¦
The rear panel jacks on your TV make it easy to connect a Digital Audio System (Home theater/
Receiver) to your TV.
ANT IN
HDMI IN
SERVICE
HDMI/PC
/DVI-D
AUDIO IN
AV IN
- AUDIO -
R
L
VIDEO
DVI-D IN
PC IN
DIGITAL
AUDIO OUT
(OPTICAL)
S
ERVICE
HDMI/P
C
/
DVI-
D
AUDIO I
N
A
V I
N
AUDIO -
VIDE
O
D
VI-D IN
PC I
N
Digital Audio System
TV Rear Panel
1
Optical Cable (Not supplied)
When a Digital Audio System is connected to the N DIGITAL AUDIO OUT (OPTICAL) jack:
Decrease the volume of the TV and adjust the volume level with the system’s volume control.
5.1CH audio is possible when the TV is connected to an external device supporting 5.1CH.
N
Each Digital Audio System has a different back panel conguration.
N
When the receiver (home theater) is set to On, you can hear sound output from the TV’s Optical
N
jack. When the TV is displaying a DTV(air) signal, the TV will send out 5.1 channel sound to the
Home theater receiver. When the source is a digital component such as a DVD / Blu-Ray player
/ Satellite receiver (Set-Top Box) and is connected to the TV via HDMI, only 2 channel sound
will be heard from the Home Theater receiver. If you want to hear 5.1 channel audio, connect
the digital audio out jack on DVD / Blu-Ray player / Satellite receiver (Set-Top Box) directly to an
Amplier or Home Theater, not the TV.
Connecting a PC ¦
Using the D-Sub Cable
ANT IN
HDMI IN
SERVICE
HDMI/PC
/DVI-D
AUDIO IN
AV IN
- AUDIO -
R
L
VIDEO
DVI-D IN
PC IN
DIGITAL
AUDIO OUT
(OPTICAL)
S
ERVI
CE
A
V I
N
AUDIO
-
VIDE
O
D
VI-D IN
D
IGITAL
AUDIO OU
T
(OPTICAL
)
TV Rear Panel
PC
1
D-Sub Cable (Not supplied)
When connecting a PC, match the color of the connection terminal to the cable N .
2
Stereo Cable (Not supplied)
Page 12
English - 10
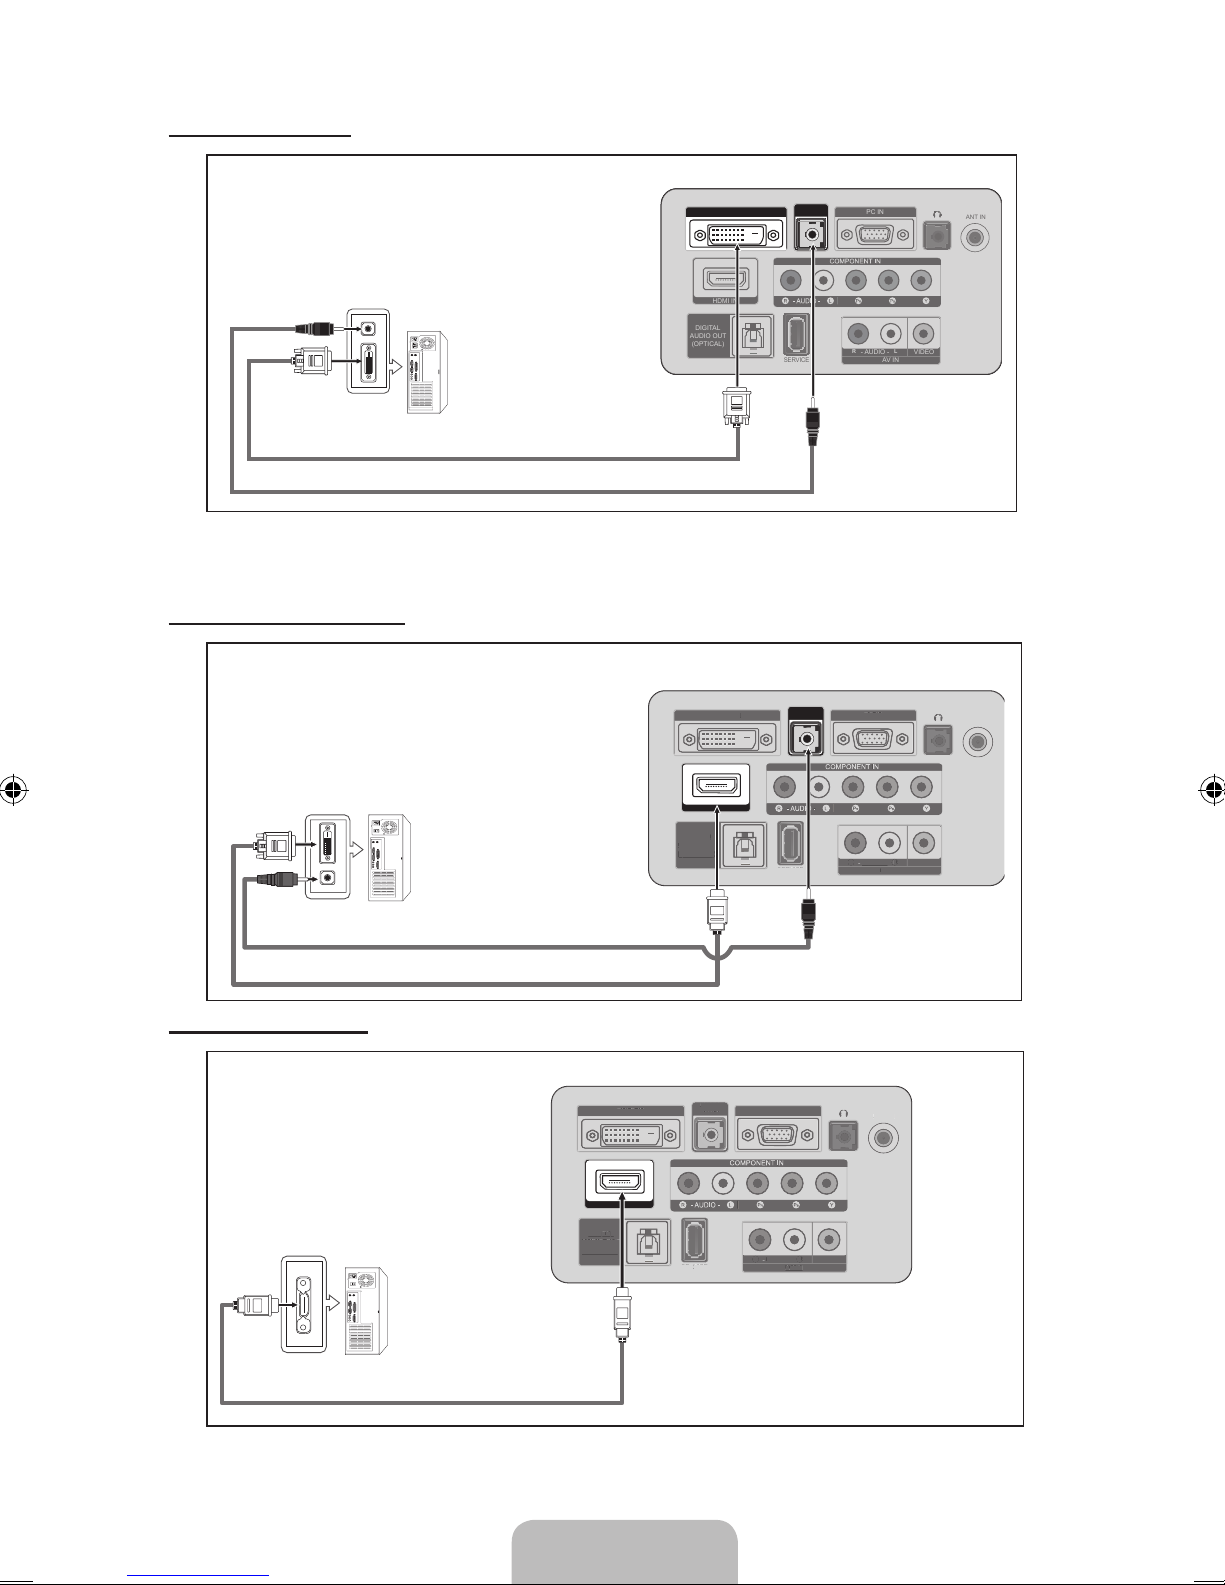
Using the DVI Cable
ANT IN
HDMI IN
SERVICE
HDMI/PC
/DVI-D
AUDIO IN
AV IN
- AUDIO -
R
L
VIDEO
DVI-D IN
PC IN
DIGITAL
AUDIO OUT
(OPTICAL)
PC
1
DVI Cable (Not supplied)
2
Stereo Cable (Not supplied)
TV Rear Panel
When connecting a PC, match the color of the connection terminal to the cable. N
The
N DVI jack is only available in the PC timing.
Using the HDMI/DVI Cable
ANT IN
HDMI IN
SERVICE
HDMI/PC
/DVI-D
AUDIO IN
AV IN
- AUDIO -
R
L
VIDEO
DVI-D IN
PC IN
DIGITAL
AUDIO OUT
(OPTICAL)
ANT IN
S
ERVICE
AUDIO -
V
IDE
O
-
P
C IN
DIGITA
L
A
UDIO OUT
(OPTICAL
)
ANT IN
HDMI IN
SERVICE
HDMI/PC
/DVI-D
AUDIO IN
AV IN
- AUDIO -
R
L
VIDEO
DVI-D IN
PC IN
DIGITAL
AUDIO OUT
(OPTICAL)
S
ERVI
CE
A
V I
N
AUDIO
-
VIDE
O
D
VI-D IN
D
IGITAL
AUDIO OU
T
(OPTICAL
)
TV Rear Panel
PC
2
Stereo Cable (Not supplied)
1
HDMI/DVI Cable (Not supplied)
Using the HDMI Cable
ANT IN
HDMI IN
SERVICE
HDMI/PC
/DVI-D
AUDIO IN
AV IN
- AUDIO -
R
L
VIDEO
DVI-D IN
PC IN
DIGITAL
AUDIO OUT
(OPTICAL)
SERVICE
H
DMI/P
C
/
DVI-D
A
UDIO IN
AUDIO
-
V
IDE
O
-
PC I
N
DIGI
T
A
L
AUDIO O
U
T
(O
PTICAL
)
PC
TV Rear Panel
1
HDMI Cable (Not supplied)
Each PC has a different back panel conguration N .
Page 13
English - 11
OPERATION
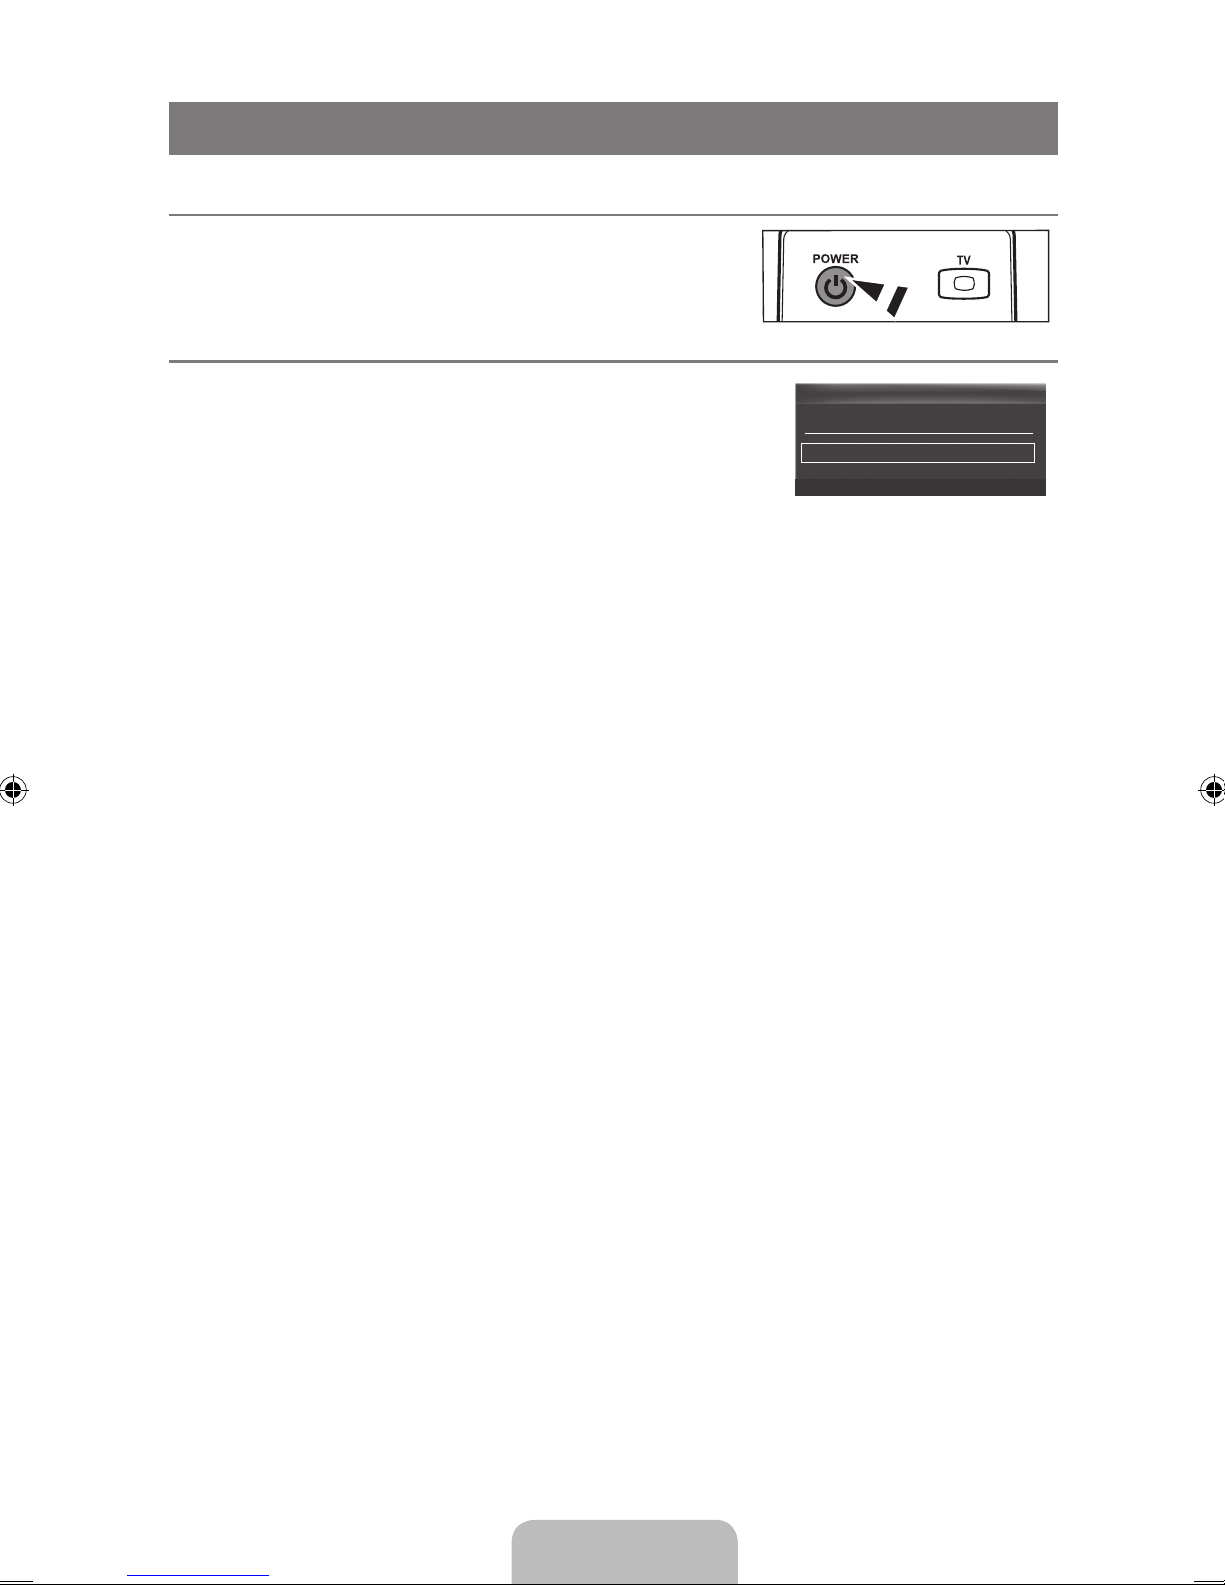
Turning the TV On and Off ¦
Press the POWER P button on the remote control. You can also
use the P button on the TV.
Plug & Play Feature ¦
When the TV is initially powered on, basic settings proceed automatically
and subsequently.
1. Press the POWER P button on the remote control.
You can also use the
N
P
button on the TV.
2. Press the E button, then “Select Language of the OSD.” menu is
automatically displayed.
3. Press the ▲ or ▼ button to select language, then press the E button. The message “Select
‘Home Use’ when installing this TV in your home.” is displayed.
4. Press the ◄ or ► button to select “Store Demo” or “Home Use”, then press the E button. The
message “Select the Antenna source to memorize.” is displayed.
We recommend setting the TV to “
N Home Use” mode for the best picture in your home
environment.
“
N Store Demo” mode is only intended for use in retail environments. If the unit is accidentally set
to “Store Demo” mode and you want to return to “Home Use” (Standard): Press the volume
button on the TV. When the volume OSD is displayed, press and hold the MENU button on the
TV for 5 seconds.
5. Press the ▲ or ▼ button to memorize the channels of the selected connection. Press the E button
to select “Start”.
Air
N : “Air” antenna signal. / Cable: “Cable” antenna signal. / Auto: “Air” and “Cable” antenna
signals.
In Cable mode, you can select the correct signal source among
N STD, HRC, and IRC by pressing
the ▲, ▼, ◄ or ► button, then press the E button. If you have Digital cable, select the cable
system signal source for both Analog and Digital. Contact your local cable company to identify
the type of cable system that exists in your particular area.
6. Press the E button to select “Start”. The TV will begin memorizing all of the available channels.
To stop the search before it has nished, press the
N E button with “Stop” selected.
After all the available channels are stored, it starts to remove scrambled channels. The
N
Auto program menu then reappears. Press the E button when channel memorization is
complete. The message “Set the Clock Mode.” is displayed.
7. Press the E button.
Press the ▲ or ▼ button to select “Auto”, then Press the E button. The message “Set to daylight
saving time.” is displayed. If you select “Manual”, “Set current date and time” is displayed.
8. Press the ▲ or ▼ button to select “Off”, “On” or “Auto”, then press the button.
9. Press the ▲ or ▼ button to highlight the time zone for your local area. Press the E button. If you
have received a digital signal, the time will be set automatically.
10. The connection method to provide the best quality HD is offered. After conrming the method, press
the E button.
11. The message “Enjoy your TV.” is displayed. When you have nished, press the E button.
If you want to reset this feature...
Plug & Play
Select Language of the OSD.
Language : English r
E
Enter
Page 14
English - 12
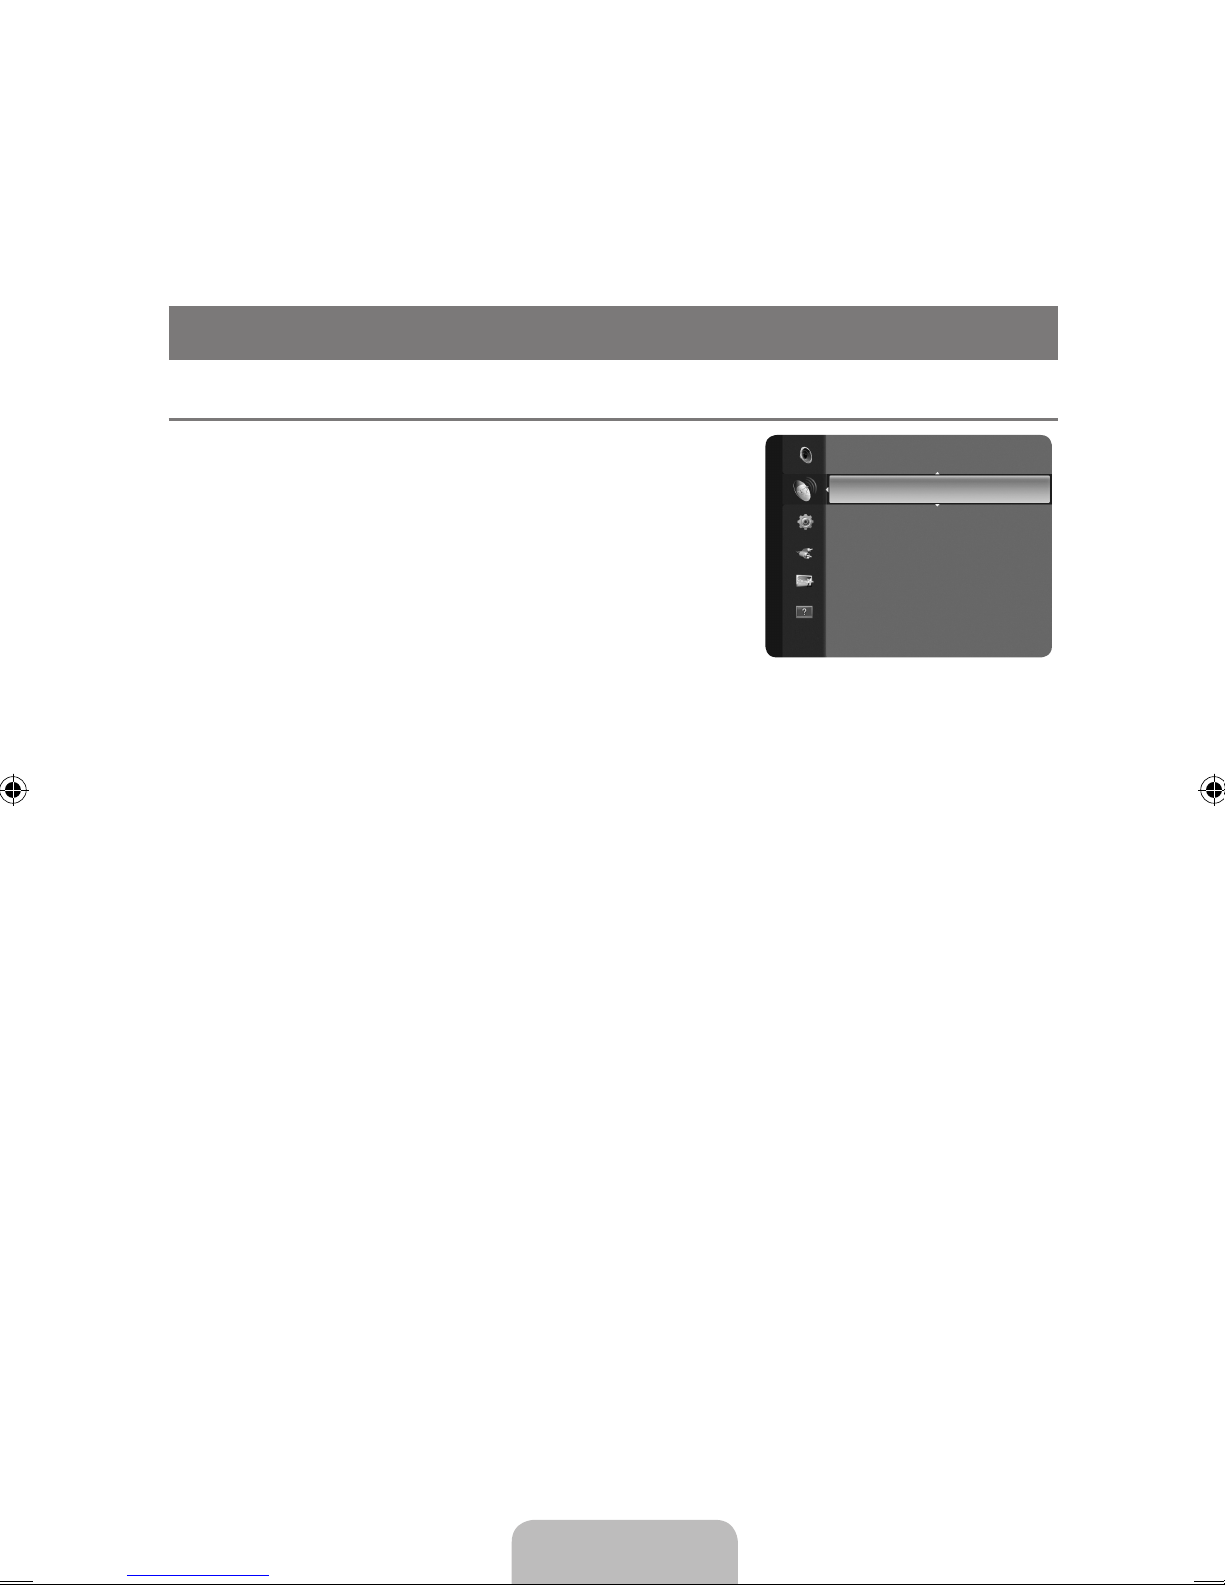
1. Press the MENU button to display the menu. Press the ▲ or ▼ button to select “Setup”, then press the E button.
2. Press the E button again to select “Plug & Play”. For further details on setting up options.
The “
N Plug & Play” feature is only available in the TV mode.
CHANNEL CONTROL
CHANNEL CONTROL
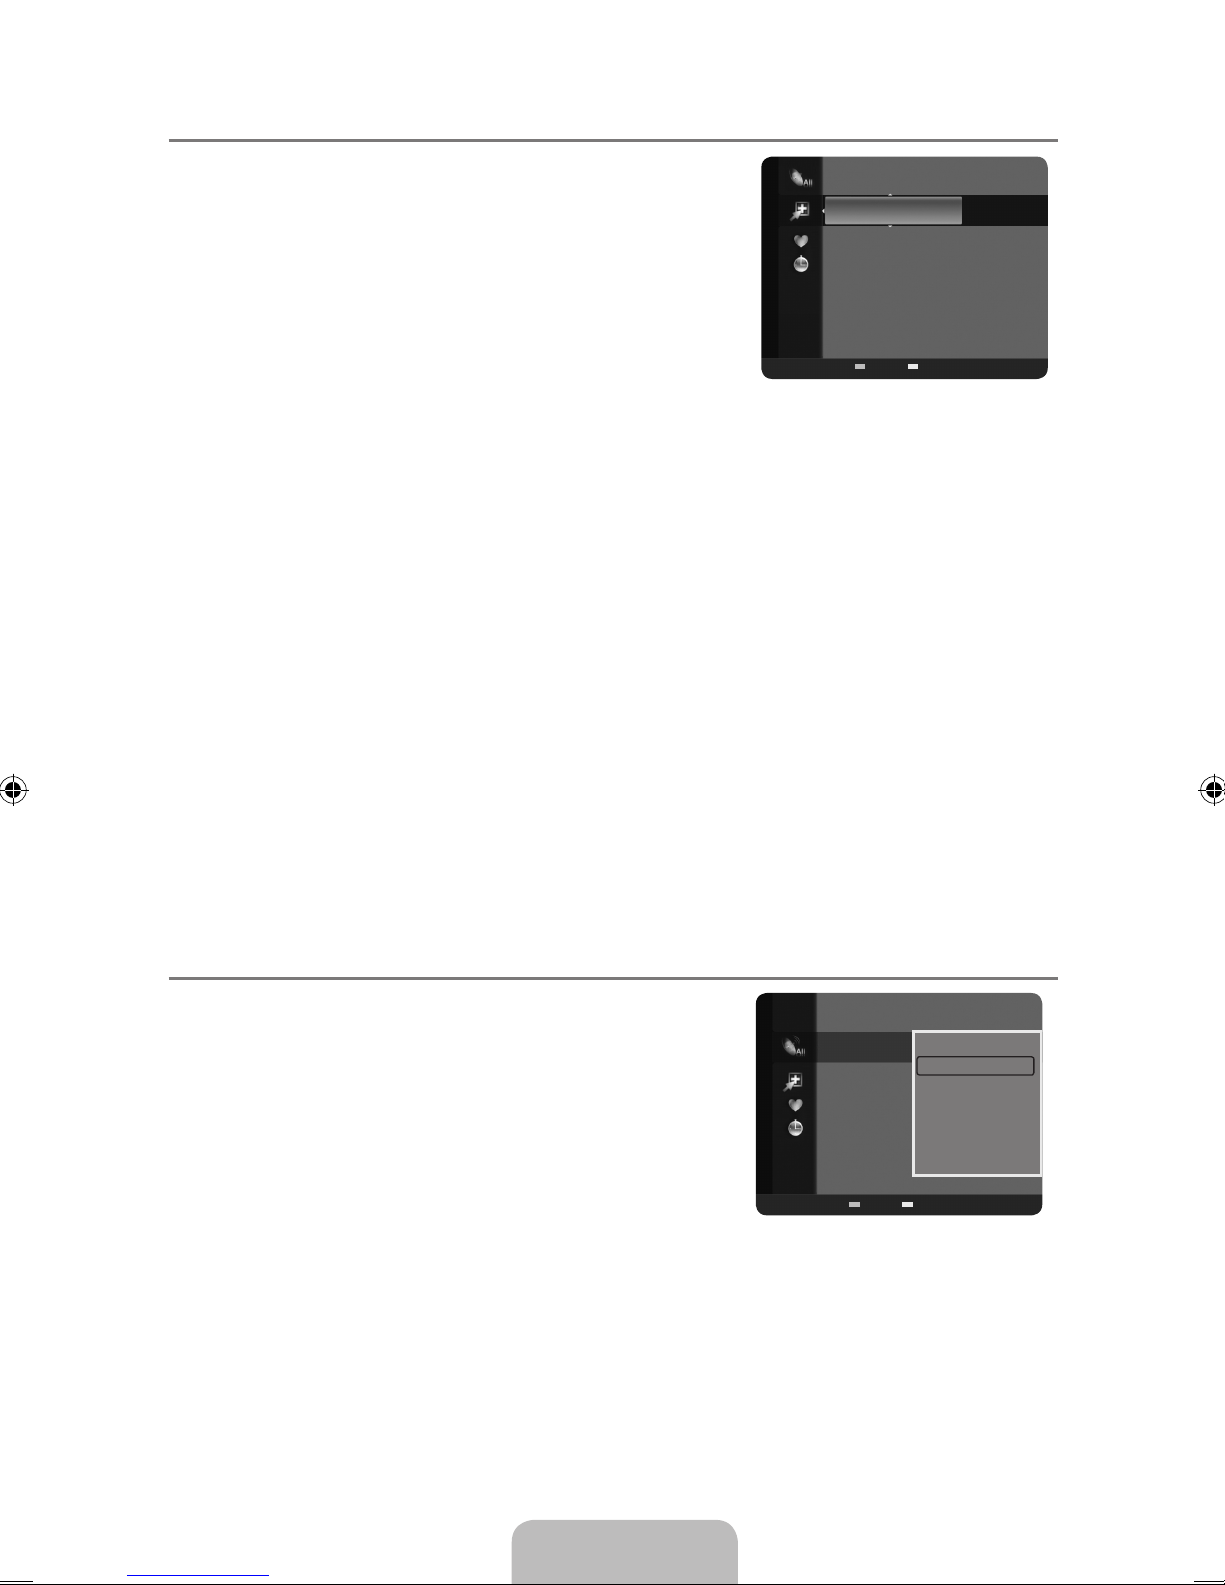
ConguringtheChannelMenu ¦
Antenna→Air ❑ / Cable
Before your television can begin memorizing the available
channels, you must specify the type of signal source that is
connected to the TV (i.e. an Air or a Cable system).
Press the
T TOOLS button to display “Tools” menu. You can
also set the Antenna by selecting “Tools → Switch to Cable
(or Switch to Air)”.
Auto Program ❑
Air : Air antenna signal. / Cable: Cable antenna signal. / Auto: Air and Cable antenna signals
When selecting the Cable TV system: Selects the cable system. STD, HRC and IRC identify
N
various types of cable TV systems. Contact your local cable company to identify the type of cable
system that exists in your particular area. At this point the signal source has been selected.
After all the available channels are stored, it starts to remove scrambled channels (Clearing
N
Scrambled Channels). The Auto program menu then reappears.
If you want to stop Auto Programming, press the
N E button. The “Stop Auto Program?”
message will be displayed. Select “Yes” by pressing the ◄ or ► button, then press the E
button.
Clearing Scrambled Channels ❑ (digital channels only)
This function is used to lter out scrambled channels after “Auto Program” is completed. This
process may take up to 20~30 minutes.
To stop searching scrambled channels: Press the
N E button to select “Stop”. Press the ◄ button
to select “Yes”, then press the button.
This function is only available in “
N Cable” mode.
Channel List ❑
For the detailed procedures on using the “Channel List”, refer to the ‘Managing Channels’
instructions.
Fine Tune ❑ (analog channels only)
Use ne tuning to manually adjust a particular channel for optimal reception.
If you do not store the ne-tuned channel in memory, adjustments are not saved.
N
“*” will appear next to the name of ne-tuned channels.
N
To reset the ne tuning setting, press the ▼ button to select “
N Reset”, then press the E button.
Antenna :Air ►
Auto Program
Clear Scrambled Channel
Channel List
Fine Tune
Channel
Page 15
English - 13
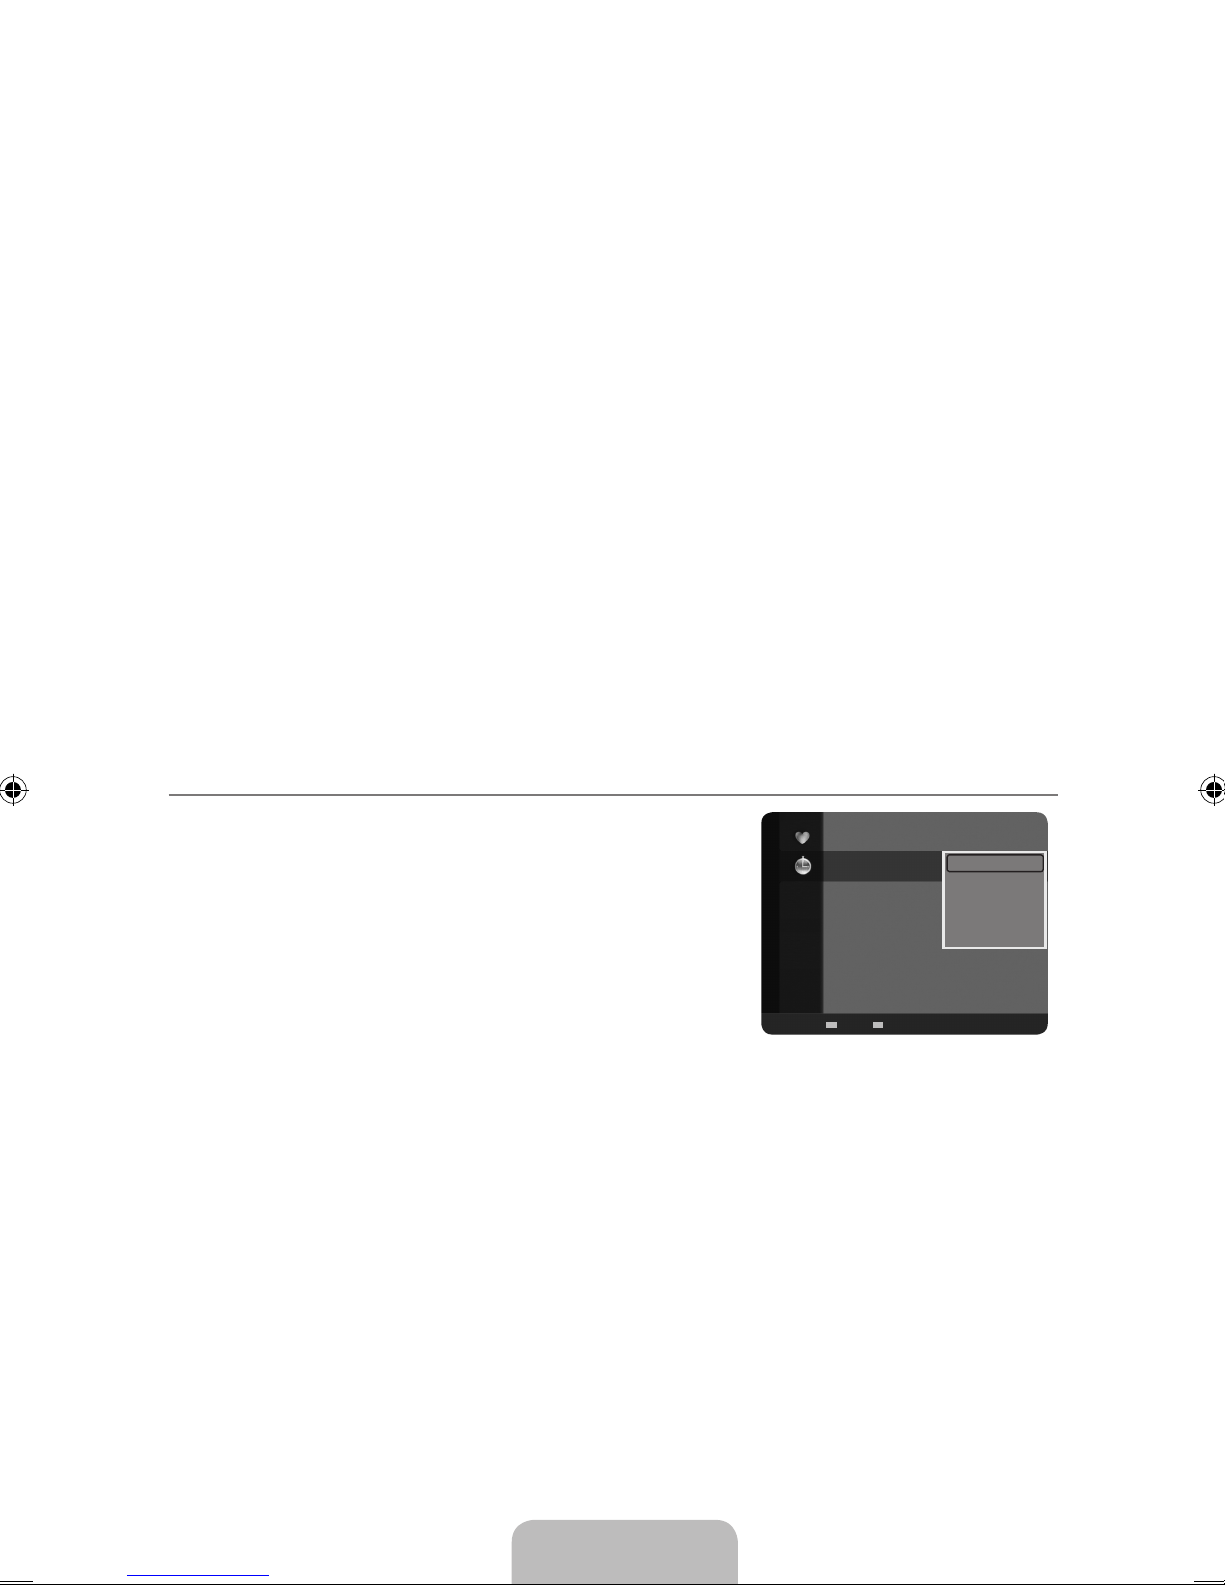
Managing Channels ¦
Using this menu, you can add / delete or set favorite channels
and use the program guide for digital broadcasts.
All Channels
Shows all currently available channels.
Added Channels
Shows all added channels.
Favorite
Shows all favorite channels.
To select the favorite channels you have set up, press the
O FAV.CH button on the remote control.
Programmed
Shows all current reserved Programs.
Select a channel in the
N All Channels, Added Channels or Favorite screen by pressing the ▲ /
▼ buttons, and pressing the E. Then you can watch the selected channel.
Using the Color buttons with the Channel List
N
Green (Zoom):
– Enlarges or shrinks a channel number.
Yellow (Select): – Selects multiple channel lists. You can perform the add / delete or add to
Favorite / delete from Favorite function for multiple channels at the same time. Select the
required channels and press the yellow button to set all the selected channels at the same
time. The c mark appears to the left of the selected channels.
TOOLS (Tools):
– Displays the Add (or Delete), Add to Favorite (or Delete from Favorite),
Timer Viewing, Channel Name Edit, Select All (or Deselect All) and Auto Program
menus (The Options menus may differ depending on the situation.)
Channel Status Display Icons
N
♥ : – A channel set as a Favorite.
c – : A channel selected by pressing the yellow button.
( – : A Program currently being broadcast.“♥” mark.
) – : A reserved program
Channel List Option Menu (in All Channels / Added Channels / Favorite) ¦
Press the
TOOLS
button to use the option menu.
Option menu items may differ depending on the channel
N
status.
Add / Delete
You can delete or add a channel to display the channels you
want.
All deleted channels will be shown on
N All Channels menu.
A gray-colored channel indicates the channel has been
N
deleted.
The
N Add menu only appears for deleted channels.
You can also delete a channel from the
N Added Channels or Favorite menu in the same
manner.
N
Add to Favorite / Delete from Favorite
You can set channels you watch frequently as Favorite.
Press the
T TOOLS button to display the Tools menu. You can also set the add to (or delete from)
Favorites by selecting Tools → Add to Favorite (or Delete from Favorite).
2 Air
4 Air
4-2 ♥ TV #8
8 Air
13 Air
13-1 ♥ TV #3
Alice’s Adventures in Wonderland
Added Channels
Air
Zoom Select T Tools
2 Air
4 Air
4-2 ♥ TV #8
8 Air
13 Air
13-1 ♥ TV #3
Alice’s Adventures in Wonderland
All Channels
Delete
Add to Favorite
Timer Viewing
Channel Name Edit
Select All
Auto Program
Air
Zoom Select T Tools
Page 16
English - 14
The ♥ symbol will be displayed and the channel will be set as a favorite. N
All favorite channels will be shown in the
N Favorite menu.
Timer Viewing
If you reserve a program you want to watch, the channel is automatically switched to the reserved
channel in the Channel List; even when you are watching another channel. To reserve a program,
set the current time rst.
Only memorized channels can be reserved.
N
You can set the channel, month, day, year, hour and minute directly by pressing the number
N
buttons on the remote control.
Reserving a program will be shown in the
N Programmed menu.
Digital Program Guide and Viewing Reservation
N
When a digital channel is selected, and you press the ► button, the Program Guide for the
N
channel appears. You can reserve a program according to the procedures described above.
Channel Name Edit (analog channels only)
Channels can labeled so that their call letters appear whenever the channel is selected.
The names of digital broadcasting channels are automatically assigned and cannot be labeled.
N
Select All / Deselect All
Select All
● : You can select all the channels in the channel list.
Deselect All ● : You can deselect all the selected channels.
You can only select N Deselect All when there is a selected channel.
Auto Program
For further details on setting up options, refer to page 12.
N
Channel List Option Menu (in Programmed) ¦
You can view, modify or delete a reservation.
Press the TOOLS button to use the option menu.
N
Change Info
Select to change a viewing reservation.
Cancel Schedules
Select to cancel a viewing reservation.
Information
Select to view a viewing reservation. (You can also change the
reservation information.)
Select All
Select all reserved Programs.
1 / 1 / 2009
9:08 am 5 TV3 The
3:15 pm 2 TV3 The Equalizer
5:50 pm 2 TV3 McMillan & Wife
Programmed
Change Info
Cancel Schedules
Information
Select All
Air
Zoom Select
T
Tools E Information
Page 17
English - 15
PICTURE CONTROL
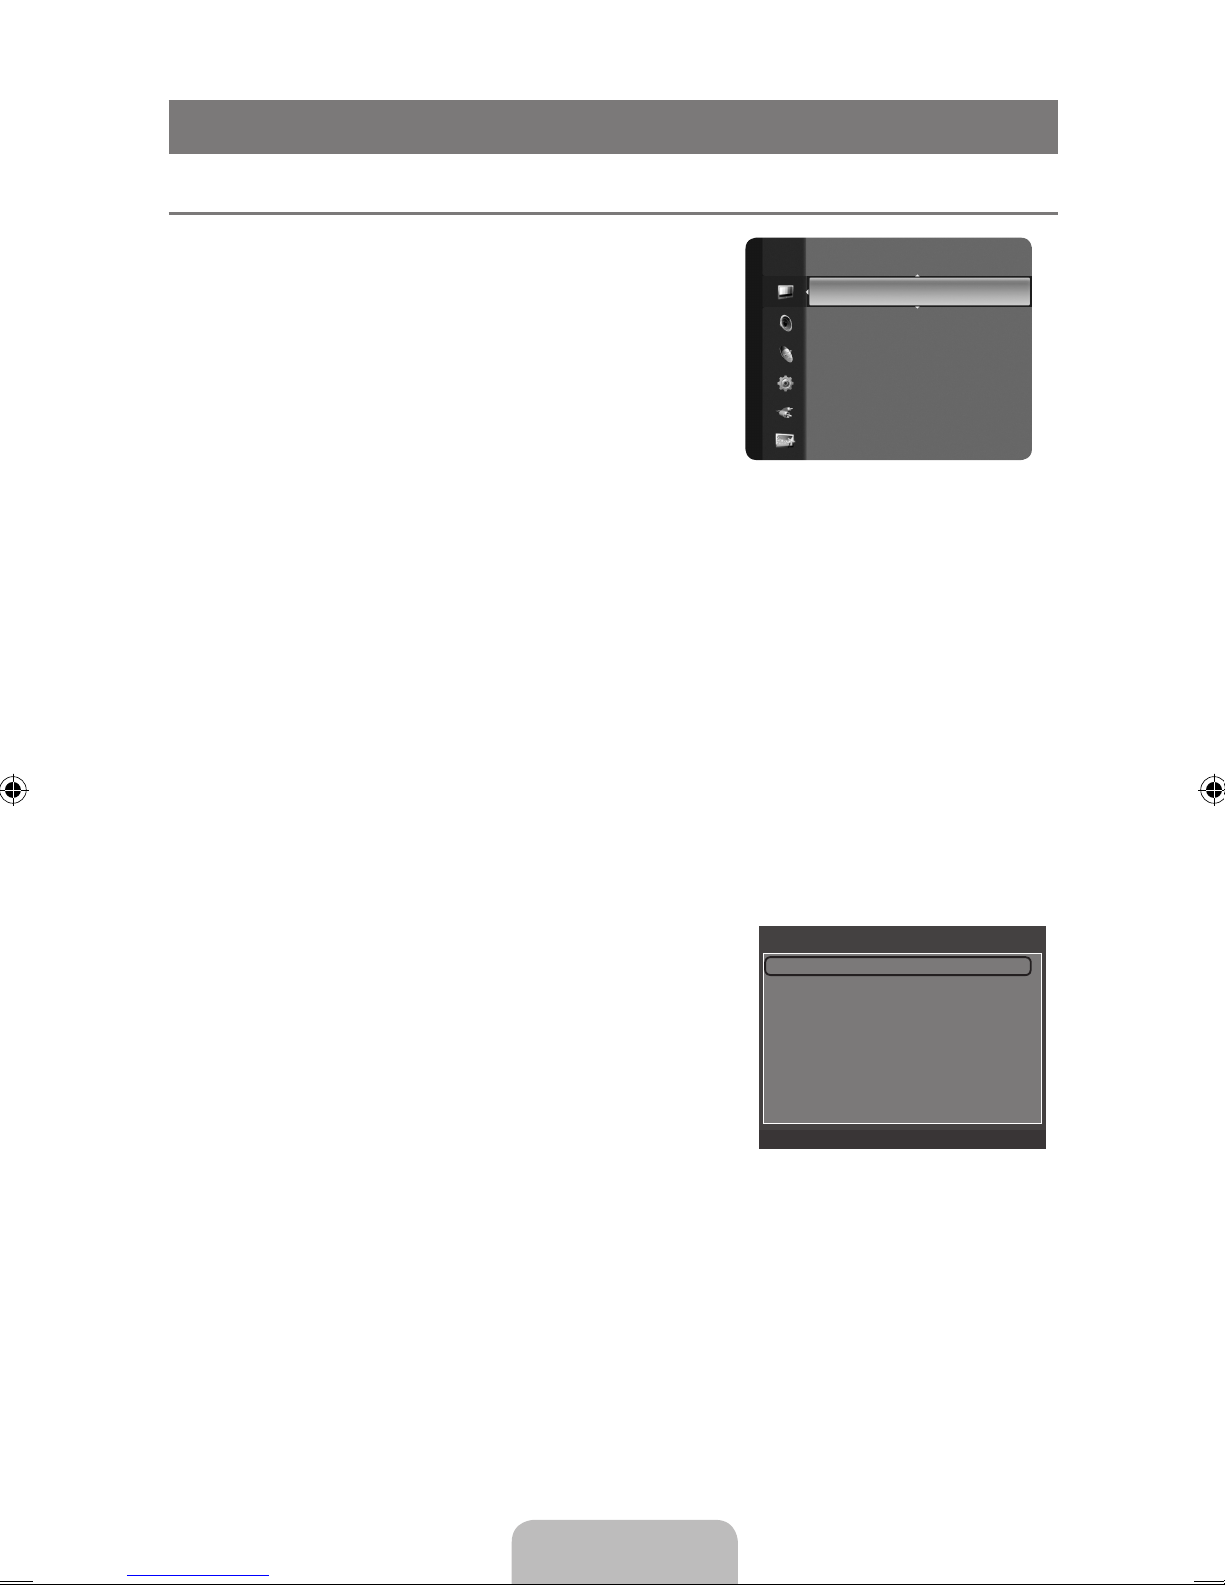
ConguringthePictureMenu(TV/AV/Component/HDMI) ¦
Mode ❑
You can select the type of picture which best corresponds to
your viewing requirements.
Dynamic
Selects the picture for increased denition in a bright room.
Standard
Selects the picture for the optimum display in a normal
environment.
Movie
Selects the picture for viewing movies in a dark room.
Backlight ❑ / Contrast / Brightness / Sharpness / Color / Tint
Your television has several setting options that allow you to control the picture quality.
Backlight
● : Adjusts the brightness of LCD back light.
Contrast ● : Adjusts the contrast level of the picture.
Brightness ● : Adjusts the brightness level of the picture
Sharpness ● : Adjusts the edge denition of the picture.
Color ● : Adjusts color saturation of the picture.
Tint ● : Adjusts the color tint of the picture.
When you make changes to “ N Backlight”, “Contrast”, “Brightness”, “Sharpness” “Color”or “Tint
(G/R)” the OSD will be adjusted accordingly.
Settings can be adjusted and stored for each external device you have connected to an input of
N
the TV.
The energy consumed during use can be signicantly reduced if the level of Backlight is reduced,
N
and that this will reduce the overall running cost.
Picture Options ❑
In PC mode, you can only make changes to the “ N Color
Tone” and “Size” from among the items in “Picture
Options”.
Color Tone
→Cool / Normal / Warm1 / Warm2
Size
Occasionally, you may want to change the size of the image on
your screen. Your TV comes with six screen size options, each
designed to work best with specic types of video input. Your
satellite receiver may have its own set of screen sizes as well. In general, though, you should view
the TV in 16:9 mode as much as possible.
Alternately, you can press the
O P.SIZE button on the remote control repeatedly to change the
picture size.
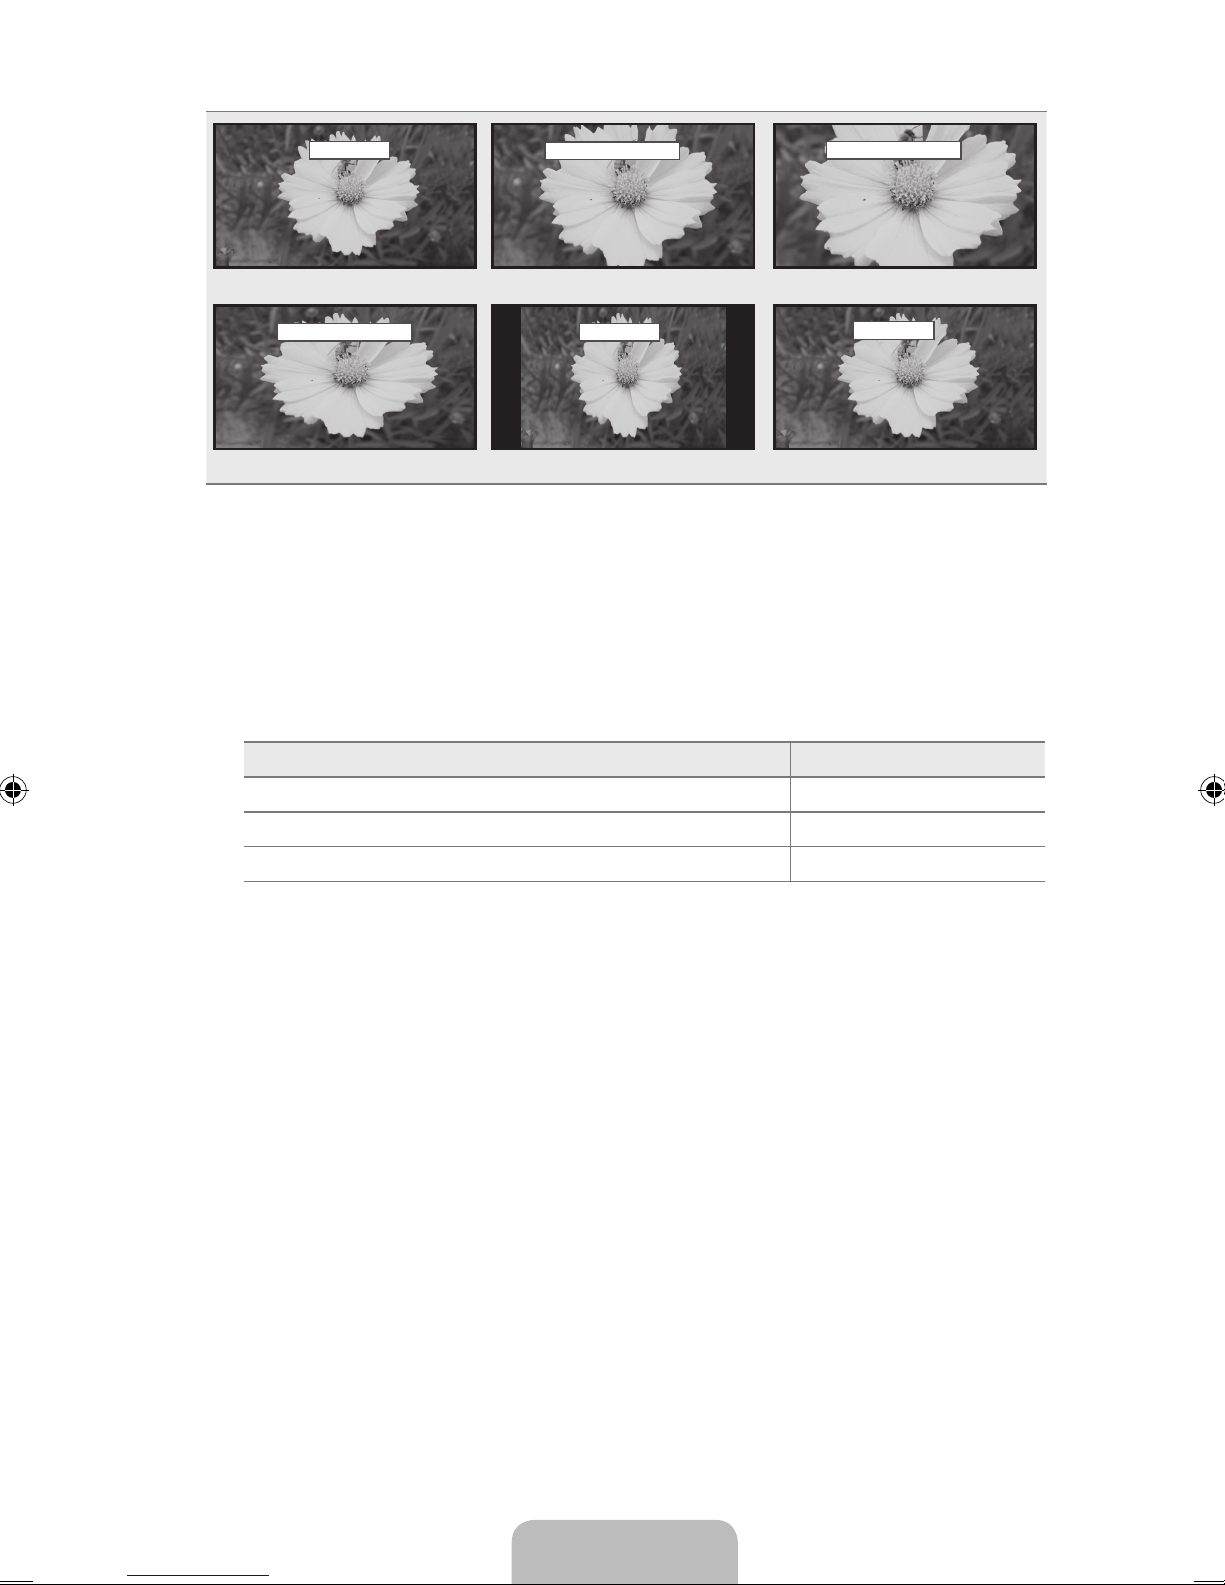
16:9
● : Sets the picture to 16:9 wide mode.
Zoom1 ● : Magnies the size of the picture on the screen.
Zoom2 ● : Magnies the size of the picture more than “Zoom1”.
Wide Fit ● : Enlarges the aspect ratio of the picture to t the entire screen.
4:3 ● : Sets the picture to 4:3 normal mode.
Screen Fit: Use the function to see the full image without any cutoff when HDMI ●
(720p/1080i/1080p), Component (1080i/1080p) or DTV (1080i) signals are input.
Mode :Standard ►
Backlight : 8
Contrast : 95
Brightness : 45
Sharpness : 50
Color : 50
Tint (G/R) : G50/R50
Picture
Picture Options
Color Tone : Normal ►
Size : 16:9
Digital NR : Auto
HDMI Black Level : Normal
Film Mode : Off
U
Move E Enter R Return
Page 18
English - 16
16:9
Zoom1 U Move
Zoom2 U Move
16:9 Zoom1 Zoom2
Wide Fit U Move
4:3
Screen Fit
Wide Fit 4:3 Screen Fit
Temporary image retention may occur when viewing a static image on the set for more than two
N
hours.
After selecting “
N Zoom1”, “Zoom2” or “Wide Fit”: Press the ◄ or ► button to select “Position”,
then press the E button. Press the ▲ or ▼ button to move the picture up and down.
Reset: Press the ◄ or ►button to select “Reset”, then press the E button. You can initialize
the setting.
HD (High Denition): 16:9 - 1080i/1080p (1920x1080), 720p (1280x720)
N
Settings can be adjusted and stored for each external device you have connected to an input of
N
the TV.
Input Source Picture Size
TV, AV, Component (480i, 480p) 16:9, Zoom1, Zoom2, 4:3
DTV(1080i), Component (1080i, 1080p), HDMI (720p, 1080i, 1080P) 16:9, 4:3, Wide Fit, Screen Fit
PC 16:9, 4:3
Digital NR →Off / Low / Medium / High / Auto
If the broadcast signal received by your TV is weak, you can activate the Digital Noise Reduction
feature to help reduce any static and ghosting that may appear on the screen.
When the signal is weak, select one of the other options until the best picture is displayed.
N
HDMI Black Level
→Normal / Low
You can select the black level on the screen to adjust the screen depth.
This function is active only when an external device is connected to the TV via HDMI. The “
N HDMI
Black Level” function may not be compatible with all external devices.
Film Mode
→Off / Auto
The TV can be set to automatically sense and process lm signals from all sources and adjust the
picture for optimum quality.
“
N Film Mode” is supported in TV, Component (480i / 1080i) and HDMI (480i / 1080i).
Reset ❑ →ResetPictureMode/Cancel
Resets all picture settings to the default values.
Reset Picture Mode
N : Current picture values return to default settings.
Page 19
English - 17
Using Your TV as a Computer (PC) Display ¦
When prompted by the operating system for the monitor driver, insert the CD included in this N
product. For details, please refer to User’s Guide in CD.
Setting Up Your PC Software (Based on Windows XP)
The Windows display-settings for a typical computer are shown below. The actual screens on your
PC will probably be different, depending upon your particular version of Windows and your particular
video card. However, even if your actual screens look different, the same basic set-up information
will apply in almost all cases. (If not, contact your computer manufacturer or Samsung Dealer.)
1. First, click on ‘Control Panel’ on the Windows start menu.
2. When the control panel window appears, click on ‘Appearance and Themes’ and a display dialog-
box will appear.
3. When the control panel window appears, click on ‘Display’ and a display dialog-box will appear.
4. Navigate to the ‘Settings’ tab on the display dialog-box.
The correct size setting (resolution): Optimum: 1920 X 1080 pixels
If a vertical frequency option exists on your display settings dialog box, the correct value is “60” or
“60 Hz”. Otherwise, just click “OK” and exit the dialog box.
Display Modes
If the signal from the system equals the standard signal mode, the screen is adjusted automatically.
If the signal from the system doesn’t equal the standard signal mode, adjust the mode by referring to
your videocard user guide; otherwise there may be no video. For the display modes listed below, the
screen image has been optimized during manufacturing.
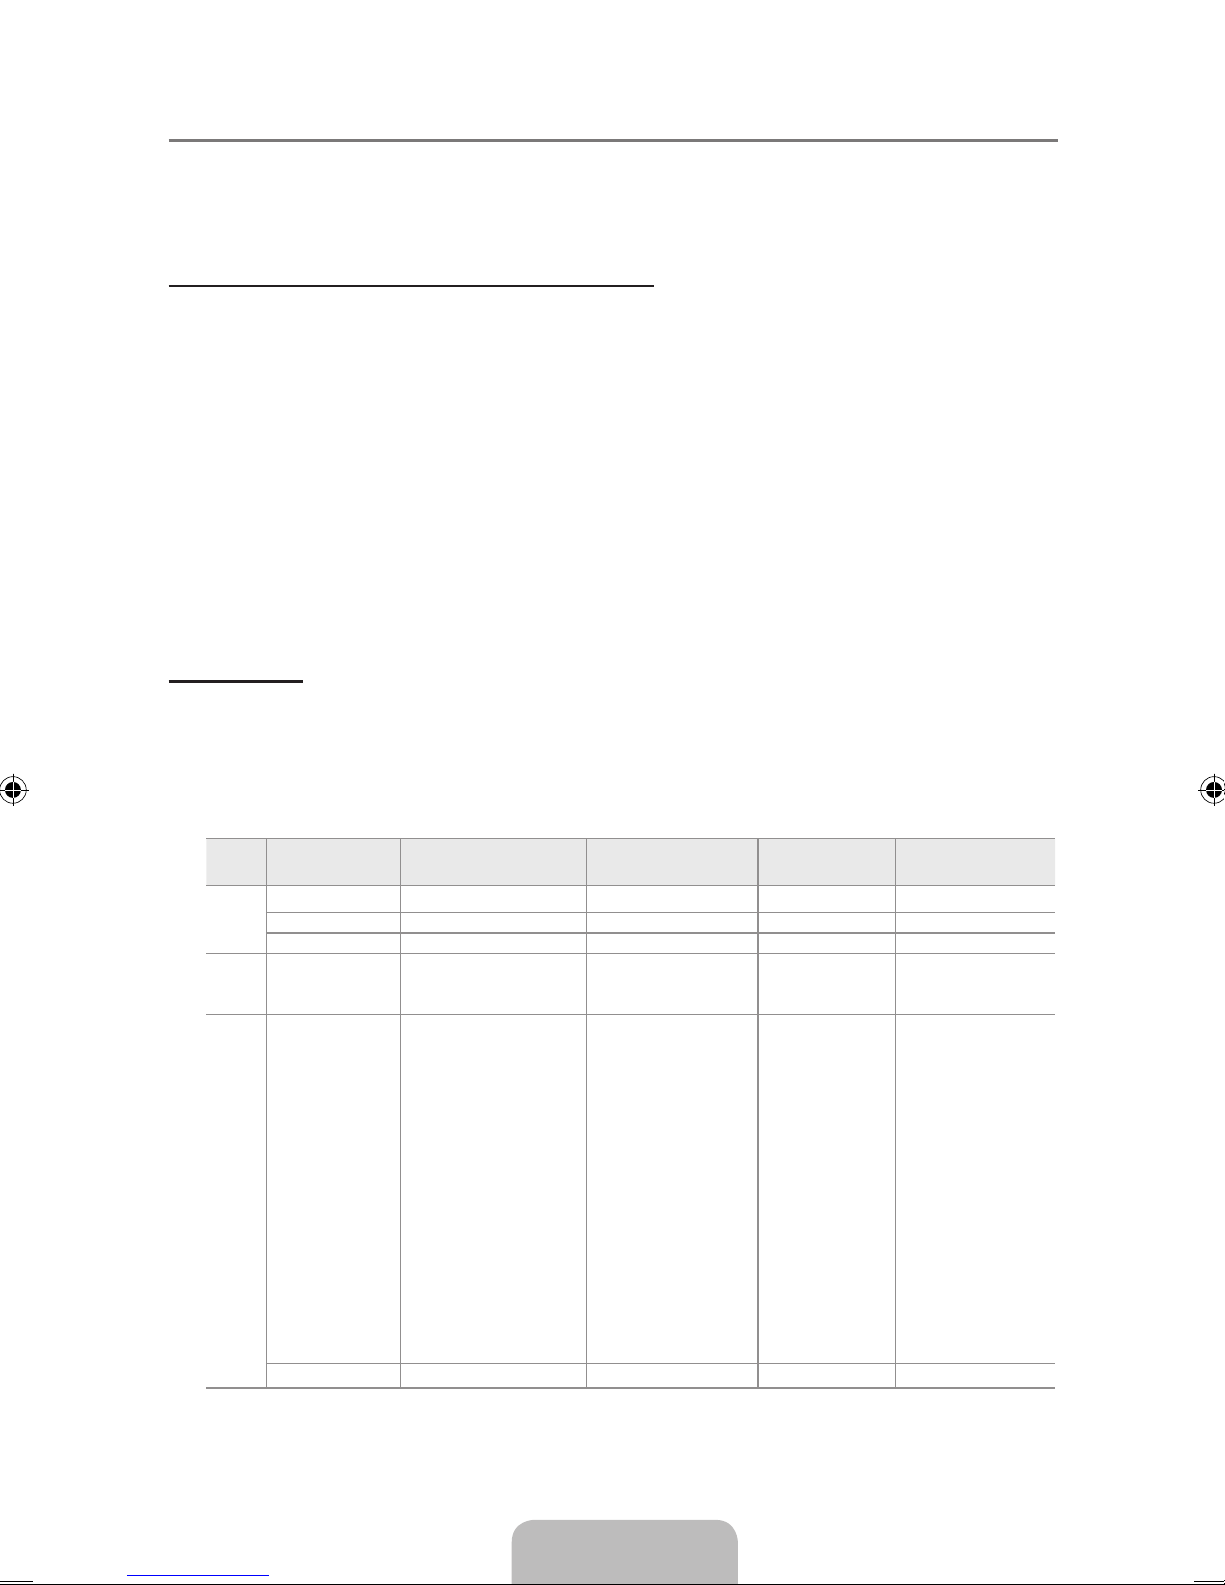
Timing modes(PC, DVI-D and HDMI input)
Mode Resolution
Horizontal Frequency
(kHz)
Vertical Frequency
(Hz)
Pixel Clock
Frequency (MHz)
Sync Polarity
(H / V)
IBM 640 x 350 31.469 70.087 25.175 + / -
640 x 480 31.469 59.940 25.175 - / 720 x 400 31.469 70.087 28.322 - / +
MAC 640 x 480 35.000 66.667 30.240 - / -
832 x 624 49.726 74.551 57.284 - / -
1152 x 870 68.681 75.062 100.000 - / -
VESA 640 x 480 37.861 72.809 31.500 - / -
640 x 480 37.500 75.000 31.500 - / 800 x 600 35.156 56.250 36.000 + / +
800 x 600 37.879 60.317 40.000 + / +
800 x 600 48.077 72.188 50.000 + / +
800 x 600 46.875 75.000 49.500 + / +
1024 x 768 48.363 60.004 65.000 - / 1024 x 768 56.476 70.069 75.000 - / 1024 x 768 60.023 75.029 78.750 + / +
1152 x 864 67.500 75.000 108.000 + / +
1280 x 800 49.702 59.810 83.500 - / +
1280 x 960 60.000 60.000 108.000 + / +
1280 x 1024 63.981 60.020 108.000 + / +
1280 x 1024 79.976 75.025 135.000 + / +
1440 x 900 55.935 59.887 106.500 - / +
1600 x 1200 75.000 60.000 162.000 + / +
1680 x 1050 69.290 59.954 146.250 - / +
1920 x 1080 67.500 60.000 148.500 + / +
Page 20
English - 18
Setting up the TV with your PC ¦
Preset: Press the N SOURCE button to select PC mode.
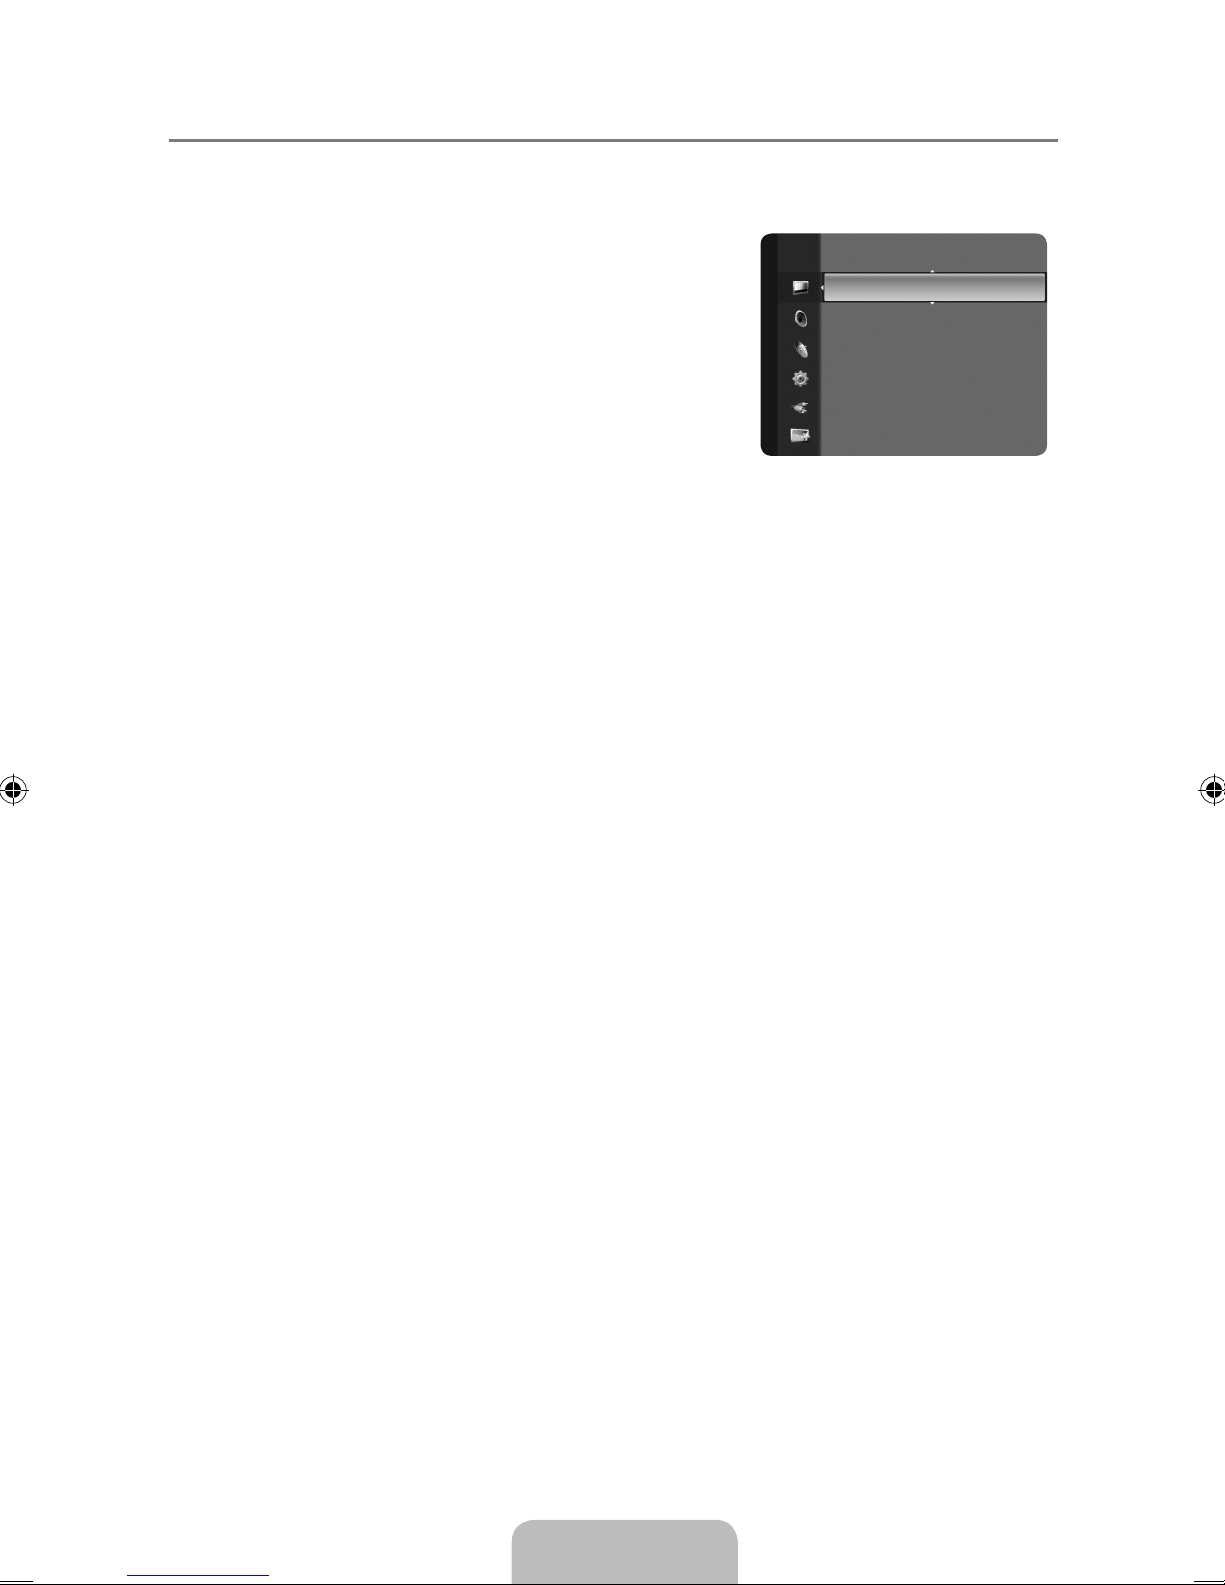
MagicBright : ❑ Entertain / Internet / Text / Dynamic Contrast / Custom
MagicBright is a feature providing optimum viewing
environment depending on the contents of the image you
are watching. Currently ve different modes are available:
Entertain, Internet, Text, Dynamic Contrast and Custom. Each
mode has its own pre-congured brightness value.
Contrast / Brightness / Sharpness ❑
Contrast: Adjusts the contrast level of the picture. •
Brightness: Adjusts the brightness level of the picture.
•
Sharpness: Adjusts the edge denition of the picture.
•
Auto Adjustment ❑
Use the Auto Adjust function to have the TV set automatically adjust the video signals it receives.
The function also automatically ne-tunes the settings and adjusts the frequency values and
positions.
Press the
T TOOLS button to display “Tools” menu. You can also set the Auto Adjustment by
selecting “Tools → Auto Adjustment”.
This function do work in PC mode only
N
Screen ❑
The purpose of the picture quality adjustment is to remove or reduce picture noise. If the noise is not
removed by ne tuning alone, then make the vertical frequency adjustments on your PC and ne
tune again. After the noise has been reduced, re-adjust the picture so that it is aligned on the center
of the screen.
Coarse / Fine
The purpose of picture quality adjustment is to remove or reduce picture noise. If the noise is not
removed by Fine-tuning alone, then adjust the frequency as best as possible (Coarse) and Fine-tune
again. After the noise has been reduced, readjust the picture so that it is aligned on the center of
screen.
Position
Adjust the PC’s screen positioning if it does not t the TV screen. Press the ▲ or ▼ button to
adjusting the Vertical-Position. Press the ◄ or ►button to adjust the Horizontal-Position.
Image Reset
You can replace all image settings with the factory default values.
Picture Options ❑
Color Tone : Cool / Normal / Warm / Custom
R-Gain / G-Gain / B-Gain
R-Gain: Adjusts the red color brightness.
N
G-Gain: Adjusts the green color brightness.
N
B-Gain: Adjusts the blue color brightness.
N
Brightness : 45
Sharpness : 50
AutoAdjustment ►
Screen
Advanced Settings
Picture Options
Picture Reset
Picture
Page 21
English - 19
Size: 16:9 / 4:3
O
Alternately, you can press the P.SIZE button on the remote control repeatedly to change the
picture size.
16:9 : Sets the picture to 16:9 wide mode.
N
4:3 : Sets the picture to 4:3 normal mode.
N
Reset : Reset Picture Mode / Cancel ❑
Resets all picture settings to the default values.
Reset Picture Mode: Current picture values return to default settings.
N
Page 22
English - 20
SOUND CONTROL
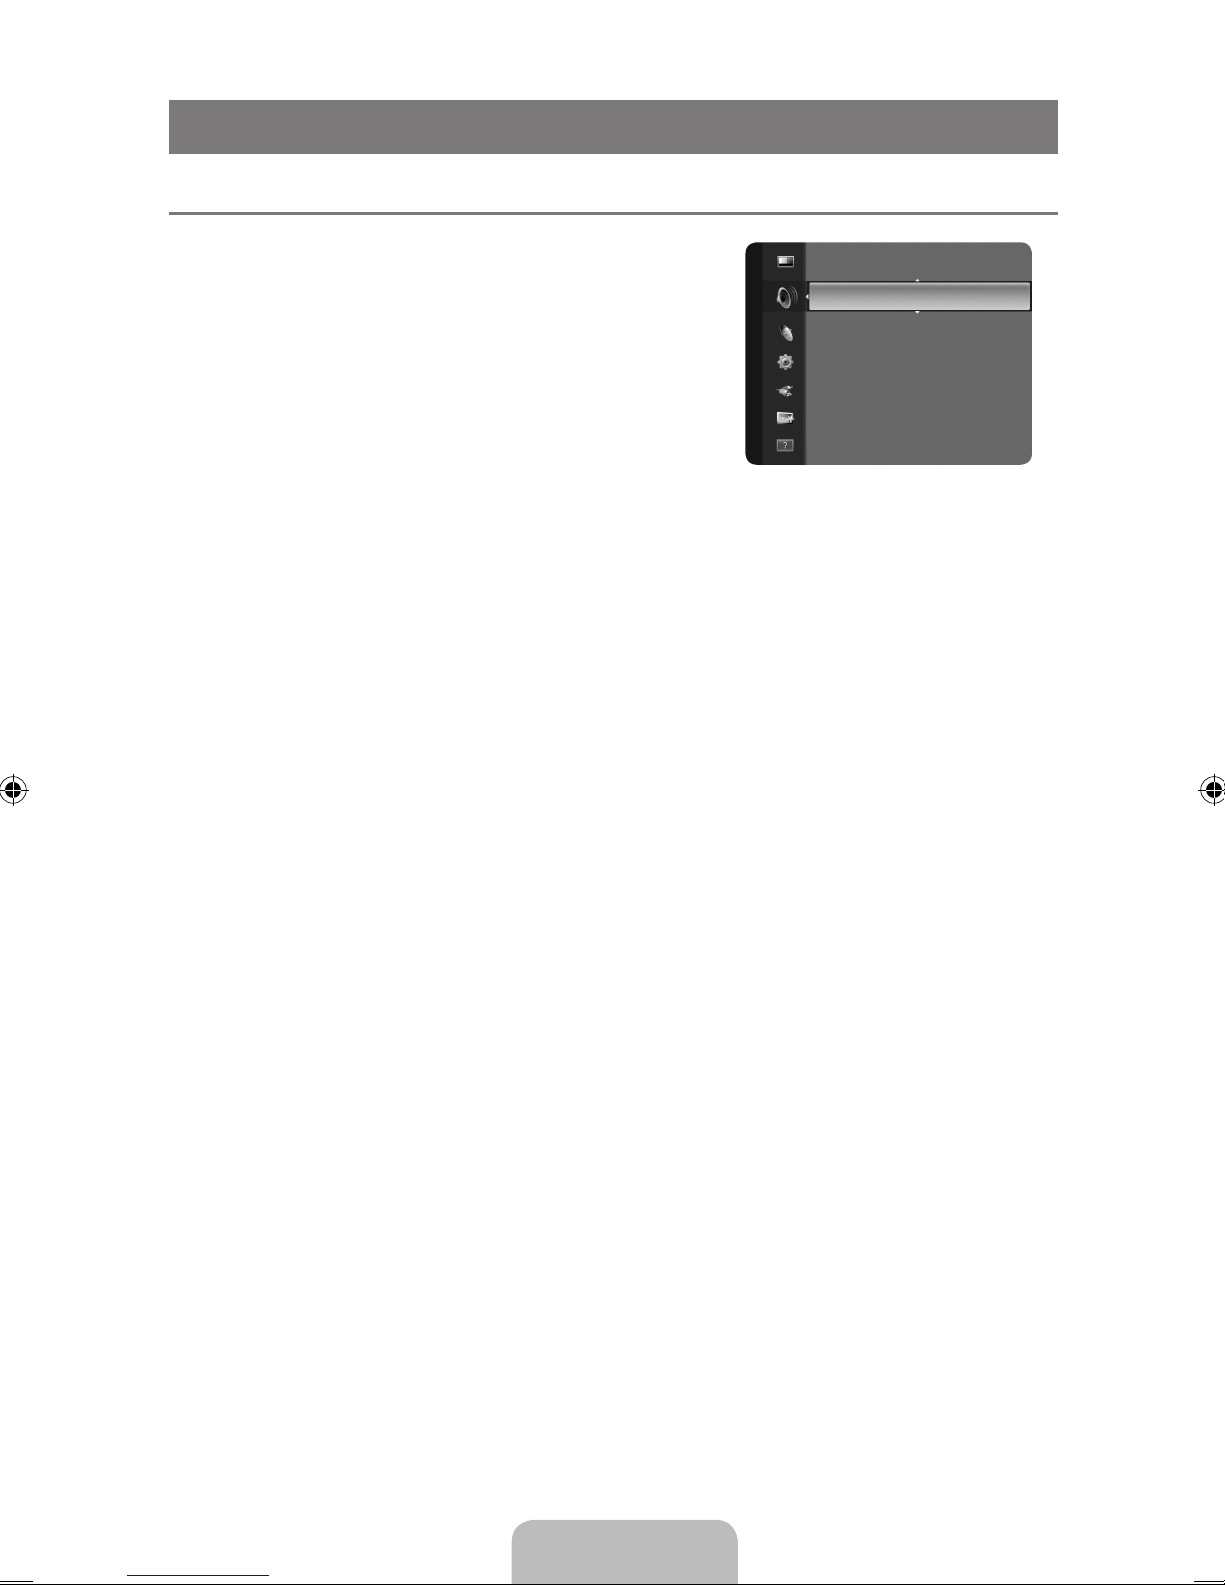
ConguringtheSoundMenu ¦
Mode ❑ →Standard / Music / Movie / Clear Voice /
Custom
You can select a sound mode to suit your personal
preferences.
Equalizer ❑
The sound settings can be adjusted to suit your personal
preference.
Mode
Selectsthesoundmodeamongthepredenedsettings.
Balance L/R
Adjusts the balance between the right and left speaker.
100Hz / 300Hz / 1kHz / 3kHz / 10kHz
(Bandwidth Adjustment)
To adjust the level of different bandwidth frequencies.
SRSTruSurroundHD→Off/On ❑
SRS TruSurround HD is a patented SRS technology that solves the problem of playing 5.1
multichannel content over two speakers. TruSurround delivers a compelling, virtual surround sound
experience through any two-speaker playback system, including internal television speakers. It is
fully compatible with all multichannel formats.
Preferred Language ❑ (only digital channel)
Digital-TV broadcasts are capable of simultaneous transmission of many audio tracks (for example,
simultaneous translations of the program into foreign languages).
You can listen in a language other than the “
O Preferred Language” by pressing the MTS button
on the remote control.
“
N Preferred Language” is available only in Digital TV mode.
You can only select the language from among the actual languages being broadcast.
N
Multi-Track Sound (MTS) ❑ (only analog channel)
Press the O MTS button on the remote control repeatedly to select “Mono”, “Stereo” or “SAP”.
Mono
● : Choose for channels that are broadcasting in mono or if you are having difculty
receiving a stereo signal.
Stereo ● : Choose for channels that are broadcasting in stereo.
SAP ● : Choose to listen to the Separate Audio Program, which is usually a foreign-language
translation.
“ N Multi-Track Sound” is available only in Analog TV mode.
Depending on the particular program being broadcast, you can listen to “
N Mono”, “Stereo” or
“SAP”.
Auto Volume ❑ →Off / On
Each broadcasting station has its own signal conditions, and so it is not easy to adjust the volume
every time the channel is changed. This feature lets you automatically adjust the volume of the
desired channel by lowering the sound output when the modulation signal is high.
Mode :Custom ►
Equalizer
SRS TruSurround HD : Off
Preferred Language : English
Multi-Track Sound : Mono
Auto Volume : Off
Speaker Select : TV Speaker
Sound
Page 23
English - 21
Speaker Select ❑
Used to listen to the sound of the TV Speakers.
When you watch TV with it connecting to a Home theater, turn the TV speakers off so you can listen
to sound from the Home theater’s (external) speakers.
External Speaker: Used to listen to the sound of the External (Home Theater) Speakers.
TV Speaker: Used to listen to the sound of the TV Speakers.
If you select
O External Speaker in the Speaker Select menu, the sound settings will be limited.
The volume and MUTE buttons do not operate when the
O Speaker Select is set to External
Speaker. Please set the volume on your Home theater.
SoundReset→ResetAll/ResetSoundMode/Cancel ❑
You can restore the Sound settings to the factory defaults.
Reset Sound Mode
O : Current sound values return to default settings.
SETUP
ConguringtheSetupMenu ¦
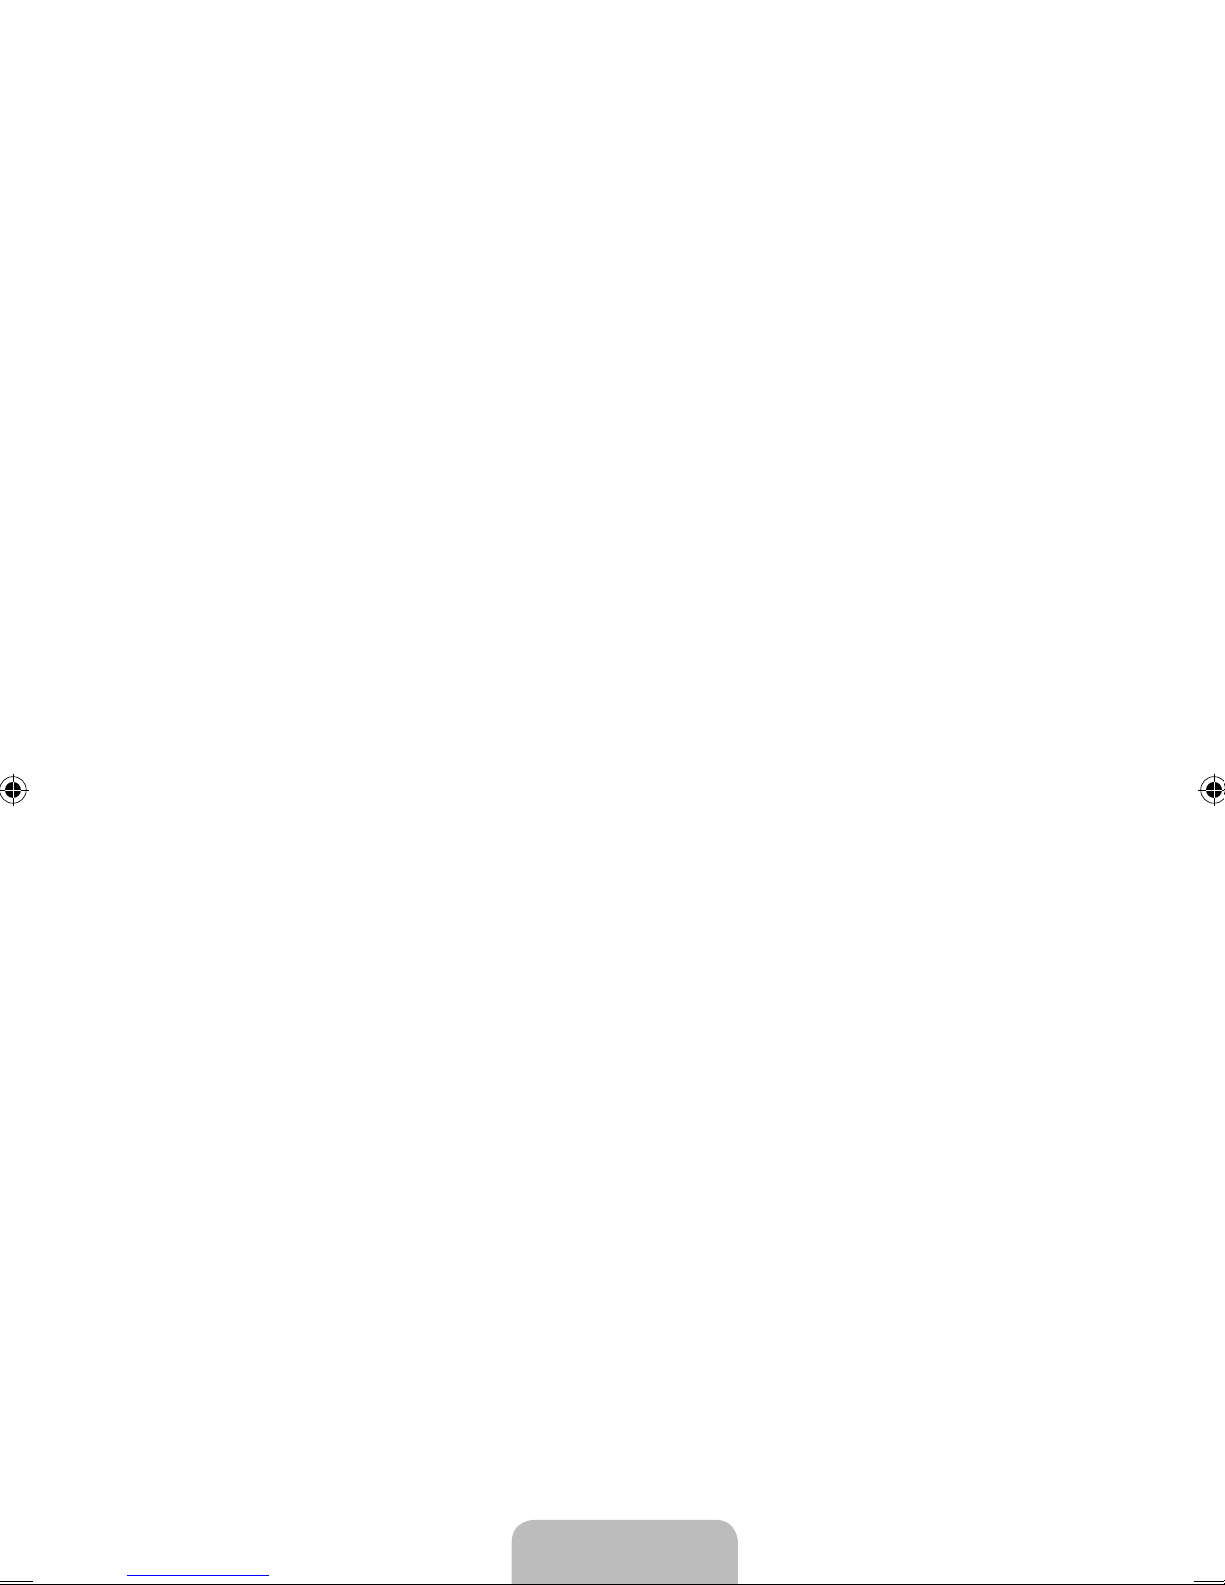
Language ❑
You can set the menu language.
Time ❑
Clock
Setting the clock is necessary in order to use the various timer
features of the TV.
The current time will appear every time you press the
O INFO
button.
If you disconnect the power cord, you have to set the clock again.
N
Clock Mode
●
You can set up the current time manually or automatically.
Auto
– : Set the current time automatically using the time from the digital broadcast.
Manual
– : Set the current time to a manually specied time.
Depending on the broadcast station and signal, the auto time may not be set correctly. If this
N
occurs, set the time manually.
The Antenna or cable must be connected in order to set the time automatically.
N
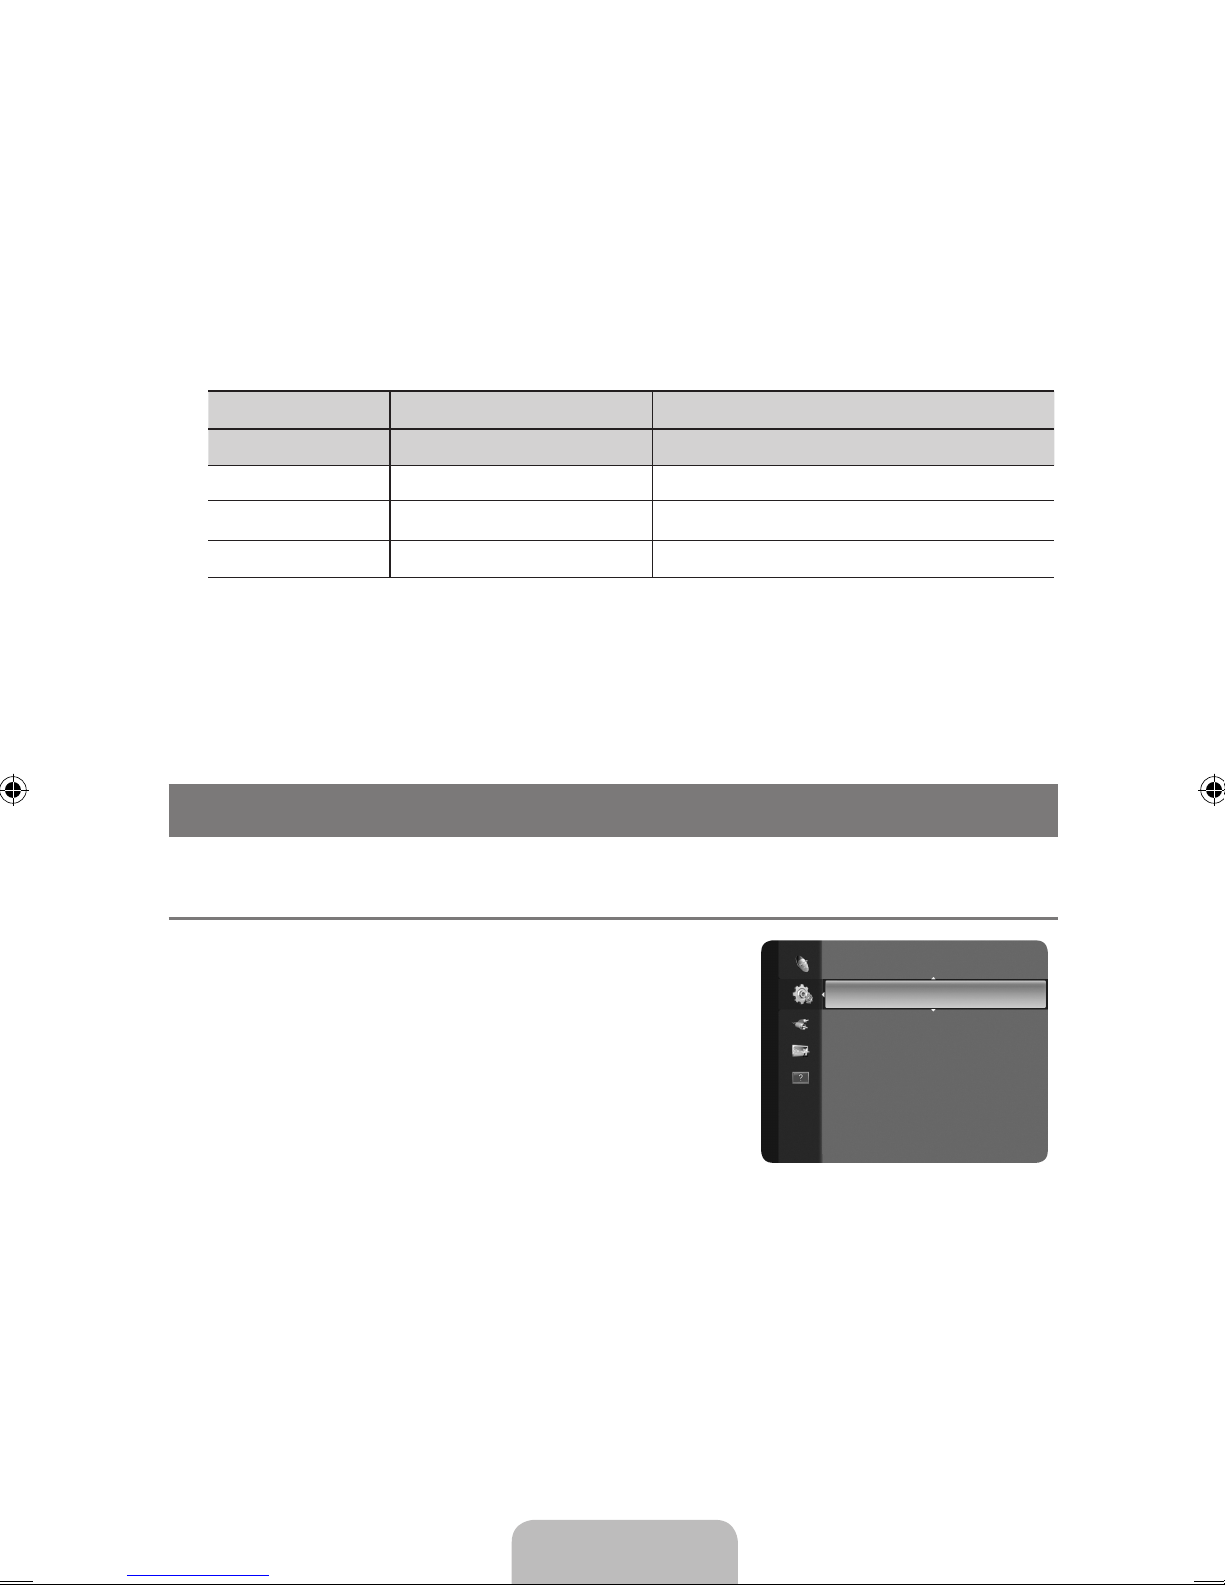
TV’s Internal Speakers Audio Out (Optical, L/R Out) to Sound System
RF, AV, Component, PC, HDMI RF, AV, Component, PC, HDMI
TV Speaker
Speaker Output Sound Output
External Speaker
Mute Sound Output
Video No Signal Mute Mute
Plug & Play
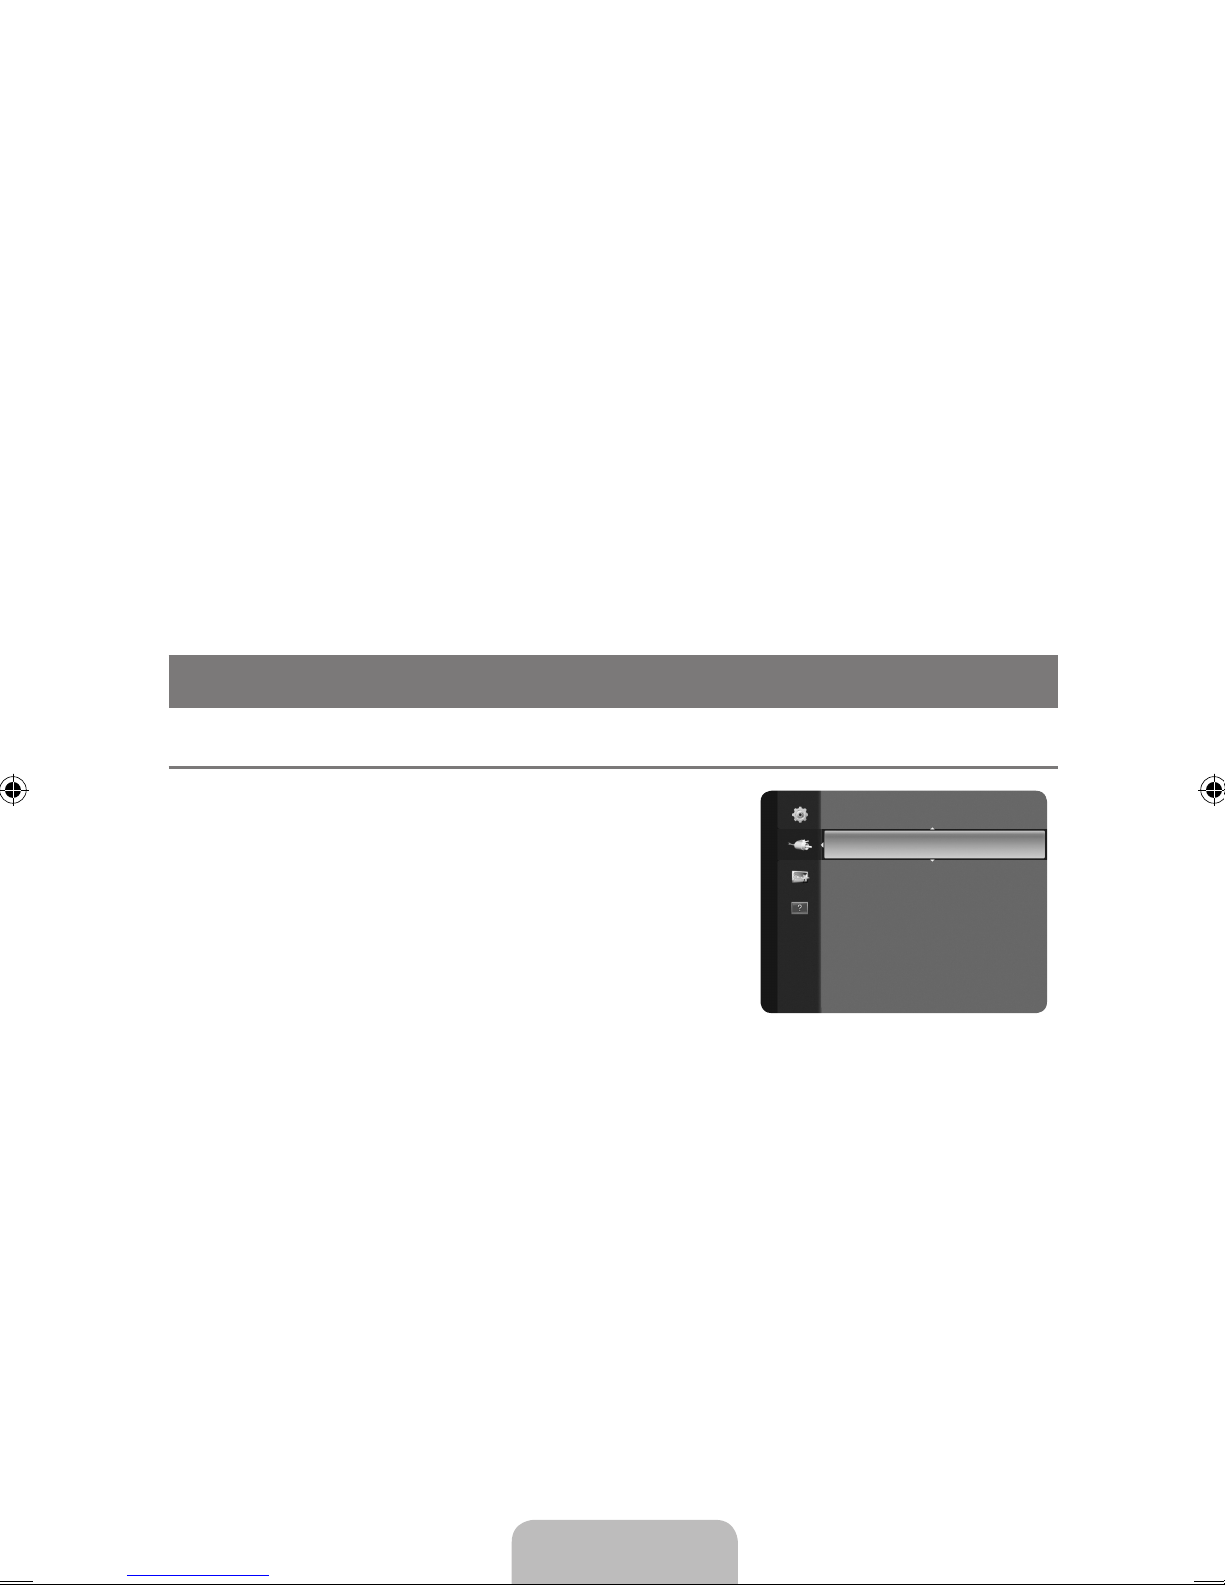
Language :English ►
Time
Game Mode : Off
V-Chip
Caption
Light Effect
Light Level : Off
Setup
Page 24
English - 22
Clock Set ●
You can set the current time manually.
This function is only available when “
N Clock Mode” is set to “Manual”.
You can set the month, day, year, hour and minute directly by pressing the number buttons on
N
the remote control.
Time Zone
●
Select your time zone.
This function is only available when “
N Clock Mode” is set to “Auto”.
DST
● (Daylight Saving Time) → Off / On / Auto
Switches the Daylight Saving Time function on or off.
This function is only available when “
N Clock Mode” is set to “Auto”.
Sleep Timer
The sleep timer automatically shuts off the TV after a preset time (30, 60, 90, 120, 150 and 180
minutes).
Press the
T TOOLS button to display “Tools” menu. You can also set the sleep timer by selecting
“Tools → Sleep Timer”.
To cancel the “
N Sleep Timer” function, select “Off”.
Timer 1
/ Timer 2 / Timer 3
Three different on / off timer settings can be made. You must set the clock rst.
On Time
● : Set the Hour, Minute, am/pm, and Activate/Inactivate. (To activate timer with the
setting you’ve chosen, set to “Activate”.)
Off Time ● : Set the Hour, Minute, am/pm, and Activate/Inactivate. (To activate timer with the
setting you’ve chosen, set to “Activate”.)
Volume ● : Set the required volume level.
Antenna ● : View antenna type. (Air or Cable)
You can set the Antenna by selecting Channel → Antenna.
N
Channel
● : Select the desired channel.
Repeat ● : Select “Once”, “Everyday”, “Mon~Fri”, “Mon~Sat”, “Sat~Sun” or “Manual”.
When “ N Manual” is selected, press the ►button to select the desired day of the week. Press the
E
button over the desired day and the c mark will appear.
You can set the hour, minute and channel by pressing the number buttons on the remote control.
N
Auto Power Off
N
When you set the timer On, the television will eventually turn off, if no controls are operated for
3 hours after the TV was turned on by the timer. This function is only available in timer On mode
and prevents overheating, which may occur if a TV is on for too long time.
GameMode→Off/On ❑
When connecting to a game console such as PlayStationTM or XboxTM, you can enjoy a more realistic
gaming experience by
selecting the game menu.
Restrictions on game mode (Caution) N
To disconnect the game console and connect another external device, set
– Game Mode
to Off in the setup menu. If you display the TV menu in Game mode, the screen shakes
slightly.
If
N Game Mode is On :
Picture mode is automatically changed to
– Standard and cannot be changed.
Sound mode is automatically changed to
– Custom and cannot be changed. Adjust the
sound using the equalizer.
Game Mode
N is not available in regular TV and PC mode.
If the picture is poor when external device is connected to TV, check if
N Game Mode is On. Set
Game Mode to Off and connect external devices.
Page 25
English - 23
V-Chip ❑
The V-Chip feature automatically locks out programs that are deemed inappropriate for children.
The user must enter a PIN (personal ID number) before any of the V-Chip restrictions are set up or
changed.
“
N V-Chip” function is not available in HDMI, Component or PC mode.
The default PIN number of a new TV set is ‘0-0-0-0’
N
If you forget the PIN, press the remote-control buttons in the following sequence, which resets
N
the pin to 0-0-0-0 : POWER (off) → MUTE → 8 → 2 → 4 → POWER (on).
Allow all
N : Press to unlock all TV ratings. / Block all: Press to lock all TV ratings.
V-Chip Lock
→Off / On
You can block rated TV Programs.
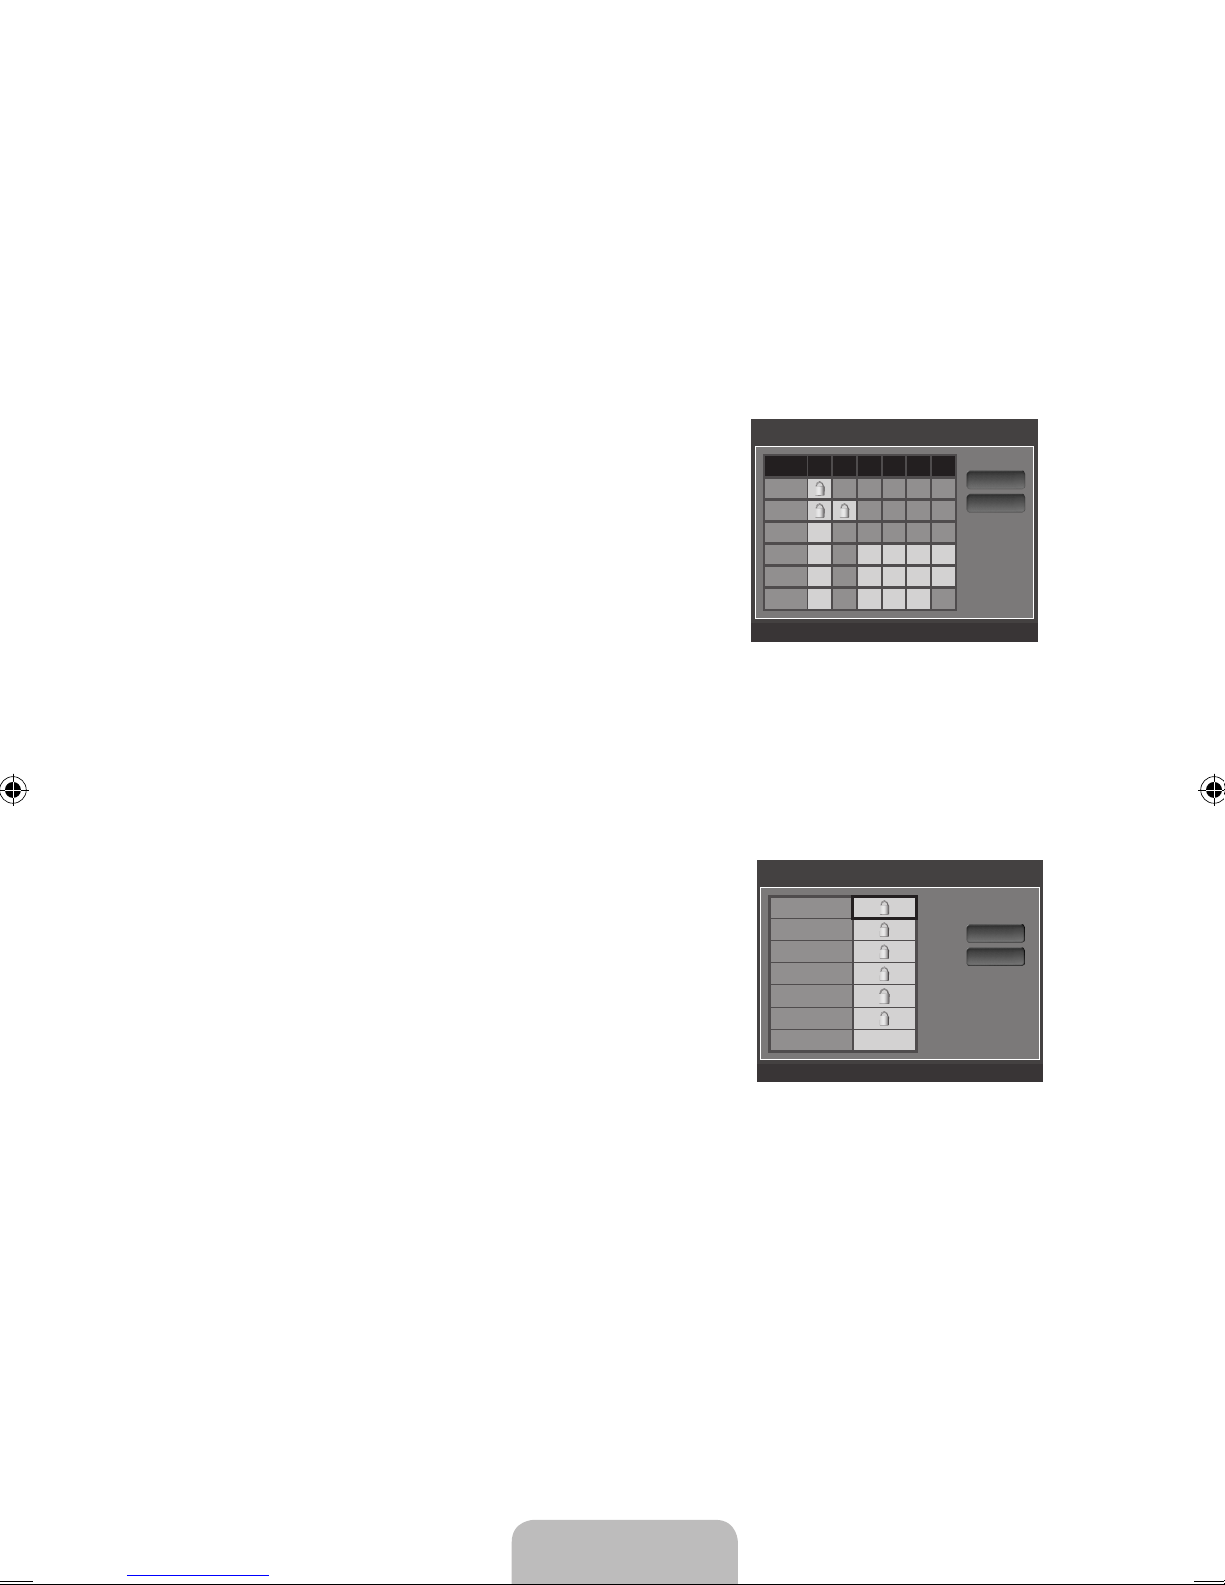
TV Parental Guidelines
You can block TV programs depending on their rating. This
function allows you to control what your children are watching.
TV-Y ● : Young children / TV-Y7: Children 7 and over / TV-G:
General audience /
TV-PG: Parental guidance / TV-14: Viewers 14 and over /
TV-MA: Mature audience
ALL
● : Lock all TV ratings. / FV: Fantasy violence / V:
Violence / S: Sexual situation /
L: Adult Language / D: Sexually Suggestive Dialog
The V-Chip will automatically block certain categories that are more restrictive. For example, if
N
you block “TV-Y” category, then TV-Y7 will automatically be blocked. Similarly, if you block the
TV-G category, then all the categories in the young adult group will be blocked (TV-G, TV-PG,
TV-14 and TV-MA). The sub-ratings (D, L, S, V) work together similarly.
The V-chip will automatically block certain categories that are ‘More restrictive’. For example, if
N
you block “L” sub-rating in TV-PG, then the “L” sub-ratings in TV-14 and TV-MA will automatically
be blocked.
MPAA Rating
You can block movies depending on their MPAA rating.
The Motion Picture Association of America(MPAA)
has implemented a rating system that provides
parents or guardians with advance information on which lms
are appropriate for children.
G
● : General audience (no restrictions).
PG ● : Parental guidance suggested.
PG-13 ● : Parents strongly cautioned.
R ● : Restricted. Children under 17 should be accompanied
by an adult.
NC-17 ● : No children under age 17.
X ● : Adults only.
NR ● : Not rated.
The V-Chip will automatically block any category that is ‘More restrictive’. For example, if you N
block the “PG-13” category, then “R”, “NC-17” and “X” will automatically be blocked also.
Canadian English
C ● : Programming intended for children under age 8.
C8+ ● : Programming generally considered acceptable for children 8 years and over to watch on
their own.
G ● : General programming, suitable for all audiences.
PG ● : Parental Guidance.
14+ ● : Programming contains themes or content which may not be suitable for viewers under the
age of 14.
18+ ● : Adult programming.
TV Parental Guidelines
ALL FV V S L D
TV-Y
TV-Y7
TV-G
TV-PG
TV-14
TV-MA
n
Move E Enter R Return
Allow All
Block All
MPAA Rating
G
PG
PG-13
R
NC-17
X
NR
n
Move E Enter R Return
Allow All
Block All
Page 26
English - 24
The V-Chip will automatically block any category that is ‘More restrictive’. For example, if you N
block G category, then PG, 14+ and 18+ will automatically be blocked also.
Canadian French
G
● : General
8 ans+ ● : Programming generally considered acceptable for children 8 years and over to watch
on their own.
13 ans+ ● : Programming may not be suitable for children under the age of 13.
16 ans+ ● : Programming is not suitable for children under the age of 16.
18 ans+ ● : Programming restricted to adults.
The V-Chip will automatically block any category that is ‘More restrictive’. For example, if you N
block 8 ans+ category, then 13 ans+, 16 ans+ and 18 ans+ will automatically be blocked also.
Downloadable U.S. Rating
Parental restriction information can be used while
watching DTV channels
If information is not downloaded from the
N
broadcasting station, the “Downloadable U.S.
rating” menu is deactivated.
Parental restriction information is automatically
N
downloaded while watching DTV channels. It may
take several seconds.
The “
N Downloadable U.S. rating” menu is available
for use after information is downloaded from the
broadcasting station. However, depending on the
information from the broadcasting station, it may not be available for use.
Parental restriction levels differ depending on the broadcasting station. The default menu name
N
and Downloadable US rating changes depending on the downloaded information.
Even if you set the On-screen display to your desired language, the “
N Downloadable U.S.
Rating” menu will appear in English only.
The rating will automatically block certain categories that are more restrictive.
N
The rating titles (For example: Humor Level..etc) and TV ratings (For example:
N DH, MH, H..etc)
may differ depending on the broadcasting station.
Change PIN
The Change PIN screen will appear. Choose any 4 digits for your PIN and enter them.
As soon as the 4 digits are entered, the
ConrmNewPIN screen appears. Re enter the same 4
digits. When the Conrm screen disappears, your PIN has been memorized.
If you forget the PIN, press the remote-control buttons in the following sequence, which resets
N
the pin to 0-0-0-0 : POWER (off) → MUTE → 8 → 2 → 4 → POWER (on).
Downloadable U.S. Rating
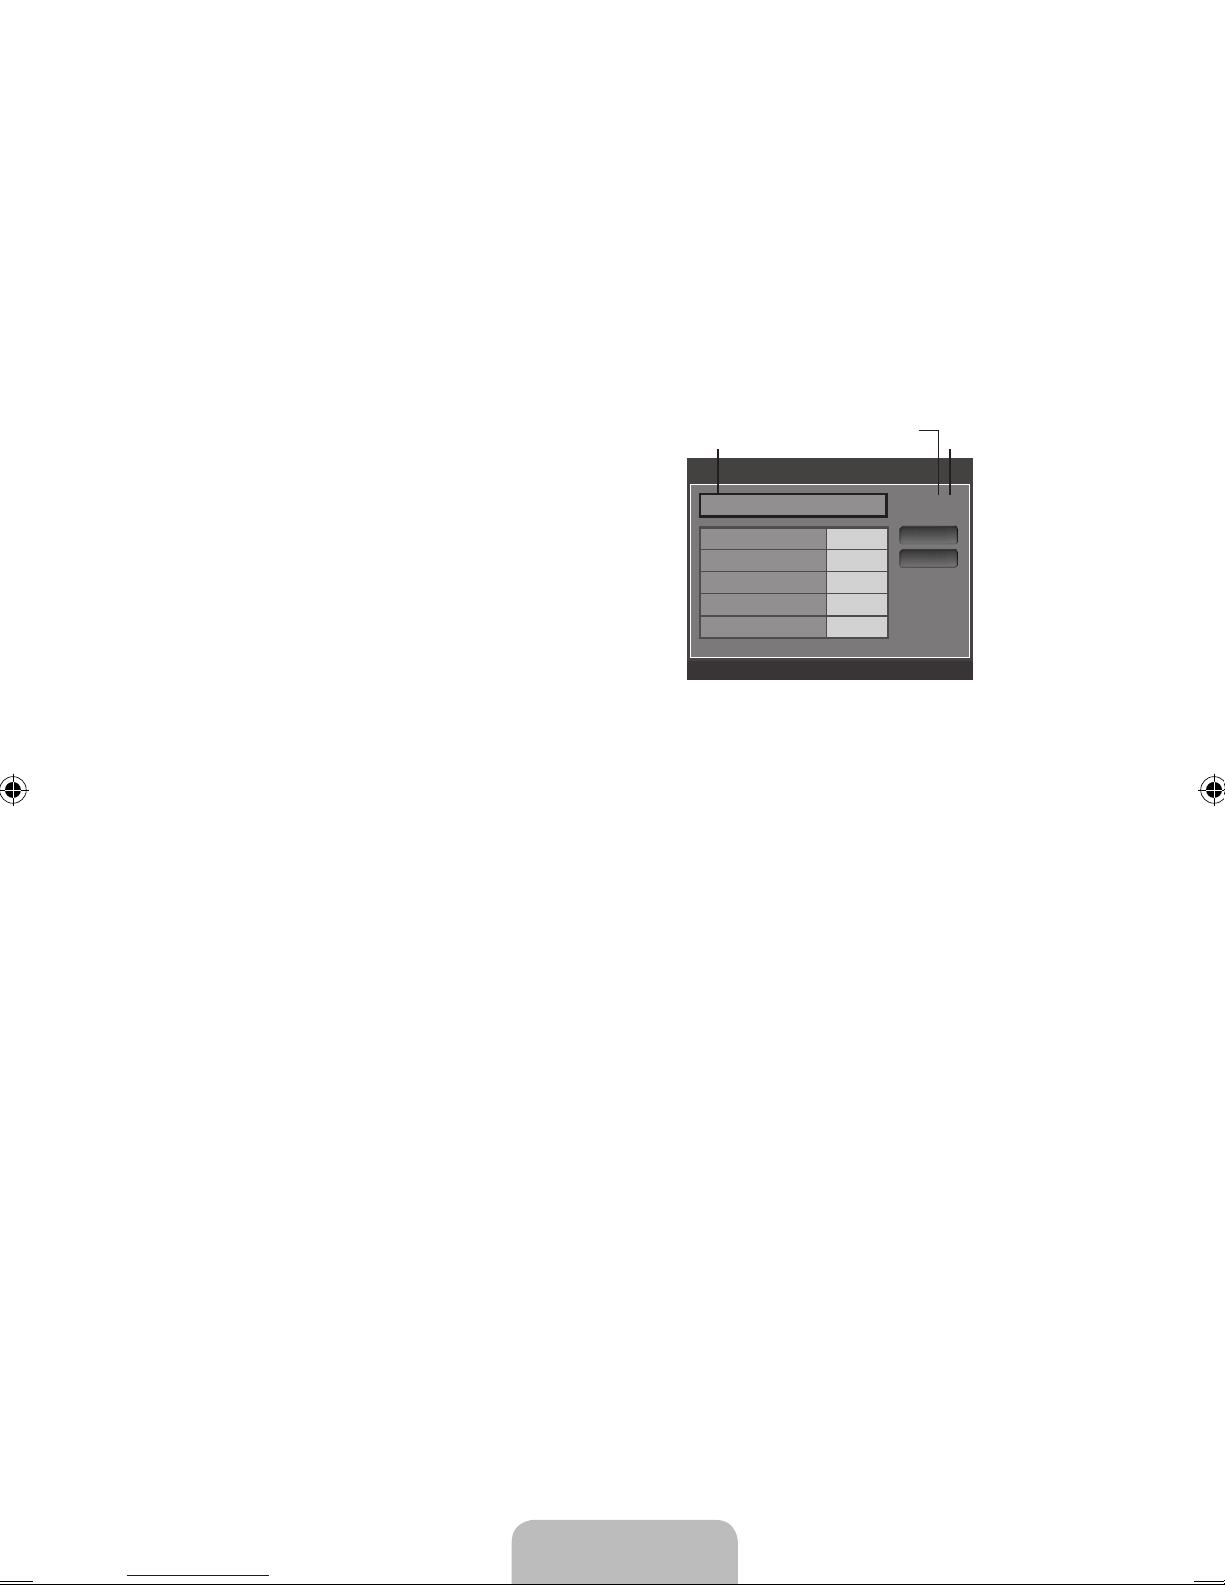
Humor Level ► 1/2
DH
MH
H
VH
EH
n
Move E Enter R Return
Allow All
Block All
Rating title
The number of all
rating information
The number of current
rating information
Page 27
English - 25
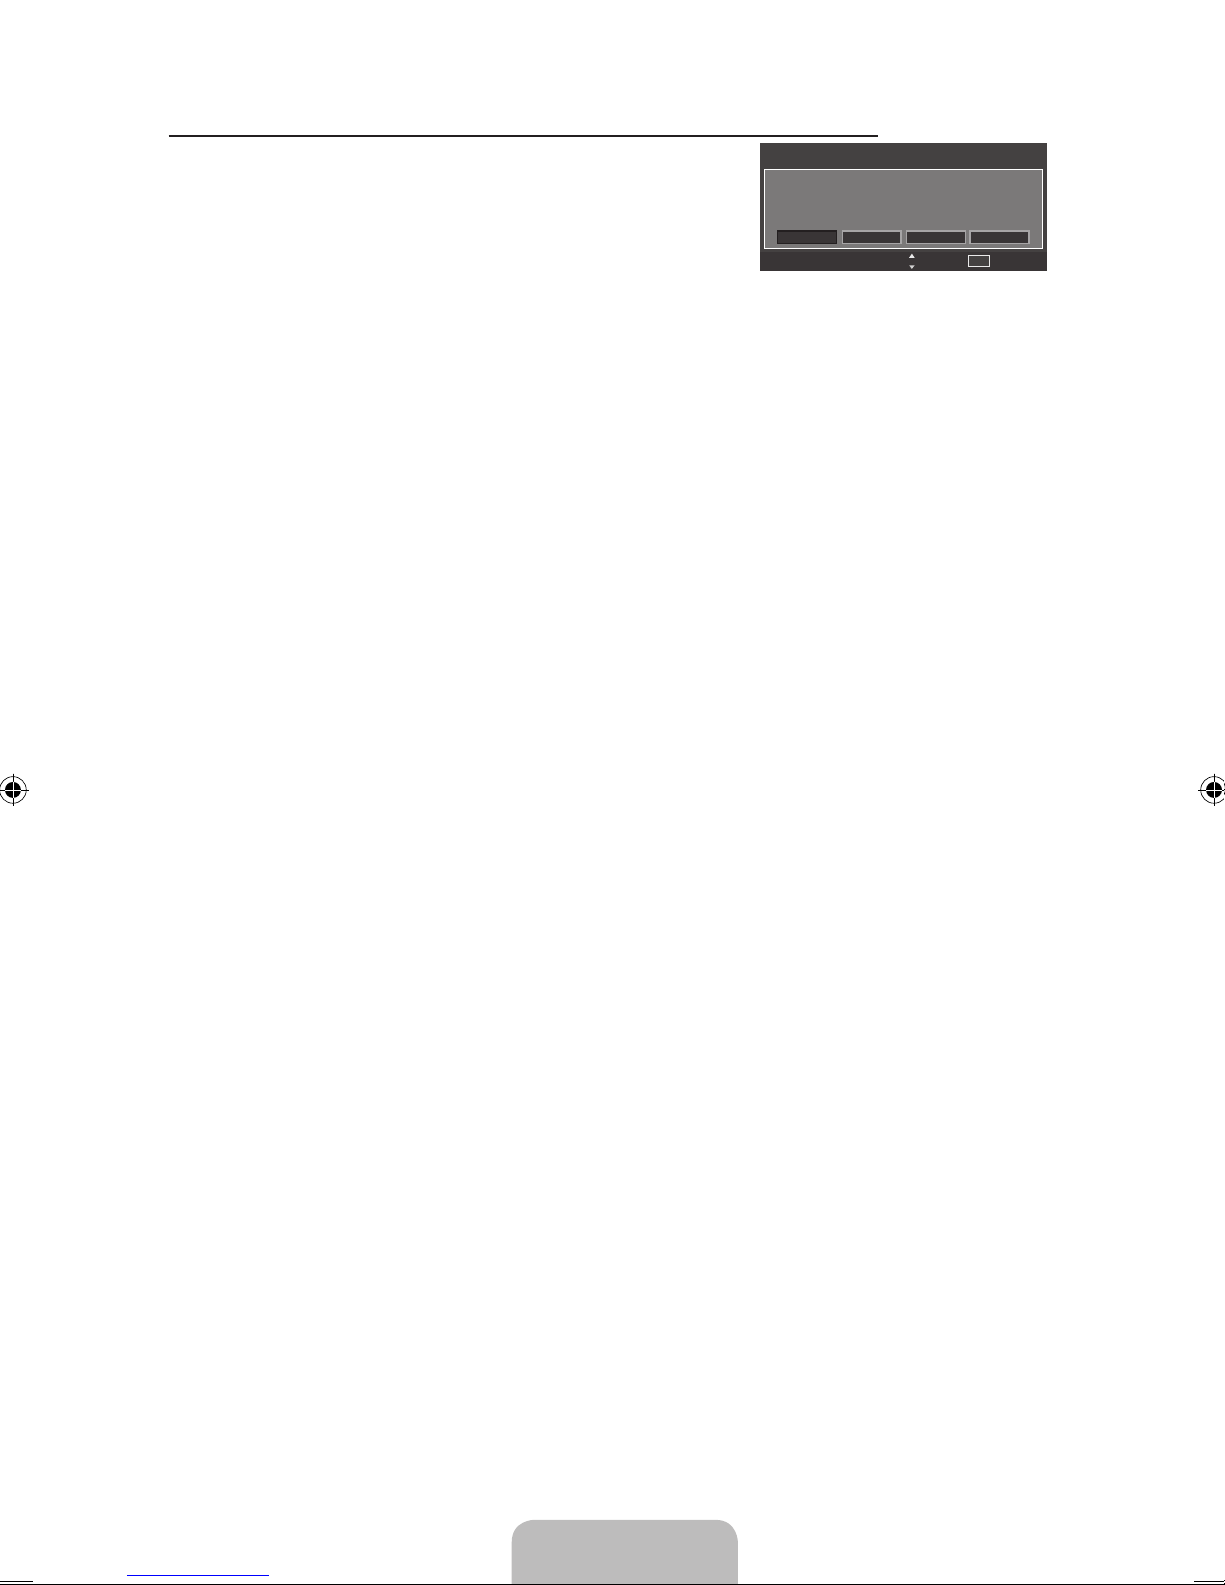
How to Reset the TV after the V-Chip Blocks a Channel (“Emergency Escape”)
If the TV is tuned to a restricted channel, the V-Chip will block it.
The screen will go blank and the following message will appear:
1. Enter your PIN, then press the E button and press the ▲ or
▼ button to temporarily disable the V-Chip Lock.
If you forget the PIN, press the remote-control buttons in the
N
following sequence, which resets the pin to 0-0-0-0 : POWER (off) → MUTE → 8 → 2 → 4
→ POWER (on)
Caption ❑ (On-Screen Text Messages)
Caption→Off/On
You can switch the caption function on or off. If captions are not available, they will not be displayed
on the screen.
Press the
O CC button on the remote control to turn the Caption on or off.
The Caption feature doesn’t work in Component, HDMI , PC or DVI modes.
N
Caption Mode
You can select the desired caption mode.
The availability of captions depends on the program being broadcast.
N
Default / CC1~CC4 / Text1~Text4
● (analog channels only)
The Analog Caption function operates in either analog TV channel mode or when a signal is
supplied from an external device to TV. (Depending on the broadcasting signal, the Analog
Caption function may operate on digital channels.)
Default / CC1~CC4 / Text1~Text4 / Service1~Service6
● (digital channels only)
The Digital Captions function operates on digital channels.
Service1~6 in digital caption mode may not be available depending on the broadcast.
N
Digital Caption Options (digital channels only)
Size
● : This option consists of “Default”, “Small”, “Standard” and “Large”. The default is
“Standard”.
Font Style ● : This option consists of “Default”, “Style0 ~ Style 7”. You can change the font you
want. The default is “Style 0”.
Foreground Color ● : This option consists of “Default”, “White”, “Black”, “Red”, “Green”, “Blue”,
“Yellow”, “Magenta” and “Cyan”. You can change the color of the letter. The default is “White”.
Background Color ● : This option consists of “Default”, “White”, “Black”, “Red”, “Green”, “Blue”,
“Yellow”, “Magenta” and “Cyan”. You can change the background color of the caption. The
default is “Black”.
Foreground Opacity ● : This option consists of “Default”, “Transparent”, “Translucent”, “Solid”
and “Flashing”. You can change the opacity of the letter.
Background Opacity ● : This option consists of “Default”, “Transparent”, “Translucent”, “Solid”
and “Flashing”. You can change the background opacity of the caption.
Return to Default ● : This option sets each of “Size”, “Font Style”, “Foreground Color”,
“Background color”, “Foreground Opacity” and “Background Opacity” to its default.
“ N Digital Caption Options” are available only when “Default” and “Service1~Service6” can be
selected in “Caption Mode”.
The availability of captions depends on the program being broadcast.
N
“
N Default” means to follow the standard set by the broadcaster.
Foreground and Background cannot be set to have the same color.
N
“
N Foreground Opacity” and “Background Opacity” cannot be both set to Transparent.
LightEffect→Off/On ❑
Received Rating: TV-14/NL
This channel is blocked by a Parental Lock. Prees enter the PIN
to unblock.
CH
Change
0~9
Enter PIN
Page 28
English - 26
You can turn on/off the LED on the front of monitor according to the situation. Use it for saving power
or when the LED dazzles your eyes.
Light Level ❑
Use to adjust the light level i.e., the brightness of the light.
Melody→Off/Low/Medium/High ❑
A melody sound can be set to come on when the TV is powered On or Off.
The Melody does not play.
N
When no sound is output from the TV because the
– MUTE button has been pressed.
When no sound is output from the TV because the volume has been reduced to minimum
–
with the VOL – button.
When the TV is turned off by Sleep Timer function.
–
Energy Saving ❑ →Off / Low / Medium / High / Auto
This feature adjusts the brightness of the TV in order to reduce power consumption. When watching
TV at night, set the “Energy Saving” mode option to “High” to reduce eye fatigue as well as power
consumption.
INPUT / SUPPORT
ConguringtheInputMenu ¦
Source List ❑
Use to select TV or other external input sources such as DVD
/ Blu-Ray players / Satellite receivers (Set-Top Box) connected
to the TV. Use to select the input source of your choice.
Press the
O SOURCE button on the remote control to view an
external signal source.
PC, TV, DVI, AV, Component, HDMI
You can choose only those external devices that are
N
connected to the TV. In the “Source List”, connected
inputs will be highlighted and sorted to the top. Inputs that are not connected will be sorted to the
bottom.
Edit Name ❑
Name the device connected to the input jacks to make your input source selection easier.
VCR
/ DVD / Cable STB / Satellite STB / PVR STB / AV Receiver / Game / Camcorder /PC / TV /
DVI PC / TV / DVI / IPTV / Blu-Ray / HD DVD / DMA
When a PC with a resolution of 1920X1080@60Hz and 640x480@60Hz is connected to the
N
HDMI IN port, you should set the “HDMI1/DVI” mode to “PC” in the “Edit Name” of the “Input”
mode. Conguring the Support Menu.Conguring the Support Menu
Source List
Edit Name
Input
Page 29
English - 27
ConguringtheSupportMenu ¦
Self Diagnosis ❑
Picture Test
If you think you have a picture problem, perform the picture test.
Check the color pattern on the screen to see if the problem still
exists.
Yes ● : If the test pattern does not appear or there is noise in
the test pattern, select Yes. There may be a problem with the
TV. Contact Samsung’s call center for assistance.
No ● : If the test pattern is properly displayed, select No. There
may be a problem with your external equipment. Please
check your connections. If the problem still persists, refer to
the external device’s user manual.
Sound Test
If you think you have a sound problem, please perform the sound test. You can check the sound by
playing a built-in melody sound through the TV. ‘Does the problem still exist with this sound test?’
appears on the screen.
If you hear no sound from the TV’s speakers, before performing the sound test, make sure
N
Speaker Select is set to TV speaker in the Sound menu.
The melody will be heard during the test even if
N Speaker Select is set to External Speaker or
the sound is muted by pressing the MUTE button.
Yes ● : If during the sound test you can hear sound only from one speaker or not at all, select Yes.
There may be a problem with the TV. Contact Samsung’s call center for assistance.
No ● : If you can hear sound from the speakers, select No. There may be a problem with your
external equipment. Please check your connections. If the problem still persists, refer to the
external device’s user manual.
Signal Strength
(digital channels only)
Unlike analog channels, which can vary in reception quality from ‘snowy’ to clear, digital (HDTV)
channels have either perfect reception quality or you will not receive them at all. So, unlike analog
channels, you cannot ne tune a digital channel. You can, however, adjust your antenna to improve
the reception of available digital channels.
If the signal strength meter indicates that the signal is weak, physically adjust your antenna to
N
increase the signal strength. Continue to adjust the antenna until you nd the best position with
the strongest signal.
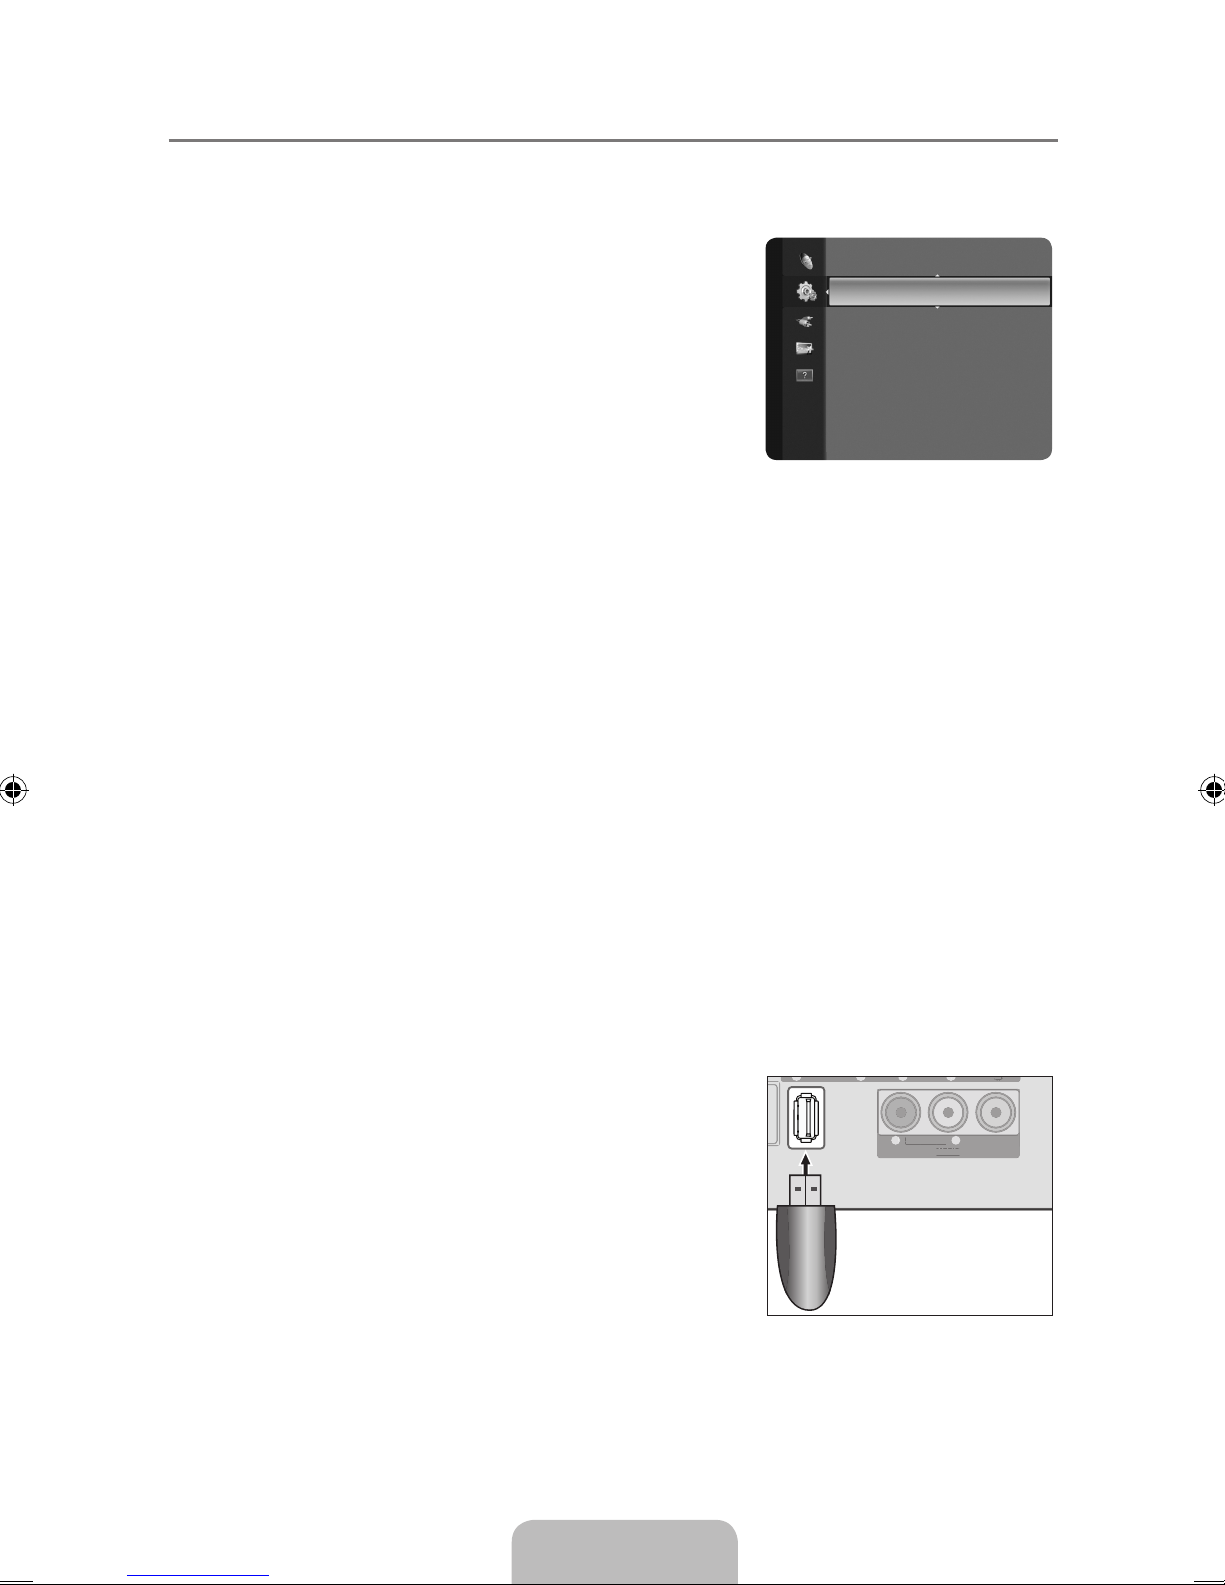
Software Upgrade
Samsung may offer upgrades for TV’s rmware in the future.
Please visit Samsung.com or contact the Samsung call center
at 1-800-SAMSUNG (726-7864) to receive information about
downloading upgrades and using a USB drive. Upgrades will
be possible by connecting a USB drive to the SERVICE port
located on your TV.
Insert a USB drive containing the rmware upgrade into the
N
SERVICE port on the TV.
Please be careful to not disconnect the power or remove
N
the USB drive while upgrades are being applied. The TV
will turn off and turn on automatically after completing the
rmware upgrade. Please check the rmware version after the upgrades are complete. When
software is upgraded, video and audio settings you have made will return to their default (factory)
settings. We recommend you write down your settings so that you can easily reset them after the
upgrade.
AV IN
- AUDIO -
R
L
VIDEO
PC IN
ANT INANT IN
COMPONENT IN
- AUDIO -
R
L
PR PB
Y
SERVI CE
HDMI/PC
/DVI-D
AUDIO IN
AV IN
- AUDIO -
R
L
VIDEO
PC IN
ANT INANT IN
COMPONENT IN
- AUDIO -
R
L
P
R
P
B
Y
HDMI/PC
/DVI-D
AUDIO IN
A
V I
N
- AUDIO -
L
V
IDE
O
PC IN
COMPO
NENT IN
-
A UDIO
-
L
H
DMI/P
C
/
DVI-D
A
UDIO I
N
USB drive
SelfDiagnosis ►
Software Upgrade
HD Connection Guide
Contact Samsung
Support
Page 30
English - 28
HD Connection Guide ❑
This menu presents the connection method that provides the optimal quality for the HD TV.
Refer to this information when connecting external devices to the TV.
Contact Samsung ❑
View this information when your TV does not work properly or when you want to upgrade the
software.
You can view the information regarding the call center, product and software le download method.
Anynet
+
ANYNET
+
Connecting Anynet ¦
+
Devices
Anynet+ is a function that enables you to control all connected Samsung devices that support
Anynet+ with your Samsung TV’s remote.
The Anynet+ system can be used only with Samsung devices that have the Anynet+ feature. To be
sure your Samsung device has this feature, check if there is an Anynet+ logo on it.
To connect to a TV
TV
AV IN
- AUDIO -
R
L
VIDEO
HDMI IN
HDMI IN
DVI-D IN
PC IN
ANT INANT IN
COMPONENT IN
- AUDIO -
R
L
PRP
B
Y
HDMI/PC
/DVI-D
AUDIO IN
DIGITAL
AUDIO OUT
(OPTICAL)
anynet+ Device
HDmI 1.3 Cable
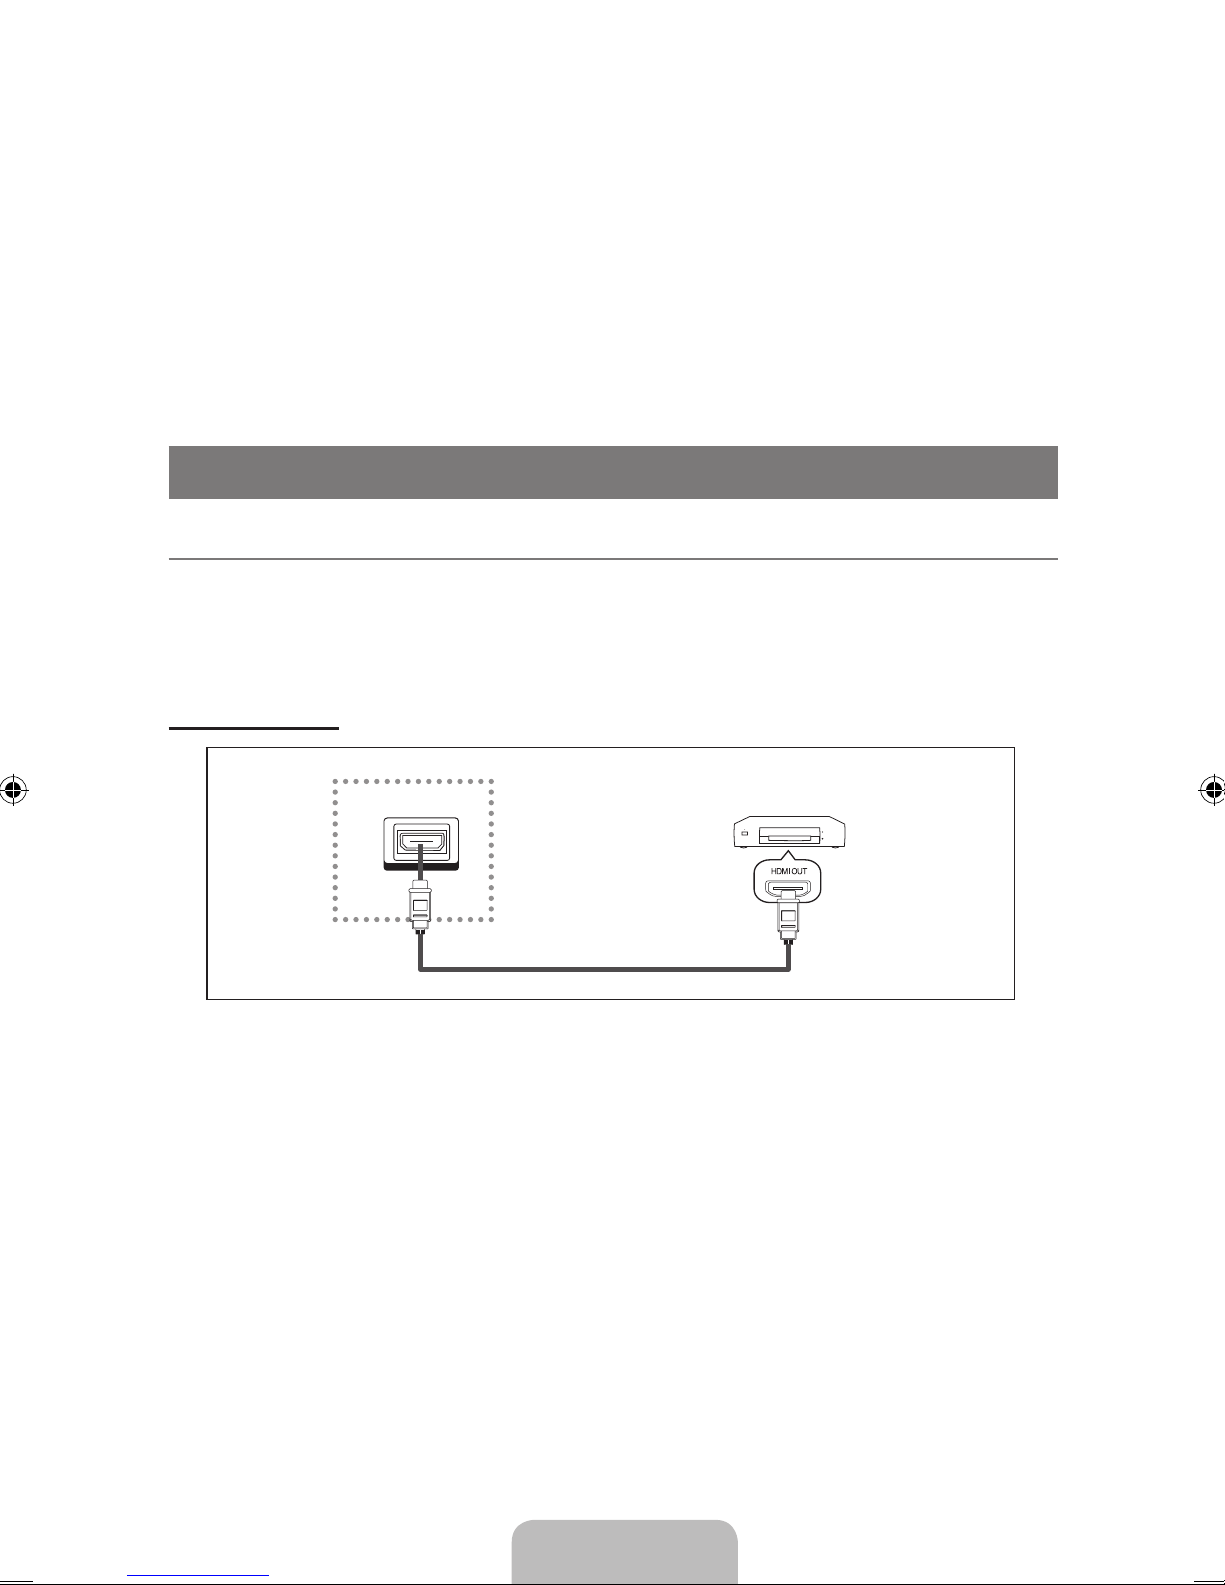
1. Connect the HDMI IN jack on the TV and the HDMI OUT jack of the corresponding Anynet+ device
using an HDMI cable.
Page 31
English - 29
To connect to Home Theater
AV IN
- AUDIO -
R
L
VIDEO
HDMI IN
HDMI IN
DVI-D IN
PC IN
ANT INANT IN
COMPONENT IN
- AUDIO -
R
L
PRP
B
Y
HDMI/PC
/DVI-D
AUDIO IN
DIGITAL
AUDIO OUT
(OPTICAL)
DIGITAL
AUDIO OUT
(OPTICAL)
HDMI IN
TV
Anynet+ Device
HDMI 1.3 Cable
Optical Cable
Home Theater
HDMI 1.3 Cable
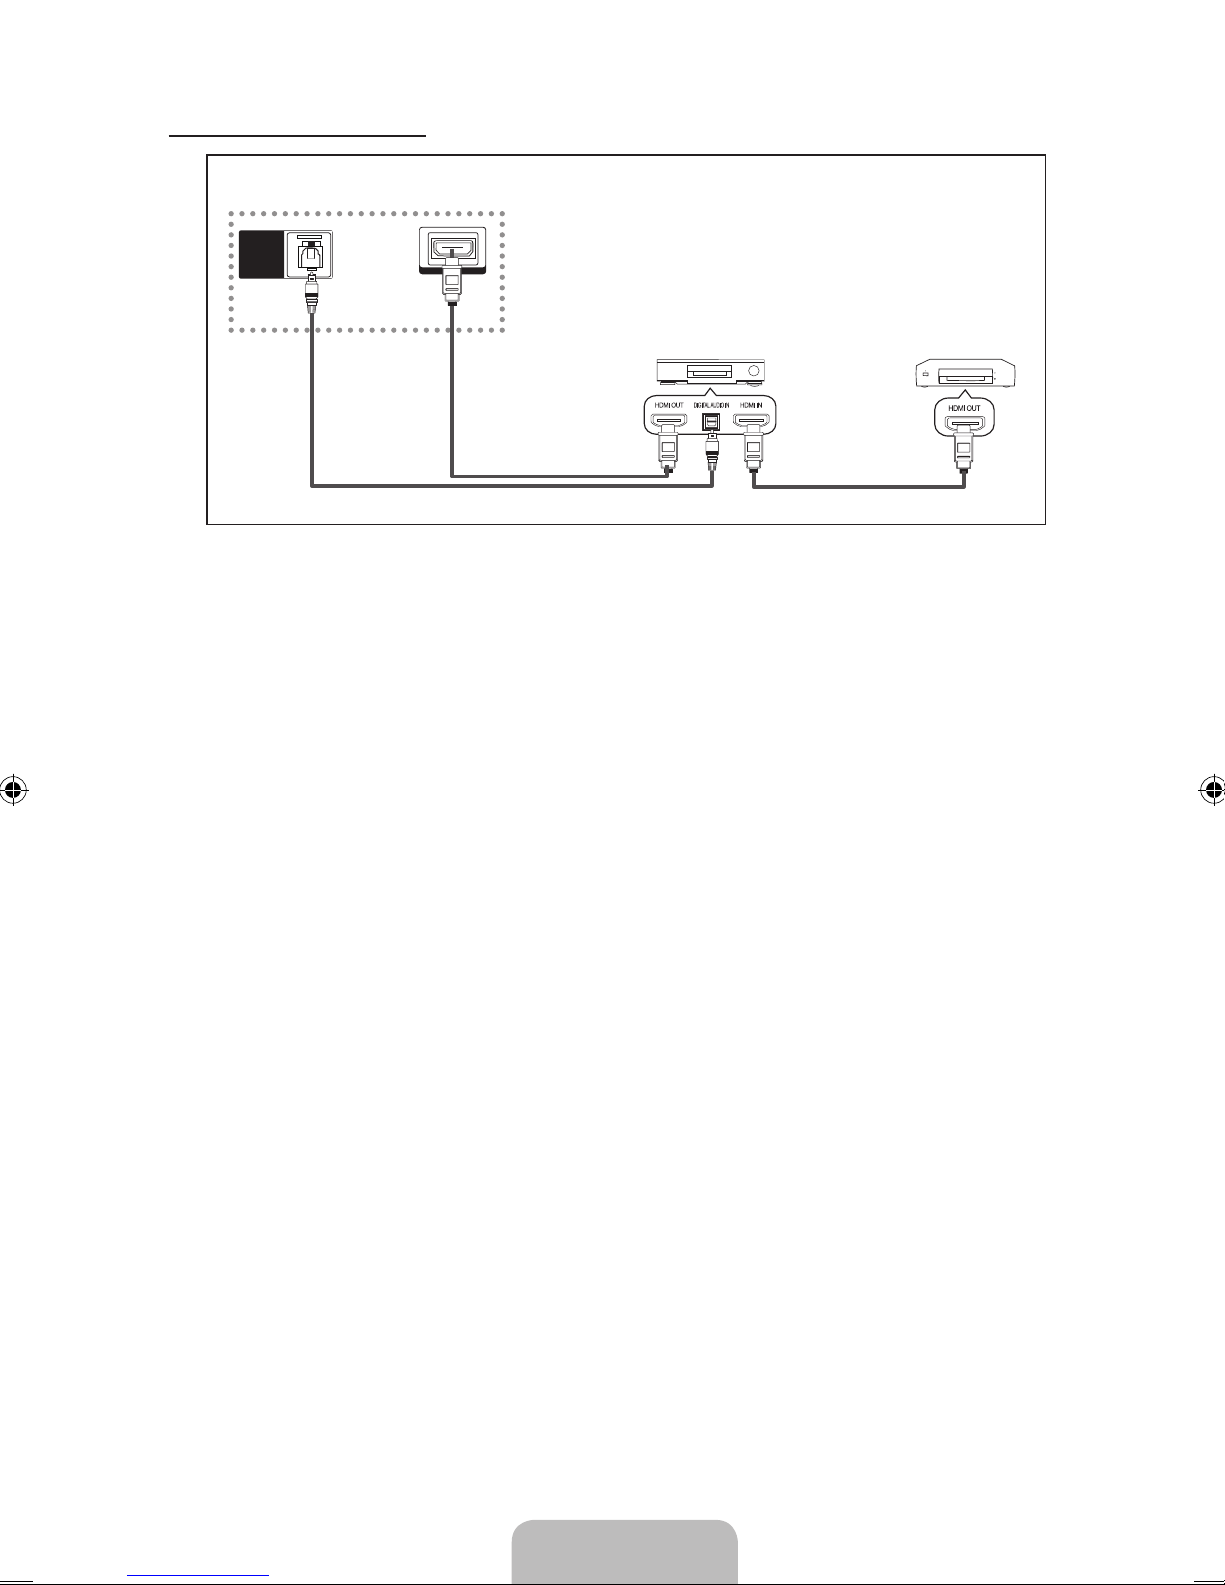
1. Connect the HDMI IN jack on the TV and the HDMI OUT jack of the corresponding Anynet+ device
using an HDMI cable.
2. Connect the HDMI IN jack of the home theater and the HDMI OUT jack of the corresponding
Anynet+ device using an HDMI cable.
Connect the Optical cable between the
N DIGITAL AUDIO OUT (OPTICAL) jack on your TV and
the Digital Audio Input on the Home Theater.
When following the connection above, the Optical jack only outputs 2 channel audio. You will
N
only hear sound from the Home Theater’s Front Left and Right speakers and the subwoofer. If
you want to hear 5.1 channel audio, connect the DIGITAL AUDIO OUT (OPTICAL) jack on the
DVD / Satellite Box (ie Anynet Device 1 or 2) directly to the Amplier or Home Theater, not the
TV.
Connect only one Home Theater.
N
You can connect an Anynet
N
+
device using the HDMI 1.3 cable. Some HDMI cables may not
support Anynet+ functions.
Anynet
N
+
works when the AV device supporting Anynet+ is in the Standby or On status.
Anynet
N
+
supports up to 10 AV devices in total. Note that you can connect up to 3 devices of the
same type.
Page 32
English - 30
Setting Up Anynet ¦
+
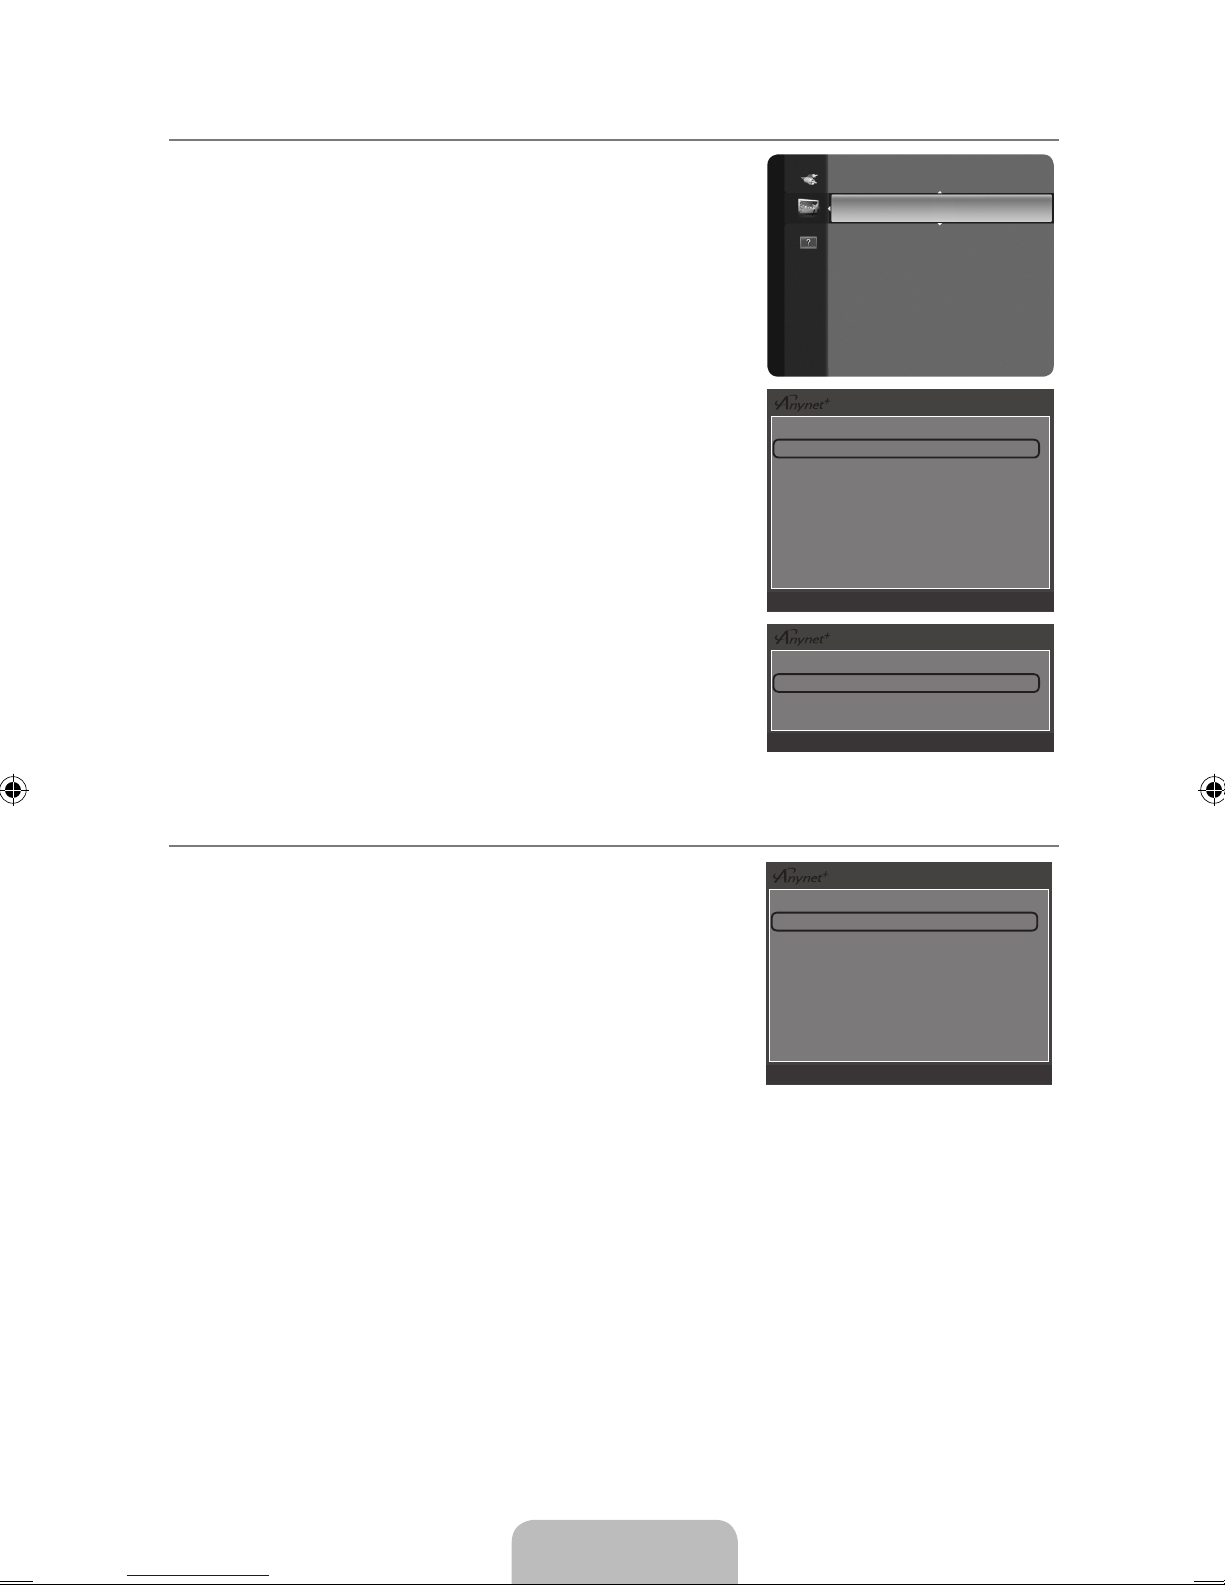
Press the T TOOLS button to display the Tools menu. You can
also display Anynet+ menu by selecting Tools→Anynet
+
(HDMI-CEC).
Setup ❑
Anynet
+
(HDMI-CEC)→Off/On
To use the Anynet+ Function, Anynet+ (HDMI-CEC) must be set
to On.
When the
N Anynet+ (HDMI-CEC) function is disabled, all the
Anynet+ related operations are deactivated.
AutoTurnOff→No/Yes
Setting an Anynet+ Device to turn Off Automatically when the
TV is Turned Off
The active source on the TV remote must be set to TV to
N
use the Anynet+ function.
If you set
N Auto Turn Off to Yes, connected external devices
are also turned off when the TV is turned off. If an external
device is still recording, it may or may not turn off.
Switching between Anynet ¦
+
Devices
1. Press the TOOLS button. Press the E button to select
Anynet+ (HDMI-CEC).
2. Press the ▲ or ▼ button to select Device List, then press the
E
button.
Anynet
N
+
devices connected to the TV are listed.
If you cannot nd a device you want, press the red button to
N
scan for devices.
3. Press the ▲ or ▼ button to select a particular device and press
the E button. It is switched to the selected device.
Only when you set
N Anynet+ (HDMI-CEC) to On in the
Application menu, the Device List menu appears.
Switching to the selected devices may take up to 2 minutes. You cannot cancel the operation
N
during the switching operation.
The time required to scan for devices is determined by the number of connected devices.
N
When the device scan is complete, the number of devices found are not displayed.
N
Although the TV automatically searches the device list when the TV is turned on via the power
N
button, devices connected to the TV when the TV is on or under some conditions are not
automatically displayed in the device list. Press the red button to search for the connected
device.
If you have selected external input mode by pressing the
N SOURCE button, you cannot use the
Anynet+ function. Make sure to switch to an Anynet+ device by using the Device List.
Anynet+(HDMI-CEC) ►
Application
Device List
Setup
U
Move E Enter R Return
Anynet+(HDMI-CEC) : On
Auto Turn Off : Yes
U
Move E Enter R Return
View TV
Device List
Record : DVDR
DVDR Menu
DVDR Operation
Setup
U
Move E Enter R Return
Page 33
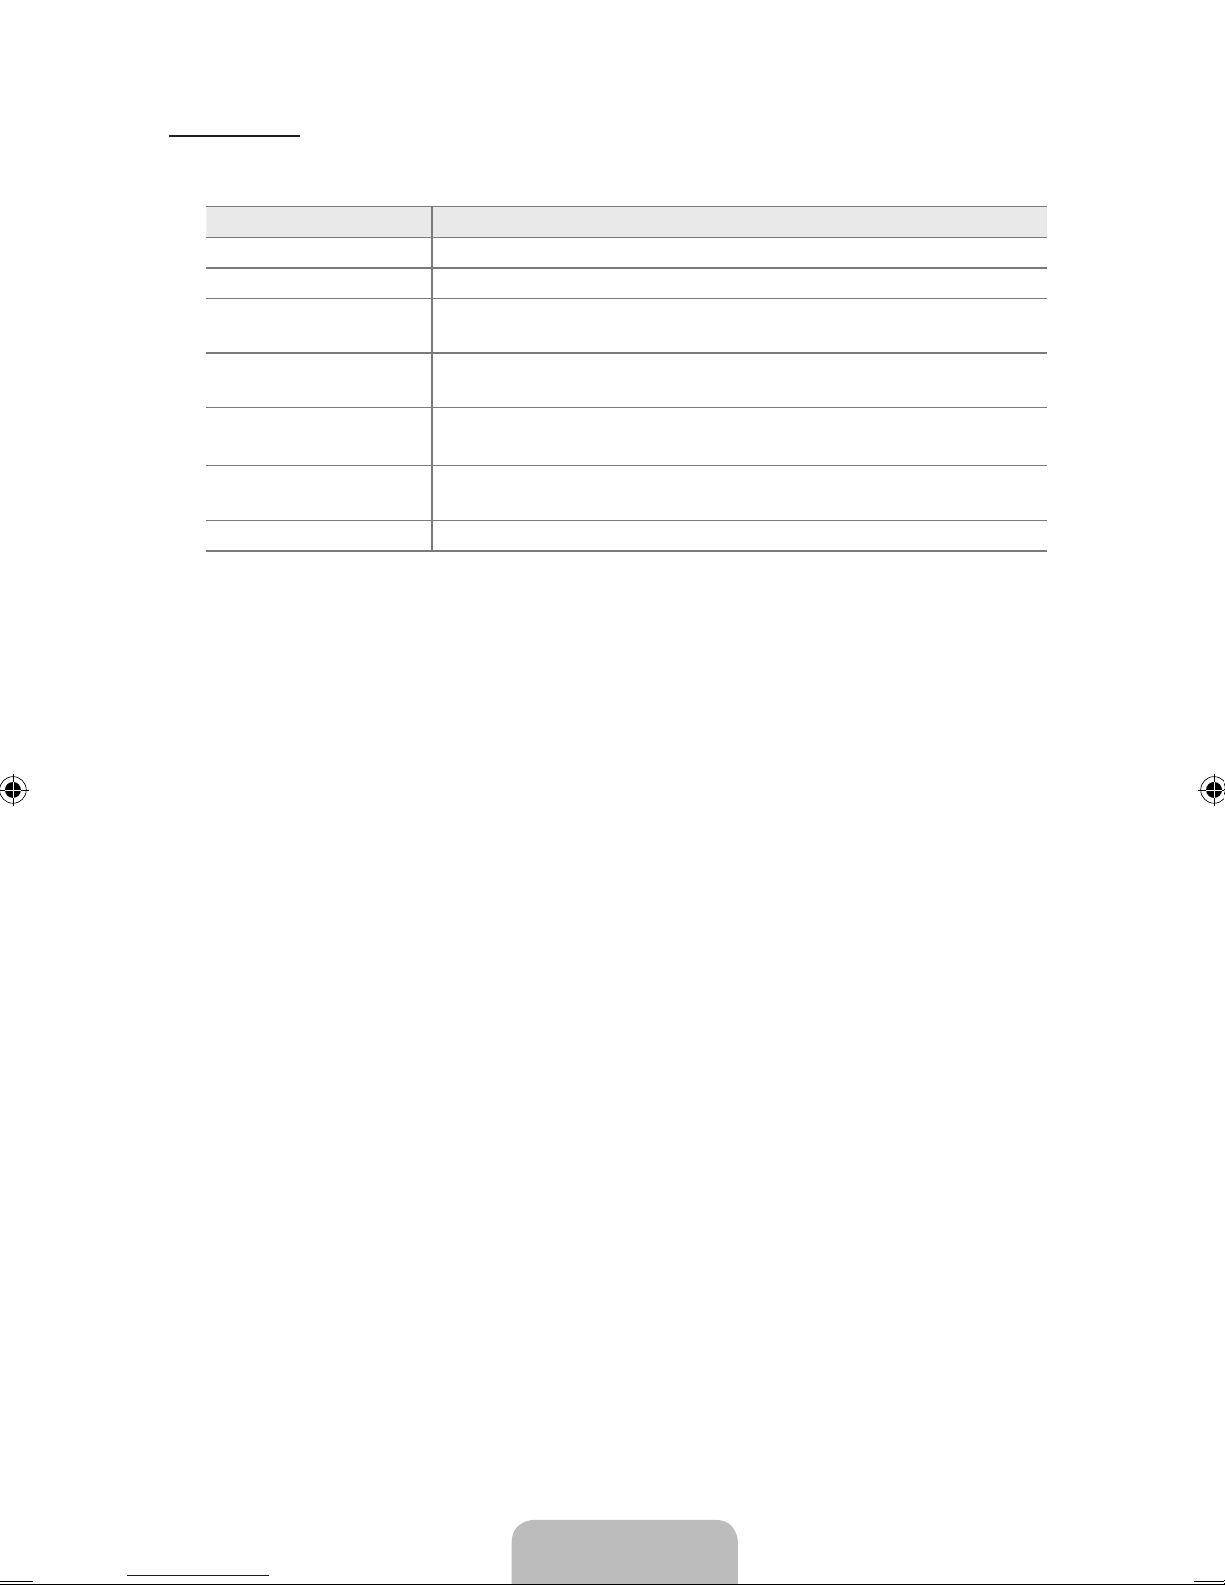
English - 31
Anynet
+
Menu
The Anynet+ menu changes depending on the type and status of the Anynet+ devices connected to
the TV.
Anynet
+
Menu Description
View TV Anynet+ mode changes to TV broadcast mode.
Device List Shows the Anynet+ device list.
(device_name) Menu
Shows the connected device menus. E.g. If a DVD recorder is
connected, the disc menu of the DVD recorder will appear.
(device_name)
Operation
Shows the play menu of the connected device. E.g. If a DVD recorder
is connected, the play menu of the DVD recorder will appear.
Record: (*recorder)
Starts recording immediately using the recorder. (This is only available
for devices that support the recording function.)
Stop Recording:
(*recorder)
Stops recording.
Receiver Sound is played through the receiver.
If more than one recording device is connected, they are displayed as (*recorder) and if only one
N
recording device is connected, it will be represented as (*device_name).
Page 34
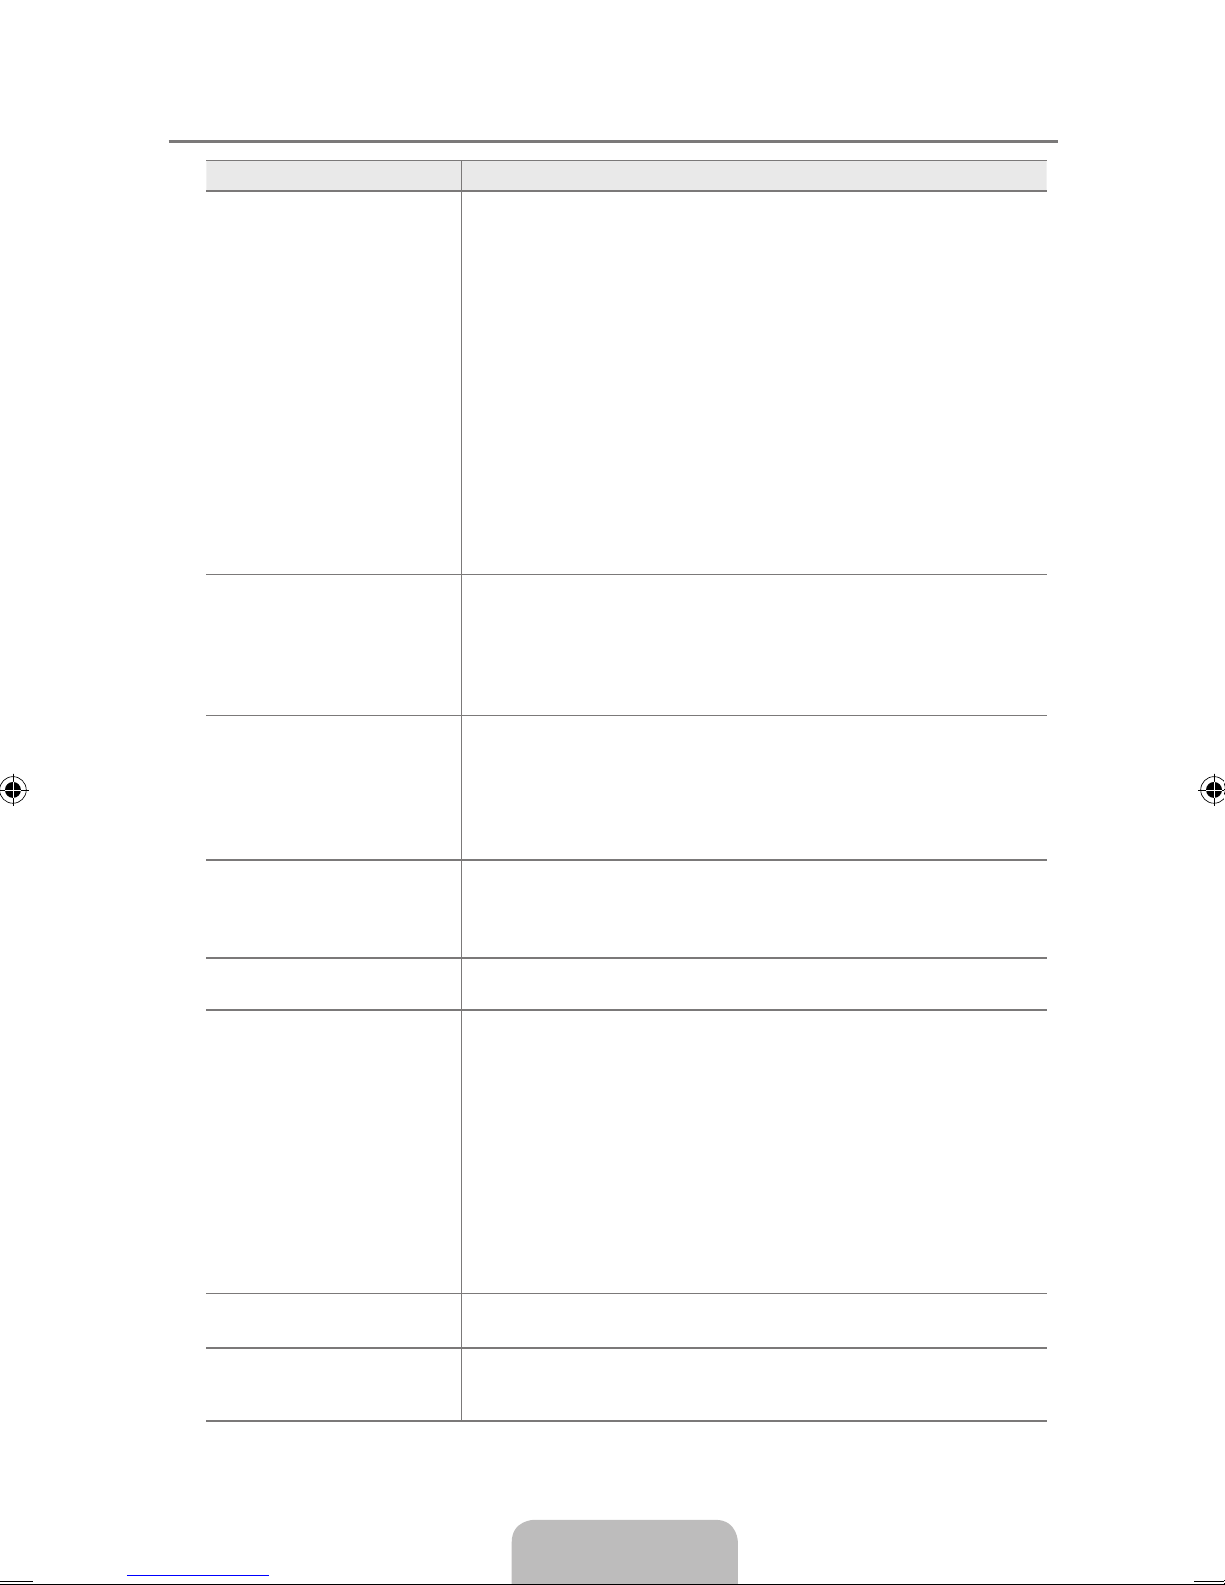
English - 32
Troubleshooting for Anynet ¦
+
Problem Possible Solution
Anynet+ does not work. Check if the device is an Anynet
●
+
device. The Anynet+ system
supports Anynet+ devices only.
Connect only one receiver (home theater).
●
Check if the Anynet
●
+
device power cord is properly connected.
Check the Anynet
●
+
device’s Video/Audio/HDMI 1.3 cable
connections.
Check whether Anynet
●
+
(HDMI-CEC) is set to On in the
Anynet+ setup menu.
Check whether the TV remote control is in TV mode.
●
Check whether it is Anynet
●
+
exclusive remote control.
Anynet
●
+
doesn’t work in certain situations. (Searching
channels, Operating, Plug & Play, etc.)
When connecting or removing the HDMI 1.3 cable, please
●
make sure to search devices again or turn your TV off and on
again.
Check if the Anynet
●
+
Function of Anynet+ device is set on.
I want to start Anynet+. Check if the Anynet
●
+
device is properly connected to the
TV and check if the Anynet+ (HDMI-CEC) is set to On in the
Anynet+ Setup menu.
Press the TV button on the TV remote control to switch to TV.
●
Then press the TOOLS button to show the Anynet+ menu and
select a menu you want.
I want to exit Anynet+. Select View TV in the Anynet
●
+
menu.
Press the SOURCE button on the TV remote control and select
●
a device other than Anynet+ devices.
Press
●
z
, CH LIST, PRE-CH, and FAV.CH to change
the TV mode. (Note that the channel button operates only when
a tuner-embedded Anynet+ device is not connected.)
The message Connecting
to Anynet+ device...
appears on the screen.
You cannot use the remote control when you are conguring
●
Anynet+ or switching to a view mode.
Use the remote control when the Anynet
●
+
setting or switching
to view mode is complete.
The Anynet+ device does
not play.
You cannot use the play function when Plug & Play is in
●
progress.
The connected device is
not displayed.
Check whether or not the device supports Anynet
●
+
functions.
Check whether or not the HDMI 1.3 cable is properly
●
connected.
Check whether Anynet
●
+
(HDMI-CEC) is set to On in the
Anynet+ setup menu.
Search Anynet
●
+
devices again.
You can connect an Anynet
●
+
device using the HDMI 1.3 cable
only. Some Some HDMI cables may not support Anynet+
functions.
If it is terminated by an abnormal situation such as
●
disconnecting the HDMI cable or power cord or a power failure,
please repeat the device scan.
The TV program cannot
be recorded.
Check whether the antenna jack on the recording device is
●
properly connected.
The TV sound is not
output through the
receiver.
Connect the optical cable between TV and the receiver.
●
Page 35
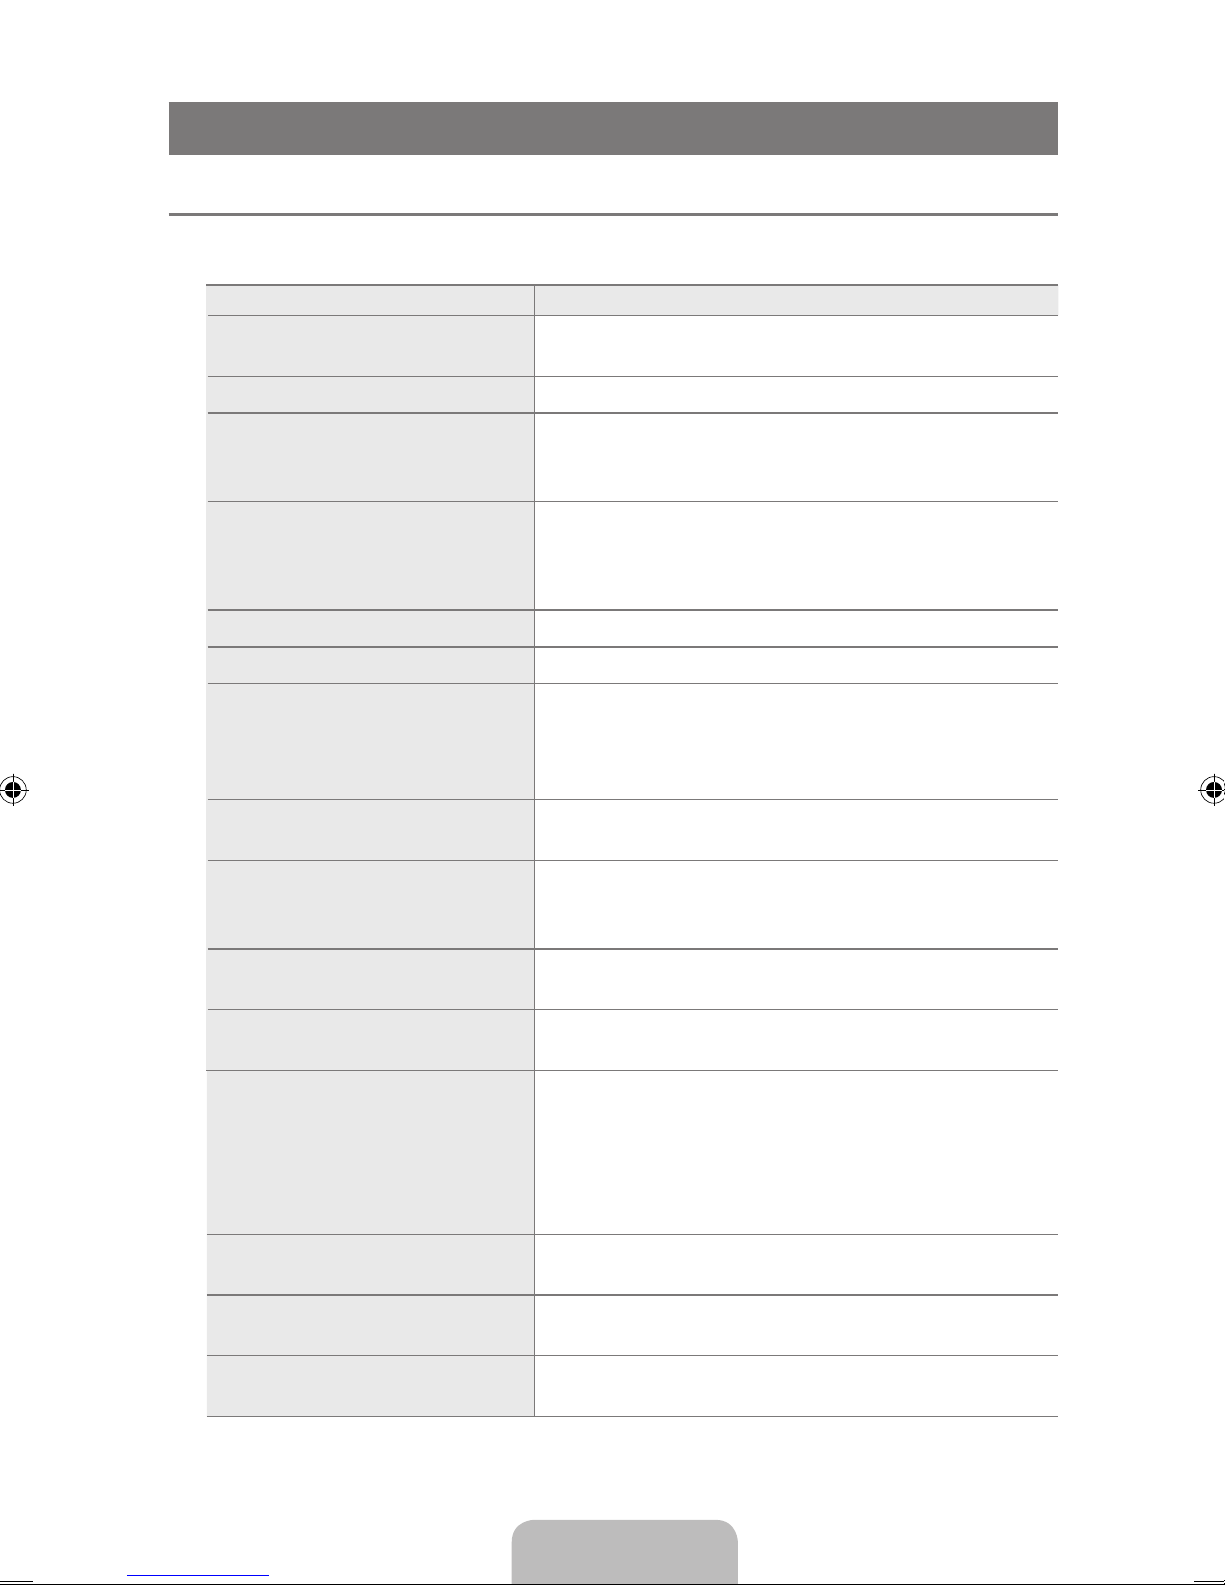
English - 33
APPENDIX
Troubleshooting ¦
If the TV seems to have a problem, rst try this list of possible problems and solutions. If none of
these troubleshooting tips apply, call Samsung customer service at 1-800-SAMSUNG.
Problem Possible Solution
Poor picture. Try another channel. / Adjust the antenna. / Check all wire
connections.
Poor sound quality. Try another channel. / Adjust the antenna.
No picture or sound. Try another channel. / Press the SOURCE button.
Make sure the TV is plugged in. / Check the antenna
connections.
No sound or sound is too low at
maximum volume.
First, check the volume of units connected to your TV
(digital broadcasting receiver, DVD, cable broadcasting
receiver, VCR, etc.). Then, adjust the TV volume
accordingly.
The TV operates erratically. Unplug the TV for 30 seconds, then try operating it again.
The TV won’t turn on. Make sure the wall outlet is working.
Remote control malfunctions. Replace the remote control batteries.
Clean the upper edge of the remote control (transmission
window).
Check the battery terminals.
‘Check signal cable’ message. Ensure that the signal cable is rmly connected to the PC
and DVI source.
‘Not Supported Mode’ message. Check the maximum resolution and connected device’s
Video frequency.
Compare these values with the data in the Display Modes.
Digital broadcasting screen
problem.
Please check the digital signal strength and input antenna.
The image is too light or too dark. Adjust the Brightness and Contrast. / Adjust the Fine
tuning.
Black bars on the screen. Make sure the broadcast you’re receiving is High Denition
(HD).
HD channels sometimes broadcast Standard Denition
(SD) programming, which can cause black bars.
Set your cable/satellite box to stretch or widescreen mode
to eliminate the bars.
Picture has a Red/Green or Pink
tint.
Make sure the Component cables are connected to the
correct jacks.
Closed Captioning not working. If you are using a Cable/Satellite box, you must set Closed
Captioning on the box, not your TV.
Snowy picture. Your cable box may need a rmware upgrade. Please
contact your Cable company.
Page 36
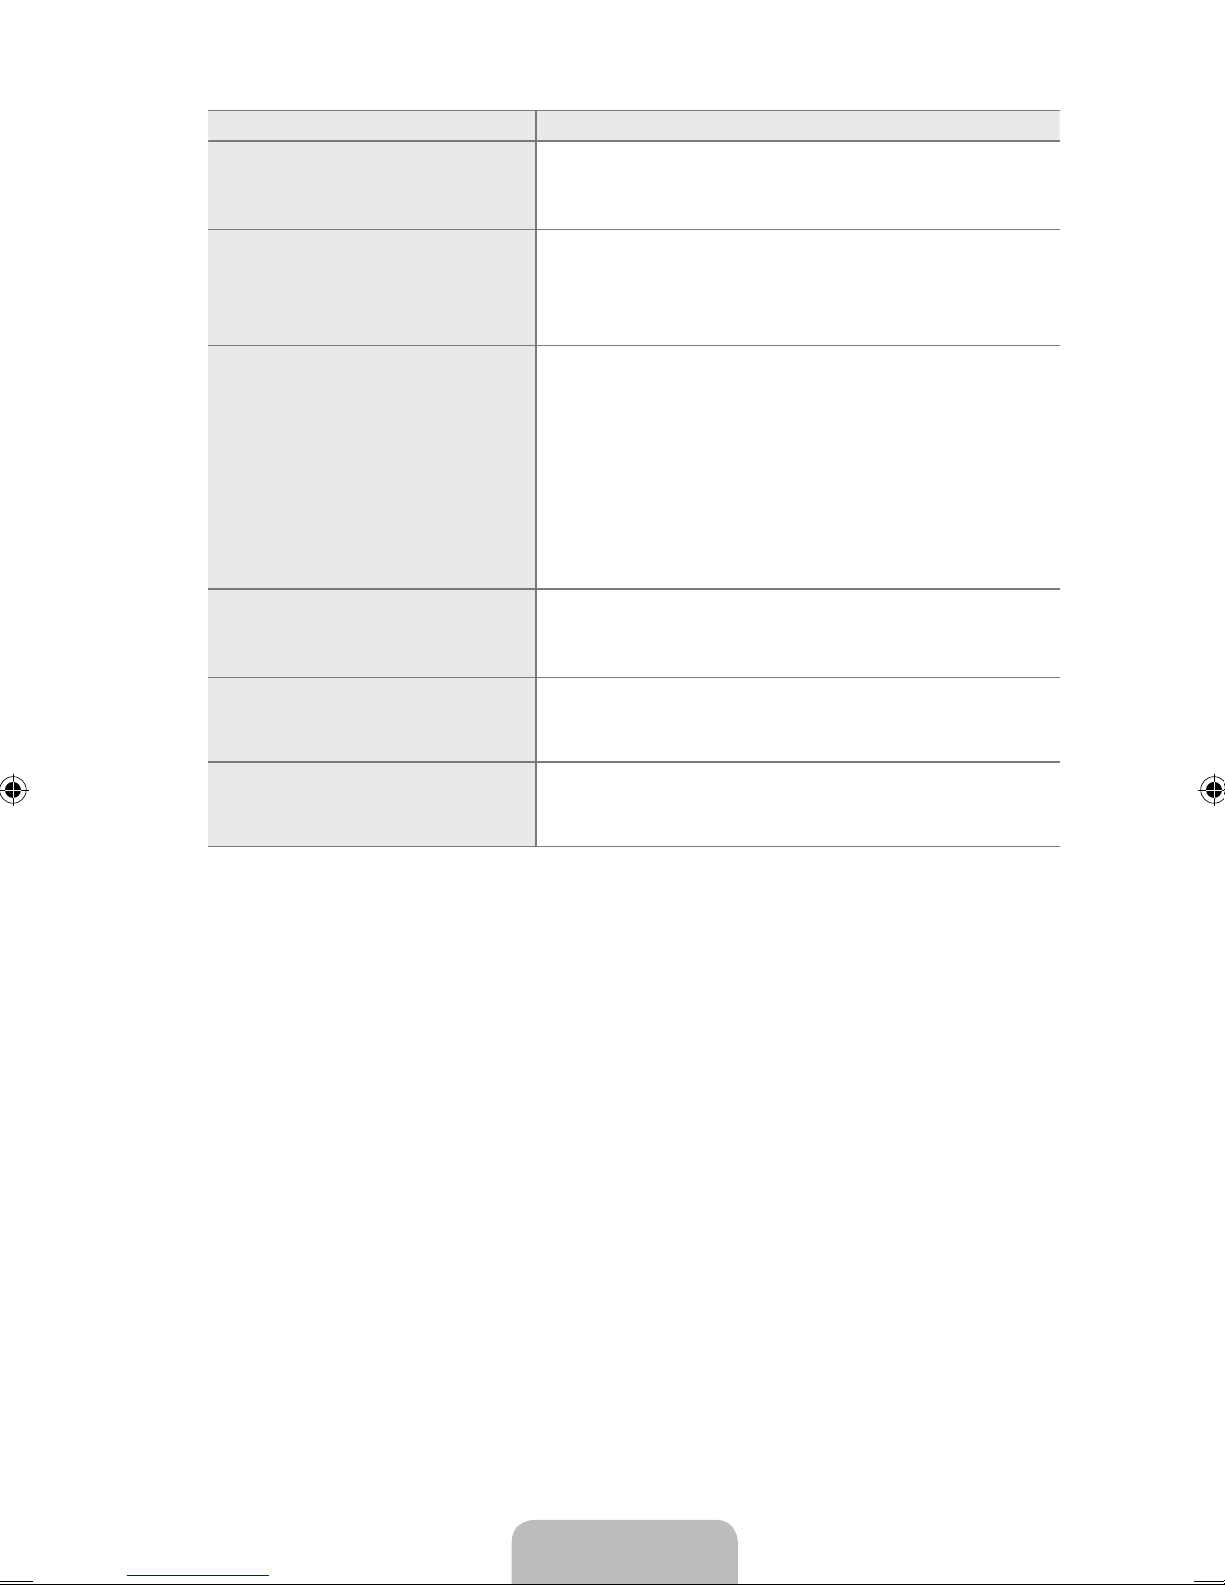
English - 34
Problem Possible Solution
Ghosting on picture. This is sometimes caused by compatibility issues with your
cable box.
Try connecting Component cables instead.
Screen is black and power indicator
light blinks steadily.
On your computer check: Power, Signal Cable.
The TV is using its power management system.
Move the computer's mouse or press any key on the
keyboard.
Image is not stable and may
appear to vibrate when you have
a computer connected to the PC
input.
If the setting is not correct, use your computer utility
program to change the display settings.
Your TV supports multiscan display functions within the
following frequency domain:
- Horizontal frequency (kHz): 30~81 (P2370HD),
52.61~82.2 (P2570HD)
- Vertical frequency (Hz): 56~75 (P2370HD), 48~75
(P2570HD)
- PC Maximum refresh rate (at 60 Hz): 1920 x 1080
Image is not centered on the
screen.
Adjust the horizontal and vertical position.
The screen position must be adjusted on the output source
(i.e. STB) with a digital signal.
The picture appears distorted in the
corner of the screen.
If “Just Scan” is selected with some external devices, the
picture may appear distorted in the corner of the screen.
This symptom is caused by the external devices, not TV.
The ‘Resets all settings to the
default values.’ message appears.
This appears when you press and hold the
EXIT button
for a while. The product settings are reset to the factory
defaults.
This TFT LCD panel uses a panel consisting of sub pixels (6 220 800) which require
N
sophisticated technology to produce. However, there may be few bright or dark pixels on the
screen. These pixels will have no impact on the performance of the product.
Page 37
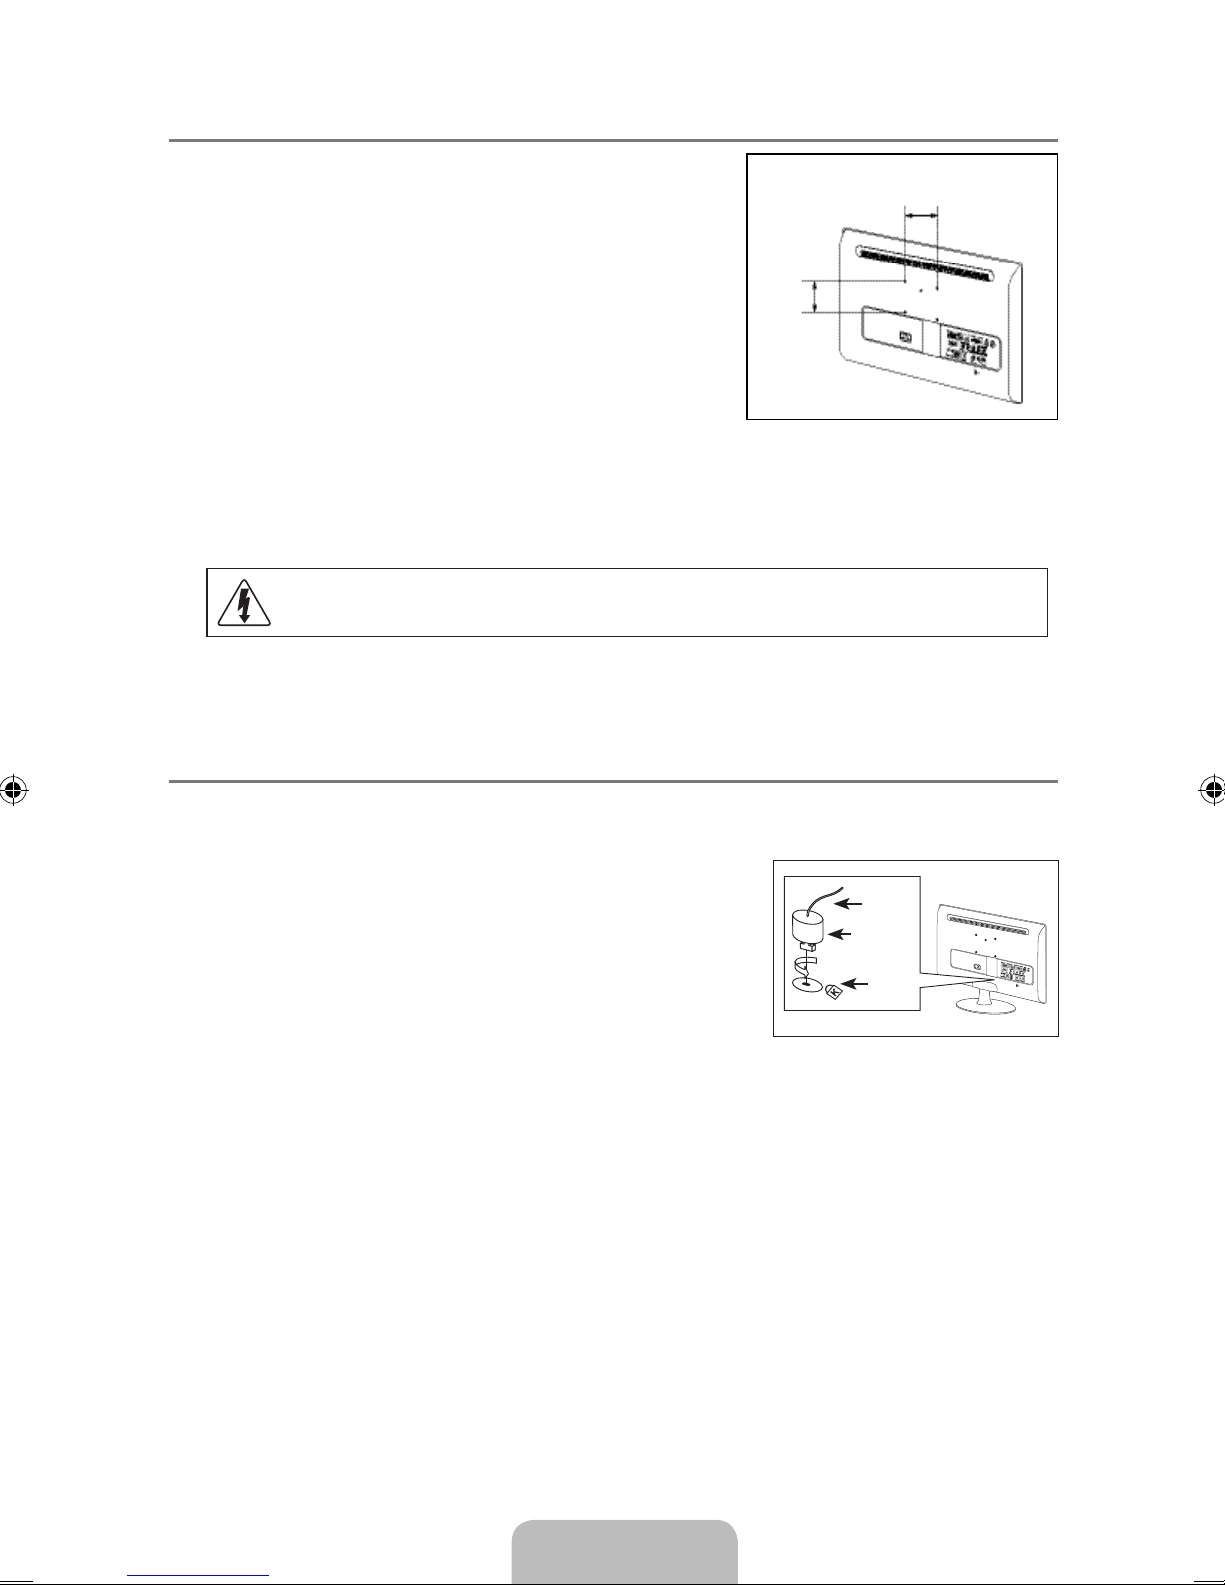
English - 35
WallMountKitSpecications(VESA) ¦
Install your wall mount on a solid wall perpendicular to the oor.
When attaching to other building materials, please contact your
nearest dealer. If installed on a ceiling or slanted wall, it may fall
and result in severe personal injury.
When purchasing our wall mount kit, a detailed installation
N
manual and all parts necessary for assembly are provided.
Do not use screws longer than the standard dimension, as
N
they may cause damage to the inside of the TV set.
For wall mounts that do not comply with the VESA standard
N
screw specications, the length of the screws may differ
depending on their specications.
Do not use screws that do not comply with the VESA standard screw specications.
N
Do not fasten the screws too strongly, this may damage the product or cause the product to fall,
N
leading to personal injury. Samsung is not liable for these kinds of accidents.
Samsung is not liable for product damage or personal injury when a non-VESA or non-specied
N
wall mount is used or the consumer fails to follow the product installation instructions.
Do not install your Wall Mount Kit while your TV is turned on. It may result in personal
injury due to electric shock.
Using the Anti-Theft Kensington Lock ¦
The Kensington Lock is a device used to physically x the system when using it in a public place.
The appearance and locking method may differ from the illustration depending on the manufacturer.
Refer to the manual provided with the Kensington Lock for
proper use. The locking device has to be purchased separately.
The location of the Kensington Lock may be different
N
depending on its model.
1. Insert the locking device into the Kensington slot on the LCD TV
(1) and turn it in the locking direction (2).
2. Connect the Kensington Lock cable (3).
3. Fix the Kensington Lock to a desk or a heavy stationary object.
3
1
2
P2370HD :75 mm (2.95 inches)
P2570HD :100 mm (3.94 inches)
P2370HD :75 mm (2.95 inches)
P2570HD :100 mm (3.94 inches)
Page 38
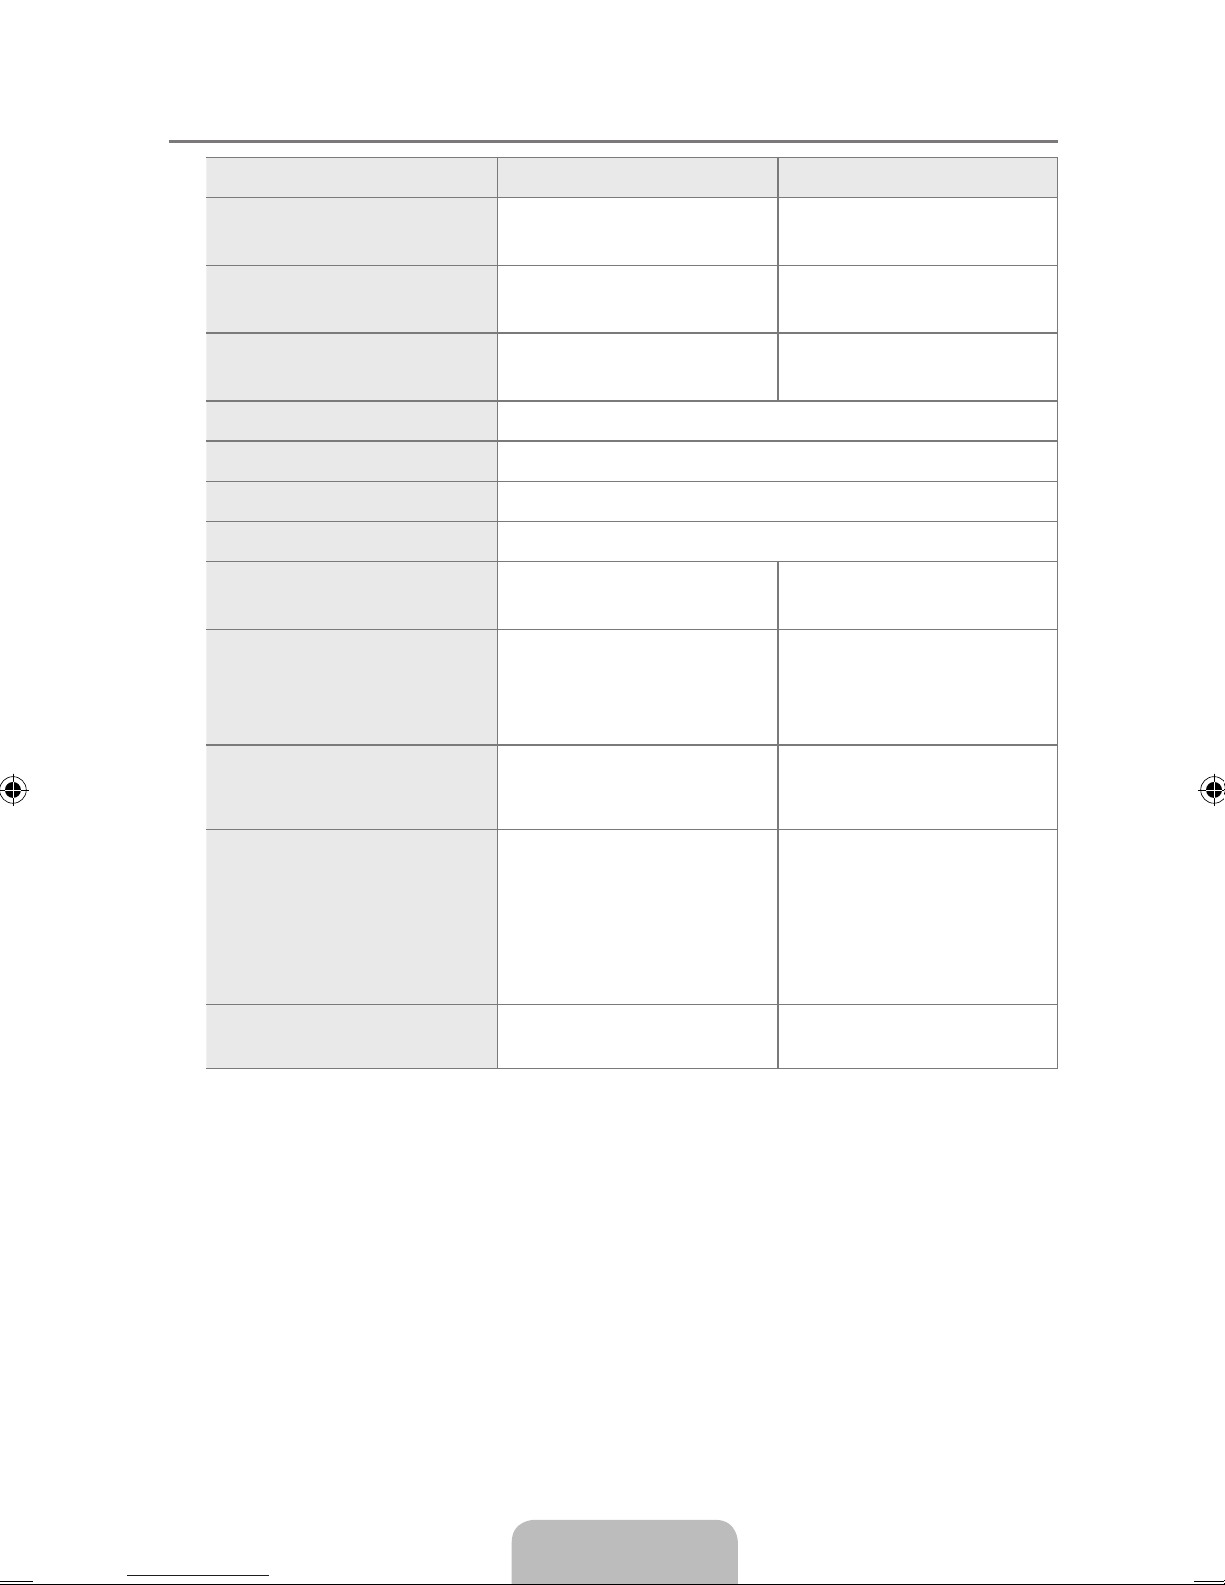
English - 36
Specications ¦
Model Name P2370HD P2570HD
Screen Size
Diagonal
23 inches
(58 cm)
24.6 inches
(62 cm)
Display area
509.76 mm(H) x 286.74 mm(V)
( 20.06 inches X 11.29 inches)
543.46 mm (H) X 305.69 mm (V)
( 21.40 inches X 12.04 inches)
Pixel Pitch
0.2655 mm(H) x 0.2655 mm(V)
( 0.01 inches X 0.01 inches)
0.283 mm (H) X 0.283 mm (V)
( 0.01 inches X 0.01 inches)
Display Color 16.7M
Maximum Pixel Clock 148.500 MHz (Analog, Digital)
Power Supply AC 100 - 240 V~ (+/- 10 %). 50/60 Hz ± 3 Hz
PC Resolution 1920x1080 @ 60Hz
Sound
Output
3W x 2 3W x 2
Dimensions (WxDxH)
Body
With stand
571.0 X 364.6 X 65.5 mm
( 22.5 x 14.4 x 2.6 inches)
571.0 X 432.5 X 189.5 mm
( 22.5 x 17 x 7.5 inches)
605 x 384 x 66 mm
( 23.8 x 15.1 x 2.6 inches)
605 x 453 x 240 mm
( 23.8 x 17.8 x 9.4 inches)
Weight
With Stand
5.8 kg ( 12.8 lbs) 7 kg(15.4 lbs)
Environmental
Considerations
Operating Temperature
Operating Humidity
Storage Temperature
Storage Humidity
50°F to 104°F (10°C to 40°C)
10% to 80%, non-condensing
-4°F to 113°F (-20°C to 45°C)
5% to 95%, non-condensing
50°F ~ 104°F (10°C ~ 40°C)
10 % ~ 80 %, non-condensing
-4°F ~ 113°F (-20°C ~ 45°C)
5 % ~ 95 %, non-condensing
VESA Mounting Interface
75 mm x 75 mm
(2.95 x 2.95 inches)
100 mm x 100 mm
(3.94 x 3.94 inches)
Design and specications are subject to change without prior notice.
N
This device is a Class B digital apparatus.
N
For the power supply and Power Consumption, refer to the label attached to the product.
N
Page 39

This page is intentionally
left blank.
Page 40
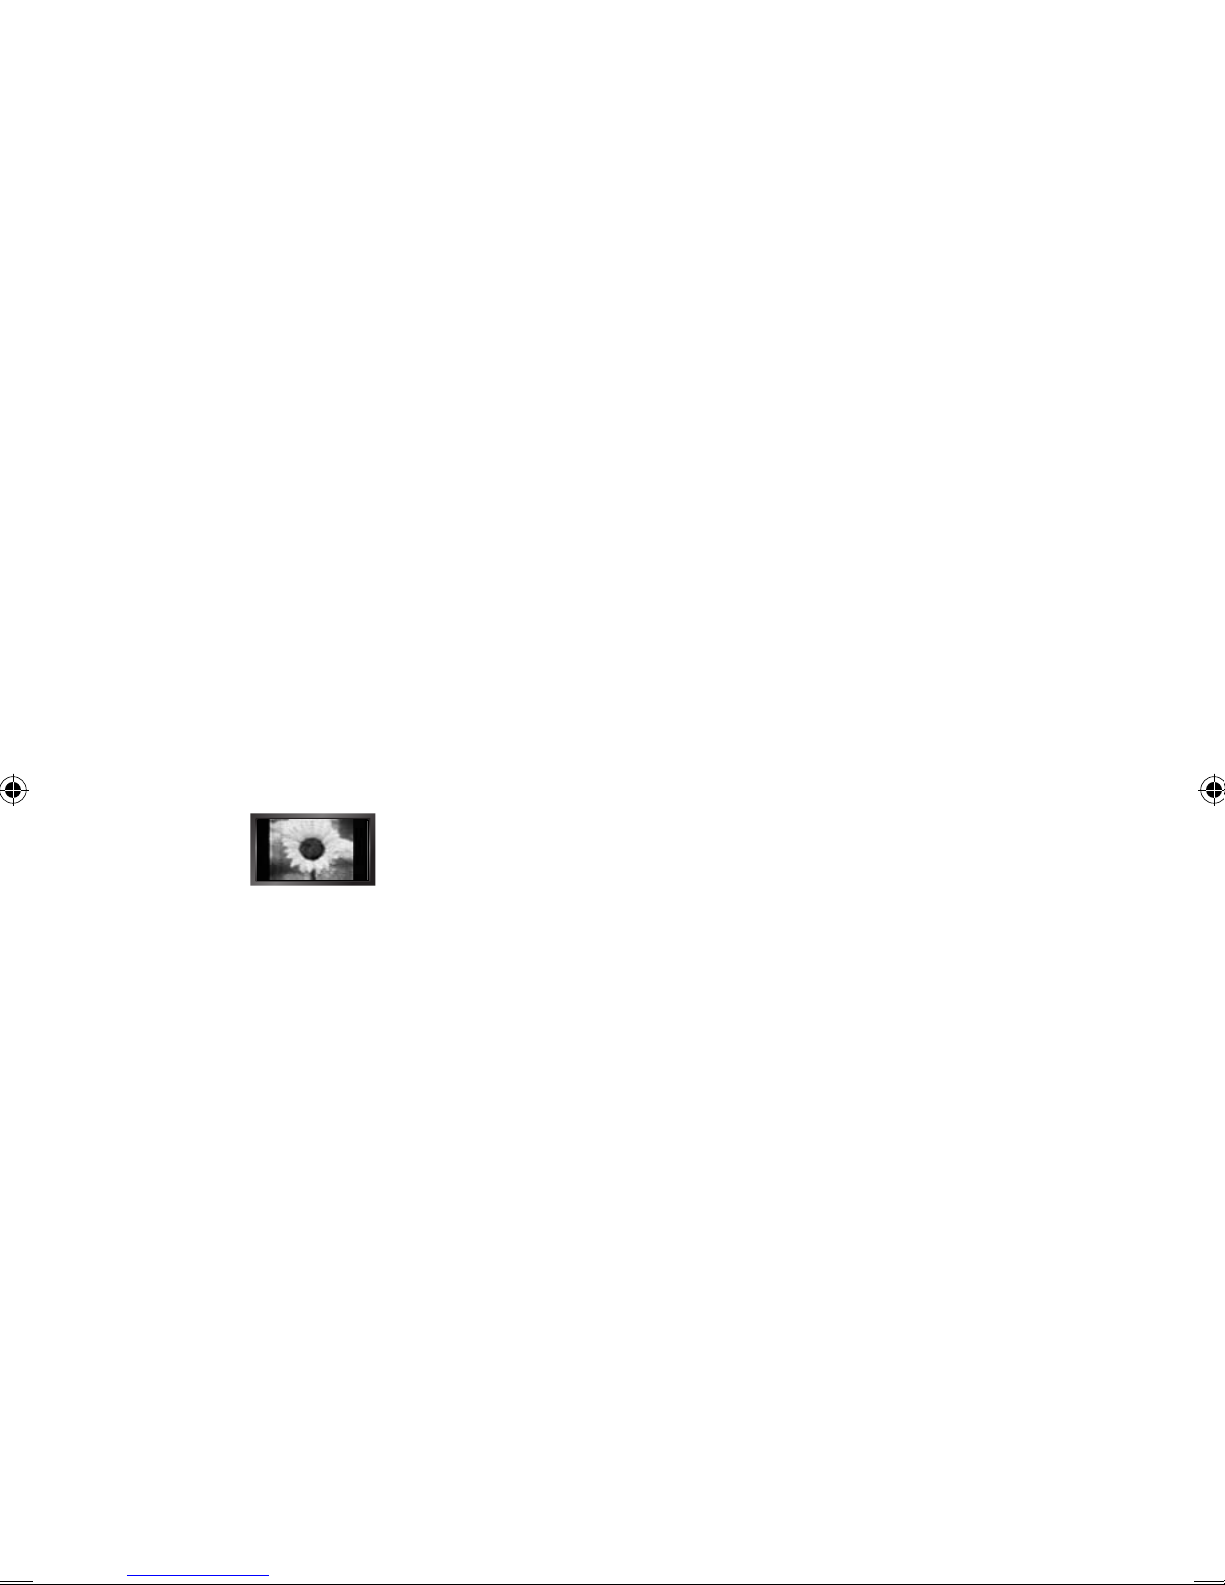
Información importante sobre la garantía relativa al formato de visualización del ❑
televisor
Las pantallas LCD con formato de pantalla panorámica (16:9, la relación de aspecto ancho:alto
de la pantalla) están diseñadas principalmente para visualizar vídeos de movimiento de formato
panorámico. Las imágenes deben estar principalmente en el formato panorámico de relación
16:9, o ampliadas para llenar la pantalla si el modelo tiene esta opción, y las imágenes están en
movimiento constante. La visualización de imágenes y grácos estáticos en la pantalla, como las
barras oscuras laterales en programación y vídeos de televisión en formato estándar no ampliados,
debe limitarse a no más del 5% del tiempo total de visualización del televisor por semana.
Además, la visualización de otras imágenes estáticas y texto, como los informes de bolsa, pantallas
de videojuegos, logotipos de emisoras, sitios Web o grácos y dibujos de ordenador, deberá
limitarse en todos los televisores como ya se ha descrito. La visualización de imágenes estáticas
que supere los límites de las instrucciones anteriores puede producir un envejecimiento
desigual de las pantallas LCD, lo que provocará una reproducción superpuesta sutil pero
permanente de la imagen de la LCD. Para evitarlo, varíe la programación y las imágenes y, sobre
todo, visualice imágenes en movimiento a toda pantalla, no grácos estáticos ni barras oscuras.
En modelos de LCD que ofrezcan opciones para el tamaño de la imagen, utilice estos controles
para ver los distintos formatos como imagen a toda pantalla.
Tenga cuidado en la selección y duración de los formatos de televisión utilizados para la
visualización. La garantía limitada de Samsung no cubre el envejecimiento desigual de la LCD
como resultado de la selección y uso de formatos, así como otras imágenes retenidas.
Precaucionesalmostrarenlapantallaunaimagenja ❑
La imagen ja puede causar daños permanentes en la pantalla del televisor.
No deje una imagen ja en la pantalla LCD durante más de dos horas ya que se podría producir
●
una retención de la imagen en la pantalla. Este fenómeno de retención de imágenes también se
denomina “quemadura de pantalla”. Para evitar que se produzca esa persistencia de la imagen,
reduzca el nivel de brillo y de contraste de la pantalla cuando muestre imágenes jas.
● El uso del televisor LCD en formato 4:3 durante un tiempo prolongado puede
dejar rastros de bordes en las partes izquierda, derecha y central de la
pantalla debido a las diferencias en la emisión lumínica de la pantalla. La
reproducción de un DVD o el uso de una consola de videojuegos pueden
provocar un efecto similar en la pantalla. La garantía no cubre estos daños.Ver imágenes jas
de videojuegos y PC durante más tiempo del indicado puede producir imágenes fantasma
parciales. Para evitar este efecto, reduzca el ‘brillo’ y el ‘contraste’ cuando vea imágenes jas.
© 2009 Samsung Electronics Co., Ltd. Reservados todos los derechos.
Page 41
Español - 1
Español
Para obtener más información sobre los procedimientos de funcionamiento, consulte el manual
del CD.
INFORMACIÓN GENERAL
Accesorios ■ ................................................... 2
Aspecto general del panel de control
■ .......... 2
Aspecto general del panel de conexiones ■
....... 3
Mando a distancia
■ ....................................... 4
Instalación de las pilas en el mando a distancia ■
..... 4
CONEXIONES
Conexión de antenas de VHF y UHF ■ .......... 5
Conexión de TV por cable
■ ........................... 6
Conexión de un reproductor de DVD o
■
receptores de televisión por cable / satélite
(decodicadores) a través de HDMI
............ 7
Conexión de un reproductor de DVD o
■
receptores de televisión por cable / satélite
(decodicadores) a través de DVI
............... 8
Conexión de un reproductor de DVD o receptores de ■
televisión por cable / satélite (decodicadores) a
través de los cables de componentes
..................... 8
Conexión de un sistema de audio digital ■ ..... 9
Conexión a un PC
■ ....................................... 9
FUNCIONAMIENTO
Encendido o apagado del TV ■ .....................11
Función Plug & Play
■ ...................................11
CONTROL DE LOS CANALES
Conguración del menú de canales ■ .......... 12
Gestión de los canales
■ .............................. 13
Menús de opciones de la lista de canales (en ■
Todos los canales / Canales agregados
/ Favoritos)
.................................................. 13
Menús de opciones de la lista de canales
■
(en Grabación con temporizador)
............. 14
CONTROL DE LA IMAGEN
Control de la imagen(TV / AV / Componente ■
/ HDMI )
..................................................... 15
Uso del televisor como una pantalla de
■
ordenador (PC)
.......................................... 17
Ajuste del televisor con el ordenador
■ ........ 18
CONTROL DE SONIDO
Conguración del menú de sonido ■ ............ 20
CONFIGURACIÓN
Conguración del menú de conguración ■
......... 21
ENTRADA / SOPORTE TÉCNICO
Conguración del menú de entrada ■ .......... 26
Conguración del menú de ayuda
■ ............. 27
ANYNET
+
Conexión de dispositivos Anynet ■
+
............. 28
Conguración de Anynet
■
+
......................... 30
Conmutación entre dispositivos Anynet ■
+
..... 30
Solución de problemas de Anynet
■
+
........... 32
APÉNDICE
Identicación de problemas ■ ....................... 33
Especicaciones del equipo de montaje
■
en la pared (VESA).................................... 35
Uso del bloqueo Kensington antirrobos
■ ..... 35
Especicaciones
■ ........................................ 36
Licencia ❑
TruSurround HD, SRS y el símbolo son marcas comerciales de SRS Labs, Inc.
TruSurround HD está incorporada bajo licencia de SRS Labs,Inc.
Fabricado bajo licencia de Dolby Laboratories. Dolby y el símbolo de la doble D son marcas comerciales de
Dolby Laboratories.
Símbolo ❑
N O T
Nota
Botón de una
pulsación
Botón TOOL
CONTENIDO
Page 42
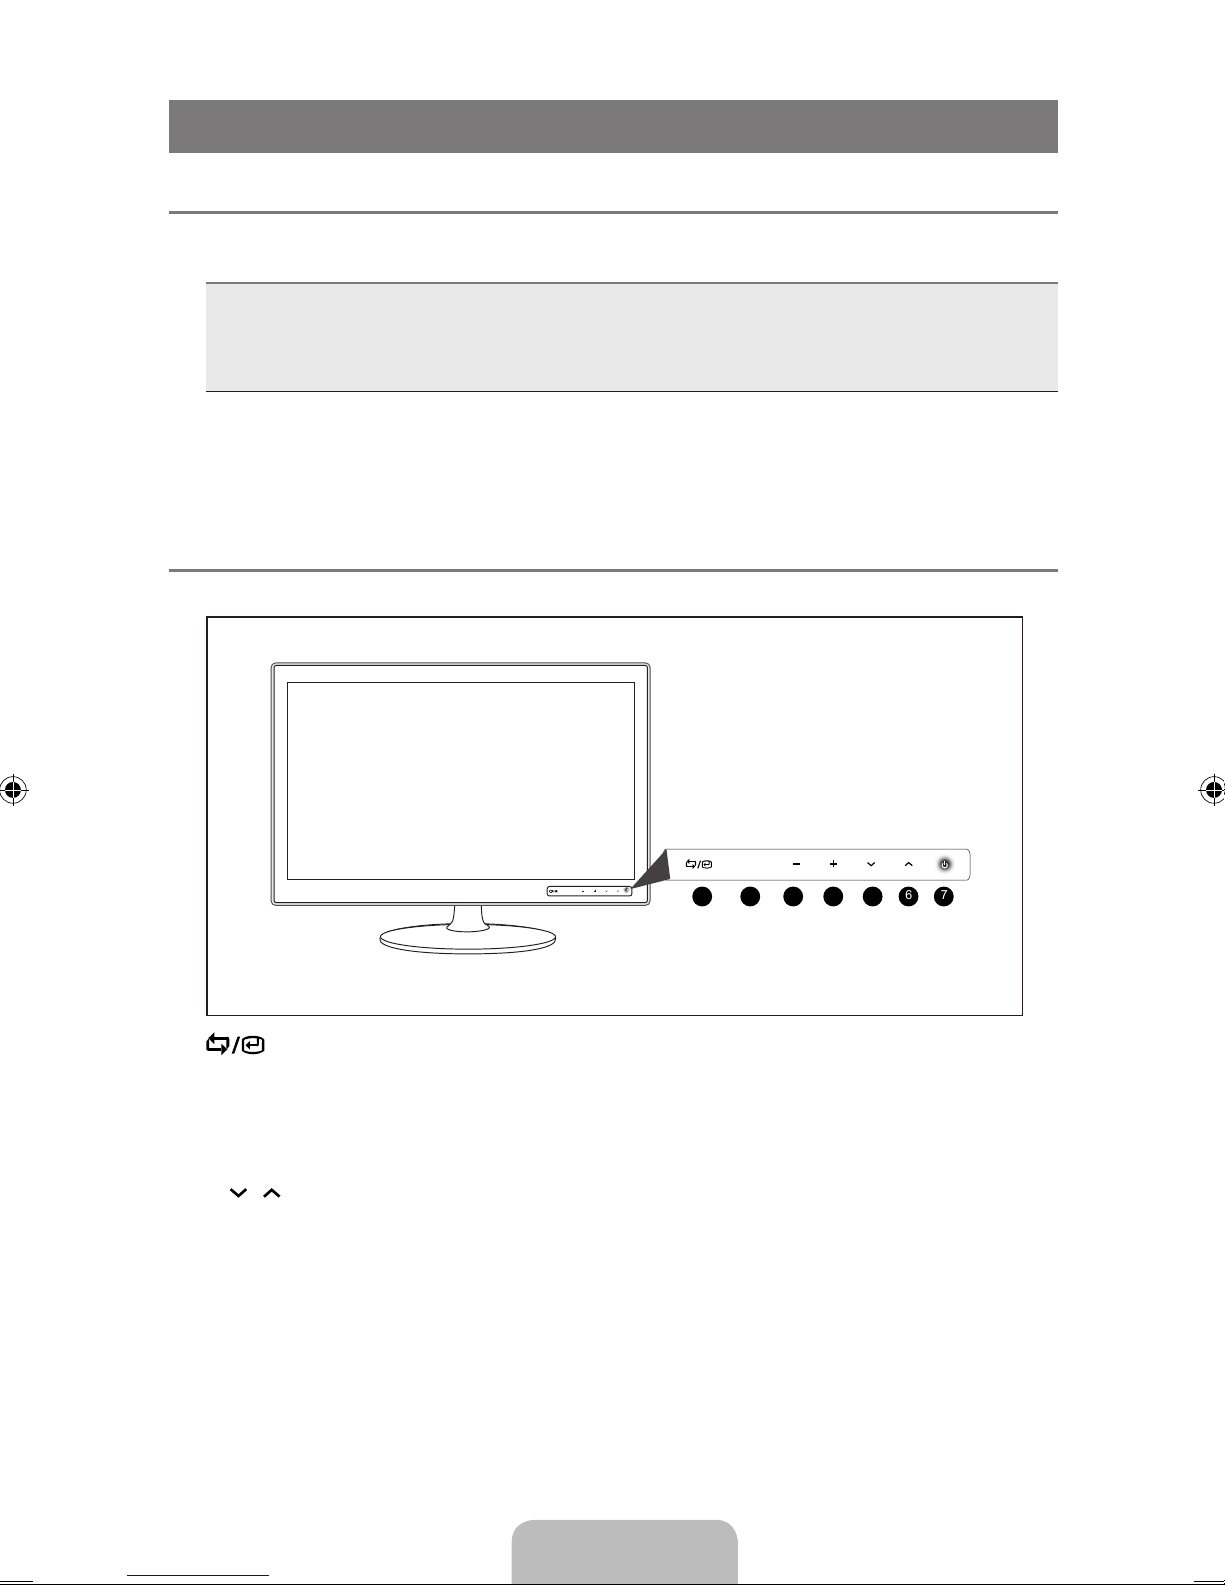
Español - 2
INFORMACIÓN GENERAL
Accesorios ¦
Compruebe que las opciones siguientes se incluyen con su TV LCD. Si falta alguna opción,
póngase en contacto con el proveedor.
Mando a distancia & Pilas (AAA x 2) (No disponible en todos los lugares) / Cable de alimentación
/ Paño de limpieza / Manual del usuario (CD, libro) / Guía de conguración rápida / Tarjeta de
garantía (No disponible en todos los lugares) / Anillo de sujeción del cable / Cuerpo del soporte /
Base del soporte
El color y la forma de los componentes pueden variar según el modelo.
N
El paño de limpieza sólo se suministra para productos de color negro reluciente como una
N
característica del producto.
Aspecto general del panel de control ¦
El color y la forma del producto pueden variar según el modelo. N
1
: Cambia entre todas las fuentes de entrada disponibles. En el menú de la pantalla, utilice
este botón del mismo modo que el botón E del mando a distancia.
2
MENU : Pulse para ver en pantalla un menú con las características del TV.
3,4
- / + : Se mueve de un elemento de menú a otro horizontalmente o ajusta los valores
seleccionados del menú. Ajusta el volumen de audio.
5,6
, : Se mueve de un elemento de menú a otro verticalmente o ajusta los valores
seleccionados del menú. En el modo TV, selecciona los canales de TV.
7 P
(POWER): Pulse para encender o apagar el TV.
INDICADOR DE ALIMENTACIÓN: Parpadea y se apaga cuando se enciende el aparato y se ilumina
en el modo en espera.
1
2 3 4 5 6 7
MENU
MENU
Page 43
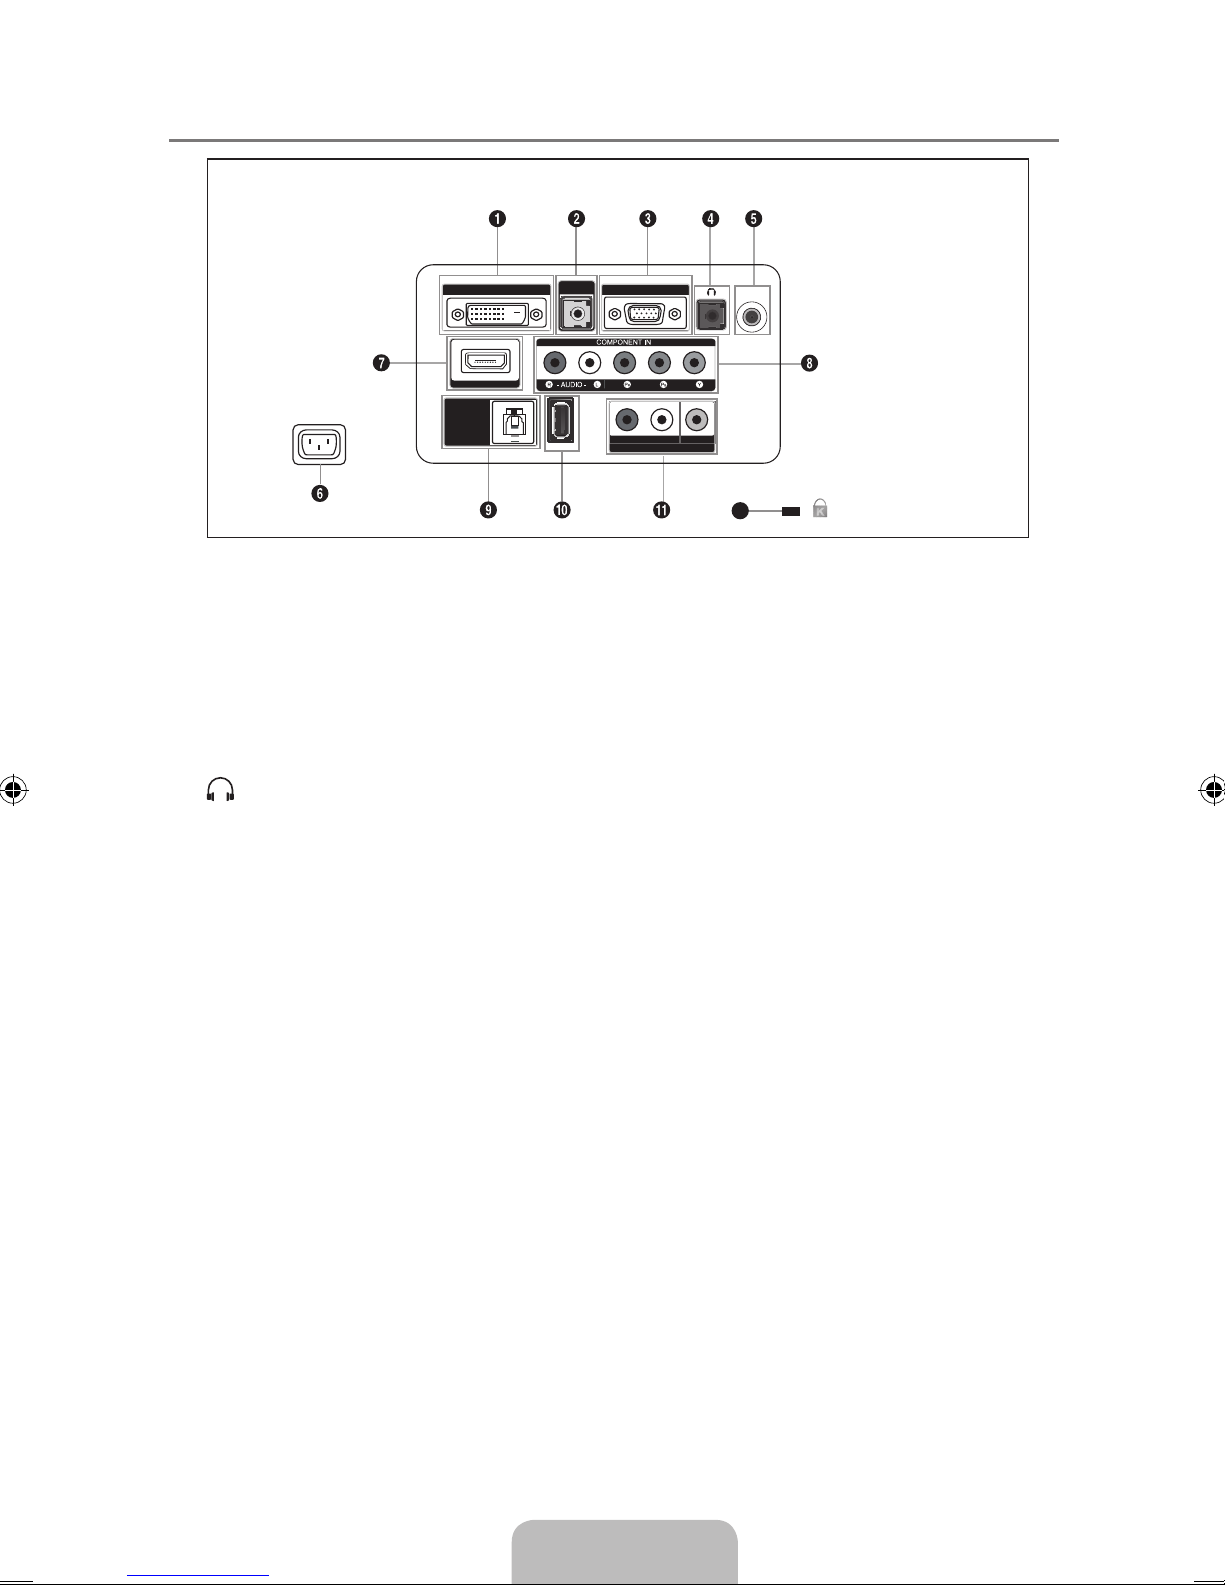
Español - 3
Aspecto general del panel de conexiones ¦
El color y la forma del producto pueden variar según el modelo. N
1
DVI-D IN
Se conecta a los terminales de vídeo del PC.
–
2
HDMI/PC/DVI-D AUDIO IN
Conecte el terminal HDMI/PC/DVI-D AUDIO IN de la parte posterior del producto a la
–
tarjeta de sonido del ordenador.
3
PC IN
Se conecta a los terminales de vídeo del PC.
–
4
Permite conectar unos auriculares externos para audiciones privadas. –
5
ANT IN
Permite conectar a una antena o un sistema de TV por cable.
–
6
ENTRADA DE ALIMENTANTACIÓN
Permite conectar el cable de alimentación suministrado. –
7
HDMI IN
Permite conectar a la toma HDMI de un dispositivo que tenga salida HDMI.
–
No se necesita ninguna conexión de sonido para una conexión de HDMI a HDMI.
N
8
COMPONENT IN
Conecte el puerto del DVD, VCR (decodicador DVD / ) al puerto [R-AUDIO-L] del monitor.
–
Conecte el puerto VIDEO OUT del decodicador DVD/ a los puertos de entrada [P
R
, PB,Y]
mediante un cable de componente de vídeo (PR, PB,Y).
9
DIGITAL AUDIO OUT (OPTICAL)
Se conecta al componente de audio digital.
–
0
SERVICE
Conector sólo para servicio.
–
!
AV IN
Entradas de vídeo y audio para dispositivos externos, como una videocámara o un
–
reproductor de vídeo.
@
BLOQUEO KENSINGTON
El bloqueo Kensington es un dispositivo que se usa para jar físicamente el sistema
–
cuando se usa en un lugar público. Si desea usar un dispositivo de bloqueo, póngase en
contacto con el distribuidor donde adquirió el televisor.
La ubicación del “Bloqueo Kensington” puede variar según el modelo.
N
[Panel posterior del TV]
ANT IN
HDMI IN
SERVICE
HDMI/PC
/DVI-D
AUDIO IN
AV IN
- AUDIO -
R
L
VIDEO
DVI-D IN
PC IN
DIGITAL
AUDIO OUT
(OPTICAL)
12
Page 44
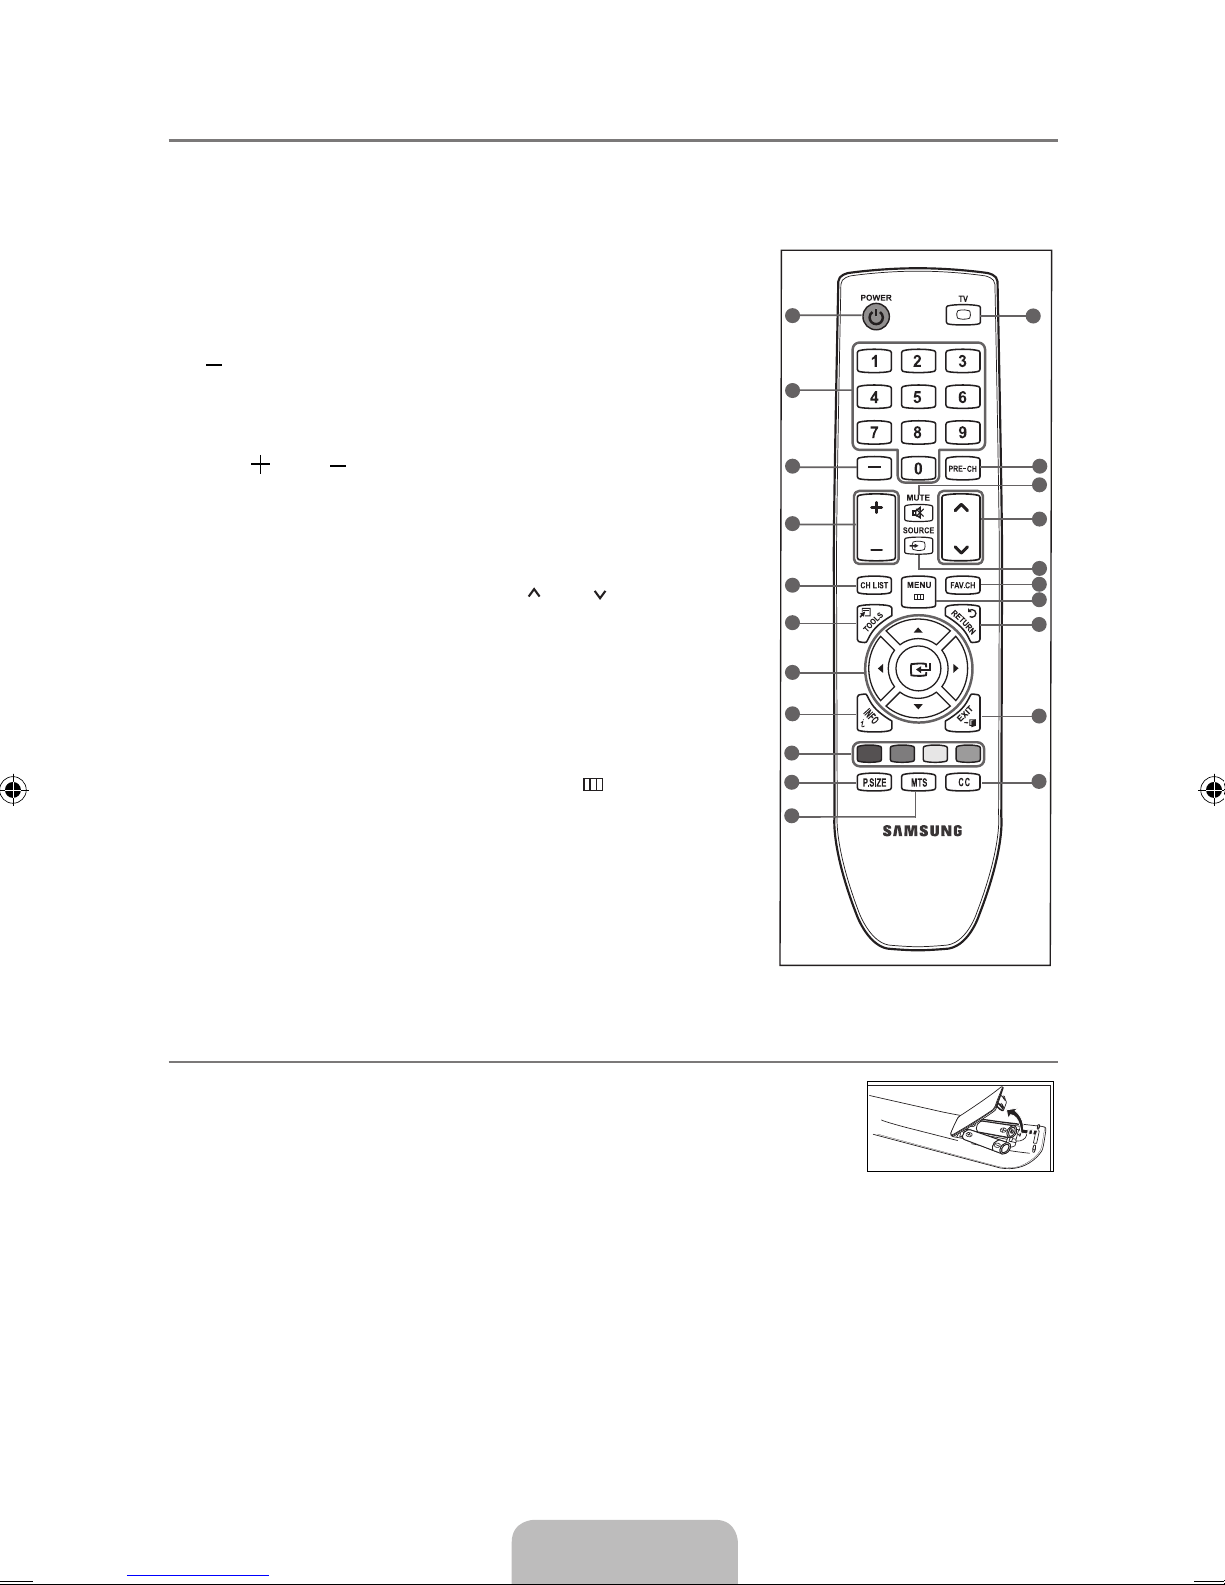
Español - 4
Mando a distancia ¦
Puede utilizar el mando a una distancia del televisor de hasta 21 metros. N
El exceso de luz puede inuir en el rendimiento del mando a distancia.
N
El color y la forma del producto pueden variar según el modelo.
N
1
POWER:Enciende o apaga el
TV.
2
BOTONES NUMÉRICOS:
Permiten cambiar de canal.
3
: El botón “-” funciona
sólo para TV. Se utiliza para
seleccionar MMS (multicanal)
para un TV.
4
VOL / VOL : Pulse para
aumentar o reducir el volumen.
5
CH LIST: Muestra las listas de
canales en la pantalla.
6
TOOLS: Se usa para
seleccionar rápidamente las
funciones que se usan con
mayor frecuencia.
7
UP▲/DOWN▼/LEFT◄/
RIGHT►/E: Se usan para
seleccionar los elementos del
menú en pantalla y cambiar los
valores del menú.
8
INFO: Púlselo para mostrar
información en la pantalla.
9
COLOR BUTTONS: Use estos
botones en la lista de canales,
menús, etc.
0
P.SIZE:Selección del tamaño
de la imagen.
!
MTS:Pulse para elegir
programas mono, estéreo
o de audio independiente
(emisión SAP).
@
TV: Selecciona directamente
el modo TV.
#
PRE-CH: Permite volver
al canal que se ha estado
viendo anteriormente.
$
MUTE M: Pulse
para desactivar
momentáneamente el
sonido.
%
CH : Permiten
cambiar de canal.
^
SOURCE: Púlselo para
mostrar y seleccionar las
fuentes de vídeo disponibles.
&
FAV.CH: Permite cambiar a
los canales favoritos.
*
MENU :Muestra el menú
de pantalla principal.
(
RETURN: Vuelve al menú
anterior.
)
EXIT:Púlselo para salir del
menú.
a
CC:Controla el decodicador
de subtítulos.
Instalación de las pilas en el mando a distancia ¦
1. Levante la tapa de la parte posterior del mando a distancia, como se muestra
en la ilustración.
2. Coloque dos pilas de tamaño AAA.
Respete los extremos “+” y “–” de las pilas que se indican en el diagrama
N
del interior del compartimiento.
3. Vuelva a poner la tapa.
Si no va a usar el mando a distancia durante un largo período de tiempo, extraiga las pilas y
N
guárdelas en un lugar fresco y seco. (Con un uso normal del TV, las pilas duran alrededor de un
año.)
Si el mando a distancia no funciona, haga estas comprobaciones:
N
¿Está encendido el TV?
●
¿Están intercambiados los polos positivos y negativos de las pilas? ●
¿Se han agotado las pilas? ●
¿Ha habido un corte de luz o el cable está desenchufado? ●
¿Hay un uorescente o un neón a poca distancia? ●
CHVOL
17
18
19
20
21
15
14
13
1
2
3
4
6
5
7
8
9
10
1 1
12
16
Page 45
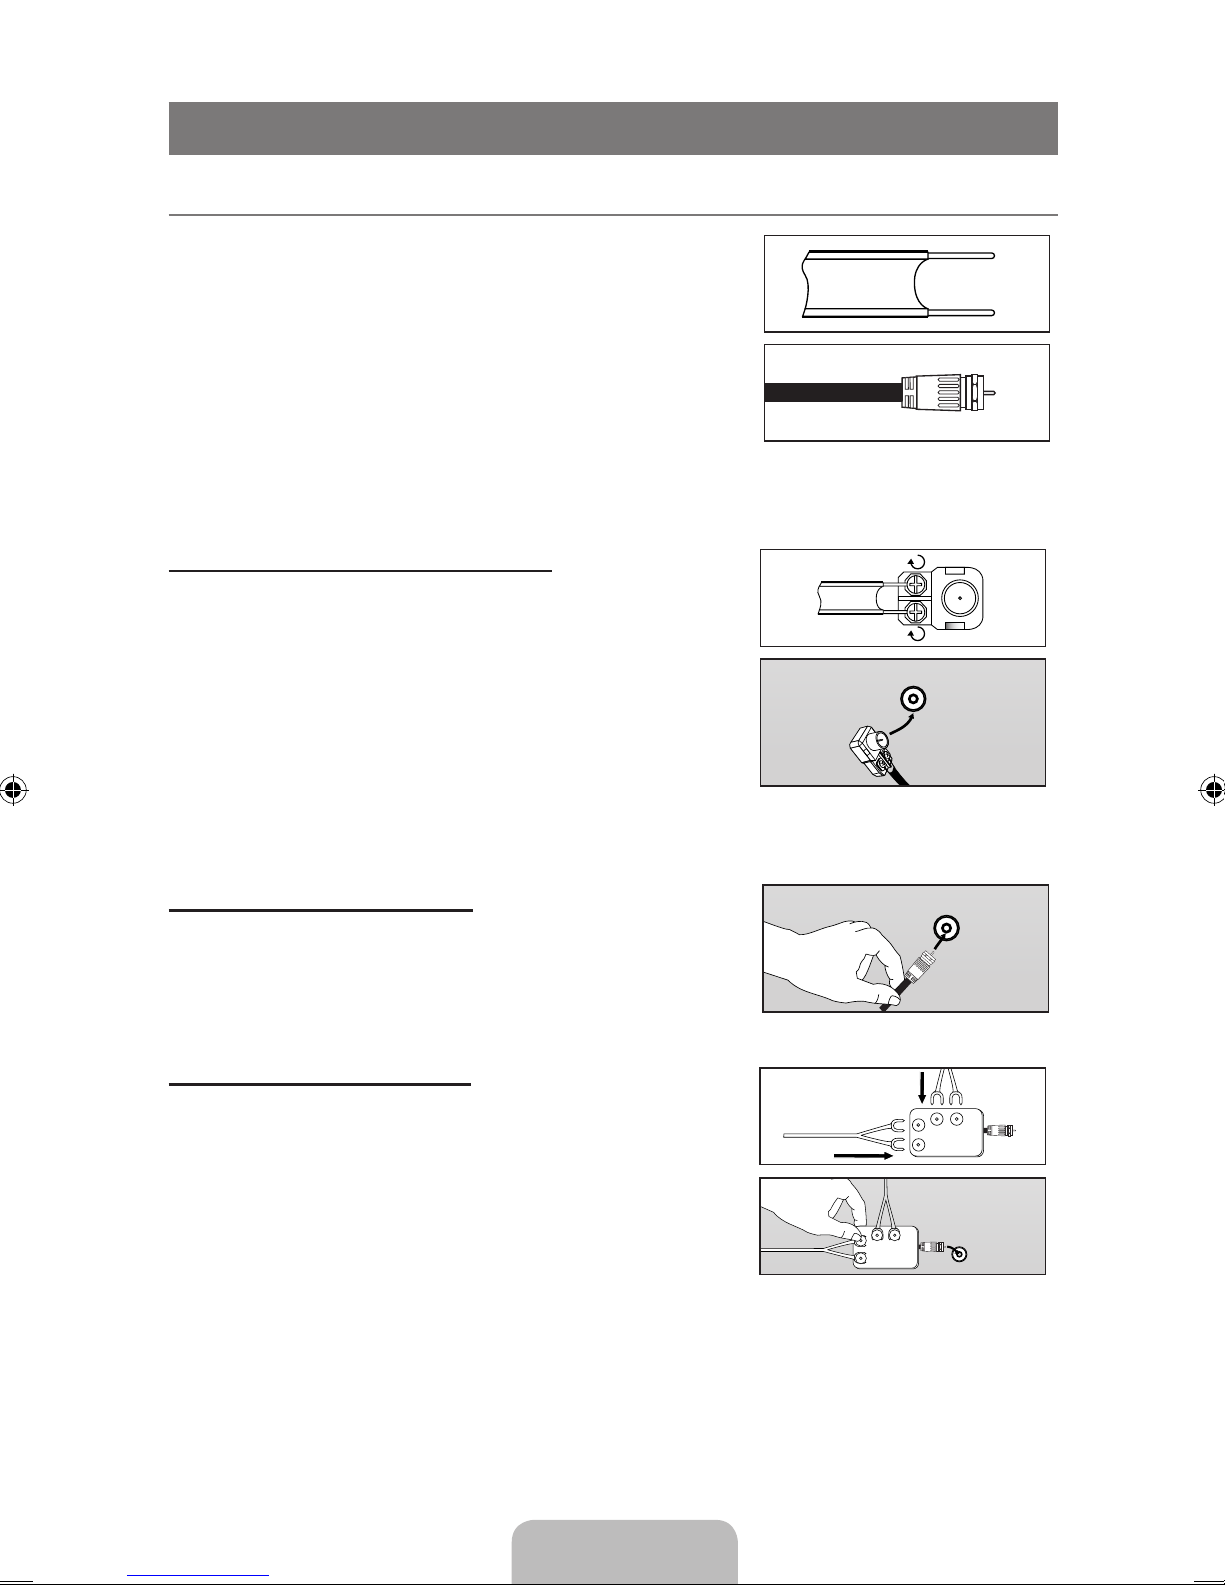
Español - 5
CONEXIONES
Conexión de antenas de VHF y UHF ¦
Si su antena tiene un conjunto de cables con este aspecto,
consulte ‘Antenas de par de cables
planos de 300 Ω’ a continuación.
Si la antena tiene un cable como el que se muestra en
el diagrama de la derecha, consulte “Antenas con cables
coaxiales de 75 ohmios”.
Si dispone de dos antenas, consulte ‘Antenas de VHF y UHF
independientes’.
Antenasdepardecablesplanosde300Ω
Si utiliza una antena externa (de techo o de “orejas de conejo”)
de par de cables planos de 300 Ω, siga las indicaciones
siguientes.
1. Coloque los conductores del par de cables bajo los tornillos del
adaptador de 300- 75 Ω (no incluido). Utilice un destornillador
para apretar los tornillos.
2. Conecte el adaptador en el terminal ANT IN en la parte
posterior del televisor.
Antennaswith75ΩRoundLeads
Plug the antenna lead into the ANT IN terminal on the back of
the TV.
Antenasdecablecoaxialde75Ω
Si dispone de dos antenas independientes para el TV (una
de VHF y otra de UHF), debe combinar ambas señales de la
antena antes de conectarlas al TV. Este procedimiento precisa
un adaptador-combinador especial (disponible en la mayoría
de tiendas de electrónica).
1. Conecte ambos cables de antena al combinador.
2. Conecte el combinador en el terminal ANT IN de la parte inferior del panel posterior.
ANT IN
ANT IN
UHF
VHF
ANT IN
UHF
VHF
Page 46
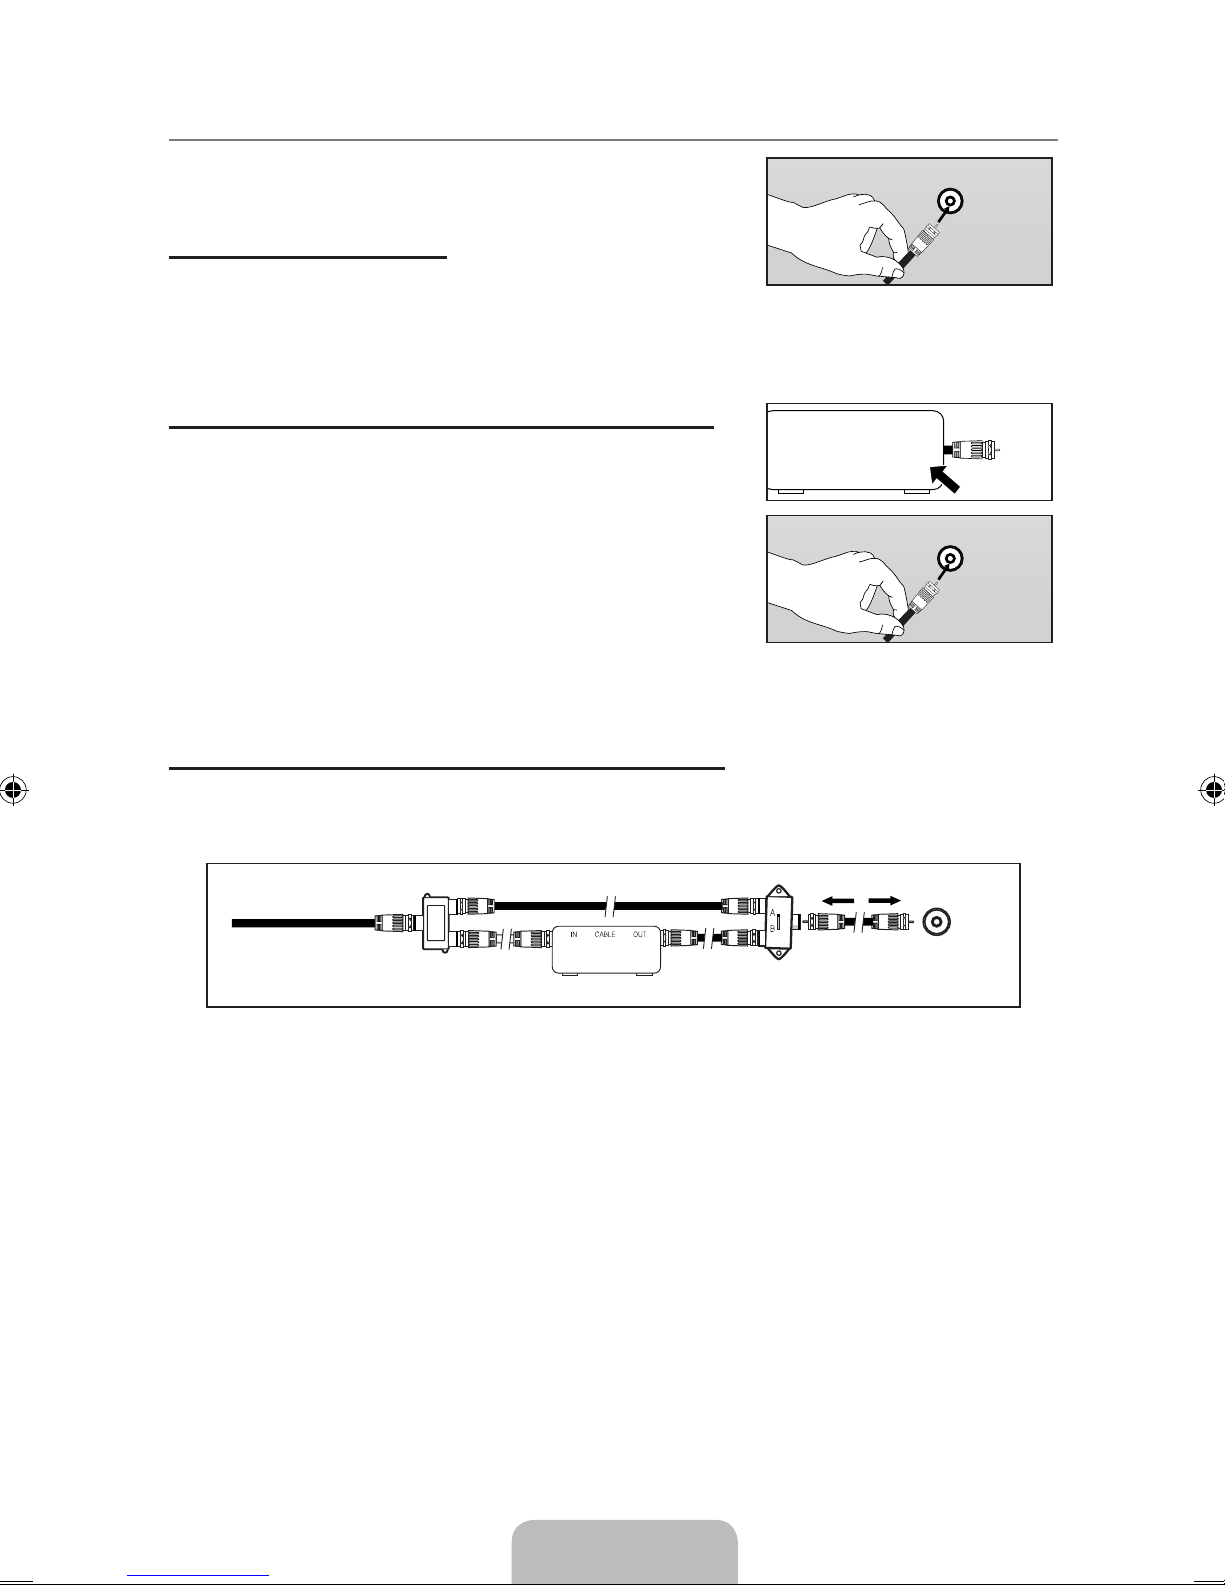
Español - 6
Conexión de TV por cable ¦
Para conectar a un sistema de TV por cable, siga estas
instrucciones.
TVporcablesindecodicador
Conecte el cable de entrada en el terminal de la antena ANT IN
de la parte posterior del TV.
Dado que el TV está preparado para la televisión por cable, no se necesita un
N
decodicador para ver canales de cable no codicados.
Conexiónaldecodicadorquedecodicatodosloscanales
1. Busque el cable conectado al terminal ANT OUT del
decodicador.
Este terminal puede estar indicado como ‘ANT OUT’, ‘VHF
N
OUT’ o ‘OUT’.
2. Conecte el otro extremo del cable en el terminal ANT IN de la
parte posterior del TV.
Conexiónaundecodicadorquedecodicaalgunoscanales
Si su decodicador sólo decodica algunos canales (como los canales de pago), siga las
instrucciones siguientes. Necesitará un divisor de dos vías, un conmutador de RF (A/B) y cuatro
largos de cable RF. (Estas opciones se encuentran en la mayoría de tiendas de electrónica.)
Antena del Televisor
ANT IN
Divisor
Servicio de Cable
Cable entrante
RF (A/B) Conmutador
1. Busque y desconecte el cable que está conectado al terminal ANT IN (entrada de antena) del
decodicador.
Este terminal puede estar indicado como ‘ANT IN’, ‘VHF IN’ o ‘IN’.
N
2. Conecte este cable al divisor de dos vías.
3. Conecte el cable RF entre un terminal OUTPUT(salida) del divisor y el terminal IN (entrada) del
decodicador.
4. Conecte el cable RF entre el terminal ANT OUT del decodicador y el terminal B.IN del conmutador
A/B.
5. Conecte otro cable RF entre el otro terminal OUT del divisor y el terminal A.IN del conmutador de
RF (A/B).
6. Conecte el último cable RF entre el terminal OUT del conmutador RF (A/B) y el terminal ANT IN en
la parte posterior del televisor.
Una vez hecha esta conexión, coloque el conmutador A/B en la posición ‘A’ para la visualización
normal. Coloque el conmutador A/B en la posición ‘B’ para ver los canales codicados. (Cuando
sitúe el conmutador A/B en ‘B’, deberá sintonizar el TV al canal de salida del decodicador, que
normalmente es el canal 3 o 4.)
ANT IN
ANT IN ANT OUT
ANT IN
Page 47
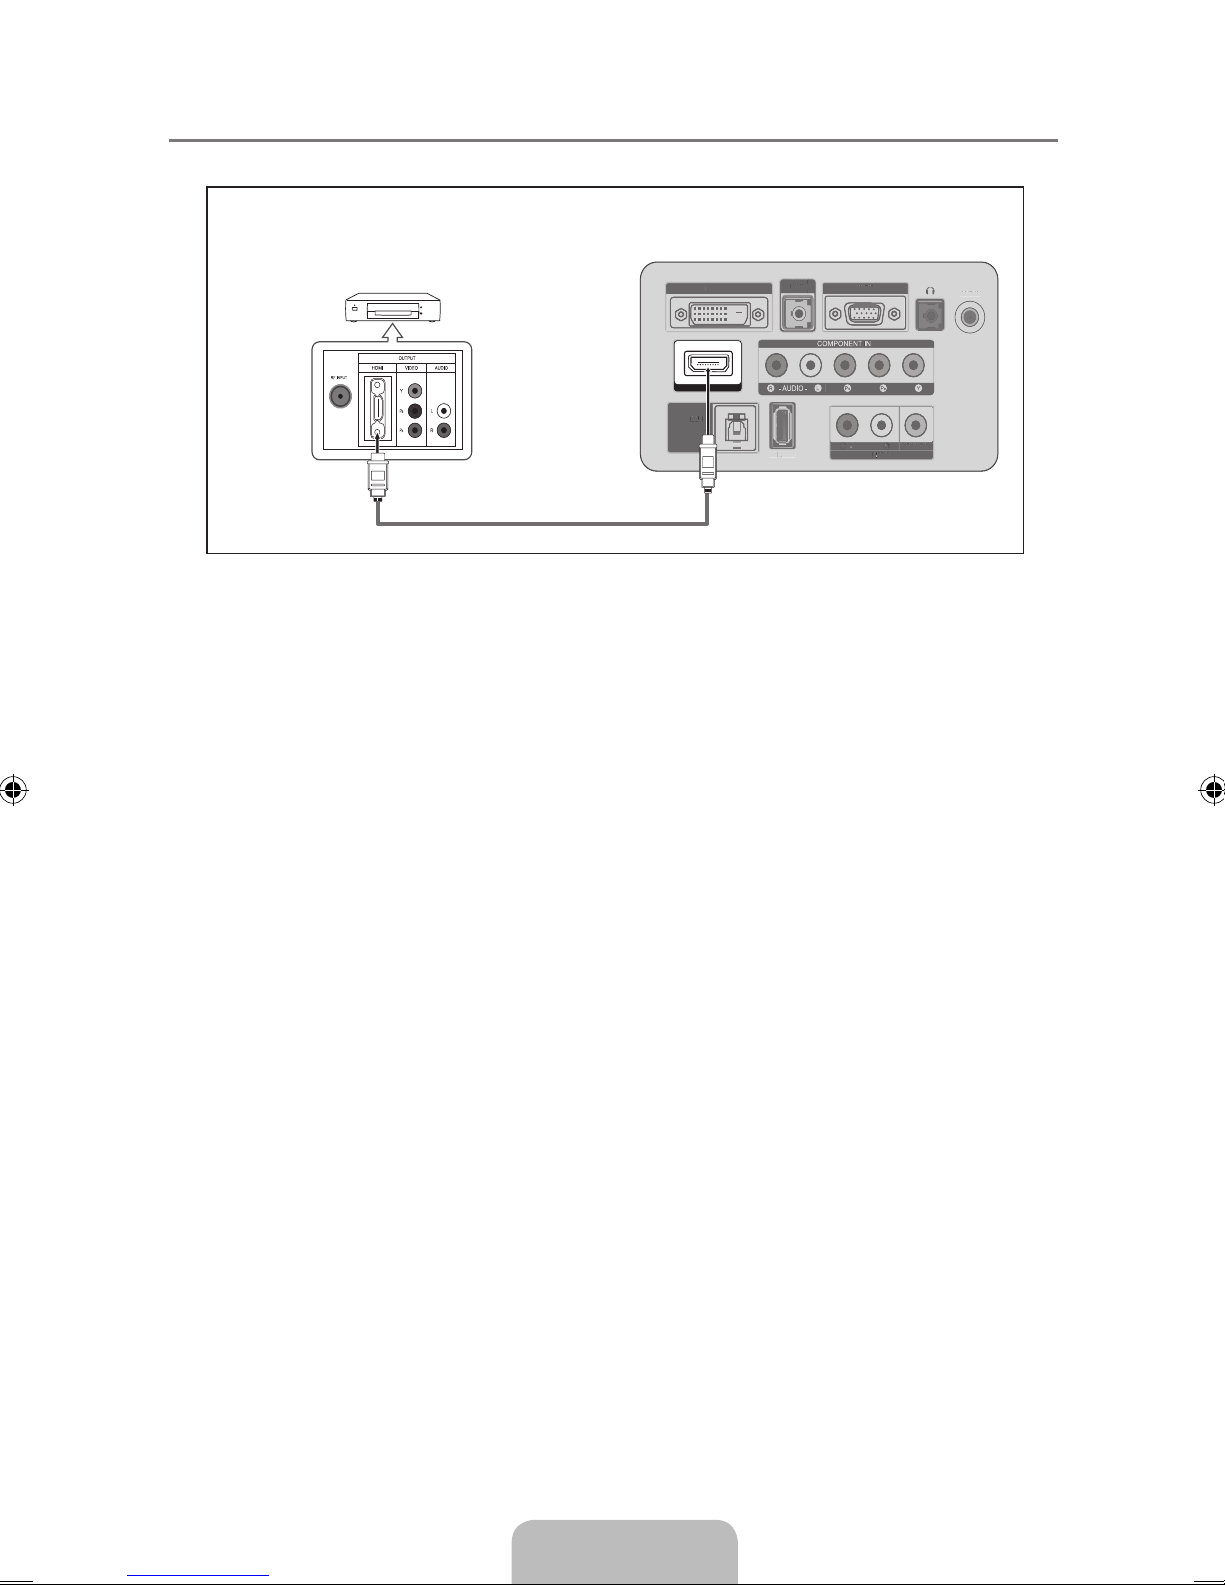
Español - 7
ConexióndeunreproductordeDVDoreceptoresdetelevisiónporcable/satélite(decodicadores)atravésdeHDMI ¦
Solo es aplicable si hay un conector de salida de HDMI en el dispositivo externo.
Panel posterior del TV
DVD o receptores de televisión por
cable / [Satellite receiver (Set-top Box)
rear Panel
ANT IN
HDMI IN
SERVICE
HDMI/PC
/DVI-D
AUDIO IN
AV IN
- AUDIO -
R
L
VIDEO
DVI-D IN
PC IN
DIGITAL
AUDIO OUT
(OPTICAL)
S
E
R
VICE
HDMI/P
C
/
DVI-D
A
UDIO IN
A
V IN
AUDIO
-
VIDE
O
D
VI-D IN
PC I
N
DIGI
T
A
L
AUDIO OU
T
(O
PTICAL
)
1
Cable de HDMI(Not supplied)
¿Qué es HDMI? N
HDMI, o interfaz multimedia de alta denición, es una interfaz de la siguiente generación que
●
permite la transmisión de señales digitales de audio y de vídeo mediante un cable simple sin
compresión.
La diferencia entre los dispositivos HDMI y DVI es que el HDMI es más pequeño y tiene ●
instalada la función de codicación HDCP (protección alta de la copia digital del ancho de
banda).
Cada reproductor de DVD o receptor de televisión por cable/satélite (decodicador) tiene una N
conguración diferente del panel posterior.Puede que el televisor no proporcione salida de
sonido y muestre imágenes con colores anómalos si hay conectados reproductores de DVD
o receptor de televisión por cable/satélite (decodicadores) que admiten versiones de HDMI
anteriores a la versión 1.3. Si se conecta un cable antiguo HDMI y no hay sonido, conecte el
cable HDMI al terminal HDMI IN (DVI) y los cables de audio a los terminales DVI AUDIO IN
[R-AUDIO-L] de la parte posterior del televisor. Si sucede esto, póngase en contacto con la
empresa suministradora del reproductor de DVD/Blu-Ray/receptor de televisión por cable/
receptor de satélite (decodicador) para conrmar la versión HDMI y solicitar una actualización.
Los cables HDMI que no son 1.3 pueden causar un molesto parpadeo o que no se muestre la
N
pantalla.
Page 48
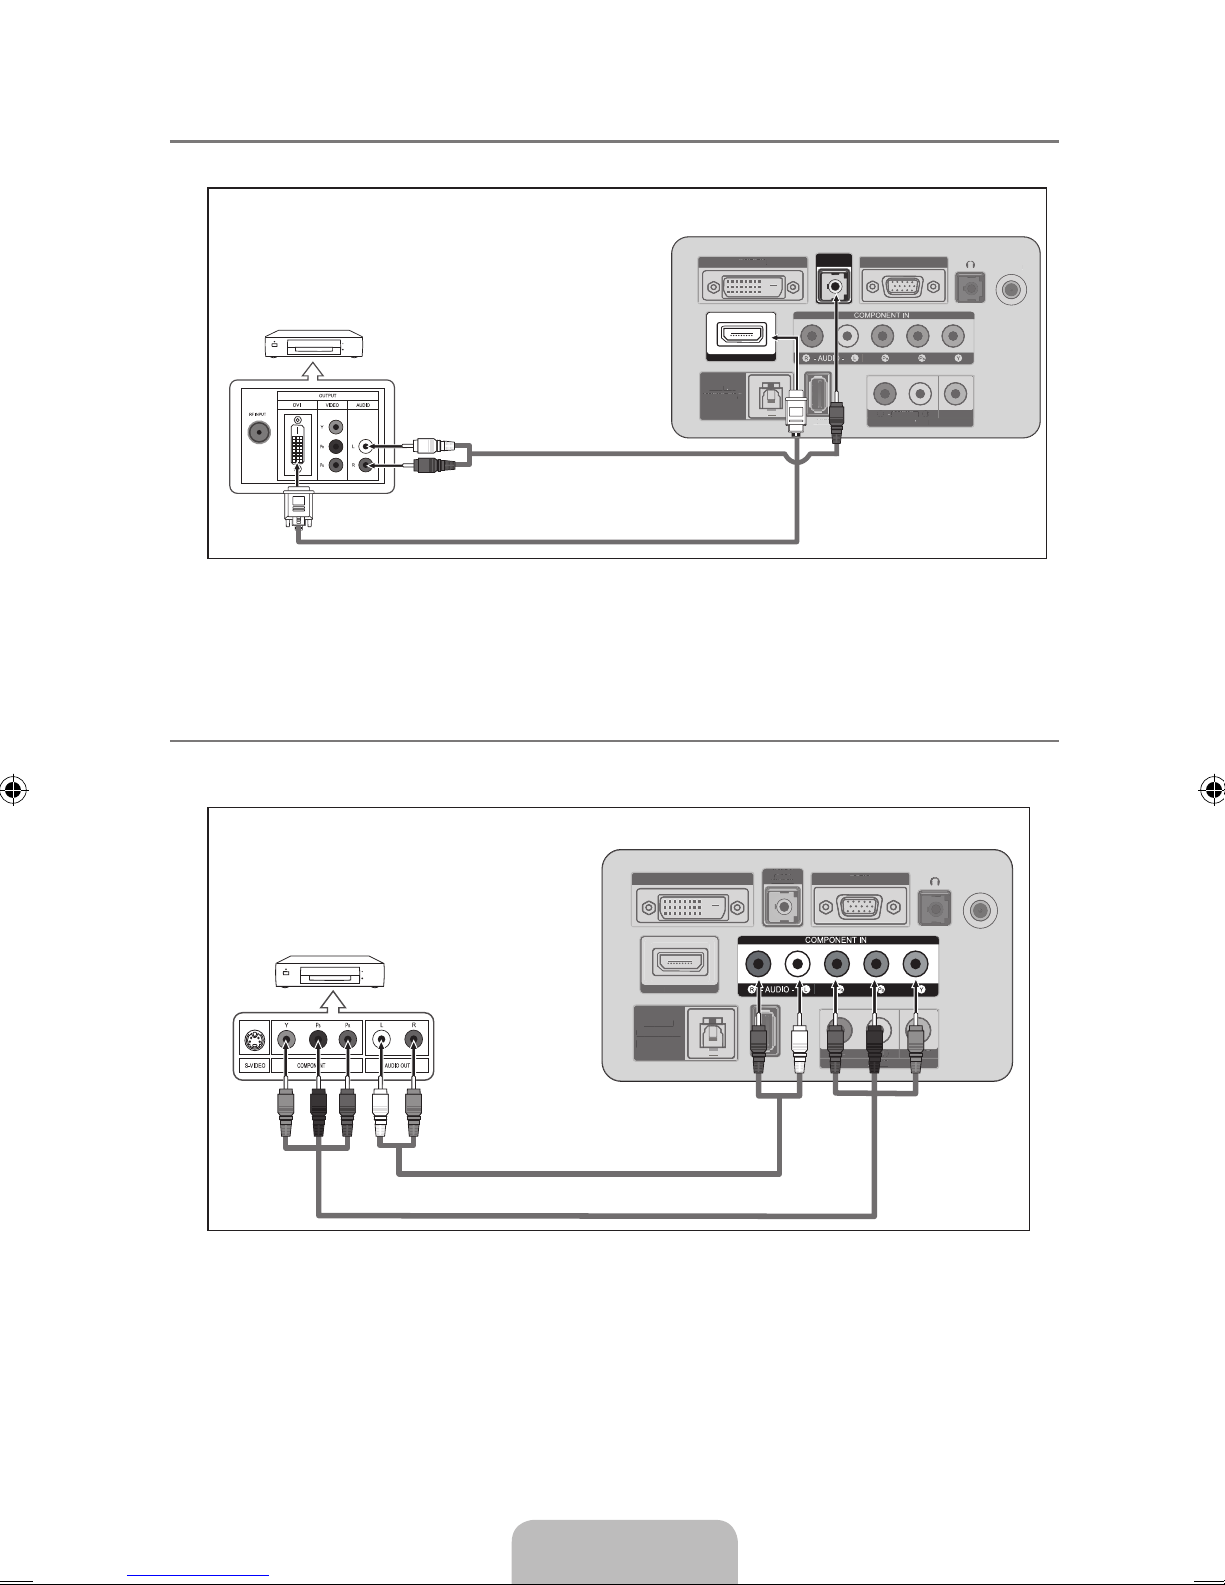
Español - 8
ConexióndeunreproductordeDVDoreceptoresdetelevisiónporcable/satélite(decodicadores)atravésdeDVI ¦
Solo es aplicable si hay un conector de salida de DVI en el dispositivo externo.
ANT IN
HDMI IN
SERVICE
HDMI/PC
/DVI-D
AUDIO IN
AV IN
- AUDIO -
R
L
VIDEO
DVI-D IN
PC IN
DIGITAL
AUDIO OUT
(OPTICAL)
ANT I
N
SERVICE
AUDIO
-
V
IDE
O
DVI-D I
N
P
C IN
D
IGI
TAL
A
UDIO O
U
T
(OPTICAL
)
1
Cable DVI a HDMI (No incluido)
2
Cable RCA a estéreo (No incluido)
DVD o receptores de
televisión por cable /
satélite(decodicador)
Panel posterior del TV
Cada reproductor de DVD o receptor de televisión por cable/satélite (decodicador) tiene una N
conguración diferente del Npanel posterior.
Cuando conecte un reproductor de DVD o receptor de televisión por cable/satélite
N
(decodicador), debe hacer coincidir Nlos colores del terminal de conexión y del cable.
ConexióndeunreproductordeDVDoreceptoresdetelevisiónporcable/satélite(decodicadores)atravésdeloscablesdecomponentes ¦
Las tomas del panel posterior del televisor facilitan la conexión de un reproductor de DVD o un
receptor de televisión por cable / satélite (decodicador) al TV.
ANT IN
HDMI IN
SERVICE
HDMI/PC
/DVI-D
AUDIO IN
AV IN
- AUDIO -
R
L
VIDEO
DVI-D IN
PC IN
DIGITAL
AUDIO OUT
(OPTICAL)
S
ERVICE
HDMI/P
C
/
DVI-
D
AUDIO IN
A
V I
N
AUDIO -
V
IDE
O
D
VI-D IN
P
C I
N
D
IGITA
L
A
UDIO OUT
(OPTICAL
)
Panel posterior del TV
2
Cable de Audio (No incluido)
1
Cable de Component (No incluido)
DVD o receptores de
televisión por cable /
satélite(decodicador)
El vídeo Componente separa el vídeo en Y (Luminancia (brillo), el Pb (azul) y el Pr (rojo) para N
realzar la calidad del video. Las conexiones de audio y de vídeo componente deben coincidir.
Por ejemplo, si conecta un cable de vídeo de componentes a COMPONENT IN, conecte
también el cable de audio a la misma entrada COMPONENT IN.
Cada reproductor de DVD o receptor de televisión por cable/satélite (decodicador) tiene una
N
conguración diferente del panel posterior.
Cuando conecte un reproductor de DVD o receptor de televisión por cable/satélite
N
(decodicador), debe hacer coincidir los colores del terminal de conexión y del cable.
Page 49
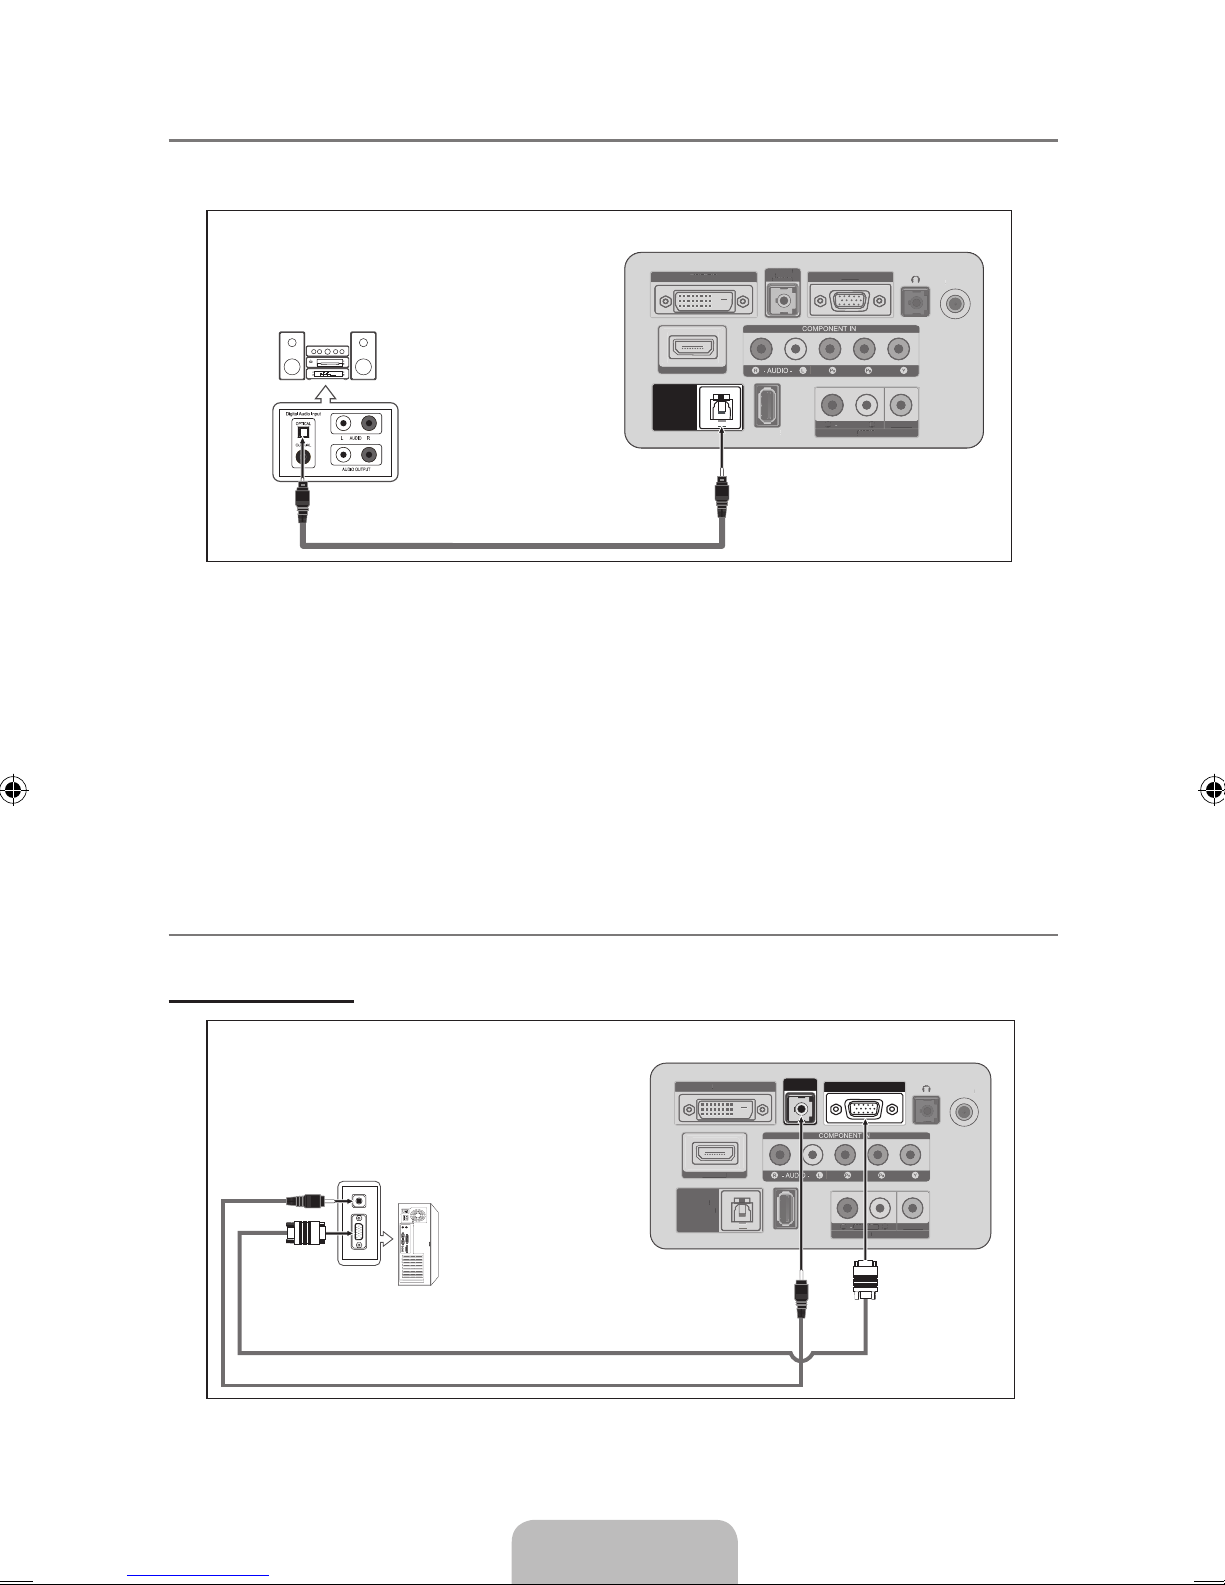
Español - 9
Conexión de un sistema de audio digital ¦
Los terminales del panel posterior del televisor facilitan la conexión de un sistema de audio digital
(Home Cinema/receptor) al televisor.
ANT IN
HDMI IN
SERVICE
HDMI/PC
/DVI-D
AUDIO IN
AV IN
- AUDIO -
R
L
VIDEO
DVI-D IN
PC IN
DIGITAL
AUDIO OUT
(OPTICAL)
S
ERVICE
HDMI/P
C
/
DVI-
D
AUDIO I
N
A
V I
N
AUDIO -
VIDE
O
D
VI-D IN
PC I
N
Sistema de audio digital
Panel posterior del TV
1
Cable óptico (No incluido)
Cuando un sistema de audio digital se conecta al terminal DIGITAL AUDIO OUT (OPTICAL): N
Reduzca la ganancia volumen) del TV, y ajuste el volumen con el control del amplicador.
El audio de 5.1 canales es posible cuando el televisor está conectado a un dispositivo externo
N
que admita 5.1 canales.
Cada sistema de audio digital tiene una conguración diferente del panel posterior.
N
Cuando el receptor (sistema Home Cinema) está establecido en Enc., se puede oír la salida
N
de sonido del terminal Optical del televisor. Cuando se ve la televisión a través de una señal
DTV (aérea), el televisor envía el sonido de 5.1 canales al receptor del sistema Home Cinema.
Cuando la fuente es un componente digital, como un DVD/Blu-Ray/ receptor de satélite
(decodicador), y está conectada al televisor a través de HDMI, sólo se oye el sonido de 2
canales del receptor del sistema Home Cinema. Si desea oír audio de 5.1 canales, conecte
el terminal de salida de audio digital del DVD/Blu-Ray/receptor de satélite (decodicador)
directamente a un amplicador o un sistema Home Cinema, no al televisor.
Conexión a un PC ¦
Uso del cable D-Sub
ANT IN
HDMI IN
SERVICE
HDMI/PC
/DVI-D
AUDIO IN
AV IN
- AUDIO -
R
L
VIDEO
DVI-D IN
PC IN
DIGITAL
AUDIO OUT
(OPTICAL)
S
ERVI
CE
A
V I
N
AUDIO
-
VIDE
O
D
VI-D IN
D
IGITAL
AUDIO OU
T
(OPTICAL
)
Panel posterior del TV
PC
1
Cable de D-sub (No incluido)
Cuando conecte una PC, debe hacer coincidir los colores del terminal de conexión y del cable. N
2
Cable estéreo (No incluido)
Page 50
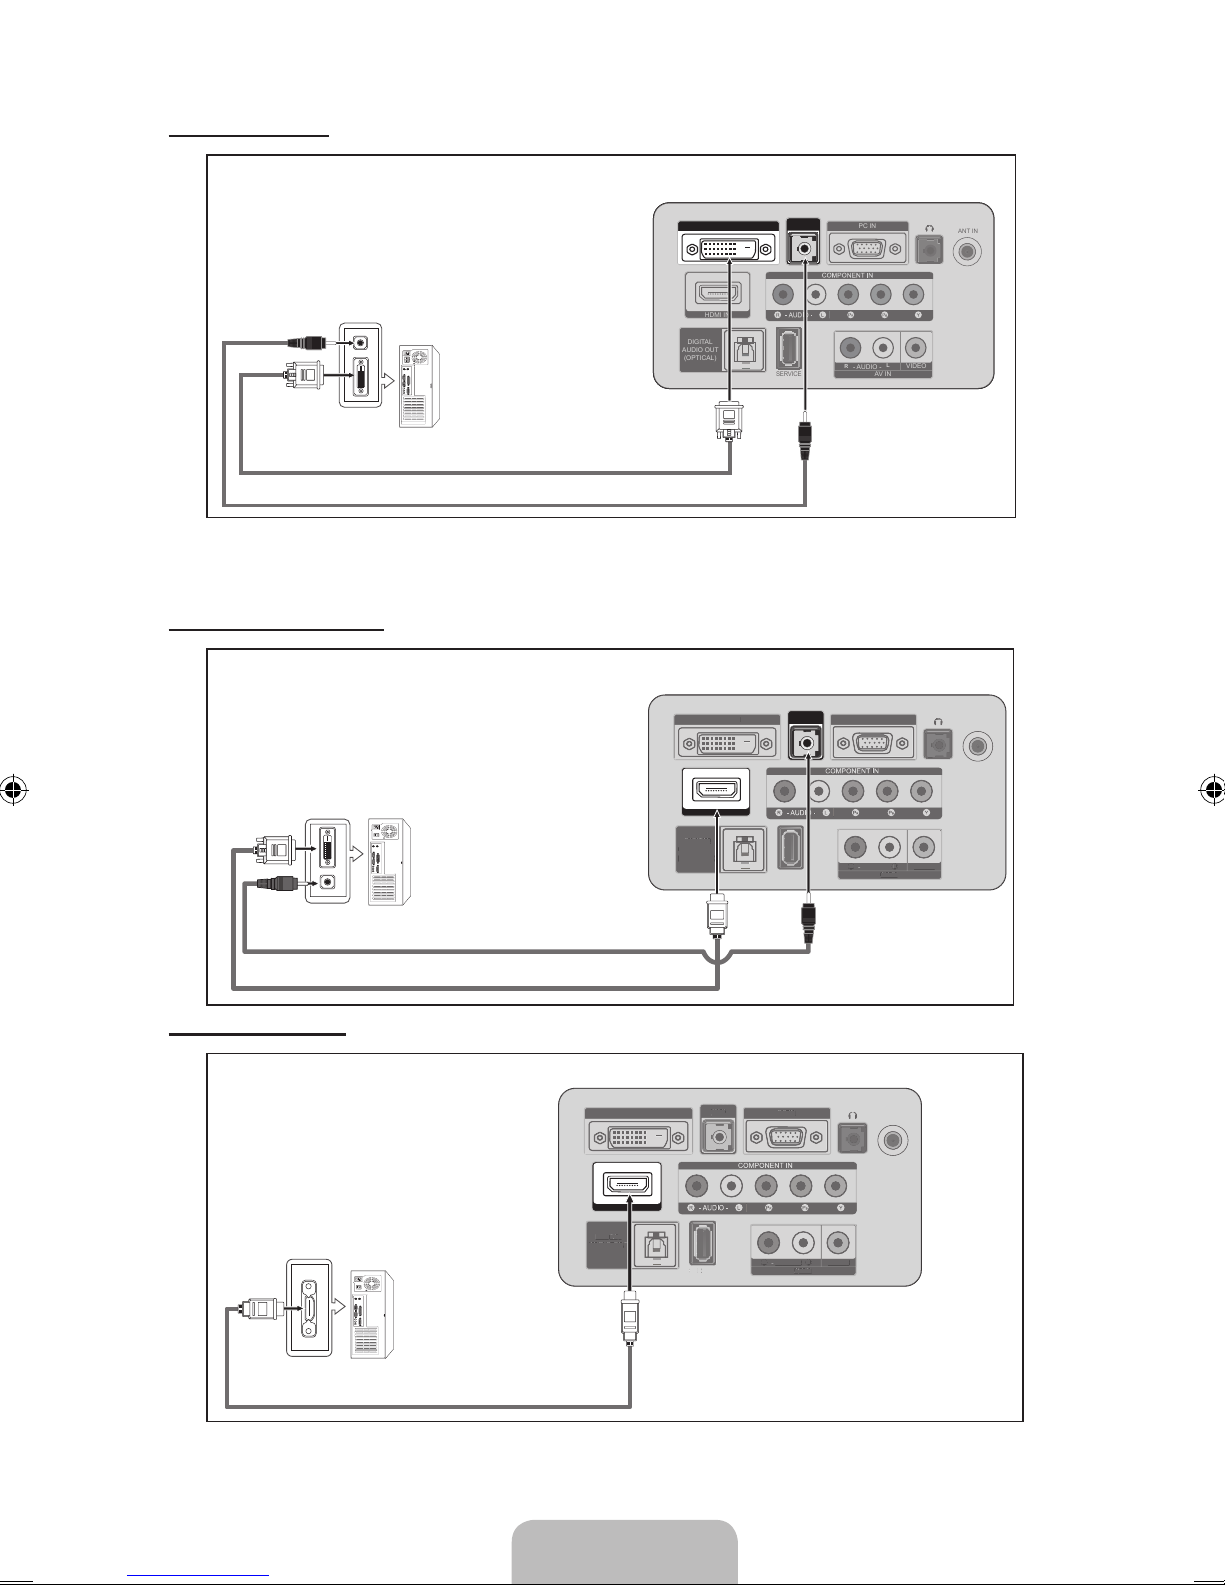
Español - 10
Uso del cable DVI
ANT IN
HDMI IN
SERVICE
HDMI/PC
/DVI-D
AUDIO IN
AV IN
- AUDIO -
R
L
VIDEO
DVI-D IN
PC IN
DIGITAL
AUDIO OUT
(OPTICAL)
2
Cable estéreo (No incluido)
Panel posterior del TV
PC
1
Cable de DVI (No incluido)
Cuando conecte una PC, debe hacer coincidir los colores del terminal de conexión y del cable. N
El terminal DVI sólo está disponible en la temporización de PC
N .
Uso del cable HDMI/DVI
ANT IN
HDMI IN
SERVICE
HDMI/PC
/DVI-D
AUDIO IN
AV IN
- AUDIO -
R
L
VIDEO
DVI-D IN
PC IN
DIGITAL
AUDIO OUT
(OPTICAL)
ANT IN
S
ERVICE
AUDIO -
V
IDE
O
-
P
C IN
DIGITA
L
A
UDIO OUT
(OPTICAL
)
ANT IN
HDMI IN
SERVICE
HDMI/PC
/DVI-D
AUDIO IN
AV IN
- AUDIO -
R
L
VIDEO
DVI-D IN
PC IN
DIGITAL
AUDIO OUT
(OPTICAL)
S
ERVI
CE
A
V I
N
AUDIO
-
VIDE
O
D
VI-D IN
D
IGITAL
AUDIO OU
T
(OPTICAL
)
Panel posterior del TV
PC
2
Cable estéreo (No incluido)
1
Cable de HDMI/DVI (No incluido)
Uso del cable HDMI
ANT IN
HDMI IN
SERVICE
HDMI/PC
/DVI-D
AUDIO IN
AV IN
- AUDIO -
R
L
VIDEO
DVI-D IN
PC IN
DIGITAL
AUDIO OUT
(OPTICAL)
SE
VICE
H
DMI/P
C
/
DVI-D
A
UDIO IN
AUDIO
-
V
IDE
O
-
PC I
N
DIGI
T
A
L
AUDIO O
U
T
(O
PTICAL
)
PC
Panel posterior del TV
1
Cable de HDMI (No incluido)
Cada PC tiene una conguración distinta en el panel posterior. N
Page 51
Español - 11
FUNCIONAMIENTO
Encendido o apagado del TV ¦
Pulse el botón POWER P del mando a distancia.
También puede usar el botón P del televisor.
Función Plug & Play ¦
Cuando se enciende el televisor por primera vez, se conguran seguidos y automáticamente dos ajustes
básicos del usuario.
1. Pulse el botón POWER P del mando a distancia.
También puede usar el botón
N
P
del televisor.
2. Pulse el botón E aparecerá automáticamente el menú Select
Language of the OSD.
3. Pulse el botón ▲ o ▼ para seleccionar el idioma y, a continuación, pulse después el botón E.Se
muestra el mensaje Seleccione ‘Use domiciliario’ para instalar este TV en su casa.
4. Pulse el botón ◄ o ► para seleccionar Demo comercio o Use domiciliario y, a continuación, pulse el
botón E. muestra el mensaje Seleccionar las antenas que desea memorizar.
Es recomendable congurar el televisor en el modo Use domiciliario para obtener la mejor
N
imagen en un entorno doméstico.Demo comercio sólo es necesario en los entornos comerciales.
Si la unidad accidentalmente se congura en el modo Demo comercio y se desea volver a Use
domiciliario (normal): Pulse el botón del volumen del televisor. Cuando se muestra la OSD del
volumen, mantenga pulsado el botón MENU del televisor durante 5 segundos.
5. Pulse los botón ▲ o ▼ para memorizar los canales de la conexión seleccionada. Pulse el botón E
para seleccionar Iniciar.
Aire
N : Señal de antena Aire. / Cable: Señal de antena Cable. / Auto: Señales de antena Aire y
Cable.
En el modo de cable, puede seleccionar el origen de señal correcto entre STD, HRC y IRC con
N
los botones ▲, ▼, ◄ o ►; a continuación, pulse el botón E.Si tiene cable digital, seleccione la
fuente de la señal del sistema de cable para analógica y para digital. Póngase en contacto con
su proveedor de cable para saber el tipo de sistema de cable existente en su zona.
6. Pulse el botón para seleccionar Iniciar. El televisor empezará a memorizar todos los canales
disponibles.
Para detener la búsqueda antes de que termine, pulse el botón
N E con la opción Detener
seleccionada.
Una vez guardados todos los canales disponibles, se inicia la eliminación de los canales
N
codicados. Vuelve a mostrarse el menú Prog. Auto. Pulse el botón E cuando se complete la
memorización de canales. Aparece automáticamente el mensaje Congure el modo de Reloj..
7. Pulse el botónv E.
Pulse los botón ▲ o ▼ para seleccionar Auto después, pulse el botón E.Se muestra el mensaje
Congurar la hora de verano.. Si selecciona Manual, se muestra Congurar fecha y hora actuales.
8. Pulse el botón ▲ o ▼ para seleccionar Apagado, Encendido o Auto y, a continuación, pulse el botón
E.
9. Pulse el botón ▲ o ▼ para resaltar la zona horaria de su región. Pulse el botón E Si ha recibido
una señal digital, se ajustará la hora automáticamente.
10. Se proporciona el método de conexión para obtener la mejor calidad HD. Después de conrmar el
método, pulse el botón E.
11. Aparece el mensaje “Disfrute de su TV.” Cuando termine, pulse el botón E.
Si desea reiniciar esta función...
Plug & Play
Select Language of the OSD.
Language : English r
E
Enter
Page 52
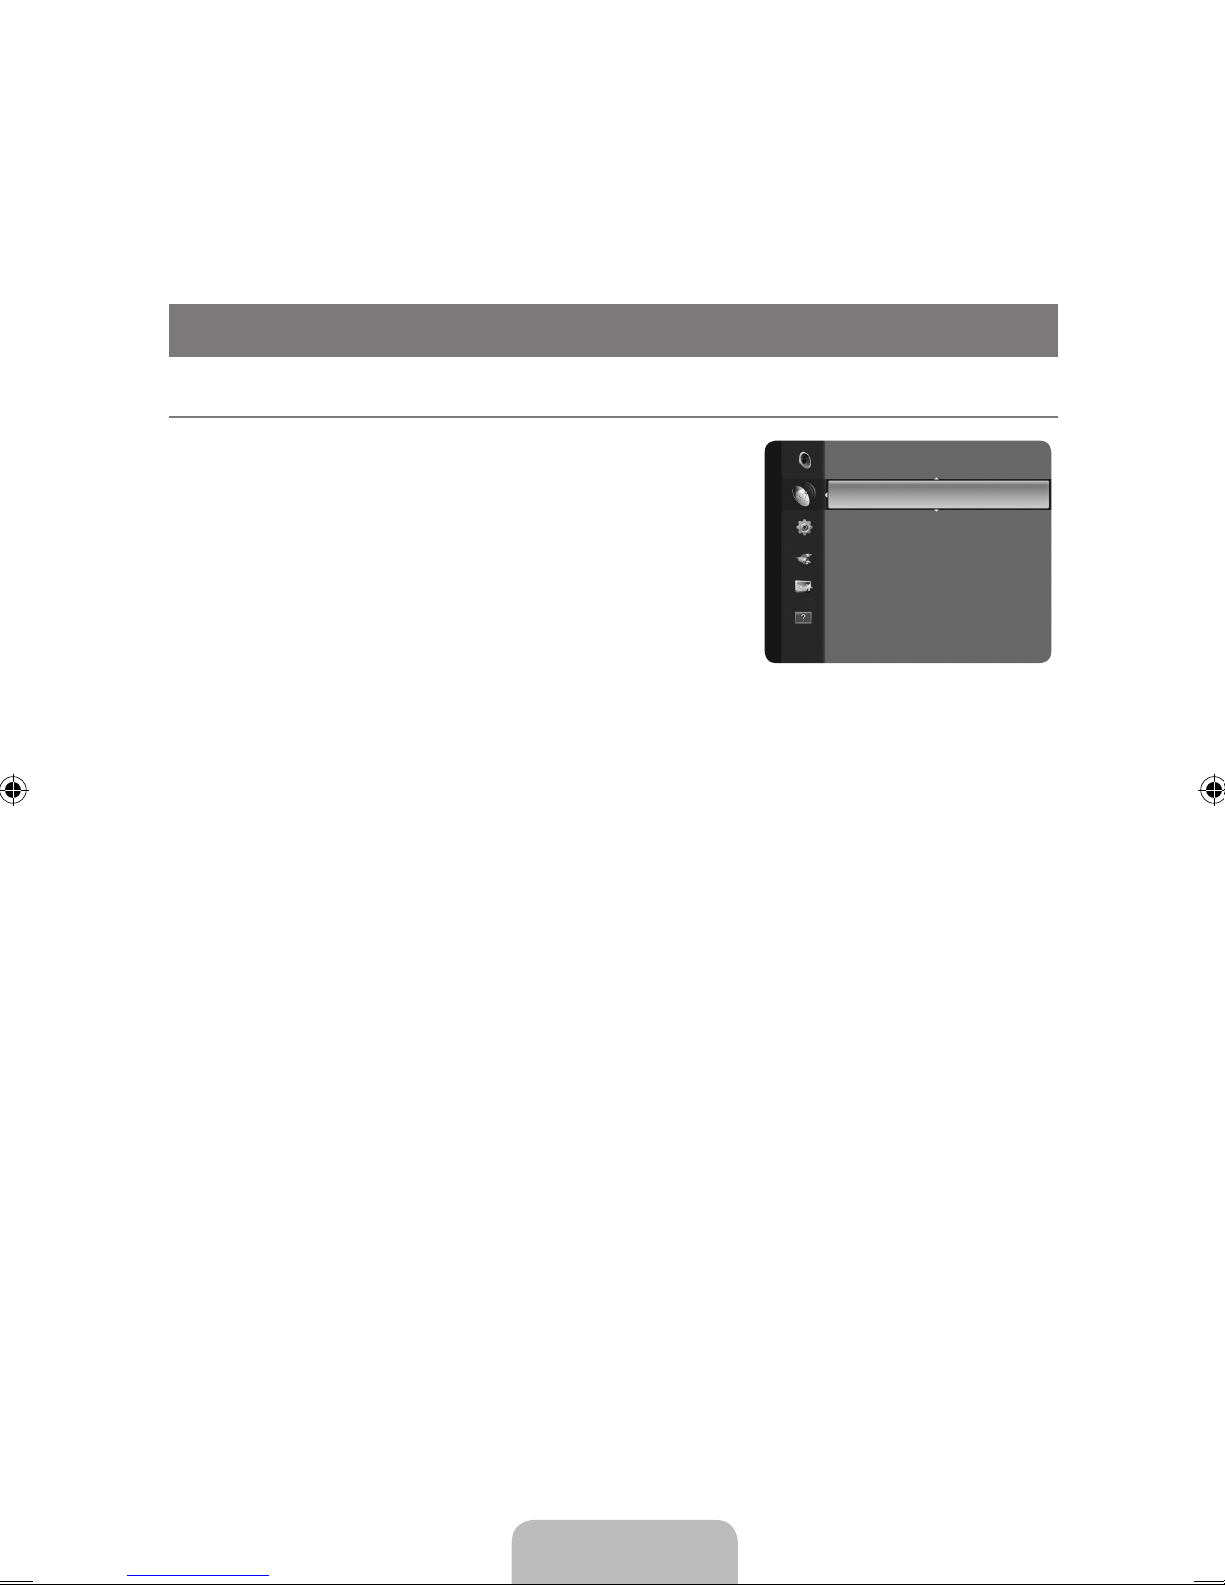
Español - 12
1. Pulse el botón MENU para ver el menú. Pulse el botón ▲ o ▼ para seleccionar Conguración
y, a continuación, pulse el botón E.
2. Pulse de nuevo el botón E para seleccionar Plug & Play.
La función Plug & Play está disponible sólo en el modo TV.
N
CONTROL DE LOS CANALES
Conguracióndelmenúdecanales ¦
Antena→Aire/Cable ❑
Antes de empezar a memorizar los canales disponibles, debe
indicar el tipo de origen de la señal conectada al TV (es decir,
antena o sistema de cable).
Pulse el botón TOOLS para ver el menú
T Tools. También
puede congurar la antena con Tools → Cambiar a Cable
(o Cambiar a Aereos).
Prog. Auto ❑
Aire: Señal de antena Aire. / Cable: Señal de antena del cable.
/ Auto: Señales de antena aérea y de cable.
Al seleccionar el sistema de TV de cable: Seleccione sistema de cable. STD, HRC e IRC
N
identican los distintos tipos de sistemas de TV por cable. Póngase en contacto con su
proveedor de cable para averiguar el tipo de sistema de cable existente en su zona. En este
momento ya se ha seleccionado el origen de la señal.
Una vez guardados todos los canales disponibles, se inicia la eliminación de los canales
N
codicados. Vuelve a mostrarse el menú Prog. Auto.
Si desea detener la programación automática, pulse el botón
N E. Aparece el mensaje ¿Detener
programación automática?. Seleccione Sí con el botón ◄ o ► y, a continuación, pulse el
botón E.
Borrar canal encriptado (sólo canales digitales) ❑
Esta función se usa para ltrar los canales codicados después de que Prog. Auto se haya
completado. Puede tardar de 20 a 30 minutos.
Para detener la búsqueda de canales codicados: Pulse el botón
N E para seleccionar Detener.
Pulse el botón ◄ para seleccionar Sí y, a continuación, pulse el botón E.
Esta función sólo está disponible en el modo
N Cable.
Lista de canales ❑
Para conocer el procedimiento detallado sobre cómo usar la Lista de canales, consulte las
instrucciones de ‘Gestión de los canales’.
Sintonia Fina (sólo canales analógicos) ❑
Utilice la sintonización na para ajustar manualmente un determinado canal a n de que la
recepción sea óptima.
Si no almacena en la memoria el canal que ha ajustado de manera precisa, los ajustes no se
N
guardan.
El símbolo * aparecerá junto al nombre de los canales cuya sintonización se haya ajustado.
N
Para restablecer la sintonía na, pulse el botón ▼ para seleccionar Reiniciar y, a continuación,
N
pulse el botón E.
Antenna :Aire ►
Prog. Auto
Borrar canal encriptado
Lista de canales
Sintonia Fina
Canal
Page 53
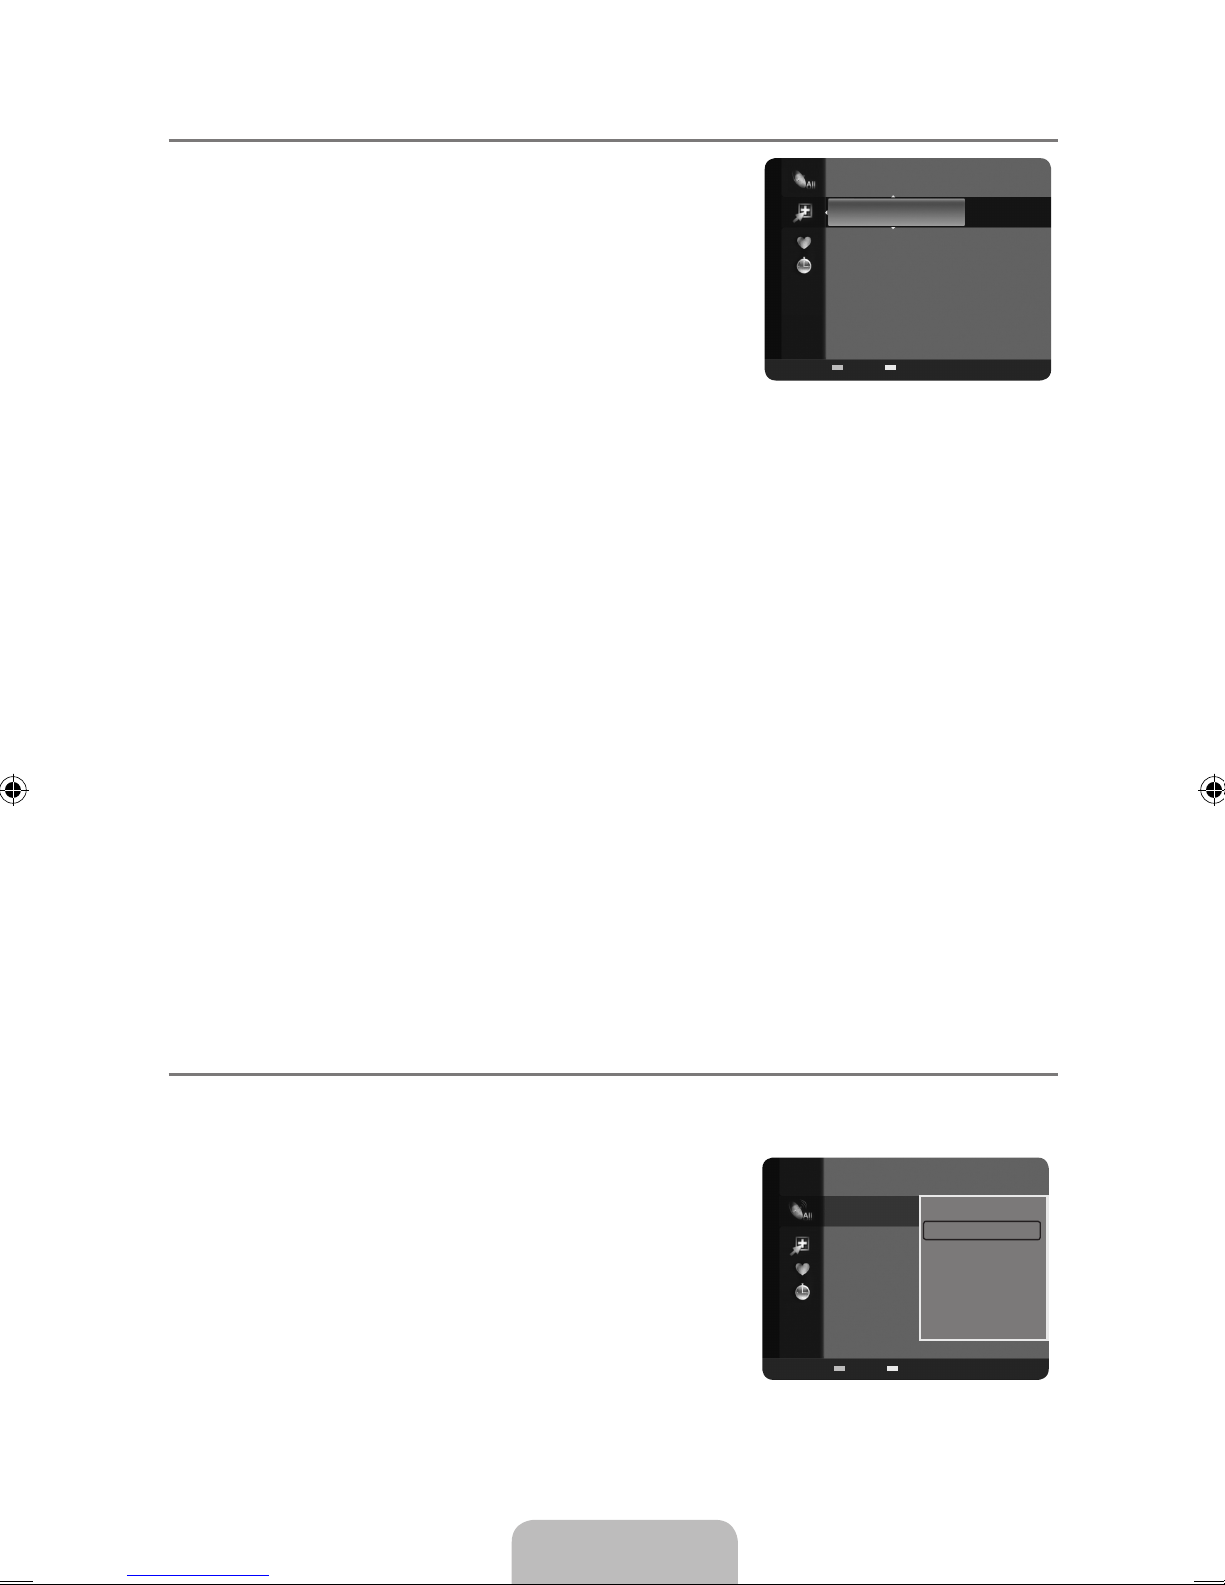
Español - 13
Gestión de los canales ¦
Con este menú puede agregar y borrar los canales o
congurarlos como favoritos y usar la guía de programas de las
emisoras digitales.
Todos los canales
Muestra todos los canales disponibles actualmente.
Canales agregados
Muestra todos los canales añadidos.
Favoritos
Muestra todos los canales favoritos.
Si desea seleccionar los canales favoritos que ha congurado, pulse el botón FAV.CH en el
O
mando a distancia.
Grabación con temporizador
Muestra todos los programas actualmente reservados.
Seleccione un canal en la pantalla Todos los canales, Canales agregados o Favoritos pulsando
N
los botones ▲/▼ y pulse el botón E.A continuación puede ver el canal seleccionado.
Uso de los botones de colores en la lista de canales
N
Verde (Zoom): Amplía o disminuye el número del canal.
–
Amarillo (Selección): Selecciona varias listas de canales. Puede aplicar la función de
–
añadir/borrar o de añadir/borrar en la lista de favoritos a varios canales al mismo tiempo.
Seleccione los canales que desee y pulse el botón amarillo para congurar los canales
seleccionados al mismo tiempo. La marca c aparece a la izquierda de los canales
seleccionados.
TOOLS (Herramientas): Muestra los menús Agregar (o Borrar), Agregar a Favoritos (o
–
Borrar de Favoritos), Visualización con temporizador, Edición de nombre, Seleccionar
todo (o Deseleccionar todos) y Prog. Auto (los menús de las opciones pueden cambiar,
dependiendo de la situación.)
Iconos de la pantalla de estado del canal
N
♥ : – Un canal congurado como favorito.
c – : Un canal seleccionado con el botón amarillo.
( – : Un programa que se está emitiendo.
) – : Un programa reservado.
Menúsdeopcionesdelalistadecanales(enTodosloscanales/Canalesagregados/Favoritos) ¦
Pulse el botón N TOOLS para usar el menú de opciones.
Los elementos del menú de opciones pueden variar según el estado del canal.
N
Agregar/Borrar
Puede suprimir o añadir un canal para que se muestren los
canales que desee.
Todos los canales borrados se mostrarán en el menú
N Todos
los canales.
Un canal de color gris quiere decir que se ha suprimido.
N
El menú
N Agregar sólo aparece con los canales borrados.
También puede borrar un canal en los menús
N Canales
agregados o Favoritos de la misma manera.
Agregar a Favoritos / Borrar de Favoritos
Puede congurar como favoritos los canales que vea con más frecuencia.
2 Aire
4 Aire
4-2 ♥ TV #8
8 Aire
13 Aire
13-1 ♥ TV #3
Alice’s Adventures in Wonderland
Canales agregados
Aire
Zoom Selección T Herramientas
2 Aire
4 Aire
4-2 ♥ TV #8
8 Aire
13 Aire
13-1 ♥ TV #3
Alice’s Adventures in Wonderland
Todos los canales
Borrar
Agregar a Favoritos
Visualización con temporizador
Edición de nombre
Seleccionar todo
Prog. Auto
Aire
Zoom Selección T Herramientas
Page 54
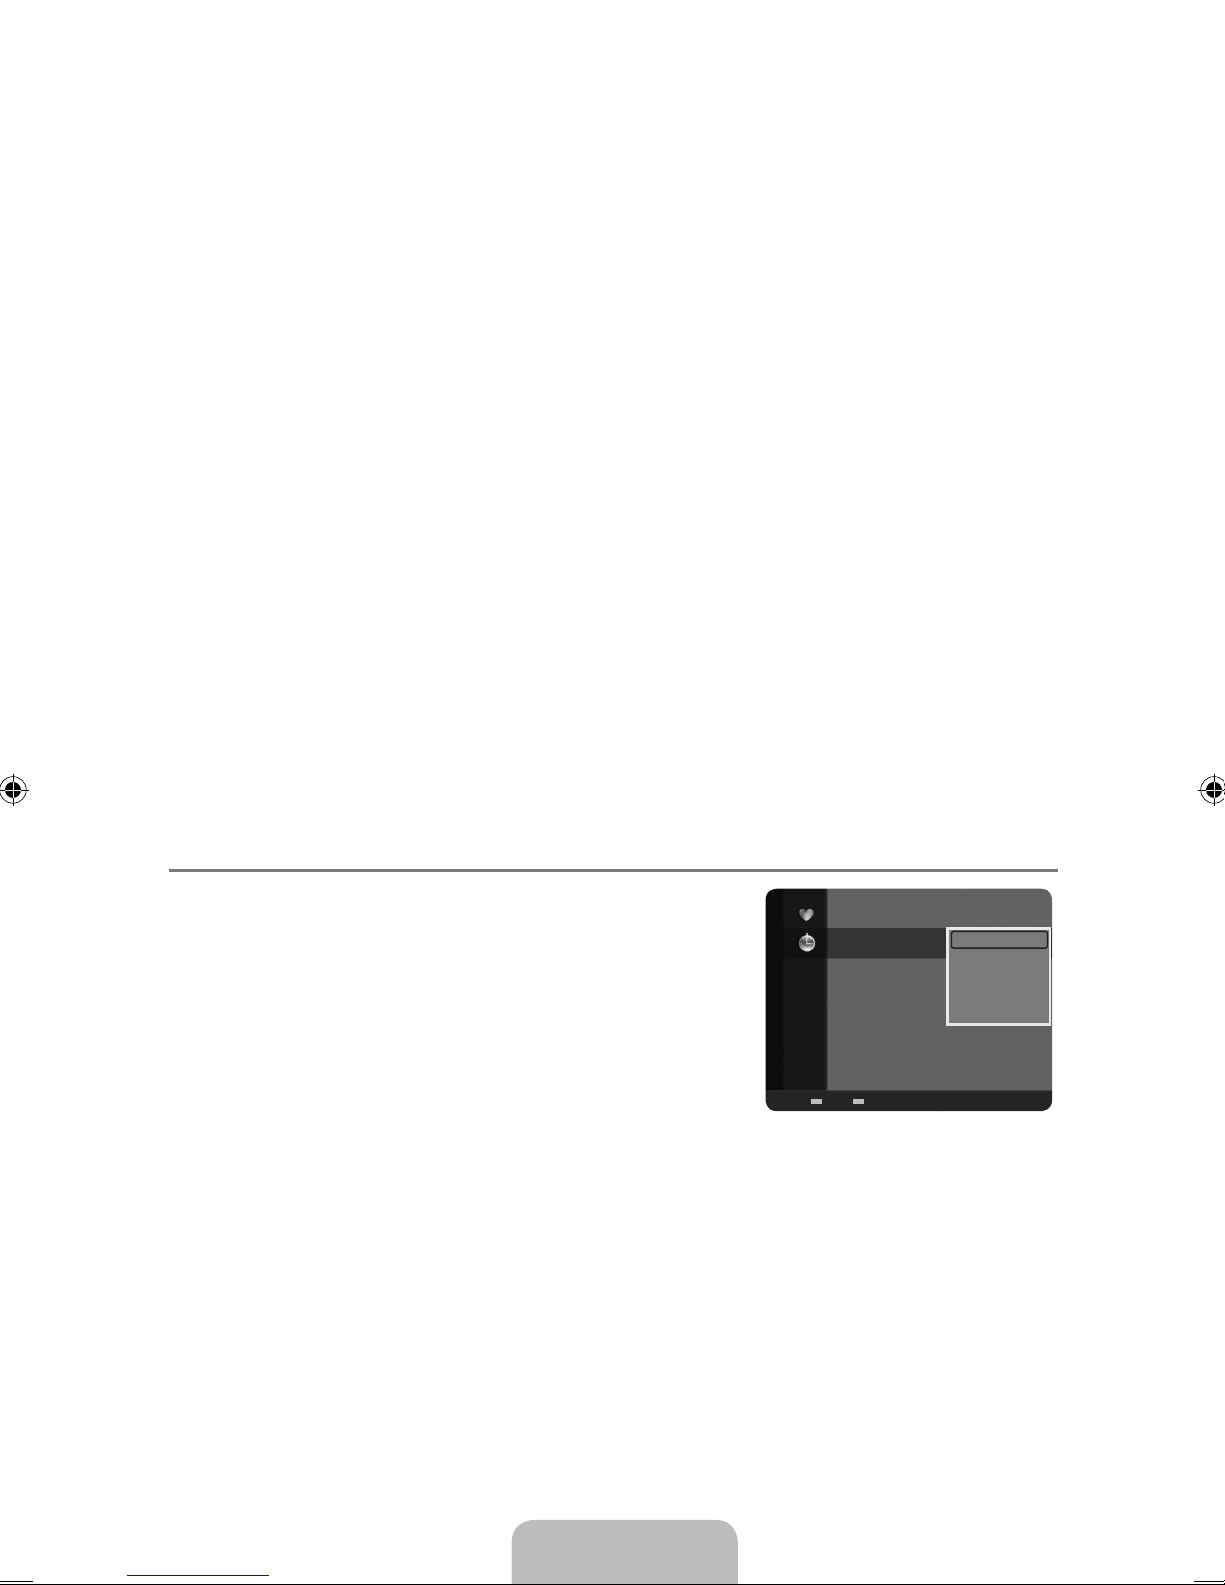
Español - 14
Pulse el botón T TOOLS para ver el menú Herramientas. También puede añadir (o borrar)
canales favoritos seleccionando Herramientas → Agregar a Favoritos (o Borrar de Favoritos).
Se mostrará el símbolo ♥ y el canal se congurará como favorito.
N
Todos los canales favoritos se mostrarán en el menú
N Favoritos.
Visualización con temporizador
Si reserva un programa que desea ver, el canal se cambia automáticamente al canal reservado en
la lista de canales aunque esté viendo otro canal. Para reservar un canal primero debe congurar la
hora actual.
Sólo se pueden reservar los canales memorizados.
N
Puede ajustar el canal, el mes, el día, el año, la hora y el minuto directamente pulsando los
N
botones numéricos del mando a distancia.
La reserva de un programa se mostrará en el menú
N Grabación con temporizador.
Guía de programas digitales y reserva de visualización
N
Si se ha seleccionado un canal digital y se pulsa el botón ► aparece la guía de programas del
canal. Se puede reservar un programa mediante el procedimiento descrito anteriormente.
Edición de nombre (sólo canales analógicos)
Los canales se pueden etiquetar con el propósito de que al seleccionar éstos se pueda ver su
nombre.
Los nombres de los canales digitales se asignan automáticamente y no se pueden etiquetar.
N
Seleccionar todo / Deseleccionar todos
Seleccionar todo
● : Puede seleccionar todos los canales de la lista.
Deseleccionar todos ● : Puede deseleccionar todos los canales seleccionados.
Sólo podrá seleccionar N Deseleccionar todos si ha seleccionado un canal.
Prog. Auto
Si desea más detalles sobre las opciones de conguración, consulte la página 12.
N
Menúsdeopcionesdelalistadecanales(enGrabacióncontemporizador) ¦
Se puede ver, cambiar o borrar una reserva.
Pulse el botón
N TOOLS para usar el menú de opciones.
Cambiar información
Selecciónelo para cambiar la reserva de visualización.
Cancelar programaciones
Selecciónelo para cancelar la reserva de visualización.
Información
Selecciónelo para ver una reserva de visualización. (También
se puede cambiar la información de
reserva.)
Seleccionar
todo
Seleccionar todos los programas reservados.
1 / 1 / 2009
9:08 am 5 TV3 The
3:15 pm 2 TV3 The Equalizer
5:50 pm 2 TV3 McMillan & Wife
Grabación con temporizador
Cambiar información
Cancelar programaciones
Información
Seleccionar todo
Aire
Zoom Selección
T
Herramienta
E
Información
Page 55
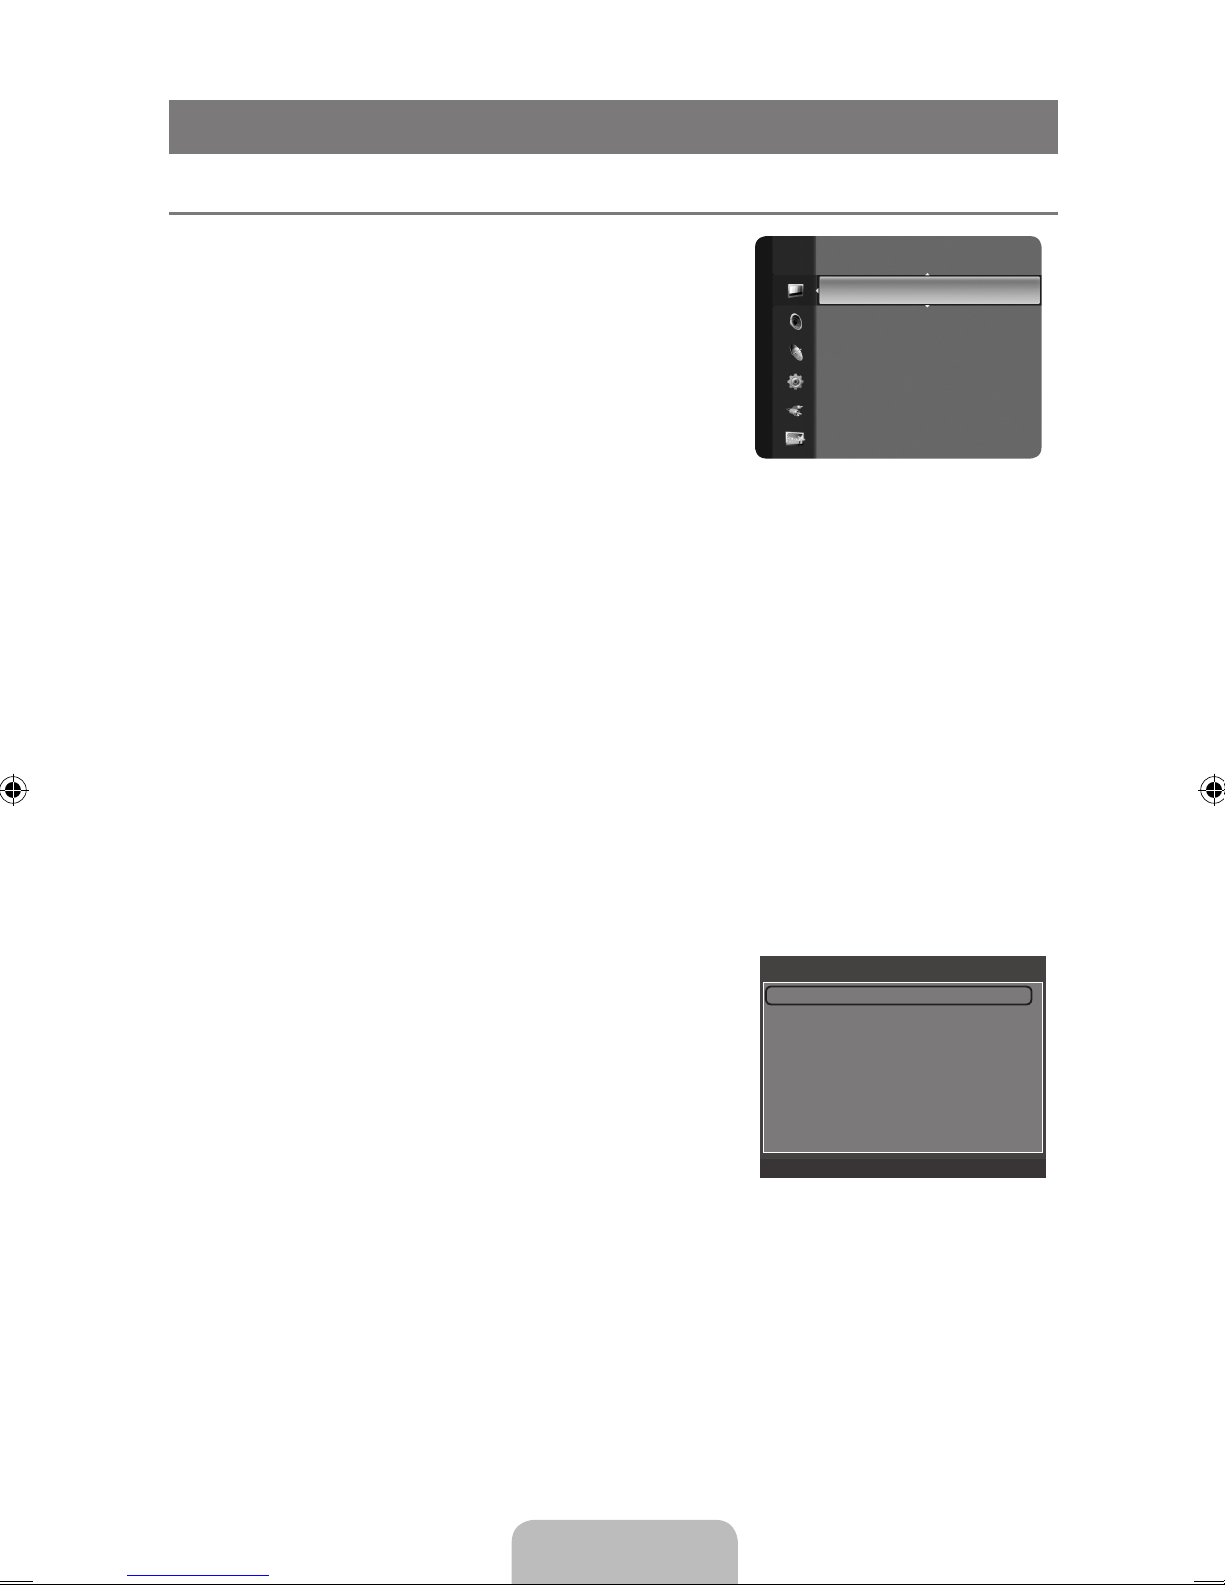
Español - 15
CONTROL DE LA IMAGEN
Control de la imagen(TV / AV / Componente / HDMI ) ¦
Modo ❑
Puede seleccionar el tipo de imagen que mejor cumpla sus
requisitos de visualización.
Dinámico
Selecciona la visualización con una denición mejorada, en
una habitación luminosa.
Normal
Selecciona la visualización óptima de la imagen, en un
entorno normal.
Cine
Selecciona la visualización para ver películas en una sala oscura.
Luzdefondo/Contraste/Brillo/Denición/Color/Tinte ❑
El televisor tiene varias opciones de conguración que permiten controlar la calidad de la imagen.
Luz de fondo: Ajusta el brillo de la luz de fondo de la pantalla LCD.
●
Contraste: Ajusta el nivel del contraste de la imagen. ●
Brillo: Ajusta el nivel del brillo de la imagen. ●
Denición: Ajusta la denición de los bordes de la imagen. ●
Color: Ajusta la saturación del color de la imagen. ●
Tinte ● : Ajusta el matiz del color de la imagen
Cuando haga cambios en Luz de fondo, Contraste, Brillo, Denición, Color o Tinte (V/R) el color N
de la OSD también se ajustará.
La conguración de cada dispositivo externo conectado a la entrada del televisor se puede
N
ajustar y guardar.
La energía consumida durante el uso se puede reducir signicativamente si se disminuye el
N
nivel de la luz de fondo, lo que repercutirá en el coste total de funcionamiento.
Opciones de imagen ❑
En el modo PC sólo se pueden hacer cambios en los N
elementos Tono Color y Tamaño del menú de Opciones de
imagen.
Tono Color
→Frío/Normal/Tibio1/Tibio2
Tamaño
Es posible que alguna vez desee cambiar el tamaño de la
imagen en la pantalla. El televisor se suministra con seis
opciones de tamaño de la pantalla, cada una diseñada para
que funcione lo mejor posible con tipos especícos de entrada de vídeo. Es posible que el receptor
de cable o satélite tenga también su propia gama de tamaños de pantalla. Sin embargo, en general,
debe ver el televisor en el modo 16:9 tanto como sea posible.
También se puede pulsar varias veces el botón P.SIZE del mando a distancia para cambiar el
O
tamaño de la imagen.
16:9 : Establece la imagen en modo panorámico 16:9.
●
Zoom1: Aumenta el tamaño de la imagen en la pantalla. ●
Zoom2: Aumenta el tamaño de la imagen más aún que el modo Zoom1. ●
Ajuste ancho: Amplía la relación de aspecto de la imagen para que se ajuste al ancho total de ●
la pantalla.
Modo :Normal ►
Luz de fondo : 8
Contraste : 95
Brillo : 45
Denición : 50
Color : 50
Tinte (V/R) : V50/R50
Imagen
Opciones de imagen
Tono Color : Normal ►
Tamaño : 16:9
Digital NR : Auto
N.neg HDMI : Normal
Modo película : Apagado
U
Mover E Ingresar R Regresar
Page 56
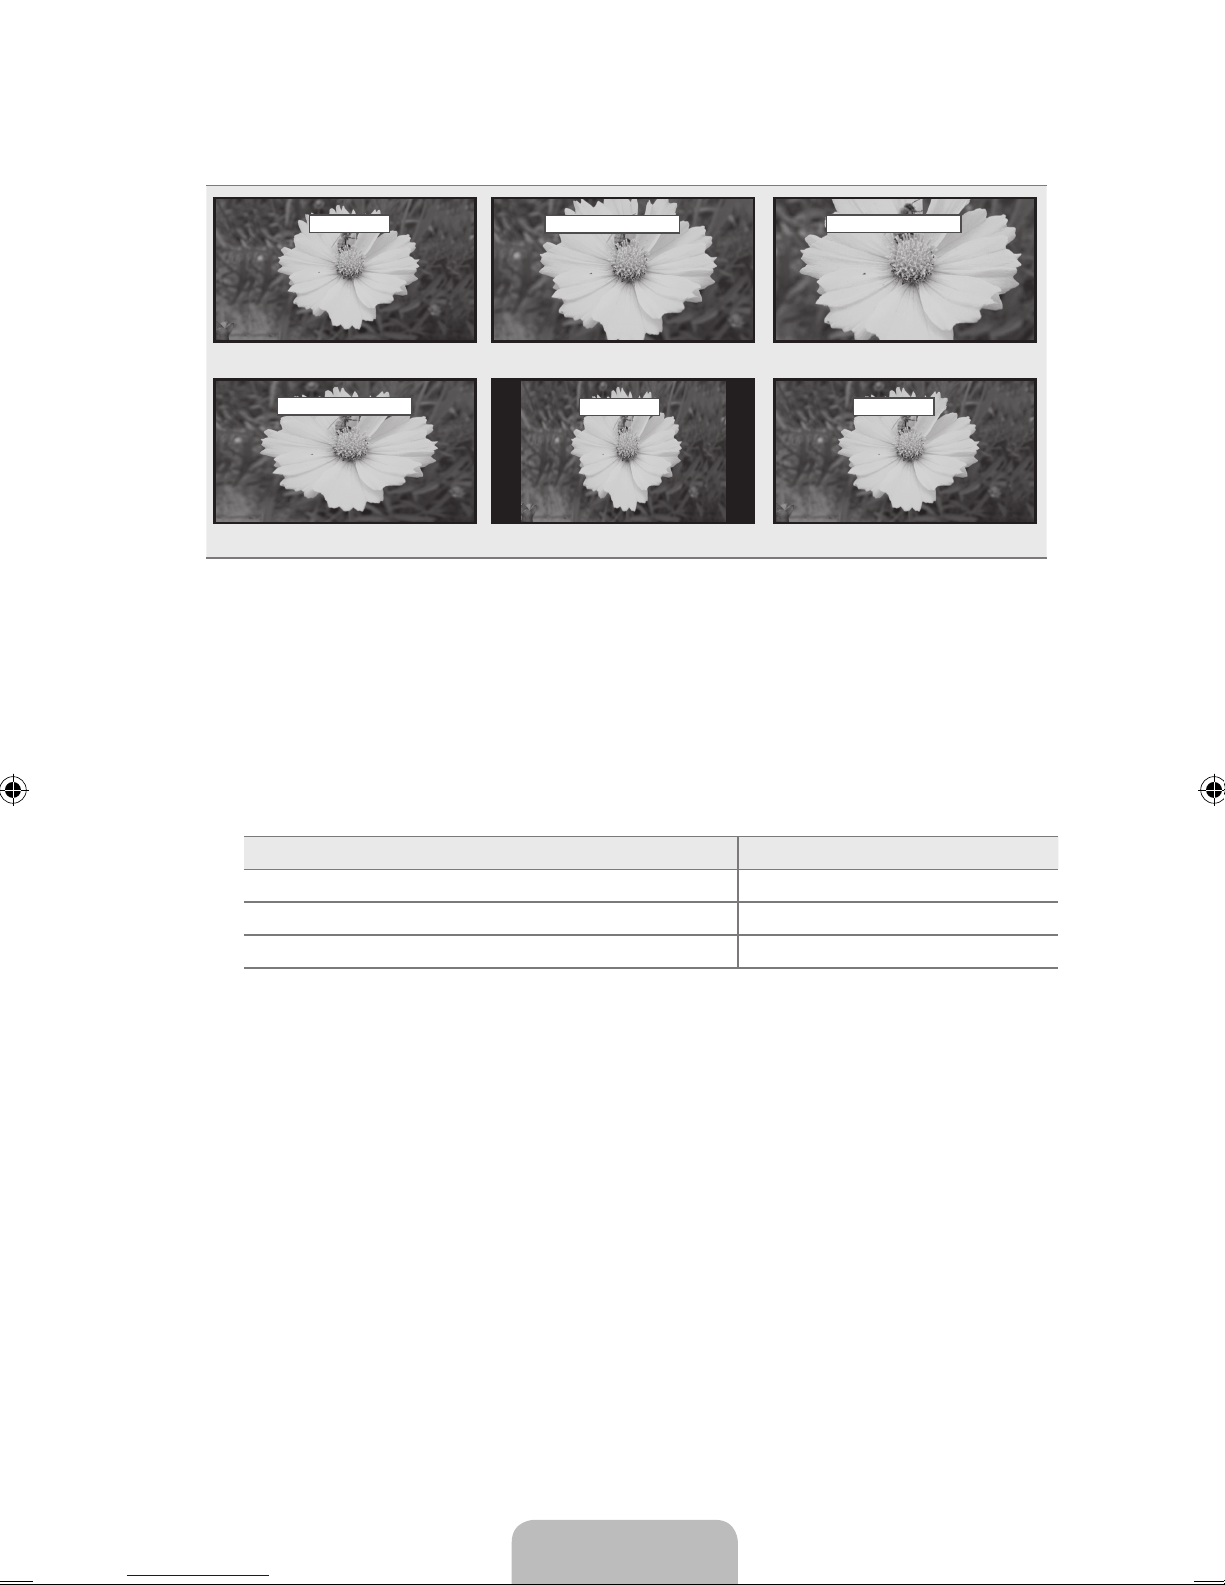
Español - 16
4:3 : Establece la imagen en modo normal 4:3. ●
Ajuste a pantalla: Use esta función para ver toda la imagen sin cortes cuando se reciban ●
señales de HDMI (720p/1080i/1080p), Componente (1080i/1080p) o DTV (1080i).
16:9
Zoom1 U Mover
Zoom2 U Mover
16:9 Zoom1 Zoom2
Ajuste ancho U Mover
4:3
Ajuste a pantalla
Ajuste ancho 4:3 Ajuste a pantalla
Puede producirse una retención temporal de imagen cuando se ve una imagen estática durante
N
más de dos horas.
Después de seleccionar Zoom1, Zoom2 o Ajuste ancho: Pulse el botón ◄ o ► para seleccionar
N
Posición y, a continuación, pulse el botón E. Pulse los botones ▲ o ▼ para desplazar la
imagen hacia arriba o hacia abajo.
Reiniciar: Pulse el botón ◄ o ► para seleccionar Reiniciar y, a continuación, pulse el botón
E.Puede inicializar la conguración.
HD (alta denición): 16:9 - 1080i/1080p (1920x1080), 720p (1280x720)
N
La conguración de cada dispositivo externo conectado a la entrada del televisor se puede
N
ajustar y guardar.
Fuente entrada Imagen Tamaño
TV, AV, Componente (480i, 480p) 16:9, Zoom1, Zoom2, 4:3
DTV(1080i), Componente (1080i, 1080p), HDMI (720p, 1080i, 1080P) 16:9, 4:3, Ajuste ancho, Ajuste a pantalla
PC 16:9, 4:3
Digital NR →Apagado/Bajo/Medio/Alto/Auto
Si la señal de emisión que recibe el televisor es débil, puede activarse la función Digital Noise
Reduction para reducir la estática y las imágenes superpuestas que pueden aparecer en la pantalla.
Cuando la señal sea débil, seleccione alguna de las otras opciones hasta que se vea una
N
imagen de mejor calidad.
N.neg HDMI
→Normal/Bajo
Se puede seleccionar el nivel de negro en la pantalla para ajustar la profundidad de ésta.
Esta función sólo está activa cuando un dispositivo externo está conectado al televisor a través
N
de HDMI. La función N.neg HDMI puede que no sea compatible con dispositivos externos.
Modo película
→Apagado/Auto
El televisor se puede congurar para detectar automáticamente y procesar las señales de las
películas procedentes de todas las fuentes y ajustar la imagen para conseguir una calidad óptima.
Modo película is supported in TV,Component (480i / 1080i) and HDMI (480i / 1080i).
N
Reinicio de la imagen ❑ →Reinic. modo imagen / Cancelar
Restablece todos los ajustes predeterminados.
Reinic. modo imagen: Los valores de la imagen actual regresan a los predeterminados.
N
Page 57
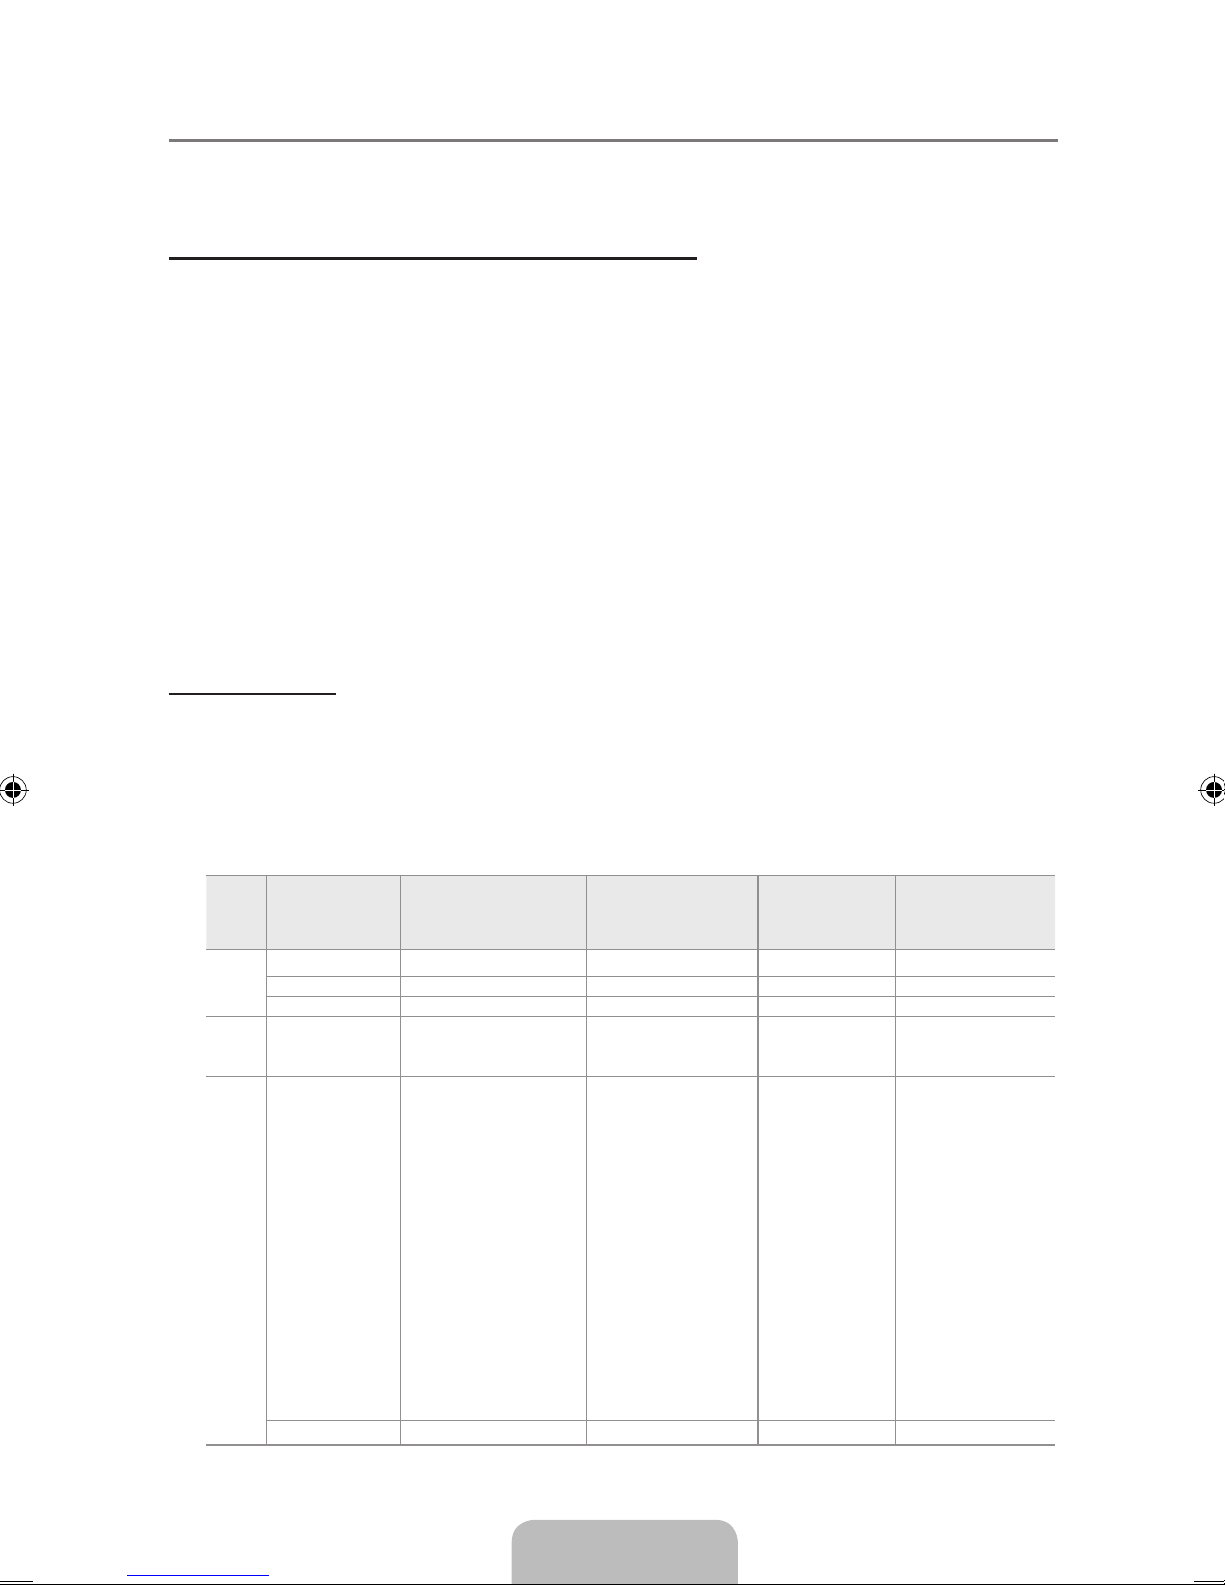
Español - 17
Uso del televisor como una pantalla de ordenador (PC) ¦
Cuando el sistema operativo solicite los datos del controlador del monitor, inserte el CD que se N
incluye con este producto. Para obtener detalles, consulte la Guía del usuario en el CD.
Instalacióndelsoftwareenelequipo(segúnWindowsXP)
A continuación se muestra la conguración de pantalla de Windows para un ordenador típico.
Probablemente la pantalla real de su PC sea distinta, según la versión concreta de Windows y de
la tarjeta de vídeo que tenga. Pero aunque las pantallas reales tengan un aspecto diferente, se
aplicarán los mismos ajustes básicos e información en la mayoría de los casos. (En caso contrario,
póngase en contacto con el fabricante del ordenador o con el distribuidor de Samsung.)
1. Primero, haga clic en ‘Panel de control’ en el menú Inicio de Windows.
2. Cuando aparezca la ventana del panel de control, haga clic en ‘Apariencia y temas’ y aparecerá un
cuadro de diálogo.
3. Cuando aparezca la pantalla del Panel de control, haga clic en ‘Pantalla’ y aparecerá un cuadro de
diálogo.
4. Seleccione la cha ‘Conguración’ en el cuadro de diálogo.
Conguración correcta del tamaño (resolución): Modo óptimo: 1920 X 1080 pixels
Si existe una opción de frecuencia vertical en el cuadro de diálogo de conguración de la pantalla,
el valor correcto es 60 o 60 Hz. Si no, haga clic en Aceptar y salga del cuadro de diálogo.
Modos de pantalla
Si la señal del sistema es igual al modo de señal estándar, la pantalla se ajusta automáticamente.
Si la señal del sistema no es igual al modo de señal estándar, ajuste el modo consultando la guía
del usuario de la tarjeta de vídeo; de lo contrario, puede no haber señal de vídeo. La imagen de
pantalla se ha optimizado durante la fabricación para los modos de visualización enumerados a
continuación.
Modos de temporización (entradas PC, DVI-D y HDMI)
Modo Resolución
Frecuencia horizontal
(kHz)
Frecuencia vertical
(Hz)
Frecuencia de
reloj de
píxeles (MHz)
Polaridad sincr.
(H/V)
IBM 640 x 350 31.469 70.087 25.175 + / -
640 x 480 31.469 59.940 25.175 - / 720 x 400 31.469 70.087 28.322 - / +
MAC 640 x 480 35.000 66.667 30.240 - / -
832 x 624 49.726 74.551 57.284 - / -
1152 x 870 68.681 75.062 100.000 - / -
VESA 640 x 480 37.861 72.809 31.500 - / -
640 x 480 37.500 75.000 31.500 - / 800 x 600 35.156 56.250 36.000 + / +
800 x 600 37.879 60.317 40.000 + / +
800 x 600 48.077 72.188 50.000 + / +
800 x 600 46.875 75.000 49.500 + / +
1024 x 768 48.363 60.004 65.000 - / 1024 x 768 56.476 70.069 75.000 - / 1024 x 768 60.023 75.029 78.750 + / +
1152 x 864 67.500 75.000 108.000 + / +
1280 x 800 49.702 59.810 83.500 - / +
1280 x 960 60.000 60.000 108.000 + / +
1280 x 1024 63.981 60.020 108.000 + / +
1280 x 1024 79.976 75.025 135.000 + / +
1440 x 900 55.935 59.887 106.500 - / +
1600 x 1200 75.000 60.000 162.000 + / +
1680 x 1050 69.290 59.954 146.250 - / +
1920 x 1080 67.500 60.000 148.500 + / +
Page 58
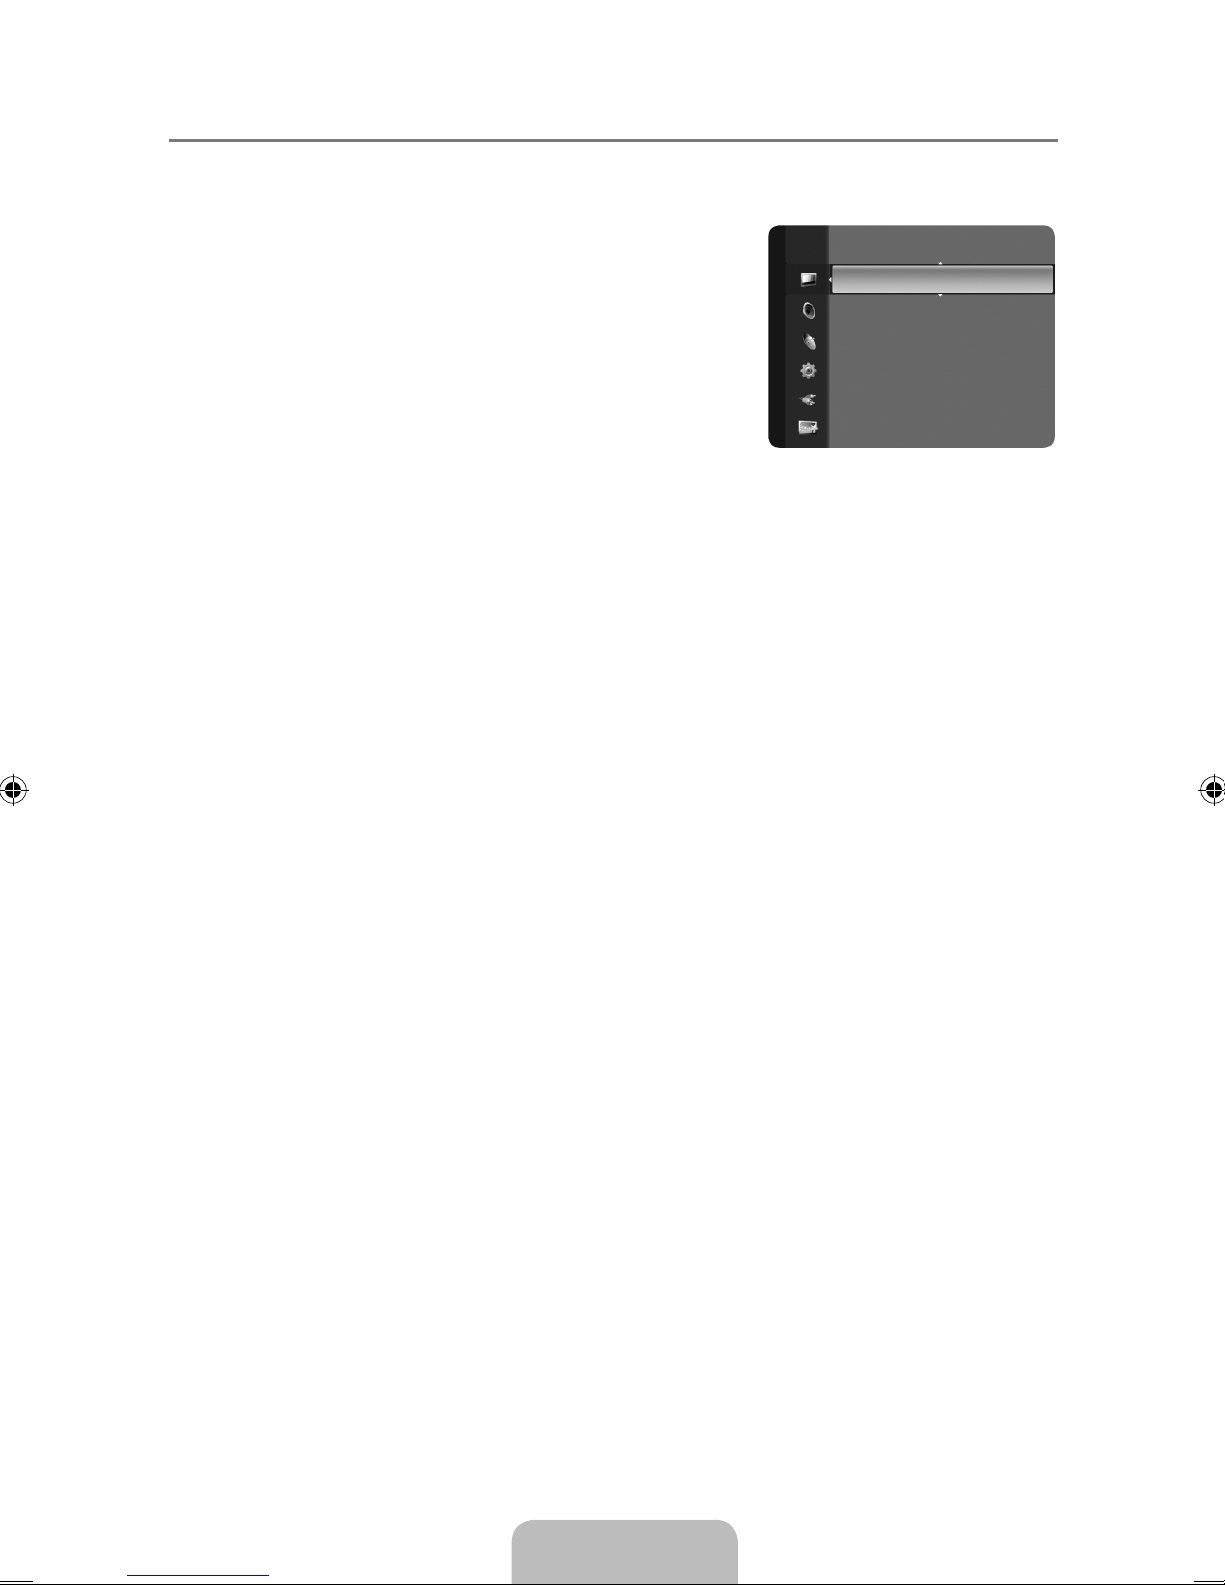
Español - 18
Ajuste del televisor con el ordenador ¦
Preselección: Pulse el botón N SOURCE para seleccionar el modo PC.
MagicBright : ❑ Ocio / Internet / Texto / Contraste dinám. / Personal.
MagicBright es una función que proporciona un entorno
de visualización óptimo, dependiendo del contenido de la
imagen que se esté viendo. En la actualidad hay cinco modos
disponibles: Ocio, Internet , Texto, Contraste dinám. y Personal.
Cada modo dispone de su propio brillo congurado previamente.
Contraste/Brillo/Denición ❑
Contraste: Ajusta el nivel del contraste de la imagen. •
Brillo: Ajusta el nivel del brillo de la imagen.
•
Denición: Ajusta la denición de los bordes de la imagen.
•
Ajuste Automático ❑
Mediante la función ‘Ajuste Auto’ se puede establecer que el televisor se ajuste
automáticamente de acuerdo con las señales de vídeo que reciba. La función también ajusta
automáticamente con más conguración y ajusta los valores y las posiciones de la frecuencia.
Pulse el botón
T TOOLS para ver el menú Tools. También puede establecer el ajuste automático
seleccionando Tools → Ajuste Automático.
Esta función sólo está activa en el modo PC.
N
Pantalla ❑
El propósito del ajuste de la calidad de imagen es eliminar o reducir el ruido de la imagen.
Si el ruido no desaparece sólo con la sintonización na, realice los ajustes de frecuencia hasta el
máximo y vuelva a realizar la sintonización na. Después de reducir el ruido, vuelva a ajustar la
imagen para que quede alineada en el centro de la pantalla.
Grueso/Fino
El objetivo del ajuste de la calidad de imagen es eliminar o reducir las interferencias. Si el ruido no
se elimina mediante la sintonización na, ajuste la frecuencia lo mejor que pueda (Grueso) y vuelva
a realizar la sintonización na. Después de reducir el ruido, vuelva a ajustar la imagen para que
quede alineada en el centro de la pantalla.
Posición
Ajuste la posición de la pantalla del PC si no se acopla a la pantalla del TV. Pulse los botones ▲ o
▼ para ajustar la posición vertical. Pulse el botón ◄ o ► para ajustar posición horizontal.
Reiniciar Imagen
Puede recuperar todos los ajustes de imagen predeterminados de fábrica.
Opciones de imagen ❑
Tono Color : Frío / Normal / Tibio / Favorito
Gan. Rojo /Gan. Verde/Gan. Azul
Gan. Rojo: Ajusta el brillo del color rojo.
N
Gan. Verde: Ajusta el brillo del color verde.
N
Gan. Azul: Ajusta el brillo del color azul.
N
Tamaño : 16:9 / 4:3
Brillo : 45
Denición : 50
AjusteAutomático ►
Pantalla
Conguración avanzada
Opciones de imagen
Reinicio de la imagen
Imagen
Page 59
Español - 19
O
Alternativo, pulse el botón P.SIZE del mando a distancia de forma repetida para seleccionar uno
de los ajustes de tamaño de imagen.
16:9 : Establece la imagen en modo panorámico 16:9.
N
4:3 : Establece la imagen en modo normal 4:3.
N
Reinicio de la imagen ❑ →Reinic. modo imagen / Cancelar
Restablece todos los ajustes predeterminados.
Reinic. modo imagen: Los valores de la imagen actual regresan a los predeterminados.
N
Page 60
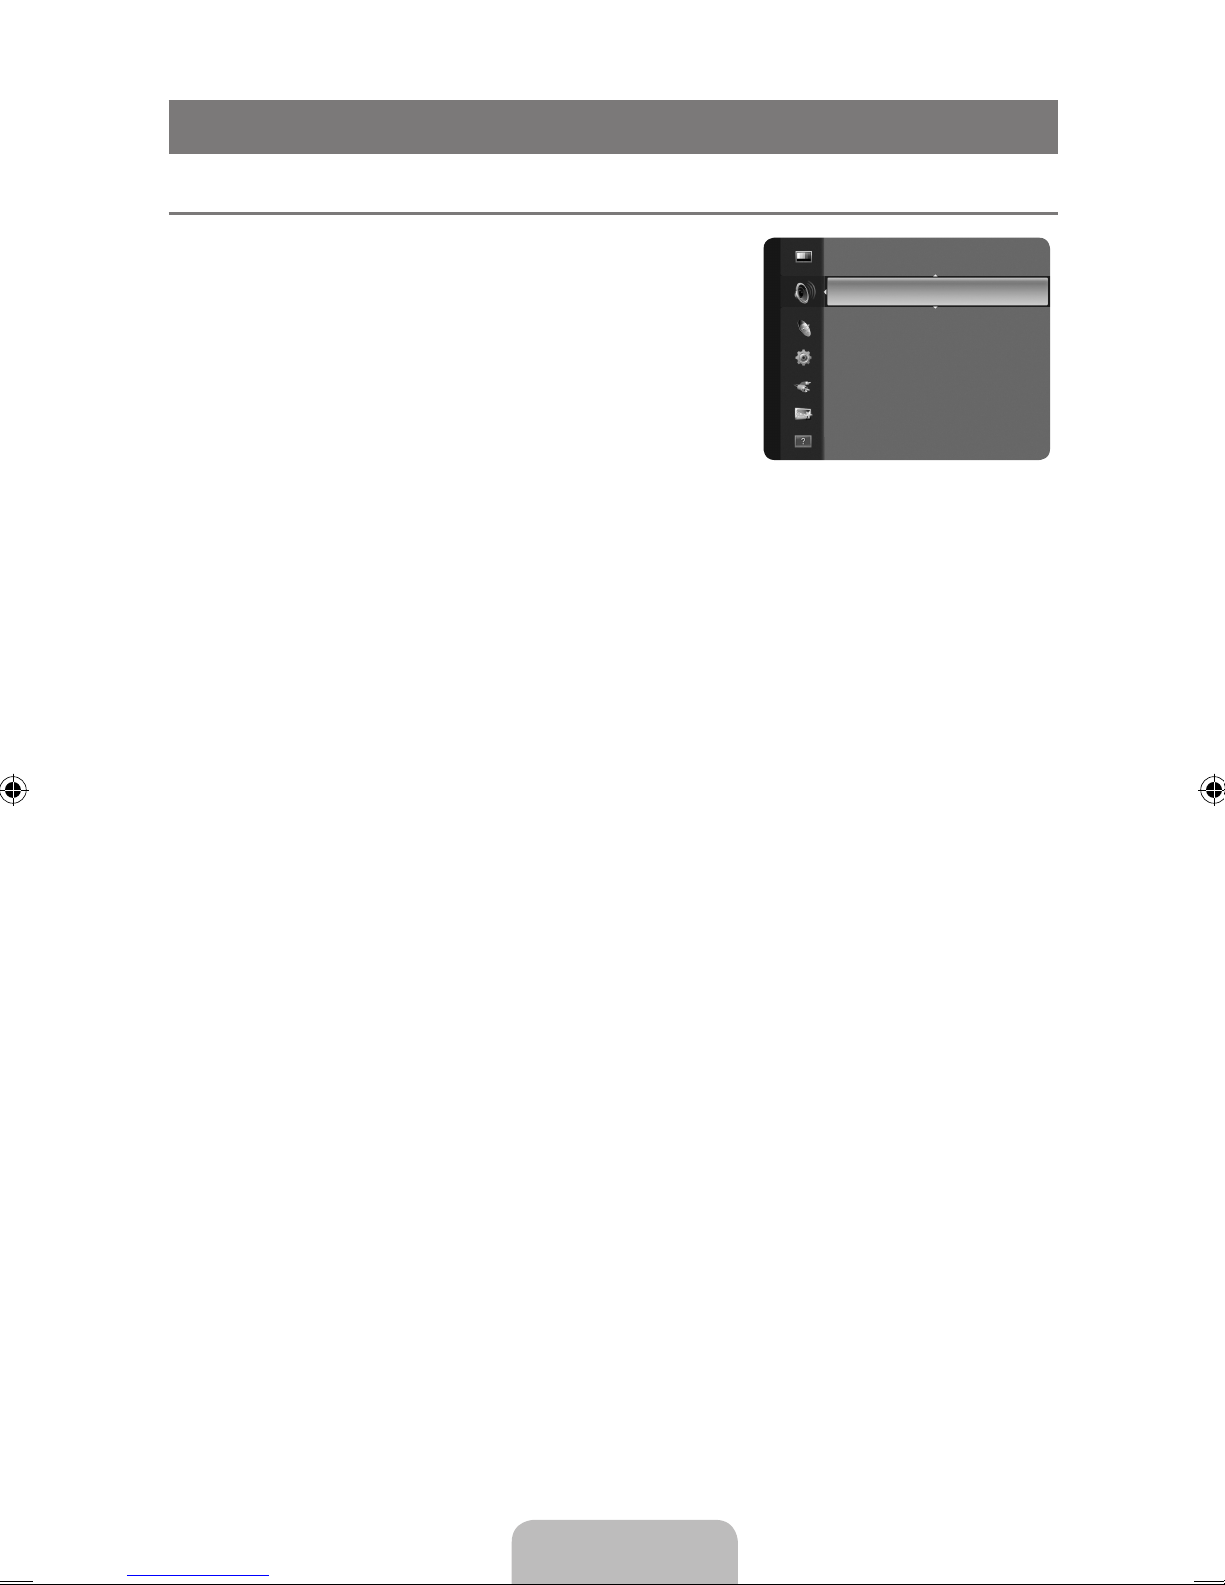
Español - 20
CONTROL DE SONIDO
Conguracióndelmenúdesonido ¦
Modo ❑ →Normal/música/Cine/Vozclara/Favorito
Puede seleccionar un modo de sonido que se adapte a sus
preferencias personales.
Ecualizador ❑
Es posible ajustar los parámetros del sonido según sus
preferencias personales.
Modo
Selecciona el modo de sonido entre los valores predenidos.
Balance L/R
Ajusta el balance entre los altavoces izquierdo y derecho.
100Hz / 300Hz / 1KHz / 3KHz / 10KHz (Ajuste del ancho de banda)
Para ajustar el nivel de las diferentes frecuencias de ancho de banda.
TrusurroundSRSHD→Apagado/Encendido ❑
Trusurround SRS HD es una tecnología SRS patentada que solventa el problema de reproducir
contenido multicanal 5.1 en dos altavoces. TruSurround proporciona una experiencia de sonido
virtual convincente a través de cualquier sistema de reproducción con dos altavoces, incluso con los
altavoces internos del televisor. Es totalmente compatible con todos los formatos multicanal.
Idioma preferido (sólo canales digitales) ❑
El sistema de emisión de TV digital permite transmitir simultáneamente muchas pistas de audio (por
ejemplo, traducciones simultáneas del programa en otros idiomas).
Puede seleccionar un idioma que no sea el Idioma preferido pulsando el botón
O MTS del mando
a distancia.
Idioma preferido está disponible sólo en el modo de televisión digital.
N
Sólo se puede seleccionar uno de los idiomas que ofrece la emisora.
N
Sonido Multi-track (MTS) (sólo canales analógicos) ❑
Pulse varias veces el botón O MTS del mando a distancia para seleccionar Mono, Estéreo o SAP.
Mono
● : Elija para canales que emiten en monoaural o si tiene dicultades con la recepción de
señales estéreo.
Estéreo ● : Elija para canales que emiten en estéreo.
SAP ● : Elija esta opción para escuchar el programa de audio independiente, que normalmente es
una traducción de otro idioma.
Sonido Multi-track está disponible sólo en el modo de televisión analógica. N
Según el programa concreto emitido, puede escuchar en Mono, Estéreo o SAP.
N
Vol.Auto→Apagado/Encendido ❑
Cada emisora tiene sus propias condiciones de señal y resulta incómodo ajustar el volumen cada
vez que se cambia de canal.Esta función permite ajustar automáticamente el volumen del canal
deseado reduciendo la salida de sonido cuando la señal de modulación es alta.
Seleccionar altavoz ❑
Cuando se ve el televisor conectado a un sistema Home Cinema, se debe apagar el altavoz del
televisor para que la salida de audio del televisor utilice los altavoces del Home Cinema (externos).
Modo :Favorito ►
Ecualizador
Trusurround SRS HD : Apagado
Idioma preferido : Inglés
Sonido Multi-track : Mono
Vol.Auto : Apagado
Seleccionar altavoz : Altavoz de TV
Sonido
Page 61
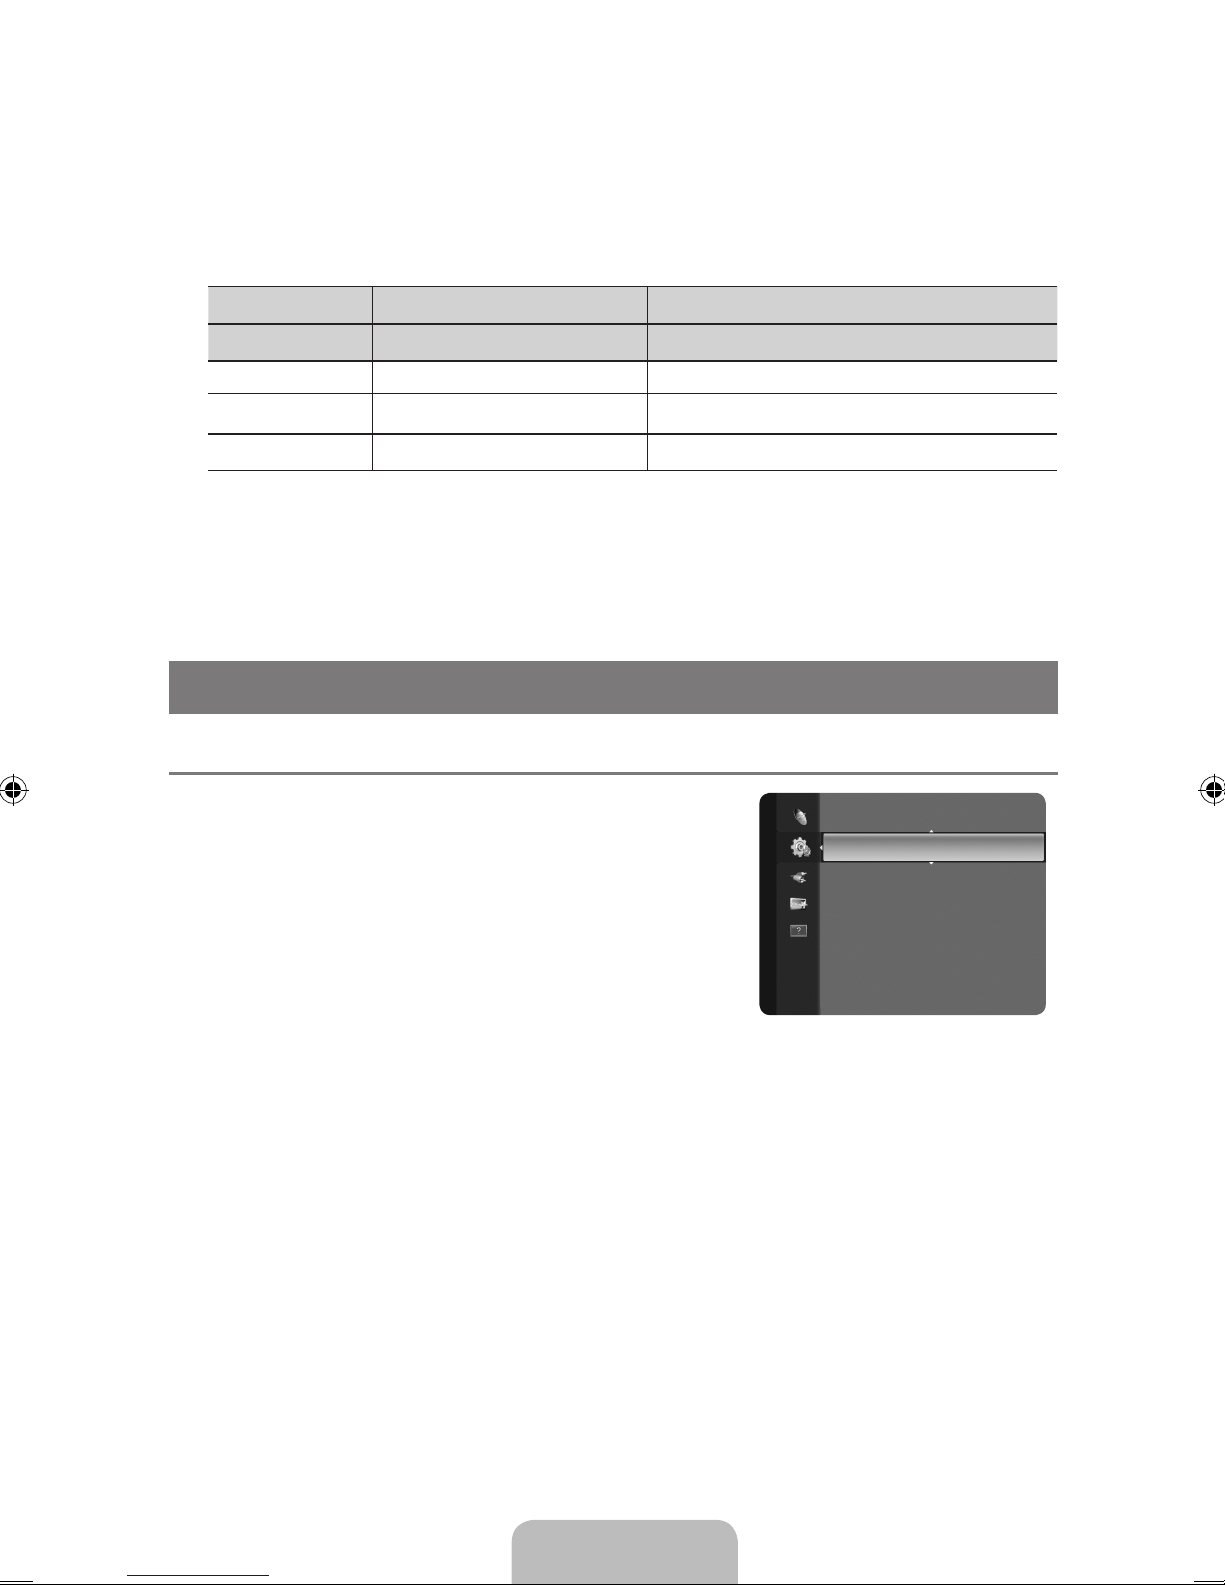
Español - 21
Altavoz externo: Utiliza los altavoces externos (Home Cinema) para la salida del sonido.
Altavoz de TV:
Utiliza los altavoces del TV para la salida del sonido.
Si selecciona Altavoz externo en el menú Seleccionar altavoz, se limita la conguración del
N
sonido.
Los botones de volumen y MUTE no funcionan si Seleccionar altavoz está establecido en
N
Altavoz externo. Congure el volumen del sistema Home Cinema.
Reiniciodelsonido→Reiniciartodo/Reinic.modosonido/Cancelar ❑
Puede restaurar la conguración del sonido con los valores predeterminados de fábrica.
Reinic. modo sonido
N : Se restablecen los valores del sonido predeterminados.
CONFIGURACIÓN
Conguracióndelmenúdeconguración ¦
Idioma ❑
Se puede congurar el idioma de los menús.
Tiempo ❑
Reloj
Establecer el reloj es necesario para usar las distintas
características de temporizador del TV.
La hora actual aparecerá siempre que se pulse el botón
O
INFO.
Si desconecta el cable de alimentación, debe congurar el reloj de nuevo.
N
Modo Reloj
●
Se puede congurar la hora actual manual o automáticamente.
Auto
– : Congure la hora automáticamente mediante la información de la hora de la emisión
digital.
Manual
– : Congure la hora actual manualmente.
Según la emisora y la señal, la hora automática no se puede ajustar correctamente. En este
N
caso, ajuste la hora manualmente.
La antena y el cable se deben conectar para ajustar la hora automáticamente.
N
Cong. Reloj
●
Puede ajustar la hora actual manualmente.
Esta función sólo está disponible si Modo Reloj está congurado como Manual.
N
Puede ajustar el mes, el día, el año, la hora y el minuto directamente pulsando los botónes
N
numéricos del mando a distancia.
Altavoces internos del televisor Audio Out (Optical, R/L Out) para el sistema de sonido
RF, AV, Componente, PC, HDMI RF, AV, Componente, PC, HDMI
Altavoz de TV
Salida de altavoces Salida de sonido
Altavoz externo
Silencio Salida de sonido
Sin señal del vídeo Silencio Silencio
Plug & Play
Idioma :Español ►
Tiempo
Modo Juego : Apagado
V-Chip
Subtítulo
Efecto de luz
Nivel de luz : Apagado
Conguración
Page 62
Español - 22
Zona Tiempo ●
Seleccione la zona horaria.
Esta función sólo está disponible si Modo Reloj está congurado como Auto.
N
Horario de Verano (Horario de verano) → Apagado/Encendido/Auto
●
Activa o desactiva la función del horario de verano.
Esta función sólo está disponible si Modo Reloj está congurado como Auto.
N
Temporizador
El temporizador de desconexión apaga automáticamente el televisor después de un período
prejado (30, 60, 90, 120, 150 y 180 minutos).
Pulse el botón
T TOOLS para ver el menú Tools. También puede congurar el temporizador
seleccionando Tools → Temporizador.
Para cancelar la función Temporizador seleccione Apagado.
N
Temporizador 1 / Temporizador 2 / Temporizador 3
La activación y desactivación del temporizador se puede congurar de tres maneras. Debe ajustar
el reloj en primer lugar.
Hora de encendido: Ajuste la hora, los minutos, am/pm y Activar/ Inactivo. (Para activar el
●
temporizador con la conguración deseada, establézcalo en Activar.)
Hora de apagado: Ajuste la hora, los minutos, am/pm y Activar/ Inactivo. (Para activar el ●
temporizador con la conguración deseada, establézcalo en Activar.)
Volumen: Congure el nivel de volumen deseado. ●
Antena: Ver el tipo de antena. (Aire o Cable) ●
Puede congurar la antena seleccionando Canal → Antenna. N
Canal: Permite seleccionar el canal deseado.
●
Repetir: Seleccione Una vez, Cada día, Lun~Vie, Lun~Sáb, Sáb~Dom o Manual. ●
Con Manual seleccionado, pulse el botón ► para seleccionar el día de la semana. Pulse el N
botón E sobre el día deseado y aparecerá la marcac
c
.
Puede ajustar la hora, los minutos y el canal pulsando los botones numéricos del mando a N
distancia.
Apagado automático
N
Si activa el temporizador, el televisor se apagará si no se pulsa ningún botón durante 3 horas,
después de que el temporizador lo haya puesto en marcha. Esta función sólo está disponible
si el temporizador está activado y evita el recalentamiento que se puede producir si el televisor
está encendido durante demasiado tiempo.
ModoJuego→Apagado/Encendido ❑
Si conecta una consola de videojuegos, como PlayStationTM o XboxTM, podrá disfrutar de
sensaciones más realistas seleccionando el menú de juegos.
Restricciones en el modo de juegos (precauciones)
N
Para desconectar la consola de videojuegos y conectar otro dispositivo externo, establezca –
Modo Juego como Apagado en el menú de conguración. Cuando se muestra el menú de
TV en el Modo Juego, la pantalla tiembla ligeramente.
Si
O Modo Juego está congurado como Encendido:
El modo de imagen cambia automáticamente a
– Normal y no se puede cambiar.
El modo de sonido cambia automáticamente a
– Favorito y no se puede cambiar. Ajuste el
sonido con el ecualizador.
Modo Juego
O no está disponible en los modos normales de TV y PC.
Si la imagen es deciente cuando hay un dispositivo externo conectado al televisor, compruebe
O
si Modo Juego está congurado como Encendido. Congure Modo Juego como Apagado y
conecte los dispositivos externos.
Page 63
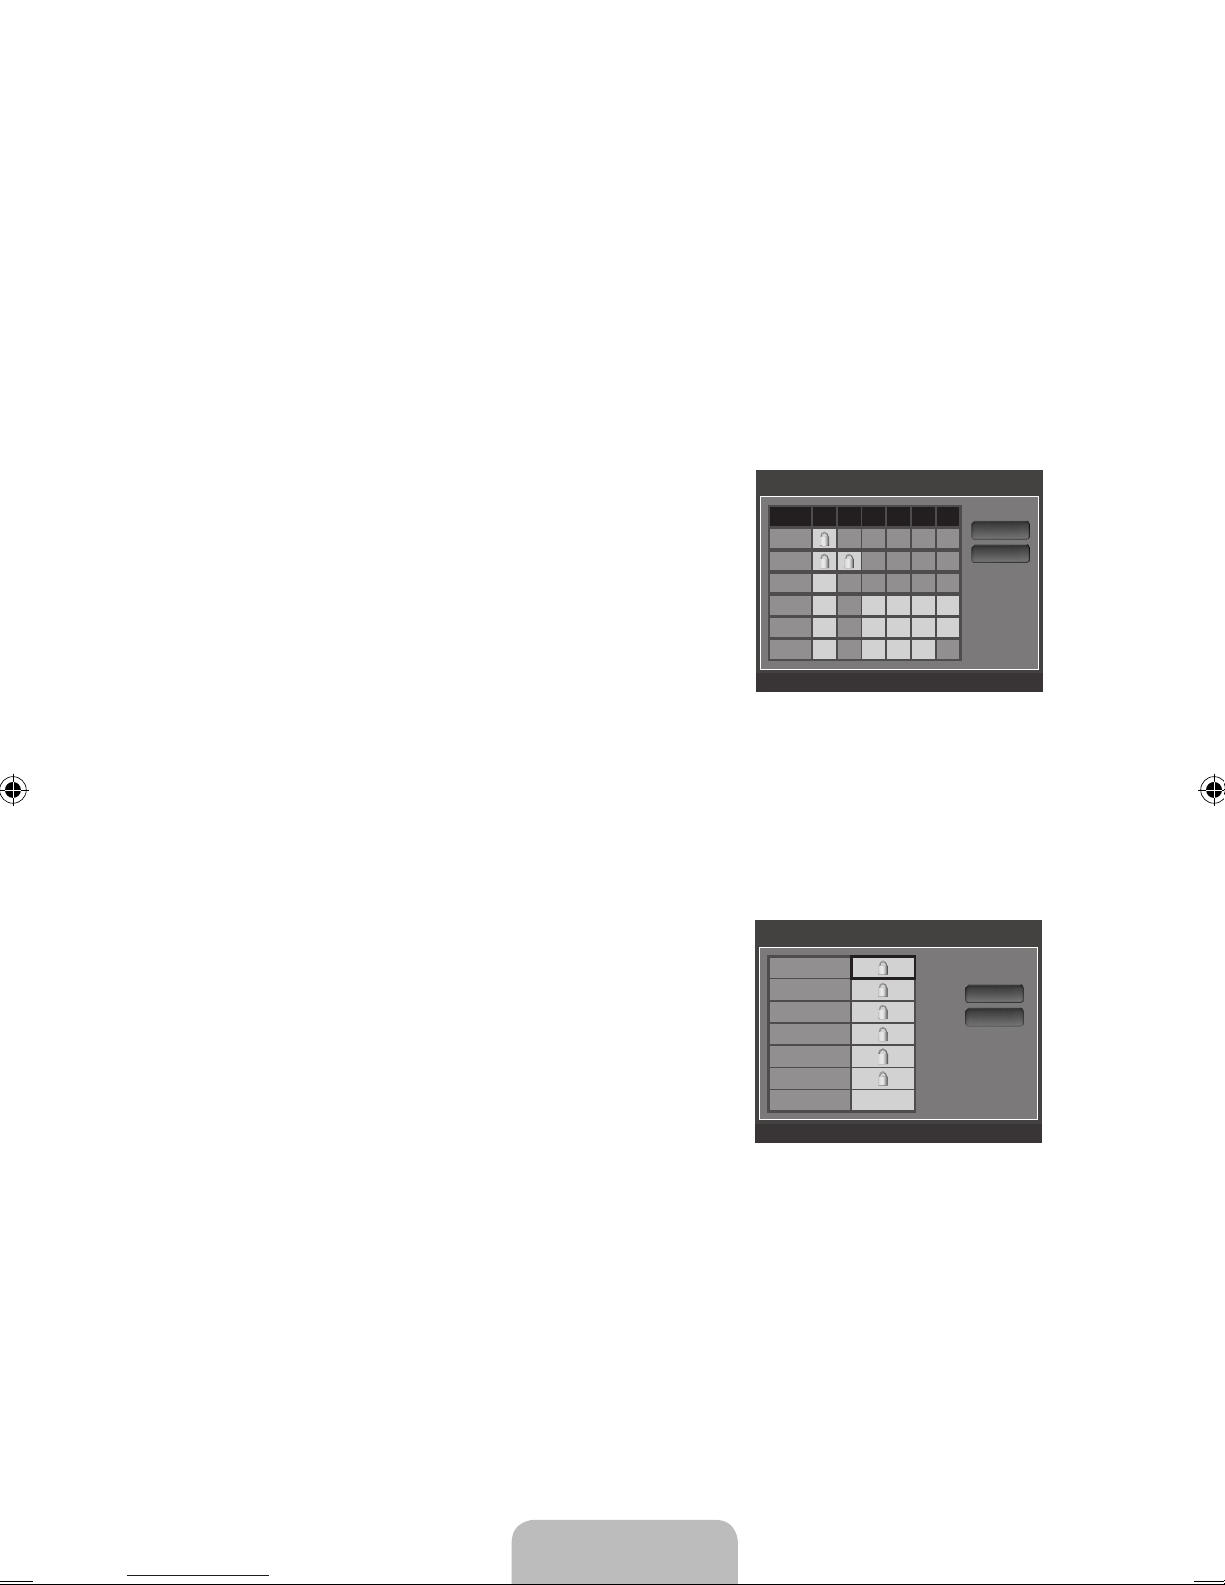
Español - 23
V-Chip ❑
La función V-Chip bloquea automáticamente la programación que se considera inadecuada para
los niños. El usuario debe escribir un número PIN (número de identicación personal) antes de
establecer o cambiar las restricciones de V-Chip.
La función V-Chip no está disponible en los modos HDMI, Componente o PC.
N
El código PIN predeterminado para un televisor nuevo es ‘0-0-0-0’.
N
Si olvida su código, pulse los botónes del mando a distancia siguiendo la secuencia siguiente,
N
que restablece el código a 0-0- 0-0: POWER (apagar) → MUTE → 8 → 2 → 4 → POWER
(encender)
Perm. todo: Se pulsa para desbloquear todos los programas de televisión. / Bloq. todo: Se pulsa
N
para bloquear todos los programas de televisión.
BloqueoV-Chip→Apagado/Encendido
Puede bloquear los programas de TV clasicados.
Guías pater. TV
Puede bloquear los programas de TV según su clasicación.
Esta función permite controlar lo que los niños pueden ver.
TV-Y: Niños pequeños/TV-Y7: Niños de más
●
de 7 años/TV-G: Todos los públicos/
TV-PG: Supervisión paterna/TV-14: Mayores de 14 años/
TV-MA: Para adultos
ALL: Bloquea todas las clasicaciones de TV. / FV: ●
Violencia y fantasía/V: Violencia/S:
Situación sexual/
L: Lenguaje grosero/D: Diálogo de contenido sexual
La opción V-Chip bloqueará automáticamente las categorías que son más restrictivas. Por
N
ejemplo, si bloquea la categoría TV-Y, automáticamente se bloqueará TV-Y7. De manera similar,
si bloquea la categoría TV-G, todas las categorías del grupo “adolescente” quedarán bloqueadas
(TV-G, TV-PG, TV-14 y TV-MA). Las subclasicaciones (D, L, S, V) funcionan de manera similar.
La opción V-chip bloqueará automáticamente ciertas categorías que son ‘More restrictive’. Por
N
ejemplo, si bloquea la subclasicación L en TV-PG, las subclasicaciones L en TV-14 y TV-MA
se bloquearán automáticamente.
Clas. MPAA
Puede bloquear las películas según su clasicación. La
Asociación americana de cinematografía (MPAA) ha creado
un sistema de clasicación que proporciona a padres y tutores
información sobre qué películas son apropiadas para los
niños.
G
● : Todos los públicos (sin restricciones).
PG ● : Se sugiere la compañía de un adulto.
PG-13 ● : Menores acompañados de un adulto.
R ● : Restringido. Los niños menores de 17 años deben
estar acompañados por un adulto.
NC-17 ● : Prohibida la entrada a menores de 17 años.
X ● : Sólo adultos.
NR ● : Sin clasicacion.
El V-Chip bloqueará automáticamente cualquier categoría que sea ‘More restrictive’. Por N
ejemplo, si bloquea la categoría PG-13, también se bloquearán automáticamente R, NC-17 y X.
Inglés Canadiense
C ● : Programación para niños menores de 8 años.
C8+ ● : Programación generalmente considerada aceptable para niños mayores de 8 años sin
acompañamiento de adultos.
G ● : Programación general, ideal para todas las audiencias.
PG ● : Supervisión paterna.
Guías pater. TV
ALL FV V S L D
TV-Y
TV-Y7
TV-G
TV-PG
TV-14
TV-MA
n
Mover E Ingresar R Regresar
Perm. todo
Bloq. todo
Clas. MPAA
G
PG
PG-13
R
NC-17
X
NR
n
Mover E Ingresar R Regresar
Perm. todo
Bloq. todo
Page 64
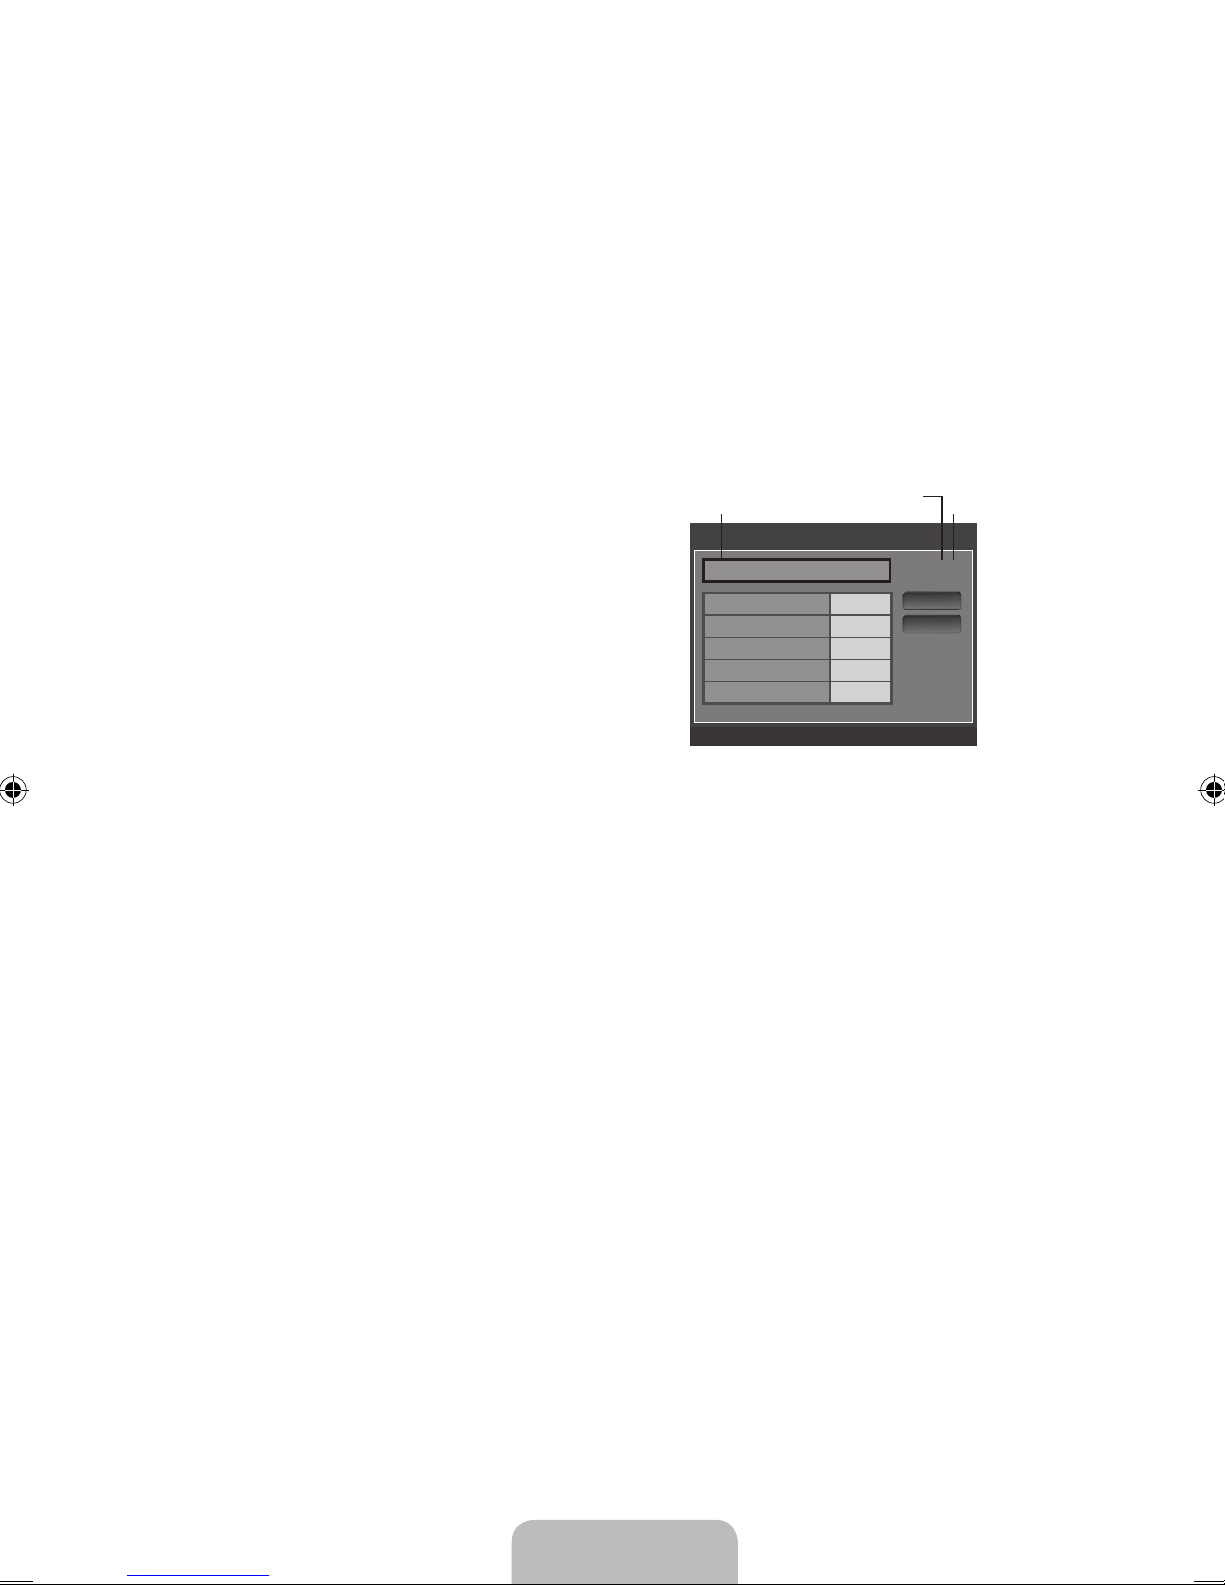
Español - 24
14+ ● : La programación contiene temas y contenidos que puede que no sean adecuados para
menores de 14 años.
18+ ● : Programación para adultos.
El V-Chip bloqueará automáticamente cualquier categoría que sea ‘More restrictive’. Por N
ejemplo, si bloquea la categoría G, también se bloquearán automáticamente PG, 14+ y 18+.
Francés Canadiense
G
● : General
8 ans+ ● : Programación generalmente considerada aceptable para niños mayores de 8 años sin
acompañamiento de adultos.
13 ans+ ● : Es posible que la programación no sea adecuada para niños menores de 13 años.
16 ans+ ● : Es posible que la programación no sea adecuada para niños menores de 16 años.
18 ans+ ● : Programación restringida para adultos.
El V-Chip bloqueará automáticamente cualquier categoría que sea ‘More restrictive’. Por N
ejemplo, si bloquea la categoría 8 ans+, también se bloquearán automáticamente 13 ans+, 16
ans+ y 18 ans+.
ClasicaciónU.S.Descargable
La información de la restricción de bloqueo se puede
usar mientras se ven los canales DTV
Si la información no se descarga desde la emisora,
N
el menú Clasicación U.S. Descargable está
desactivado.
La información de la restricción de bloqueo se
N
puede descargar automáticamente mientras se
ven los canales DTV. Esto puede tardar algunos
segundos.
El menú Clasicación U.S. Descargable está
N
disponible después de que la información se haya descargado desde la emisora. Sin embargo,
según el tipo de información de la emisora, el menú podría no estar disponible para su uso.
Los niveles de restricción de bloqueo dieren según la emisora. El nombre de menú
N
predeterminado y “Clasicacion U.S. Descargable” cambian según la información descargada.
Aunque congure la visualización en pantalla en su propio idioma, el menú Clasicación U.S.
N
Descargable siempre lo verá en inglés.
La clasicación bloqueará automáticamente ciertas categorías que son más restrictivas.
N
Los títulos de clasicación (por ejemplo, Humor Level (Nivel humor), etc) y las clasicaciones de
N
televisión (por ejemplo, DH, MH, H, etc) pueden diferir según la emisora.
Cambiar Código
Aparecerá la pantalla para cambiar el Cambiar Código. Escriba un nuevo código PIN de 4 dígitos.
En cuanto se introducen los 4 dígitos, aparece la pantalla Conrmar Nuevo Código. Vuelva
a escribir los 4 dígitos. Cuando desaparezca la pantalla de conrmación, el código quedará
memorizado.
Si olvida su código, pulse los botónes del mando a distancia siguiendo la secuencia siguiente,
N
que restablece el código a 0-0-0-0: POWER (apagar) → MUTE → 8 → 2 → 4 → POWER
(encender).
ClasicaciónU.S.Descargable
Humor Level ► 1/2
DH
MH
H
VH
EH
n
Mover E Ingresar R Regresar
Perm. todo
Bloq. todo
Título de clasicación
El número de todos los
títulos de clasicación
El número del título de
clasicación actual
Page 65
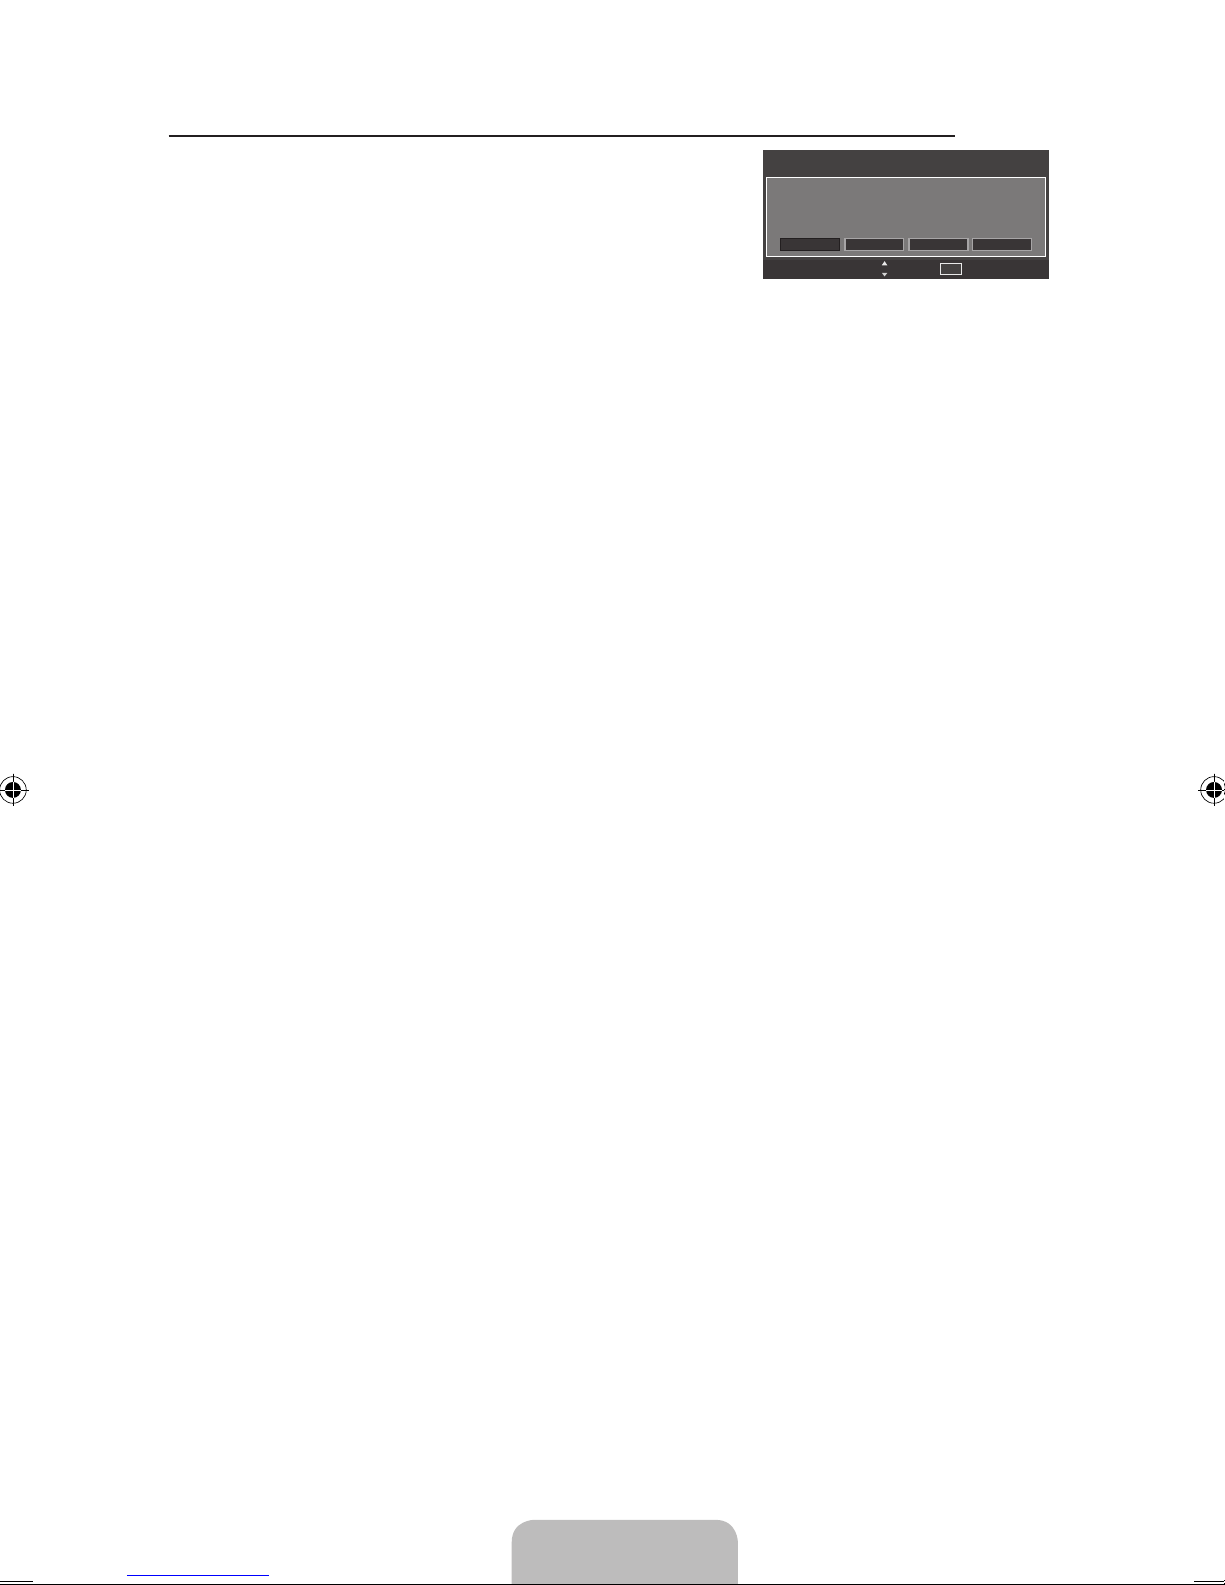
Español - 25
Cómo reiniciar el televisor cuando el V-Chip bloquea un canal (Escape de emergencia)
Si el televisor sintoniza un canal restringido, el V-Chip lo
bloqueará. La pantalla quedará en blanco y aparecerá el
siguiente mensaje:
1. Escriba el código PIN, pulse el botón E y ▲ o ▼ para
desactivar temporalmente el bloqueo V-Chip.
blanco y aparecerá el siguiente mensaje:
Si olvida su código, pulse los botónes del mando a distancia siguiendo la secuencia siguiente,
N
que restablece el código a 0-0-0-0: POWER (apagar) → MUTE → 8 → 2 → 4 → POWER
(encender).
Subtítulo (mensajes de texto en pantalla) ❑
Subtítulo→Apagado/Encendido
Puede activar o desactivar la función de subtítulos. Si los subtítulos no están disponibles, no se
mostrarán en la pantalla.
Pulse el botón
O CC del mando a distancia para activar o desactivar la función de subtítulos.
La función de subtítulos no está disponible en los modos Componente, HDMI, PC ni DVI.
N
Modo de Subtítulo
Puede seleccionar el modo de subtítulo deseado.
La disponibilidad de los subtítulos depende del programa que se esté emitiendo.
N
Programado/CC1~CC4/Texto1~Texto4 (sólo canales analógicos)
●
La función Analog Caption (Subtítulo analógico) funciona tanto en el modo de canal de
televisión analógica o como cuando la señal proviene de un dispositivo externo. (Dependiendo
de la señal de transmisión, puede funcionar en canales digitales.)
Programado/CC1~CC4/Texto1~Texto4/Servicio1~Servicio6 (sólo canales digitales)
●
La función Subtítulo digital funciona en canales digitales.
Los modos de subtitulación Servicio 1~6 pueden no estar disponibles según el tipo de emisión.
N
Opciones - Subtítulos Dig. (sólo canales digitales)
Tamaño: Esta opción consta de Programado, Pequeño, Normal y Grande. El valor
●
predeterminado es Normal.
Estilo fuente: Esta opción consta de Programado, Estilo0~ Estilo7. Puede cambiar el tipo de ●
letra que desee. El valor predeterminado es Estilo0.
Color de primer plano: Esta opción consta de Programado, Blanco, Negro, Rojo, Verde, Azul, ●
Amarillo, Magenta y Cian. Puede cambiar el color del texto. El valor predeterminado es Blanco.
Color de fondo: Esta opción consta de Programado, Blanco, Negro, Rojo, Verde, Azul, Amarillo, ●
Magenta y Cian. Puede cambiar el color del fondo de los subtítulos. El valor predeterminado es
Negro.
Opacidad de primer plano: Esta opción consta de Programado, Transparente, Traslúcido, ●
Sólido y Intermitente. Puede cambiar la opacidad de la letra.
Opacidad de fondo: Esta opción consta de Programado, Transparente, Traslúcido, Sólido y ●
Intermitente. Puede cambiar la opacidad del fondo de los subtítulos.
Regresar al Predeterminado: Esta opción reajusta las opciones Tamaño, Estilo fuente, Color ●
de primer plano, Color de fondo, Opacidad de primer plano y Opacidad de fondo a sus valores
predeterminados.
Las Opciones - Subtítulos Dig. sólo están habilitadas cuando el Modo de Subtítulo es Servicio 1 N
~ Servicio 6.
La disponibilidad de los subtítulos depende del programa que se esté emitiendo.
N
Programado signica que se sigue el estándar establecido por el emisor.
N
Las opciones Color de primer plano y Color de fondo no se pueden ajustar con el mismo color.
N
Opacidad de primer plano y Opacidad de fondo no se pueden establecer a la vez como
N
transparentes.
Clasicaciónrecibida:TV-14/NL
Canal bloqueado por el Control Paterno. Introduzca PIN para
desbloquear.
CH
Cambio
0~9
Ingresar Código
Page 66
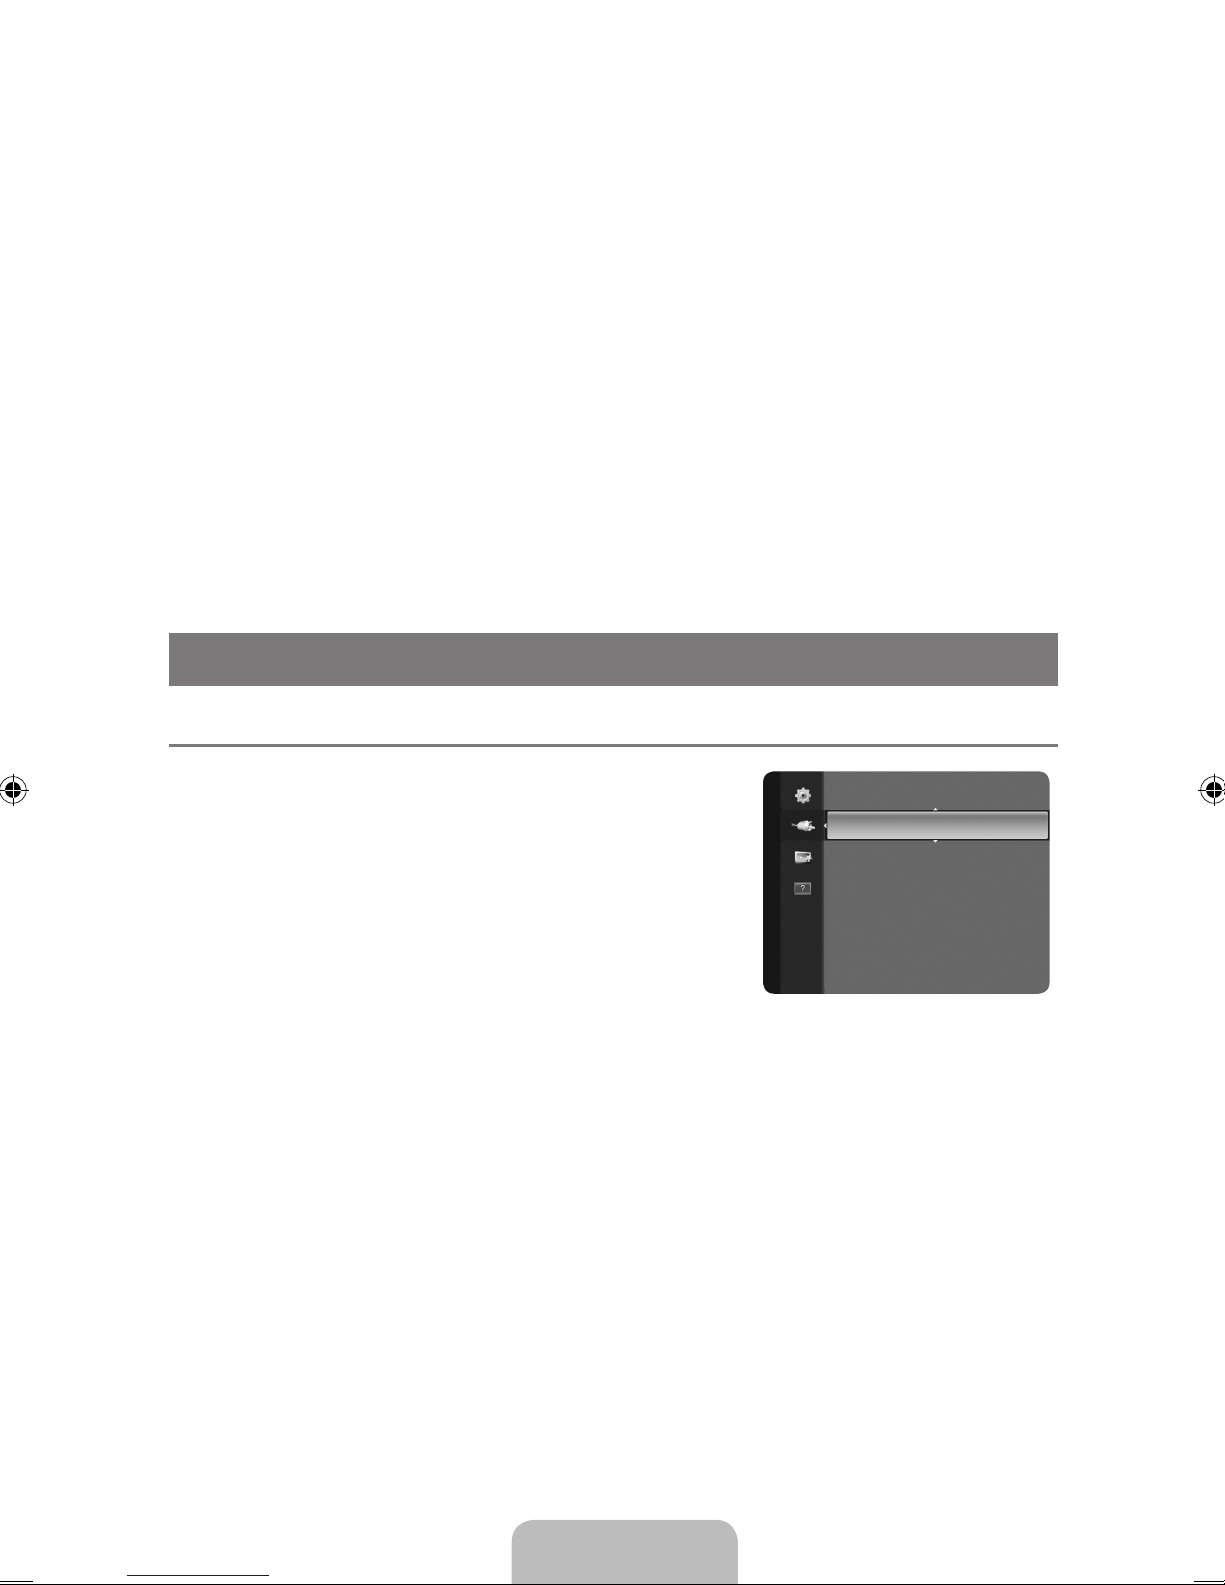
Español - 26
Efecto de luz ❑ → Apagado / Encendido
Puede encender o apagar el LED del frontal del monitor según la situación. Utilice esta función para
ahorrar energía o cuando el LED le deslumbre.
Nivel de luz ❑
Use esta función para ajustar el nivel de luz (el brillo de la luz).
Melodía→Apagado/Bajo/Medio/Alto ❑
Puede denirse un sonido de melodía para que suene cuando se encienda o se apague el TV.
La melodía no se reproduce.
N
Cuando no hay salida de sonido desde el televisor porque se ha activado el botón
– MUTE.
Cuando no hay salida de sonido desde el televisor porque se ha reducido al mínimo con el
–
botón VOL –.
Cuando la función de temporizador ha apagado el televisor.
–
Ahorroenergía→Apagado/Bajo/Medio/Alto/Auto ❑
Esta función ajusta el brillo del televisor, lo cual reduce el consumo de energía. Si desea ver
la televisión por la noche, ajuste la opción del modo Ahorro energía en Alto; sus ojos se lo
agradecerán y, además, reducirá el consumo de energía.
ENTRADA / SOPORTE TÉCNICO
Conguracióndelmenúdeentrada ¦
Lista de Entradas ❑
Úselo para seleccionar TV u otras fuentes de entrada externas
como reproductores de DVD o
receptores de cable y satélite (decodicadores), conectados al
televisor. Permite seleccionar la
fuente de entrada que se preera.
Pulse el botón
O SOURCE del mando a distancia para ver
una fuente de señal externa.
PC, TV, DVI, AV, Componente, HDMI
Puede elegir solamente los dispositivos externos que estén conectados al televisor. En Lista de
N
Entradas, las entradas conectadas se resaltan y se ordenan en la parte superior. Las entradas
que no están conectadas se ordenan en la parte inferior.
Editar Nombre ❑
Dé un nombre al dispositivo conectado en las tomas de entrada; de esta manera será más fácil
seleccionar el dispositivo de entrada.
Vídeo / DVD / Cable STB / Satélite STB / PVR STB / Receptor AV / Juego / Filmadora / PC / TV /
DVI PC / DVI / TV / IPTV / Blu-Ray / HD DVD / DMA
Cuando se conecta un ordenador con una resolución de 1920 x 1080 a 60 Hz y 640 x 480 a 60
N
Hz al puerto HDMI IN, se debe congurar el modo “HDMI1/DVI” como “PC” en “Editar Nombre”
en el modo “Entrada”. Conguración del menú de soporte técnico
Lista de Entradas
Editar Nombre
Entrada
Page 67
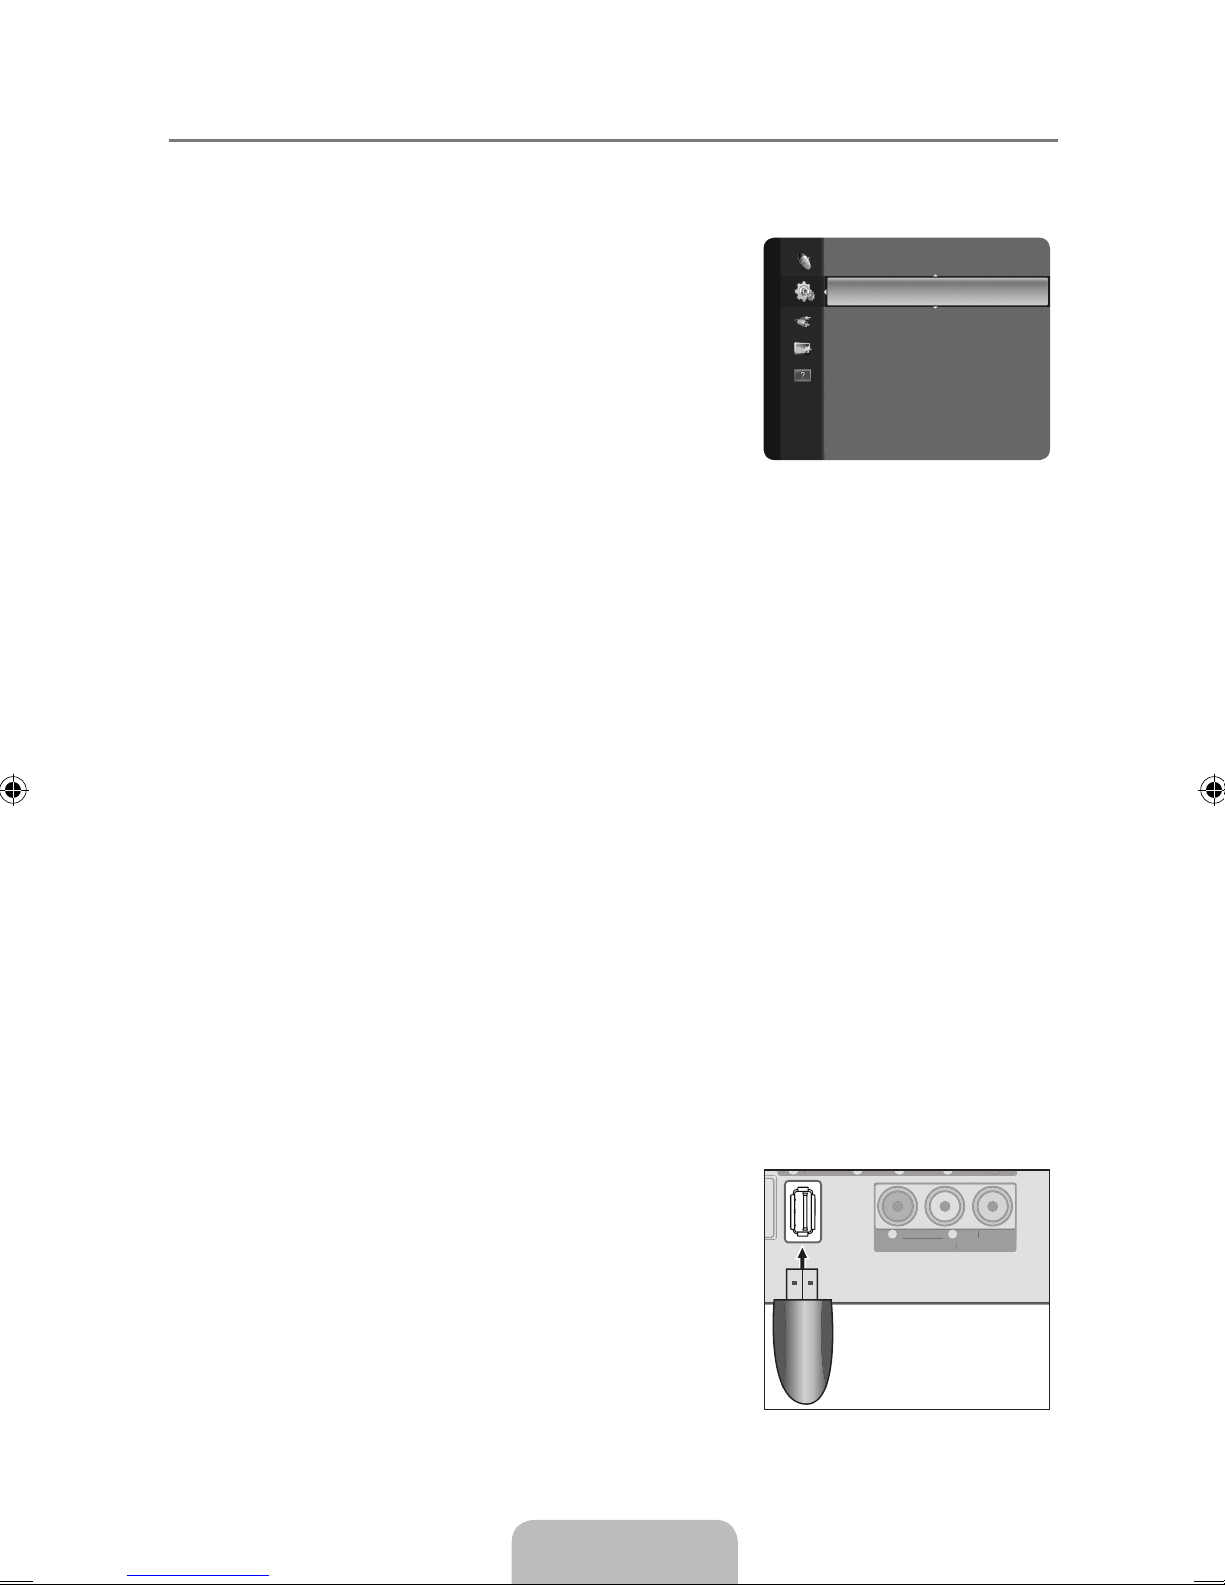
Español - 27
Conguracióndelmenúdeayuda ¦
Autodiagnóstico ❑
Prueba de imagen
Si cree que tiene un problema con la imagen, efectúe la prueba
de imagen. Compruebe el patrón del color en la pantalla para
ver si persiste el problema.
Sí
● : Si no se muestra el patrón de prueba o hay ruido en el
patrón de prueba, seleccione Sí. Puede haber un problema
en el televisor. Póngase en contacto con el centro de
servicio de Samsung.
No ● : Si el patrón de prueba se muestra correctamente,
seleccione No. Puede haber un problema en el equipo
externo. Compruebe las conexiones. Si persiste el
problema, consulte el manual del usuario del dispositivo
externo.
Prueba de sonido
Si cree que tiene un problema con el sonido, efectúe la prueba de sonido. Compruebe el sonido
reproduciendo una melodía en el televisor. En la pantalla se muestra ‘¿Continúa el problema con
esta prueba del sonido?’.
Si no oye sonido a través de los altavoces del televisor, antes de realizar la prueba de sonido
N
compruebe que Seleccionar altavoz está congurado como Altavoz de TV en el menú Sonido.
La melodía se debe oír durante la prueba aunque
N Seleccionar altavoz esté establecido en
Altavoz externo o se haya silenciado el sonido con el botón MUTE.
Sí
● : Si durante la prueba de sonido sólo se oye sonido de un altavoz o no se oye sonido en
ninguno, seleccione Sí. Puede haber un problema en el televisor. Póngase en contacto con el
centro de servicio de Samsung.
No ● : Si desde los altavoces no se oye sonido, seleccione No. Puede haber un problema en el
equipo externo. Compruebe las conexiones. Si persiste el problema, consulte el manual del
usuario del dispositivo externo.
Intensidad señal
(sólo canales digitales)
A diferencia de los canales analógicos, cuya calidad de recepción puede variar desde ‘nebuloso’
a claro, los canales digitales (HDTV) tienen una calidad de recepción perfecta o no se reciben en
absoluto. Por ello, a diferencia de los canales analógicos, no se puede realizar una sintonización
na de un canal digital. Se puede, no obstante, ajustar la antena para mejorar la recepción de los
canales digitales disponibles.
Si el medidor de la intensidad de la señal indica que ésta es débil, mueva la antena para
N
aumentar la intensidad de la señal. Siga ajustando la antena hasta que encuentre la mejor
posición para recibir la señal más fuerte.
AV IN
- AUDIO -
R
L
VIDEO
PC IN
ANT INANT IN
COMPONENT IN
- AUDIO -
R
L
PR PB
Y
SERVI CE
HDMI/PC
/DVI-D
AUDIO IN
PC IN
ANT INANT IN
HDMI/PC
/DVI-D
AUDIO IN
PC IN
COMPO
NENT IN
H
DMI/P
C
/
DVI-D
A
UDIO I
N
Autodiagnóstico ►
Actualización del software
Guía de conexión HD
Contacto con Samsung
Soporte técnico
COMPONENT IN
Actualización del software ❑
L
L
- AUDIO -
- A UDIO -
Unidad USB
P
R
P
RR
R
R
- AUDIO -
- AUDIO -
AV IN
AV IN
P
P
Samsung puede ofrecer actualizaciones para el rmware del
televisor en el futuro. Póngase en contacto con el centro de
llamadas de Samsung en 1-800-SAMSUNG(726-7864) para
recibir información acerca de la descarga de las actualizaciones
y del uso de un controlador USB. Las actualizaciones se
pueden realizar conectando una unidad USB al puerto
SERVICE situado en el televisor.
Inserte una unidad USB que contenga la actualización del N
rmware en el puerto SERVICE del televisor.
R
R
B
B
Y
Y
L
L
VIDEO
VIDEO
Page 68
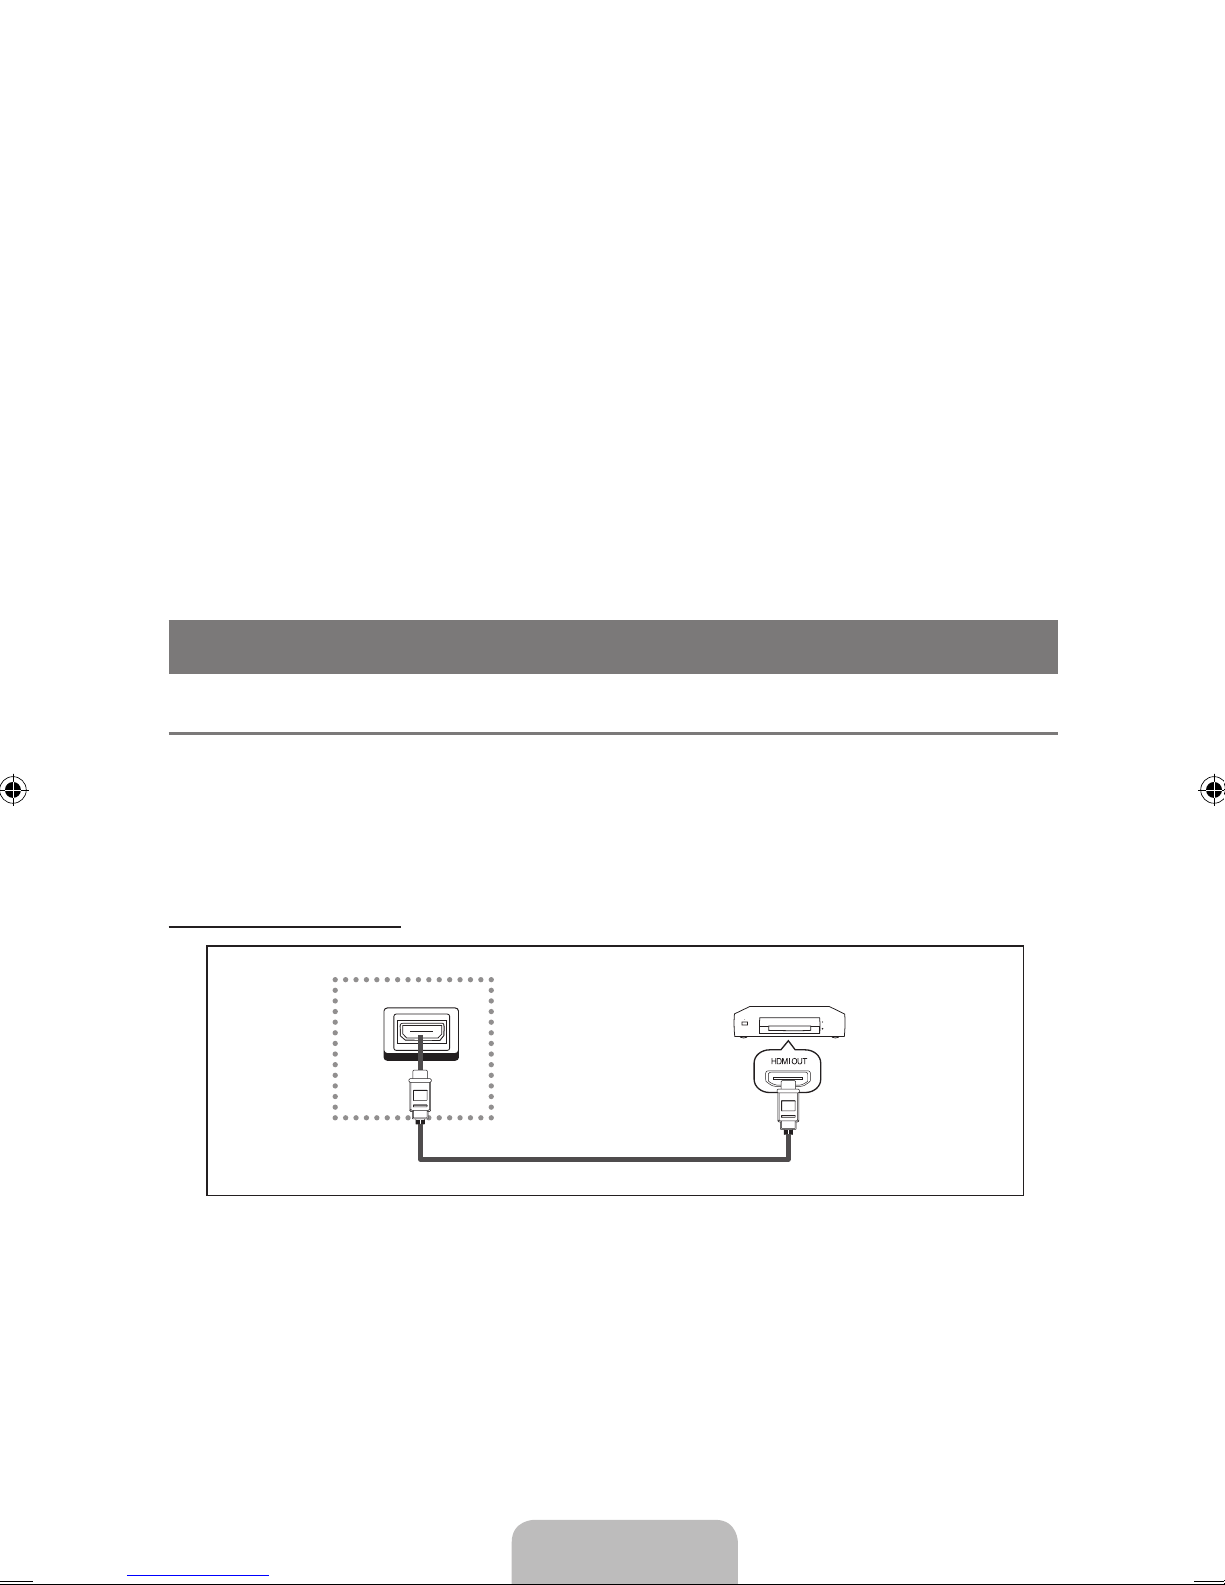
Español - 28
No desconecte la alimentación ni retire la unidad USB mientras se aplican las actualizaciones. N
El televisor se apagará y se encenderá automáticamente después de completar la actualización
del rmware. Después de realizar la actualización compruebe la versión del rmware. Cuando
se actualiza el software, la conguración del vídeo y audio que se haya efectuado vuelve a
la conguración predeterminada (de fábrica). Es aconsejable anotar la conguración para
recuperarla fácilmente después de la actualización.
Guía de conexión HD ❑
Este menú presenta el método de conexión que proporciona la mejor calidad de imagen en el
televisor de alta denición.
Consulte esta información cuando conecte dispositivos externos al televisor.
Contacto con Samsung ❑
Revise esta información cuando el televisor no funcione correctamente o cuando desee actualizar
el software.
Puede ver la información relacionada con el centro de llamadas, el producto y el método de
descarga del archivo de software.
ANYNET
+
Conexión de dispositivos Anynet ¦
+
Anynet+ es una función que permite controlar con el mando a distancia del televisor Samsung todos
los dispositivos de Samsung conectados que sean compatibles con Anynet+.
El sistema Anynet+ sólo se puede usar con dispositivos de Samsung que tengan la función
Anynet+. Para asegurarse de que el dispositivo de Samsung tenga dicha función, compruebe si
lleva el logotipo Anynet+.
Para conectar al televisor
TV
AV IN
- AUDIO -
R
L
VIDEO
HDMI IN
HDMI IN
DVI-D IN
PC IN
ANT INANT IN
COMPONENT IN
- AUDIO -
R
L
PRP
B
Y
HDMI/PC
/DVI-D
AUDIO IN
DIGITAL
AUDIO OUT
(OPTICAL)
Dispositivo Anynet+
Cable HDMI 1.3
1. Conecte los terminales HDMI IN del televisor y el terminal HDMI OUT del dispositivo Anynet+
correspondiente mediante un cable HDMI.
Page 69
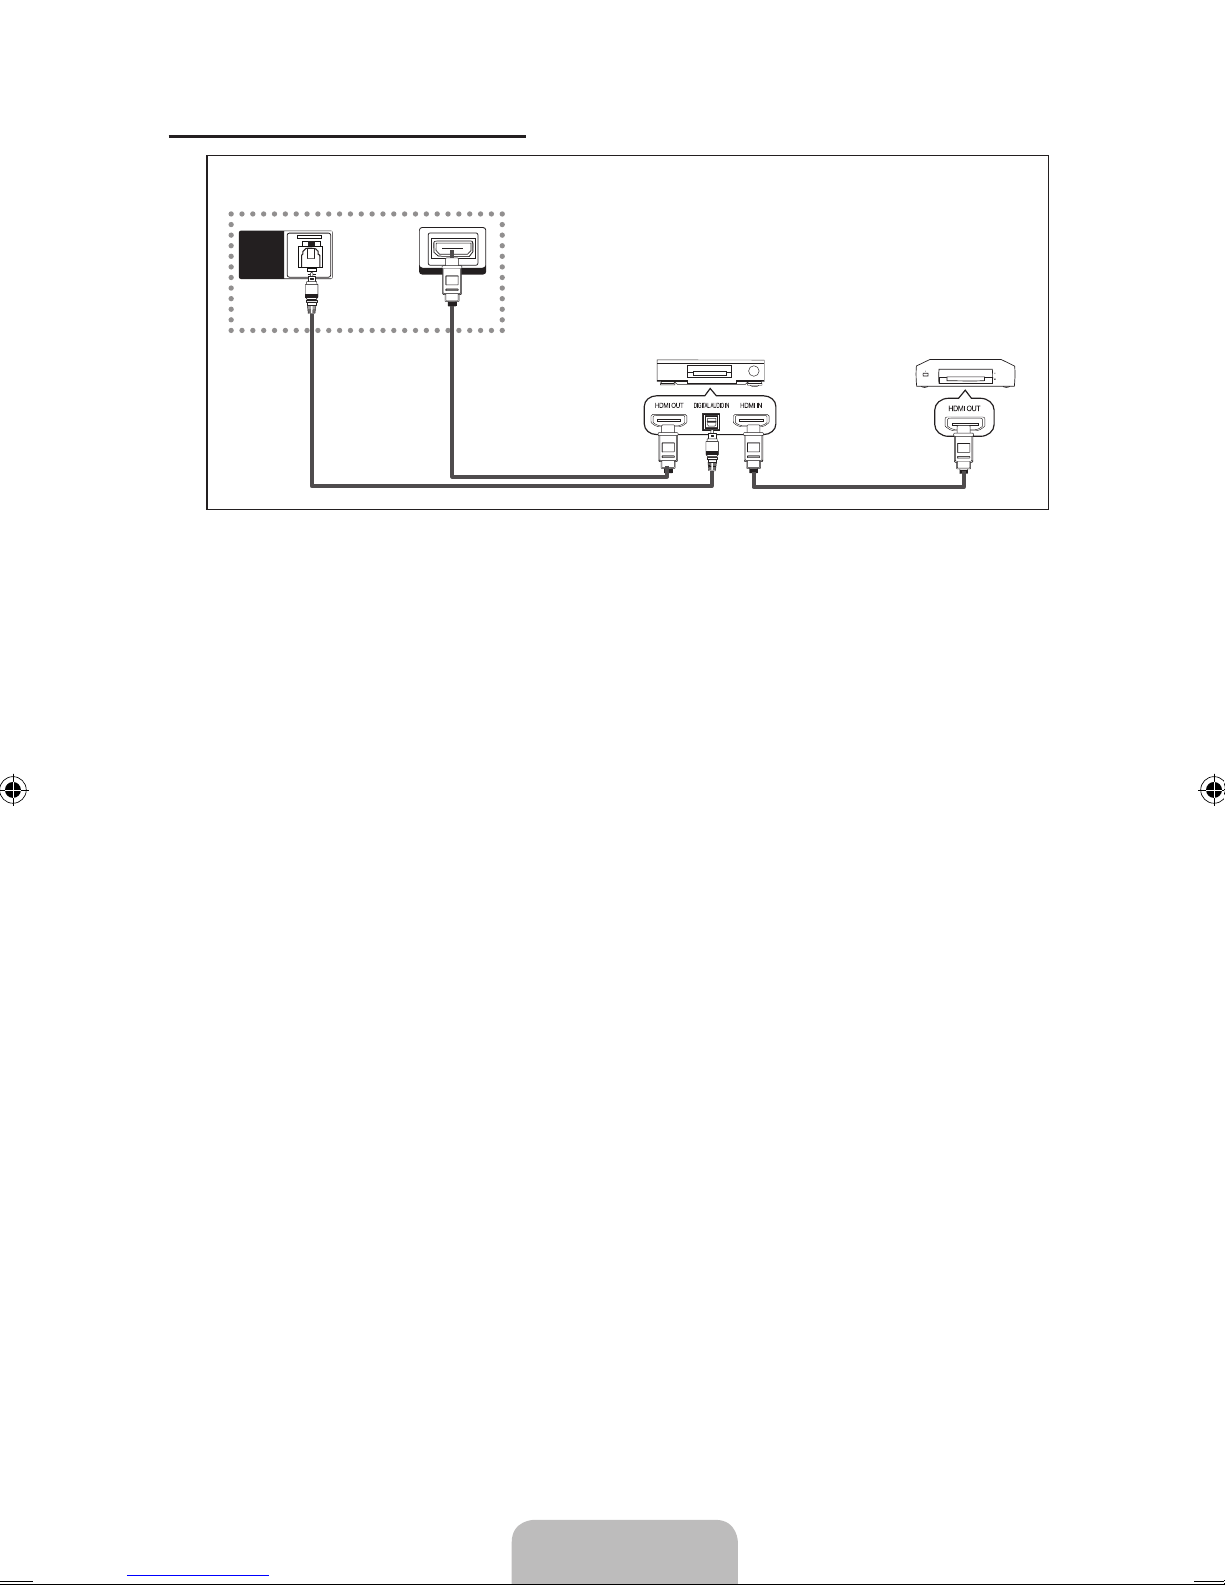
Español - 29
Para conectar al sistema Home Cinema
AV IN
- AUDIO -
R
L
VIDEO
HDMI IN
HDMI IN
DVI-D IN
PC IN
ANT INANT IN
COMPONENT IN
- AUDIO -
R
L
PRP
B
Y
HDMI/PC
/DVI-D
AUDIO IN
DIGITAL
AUDIO OUT
(OPTICAL)
DIGITAL
AUDIO OUT
(OPTICAL)
HDMI IN
TV
Dispositivo Anynet+
Cable HDMI 1.3
Cable óptico
Home Cinema
Cable HDMI 1.3
1. Conecte los terminales HDMI IN del televisor y el terminal HDMI OUT del dispositivo Anynet+
correspondiente mediante un cable HDMI.
2. Conecte el terminal HDMI IN del sistema Home Cinema y el terminal HDMI OUT del dispositivo
Anynet+ correspondiente mediante un cable HDMI.
Conecte el cable óptico entre el terminal
N DIGITAL AUDIO OUT (OPTICAL) del televisor y la
entrada de audio digital del sistema Home Cinema.
Si se sigue la conexión anterior, la toma Optical sólo produce la salida de 2 canales de audio.
N
Sólo oirá sonido de los altavoces frontales izquierdo y derecho y del subwoofer del sistema
Home Cinema. Para escuchar el canal de audio 5.1, conecte el terminal DIGITAL AUDIO OUT
(OPTICAL) del DVD/decodicador de satélite (es decir, dispositivo Anynet 1 o 2) directamente al
amplicador o sistema Home Cinema, no al televisor.
Conecte sólo un sistema Home Cinema.
N
Puede conectar un dispositivo Anynet
N
+
mediante el cable HDMI 1.3. Algunos cables HDMI
pueden no admitir las funciones Anynet+.
Anynet
N
+
funciona cuando el dispositivo de AV que admite Anynet+ se encuentra en estado de
espera o de encendido.
Anynet
N
+
admite hasta 10 dispositivos de AV en total. Tenga en cuenta que puede conectar hasta
3 dispositivos del mismo tipo.
Page 70
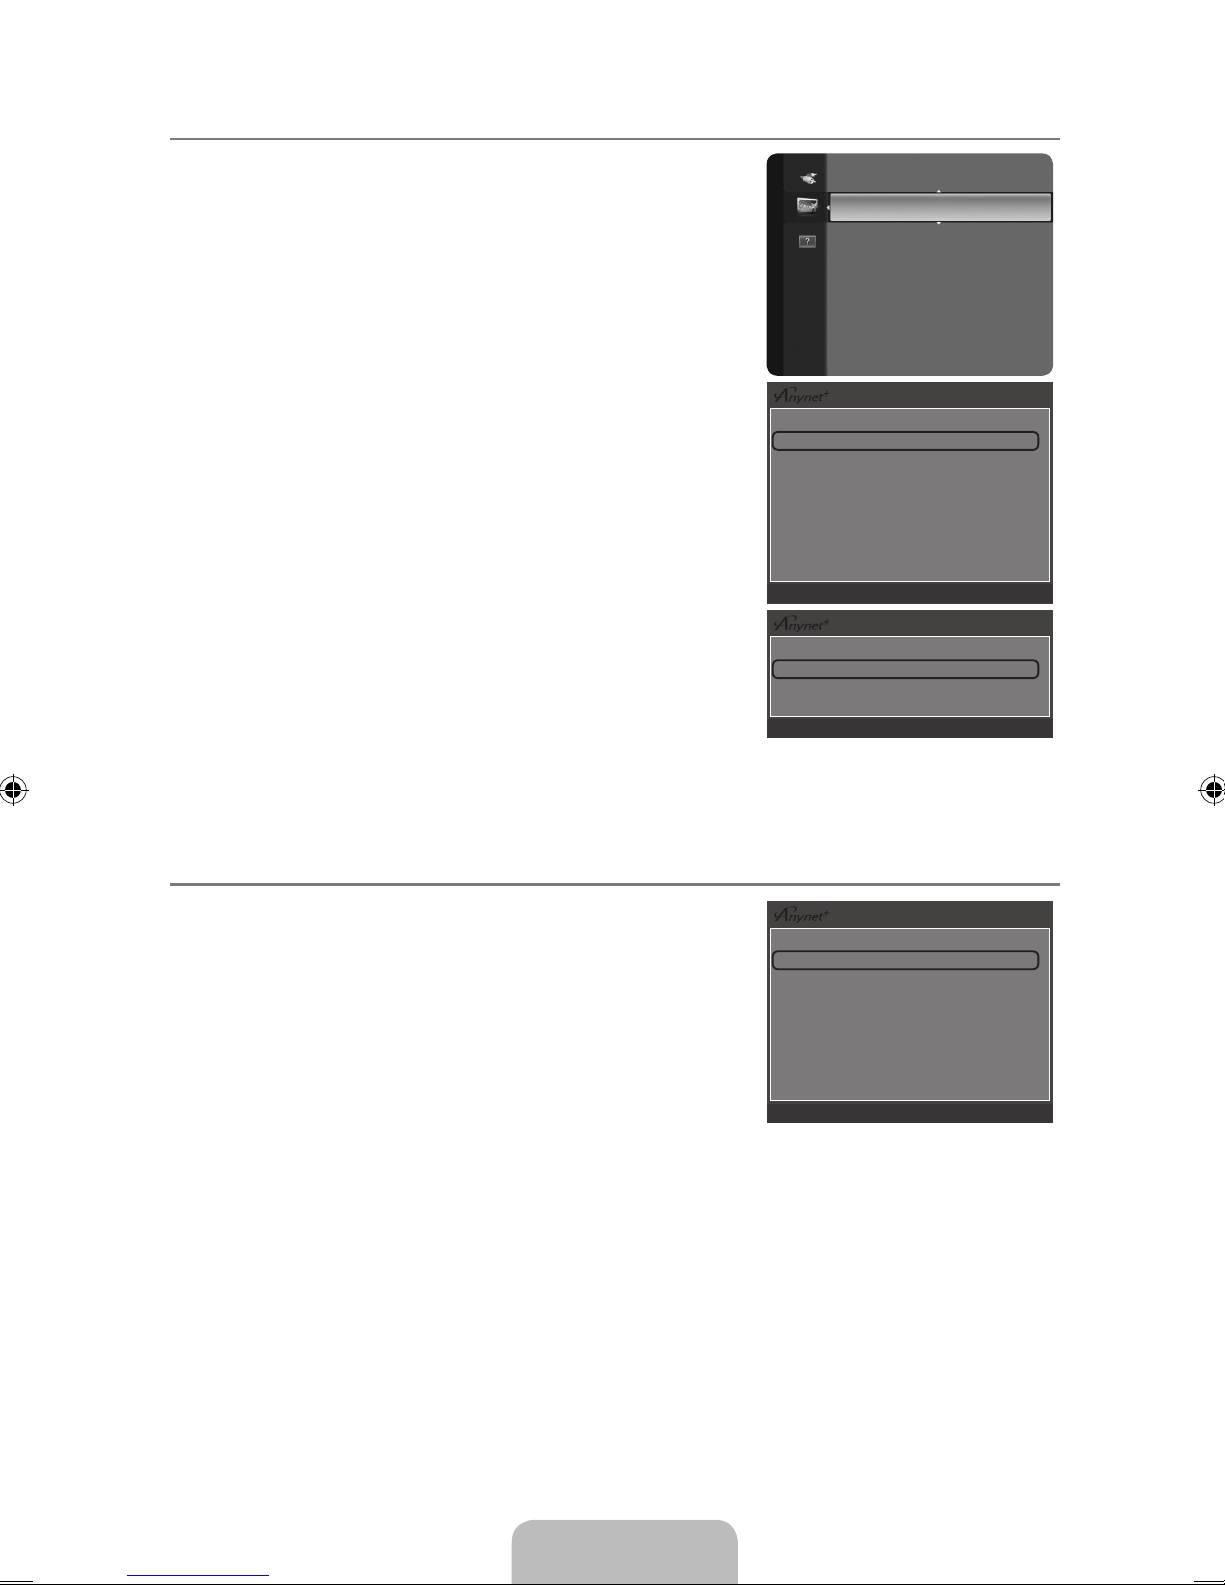
Español - 30
ConguracióndeAnynet ¦
+
Pulse el botón T TOOLS para ver el menú Herramientas.
También puede mostrar el menú Anynet+ seleccionando
Herramientas → Anynet+ (HDMI-CEC).
Conguración ❑
Anynet
+
(HDMI-CEC)→Apagado/Encendido
Para usar la función Anynet+, Anynet+ (HDMI-CEC) debe estar
activado.
Cuando la función
N Anynet+ (HDMI-CEC) está desactivada,
todas las operaciones relacionadas con Anynet+ se
desactivan.
ApagadoAutomático→No/Sí
Conguración de un dispositivo Anynet+ para que se desactive
automáticamente cuando el televisor se apaga
La fuente activa del mando a distancia del televisor se debe
N
congurar para que éste utilice la función Anynet+.
Si establece
N Apagado Automático como Sí, los dispositivos
externos conectados también se desactivan cuando se
apaga el televisor. Si un dispositivo externo todavía está
grabando, puede apagarse o no.
Conmutación entre dispositivos Anynet ¦
+
1. Pulse el botón TOOLS. Pulse el botón E para seleccionar
Anynet+ (HDMI-CEC).
2. Pulse el botón ▲ o ▼ para seleccionar Lista Disp. y, a
continuación, pulse el botón
E
.
Anynet
N
+
conectados al televisor.
Si no encuentra el dispositivo que desea, pulse el botón rojo
N
para buscar los dispositivos.
3. Pulse el botón ▲ o ▼ para seleccionar un dispositivo y, a
continuación, pulse el botón
E
. Se cambia al dispositivo
seleccionado.
Sólo cuando se congura
N Anynet+ (HDMI-CEC) en el menú Aplicaciones, aparece el menú
Lista Disp.
El cambio a los dispositivos seleccionados puede tardar unos 2 minutos. No se puede cancelar
N
la operación de cambio de dispositivo mientras ésta se está efectuando.
El tiempo necesario para la búsqueda de dispositivos depende de la cantidad de dispositivos
N
conectados.
Cuando naliza la búsqueda de dispositivos, no se muestra el número de dispositivos
N
encontrados.
Aunque el televisor busca automáticamente la lista de dispositivos cuando se enciende con el
N
botón de alimentación, los dispositivos que se conectan cuando el televisor está encendido, o en
algunas circunstancias determinadas, no aparecen automáticamente en la lista. Pulse el botón
rojo para buscar el dispositivo conectado.
Si ha seleccionado el modo de entrada externa pulsando el botón
N SOURCE no podrá usar la
función Anynet+. Asegúrese de cambiar a un dispositivo Anynet+ mediante la Lista Disp.
Ver TV
Lista Disp.
Grabar : DVDR
DVDR Menú
DVDR Funcionamiento
Conguración
U
Mover E Ingresar R Regresar
Anynet+(HDMI-CEC) ►
Aplicaciones
Anynet+ (HDMI-CEC) : Encendido
Apagado Automático : Sí
U
Mover E Ingresar R Regresar
Lista Disp.
Conguración
U
Mover E Ingresar R Regresar
Page 71
Español - 31
MenúAnynet
+
El menú Anynet+ cambia según el tipo y el estado de los dispositivos Anynet+ conectados al
televisor.
MenúAnynet
+
Descripción
Ver TV El modo Anynet+ cambia al modo de emisión de TV.
Lista Disp. Muestra la lista de dispositivos de Anynet+.
(nombre_dispositivo) Menú
Muestra los menús del dispositivo conectado. Por ejemplo, si se ha
conectado un grabador de DVD, se muestra el menú del disco del
grabador de DVD.
(nombre_dispositivo)
Funcionamiento
Por ejemplo, si se ha conectado un grabador de DVD, se muestra
el menú del disco del grabador de DVD.
Grabar: (*grabador)
Inicia inmediatamente la grabación en el grabador. (Sólo está
disponible en los dispositivos que admiten la función de grabación.)
Detener grabación:
(*grabador)
Detiene la grabación.
Receptor La reproducción del sonido se efectúa a través del receptor.
Cuando hay conectados varios dispositivos de grabación, éstos se muestran como (*grabador),
N
pero si sólo hay conectado un dispositivo, éste se muestra como (*nombre_dispositivo).
Page 72

Español - 32
Solución de problemas de Anynet ¦
+
Problema Posible Solución
Anynet+ no funciona. Compruebe si el dispositivo es un dispositivo Anynet
●
+
. El sistema
Anynet+ sólo admite dispositivos Anynet+.
Conecte sólo un receptor (sistema Home Cinema).
●
Compruebe si el cable de alimentación del dispositivo Anynet
●
+
está debidamente conectado.
Compruebe las conexiones de los cables de Vídeo/Audio/HDMI
●
1.3 del dispositivo Anynet+.
Compruebe si Anynet
●
+
(HDMI-CEC) está activado en el menú de
conguración de Anynet+.
Compruebe si el mando a distancia del televisor está en modo TV.
●
Compruebe si es un mando a distancia exclusivo para Anynet
●
+
.
Anynet
●
+
no funciona en algunas situaciones. (Búsqueda de
canales, funcionamiento, Plug & Play, etc.)
Cuando se conecta o se desconecta el cable HDMI 1.3, se han de
●
buscar de nuevo los dispositivos o volver a apagar y encender el
televisor.
Compruebe si la función Anynet
●
+
del dispositivo Anynet+ está
activada.
Deseo iniciar Anynet+. Compruebe si el dispositivo Anynet
●
+
está debidamente conectado
al TV y si la opción Anynet+ (HDMI-CEC) está activada en el menú
de conguración de Anynet+.
Pulse el botón TV del mando a distancia del televisor para cambiar
●
a TV. A continuación pulse el botón TOOLS para visualizar el
menú Anynet+ y seleccionar el menú que desee.
Deseo salir de
Anynet+.
Seleccione la opción para ver la televisión en el menú de Anynet
●
+
.
Pulse el botón SOURCE del mando a distancia del TV y
●
seleccione un dispositivo que no sea Anynet+.
Pulse
●
z
, CH LIST, PRE-CH y FAV.CH para cambiar al
modo TV. (Tenga en cuenta que el botón de canal sólo funciona
cuando no hay ningún dispositivo Anynet+ con sintonizador
incorporado conectado.)
En la pantalla aparece
el mensaje Connecting
to Anynet+ device...
El mando a distancia no se puede utilizar cuando se está
●
congurando Anynet+ o cambiando a un modo de visualización.
Utilice el mando a distancia cuando haya terminado la
●
conguración de Anynet+ o el cambio al modo de visualización.
El dispositivo Anynet+
no funciona.
No se puede usar la función de reproducción mientras se efectúa
●
una conexión Plug & Play.
El dispositivo
conectado no se
muestra.
Compruebe si el dispositivo admite las funciones Anynet
●
+
.
Compruebe si el cable HDMI 1.3 está debidamente conectado.
●
Compruebe si Anynet
●
+
(HDMI-CEC) está activado en el menú de
conguración de Anynet+.
Vuelva a efectuar una búsqueda de dispositivos Anynet
●
+
.
Sólo puede conectar un dispositivo Anynet
●
+
mediante el cable
HDMI 1.3. Algunos cables HDMI pueden no admitir las funciones
Anynet+.
Si se ha interrumpido por una situación anormal como la
●
desconexión del cable HDMI o el de alimentación o por un fallo en
la corriente eléctrica, deberá repetir la búsqueda del dispositivo.
El programa de
televisión no se puede
grabar.
Compruebe la conexión de la toma de antena del dispositivo de
●
grabación.
El sonido del televisor
no sale a través del
receptor.
Conecte el cable óptico entre el televisor y el receptor.
●
Page 73
Español - 33
APÉNDICE
Identicacióndeproblemas ¦
Si cree que el televisor tiene un problema, compruebe primero esta lista de posibles problemas y
soluciones.Si ninguno de los consejos funciona, póngase en contacto con el centro de atención al
cliente de Samsung o llame al 1-800-SAMSUNG (726-7864).
Problema Posible Solución
Imagen deciente. Intente sintonizar otro canal. /Ajuste la antena. /
Compruebe todas las conexiones de cable.
Calidad de sonido deciente. Intente sintonizar otro canal. /Ajuste la antena.
No hay imagen o sonido. Intente sintonizar otro canal. /Pulse el botón SOURCE.
Compruebe que el TV esté conectado./Compruebe las
conexiones de la antena.
No se percibe ningún sonido, o muy
bajo, con el volumen al máximo.
Primero, compruebe el volumen de los aparatos
conectados al TV (por ejemplo, un receptor digital, DTV,
DVD, receptor de cable, VCR, etc.). A continuación, ajuste
el volumen del TV según sea más conveniente.
El TV funciona de forma irregular. Desconecte el TV durante 30 segundos y, después, intente
que funcione otra vez.
El televisor no se enciende. Compruebe que la toma de la pared funciona.
Anomalías del mando a distancia. Remplace las pilas del mando a distancia.
Limpie el borde superior del mando a distancia (ventana
de transmisión).
Compruebe los terminales de las pilas.
Mensaje ‘Vericar cable señal’. Compruebe que el cable de señal esté conectado
rmemente con las fuentes PC y DVI..
Mensaje ‘Modo no compatible’. Compruebe la resolución máxima y la frecuencia de vídeo
del dispositivo conectado.
Compare estos valores con los datos de los modos de
visualización.
Problema en pantalla con la
emisión digital.
Compruebe la potencia de la señal digital y la antena de
entrada.
La imagen es demasiado clara o
demasiado oscura.
Ajuste Luminos. y Contraste. /Ajuste la función Fino.
Barras negras en la pantalla. Compruebe que la emisión que se está recibiendo es de
alta denición (HD).
Los canales HD en ocasiones emiten una programación en
SD (denición estándar) que puede dar lugar a la aparición
de barras negras.
Para eliminar las barras congure el decodicador de
cable o satélite en los modos
Alargar o Panorámica.
Las imágenes tienen un tono
rojoverde o rosa.
Compruebe que los cables de los componentes estén
conectados en los terminales
correctos.
Page 74
Español - 34
Problema Posible Solución
Los subtítulos para sordos no
funcionan.
Cuando se usa un decodicador de cable o satélite, la
opción de los subtítulos para
sordos se debe congurar en el decodicador, no en el
televisor.
Las imágenes se ven con nieve. Quizás se necesite actualizar el rmware. Póngase en
contacto con el proveedor de cable.
Se ven imágenes superpuestas. Quizás haya problemas de compatibilidad con el
decodicador de cable.
Intente conectarse a través de los cables de los
componentes.
La pantalla está negra y el
indicador luminoso de alimentación
parpadea constantemente.
Compruebe lo siguiente en el equipo: Alimentación, cable
de señal.
El televisor está usando su sistema de gestión de energía.
Mueva el ratón del equipo o pulse una tecla del teclado.
La imagen no es estable y parece
vibrar cuando se conecta el
ordenador en la entrada de PC.
Si el ajuste no es correcto, use la utilidad del ordenador
para cambiar los ajustes de pantalla.
El televisor admite funciones de visualización multiscan
dentro del siguiente rango de frecuencias:
- Frecuencia horizontal (KHz): 30~81 (P2370HD),
52,61~82,2 (P2570HD)
- Frecuencia vertical (Hz): 56~75 (P2370HD),
48~75 (P2570HD)
- Índice de barrido máximo (60 Hz): 1920 x 1080
La imagen no está centrada en la
pantalla.
Ajuste la posición horizontal y vertical.
La posición de la pantalla se debe ajustar respecto a la
fuente de salida (por ejemplo,
STB) con una señal digital.
La imagen aparece distorsionada
en la esquina de la pantalla.
Si Ajuste a pantalla está seleccionado en algún dispositivo
externo, la imagen puede
aparecer distorsionada en la esquina de la pantalla. Este
síntoma se origina en los dispositivos externos, no en el
televisor.
Aparece el mensaje ‘Resets all
settings to the default values.’.
Aparece cuando el botón
EXIT se mantiene pulsado
durante unos momentos. La conguración del producto se
reinicia con los valores predeterminados.
El panel LCD TFT utiliza un panel que consta de muchos píxeles de ínmo tamaño (6 220 800)
N
que requieren de una tecnología altamente sosticada para su fabricación. No obstante, puede
que existan unos cuantos píxeles brillantes u oscuros en la pantalla. Estos píxeles no inuirán
en el rendimiento del aparato.
Page 75
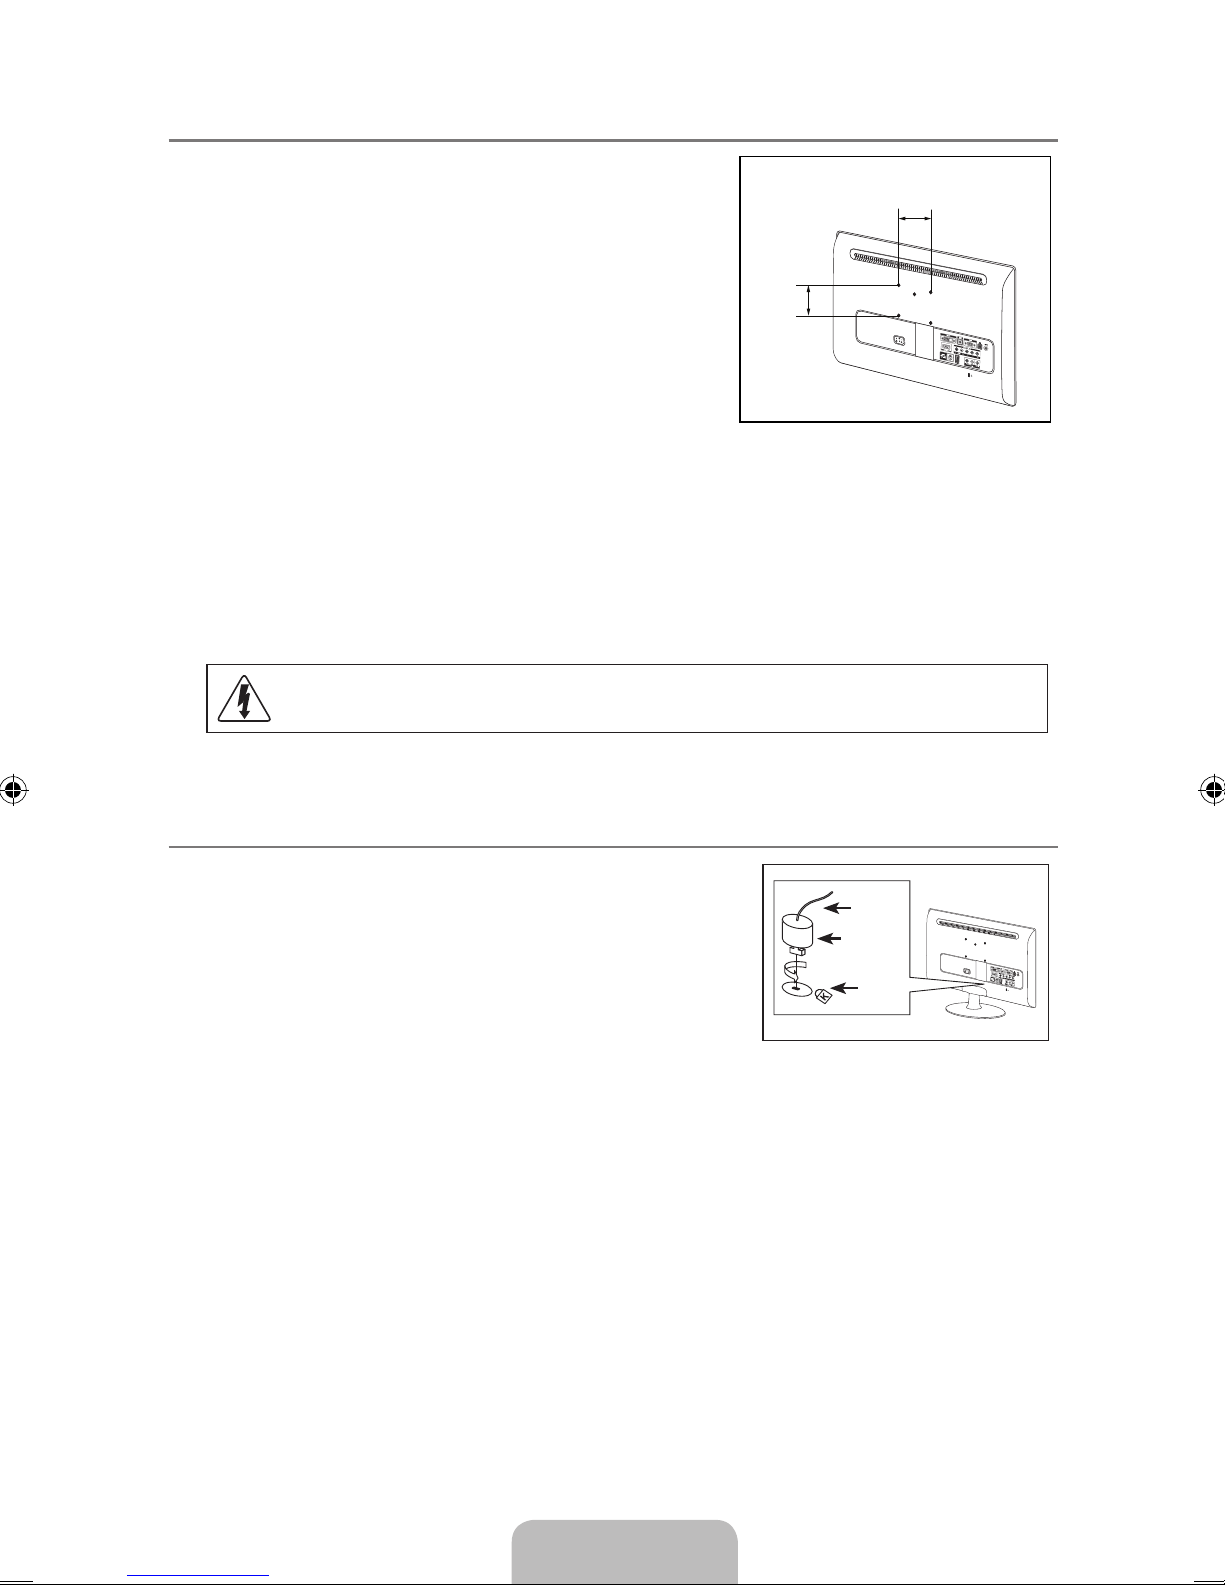
Español - 35
Especicacionesdelequipodemontajeenlapared(VESA) ¦
Instale el montaje mural en una pared sólida, perpendicular
al suelo. Para colocarlo en otros materiales de construcción,
póngase en contacto con el distribuidor más cercano. Si se
instala en el techo o en una pared inclinada, puede caerse y
causar graves lesiones personales.
Al adquirir el equipo de montaje en la pared, también se
N
distribuye un manual de instalación detallado y todas las
piezas necesarias para el montaje.
No use tornillos con un tamaño superior al estándar, ya
N
que pueden causar daños en el interior del televisor.
Para montajes murales que no cumplen las
N
especicaciones de tornillos estándar VESA, la longitud de
éstos puede variar dependiendo de las especicaciones.
No use tornillos que no cumplan las especicaciones de tornillos estándar VESA.
N
No apriete excesivamente los tornillos, ya que podría dañar el producto o provocar la caída de
N
éste con riesgo de causar lesiones personales. Samsung no se hace responsable de este tipo
de accidentes.
Samsung no se hace responsable de daños o lesiones personales cuando se usa un montaje
N
mural que no cumple las especicaciones VESA o si el cliente no sigue las instrucciones de
instalación del producto.
No instale el equipo de montaje mural mientras el televisor está encendido. Se podría
producir una descarga eléctrica con riesgo de causar lesiones personales.
Uso del bloqueo Kensington antirrobos ¦
El bloqueo Kensington es un dispositivo que se utiliza para jar
físicamente el sistema cuando se utiliza en un sitio público. El
aspecto y el método de bloqueo pueden ser diferentes a los
que se muestran en la ilustración según el fabricante.
Consulte el manual que acompaña al bloqueo Kensington
para utilizarlo correctamente. El dispositivo de bloqueo debe
adquirirse por separado.
La ubicación del “Bloqueo Kensington” puede variar según
N
el modelo.
1. Inserte el dispositivo de bloqueo en la ranura Kensington del TV LCD (1) y gírelo en el sentido del
bloqueo (2).
2. Conecte el cable del bloqueo Kensington (3).
3. Fije el bloqueo Kensington a la mesa o a un objeto estático pesado.
3
1
2
P2370HD :75 mm
P2570HD :100 mm
P2370HD :75 mm
P2570HD :100 mm
Page 76
Español - 36
Especicaciones ¦
Nombre del modelo P2370HD P2570HD
Tamaño de pantalla
Diagonal
23 pulg
(58 cm)
24,6 pulg
(62 cm)
Área de visualización 509,76 mm(H) x 286,74 mm(V) 543,46 mm (H) X 305,69 mm (V)
Separación entre píxeles 0,2655 mm(H) x 0,2655 mm(V) 0,283 mm (H) X 0,283 mm (V)
Color de la pantalla 16,7M
Reloj de píxeles máximo 148,500 MHz (Analógica, Digital)
Alimentación eléctrica AC 100 - 240 V~ (+/- 10 %). 50/60 Hz ± 3 Hz
Resolución de PC
1920x1080 @ 60Hz
Sonido
Salida
3W x 2 3W x 2
Dimensiones (An x Pr x Al)
Sin el soporte
con soporte
571,0 x 364,5 x 65,5 mm
571,0 x 423,5 x 189,5 mm
605 x 384 x 66 mm
605 x 453 x 240 mm
Peso
Con soporte
5,8 kg 7 kg
Consideraciones
medioambientales
Temperatura de funcionamiento
Humedad de funcionamiento
Temperatura de
almacenamiento
Humedad de almacenamiento
Entre -10°C y 40°C (50°F a 104°F)
10% al 80%, sin condensación
Entre -20°C y 45°C (-4°F a 113°F)
5% al 95%, sin condensación
Interfaz de montaje VESA
75 mm x 75 mm 100 mm x 100 mm
El diseño y las especicaciones pueden cambiar sin previo aviso.
N
Este dispositivo es un aparato digital de la Clase B.
N
Para conocer la fuente de alimentación y el consumo de energía, consulte la etiqueta adherida
N
al producto.
Page 77

Busayfabilerekboş
bırakılmıştır.
Page 78

Busayfabilerekboş
bırakılmıştır.
Page 79

Busayfabilerekboş
bırakılmıştır.
 Loading...