

Page 1

The color and the appearance may differ depending on the
product, and the specifications are subject to change
without prior notice to improve the performance.
SyncMaster OL46B
LCD Display
User Manual
Page 2
Safety Instructions
Notational
Note
These safety instructions must be followed to ensure your safety and prevent property damage.
Make sure to read the instructions carefully and use the product in the correct manner.
Warning / Caution
Failure to follow directions noted by this symbol could result in bodily harm
or damage to the equipment.
Note
Prohibited
Important to read and understand at all times
Do not disassemble
Disconnect the plug from the
outlet
Do not touch
Ground to prevent an electric
shock
An administration fee may be charged if either
• (a) an engineer is called out at your request and there is no defect in the product
(i.e. where you have failed to read this user manual).
• (b) you bring the unit to a repair centre and there is no defect in the product
(i.e. where you have failed to read this user manual).
The amount of such administration charge will be advised to you before any work or home
visit is carried out.
Cleaning the Monitor
Cleaning
The panel and exterior of the cutting-edge monitor scratch easily and require careful attention. Clean
the monitor according to the following steps.
• Power off the monitor and PC.
• Disconnect the power cable from the monitor.
Note
To avoid electric shock, be sure you disconnect the cable by gripping the
plug and do not touch the cable with wet hands.
Page 3
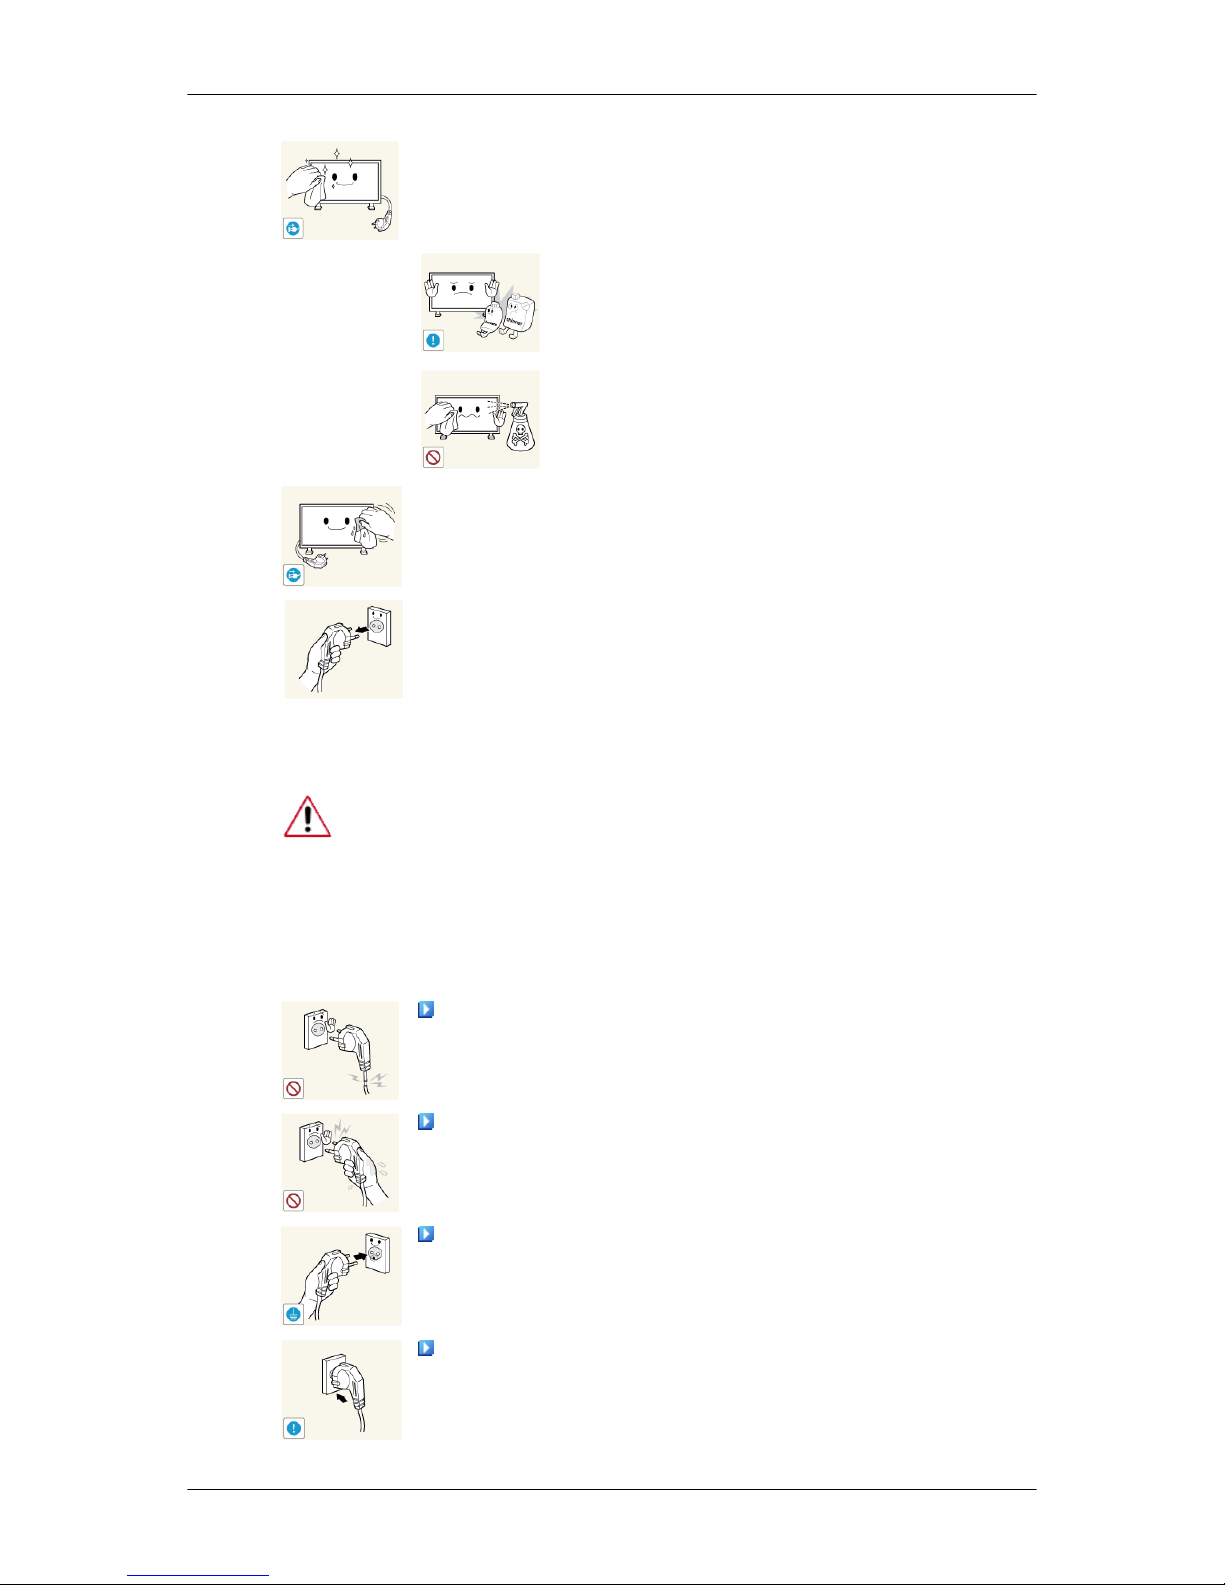
• Wipe the monitor using a soft, slightly damp cloth that has been
squeezed .
Do not use a cleaning agent that contains alcohol or
solvents, or that is surface active.
Otherwise, the exterior may discolor or crack or the
panel coating may come off.
Do not spray water or cleaning agent directly onto the
monitor.
Otherwise, the liquid may sink into the monitor and
cause a fire, electric shock, or failure.
Clean the exterior of the monitor using a soft cloth dampened with a small
amount of water.
• Connect the power cable to the monitor after you have finished cleaning.
• Power on the monitor and PC.
Power
When not used for extended period of time, set your computer to DPM.
If using a screen saver, set it to active screen mode.
The images here are for reference only, and are not applicable in all cases (or
countries).
Shortcut to Anti-Afterimage Instructions
Do not use a damaged power cord or plug or a damaged or loose power
outlet.
• Otherwise, this may result in electric shock or fire.
Do not touch the power plug with wet hands when removing or plug-
ging the plug into the outlet.
• Otherwise, this may result in electric shock.
Make sure to connect the power cord to a grounded power outlet.
• Otherwise, it may result in electric shock or personal injury.
Ensure that the power plug is plugged into the power outlet firmly and
correctly.
• Otherwise, this may result in fire.
Safety Instructions
Page 4
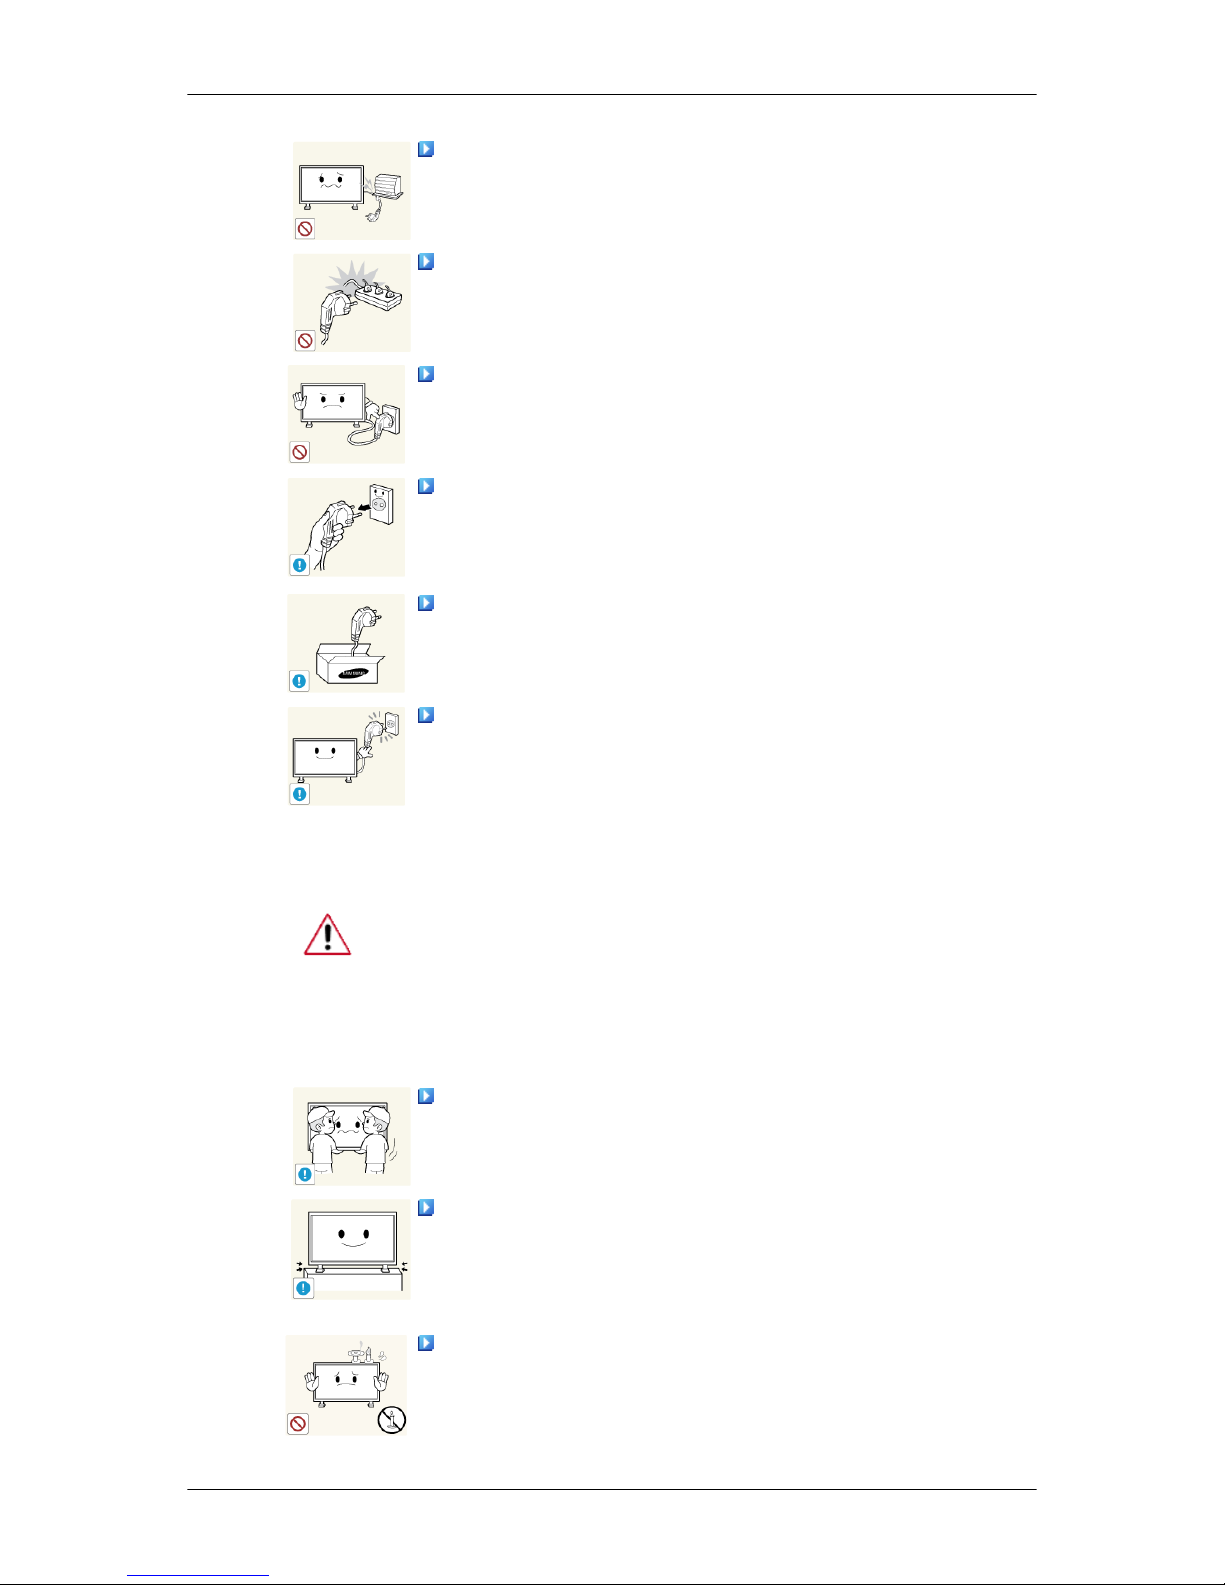
Do not forcefully bend or pull the power plug and do not place any
heavy material on it.
• Otherwise, this may result in fire.
Do not connect multiple appliances to the same power outlet.
• Otherwise, this may cause fire due to overheating.
Do not disconnect the power cord while using the product.
• Otherwise, this may result in damage to the product due to electric
shock.
To disconnect the apparatus from the mains, the plug must be pulled
out from the mains socket, therefore the mains plug shall be readily operable.
• Otherwise, this may cause electric shock or fire.
Use only the power cord provided by our company. Do not use the
provided power cord of another product.
• Otherwise, this may result in fire or electric shock.
Connect the power plug to a wall outlet that can be easily reached.
• When a problem occurs with the product, you must unplug the power
plug to cut the power off completely. You cannot cut the power off
completely using only the power button on the product.
Installation
Be sure to contact an authorized Service Center when installing your monitor in
a location with heavy dust, high or low temperatures, high humidity, and exposed
to chemical substances and where it operates for 24 hours such as at airports,
train stations etc.
Failure to do so may cause serious damage to your monitor.
Ensure that at least two persons lift and move the product.
• Otherwise, it may be dropped and cause personal injury, and/or dam-
age the product.
When installing the product in a cabinet or rack, make sure that the
front end of the bottom of the product does not project out.
• Otherwise, it may fall or cause personal injury.
• Use a cabinet or rack of a size appropriate to the product.
DO NOT PLACE CANDLES, MOSQUITO REPELLANT, CIGARETTES AND ANY HEATING APPLIANCES NEAR THE PRODUCT.
• Otherwise, this may result in fire.
Safety Instructions
Page 5
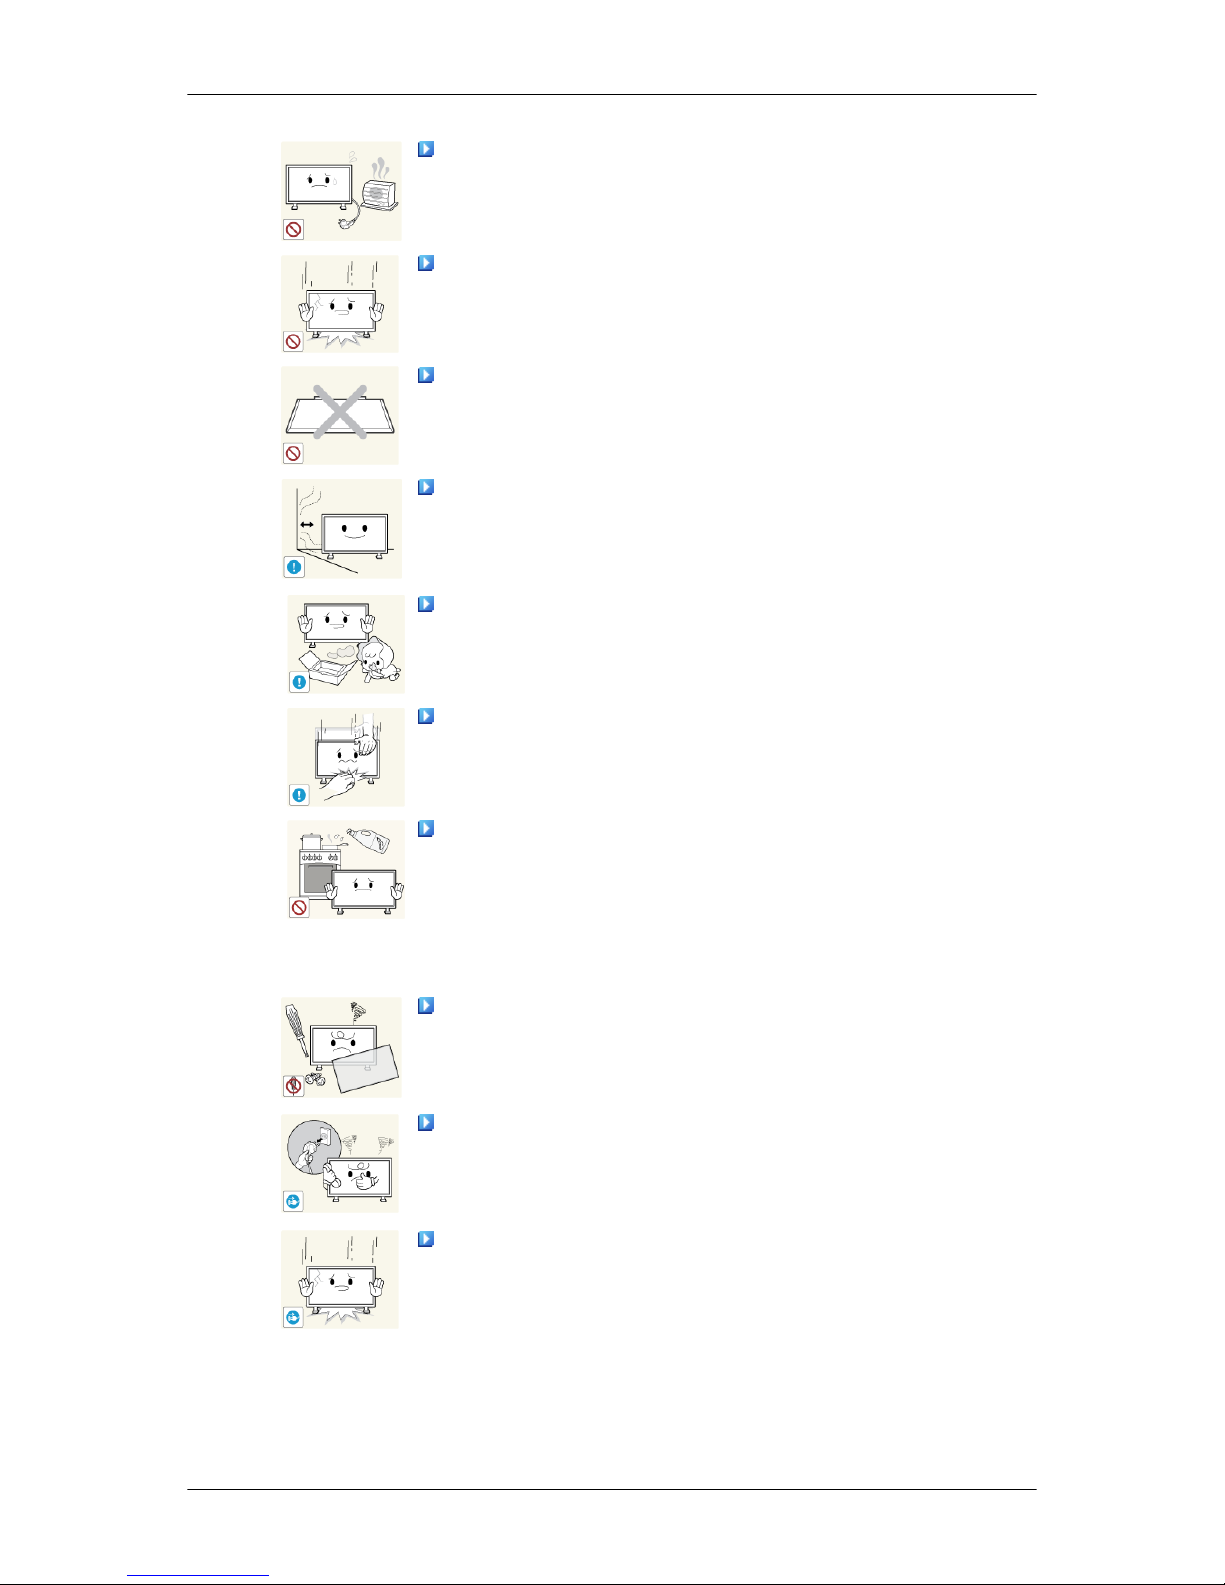
Keep heating appliances as far away from the power cord or the product as possible.
• Otherwise, this may result in electric shock or fire.
When putting the product down, make sure to put it down softly.
• Otherwise, this may result in damage to the screen display.
Do not place the front of the product on the floor.
• Otherwise, this may result in damage to the screen display.
Install your product in a well ventilated location. Ensure that there is
a clearance of more than 4 inches (10 cm) from the wall.
• Otherwise, it may result in fire due to an increase in the internal tem-
perature.
Ensure that the packaging vinyl is kept away from children.
• Otherwise, it may result in serious harm (suffocation) if children play
with it.
If the height of your monitor is adjustable, do not place any object or
part of your body on the stand when lowering it.
• This may cause damage to the product or the person carrying it.
Edible oil, such as soybean oil, can damage or deform the product. Do
not install the product in a kitchen or near a kitchen counter.
Others
The product is a high voltage product. Do not disassemble, repair or
modify the product yourself.
• Otherwise, this may result in electric shock or fire. If the product
needs to be repaired, contact a Service Center.
If there is a strange smell or a strange sound or smoke is coming from
the product, disconnect the power plug immediately and contact a Service
Center.
• Otherwise, this may result in electric shock or fire.
When you drop the product or the case is broken, turn the power off
and disconnect the power cord. Contact a Service Center.
• Otherwise, this may result in electric shock or fire.
Safety Instructions
Page 6
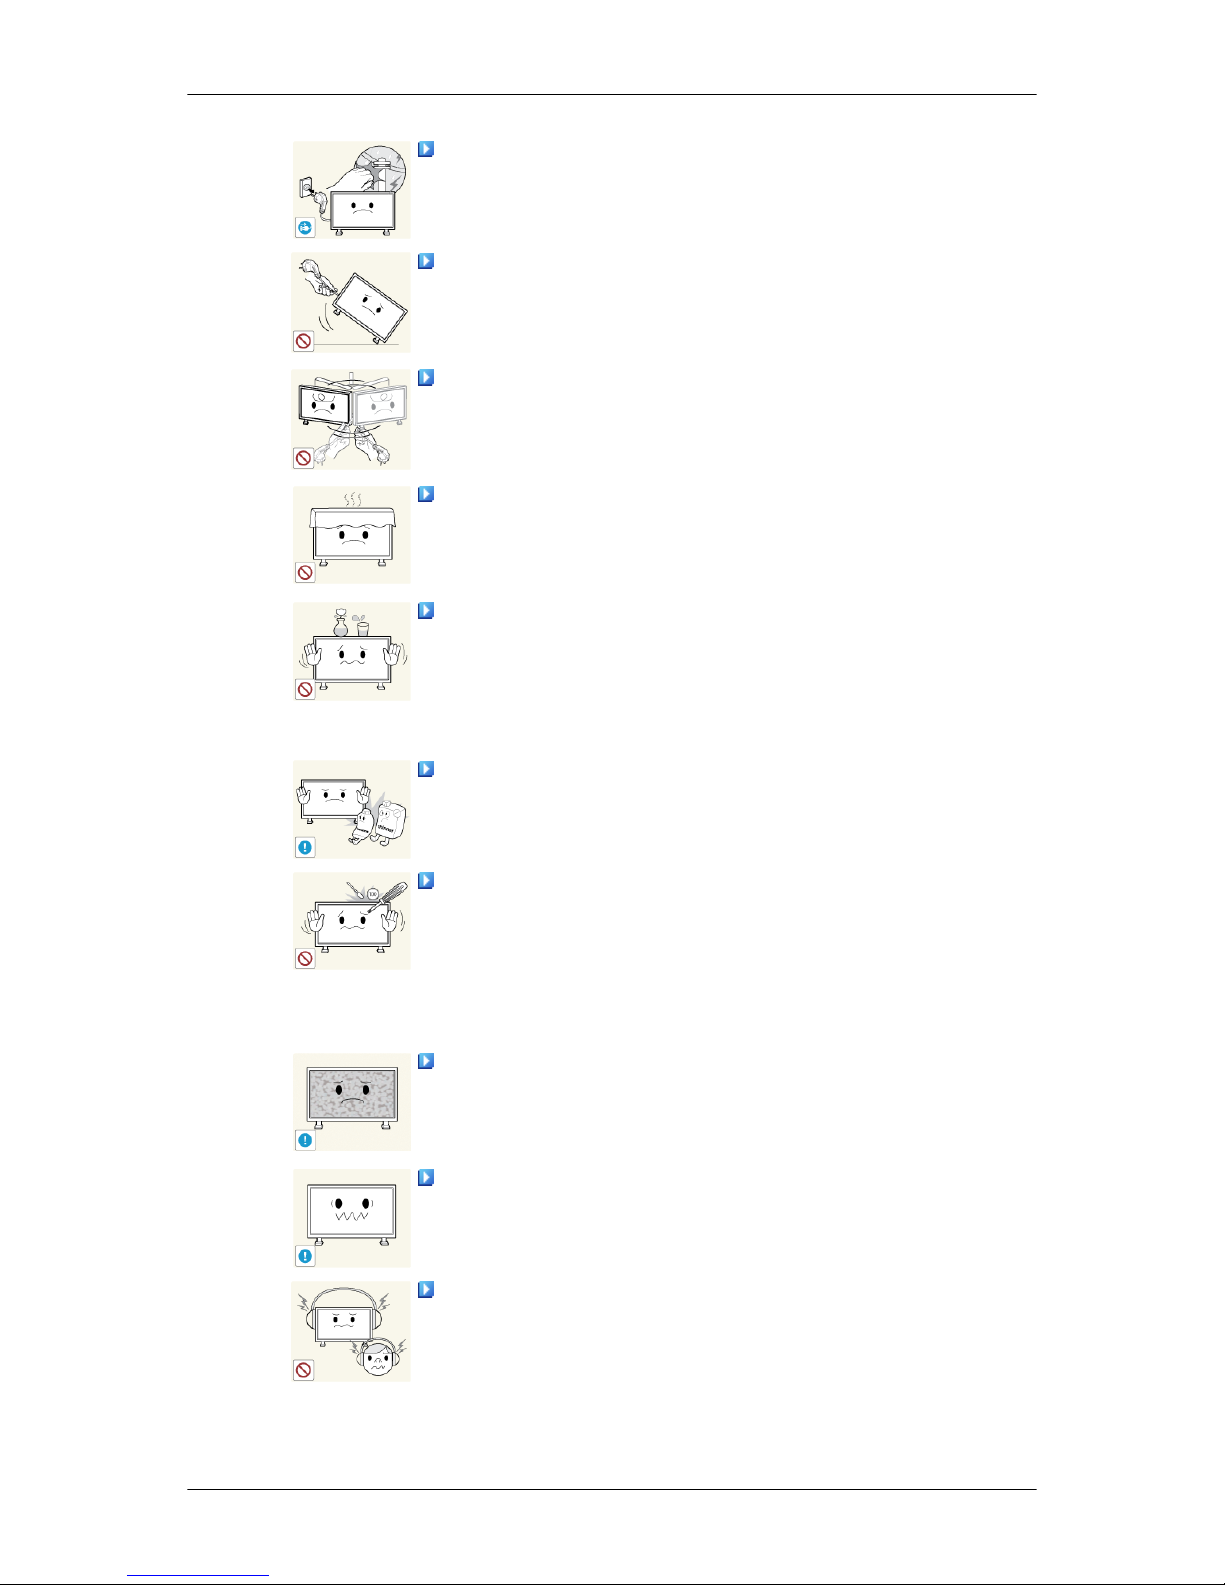
During a lightning or thunderstorm, power off the product and remove
the power cable.
• Otherwise, this may result in electric shock or fire.
Do not try to move the monitor by pulling only the wire or the signal
cable.
• Otherwise, it may fall and result in electric shock, damage to the
product or fire due to damage to the cable.
Do not lift or move the product back and forwards or right and left
while only holding the power cord or signal cables.
• Otherwise, it may fall and result in electric shock, damage to the
product or fire due to damage to the cable.
Make sure that the ventilating opening is not blocked by a table or
curtain.
• Otherwise, it may result in fire due to an increase in the internal tem-
perature.
Do not place any containers containing water, vases, flowerpots, medicines as well as any metal on the product.
• If water or a foreign material enters the product, disconnect the power
cord and contact a Service Center.
• This may result in a product malfunction, electric shock, or fire.
Do not use or keep combustible spray or flammable material near the
product.
• Otherwise, this may result in an explosion or fire.
Do not insert any metal, such as chopsticks, coins, pins and steel, or
flammable objects, such as matches or paper, inside the product (through
the ventilating openings, input and output terminals, etc).
• If water or foreign material enters the product, disconnect the power
cord and contact a Service Center.
• Otherwise, this may result in electric shock or fire.
When using a fixed screen for a long time, an afterimage or stain may
occur.
• If you are not using your product for a long period of time, put it into
sleep mode or use a moving screen saver.
Set a resolution and frequency appropriate to the product.
• Otherwise, your eyesight may be damaged.
When using headphones or earphones, do not turn the volume too high.
• Having the sound too loud may damage your hearing.
Safety Instructions
Page 7
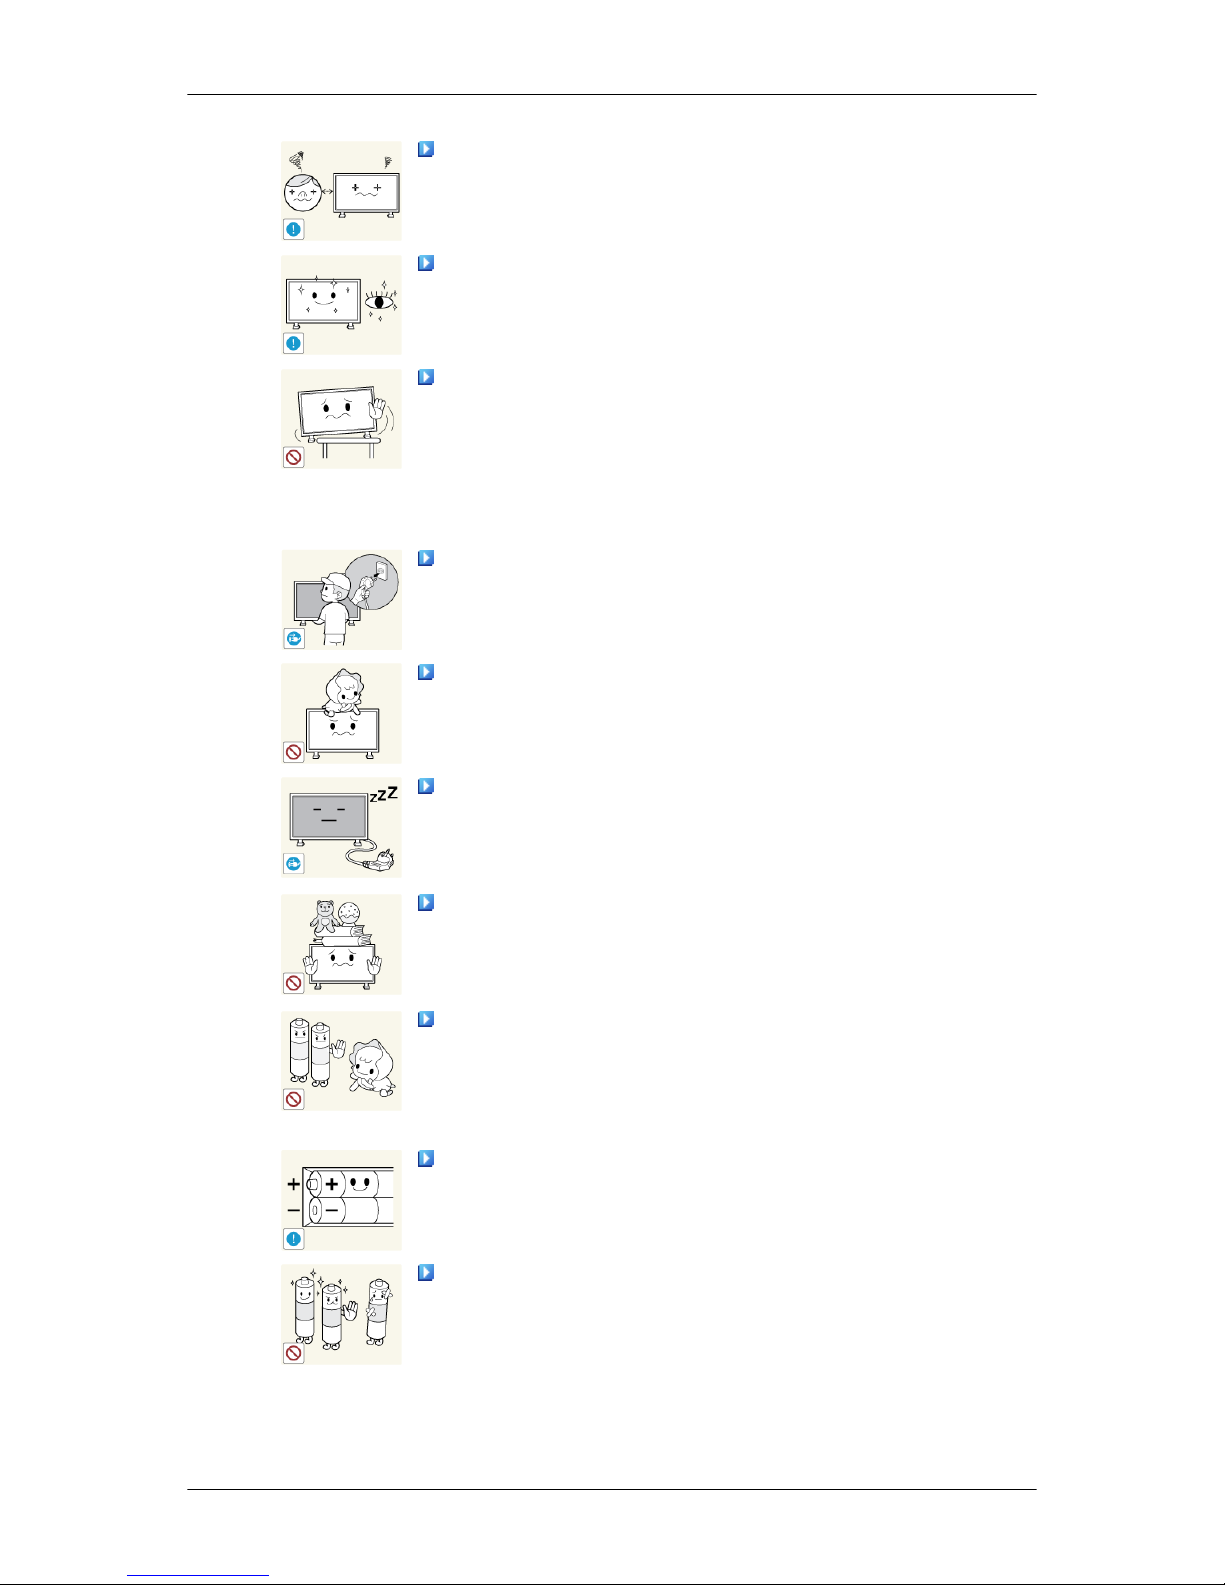
To avoid eyestrain, do not sit too close to the product.
Take a rest for at least five (5) minutes after using the monitor for one
(1) hour.
This reduces eye fatigue.
Do not install it in an unstable location such as an unstable rack or
uneven surface or a location exposed to vibrations.
• Otherwise, it may fall and cause personal injury and/or damage the
product.
• If you use the product in a location exposed to vibrations, it may
damage the product and result in fire.
When moving the product, turn the power off and disconnect the power
plug, antenna cable, and all the cables connected to the product.
• Otherwise, it may result in electric shock or fire.
Ensure that children do not hang onto the product or climb up onto the
product.
• The product may fall and cause personal injury or death.
If you do not use the product for a long period of time, disconnect the
power cord from the power outlet.
• Otherwise, this may result in overheating or fire due to dust, and may
result in fire due to electric shock or leakage.
Do not place any heavy items or toys or confectionery, such as cookies
etc. that may attract the attention of children and to the product.
• Your children may hang onto the product causing it to fall and this
may result in personal injury or death.
Be careful that children do not place the battery in their mouths when
removed from the remote control. Place the battery in a location that
children or infants cannot reach.
• If children have had the battery in their mouths, consult your doctor
immediately.
When replacing the battery, insert it with the right polarity (+, -).
• Otherwise, the battery may become damaged or it may cause fire,
personal injury or damage due to leakage of the internal liquid.
Use only the specified standardized batteries, and do not use a new
battery and a used battery at the same time.
• Otherwise, the batteries may be damaged or cause fire, personal in-
jury or damage due to a leakage of the internal liquid.
Safety Instructions
Page 8
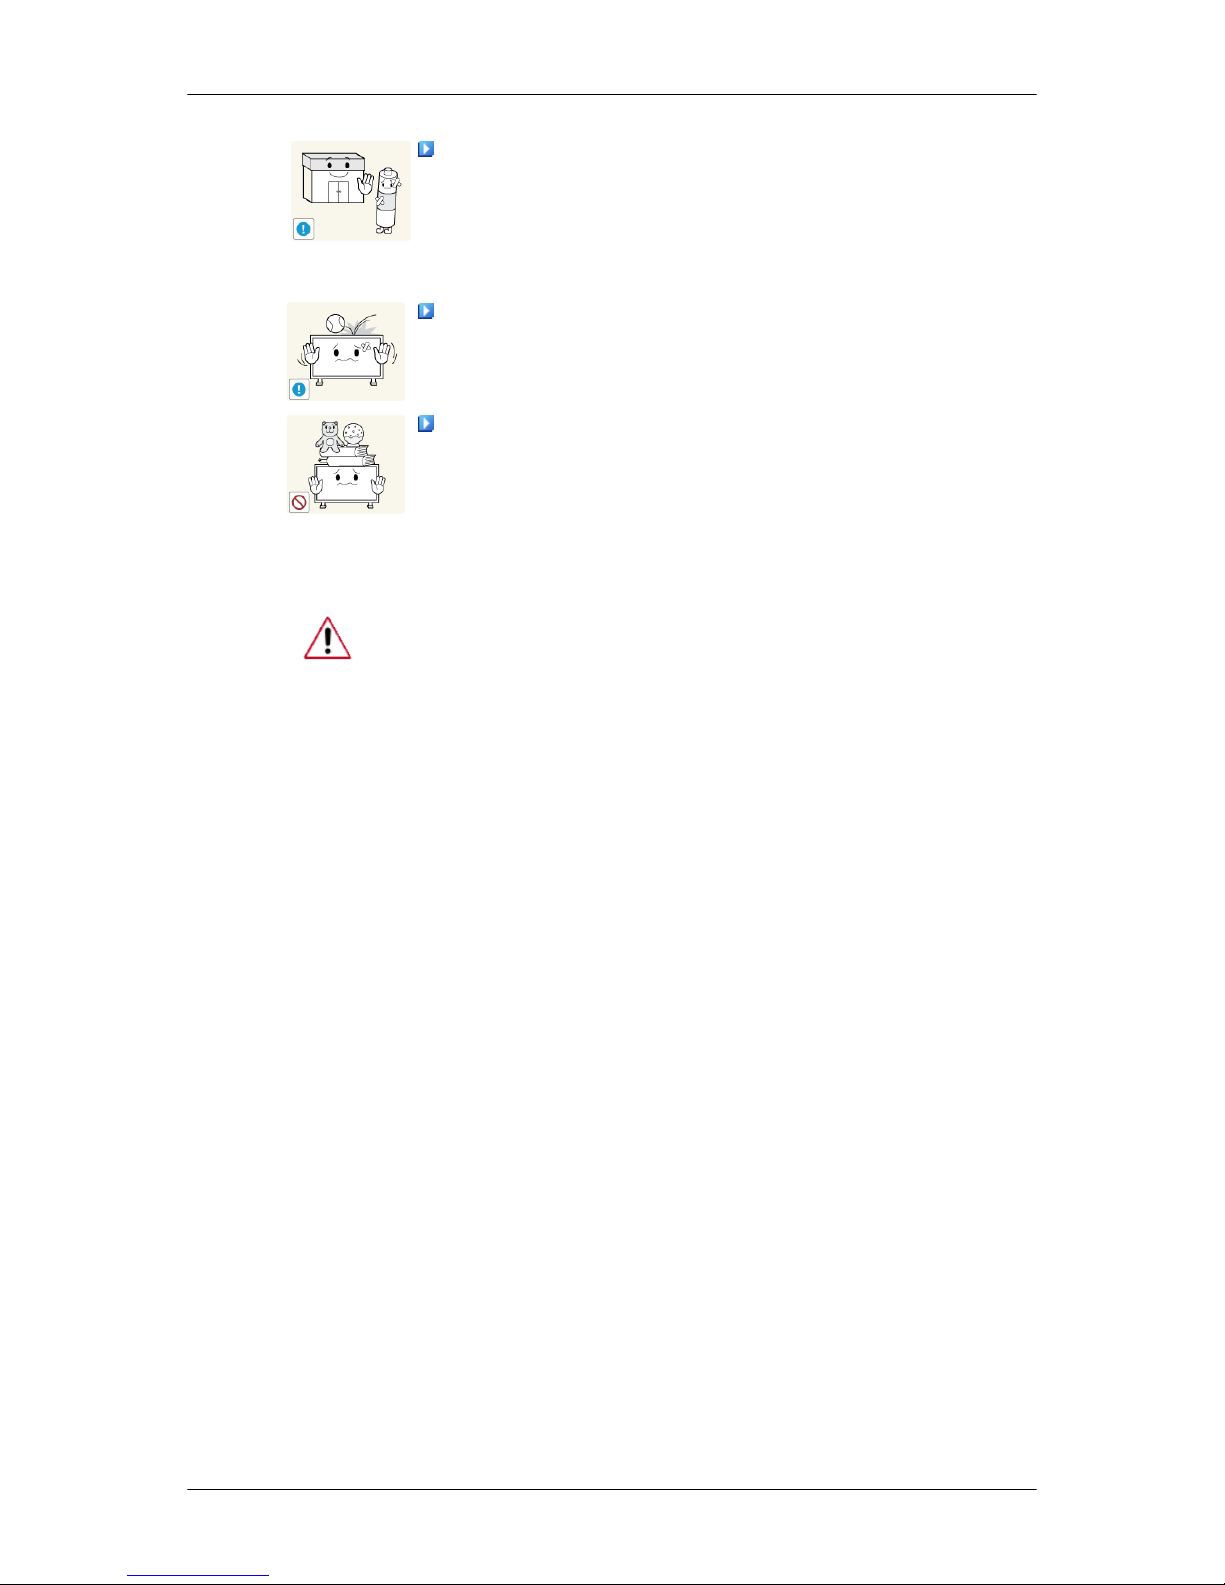
The batteries (and rechargeable batteries) are not ordinary refuse and
must be returned for recycling purposes. The customer is responsible for
returning the used or rechargeable batteries for recycling.
• The customer can return used or rechargeable batteries to a nearby
public recycling center or to a store selling the same type of the battery
or rechargeable battery.
Do not drop any objects onto the product or cause any impact to the
product.
• Otherwise, this may result in electric shock or fire.
Do not put any heavy objects on the product.
• This may result in personal injury and/or damage to the product.
Power Installation Guide
Make sure to read and follow the instructions carefully and correctly. Failing to
do so, may result in death, serious personal injury or fire.
• Before installing the product, make sure to check the power requirements for the installation location.
If you want to install the product in a power environment (power cable, power outlet, circuit breaker,
etc.) with a current/power capacity lower than the current product consumption/power consumption, install a separate power transformer according to the ’Rated Capacities’ table.
The consumer should pay the expenses for this.
• Make sure to connect the product to a dedicated power outlet and do not connect it to a multi-plug
extension cord.
If you have to use a multi-plug extension cord, refer to the current consumption in the ’Rated
Capacities’ table and use a multi-plug with the permitted current specifications greater than the
total current consumption of the products connected to it.
• When using a dedicated power extension cable, use a high-capacity power cable.
Use a power cable with a permitted current of 12.5 A or more.
Rated Current of the Power Plug /Cord/Appliance Coupler
• Use a power cable with 12.5 A or more.
Refer to the Cable Safety Specifications.
• UL specifications - Use a cable with 14 AWG or more
• KS specification - Use a cable with 20.SQ or more
• IEC specification - Use a cable with 2.5 SQ or more
Safety Instructions
Page 9
Introduction
Package Contents
Note
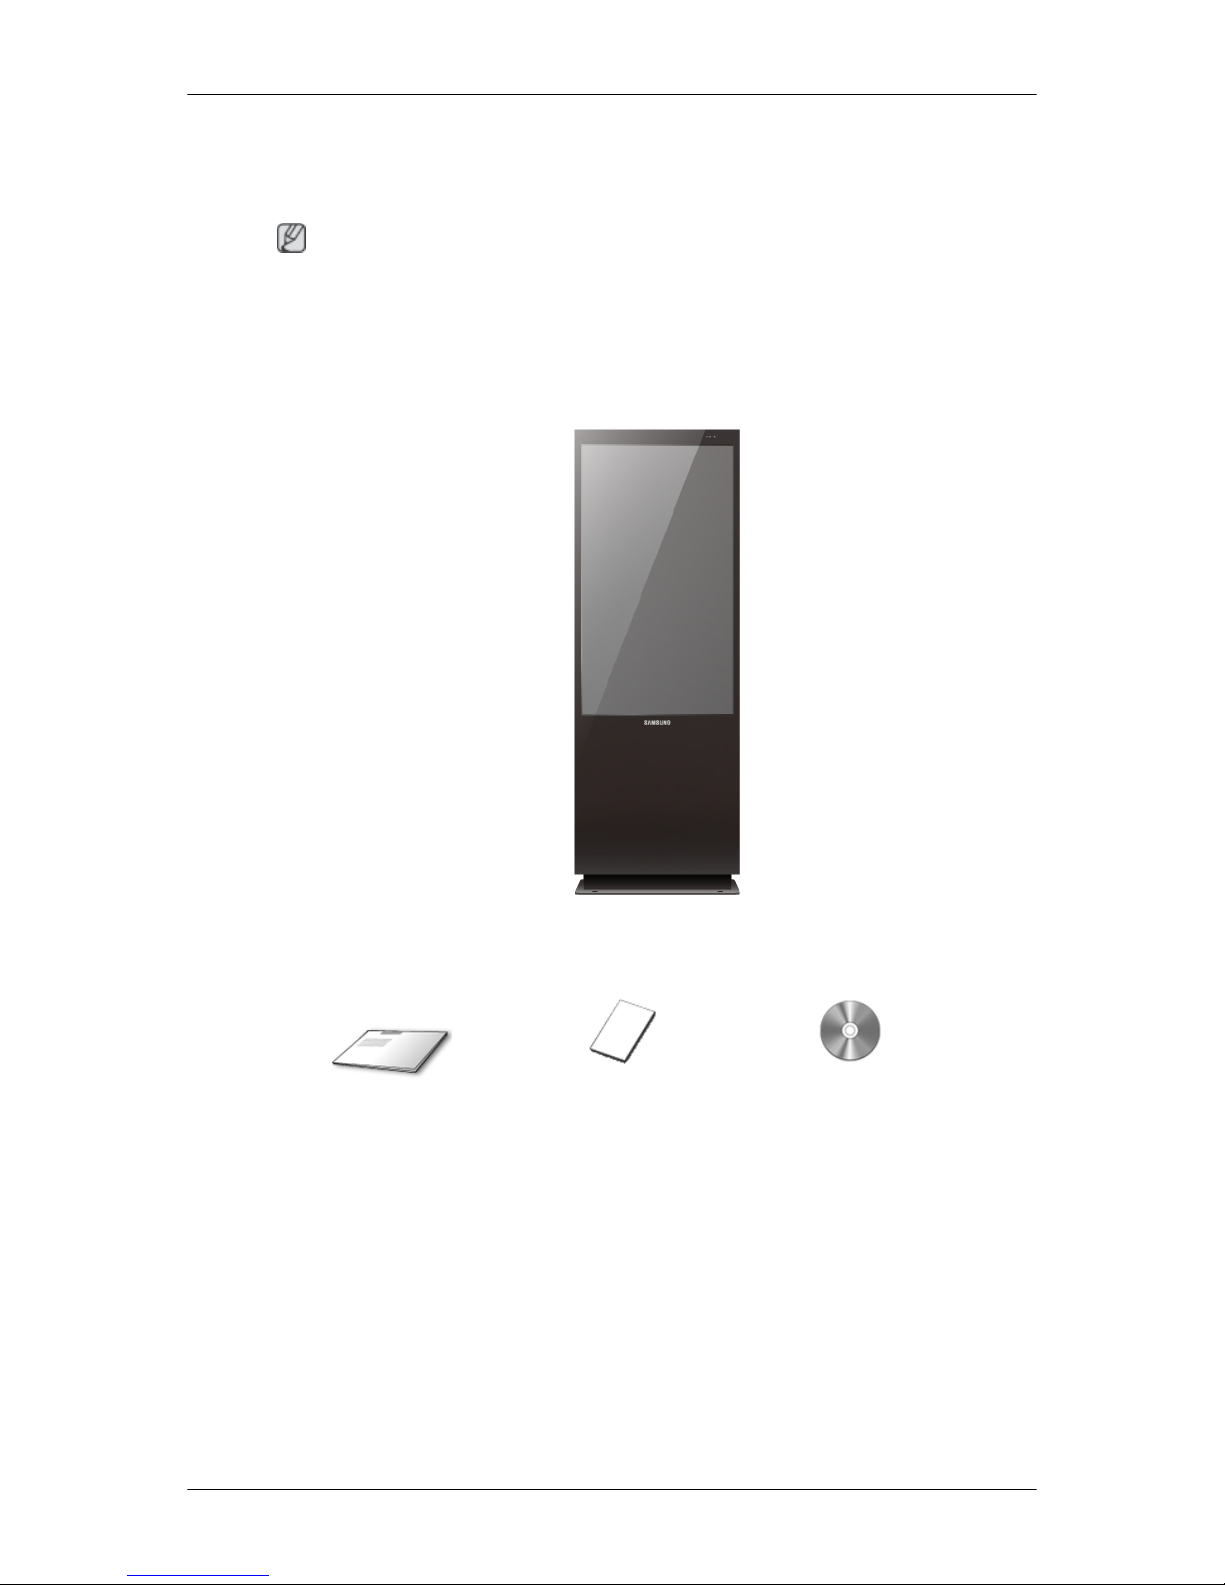
Please make sure the following items are included with your LCD Display.
If any items are missing, contact your dealer.
Contact a local dealer to buy optional items.
Unpacking
LCD Display
Manuals
Quick Setup Guide Warranty Card
(Not available in some loca-
tions)
User Manual
Page 10
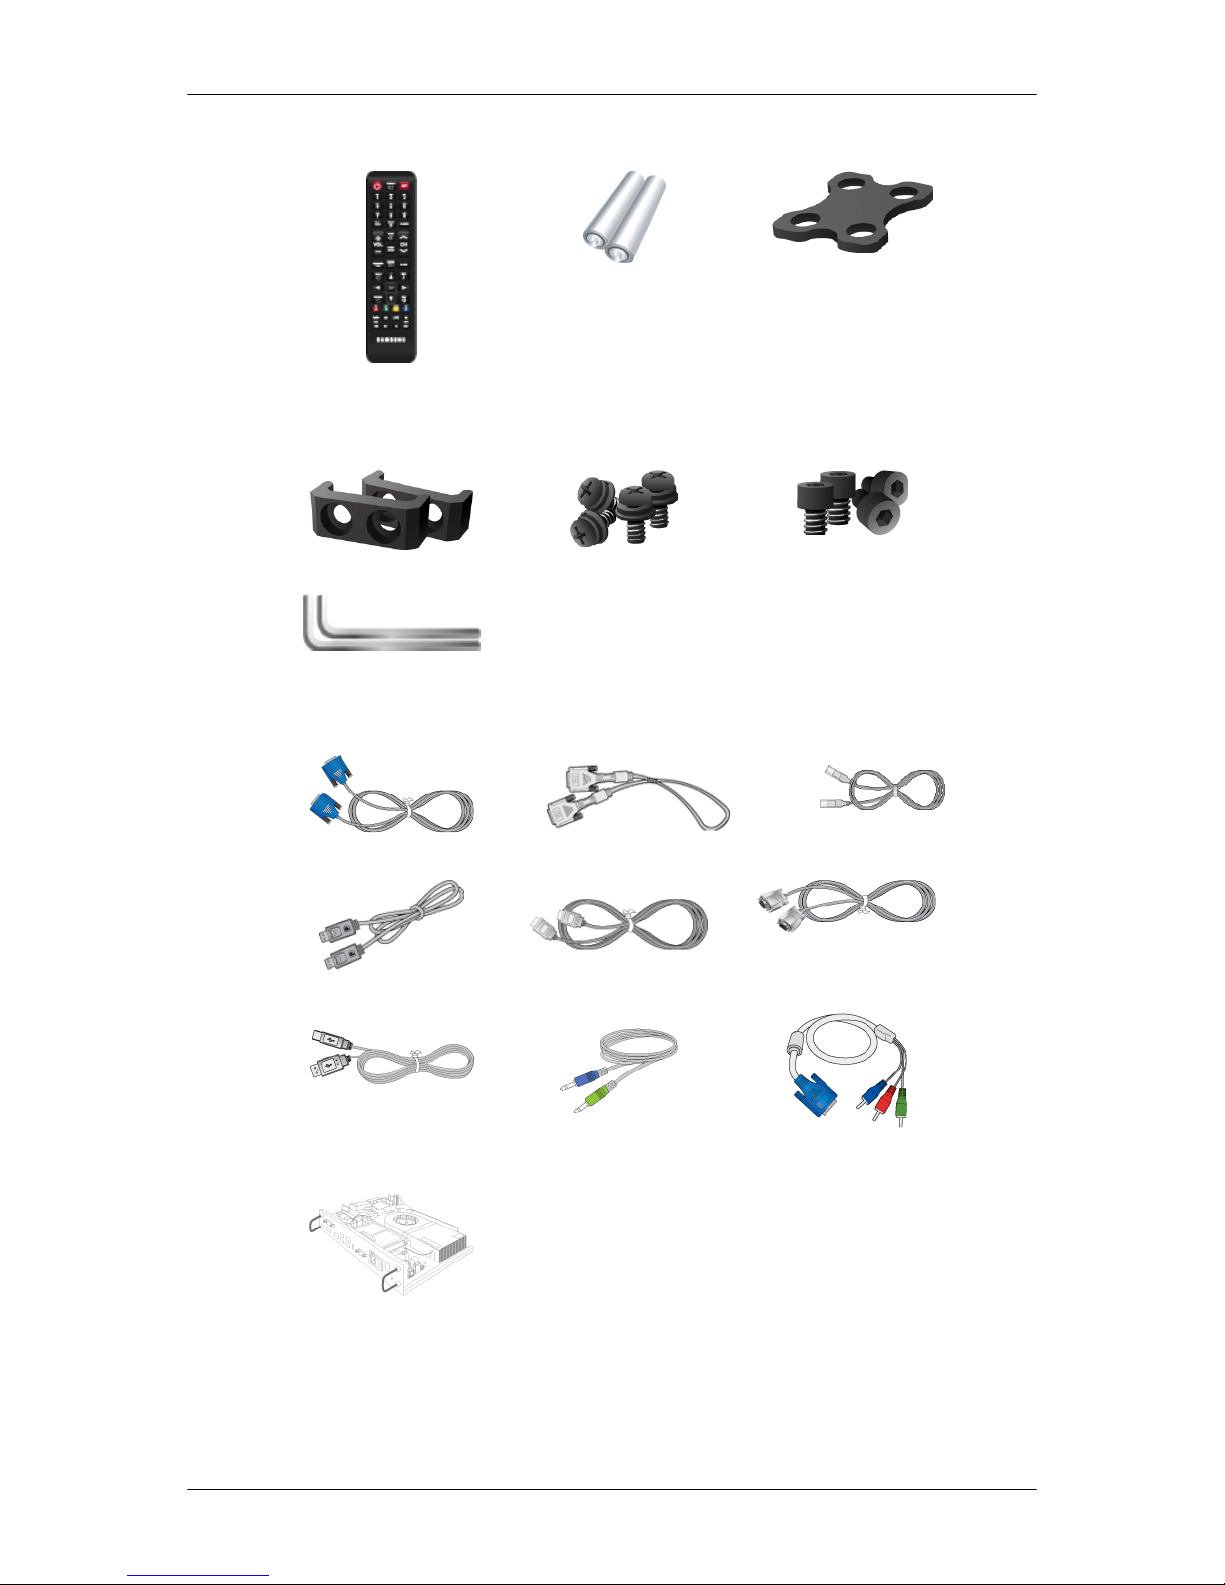
Others
Remote Control Batteries (AAA X 2)
(Not available in some loca-
tions)
Brackets link top
Brackets link bottom (x 2) Bolts (x 4) Wrench Bolts (x 4)
L Wrench (x 2)
Sold separately
D-Sub Cable DVI Cable LAN Cable
DP Cable HDMI Cable RS232C Cable
USB Cable
Stereo Cable
RGB to COMPONENT Ca-
ble
Network Box
Your LCD Display
The color and the appearance may differ depending on the product, and the specifications are subject
to change without prior notice to improve the performance.
Introduction
Page 11
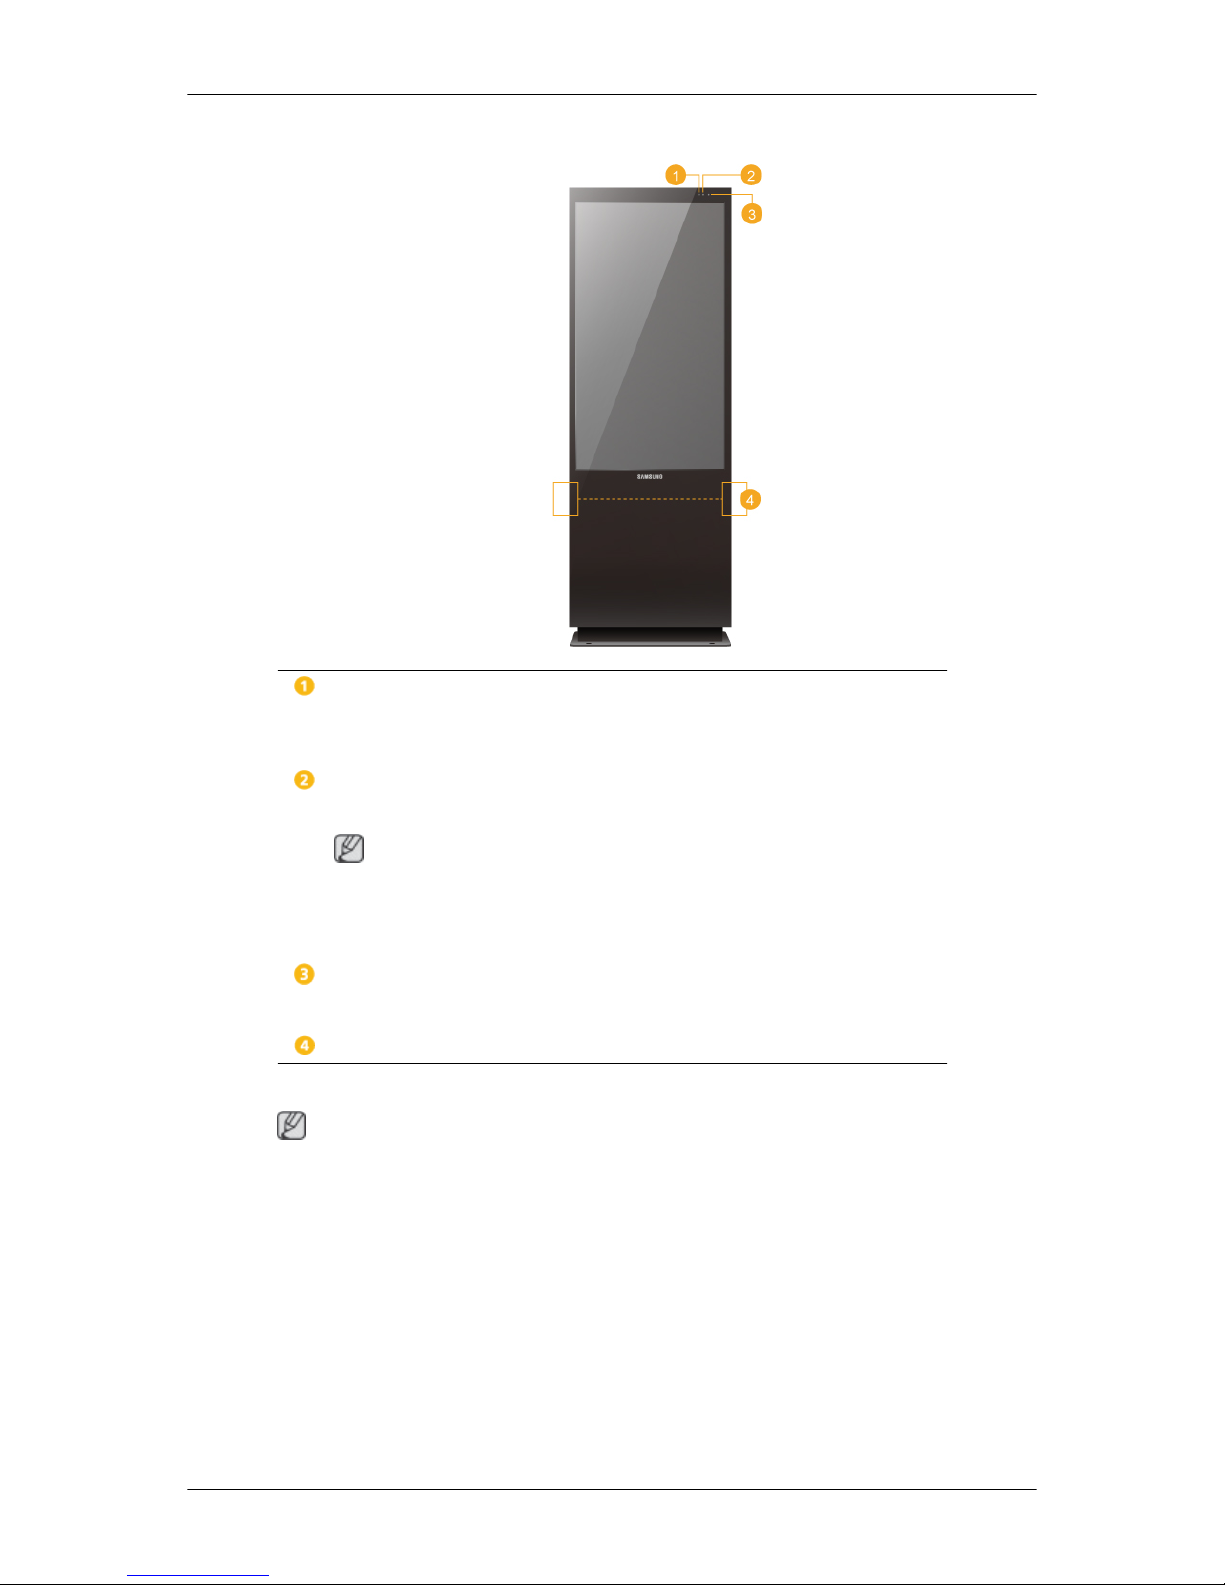
Front
Brightness Sensor
Brightness Sensor detects the ambient light intensity so that the picture brightness
can automatically be adjusted.
Power indicator
Shows PowerSaver mode by blinking green
Note
See PowerSaver described in the manual for further information regarding power
saving functions. For energy conservation, turn your LCD Display OFF when it
is not needed or when leaving it unattended for long periods.
Remote Control Sensor
Aim the remote control towards this spot on the LCD Display.
Speaker
Rear
Note
For detailed information concerning cable connections, refer to Connecting Cables under Setup. The
LCD Display 's configuration at the back may vary slightly depending on the LCD Display model.
Introduction
Page 12
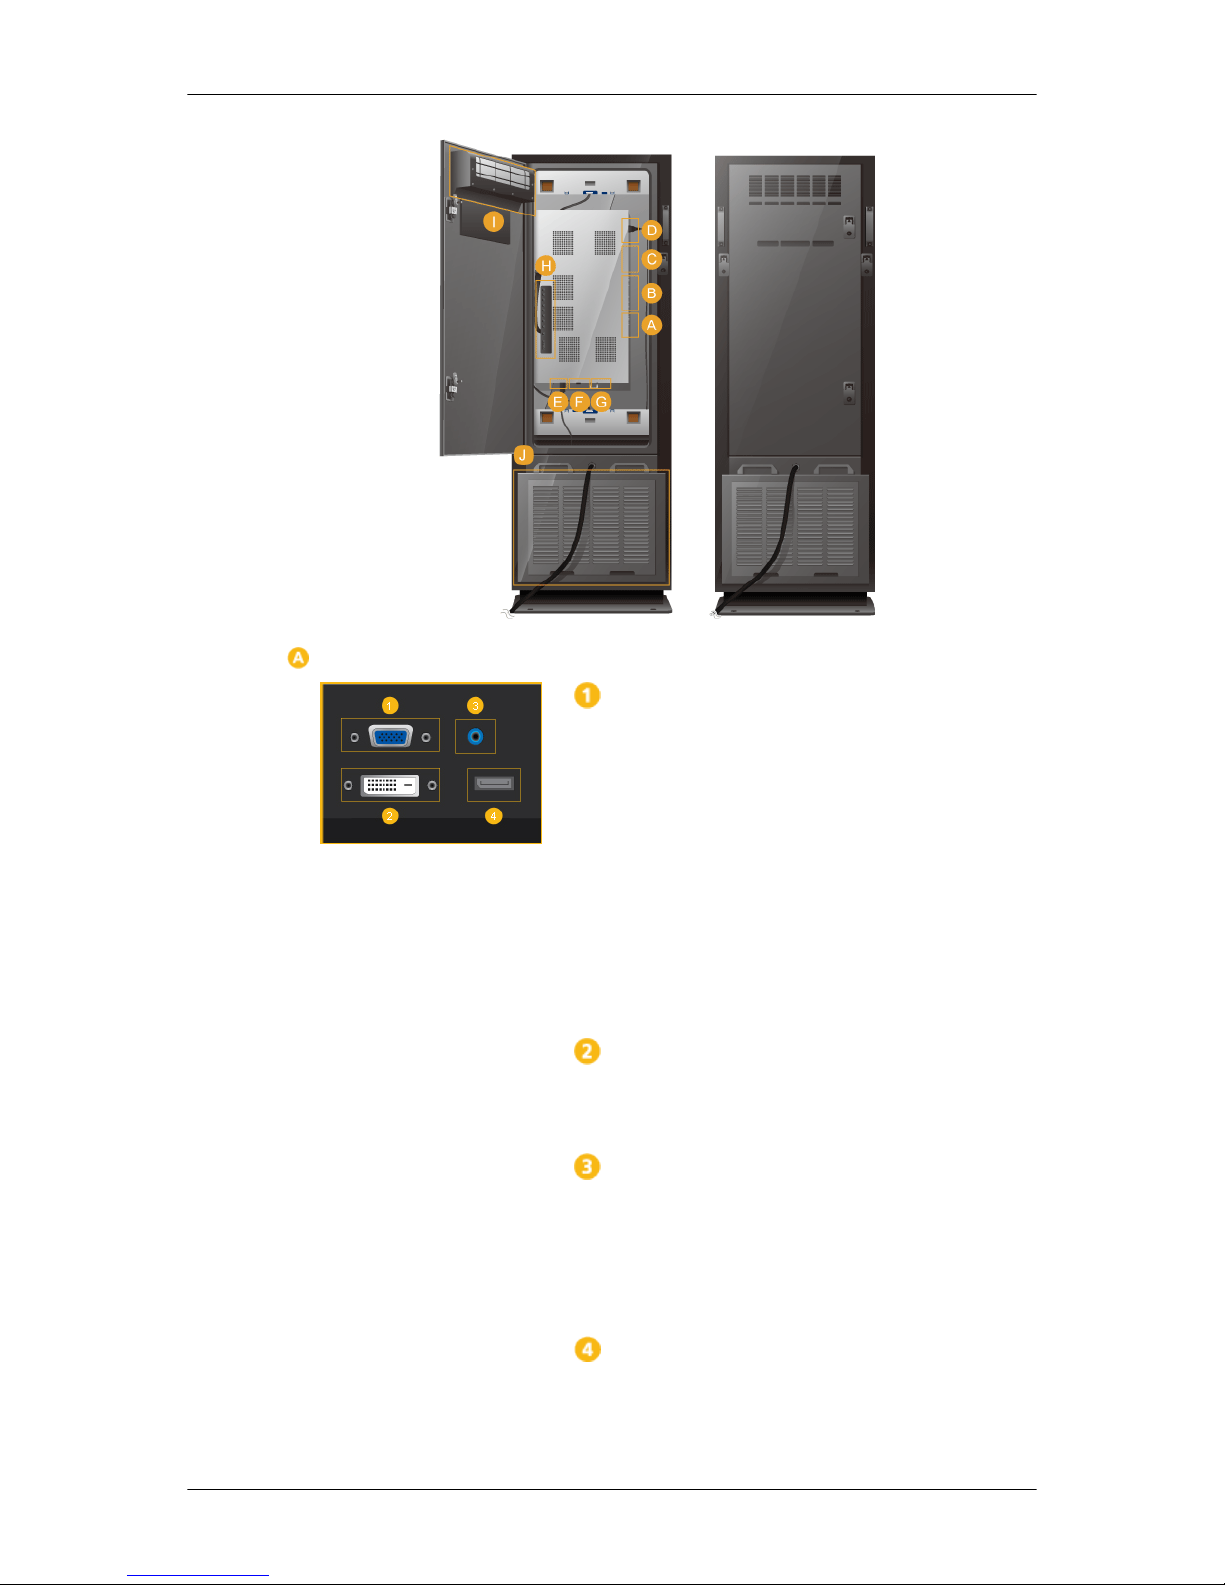
RGB/COMPONENT IN (PC/COMPONENT
Connection Terminal (Input))
• Connect the [RGB/COMPONENT IN] port
on the monitor to the RGB port on the PC using the D-SUB cable.
• Connect the [RGB/COMPONENT IN] port
on the monitor to the COMPONENT port on
the external device using the RGB to COMPONENT cable.
• Connect the [RGB/COMPONENT IN] port
on the monitor to the BNC port on the PC using the RGB to BNC cable.
DVI IN (PC Video Connection Terminal)
Connect the [DVI IN] port on the monitor to the
DVI port on the PC using the DVI cable.
RGB/DVI/HDMI AUDIO IN (PC/DVI/HDMI
Audio Connection Terminal (Input))
Connect the [RGB/DVI/HDMI AUDIO IN] terminal of the monitor and the speaker output terminal of your computer's sound card using a
stereo cable (sold separately).
DP IN
Receives a signal from the Display port.
Introduction
Page 13

Connect a DP cable to [DP IN] on the product and
DP IN on another devices.
AV/COMPONENT AUDIO IN [R-AUDIO-L]
Connect the [AV/COMPONENT AUDIO IN [R-
AUDIO-L]] port on the monitor to the audio
output port on the PC or on the external device
using an audio cable.
AV IN
Connect the [AV IN] terminal of your monitor to
the video output terminal of the external device
using a VIDEO cable.
AUDIO OUT
Connect a headphone or an External speaker.
HDMI IN 1
• Connect the [HDMI IN 1] terminal at the back
of your LCD Display to the HDMI terminal
of your digital output device using a HDMI
cable.
• Up to HDMI 1.3 can be supported.
Note
• A normal external device (DVD player or
camcorder, etc.) can be connected to the
[HDMI IN 1] terminal.
HDMI IN 2 (MAGICINFO)
• Connect the [HDMI IN 2 (MAGICINFO)]
terminal at the back of your LCD Display to
the HDMI terminal of your digital output device using a HDMI cable.
• Up to HDMI 1.3 can be supported.
Note
To use MagicInfo, the network box specified
separately by Samsung must be installed inside
the product and the MagicInfo output of the network box must be connected to the [HDMI IN 2
(MAGICINFO)] terminal.
For more information on how to purchase and install a network box, contact Samsung Electronics.
Introduction
Page 14
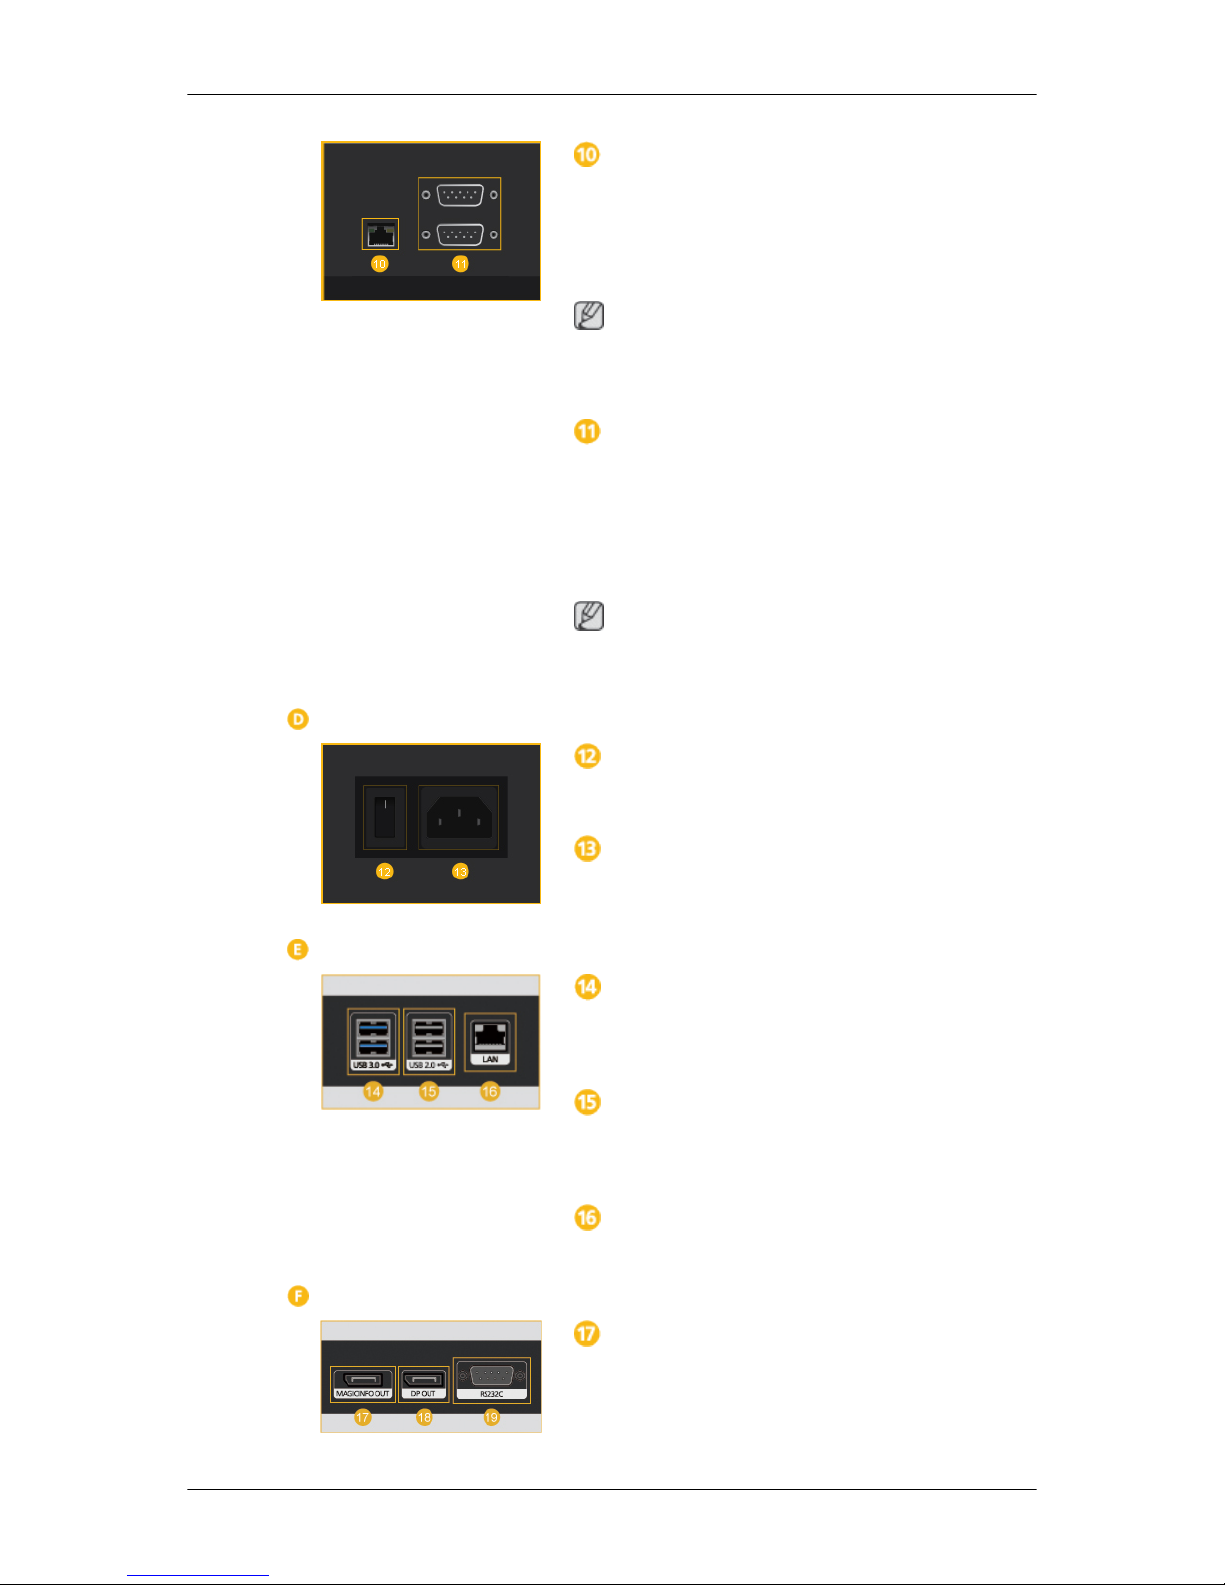
RJ 45 MDC (MDC PORT)
MDC(Multiple Display Control) Program Port
Connect the LAN cable to [RJ45 MDC] on the
product and LAN on the PC. To use an MDC, the
MDC Program must be installed on the PC.
Note
Go to Multi Control and select RJ45 MDC as
the MDC Connection.
RS232C OUT/IN (RS232C Serial PORT)
MDC(Multiple Display Control) Program Port
Connect a serial cable (cross type) to [RS232C]
on the product and RS232C on the PC. To use an
MDC, the MDC Program must be installed on the
PC.
Note
Go to Multi Control and select RS232C MDC
as the MDC Connection.
POWER S/W ON [ │ ] / OFF
Switches the LCD Display On/Off.
POWER
The power cord plugs into the LCD Display and
the wall outlet.
Connecting a Network Box (sold separately)
USB 3.0 (USB Connection Terminal)
Connect to a device that supports USB 3.0. (Also
compatible with a USB 2.0 device)
USB 2.0 (USB Connection Terminal)
Connect to a USB device such as a USB keyboard, mouse, memory, or digital camera.
LAN (LAN Connection Terminal)
Connect to the Internet using a LAN cable.
Connecting a Network Box (sold separately)
MAGICINFO OUT
Connect the network box to a Samsung display
device that has a MAGICINFO port using the
MAGICINFO OUT-HDMI cable provided. (A
Introduction
Page 15
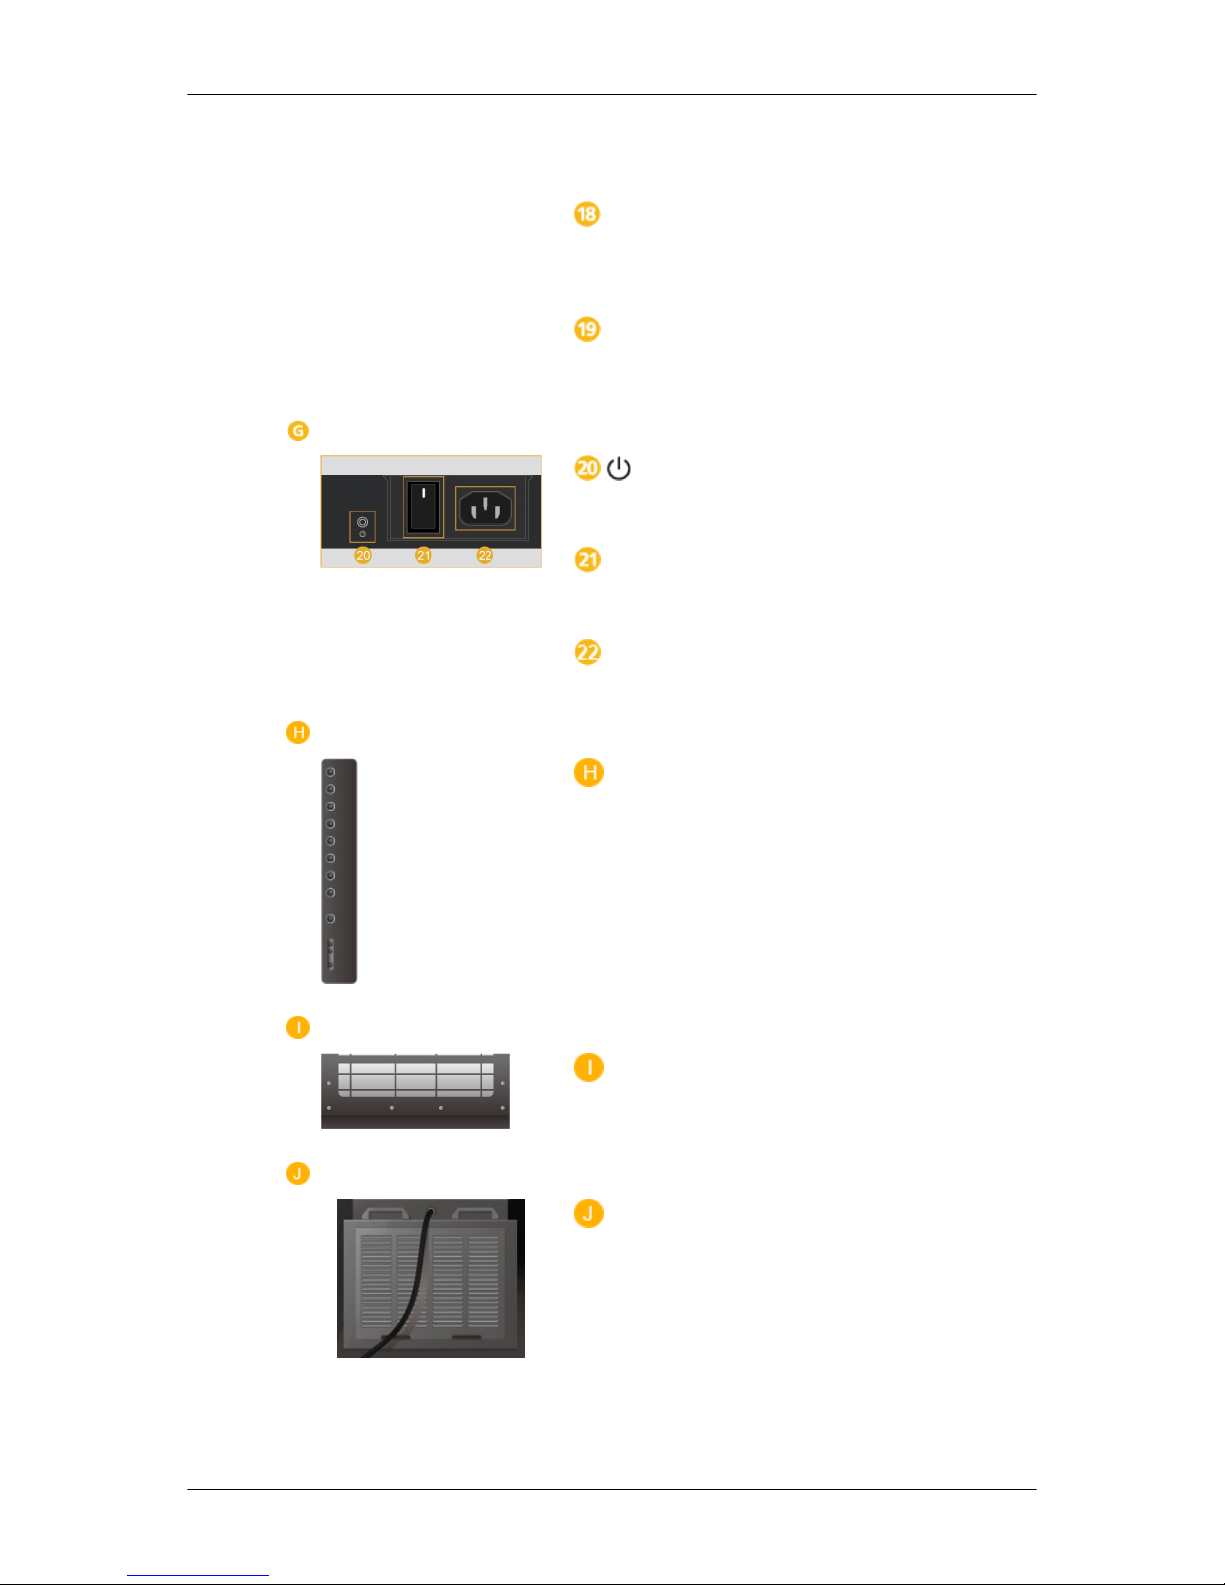
display device not manufactured by Samsung
cannot be used.)
DP OUT
Connect the network box to a display device that
supports DP using the DP cable.
RS232C (RS232C Serial PORT)
Connect to a device that supports serial communication.
Connecting a Network Box (sold separately)
Power on or off the network box.
POWER S/W ON [ │ ] / OFF [O]
Turn on or shut off the AC power supply.
POWER
Connect to the power cord.
Button
Not available.
Air exhaust vent
Air intake vent
Introduction
Page 16

Note
• Periodically replace the intake vent filter at the lower part of the product.
• Length of the replacement cycle may vary depending on the fine dust concentration (PM-10) in
the location of installation. Refer to the table below.
• Fine dust (PM-10): Tiny particles that are very thin with a diameter of 10 or less
Intake filter replacement cycle according to the dust concentration
Dust Concentration
( )
70 60 50 40 30 20 10
Replacement cycle
9 months 11
months13months16months21months32months64months
• If you do not know the dust concentration in the area of installation, it is recommended that you
replace the filter before summer begins every year.
• Especially in a location exposed to a lot of dust, the filter must be replaced at least every 6
months. A partially dark screen is likely a result of the filter being used longer than the recommended replacement cycle. Replace the filter immediately.
•
In Europe and the United States, the yearly mean dust concentration is less than 30
and
the recommended replacement cycle is about 21 months. In Korea, the yearly mean dust con-
centration is less than 60 and the recommended replacement cycle is about 11 months.
The dust concentration and recommended replacement cycle may vary according to the location
of installation.
Note
The power switches of both of the monitor and the network box must be turned on for the network box
to operate normally.
Remote Control
Note
• Using other display devices in the same space as the remote control of this product can cause the
other display devices to be inadvertently controlled.
• Remote control button functions may differ for different products.
Introduction
Page 17
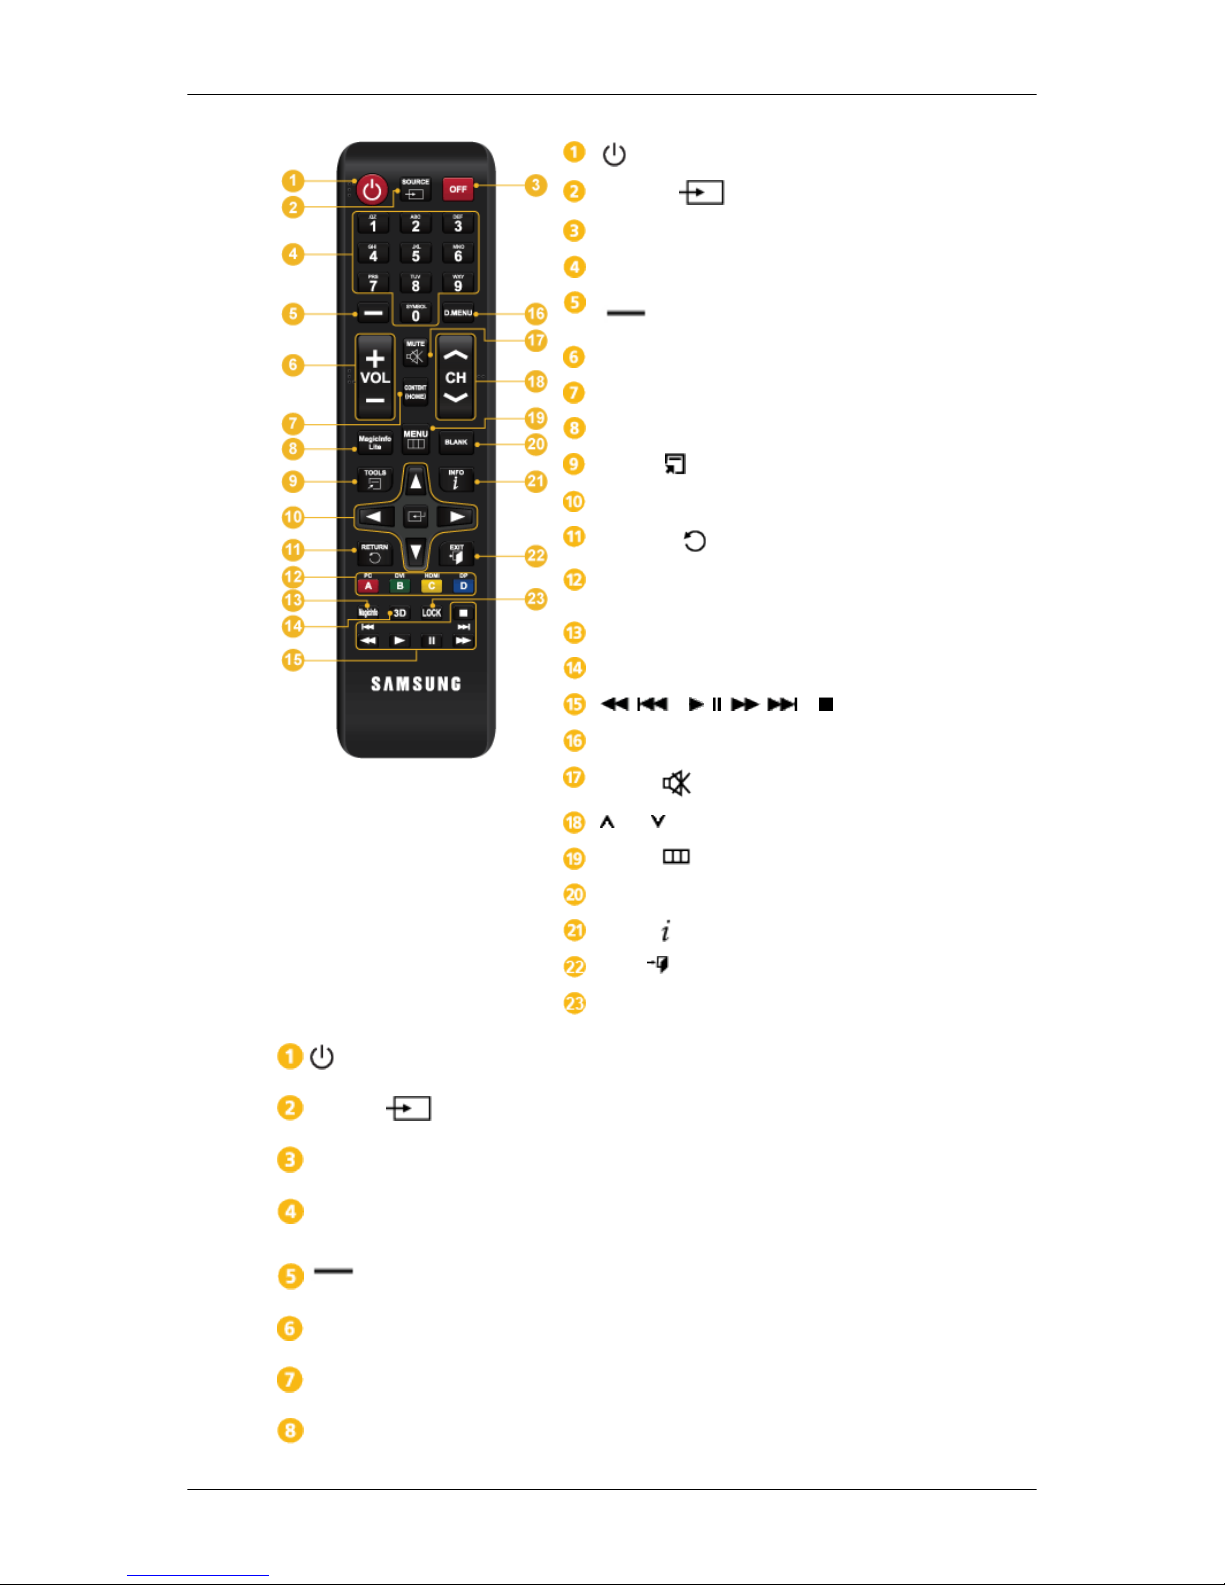
SOURCE
OFF
Number Buttons
+ VOL -
CONTENT (HOME)
MagicInfo Lite
TOOLS
Up-Down Left-Right / Enter buttons
RETURN
The Color button / The PC/DVI/HDMI/DP selection button
MagicInfo
3D
( ) / / / ( ) /
D.MENU
MUTE
CH
MENU
BLANK
INFO
EXIT
LOCK
Power on the product.
SOURCE
Select a connected source device.
OFF
Power off the product.
Number Buttons
Enter the password in the OSD menu.
Not available.
+ VOL -
Adjust the volume.
CONTENT (HOME)
Not available.
MagicInfo Lite
Not available.
Introduction
Page 18
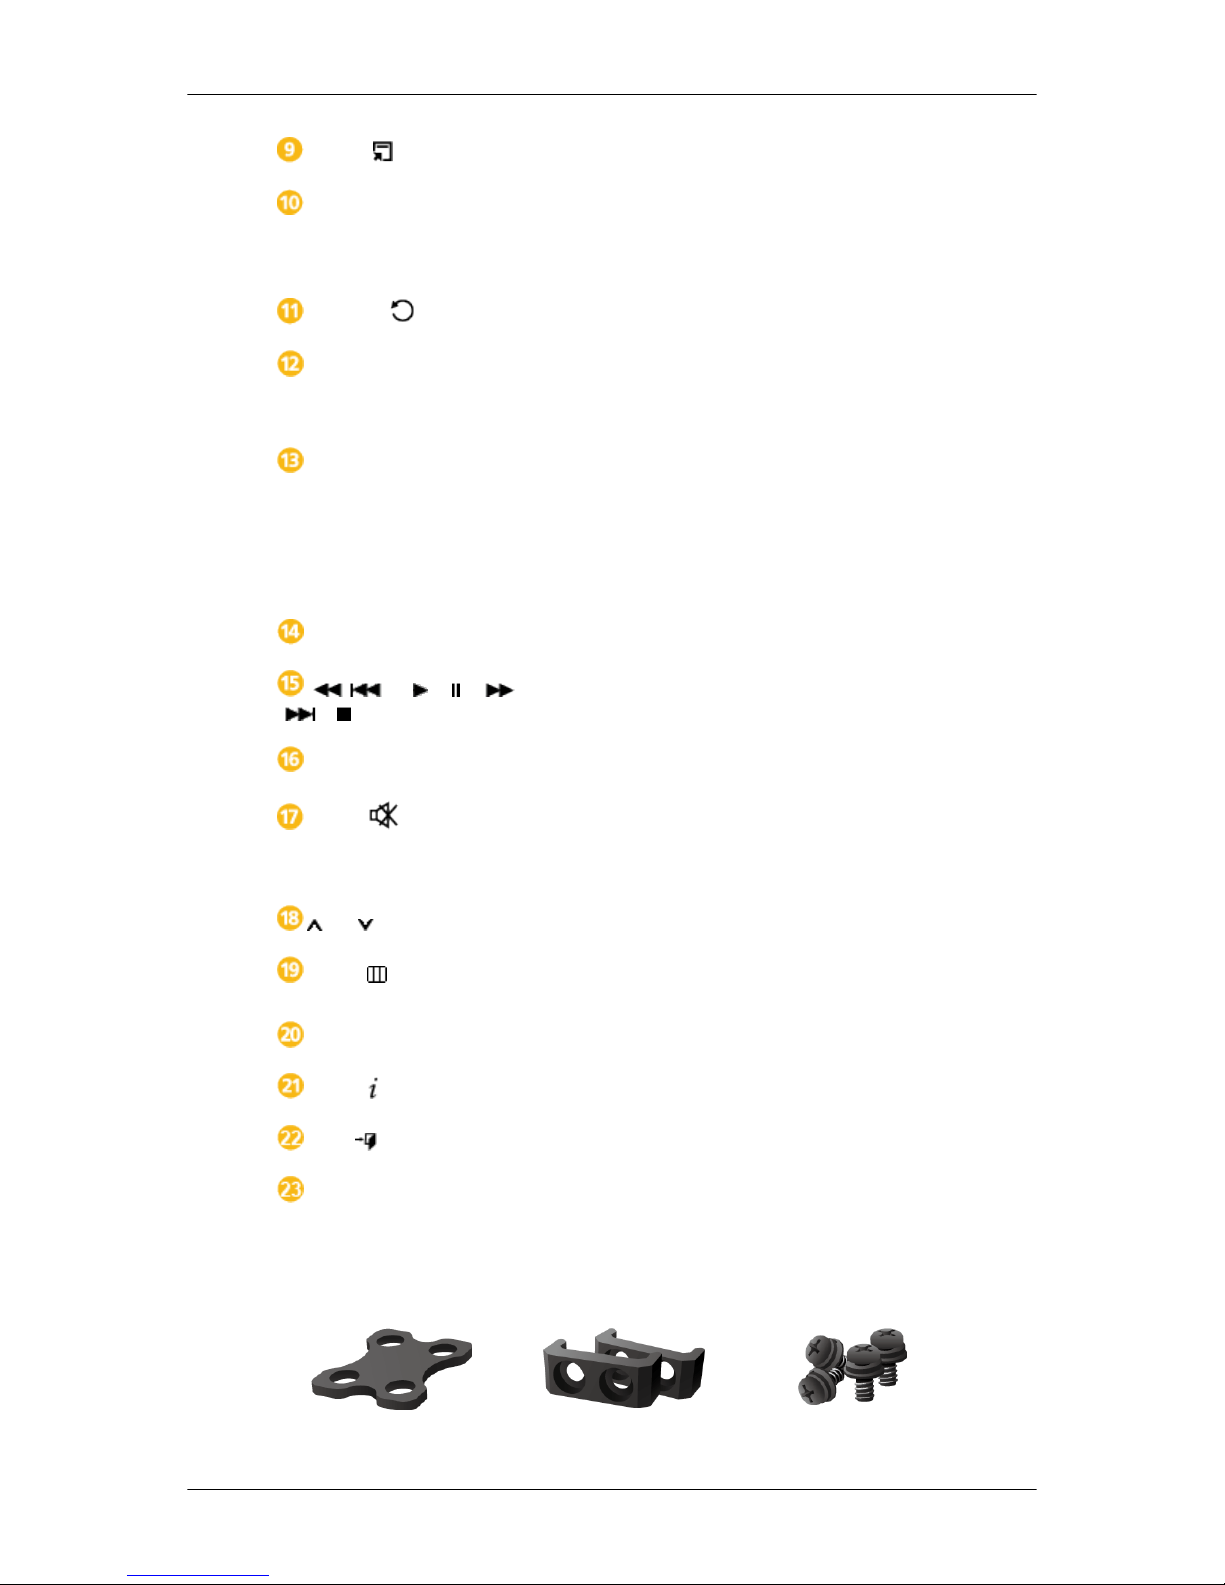
TOOLS
Not available.
Up-Down Left-Right / En-
ter buttons
Up-Down Left-Right button : Move to the upper, lower, left or
right menu, or adjust an option's setting.
Enter button : Activates a highlighted menu item.
RETURN
Return to the previous menu.
The Color button / The PC/
DVI/HDMI/DP selection button
Manually select a connected input source from PC, DVI,
HDMI or DP.
MagicInfo
MagicInfo Quick Launch Button.
MagicInfo can only be enabled when a network box(sold separately)is connected.
This button is disabled for products that do not support MagicIn-
fo.
3D
Not available.
( ) / / /
( ) /
Not available.
D.MENU
Not available.
MUTE
Mute the sound.
Unmuting the sound: Press MUTE again or press the volume control (+ VOL -) button.
CH
Not available.
MENU
Display or hide the onscreen display menu, or return to the previous menu.
BLANK
Not available.
INFO
Display information on the screen.
EXIT
Exit the current menu.
LOCK
It sets safe lock function.
Fixing the product
Unpacking
Brackets link top Brackets link bottom (x 2) Bolts (x 4)
Introduction
Page 19
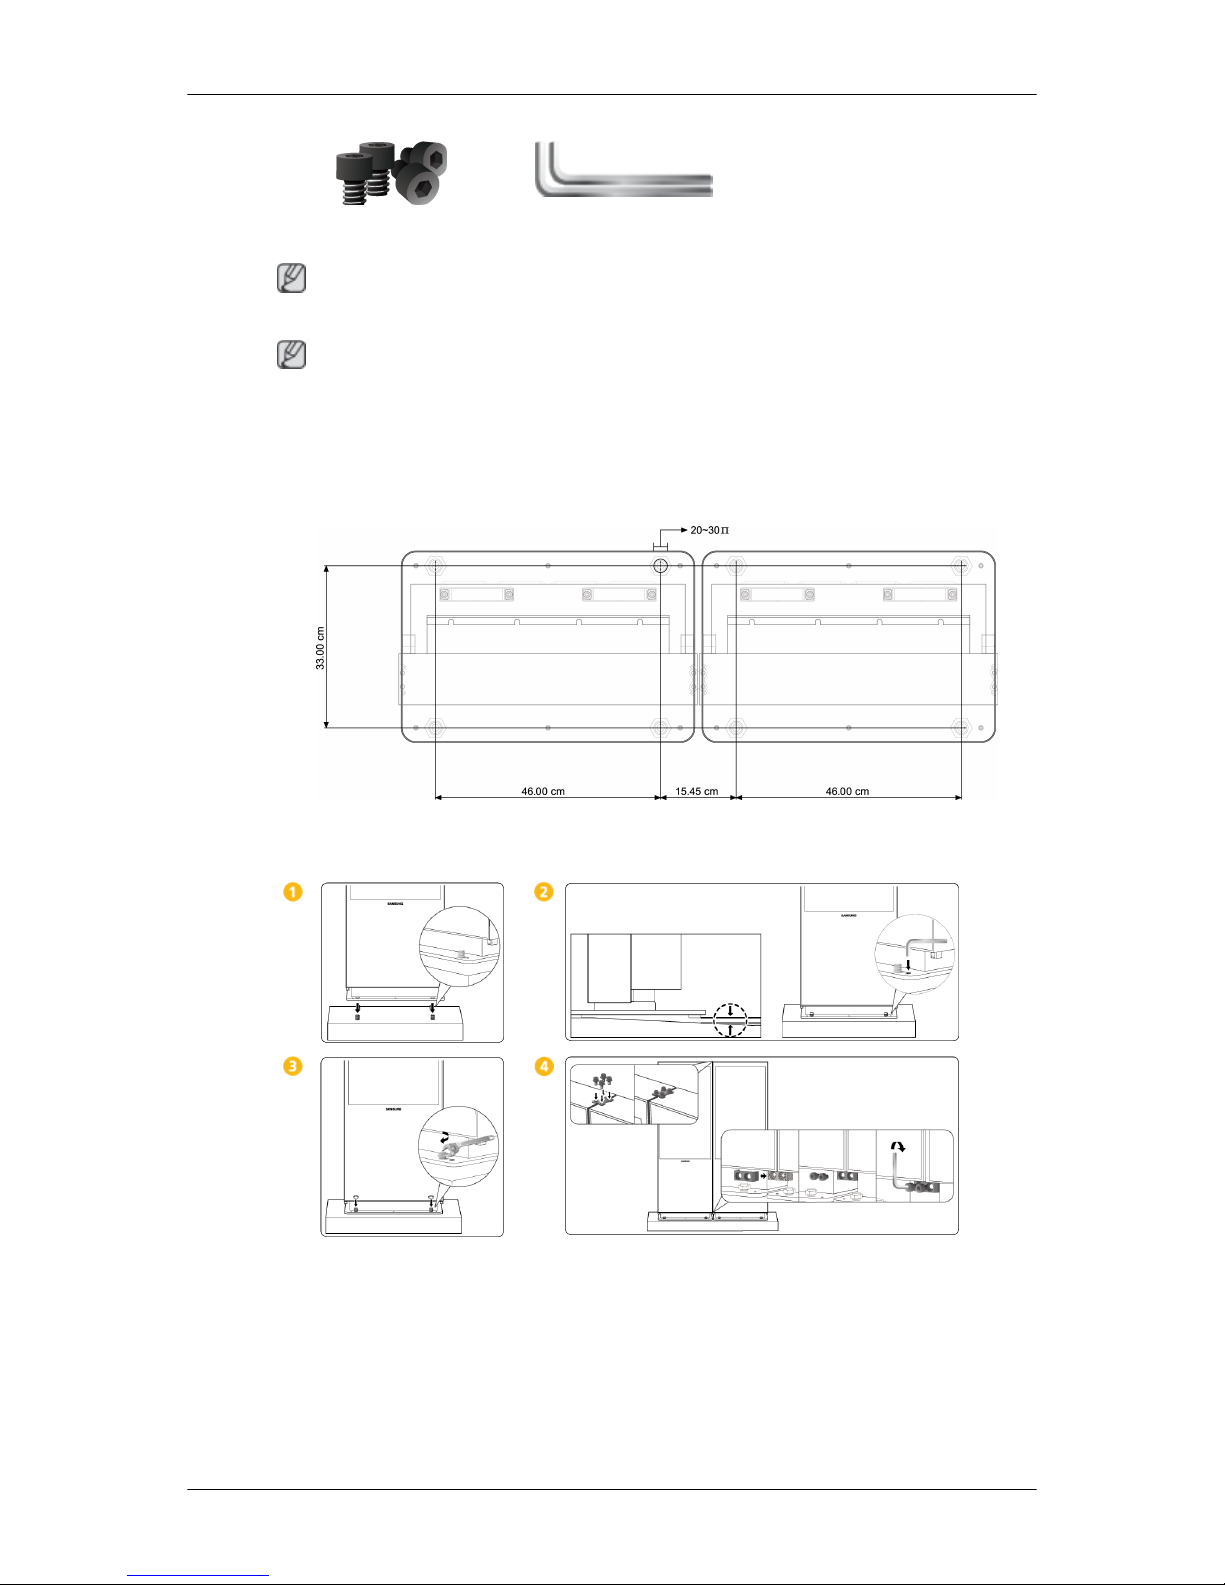
Wrench Bolts (x 4) L Wrench (x 2)
Note
To install components that are not provided in the package, purchase the components separately.
Note
• The product can tip over easily. Ensure the product is fastened to the ground.
• For the installation locations of the anchors (sold separately) on the ground, refer to the dimensions
of the base as shown below.
Dimensions of the base
Process to fix the product
Introduction
Page 20
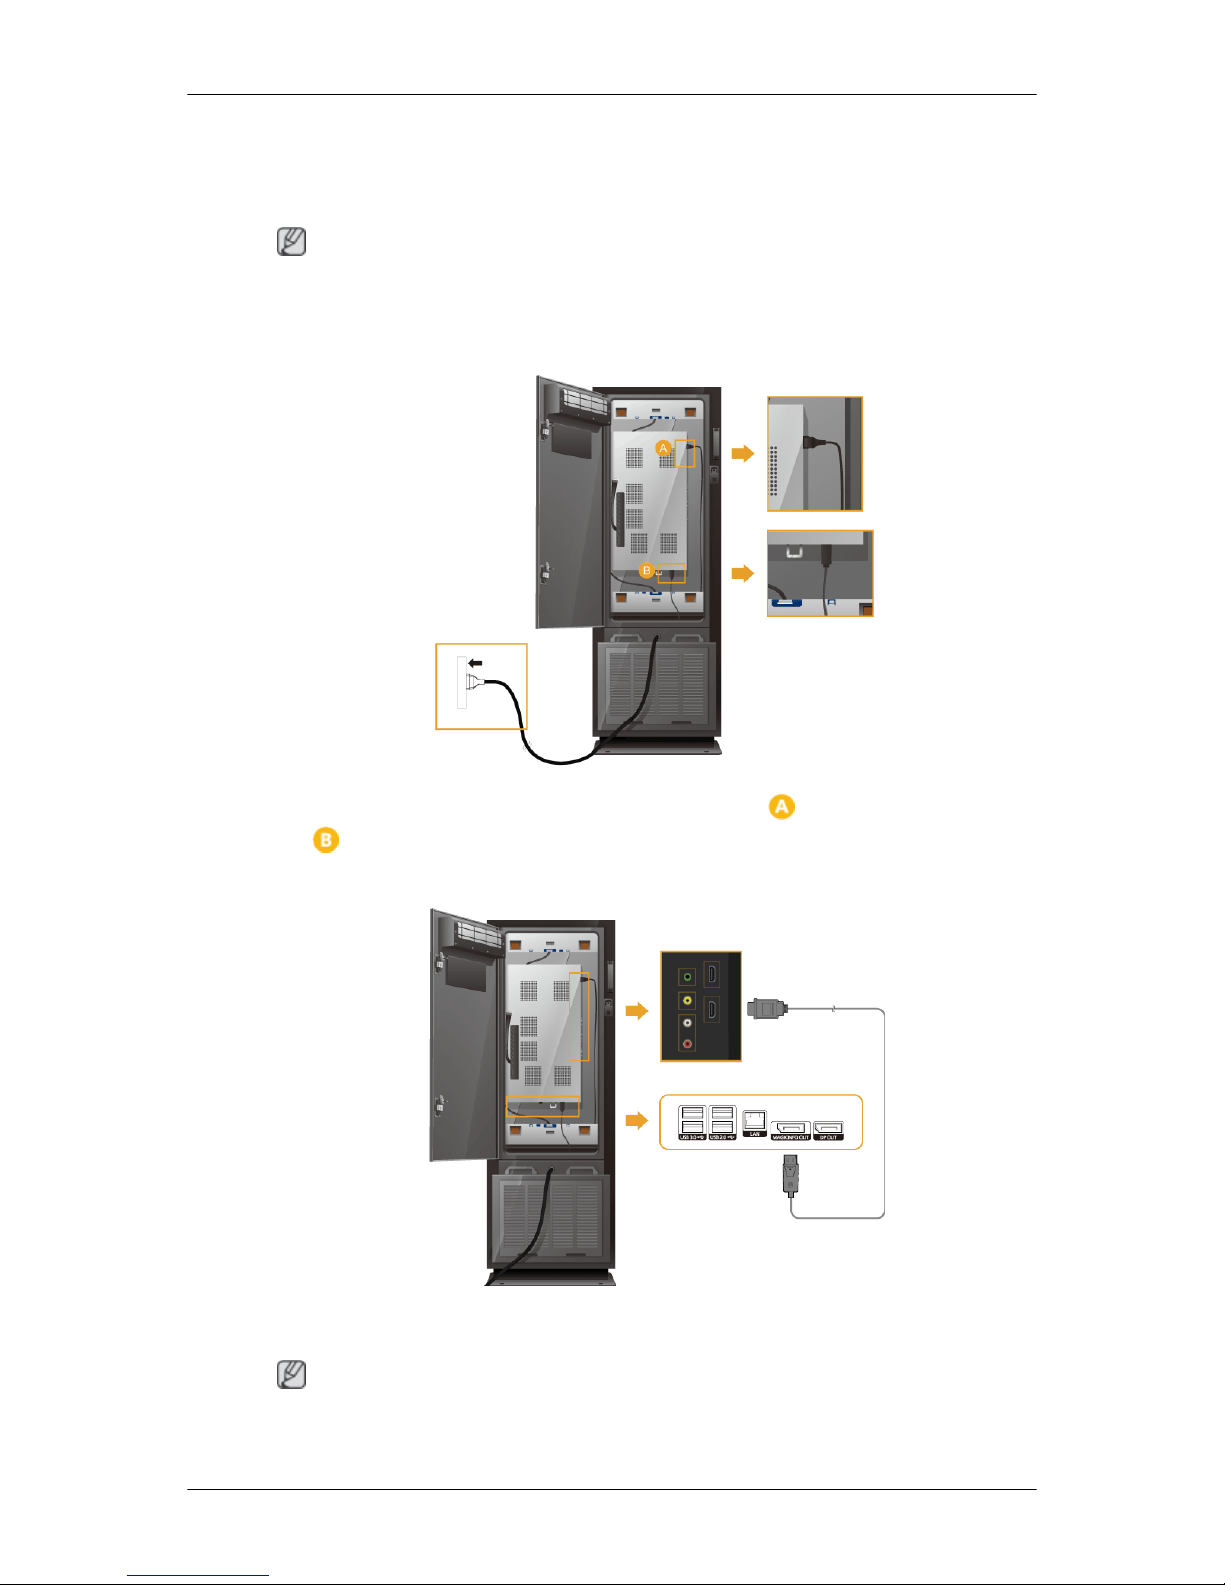
Connecting a Network Box
Connecting the Power
Note
• Network boxes are sold separately.
• For more information on how to purchase and install a network box, contact Samsung Electronics.
Connect the power cables inside the product to power input port on the product and power input
port on the network box respectively.
Connecting to MAGICINFO OUT
Connect the [MAGICINFO OUT] terminal of the network box and the [HDMI IN 2 (MAGICINFO)]
terminal of the monitor using the DP to HDMI cable.
Note
• A MAGICINFO OUT-HDMI cable is provided with the network box.
Page 21
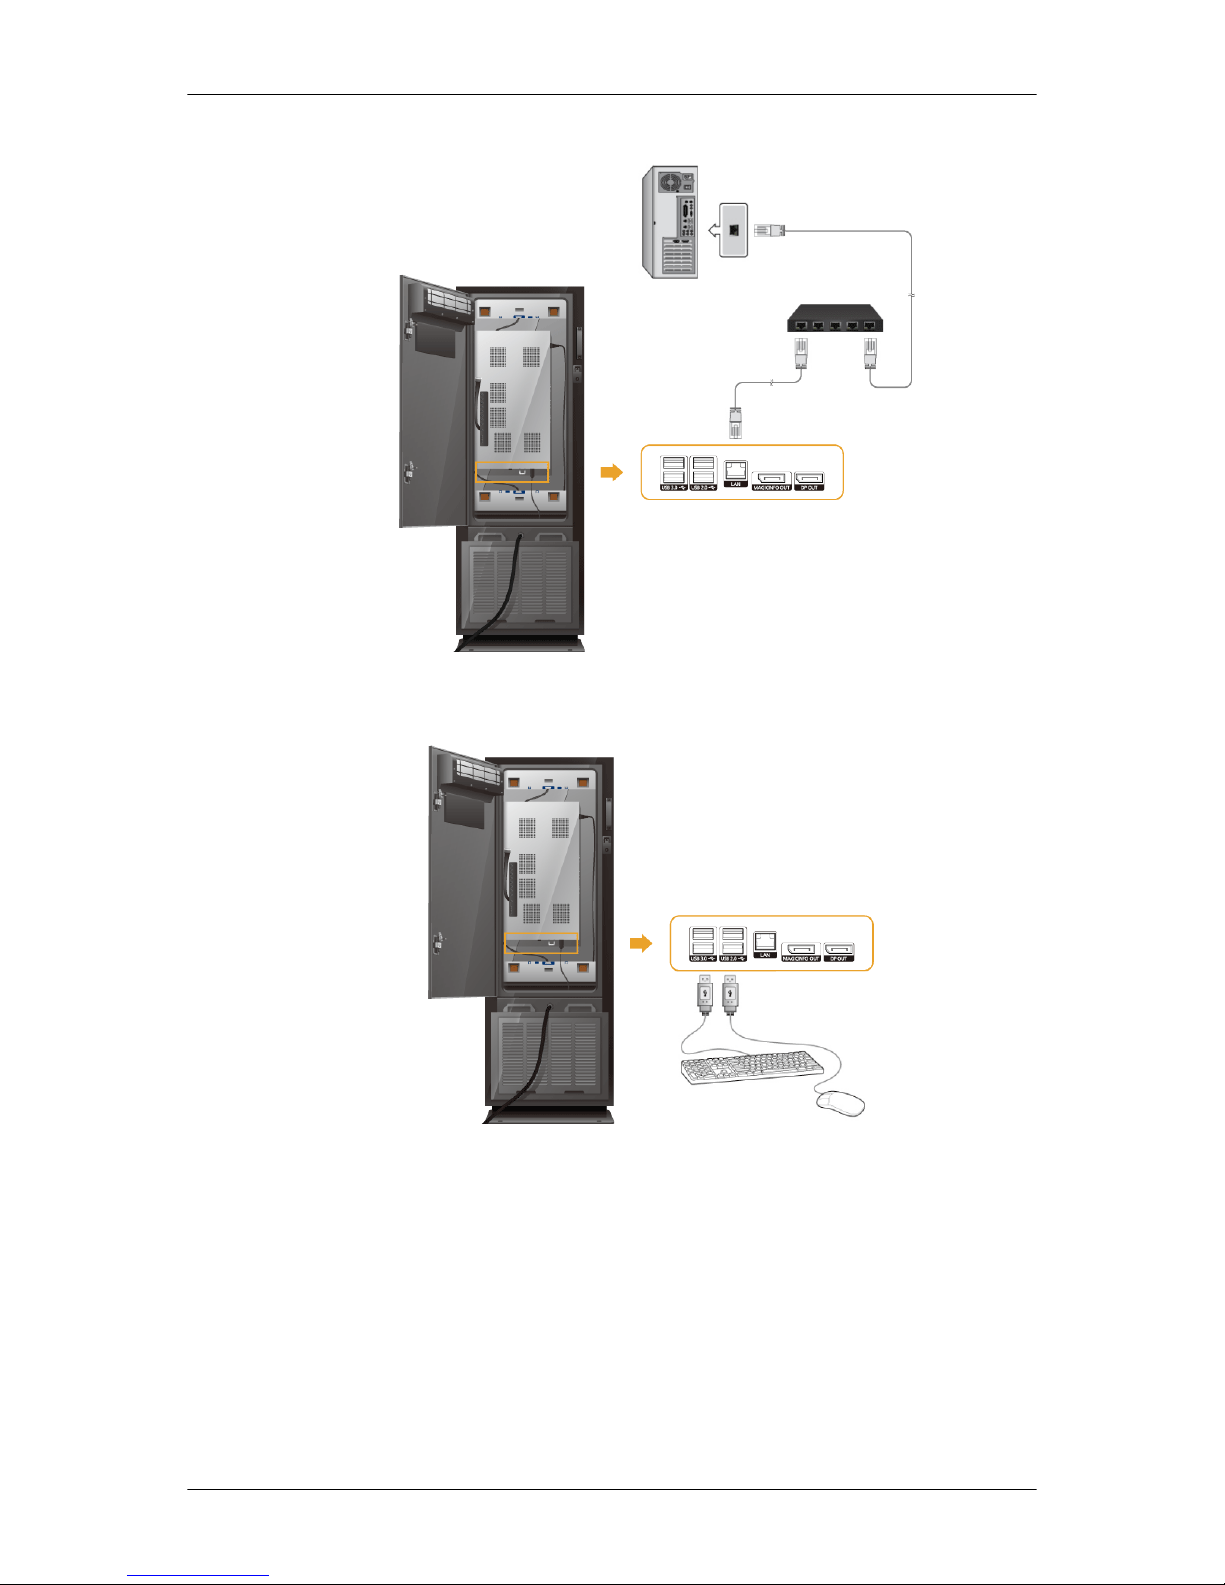
Connecting a LAN Cable
Connect the [LAN] port on the product and your network using a LAN cable.
Connecting a USB devices
You can connect USB devices such as a mouse or keyboard.
Connecting a Network Box
Page 22
Using the Software
Monitor Driver
Note
When prompted by the operating system for the monitor driver, insert the CD-ROM
included with this monitor. Driver installation is slightly different from one operating
system to another. Follow the directions appropriate for the operating system you
have.
Prepare a blank disk and download the driver Program file at the Internet web site
shown here.
Internet web site :
http://www.samsung.com/
Installing the Monitor Driver (Automatic)
1. Insert CD into the CD-ROM drive.
2. Click "Windows".
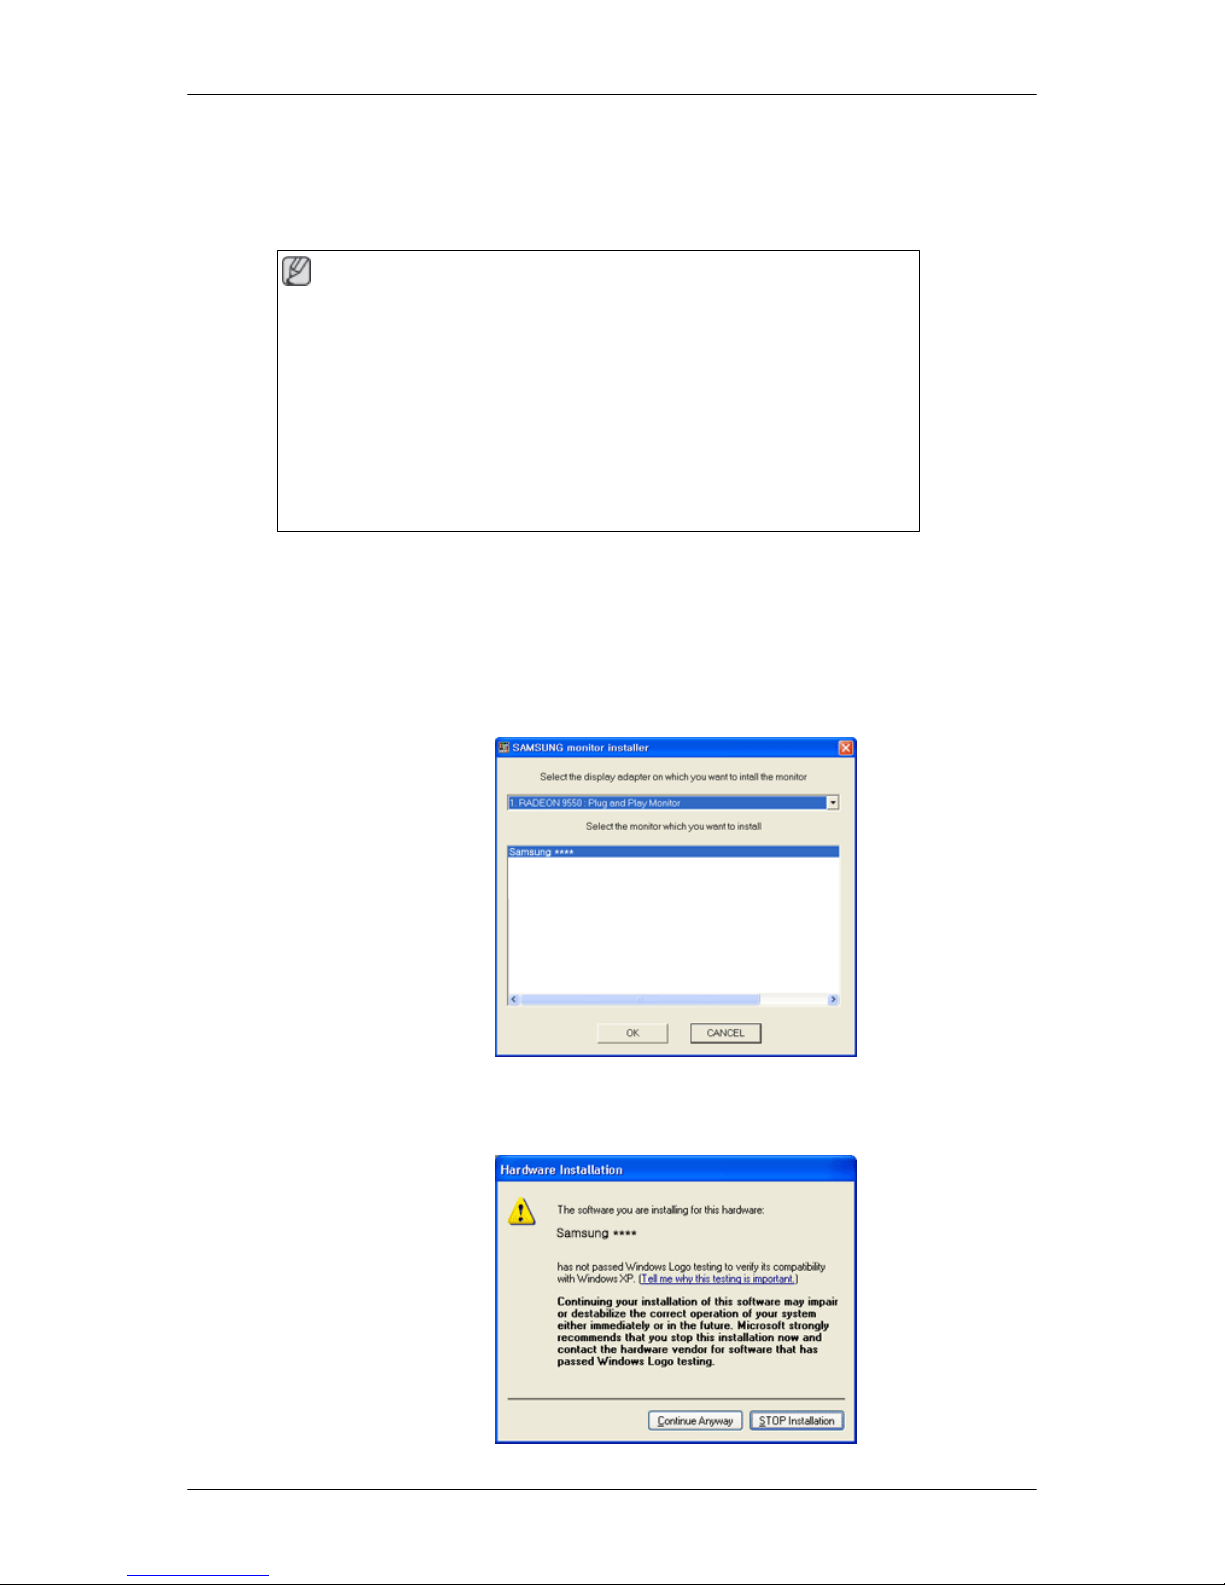
3. Choose your monitor model in the model list, then click the "OK" button.
4. If you can see following message window, then click the "Continue Anyway" button. Then click
"OK" button (Microsoft® Windows® XP/2000 Operating System).
Page 23
Note
This monitor driver is certified by Microsoft, and installing it will not damage your system.
The certified driver will be posted on Samsung Monitor homepage.
http://www.samsung.com/
Installing the Monitor Driver (Manual)
Microsoft® Windows Vista™‚ Operating System
1. Insert your Manual CD into your CD-ROM drive.
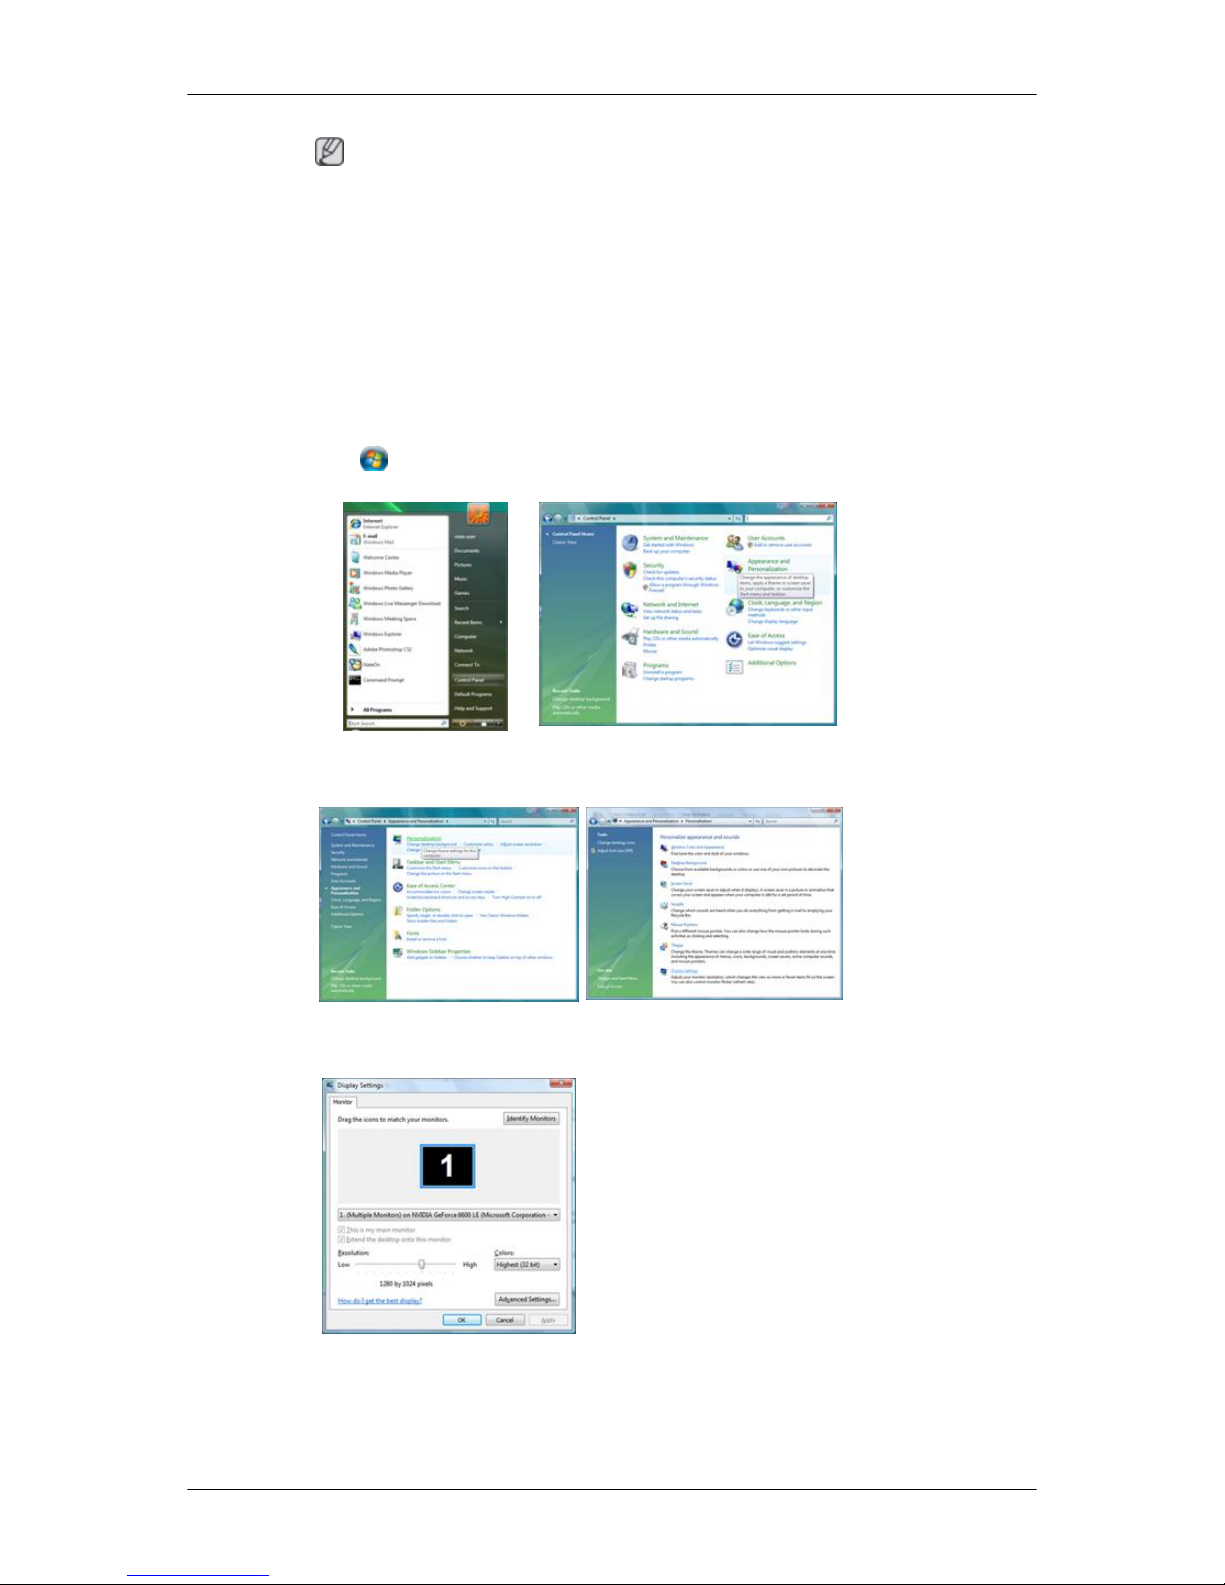
2.
Click
(Start) and "Control Panel". Then, double-click on "Appearance and Personalization".
3. Click "Personalization" and then "Display Settings".
4. Click "Advanced Settings...".
5. Click "Properties" in the "Monitor" tab. If the "Properties" button is deactivated, it means the
configuration for your monitor is completed. The monitor can be used as is.
If the message "Windows needs..." is displayed, as shown in the figure below, click "Continue".
Using the Software
Page 24
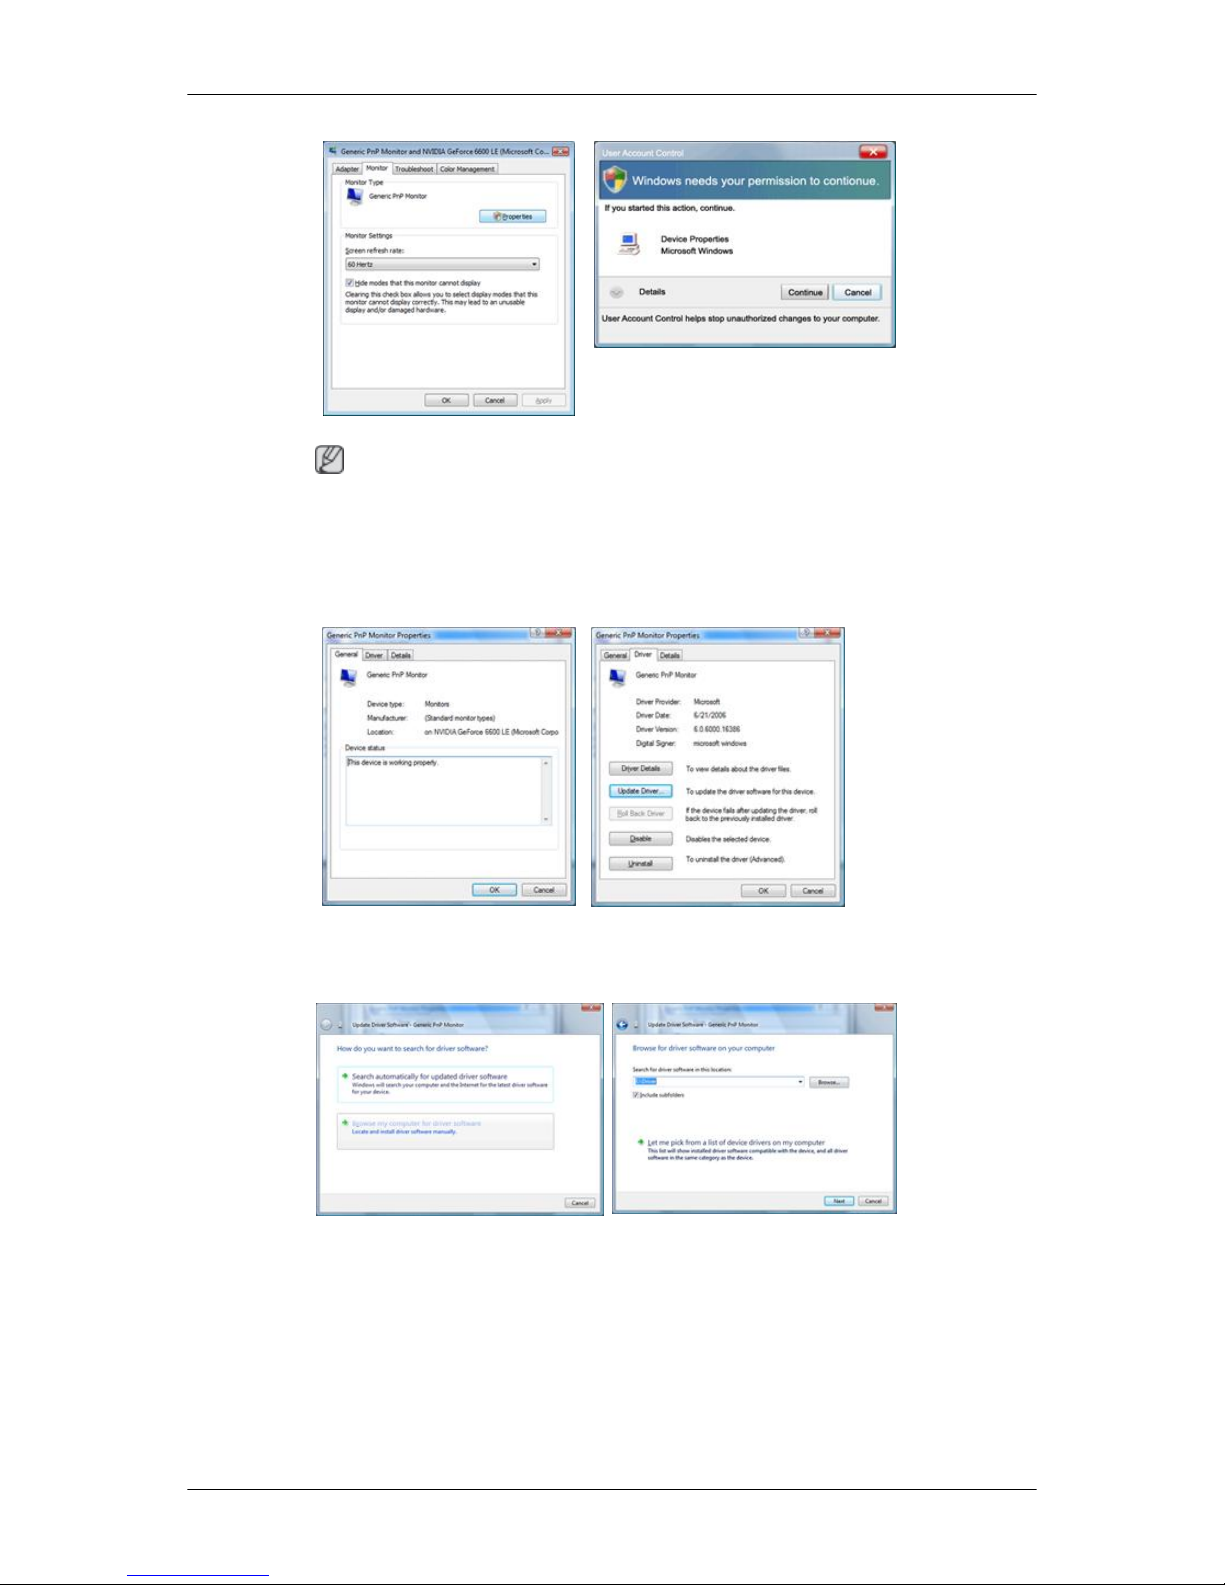
Note
This monitor driver is under certifying MS logo, and this installation will not damage your system.
The certified driver will be posted on Samsung Monitor homepage.
6. Click "Update Driver..." in the "Driver" tab.
7. Check the "Browse my computer for driver software" checkbox and click "Let me pick from a
list of device drivers on my computer".
8. Click "Have Disk...” and select the folder (for example, D:\Drive) where the driver setup file is
located, and click "OK".
Using the Software
Page 25
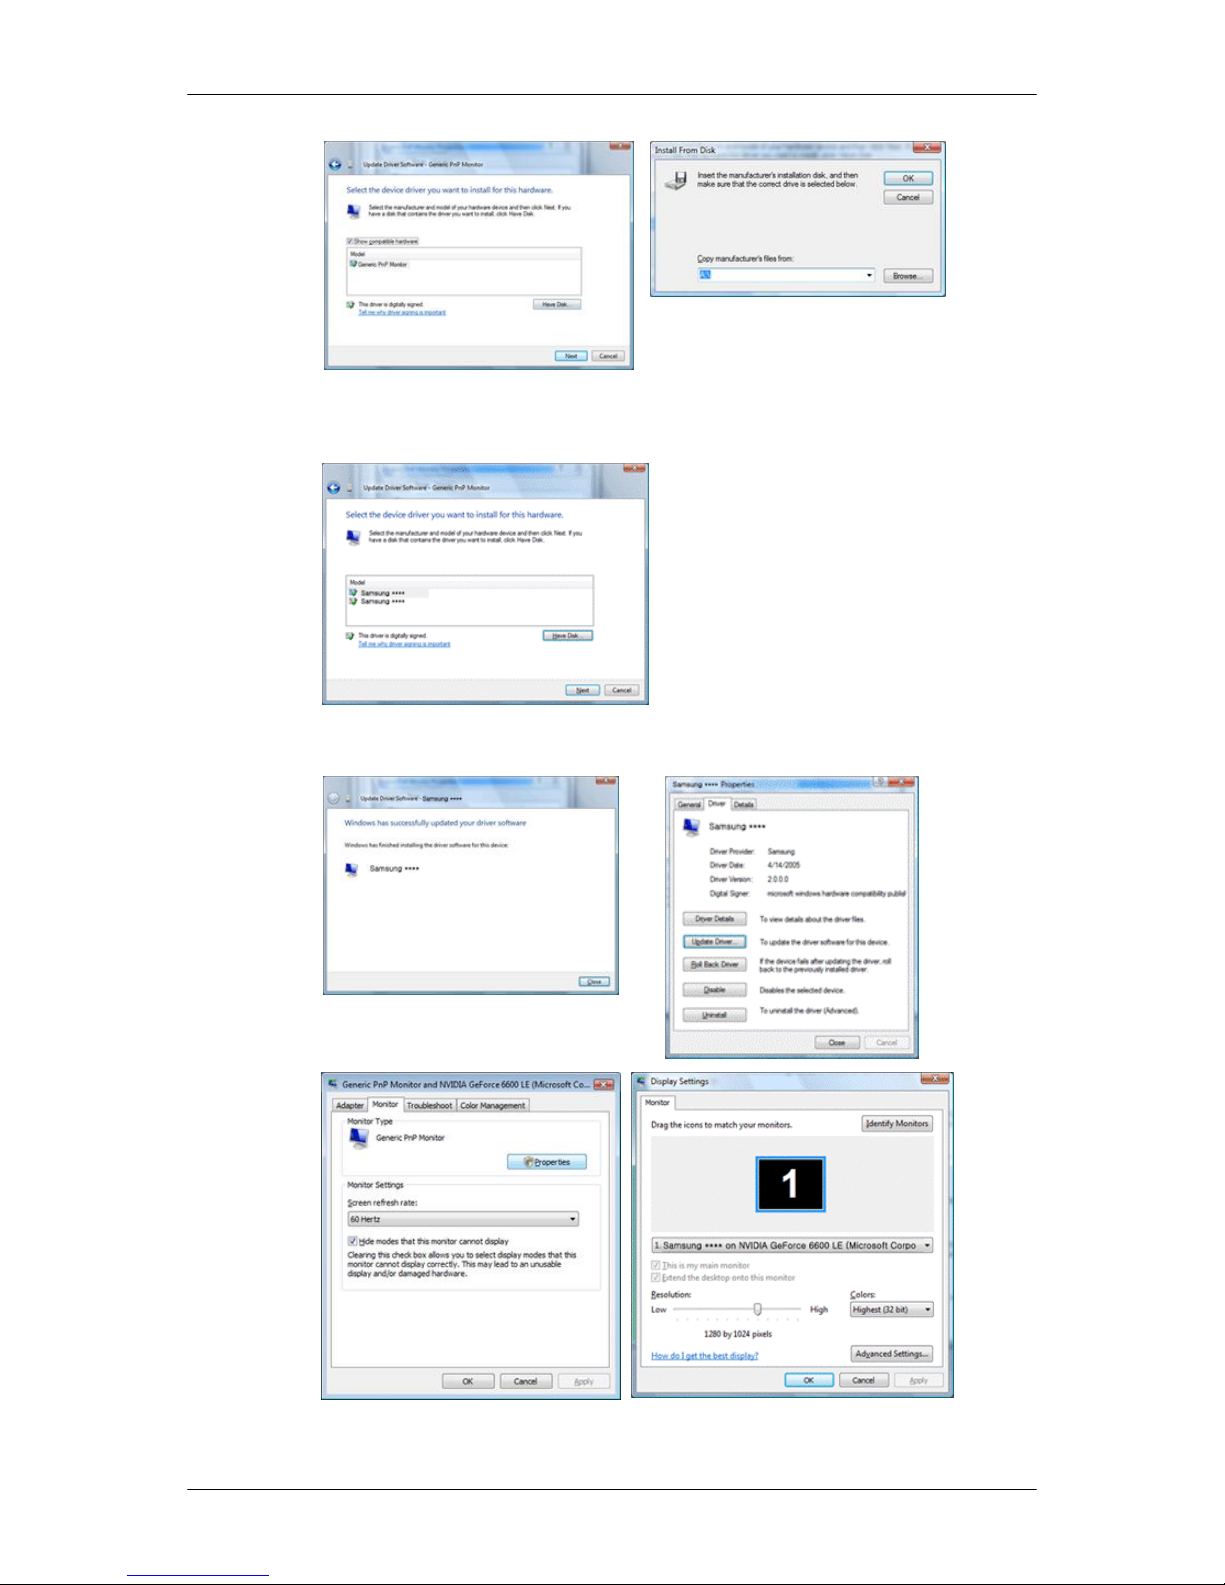
9. Select the model that matches your monitor from the list of monitor models on the screen, and
click "Next".
10.
Click "Close" → "Close" → "OK" → "OK" on the following screens displayed in sequence.
Microsoft® Windows® XP Operating System
Using the Software
Page 26
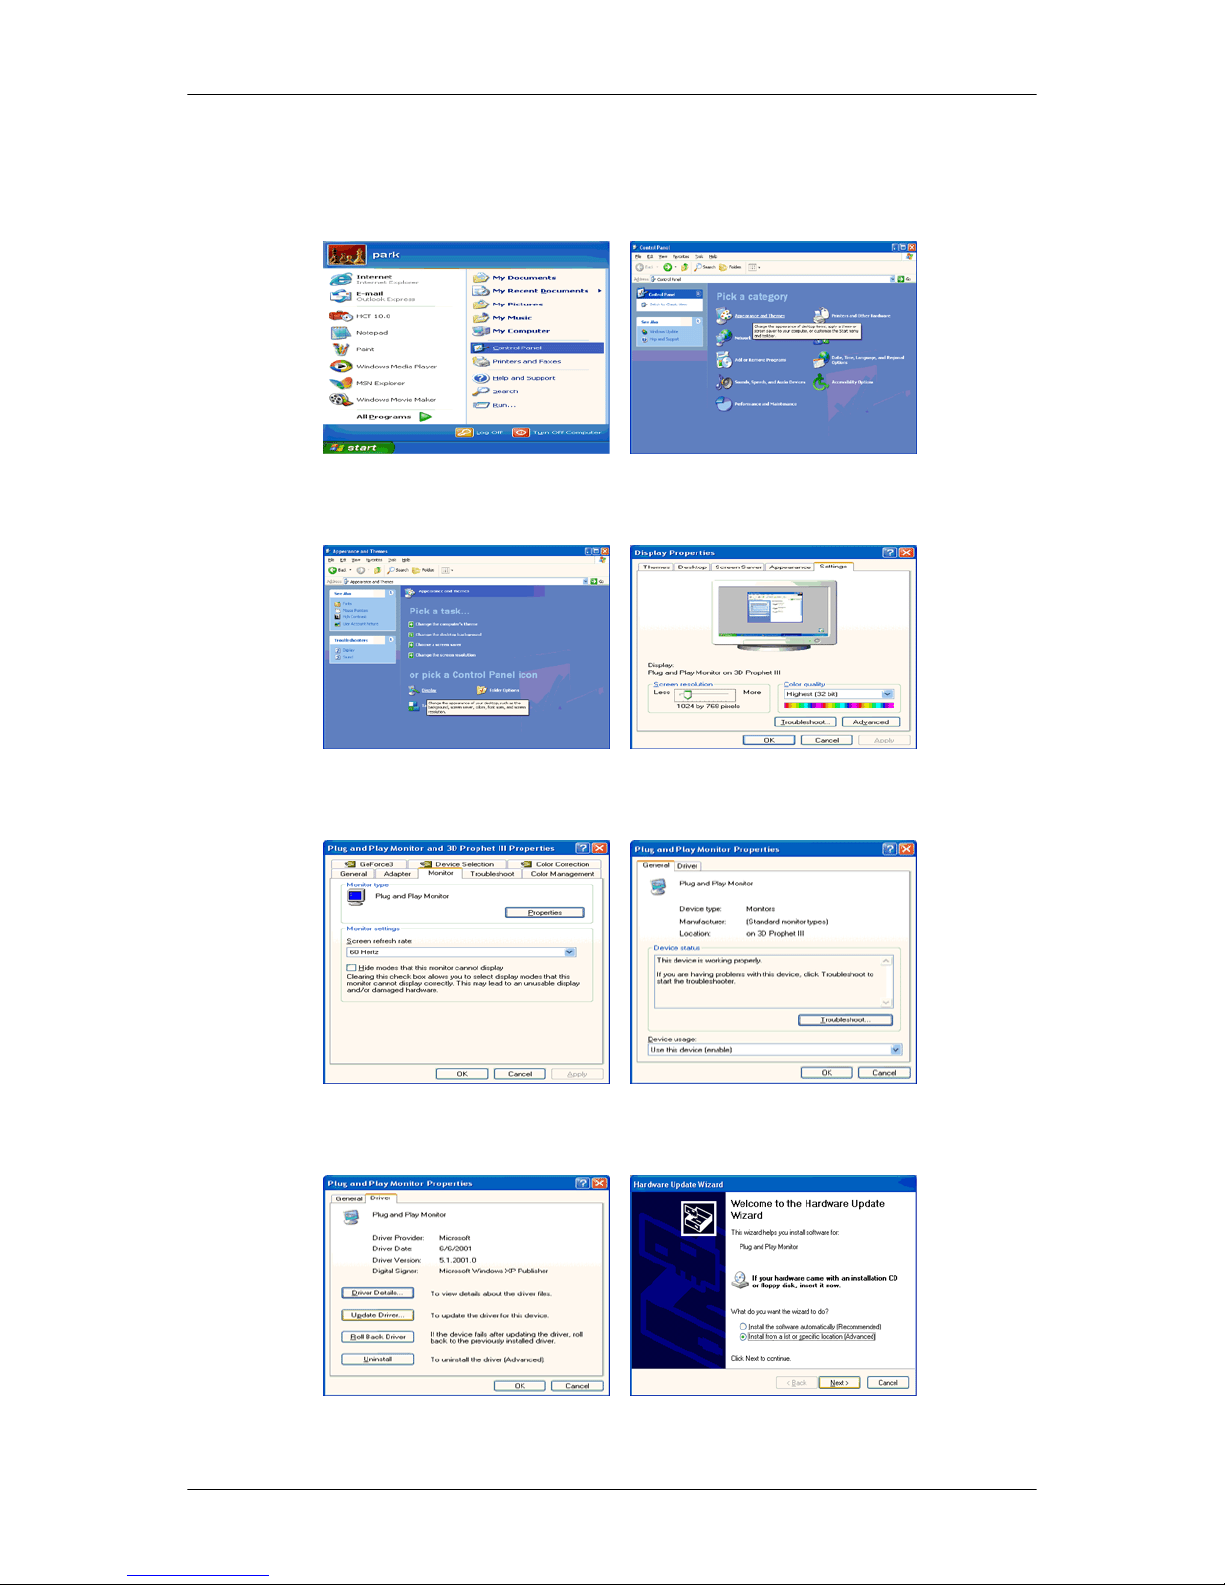
1. Insert CD into the CD-ROM drive.
2.
Click "Start" → "Control Panel", then click the "Appearance and Themes" icon.
3. Click "Display" icon and choose the "Settings" tab then click "Advanced...".
4. Click the "Properties" button on the "Monitor" tab and select "Driver" tab.
5. Click "Update Driver..." and select "Install from a list or..." then click "Next" button.
6. Select "Don't search, I will...", then click "Next" and then click "Have disk".
Using the Software
Page 27
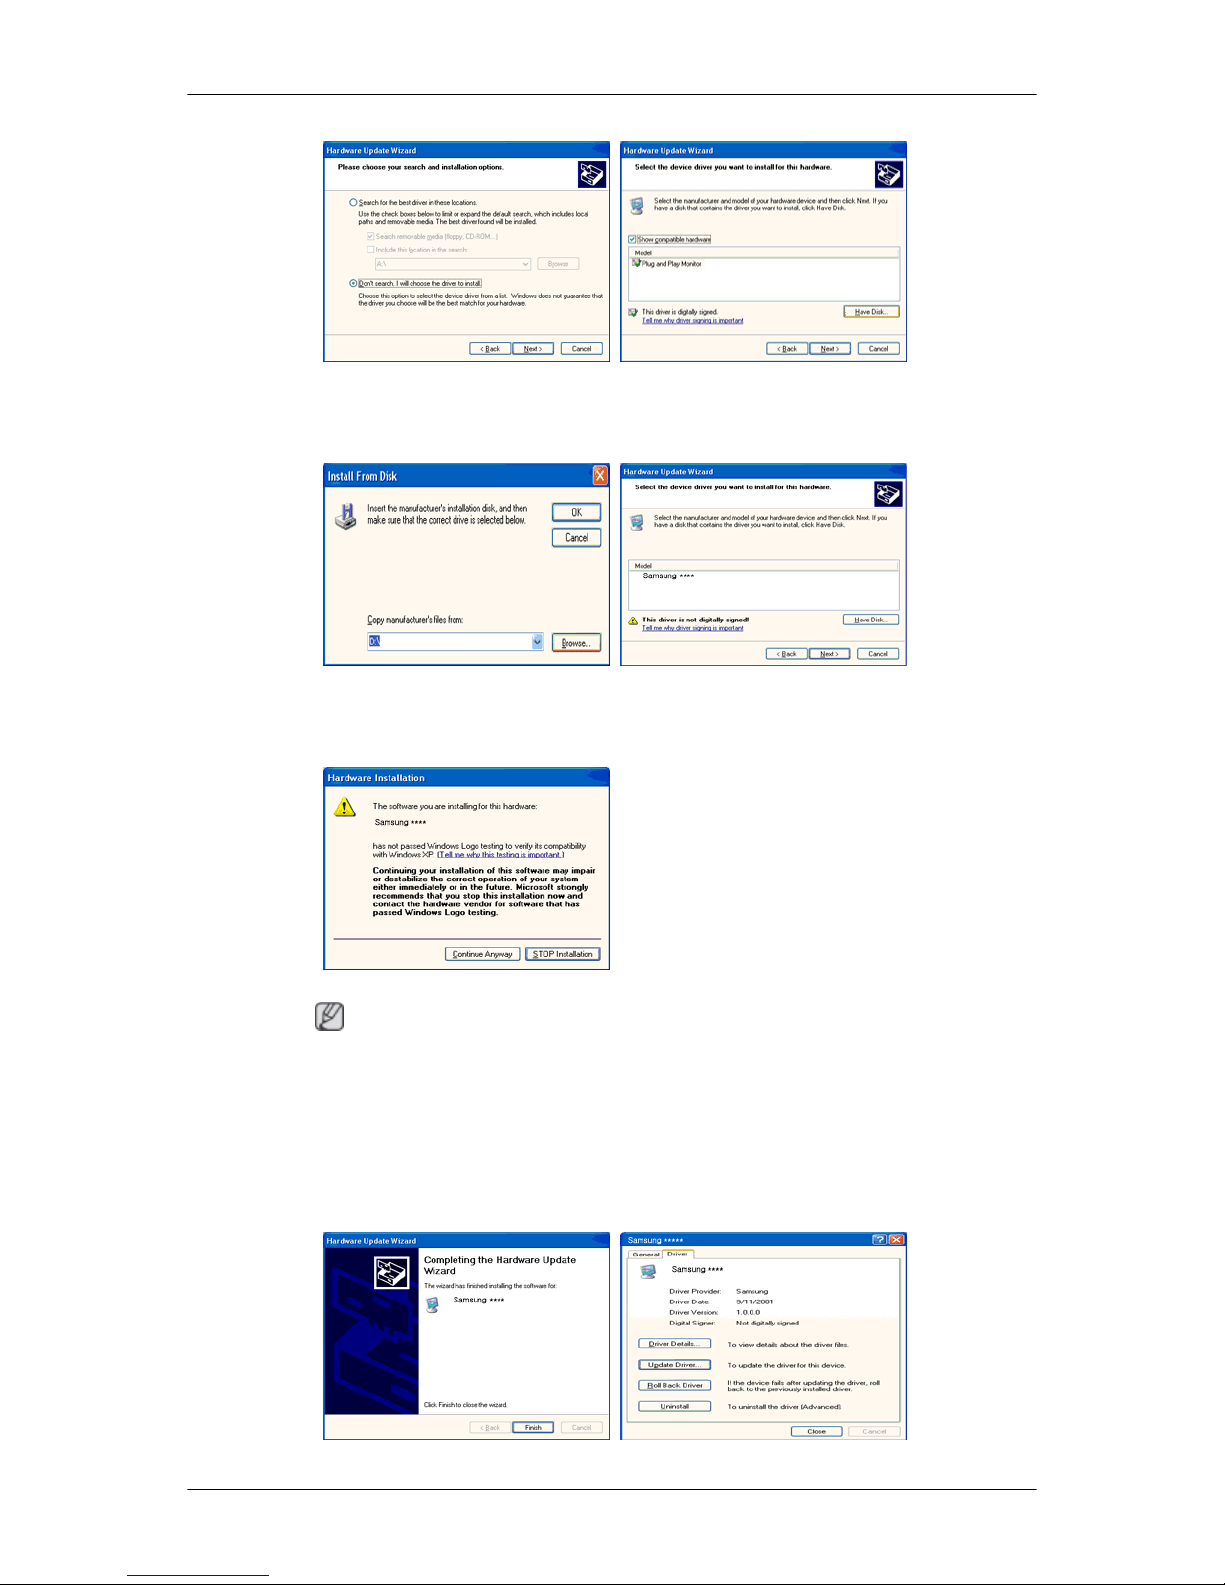
7. Click the "Browse" button then choose A:(D:\Driver) and choose your monitor model in the model
list and click the "Next" button.
8. If you can see the following message window, then click the "Continue Anyway" button. Then
click "OK" button.
Note
This monitor driver is certified by Microsoft, and this installation will not damage your system.
The certified driver will be posted on Samsung Monitor homepage.
http://www.samsung.com/
9. Click the "Close" button, then click the "OK" button continually.
Using the Software
Page 28
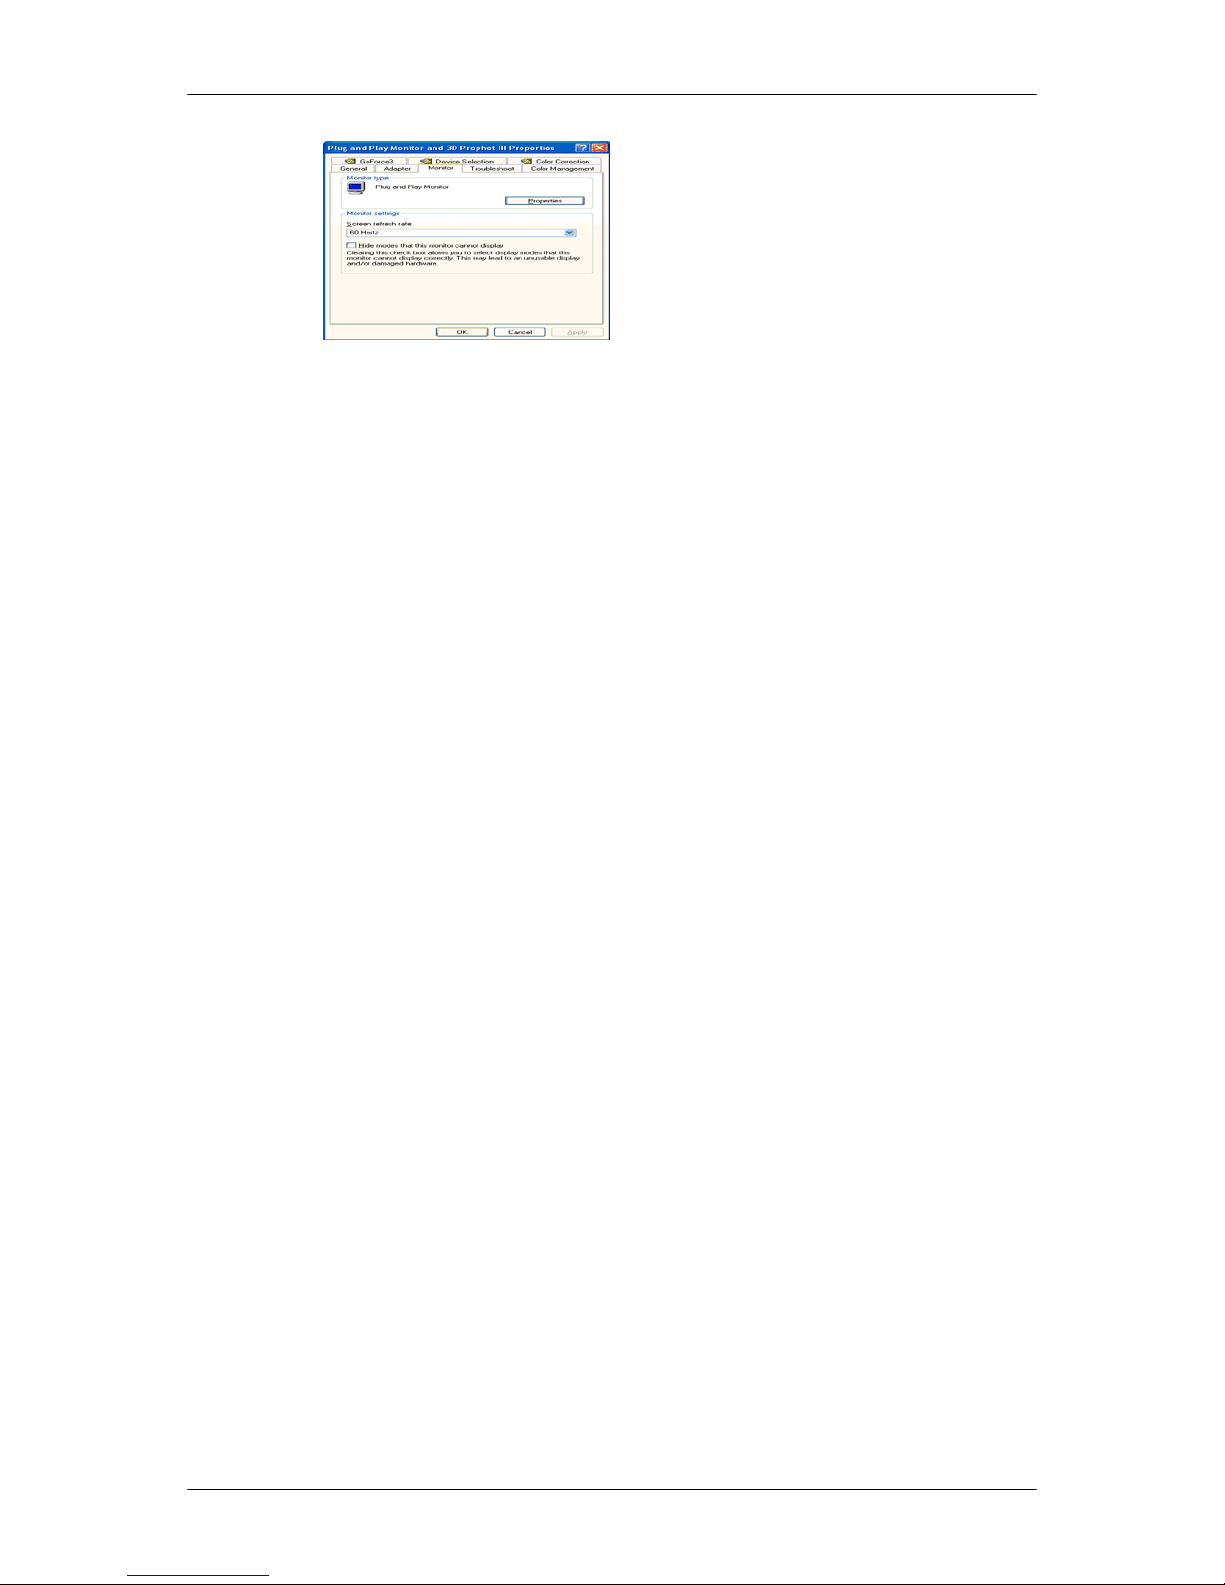
10. Monitor driver installation is completed.
Microsoft® Windows® 2000 Operating System
When you can see "Digital Signature Not Found" on your monitor, follow these steps.
1. Choose "OK" button on the "Insert disk" window.
2. Click the "Browse" button on the "File Needed" window.
3. Choose A:(D:\Driver), then click the "Open" button and then click "OK" button.
How to install
1. Click "Start", "Setting", "Control Panel".
2. Double click the "Display" icon.
3. Select the "Settings" tab and click "Advanced Properties" button.
4. Choose "Monitor".
Case1 : If the "Properties" button is inactive, it means your monitor is properly configured. Please
stop installation
Case2 : If the "Properties" button is active, click the "Properties" button, then follow the next
steps.
5. Click "Driver" and then click on "Update Driver...", then click on the "Next" button.
6. Choose "Display a list of the known drivers for this device so that I can choose a specific driver",
then click "Next" and then click "Have disk".
7. Click the "Browse" button, then choose A:(D:\Driver).
8. Click the "Open" button, then click "OK" button.
9. Choose your monitor model and click the "Next" button. Then click "Next" button.
10. Click the "Finish" button, then the "Close" button.
If you can see the "Digital Signature Not Found" window, then click the "Yes" button. Then click
the "Finish" button and the "Close" button.
Microsoft® Windows® Millennium Operating System
1. Click "Start", "Setting", "Control Panel".
2. Double click the "Display" icon.
3. Select the "Settings" tab and click "Advanced Properties" button.
Using the Software
Page 29

4. Select the "Monitor" tab.
5. Click the "Change" button in the "Monitor Type" area.
6. Choose "Specify the location of the driver".
7. Choose "Display a list of all the driver in a specific location...", then click "Next" button.
8. Click the "Have Disk" button.
9. Specify A:\(D:\driver), then click "OK" button.
10. Select "Show all devices" and choose the monitor that corresponds to the one you connected to
your computer and click "OK".
11. Continue choosing "Close" button and "OK" button until you close the Display Properties dia-
logue box.
Microsoft® Windows® NT Operating System
1. Click "Start", "Settings", "Control Panel", and then double-click "Display" icon.
2. In Display Registration Information window, click Settings Tab and then click "All Display
Modes".
3. Select a mode that you wish to use (Resolution, Number of Colors and Vertical frequency) and
then click "OK".
4. Click "Apply" button if you see the screen working normally after clicking "Test". If the screen
is not normal, change to a different mode (lower mode of resolution, Colors or frequency).
Note
If there is no Mode at All Display Modes, select the level of resolution and vertical frequency by
referring to the Preset Timing Modes in the user guide.
Linux Operating System
To execute X-Window, you need to make the X86Config file, which is a type of system setting file.
1. Press "Enter" at the first and the second screen after executing the X86Config file.
2. The third screen is for setting your mouse.
3. Set a mouse for your computer.
4. The next screen is for selecting a keyboard.
5. Set a Keyboard for your computer.
6. The next screen is for setting your monitor.
7. First of all, set a horizontal frequency for your monitor. (You can enter the frequency directly.)
8. Set a vertical frequency for your monitor. (You can enter the frequency directly.)
9. Enter the model name of your monitor. This information will not affect the actual execution of
X-Window.
10. You have finished setting up your monitor. Execute X-Window after setting other requested
hardware.
Using the Software
Page 30

MDC Program Installation/Uninstallation
Installation
1 Insert the installation CD into the CD-ROM drive.
2 Click the MDC Unified installation program.
If a software installation window is not displayed on the main screen, install with the "MDC Unified"
execution file in the MDC folder on the CD.
3 Click "Next" in the displayed Installation Wizard screen.
4 In the "License Agreement" window displayed, select "I accept the terms in the license agreement"
and click "Next".
5 In the displayed "Customer Information" window, fill out all the information fields and click "Next".
6 In the displayed "Destination Folder" window, select the directory path you want to install the
program in and click "Next".
If the directory path is not specified, the program will be installed in the default directory path.
7 In the displayed "Ready to Install the Program" window, check the directory path to install the
program in and click "Install".
8 Installation progress will be displayed.
9 Click "Finish" in the displayed "InstallShield Wizard Complete" window.
Select "Launch MDC Unified" and click "Finish" to run the MDC program immediately.
10 The MDC Unified shortcut icon will be created on the desktop after installation.
The MDC execution icon may not be displayed depending on the PC system or product
specifications.
Press F5 if the execution icon is not displayed.
Uninstallation
1 Select Settings > Control Panel on the Start menu and double-click Add/Delete Program.
2 Select MDC Unified from the list and click Change/Remove.
MDC installation can be affected by the graphics card, mother board and network conditions.
Page 31

Connecting to MDC
Using MDC via RS-232C (serial data communications standards)
An RS-232C serial cable must be connected to the serial ports on the PC and monitor.
What is MDC?
Multiple display control "MDC" is an application that allows you to easily control multiple display devices
simultaneously using a PC.
Page 32

Using MDC via Ethernet
Enter the IP for the primary display device and connect the device to the PC. One display device can
connect to another using an RS-232C serial cable.
Server PC
RJ 45 MDC RJ 45 MDC
RJ 45 RJ 45
Communicate with LAN cable
Multiple products can be connected using the [RJ45] port on the product and the LAN ports on the
HUB.
Page 33
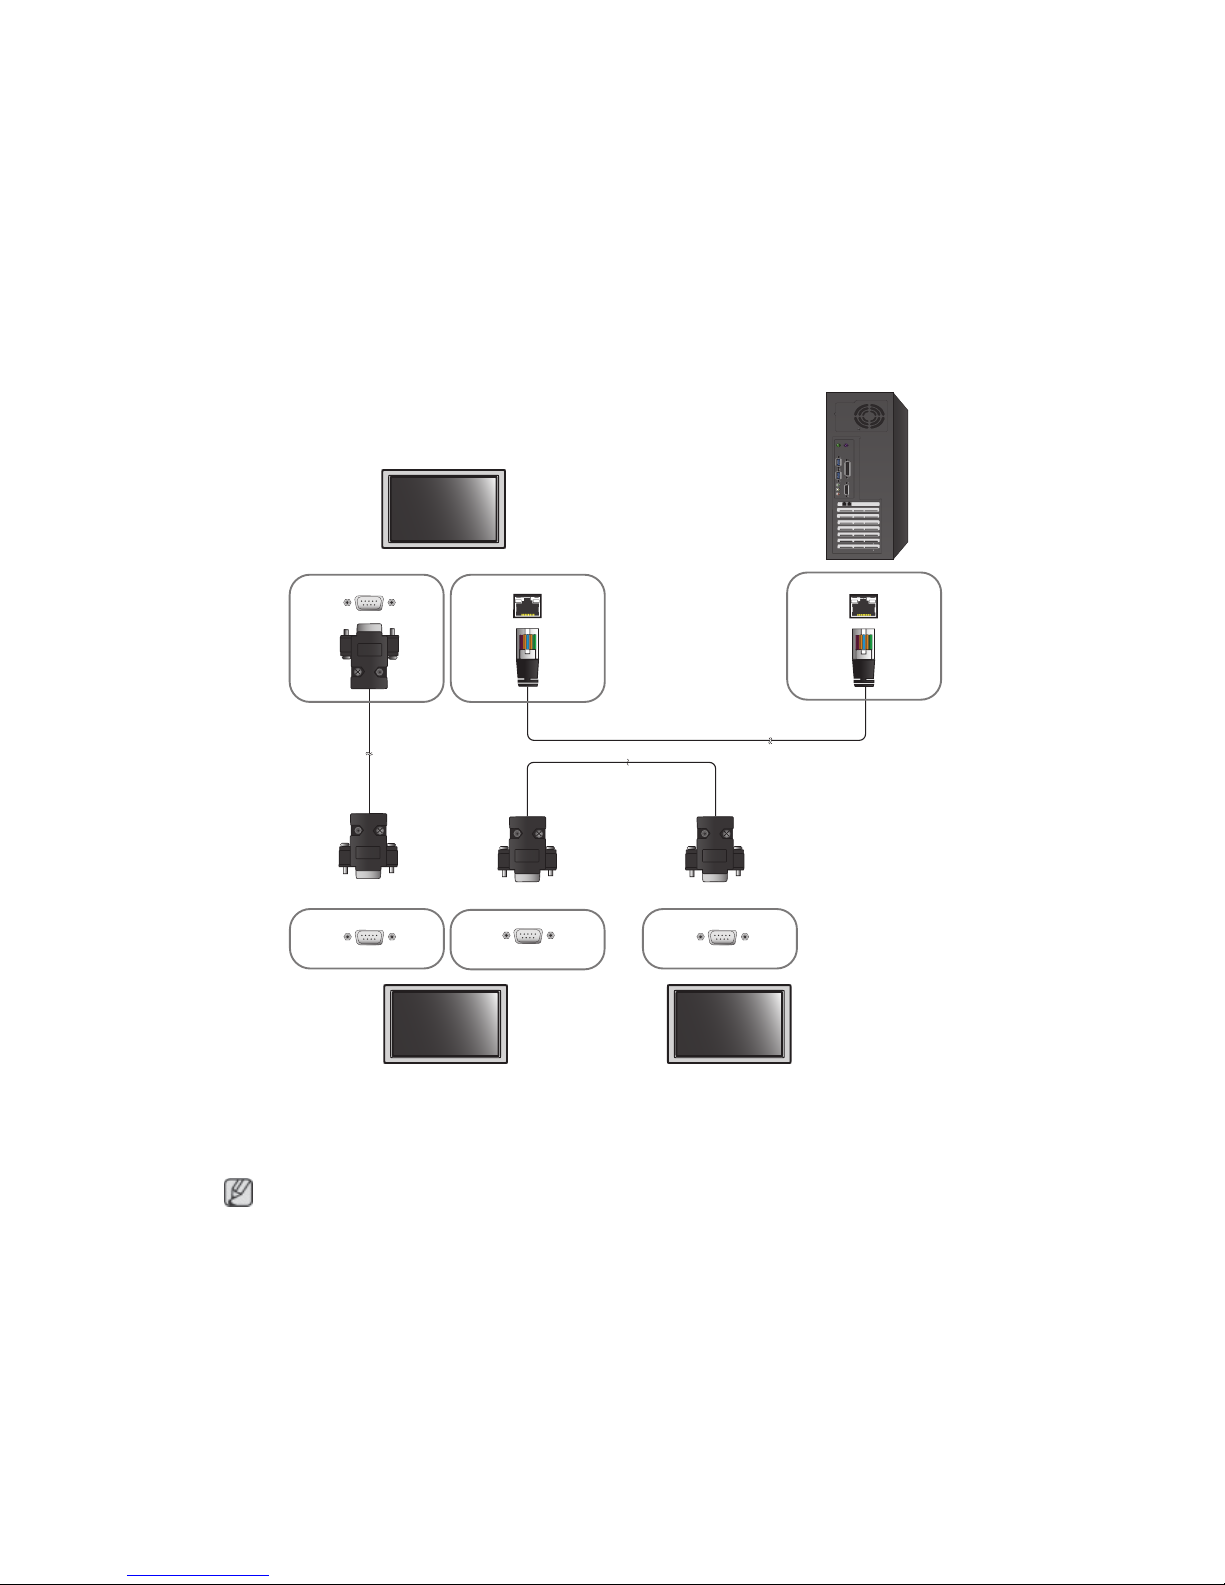
Server PC
RJ 45 MDC
RS232C OUT
RS232C OUT
RS232C IN RS232C IN
Communicate with RS232C cable via the LAN cable
Multiple products can be connected using the [RS232C IN / OUT] port on the product.
Page 34
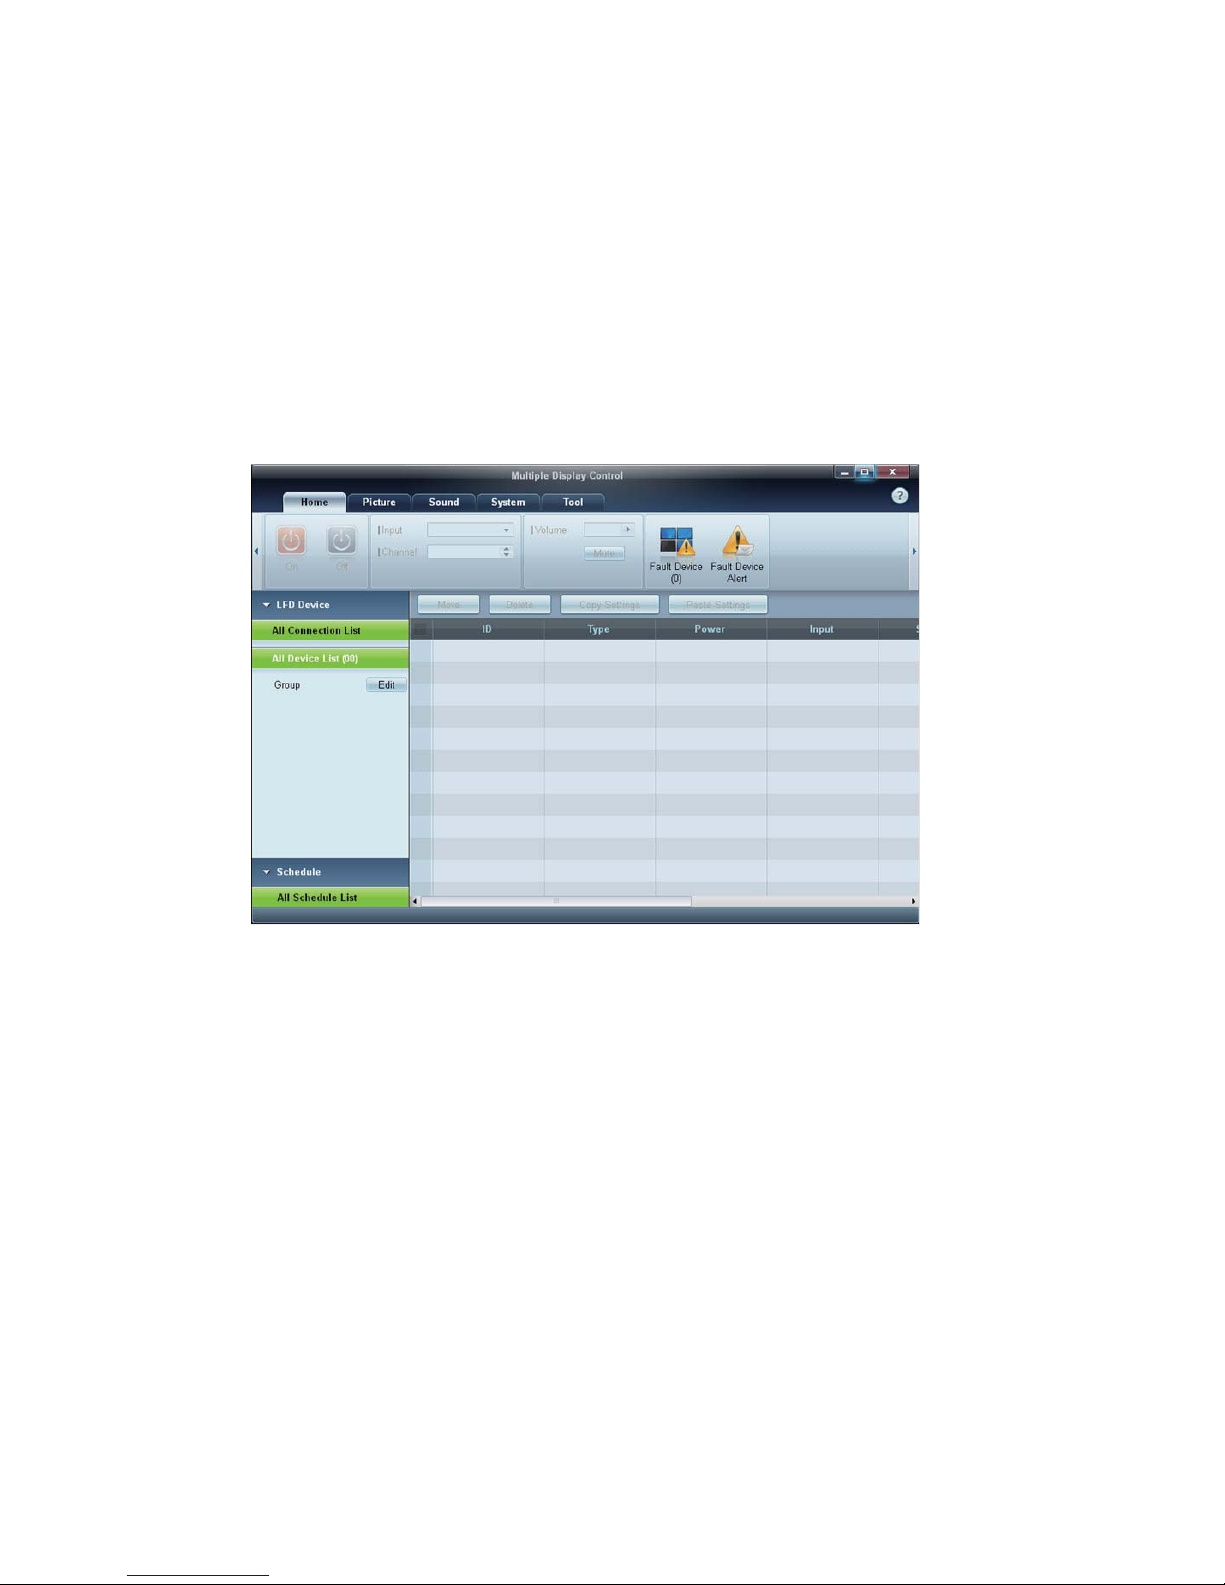
Connection Management
Connection management includes the Connection list and Connection list modification options.
Connection list – Connection list shows the details of the connections such as connection setting (IP/
COM, Port No, MAC, and Connection Type), connection status, Set ID Range, and detected devices.
Each connection can contain a maximum of 100 devices connected in serial daisy-chain fashion. All the
LFDs detected in a connection are displayed in the Device list, where the user can make groups and
send commands to detected devices.
Connection list modification options – Connection modification options includes Add, Edit, Delete,
and Refresh.
Page 35

Auto Set ID
Auto Set ID feature assigns a Set ID for all the LFDs connected in daisy-chain of a selected connection.
There can be a maximum of 100 LFDs in a connection. The Set ID is assigned sequentially in the daisy-
chain running from 1 to 99, and then finally to Set ID 0.
Cloning
Using the Cloning feature, you can copy the setting of one LFD and apply it to multiple selected LFDs.
You can select specific tab categories or all tab categories for cloning, using the copy setting option
window.
Page 36

Command Retry
This feature is used to specify the maximum number of times the MDC command will be retried in case of
there being no reply or a corrupted reply from an LFD. The retry count value can be set using the MDC
options window. The retry count value must be between 1-10. The default value is 1.
Page 37
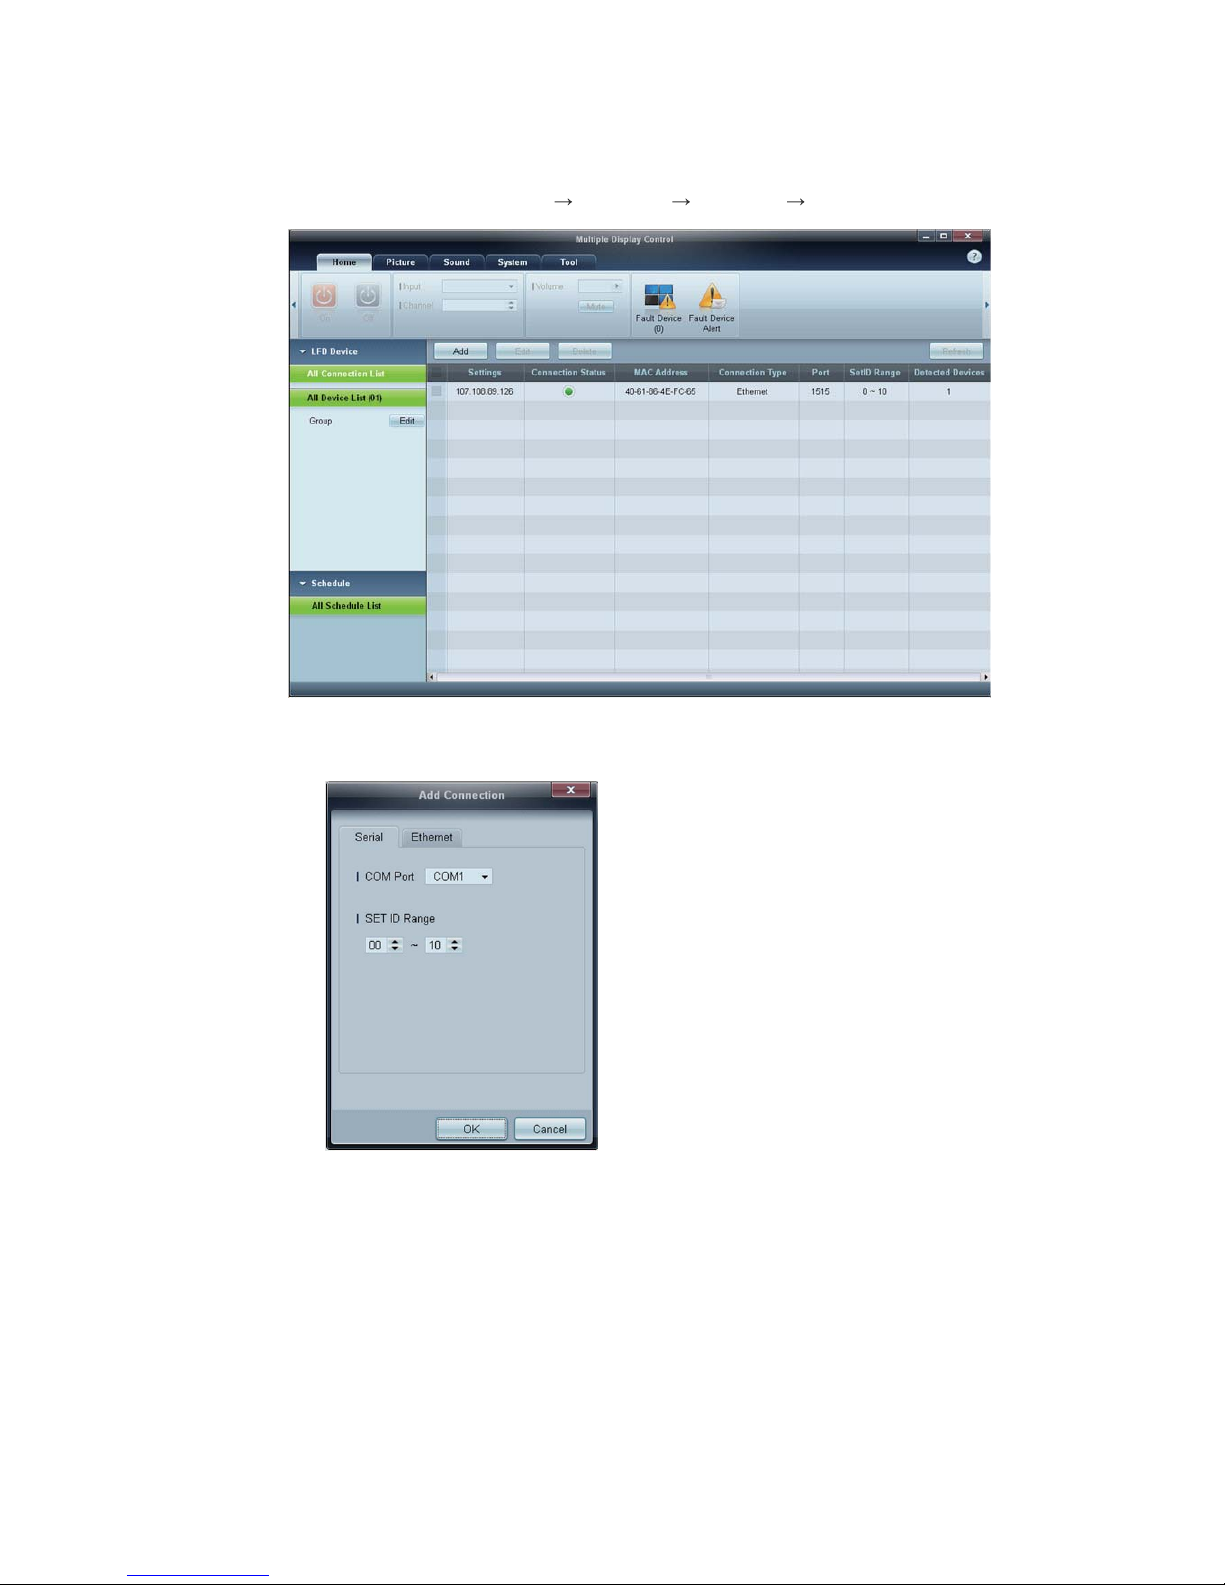
Getting Started with MDC
1 To start the program, click Start Programs Samsung MDC Unified.
2 Click Add to add a display device.
z If the connection is established via RS232C, go to Serial and specify the COM Port.
Page 38

z If the connection is established via Ethernet, enter the IP that was entered for the display
device.
Page 39

Main Screen Layout
Menu Bar
Change the status of a display device or the properties of the program.
Device Category
View a list of connected display devices or device groups.
Schedule Category
View a list of schedules for display devices.
Set List
Select the display device you want to adjust.
Modify the Set List
Add, edit, regroup or delete sets.
Help Topics
Display help topics for the program.
4
3
2
1
6
5
1
2
3
4
5
6
Page 40

Menus
You can power on or off a selected device or change the input source or volume of the device.
Choose display devices from the list of sets, and select the Home tab.
Home
Select an item and change the corresponding setting.
Power
z On: Power on a selected display.
z Off: Power off a selected dis
Input
z Input Source : Change the input source.
Input sources available can vary depending on the Display Device Models.
The input source can be changed only for displays that are turned on.
z Channel : Change the channel.
The TV channel can be changed by using the up/down arrow keys.
The channel can be changed only when the input source is TV.
Only registered channels can be selected.
Volume
The volume can be changed or the sound can be muted only for displays that are turned on.
Volume
The volume can be adjusted using the slider bar in the range of 0 to 100.
Adjust the volume of a selected display.
Input
Enable or disable Mute for a selected display.
Mute will automatically be disabled if Volume is adjusted when Mute is on.
Alert
z Fault Device
1
2
3
Page 41

This menu shows a list of display devices which have following errors - fan error, temperature
error, brightness sensor error, or lamp error.
Select a display device from the list. The Repair button will be enabled. Click the refresh button
to refresh the error status of the display device. The recovered display device will disappear
from the Fault Device List.
Fault Device Alert
Display device in which error is detected will be reported by email.
Fill in all required fields. The Test and OK buttons will be enabled. Ensure the Sender
information and at least one Recipient are entered.
Page 42

Screen Adjustment
The screen settings (contrast, brightness, etc.) can be adjusted.
Choose display devices from the list of sets, and select the Picture tab.
Custom
Select an item and change the corresponding screen setting.
z Color and Tint are not available if the input source is PC.
z Red, Green, Blue and PC Screen Adjustment are not available if the input source is Video.
z Color, Tint, Color Tone, Color Temp, Red, Green, Blue and PC Screen Adjustment are not
available if both PC Source and Video Source are selected.
Contrast
z Adjust the contrast for the selected display device.
Brightness
z Adjust the brightness for the selected display device.
Color
z Adjust the colors for the selected display device.
Tint (G/R)
z Adjust the tint for the selected display device.
Color Tone
z Adjust the background color tone for the selected display device.
Color Temp
z Adjust the color temperature for the selected display device.
This option is enabled if Color Tone is set to Off.
Red
z Customize the intensity of red color for the selected display device.
Green
z Customize the intensity of green color for the selected display device.
Blue
z Customize the intensity of blue color for the selected display device.
Page 43
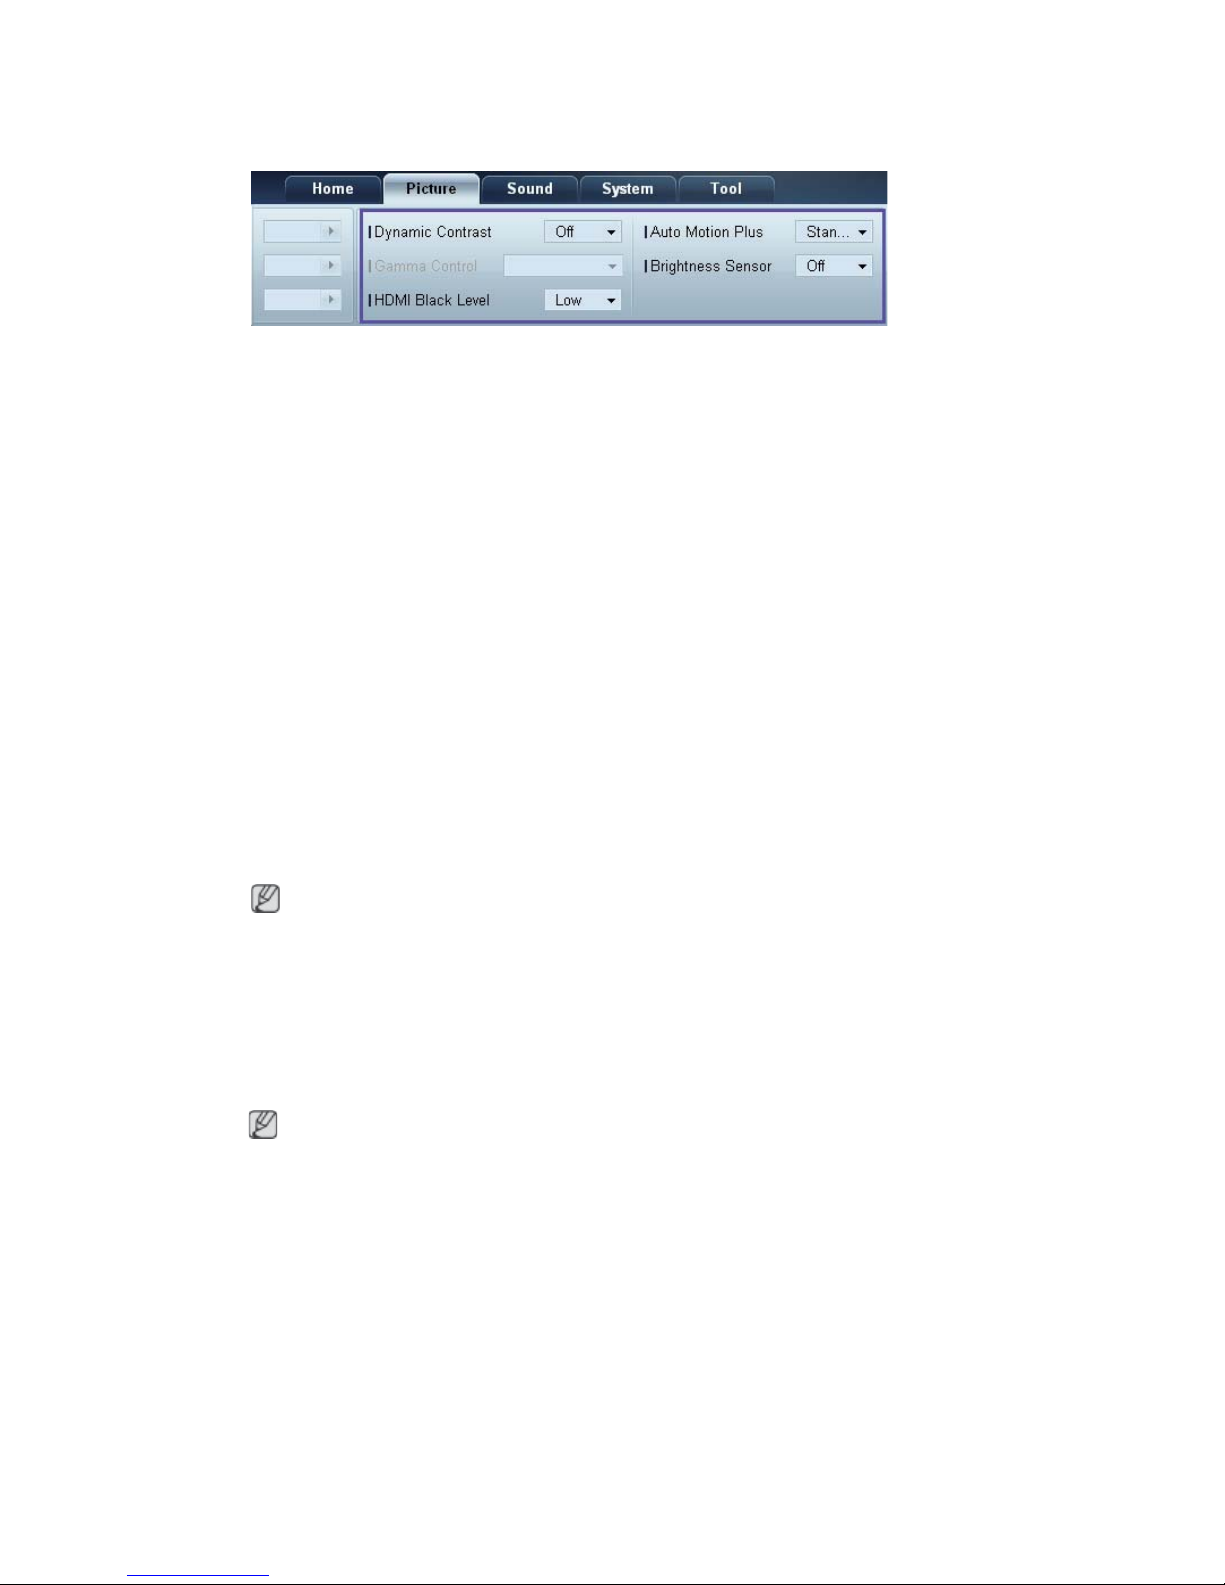
Options
Dynamic Contrast
Adjust the Dynamic Contrast for the selected display device.
Gamma Control
Change the gamma value for the selected display.
Auto Motion Plus
This option is used to view dynamic images.
z Off: Disable the Auto Motion Plus function.
z Clear: Set the level of Auto Motion Plus to clear. This mode is suitable to display vivid images.
z Standard: Set the level of Auto Motion Plus to standard.
z Smooth: Set the level of Auto Motion Plus to smooth. This mode is suitable to display smooth
images.
z Custom: Customize the level of screen burn-in or flickering.
z Demo: This function demonstrates the technology of Auto Motion Plus. The result when the mode
is changed can be previewed on the left side of the window.
Brightness Sensor
Enable
or disable the Brightness Sensor for the selected display device.
The Brightness Sensor detects the ambient light intensity and automatically adjusts the scree
brightness.
Brightness Sensor may not be available depending on the product.
n
may not be available depending on the product.
Auto Motion Plus
Page 44
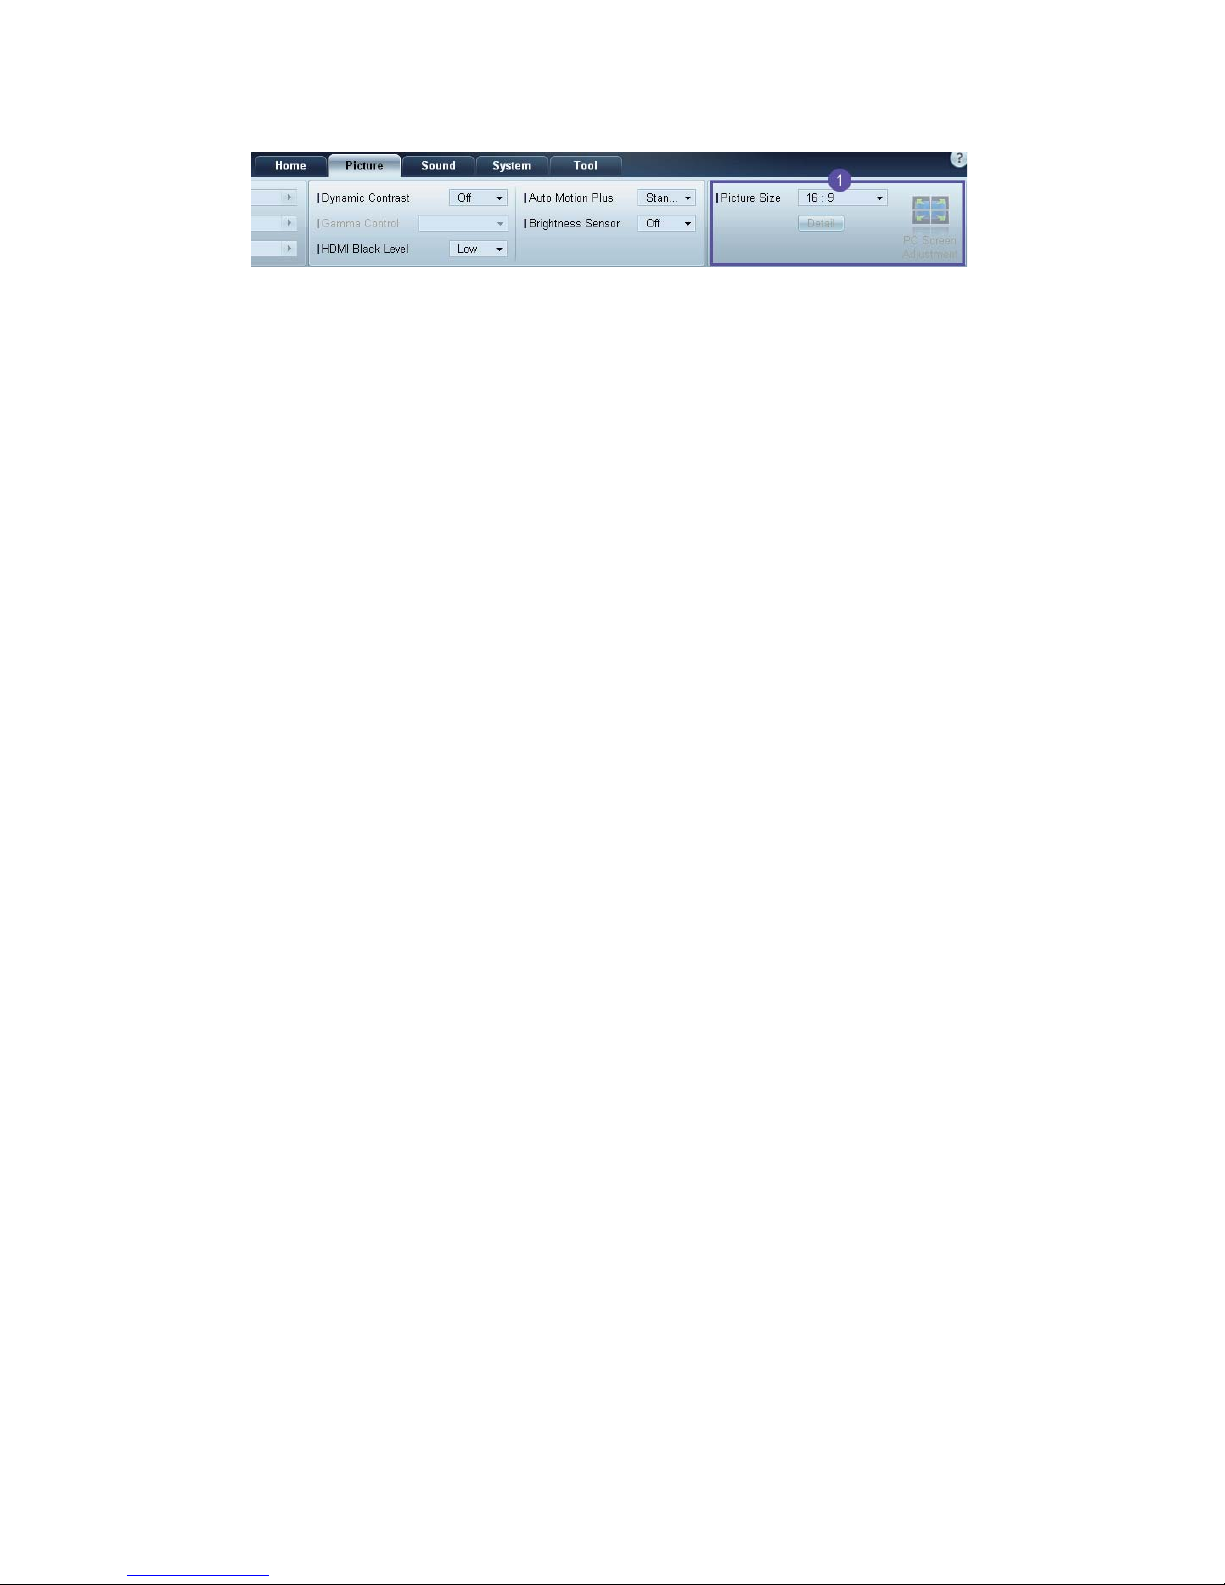
Size
Picture Size
Adjust the screen size for the selected display device.
The Detail item will be disabled if Picture Size is set to a mode that does not support detailed
configuration.
The -/+ buttons can be used to adjust Zoom.
The screen can be relocated using the up/down/left/right buttons.
Detail
You can view details of the selected screen size.
PC Screen Adjustment
Frequency adjustment or fine-tuning is available by using the -/+ buttons in Coarse or Fine.
To relocate the screen, click one of the four images below Position.
To automatically adjust the frequency, fine-tune or relocate the screen, click Auto Adjustment.
Page 45

Sound Adjustment
You can change the sound settings.
Choose display devices from the list of sets, and select the Sound tab.
The Bass or Treble item will be disabled if the item is not supported by the selected set.
Bass
Adjust the bass for the selected display.
Treble
Adjust the treble for the selected display.
Balance (L/R)
Adjust the volume of the left and right speakers of the selected display device.
SRS TS XT
Enable or disable the SRS TS XT effect for the selected display device.
Page 46
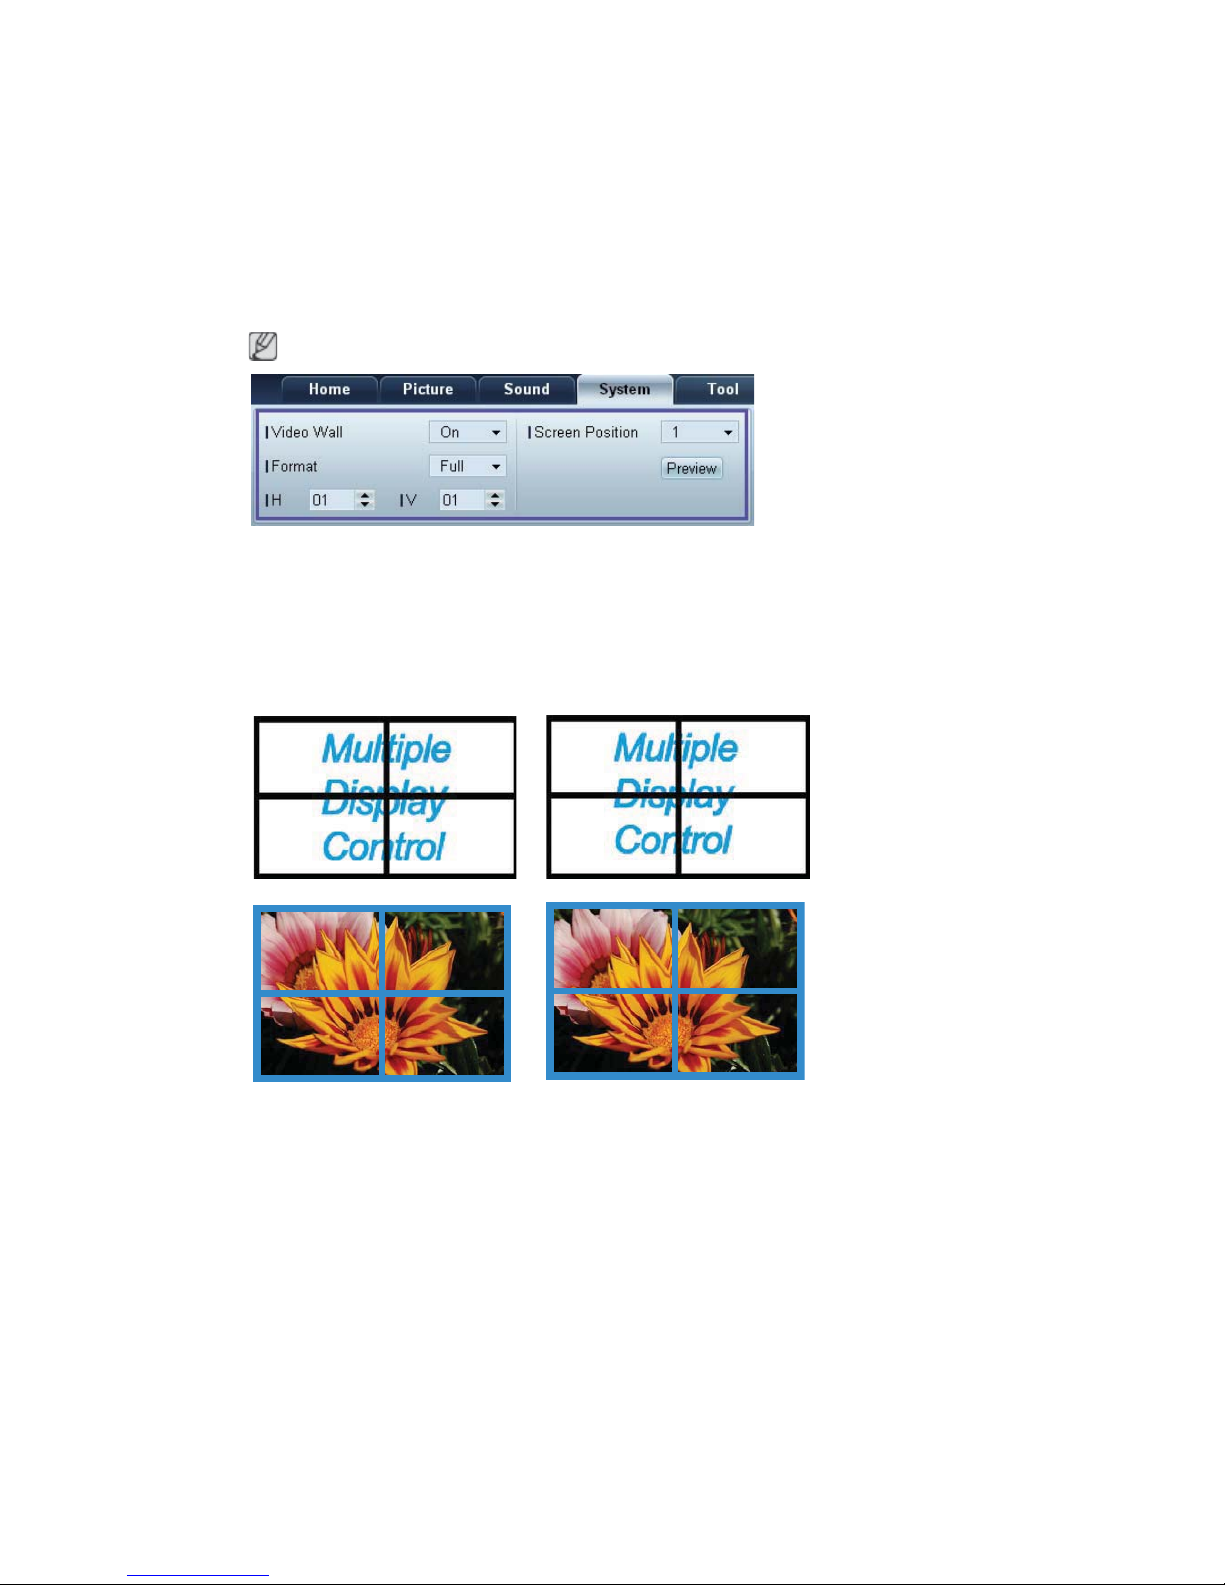
System Setup
Choose display devices from the list of sets, and select the System tab.
Video Wall
The Video Wall function can be used to display part of a whole picture or repeat the same picture on
each of connected multiple display devices.
Video Wall is enabled only when devices are in the group.
Video Wall
Enable or disable Video Wall.
Format
Select the format to display the split screen.
Full Natural
Page 47

H
Select the number of horizontal display devices.
A maximum of 15 displays can be arranged in a row.
A maximum of 6 can be assigned to V if 15 is assigned to H.
V
Select the number of vertical display devices.
A maximum of 15 displays can be arranged in a row.
A maximum of 6 can be assigned to V if 15 is assigned to H.
Screen Position
View the layout of displays (configured by the screen divider) or change the layout as required.
Screen Position and Preview are enabled when Video Wall is set to on.
Note that if multiple sets are selected, Preview is enabled only if the settings for H and V match the
layout of the selected sets.
To change the Position, select a set and drag it to a new position.
The range of screen divider settings may differ depending on the model.
Page 48
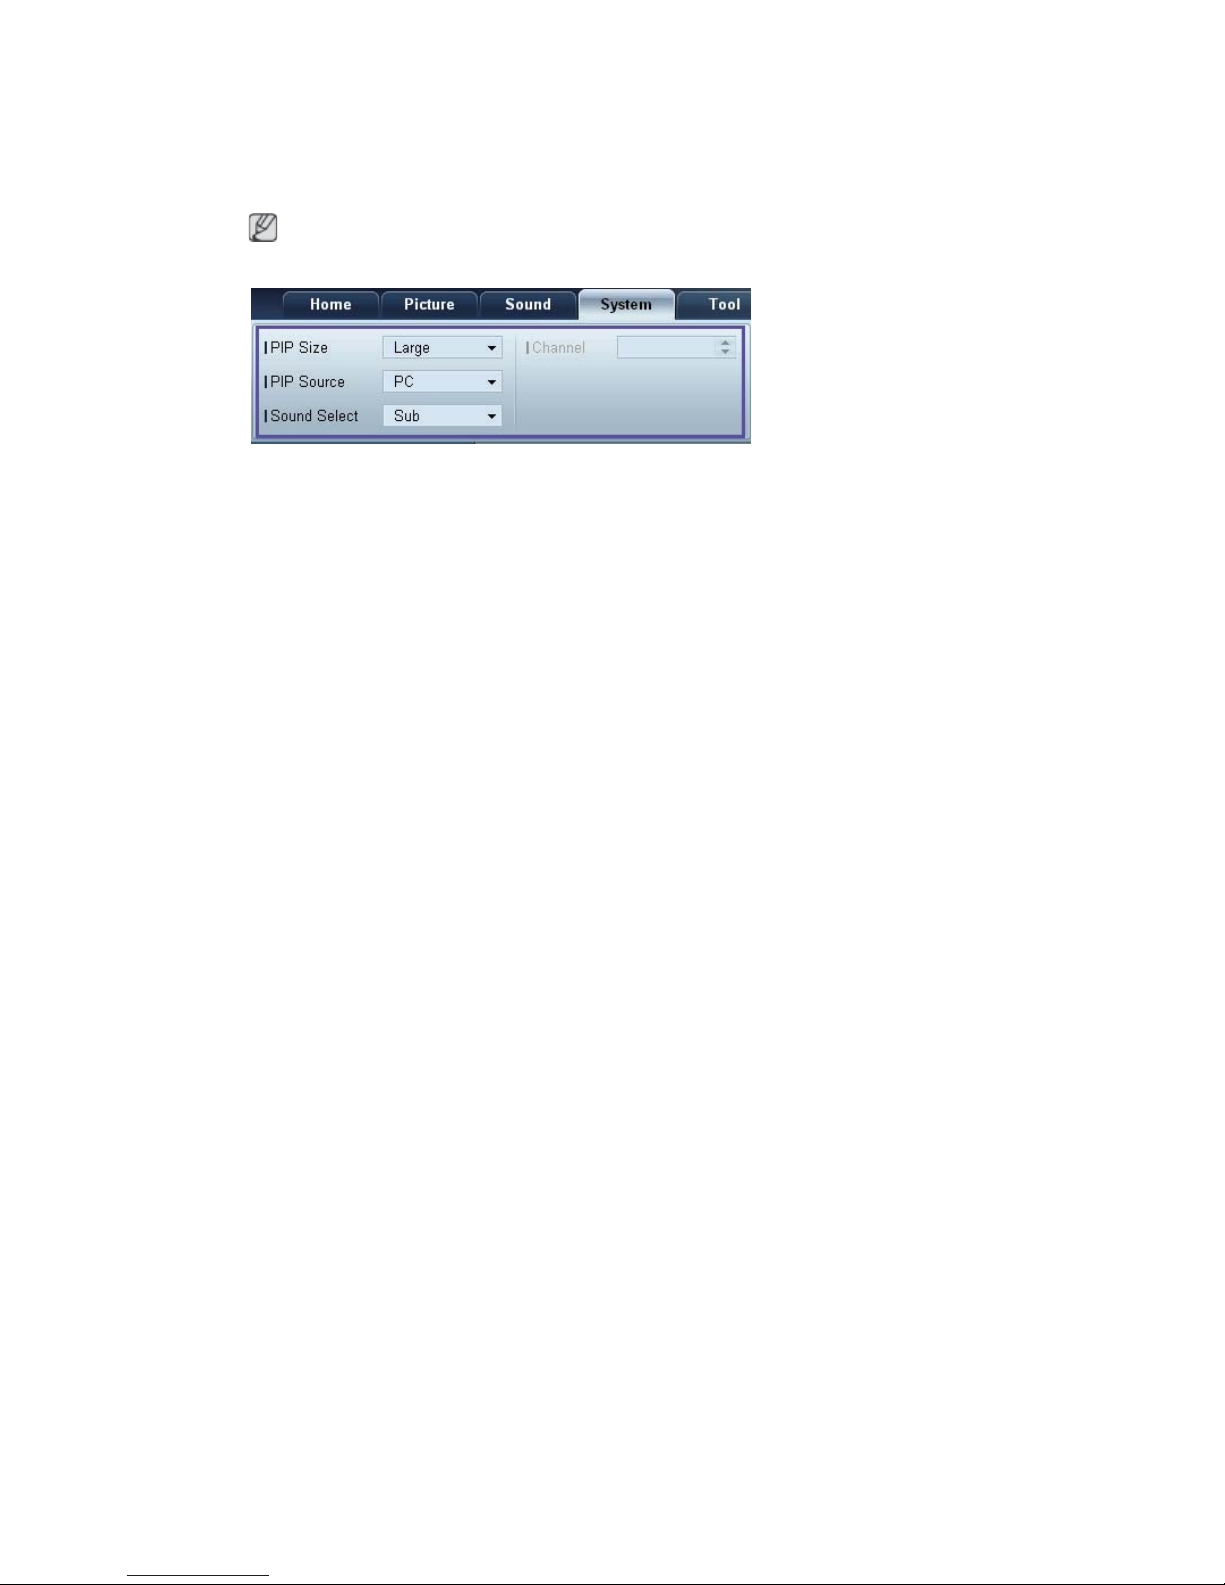
PIP
Basic information required to adjust PIP will appear in the menu screen.
z PIP will be disabled when Video Wall is ON.
z Note that Picture Size is disabled when PIP is ON.
PIP Size
View the PIP Size of the current display.
PIP Source
Select a PIP input source.
Sound Select
Select and enable the sound from either the primary screen or secondary screen.
Channel
The channel can be changed if PIP Source is TV.
Page 49

General
User Auto Color
Automatically adjust the screen colors.
Available only in PC mode.
Auto Power
Set the product to automatically power on.
Standby Control
Set the standby mode to activate if an input source is not detected.
Fan & Temperature
Configure the settings required to detect the fan speed and internal temperature for the product's
protection.
Fan Control
Select a method to configure the fan speed.
Fan Speed
Configure the fan speed.
Temperature
Detect the internal temperature by specifying the range of temperature.
Page 50
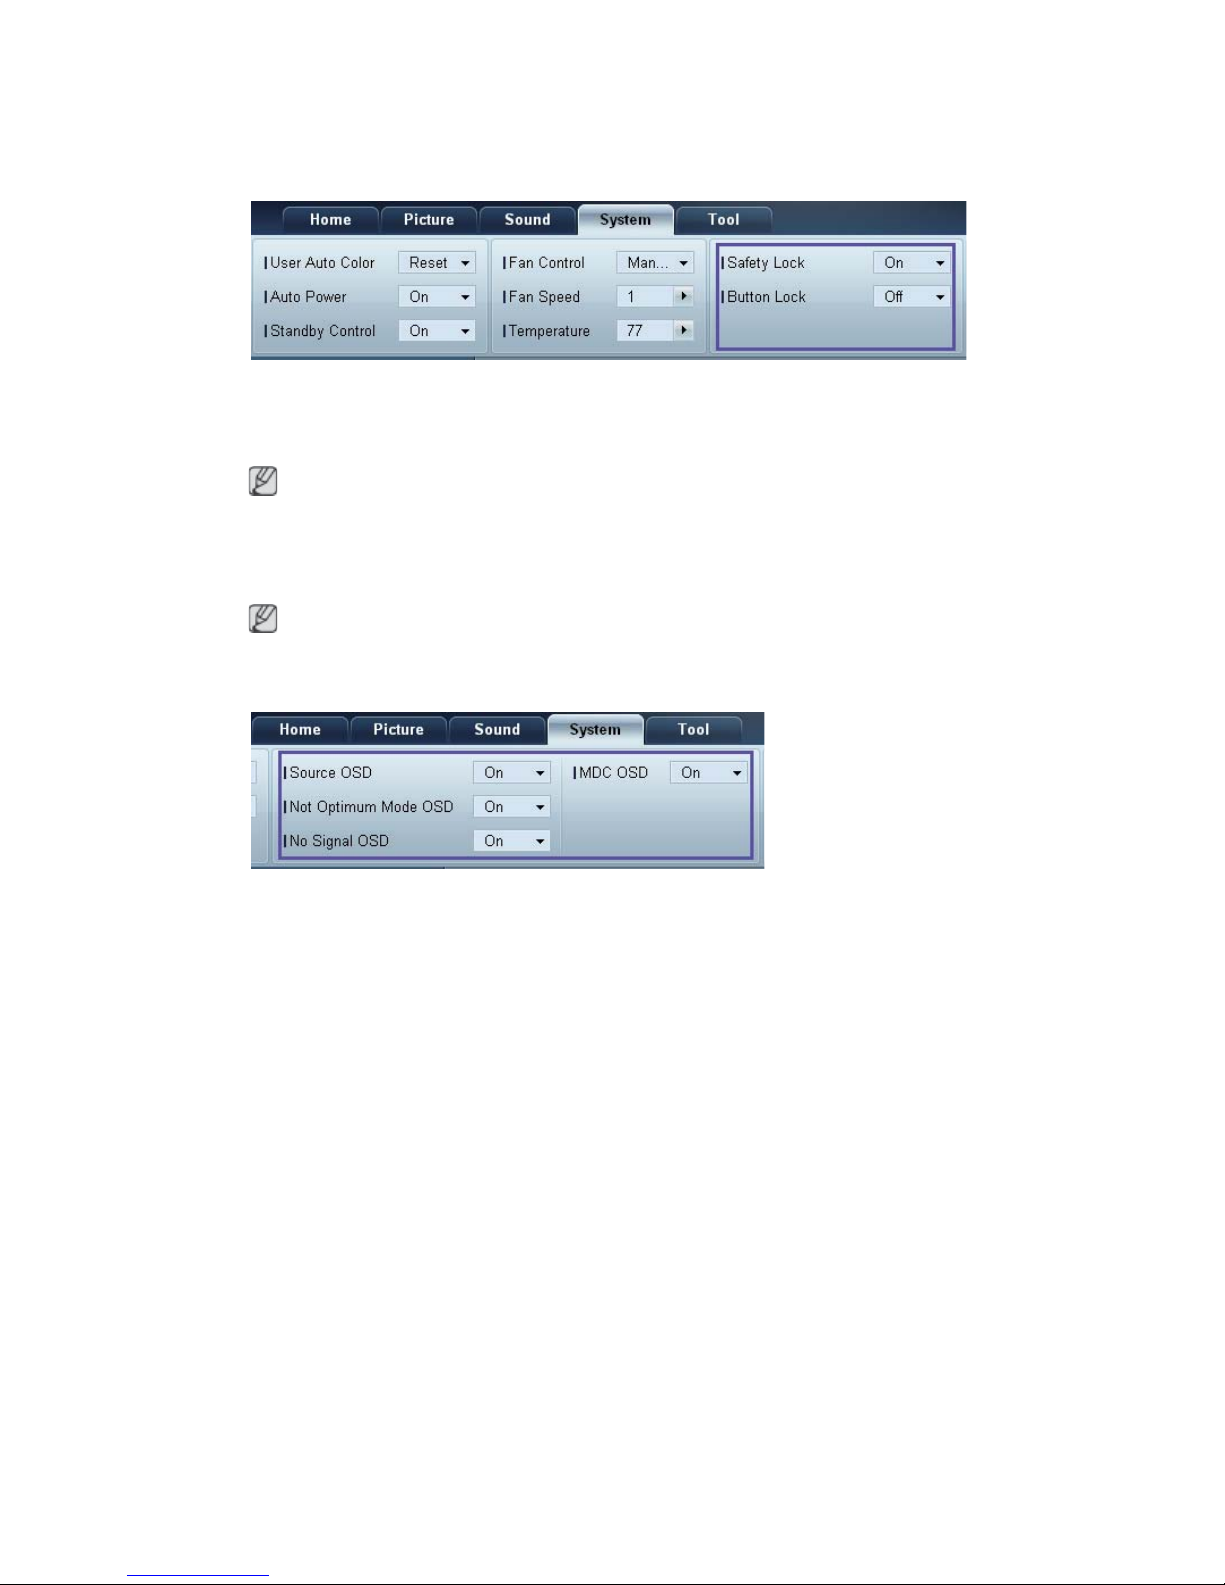
Security
Safety Lock
Lock the on-screen menus.
To unlock the menus, set Safety Lock to Off.
Button Lock
Lock the buttons on the display device.
To unlock the buttons, set Button Lock to Off.
OSD Display
Source OSD
Select whether to display a message when the Source is changed.
Not Optimum Mode OSD
Select whether to display a message when a non-compatible mode is selected.
No Signal OSD
Select whether to display a message when there is no input signal.
MDC OSD
Select whether to display a message when settings are changed by the MDC.
Page 51
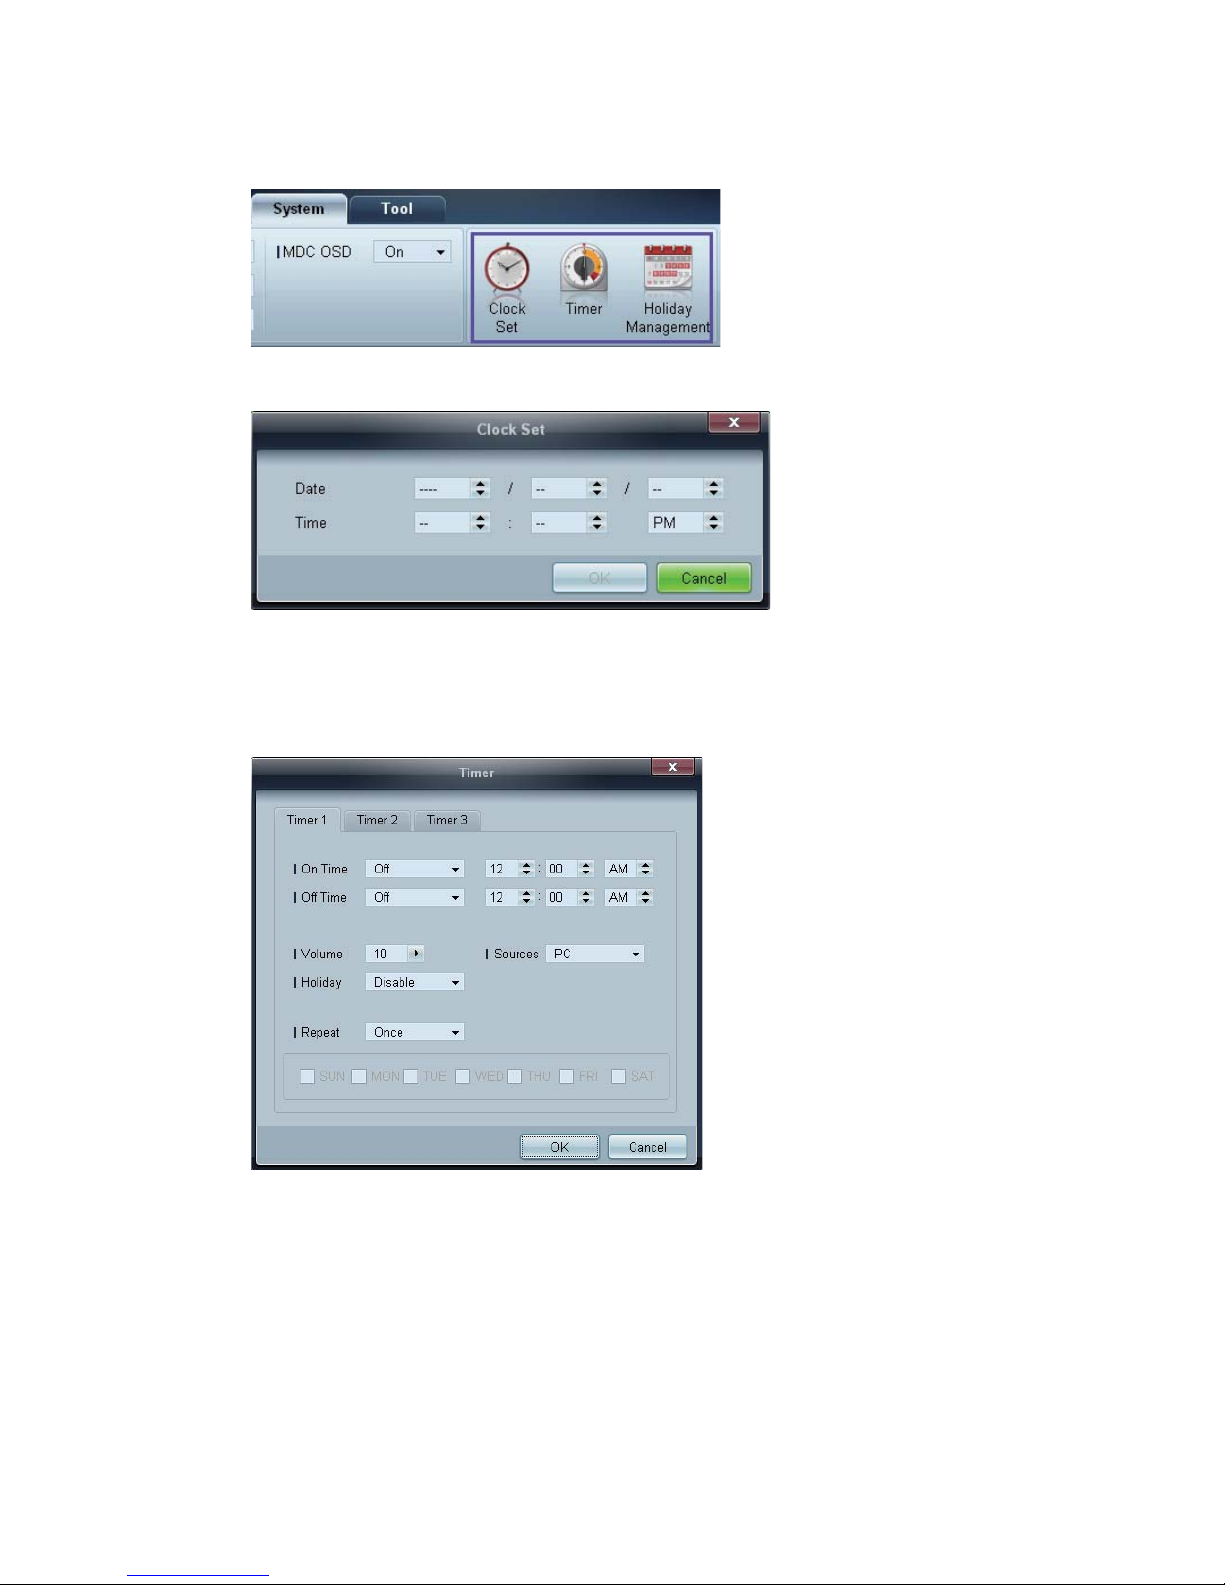
Time
Clock Set
Change the current time on the selected display device according to the time set on a PC.
If the time is not set on the display device, null values will be displayed.
Timer
z On Time: Set the time to power on the selected display device.
z Off Time: Set the time to power off the selected display device.
z Volume: Specify the volume of the display device when it is powered on by On Time.
z Source: Specify the input source of the display device when it is powered on by On Time.
z Holiday: The Holiday Management settings can be applied to the Timer.
z Repeat : Specify the period for which you want to repeat the selected Timer.
Page 52
Once
EveryDay
Mon~Fri
Manual
The checkboxes to select days of the week below Repeat are enabled only if Manual is selected.
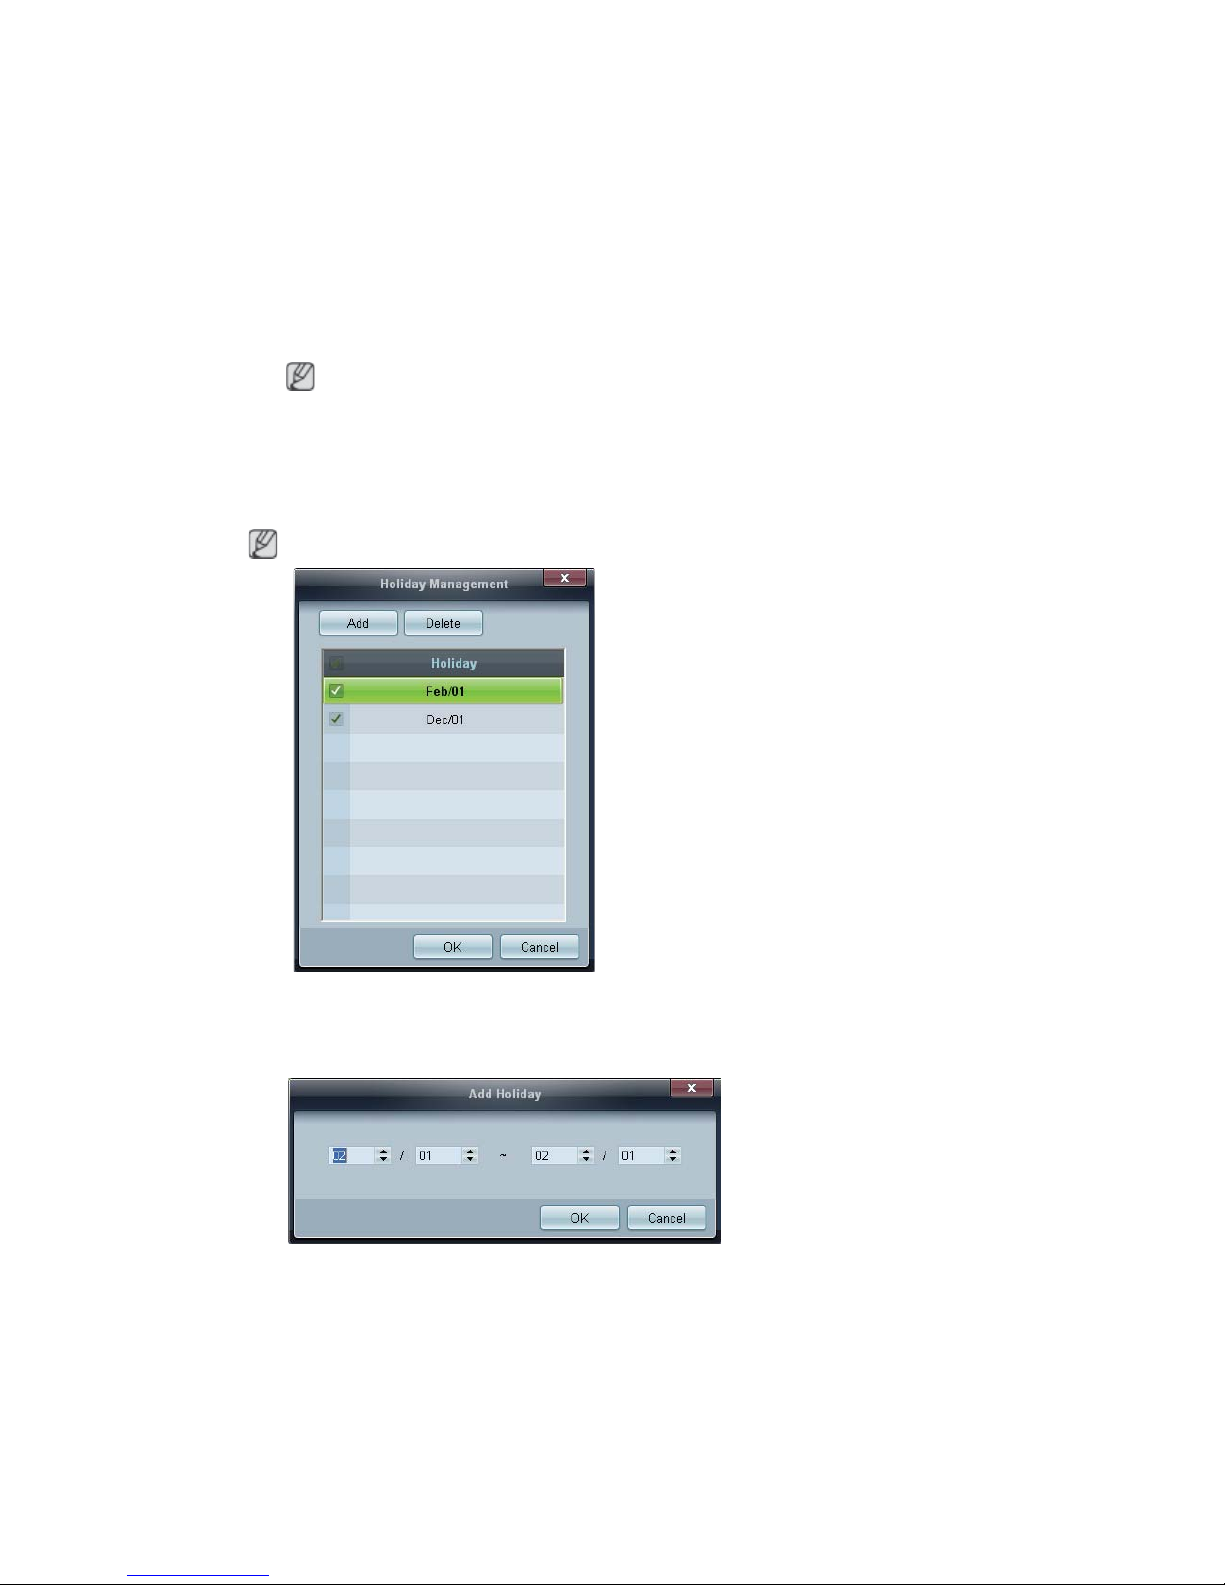
Holiday Management
Holiday Management allows you to prevent devices that are set to be powered on by the Timer from
turning on at a specified date.
The Holiday Management function can be enabled or disabled in the Timer settings menu.
z Add: You can specify holidays:
Click the Add button in the Holiday Management window.
z Delete: Delete holidays: check the corresponding checkboxes and click this button.
z List of holidays: View a list of holidays you have added.
Mon~Sat
Sat~Sun
Page 53
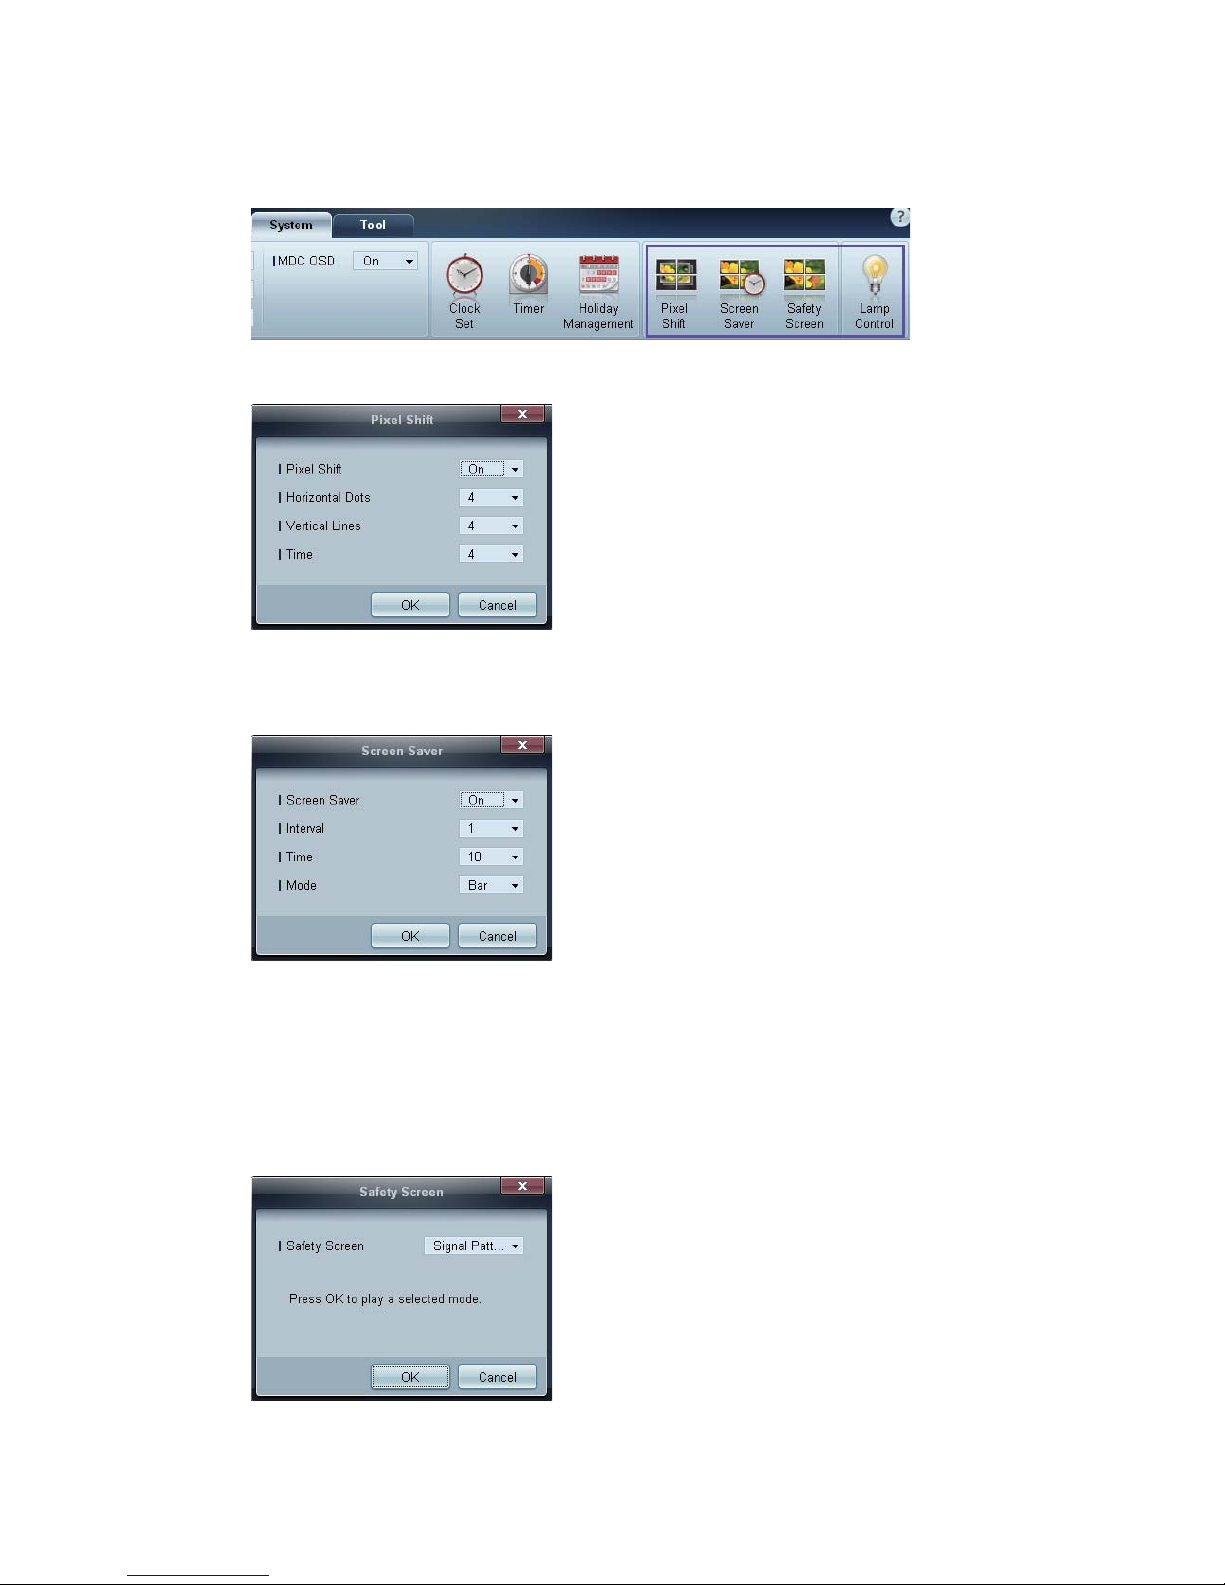
Screen Burn Protection
Pixel Shift
Move the screen slightly at specified time intervals to prevent screen burn-in.
Screen Saver
This function prevents screen burn-in when the screen of the selected display device is left idle for an
extended period of time.
z Interval: Set the interval to activate the Screen Saver.
z Mode: The Time setting can vary for each Mode.
Safety Screen
Page 54
The Safety Screen function can be used to prevent screen burn-in when a stationary image displays on
the screen of a display device for an extended period of time.
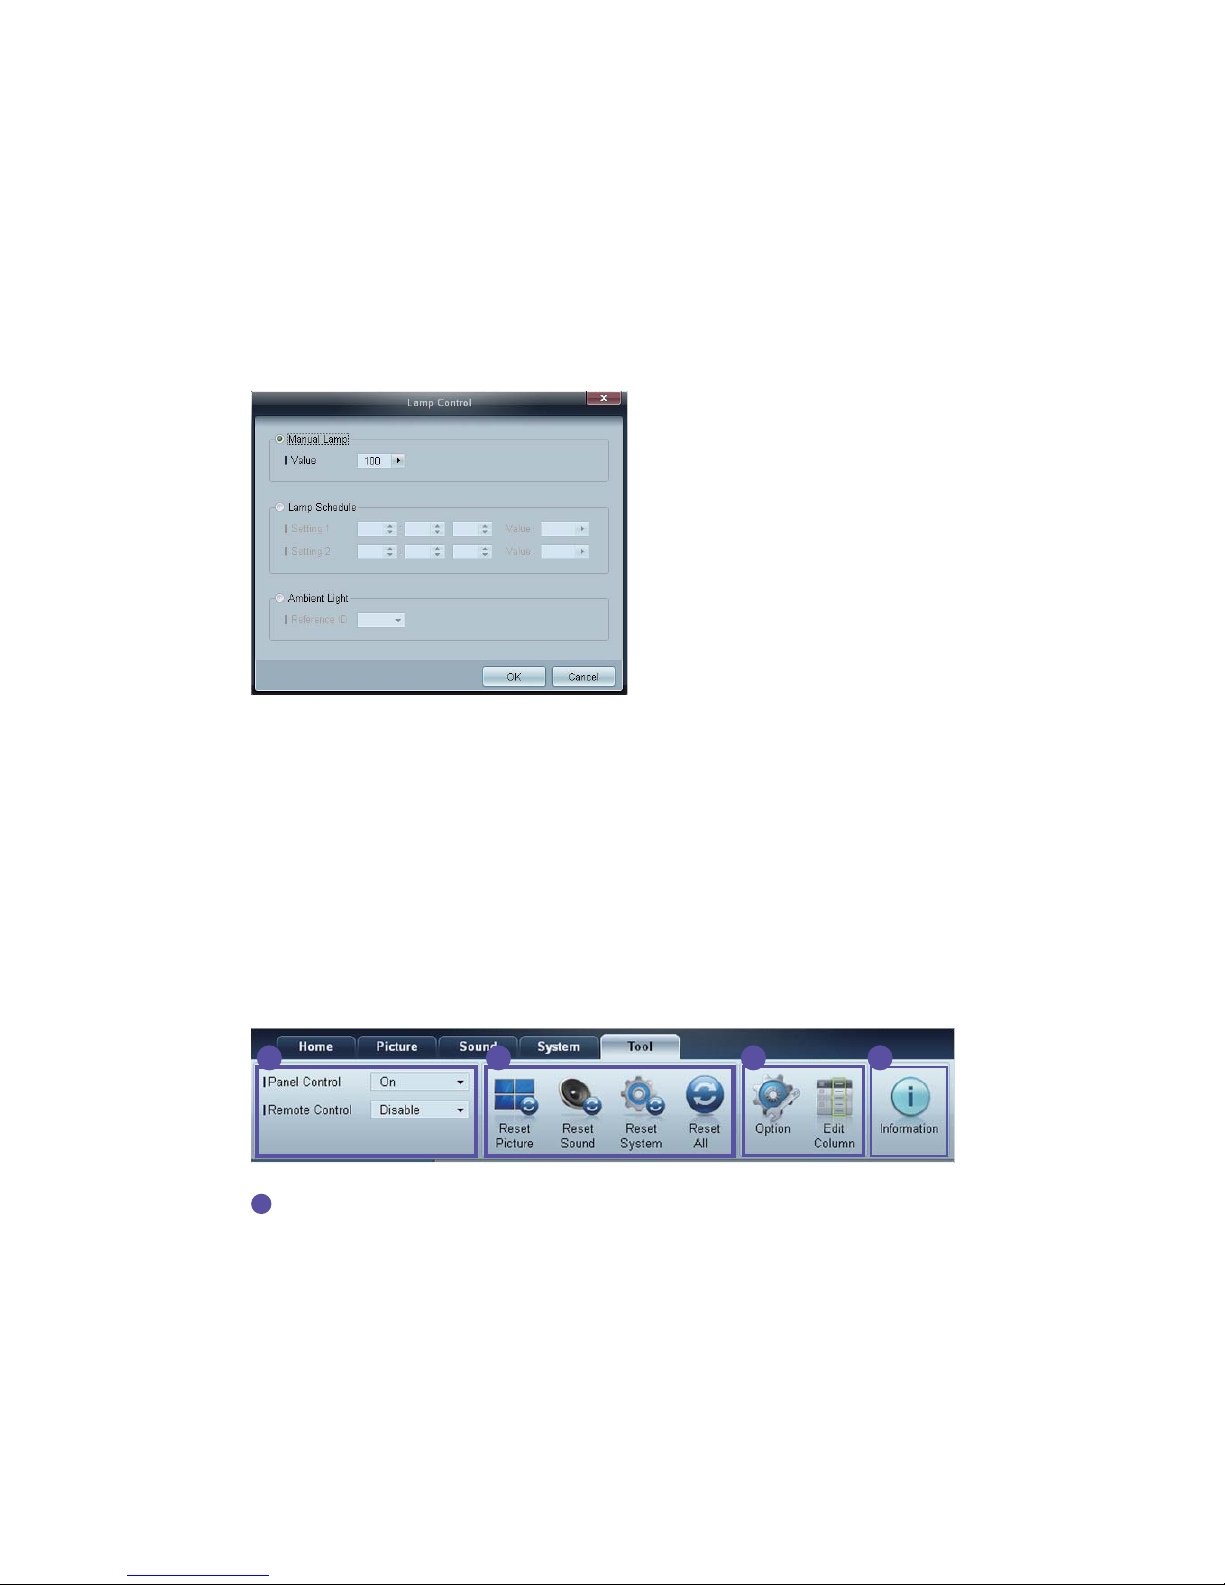
Lamp Control
Lamp Control is used to adjust the backlight to reduce power consumption.
Automatically adjust the backlight of the selected display device at a specified time.
If Manual Lamp Control is adjusted, Auto Lamp Control will automatically switch to Off.
Manually adjust the backlight for the selected display.
If Auto Lamp Control is adjusted, Manual Lamp Control will automatically switch to Off.
z Ambient Light: Ambient Light detects ambient light intensity and automatically adjusts the screen
brightness of all the LFDs in the same serial chain.
Tool Settings
Security
Panel Control
Turn on or off the screen of a display device.
Remote Control
Enable or disable the remote control.
1 2 3 4
1
Page 55
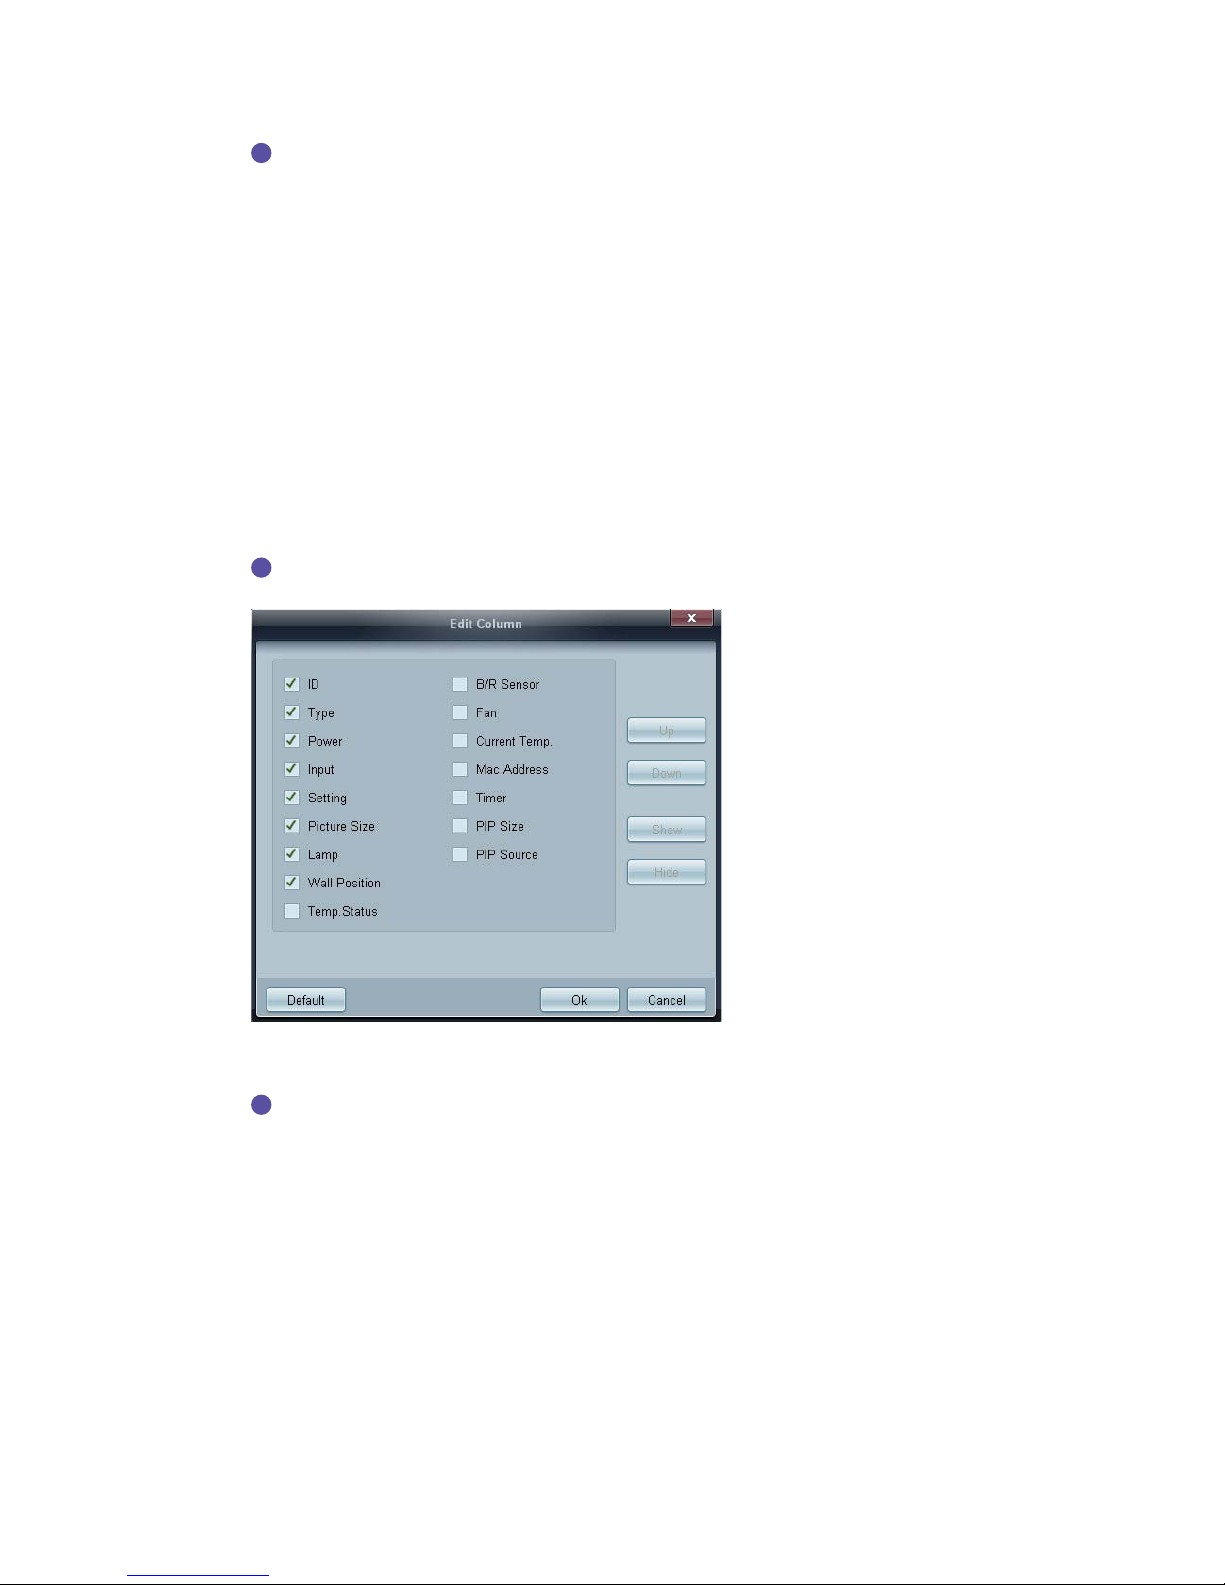
Reset
Reset Picture
Reset the screen settings.
Reset Sound
Reset the sound settings.
Reset System
Reset the system settings.
Reset All
Reset the screen, sound and system settings at the same time.
Edit Column
Select the items you want to display in the list of sets.
Information
View the program information.
2
3
4
Page 56

Other Functions
Resizing a Window
Place the mouse pointer on a corner of the program window. An arrow will appear. Move the arrow to
customize the size of the program window.
Page 57

Group Management
Creating Groups
Create groups and manage the list of sets on a group basis.
Duplicate group names cannot be used.
1 Right-click and select Group>Edit in the display device list section on the left side of the program
window.
2 In the Edit Group window displayed, click Add on the sub level or Add on the same level.
z Add on the sub level: Create a sub-group under the selected group.
z Add on the same level: Create a group on the same level as the selected group.
Page 58
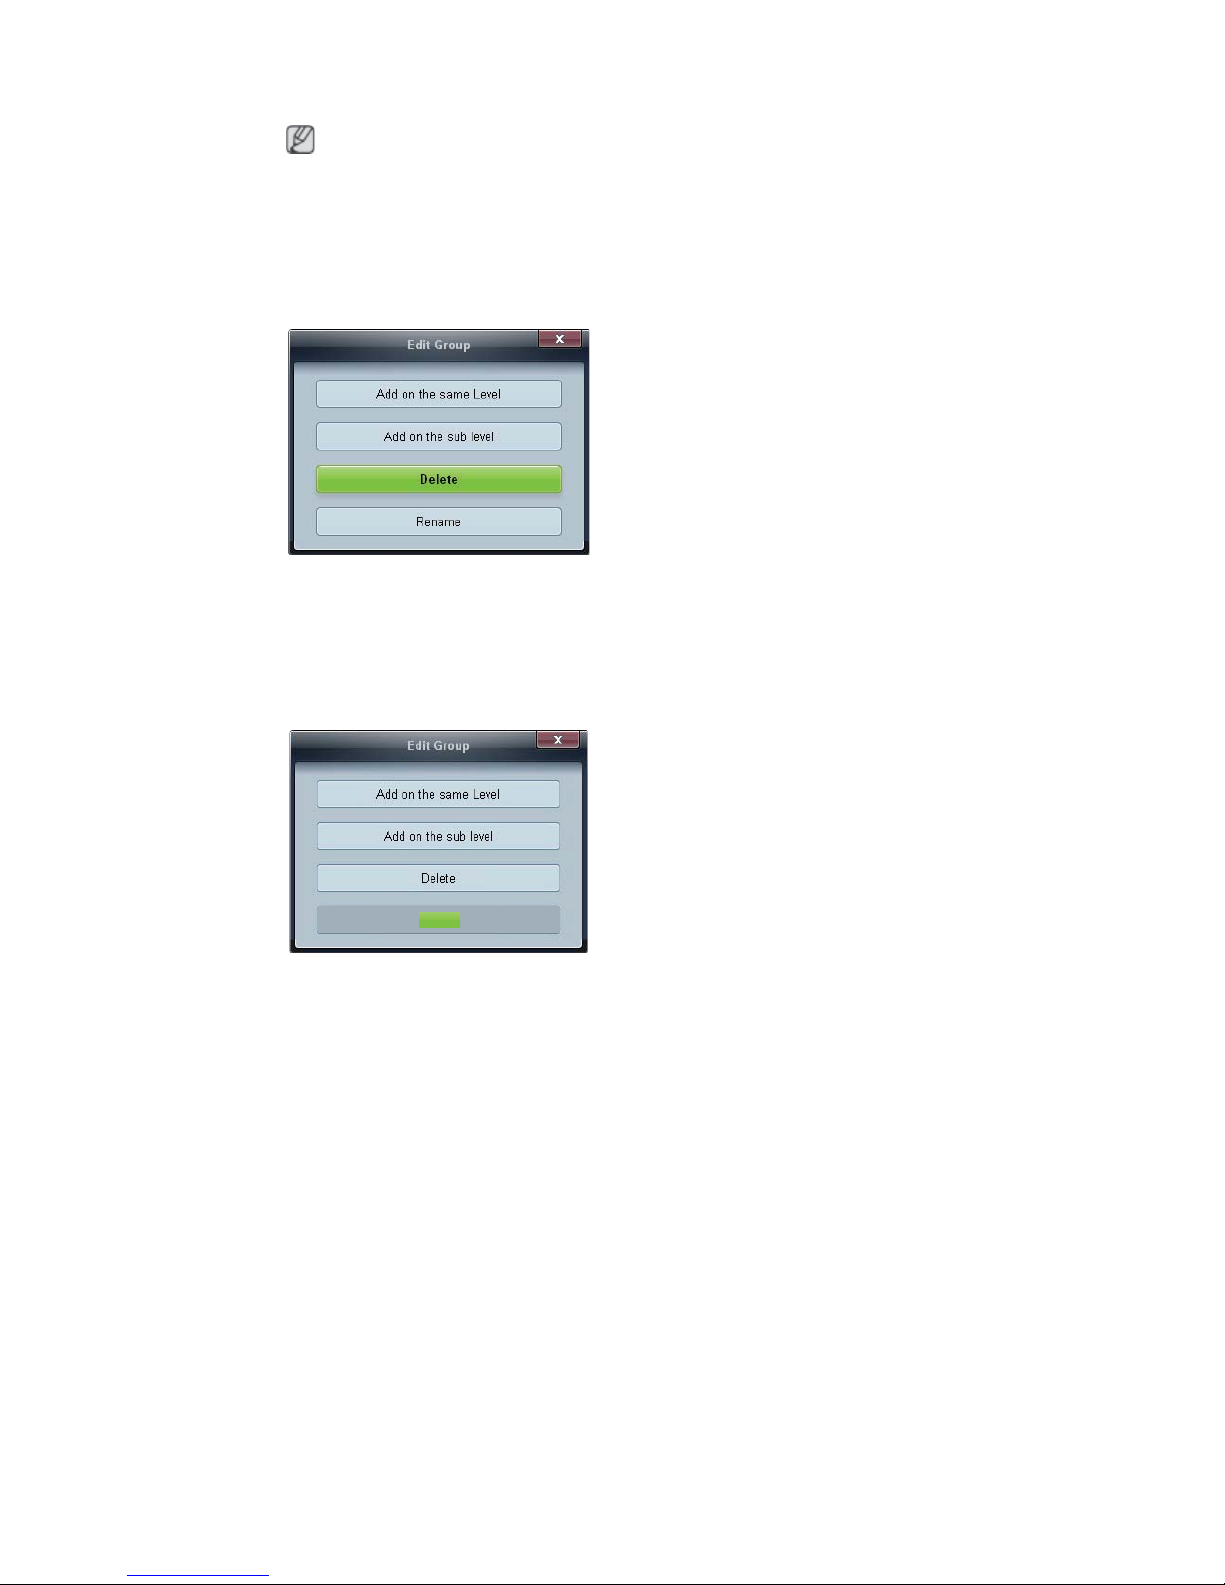
The Add on the same level button is enabled only if at least one group is created.
3 Enter the group name.
Deleting Groups
1 Select a group name, and click Edit.
2 In the Edit Group window displayed, click Delete.
3 Click Yes. The group will be deleted.
Renaming Groups
1 Select a group name, and click Edit.
2 In the Edit Group window displayed, click Rename.
3 If a cursor appears in the old group name, enter a new group name.
Rename
Page 59

Schedule Management
Creating Schedules
Create and register a schedule on a group basis.
1 Click All Schedule List in the schedule section on the left side of the program window. The Add
button will be enabled in the middle.
2 Click the Add button. The Add Schedule window will appear.
Page 60

3 Click Add below the Device Group item, and select the group you want to add a schedule to.
4 Select Date&Time/Action and click OK. The schedule will be added and a list of schedules will
appear in the set list window.
z Device Group: Select a group.
z Date&Time
Instant Execution: Run the schedule immediately.
Timer Set the date, time and interval to run the schedule.
z Action: Select a function that will activate at the specified time and interval.
Schedule Modification
To modify a schedule, select the schedule and click Edit.
Deleting a Schedule
To delete a schedule, select the schedule and click Delete.
Page 61
Troubleshooting Guide
This program may malfunction sometimes due to a communication problem between the PC and
display or electromagnetic waves emitted from nearby electronic devices.
Issue Solution
The display you want to control
does not appear on the system
information chart.
1. Check the connection of the RS232C cable (check that the
cable is properly connected to appropriate serial port).
2. Check that another display with a duplicate ID is not
connected. Connecting displays with a duplicate ID can
cause the displays not to be shown due to data collision.
3. Check that the display ID is within the range of 0 and 99.
(Change the ID using the Display menu.)
For a display that supports the ID in a range of 0 to 99,
the ID should be set between 0 and 99.
The display you want to control
does not appear on the other
Control Info Grids.
Check that the display is powered on. (See the power status in
the system information chart.)
Ensure you select the input source the display is connected to.
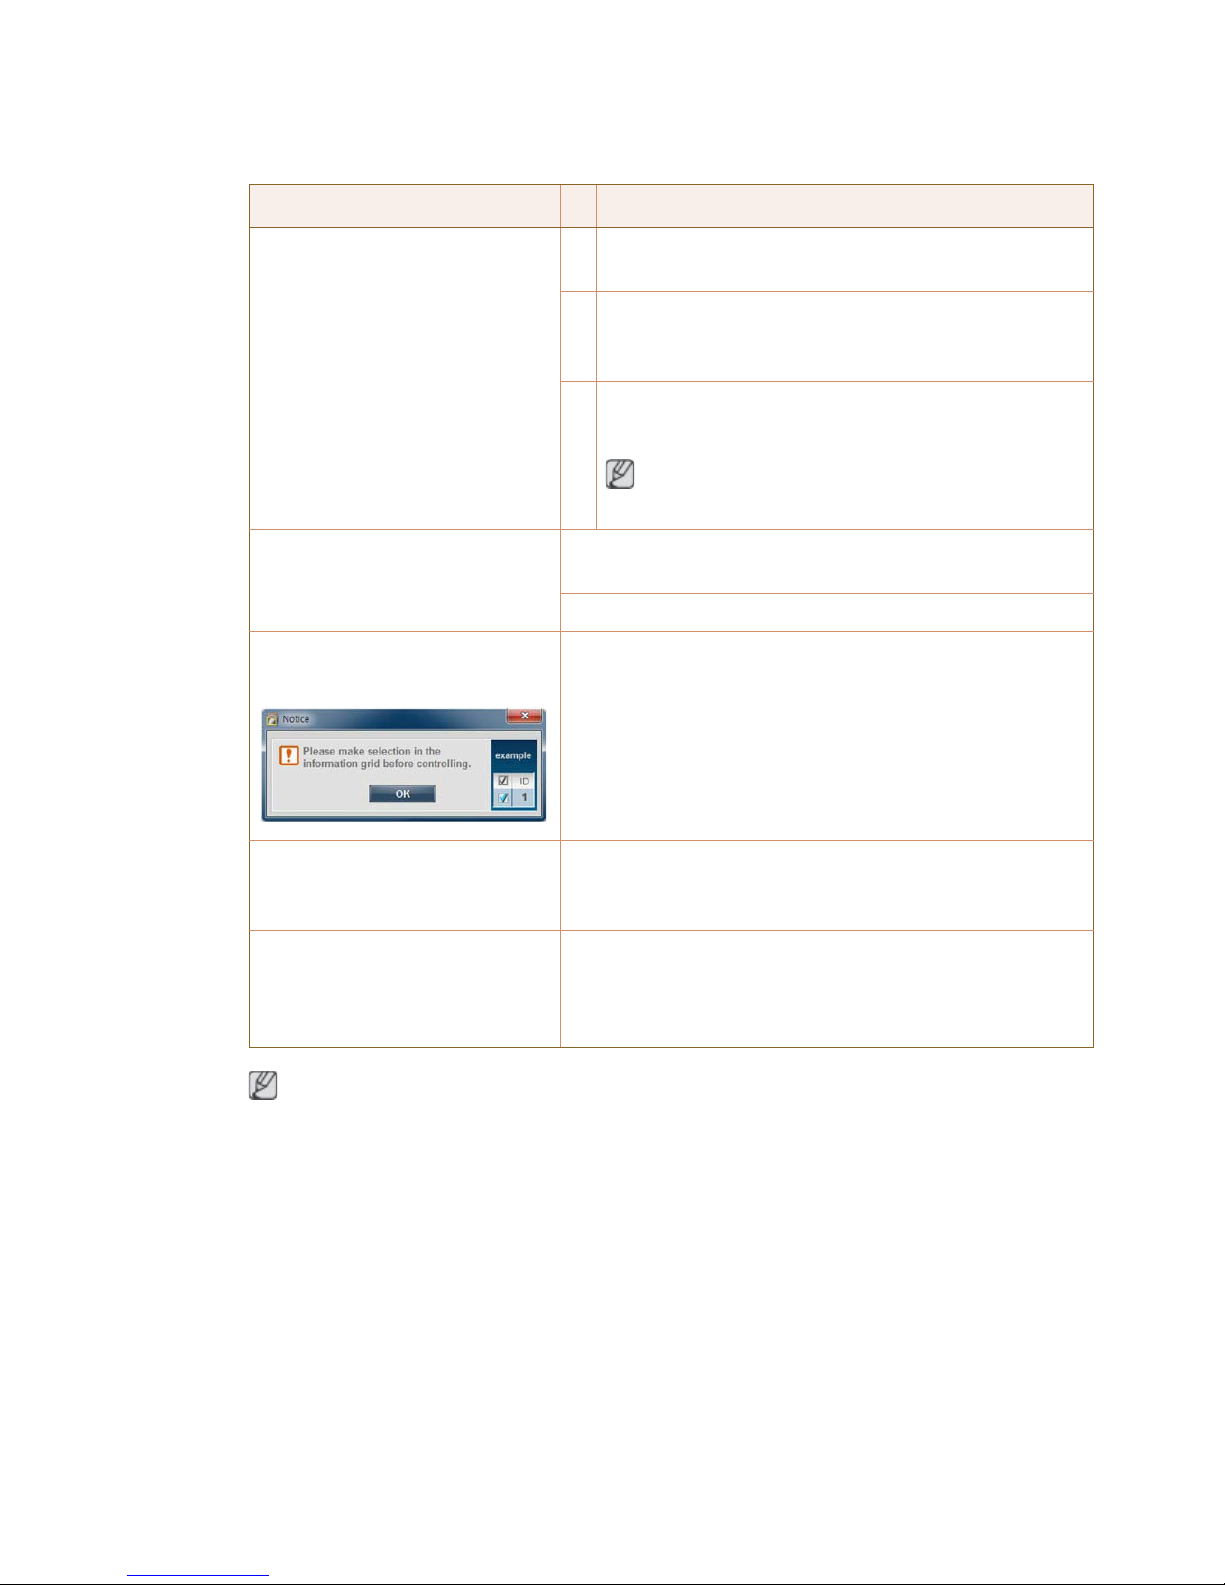
The following message appears
repeatedly.
Check that the display you want to control is selected.
Displays power on or off at different
time from one another even though
On Time or Off Time is set.
Adjust the time on the PC to synchronize the time between the
connected displays.
The remote control does not work. The remote control may not work if the RS-232C cable is
removed or the program is closed abnormally while the Remote
Control function is Disable. To resolve this, run the program
again and set Remote Control to Enable.
Page 62

How display properties are shown when multiple displays are used
1 When no display is selected: The default value is displayed.
2 When one display is selected: Settings for the selected display are displayed.
3 When two displays are selected (e.g. in sequence of ID 1 andID 3): The settings for ID 1 are
displayed before the settings for ID 3.
4 When the All+Select checkbox is checked and all displays are selected: The default settings are
displayed.
Page 63
Adjusting the LCD Display
Input
Available Modes
•
PC / DVI / DisplayPort
•
AV
•
Component
•
HDMI
•
MagicInfo
Note
MagicInfo can only be enabled when a network box(sold separately) is connected.
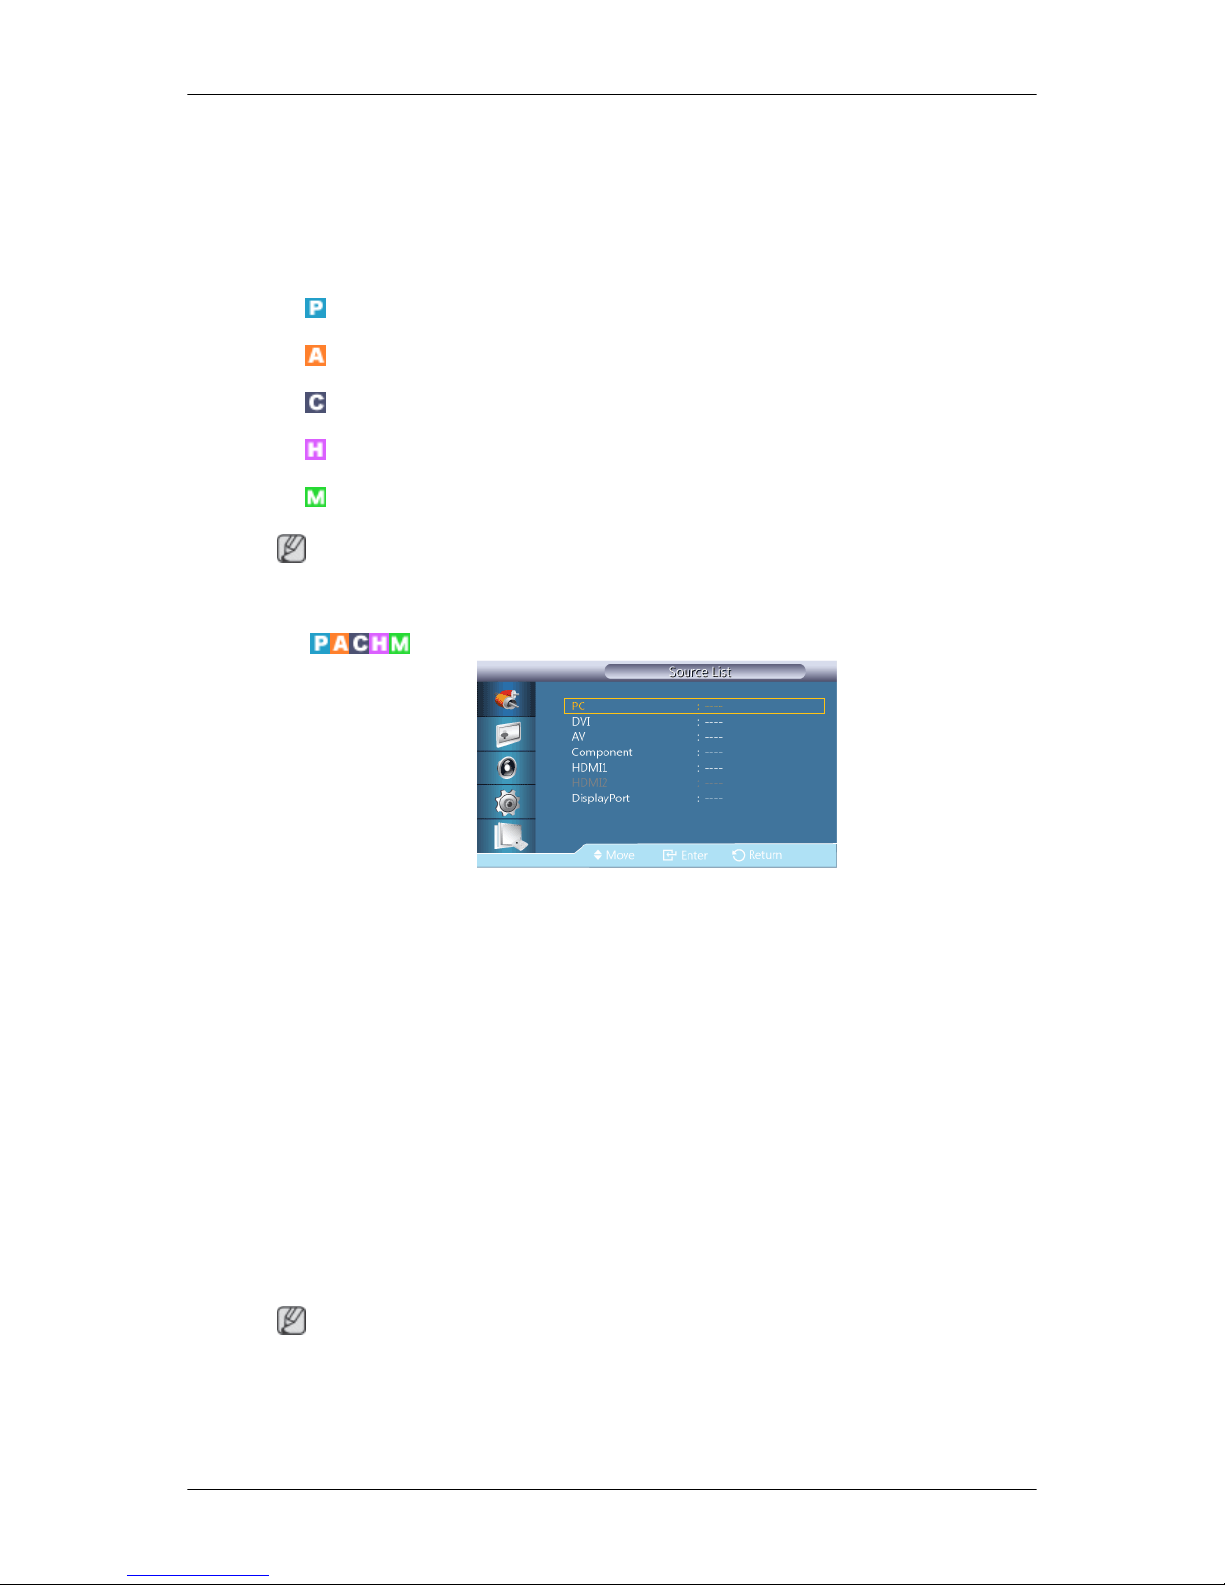
Source List
Use to select PC, HDMI or other external input sources connected to the LCD Display. Use to select
the screen of your choice.
1. PC
2. DVI
3. AV
4. Component
5. HDMI1
6. HDMI2 - Enabled if a network box is connected.
7. DisplayPort
8. MagicInfo - Enabled if a network box is connected.
Note
The [RGB/COMPONENT IN] port is compatible with a PC or component input.
However, the picture may not display normally if you select an input source different from the actual
connected input source.
Page 64

PIP
Note
• The PIP function is not available when Video Wall is On.
• The PIP function is not available when Source AutoSwitch is On.
When external AV devices such as VCRs or DVDs are connected to the LCD Display, PIP allows you
to watch video from those devices in a small window super-imposed on the PC Video signal. (Off/
On)
Note
• PIP turns off when the LCD Display is switched to an external source.
•
If you select , , in Size, Position and Transparency will not be activated.
PIP
Turns the PIP Screen Off/On.
• Off
• On
Source
Selects the input source for the PIP.
Note
PIP is disabled if the primary screen does not receive a signal.
• PC : DVI, AV, HDMI1, HDMI2, DisplayPort
• DVI : PC
• AV : PC
• HDMI : PC
Adjusting the LCD Display
Page 65
• DisplayPort : PC
Note
HDMI2 is disabled if a network box is connected.
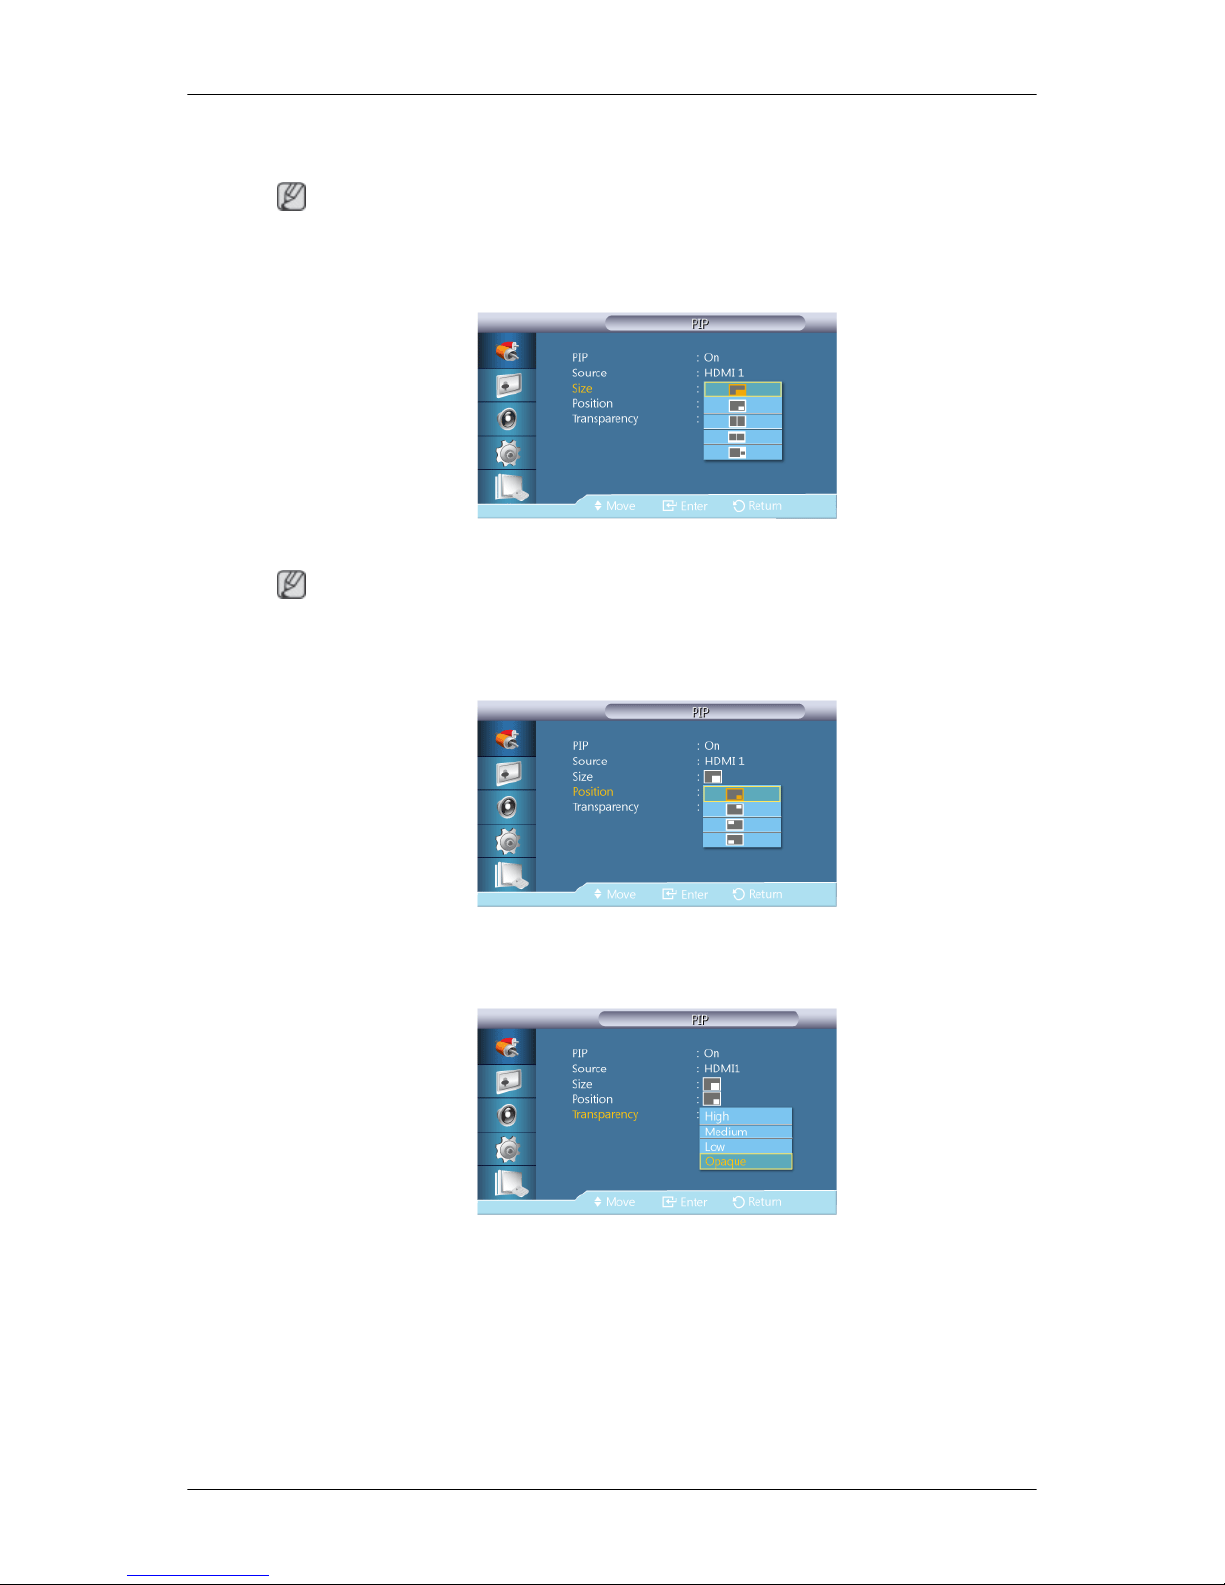
Size
Changes the Size of the PIP window.
Note
Picture > Size will be changed to 16:9 when PIP is On.
Position
Changes the Position of the PIP window.
Transparency
Adjusts the Transparency of PIP windows.
• High
• Medium
• Low
• Opaque
Adjusting the LCD Display
Page 66

Edit Name
Name the input device connected to the input jacks to make your input source selection easier.
VCR / DVD / Cable STB / HD STB / Satellite STB / AV Receiver / DVD Receiver / Game /
Camcorder / DVD Combo / DHR / PC / DVI PC / DVI Devices
Note
• The displayed devices differ depending on the external input mode.
• When connecting a PC to the HDMI terminal, set Edit Name to PC. In other cases, set Edit
Name to AV. However, since 640x480, 720p (1280x720), and 1080p (1920x1080) are common
signals for AV and PC, make sure to set the Edit Name in accordance with the input signal.
• The Picture menu changes depending on the input signal and Edit Name.
When using a DVI to HDMI cable connection (which does not support audio and video at the same
time), the audio port should be connected via a separate audio cable.
• When a PC is connected, set Edit Name to DVI PC to enjoy the video and audio from the connected
PC.
• When an AV device is connected, set Edit Name to DVI Device to enjoy the video and audio from
the connected AV device.
Source AutoSwitch Settings
Turning on the display with Source AutoSwitch On, and the previous video source selection is not
active, the display will automatically search the different video input sources for active video.
Note
• Source AutoSwitch selection and PIP function: If the Source AutoSwitch selection is set to
On, the PIP function will not work, the Source AutoSwitch selection must be set to Off, for the
PIP feature to work.
• When the Source AutoSwitch selection is On, and or the Primary Source Recovery is On, the
display power saving mode becomes inactive.
• When Primary Source Recovery is On, only the Primary Source and Secondary Source selection are available and they are interchangeable and selectable at will.
Refer to PIP > Source for compatible signals for each primary input source.
Adjusting the LCD Display
Page 67

Source AutoSwitch
When the Source AutoSwitch is On, the display video source will automatically be searched for active
video.
The Primary Source selection will be activated, if the current video source is not recognized. Sec-
ondary source selection will become active, if no primary video source is available. If the primary or
secondary source is not recognized, the display will search again, if no active video is found the display
will show the no-input-signal message.
When the Primary Source selection is set to All, the display will search all the video source inputs
twice in sequence looking for an active video source, returning back to the first video source in the
sequence if no video is found.
1. Off
2. On
Primary Source Recovery
When Primary Source Recovery is On, only the Primary Source and Secondary Source video
source selection will be searched for active video.
The Primary Source will be selected if active video is found, if no video is found, the Secondary
Source will be selected, if no video is found in Secondary Source again, the no-input-signal is displayed.
1. Off
2. On
Primary Source
Adjusting the LCD Display
Page 68
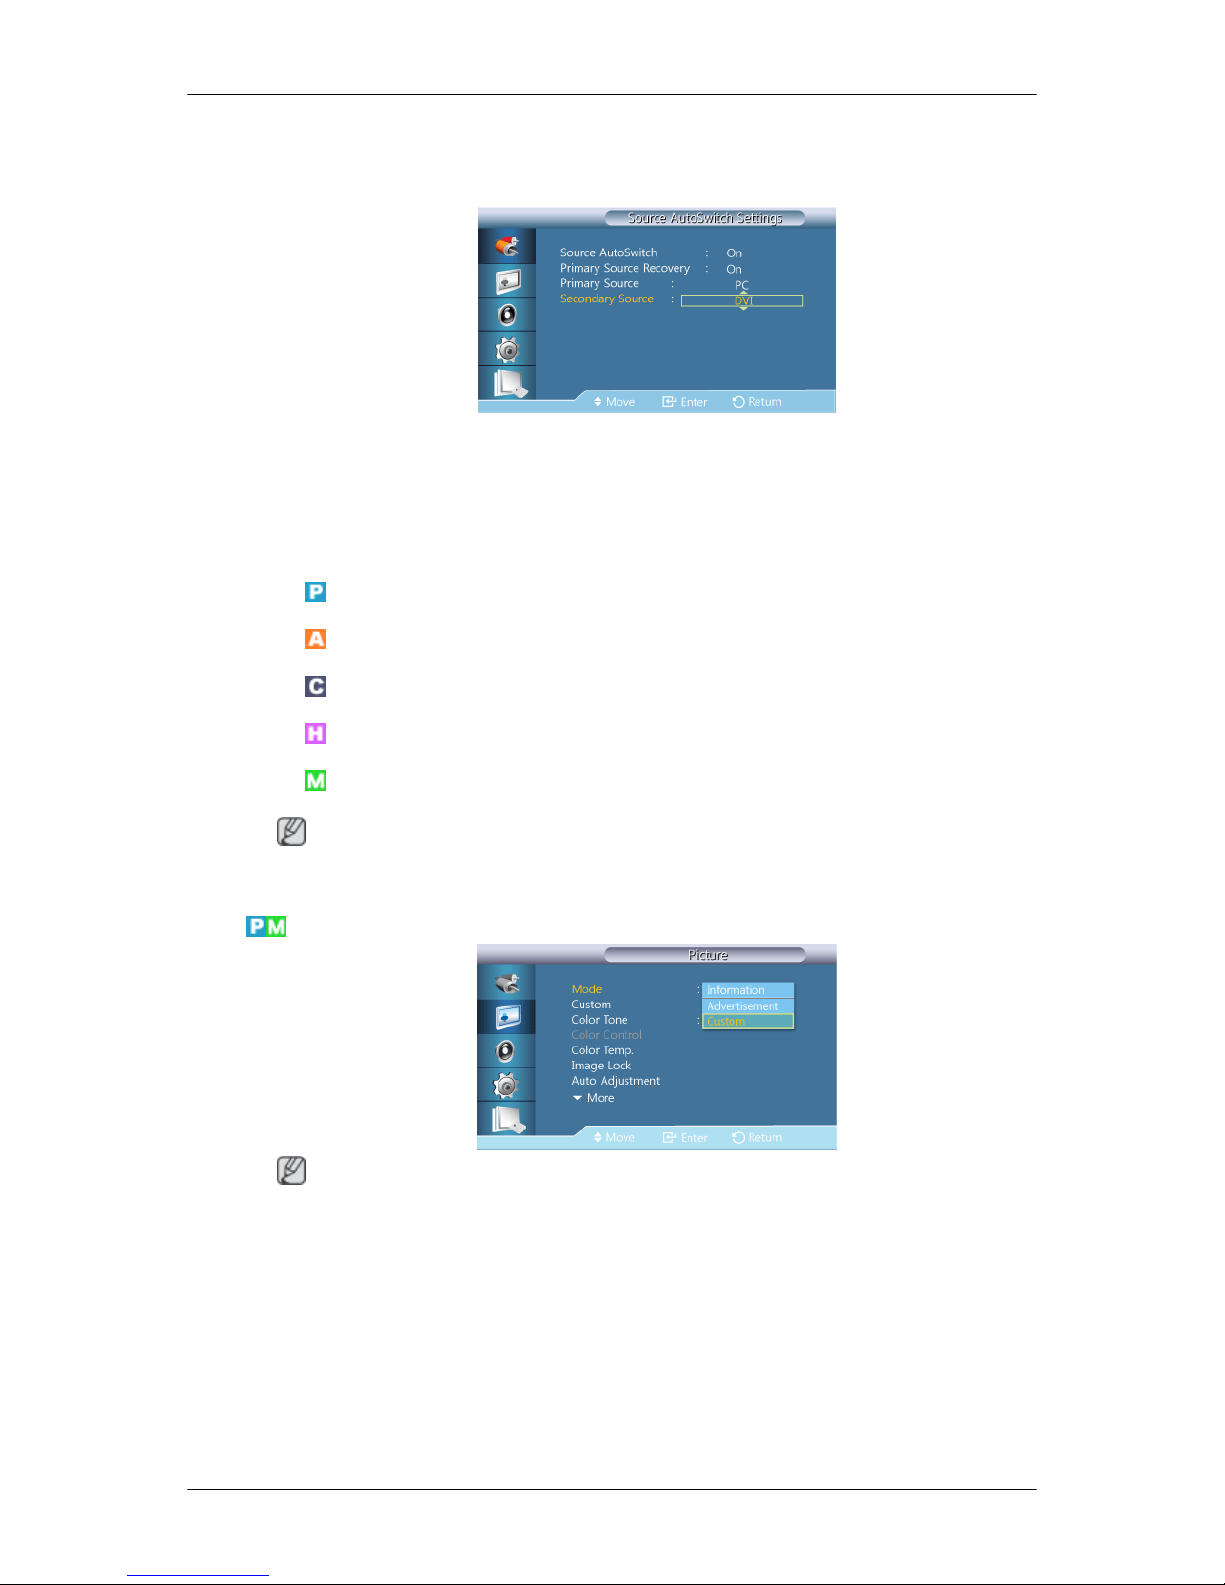
Specify Primary Source for the automatic input source.
Secondary Source
Specify Secondary Source for the automatic input source.
Picture [PC / DVI / DisplayPort / MagicInfo Mode]
Available Modes
•
PC / DVI / DisplayPort
•
AV
•
Component
•
HDMI
•
MagicInfo
Note
MagicInfo can only be enabled when a network box(sold separately) is connected.
Mode
Note
Not available when Dynamic Contrast is set to On.
1. Information
Recommended for communicating exact information (e.g. public information).
2. Advertisement
Recommended for displaying advertisements (e.g. videos or indoor or outdoor ads).
3. Custom
Adjusting the LCD Display
Page 69
Custom
By using the on-screen menus, the contrast and brightness can be changed to your personal preference.
Note
• By adjusting the picture using the Custom function, MagicBright will change to Custom mode.
• Not available when Dynamic Contrast is set to On.
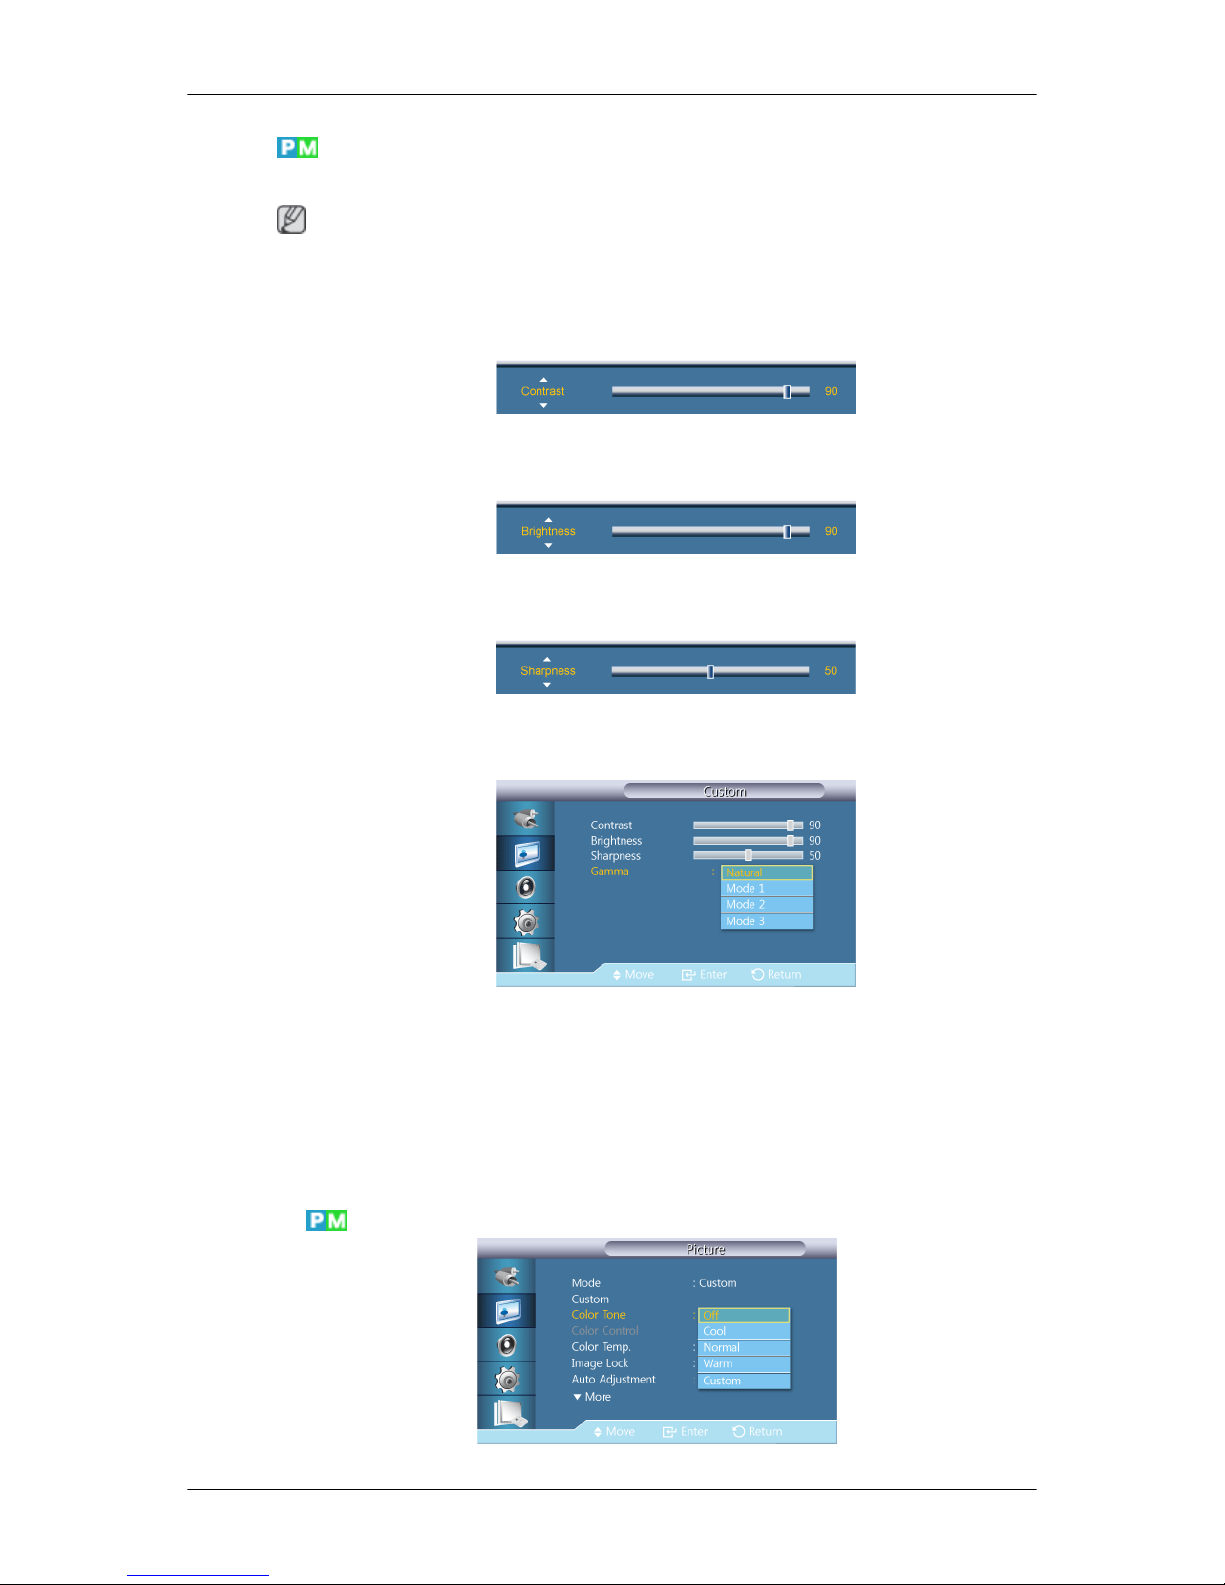
1. Contrast
Adjusts the Contrast.
2. Brightness
Adjusts the Brightness.
3. Sharpness
Adjusts the Sharpness.
4. Gamma
Adjust the mid-range brightness (Gamma) for the picture.
• Natural
• Mode 1 - Sets the picture brighter than Natural.
• Mode 2 - Sets the picture darker than Mode1.
• Mode 3 - Increases the contrast between dark and bright colors.
Color Tone
Adjusting the LCD Display
Page 70
Note
Not available when Dynamic Contrast is set to On.
The Color tones can be changed.
1. Off
2. Cool
3. Normal
4. Warm
5. Custom
Note
• If you set the Color Tone to Cool, Normal, Warm, or Custom, the Color Temp. function is
disabled.
• If you set the Color Tone to Off, the Color Control function is disabled
• By adjusting the picture using the Color Tone function, Mode will change to Custom mode.
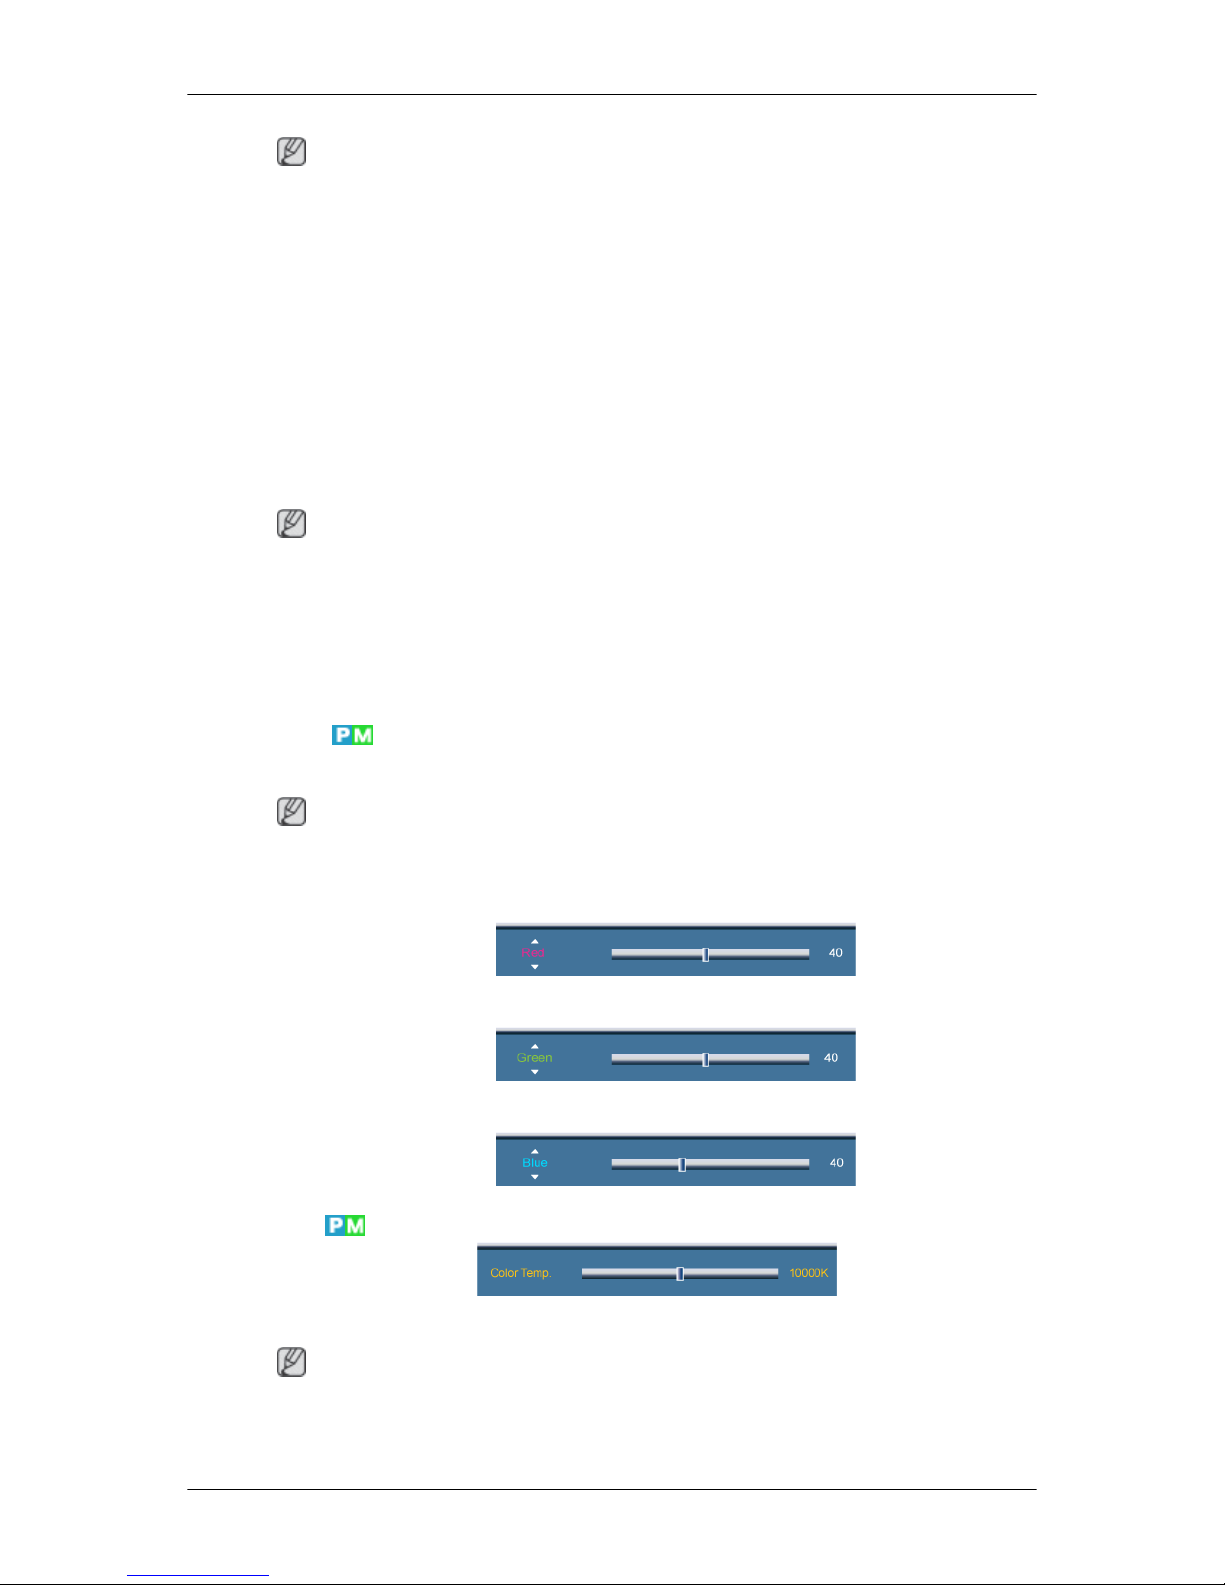
Color Control
Adjusts individual Red, Green, Blue Color balance.
Note
Not available when Dynamic Contrast is set to On.
1. Red
2. Green
3. Blue
Color Temp.
Color Temp. is a measure of the 'warmth' of the image Colors.
Note
This function is enabled when Mode is set to Custom, and Dynamic Contrast and Color Tone are
Off.
Adjusting the LCD Display
Page 71
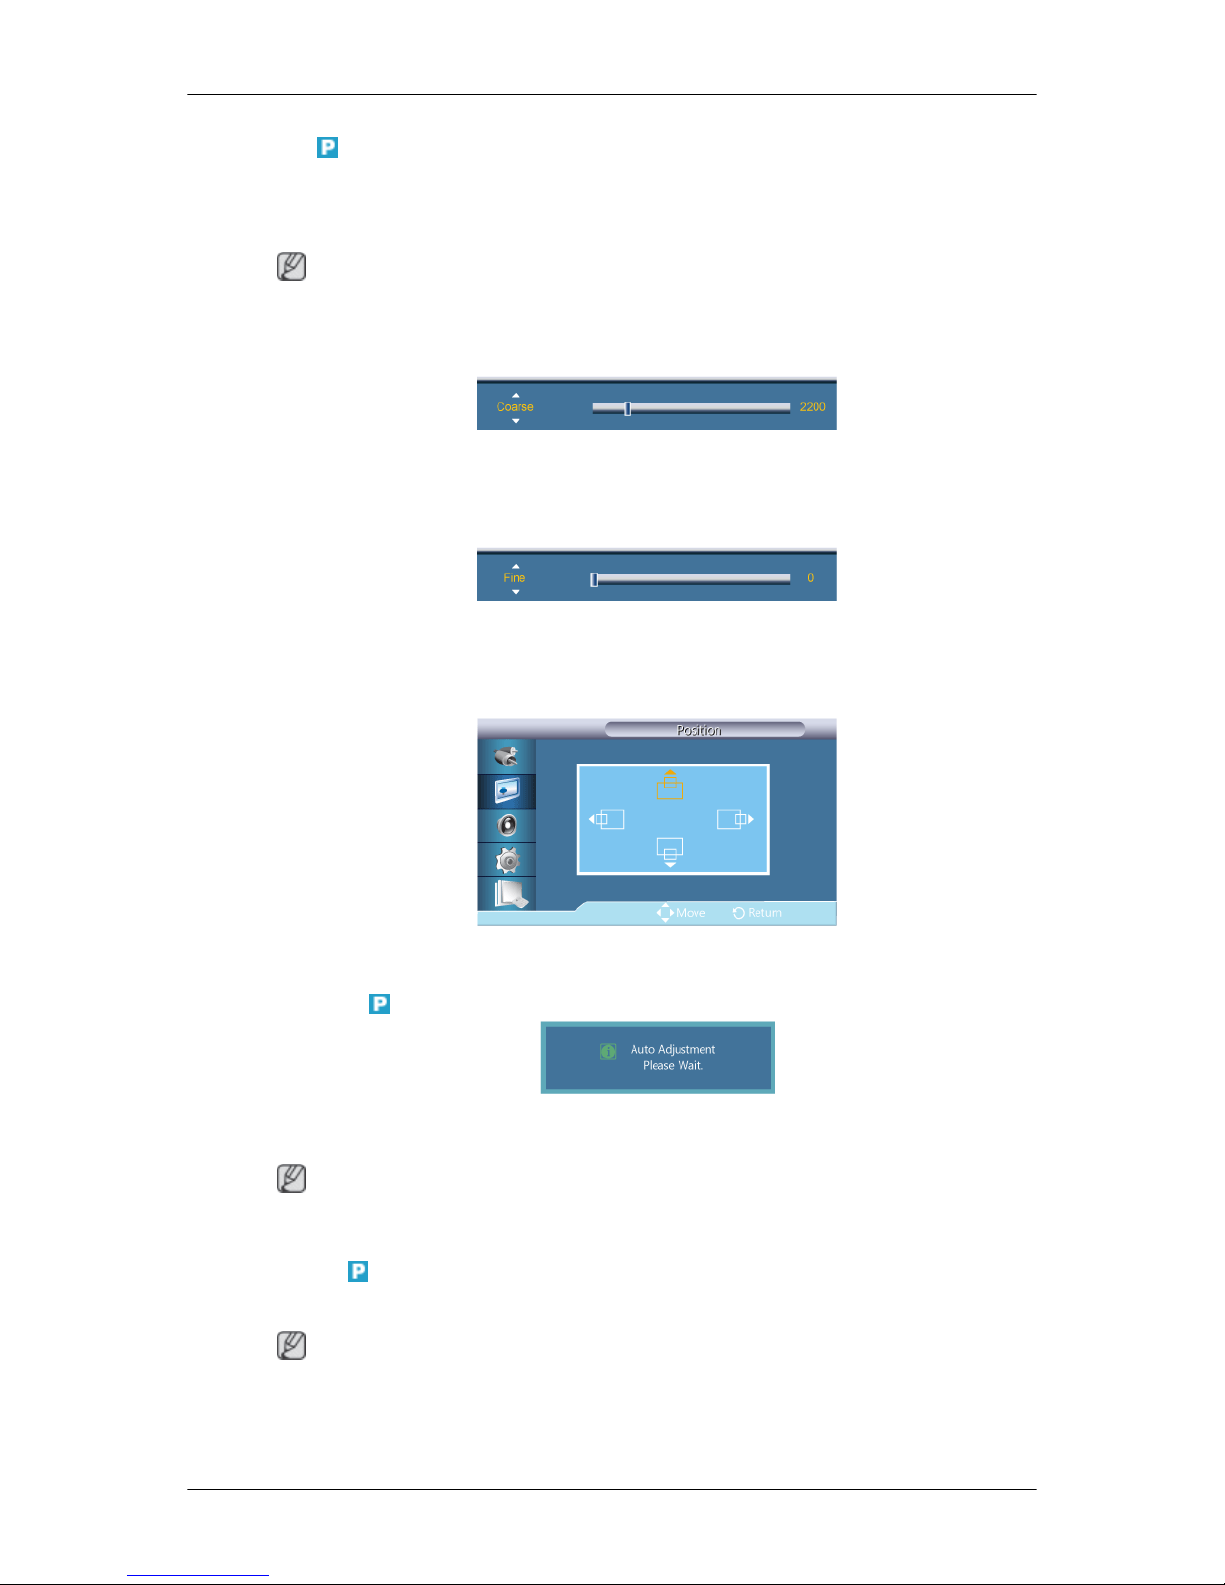
Image Lock
Image Lock is used to fine-tune and get the best image by removing noise that creates unstable images
with jitters and shakiness. If satisfactory results are not obtained using the Fine adjustment, use the
Coarse adjustment and then use Fine again.
Note
Available in PC mode only.
Coarse
Removes noise such as vertical stripes. Coarse adjustment may move the screen image area. You may
relocate it to the Center using the horizontal control menu.
Fine
Removes noise such as horizontal stripes. If the noise persists even after Fine tuning, repeat it after
adjusting the frequency (clock speed).
Position
Adjusts the screen location horizontally and vertically.
Auto Adjustment
The values of Fine, Coarse, Position are adjusted automatically. By changing the resolution in the
control panel, the auto function is performed.
Note
Available in PC mode only.
Signal Balance
This is used to make up for the weak RGB signal transmitted by a long signal cable.
Note
• Not available when Dynamic Contrast is set to On.
• Available in PC mode only.
Adjusting the LCD Display
Page 72
Signal Balance
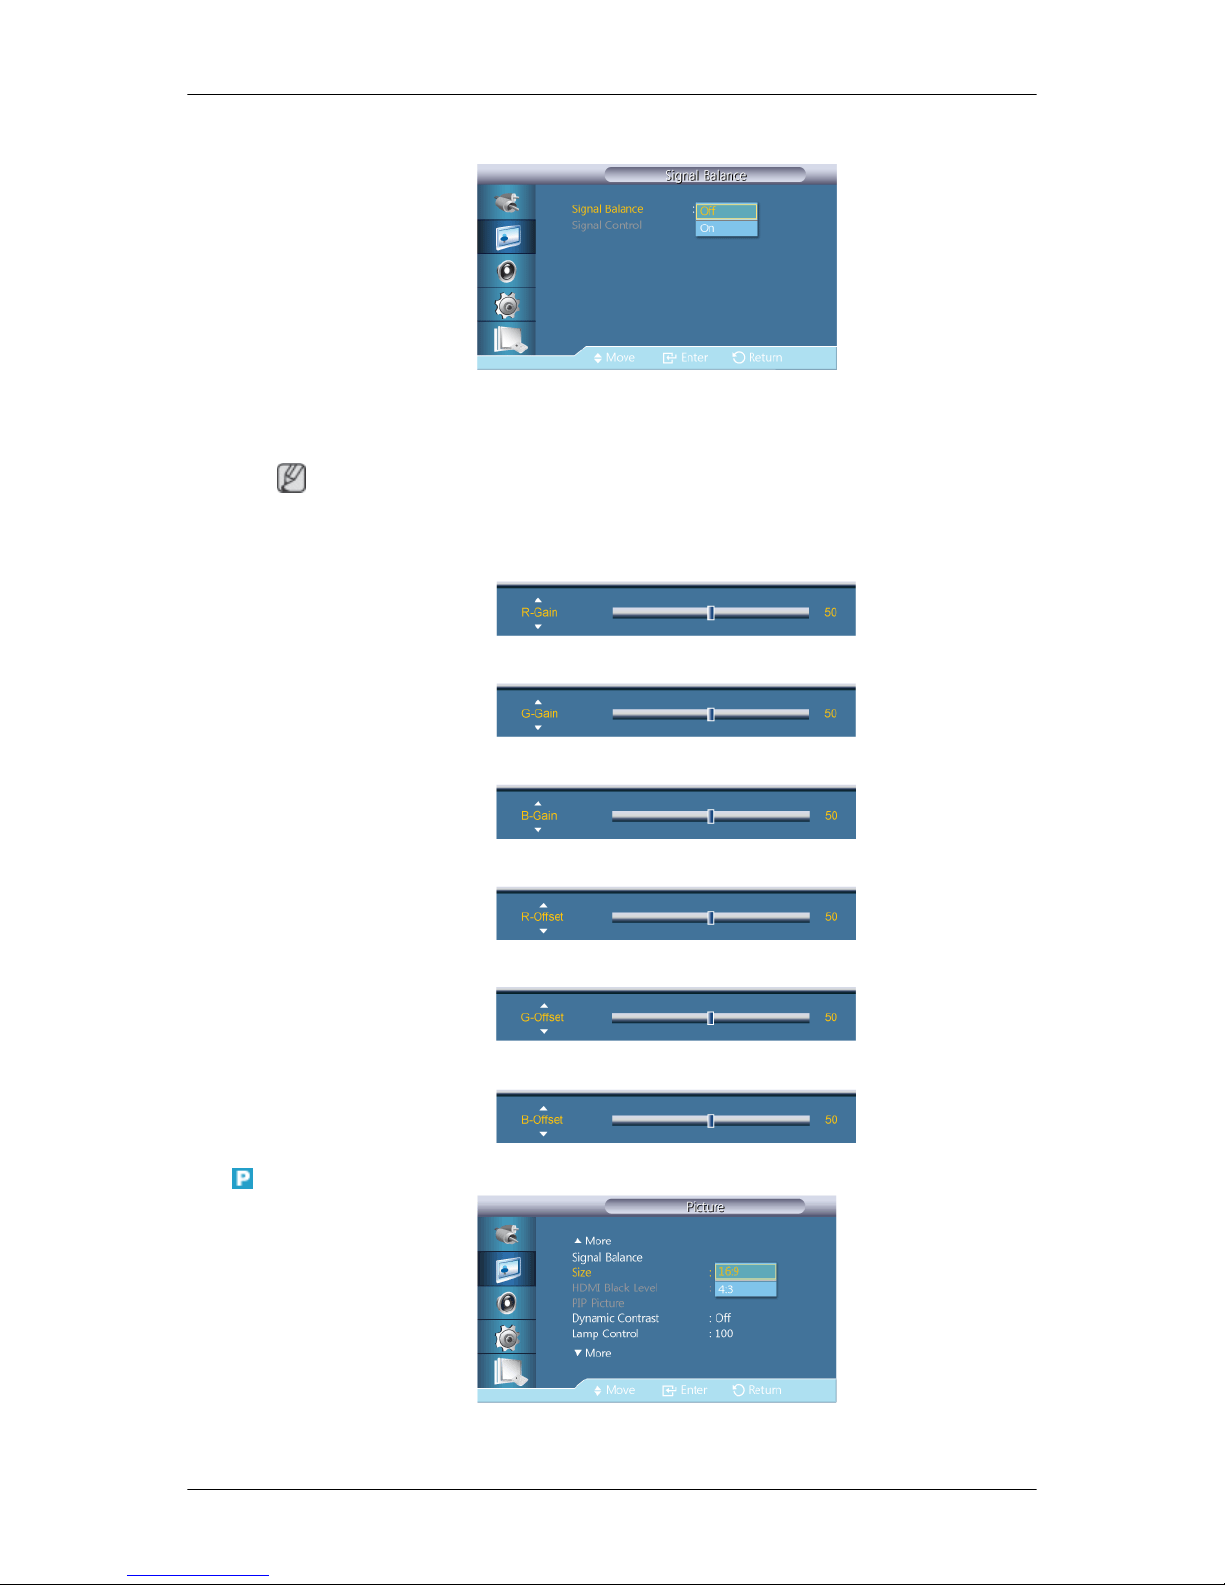
Selects either On or Off with the signal balance.
Signal Control
Note
Available when Signal Balance is set to On.
1. R-Gain
2. G-Gain
3. B-Gain
4. R-Offset
5. G-Offset
6. B-Offset
Size
The Size can be switched.
Adjusting the LCD Display
Page 73

1. 16:9
2. 4:3
Note
Size will change to 16:9 if PIP mode is active.
HDMI Black Level
Selects the black level on the screen to adjust the screen depth.
1. Normal
2. Low
Note
Available only in HDMI mode.
PIP Picture
Adjusts the PIP Screen Settings.
Note
• Available Modes: PIP On
1. Contrast
Adjusts the Contrast of the PIP window on the screen.
2. Brightness
Adjusts the Brightness of the PIP window on the screen.
3. Sharpness
Adjusts the Sharpness of the PIP window on the screen.
4. Color
Adjusting the LCD Display
Page 74
Adjusts the Color of the PIP window on the screen.
Note
PIP input only operates in AV, HDMI mode.
5. Tint
Adds a natural tone to the PIP window.
Note
The Tint slider is only displayed when PIP input source is HDMI or AV.
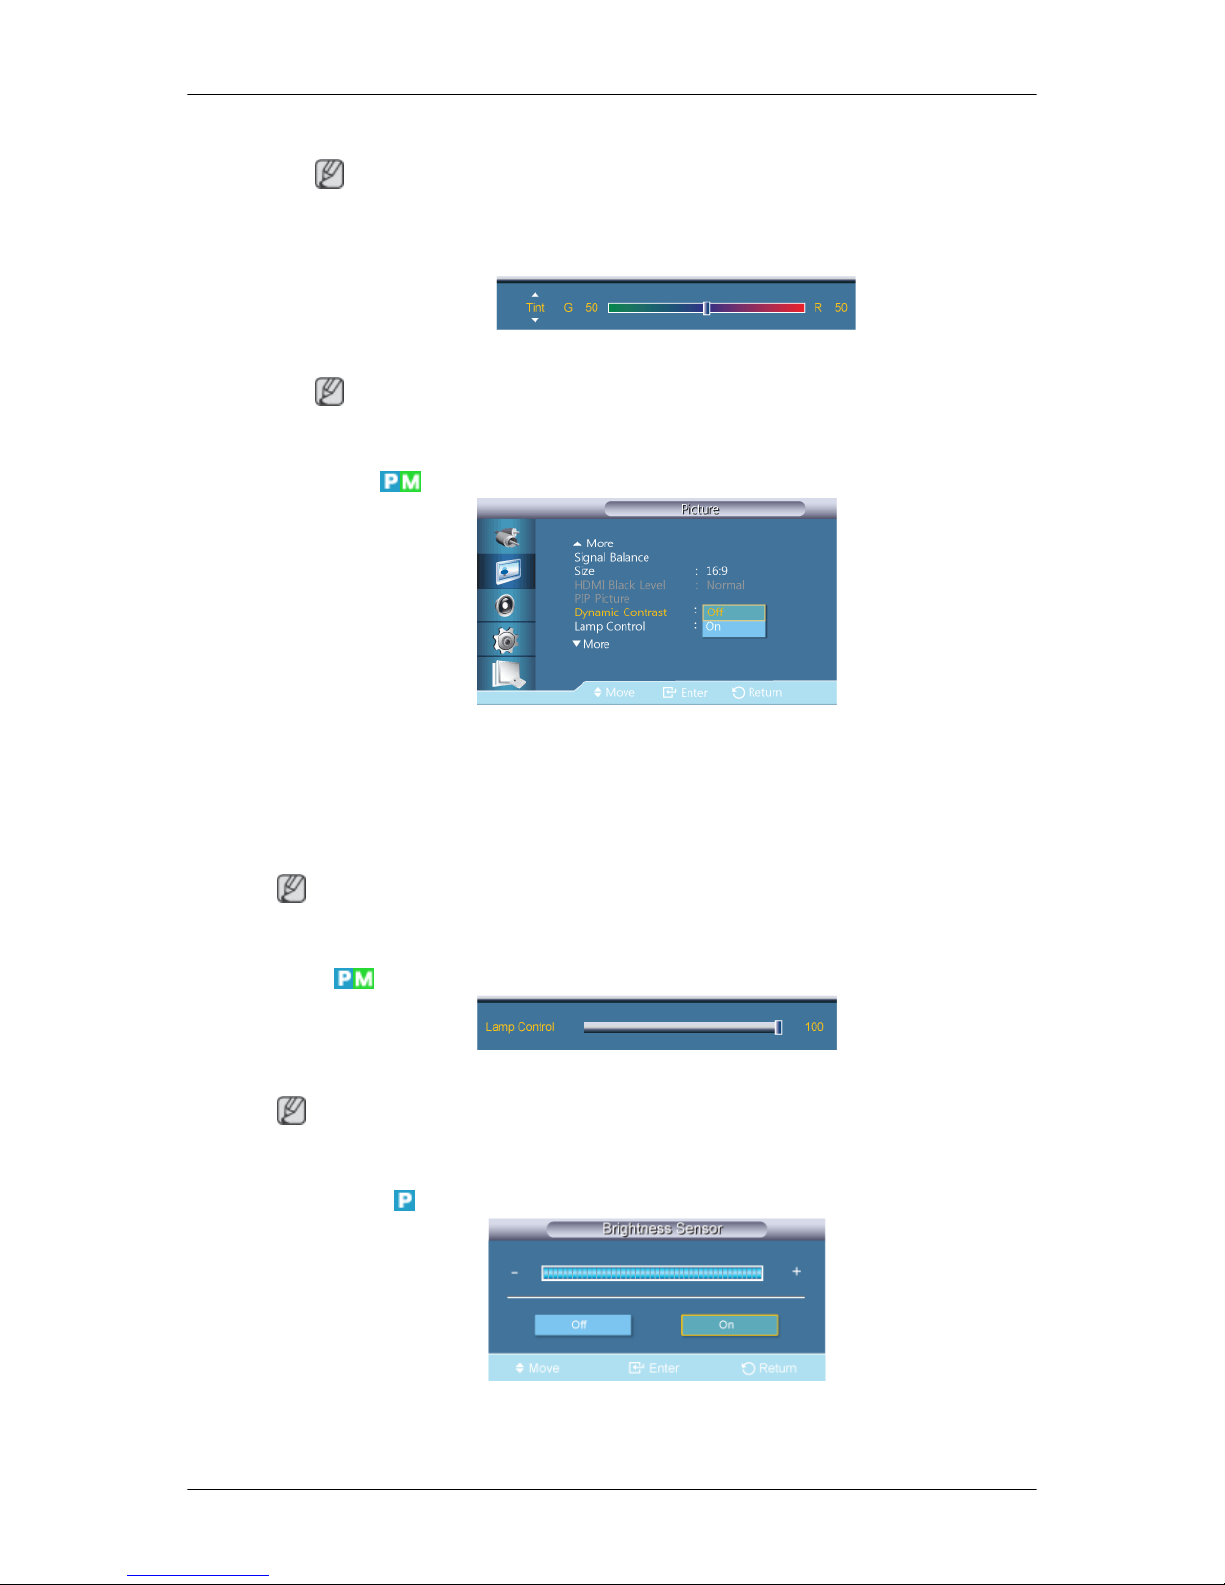
Dynamic Contrast
Dynamic Contrast automatically detects the distribution of the visual signal and adjusts to create an
optimum contrast.
1. Off
2. On
Note
Disabled when PIP is set to On.
Lamp Control
Adjusts the inverter lamp in order to reduce energy consumption.
Note
Not available when Dynamic Contrast is set to On.
Brightness Sensor
Brightness Sensor detects the surrounding light intensity and automatically optimizes the screen
brightness accordingly.
Adjusting the LCD Display
Page 75

1. Off
2. On
Picture Reset
Reset the screen settings.
Picture [ AV / HDMI / Component Mode]
Available Modes
•
PC / DVI / DisplayPort
•
AV
•
Component
•
HDMI
•
MagicInfo
Note
MagicInfo can only be enabled when a network box(sold separately) is connected.
Mode
The LCD Display has four automatic picture settings ("Dynamic", "Standard", "Movie" and "Custom") that are preset at the factory.
Note
Not available when Dynamic Contrast is set to On.
1. Dynamic
2. Standard
3. Movie
4. Custom
Custom
By using the on-screen menus, the contrast and brightness can be changed to your personal preference.
Adjusting the LCD Display
Page 76

Note
• By adjusting the picture using the Custom function, MagicBright will change to Custom mode.
• Not available when Dynamic Contrast is set to On.
Contrast
Adjusts the Contrast.
Brightness
Adjusts the Brightness.
Sharpness
Adjusts the picture Sharpness.
Color
Adjusts the picture Color.
Tint
Adds a natural tone to the display.
Note
The tint slider is only displayed when input source is HDMI or AV.
Color Tone
The Color tones can be changed. The individual Color components are also user adjustable.
Note
Not available when Dynamic Contrast is set to On.
Adjusting the LCD Display
Page 77
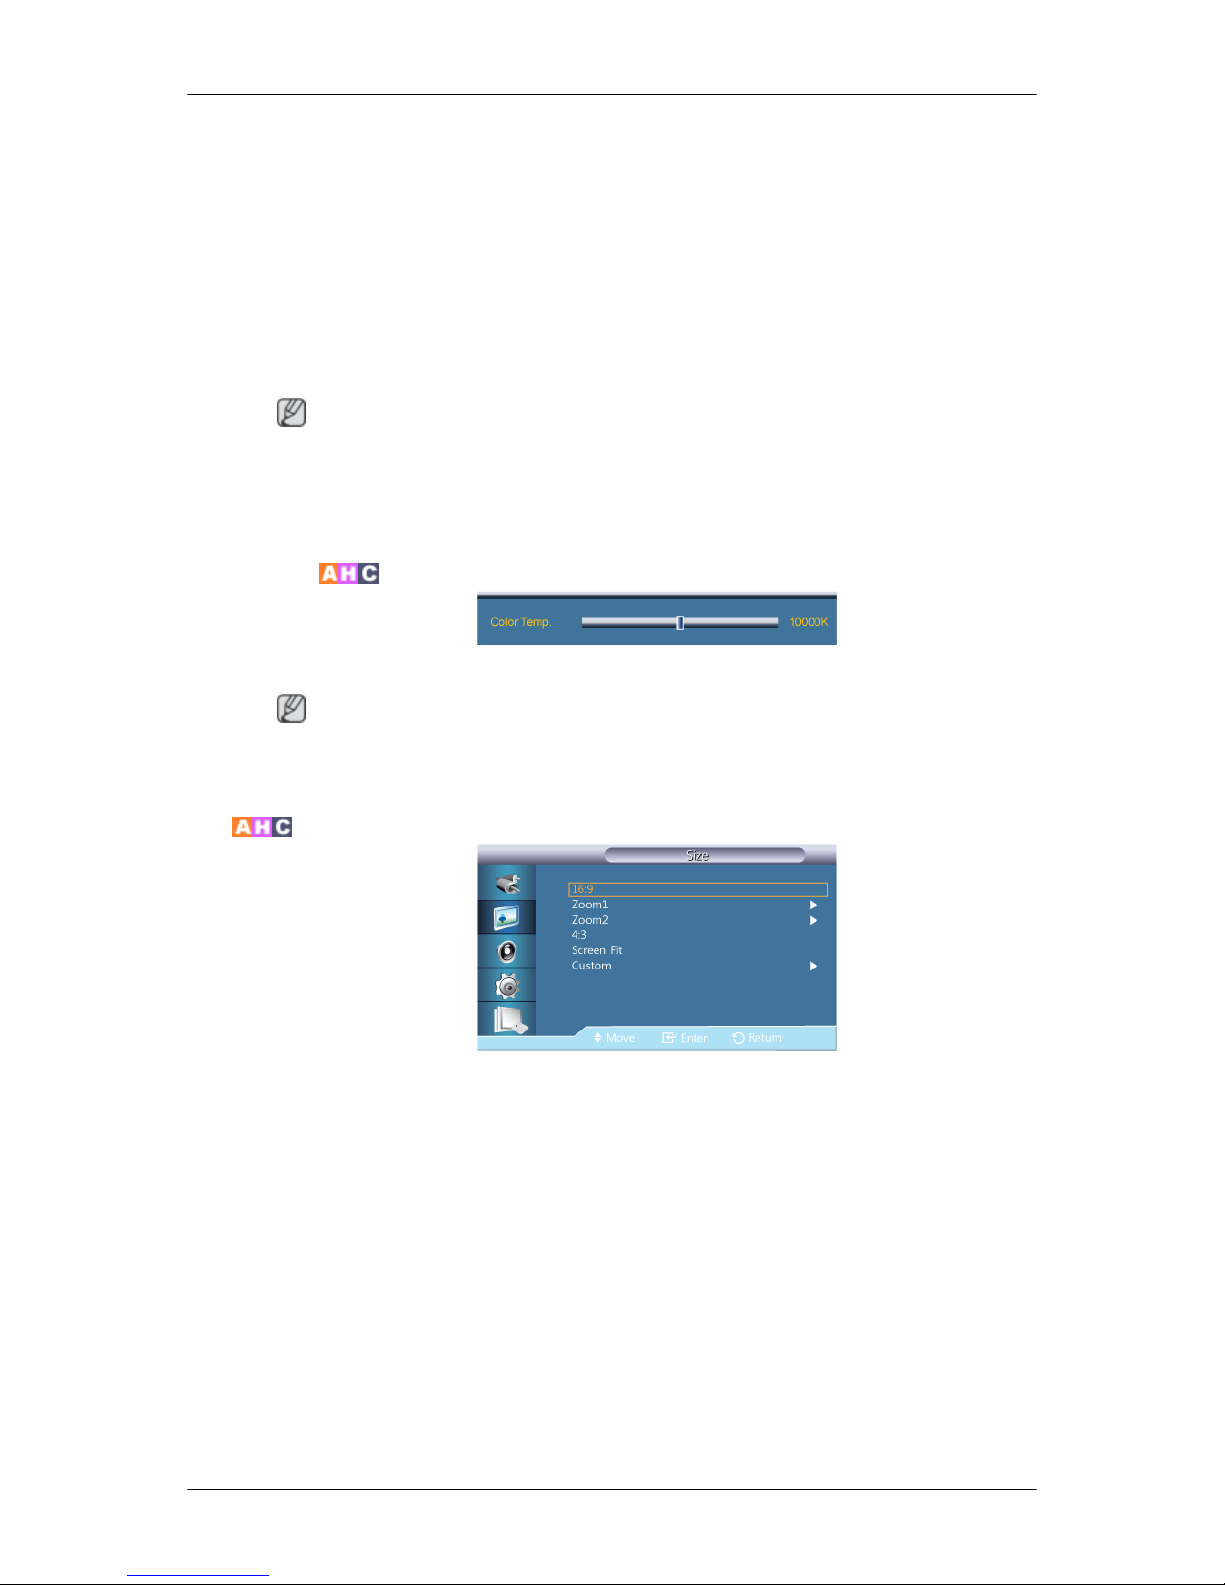
1. Off
2. Cool2
3. Cool1
4. Normal
5. Warm1
6. Warm2
Note
• If you set the Color Tone to Cool2, Cool1, Normal, Warm1, or Warm2, the Color Temp.
function is disabled.
• By adjusting the picture using the Color Tone function, Mode will change to Custom mode.
Color Temp.
Color Temp. is a measure of the 'warmth' of the image Colors.
Note
This function is enabled when Mode is set to Custom, and Dynamic Contrast and Color Tone are
Off.
Size
The Size can be switched.
PC mode(PC, HDMI[PC Timing ]): 16:9 - 4:3
Video mode (HDMI [Video Timing], AV or Component): 16:9 - Zoom1 - Zoom2 - 4:3 - Screen
Fit - Custom
1. 16:9 - Sets the picture to 16:9 wide mode.
2. Zoom 1 - Magnifies the size of the picture on the screen.
3. Zoom 2 - Magnifies the size of the picture more than Zoom 1.
4. 4:3 - Sets the picture to 4:3 normal mode.
5. Screen Fit - Displays the input scenes as they are without any cutoff when HDMI 720p, 1080i,
1080p signals are input.
Adjusting the LCD Display
Page 78
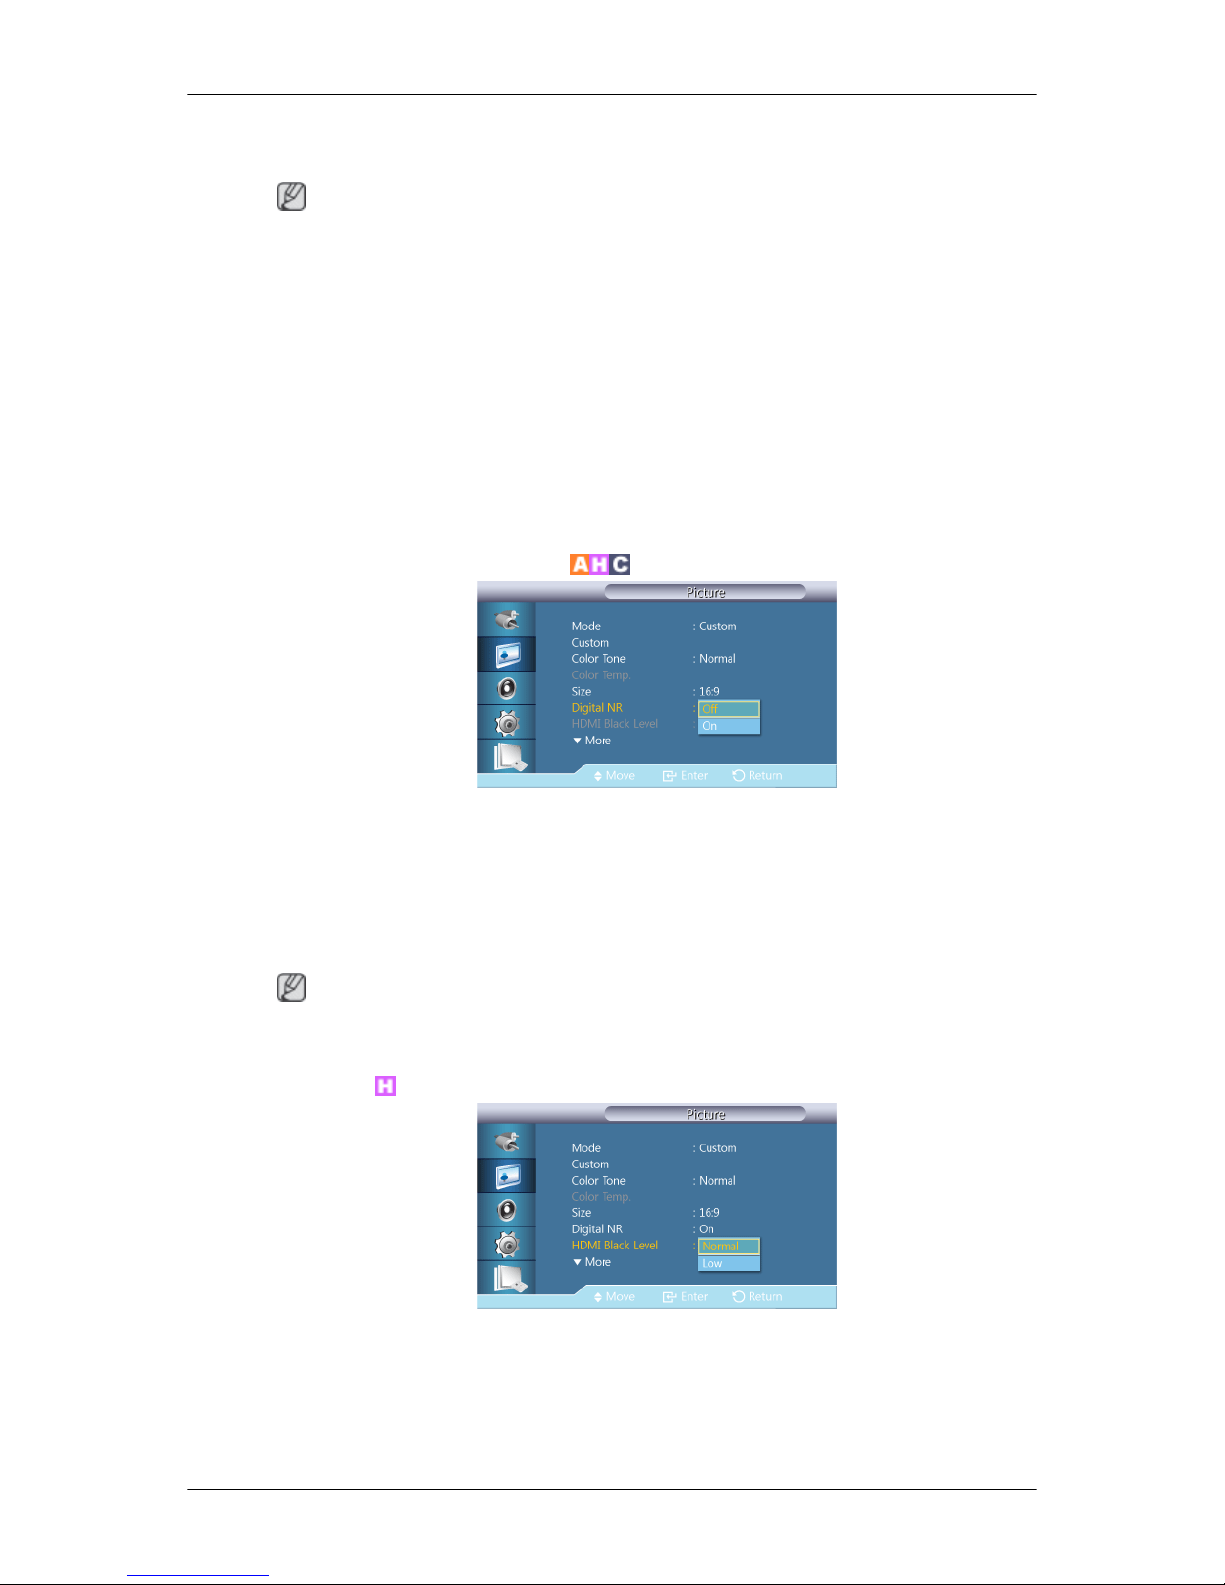
6. Custom - Changes the resolution to suit the user's preferences.
Note
• Certain external devices may feed the display an out of spec signal that may cause cutoff even
when using the Screen Fit feature.
• Zoom 1 and Zoom 2 are not available in HDMI mode.
• Screen Fit is enabled for only 1080i/p in Component mode and for 1080i/p or 720p in HDMI
mode.
• Zoom 1 and Zoom 2 are disabled for HD signals (1080i/p, 720p or 768p).
• The Position and Reset functions are available in Zoom 1 or Zoom 2 modes.
• Size will change to 16:9 if PIP mode is active.
Digital NR (Digital Noise Reduction)
Turns the Digital Noise Reduction feature Off/On. The Digital Noise Reduction feature allows you to
enjoy clearer and crisper images.
1. Off
2. On
Note
Digital NR function is not available for all resolutions.
HDMI Black Level
Selects the black level on the screen to adjust the screen depth.
1. Normal
2. Low
Adjusting the LCD Display
Page 79
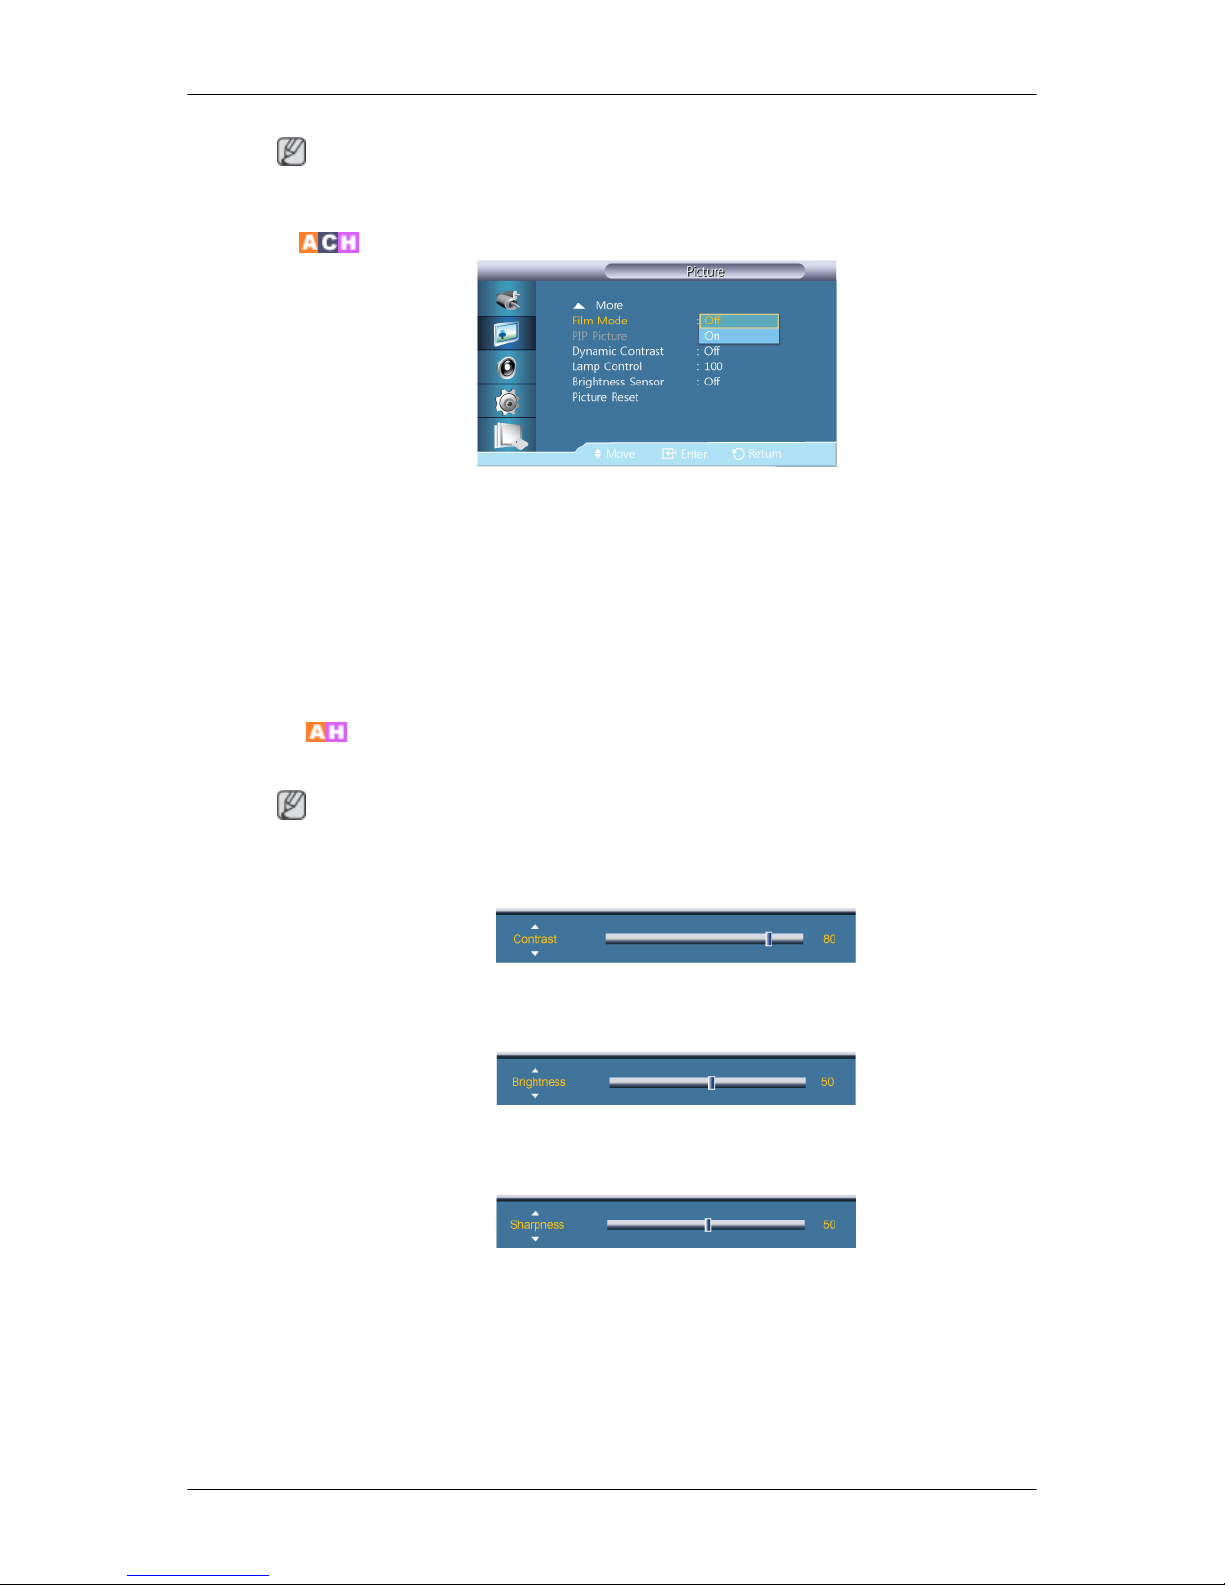
Note
Available only in HDMI mode.
Film Mode
Film Mode calibrates unnatural pictures that may occur in a movie (which is in 24 frames).
Moving subtitles may appear corrupted when this mode is enabled.
(In HDMI mode, this function is available when the input signal is interlaced scan; it is not available
in progressive scan.)
1. Off
2. On
PIP Picture
Adjusts the PIP Screen Settings.
Note
Available Modes: PIP On
1. Contrast
Adjusts the Contrast of the PIP window on the screen.
2. Brightness
Adjusts the Brightness of the PIP window on the screen.
3. Sharpness
Adjusts the Sharpness of the PIP window on the screen.
Adjusting the LCD Display
Page 80

Dynamic Contrast
Dynamic Contrast automatically detects the distribution of the visual signal and adjusts to create an
optimum contrast.
1. Off
2. On
Note
This function is disabled when PIP or Energy Saving is On.
Lamp Control
Adjusts the inverter lamp in order to reduce energy consumption.
Note
Not available when Dynamic Contrast is set to On.
Brightness Sensor
Brightness Sensor detects the surrounding light intensity and automatically optimizes the screen
brightness accordingly.
1. Off
2. On
Picture Reset
Reset the screen settings.
Adjusting the LCD Display
Page 81

Sound
Available Modes
•
PC / DVI / DisplayPort
•
AV
•
Component
•
HDMI
•
MagicInfo
Note
MagicInfo can only be enabled when a network box(sold separately) is connected.
Mode
The LCD Display has a built-in high fidelity stereo amplifier.
1. Standard
Selects Standard for the standard factory settings.
2. Music
Selects Music when watching music videos or concerts.
3. Movie
Selects Movie when viewing movies.
4. Speech
Selects Speech when watching a show that is mostly dialog (i.e., news).
5. Custom
Selects Custom if you want to adjust the settings according to your personal preferences.
Custom
The sound settings can be adjusted to suit your personal preferences.
Note
• You can hear the sound even when sound value is set to 0.
Adjusting the LCD Display
Page 82

• If you adjust sound using Custom function, Mode will turn to Custom mode.
Bass
Emphasizes low frequency audio.
Treble
Emphasizes high frequency audio.
Balance
Allows you to Adjusts the sound balance between the left and right speakers.
Auto Volume
Reduces the difference in volume control between broadcasters.
1. Off
2. On
SRS TS XT
SRS TS XT is a patented SRS technology that solves the problem of playing 5.1 multichannel content
over two speakers. TruSurround XT delivers a compelling, virtual surround sound experience through
any two-speaker playback system, including internal television speakers. It is fully compatible with
all multichannel formats.
1. Off
2. On
Adjusting the LCD Display
Page 83

Sound Select
Enable the sound of either the primary or secondary display in PIP mode.
Note
Available when PIP is set to On.
1. Main
2. Sub
Speaker Select
When you use the product with it connecting to a Home Theater, turn the internal speakers off so you
can listen to sound from the Home Theater's (external) speakers.
1. Internal
Sound is outputted both from the Internal speaker and the External speakers, but the volume
control is only available from the Internal speaker.
2. External
When sound is only outputted from the External speakers, the volume control is also only avail-
able from the External speakers.
Sound Reset
Reset the sound settings.
Setup
Available Modes
•
PC / DVI / DisplayPort
Adjusting the LCD Display
Page 84

•
AV
•
Component
•
HDMI
•
MagicInfo
Note
MagicInfo can only be enabled when a network box(sold separately) is connected.
Language
You can choose one of 14 languages.
Note
The language chosen affects only the language of the OSD.
Time
Selects from one of 4 time settings, Clock Set, Sleep Timer, Timer, and Holiday Management.
Clock Set
Current Time Setting.
Sleep Timer
Adjusting the LCD Display
Page 85
Turns the LCD Display off automatically at certain times.
1. Off
2. 30
3. 60
4. 90
5. 120
6. 150
7. 180
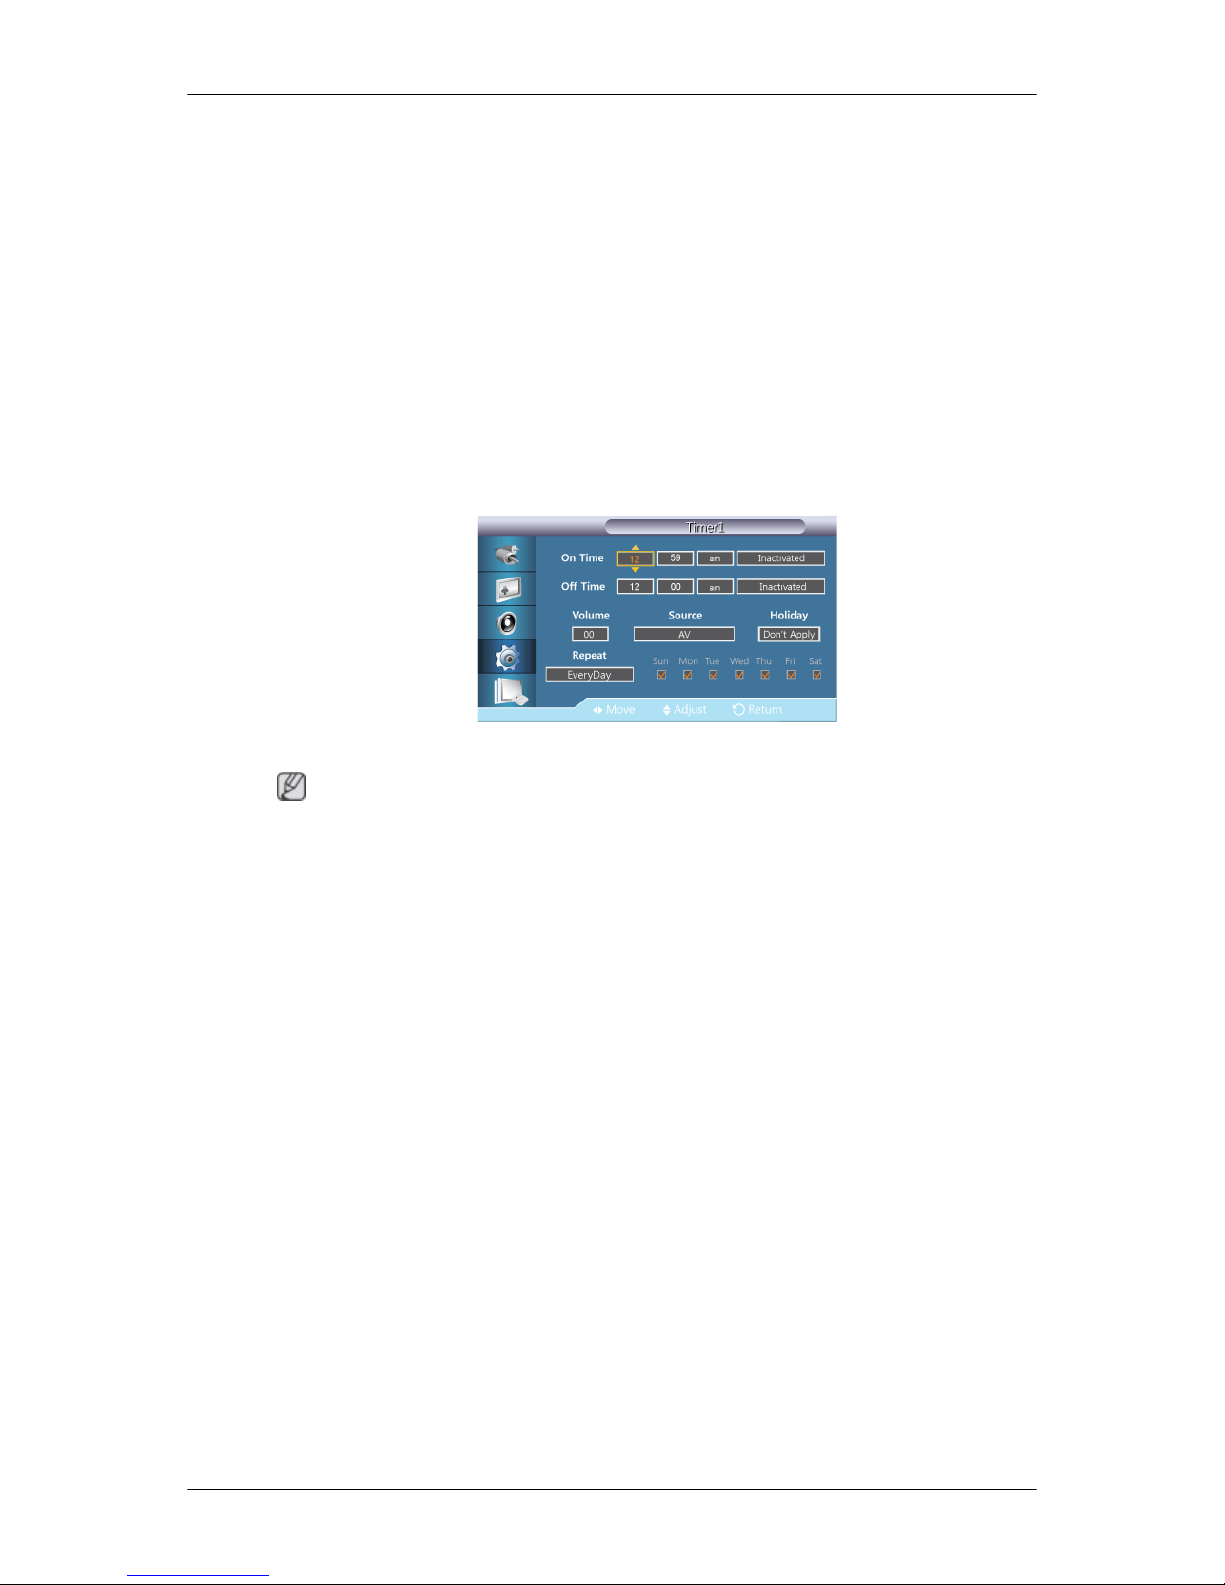
Timer1 / Timer2 / Timer3
You can set the LCD display to automatically turn on or off at a specified time.
Note
• Holiday : Select Apply to disable the timer on holidays and Don't Apply to enable the timer on
holidays.
• Only enabled when the clock is set using the Clock Set menu.
• The Manual option allows you to select a day of the week.
• Source : Selects the external input source that will be displayed when the selected monitor is turned
on.
• Repeat : Available selections include Once, EveryDay, Mon~Fri, Mon~Sat, Sat~Sun, and
Manual.
• Once : The Timer goes off only once.
• EveryDay : The Timer repeats daily.
• Mon~Fri : The Timer repeats from Monday through Friday.
• Mon~Sat : The Timer repeats from Monday through Saturday.
• Sat~Sun : The Timer goes off on Saturday and Sunday.
• Manual : Select a day of the week you want the Timer to go off.
Holiday Management
• Add
Adjusting the LCD Display
Page 86

You can register holidays.
• Delete Selected
You can delete selected holidays.
Note
• Only enabled when registered holidays are selected.
• More than one holiday can be selected and deleted.
• Delete All
You can delete all the registered holidays.
Menu Transparency
Change the transparency of the background of the OSD.
Adjusting the LCD Display
Page 87

1. High
2. Medium
3. Low
4. Opaque
Safety Lock
Change PIN
The password can be changed.
The preset password for the LCD Display is "0000".
Note
If you forgot your password, press the remote buttons INFO + EXIT + MUTE to reset the password
to "0000."
Lock
This is the function that locks the OSD in order to keep the current settings or to prevent others from
adjusting the settings.
Note
Selecting Lock On will enable Lock Off. To disable the Lock function, enter the password for Lock
Off.
Energy Saving
This feature adjusts the power consumption of the unit in order to save energy.
Adjusting the LCD Display
Page 88

1. Off
2. On
Video Wall
A Video Wall is a set of video screens connected together, so that each screen shows a part of the
whole picture or where the same picture is repeated on each screen.
When the Video Wall is on, you can adjust the Video Wall screen setting.
Note
• When Video Wall is running, the Size functions are not available.
• Disabled when PIP is set to On.
• When a Horizontal or Vertical split is greater than four, use a resolution of XGA 1024 x 768 or
greater to prevent any picture degradation.
Video Wall
Turns Off/On the Video Wall function of the selected display Off/On.
• Off
• On
Format
The Format can be selected to see a divided screen.
• Full
Provides a full screen without any margins.
• Natural
Displays a natural image with the original aspect ratio intact.
Adjusting the LCD Display
Page 89
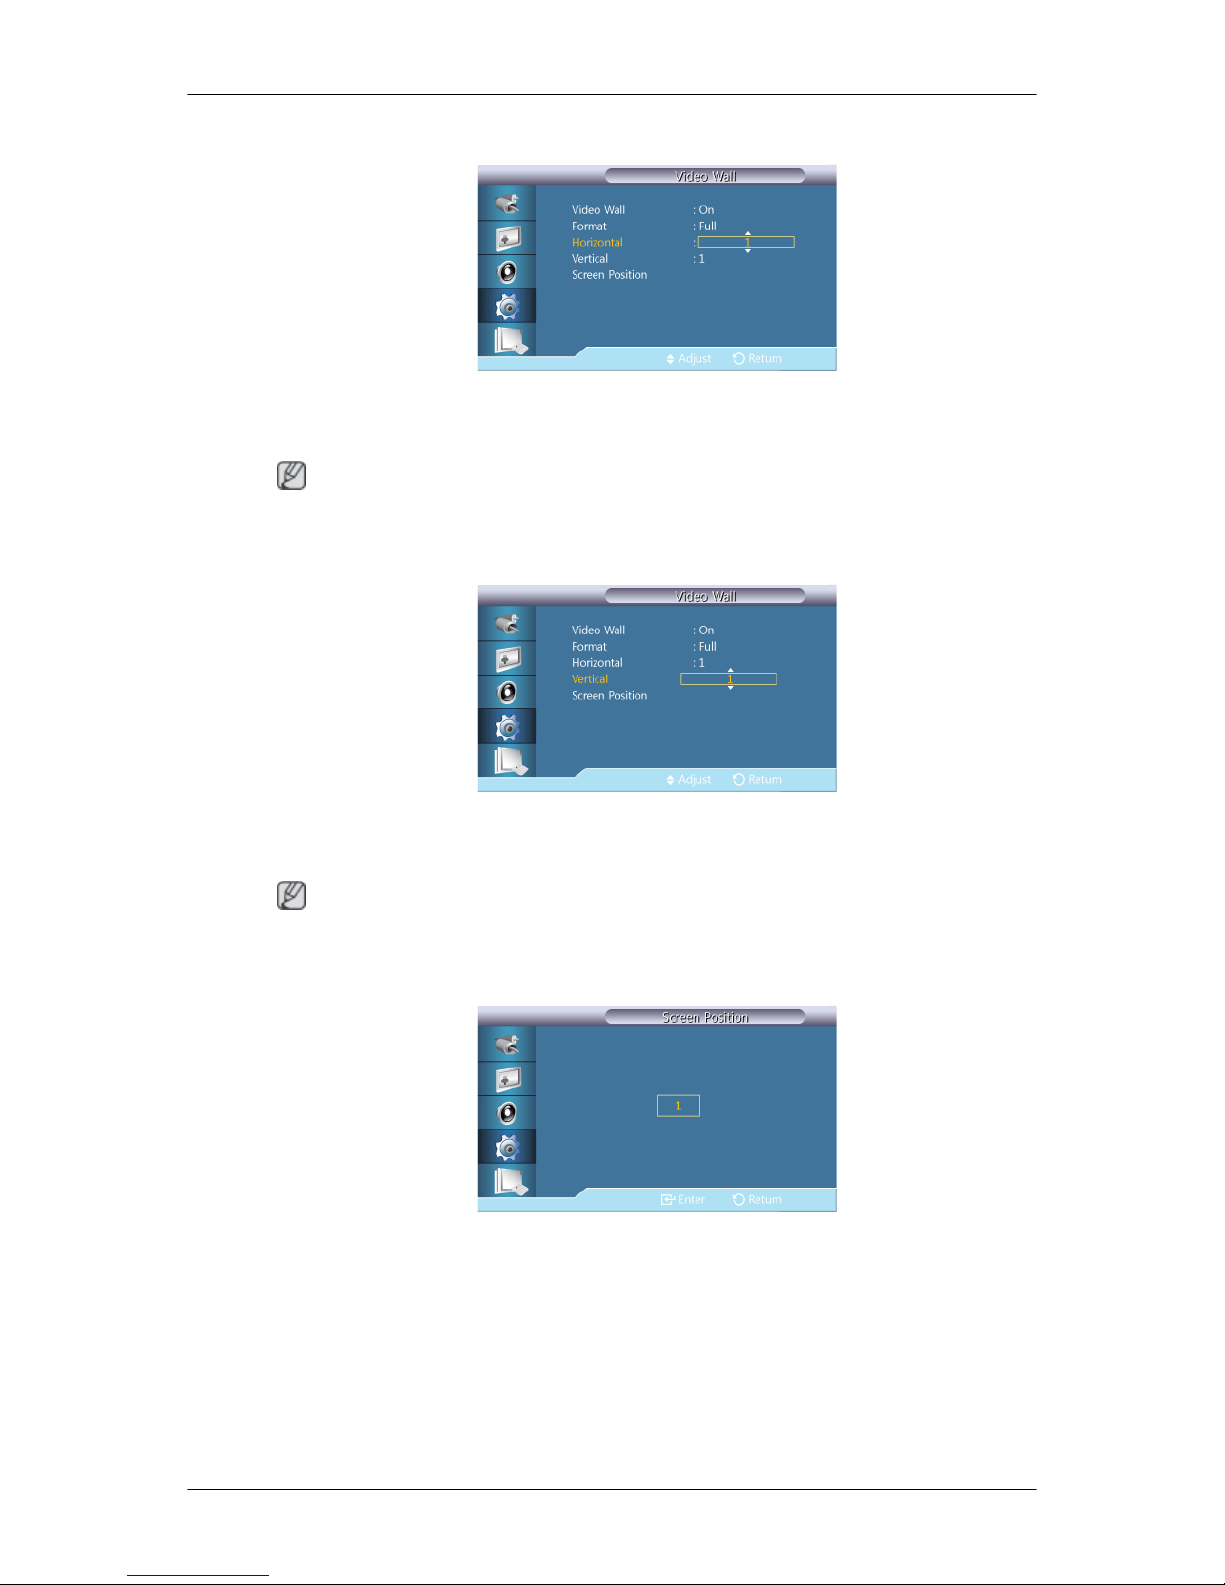
Horizontal
Sets how many parts the screen should be divided horizontally.
Fifteen adjustment levels: 1~15.
Note
If Vertical is set to 15, the maximum value for Horizontal is 6.
Vertical
Sets how many parts the screen should be divided vertically.
Fifteen adjustment levels: 1~15.
Note
If Horizontal is set to 15, the maximum value for Vertical is 6.
Screen Position
The screen can be divided into several images. A number of screens can be selected with a different
layout when dividing.
• Select a mode in Screen Position.
• Select a display in Display Selection.
• The selection will be set up by pressing a number in the selected mode.
• The screen can be split into a maximum of 100 sub-screens.
Adjusting the LCD Display
Page 90
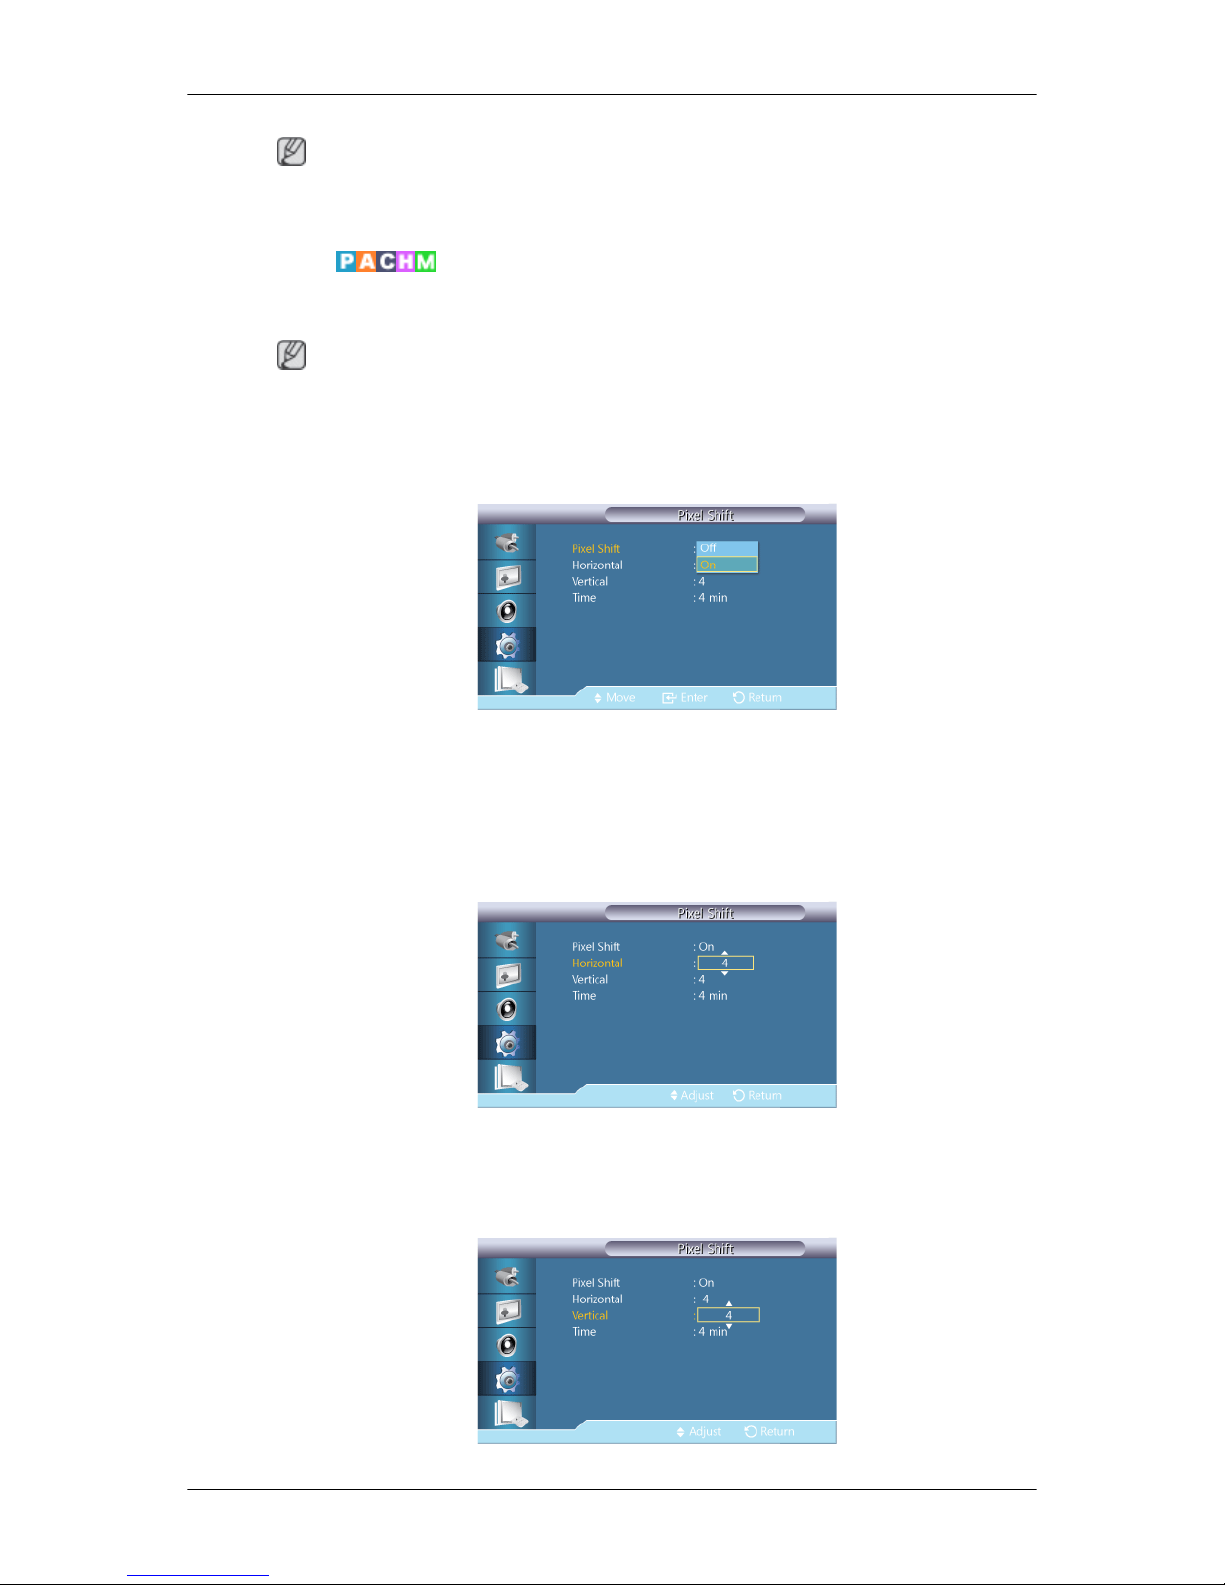
Note
When more than four displays are connected, we recommend a resolution of XGA (1024 x 768) or
greater to prevent any picture degradation.
Safety Screen
The Safety Screen function is used to prevent afterimages that may appear when a still picture is
displayed on the screen over a long time.
Note
This function is not available when the power is turned off.
Pixel Shift
Pixel Shift
To prevent after-images on the screen, you can use this function to have pixels move on the LCD in
the horizontal or vertical direction.
• Off
• On
Horizontal
Sets how many pixels the screen moves horizontally.
Five adjustment levels: 0, 1, 2, 3, and 4.
Vertical
Adjusting the LCD Display
Page 91
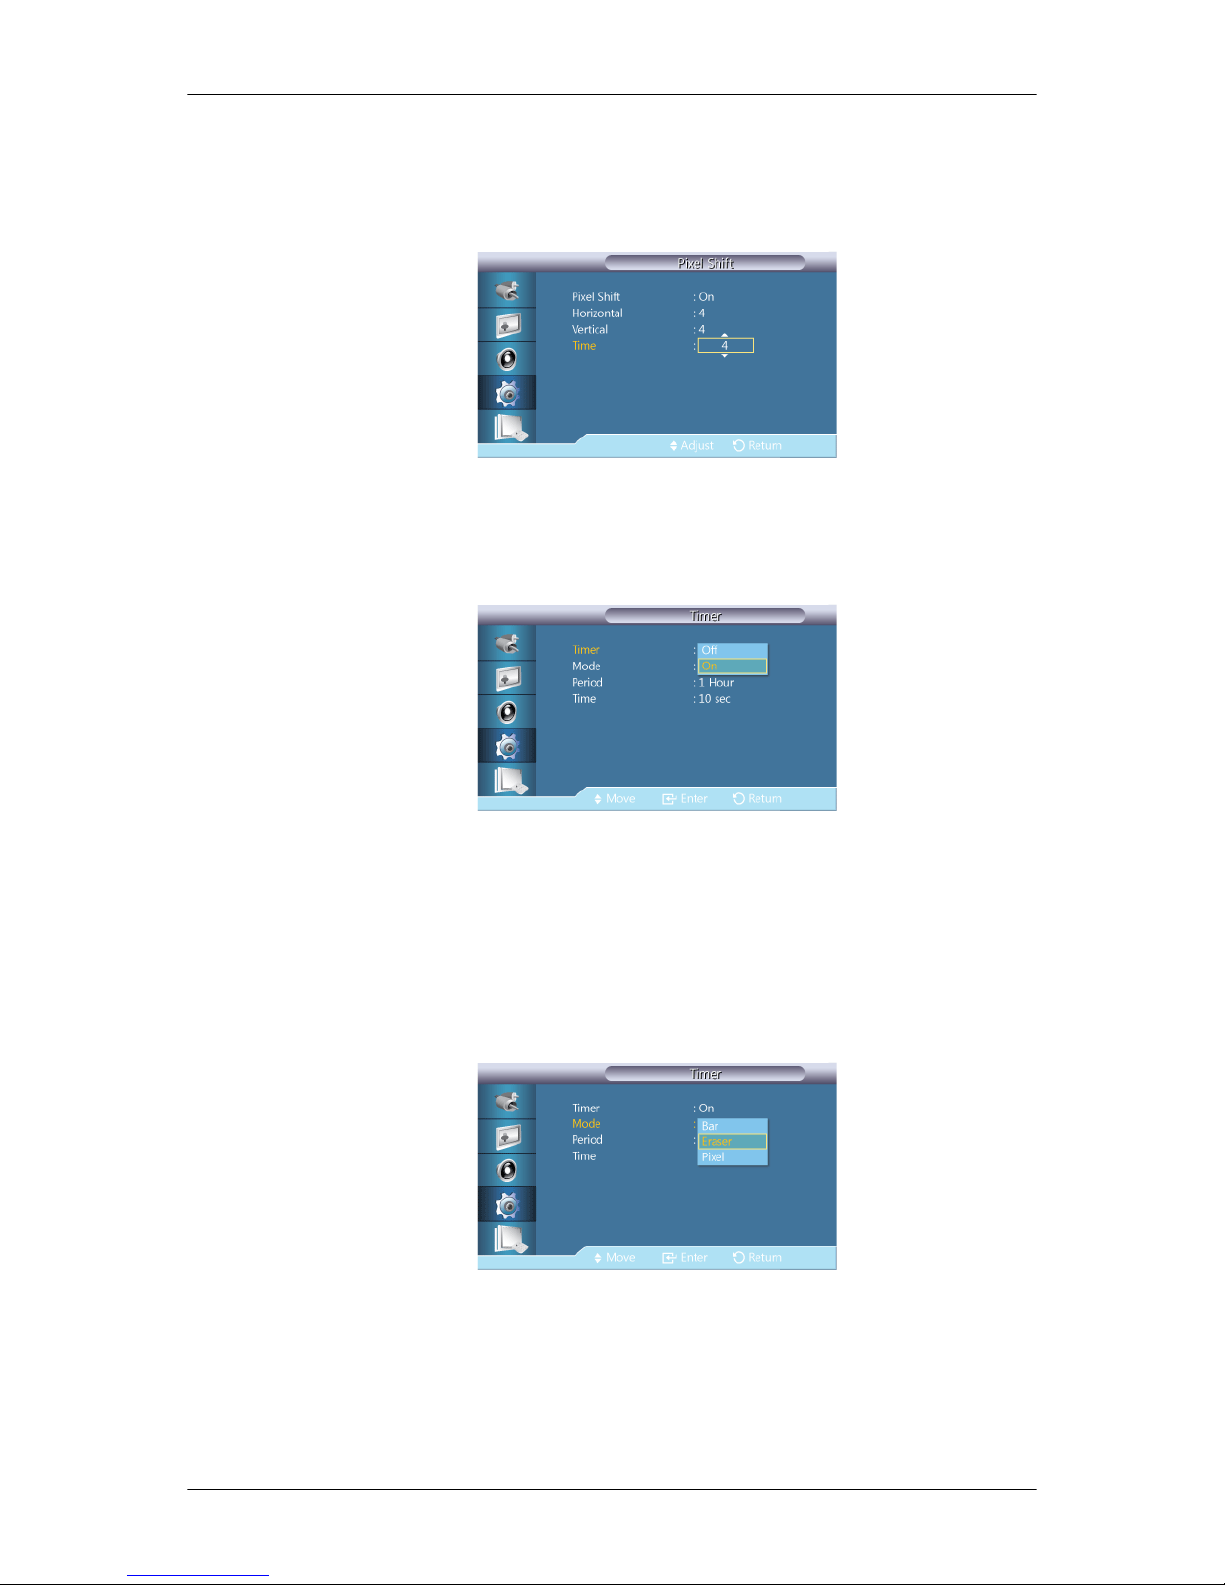
Sets how many pixels the screen moves vertically.
Five adjustment levels: 0, 1, 2, 3, and 4.
Time
Set the time interval for performing the horizontal or vertical movement, respectively.
Timer
Timer
You can set the timer for Screen Burn Protection.
If you start the operation to erase any residual image, the operation will be performed for the set period
of time and then automatically finish.
• Off
• On
Mode
You can change the Safety Screen Type.
• Bar
• Eraser
• Pixel
Adjusting the LCD Display
Page 92

Period
Use this function to set the execution period for each mode set in the timer.
Time
Within the set period of time specify a time for execution.
Bar
This function prevents after-images on the screen by moving long black and white vertical lines.
Eraser
This function prevents after-images on the screen by moving a rectangular pattern.
Adjusting the LCD Display
Page 93
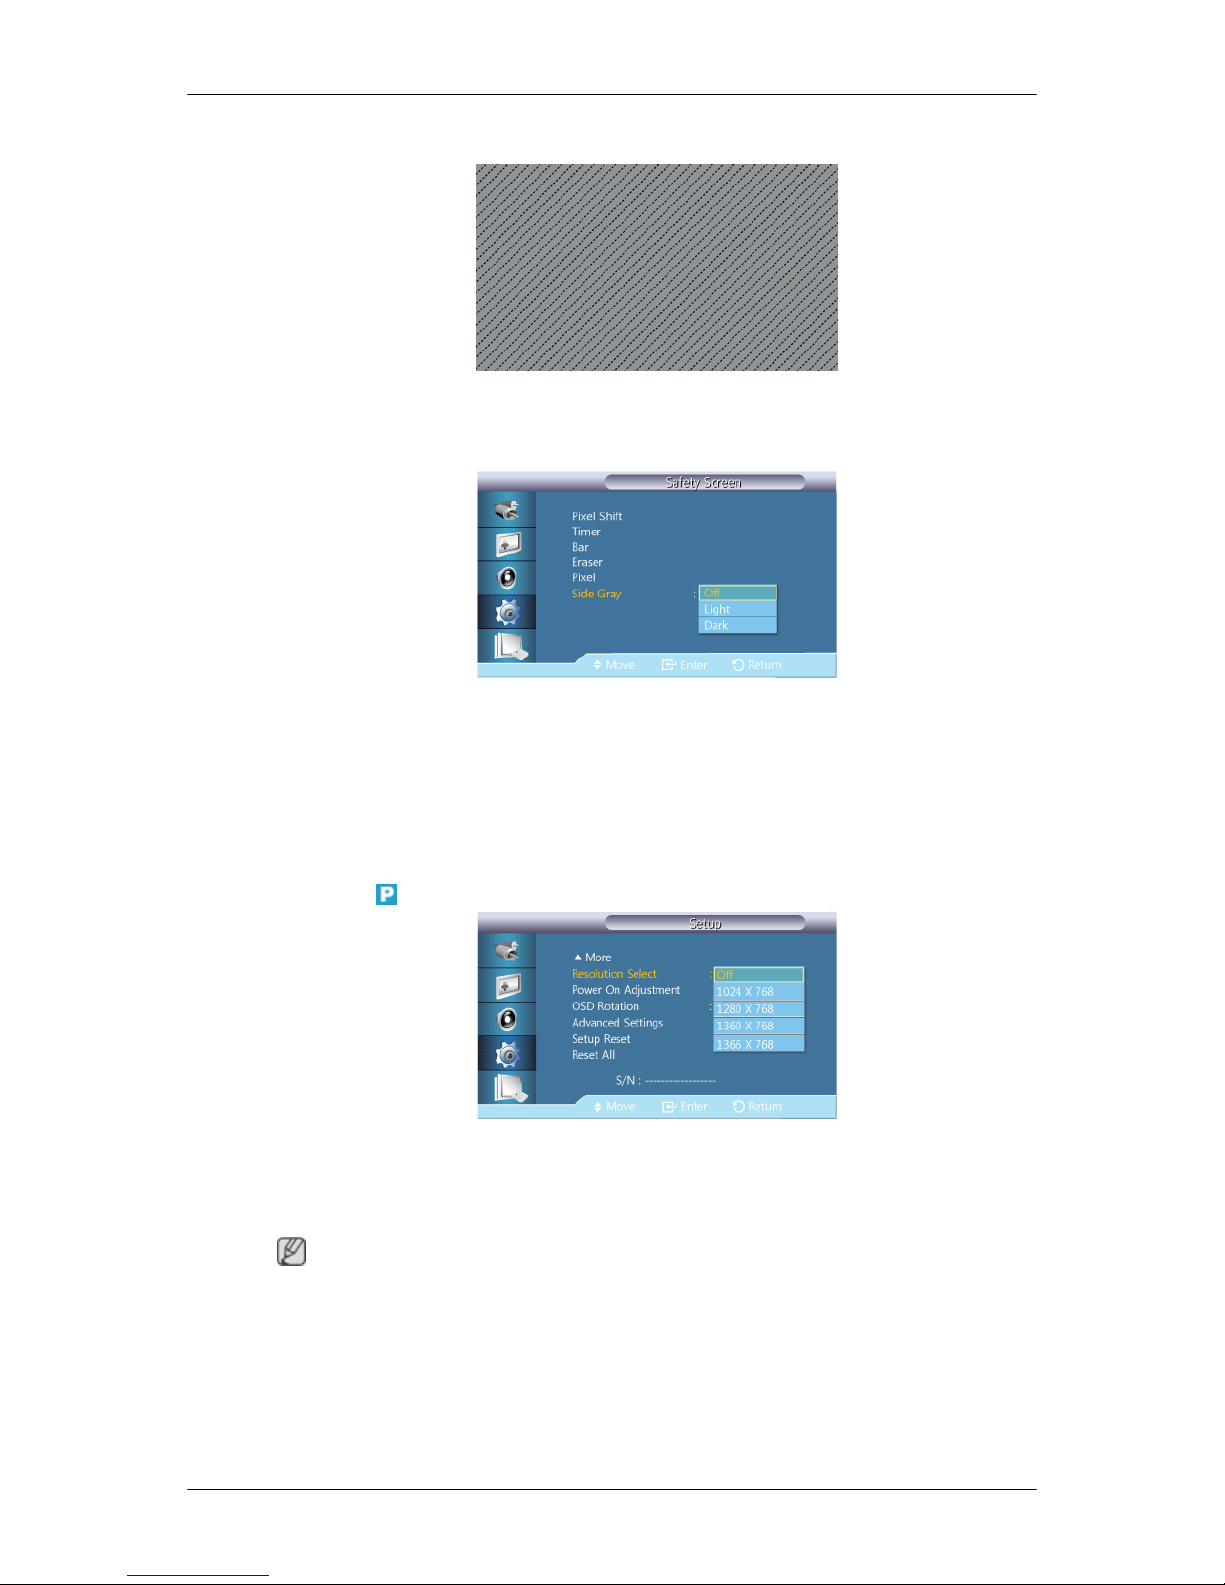
Pixel
This function prevents after-images by moving many pixels on the screen.
Side Gray
Select the brightness of the grey for the screen background.
• OFF
• Light
• Dark
Resolution Select
When the picture is not displayed properly on the screen when setting the graphics card resolution of
the computer to 1024 x 768 @ 60Hz, 1280 x 768 @ 60Hz, 1360 x 768@ 60Hz or 1366 x 768 @
60Hz, by using this function(Resolution Select), you can have the picture displayed on the screen in
the specified resolution.
Note
Available in PC mode only.
1. Off
2. 1024 x 768
3. 1280 x 768
Adjusting the LCD Display
Page 94
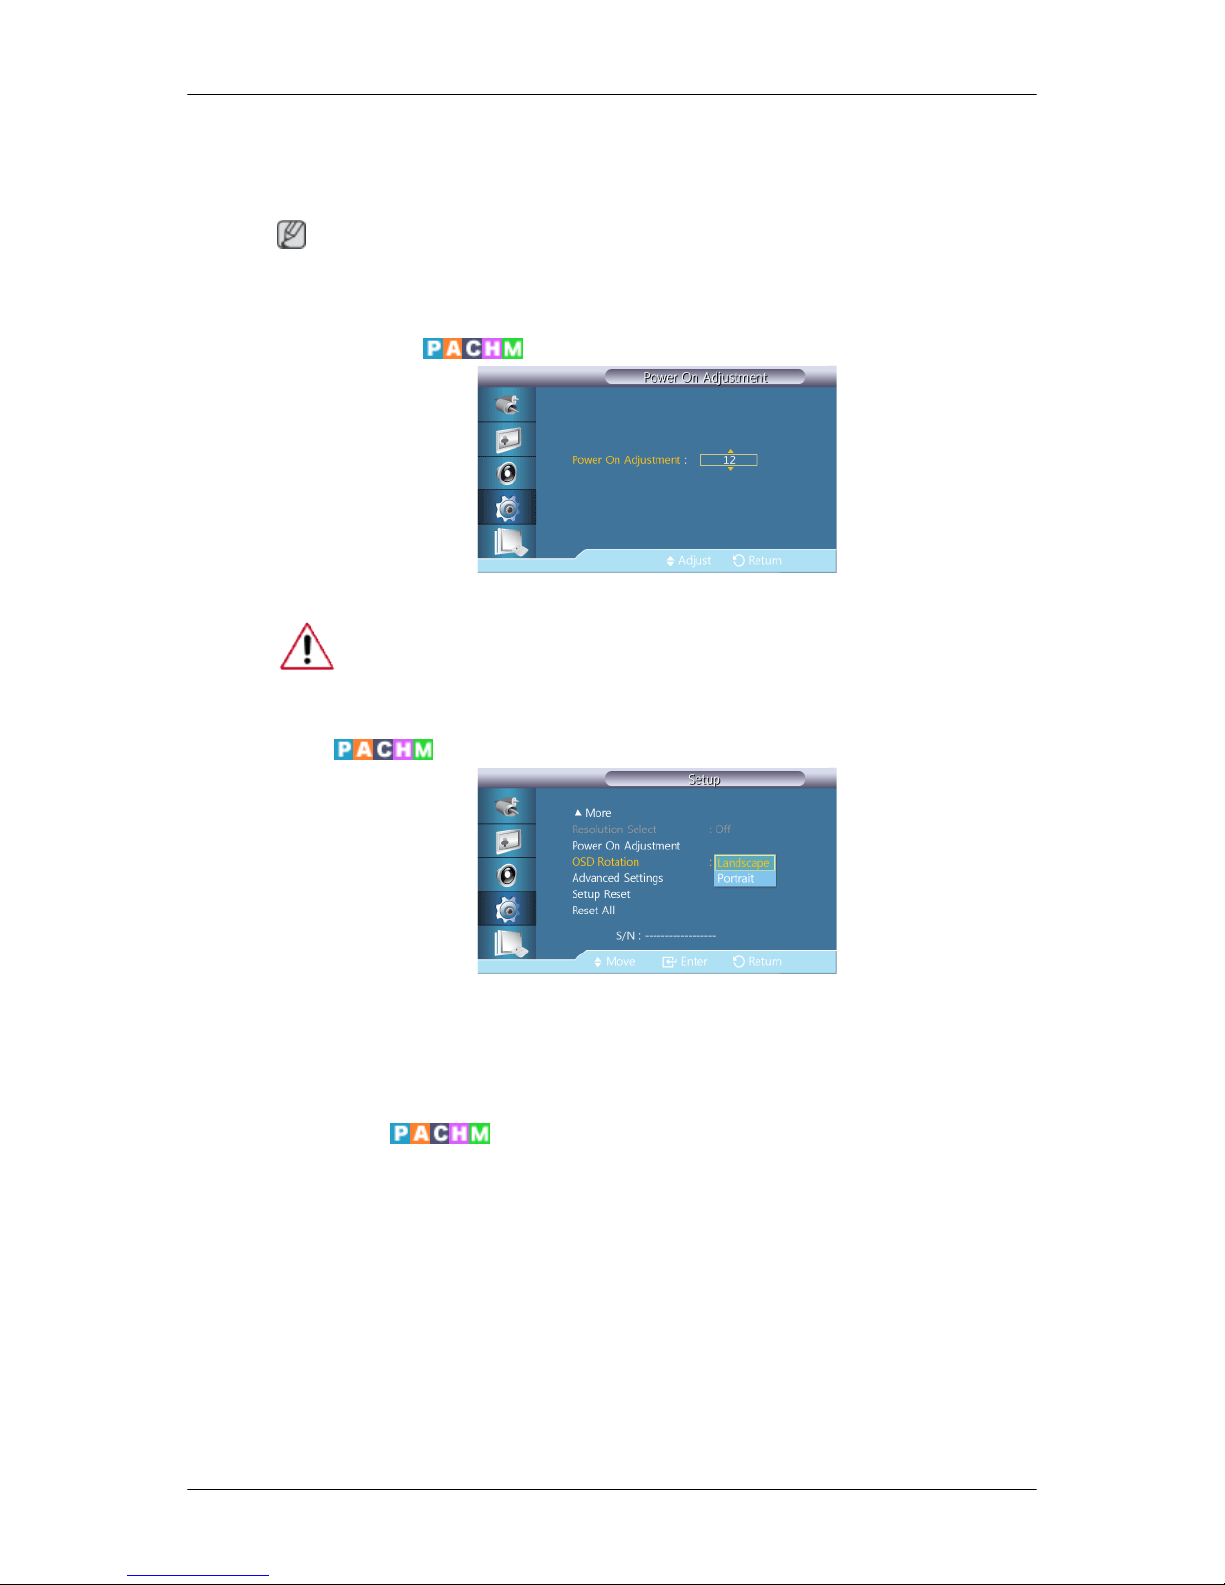
4. 1360 x 768
5. 1366 x 768
Note
Selecting the menu is only allowed when the graphics resolution is set to 1024 x 768 @ 60Hz, 1280
x 768 @ 60Hz, 1360 x 768 @ 60Hz or 1366 x 768 @ 60Hz.
Power On Adjustment
Adjusts the Power On time for the screen.
Caution: Set the Power On time to be longer to avoid overvoltage.
OSD Rotation
OSD Rotate
1. Landscape
2. Portrait
Advanced Settings
Configures the settings more elaborately.
Fan & Temperature
Protects the product by detecting the fan speed and internal temperature.
Adjusting the LCD Display
Page 95

Fan Control
Selects auto or manual for the fan speed settings.
• Auto
• Manual
Fan Speed Setting
Sets the fan speed within a range of 0 and 100.
Note
Enabled when Fan Control is set to Manual.
Temperature Control
Detects the product's internal temperature and specifies the desired temperature.
The product is set to 77 °C by default.
Note
• The picture will be dimmed if the temperature exceeds the specified temperature, and the product
will automatically power off to prevent overheating if the temperature keeps rising.
• It is best to use the product at temperatures 75 - 80 °C (based on ambient temperature of 40 °C).
Refer to "Specifications" herein for details about operating conditions.
Adjusting the LCD Display
Page 96
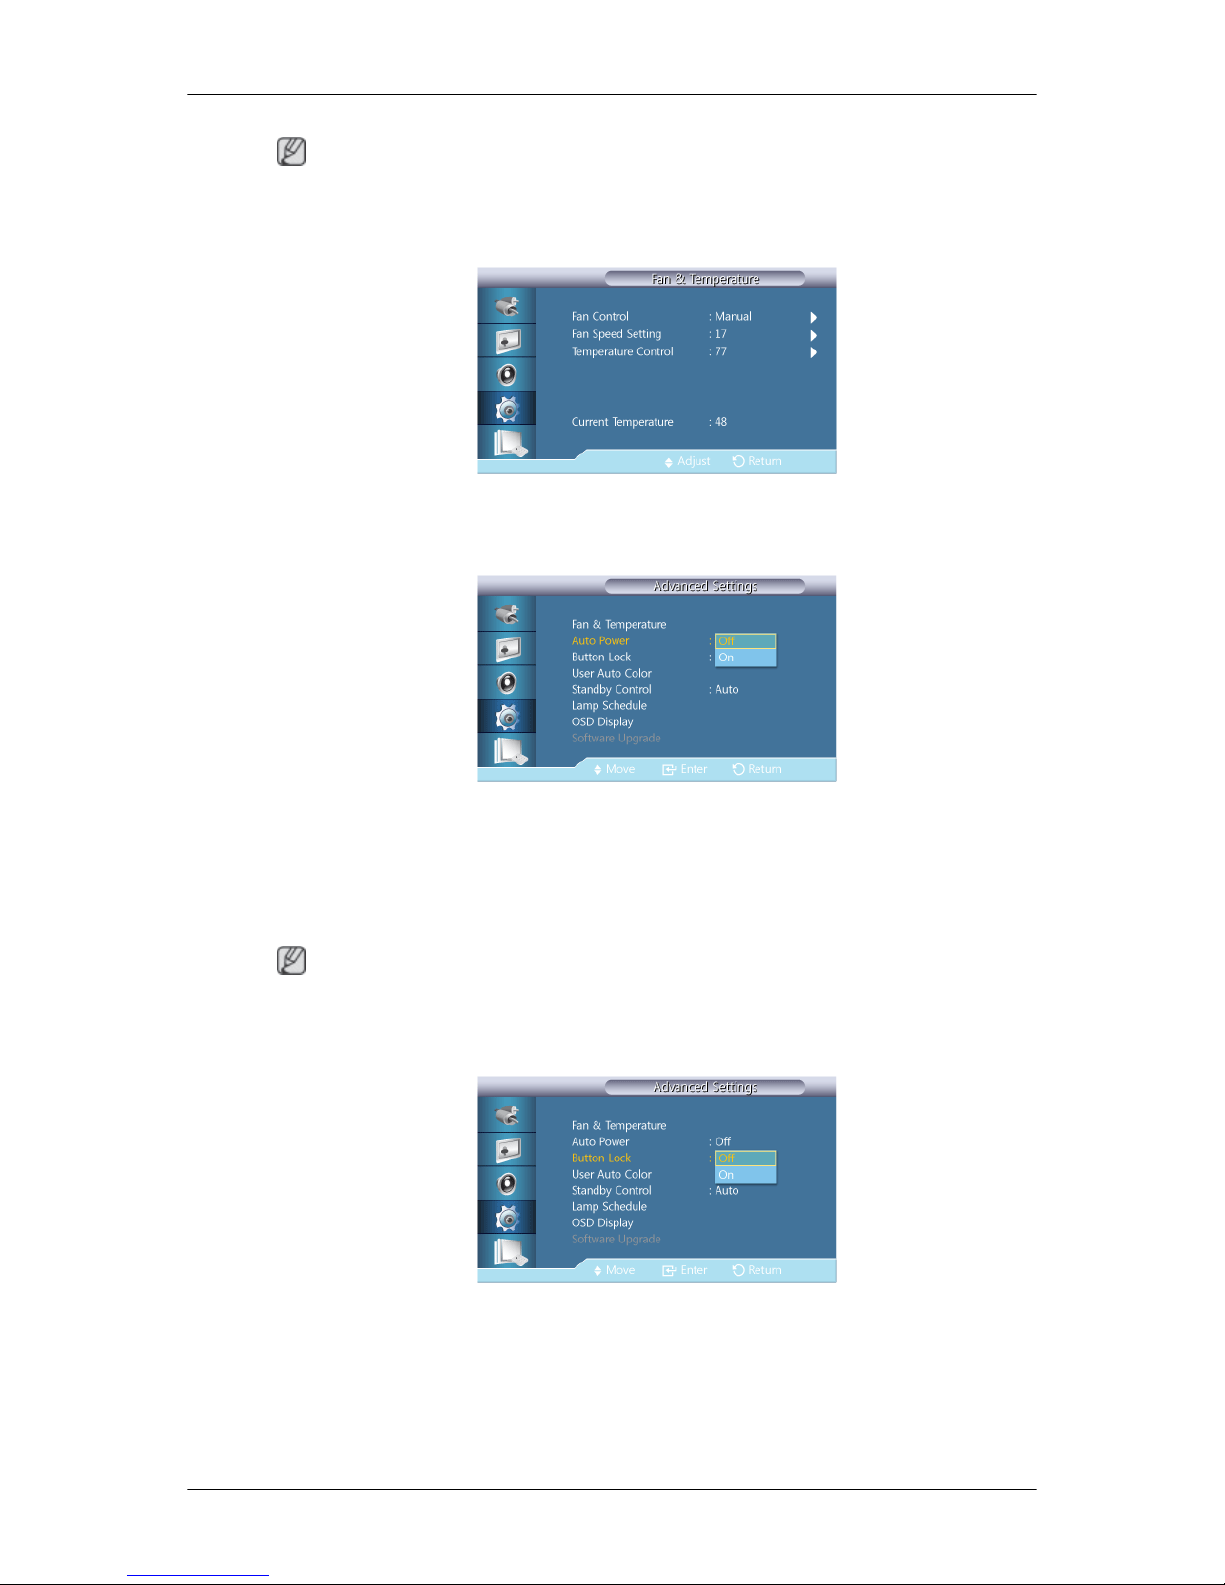
Note
It is best to set Fan Control to Auto when you change the Temperature Control setting.
Current Temperature
Shows the current temperature of the product.
Auto Power
Enables or disables Auto Power for the product.
• Off
• On
Note
When Auto Power is On, the product will power on automatically as soon as it is connected to power.
Button Lock
Locks or unlocks the monitor control buttons on the product.
• Off
• On
Adjusting the LCD Display
Page 97

User Auto Color
1. Auto Color
Automatically adjusts the Colors.
2. Reset
Resets the Color settings.
Note
Enabled only in PC mode.
Standby Control
Sets the standby mode, which will be activated when no input signal is detected.
• Off
A message will read <No Signal> if no input signal is detected.
• On
Power-saving mode will be activated if no input signal is detected.
• Auto
When no input signal is detected,
- Power-saving mode will be activated if an external device is connected.
- A message will read <No Signal> if no external device is connected.
Note
• Enabled only in PC, DVI, HDMI, or DP(DisplayPort) mode.
• Auto will be disabled in HDMI mode.
Adjusting the LCD Display
Page 98
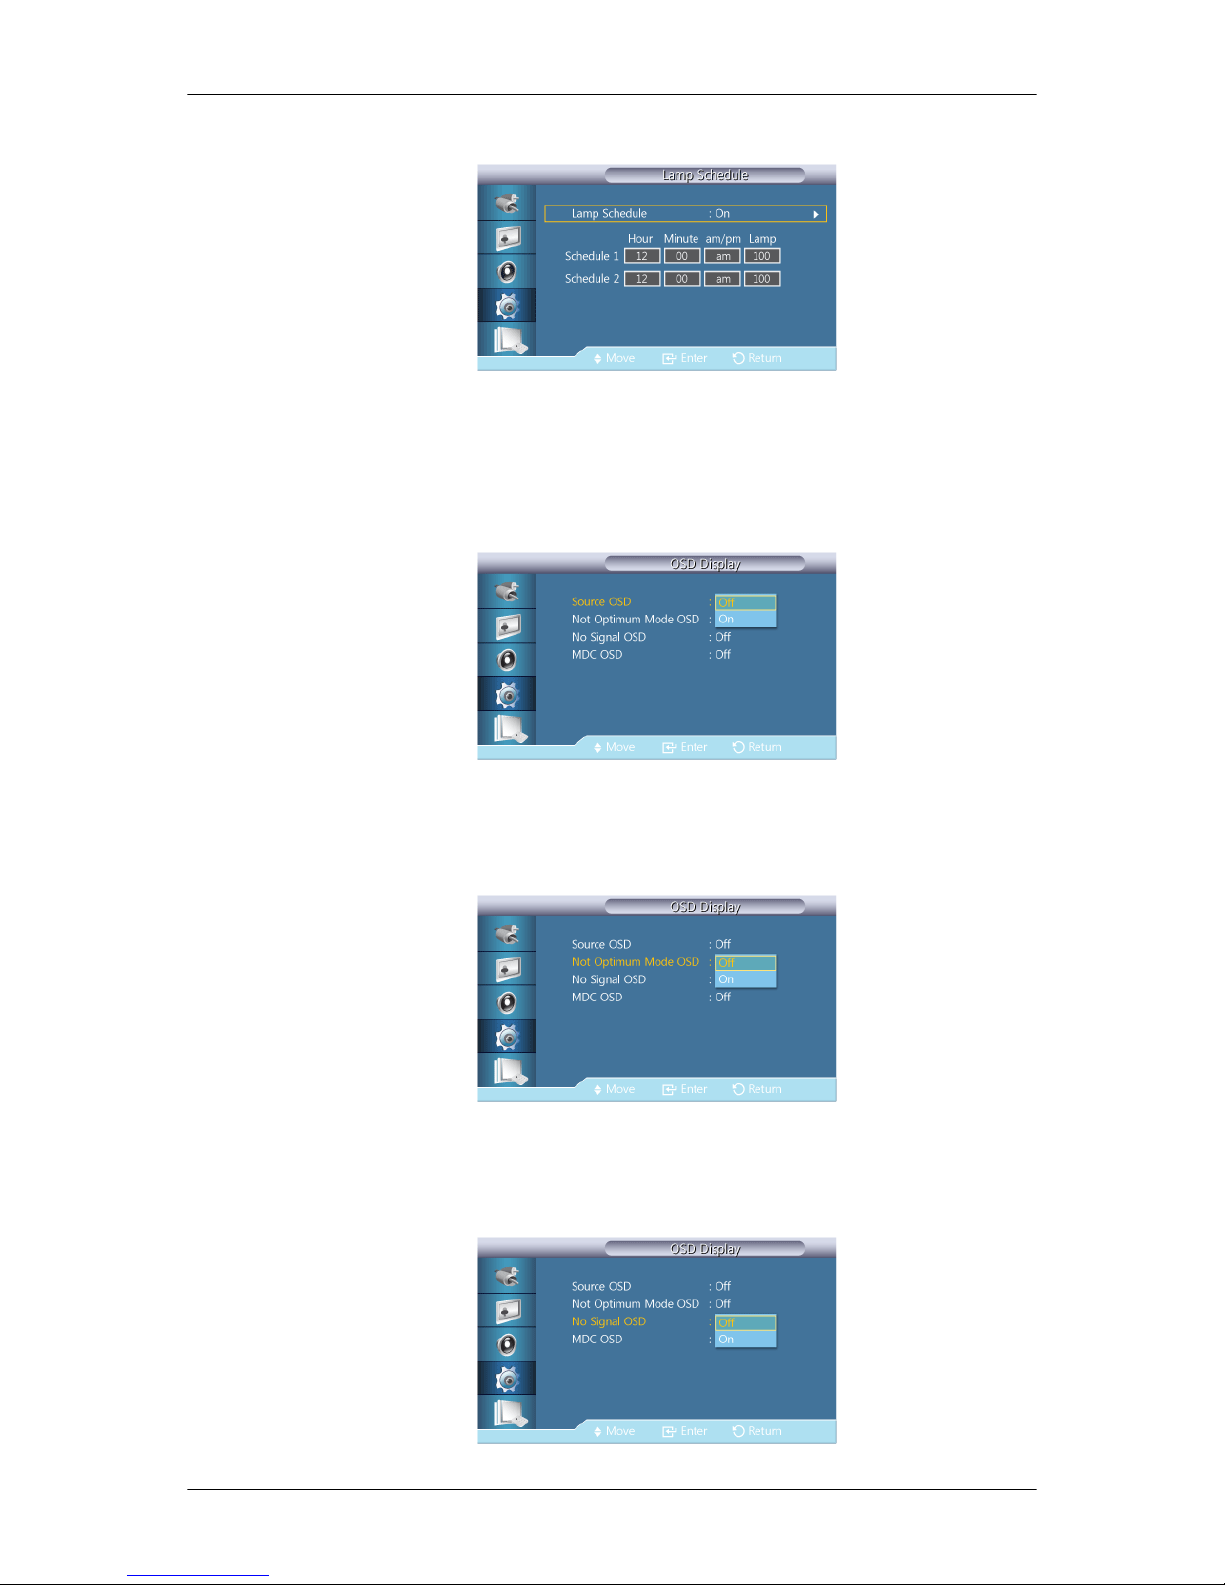
Lamp Schedule
Adjusts the luminance to a user-specified value at a specified time.
OSD Display
Displays or hides a menu item on the screen.
Source OSD
• Off
• On
Not Optimum Mode OSD
• Off
• On
No Signal OSD
Adjusting the LCD Display
Page 99
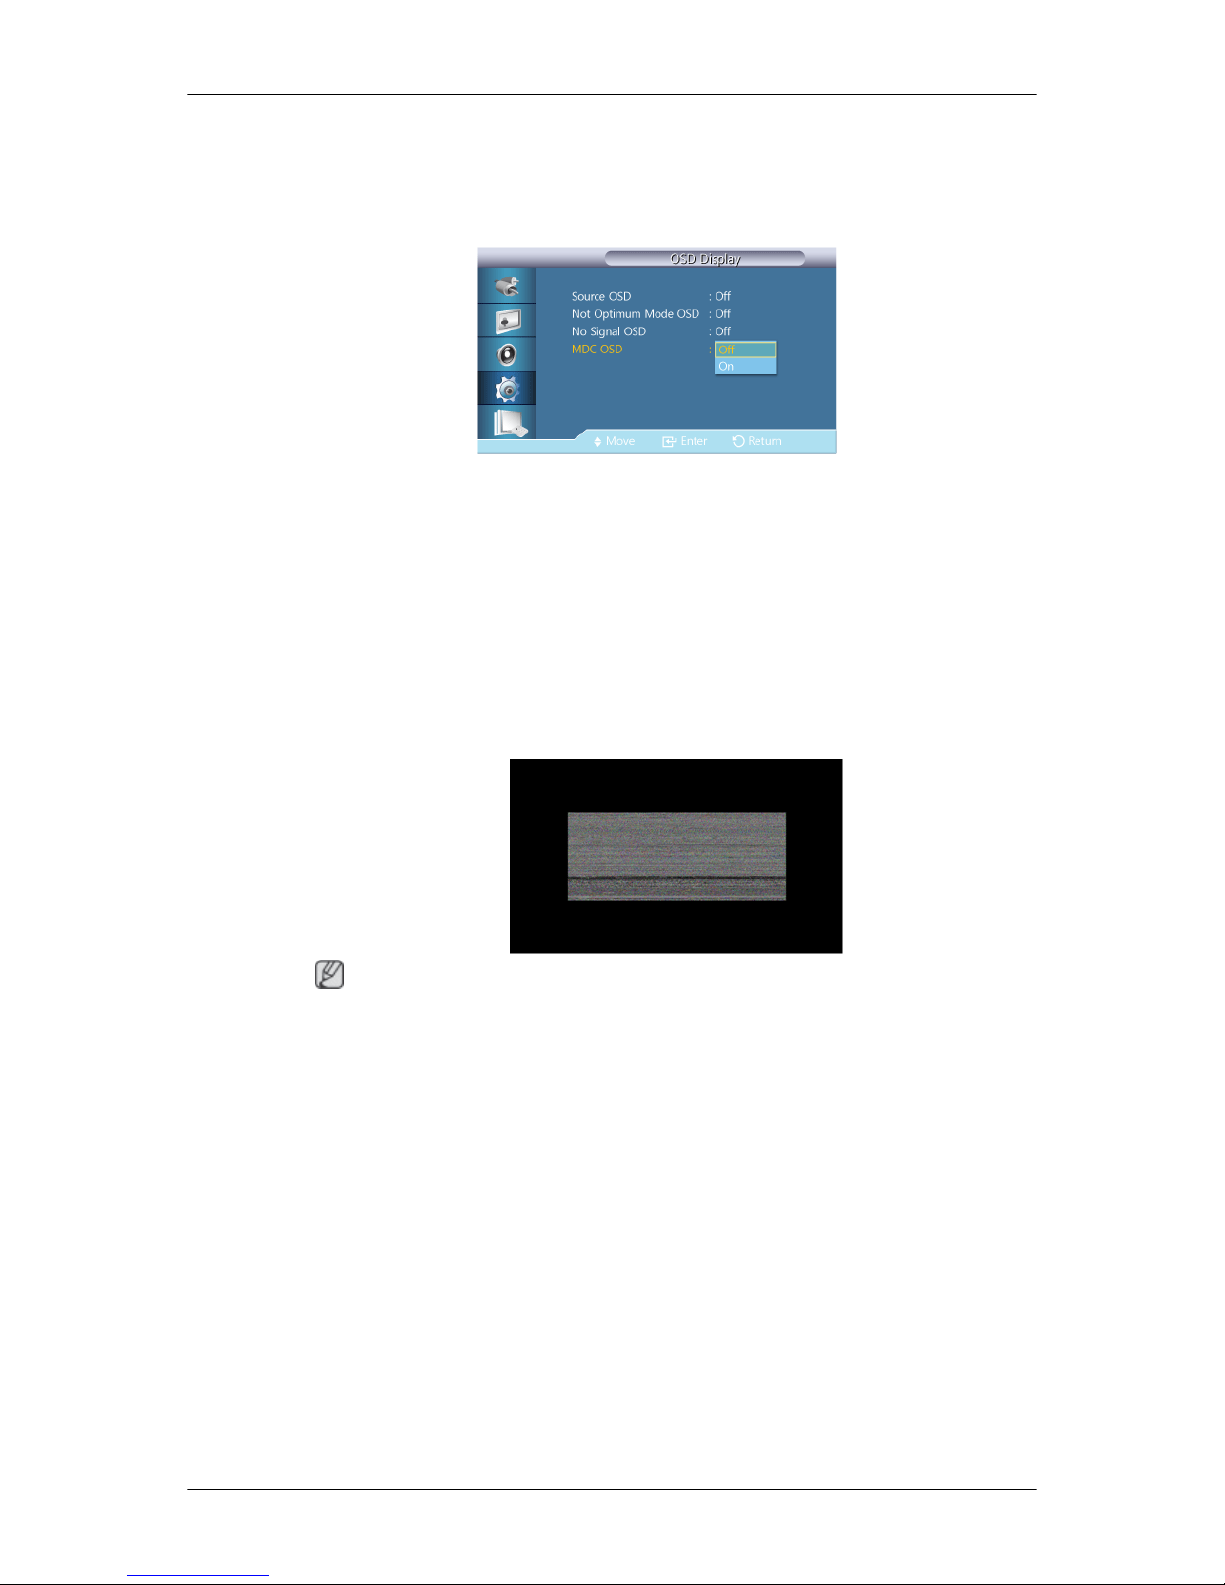
• Off
• On
MDC OSD
• Off
• On
Software Upgrade
Performs a software upgrade.
1. Connect the product to a computer via a digital signal such as DVI or HDMI. Click the BMP
image file converted from an SW code. The image below will appear on the screen of the product.
2. While a BMP image onto which the software code has been converted is displayed on the screen,
select Software Upgrade.
Note
When there are two or more BMP images, they are displayed on the screen using a slideshow.
• It is recommended that the playback interval between two BMP images in the slideshow
should be one second. The image extraction probability will decrease with other playback
intervals.
• A BMP image might not be extracted if it is covered by another image (for example, the mouse
pointer).
3. If a more recent version than the current software version is detected, you will be asked whether
to upgrade the current software. If you select <Yes>, the upgrade is performed.
4. When the software upgrade is completed, the product is turned off and on automatically.
Adjusting the LCD Display
Page 100

Note
• This only operates with a digital signal, such as in DVI, HDMI1, or HDMI2 mode. (The input
resolution must be identical to the panel resolution.)
• In HDMI1 and HDMI2 modes, the timing values used for both the PC and TV are only supported
if the Edit Name is set to PC or DVI PC.
• This is only supported if the Size is set to 16:9.
Setup Reset
Reset all the values for a setting.
Reset All
Reset all the settings for the display.
Multi Control
Available Modes
•
PC / DVI / DisplayPort
•
AV
•
Component
•
HDMI
•
MagicInfo
Note
MagicInfo can only be enabled when a network box(sold separately) is connected.
Multi Control
Assigns an individual ID to the SET.
Adjusting the LCD Display
 Loading...