

Page 1
SyncMaster 765MB/955MB
http://www.samsung-monitor.com
BH68-00492E-00
765MB-955MBcover-NEW.qxd 1/27/2003 5:57 PM Page 1
Page 2
Muïc Luïc
Höôùng Daãn An Toaøn
Maøn Hình Vi Tính
Caøi Ñaët Maøn Hình
Keát Noái Maøn Hình
Kieåm Tra Chöùc Naêng Töï Kieåm
Thoâng Ñieäp Caûnh Baùo
Moâi Tröôøng
Caùc Löu YÙ Khi Duøng
Chænh Maøn Hình
Cacù Phím Ñieuà Chænh
Söû Duïng Maøn Hình
MagicBright
User Delete (Xoùa döõ lieäu)
Ñoä Saùng (Brightness)/Ñoä Töông Phaûn (Contrast)
Vò Trí Maøn Hình ( Position)/Kích Thöôùc Maøn Hình (Size)
Vò Trí Maøn Hình ( Position)
Kích Thöôùc Maøn Hình (Size)
Phoùng AÛnh ( Zoom)
Geometry (Hình hoïc)
Hình Bình Haønh(Pallalel)/Xoay(Rotation)
Cong Caïnh Beân( Pincushion)/ Hình Thang(Trapezoid)
Cong Bieân( Pinbalance)
Tuyeán Tính Hình Hoïc( Linearity)
Color (Maøu)
9300K/6500K/sRGB
Screen (Maøn hình)
Chænh Nhieãu Vaân(Clear Moire)
Advanced (Naâng cao)
Khöû Töø (Degauss)
Trôû Veà Caøi Ñaët Goác( Recall )
Möùc Tín Hieäu Vaøo( Video Input Level)
Menu (Muïc luïc)
Söï Ñieàu Chænh Hieån Thò ( Display Timing)
Menu Duration (Thôøi gian hieån thò cuûa Muïc luïc)
Ngoân Ngöõ ( Language )
Menu Color (Muïc luïc Maøu)
Halftone
Vuøng Saùng (Highlight Zone)
Cacù Phím Ñieuà Chænh
Vuøng Saùng( Highlight Zone)
Vò Trí( Position )
Kích côõ( Size )
Ñoä Töông Phaûn( Contrast )
Maøu ( Color )
Phoùng AÛnh (Zoom)
Ñoä neùt (Sharpness )
Tieát Kieäm Naêng Löôïng
Giaûi Quyeát Söï Coá
Ñaëc Tính Kyõ Thuaät
Cheá Ñoä Hieån Thò
2
3
4
5
5
5
6
7
7
7
8
8
8
9
9
9
10
10
11
11
11
12
12
13
13
14
15
16
17
17
18
18
19
19
20
21
22
25
27
Tieáng Vieät
765mb-955mb-VE-new.qxd 1/27/2003 3:43 PM Page 1
Page 3
2
Höôùng Daãn An Toaøn
1. Tröôùc khi keát noái caùc nguoàn phaûi kieåm tra nguoàn ñieän cung caáp coù phuø hôïp vôùi ñieän aùp yeâu caàu.
2. Ñöøng bao giôø ñeå caùc vaät baèng kim loaïi vaøo maøn hình ñang môû. Ñieàu naøy seõ gaây ra ñieän giaät.
3. Ñeå traùnh ñieän giaät, khoâng ñöôïc chaïm tay vaøo phía sau maøn hình. Chæ coù nhöõng ngöôøi am hieåu kyõ thuaät môùi neân
môû naép maùy.
4. Khoâng ñöôïc söû duïng caùc daây nguoàn ñaõ bò hö hoûng. Traùnh laøm daây nguoàn bò caùc vaät khaùc caán leân, traùnh daãm leân
daây nguoàn.
5. Chæ neân duøng oå chæ söû duïng cho maøn hình nhaèm traùnh quaù nhieät oå caém.
6. Neân laép ñaët maøn hình taïi nôi thoâng thoaùng nhaèm traùnh söï quaù nhieät. Beà maët laép ñaët phaûi cöùng vöõng.
7. Khoâng ñaët maøn hình taïi nôi coù ñoä aåm cao cuõng nhö quaù buïi.
8. Khoâng ñaët maøn hình gaàn caùc vaät nhieãm töø.
9. Ñöøng laép ñaët maøn hình taïi nhöõng nôi coù theå bò taït möa hoaëc bò nöôùc. Neáu maøn hình bò nöôùc taït vaøo maùy, ruùt
nguoàn vaø lieân laïc vôùi traïm baûo haønh.
10. Nôi laép ñaët phaûi cöùng vöõng vaø phaúng. Maøn hình ñöôïc cheá taïo baèng thuûy tinh neân nguy hieåm khi bò rôùt.
11. Vò trí laép ñaët phaûi gaàn oå ñieän, traùnh laøm caêng daây nguoàn.
12. Khi maøn hình khoâng hoaït ñoäng bình thöôøng, aâm thanh baát thöôøng hoaëc coù maøu laï haõy laäp töùc ruùt nguoàn vaø lieân
heä vôùi traïm baûo haønh.
13. Nhieät ñoä cao laø nguyeân nhaân gaây hö hoûng. Khoâng ñöôïc laép ñaët maùy tröïc tieáp döôùi aùnh naéng maët trôøi vaø traùnh xa
caùc nguoàn nhieät.
14. Ruùt nguoàn khi khoâng söû duïng moät thôøi gian daøi hoaëc khi vaéng nhaø.
15. Ruùt daây nguoàn tröôùc khi söûa chöõa.
LÖU Y Ù: ÑEÅ TRAÙNH SÖÏ COÁ VEÀ ÑIEÄN, KHOÂNG ÑÖÔÏC
MÔÛ NAÉP MAÙY, KHOÂNG ÑÖÔÏC SÖÛ DUÏNG CAÙC
LINH KIEÄN BEÂN TRONG MAÙY. LIEÂN HEÄ VÔÙI
CHUYEÂN VIEÂN KYÕ THUAÄT ÑEÅ SÖÛA CHÖÕA.
765mb-955mb-VE-new.qxd 1/27/2003 3:43 PM Page 2
Page 4
3
Maøn Hình Vi Tính
Maøn Hình vaø Chaân Ñeá
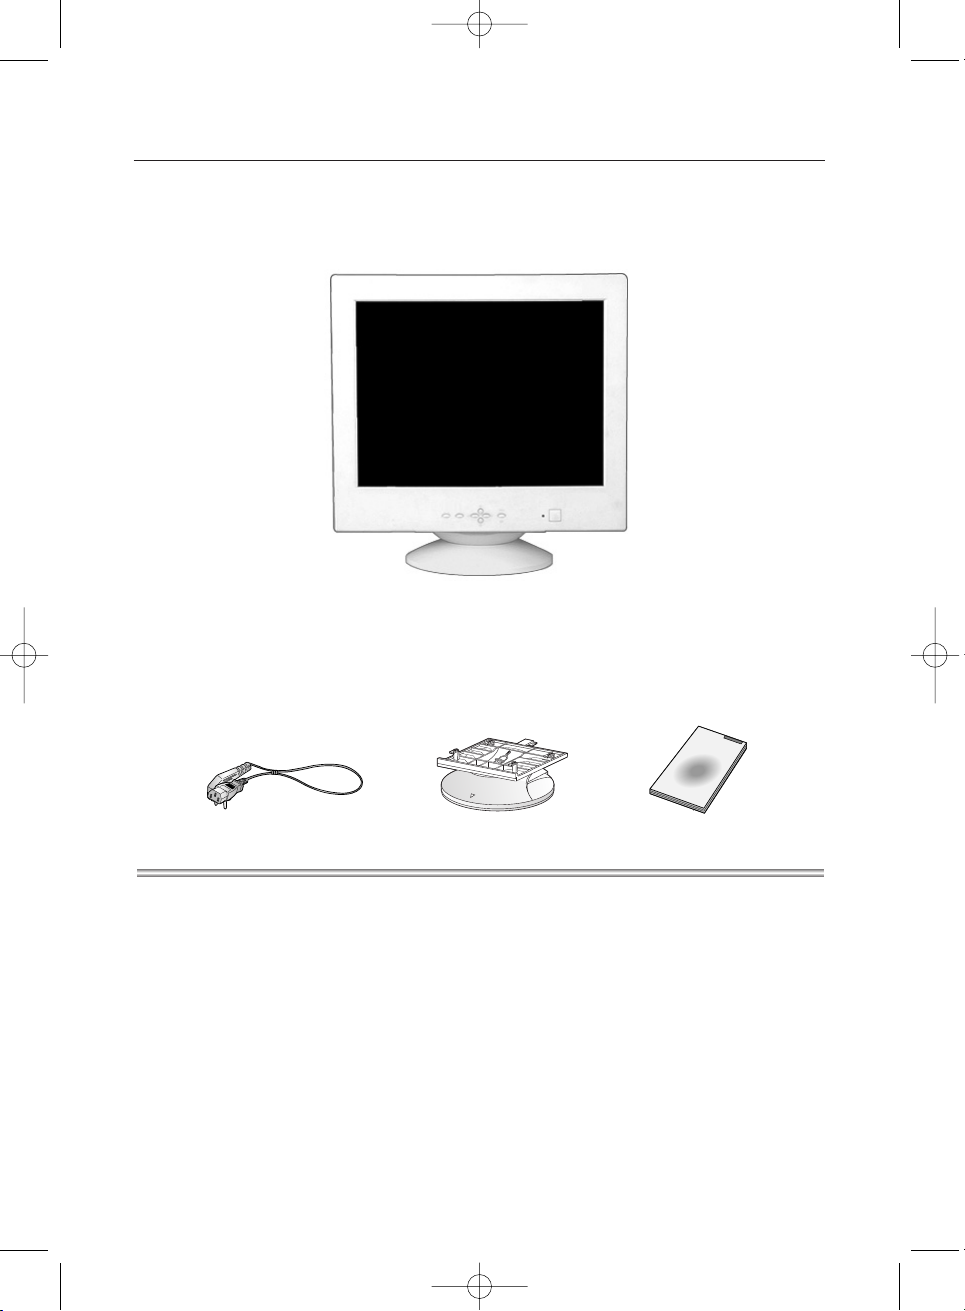
Kieåm tra vaät tö döôùi ñaây coù ñöôïc keøm theo maøn hình hay
khoâng. Neáu khoâng ñuû, lieân laïc vôùi ngöôøi baùn ñeå yeâu caàu
nhaän ñuû.
Daây nguoàn
Boä chaân ñeá
Theû baûo haønh
765mb-955mb-VE-new.qxd 1/27/2003 3:43 PM Page 3
Page 5
4
Caøi Ñaët Maøn Hình
Ketá Noiá Manø Hình
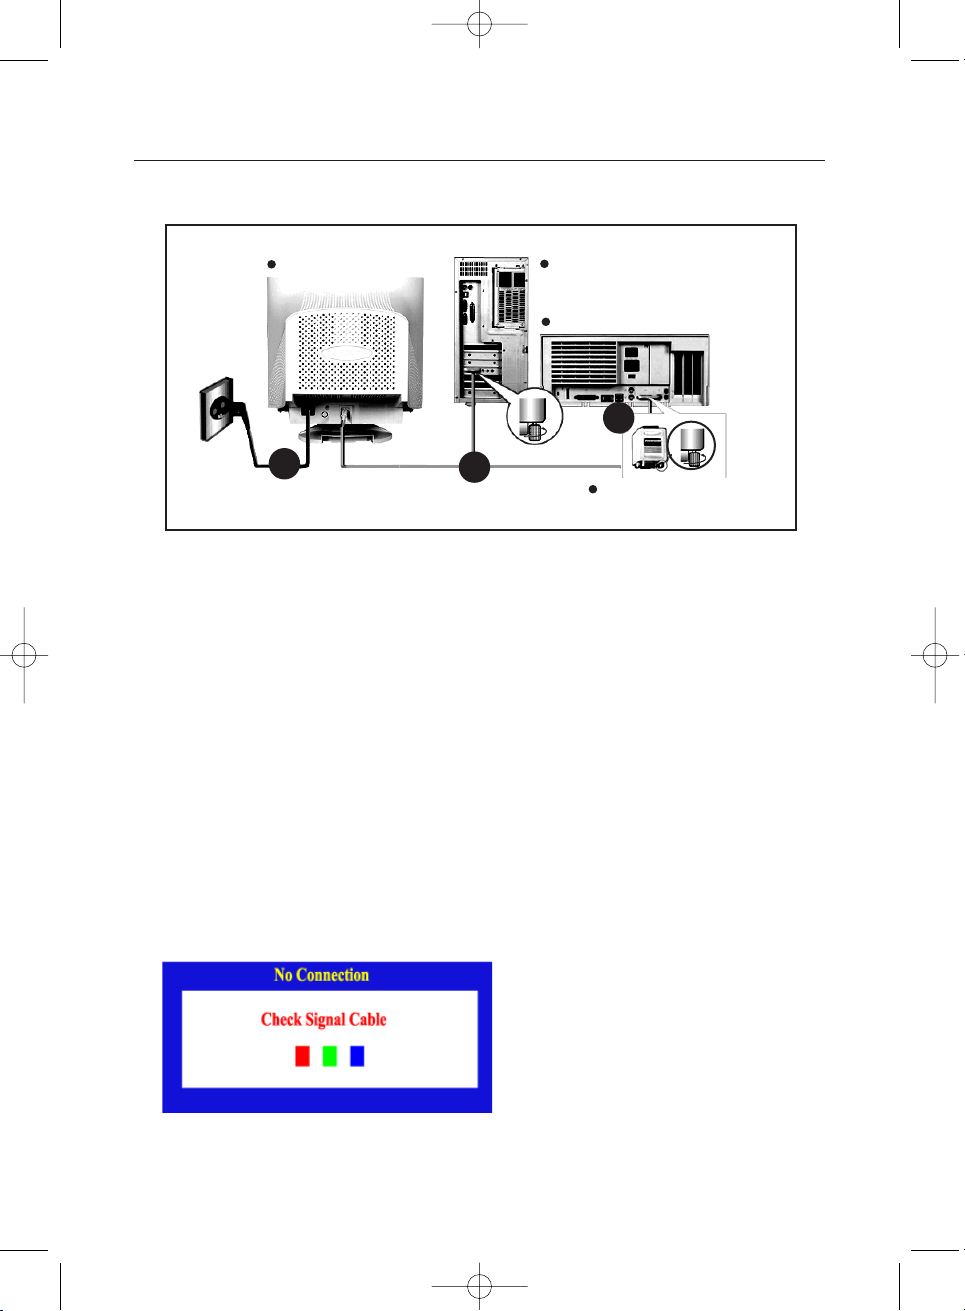
1 Keát noái daây nguoàn maøn hình vaøo loã caém phía sau maùy. Caém daây nguoàn vaøo nguoàn ñieän.
2 Keát noái daây tín hieäu cuûa maøn hình vaøo ngoõ ra tín hieäu cuûa maùy tính.
3 Neáu baïn söû duïng maùy tính Macintosh, keát noái daây tín hieäu vôùi ñaàu noái vaø caém vaøo maùy tính(
ñaàu noái khoâng bao goàm)
Maùy tính thoâng thöôøng khoâng caàn söû duïng ñaàu noái.
4
Baät maùy tính vaø maøn hình. Neáu maøn hình hieån thò hình aûnh, quaù trình laép ñaët thaønh coâng.
3
Maët sau maùy tính
Maët sau maùy Macintosh
Ñaàu chuyeån cho maùy macintosh
(khoâng bao goàm theo maùy)
Maët sau maøn hình
1
2
Kieåm tra chöùc naêng töï kieåm:
1. Taét maùy tính vaø maøn hình cuûa baïn.
2. Ruùt daây tín hieäu ra khoûi maùy.
3. Baät nguoàn cho maøn hình.
Neáu maøn hình hoaït ñoäng bình thöôøng, treân maøn hình seõ hieån thò khung hình döôùi ñaây.
Baát kyø bieåu töôïng naøo trong khung hình khoâng hieån thò, chæ ra raèng maøn hình cuûa baïn bò hoûng. Khung
hình naøy seõ xuaát hieän khi daây tín hieäu khoâng keát noái hoaëc bò hö hoûng.
Maùy tính cuûa baïn coù chöùc naêng töï kieåm tra, baïn coù theå kieåm tra chöùc naêng naøy baèng caùch:
765mb-955mb-VE-new.qxd 1/27/2003 3:43 PM Page 4
Page 6
5
Caøi Ñaët Maøn Hình
Thoâng ñieäp caûnh baùo
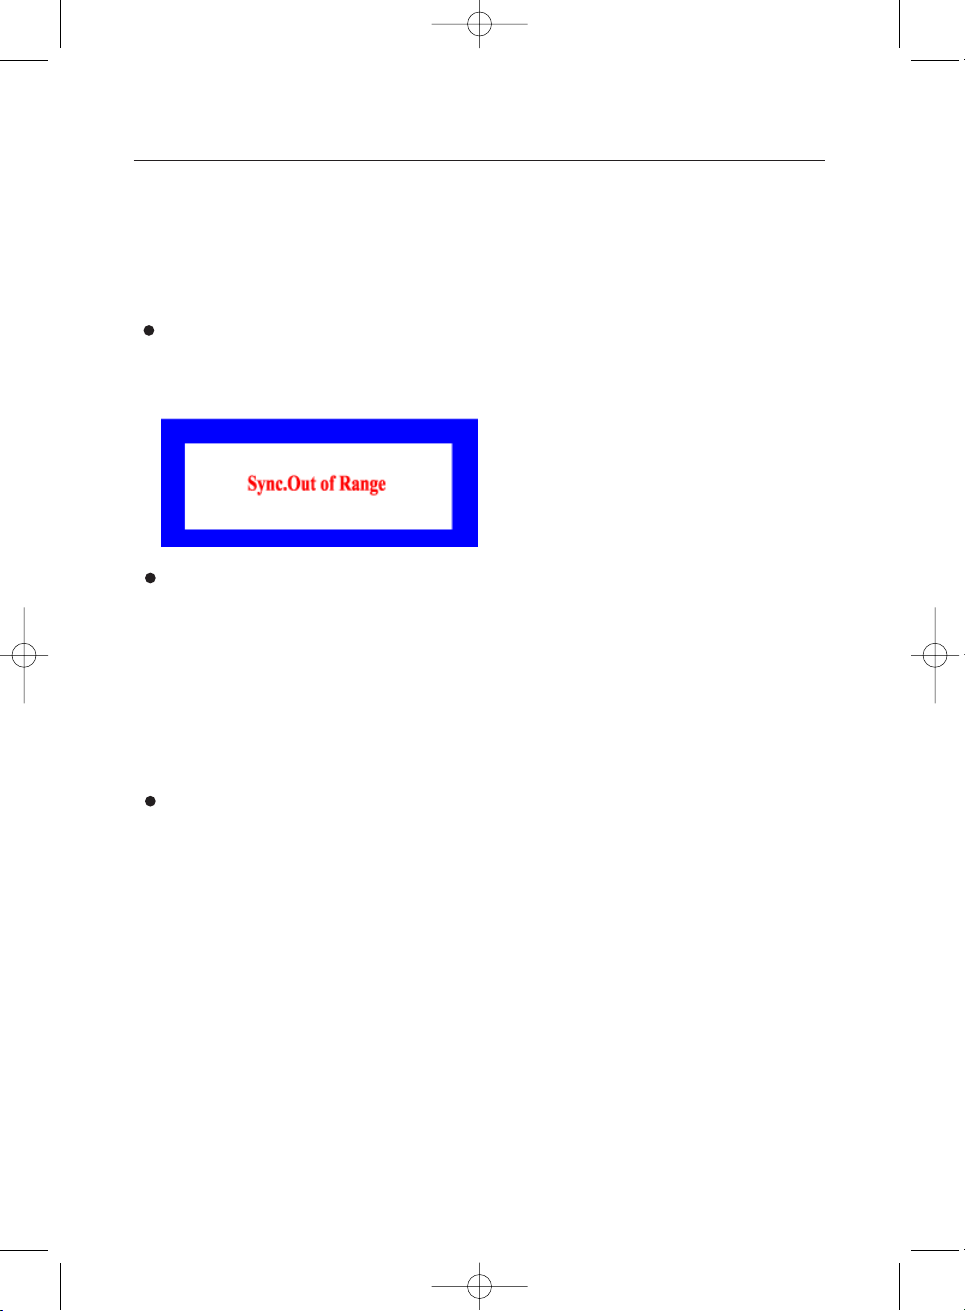
Neáu tín hieäu vaøo khoâng töông thích, moät thoâng ñieäp seõ xuaát hieän treân maøn hình hoaëc maøn hình seõ ñen
maëc duø ñeøn chæ thò vaãn saùng. Thoâng ñieäp chæ ra raèng tín hieäu vöôït qua möùc cho pheùp maøn hình hoaëc
baïn neân kieåm tra daây caùp tín hieäu.
4. Taét nguoàn maøn hình vaø keát noái daây tín hieäu, sau ñoù baät caû maøn hình vaø maùy tính.
Neáu maøn hình vaãn maøu ñen khi ñaõ thöïc hieän caùc böôùc tröôùc ñoù, kieåm tra card maøn hình vaø heä thoáng maùy
tính.
Moâi tröôøng
Vò trí vaø höôùng laép ñaët coù aûnh höôûng ñeán chaát löôïng cuûa maøn hình.
1. Khoâng neân ñeå loa traàm gaàn maøn hình maø neân di chuyeån loa traàm sang phoøng khaùc.
2. Baïn neân di chuyeån caùc thieát bò ñieän( quaït ñieän, ñieän thoaïi ...) Caùch xa maøn hình khoaûng hôn 1 meùt.
3. Baïn neân khöû töø khi di chuyeån maøn hình sang höôùng khaùc.
Caùc löu yù khi duøng.
¶Maøn hình taïo ra caùc tín hieäu coù theå thaáy ñöôïc, nhaän ñöôïc töø maùy tính. Do ñoù, maùy tính coù vaán ñeà
hoaëc card maøn hình coù vaán ñeà, maøn hình seõ chuyeån sang maøu ñen hoaëc maøu khoâng chuaån, maøn
hình bò oàn, vöôït möùc tín hieäu ....Trong tröôøng hôïp naøy, tröôùc tieân kieåm tra caùc tín hieäu hoaëc goïi cho
traïm baûo haønh neáu baïn khoâng giaûi quyeát ñöôïc.
¶Caùc vaán ñeà trong quaù trình hoaït ñoäng cuûa maøn hình.
Neáu khoâng coù hình aûnh hoaëc coù doøng kyù töï “ Sync.Out of Range” hieån thò treân maøn hình, thaùo daây
tín hieäu khoûi maùy tính khi maøn hình vaãn ñeå nguoàn.
°Neáu coù kyù töï hieån thò treân maøn hình hoaëc maøn hình chuyeån veà maøu traéng nghóa laø maøn hình vaãn
hoaït ñoäng bình thöôøng.
°Trong tröôøng hôïp naøy, kieåm tra maùy tính cuûa baïn.
765mb-955mb-VE-new.qxd 1/27/2003 3:43 PM Page 5
Page 7
Cacù Phím Ñieuà Chænh
Chænh Maøn Hình
6
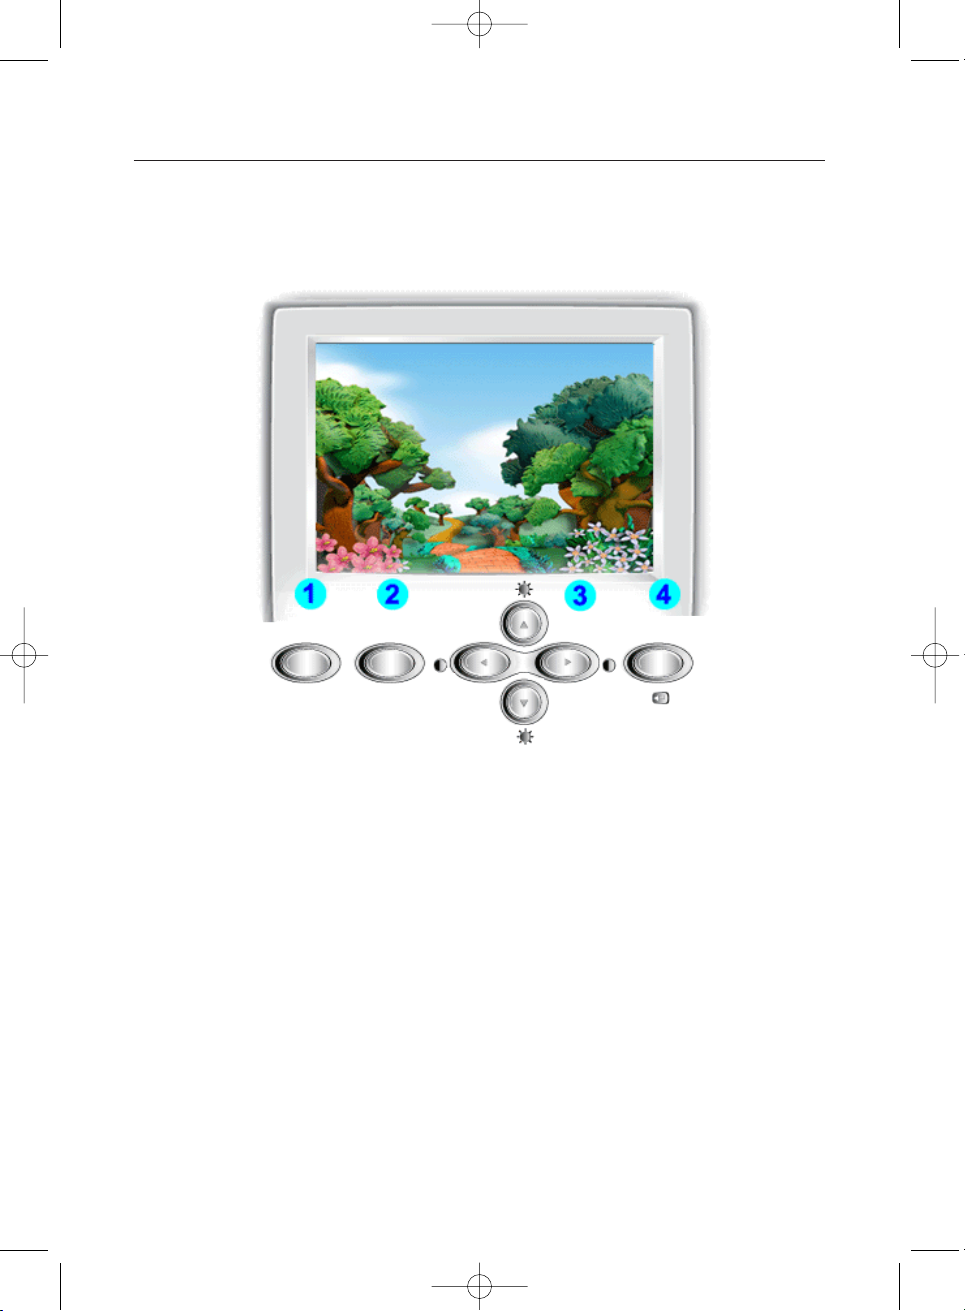
1 Phím Highlight : Highlight zone giuùp cho hình aûnh roõ raøng hôn khi xem caùc hình
aûnh treân maøn hình.
2 Nuùt Exit (Thoaùt)/MagicBright : Duøng nuùt naøy ñeå thoaùt khoûi hoaëc môû danh muïc MagicBright..
3 Caùc phím ñieàu chænh : Di chuyeån con troû tôùi muïc choïn vaø chænh giaù trò trong muïc choïn.
4 Phím Muïc luïc(Menu) : Söû duïng môû maøn hình OSD hoaëc kích hoaït caùc muïc ñöôïc choïn.
Highlight MagicBright
Exit
Menu
765mb-955mb-VE-new.qxd 1/27/2003 3:44 PM Page 6
Page 8
Söû Duïng Maøn Hình
7
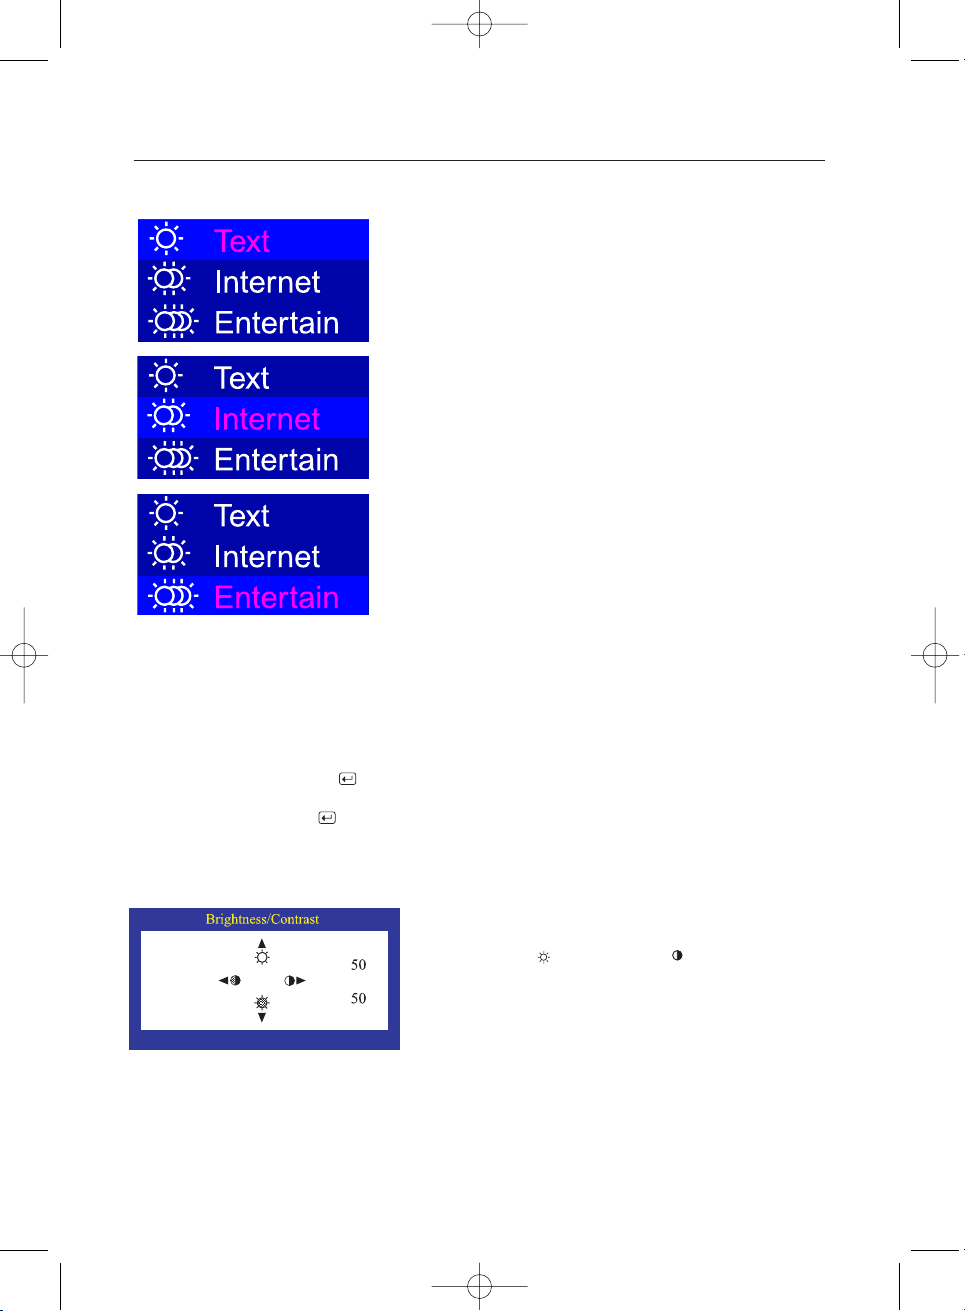
1 Nhaán nuùt MagicBright.
Nhaán nuùt MagicBright laàn nöõa vaø choïn cheá ñoä mong muoán. Khi
muïc Text (Vaên baûn) ñöôïc choïn, maøn hình seõ chuyeån sang ñoä
saùng bình thöôøng töông töï nhö nhöõng maøn hình hieän taïi khaùc;
cheá ñoä naøy thích hôïp ñeå ñoïc hoaëc laøm vieäc vôùi vaên baûn. Khi muïc
Internet ñöôïc choïn, maøn hình seõ chuyeån sang ñoä saùng taêng
cöôøng hoã trôï cho vieäc trình duyeät Internet (vaên baûn vaø ñoà hoïa),
trong khi vaãn giöõ ñöôïc khaû naêng ñoïc kyù töï vaên baûn deã daøng. Khi
muïc Entertain (Giaûi trí) ñöôïc choïn, maøn hình seõ chuyeån sang ñoä
saùng toái ña (330 cd/m2) töông töï ñoä saùng cuûa tivi; cheá ñoä naøy
thích hôïp nhaát ñeå xem caùc chöông trình giaûi trí (hình ñoäng, phim
DVD, chöông trình TV hoaëc troø chôi tröïc tuyeán)
MagicBright
MagicBright duøng ñeå chæ moät chöùc naêng môùi cuûa maøn hình, mang laïi
chaát löôïng hieån thò hình aûnh saùng vaø roõ gaáp ñoâi chaát löôïng hieån thò
cuûa caùc maøn hình hieän taïi.
Chöùc naêng naøy mang laïi ñoä saùng vaø ñoä phaân giaûi maøn hình phuø hôïp
nhaát ñeå xem vaên baûn, Internet, hoaëc nhöõng ñoaïn hoaït hình ña
phöông tieän nhaèm ñaùp öùng nhöõng yeâu caàu khaùc nhau cuûa ngöôøi söû
duïng.
Ngöôøi söû duïng coù theå deã daøng choïn moät trong ba tuøy choïn ñoä saùng vaø
ñoä phaân giaûi ñöôïc caøi ñaët saün chæ baèng vieäc nhaán moät trong caùc nuùt
ñieàu chænh MagicBright naèm ôû maët tröôùc cuûa maøn hình.
1 Nhaán nuùt MUÏC Luïc ( ) laâu hôn 5 giaây.
User Delete (Xoùa döõ lieäu)
Khi baïn nhaán nuùt MUÏC LUÏC ( ) laâu hôn 5 giaây, taát caû döõ lieäu ñieàu chænh cuûa ngöôøi söû duïng seõ bò
xoùa khi ñeøn LED nhaáp nhaùy. Thao taùc naøy khaùc vôùi chöùc naêng chuyeån veà traïng thaùi maëc ñònh.
1 AÁn phím ( ) hoaëc phím ( ) .
Muïc brightness/contrast seõ ñöôïc hieån thò.
2 AÁn phím ñeå taêng ñoä saùng. AÁn phím ñeå giaûm
ñoä saùng.
AÁn phím ñeå taêng ñoä töông phaûn. AÁn phím ñeå
giaûm ñoä töông phaûn.
Ñoä Saùng (Brightness)/Ñoä Töông Phaûn (Contrast)
Duøng hieäu chænh ñoä saùng vaø ñoä töông phaûn cuûa maøn hình
hieån thò.
765mb-955mb-VE-new.qxd 1/27/2003 3:44 PM Page 7
Page 9
Söû Duïng Maøn Hình
8
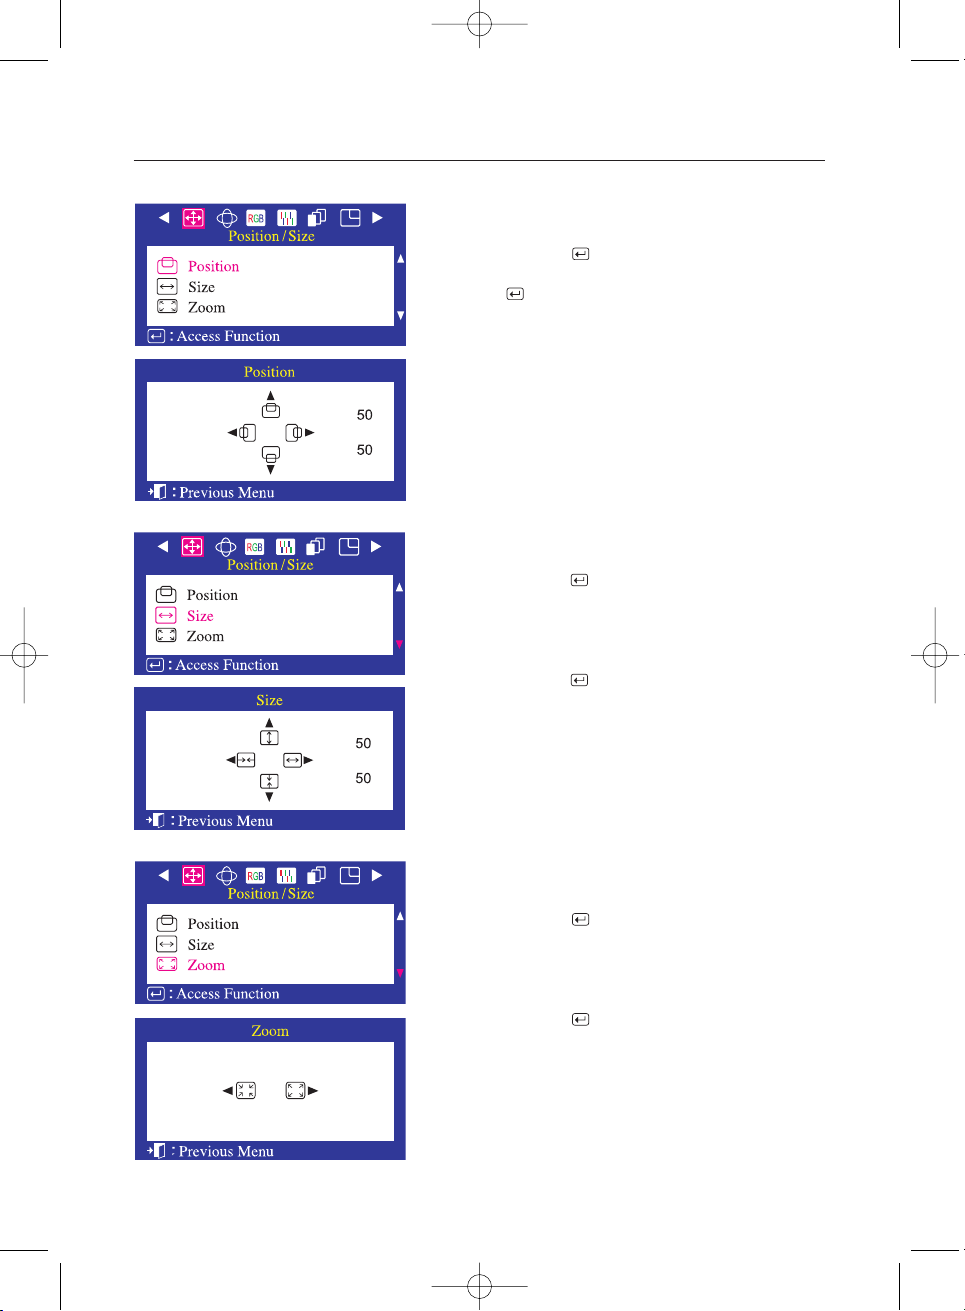
Kích Thöôùc Maøn Hình(Size)
Duøng thay ñoåi kích thöôùc maøn hình hieån thò
Duøng thay ñoåi vò trí hieån thò cuûa cöûa soå maøn hình
Vò Trí Maøn Hình(Position)
1 AÁn phím Muïc Luïc ( ).
2 AÁn phím( ) ñeå môû maøn hình ñieàu chænh vò trí
3 AÁn phím vaø ñeå chænh vò trí ngang cuûa maøn hình hieån thò.
AÁn phím vaø ñeå chænh vò trí doïc cuûa maøn hình hieån thò.
1 AÁn phím Muïc Luïc ( ).
2 AÁn phím vaø cho ñeán khi maøn hình Position/Size hieån
thò. AÁn phím vaø ø ñeå choïn muïc Zoom.
3 AÁn phím Muïc Luïc ( ) ñeå môû muïc ñieàu chænh Zoom.
4 AÁn phím thu nhoû maøn hình hieån thò.
AÁn phím phoùng maøn hình hieån thò.
Phoùng AÛnh (Zoom)
Chöùc naêng naøy duøng phoùng to hay thu nhoû maøn hình
hieån thò.
1 AÁn phím Muïc Luïc ( ).
2 AÁn phím vaø cho ñeán khi maøn hình Position/Size hieån thò.
AÁn phím vaø ø ñeå choïn muïc Size.
3 AÁn phím Muïc Luïc ( ) ñeå môû muïc ñieàu chænh Size.
4 AÁn phím vaø ñeå chænh kích thöôùc ngang cuûa maøn hình. AÁn
phím vaø ø ñeå chænh kích thöôùc doïc cuûa maøn hình hieån thò.
765mb-955mb-VE-new.qxd 1/27/2003 3:44 PM Page 8
Page 10
9
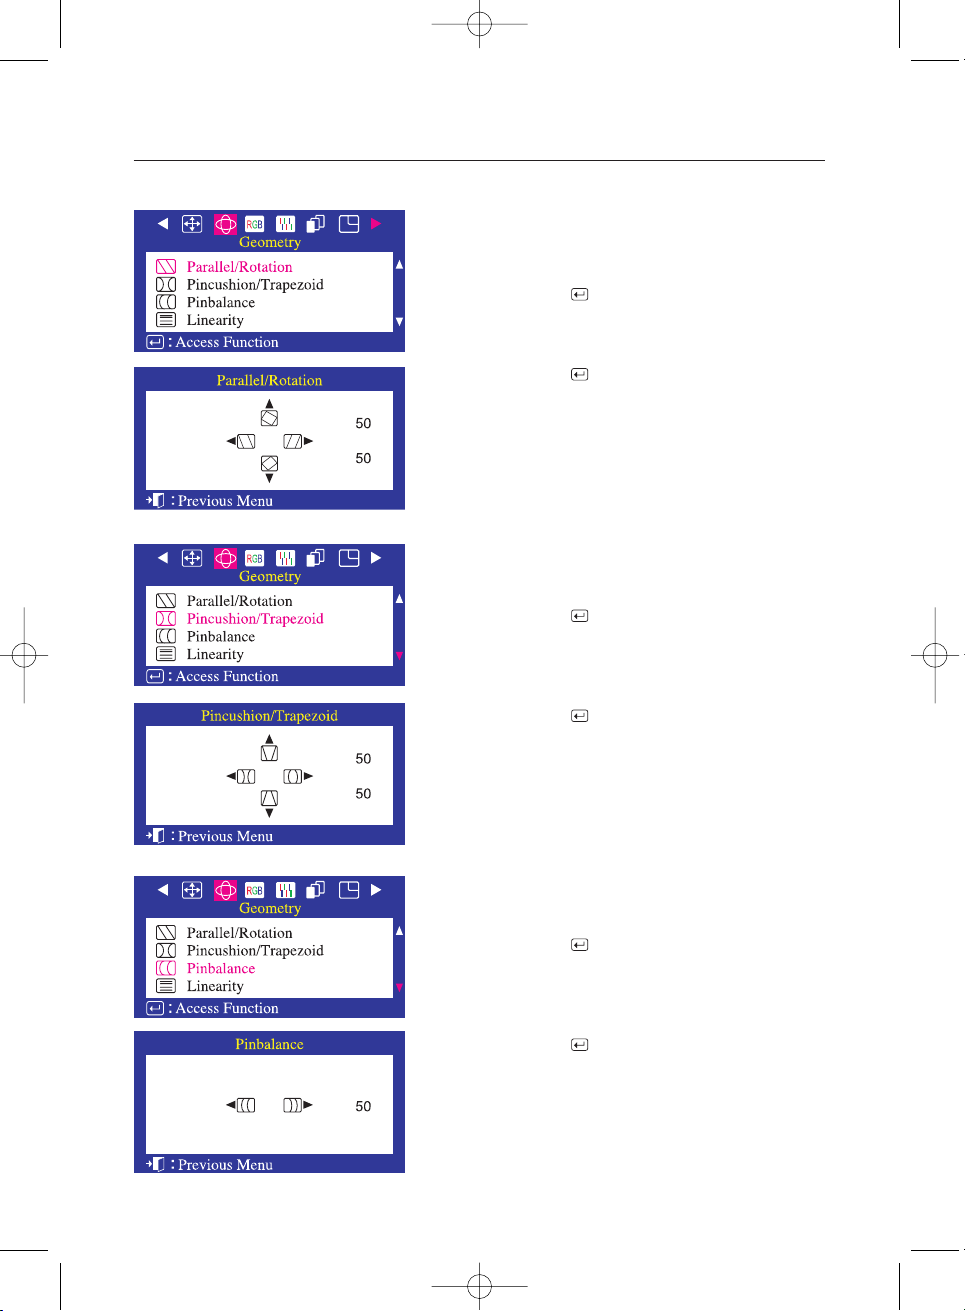
1 AÁn phím Muïc Luïc ( ).
2 AÁn phím hoaëc cho tôùi khi muïc Geometry hieån thò.
3 AÁn phím Muïc Luïc ( ) ñeå vaøo muïc Parallel/Rotation.
4 AÁn phím hoaëc chænh muïc Parallel.
AÁn phím hoaëc chænh muïc Rotation.
Söû Duïng Maøn Hình
Hình Bình Haønh( Parallel )/ Xoay( Rotation )
Chænh Parallel khi maøn hình bò nghieâng sang traùi hoaëc sang
phaûi; Chænh Rotation khi toaøn boä maøn hình bò nghieâng sang
traùi hoaëc sang phaûi.
1 AÁn phím Muïc Luïc ( ).
2 AÁn phím hoaëc cho tôùi khi muïc Geometry hieån thò.
AÁn phím hoaëc choïn muïc Pincushion/Trapezoid.
3 AÁn phím Muïc Luïc ( ) ñeå vaøo muïc Pincushion/Trapezoid.
4 AÁn phím hoaëc chænh muïc Pincushion.
AÁn phím hoaëc chænh muïc Trapezoid.
Cong Caïnh Beân ( Pincushion )/ Hình Thang( Trapezoid )
Duøng Pincushion ñeå hieäu chænh ñoä cong( vaøo trong hoaëc ra ngoaøi)
cuûa hai caïnh beân cuûa cöûa soå maøn hình hieån thò. Duøng Trapezoid ñeå
chænh ñoä roäng cuûa ñænh hoaëc ñaùy maøn hình hieån thò.
1 AÁn phím Muïc Luïc ( ).
2 AÁn phím hoaëc tôùi khi muïc Geometry hieån thò.
AÁn phím hoaëc choïn muïc Pinbalance.
3 AÁn phím Muïc Luïc ( ) ñeå vaøo muïc Pinbalance.
4 AÁn phím hoaëc ñeå chænh muïc Pinbalance.
Cong Bieân( Pinbalance)
Chænh cong bieân khi maøn hình hieån thò bò cong beân traùi hoaëc
beân phaûi.
765mb-955mb-VE-new.qxd 1/27/2003 3:44 PM Page 9
Page 11
Söû Duïng Maøn Hình
10
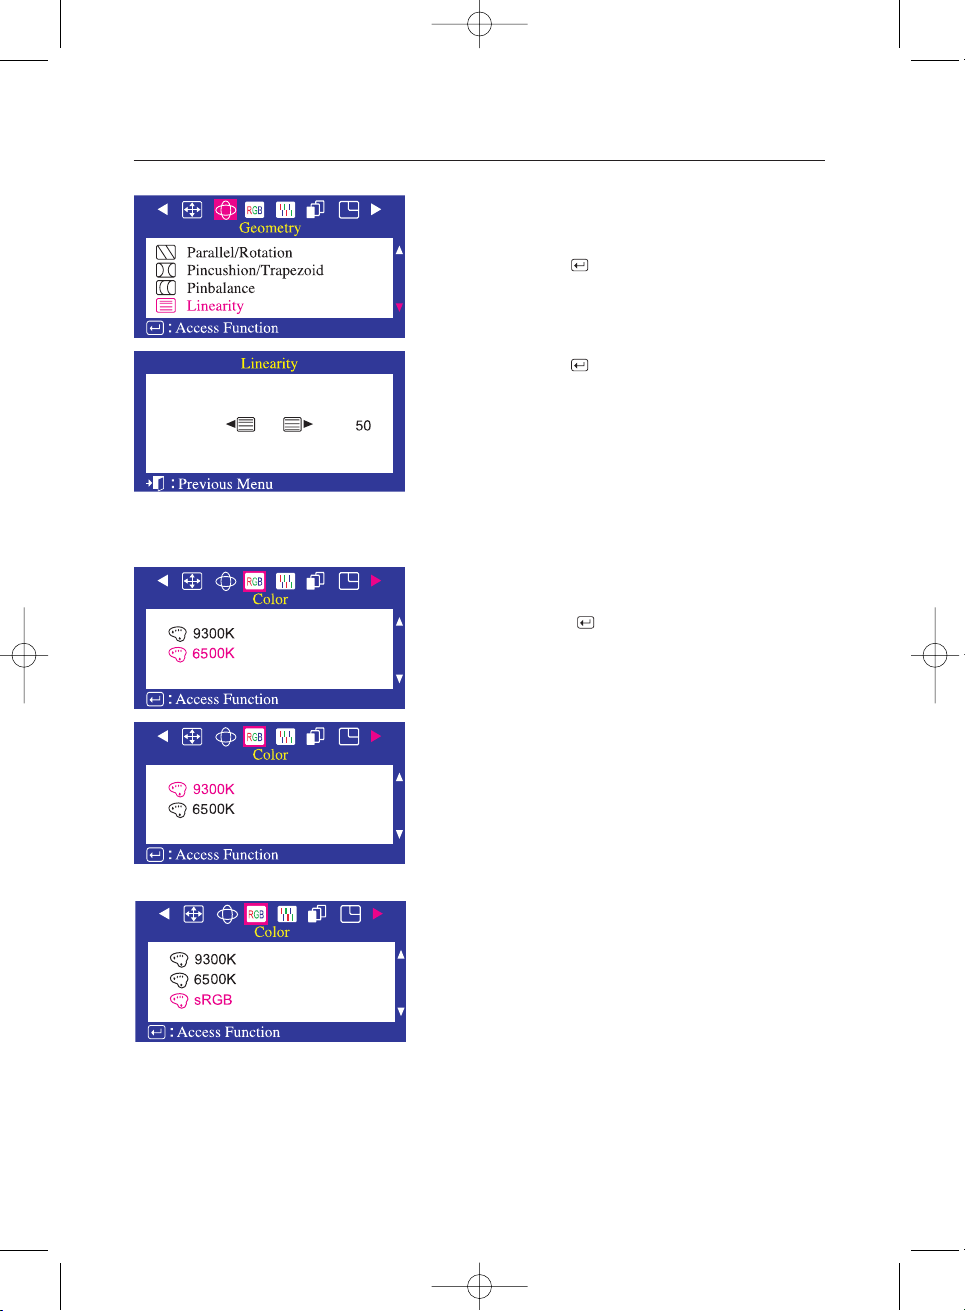
1 AÁn phím Muïc Luïc ( ).
2 AÁn phím hoaëc tôùi khi muïc Geometry hieån thò.
AÁn phím hoaëc choïn muïc Linearity.
3 AÁn phím Muïc Luïc ( ) ñeå vaøo muïc Linearity.
4 AÁn phím hoaëc ñeå chænh muïc Linearity.
Tuyeán Tính Hình Hoïc(Linearity)
Maøu ( Color )
Söû duïng chöùc naêng naøy khi maøn hình bò co veà phía Traùi, phaûi
hoaëc Treân, Döôùi.
1 AÁn phím Muïc Luïc ( ).
2 AÁn phím hoaëc tôùi khi muïc Color hieån thò.
3 AÁn phím hoaëc ñeå choïn möùc 9300K(toâng xanh) vaø
6500K (toâng ñoû).
Color Temperature ñoä aám cuûa maøu hình aûnh. Möùc giaù trò ñieàu
chænh giöõa 9300K vaø 6500K
SyncMaster 765MB
SyncMaster 955MB
765mb-955mb-VE-new.qxd 1/27/2003 3:44 PM Page 10
Page 12
11
Söû Duïng Maøn Hình
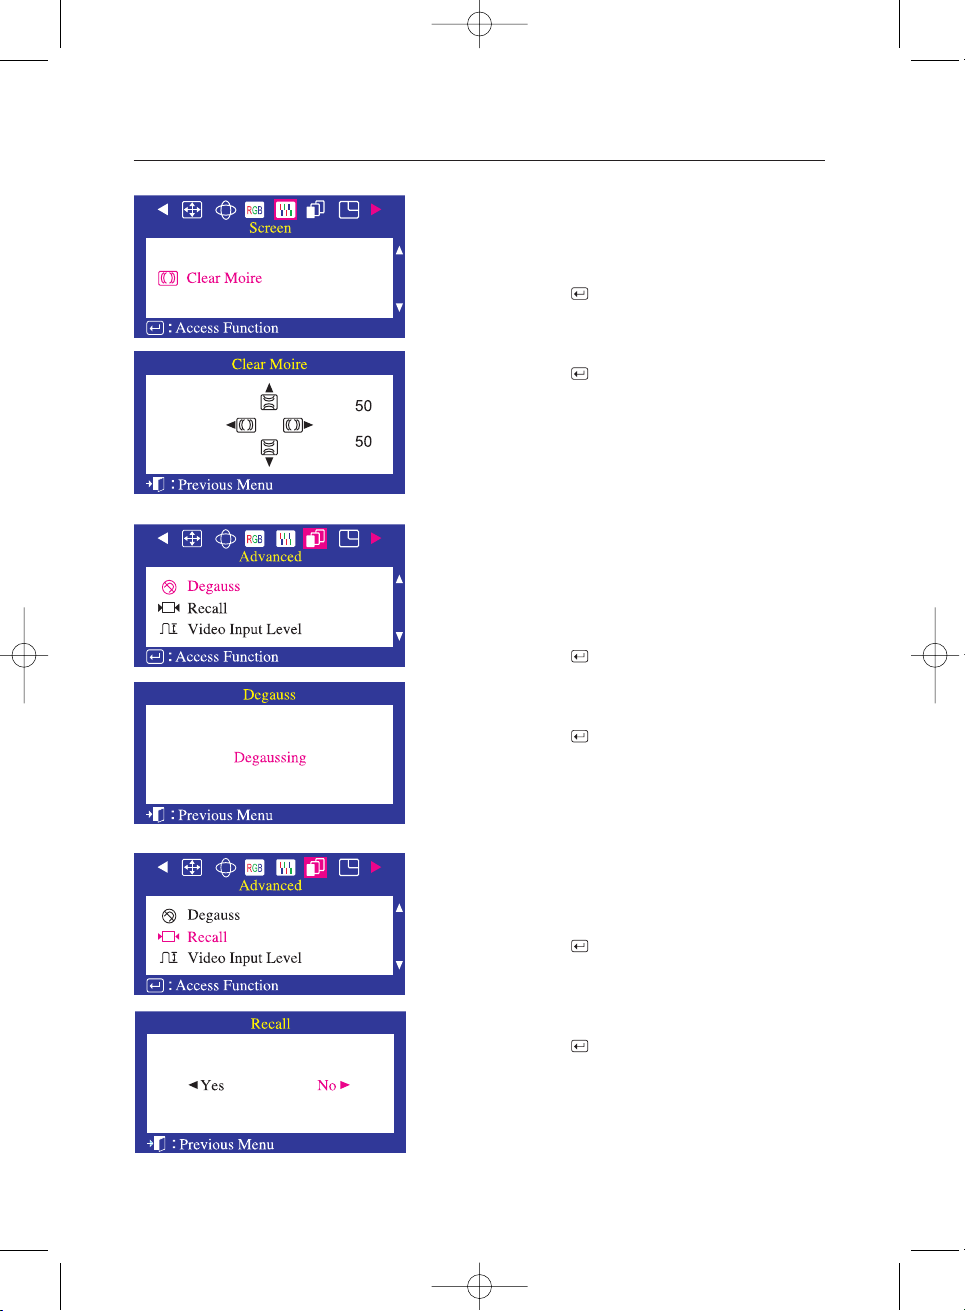
Chænh Nhieãu Vaân (Clear Moire)
Khi maøn hình xuaát hieän caùc vaân môø( hình troøn hoaëc hình
cong), ta duøng chöùc naêng Moire ñeå loaïi boû hoaëc laøm giaûm caùc
vaân.
1 AÁn phím Muïc Luïc ( ).
2 AÁn phím hoaëc tôùi khi maøn hình Advance hieån thò.
3 AÁn phím Muïc Luïc ( ) ñeå kích hoaït chöùc naêng khöû tö.
Maøn hình ñang khöû töø seõ hieån thò. Sau vaøi giaây, maøn hình seõ
trôû veà muïc luïc khöû töø chính.
Khöû Töø ( Degauss)
Chöùc naêng khöû töø duøng loaïi boû caùc beät maøu loang loã treân
maøn hình do maøn hình bò nhieãm töø. Moãi laàn söû duïng chöùc
naêng khöû töø caùch nhau ít nhaát 30 phuùt.
Ghi chuù: * Maøn hình seõ phaùt ra tieáng keâu nheï vaø maøu cuûa
hình aûnh seõ thay ñoåi ñoàng thôøi maøn hình seõ ñong
ñöa moät vaøi giaây. Ñaây laø hieän töôïng bình thöôøng.
1 AÁn phím Muïc Luïc ( ).
2 AÁn phím hoaëc tôùi khi maøn hình Screen hieån thò.
3 AÁn phím Muïc Luïc ( ) ñeå vaøo maøn hình Clear Moire.
4 AÁn phím hoaëc ñeå chænh muïc Moire ngang.
AÁn phím hoaëc ñeå chænh muïc Moire doïc.
1 AÁn phím Muïc Luïc ( ).
2 AÁn phím hoaëc tôùi khi maøn hình Advance hieån thò.
AÁn phím hoaëc choïn muïc Recall.
3 AÁn phím Muïc Luïc ( ) ñeå kích hoaït chöùc naêng Recall.
4 AÁn phím choïn Yes. neáu khoâng muoán caøi ñaët laïi maøn hình,
aán phím ñeå choïn No.
Trôû Veà Caøi Ñaët Goác( Recall )
Chöùc naêng Recall duøng ñöa maùy veà caøi ñaët goác:
Vò trí, Kích thöôùc...
Ghi chuù: * Neáu baïn choïn Yes, taát caû caùc caøi ñaët tröôùc ñaây cuûa
baïn seõ bò xoùa vaø maøn hình seõ trôû veà caøi ñaët goác.
765mb-955mb-VE-new.qxd 1/27/2003 3:44 PM Page 11
Page 13
Söû Duïng Maøn Hình
12
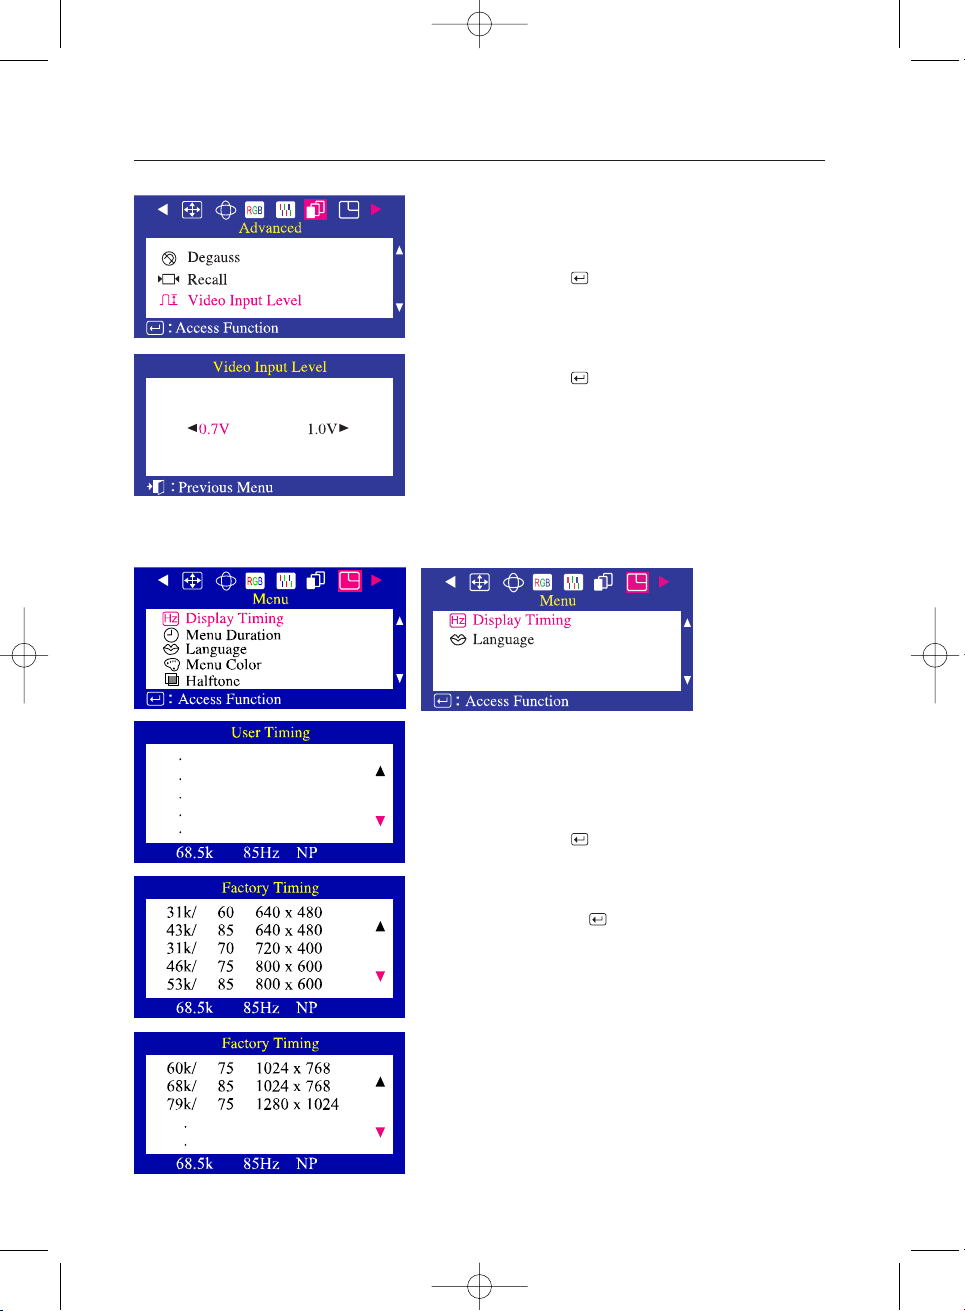
1 AÁn phím Muïc Luïc ( ).
2 AÁn phím hoaëc tôùi khi maøn hình Advance hieån thò. AÁn
phím hoaëc ñeå choïn muïc Video Input Level.
3 AÁn phím Muïc Luïc ( ) ñeå vaøo maøn hình Video Input Level.
4 AÁn phím hoaëc ñeå choïn möùc 0.7V hoaëc 1.0V.
Möùc Tín Hieäu (Video In Level)
Moät vaøi loaïi card maøn hình söû duïng tín hieäu hình lôùn hôn
1.0V, ñaây laø nguyeân nhaân gaây ra maøn hình quaù saùng. Ñoái vôùi
caùc loaïi card naøy, baïn neân caøi ñaët möùc tín hieäu vaøo laø 1.0V.
1 AÁn phím Muïc Luïc ( ).
2 AÁn phím hoaëc tôùi khi maøn hình Menu hieån thò.
3 AÁn phím Muïc Luïc ( ) ñeå vaøo maøn hình Display
Timing.
4 AÁn phím ñeå xem cheá ñoä ngöôøi söû duïng vaø cheá ñoä caøi
saún.
Söï Ñieàu Chænh Hieån Thò ( Display Timing )
Baïn coù theå xem taàn soá söû duïng cuûa ngöôøi duøng cuõng nhö taàn
soá ñöôïc caøi ñaët trong maùy khi mua maøn hình vaø ñoä phaân giaûi
cuûa maøn hình.
Ghi chuù: * Caùc thoâng tin treân maøn hình khoâng theå thay ñoåi,
chuùng chæ mang tính chaát caùc thoâng tin tham khaûo.
SyncMaster 765MB
SyncMaster 955MB
765mb-955mb-VE-new.qxd 1/27/2003 3:44 PM Page 12
Page 14
13
Adjusting Your Monitor
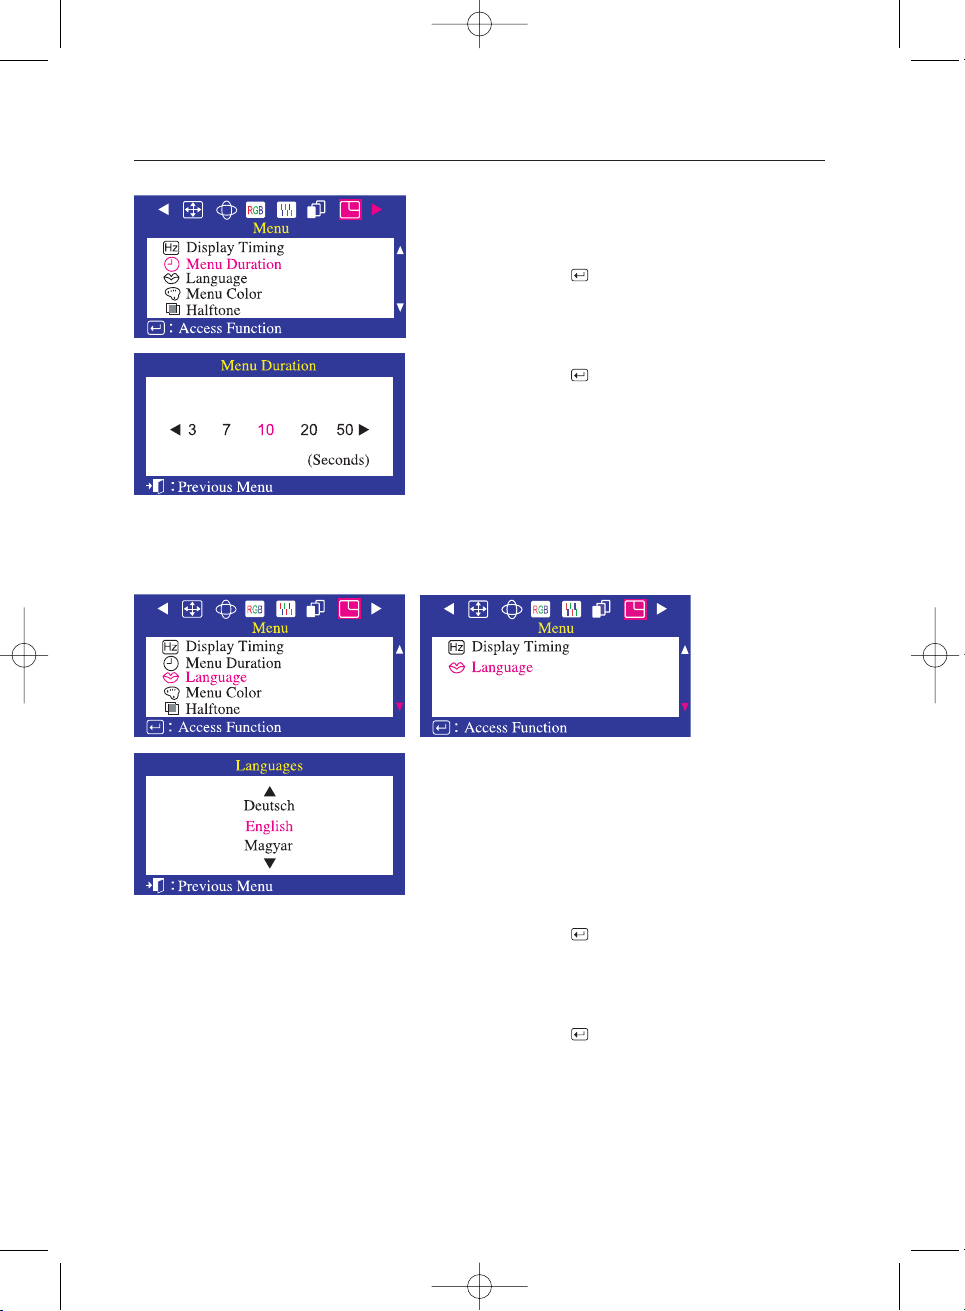
1 AÁn phím Muïc Luïc ( ).
2 AÁn phím hoaëc tôùi khi maøn hình Menu hieån thò. AÁn phím
hoaëc ñeå choïn muïc Menu Duration.
3 AÁn phím Muïc Luïc ( ) ñeå vaøo maøn hình Menu Duration.
4 Duøng nuùt hoaëc nuùt ñeå choïn caùc khoaûng thôøi gian 3, 7, 20
hoaëc 50 giaây. 10 giaây laø khoaûng thôøi gian maëc ñònh.
Menu Duration (Thôøi gian hieån thò cuûa Muïc luïc) (SyncMaster 765MB)
Muïc luïc seõ töï ñoäng taét neáu khoâng thöïc hieän ñieàu chænh naøo
trong moät khoaûng thôøi gian nhaát ñònh. Baïn coù theå caøi ñaët
khoaûng thôøi gian chôø cuûa danh muïc tröôùc khi töï ñoäng taét.
1 AÁn phím Muïc Luïc ( ).
2 AÁn phím hoaëc tôùi khi maøn hình Menu hieån thò. AÁn phím
hoaëc ñeå choïn muïc Language.
3 AÁn phím Muïc Luïc ( ) ñeå vaøo maøn hình Language.
4 AÁn phím hoaëc ñeå choïn ngoân ngöõ muoán hieån thò.
Ngoân Ngöõ ( Language )
Baïn coù theå choïn moät trong möôøi ngoân ngöõ hieån thò coù trong
maùy. ( Moät vaøi ngoân ngöõ seõ khoâng hieån thò tuøy thuoäc vaøo kieåu
maùy).
(Tieáng Anh, Ñöùc, Phaùp, YÙ, Boà Ñaøo Nha, Taây Ban Nha, Thuïy
Ñieån, Nga, Ba Lan hoaëc Hungari. Tieáng Ba Lan vaø Hungari coù
theå khoâng coù ôû moät soá saûn phaåm.)
Ghi chuù: Ngoân ngöõ ñöôïc choïn chæ aûnh höôûng treân maøn hình
hieån thò, khoâng aûnh höôûng tôùi ngoân ngöõ hieån thò trong
caùc phaàn meàm baïn söû duïng.
SyncMaster 765MB
SyncMaster 955MB
765mb-955mb-VE-new.qxd 1/27/2003 3:44 PM Page 13
Page 15
Söû Duïng Maøn Hình
14
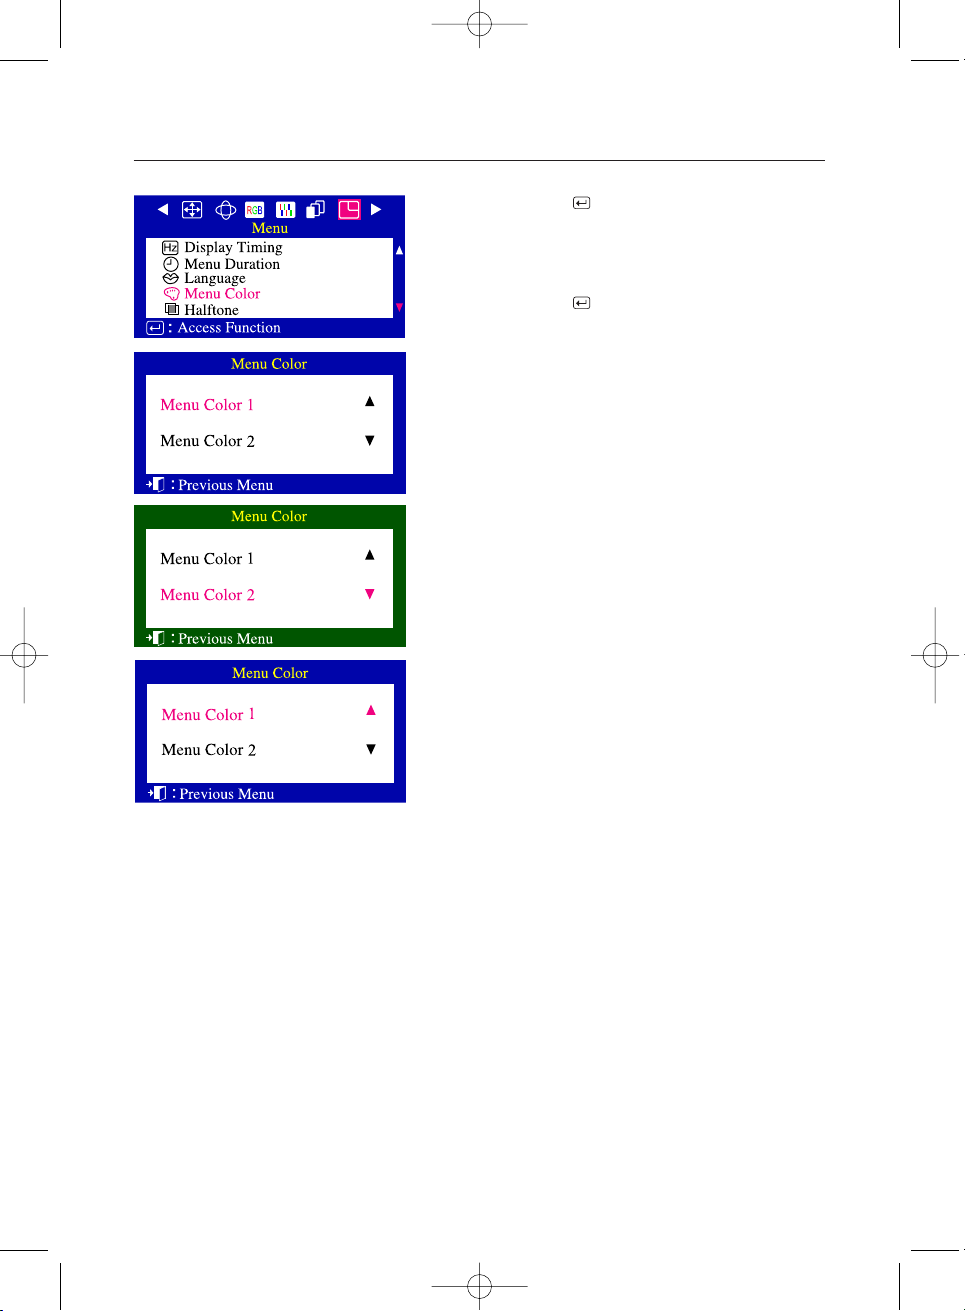
Menu Color (Muïc luïc Maøu) (SyncMaster 765MB)
1 AÁn phím Muïc Luïc ( ).
2 AÁn phím hoaëc tôùi khi maøn hình Menu hieån thò. AÁn phím
hoaëc ñeå choïn muïc Menu Color.
3 AÁn phím Muïc Luïc ( ) ñeå vaøo maøn hình Menu Color .
4 Duøng nuùt hoaëc nuùt ñeå choïn Menu Color 1 hoaëc Menu
Color 2.
765mb-955mb-VE-new.qxd 1/27/2003 3:44 PM Page 14
Page 16
15
Söû Duïng Maøn Hình
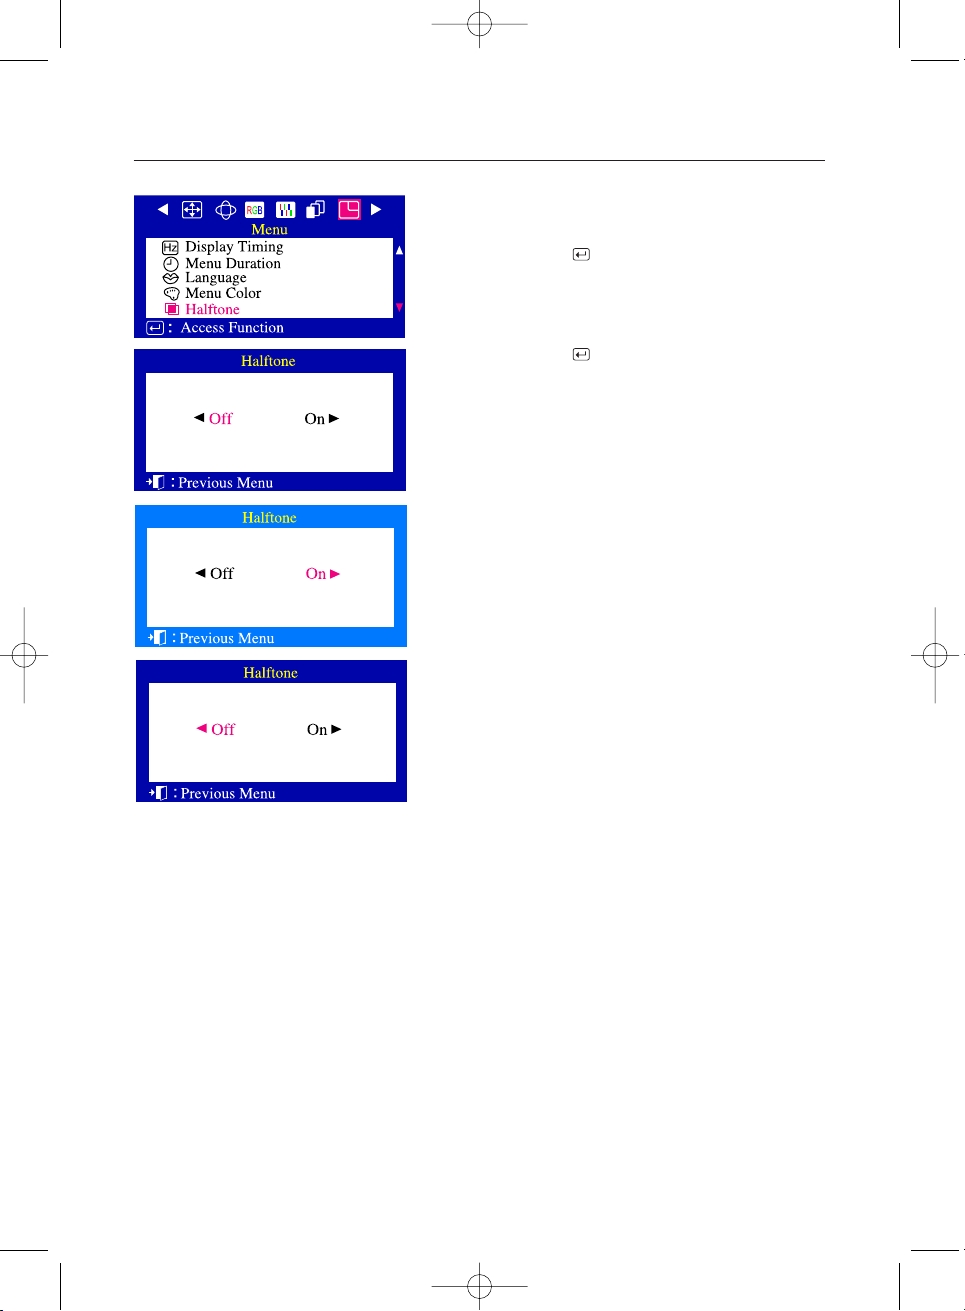
Halftone (SyncMaster 765MB)
Duøng chöùc naêng naøy ñeå xem hình aûnh trong suoát treân
maøn hình.
1 AÁn phím Muïc Luïc ( ).
2 AÁn phím hoaëc tôùi khi maøn hình Menu hieån thò. AÁn phím
hoaëc ñeå choïn muïc Halftone.
3 AÁn phím Muïc Luïc ( ) ñeå vaøo maøn hình Halftone.
4 Duøng nuùt hoaëc nuùt ñeå choïn baät hoaëc taét.
765mb-955mb-VE-new.qxd 1/27/2003 3:44 PM Page 15
Page 17
Söû Duïng Maøn Hình
16
Cacù Phím Ñieuà Chænh
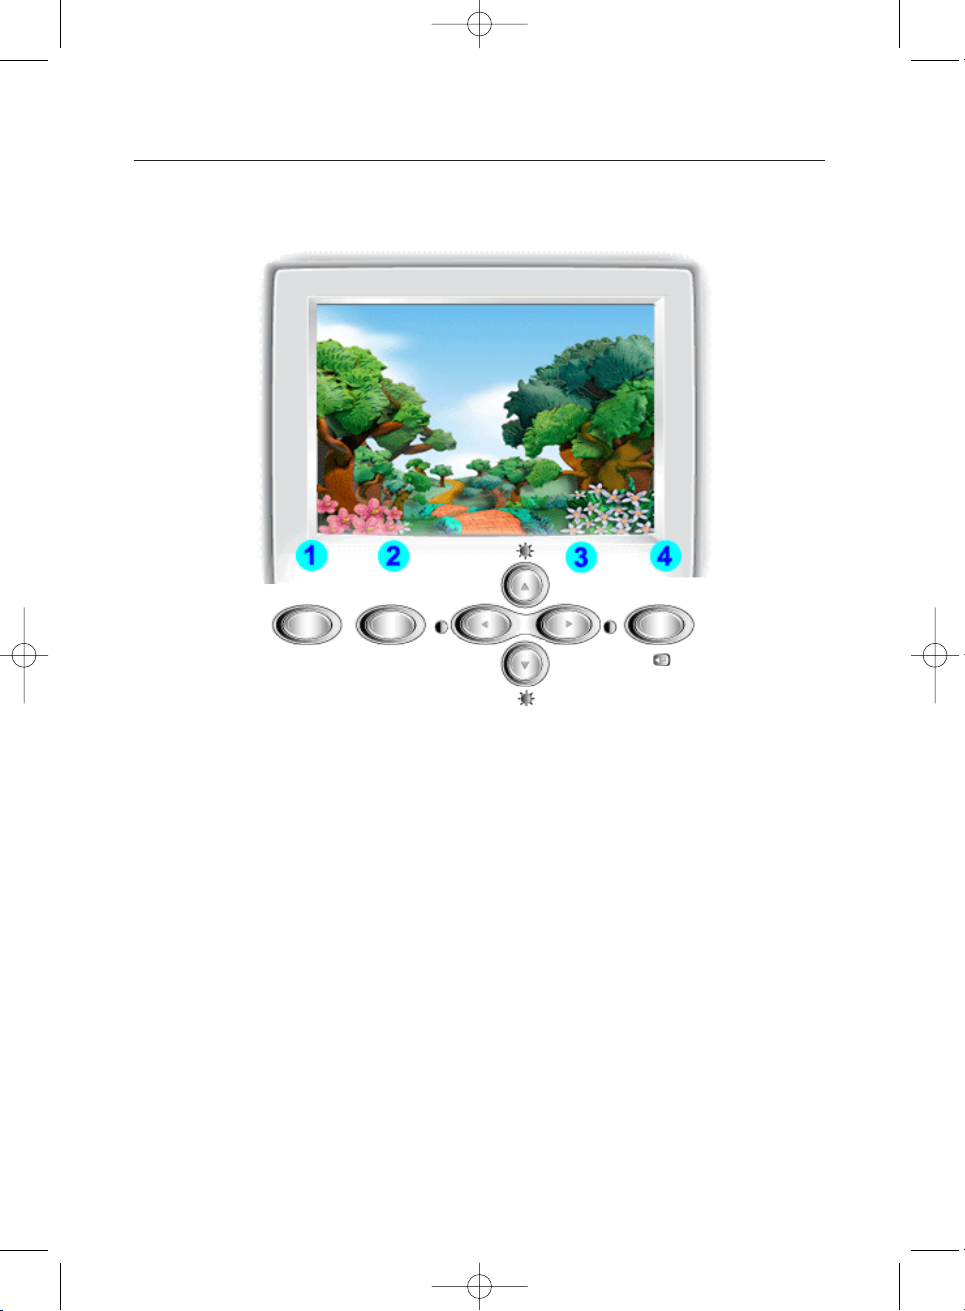
Chöùc naêng Highlight ñöôïc thieát keá duøng ñeå di chuyeån hình aûnh, do ñoù xin vui
loøng söû duïng chöùc naêng naøy ôû cheá ñoä maøn hình di chuyeån hình aûnh.
Highlight MagicBright
Exit
Menu
765mb-955mb-VE-new.qxd 1/27/2003 3:44 PM Page 16
Page 18
Söû Duïng Maøn Hình
17
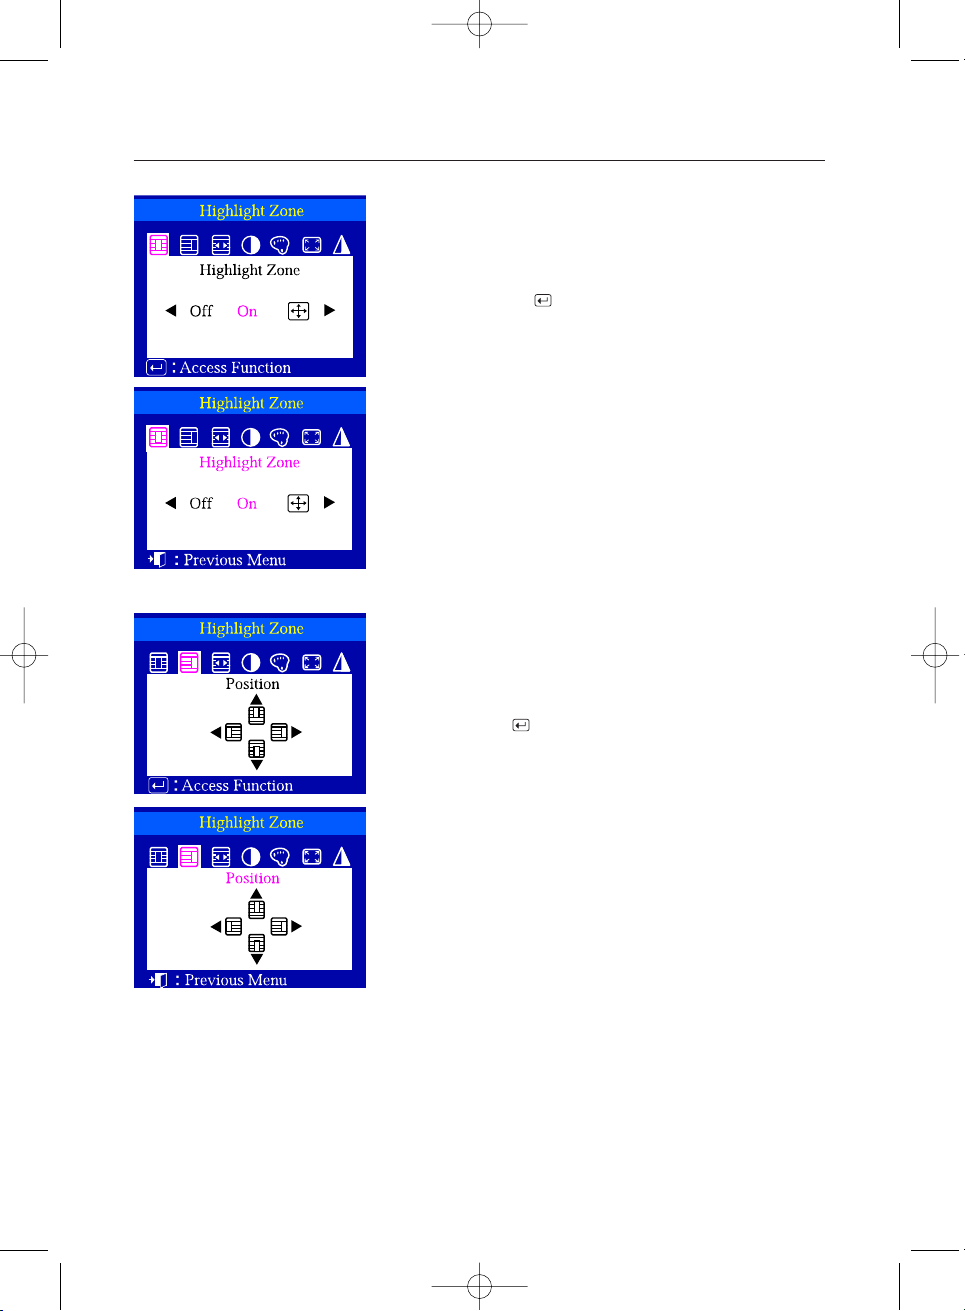
1 AÁn phím Highlight.
2 AÁn phím Muïc Luïc ( ).
3 AÁn phím hoaëc ñeå boû qua,kích hoaït hay phoùng to toaøn boä
maøn hình.
Vuøng Saùng( Highlight Zone)
Chöùc naêng naøy duøng kích hoaït hay boû qua chöùc naêng
Highlight Zone.
Vò Trí( Position )
1 AÁn phím Highlight.
2 AÁn phím hoaëc ñeå choïn maøn hình Position vaø sau ñoù aán
phím Muïc Luïc ( ).
3 AÁn phím hoaëc ñeå di chuyeån vò trí cuûa vuøng saùng theo
chieàu ngang, aán phím hoaëc ñeå di chuyeån vò trí cuûa vuøng
saùng theo chieàu doïc.
Chöùc naêng naøy duøng di chuyeån vuøng saùng theo chieàu ngang hay
chieàu doïc.
765mb-955mb-VE-new.qxd 1/27/2003 3:44 PM Page 17
Page 19
18
Söû Duïng Maøn Hình
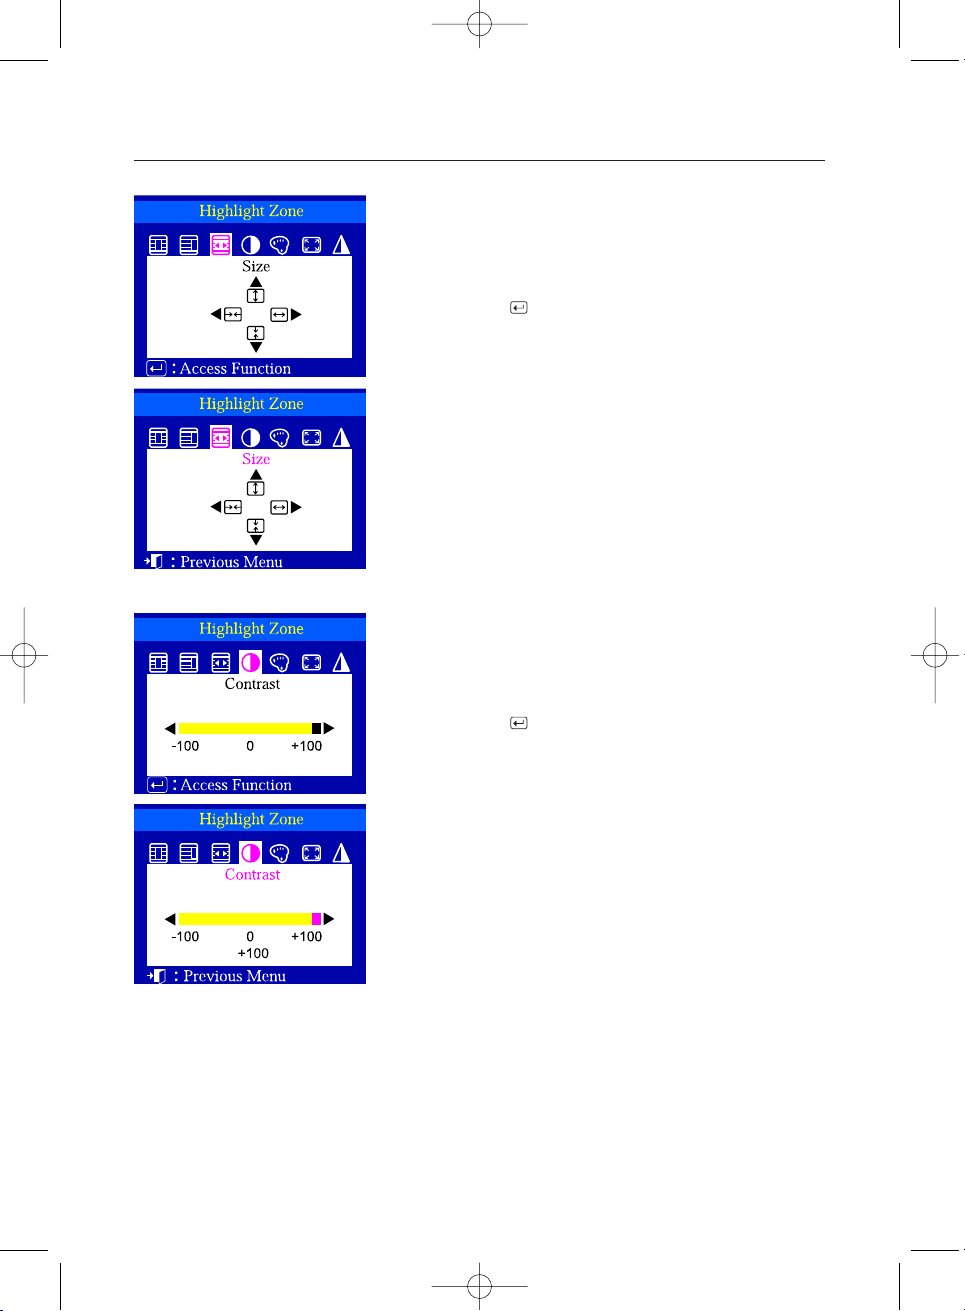
Kích côõ( Size )
Ñoä Töông Phaûn( Contrast )
1 AÁn phím Highlight.
2 AÁn phím hoaëc ñeå choïn maøn hình Size vaø sau ñoù aán
phím Muïc Luïc ( ).
3 AÁn phím hoaëc ñeå chænh kích thöôùc khung saùng theo
chieàu ngang. AÁn phím hoaëc ñeå chænh kích thöôùc khung
saùng theo chieàu doïc.
Chöùc naêng naøy duøng chænh kích thöôùc cuûa vuøng saùng treân maøn
hình.
1 AÁn phím Highlight.
2 AÁn phím hoaëc ñeå choïn maøn hình Contrast vaø sau ñoù aán
phím Muïc Luïc ( ).
3 AÁn phím hoaëc ñeå chænh ñoä töông phaûn cuûa khung saùng.
Chöùc naêng naøy duøng chænh ñoä töông phaûn cuûa khung saùng.
765mb-955mb-VE-new.qxd 1/27/2003 3:44 PM Page 18
Page 20
Söû Duïng Maøn Hình
19
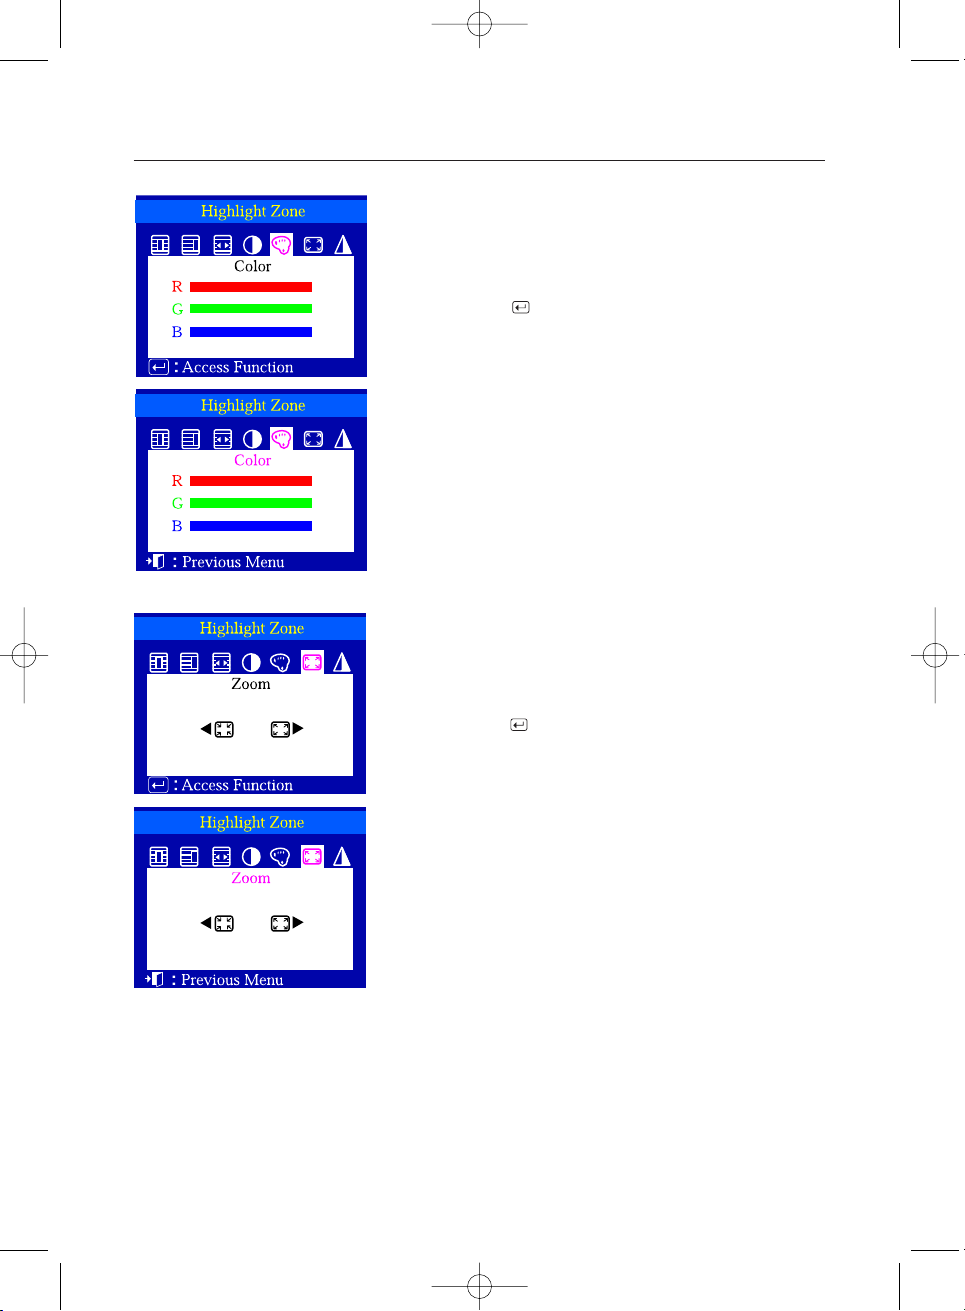
Maøu ( Color )
Phoùng AÛnh (Zoom)
1 AÁn phím Highlight.
2 AÁn phím hoaëc ñeå choïn maøn hình Color vaø sau ñoù aán
phím Muïc Luïc ( ).
3 AÁn phím hoaëc ñeå choïn maøu R,G hoaëcB.
AÁn phím hoaëc ñeå chænh maøu cuûa R,G hoaëc B.
Chöùc naêng naøy duøng chænh maøu cuûa vuøng saùng treân maøn hình.
1 1 AÁn phím Highlight.
2 AÁn phím hoaëc ñeå choïn maøn hình Zoom vaø sau ñoù aán
phím Muïc Luïc ( ).
3 AÁn phím hoaëc ñeå phoùng to hay thu nhoû vuøng hieån thò
khung saùng.
Chöùc naêng naøy duøng phoùng to hay thu nhoû khung saùng.
765mb-955mb-VE-new.qxd 1/27/2003 3:44 PM Page 19
Page 21
Söû Duïng Maøn Hình
20
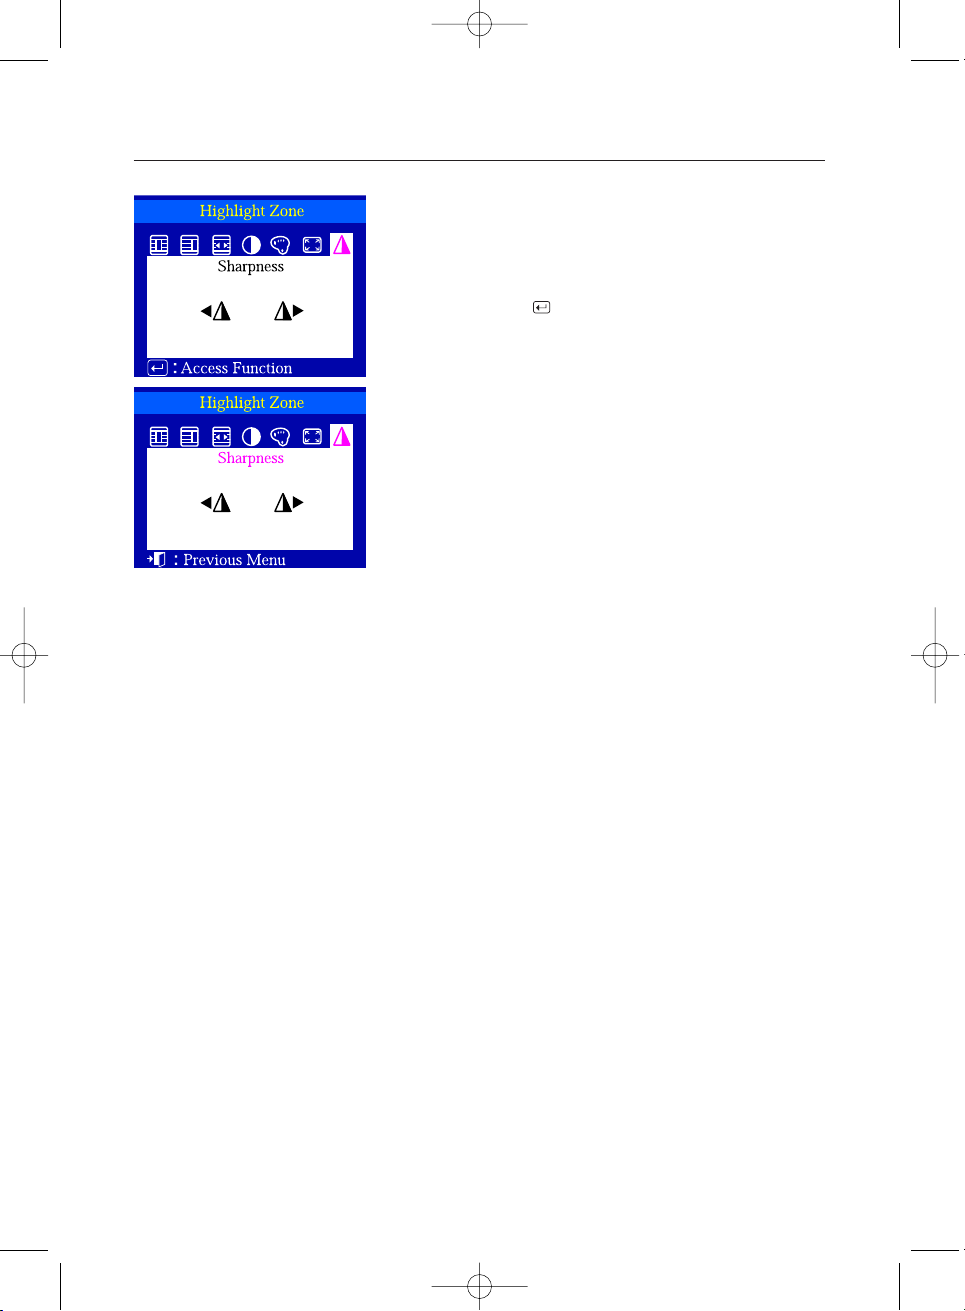
Ñoä neùt( Sharpness )
1 AÁn phím Highlight.
2 AÁn phím hoaëc ñeå choïn maøn hình Sharpness vaø sau ñoù
aán phím Muïc Luïc ( ).
3 AÁn phím hoaëc ñeå chænh ñoä neùt cuûa khung saùng.
Chöùc naêng naøy duøng chænh maøu cuûa vuøng saùng treân maøn hình.
765mb-955mb-VE-new.qxd 1/27/2003 3:44 PM Page 20
Page 22
Tieát Kieäm Naêng Löôïng
21
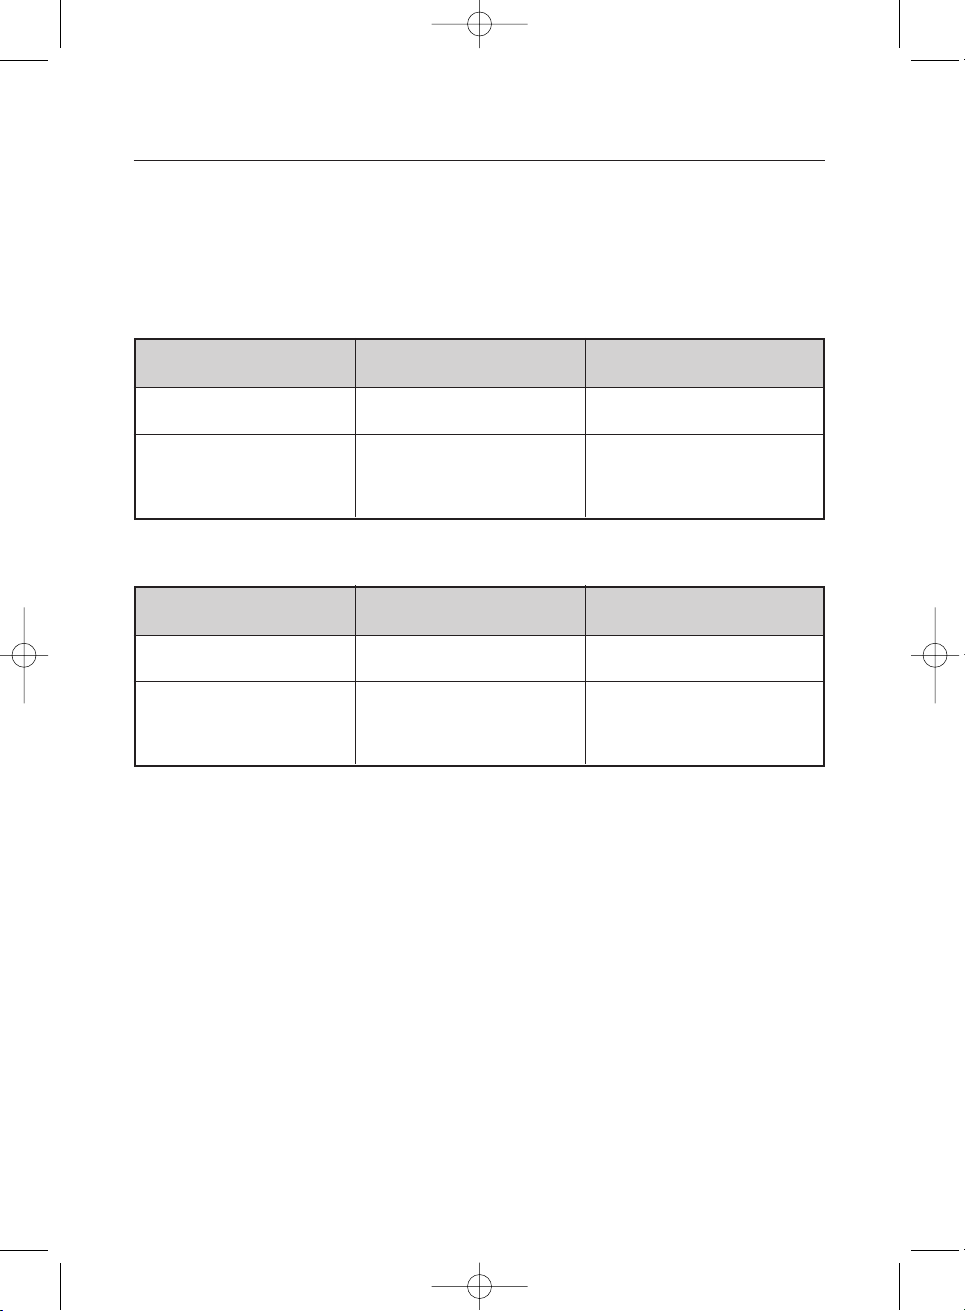
Maøn hình Vi tính ñöôïc xaây döïng heä thoáng quaûn lyù naêng löôïng goïi laø möùc naêng löôïng thaáp. Cheá ñoä naøy
seõ ñöa maùy veà cheá ñoä tieát kieäm naêng löôïng khi maùy khoâng duøng trong moät khoaûng thôøi gian. Khi baïn di
chuyeån chuoät hay aán baát kyø phím naøo treân baøn phím, maøn hình seõ hoaït ñoäng laïi bình thöôøng. Baïn neân
taét haún khi khoâng söû duïng trong moät thôøi gian daøi hoaëc khi vaéng nhaø.
Cheá ñoä tieát kieäm naêng löôïng chæ hoaït ñoäng khi maùy tính cuûa baïn töông thích chuaån VESA DPMS.
Tình traïng
Bình thöôøng
Tieát kieäm naêng löôïng
(EPA/ENERGY 2000)
Ñeøn chæ thò
Möùc tieâu thuï
83W (lôùn nhaát)
90W (bình thöôøng)
Ít hôn 2,6W
Xanh Ñeøn xanh nhaáp nhaùy
SyncMaster 765MB
Tình traïng
Bình thöôøng
Tieát kieäm naêng löôïng
(EPA/ENERGY 2000)
Ñeøn chæ thò
Möùc tieâu thuï
110W (lôùn nhaát)
100W (bình thöôøng)
Ít hôn 2W
Xanh Ñeøn xanh nhaáp nhaùy
SyncMaster 955MB
765mb-955mb-VE-new.qxd 1/27/2003 3:44 PM Page 21
Page 23
Giaûi Quyeát Söï Coá
22
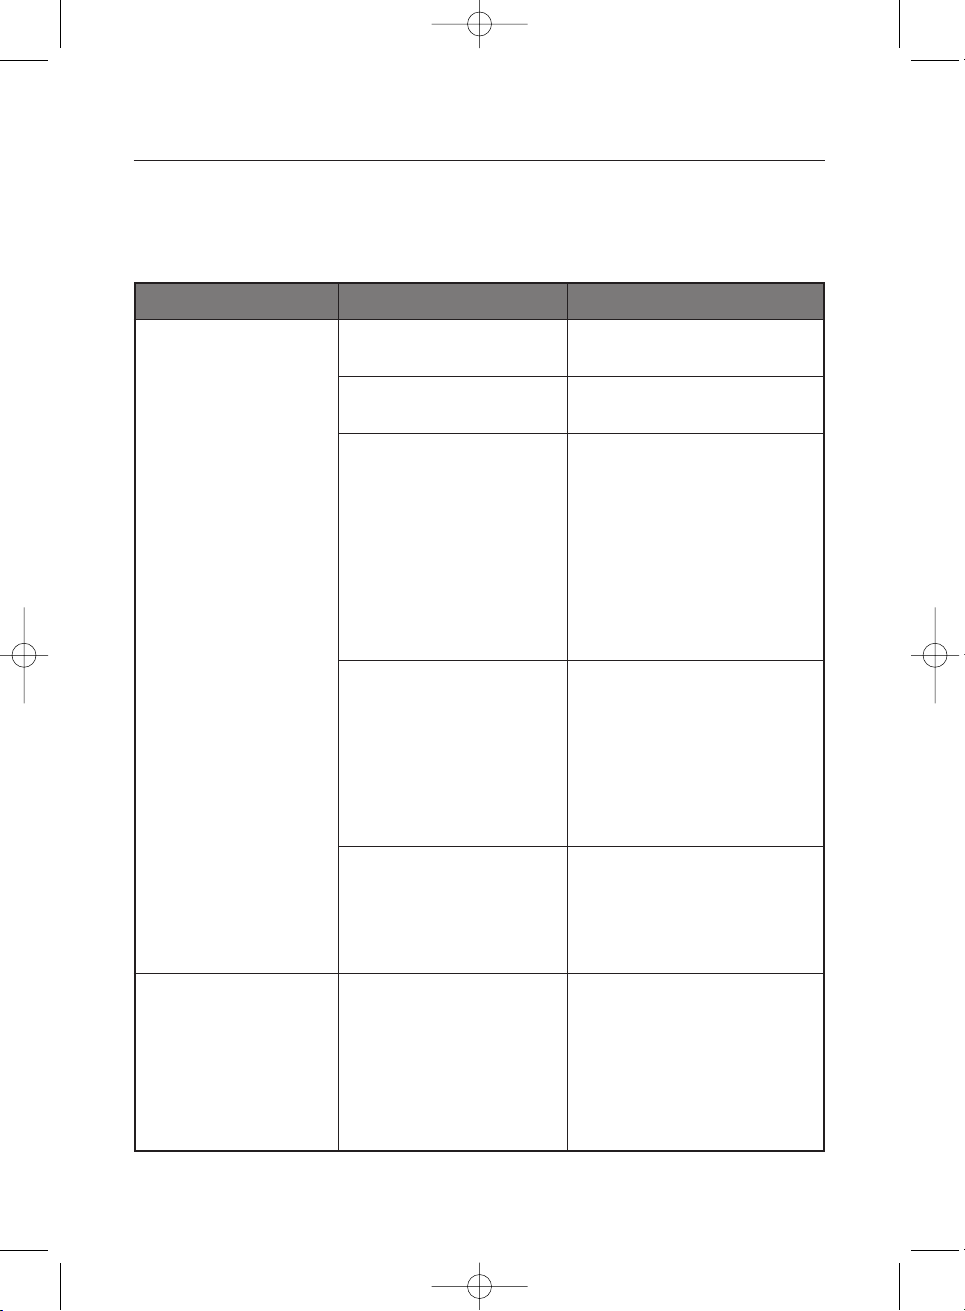
Tröôùc khi lieân heä vôùi traïm baûo haønh, kieåm tra caùc vaán ñeà neâu döôùi ñaây. Neáu baïn caàn söï trôï giuùp vui loøng
lieân laïc vôùi traïm baûo haønh gaàn nhaát.
Mucï kiemå tra
Hieän Töôïng Muïc Kieåm Tra Höôùng Giaûi Quyeát
Khoâng coù hình aûnh. Maøn
hình khoâng coù nguoàn.
Khoâng chænh ñöôïc maøn
hình hieån thò.
Daây nguoàn ñaõ ñöôïc keát noái? Kieåm tra traïng thaùi keát noái cuûa daây
nguoàn vaø nguoàn cung caáp.
Maøn hình coù hieån thò doøng chöõ
“ No Connection, Check Signal
Cable ” ?
Kieåm tra tình traïng keát noái cuûa daây tín
hieäu.
Neáu nguoàn ôû traïng thaùi môû, khôûi
ñoäng maùy ñeå vaøo maøn hình ñaàu
tieân maø baïn coù theå nhìn thaáy
ñöôïc.
Khi maøn ñaàu tieân hieån thò, khôûi ñoäng maùy
ôû cheá ñoä thích hôïp( cheá ñoä safe mode
ñoái vôùi Windows 95,98). Sau ñoù thay ñoåi
taàn soá cuûa card maøn hình.
Ghi chuù: Neáu baïn khoâng theå vaøo maøn
hình ñaàu tieân, vui loøng lieân laïc vôùi trung
taâm baûo haønh hoaëc ngöôøi baùn.
Maøn hình hieån thò doøng chöõ:
“ Sync. Out of Range ” ?
Treân maøn hình seõ xuaát hieän doøng kyù töï
naøy khi tín hieäu töø card maøn hình vöôït
quaù ñoä phaân giaûi vaø taàn soá queùt lôùn nhaát
cuûa maøn hình. Chænh ñoä phaân giaûi vaø taàn
soá queùt naèm trong möùc cho pheùp cuûa
maøn hình.
Maøn hình khoâng coù hình aûnh.
Ñeøn chæ thò nguoàn nhaáp nhaùy?
Maøn hình ñang ôû cheá ñoä tieát kieäm naêng
löôïng? AÁn baát kyø phím naøo treân baøn
phím hoaëc di chuyeån chuoät ñeå kích hoaït
maøn hình.
Maøn hình hieån thò (OSD) coù bò
khoùa daãn tôùi khoâng theå chænh
maøn hình hieån thò ?
Môû khoùa maøn hình hieån thò (OSD) baèng
caùch aán giöõ phím muïc luïc hôn 10 giaây.
765mb-955mb-VE-new.qxd 1/27/2003 3:44 PM Page 22
Page 24
Giaûi Quyeát Söï Coá
23
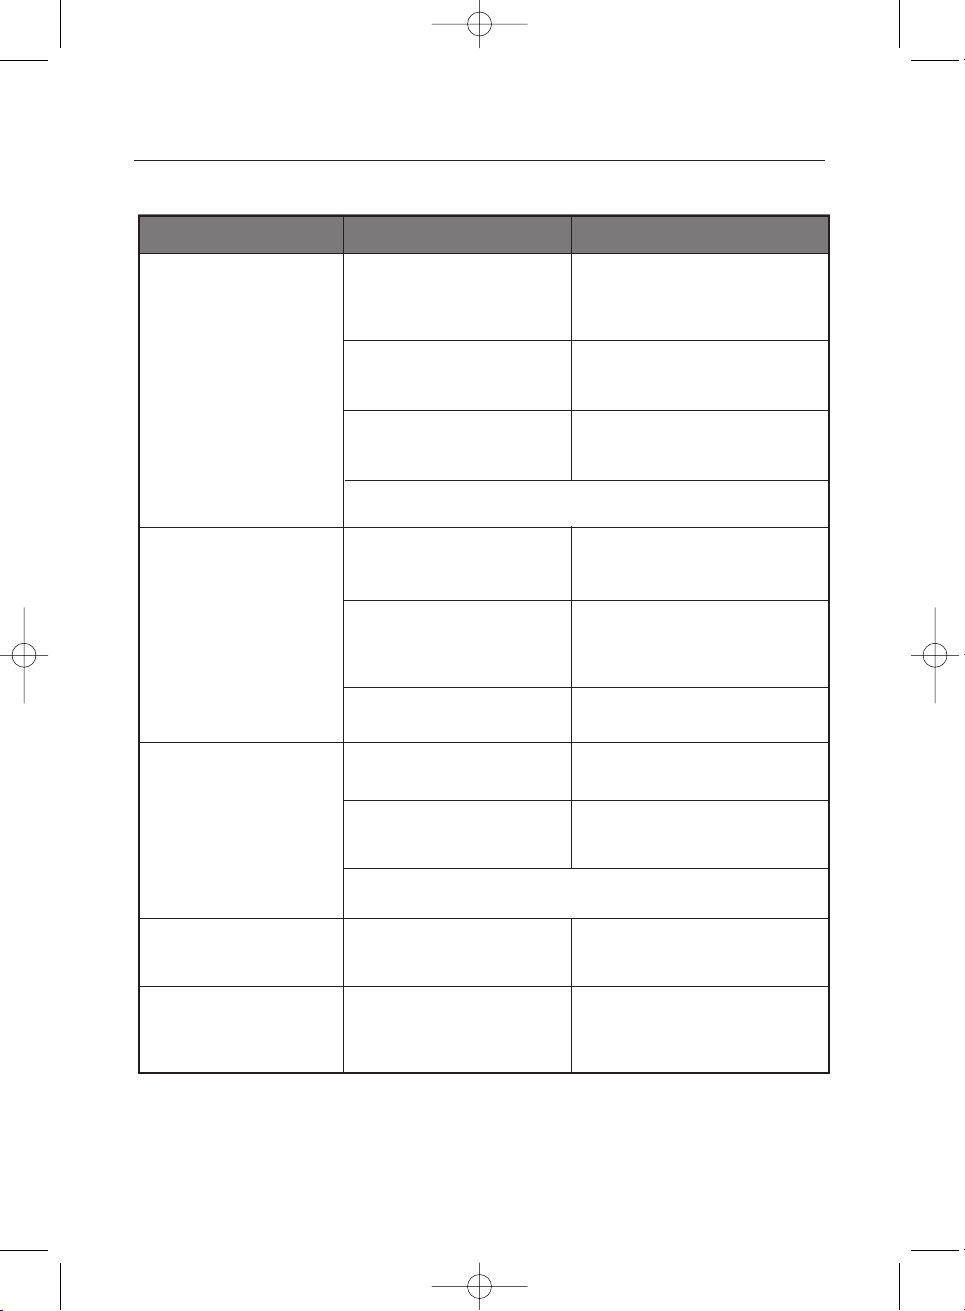
Mucï kiemå tra
Hieän Töôïng Muïc Kieåm Tra Höôùng Giaûi Quyeát
Maøu cuûa maøn hình khoâng
ñuùng hoaëc maøn hình chæ
hieån thò traéng ñen.
Hình aûnh treân maøn hình
bò rung.
Maøn hình ñoät nhieân maát
caân baèng.
Coù phaûi maøn hình chæ hieån thò
moät maøu gioáng nhö ta nhìn maøn
hình xuyeân qua giaáy boùng kính?
Kieåm tra caáu hình cuûa maøn hình
ñeå xem coù ôû cheá ñoä töông thích
( Cheá ñoä töông thích: Taàn soá
doïc : 43Hz, 87Hz(i)...)
Tín hieäu cuûa card maøn hình vöôït quaù
ñoä phaân giaûi vaø taàn soá queùt lôùn nhaát
cuûa maøn hình.
Kieåm tra xem coù caùc vaät naøo gaây töø
tính( cuïc bieán ñieän, loa, daây cao theá...)
Naèm gaàn maøn hình hay khoâng?
Di chuyeån maøn hình traùnh xa caùc vaät taïo
ra töø tröôøng.
Nguoàn ñieän coù oån ñònh?
Hình aûnh treân maøn hình cuõng coù theå bò rung vaø xoïc khi card maøn hình
vaø baûn maïch chính cuûa maùy tính coù vaán ñeà.
Maøn hình coù theå maát caân baèng do chu kyø cuûa tín hieäu card maøn hình.
Chænh laïi vò trí cuûa maøn hình hieån thò trong OSD
Hình aûnh treân maøn hình coù theå bò rung
vaø xoïc hình neáu nguoàn cung caáp quaù
thaáp
Maøn hình xuaát hieän maøu laï sau
khi chaïy moät chöông trình hay
chuyeån qua laïi giöõa hai cöûa soå
maøn hình.
Kieåm tra tình traïng keát noái daây tín ieäu.
Kieåm tra card maøn hình ñaõ ñöôïc caém
chuaån.
Khôûi ñoäng laïi maùy tính.
Card maøn hình ñaõ ñöôïc caøi ñaët
ñuùng?
Caøi ñaët laïi card maøn hình.
Baïn coù thay ñoåi card maøn hình
hoaëc phaàn meàm caøi ñaët?
Chænh vò trí, kích thöôùc cöûa soå maøn hình
baèng caùch söû duïng maøn hình hieån thò.
Baïn coù ñieàu chænh ñoä phaân giaûi
vaø taàn soá queùt cuûa maøn hình?
Ñieàu chænh ñoä phaân giaûi vaø taàn soá queùt
cuûa card maøn hình.
Maøn hình ñoät nhieân maát
caân baèng.
Baïn coù thay ñoåi card maøn hình
hoaëc phaàn meàm caøi ñaët?
Chænh vò trí, kích thöôùc cöûa soå maøn hình
baèng caùch söû duïng maøn hình hieån thò.
Maøn hình bò maøu loang loã. Kieåm tra xem coù caùc vaät gaây töø
tröôøng (cuïc bieán ñieän, loa...) ñaët
gaàn maøn hình hay khoâng?
Vaøo muïc Degauss trong maøn hình OSD.
Ñaët maøn hình traùnh xa caùc vaät gaây töø
tröôøng.
765mb-955mb-VE-new.qxd 1/27/2003 3:44 PM Page 23
Page 25
Giaûi Quyeát Söï Coá
24
Mucï kiemå tra
Hieän Töôïng Muïc Kieåm Tra Höôùng Giaûi Quyeát
Ñeøn chæ thò nhaáp nhaùy
nhöng khoâng coù hình aûnh
hieån thò treân maøn hình.
Vaøo muïc Display Timing xem
baïn ñaõ ñieàu chænh ñuùng taàn soá?
Chænh laïi taàn soá cuûa card maøn hình vaø
ñaët laïi cheá ñoä hieån thò.
(Taàn soá queùt treân ñoä phaân giaûi laø khaùc
nhau theo moãi saûn phaåm)
Chæ coù 16 maøu hieån thò
treân maøn hình. Maøu cuûa
maøn hình bò thay ñoåi sau
khi thay ñoåi card maøn
hình.
Cheá ñoä maøu trong Windows ñaõ
ñöôïc caøi ñaët ñuùng?
Ñoái vôùi Windows ME/XP/2000:
Trong Windows, vaøo muïc : Control
Panel --> Display --> Settings ñeå caøi
ñaët laïi cheá ñoä maøu.
Treân maøn hình hieån thò
doøng kyù töï :
“Unrecognized monitor,
Plug & Play (VESA DDC)
monitor found”.
Kieåm tra caùc muïc döôùi ñaây xem coù vaán ñeà hay khoâng:
1. Kieåm tra xem daây nguoàn vaø daây tín hieäu keát noái vôùi maùy tính coù chính xaùc chöa.
2. Kieåm tra xem maùy tính coù phaùt ra maùy tính coù phaùt ra tieáng keâu 03 laàn.
( Neáu maùy phaùt ra tieáng keâu, vui loøng kieåm tra laïi maïch ñieän chính cuûa maùy tính).
3. Neáu baïn laép ñaët card maøn hình môùi hoaëc laép môùi maùy tính. Baïn phaûi caøi ñaët chöông trình chaïy cho
tín hieäu hình cuûa card maøn hình vaø maøn hình.
4. Kieåm tra taàn soá maøn hình ñöôïc caøi ñaët ôû möùc 75Hz hay 85Hz.
( Khoâng caøi ñaët vöôït quaù 60Hz khi ñoä phaân giaûi ôû möùc lôùn nhaát).
5. Khi chöông trình caøi ñaët tính hieäu daãn cuûa card maøn hình, khôûi ñoäng maùy ôû cheá ñoä Safe Mode, loaïi
boû chöông trình vöøa caøi ñaët vaø caøi ñaët laïi chöông trình khaùc.
Chöùc naêng khung saùng( Highlight Zone)
1. Nhaèm baûo veä ñeøn hình khi maøn hình quaù saùng, chöùc naêng khung saùng seõ duy trì trong khoaûng 03
tieáng sau ñoù seõ töï ñoäng ngöng hoaït ñoäng. Ñeå tieáp tuïc söû duïng chöùc naêng naøy baïn phaûi kích hoaït laïi
chöùc naêng naøy.
2. Khi taét chöùc naêng Highlight Zone (Vuøng saùng), baïn khoâng theå choïn baát kyø danh muïc naøo khaùc trong
muïc Highlight Zone.
3. Khi chöùc naêng khung saùng hoaït ñoäng, maøn hình xung quanh khung saùng seõ toái.
4. Tuøy thuoäc vaøo loaïi card maøn hình baïn söû duïng, hieän töôïng maøu bò baõo hoøa seõ xuaát hieän trong khung
saùng. Trong tröôøng hôïp naøy, giaûm ñoä töông phaûn cuûa khung saùng vaø maøu bò baõo hoøa seõ giaûm.
Ghi chuù: Neáu loãi laëp laïi, lieân laïc vôùi trung taâm baûo haønh.
Baïn ñaõ caøi ñaët phaàn meàm caøi
ñaët?
Caøi ñaët theo höôùng daãn cuûa dóa caøi ñaët.
Kieåm tra card maøn hình xem
chöùc naêng Plug & Play(VESA
DDC) ñaõ ñöôïc hoå trôï.
Caøi ñaët theo höôùng daãn cuûa dóa caøi ñaët.
Card maøn hình ñaõ ñöôïc caøi ñaët
ñuùng?
Caøi ñaët laïi card maøn hình.
765mb-955mb-VE-new.qxd 1/27/2003 3:44 PM Page 24
Page 26
Ñaëc Tính Kyõ Thuaät
25
Ñaëc Tính Chung
Ñeøn Hình
Ñoä Phaân Giaûi Lôùn Nhaát
Kieåu Maùy SyncMaster 765MB
Loaïi
Goùc Queùt
Kích Thöôùc Ñieåm
Loaïi Maøn Hình
17"(43cm) MagicBright™ (40,6cm viewable)
90 °
0,20mm (Ngang)
Aluminized tri-color phosphor dot trio with black matrix.
Anti-doming invar shadow mask.
Multi-layer coated with anti-static.
1600 Ñieåm, 1200 Doøng @65Hz
30 ~ 85 kHz
50 ~ 160 Hz
312 ± 4 mm
234 ± 4 mm
Hieån Thò
Ngang
Doïc
Taàn Soá Queùt
Ngang
Doïc
Tín Hieäu Vaøo
Tín Hieäu Hình
Tín Hieäu Ñoàng Boä
RGB, Analog 0,7 Vpp positive at 75 ohms
Separate H/V sync, TTL level, positive or negative
Hieån Thò Maøu
Khoâng Giôùi Haïn
Xung Clock Cöïc Ñaïi
185MHz
Nguoàn Ñieän Caáp
AC 90 ~ 264 VAC rms, 60/50 Hz ± 3Hz
Power Consumption
90W (Lôùn nhaát), 83W (Bình thöôøng)
Kích Thöôùc (WxDxH)
398 x 412 x 400mm (Coù chaân ñeá)
Troïng Löôïng
16kg
Khi Maùy Hoaït Ñoäng
Khi Löu Giöõ
Maøn hình ñöôïc caøi ñaët cheá ñoä Plug & Play. Söï töông thích giöõa maøn hình vaø maùy tính seõ cung caáp
ñieàu kieän hoaït ñoäng vaø caøi ñaët toát nhaát. Trong tröôøng hôïp toát nhaát quaù trình caøi ñaët seõ töï ñoäng, tröø
phi, ngöôøi söû duïng muoán caøi ñaët tuaàn töï.
Nhieät ñoä: 32°F ~ 104°F(0°C ~ 40°C)
Ñoä aåm 10% ~ 80%, khoâng taäp trung.
Nhieät ñoä: -4°F ~113°F (-20°C ~ 45°C)
Ñoä aåm 5% ~ 95%, khoâng taäp trung.
Moâi Tröôøng
Cheá Ñoä Plug & Play
Ghi chuù: Kieåu daùng vaø ñaëc tính kyõ thuaät coù theå thay ñoåi maø khoâng caàn phaûi baùo tröôùc.
SyncMaster 765MB
765mb-955mb-VE-new.qxd 1/27/2003 3:44 PM Page 25
Page 27
26
Ñaëc Tính Kyõ Thuaät
Ñaëc Tính Chung
Ñeøn Hình
Ñoä Phaân Giaûi Lôùn Nhaát
Kieåu Maùy SyncMaster 955MB
Loaïi
Goùc Queùt
Kích Thöôùc Ñieåm
Loaïi Maøn Hình
19"(48cm) MagicBright™ (45,8cm viewable)
90 °
0,20mm (Ngang)
Aluminized tri-color phosphor dot trio with black matrix.
Anti-doming invar shadow mask.
Multi-layer coated with anti-static.
1600 Ñieåm, 1200 Doøng @68Hz
30 ~ 85 kHz
50 ~ 160 Hz
352 ± 3 mm
264 ± 3 mm
Hieån Thò
Ngang
Doïc
Taàn Soá Queùt
Ngang
Doïc
Tín Hieäu Vaøo
Tín Hieäu Hình
Tín Hieäu Ñoàng Boä
RGB, Analog 0,7 Vpp positive at 75 ohms
Separate H/V sync, TTL level, positive or negative
Hieån Thò Maøu
Khoâng Giôùi Haïn
Xung Clock Cöïc Ñaïi
185MHz
Nguoàn Ñieän Caáp
AC 90 ~ 264 VAC rms, 60/50 Hz ± 3Hz
Power Consumption
110W (Lôùn nhaát), 100W (Bình thöôøng)
Kích Thöôùc (WxDxH)
440 x 460 x 461mm (Coù chaân ñeá)
Troïng Löôïng
21,0kg
Khi Maùy Hoaït Ñoäng
Khi Löu Giöõ
Maøn hình ñöôïc caøi ñaët cheá ñoä Plug & Play. Söï töông thích giöõa maøn hình vaø maùy tính seõ cung caáp
ñieàu kieän hoaït ñoäng vaø caøi ñaët toát nhaát. Trong tröôøng hôïp toát nhaát quaù trình caøi ñaët seõ töï ñoäng, tröø
phi, ngöôøi söû duïng muoán caøi ñaët tuaàn töï.
Nhieät ñoä: 32°F ~ 104°F(0°C ~ 40°C)
Ñoä aåm 10% ~ 80%, khoâng taäp trung.
Nhieät ñoä: -4°F ~113°F (-20°C ~ 45°C)
Ñoä aåm 5% ~ 95%, khoâng taäp trung.
Moâi Tröôøng
Cheá Ñoä Plug & Play
Ghi chuù: Kieåu daùng vaø ñaëc tính kyõ thuaät coù theå thay ñoåi maø khoâng caàn phaûi baùo tröôùc.
SyncMaster 955MB
765mb-955mb-VE-new.qxd 1/27/2003 3:44 PM Page 26
Page 28
27
Cheá Ñoä Hieån Thò
Neáu tín hieäu chuyeån töø maùy tính ôû cheá ñoä hieån thò cho trong baûng döôùi ñaây, maøn hình seõ töï ñoäng ñieàu
chænh. Tuy nhieân, neáu tín hieäu khaùc, maøn hình seõ bò traéng trong khi ñeøn chæ thò vaãn saùng. Chænh card
maøn hình theo baûng thoâng soá döôùi ñaây.
Tanà soá quetù ngang
Thôøi gian queùt töø phaûi sang traùi cuûa chieàu ngang maøn hình goïi laø chu kyø queùt ngang vaø nghòch
ñaûo cuûa chu kyø queùt ngang goïi laø taàn soá queùt. Ñôn vò : kHz
Tanà soá quetù docï
Gioáng nhö ñeøn huyønh quang, maøn hình seõ laäp laïi hình aûnh nhieàu laàn treân 4 giaây ñeå
hieån thò aûnh. Taàn soá cuûa söï laäp laïi naøy ñöôïc goïi laø taàn soá queùt doïc.
Ñôn vò : Hz.
IBM, 640 x 480 31,469 59,940 25,175 -/-
IBM, 720 x 400 31,469 70,087 28,322 -/+
VESA, 640 x 480 43,269 85,008 36,000 -/-
VESA, 800 x 600 46,875 75,000 49,500 +/+
VESA, 800 x 600 53,674 85,061 56,250 +/+
VESA, 1024 x 768 60,023 75,029 78,750 +/+
VESA, 1024 x 768 68,677 84,997 94,500 +/+
VESA, 1280 x 1024 79,976 75,025 135,00 +/+
Sync Polarity
(H/V)
Xung clock
(MHz)
Cheá ñoä hieån thò
Taàn soá queùt
ngang (kHz)
Taàn soá queùt
doïc (Hz)
SyncMaster 765MB
IBM, 640 x 480 31,469 59,940 25,175 -/-
IBM, 720 x 400 31,469 70,087 28,322 -/+
VESA, 640 x 480 37,500 75,000 31,500 -/-
VESA, 640 x 480 43,269 85,008 36,000 -/-
VESA, 800 x 600 53,674 85,061 56,250 +/+
VESA, 1024 x 768 60,023 75,029 78,750 +/+
VESA, 1024 x 768 68,677 84,997 94,500 +/+
VESA, 1280 x 1024 79,976 75,025 135,00 +/+
Sync Polarity
(H/V)
Xung clock
(MHz)
Cheá ñoä hieån thò
Taàn soá queùt
ngang (kHz)
Taàn soá queùt
doïc (Hz)
SyncMaster 955MB
765mb-955mb-VE-new.qxd 1/27/2003 3:44 PM Page 27
Page 29
Memo
765mb-955mb-VE-new.qxd 1/27/2003 3:44 PM Page 28
Page 30
Contents
Safety Instructions
Unpacking Your Monitor
Setting up Your Monitor
Connecting Your Monitor
Self-Test Feature Check
Werning Messages
Environment
Useful Tips
Adjusting Your Monitor
User Controls
Menu Features
MagicBright
User Delete
Brightness/Contrast
Position/Size
Position
Size
Zoom
Geometry
Parallel/Rotation
Pincushion/Trapezoid
Pinbalance
Linearity
9300K/6500K/sRGB
Clear Moire
Advanced
Degauss
Recall
Video Input Level
Menu
Display Timing
Menu Duration
Language
Menu Color
Halftone
Highlight Zone
User Controls
Highlight Zone
Position
Size
Contrast
Color
Zoom
Sharpness
Power Saver
Troubleshooting
Specifications
Display Modes
2
3
4
5
5
5
6
7
7
7
8
8
8
9
9
9
10
10
11
11
11
12
12
13
13
14
15
16
17
17
18
18
19
19
20
21
22
25
27
English
768mb-955mb-en-new.qxd 1/27/2003 5:21 PM Page 1
Page 31
2
Safety Instructions
1. Do not use a damaged or loose plug.
2. Do not pull the plug out by the wire nor touch the plug with wet hands.
3. Use only a properly grounded plug and recepticle.
4. Do not excessively bend the plug and wire nor place heavy objects upon them, which could cause damage.
5. Disconnect the plug from the outlet during storms or lightening or if it is not used for a long period of time.
6. Do not connect too many extension cords or plugs to an outlet.
7. Do not cover the vents on the monitor cabinet.
8. Put your monitor in a location with low humidity and a minimum of dust.
9. Do not drop the monitor when moving it.
10. Place the monitor on a flat and stable surface.
11. Set down the monitor carefully.
12. Do not place the monitor face down on the screen.
13. Do not use the monitor without the monitor stand.
14. Do not spray detergent directly on the monitor.
15. Use the recommended detergent with a smooth cloth.
16. If the connector between the plug and the pin is dusty or dirty, clean it properly with a dry cloth.
17. Do not set a glass of water, chemicals or any small metal objects on the monitor.
18. Do not remove cover(or back). No user serviceable parts inside.
19. If your monitor does not operate normally - in particular, if there are any unusual sounds or
smells coming from it - unplug it immediately and contact an authorized dealer or service center.
20. Do not place any heavy objects on the monitor.
21. For each hour of looking at the monitor, you should let your eyes rest for 5 minutes.
22. Do not use or store inflammable substances near the monitor.
23. Do not try to move the monitor by pulling on the wire or the signal cable.
24. Do not move the monitor right or left by pulling only the wire or the signal cable.
25. Never insert anything metallic into the monitor openings.
26. Keep the monitor away from any magnetic substances.
Caution : Use a recommended detergent only, as other
surfactants containing large amounts of alcohol,
solvent or other strong substances, can discolor or
crack the monitor or damage the coated CDT
768mb-955mb-en-new.qxd 1/27/2003 5:21 PM Page 2
Page 32
3
Unpacking Your Monitor
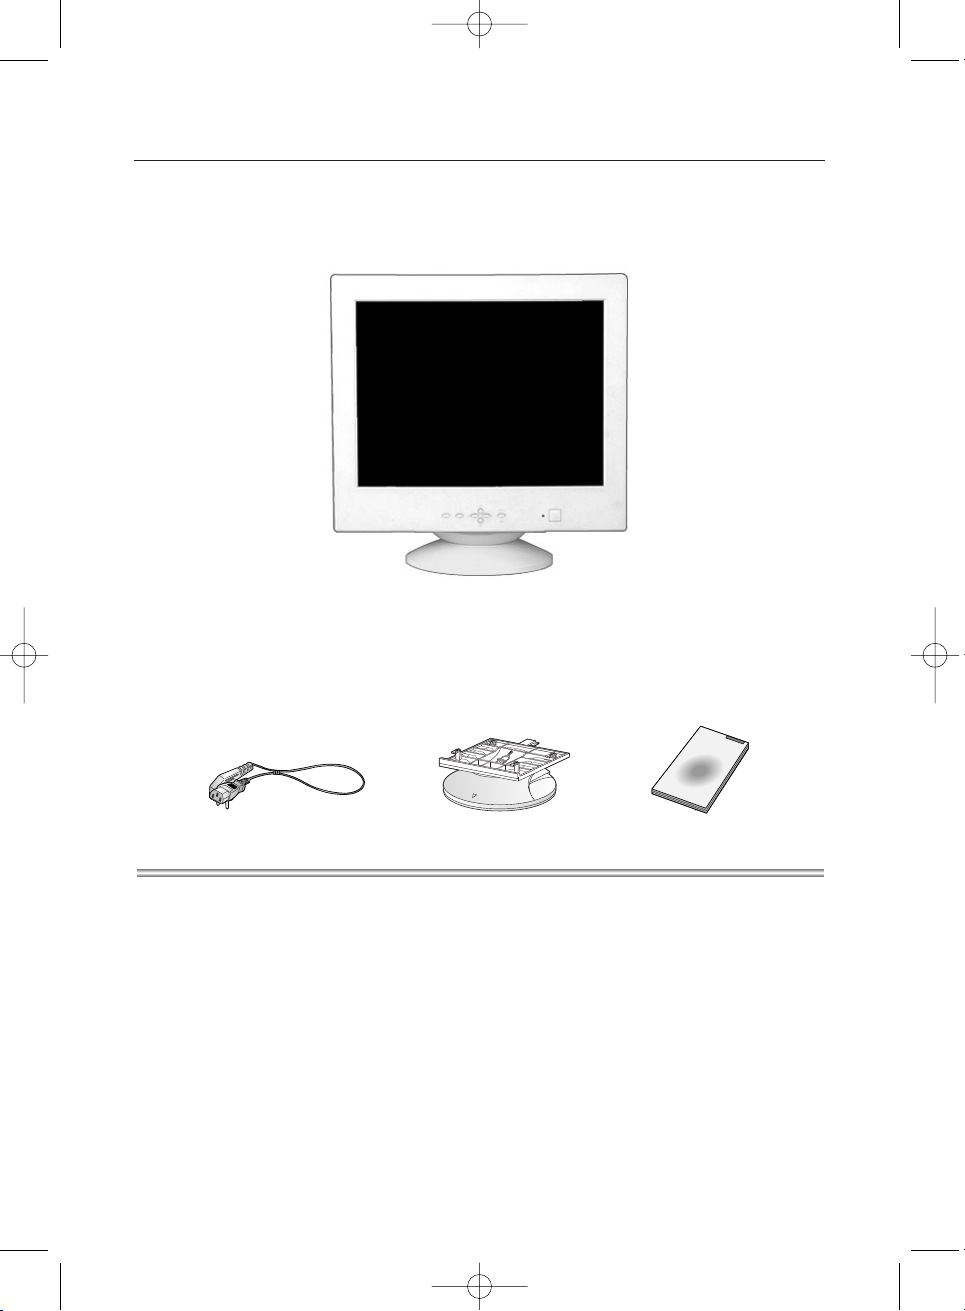
Monitor and Stand
(Some models include a stand attached. )
Please make sure the following items are
included with your monitor. If any items are
missing, contact your dealer.
Power Cord
Stand
User Guide
768mb-955mb-en-new.qxd 1/27/2003 5:21 PM Page 3
Page 33
4
Setting up Your Monitor
Connecting Your Monitor
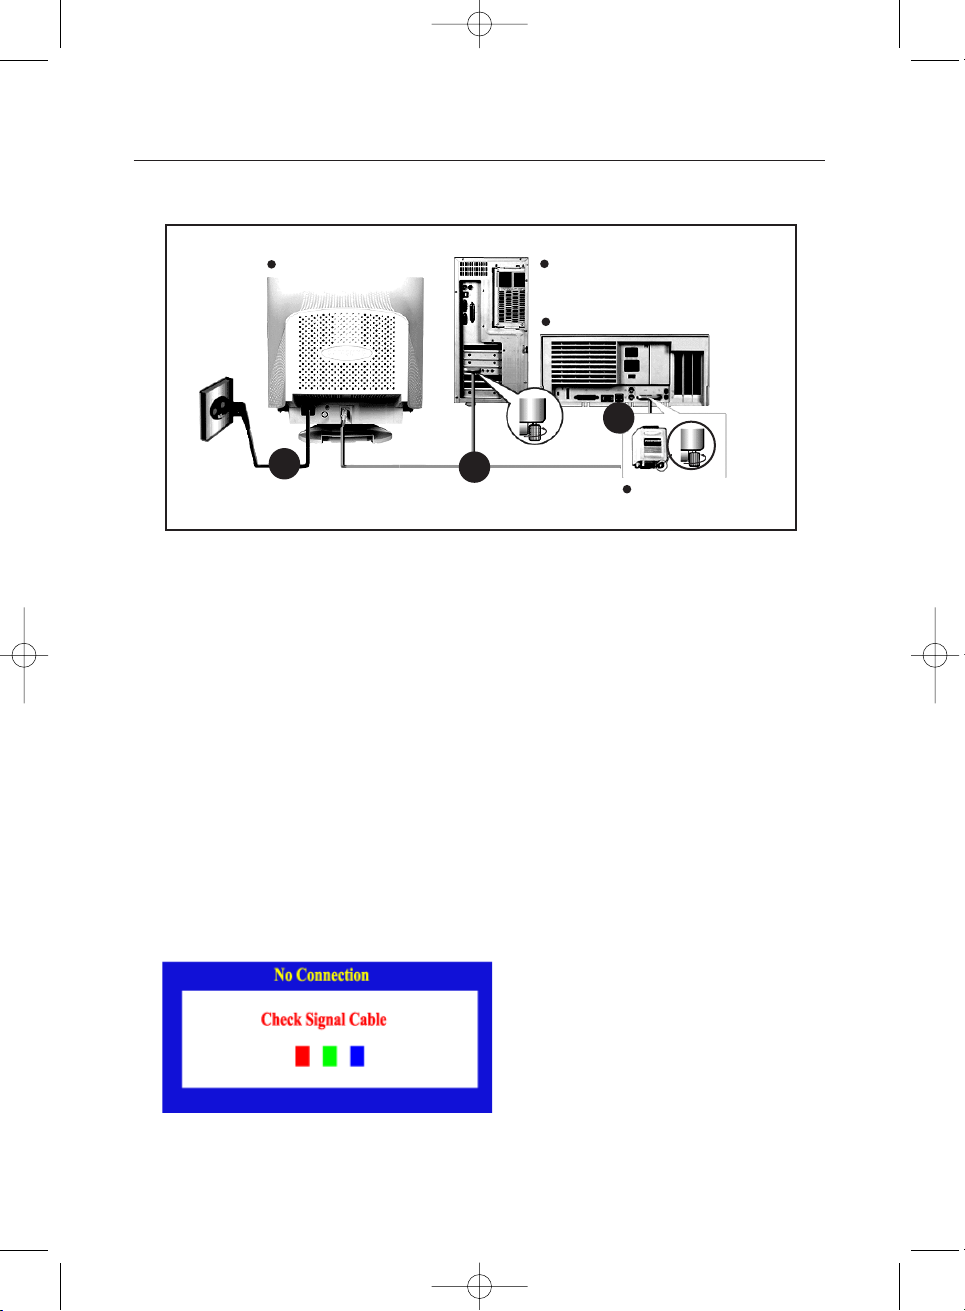
1 Connect the power cord for your monitor to the power port on the back of the monitor.
Plug the power cord for the monitor into a nearby outlet.
2 Connect the end of the signal cable to your computer's video port
(video board, video card or graphics card).
3 If you are using a Macintosh computer, connect the cable to a Macintosh adapter,
and set the pins on your adapter(Adapter not included).
A PC-compatible computer does not need an adapter.
4
Turn on your computer and monitor. If your monitor displays an image, installation is complete.
3
Rear of Computer
Rear of Macintosh
Adapter for Macintosh
(Not included)
Rear of Monitor
1
2
Self-Test Feature Check
1. Turn off both your computer and the monitor.
2. Unplug the video cable from the back of the computer.
3. Turn on the monitor.
If your monitor works normally, the following screen appears.
Failure of any of the boxes to appear indicates a problem with your monitor. This box also appears during
normal operation if the video cable becomes disconnected or damaged.
Your monitor provides a self test feature that allows you to check whether your monitor is
functioning properly.
768mb-955mb-en-new.qxd 1/27/2003 5:21 PM Page 4
Page 34
5
Setting up Your Monitor
Werning Messages
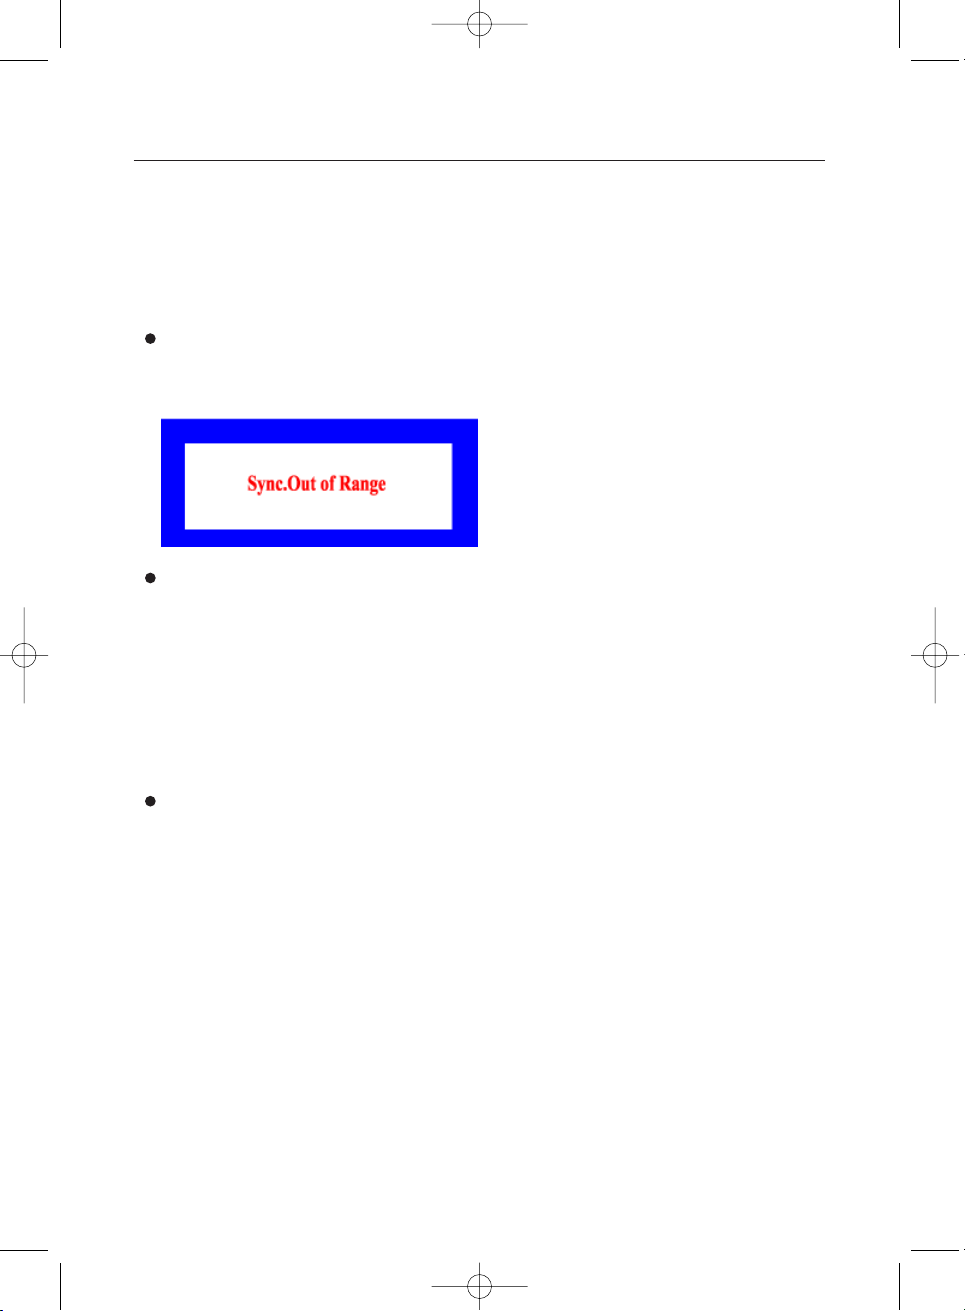
If there is something wrong with the input signal, a message appears on the screen or the screen
goes blank although the power indicator LED is still on. The message may indicate that the
monitor is out of scan range or that you need to check the signal cable.
4. Turn off your monitor and reconnect the video cable; then turn on both your computer and the monitor.
If your monitor screen remains blank after using the previous procedure, check your video controller and
computer system; your monitor is functioning properly.
Environment
The location and the position of the monitor may influence the quality and other features of the monitor.
1. If there are any woofer speakers near the monitor, unplug and relocate the
woofer to another room.
2. Remove all electronic devices such as radios, fans, clocks and telephones that
are within 3 feet (one meter) of the monitor.
3. Degauss the monitor if any devices were removed from the area.
Useful Tips
¶UA monitor recreates visual signals received from the PC. Therefore, if there is trouble with the PC or
the video card, this can cause the monitor to become blank, have poor coloring, noise, Sync. Out of
Range, etc. In this case, first check the source of the problem, and then contact a service center or
your dealer.
¶UJudging the monitor's working condition
If there is no image on the screen or an "Sync. Out of Range" message comes up,
disconnect the cable from the computer while the monitor is still powered on.
°§If there is a message coming up on the screen or if the screen goes white, this means the
monitor is in working condition.
°§In this case, check the computer for trouble.
768mb-955mb-en-new.qxd 1/27/2003 5:21 PM Page 5
Page 35
User Controls
Adjusting Your Monitor
6
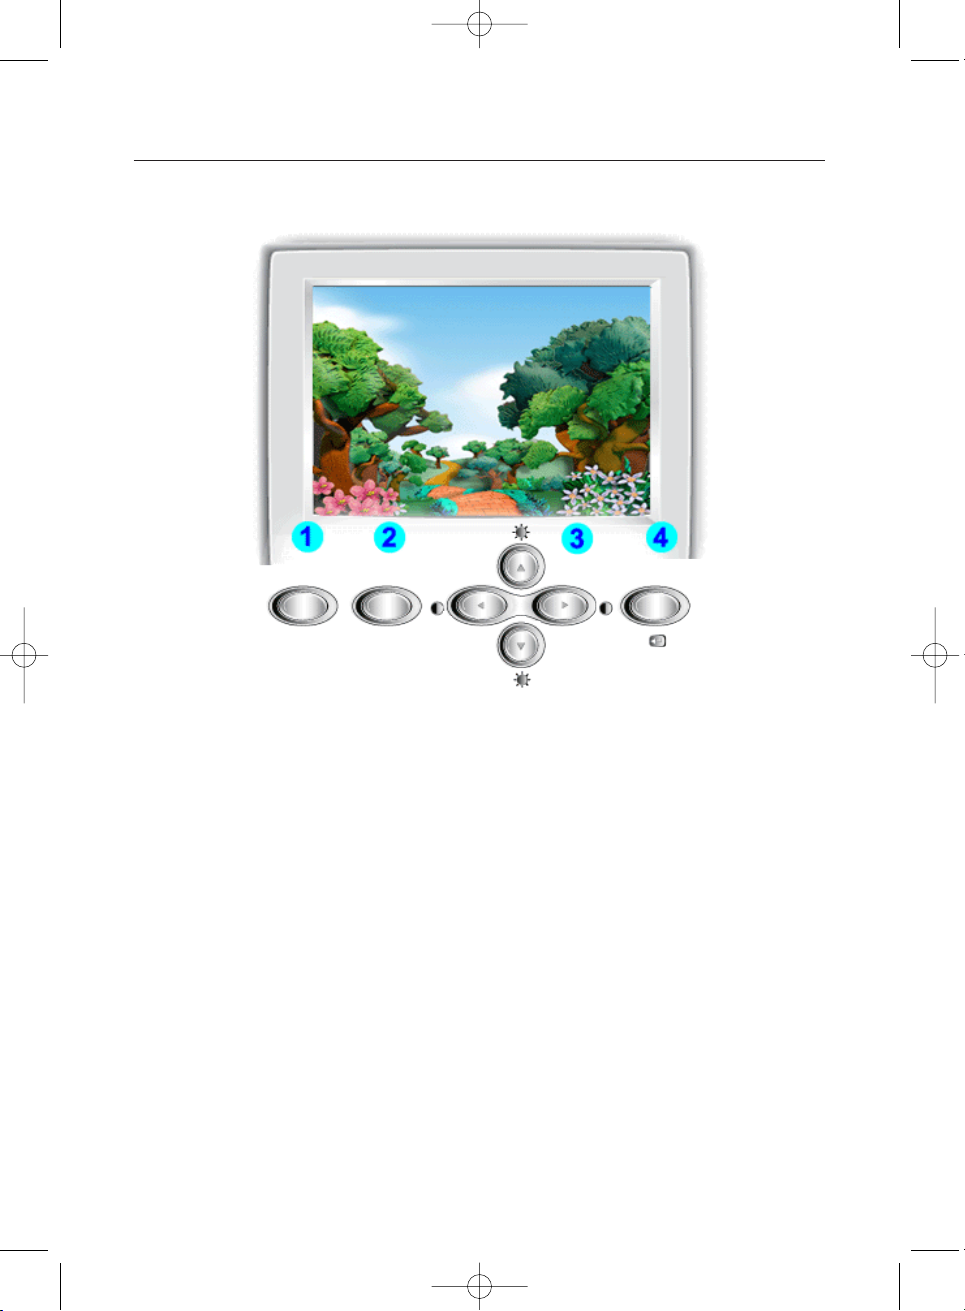
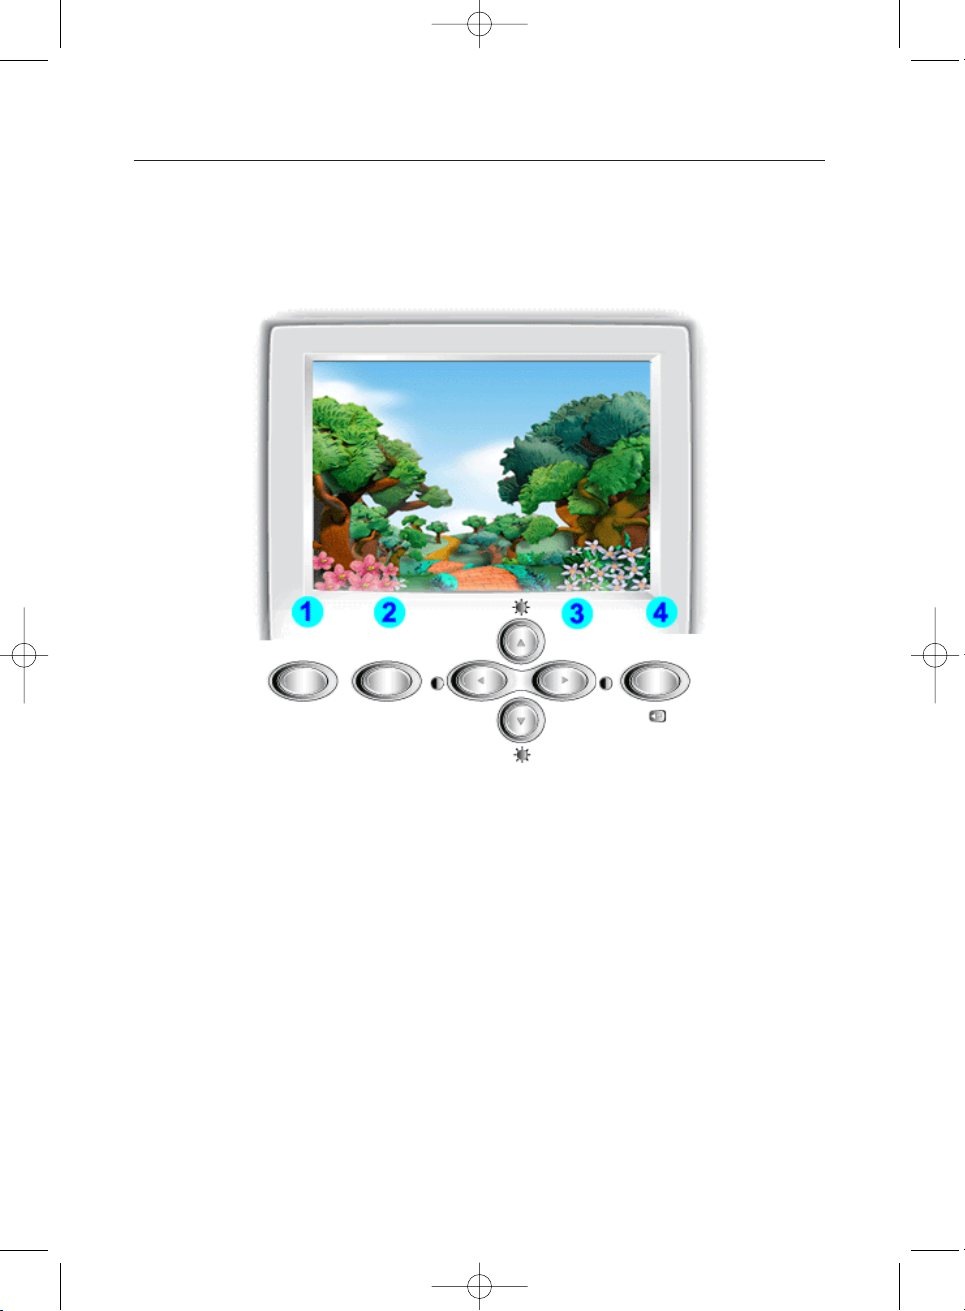
1 Highlight button : The Highlight Zone ensures clear images on TVs, video conferencing
systems or photos by emphasizing a certain area on the screen.
2 Exit/MagicBright button :
Use this button to exit or to activate the MagicBright menu.
3 Adjust buttons : These buttons allow you to highlight and adjust items in the menu.
4 Menu button : Use this button to open the OSD and activate a highlighted menu item.
Highlight MagicBright
Exit
Menu
768mb-955mb-en-new.qxd 1/27/2003 5:21 PM Page 6
Page 36
Adjusting Your Monitor
7
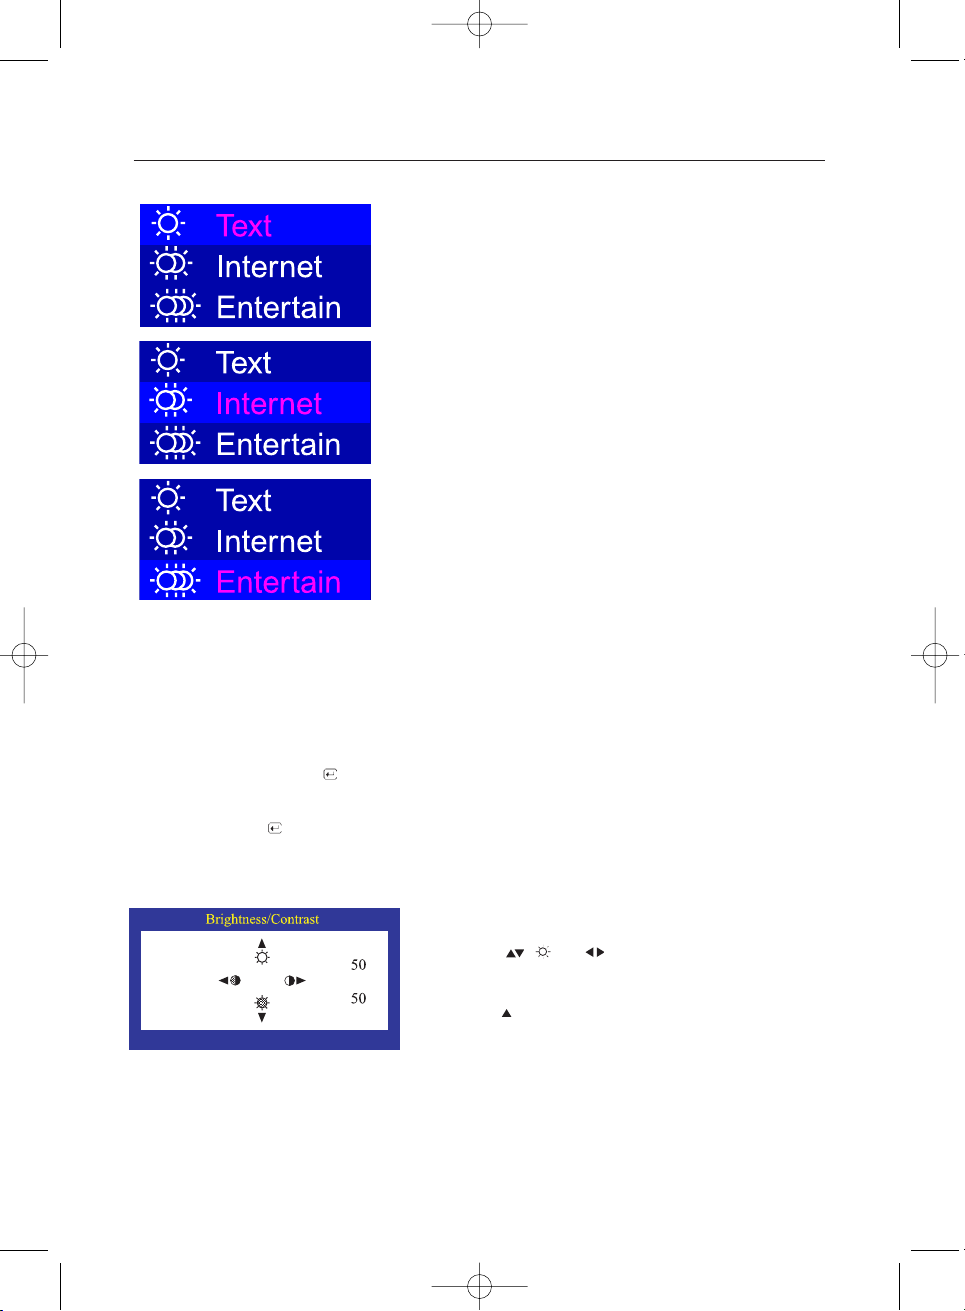
1 Push the MagicBright button.
Push the MagicBright button again and select the desired
mode. When Text is selected, the monitor turns on normal
brightness identical to that of existing monitors, which is
suitable for reading or working with text. When Internet is
selected, the monitor turns on an enhanced brightness
for Internet browsing (text and graphics), while retaining the
readability of text characters. When Entertain is selected,
the monitor switches to maximum brightness (330 cd/m2),
identical to television brightness, which is optimum for
viewing entertainment programs (animation, DVDs,
television or online games).
MagicBright
MagicBright refers to a new monitor feature that offers screen
display quality twice as bright and clear than that of existing
monitors. It provides display brightness and resolution most
appropriate for viewing text, Internet or multimedia animations
to satisfy varying user requirements. The user may easily
select one of three pre-configured brightness and resolution
options by simply pressing one of the MagicBright control
buttons located on the monitorís front.
1 Push the ( ) or ( ) button.
The brightness/contrast display will appear.
2 Push the button to increase the brightness or
the button to decrease the brightness.
Push the button to increase the contrast or
the button to decrease the contrast.
Brightness/Contrast
Adjust Brightness and Contrast.
1 Push the Menu ( ) button for over 5 seconds.
User Delete
When you press the Menu ( ) button for over 5 seconds, all the user adjustment data are
deleted as the LED blinks. This is different from the function that restores the default status.
768mb-955mb-en-new.qxd 1/27/2003 5:21 PM Page 7
Page 37
Adjusting Your Monitor
8
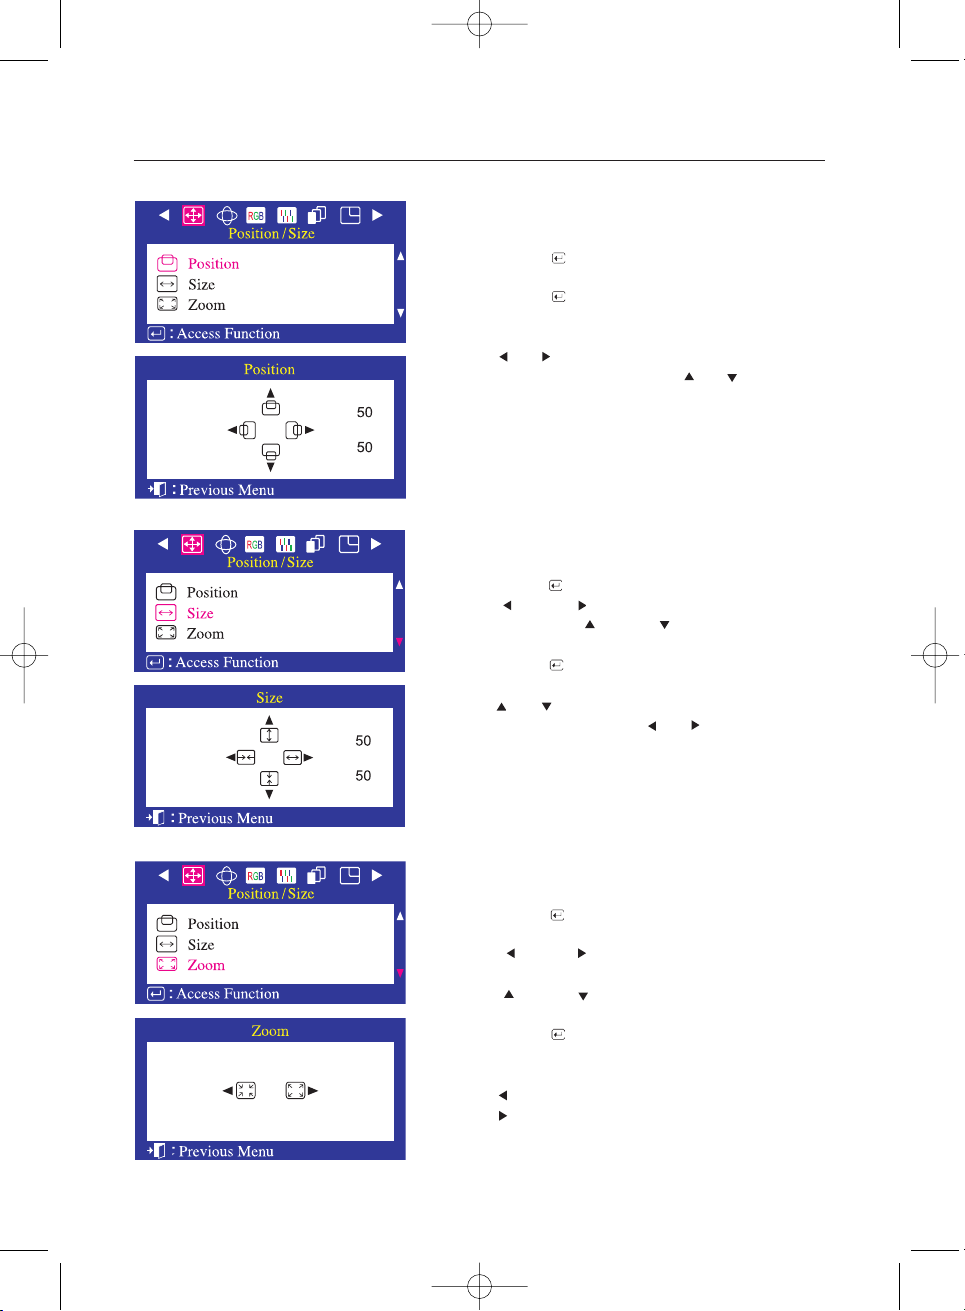
Size
Follow these instructions to change the size of the monitor's
entire display.
1 Push the Menu ( ) button.
2 Push the button or button until the Position/Size screen
is displayed. push the button or button to select Size.
3 Push the Menu ( ) button to open the Size adjustment screen.
4 Use the and buttons to change the vertical size of the
monitor's viewing area; use the and buttons to change
the horizontal size of the monitor's viewing area.
Follow these instructions to change the Position of the
monitor's entire display.
Position
1 Push the Menu ( ) button.
2 Push the Menu ( ) button to open the Position
adjustment screen.
3 Use the and buttons to change the vertical position
of the monitor's viewing area; use the and buttons to
change the horizontal position of the monitor's viewing area.
1 Push the Menu ( ) button.
2 Push the button or button until the Position/Size screen
is displayed.
push the button or button to select zoom.
3 Push the Menu ( ) button to open the Size
adjustment screen.
4 Use the button to decrease the screen viewing area.
Use the button to enlarge the screen viewing area.
Zoom
Follow these instructions to get a close-up or a longshot
view of the monitor's viewing area.
768mb-955mb-en-new.qxd 1/27/2003 5:21 PM Page 8
Page 38
9
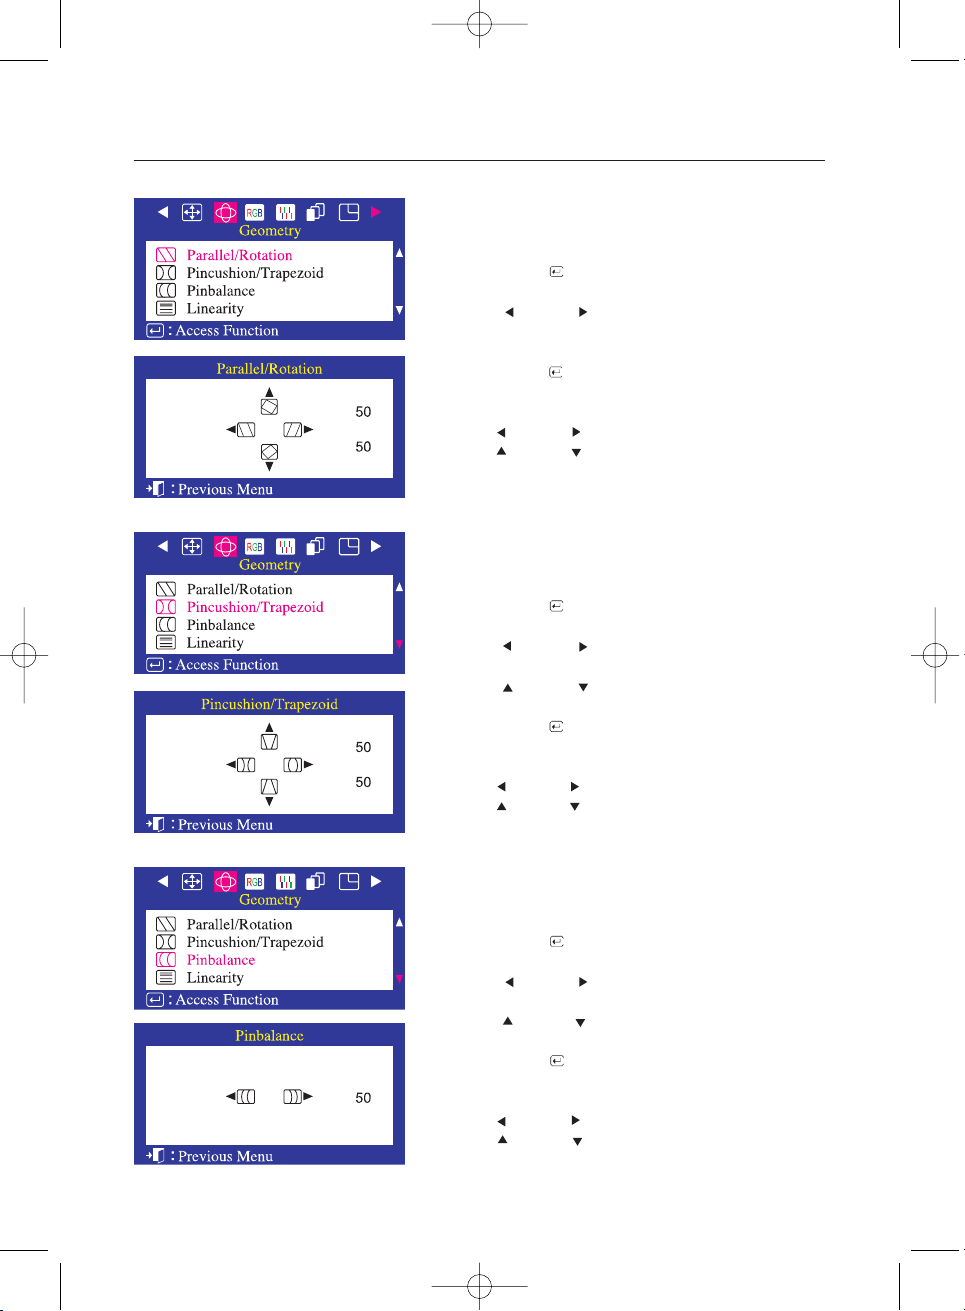
1 Push the Menu ( ) button.
2 Push the button or button until the Geometry
screen is displayed.
3 Push the Menu ( ) button to open the Parallel/Rotation
adjustment screen.
4 Use the button or button to adjust the parallel setting;
Use the button or button to adjust the rotation setting.
Adjusting Your Monitor
Parallel/Rotation
Adjust the parallelogram setting when the display is leaning
left or right; adjust the rotation setting when the entire
display is tilted left or right.
1 Push the Menu ( ) button.
2 Push the button or button until the Geometry
screen is displayed.
push the button or button to select Pincushion/Trapezoid
3 Push the Menu ( ) button to open the Pincushion/Trapezoid
adjustment screen.
4 Use the button or button to adjust the pincushion setting;
Use the button or button to adjust the trapezoid setting.
Pincushion/Trapezoid
Adjust the pincushion setting when the sides of the display
are bowed in or bowed out; adjust the trapezoid setting when
the top or bottom of the display is too large or small.
1 Push the Menu ( ) button.
2 Push the button or button until the Geometry
screen is displayed.
push the button or button to select Pinbalance
3 Push the Menu ( ) button to open the Pinbalance
adjustment screen.
4 Use the button or button to adjust the pincushion setting;
Use the button or button to adjust the trapezoid setting.
Pinbalance
Adjust the pincushion setting when the sides of the display are
bowed in or bowed out; adjust the pinbalance setting when the
top or bottom of the display is too large or small.
768mb-955mb-en-new.qxd 1/27/2003 5:21 PM Page 9
Page 39
Adjusting Your Monitor
10
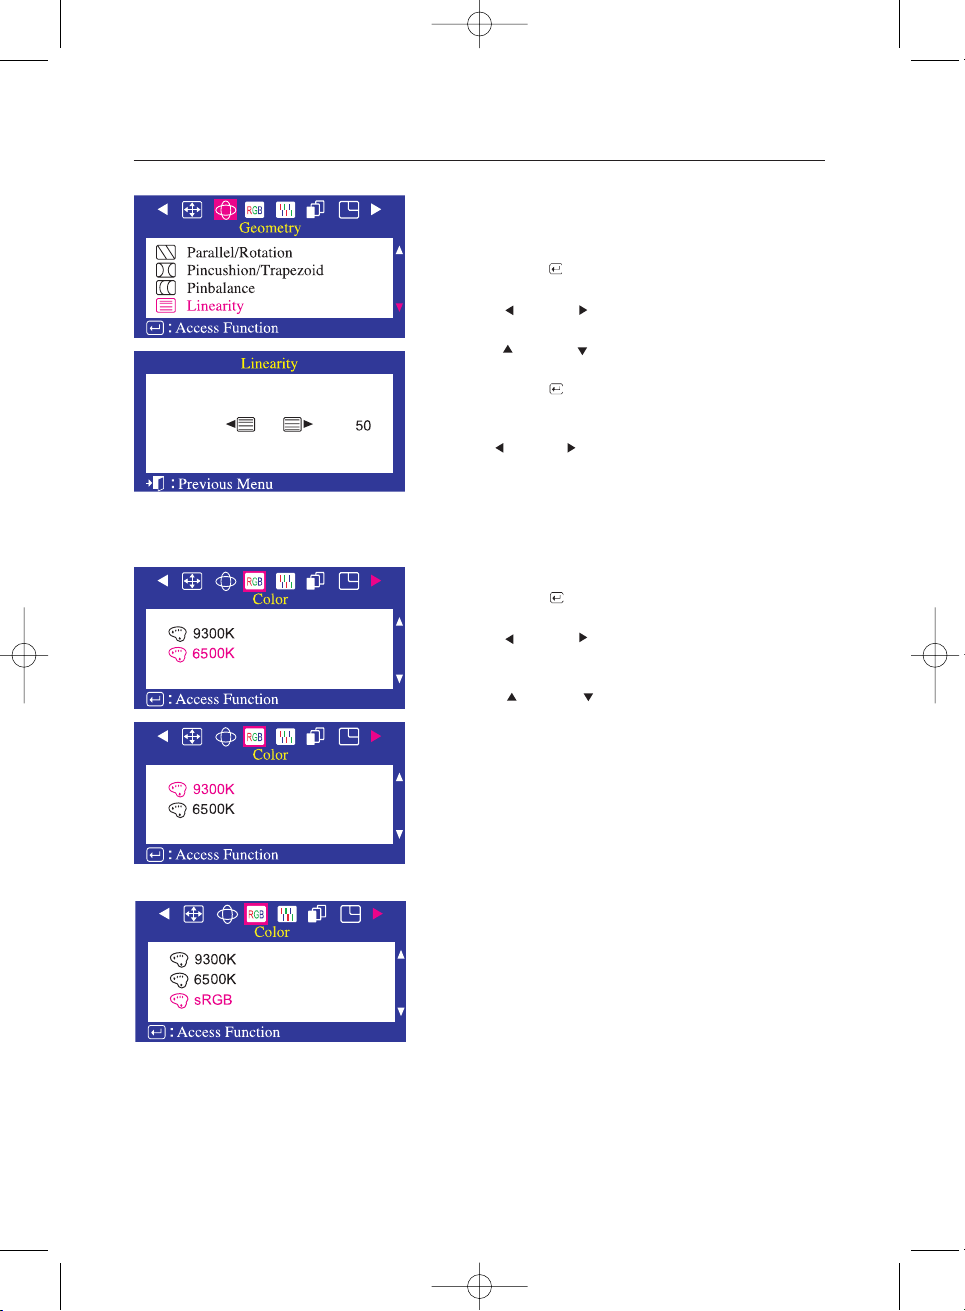
1 Push the Menu ( ) button.
2 Push the button or button until the Geometry
screen is displayed.
push the button or button to select Linearity.
3 Push the Menu ( ) button to open the Linearity
adjustment screen.
4 Use the button or button to adjust the vertical Linearity.
Linearity
Adjust the linearity setting when the display image is
compressed at the left,right or top,bottom.
1 Push the Menu ( ) button.
2 Push the button or button until the Color
screen is displayed.
3 Push the button or button to select 9300K (Bluish colors)
or 6500K (Reddish colors).
Color temperature is a measure of the "Warmth"of the image
colors. The available range is between 6500 to 9300K.
Maøu ( Color )
SyncMaster 765MB
SyncMaster 955MB
768mb-955mb-en-new.qxd 1/27/2003 5:21 PM Page 10
Page 40
11
Adjusting Your Monitor
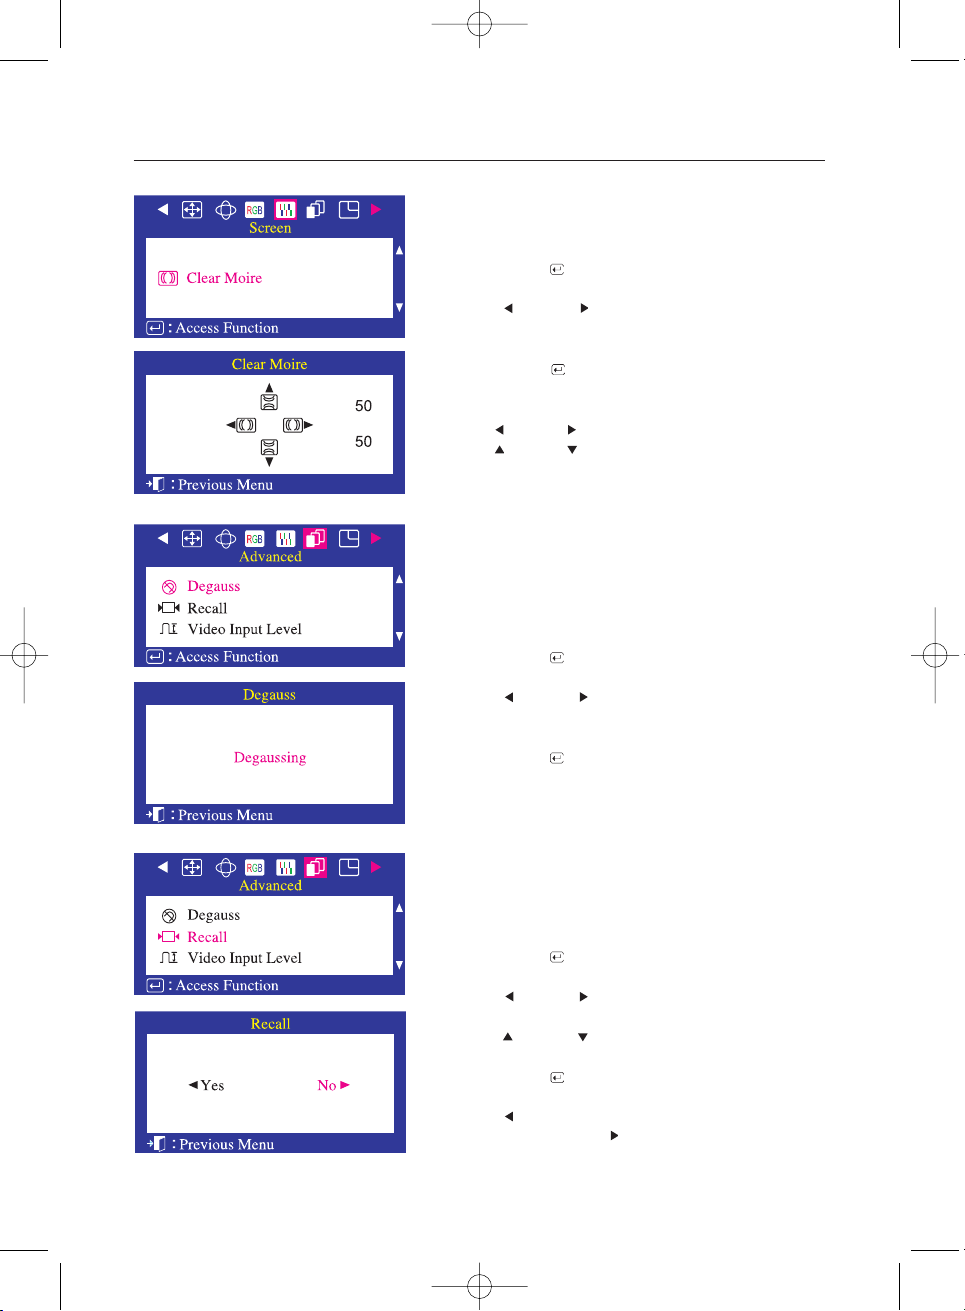
Clear Moire
A 'moiré' pattern can appear on your screen, looking like a
series of concentric circles or arcs. To eliminate this pattern,
use the clear moiré adjustments.
1 Push the Menu ( ) button.
2 Push the button or button until the Advanced
screen is displayed.
3 Push the Menu ( ) button to execute the degauss function.
The degaussing screen will appear. After a few seconds,
the degauss main menu will return.
Degauss
The Degauss feature will remove color impurities caused by
magnetic fields. Do not use the Degauss feature more than
once within a 30-minute period.
Note: The monitor may buzz momentarily, the image colors
may change and the image will jiggle for a few seconds.
These effects are normal.
1 Push the Menu ( ) button.
2 Push the button or button until the
screen OSD is displayed.
3 Push the Menu ( ) button to open the Clear Moire
adjustment screen.
4 Use the button or button to adjust horizontal moiré;
Use the button or button to adjust vertical moiré.
1 Push the Menu ( ) button.
2 Push the button or button until the Advanced
screen is displayed.
push the button or button to select Recall.
3 Push the Menu ( ) button to open the recall selection screen.
4 Push the button to select Yes. If you don't want to
reset the monitor, use the button to select No.
Recall
Use the recall feature to reset these monitor settings to their
original levels: Position, Size, Pincushion, Trapezoid,
Parallelogram, Pinbalance, Rotation, Clear Moire.
Note: If you have selected "Yes", all settings listed above will
be reset. All other settings will remain the same.
768mb-955mb-en-new.qxd 1/27/2003 5:21 PM Page 11
Page 41
Adjusting Your Monitor
12
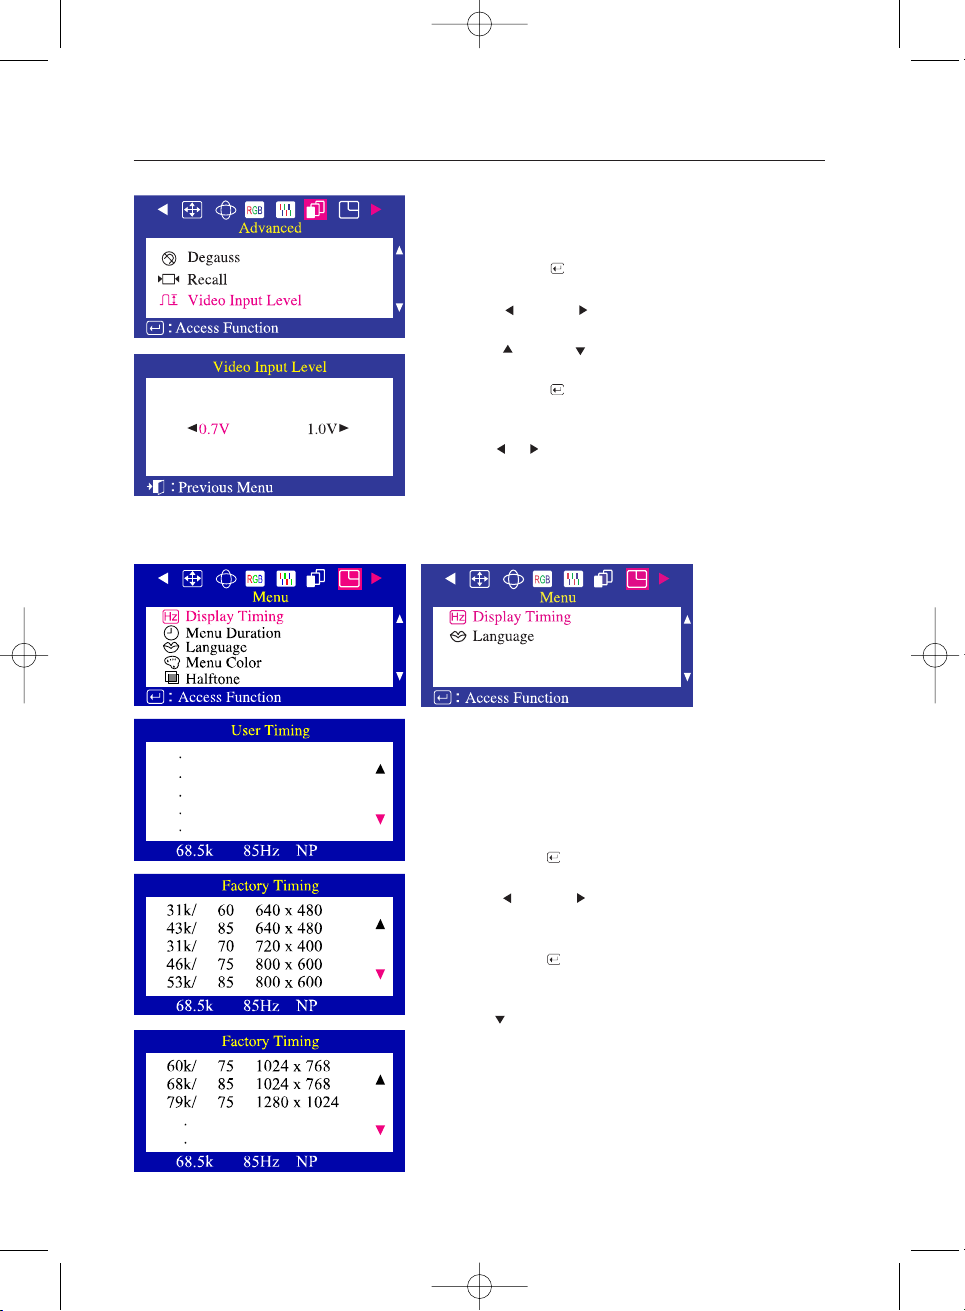
1 Push the Menu ( ) button.
2 Push the button or button until the Advanced
screen is displayed.
push the button or button to select Video Input Level.
3 Push the Menu ( ) button to open the Video Input Level
selection screen.
4 Use the or buttons to select 0.7 V or 1.0 V.
Video Input Level
Some video cards use video signals higher than 1.0V which
causes the display to be very bright. For those video cards,
use this feature to select the 1.0 V Level.
1 Push the Menu ( ) button.
2 Push the button or button until the Menu
screen is displayed.
3 Push the Menu ( ) button to open the Display Timing
adjustment screen.
4 Use the button to see the user control mode and the
default mode.
Display Timing
You can see the frequency (user control mode) used by the
user, the polarity of the operational signals, the default
frequency (default mode) set when you buy the monitor and
the resolution level.
Note: These screens do not allow any changes to the settings,
they are for information only.
SyncMaster 765MB
SyncMaster 955MB
768mb-955mb-en-new.qxd 1/27/2003 5:21 PM Page 12
Page 42
13
Adjusting Your Monitor
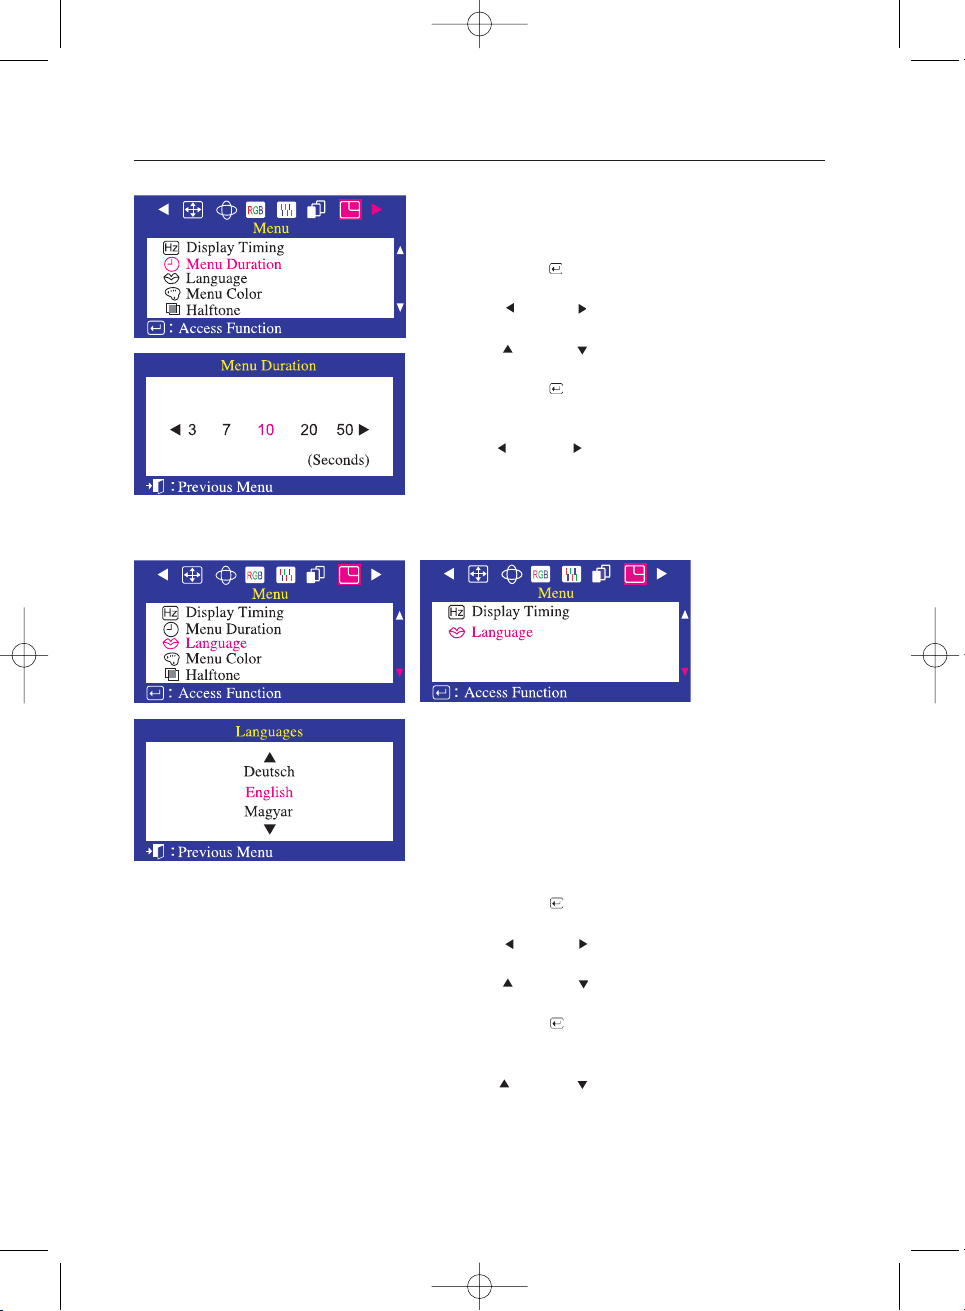
1 Push the Menu ( ) button.
2 Push the button or button until the Menu
screen is displayed.
push the button or button to select Menu Duration.
3 Push the Menu ( ) button to open the Menu Duration.
selection screen.
4 Use the button or button to select the language
you would like to use.
Menu Duration (SyncMaster 765MB)
The menu will automatically turn off if no adjustments are
made for a certain time period. You can set the amount of
time the menu will wait before it turns off.
1 Push the Menu ( ) button.
2 Push the button or button until the Menu
screen is displayed.
push the button or button to select Languages.
3 Push the Menu ( ) button to open the Languages selection
screen.
4 Use the button or button to select the language you
would like to use.
Language
Follow these steps to change the language used in the menu.
You can choose one of ten languages.
(English,German, French, Italian, Portuguese, Spanish,
Swedish, Russian, Polish, or Magyar. Polish and Magyar may
not be available for some products. )
Note:The language chosen affects only the language of the
OSD. It has no effect on any software running on the
computer.
SyncMaster 765MB
SyncMaster 955MB
768mb-955mb-en-new.qxd 1/27/2003 5:21 PM Page 13
Page 43
Adjusting Your Monitor
14
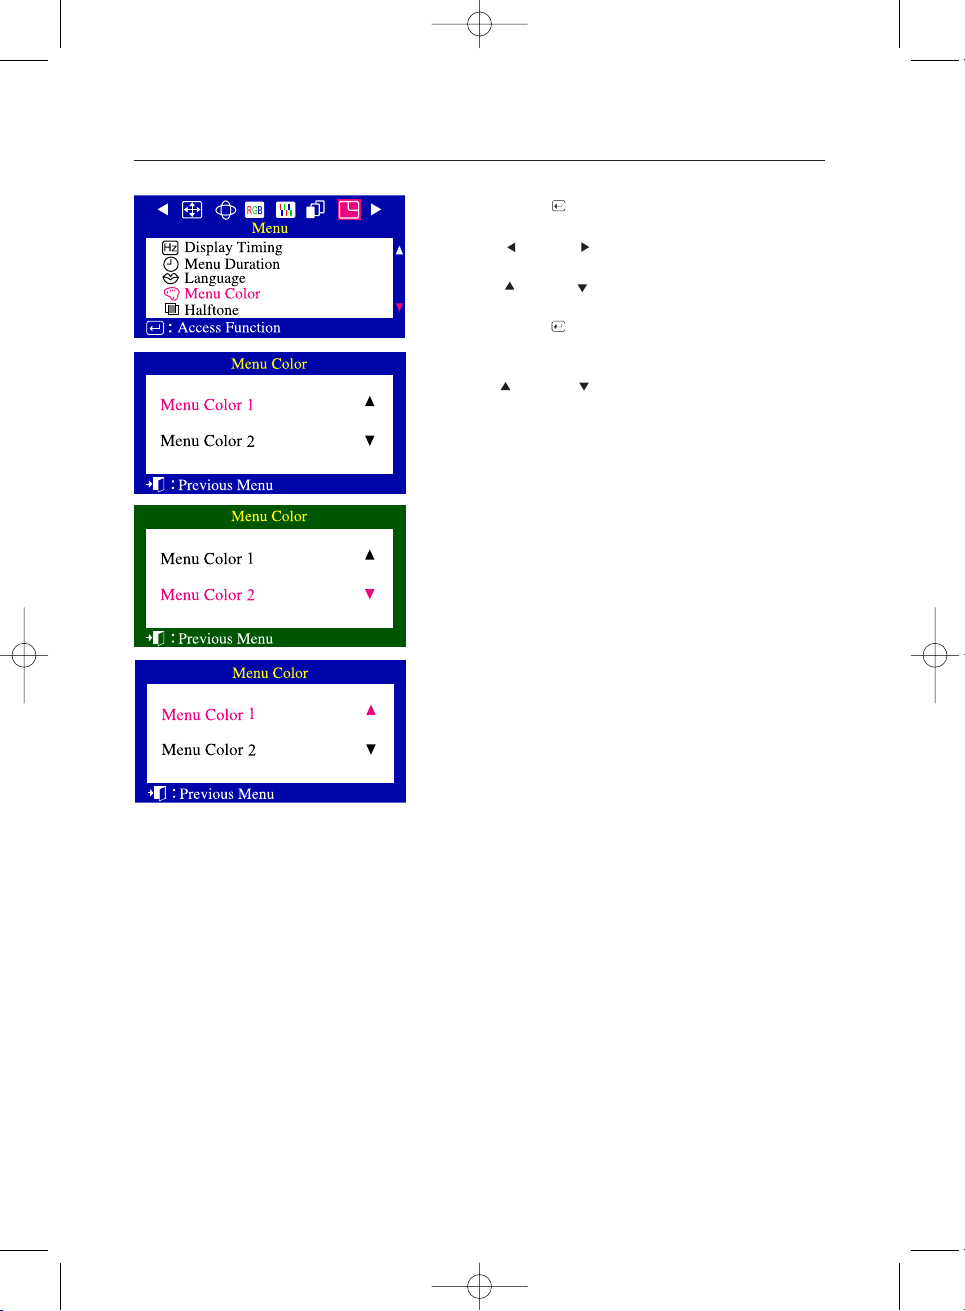
Menu Color (SyncMaster 765MB)
1 Push the Menu ( ) button.
2 Push the button or button until the ‘Menu’
screen is displayed.
push the button or button to select Menu Color.
3 Push the Menu ( ) button to open the Menu Color
selection screen.
4 Use the button or button to select Menu Color 1 or
Menu Color 2.
768mb-955mb-en-new.qxd 1/27/2003 5:21 PM Page 14
Page 44
15
Adjusting Your Monitor
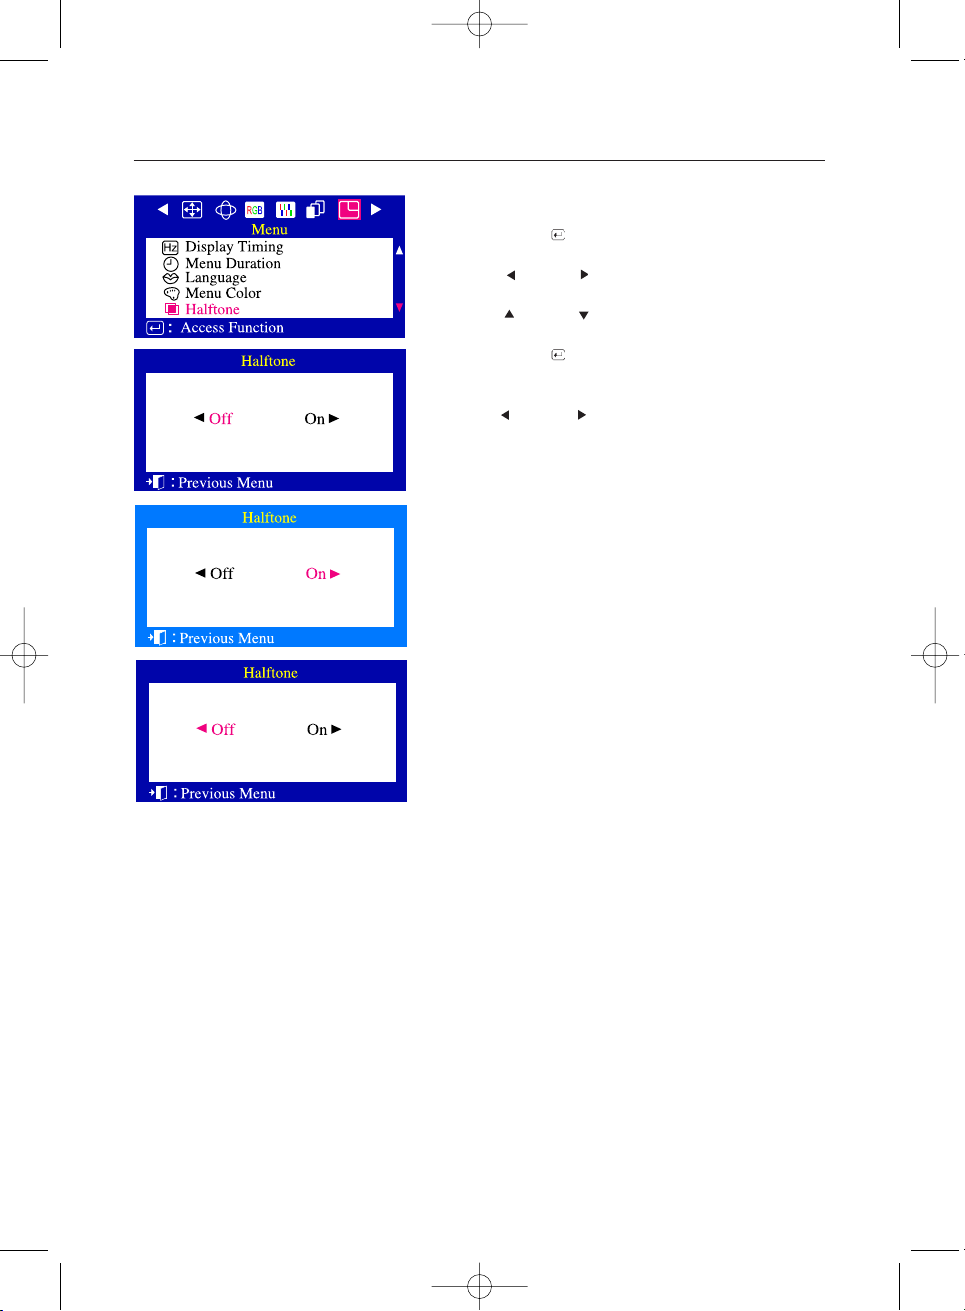
Halftone (SyncMaster 765MB)
Use this function to see the transparent on-screen display.
1 Push the Menu ( ) button.
2 Push the button or button until the ‘Menu’
screen is displayed.
push the button or button to select Halftone.
3 Push the Menu ( ) button to open the Halftone
selection screen.
4 Use the button or button to select off or on.
768mb-955mb-en-new.qxd 1/27/2003 5:21 PM Page 15
Page 45
Adjusting Your Monitor
16
User Controls
Highlight MagicBright
Exit
Menu
SyncMaster 765MB/955MB
The Highlight feature is designed for moving image and
so please use it in the moving image screen.
768mb-955mb-en-new.qxd 1/27/2003 5:21 PM Page 16
Page 46
Adjusting Your Monitor
17
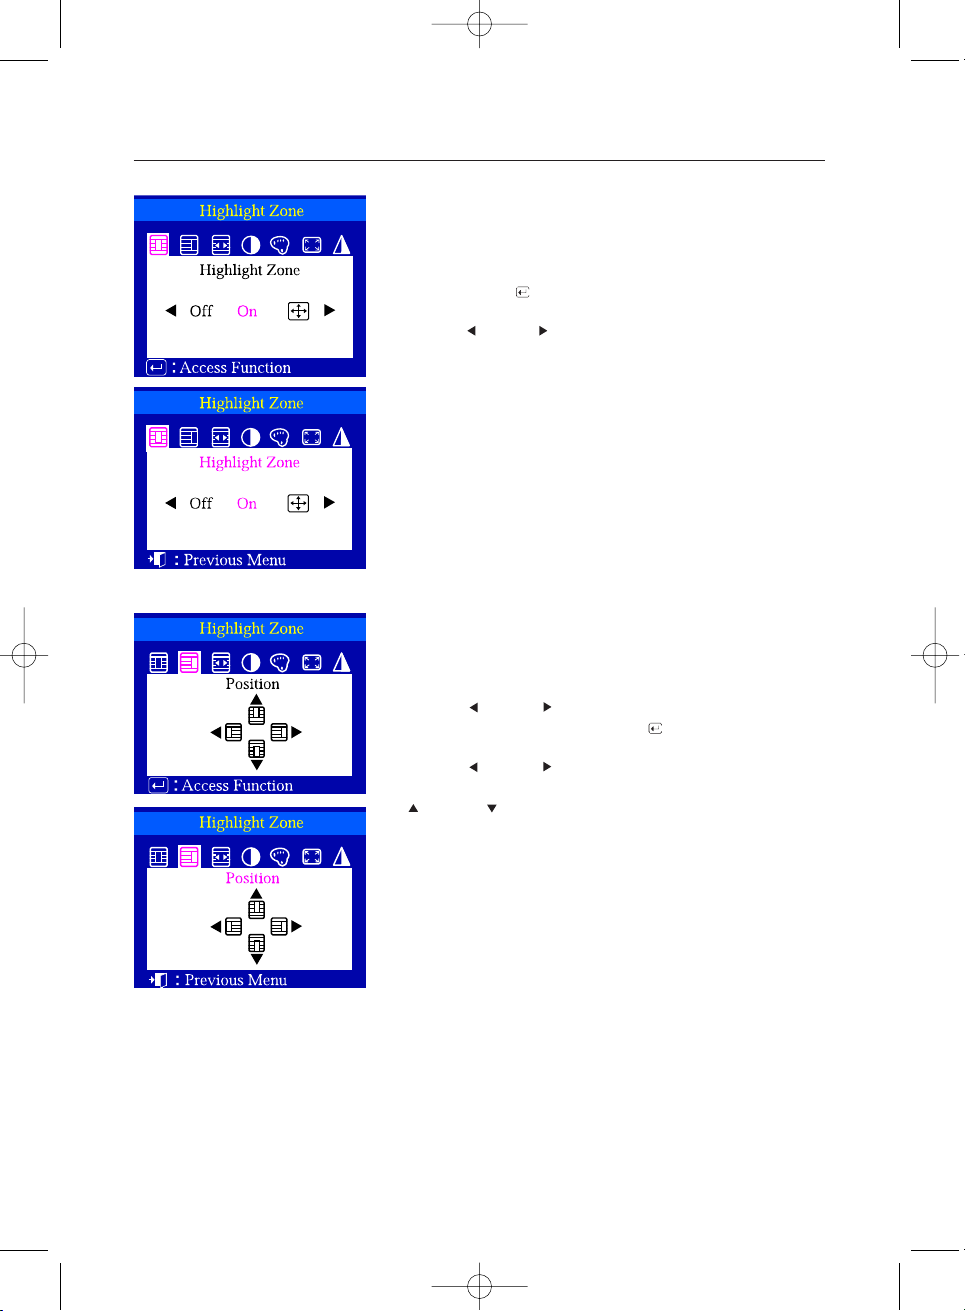
1 Push the Highlight button.
2 Push the Menu ( ) button.
3 Push the button or button to cancel, execute or
enlarge the entire screen.
Highlight Zoon
This function is to execute or cancel the Highlight Zone.
Position
1 Push the Highlight button.
2 Push the button or button to select the Screen Position
Adjustment and then push the Menu ( ) button.
3 Push the button or button to move the position of the
Highlight Zone horizontally and use the push the
button or button to move it vertically.
This function is to move the Highlight Zone horizontally
or vertically.
768mb-955mb-en-new.qxd 1/27/2003 5:21 PM Page 17
Page 47
18
Adjusting Your Monitor
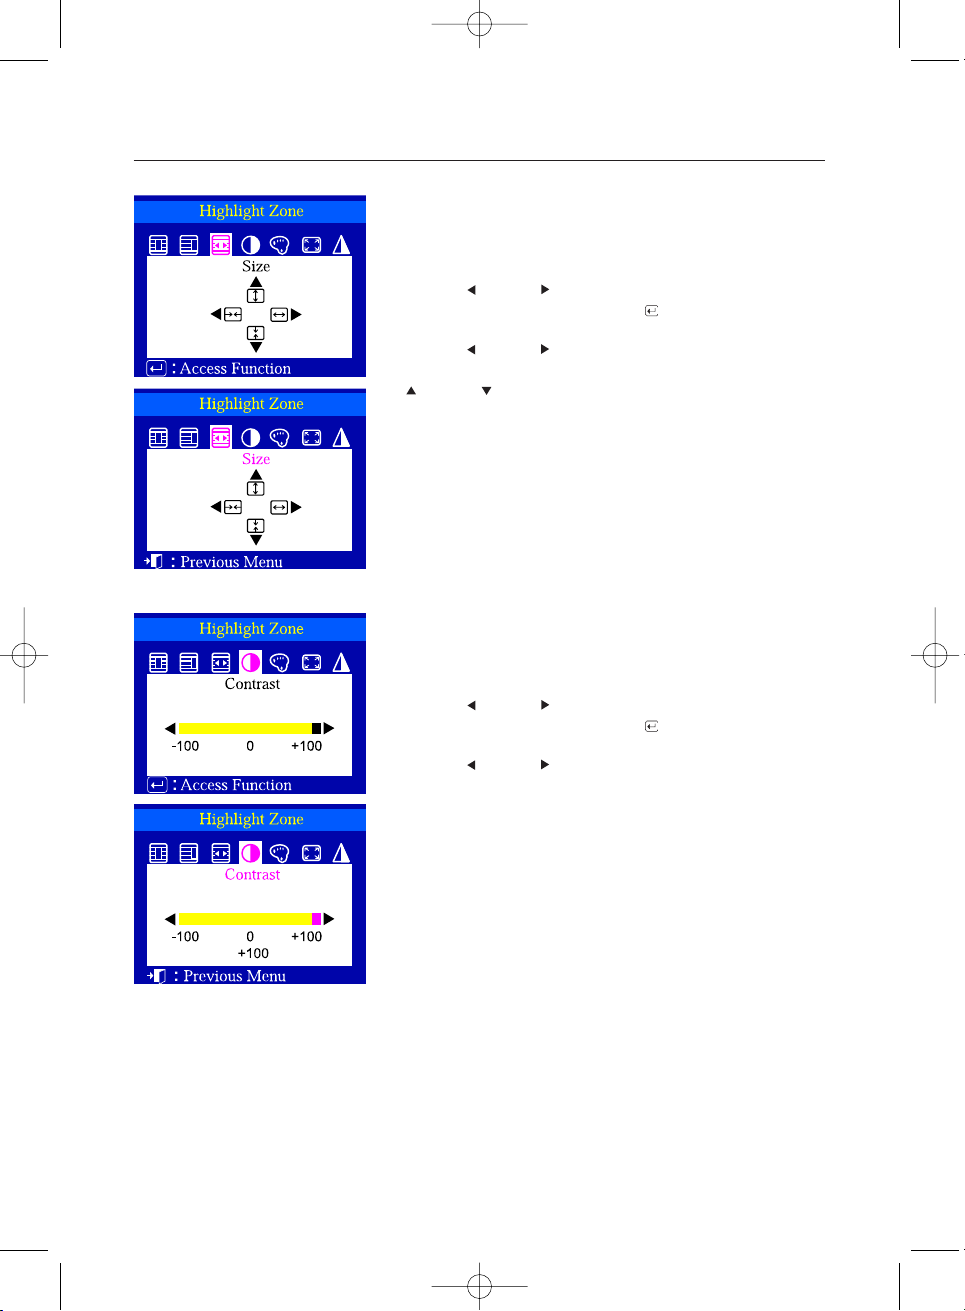
Size
Contrast
1 Push the Highlight button.
2 Push the button or button to select the Screen Size
Adjustment and then push the Menu ( ) button.
3 Push the button or button to move the size of the
Highlight Zone horizontally and use the push the
button or button to move it vertically.
This function is to adjust the size of the Highlight Zone.
1 Push the Highlight button.
2 Push the button or button to select the Contrast
Adjustment and then push the Menu ( ) button.
3 Push the button or button to adjust the Contrast of the
Highlight zone.
This function is to use the Contrast of the Highlight Zone.
768mb-955mb-en-new.qxd 1/27/2003 5:21 PM Page 18
Page 48
Adjusting Your Monitor
19
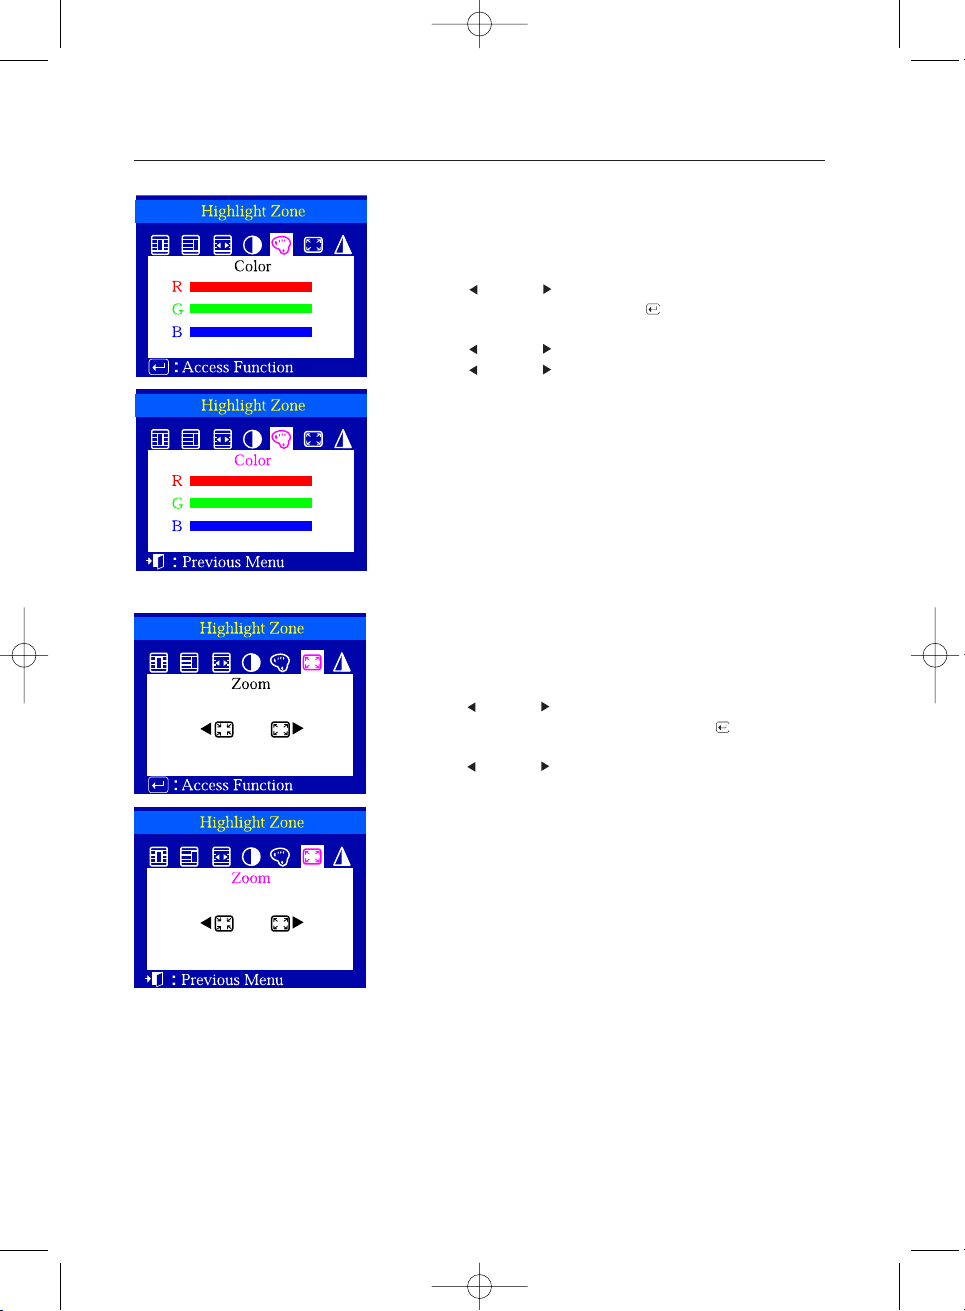
Color
Zoom
1 Push the Highlight button.
2 Push the button or button to select the Color
Adjustment and then push the Menu ( ) button.
3 Push the button or button to select a color from R, G or B.
Push the button or button to adjust the R, G or B color of
the Highlight Zone.
This function is to adjust the size of the Highlight Zone.
1 Push the Highlight button.
2 Push the button or button to select the Enlargement and
Reduction Adjustment and then push the Menu ( ) button.
3 Push the button or button to enlarge or reduce the
Highlight Zone.
This function is to enlarge or reduce the Highlight Zone.
768mb-955mb-en-new.qxd 1/27/2003 5:22 PM Page 19
Page 49
Adjusting Your Monitor
20
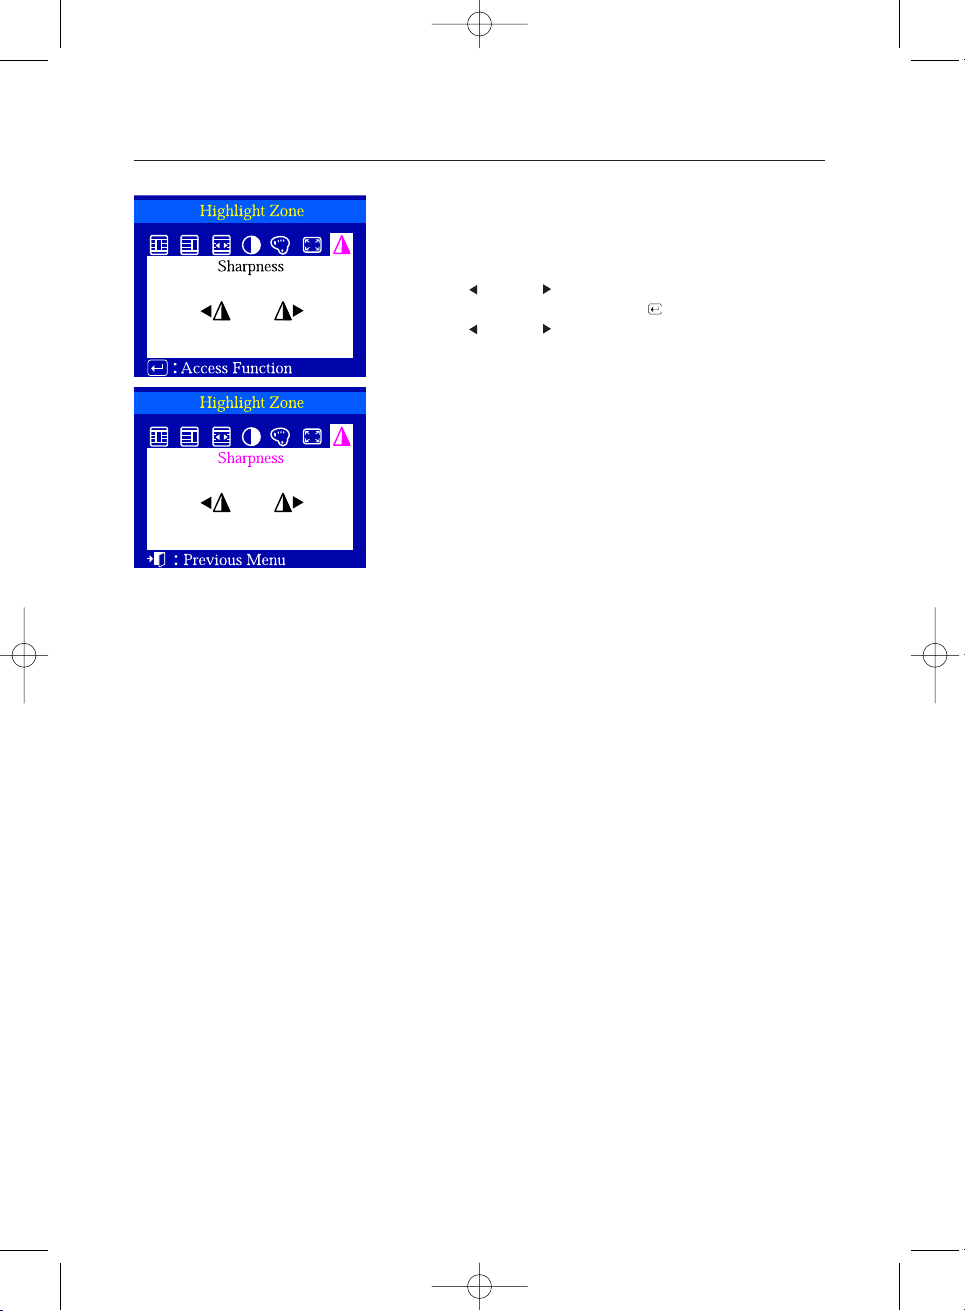
Sharpness
1 Push the Highlight button.
2 Push the button or button to select the Sharpness
Adjustment and then push the Menu ( ) button
3 Push the button or button to adjust the sharpness of the
Highlight Zone.
This function is to adjust the sharpness of the Highlight Zone.
768mb-955mb-en-new.qxd 1/27/2003 5:22 PM Page 20
Page 50
Power Saver
21
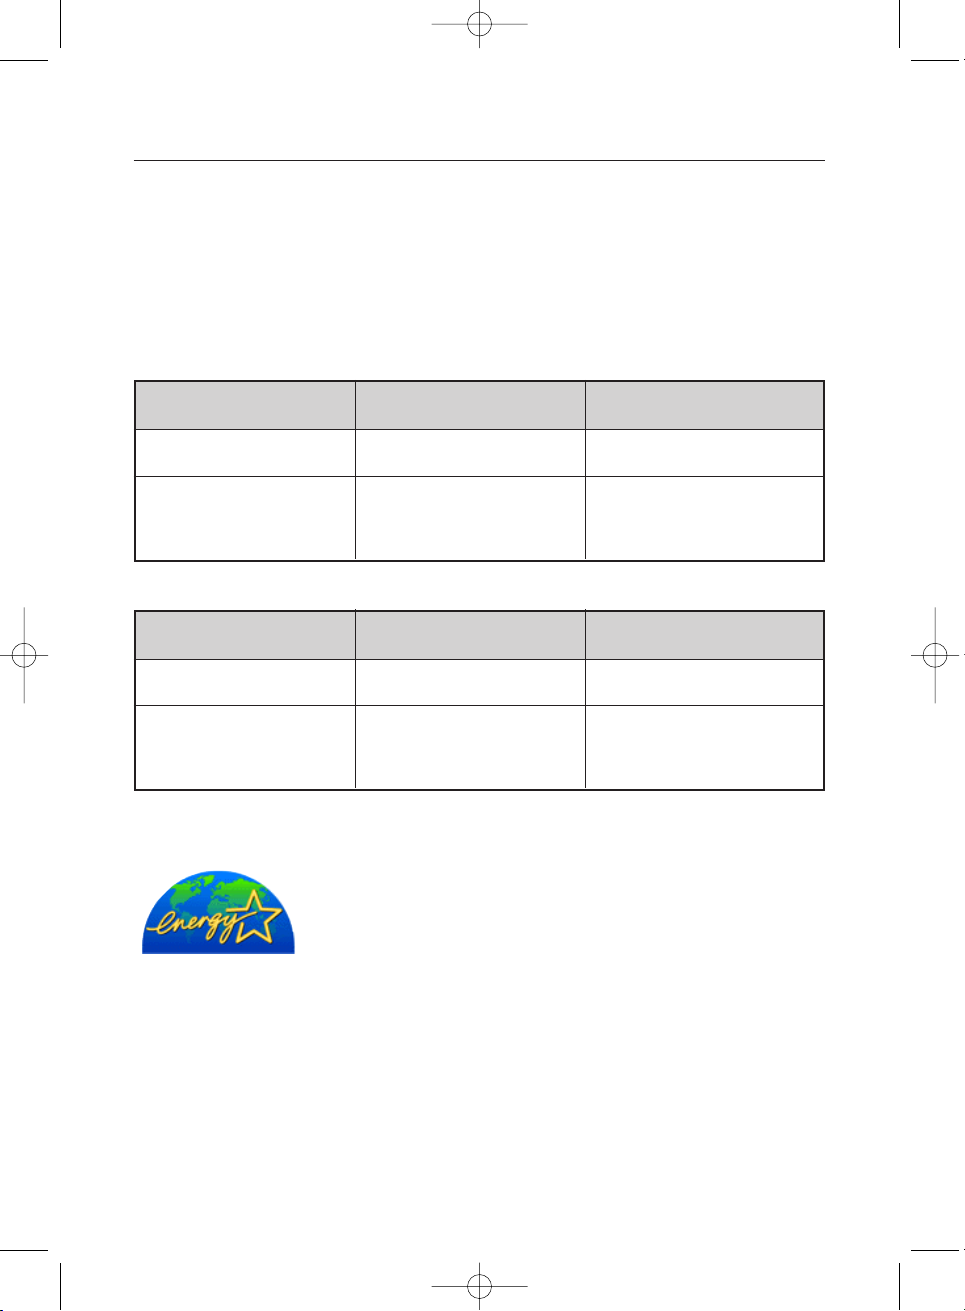
This monitor has a built-in power management system called PowerSaver. This system saves energy by
switching your monitor into a low-power mode when it has not been used for a certain amount of time. The
monitor automatically returns to normal operation when you move the computer's mouse or press a key on
the keyboard. For energy conservation, turn your monitor OFF when it is not needed, or when leaving it
unattended for long periods. The PowerSaver system operates with a VESA DPMS compliant video card
installed in your computer.
Use a software utility installed on your computer to set up this feature.
This monitor is EPA ENERGY STAR
®
compliant and ENERGY2000 compliant
when used with a computer equipped with VESA DPMS functionality.
As an ENERGY STAR®Partner, SAMSUNG has determined that this product
meets the ENERGY STAR®guidelines for energy efficiency.
State
Normal Operation
Power- off mode
EPA/ ENERGY 2000
Power Indicator
Power Consumption
83W (Nominal)
90W (Maximum)
Less than 2.6W
Green Green, Blinking
SyncMaster 765MB
SyncMaster 955MB
State
Normal Operation
Power- off mode
EPA/ ENERGY 2000
Power Indicator
Power Consumption
100W (Nominal)
110W (Maximum)
Less than 2.0W
Green Green, Blinking
768mb-955mb-en-new.qxd 1/27/2003 5:22 PM Page 21
Page 51
Troubleshooting
22
Before calling for service, check the information in this section to see if you can solve the problem yourself.
If you do need assistance, please call the phone number on the warranty card, the phone number on
the Information section or contact your dealer.
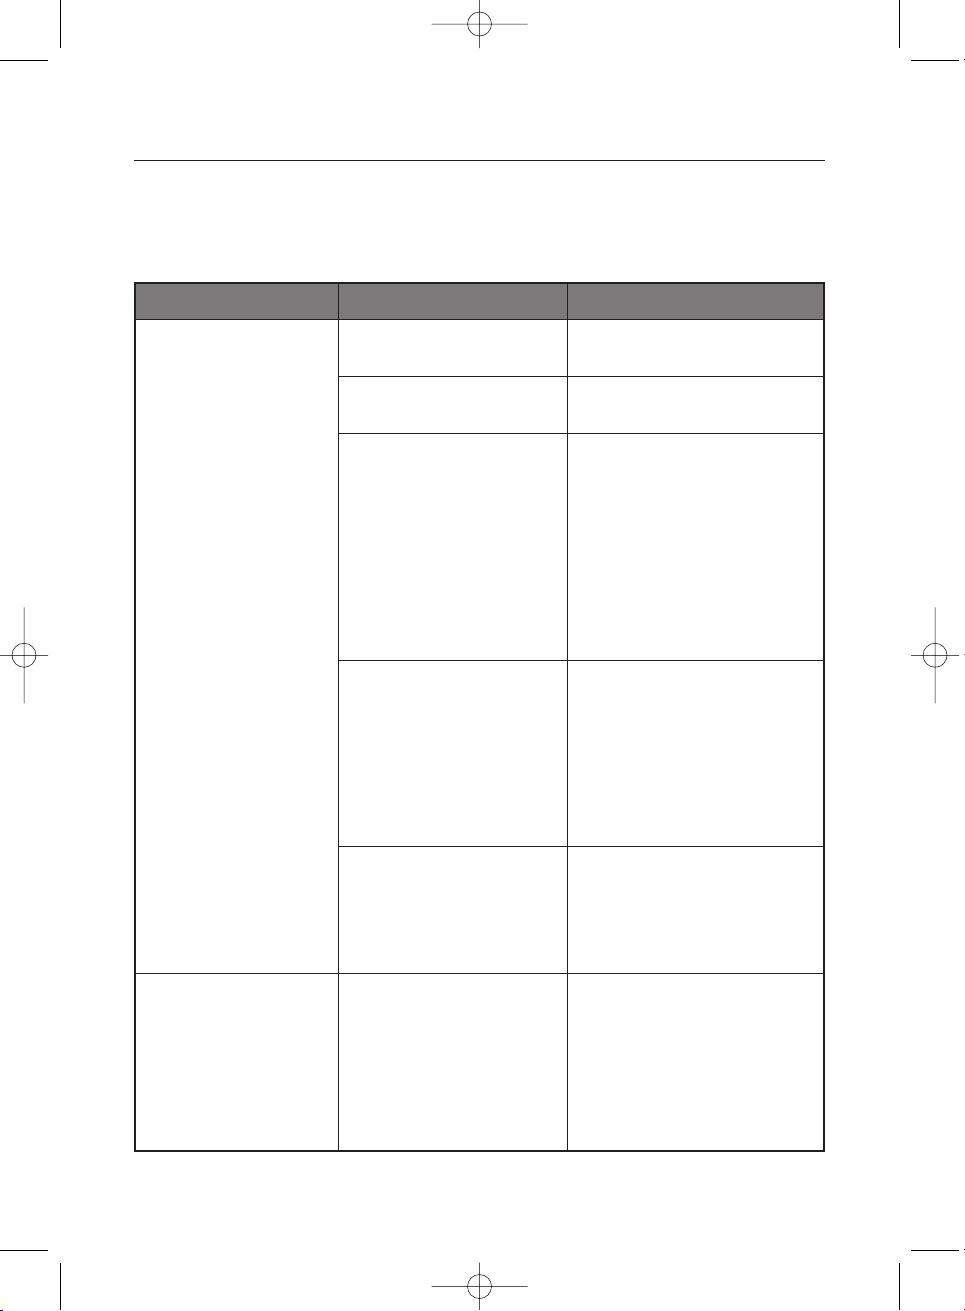
Check List
Symptom Chek List Solution
No images on the screen.
I cannot turn on the monitor.
I cannot see the On
Screen Display.
Is the power cord connected
properly?
Check the power cord connection
and supply.
Can you see "No Connection,
Check Signal Cable" on the screen?
Check the signal cable connection.
If the power is on, reboot the
computer to see the initial
screen(the login screen), which
can be seen.
If the initial screen (the login screen)
appears, boot the computer in the
applicable mode (the safe mode for
Windows ME/XP/2000) and
then change the frequency of the
video card.
(Refer to the Preset Timing Modes)
Note: If the initial screen (the login
screen) does not appear, contact
a service center or your dealer.
Can you see "Sync. Out of
Range" on the screen?
You can see this message when the
signal from the video card exceeds
the maximum resolution and frequency
that the monitor can properly handle.
Adjust the maximum resolution and
frequency that the monitor can
properly handle.
There is no image on the
screen. Is the power indicator
on the monitor blinking at
1second intervals?
The monitor is in PowerSaver mode.
Press a key on the keyboard or
move the mouse to activate the
monitor and restore the image on the
screen.
Have you locked the On
Screen Display (OSD) Menu to
prevent changes?
Unlock the OSD by pressing the
Menu button for at least 10 seconds.
768mb-955mb-en-new.qxd 1/27/2003 5:22 PM Page 22
Page 52
Troubleshooting
23
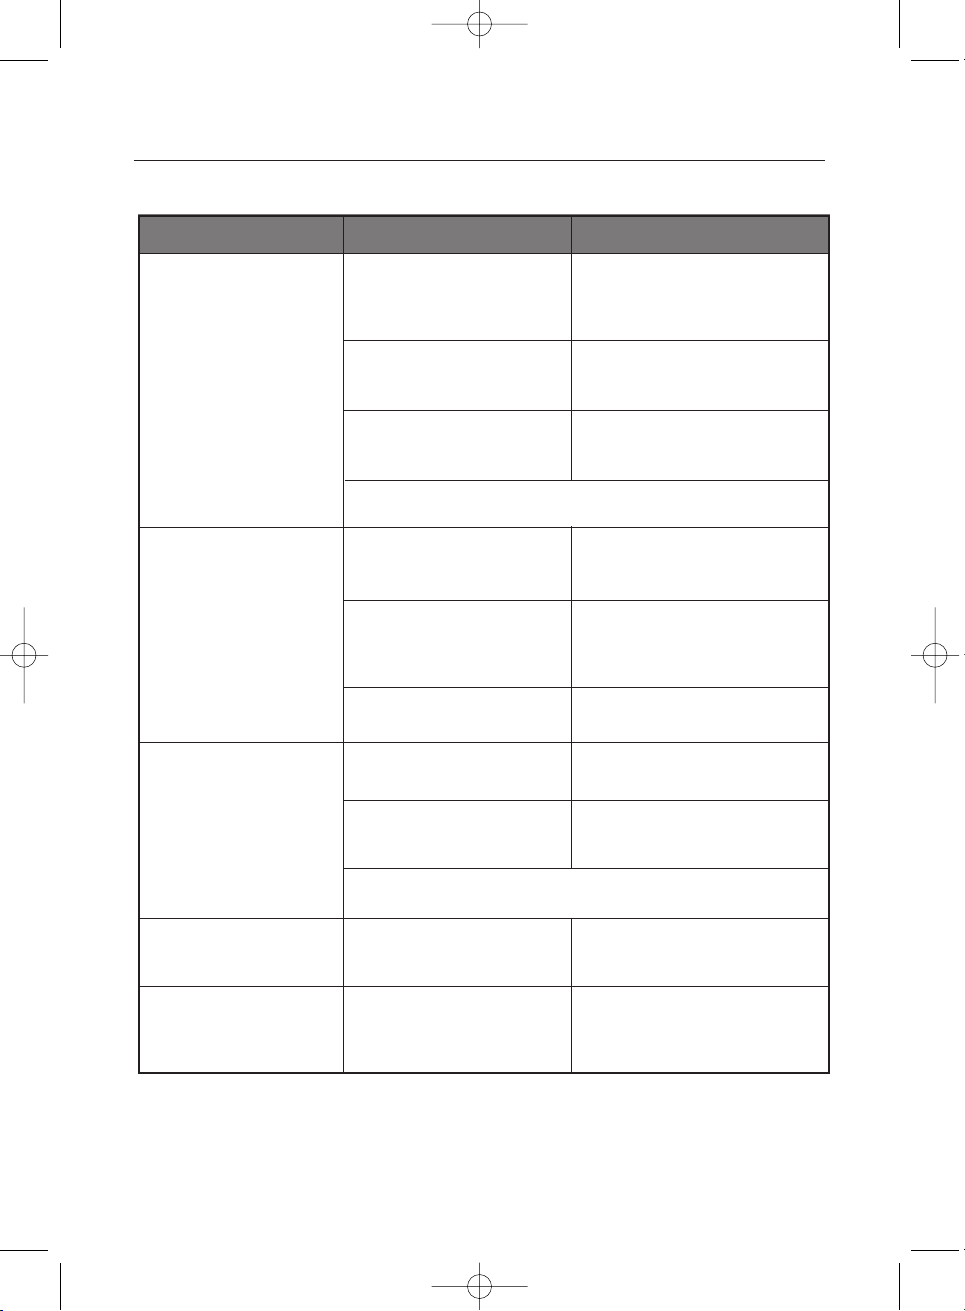
Check List
Symptom Chek List Solution
The screen shows strange
colors or just black and white.
The image on the
screen is shaking.
The screen suddenly has
become unbalanced.
Is the screen displaying only one
color as if looking at the screen
through a cellophane paper?
Check the monitor configuration
to see if it is in Interlace Mode.
(Interlace Mode: Vertical
frequency 43Hz, 87Hz(i), etc)
The signal from the video card
exceeds the maximum resolution
and frequency of the monitor.
Are there any magnetic products
such as a power adapter, speaker
or a high voltage wire near by?
Move the monitor away from
anything that can create a strong
magnetic field.
Is the voltage stable?
The screen image can also appear to shake or vibrate if there is a
problem with the video card or the computer's main board.
The screen can be unbalanced due to the cycle of the video card
signals. Readjust Position by referring to the OSD.
The screen image can appear to
shake or vibrate at a particular time
of day due to low supply voltage.
Have the screen colors become
strange after running a program
or due to a crash between
applications?
Check the signal cable connection.
Make sure the video card is fully
inserted in it's slot.
Reboot the computer.
Has the video card been set
properly?
Set the video card by referring to the
video card manual.
Have you changed the video
card or the driver?
Adjust screen image position and
size using the OSD.
Have you adjusted the
resolution or frequency to the
monitor?
Adjust the resolution and frequency
at the video card.
(Refer to the Preset Timing Modes).
The screen is out of focus or
OSD cannot be adjusted.
Have you adjusted the resolution or
frequency on the monitor?
Adjust the resolution and frequency
of the video card. (Refer to the Preset
Timing Modes).
The screen is partially distorted. Are there any magnetic
products such as an adapter,
speaker or a high voltage wire
near the monitor?
Enter the OSD and perform a "Degauss".
Keep the monitor away from any
magnetic products.
768mb-955mb-en-new.qxd 1/27/2003 5:22 PM Page 23
Page 53
Troubleshooting
24
Check List
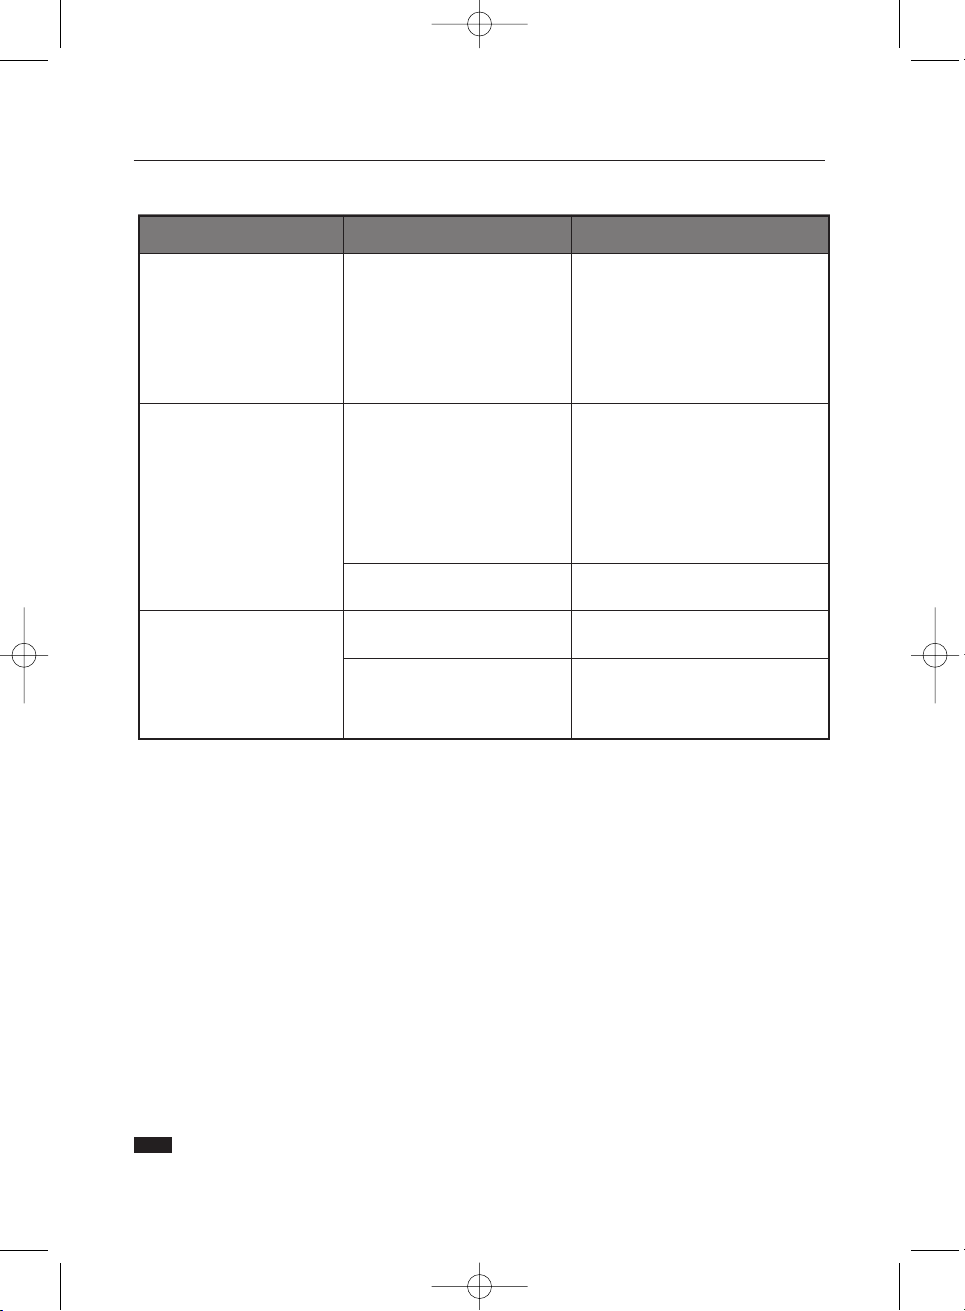
Symptom Chek List Solution
LED is blinking but no images
on the screen.
Is the frequency properly
adjusted when checking the
Display Timing on the menu?
Adjust the frequency properly by
referring to the video card manual
and the Preset Timing Modes.
(The maximum frequency per
resolution may differ from product to
product.)
There are only 16 colors
shown on the screen.
The screen colors have
changed after changing the
video card.
Have the Windows colors been
set properly?
For Windows ME/XP/2000:
Set the colors properly at the
Control Panel, Display, Settings.
There is a message that reads
"Unrecognized monitor, Plug
& Play (VESA DDC) monitor
found".
Check the following items if there is trouble with the monitor.
1. Check if the power cord and the cable are properly connected to the computer.
2. Check if the computer beeps more than 3 times when booting.
(If it does, request an after-service for the main board of the computer.)
3. If you installed a new video card or if you assembled the PC, check if the installed the adapter
(video) driver and the monitor driver.
4. Check if the scanning ratio of the video screen is set at 75Hz or 85Hz.
(Do not exceed 60Hz when using the maximum resolution.)
5. If you have problems in installing the adapter (video) driver, boot the computer in Safe Mode, remove
the Display Adapter at the "Control Panel, System, Device Administrator" and then reboot the computer
to reinstall the adapter (video) driver.
Tips for Highlight Zone
1. To protect CDT against the screen brightness, the Highlight Zone function persists for three hours and then
automatically stops. So please reset it to continue.
2. Once the Highlight Zone has been switched off, you can't select any of the other menus within
the Hightlight Zone.
3. When the Highlight Zone function is operated, the surrounding brightness of screen may become dark.
4. Depending on the video card you use, a color saturation phenomenon may occur in the Highlight Zone.
In this case, slightly lower the contrast of the Highlight Zone and the color saturation will be reduced.
Note If problems repeatedly occur, contact an authorized service center.
Have you installed the monitor
driver?
Install the monitor driver according to
the Driver Installation Instructions.
See the video card manual to
see if the Plug & Play (VESA
DDC) function can be supported.
Install the monitor driver according to
the Driver Installation Instructions.
Has the video card been set
properly?
Set the video card by referring to the
video card manual.
768mb-955mb-en-new.qxd 1/27/2003 5:22 PM Page 24
Page 54
25
Specifications
General
Picture Tube
Maximum Resolution
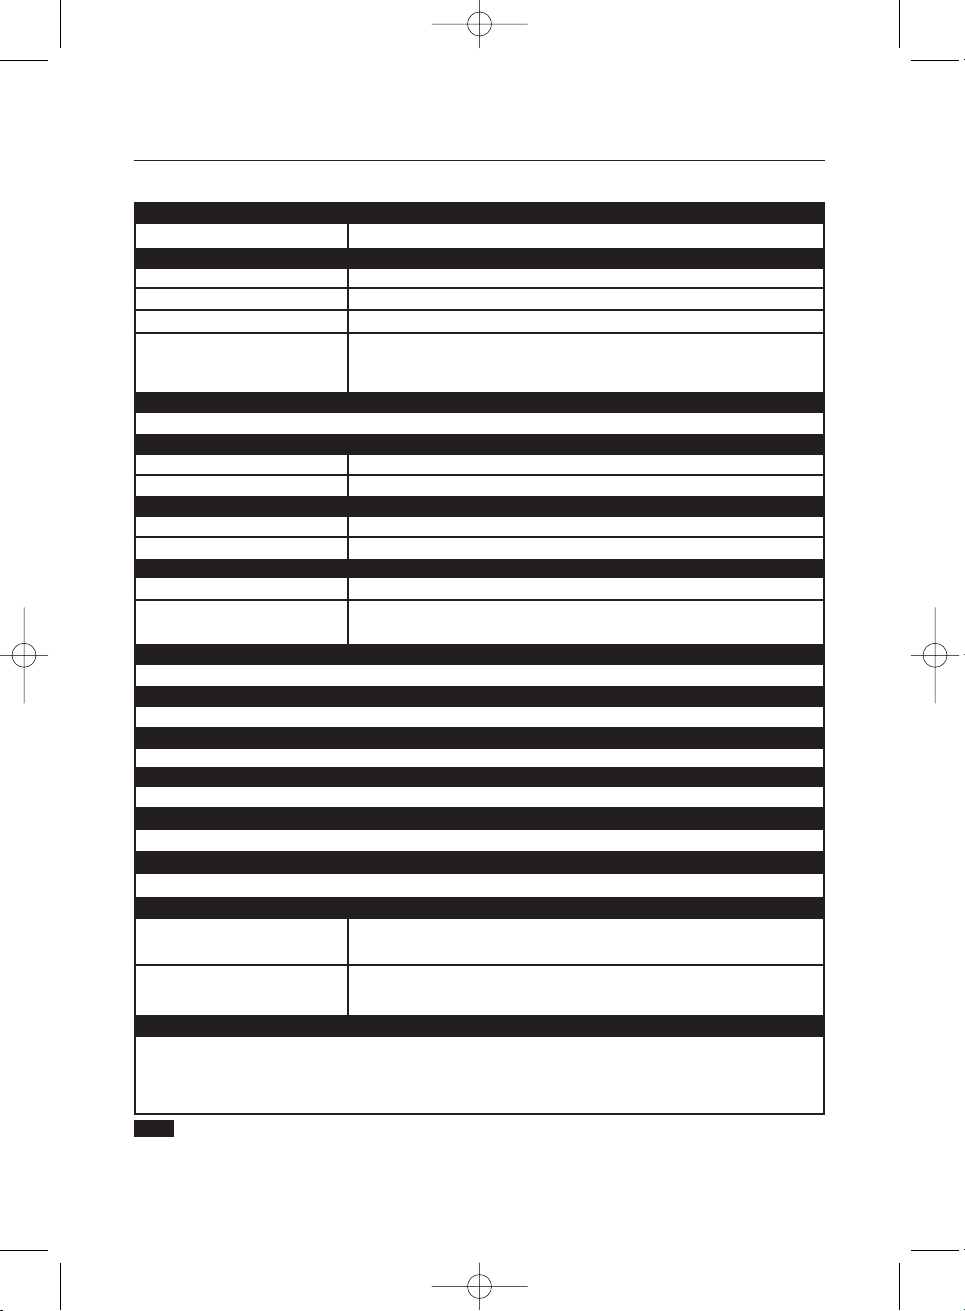
Model Name SyncMaster 765MB
Type
Deflection angle
Dot Pitch
Screen type
17"(43cm) MagicBright™ (40.6cm viewable)
90 °
0.20mm (Horizontal)
Aluminized tri-color phosphor dot trio with black matrix.
Anti-doming invar shadow mask.
Multi-layer coated with anti-static
1600 Dots, 1200 Lines @65Hz
30 ~ 85 kHz
50 ~ 160 Hz
312 ± 4 mm
234 ± 4 mm
Active Display
Horizontal
Verti cal
Synchronization
Horizontal
Vertical
Input Signal Definition
Video Signal
Sync Signal
RGB, Analog 0.7 Vpp positive at 75 ohms
Separate H/V sync, TTL level, positive or negative
Display Color
Unlimited
Maximum Pixel Clock
185MHz
Power Supply
AC 90 ~ 264V, 60/50 Hz ± 3Hz
Power Consumption
90W (Maximum), 83W (Nominal)
Dimensions (WxDxH)
398 x 412 x 400mm (with Stand)
Weight
16 kg
Operating
Storage
This monitor can be installed on any Plug & Play compatible system. Interaction of the monitor and
computer systems will provide the best operating conditions and monitor settings. In most cases,
monitor installation will proceed automatically, unless the user wishes to select alternate settings.
Temperature: 32°F ~ 104°F(0°C ~ 40°C)
Humidity: 10% ~ 80%, non-condensing
Temperature: -4°F ~113°F (-20°C ~ 45°C)
Humidity: 5% ~ 95%, non-condensing
Environmental considerations
Plug and Play Capability
Note Design and specifications are subject to change without prior notice.
SyncMaster 765MB
768mb-955mb-en-new.qxd 1/27/2003 5:22 PM Page 25
Page 55
26
Specifications
General
Picture Tube
Maximum Resolution
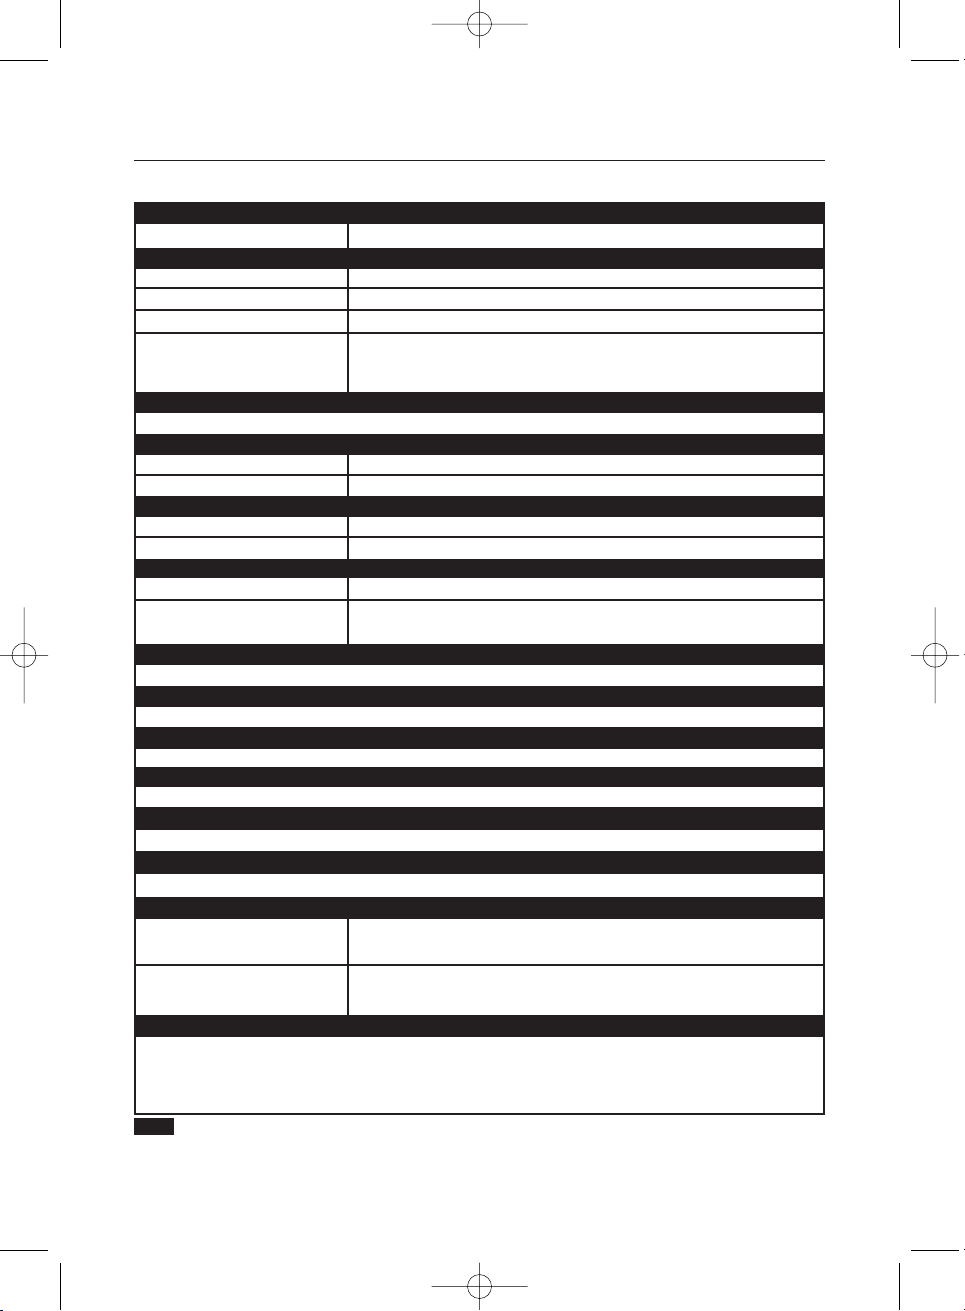
Model Name SyncMaster 955MB
Type
Deflection angle
Dot Pitch
Screen type
19"(48cm) MagicBright™ (45.8cm viewable)
90 °
0.20mm (Horizontal)
Aluminized tri-color phosphor dot trio with black matrix.
Anti-doming invar shadow mask.
Multi-layer coated with anti-static
1600 Dots, 1200 Lines @68Hz
30 ~ 85 kHz
50 ~ 160 Hz
352 ± 3 mm
264 ± 3 mm
Active Display
Horizontal
Verti cal
Synchronization
Horizontal
Vertical
Input Signal Definition
Video Signal
Sync Signal
RGB, Analog 0.7 Vpp positive at 75 ohms
Separate H/V sync, TTL level, positive or negative
Display Color
Unlimited
Maximum Pixel Clock
185MHz
Power Supply
AC 90 ~ 264V, 60/50 Hz ± 3Hz
Power Consumption
110W (Maximum), 100W (Nominal)
Dimensions (WxDxH)
440 x 460 x 461mm (with Stand)
Weight
21.0kg
Operating
Storage
This monitor can be installed on any Plug & Play compatible system. Interaction of the monitor and
computer systems will provide the best operating conditions and monitor settings. In most cases,
monitor installation will proceed automatically, unless the user wishes to select alternate settings.
Temperature: 32°F ~ 104°F(0°C ~ 40°C)
Humidity: 10% ~ 80%, non-condensing
Temperature: -4°F ~113°F (-20°C ~ 45°C)
Humidity: 5% ~ 95%, non-condensing
Environmental considerations
Plug and Play Capability
Note Design and specifications are subject to change without prior notice.
SyncMaster 955MB
768mb-955mb-en-new.qxd 1/27/2003 5:22 PM Page 26
Page 56
27
Display Modes
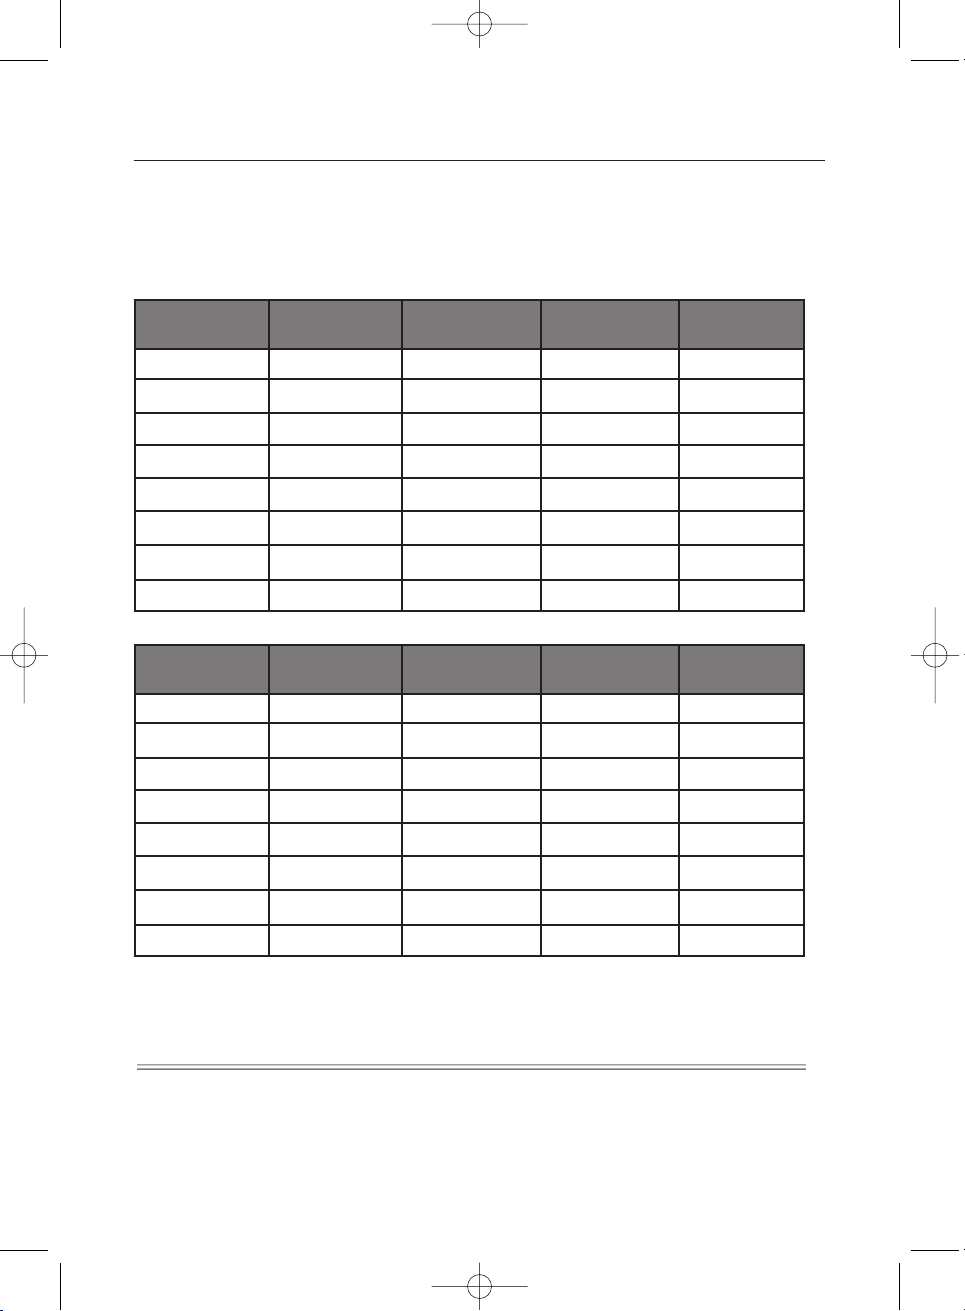
If the signal transferred from the computer is the same as the following Preset Timing Modes, the screen will
be adjusted automatically. However, if the signal differs, the screen may go blank while the power LED is on.
Refer to the video card manual and adjust the screen as follows.
Horizontal Frequency
The time to scan one line connecting the right edge to the left edge of the screen
horizontally is called Horizontal Cycle and the inverse number of the Horizontal Cycle is
called Horizontal Frequency. Unit: kHz
Vertical Frequency
Like a fluorescent lamp, the screen has to repeat the same image many times per second
to display an image to the user. The frequency of this repetition is called Vertical Frequency
or Refresh Rate. Unit: Hz
IBM, 640 x 480 31.469 59.940 25.175 -/-
IBM, 720 x 400 31.469 70.087 28.322 -/+
VESA, 640 x 480 43.269 85.008 36.000 -/-
VESA, 800 x 600 46.875 75.000 49.500 +/+
VESA, 800 x 600 53.674 85.061 56.250 +/+
VESA, 1024 x 768 60.023 75.029 78.750 +/+
VESA, 1024 x 768 68.677 84.997 94.500 +/+
VESA, 1280 x 1024 79.976 75.025 135.00 +/+
Sync Polarity
(H/V)
Pixel Clock (MHz)Display Mode
Horizontal
Frequency (kHz)
Vertical Frequency
(Hz)
SyncMaster 765MB
SyncMaster 955MB
IBM, 640 x 480 31.469 59.940 25.175 -/-
IBM, 720 x 400 31.469 70.087 28.322 -/+
VESA, 640 x 480 37.500 75.000 31.500 -/-
VESA, 640 x 480 43.269 85.008 36.000 -/-
VESA, 800 x 600 53.674 85.061 56.250 +/+
VESA, 1024 x 768 60.023 75.029 78.750 +/+
VESA, 1024 x 768 68.677 84.997 94.500 +/+
VESA, 1280 x 1024 79.976 75.025 135.00 +/+
Sync Polarity
(H/V)
Pixel Clock (MHz)Display Mode
Horizontal
Frequency (kHz)
Vertical Frequency
(Hz)
768mb-955mb-en-new.qxd 1/27/2003 5:22 PM Page 27
Page 57
Memo
768mb-955mb-en-new.qxd 1/27/2003 5:22 PM Page 28
 Loading...