

Samsung SyncMaster 933HD Plus, SyncMaster BN59-00905F, 933HDPLUS-1, 933HD - SyncMaster Plus - 18.5"" LCD Monitor User Manual
Page 1

LCD TV MONITOR
user manual
imagine the possibilities
Thank you for purchasing this Samsung product.
To receive more complete service, please
register your product at
Model Serial No.
SyncMaster 933HD Plus
www.samsung.com/register
BN59-00905F_eng.indd 1 2009-11-10 9:30:36
Page 2
Important Warranty Information Regarding Television Format Viewing ❑
See the warranty card for more information on warranty terms. N
Wide screen format LCD Displays (16:9, the aspect ratio of the screen width to height) are primarily
designed to view wide screen format full-motion video. The images displayed on them should
primarily be in the wide screen 16:9 ratio format, or expanded to ll the screen if your model offers
this feature and the images are constantly moving. Displaying stationary graphics and images
on screen, such as the dark sidebars on nonexpanded standard format television video and
programming, should be limited to no more than 5% of the total television viewing per week.
Additionally, viewing other stationary images and text such as stock market reports, video game
displays, station logos, web sites or computer graphics and patterns, should be limited as described
above for all televisions. Displaying stationary images that exceed the above guidelines can cause
uneven aging of LCD Displays that leave subtle, but permanent burned-in ghost images in the LCD
picture. To avoid this, vary the programming and images, and primarily display full screen moving
images, not stationary patterns or dark bars.
On LCD models that offer picture sizing features, use these controls to view different formats as a
full screen picture.
Be careful in the selection and duration of television formats used for viewing. Uneven LCD aging
as a result of format selection and use, as well as burned-in images, are not covered by your
Samsung limited warranty.
Precautions When Displaying a Still Image ❑
A still image may cause permanent damage to the TV screen
Do not display a still image on the LCD panel for more than 2 hours as it can cause screen ●
image retention. This image retention is also known as “screen burn”. To avoid such image
retention, reduce the degree of brightness and contrast of the screen when displaying a still
image.
● Watching the LCD TV in 4:3 format for a long period of time may leave traces
of borders displayed on the left, right and center of the screen caused by the
difference of light emission on the screen.
Playing a DVD or a game console may cause a similar effect to the screen.
Damages caused by the above effect are not covered by the Warranty.
Displaying still images from Video games and PC for longer than a certain period of time may ●
produce partial after-images.
To prevent this effect, reduce the ‘brightness’ and ‘contrast’ when displaying still images.
© 2009 Samsung Electronics Co., Ltd. All rights reserved.
BN59-00905F_eng.indd 2 2009-11-10 9:30:36
Page 3
English - 1
License ❑
Manufactured under license from Dolby Laboratories. Dolby and the double-D symbol are trademarks
of Dolby Laboratories.
Symbol ❑
N O T
Note One-Touch Button TOOLS Button
General Information
Accessories ■ ................................................. 2
Viewing the Control Panel ■ ........................... 2
Viewing the Connection Panel ■ ..................... 3
Remote Control ■ ........................................... 4
Installing Batteries in the Remote Control ■ ... 4
Connections
Connecting VHF and UHF Antennas ■ ........... 5
Connecting Cable TV ■ .................................. 6
Connecting a DVD / Blu-Ray player / ■
Satellite receiver (Set-Top Box) via HDMI ... 7
Connecting a DVD / Blu-Ray player / ■
Satellite receiver (Set-Top Box) via DVI ...... 8
Connecting a VCR ■ ....................................... 8
Connecting a Camcorder ■ ............................. 9
Connecting a PC ■ ....................................... 10
Operation
Turning the TV On and Off ■ .........................11
Plug & Play Feature ■ ....................................11
CHANNEL CONTROL
Conguring the Channel Menu ■ .................. 12
Managing Channels ■ .................................. 13
Picture Control
Conguring the Picture Menu ■
(TV / AV / HDMI ) ....................................... 15
Using Your TV as a Computer (PC) ■
Display ....................................................... 18
Setting up the TV with your PC ■ ................. 19
Sound Control
Conguring the Sound Menu ■ ..................... 20
Setup
Conguring the Setup Menu ■ ...................... 21
Input / Support
Conguring the Input Menu ■ ....................... 26
Conguring the Support Menu ■ ................... 27
Anynet
+
Connecting Anynet ■
+
Devices .................... 28
Setting Up Anynet+ ■ .................................... 29
Switching between Anynet ■
+
Devices ......... 30
Troubleshooting for Anynet ■
+
...................... 31
Installing the Software
Installing the Device Driver ■ ........................ 32
Natural Color ■ ............................................. 32
MultiScreen ■ ................................................ 33
Appendix
TV Monitor Self-Diagnosis ■ ......................... 34
Troubleshooting ■ ......................................... 34
FAQ ■ ........................................................... 36
Installing the Stand ■ .................................... 37
Disconnecting the Stand ■ ............................ 37
Wall Mount Kit Specications (VESA) ■ ....... 37
Using the Anti-Theft Kensington Lock ■ ....... 38
Securing the Installation Space ■ ................. 39
Specications ■ ............................................ 40
Power Saving Function ■ .............................. 40
CONTENTS
BN59-00905F_eng.indd 1 2009-11-10 9:30:36
Page 4
English - 2
GENERAL INFORMATION
Accessories ¦
Please make sure the following items are included with your LCD TV. If any items are missing,
contact your dealer.
Remote Control / Batteries (AAA x 2) (Not available in all locations) / Power Cord / Cleaning Cloth
/ User Manual / Quick Setup Guide / Warranty Card (Not available in all locations) / Cable holder
/ Stand Base
The items color and shape may vary depending on the model. N
Cleaning Cloth is only provided for highly polished black products as a product feature. N
Viewing the Control Panel ¦
The product color an shape may vary depending on the model. N
1
SOURCE
2
3
5
6
4
7
8
9
10
MENU
1
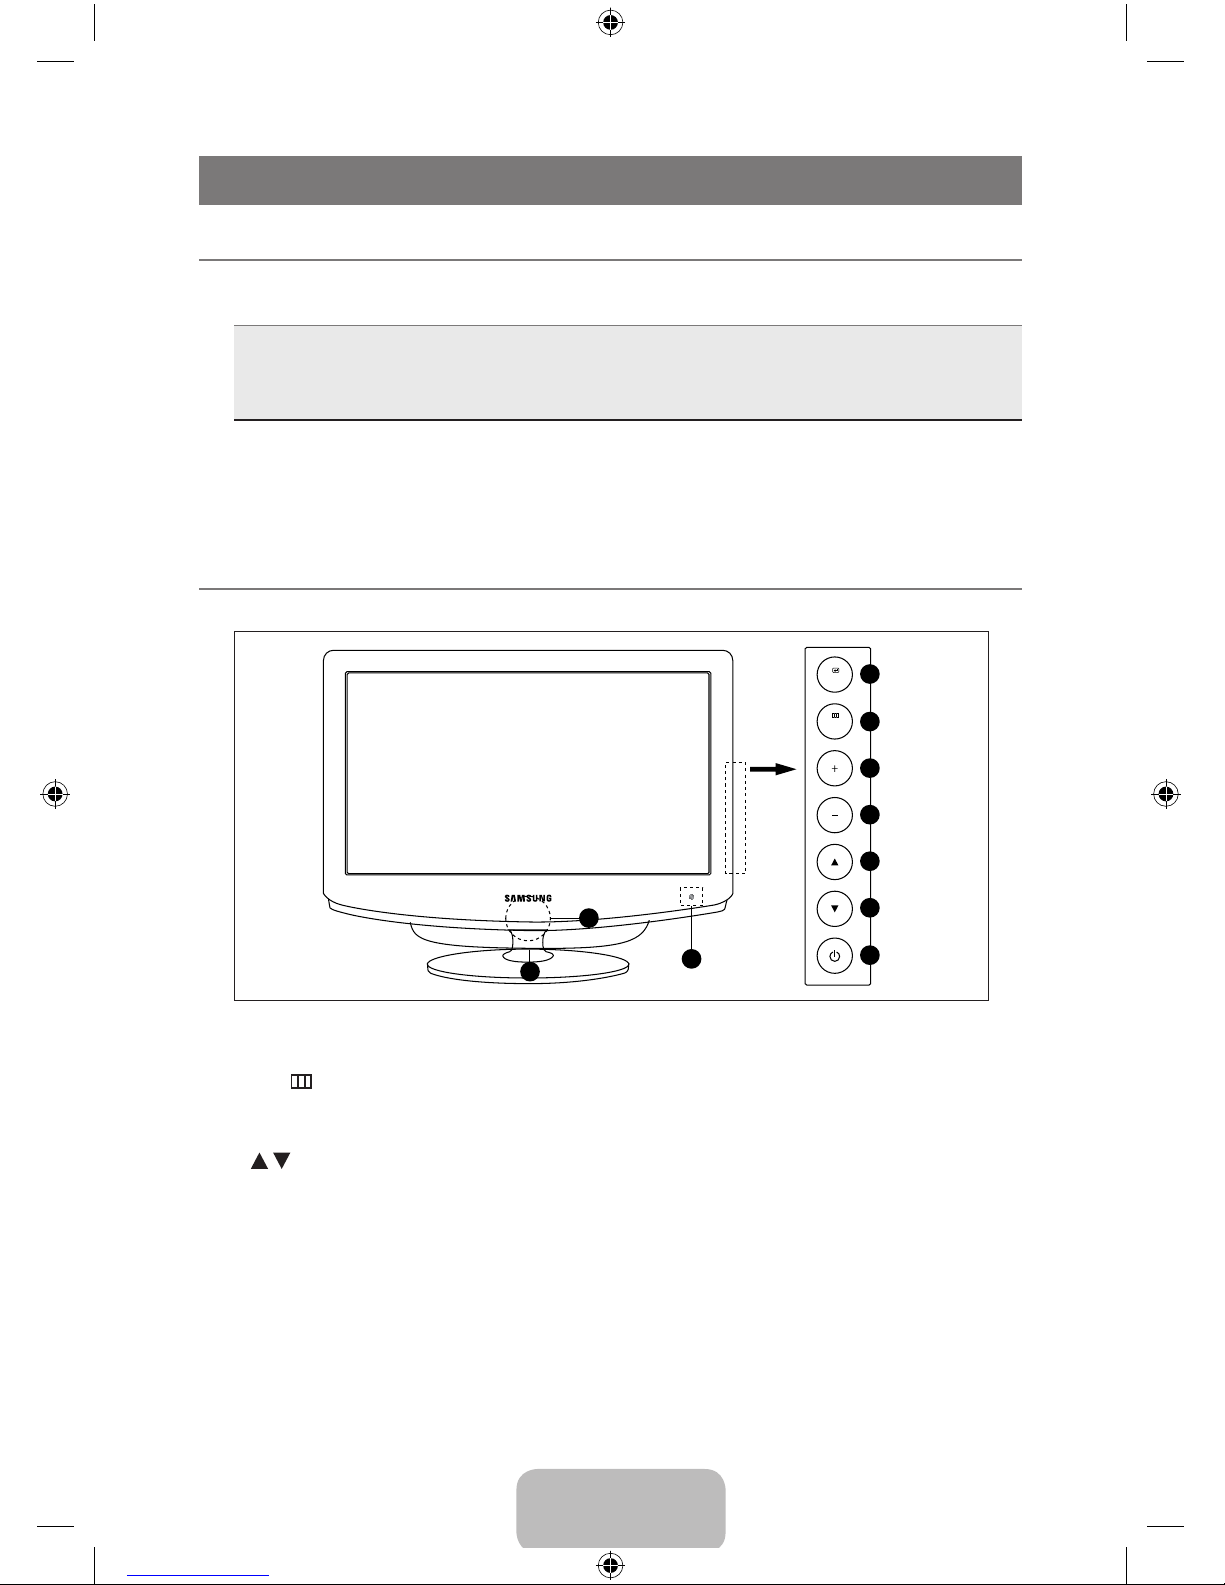
SOURCEE: Toggles between all the available input sources. In the on-screen menu, use this
E
button as you use the button on the remote control.
2
MENU : Press to see an on-screen menu of your TV’s features.
3,4
+ / - : Moves from one menu item to another horizontally or adjusts selected menu values
Adjusts the audio volume.
5,6
, : Moves from one menu item to another vertically or adjusts selected menu values. In TV
mode, selects TV channels.
7 P
(POWER): Press to turn the TV on and off.
8
REMOTE CONTROL SENSOR: Aim the remote control towards this spot on the TV.
9
POWER INDICATOR: Blinks and turns off when the power is on and lights up in stand-by mode.
0
SPEAKERS
BN59-00905F_eng.indd 2 2009-11-10 9:30:36
Page 5

English - 3
Viewing the Connection Panel ¦
The product color and shape may vary depending on the model. N
1
ANT IN
Connects to an antenna or cable TV system. –
2
SERVICE
Connector for service only. –
3
HDMI IN
Connects to the HDMI jack of a device with an HDMI output. –
No sound connection is needed for an HDMI to HDMI connection. N
4
AV IN
Video and audio inputs for external devices, such as a camcorder or VCR. –
5
PC IN
Connects to the video jacks on your PC. –
6
Connect your headphones to the Headphone connection terminal. –
7
HDMI / PC AUDIO IN
Connect the HDMI / PC AUDIO IN terminal at the back of your product to your –
computer’s sound card.
8
POWER INPUT
Connects the supplied power cord. –
9
KENSINGTON LOCK
The Kensington Lock (optional) is a device used to physically x the system when used in –
a public place. If you want to use a locking device, contact the dealer where you purchased
the TV.
The location of the Kensington Lock may be different depending on its model. N
[TV Rear Panel]
ANT IN
HDMI IN
AV IN
- AUDIO -
VIDEO
R
L
PC IN
HDMI / PC
AUDIO IN
POWER
BN59-00905F_eng.indd 3 2009-11-10 9:30:37
Page 6
English - 4
Remote Control ¦
You can use the remote control up to a distance of about 23 feet from the TV. N
The performance of the remote control may be affected by bright light. N
1
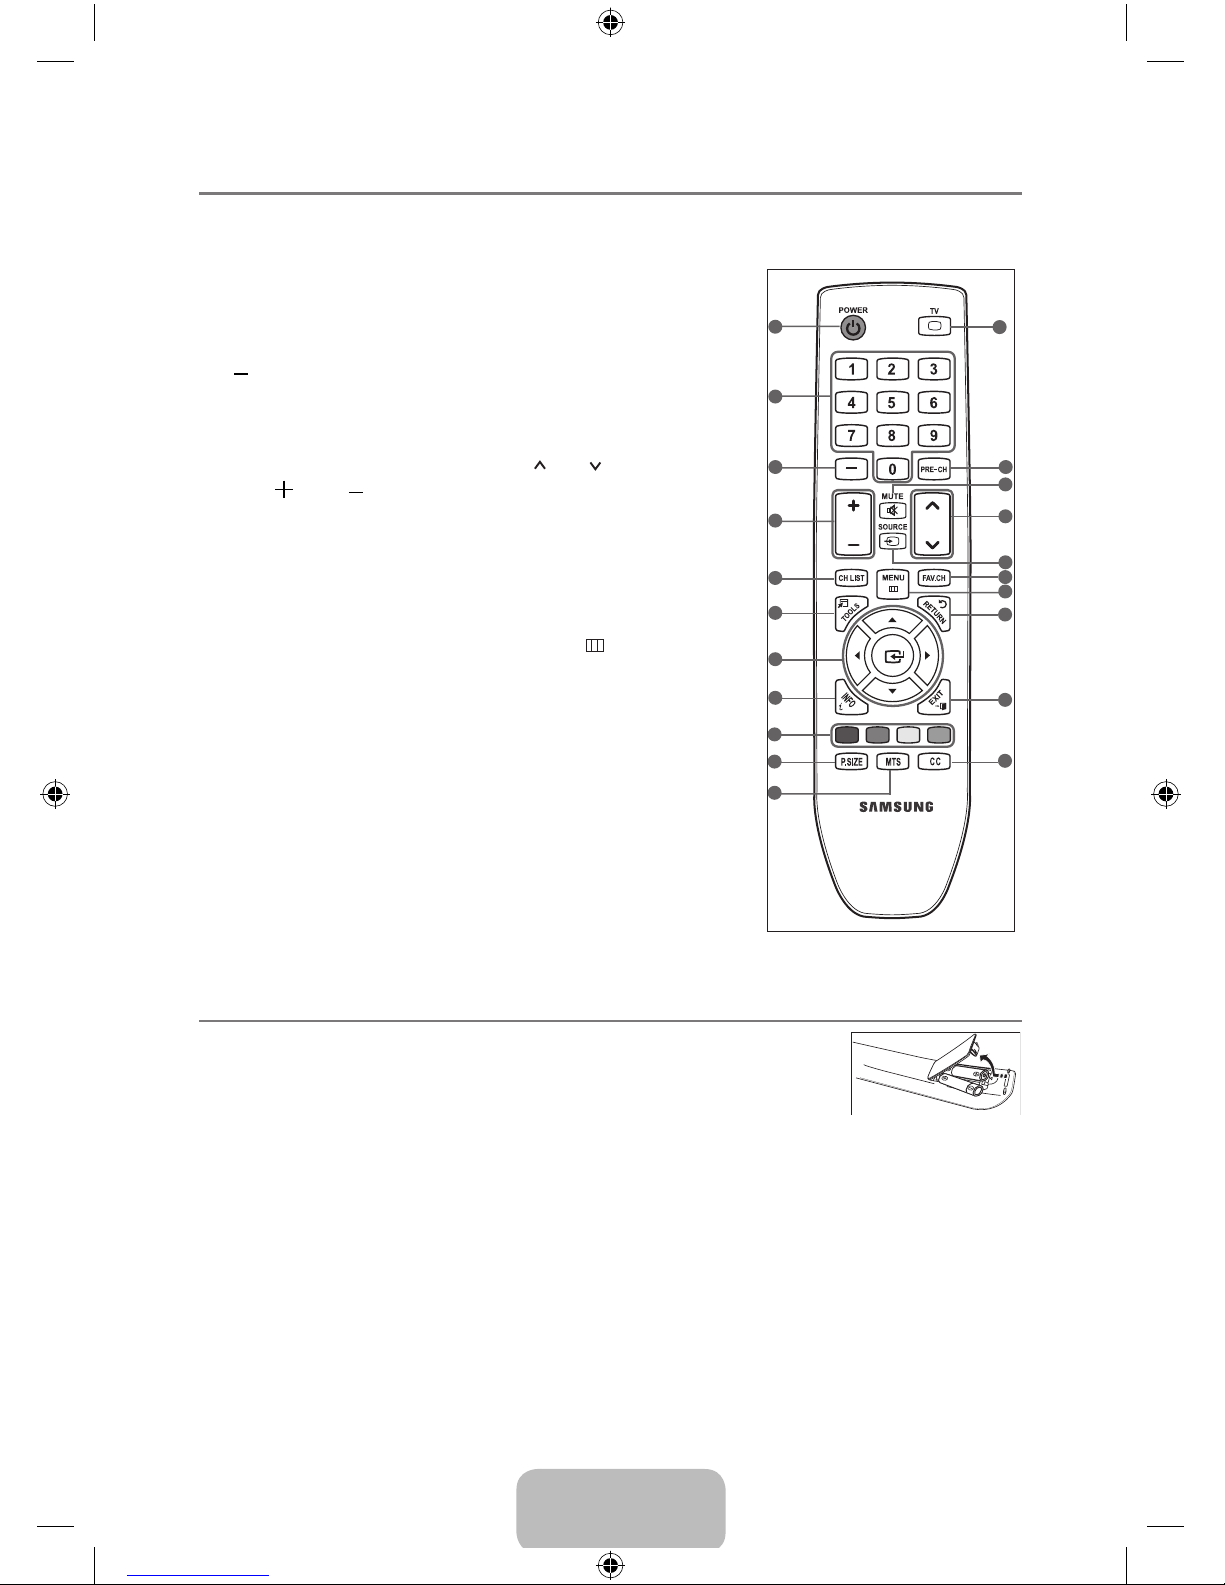
POWER:Turns the TV on and
off.
2
NUMERIC BUTTONS: Press to
change the channel.
3
:
Press to select additional
channels (digital) being broadcast
by the same station. For example,
to select channel ‘54-3’, press
‘54’, then press ‘-’ and ‘3’.
4
VOL / VOL : Press to
increase or decrease the
volume.
5
CH LIST: Used to display
Channel Lists on the screen.
6
TOOLS: Use to quickly select
frequently used functions.
7
UP▲/DOWN▼/LEFT◄/
RIGHT►/E: Use to select on-
screen menu items and change
menu values.
8
INFO: Press to display
information on the TV screen.
9
COLOR BUTTONS: Use these
buttons in the Channel list, etc.
0
P.SIZE:Picture size selection.
!
MTS:Press to choose stereo,
mono or Separate Audio
Program (SAP broadcast).
@
TV: Selects the TV mode
directly.
#
PRE-CH: This button
is used to return to the
previous channel viewed.
$
MUTE M: Press to
temporarily cut off the
sound.
%
CH : Press to change
channels.
^
SOURCE: Press to display
and select the available
video sources.
&
FAV.CH: Press to switch to
your favorite channels.
*
MENU : Displays the
main on-screen menu.
(
RETURN: Returns to the
previous menu.
)
EXIT:Press to exit the
menu.
a
CC:Controls the caption
decoder.
Installing Batteries in the Remote Control ¦
1. Lift the cover at the back of the remote control upward as shown in the gure.
2. Install two AAA size batteries.
Make sure to match the “+” and “–” ends of the batteries with the diagram N
inside the compartment.
3. Replace the cover.
Remove the batteries and store them in a cool, dry place if you won’t be using the remote control N
for a long time. (Assuming typical TV usage, the batteries should last for about one year.)
If the remote control doesn’t work, check the following: N
Is the TV power on? ●
Are the plus and minus ends of the batteries reversed? ●
Are the batteries drained? ●
Is there a power outage or is the power cord unplugged? ●
Is there a special uorescent light or neon sign nearby? ●
CHVOL
17
18
19
20
21
15
14
13
1
2
3
4
6
5
7
8
9
10
1 1
12
16
BN59-00905F_eng.indd 4 2009-11-10 9:30:37
Page 7
English - 5
CONNECTIONS
Connecting VHF and UHF Antennas ¦
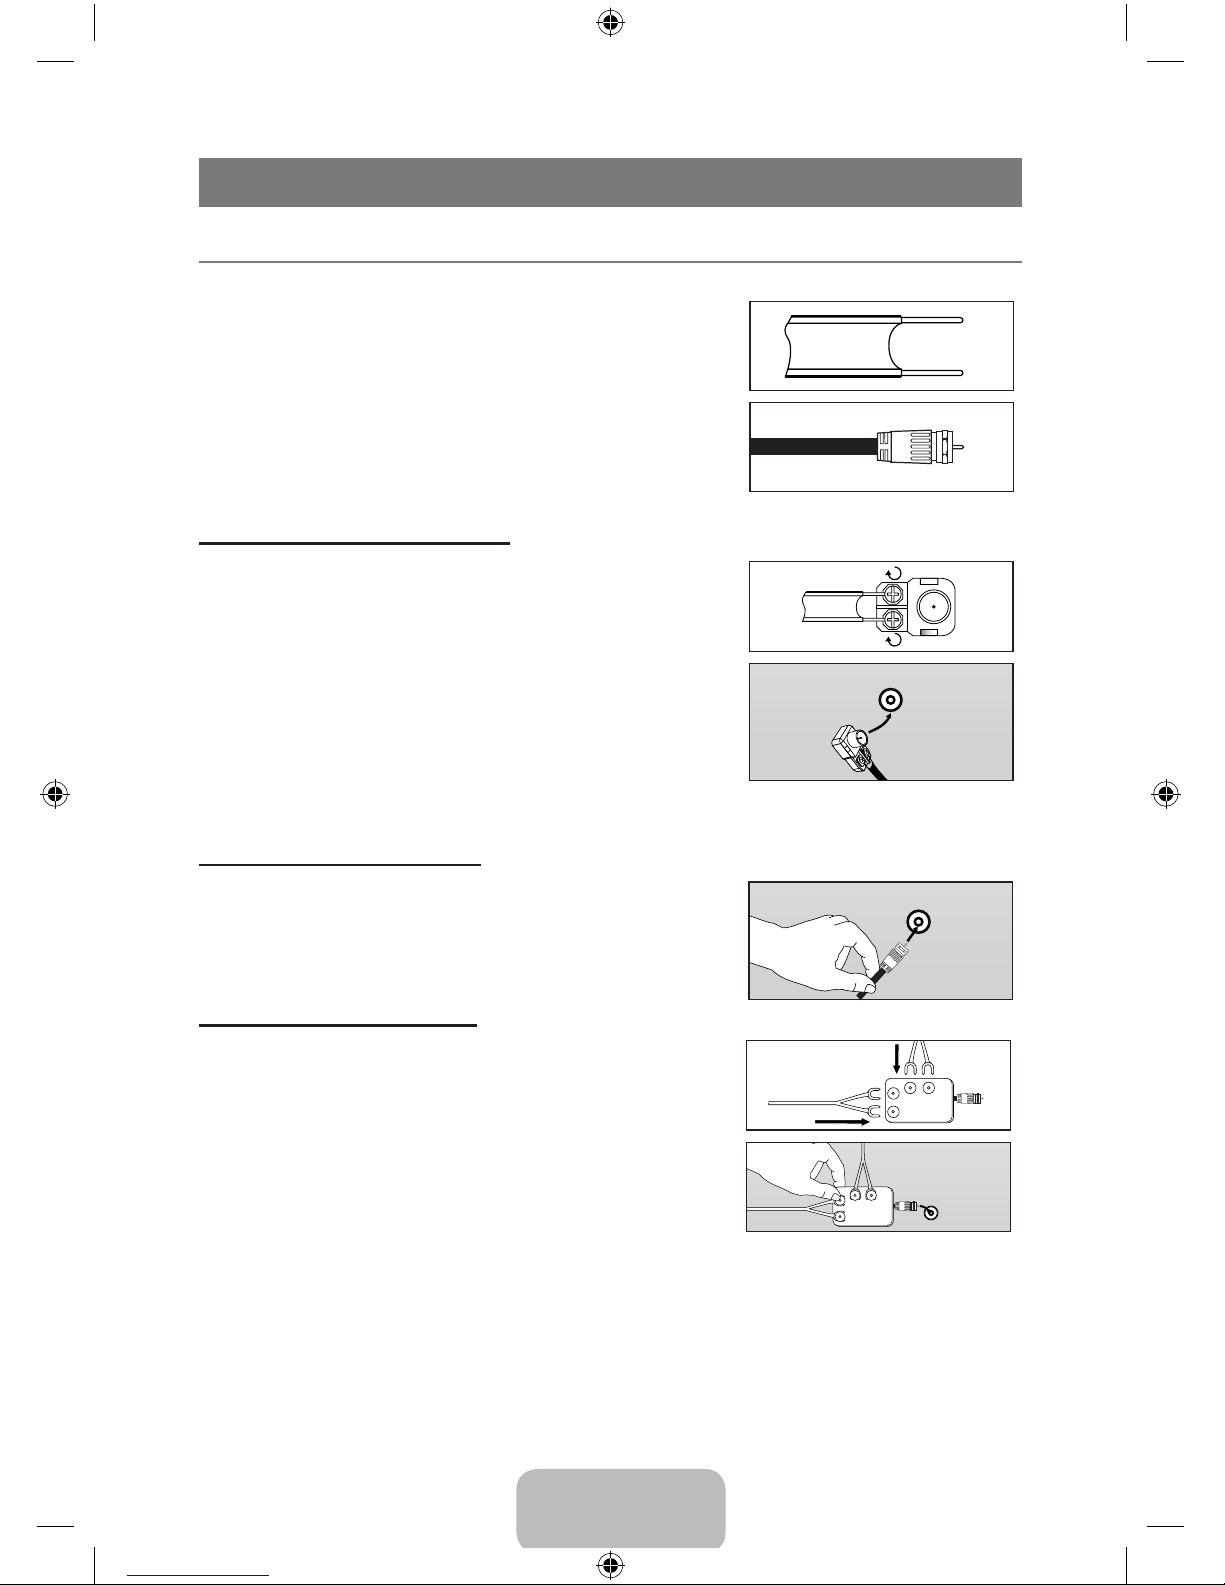
If your antenna has a set of leads that look like the diagram to the right, see ‘Antennas with 300 Ω
Flat Twin Leads’ below.
If your antenna has one lead that looks like the diagram to the
right, see ‘Antennas with 75 Ω Round Leads’.
If you have two antennas, see ‘Separate VHF and UHF
Antennas’.
Antennaswith300ΩFlatTwinLeads
If you are using an off-air antenna (such as a roof antenna or
‘rabbit ears’) that has 300Ω twin at leads, follow the directions
below.
1. Place the wires from the twin leads under the screws on a 300-
75 Ω adapter (not supplied). Use a screwdriver to tighten the
screws.
2. Plug the adaptor into the ANT IN terminal on the back of the TV.
Antennaswith75ΩRoundLeads
Plug the antenna lead into the ANT IN terminal on the back of
the TV.
Separate VHF and UHF Antennas
If you have two separate antennas for your TV (one VHF and
one UHF), you must combine the two antenna signals before
connecting the antennas to the TV. This procedure requires
an optional combiner-adaptor (available at most electronics
shops).
1. Connect both antenna leads to the combiner.
2. Plug the combiner into the ANT IN terminal on the bottom of
the rear panel.
ANT IN
ANT IN
UHF
VHF
ANT IN
UHF
VHF
BN59-00905F_eng.indd 5 2009-11-10 9:30:38
Page 8
English - 6
Connecting Cable TV ¦
To connect to a cable TV system, follow the instructions below.
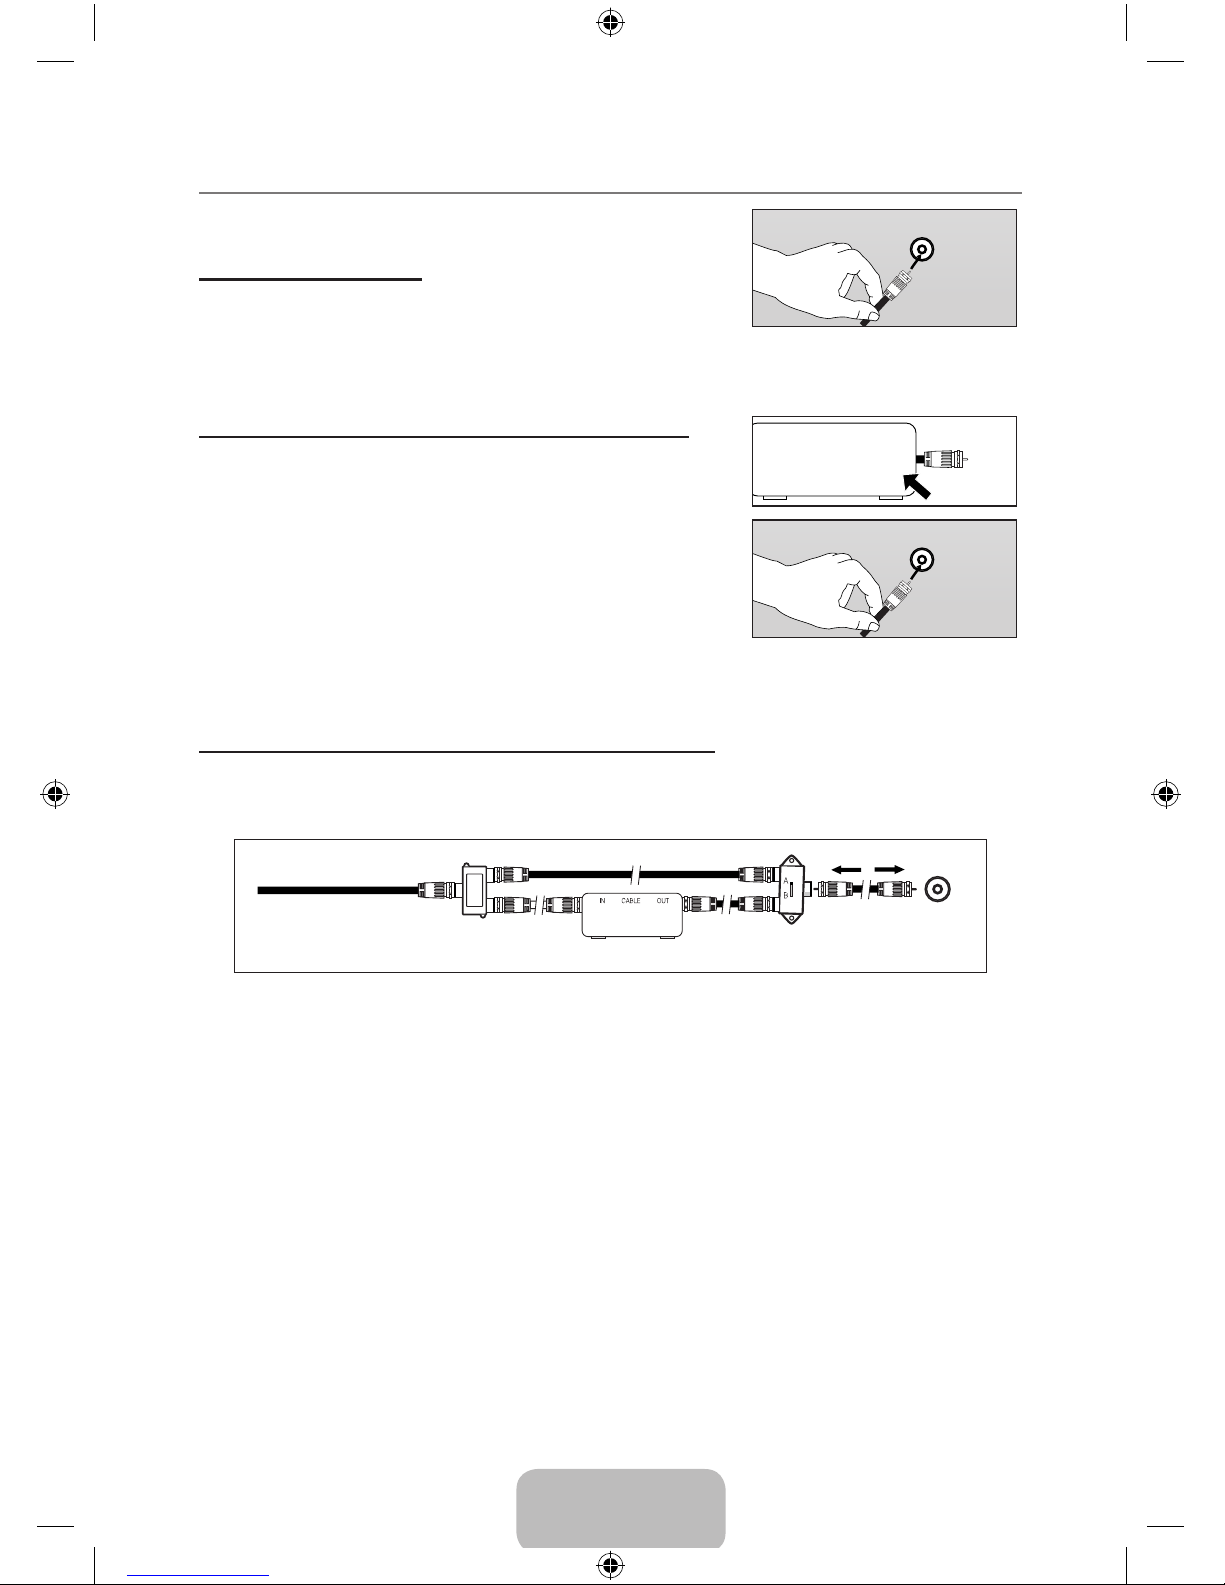
Cable without a Cable Box
Plug the incoming cable into the ANT IN terminal on the back of
the TV.
Because this TV is cable-ready, you do not need a cable box N
to view unscrambled cable channels.
Connecting to a Cable Box that Descrambles All Channels
1. Find the cable that is connected to the ANT OUT terminal on
your cable box.
This terminal might be labeled ‘ANT OUT’, ‘VHF OUT’ or N
simply, ‘OUT’.
2. Connect the other end of this cable to the ANT IN terminal on
the back of the TV.
Connecting to a Cable Box that Descrambles Some Channels
If your cable box descrambles only some channels (such as premium channels), follow the
instructions below. You will need a two-way splitter, an RF (A/B) switch and four lengths of RF cable.
(These items are available at most electronics stores.)
Splitter
Cable Box
Incoming cable
TV Rear
ANT IN
RF (A/B) Switch
1. Find and disconnect the cable that is connected to the ANT IN terminal on your cable box.
This terminal might be labeled ‘ANT IN’, ‘VHF IN’ or simply, ‘IN’. N
2. Connect this cable to a two-way splitter.
3. Connect an RF cable between the OUTPUT terminal on the splitter and the IN terminal on
the cable box.
4. Connect an RF cable between the ANT OUT terminal on the cable box and the B–IN terminal
on the RF(A/B) switch.
5. Connect another cable between the other OUT terminal on the splitter and the A–IN terminal
on the RF (A/B) switch.
6. Connect the last RF cable between the OUT terminal on the RF (A/B) switch and the ANT IN
terminal on the rear of the TV.
After you have made this connection, set the A/B switch to the ‘A’ position for normal viewing. Set
the A/B switch to the ‘B’ position to view scrambled channels. (When you set the A/B switch to ‘B’,
you will need to tune your TV to the cable box’s output channel, which is usually channel 3 or 4.)
ANT IN
ANT IN ANT OUT
ANT IN
BN59-00905F_eng.indd 6 2009-11-10 9:30:38
Page 9
English - 7
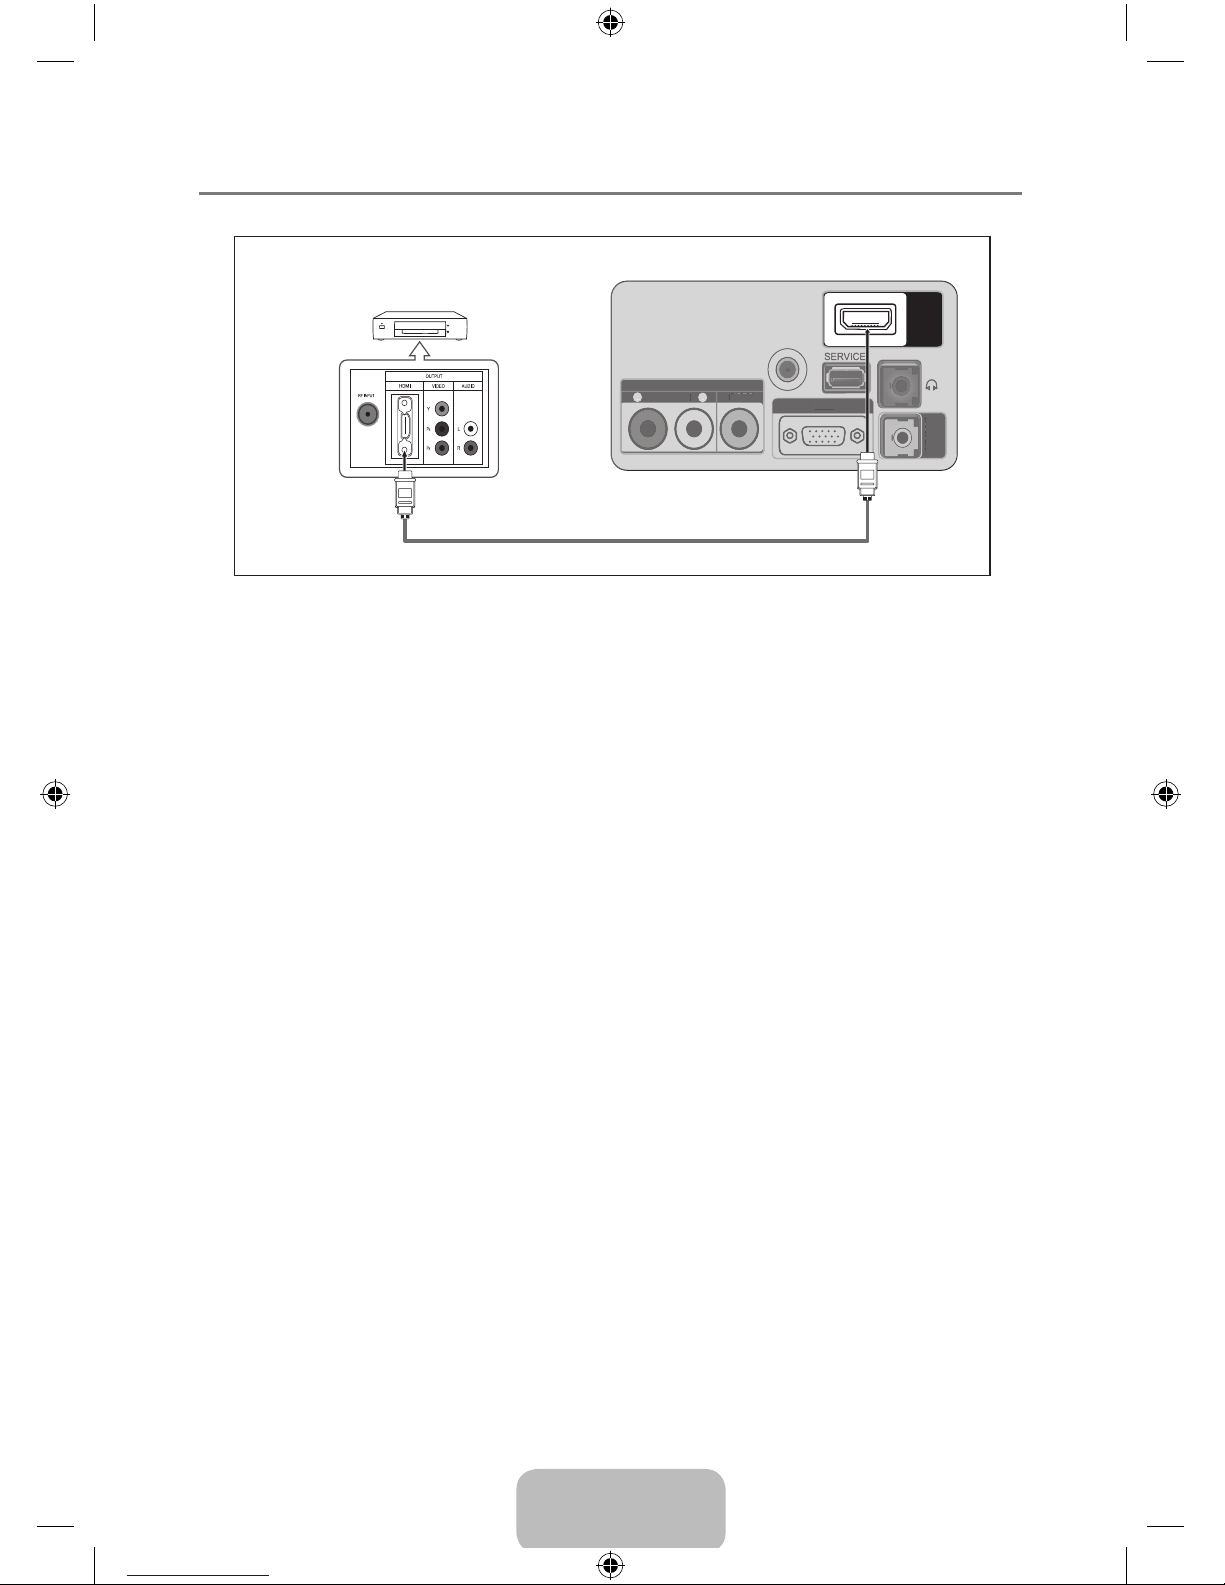
Connecting a DVD / Blu-Ray player / Satellite receiver (Set-Top Box) via HDMI ¦
This connection can only be made if there is an HDMI Output connector on the external device.
TV Rear Panel
DVD / Blu-Ray player / Satellite receiver
(Set-Top Box) Rear Panel
ANT IN
HDMI IN
AV IN
- AUDIO -
VIDEO
R
L
PC IN
HDMI / PC
AUDIO IN
-
AUDIO -
V
IDE
O
L
PC I
N
HDMI
/
P
C
A
UDI
O
I
N
1
HDMI Cable (Not supplied)
What is HDMI? N
HDMI(High-Denition Multimedia Interface), is an interface that enables the transmission of ●
digital audio and video signals using a single cable.
The difference between HDMI and DVI is that the HDMI device is smaller in size and has the ●
HDCP (High Bandwidth Digital Copy Protection) coding feature installed.
Each DVD / Blu-Ray player / Satellite receiver (Set-Top Box) has a different back panel N
conguration.
The TV may not output sound and pictures may be displayed with abnormal color when DVD / N
Blu-Ray player / Satellite receiver (Set-Top Box) supporting HDMI versions older than 1.3 are
connected. When connecting an older HDMI cable and there is no sound, connect the HDMI
cable to the HDMI IN jack and the audio cables to the HDMI / PC AUDIO IN jacks on the back of
the TV. If this happens, contact the company that provided the DVD / Blu-Ray player / Satellite
receiver (Set-Top Box) to conrm the HDMI version, then request an upgrade.
HDMI cables that are not 1.3 may cause annoying icker or no screen display. N
BN59-00905F_eng.indd 7 2009-11-10 9:30:38
Page 10
English - 8
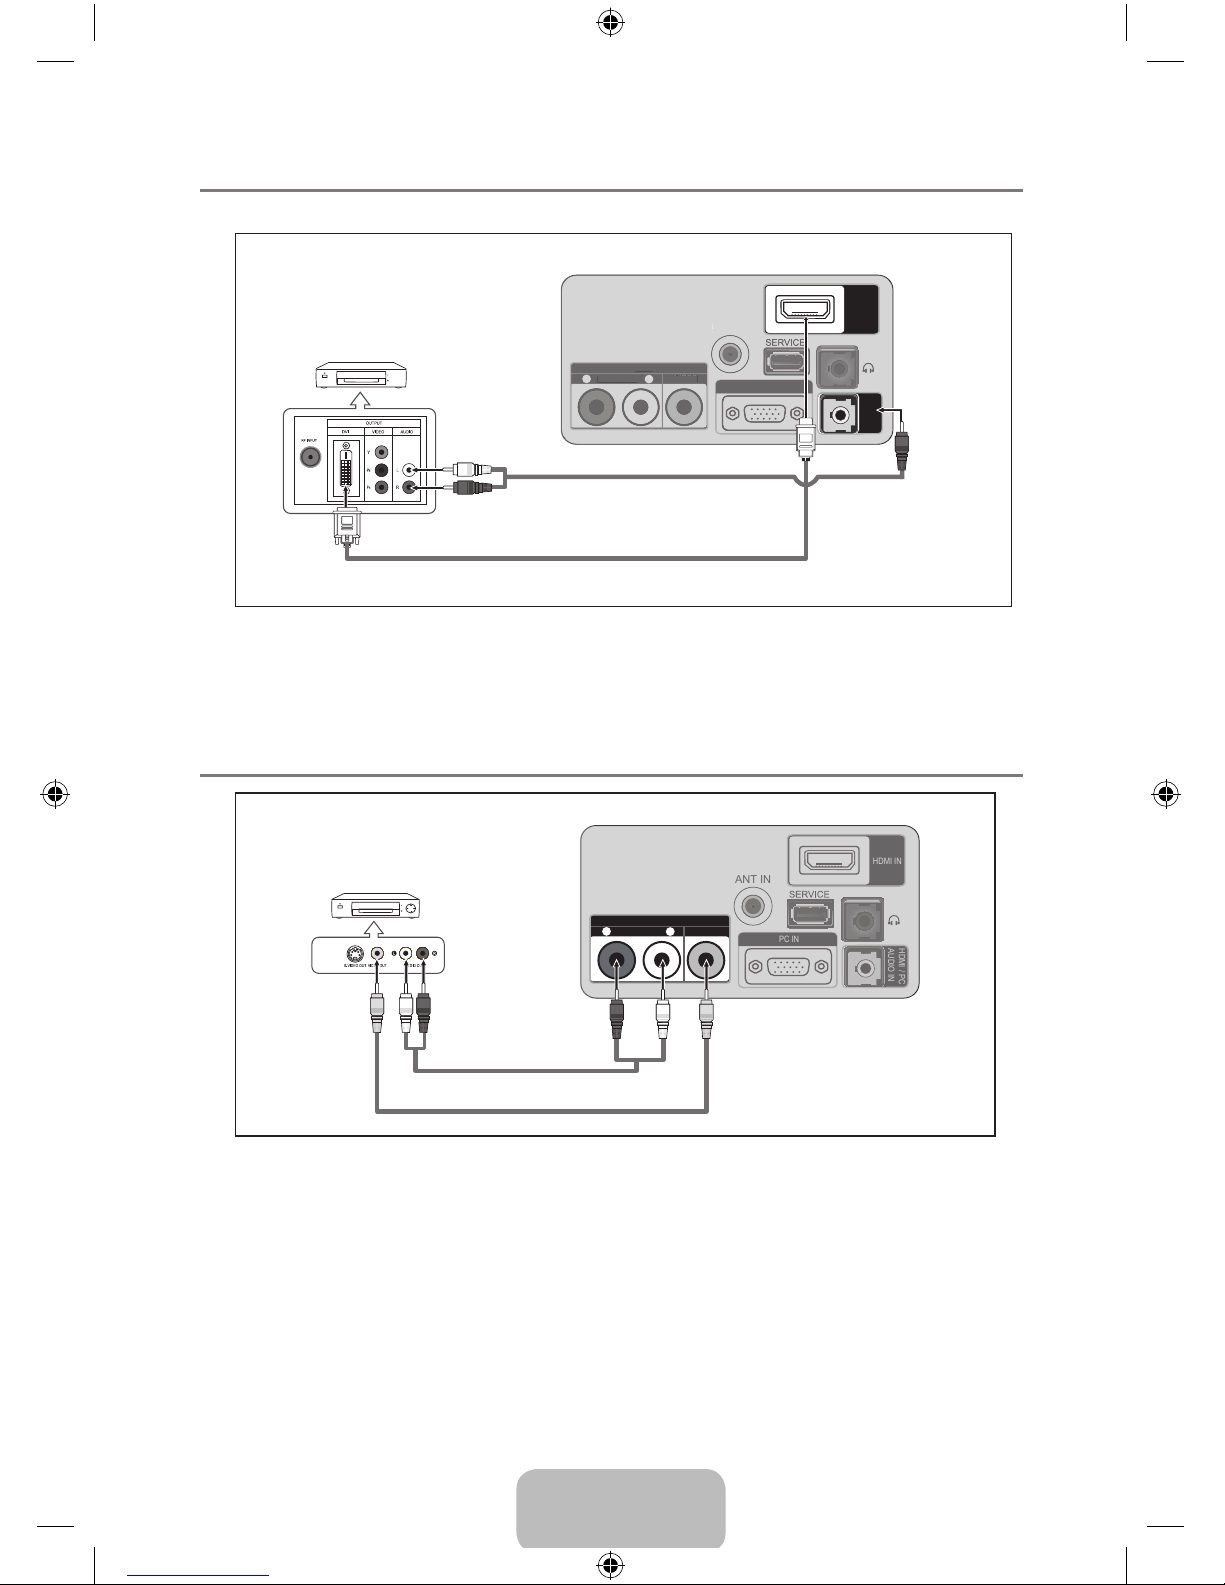
Connecting a DVD / Blu-Ray player / Satellite receiver (Set-Top Box) via DVI ¦
This connection can only be made if there is a DVI Output connector on the external device.
ANT IN
HDMI IN
AV IN
- AUDIO -
VIDEO
R
L
PC IN
HDMI / PC
AUDIO IN
- AUDIO
-
V
IDE
O
L
PC I
N
1
DVI to HDMI Cable (Not supplied)
2
RCA to stereo Cable (Not supplied)
DVD / Blu-Ray player /
Satellite receiver
(Set-Top Box)
TV Rear Panel
Each DVD / Blu-Ray player / Satellite receiver (Set-Top Box) has a different back panel N
conguration.
When connecting a DVD / Blu-Ray player / Satellite receiver (Set-Top Box), match the N
color of the connection terminal to the cable.
Connecting a VCR ¦
ANT IN
HDMI IN
AV IN
- AUDIO -
VIDEO
R
L
PC IN
HDMI / PC
AUDIO IN
If you have a ‘mono’ (non-stereo) VCR, use a Y-connector (not supplied) to connect to the right N
and left audio input jacks of the TV. Alternatively, connect the cable to the ‘R’ jack. If your VCR is
stereo, you must connect two cables.
Each VCR has a different back panel conguration. N
When connecting a VCR, match the color of the connection terminal to the cable. N
1
Video Cable (Not supplied)
2
Audio Cable (Not
supplied)
VCR Rear Panel
TV Rear Panel
BN59-00905F_eng.indd 8 2009-11-10 9:30:39
Page 11
English - 9
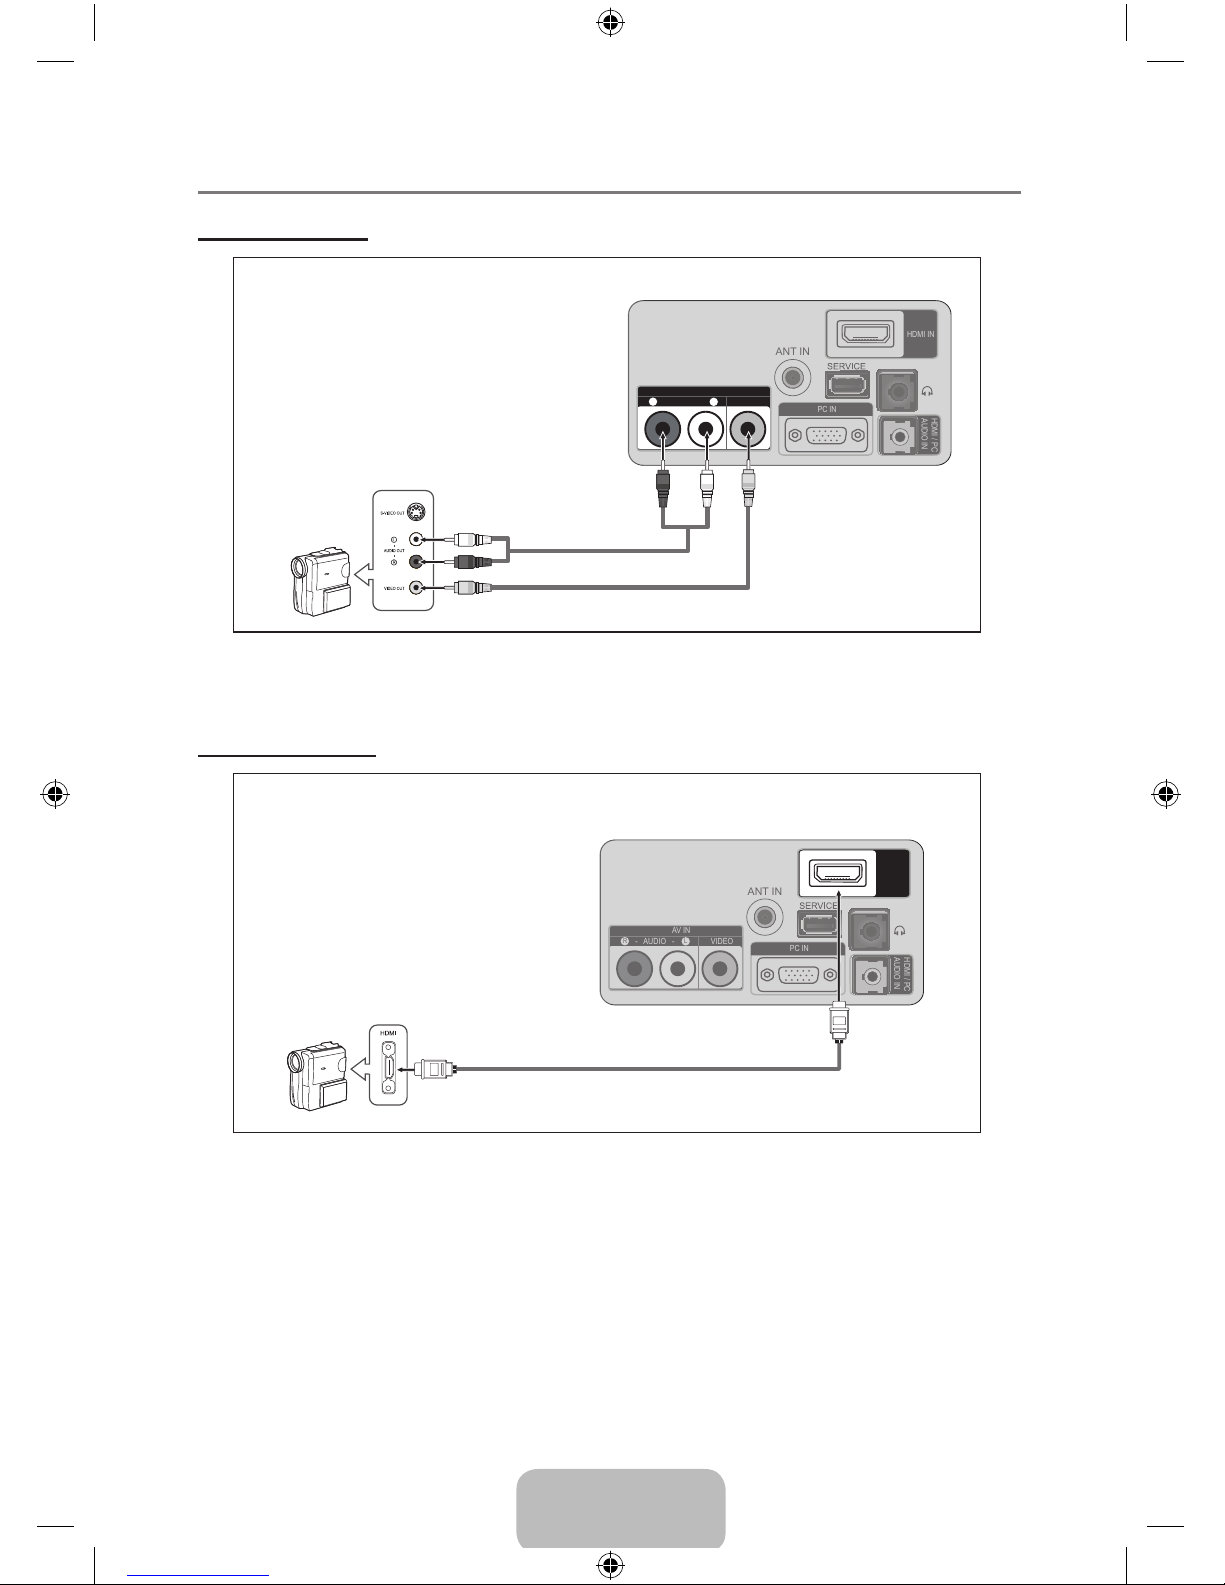
Connecting a Camcorder ¦
Using a Video Cable
ANT IN
HDMI IN
AV IN
- AUDIO -
VIDEO
R
L
PC IN
HDMI / PC
AUDIO IN
Camcorder
TV Rear Panel
1
Video Cable (Not supplied)
2
Audio Cable
(Not supplied)
Each Camcorder has a different back panel conguration. N
When connecting a Camcorder, match the color of the connection terminal to the cable. N
Using an HDMI Cable
ANT IN
HDMI IN
AV IN
- AUDIO -
VIDEO
R
L
PC IN
HDMI / PC
AUDIO IN
ANT IN
HDMI IN
AV IN
- AUDIO -
VIDEO
R
L
PC IN
HDMI / PC
AUDIO IN
TV Rear Panel
HD Camcorder
1
HDMI Cable (Not supplied)
1. Connect an HDMI Cable between the HDMI IN jack on the TV and the HDMI OUT jack on the
camcorder.
BN59-00905F_eng.indd 9 2009-11-10 9:30:40
Page 12
English - 10
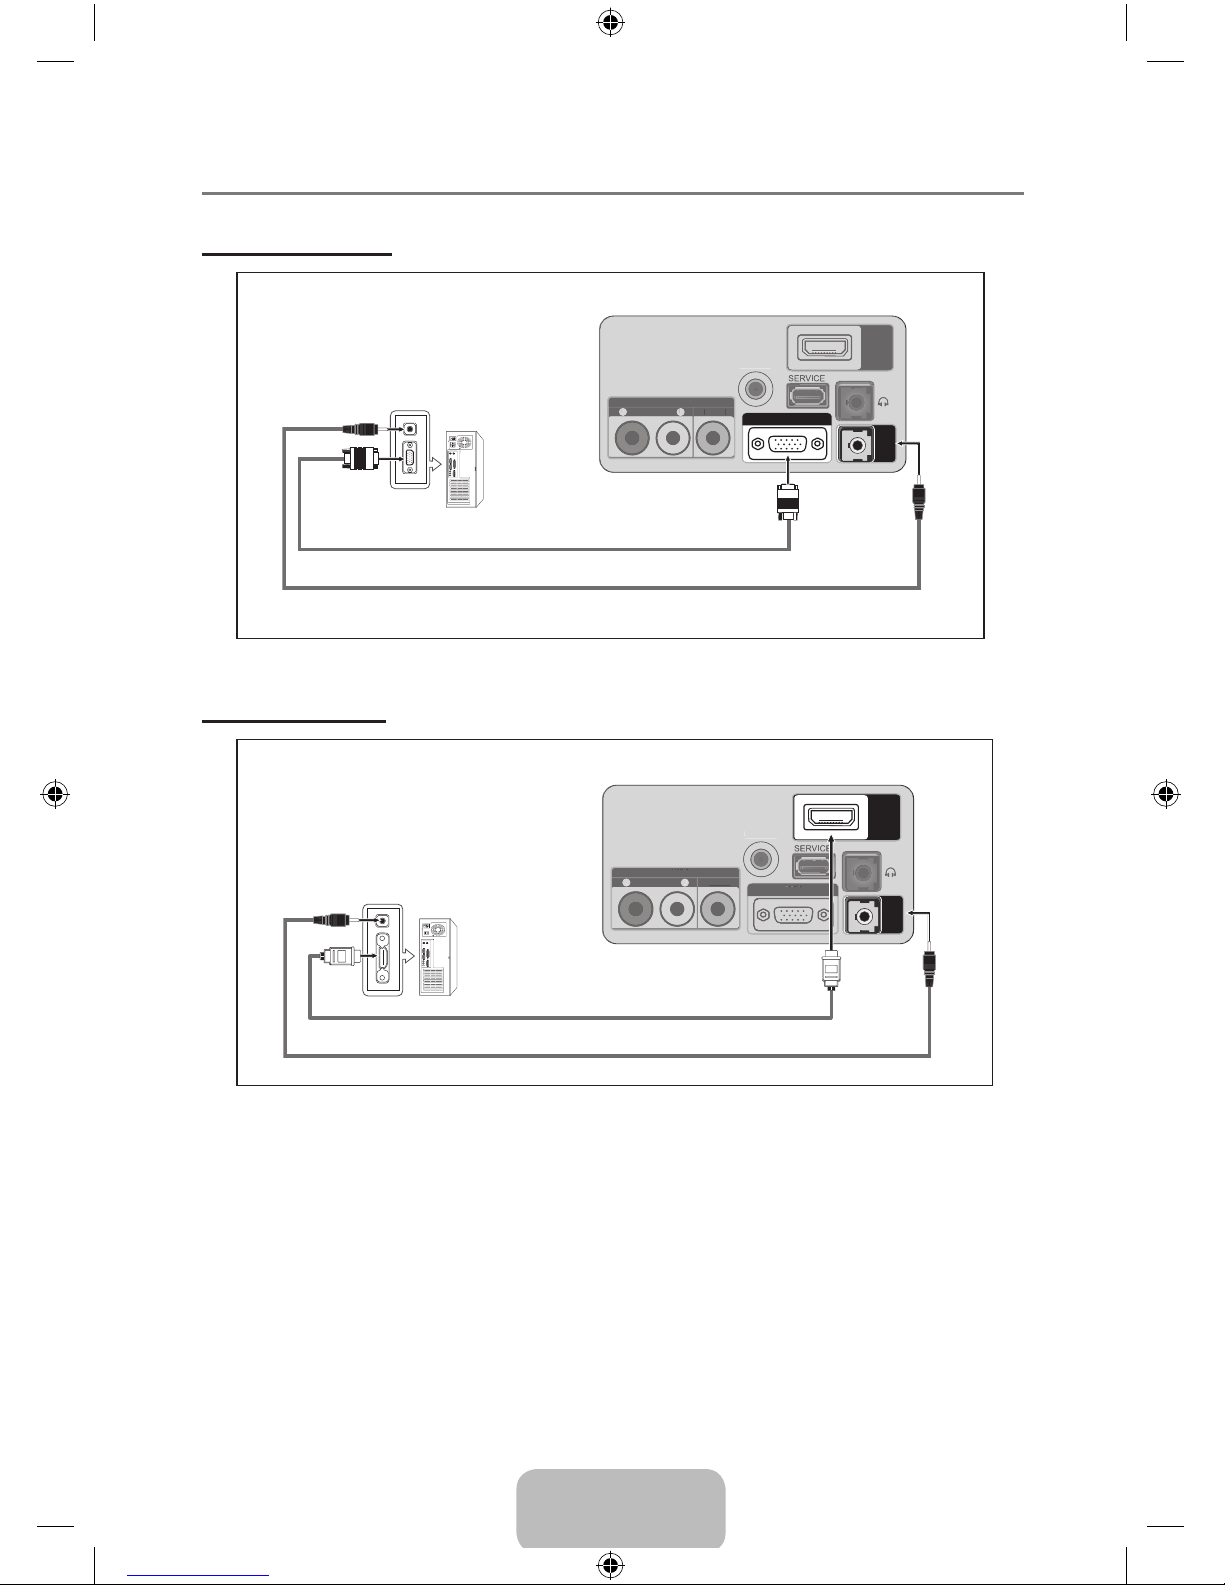
Connecting a PC ¦
Using the D-Sub Cable
ANT IN
HDMI IN
AV IN
- AUDIO -
VIDEO
R
L
PC IN
HDMI / PC
AUDIO IN
A
NT I
N
- AUDIO -
V
IDE
O
L
TV Rear Panel
PC
1
D-Sub Cable
When connecting a PC, match the color of the connection terminal to the cable N .
Using the HDMI Cable
ANT IN
HDMI IN
AV IN
- AUDIO -
VIDEO
R
L
PC IN
HDMI / PC
AUDIO IN
A
NT I
N
- AUDIO -
V
IDE
O
L
PC I
N
PC
TV Rear Panel
1
HDMI Cable (Not supplied)
2
Stereo Cable (Not supplied)
Each PC has a different back panel conguration N .
2
Stereo Cable (Not supplied)
BN59-00905F_eng.indd 10 2009-11-10 9:30:41
Page 13
English - 11
OPERATION
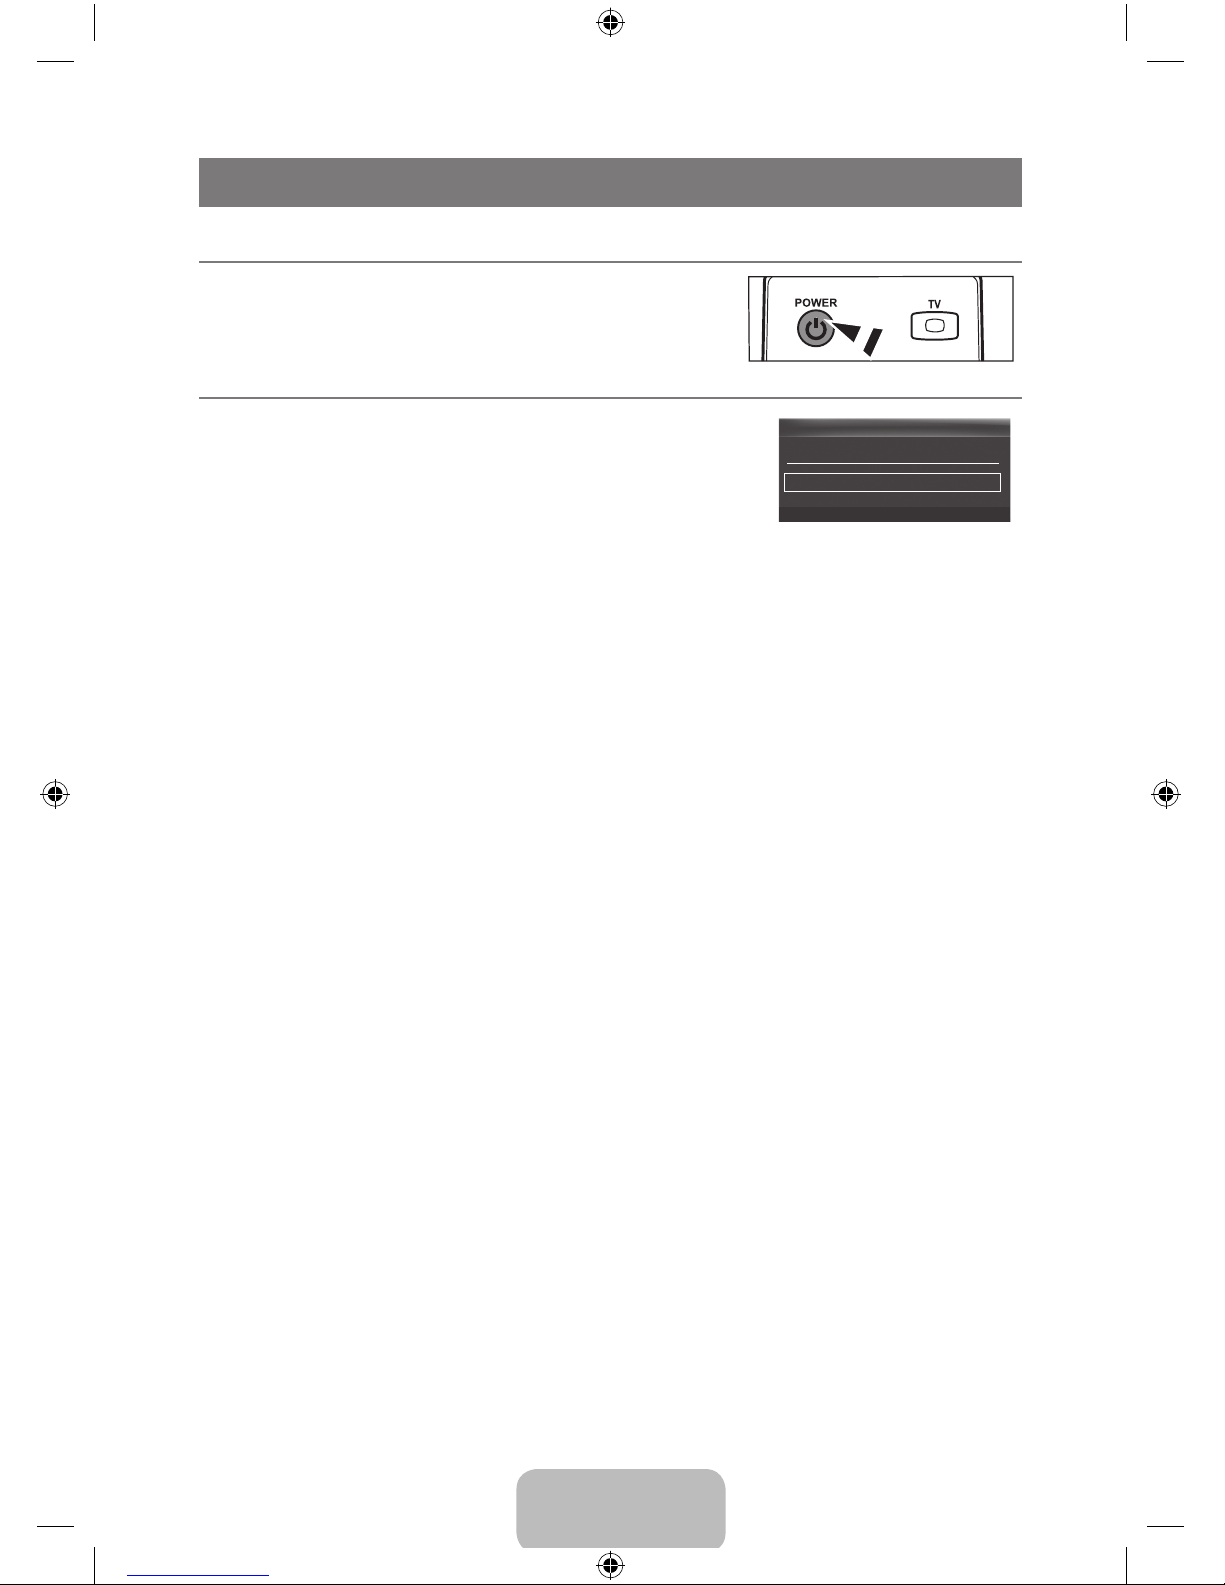
Turning the TV On and Off ¦
Press the POWER P button on the remote control. You can
also use the P button on the TV.
Plug & Play Feature ¦
When the TV is initially powered on, basic settings proceed automatically
and subsequently.
1. Press the POWER P button on the remote control.
You can also use the N
P
button on the TV.
2. Press the E button, then “Select Language of the OSD.” menu is
automatically displayed.
3. Press the ▲ or ▼ button to select language, then press the E button. The message “Select
‘Home Use’ when installing this TV in your home.” is displayed.
4. Press the ◄ or ► button to select “Store Demo” or “Home Use”, then press the E button. The
message “Select the Antenna source to memorize.” is displayed.
We recommend setting the TV to “ N Home Use” mode for the best picture in your home
environment.
“ N Store Demo” mode is only intended for use in retail environments. If the unit is accidentally set
to “Store Demo” mode and you want to return to “Home Use” (Standard): Press the volume
button on the TV. When the volume OSD is displayed, press and hold the MENU button on the
TV for 5 seconds.
5. Press the ▲ or ▼ button to memorize the channels of the selected connection. Press the E button
to select “Start”.
Air N : “Air” antenna signal. / Cable: “Cable” antenna signal. / Auto: “Air” and “Cable” antenna
signals.
In Cable mode, you can select the correct signal source among N STD, HRC, and IRC by pressing
the ▲, ▼, ◄ or ► button, then press the E button. If you have Digital cable, select the cable
system signal source for both Analog and Digital. Contact your local cable company to identify
the type of cable system that exists in your particular area.
6. Press the E button to select “Start”. The TV will begin memorizing all of the available channels.
To stop the search before it has nished, press the N E button with “Stop” selected.
After all the available channels are stored, it starts to remove scrambled channels. The N
Auto program menu then reappears. Press the E button when channel memorization is
complete. The message “Set the Clock Mode.” is displayed.
7. Press the E button.
Press the ▲ or ▼ button to select “Auto”, then Press the E button. The message “Set to daylight
saving time.” is displayed. If you select “Manual”, “Set current date and time” is displayed.
8. Press the ▲ or ▼ button to select “Off”, “On” or “Auto”, then press the button.
9. Press the ▲ or ▼ button to highlight the time zone for your local area. Press the E button. If you
have received a digital signal, the time will be set automatically.
10. The connection method to provide the best quality HD is offered. After conrming the method, press
the E button.
11. The message “Enjoy your TV.” is displayed. When you have nished, press the E button.
Plug & Play
Select Language of the OSD.
Language : English r
E
Enter
BN59-00905F_eng.indd 11 2009-11-10 9:30:41
Page 14
English - 12
If you want to reset this feature...
1. Press the MENU button to display the menu. Press the ▲ or ▼ button to select “Setup”, then press the E button.
2. Press the E button again to select “Plug & Play”. For further details on setting up options.
The “ N Plug & Play” feature is only available in the TV mode.
CHANNEL CONTROL
CHANNEL CONTROL
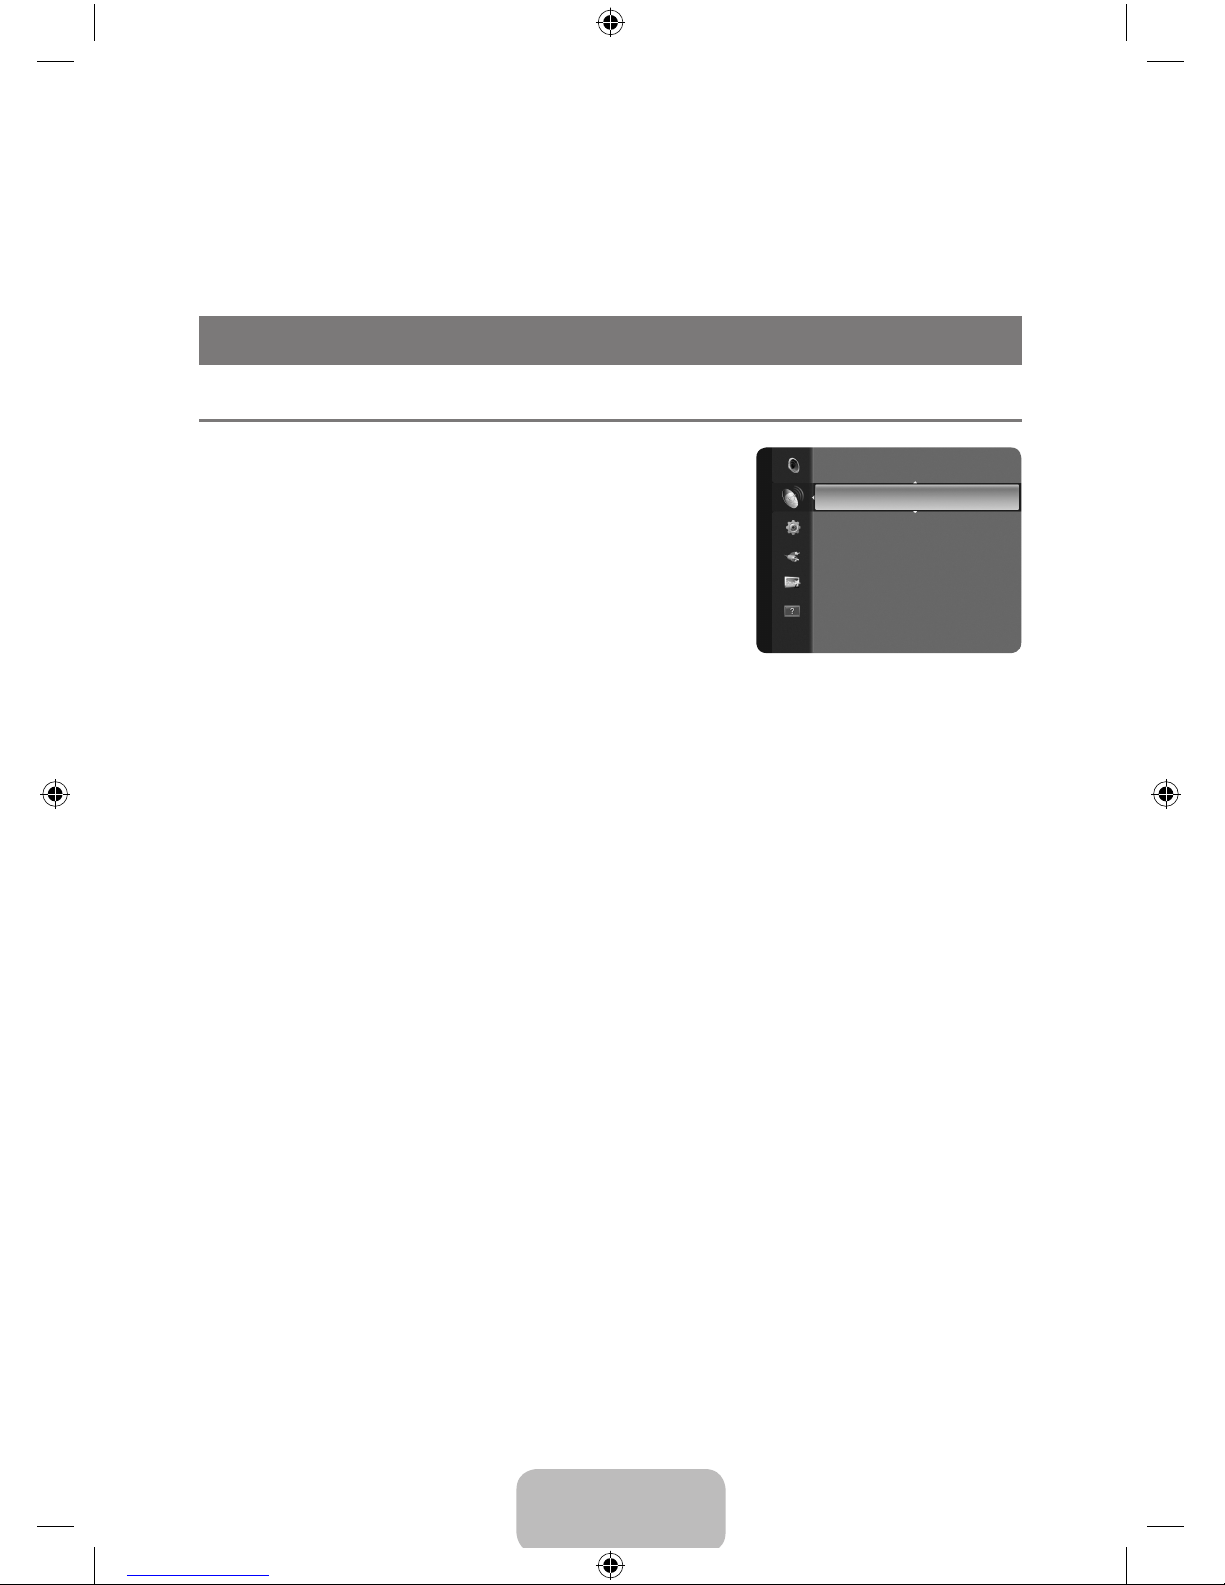
ConguringtheChannelMenu ¦
Antenna→Air ❑ / Cable
Before your television can begin memorizing the available
channels, you must specify the type of signal source that is
connected to the TV (i.e. an Air or a Cable system).
Press the T TOOLS button to display “Tools” menu. You can
also set the Antenna by selecting “Tools → Switch to Cable
(or Switch to Air)”.
Auto Program ❑
Air : Air antenna signal. / Cable: Cable antenna signal. /
Auto: Air and Cable antenna signals
When selecting the Cable TV system: Selects the cable system. STD, HRC and IRC identify N
various types of cable TV systems. Contact your local cable company to identify the type of cable
system that exists in your particular area. At this point the signal source has been selected.
After all the available channels are stored, it starts to remove scrambled channels (Clearing N
Scrambled Channels). The Auto program menu then reappears.
If you want to stop Auto Programming, press the N E button. The “Stop Auto Program?”
message will be displayed. Select “Yes” by pressing the ◄ or ► button, then press the E
button.
Clearing Scrambled Channels ❑ (digital channels only)
This function is used to lter out scrambled channels after “Auto Program” is completed. This
process may take up to 20~30 minutes.
To stop searching scrambled channels: Press the N E button to select “Stop”. Press the ◄ button
to select “Yes”, then press the button.
This function is only available in “ N Cable” mode.
Channel List ❑
For the detailed procedures on using the “Channel List”, refer to the ‘Managing Channels’
instructions.
You can select these options by simply pressing the N CH LIST button on the remote control.
Fine Tune ❑ (analog channels only)
Use ne tuning to manually adjust a particular channel for optimal reception.
If you do not store the ne-tuned channel in memory, adjustments are not saved. N
“*” will appear next to the name of ne-tuned channels. N
To reset the ne tuning setting, press the ▼ button to select “ N Reset”, then press the E button.
Antenna :Air ►
Auto Program
Clear Scrambled Channel
Channel List
Fine Tune
Channel
BN59-00905F_eng.indd 12 2009-11-10 9:30:41
Page 15
English - 13
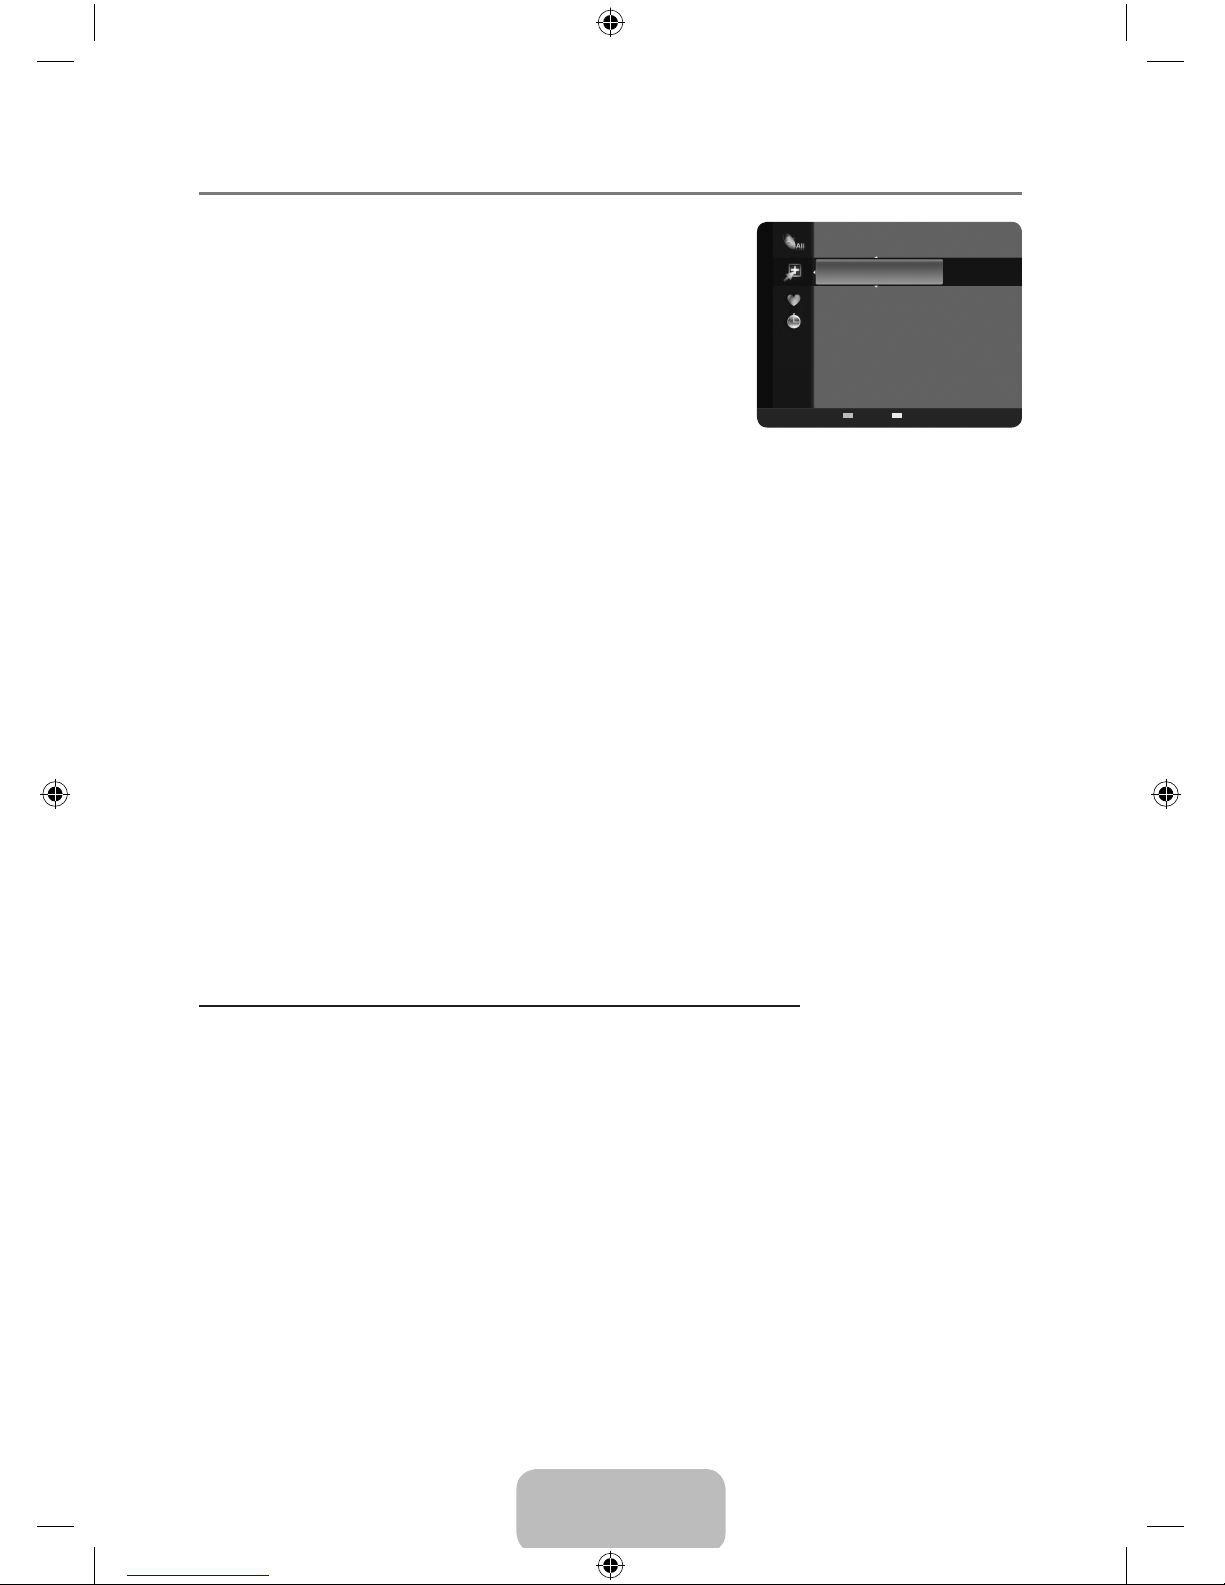
Managing Channels ¦
Channel List ❑
Using this menu, you can add / delete or set favorite channels
and use the program guide for digital broadcasts.
All Channels
Shows all currently available channels.
Added Channels
Shows all added channels.
Favorite
Shows all favorite channels.
To select the favorite channels you have set up, press the O FAV.CH button on the remote control.
Programmed
Shows all current reserved Programs.
Select a channel in the N All Channels, Added Channels or Favorite screen by pressing the ▲ /
▼ buttons, and pressing the E. Then you can watch the selected channel.
Using the Color buttons with the Channel List N
Green (Zoom): – Enlarges or shrinks a channel number.
Yellow (Select): – Selects multiple channel lists. You can perform the add / delete or add to
Favorite / delete from Favorite function for multiple channels at the same time. Select the
required channels and press the yellow button to set all the selected channels at the same
time. The c mark appears to the left of the selected channels.
TOOLS (Tools): – Displays the Add (or Delete), Add to Favorite (or Delete from Favorite),
Timer Viewing, Channel Name Edit, Select All (or Deselect All) and Auto Program
menus (The Options menus may differ depending on the situation.)
Channel Status Display Icons N
♥ : – A channel set as a Favorite.
c – : A channel selected by pressing the yellow button.
( – : A Program currently being broadcast.
) – : A reserved program
Channel List Option Menu (in All Channels / Added Channels / Favorite)
Press the
TOOLS
button to use the option menu.
Option menu items may differ depending on the channel status. N
Add / Delete
You can delete or add a channel to display the channels you want.
All deleted channels will be shown on N All Channels menu.
A gray-colored channel indicates the channel has been deleted. N
The N Add menu only appears for deleted channels.
You can also delete a channel from the N Added Channels or Favorite menu in the same manner.
2 Air
4 Air
4-2 ♥ TV #8
8 Air
13 Air
13-1 ♥ TV #3
Alice’s Adventures in Wonderland
Added Channels
Air
Zoom Select T Tools
BN59-00905F_eng.indd 13 2009-11-10 9:30:41
Page 16
English - 14
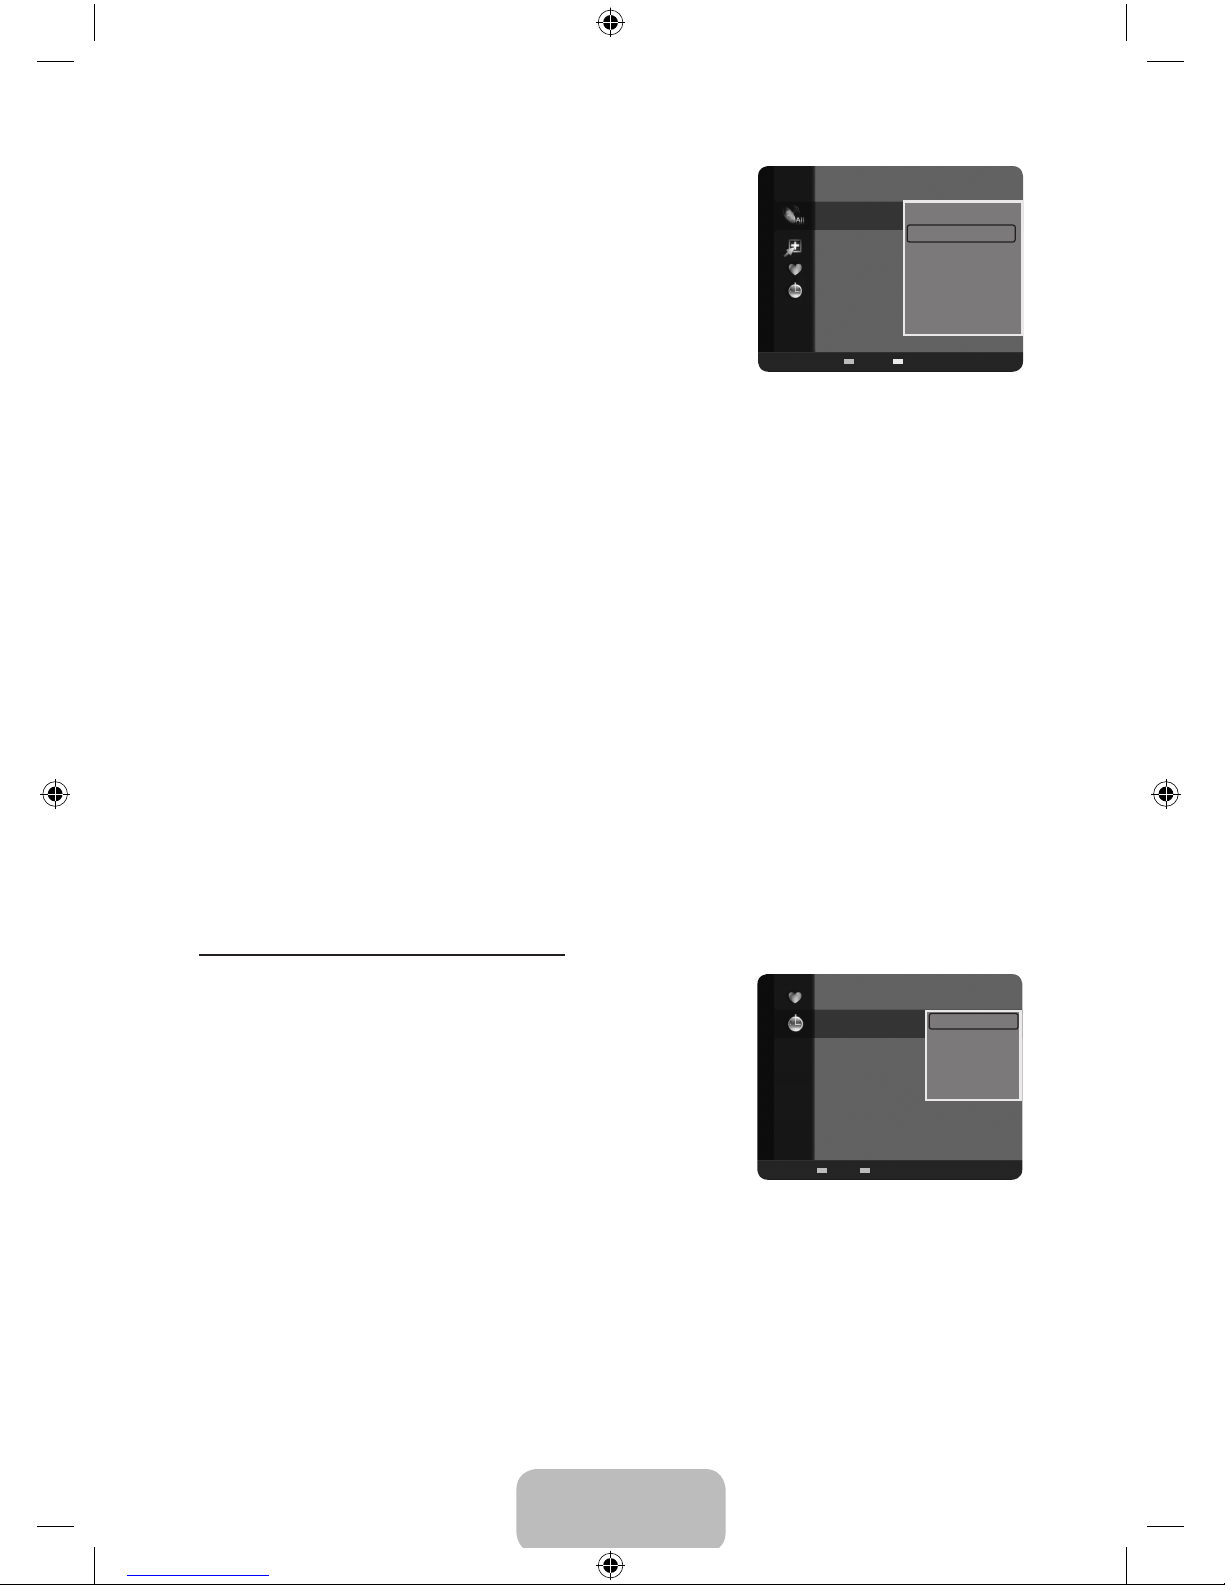
Add to Favorite / Delete from Favorite
You can set channels you watch frequently as Favorite.
Press the T TOOLS button to display the Tools menu. You can
also set the add to (or delete from) Favorites by selecting
Tools → Add to Favorite (or Delete from Favorite).
The ♥ symbol will be displayed and the channel will be set as N
a favorite.
All favorite channels will be shown in the N Favorite menu.
Timer Viewing
If you reserve a program you want to watch, the channel is automatically switched to the reserved
channel in the Channel List; even when you are watching another channel. To reserve a program,
set the current time rst.
Only memorized channels can be reserved. N
You can set the channel, month, day, year, hour and minute directly by pressing the number N
buttons on the remote control.
Reserving a program will be shown in the N Programmed menu.
Digital Program Guide and Viewing Reservation N
When a digital channel is selected, and you press the ► button, the Program Guide for the N
channel appears. You can reserve a program according to the procedures described above.
Channel Name Edit (analog channels only)
Channels can labeled so that their call letters appear whenever the channel is selected.
The names of digital broadcasting channels are automatically assigned and cannot be labeled. N
Select All / Deselect All
Select All ● : You can select all the channels in the channel list.
Deselect All ● : You can deselect all the selected channels.
You can only select N Deselect All when there is a selected channel.
Auto Program
For further details on setting up options, refer to page 12. N
Channel List Option Menu (in Programmed)
You can view, modify or delete a reservation.
Press the TOOLS button to use the option menu. N
Change Info
Select to change a viewing reservation.
Cancel Schedules
Select to cancel a viewing reservation.
Information
Select to view a viewing reservation. (You can also change the
reservation information.)
Select All
Select all reserved Programs.
1 / 1 / 2009
9:08 am 5 TV3 The
3:15 pm 2 TV3 The Equalizer
5:50 pm 2 TV3 McMillan & Wife
Programmed
Change Info
Cancel Schedules
Information
Select All
Air
Zoom Select
T
Tools E Information
2 Air
4 Air
4-2 ♥ TV #8
8 Air
13 Air
13-1 ♥ TV #3
Alice’s Adventures in Wonderland
All Channels
Delete
Add to Favorite
Timer Viewing
Channel Name Edit
Select All
Auto Program
Air
Zoom Select T Tools
BN59-00905F_eng.indd 14 2009-11-10 9:30:42
Page 17
English - 15
PICTURE CONTROL
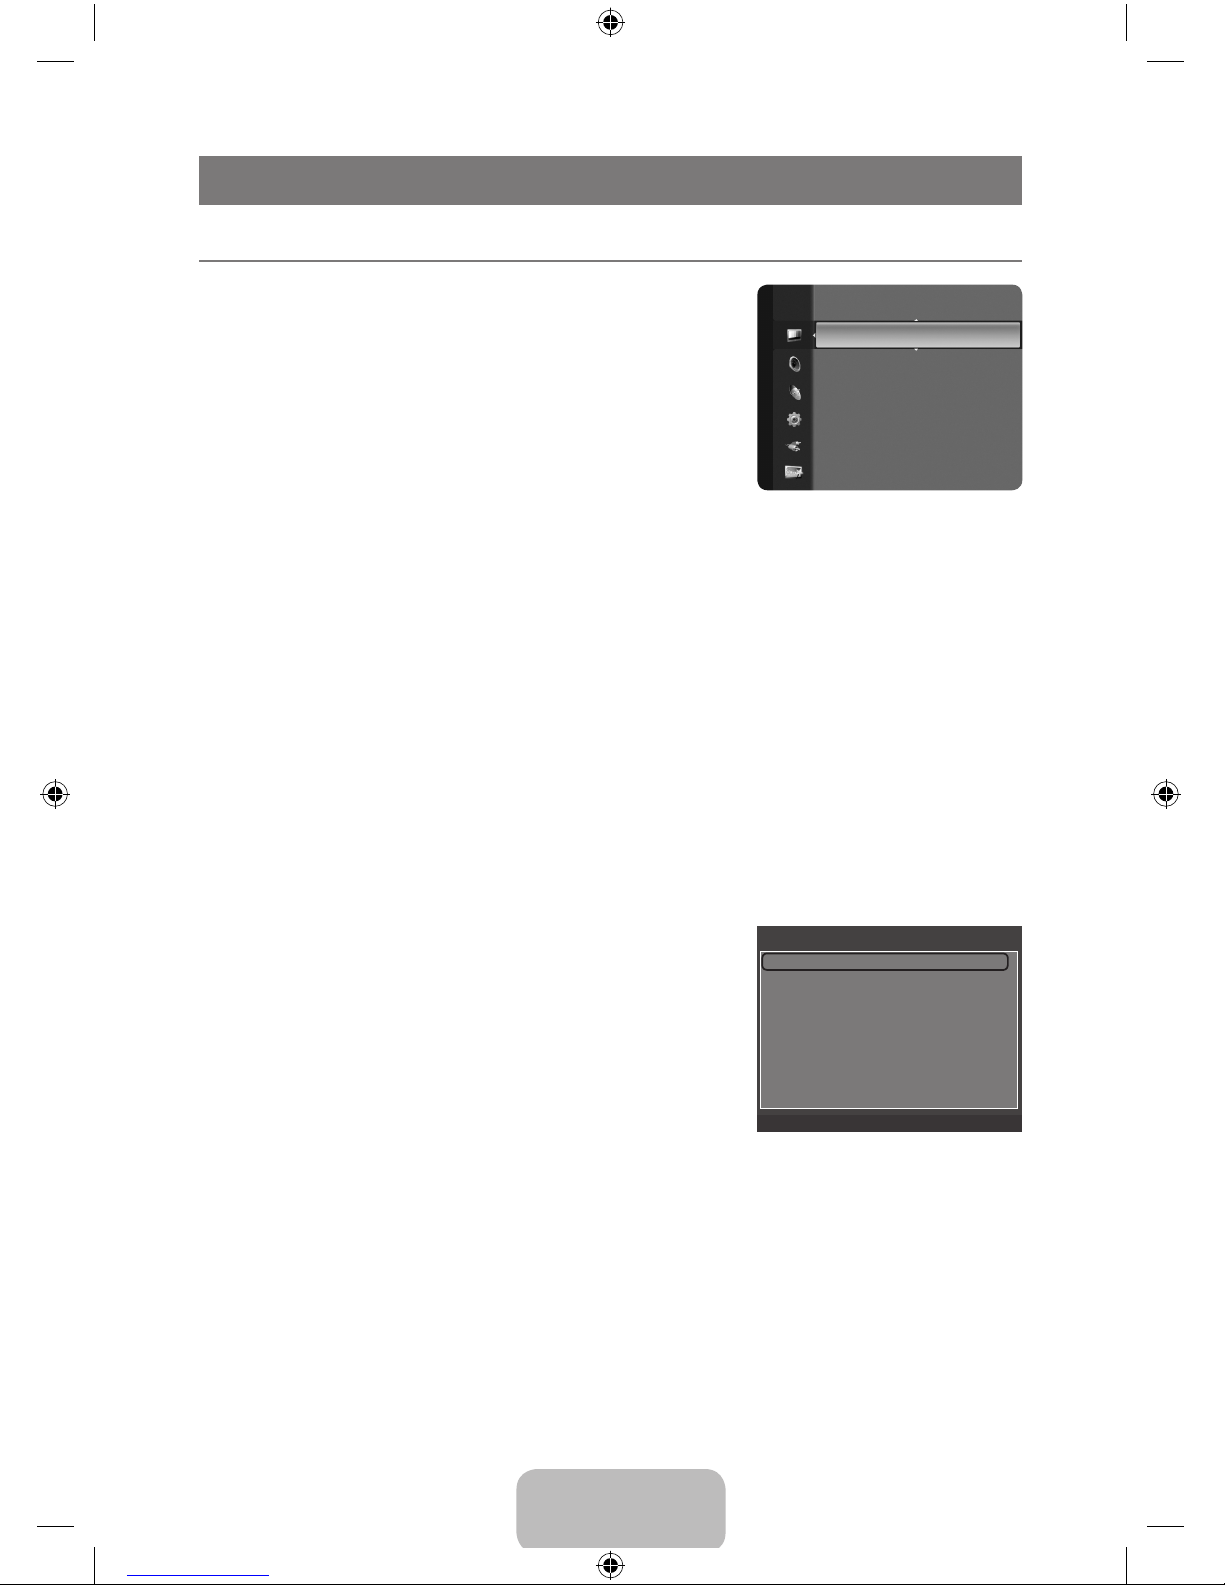
ConguringthePictureMenu(TV/AV/HDMI) ¦
Mode ❑
You can select the type of picture which best corresponds to
your viewing requirements.
Dynamic
Selects the picture for increased denition in a bright room.
Standard
Selects the picture for the optimum display in a normal
environment.
Movie
Selects the picture for viewing movies in a dark room.
Backlight ❑ / Contrast / Brightness / Sharpness / Color / Tint (G/R)
Your television has several setting options that allow you to control the picture quality.
Backlight ● : Adjusts the brightness of LCD back light.
Contrast ● : Adjusts the contrast level of the picture.
Brightness ● : Adjusts the brightness level of the picture
Sharpness ● : Adjusts the edge denition of the picture.
Color ● : Adjusts color saturation of the picture.
Tint (G/R) ● : Adjusts the color tint of the picture.
When you make changes to “ N Backlight”, “Contrast”, “Brightness”, “Sharpness” “Color”or “Tint
(G/R)” the OSD will be adjusted accordingly.
Settings can be adjusted and stored for each external device you have connected to an input of N
the TV.
The energy consumed during use can be signicantly reduced if the level of Backlight is reduced, N
and that this will reduce the overall running cost.
Advanced Settings ❑
Samsung’s new TVs allow you to make even more precise
picture settings than previous models.
Advanced Settings N is available in Standard or Movie mode
.
In PC mode, you can only make changes to N Gamma and
White Balance from among the Advanced Settings items.
BlackTone→Off/Dark/Darker/Darkest
You can select the black level on the screen to adjust the screen
depth.
DynamicContrast→Off/Low/Medium/High
You can adjust the screen contrast so that the optimal contrast is provided.
Gamma
You can adjust the primary color (red, green, blue) Intensity. (-3 ~ +3)
Color Space
Color space is a color matrix composed of red, green and blue colors. Select your favorite color
space to experience the most natural color.
Native ● : Native Color Space offers deep and rich color tone.
Auto ● :
Auto Color Space automatically adjusts to the most natural color tone based on program sources.
Mode :Standard ►
Backlight : 8
Contrast : 95
Brightness : 45
Sharpness : 50
Color : 50
Tint (G/R) : G50/R50
Picture
Advanced Settings
Black Tone : Off ►
Dynamic Contrast : Medium
Gamma : 0
Color Space : Native
White Balance
Flesh Tone : 0
Edge Enhancement : On
U
Move E Enter R Return
BN59-00905F_eng.indd 15 2009-11-10 9:30:42
Page 18
English - 16
White Balance
You can adjust the color temperature for more natural picture colors.
R-Offset / G-Offset / B-Offset / R-Gain / G-Gain / B-Gain ● :
You can adjust the Color ‘temperature’
in the light areas by changing the values of R, G, B. Recommended for advanced users only.
Reset ● : The previously adjusted white balance will be reset to the factory defaults.
Changing the adjustment value will refresh the adjusted screen. N
Flesh Tone
You can emphasize the pink ‘esh tone’ in the picture.
Changing the adjustment value will refresh the adjusted screen. N
EdgeEnhancement→Off/On
You can emphasize object boundaries in the picture.
Picture Options ❑
In PC mode, you can only make changes to the “ N Color Tone”
and “Size” from among the items in “Picture Options”.
Color Tone →Cool / Normal / Warm1 / Warm2
Warm1 N or Warm2 is only activated when the picture mode is Movie.
Settings can be adjusted and stored for each external N
device you have connected to an input of the TV.
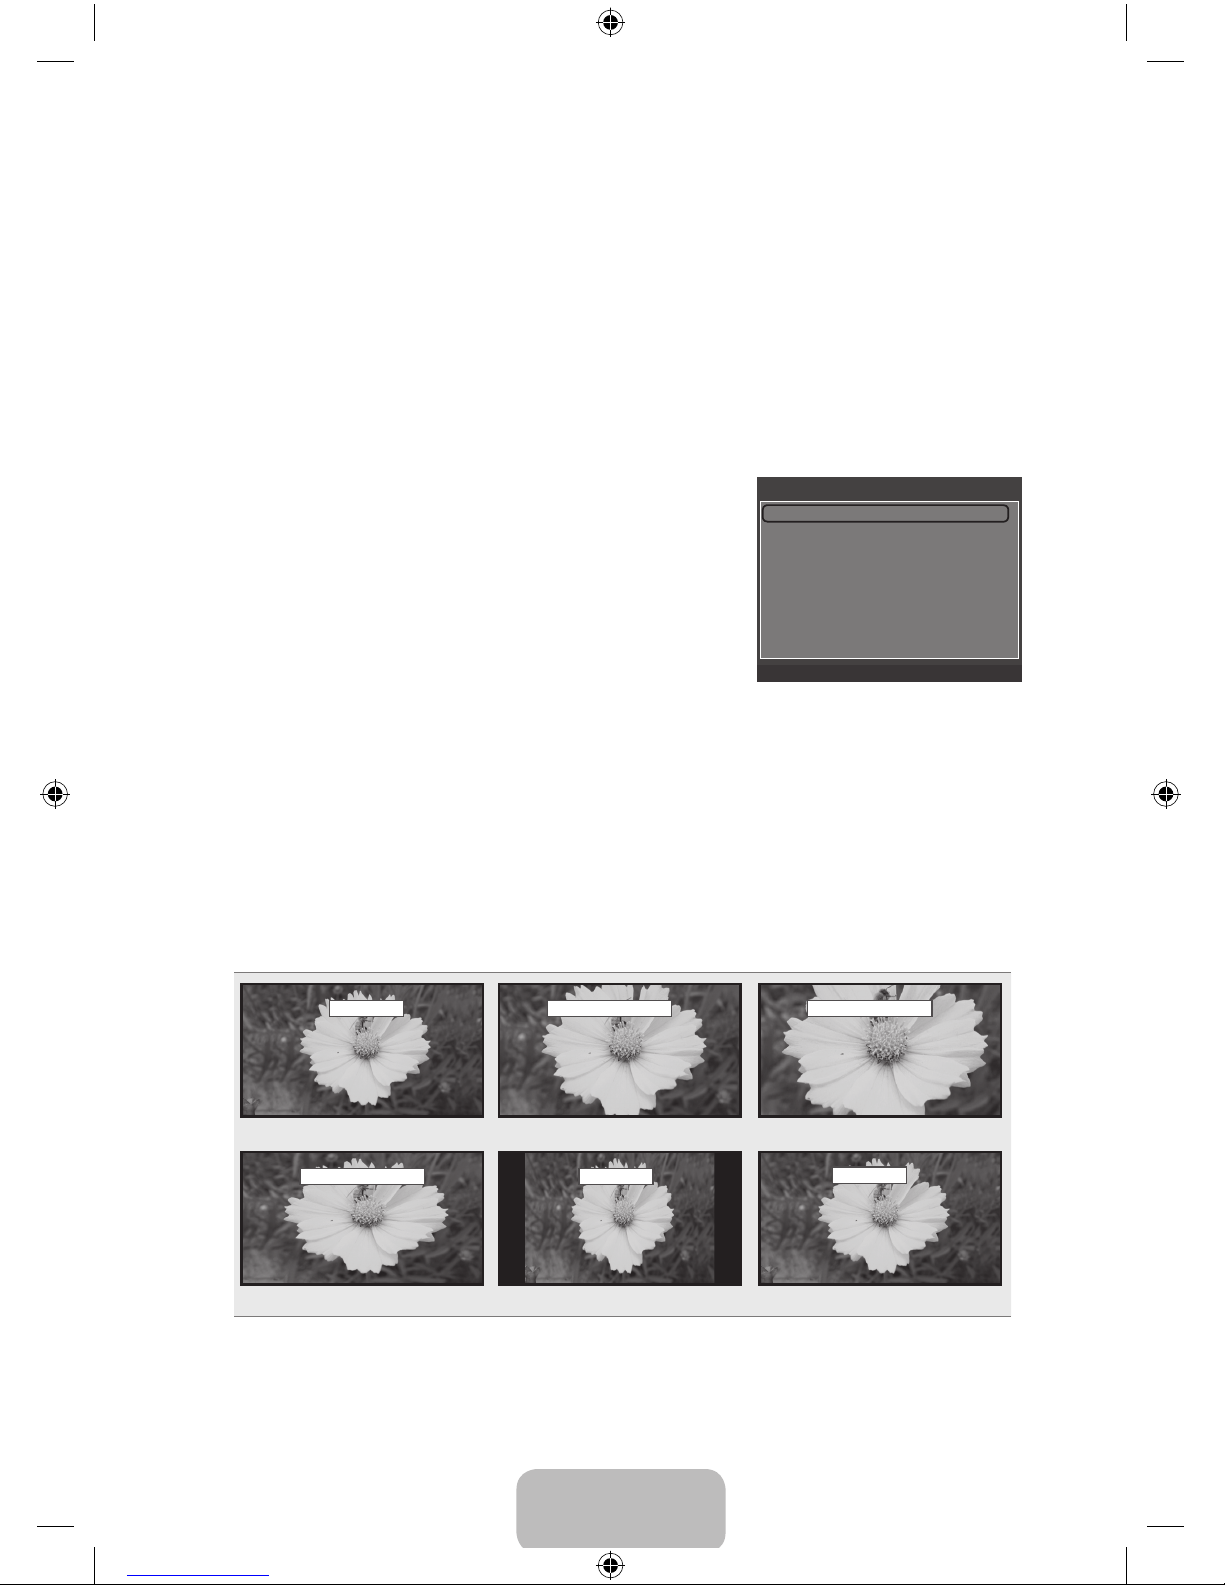
Size
Occasionally, you may want to change the size of the image on your screen. Your TV comes with
six screen size options, each designed to work best with specic types of video input. Your satellite
receiver may have its own set of screen sizes as well. In general, though, you should view the TV in
16:9 mode as much as possible.
Alternately, you can press the O P.SIZE button on the remote control repeatedly to change the picture size.
16:9 ● : Sets the picture to 16:9 wide mode.
Zoom1 ● : Magnies the size of the picture on the screen.
Zoom2 ● : Magnies the size of the picture more than “Zoom1”.
Wide Fit ● : Enlarges the aspect ratio of the picture to t the entire screen.
4:3 ● : Sets the picture to 4:3 normal mode.
Screen Fit: ● Use the function to see the full image without any cutoff when HDMI
(720p/1080i/1080p) or DTV (1080i) signals are input.
16:9
Zoom1 U Move
Zoom2 U Move
16:9 Zoom1 Zoom2
Wide Fit U Move
4:3
Screen Fit
Wide Fit 4:3 Screen Fit
Picture Options
Color Tone : Normal ►
Size : 16:9
Digital NR : Auto
HDMI Black Level : Normal
Film Mode : Off
U
Move E Enter R Return
BN59-00905F_eng.indd 16 2009-11-10 9:30:42
Page 19
English - 17
Temporary image retention may occur when viewing a static image on the set for more than two hours. N
After selecting “ N Zoom1”, “Zoom2” or “Wide Fit”: Press the ◄ or ► button to select “Position”, then
press the E button. Press the ▲ or ▼ button to move the picture up and down.
Reset: Press the ◄ or ►button to select “Reset”, then press the E button. You can initialize the setting.
HD (High Denition): 16:9 - 1080i/1080p (1920x1080), 720p (1280x720) N
Settings can be adjusted and stored for each external device you have connected to an input of the TV N
.
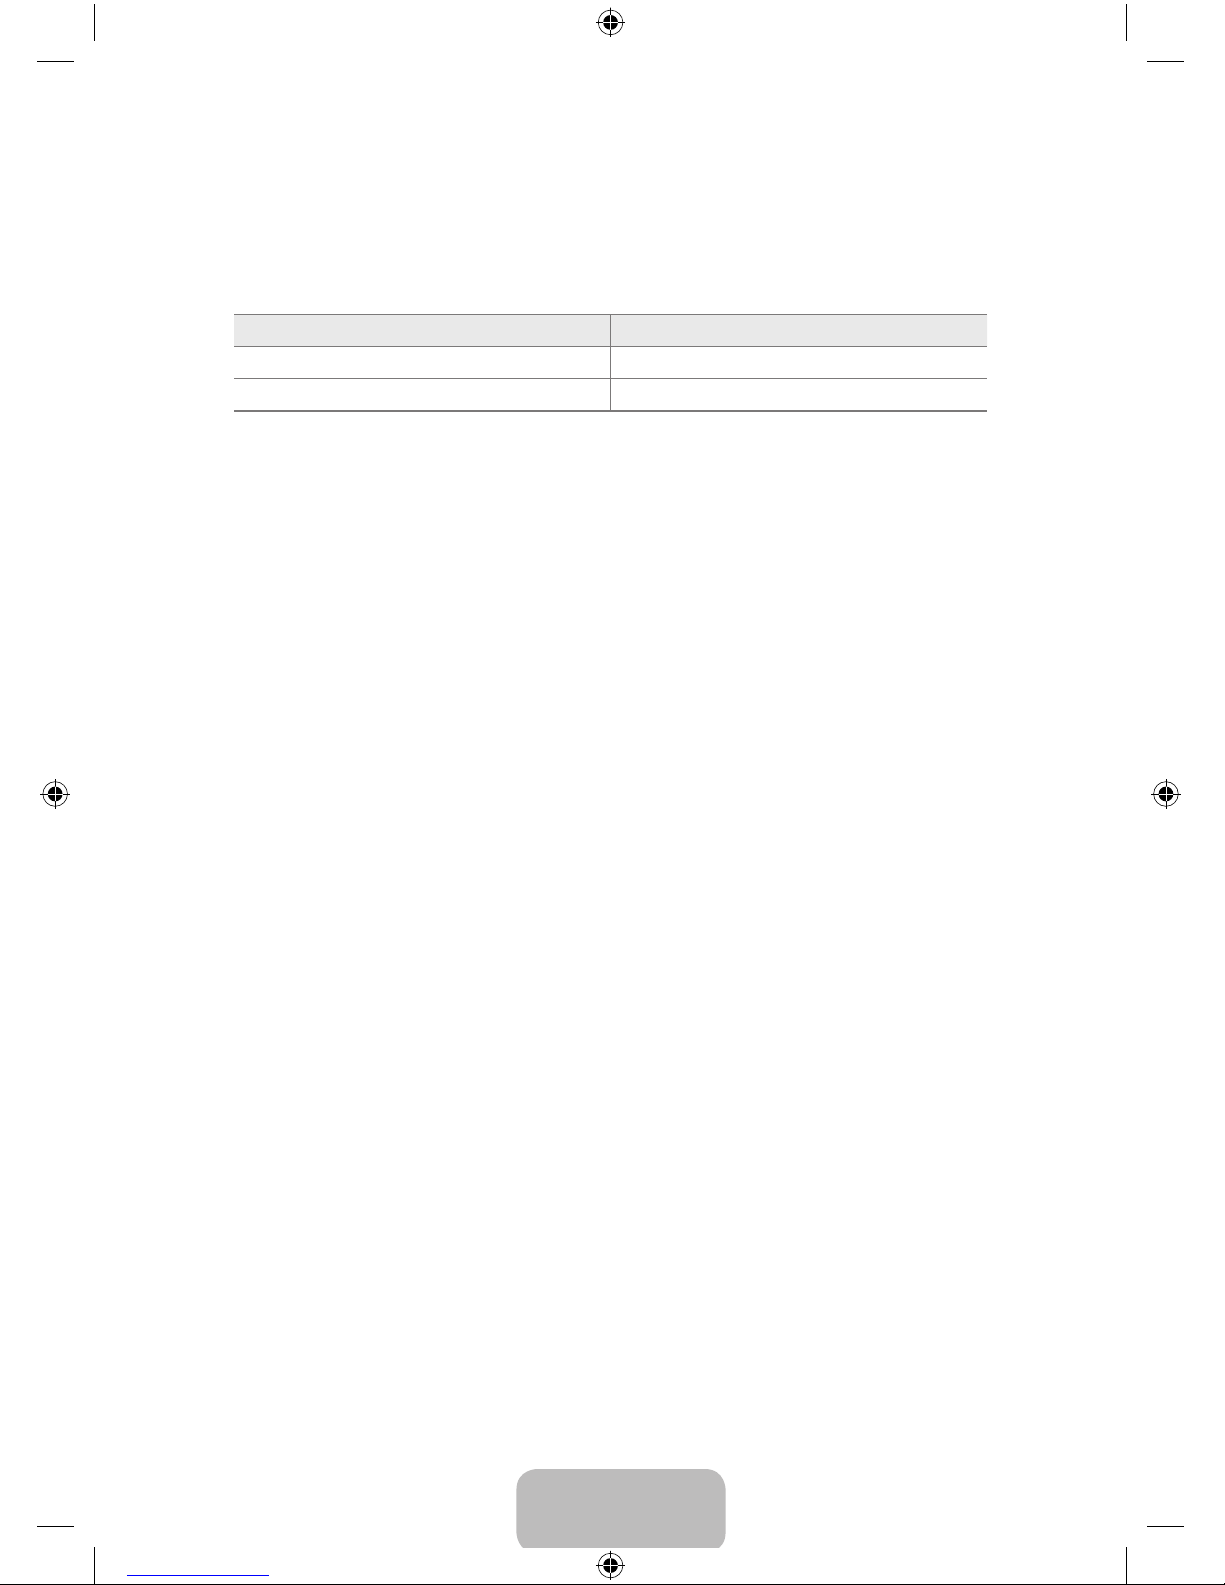
Input Source Picture Size
TV, AV 16:9, Zoom1, Zoom2, 4:3
DTV(1080i), HDMI (720p, 1080i, 1080P) 16:9, 4:3, Wide Fit, Screen Fit
Digital NR →Off / Low / Medium / High / Auto
If the broadcast signal received by your TV is weak, you can activate the Digital Noise Reduction
feature to help reduce any static and ghosting that may appear on the screen.
When the signal is weak, select one of the other options until the best picture is displayed. N
HDMI Black Level →Normal / Low
You can select the black level on the screen to adjust the screen depth.
This function is active only when an external device is connected to the TV via HDMI. The “ N HDMI
Black Level” function may not be compatible with all external devices.
Film Mode →Off / Auto
The TV can be set to automatically sense and process lm signals from all sources and adjust the
picture for optimum quality.
“ N Film Mode” is supported in TV and HDMI (480i / 1080i).
Reset ❑ →ResetPictureMode/Cancel
Resets all picture settings to the default values.
Reset Picture Mode N : Current picture values return to default settings.
BN59-00905F_eng.indd 17 2009-11-10 9:30:42
Page 20
English - 18
Using Your TV as a Computer (PC) Display ¦
Setting Up Your PC Software (Based on Windows XP)
The Windows display-settings for a typical computer are shown below. The actual screens on your
PC will probably be different, depending upon your particular version of Windows and your particular
video card. However, even if your actual screens look different, the same basic set-up information
will apply in almost all cases. (If not, contact your computer manufacturer or Samsung Dealer.)
1. First, click on ‘Control Panel’ on the Windows start menu.
2. When the control panel window appears, click on ‘Appearance and Themes’ and a display dialog-
box will appear.
3. When the control panel window appears, click on ‘Display’ and a display dialog-box will appear.
4. Navigate to the ‘Settings’ tab on the display dialog-box.
The correct size setting (resolution): Optimum: 1360 X 768 pixels
If a vertical frequency option exists on your display settings dialog box, the correct value is “60” or
“60 Hz”. Otherwise, just click “OK” and exit the dialog box.
Display Modes
If the signal from the system equals the standard signal mode, the screen is adjusted automatically.
If the signal from the system doesn’t equal the standard signal mode, adjust the mode by referring to
your videocard user guide; otherwise there may be no video. For the display modes listed below, the
screen image has been optimized during manufacturing.
Timing modes(PC, DVI-D and HDMI input)
Mode Resolution
Horizontal Frequency
(kHz)
Vertical Frequency
(Hz)
Pixel Clock
Frequency (MHz)
Sync Polarity
(H / V)
IBM 640 x 350 31.469 70.086 25.175 + / -
640 x 480 31.469 59.940 25.175 - / 720 x 400 31.469 70.087 28.322 - / +
MAC 640 x 480 35.000 66.667 30.240 - / -
832 x 624 49.726 74.551 57.284 - / -
VESA 640 x 480 37.861 72.809 31.500 - / -
640 x 480 37.500 75.000 31.500 - / 800 x 600 35.156 56.250 36.000 + / +
800 x 600 37.879 60.317 40.000 + / +
800 x 600 48.077 72.188 50.000 + / +
800 x 600 46.875 75.000 49.500 + / +
1024 x 768 48.363 60.004 65.000 - / 1024 x 768 56.476 70.069 75.000 - / 1024 x 768 60.023 75.029 78.750 + / +
1360 x 768 47.712 60.015 85.500 + / +
BN59-00905F_eng.indd 18 2009-11-10 9:30:42
Page 21
English - 19
Setting up the TV with your PC ¦
Preset: Press the N SOURCE button to select PC mode.
MagicBright : ❑ Entertain / Internet / Text / Dynamic Contrast / Custom
MagicBright is a feature providing optimum viewing environment depending on the contents of
the image you are watching. Currently ve different modes are available: Entertain, Internet, Text,
Dynamic Contrast and Custom. Each mode has its own pre-congured brightness value.
Contrast / Brightness / Sharpness ❑
Contrast: Adjusts the contrast level of the picture. •
Brightness: Adjusts the brightness level of the picture. •
Sharpness: Adjusts the edge denition of the picture. •
Auto Adjustment ❑
Use the Auto Adjust function to have the TV set automatically
adjust the video signals it receives. The function also
automatically ne-tunes the settings and adjusts the frequency
values and positions.
Press the T TOOLS button to display “Tools” menu. You can
also set the Auto Adjustment by selecting “Tools → Auto
Adjustment”.
This function do work in PC mode only N
Screen ❑
The purpose of the picture quality adjustment is to remove or reduce picture noise. If the noise is not
removed by ne tuning alone, then make the vertical frequency adjustments on your PC and ne tune
again. After the noise has been reduced, re-adjust the picture so that it is aligned on the center of the
screen.
Coarse / Fine
The purpose of picture quality adjustment is to remove or reduce picture noise. If the noise is not removed
by Fine-tuning alone, then adjust the frequency as best as possible (Coarse) and Fine-tune again. After the
noise has been reduced, readjust the picture so that it is aligned on the center of screen.
PC Position
Adjust the PC’s screen positioning if it does not t the TV screen. Press the ▲ or ▼ button to
adjusting the Vertical-Position. Press the ◄ or ►button to adjust the Horizontal-Position.
Image Reset
You can replace all image settings with the factory default values.
Picture Options ❑
Color Tone : Cool / Normal / Warm / Custom
R-Gain / G-Gain / B-Gain
R-Gain: Adjusts the red color brightness. N
G-Gain: Adjusts the green color brightness. N
B-Gain: Adjusts the blue color brightness. N
Size: 16:9 / 4:3
Alternately, you can press the O P.SIZE button on the remote control repeatedly to change the
picture size.
16:9 : Sets the picture to 16:9 wide mode. N
4:3 : Sets the picture to 4:3 normal mode. N
Reset : Reset Picture Mode / Cancel ❑
Resets all picture settings to the default values.
Reset Picture Mode: Current picture values return to default settings. N
Brightness : 45
Sharpness : 50
AutoAdjustment ►
Screen
Advanced Settings
Picture Options
Picture Reset
Picture
BN59-00905F_eng.indd 19 2009-11-10 9:30:42
Page 22
English - 20
SOUND CONTROL
ConguringtheSoundMenu ¦
Mode ❑ →Standard / Music / Movie / Clear Voice /
Custom
You can select a sound mode to suit your personal preferences.
Equalizer ❑
The sound settings can be adjusted to suit your personal
preference.
Mode
Selects the sound mode among the predened settings.
Balance L/R
Adjusts the balance between the right and left speaker.
100Hz / 300Hz / 1kHz / 3kHz / 10kHz (Bandwidth Adjustment)
To adjust the level of different bandwidth frequencies.
Reset
Resets the equalizer settings to the default values.
Preferred Language ❑ (only digital channel)
Digital-TV broadcasts are capable of simultaneous transmission of many audio tracks (for example,
simultaneous translations of the program into foreign languages).
You can listen in a language other than the “ O Preferred Language” by pressing the MTS button
on the remote control.
“ N Preferred Language” is available only in Digital TV mode.
You can only select the language from among the actual languages being broadcast. N
Multi-Track Sound (MTS) ❑ (only analog channel)
Press the O MTS button on the remote control repeatedly to select “Mono”, “Stereo” or “SAP”.
Mono ● : Choose for channels that are broadcasting in mono or if you are having difculty
receiving a stereo signal.
Stereo ● : Choose for channels that are broadcasting in stereo.
SAP ● : Choose to listen to the Separate Audio Program, which is usually a foreign-language
translation.
“ N Multi-Track Sound” is available only in Analog TV mode.
Depending on the particular program being broadcast, you can listen to “ N Mono”, “Stereo” or
“SAP”.
Auto Volume ❑ →Off / On
Each broadcasting station has its own signal conditions, and so it is not easy to adjust the volume
every time the channel is changed. This feature lets you automatically adjust the volume of the
desired channel by lowering the sound output when the modulation signal is high.
SoundReset→ResetAll/ResetSoundMode/Cancel ❑
You can restore the Sound settings to the factory defaults.
Reset Sound Mode O : Current sound values return to default settings.
Mode :Custom ►
Equalizer
Preferred Language : English
Multi-Track Sound : Mono
Auto Volume : Off
Sound Reset
Sound
BN59-00905F_eng.indd 20 2009-11-10 9:30:42
Page 23
English - 21
SETUP
ConguringtheSetupMenu ¦
Language ❑
You can set the menu language.
Time ❑
Clock
Setting the clock is necessary in order to use the various timer
features of the TV.
The current time will appear every time you press the O INFO
button.
If you disconnect the power cord, you have to set the clock again. N
Clock Mode ●
You can set up the current time manually or automatically.
Auto – : Set the current time automatically using the time from the digital broadcast.
Manual – : Set the current time to a manually specied time.
Depending on the broadcast station and signal, the auto time may not be set correctly. If this N
occurs, set the time manually.
The Antenna or cable must be connected in order to set the time automatically. N
Clock Set ●
You can set the current time manually.
This function is only available when “ N Clock Mode” is set to “Manual”.
You can set the month, day, year, hour and minute directly by pressing the number buttons on N
the remote control.
Time Zone ●
Select your time zone.
This function is only available when “ N Clock Mode” is set to “Auto”.
DST ● (Daylight Saving Time) → Off / On / Auto
Switches the Daylight Saving Time function on or off.
This function is only available when “ N Clock Mode” is set to “Auto”.
Sleep Timer
The sleep timer automatically shuts off the TV after a preset time (30, 60, 90, 120, 150 and 180
minutes).
Press the T TOOLS button to display “Tools” menu. You can also set the sleep timer by selecting
“Tools → Sleep Timer”.
To cancel the “ N Sleep Timer” function, select “Off”.
Plug & Play
Language :English ►
Time
Game Mode : Off
V-Chip
Caption
Light Level : Off
Melody : Medium
Setup
BN59-00905F_eng.indd 21 2009-11-10 9:30:43
Page 24

English - 22
Timer 1 / Timer 2 / Timer 3
Three different on / off timer settings can be made. You must set the clock rst.
On Time ● : Set the Hour, Minute, am/pm, and Activate/Inactivate. (To activate timer with the
setting you’ve chosen, set to “Activate”.)
Off Time ● : Set the Hour, Minute, am/pm, and Activate/Inactivate. (To activate timer with the
setting you’ve chosen, set to “Activate”.)
Volume ● : Set the required volume level.
Antenna ● : View antenna type. (Air or Cable)
You can set the Antenna by selecting Channel → Antenna. N
Channel ● : Select the desired channel.
Repeat ● : Select “Once”, “Everyday”, “Mon~Fri”, “Mon~Sat”, “Sat~Sun” or “Manual”.
When “ N Manual” is selected, press the ►button to select the desired day of the week. Press the
E
button over the desired day and the c mark will appear.
You can set the hour, minute and channel by pressing the number buttons on the remote control. N
Auto Power Off N
When you set the timer On, the television will eventually turn off, if no controls are operated for
3 hours after the TV was turned on by the timer. This function is only available in timer On mode
and prevents overheating, which may occur if a TV is on for too long time.
GameMode→Off/On ❑
When connecting to a game console such as PlayStationTM or XboxTM, you can enjoy a more realistic
gaming experience by selecting the game menu.
Restrictions on game mode (Caution) N
To disconnect the game console and connect another external device, set – Game Mode
to Off in the setup menu. If you display the TV menu in Game mode, the screen shakes
slightly.
If N Game Mode is On :
Picture mode is automatically changed to – Standard and cannot be changed.
Sound mode is automatically changed to – Custom and cannot be changed. Adjust the
sound using the equalizer.
Game Mode N is not available in regular TV and PC mode.
If the picture is poor when external device is connected to TV, check if N Game Mode is On. Set
Game Mode to Off and connect external devices.
V-Chip ❑
U.S.A and Canada Only N
The V-Chip feature automatically locks out programs that are deemed inappropriate for children.
The user must enter a PIN (personal ID number) before any of the V-Chip restrictions are set up or
changed.
“ N V-Chip” function is not available in HDMI or PC mode.
The default PIN number of a new TV set is ‘0-0-0-0’ N
If you forget the PIN, press the remote-control buttons in the following sequence, which resets N
the pin to 0-0-0-0 : POWER (off) → MUTE → 8 → 2 → 4 → POWER (on).
Allow all N : Press to unlock all TV ratings. / Block all: Press to lock all TV ratings.
BN59-00905F_eng.indd 22 2009-11-10 9:30:43
Page 25
English - 23
V-Chip Lock →Off / On
You can block rated TV Programs.
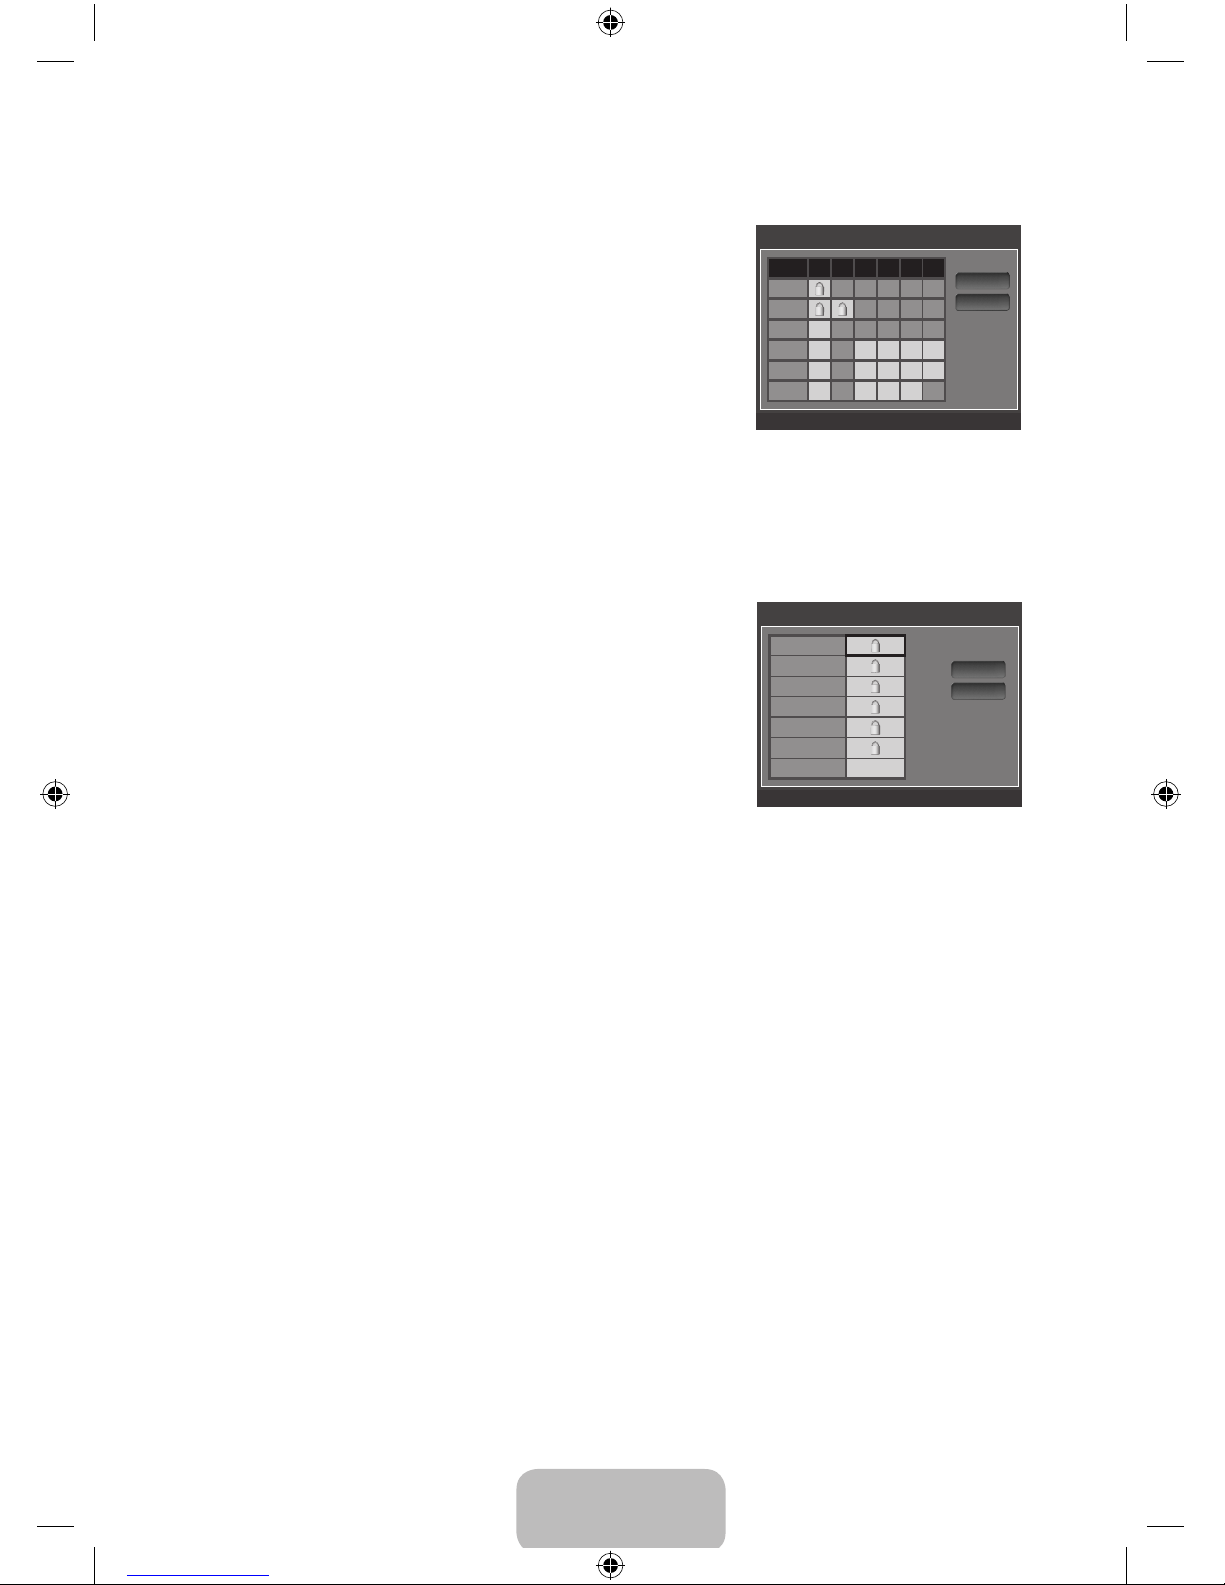
TV Parental Guidelines
You can block TV programs depending on their rating. This
function allows you to control what your children are watching.
TV-Y ● : Young children / TV-Y7: Children 7 and over / TV-G:
General audience /
TV-PG: Parental guidance / TV-14: Viewers 14 and over /
TV-MA: Mature audience
ALL ● : Lock all TV ratings. / FV: Fantasy violence / V:
Violence / S: Sexual situation /
L: Adult Language / D: Sexually Suggestive Dialog
The V-Chip will automatically block certain categories that are more restrictive. For example, if N
you block “TV-Y” category, then TV-Y7 will automatically be blocked. Similarly, if you block the
TV-G category, then all the categories in the young adult group will be blocked (TV-G, TV-PG,
TV-14 and TV-MA). The sub-ratings (D, L, S, V) work together similarly.
The V-chip will automatically block certain categories that are ‘More restrictive’. For example, if you block N
“L” sub-rating in TV-PG, then the “L” sub-ratings in TV-14 and TV-MA will automatically be blocked.
MPAA Rating
You can block movies depending on their MPAA rating.The
Motion Picture Association of America(MPAA) has implemented
a rating system that provides parents or guardians with advance
information on which lms are appropriate for children.
G ● : General audience (no restrictions).
PG ● : Parental guidance suggested.
PG-13 ● : Parents strongly cautioned.
R ● : Restricted. Children under 17 should be accompanied by
an adult.
NC-17 ● : No children under age 17.
X ● : Adults only.
NR ● : Not rated.
The V-Chip will automatically block any category that is ‘More restrictive’. For example, if you N
block the “PG-13” category, then “R”, “NC-17” and “X” will automatically be blocked also.
Canadian English
C ● : Programming intended for children under age 8.
C8+ ● : Programming generally considered acceptable for children 8 years and over to watch on
their own.
G ● : General programming, suitable for all audiences.
PG ● : Parental Guidance.
14+ ● : Programming contains themes or content which may not be suitable for viewers under the
age of 14.
18+ ● : Adult programming.
The V-Chip will automatically block any category that is ‘More restrictive’. For example, if you N
block G category, then PG, 14+ and 18+ will automatically be blocked also.
MPAA Rating
G
PG
PG-13
R
NC-17
X
NR
n
Move E Enter R Return
Allow All
Block All
TV Parental Guidelines
ALL FV V S L D
TV-Y
TV-Y7
TV-G
TV-PG
TV-14
TV-MA
n
Move E Enter R Return
Allow All
Block All
BN59-00905F_eng.indd 23 2009-11-10 9:30:43
Page 26
English - 24
Canadian French
G ● : General
8 ans+ ● : Programming generally considered acceptable for children 8 years and over to watch
on their own.
13 ans+ ● : Programming may not be suitable for children under the age of 13.
16 ans+ ● : Programming is not suitable for children under the age of 16.
18 ans+ ● : Programming restricted to adults.
The V-Chip will automatically block any category that is ‘More restrictive’. For example, if you N
block 8 ans+ category, then 13 ans+, 16 ans+ and 18 ans+ will automatically be blocked also.
Downloadable U.S. Rating
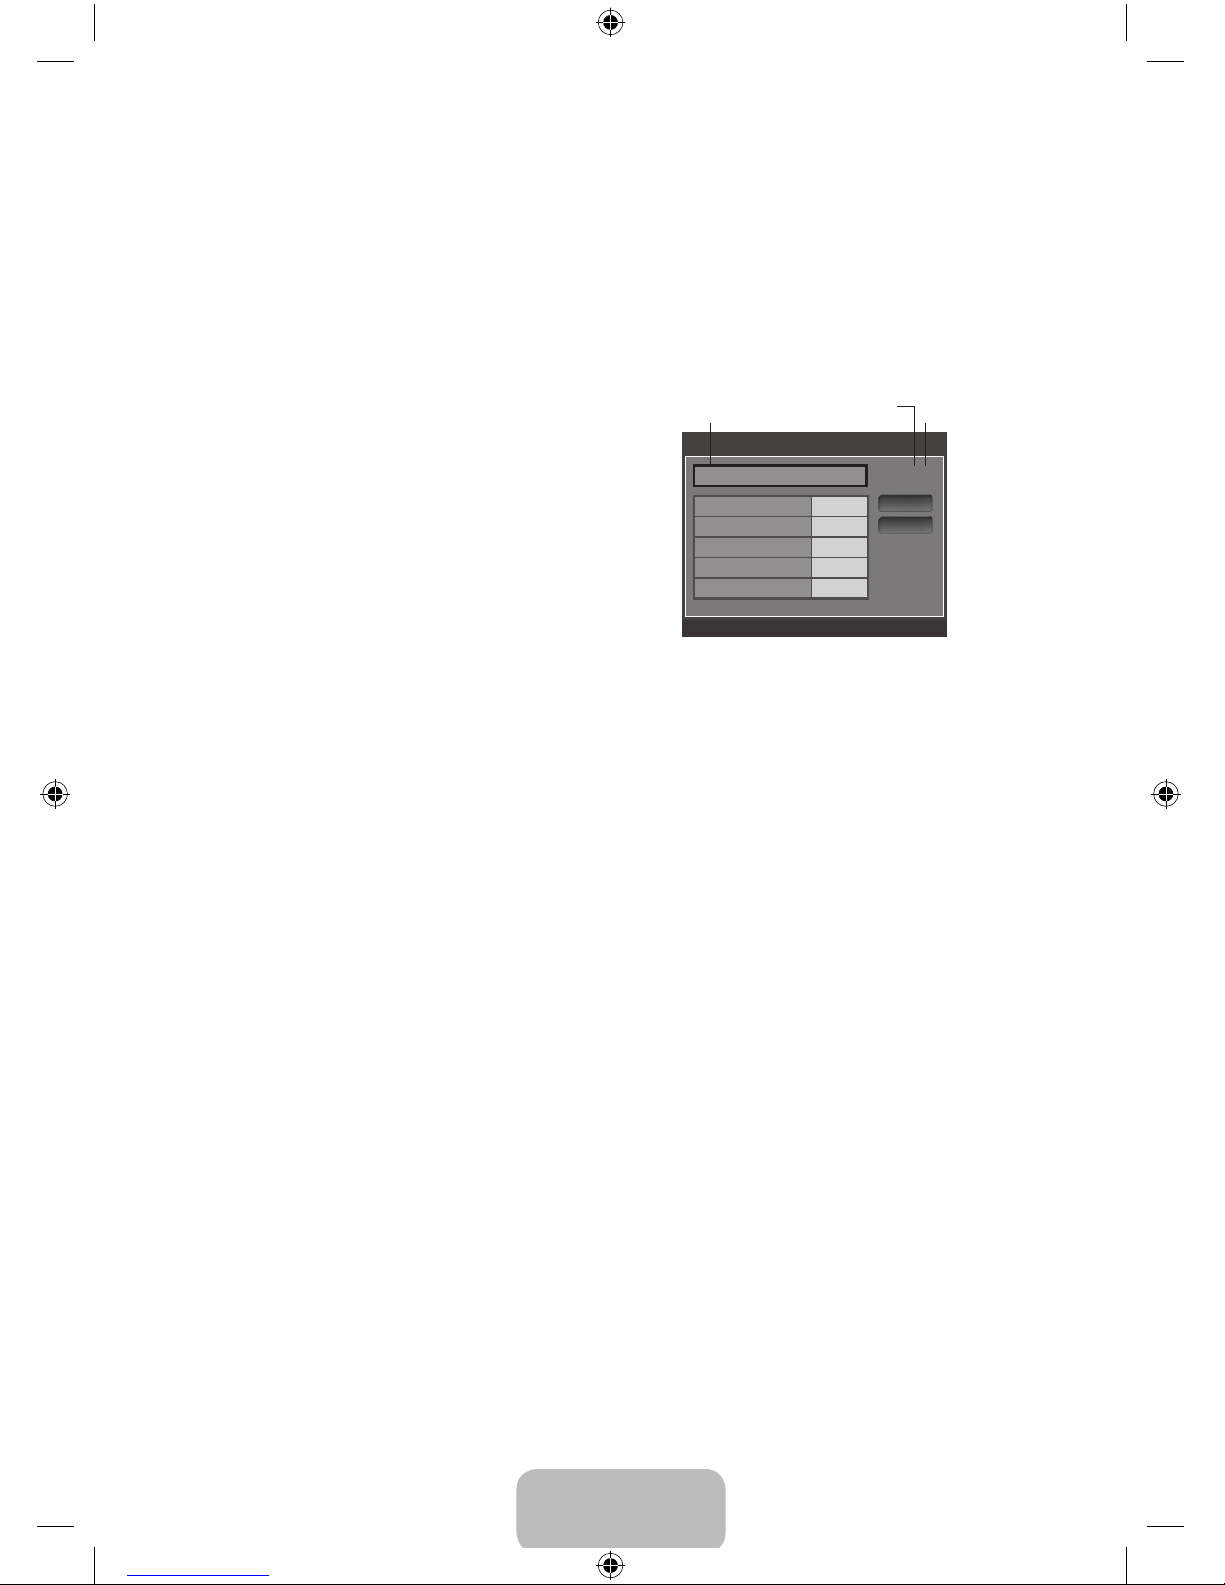
Parental restriction information can be used while
watching DTV channels
If information is not downloaded from the N
broadcasting station, the “Downloadable U.S.
rating” menu is deactivated.
Parental restriction information is automatically N
downloaded while watching DTV channels. It may
take several seconds.
The “ N Downloadable U.S. rating” menu is available
for use after information is downloaded from the
broadcasting station. However, depending on the
information from the broadcasting station, it may not be available for use.
Parental restriction levels differ depending on the broadcasting station. The default menu name N
and Downloadable US rating changes depending on the downloaded information.
Even if you set the On-screen display to your desired language, the “ N Downloadable U.S.
Rating” menu will appear in English only.
The rating will automatically block certain categories that are more restrictive. N
The rating titles (For example: Humor Level..etc) and TV ratings (For example: N DH, MH, H..etc)
may differ depending on the broadcasting station.
Change PIN
The Change PIN screen will appear. Choose any 4 digits for your PIN and enter them.
As soon as the 4 digits are entered, the ConrmNewPIN screen appears. Re enter the same 4
digits. When the Conrm screen disappears, your PIN has been memorized.
If you forget the PIN, press the remote-control buttons in the following sequence, which resets N
the pin to 0-0-0-0 : POWER (off) → MUTE → 8 → 2 → 4 → POWER (on).
Downloadable U.S. Rating
Humor Level ► 1/2
DH
MH
H
VH
EH
n
Move E Enter R Return
Allow All
Block All
Rating title
The number of all
rating information
The number of current
rating information
BN59-00905F_eng.indd 24 2009-11-10 9:30:43
Page 27
English - 25
How to Reset the TV after the V-Chip Blocks a Channel (“Emergency Escape”)
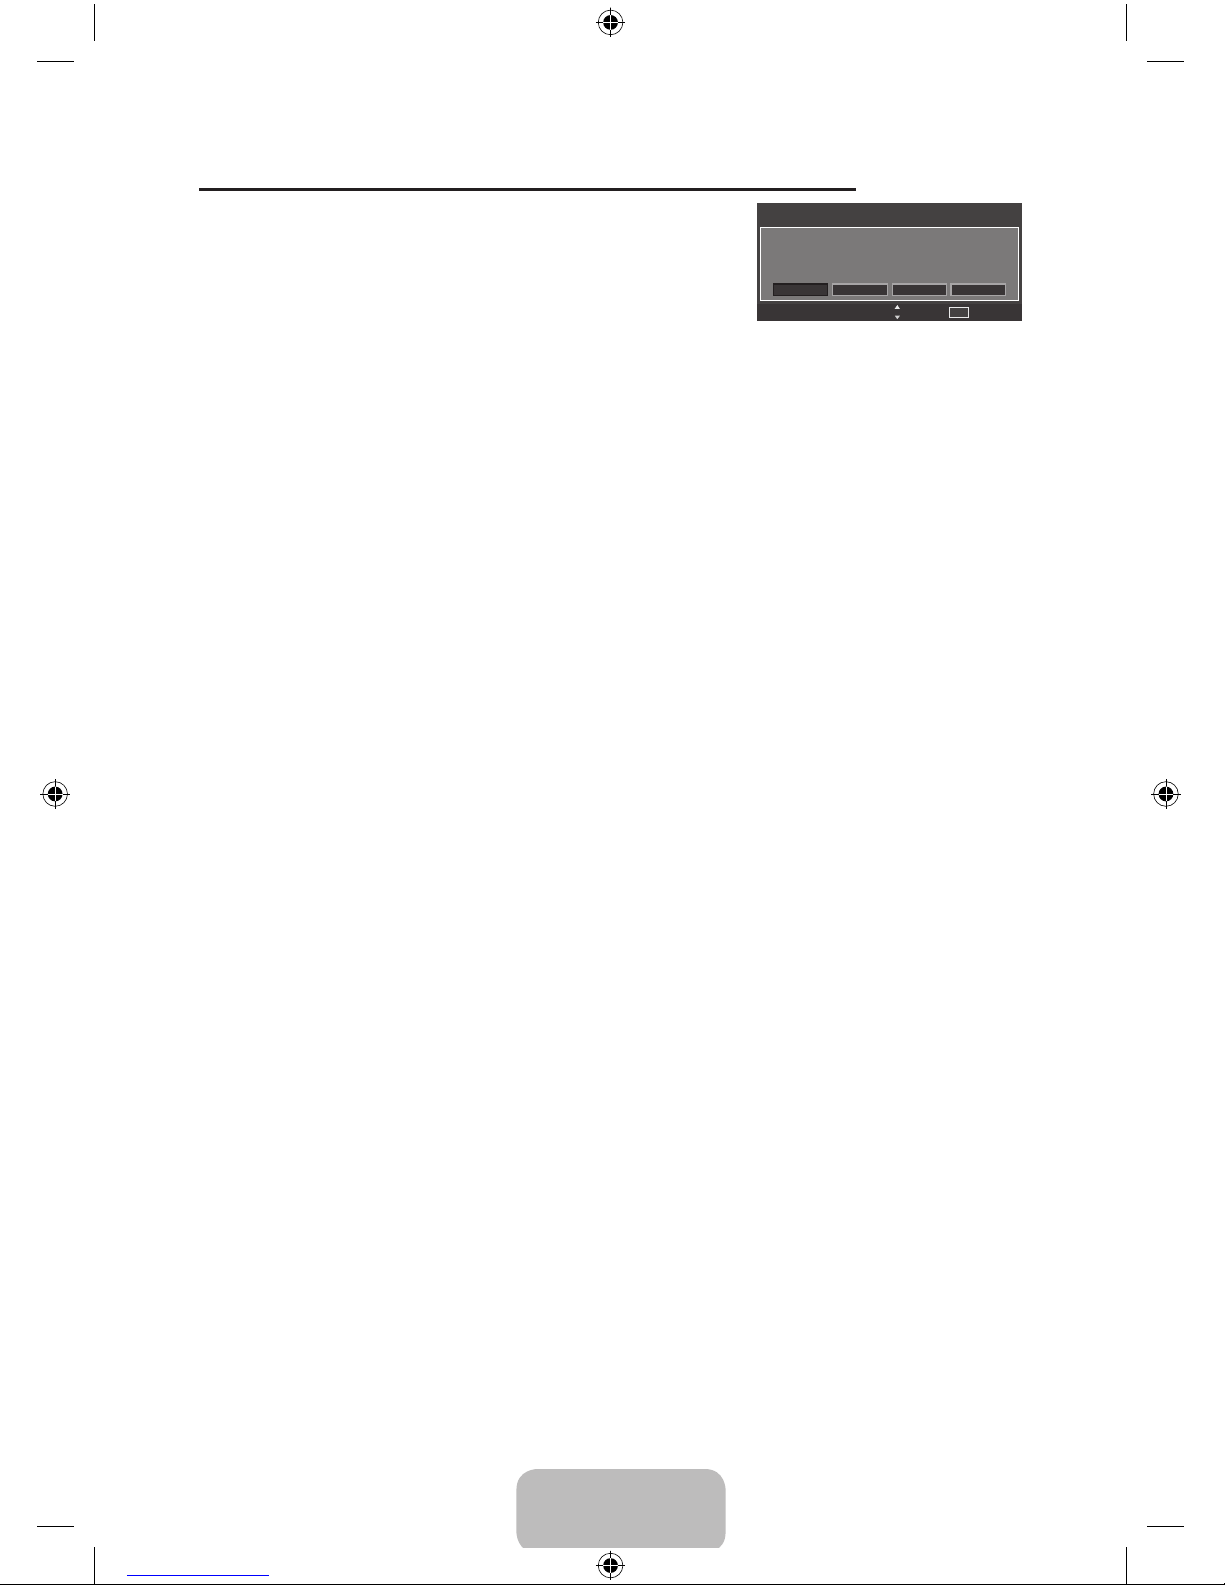
If the TV is tuned to a restricted channel, the V-Chip will block it.
The screen will go blank and the following message will appear:
1. Enter your PIN, then press the E button and press the ▲ or ▼
button to temporarily disable the V-Chip Lock.
If you forget the PIN, press the remote-control buttons in the N
following sequence, which resets the pin to 0-0-0-0 : POWER
(off) → MUTE → 8 → 2 → 4
→ POWER (on)
Caption ❑ (On-Screen Text Messages)
Caption→Off/On
You can switch the caption function on or off. If captions are not available, they will not be displayed
on the screen.
Press the O CC button on the remote control to turn the Caption on or off.
The Caption feature doesn’t work in HDMI , PC or DVI modes. N
Caption Mode
You can select the desired caption mode.
The availability of captions depends on the program being broadcast. N
Default / CC1~CC4 / Text1~Text4 ● (analog channels only)
The Analog Caption function operates in either analog TV channel mode or when a signal is
supplied from an external device to TV. (Depending on the broadcasting signal, the Analog
Caption function may operate on digital channels.)
Default / CC1~CC4 / Text1~Text4 / Service1~Service6 ● (digital channels only)
The Digital Captions function operates on digital channels.
Service1~6 in digital caption mode may not be available depending on the broadcast. N
Digital Caption Options (digital channels only)
Size ● : This option consists of “Default”, “Small”, “Standard” and “Large”. The default is
“Standard”.
Font Style ● : This option consists of “Default”, “Style0 ~ Style 7”. You can change the font you
want. The default is “Style 0”.
Foreground Color ● : This option consists of “Default”, “White”, “Black”, “Red”, “Green”, “Blue”,
“Yellow”, “Magenta” and “Cyan”. You can change the color of the letter. The default is “White”.
Background Color ● : This option consists of “Default”, “White”, “Black”, “Red”, “Green”, “Blue”,
“Yellow”, “Magenta” and “Cyan”. You can change the background color of the caption. The
default is “Black”.
Foreground Opacity ● : This option consists of “Default”, “Transparent”, “Translucent”, “Solid”
and “Flashing”. You can change the opacity of the letter.
Background Opacity ● : This option consists of “Default”, “Transparent”, “Translucent”, “Solid”
and “Flashing”. You can change the background opacity of the caption.
Return to Default ● : This option sets each of “Size”, “Font Style”, “Foreground Color”,
“Background color”, “Foreground Opacity” and “Background Opacity” to its default.
“ N Digital Caption Options” are available only when “Default” and “Service1~Service6” can be
selected in “Caption Mode”.
The availability of captions depends on the program being broadcast. N
“ N Default” means to follow the standard set by the broadcaster.
Foreground and Background cannot be set to have the same color. N
“ N Foreground Opacity” and “Background Opacity” cannot be both set to Transparent.
Received Rating: TV-14/NL
This channel is blocked by a Parental Lock. Prees enter the PIN
to unblock.
CH
Change
0~9
Enter PIN
BN59-00905F_eng.indd 25 2009-11-10 9:30:43
Page 28
English - 26
Light Level ❑
Use to adjust the light level i.e., the brightness of the light.
Melody→Off/Low/Medium/High ❑
A melody sound can be set to come on when the TV is powered On or Off.
The Melody does not play. N
When no sound is output from the TV because the – MUTE button has been pressed.
When no sound is output from the TV because the volume has been reduced to minimum –
with the VOL – button.
When the TV is turned off by Sleep Timer function. –
Energy Saving ❑ →Off / Low / Medium / High / Auto
This feature adjusts the brightness of the TV in order to reduce power consumption. When watching TV at
night, set the “Energy Saving” mode option to “High” to reduce eye fatigue as well as power consumption.
INPUT / SUPPORT
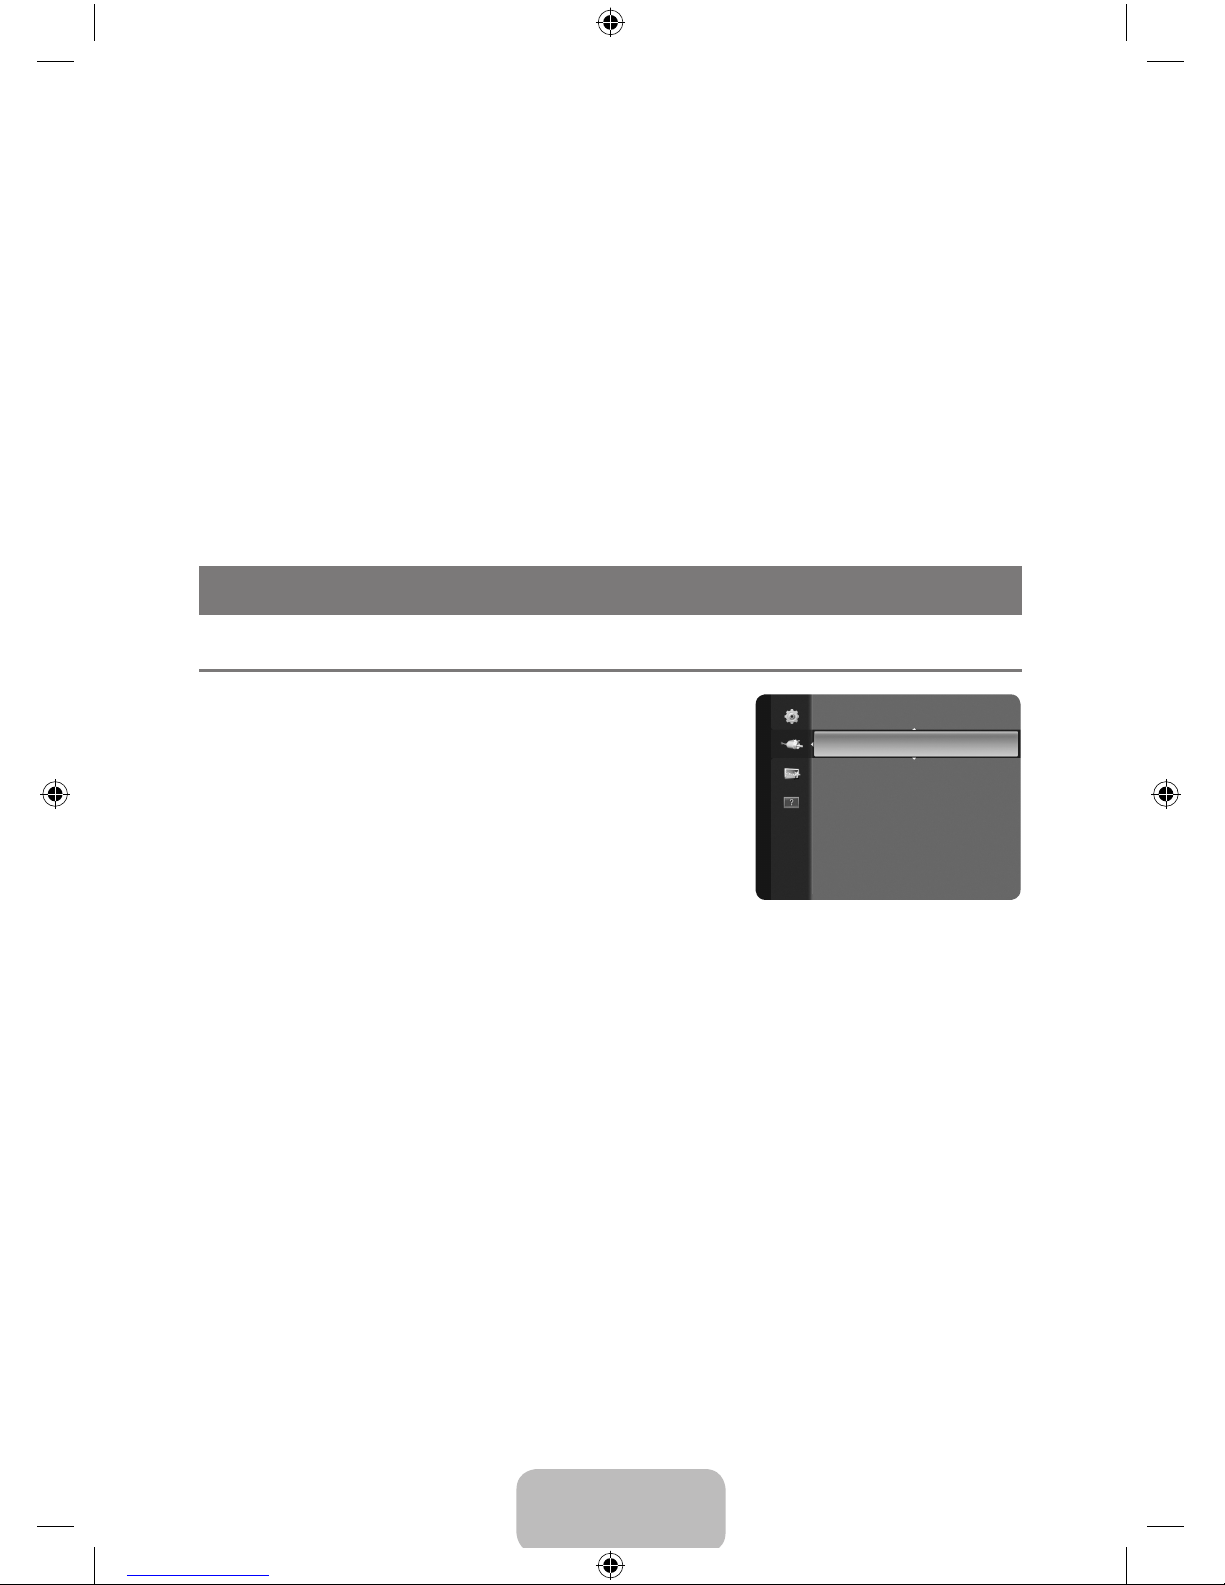
ConguringtheInputMenu ¦
Source List ❑
Use to select TV or other external input sources such as DVD /
Blu-Ray players / Satellite receivers (Set-Top Box) connected to
the TV. Use to select the input source of your choice.
Press the O SOURCE button on the remote control to view an
external signal source.
PC / TV / AV / HDMI
You can choose only those external devices that are connected N
to the TV. In the “Source List”, connected inputs will be
highlighted and sorted to the top. Inputs that are not connected will be sorted to the bottom.
Edit Name ❑
Name the device connected to the input jacks to make your input source selection easier.
VCR / DVD / Cable STB / Satellite STB / PVR STB / AV Receiver / Game / Camcorder /PC / DVI
PC / DVI / TV / IPTV / Blu-Ray / HD DVD / DMA
When a PC with a resolution of 1920X1080@60Hz and 640x480@60Hz is connected to the N
HDMI IN port, you should set the “HDMI1/DVI” mode to “PC” in the “Edit Name” of the “Input”
mode. Conguring the Support Menu.Conguring the Support Menu
Source List
Edit Name
Input
BN59-00905F_eng.indd 26 2009-11-10 9:30:43
Page 29
English - 27
ConguringtheSupportMenu ¦
Self Diagnosis ❑
Picture Test
If you think you have a picture problem, perform the picture test. Check
the color pattern on the screen to see if the problem still exists.
Yes ● :
If the test pattern does not appear or there is noise in the
test pattern, select Yes. There may be a problem with the
TV. Contact Samsung’s call center for assistance.
No ● :
If the test pattern is properly displayed, select No. There
may be a problem with your external equipment. Please
check your connections. If the problem still persists, refer to the external device’s user manual.
Sound Test
If you think you have a sound problem, please perform the sound test. You can check the sound by
playing a built-in melody sound through the TV. ‘Does the problem still exist with this sound test?’
appears on the screen.
Yes ● : If during the sound test you can hear sound only from one speaker or not at all, select Yes.
There may be a problem with the TV. Contact Samsung’s call center for assistance.
No ● : If you can hear sound from the speakers, select No. There may be a problem with your
external equipment. Please check your connections. If the problem still persists, refer to the
external device’s user manual.
Signal Strength (digital channels only)
Unlike analog channels, which can vary in reception quality from ‘snowy’ to clear, digital (HDTV)
channels have either perfect reception quality or you will not receive them at all. So, unlike analog
channels, you cannot ne tune a digital channel. You can, however, adjust your antenna to improve
the reception of available digital channels.
If the signal strength meter indicates that the signal is weak, physically adjust your antenna to increase the N
signal strength. Continue to adjust the antenna until you nd the best position with the strongest signal.
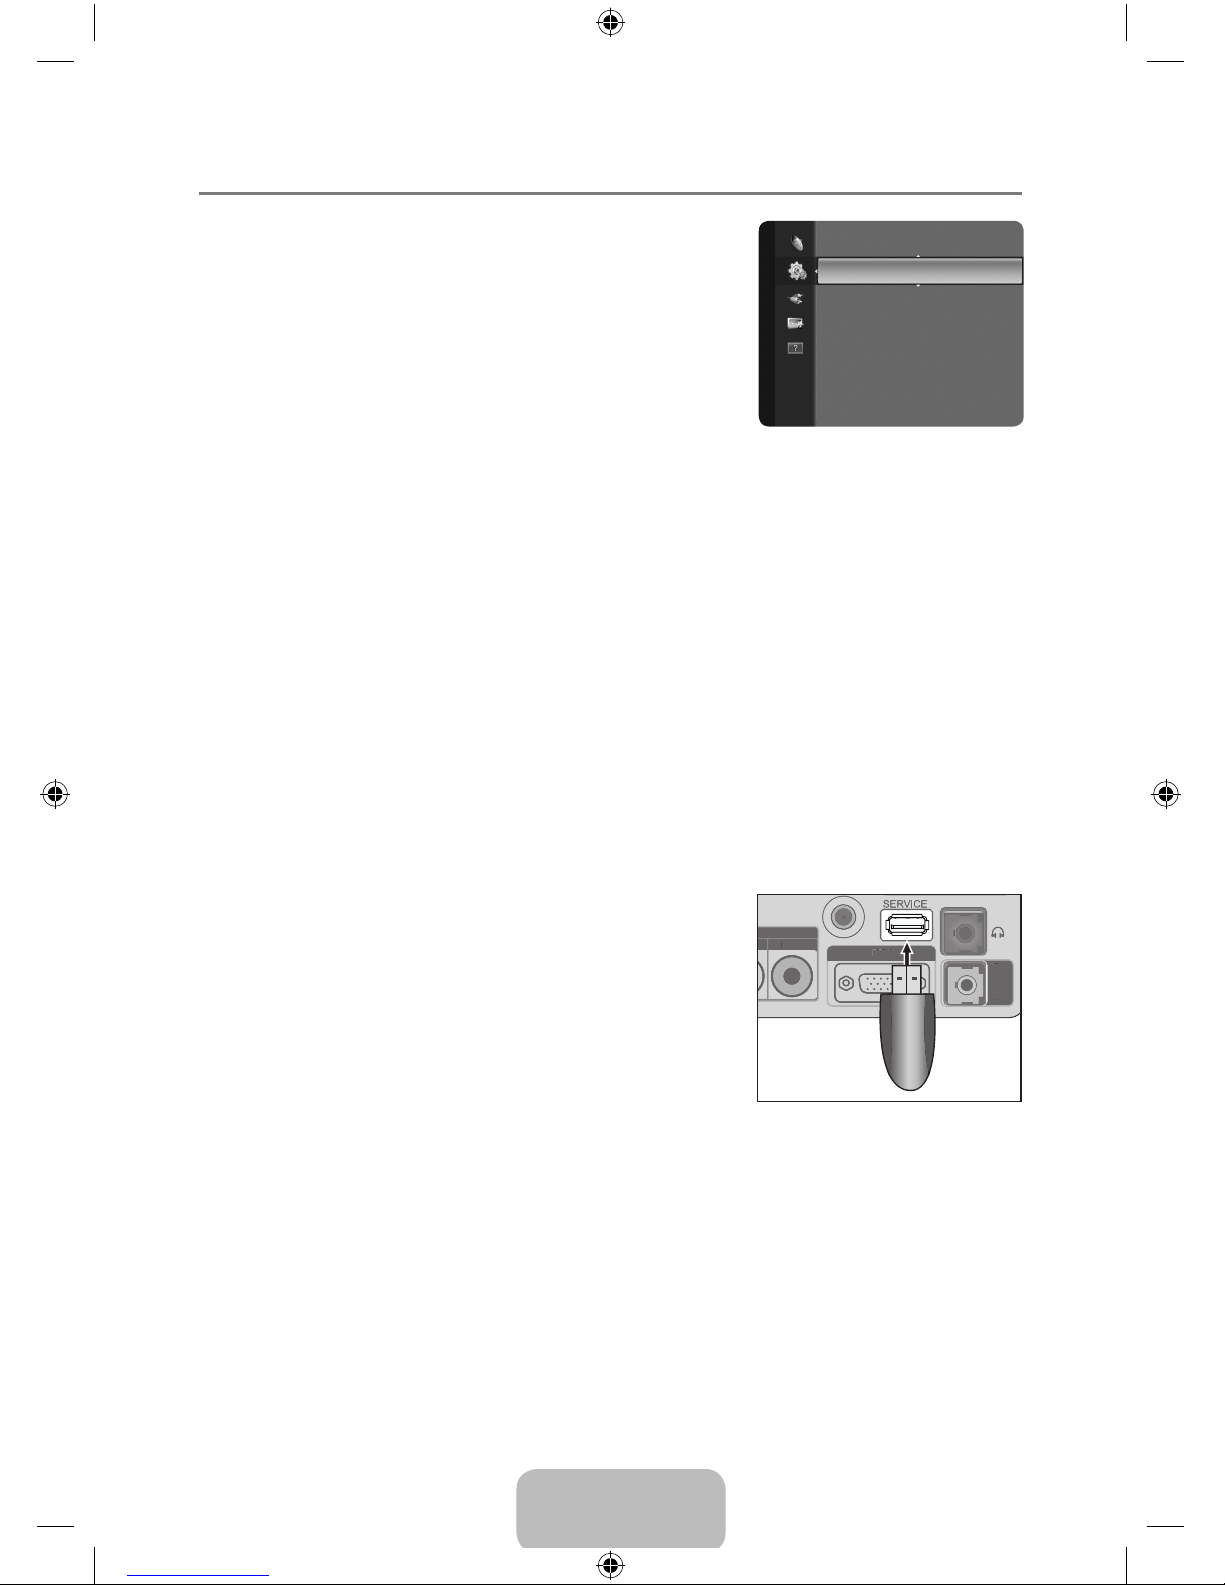
Software Upgrade ❑
Samsung may offer upgrades for TV’s rmware in the future.
Please visit Samsung.com or contact the Samsung call center
at 1-800-SAMSUNG (726-7864) to receive information about
downloading upgrades and using a USB drive. Upgrades will
be possible by connecting a USB drive to the SERVICE port
located on your TV.
Insert a USB drive containing the rmware upgrade into the N
SERVICE port on the TV.
Please be careful to not disconnect the power or remove the N
USB drive while upgrades are being applied. The TV will turn
off and turn on automatically after completing the rmware
upgrade. Please check the rmware version after the upgrades are complete. When software is
upgraded, video and audio settings you have made will return to their default (factory) settings. We
recommend you write down your settings so that you can easily reset them after the upgrade.
SelfDiagnosis ►
Software Upgrade
HD Connection Guide
Contact Samsung
Support
ANT IN
HDMI IN
VIDEO
PC IN
HDMI / PC
AUDIO IN
ANT IN
V
IDE
O
PC I
N
HDMI
/
P
C
A
UDI
O
IN
AV IN
- AUDIO -
R
L
VIDEO
HDMI IN
DIGITA L
AUDIO OUT
(OPTICAL)
DVI-D IN
PC IN
ANT INANT IN
COMPONENT IN
- AUDIO -
R
L
PR PB
Y
SERVI CE
HDMI/PC
/DVI-D
AUDIO IN
USB drive
BN59-00905F_eng.indd 27 2009-11-10 9:30:44
Page 30
English - 28
HD Connection Guide ❑
This menu presents the connection method that provides the optimal quality for the HD TV.
Refer to this information when connecting external devices to the TV.
Contact Samsung ❑
View this information when your TV does not work properly or when you want to upgrade the software.
You can view the information regarding the call center, product and software le download method.
ANYNET
+
Connecting Anynet ¦
+
Devices
Anynet+ is a function that enables you to control all connected Samsung devices that support
Anynet+ with your Samsung TV’s remote.
The Anynet+ system can be used only with Samsung devices that have the Anynet+ feature. To be
sure your Samsung device has this feature, check if there is an Anynet+ logo on it.
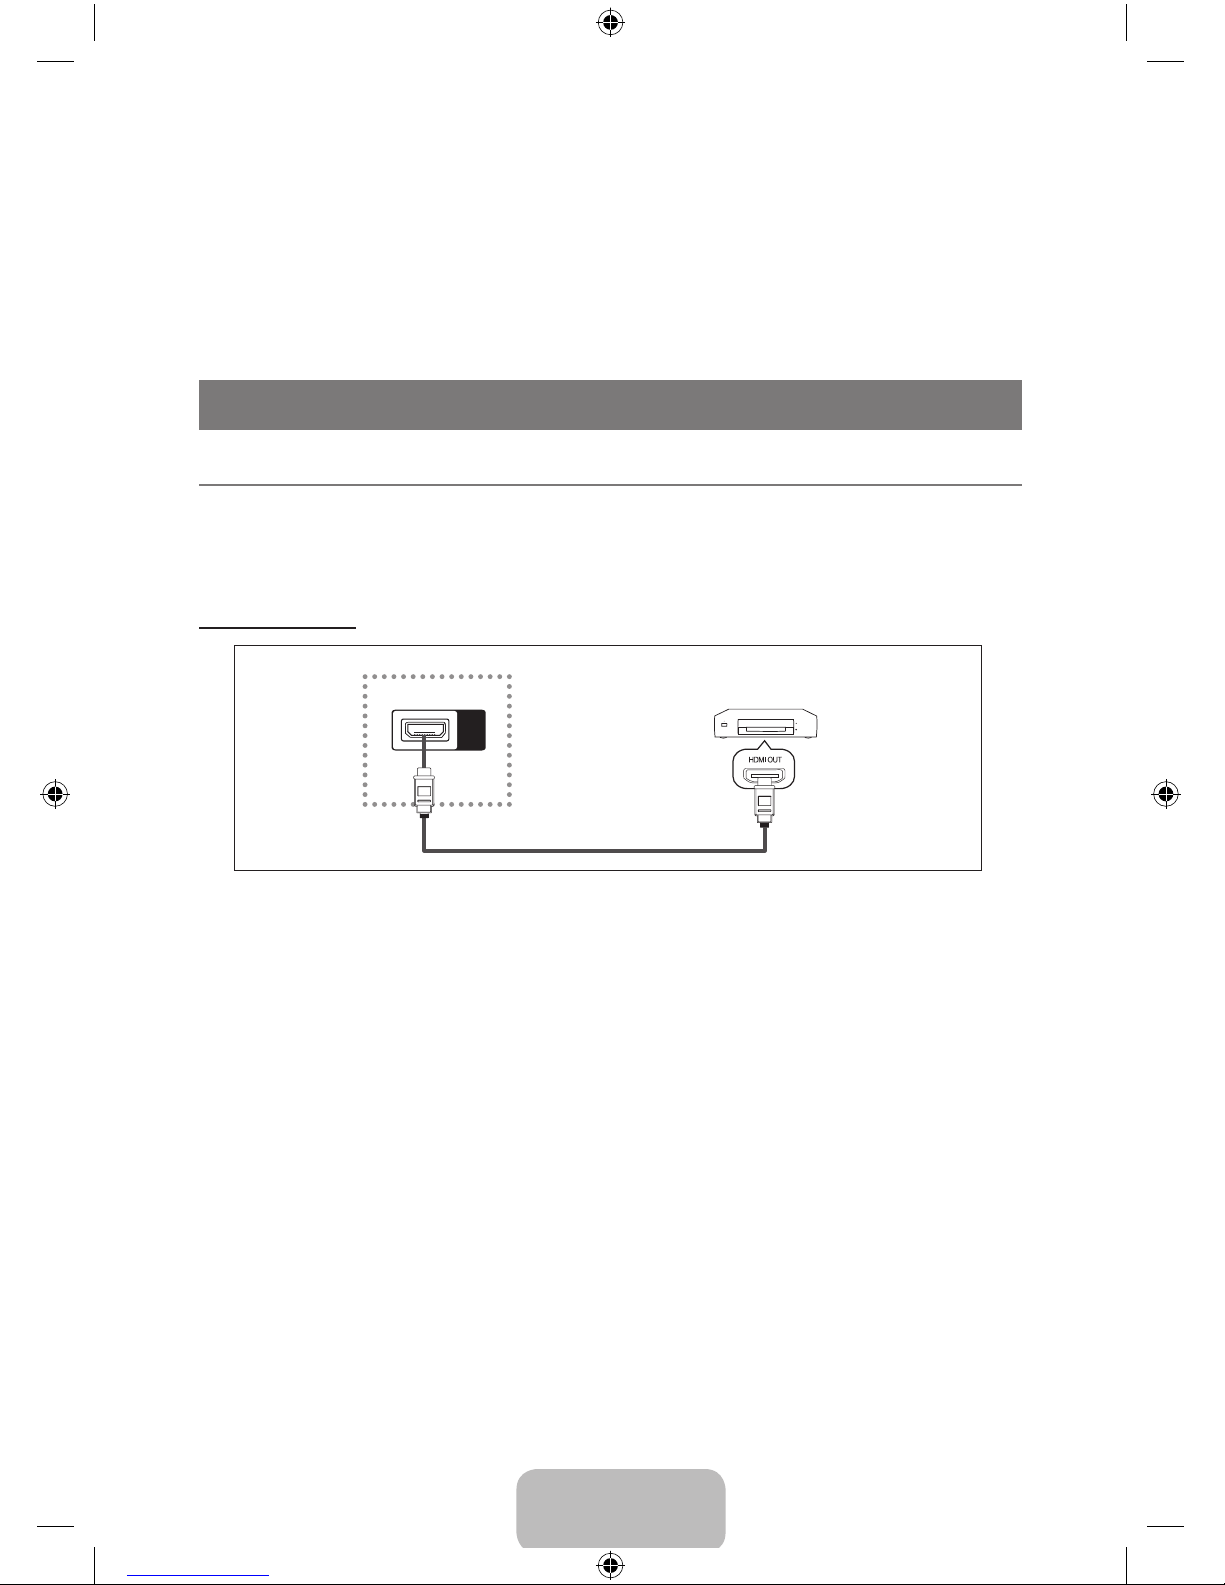
To connect to a TV
TV
HDMI IN
AV IN
- AUDIO -
R
L
VIDEO
HDMI IN
DVI-D IN
PC IN
ANT INANT IN
COMPONENT IN
- AUDIO -
R
L
PRP
B
Y
HDMI/PC
/DVI-D
AUDIO IN
DIGITAL
AUDIO OUT
(OPTICAL)
Anynet+ Device
HDMI 1.3 Cable
1.
Connect the HDMI IN jack on the TV and the HDMI OUT jack of the corresponding Anynet+ device using an HDMI cable.
Conn N ect only one Home Theater.
You can connect an Anynet N
+
device using the HDMI 1.3 cable. Some HDMI cables may not support Anynet+ functions.
Anynet N
+
works when the AV device supporting Anynet+ is in the Standby or On status.
Anynet N
+
supports up to 10 AV devices in total. Note that you can connect up to 4 devices of the same type.
BN59-00905F_eng.indd 28 2009-11-10 9:30:44
Page 31
English - 29
Setting Up Anynet+ ¦
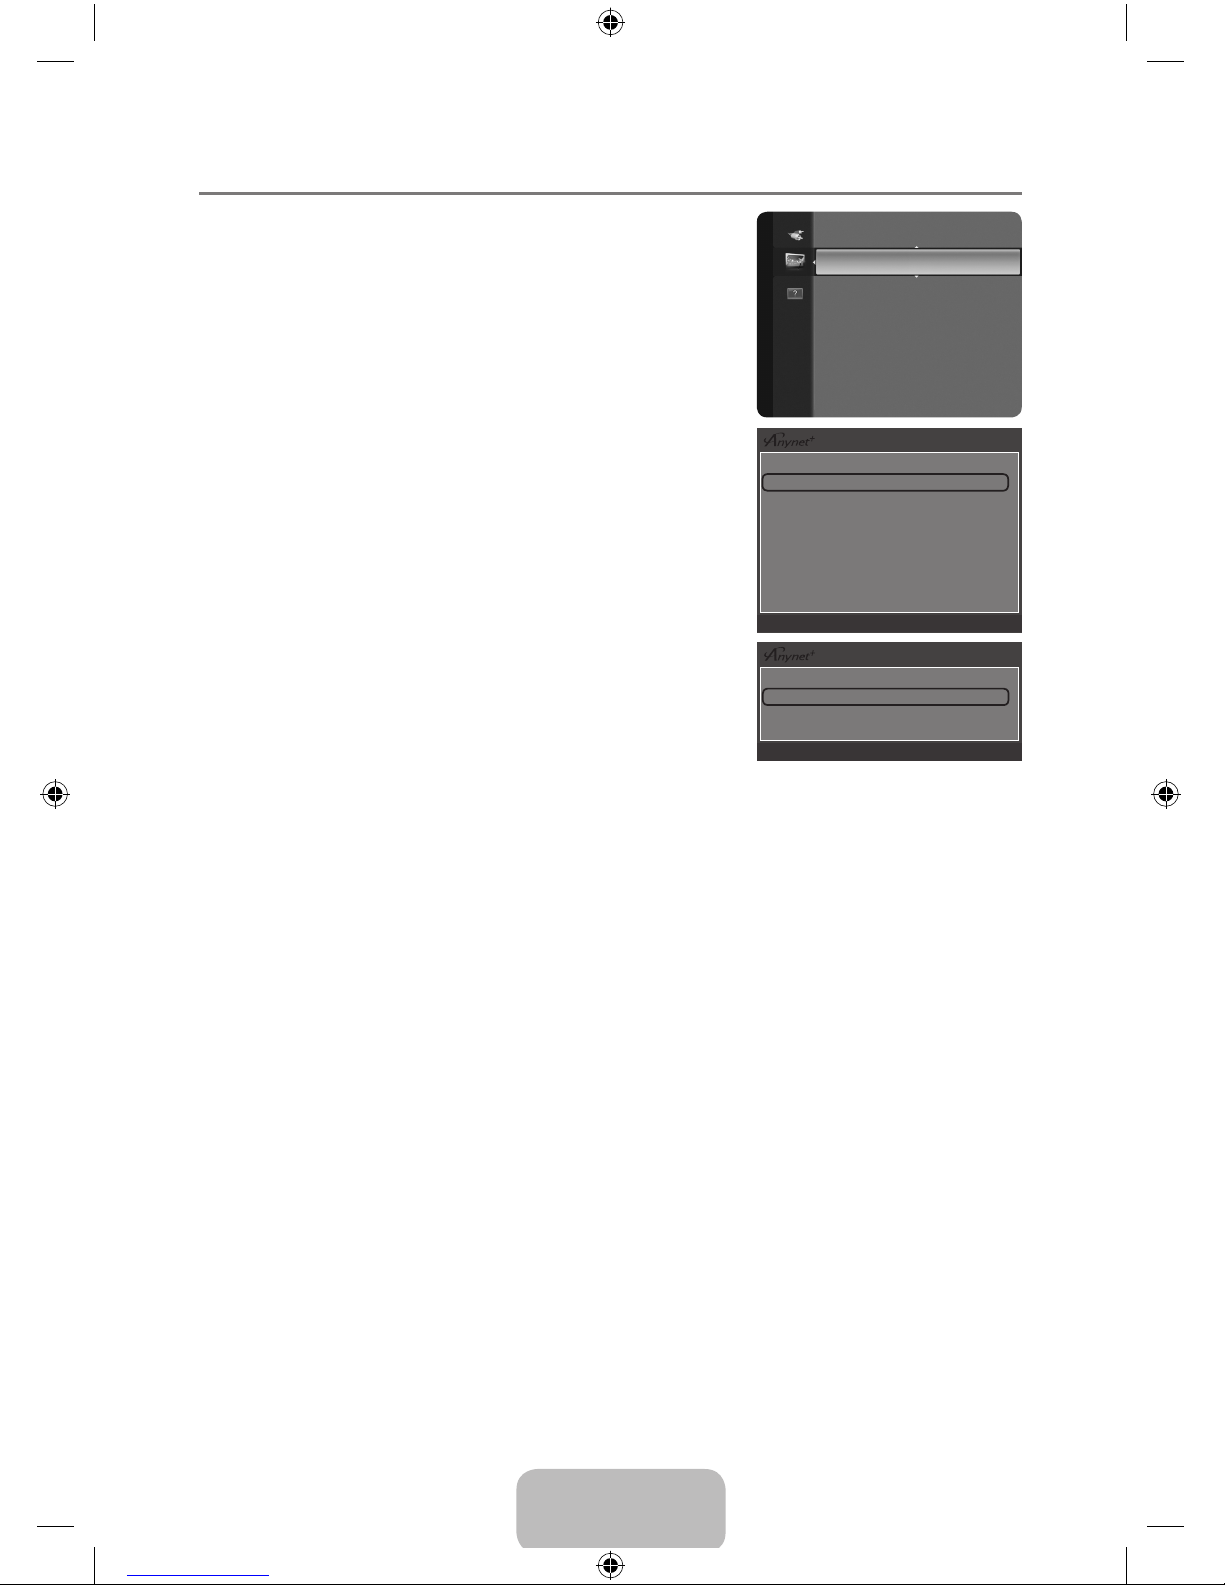
Press the T TOOLS button to display the Tools menu. You can
also display Anynet+ menu by selecting Tools→Anynet
+
(HDMI-CEC).
Setup ❑
Anynet
+
(HDMI-CEC)→Off/On
To use the Anynet+ Function, Anynet+ (HDMI-CEC) must be set to On.
When the N Anynet+ (HDMI-CEC) function is disabled, all the
Anynet+ related operations are deactivated.
AutoTurnOff→No/Yes
Setting an Anynet+ Device to turn Off Automatically when the TV
is Turned Off
The active source on the TV remote must be set to TV to use N
the Anynet+ function.
If you set N Auto Turn Off to Yes, connected external devices
are also turned off when the TV is turned off. If an external
device is still recording, it may or may not turn off.
Anynet+(HDMI-CEC) ►
Application
Device List
Setup
U
Move E Enter R Return
Anynet+(HDMI-CEC) : On
Auto Turn Off : Yes
U
Move E Enter R Return
Setup
BN59-00905F_eng.indd 29 2009-11-10 9:30:45
Page 32
English - 30
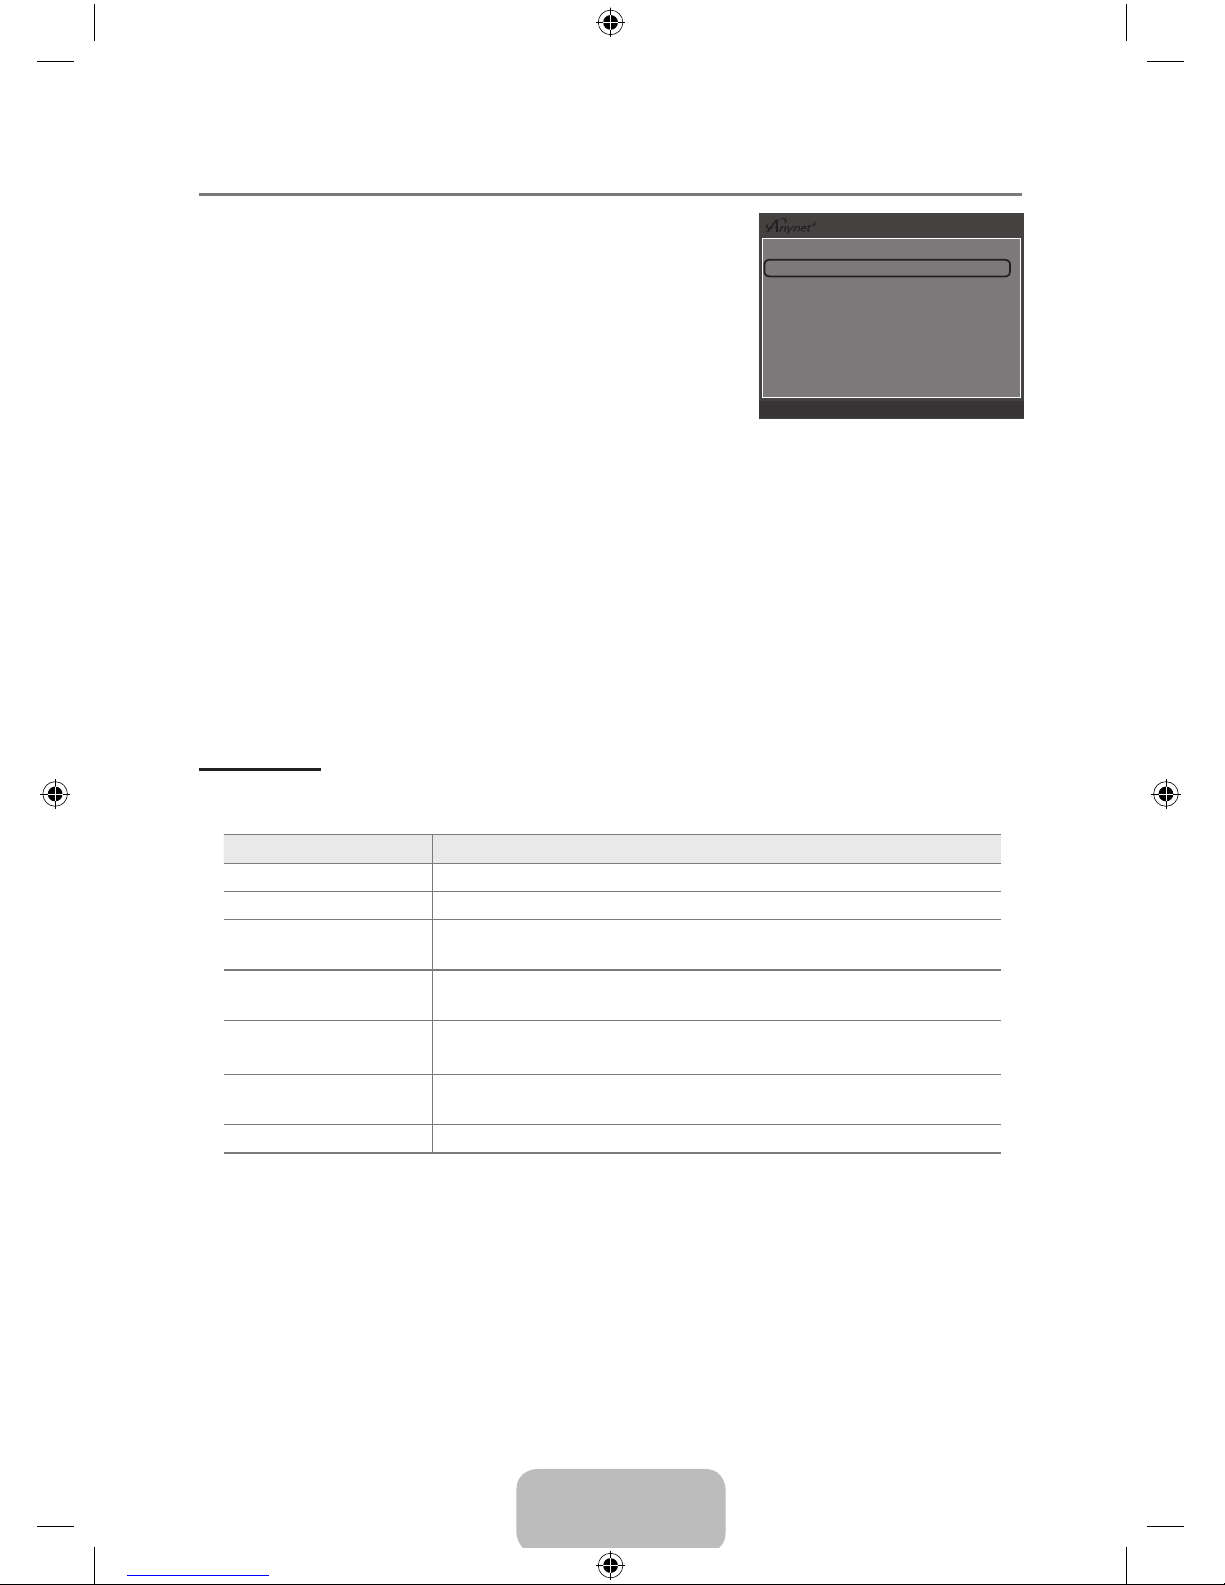
Switching between Anynet ¦
+
Devices
1. Press the TOOLS button. Press the E button to select Anynet+
(HDMI-CEC).
2. Press the ▲ or ▼ button to select Device List, then press the
E
button.
Anynet N
+
devices connected to the TV are listed.
If you cannot nd a device you want, press the red button to N
scan for devices.
3. Press the ▲ or ▼ button to select a particular device and press
the E button. It is switched to the selected device.
Only when you set N Anynet+ (HDMI-CEC) to On in the
Application menu, the Device List menu appears.
Switching to the selected devices may take up to 2 minutes. You cannot cancel the operation N
during the switching operation.
The time required to scan for devices is determined by the number of connected devices. N
When the device scan is complete, the number of devices found are not displayed. N
Although the TV automatically searches the device list when the TV is turned on via the power N
button, devices connected to the TV when the TV is on or under some conditions are not
automatically displayed in the device list. Press the red button to search for the connected
device.
If you have selected external input mode by pressing the N SOURCE button, you cannot use the
Anynet+ function. Make sure to switch to an Anynet+ device by using the Device List.
Anynet+ Menu
The Anynet+ menu changes depending on the type and status of the Anynet+ devices connected to
the TV.
Anynet+ Menu Description
View TV Anynet+ mode changes to TV broadcast mode.
Device List Shows the Anynet+ device list.
(device_name) Menu
Shows the connected device menus. E.g. If a DVD recorder is
connected, the disc menu of the DVD recorder will appear.
(device_name)
Operation
Shows the play menu of the connected device. E.g. If a DVD recorder
is connected, the play menu of the DVD recorder will appear.
Record: (*recorder)
Starts recording immediately using the recorder. (This is only available
for devices that support the recording function.)
Stop Recording:
(*recorder)
Stops recording.
Receiver Sound is played through the receiver.
If more than one recording device is connected, they are displayed as (*recorder) and if only one N
recording device is connected, it will be represented as (*device_name).
View TV
Device List
Record : DVDR
DVDR Menu
DVDR Operation
Setup
U
Move E Enter R Return
Device List
BN59-00905F_eng.indd 30 2009-11-10 9:30:45
Page 33
English - 31
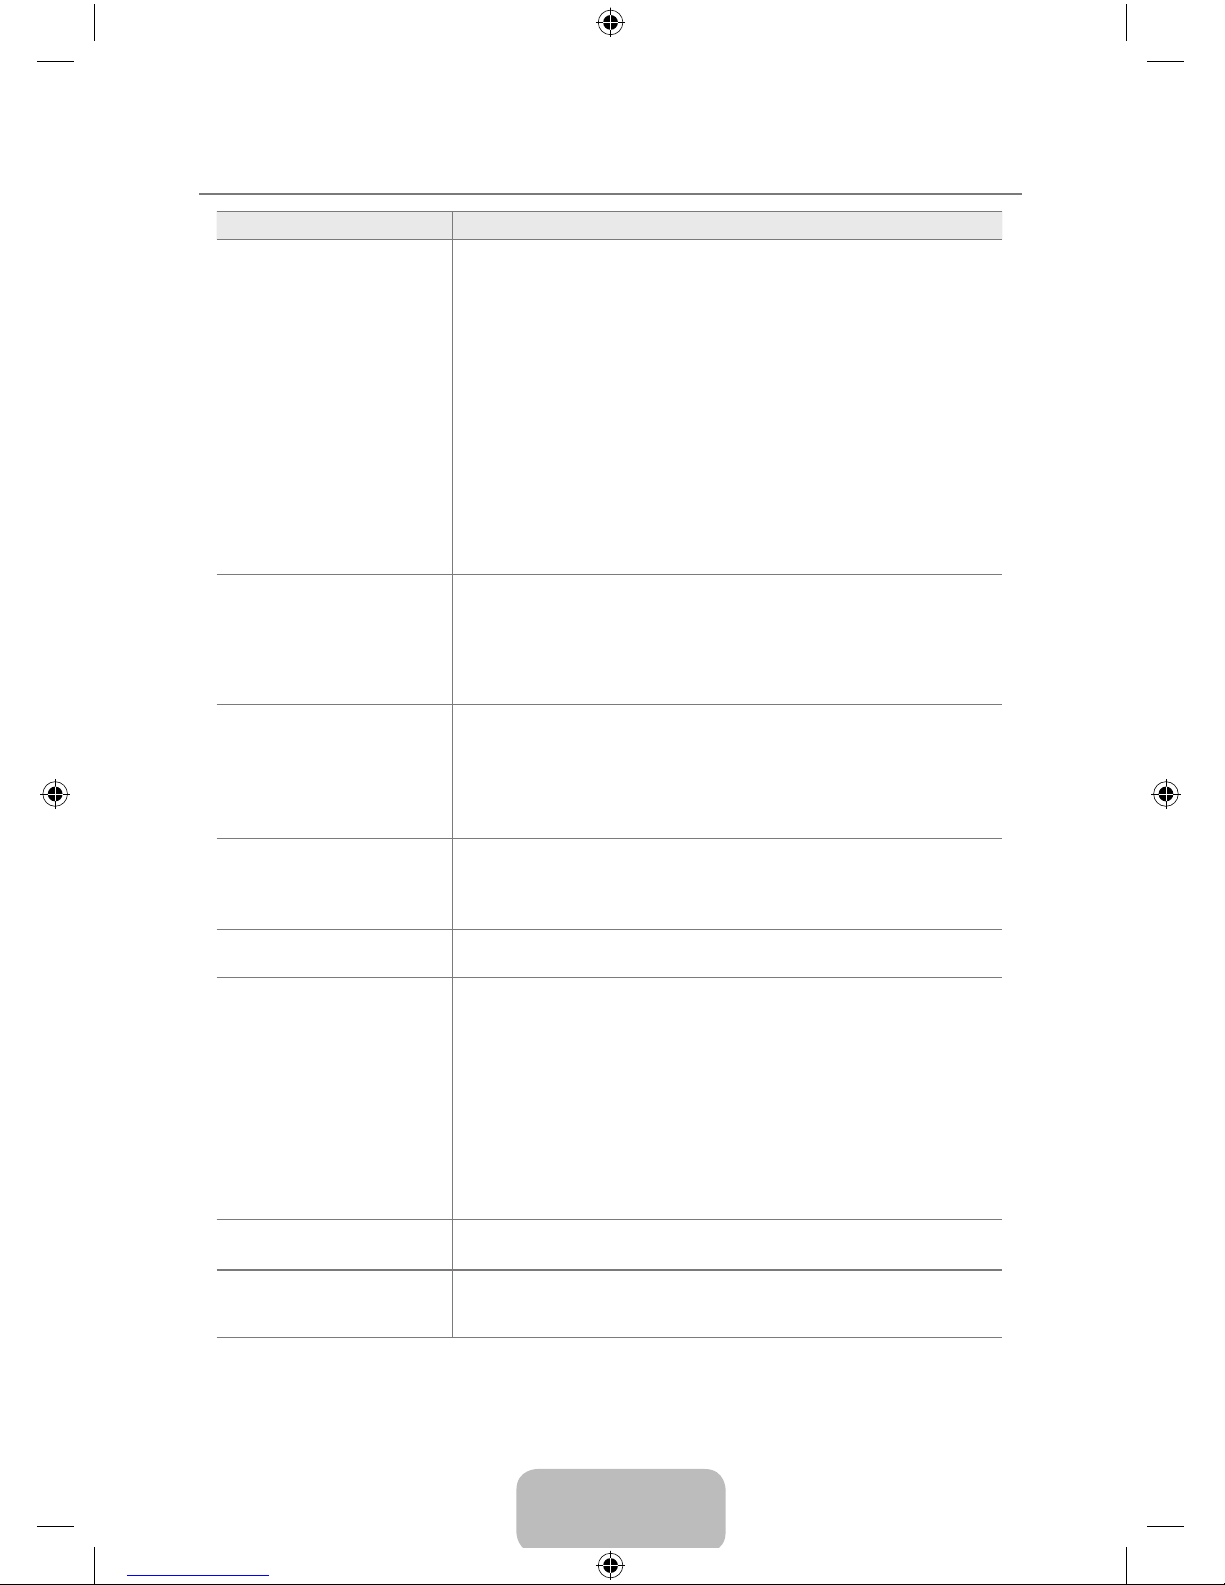
Troubleshooting for Anynet ¦
+
Problem Possible Solution
Anynet+ does not work. Check if the device is an Anynet ●
+
device. The Anynet+ system
supports Anynet+ devices only.
Connect only one receiver (home theater). ●
Check if the Anynet ●
+
device power cord is properly connected.
Check the Anynet ●
+
device’s Video/Audio/HDMI 1.3 cable
connections.
Check whether Anynet ●
+
(HDMI-CEC) is set to On in the Anynet+
setup menu.
Check whether the TV remote control is in TV mode. ●
Check whether it is Anynet ●
+
exclusive remote control.
Anynet ●
+
doesn’t work in certain situations. (Searching channels,
Operating, Plug & Play, etc.)
When connecting or removing the HDMI 1.3 cable, please make ●
sure to search devices again or turn your TV off and on again.
Check if the Anynet ●
+
Function of Anynet+ device is set on.
I want to start Anynet+. Check if the Anynet ●
+
device is properly connected to the TV and
check if the Anynet+ (HDMI-CEC) is set to On in the Anynet+
Setup menu.
Press the TV button on the TV remote control to switch to TV. ●
Then press the TOOLS button to show the Anynet+ menu and
select a menu you want.
I want to exit Anynet+. Select View TV in the Anynet ●
+
menu.
Press the SOURCE button on the TV remote control and select ●
a device other than Anynet+ devices.
Press ●
z
, CH LIST, PRE-CH, and FAV.CH to change
the TV mode. (Note that the channel button operates only when
a tuner-embedded Anynet+ device is not connected.)
The message Connecting
to Anynet+ device...
appears on the screen.
You cannot use the remote control when you are conguring ●
Anynet+ or switching to a view mode.
Use the remote control when the Anynet ●
+
setting or switching to
view mode is complete.
The Anynet+ device does
not play.
You cannot use the play function when Plug & Play is in ●
progress.
The connected device is
not displayed.
Check whether or not the device supports Anynet ●
+
functions.
Check whether or not the HDMI 1.3 cable is properly connected. ●
Check whether Anynet ●
+
(HDMI-CEC) is set to On in the Anynet+
setup menu.
Search Anynet ●
+
devices again.
You can connect an Anynet ●
+
device using the HDMI 1.3 cable
only. Some Some HDMI cables may not support Anynet+
functions.
If it is terminated by an abnormal situation such as disconnecting ●
the HDMI cable or power cord or a power failure, please repeat
the device scan.
The TV program cannot
be recorded.
Check whether the antenna jack on the recording device is ●
properly connected.
The TV sound is not
output through the
receiver.
Connect the optical cable between TV and the receiver. ●
BN59-00905F_eng.indd 31 2009-11-10 9:30:45
Page 34
English - 32
INSTALLING THE SOFTWARE
Installing the Device Driver ¦
If you install the device driver, you can set up the appropriate resolution and frequency for N
the product. The device driver isincluded on the CD supplied with the product. If the supplied
drive le is corrupted, please visit the Samsung Electronicswebsite (www.samsung.com), and
download the driver.
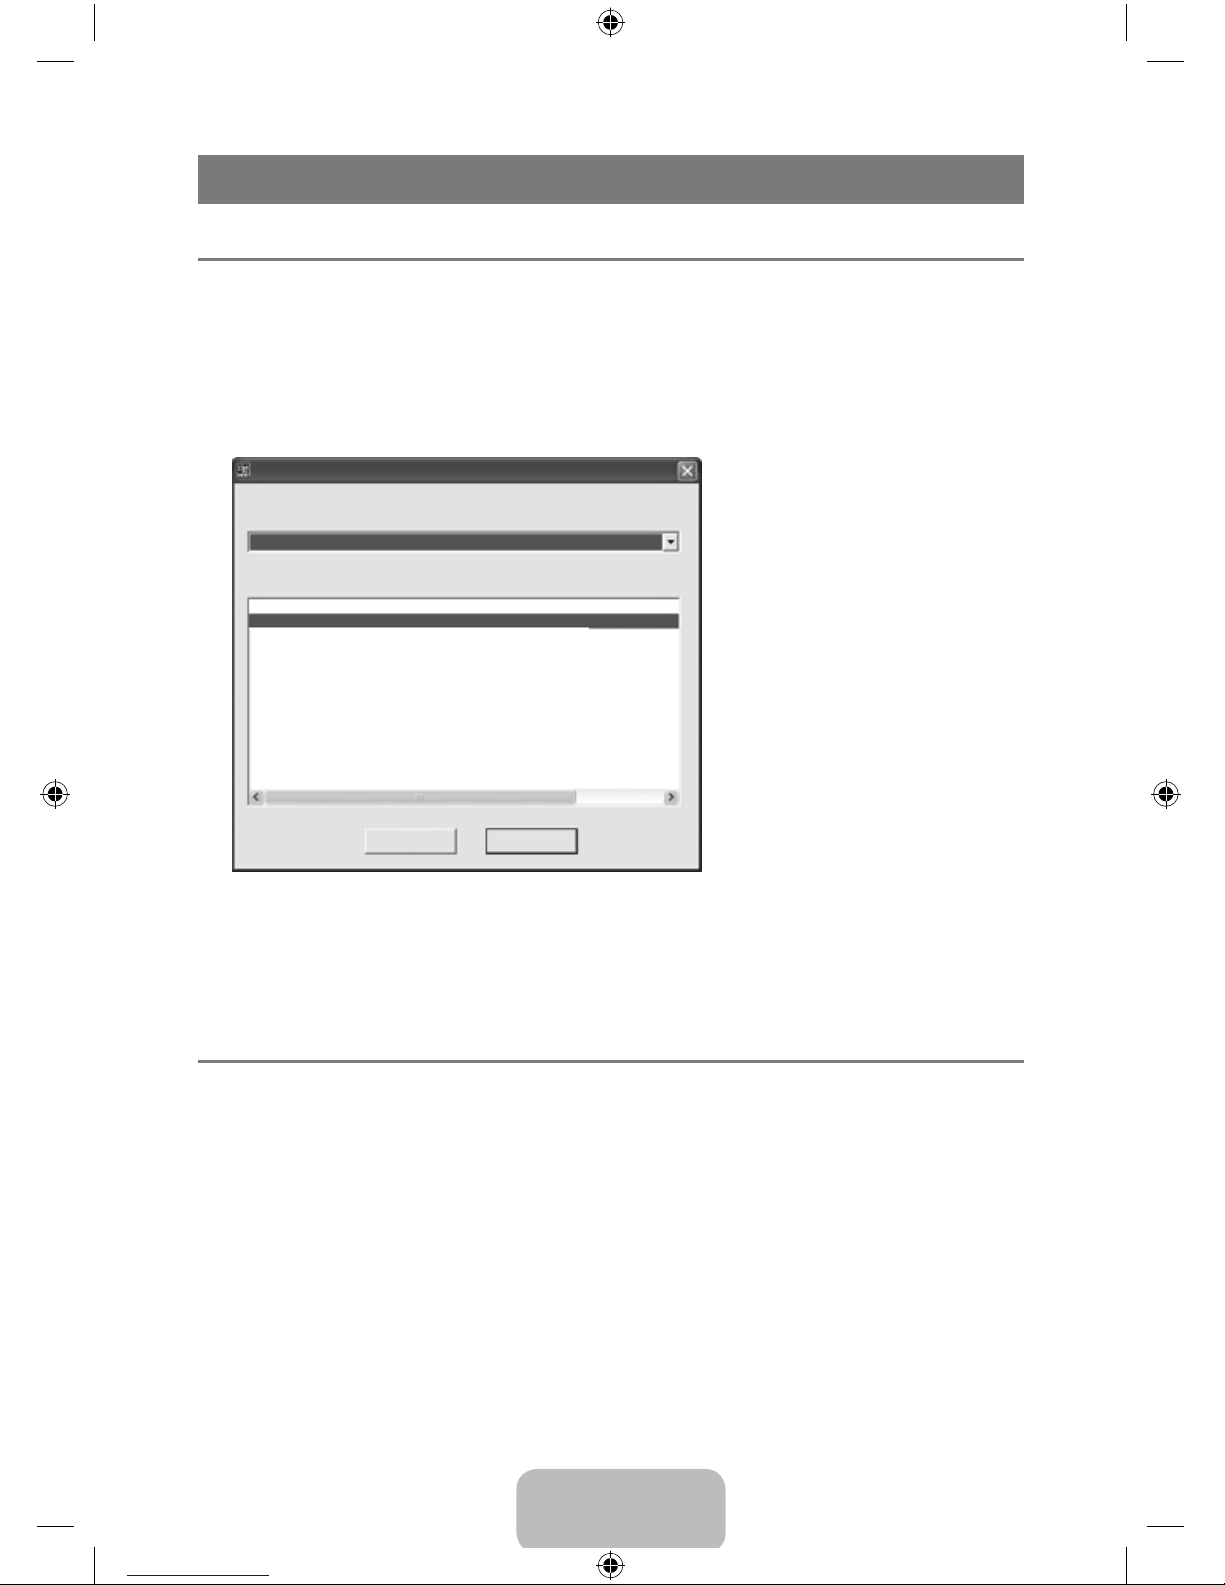
1. Insert the driver installation CD into the CD-ROM drive.
2. Click on Windows Driver.
3. Select the model of your product from the model list.
SAMSUNG monitor installer
Select the display adapter on which you want to intall the monitor
1.RADEON 9550 : Plug and Play Monitor
Select the monitor which you want to install
Samsung
....
Samsung
....
OK
CANCEL
4. Complete the remaining installation steps according to the instructions displayed on the screen.
5. Check if the appropriate resolution and screen refresh rate are displayed in the Control Panel
settings. For more information,refer to the document about the Windows operating system.
Natural Color ¦
This software is for Samsung products only and enables you to adjust the displayed colors on the
product so they more closely match the colors of printed pictures. For more information, refer to the
online help of the software (F1).
Natural Color is provided online. You can download it from the website below and install; N
http://www.samsung.com/us/consumer/learningresources/monitor/naturalcolorexpert/pop_
download.html
BN59-00905F_eng.indd 32 2009-11-10 9:30:45
Page 35
English - 33
MultiScreen ¦
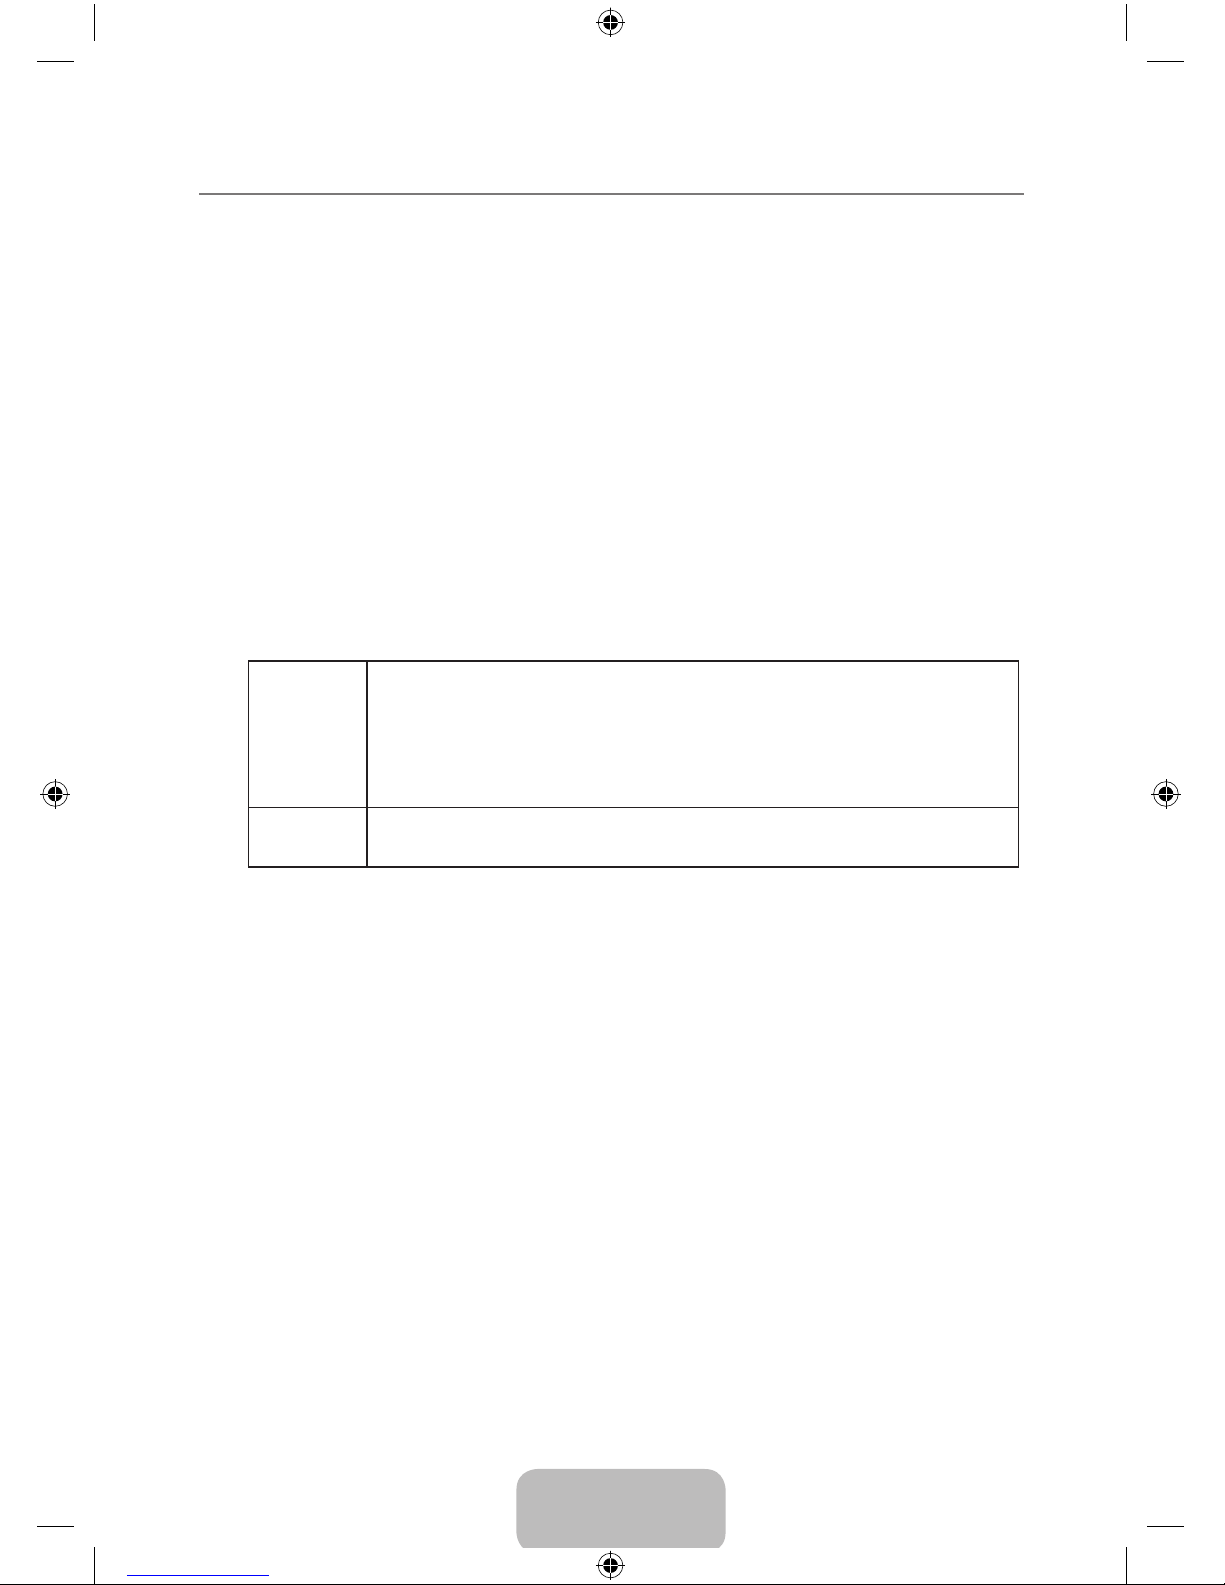
MultiScreen enables you to partition multiple sections on the Monitor.
Installing the Software ●
1. Insert the installation CD into the CD-ROM drive.
2. Select the MultiScreen setup program.
If the pop-up screen for the software installation does not appear on the main screen, nd N
and double-click the MultiScreen setup le on the CD-ROM.
3. When the Installation Wizard appears, click [Next].
4. Complete the remaining software installation steps according to the instructions displayed on
the screen.
The software may not work properly if you do not restart the computer after the installation. N
The MultiScreen icon may not appear depending on the computer system and the product N
specications.
If the shortcut icon does not appear, press the F5 key. N
MultiScreen Installation Requirements ●
The MultiScreen installation may be affected by the graphics card, motherboard and the
networking environment.
Operating System ●
OS
• Windows 2000
• Windows XP Home Edition
• Windows XP Professional
• Windows Vista
For MultiScreen, Windows 2000 or later operating systems are recommended. N
Hardware
• At least 32MB of memory
• At least 60MB of free space on the hard disk drive
Removing the Software ❑
Click [Start], select [Settings]/[Control Panel], and then double-click [Add or Remove Programs].
Select MultiScreen from the program list and click the [Add/Delete] button.
BN59-00905F_eng.indd 33 2009-11-10 9:30:45
Page 36
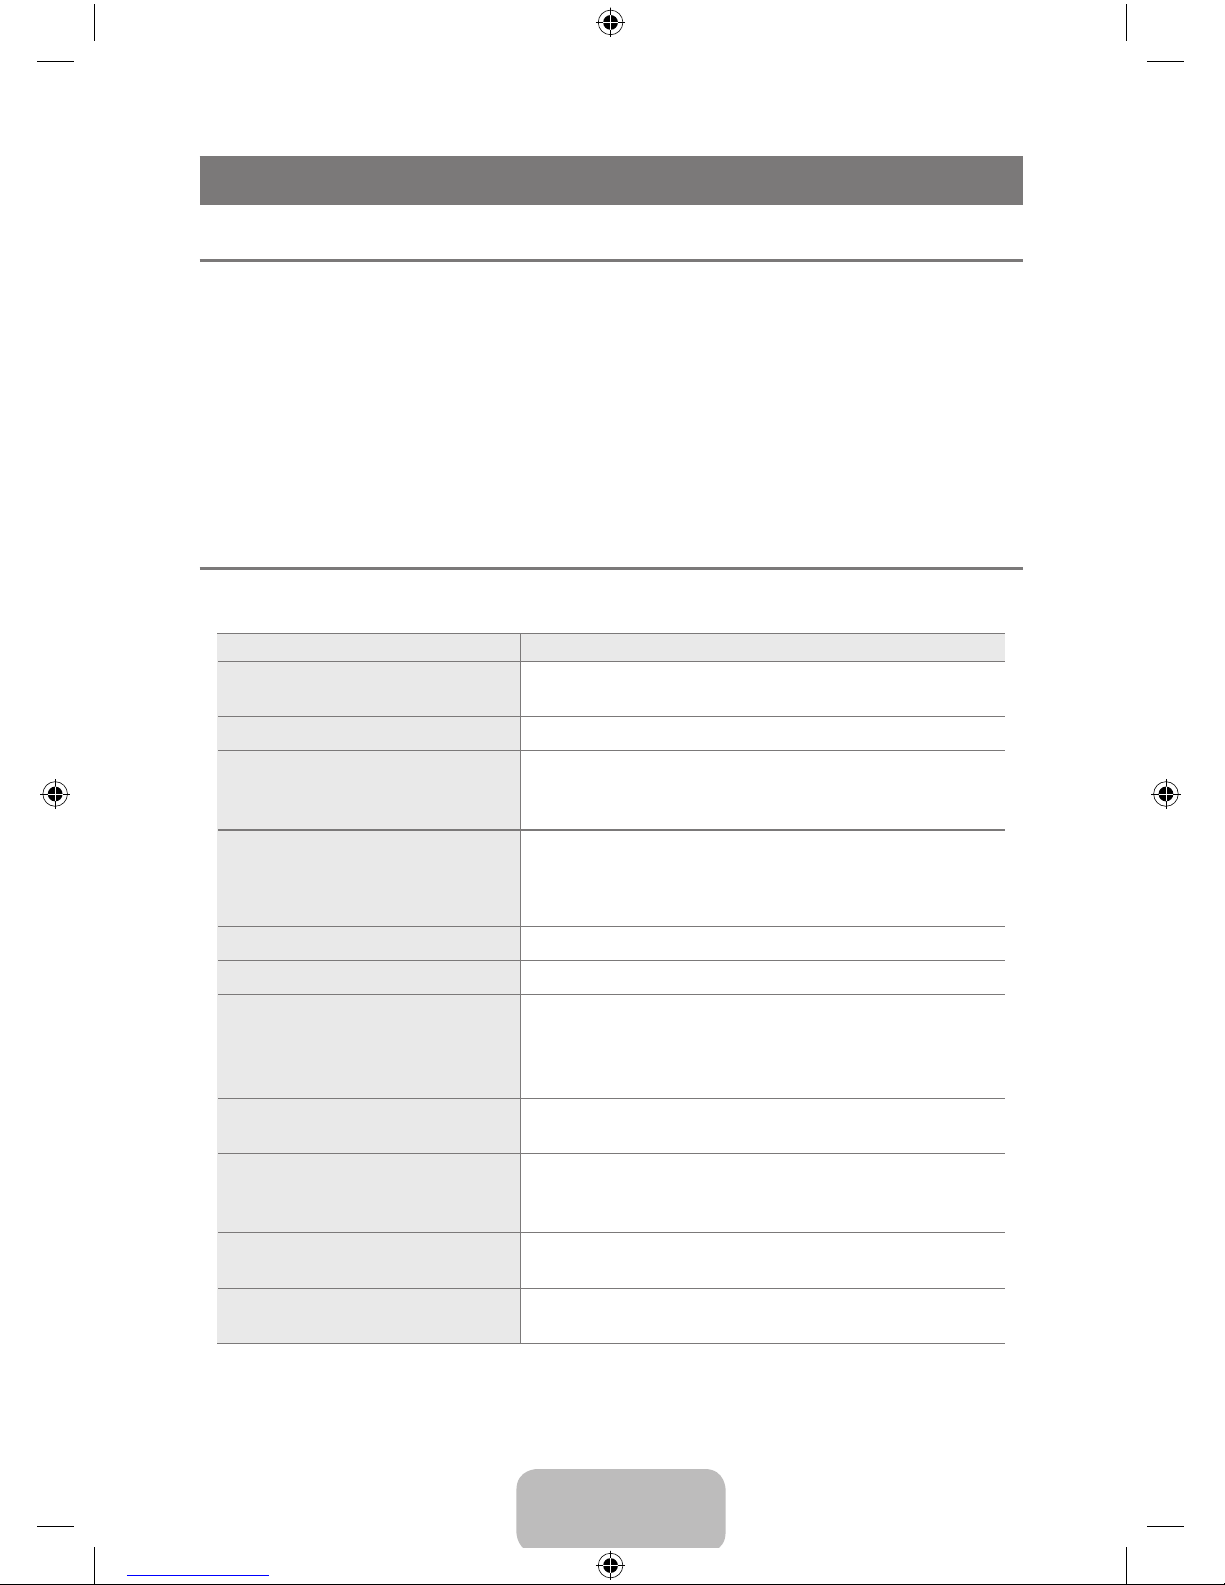
English - 34
APPENDIX
TV Monitor Self-Diagnosis ¦
You can check if the product is working properly using the Self-Diagnosis function. N
If a blank screen is displayed and the Power LED blinks even if the product and the PC are N
properly connected, perform the selfdiagnosis function according to the procedures below.
1. Turn the product and the PC off.
2. Remove the D-Sub cable from the product.
3. Turn the product on.
4. If the product is working properly, the <Check Signal Cable> message appears.
In this case, if a blank screen is displayed again, make sure that there is no problem with the PC
and the connection.
Troubleshooting ¦
If the TV seems to have a problem, rst try this list of possible problems and solutions. If none of
these troubleshooting tips apply, call Samsung customer service at 1-800-SAMSUNG.
Problem Possible Solution
Poor picture. Try another channel. / Adjust the antenna. / Check all wire
connections.
Poor sound quality. Try another channel. / Adjust the antenna.
No picture or sound. Try another channel. / Press the SOURCE button.
Make sure the TV is plugged in. / Check the antenna
connections.
No sound or sound is too low at
maximum volume.
First, check the volume of units connected to your TV
(digital broadcasting receiver, DVD, cable broadcasting
receiver, VCR, etc.). Then, adjust the TV volume
accordingly.
The TV operates erratically. Unplug the TV for 30 seconds, then try operating it again.
The TV won’t turn on. Make sure the wall outlet is working.
Remote control malfunctions. Replace the remote control batteries.
Clean the upper edge of the remote control (transmission
window).
Check the battery terminals.
‘Check signal cable’ message. Ensure that the signal cable is rmly connected to the PC
and DVI source.
‘Not Supported Mode’ message. Check the maximum resolution and connected device’s
Video frequency.
Compare these values with the data in the Display Modes.
Digital broadcasting screen
problem.
Please check the digital signal strength and input antenna.
The image is too light or too dark. Adjust the Brightness and Contrast. / Adjust the Fine
tuning.
BN59-00905F_eng.indd 34 2009-11-10 9:30:45
Page 37
English - 35
Problem Possible Solution
Black bars on the screen.
Make sure the broadcast you’re receiving is High Denition (HD).
HD channels sometimes broadcast Standard Denition
(SD) programming, which can cause black bars.
Set your cable/satellite box to stretch or widescreen mode
to eliminate the bars.
Picture has a Red/Green or Pink tint.
Make sure the Component cables are connected to the correct jacks.
Closed Captioning not working. If you are using a Cable/Satellite box, you must set Closed
Captioning on the box, not your TV.
Snowy picture. Your cable box may need a rmware upgrade. Please
contact your Cable company.
Ghosting on picture.
This is sometimes caused by compatibility issues with your cable box.
Try connecting Component cables instead.
Screen is black and power indicator
light blinks steadily.
On your computer check: Power, Signal Cable.
The TV is using its power management system.
Move the computer's mouse or press any key on the keyboard.
Image is not stable and may
appear to vibrate when you have
a computer connected to the PC
input.
If the setting is not correct, use your computer utility
program to change the display settings.
Your TV supports multiscan display functions within the
following frequency domain:
- Horizontal frequency (kHz): 30 ~ 81 kHz
- Vertical frequency (Hz): 56 ~ 75 Hz
- PC Maximum refresh rate (at 60 Hz): 1360 X 768
Image is not centered on the
screen.
Adjust the horizontal and vertical position.
The screen position must be adjusted on the output source
(i.e. STB) with a digital signal.
The picture appears distorted in the
corner of the screen.
If “Screen Fit” is selected with some external devices, the
picture may appear distorted in the corner of the screen.
This symptom is caused by the external devices, not TV.
The ‘Resets all settings to the
default values.’ message appears.
This appears when you press and hold the EXIT button for a
while. The product settings are reset to the factory defaults.
This TFT LCD panel uses a panel consisting of sub pixels (3,133,440) which require N
sophisticated technology to produce. However, there may be few bright or dark pixels on the
screen. These pixels will have no impact on the performance of the product.
BN59-00905F_eng.indd 35 2009-11-10 9:30:45
Page 38
English - 36
FAQ ¦
FAQ PLEASE TRY THE FOLLOWING!
How can I change the frequency of
the video signal?
You have to change the frequency of the graphics card.
(For more information, refer to the User Manual of the
computer or thegraphics card.)
How can I change the resolution? Windows XP: Change the resolution by selecting Control
Panel→Appearance and Themes→Display→Settings.
Windows ME/2000 : Change the resolution by selecting Control
Panel→Appearance and Themes→Display→Settings.
(For more information, refer to the User Manual of the
computer or thegraphics card.)
How can I use the power saving
function?
Windows XP: Congure it by selecting Control
Panel→Appearance and Themes→Display→Screen Saver
Setting or congure it in the BIOS SETUP of the computer.
Windows ME/2000 : Congure it by selecting Control
Panel→Appearance and Themes→Display→Screen Saver
Setting or congure it in the BIOS SETUP of the computer.
For more information, refer to the Windows user manual for
the computer.
How can I clean the outer case/
LCD Panel?
Disconnect the power cord and then clean the monitor with
a soft, dry or slightly damp cloth.
Do not leave any detergent or scratches on the case.
Do not let any water enter the monitor.
Can I watch digital TV broadcasting
with an analog TV?
No.
The analog TV cannot interpret digital signals. Therefore, a
digital TV is required to watch digital TV broadcasting.
Can I use my present antenna to
receive digital broadcasting?
As for existing analog TV, digital TV is designed so that
digital broadcasting signals are received via both indoor
and outdoor antennas.
If signal reception is very good in your environment, you
can watch digital broadcasts with your existing indoor
antenna. If not, it is better to install an outdoor antenna.
BN59-00905F_eng.indd 36 2009-11-10 9:30:45
Page 39
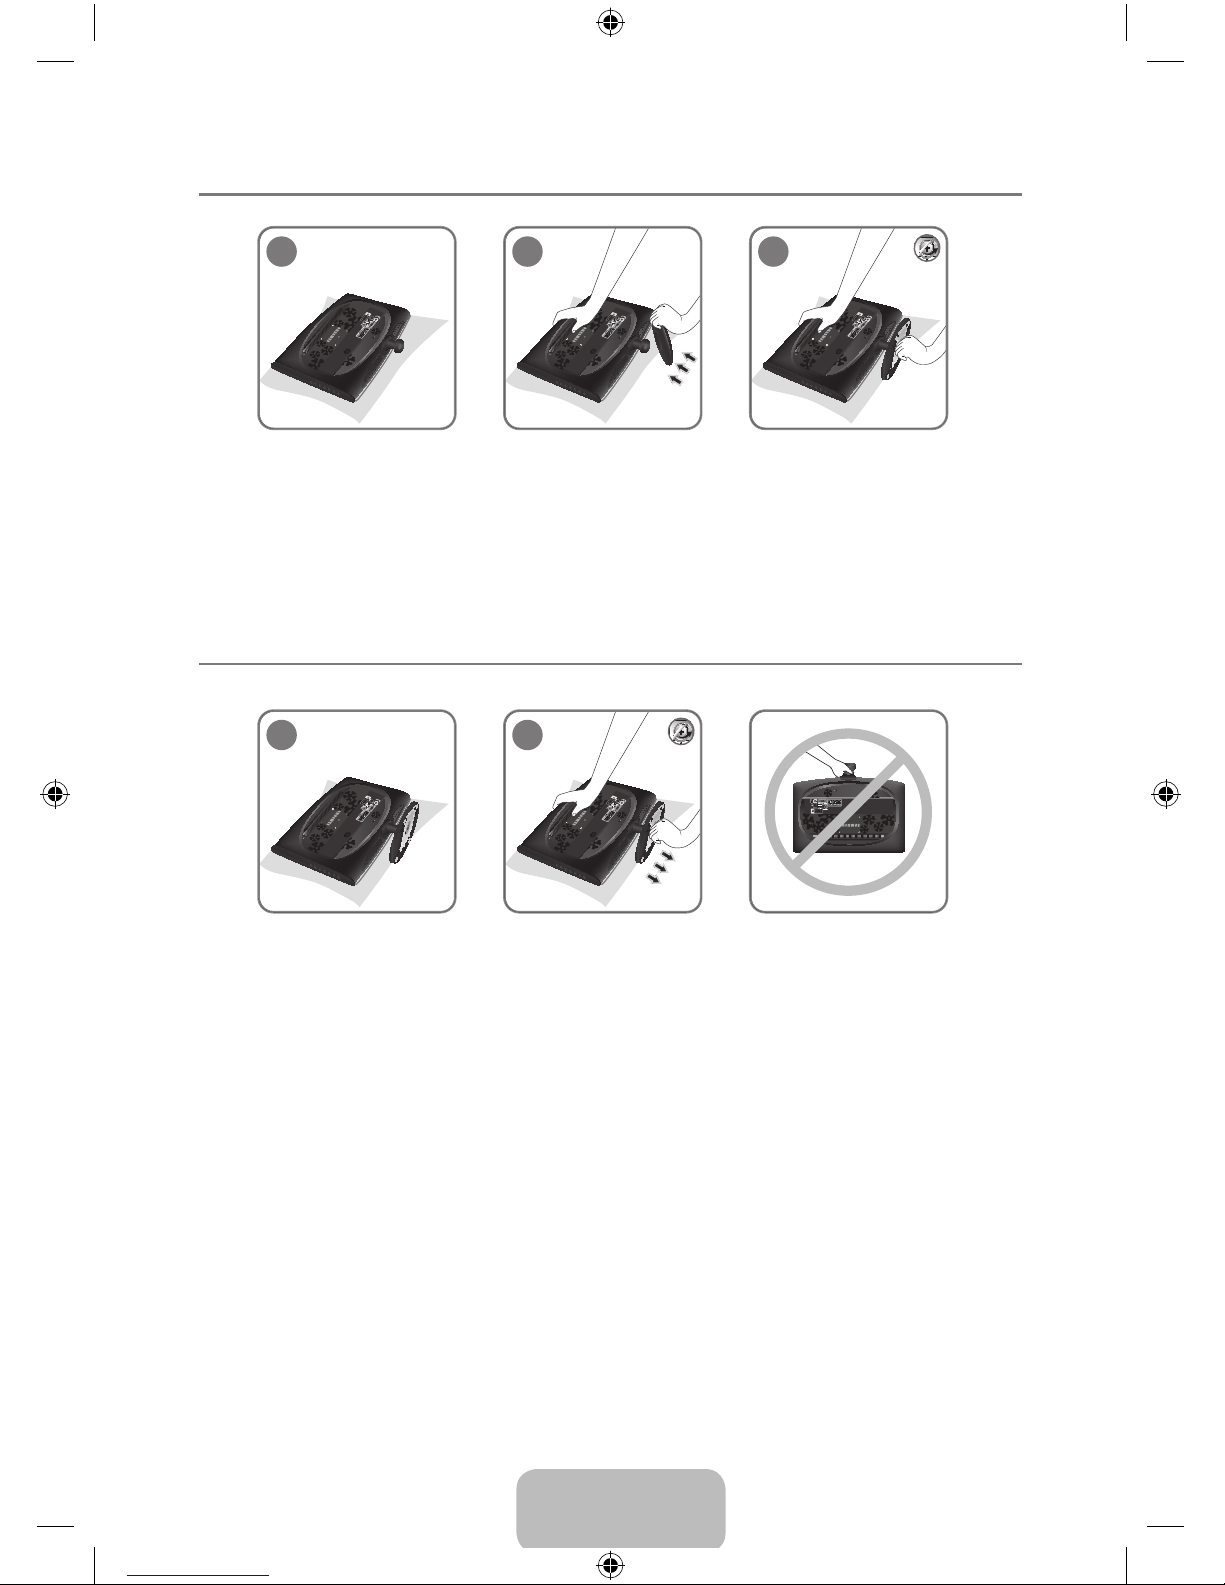
English - 37
Installing the Stand ¦
1
2
3
1. Place the front of the TV onto a soft cloth or cushion on a table.
Align the TV bottom along the table edge. N
2. Insert the Stand Connector into the Stand in the direction shown by the gure.
3. Turn the connecting screw at the bottom of the stand fully so that it is completely xed.
Disconnecting the Stand ¦
1
2
1. Place the front of the TV onto a soft cloth or cushion on a table.
Align the TV bottom along the table edge. N
2. Turn the connecting screw at the bottom of the stand to separate it.
Do not lift the product holding only the stand. N
BN59-00905F_eng.indd 37 2009-11-10 9:30:48
Page 40
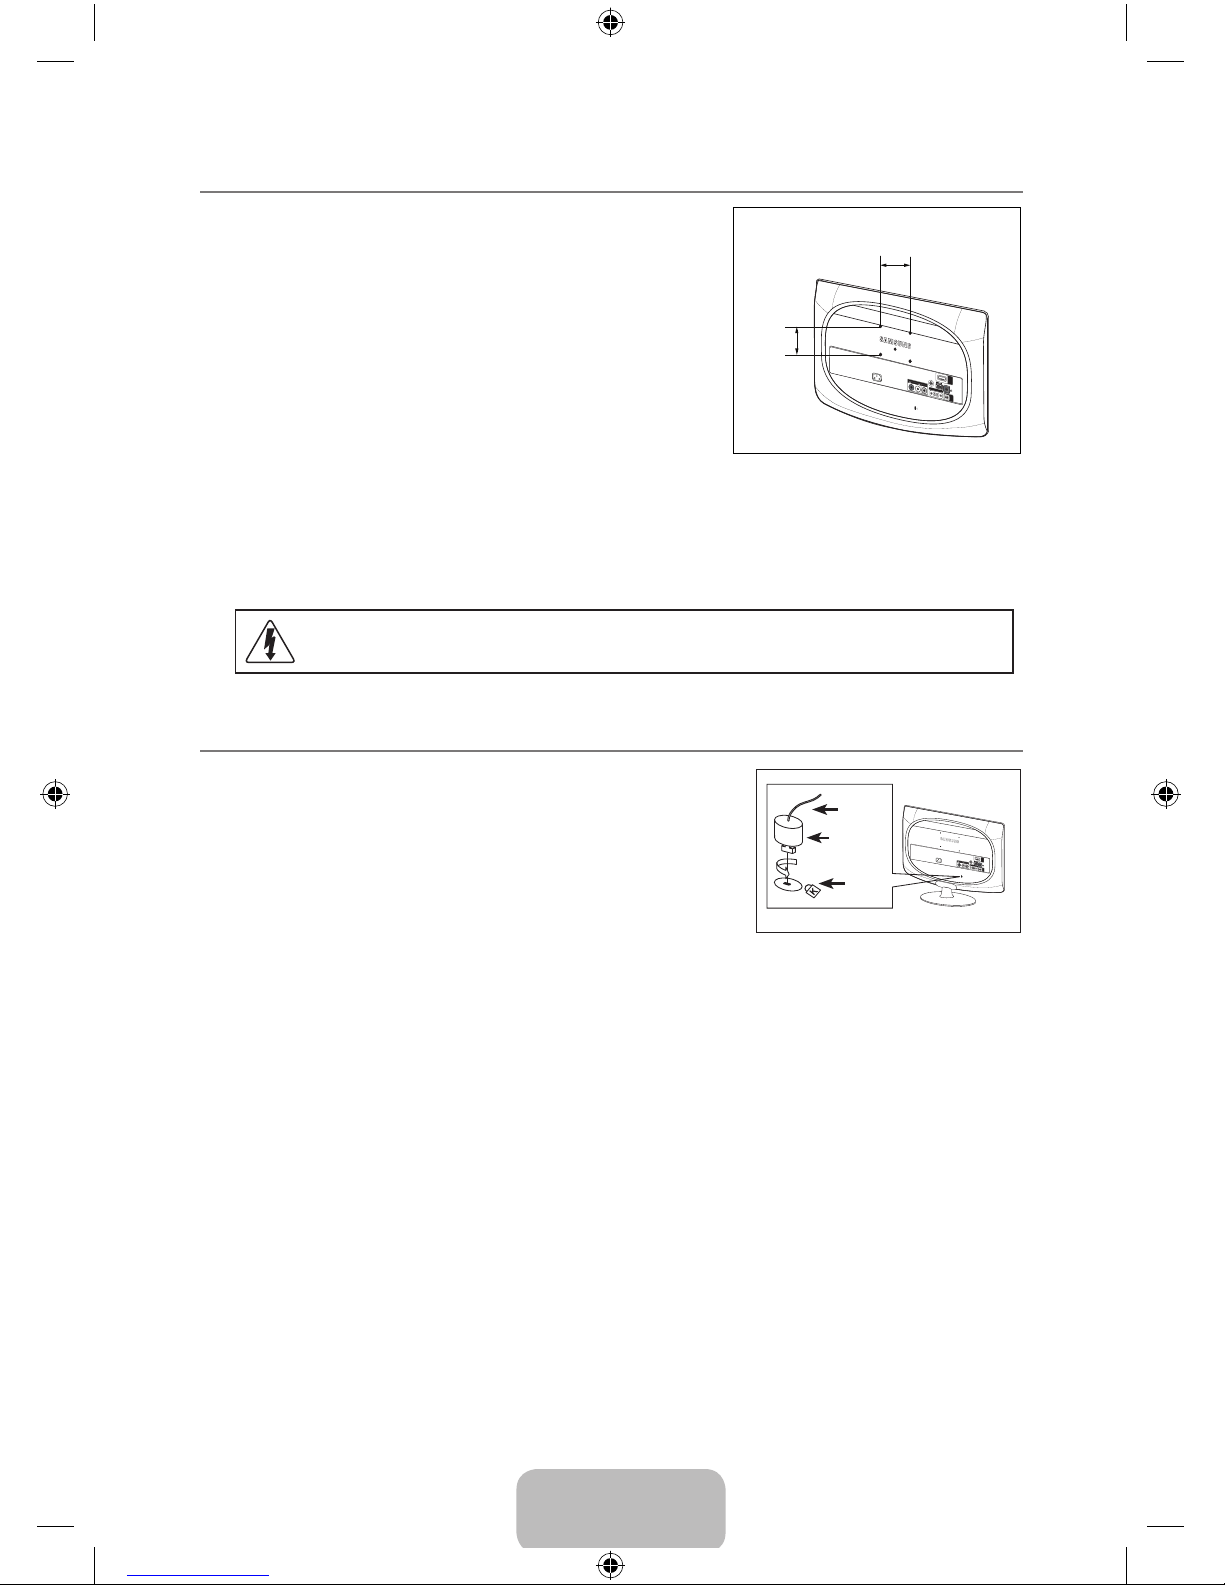
English - 38
WallMountKitSpecications(VESA) ¦
Install your wall mount on a solid wall perpendicular to the
oor. When attaching to other building materials, please
contact your nearest dealer. If installed on a ceiling or slanted
wall, it may fall and result in severe personal injury.
When purchasing our wall mount kit, a detailed installation N
manual and all parts necessary for assembly are
provided.
Do not use screws longer than the standard dimension, N
as they may cause damage to the inside of the TV set.
For wall mounts that do not comply with the VESA N
standard screw specications, the length of the screws
may differ depending on their specications.
Do not use screws that do not comply with the VESA standard screw specications. N
Do not fasten the screws too strongly, this may damage the product or cause the product to fall, N
leading to personal injury. Samsung is not liable for these kinds of accidents.
Samsung is not liable for product damage or personal injury when a non-VESA or non-specied N
wall mount is used or the consumer fails to follow the product installation instructions.
Do not install your Wall Mount Kit while your TV is turned on. It may result in personal
injury due to electric shock.
Using the Anti-Theft Kensington Lock ¦
The Kensington Lock is a device used to physically x the
system when using it in a public place. The appearance and
locking method may differ from the illustration depending on the
manufacturer.
Refer to the manual provided with the Kensington Lock for
proper use. The locking device has to be purchased separately.
The location of the Kensington Lock may be different N
depending on its model.
1. Insert the locking device into the Kensington slot on the LCD TV (1) and turn it in the locking
direction (2).
2. Connect the Kensington Lock cable (3).
3. Fix the Kensington Lock to a desk or a heavy stationary object.
ANT IN
HDMI IN
AV IN
- AUDIO -
VIDEO
R
L
PC IN
HDMI / PC
AUDIO IN
POWER
3
1
2
ANT IN
HDMI IN
AV IN
- AUDIO -
VIDEO
R
L
PC IN
HDMI / PC
AUDIO IN
POWER
ANT IN
HDMI IN
AV IN
- AUDIO -
VIDEO
R
L
PC IN
HDMI / PC
AUDIO IN
75 mm (2.95 inches)
75 mm (2.95 inches)
BN59-00905F_eng.indd 38 2009-11-10 9:30:49
Page 41
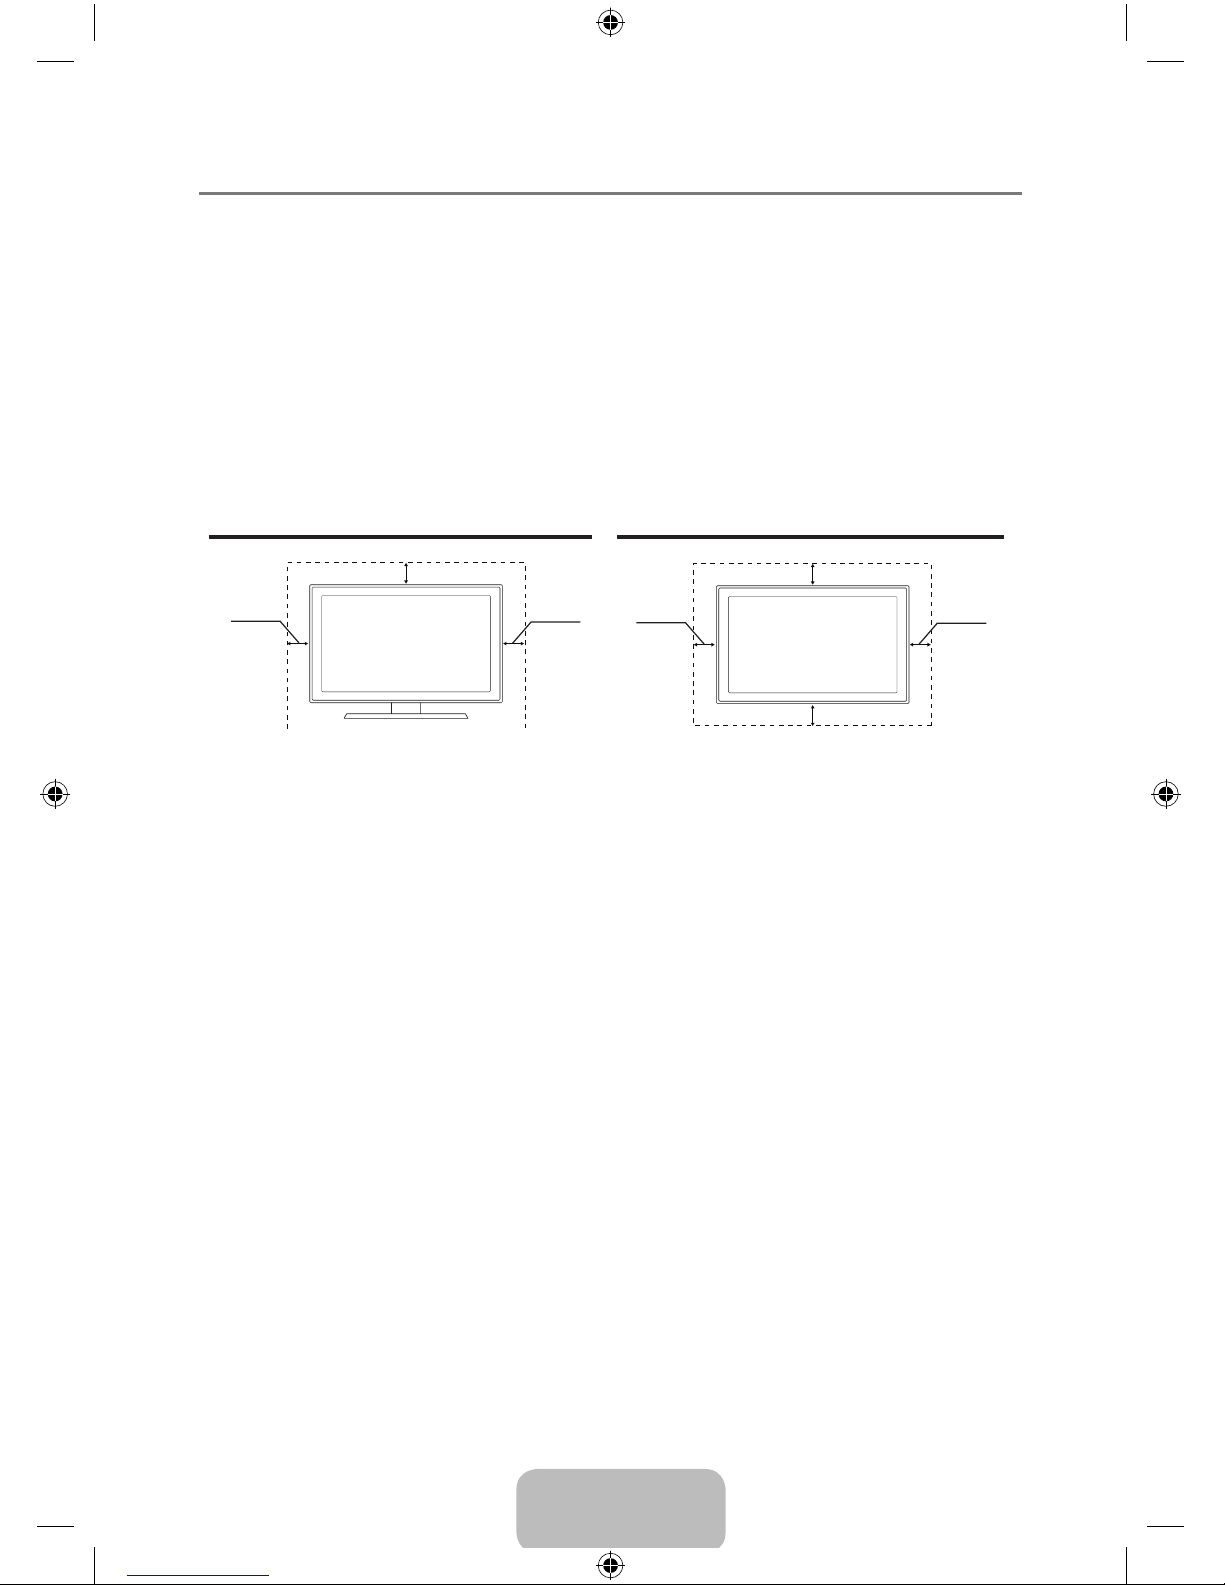
English - 39
Securing the Installation Space ¦
Keep the required distances between the product and other objects (e.g. walls) to ensure proper
ventilation.
Failing to do so may result in re or a problem with the product due to an increase in the internal
temperature of the product.
Install the product so the required distances shown in the gure are kept.
When using a stand or wall-mount, use parts provided by Samsung Electronics only. N
If you use parts provided by another manufacturer, it may result in a problem with the –
product or an injury due to the product falling.
If you use parts provided by another manufacturer, it may result in a problem with the –
product or re due to an increase in the internal temperature of the product due to poor
ventilation.
The appearance may differ depending on the product. N
When installing the product with a stand
When installing the product with a wall-mount
10 cm (3.9 inches)
10 cm (3.9 inches)
10 cm (3.9 inches)
10 cm
(3.9 inches)
10 cm
(3.9 inches)
10 cm
(3.9 inches
)
10 cm
(3.9 inches
)
BN59-00905F_eng.indd 39 2009-11-10 9:30:49
Page 42
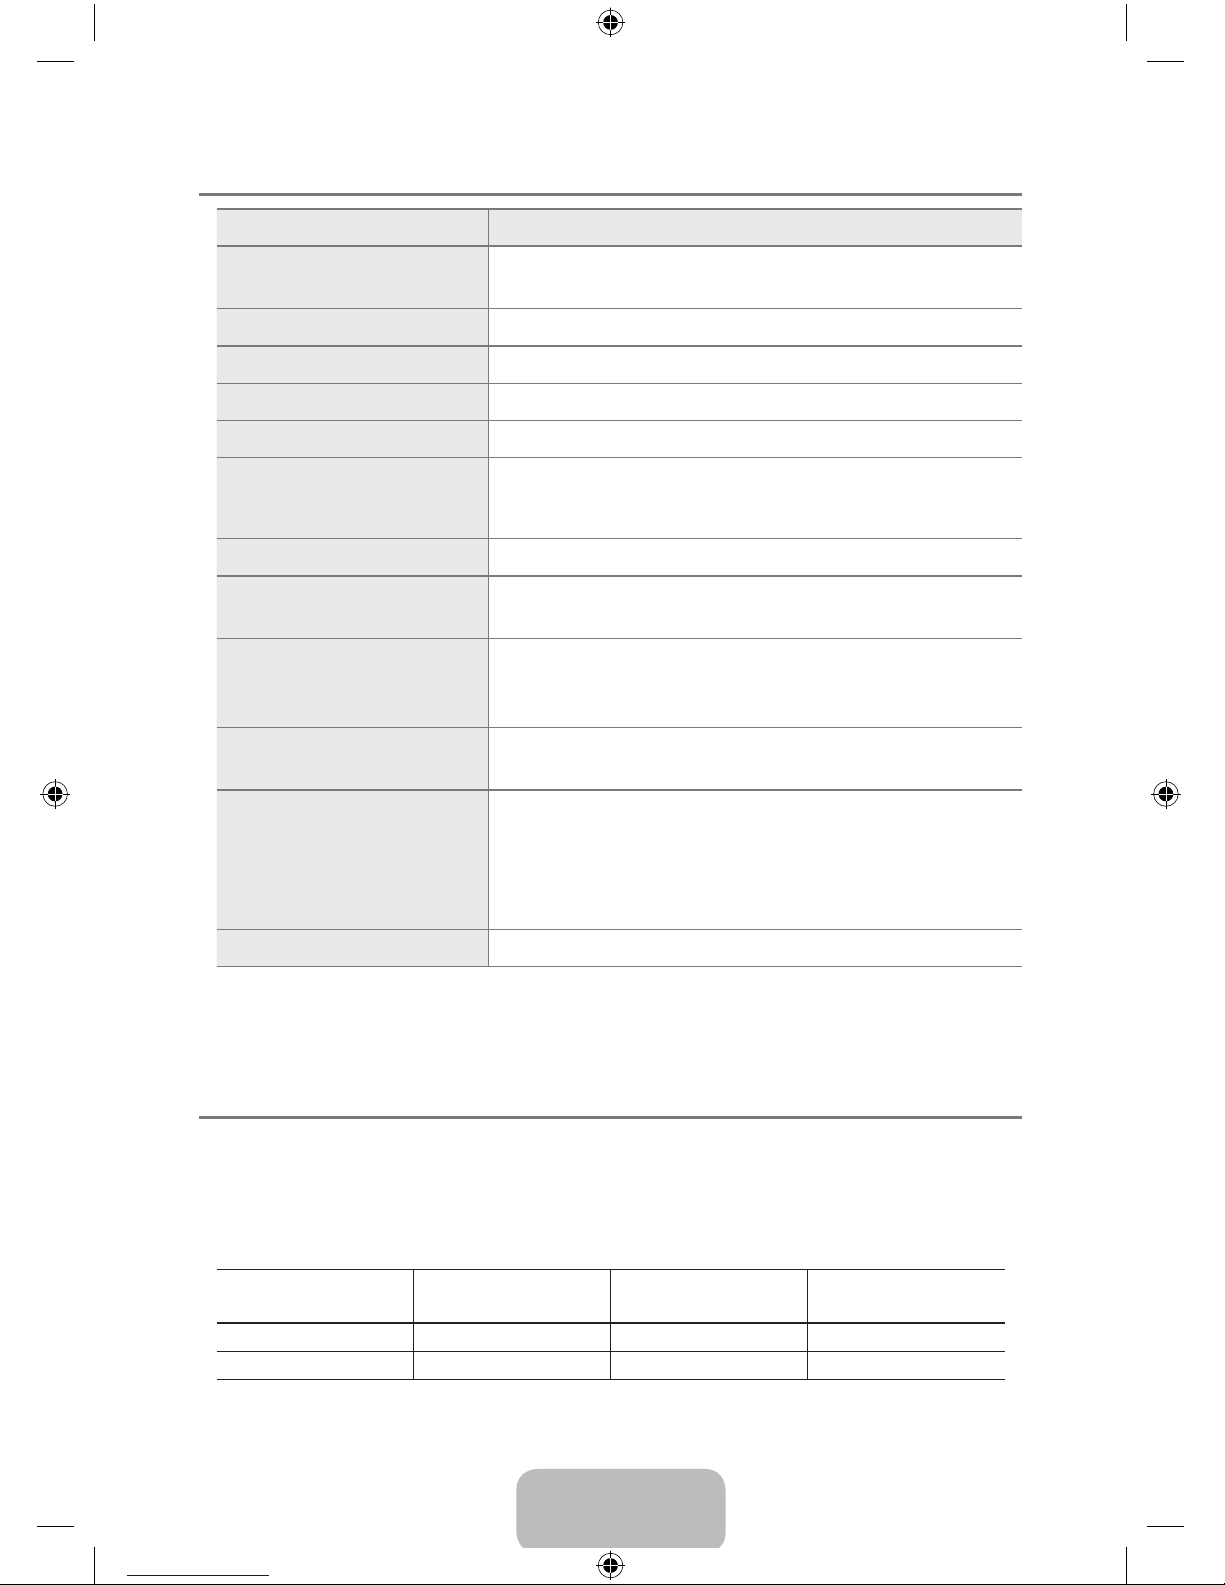
English - 40
Specications ¦
Model Name 933HD Plus
Screen Size
Diagonal
18.5 inches (47 cm)
Display area 409.8 mm (H) x 230.4 mm(V) (16.13 inches X 9.07 inches)
Pixel Pitch 0.3 mm (H) x 0.3 mm (V) (0.01 inches X 0.01 inches)
Display Color 16.7M
Maximum Pixel Clock 85.000 MHz (Analog, Digital)
Power Supply
This product supports 100 – 240 V. Since the standard voltage
may differ from country to country, please check the label on the
back of the product.
PC Resolution 1360 X 768 @ 60 Hz
Sound
Output
3W x 2
Dimensions (WxDxH)
Body
With stand
454.5 x 307 x 67.5 mm ( 17.9 x 12.1 x 2.7 inches)
454.5 x 353.5 x 177 mm ( 17.9 x 14.0 x 7.0 inches)
Weight
With Stand
4.0 kg ( 8.8 lbs)
Environmental Considerations
Operating Temperature
Operating Humidity
Storage Temperature
Storage Humidity
50°F to 104°F (10°C to 40°C)
10% to 80%, non-condensing
-4°F to 113°F (-20°C to 45°C)
5% to 95%, non-condensing
VESA Mounting Interface 75 mm x 75 mm (2.95 x 2.95 inches)
Design and specications are subject to change without prior notice. N
This device is a Class B digital apparatus. N
For the power supply and Power Consumption, refer to the label attached to the product. N
Power Saving Function ¦
This product provides a power saving function that automatically turns the screen off when the product
is not used for a predetermined period of time to reduce power consumption. If the product enters
power saving mode, the power LED turns to a different color to indicate that the product is in power
saving mode.When the product is in power saving mode, the power is not turned off and you can turn
the screen on again by pressing any key or clicking the mouse. However, the power saving function
only works when the product is connected to a computer that provides the power saving function.
POWER SAVING
FUNCTION
NORMAL OPERATION
POWER SAVING
MODE
POWER OFF
(POWER BUTTON)
Power LED On Blinks Off
Power Consumption 34 watts less than 2 watts less than 1 watts
If there is no power cut-off switch, the power consumption is “0” only when the power cord is disconnected. N
BN59-00905F_eng.indd 40 2009-11-10 9:30:49
Page 43
Contact SAMSUNG WORLDWIDE
If you have any questions or comments relating to Samsung products, please contact the SAMSUNG customer
care center.
Country
Customer Care
Center
Web Site Address
U.S.A
1-800SAMSUNG
(726-7864)
www.samsung.com/us
Samsung Electronics America, Inc.
105 Challenger Road Ridgefield Park, NJ
07660-0511
CANADA
1-800SAMSUNG
(726-7864)
www.samsung.com/ca
Samsung Electronics Canada Inc.,
Customer Service 55 Standish Court
Mississauga, Ontario L5R 4B2 Canada
Samsung Electronique Canada Inc.,
Service à la Clientèle 55 Standish Court
Mississauga, Ontario L5R 4B2 Canada
Country
Customer Care Center
Web Site
ARGENTINA 0800-333-3733 www.samsung.com/ar
BRAZIL
0800-124-421
4004-0000
www.samsung.com/br
CHILE 800-SAMSUNG(726-7864) www.samsung.com/cl
COLOMBIA 01-8000112112 www.samsung.com.co
COSTA RICA 0-800-507-7267 www.samsung.com/latin
ECUADOR 1-800-10-7267 www.samsung.com/latin
EL SALVADOR 800-6225 www.samsung.com/latin
GUATEMALA 1-800-299-0013 www.samsung.com/latin
HONDURAS 800-7919267 www.samsung.com/latin
JAMAICA 1-800-234-7267 www.samsung.com/latin
PANAMA 800-7267 www.samsung.com/latin
PUERTO RICO 1-800-682-3180 www.samsung.com/latin
REP. DOMINICA 1-800-751-2676 www.samsung.com/latin
NICARAGUA 00-1800-5077267 www.samsung.com/latin
MEXICO 01-800-SAMSUNG(726-7864) www.samsung.com/mx
TRINIDAD & TOBAGO 1-800-SAMSUNG(726-7864) www.samsung.com/latin
VENEZUELA 0-800-100-5303 www.samsung.com/latin
IMPORTADO POR:
AV. PRESIDENTE MASARIK #111 INT701
COL. CHAPULTEPEC MORALES C.P.11570
DELEGACION MIGUEL HIDALGO MEXICO. DISTRITO FEDERAL
Tel: 01-55-5747-5100 / 01-800-726-7864
BN59-00905F_eng.indd 41 2009-11-10 9:30:50
 Loading...