

Page 1
Install drivers Install programs
SyncMaster 703MS / 704MS
/ 705MS / 706MS
Page 2
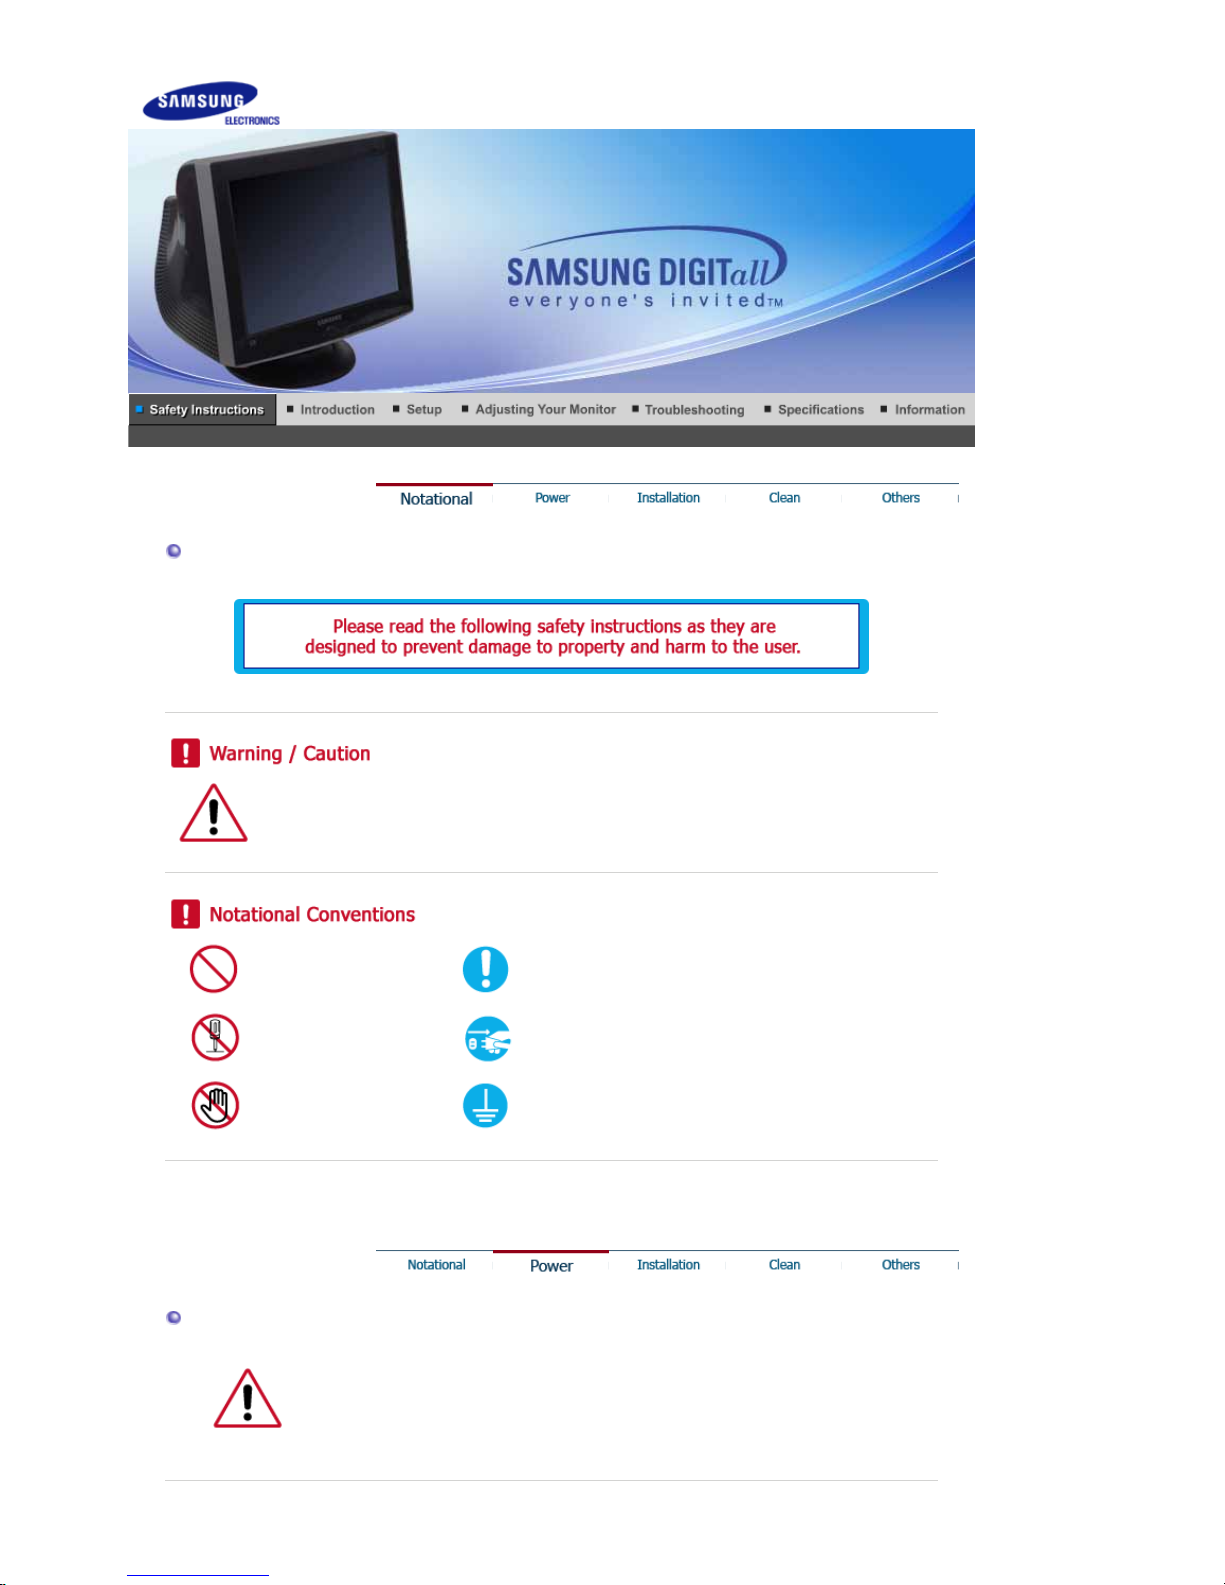
Notational
Failure to follow directions noted by this symbol could result in bodily harm or da mage to
equipment.
Prohibited Important to read and understand at all times
Do not disassemble Disconnect the plug from the outlet
Do not touch Grounding to prevent an electric shock
Power
When not used for extended periods of time, set your computer to a screen
saver.
z If the same image is present for long periods of time, Phosphor Burnt can be
occured, or the screen may be blurred.
Page 3
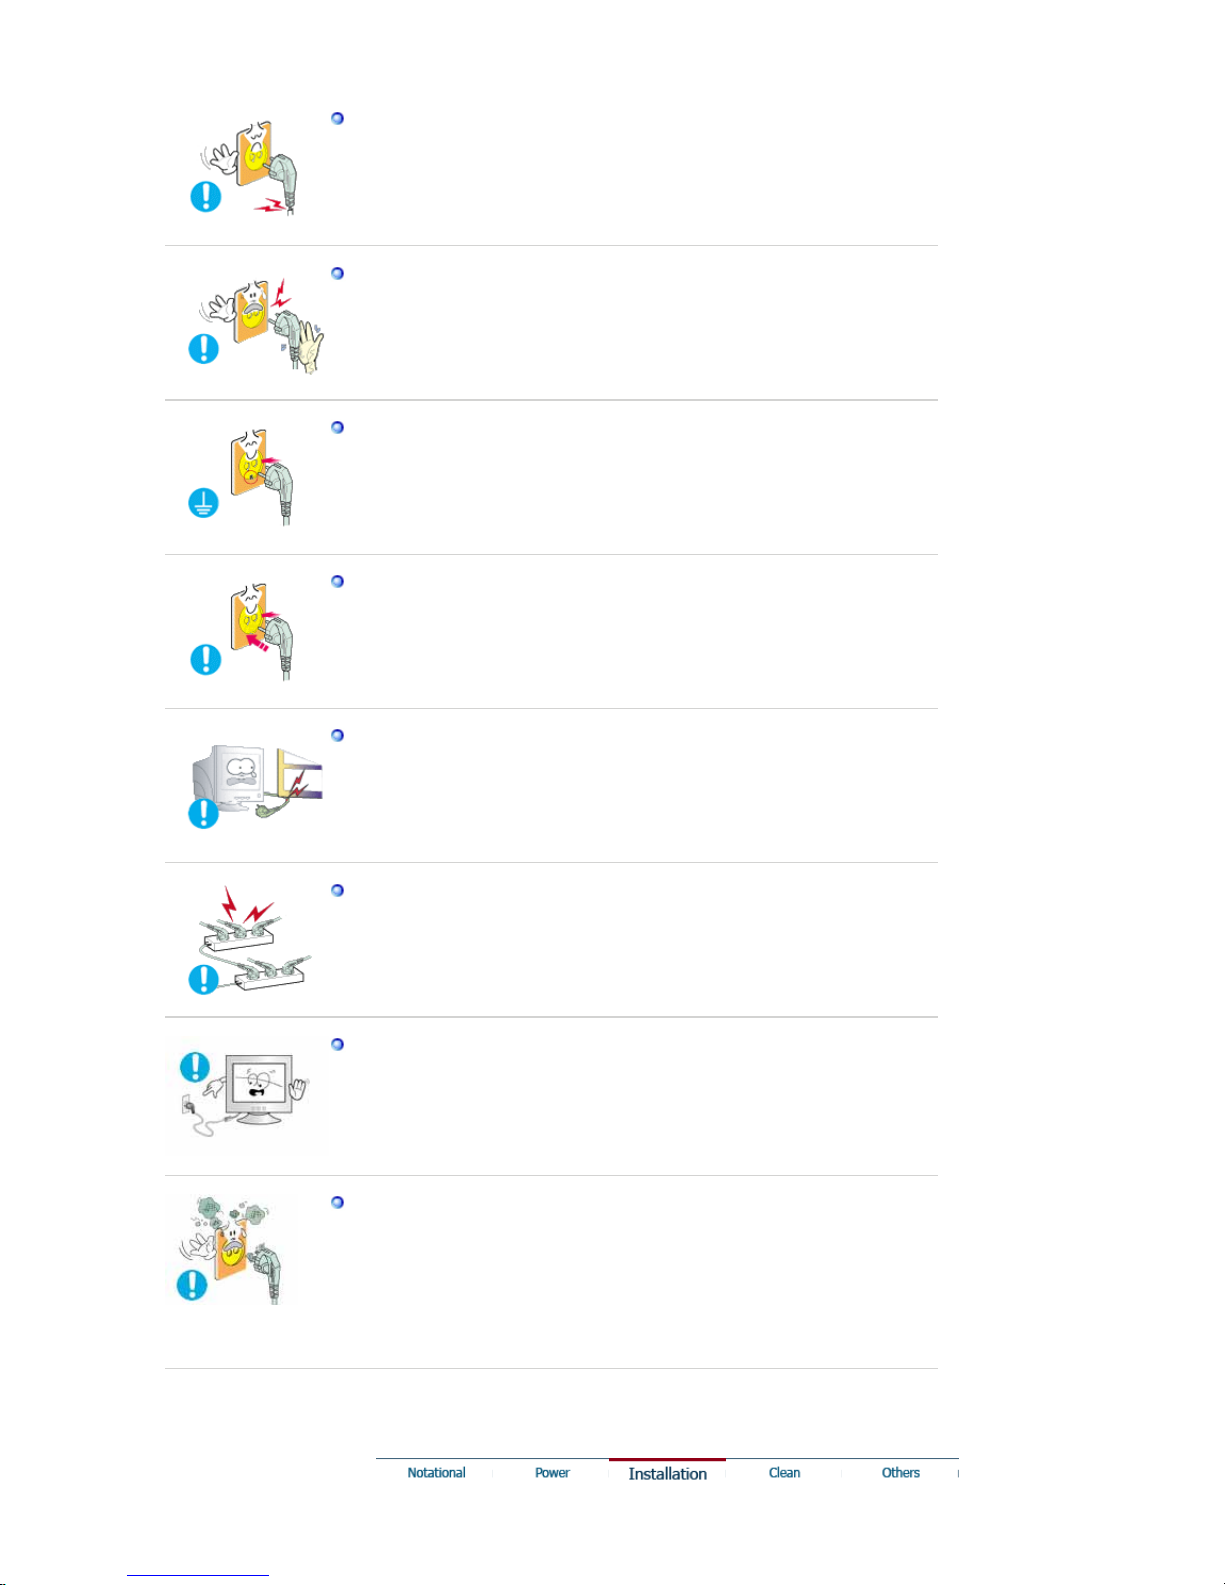
Do not use a damaged or loose plug.
z This may cause an electric shock or fire.
Do not pull the plug out by the wire nor touch the plug with wet hands.
z
This may cause an electric shock or fire.
Use only a properly grounde d plug and receptacle.
z An improper ground may cause electric shock or equipment da mag e.
Insert the power plug firmly so that it does not come loose.
z
A bad connection may cause fire.
Do not excessively bend the plug and wire nor place heavy objects upon
them, which could cause damage.
z
This may cause an electric shock or fire.
Do not connect too many extension cords or plugs to an outlet.
z This may cause fire.
Do not disconnect the power cord while using the monitor.
z A surge may be caused by the separation and may damage the monitor.
Do not use the power cord when the connector or plug is dusty.
z If the connector or plug of the power cord is dusty, clean it with a dry
cloth.
z Using the power cord with a dusty plug or connector may cause an
electric shock or fire.
Page 4
Installation
Be sure to contact an authorized Service Center when installing your set in a
location with heavy dust, high or low temperatures, high humidity, and che m ical
substances, or where it will be operated for 24 hours continuously such as an
airport, train station or etc.
Failure to do so may cause serious damage to your set.
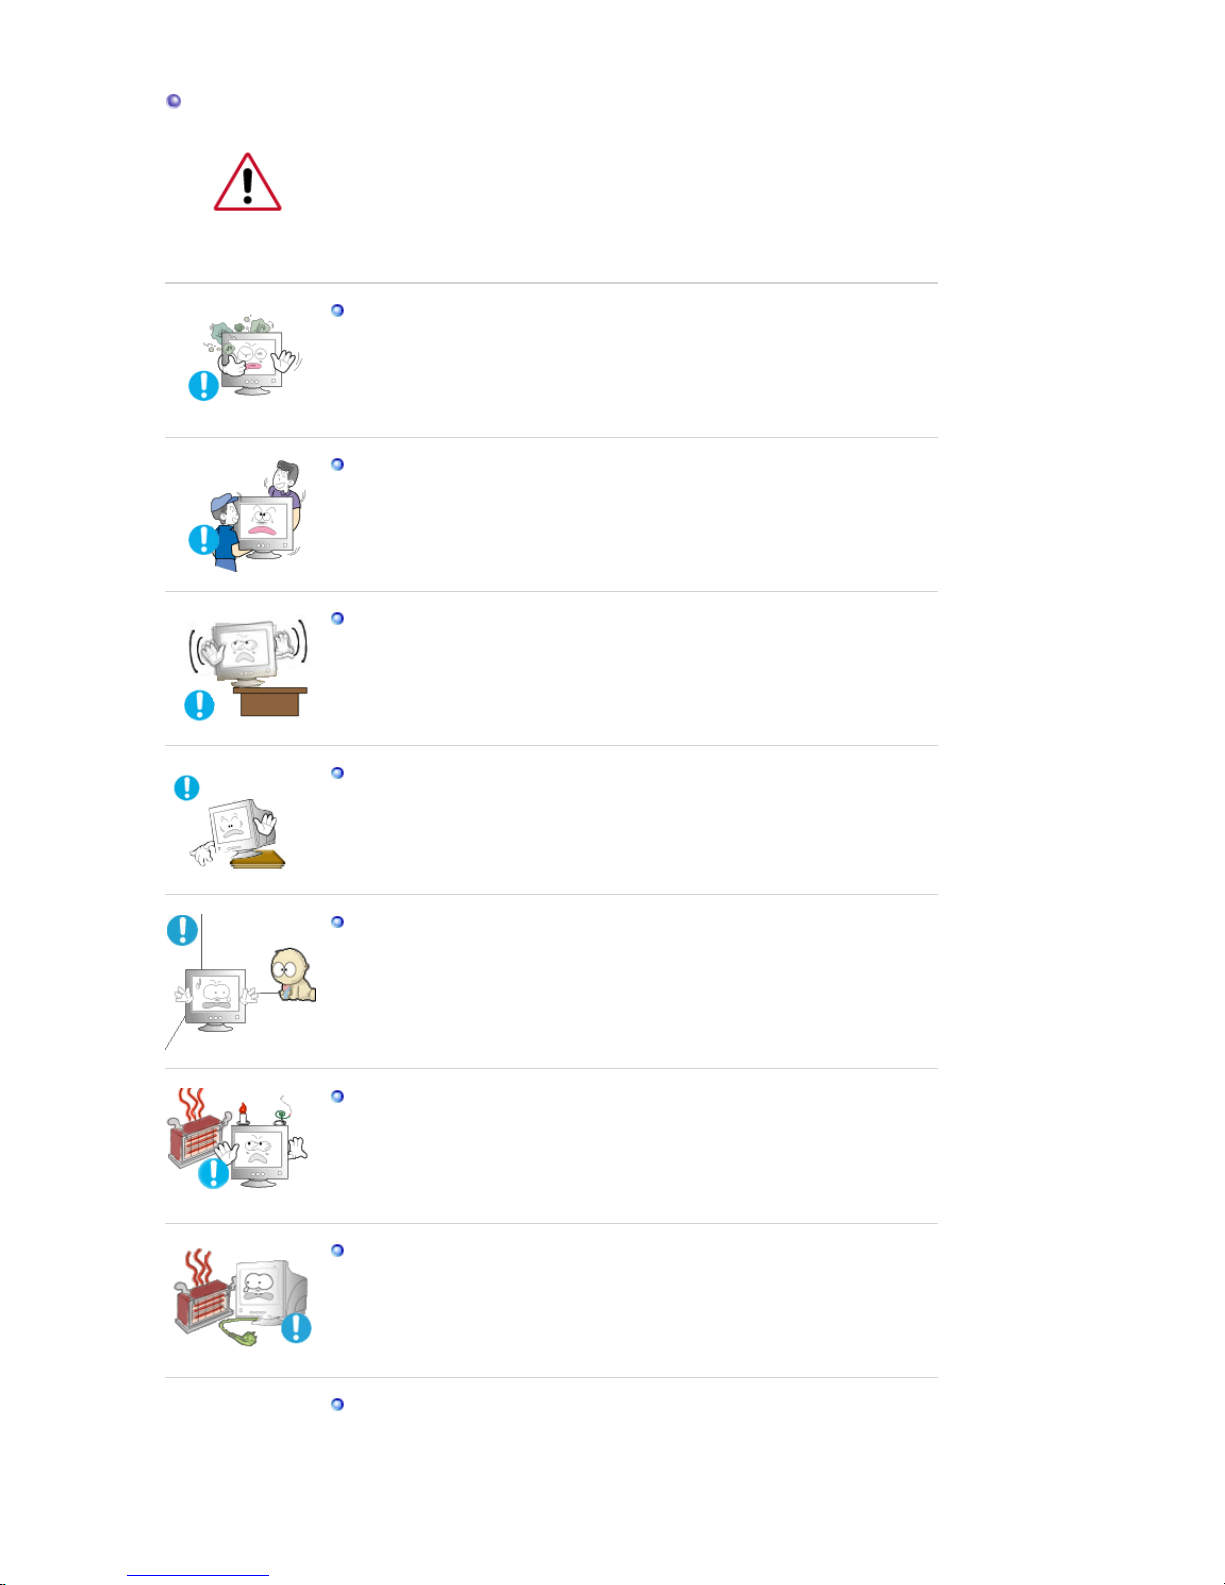
Put your monitor in a location with low humidity and a minimum of dust.
z Failure to do so may cause an electric shock or fire inside the monitor.
Do not drop the monitor when moving it.
z This may cause damage to the product or human body.
Install the monitor base in a showcase or shelf so that the end of the
base does not protrude from the showcase or sh elf.
z
Dropping the product may cause damage to the product or personal
injury.
Do not place the product on an unstable or small surface area.
z Place the product on an even, stable surface, as the product may fall
and cause harm to someone walking by, specifically children.
Do not place the product on the floor.
z Someone, specifically children could trip over it.
Keep any flammable objects such as candles, insecticides or cigarettes
away from the product.
z Otherwise, this may cause a fire.
Keep any heating devices away from the power cable.
z A melted coating may lead to electric shock or fire.
Do not install the product in places with poor ventilation, for instance, a
bookshelf, closet, etc.
z Any increase in internal temperature may cause fire.
Page 5
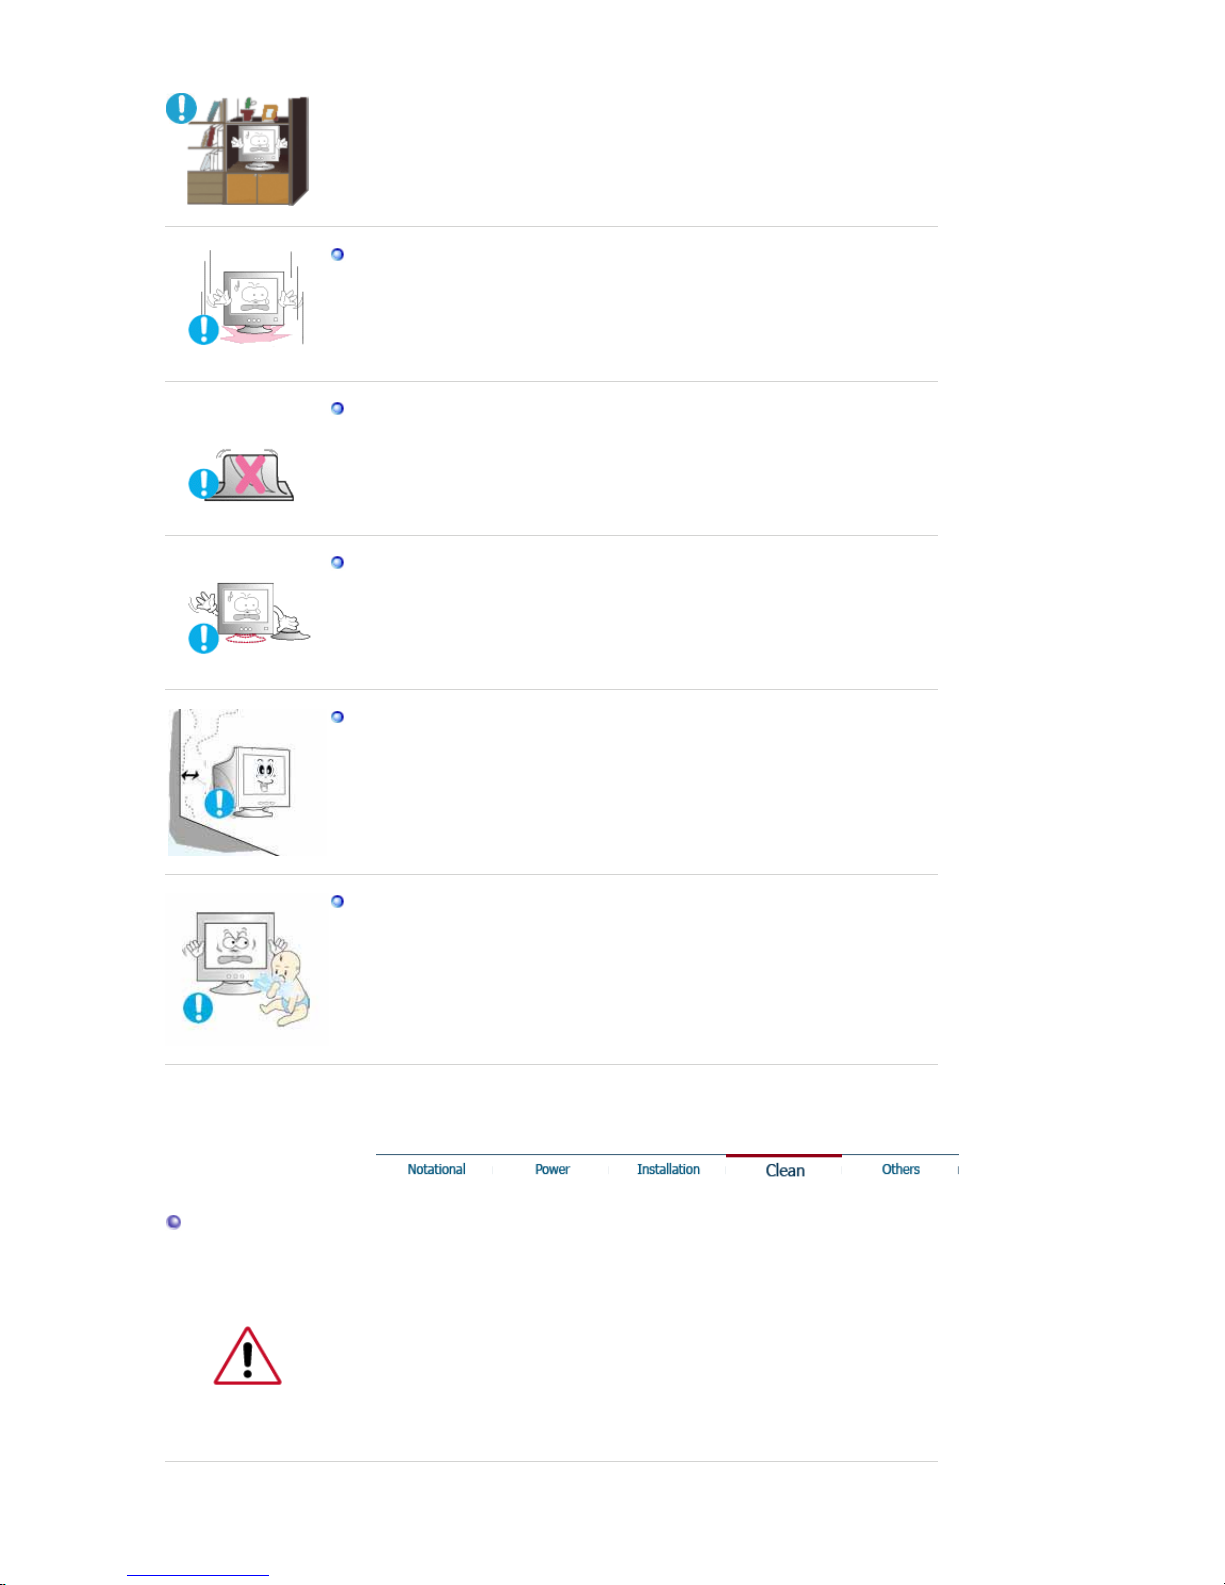
Set down the monitor carefully.
z The monitor could be damaged or broken.
Do not place the monitor face down.
z The CDT surface may be damaged.
Do not use the monitor without the monitor stand.
z It could break down or cause fire due to bad ventilation.
z
If the monitor must be used without the supplied stand, take steps to
insure proper ventilation.
When installing the product, make sure to keep it away from the wall
(more than 10 cm/4 inch ) for ventilation purposes.
z Poor ventilation may cause an increase in the internal temperature of
the product, resulting in a shortened component life and degraded
performance.
Keep the plastic packaging (bag) out of children's reach.
z The plastic packaging (bag) may cause suffocation if children play with
it.
Clean
When cleaning the monitor case or the surface of the CDT, wipe with a slightly
moistened, soft fabric.
Do not clean Flat monitor with water. Use a water-diluted mild detergent.
(Some detergents contain significant amounts of alcoho l-b ased solvents, which
can damage (color change) or crack the monitor case. The antiglare/anti-sta tic
surface coating on the CDT may also be affected.)
Dilute the detergent (1:10 ratio) with water before using.
Page 6

Do not spray water or detergent directly on the monitor.
z This may cause damage, electric shock or fire.
Use the recommended detergent with a smooth cloth.
z You may prevent the coated CDT from being damaged or the monitor
cabinet from being dissolved, cracked or discolored.
z
You may buy a recommended detergent at any Service Center.
If the connector between the plug and the pin is dusty or dirty, clean it
properly with a dry cloth.
z A dirty connector may cause an electric shock or fire.
Make sure to unplug the power cord before cleaning the product.
z
Otherwise, this may cause electric shock or fire.
Unplug the power cord from the power outlet and wipe the product using
a soft, dry cloth.
z Do not use any chemicals such as wax, benzene, alcohol, thinners,
insecticide, air freshener, lubricant or detergent.
Contact the Service Center or Customer Center for interior cleaning once
a year.
z
Keep the product's interior clean. Dust which has accumulated in the
interior over an extended period of time may cause malfunction or fire.
Others
Do not remove cover(or back).
z This may cause an electric shock or fire.
z Refer servicing to qualified service personnel.
If your monitor does not operate normally - in particular, if there are any
unusual sounds or smells coming from it - unplug it immediately and
contact an authorized dealer or service
.
Page 7
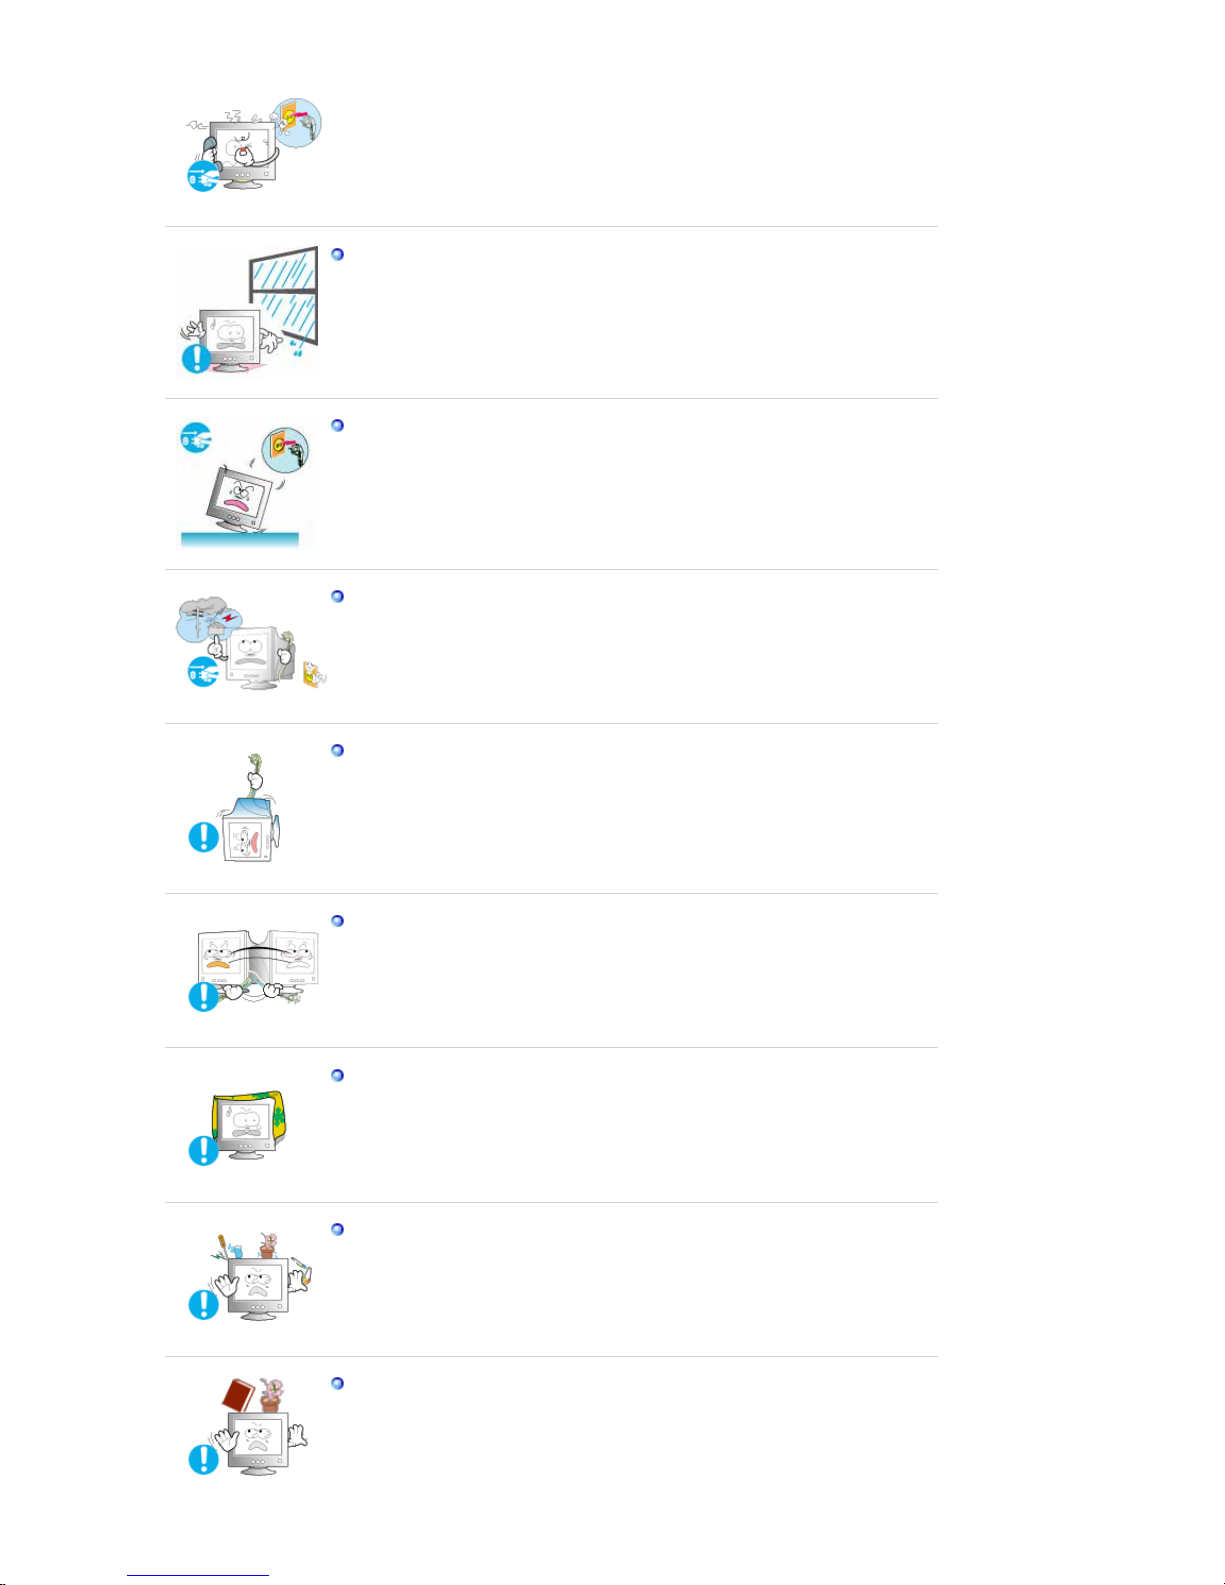
z This may cause an electric shock or fire.
Keep the product away from places exposed to oil, smoke or moisture;
do not install inside a vehicle.
z
This may cause malfunction, an electric shock or fire.
z Especially avoid operating the monitor near water or outdoors where the
monitor could be exposed to snow or rain.
If the monitor is dropped or the casing is damaged, turn the monitor off
and unplug the power cord. Then contact the Service Center.
z The monitor may malfunction, causing an electric shock or fire.
Disconnect the plug from the outlet during storms or lightening or if it is
not used for a long period of time.
z Failure to do so may cause an electric shock or fire.
Do not try to move the monitor by pulling only the wire or the signal
cable.
z This may cause a breakdown, electric shock or fire due to damage to the
cable.
Do not move the monitor right or left by pulling only the wire or the
signal cable.
z This may cause a breakdown, electric shock or fire due to damage to the
cable.
Do not cover the vents on the monitor cabinet.
z Bad ventilation may cause a breakdown or fire.
Do not place water containers, chemical products or small metal objects
on the monitor.
z This may cause malfunction, an electric shock or fire.
z
If a foreign substance enters the monitor, unplug the power cord and
contact the Service Center .
Do not place any heavy objects on the monitor.
z This may cause an electric shock or fire.
Page 8
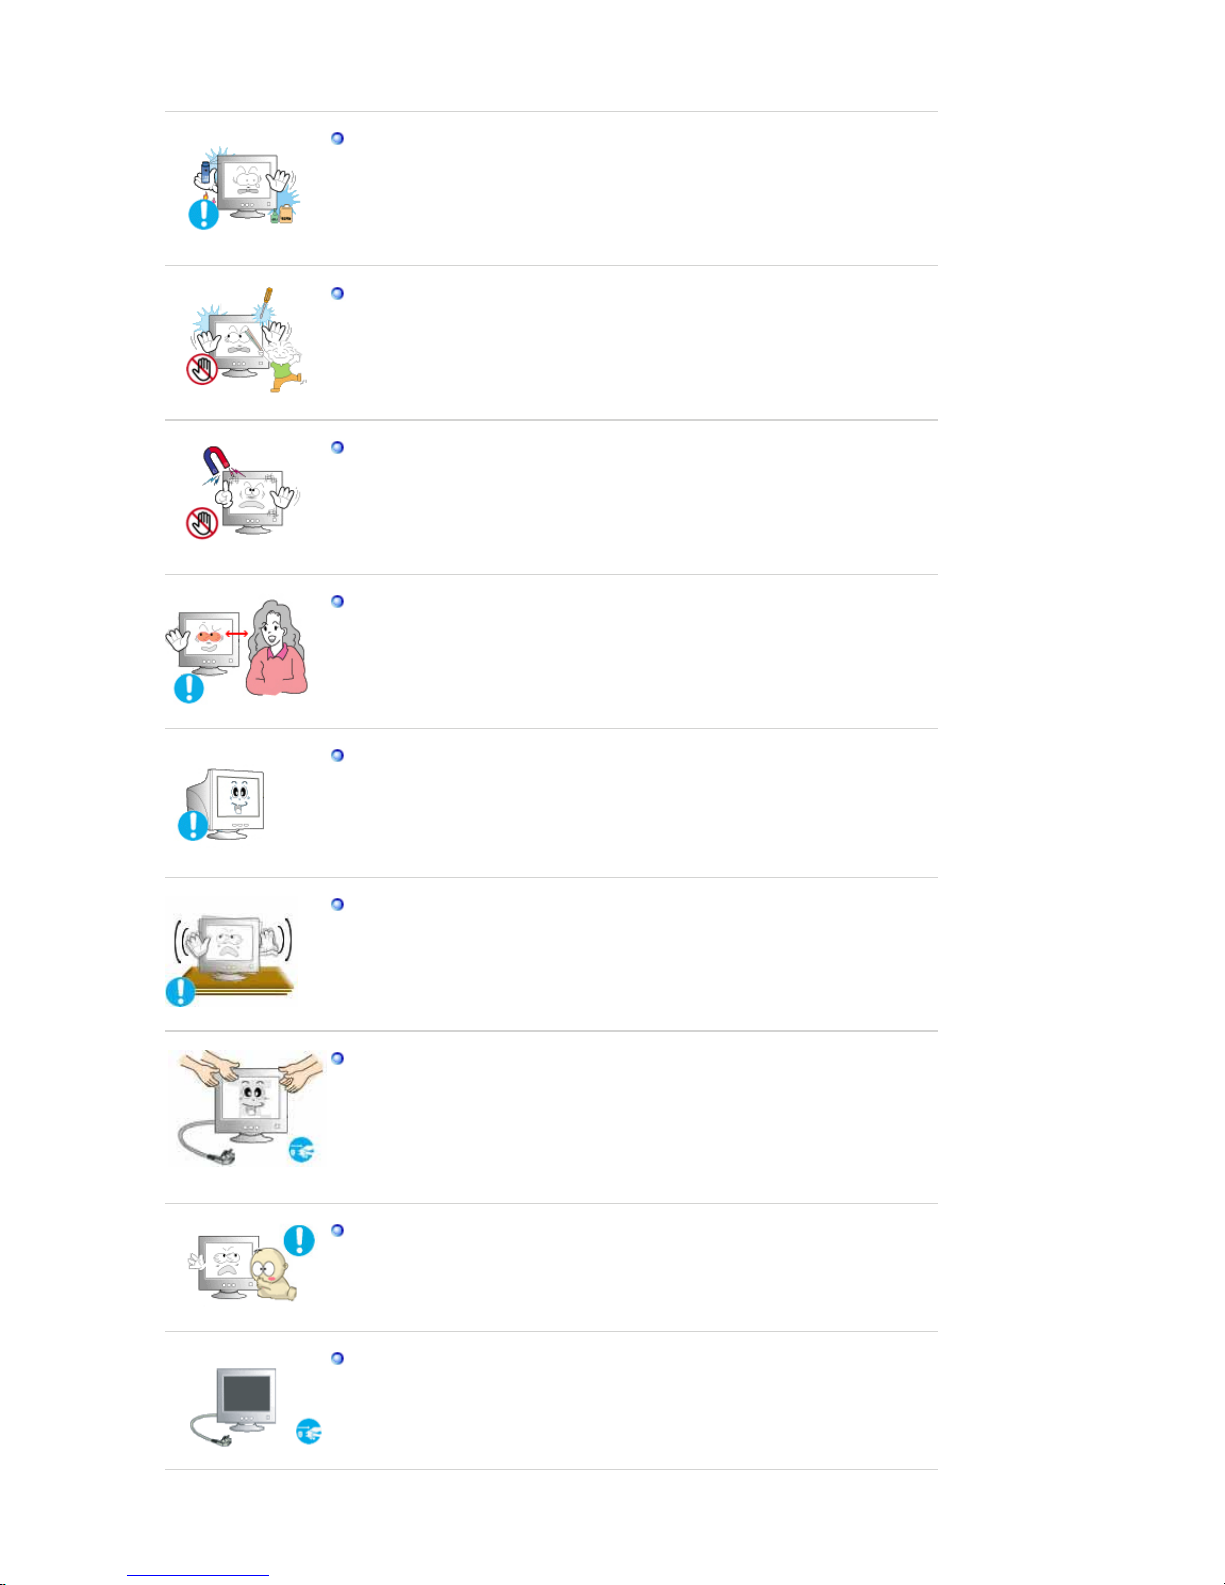
Keep the product away from combustible chemical sprays or
inflammable substances.
z This may cause an explosion or fire.
Never insert anything metallic into the monitor openings.
z
This may cause an electric shock, fire or injury.
Keep the monitor away from any magnetic substances.
z This may cause discoloring or distortion of the image.
Watching the monitor continuously at a too close angle may result in
eyesight damage.
To ease eye strain, take at least a five-minute break after every hour of
using the monitor.
Do not install the product on an unstable, uneven surface or a location
prone to vibrations.
z Dropping the product may cause damage to the product or personal
injury. Using the product in a location prone to vibrations may shorten
the lifetime of the product or may catch fire.
When moving the monitor, turn off and unplug the power cord.
Make sure that all cables, including the antenna cable and cables
connected to other devices, are disconnected before moving the
monitor.
z Failure to disconnect a cable may damage it and lead to fire or an
electric shock.
Place the product out of children's reach, as they could damage it by
hanging onto it.
z A falling product could cause physical damage even death.
When not using the product for an extended time period, keep the
product unplugged
z Otherwise, this may cause heat emission from the accumulated dirt or
degraded insulation, leading to electric shock or fire.
Page 9

Do not place children's favorite objects (or anything else that may be
tempting) on the product.
z Children may try to climb on the product to retrieve an object. The
product could fall, causing physical damage or even death.
Page 10
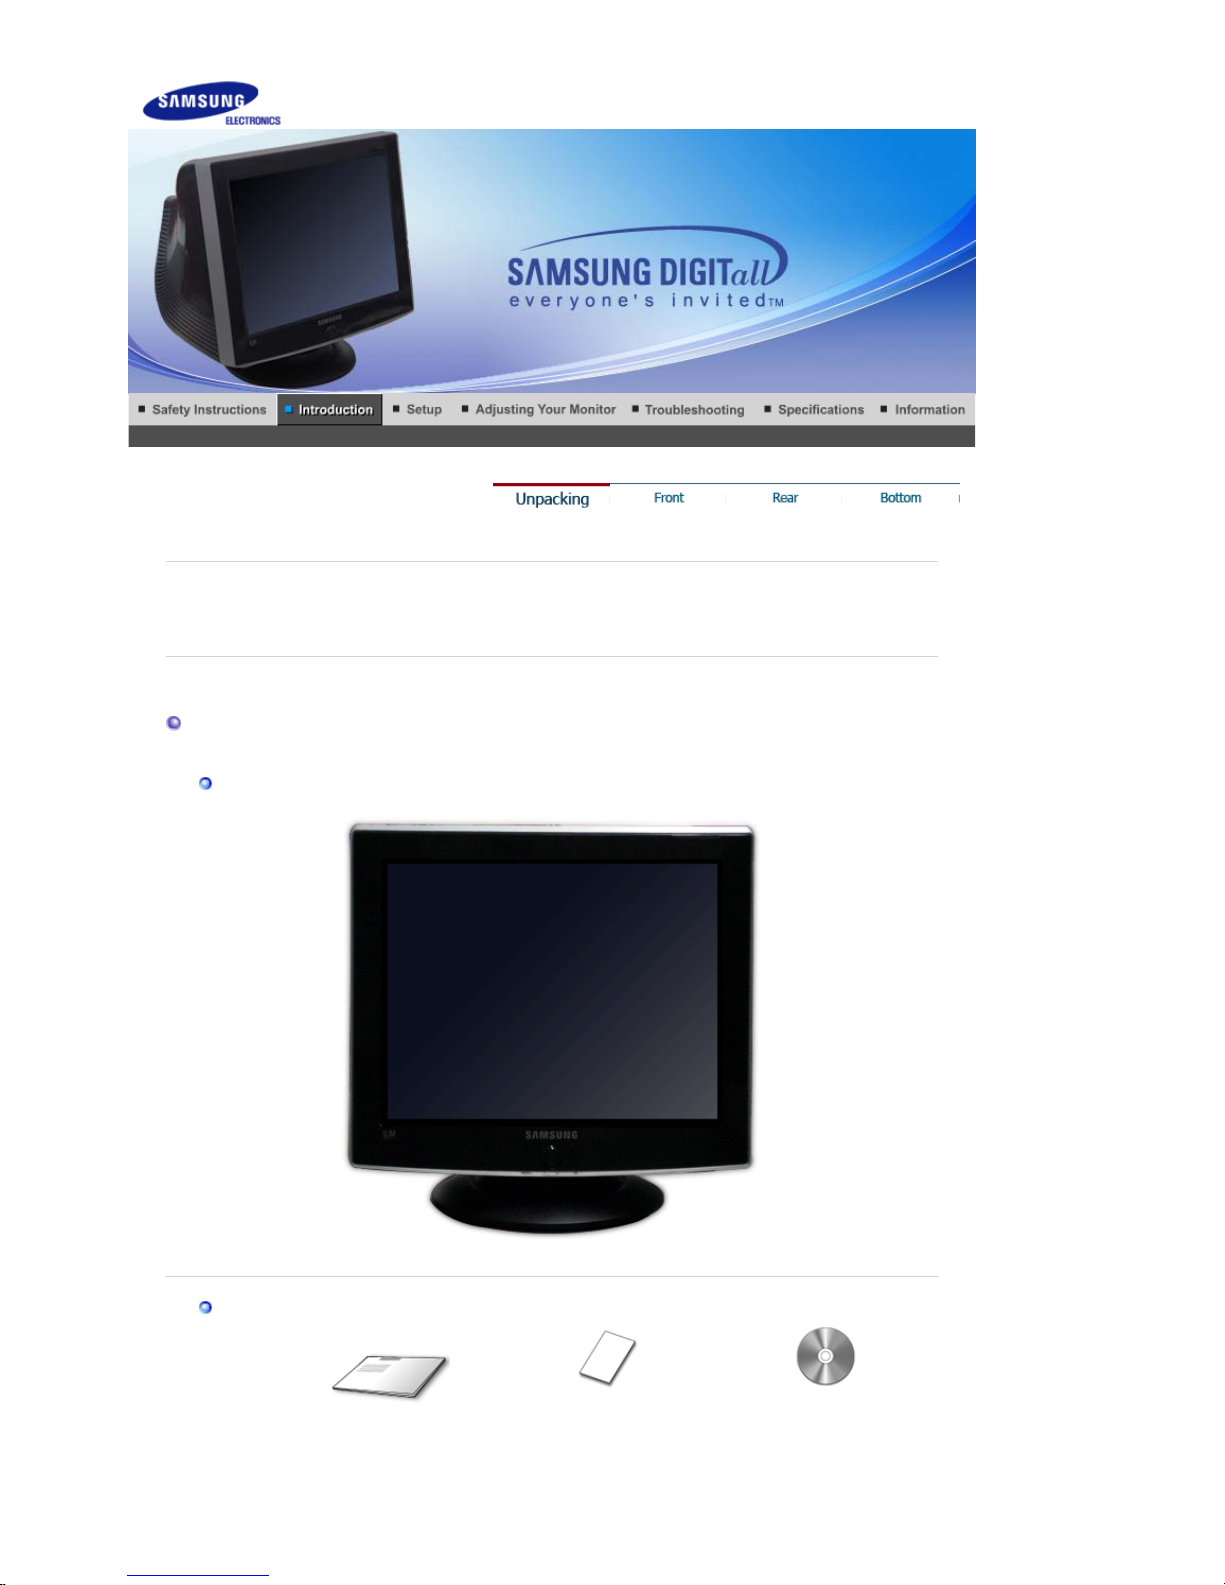
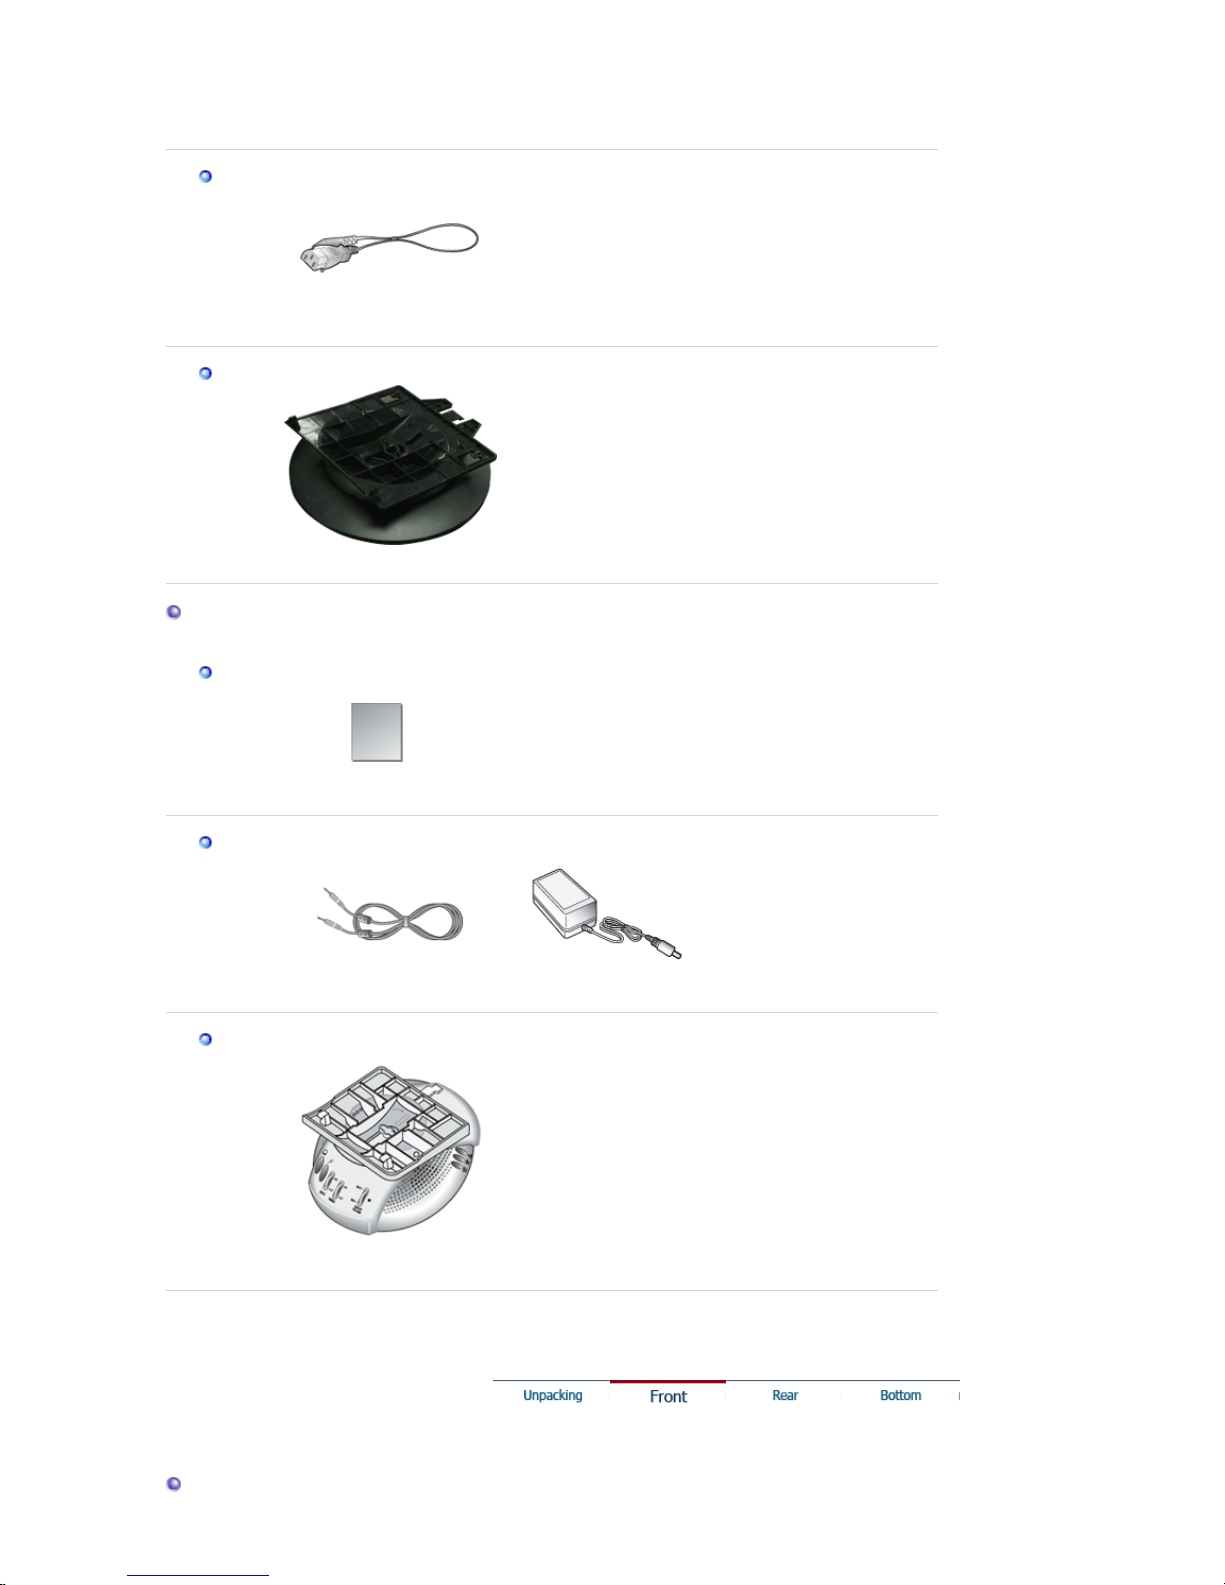
Please make sure the following items are included with your monitor.
If any items are missing, contact your dealer.
Contact a local deale
r
to buy optional items.
Unpacking
Monitor and Stand
(Some models include a stand attached.)
Manual
Quick Setup Guide
Warranty Card
(Not available in all
User's Guide,
Monitor Driver,
Natural Color software,
Page 11
locations)
MagicTune™ software,
HighlightZone III 3.5 software
Cable
Power Cord
Stand
Stand
For Multimedia model (Option)
Manual
User Guide
Cable
Sound Cables(2each
)
DC Power Cord
Stand
Multimedia Speaker Stand
Front
Page 12
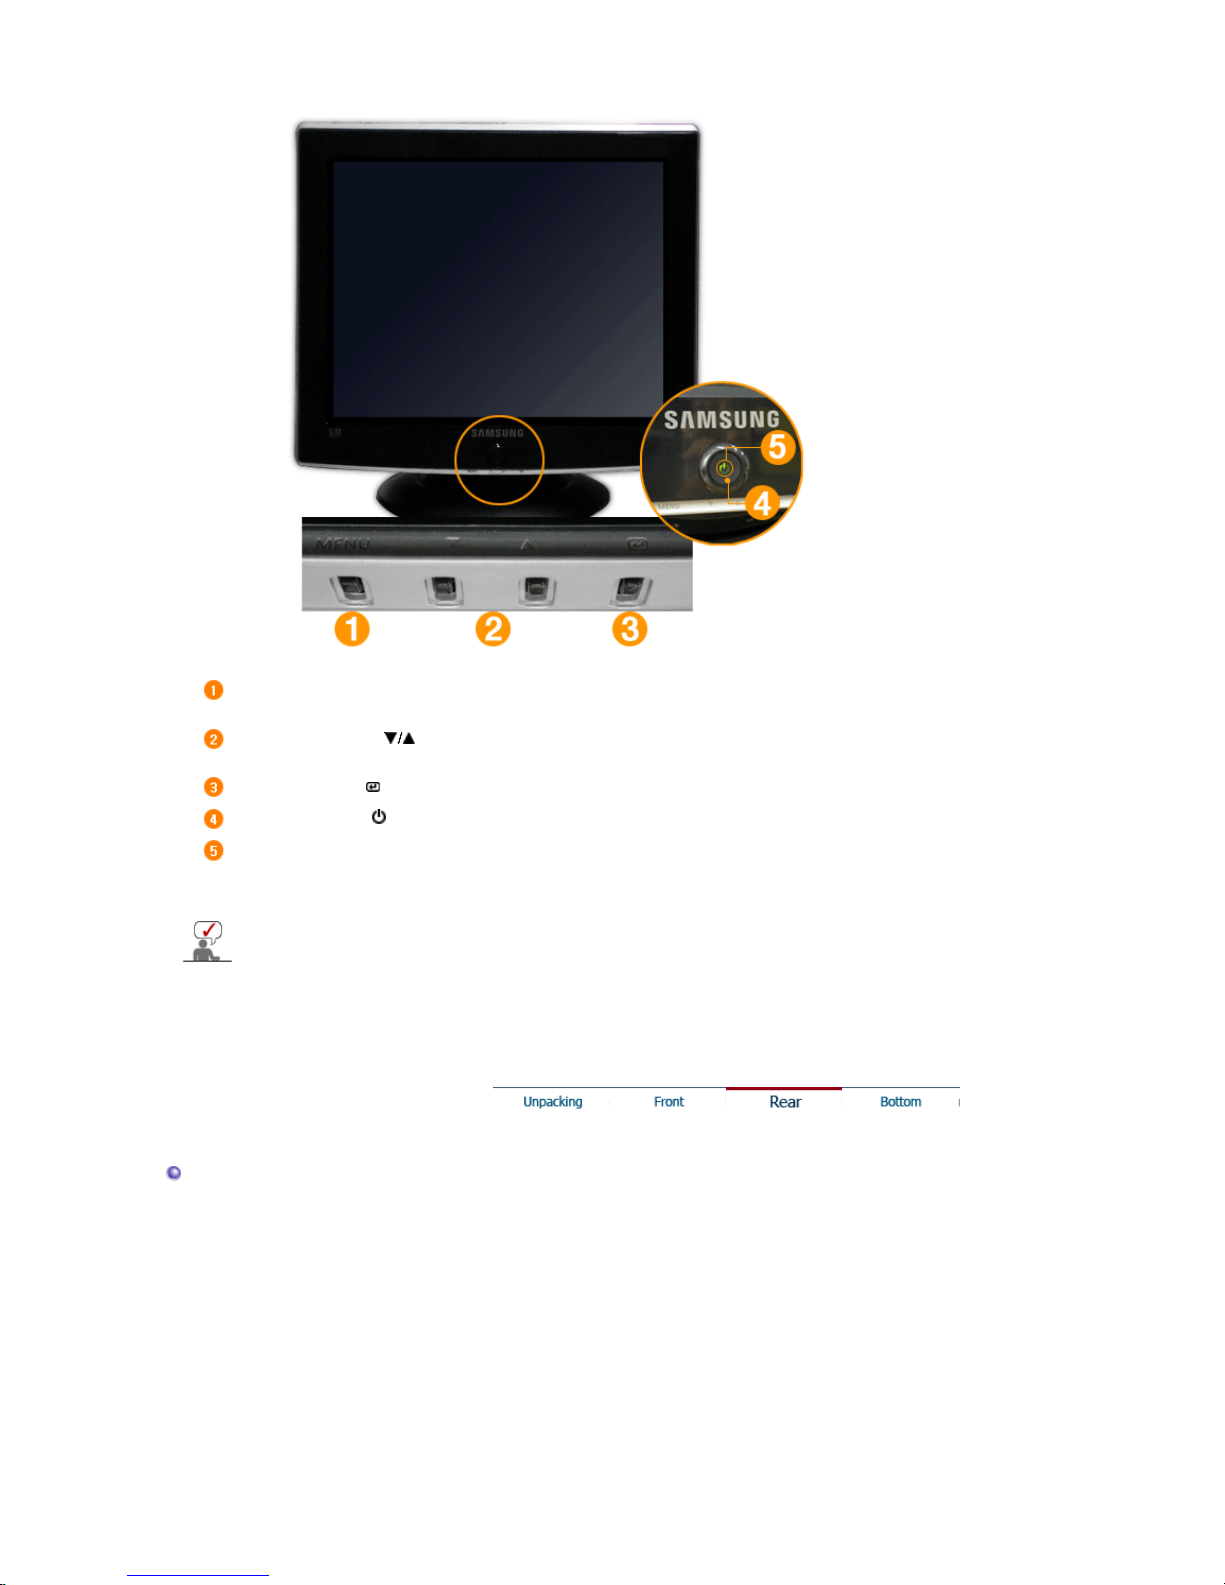
MENU button
Opens the OSD menu. Also used to exit the OSD menu or
return to the previous menu.
Adjust buttons [ ]
These buttons allow you to highlight and adjust items in the
menu.
Enter button [ ]
Used to select the OSD menu.
Power button [ ]
Use this button for turn the monitor on and off.
Power indicator
This light glows green during normal operation, and blinks green
once as the monitor saves your adjustments.
See PowerSaver described in the manual for further information regarding power saving
functions. For energy conservation, turn your monitor OFF when it is not needed, or when
leaving it unattended for long periods.
Rear
Page 13
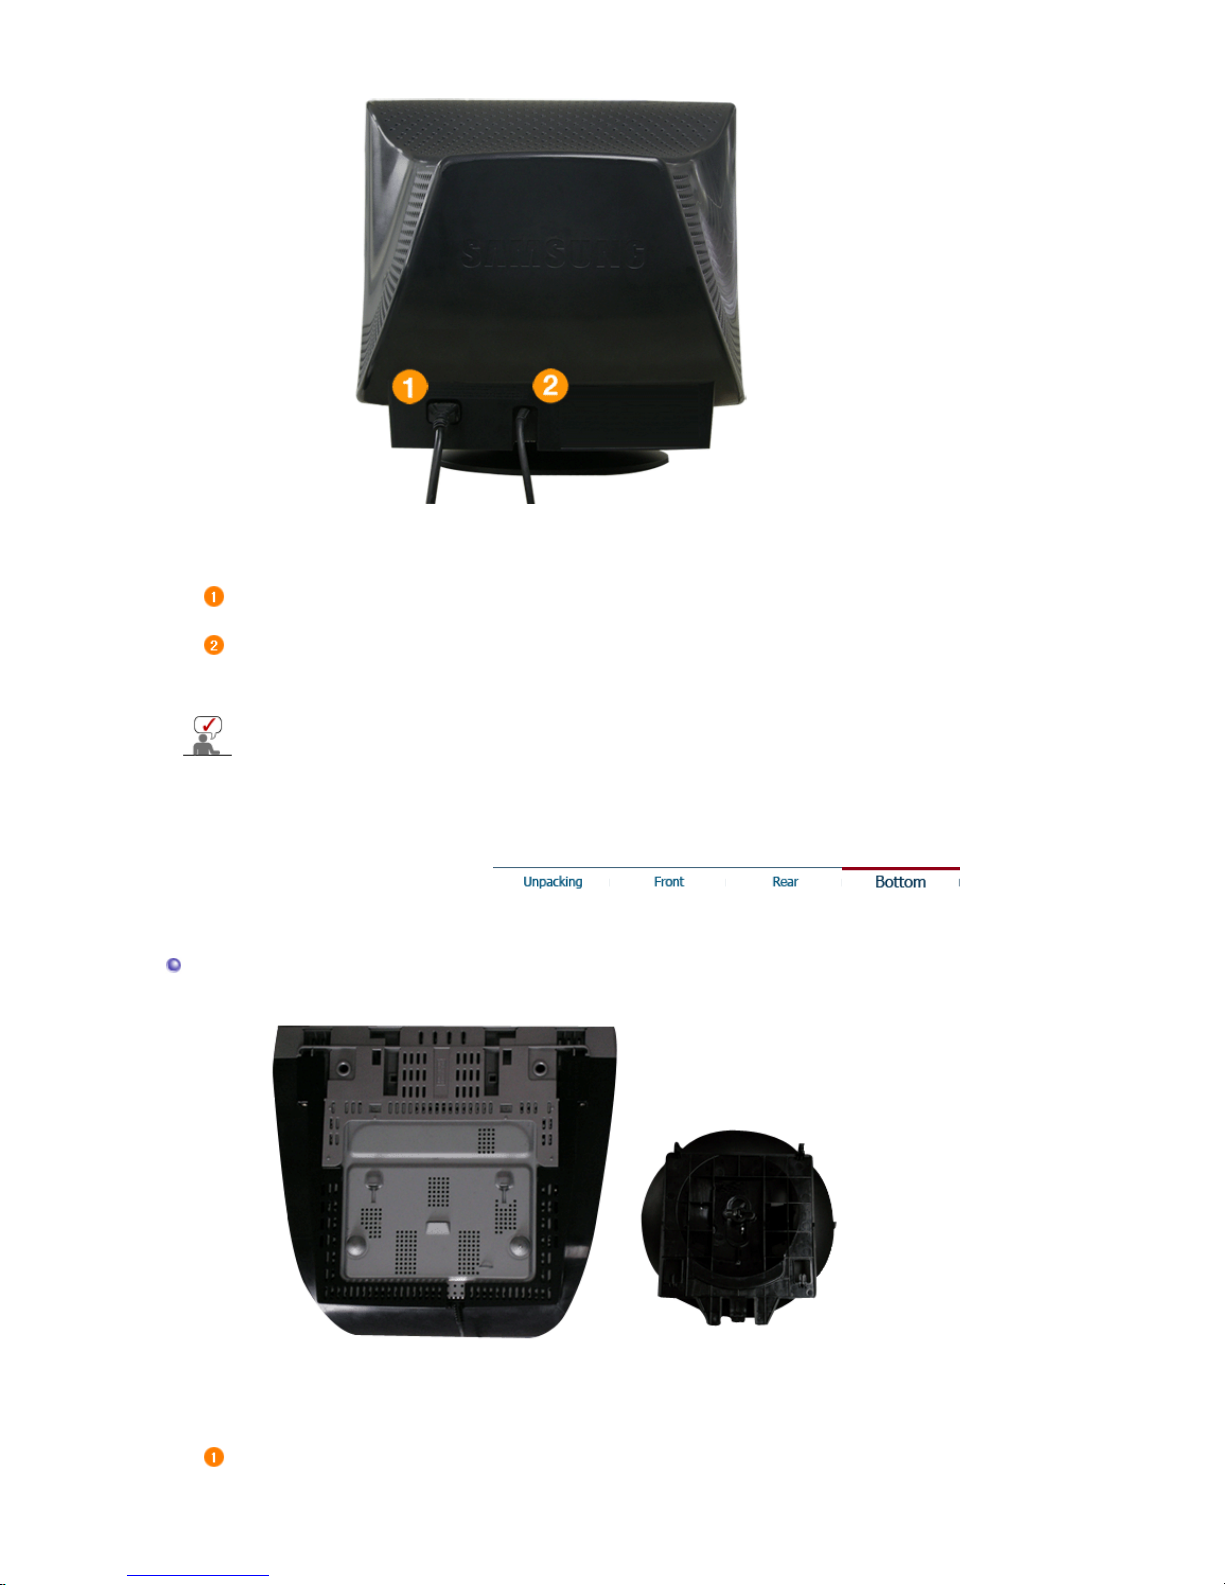
(The configuration at the back of the monitor may vary from product to product.)
Power port
Connect the power cord for your monitor to the power port on
the back of the monitor.
Signal Cable
Connect the signal cable to the video port on your computer.
(video board, video card, or graphics card)
See Connecting the Monitor for further information regarding cable connections.
Bottom
Tilt/Swivel Base
You can separate the base from the monitor.
Page 14
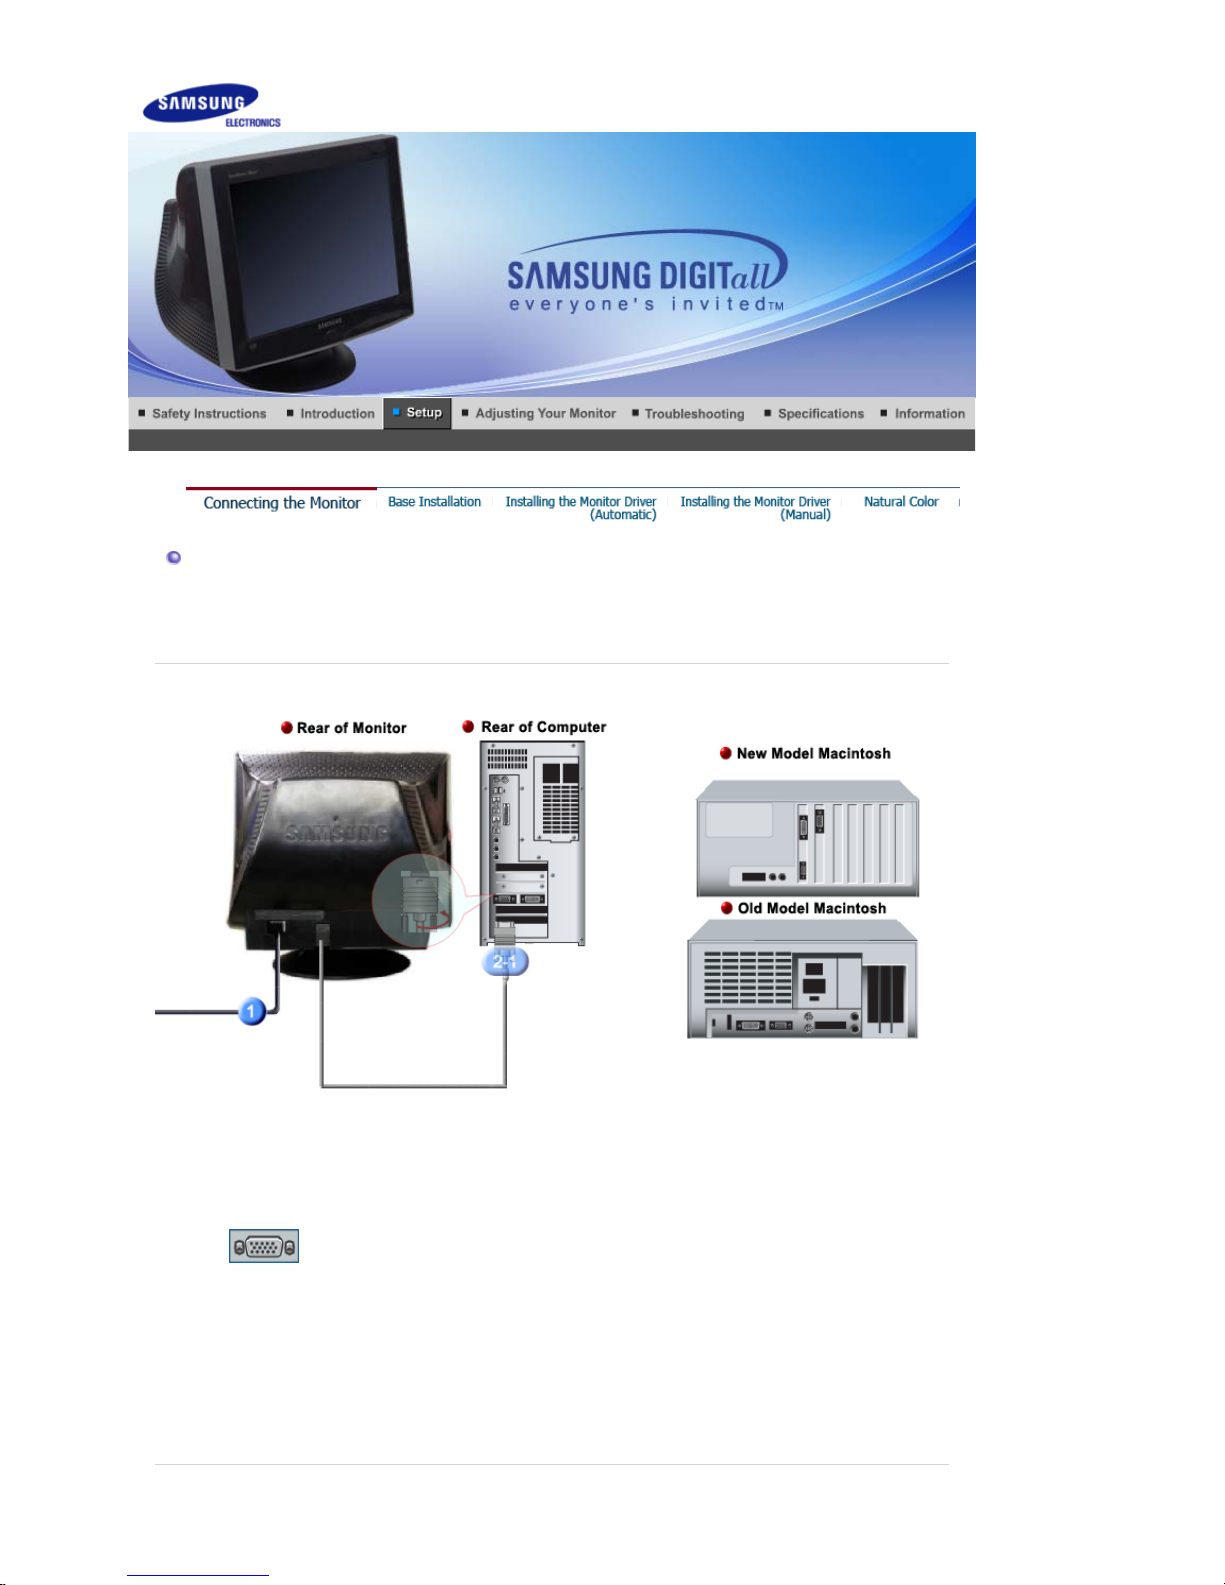
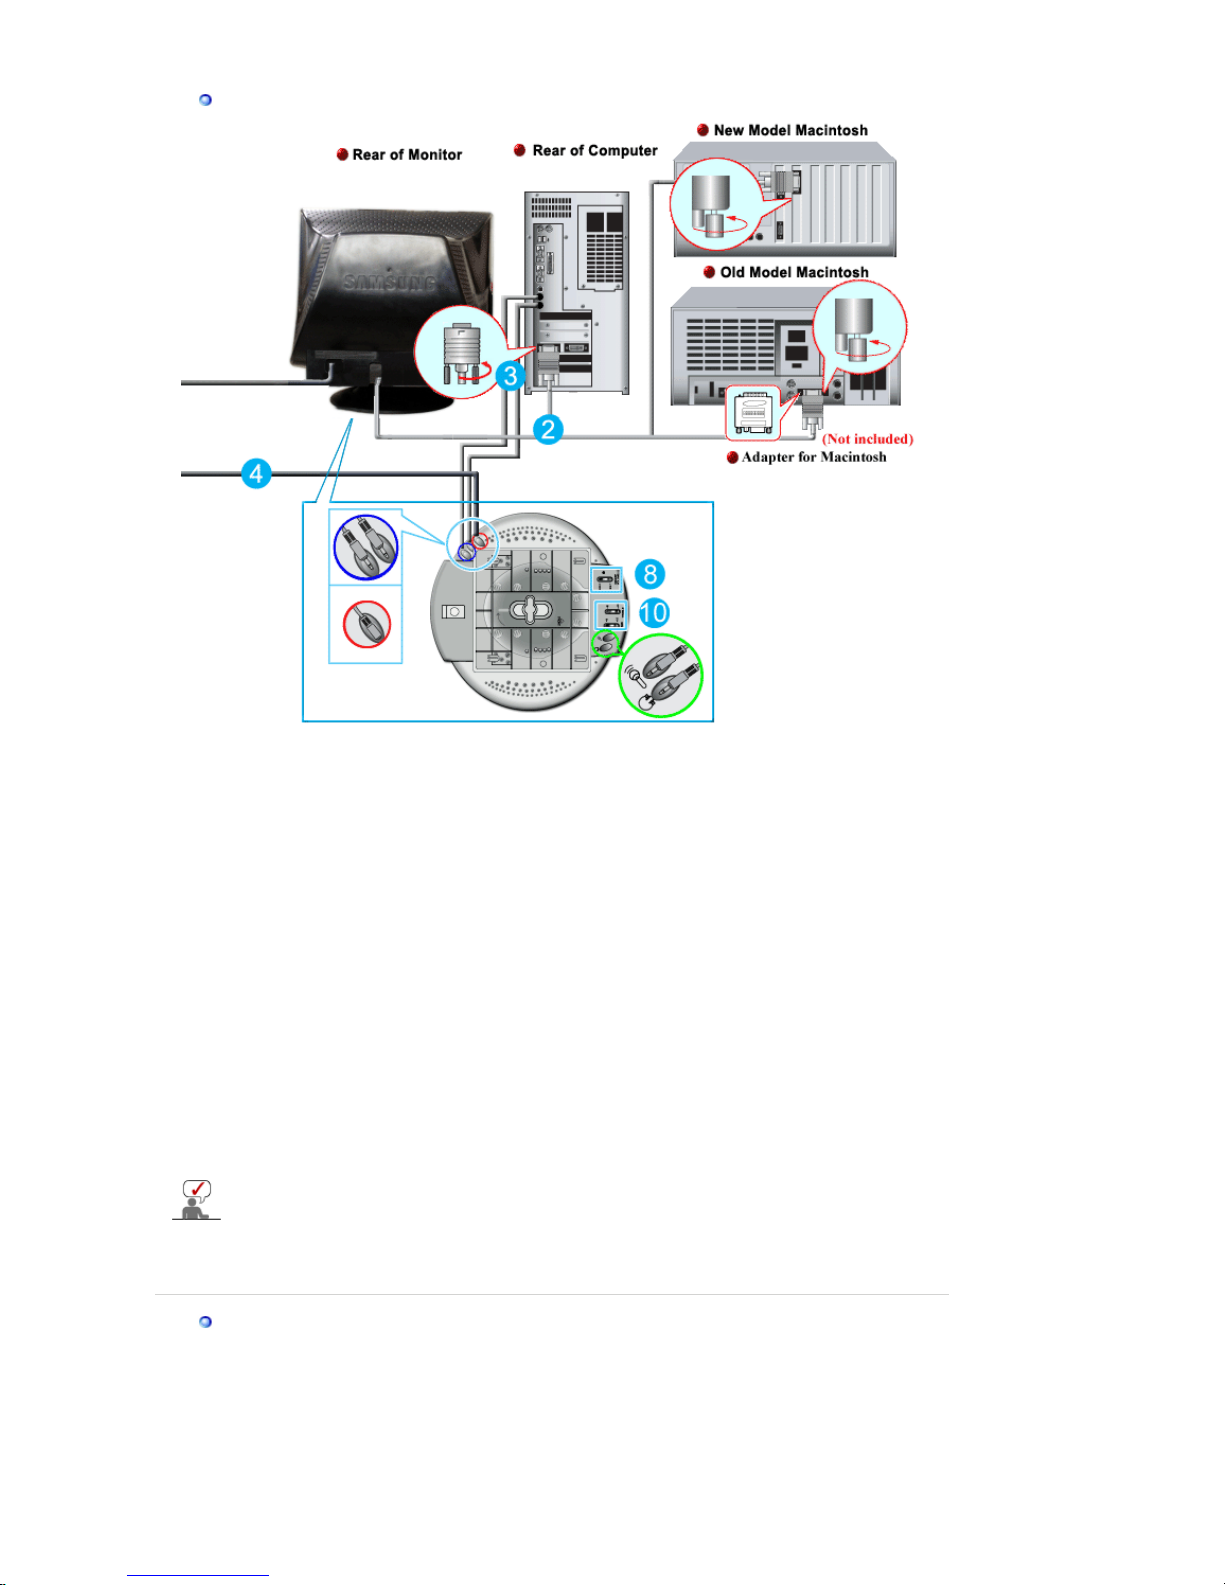
Connecting the Monitor
Setup-For Multimedia model | Multimedia Speaker Stand
1.
Connect the power cord for your monitor to the power port on the back of the monitor.
Plug the power cord for the monitor into a nearby outlet.
2-1.
Connecting to a computer
Connect the signal cable to the 15-pin, D-sub connector on the back of your computer.
2-2.
Connecting to a new Macintosh
Connect the monitor to the Macintosh computer using the D-SUB connection cable.
2-3.
Connecting to an old Macintosh
Connect your monitor to the Macintosh using the adapter for Macintosh (sold separately).
3.
Turn on your computer and monitor. If your monitor displays an image, installation is
complete.
Page 15
Setu
p
-For Multimedia model
1.
Turn off your computer and unplug the power cord.
2.
Connect the end of the signal cable to your computer's video port(video board, video card or
graphics card).
3.
Connect one end of the other sound cable to the Mic Input jack on your sound card or
computer.Connect the other end of this cable to the Mic By-pass jack on the back of the
monitor stand.
4.
Plug the DC power cord from the stand into a nearby outlet.
5.
Connect the power cord for your monitor to the power port on the back of the monitor.
6.
Plug the power cord for the monitor and the power cord for your computer in to a nearby
outlet.
7.
Turn on your computer and monitor.
8.
Turn up or down the On-Off control terminal on the stand of the monitor until it clicks.
9.
Execute a sound program, music or sound effect in your computer and then adjust the volume
by turning up or down until the sound volume is appropriate.
10.
Adjust the treble and bass.
Sound distortion may occur when the monitor is placed on top of a mostly hollow cabinet
such as your computer. If this occurs, place a pad or magazine beneath the monitor stand.
High sound volume may also cause sound distortion; lower the volume.
Multimedia S
p
eaker Stand
1. Mic By-pass Jack
To transmit your voice,connect a sound cable from
the Mic By-pass jack to the mic in jack on the sound
card slot in your computer.
2. Stereo Input Jack
Connect a sound cable from the input source(sound
card,computer,CD-ROM drive).
Page 16
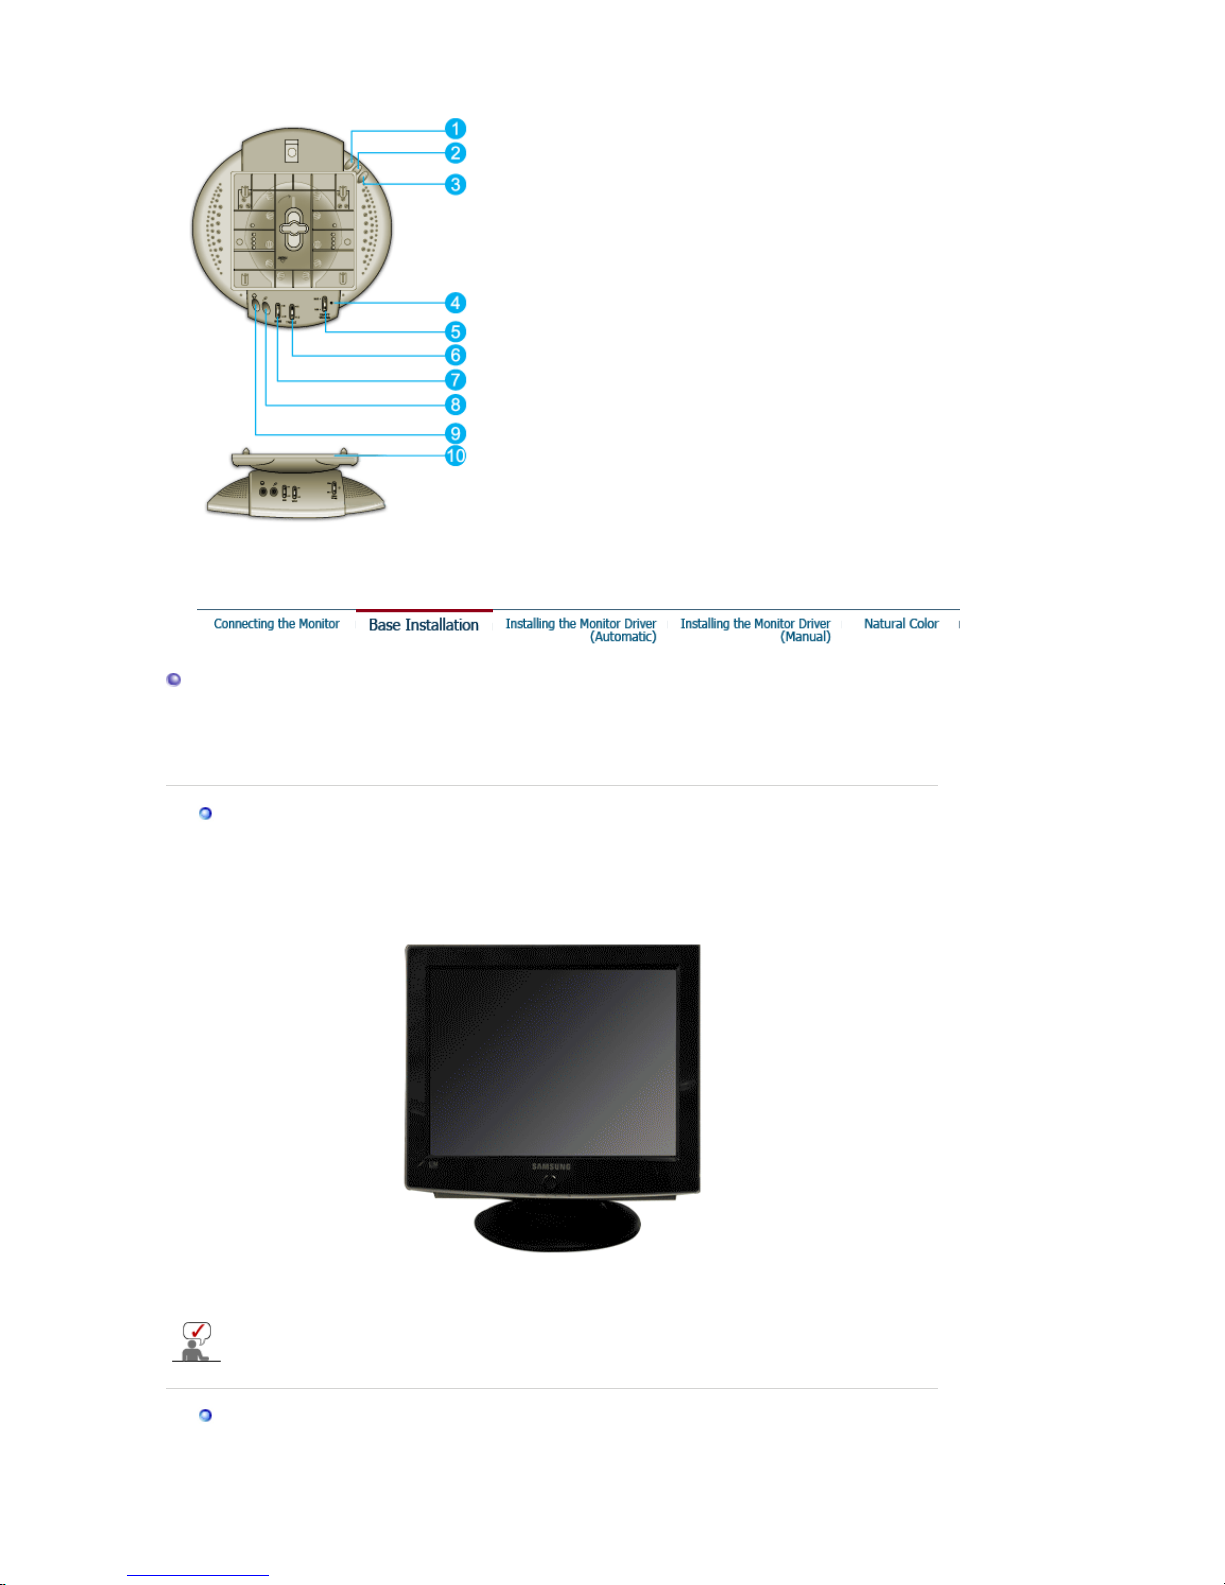
3. DC Power Cord
Connect DC power cord to monitor DC 12V output
jack.
4. Power Indicator
Glows green when the speakers are turned on.
5. On/Off Volume
Turns On/Off and adjusts the output volume.
6. Treble Control
Use to control high frequencies.
7. Bass Control
Use to control low frequencies.
8. Mic Input Jack
To transmit your voice,connect a microphone to this
jack.
9. Headphone Jack
To listen in privacy,connect headphones here.
10.
Detachable Stand Top
Base Installation
Tilt/Swivel Base | Attaching and Removing the Base
Tilt/Swivel Base
With the built-in pedestal, you can tilt and/or swivel the monitor for the most comfortable
viewing angle.
The base is detachable.
Attachin
g
and Removing the Base
If
y
our monitor was supplied with the base detached, attach the base as follows.
Page 17
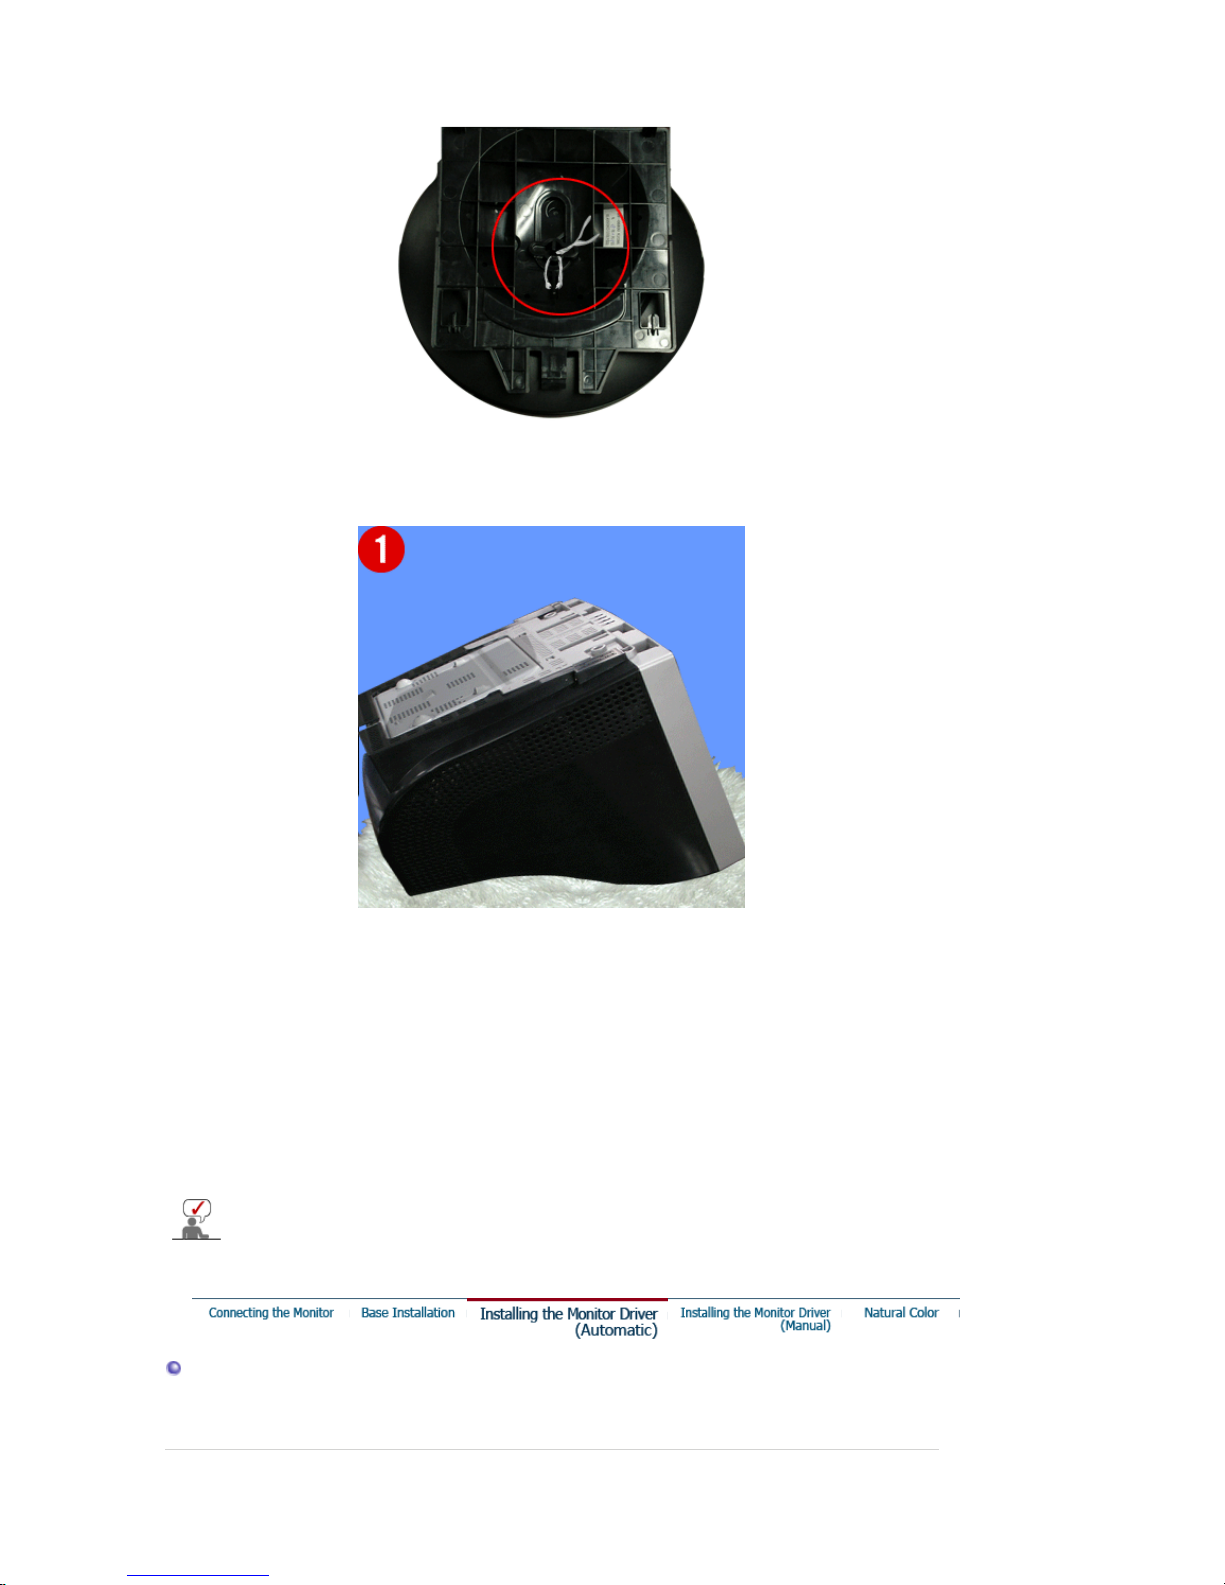
Remove the twist-tie before attaching the base to the monitor.
Attaching the Base
1. Place the monitor upside-down on a flat work surface.
2. Align the tabs on the base with the corresponding slots on the bottom of the monitor.
3. Press the base onto the monitor until the tabs are fully engaged in the slots.
4. Push the base toward the front of the monitor until the release latch clicks into the locked
position.
* Do not bend the snap.
Removin
g
the Base
5. Squeeze and pull up on the release latch on the base.
6. Push the base toward the back of the monitor and lift up to remove the base.
The base will align with the monitor slots in only one position.
Installing the Monitor Driver(Automatic)
When prompted by the operating system for the monitor driver, insert the CD-ROM
Page 18
included with this monitor. Driver installation is slightly different from one operating
system to another. Follow the directions appropriate for the operating system you
have.
Prepare a blank disk and download the driver program file at the Internet web site shown
here.
z Internet web site : http://www.samsung.com/ (Worldwide)
http://www.samsung.com/monitor (U.S.A)
http://www.sec.co.kr/monitor (Korea)
http://www.samsungmonitor.com.cn/ (China)
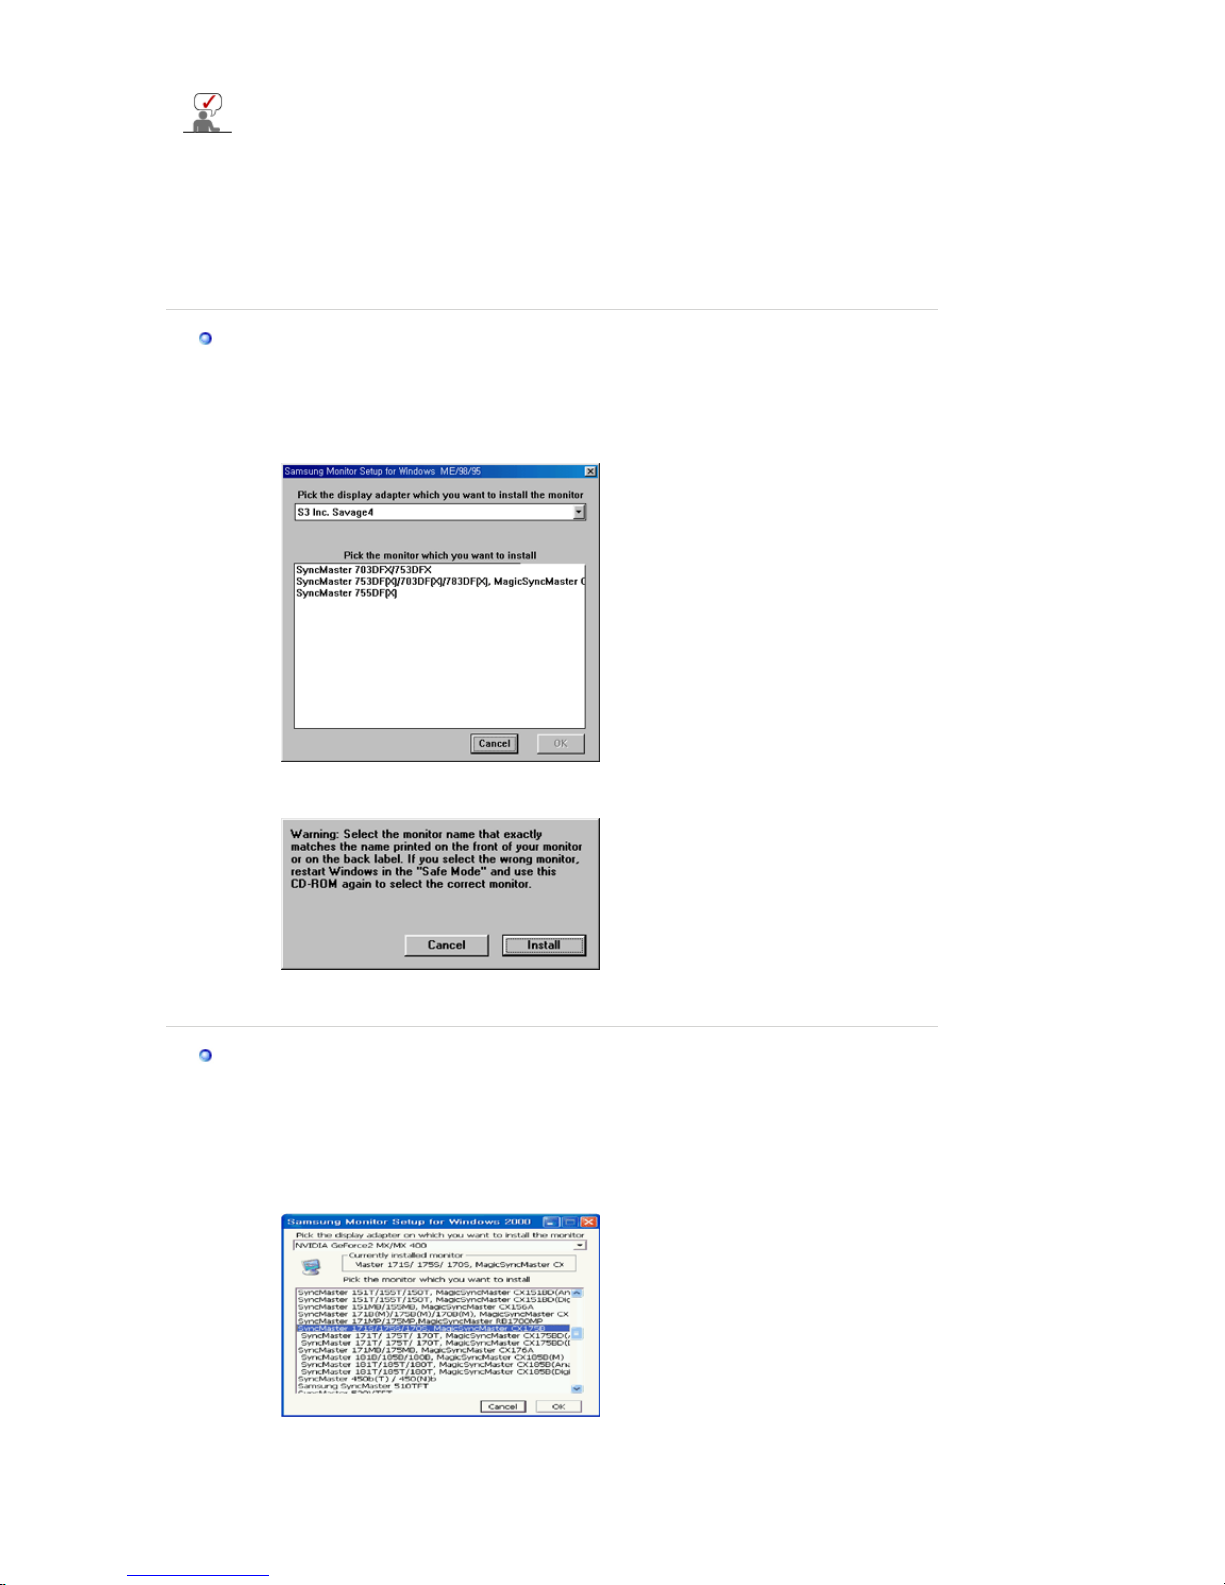
Windows ME
1. Insert CD into the CD-ROM drive.
2. Click
"Windows ME Driver"
.
3. Choose your monitor model in the model list, then click the
"OK"
button.
4. Click the
"Install"
button in the
"Warning"
window.
5. Monitor driver installation is completed.
Windows XP/2000
1. Insert CD into the CD-ROM drive.
2. Click
"Windows XP/2000 Driver"
3. Choose your monitor model in the model list, then click the
"OK"
button.
4. If you can see following message window, then click the
"Continue Anyway"
button.
Then click
"OK"
button.
Page 19
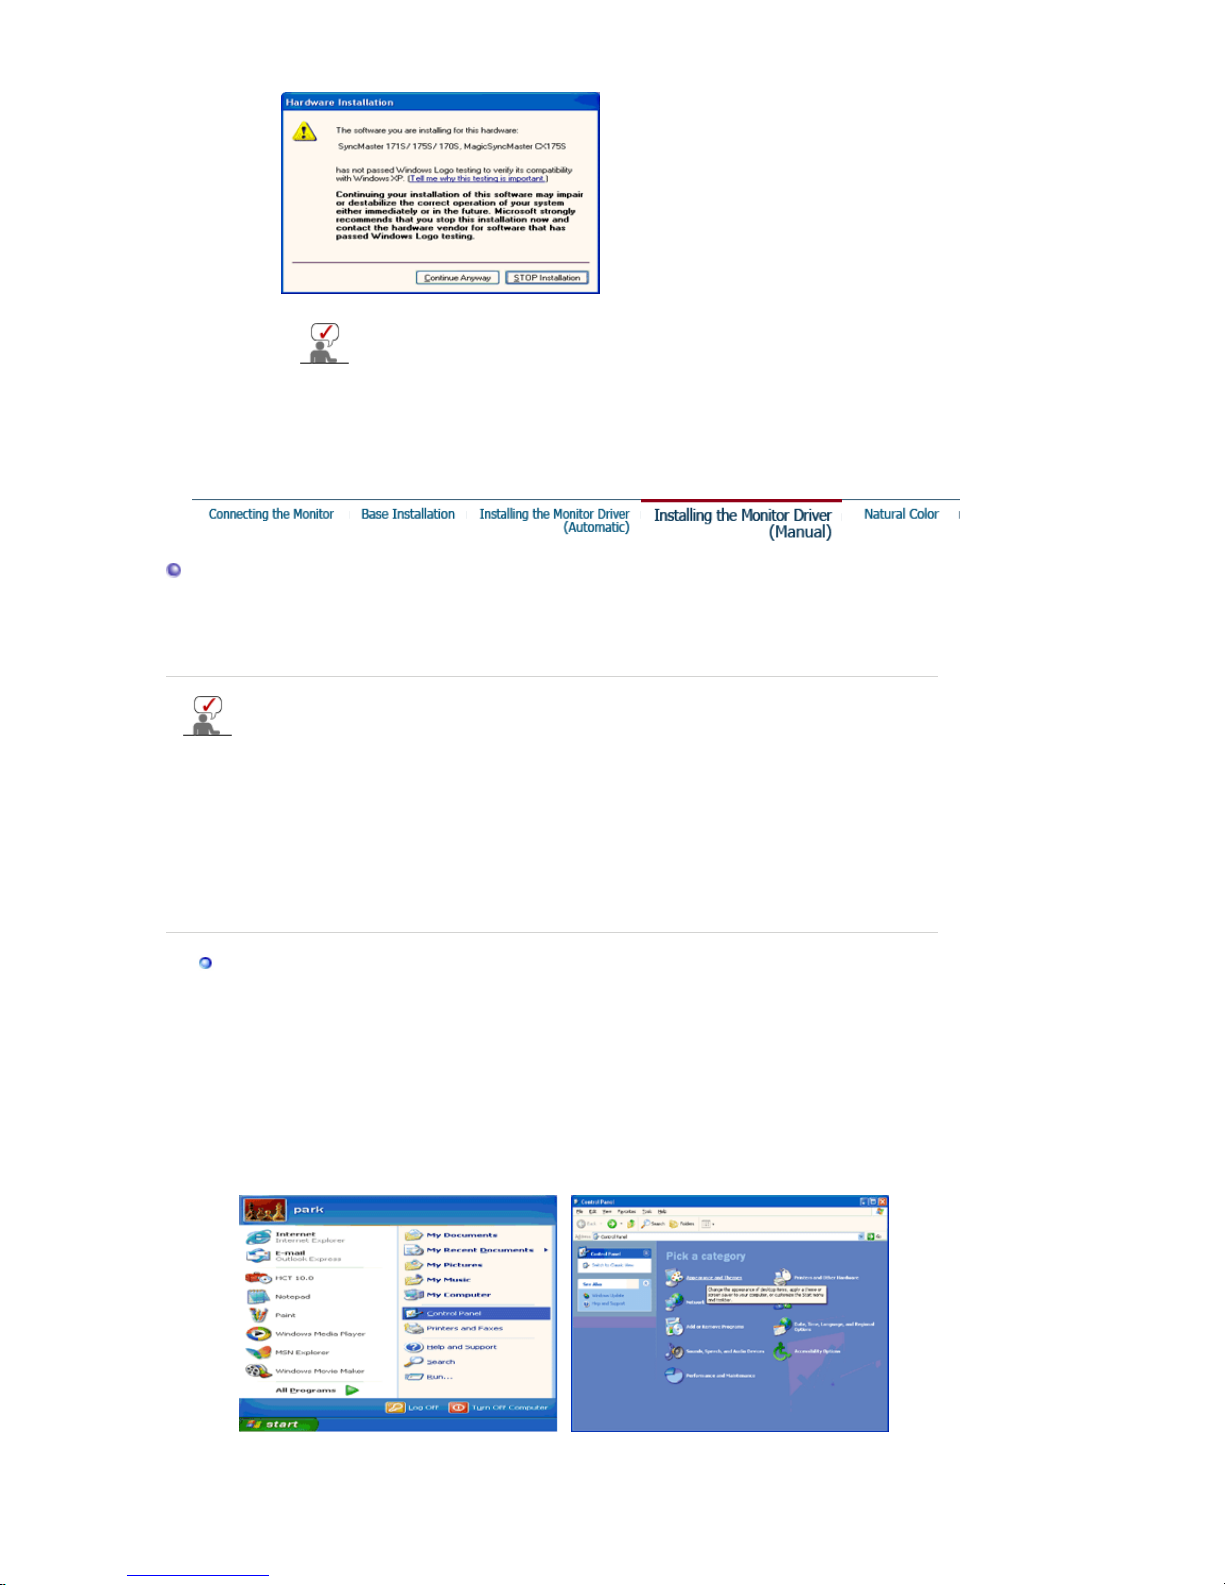
5. Monitor driver installation is completed.
This monitor driver is under certified MS logo and this installation doesn't
damage your system. The certified driver will be posted on Samsung
Monitor homepage.
http://www.samsung.com/.
Installing the Monitor Driver(Manual)
Windows XP | Windows 2000 | Windows Me | Windows NT | Linux
When prompted by the operating system for the monitor driver, insert the CD-ROM
included with this monitor. Driver installation is slightly different from one operating
system to another. Follow the directions appropriate for the operating system you
have.
Prepare a blank disk and download the driver program file at the Internet web site shown
here.
z Internet web site : http://www.samsung.com/ (Worldwide)
http://www.samsung.com/monitor (U.S.A)
http://www.sec.co.kr/monitor (Korea)
http://www.samsungmonitor.com.cn/ (China)
Microsoft® Windows® XP Operating System
1. Insert CD into the CD-ROM driver.
2. Click "
Start
" —> "
Control Panel
" then click the "
Appearance and Themes
" icon.
3. Click "
Display
" icon and choose the "
Settings
" tab then click "
Advanced..
".
Page 20
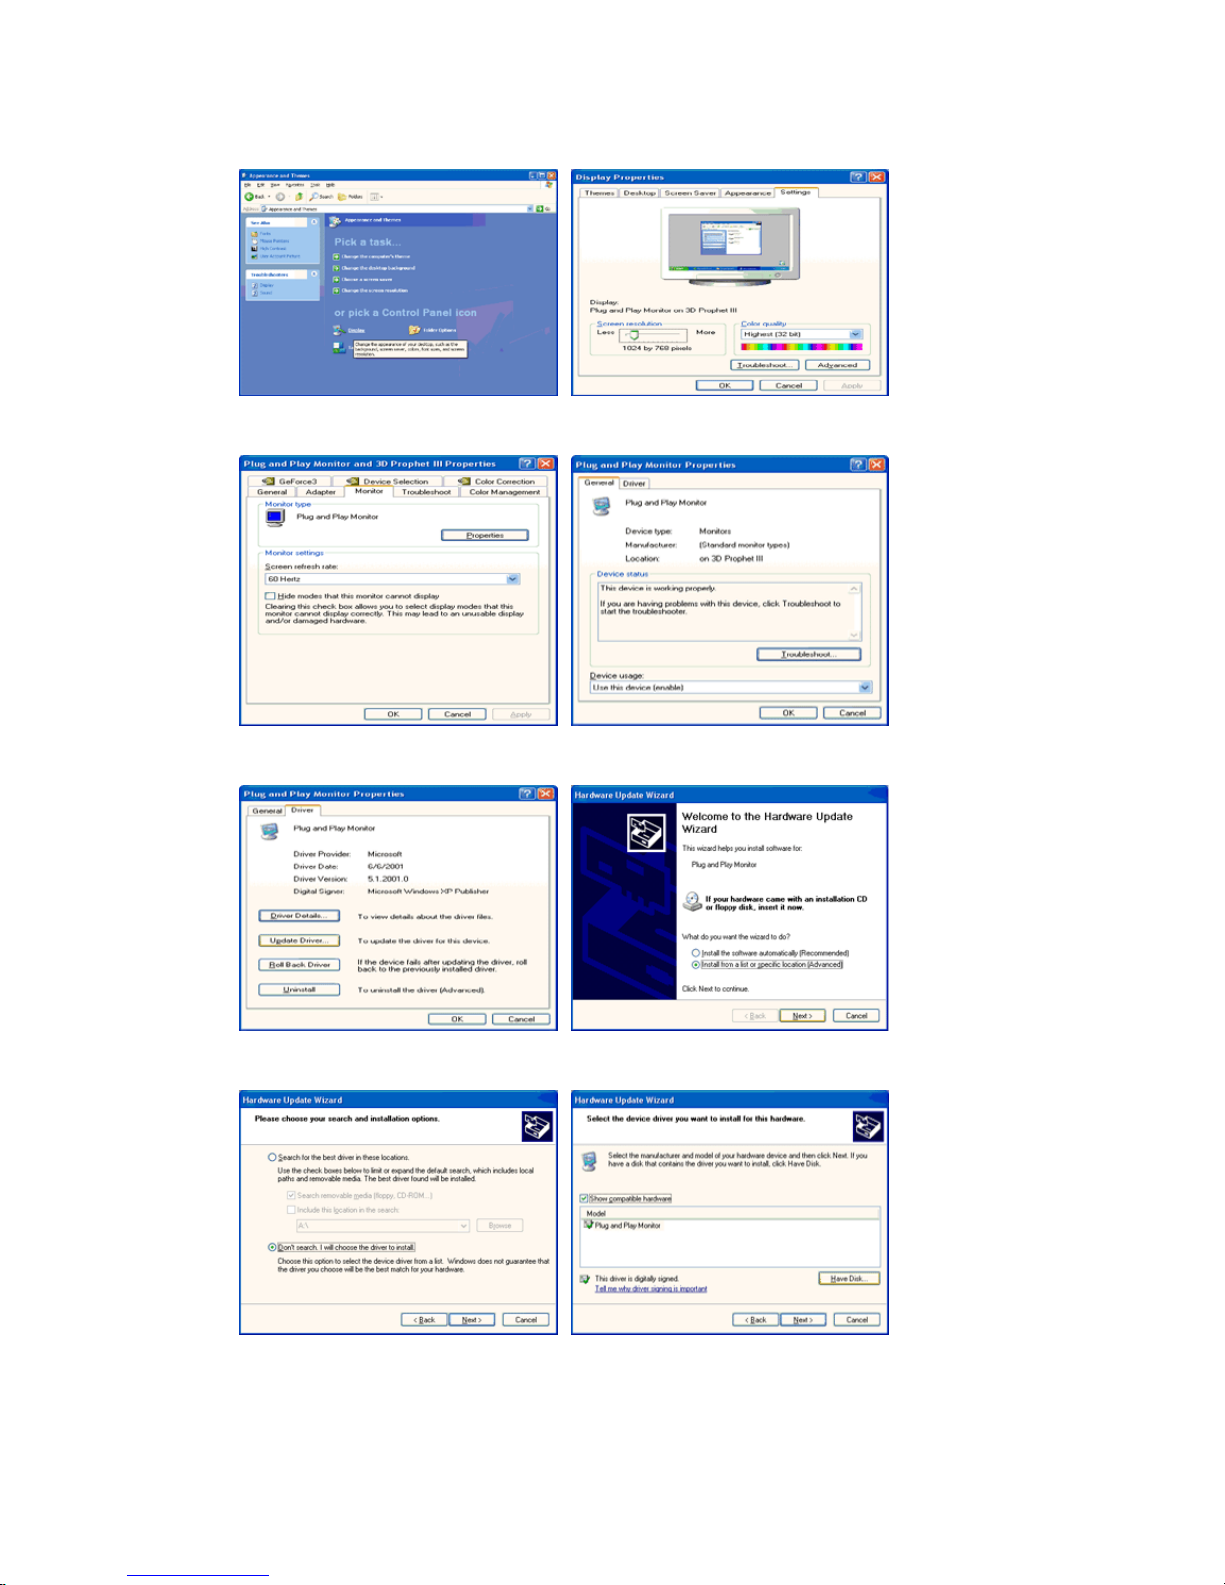
4. Click the "
Properties
" button on the "
Monitor
" tab and select "
Driver
" tab.
5. Click "
Update Driver..
" and select "
Install from a list or..
" then click "
Next
" button.
6. Select "
Don't search ,I will..
" then click "
Next
" and then click "
Have disk
".
7. Click the "
Browse
" button then choose A:(D:\Driver) and choose your monitor model in the
model list and click the "
Next
" button.
Page 21
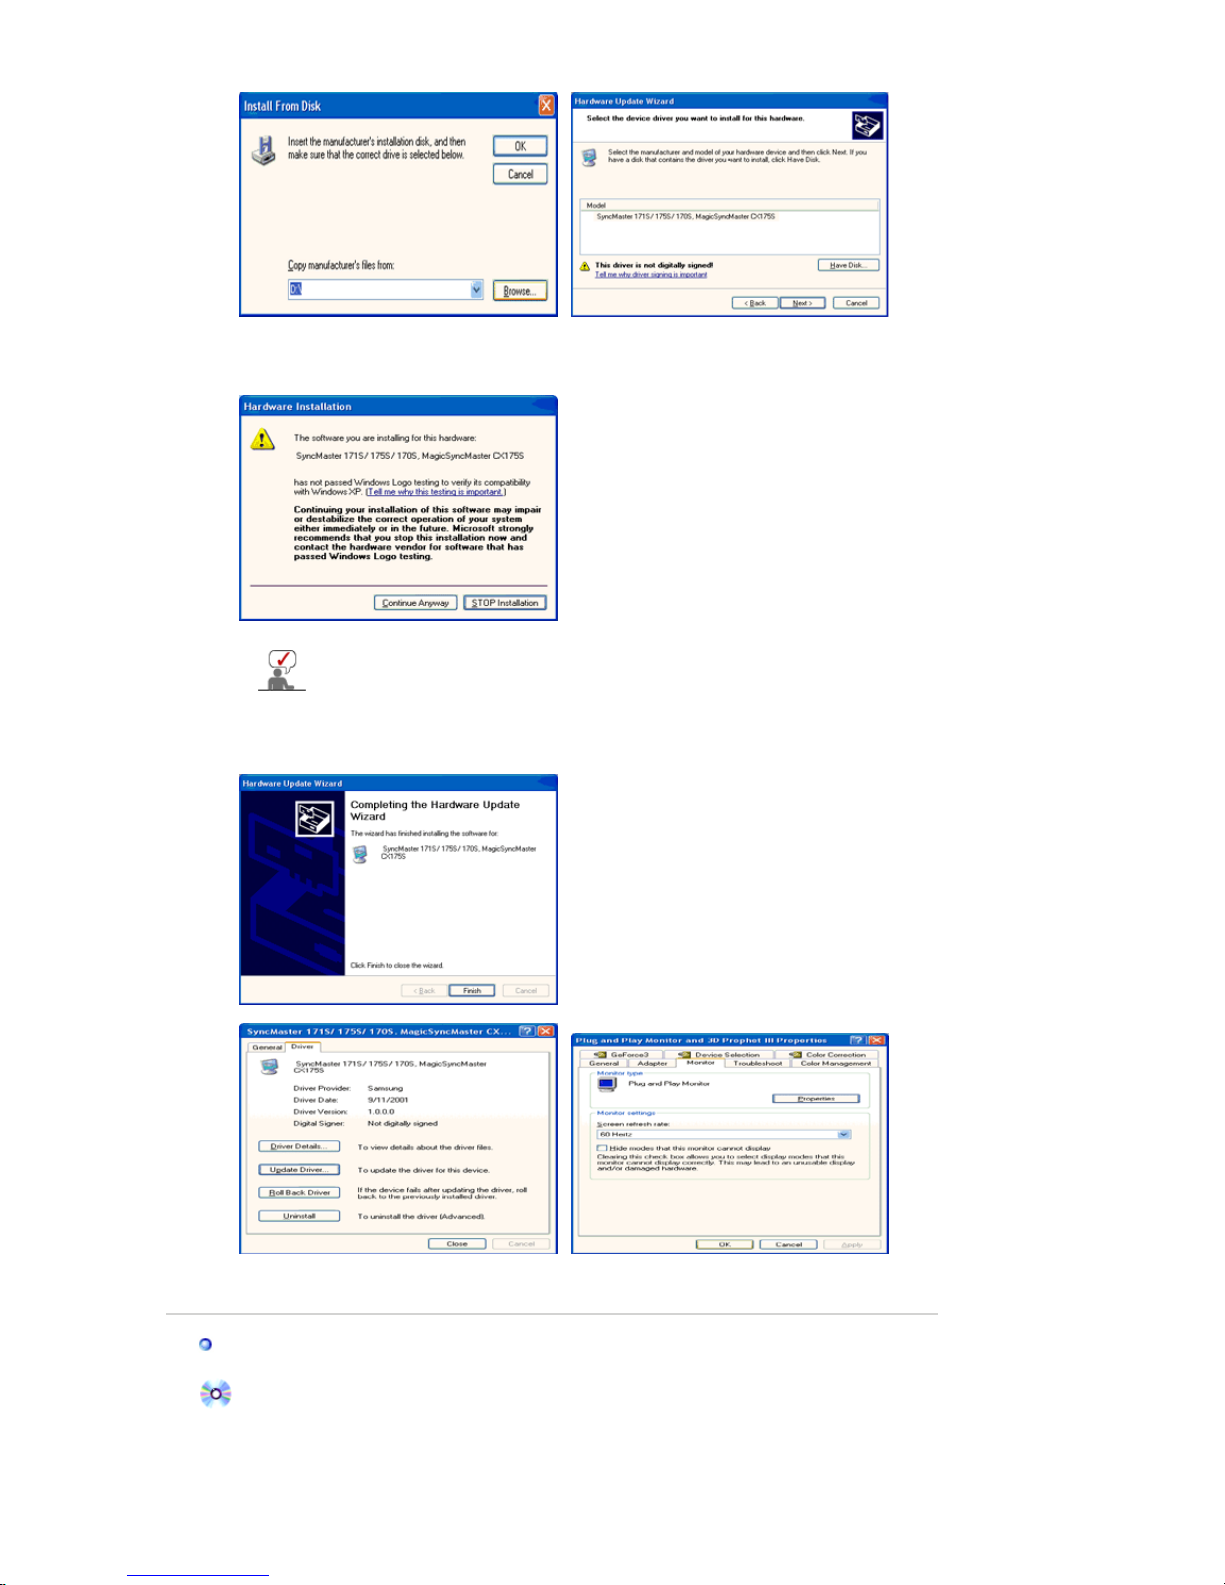
8. If you can see following message window, then click the "
Continue Anyway
" button. Then
click "OK" button.
9. Click the "
Close
" button, then click "OK" button continually.
10. Monitor driver installation is completed.
This monitor driver is under certified MS logo and this installation doesn't
damage your system. The certified driver will be posted on Samsung
Monitor homepage.
http://www.samsung.com/.
Microsoft
®
Windows® 2000 Operating System
When you can see "Digital Signature Not Found" on your monitor, follow these steps.
1. Choose "OK" button on the "
Insert disk
" window.
2. Click the "
Browse
" button on the "
File Needed
" window.
3. Choose A:(D:\Driver) then click the "Open" button and then click "OK" button.
Page 22

How to install
1. Click "
Start
" , "
Setting
" , "
Control Panel
".
2. Double click the "
Display
" Icon.
3. Choose the "
Settings
" tab and then click "
Advanced..
".
4. Choose "
Monitor
".
5. Click "
Driver
" and then click on "
Update Driver..
" then click on the "Next" button.
6. Choose "
Display a list of the known drivers for this device so that I can choose a
specific driver
" then click "
Next
" and then click "
Have disk
".
7. Click the "
Browse
" button then choose A:(D:\Driver).
8. Click the "
Open
" button, then click "OK" button.
9. Choose your monitor model and click the "
Next
" button then click "
Next
" button.
10. Click the "
Finish
" button then the "
Close
" button.
If you can see the "
Digital Signature Not Found
" window then click the "
Yes
"button.
And click the "
Finish
" button then the "
Close
" button.
Case1:If the "Properties" button is inactive, it means your monitor is properly configured.
Please stop installation
Case2:If the "Properties" button is active, click the "Properties" button then follow next step s
continually.
Microsoft
®
Windows® Millennium Operating System
1. Click "
Start
" , "
Setting
" , "
Control Panel
".
2. Double click "
Display
" icon.
3. Select the "
Settings
" tab and click "
Advanced Properties
" button.
4. Select the "
Monitor
" tab.
5. Click the "
Change
" button in the "
Monitor Type
" area.
6. Choose "
Specify the location of the driver
".
7. Choose "
Display a list of all the driver in a specific location..
" then click "
Next
" button.
8. Click the "
Have Disk
" button
9. Specify A:\(D:\driver) then click "OK" button.
10. Select "
Show all devices
" and choose the monitor that corresponds to the one you
connected to your computer and click "OK".
11. Continue choosing "
Close
" button and "OK" button until you close the Display Properties
dialogue box.
Microsoft
®
Windows® NT Operating System
1. Click
Start, Settings, Control Panel
, and then double-click
Display
icon.
2. In Display Registration Information window, click Settings Tab and then click
All Display
Modes
.
3. Select a mode that you wish to use (Resolution, Number of colors and Vertical frequency)
and then click OK.
4. Click
Apply
button if you see the screen working normally after clicking
Test
. If the screen is
not normal, change to a different mode (lower mode of resolution, colors or frequency).
If there is no Mode at
All Display Modes
, select the level of resolution and vertical
frequency by referring to the Preset Timing Modes in the user guide.
Linux Operating System
To execute X-Window, you need to make the X86Config file, which is a type of system setting file.
1. Press Enter at the first and the second screen after executing the X86Config file.
2. The third screen is for
setting your mouse
.
3. Set a mouse for your computer.
4. The next screen is for
selecting a keyboard
.
5. Set a Keyboard for your computer.
6. The next screen is for
setting your monitor
.
7. First of all, set a
horizontal frequency
for your monitor. (You can enter the frequency
directly.)
8. Set a
vertical frequency
for your monitor. (You can enter the frequency directly.)
9. Enter the
model name of your monitor
. This information will not affect the actual execution
of X-Window.
10. You have
finished
setting up your monitor.
Execute
X-Window after setting other requested hardware.
Page 23
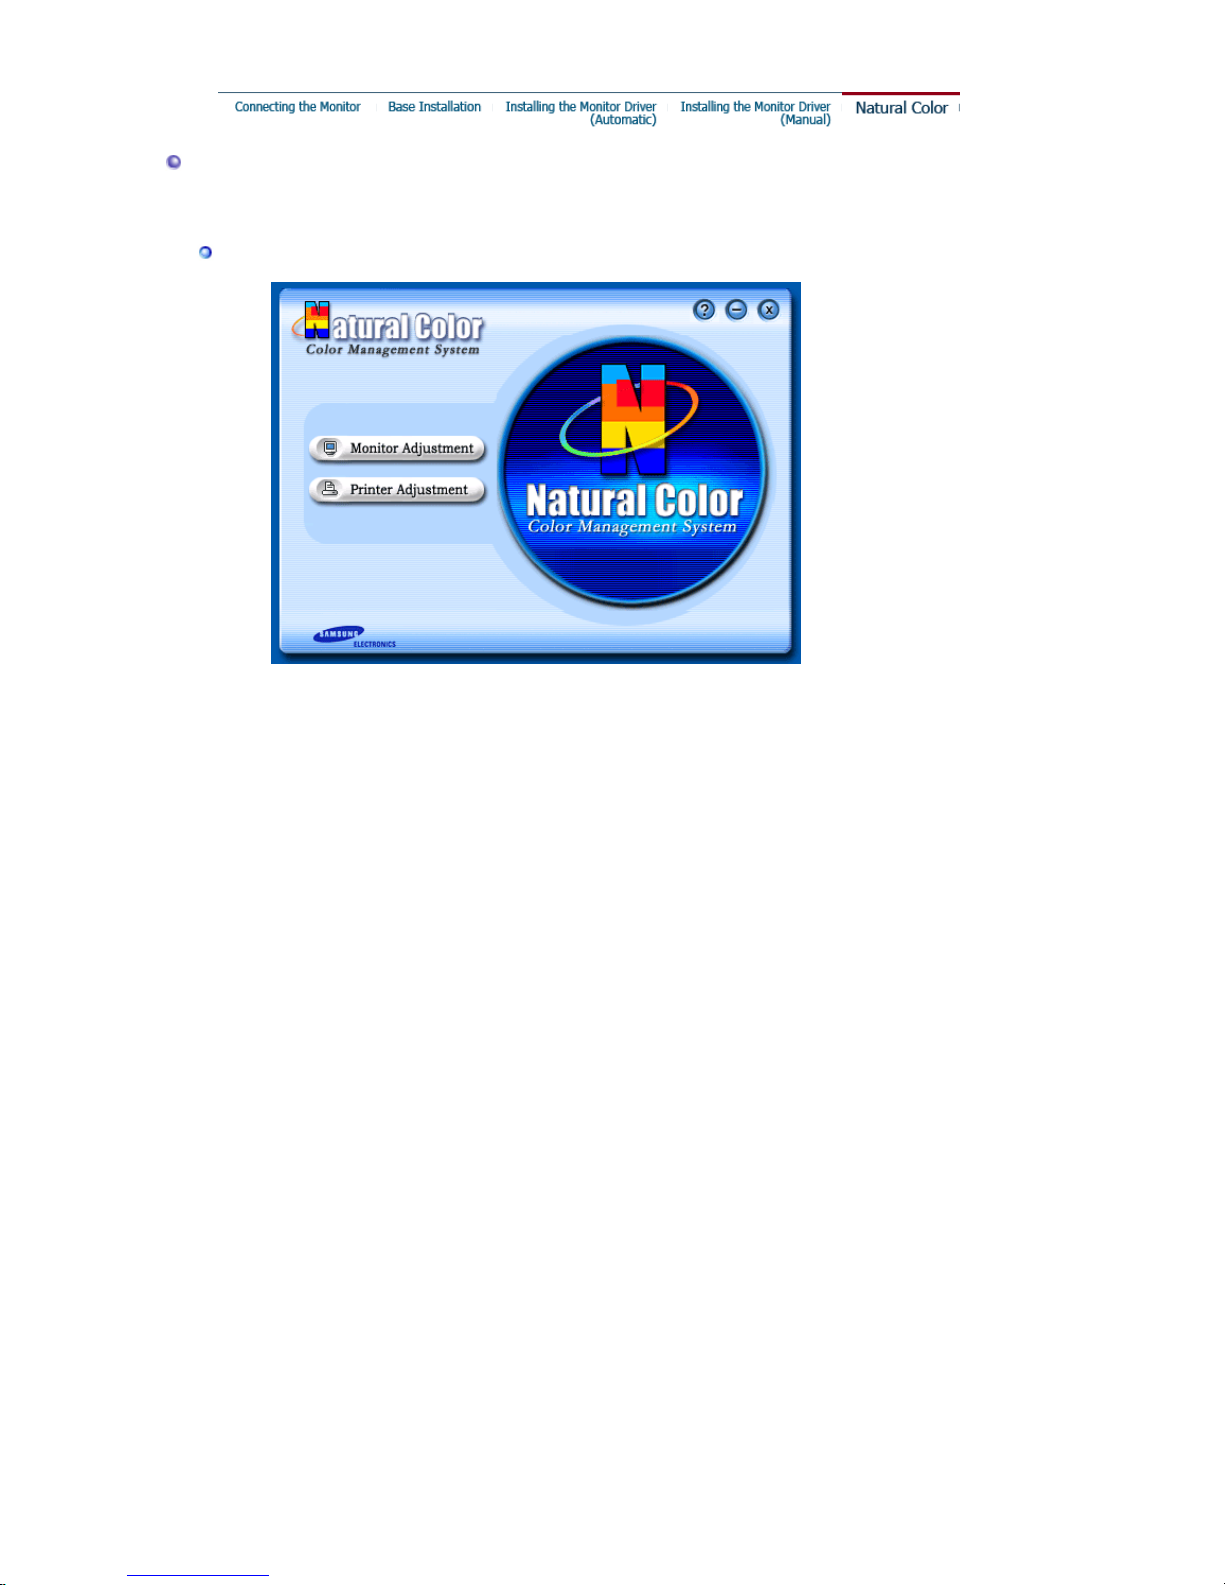
Natural Color
Natural Color Software Program
One of the recent problems in using a computer is that the color of the images printed out by a
printer or other images scanned by a scanner or a digital camera are not the same as those
shown on the monitor.
The Natural Color S/W is the very solution for this problem. It is a color administration system
developed by Samsung Electronics in association with Korea Electronics &
Telecommunications Research Institute (ETRI).
This system is available only for Samsung monitors and makes the color of the images on the
monitor the same as the printed or scanned images.
For more information, refer to Help (F1) in the software program.
How to install the Natural Color software
Insert the CD included with the Samsung monitor into the CD-ROM Drive. Then, the initial
screen of the program Natural Color will be executed. Click Natural Color on the initial screen
to install the Natural Color software.
To install the program manually, insert the CD included with the Samsung monitor into th e CDROM Drive, click the
[Start]
button of Windows and then select
[Execute]
.
Enter D:\color\eng\setup.exe and then press the
<Enter>
key.
(If the drive where the CD is inserted is not D:\, enter the applicable drive.)
How to delete the Natural Color software program
Select
[Setting]/[Control Panel]
on the
[Start]
menu and then double-click
[Add/Delete a
program]
.
Select Natural Color from the list and then click the
[
Add/Delete
]
button.
Page 24
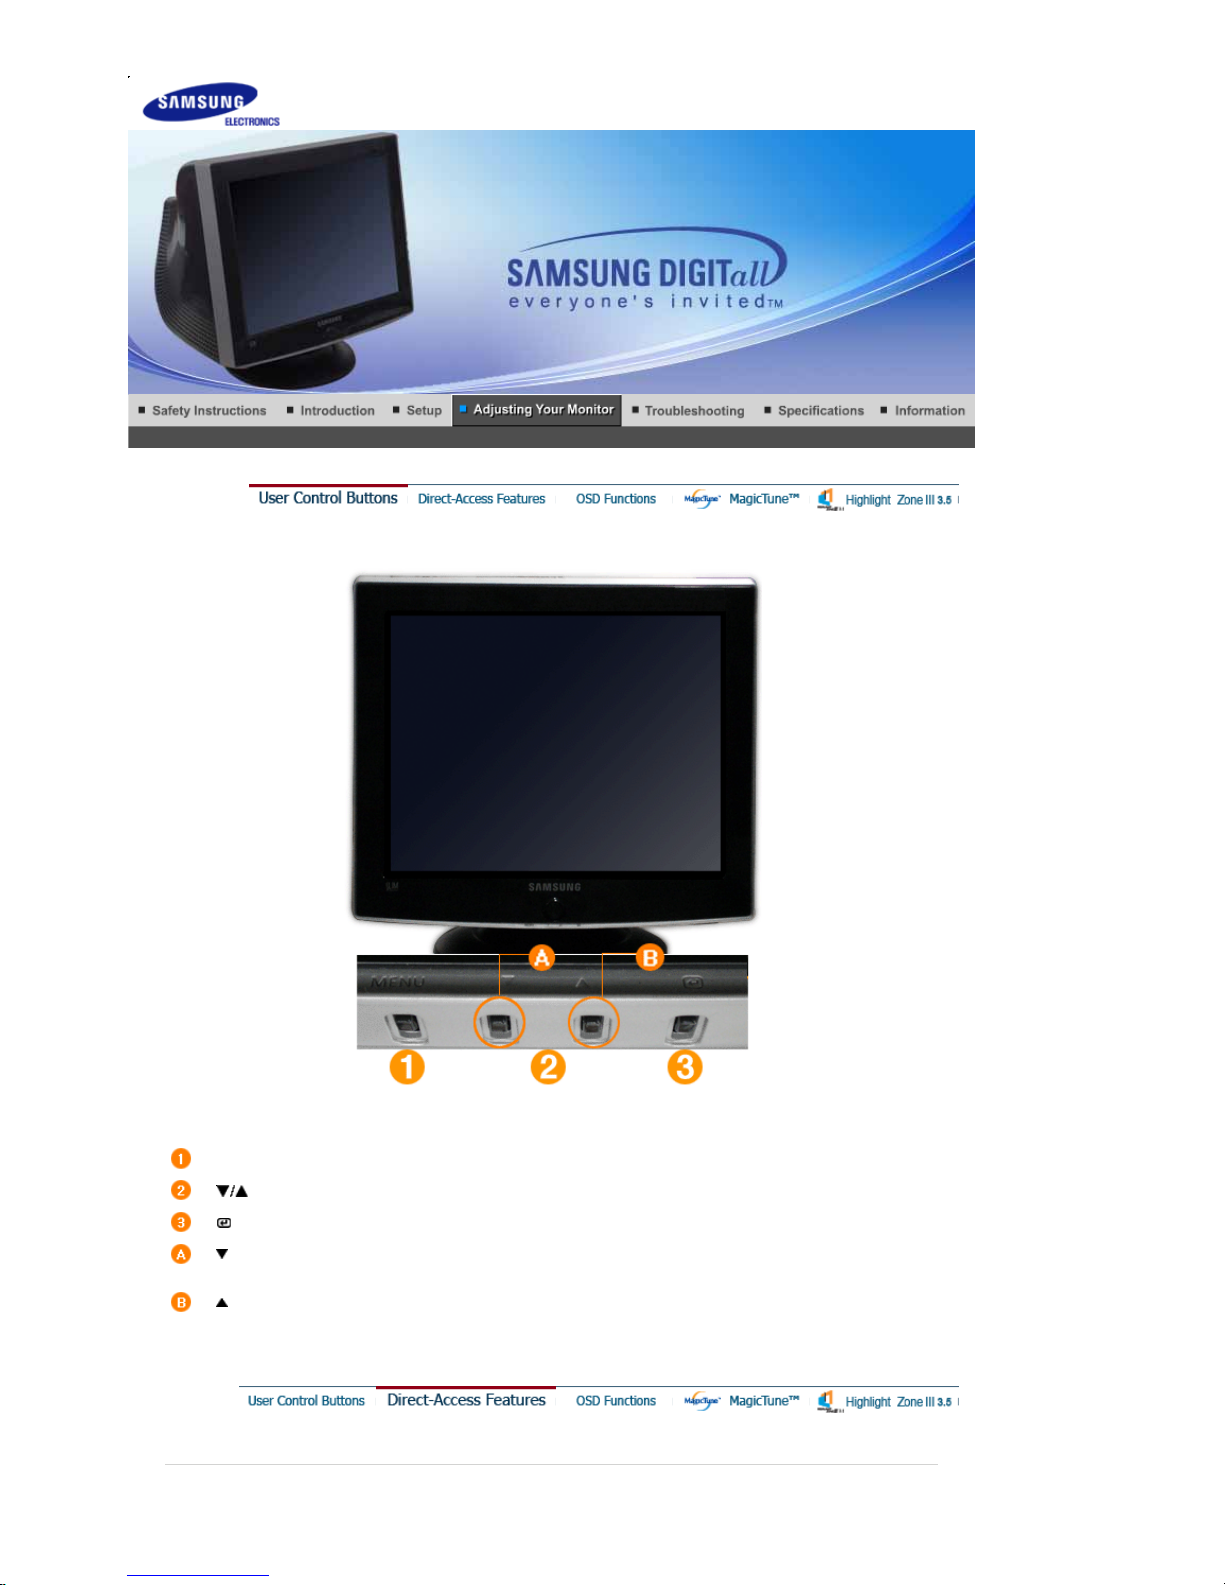
MENU
Opens the OSD menu. Also use to exit the OSD menu or return to the previous menu.
[]
These buttons allow you to highlight and adjust items in the menu.
[]
Use to select the OSD menu.
[]
MagicBright2™ is a new feature providing optimum viewing environment depending on
the contents of the image you are watching.
[]
The HighlightZone ensures clear images on TVs, video conferencing systems or photos
by emphasizing a certain area on the screen.
Page 25
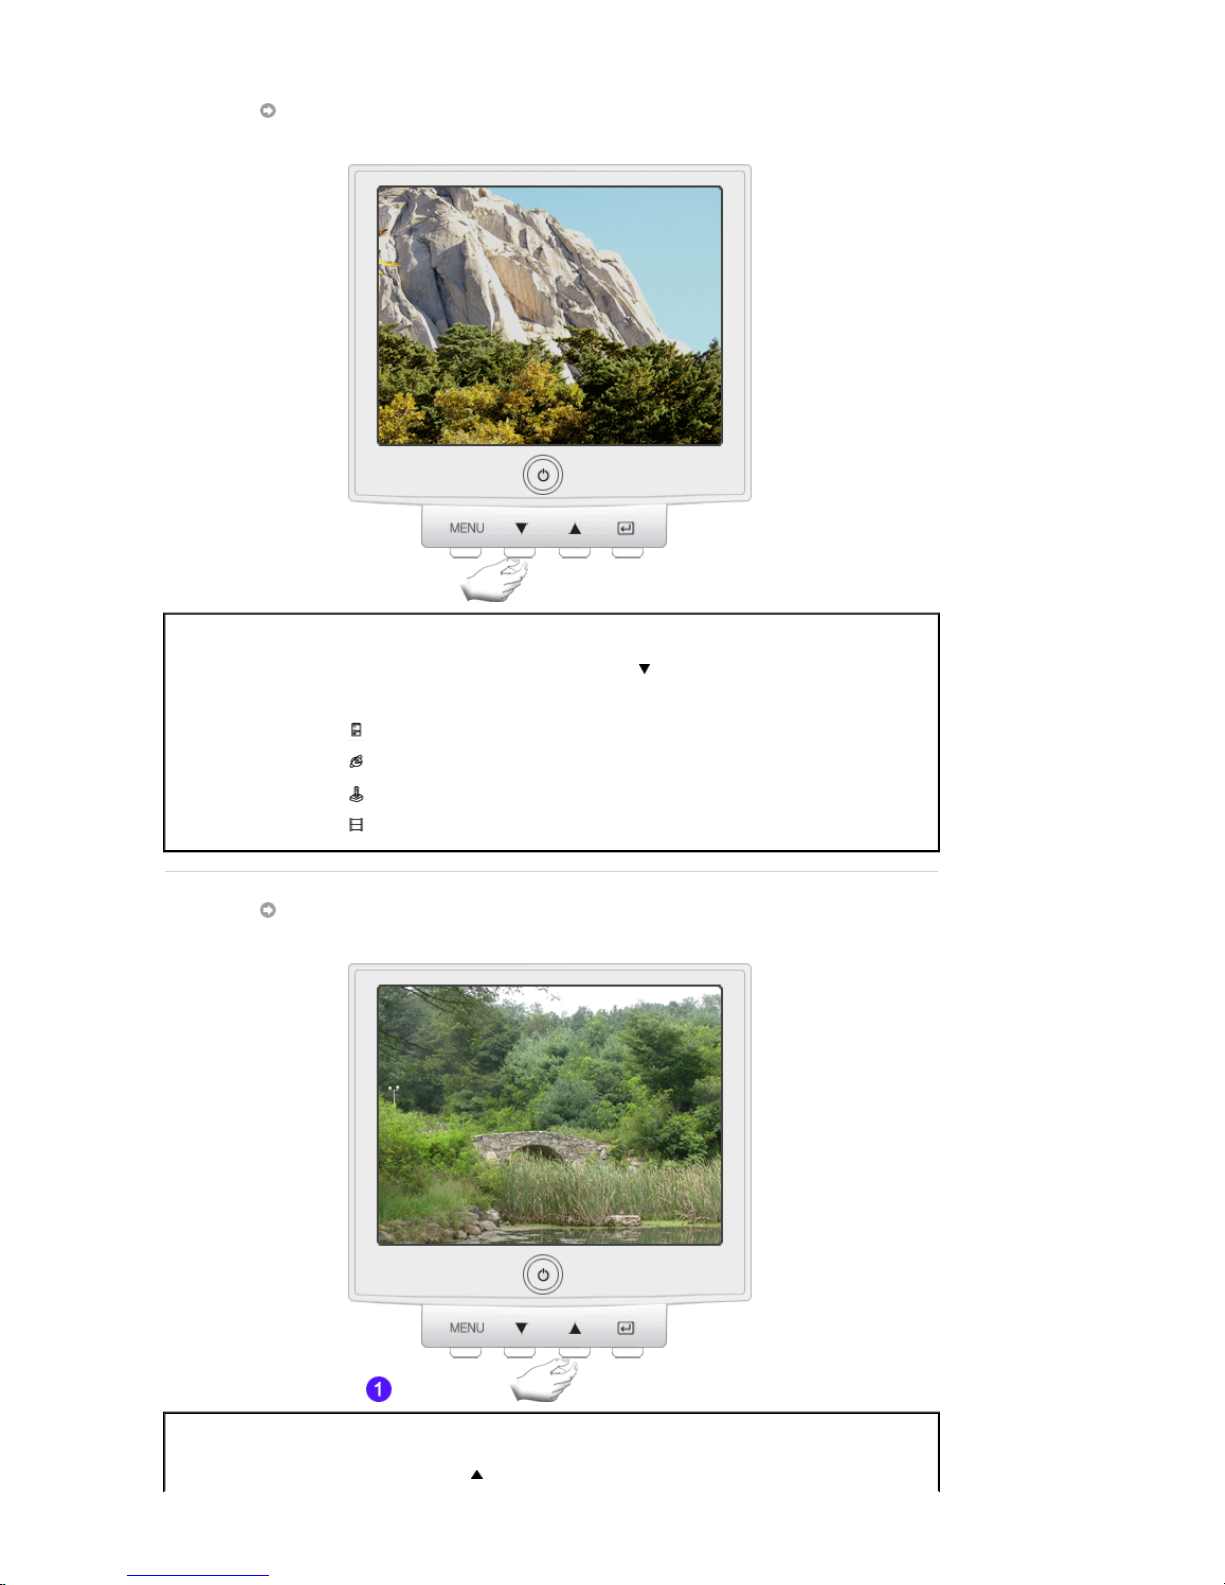
MagicBright2™
Menu Description
MagicBright2™
Then push the MagicBright2™ button [] again to circle through available
preconfigured modes.
For documentations or works involving heavy text.
For working with a mixture of images such as text and graphics.
For watching motion pictures such as a game.
For watching motion pictures such as a DVD or Video CD.
HighlightZone
Menu Description
Use this button [] for HighlightZone on and off. The HighlightZone ensures
Page 26
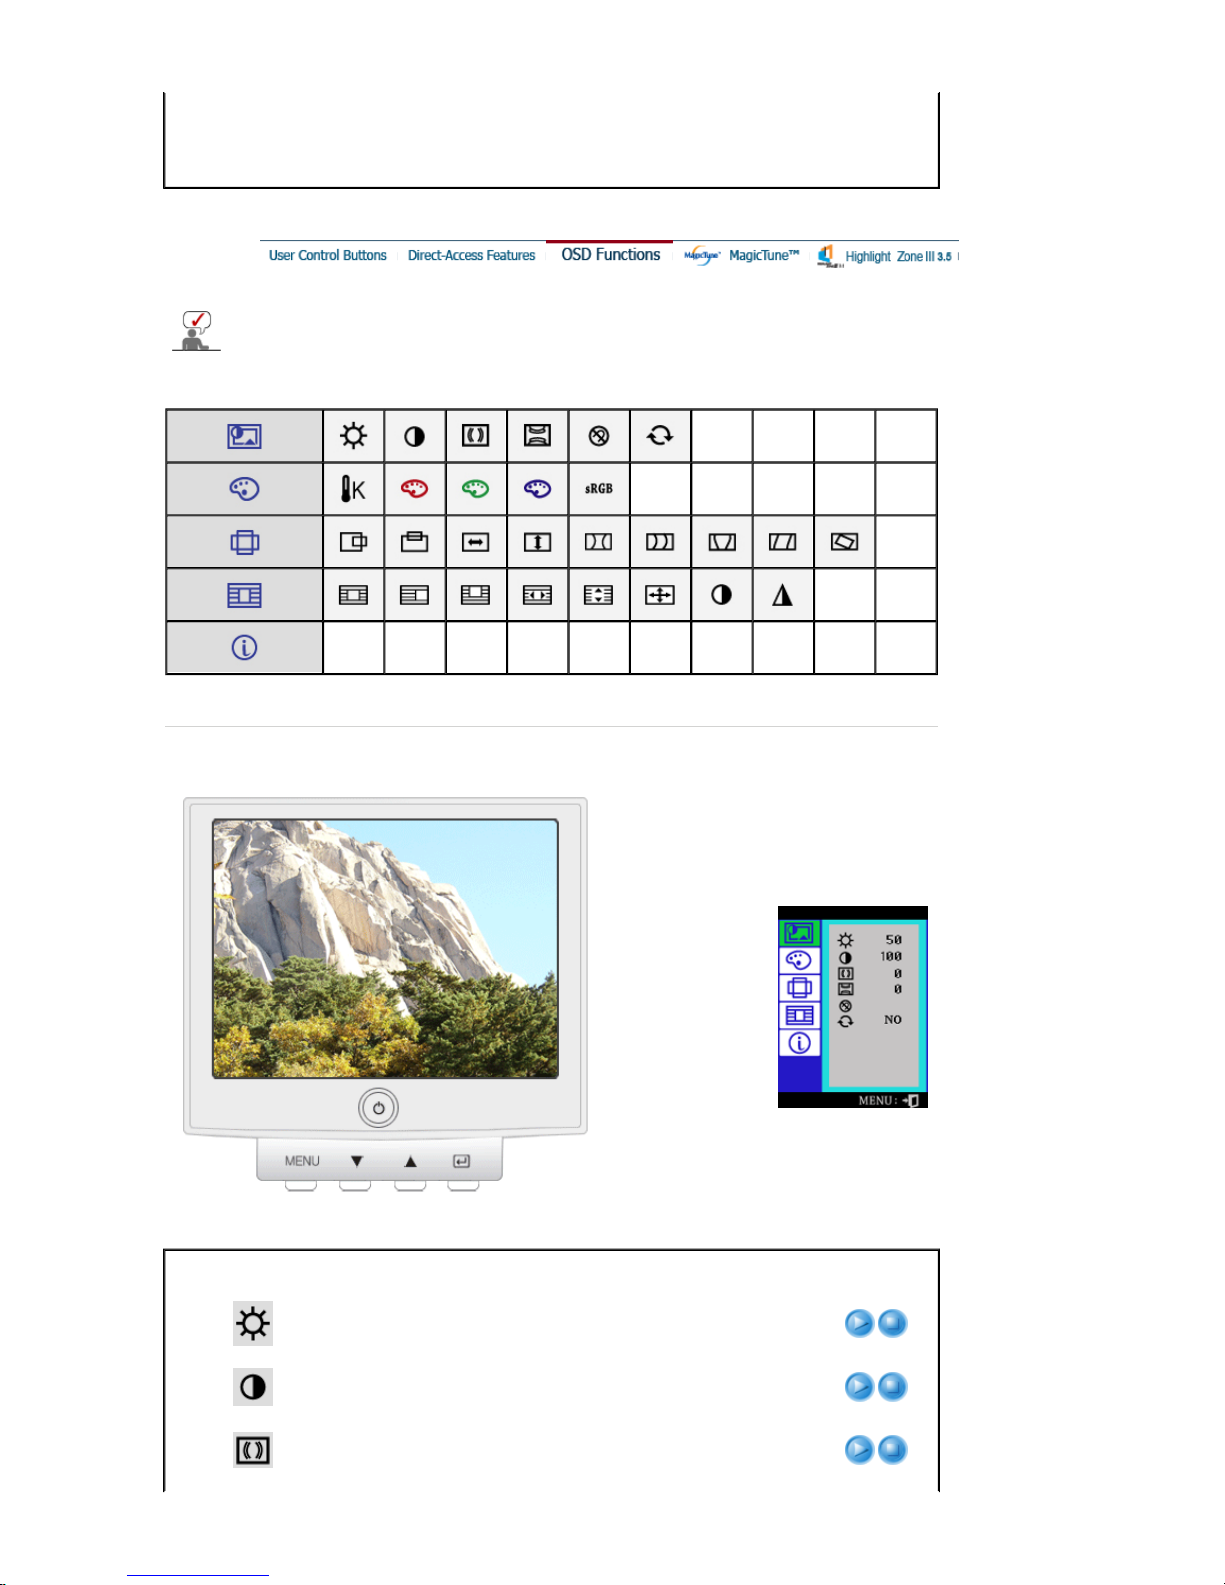
HighlightZone
the clear and sharp display of animated multimedia or photo imag es by
enhancing the brightness of a certain area on the screen.
Note
: If control MagicBright function after HighlightZone setting,
HighlightZone turns off automatically.
Select an icon that you want to know from the OSD menu to display a text or animation
explanation of that icon.
Menu Description Play/Stop
You can use the on-screen menus to change the brightness
according to personal preference.
You can use the on-screen menus to change the contrast
according to personal preference.
A "Moiré" pattern can appear on your screen, looking like a
series of concentric circles or arcs. To eliminate this pattern,
use the horizontal moire adjustments.
Page 27
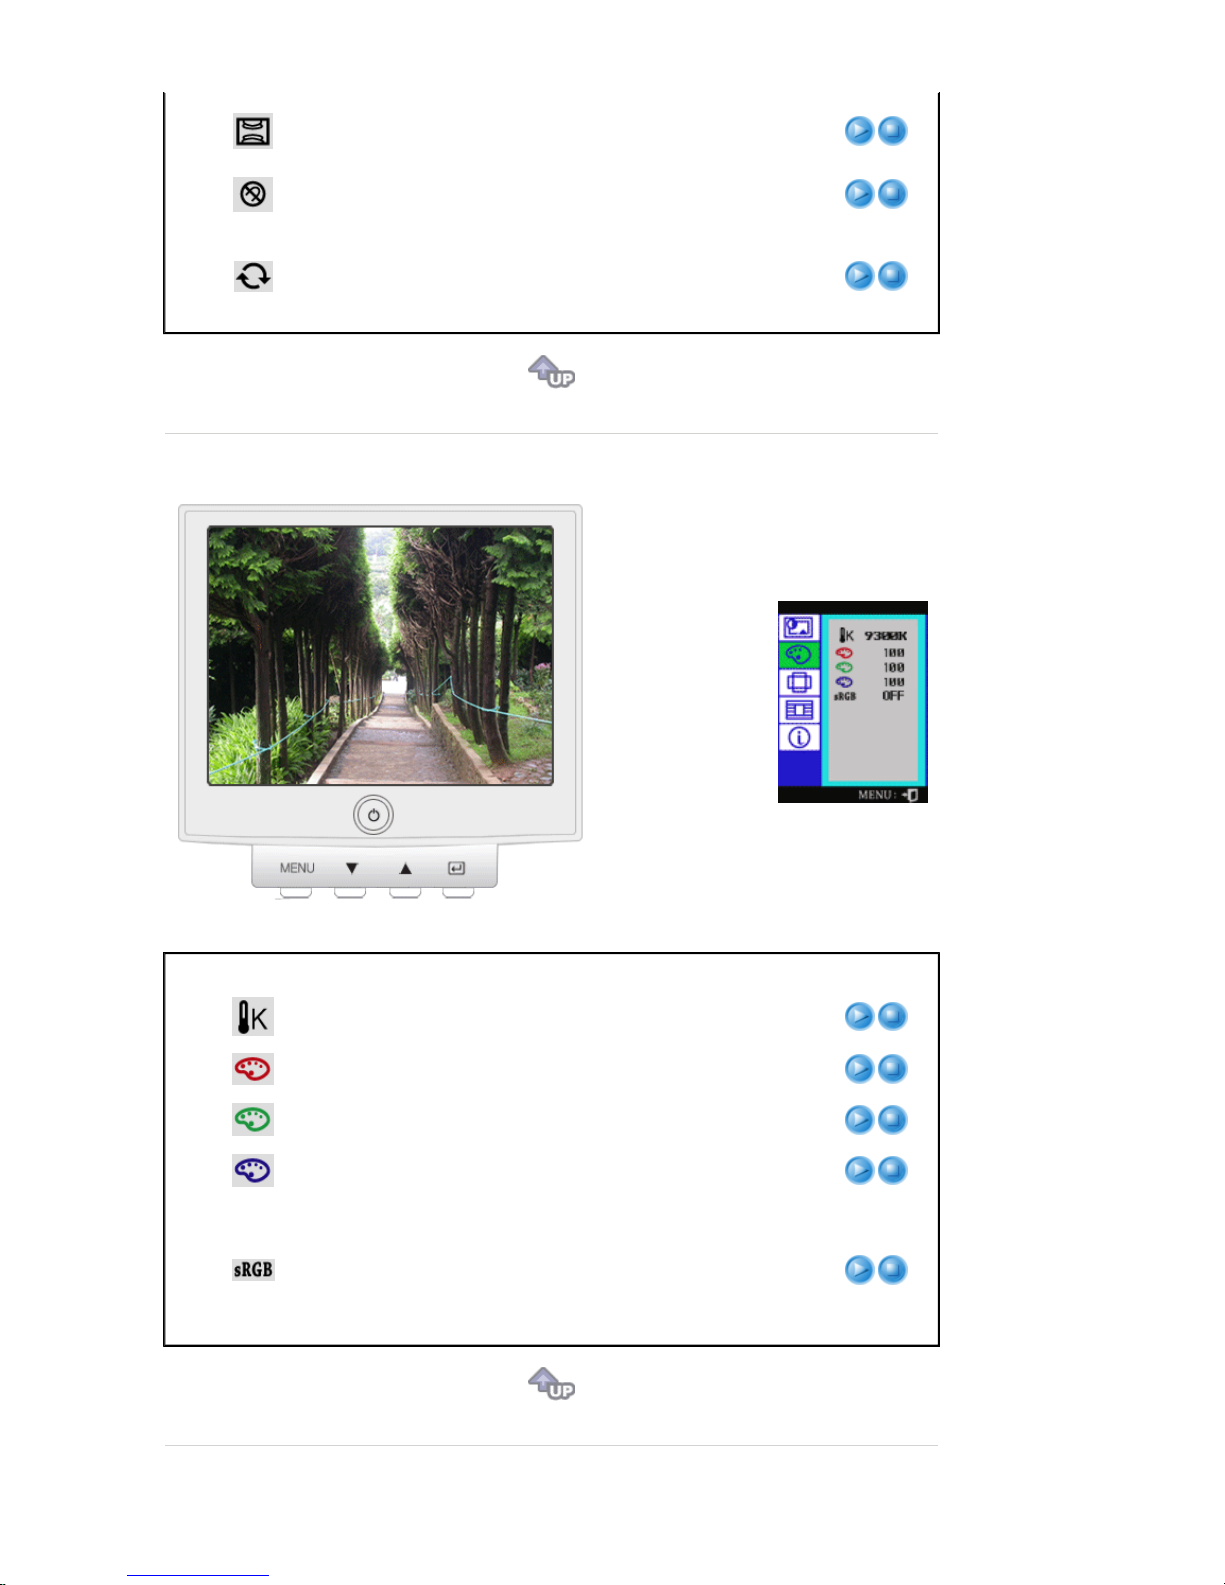
A "Moiré" pattern can appear on your screen, looking like a
series of concentric circles or arcs. To eliminate this pattern,
use the vertical moire adjustments.
The Degauss feature will remove color impurities caused by
magnetic fields.
Use the recall feature to reset these monitor settings to their
original levels: Position, Size, Pincushion, Trapez oid,
Parallelogram, Pinbalance, Rotati on , H-Moire,and V-Moire.
Note:
If you have selected "Yes", all settings listed above will
be reset. All other settings will remain the same.
Menu Description Play/Stop
Color temperature is a measure of the 'warmth' of the image
colors. (6500K / 9300K)
Use to adjust the monitor color setting.(Red)
Use to adjust the monitor color setting.(Green)
Use to adjust the monitor color setting.(Blue)
Standard Red Green Blue (sRGB) is a defined default color
space. If a monitor, printer and scanner are all calibrated to
the sRGB color characteristics, then you can find color
matching from each peripheral.
Note:
When the monitor is in the sRGB mode, Brightness /
Contrast / MagicBright2™ / HighlightZone adjustment is not
available.
Page 28
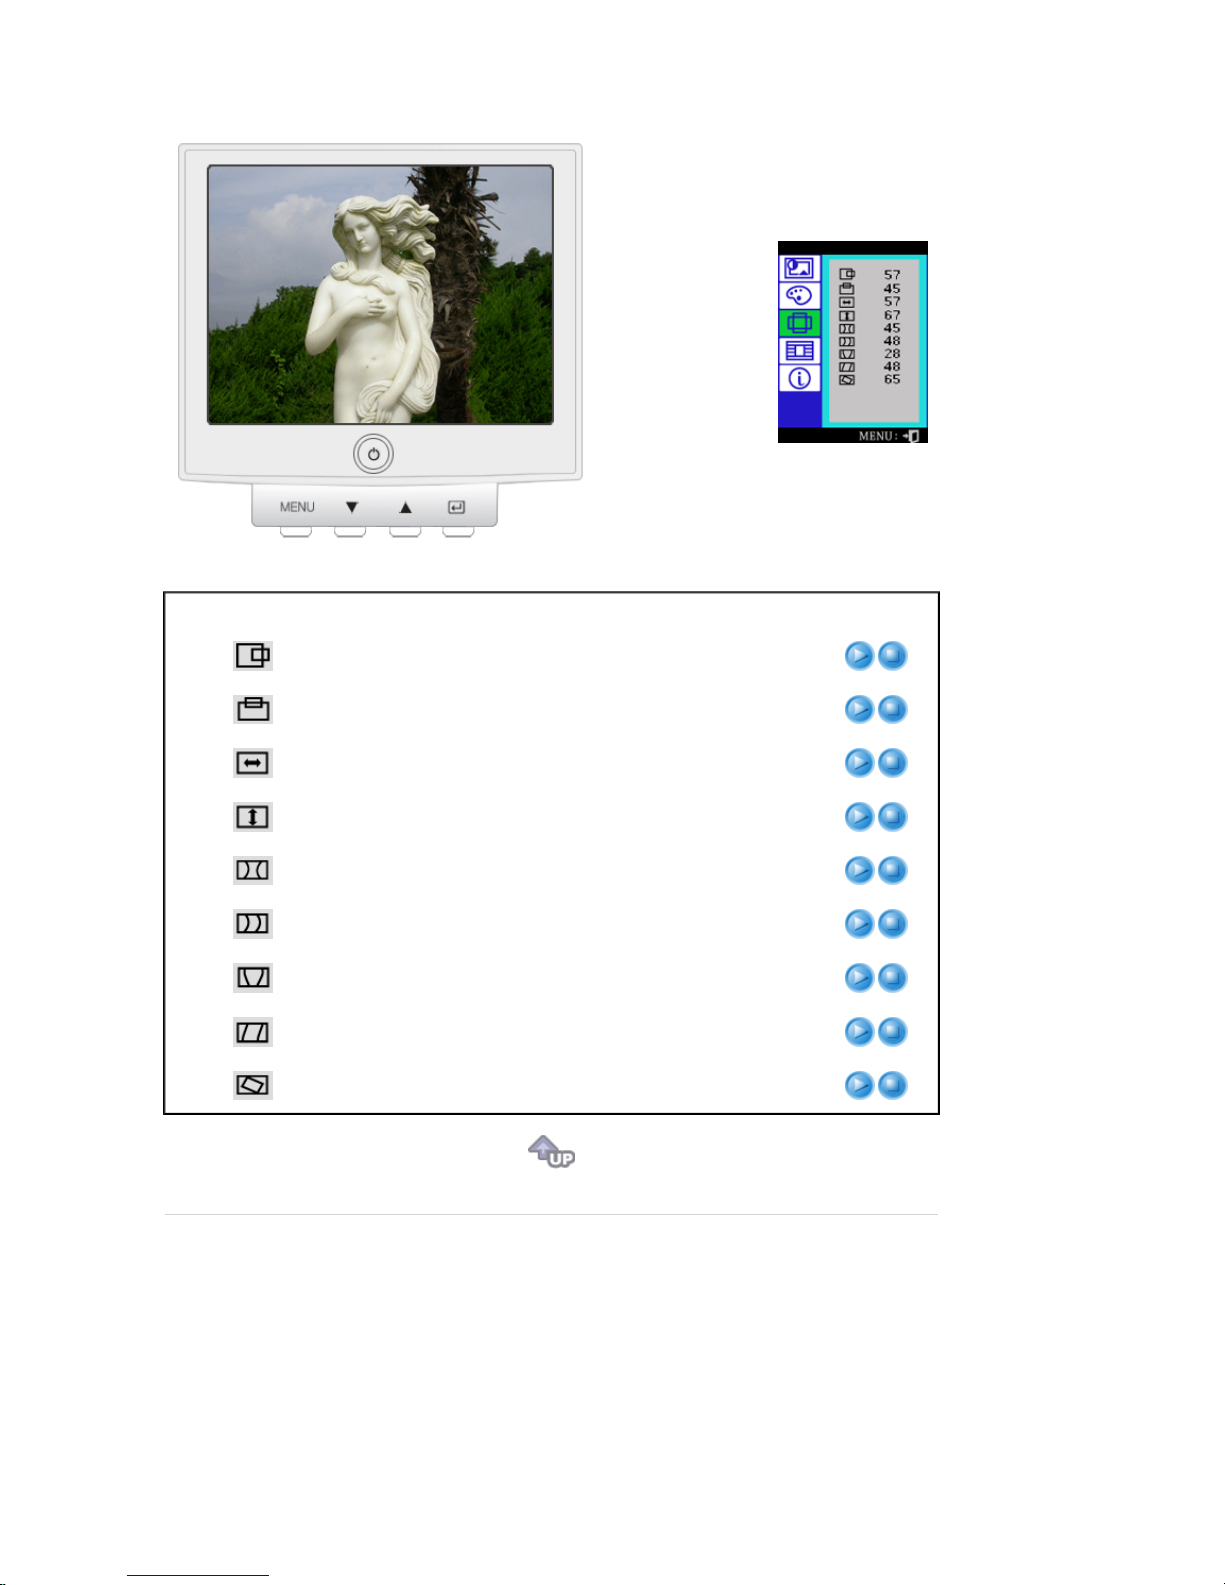
Menu Description Play/Stop
Follow these instructions to change the horizontal position of
the monitor's entire display.
Follow these instructions to change the vertical position of
the monitor's entire display.
Follow these instructions to change the horizontal size of the
monitor's entire display.
Follow these instructions to change the vertical size of the
monitor's entire display.
Adjust the pincushion setting when the sides of the display
are bowed in or bowed out.
Adjust the pinbalance setting when the sides of the display
are bowed towards the left or right.
Adjust the trapezoid setting when the top or bottom of the
display is too large or small.
Adjust the parallelogram setting when the display is leaning
left or right.
Adjust the rotation setting when the entire display is tilted left
or right.
Page 29
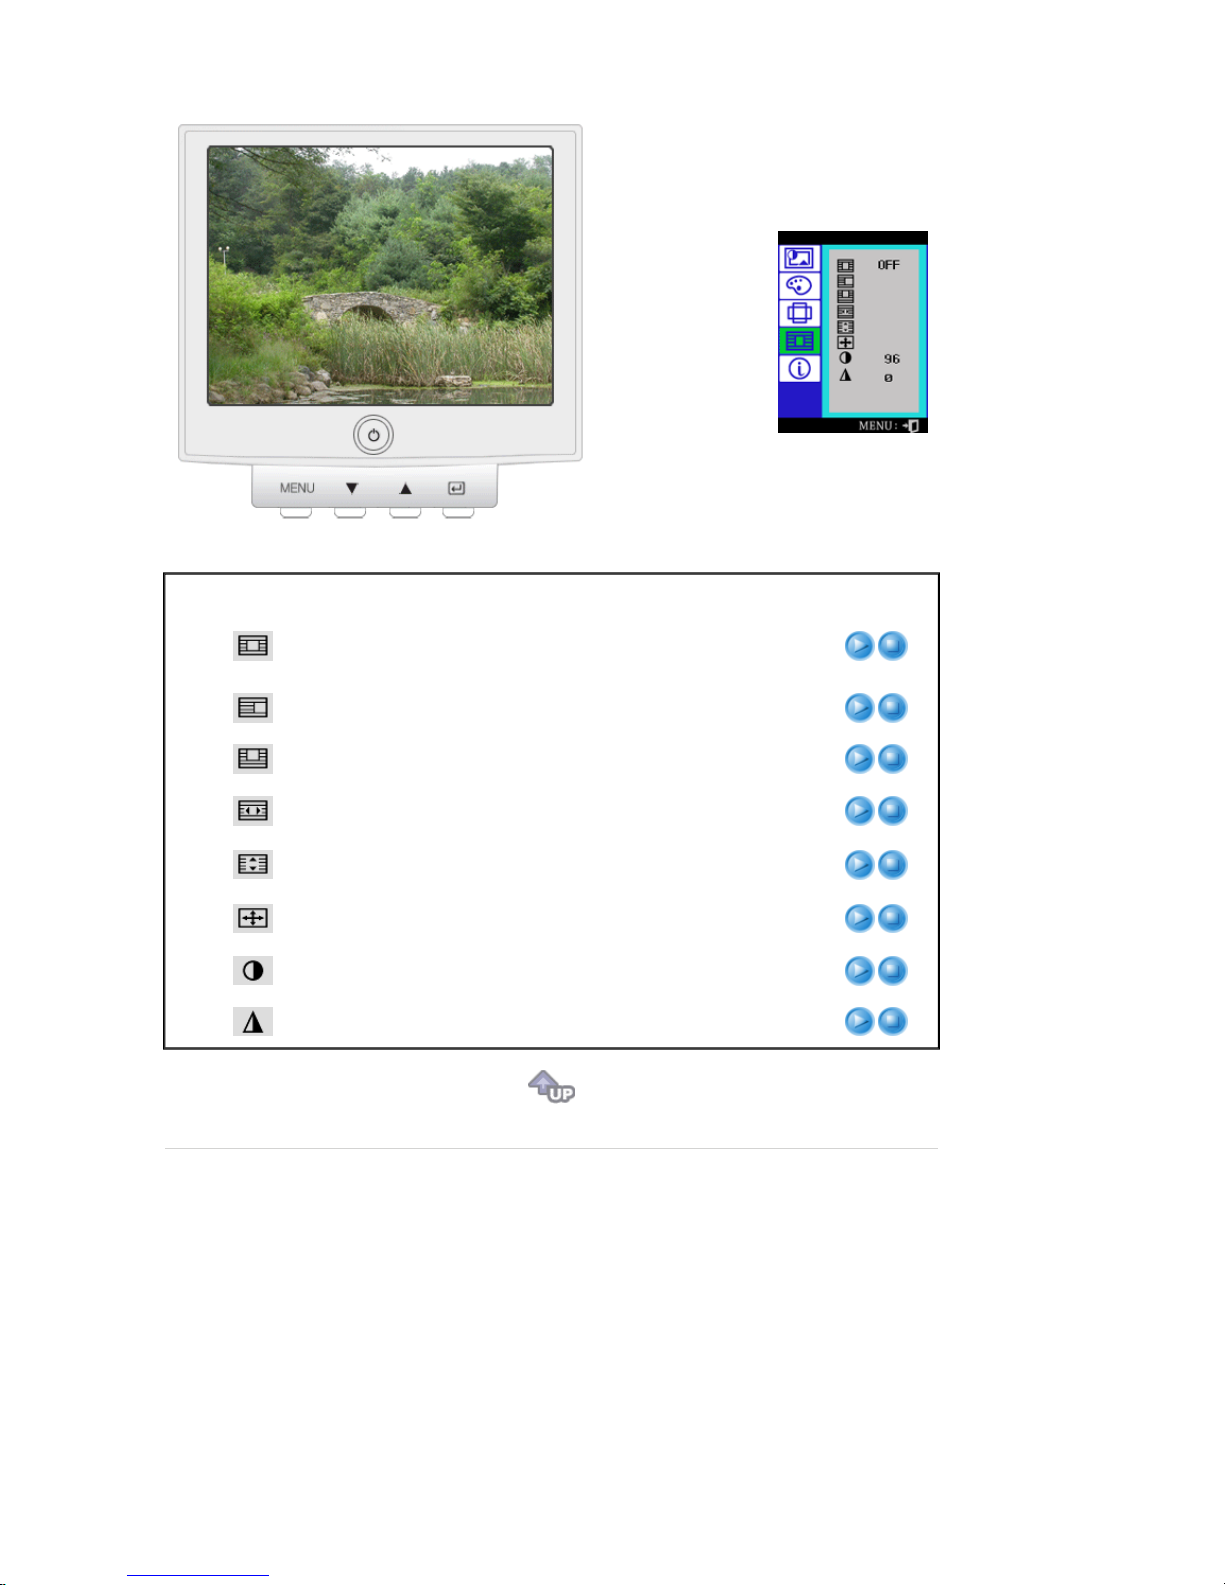
OSD Description Play / Stop
Use to turn the HighlightZone features on or off.
Note
: When "OFF" is selected, the user cannot choose any
other HighlightZone features.
This function is to move the HighlightZone horizontally.
This function is to move the HighlightZone vertically.
This function is to adjust the horizontal size of the
HighlightZone.
This function is to adjust the vertical size of the
HighlightZone.
This function is to adjust horizontal and vertical size of the
HighlightZone.
This function is to use the contrast of the HighlightZone.
This function is to adjust the sharpness of the HighlightZone.
Page 30
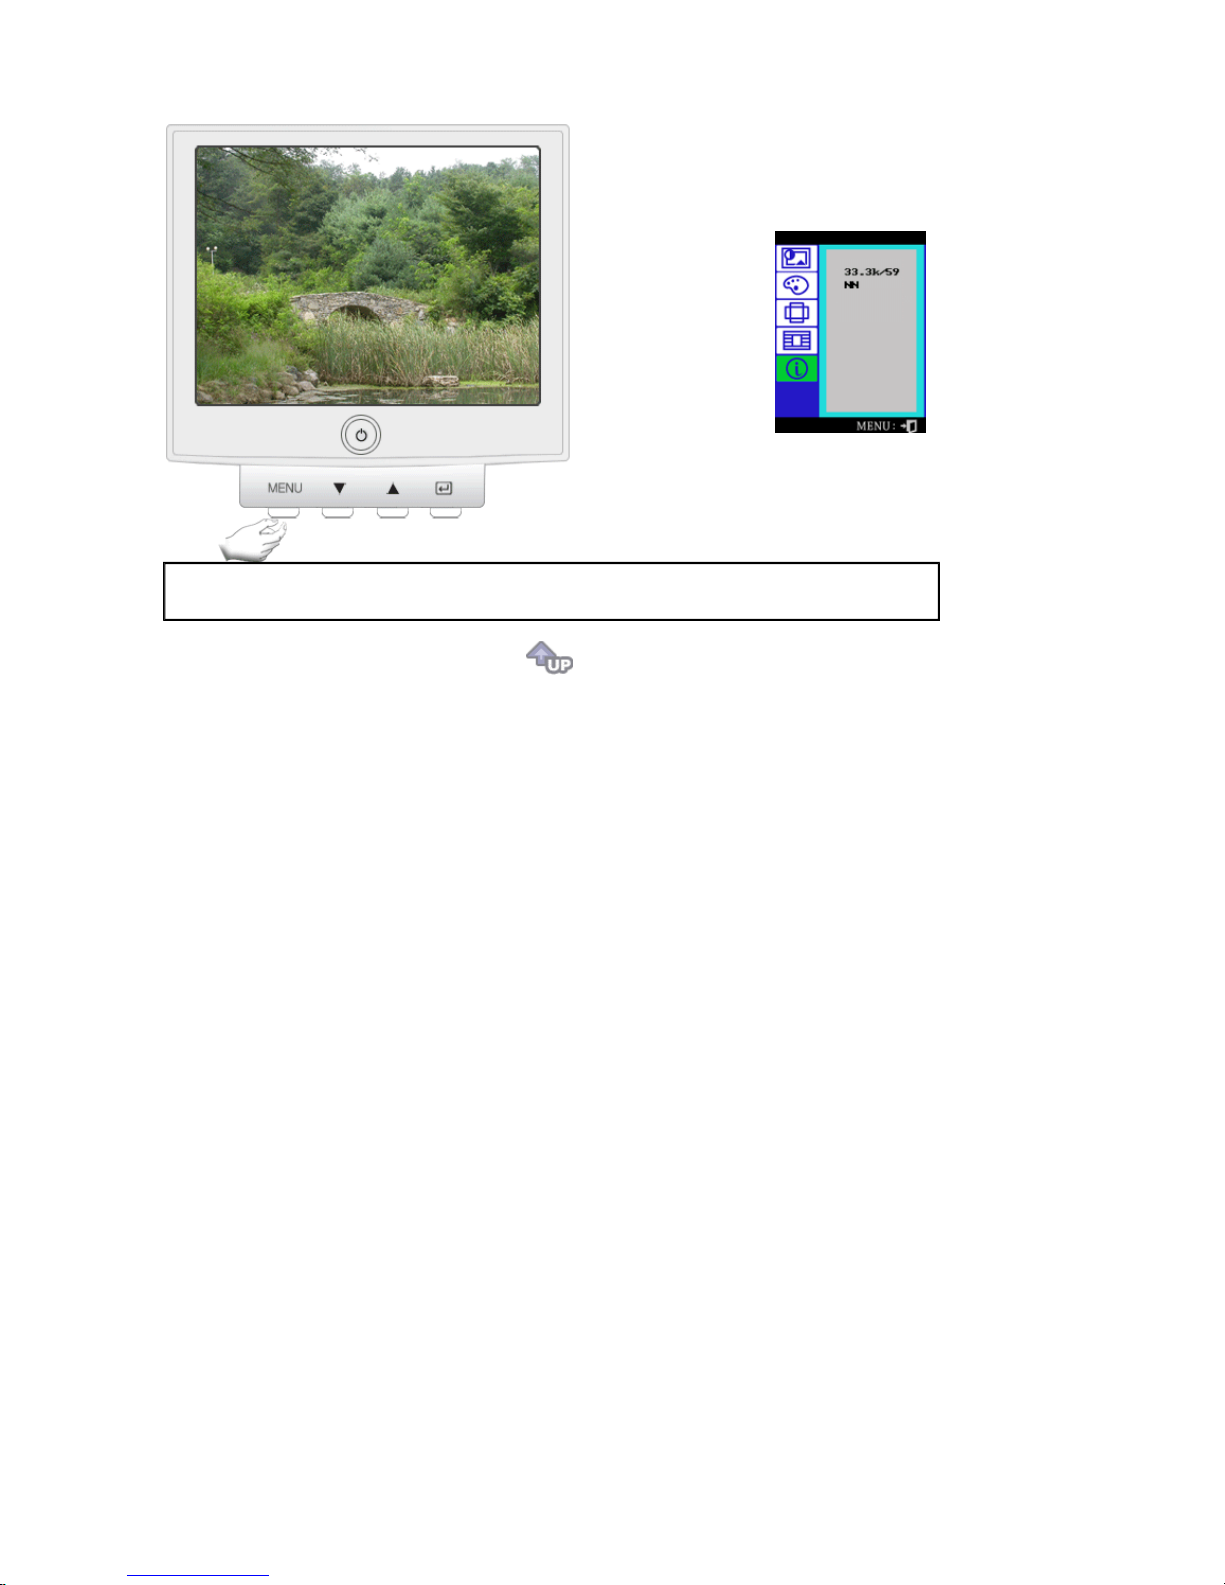
Provides information about the display timing and sync signals polarity(user mode).
Note
: These screens do not allow any changes to the settings, they are for information only.
Page 31
Overview | Installation | OSD Mode | | Uninstall | Troubleshooting
Overview
What is MagicTune™?
Monitor performance can vary due to the graphics card, host computer lighting conditions and other
environmental factors. In order to get the best image on a monitor requires you to adjust it for your unique
setting. Unfortunately, the manual controls available to tune the image often prove to be challenging. Proper
adjustment (tuning) requires an easy to use program that goes through a step-by-step process to obtain the best
overall picture quality.
In most cases even simple adjustments to Brightness, or Contrast require navigation of the multi-level, on-screen
display (OSD) menus that are not easy to understand. Furthermore, there is no feedback to assist in correctly
setting the controls of the monitor. MagicTune™ is a software utility that guides you through the tuning process
with easy to understand instructions and back ground patterns designed for each monitor control. The display
settings for each user can be saved, providing an easy way to select display characteristics in a multi-user
environme or having a single user have multiple defined presets based on content and ambient lighting.
Basic Functionality
MagicTune™ is a software utility that allows monitor adjustment and color tuning using the Display Data
Channel Command Interface (DDC/CI)
protocol. All adjustments to the display are controlled via software
to eliminate the need to use the monitor on-screen display (OSD).
MagicTune™ supports Windows™ 98 SE, Me, 2000, XP Home, and XP Professional.
It is recommended using MagicTune™ in Windows™ 2000 or later.
MagicTune™ allows for quick accurate tuning of the display with the ability to easily save and use monitor
configurations that are best suited for you.
OSD Mode
The OSD mode allows easy adjustment of monitor settings without taking pre-defined steps. You can access the
desired menu item to set with ease.
Page 32
Overview | Installation | OSD Mode | | Uninstall | Troubleshooting
Installation
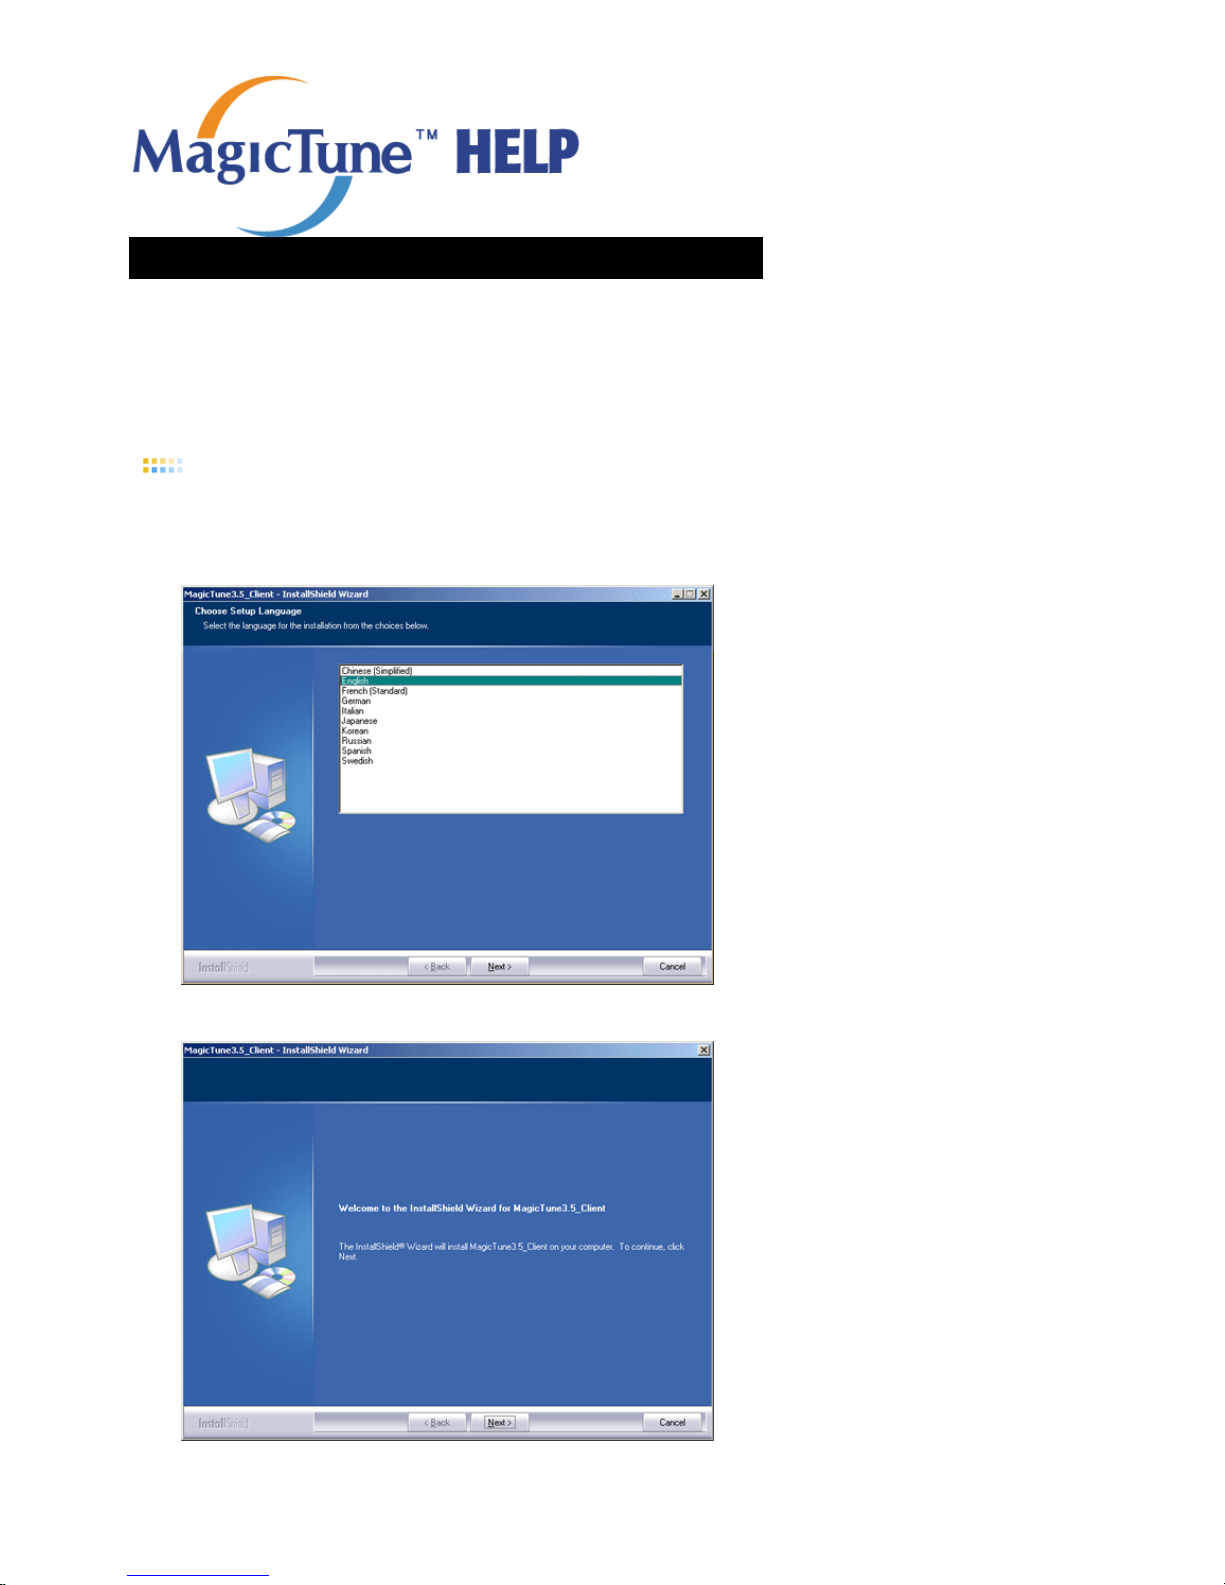
1. Insert the installation CD into the CD-ROM drive.
2. Click the Ma gi c T un e ™ inst a l lat i o n fi l e.
3. Select installation Language, Click "Next".
4. When the Installation Shield Wizard window appears, click "Next."
5. Select "I agree to the terms of the license agreement" to accept the terms of use.
Page 33
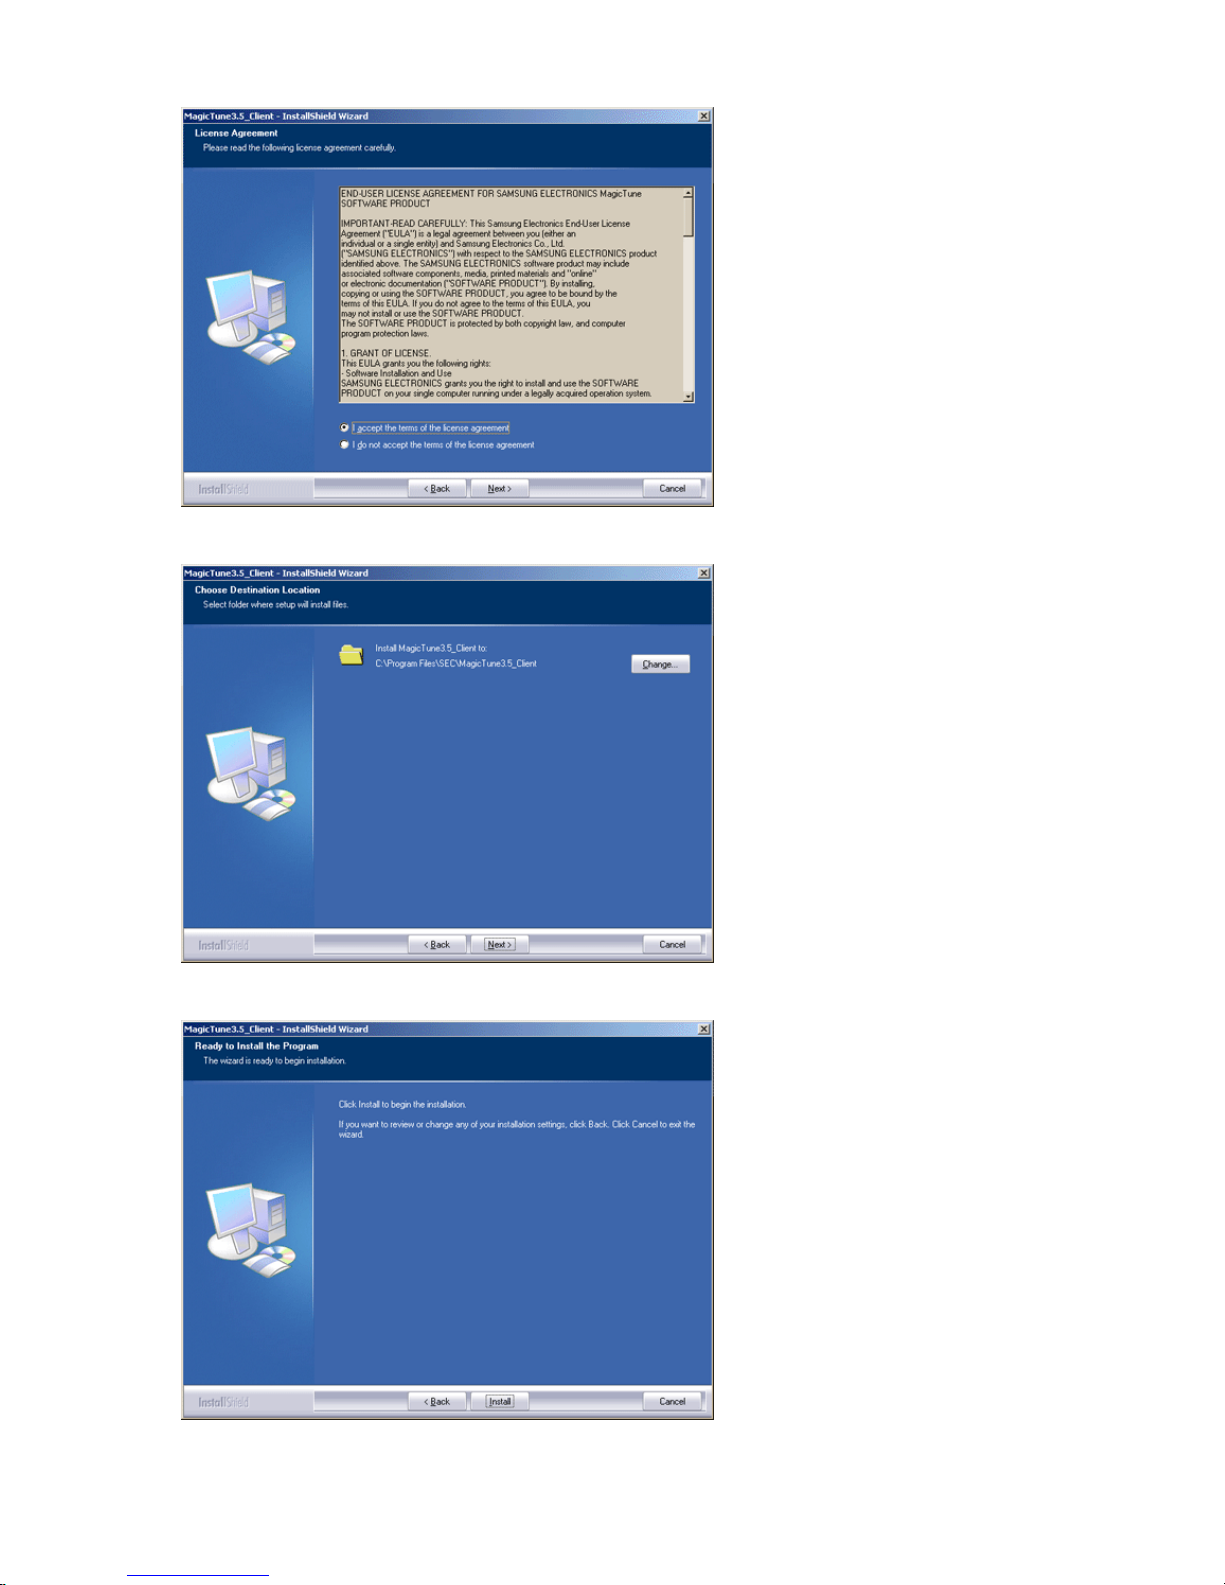
6. Choose a folder to install the MagicTune™ program.
7. Click "Install."
8. The "Installation Status" window appears.
Page 34
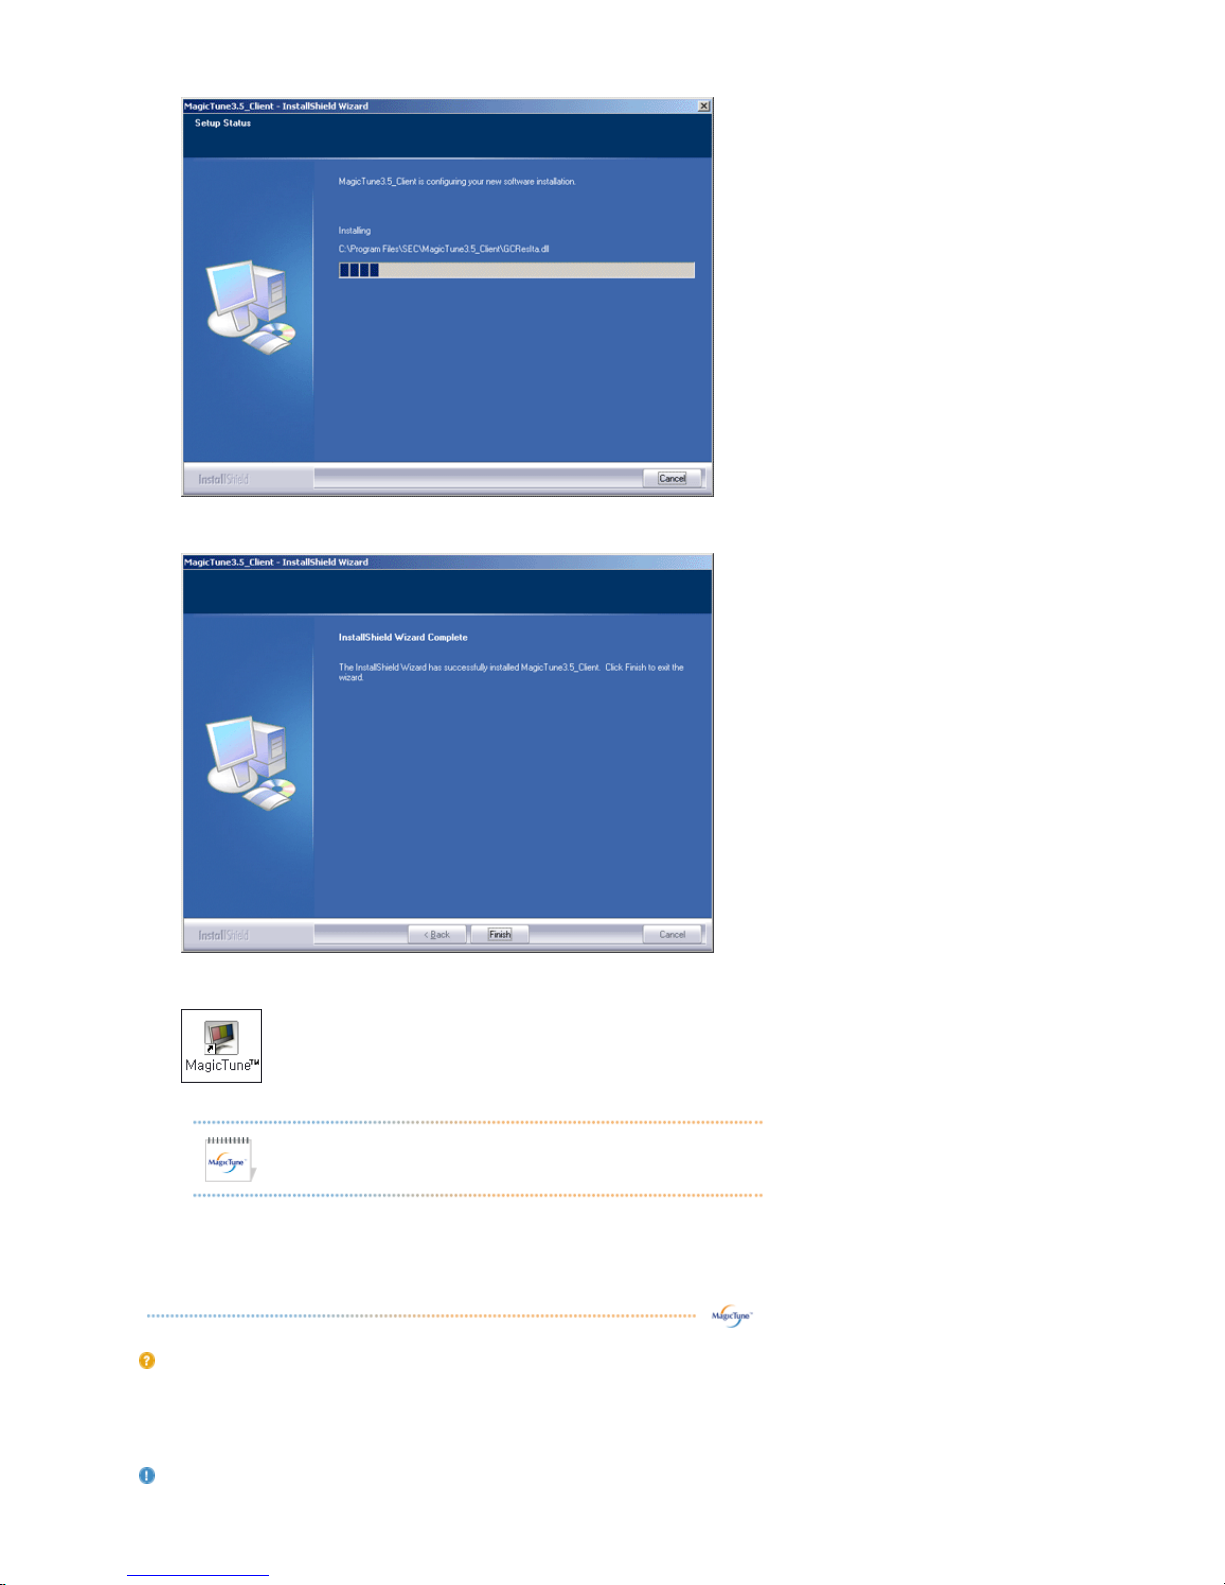
9. Click "Finish."
10. When the installation is complete, the MagicTune™ executable icon appears on your desktop.
Double-click the icon to start the program.
Installation Problems
The installation of MagicTune™ can be affected by such factors as the video card, motherboard and the network
environment.
See
"Troubleshooting"
if you have trouble during installation.
System Requirem en t s
MagicTune™ execution icon may not appear depending on specification of computer
system or monitor. If that happens, press F5 Key.
Page 35
OS
z Windows™ 98 SE
z Windows™ Me
z Windows™ 2000
z Windows™ XP Home Edition
z
Windows™ XP Professional
Hardware
z 32MB Memory above
z 25MB Hard disk space above
* For more information, visit the MagicTune™
website.
It is recommended using MagicTune™ in Windows™ 2000 or
later.
Page 36
Overview | Installation | OSD Mode | Uninstall | Troubleshooting
OSD Mode
The OSD mode makes the adjustment of settings on all monitors easy. When selected , each tab on top of the
control window displays the general descriptions of the sub-menu items for adjustment.
When selected, each tab displays a list of menus. For quick adjustment of the monitor settings, the OSD mode
allows easy and convenient access to all tabs and sub-menu items.
Button Tab Definition
Picture Tab Definition
Allows the user to adjust the screen settings to the desired values.
MagicTune allows for quick accurate tuning of the display with the ability to easily
save and use monitor configurations that are best suited for you.
z OSD mode may appear inconsistent with the explanation in
guidance book depending on specification of each monitor.
z MagicTune control mode will be different according to monitor models.
OK
Applies any changes made and exits MagicTune.
Reset
Restores the display settings to the factory settings.
Cancel
Exits MagicTune without applying the changes made. If you have not made any changes
in the control window, clicking "Cancel" does not cause any actions.
Brightness
Makes the entire screen brighter or darker. The detailed data of the images in the dark
areas can be lost if the brightness is not adjusted to the proper level. Adjust the
brightness for best viewing conditions.
Contrast
Adjusts the difference in brightness between the bright and dark areas on screen.
Determines the crispness of the images.
MagicBright™
MagicBright™ is a new feature providing the optimum viewing environment depending on
the contents of the image you are watching. Currently four different modes are available:
Text, Internet,Game, Sport, Movie and Custom. Each mode has its own pre-configured
brightness value. You can easily select one of six settings by simply pressing MagicBright
control buttons.
z 19" or above
1. Text: For documentations or works involving heavy text.
2. Internet: For working with a mixture of images such as text and graphics.
3. Game: For watching motion pictures such as a Game.
4. Entertain: For watching motion pictures such as a DVD or VCD.
Page 37

Color Tab Definition
Adjusts the "warmth" of the monitor background or image color.
Image Tab Definition
Adjusts the Position, Size and Rotation values.
z Less than 19"
1. Text: For documentations or works involving heavy text.
2. Internet: For working with a mixture of images such as text and graphics.
3. Entertain: For watching motion pictures such as a DVD or VCD.
Color Tone
The tone of the color can be changed.
z 5000K - 6500K - 9300K
z
Reset
Color Control
Adjusts of the monitor image color.
You can change the monitor color to your desired color.
z R- G - B
z
sRGB
Geometry 1
Adjusts the Position, Size and Rotation values.
z
Position
z Size
z Rotation
Geometry 2
Adjusts the Pincushion, Pinbalance, Trapezoid and Parallelogram values.
z Pincushion
z Pinbalance
z Trapezoid
z Parallelogram
Other
Adjusts the Moire, Degauss, Sidepin Corner, and Pinbalance Corner values.
z Moire
z Degauss
z Sidepin Corner Top
z
Sidepin Corner Bottom
z Pinbalance Corner Top
z Pinbalance Corner Bottom
Page 38
Option Tab Definition
You can configure MagicTune using the following options.
Support Tab Definition
Shows the Asset ID and the version number of the program, and allows you to use the Help feature.
Preferences
Loads the Preferences Dialo
g
Box. Preferences in use will have an "V" in the check box. To
turn on or off any Preference, position the cursor over the box and click.
z Enable task tray menu .
- To access the MagicTune menus, click the icon on the [task tray menu].
The menus are not displayed if the [Enable System Tray] is deselected in
[Options] ' [Basic Settings].
z Select Language - The language chosen affects only the language of the OSD.
Help
Visit the MagicTune website or click to open the Help files (User Manual) if you need any
help installing or running MagicTune. The User Manual opens within a basic browser
window.
Asset ID
you can use the server to control the Client monitor.
(Server program should be installed to use this program as Client)
User Name
Shows the user name that is registered in PC.
User ID
Shows the user ID that is register in PC.
Server IP
Write down the server IP .
Department
Write down the department.
Location
Write down the location.
Version
Displays the version of MagicTune.
Page 39
Overview | Installation | OSD Mode | | Uninstall | Troubleshooting
Uninstall
The MagicTune™ program can be removed only by using the "Add or Remove Programs" option of the
Windows™ Control Panel.
Perform the following steps remove MagicTune™.
1. Go to [Task Tray] ' [Start] ' [Settings] and select [Control Panel] in the menu. If the program runs on
Windows™ XP, go to [Control Panel] in the [Start] menu.
2. Click the "Add or Remove Programs" icon in Control Panel.
3. In the "Add or Remove Programs" screen, scroll down to find "MagicTune™." Click on it to highlight
it.
4. Click the "Change/Remove" button to remove the program.
5. Click "Yes" to begin the uninstall process.
6. Wait until the "Uninstall Complete" dialog box appears.
Visit the MagicTune™
website for technical support for MagicTune™, FAQs (questions and answers) and
software upgrades.
Page 40
Overview | Installation | OSD Mode | | Uninstall | Troubleshooting
Troubleshooting
The current computing system is not compatible with MagicTune™.
Please press OK and click on the "Shortcut to the MagicTune™ site" to view our home
page for further reference.
An error may occur when your video/graphic card is not in the ' Available' list.
(The latest or oldest video cards may not be compatible.)
Please visit our homepage to see the Troubleshooting section.
An error may occur if the card maker has modified the video card driver or the
graphics chip even when the video card is in the list.
Please visit our homepage to see the Troubleshooting section.
Check if your monitor is manufactured by Samsung.
Products from other manufacturers may cause errors.
Only Samsung products are able to support this feature.
An error may occur even when your monitor is manufactured by Samsung but is
out of date.
Check if your monitor is able t o support MagicTune™.
This feature is only supported by those monitors that are registered on our homepage.
Check for the monitor before purchasing it as out-of-date models are not supported.
An error occurs when no information on EDID (Extended Display Identification
Data) exists for the current monitor.
This happens when from your desktop, Start > Setup > Control Panel > System >
Hardware > Device Manager > Monitor is selected, the current "Plug-and-play
monitor" is removed and new hardware is searched for but the system couldn't find
any "Plug-and-play monitor".
Please visit our homepage to see the Troubleshooting section.
An error occurs when replacing the monitor with a new one when the syst em
power is off but the system has not been restarted.
Please restart the system each time the monitor is replaced before using
MagicTune™.
An error occurs when the video card driver is not installed properly.
This happens when the current video card list is not displayed normally. You can
check this via Start > Setup > System > Hardware > Device Manager > Display
Adapter.
Page 41

Visit the video card maker's homepage and download and install the latest driver.
For more information about the video card, contact the card manufacturer.
To ensure normal operation, plea se re st ar t yo u r syst em .
An error occurs when the system is not restarted after installing MagicTune™.
(This is for Win98SE and WinMe only.)
Restart the system before use.
For the best performance of MagicTune™, adjust to the optimal resolution. Refer to the
User Guide for the optimal resolution.
If you do not adjust to the optimal resolution and perform Color Calibration, the
monitor cannot be adjusted to the optimal condition.
Refer to the manual for the optimal resolution.
This video card does not support MagicTune™.
Please install a new video card driver.
An error occurs when the video card driver is not installed properly.
This happens when the current video card list is not displayed normally. You can
check this from Start > Setup > System > Hardware > Device Manager > Display
Adapter.
Visit the video card manufacturer's homepage and download and install the latest
driver.
For more information about the video card, contact the card manufacturer.
As the Highlight program uses the communication lines,
please exit the Highlight program before you can access MagicTune™.
Some of Samsung CDT monitors support the Highlight feature.
When using both the Highlight feature and MagicTune™ simultaneously, conflicts
occur, which cause errors.
Make sure to turn OFF Highlight before using MagicTune™.
Troubleshooting
z MagicTune™ may not work in case monitor is replaced or driver of graphic card is updated while
MagicTune™ is operating. If so, please restart the system.
Symptom Check List Solutions
Check when
MagicTune™ does
not function
properly.
MagicTune™ feature is
found only on PC (VGA)
with Window OS that
supports Plug and Play.
* To check whether your PC is available for
MagicTune™ feature, follow the
steps below (When Windows™ is XP);
Control Panel -> Performance and Maintenance
-> System -> Hardware -> Device Manager ->
Monitors -> After deleting Plug and Play
monitor, find 'Plug and Play monitor' by
searching new Hardware.
MagicTune™ is an additional software for the
monitor. Some graphic cards may not support
your monitor. When you have a problem with
Page 42
z Visit the MagicTune™
website
for technical support for MagicTune™, FAQs (questions and answers)
and software upgrades.
z Visit the MagicTune™
website
and download the installation software for MagicTune™ MAC.
the graphic card, visit our website to check the
compatible graphic card list provided.
http://www.samsung.com/monitor/magicTune
.
MagicTune™
doesn't work
properly.
Have you changed your PC
or video graphic card?
Download the latest program. The program can
be downloaded
http://www.samsung.com/monitor/magicTune.
Page 43
Automatic detect
Manual detect
Exit Program
Auto Detect
Picture Setting
Full Screen
Highlight Off
Other Features
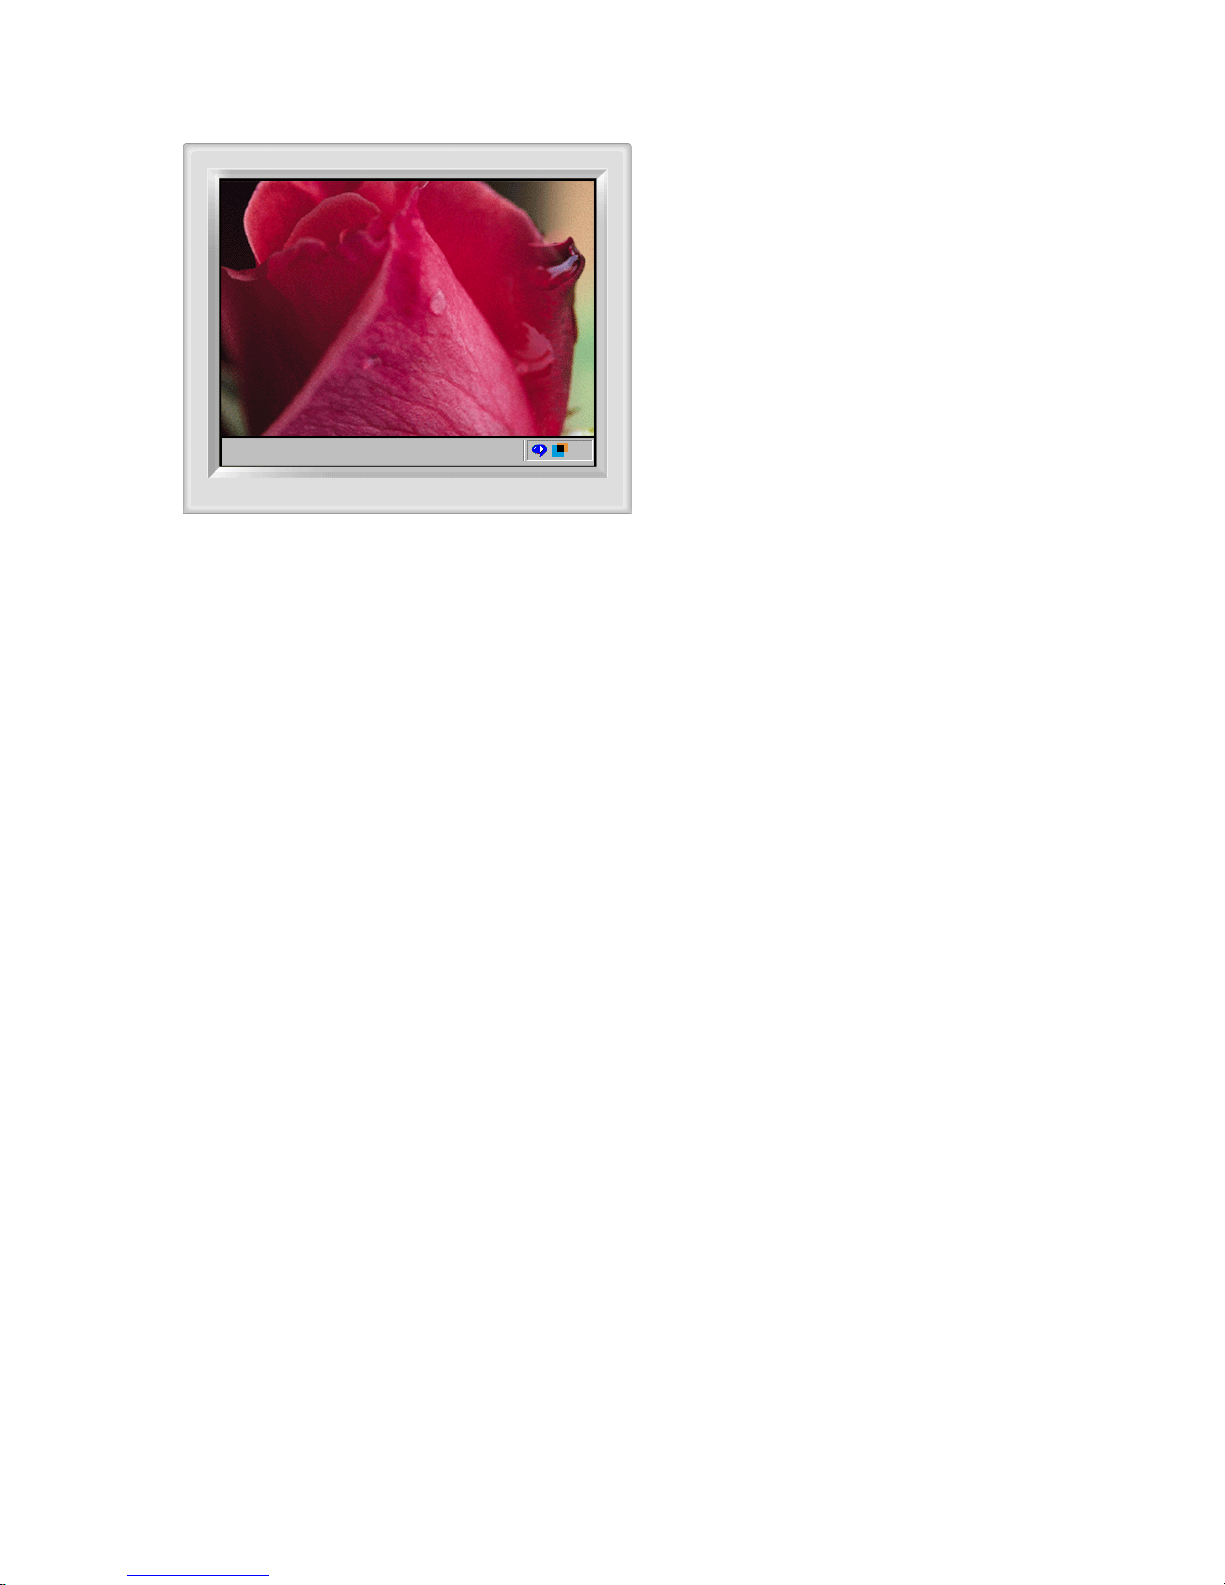
The Highlight Zone ensures the clear and sharp display
of animated multimedia or photo images by enhancing
the brightness of a certain area on the screen.
Highlight Zone III 3.5 features a combination of the circuitry
and the program built on the proprietary technology of
SEC.
This offers an easy-to-use interface that highlights the
video-playing portion of your multimedia program by
automatically detecting and highlight the desired area
by dragging.
The Highlight Zone provides optimal display of moving
pictures. So, text may appear blurry in the Highlight
Zone.
Page 44
Automatic detect
Manual detect
Exit Program
Auto Detect
Picture Setting
Full Screen
Highlight Off
Other Features
Automatic detect
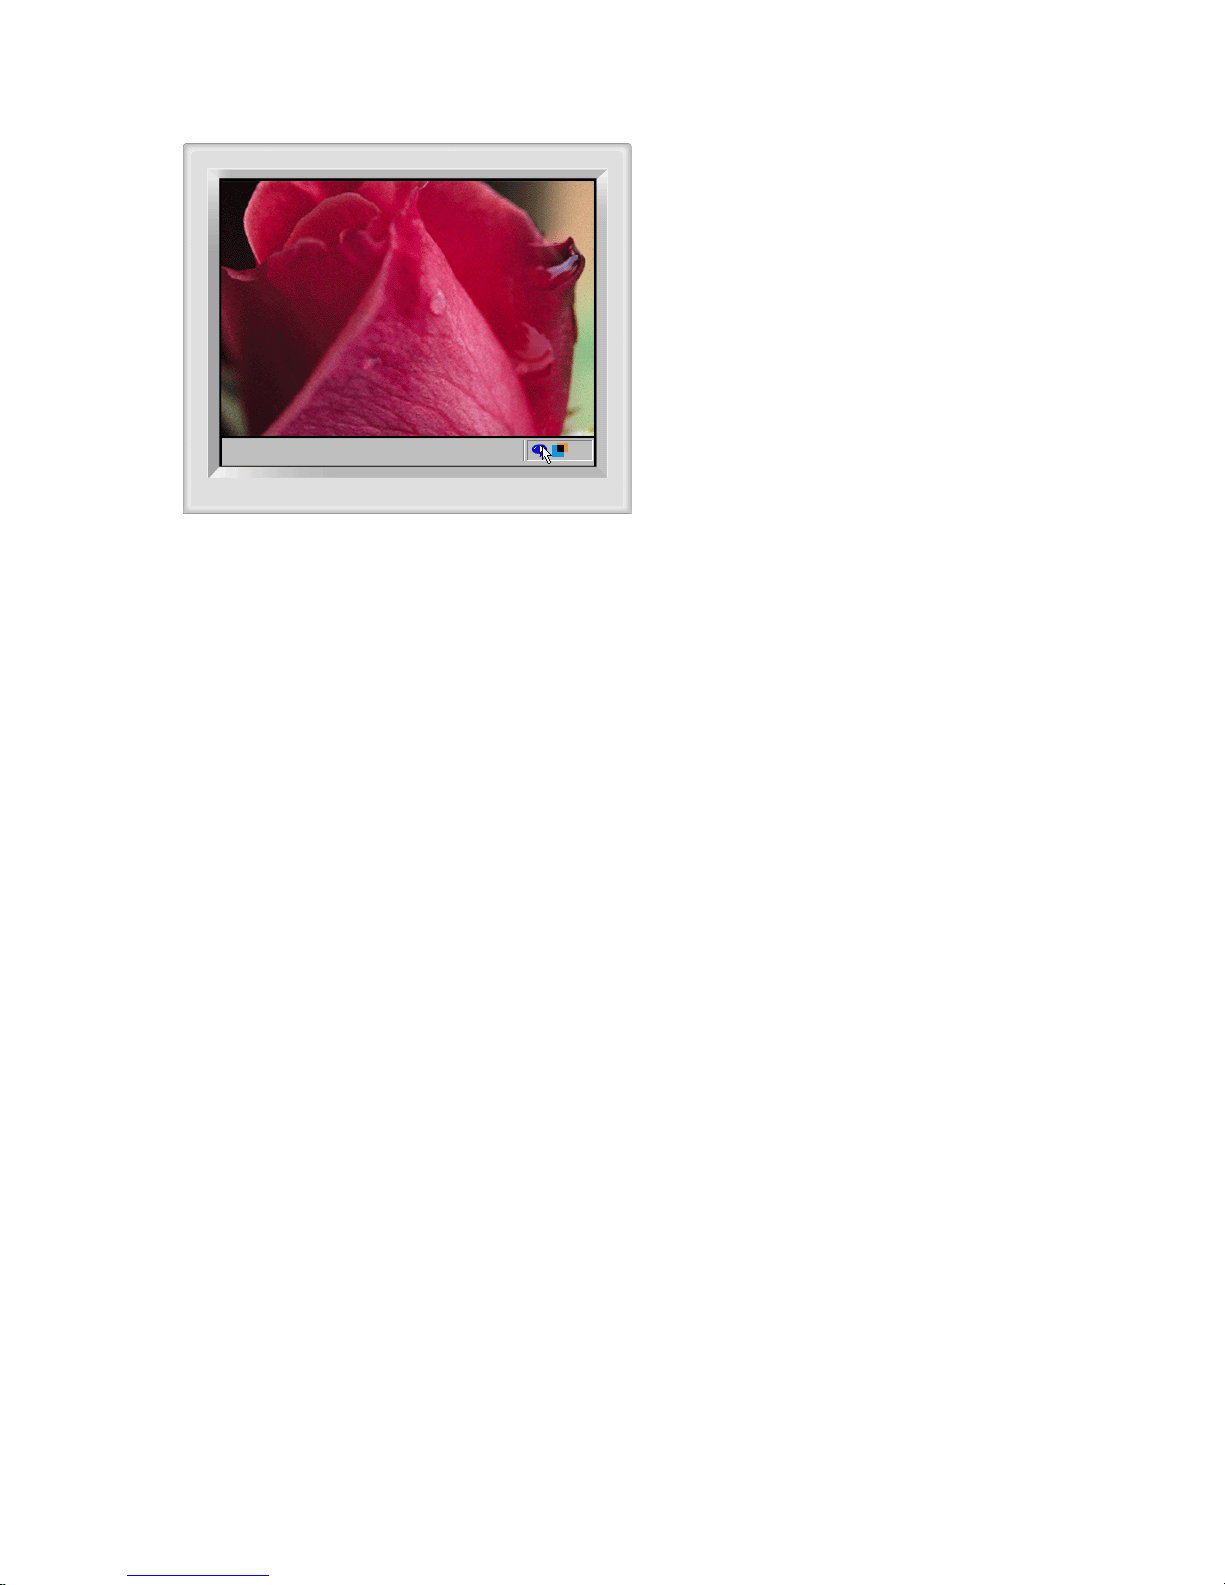
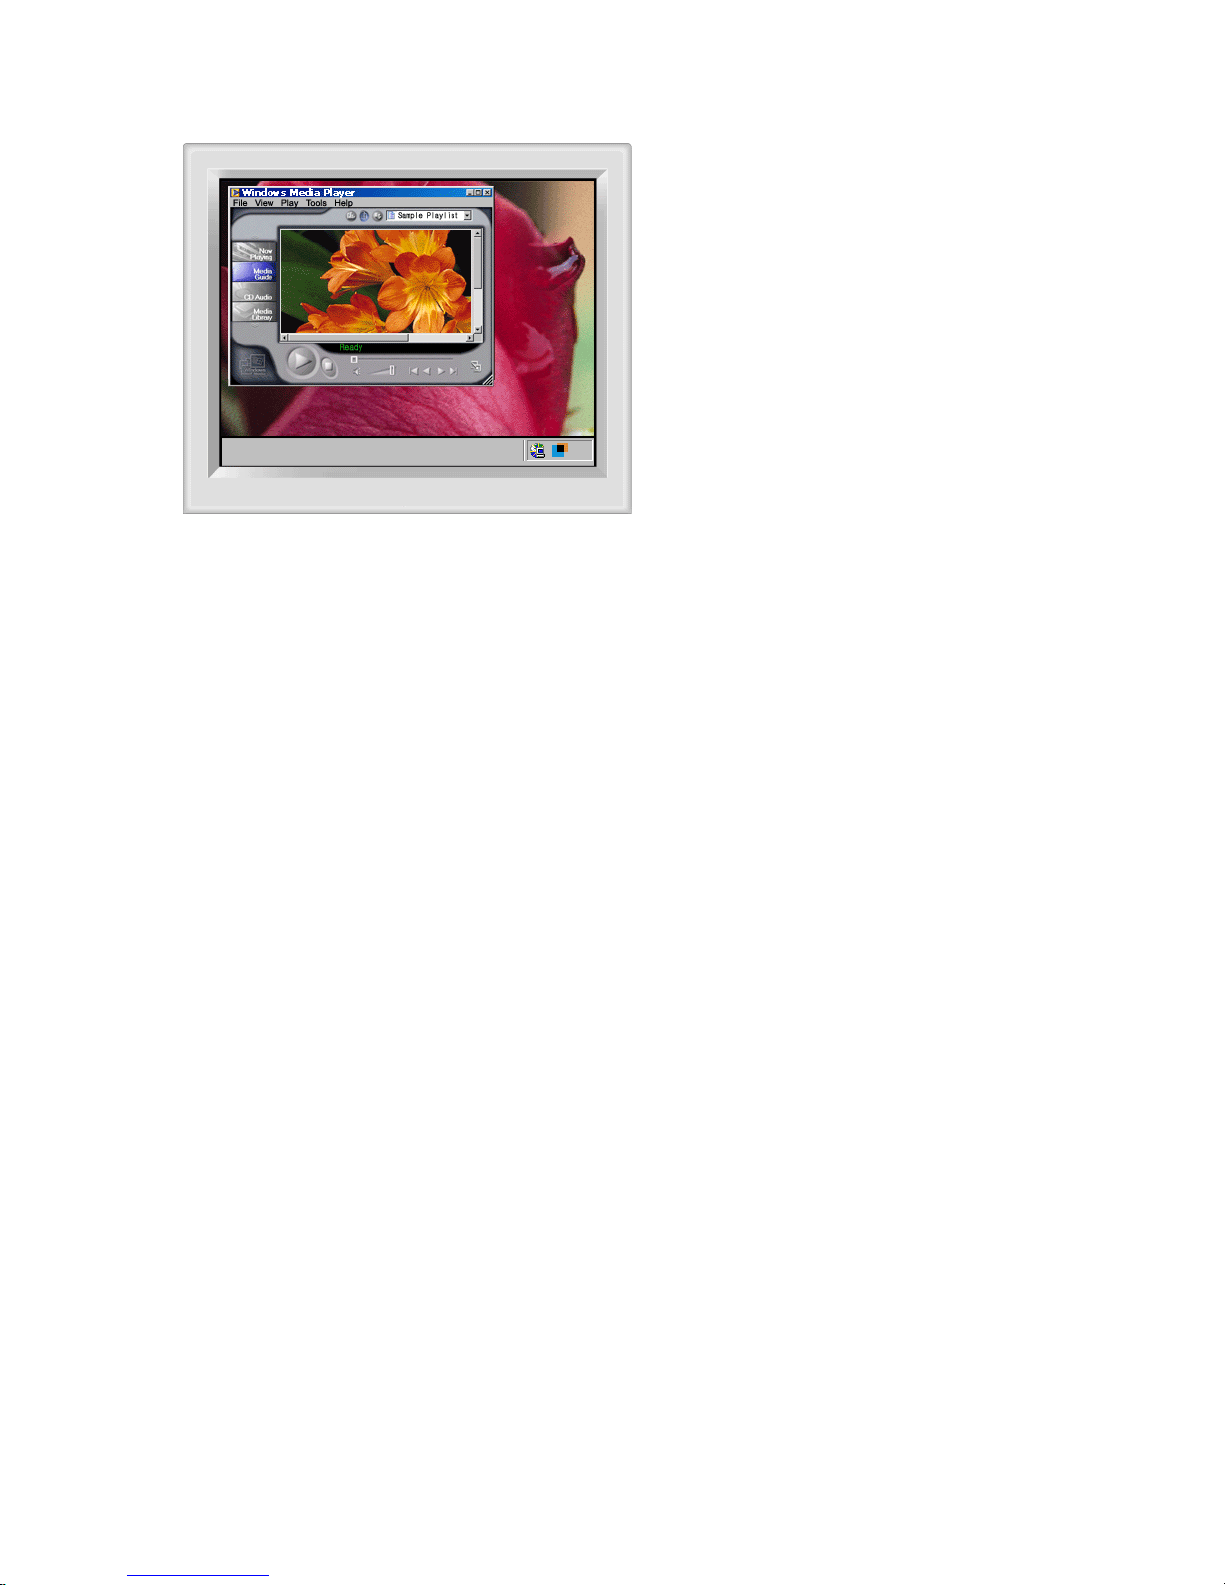
1. When the Highlight program is running, the monitor automatically detects the video-playing portion of your multimedia program and activates the
Highlight Zone feature. No selection is necessary.
Major multimedia programs: Windows Media Player, RealPlayer 8.0, video players on the broadcasters¡¯ websites, etc.
However, Automatic Detect may not work with a DVD player. (In this case, change the setting to Manual Detect mode to create a Highlight Zone.)
Select 'Off' in Auto Detect menu when you wish to deactivate the Automatic Detect feature.
Since this disables the Auto Detect capability of the monitor, the monitor does not automatically create a Highlight Zone.
(When you first install the program, Automatic Detect is set to 'On'.)
Note 1 : When OSD is selected while the Auto Detect is running, Highlight Zone turns off temporarily not to disturb adjustment of display conditions
such as bri
g
htness and color.
Page 45
Automatic detect
Manual detect
Exit Program
Auto Detect
Picture Setting
Full Screen
Highlight Off
Other Features
Manual detect
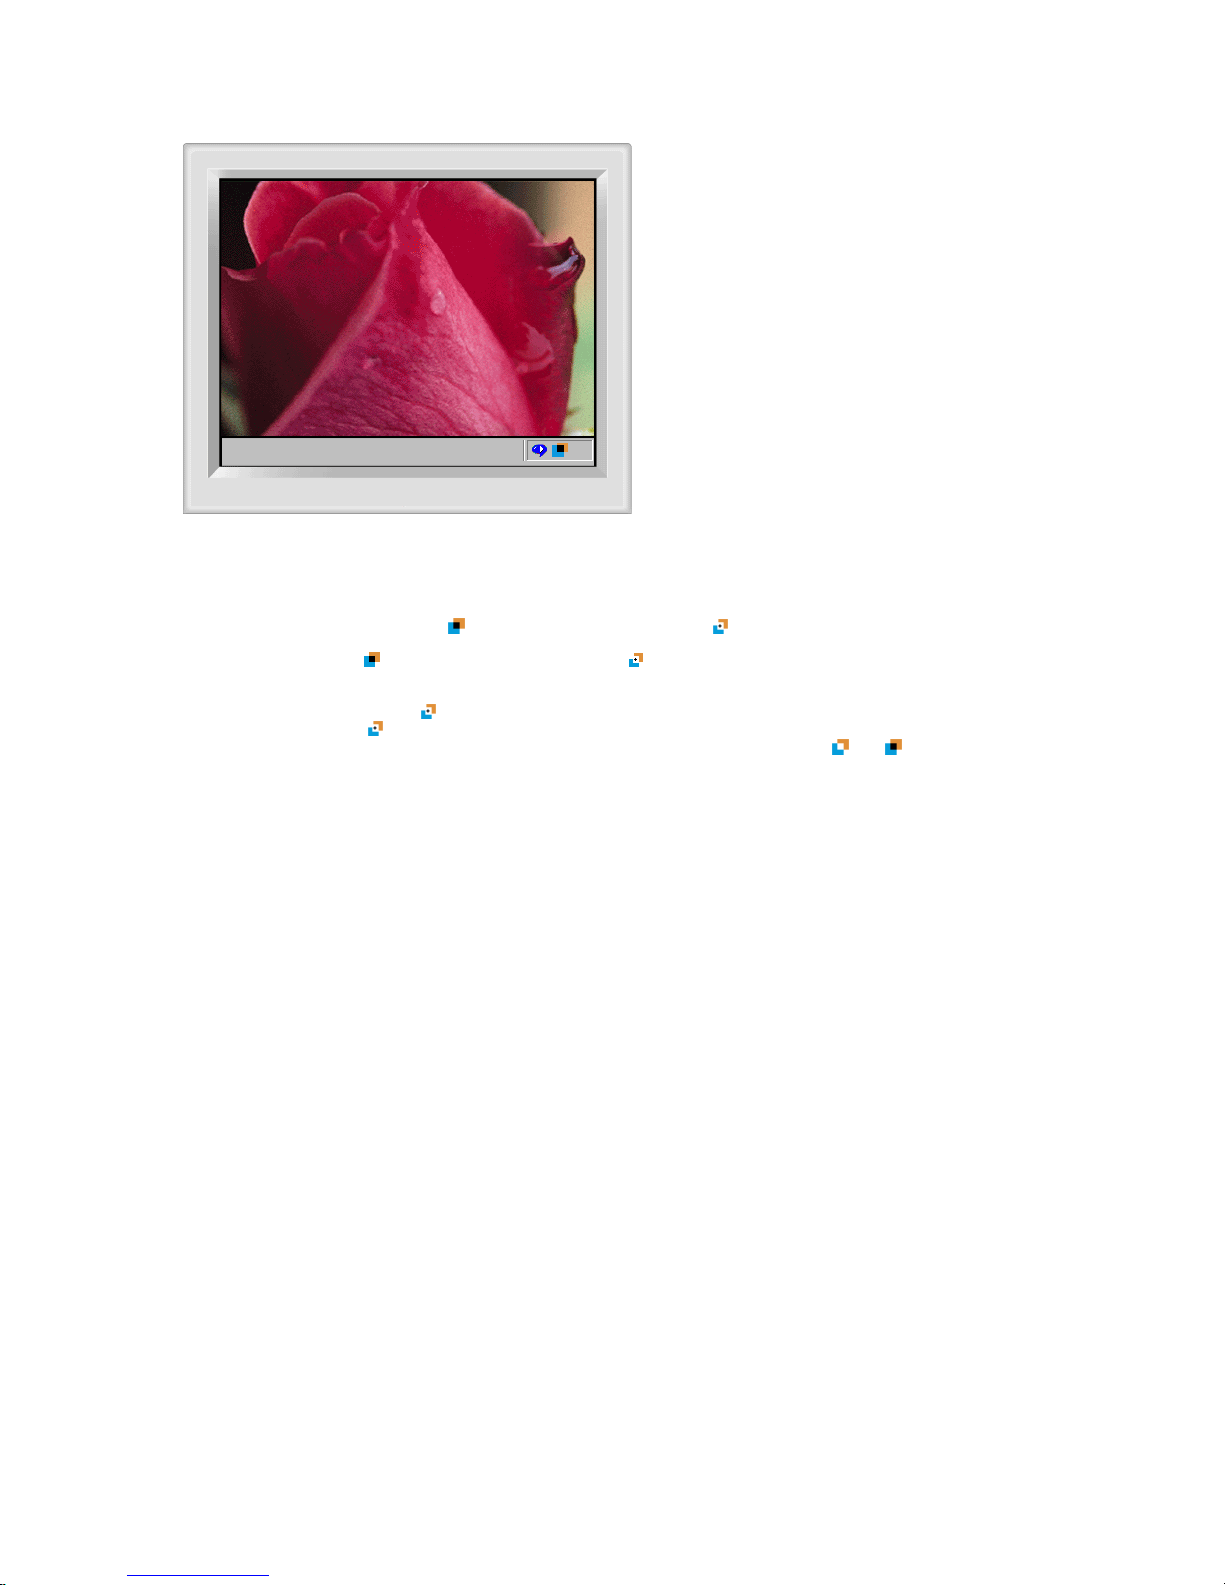
In Manual Detect mode, you can either select a window or use the Drag function to create a Highlight Zone.
1. Selecting a window: Click the Highlight icon( )on the Windows taskbar once to activate( )the cursor.
Move the cursor onto the window of your choice and click once to Highlight the window.
2. Drag: Click the Highlight icon( )on the Windows taskbar once to activate( )the cursor.
Click and hold the left mouse button, then drag the cursor to create a rectangle that covers the desired area. This rectangle becomes the Highlight Zone.
Note 1 :
When the mouse cursor is activated( )and it is necessary to de-activate it to use it for other tasks, right click your mouse,
or put the activated cursor
(
)
on the taskbar and click. When de-activated, the icon on the s creen changes back to the one shown before activation.
Note 2 :
You can determine w hether the Hi
g
hlight feature is on/off by the appearance of the icon on the taskbar. On
(
)
, Off
(
)
Note 3 : When OSD is selected while the Manual Detect is running, Highlight Zone turns off temporarily, as it does when Auto detect is running.
Page 46
Automatic detect
Manual detect
Exit Program
Auto Detect
Picture Setting
Full Screen
Highlight Off
Other Features
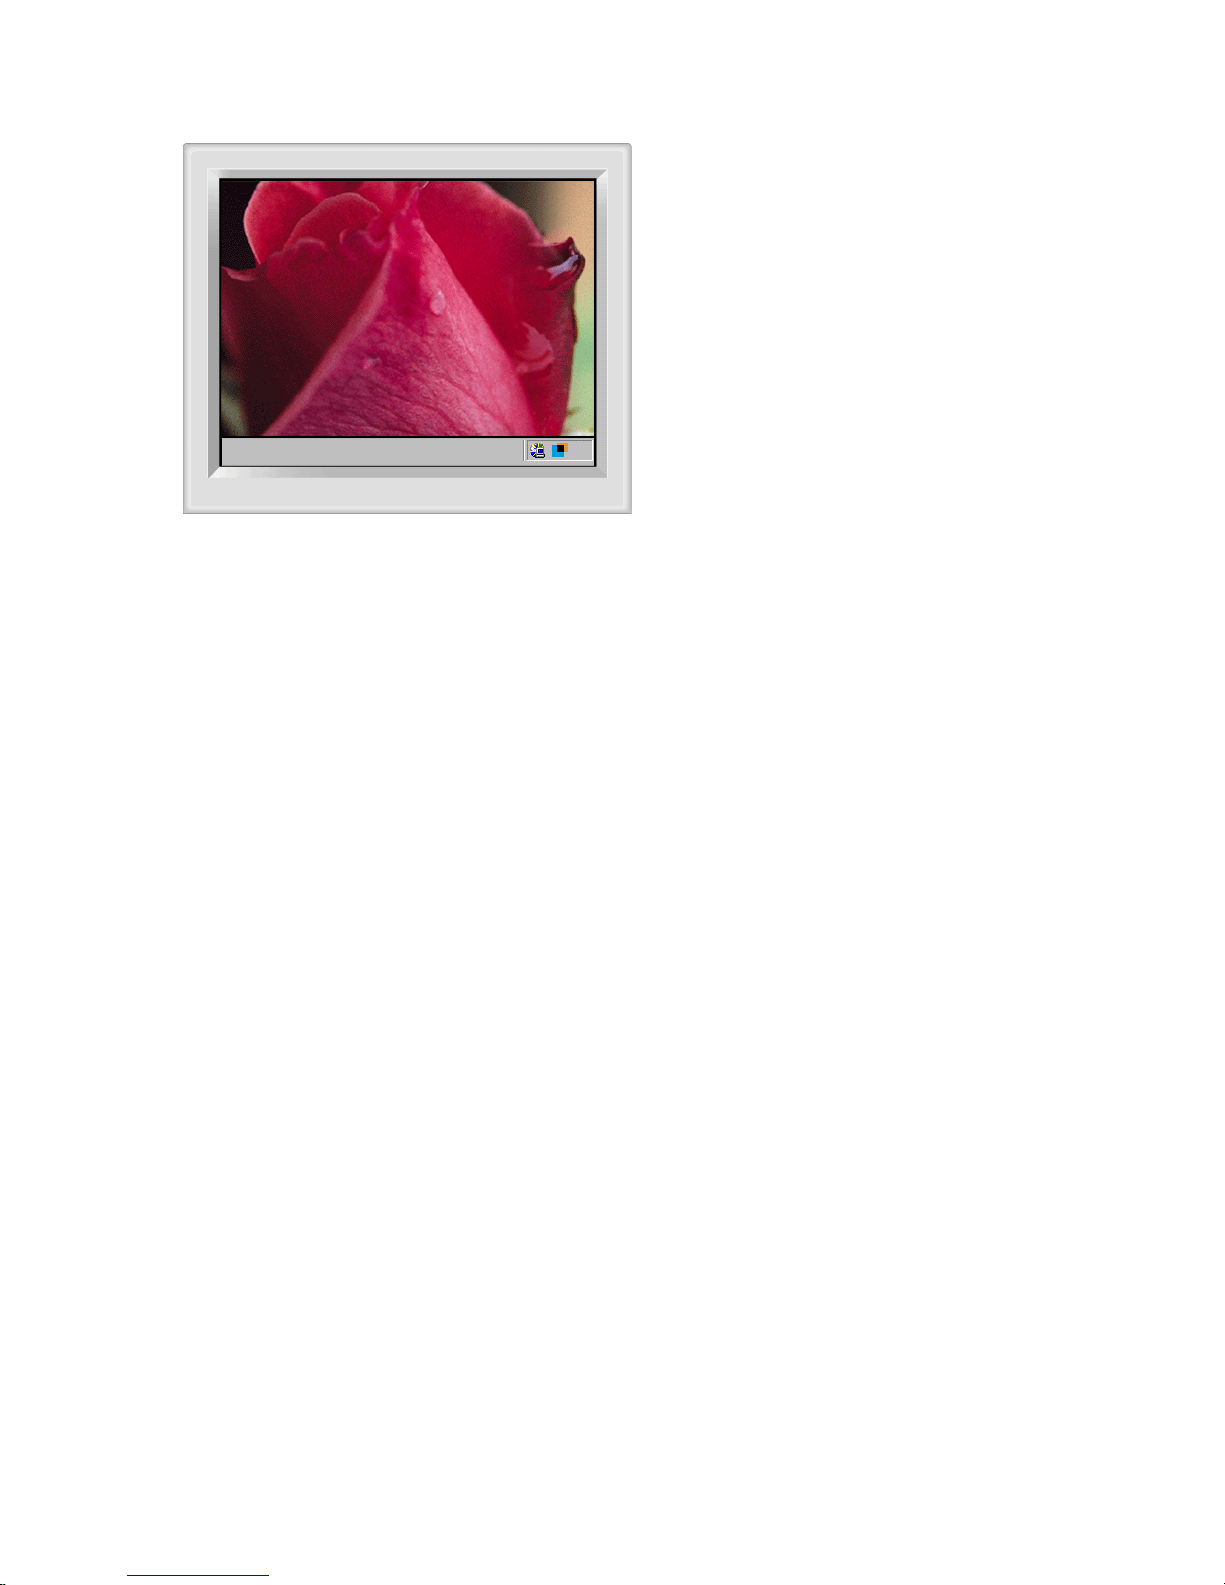
Exit Progra m
1. Exits the Hi
g
hlight program.
Page 47
Automatic detect
Manual detect
Exit Program
Auto Detect
Picture Setting
Full Screen
Highlight Off
Other Features
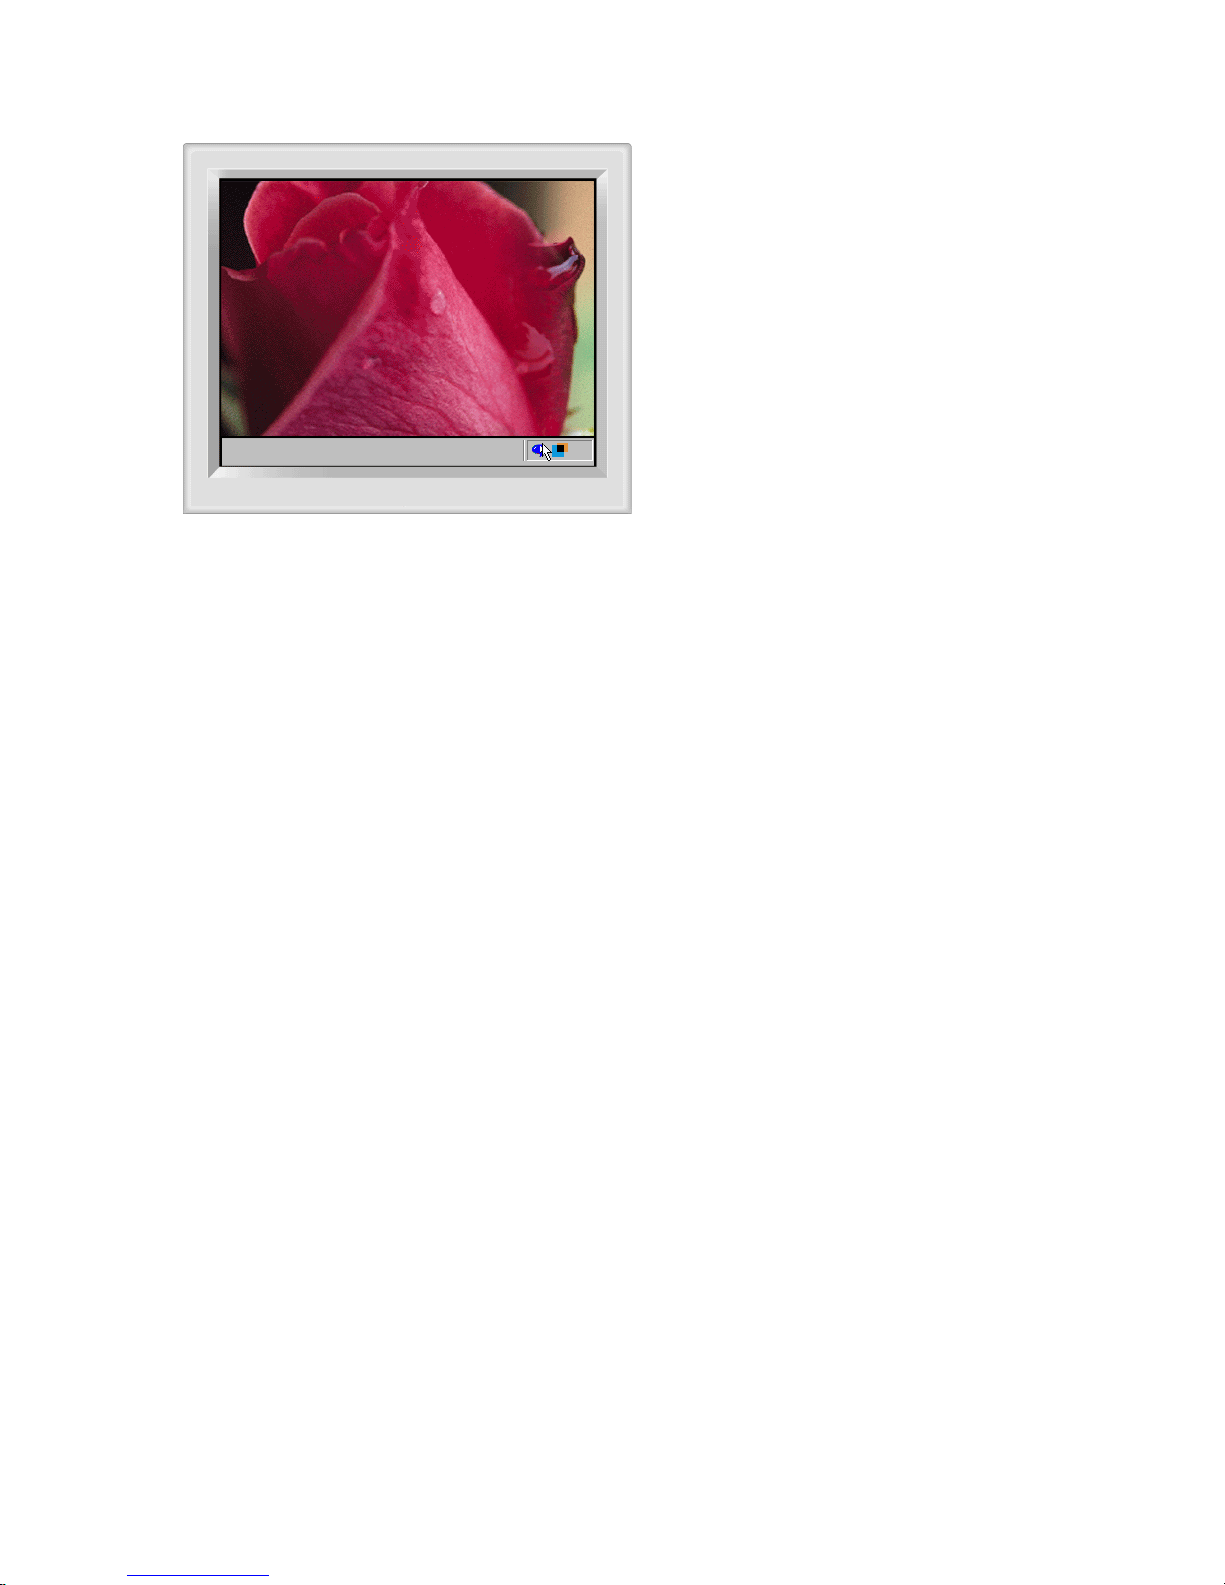
Auto Detect
1. Allows user to disable Auto Detect when necessary.
Once selected, this function saves the selection and keeps it in the memory regardless of exiting or restarting the program.
When selected, a check mark
(V)
appears.
Page 48
Automatic detect
Manual detect
Exit Program
Auto Detect
Picture Setting
Full Screen
Highlight Off
Other Features
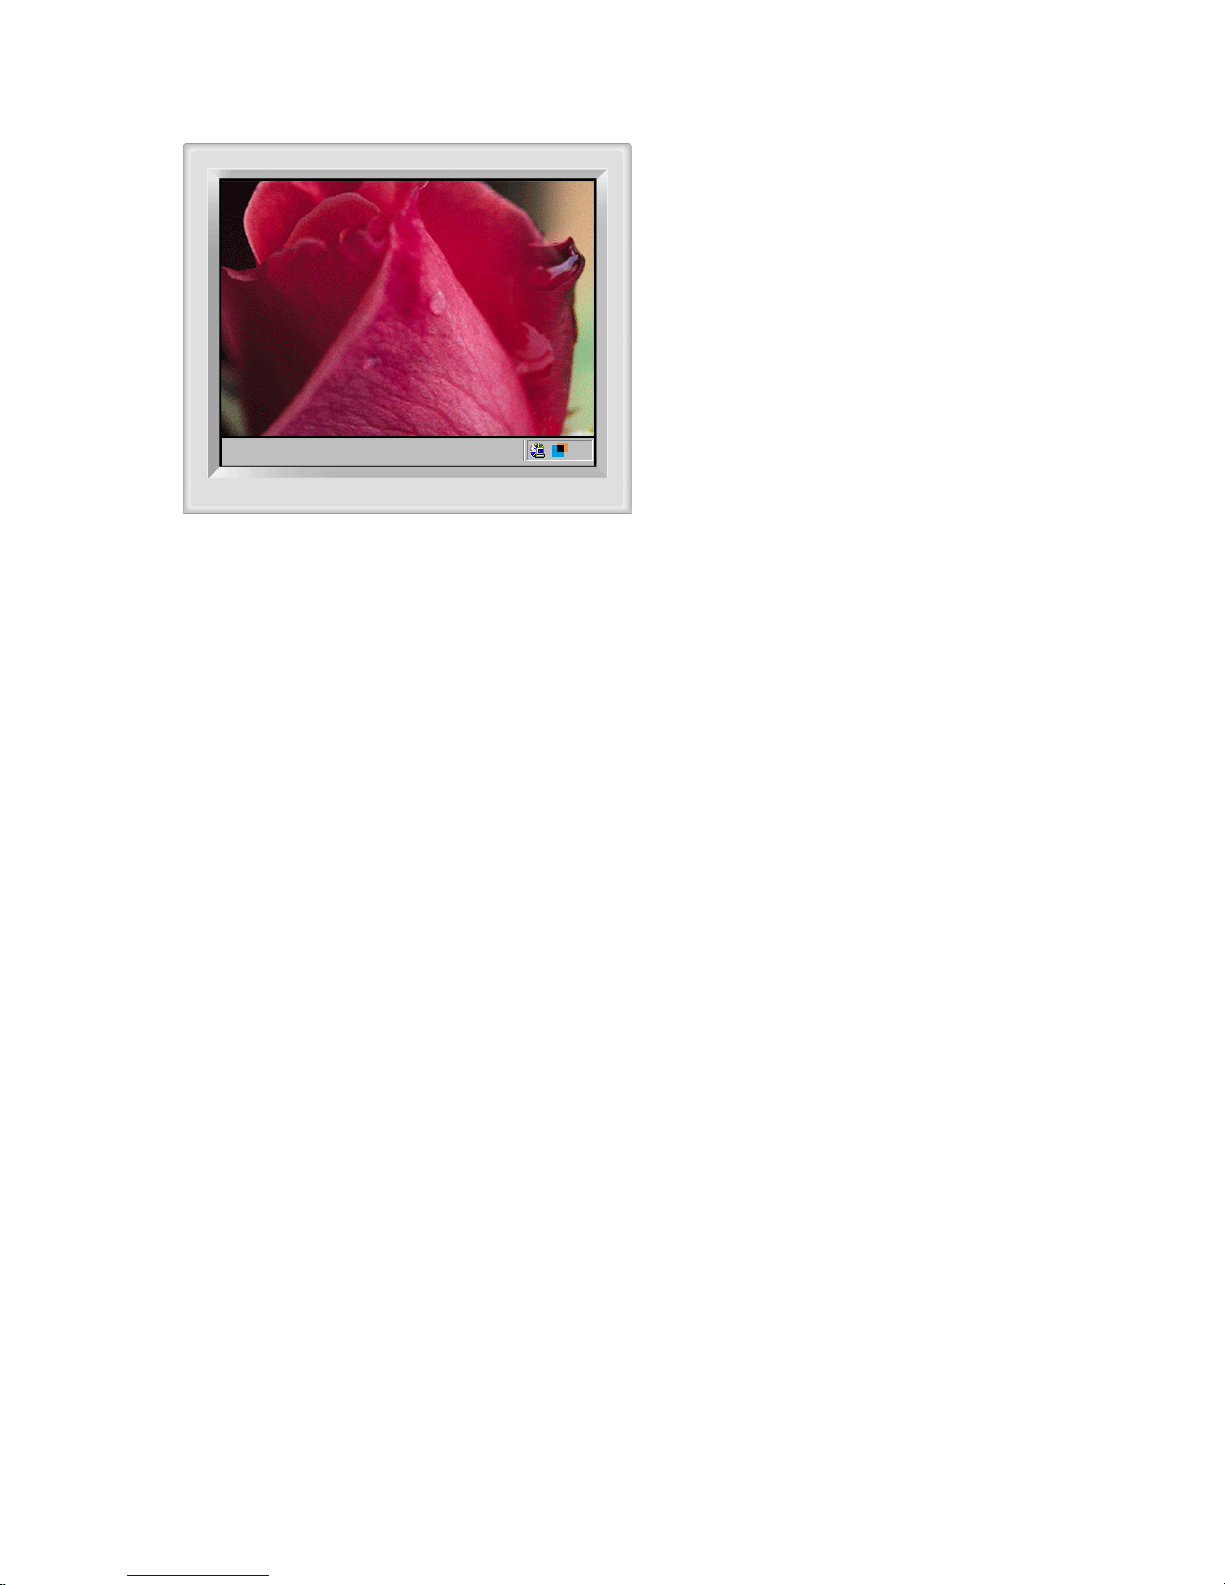
Picture Setting
1. Can be selected only when the Highlight Zone function is on. When selected, a menu window appears which can be used to adjust Contrast
and Sharpness within the Highlight Zone.
After chan
ging
the setting, select OK to save the changes, or Cancel to return to the previous setting.
Page 49
Automatic detect
Manual detect
Exit Program
Auto Detect
Picture Setting
Full Screen
Highlight Off
Other Features
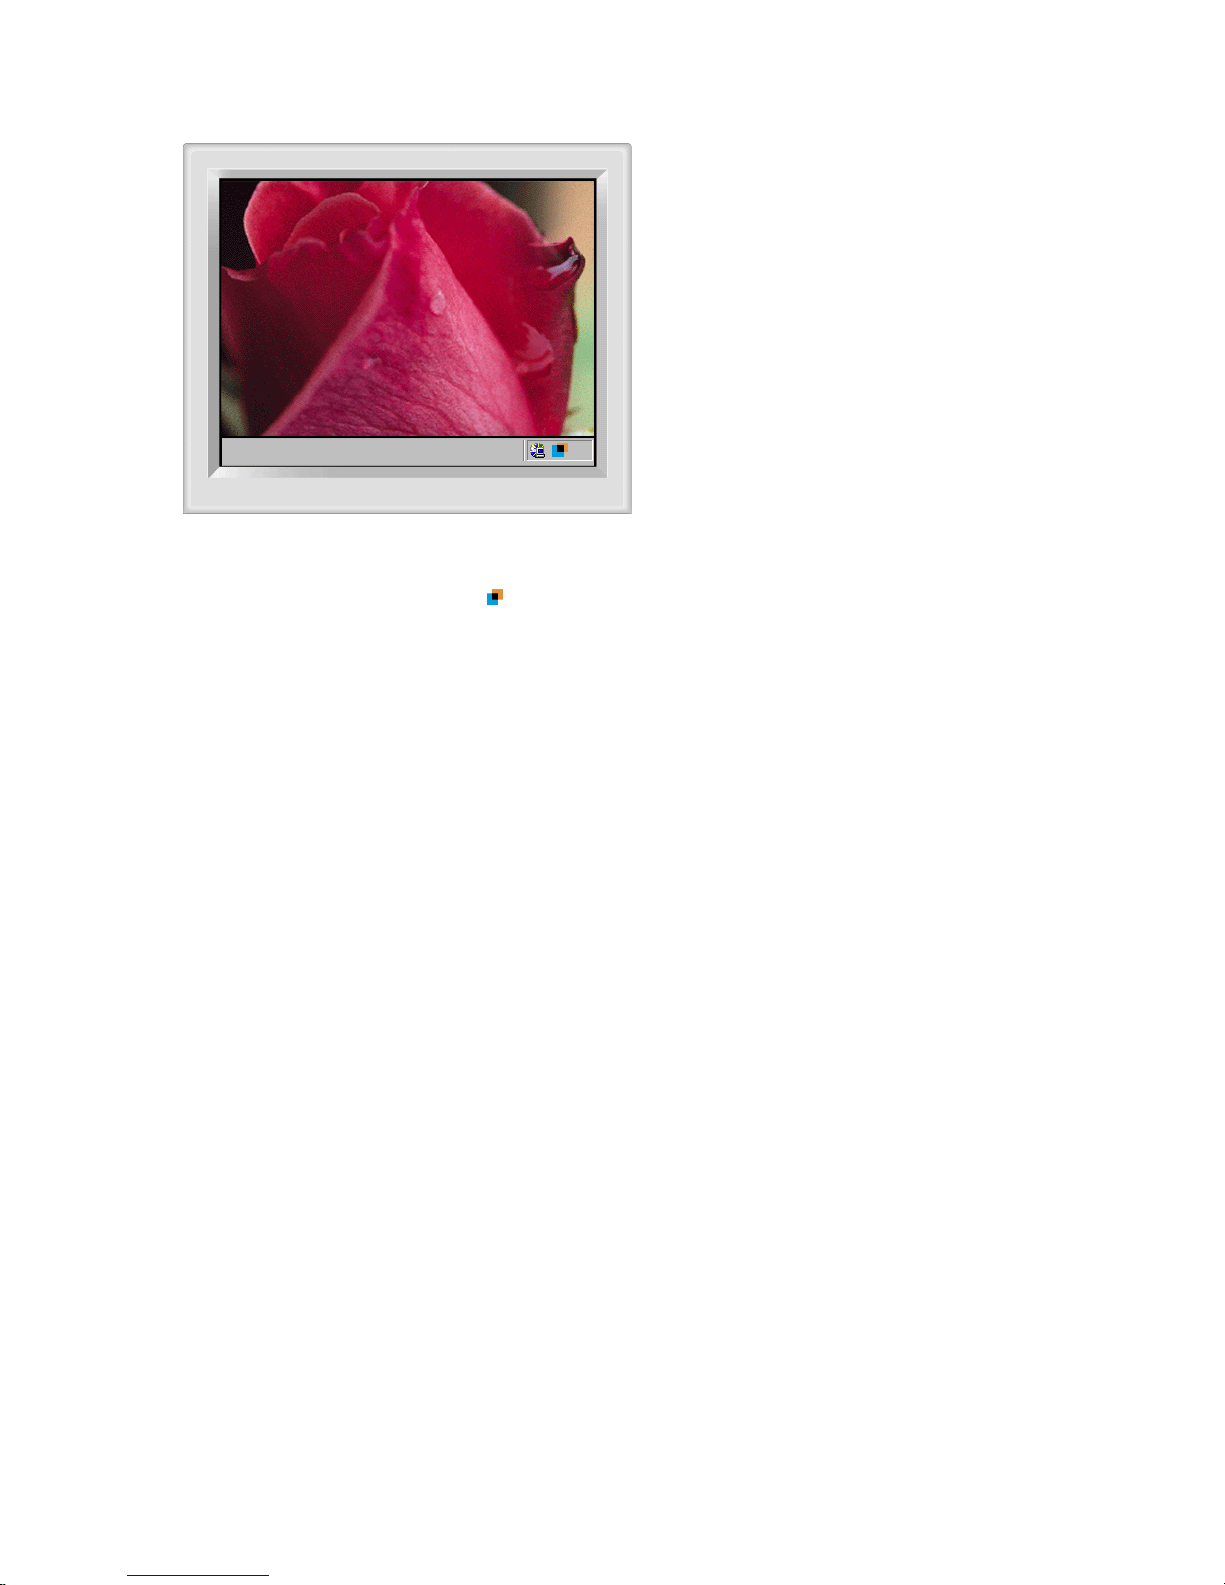
Full Screen
1. Full Screen: Place the cursor on the Hi
g
hlight icon
(
)
on the Windows taskbar and right click your mouse once. Th en select Full Screen from the menu.
Page 50
Automatic detect
Manual detect
Exit Program
Auto Detect
Picture Setting
Full Screen
Highlight Off
Other Features
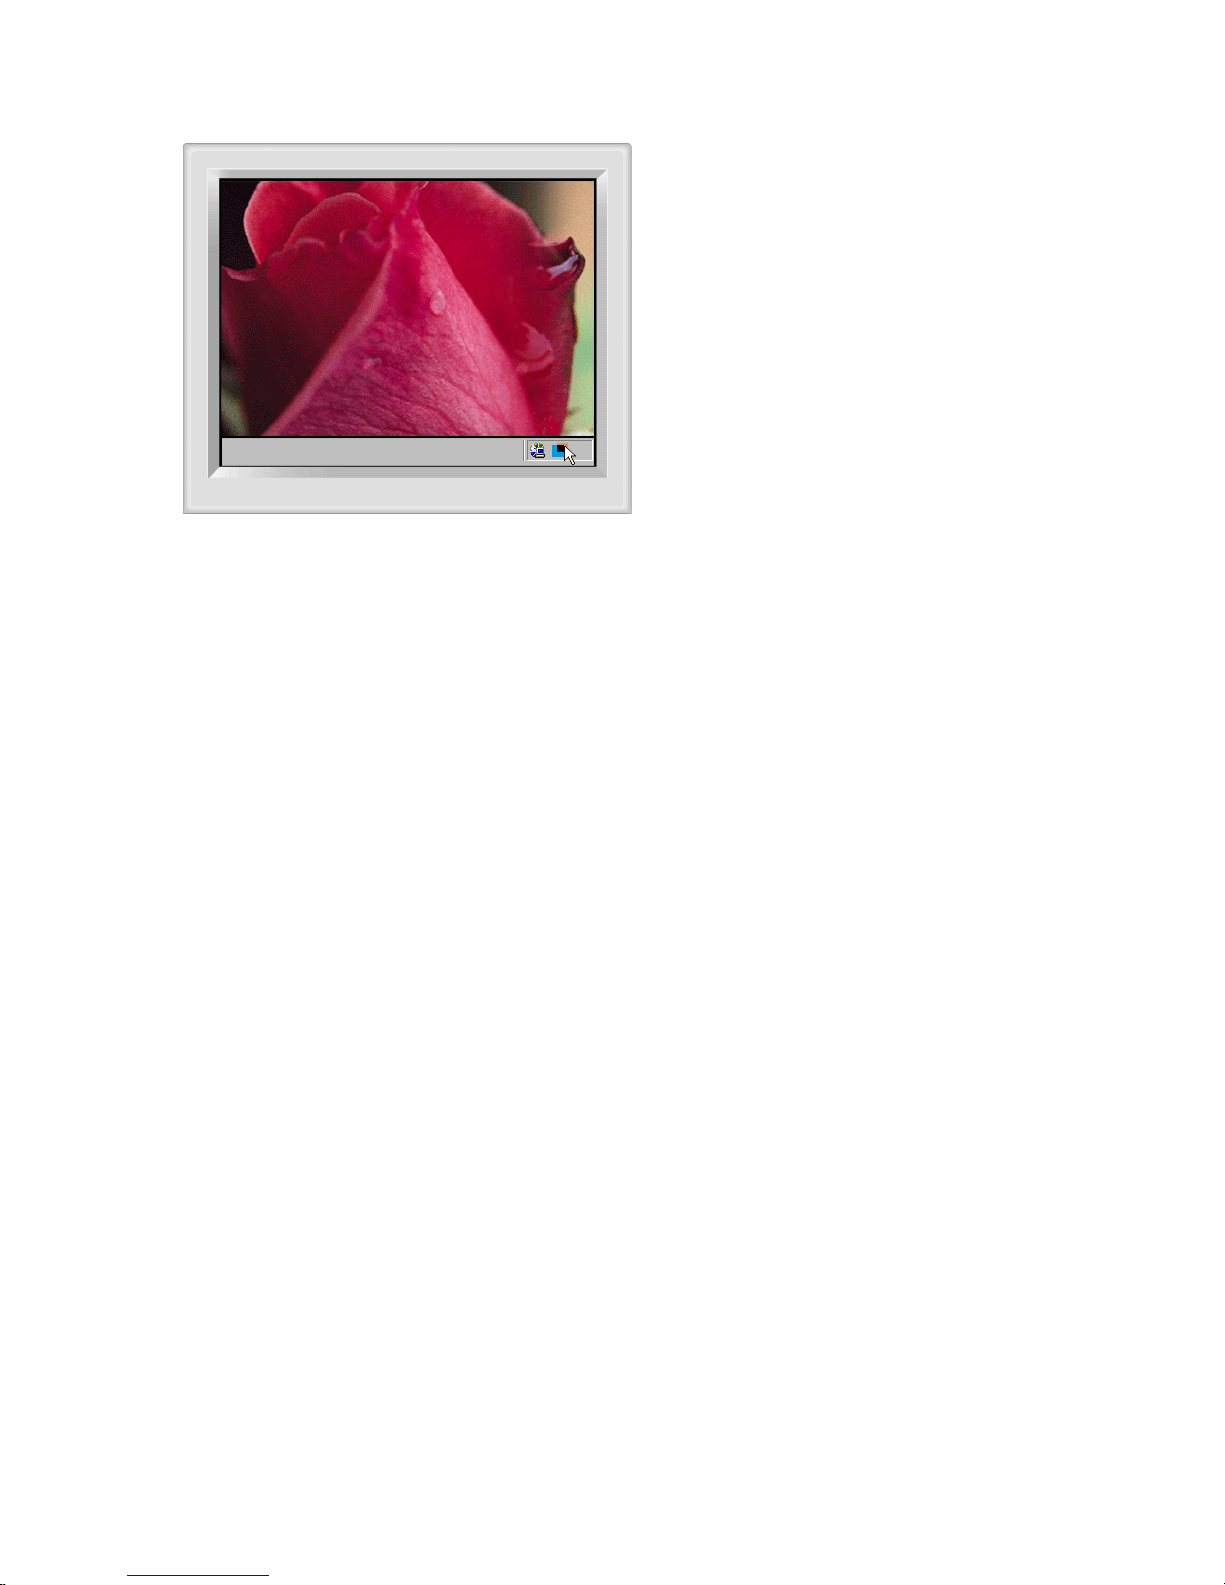
Highlight Off
1. Cancels the selection of a Hi
g
hlight Zone and reverts to the original screen.
Page 51
Automatic detect
Manual detect
Exit Program
Auto Detect
Picture Setting
Full Screen
Highlight Off
Other Features
Other Features
The Highlight Zone function remembers the variables of the selected areas in Automatic and Manual Detect modes, respectively.
1. If the window selected as a Highlight Zone is moved or its size changed, the Highlight Zone changes accordingly.
2. If an un-selected window overlaps the window selected as a Highlight Zone, the Highlight Zone of the selected window turns off.
However, it does not turn off the Zone completely and only makes the window shift to standby mode while the settings are saved. When the window is reactivated, the Highlight Zone turns on again with the settings unchanged.
3. If another un-overlapped window beside one with a Highlight Zone is selected as a Highlight Zone, Highlight Zone function is activated for the two
separate windows simultaneously. (Up to eight windows can be selected as a Highlight Zone and if another window is selected as a Highlight Zone, the
Highlight Zone of the previous windows turns off.)
When the Highlight Zone is created using the Drag function, the Zone functions independently of the above since it uses a random portion of the screen
instead of a particular window.
Note 1 : How to cancel the saved variables of a selected window.
1) When a window selected in Automatic Detect mode is replaced with another window also selected in Automatic Detect mode,
onl
y
the last selection is saved, and the Highlight Zone function is de-activated for the previous windows.
2) In Manual Detect mode, only the window (or the frame window) created last is saved, and the Highlight Zone function is de-activated for the
previous windows.
The Highlight Zone is de-selected when the program used to create the selected window is closed. The variables of the Highlight Zone created using
the Drag function are not saved.
Note 2 : The changes saved under Picture Setting of the Highlight Zone menu remain effective even after the program is closed using Exit Program.
(
The next time you start the Highlight Zone program, the settings are shown as previously saved.
)
Page 52
Before calling for service, check the information in this section to see if you can remedy any
problems yourself. If you do need assistance, please call the phone number on the
Information section or contact your dealer.
Symptom Check List Solutions
No images on the
screen. I cannot turn on
the monitor.
Is the power cord
connected properly?
Check the power cord connection and
supply.
Can you see
""
on
the screen?
Check the signal cable connection.
If the power is on, reboot
the computer to see the
initial screen(the login
screen), which can be
seen.
If the initial screen (the login screen)
appears, boot the computer in the applicable
mode (the safe mode for Windows
ME/XP/2000) and then change the
frequency of the video card.
(Refer to the Preset Timing Modes)
Note: If the initial screen (the login screen)
does not appear, contact a service center or
your dealer.
Can you see
""
on
the screen?
You can see this message when the signal
from the video card exceeds the maximum
resolution and frequency that the monitor
can properly handle.
Adjust the maximum resolution and
frequency that the monitor can handle
properly.
There is no image on the
screen.
Is the power indicator on
the monitor blinking at 1
second intervals?
The monitor is in PowerSaver mode.
Press any key on the keyboard to activate
the monitor and restore the image on the
screen.
The image on the screen
is shaking.
Check the monitor
configuration to see if it
is in Interlace Mode.
(Interlace Mode: Vertical
frequency 43Hz, 87Hz(i),
etc)
Change the vertical frequency to NonInterlace mode by referring to the video card
manual.
Are there any magnetic
products such as a
power adapter, speaker
Move the monitor away from anything that
can create a strong magnetic field.
SyncMaster 703MS / 704MS
Page 53

or a high voltage wire
near by?
Is the voltage stable? The screen image can appear to shake or
vibrate at a particular time of day due to low
supply voltage.
The screen image can also appear to shake or vibrate if there is a
problem with the video card or the computer's main board.
The screen shows
strange colors or just
black and white.
Is the screen displaying
only one color as if
looking at the screen
through a cellophane
paper?
Check the signal cable connection.
Make sure the video card is fully inserted in
it's slot.
Have the screen colors
become strange after
running a program or
due to a crash between
applications?
Reboot the computer.
Has the video card been
set properly?
Set the video card by referring to the video
card manual.
The screen suddenly has
become unbalanced.
Have you changed the
video card or the driver?
Adjust screen image position and size using
the OSD.
Have you adjusted the
resolution or frequency
on the monitor?
Adjust the resolution and frequency of the
video card.
(Refer to the Preset Timing Modes).
The screen can be unbalanced due to the cycle of the video card
signals. Readjust Position by referring to the OSD.
The screen is out of
focus or OSD cannot be
adjusted.
Have you adjusted the
resolution or frequency
on the monitor?
Adjust the resolution and frequency of the
video card.
(Refer to the Preset Timing Modes).
The screen is partially
distorted.
Are there any magnetic
products such as an
adapter, speaker or a
high voltage wire near
the monitor?
Enter the OSD and perform a "Degauss".
Keep the monitor away from any magnetic
products.
LED is blinking but no
images on the screen.
Is the frequency properly
adjusted when checking
the Display Timing on
the menu?
Adjust the frequency properly by referring to
the video card manual and the Preset Timing
Modes.
(The maximum frequency per resolution may
differ from product to product.)
There are only 16 colors
shown on the screen.
The screen colors have
changed after changing
the video card.
Have the Windows
colors been set properly?
Windows ME/2000/XP:
Set the colors properly at the
Control Panel
→
Display → Settings
.
Has the video card been
set properly?
Set the video card by referring to the video
card manual.
There is a message that
reads "Unrecognized
monitor, Plug & Play
(VESA DDC) monitor
found".
Have you installed the
monitor driver?
Install the monitor driver according to the
Driver Installation Instructions.
See the video card
manual to see if the Plug
& Play (VESA DDC)
function can be
supported.
Install the monitor driver according to the
Driver Installation Instructions.
Check when MagicTune
does not function
properly.
MagicTune feature is
found only on PC (VGA)
with Window OS that
supports Plug and Play.
* To check whether your PC is available for
MagicTune feature, follow the
steps below (When Windows is XP);
Control Panel → Performance and
Maintenance → System → Hardware →
Device Manager → Monitors → After
Page 54
deleting Plug and Play monitor, find 'Plug
and Play monitor' by searching new
Hardware.
MagicTune is an additional software for the
monitor. Some graphic cards may not
support your monitor. When you have a
problem with the graphic card, visit our
website to check the compatible graphic
card list provided.
http://www.samsung.com/monitor/magictune
MagicTune™ doesn't
work properly.
Have you changed your
PC or video graphic
card?
Download the latest program. The program
can be downloaded
http://www.samsung.com/monitor/magictune.
Visit the MagicTune™ website and download the installation software for MagicTune™
MAC.
Check the following items if there is trouble with the monitor.
1. Check if the power cord and the video cables are properly connected to the computer.
2. Check if the computer beeps more than 3 times when booting.
(If it does, request an after-service for the main board of the computer.)
3. If you installed a new video card or if you assembled the PC, check if the installed adapter (video)
driver and the monitor driver.
4. Check if the scanning ratio of the video screen is set at 50Hz ~ 160Hz .
(Do not exceed 65Hz when using the maximum resolution.)
5. If you have problems in installing the adapter (video) driver, boot the computer in Safe Mode,
remove the Display Adapter at the "
Control Panel→System→Device Administrator
" and then
reboot the computer to reinstall the adapter (video) driver.
Tips for HighlightZone
1. To protect CDT against the screen brightness, the HighlightZone function persists for three hours
and then automatically stops. So please reset it to continue.
2. Once the HighlightZone has been switched off, you can't select any of the other menus within the
Hightlight Zone.
3. When the HighlightZone function is operated, the surrounding brightness of screen may become
dark.
4. Depending on the video card you use, a color saturation phenomenon may occur in the
HighlightZone . In this case, slightly lower the contrast of the HighlightZone and the color
saturation will be reduced.
If problems repeatedly occur, contact an authorized service center.
Q & A
Question
Answer
How can I change the
frequency?
Frequency can be changed by reconfiguring the video card.
Note that video card support can vary, depending on the version
of the driver used. (Refer to the computer or the video card
manual for details.)
How can I adjust the resolution? Windows ME/XP/2000 : Set the resolution at the
Control
Panel→Display→Settings
.
* Contact the video card manufacturer for details.
Page 55
How can I set the Power Saving
function?
Windows ME/XP/2000 : Set the function at BIOS-SETUP of the
computer or the screen saver. (Refer to Windows/Computer
Manual).
The monitor makes a sound
when it is turned on.
This is normal as some sound may be generated when the metal
case and the electromagnet, which are installed to block any
electromagnetic waves, interact with each other.
How can I clean the outer
case/Picture tube?
Disconnect the power cord and then clean the monitor with a soft
cloth, using either a cleaning solution or plain water.
Do not leave any remains of the detergent nor scratch the case.
Do not allow any water to go inside the monitor.
HighlightZone III 3.5 Q & A
Question
Answer
The program does not function
properly.
HighlightZone III 3.5 features a combination of circuitry and
software built on proprietary technology of SEC. Therefore, the
HighlightZone III 3.5 feature is found only on SEC monitors that
support the feature.
Check if your monitor supports the HighlightZone III 3.5 feature.
If not, the HighlightZone III 3.5 icon will show a message saying,
"No Connection" ( )Connect the monitor properly before using it.
Neither Automatic Detect or nor Manual Detect function while the
icon shows the message, "No Connection". You can only exit the
program.
Started a multimedia program
but the HighlightZone function
does not automatically activate.
Check the HighlightZone III 3.5 menu and see if Disable Auto
Detect is selected.
When selected, the HighlightZone function is not automatically
activated.
The function may not be activated automatically for some
multimedia programs.
In this case, use Manual Detect instead.
See Manual Detect under (HighlightZone III 3.5 )
Check the color settings and see if sRGB is selected.
When sRGB is selected, the HighlightZone function remains deactivated in order to maintain the sRGB color attributes.
Changed the setting to
HighlightZone in Manual Detect
mode but the HighlightZone
feature has not been activated
Check the color setting of the monitor and see if sRGB is
selected.
When sRGB is selected, the HighlightZone function remains deactivated in order to maintain the sRGB color attributes.
Some of the windows may not be selected when HighlightZone
function is on.
Want to turn the Auto Detect
function off.
Set Disable Auto Detect to off from the HighlightZone III 3.5
menu.
See (HighlightZone III 3.5 functions)
Don't know whether the
Highlight program is running.
Check the icon on the taskbar.
( ) indicates the function is activated and ( )shows it has been
deactivated.
When a HighlightZone is on, the
rest of the screen dims.
Monitors with the HighlightZone feature are equipped with an
Automatic Beam Control function. When activated, this may cause
slight dimming of the surrounding screen. However, this does not
indicate a malfunction of any kind, and it is safe to continue to use
the product.
The HighlightZone appears too
dark.
Check the Contrast value in Picture Setting and adjust it for your
ideal viewing.
Want to adjust the position and
size of the HighlightZone .
You can change the position and/or the size of the HighlightZone
easily using the Manual Detect function.
Page 56
See (HighlightZone III 3.5 functions)
Cannot select Picture Setting. The Picture Setting feature can be selected only when the
HighlightZone function is on.
Turn the HighlightZone function on before selecting Picture
Setting.
Self-Test Feature Check
Self-Test Feature Check | Warning Messages | Environment | Useful Tips
Y
our monitor provides a self test feature that allows you to check whether your monitor is
functioning properly.
Self-Test Feature Check
1. Turn off both your computer and the monitor.
2. Unplug the video cable from the back of the computer.
3. Turn on the monitor.
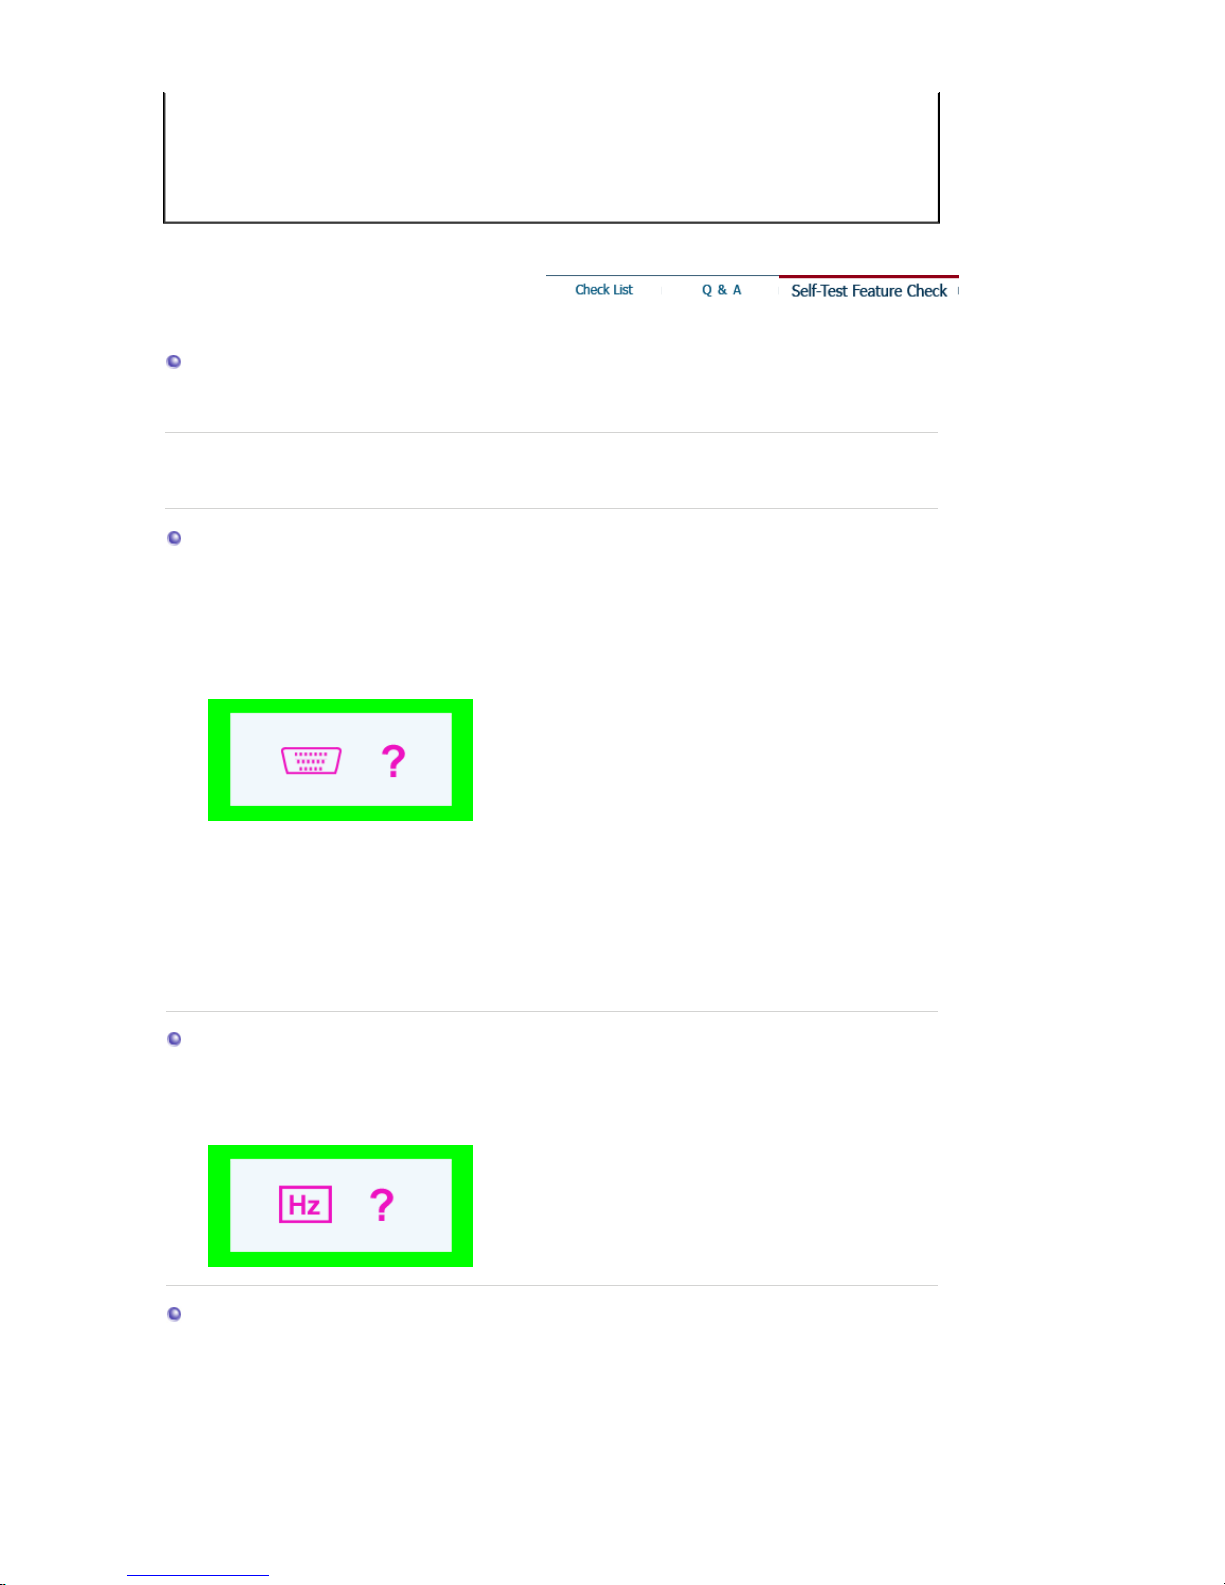
If the monitor is functioning properly, you will see a box in the illustration below.
This box appears during normal operation if the video cable becomes disconnected or
damaged.
4. Turn off your monitor and reconnect the video cable; then turn on both your computer and the
monitor.
If your monitor screen remains blank after using the previous procedure, check your video
controller and computer system; your monitor is functioning properly.
Warning Messages
If there is something wrong with the input signal, the message below appears on the screen
or the screen goes blank although the power indicator LED is still on. The message may
indicate that the monitor is out of scan range or that you need to check the signal cable.
Environment
The location and the position of the monitor may influence the quality and other
features of the monitor.
1. If there are any sub woofer speakers near the monitor, unplug and relocate the woofer
to another room.
2. Remove all electronic devices such as radios, fans, clocks and telephones that are
Page 57

within 3 feet (one meter) of the monitor.
3. Degauss the monitor if any devices were removed from the area.
Useful Tips
z
A monitor recreates visual signals received from the computer. Therefore, if there is trouble with
the computer or the video card, this can cause the monitor to become blank, have poor coloring,
noise, unavailable video mode, etc. In this case, first check the source of the problem, and then
contact a service center or your dealer.
z
Judging the monitor's working condition
If there is no image on the screen or a
""
message comes up, disconnect the cable from the
computer while the monitor is still powered on.
{
If there is a message coming up on the screen or if the screen goes white, this means the
monitor is in working condition.
{ In this case, check the computer for trouble.
Page 58
Before calling for service, check the information in this section to see if you can remedy any
problems yourself. If you do need assistance, please call the phone number on the
Information section or contact your dealer.
Symptom Check List Solutions
No images on the
screen. I cannot turn on
the monitor.
Is the power cord
connected properly?
Check the power cord connection and
supply.
Can you see
""
on
the screen?
Check the signal cable connection.
If the power is on, reboot
the computer to see the
initial screen(the login
screen), which can be
seen.
If the initial screen (the login screen)
appears, boot the computer in the applicable
mode (the safe mode for Windows
ME/XP/2000) and then change the
frequency of the video card.
(Refer to the Preset Timing Modes)
Note: If the initial screen (the login screen)
does not appear, contact a service center or
your dealer.
Can you see
""
on
the screen?
You can see this message when the signal
from the video card exceeds the maximum
resolution and frequency that the monitor
can properly handle.
Adjust the maximum resolution and
frequency that the monitor can handle
properly.
There is no image on the
screen.
Is the power indicator on
the monitor blinking at 1
second intervals?
The monitor is in PowerSaver mode.
Press any key on the keyboard to activate
the monitor and restore the image on the
screen.
The image on the screen
is shaking.
Check the monitor
configuration to see if it
is in Interlace Mode.
(Interlace Mode: Vertical
frequency 43Hz, 87Hz(i),
etc)
Change the vertical frequency to NonInterlace mode by referring to the video card
manual.
Are there any magnetic
products such as a
power adapter, speaker
Move the monitor away from anything that
can create a strong magnetic field.
SyncMaster 705MS / 706MS
Page 59

or a high voltage wire
near by?
Is the voltage stable? The screen image can appear to shake or
vibrate at a particular time of day due to low
supply voltage.
The screen image can also appear to shake or vibrate if there is a
problem with the video card or the computer's main board.
The screen shows
strange colors or just
black and white.
Is the screen displaying
only one color as if
looking at the screen
through a cellophane
paper?
Check the signal cable connection.
Make sure the video card is fully inserted in
it's slot.
Have the screen colors
become strange after
running a program or
due to a crash between
applications?
Reboot the computer.
Has the video card been
set properly?
Set the video card by referring to the video
card manual.
The screen suddenly has
become unbalanced.
Have you changed the
video card or the driver?
Adjust screen image position and size using
the OSD.
Have you adjusted the
resolution or frequency
on the monitor?
Adjust the resolution and frequency of the
video card.
(Refer to the Preset Timing Modes).
The screen can be unbalanced due to the cycle of the video card
signals. Readjust Position by referring to the OSD.
The screen is out of
focus or OSD cannot be
adjusted.
Have you adjusted the
resolution or frequency
on the monitor?
Adjust the resolution and frequency of the
video card.
(Refer to the Preset Timing Modes).
The screen is partially
distorted.
Are there any magnetic
products such as an
adapter, speaker or a
high voltage wire near
the monitor?
Enter the OSD and perform a "Degauss".
Keep the monitor away from any magnetic
products.
LED is blinking but no
images on the screen.
Is the frequency properly
adjusted when checking
the Display Timing on
the menu?
Adjust the frequency properly by referring to
the video card manual and the Preset Timing
Modes.
(The maximum frequency per resolution may
differ from product to product.)
There are only 16 colors
shown on the screen.
The screen colors have
changed after changing
the video card.
Have the Windows
colors been set properly?
Windows ME/2000/XP:
Set the colors properly at the
Control Panel
→
Display → Settings
.
Has the video card been
set properly?
Set the video card by referring to the video
card manual.
There is a message that
reads "Unrecognized
monitor, Plug & Play
(VESA DDC) monitor
found".
Have you installed the
monitor driver?
Install the monitor driver according to the
Driver Installation Instructions.
See the video card
manual to see if the Plug
& Play (VESA DDC)
function can be
supported.
Install the monitor driver according to the
Driver Installation Instructions.
Check when MagicTune
does not function
properly.
MagicTune feature is
found only on PC (VGA)
with Window OS that
supports Plug and Play.
* To check whether your PC is available for
MagicTune feature, follow the
steps below (When Windows is XP);
Control Panel → Performance and
Maintenance → System → Hardware →
Device Manager → Monitors → After
Page 60
deleting Plug and Play monitor, find 'Plug
and Play monitor' by searching new
Hardware.
MagicTune is an additional software for the
monitor. Some graphic cards may not
support your monitor. When you have a
problem with the graphic card, visit our
website to check the compatible graphic
card list provided.
http://www.samsung.com/monitor/magictune
MagicTune™ doesn't
work properly.
Have you changed your
PC or video graphic
card?
Download the latest program. The program
can be downloaded
http://www.samsung.com/monitor/magictune.
Visit the MagicTune™ website and download the installation software for MagicTune™
MAC.
Check the following items if there is trouble with the monitor.
1. Check if the power cord and the video cables are properly connected to the computer.
2. Check if the computer beeps more than 3 times when booting.
(If it does, request an after-service for the main board of the computer.)
3. If you installed a new video card or if you assembled the PC, check if the installed adapter (video)
driver and the monitor driver.
4. Check if the scanning ratio of the video screen is set at 50Hz ~ 160Hz .
(Do not exceed 68 Hz when using the maximum resolution.)
5. If you have problems in installing the adapter (video) driver, boot the computer in Safe Mode,
remove the Display Adapter at the "
Control Panel→System→Device Administrator
" and then
reboot the computer to reinstall the adapter (video) driver.
Tips for HighlightZone
1. To protect CDT against the screen brightness, the HighlightZone function persists for three hours
and then automatically stops. So please reset it to continue.
2. Once the HighlightZone has been switched off, you can't select any of the other menus within the
Hightlight Zone.
3. When the HighlightZone function is operated, the surrounding brightness of screen may become
dark.
4. Depending on the video card you use, a color saturation phenomenon may occur in the
HighlightZone . In this case, slightly lower the contrast of the HighlightZone and the color
saturation will be reduced.
If problems repeatedly occur, contact an authorized service center.
Q & A
Question
Answer
How can I change the
frequency?
Frequency can be changed by reconfiguring the video card.
Note that video card support can vary, depending on the version
of the driver used. (Refer to the computer or the video card
manual for details.)
How can I adjust the resolution? Windows ME/XP/2000 : Set the resolution at the
Control
Panel→Display→Settings
.
* Contact the video card manufacturer for details.
Page 61
How can I set the Power Saving
function?
Windows ME/XP/2000 : Set the function at BIOS-SETUP of the
computer or the screen saver. (Refer to Windows/Computer
Manual).
The monitor makes a sound
when it is turned on.
This is normal as some sound may be generated when the metal
case and the electromagnet, which are installed to block any
electromagnetic waves, interact with each other.
How can I clean the outer
case/Picture tube?
Disconnect the power cord and then clean the monitor with a soft
cloth, using either a cleaning solution or plain water.
Do not leave any remains of the detergent nor scratch the case.
Do not allow any water to go inside the monitor.
HighlightZone III 3.5 Q & A
Question
Answer
The program does not function
properly.
HighlightZone III 3.5 features a combination of circuitry and
software built on proprietary technology of SEC. Therefore, the
HighlightZone III 3.5 feature is found only on SEC monitors that
support the feature.
Check if your monitor supports the HighlightZone III 3.5 feature.
If not, the HighlightZone III 3.5 icon will show a message saying,
"No Connection" ( )Connect the monitor properly before using it.
Neither Automatic Detect or nor Manual Detect function while the
icon shows the message, "No Connection". You can only exit the
program.
Started a multimedia program
but the HighlightZone function
does not automatically activate.
Check the HighlightZone III 3.5 menu and see if Disable Auto
Detect is selected.
When selected, the HighlightZone function is not automatically
activated.
The function may not be activated automatically for some
multimedia programs.
In this case, use Manual Detect instead.
See Manual Detect under (HighlightZone III 3.5 )
Check the color settings and see if sRGB is selected.
When sRGB is selected, the HighlightZone function remains deactivated in order to maintain the sRGB color attributes.
Changed the setting to
HighlightZone in Manual Detect
mode but the HighlightZone
feature has not been activated
Check the color setting of the monitor and see if sRGB is
selected.
When sRGB is selected, the HighlightZone function remains deactivated in order to maintain the sRGB color attributes.
Some of the windows may not be selected when HighlightZone
function is on.
Want to turn the Auto Detect
function off.
Set Disable Auto Detect to off from the HighlightZone III 3.5
menu.
See (HighlightZone III 3.5 functions)
Don't know whether the
Highlight program is running.
Check the icon on the taskbar.
( ) indicates the function is activated and ( )shows it has been
deactivated.
When a HighlightZone is on, the
rest of the screen dims.
Monitors with the HighlightZone feature are equipped with an
Automatic Beam Control function. When activated, this may cause
slight dimming of the surrounding screen. However, this does not
indicate a malfunction of any kind, and it is safe to continue to use
the product.
The HighlightZone appears too
dark.
Check the Contrast value in Picture Setting and adjust it for your
ideal viewing.
Want to adjust the position and
size of the HighlightZone .
You can change the position and/or the size of the HighlightZone
easily using the Manual Detect function.
Page 62
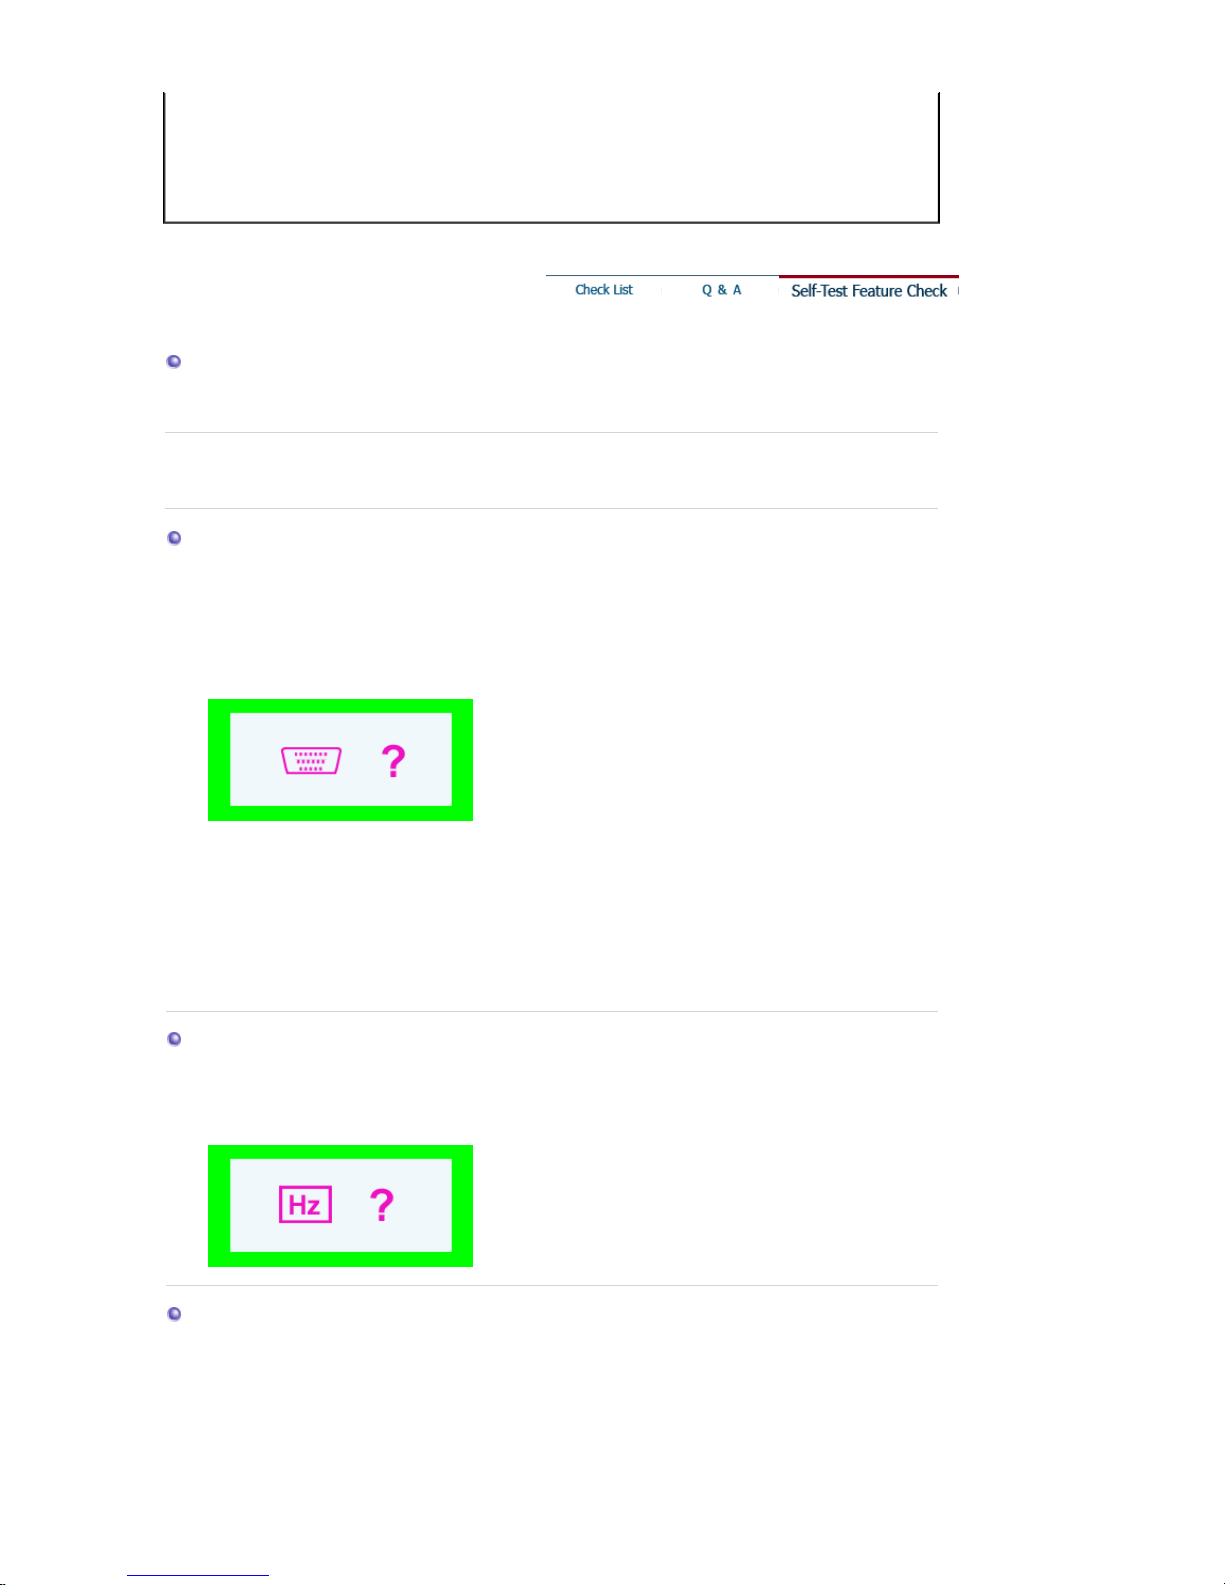
See (HighlightZone III 3.5 functions)
Cannot select Picture Setting. The Picture Setting feature can be selected only when the
HighlightZone function is on.
Turn the HighlightZone function on before selecting Picture
Setting.
Self-Test Feature Check
Self-Test Feature Check | Warning Messages | Environment | Useful Tips
Y
our monitor provides a self test feature that allows you to check whether your monitor is
functioning properly.
Self-Test Feature Check
1. Turn off both your computer and the monitor.
2. Unplug the video cable from the back of the computer.
3. Turn on the monitor.
If the monitor is functioning properly, you will see a box in the illustration below.
This box appears during normal operation if the video cable becomes disconnected or
damaged.
4. Turn off your monitor and reconnect the video cable; then turn on both your computer and the
monitor.
If your monitor screen remains blank after using the previous procedure, check your video
controller and computer system; your monitor is functioning properly.
Warning Messages
If there is something wrong with the input signal, the message below appears on the screen
or the screen goes blank although the power indicator LED is still on. The message may
indicate that the monitor is out of scan range or that you need to check the signal cable.
Environment
The location and the position of the monitor may influence the quality and other
features of the monitor.
1. If there are any sub woofer speakers near the monitor, unplug and relocate the woofer
to another room.
2. Remove all electronic devices such as radios, fans, clocks and telephones that are
Page 63

within 3 feet (one meter) of the monitor.
3. Degauss the monitor if any devices were removed from the area.
Useful Tips
z
A monitor recreates visual signals received from the computer. Therefore, if there is trouble with
the computer or the video card, this can cause the monitor to become blank, have poor coloring,
noise, unavailable video mode, etc. In this case, first check the source of the problem, and then
contact a service center or your dealer.
z
Judging the monitor's working condition
If there is no image on the screen or a
""
message comes up, disconnect the cable from the
computer while the monitor is still powered on.
{
If there is a message coming up on the screen or if the screen goes white, this means the
monitor is in working condition.
{ In this case, check the computer for trouble.
Page 64
General
General
Model Name SyncMaster 703MS
Picture Tube
Type 17" (43 cm) DynaFlat-X (16.0" viewable)
Deflection angle 90 °
Dot Pitch 0.20 mm (Horizontal)
Screen type Aluminized tri-color phosphor dot trio with black matrix.
Anti-doming invar shadow mask.
Multi-layer coated with anti-static.
Resolution
Optimum resolution 1024 x 768 @ 85 Hz
Maximum resolution 1280 x 1024 @ 65 Hz
Active Display
Horizontal 312 ± 4 mm
Vertical 234 ± 4 mm
Synchronization
Horizontal 30 ~ 70 kHz
Vertical 50 ~ 160 Hz
Input Signal Definition
Video Signal RGB, Analog 0.7 Vp-p Positive at 75 Ω
Sync Signal Separate H/V sync, TTL level, positive or negative
Display Color
Unlimited
Maximum Pixel Clock
120 MHz
Power Supply
AC 90 ~ 264 VAC, 50/60 Hz
SyncMaster 704MS
Page 65
Power Consumption
Less than 75 W
Dimensions (WxDxH)
456 x 465 x 462 mm / 18.0 x 18.3 x 18.2 inch (After installation of Stand)
Weight
13.2 kg
Environmental considerations
Operating Temperature 32°F ~ 104°F(0°C ~ 40°C)
Humidity 10% ~ 80%, non-condensing
Storage Temperature -4°F ~113°F (-20°C ~ 45°C)
Humidity 5% ~ 95%, non-condensing
Plug and Play Capability
This monitor can be installed on any Plug & Play compatible system. Interaction of the monitor and
computer systems will provide the best operating conditions and monitor settings. In most cases,
monitor installation will proceed automatically, unless the user wishes to select alternate settings.
Note: Design and specifications are subject to change without prior notice.
PowerSaver
This monitor has a built-in power management system called PowerSaver. This system saves energy
by switching your monitor into a low-power mode when it has not been used for a certain amount of
time. The monitor automatically returns to normal operation when you press a key on the keyboard. For
energy conservation, turn your monitor OFF when it is not needed, or when leaving it unattended for
long periods. The PowerSaver system operates with a VESA DPMS compliant video card installed in
your computer. Use a software utility installed on your computer to set up this feature.
State
Normal Operation
Power-off mode
Power Indicator Green Green, Blinking
Power Consumption Less than 72 W Less than 1 W
Preset Timing Modes
If the signal transferred from the computer is the same as the following Preset Timing Modes, the
screen will be adjusted automatically. However, if the signal differs, the screen may go blank while
the power LED is on. Refer to the video card manual and adjust the screen as follows.
Display Mode
Horizontal
Frequency
(kHz)
Vertical
Frequency
(Hz)
Pixel Clock
(MHz)
Sync Polarity
(H/V)
VESA, 640 x 480 37.500 75.000 31.500 -/-
VESA, 800 x 600 53.700 85.100 56.250 +/+
VESA, 1024 x 768 68.700 85.000 94.500 +/+
Page 66

Horizontal Frequency
The time to scan one line connecting the right edge to the left edge of
the screen horizontally is called Horizontal Cycle and the inverse
number of the Horizontal Cycle is called Horizontal Frequency. Unit:
kHz
Vertical Frequency
Like a fluorescent lamp, the screen has to repeat the same image
many times per second to display an image to the user. The
frequency of this repetition is called Vertical Frequency or Refresh
Rate. Unit: Hz
Page 67
General
General
Model Name SyncMaster 705MS
Picture Tube
Type 17" (43 cm) DynaFlat-X (16.0" viewable)
Deflection angle 90 °
Dot Pitch 0.20 mm (Horizontal)
Screen type Aluminized tri-color phosphor dot trio with black matrix.
Anti-doming invar shadow mask.
Multi-layer coated with anti-static.
Resolution
Optimum resolution 1024 x 768 @ 85 Hz
1280 x 1024 @ 75 Hz
Maximum resolution 1600 x 1200 @ 68 Hz
Active Display
Horizontal 312 ± 4 mm
Vertical 234 ± 4 mm
Synchronization
Horizontal 30 ~ 85 kHz
Vertical 50 ~ 160 Hz
Input Signal Definition
Video Signal RGB, Analog 0.7 Vp-p Positive at 75 Ω
Sync Signal Separate H/V sync, TTL level, positive or negative
Display Color
Unlimited
Maximum Pixel Clock
120 MHz
Power Supply
SyncMaster 706MS
Page 68
AC 90 ~ 264 VAC, 50/60 Hz
Power Consumption
Less than 75 W
Dimensions (WxDxH)
456 x 465 x 462 mm / 18.0 x 18.3 x 18.2 inch (After installation of Stand)
Weight
13.2 kg
Environmental considerations
Operating Temperature 32°F ~ 104°F(0°C ~ 40°C)
Humidity 10% ~ 80%, non-condensing
Storage Temperature -4°F ~113°F (-20°C ~ 45°C)
Humidity 5% ~ 95%, non-condensing
Plug and Play Capability
This monitor can be installed on any Plug & Play compatible system. Interaction of the monitor and
computer systems will provide the best operating conditions and monitor settings. In most cases,
monitor installation will proceed automatically, unless the user wishes to select alternate settings.
Note: Design and specifications are subject to change without prior notice.
PowerSaver
This monitor has a built-in power management system called PowerSaver. This system saves energy
by switching your monitor into a low-power mode when it has not been used for a certain amount of
time. The monitor automatically returns to normal operation when you press a key on the keyboard. For
energy conservation, turn your monitor OFF when it is not needed, or when leaving it unattended for
long periods. The PowerSaver system operates with a VESA DPMS compliant video card installed in
your computer. Use a software utility installed on your computer to set up this feature.
State
Normal Operation
Power-off mode
Power Indicator Green Green, Blinking
Power Consumption Less than 73 W Less than 1 W
Preset Timing Modes
If the signal transferred from the computer is the same as the following Preset Timing Modes, the
screen will be adjusted automatically. However, if the signal differs, the screen may go blank while
the power LED is on. Refer to the video card manual and adjust the screen as follows.
Display Mode
Horizontal
Frequency
(kHz)
Vertical
Frequency
(Hz)
Pixel Clock
(MHz)
Sync Polarity
(H/V)
VESA, 640 x 480 37.500 75.000 31.500 -/-
VESA, 1024 x 768 68.700 85.000 94.500 +/+
VESA, 1280 x 1024 80.000 75.000 135.000 +/+
Page 69

Horizontal Frequency
The time to scan one line connecting the right edge to the left edge of
the screen horizontally is called Horizontal Cycle and the inverse
number of the Horizontal Cycle is called Horizontal Frequency. Unit:
kHz
Vertical Frequency
Like a fluorescent lamp, the screen has to repeat the same image
many times per second to display an image to the user. The
frequency of this repetition is called Vertical Frequency or Refresh
Rate. Unit: Hz
Page 70
Contact SAMSUNG WORLD-WIDE
If you have any questions or comments relating to Samsung products, please
contact the SAMSUNG customer care center.
North America
CANADA 1-800-SAMSUNG (7267864) http://www.samsung.com/ca
MEXICO 01-800-SAMSUNG (7267864) http://www.samsung.com/mx
U.S.A 1-800-SAMSUNG (7267864) http://www.samsung.com
Latin America
ARGENTINE 0800-333-3733 http://www.samsung.com/ar
BRAZIL 0800-124-421 http://www.samsung.com/br
CHILE 800-726-7864 (SAMSUNG) http://www.samsung.com/cl
COSTA RICA 0-800-507-7267 http://www.samsung.com/latin
ECUADOR 1-800-10-7267 http://www.samsung.com/latin
EL SALVADOR 800-6225 http://www.samsung.com/latin
GUATEMALA 1-800-299-0013 http://www.samsung.com/latin
JAMAICA 1-800-234-7267 http://www.samsung.com/latin
PANAMA 800-7267 http://www.samsung.com/latin
PUERTO RICO 1-800-682-3180 http://www.samsung.com/latin
REP. DOMINICA 1-800-751-2676 http://www.samsung.com/latin
TRINIDAD & TOBAGO 1-800-7267-864 http://www.samsung.com/latin
VENEZUELA 1-800-100-5303 http://www.samsung.com/latin
Page 71
Europe
BELGIUM 02 201 2418 http://www.samsung.com/be
CZECH REPUBLIC 844 000 844 http://www.samsung.com/cz
DENMARK 38 322 887 http://www.samsung.com/dk
FINLAND 09 693 79 554 http://www.samsung.com/fi
FRANCE 08 25 08 65 65 (€ 0,15/min) http://www.samsung.com/fr
GERMANY 01805 - 121213 (€ 0,12/Min) http://www.samsung.de
HUNGARY 06 40 985 985 http://www.samsung.com/hu
ITALIA 199 153 153 http://www.samsung.com/it
LUXEMBURG 02 261 03 710 http://www.samsung.lu
NETHERLANDS 0900 20 200 88 (€ 0.10/Min) http://www.samsung.com/nl
NORWAY 231 627 22 http://www.samsung.com/no
POLAND 0 801 801 881 http://www.samsung.com/pl
PORTUGAL 80 8 200 128 http://www.samsung.com/pt
SLOVAKIA 0850 123 989 http://www.samsung.com/sk
SPAIN 902 10 11 30 http://www.samsung.com/es
SWEDEN 08 585 367 87 http://www.samsung.com/se
U.K 0870 242 0303 http://www.samsung.com/uk
CIS
RUSSIA 8-800-200-0400 http://www.samsung.ru
UKRAINE 8-800-502-0000 http://www.samsung.com/ur
Asia Pacific
AUSTRALIA 1300 362 603 http://www.samsung.com/au
CHINA 800-810-5858, 010- 6475 1880 http://www.samsung.com.cn
HONG KONG 2862 6001 http://www.samsung.com/hk
INDIA 3030 8282, 1600 1100 11 http://www.samsung.com/in
INDONESIA 0800-112-8888 http://www.samsung.com/id
JAPAN 0120-327-527 http://www.samsung.com/jp
MALAYSIA 1800-88-9999 http://www.samsung.com/my
PHILIPPINES 1800-10-SAMSUNG (7267864) http://www.samsung.com/ph
SINGAPORE 1800-SAMSUNG (7267864) http://www.samsung.com/sg
THAILAND 1800-29 -3232, 02-689-3232 http://www.samsung.com/th
TAIWAN 0800-329-999 http://www.samsung.com/tw
VIETNAM 1 800 588 889 http://www.samsung.com/vn
Middle East & Africa
SOUTH AFRICA 0860 7267864 (SAMSUNG) http://www.samsung.com/za
Page 72

U.A.E 800SAMSUNG (7267864) http://www.samsung.com/mea
Terms
Dot Pitch
The image on a monitor is composed of red, green and blue dots. The closer the do ts, the
higher the resolution. The distance between two dots of the same color is called the 'Dot
Pitch'. Unit: mm
Vertical Frequency
The screen must be redrawn several times per second in order to create and display an image
for the user. The frequency of this repetition per second is called Vertical Frequency or
Refresh Rate. Unit: Hz
Example: If the same light repeats itself 60 times per second, this is regarded as 60 Hz.
Horizontal Frequency
The time to scan one line connecting the right edge to the left edge of the screen horizontally
is called Horizontal Cycle. The inverse number of the Horizontal Cycle is called Horizontal
Frequency. Unit: kHz
Interlace and Non-Interlace Methods
Showing the horizontal lines of the screen from the top to the bottom in ord er is called the
Non-Interlace method while showing odd lines and then even lines in turn is called the
Interlace method. The Non-Interlace method is used for the majority of monitors to ensure a
clear image. The Interlace method is the same as that used in TVs.
Plug & Play
This is a function that provides the best quality screen for the user by allowing the computer
and the monitor to exchange information automatically. This monitor foll ows the international
standard VESA DDC for the Plug & Play function.
Resolution
The number of horizontal and vertical dots used to compose the screen image is called
'resolution'. This number shows the accuracy of the display. High resolution is good for
performing multiple tasks as more image information can be shown on the screen.
Example: If the resolution is 1024 X 768, this mean s the scree n is composed of 1024
horizontal dots (horizontal resolution) and 768 vertical li ne s (verti cal resolu ti on ).
Highlight Zone III 3.5
Highlight Zone is an enhancement feature to increase luminance in a certain area of the
monitor for brighter and sharper images/photos. Highlight Zone III 3.5 is carried by Samsung’s
unique circuit technology and a powerful combination of programs in order to implement the
Highlight Zone feature. This is a user friendly program that automatically highlights a certain
video area or enables users to specify an area of their choice to be highlighted.
MagicBright2™
MagicBright is an advanced monitor that boasts more than twice the brightness and sharpness
compared to conventional models, and which provides a contextua l displ a y environment
depending on word processing, internet, game or video purposes. The user can use the front
button panel to control the screen at four different levels of brightne ss and sharpness for their
preference.
Page 73
Authority
Information in this document is subject to change without notice.
© 2006 Samsung Electronics Co., Ltd. All rights reserved.
Reproduction in any manner whatsoever without the written permission of Samsung Electronics
Co., Ltd. is strictly forbidden.
Samsung Electronics Co., Ltd. shall not be liable for errors contained herein or for incidental or
consequential damages in connection with the furnishing, performance, or use of this material.
Samsung is the registered trademark of Samsung Electronics Co., Ltd.; Microsoft, Windows and
Windows NT are registered trademarks of Microsoft Corporation; VESA, DPMS and DDC are
registered trademarks of Video Electronics Standard Association; the E
NERGY STAR® name and
logo are registered trademarks of the U.S. Environmental Protection Agency (EPA). All other
product names mentioned herein may be the trademarks or registered trademarks of their
respective owners.
Class B
This device is a Class B digital apparatus. For Safety and EMC compliance guide, you may refer
to "Regulatory" Guide.
MÉXICO
IMPORTADO POR: SAMSUNG ELECTRONICS MÉXICO. S.A. de C.V.
Vía Lopez Portillo No. 6, Col. San Fco. Chilpan
Tultitlán, Estado de México, C.P. 54940
Tel: 01-55-5747-5100 / 01-800-726-7864
EXPORTADO POR: Samsung Electronics CO.,LTD.
416, Mae tan-3dong, Yeongtong - gu,
Suwon City, Gyeonggi-do Korea
Page 74
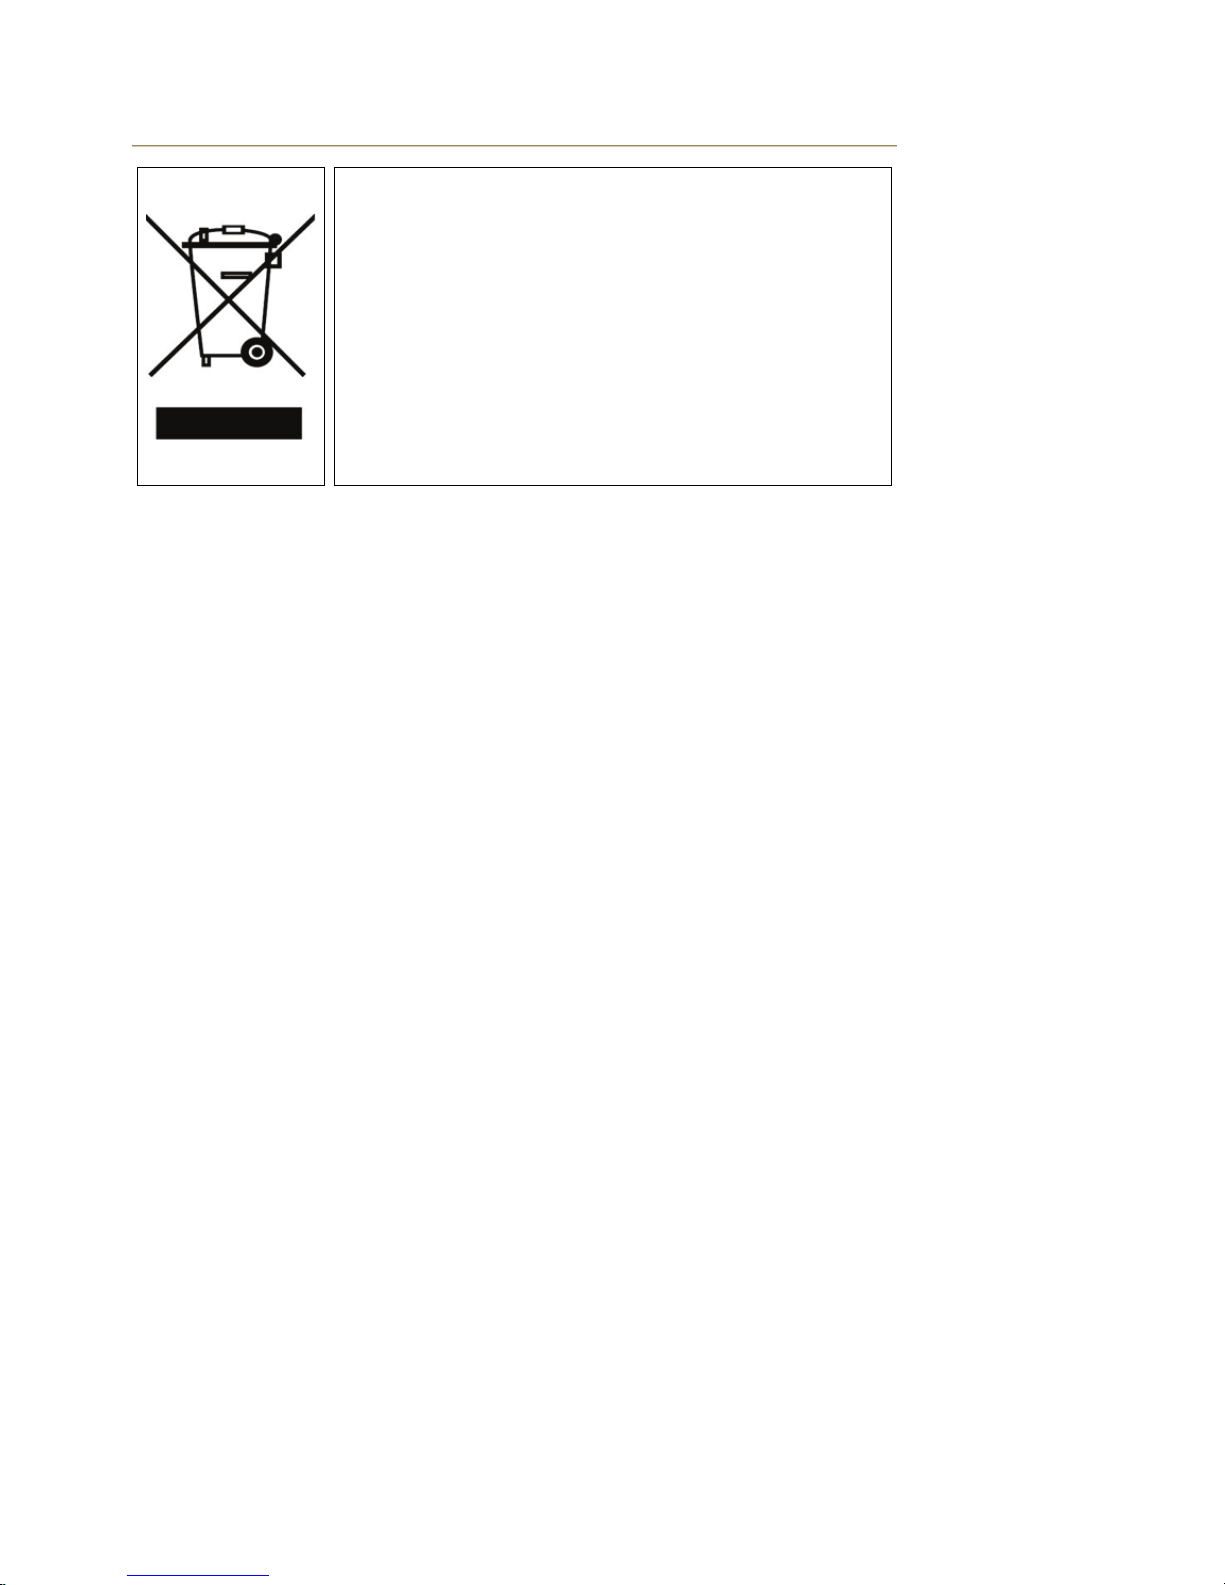
Correct Disposal of This Product
(Waste Electrical & Electronic Equipment) - Europe only
(Applicable in the European Union and other European countries with
separate collection systems)
This marking shown on the product or its literature, indicates that it should not
be disposed with other household wastes at the end of its working life. To
prevent possible harm to the environment or human health from uncontrolled
waste disposal, please separate this from other types of wastes and recycle it
responsibly to promote the sustainable reuse of material resources.
Household users should contact either the retailer where they purchased this
product, or their local government office, for details of where and how they
can take this item for environmentally safe recycling.
Business users should contact their supplier and check the terms and
conditions of the purchase contract. This product should not be mixed with
other commercial wastes for disposal.
 Loading...