

Page 1
510/710
Page 2
Main > Index
Main Page On-Screen Display
Safety Instructions Troubleshooting
Notational Check List
Power Q & A
Installation Self-Test Feature Check
Cleaning
Other
Introduction Specifications
Unpacking General Specifications
Front Preset Timing Modes
Rear PowerSaver
Bottom
Setup Information
Connecting Your Monitor
Terms
Base Installation
Page 3
Main > Safety Instructions > Notational
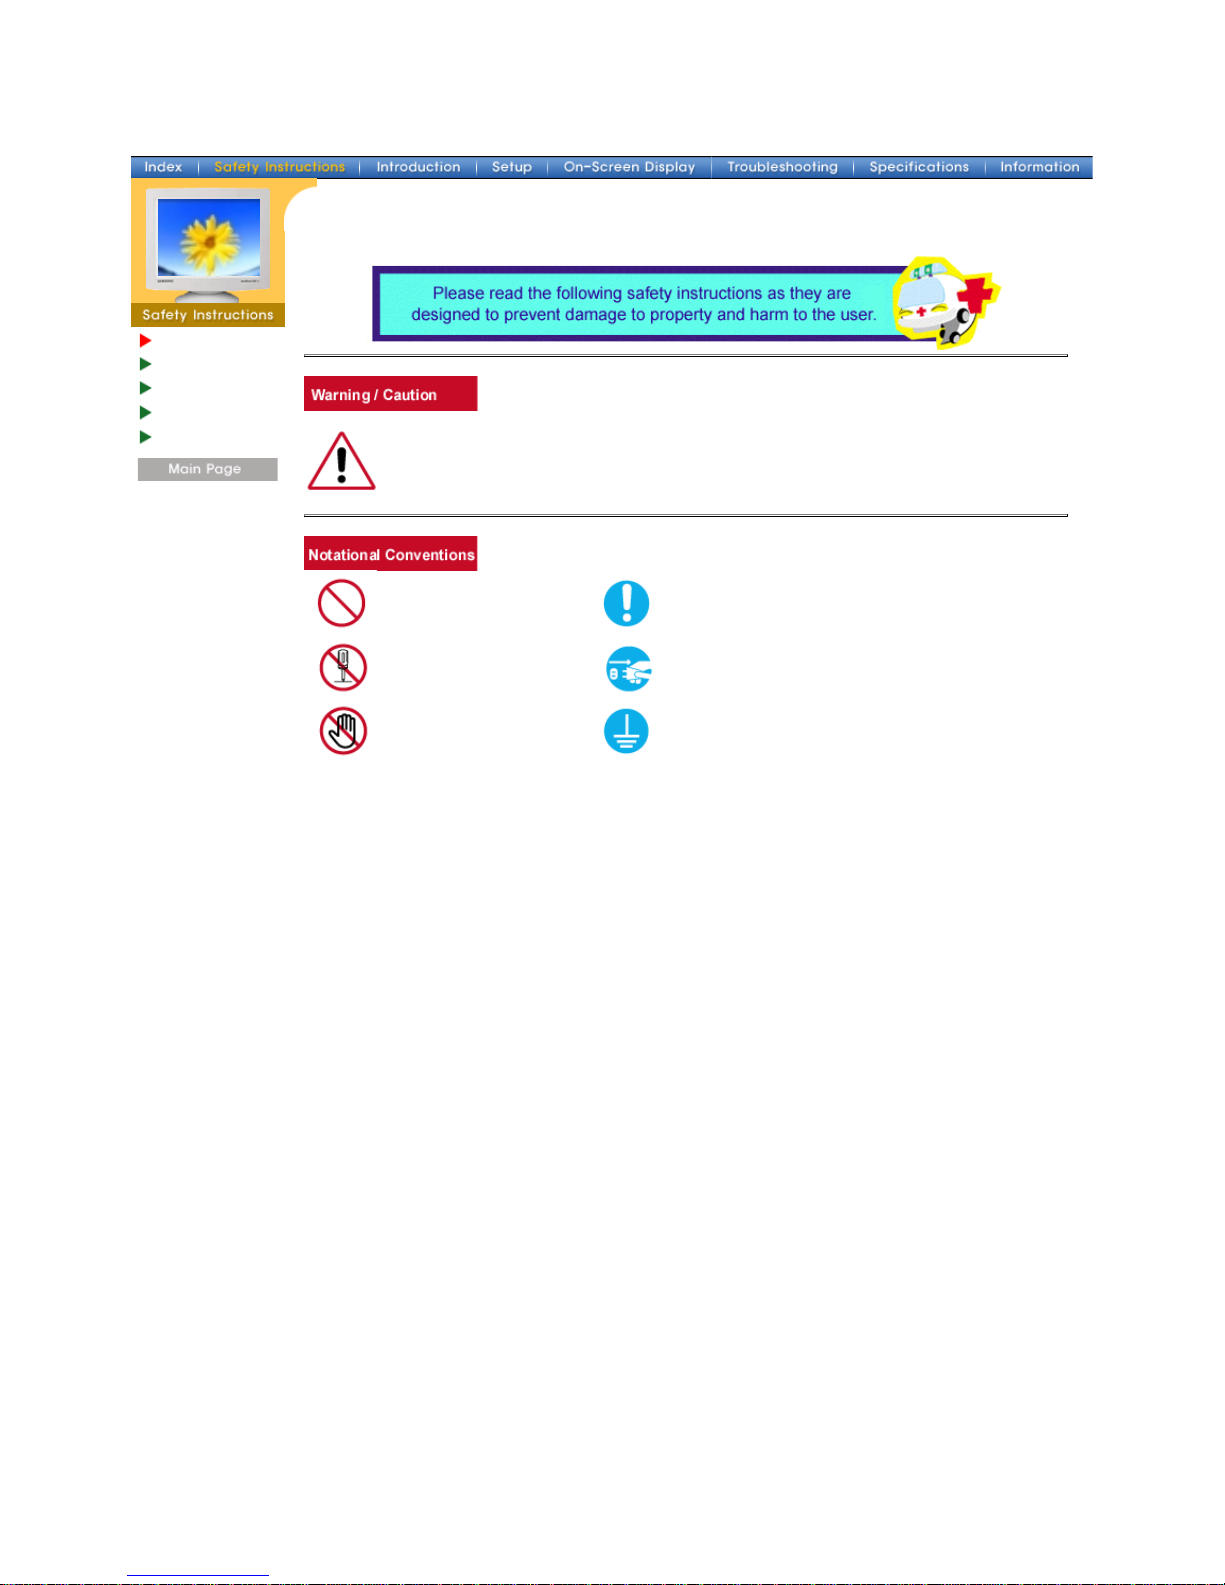
Notational
Power
Installation
Clean
Other
Failure to follow directions noted by this symbol could result in bodily harm or damage to
equipment.
Prohibited Important to read and understand at all times
Do not disassemble Disconnect the plug from the outlet
Do not touch Grounding to prevent an electric shock
Page 4
Main > Safety Instructions > Power
Notational
Power
Installation
Clean
Other
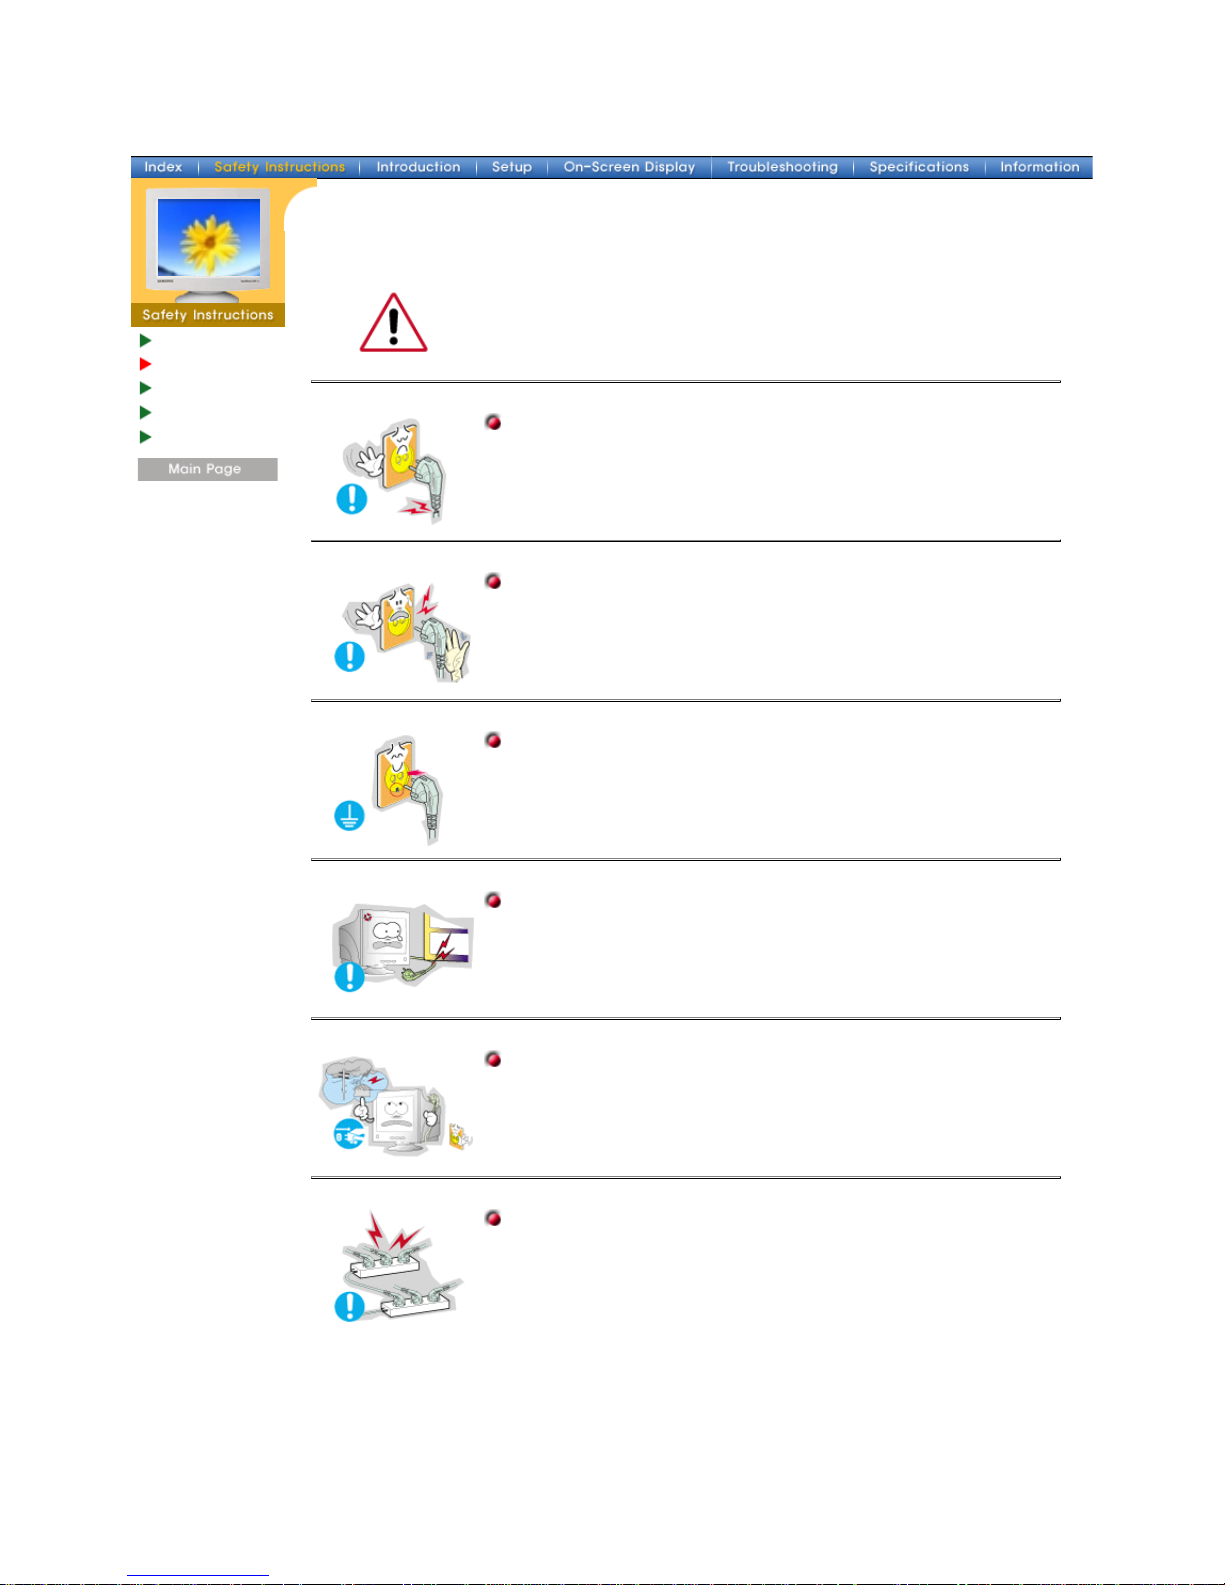
When not used for extended periods of time, set your PC to DPMS. If using
a screen saver, set it to the active screen mode.
z
If the size of your monitor is small, or if the same image is present for long
periods of time, you may see afterimages due to damage to the
fluorescent substance on the inside of the CRT.
Do not use a damaged or loose plug.
z
This may cause an electric shock or fire.
Do not pull the plug out by the wire nor touch the plug with wet
hands.
z
This may cause an electric shock or fire.
Use only a properly grounded plug and recepticle.
z
An improper ground may cause electric shock or equipment
damage.
Do not excessively bend the plug and wire nor place heavy objects
upon them, which could cause damage.
z
Failure to do so may cause an electric shock or fire.
Disconnect the plug from the outlet during storms or lightening or
if it is not used for a long period of time.
z
Failure to do so may cause an electric shock or fire.
Do not connect too many extension cords or plugs to an outlet.
z
This may cause a fire.
Page 5
Main > Safety Instructions > Installation
Notational
Power
Installation
Clean
Other
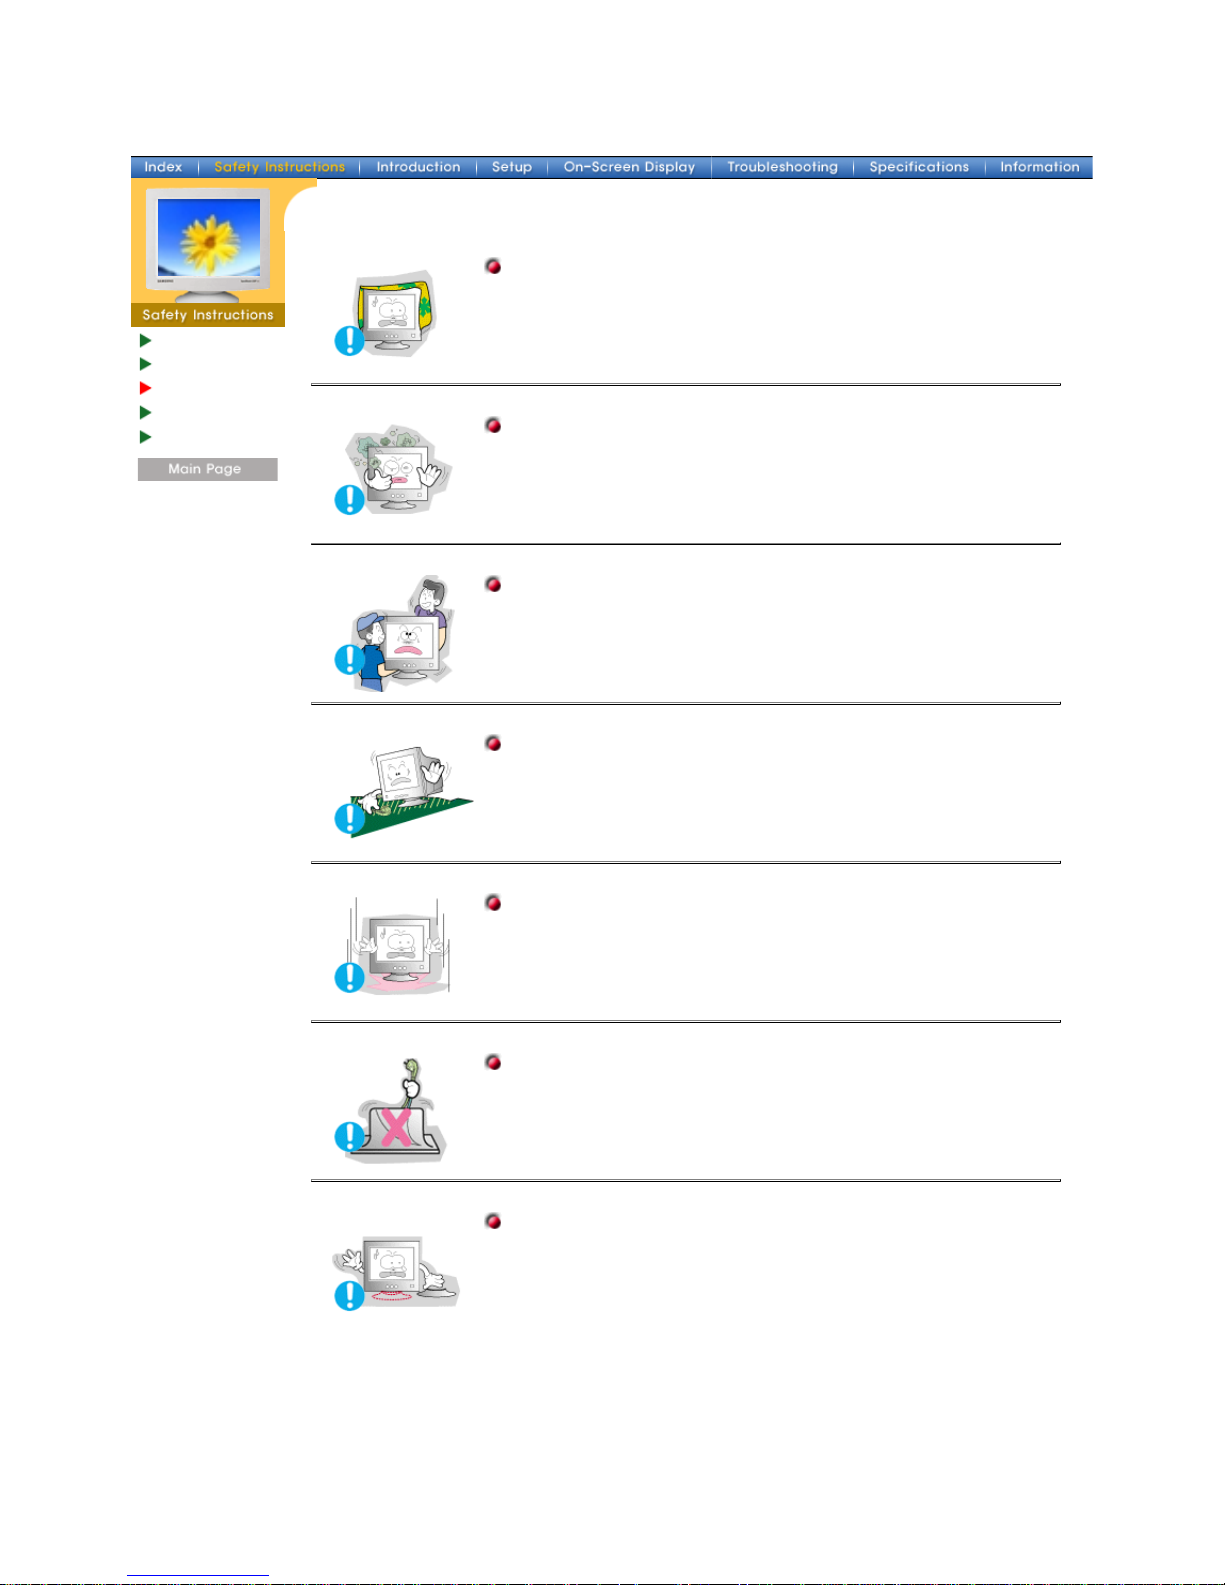
Do not cover the vents on the monitor cabinet.
z
Bad ventilation may cause a breakdown or fire.
Put your monitor in a location with low humidity and a minimum of
dust.
z
An electric shock or fire could result inside the monitor.
Do not drop the monitor when moving it.
z
This may cause damage to the product or human body.
Place the monitor on a flat and stable surface.
z
The monitor can cause injury by falling.
Set down the monitor carefully.
z
It could be damaged or broken.
Do not place the monitor face down.
z
The CRT surface may be damaged.
Do not use the monitor without the monitor stand.
z
It could break down or cause a fire due to bad ventilation.
z
If the monitor must be used without the supplied stand, take steps
to insure proper ventilation.
Page 6
Main > Safety Instructions > Clean
Notational
Power
Installation
Clean
Other
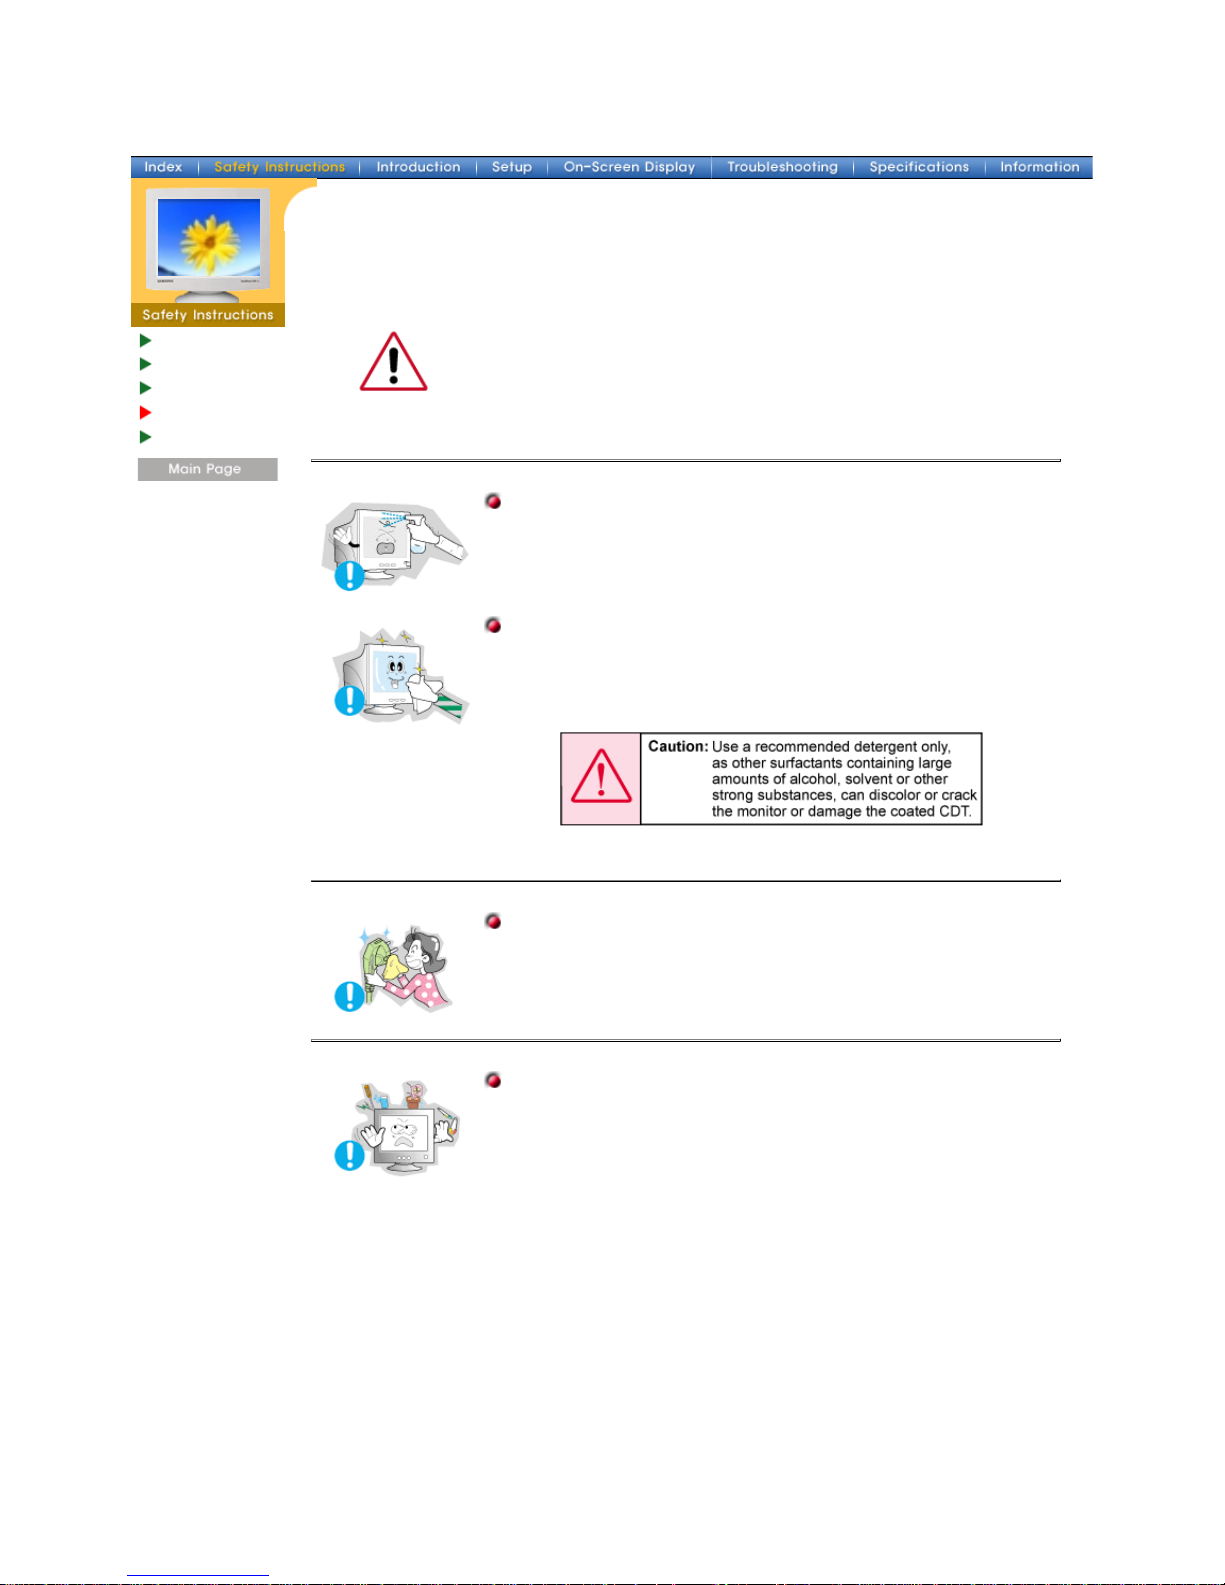
When cleaning the monitor case or the surface of the CRT, wipe with a
slightly moistened, soft fabric.
Do not clean Flat monitor with water. Use a water-diluted mild
detergent.
(Some detergents contain significant amounts of alcohol-based solvents,
which can damage (color change) or crack the monitor case. The
antiglare/anti-static surface coating on the CRT may also be affected.)
Dilute the detergent (1:10 ratio) with water before using.
Do not spray detergent directly on the monitor.
Use the recommended detergent with a smooth cloth.
z
You can prevent the coated CRT from being damaged or the
monitor cabinet from being dissolved, cracked or discolored.
If the connector between the plug and the pin is dusty or dirty,
clean it properly with a dry cloth.
z
A dirty connector can cause an electric shock or fire.
Do not set a glass of water, chemicals or any small metal objects
on the monitor.
z
This may cause damage, electric shock or a fire.
z
If a foreign substance gets into the monitor, disconnect the plug
and then contact a service center.
Page 7
Main > Safety Instructions > Other
Notational
Power
Installation
Clean
Other
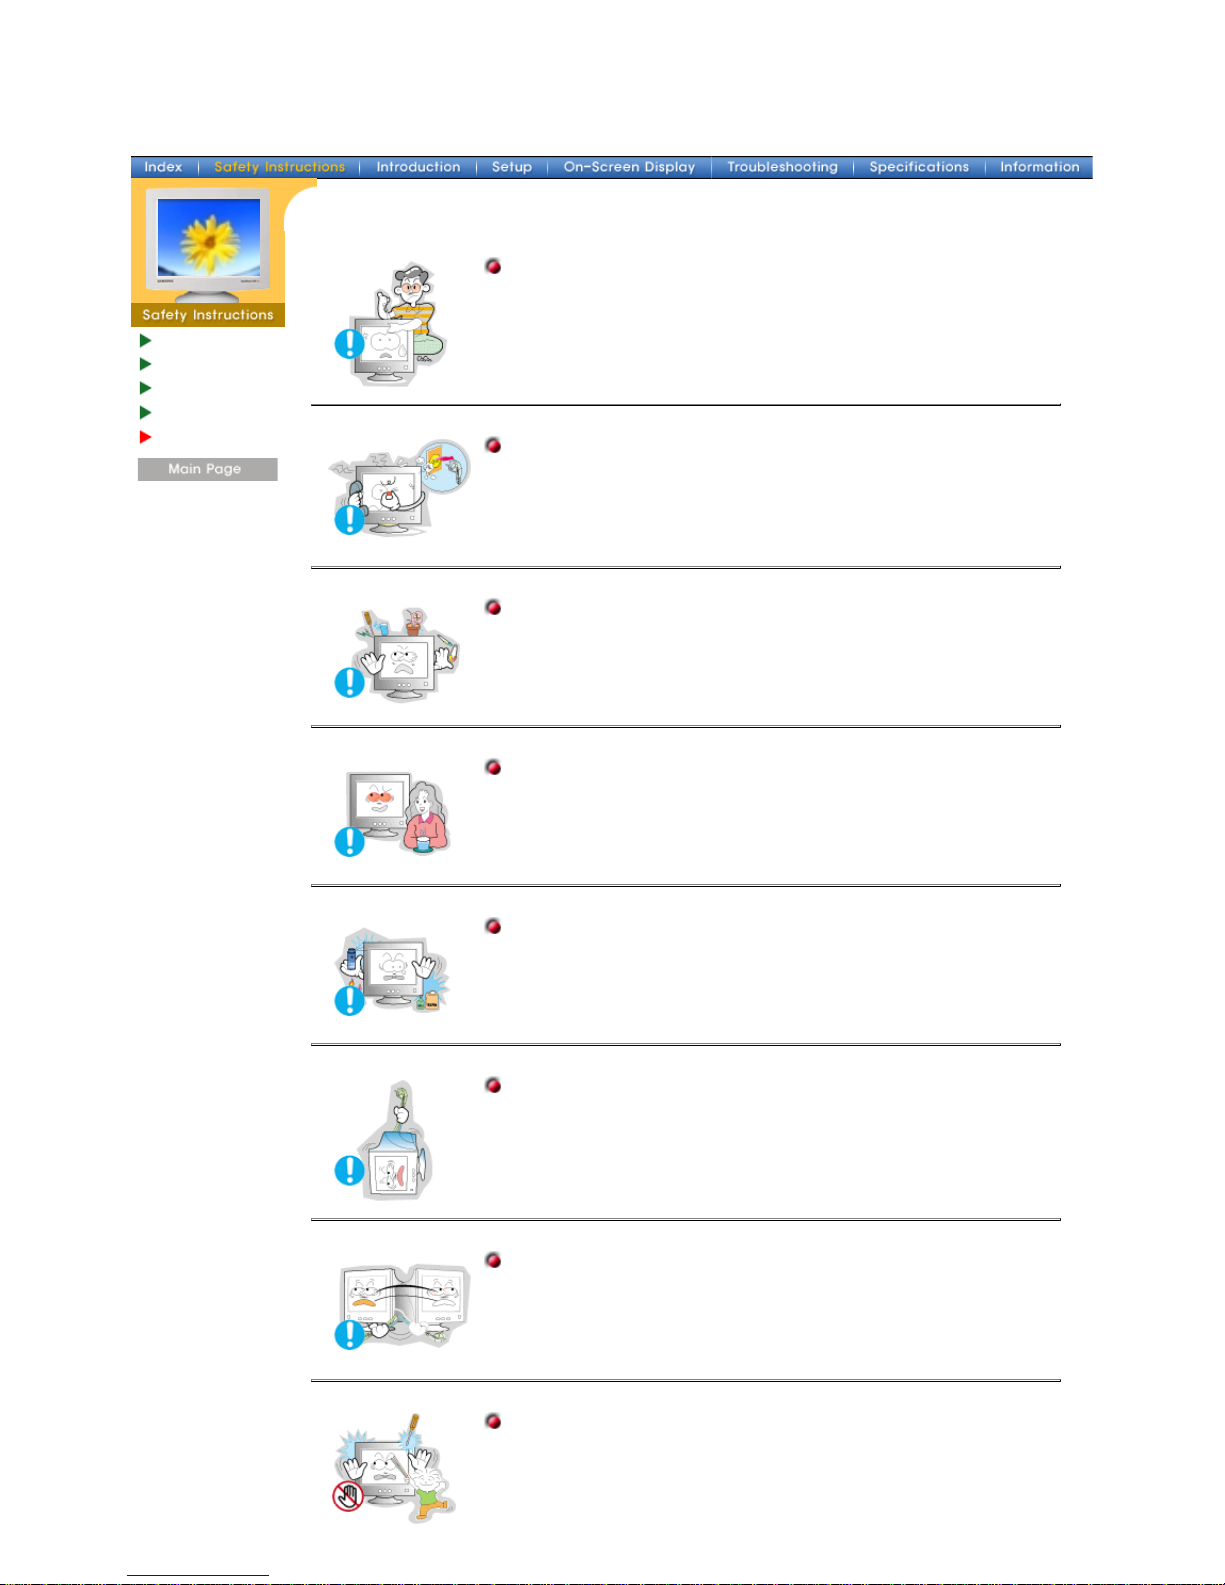
Do not remove cover(or back). No user serviceable parts inside.
z
This may cause an electric shock or a fire.
z
Refer servicing to qualified service personnel.
If your monitor does not operate normally - in particular, if there are
any unusual sounds or smells coming from it - unplug it
immediately and contact an authorized dealer or service.
z
This may cause an electric shock or a fire.
Do not place any heavy objects on the monitor.
z
This may cause an electric shock or a fire.
For each hour of looking at the monitor, you should let your eyes
rest for 5 minutes.
z
This will reduce eye fatigue.
Do not use or store inflammable substances near the monitor.
z
This may cause an explosion or fire.
Do not try to move the monitor by pulling on the wire or the signal
cable.
z
This may cause a breakdown, electric shock or a fire due to
damage to the cable.
Do not move the monitor right or left by pulling only the wire or the
signal cable.
z
This may cause a breakdown, electric shock or a fire due to
damage to the cable.
Never insert anything metallic into the monitor openings.
z
This may cause an electric shock, fire or injury.
Page 8

Keep the monitor away from any magnetic substances.
z
This may cause discoloring or distortion of the image.
Page 9

Main > Introduction > Unpacking
Unpacking
Front
Rear
Bottom
Monitor and Stand
(Some models include a stand attached. )
Please make sure the following items are included
with your monitor. If any items are missing,
contact your dealer.
Power Code
Stand
Quick Setup Guide
User's Guide CD
2002-09-16file://\\Ssj\an15vt\ver02\MANUAL\EN\product\index.htm
Page 10
Unpacking
Front
Rear
Bottom
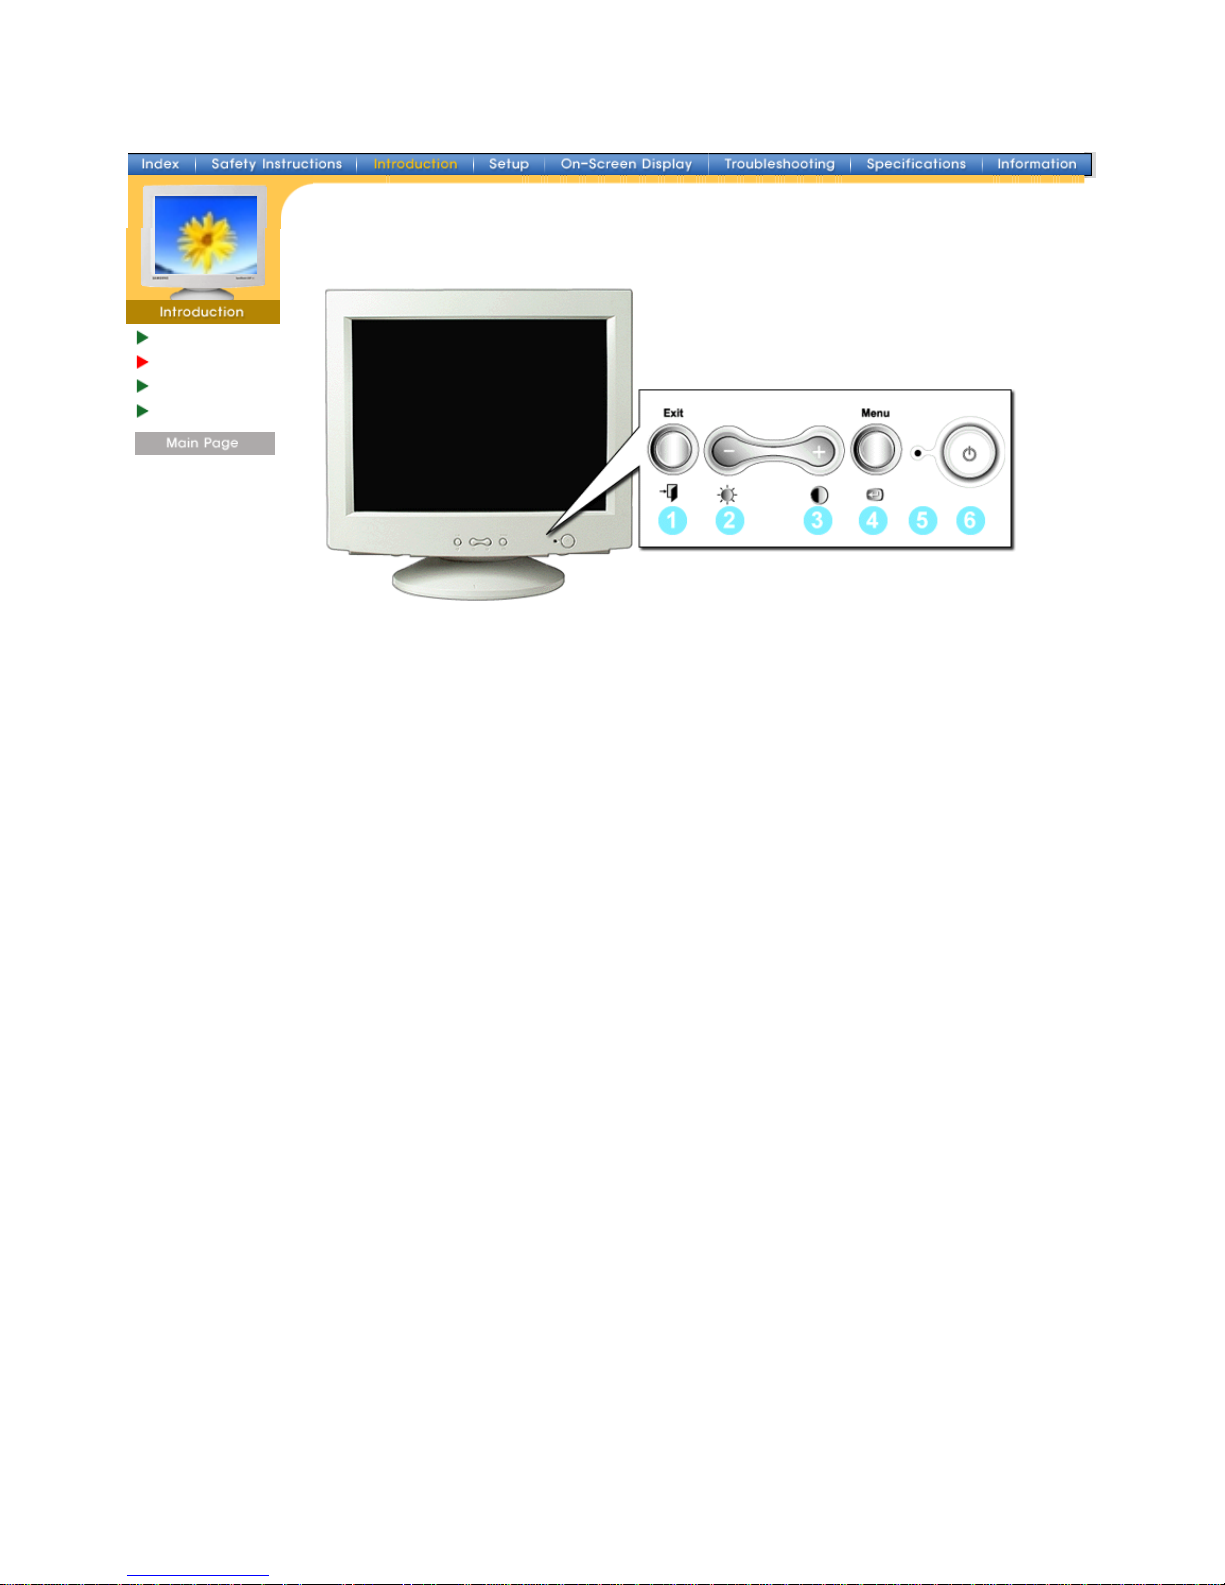
1. Exit button
Use this button to Exit the active menu or the OSD.
2,3. Adjust buttons
These buttons allow you to highlight and adjust items in the menu.
4. Menu button
Use this button to open the OSD and activate a highlighted menu item.
5. Power indicator
This light glows green during normal operation, and blinks green once as
the monitor saves your adjustments.
6. Power button
Use this button to turn the monitor on and off.
Note:
See PowerSaver described in the manual for further information regarding power saving
functions. For energy conservation, turn your monitor OFF when it is not needed, or when
leaving it unattended for long periods.
Page 11
Unpacking
Front
Rear
Bottom
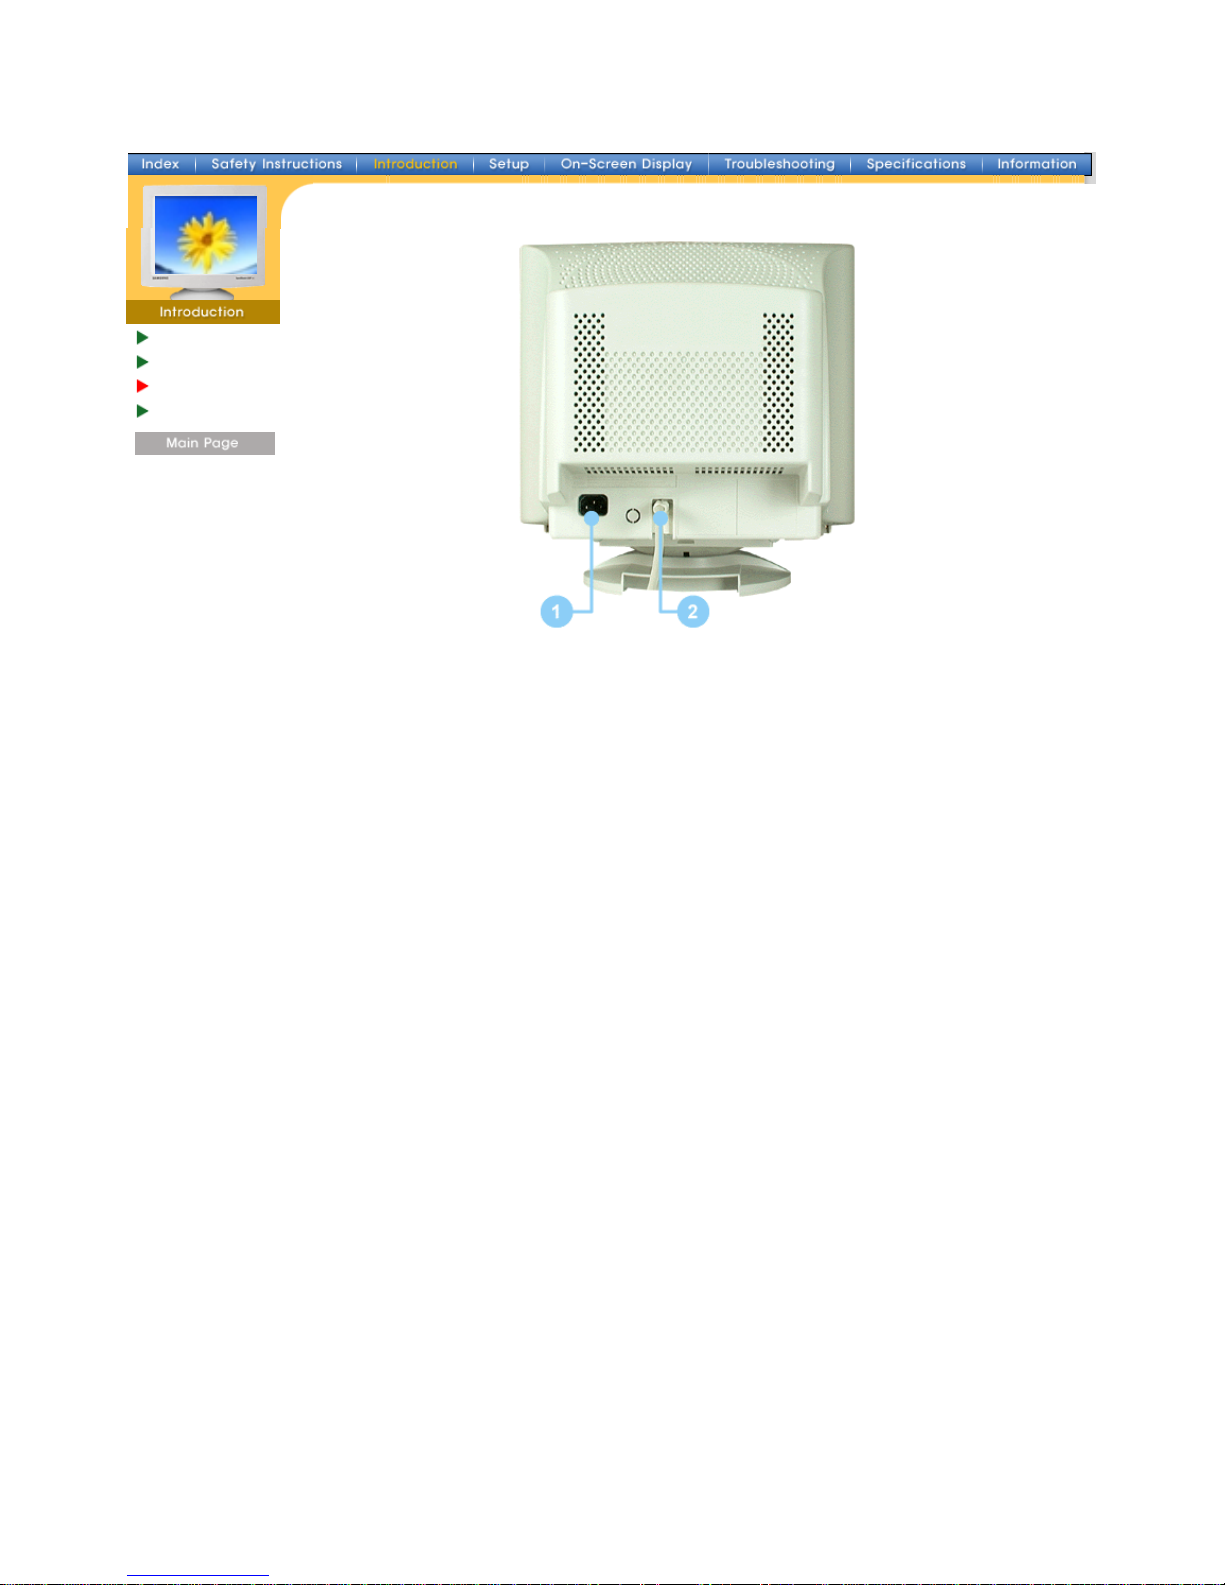
(The configuration at the back of the monitor may vary from product to product.)
1. Power port
Connect the power cord for your monitor to the power port on the back of
the monitor.
2. Signal Cable
Connect the signal cable to the video port on your computer, video board,
video card, or graphics card.
Note:
See Connecting Your Monitor for further information regarding cable connections.
Page 12
Unpacking
Front
Rear
Bottom
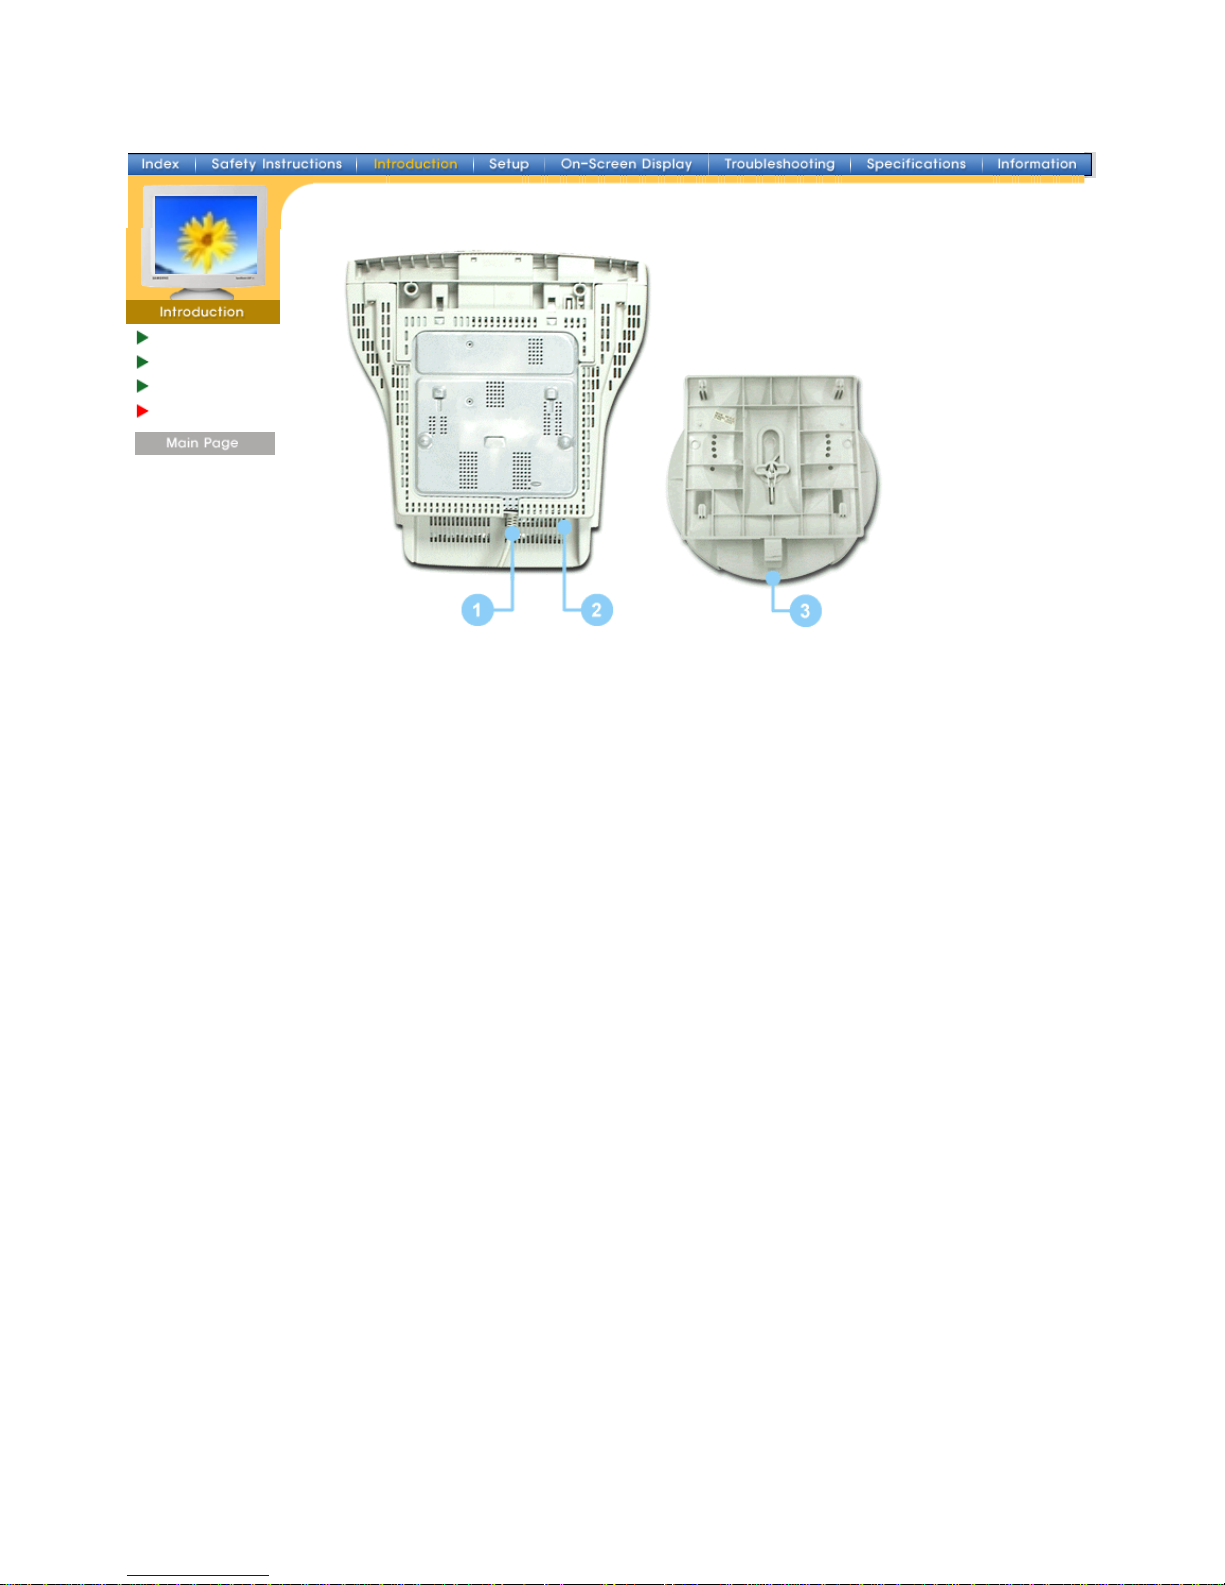
1. Signal Cable
Connect the signal cable to the video port on your computer, video board,
video card, or graphics card.
2. Power port
Connect the power cord for your monitor to the power port on the back of
the monitor.
3. Tilt/Swivel Base
You can separate the base from the monitor.
Page 13
Connecting
Your Monitor
Base Installation
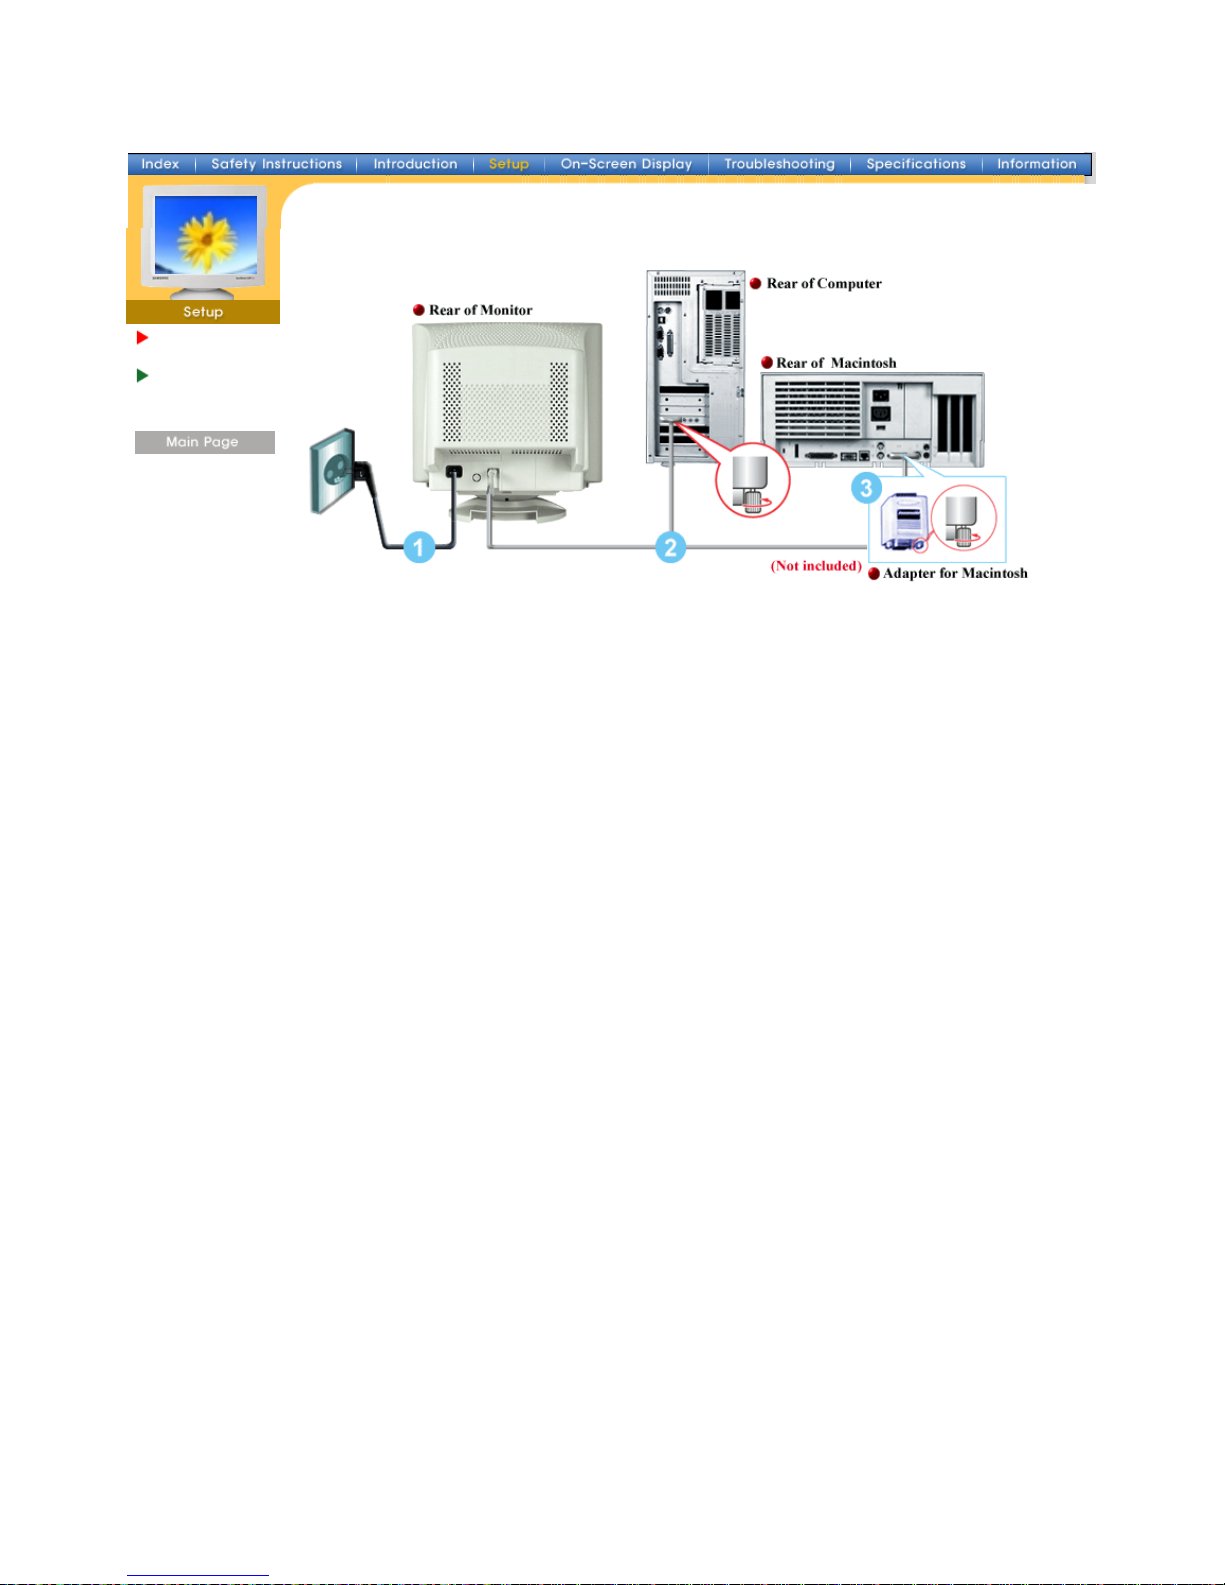
1. Connect the power cord for your monitor to the power port on the back of the monitor.
Plug the power cord for the monitor into a nearby outlet.
2. Connect the signal cable to the video port on your computer, video board, video card, or
graphics card.
3. If you are using a Macintosh computer, connect the cable to a Macintosh adapter, and set the
pins on your adapter(Adapter not included). A PC-compatible computer does not need an
adapter.
4. Turn on your computer and monitor. If your monitor displays an image, installation is complete.
Page 14
Connecting Your
Monitor
Base Installation
Tilt/Swivel Base
|
Attaching and Removing the Base
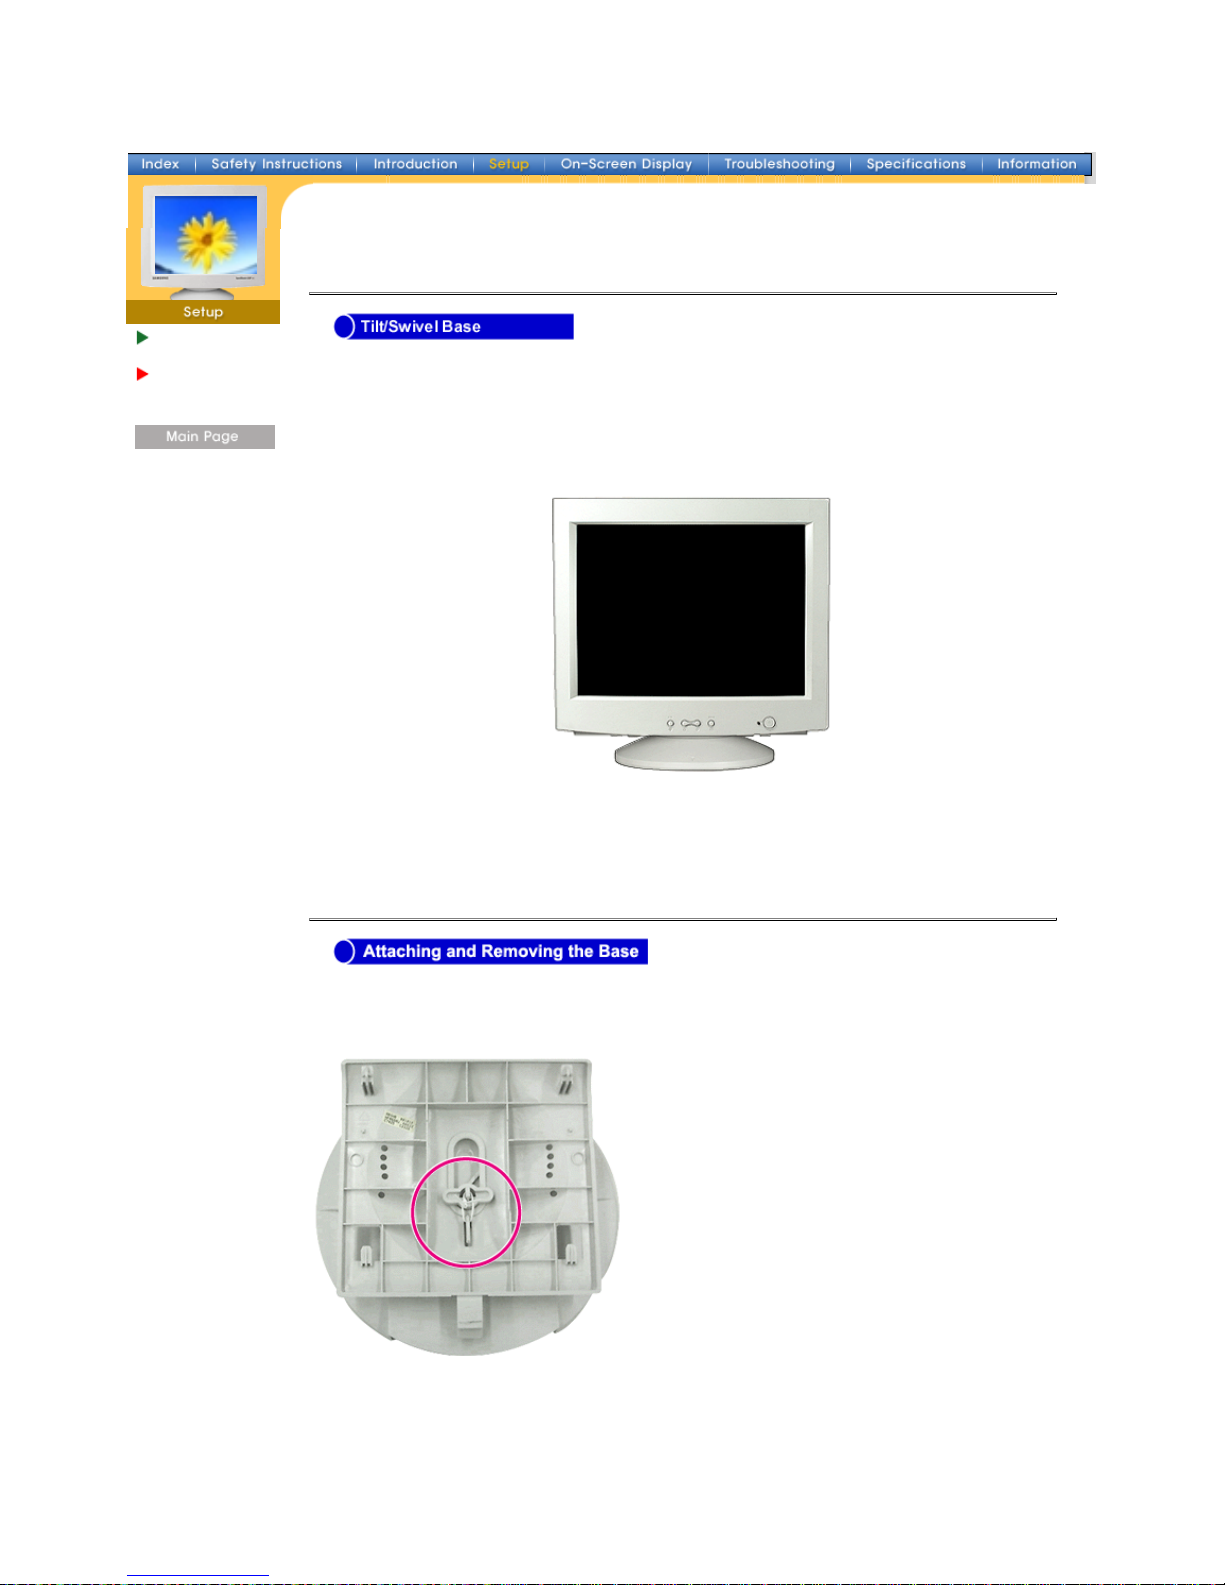
With the built-in pedestal, you can tilt and/or swivel the monitor for the most comfortable
viewing angle.
Note:
The base is detachable.
If your monitor was supplied with the base detached, attach the base as follows.
Remove the twist-tie before attaching the base to the monitor.
Page 15
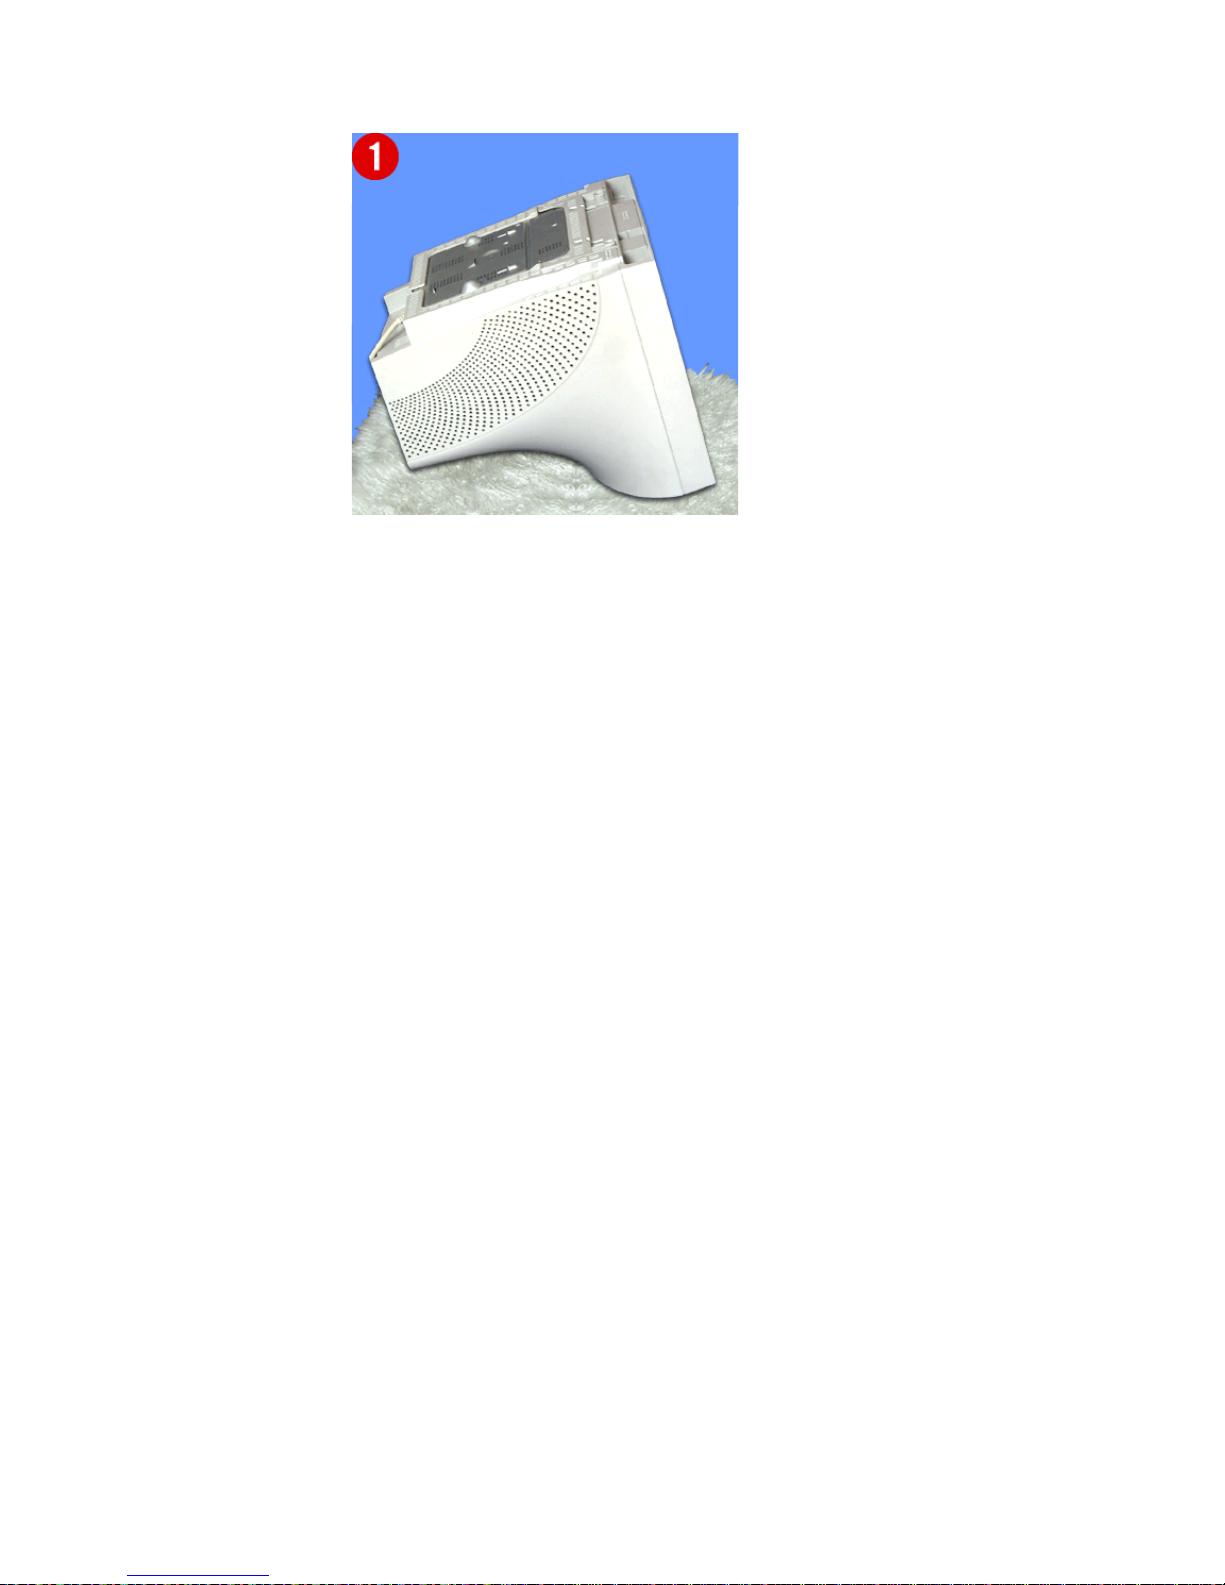
Attaching the Base
1. Place the monitor upside-down on a flat work surface.
2. Align the tabs on the base with the corresponding slots on the bottom of the monitor.
3. Press the base onto the monitor until the tabs are fully engaged in the slots.
4. Push the base toward the front of the monitor until the release latch clicks into the locked
position.
* Do not bend the snap.
Removing the Base
5. Squeeze and pull up on the release latch on the base.
6. Push the base toward the back of the monitor and lift up to remove the base.
Note: The base will align with the monitor slots in only one position.
Page 16
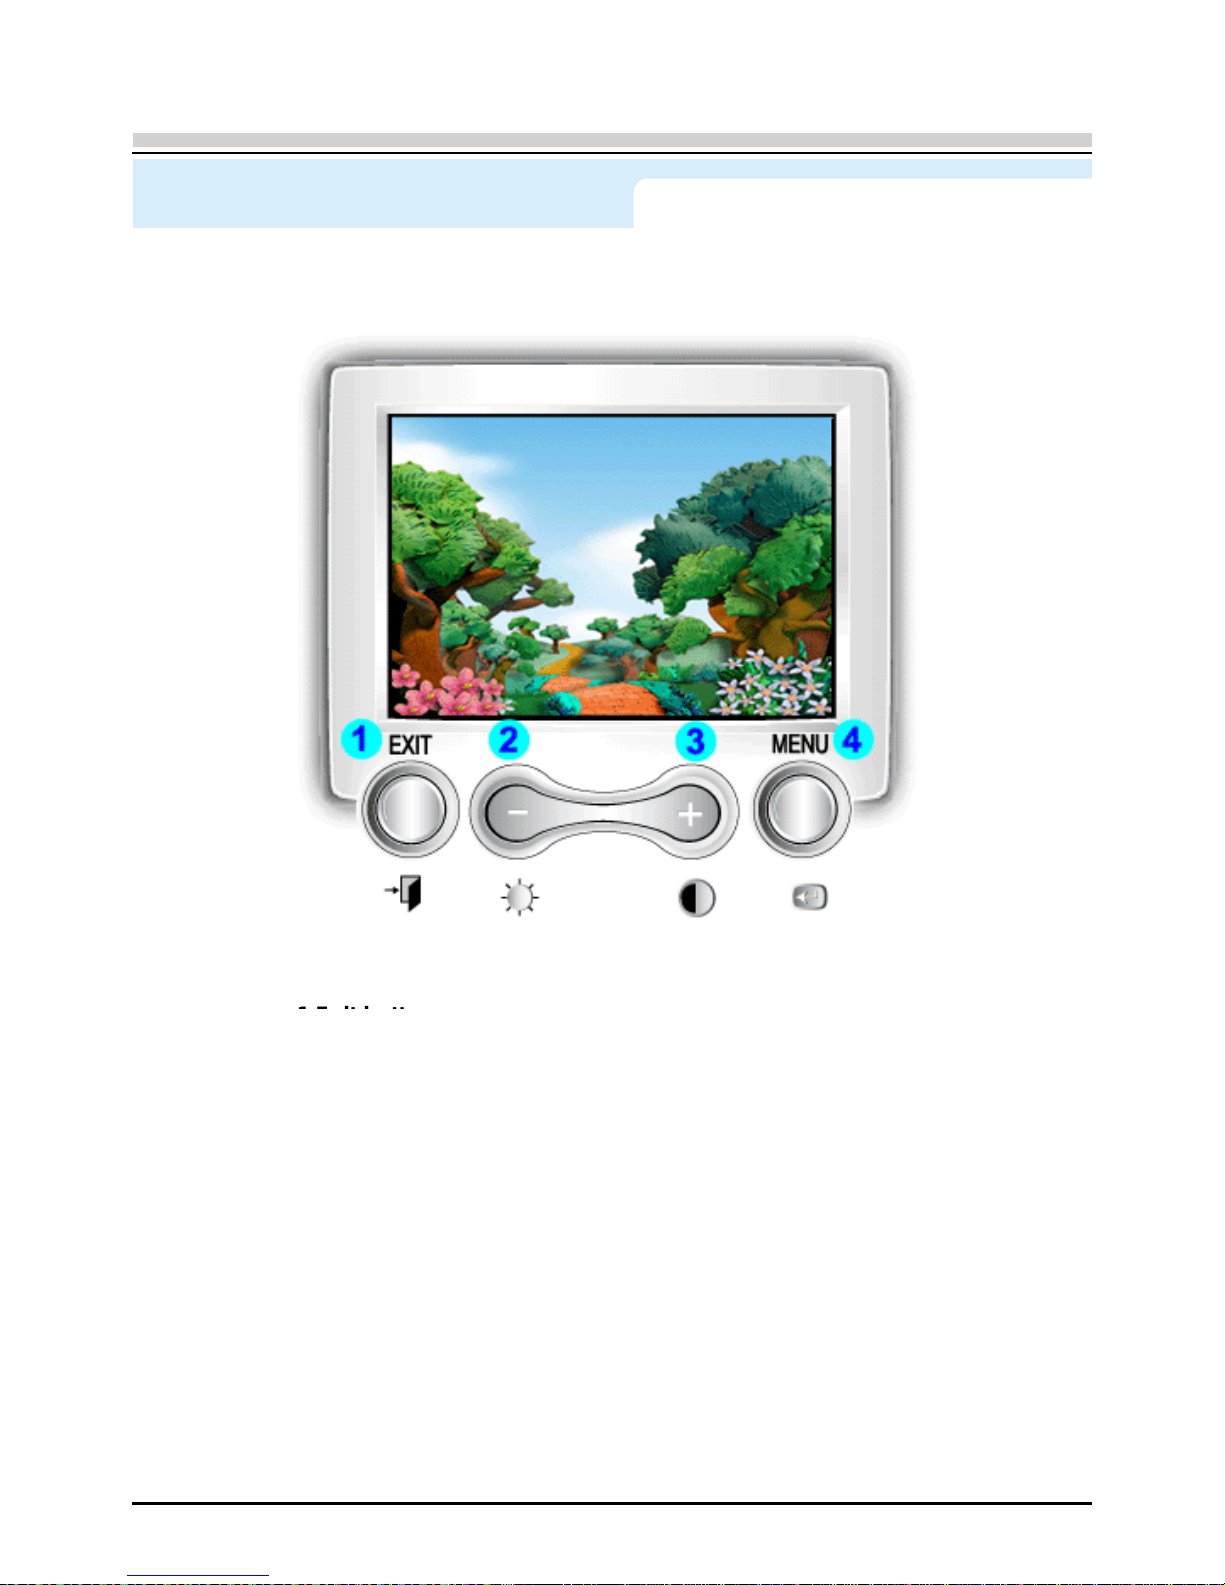
On Screen Display (OSD) Menu System
1 Exit butt
on:
U
se
this butt
on to Exit the active menu or the
OSD.
2,3 Adjust buttons:
These buttons allow you to highlight and
adjust items in the menu.
4 Menu button:
Use this button to open the OSD and activate
a highlighted menu item.
Page 17
On Screen Display (OSD) Menu System
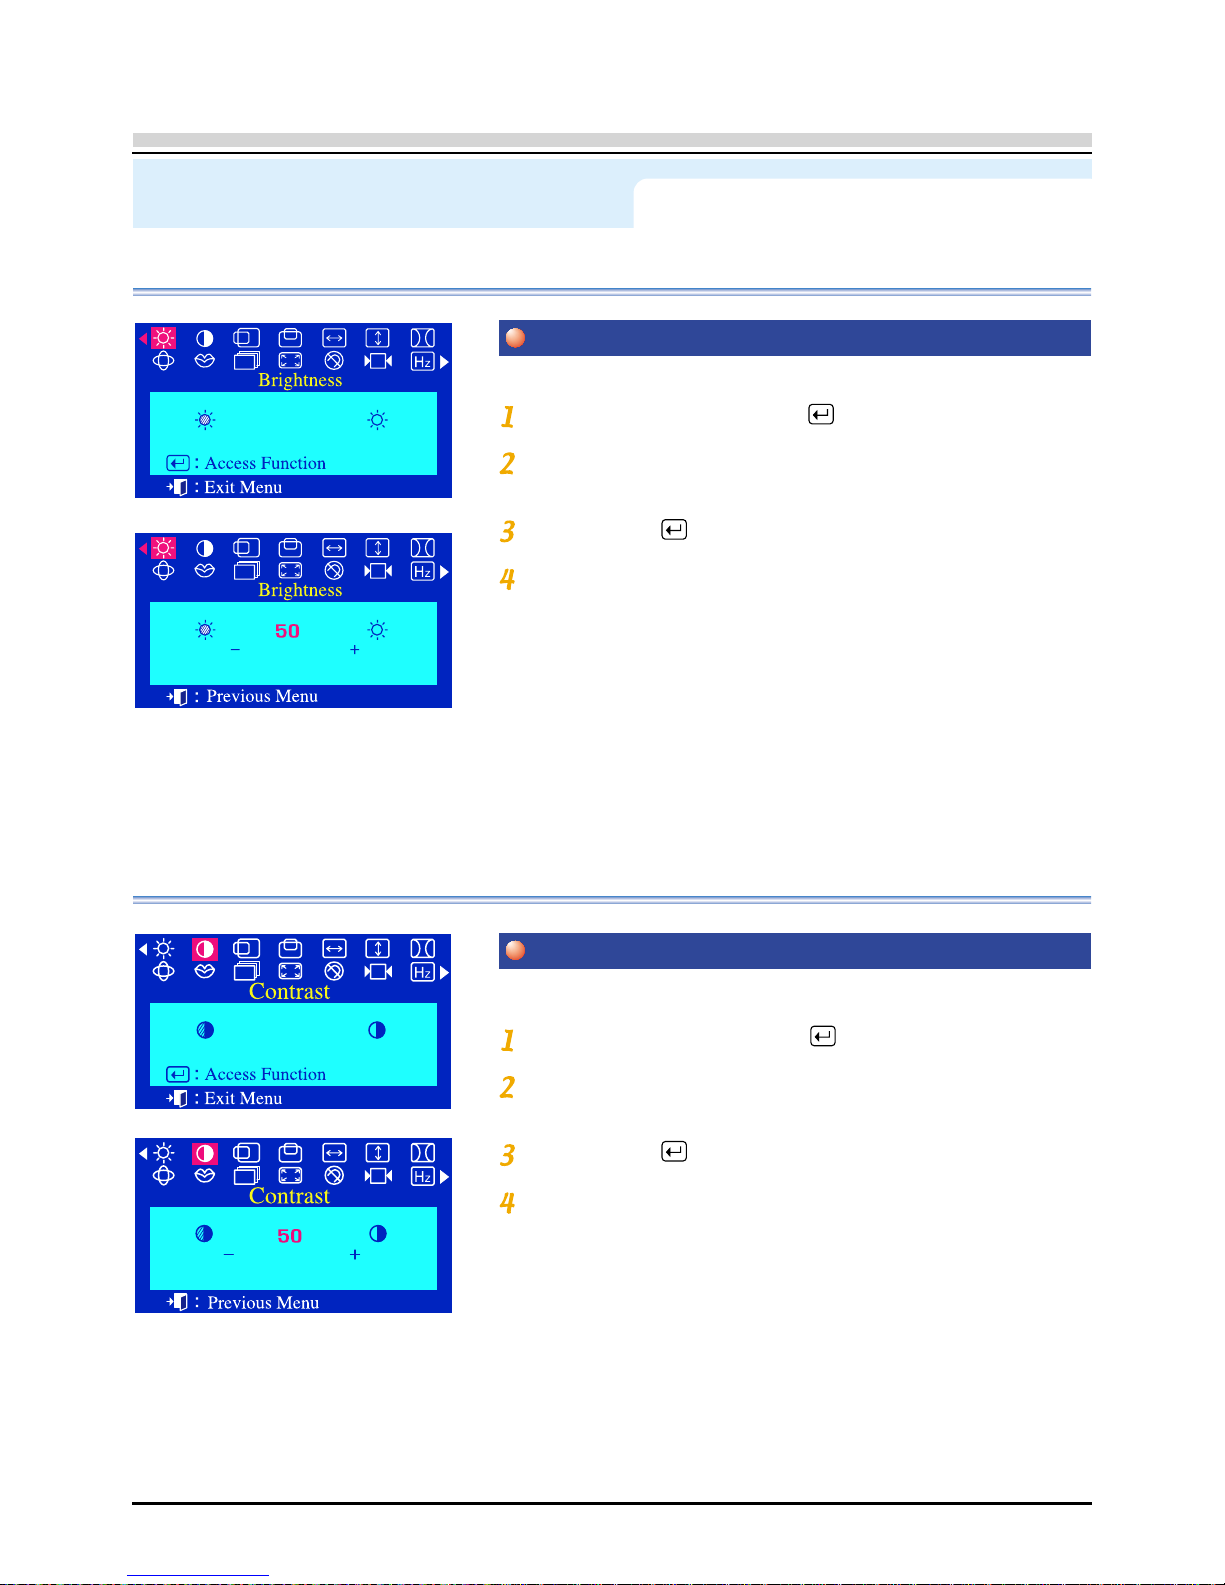
With the menu off, push the menu button.
Push the - button or + button until the Brightness
screen is displayed.
Push the menu button to open the Brightness adjustment screen.
Use the + button to increase the brightness or - button to decrease the
brightness.
Menu How to adjust
Brightness
Contrast
With the menu off, push the menu button.
Push the - button or + button until the Contrast
screen is displayed.
Push the menu button to open the Contrast adjustment screen.
Use the + button to increase the contrast or - button to decrease the
contrast.
Adjust the Brightness.
Adjust the Contrast.
Page 18
On Screen Display (OSD) Menu System
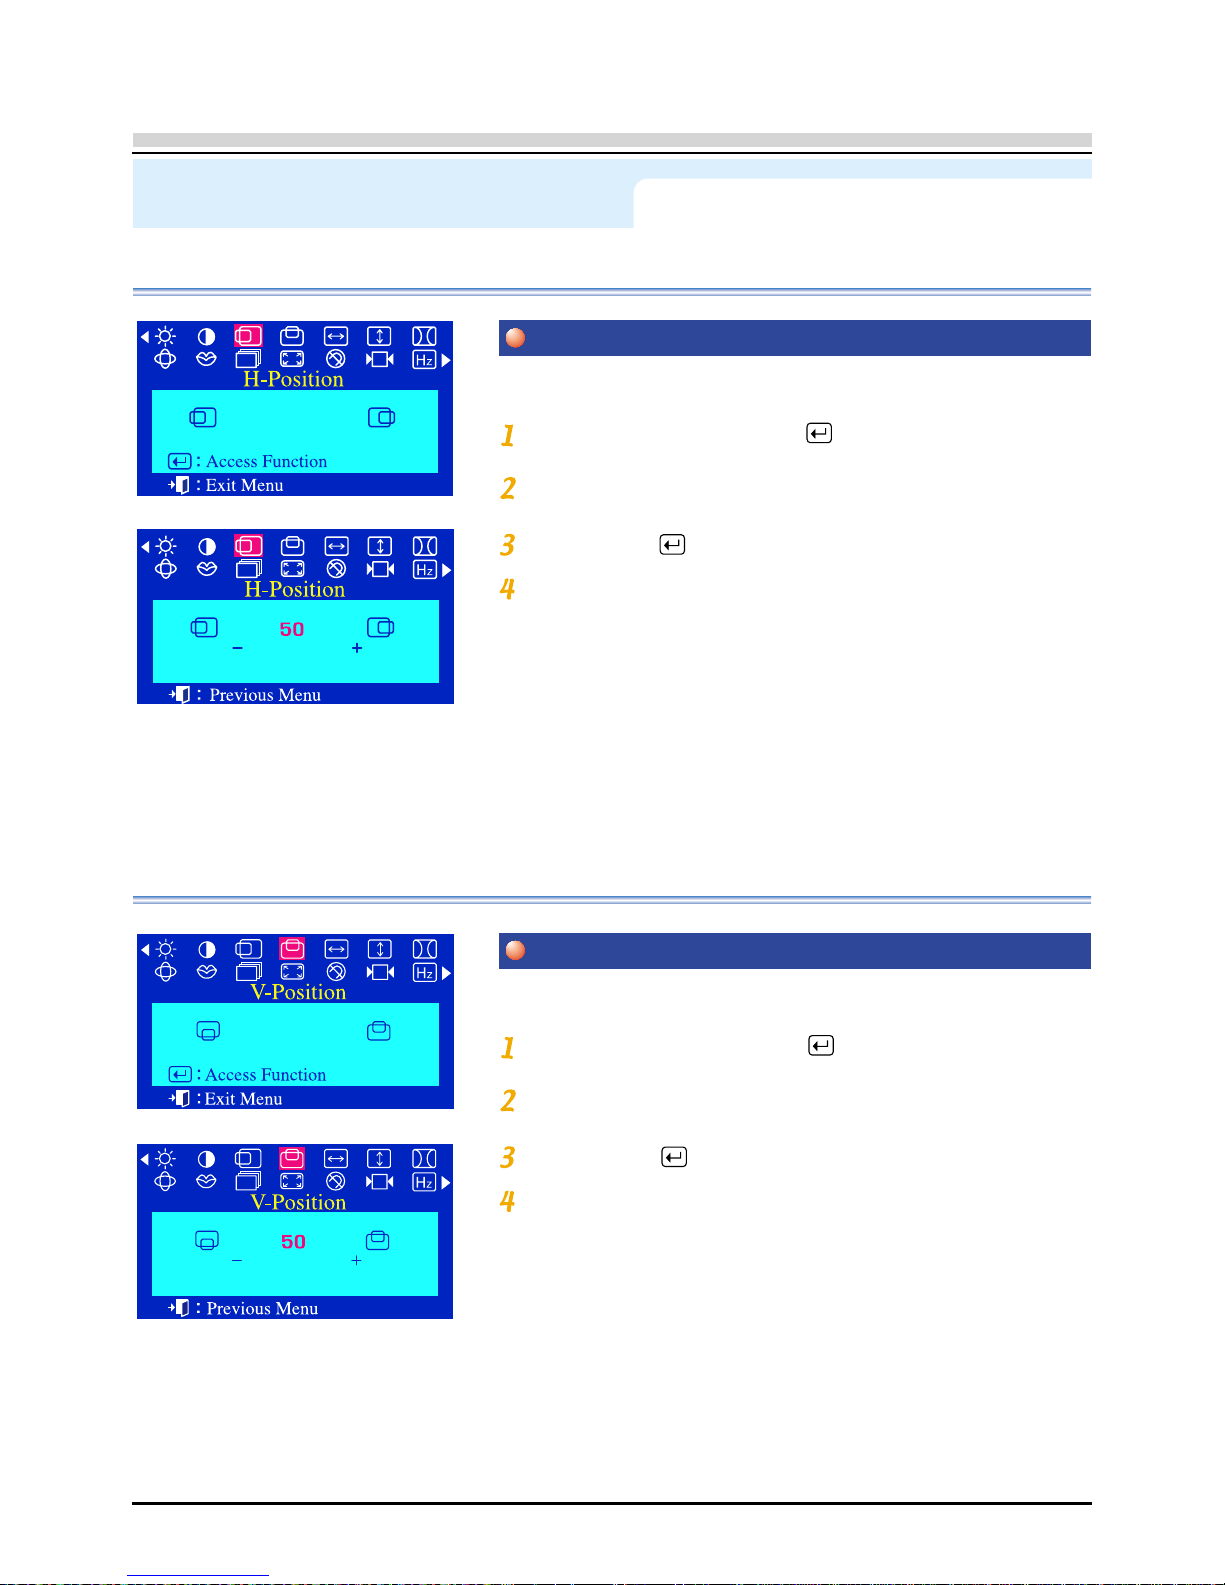
Follow these instructions to change the Position of
the monitor’s entire display.
With the menu off, push the menu button.
Push the - button or + button until the H-Position screen is
displayed.
Push the menu button to open the H-Position adjustment screen.
Use the - and + buttons to change the Horizontal
position of the monitor’s viewing area.
Menu How to adjust
H-Position
V-Position
With the menu off, push the menu button.
Push the - button or + button until the V-Position screen is
displayed.
Push the menu button to open the V-Position adjustment screen.
Use the - and + buttons to change the vertical
position of the monitor’s viewing area.
Follow these instructions to change the Position of
the monitor’s entire display.
Page 19
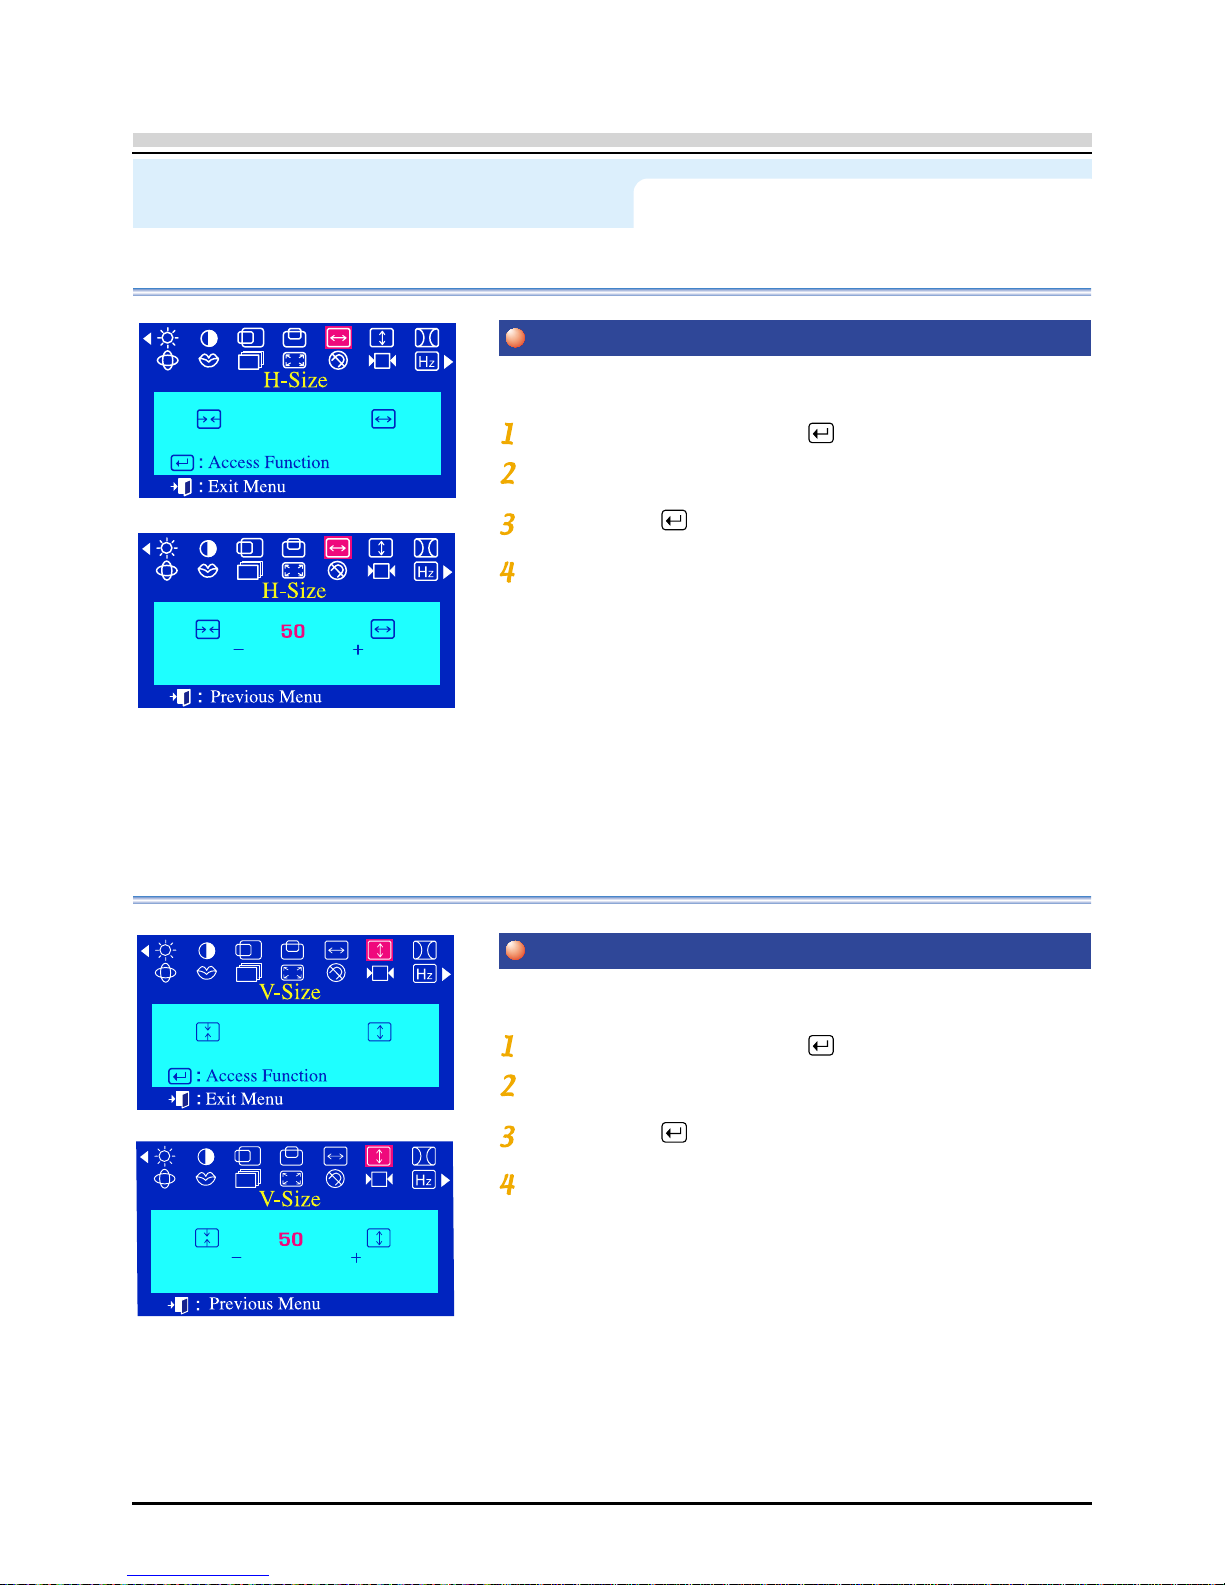
On Screen Display (OSD) Menu System
Follow these instructions to change the Size of
the monitor’s entire display.
Menu How to adjust
H-Size
Follow these instructions to change the Size of
the monitor’s entire display.
V-Size
With the menu off, push the menu button.
Push the - button or + button until the H-Size screen is displayed.
Push the menu button to open the H-Size adjustment screen.
Use the - and + buttons to change the Horizontal
Size of the monitor’s viewing area.
With the menu off, push the menu button.
Push the - button or + button until the V-Size screen is displayed.
Push the menu button to open the V-Size adjustment screen.
Use the - and + buttons to change the Vertical
Size of the monitor’s viewing area
Page 20
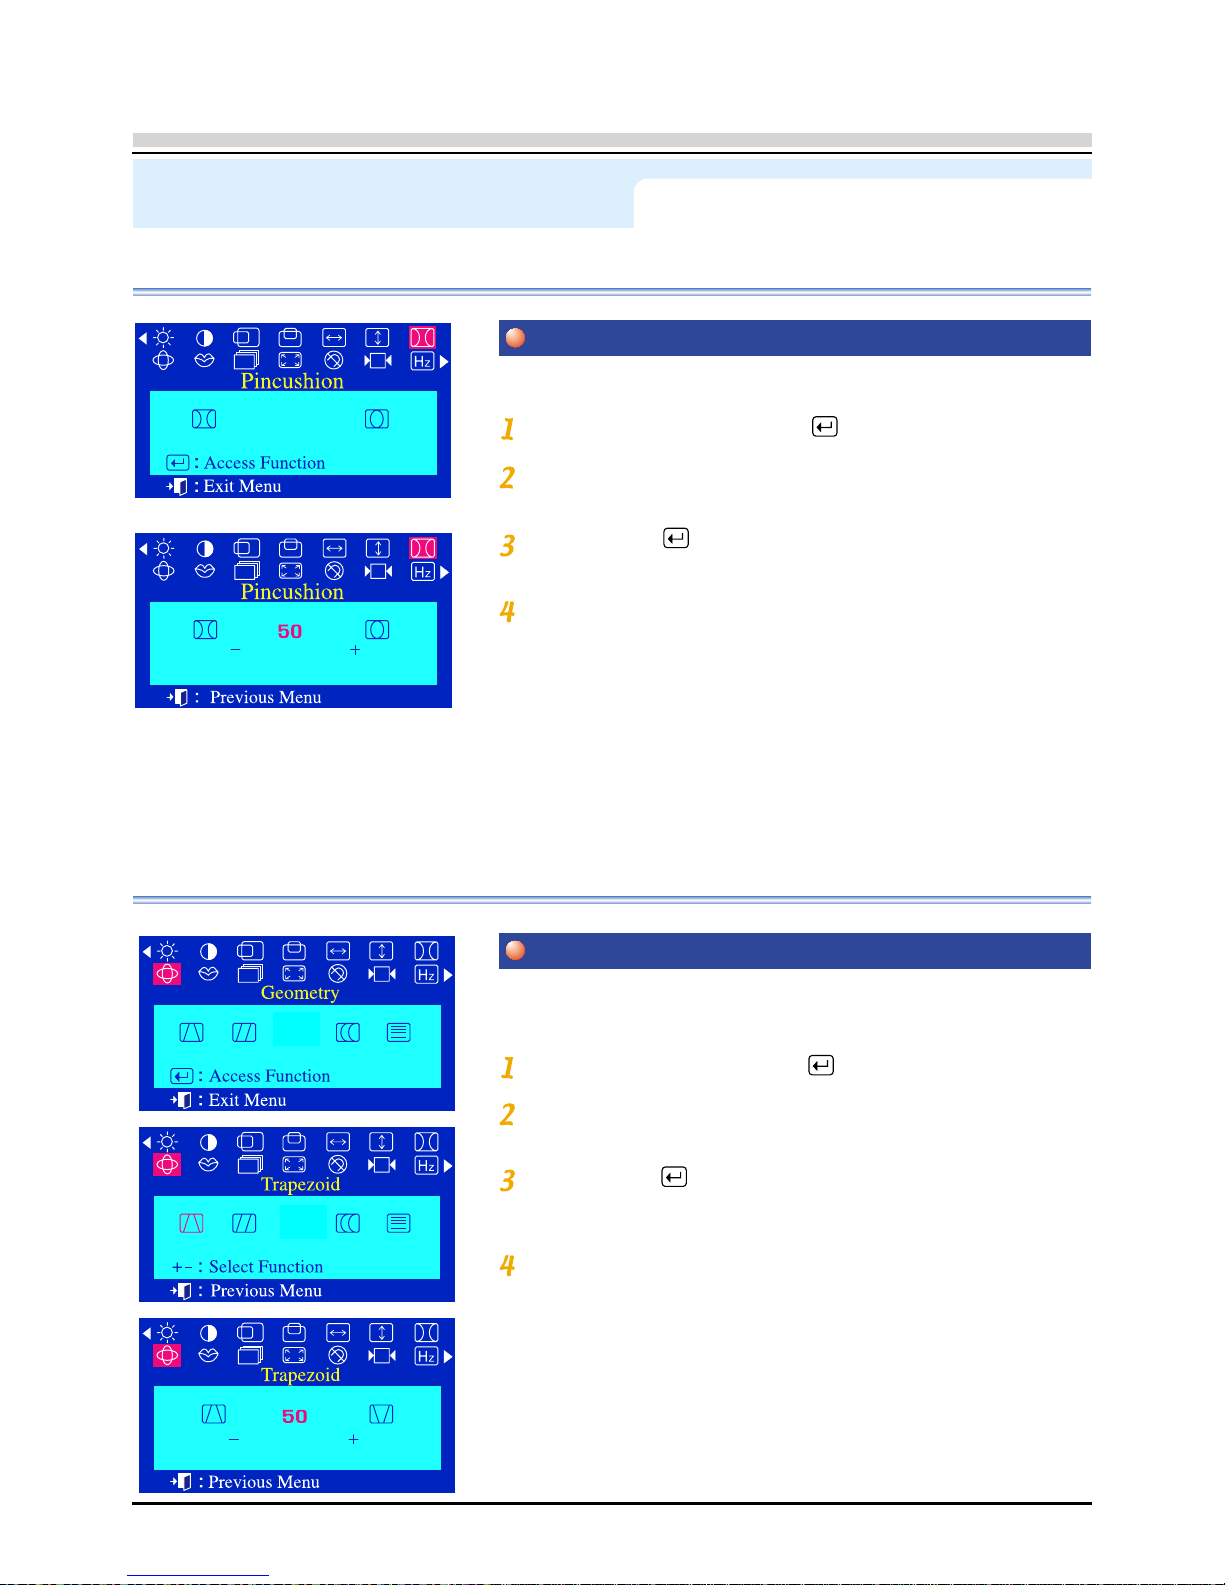
On Screen Display (OSD) Menu System
Menu How to adjust
Adjust the pincushion setting when the sides of the display
are bowed in or bowed out
Pincushion
With the menu off, push the menu button.
Push the - button or + button until the Pincushion
screen is displayed.
Push the menu button to open the Pincushion
adjustment screen.
Use the - button or + button to adjust the pincushion setting.
Adjust the trapezoid setting when the top or bottom of the
display is too large or small.
Trapezoid
With the menu off, push the menu button.
Push the - button or + button until the Geometry
screen is displayed.
Push the menu button again and then press the - or + button until
the Trapezoid screen appears.
Push the menu button to open the Trapezoid adjustment screen.
Use the - button or + button to adjust the trapezoid setting.
Page 21
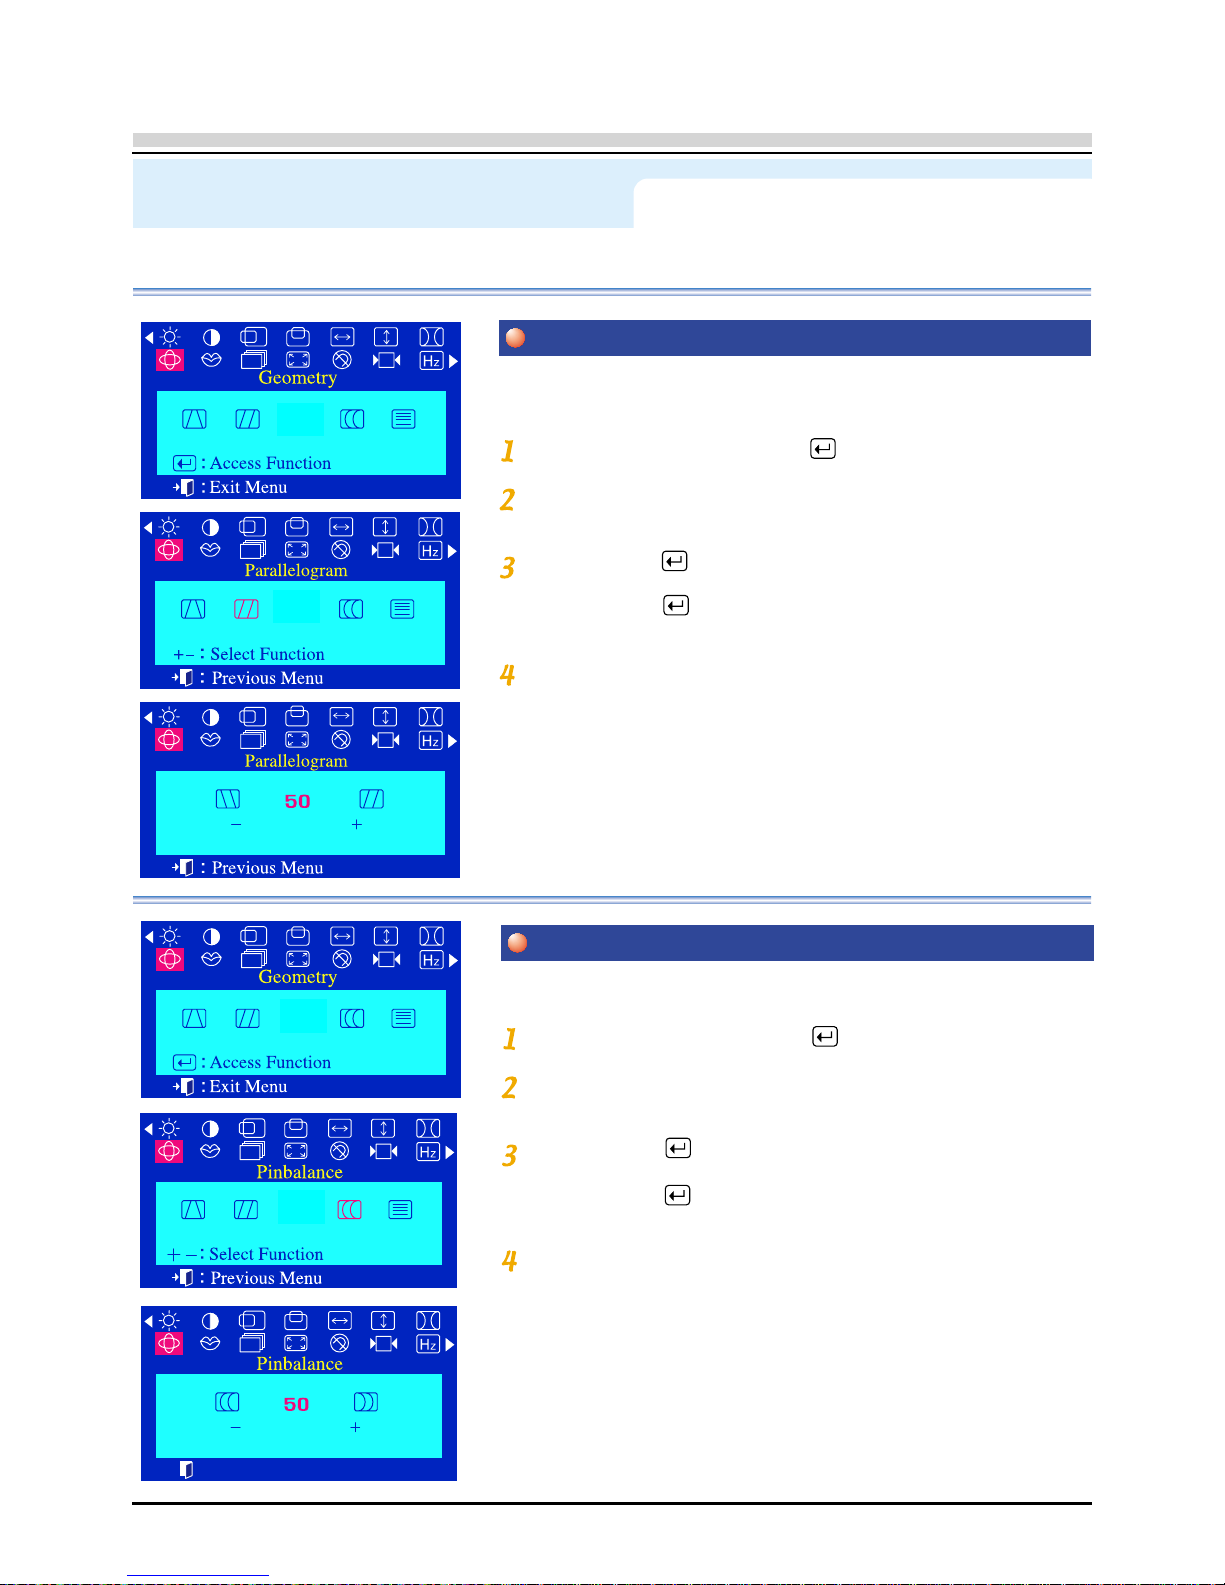
On Screen Display (OSD) Menu System
Menu How to adjust
Adjust the parallelogram setting when the display is leaning
left or right.
Parallelogram
With the menu off, push the menu button.
Push the - button or + button until the Geometry
screen is displayed.
Push the menu button again and then press the - or + button until
the Parallelogram screen appears.
Push the menu button to open the Parallelogram
adjustment screen.
Use the - button or + button to adjust the parallel setting.
Adjust the pinbalance setting when the sides of the display are
bowed towards the left or right.
Pinbalance
With the menu off, push the menu button.
Push the - button or + button until the Geometry
screen is displayed.
Push the menu button again and then press the - or + button until
the Pinbalance screen appears.
Push the menu button to open the Pinbalance
adjustment screen.
Use the - button or + button to adjust the pinbalance setting.
Page 22
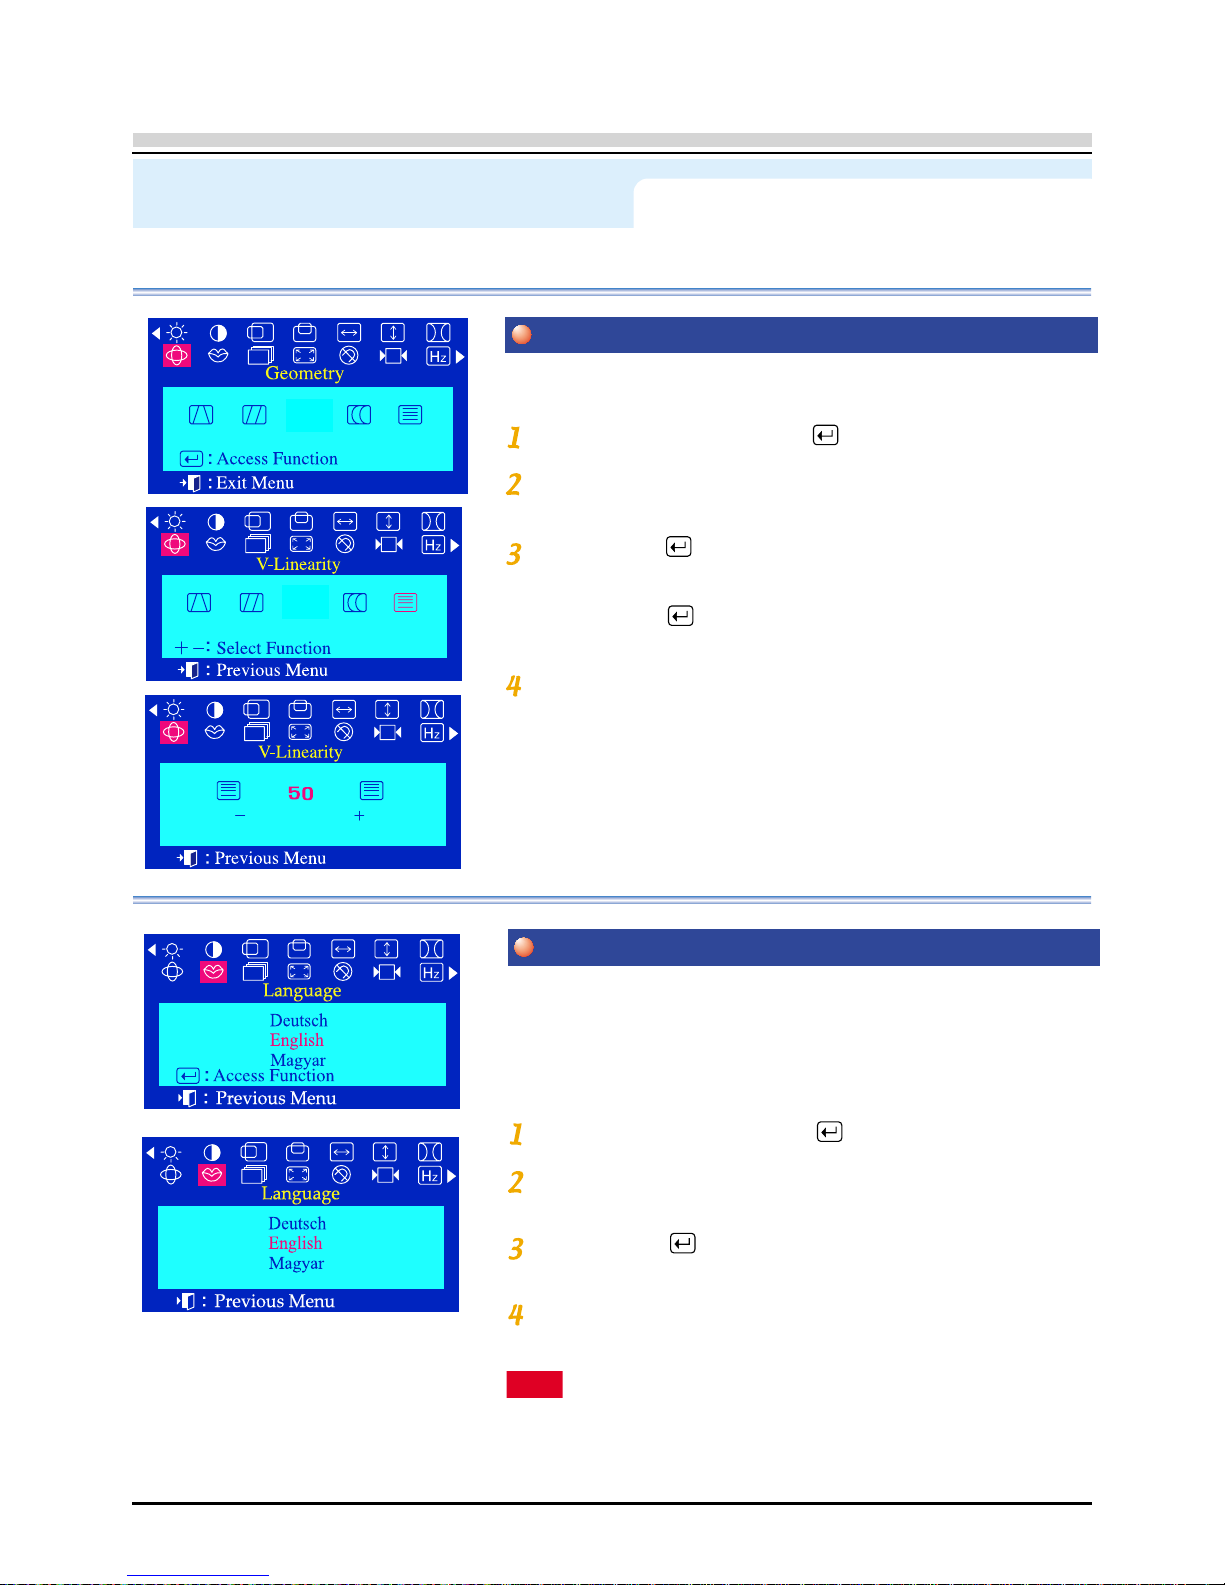
On Screen Display (OSD) Menu System
Menu How to adjust
Adjust the linearity setting when the display image is
compressed at the left, right or top, bottom.
V -Linearity
With the menu off, push the menu button.
Push the - button or + button until the Geometry
screen is displayed.
Push the menu button.
Push the - button or + button until the V-Linearity
screen is displayed.
Push the menu button to open the V-Linearity adjustment screen.
Use the - button or + button to adjust the vertical linearity.
Language
With the menu off, push the menu button.
Push the - button or + button until the Language
screen is displayed.
Push the menu button to open the Language selection screen.
Use the - button or + button to select the language you would like to
use.
Note The language chosen affects only the language of the
OSD. It has no effect on any software running on the
computer.
Follow these steps to change the language used in the menu.
You can choose one of ten languages.
English,German,French, Italian, Portuguese, Spanish, Swedish,
Russian, Polish, or Magyar.
(Some OSD languages may not appear in some areas.)
Page 23
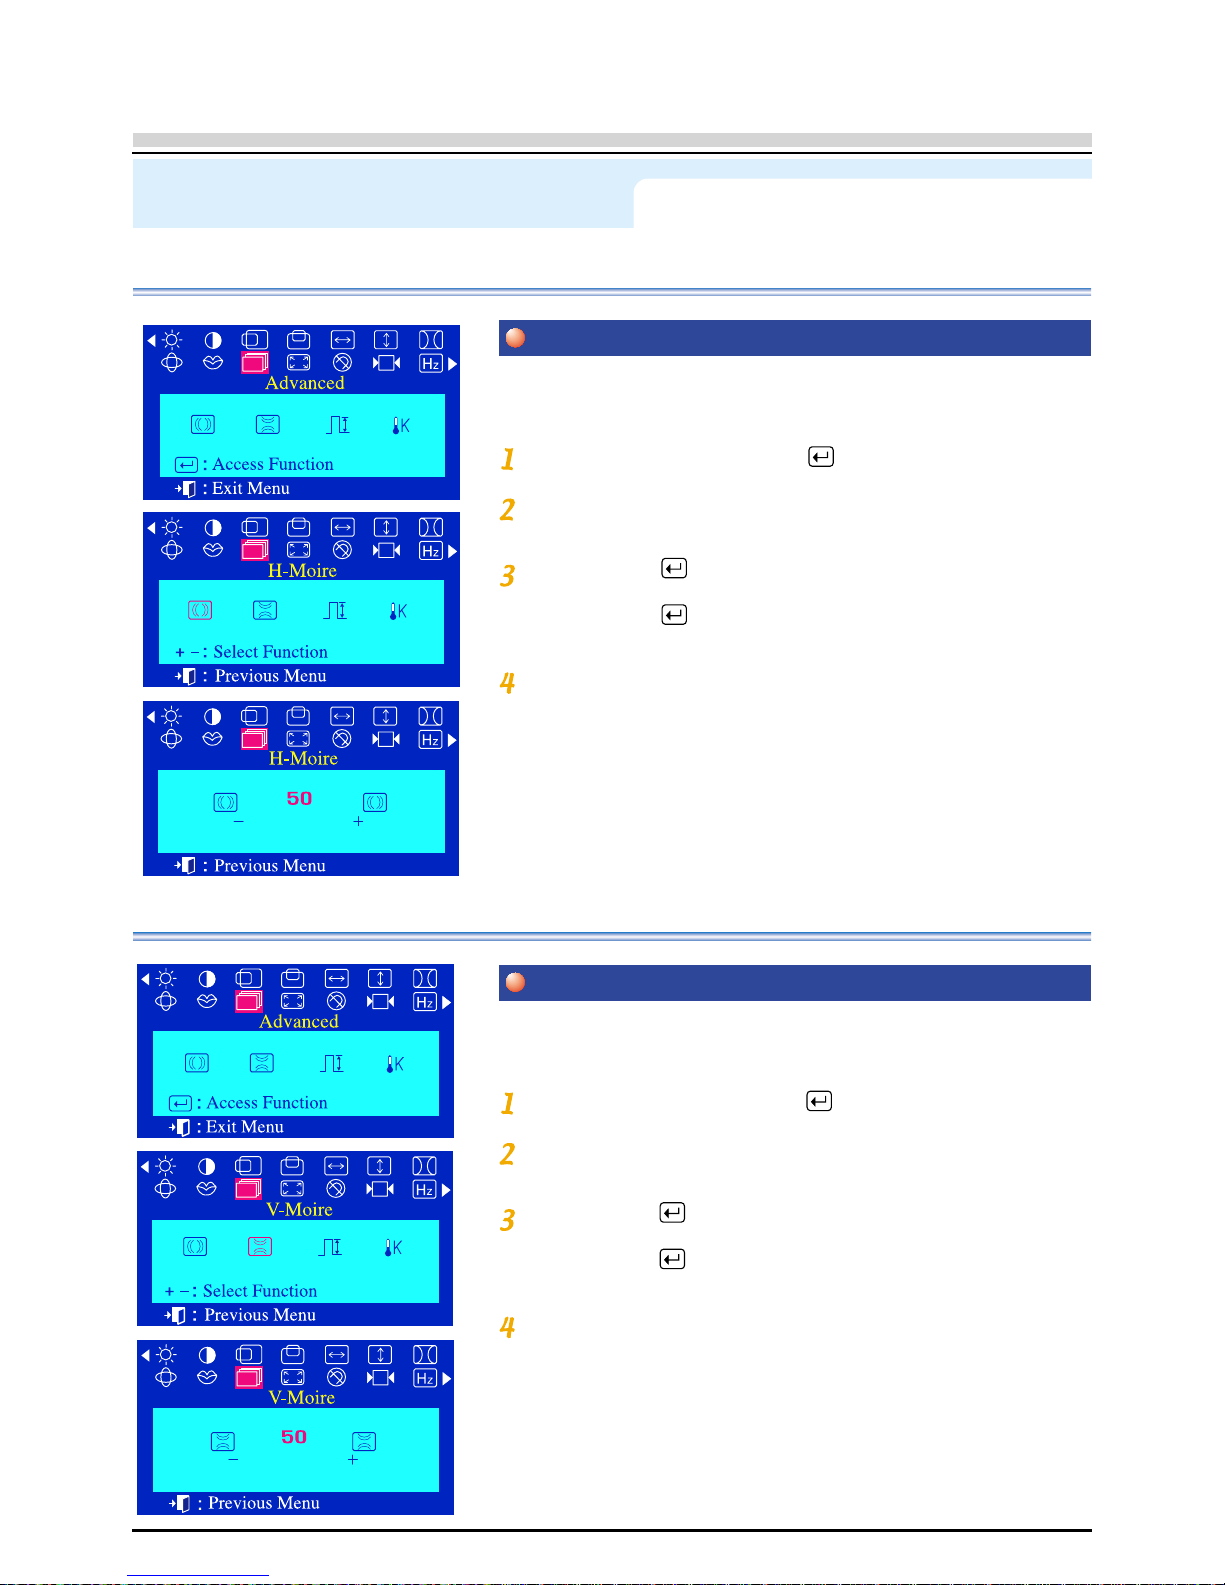
On Screen Display (OSD) Menu System
A “Moiré” pattern can appear on your screen, looking like a
series of concentric circles or arcs. To eliminate this pattern,
use the clear moiré adjustments.
Menu How to adjust
H-Moire
With the menu off, push the menu button.
Push the - button or + button until the Advanced
screen is displayed.
Push the menu button again and then press the - or + button until
the H-Moire screen appears.
Push the menu button to open the H-Moire
adjustment screen.
Use the - button or + button to adjust horizontal moiré.
A “Moiré” pattern can appear on your screen, looking like a
series of concentric circles or arcs. To eliminate this pattern,
use the clear moiré adjustments.
V -Moire
With the menu off, push the menu button.
Push the - button or + button until the Advanced
screen is displayed.
Push the menu button again and then press the - or + button until
the V-Moire screen appears.
Push the menu button to open the V-Moire
adjustment screen.
Use the - button or + button to adjust vertical moiré.
Page 24
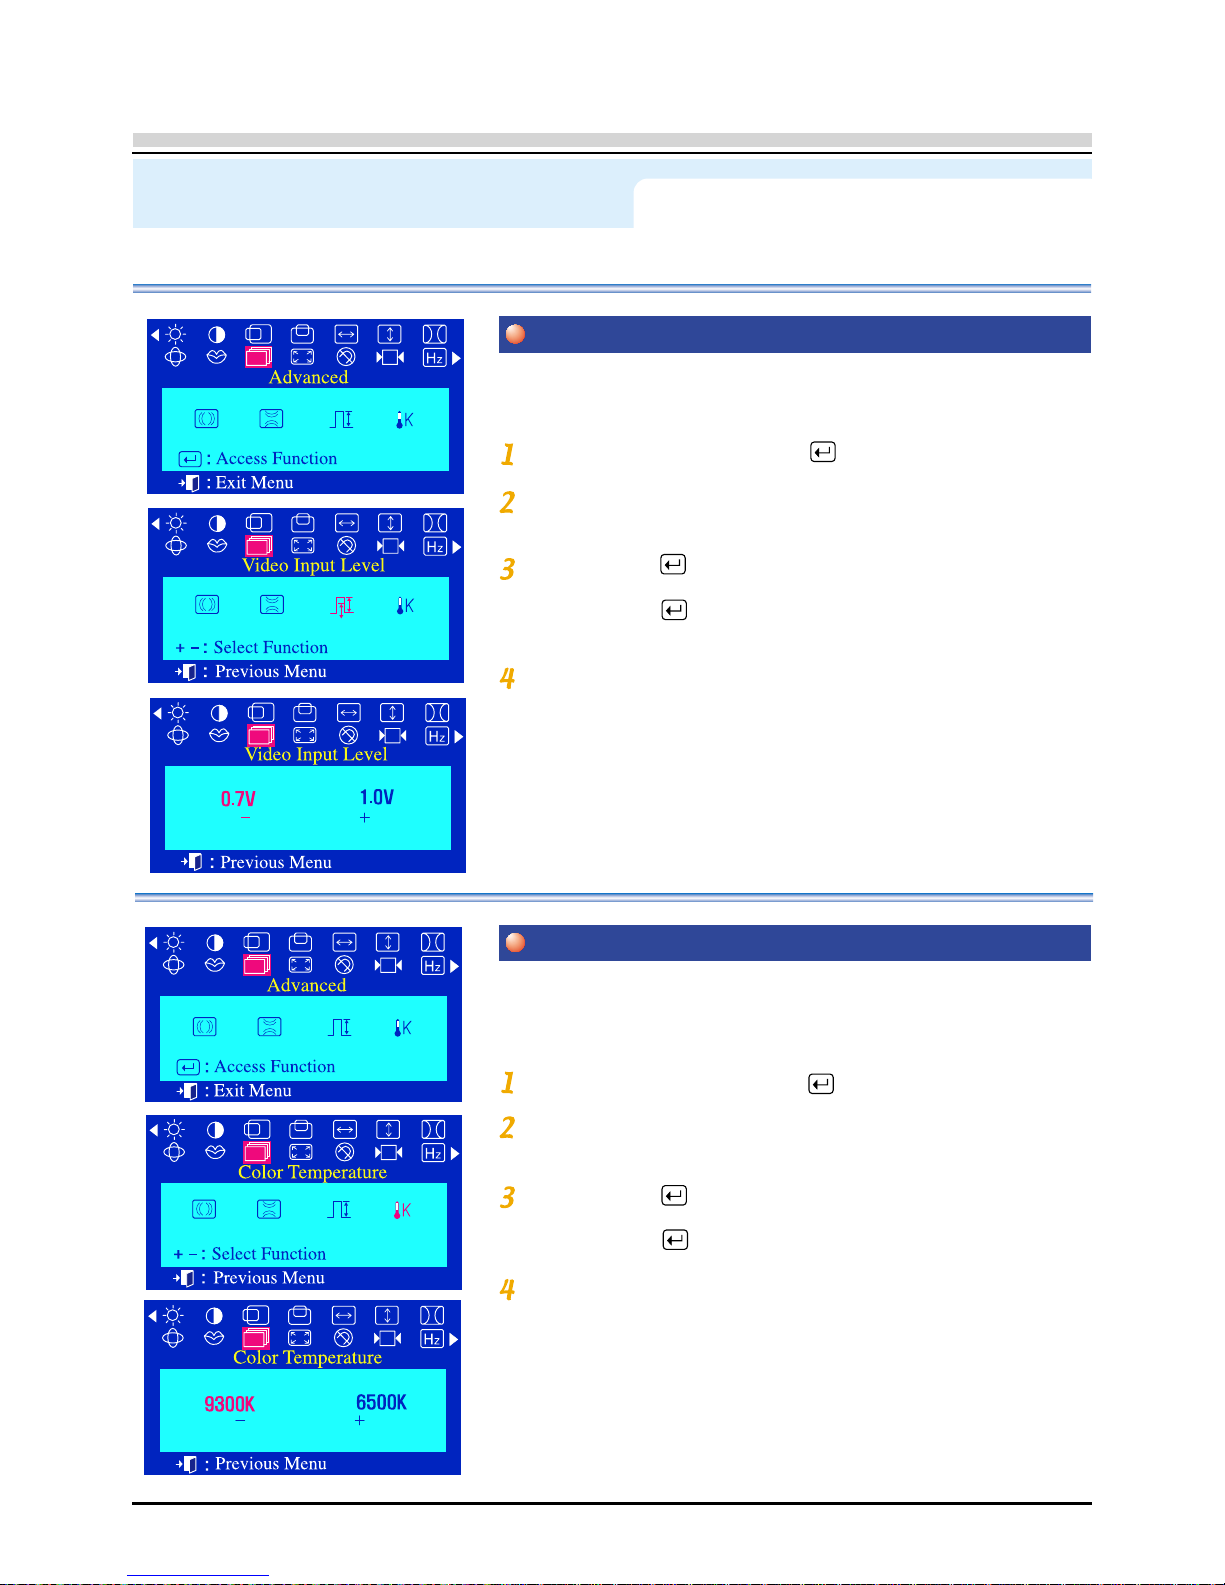
On Screen Display (OSD) Menu System
Menu How to adjust
Some video cards use video signals higher than 1.0V which
causes the display to be very bright. For those video cards,
use this feature to select the 1.0V Level.
Video Input Level
With the menu off, push the menu button.
Push the - button or +button until the Advanced
screen is displayed.
Push the menu button again and then press the - or + button until
the Video Input Level screen appears.
Push the menu button to open the Video Input Level
selection screen.
Use the - button or + button to select 0.7 V or 1.0 V.
Color temperature is a measure of the “warmth” of the image
colors. The available range is between 6500 to 9300K.
Color Temperature
With the menu off, push the menu button.
Push the - button or + button until the Advanced
screen is displayed.
Push the menu button again and then press the - or + button until
the Color Temperature screen appears.
Push the menu button to open the Color Temperature selection
screen.
Press the - or + button to select 9300K(Bluish colors)
or 6500K(Reddish colors).
Page 25
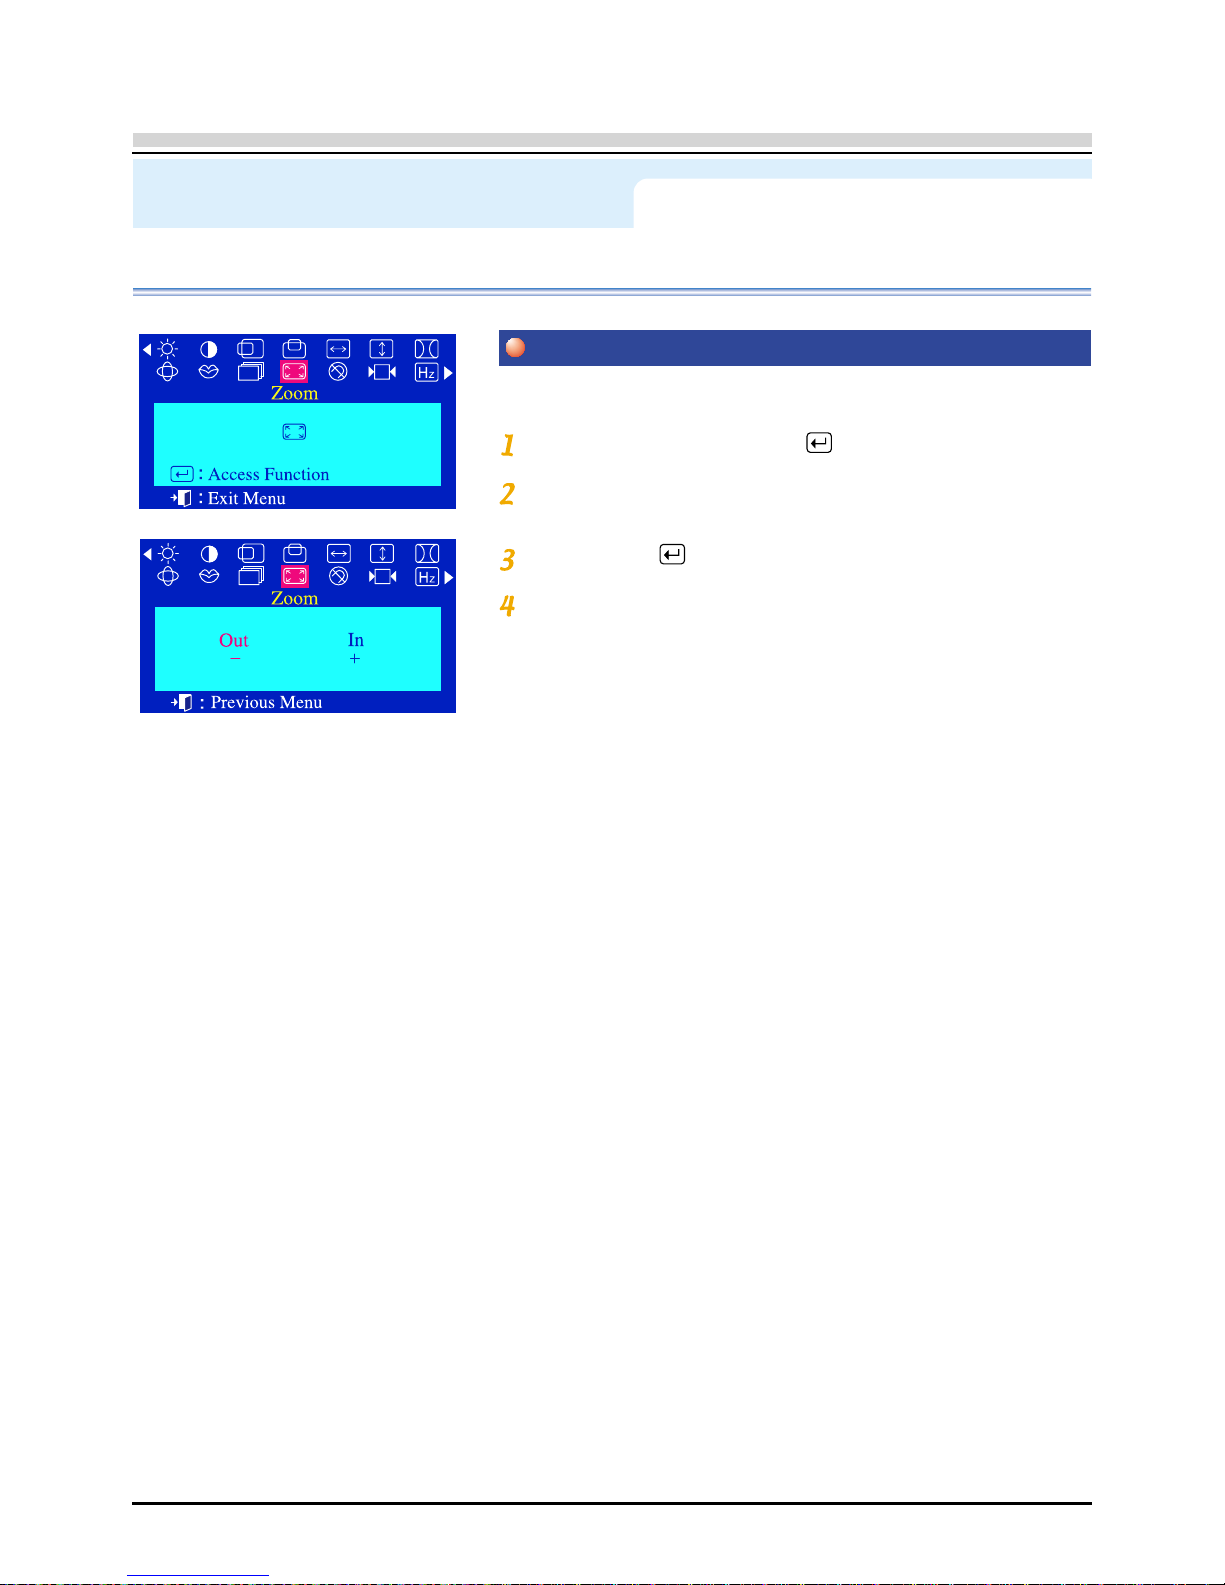
On Screen Display (OSD) Menu System
Menu How to adjust
Follow these instructions to get a close-up or a longshot view
of the monitor’s viewing area.
Zoom
With the menu off, push the menu button.
Push the - button or + button until the Zoom
screen is displayed.
Push the menu button to open the Zoom adjustment screen.
Use the - button to decrease the screen viewing area.
Use the + button to enlarge the screen viewing area.
Page 26
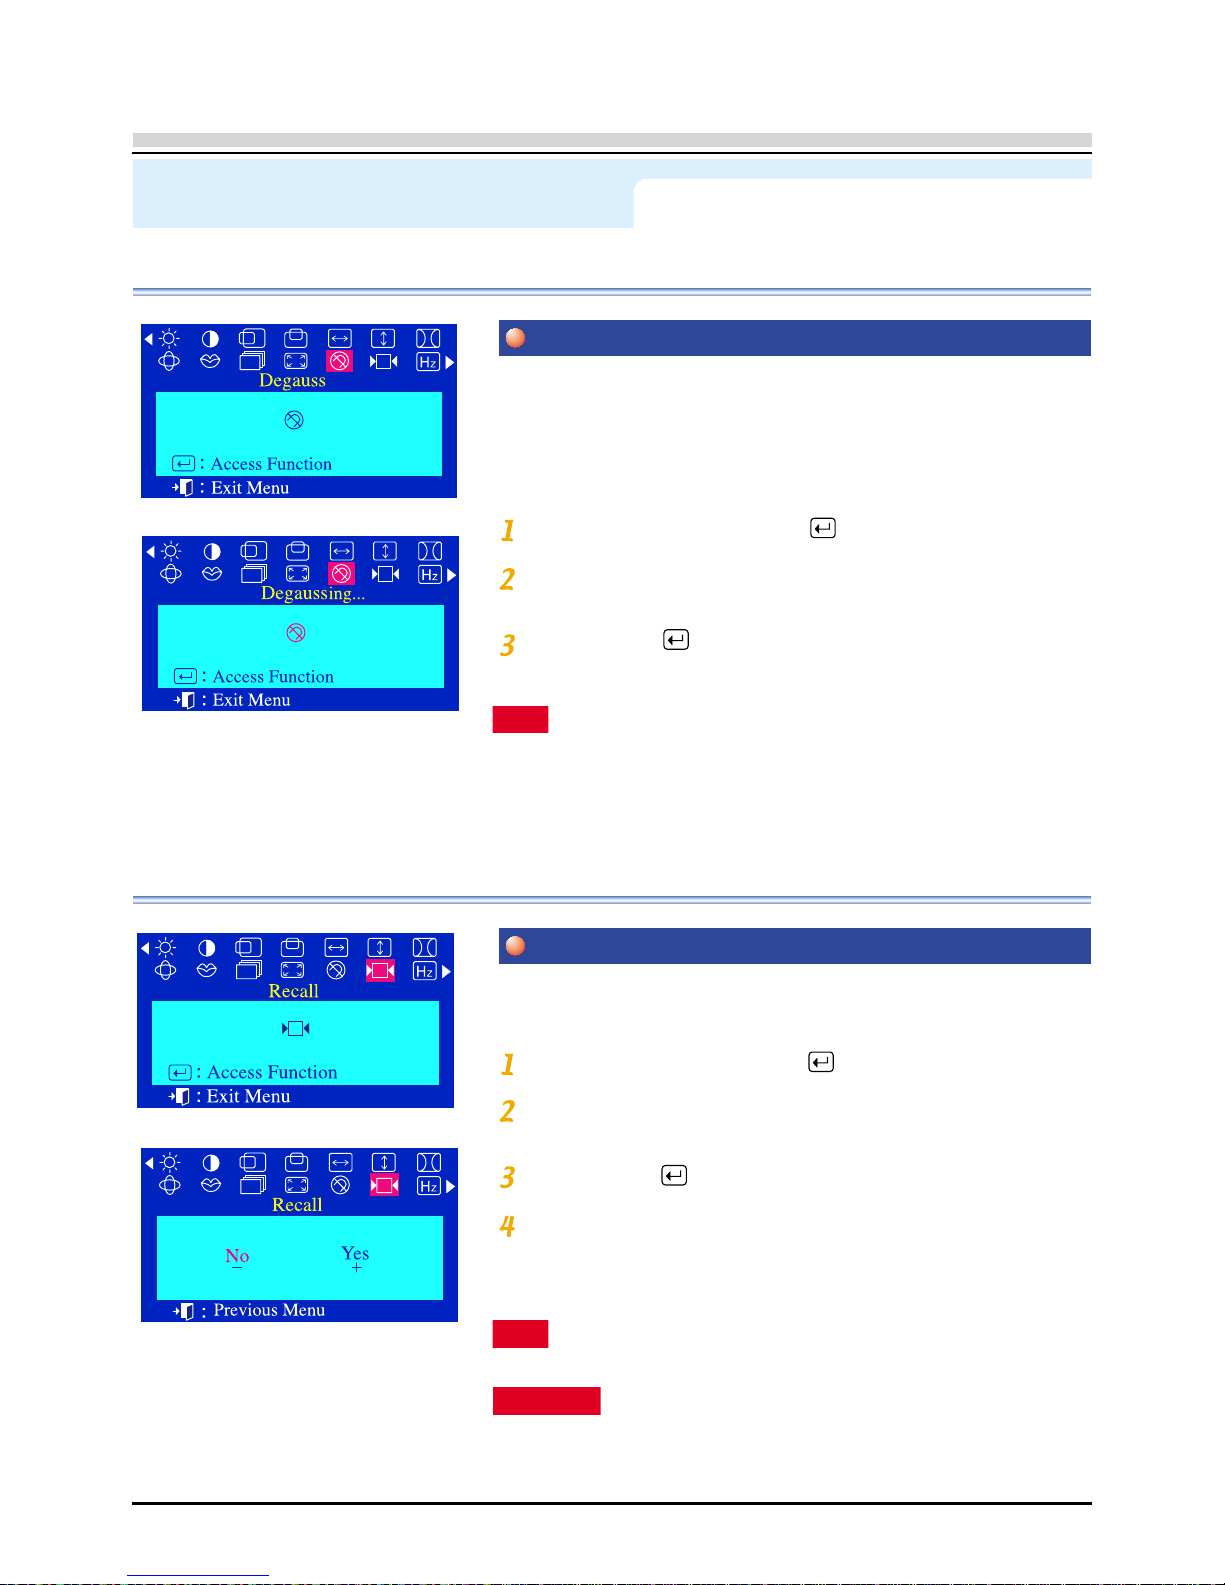
Note The monitor may buzz momentarily, the image colors may
change and the image will jiggle for a few seconds.
These effects are normal.
On Screen Display (OSD) Menu System
The Degauss feature will remove color impurities caused by
magnetic fields.
You can use this function to turn on the power of the monitor
or change the power saving mode to the normal mode.
Do not use the Degauss feature more than once within a
30-minute period.
Menu How to adjust
Degauss
With the menu off, push the menu button.
Push the - button or + button until the Degauss
screen is displayed.
Push the menu button to execute the degauss function.
The degaussing screen will appear.
Note If you have selected “Yes”, all settings listed above will be
reset. All other settings will remain the same.
CAUTION This operation resets all of the data in the user memory
area for the current timing signal.
Use the recall feature to reset these monitor settings to their
original levels: Position, Size, Pincushion, Trapezoid,
Parallelogram, Pinbalance, Rotation, H-Moire and V-Moire.
Recall
With the menu off, push the menu button.
Push the - button or + button until the Recall
screen is displayed.
Push the menu button to open the Recall adjustment screen.
Push the + button to select Yes.
If you don’t want to reset the monitor, use the - button to select No.
Page 27
On Screen Display (OSD) Menu System
Menu How to adjust
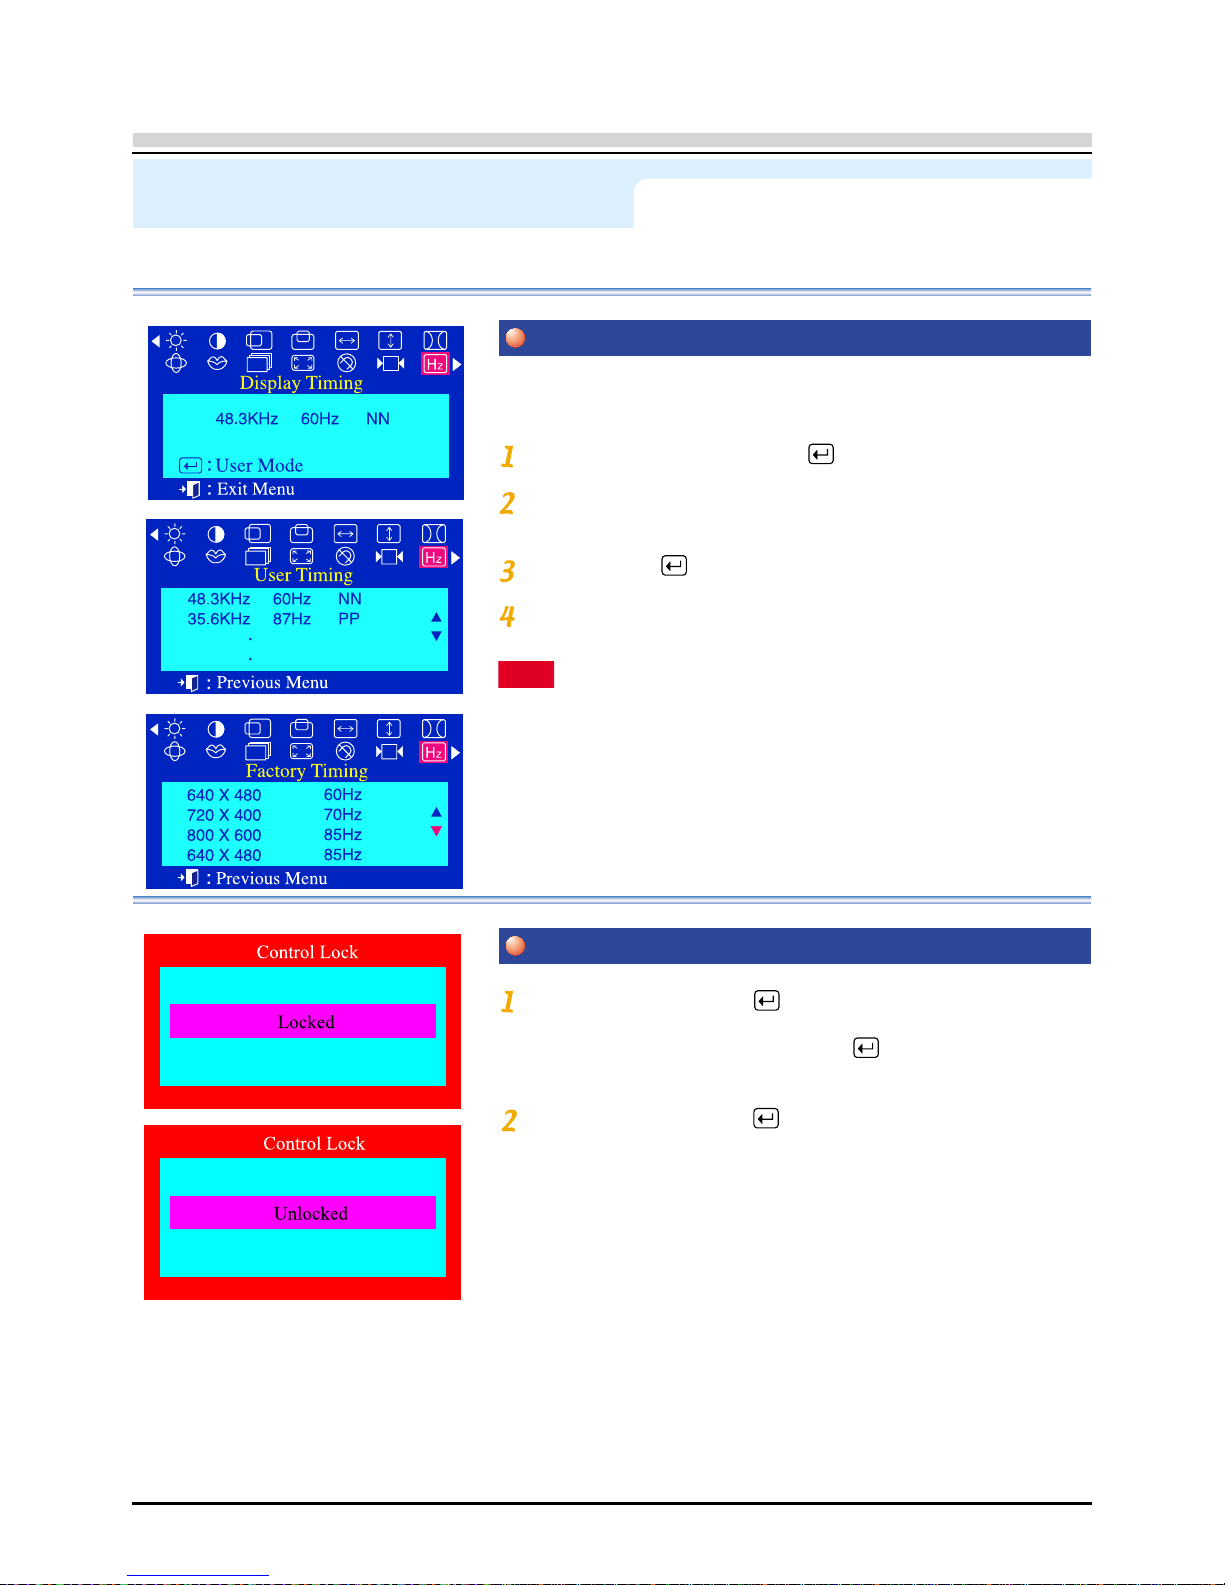
The information on this screen shows Display Timing , User
Timing and Factory Timing.
Display Timing
With the menu off, push the menu button.
Push the - button or + button until the Display Timing
screen is displayed.
Push the menu button to open the Display Timing adjustment screen.
Use the - button to see user control mode and thedefault mode.
Push and hold in the menu button for 10 seconds or more
to Lock the OSD.
(In this case, even if you click the menu button the control
screen will not be printed.)
Push and hold in the menu button for 10 seconds or more
to Unlock the OSD.
OSD Lock/Unlock
Note You can see the frequency(user control mode) used by the user,
the polarity of the operational signals, the default frequency(default mode)
set when you buy the monitor and the resolution level.
Page 28
Main > Troubleshooting > Check List
Check List
Q & A
Self-Test Feature
Check
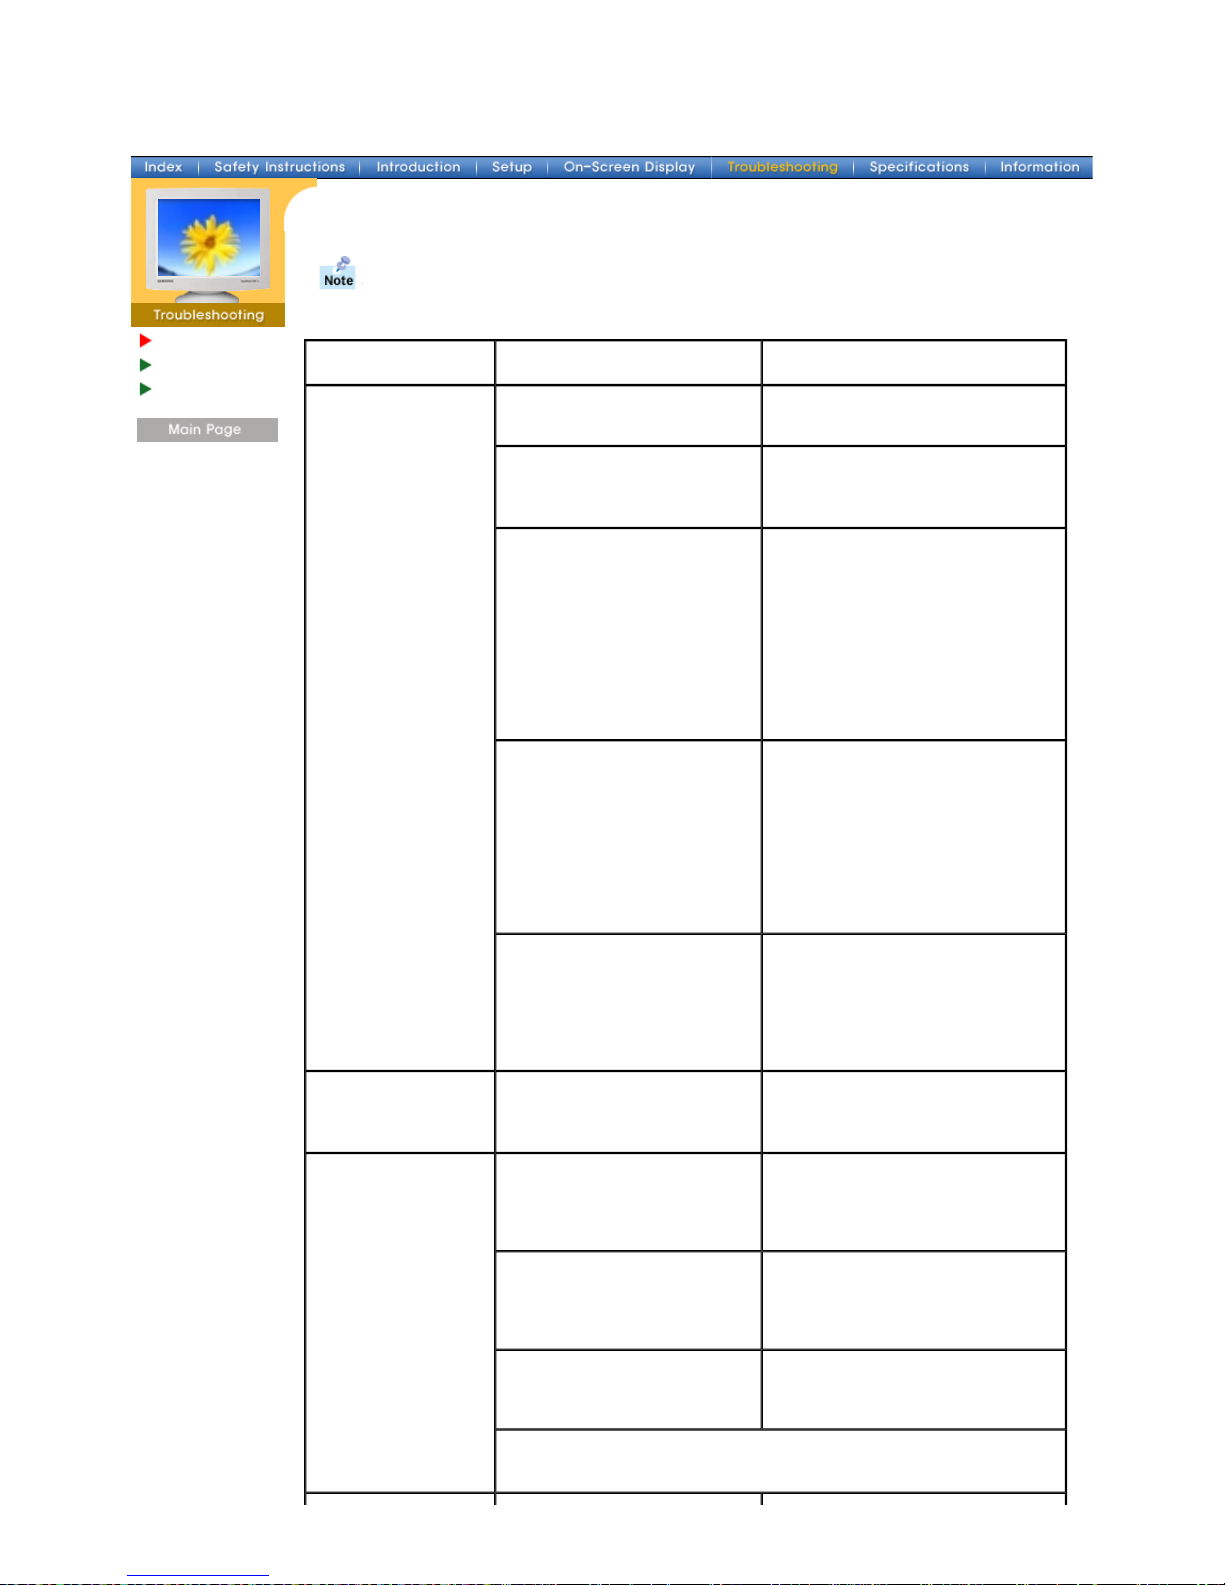
Before calling for service, check the information in this section to see if you can remedy any
problems yourself. If you do need assistance, please call the phone number on the
warranty card, the phone number on the Information section or contact your dealer.
Symptom Check List Solutions
No images on the
screen. I cannot
turn on the monitor.
Is the power cord connected
properly?
Check the power cord connection
and supply.
Can you see "
No Connection,
Check Signal Cable
" on the
screen?
Check the signal cable connection.
If the power is on, reboot the
computer to see the initial
screen(the login screen), which
can be seen.
If the initial screen (the login screen)
appears, boot the computer in the
applicable mode (the safe mode for
Windows ME/XP/2000) and then
change the frequency of the video
card. (Refer to the Preset Timing
Note: If the initial screen (the login
screen) does not appear, contact a
service center or your dealer.
Can you see "
Sync. Out of
Range
" on the screen?
You can see this message when the
signal from the video card exceeds
the maximum resolution and
frequency that the monitor can
properly handle.
Adjust the maximum resolution and
frequency that the monitor can
properly handle.
There is no image on the
screen. Is the power indicator
on the monitor blinking at 1
second intervals?
The monitor is in PowerSaver mode.
Press a key on the keyboard or
move the mouse to activate the
monitor and restore the image on the
screen.
I cannot see the On
Screen Display.
Have you locked the
On
Screen Display (OSD)
Menu to
prevent changes?
Unlock the OSD by pressing the
MENU button for at least 10
seconds.
The image on the
screen is shaking.
Check the monitor configuration
to see if it is in Interlace Mode.
(Interlace Mode: Vertical
frequency 43Hz, 87Hz(i), etc)
The signal from the video card
exceeds the maximum resolution
and frequency of the monitor.
Are there any magnetic
products such as a power
adapter, speaker or a high
voltage wire near by?
Move the monitor away from
anything that can create a strong
magnetic field.
Is the voltage stable? The screen image can appear to
shake or vibrate at a particular time
of day due to low supply voltage.
The screen image can also appear to shake or vibrate if there is a
problem with the video card or the computer's main board.
Modes)
Page 29
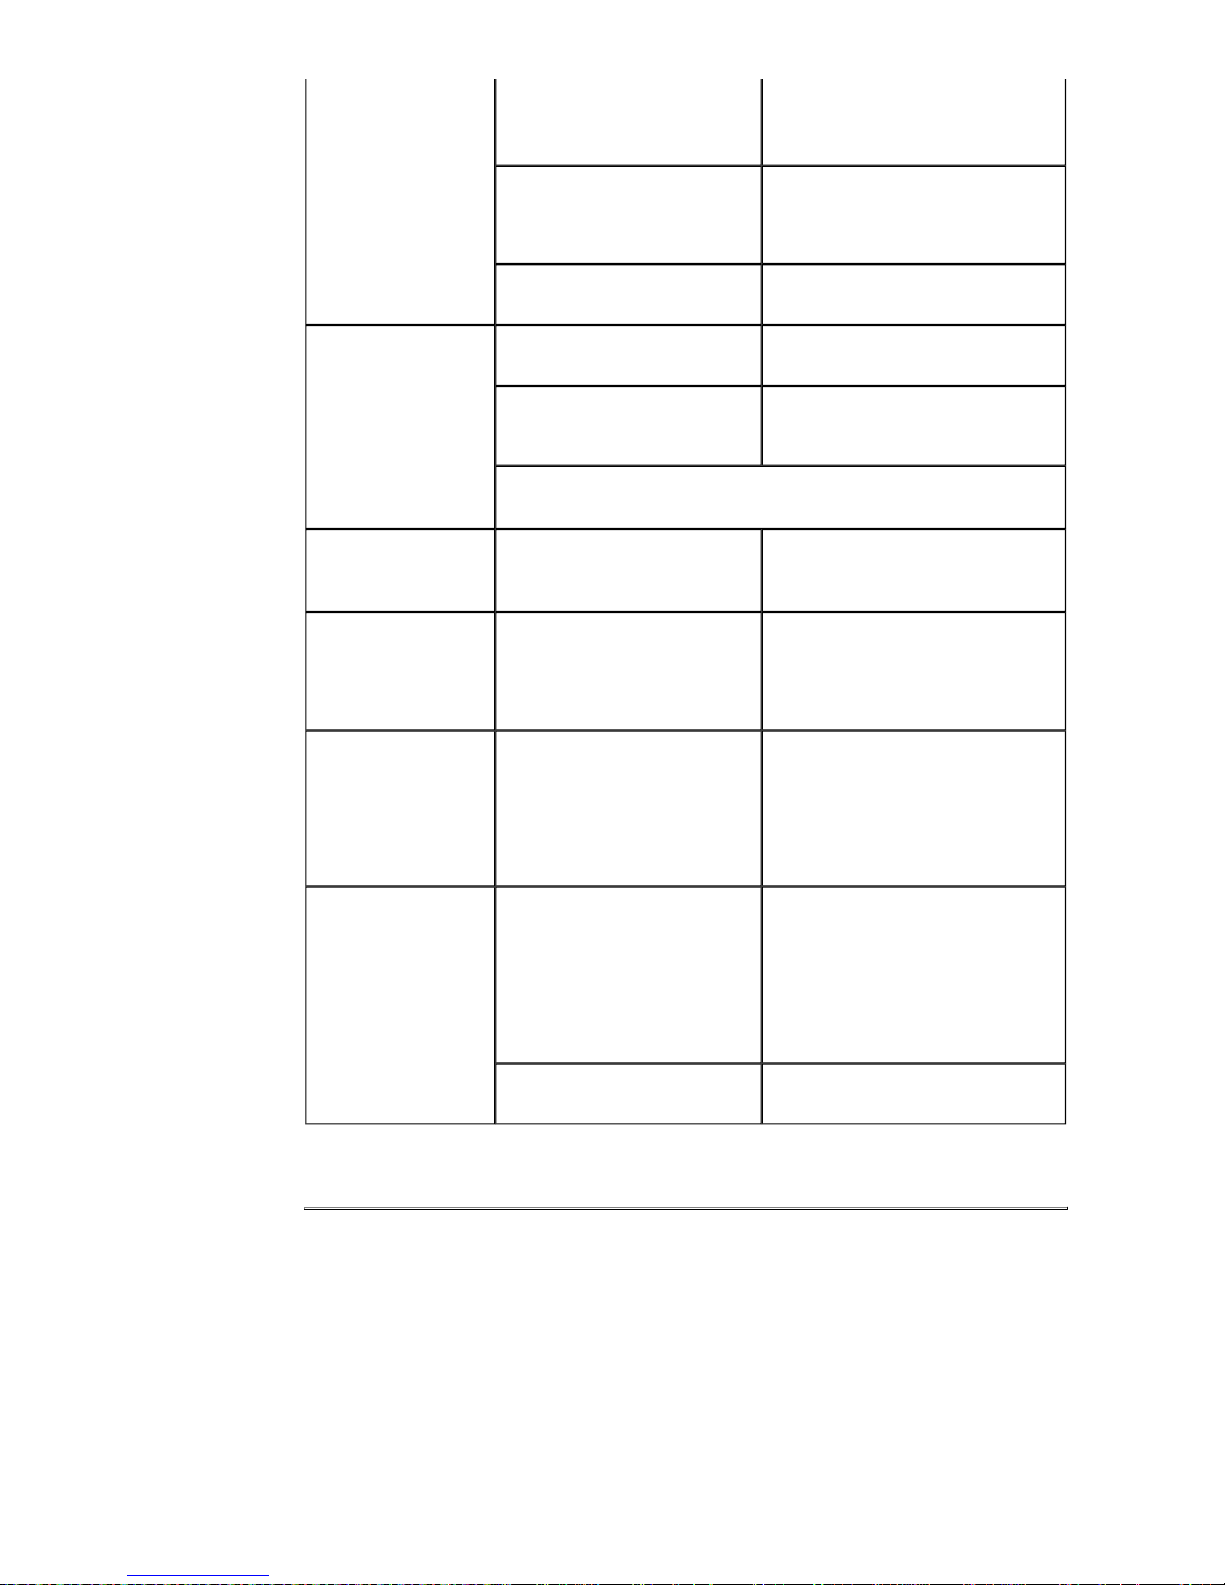
The screen shows
strange colors or
just black and
white.
Is the screen displaying only
one color as if looking at the
screen through a cellophane
paper?
Check the signal cable connection.
Make sure the video card is fully
inserted in it's slot.
Have the screen colors become
strange after running a program
or due to a crash between
applications?
Reboot the computer.
Has the video card been set
properly?
Set the video card by referring to the
video card manual.
The screen
suddenly has
become
unbalanced.
Have you changed the video
card or the driver?
Adjust screen image position and
size using the OSD.
Have you adjusted the
resolution or frequency to the
monitor?
Adjust the resolution and frequency
at the video card.
(Refer to the Preset Timing Modes).
The screen can be unbalanced due to the cycle of the video card
signals. Readjust Position by referring to the OSD.
The screen is out of
focus or OSD
cannot be adjusted.
Have you adjusted the
resolution or frequency on the
monitor?
Adjust the resolution and frequency
of the video card.
(Refer to the Preset Timing Modes).
The screen is
partially distorted.
Are there any magnetic
products such as an adapter,
speaker or a high voltage wire
near the monitor?
Enter the OSD and perform a
"Degauss".
Keep the monitor away from any
magnetic products.
LED is blinking but
no images on the
screen.
Is the frequency properly
adjusted when checking the
Display Timing on the menu?
Adjust the frequency properly by
referring to the video card manual
and the Preset Timing Modes.
(The maximum frequency per
resolution may differ from product to
product.)
There are only 16
colors shown on the
screen. The screen
colors have
changed after
changing the video
card.
Have the Windows colors been
set properly?
For Windows ME/XP/2000:
Set the colors properly at the
Control Panel, Display, Settings
.
Has the video card been set
properly?
Set the video card by referring to the
video card manual.
Check the following items if there is trouble with the monitor.
1. Check if the power cord and the cable are properly connected to the computer.
2. Check if the computer beeps more than 3 times when booting.
(If it does, request an after-service for the main board of the computer.)
3. If you installed a new video card or if you assembled the PC, check if the installed the adapter
(video) driver and the monitor driver.
4. Check if the scanning ratio of the video screen is set at 75Hz or 85Hz.
(Do not exceed 60Hz when using the maximum resolution.)
Page 30

5.If
you have problems in insta
lli
ng the adapter (video) driver, boot the computer in Safe Mode,
remove the Display Adapter at the "
Control Panel, System, Device Administrator
" and then
reboot the computer to reinstall the adapter (video) driver.
Note:
If problems repeatedly occur, contact an authorized service center.
Page 31
Main > Troubleshooting > Q & A
Check List
Q & A
Self-Test Feature
Check
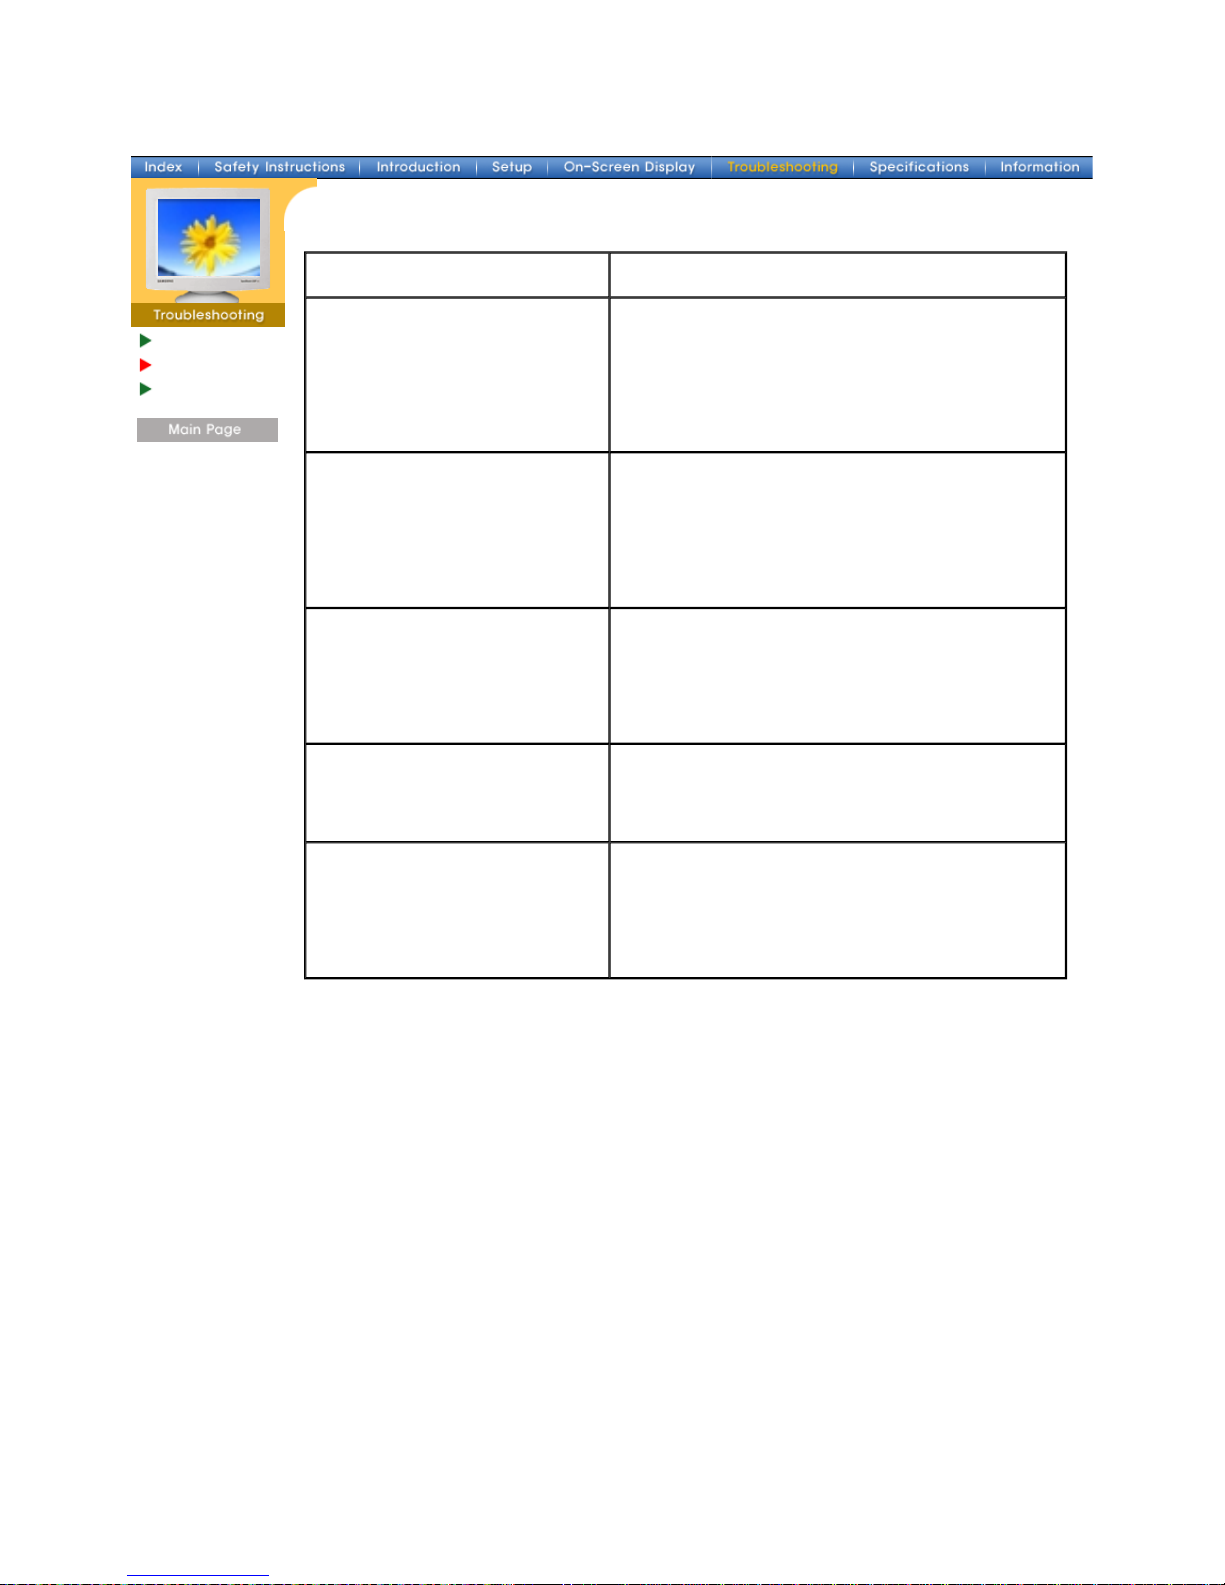
Question Answer
How can I change the frequency? Frequency can be changed by reconfiguring the video
card.
Note that video card support can vary, depending on the
version of the driver used.
(Refer to the computer or the video card manual for
details.)
How can I adjust the resolution? Windows ME/XP/2000: Set the resolution at the
Control Panel, Display, Settings
.
* Contact the video card manufacturer for details.
How can I set the Power Saving
function?
Windows ME/XP/2000: Set the function at BIOSSETUP of the computer or the screen saver. (Refer to
Windows/Computer Manual).
The monitor makes a sound when it
is turned on.
This is normal as some sound may be generated when
the metal case and the electromagnet, which are
installed to block any electromagnetic waves, interact
with each other.
How can I clean the outer
case/Picture tube?
Disconnect the power cord and then clean the monitor
with a soft cloth, using either a cleaning solution or plain
water.
Do not leave any remains of the detergent nor scratch
the case. Do not allow any water to go inside the monitor.
Page 32
Main > Troubleshooting > Self-Test Feature Check
Check List
Q & A
Self-Test
Feature Check
Self-Test Feature Check
|
Warning Messages
|
Environment
|
Useful Tips
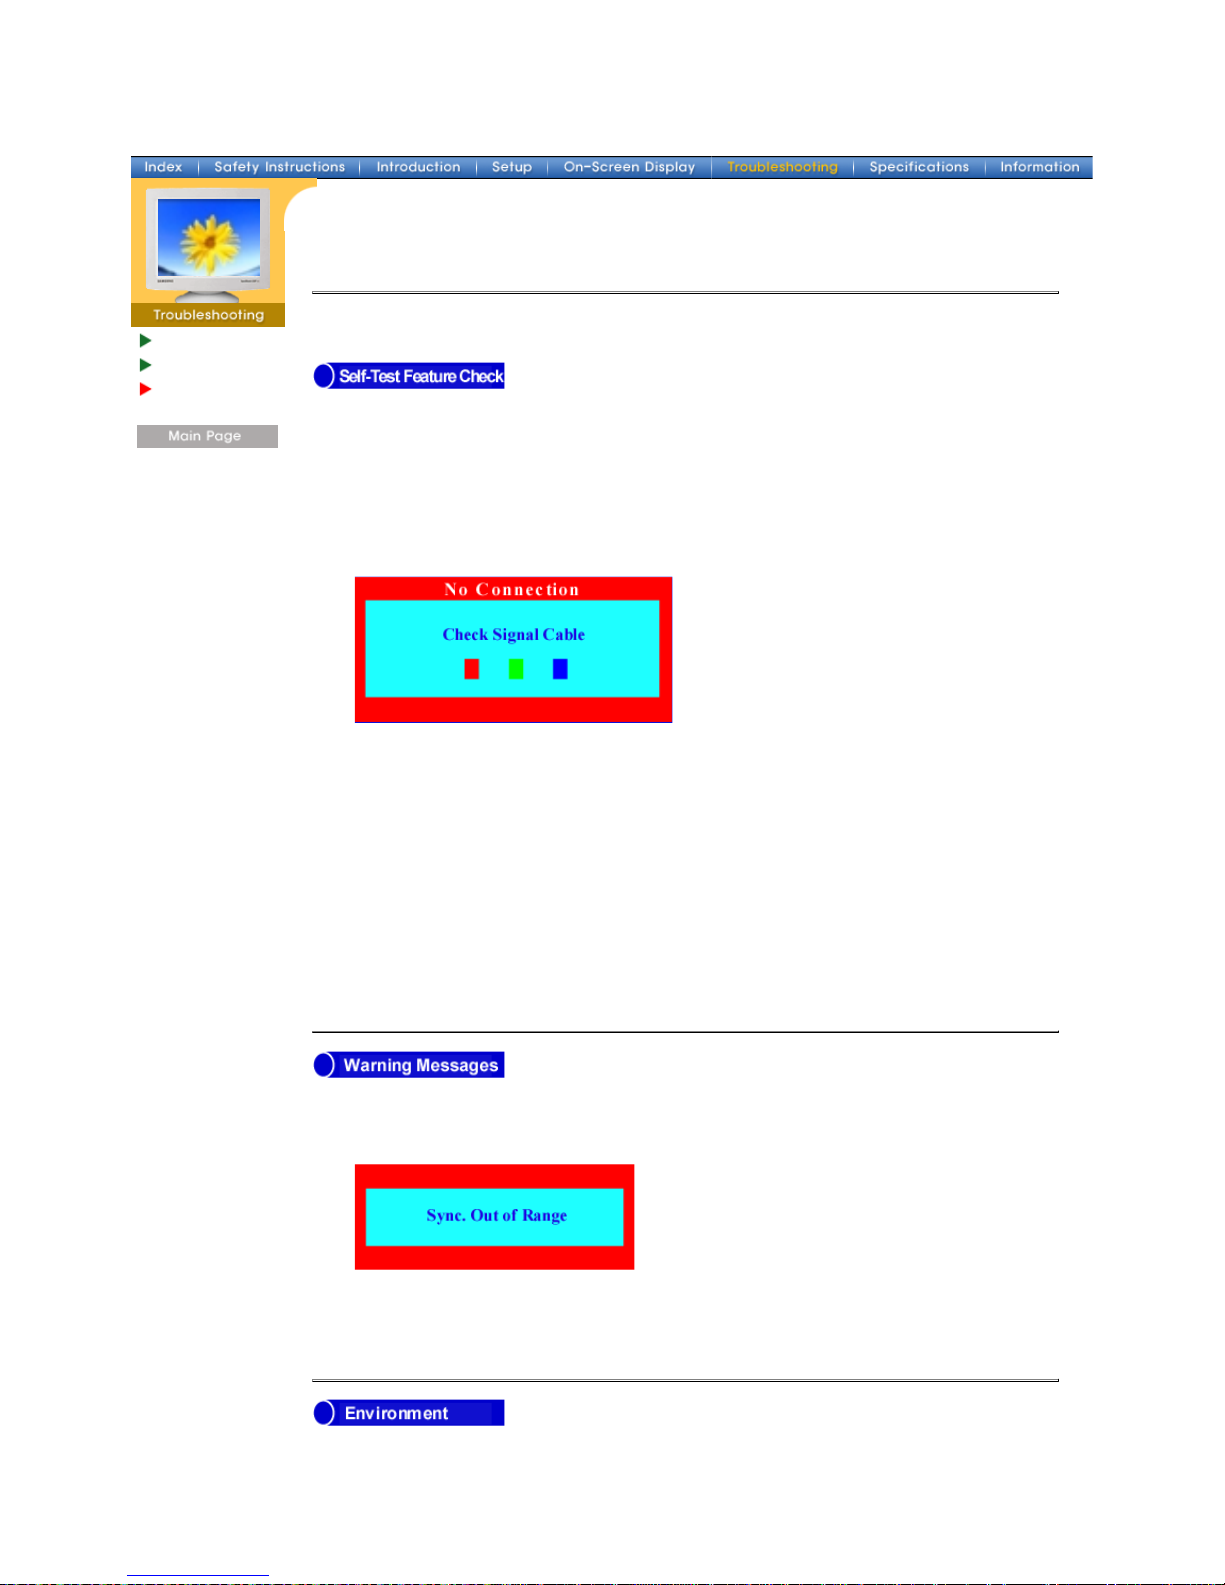
Your monitor provides a self test feature that allows you to check whether your monitor is
functioning properly.
1. Turn off both your computer and the monitor.
2. Unplug the video cable from the back of the computer.
3. Turn on the monitor.
If your monitor works normally, the following screen appears.
Failure of any of the boxes to appear indicates a problem with your monitor. This box
also appears during normal operation if the video cable becomes disconnected or
damaged.
4. Turn off your monitor and reconnect the video cable; then turn on both your computer and the
monitor.
If your monitor screen remains blank after using the previous procedure, check your
video controller and computer system; your monitor is functioning properly.
If there is something wrong with the input signal, a message appears on the screen or
the screen goes blank although the power indicator LED is still on. The message may
indicate that the monitor is out of scan range or that you need to check the signal cable.
The location and the position of the monitor may influence the quality and other
features of the monitor.
Page 33

1.If th
ere are any woofer speakers near the monitor, unplug and relocate the woofer to another
room.
2. Remove all electronic devices such as radios, fans, clocks and telephones that are within 3
feet (one meter) of the monitor.
3. Degauss the monitor if any devices were removed from the area.
z
A monitor recreates visual signals received from the PC. Therefore, if there is trouble with the
PC or the video card, this can cause the monitor to become blank, have poor coloring, noise,
Sync. Out of Range, etc. In this case, first check the source of the problem, and then contact
a service center or your dealer.
z
Judging the monitor's working condition
If there is no image on the screen or an "Sync. Out of Range" message comes up,
disconnect the cable from the computer while the monitor is still powered on.
{
If there is a message coming up on the screen or if the screen goes white, this means
the monitor is in working condition.
{
In this case, check the computer for trouble.
Page 34
General
PowerSaver
Preset Timing
Modes
General
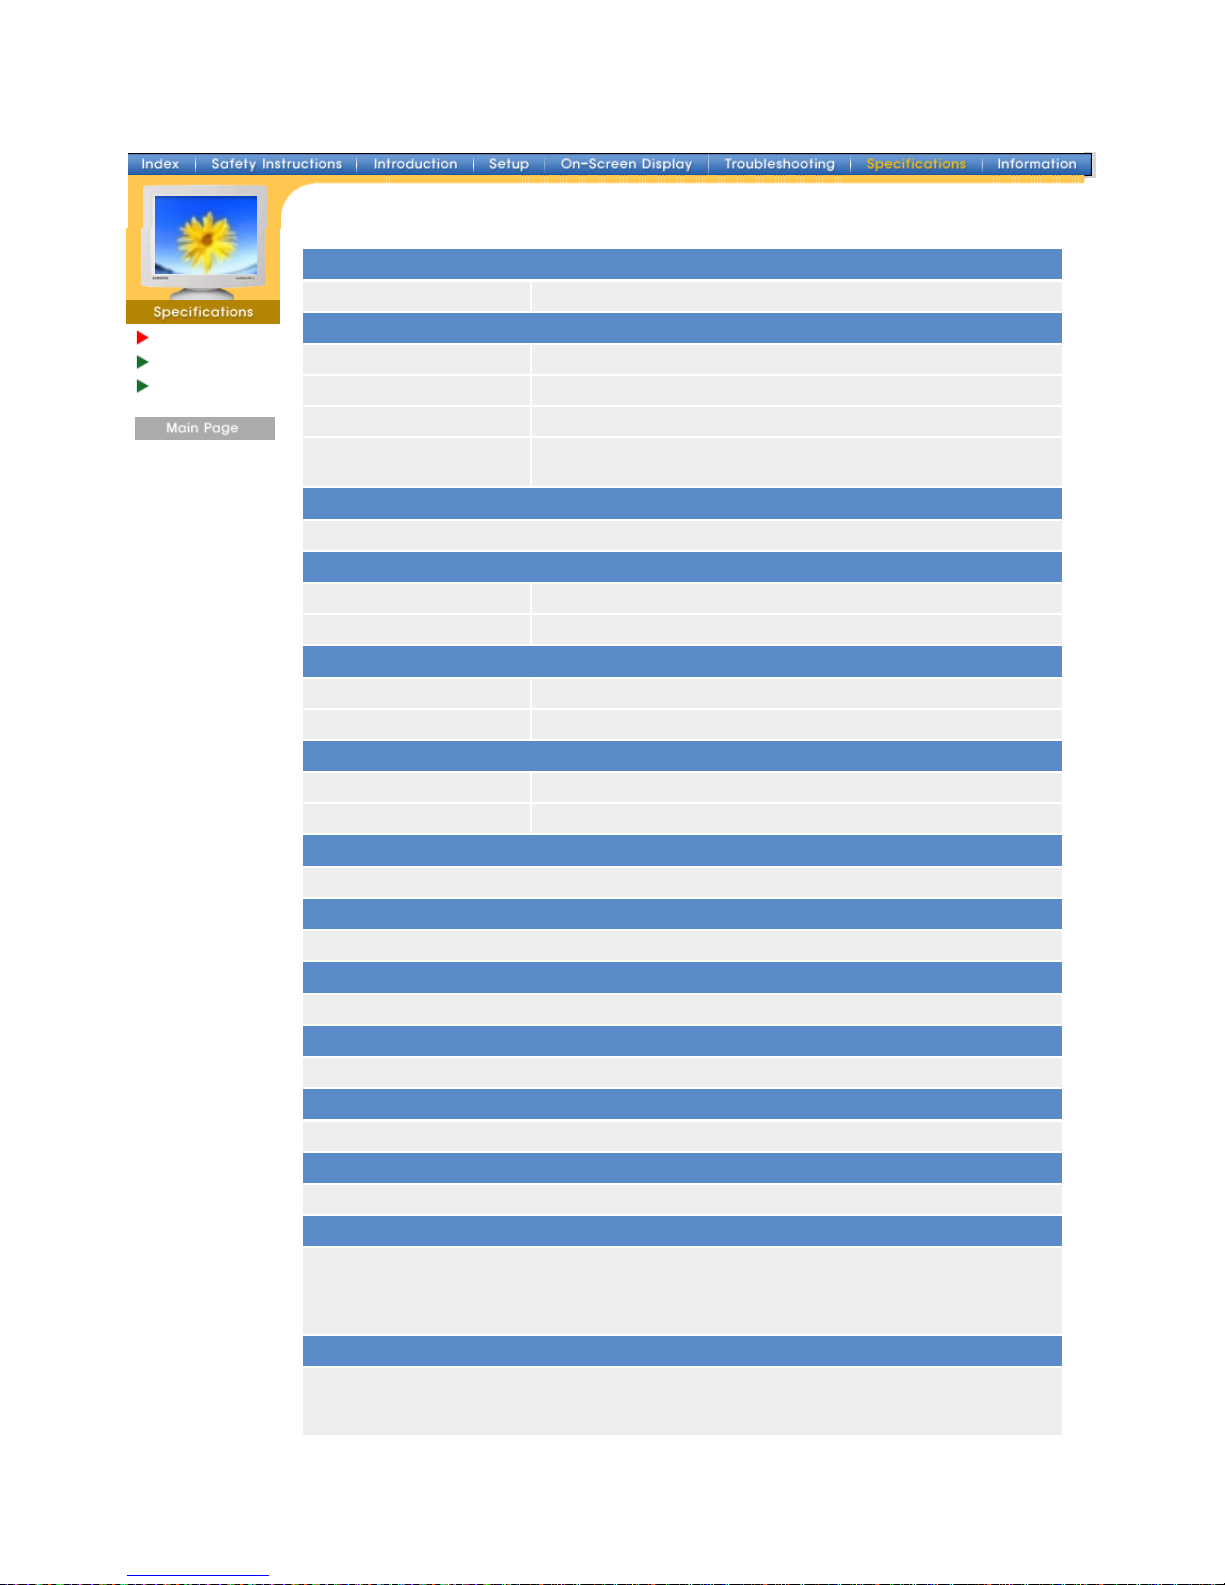
Model Name 510
Picture Tube
Type 15"(38cm) Full square type (35cm viewable)
Deflection angle 90 °
Dot Pitch 0.24mm (Horizontal)
Screen type Aluminized tri-color phosphor dot trio with black matrix.
Anti-doming invar shadow mask.
Maximum Resolution
1024 Dots, 768 Lines
Active Display
Horizontal 267 ± 4 mm
Vertical 200 ± 4 mm
Synchronization
Horizontal 30 ~ 55 kHz
Vertical 50 ~ 120 Hz
Input Signal Definition
Video Signal RGB, Analog 0.7 Vpp positive at 75 ohms
Sync Signal separate H/V sync, TTL level, positive or negative
Display Color
Unlimited
Maximum Pixel Clock
65 MHz
Power Supply
90 ~ 264 VAC rms, 60/50 Hz ± 3 Hz
Power Consumption
70W (Maximum), 65W (Nominal)
Dimensions (WxDxH)
356 x 380 x 369.5mm (with Stand)
Weight
11.5 kg
Environmental considerations
Operating Temperature 32°F ~ 104°F(0°C ~ 40°C)
Humidity 10% ~ 80%, non-condensing
Storage Temperature -4°F ~113°F (-20°C ~ 45°C)
Humidity 5% ~ 95%, non-condensing
Plug and Play Capability
This monitor can be installed on any Plug & Play compatible system. Interaction of the monitor and
computer systems will provide the best operating conditions and monitor settings. In most cases,
monitor installation will proceed automatically, unless the user wishes to select alternate settings.
Note: Design and specifications are subject to change without prior notice.
Page 35
General
PowerSaver
Preset Timing
Modes
This monitor has a built-in power management system called PowerSaver. This system saves
energy by switching your monitor into a low-power mode when it has not been used for a certain
amount of time. The monitor automatically returns to normal operation when you move the
computer's mouse or press a key on the keyboard. For energy conservation, turn your monitor OFF
when it is not needed, or when leaving it unattended for long periods. The PowerSaver system
operates with a VESA DPMS compliant video card installed in your computer. Use a software utility
installed on your computer to set up this feature.
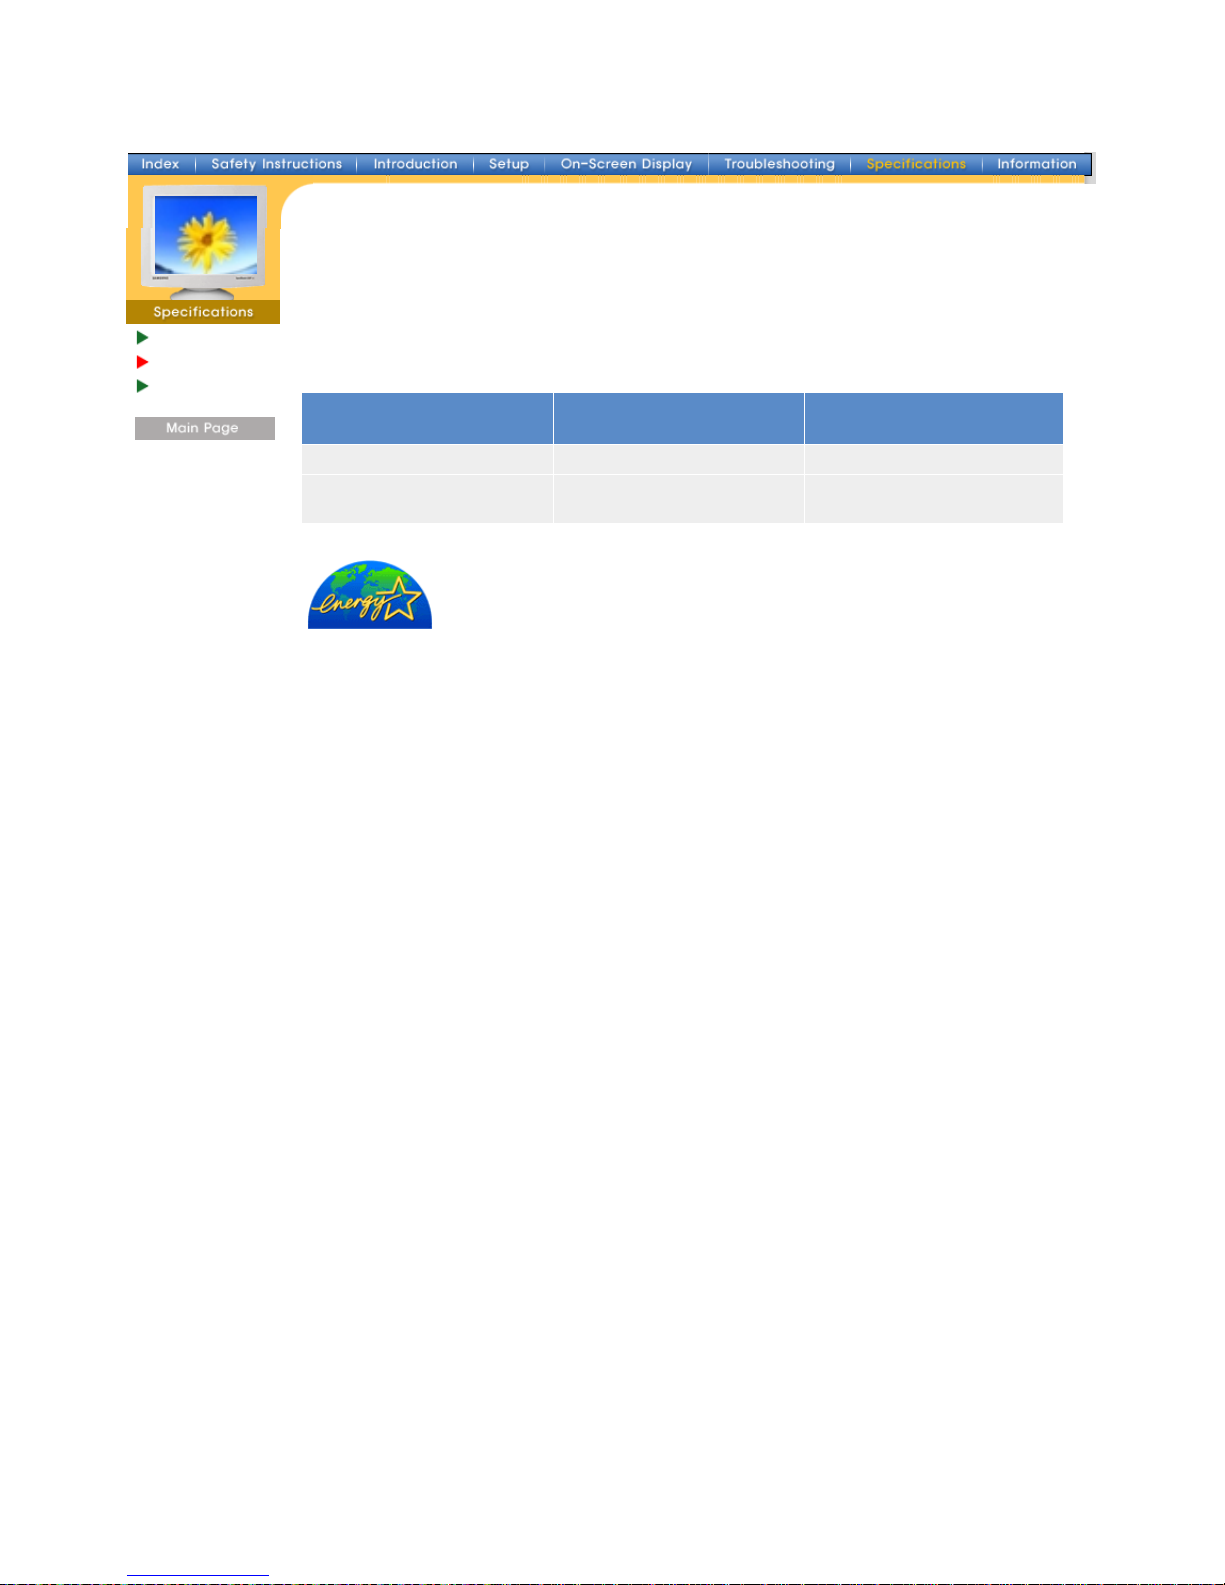
State Normal Operation
Power-off Mode EPA/ENERGY
2000
Power Indicator Green Green, Blinking
Power Consumption
65W(Nominal)
70W(Maximum)
Less than 2W
This monitor is EPA E
NERGY STAR
®
compliant and ENERGY2000 compliant when
used with a computer equipped with VESA DPMS functionality.
As an E
NERGY STAR
®
Partner, SAMSUNG has determined that this product meets
the E
NERGY STAR
®
guidelines for energy efficiency.
Page 36
General
PowerSaver
Preset Timing
Modes
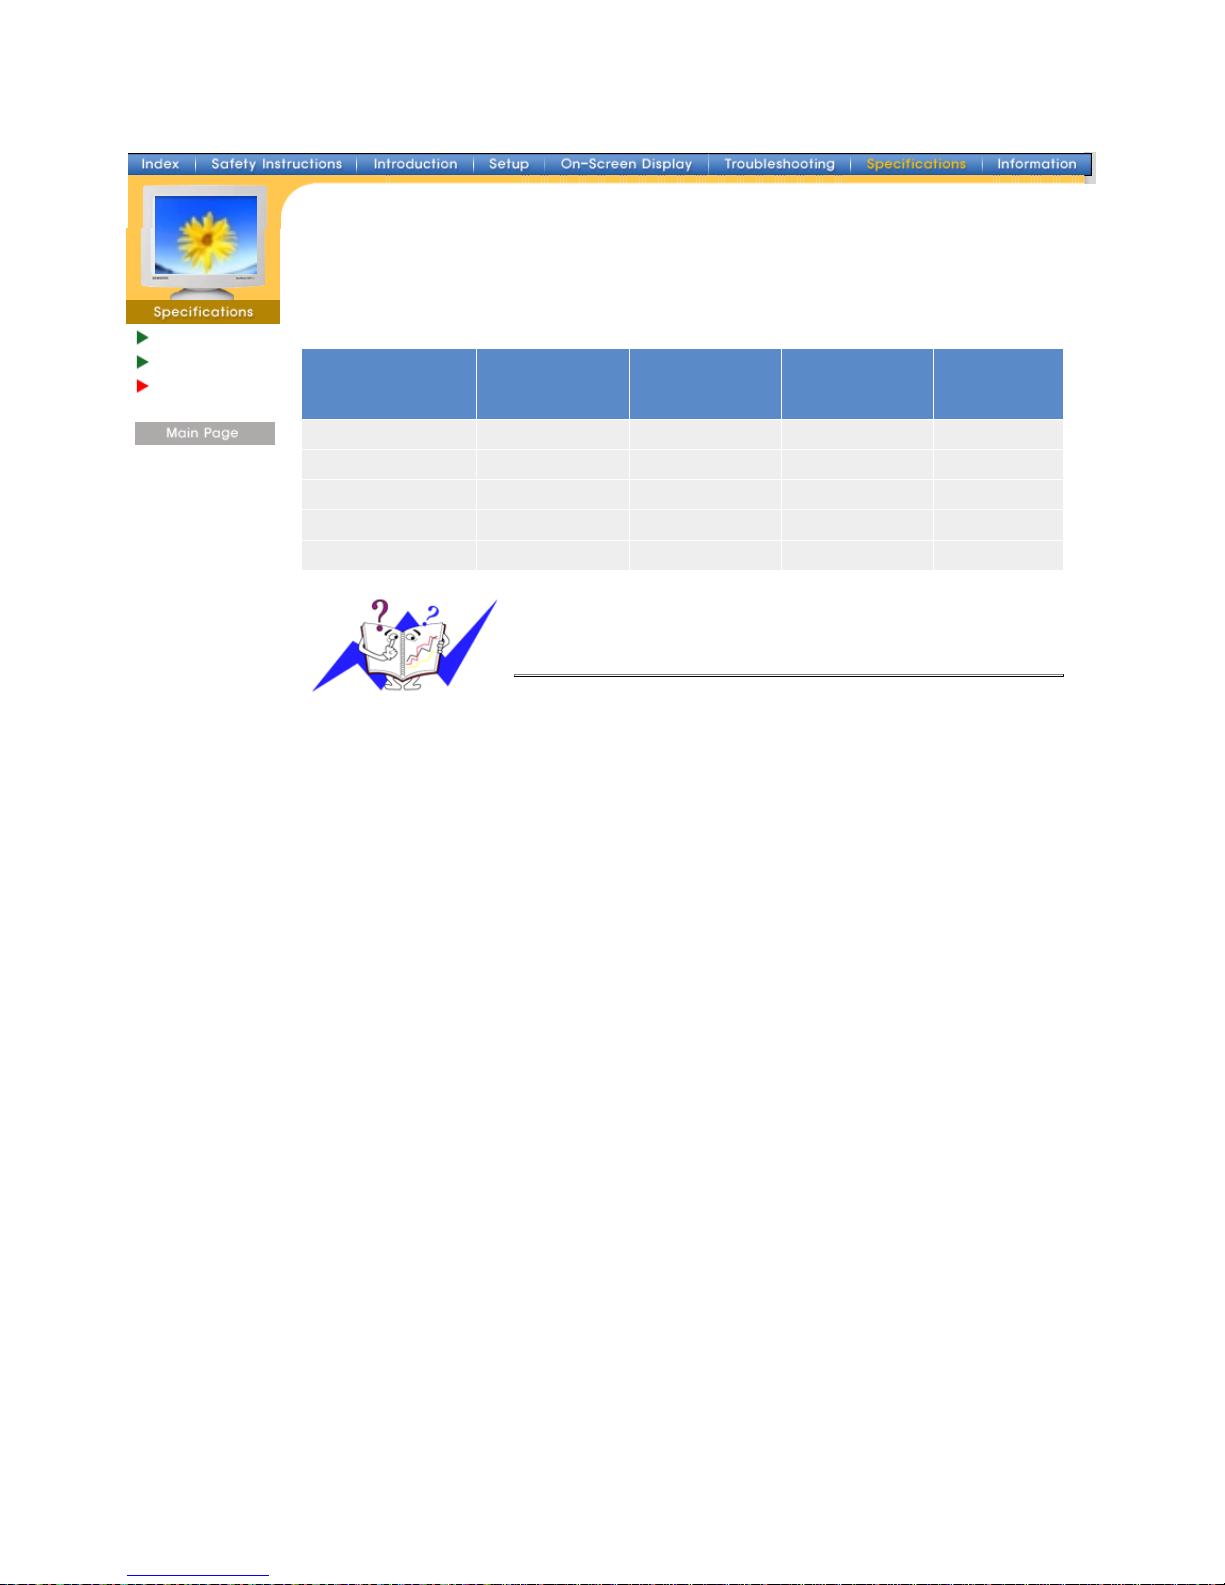
If the signal transferred from the computer is the same as the following Preset Timing Modes, the
screen will be adjusted automatically. However, if the signal differs, the screen may go blank while
the power LED is on. Refer to the video card manual and adjust the screen as follows.
Table 1. Preset Timing Modes
Display Mode
Horizontal
Frequency
(kHz)
Vertical
Frequency
(Hz)
Pixel Clock
(MHz)
Sync Polarity
(H/V)
IBM, 640 x 480 31.469 59.940 25.175 -/IBM, 720 x 400 31.469 70.087 28.322 -/+
VESA, 640 x 480 37.500 75.000 31.500 -/VESA, 640 x 480 43.269 85.008 36.000 -/VESA, 800 x 600 53.674 85.061 56.250 +/+
Horizontal Frequency
The time to scan one line connecting the right edge to the left edge of
the screen horizontally is called Horizontal Cycle and the inverse
number of the Horizontal Cycle is called Horizontal Frequency. Unit: kHz
Vertical Frequency
Like a fluorescent lamp, the screen has to repeat the same image many
times per second to display an image to the user. The frequency of this
repetition is called Vertical Frequency or Refresh Rate. Unit: Hz
Page 37
Main > Specifications > General
General
PowerSaver
Preset Timing
Modes
General
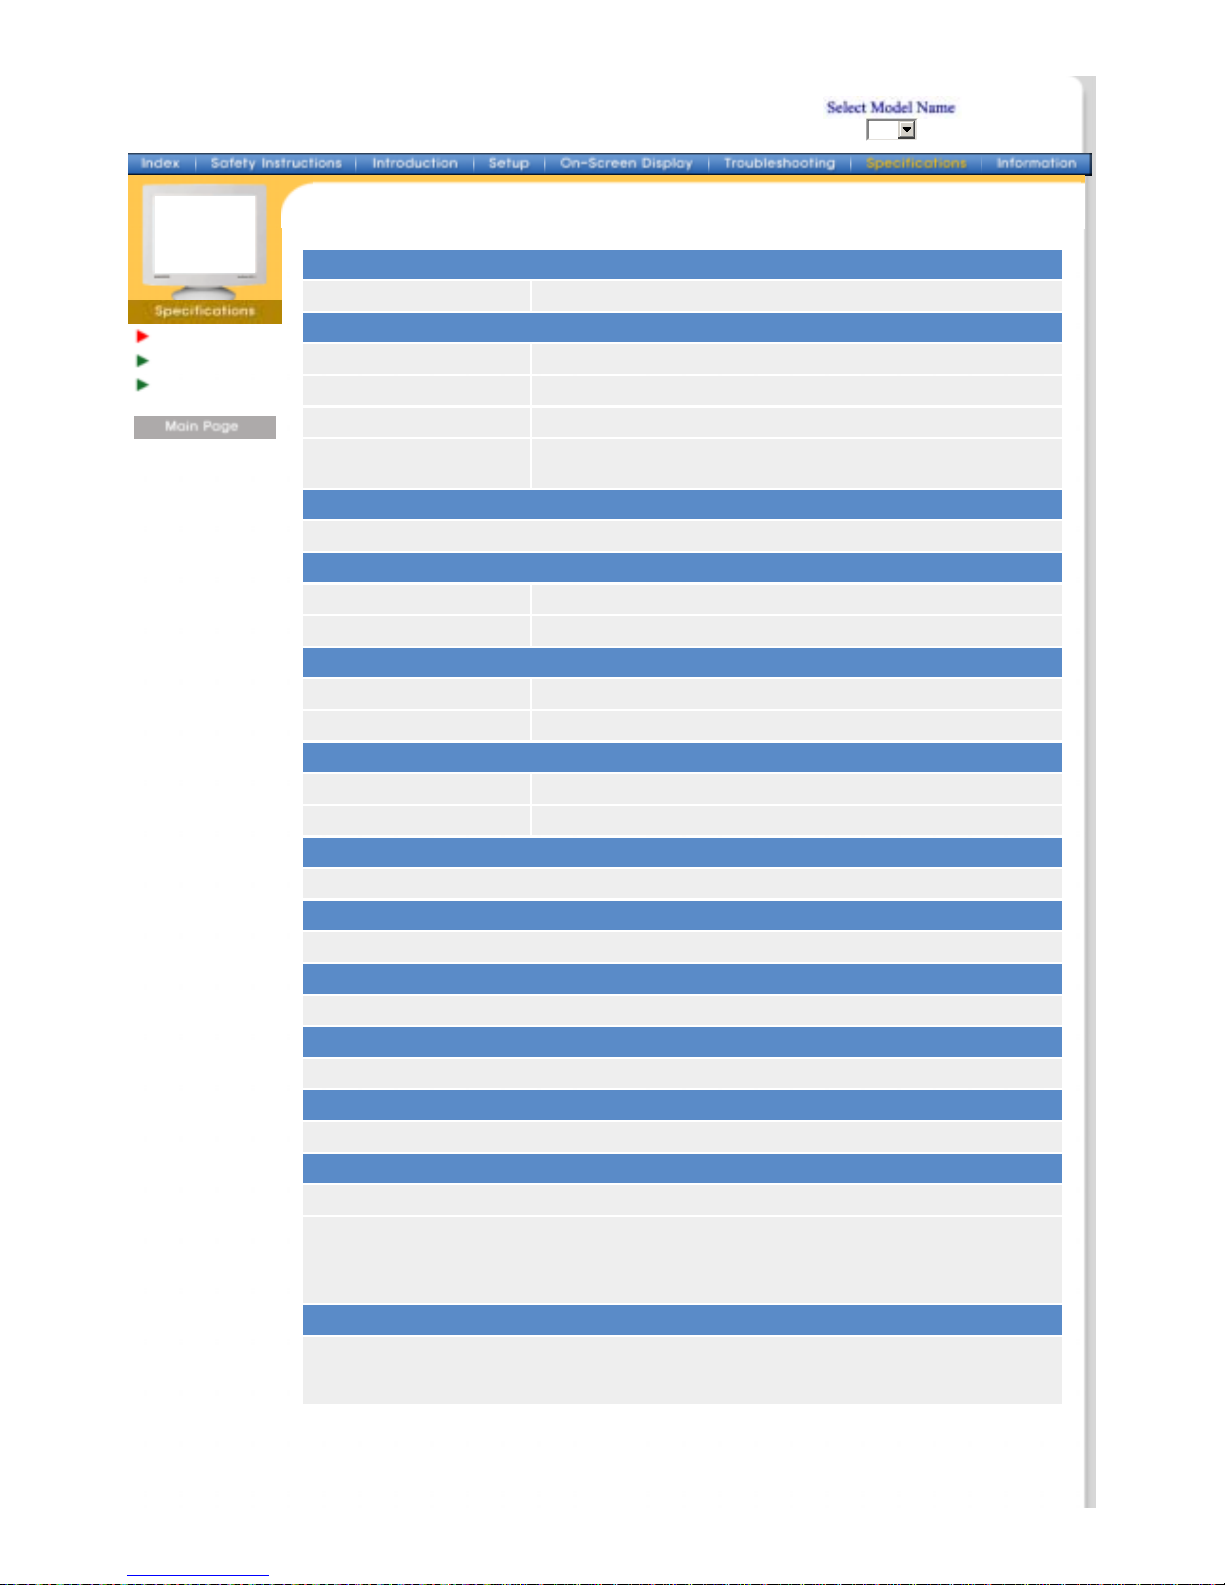
Model Name 710
Picture Tube
Type 17"(43cm) Full square type (40.6cm viewable)
Deflection angle 90 °
Dot Pitch 0.23mm(Horizontal)
Screen type Aluminized tri-color phosphor dot trio with black matrix.
Anti-doming invar shadow mask.
Maximum Resolution
1280 Dots, 1024 Lines
Active Display
Horizontal 312 ± 4 mm
Vertical 234 ± 4 mm
Synchronization
Horizontal 30 ~ 70 kHz
Vertical 50 ~ 160 Hz
Input Signal Definition
Video Signal RGB, Analog 0.7 Vpp positive at 75 ohms
Sync Signal separate H/V sync, TTL level, positive or negative
Display Color
Unlimited
Maximum Pixel Clock
110 MHz
Power Supply
90 ~ 264VAC rms, 60/50 Hz ± 3Hz
Power Consumption
90W (Maximum), 80W (Nominal)
Dimensions (WxDxH)
398 x 412 x 400mm (with Stand)
Weight
15 kg
Operating Temperature 32°F ~ 104°F(0°C ~ 40°C)
Humidity 10% ~ 80%, non-condensing
Storage Temperature -4°F ~113°F (-20°C ~ 45°C)
Humidity 5% ~ 95%, non-condensing
Plug and Play Capability
This monitor can be installed on any Plug & Play compatible system. Interaction of the monitor and
computer systems will provide the best operating conditions and monitor settings. In most cases,
monitor installation will proceed automatically, unless the user wishes to select alternate settings.
Note: Design and specifications are subject to change without prior notice.
710
Page 38
Main > Specifications > PowerSaver
General
PowerSaver
Preset Timing
Modes
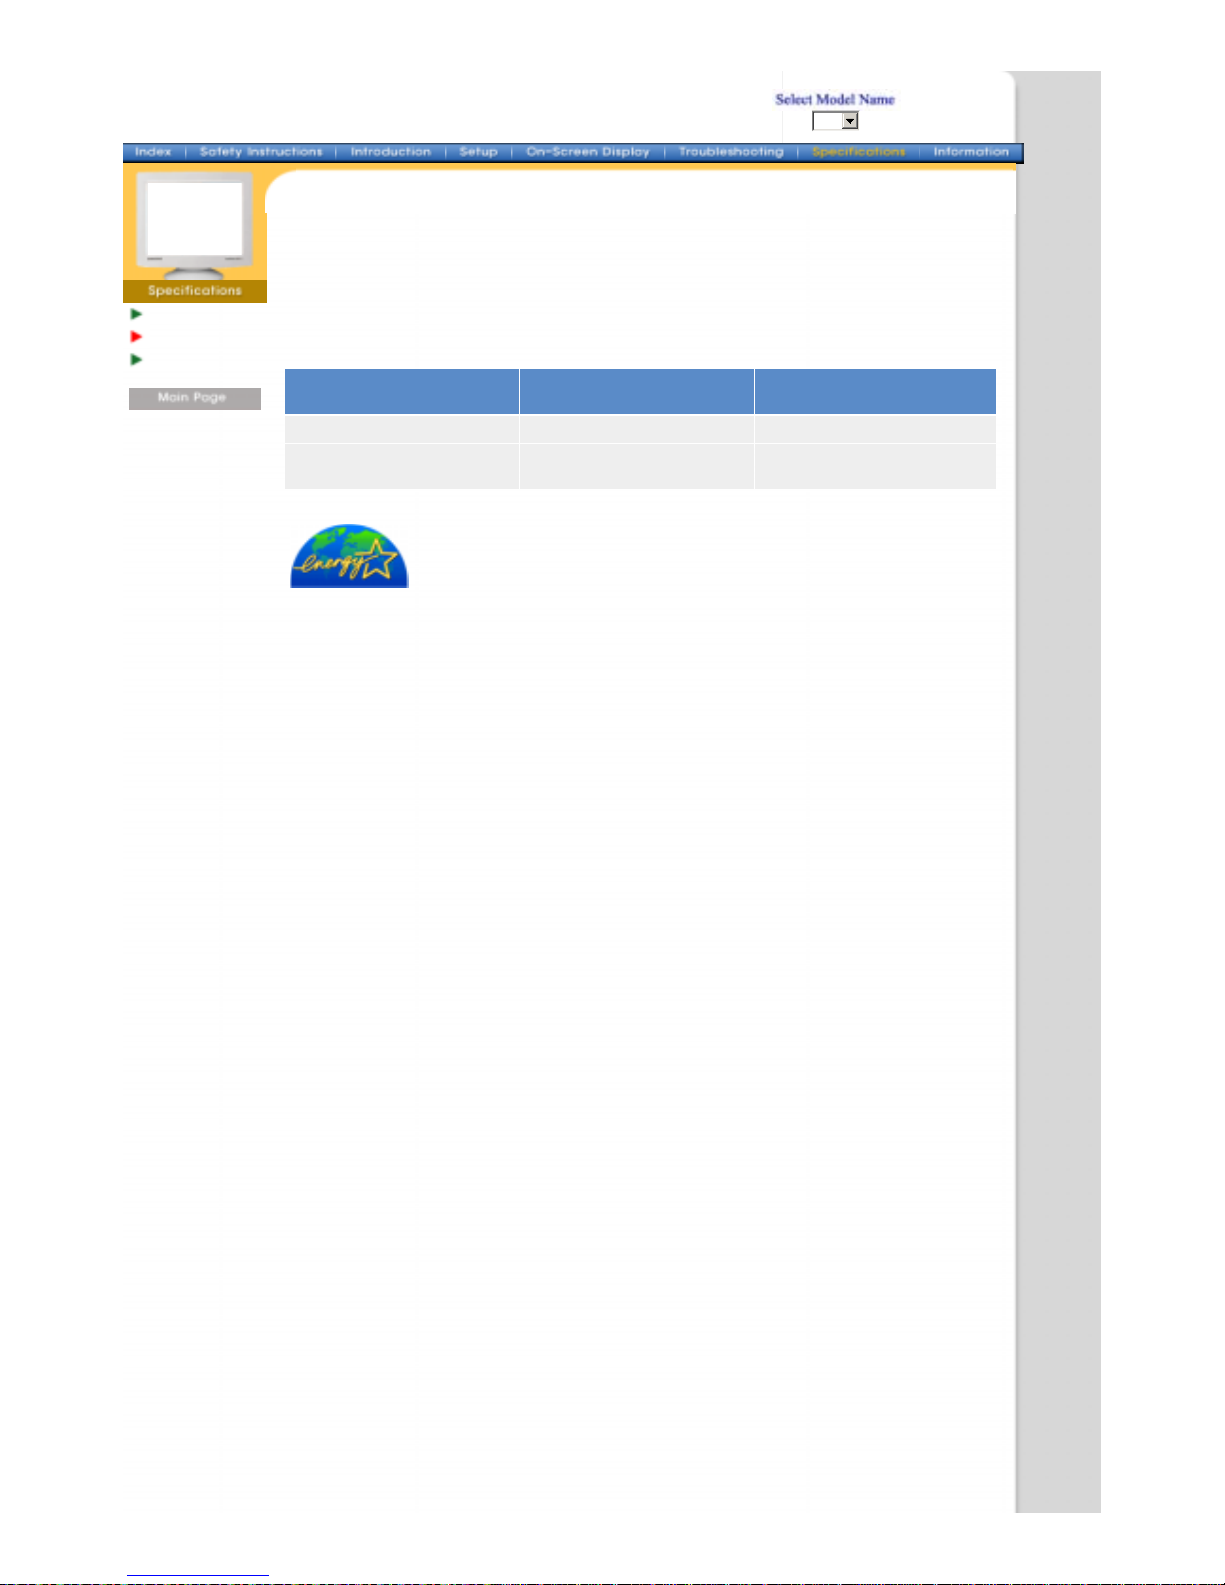
This monitor has a built-in power management system called PowerSaver. This system saves
energy by switching your monitor into a low-power mode when it has not been used for a certain
amount of time. The monitor automatically returns to normal operation when you move the
computer's mouse or press a key on the keyboard. For energy conservation, turn your monitor OFF
when it is not needed, or when leaving it unattended for long periods. The PowerSaver system
operates with a VESA DPMS compliant video card installed in your computer. Use a software utility
installed on your computer to set up this feature.
State Normal Operation
Power-off Mode EPA/ENERGY
2000
Power Indicator Green Green, Blinking
Power Consumption
80W(Nominal)
90W(Maximum)
Less than 2W
This monito r is E PA E
NERGY STAR
®
compliant and ENERGY2000 compliant when
used with a computer equipped with VESA DPMS functionality.
As an E
NERGY STAR
®
Partner, SAMSUNG has determined that this product meets
the E
NERGY STAR
®
guidelines for energy efficiency.
710
Page 39
Main > Specifications > Preset Timing Modes
General
PowerSaver
Preset Timing
Modes
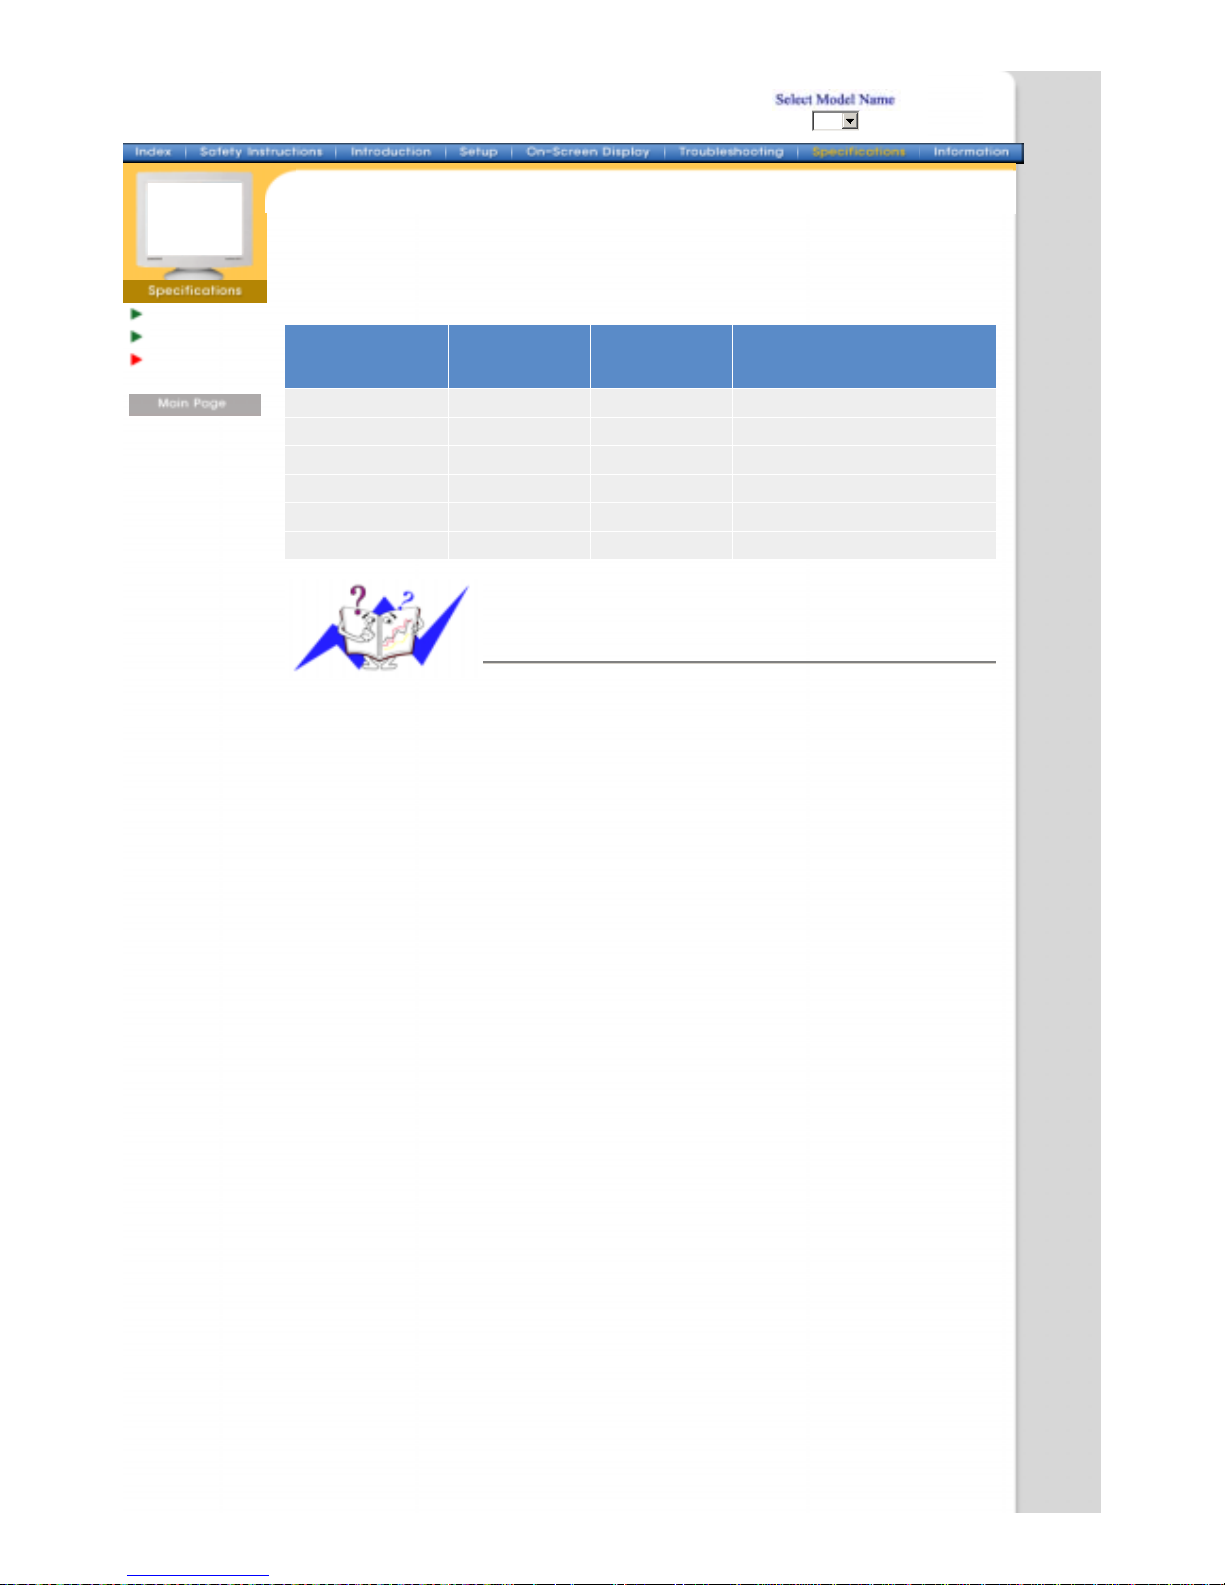
If the signal transferred from the computer is the same as the following Preset Timing Modes, the
screen will be adjusted automatically. However, if the signal differs, the screen may go blank while
the power LED is on. Refer to the video card manual and adjust the screen as follows.
Table 1. Preset Timing Modes
Display Mode
Horizontal
Frequency
(kHz)
Vertical
Frequency
(Hz)
Pixel Clock
(MHz)
Sync Polarity
(H/V)
IBM, 640 x 480 31.469 59.940 25.175 -/IBM, 720 x 400 31.469 70.087 28.322 -/+
VESA, 640 x 480 37.500 75.000 31.500 -/VESA, 640 x 480 43.269 85.008 36.000 -/VESA, 800 x 600 53.674 85.061 56.250 +/+
VESA, 1024 x 768 68.677 84.997 94.500 +/+
Horizontal Frequency
The time to scan one line connecting the right edge to the left edge of the
screen horizontally is called Horizontal Cycle and the inverse number of
the Horizontal Cycle is called Horizontal Frequency. Unit: kHz
Vertical Frequency
Like a fluorescent lamp, the screen has to repeat the same image many
times per second to display an image to the user. The frequency of this
repetition is called Vertical Frequency or Refresh Rate. Unit: Hz
710
Page 40
Information > Terms
Terms
Dot Pitch
The image on a monitor is composed of red, green and blue dots. The closer the dots, the
higher the resolution. The distance between two dots of the same color is called the 'Dot Pitch'.
Unit: mm
Vertical Frequency
The screen must be redrawn several times per second in order to create and display an image
for the user. The frequency of this repetition per second is called Vertical Frequency or Refresh
Rate. Unit: Hz
Example: If the same light repeats itself 60 times per second, this is regarded as 60 Hz. In this
case, flickering of the screen can be detected. To avoid this problem, there is a
Flicker-free Mode using a vertical frequency over 70 Hz.
Horizontal Frequency
The time to scan one line connecting the right edge to the left edge of the screen horizontally is
called Horizontal Cycle. The inverse number of the Horizontal Cycle is called Horizontal
Frequency. Unit: kHz
Interlace and Non-Interlace Methods
Showing the horizontal lines of the screen from the top to the bottom in order is called the NonInterlace method while showing odd lines and then even lines in turn is called the Interlace
method. The Non-Interlace method is used for the majority of monitors to ensure a clear image.
The Interlace method is the same as that used in TVs.
Plug & Play
This is a function that provides the best quality screen for the user by allowing the computer and
the monitor to exchange information automatically. This monitor follows the international
standard VESA DDC for the Plug & Play function.
Resolution
The number of horizontal and vertical dots used to compose the screen image is called
'resolution'. This number shows the accuracy of the display. High resolution is good for
performing multiple tasks as more image information can be shown on the screen.
Example: If the resolution is 1024 X 768, this means the screen is composed of 1024
horizontal dots (horizontal resolution) and 768 vertical lines (vertical resolution).
 Loading...