

Page 1

460I-S
uVending Solution
User Manual
Training Manual
Service Manual
Thank you for purchasing this Samsung product.
To receive more complete service, please register
your product at
www.samsung.com/global/register
Model Serial No.
Page 2

Safety Precautions
Warning! Important Safety Instructions
(Please read the appropriate section that corresponds to the marking on your Samsung product before attempting to install the product.)
CAUTION
RISK OF ELECTRIC SHOCK DO NOT OPEN
CAUTION: TO REDUCE THE RISK OF ELECTRIC SHOCK, DO
NOT REMOVE COVER (OR BACK). THERE ARE NO USER
SERVICEABLE PARTS INSIDE. REFER ALL SERVICING TO
QUALIFIED PERSONNEL.
This symbol indicates that high voltage is present
inside. It is dangerous to make any kind of contact
with any internal part of this product.
This symbol alerts you that important literature
concerning operation and maintenance has been
included with this product.
Power Precautions
Insert the power plug fi rmly and correctly. An unstable connection may cause fi re. y
Do not use a damaged power cord or plug, or a loose power outlet. This may result in electric shock or fi re. y
Do not touch the power plug with wet hands when connecting or disconnecting it from the outlet. This may y
result in an electric shock.
Do not bend or pull out the power plug by force and do not place any heavy objects onto it. Otherwise, it y
may damage the cord and result in fi re.
There is a high voltage inside the product. Make sure that users do not disassemble, repair or modify the product y
arbitrarily . This may result in electric shock or fi re. If you require repairs, contact a service center.
Use a dry cloth when cleaning the pins of the power plug or cleaning dust from the power outlet. Failing to y
do so may result in fi re.
Make sure to disconnect the power cord while fi rmly holding the plug. Failing to do so may result in electric y
shock or fi re.
Make sure to connect the power cord to a grounded power outlet. Failing to do may result in electric shock y
or personal injury .
Only use the power cord provided with the product. Do not use a power cord from another product. This y
may result in fi re or electric shock.
Installation Precautions
Ensure that at least two persons lift and move the product. Failing to do so, may result in the product being y
dropped and damaged, as well as personal injury .
When the product has been dropped or the case is broken, turn the power off and disconnect the power y
cord. Contact a service center. Failing to do so, may result in electric shock or fi re.
Do not insert metal objects, such as chopsticks, coins or pins, or infl ammable objects such as matches or y
paper into the product (into the vents, the input and output terminals, etc). If water or any foreign material
enters the product, disconnect the power cord and contact a service center. Failing to do so may result in
electric shock or fi re.
If you detect a strange smell or hear a strange sound or there is smoke coming from the product, y
disconnect the power plug immediately and contact a service center. Failing to do so may result in electric
shock or fi re.
Place the product down gently . Failing to do so may result in personal injury and damage to the product. y
Do not place the front of the product on the fl oor . This may result in damage to the screen. y
When an image remains on the screen for too long time, an afterimage or stain may occur. When not using y
the product for a long period of time, put it into sleep mode or activate a moving screensaver.
When cleaning the product, make sure to disconnect the power cord Failing to do so may result in electric y
shock or fi re.
When cleaning the product, do not allow water to come into contact with the main body of the product. y
Ensure that water does not enter the product and that it is not wet. Failing to do so may result in electric
shock or fi re.
When cleaning the product, disconnect the power cord and clean it with a soft, dry cloth. Do not use any y
chemicals such as wax, benzene, alcohol, thinner, mosquito repellant, or lubricant.
These may alter the product surface and peel the indicator items off the product.
Page 3

Contents
uVending machine 01 Hardware
Connecting02
Connecting and Using External Devices ............................................................3
Ferrite Core .......................................................................................................4
Parts and Assembling of Parts03
What is uVending Management Software? ...................................................... 4
Disassembly ......................................................................................................5
uVending management04 Software
What is uVending Management Software? ...................................................... 15
Main Functions of uVending Management Software .......................................15
Compatibility ..................................................................................................... 16
System Requirements........................................................................................16
Genera05 l
Interaction ......................................................................................................... 17
Screen ...............................................................................................................18
Logi06 n
How to Login ....................................................................................................19
Change Password .............................................................................................20
Hom07 e
LFD Manage08 r
LFD Manager ...................................................................................................23
Display ..............................................................................................................24
Sounds ..............................................................................................................25
Plan-O-Gram Manage09 r
Plan-O-Gram.....................................................................................................27
Template Library ................................................................................................32
Cart Discount Setup ..........................................................................................38
Related Product Discount Setup........................................................................42
Page 4

uVending
machine Hardware
Connecting
Connecting and Using External Devices
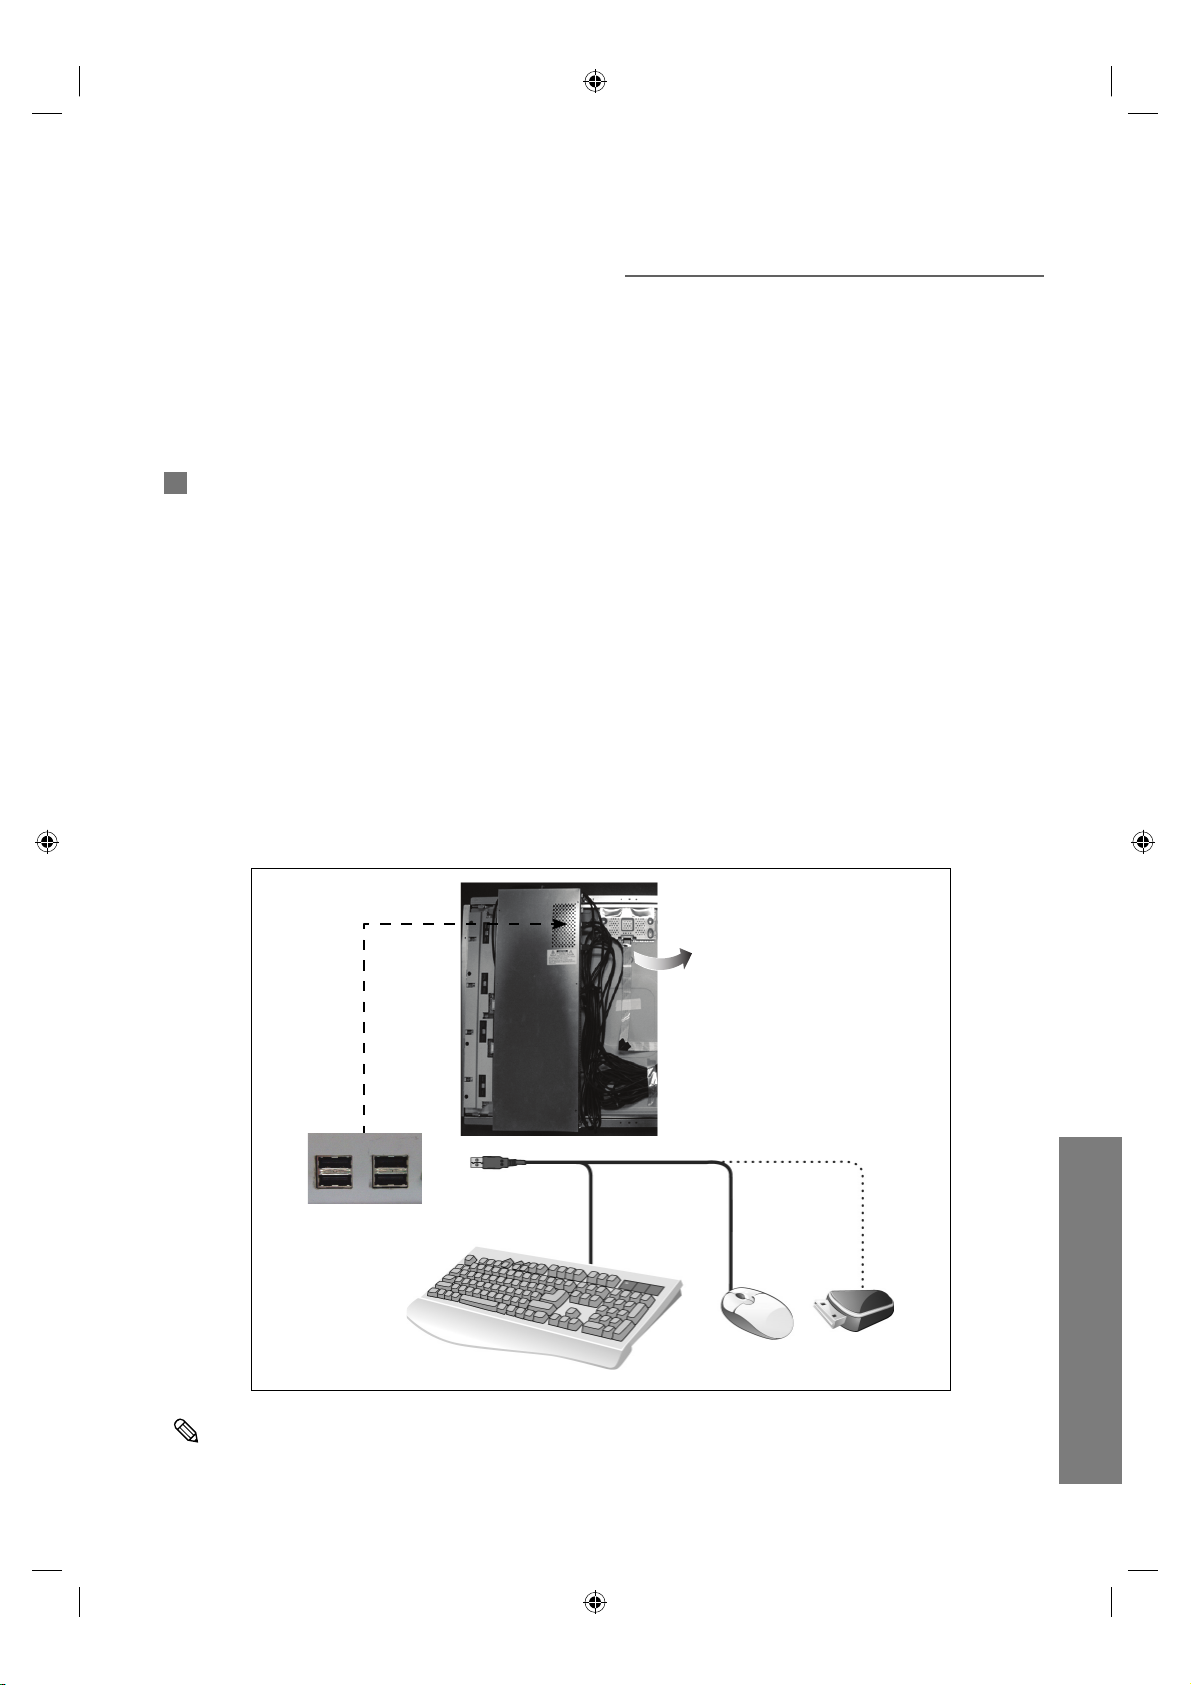
You can use the software upgrade function and additional functions conveniently by connecting
an external device to your vending machine and touching the LCD screen with your finger.
You can connect a keyboard, mouse, or USB memory device to your vending machine.
①
To connect a USB device, open the door of your vending machine. Wait until the Administrator
Program is loaded and displayed on the screen.
②
Connect the USB device.
uVending
English
3
①
USB
②
USB Keyboard
The appearance, color, and specifications of the product are subject to change for
enhancements without prior notice.
USB Mouse
Page 5

Ferrite Core
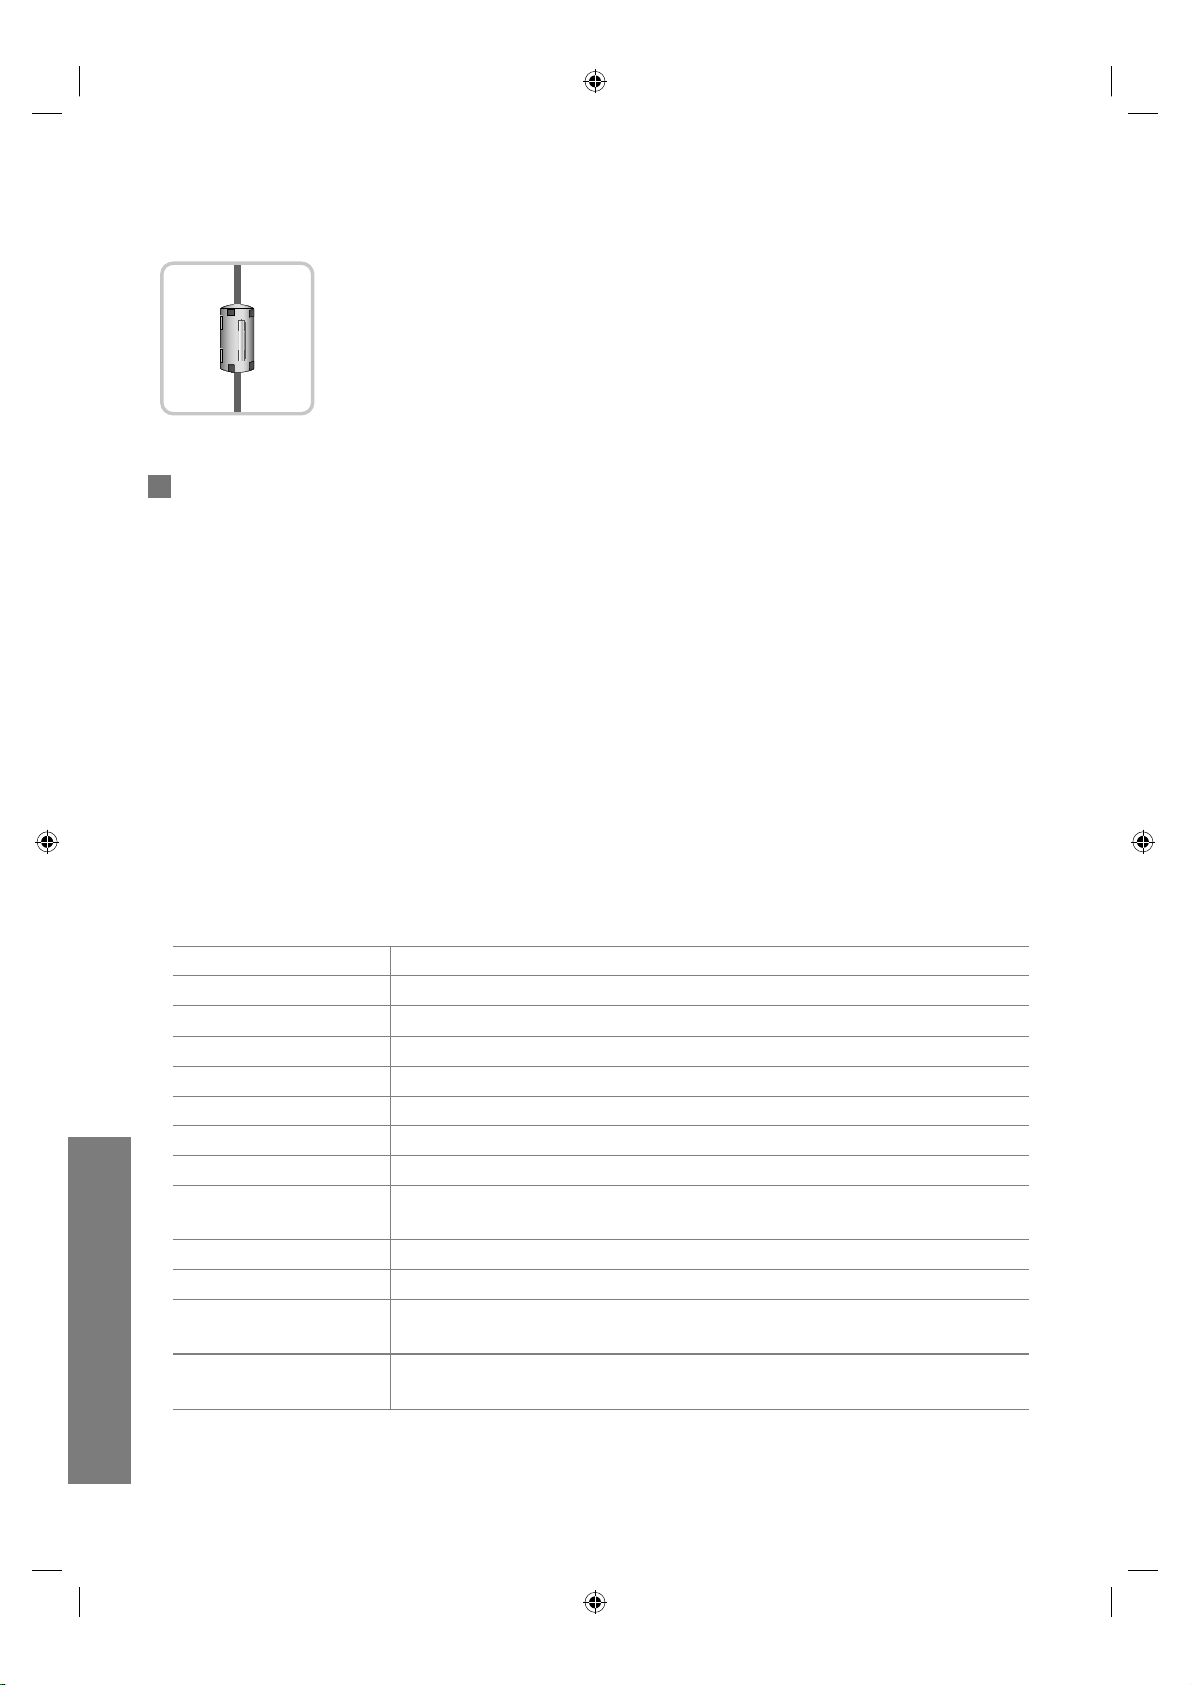
• The ferrite cores are used to shield the cables from interference.
• When connecting a cable, open the ferrite core and clip it around
the cable near the plug.
Parts and Assembling of Parts
Parts and Assembling of Parts
The product appearance may differ depending on the product model. The product specifications
are subject to change for product enhancement purposes without prior notice.
Product Features >
- An SPVA response time of 8ms has been adopted
- The Sound function has been reinforced by adopting SRS TruSurround
- Speaker out
- 10W x 2 speaker
Specifications >
Model Name 460I-S
Panel AMLCD 46”(LTI460HA03)
Optimum Resolution 1920 x 1080 Wide (UXGA) 60Hz
Display Size (H X V) 46” (16 x 9)
Brightness 616 cd/m2
Contrast Ratio 2000 : 1
Response Time 8 ms
Viewing Angle Left/Right/Up/Down : 89” / 89” / 89” /89”
Power Consumption
(on mode)
DPMS 5 W
Sound Output Max. 10 W x 2
Size (W X H X D) SET Unpackaged : 1114 x 664 x 157 mm(W x H x D)
weight Unpackaged : 37 kg
TYP : 365 watts
MAX : less than 425 watts
Packaged : 1252 x 803 x 367 mm (W x H x D)
Packaged : 45 kg
uVending
English
4
Page 6

Disassembly
Remove 6 screws from the rear cover
Lift up the shield cover.
uVending
English
5
Page 7

Internal View
① ③
①
Network Board : CPU and Video decoder are used to process video and audio
②
Sub SMPS : Network board power supply
③
SMPS : MAIN PBA and PANEL power supply
Assembly Method
②
①
Touch Module controller
②
HDMI cable
③
Speaker wire connector (L R)
④
Control button
④
③
②
①
uVending
English
6
Page 8

Assembly Method - Touch module connection
USB Cable
Assembly Method - Speaker connection
Left side (Yellow)
uVending
English
7
Right side (Green)
Page 9

Assembly Method – Method that use PC Box
unscrew 3 bolts; take the
cover off; repeat this for 4
corners and then use PC Box
Assembly Method – Touch module connection
USB Cable
PC Box
Mini USB
connector
Touch module
controller
uVending
English
8
Page 10

Assembly Method - HDMI cable connection
HDMI Cable
HDMI cable
PC Box
HDMI cable
Assembly Method – Speaker connection
Left side (Yellow)
uVending
English
9
Speaker Wire
Right side (Green)
Page 11

Assembly Method - Power on/off switch connection
②②
①①
② ①
①
Power Button : Power on/off button.
②
LED : Green – Normal condition. / Yellow – Power off condition.
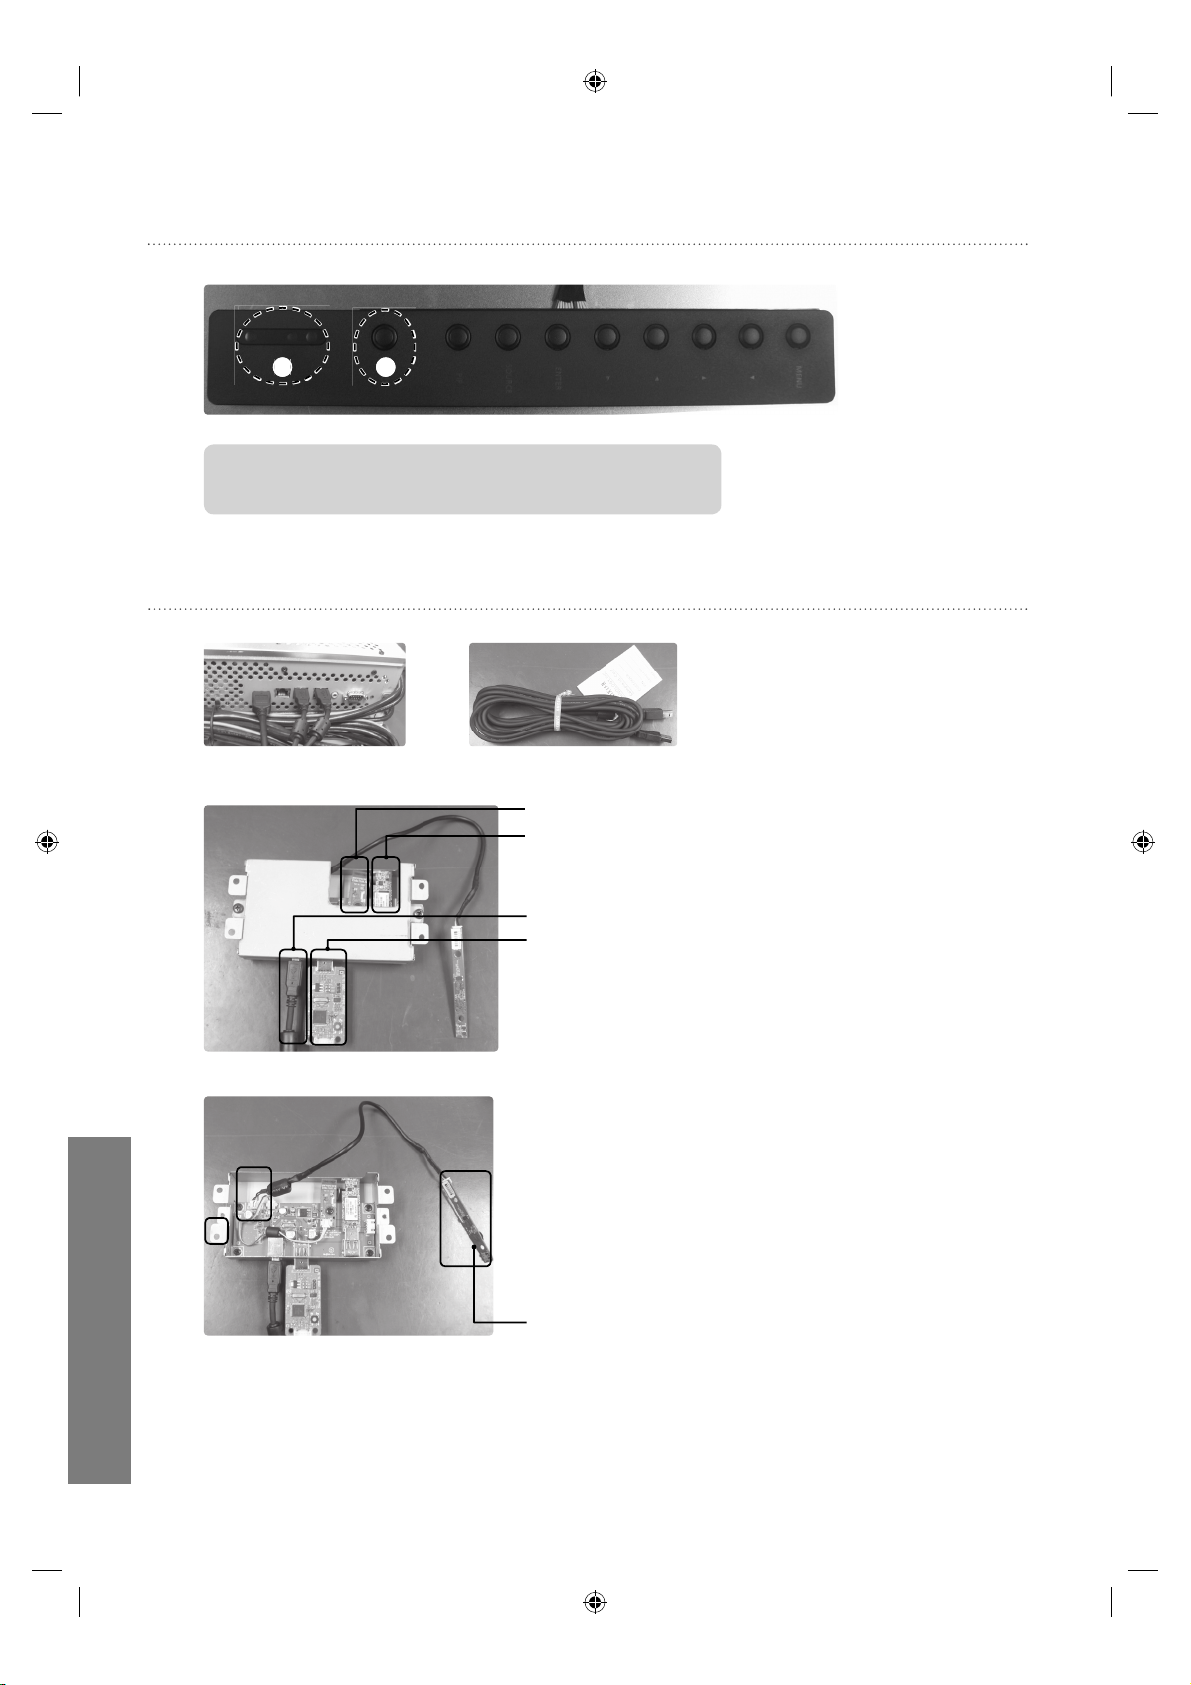
Assembly Method - Wi-Fi / BT / Camera/ Shock sensor connection
PC Box
Wi-Fi/BT/Shock sensor/ Camera
USB cable
Wi-Fi
Bluetooth
USB cable
Shock sensor
Unscrew 2 bolts ; take the cover off ;
and connect camera cable
Camera
uVending
English
10
Page 12

Block Diagram
uVending
English
11
Page 13

Board Connections - Main Board
④③
①
②
⑤
USBLAN RS-232CHDMI
①
Power Connector : connecting to SMPS
②
Function Connector : Connecting to Function Board
③
LVDS Connector : connecting to PANEL
④
Speaker Connector : connecting to speaker
⑤
HDMI Connector : connecting to Network Board
Board Connections - SMPS Board
④
⑤
①
Lamp connector : Connection to Panel Inverter, 30P
②
Power connector : Connection to Main PBA, 30P
③
AC Power connector : Connection to Sub SMPS
④
Connection to AC socket
⑤
Power GND
③
②
①
uVending
English
12
Page 14

Board Connections - Network Power Board
②
①
①
AC Power Connector : Connecting to SMPS Board
②
Network Connector : Connecting to Network Board
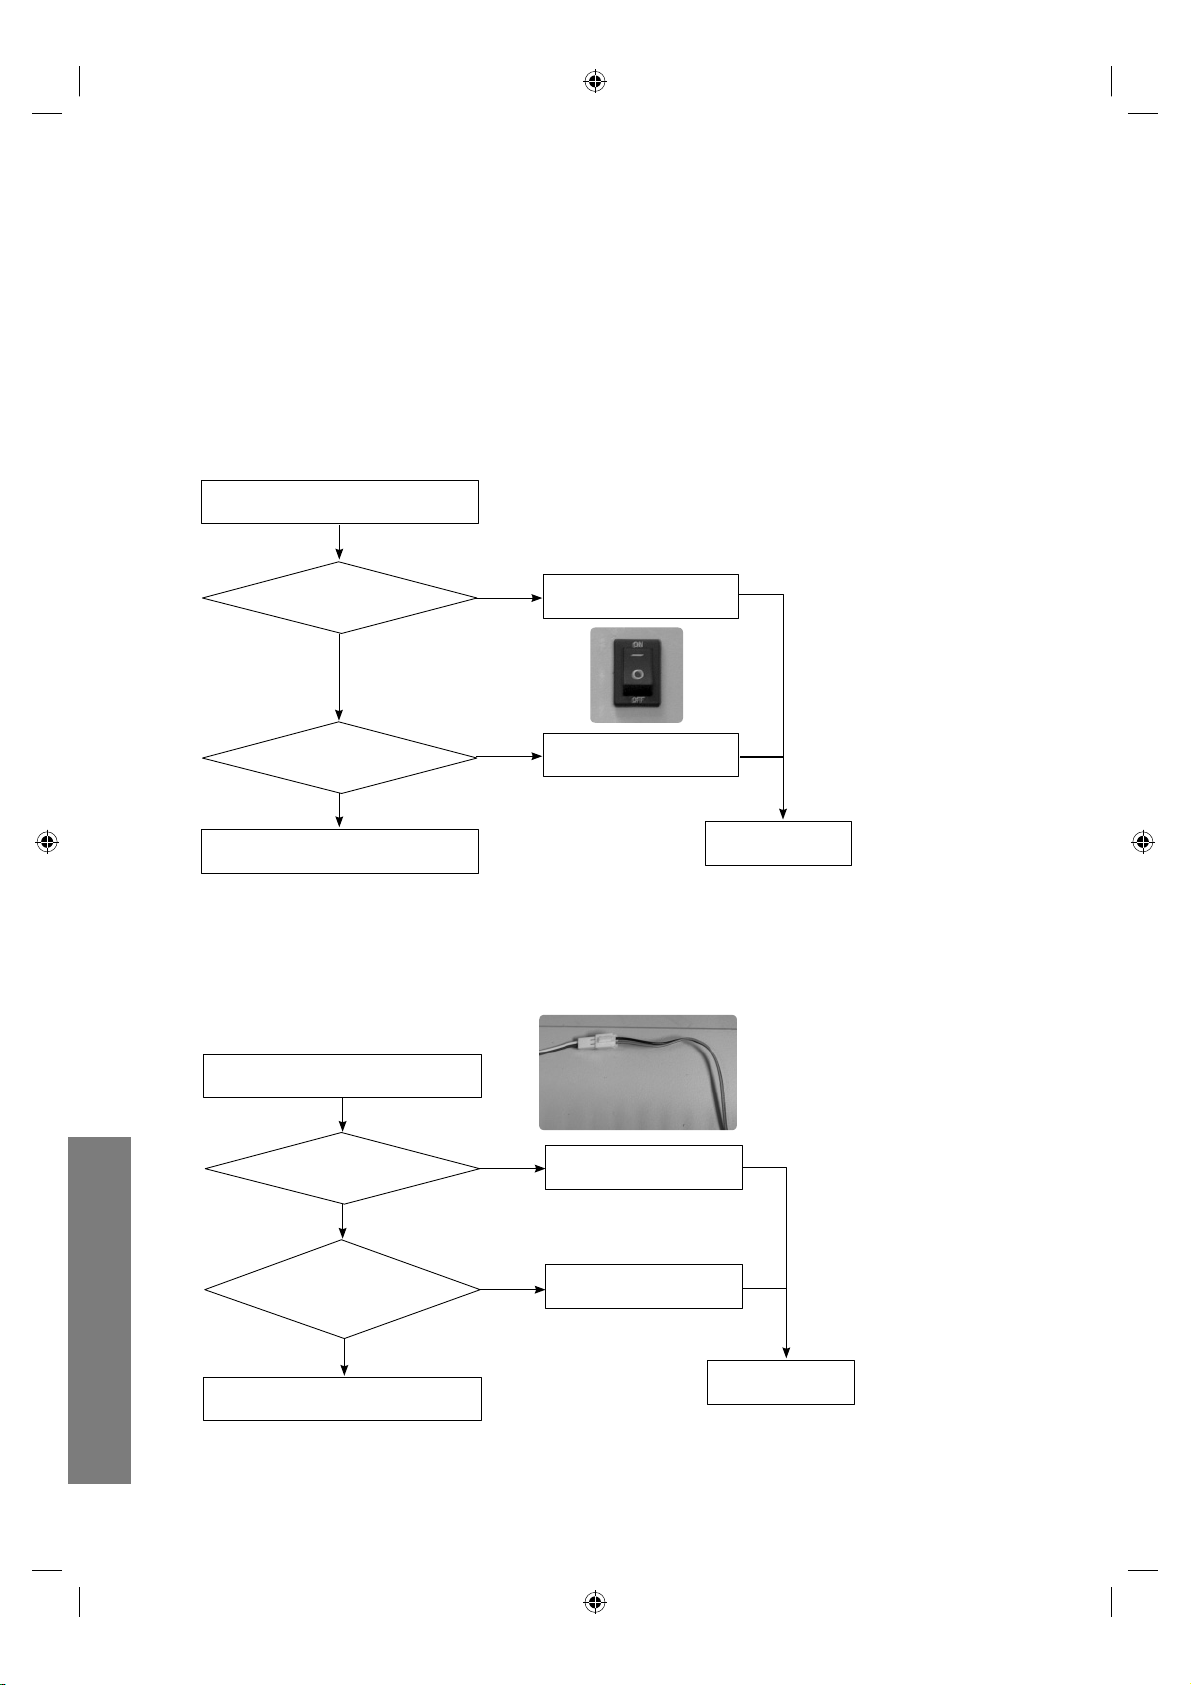
Network Board: Battery Replacement >
Battery Replacement*
You may replace the battery in the same or similar cases as followings:
- EX1) The required information is not properly stored when the FDM
and BIOS are updated.
uVending
English
13
Battery (4301-000108)
Page 15

Disassemble as the picture (refer to the Set disassembly diagram) and remove the *
current battery from BAT1, then insert the new battery.
- Pull back the holder on the left of the battery
- Hold both sides and remove the battery
- Replace with the new battery
no-power >
NO-POWER
Is the power cord connected?
Ye s
Is the Power switch turned on?
Ye s
Check the u-Vending internals.
(Contact a service center.)
No
No
Connect the power cord.
Turn on the Power Switch
Complete
No - Sound >
No - Sound
Is the speaker cable
connected?
No
Connect the speaker cable.
uVending
Ye s
Is the volume
level normal?
(Refer to uVending
management Software.)
Ye s
Check the u-Vending internals.
(Contact a service center.)
No
Increase the volume.
Complete
English
14
Page 16

uVending
management Software
What is uVending Management Software?
uVending Management Software is a program which sets the information, screen Template
(Theme) and discount functions used when products are sold by the Samsung uVending
machine. It also controls the display and sounds of the Samsung uVending machine. uVending
Management Software comprises an LFD display and Plan-O-Gram. The LFD display controls
Samsung uVending machine’s environment, such as the display and sounds, while the Plan-OGram controls products, the Template and discount functions.
For further details on Template and Theme, refer to the uVending Template Builder manual.
Main Functions of uVending Management Software
LFD Manager*
Sets Samsung uVending machine’s environment, including the display and sounds.
Plan-O-Gram*
Displays and modifies product display information and Template items.
uVending
English
Template Library *
Provides an interface which allows imported Template and Theme items to be used in the uVending
device.
Discount Function Setting*
Settings can be changed to apply a discount to each purchased product when the total price of items
in the shopping cart has reached a set amount, or apply a discount to related products at the time of
purchase.
15
For further details on Template and Theme, refer to the uVending Template Builder manual.
Page 17

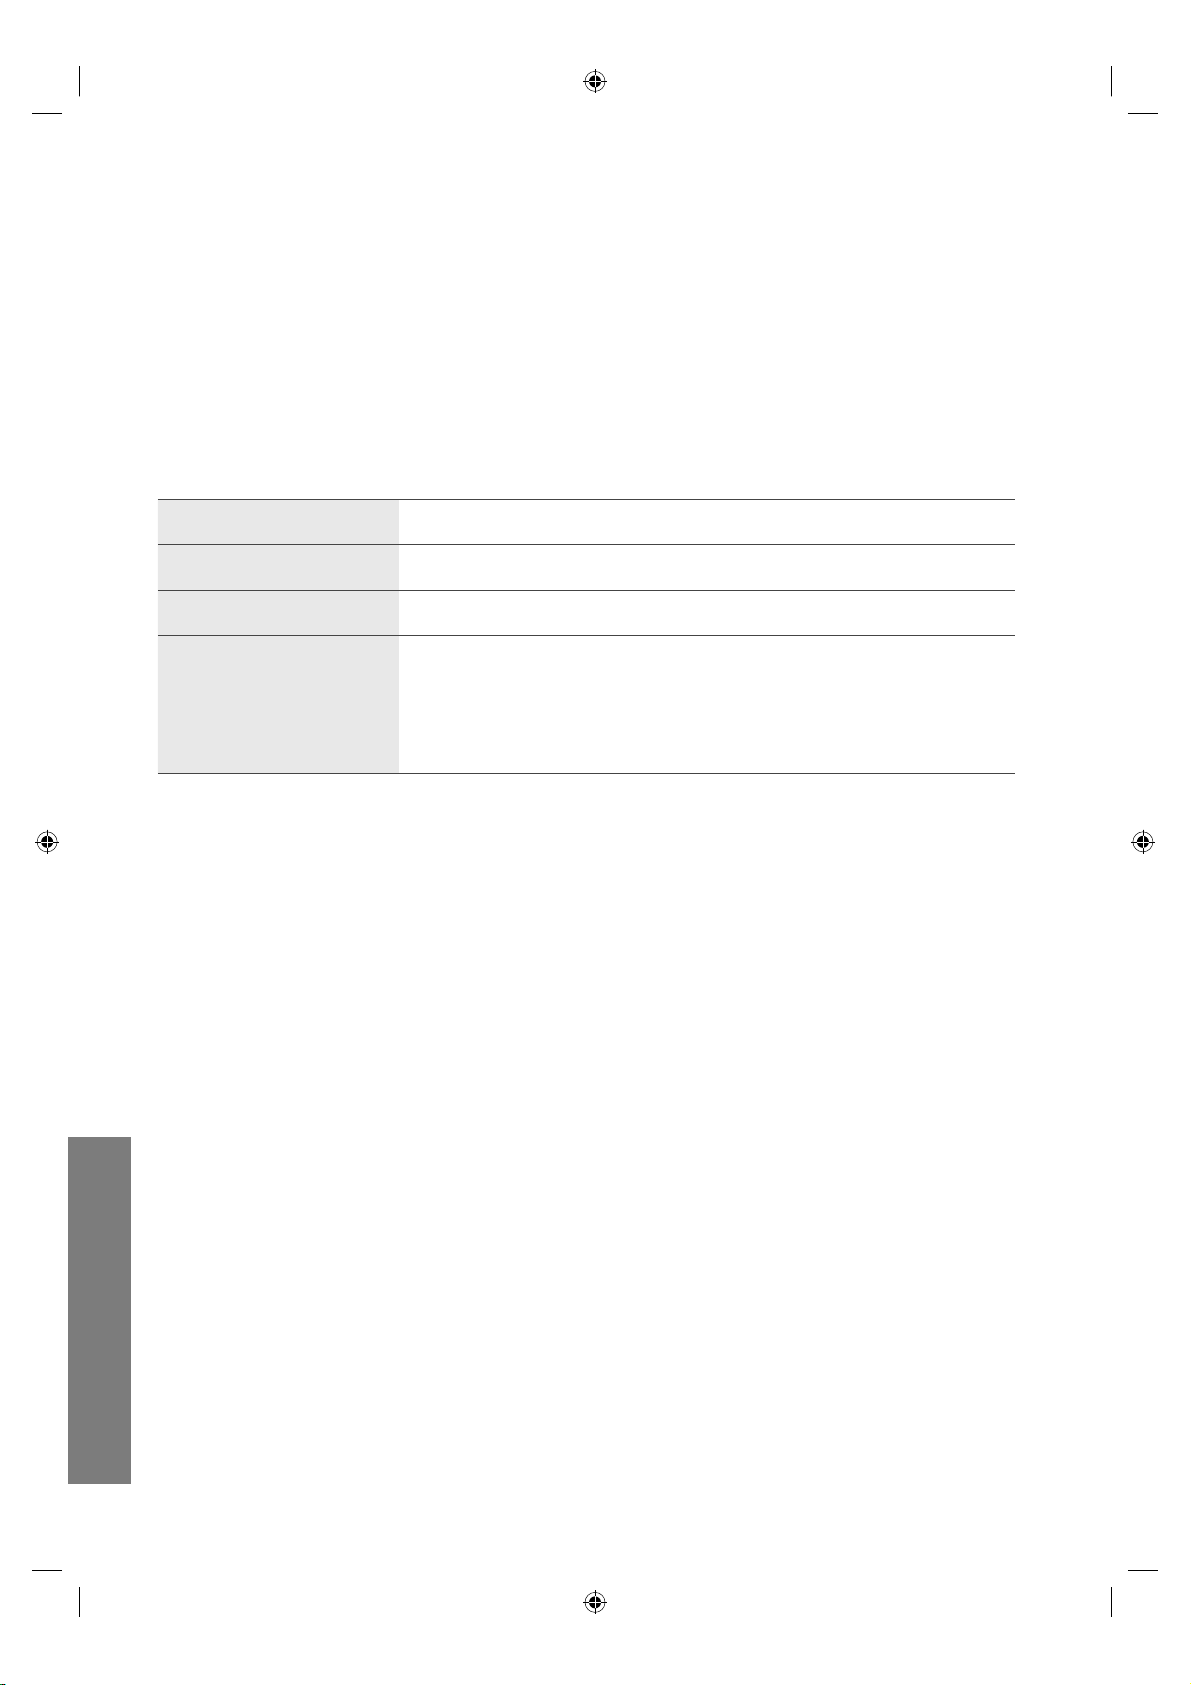
Compatibility
Compatible only with the Samsung uVending machine *
This program is only compatible with the Samsung uVending machine. It operates only with the
Samsung uVending machine.
System Requirements
> CPU
> Memory
> HDD
> OS
Intel Pentium 4 1.8GHz or higher
1024MB or higher
10GB or higher
Windows XP/2000
IE 7.0 or higher
DirectX 9.0 or higher
Adobe Flash Player 9.0 or higher
uVending
English
16
Page 18

General
Interaction
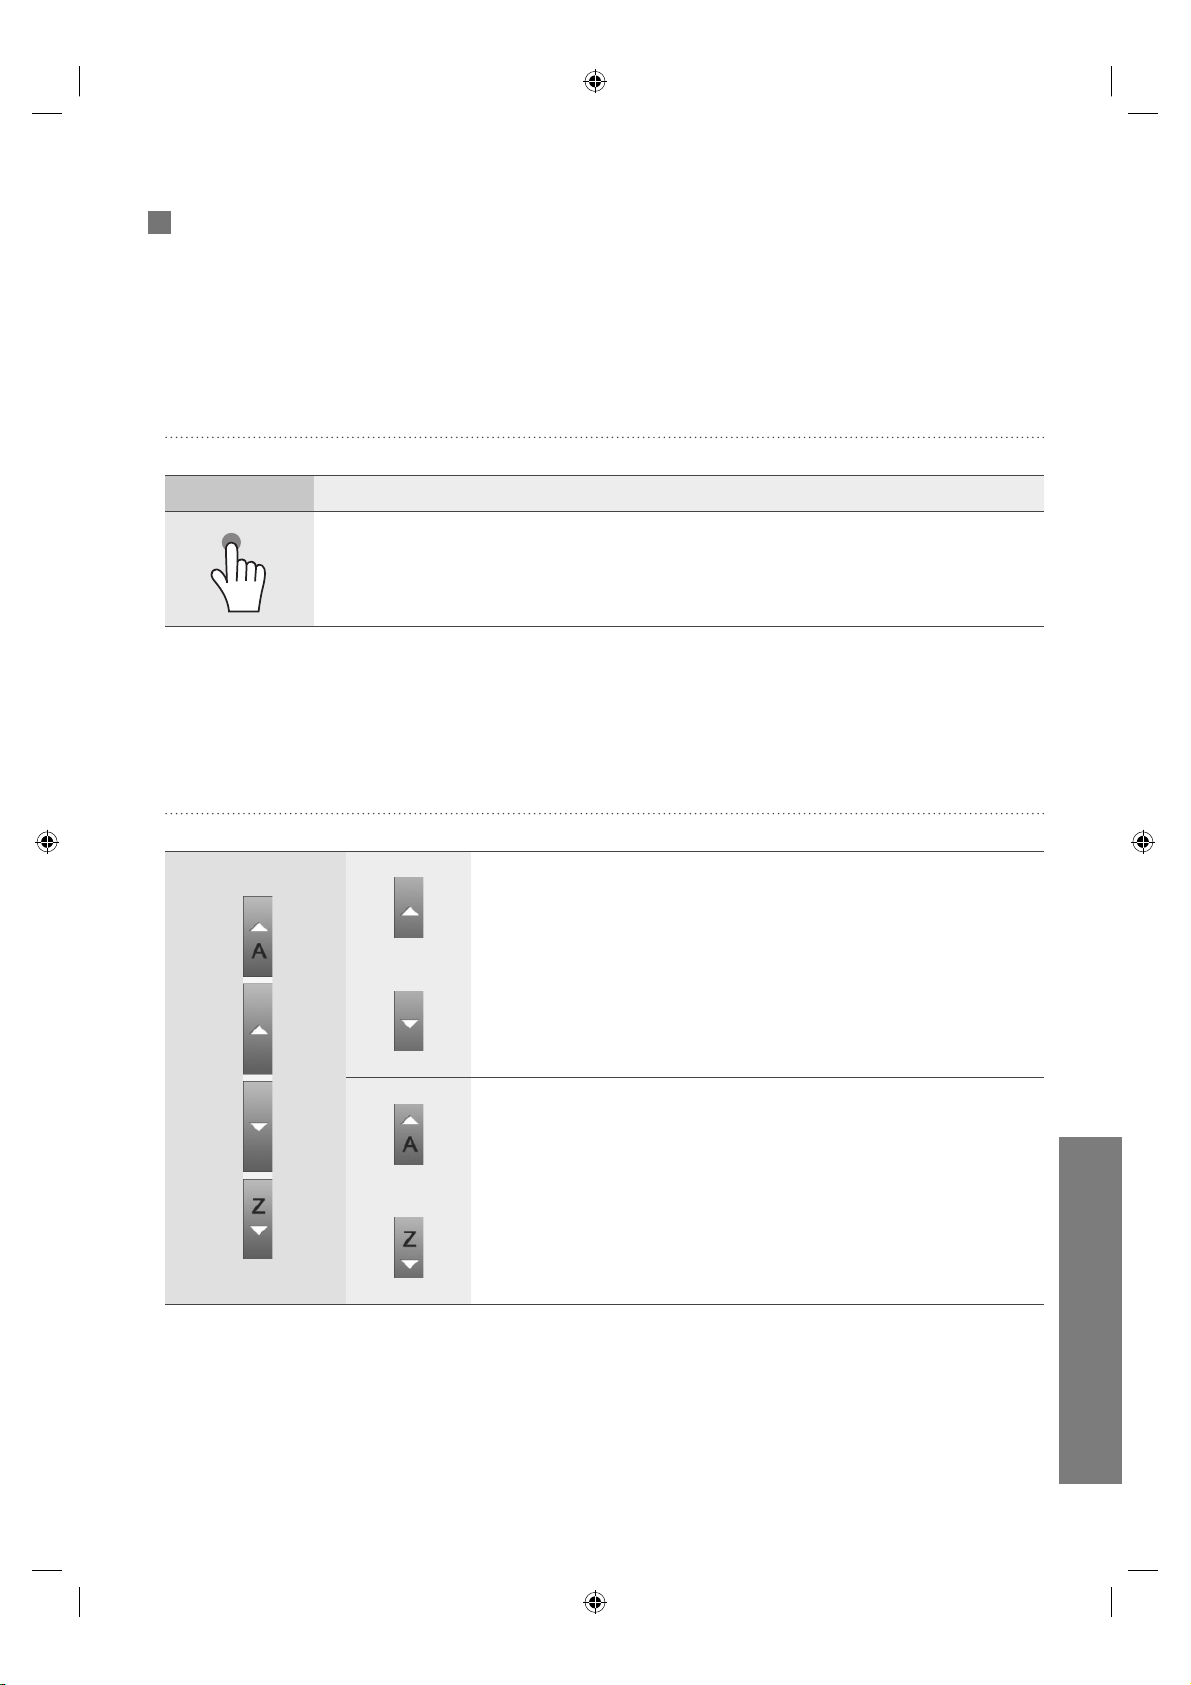
Touch Motion
Indication Behavior
Touch
Lightly press the screen once with one finger.
Scroll Buttons & Indicator
Single touch : The screen is scrolled by one unit.
Long touch : The screen is continuously scrolled down at a uniform
speed.
uVending
English
17
Moves to the first or last page when touched.
Page 19

Screen
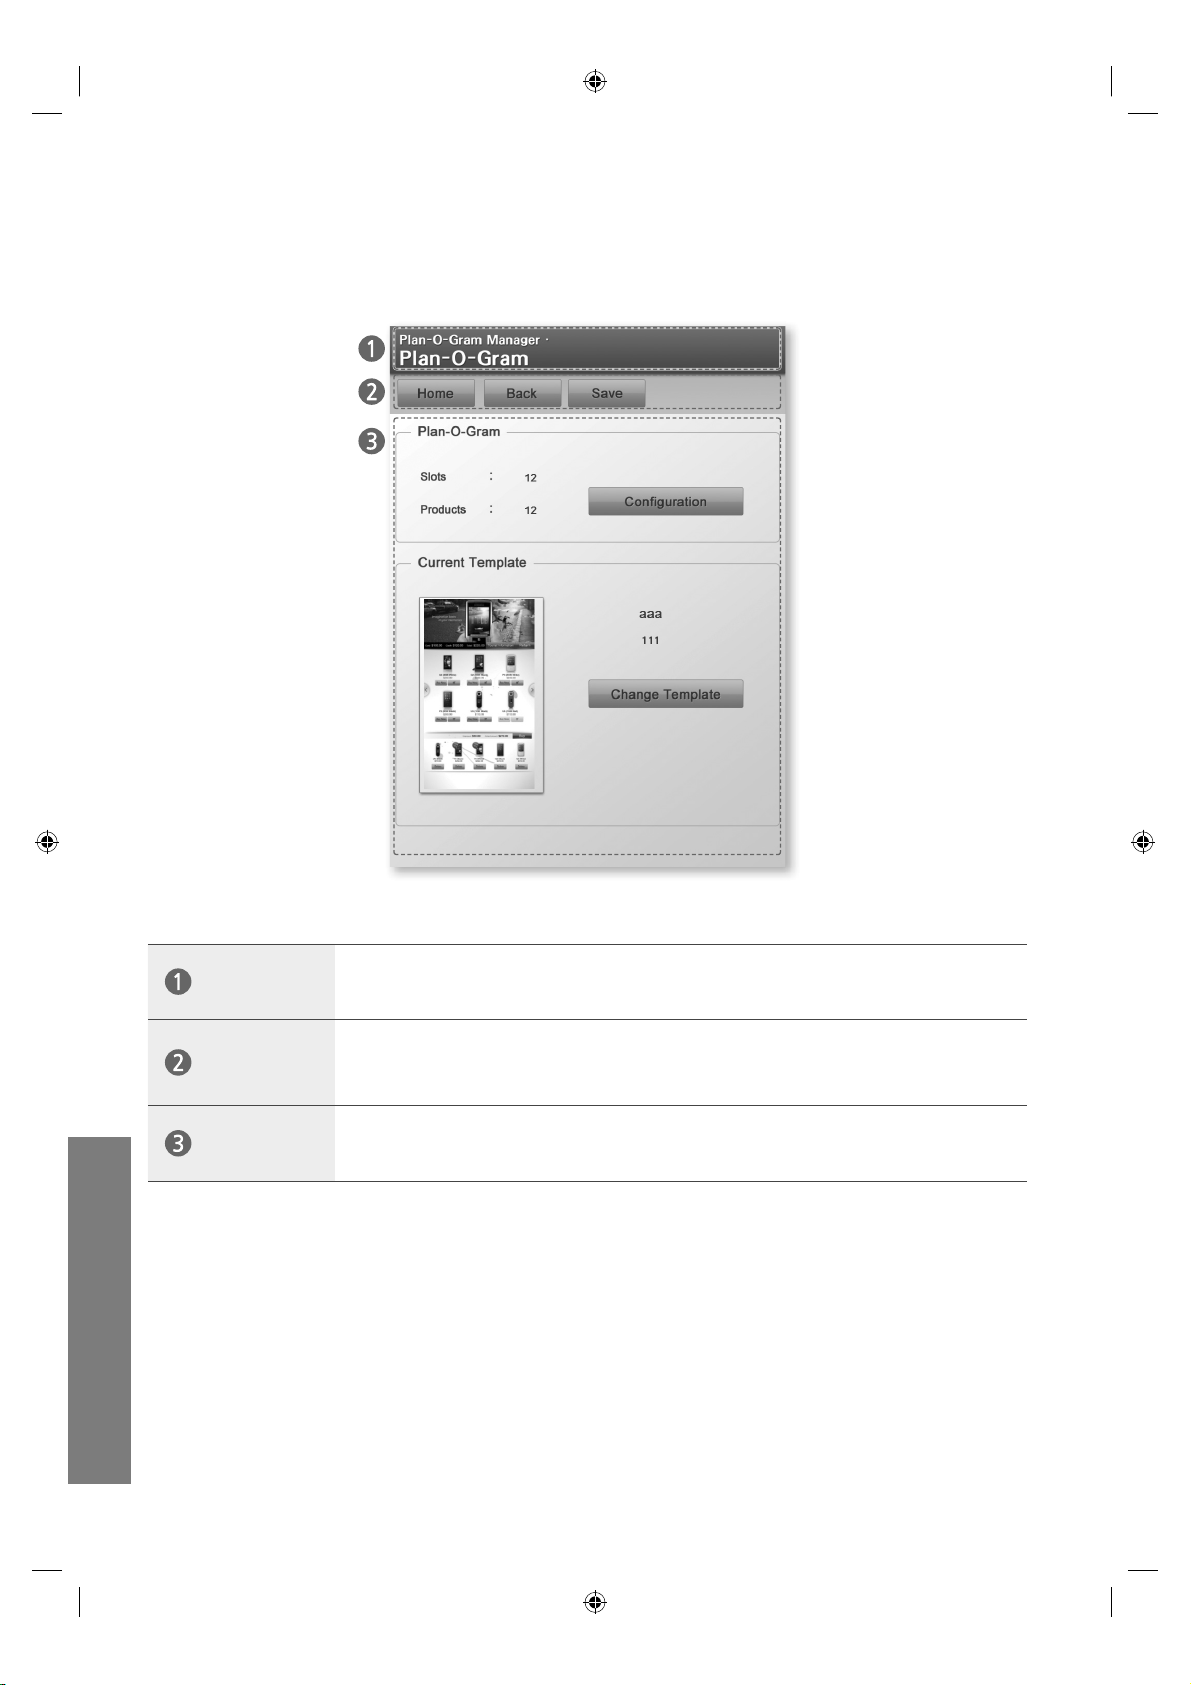
The screen is divided largely into the title, navigation and content sections.
Title
Menu Bar
Contents
Displays the current location and channel.
Displays the navigation buttons. Additional buttons, such as Save and Add Item,
are displayed when available.
Displays the content items of the current location.
uVending
English
18
Page 20

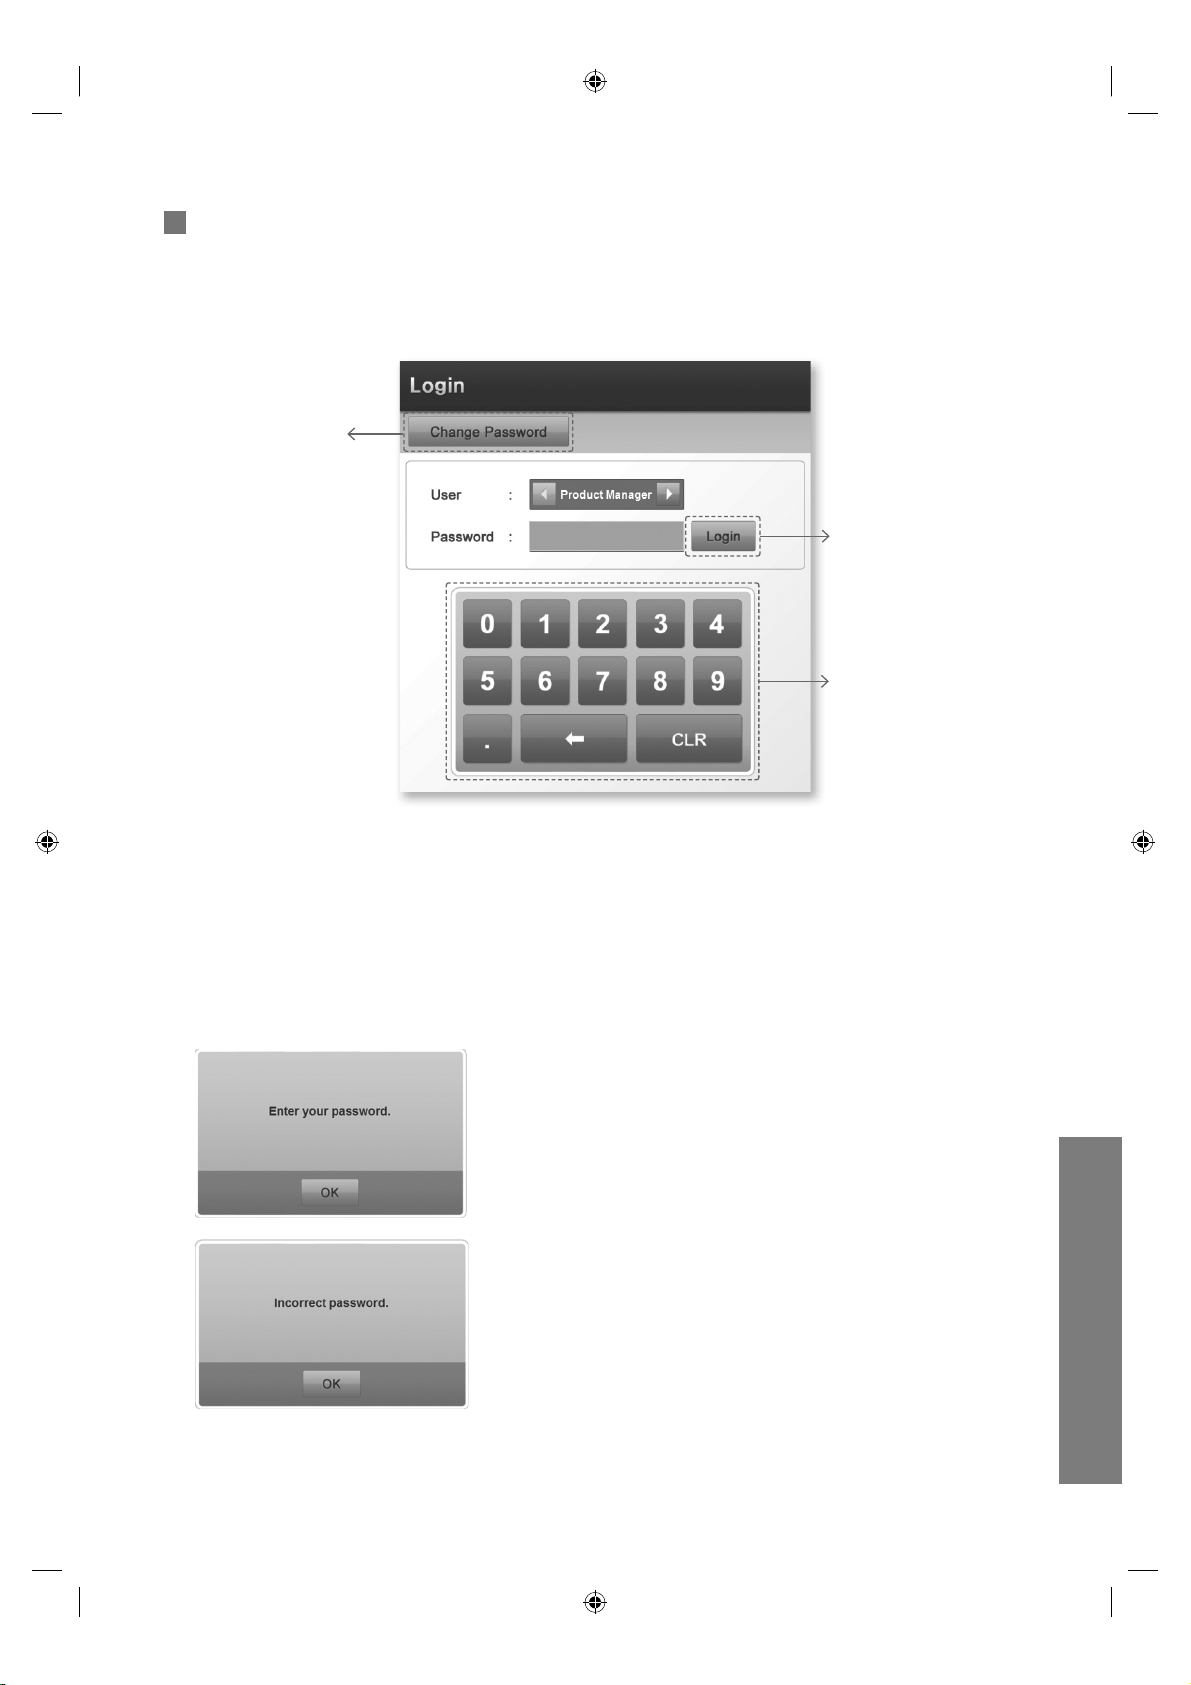
Login
Change Password
Use to change the
password.
Login Button
Numeric Keypad
Touch the numbers you
want.
How to Login
1 In the User field, use ◀▶ to select a user.
2 Enter the Password using the numeric keypad. (Entered password is displayed as *.)
3 Touch the Login button.
The Home screen is displayed when the correct Password is entered.
uVending
English
This warning screen is displayed when no Password is
entered.
This warning screen is displayed when an incorrect Password
is entered.
19
Page 21

2
The initial Password for every User is ‘00000.’
Product Manager, Vending Manager or System Manager can be selected in the User field, and
the access level of each user varies depending on the model.
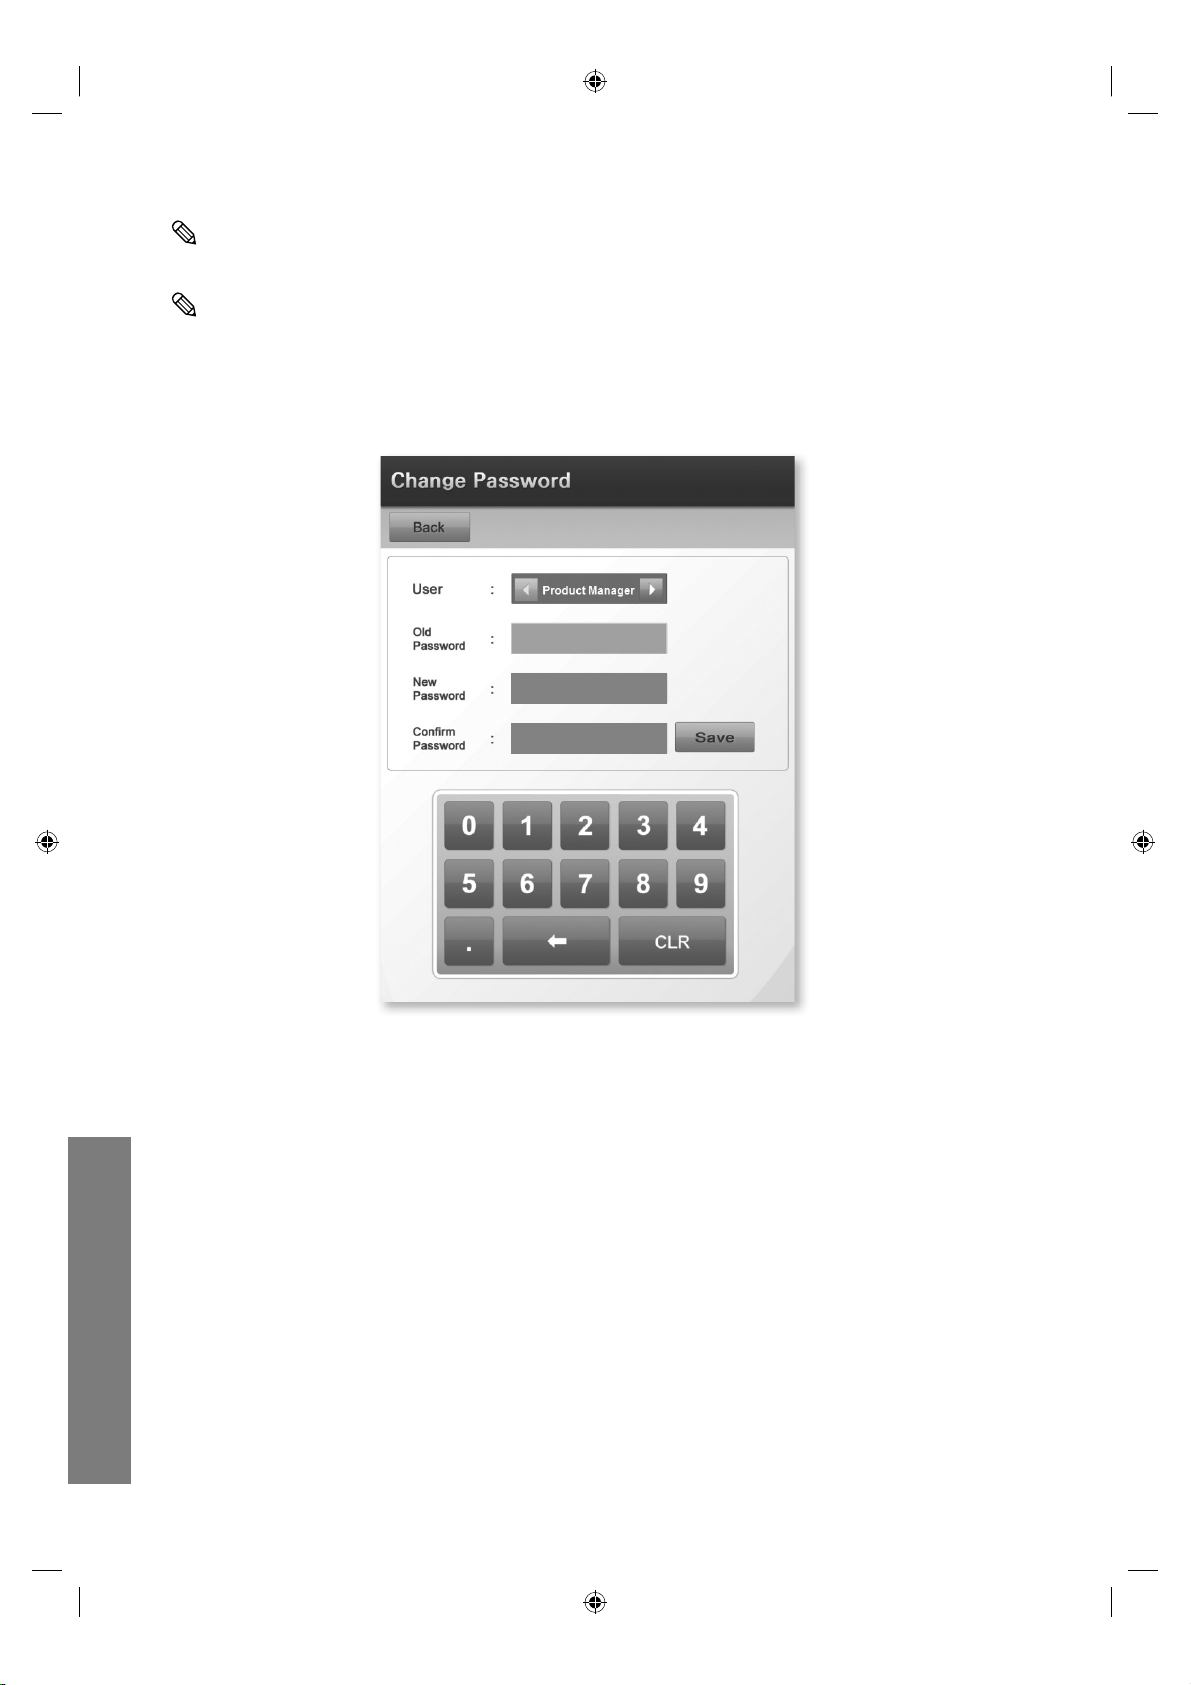
Change Password
1 Touch Change Password on the Login screen.
2 In the User field, select the user name you want to change the Password for.
3 Enter the old password in the Old Password field using the numeric keypad.
4 Enter the new password in the New Password field using the numeric keypad.
5 Enter the new password in the Confirm Password field using the numeric keypad.
6 Touch Save to change the password and return to the Login screen.
uVending
English
20
Page 22

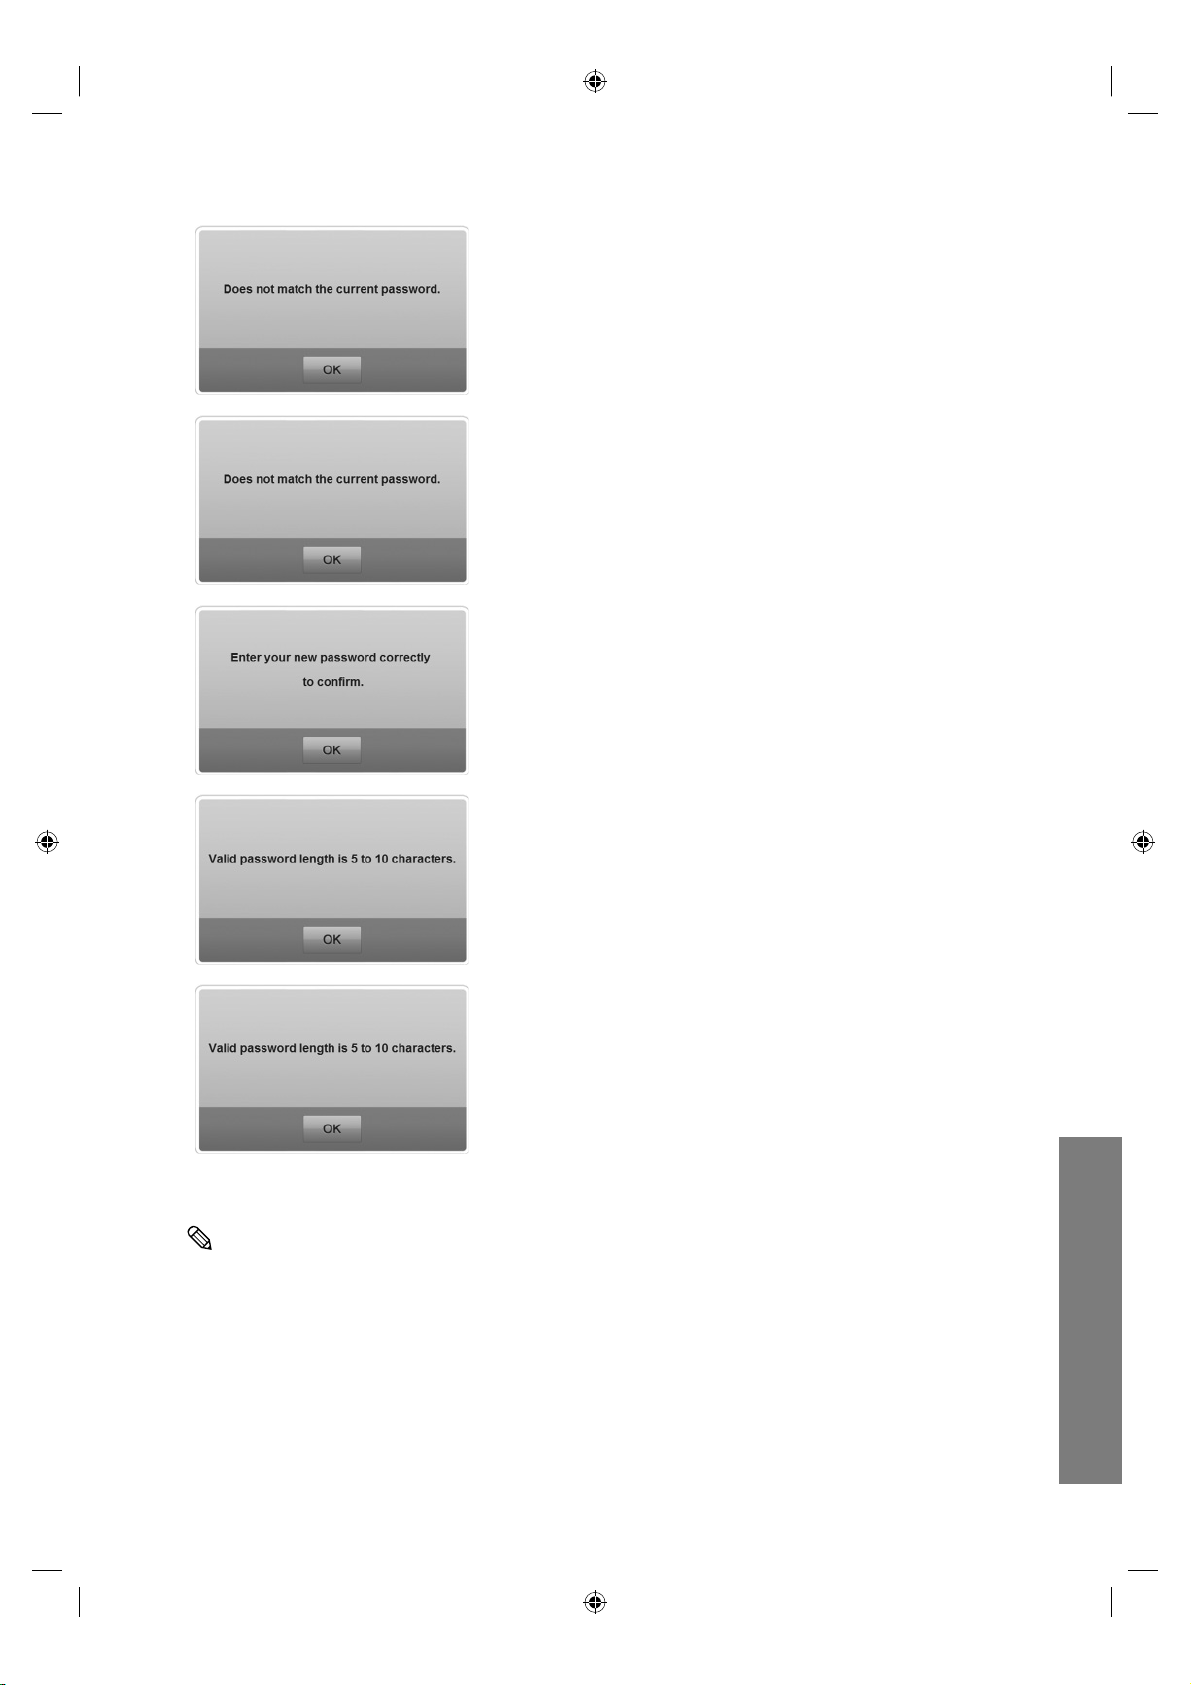
This warning screen is displayed if Save is touched without
entering the Old Password.
This warning screen is displayed if the Original Password is
entered incorrectly.
This warning screen is displayed if the passwords entered
in the New Password and Confirm Password fields do not
match.
This warning screen is displayed if the New Password field is
not filled in.
uVending
English
21
This warning screen is displayed if the Confirm Password
field is not filled in.
The Password must be between 5 and 10 digits made up of numbers between 1 and 9.
Page 23

2
Home
The screen below is displayed after log-in.
LFD Manager or Plan-O-Gram Manager can be selected.
Sets Samsung uVending machine’s environment, including the display and
LFD Manager
Plan-O-Gram
Manager
sounds.
Comprises the Display and Sounds options.
Adds products, Template items and discount functions.
Comprises the Plan-O-Gram, Template Library, Cart Discount Setup and
Related Product Discount Setup menus.
uVending
English
22
Page 24

LFD Manager
LFD Manager
The LFD Manager controls the display and sounds for the Samsung uVending machine.
uVending
English
23
Display
Sounds
Changes the screen Contrast, Brightness and Color Tone settings. You can
also preview the changes before they are applied.
Changes the Volume, Sound Mode and Virtual Surround Sound settings.
You can also preview the changes before they are applied.
Page 25

2
Display
The Display screen controls the display.
To make an adjustment,
touch ◀ or ▶
Touch and move the slide bar in the
desired direction.
(Touch the ◀ or ▶ button to move
1 unit or touch the slide bar to move
10 units.)
Magic Brightness
Mode
Color Tone
Options can only be changed if the Option field is set to Custom.
Contrast Adjusts the screen contrast.
Brightness Adjusts the screen brightness.
Red Gain Adjusts the level of red gain on the screen.
Green Gain Adjusts the level of green gain on the screen.
Blue Gain Adjusts the level of blue gain on the screen.
Option
uVending
English
24
Page 26

Sounds
The Sounds screen controls the sounds.
Music is played when the Sounds screen is opened. Changes to options are applied immediately.
Sound ON/OFF
To make an adjustment,
touch ◀ or ▶
Volume
uVending
Sound Mode
English
Virtual Surround Sound
25
Adjusts the volume.
Bass Adjusts the bass level.
Treble Adjusts the treble level.
Balance
The deep and vivid sound of 5.1 channel speakers can be enjoyed with two
speakers.
SRS TruSurround HD is ON by default.
Touch and move the slide bar in the
desired direction.
(Touch the ◀ or ▶ button to move 1
unit or touch the slide bar to move 10
units.)
Adjusts the volume of each speaker to achieve balance in
sound.
Page 27

2
Plan-O-Gram Manager
The Plan-O-Gram Manager manages products, Template items and discount functions.
Plan-O-Gram
Template Library
Cart Discount
Setup
Related Product
Discount Setup
Displays product display information.
Manages (adds/deletes) a Template.
Sets the function which applies a discount to each purchased product
when the value of the items in the shopping cart reaches a certain level.
Sets the function which applies a discount to related products at the time
of purchase.
uVending
English
26
Page 28

Plan-O-Gram
Plan-O-Gram displays and modifies product display information and Template items.
uVending
English
27
Slots
Products
Configuration
Change Template
The number of spaces where products can be displayed.
The number of products displayed in the Slot of the current Samsung
uVending machine.
Sets product display.
Changes the current Template and Theme.
Page 29
2
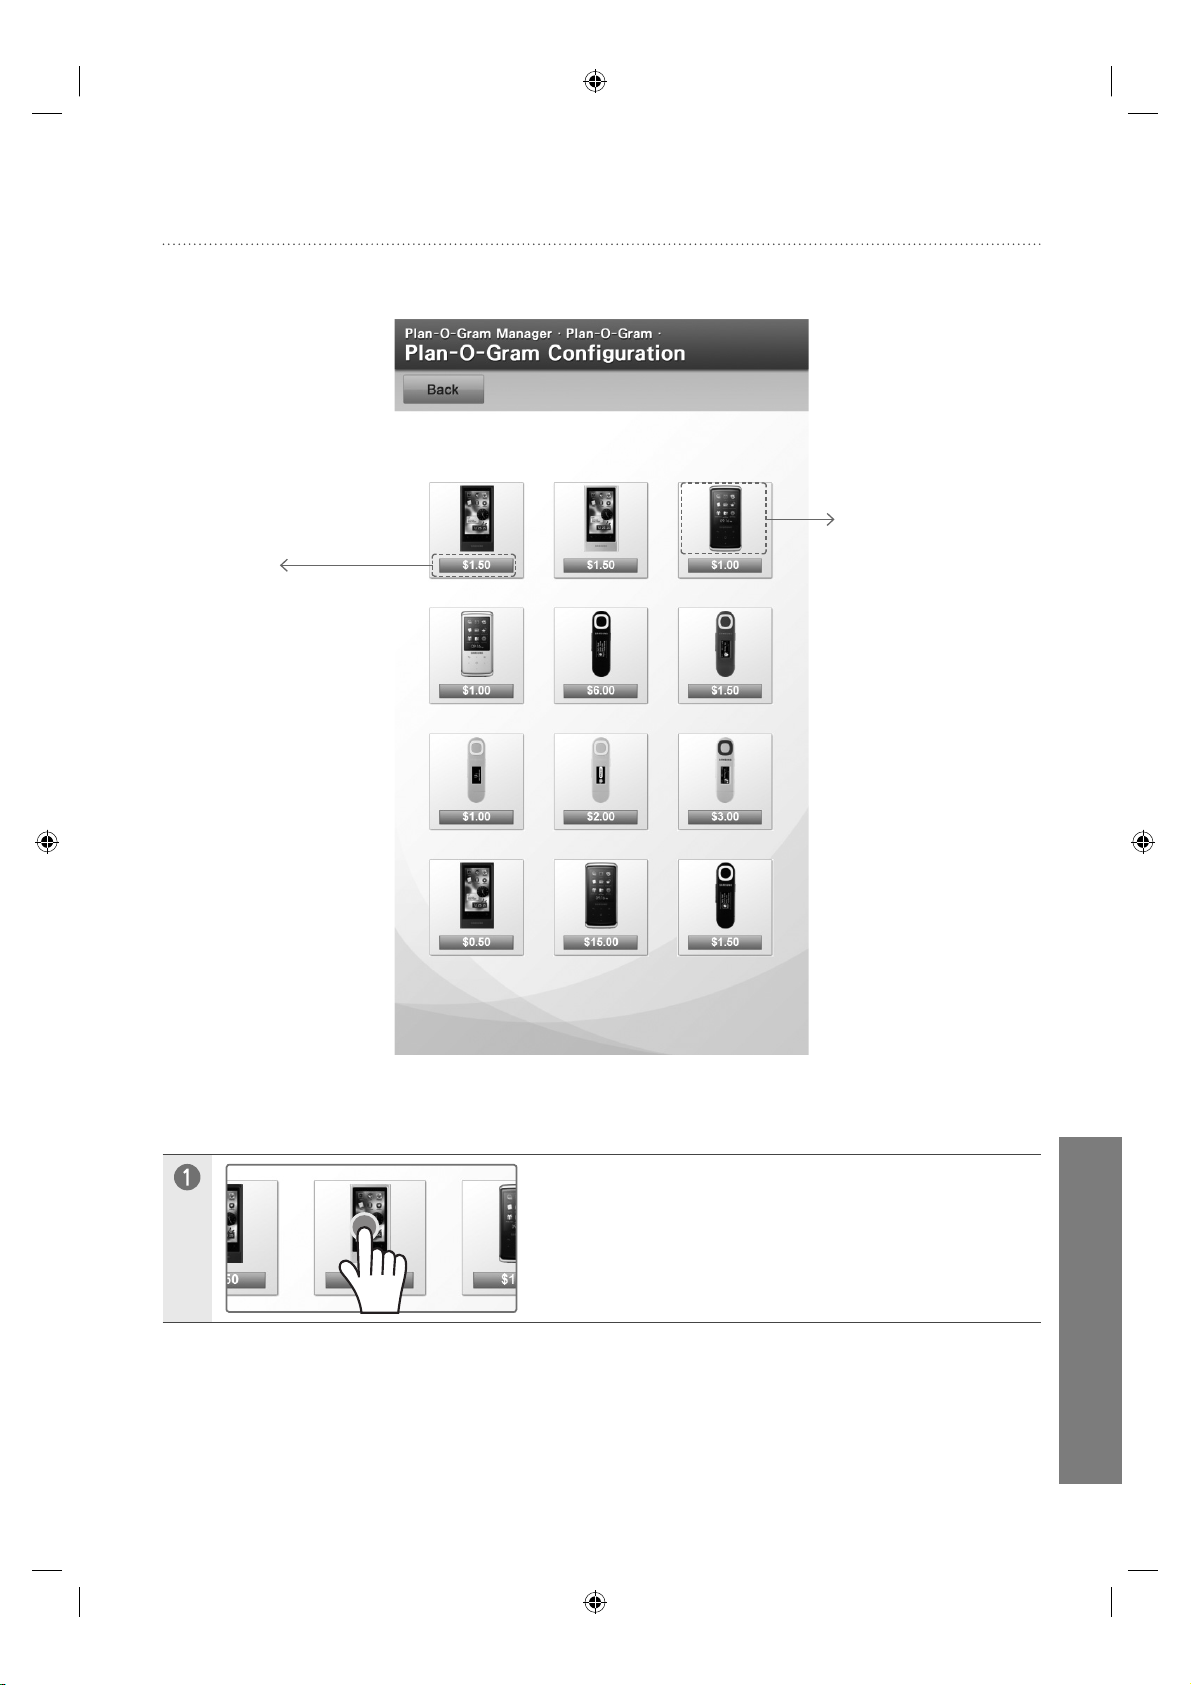
Configuration
The Configuration screen changes the images and prices of products displayed.
Price
Touch this area to
set the price of a
product.
Image
Touch this area to
display the window
to replace a product.
Changing Product Images >
uVending
Touch the image of the product you want to change.
English
28
Page 30
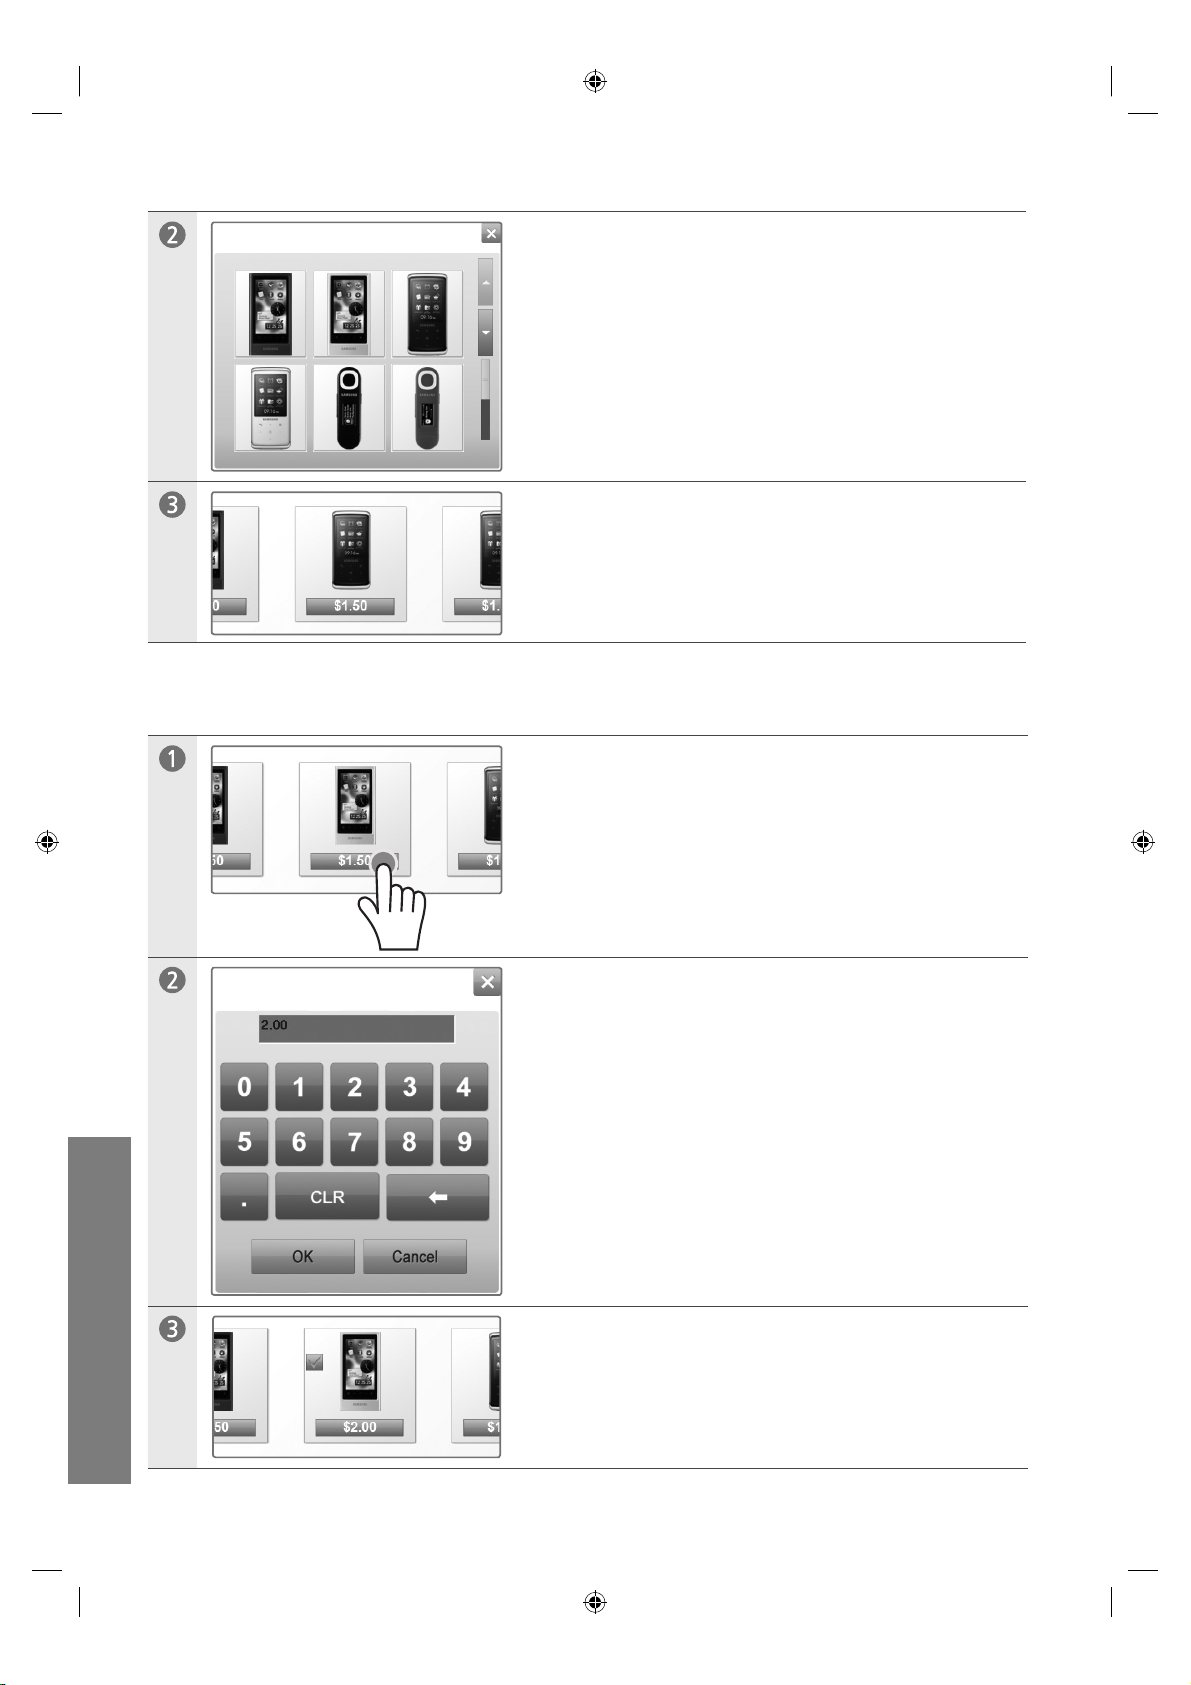
Touch and select a new image from the images displayed.
The product image is changed.
Changing Product Prices >
Touch the price of the product you want to change.
uVending
English
29
Enter a new price and touch OK.
The product price is changed.
Page 31
Products and product display layouts differ by Template
For further details on Template, refer to the uVending Template Builder manual.
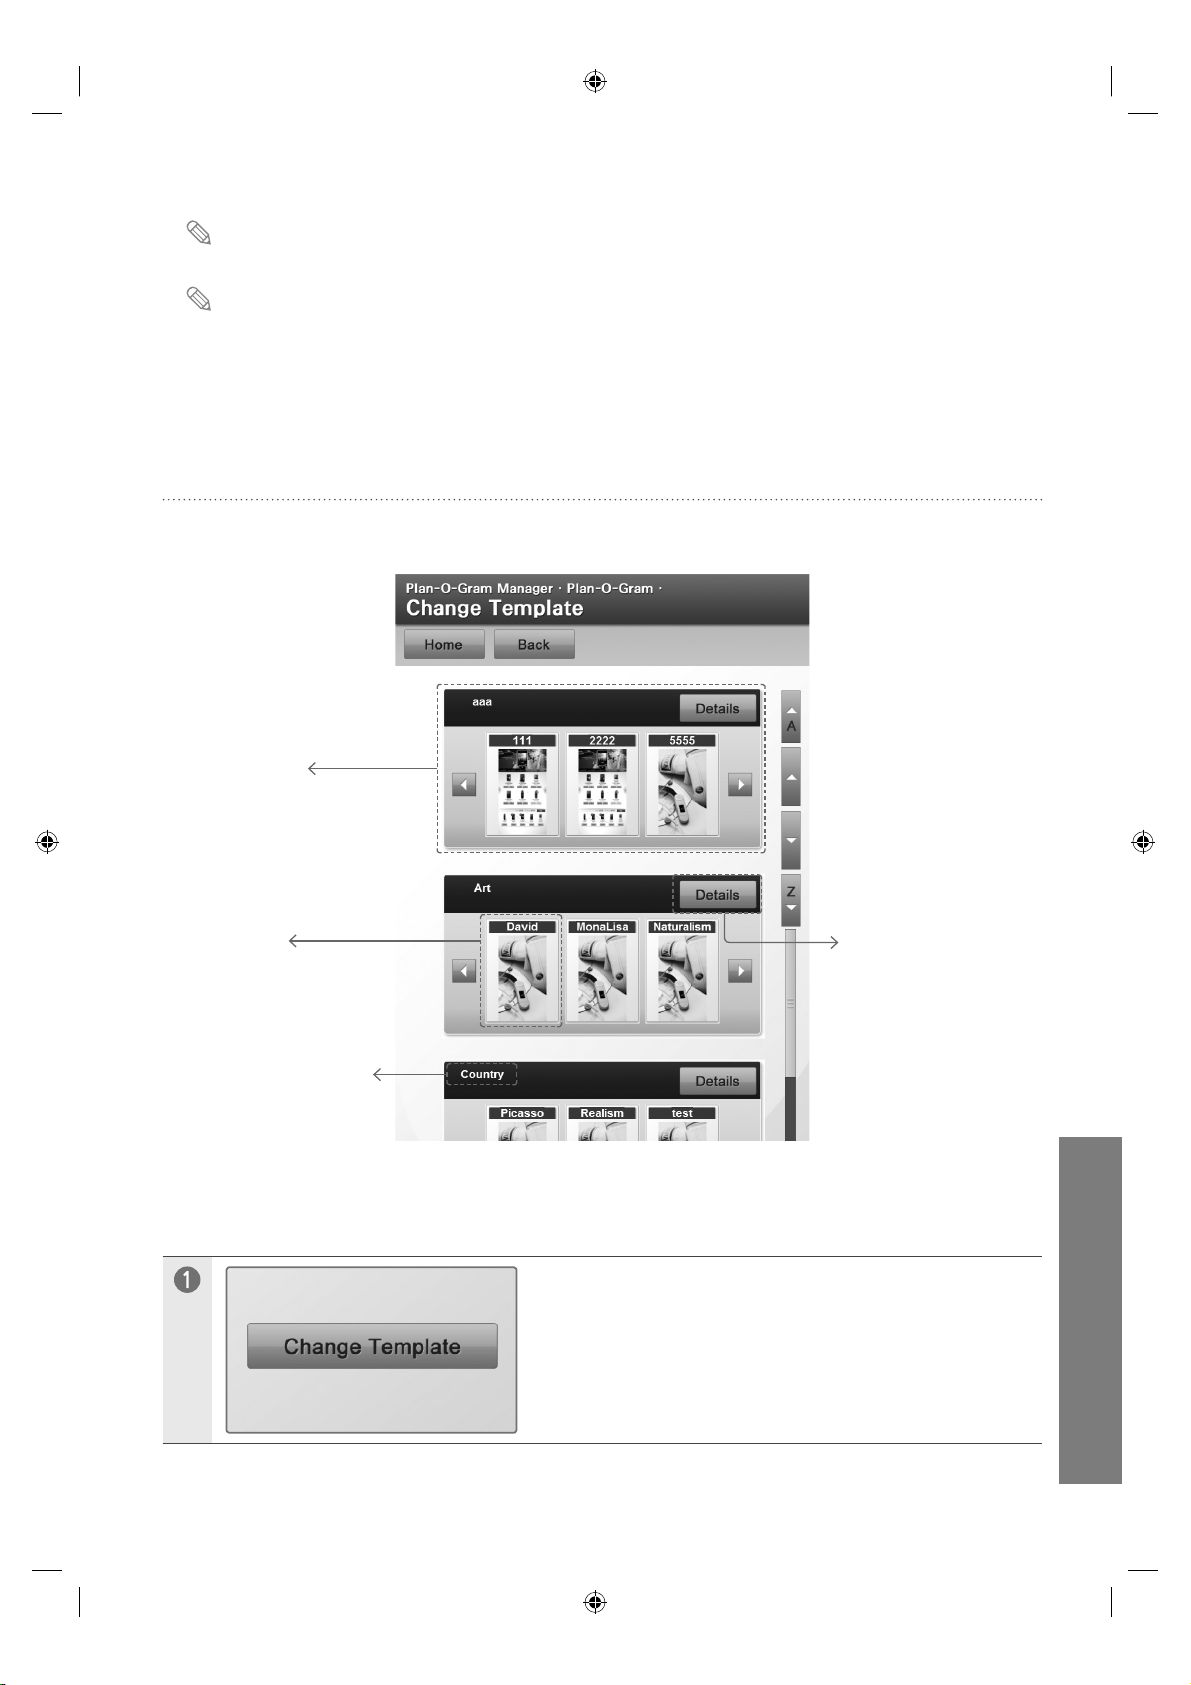
Change Template
In the Change Template screen, Template and Theme items can be changed.
Template
Displays the Theme
items of a Template
Theme
A Theme of a Template
Template Name
Template의 이름
Changing Template >
Touch Change Template.
Details
Displays the details of
a Template.
uVending
English
30
Page 32
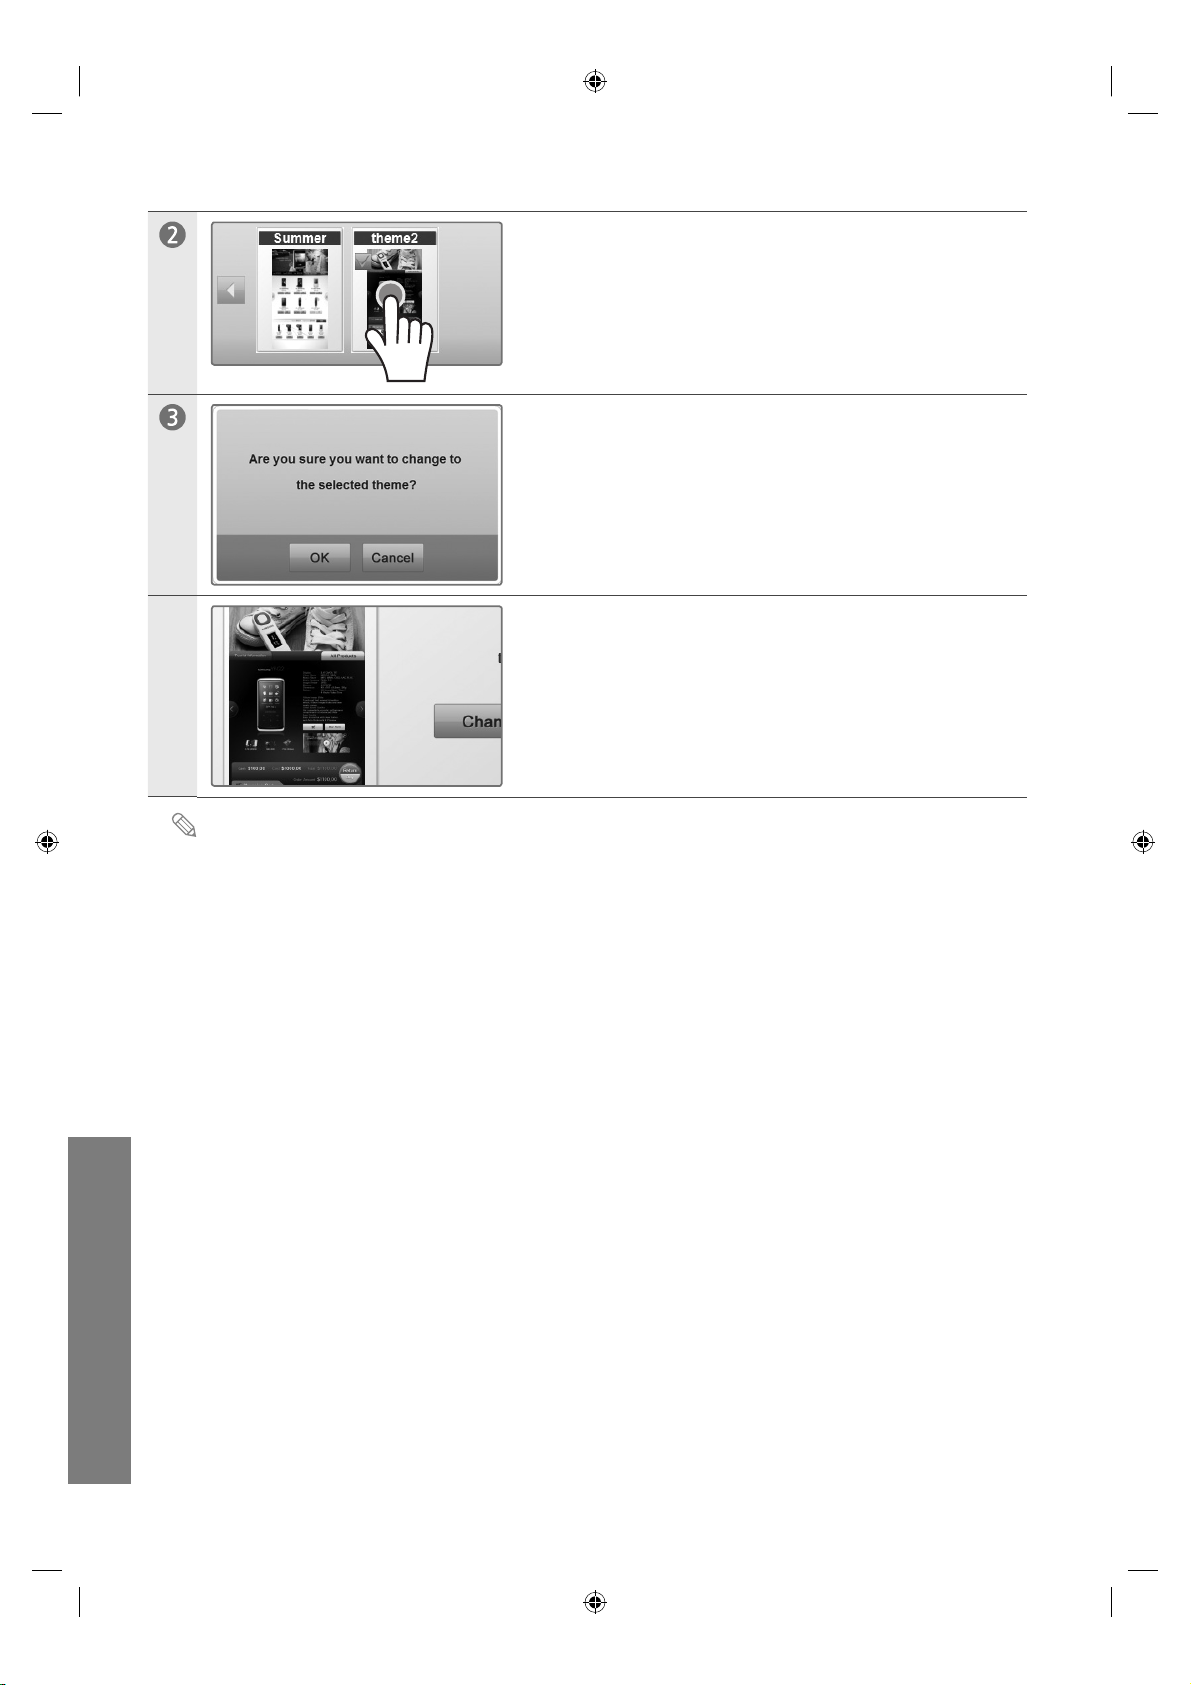
Touch the Template you want to use.
Touch OK.
Template is changed.
For further details on Template or Theme, refer to the uVending Template Builder manual.
uVending
English
31
Page 33
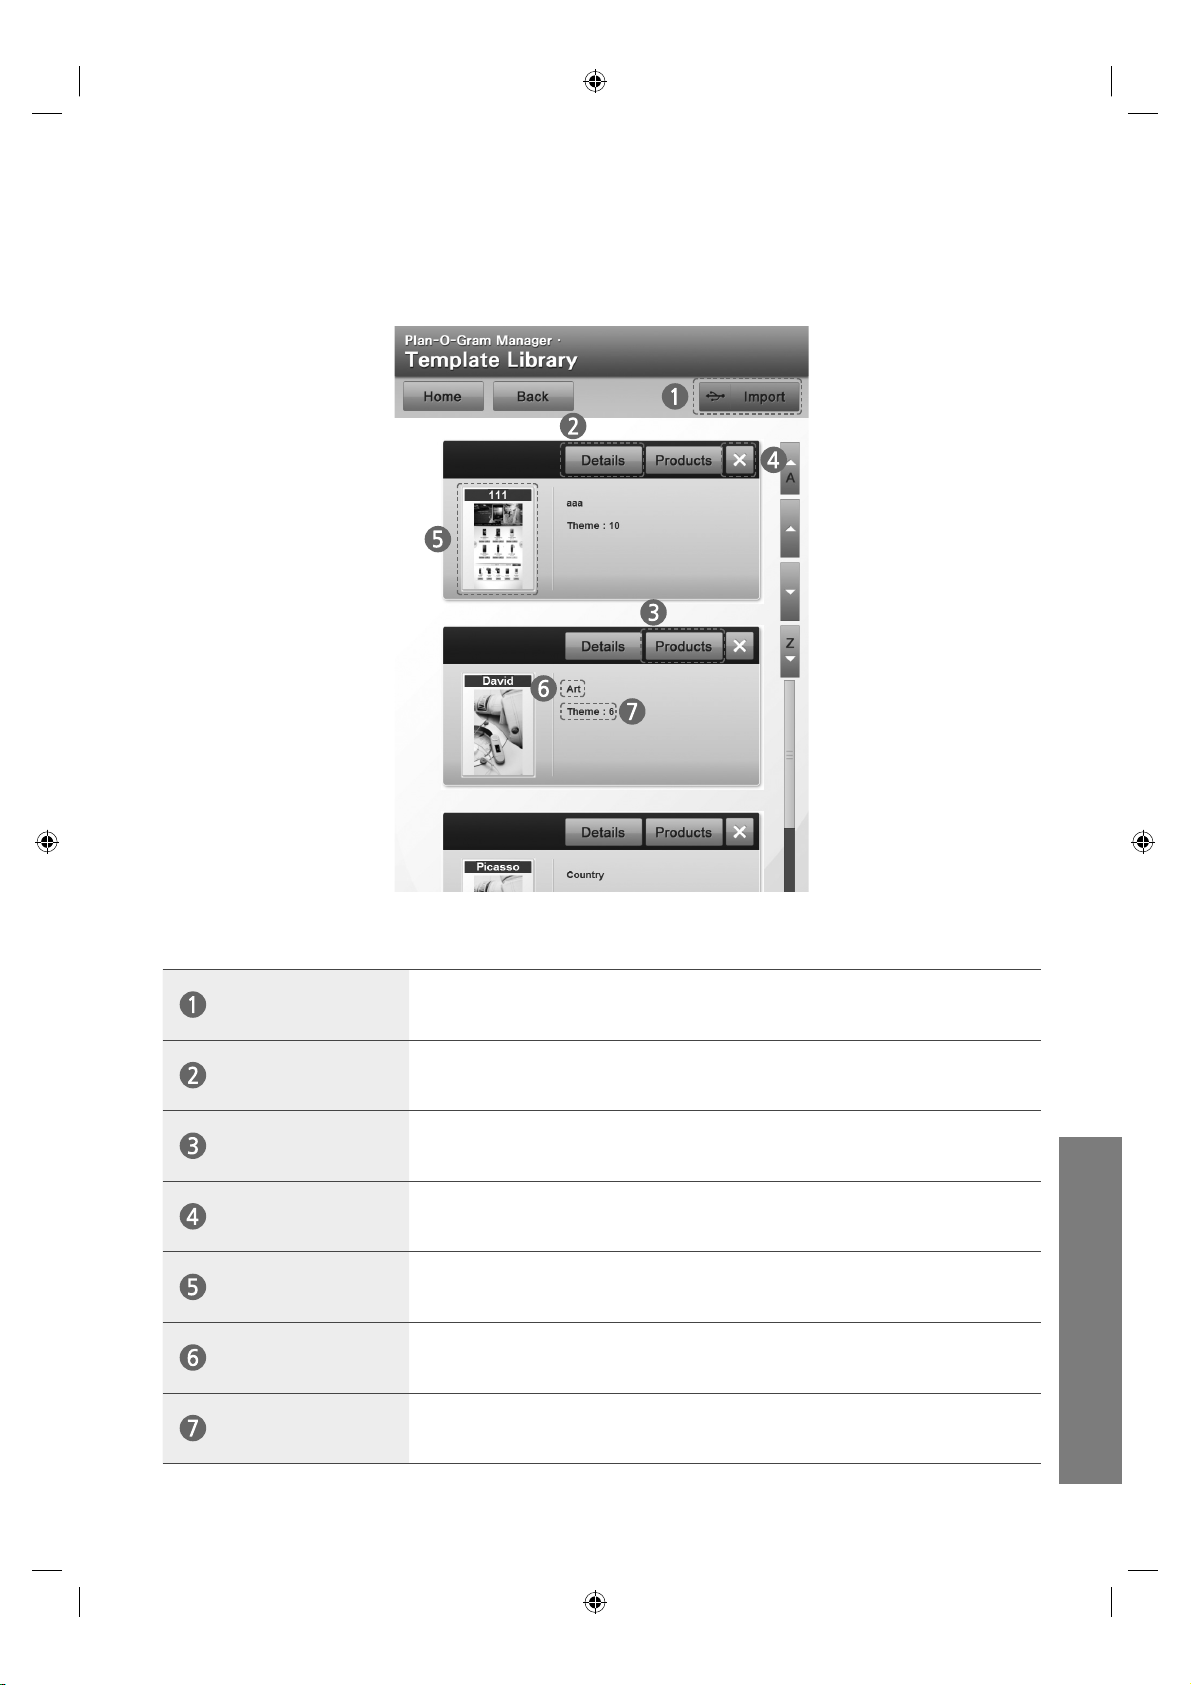
Template Library
The Template Library can manage (add or delete) a Template.
Import
Details
Products
Delete
Theme
Template Name
Theme의 개수
Imports a Template from a USB device.
Displays Template details.
Displays the products included in a Template.
Select and delete a Theme included in a Template.
Displays a preview of the Theme items included in a Template.
The name of a Template.
The number of Theme items included in a Template.
uVending
English
32
Page 34
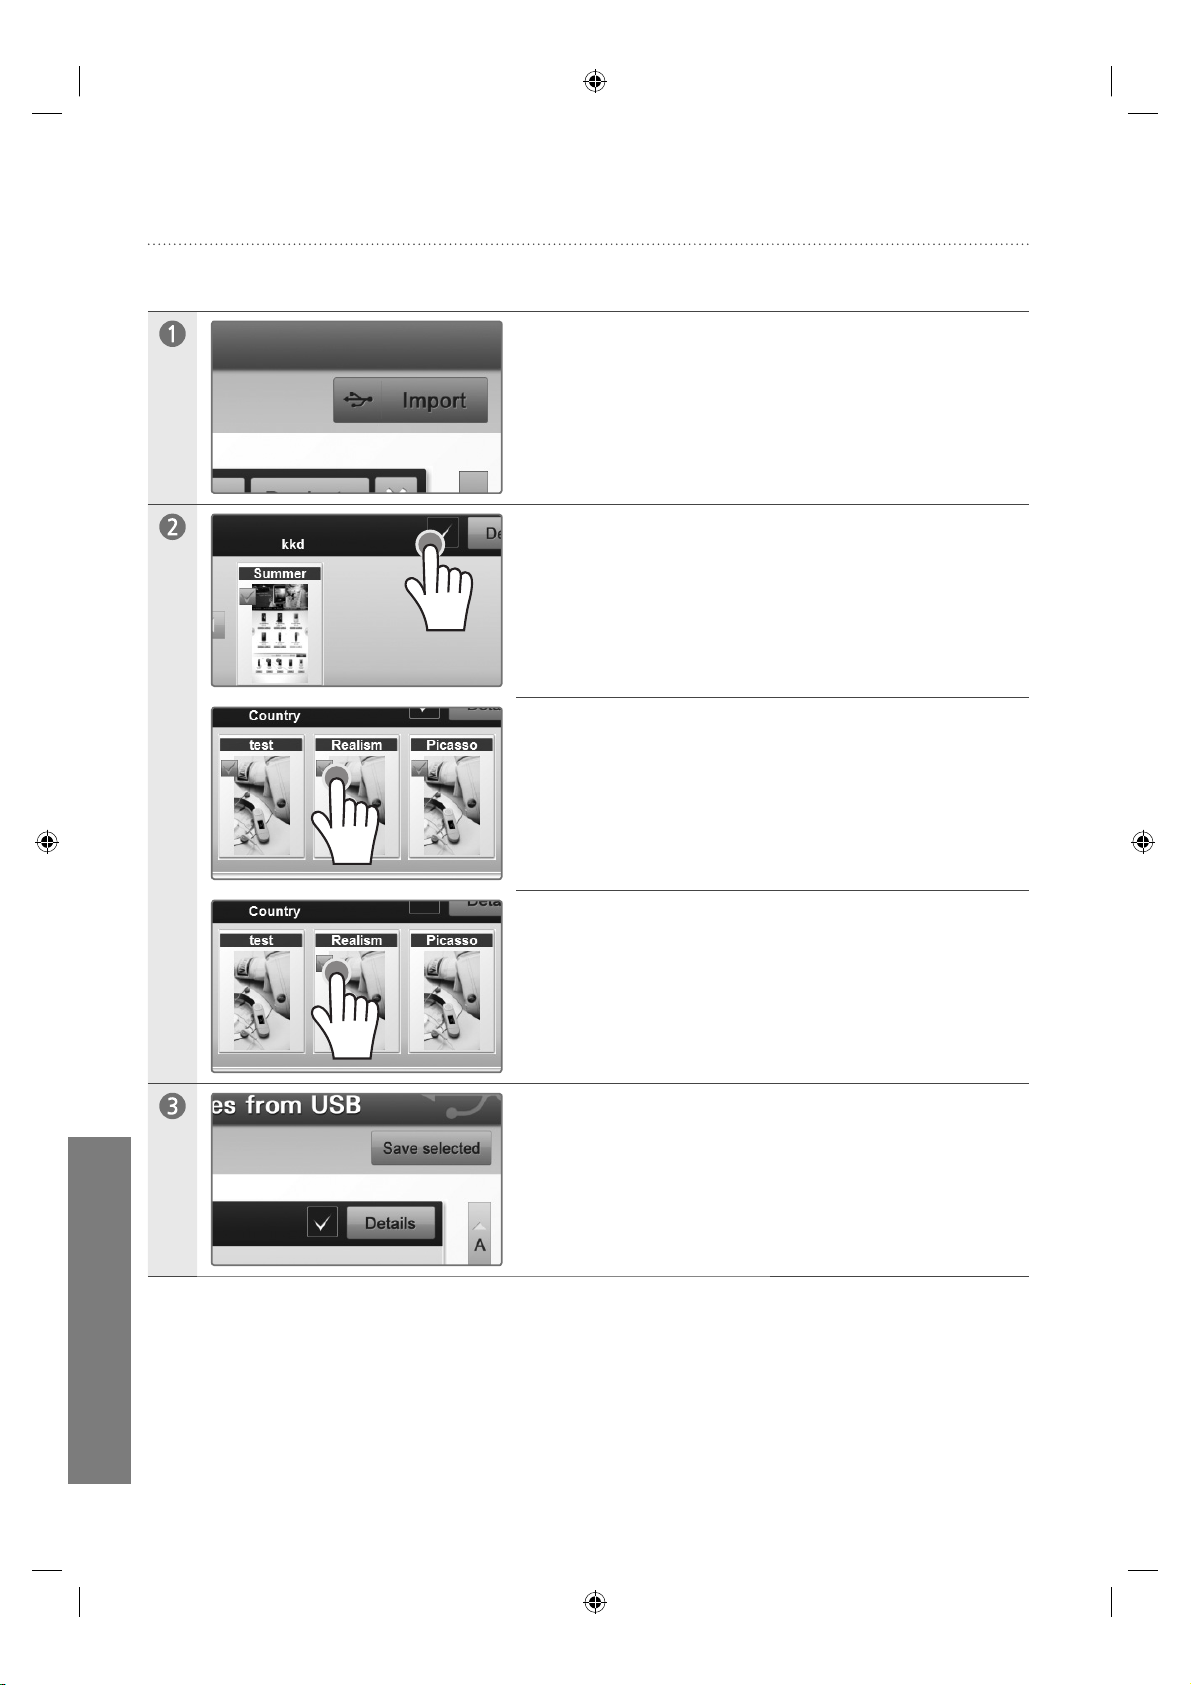
Import
Importing a Template from a USB device. >
Touch Import on the Template Library screen.
Touch the check box of the Template you want to add.
For any Theme of a Template you do not want to add,
touch and uncheck the corresponding check box.
uVending
English
33
To add a desired Theme of a Template, touch and check the
checkbox of the corresponding Theme.
Touch Save selected.
Page 35
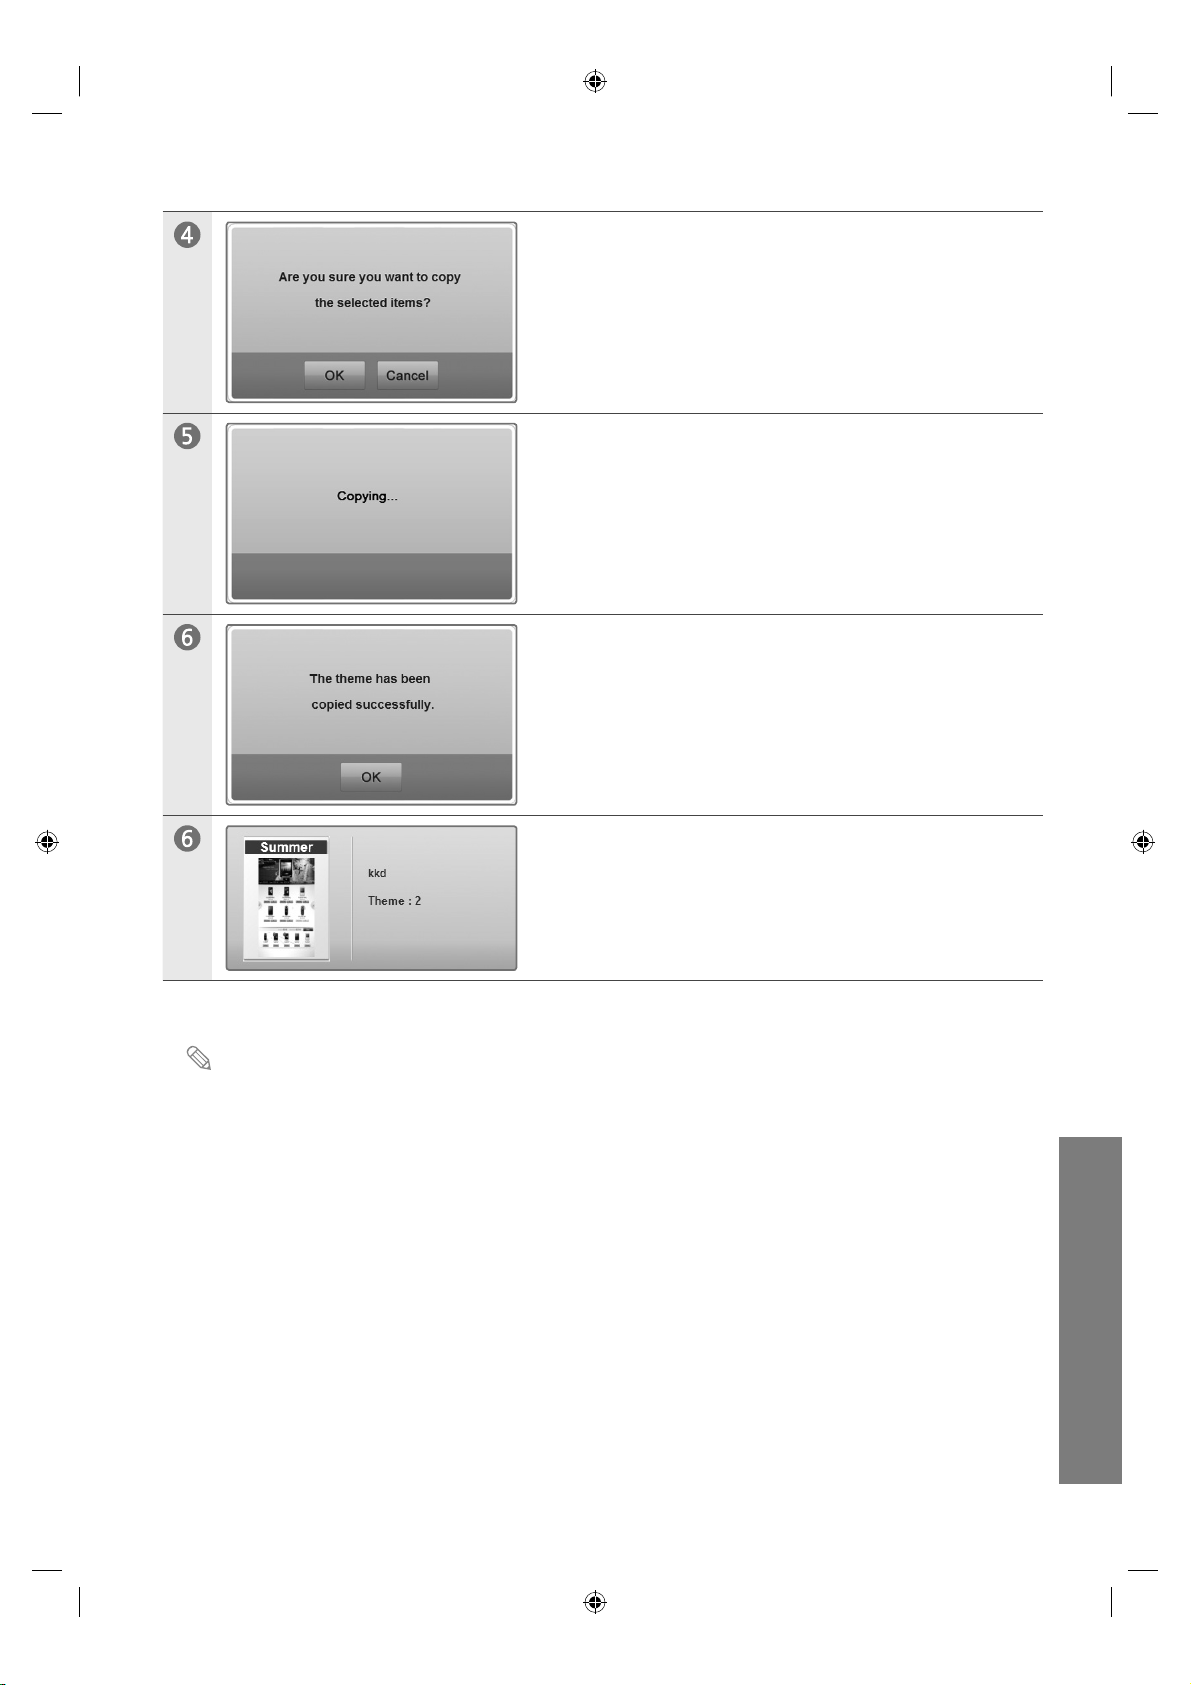
Touch OK.
The Template (Theme) items selected from a USB device are
copied.
Touch OK.
Template (Theme) items are added to the Template Library.
The Import option (add a Template) is unavailable if a USB device is not connected.
uVending
English
34
Page 36
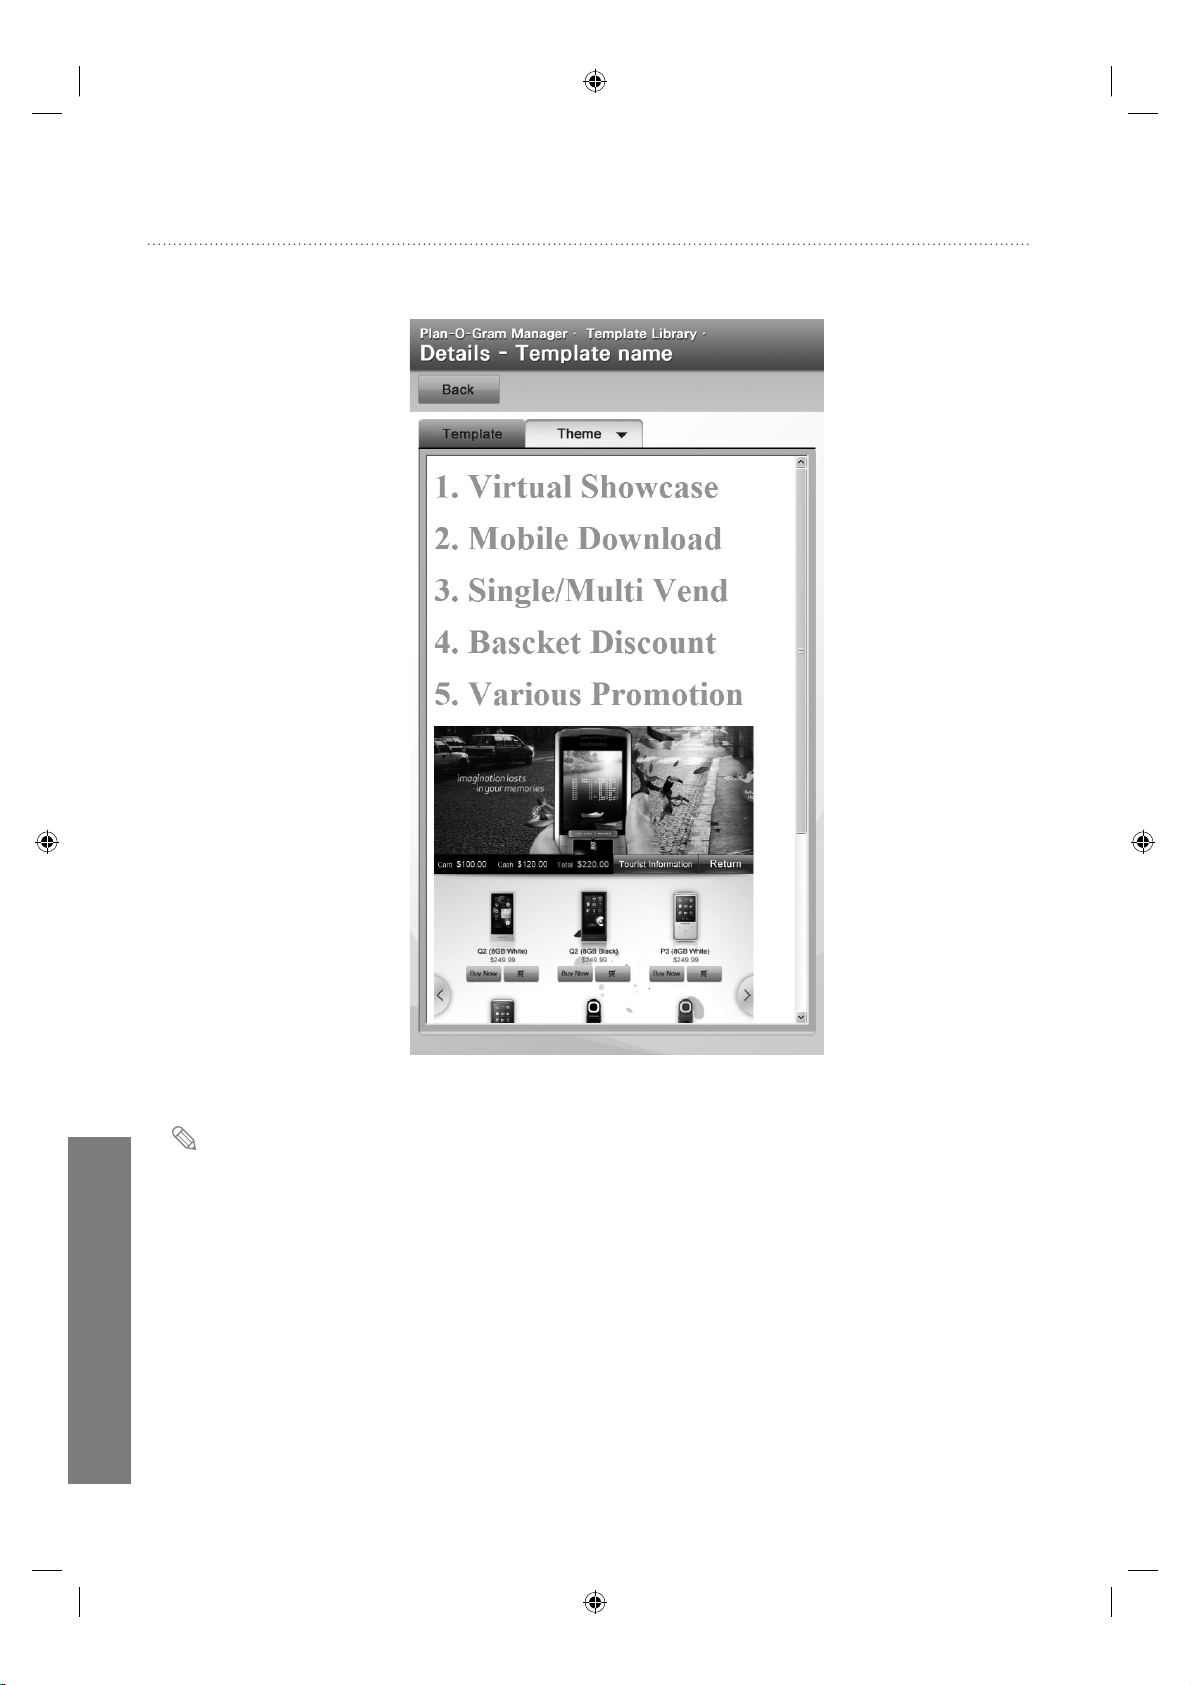
Details
The Details screen displays Template details.
uVending
English
35
For further details on Template and Theme, refer to the uVending Template Builder manual.
Page 37
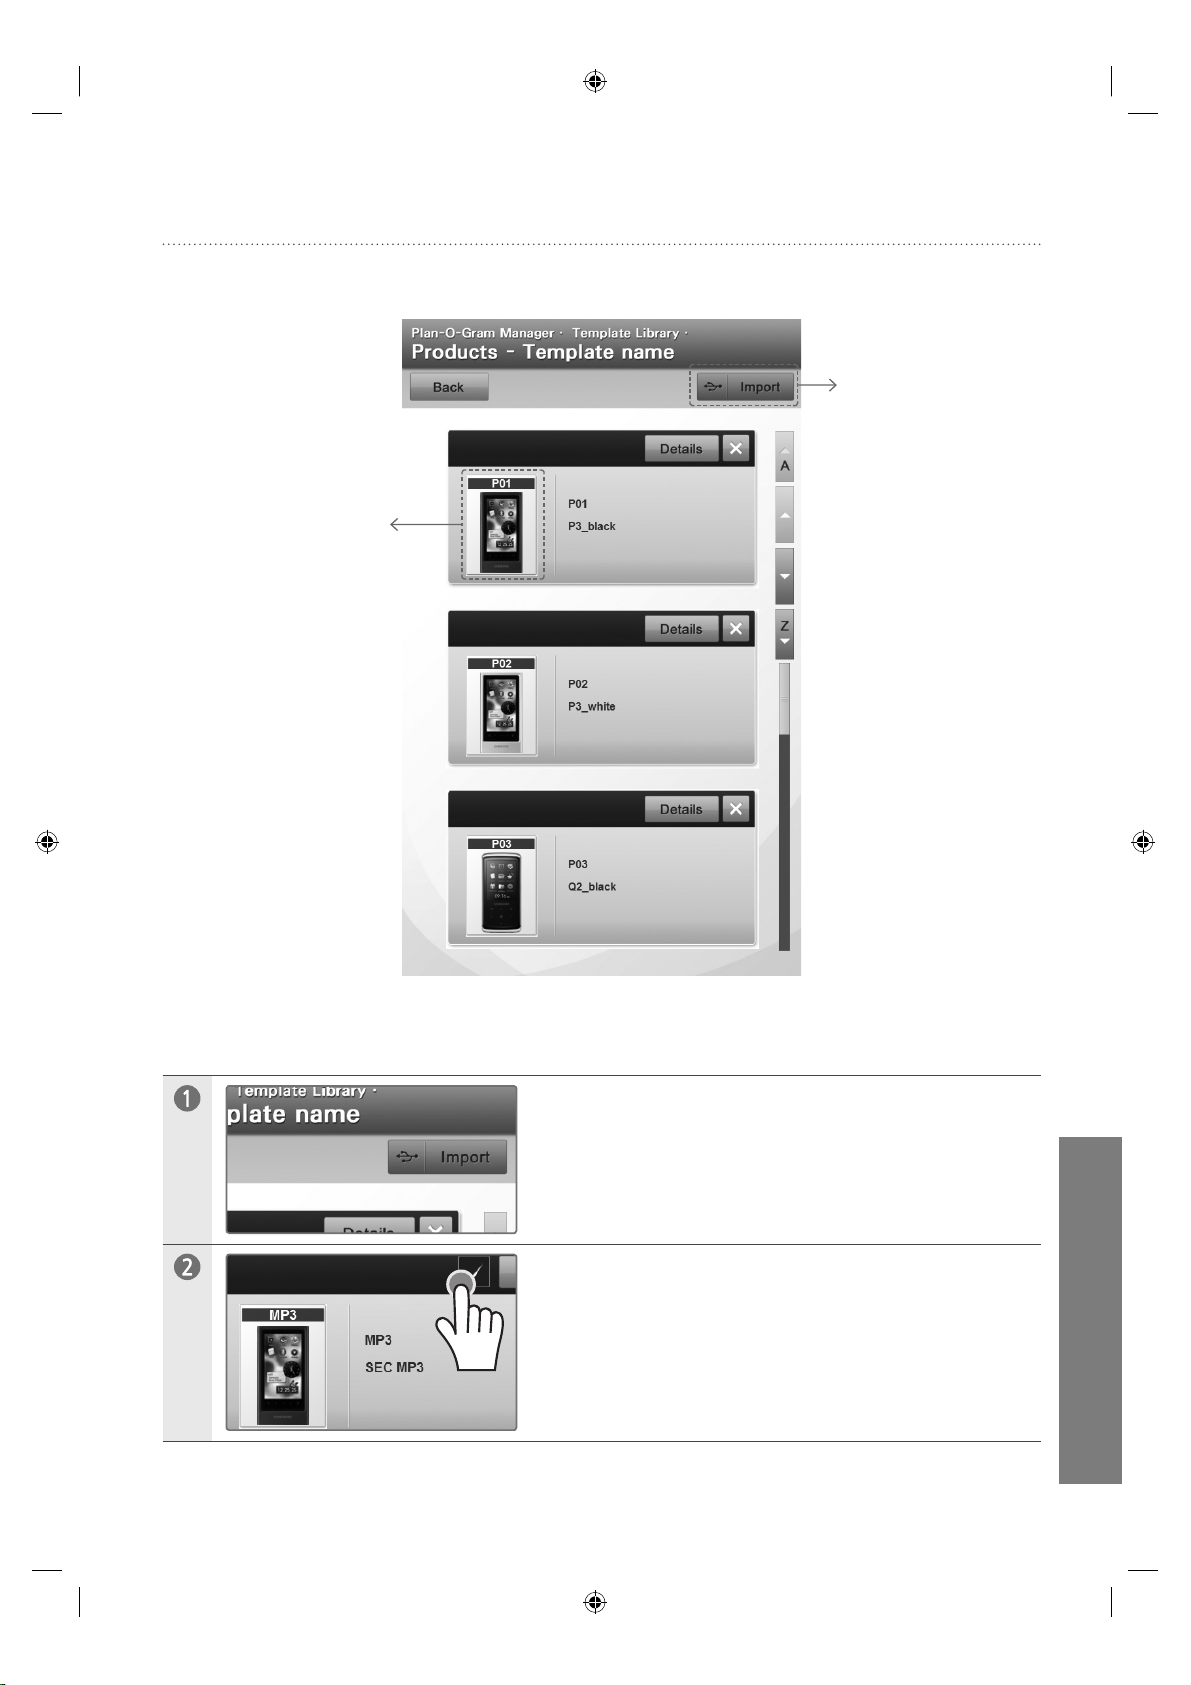
Products
In the Products screen, product lists can be added or deleted in a Template.
Product Image
The image of a
product
Import
Import a product from
a USB device.
Import (add products from a USB device) >
Touch Import.
Touch the check box of a product to add.
uVending
English
36
Page 38
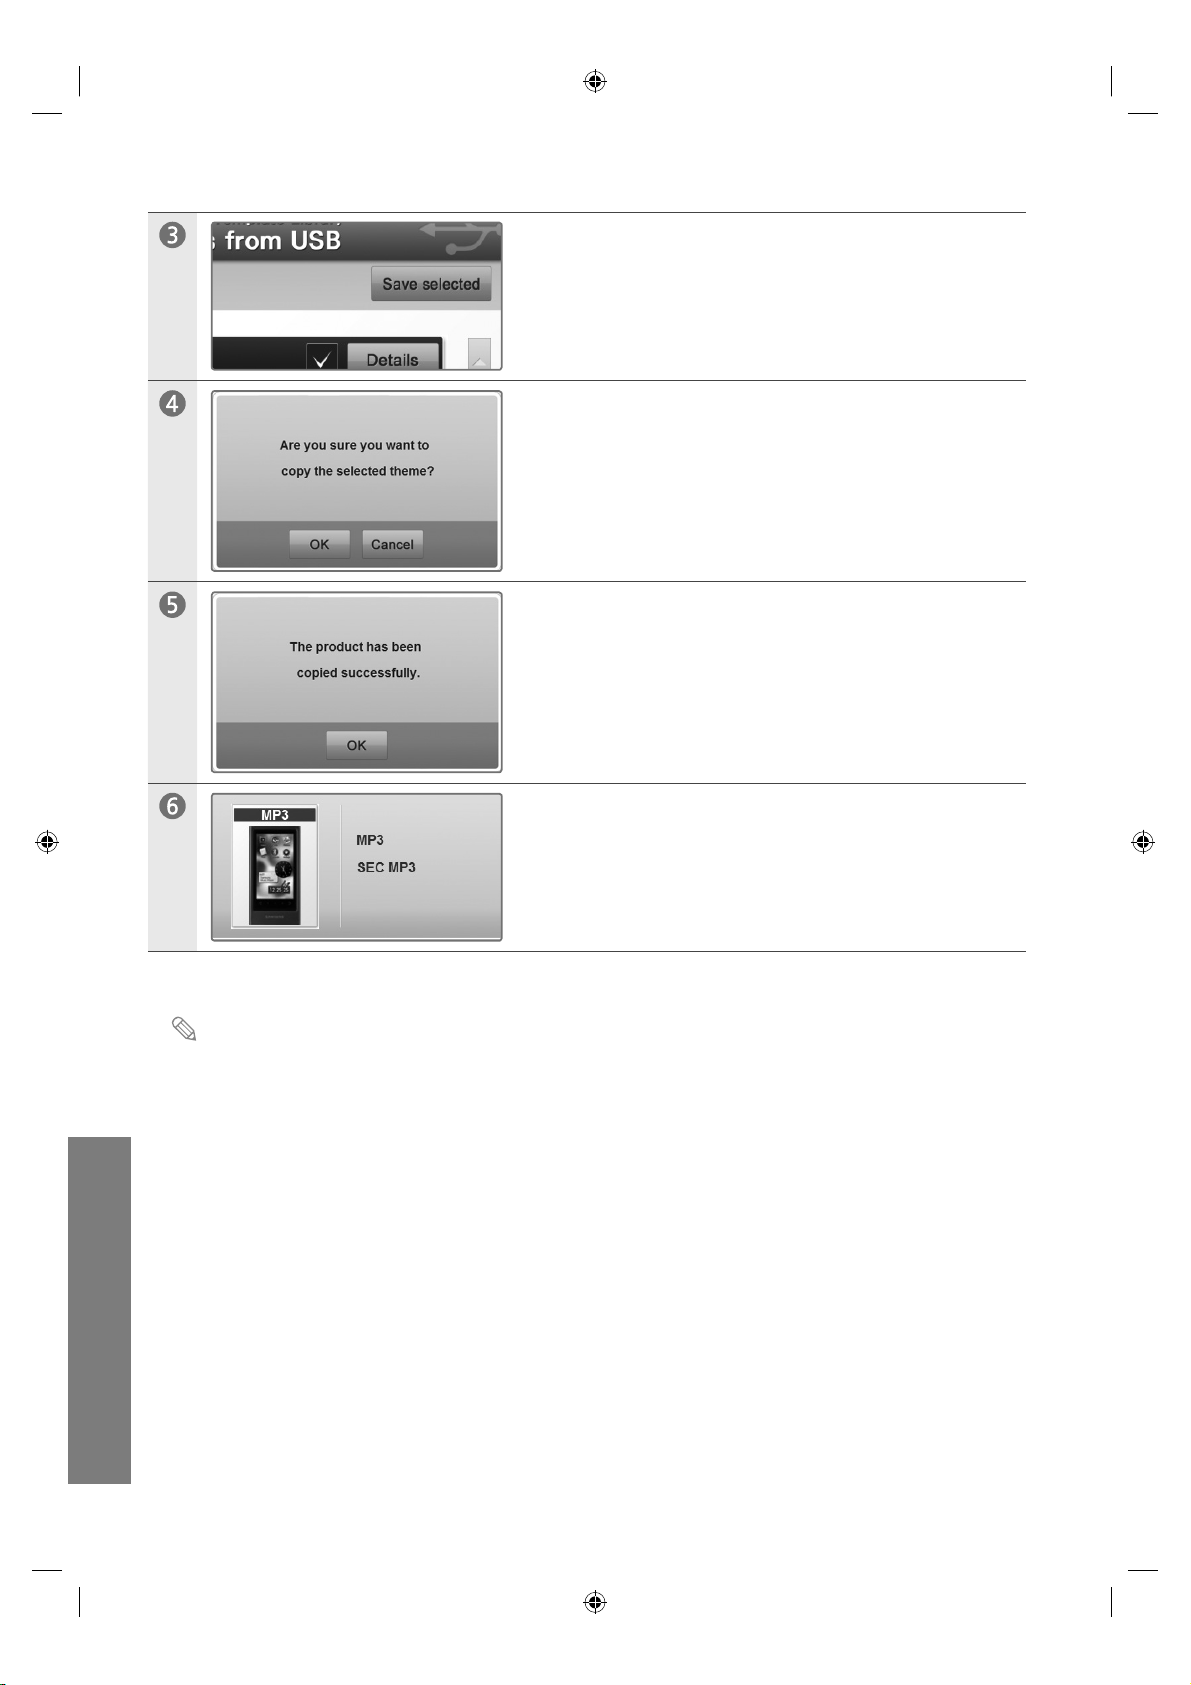
Touch Save selected.
Touch OK.
Touch OK.
The product is added.
uVending
English
37
The Import option (add a Product) is unavailable if a USB device is not connected.
Page 39
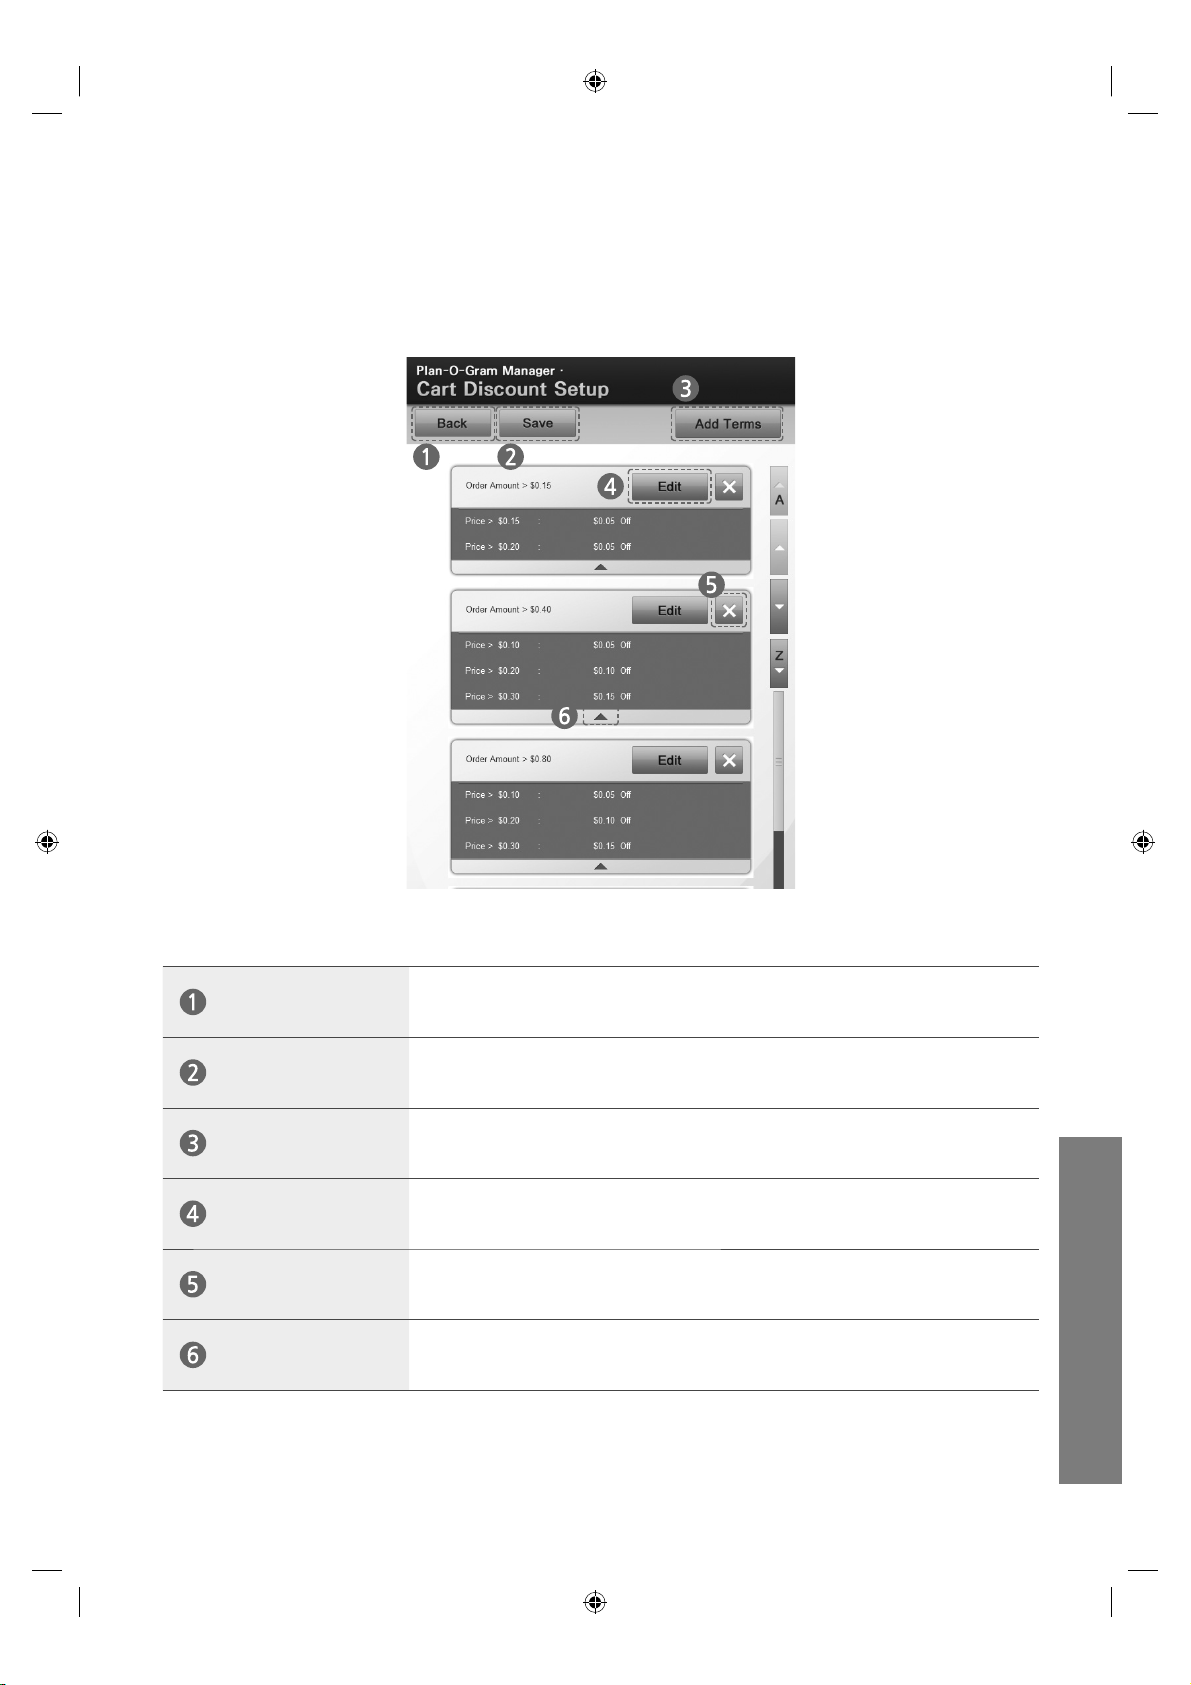
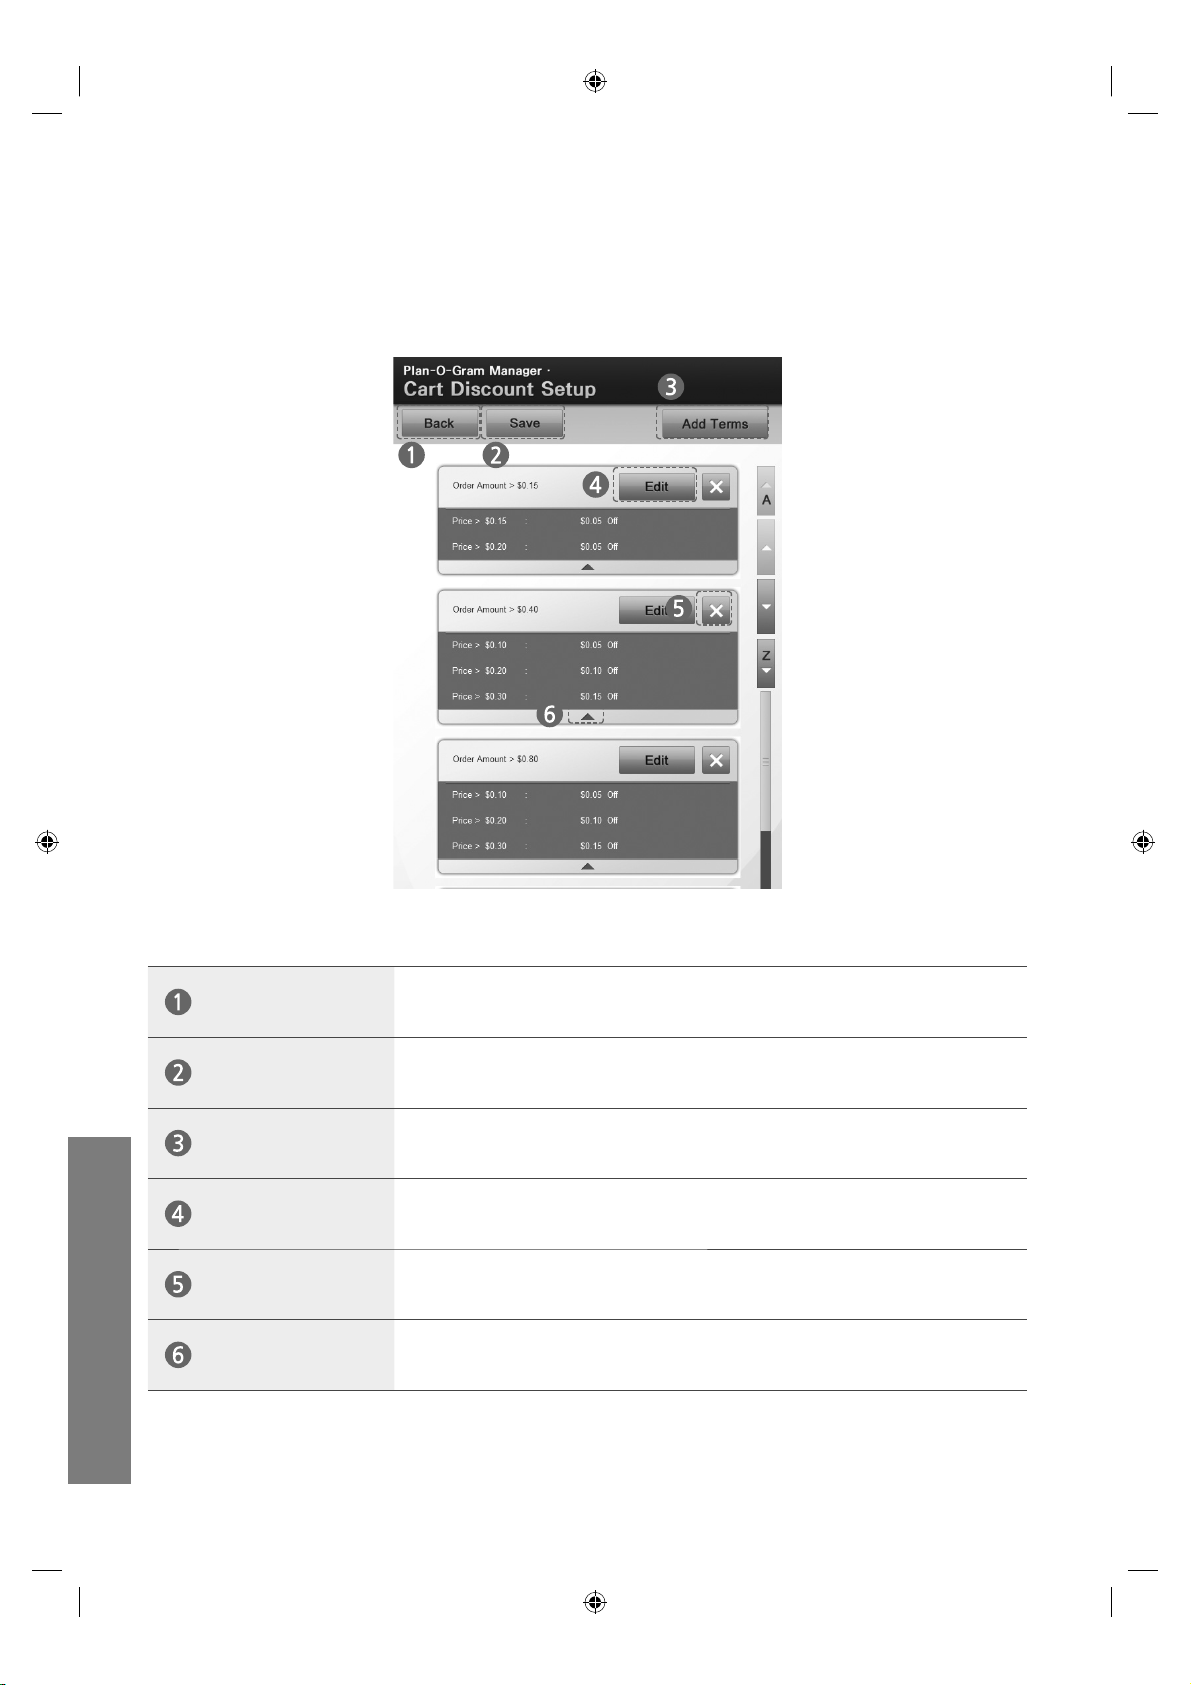
Cart Discount Setup
The Cart Discount Setup screen can set the function which applies a discount to each purchased
product when the value of items in the shopping cart reaches a certain level.
Back
Save
Add Terms
Edit
Delete
Drop-down Icon
Returns to the previous page.
Saves the current settings.
Adds a discount item.
Edits settings.
Deletes settings.
Displays or hides a drop-down menu when touched.
uVending
English
38
Page 40
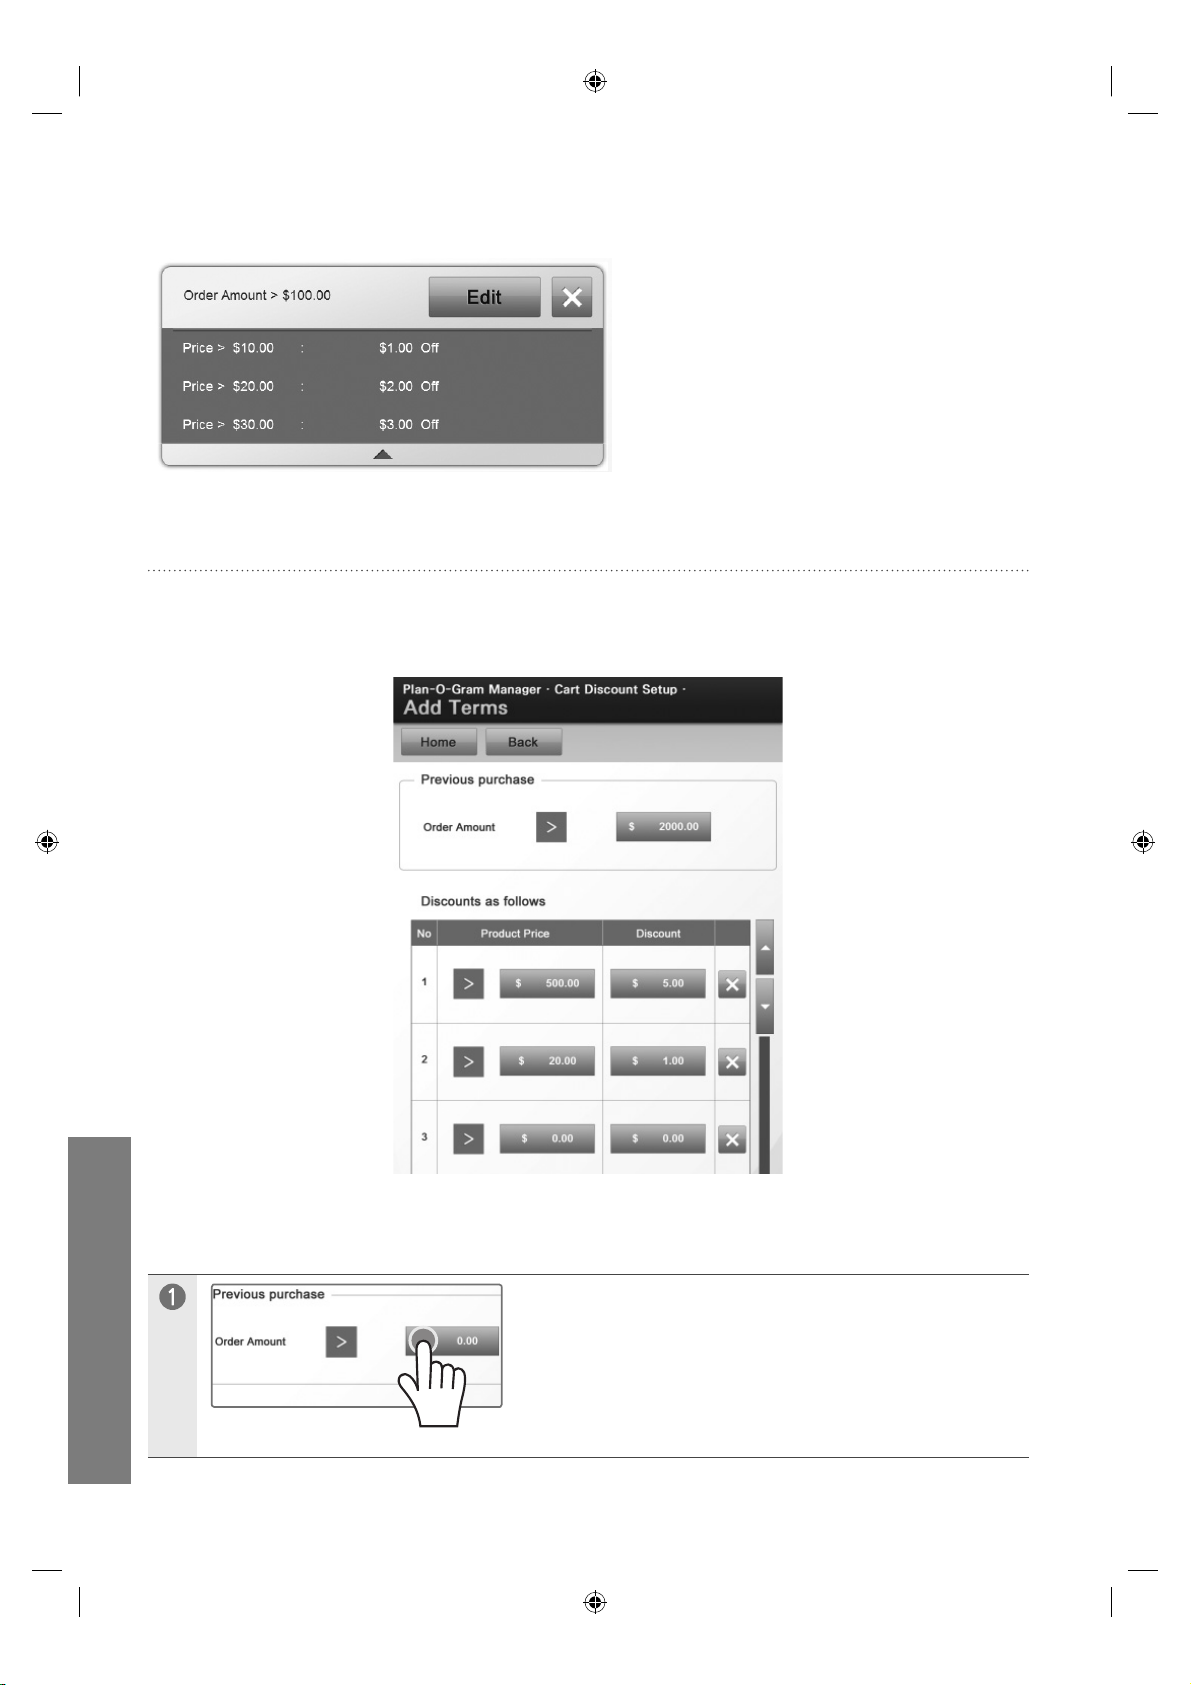
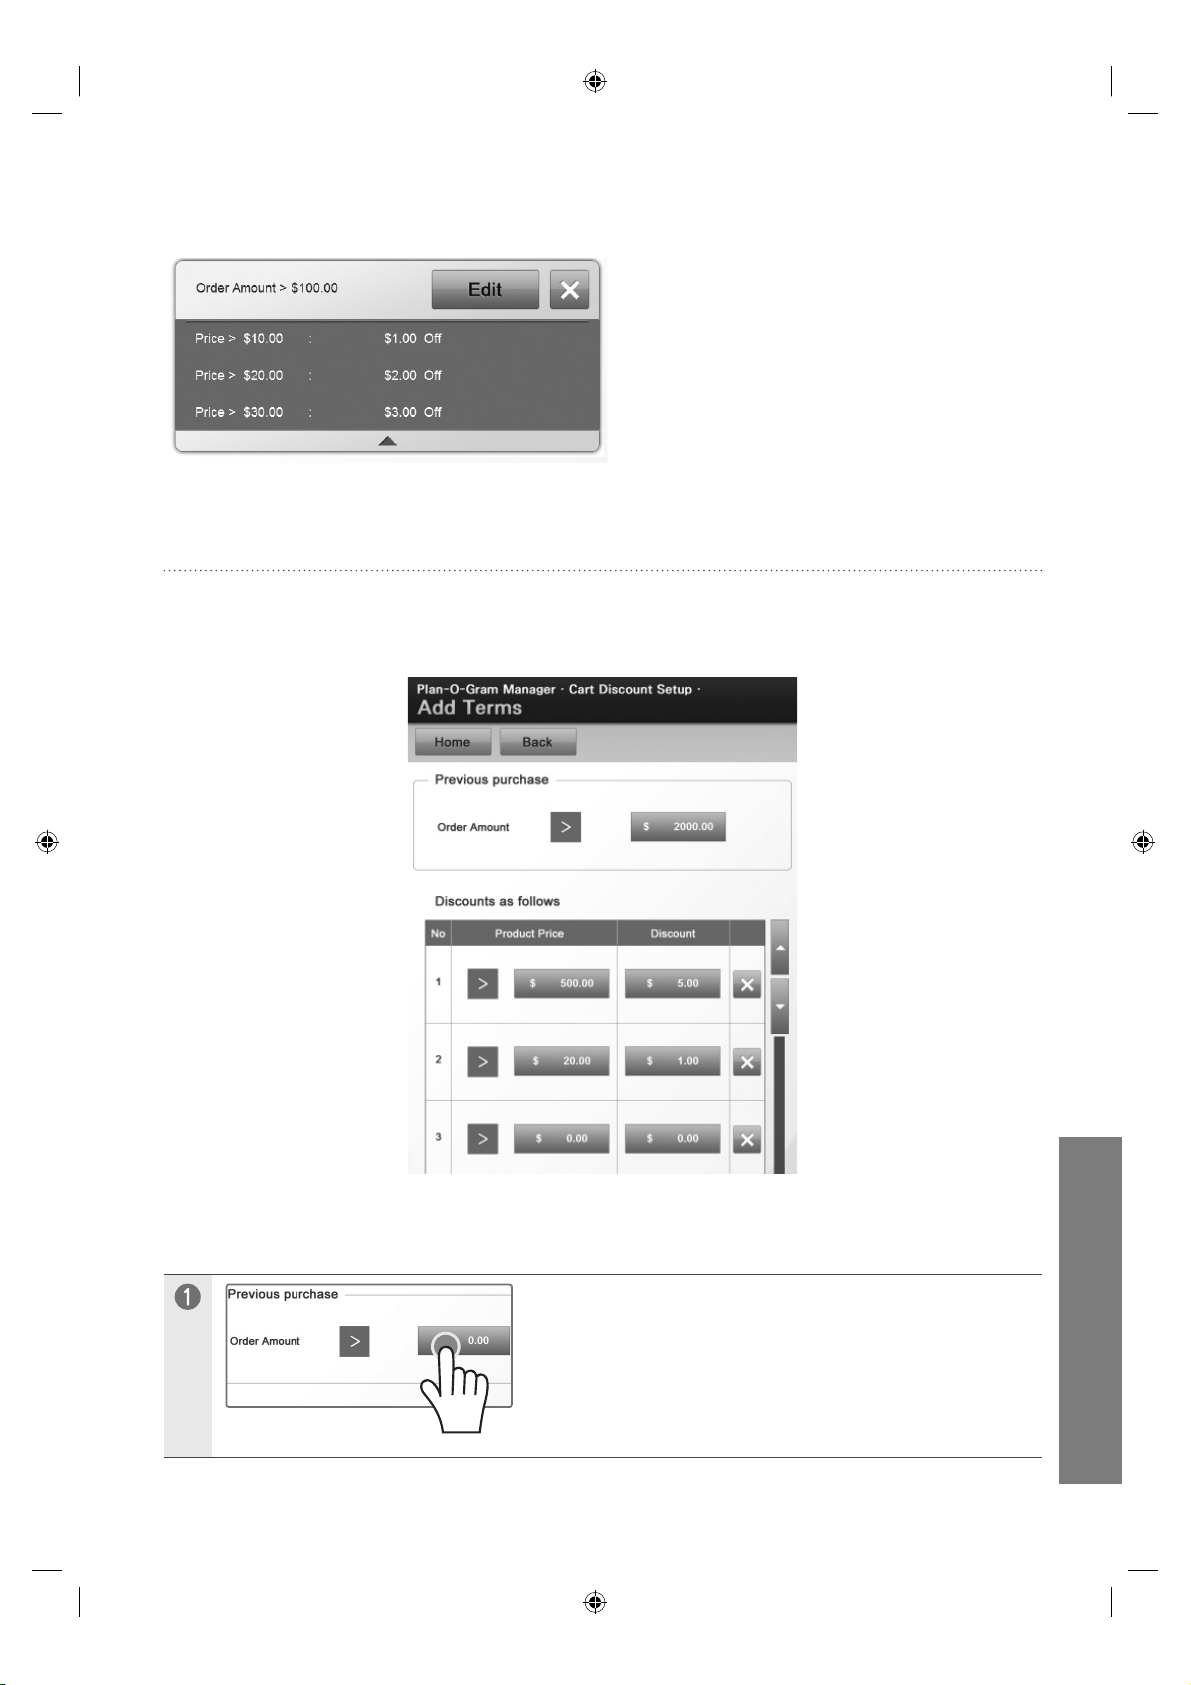
Example of Cart Discount Setup >
A discount is applied when items with
a value of over $100 are placed in the
shopping cart.
For each product,
$1 is discounted for products over $10,
$2 is discounted for products over $20,
and $3 is discounted for products over $30.
Add Terms
The Add Terms screen adds terms which apply a discount to each purchased product when the
value of items in the shopping cart reaches a certain level.
uVending
English
39
Adding a Discount Term >
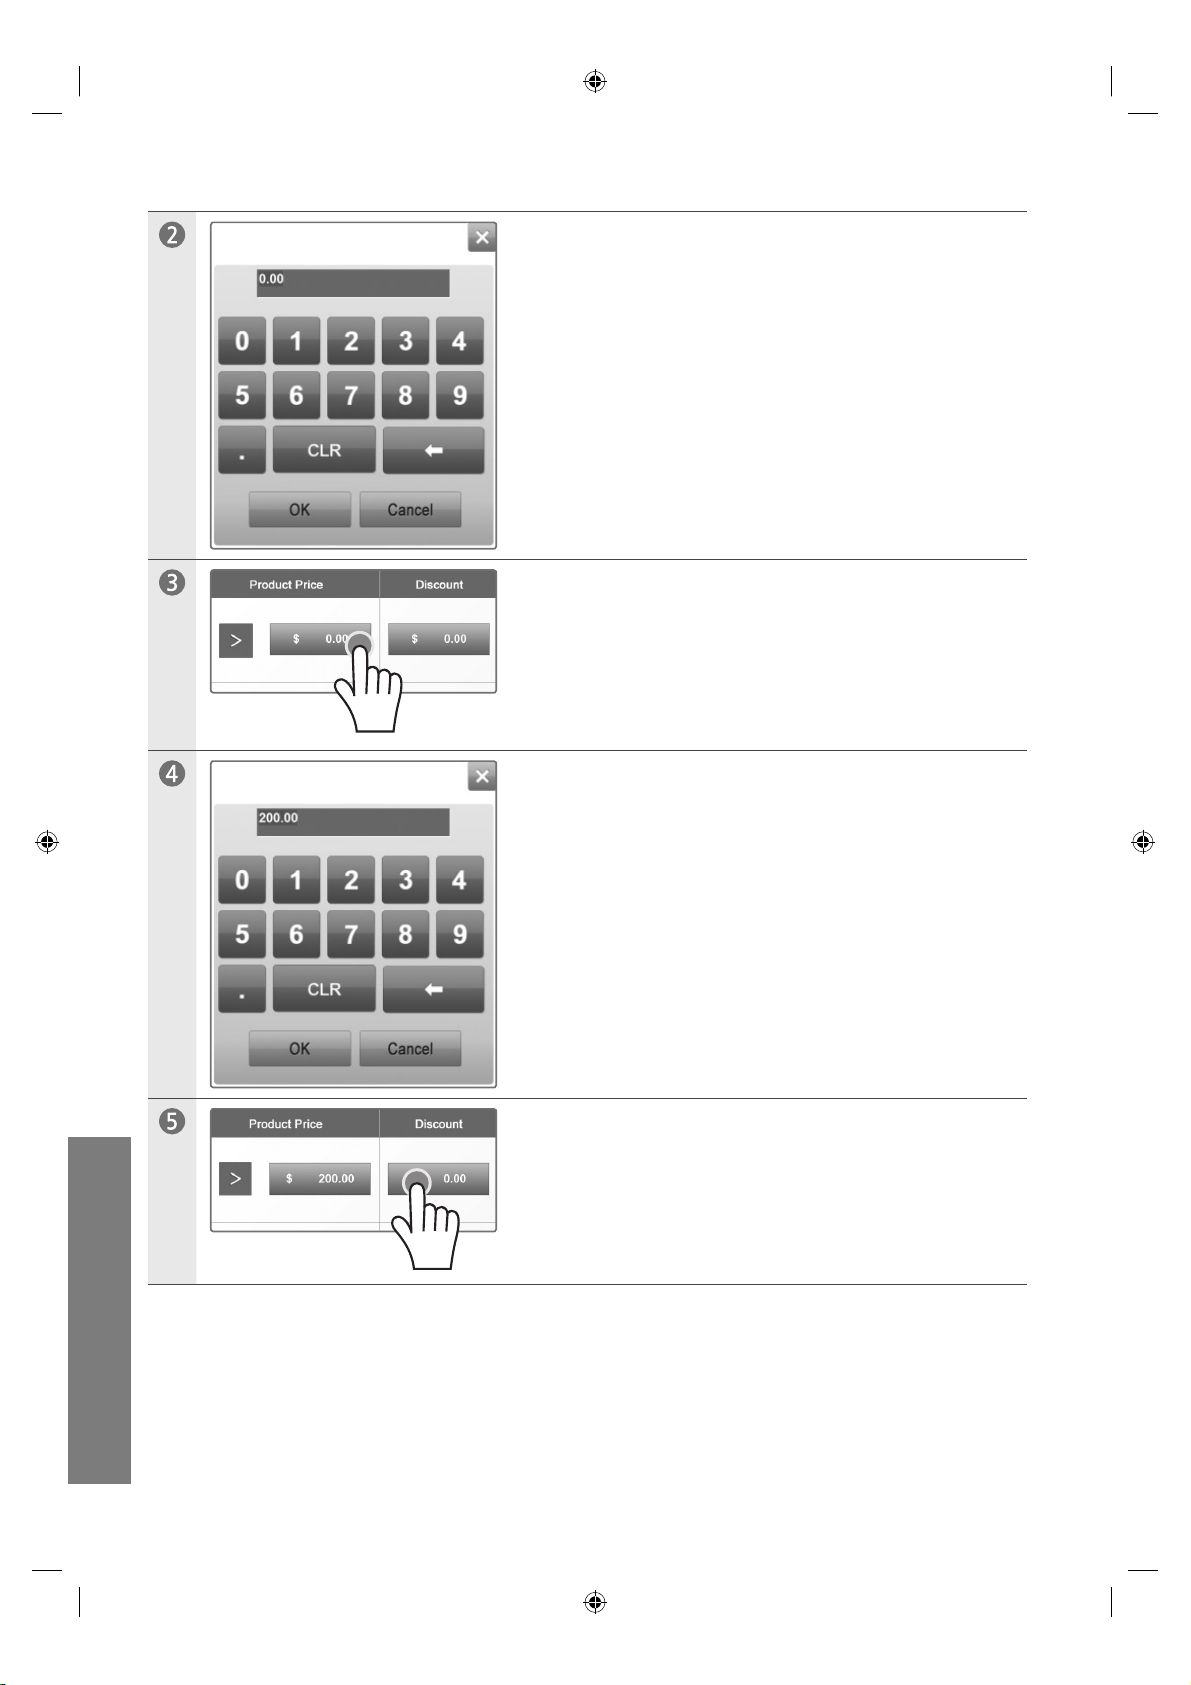
Touch the price field in the shopping cart.
Page 41
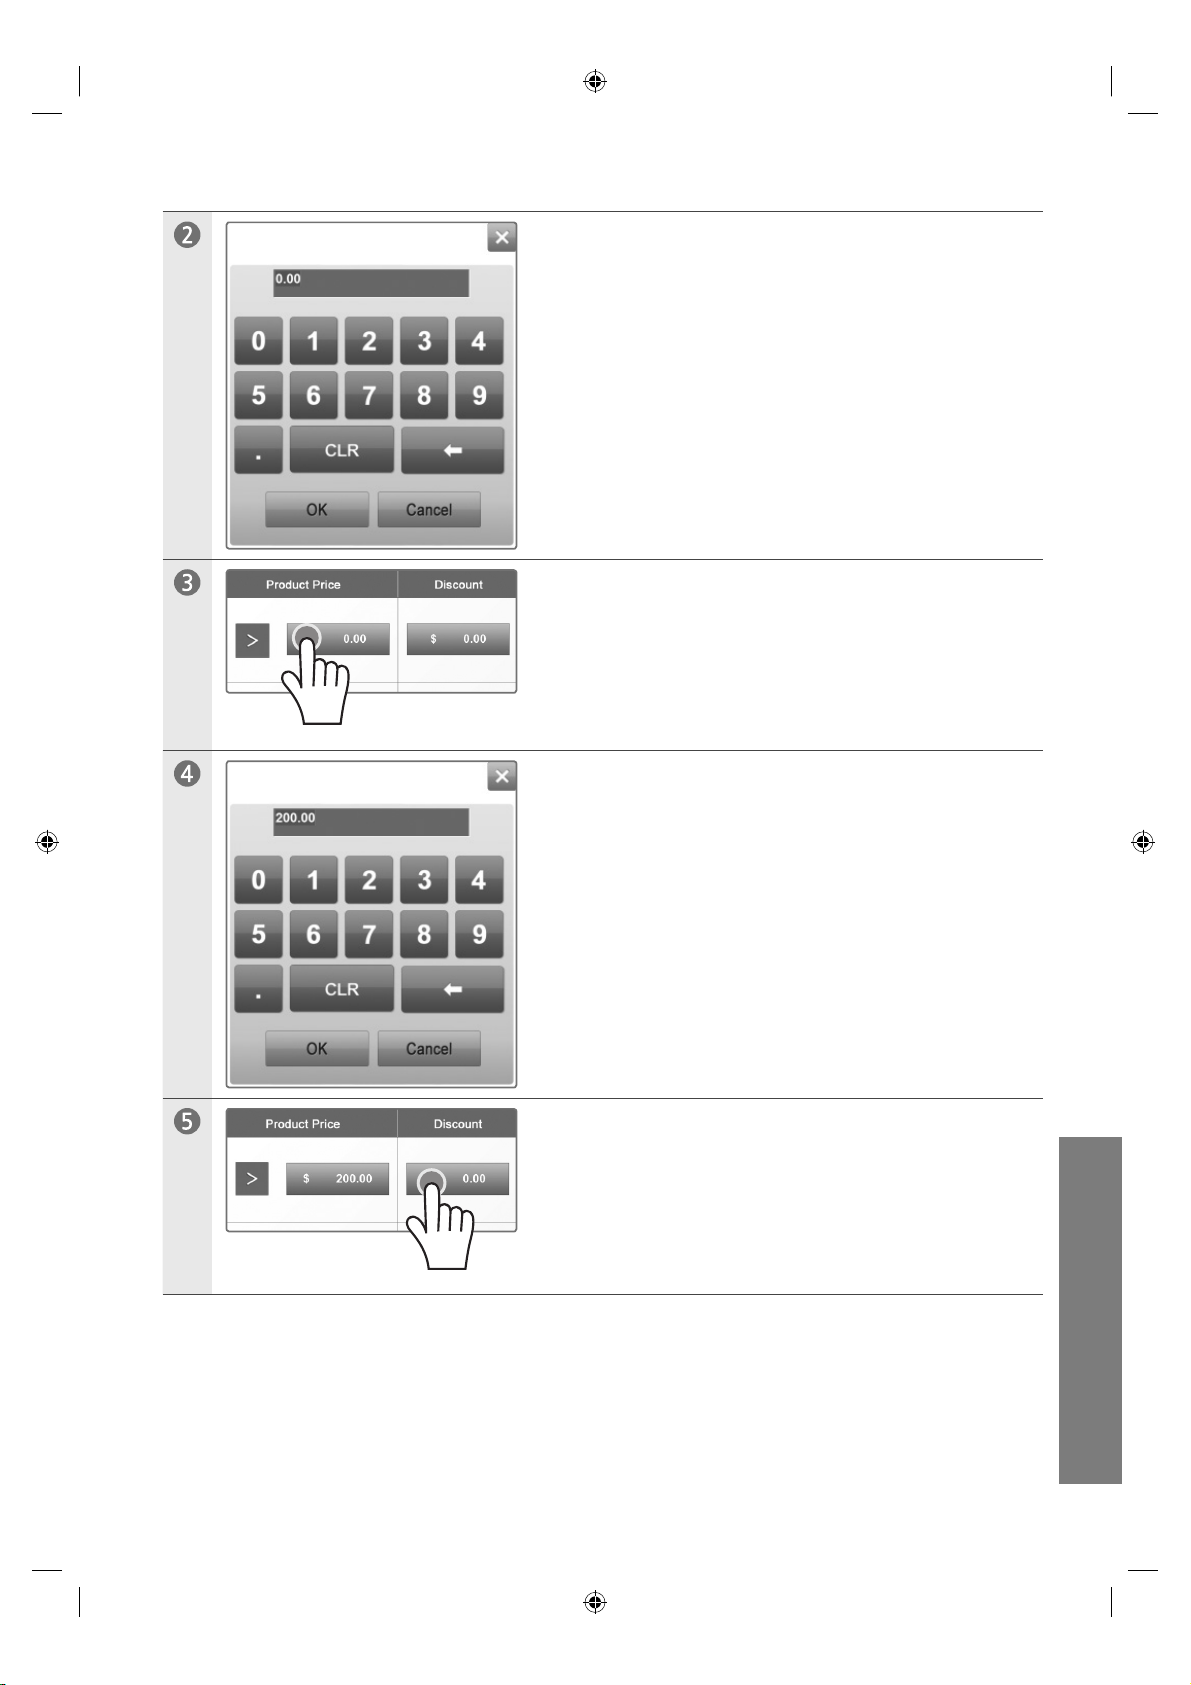
4
Enter a price and touch OK.
Touch the product price field.
Enter a price.
uVending
Touch the field where the discount will be entered.
English
40
Page 42
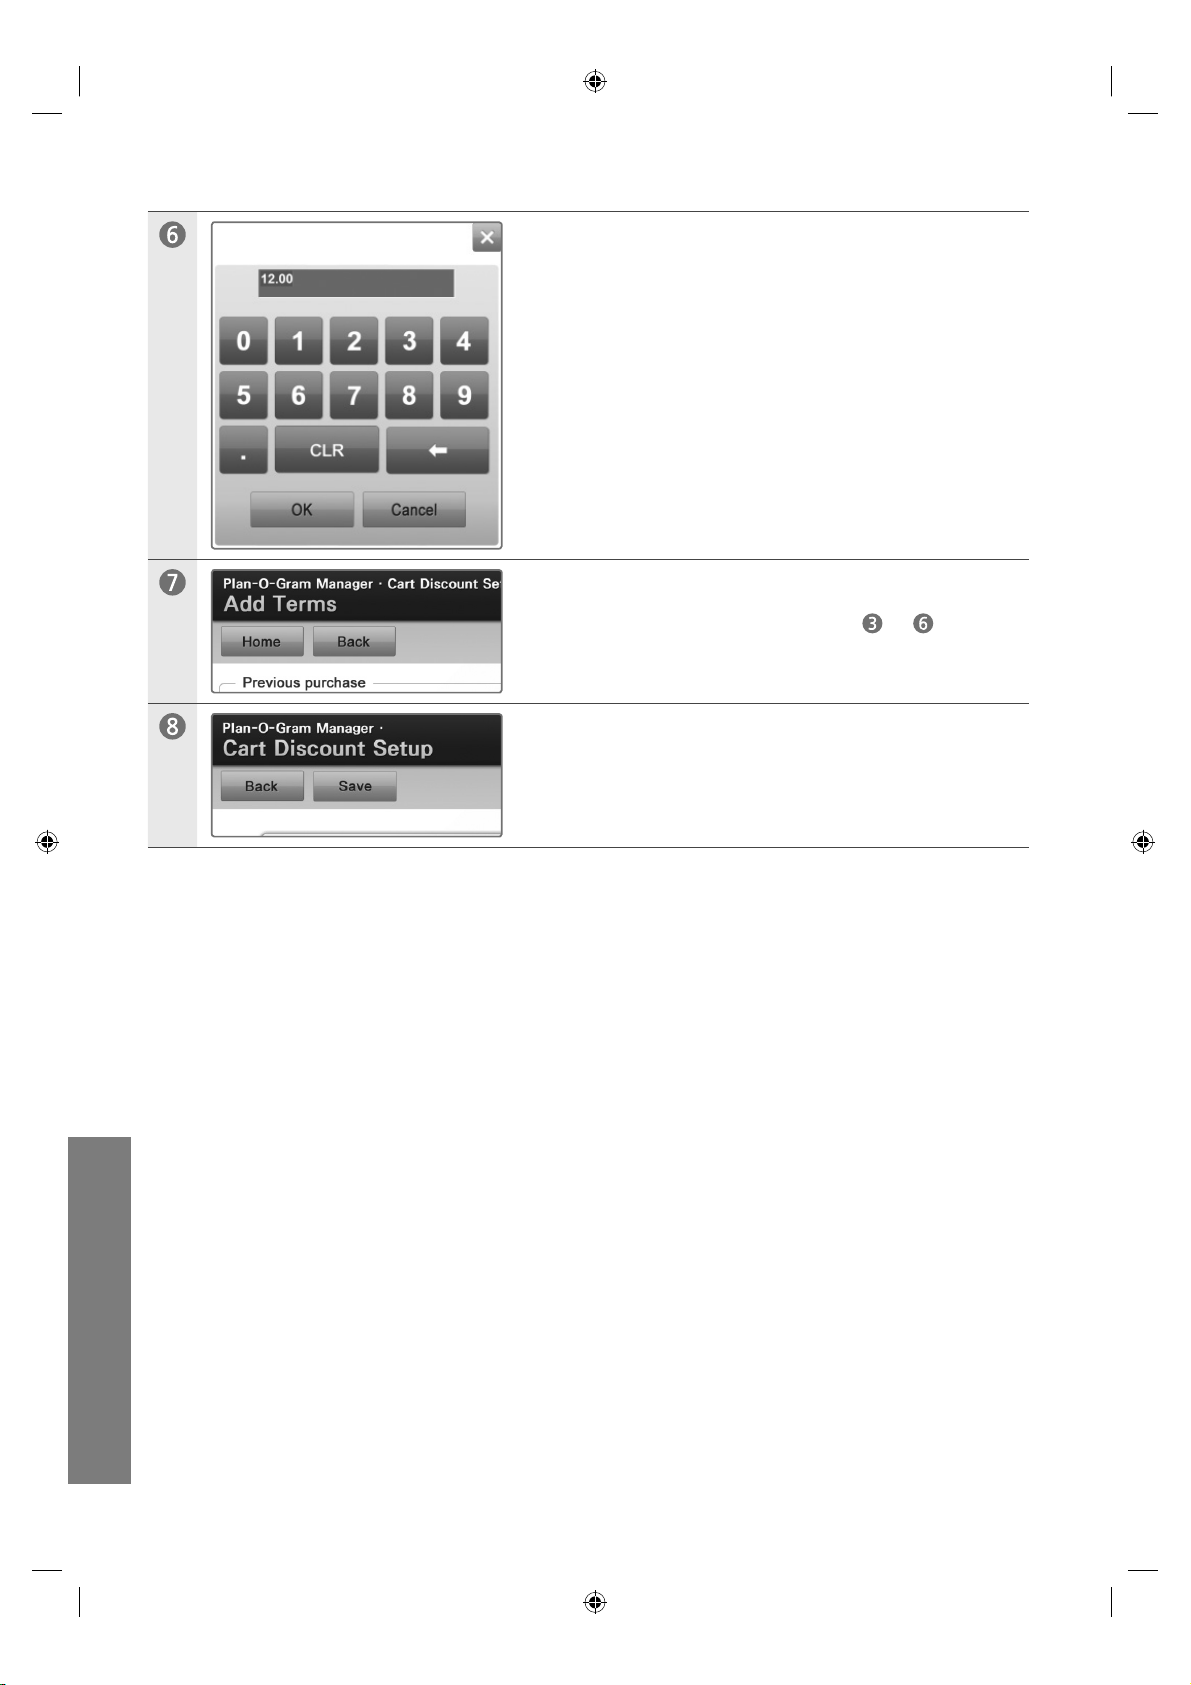
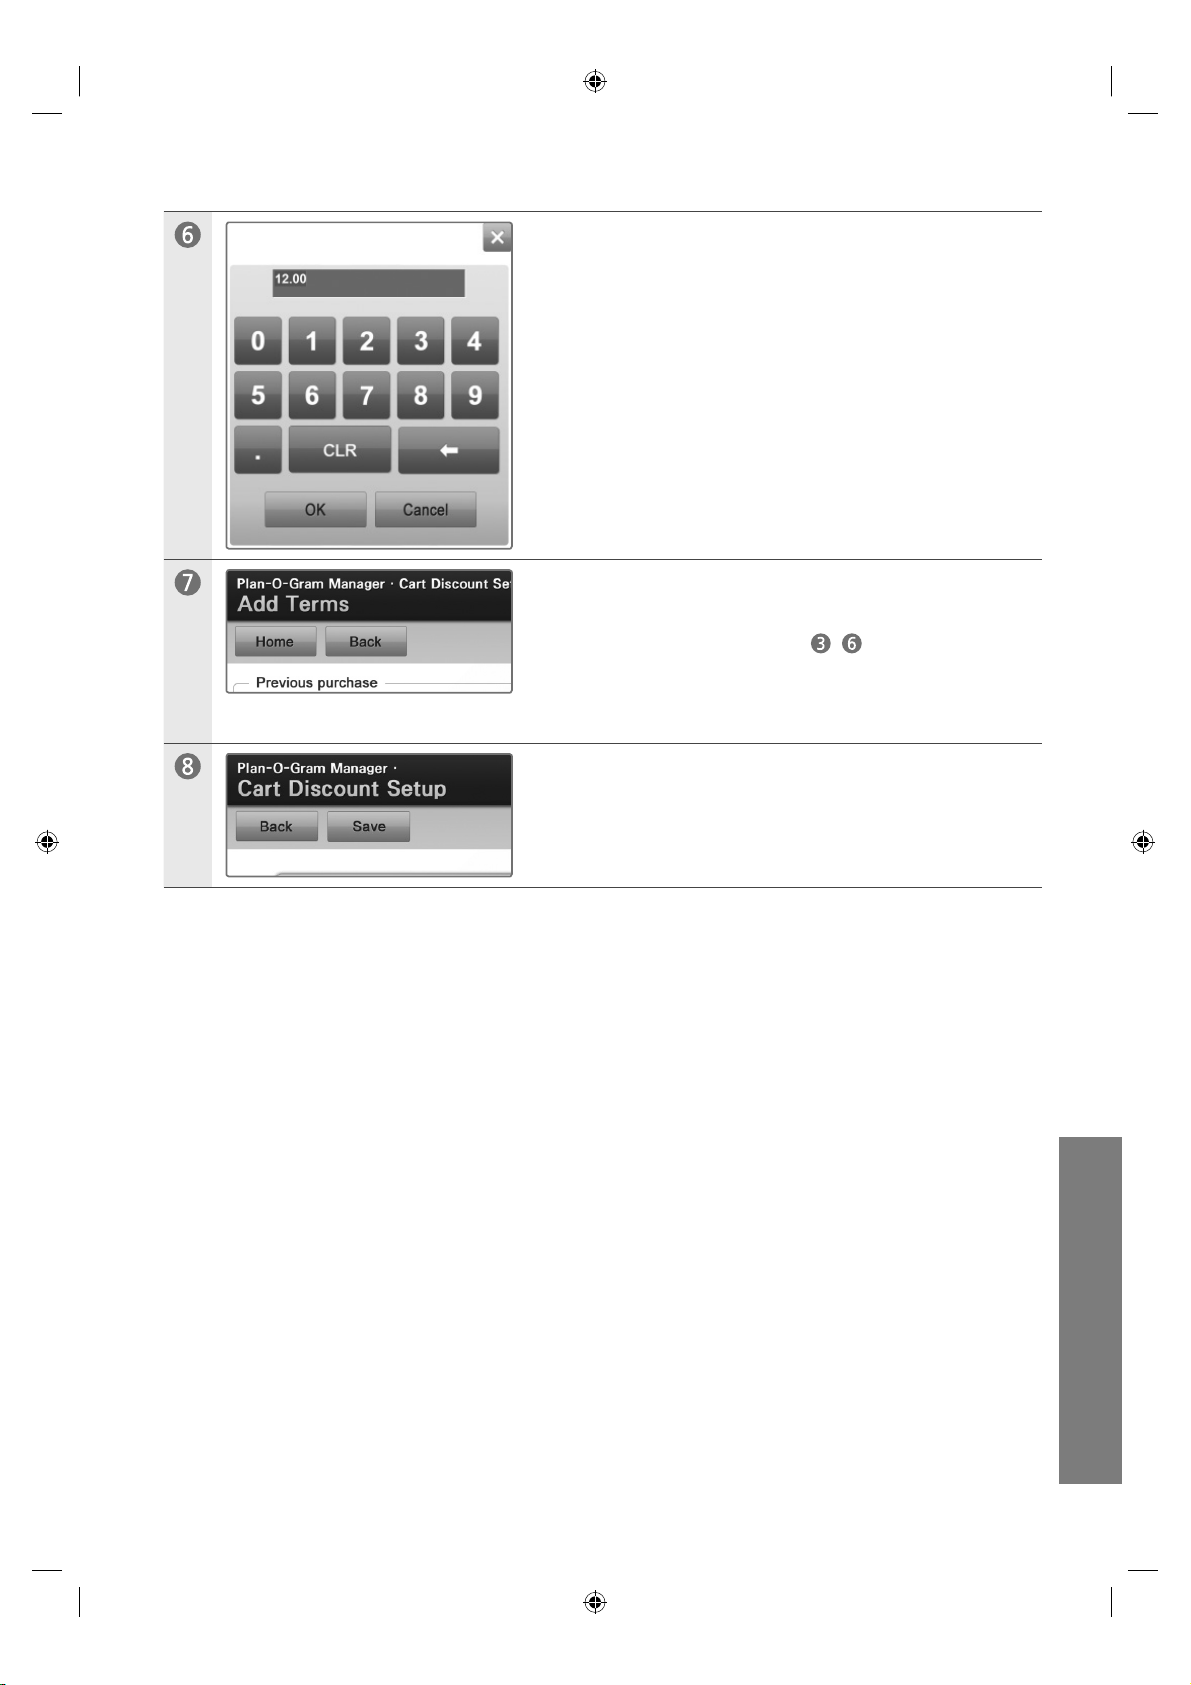
Enter the Discount to apply and touch OK.
To add product price terms, repeat steps
finished, touch Back to update the settings.
Touch Save.
. When
to
uVending
English
41
Page 43
4
Related Product Discount Setup
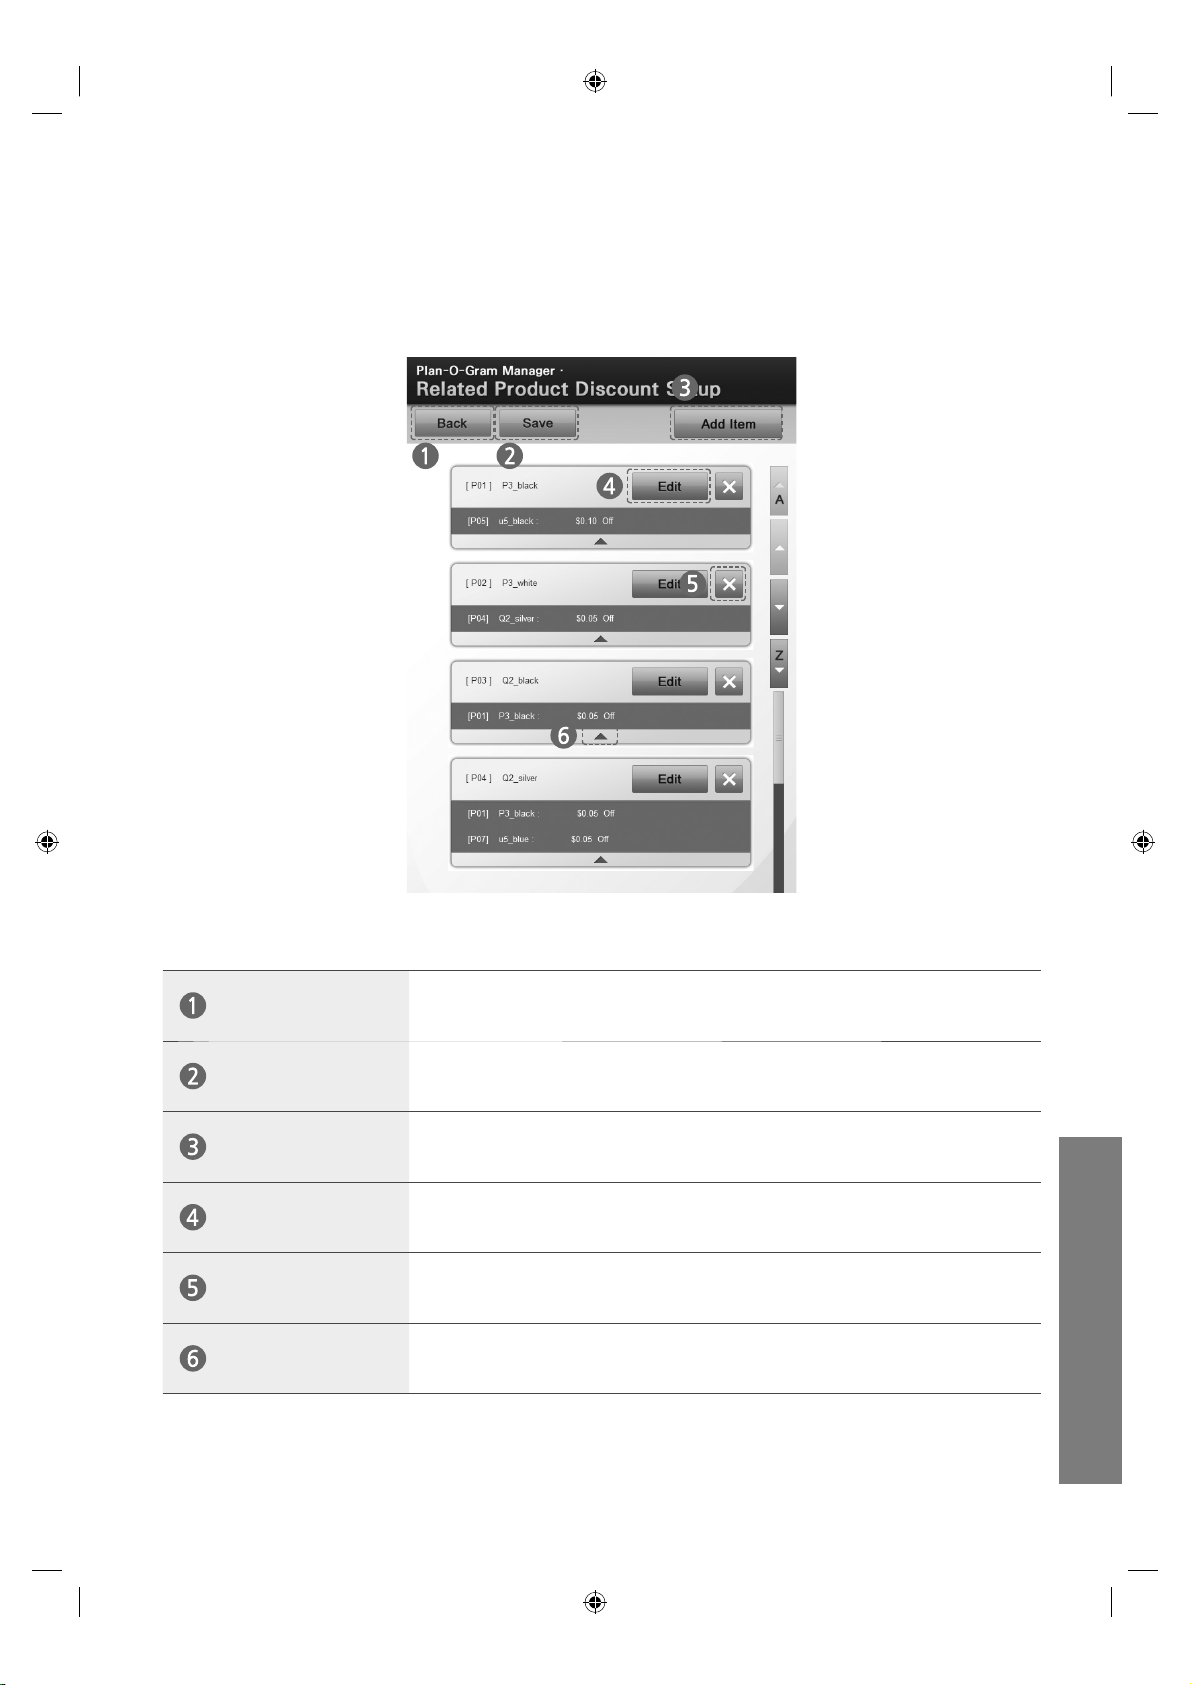
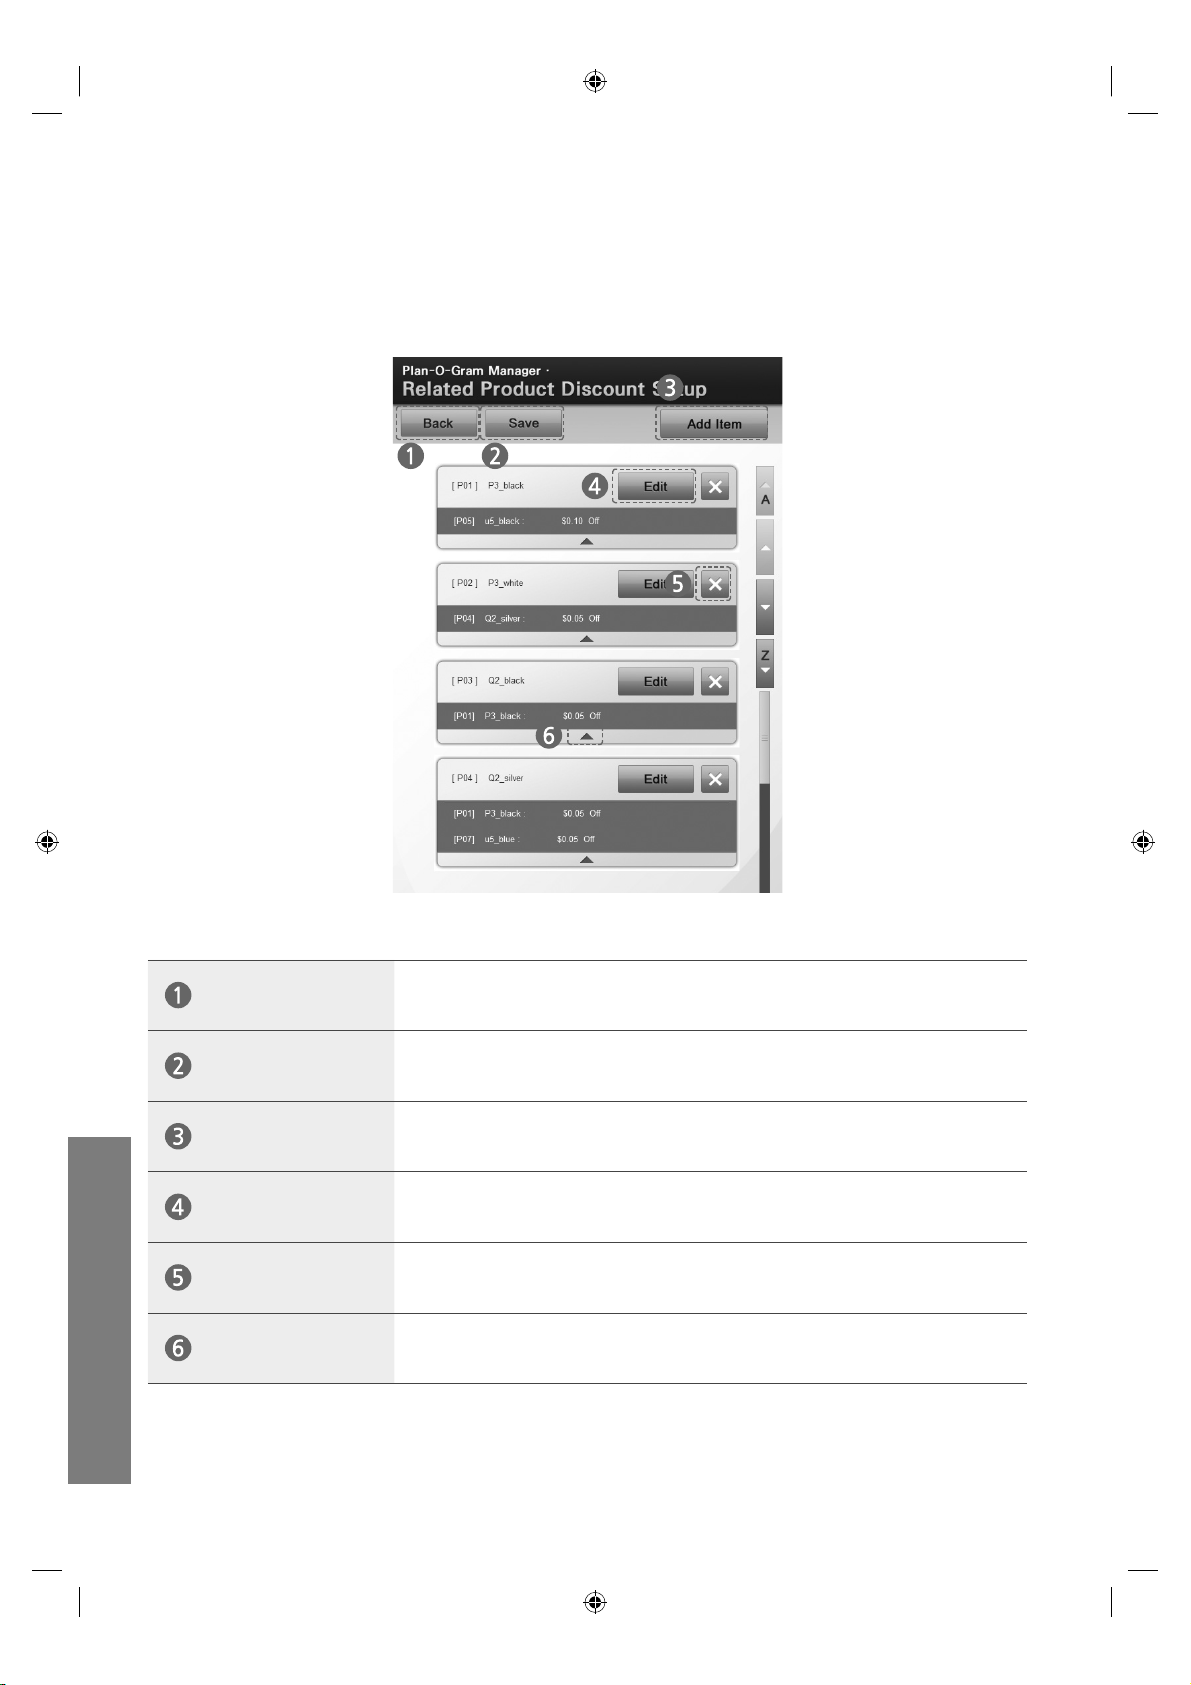
The Related Product Discount Setup screen can apply a discount to related products at the time
of purchase.
Back
Save
Add Item
Edit
Delete
Drop-down Icon
Returns to the previous page.
Saves the current settings.
Adds an item.
Edits a Template.
Deletes settings.
Displays or hides a drop-down menu when touched.
uVending
English
42
Page 44
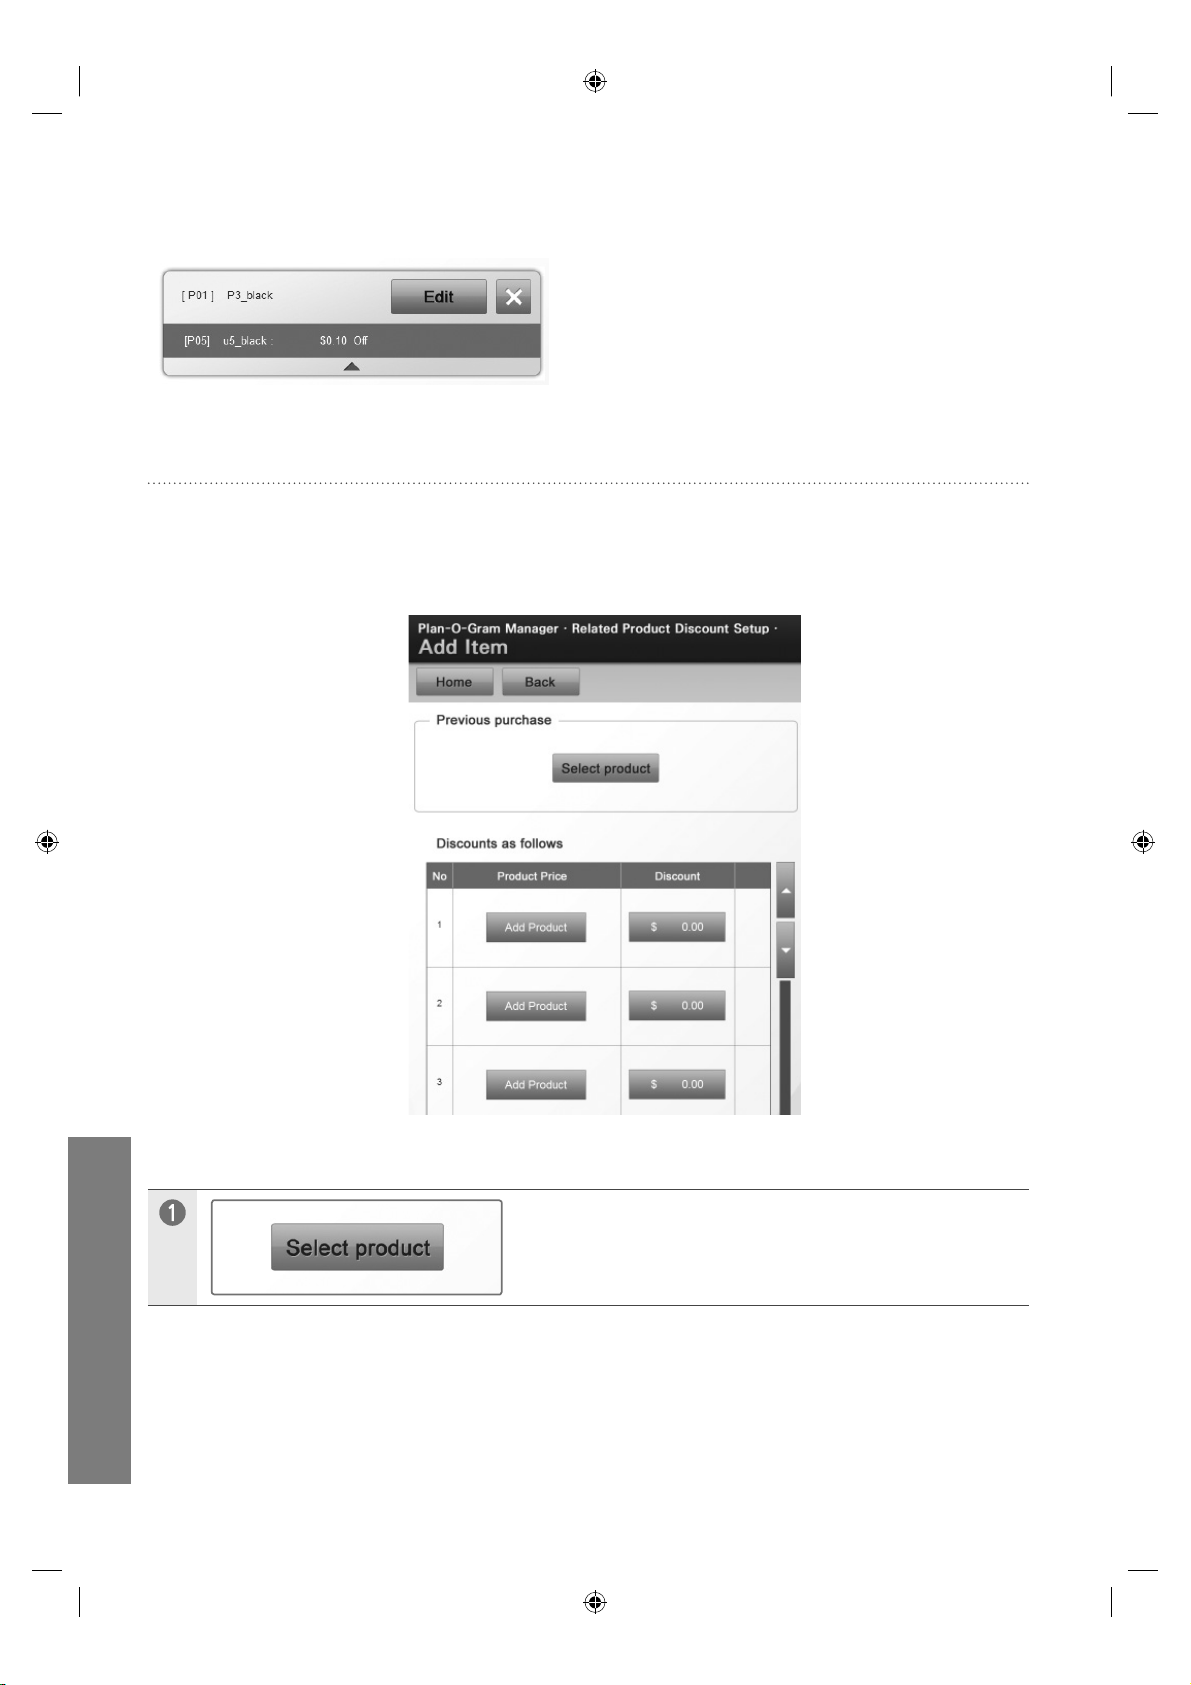
Example of Related Product Discount Setup >
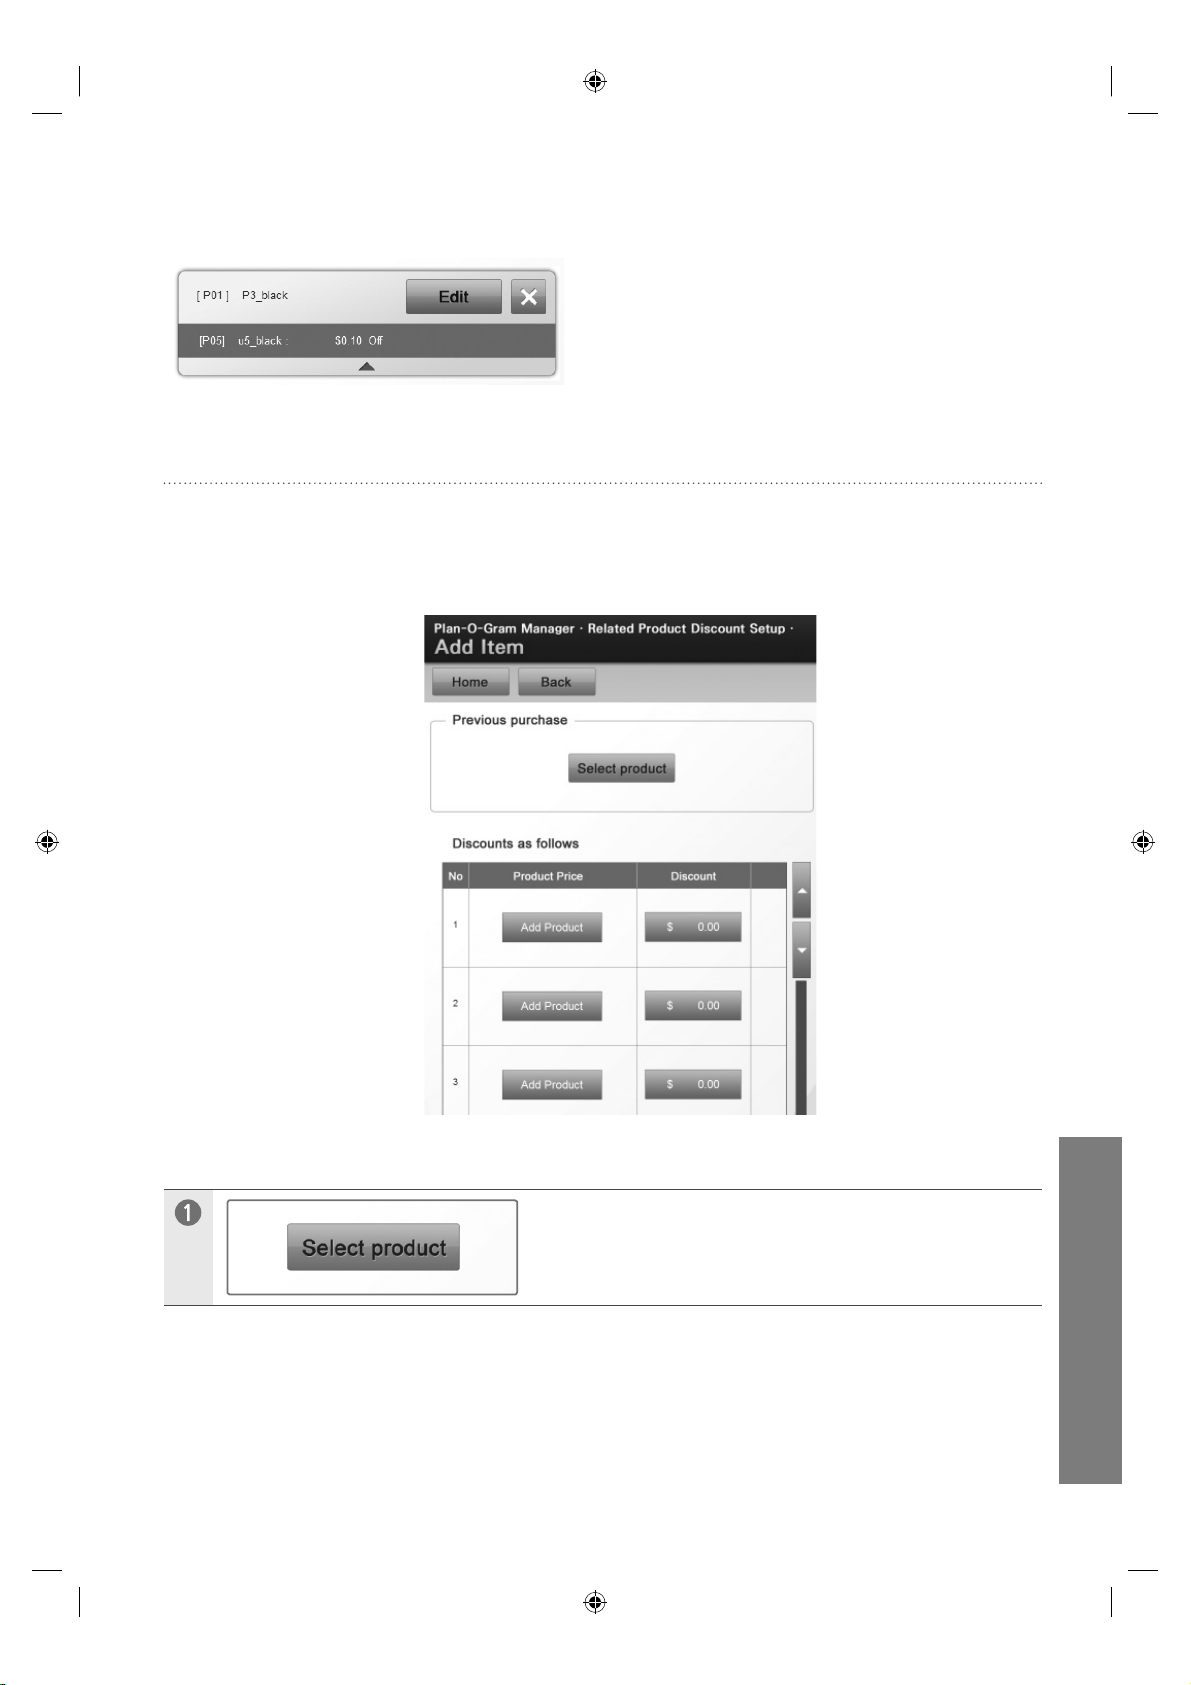
When the product P3_black is purchased, $0.10 is
discounted from the product u5_black.
Add Item
The Add Item screen adds terms which apply a discount to related products at the time of
purchase.
uVending
English
43
Adding Discount Items >
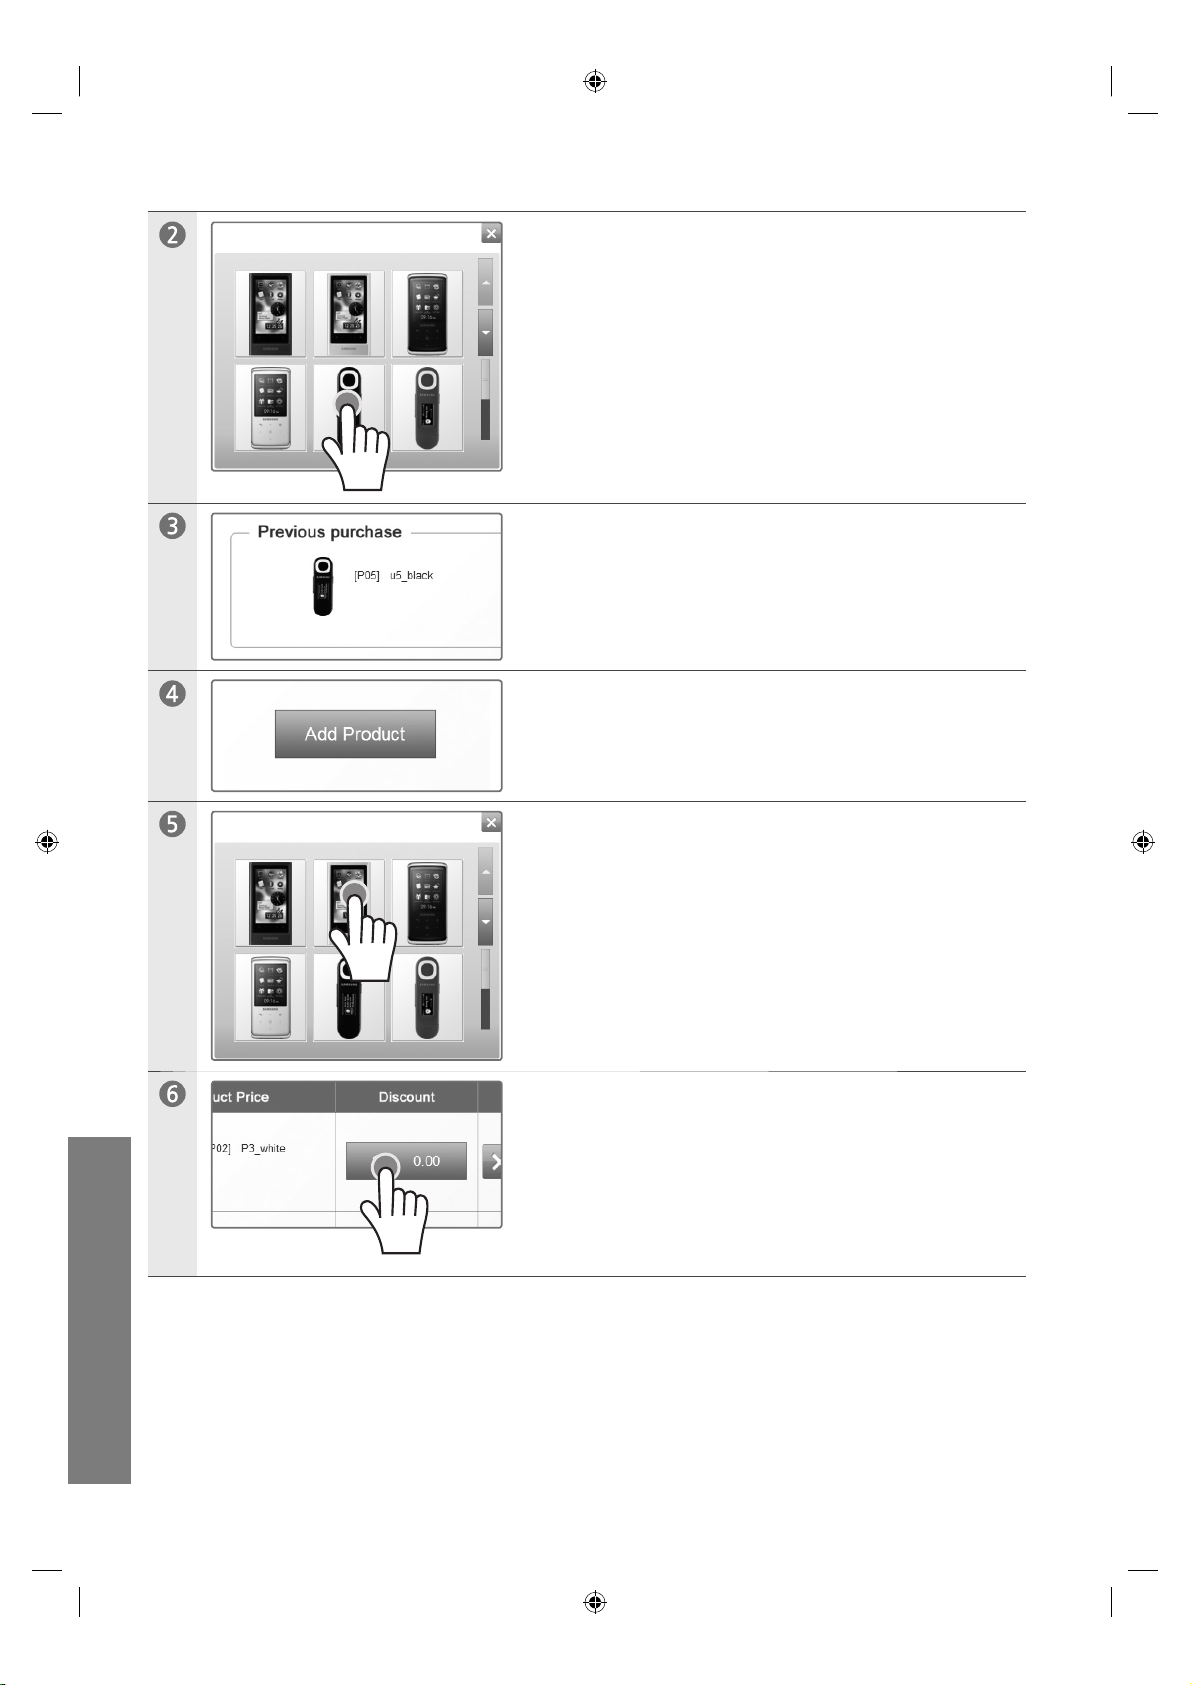
Touch Select Product.
Page 45
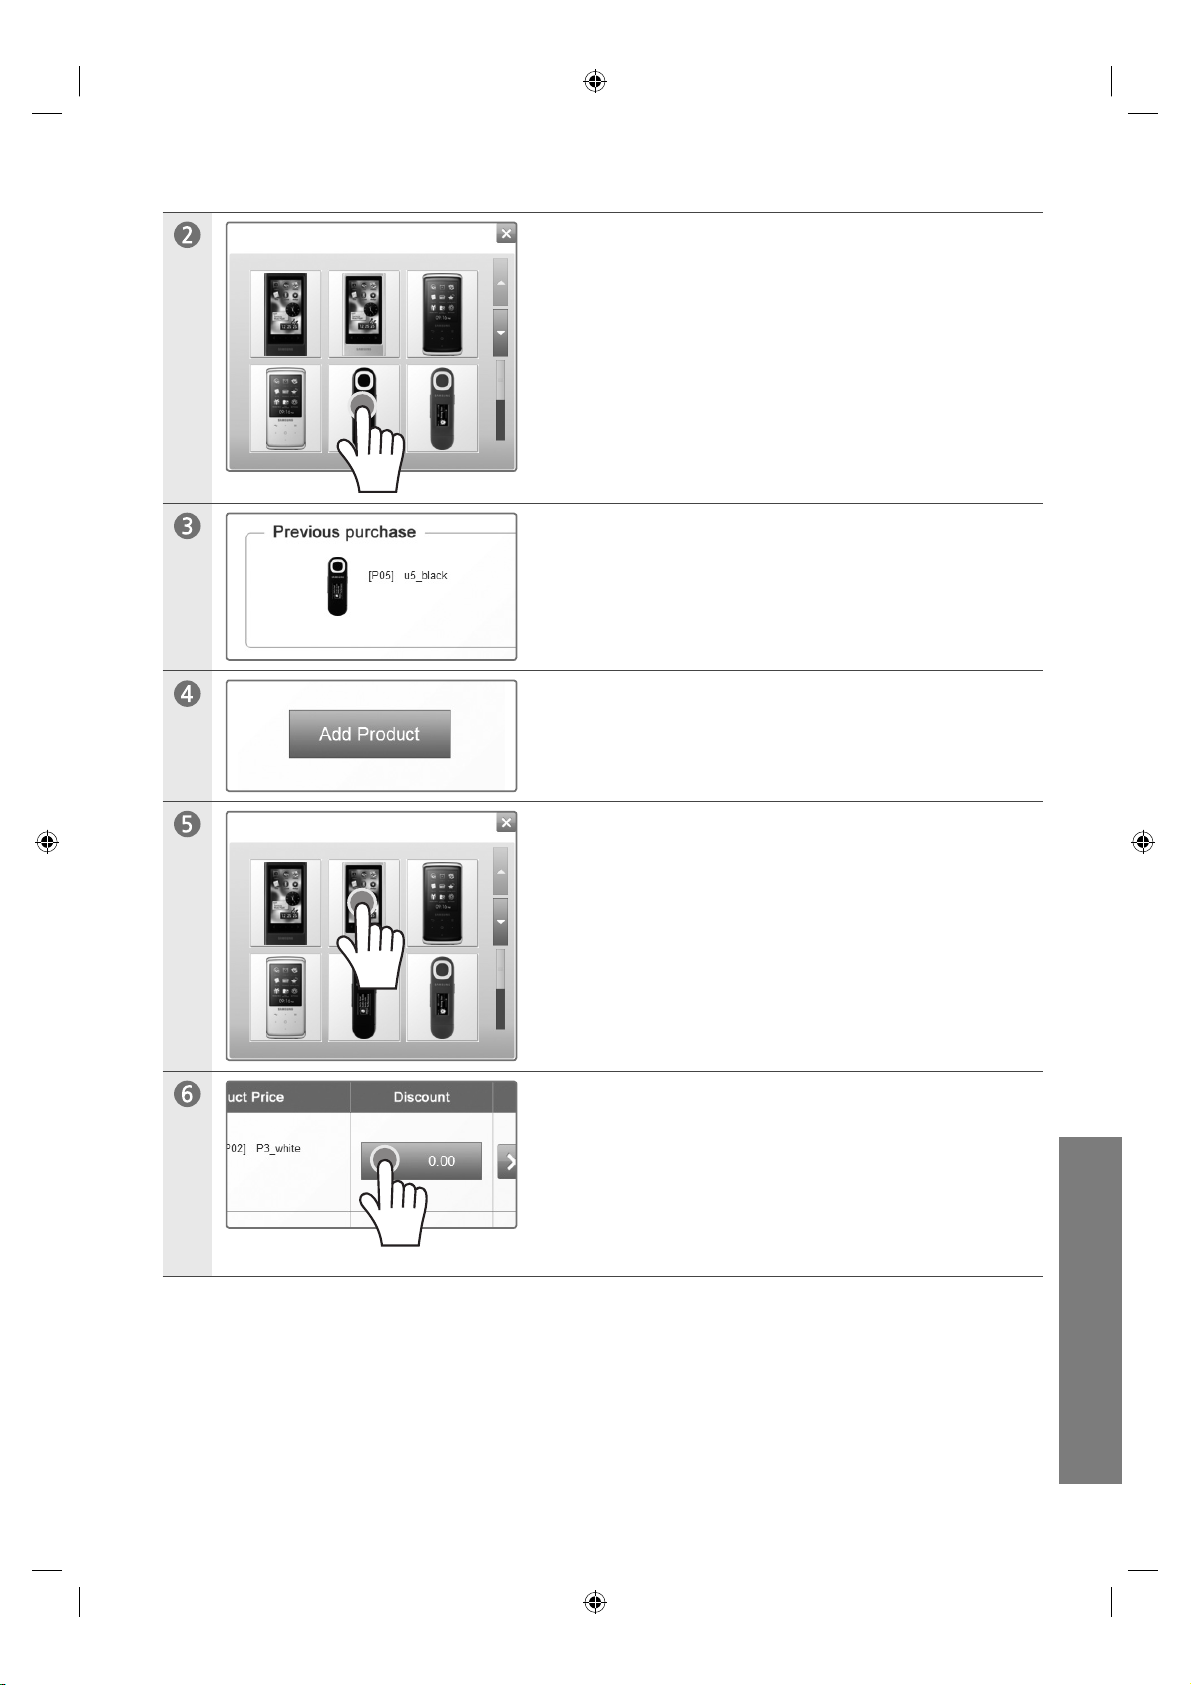
4
Touch the image of the product to select.
The product is selected.
Touch Add Product.
When the product selected above is purchased, touch the
image of the product to apply an additional discount to.
uVending
Touch the field where the discount will be entered.
English
44
Page 46
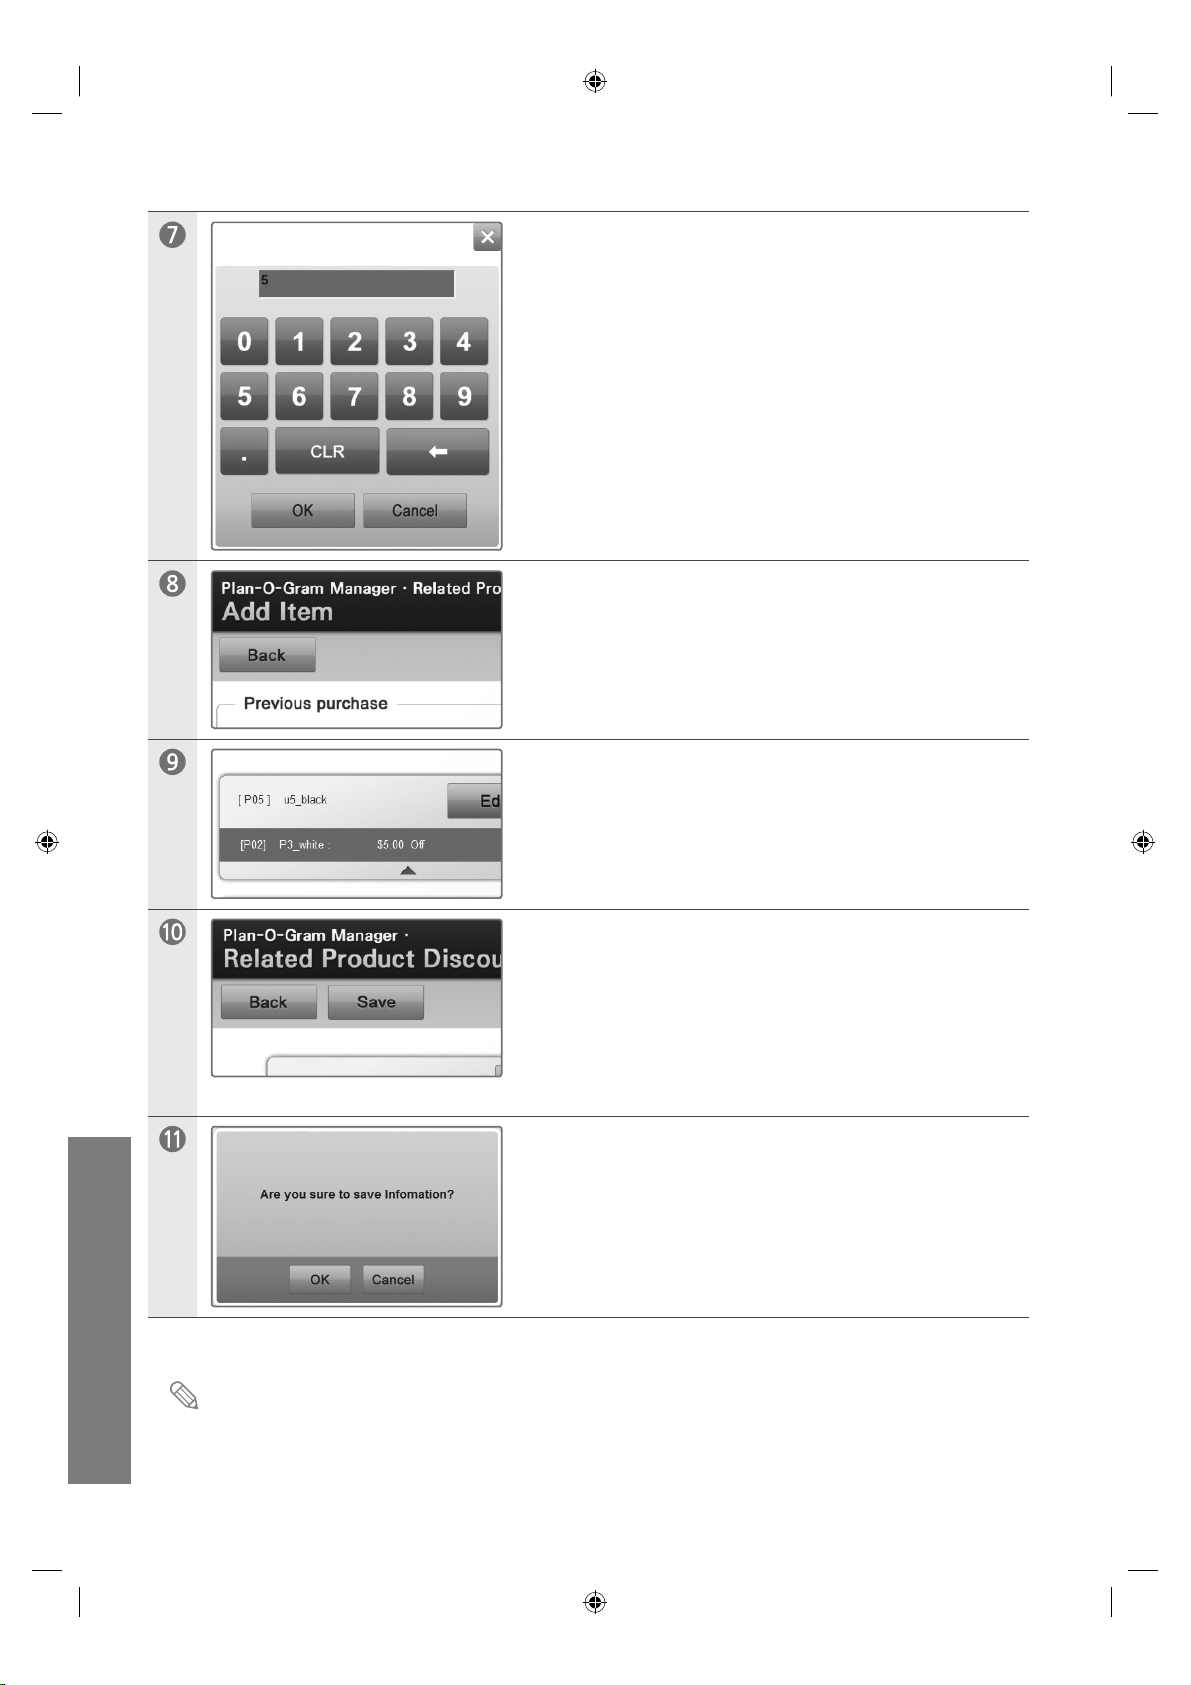
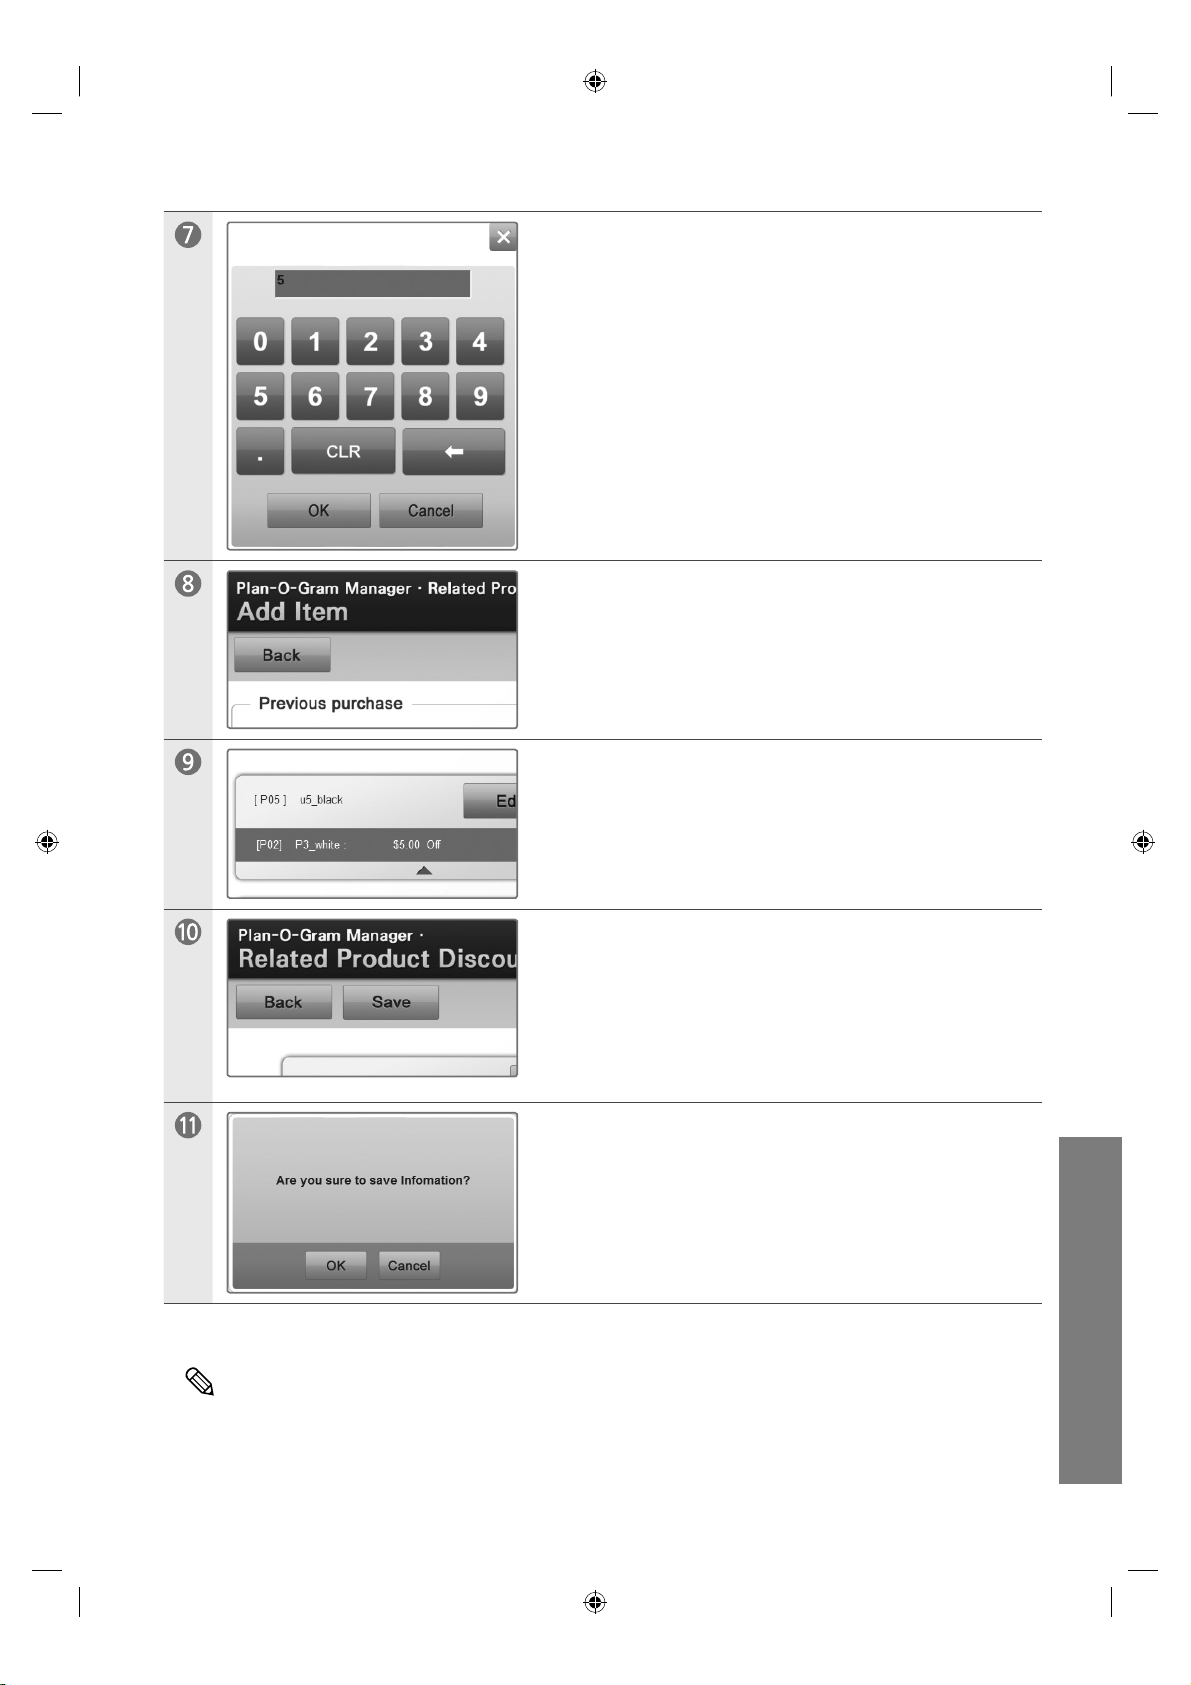
Enter the discount to apply and touch OK.
Touch Back.
Check that the discount item has been added,
uVending
English
45
and touch Save.
Touch OK.
A product must be selected before adding discount items.
Page 47

Safety Precautions
전원 관련
전원플러그가 흔들리지 않도록 안쪽 끝까지 정확히 꽂아 주세요 y .
접속이 불안정한 경우는 화재의 원인이 됩니다.
손상된 전원코드나 플러그, 헐거운 콘센트는 사용하지 마세요. y
감전, 화재가 발생할 수 있습니다.
전원플러그를 뽑을 때나 끼울 때 젖은 손으로 만지지 마세요. y
감전의 위험이 있습니다.
전원코드를 무리하게 구부리거나 잡아당기거나 무거운 물건에 눌리지 않도록 하세요. y
코드가 손상되어 화재, 감전의 원인이 됩니다.
제품 내부에 고전압이 흐르므로 사용자 임의로 절대 분리, 수리, 개조하지 마세요. y
화재, 감전사고의 원인이 됩니다. 수리할 필요가 있을 때에는 서비스센터로 연락하세요.
전원플러그 핀 부위 또는 콘센트에 먼지 등이 묻어 있을 때에는 마른 천으로 깨끗이 닦아 주세요. y
화재의 원인이 될 수 있습니다.
전원코드를 콘센트에서 분리할 때에는 반드시 플러그를 잡고 분리해주세요. y
감전, 화재가 발생할 수 있습니다.
반드시 접지가 된 콘센트에 전원코드를 연결하세요. y
전기적 쇼크(감전) 및 상해를 입을 수 있습니다.
전원코드는 당사에서 공급하는 정품만 사용하세요. y
그리고 다른 제품에는 사용을 하지마세요. 화재, 감전의 요인이 될 수 있습니다.
설치 관련
제품을 들어서 운반할 때에는 2명 이상이 안전하게 운반하세요. y
제품이 떨어지면 다치거나 고장이 날 수 있습니다.
제품을 떨어뜨리거나 케이스가 파손된 경우에는, 제품의 전원을 끄고 전원코드를 뽑으세요. y
서비스센터로 연락하세요.
그대로 사용하면 화재, 감전의 원인이 됩니다.
제품 속(통풍구,입출력단자 등)에 젓가락, 동전, 머리핀 등의 금속물이나, 종이, 성냥 등 불에 타기 y
쉬운 물건을 집어넣지 마세요. 제품 내부에 물 또는 이물질이 들어갔을 경우 반드시 제품의
전원을 끄고 전원코드를 빼고 서비스 센터로 연락하세요.
감전, 화재의 원인이 될 수 있습니다.
제품에서 이상한 소리, 타는 냄새, 연기가 나면 즉시 전원코드를 뽑고 서비스센터로 연락하세요. y
화재, 감전의 위험이 있습니다.
제품을 놓을 때 살며시 놓으세요. y
고장 및 상해를 입을 수 있습니다.
제품 앞면을 바닥에 놓지 마세요. y
제품의 화면 표시부가 손상될 수 있습니다.
오랜 시간 고정된 화면으로 사용하면 잔상 또는 얼룩불량이 발생할 수도 있습니다. y
오랜 시간 사용하지 않을 경우에는 절전모드나, 화면보호기를 움직이는 동화상 모드로 설정하세요.
청소를 할 때에는 반드시 전원코드를 빼 주세요. y
감전, 화재의 원인이 됩니다.
청소할 때 제품 본체 각 부분에 직접 물을 뿌리지 마세요. y
제품에 물이 들어 가거나 젖지 않도록 하세요. 화재, 감전의 원인이 됩니다.
청소할 때에는 전원코드를 뽑고 부드러운 마른 헝겊으로 닦아 주세요. y
왁스, 벤젠, 알코올, 신나, 모기약, 방향제, 윤활제, 세정제 등의 화학 약품을사용하지 마세요.
외관을 손상시키거나 표시 사항이 지워질 수 있습니다.
Page 48

차 례
uVending machine Hardwar01 e
제품 연02 결
제품 연결 및 사용 ......................................................................3
페라이트 코어 ...........................................................................4
구성품 및 구성품 조03 립
구성품 및 구성품 조립 ................................................................4
분해 .........................................................................................5
uVending management04 Software
uVending management Software란? ......................................15
uVending management Software의 주요 기능 .........................15
기능 제약 사항 ..........................................................................16
시스템 요구사항 ........................................................................16
Genera05 l
Interaction ...............................................................................17
화면구성 ...................................................................................18
Logi06 n
Login 하기 ................................................................................19
Change Password ....................................................................20
Hom07 e
LFD Manage08 r
LFD Manager ..........................................................................23
Display .....................................................................................24
Sounds ....................................................................................25
Plan-O-Gram Manage09 r
Plan-O-Gram ...........................................................................27
Template Library ......................................................................32
Cart Discount Setup.................................................................38
Related Product Discount Setup ..............................................42
Page 49
uVending
machine Hardware
제품 연결
제품 연결 및 사용
SW Upgrade와 부가 기능 등을 사용하려면 Vending Machine과 외부기기를 연결한 후 Vending
Machine의 액정화면을 손으로 Touch 하여 편리하게 이용할 수 있습니다.
키보드, 마우스, USB 메모리를 연결할 수 있습니다.
①
USB를 연결하기 위해서는 기기의 문을 열어 관리자 프로그램이 화면에 로딩되면 USB를 연결합니다.
②
USB를 연결하세요.
USB
②
USB 키보드
규격내용은 성능개선을 위해 예고없이 변경될 수 있습니다.
①
USB 마우스
USB 메모리
uVending
한국어
3
Page 50
페라이트 코어
• 페라이트 코어는 케이블이 전자파 방해를 받지 않도록 차폐시키는데
사용됩니다.
• 케이블을 연결할 때는 페라이트 코어를 열어 플러그 근처의 케이블 둘레에
끼웁니다.
구성품 및 구성품 조립
구성품 및 구성품 조립
규격내용은 성능개선을 위해 예고없이 변경될 수 있습니다.
제품 특징 >
- 응답시간 8ms인 SPVA 채택
- SRS TruSurround 채택을 통해 음향기능 강화
- 외장스피커
- 10W 스피커 2대
uVending
한국어
4
Specifications >
모델명 460I-S
패널 AMLCD 46”(LTI460HA03)
최적 해상도 1920 x 1080 Wide (UXGA) 60Hz
화면 크기 (H X V) 46” (16 x 9)
밝기 616 cd/m2
명암비 2000 : 1
반응 시간 8 ms
시야각 Left/Right/Up/Down : 89” / 89” / 89” /89”
소비 전력
(on mode)
DPMS 5 W
사운드 출력 Max. 10 W x 2
크기 (W X H X D) SET 단품 : 1114 x 664 x 157 mm(W x H x D)
무게 단품 : 37 kg
TYP : 365 watts
MAX : less than 425 watts
포장 : 1252 x 803 x 367 mm (W x H x D)
포장 : 45 kg
Page 51
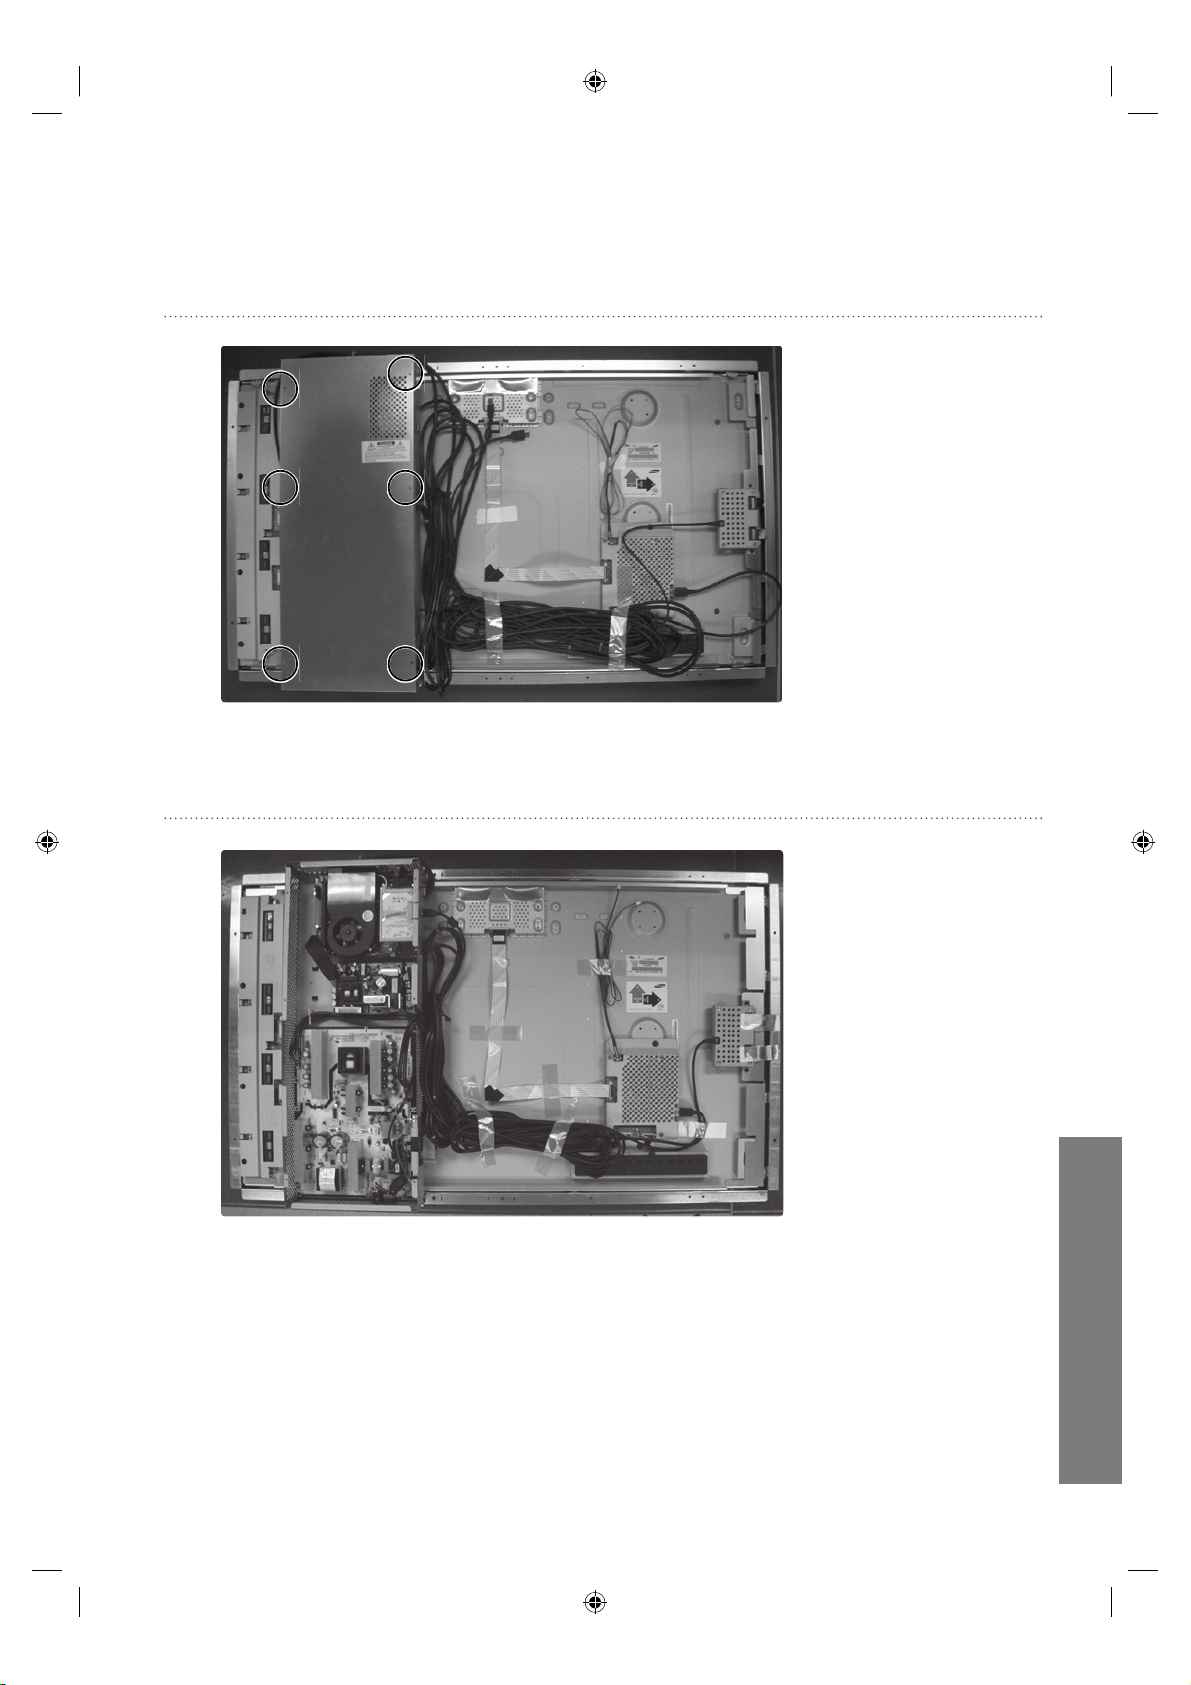
분해
후면커버의 나사 6개를 제거하세요.
쉴드커버를 들어 올리세요.
uVending
한국어
5
Page 52
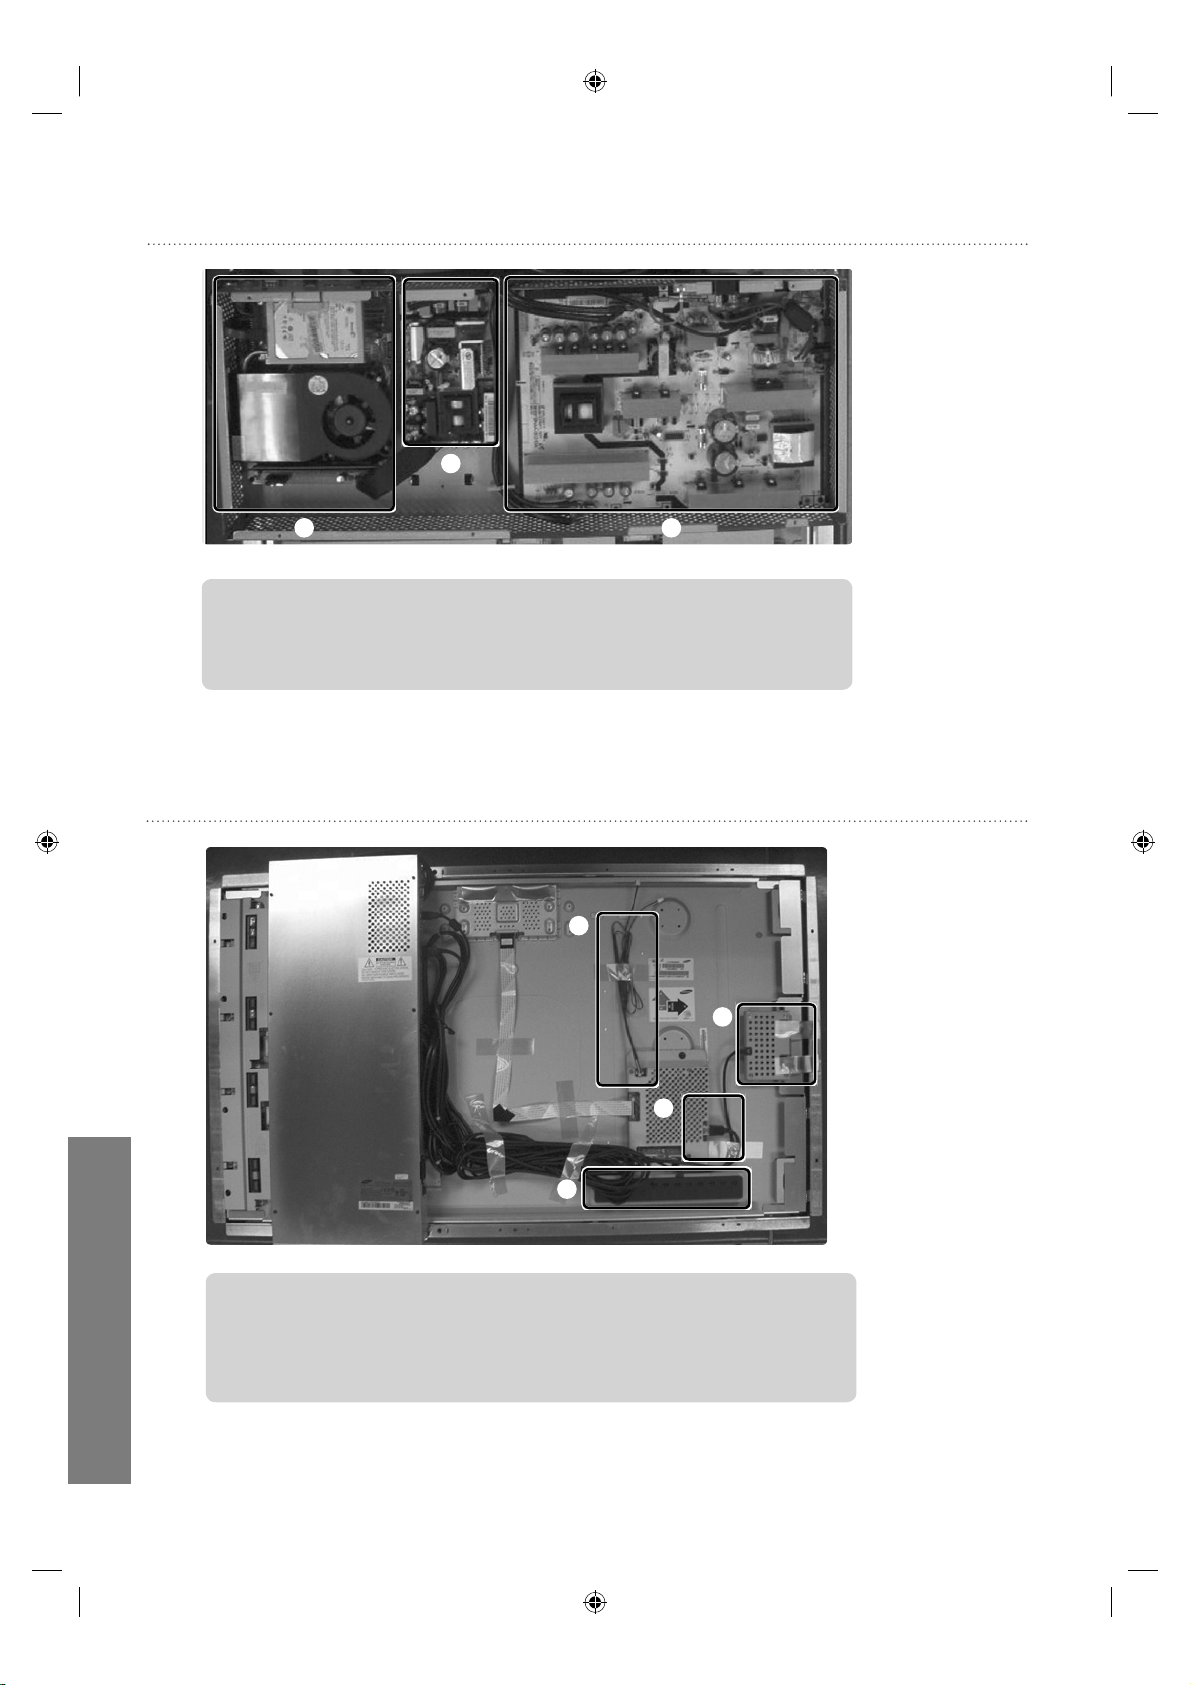
내부 모습
① 네트워크 보드: CPU 및 비디오 데코더는 영상 및 음향 처리에 사용됩니다.
② 서브 SMPS: 네트워크 보드 전원공급장치
③ 메인 PBA 및 패널 전원공급장치pply
조립방법
②
① ③
uVending
한국어
6
③
①
②
④
① 터치모듈 컨트롤러
② HDMI 케이블
③ 스피커선 커넥터 (좌 우)
④ 제어버튼
Page 53
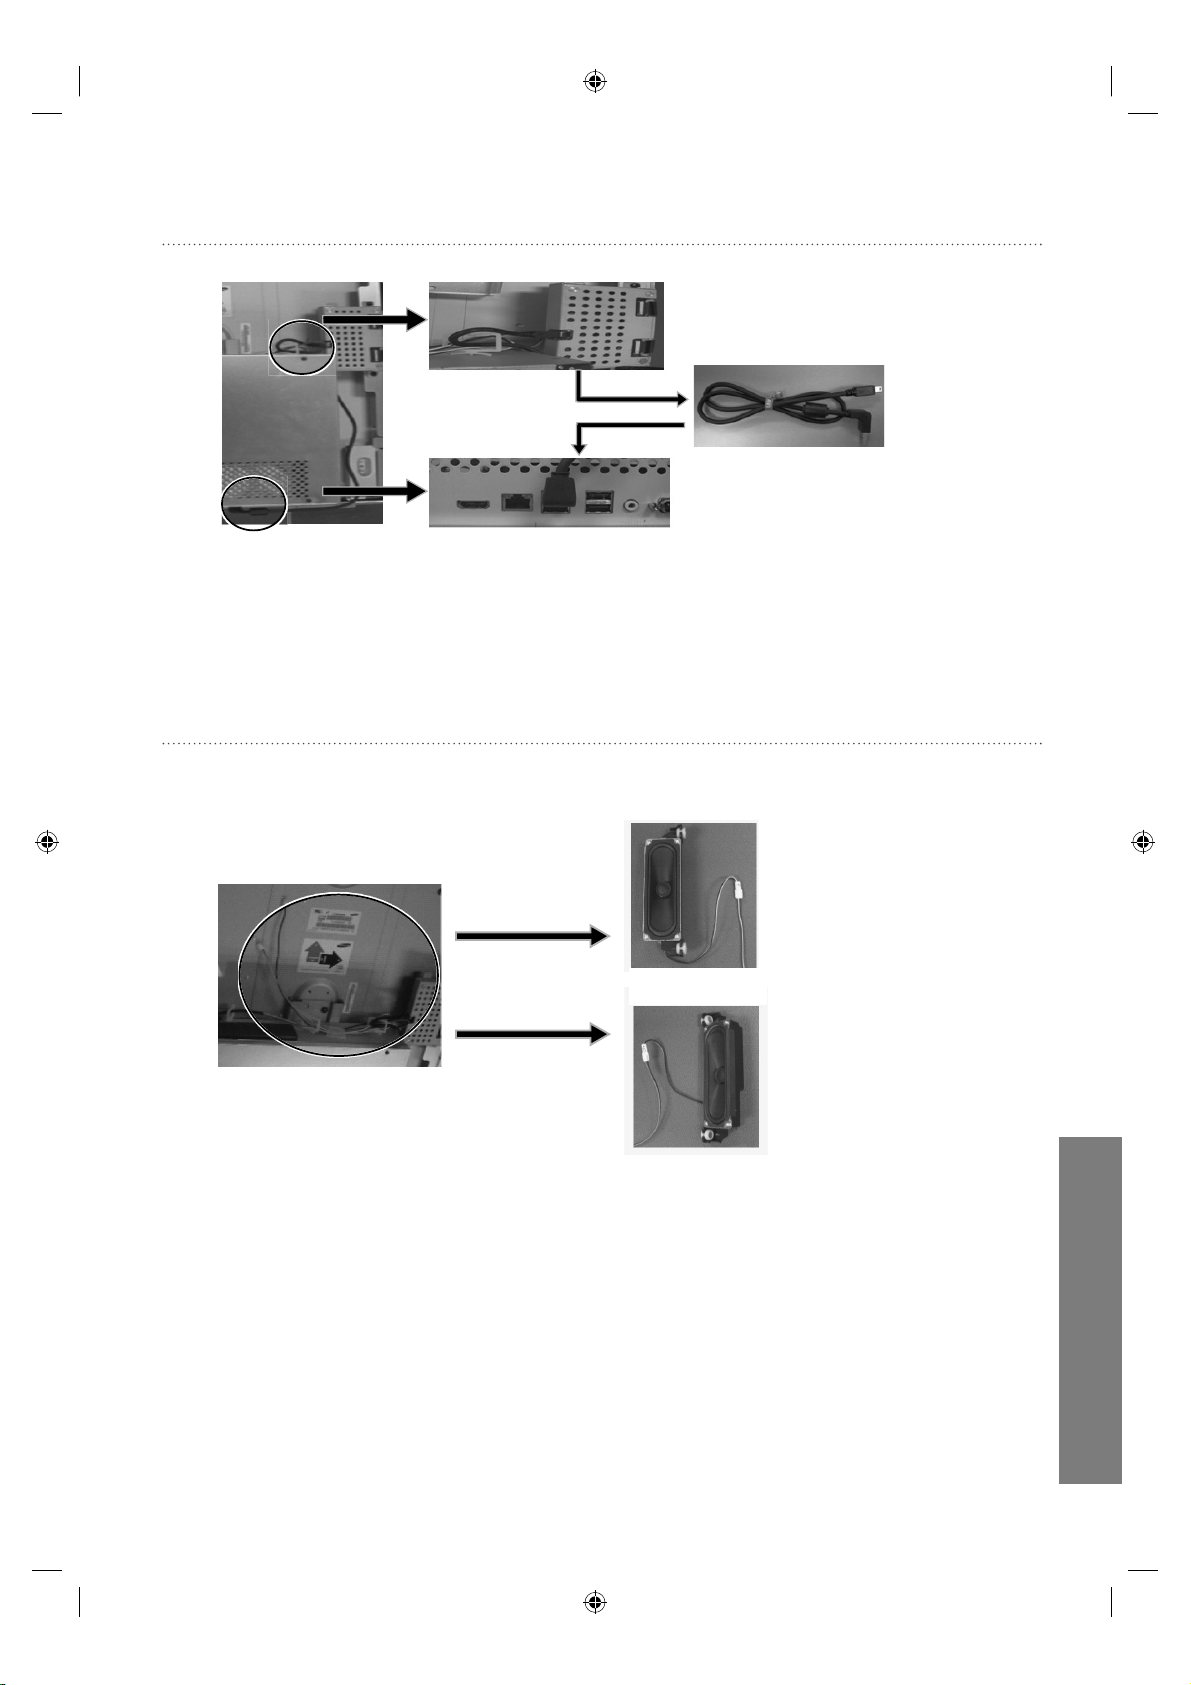
조립방법 - 터치모듈 연결
조립방법 - 스피커 연결
USB Cable
왼쪽 (노란색)
오른쪽 (초록색)
uVending
한국어
7
Page 54
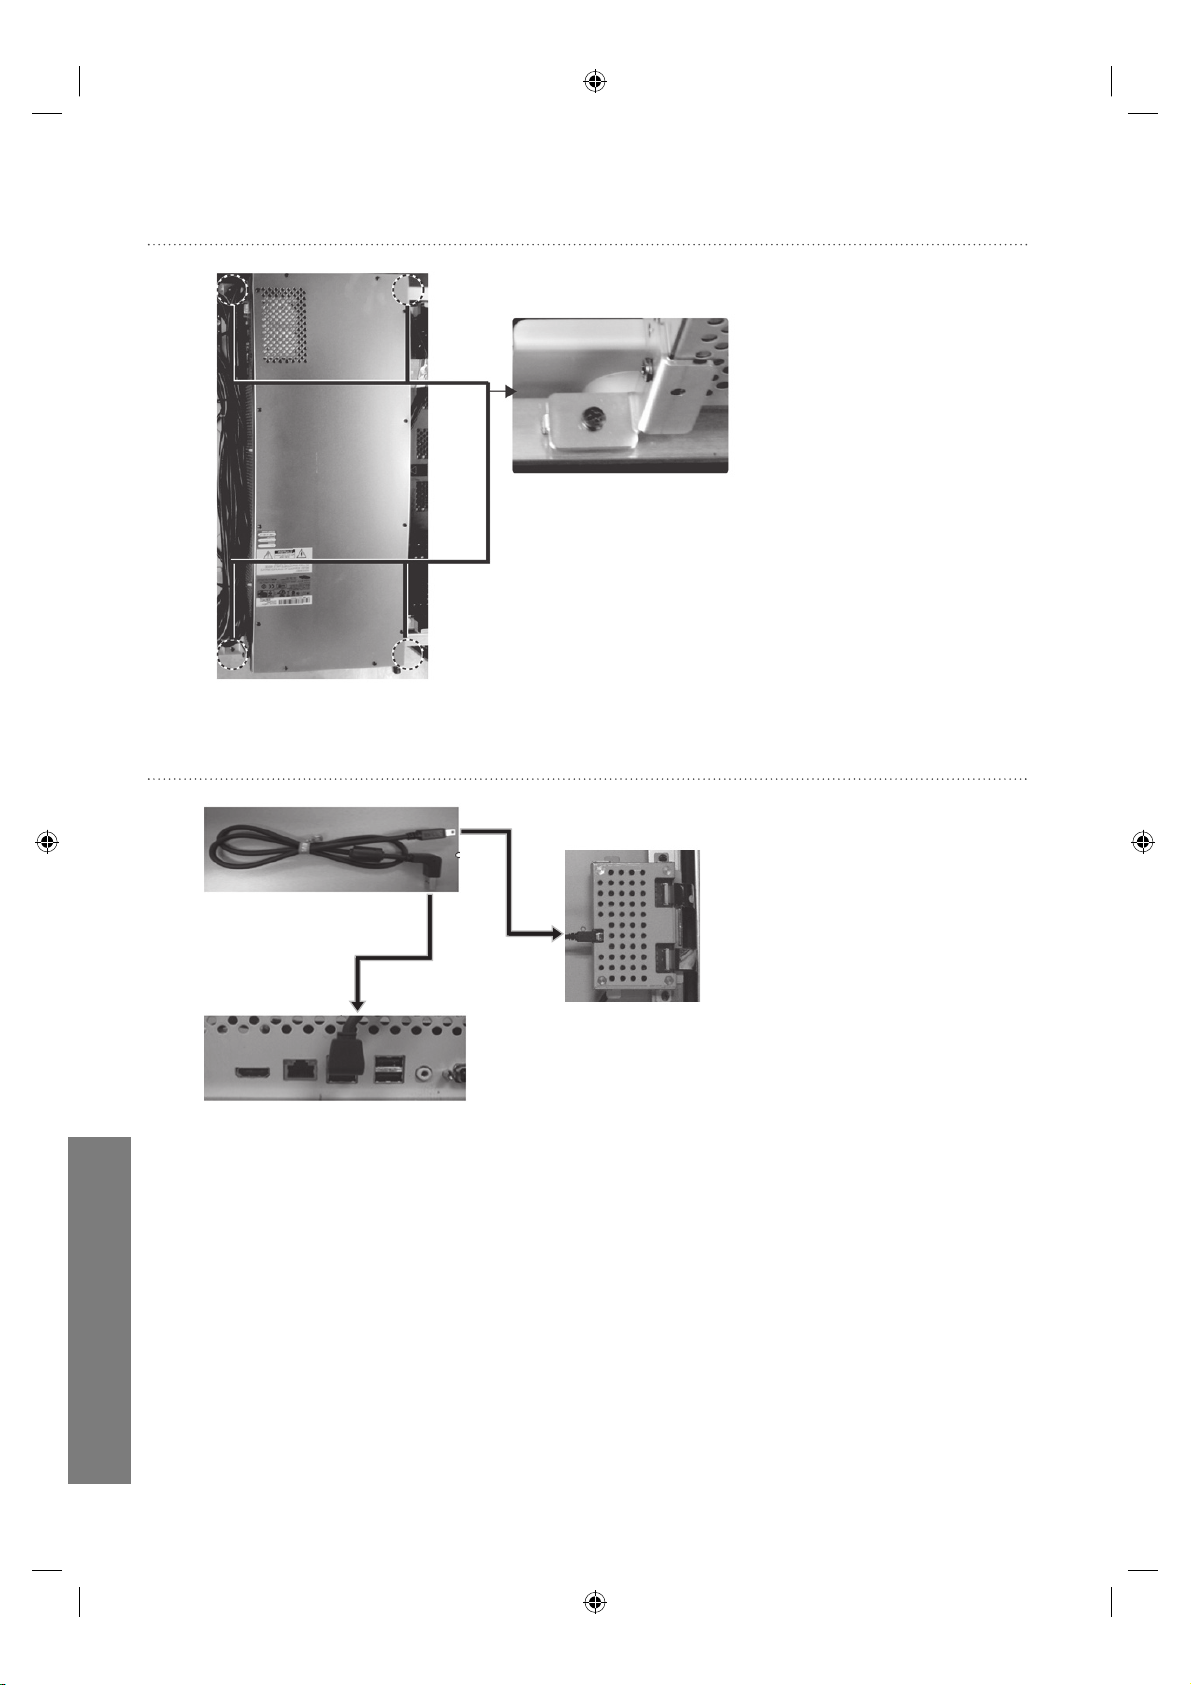
조립방법 - PC 박스를 사용하는 방법
볼트 3개를 풀고 커버를
벗기세요. 이 과정을 4개 각
코너에서 반복한 후 PC 박스를
사용하세요.
조립방법 - 터치모듈 연결
uVending
한국어
8
USB 케이블
Mini USB
connector
Touch module
controller
PC Box
Page 55
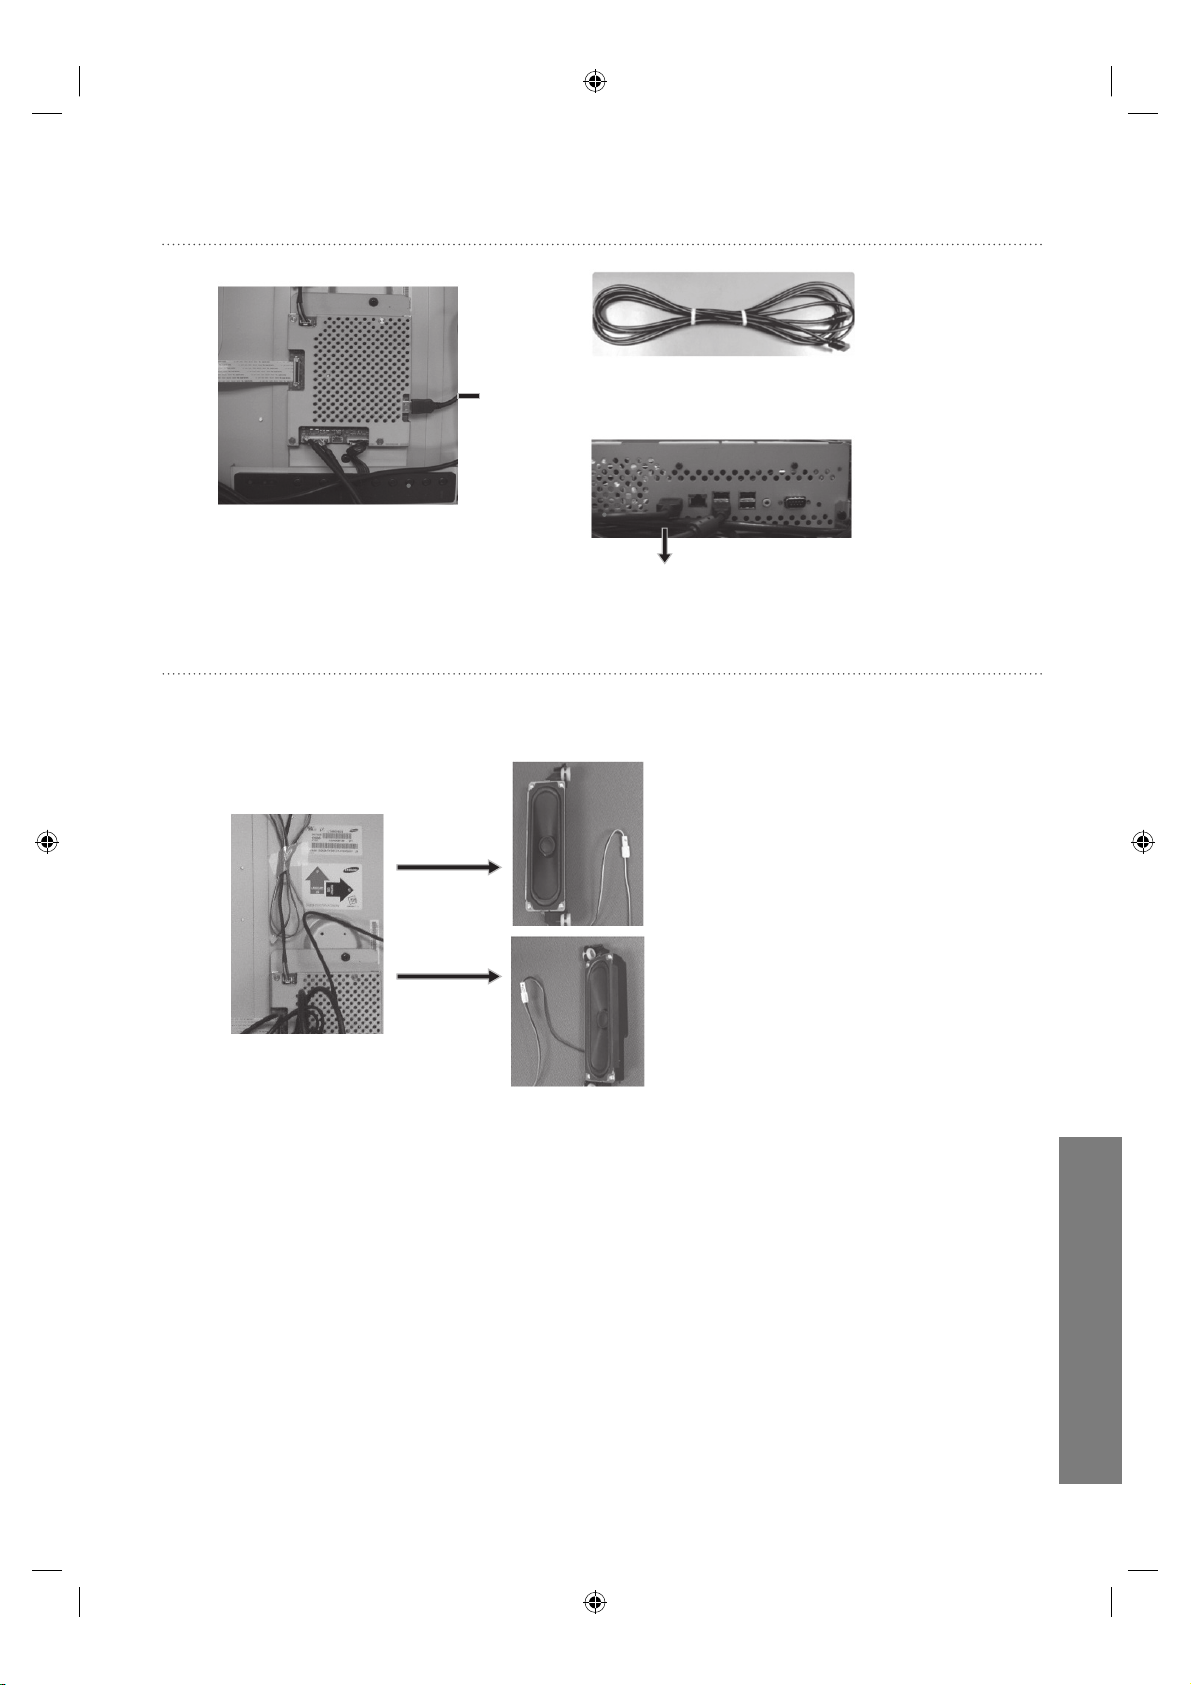
조립방법 - HDMI 케이블 연결
HDMI 케이블
조립방법 - 스피커 연결
왼쪽 (노란색)
HDMI 케이블
PC Box
HDMI 케이블
스피커 선
오른쪽 (초록색)
uVending
한국어
9
Page 56
조립방법 - 전원 on/off 스위치 연결
②②
①①
② ①
① Power 버튼: 전원 on/off 버튼
② LED : 녹색 – 정상 작동/ 노란색 – 전원 꺼짐
조립방법 - Wi-Fi / BT / 카메라 / 충격센서 연결
uVending
한국어
PC Box
Wi-Fi/BT/충격 센서/ 카메라
USB 케이블
Wi-Fi
Bluetooth
USB 케이블
충격 센서
볼트 2개를 풀고 커버를 벗긴 후, 카메라
케이블을 연결하세요.
카메라
10
Page 57
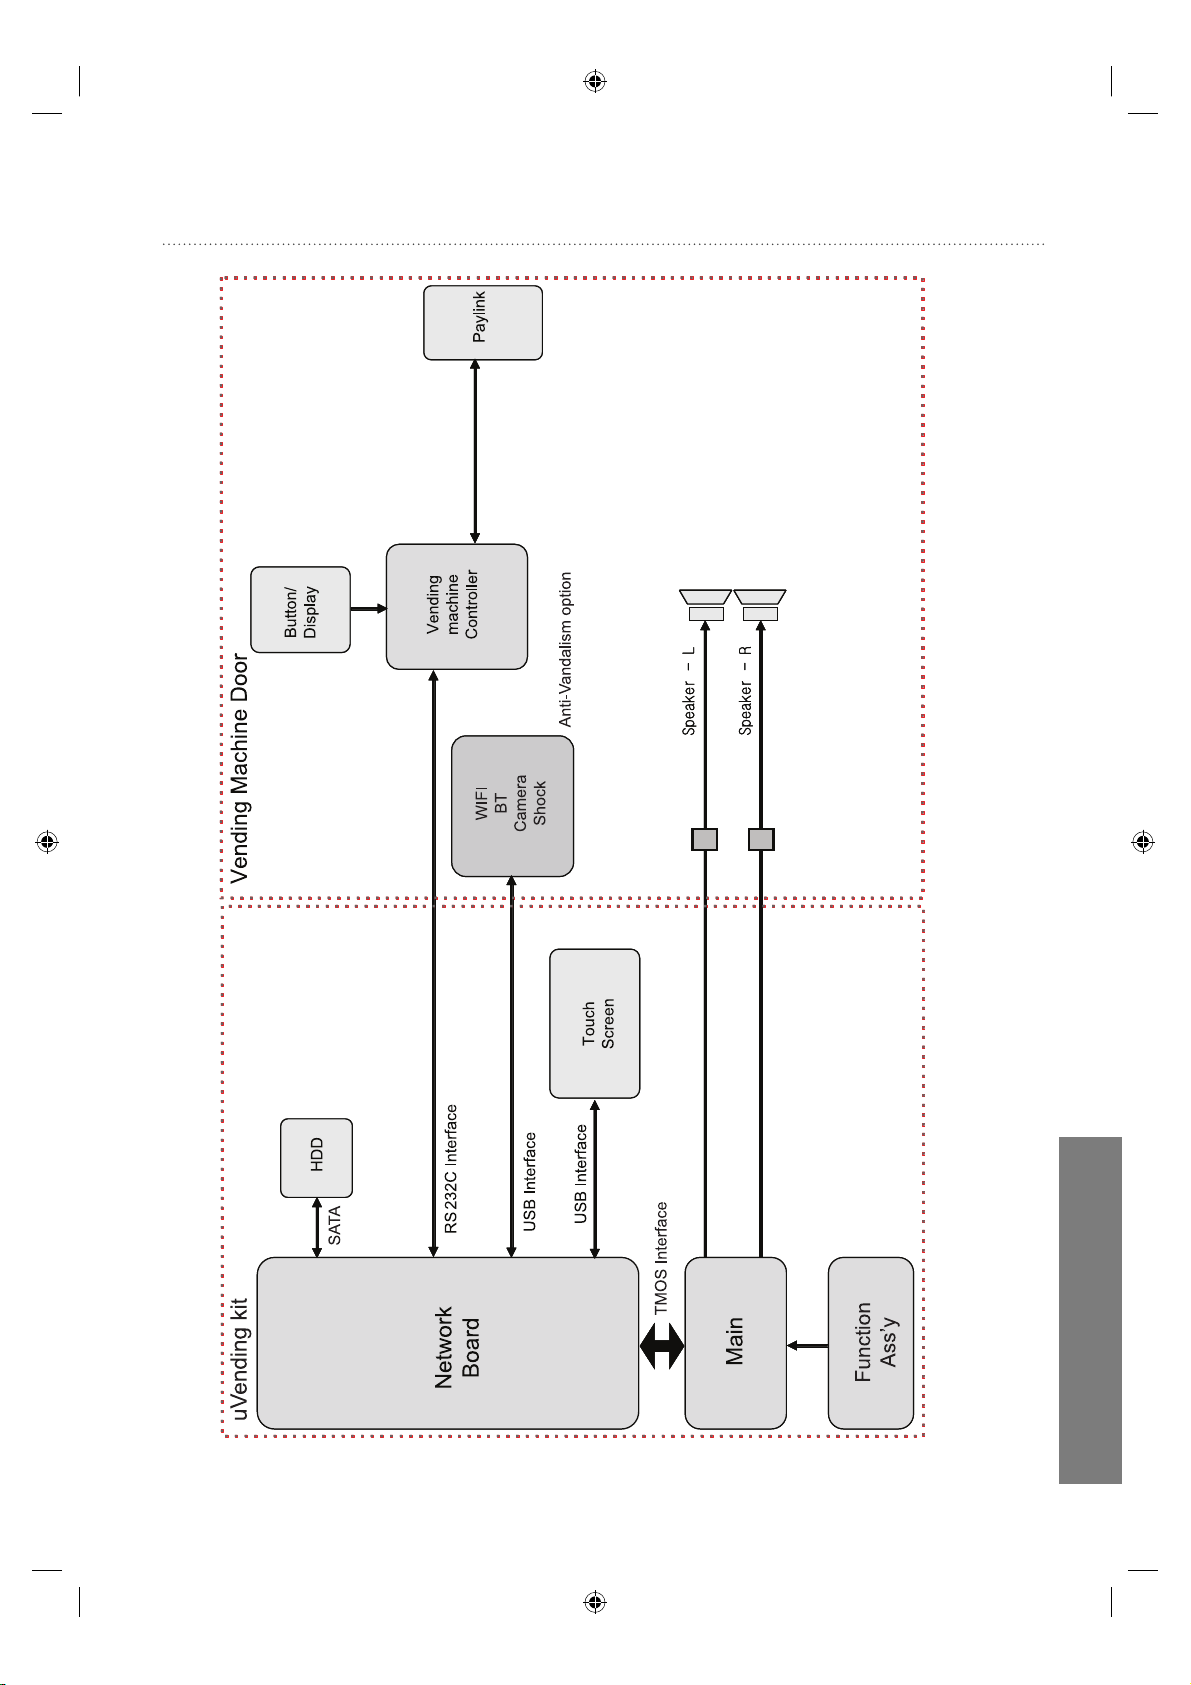
블록선도
uVending
한국어
11
Page 58
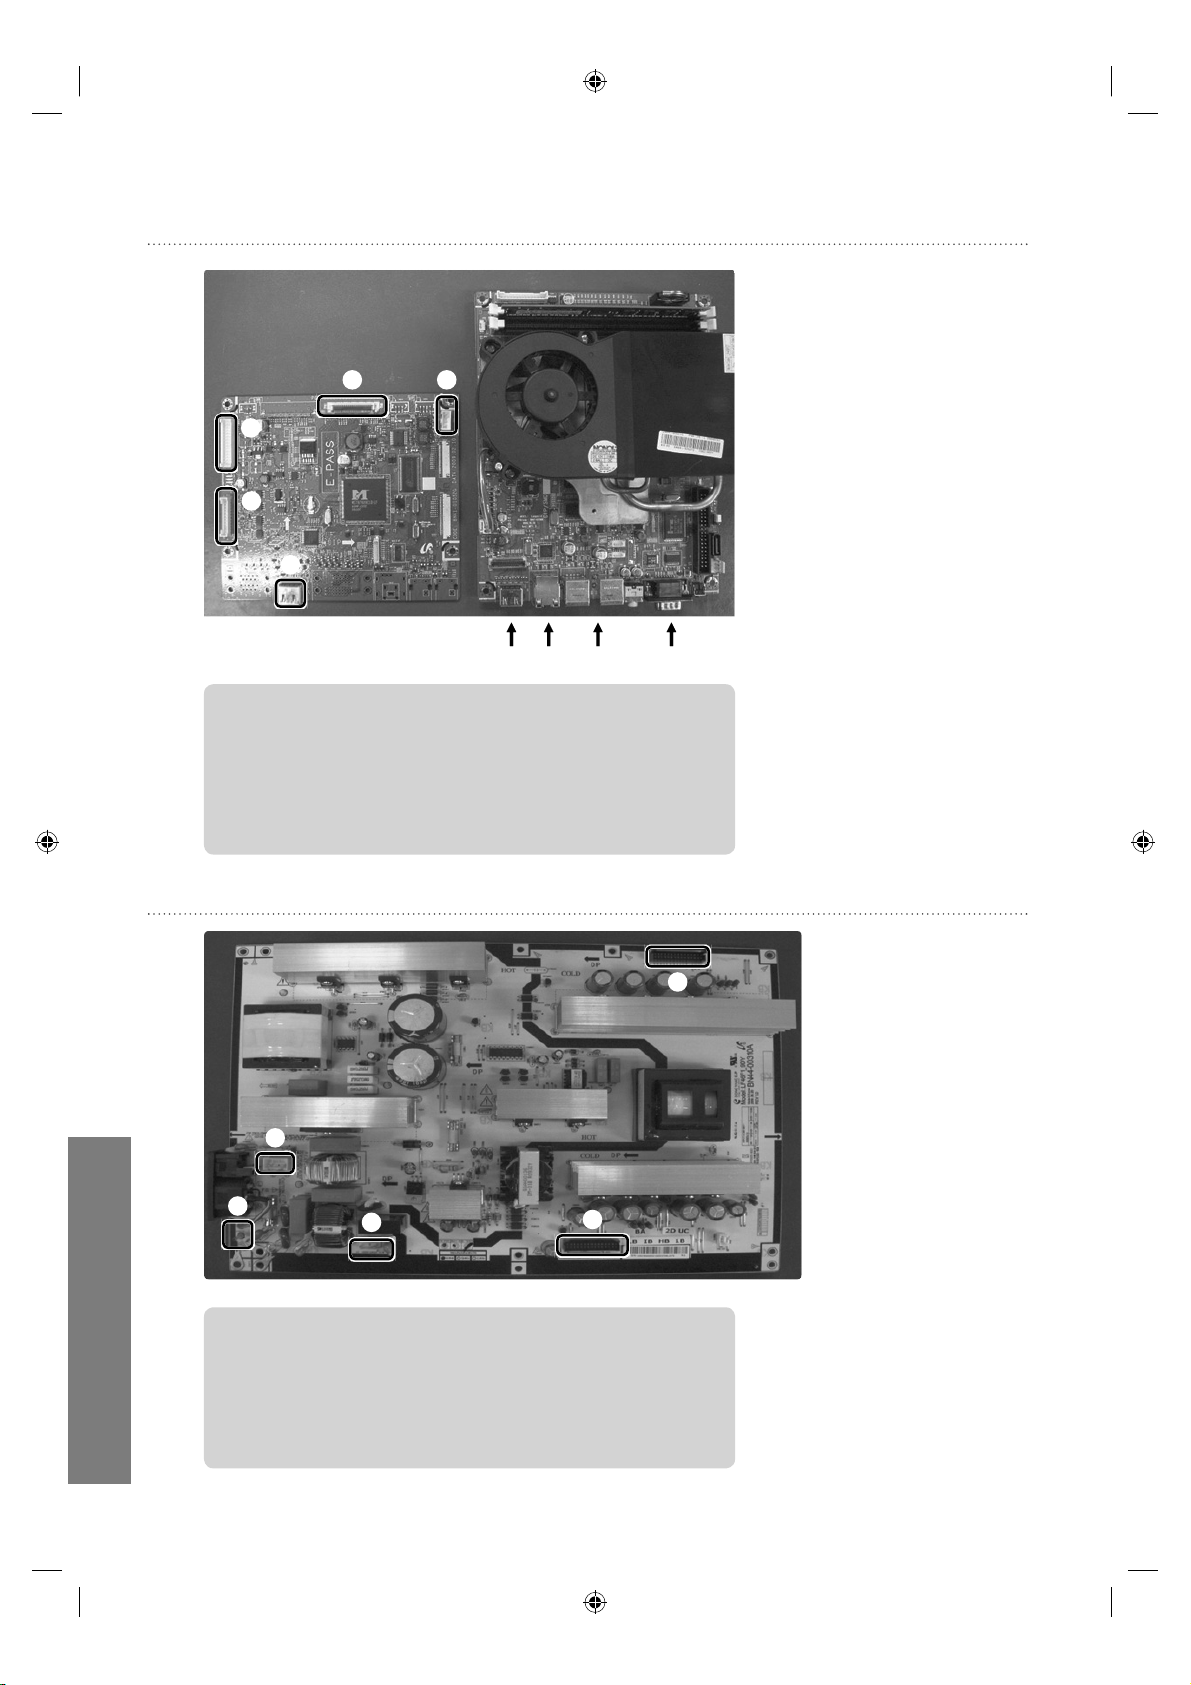
보드 연결 - 메인보드
①
②
⑤
① 전원 커넥터 : SMPS에 연결
② 기능 커넥터 : 기능보드에 연결
③ LVDS 커넥터 : 패널에 연결
④ 스피커 커넥터 : 스피커에 연결
⑤ HDMI 커넥터 : 네트워크 보드에 연결
④③
USBLAN RS-232CHDMI
보드 연결 - SMPS 보드
uVending
한국어
12
④
⑤
① 램프 커넥터 : 패널 인버터(30P)에 연결
② 전원 커넥터 : 메인 PBA(30P)에 연결
③ AC 전원 커넥터 : 서브 SMPS에 연결
④ AC 전원 소켓에 연결
⑤ 전원 GND
③
①
②
Page 59
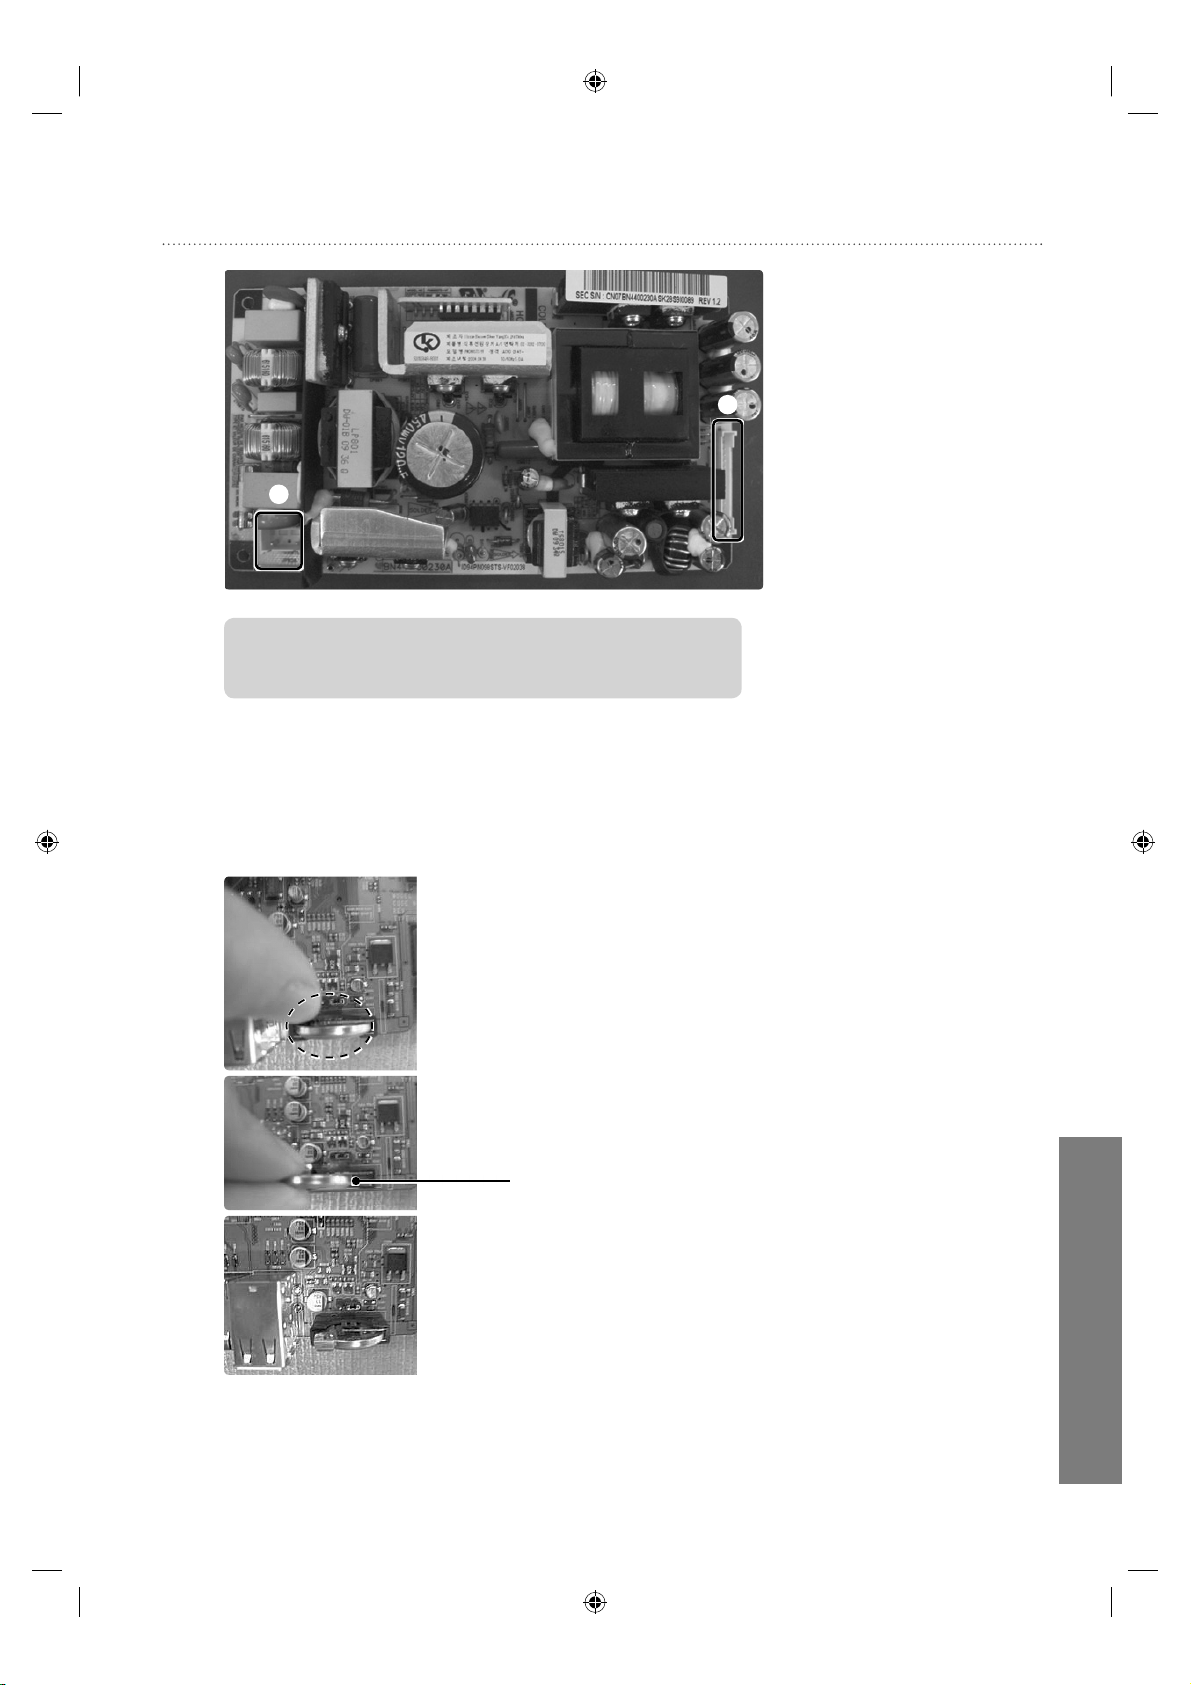
보드 연결 - 네트워크 전원보드
①
① AC 전원 커넥터 : SMPS 보드에 연결
② 네트워크 커넥터 : 네트워크 보드에 연결
네트워크 보드: 배터리 교체 >
배터리 교체*
다음과 같은 방법으로 배터리를 교체하시면 됩니다.
- 예1) FDM과 BIOS 업데이트 시 필요한 정보가 올바르게 저장되지 않음.
②
Battery (4301-000108)
uVending
한국어
13
Page 60
그림(세트 분해도 참조)과 같이 분해한 후 BAT1에서 기존의 yy 배터리를 제거한 후 새 *
배터리를 삽입하세요.
- 배터리 좌측의 홀더를 젖히세요.
- 양쪽을 잡고 배터리를 제거하세요.
- 새 배터리로 교체하세요.
no-power >
NO-POWER
전원 코드 연결
Ye s
Power Switch ON
Ye s
u-Vending 내부 체크 (A/S 신청)
No
No
전원 코드 연결
전원 스위치 켬
완료
No - Sound >
No - Sound
uVending
Speaker - Cable 연결
No
Speaker - Cable 연결
한국어
14
Ye s
Volume Level
(uVending management
Software 참조)
Ye s
u-Vending 내부 체크 (A/S 신청)
No
Volume Up
완료
Page 61

uVending
management Software
uVending management Software란?
uVending management Software는 Samsung uVending machine이 제품을 판매할 때 필요한
제품정보나 화면을 구성하는 Template(Theme), 그리고 할인기능을 설정하고, Samsung uVending
machine의 화면이나 소리를 제어하는 프로그램입니다. uVending management Software는 크게 LFD
Display와 Plan-O-Gram으로 이루어져 있습니다. LFD Display에서는 Samsung uVending machine
의 화면, 소리 등 환경을 제어하고, Plan-O-Gram에서는 제품과 Template, 그리고 할인기능 등을
관리합니다.
Template과 Theme에 대한 자세한 설명은 uVending Template Builder 매뉴얼을 참조하세요.
uVending management Software의 주요 기능
LFD Manager*
Samsung uVending machine의 화면과 소리 등의 환경설정을 할 수 있습니다.
Plan-O-Gram*
제품 진열 정보와 Template을 확인하고 수정합니다.
Template Library *
외부에서 제작한 Template 과 Theme 을 uVending 장치에서 사용할 수 있게 인터페이스를 구성합니다.
할인 기능 설정*
제품 구매할 때 장바구니에 일정금액 이상 담았으면 각 제품의 가격에 따라 할인하도록 설정하거나, 특정제품을
구매하였으면 관련 제품도 할인된 가격으로 구매하도록 설정할 수 있습니다.
Template과 Theme에 대한 자세한 설명은 uVending Template Builder 매뉴얼을 참조하세요.
uVending
한국어
15
Page 62
기능 제약 사항
Samsung uVending machine에만 동작하도록 되어 있습니다. *
이 프로그램은 Samsung uVending machine과 호환하는 프로그램입니다. Samsung uVending machine이
아닌 장치에서는 동작하지 않습니다.
시스템 요구사항
> 최소 CPU 사양
> 최소 메모리 사양
> 최소 저장매체 사양
> 권장 OS
Intel Pentium 4 1.8GHz 이상 권장
1024 MB 이상
10 GB 이상
Windows XP/2000
IE 7.0 이상
DirectX 9.0 이상
Adobe flash player 9.0 이상
uVending
한국어
16
Page 63
General
Interaction
터치 모션
Indication Behavior
터치
한 손가락으로 화면을 가볍게 눌렀다 뗍니다.
Scroll Buttons & Indicator
한번 터치 시 : 일정 단위씩 화면이 스크롤 됩니다.
길게 터치 시 : 터치하는 동안 일정 속도로 화면이 아래로 스크롤 됩니다.
터치 시 처음/마지막 페이지로 이동합니다.
uVending
한국어
17
Page 64
화면구성
화면은 크게 타이틀, 내비게이션, 콘텐츠 영역으로 나누어집니다.
uVending
한국어
18
타이틀
메뉴바
콘텐츠
현재 위치와 경로가 표시됩니다.
기본적으로 페이지 이동에 관련된 메뉴가 표시됩니다. 또한 저장 명령 혹은 아이템 추가
등의 버튼이 필요할 때 나타나게 됩니다.
현재 위치의 구성요소들이 표시됩니다.
Page 65
Login
Change Password
비밀번호를 바꿀 때
사용합니다.
Login 버튼
숫자패드
원하는 숫자를 터치하세요.
Login 하기
1 User에서 ◀▶버튼으로 사용자를 선택하세요.
2 숫자 패드로 Password를 입력하세요. (입력된 값은‘ * ’로 표시됩니다.)
3 Login을 터치하세요.
정상적으로 Password를 입력하였을 경우 Home 화면으로 이동합니다.
Password를 입력하지 않았을 경우 다음과 같은 경고창이
나타납니다.
Password를 잘못 입력하였을 경우 다음과 같은 경고창이
나타납니다.
uVending
한국어
19
Page 66
모든 User의 초기 Password는‘00000’입니다.
선택할 수 있는 User는 Product Manager, Vending Manager, System Manager, 이렇게 3가지가
존재하며 각 User의 권한은 모델마다 다릅니다.
Change Password
uVending
한국어
20
1 Login 화면에서 Change Password를 터치하세요.
2 User에서 Password를 바꿀 UserName 을 선택합니다.
3 Old Password에 예전 비밀번호를 숫자 패드로 입력합니다.
4 New Password에 바꿀 비밀번호를 숫자 패드로 입력합니다.
5 Confirm Password에 바꿀 비밀번호를 숫자 패드로 입력합니다.
6 Save를 터치하면 비밀번호가 바뀌고 Login 화면으로 돌아갑니다.
Page 67
Old Password를 입력하지 않고 Save를 터치했을 경우
다음과 같은 경고창이 나타납니다.
Original Password가 틀렸을 경우 다음과 같은 경고창이
나타납니다.
New Password와 Confirm Password가 다른 경우 다음과
같은 경고창이 나타납니다.
New Password를 입력하지 않은 경우 다음과 같은 경고창이
나타납니다.
Confirm Password를 입력하지 않은 경우 다음과 같은
경고창이 나타납니다.
Password는 1부터 9까지의 숫자 5~10개만 가능합니다.
uVending
한국어
21
Page 68
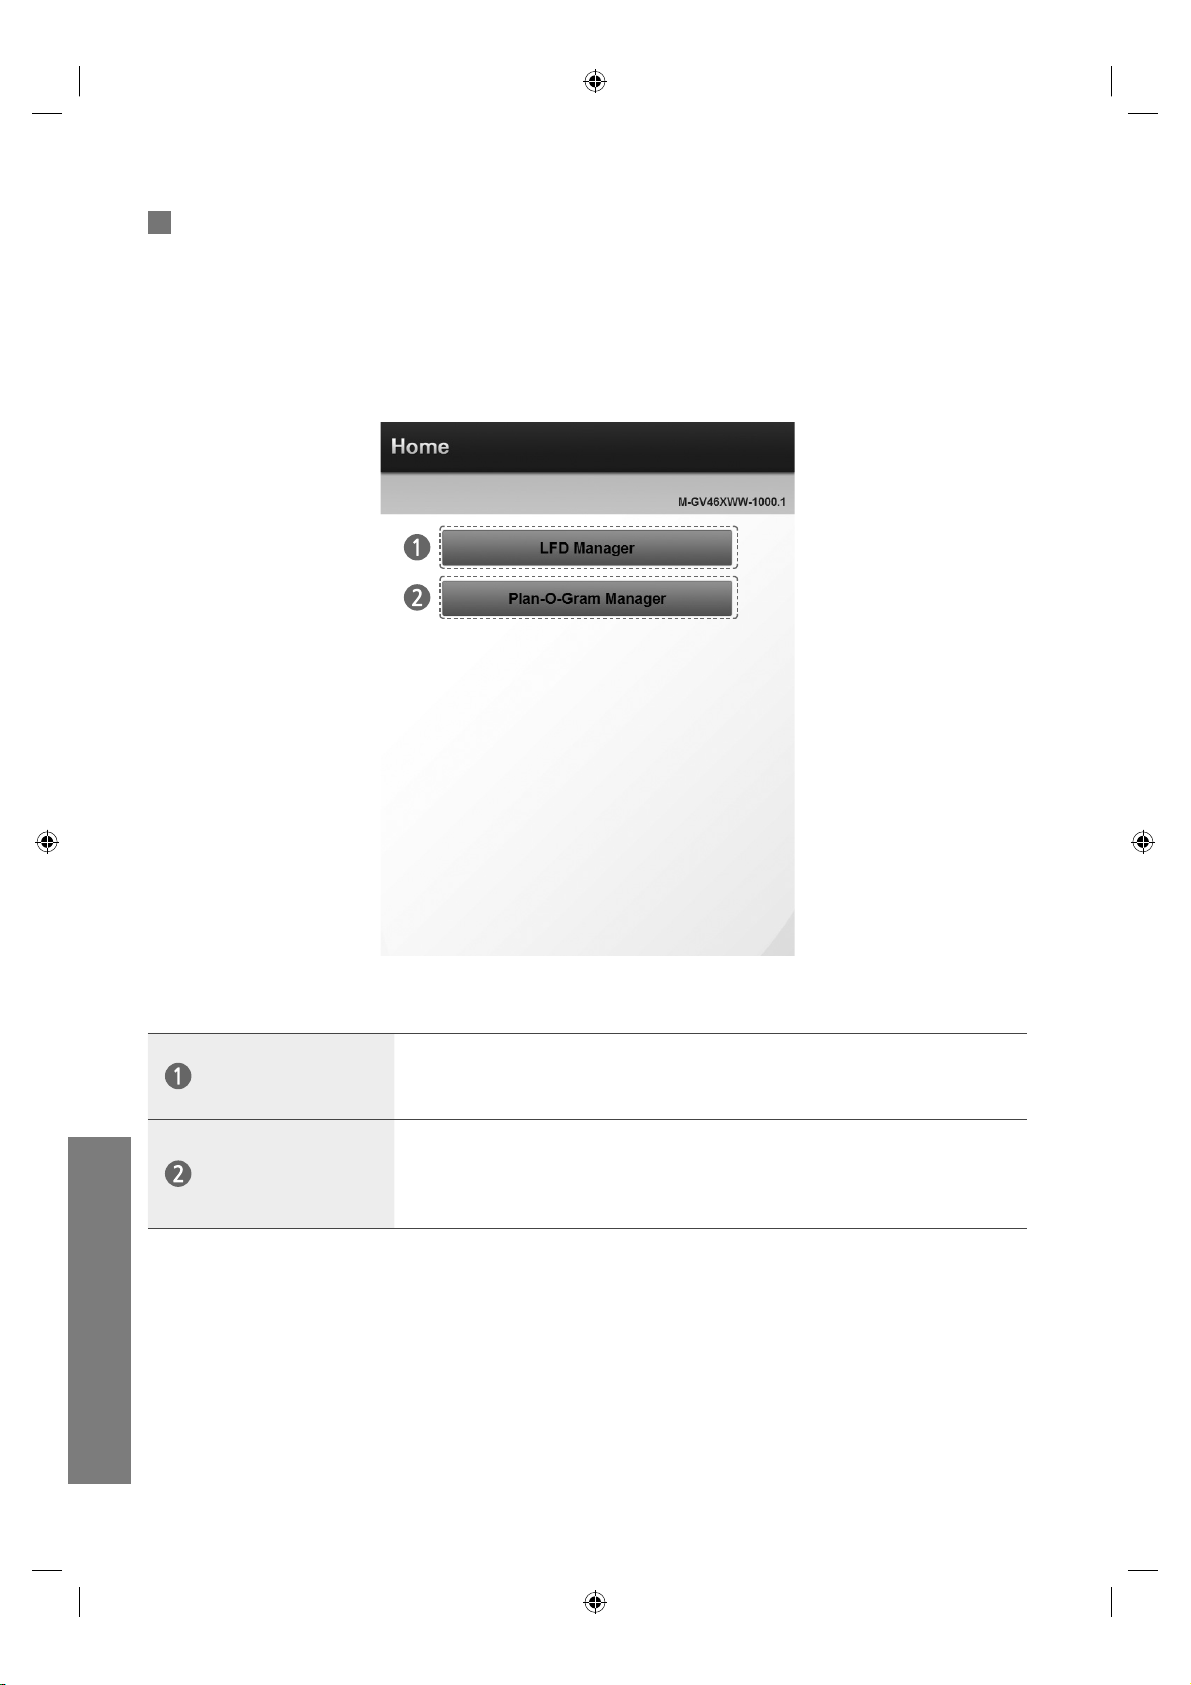
Home
로그인을 했을 때 나타나는 기본 선택화면입니다.
LFD Manager와 Plan-O-Gram Manager를 선택할 수 있습니다.
uVending
한국어
22
LFD Manager
Plan-O-Gram
Manager
Samsung uVending machine의 화면과 소리를 제어하는 환경설정 메뉴입니다.
Display와 Sounds 이 2가지 메뉴로 구성되어 있습니다.
제품과 Template, 그리고 할인기능을 추가할 수 있는 메뉴입니다.
Plan-O-Gram,Template Library, Cart Discount Setup, Related Product
Discount Setup 이 4가지 메뉴로 구성되어 있습니다.
Page 69
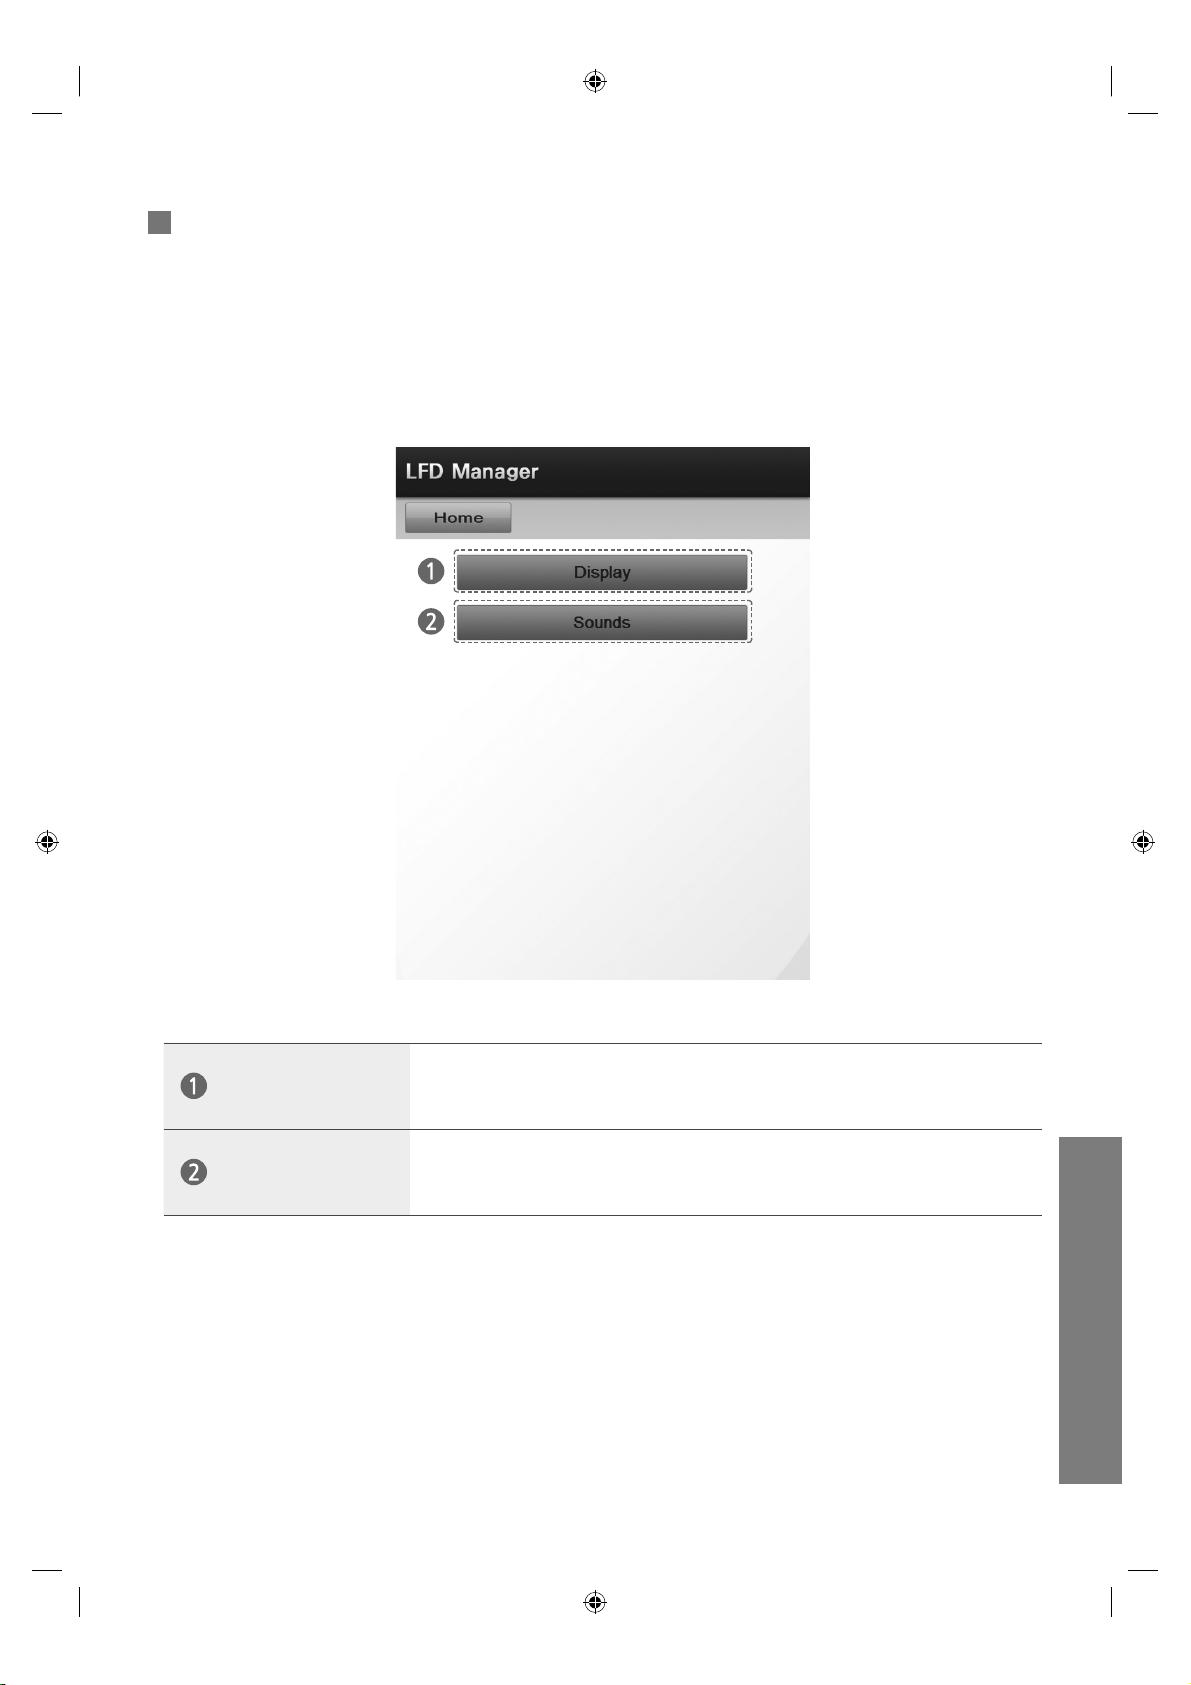
LFD Manager
LFD Manager
LFD Manager에서는 Samsung uVending machine의 화면과 소리를 제어합니다.
Display
Sounds
화면의 Contrast나 Brightness, Color Tone의 옵션 값을 변경하거나 변경된 옵션
값이 적용된 화면을 미리 확인할 수 있습니다.
소리의 Volume나 Sound Mode,Virtual Surround Sound의 옵션 값을
변경하거나 변경된 옵션 값이 적용된 소리를 미리 확인할 수 있습니다.
uVending
한국어
23
Page 70
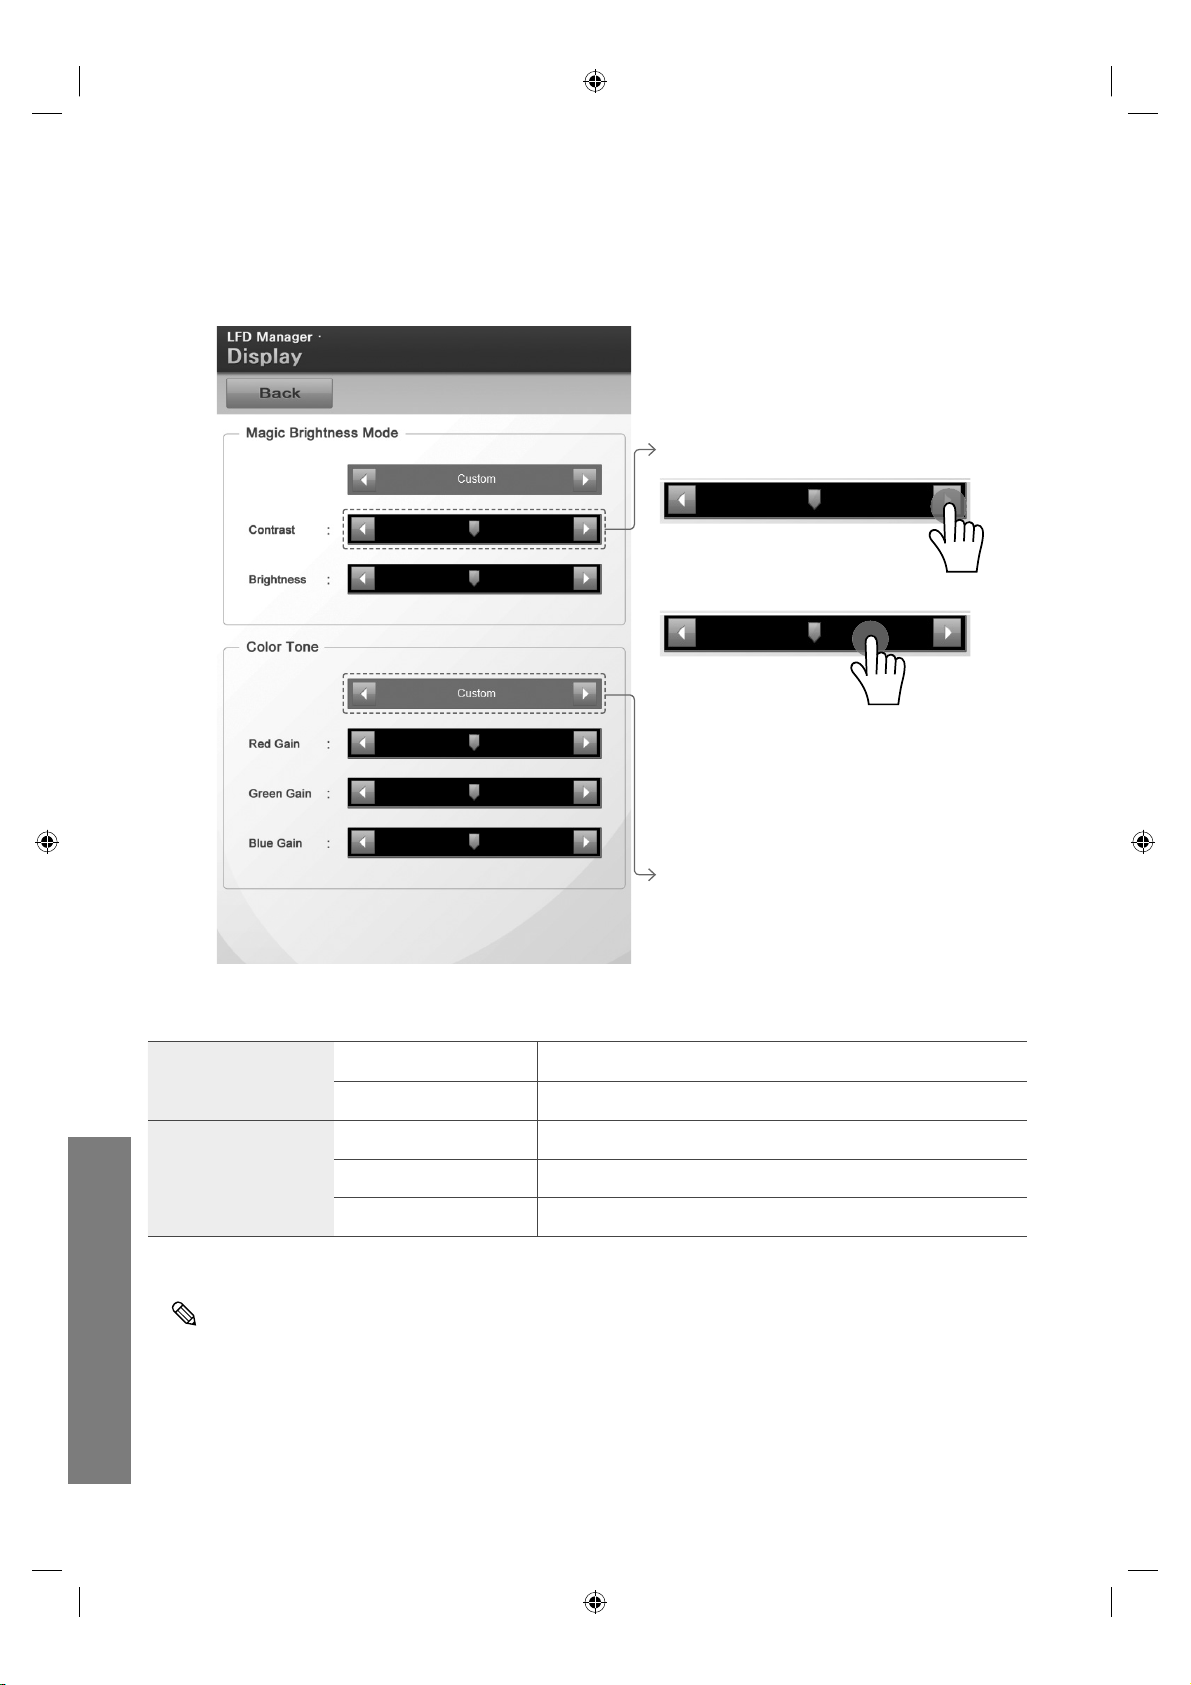
Display
Display에서는 화면을 제어합니다.
값을 조절하려면
◀,▶ 버튼을 터치하거나
이동하려는 방향의 바 부분을 터치하세요.
( ◀,▶ 버튼을 터치하면 1씩 이동하고
이동하는 방향의 바를 터치하면 10씩
이동합니다.)
Magic Brightness
Mode
uVending
Color Tone
한국어
Option
Contrast 화면의 명암비를 조절합니다.
Brightness 화면의 밝기를 조절합니다.
Red Gain 화면의 적색 값을 임의대로 조정합니다.
Green Gain 화면의 녹색 값을 임의대로 조정합니다.
Blue Gain 화면의 청색 값을 임의대로 조정합니다.
각각의 옵션 값은 Option이 Custom인 경우에만 조절할 수 있습니다.
24
Page 71
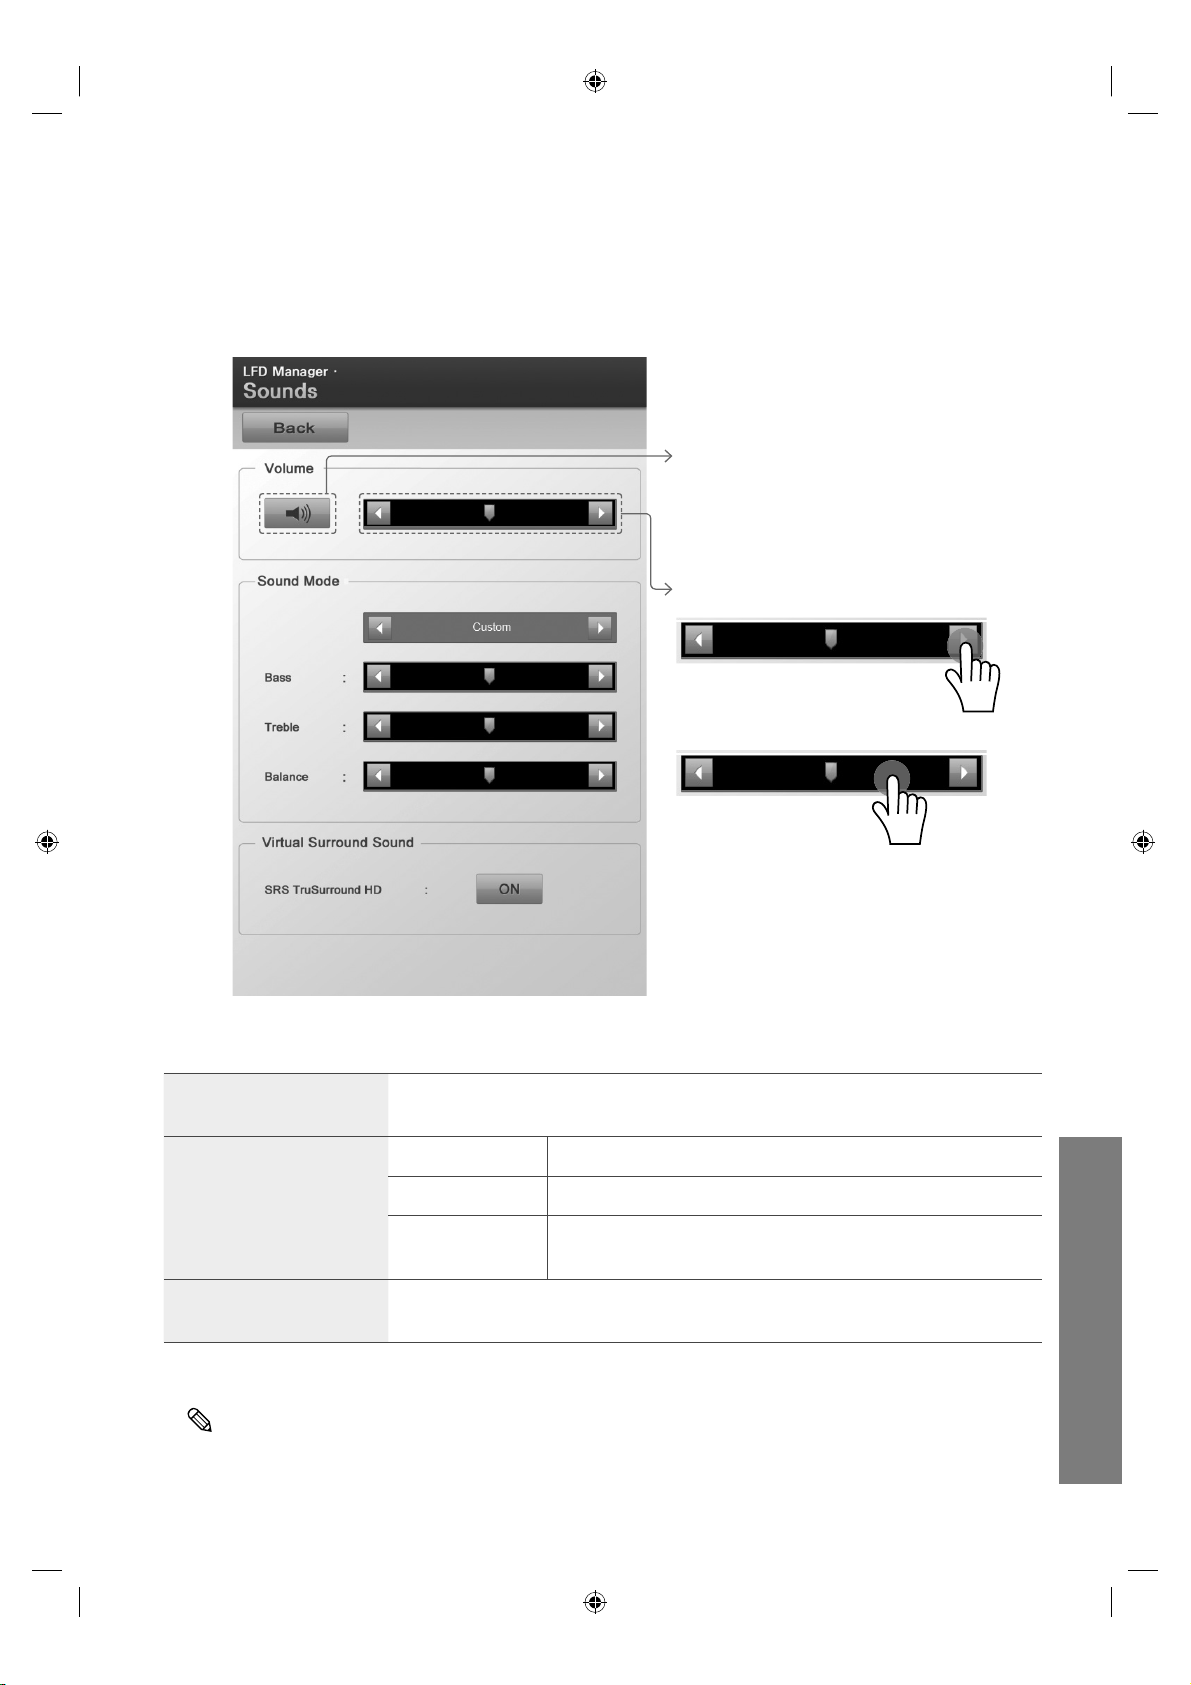
Sounds
Sounds에서는 소리를 제어합니다.
Sounds 메뉴 진입 시 음악이 재생되며 옵션 값을 변경한 경우 바로 적용됩니다.
Sound ON/OFF
값을 조절하려면
◀,▶ 버튼을 터치하거나
Volume
Sound Mode
Virtual Surround Sound
SRS TruSurround HD의 초기값은 ON입니다.
소리의 크기를 조절합니다.
Bass 낮은 주파수의 음을 조절합니다.
Treble 높은 주파수의 음을 조절합니다.
Balance
2개의 스피커로 마치 5.1 채널 스피커에서 소리를 듣는 것과 같이 웅장하고 생생한
소리로 즐길 수 있습니다.
이동하려는 방향의 바 부분을 터치하세요.
( ◀,▶ 버튼을 터치하면 1씩 이동하고
이동하는 방향의 바를 터치하면 10씩
이동합니다.)
2개의 스피커에서 각각 나오는 소리의 크기를 조절하여 음의
균형을 맞춥니다.
uVending
한국어
25
Page 72
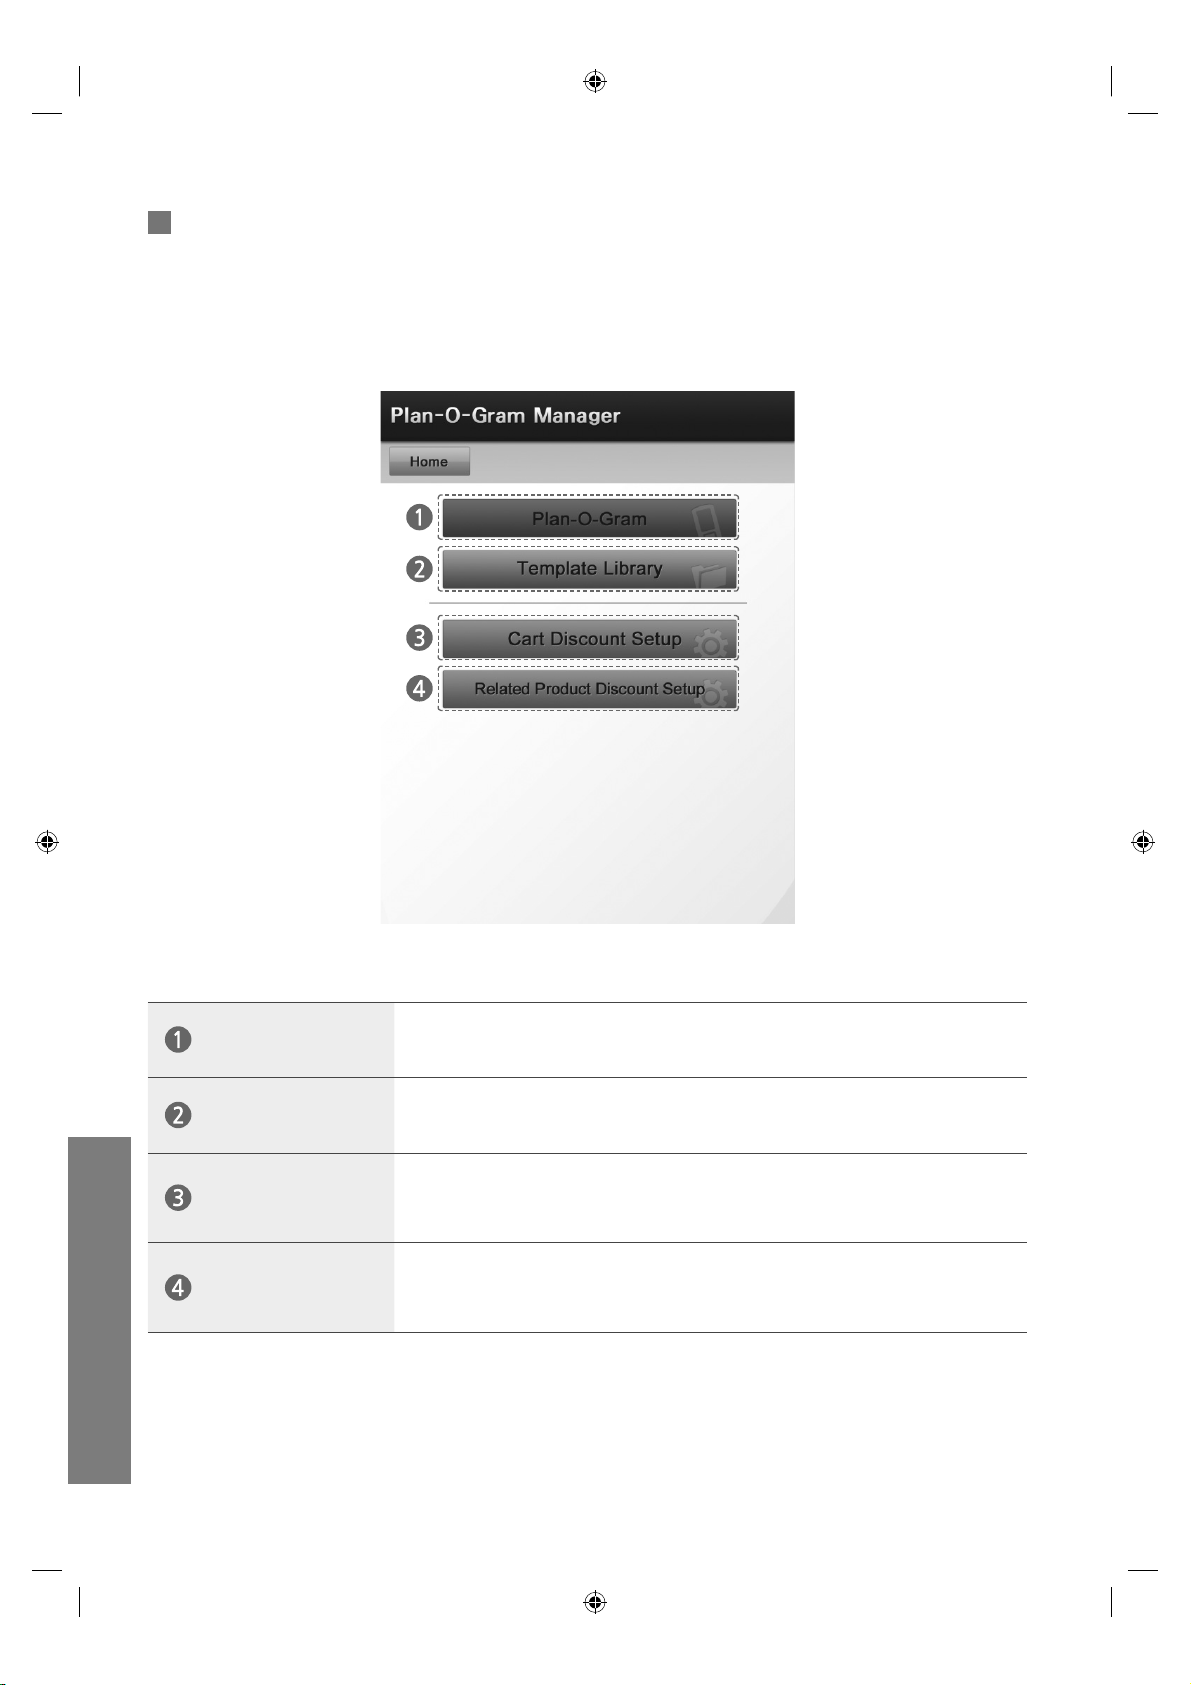
Plan-O-Gram Manager
Plan-O-Gram Manager에서는 제품과 Template, 그리고 할인기능을 관리합니다.
uVending
한국어
26
Plan-O-Gram
Template Library
Cart Discount
Setup
Related Product
Discount Setup
제품 진열 정보를 표시합니다.
Template을 관리(추가/삭제)합니다.
장바구니에 일정 금액 이상 담았을 경우 각 제품의 가격에 따라 할인해 주는 기능을
설정합니다.
소비자가 특정 제품을 구매하였을 경우 관련 제품을 할인된 가격으로 구입할 수
있도록 설정합니다.
Page 73
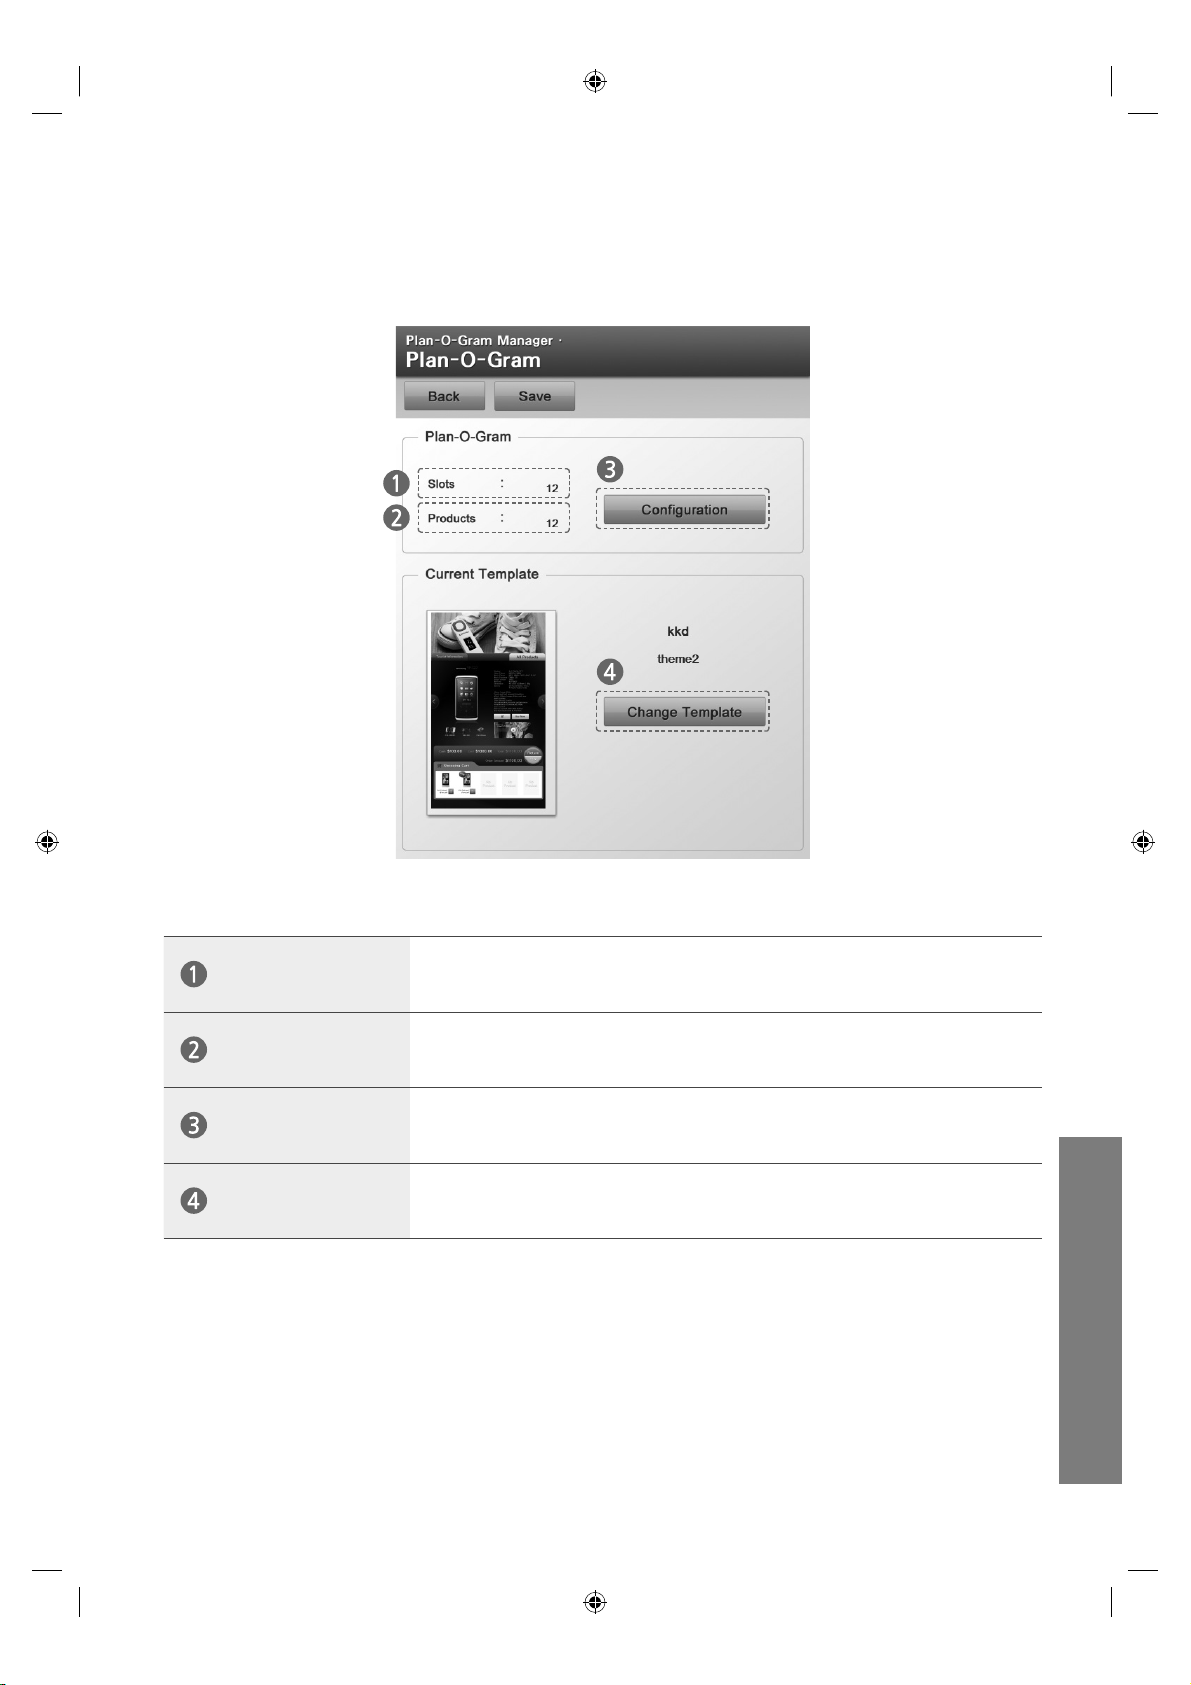
Plan-O-Gram
Plan-O-Gram에서는 제품 진열 정보와 Template을 확인하고 수정합니다.
Slots
Products
Configuration
Change Template
제품이 진열되는 공간의 수입니다.
현재 Samsung uVending machine의 Slot에 진열되어 있는 제품의 수 입니다.
제품의 진열을 설정합니다.
Template과 Theme를 변경합니다.
uVending
한국어
27
Page 74
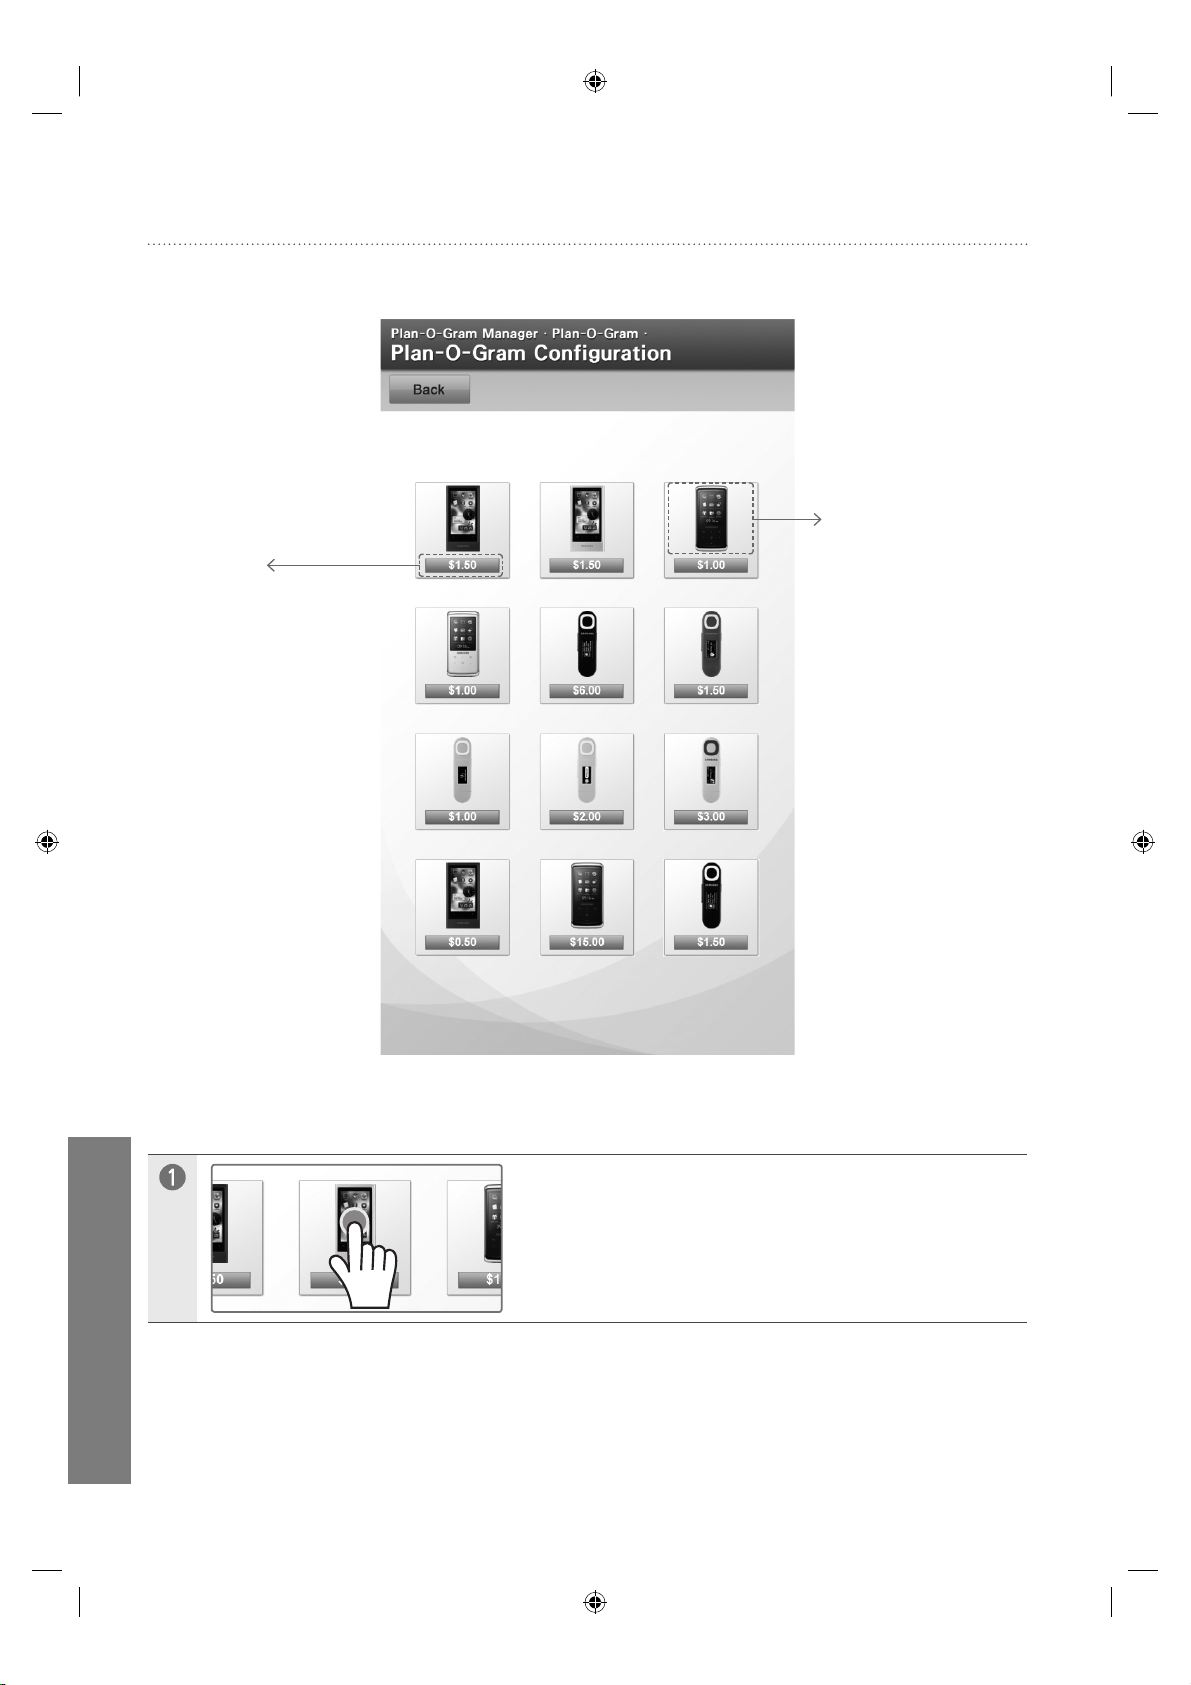
Configuration
Configuration에서는 진열되는 제품의 이미지나 가격을 변경합니다.
Price
해당 영역을 터치하여
제품의 가격을
설정합니다.
Image
해당 영역을 터치하면
제품을 변경할 수 있는
선택 창이 나타납니다.
uVending
한국어
28
제품 이미지 변경하기 >
변경하고자 하는 제품의 이미지를 터치하세요.
Page 75
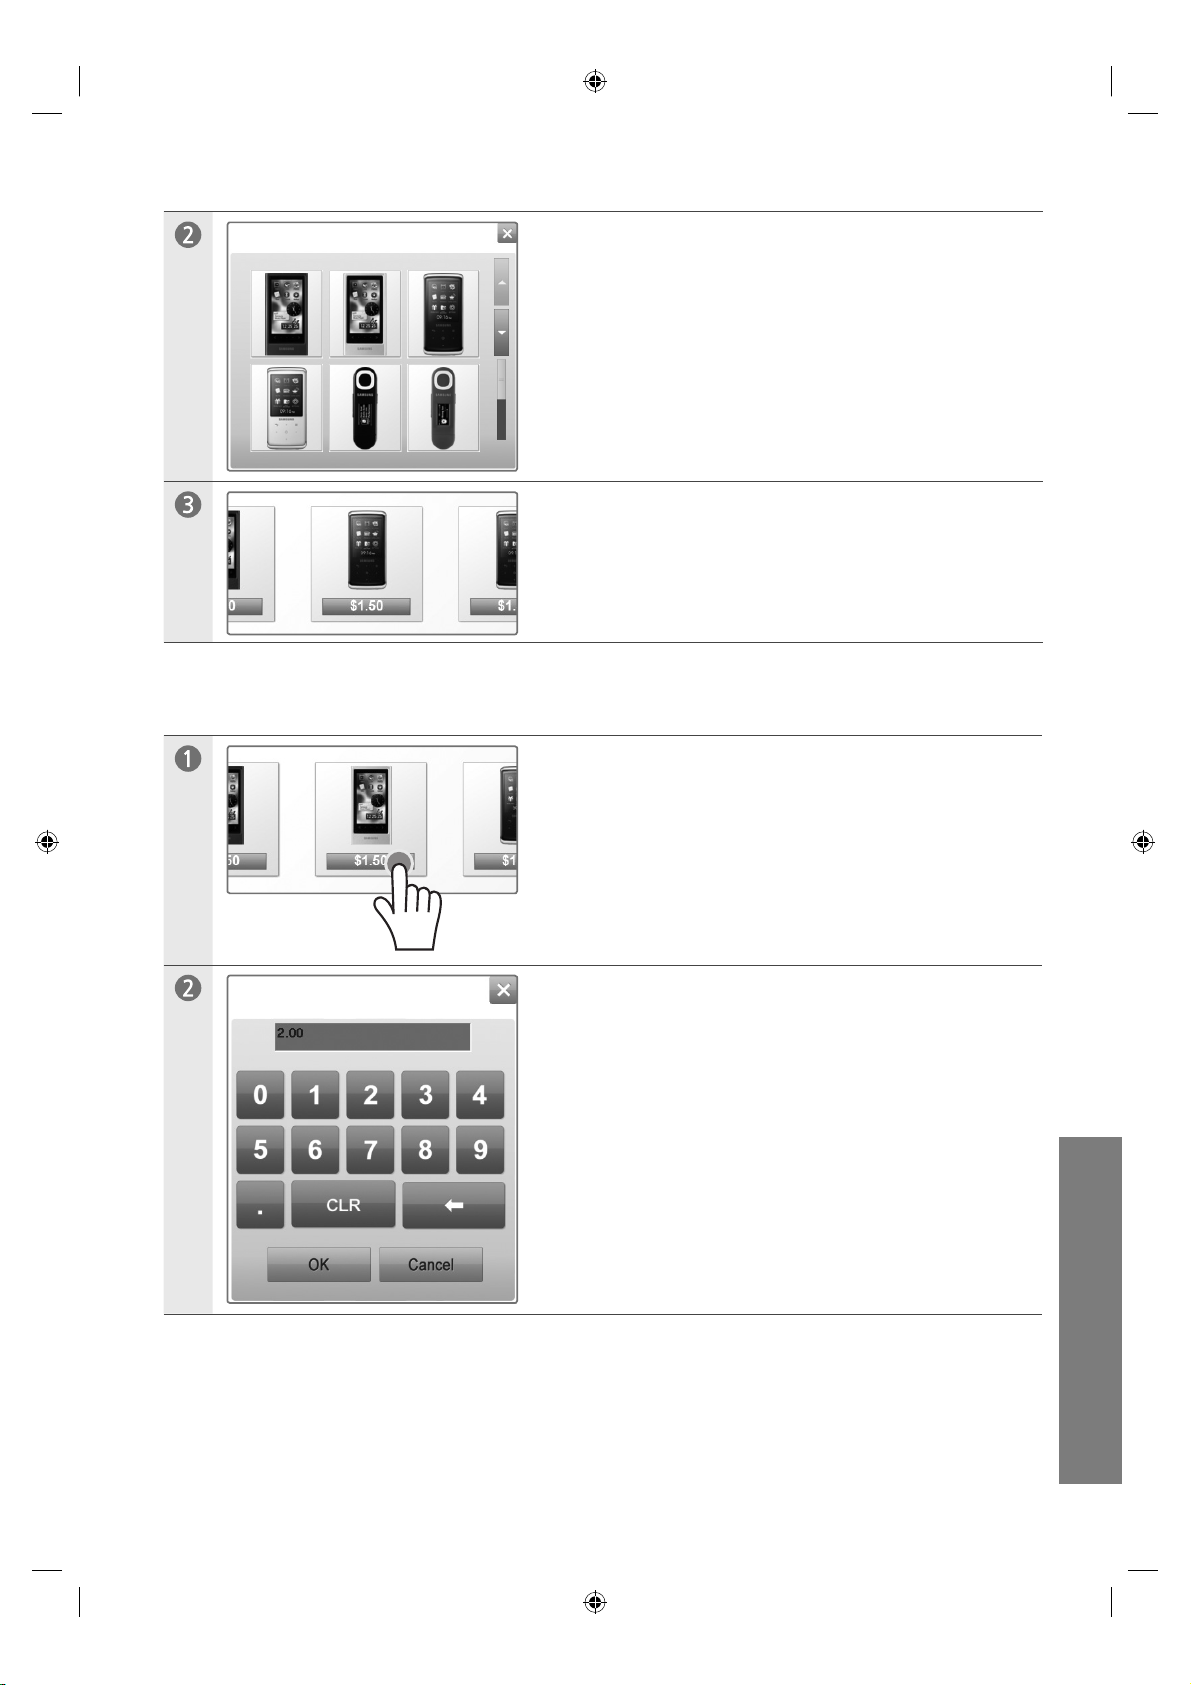
나타난 이미지중 변경하고자 하는 제품이미지를 터치하세요.
제품의 이미지가 변경되었습니다.
제품 가격 변경하기 >
가격을 변경하고 싶은 제품의 가격을 터치하세요.
원하는 액수를 입력하고 나서 OK를 터치하세요.
uVending
한국어
29
Page 76
제품의 가격이 변경되었습니다.
Template에 따라 제품과 제품이 진열되는 레이아웃이 다릅니다.
Template에 대한 자세한 설명은 uVending Template builder 매뉴얼을 참조하세요.
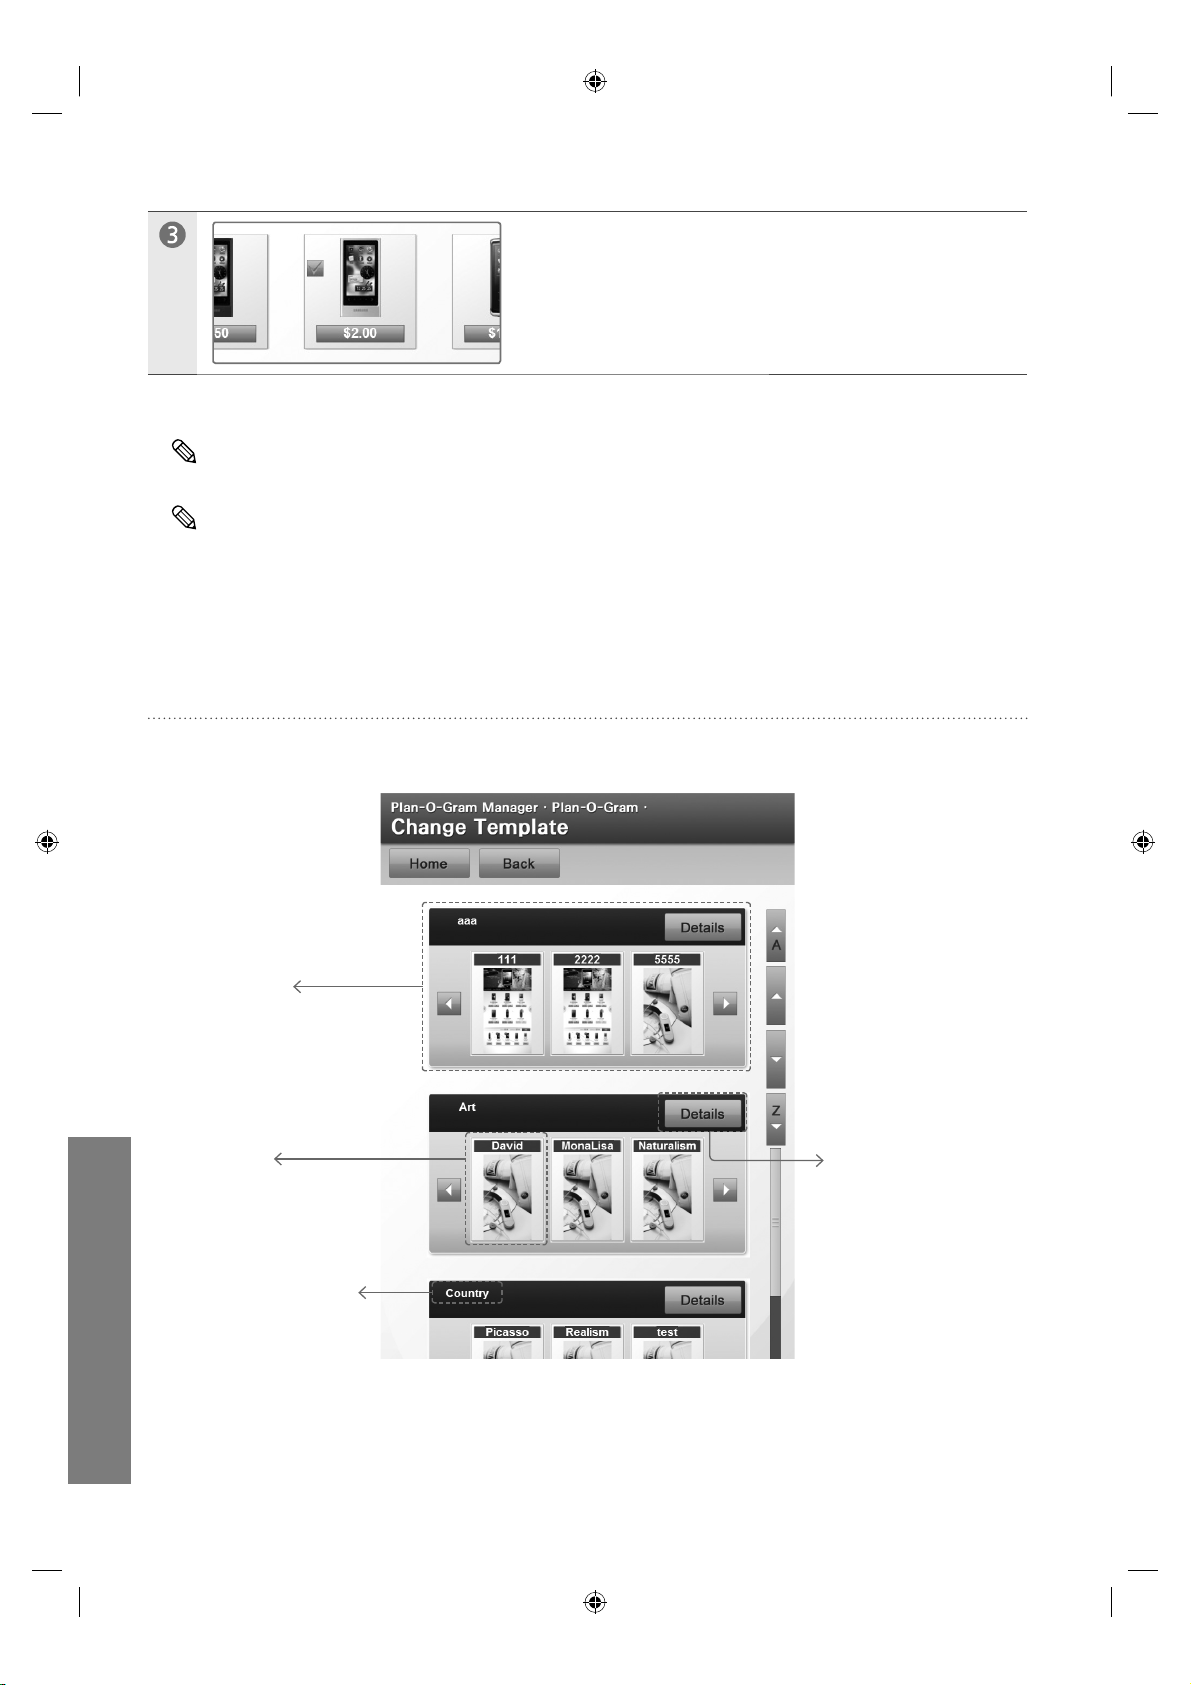
Change Template
Change Template에서는 Template과 Theme를 변경합니다.
uVending
한국어
30
Template
Template의 Theme를
확인
Theme
Template에 속해있는
Theme
Template Name
Template의 이름
Details
Template의 자세한
설명을 볼 수 있다.
Page 77
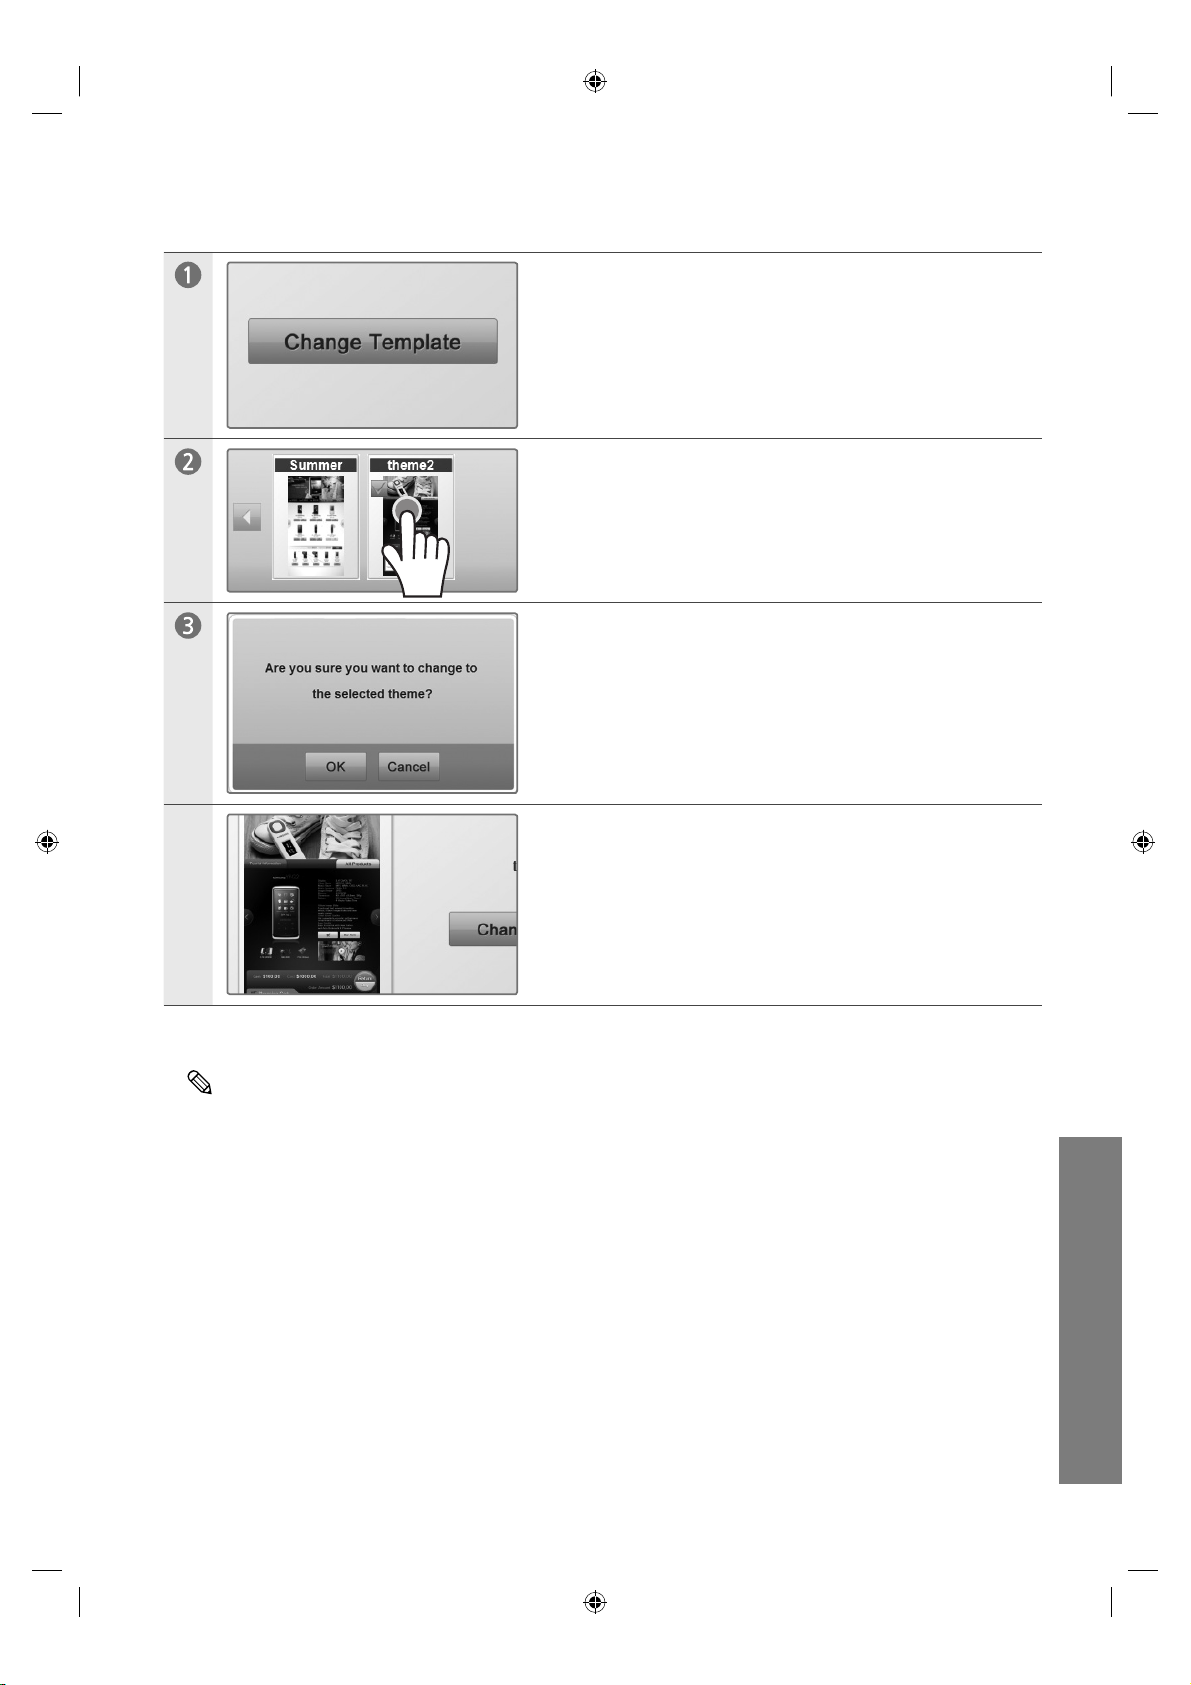
Template 변경하기 >
Change Template을 터치하세요.
사용할 Template을 터치하세요.
OK를 터치하세요.
Template이 변경되었습니다.
Template,Theme 설명과 자세한 내용은 uVending Template builder 매뉴얼을 참조하세요.
uVending
한국어
31
Page 78
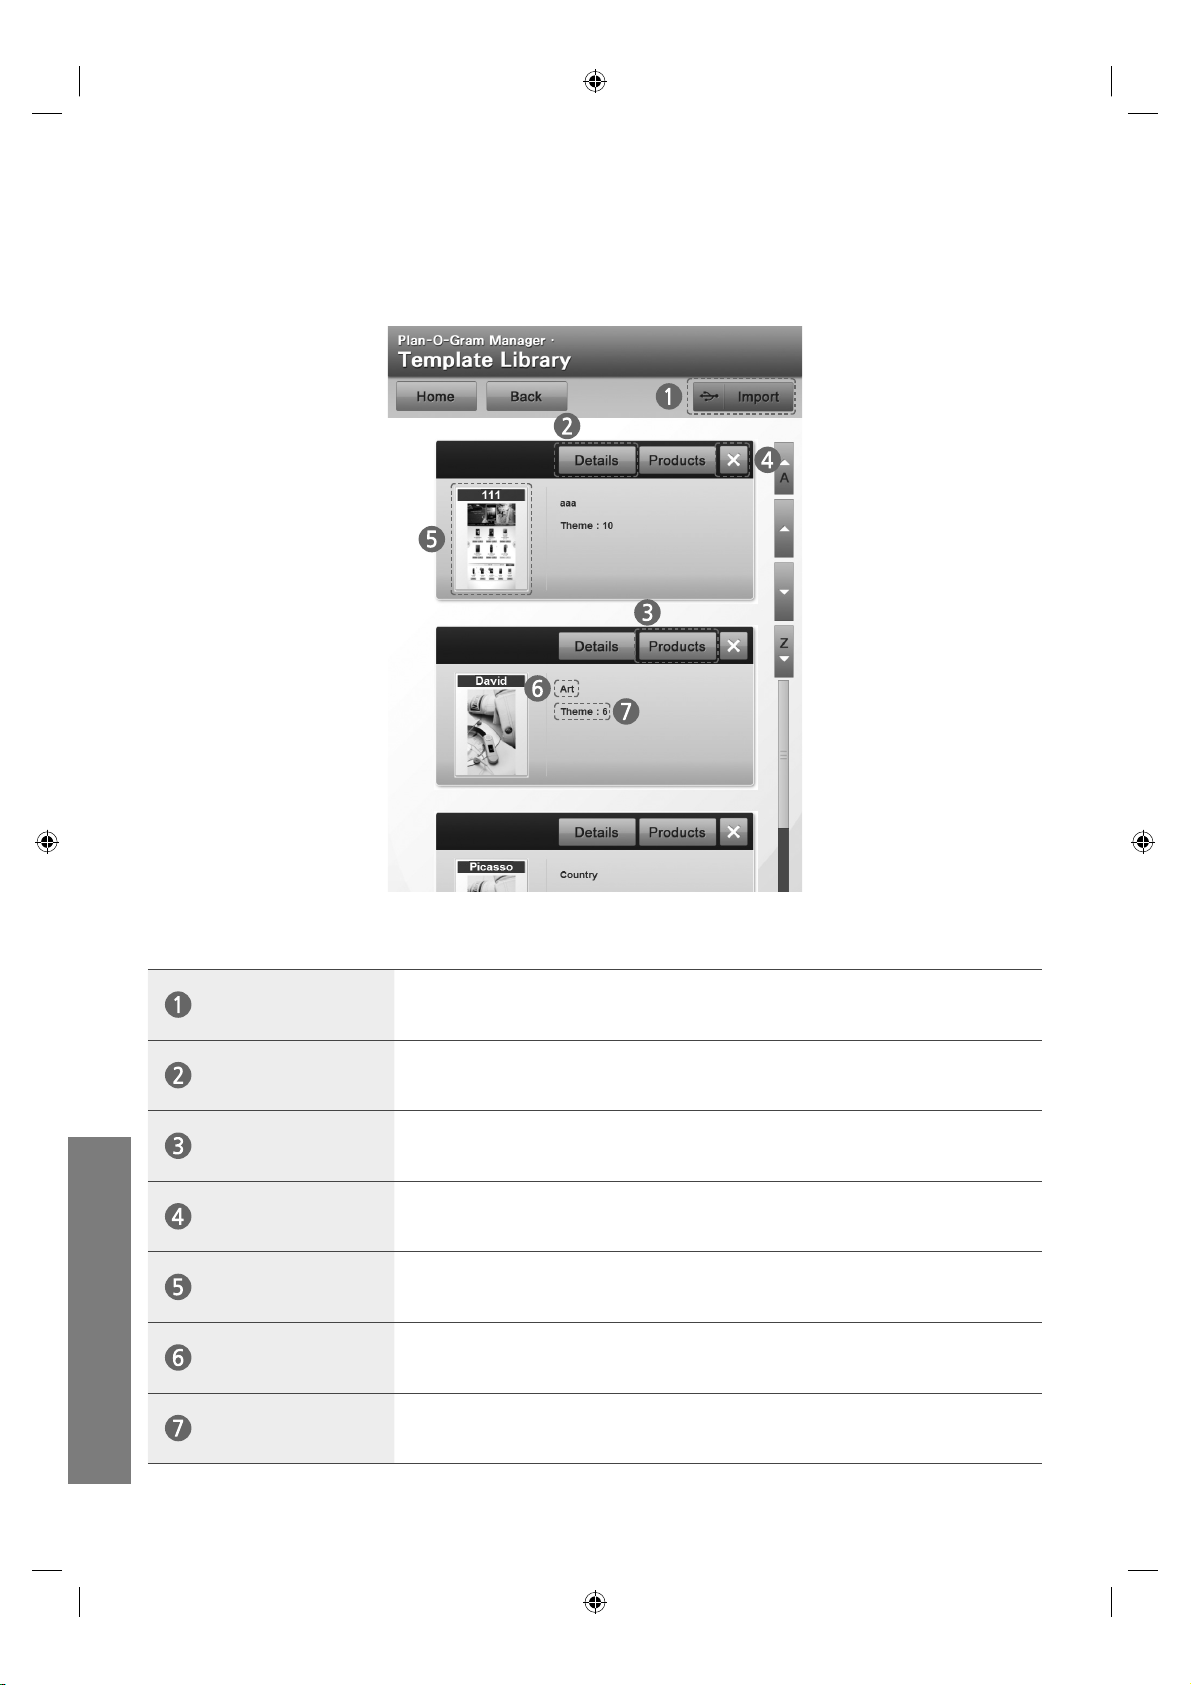
Template Library
Template Library에서는 Template을 관리(추가/삭제) 합니다.
uVending
한국어
32
Import
Details
Products
Delete
Theme
Template Name
Theme의 개수
USB에서 Template을 추가합니다.
Template의 상세한 설명을 볼 수 있습니다.
Template에 포함되어 있는 제품을 확인합니다.
Template에 포함되어 있는 Theme를 선택하여 삭제합니다.
Template에 포함된 Theme 들의 프리뷰 화면입니다.
Template의 이름입니다.
Template에 포함되어 있는 Theme의 개수입니다.
Page 79
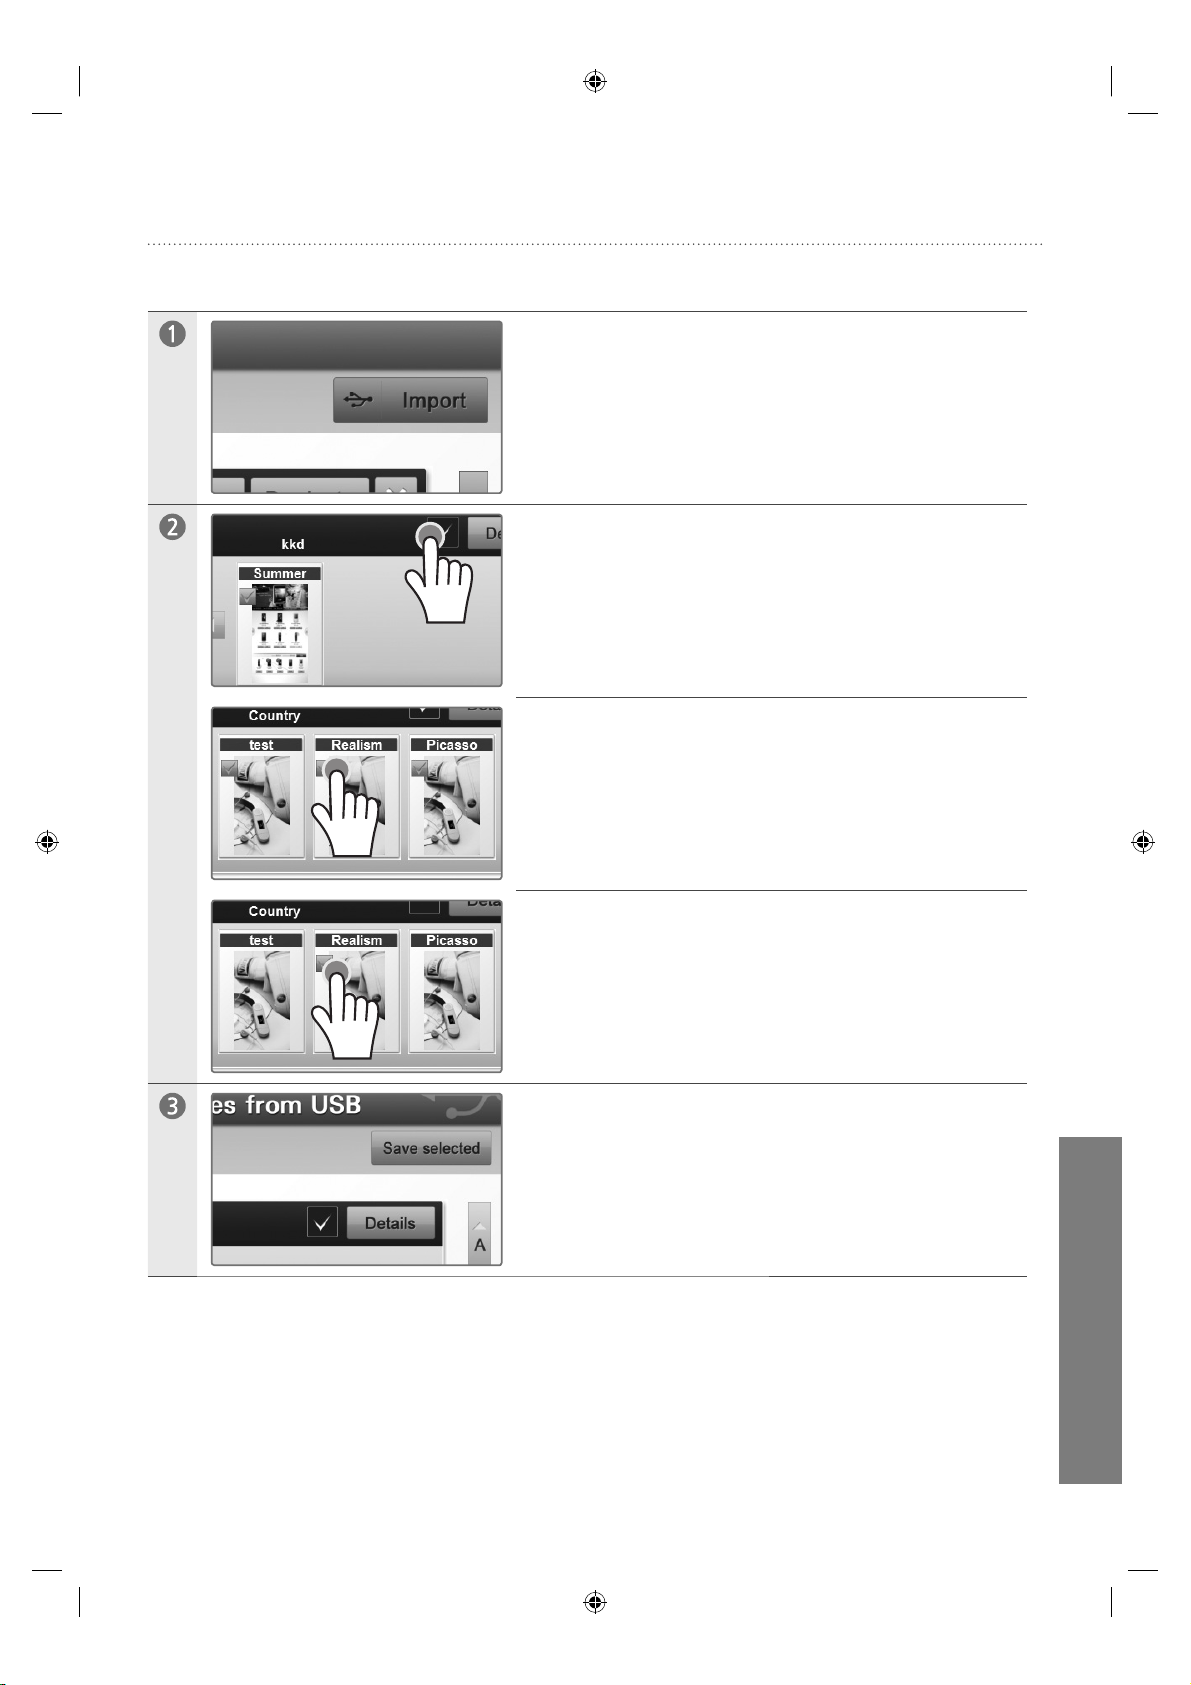
Import
USB에서 Template을 추가하기 >
Template Library 화면에서 Import를 터치하세요.
추가하고 싶은 Template의 체크박스를 터치하세요.
Template에서 추가하고 싶지 않은 Theme 가 있으면
그 Theme 체크박스를 터치해서 체크를 해제하세요.
Template의 Theme 중에서 원하는 것만 추가하고 싶을 경우에는
원하는 Theme의 체크박스만 터치하세요.
Save selected를 터치하세요.
uVending
한국어
33
Page 80
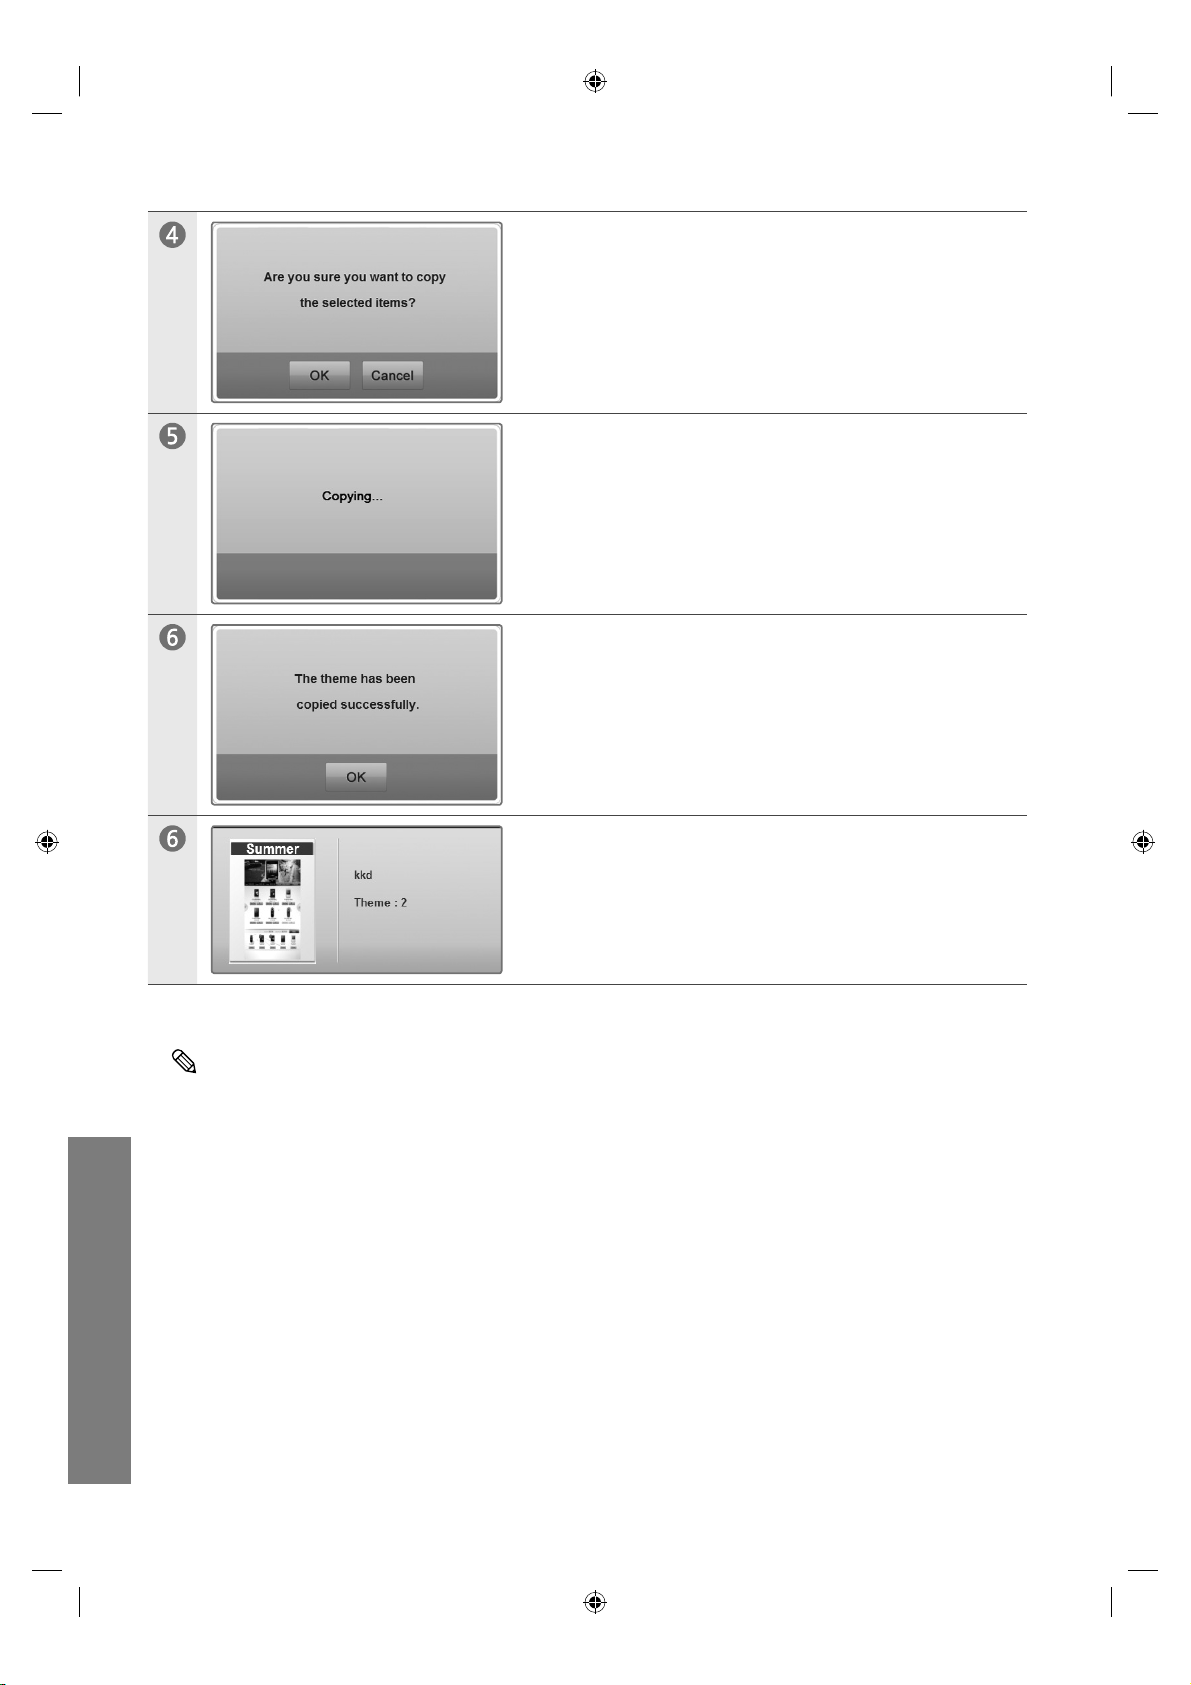
OK를 터치하세요.
USB에서 선택한 Template(Theme) 이 복사됩니다.
OK를 터치하세요.
uVending
한국어
34
Template(Theme) 이 Template Library에 추가되었습니다.
USB가 연결되지 않은 경우 Import(Template을 추가)할 수 없습니다.
Page 81
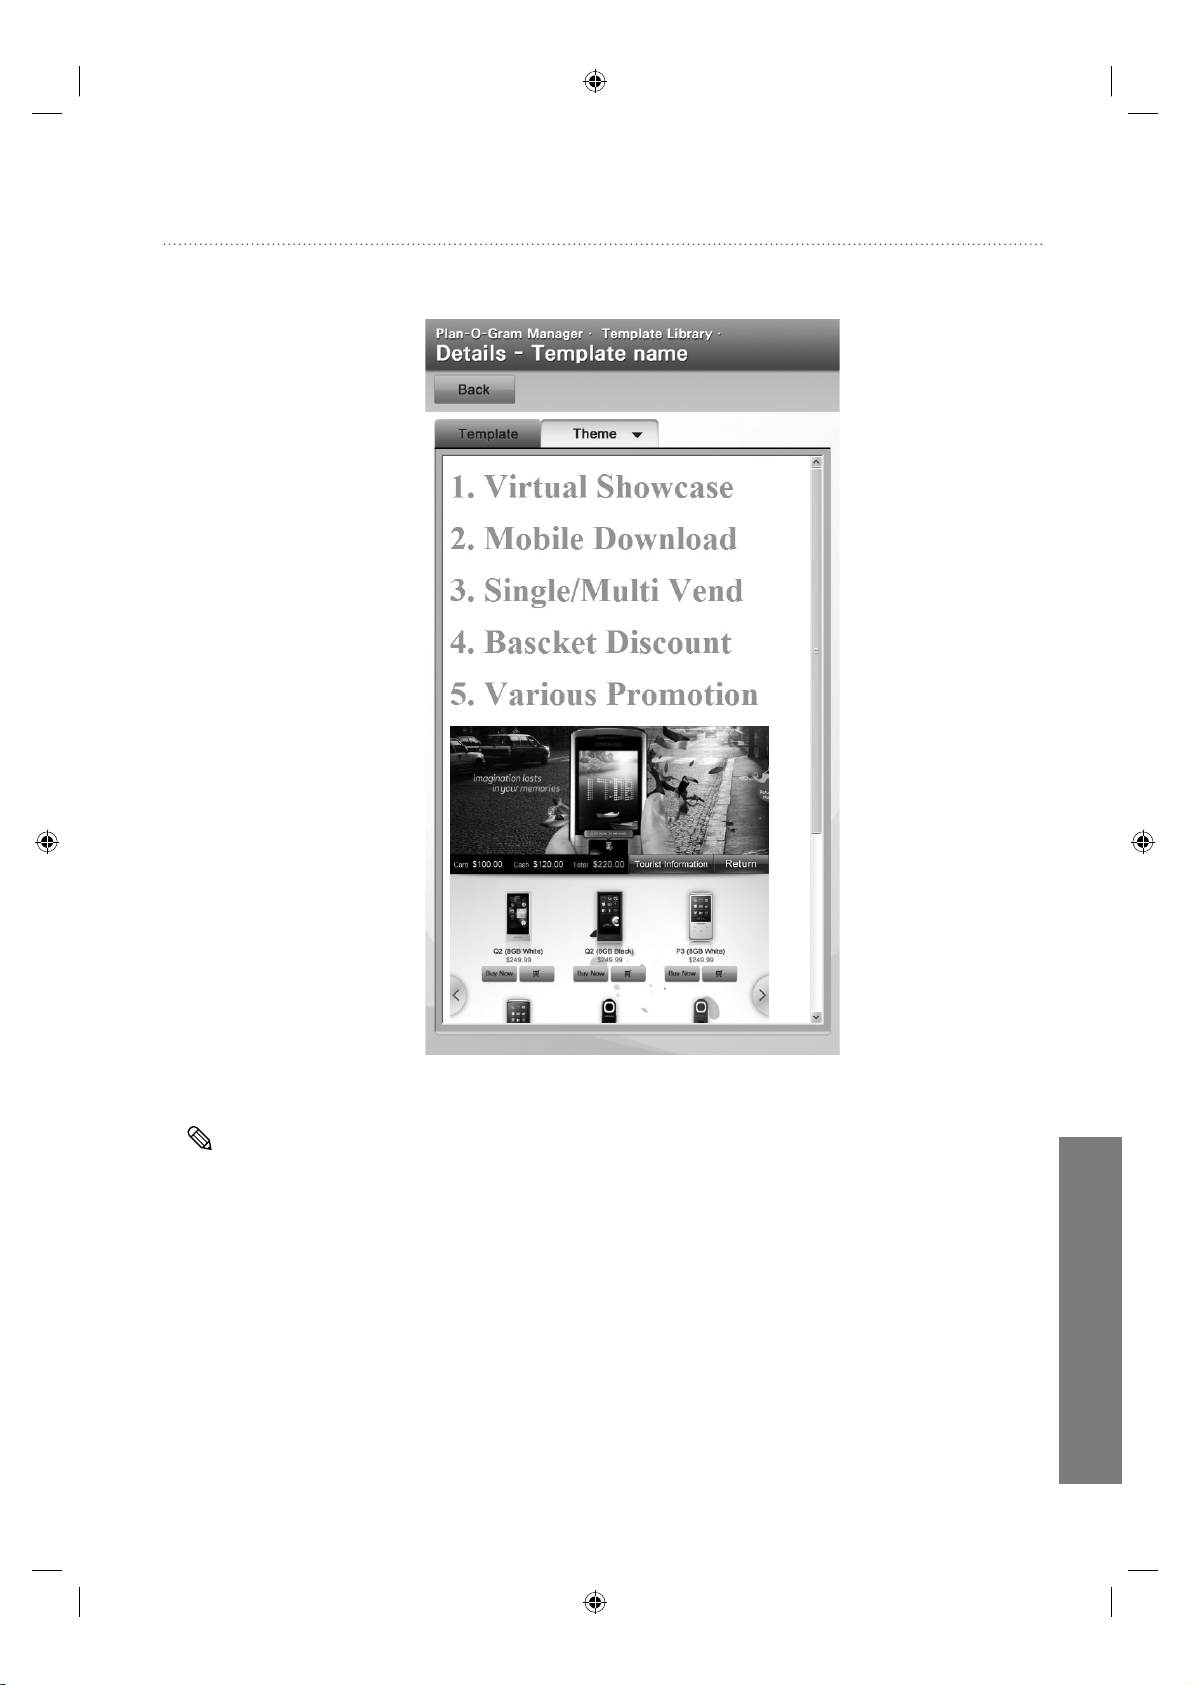
Details
Details에서는 Template의 상세한 설명을 보여줍니다.
Template과 Theme에 대한 자세한 설명은 uVending Template builder 매뉴얼를 참조하세요.
uVending
한국어
35
Page 82
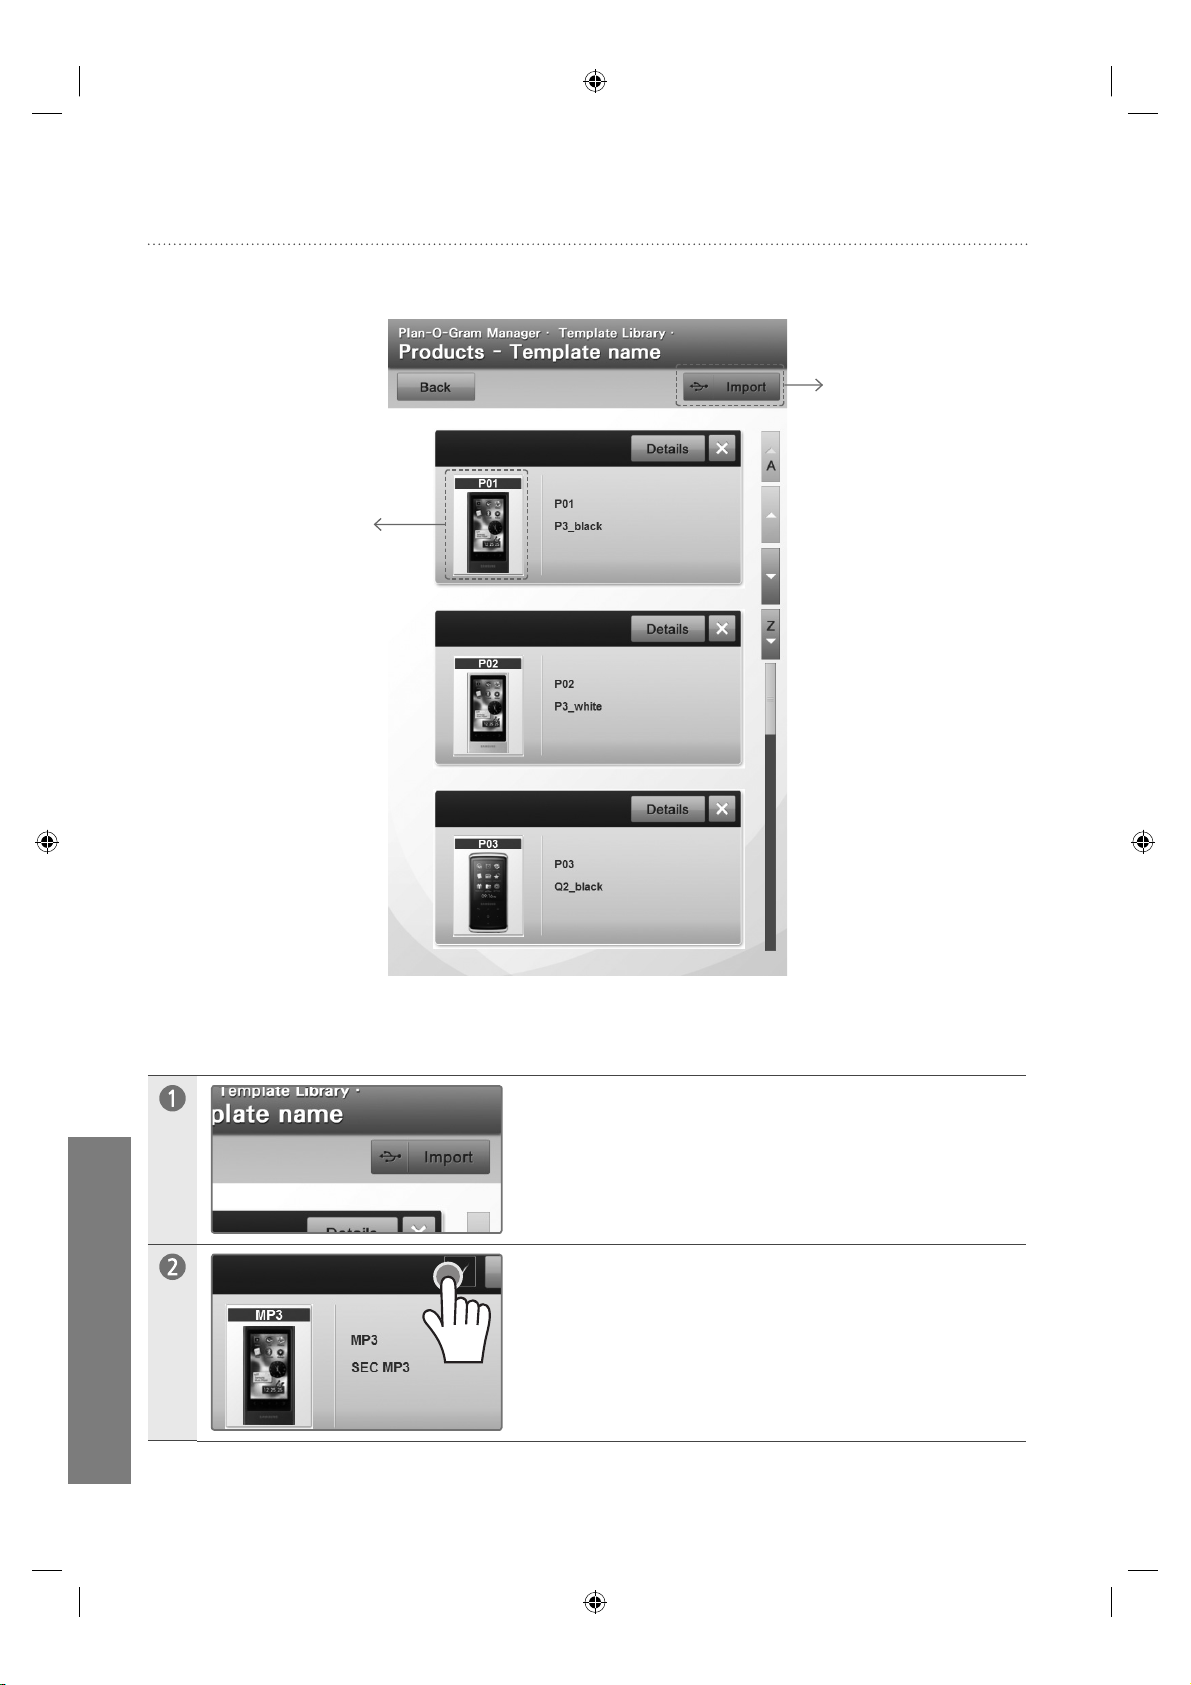
Products
Products에서는 Template에 제품 리스트를 추가하거나 삭제합니다.
Product Image
제품의 이미지
Import
USB에서 제품을
불러옵니다.
uVending
한국어
36
Import (USB에서 제품을 추가하기) >
Import를 터치하세요.
추가할 제품의 체크박스를 한번 터치하세요.
Page 83
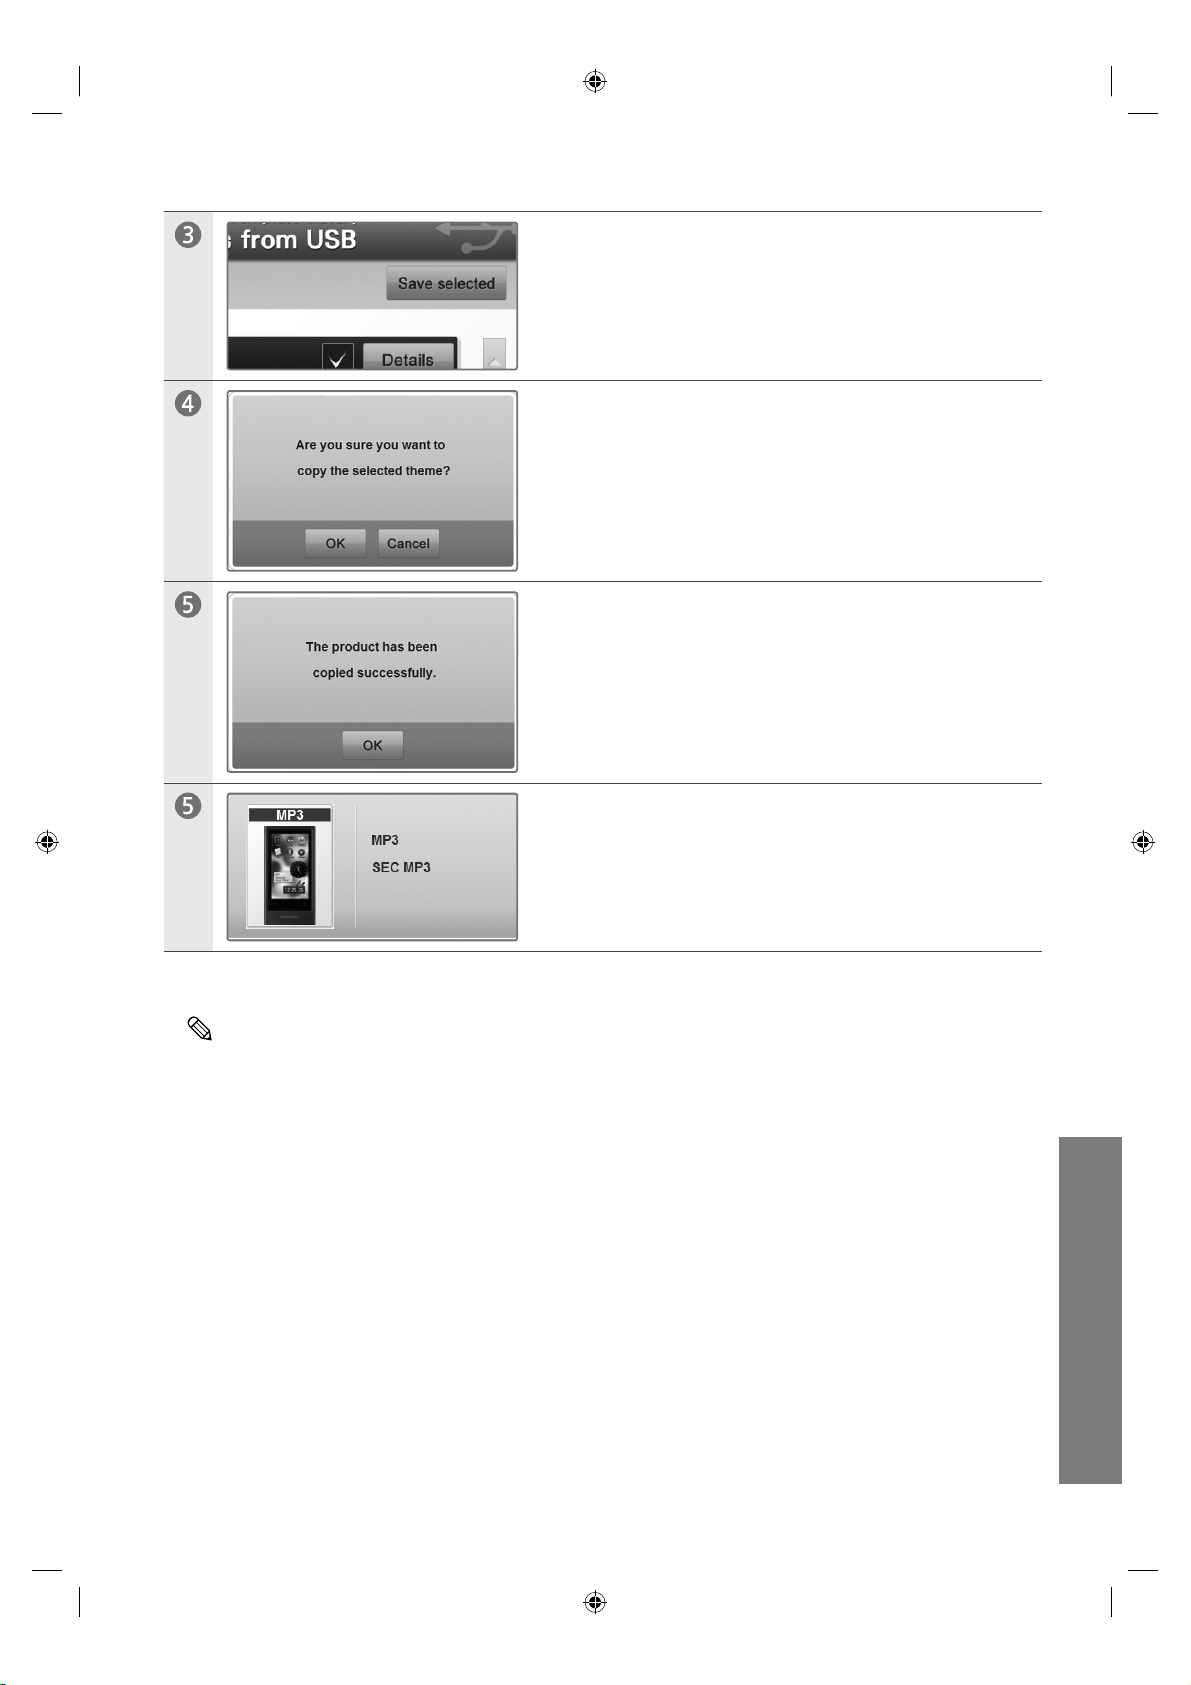
Save selected를 터치하세요.
OK를 터치하세요.
OK를 터치하세요.
제품이 추가되었습니다.
USB가 연결되지 않은 경우 Import(Product를 추가) 할 수 없습니다.
uVending
한국어
37
Page 84
Cart Discount Setup
Cart Discount Setup에서는 장바구니에 일정 금액 이상 담았을 경우 각 제품의 가격에 따라 할인해 주는
기능을 설정합니다.
uVending
한국어
38
Back
Save
Add Terms
Edit
Delete
펼침/줄임 아이콘
이전 페이지로 되돌아갑니다.
현재의 설정을 저장합니다.
설정을 추가합니다.
설정을 수정합니다.
설정을 삭제합니다.
터치하면 하위항목을 펼치거나 줄입니다.
Page 85
Cart Discount Setup 의 예 >
$100 이상의 물건을 장바구니에 담았을 때
각각의 제품에 대해서
$10가 넘는 제품일 경우에는 $1 를 할인해 주고
$20가 넘는 제품일 경우에는 $2 를 할인해 주고
$30가 넘는 제품일 경우에는 $3 를 할인해 줍니다.
Add Terms
Add Terms에서는 장바구니에 일정 금액 이상 담았을 경우 각 제품의 가격에 따라 할인해 주는 조건을
추가합니다.
uVending
할인조건 추가하기 >
장바구니의 금액 부분을 터치하세요.
한국어
39
Page 86
원하는 액수를 터치하고 OK를 터치하세요.
제품의 가격을 터치하세요.
제품의 원하는 액수를 터치하세요.
uVending
한국어
40
Discount 할 액수 부분을 터치하세요.
Page 87
Discount 할 금액을 터치한 후 OK를 터치하세요.
제품의 가격 조건을 추가하고 싶으면 ~ 을 반복하여 추가하고
모두다 추가하였으면 Back 버튼을 누르면 설정이 추가됩니다.
Save를 클릭하세요.
설정이 저장됩니다.
uVending
한국어
41
Page 88
Related Product Discount Setup
Related Product Discount Setup에서는 소비자가 특정 제품을 구매 하였을 경우 관련 제품을 할인된
가격으로 구입할 수 있도록 설정합니다.
uVending
한국어
42
Back
Save
Add Item
Edit
Delete
펼침/줄임 아이콘
이전 페이지로 되돌아갑니다.
현재의 설정을 저장합니다.
설정을 추가합니다.
Template을 수정합니다.
설정을 삭제합니다.
터치하면 하위항목을 펼치거나 줄입니다.
Page 89
Related Product Discount Setup 의 예 >
P3_black의 제품을 사면 u5_black 제품을 $0.10
할인하여 판매합니다.
Add Item
Add Item에서는 제품을 구매하였을 경우 관련 제품을 할인된 가격으로 구입할 수 있는 조건을
추가합니다.
할인 항목 추가 하기 >
Select Product를 터치하세요.
uVending
한국어
43
Page 90
선택할 제품의 이미지를 터치하세요.
제품이 선택되었습니다.이
Add Product를 터치하세요.
위에서 선택한 제품을 구매하였을 경우 추가로 할인할
제품의 이미지를 터치하세요.
uVending
한국어
44
Discount 할 액수 부분을 터치하세요.
Page 91
할인할 액수를 터치하고 나서 OK를 터치하세요.
Back을 터치하세요.
할인 항목이 추가 된 것을 확인하고 나서
Save를 터치하세요.
OK를 터치하세요.
할인 항목을 추가할 시에는 먼저 제품을 선택해야 합니다.
uVending
한국어
45
Page 92
Contact SAMSUNG WORLDWIDE
If you have any questions or comments relating to Samsung products,
please contact the SAMSUNG customer care centre.
Country
U.S.A 1-800-SAMSUNG(726-7864) www.samsung.com
서비스 센터 안내
삼성전자 서비스는 고객의 입장에서 한 번 더 생각하고 확실한 기술과 따뜻한 인간미, 완벽한 고객시스템을 바탕으로 최상의
서비스를 제공해 드리고자 항상 연구하고 있으며 고객의 생활 속에 가족과 같이 함께하는 회사가 되겠습니다.
Customer Care Centre
Web Site Address
Samsung Electronics America, Inc.
105 Challenger Road
Ridgefi eld Park, NJ 07660-0511
BN68-01603D-00
 Loading...