

Page 1
USER’S MANUAL
36cm (14”) Color Monitor
45B/45Bn
EDel2.book Page 1 Monday, April 17, 2000 10:47 PM
Page 2
1
Before connecting the AC power cord
to an outlet, make sure the voltage
designation on your monitor
corresponds to the local electrical
supply.
2
Never insert anything metallic into the
monitor openings. Doing so may
create the danger of electric shock.
3
To avoid electric shock, never touch
the inside of the monitor. Only a
qualified technician should open the
monitor’s case.
4
Never use your monitor if the power
cord has been damaged. Do not allow
anything to rest on the power cord,
and keep the cord away from areas
where people can trip over it.
5
Be sure to hold the plug, not the cord,
when disconnecting the monitor from
an electric socket.
6
Openings in the monitor cabinet are
provided for ventilation. To prevent
overheating, these openings should
not be blocked or covered. Also, avoid
using the monitor on a bed, sofa, rug,
or other soft surface. Doing so may
block the ventilation openings in the
bottom of the cabinet. If you put the
monitor in a bookcase or some other
enclosed space, be sure to provide
adequate ventilation.
7
Put your monitor in a location with low
humidity and a minimum of dust.
8
Do not expose the monitor to rain or
use it near water (in kitchens, near
swimming pools, etc.). If the monitor
accidentally gets wet, unplug it and
contact an authorized dealer
immediately. You can clean the
monitor with a damp cloth when
necessary, but be sure to unplug the
monitor first.
9
Place the monitor on a solid surface
and treat it carefully. The screen is
made of glass and can be damaged if
dropped, hit or scratched.
10
Locate your monitor near an easily
accessible AC outlet.
11
If your monitor does not operate
normally – in particular, if there are
any unusual sounds or smells coming
from it – unplug it immediately and
contact an authorized dealer or service
center.
12
High temperatures can cause
problems. Don’t use your monitor in
direct sunlight, and keep it away from
heaters, stoves, fireplaces, and other
sources of heat.
13
Unplug the monitor when it is going to
be left unused for an extended period
of time.
14
Unplug your monitor from the AC
outlet before any service.
CAUTION
RISK OF ELECRIC SHOCK
DO NOT OPEN
CAUTION: TO REDUCE THE RISK OF ELECTRIC SHOCK,
DO NOT REMOVE COVER (OR BACK).
NO-USER-SERVICEABLE PARTS INSIDE.
REFER SERVICING TO QUALIFIED SERVICE PERSONNEL.
Safety Instructions
EDel2.book Page 2 Monday, April 17, 2000 10:47 PM
Page 3
English - 1
Français EnglishEspañol
Safety Instructions. . . . . . . . . . . . . . . . . . . . . . . . . . . . . . . . . . . . . . . . . . . . . . . . . . . . . . . . . . . . . . . . . . . ii
Your New Monitor. . . . . . . . . . . . . . . . . . . . . . . . . . . . . . . . . . . . . . . . . . . . . . . . . . . . . . . . . . . . . . . . . . . 1
Operation. . . . . . . . . . . . . . . . . . . . . . . . . . . . . . . . . . . . . . . . . . . . . . . . . . . . . . . . . . . . . . . . . . . . . . . . . . 2
Connecting Your Monitor . . . . . . . . . . . . . . . . . . . . . . . . . . . . . . . . . . . . . . . . . . . . . . . . . . . . . . . . . . 2
The Front Panel . . . . . . . . . . . . . . . . . . . . . . . . . . . . . . . . . . . . . . . . . . . . . . . . . . . . . . . . . . . . . . . . . 2
Monitor Control Buttons . . . . . . . . . . . . . . . . . . . . . . . . . . . . . . . . . . . . . . . . . . . . . . . . . . . . . . . . . . 3
Troubleshooting. . . . . . . . . . . . . . . . . . . . . . . . . . . . . . . . . . . . . . . . . . . . . . . . . . . . . . . . . . . . . . . . . . . . . 5
PowerSaver . . . . . . . . . . . . . . . . . . . . . . . . . . . . . . . . . . . . . . . . . . . . . . . . . . . . . . . . . . . . . . . . . . . . . . . . 5
Specifications . . . . . . . . . . . . . . . . . . . . . . . . . . . . . . . . . . . . . . . . . . . . . . . . . . . . . . . . . . . . . . . . . . . . . . 6
Display Modes. . . . . . . . . . . . . . . . . . . . . . . . . . . . . . . . . . . . . . . . . . . . . . . . . . . . . . . . . . . . . . . . . . . . . . 6
Your New Monitor
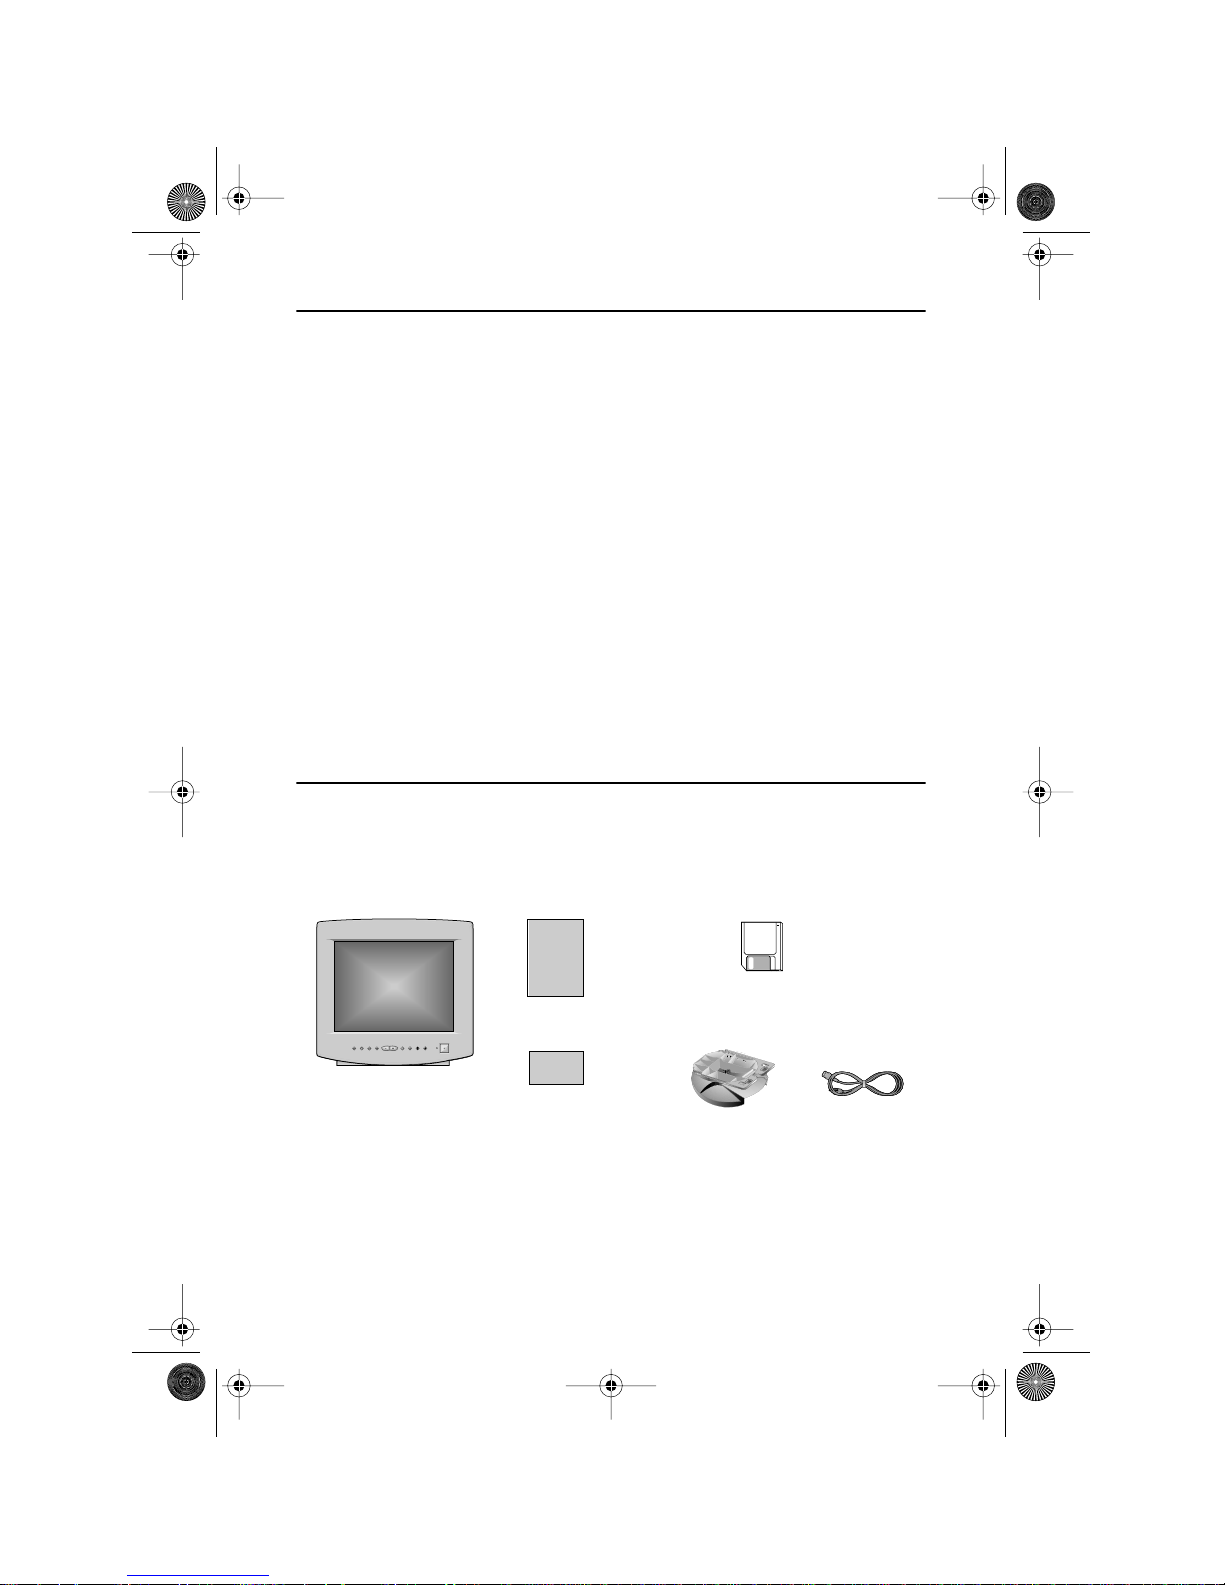
Please make sure the following items are included with your monitor. If any items are missing, contact
your dealer.
Monitor
This manual
Power cord
Warranty card
(not available in all locations)
User’ s
Manual
Warranty
Stand
Display Driver Diskette
(not available in all locations)
Contents
EDel2.book Page 1 Monday, April 17, 2000 10:47 PM
Page 4
English - 2
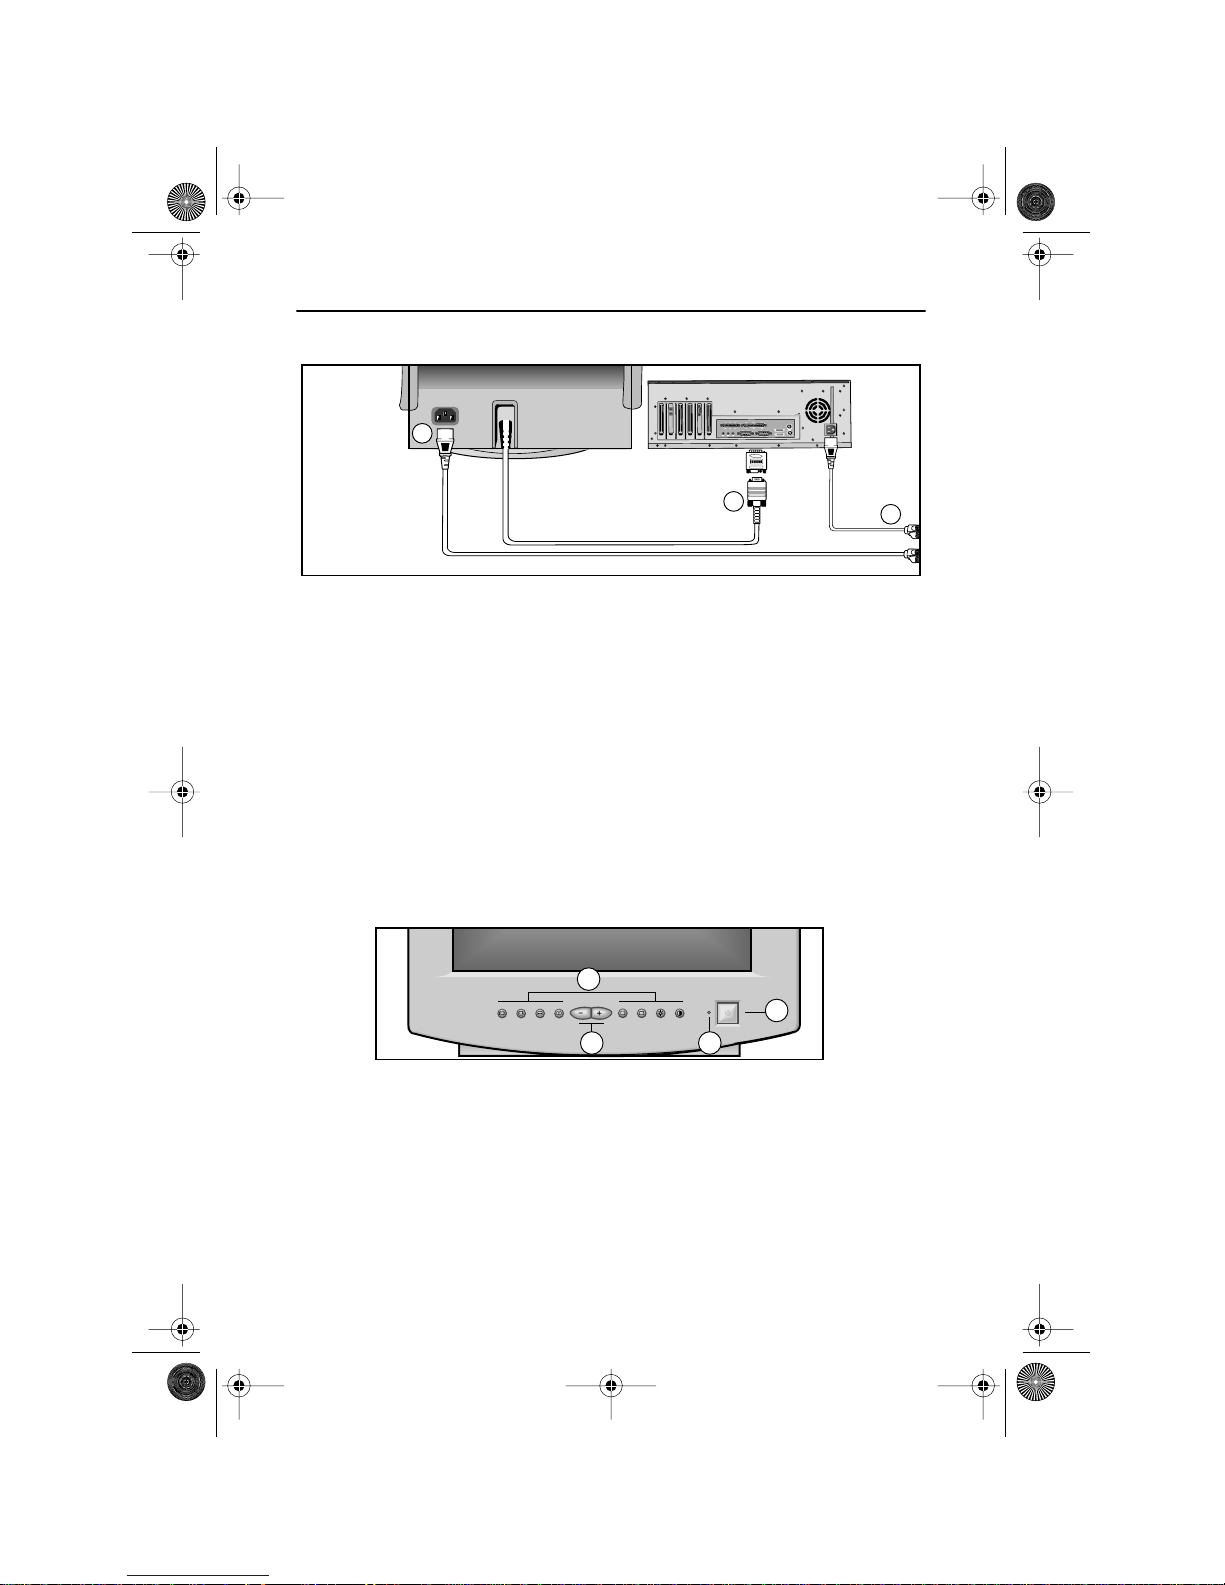
Connecting Your Monitor
1
Turn off your computer and unplug the
power cord.
2
Signal cable
Connect the end of the signal cable to
your computer’s video port. If you are
using a Macintosh computer, connect
the cable to a Macintosh adapter, and
set the pins on your adapter (adapter
not included). A PC-compatible
computer does not need an adapter.
3
Power port
Connect the power cord for your
monitor to the power port on the back
of the monitor.
4
Power cords
Plug the power cord for the monitor
and the power cord for your computer
into a nearby outlet.
5
Turn on your computer and monitor. If
your monitor displays an image,
installation is complete.
6
Install the monitor driver
• Ins
ert the provided diskette into the
A drive.
•
Double click the “install.exe” file.
The Front Panel
1
Monitor control buttons
All adjustments to the image display
are made using these control buttons,
including control of the screen display
area shape and the display image.
2
Adjustment buttons
The decrease ( – ) button lowers the
value of the selected function. The
increase ( + ) button raises the value of
the selected function.
3
Power indicator
This light glows green during normal
operation. It also blinks when a
function button is pressed, or while a
function setting is being automatically
saved.
4
Power button
Turns the monitor on and off.
3
4
2
4
3
1
2
Operation
EDel2.book Page 2 Monday, April 17, 2000 10:47 PM
Page 5
English - 3
FrançaisEspañolDeutschItaliano EnglishPortuguese
Operation
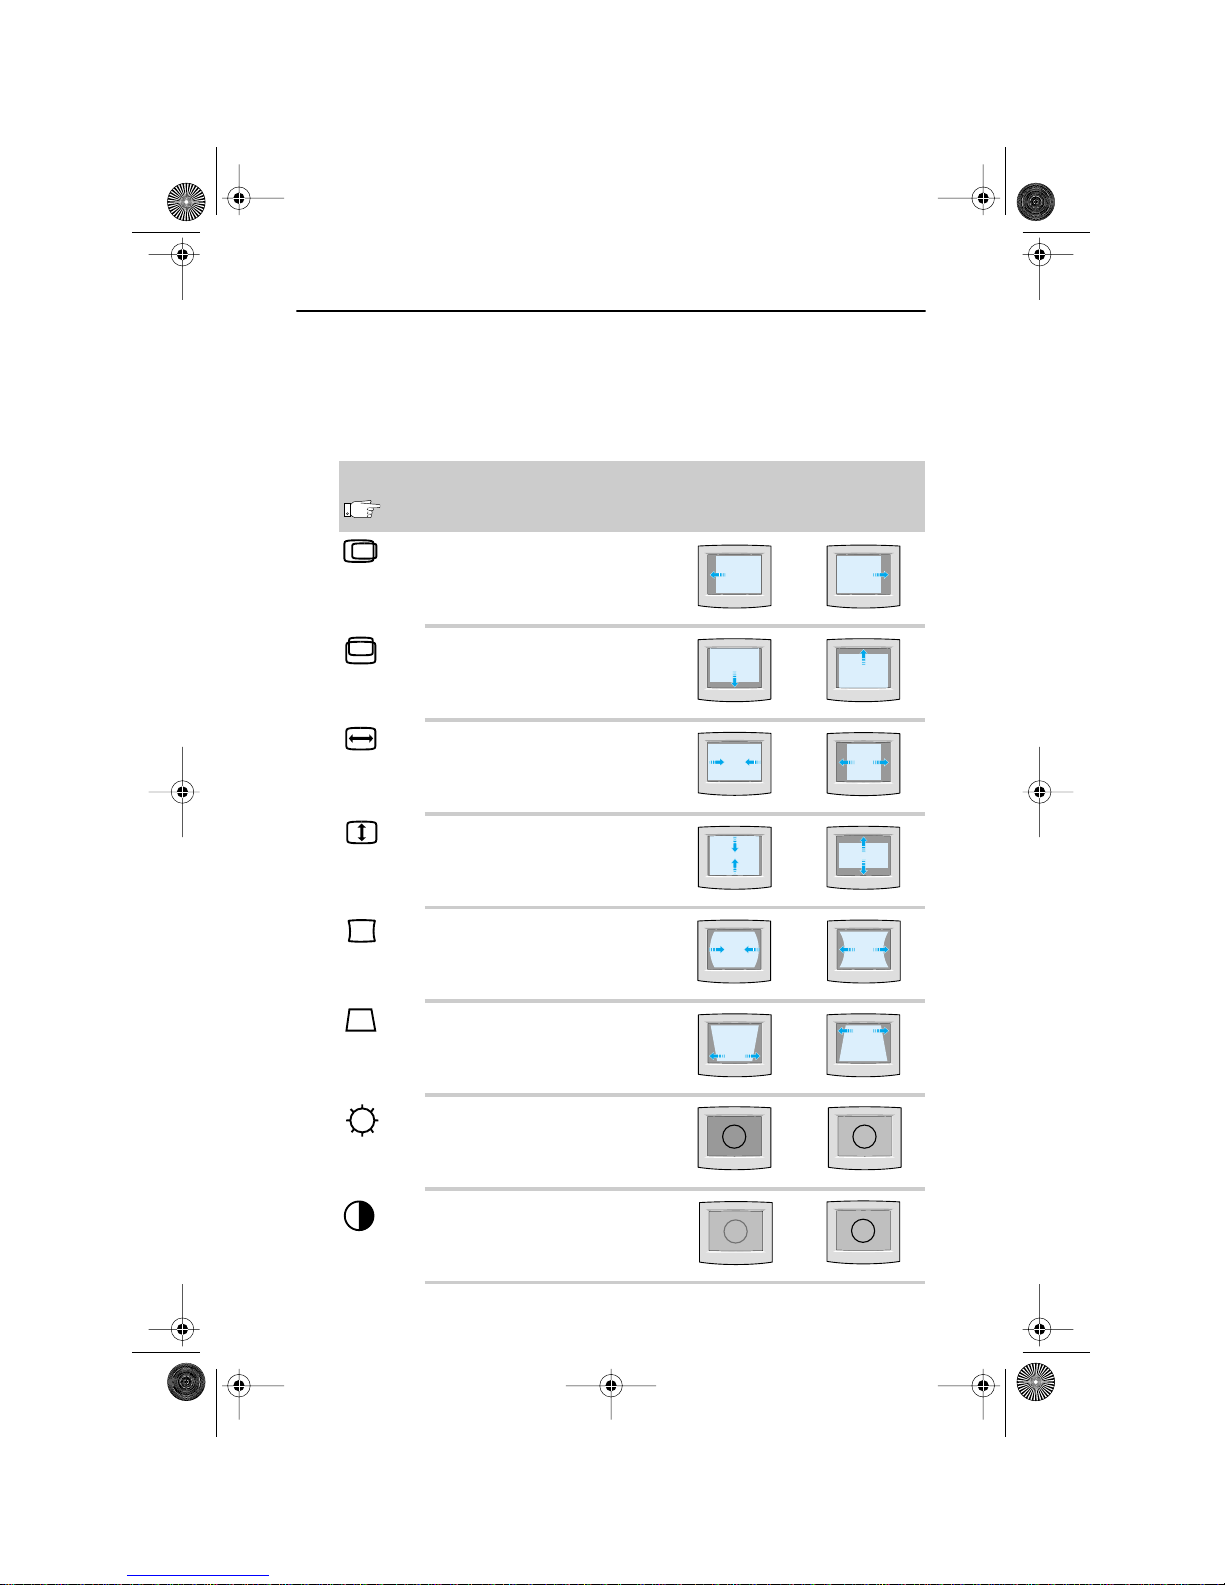
Monitor Control Buttons
1
Press the desired control button once. (Some controls require that two buttons be pressed
simultaneously.) See the following tables for descriptions of button functions.
2
Use the adjustment buttons (+, –) to increase or decrease the adjustment. The power
indicator light blinks rapidly when a maximum setting is reached.
Button
Control Adjustment Effect
Press Once
–
+
Horizontal Position
Horizontal screen position.
– moves screen left
+ moves screen right
Vertical Position
Vertical screen position.
– moves screen down
+ moves screen up
Horizontal Size
Horizontal screen size.
– decreases size of screen image
+ increases size of screen image
Vertical Size
Vertical screen size
– decrease size of screen image
+ increases size of screen image
Pincushion
Straightness of vertical edges.
– curves image inward
+ curves image outward
Trapezoid
Width of top & bottom of screen.
– widens bottom of screen image
+ widens top of screen image
Brightness
Background brightness of screen.
– decreases brightness of screen
+ increases brightness of screen
Contrast
Contrast of screen image.
– decreases contrast of screen image
+ increases contrast of screen image
S
S
S
S
EDel2.book Page 3 Monday, April 17, 2000 10:47 PM
Page 6
English - 4
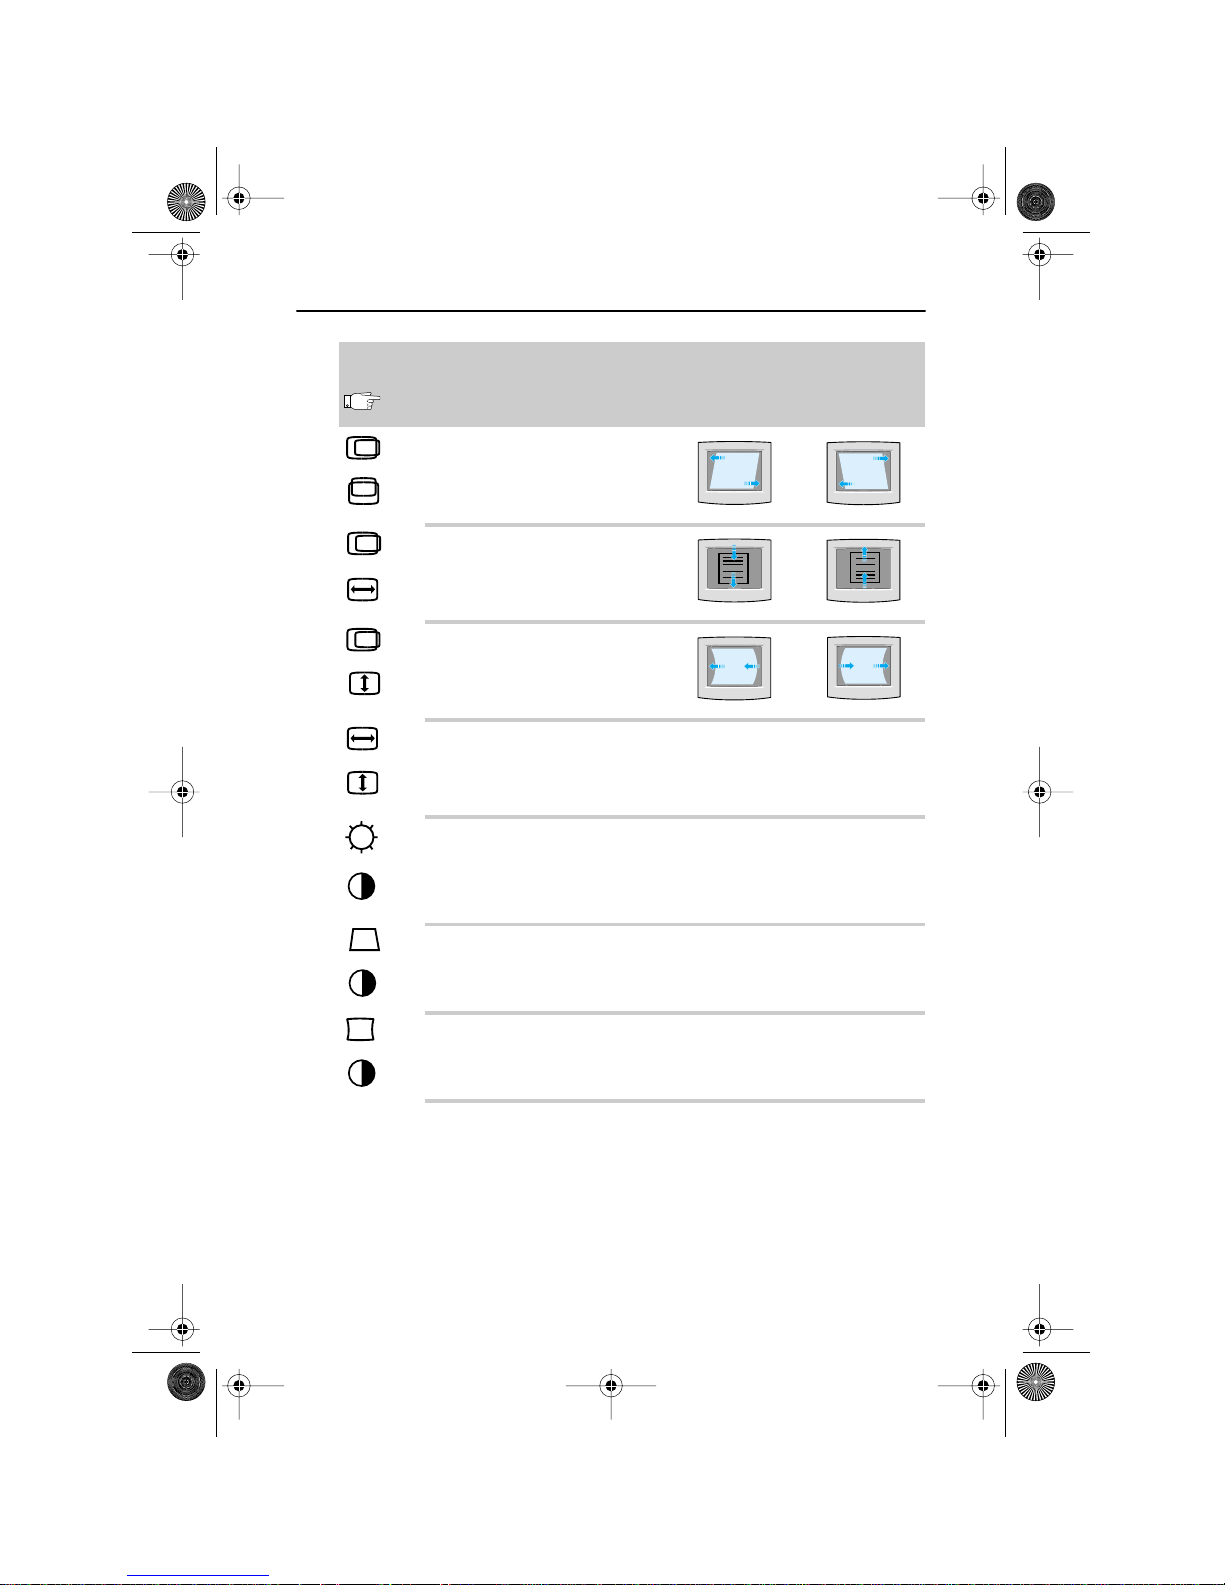
Note: When you are finished adjusting your monitor using the control buttons, the power indicator light
will blink once as the monitor automatically saves your changes.
Buttons
Control Adjustment Effect
Press both & Hold for 3 seconds
–
+
Parallelogram
Skews screen image.
– skews to left
+ skews to right
V-linearity
Compression of image on screen.
– compresses bottom of screen
+ compresses top of screen
Pinbalance
Curves of vertical lines.
– curves lines to left
+ curves lines to right
V-moiré
Corrects for moiré pattern on screen.
– Vertical moiré correction off
+ Vertical moiré correction on
Degauss
Removes color distortion caused by magnetic fields.
Press brightness and contrast buttons once.
Do not use more than once in 30 minutes.
Recall
Returns monitor controls to original settings.
Press and hold trapezoid and contrast buttons for 3 seconds.
User Delete
Resets data in monitor’s memory.
Press and hold pincushion and contrast buttons for at least 5 seconds.
AND
AND
AND
AND
AND
AND
AND
Operation
EDel2.book Page 4 Monday, April 17, 2000 10:47 PM
Page 7
English - 5
FrançaisEspañolDeutschItaliano EnglishPortuguese
Before calling for service, check the information in this section to see if you can solve the problem
yourself. If you do need assistance, please call the phone number on the warranty card, the phone
number on the back cover of this manual, or contact your dealer.
There is no screen image.
■
Check to see that both the monitor and the computer are plugged in and turned on (page 2).
Screen image area is lightened but no image appears.
■
Check the signal cable connection between the computer and the monitor (page 2).
The screen image is too light or too dark.
■
Adjust the brightness or contrast settings (page 3).
The screen image is too large or too small.
■
Adjust the size settings (page 3).
The colors are distorted with dark or shadowed areas.
■
Activate the degauss feature (page 4).
The power indicator light blinks every 0.5 or 1 seconds.
■
The monitor is using its power management system (see “PowerSaver” on page 5 ).
There is no screen image and the power indicator light blinks every 0.25 seconds.
■
The input signal frequency is over or under the synchronization range of the monitor, see
“Specifications” on page 6.
You need the monitor driver software.
■
Download the driver from the internet at http://www.samsungelectronics.com/support
/downloads/monitor/index.html
PowerSaver
This monitor has a built-in power management system called PowerSaver. This system saves energy by
switching your monitor into a low-power mode when it has not been used for a certain amount of time. The
monitor automatically returns to normal operation when you move the computer’ s mouse or press a key on
the keyboard. For energy conservation, turn your monitor OFF when it is not needed, or when leaving it
unattended for long periods. The PowerSaver system operates with a VESA DPMS compliant video card
installed in your computer. Use a software utility installed on your computer to set up this feature.
Note: This monitor is EPA ENERGY STAR
®
compliant and NUTEK compliant when used with a
computer equipped with VESA DPMS functionality.
State
Normal
operation
Power saving function modes EPA/NUTEK
Standby mode
Suspend mode
Position A1
Power-off mode
Position A2
Power Indicator Green Green Blinking
(0.5 sec. interval)
Green Blinking
(0.5 sec. interval)
Green Blinking
(1 sec. interval)
Power Consumption 75W (maximum)
65W (nominal)
50W (nominal) Less than 15W Less than 3W
Troubleshooting
EDel2.book Page 5 Monday, April 17, 2000 10:47 PM
Page 8
English - 6
Design and specifications are subject to change without notice.
Display Modes
Specification Models : SAMTRON 45B/45Bn
Picture Tube
■
14” (36 cm), 13” (33.5 cm) viewable
■
90˚ deflection
■
Dot pitch: 0.24 mm (H) / 0.14 mm (V)
■
Silica-coated with anti-electrostatic properties
■
Medium-short persistence phosphor
Synchronization
■
Horizontal:
■
Vertical:
30 - 55 kHz
50 - 120 Hz
Display Colors
■
Unlimited
Maximum Resolution
■
1024 dots
■
768 lines
Active Display
■
Horizontal:
■
Vertical:
10.04 ± 0.16 in (255 ± 4 mm)
7.52 ± 0.16 in (191 ± 4 mm)
Input Signal, Terminated
■
Video:
■
Sync.:
Analog 0.7 Vpp positive at 75 ohms
Separate sync, TTL level, positive or negative
Maximum Pixel Clock
■
65 MHz
Power Supply
■
AC 100 - 240 V ± 10%, 60 Hz / 50 Hz ± 3 Hz
Power Consumption
■
75 W maximum (65 W Nominal)
Dimensions / Weight
(WxDxH)
■
Unit: 13.70 x 14.65 x 14.49 in / 23.4 Ibs (348 x 372 x 368 mm /10.6 kg)
■
Carton: 16.61 x 18.11 x 15.35 in / 26.9 Ibs (422 x 460 x 390 mm /12.2 kg)
Environmental
Considerations
■
Operating Temperature : 32˚F - 104˚F (0˚C - 40˚C)
Humidity : 10% - 80%
■
Storage temperature : -4˚F - 113˚F (-20˚C - 45˚C)
Humidity : 5% - 95%
Display Mode
Horizontal
Frequency (kHz)
Vertical
Frequency (Hz)
Pixel Clock
(MHz)
Sync Polarity
(H/V)
IBM, VGA2, 720 x 400
IBM, VGA2, 640 x 480
VESA, 640 x 480
VESA, 640 x 480
VESA, 800 x 600
VESA, 800 x 600
VESA, 1024 x 768
31.469
31.469
37.500
43.269
46.875
53.674
48.363
70.087
59.940
75.000
85.008
75.000
85.061
60.004
28.322
25.175
31.500
36.000
49.500
56.250
65.000
–/+
– / –
– / –
– / –
+/+
+/+
– / –
Specifications
EDel2.book Page 6 Monday, April 17, 2000 10:47 PM
Page 9
FrançaisDeutschEspañolPortuguese EnglishItaliano
Regulatory Information
FCC Information
User Instructions
The Federal Communications Commission Radio
Frequency Interference Statement includes the
following warning:
Note: This equipment has been tested and found to
comply with the limits for a Class B digital device,
pursuant to Part 15 of the FCC Rules. These limits are
designed to provide reasonable protection against
harmful interference in a residential installation. This
equipment generates, uses, and can radiate radio
frequency energy and, if not installed and used in
accordance with the instructions, may cause harmful
interference to radio communications. However, there
is no guarantee that interference will not occur in a
particular installation.
If this equipment does cause harmful interference to
radio or television receptions, which can be
determined by turning the equipment off and on, the
user is encouraged to try to correct the interference by
one or more of the following measures:
■
Reorient or relocate the receiving antenna.
■
Increase the separation between the equipment and
receiver.
■
Connect the equipment into an outlet on a circuit
different from that to which the receiver is
connected.
■
Consult the dealer or an experienced radio/TV
technician for help.
User Information
Changes or modifications not expressly approved by
the party responsible for compliance could void the
user’s authority to operate the equipment.
If necessary, consult your dealer or an experienced
radio/television technician for additional suggestions.
You may find the booklet called How to Identify and
Resolve Radio/TV Interference Problems helpful. This
booklet was prepared by the Federal Communications
Commission. It is available from the U.S. Government
Printing Office, Washington, DC 20402, Stock Number
004-000-00345-4.
Warning
User must use shielded signal interface cables to
maintain FCC compliance for the product.
Declaration of conformity for products
Marked with FCC Logo
This device complies with Part 15 of the FCC Rules.
Operation is subject to the following two conditions: (1)
this device may not cause harmful interference, and (2)
this device must accept any interference received,
including interference that may cause undesired
operation.
The party responsible for product compliance:
SAMSUNG ELECTRONICS CO., LTD
America QA Lab of Samsung
85 West Tasman Drive
San Jose, CA 95134 USA
Tel) 408-544-5124
Fax) 408-544-5191
Provided with this monitor is a detachable power supply
cord with IEC320 style terminations. It may be suitable for
connection to any UL Listed personal computer with
similar configuration. Before making the connection, make
sure the voltage rating of the computer convenience
outlet is the same as the monitor and that the ampere
rating of the computer convenience outlet is equal to or
exceeds the monitor voltage rating.
For 120 Volt applications, use only UL Listed detachable
power cord with NEMA configuration 5-15P type (parallel
blades) plug cap. For 240 Volt applications use only UL
Listed Detachable power supply cord with NEMA
configuration 6-15P type (tandem blades) plug cap.
IC Compliance Notice
This Class B digital apparatus meets all requirements
of the Canadian Interference-Causing Equipment
Regulations of ICES-003.
Cet appareil Numérique de classe B respecte toutes
les exigences du Règlemont ICES-003 sur les
équipements produisant des interférences au Canada.
European Notice
Products with the CE Marking comply with both the
EMC Directive (89/336/EEC), (92/31/EEC), (93/68/EEC)
and the Low Voltage Directive (73/23/EEC) issued by
the Commission of the European Community.
Compliance with these directives implies conformity to
the following European Norms:
■
EN55022 (CISPR 22) – Radio Frequency Interference
■
EN50082-1 : 1992 – Electromagnetic Immunity
■
EN60555-2 (IEC555-2) – Power Line Harmonics
■
EN60555-3 (IEC555-3) – Voltage Fluctuations
■
EN60950 (IEC950) – Product Safety.
EDel2.book Page 3 Monday, April 17, 2000 10:47 PM
Page 10
SAMTRON SEOUL
15TH FL, JOONGANG DAILY NEWS BLDG. 7, SOONHWA-DONG,CHUNG -KU,
SEOUL, KOREA, 100-759
TEL : (82-2) 727-3114
SAMTRON U.S.A.
SAMSUNG ELECTRONICS AMERICA (SEA)
ONE SAMSUNG PLACE LEDGEWOOD NJ 07852
TEL : 1-800-SAMTRON (726-8766)
SAMTRON EUROPE
SAMSUNG HAUS, AM UNISYSPARK 1, 65843 SULZBACH, GERMANY
TEL : (49-6196) 74001-5 FAX : (49-6196) 758149
SAMTRON TOKYO
17TH, HAMACHO CENTER BLDG. 2-31-1, NIHONBASHI-HAMACHO,
CHOU-KU, TOKYO 103, JAPAN
TEL : (81-3) 5641-9860 FAX : (81-3) 5641-9861
SAMTRON MEXICO
SAMSUNG ELECTRONICS MEXICO S.A. DE C.V.
SATURNO 44 COL. NVA. INDUSTRIAL VALLEJO
DEL. GUSTAVO A. MADERO C.P. 07700
MEXICO D.F. TEL. 5747-5100
RFC: SEM950215S98
SAMTRON SWEDEN
SAMSUNG ELECTRONICS SYENSKA, AB
BOX 713, S- 194 27 UPPLANDS VASBY
TEL : 468- 590- 966- 00 FAX : 468- 590- 966- 50
P/N: BH68-00095L-02
Printed on the recyclable paper
IMPORTADO POR: SAMSUNG ELECTRONICS MEXICO S.A. DE C.V.
SATURNO 44 COL. NV A. INDUSTRIAL V ALLEJO
DEL. GUSTAVO A. MADERO C.P. 07700
MEXICO D.F . TEL. 5747-5100
RFC: SEM950215S98
EXPORTADO POR: SAMSUNG ELECTRONICS CO.,LTD.
JOONG-ANG DAILY NEWS BLDG.
7 SOON-WHA-DONG CHUNG-KU,
C.P.O BOX 2775, 1144 SEOUL, KOREA
“As an ENERGYSTAR® Partner, SAMSUNG has
determined that this product meets the E
NERGY
STAR® guidelines for energy efficiency.”
EDel2.book Page 4 Monday, April 17, 2000 10:47 PM
 Loading...