


Some of the contents in this manual may differ from your phone depending on the software of the phone or your
service provider.
Printed in Korea
World Wide Web
http://www.samsungmobile.com
Code No.:GH68-xxxxxA
English (EU).
01/2009. Rev. 1.0

Samsung S7350
user manual
using this
manual
This user manual has been specially designed to
guide you through the functions and features of your
mobile phone. To get started quickly,
refer to “introducing your mobile phone,”
“assembling and preparing your mobile phone,”
and “using basic functions.”
ii
Instructional icons
Before you start, familiarise yourself with the icons
you will see in this manual:
Warning
—situations that could cause
injury to yourself or others
Caution
—situations that could cause
damage to your phone or other equipment
Note
—notes, usage tips, or additional
information
Refer to
X
—pages with related information;
for example:
page 12”)
X
p. 12 (represents “see

→
[ ]
< >
Followed by
menus you must select to perform a step;
for example: In Menu mode, select
Messages → Create message
(represents Messages, followed by
Create message)
Square brackets
example: [ ] (represents the Power/
Menu exit key)
Angled brackets
different functions at each screen; for
example: <OK> (represents the OK
softkey)
—the order of options or
—phone keys; for
—softkeys that control
Copyright information
Rights to all technologies and products that
comprise this device are the property of their
respective owners:
•Bluetooth
• Java™ is a trademark of Sun Microsystems, Inc.
• Windows Media Player
•DivX
®
Bluetooth SIG, Inc. worldwide—Bluetooth QD
ID: B014833.
of Microsoft Corporation.
DivX, Inc., and is used under
licence.
is a registered trademark of the
®
is a registered trademark
®
is a registered trademark of
using this manual
iii

ABOUT DIVX VIDEO
®
is a digital video format created by DivX, Inc.
DivX
This is an official DivX Certified device that plays DivX
video. Plays DivX
®
DivX
using this manual
video up to 720x480.
ABOUT DIVX VIDEO-ON-DEMAND
This DivX
®
video up to 320x240. May play
®
Certified device must be registered with
DivX in order to play DivX Video-on-Demand (VOD)
content. First generate the DivX VOD registration
code for your device and submit it during the
registration process. [Important: DivX VOD content is
protected by a DivX DRM (Digital Rights
Management) system that restricts playback to
registered DivX Certified devices. If you try to play
DivX VOD content not authorised for your device, the
message "Authorization Error" will be displayed and
your content will not play.] Learn more at
www.divx.com/vod.
iv

contents
safety and usage information 1
Safety warnings .......................................... 1
Safety precautions ...................................... 3
Important usage information ....................... 6
introducing your mobile phone 10
Unpack ..................................................... 10
Phone layout ............................................. 11
Keys ......................................................... 12
Display ...................................................... 13
Icons .........................................................13
assembling and preparing your mobile
phone 15
Install the SIM card and battery .................15
Charge the battery .................................... 17
Insert a memory card (optional) ................. 18
using basic functions 19
Turn your phone on and off ....................... 19
Access menus .......................................... 20
v

Customise your phone .............................. 20
Use basic call functions ............................ 23
Send and view messages ......................... 24
Add and find contacts ............................... 26
Use basic camera functions ...................... 27
contents
Listen to music ......................................... 28
Browse the web ........................................ 30
Use the Google services ........................... 30
using advanced functions 32
Use advanced call functions ..................... 32
Use advanced phonebook functions ......... 34
Use advanced messaging functions ..........36
Use advanced music functions ................. 37
using tools and applications 41
Use the Bluetooth wireless feature ............41
Activate and send an SOS message ......... 43
Activate the mobile tracker ........................ 44
Make fake calls ......................................... 45
Record and play voice memos .................. 46
vi
Edit images ............................................... 46
Edit videos ................................................ 50
Upload photos and videos to the web ......55
Use Java-powered games and applications 56
Synchronise data ...................................... 56
Use RSS reader ........................................ 57
Search for an item .................................... 58
Create and view world clocks ................... 58
Set and use alarms ................................... 59
Use the calculator ..................................... 60
Convert currencies or measurements ....... 60
Set a countdown timer ............................. 61
Use the stopwatch .................................... 61
Create a new task ..................................... 61
Create a text memo .................................. 61
Manage your calendar .............................. 62
troubleshooting a
index d

Correct disposal of this product
(Waste Electrical & Electronic Equipment)
(Applicable in the European Union and
safety and usage information
disposed with other household wastes at the end of
its working life. To prevent possible harm to the
environment or human health from uncontrolled
waste disposal, please separate this from other
types of wastes and recycle it responsibly to
promote the sustainable reuse of material resources.
8
other European countries with separate
collection systems)
This marking shown on the product or its
literature, indicates that it should not be
Household users should contact either the retailer
where they purchased this product, or their local
government office, for details of where and how they
can take this item for environmentally safe recycling.
Business users should contact their supplier and
check the terms and conditions of the purchase
contract. This product should not be mixed with
other commercial wastes for disposal.

Correct disposal of batteries in this
product
(Applicable in the European Union and
other European countries with separate
battery return systems)
This marking on the battery, manual or
packaging indicates that the batteries in this product
should not be disposed of with other household
waste at the end of their working life. Where marked,
the chemical symbols Hg, Cd or Pb indicate that the
battery contains mercury, cadmium or lead above
the reference levels in EC Directive 2006/66. If
batteries are not properly disposed of, these
substances can cause harm to human health or the
environment.
To protect natural resources and to promote material
reuse, please separate batteries from other types of
waste and recycle them through your local, free
battery return system.
safety and usage information
9

introducing your
mobile phone
In this section, learn about your mobile phone’s
layout, keys, display, and icons.
10
Unpack
Check your product box for the following items:
• Mobile phone
• Battery
• Travel adapter (charger)
• User manual
• The items supplied with your phone may vary
depending on the software and accessories
available in your region or offered by your
service provider. You can obtain additional
accessories from your local Samsung dealer.
• Use only Samsung-approved software.
Pirated or illegal software may cause damage
or malfunctions that are not covered by
manufacturer’s warranty.
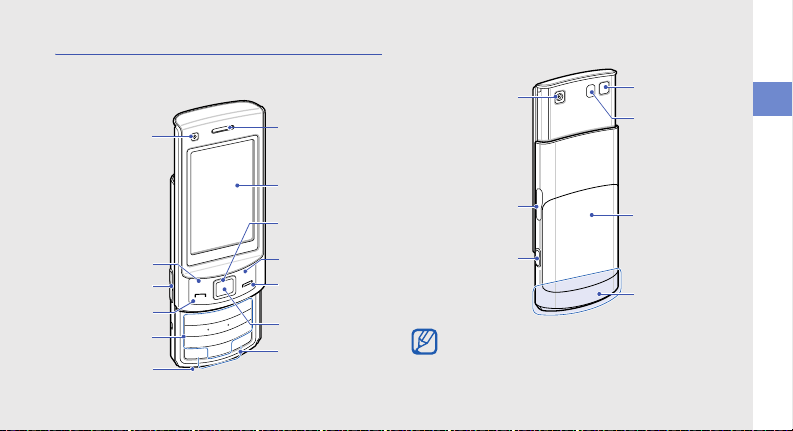
Phone layout
The front of your phone includes the following keys
and features:
Front
camera lens
Left softkey
Volume key
Dial key
Alphanumeric
keys
Mouthpiece
Earpiece
Display
4-way
navigation key
Right softkey
Power/Menu
exit key
Confirm key
Special
function keys
The rear of your phone includes the following keys
and features:
Rear camera lens
Multifunction jack
Camera key
Mirror
Flashbulb
Battery cover
Internal antenna
Closing the phone automatically locks the
exposed keys to prevent you from accidentally
pressing them. To unlock these keys, press
<Unlock> → <OK>
.
introducing your mobile phone
11
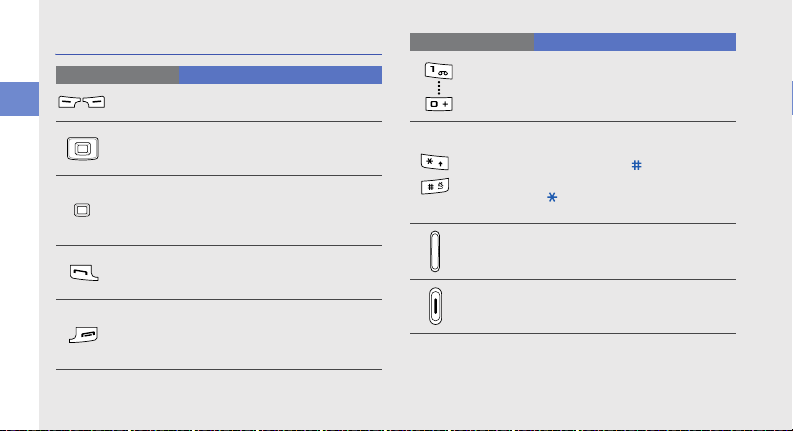
Keys
Key Function
Softkeys
introducing your mobile phone
4-way
navigation
Confirm
Dial
Power/
Menu exit
12
Perform actions indicated at the
bottom of the display
In Idle mode, access user-defined
menus; In Menu mode, scroll
through menu options
In Idle mode, access Menu mode;
In Menu mode, select the
highlighted menu option or confirm
an input
Make or answer a call; In Idle mode,
retrieve recently dialled, missed, or
received numbers
Turn the phone on and off (press
and hold); End a call; In Menu
mode, cancel input and return to
Idle mode
Key Function
Alphanumeric
Special
function
Volu me
Camera
Enter numbers, letters and special
characters; In Idle mode, press and
hold [1] to access voice mails and
[0] to enter an international call prefix
Enter special characters or perform
special functions; In Idle mode,
press and hold [ ] for the silent
profile; In Idle mode, press and hold
[ ] to enter a pause between
numbers
Adjust the phone’s volume
In Idle mode, turn on the camera
(press and hold); In Camera mode,
take a photo or record a video
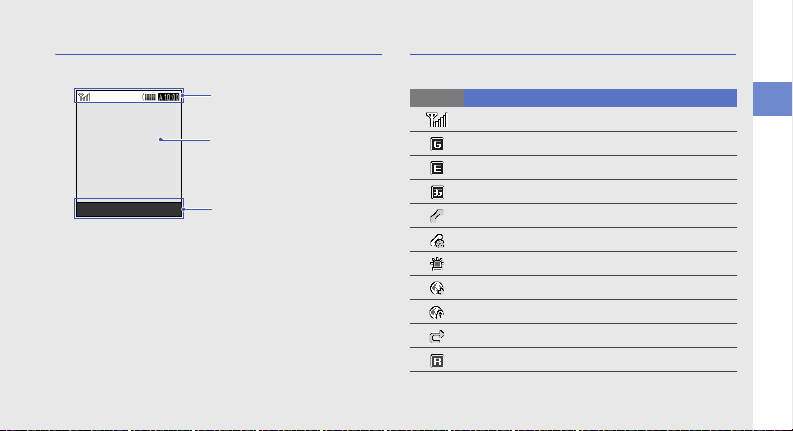
Display
Your phone’s display consists of three areas:
Icon line
Displays various icons
Text and graphic area
Displays mess ages,
instructions, and
information you enter
Select Back
Softkey line
Displays the current actions
assigned to each softkey
Icons
Learn about the icons that appear on your display.
Icon Definition
Signal strength
GPRS network status
EDGE network status
UMTS network status
Voice call in progress
Video call in progress
SOS message feature activated
Browsing the web
Connecting to secured web page
Call diverting active
Roaming (outside of normal service area)
introducing your mobile phone
13
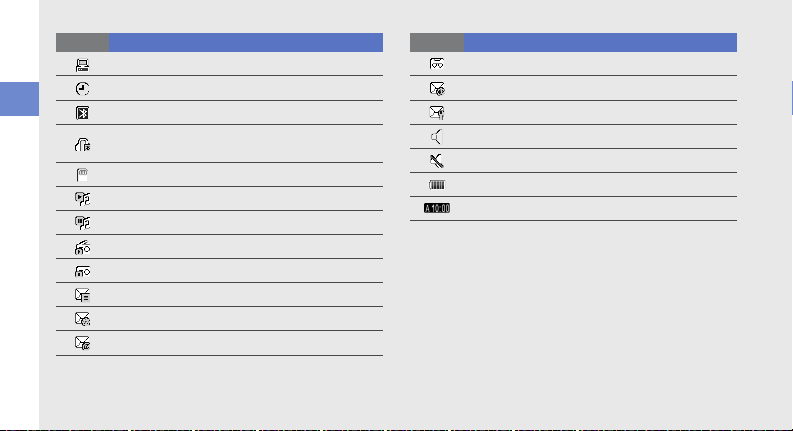
Icon Definition
introducing your mobile phone
14
Connected to a PC
Alarm activated
Bluetooth activated
Bluetooth hands-free car kit or headset
connected
Memory card inserted
Music playback in progress
Music playback paused
FM radio on
FM radio suspended
New text message (SMS)
New multimedia message (MMS)
New email message
Icon Definition
New voice mail message
New push message
New configuration message
Normal profile activated
Silent profile activated
Battery power level
Current time
assembling and
preparing your
mobile phone
Get started by assembling and setting up
your mobile phone for its first use.
Install the SIM card and battery
When you subscribe to a cellular service, you will
receive a Subscriber Identity Module, or SIM card,
with subscription details, such as your personal
identification number (PIN) and optional services.
To use UMTS service, you can purchase a Universal
Subscriber Identity Module (USIM) card.
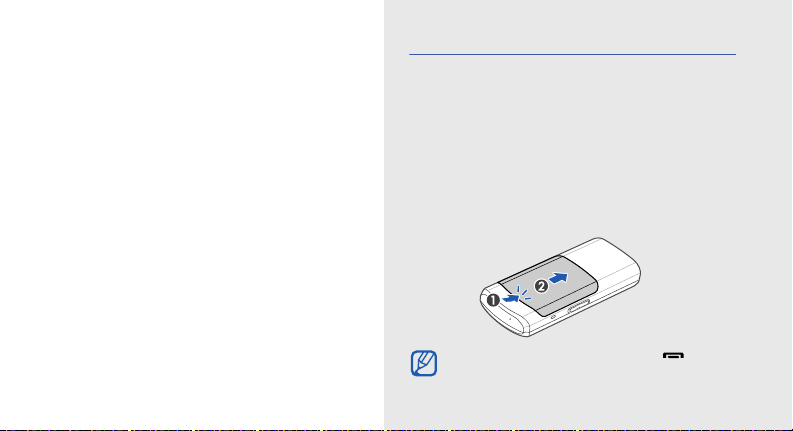
To install the SIM or USIM card and battery,
1. Remove the battery cover.
If the phone is on, press and hold [ ] to turn
it off.
15
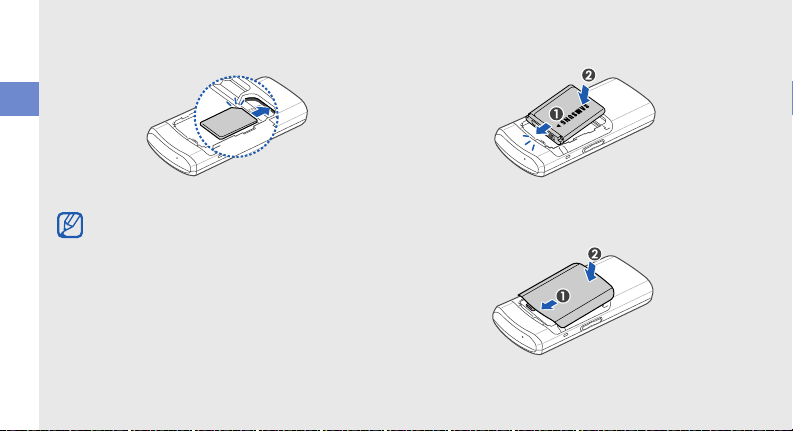
2. Insert the SIM or USIM card. 3. Insert the battery.
assembling and preparing your mobile phone
Place the SIM or USIM card in the phone with
the gold-coloured contacts facing down.
16
4. Replace the battery cover.
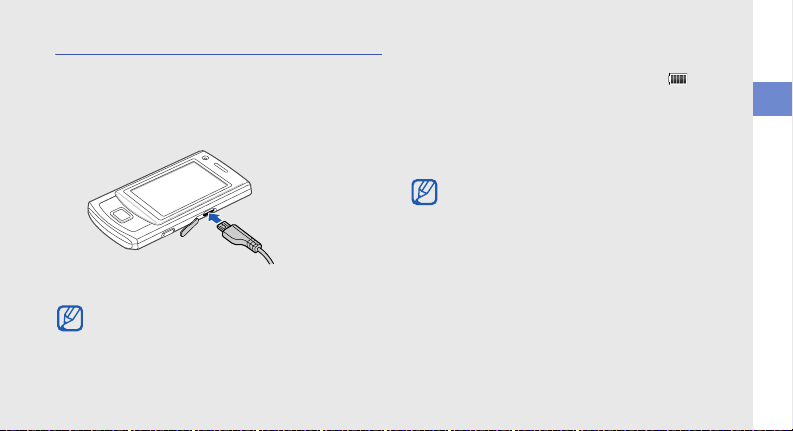
Charge the battery
Before using the phone for the first time, you must
charge the battery.
1. Open the cover to the multifunction jack and plug
the small end of the travel adapter.
With the triangle
facing up
Improperly connecting the travel adapter can
cause serious damage to the phone. Any
damages by misuse are not covered by the
warranty.
2. Plug the large end of the travel adapter into a
power outlet.
3. When the battery is fully charged (the icon is
no longer moving), unplug the travel adapter from
the power outlet.
4. Unplug the travel adapter from the phone.
5. Close the cover to the multifunction jack.
About the low battery indicator
When your battery is low, the phone will emit a
warning tone and a low battery message. The
battery icon will also be empty and blinking. If
the battery level becomes too low, the phone
will automatically power off. Recharge your
battery to continue using your phone.
assembling and preparing your mobile phone
17
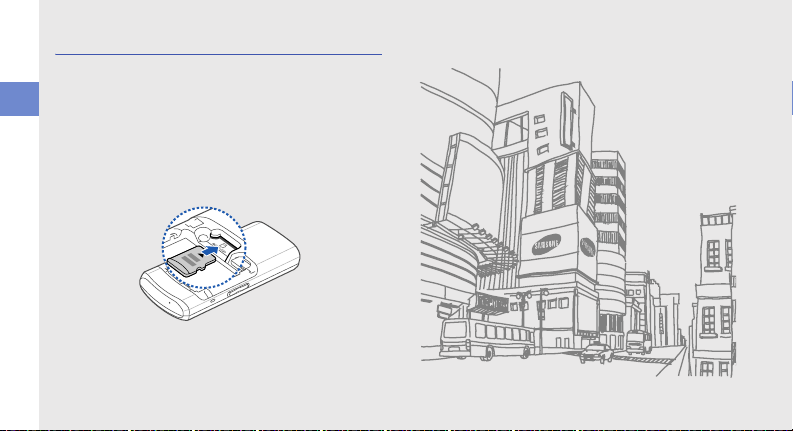
Insert a memory card (optional)
To store additional multimedia files, you must insert a
memory card. Your phone accepts microSD™
memory cards up to 16 GB (depending on memory
assembling and preparing your mobile phone
card manufacturer and type).
1. Remove the battery cover and battery.
2. Insert a memory card with the label side facing
up.
3. Insert the battery and replace the battery cover.
18

using basic
functions
Learn how to perform basic operations and use the
main features of your mobile phone.
Turn your phone on and off
To turn your phone on,
1. Slide open the phone.
2. Press and hold [ ].
3. Enter your PIN and press <Confirm> (if
necessary).
4. When the setup wizard opens, customise your
phone as desired by following the screen.
To turn your phone off, repeat steps 1 and 2 above.
Switch to the offline profile
By switching to the offline profile, you can use your
phone’s non-network services in areas where
wireless devices are prohibited, such as aeroplane
and hospitals.
19

To switch to the offline profile, in Menu mode, select
Settings → Phone profiles → Offline.
Follow all posted warnings and directions from
official personnel when in areas where wireless
devices are prohibited.
Access menus
using basic functions
To access your phone’s menus,
1. In Idle mode, press the Confirm key to access
Menu mode.
2. Use the navigation key to scroll to a menu or
option.
3. Press the Confirm key, <Select>, or <OK> to
confirm the highlighted option.
4. Press <Back> to move up one level; Press [ ]
to return to Idle mode.
20
Customise your phone
Get more from your phone by customising it to
match your preferences.
Adjust the volume of the key tones
In Idle mode, press the Volume key up or down to
adjust the key tone volume.
Switch to or from the silent profile
In Idle mode, press and hold [ ] to silence or
unsilence your phone.
Change your ringtone
1. In Menu mode, select Settings → Phone
profiles.
2. Scroll to the profile you are using.
3. Press <Options> → Edit → Voice call ringtone.

4. Select a ringtone category → a ringtone.
5. Select Video call ringtone.
6. Select a ringtone category → a ringtone.
7. Press <Options> → Save.
To switch to another profile, select it from the list and
press the Confirm key.
Select a wallpaper (Idle mode)
1. In Menu mode, select Settings → Display and
light → Home screen.
2. Scroll left or right to Image.
3. Select Wallpaper.
4. Select an image category → an image.
5. Press <Set>.
6. Press <Options> → Save.
Select a theme for the display
To create a theme,
1. In Menu mode, select Settings → Display and
light → My theme.
2. Press <Options> → Create → Easy or Export.
3. Customise the theme as desired by following the
screen.
4. When you are finished, enter a name for the
theme and press <Save>.
5. Press <Yes> to apply the theme.
To apply a theme,
1. In Menu mode, select Settings → Display and
light → My theme.
2. Scroll to a theme.
3. Press <Options> → Save to apply the theme.
using basic functions
21

Set menu shortcuts
1. In Menu mode, select Settings → Phone
settings → Shortcuts.
2. Select a key to use as a shortcut.
3. Select a menu to assign to the shortcut key.
4. Press <Save>.
using basic functions
Use the simplified menus
To set up simplified menu items,
1. In Idle mode, press <Custom>.
2. Press <Options> → Customise menu.
3. Select your favourite menus.
Press <Options> → Open to select submenus
(if necessary).
4. Press <Save>.
22
To access an item from the simplified menus,
1. In Idle mode, press <Custom>.
2. Scroll to the menu item you want and press the
Confirm key.
Lock your phone
1. In Menu mode, select Settings → Security →
Phone lock → On.
2. Press <Save>.
3. Enter a new 4- to 8-digit password and press
<Confirm>.
4. Enter the new password again and press
<Confirm>.
Use basic call functions
Learn to make or answer calls and use basic call
functions.
Make a call
1. In Idle mode, enter an area code and a phone
number.
2. Press [ ] to dial the number.
For a video call, press <Options> → Video call.
3. To end the call, press [ ].
Answer a call
1. When a call comes in, press [ ].
2. For a video call, press <Show me> to allow the
caller to see you via the front camera lens.
3. To end the call, press [ ].
Adjust the volume
To adjust the volume during a call, press the Volume
key up or down.
Use the speakerphone feature
1. During a call, press the Confirm key → <Yes> to
activate the speaker.
2. To switch back to the earpiece, press the
Confirm key again.
In noisy environment, you may have difficulty
hearing the calls while using the speakerphone
feature. For better performance, use the normal
phone mode.
using basic functions
23

Use the headset
By plugging the supplied headset into the
multifunction jack, you can make and answer calls:
• To redial the last call, press and hold the headset
button.
• To answer a call, press and hold the headset
using basic functions
button.
• To end a call, press and hold the headset button.
Send and view messages
Lea rn to s en d or view text (SMS), mult imedia ( MMS),
or email messages.
Send a text or multimedia message
1. In Menu mode, select Messages → Create
message → Message.
24
X
2. Enter your message text.
For sending as a text message, skip to step 6.
For attaching multimedia, continue with step 3.
3. Press <Options> → Add multimedia and add
an item.
4. Press <Options> → Advanced → Add subject.
5. Enter a subject.
6. Scroll up and enter a destination number.
7. Press <Options> → Send to send the
message.
p. 25
Send an email
1. In Menu mode, select Messages → Create
message → Email.
2. Enter your email text.
3. Press <Options> → Attach multimedia or
Attach organiser and attach a file (if necessary).

4. Scroll up and enter a subject.
5. Scroll up and enter an email address.
6. Press <Options> → Send to send the
message.
Enter text
When entering text, you can change the text input
mode:
• Press and hold [ ] to switch between T9 and
ABC modes.
• Press [ ] to change case or switch to Number
mode.
• Press and hold [ ] to switch to Symbol mode.
Enter text in one of the following modes:
Mode Function
Press the appropriate alphanumeric key until
ABC
T9
Number
Symbol
the character you want appears on the
display.
1. Press the appropriate alphanumeric
keys to enter an entire word.
2. When the word displays correctly, press
[ ] to insert a space. If the correct word
does not display, select an alternate
word from the list that appears.
Press the appropriate alphanumeric key to
enter a number.
Press the appropriate alphanumeric key to
select a symbol.
using basic functions
25

View text or multimedia messages
1. In Menu mode, select Messages → Inbox.
2. Select a text or multimedia message.
View an email
1. In Menu mode, select Messages → Email
using basic functions
inbox.
2. Press <Options> → Download.
3. Select an email or a header.
4. If you selected a header, press <Options> →
Retrieve to view the body of the email.
26
Add and find contacts
Learn the basics of using the phonebook feature.
Add a new contact
1. In Idle mode, enter a phone number and press
<Options>.
2. Select Add to Phonebook → a memory location
(phone or SIM) → New.
3. Select a number type (if necessary).
4. Enter contact information.
5. Press the Confirm key or press <Options> →
Save to add the contact to memory.

Find a contact
1. In Menu mode, select Phonebook.
2. Enter the first few letters of the name you want to
find.
3. Select the contact’s name from the search list.
Once you have found a contact, you can:
• call the contact by pressing [ ]
• edit the contact information by pressing
<Options> → Edit
Use basic camera functions
Learn the basics to capture and view photos and
videos.
Capture photos
1. In Idle mode, press and hold the Camera key to
turn on the camera.
2. Rotate the phone anti-clockwise to landscape
view.
3. Aim the lens at the subject and make any
adjustments.
4. Press the Confirm key or the Camera key to take
a photo.
The photo is saved automatically.
5. Press < > or the Camera key to take another
photo (step 3).
View photos
In Menu mode, select My files → Images → My
photos → a photo file.
using basic functions
27

Capture videos
1. In Idle mode, press and hold the Camera key to
turn on the camera.
2. Rotate the phone anti-clockwise to landscape
view.
3. Press [1] twice to switch to Recording mode.
using basic functions
4. Aim the lens at the subject and make any
adjustments.
5. Press the Confirm key or the Camera key to start
recording.
6. Press < > or the Camera key to stop
recording.
The video is saved automatically.
7. Press < > or the Camera key to record another
video (step 4).
28
View videos
In Menu mode, select My files → Videos → My
video clips → a video file.
Listen to music
Learn how to listen to music via the music player or
FM radio.
Listen to the FM radio
1. Plug the supplied headset into the phone’s
multifunction jack.
2. In Menu mode, select Applications → FM
radio.
3. Press the Confirm key to turn on the FM radio.

4. Press <Yes> to start automatic tuning.
The radio scans and saves available stations
automatically.
The first time you access the FM radio, you will
be prompted to start automatic tuning.
5. Scroll up or down to a radio station.
6. If you want to get information about the song you
hear, press <Options> → Music recognition.
X
p. 40
7. To turn off the FM radio, press the Confirm key.
Listen to music files
Start by transferring files to your phone or memory
card:
• Download from the wireless web.
• Download from a PC with the optional Samsung
PC Studio.
• Receive via Bluetooth.
X
p. 37
X
p. 42
X
p. 30
X
• Copy to your memory card.
p. 37
After transferring music files to your phone or
memory card,
1. In Menu mode, select Music → Music player.
2. Select a music category → a music file.
3. Control playback using the following keys:
Key Function
Confirm
Volume
Navigation
Pause or resume playback
Adjust the volume
• Left: Restart playback; Skip
backward (press within 3
seconds); Scan backward in a
file (press and hold)
• Right: Skip forward; Scan
forward in a file (press and hold)
• Up: Open the play list
• Down: Rate the current track
using basic functions
29
Browse the web
Learn to access and bookmark your favourite web
pages.
Browse web pages
1. In Menu mode, select Browser → Home to
using basic functions
launch your service provider’s homepage.
2. Navigate web pages using the following keys:
Key Function
Scroll up or down on a web page
Select an item
>
Return to the previous page
>
Access a list of browser options
30
Navigation
Confirm
<
Back
<
Options
Bookmark your favourite web pages
1. In Menu mode, select Browser → Bookmarks.
2. Press <Options> → Add bookmark.
3. Enter a page title and a web address (URL).
4. Press <Save>.
Use the Google services
If the Navigation service is available, the
Google service is unavailable. For information
about
Navigation
included on the supplied CD.
Connect to Search
1. In Menu mode, select Google → Search.
2. Enter a keyword in the search box.
, refer to the user manual
 Loading...