

Page 1
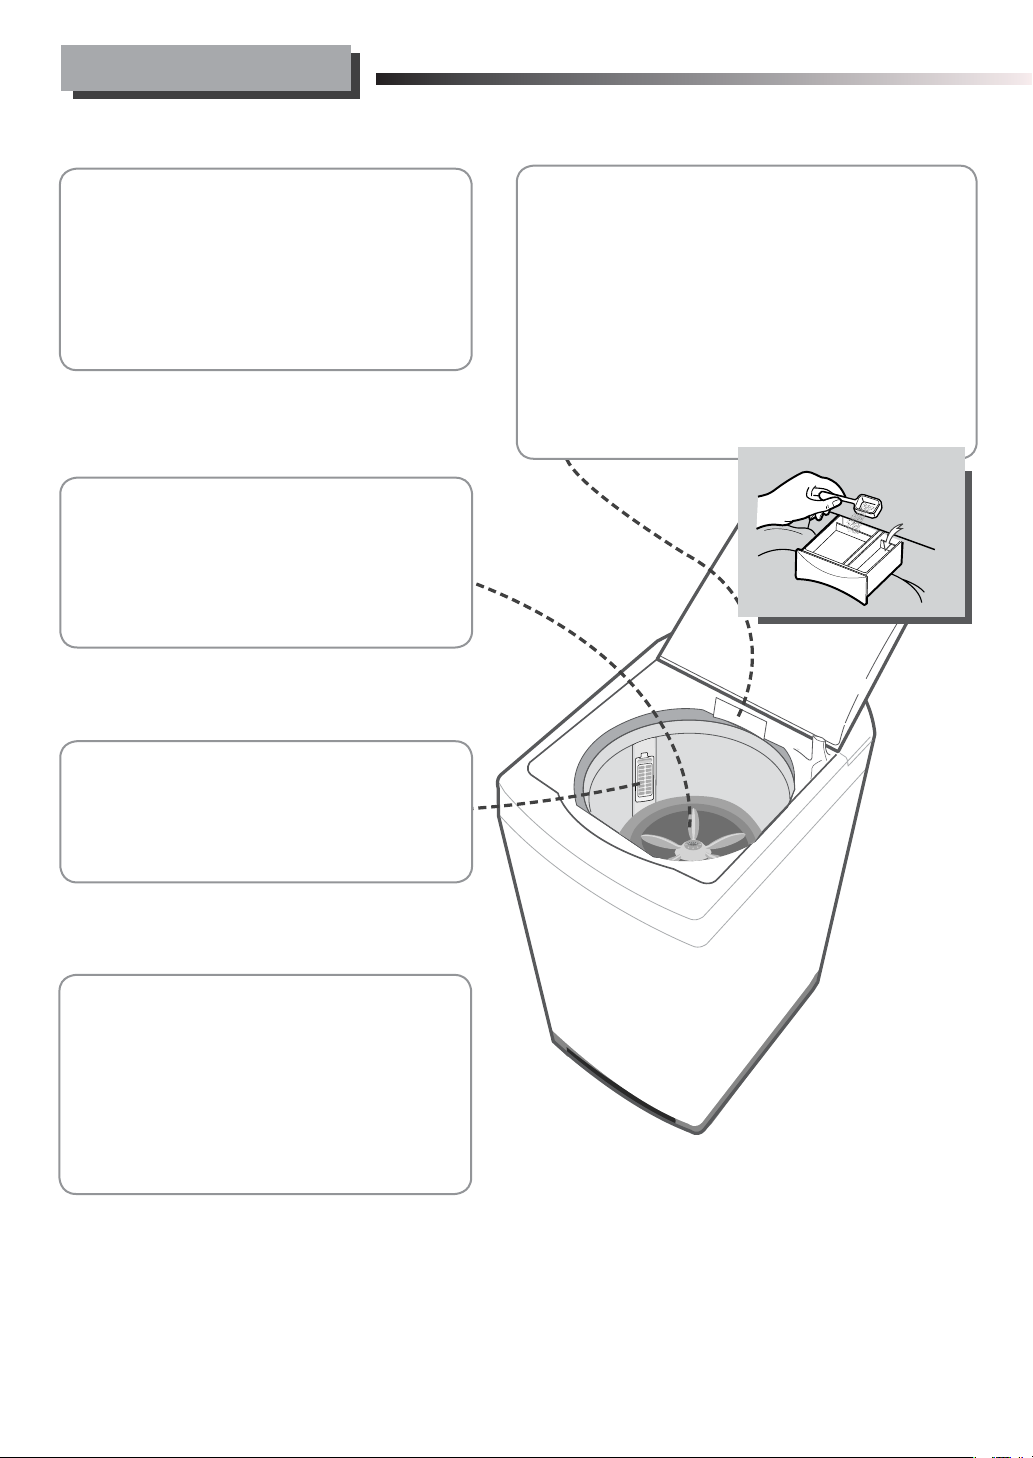
FEATURES
Water saving course:
1
• Designed to address concerns on water
consumption. Less water is used per
wash, while continuing to deliver a clean
and effective washing performance.
It has been certified with an 4A rating
from the Water Service Association of
Australia.
Center Jet pulsator:
2
• The "Jets of water" generated from the
center of the Pulsator improves washing
effectiveness by lifting any clothes
that fall down onto the surface of the
Pulsator, preventing tangle.
Bio magic filter:
3
• This unique magic Filter ensures that
all the lint inside the tub is captured
for top quality filtering results to deliver
consistently effective cleaning results.
Detergent box and fabric softener
5
dispenser:
• The detergent box evenly dispenses the
washing detergent during the wash cycle to
improve detergent dilution and reduce residue
build-up.
This feature also prevents bleaching damage
to clothes from undiluted detergent when using
the delay start cycle.
• The convenient fabric softener dispenser adds
the softener automatically.
FABRIC
SOFTENER
Waterfall Flow:
4
• The Waterfall Flow injected from
under the pulsator cascades with full
force back into the tub, pushing down
any clothes that float right under the
water surface. It is this Waterfall Flow
that enables this washing machine to
effectively wash large and heavy items,
such as bluejeans and blankets.
1
Page 2
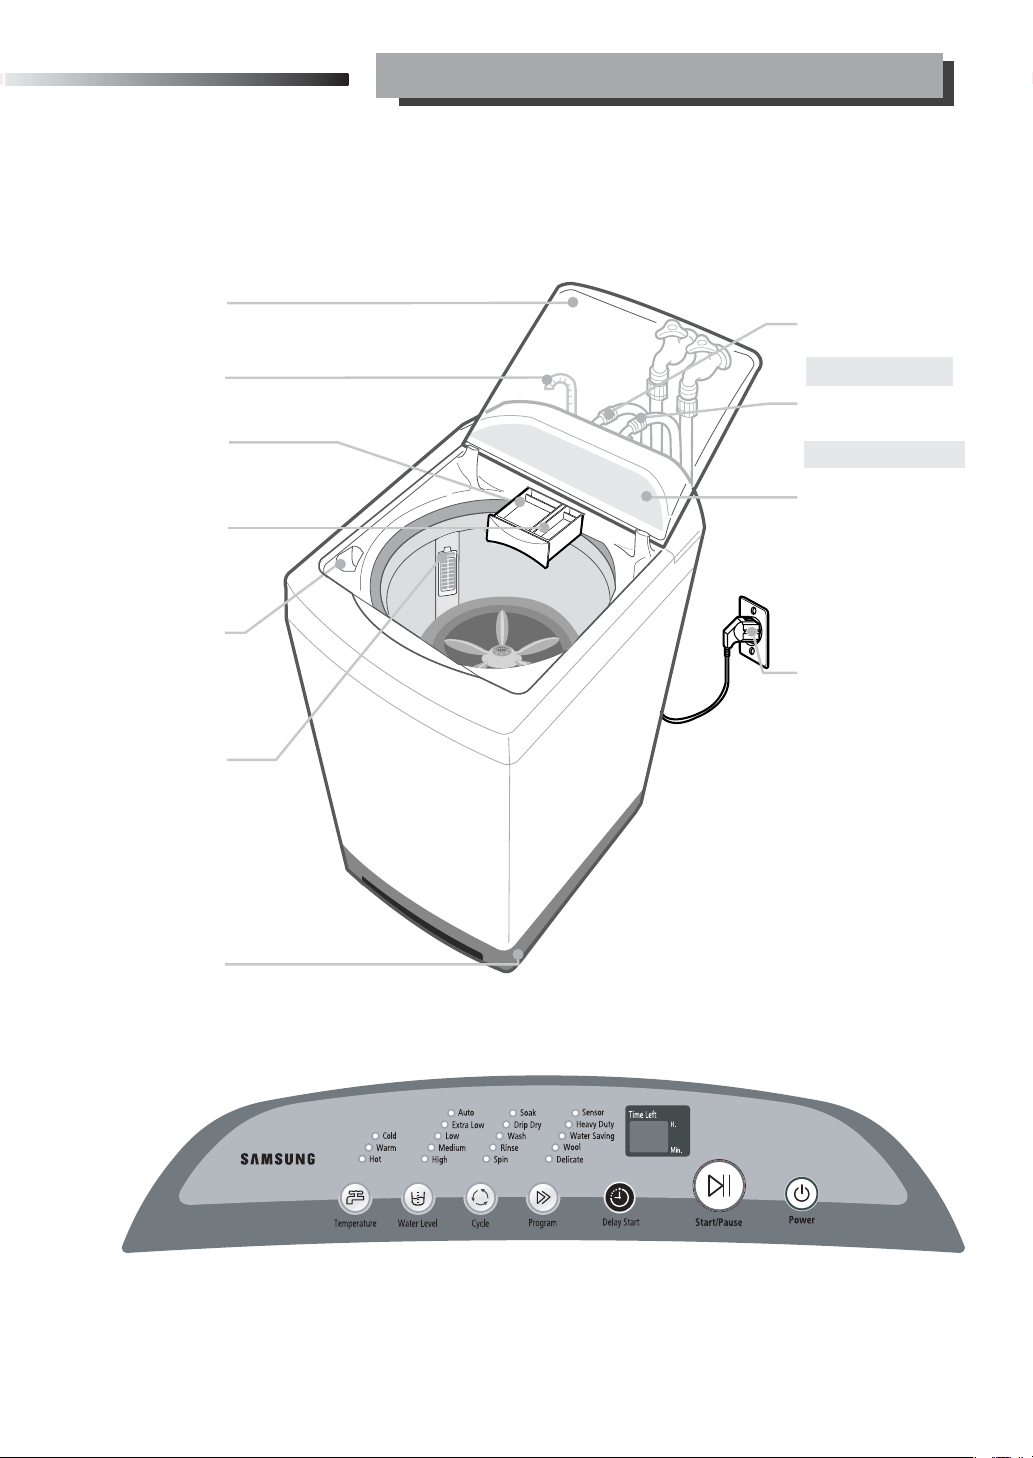
DESCRIPTION OF PARTS
LID
DRAIN HOSE
DETERGENT BOX
FABRIC SOFTENER
DISPENSER
BLEACH INLET
MAGIC FILTER
WATER
SUPPLY HOSE
RED-HOT WATER
WATER SUPPLY
HOSE
BLUE-COLD WATER
CONTROL PANEL
POWER PLUG
HEIGHT
ADJUSTING FEET
CONTROL PANEL
2
Page 3

SAFETY INSTRUCTIONS
WARNING!
To reduce the risk of fire, electric shock, or injury to persons when using your appliance,
take care to adhere to the following precautions.
• Where an unearthed power cord is not fitted,
be sure that the washer is grounded.
To avoid electrical shock use metal piping for the ground
connection.
Take care not to ground the washer to gas pipes or
telephone cables due to the danger of explosion from
lightning strikes.
• During spinning, don't put your
hand in the spin basket.
Because the spin basket is rotating
at the high speed, rotating parts
may injure your hand.
• Openings must not be obstructed
by carpeting when the washing machine is
installed on a carpeted floor.
• Turn off water taps when the washer is not in
use to avoid water pressure damage to the
pump.
• To minimize the possibility of electric shock,
unplug this appliance from the power supply
or disconnect the washer at the household
distribution panel by removing the fuse or
switching off the circuit breaker before
attempting any maintenance or cleaning.
• The appliance is not intended for use by young
children or infirm persons without supervision.
• Young children should be supervised to ensure
that they do not play with the appliance.
• If the power supply cord is damaged,
it must be replaced by the manufacturer
or its service agent or a similary qualified
person in order to avoid a hazard.
• Place clothes evenly into the washer
as unevenly distributed laundry may cause
excessive out-of-balance noise and vibration.
• Maximum hot water supply temperature
60 degrees.
• Before washing, check all pockets.
If nails or pins remain in pockets, they may
damage the washer or clothes.
• Don’t press the control panel with a
sharp object.
Panel damaged or malfunction may occur.
If the control panel for this
washer is damaged, it must be
replaced by a repair shop appointed
by the manufacturer, as special
purpose tools are required.
• Do not operate this appliance
if it is damaged, malfunctioning,
partially disassembled, or has
missing or broken parts, including
a damaged cord or plug.
• Do not store or use gasoline
or other flammable vapors
and liquids in the vicinity of this
or any other appliance.
• The instructions for use shall specity the
maximum mass or dry cloth in kg, for which
the appliance is designed.
• If the appliance is supplied from a cord
extension set or electrical portable outlet
device the cord extension set or electrical
portable outlet device should be positioned
so it is not subject to splashing or ingress
of moisture.
• This appliance is not intended for use by young
children or infirm persons unless they have
been adequately supervised by a responsible
person to ensure that they can use the
appliance safely.
Young children should be supervised to ensure
that they do not play with the appliance.
3
Page 4

INSTALLATION & MAINTENANCE
ENVIRONMENT
Leave some space.
Maintain at least 10cm between the washer
and the wall.
Place the washer on a sturdy flat surface.
If the washer is placed on an uneven or weak
surface, noise and vibration can occur
Never install the washer in a very steamy
(allowable slope is 1 degree)
IN CASE OF PUMP-DRAINED WASHER
•
Take out the
cap-hose
connect the
outlet-hose.
cap-hose
outlet-hose
environment or where it might be open to the rain.
Excessive moisture may cause an electrical shock hazard.
Avoid direct sunlight or heaters.
As plastic and electrical components are affected
by direct heat,never place the washer near furnaces,
boilers,etc.Do not place under direct sunlight.
HOW TO CONNECT WATER SUPPLY HOSE
Check the type of tap fitting which is in your laundry and then see appropriate instruction below:
A tap of ordinary type is desirable
In case of square tap
•
Take out the internal part of the connector
and join it in the following way.
•
Be sure to join tightly
and
the drain hose into the
drain-outlet on the left
side of the machine.
•
Install the drain
hose in the position
of about 70~80cm
above the ground.
ORDINARY TAP SQUARE TAP ROTATING TAP
Internal part
1.Remove the adaptor from the
water supply hose.
2.First,using a "+" type screw
driver, loosen the four screws
on the adaptor.
Next,take the adaptor and
turn part(b) following the
arrow for gap about 5mm
between them.
3. Connect adaptor to the water
tap by tightening the screws
firmly.
Then,turn part (b) following
the arrow and put (a) and
(b)together.
Note : The appliance is to be connected to the water mains using new hose-sets and that old hose-sets should not
be used.
4.Connect the water supply hose to
the adaptor. Pull down the part
(c) of the water supply hose .
When you release part (c) the
hose is automatically connects to
the adaptor making a 'click'
sound.
5.Connect the other end of the
water supply hose to the inlet
water valve at the top of the
washer.
Screw the hose clockwise all
the way in.
6.If the water tap is a screw
type,assemble a water
supply hose that fits to
the tap as shown.
4
Page 5

HOW TO CLEAN THE FILTER
Clean the filter net often to keep the washer clean.
CLEANING THE FILTER
1.
Place a rag under washer filter not to wet the floor.
2.
Turn the filter-cap to the left.
3.
Take out the filter and remove any sludge.
(pump drained washer)
4. Reassemble in reverse order.
1. Push the upper
part of the filter
and pull in.
2. Open the cover
as shown in the
figure.
3. Clean the filter. 4. Close the cover and insert
the lower part of the filter in
the basket first and then
push the filter with "click"
sound .
HOW TO ADD THE DETERGENT
1.
Open the detergent box
by pulling in the direction of the
arrow as shown in the figure.
2.
Add the amount of detergent for one
washing evenly in the box so that the
detergent does not overflow the box.
HOW TO ADD THE FABRIC SOFTENER
• When a proper amount of fabric softener is stored
in the box, it is automatically added in at the
final rinse cycle.
• In case the hot water only is connected,
this function will not be operated.
LEVELLING
1. Pull down the adjusting handles of
the adjusting feet which are located
at the right and left of the front side.
2. Adjust the height of the
machine upwards or downwards.
3. When the adjustment is finished,
push back the handles to fix the
adjusting feet.
NOTE
Do not kick or step on the adjusting
handles.
• When too much softener is stored above the
base line, it may not be operated properly.
SEE IF THE MACHINE IS PLACED LEVEL BY CHECKING
THE POSITION OF THE WASHING TUB.
• Open the lid of the machine, pour water into the tub up
to the level just below the pulsator, and adjust the legs
so that the pulsator is positioned at the center of the
water as shown in the figure.
• Place the machine more than 10cm away from the wall.
5
Page 6

PRECAUTIONS
WARNING! NOTE THE FOLLOWING PRECAUTIONS TO PREVENT ELECTRICITY
LEAKAGE AND THE POSSIBILITY OF ELECTRIC SHOCK.
Earthing is necessary to prevent leakage or electric shocks caused by the electric currents leaked from the machine.
How to earth an outlet with earthing terminals when
an earthed power load is not fitted.
Outlet with earthing terminals:
• Even when the internal wires of the earthing terminals are joined,
connect the earthing conductor (green) of the machine to the tap.
When using an extension cord and a boosting transformer:
• Make sure that the earthing conductor is connected.
Never make an earthing to
• The telephone line, lightning rod, or gas pipe as it is
extremely dangerous in case of lightning strikes.
TO DO A CLEAN WASHING
• Press the POWER botton.
• Pour a little detergent into case-detergent.
• Turn on water supply to the wshing machine.
• Choose the SOAK in CYCLE button and the HIGH in WATER LEVEL button.
• Press the START/PAUSE button.
WASHING INSTRUCTION
PROCEDURE
1. Sort the laundry into separate wash loads.
Each load of washing should contain clothing which needs the same washing conditions.
For example, you should not wash delicate clothes with very dirty work clothes.
2. Load the laundry into washing.
Before load, check all pockets, and close zippers, hooks and eyes.
3. Add the detergent. (see page 5)
4. Add the fabric softener. (see page 5)
5. Close the lid.
6. Press power button.
7. Choose the wash program & optional cycle. (see page 7~8)
If you choose “SENSOR” program you don’t need to select water level.
Water level is set automatically at “SENSOR” program.
Press the START/PAUSE button.
8. Select the water level.
Before choosing the water level, remember following things.
When you choose SENSOR, HEAVY-DUTY, WATER SAVING, DELICATE program,
water level is selected “AUTO” automatically, but if you want to choose water level manually
you can select. HIGH, MEDIUM, LOW, EXTRA LOW
6
Page 7

9. Select the water temperature.
Before choosing thr water temperature remember the following:
1) You can choose HOT, WARM, COLD on all programs except for delicate program.
HOT is hot wash and cold rinse.
WARM is warm wash and cold rinse.
COLD is cold wash and cold rinse.
2) When you choose delicate program, water temperature is selected automatically
for warm wash and warm rinse.
10. Close the lid and press the START/PAUSE button.
11. Do you want extra rinse?
For extra rinses press the cycle key 1 to 5 times (depending on the number of extra rinses required).
You can select up to 5 extra rinses or return to a single rinse by pressing the cycle key.
The time left display will show the number of rinses selected.
Note that the extra rinse program is not available when pause is selected or during the spin cycle.
WASH PROGRAM
SENSOR HEAVY DUTY WATER SAVING WOOL DELICATE
Wash Time 18 min 21 min 18 min 6 min 6 min
Wash Action Normal Normal Normal Gentle Gentle
HOT HOT HOT
Wash Temp.
Deep Rinse COLD COLD COLD
Spin Time 6 min 6 min 6 min 1 min 1 min
Total Time
(High Water level)
WARM WARM WARM WARM WARM
COLD COLD COLD COLD COLD
WARM
COLD
56 min 59 min 48 min 36 min 37 min
WARM
COLD
WASHING PROGRAM
SENSOR Program
• The best washing program is chosen automatically
• Load size and water level is determined automatically
❖ Unplug the power cord after washing.
Water saving Program
• Saving your time and energy
• This program is suitable for saving water consumption
• Load size and water level are determined automatically
or you can choose the water level you want
❖ Unplug the power cord after washing.
DELICATE Program
• Washing action is very gentle, so this program is suitable for
delicate clothes like lingerie.
• Load size and water level are determined automatically
or you can choose the water level you want
❖ Unplug the power cord after washing.
HEAVY DUTY Program
• This program is suitable for heavily soiled laundry
• Load size and water level are determined automatically
or you can choose the water level you want
❖ Unplug the power cord after washing.
WOOL Program
• This program is suitable for woollen clothes
• Only high and medium water levels are available
❖ Unplug the power cord after washing.
7
Page 8

OPTIONAL CYCLE
WASH ONLY
• When you choose this cycle, only wash cycle is operated.
• Pressing optional cycle key during washing changes the wash
time in two minute intervals.
• The wash time can be changed to between 3 and 25 minutes.
• Load size and water level is determined automatically.
❖ Unplug the power cord after washing.
SOAK
• The laundry is soaked in water so that heavy dirt can be
eliminated sufficiently.
• You can choose soak cycle after choosing wash program.
• When you select soak function, 5 minute cycle (1 min. washing
then 4 min. pause) continue for 30 minutes before main wash
program.
• Load size and water level is determined automatically.
❖ Unplug the power cord after washing.
SPIN ONLY
• When you choose this cycle, only spin cycle is operated.
• Pressing cycle key during spinning only cycle changes the
spin dry time.
The spin dry time can be changed to between 1 and 7 minutes.
❖ Unplug the power cord after washing.
RINSE ONLY
• When you choose this function, only rinse cycle is operated.
• Pressing function key during rinsing changes the number of
rinses. Up to 5 rinses can be optionally selected.
❖ Unplug the power cord after washing.
DRIP DRY
• This function allows you to take drip clothes out of the washing
machine while they are still wet before the final spin.
• You can choose drip dry cycle after choosing main wash
program.
• When you select drip dry the cycle is finished before final spin.
❖ Unplug the power cord after washing.
RINSE AND SPIN ONLY
● When you choose this cycle, only rinse & spin cycle are
operated without wash cycle.
● Pressing cycle key during operation changes the number
of rinse (see above).
You cannot change the spin dry time using this function.
❖ Unplug the power cord after washing.
DELAY START
• This function allows you to delay the start of your chosen wash program for 3, 4, ... 18 hours.
• By pressing the delay start key you can select delayed period for 3, 4, ... 17, 18 hours, and your washing machine will finish
the selected wash program after the delayed period.
TROUBLESHOOTING
Washing machine won’t work
Is the water tap opened?
Is the washer plugged in?
Is the power cut off?
Is the fuse all right?
Is there enough water?
Water does not drain
Is the drain hose down? (No pump)
Is the drain hose frozen?
Is the drain hose clogged?
If the water does not drain in 15
minutes, a buzzer will sound,
and the remaining time
indicator will show “E”
While lid is opening,
the washing machine won’t work
Make sure to close the lid while washing
machine is operating.
Spinning does not work
Is the laundry spread out evenly
in the washer?
Is the washer set on a sturdy
flat surface?
Is the lid closed?
Water is not supplied
Is the water tap opened?
Is the water cut off?
Is the water supply hose or hose
connection clogged?
Is the water tap frozen?
If water is not supplied in 60 minutes,
a buzzer will sound, and the
remaining
time indicator will shown “7E”.
Water supply does not stop
Close the water tap.
Disconnect the power supply cord.
Call Samsung or service centre.
8
Page 9

IF YOU NEED HELP WITH YOUR NEW SAMSUNG WASHING MACHINE
Contact your nearest Samsung office or Samsung authorised
service centre for technical assistance.
Register your porduct at
www.samsung.com/global/register
SPECIFICATION
Bowl Stainless Steel
Power input(Watts)
Load capacity(kg) 6.5
Size (WxDxH)(mm)
Net Weight (kg) 48
Water Consumption(liters)
Water Pressure(min-max) 50~780KPa
CODE NO : DC68-00967C
SW674ASP
450
600X660X1010
150(high)
Page 10

WASHING MACHINE
User’s Manual
SW674ASP
“In order to prevent malfunctioning of the appliance, before
using your washing machine for the first time, please read this
user manual carefully and keep it at hand for future reference.”
FEATURES . . . . . . . . . . . . . . . . . . . . . . . . . . . . . . . . . . . . . . . . . . . . . .1
DESCRIPTION OF PARTS. . . . . . . . . . . . . . . . . . . . . . . . . . . . . . . . . . 2
SAFETY INSTRUCTIONS . . . . . . . . . . . . . . . . . . . . . . . . . . . . . . . . . .3
INSTALLATION & MAINTENANCE . . . . . . . . . . . . . . . . . . . . . . . . . . . 4
ENVIRONMENT . . . . . . . . . . . . . . . . . . . . . . . . . . . . . . . . . . . . . . .4
HOW TO CONNECT WATER SUPPLY HOSE . . . . . . . . . . . . . . . .4
IN CASE OF PUMP-DRAINED WASHER . . . . . . . . . . . . . . . . . . . .4
HOW TO CLEAN THE FILTER . . . . . . . . . . . . . . . . . . . . . . . . . . . .5
HOW TO ADD THE DETERGENT . . . . . . . . . . . . . . . . . . . . . . . . .5
HOW TO ADD THE FABRIC SOFTENER . . . . . . . . . . . . . . . . . . .5
CLEANING THE FILTER
LEVELLING . . . . . . . . . . . . . . . . . . . . . . . . . . . . . . . . . . . . . . . . . . .5
PRECAUTIONS . . . . . . . . . . . . . . . . . . . . . . . . . . . . . . . . . . . . . . . .6
WASHING INSTRUCTION . . . . . . . . . . . . . . . . . . . . . . . . . . . . . . . . . .6
PROCEDURE . . . . . . . . . . . . . . . . . . . . . . . . . . . . . . . . . . . . . . . . .6
WASH PROGRAM . . . . . . . . . . . . . . . . . . . . . . . . . . . . . . . . . . . . .7
WASHING PROGRAM . . . . . . . . . . . . . . . . . . . . . . . . . . . . . . . . . . . . .7
OPTIONAL CYCLE . . . . . . . . . . . . . . . . . . . . . . . . . . . . . . . . . . . . . . . . 8
TROUBLESHOOTING . . . . . . . . . . . . . . . . . . . . . . . . . . . . . . . . . . . . . 8
SPECIFICATION
(pump drained washer). . . . . . . . . . . . . . 5
 Loading...