

Samsung SVP-5000N, SVP-5100N, SVP-5200N, SVP-5000P, SVP-5100P Operation Manual
...
WHERE THE VIDEO PRESENTER IS NEEDED 4
CHECKING PARTS 5
Accessories Supplied 5
Options 5
CONTROL LOCA TIONS AND FUNCTIONS 6
Front View 6
Control Panel 7
Input and Output Connectors 7
Remote Control 8
CONNECTION 10
To TV or Monitor 10
To TV or Monitor and External AV Device 10
To Personal Computer 11
To AC Power Outlet 11
To Microphone 12
Installing Head Lamp 12
OPERATION 13
Using Control Buttons 14
Digital Features 17
OPTIONAL ACCESSORIES 19
Lightbox 19
LCD Monitor 19
Microscope Eyepiece and Lamp 20
RS-232C COMMUNICATION 22
Setup 22
Pin Configuration of RS-232C Jack 22
RS-232C Command Code 22
Data Format of State Request Code 23
CARE AND STORAGE 24
Storage 24
Safety Precautions 24
TROUBLESHOOTING 26
Replacing Fuse 27
Installing or Replacing Battery on
Remote Control
27
LENS MAGNIFICATION RAT E 28
Adapter Lens 28
Microscope Eyepiece 28
SPECIFICATIONS 29
VIDEO PRESENTER
Operation Manual
SVP-5000N/SVP-5100N/SVP-5200N
SVP-5000P/SVP-5100P/SVP-5200P
2
Thank you for purchasing this product. Your
Video Presenter displays a wide variety of
items such as documents, transparencies,
merchandise, and components, etc.
It can also display an assembly or production
procedure, as well as the motion of an object
being monitored.
High resolution and fine image quality
ensures crisp, clear image. A wide range
of functions ensures flexibility of use.
This manual covers six models.
The main differences among them are as follows:
SVP-5000N, SVP-5000P: Standard
SVP-5100N, SVP-5100P:
Standard + PC interface board equipped
SVP-5200N, SVP-5200P:
Standard + PC interface board+ Digital board
equipped
PC interface board:
This board allows the unit to be connected with a
personal computer.
Digital board:
This board allows you to save the
image data into the Video Presenter’s memory,
recall them, reverse or freeze picture and so on.
Adapter lens
It is used to project documents, slides, and
films being close.
Free-angle camera head
The camera head can be freely rotated through
270
to right or left, 120 to top or bottom for
displaying a document on a wall or an
instructor, and for demonstrating merchandise
in addition to the data on the bottom.
Easy flexible body
Each part can be bent and stretched so that you
can project any kind of objects with ease.
Automatic focusing
The Video Presenter has automatic focusing
feature. In most situations, this feature ensures
precision focusing on the object. If automatic
focusing is inadequate, you can focus manually.
Connection with a
microscope (option)
You can watch the object checked through
a microscope on the screen by connecting
an optional eyepiece with the microscope.
<SVP-5000N/5100N/5200N>
This equipment has been tested and found to comply
with the limits for a class A digital device, pursuant to
part 15 of the FCC Rules. These limits are designed to
provide reasonable protection against harmful
interference when the equipment is operated in a
commercial environment. This equipment generates,
uses, and can radiate radio frequency energy and, if
not installed and used in accordance with the
instruction manual, may cause harmful interference to
radio communications. Operation of this equipment in
a residential area is likely to cause harmful
interference in which case the user will be required to
correct the interference at his own expense.

POWER
R
B
FREEZE
REVERSE
TELE
IRIS-
1
2
RECALL
SAVE
IRIS+
WIDE
DIVIDE
SHIFT
EXIT
FLICKERLESS
AWC
W.B
SHARP
AF
COLOR/BW
MICRO
VOLUME
LIGHT
NEGA/POSI
INT/EXT
Head Lamp
This is used when you project an
object in a dark place.
Menu display on the
screen
When you control functions, the setup status
will be displayed on the screen.
Remote control
All the functions are controlled
with it.
LCD monitor
This monitor eliminates the need to provide a
separate TV monitor or to position the image while
watching the screen. The compact monitor is easy
to attach and remove, and can be adjusted to give
the best view for the operator.
Control panel
Control panel is built in the main body. You can
control main functions using the buttons on this
control panel.
Connection with PC (available for
SVP-5100N, SVP-5200N, SVP-5100P, SVP5200P)
Image displayed can be stored to a personal computer.
You can control your Video Presenter on a personal
computer using Helios program supplied.
Digital feature
(available for SVP-5200N, SVP-5200P)
Lightbox(option)
This backlight illuminator is useful to
project transparencies, slides and negative
films. It is easy to attach and remove.
This feature allows you to freeze the image, save
the displayed image into this unit's memory and
recall them any time, divide the screen to see the
recalled data and the image currently
monitoring.
3
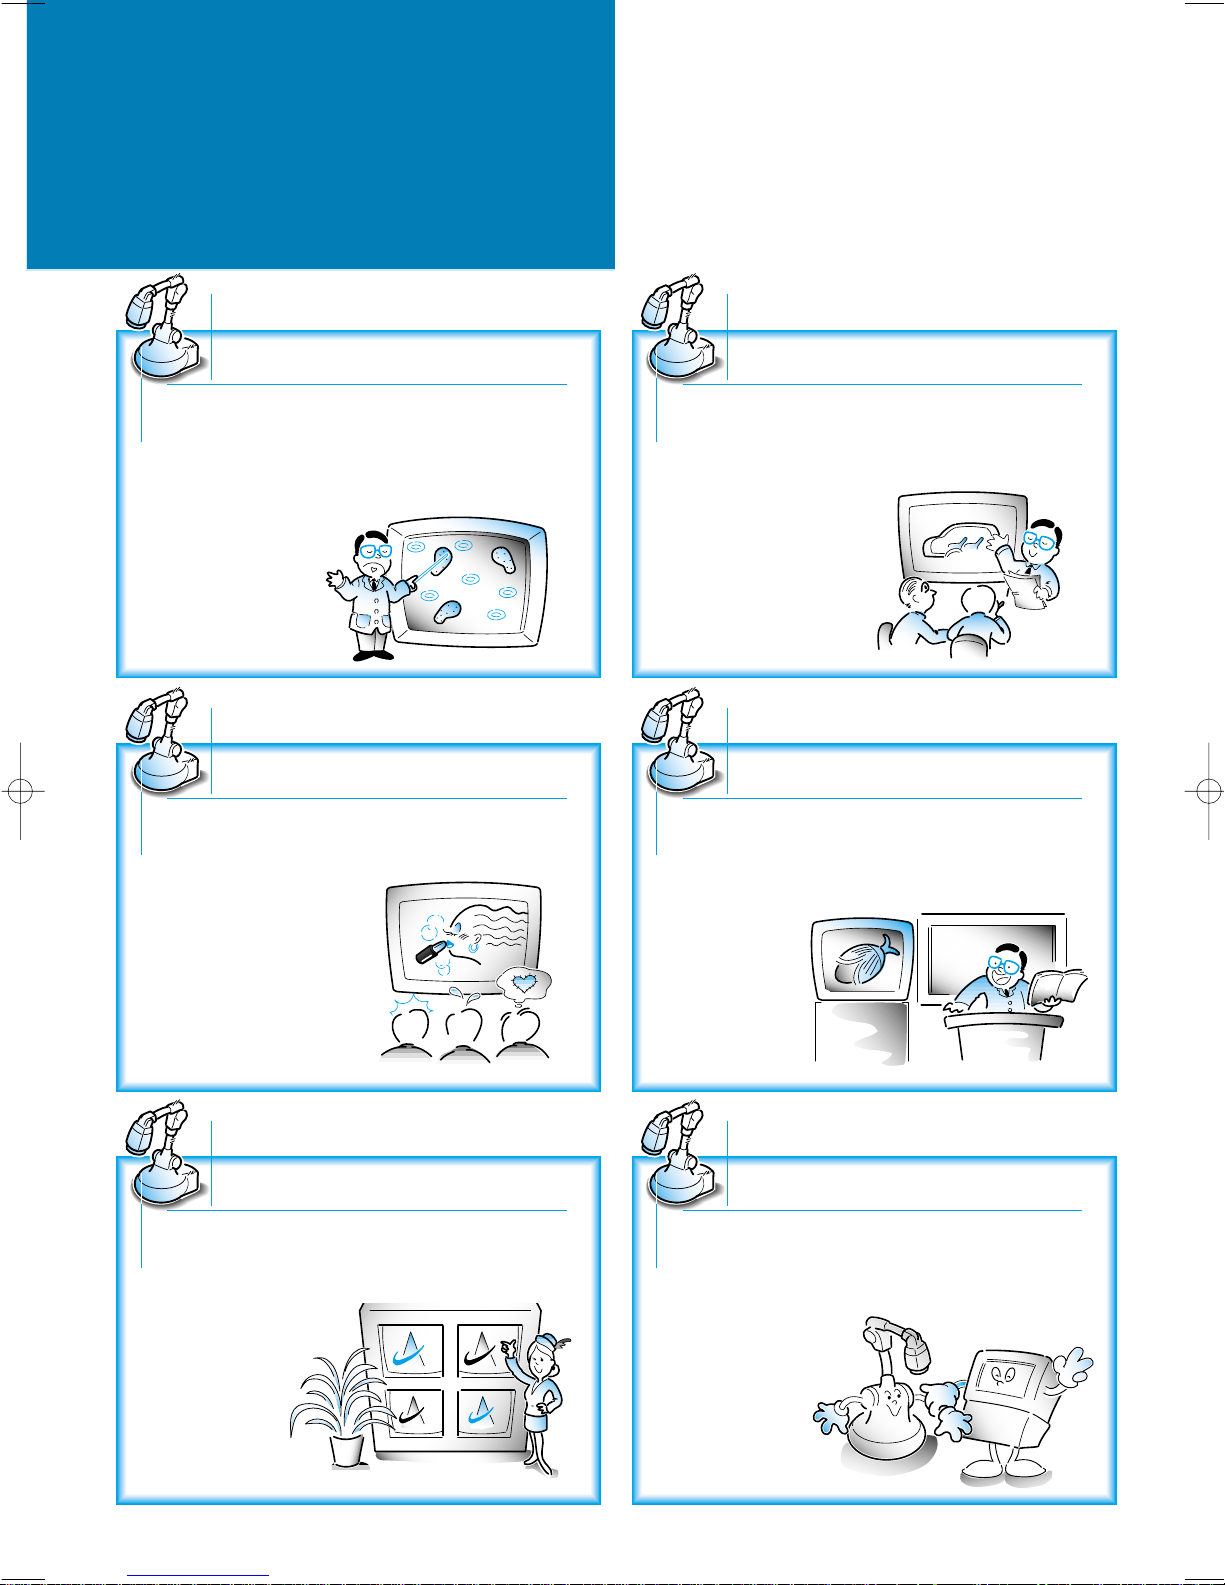
Education field
4
WHERE THE VIDEO
PRESENTER IS NEEDED
Medical or scientific research
Video conference
Design preview
PC interface
(available for SVP-5100N, SVP-5200N, SVP-5100P, SVP-5200P)
Presentation
Your Video Presenter allows you to use X-rays,
transparencies, slides and negatives for
study/research purposes. If you connect your
Video Presenter to a microscope currently used by
using optional microscope eyepiece, you can check
the object through
the microscope
on the screen.
Your Video Presenter may be effectively used to
display a design artwork of a catalog or things like
that on the screen. It allows
the effect to be viewed.
Your Video Presenter is highly usable for a image
demonstration at a presentation for a new product
or at a exhibition. It can also create a great visual
effect by connecting
multivision.
Your Video Presenter may be effectively used to
present data in a video conference. Data, a photo
and the image of a real thing at hand may be
displayed on the screen. Thus, it allows you to
communicate elaborately
in the conference.
Your Video Presenter may be effectively used as an
audio-video aid in school which shows printed
material, visual data, and even the products that the
students made. It also allows a three-dimensional
object to be
displayed.
Once it has been connected with a personal
computer, your Video Presenter may be used as a
scanner and is capable
of storing images.

CHECKING PARTS
Accessories Supplied
Remote Control
Operation manual
Head lamp
RS-232C Jack
Used to control your unit
through serial port of PC.
Audio/Video cables
Yellow plug: Video cable
White plug: Audio cable
PC interface cable and Picaso receiver program
(available for SVP-5100N/SVP-5200N/SVP-5100P/SVP-5200P)
Adapter lens and lens cap
They are pre-attached in the
main body at factory.
S-video cable
Required to connect with a TV
equipped with S-video terminal.
Power cable
Carring bag
Lamp easily attachable
Options
Lightbox (SLB-5)
Required to display a slide
and negative film.
Cable
Required to connect with PC.
LCD monitor (LCD-5500)
It allows the same video
signal to be viewed.
Diskettes
Microscope eyepiece and lamp
(MSA-5000)
Eyepiece
Required to connect with a microscope
currently used.
Operation
manual
Lamp
5
6
CONTROL LOCATIONS
AND FUNCTIONS
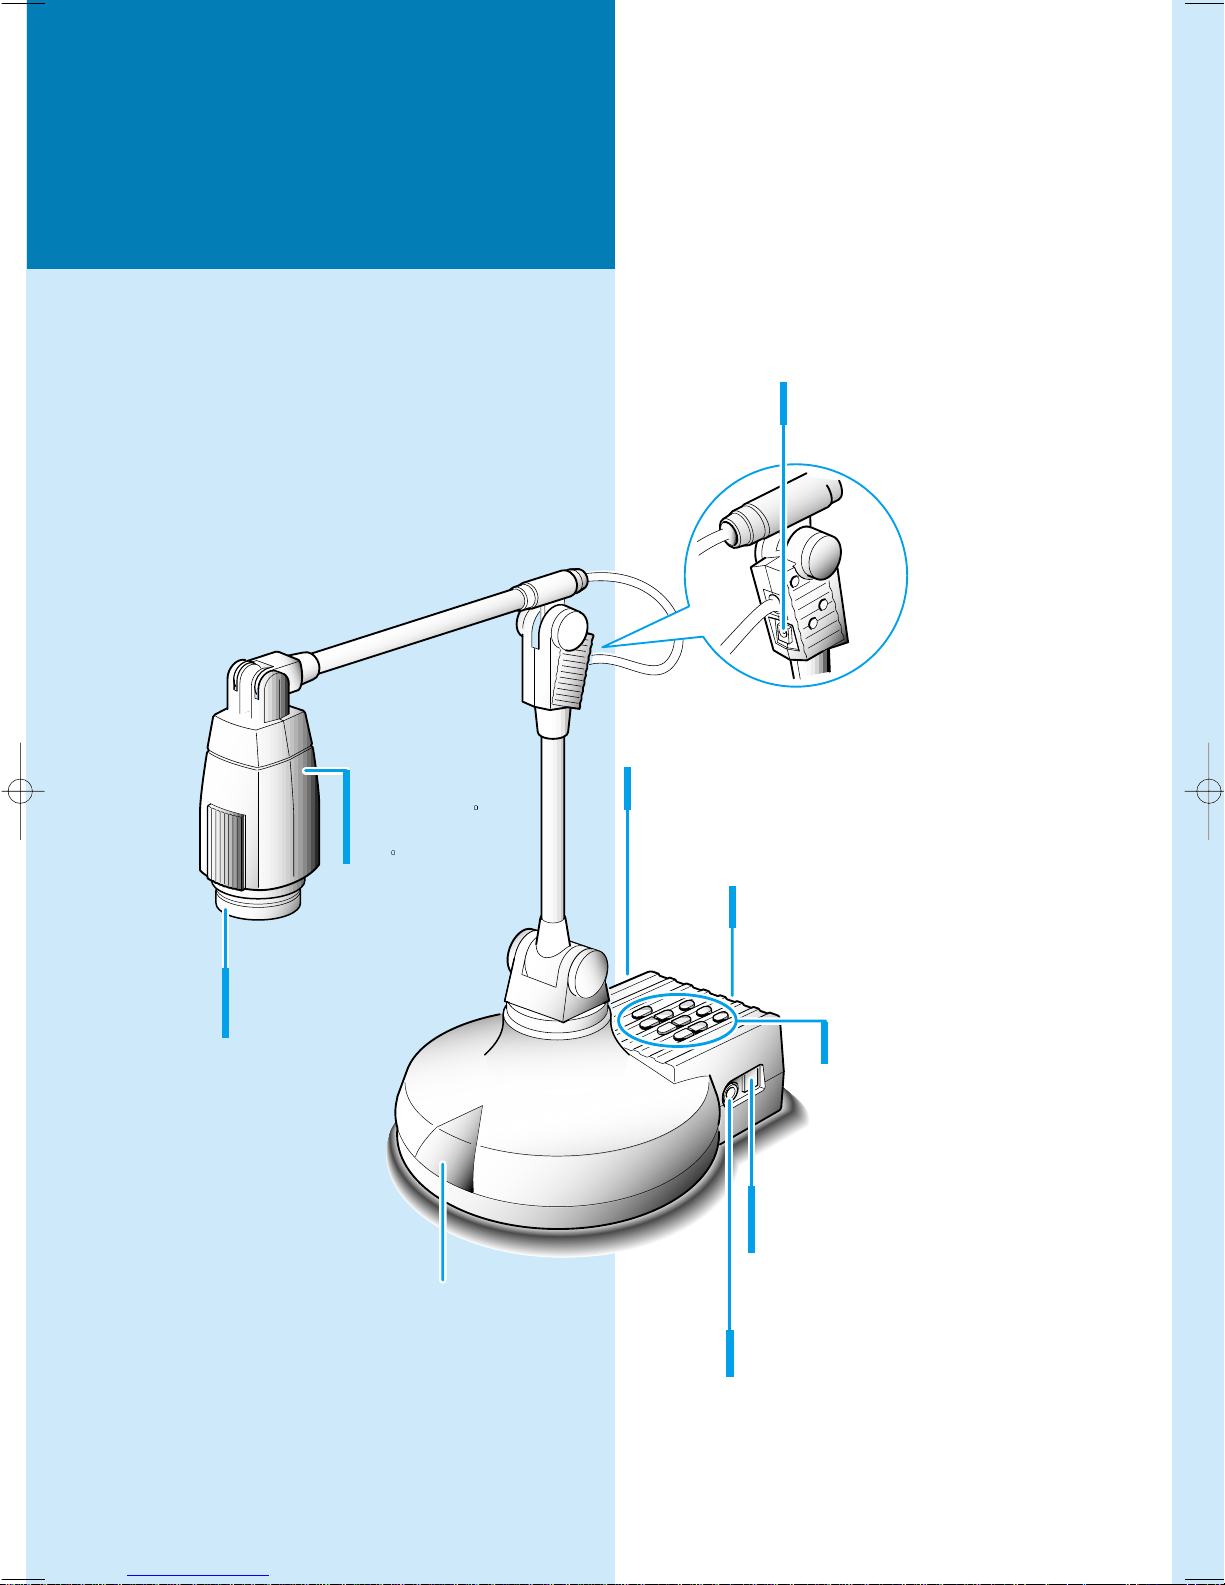
Front View
Remote control signal receiver
Camera head
Rotatable 120 to
top or bottom and
270 to right or left.
Adapter lens
Enables the unit to display
objects being close.
Control panel
Refer to the opposite page.
Connectors
Refer to the opposite page.
Microphone connector
Used to connect microphone.
Lightbox/Microscope connector
Used to connect the optional lightbox or
your microscope (DC15V, 600 mA or less).
Head lamp connector
Used to connect the head lamp.
LCD monitor connetor
Used to connect the optional LCD monitor.
POWER
IRIS AWC
AF
NEGA/POSI
FOCUS
ZOOM
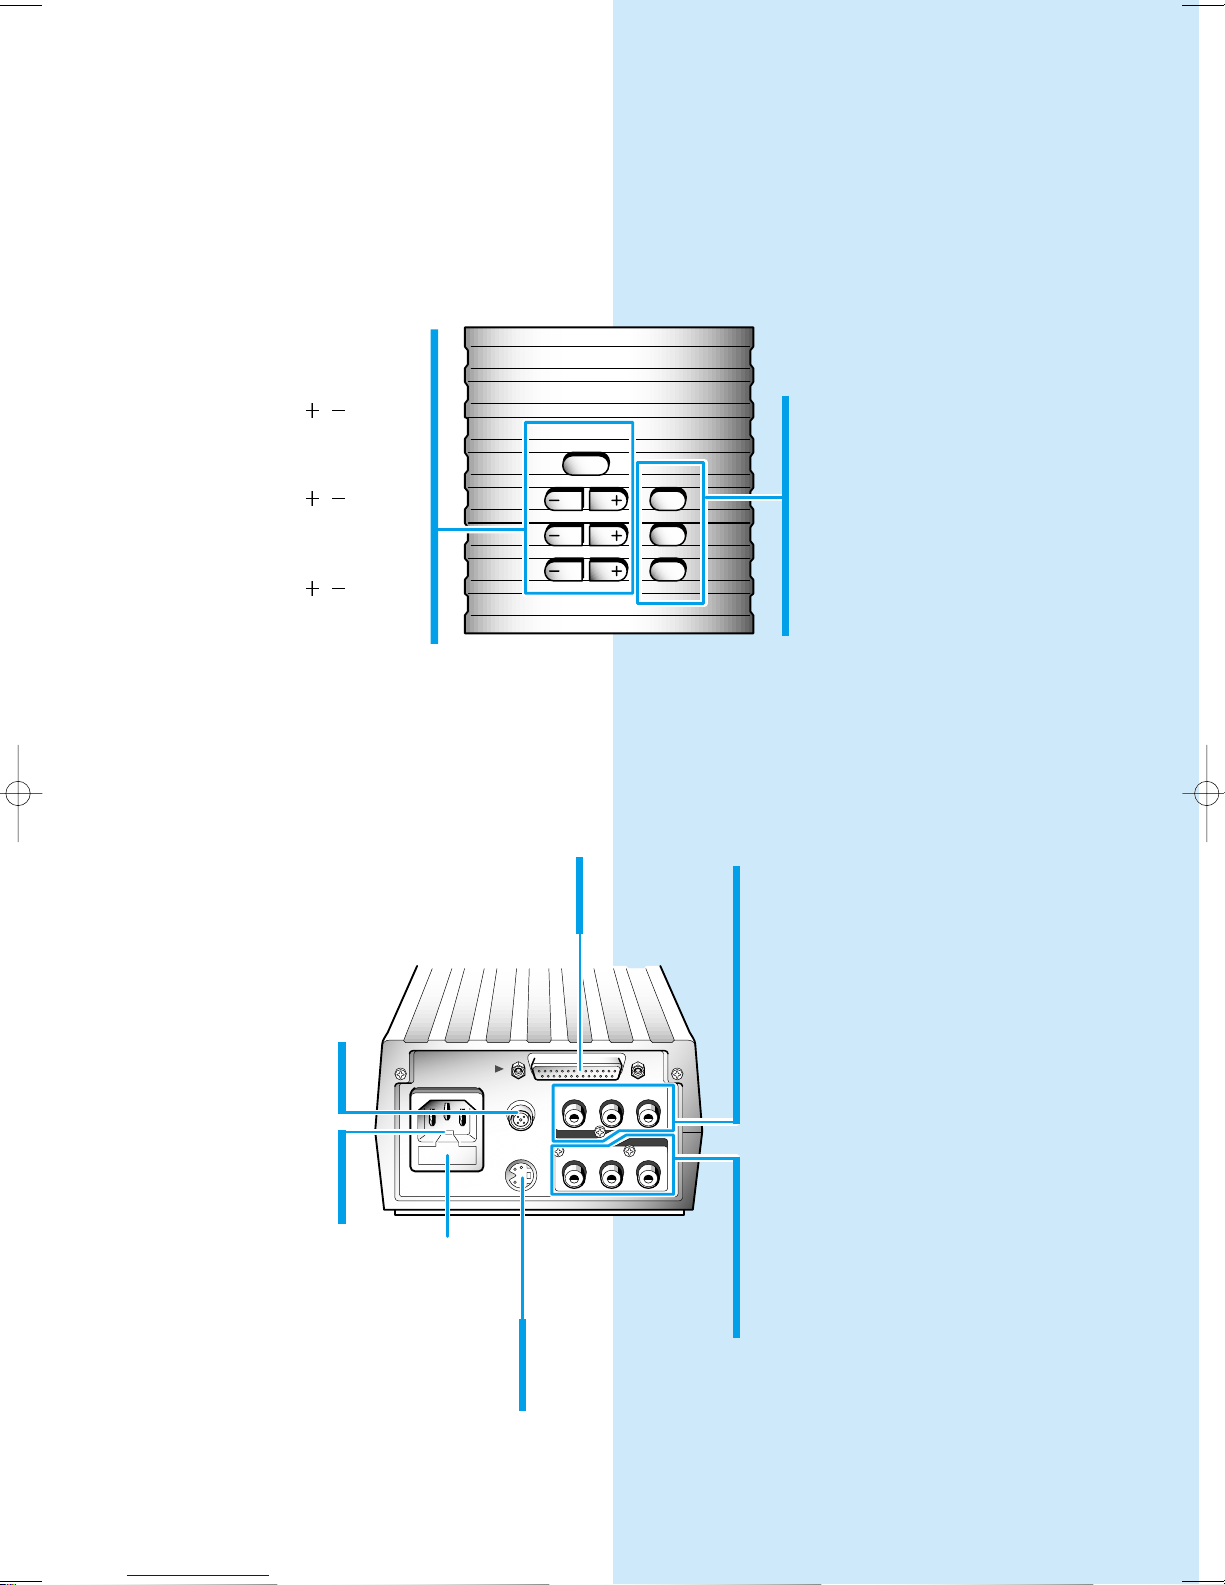
Control Panel
POWER IN
PC interface
S-Video out
RS232C
OUT 1
VIDEO
AUDIO
OUT 2 IN
OUT 1 OUT 2 IN
You can find the same function buttons on
the remote control supplied. The buttons
perform the same function as buttons on this
control panel.
POWER button
Used to turn power on and off.
IRIS / button
Used to adjust the brighteness
of the image on the screen.
FOCUS / button
Used to adjust the focus
manually.
ZOOM / button
Used to magnify or reduce the
image of an object on the screen.
Input and Output Connectors
PC INTERFACE connector
(available for SVP-5100N, SVP-5200N, SVP-5100P, SVP-5200P)
Used to be controlled by PC and send image data to PC.
AWC button
Used to adjust white balance
automatically.
AF button
Used to adjust the focusing
automatically.
NEGA/POSI button
Used to project a negative film as a
positive one.
VIDEO OUT 1, 2 jacks
Used to send video signal from your Video
Presenter to a TV or LCD projector. The
signal from these jacks are equivalent.
RS-232C Jack
Used to be controlled by PC
through serial port.
POWER IN connector
Connects to AC power
outlet (100-240V AC,
50/60Hz, 1A).
Fuse box
S-VIDEO OUT jack
Used to send video signals from your
Video Presenter to a TV equipped with
S-video input terminal.
VIDEO IN jack
Used to receive video signal from another
AV device (such as VCR or camcorder).
To see the signal from this jack, press
INT/EXT button on the remote control or
the control panel of this unit.
AUDIO OUT 1, 2 jacks
Used to send Audio signal from your Video
Presenter to a TV or LCD projector. The
signals from these jacks are equivalent.
AUDIO IN jack
Used to receive audio signal from another
AV device (such as VCR or camcorder).
7
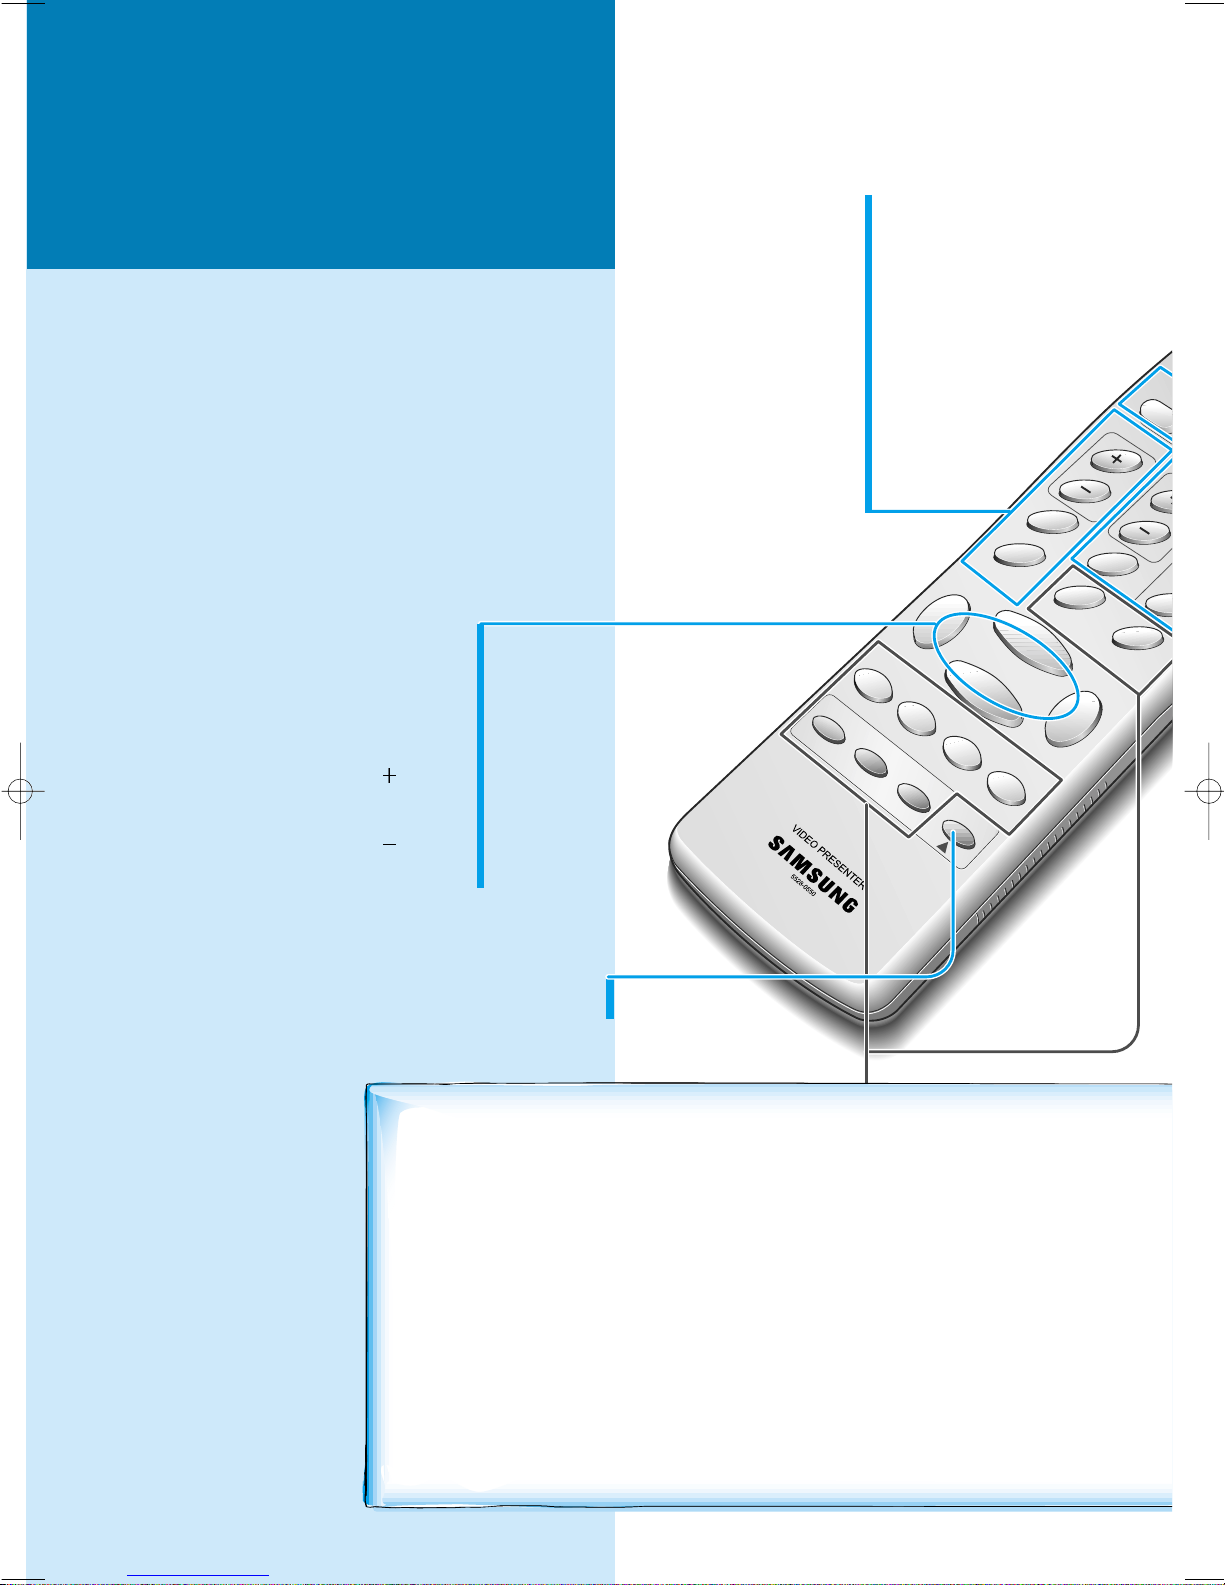
FREEZE
REVERSE
TELE
IRIS-
1
2
RECALL
SAVE
IRIS+
WIDE
DIVIDE
SHIFT
EXIT
FLICKERLESS
AWC
SHARP
AF
COLOR/BW
MICRO
INT/
8
Remote Control
All function buttons are on this remote control.
You can find several main function buttons on the
control panel of the main body. The buttons perform
the same function as buttons on this remote control.
You may use whichever button is more convenient at
time.
SHARP+ button
For making the image sharper
.
SHARP- button
For making the image duller
.
AF button
Used to focus automatically.
COLOR/BW button
Used to choose color or
black and white display.
WIDE button
Used to reduce the image of an object.
TELE button
Used to magnify the image of an object.
IRIS button
Used to increase the brightness.
IRIS button
Used to decrease the brightness.
FLICKERLESS button
Used to reduce the flicker on the screen.
CONTROL LOCATIONS
AND FUNCTIONS
(continued)
1, 2 buttons
Used with the SAVE or RECALL button
to save the image into the memory or recall
the image from the memory.
RECALL button
Used to recall the image stored in memory.
DIVIDE button
Used to divide the screen to see both of the
image of an object currently monitoring and
the image stored in memory
simultaneously on one screen.
These buttons are effective on SVP-5200N, SVP-5200P
only.
REVERSE button
Used to put the image into reverse.
It rotates the image by 180o.
FREEZE button
Used to freeze the image on the
screen.
SAVE button
Used to save the image on the screen
into this unit's memory.

POWER
R
B
W.B
VOLUME
LIGHT
NEGA/POSI
XT
12m
5m
30
5m
30
POWER button
Used to turn power on and off.
INT/EXT button
Used to choose the signal input to be displayed.
INT: Internal signal out from this unit.
EXT: External signal out from external AV device
(if connected to this unit).
NEGA/POSI button
Used to project a negative film as a positive one.
LIGHT button
Used to turn the head lamp on or off.
VOLUME / buttons
Used to increase or decrease the volume
of an optional microphone.
MICRO button
Used to see the image from a microscope.
W.B buttons
Used to adjust white balance.
R button
Used to increase the red color factor.
B button
Used to increase the blue color factor.
AWC button
Used to adjust white balance automatically.
Effective range of the remote
control
When using the remote control, always aim
it directly at the remote control receive
window of your Video Presenter. Refer to
the figure befow for acceptable range.
SHIFT button
Used to shift the recalled image shown in the
divided screen from the left to right to see the
hidden portion of the stored image.
EXIT button
Used to exit the recall or divided screen and
return to normal mode.
9
POWER IN
PC interface
S-Video out
RS232C
OUT 1
VIDEO
AUDIO
OUT 2 IN
OUT 1 OUT 2 IN
POWER IN
PC interface
S-Video out
RS232C
OUT 1
VIDEO
AUDIO
OUT 2 IN
OUT 1 OUT 2 IN
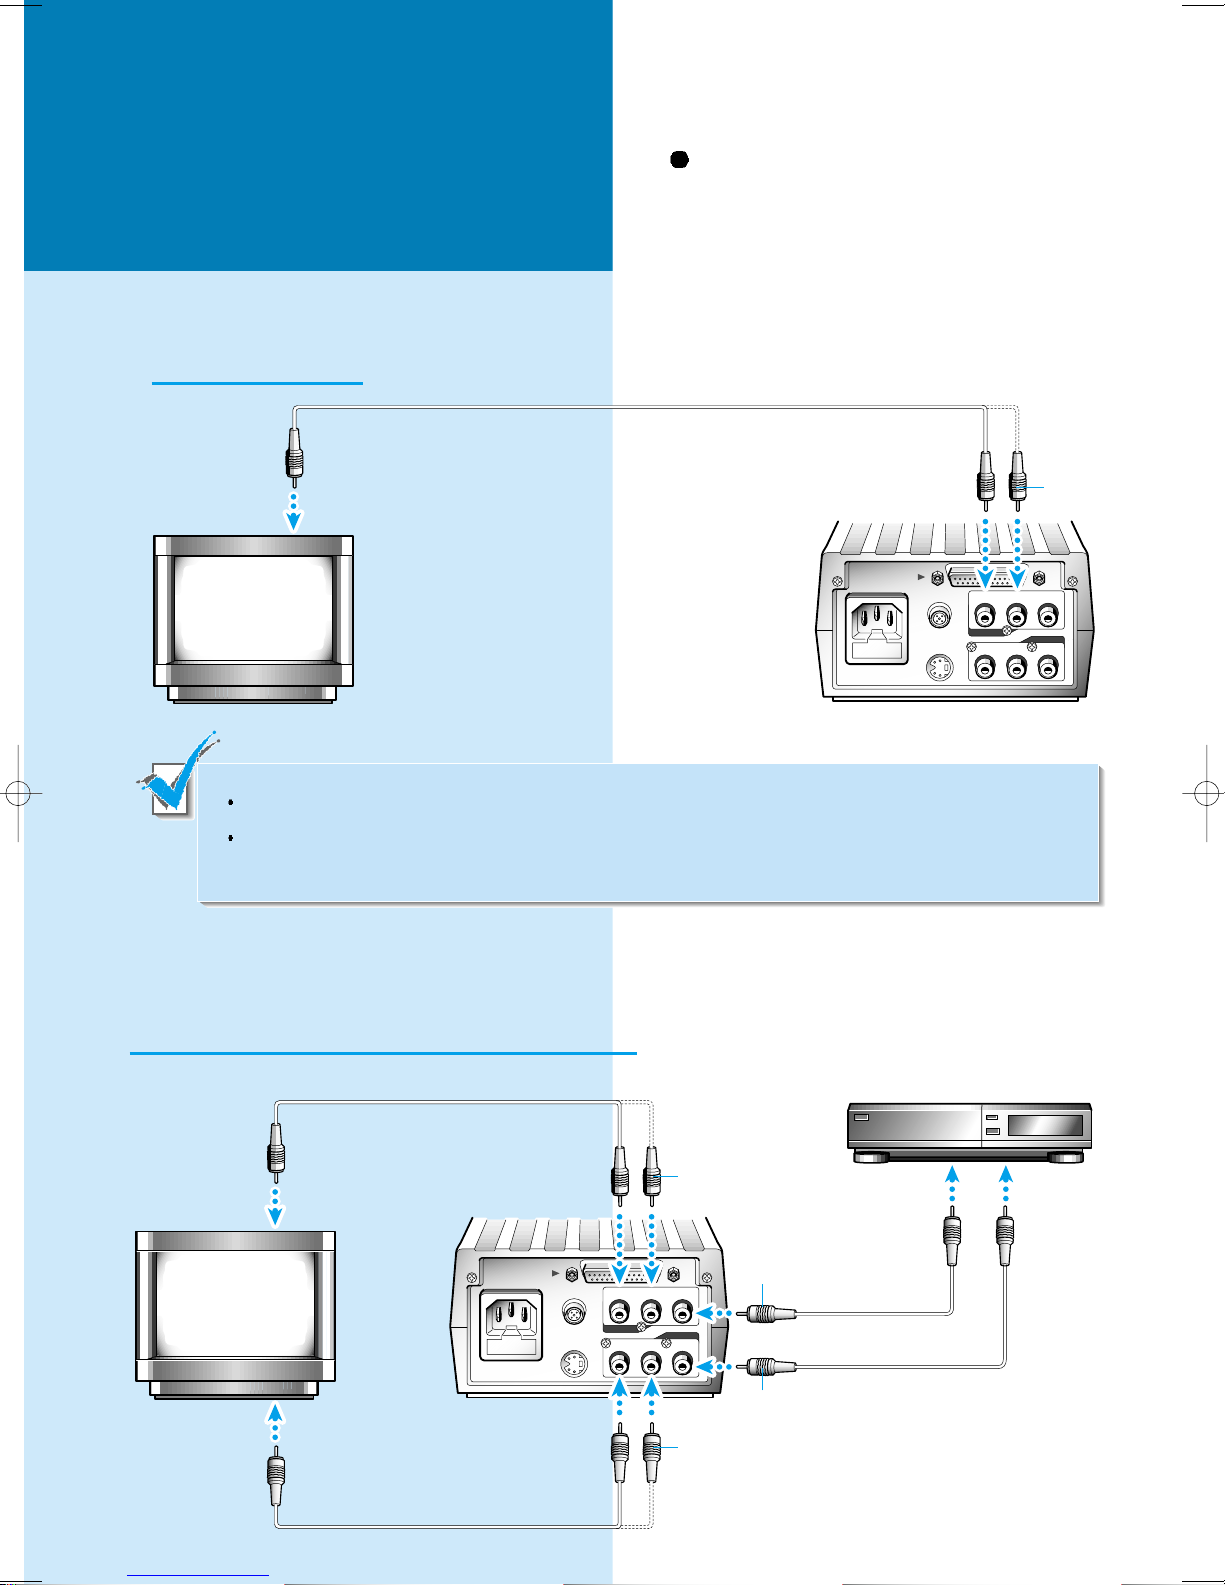
CONNECTION
To TV or Monitor
Use yellow (or red) plug to connect
video terminal and white plug to
connect audio terminal.
TV, Monitor,
LCD Projector
To Video Input terminal
You may use either VIDEO OUT 1 or VIDEO OUT 2 jack. These jacks provides the same video signal.
If you have a TV equipped with S-video terminal, connect to S-video terminal. You may obtain more clear
image, but the signal from the external AV source (if connected) will not be available on this terminal.
To TV or Monitor and External AV Device
Yellow
Video Presenter
To Video Input terminal
TV, Monitor,
LCD Projector
To Audio Input terminal
10
Video Presenter
Yellow
White
Yellow
White
AV Device (VTR, Camcorder)
To
Video Output
terminal
To
Audio Output
terminal
 Loading...