

Page 1

■■
Contents
■■
General Description
■■
Installation
■■
Programming
- DCS Compact MMCs
- DCS 50si MMCs
■■
User Guide
■■
Index
SVMi-4 TECH-01 12/00
Page 2

How to use this online manual
This manual provides detailed information on how to use the SVMi-4 plug in
voice mail and auto attendant card for the DCS Compact and DCS 50si.
It has been subdivided into the following sections: general description, installation, programming, user guide, and index.
To navigate in this manual do one of the following:
Go to the next page.
Go to the previous page.
Go to the home page.
Go to the index.
Go to the help.
Go to the search command.
How to use this online manual
Page 3

Note: For best results when viewing the screen captures of the SVMi-4
programming options, increase the magnification level of the page to 200% by
using the magnification box at the bottom of the window.
How to print this online manual
This manual was designed for online viewing, but if you prefer to print it do the
following:
1. Use File > Page Setup to set general printing options. The available options
will vary with different printers and drivers. See your printer documentation
for details.
2. Click the Print button , or choose File Print. Specify the printer, page
range, number of copies, and other options, and click OK.
How to use this online manual
Page 4

Contents
GENERAL DESCRIPTION
■ Overview
● The SVMi-4 System
● Auto Attendant
● Voice Mail
■ Hardware Description
● Main Board
● Memory
● Upgrade Key
● Back Up Adapter
■ Software Features
● Feature List
● Feature Descriptions
- System Features
- Auto Attendant Features
- Voice Mail Features
- Administration Features
Contents - Page 1
Page 5

INSTALLATION
■ System Capacities
● DCS Compact
● DCS 50si
■ Hardware Description
● SVMi-4 Main System
- Serial Port
- Memory Connector
- Reset Button
- Upgrade Key Socket
- Back Plane Connectors
- Memory Access LED
- Run Status LED
- Port Status LED
- Memory
- Upgrade Key
How to Upgrade
Contents - Page 2
Page 6

■ Installing the SVMi-4 System
● Inspection
● Installation
● SVMi-4 / DCS Set Up
● Testing the Hardware
PROGRAMMING
■ System Administration
● The Subscriber
● The System Administrator
● The Applications Administrator
■ Programming Methods
● The Screen Interface
- Knowledge Requirements
- Equipment Requirements
- Connections
- Using the Screen Interface
Logging In
Getting Help
Navigation
Contents - Page 3
Page 7

■ DTMF System Administration
● Adding and Removing Subscribers
● Recording System Greetings
● Changing the Operating Mode
■ Programming Categories
● Subscriber Options
● SVMi-4 Administration Options
● DCS Related Options
- MMC Listing for the Compact
MMC 110 MMC 207 MMC 308 MMC 309
MMC 408 MMC 501 MMC 601 MMC 701
MMC 722 MMC 723 MMC 724 MMC 727
MMC 740 MMC 741 MMC 745 MMC 746
MMC 747 MMC 748 MMC 749
- MMC Listing for the DCS 50si
MMC 110 MMC 207 MMC 308
MMC 309 MMC 408 MMC 501
MMC 601 MMC 701 MMC 722
MMC 723 MMC 724 MMC 727
Contents - Page 4
Page 8

MMC 740 MMC 741 MMC 745
MMC 746 MMC 747 MMC 748
MMC 749
● Back Up and Restore
- SVMi-4 Directory Structure
■ Programming Reference
● System Main Menu
- Open Block Table
- Subscriber List
- System Wide Parameters
- Voice Studio
- Operating Utilities
- Port Activity
- Site Information
- Status Screen
● Block Tables
- Bye Block
- Directory Block
- Extension
Contents - Page 5
Page 9

- Mailbox
- Menu Block
- Station Block
USER GUIDE
INDEX
General Description - Page 6
Page 10

General Description
OVERVIEW
The SVMi-4 System
The SVMi-4 is a self contained plug in voice mail
and auto attendant card for the DCS compact
and DCS 50si. It is designed to meet the
demands of the sophisticated voice mail user
without sacrificing simplicity.
The SVMi-4 May act as an Auto Attendant system
only, a Voice mail system only or both.
Out of the box the SVMi-4 can handle 2 calls
simultaneously. It can be easily upgraded to
handle up to 4 calls simultaneously.
No external line or power connections are necessary, these are accomplished directly through
the phone system.
At this time of this writing the memory capacity is about 5 hours, although
changes in technology will allow for additional storage as time goes on.
General Description - Page 7
Page 11

Auto Attendant
The SVMi-4 Auto attendant works by automatically answering calls and playing a
custom greeting to the caller along with some dialing instructions. The caller
may then press digits on the keypad to direct the call to the appropriate person
or department.
The SVMi-4 Auto attendant replaces or works in conjunction with your system
operator by answering calls with a pre recorded greeting, and offering the caller
a several possible dialing options including dialing another extension number,
transferring to an operator, access pre recorded information or connect to voice
mail.
Voice Mail
Voice mail provides a service if called stations are unavailable. Upon dialing an
extension number, callers may be routed directly to voice mail or transferred to
the extension first. The call may be forwarded from the station on conditions.
Each mailbox will answer calls with a custom greeting in the mailbox owners
own voice. The caller can then leave a message.
The mailbox owner can access the mailbox and retrieved the messages. Many
options are available to handle the message.
General Description - Page 8
Page 12
HARDWARE DESCRIPTION
Unlike traditional PC based Voice Mail / Auto Attendant
Systems, the SVMi-4 has no moving parts. This adds to the
robustness and reliability. All the custom speech prompts
and callers messages are stored in digital form on static
memory. This memory is faster and more reliable than conventional disk drives.
Main Board (Included)
This is a self contained voice mail system on a plug in
card designed to work exclusively with the DCS Compact
and DCS 50si.
Memory (Included)
The memory unit consists of Compact Flash. The current
size of this memory is 64 MB. This allows for the operating program and all the prompt and message storage. The
memory for the SVMi-4 card is available only from SAMSUNG.
General Description - Page 9
Main Board
Page 13

Upgrade Key (Optional)
The upgrade key is a small hardware device with some unique properties. When
it is installed in the SVMi-4 Card it increases the number of available ports from
2 to 4, and the number of mailboxes from 16 to 32. The SVMi-4 card can not
be expanded beyond 4 ports and 32 mailboxes. This upgrade key is necessary to
use the SVMi-4 in the DCS 50si.
The 2 port upgrade key for the SVMi-4 card is available only from SAMSUNG.
General Description - Page 10
Memory
Upgrade Key
Page 14

Back Up Adapter (Optional)
The Back up adapter allows the removable memory
card to be installed in the PCMCIA card slot of a
Laptop PC. When this is done a back up may be
made of the customer database. This item is available from www
.sandisk.com or Insight direct.
General Description - Page 11
Back Up Adapter
Page 15

SOFTWARE FEATURES
The software for the SVMi-4 is installed at the factory. All that is needed is for
it to be customized to meet the individual requirements of each installation, In
some cases even this may not be necessary.
The SVMi-4 software comes equipped with many useful features to fit a wide
range of call processing requirements.
Feature List
■ System Features
- Caller ID Compatible
- Expandable
- Keyset Display and Soft Key Support
- MOH Supply
- Proprietary Design
- Recordable System Prompts
- Synchronized Clock
General Description - Page 12
Page 16

■ Auto Attendant Features
- Alphabetic Directory
- Audiotext
- Auto Attendant Routing
- Automatic After Hours Answering
- Camp On Support
- Direct to Mailbox
- Holidays and Special Events
- Incoming Call Overflow
- Interruptible Voice Prompts
- Multiple Call Handling
- Operator Access
■ Voice Mail Features
- Answer Machine Emulation
- Auto Log In
- Auto Forward
- Broadcast
- Call Back
- Call Forward to Voice Mail
- Date and Time Stamp
General Description - Page 13
Page 17

- External Number Notification
- External Pager Notification
- Individual Mailbox Greeting
- Individual Mailbox Name
- Individual Mailbox Password
- Message Counter
- Message Delete
- Message Fast Forward
- Message Forward with Append
- Message Pause
- Message Play Order
- Message Replay
- Message Reply
- Message Retrieve
- Message Rewind
- Message Save
- Message Send
- Message Scan
- Message Skip
- Message Undelete
- Message Waiting Light Indication
- New / Old Selection
General Description - Page 14
Page 18

- One Touch Access
- Personal Mailbox Administration
- Personal Greetings
- Quick Memo / Direct Messaging
■ Administration Features
- Activity Display
- Administrators Mailbox
- Automatic Setup
- Back Up and Restore
- Default Operation
- Password Security
- Programming – On Site or Remote
- Subscriber Database
- Voice Prompted Programming
- Voice Studio
General Description - Page 15
Page 19

Feature Descriptions
SYSTEM FEATURES
Caller ID Compatible If you subscribe to central office based caller ID, the
SVMi-4 is compatible. Just as the Caller ID data appears on DCS keysets, so the
same information is saved in your voice mail box for each message you receive.
This can be used for call back or simply to identify the caller.
Expandable The SVMi-4 can be easily field upgraded from 2 ports and 16 mailboxes to 4 ports and 32 mailboxes by using a hardware upgrade key. This
upgrade doubles the call handling capabilities of the system.
Keyset Display and Soft Key Support If you have a DCS display keyset the
number of new messages will be displayed on it. The display will also echo
many of the options available. You will be able to negotiate through the SVMi-4
menus using the Keyset display and the soft keys below the display to respond
to the prompts.
MOH Supply Music or announcements may be recorded in the SVMi-4 Memory
and used by the DCS phone system for music on hold. The recorded announcement or music will play in a continuous loop and may be used to provide custom on hold announcements or promotional messages.
General Description - Page 16
Page 20

Proprietary Design The SVMi-4 is designed to work specifically with the DCS
50si and the DCS compact. This allows tighter integration with the phone system and allows for enhanced features like Call Record and Answer Machine
Emulation and Display and soft key support not normally available third party
voice mail / auto attendant systems.
Recordable System Prompts Although the SVMi-4 contains all the spoken
prompts to provide an operational system, some people may want to add or re
record some prompts. This can easily be done using the built in voice studio.
Synchronized Clock The SVMi-4 clock is responsible for providing each message with a date and time stamp, changing between day and night modes is
always synchronized with the phone system.
AUTO ATTENDANT FEATURES
Alphabetic Directory Callers who do not know an extension number in the
system but do know a name, may enter the first few letters of the persons name
and be transferred. This system may even be used internally if an extension
number is not known.
Audiotext You may use the SVMi-4 to supply a recorded announcements or
audiotext message to callers. Audiotext allows you to provide information only
General Description - Page 17
Page 21

without giving the option to record a message. An example of this might be
directions or movie times.
Auto Attendant Routing The Auto attendant can transfer or route callers
based on the digits they enter. Callers may be transferred to station, groups or
the system directory to select a subscriber based on their name
Automatic After Hours Answering The Main Auto Attendant greeting for the
SVMi-4 changes from the day to the night greeting automatically when the
phone system changes from day to night mode.
Camp On Support Each station user on the system may decide if they want
the SVMi-4 to transfer additional calls to them if they are on the phone. Calls
transferred to a busy station, if unanswered will be sent to voice mail or any
other destination according to the users needs.
Direct to Mailbox You may have mailboxes on the SVMi-4 system that do not
have associated stations. This is ideal if you have a small number of employees
in your office but numerous employees outside the office that need to keep in
contact.
Holidays and Special Events When your business closes because of a Holiday
or special event the SVMi-4 can provide a special appropriate greeting to your
callers.
General Description - Page 18
Page 22

Incoming Call Overflow The SVMi-4 may be programmed to answer any or all
lines immediately or answer only the calls that your operator does not pick up.
Interruptible Voice Prompts At any time during an announcement or greeting, callers may dial a selection and the SVMi-4 will immediately respond. It is
not necessary to listen to all the options if you are a ‘power user’ and know
what you are doing.
Multiple Call Handling The SVMi-4 can answer and process up to 4 calls
simultaneously, with the upgrade key installed.
Operator Access Callers may connect with an available operator any time by
dialing 0.
VOICE MAIL FEATURES
Answer Machine Emulation This feature allows you to monitor calls left in
your voice mail box through the speaker of your DCS keyset. In function it is
very much like screening a call on your home answer machine.
Auto Log In When calling Voice Mail, the DCS system can correctly identify
you as the caller and ask for your password (optional). The benefit of this is
that you do not have to identify yourself to the SVMi-4, it knows who is calling
and what mailbox you want to access.
General Description - Page 19
Page 23

Auto Forward Message auto forward allows messages left in one mailbox to be
automatically forwarded to another mailbox. The delay time before the message
is forwarded is programmable between 00:00 (immediately) and 23:59 (1 day).
After the message is forwarded it may be deleted or saved in the original mailbox.
Broadcast The designated system administrator can broadcast a message to
everyone in the system.
Call Back When listening to your voice mail messages you may press one key
to automatically call back the person who left you the message, This call back
feature may be allowed for internal calls and / or external calls. Long distance
may be either allowed or denied and specific area codes may be allowed or
denied. For external calls, Caller ID is used and therefore must be received from
the phone company.
Call Forward to Voice Mail Any station on the DCS phone system may be forwarded to the SVMi-4 voice mail. Forwarding types are Forward all calls, Forward
only when busy, Forward only when no answer, or forward when either Busy or
No answer.
Date and Time Stamp Each message you receive will be stamped with the
time and date of its arrival.
General Description - Page 20
Page 24

External Number Notification When you have messages in your mailbox, you
may be alerted at your cell phone, home phone or any other phone.
External Pager Notification When you have messages in your mailbox you
may be notified via your pager. The display on your pager will show your mailbox number.
Individual Mailbox Greeting Each mailbox has its own associated individual
greeting recorded in the mailbox owners voice. This may be changed as frequently as you desire.
Individual Mailbox Name Each mailbox has its own associated individual
name recorded in the mailbox owner’s voice.
Individual Mailbox Password Each mailbox has its own associated individual
password selected by the user or system administrator. This provides some security and prevents unauthorized access. The password may be up to 8 digits long.
Message Counter Whenever you access your mailbox, you are told the number
of new and old messages. You may selectively listen to the new or the old messages.
Message Delete When a message has been heard, you may delete it.
General Description - Page 21
Page 25

Message Fast Forward When listening to a message you may fast - forward 5
seconds. This is useful if you are looking for a specific piece of information like
a phone number.
Message Forward With Append Messages received in your mailbox may be
forwarded to other mailboxes on the system. Introductory remarks may be added
for the recipient in front of the message.
Message Pause At any time while listening to your voice mail messages, you
can pause the playback.
Message Play Order Each mailbox may be set up to play messages in order of
oldest first (FIFO) or newest first (LIFO).
Message Replay Messages may be replayed as many times as you like.
Message Reply When listening to your voice mail messages you may press one
key to automatically leave a message for the person who left you a message,
This call return feature may only be used for internal calls.
Message Retrieve Any sent message may be canceled before the recipient has
received it.
Message Rewind When listening to a message you may rewind 5 seconds. This
is useful if you are looking for a specific piece of information like a phone number.
General Description - Page 22
Page 26

Message Save You may save any message. Once saved it will remain as a
‘saved’ message until it is deleted.
Message Send From within your mailbox you may send a message to any other
mailbox owner on the system. This makes it easy for any employee who is out
of the office to send a message to another internal user.
Message Scan Message Scan allows a user who is retrieving their messages to
‘scan’ through them. The first few seconds of each message will be played.
Message Skip When listening to new messages, if you a searching for a specific one you can skip over new messages. This saves the message as a new
the others.
Message Undelete At some time, everyone discards a message, and immediately wishes they had kept it. The undelete feature of the SVMi-4 will allow you
to retrieve messages that have been deleted.
Message Waiting Light Indication An indication on your keyset tells you
when you have new messages. Press one button to connect with your voice
mail.
New / Old Selection When you access your mailbox you may chose to listen
to either new or old messages. This makes it easier to find specific information
General Description - Page 23
message. Its like picking one thing out of your in-basket without disturbing all
Page 27

contained in an old message without having to listen to all the new messages
first.
One Touch Access The SVMi-4 Voice Mail can be accessed to check messages
or perform administration simply by pressing one button on your DCS keyset.
Personal Mailbox Administration You may change settings for your mailbox
any time you like. Personalize the greeting that callers will hear, your name,
password and notification options.
Personal Greetings Each mailbox can greet the caller in with a personalized
announcement offering instructions. This greeting may be changed as often as
necessary. The new message will replace the existing greeting.
Quick Memo / Direct Messaging This feature makes it easier to leave messages for others in the office. It allows the user to access mailboxes without
dialing the extension number first. Easily leave a message for anyone that has a
mailbox.
General Description - Page 24
Page 28

ADMINISTRATION FEATURES
Activity Display While the SVMi-4 system is running, a connected administra-
tion terminal will show useful statistics about the system. Number of calls,
average calls per week, number of times all ports were busy, total messages and
space available.
Administrators Mailbox The designated system administrator can perform
many routine activities from their mailbox by using the system administration
special menu. These activities include adding and removing mailboxes, and
changing prompts.
Automatic Setup When the SVMi-4 is first installed a range of mailboxes
matching the DCS database is created. This reduces set up time.
Back Up And Restore The customer database can be saved to a PC hard drive
and restored at a later date. This is useful in a number of maintenance scenarios. Note: additional hardware is necessary to accomplish this.
Default Operation The SVMi-4 is designed to be in operation as soon as it is
installed.
Password Security All administration is under password control to prevent
unauthorized access.
General Description - Page 25
Page 29

Programming - On Site Or Remote Many of the commonly accessed program-
ming options are accessible from a touch tone telephone. This makes routine
administration easy and convenient.
Subscriber Database A database of subscribers can be viewed at the administration terminal.
Voice Prompted Programming From any Tone phone in the world an administrator can record custom prompts and add or delete mailboxes.
Voice Studio An included voice studio lets you re – record any prompt in the
system and even edit it for better sound.
General Description - Page 26
Page 30

Installation
This section deals with the installation of the SVMi-4 installation.
DCS 50si Software Compatibility
To operate the SVMi-4 in the DCS 50si you must have the s/w release listed
below or later.
DCS Compact Software Compatibility
To operate the SVMi-4 in the DCS Compact you must have the s/w release listed
below or later.
Installation - Page 27
Basic 4 Chips 00.10.12 V 2.5 or later
CID 4 Chips 00.10.12 V 2.5 or later
50si 00.09.26 V 1.4 or later
Page 31

SYSTEM CAPACITIES
DCS Compact
The DCS Compact system can support 32 station devices in a fully expanded system. For the purpose of assigning system resources the SVMi-4 card consumes
the equivalent system capacity of 4 keysets. This means that when a SVMi-4
card is installed in the Compact the system can now support a maximum of 28
station devices. This capacity includes keysets, any device connected to a keyset port, SLTs and keyset port, SLTs and keyset daughter boards. As the SVMi-4
card uses a 2x4 card slot the maximum number of trunks will be reduced by 2 to
8 trunks.
DCS 50si
The 50si system must be equipped with a new type power supply to use the
SVMi-4.
To determine the type of power supply installed in the KSU:
● Remove the cover of the KSU. Look through the protective grid over the
power supply and locate the serial number.
● Immediately to the right of the serial number locate the power supply part
code.
Installation - Page 28
Page 32

● If this code is CKPS-V1B the power supply is the older type that supports 40
station devices. If this code is CKPS-V1C then the power supply is the newer
type that supports up to 56 station devices.
For the purposes of assigning system resources the SVMi-4 card consumes the
equivalent system capacity of 4 keysets. This means that when a SVMi-4 card is
installed in the 50si the system can now support a maximum of 52 station
devices. This capacity includes keysets, any device connected to a keyset port,
SLTs and keyset daughter boards.
Installation - Page 29
Page 33

HARDWARE DESCRIPTION
SVMi-4 Main System
The SVMi-4 system is a compact self contained system that is designed exclusively for the DCS 50si and DCS Compact. It can not be used in any other SAMSUNG product.
Only one SVMi-4 card can be installed in a DCS system.
Do not use other voice mail system in combination with the SVMi-4.
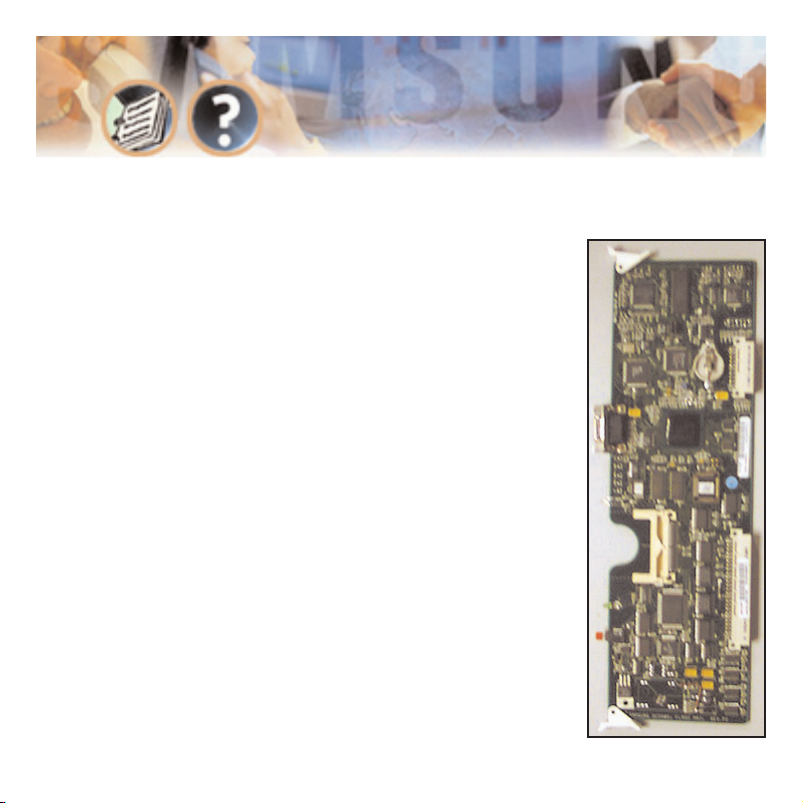
The main SVMi-4 system is a Single Board Computer with all related DSP circuitry embedded on it.
The following diagram shows all the switches and connectors on the SVMi-4.
Serial Port The serial interface can be used to connect a modem or PC and
provide local or remote PC based administration.
Memory Connector This is the connector to install the Compact Flash memory.
The memory is used to store all system programs and data.
Reset Button Pressing the RESET button during operation will disconnect all
callers and immediately restart the SVMi-4.
Installation - Page 30
Page 34

Immediately after plugging in the SVMi-4 card and turning the DCS power
switch ON, you MUST press this button to initialize the SVMi-4.
This button should not be pressed if the SCMi-4 is actively processing calls.
Upgrade Key Socket This is the socket where the upgrade key is installed. The
upgrade key will add mailbox capacity and port availability to the SVMi-4. It
will also be necessary to run the SVMi-4 on a DCS 50si.
Back Plane Connectors These are the connectors to the phone system.
Memory Access LED The Memory access LED will flash green whenever the
memory is being accessed. This works in a similar way to the Hard disk access
LED on a PC.
Run Status LED The Run Status LED shows the operating status of the card.
Green = SVMi-4 running normally, Any other condition indicates a fault.
Port Status LED Each LED (1 – 4) will indicate that a call is in progress on
that port.
Memory This device is a compact FLASH media card used for storing the main
system program as well as all messages and prompts. The amount of storage
time on this module is determined by the size of the media card measured in
Mega Bytes (MB). To remove or insert a memory card remove the SVMi-4 from
Installation - Page 31
Page 35

the system and then remove the Compact Flash from the SVMi-4 by simply
pulling it out.
Upgrade Key The SVMi-4 hardware upgrade key is a small passive device that
resembles a calculator battery. It is installed in the upgrade key socket and will
provide 2 additional ports and 16 additional mailbox to the System. This key is
also necessary to operate the SVMi-4 in the 50si.
Installation - Page 32
Page 36

Installation - Page 33
B
AR
CODE
U
1
U
14
U
15
J4
U
30
U
23
U
29
U
28
U
19
U
27
U
26
U
21
U
24
U
25
U
9
U
10
S1
U
8
U
34
U41
U
32
U
33
Z2
J5
U36
Upgrade Key
Socket
SIO Port
Compact Flash
Socket
Reset Button
Back Plane
Connectors
Port Status
LED
Run Status
LED
Memory Access
LED
Page 37

HOW TO UPGRADE
Upgrading the SVMi-4 card basically means installing an SVMi-4 upgrade key
into its dedicated socket.
The first thing you should do before proceeding is to discharge any static electricity you may have gathered by touching a ground point such as the cover of
the KSU Power Supply. When you have done this then lay the SVMi-4 card face
up on a non-conductive surface.
Note: The SVMi-4 upgrade key will only fit in the socket with the flat side
uppermost.
The SVMi-4 upgrade key is essential for the SVMi-4 to operate in a DCS 50si.
Installation - Page 34
Position the SVMi-4 upgrade key over the socket on the SVMi-4 base board with
one edge of the SVMi-4 upgrade key under the spring clip and gently apply
pressure until the SVMi-4 upgrade key seats. The SVMi-4 card can now be
installed in the KSU.
Page 38

INSTALLING THE SVMi-4
Inspection
Unpack and inspect the unit for obvious damage. This card should be labeled
SVMi-4. If it is not, you have the wrong card.
Installation
The SVMi-4 card is installed in any 2X4 slot in either the DCS 50si or the DCS
Compact. The first thing you should do before proceeding is to discharge any
static electricity you may have gathered by touching a ground point such as the
cover of the KSU Power Supply. When you have done this then check the power
switch on the KSU and ensure that the switch is in the OFF position. Next position the SVMi-4 card in the grooves of the card guide, and gently slide the card
in until it makes contact with the connector. Press gently but firmly on the top
and bottom of the front edge of the card until the card seats in its connector.
All the power to run this self contained Voice Mail system comes from the
phone system power supply. No special power considerations are necessary The
KSU can now be turned on.
The final step is to press the reset button on the front of the SVMi-4.
Installation - Page 35
Page 39

SVMi-4 / DCS Set Up
After inserting the SVMi-4 card and turning the power on there are some Key
system options that should be set in order for the SVMi-4 to function correctly.
These steps are performed in the DCS 50si or DCS Compact. It is necessary to
perform these at this time so that the SVMi-4 will initialize properly and synchronize its mailbox database with that of the Key system. For more information
on this see INITIAL SET UP.
Assigning Groups All SVMi-4 ports installed must be assigned to group 529 in
MMC 601.
Ring Mode Select either SEQUENTIAL or DISTRIBUTED ring mode in MMC 601.
VMAA Ports Confirm that all SVMi-4 ports are set for VMAA use in MMC 207.
This will be done automatically. You are just confirming at this point.
Auto Attendant If you are using SVMi-4 for Auto Attendant use MMC 406 to
set the desired trunk(s) to ring group 529.
Call Forwarding If you are using SVMi-4 for Voice Mail make sure that all
desired stations are forwarded to group 529.
Mailbox Set Up Select “NO” for each station that you DO NOT want to create a
mailbox for in MMC 741.
Installation - Page 36
Page 40

Testing the Hardware
1. Call each SVMi-4 port individually and confirm that it answers.
2. Call group 529 and confirm that the SVMi-4 answers.
If steps 1 and 2 above proved to be successful you have completed the installation and setup of the SVMi-4 hardware.
You are now ready to begin programming the SVMi-4 Voice Mail/Auto Attendant
System.
Installation - Page 37
Page 41

Programming
The SVMi-4 has been designed to simplify the installation procedure an minimize set up time. The following have been automated.
● An extension is created for every extension on the system. This means that
the automated attendant will immediately recognize all extensions and groups
on the DCS equipment.
● A mailbox is created for the first 16 or 32 extensions on the phone system.
(depending on the existence of an upgrade key).
● The Day / Night service of the SVMi-4 system will change automatically when
the phone systems changes.
● Menus have been created to answer calls in the Day and Night mode. Here are
also default menus for answering in the Holiday or bad weather mode.
QUICK SETUP
Although the set up process has be automates as much as possible, the following things must be manually completed.
● Record a greeting for the Day mode operation (prompt number 1001). The
Programming - Page 38
Page 42

Night mode operation (prompt number 1002) and optionally the Holiday and
bad weather modes (prompt numbers 1003 and 1004 respectively).
● Give everyone the user instructions and have them record their name, person-
al message and password.
SYSTEM ADMINISTRATION
System administration can be on several levels.
The Subscriber
A subscriber is someone who has an extension or mailbox on the SVMi-4 system.
Each Subscriber has control over individual options associated with their mailbox and extension settings.
Each subscriber (mailbox owner) will have the option of setting or changing
The mailbox owner will use DTMF subscriber administration to change and set
these options.
Programming - Page 39
certain mailbox options. These are listed in the user guide.
For a full description of this process refer to the SVMi-4 user guide.
Page 43

The System Administrator
The Installing Technician or System Administrator has ultimate authority over
the operation of the SVMi-4 system and can set or change all the options that
require specialized knowledge.
It is the responsibility of the Installing Technician to install and program the
SVMi-4 to suit the customers requirement. This includes initial set up and creation of the customer database. The Technician will use the Screen Interface to
program and set up the SVMi-4.
The Applications Administrator
The Applications Administrator has limited authority to make changes within
the SVMi-4 system that pertain to the day to day operation of the system.
Following the installation of the SVMi-4, any ongoing changes including the creation and deletion of mailboxes, recording or changing system greetings and
activating holiday and emergency greetings.
The system administrator will use DTMF system administration to perform this
service.
Programming - Page 40
Page 44

PROGRAMMING METHODS
Data may be entered and changed in the SVMi-4 by three methods. These are,
The screen Interface, DTMF system administration and DTMF subscriber administration.
The Screen Interface
Most of the programming is achieved using a PC attached to the SVMi-4 serial
port. This makes use of a graphical user interface, and is considered necessary
for initial set up.
KNOWLEDGE REQUIREMENTS
A general knowledge of PC’s an windows is required. Some understanding of
serial port communications is advised.
EQUIPMENT REQUIREMENTS
● A Windows PC running Hyper Term (or equivalent) is needed. You will also
require a serial cable with straight trough wiring. If you already have a cable for
programming the Samsung CADENCE card, you can use this.
● A Compact Flash PC card adapter is required if you plan to perform a system
Programming - Page 41
Page 45

backup or reload new update files. These are inexpensive (less than $20.00) and
available from www
.sandisk.com.
CONNECTIONS
Connect the serial cable between the SVMi-4 serial port and the PC serial port
and set the terminal settings to No Parity, 8 Bit word length, 1 Stop Bit, and
38,400 BPS.
USING THE SCREEN INTERFACE
After connecting the terminal equipment press Ctrl ‘L’ to clear and refresh the
screen. You will see a status of the current operating condition including the
status of each port and some general system data.
Programming - Page 42
Page 46

The main screen looks like this and shows port activity and general statistics.
Programming - Page 43
Page 47

LOGGING IN
To log into the system press the ‘Esc.’ Key and enter the password, th
e default
password is 0000. You will now be at the System Administration Main menu.
And are ready to begin programming.
GETTING HELP
The key-strokes available to you during editing can be viewed by pressing F1,
and are as follows:
F1 Navigation Keys Help
Ctrl + E Save and RETURN TO Starting Facility
Ctrl + A Save Block As
Ctrl + O Save and OPEN Block or Prompt Text under Cursor
Ctrl + R Save and RETURN TO LAST Block in Control Path
Ctrl + N Save and OPEN Next Block of Same Type or Template Blocks
Ctrl + V Save and OPEN Previous Block of Same Type or Templates
Ctrl + F Find blocks that refer to the current block
F3 Sort in Current Object or Facility
Programming - Page 44
Page 48

Screen Movement Keys
Tab Moves Cursor to NEXT Field or Line (Wraps around)
Ctrl + Q Moves Cursor to BACK to Previous Field or Line
Arrow Keys Move Cursor Between Fields or Lines in Arrow Direction
Ctrl + T Moves Cursor to TOP Field on Screen
Ctrl + B Moves Cursor to BOTTOM Field on Screen
Ctrl + U Page Up, Displays previous Page/Screen
Ctrl + D Page Down, Displays Next Page/Screen
Editing and Mo
ving within a Field
Delete Deletes Character Under Insert Point in Field
Ctrl + Y Deletes Contents of Field or Line
Backspace Deletes (1) Character to Left of Insert Point in Field
NAVIGATION
As you move the cursor around in each screen you will notice that some fields
cannot be accessed. This is normal and is intended to simplify the installation.
As the cursor is placed on different fields the data will be shown in different
colors.
Programming - Page 45
Page 49

YELLOW – You may type new data in the selected field.
GREEN – This indicates that the data represents a Block You may press the
enter Key to select a different block or you may press ‘Ctrl + O’ to Open the
block beneath the cursor. This non-linear method of navigation is extremely
flexible as you can easily follow the path of any call. To Return to the previous block in this path press ‘Ctrl + R’.
DTMF SYSTEM ADMINISTRATION
Some System Administration functions can be accessed by calling the SVMi-4
from a touch tone phone. These administrative functions allow the system
administrator to do the following:
Adding and Removing Subscribers
Call the SVMi-4, and when it answers, press the ‘#’ key followed by 3 zeros and
when prompted enter the administration password specified in the System Wide
Parameters.
You will be presented with the System administration menu containing the following options:
● To edit system prompts, press 1.
Programming - Page 46
Page 50

● For subscriber Administration press 2.
● Follow the spoken instructions to add or delete mailboxes and extensions.
Recording System Greetings
Call the SVMi-4, and when it answers, press the ‘#’ key followed by 3 zeros and
when prompted enter the administration password specified in the System Wide
Parameters.
You will be presented with the System administration menu containing the following options:
● To edit system prompts, press 1.
● Follow the spoken instructions to edit system prompts:
Day Greeting = Prompt 1001
Night Greeting = Prompt 1002
Holiday Greeting = Prompt 1003
Emergency (bad weather) Greeting = Prompt 1004
Programming - Page 47
Page 51

Changing the Operating Mode
Call the SVMi-4, and when it answers, press the ‘#’ key followed by 3 zeros and
when prompted enter the administration password specified in the System Wide
Parameters.
You will be presented with the System administration menu containing the following options:
● To manually set the mode press 3.
● Follow the spoken instructions to change the operating mode:
Day Mode = 1
Night Mode = 2
Holiday Mode = 3
Emergency (bad weather) Mode = 4
The mode to automatically follow the DCS Day/ Night mode = 0
Programming - Page 48
Page 52

PROGRAMMING CATEGORIES
When programming the SVMi- 4 there are three types of data, Subscriber options
SVMi-4 administration options and Phone system options.
Subscriber Options
These are the options entered by a Subscriber and control the individual behavior of their mailbox. The instructions for this can be found in the SVMi-4
System user guide.
SVMi-4 Administration Options
This is all the programming options for the SVMi-4, that are unique to the particular installation.
DCS Related Options
This is a collection of DCS programming options to make SVMi-4 operate correctly. When the SVMi-4 is initialized, much of the set up is completed, but
there is still some phone system programming that must be entered.
Programming - Page 49
Page 53

Note that If the SVMi-4 card is being installed in an existing (a system that did
not previously have an SVMi-4), you will have to use MMC 806 to pre install the
card and MMC 724 to assign extension numbers to each SVMi-4 port. Use any
available numbers.
In addition to the MMCs listed below you must set call forwarding to the SVMi-4
at every phone that wants to use voice mail.
MMC LISTING FOR THE COMPACT
The following is a listing of all the DCS Compact MMCs that relate to the
SVMi-4.
MMC 110 MMC 207 MMC 308 MMC 309
MMC 408 MMC 501 MMC 601 MMC 701
MMC 722 MMC 723 MMC 724 MMC 727
MMC 740 MMC 741 MMC 745 MMC 746
MMC 747 MMC 748 MMC 749
Programming - Page 50
Page 54

MMC LISTING FOR THE DCS 50si
The following is a listing of all the DCS 50si MMCs that relate to the SVMi-4.
MMC 110 MMC 207 MMC 308 MMC 309
MMC 408 MMC 501 MMC 601 MMC 701
MMC 722 MMC 723 MMC 724 MMC 727
MMC 740 MMC 741 MMC 745 MMC 746
MMC 747 MMC 748 MMC 749
Back Up and Restore
● Remove SVMi-4.
● Remove Compact Flash.
● Place Compact flash in PC using PC Adapter card.
● Drag and drop files as specified for the back up or upgrade procedure.
Programming - Page 51
Page 55

SVMi-4 DIRECTORY STRUCTURE
● All customer configuration is located in the \Dta\ *.tbl files.
● All Mailbox date is located in the \Mailbox\ *.* files.
● All Message date is located in the \Msg\ *.* files.
● All Prompt date is located in the \Prompts\ *.* files.
THE TABLE FILES (*.TBL)
Block.TBL All block parameter data.
Schedule.TBL The schedule table is not a block, so it’s data is stored sepa-
rately in this file.
SiteInfo.TBL Useful customer data entered in “site Information” off of the
main menu.
Message.TBL Automatically gets updated every time a new message is recorded, saved, forwarded, or deleted.
Programming - Page 52
Page 56

PROMPTS
Prompts are stored in the PMT directory. The reference to speak the prompt in
a particular block is stored in the “Block.TBL” file, but the recorded prompt
itself and it’s associated Text are stored in the PMT directory. The file format is
‘{4 digits}.PMT’.
Programming - Page 53
Page 57

PROGRAMMING REFERENCE
The following section provides in depth definitions and descriptions of all the
programmable fields within the SVMi-4 software.
Some fields are not accessible in the SVMi-4. If you cannot put the cursor on
them you can not change them.
System Main Menu
To access the System Main Menu, from the Status screen press [escape] and
enter the password, then press ENTER.
The System Main Menu provides easy access to the different areas of SVMi-4
programming. The specific areas can be accessed using the cursor controls or by
selecting the designation letter A. The areas that can be accessed are:
[A] OPEN BLOCK TABLE
[B] SUBSCRIBER LIST
[C] SYSTEM WIDE PARAMETERS
[D] VOICE STUDIO
[E] OPERATING UTILITIES
[F] PORT ACTIVITY
Programming - Page 54
Page 58

[G] SITE INFORMATION
[H] STATUS SCREEN
Programming - Page 55
Page 59

OPEN BLOCK TABLE
To Open a Block Table, from the System Main Menu select OPEN BLOCK TABLE
and press ENTER.
Programming - Page 56
Page 60

The block table is used for building SVMi-4 call routing applications. This is the
most frequently accessed area in the SVMi-4 and determines its behavior when
it is routing calls. All the prompts and options offered to callers are programmed here.
Because most of the programming for any customer will usually be in the block
tables these are dealt separately in the next section. For more information on
building call routing applications see BLOCK TABLES.
SUBSCRIBER LIST
To access the subscriber list, from the System Main Menu select SUBSCRIBER
LIST and press ENTER.
This area of programming is used to quickly view, or edit the subscriber list.
You will see a list of subscribers along with their extension and their mailbox
number.
The number of mailboxes activated on your system will depend on the existence
of a valid upgrade key.
You will also see an Eclass and Mclass. These are class of service options for the
Extension and Mailbox, and are not accessible in the SVMi-4.
Programming - Page 57
Page 61

To view a subscribers data scroll to the correct subscriber using the arrow keys
and press ‘enter’. Use the right arrow key to select extension block or mailbox
block. When you have made your selection press ‘Ctrl + O’ (for open) and the
Programming - Page 58
Page 62

highlighted block will open. You can then edit specific fields. See Extension
block and Mailbox block for additional information.
Entering a Ne
w Subscriber
To enter a new subscriber, highlight a blank line and press ENTER. Type in the
subscriber name, Extension and Mailbox numbers. SVMi-4 automatically creates
the Extension and Mailbox for the subscriber to use and fills in the EClass and
MClass data.
SYSTEM WIDE PARAMETERS
To access the System Wide Parameters, from the System Main Menu select SYSTEM WIDE PARAMETERS and press ENTER.
The System Wide Parameters include the software release, version number, the
authorized number of ports, and options. Starred (*) items require the system
to be restarted before they take effect.
Th
e first screen provides information only. It may be useful to you or may be
need
ed during a technical support call.
Programming - Page 59
Page 63

Programming - Page 60
Page 64

Programming - Page 61
Page 65

Screen Timeout This is the time before the administration screen will revert
to the port status screen.
Daily Maintenance Time This is the time when SVMi-4 performs routine daily
maintenance. Daily Maintenance will save the system tables and perform message purging (Voice Mail or Announcement features). Inputs must be specified
in 24-hour time. The default setting is 3:00 AM.
Subscriber Default password The digits used as the default settings for
extension and mailbox passwords. The digit input may be from 1 to 8 digits.
When a mailbox or extension password is reset, this is the value that the password will be reset to. The default setting is 0000.
System Admin This effects both the GUI and the TUI. With the GUI; this
password gives the administrator access to all parameters. It is the highest
level password and enables the administrator access to shutting the system
down. With the TUI: this password along with the remote login procedure gives
the administrator access to Recording System Prompts and Overriding the scheduling by engaging a specific Mode.
Application Admin This effects only the GUI. This works with the GUI only
and denies access to only three areas: System Wide Parameters, Exit SVMi-4, and
Port Activity. This is typically given out to an administrator’s assistant. Though
accessing the system with this password could still allow the user to damage
Programming - Page 62
Page 66

the application, they would not be able to shut down the system or change the
passwords.
Subscriber Admin This effects only the GUI. This also works only with the
GUI and allows access to the following: Subscriber List, Display User Log, and
Status Screen.
Min Recorded Length This parameter sets the minimum record time that is to
be considered valid. It is specified in hundredths of seconds. A setting of 50
means 0.5 seconds or 500 milliseconds. The default value is 75. If this value is
too high, short recordings will be discarded. If it is too low, the system will
consider disconnects as a valid recording.
Dial Tone Trim Size This amount is trimmed off the end of any recorded message that is terminated by dial tone. This parameter is measured in hundredths
of seconds.
Detect on leading edge Not used.
Minimum DTMF Duration This parameter controls the sensitivity of the DTMF
(touch-tone) detectors only during recording of voice prompts and announcements. The value represents the minimum time period (in hundredths of seconds) during which a tone must be valid in order to be accepted as a caller
entry. A lower value makes the SVMi-4 more sensitive to DTMF tones. If exces-
Programming - Page 63
Page 67

sive “Talk Off” problems are experienced during recording operations, the value
should be increased. Talk Off occurs when a human voice emulates a DTMF tone.
If users frequently experience difficulty in stopping recording (as evidenced by
touch tones being included in the recordings), this value should be reduced.
This parameter is expressed in hundredths of a second. The default is 7 (70 ms).
Note: Drastic changes of this value are not recommended. A small change can
make a significant difference. This parameter has no effect during playback.
DTMF Cutout Period If, during prompt playback, the DTMF detector senses a
tone, The SVMi-4 will temporarily suspend playback for the time period specified
by this parameter. If the tone remains valid during this time, it is considered to
be a valid caller entry and playback is stopped. If the tone becomes invalid
while playback is temporarily suspended, it is considered to be “Talk Off” and
playback is resumed. This value is expressed in hundredths of a second. The
default is 1 (10 ms).
Note: This parameter has no effect during recording.
*Outbound DTMF Duration This parameter controls the duration of tones
dialed by SVMi-4. Tone Duration sets the duration of each tone dialed. This
value is expressed in hundredths of a second. The default is 8 (80 ms).
*Outbound Inter-Digit Time These parameters control the duration of tones
Programming - Page 64
Page 68

dialed by SVMi-4. Inter-Digit Time sets the time between dialed tones. This
value is expressed in hundredths of a second. The default is 8 (80 ms).
VOICE STUDIO
To access the Voice Studio, from the System Main Menu select VOICE STUDIO
and press ENTER.
The Voice Studio is a utility for recording custom prompts and announcements.
A series of dialog screens will lead you through setting up your system for
recording.
The Telephone Extension The telephone extension number to use. Enter your
extension or telephone number that the SVMi-4 will call to set up a recording
session. Typically this will be a conveniently located station on the system.
Leave the telephone number blank to review the prompt or announcement text
only.
Prompt or Announcement Two studios are available to choose from. Select
either Prompt or Announcement. Select the Prompt (P) or Announcement (A).
Programming - Page 65
Page 69

The screen will show the following options:
Prompt Number The number of the Prompt or Announcement to be recorded
or reviewed.
Programming - Page 66
Page 70

Length The length of the recording in seconds. This parameter is automatical-
ly filled in by the SVMi-4 when the Prompt or Announcement is recorded.
Recorded The date the recording was made or last updated.
Text Space is provided for entering the text of the Prompt or Announcement
to be recorded. Use this space to provide information on the intended usage of
the recording. The entered text has no effect on the actual recording. However,
it is recommended that the recording be the same as the text to make later
editing or re-recording easier.
OPERATING UTILITIES
To access Operating Utilities, from the System Main Menu select OPERATING
UTILITIES and press ENTER.
This menu screen is used for accessing various display logs and System
Administrator facilities. The utilities and parameters contained within the
Operating Utilities are as follows:
Display User Log This log provides information on all user accesses to the
system. Information displayed includes subscriber logon, port used, service
accessed, Message Center activities, greetings recorded, and all other user activities.
Programming - Page 67
Page 71

Display Error Log This is a log of all system errors and other information
including startup and System Daily Maintenance. The information supplied in
this log includes: SVMi-4 breeding mailbox, lost message file recovered, SVMi-4
shutting down and other system information.
Programming - Page 68
Page 72

Activity Log This screen provides a log of all of SVMi-4 activities. These
include: changing to another Mode, SVMi-4 hanging up, new call and call data,
or searching on caller ID or entry. Everything SVMi-4s does is logged here.
Usually this will only be used under direction of Samsung Technical support.
Exit SVMi-4 Exit SVMi-4 does exactly that. It will deactivate SVMi-4 and shut
down the application. The SVMi-4 will not answer the telephone until restarted.
Exit to Previous menu Returns to the main menu.
Programming - Page 69
Page 73

PORT ACTIVITY
This screen provides the system administrator the ability to observe, port specific, line by line system activity in either real time (as it happens) or through
Programming - Page 70
Page 74

the SVMi-4 activity Log (if it’s already happened). This activity contains
detailed information for both subscriber and public caller call sessions. Refer to
the Port activity help screen for detailed options.
You may be asked to access this screen by Samsung technical support.
SITE INFORMATION
This screen menu allows the System Administrator access to helpful information
about the site in which the SVMi-4 is installed. This information becomes very
useful long after the system installation has been completed.
These are only memo screens but it is recommended that these screens be filled
out for all sites. Having a record of all port connections helps make trouble
shooting easier if it becomes necessary.
Programming - Page 71
Page 75

STATUS SCREEN
The is the normal operating screen for the SVMi-4. The Status Screen is a display only facility, and shows information in real time relating to the current status of the SVMi-4. The following information is displayed.
Programming - Page 72
Page 76

Prt. Column The Port column gives you the number of the voice circuit that
the call is taking place on.
MN Column The Mode Number column lets you know which Mode the port is
in.
Active Block Column This column shows you which block is currently servicing the call, as the call gets directed through the call session.
Status Column The status column displays the current condition that the port
is in. Some examples are; Idle, Processing, Transferring, messaging, etc.
SYSTEM ACTIVITY
Calls To – Date The total number of calls that the SVMi-4 has processed.
Average Calls per Week The average number of calls per week averaged over
all weeks.
Directory Accesses The total number of callers that have accessed the directory.
Times All Ports Busy The total number of times all ports have been busy.
Number of Subscribers The total number of subscribers on the system.
Programming - Page 73
Page 77

Total Message Count The total number of messages in the system. This
includes new and saved messages.
Avg Messages/Mailbox The average number of messages in subscriber mailboxes.
Disk Space Available The total disk space available in hours and minutes.
Programming - Page 74
Page 78

Block Tables
All applications are built using blocks.
BYE BLOCK
Programming - Page 75
Page 79

Description The BYE Block is very simple. Its purpose is to say good-bye to
the caller, disconnect the call, and free the port. The only parameter is the
prompt to be spoken before disconnecting. There is only one bye block available
in the SVMi-4.
Pr
ogram Fields
Prompt The number of the prompt that the SVMi-4 speaks before disconnect-
ing the caller. Allowable inputs are 0001 − 9999 with Blank indicating “say
nothing”. Press Ctrl+O at this field to review or edit the prompt text.
DIRECTORY BLOCK
Description A Directory Block defines necessary information about how the
system Dial-by-Name Directory will function.
This information includes the maximum number of digits the caller may enter to
search for an individual's name, the maximum number of names matching the
caller's entry, and also, whether or not to speak the extension number of the
matching name to the called party. The directory will search on extensions
first, if no match is found then it will search mailboxes.
Programming - Page 76
Page 80

Program Fields
Maximum Entry Digits The maximum number of digits the caller may enter to
search for the target the caller is trying to locate. This is usually set to three
Programming - Page 77
Page 81

because most people's names do not have the same first three letters. This
number can be between 1 and 10.
Wait For First Digit This is the amount of time, in seconds, the system waits
for the caller to enter the first digit.
Wait For Subsequent Digits The amount of time, in seconds, the system waits
for the caller to enter the digits following his first entry digit.
Repeat Prompts If No Entry The number of times the system repeats prompts
if the caller does not enter any digits.
Retries If No Match This is the maximum number of names a caller may enter
if no match is found on the digits the caller entered. If this occurs, it is considered an INVALID entry.
Maximum Number Of Matches The number of names played to the caller if
more than one name matches the entry. The number can be between 1 and 8.
Search Last Part of Label When an extension group is set up, generally people are listed by last name, comma, and first name. This parameter determines
which part of the name (label) that will be searched for a match.
Include Unnamed Objects If this parameter is set to YES, Search Targets with
no recorded name will be included in the Directory listing played to the caller.
Programming - Page 78
Page 82

In this case, the SVMi-4 speaks the number of the Search Target. This could, for
example, be an extension or mailbox number.
Speak Name on Exit If this parameter is set to YES, the selected object's
name is played to the caller prior to exiting the Directory. If no name is
recorded, the selected object's number is played to the caller. This could, for
example, be an extension or mailbox number.
Speak Key Value on Exit If set to YES, the selected object's number is played
to the caller prior to exiting the Directory.
Verify Before Exit If this parameter is set to YES, the system requests the
caller to confirm the object selection before transferring the caller to that
object. If set to NO, confirmation is not needed.
Programming - Page 79
Page 83

EXTENSION
Description The Extension Block is one of the two Blocks (Extension, Mailbox)
that describes a subscriber. The extension Block controls the operating characteristics specific to a Subscriber’s extension.
Programming - Page 80
Page 84

Program Fields
Extension Name The name of the extension. This is used by the directory fea-
ture.
Extension Number The number that must be entered by the caller in order to
access the subscriber extension. It does not necessarily have to be the same
number dialed by SVMi-4 when transferring to the extension on the telephone
system. This can not be the same number of any other extension.
Mailbox The mailbox corresponding to the subscriber Extension Block. Press
ENTER to bring up the Target Generator. Select and open the appropriate block
type from the Target Generator pick list. Choose a new or existing block of that
type and press ENTER. Press Ctrl+O at this field to review or edit the Mailbox
Block or Distribution List associated with the Block.
Dial Number The actual number that the SVMi-4 will dial to complete the
transfer. In other words, this is the number that is dialed when the caller enters
the extension number.
Subscriber Password The digits the extension user enters to gain access to
the extension user menu.
Station If there is no entry entered here the system will automatically search
the Station options for the appropriate Station required to send the call. Press
Programming - Page 81
Page 85

ENTER at this field to bring up the Target Generator. Select a new or existing
Station Block from the Target Generator pick list. Press Ctrl+O to review the
selected Station Block.
Directory Public/User A ‘Y’ in these parameters, and the subscribers’ name
recorded in the mailbox, allows the Subscriber to be listed in either of the
appropriate Directories.
Retention Days Remaining The number of days remaining before this block is
automatically discarded during system maintenance if unused.
MAILBOX
Description The Mailbox Block is used to implement the Voice Mail messaging
features on SVMi-4. It also controls the operating characteristics specific to an
individual mailbox such as whether the Mailbox is announce only or if the subscriber has Mailbox Administration capabilities. This Block maintains the message notification details. The Mailbox is where a subscriber receives, sends, and
manages messages. The public caller may record a message after hearing a personal greeting from the Mailbox User and choose to review, re-record, send, or
discard his message.
Event pointers are used to provide the flexibility to handle messaging differently for various modes of operation (typically at different times of the day).
Programming - Page 82
Page 86

The information contained within the three Mailbox Block screens shown in this
section is for discussion and display purposes only. Three pages are required to
contain the Mailbox Block parameters. The parameters are grouped by category.
The categories contained in each page are as follows.
Programming - Page 83
Page 87

Program Fields
Mailbox Name The name of the mailbox.
Extension Number The Extension number to which the mailbox belongs.
Announce Only Mailbox A ‘Y’ in this field designates this as an announce-
ment only mailbox. When a public caller accesses this mailbox, it will play the
greeting message (announcement) and exit immediately without recording a
message. This may be used for bulletin boards and other simple audiotex applications. After playing the announcement, SVMi-4 will pass control to the block
defined by the <No Msg Left> pointer.
Subscriber Administrator A ‘Y’ in this field gives the mailbox user the following Subscriber Administration capabilities:
● Create/Delete mailboxes and/or extensions.
● Set an operating mode.
● Inputs are ‘Y’ for yes or ‘N’ for no.
LIFO / FIFO If set to ‘Y’, messages are reviewed in “Last In First Out” order. If
set to ‘N’, they are reviewed in “First In Last Out” order.
Programming - Page 84
Page 88

Directory Public/User A ‘Y’ in these parameters, and the subscribers’ name
recorded in the mailbox, allows the Subscriber to be listed in either of the
appropriate Directories.
Subscriber Password Allows the mailbox password to be changed to the
default digits specified by Default password in the System Wide Parameters or
removed completely. Inputs are “DEFAULT” or “NONE”.
Retention Days Remaining The number of days remaining before this block is
automatically discarded during system maintenance if unused.
Mailbox Greeting Allowed When set to yes the caller is allowed to record a
mailbox greeting.
Message Alert Control Allowed When set to yes the caller is allowed to turn
on and off the message alert and set the alert number.
Enable Extended Prompting A ‘Y’ in this field enables the full length, extended prompting to play to the subscriber the next time he logs into his Mailbox.
Once the flag is set to ‘N’, extended prompting does not play again and the
subscriber does not have to listen to the dialing options. The extended prompting is used to aid the new mailbox user.
Programming - Page 85
Page 89

Auto Play New Messages If set to “Y”, any new messages, or those messages
not saved, will automatically begin to play when the Subscriber logs in to their
Executary.
Programming - Page 86
Page 90

Auto Play Message Info If this option is set, the sender information and time
will be automatically played for each message. If this is not set to Y, the caller
can still get this information on demand by pressing ‘00’ while a message is
playing.
Message Alert Contr
ols
● Alert On A ‘Y’ in this field enables Message Alert capabilities for this
mailbox. An ‘N’ disables the Message Alert feature. This parameter setting may
be overridden by the phone interface.
● Alert Phone Number This is the phone number where you want to be
notified of your new messages if you have enabled message alert in your
mailbox.
Message W
aiting Indications
● Mailbox has MWI A ‘Y’ in this parameter signals SVMi-4 to set the
Message Waiting Indicator when a new message arrives and extinguish the
Message Waiting Indicator when all new messages are reviewed. Inputs are ‘Y’
for yes or ‘N’ for no. Dialing strings for MWI On and MWI Off must also be
programmed in the associated MCLASS.
● MWI currently on A ‘Y’ in this parameter signifies that the SVMi-4 has
set the Message Waiting Indicator. A ‘N’ in this parameter signifies that the
Message Waiting Indicator is not on. If this parameter indicates that the MWI
Programming - Page 87
Page 91

is set and it is not on, enter an ‘N’ in this parameter and SVMi-4 will issue a
MWI On command. If this parameter indicates that the MWI is off and it is
not off, enter a ‘Y’ in this parameter and the SVMi-4 will issue a MWI off Dial
string.
● MWI number The extension number that will be used to activate a
Message Waiting Indicator for this mailbox.
Message A
uto Forward
● Enable Auto Forward This option turns Auto Forward on. When set any
messages arriving in this mailbox will be automatically forwarded.
● Delete After Forwarding The new message that is to be Auto Forwarded
will be discarded from this mailbox, when the forwarding takes place, if this
parameter is set to ‘Y’. If this parameter is set to ‘N’ the mailbox will retain a
copy of the message that is Auto-Forwarded. This parameter is only active
when ‘Auto-Forward Message After’ parameter is set.
● Auto-Forward Delay The number of hours and/or minutes before a new
message is automatically forwarded to another mailbox. Auto forwarding is
disabled if this parameter is left blank.
Programming - Page 88
Page 92

Pager Notification Enabled A ‘Y’ enables the pager notification of new mes-
sages received. A ‘N’ disables this option.
Programming - Page 89
Page 93

Pager Station The type of station block to use for pager outdials. Press ENTER
to bring up the Target Generator. Select a new or existing Station Block and
press ENTER. Press Ctrl+0 to review or edit the selected Station Block.
Dial The pager number to dial to notify of new messages.
Programming - Page 90
Page 94

Operating Mode Indicates the Mode Name and Number for which the displayed Block Pointers’ Targets are active. Operating Modes are given a unique
Number by the system. In the SVMi-4 they are 01 - 04, indicating Day, Night,
Holiday and Emergency / Bad weather.
Programming - Page 91
Page 95

● CallDirector Event Pointers To edit any Event Pointer, press ENTER to
bring up the Target Generator. Highlight and open the appropriate Block
type. Select a new or existing Block and press ENTER.
● MSG-LEFT Pointer This is the Block that the SVMi-4 will pass control to if
the caller leaves a message. The target block allows the caller the option of
returning to the beginning of the application, or sending the caller to the
Bye block if the organization or individual does not want to give the caller
additional options.
● NO MSG-LEFT Pointer This is the Block that the SVMi-4 will pass control
to if the caller does not leave a message or if this is an announcement only
mailbox. The target block may allow the caller the option of returning to the
beginning of the application, or sending the caller to the Bye block, if the
organization or individual does not want to give the caller additional options.
● ESCAPE Pointer This is the Block that the SVMi-4 will pass control to if
the caller presses the escape digit while listening to the mailbox greeting or
while leaving a message in the mailbox. When the Escape digit is pressed
SVMi - 4 will immediately exit the process it’s in and go to the block defined
in this pointer.
● GREET-DTMF Pointer This is the Block that the SVMi-4 passes control to
if the caller enters any valid DTMF while listening to the mailbox greeting. If
defined, the Admin digit, escape digit, digit to skip the greeting, and the
operator digit are not considered valid for this pointer. The target block is a
Programming - Page 92
Page 96

menu which performs a search operation to match the caller ENTRY to the
INPUT value of a pointer, or Number of an Extension, Mailbox or
Announcement.
● OPERATOR Pointer This is the target Block that the SVMi-4 will pass con-
trol to if the caller presses the Operator digit while listening to the mailbox
greeting or recording a message.
● AUTO-FWD Pointer This is the Mailbox to forward new messages to when
the time has expired in the ‘Auto-Forward Message After’ parameter. The target must be another mailbox and may not point back to itself.
MENU BLOCK
Description The Menu is used to speak something to the caller, collect a
caller’s DTMF entry, and pass control to another Block. A menu can accept
entries from 1 to 10 digits in length.
The Menu performs a search operation to match the caller ENTRY. For example, a
Menu prompt may be, “You may dial an extension directly or for sales press 1,
for service press 2.”L If the caller presses 1, a pointer with an Input value of
<1> directs the caller to an extension group within the phone system called
“SALES.” If the caller entered 123, the MENU may be configured to search for
an extension or mailbox.
Programming - Page 93
Page 97

When a match is found, it transfers control to Block defined in the target name
field. It can also translate values into new values before conducting the search.
This is all done in the in the Menu Processor.
The Menu screens consists of a Personality page and a specialized form of
CallDirector —called an Input Processor— as the second page.
The Personality section determines the prompts spoken to the caller.
The Input Processor contains Input Pointers which determine the Block which
receives control of the call.
Pr
ogram Fields
Administration Digit This is the digit to identify a subscriber on the system.
If this digit is entered followed by a mailbox number you will be asked for a
password.
Escape Digit This is the digit to escape out of the current menu and back to
the previous menu. If this is pressed at the main menu the caller will be disconnected.
Programming - Page 94
Page 98

Prompts 1 through 6 These are the voice prompts that the SVMi-4 speaks
when the Menu Block is entered. Menu prompts 1- 6 are spoken in succession
and are normally used to prompt the caller for an entry. Allowable inputs
Programming - Page 95
Page 99

include any four digit prompt number (1000 - 9999). A blank entry means “say
nothing.” To use a different, or custom prompt, highlight the field to be
changed and enter the desired prompt number. To review or edit the prompt
text, press Ctrl + O (O is for Open). Press F1 to bring up the help screens and
page down to page 2 for instructions on how to edit text boxes.
Invalid Condition Pmt The prompt spoken when no match is found during a
MENU search. It normally advises the caller that their entry is invalid, try again.
Press Ctrl + O ( O is for Open). To review the prompt text, number, recorded
length and date recorded.
Request Password Pmt The prompt which asks the caller to enter a password
(when appropriate). The prompt is used when a caller has made an entry that
requires a password for access to another Block or perform an administrative
function.
Maximum Caller Entry Digits Indicates the maximum number of digits the
caller may enter in response to the Menu prompts. The allowable values are 1 -
10. This should be set to the length of the maximum valid entry in this Menu.
If set greater, SVMi-4 will wait unnecessarily for additional digits to be entered.
If the caller enters more than the specified number of digits, the excess will be
carried forward to the next Block.
Programming - Page 96
Page 100

Wait for First Entry Digit This is the time, in seconds (from 0 to 99), that
SVMi-4 will wait for the caller to make an entry. This timer begins after the last
Menu prompt has been spoken.
Wait for Subsequent Digits This is the time, in seconds (from 0 to 99), that
SVMi-4 will wait for the caller to make a subsequent entry. This timer begins
after the first caller entry digit has been received and resets after each digit
pressed by the caller, up to the Max Caller Entry value.
Repeat Prompts if NO ENTRY Indicates the number of times, from 0 to 9, the
Menu prompts are repeated, if no entry is made by the caller.
Retry if INVALID Condition The number of additional attempts that this
MENU allows if the caller makes an invalid entry. The allowable inputs are 0 - 9.
When retries are exhausted, the SVMi –4 will exit the MENU using the
<INVALID> condition.
Operating MODE Indicates the Mode Name and Number for which the displayed Block Pointers’ Targets are active. Operating Modes are given a unique
Number by the system. In the SVMi-4 they are 01 - 04, indicating Day, Night,
Holiday and Emergency / Bad weather.
Programming - Page 97
 Loading...