

Page 1
Samsung Electronics
4-1
4. VCR Alignment and Adjustments
4-1 Reference
1) X-Point (Tracking center) adjustment, “Head switching adjustment” and “NVRAM option setting” can be adjusted with remote control.
2) When replacing the VCR Main PCB Micom (IC601) and NVRAM (IC605 ; EEPROM) be sure to adjust the “Head switching adjustment”
and “NVRAM option setting”.
3) When replacing the cylinder ass’y, be sure to adjust the “X-Point” and “Head switching adjustment”.
4) How to adjustment.
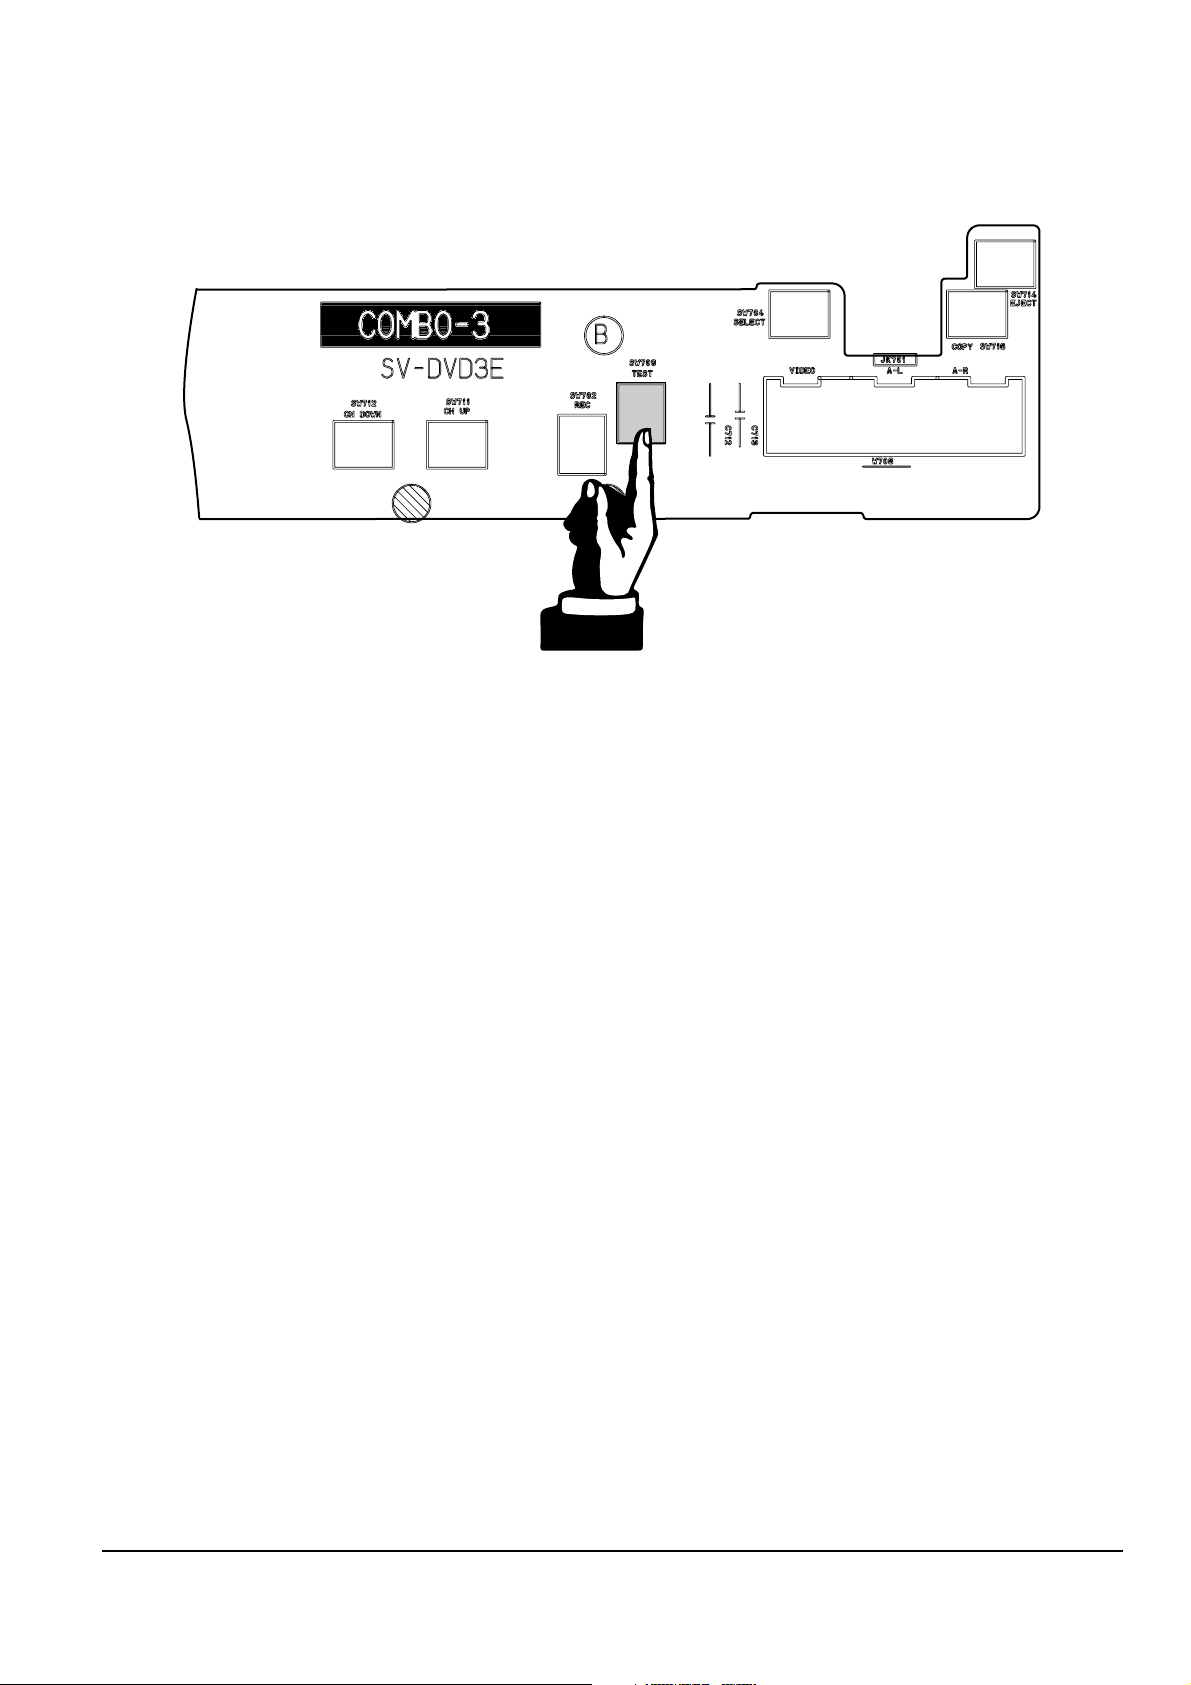
- Press the “SW709 (TEST)” button on Function-Timer PCB to set the adjustment mode.
- If the corresponding adjustment button is pressed, the adjustment is performed automatically.
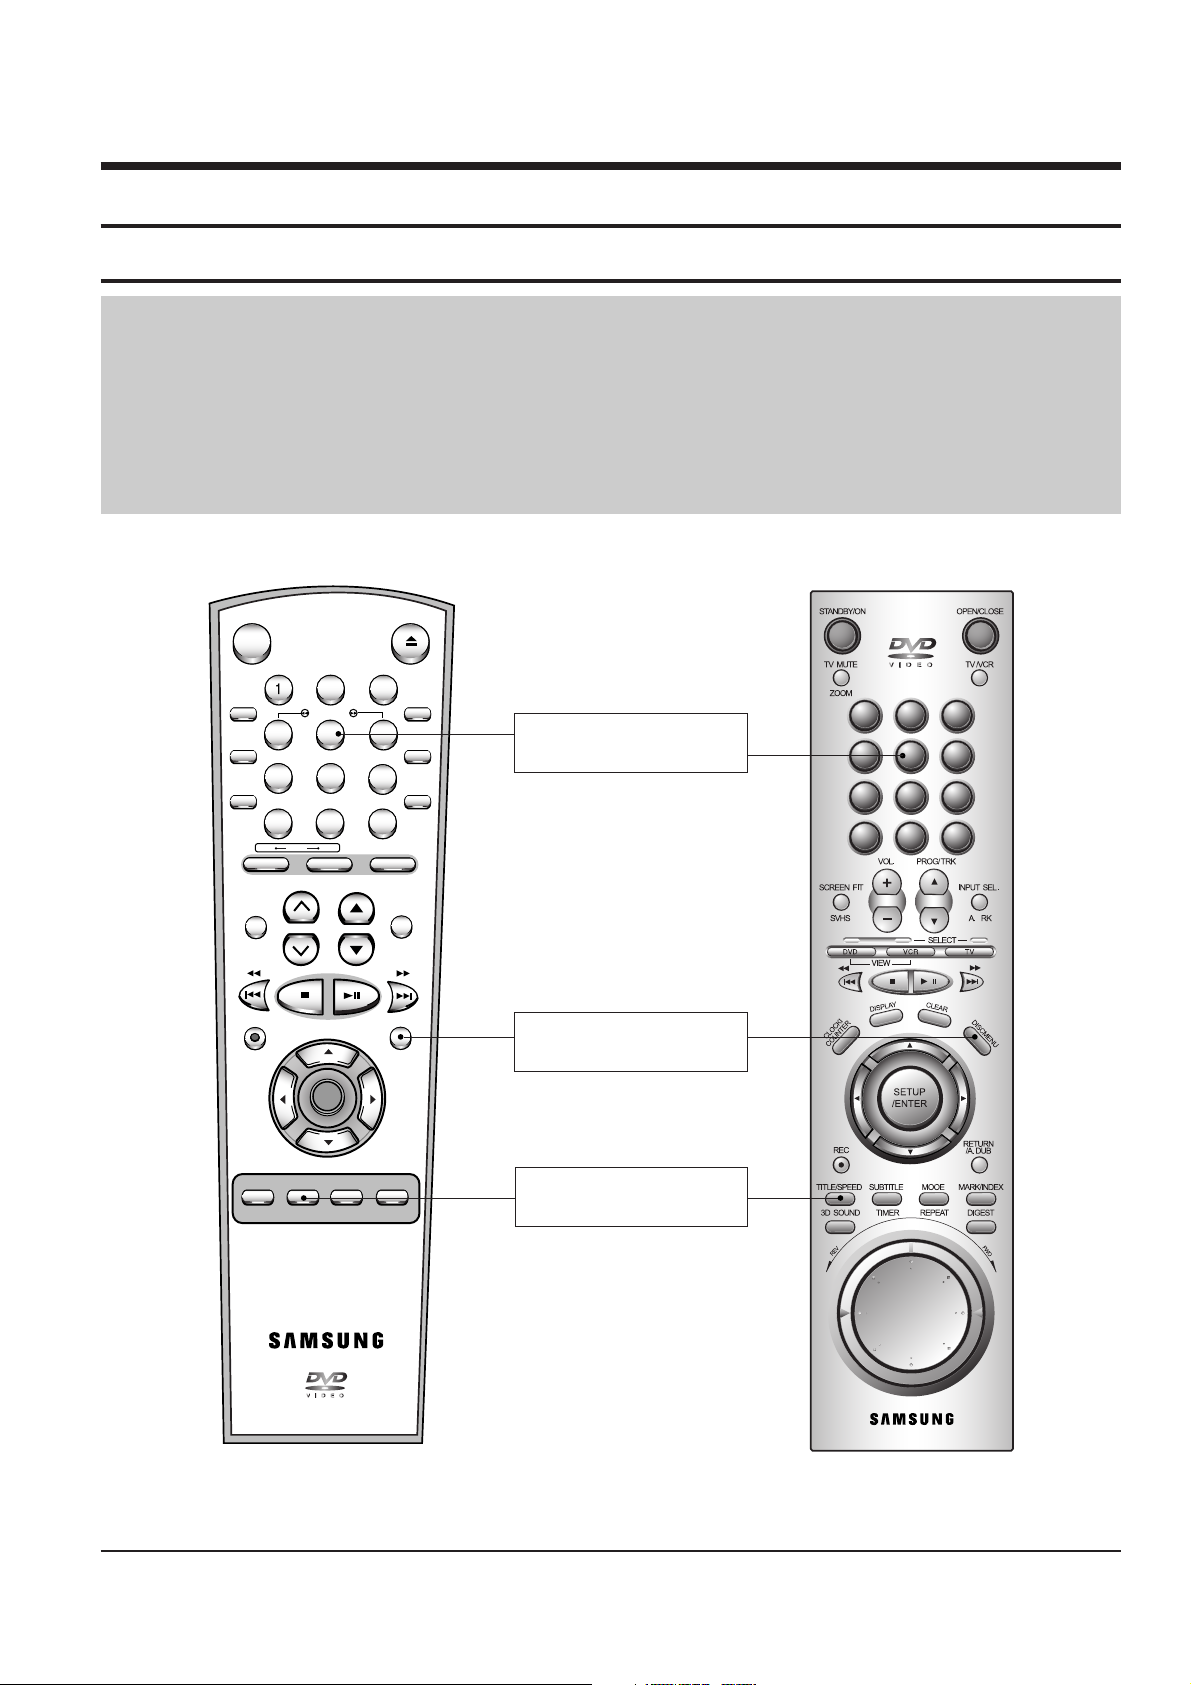
4-1-1 Location of adjustment button of remote control
Fig. 4-1
2
3
4
5
6
78
9
0
SHUTTLE
STANDBY/ON OPEN/CLOSE
AUDIO
3D SOUND SCREEN FIT CLEAR
DVD VCR INPUT SEL.
ZOOM
VIEW
TRK PROG
DISPLAY
REC
DISC MENU
F.ADV/STEP
SETUP
/ENTER
RETURN TITLE SUBTITLE MARK
A.DUB SPEED TIMER INDEX
MODE/
REPEAT
DIGEST
SVHS
TV/VCR
CLOCK/
COUNTER
ANGLE
A.TRK
123
456
7
809
ANGLE AUDIO
/
X-Point (Tracking Center)
Adjustment ; "5"
Head Switching
Adjustment ; "SPEED"
NVRAM Option Setting
; "DISC MENU"
SV-DVD3E SV-DVD6E
Page 2
4-2
Alignment and Adjustments
Samsung Electronics
4-1-2 TEST location for adjustment mode setting
Fig. 4-2 Function-Timer PCB (Top View)
TEST (SW709) BUTTON
Page 3

Alignment and Adjustments
4-3
Samsung Electronics
Test point : TP2 (Audio Output)
TP3 (Envelope)
TP4 (H’D S/W -Trigger)
TP5 (Control Pulse)
Fig. 4-3 Location of Test point (VCR Main PCB-Top View)
AUDIO OUTPUT
CONTROL PULSE
HEAD SWITCHING
ENVELOPE
4-2 Mechanical Adjustment
Note : Refer to the Mechanical Manual “TS-10A (AC82-00023A)” for the adjustment and confirmation of ass’y full
deck.
4-2-1 The number and position of test point
4-2-2 ACE Head position (X-Point) Adjustment
(See the 4-2-1(d) ACE Head Position (X-Point) Adjustment
on page 4-2 of the Mechanical Manual)
1) Playback the alignment tape (Color bar).
2)
Press the “SW709 (TEST)” button on F/Timer PCB to
set the adjustment mode. (See Fig. 4-2)
3) Press the “5” button of remote control then
adjustment is operated automatically. (See Fig. 4-1)
4) Connect the CH-1 probe to TP3 (Envelope) the
CH-2 probe to TP4 (H’D switching pulse) and then
trigger to CH-1.
5) Insert the (-) driver into the X-Point adjustment
hole and adjust it so that envelope waveform is
maximum.
6) Turn the Power off.
Page 4

4-4
Alignment and Adjustments
Samsung Electronics
4-3 Head Switching Point Adjustment
1) Playback the alignment tape.
2) Press the “SW709(TEST)” button on Function-Timer PCB to set the adjustment mode. (See Fig. 4-2)
3) Press the “SPEED” button of remote control then adjustment is operated automatically. (See Fig. 4-1)
4-4 NVRAM Option Setting
1) Press the “SW709(TEST)” button on Function-Timer PCB to set the adjustment mode. (See Fig. 4-2)
2)
Press the “DISC MENU” button on the remote control about 5 seconds then option setting is appeared. (See Fig. 4-4)
3)
Select the option number (See table 4-1) of corresponding model with “ , , ▲ , ▼” button on the remote control.
4) If selecting the option number is completed, press the “▼” button of remote control.
(If “▼” button is pressed, the selected number is changes reversed color. ; See Fig. 4-4)
5) Press the “RETURN” button of remote control again to store the option number.
6) Turn the Power off.
1) NVRAM Option is adjusted at production line basically.
2) In case VCR Main PCB Micom (IC601) and NVRAM (IC605 ; EEPROM) is replaced, be sure to set the corresponding option number of the
reqaired model. (If the option is not set, the unit is not operated.)
CNG:OK SAVE : RETURN
01 02 03 04 05 06 07 08
09 10 11 12 13 14 15 16
17 18 19 20 21 22 23 24
25 26 27 28 29 30 31 32
33 34 35 36 37 38 39 40
41 42 43 44 45 46 47 48
49 50 51 52 53 54 55 56
57 58 59 60 61 62 63 64
65 66 67 68 69 70 71 72
Fig.4-4
<Table 4-1 NVRAM Option Table>
COUNTRY MODELS OPTION NUMBER
France SV-DVD3E 2, 4, 5, 6, 7, 8, 9, 10, 11, 12, 13, 15, 20, 21, 26, 29, 33, 34, 35, 36, 40, 45, 47, 60, 61, 63
SV-DVD6E 2, 4, 5, 6, 7, 8, 9, 10, 11, 12, 13, 15, 20, 21, 23, 26, 29, 32, 33, 34, 35, 36, 40, 45, 47, 60, 61, 63
U.K SV-DVD3E 3, 4, 5, 6, 7, 8, 9, 10, 11, 12, 13, 15, 27, 29, 34, 40, 41, 45, 47, 60, 61, 63
SV-DVD6E 3, 4, 5, 6, 7, 8, 9, 10, 11, 12, 13, 15, 23, 27, 29, 32, 34, 40, 41, 45, 47, 60, 61, 63
Swiss SV-DVD3E 2, 4, 5, 6, 7, 8, 9, 10, 11, 12, 13, 15, 20, 21, 29, 34, 36, 40, 42, 45, 47, 60, 61, 63
SV-DVD6E 2, 4, 5, 6, 7, 8, 9, 10, 11, 12, 13, 15, 20, 21, 23, 29, 32, 34, 36, 40, 42, 45, 47, 60, 61, 63
CIS SV-DVD3E 2, 4, 6, 7, 8, 9, 10, 11, 12, 13, 15, 20, 21, 29, 34, 36, 42, 45, 47, 54, 60, 61, 63
SV-DVD6E 2, 4, 6, 7, 8, 9, 10, 11, 12, 13, 15, 20, 21, 23, 29, 32, 34, 36, 42, 45, 47, 54, 60, 61, 63
Greece/Hungary/Czech
SV-DVD3E 2, 4, 6, 7, 8, 9, 10, 11, 12, 13, 15, 20, 29, 34, 36, 42, 45, 47, 60, 61, 63
Macedonia/Poland/Croatia
SV-DVD6E 2, 4, 6, 7, 8, 9, 10, 11, 12, 13, 15, 20, 23, 29, 32, 34, 36, 42, 45, 47, 60, 61, 63
Germany/Italy/Spain/Austria
SV-DVD3E 2, 4, 5, 6, 7, 8, 9, 10, 11, 12, 13, 15, 20, 29, 34, 36, 40, 42, 45, 47, 60, 61, 63
Netherlans/Portugal/Pan-Scan
SV-DVD6E 2, 4, 5, 6, 7, 8, 9, 10, 11, 12, 13, 15, 20, 23, 29, 32, 34, 36, 40, 42, 45, 47, 60, 61, 63
 Loading...