

Samsung SVDVD1E-XEUI, SV-DVD1E User Manual
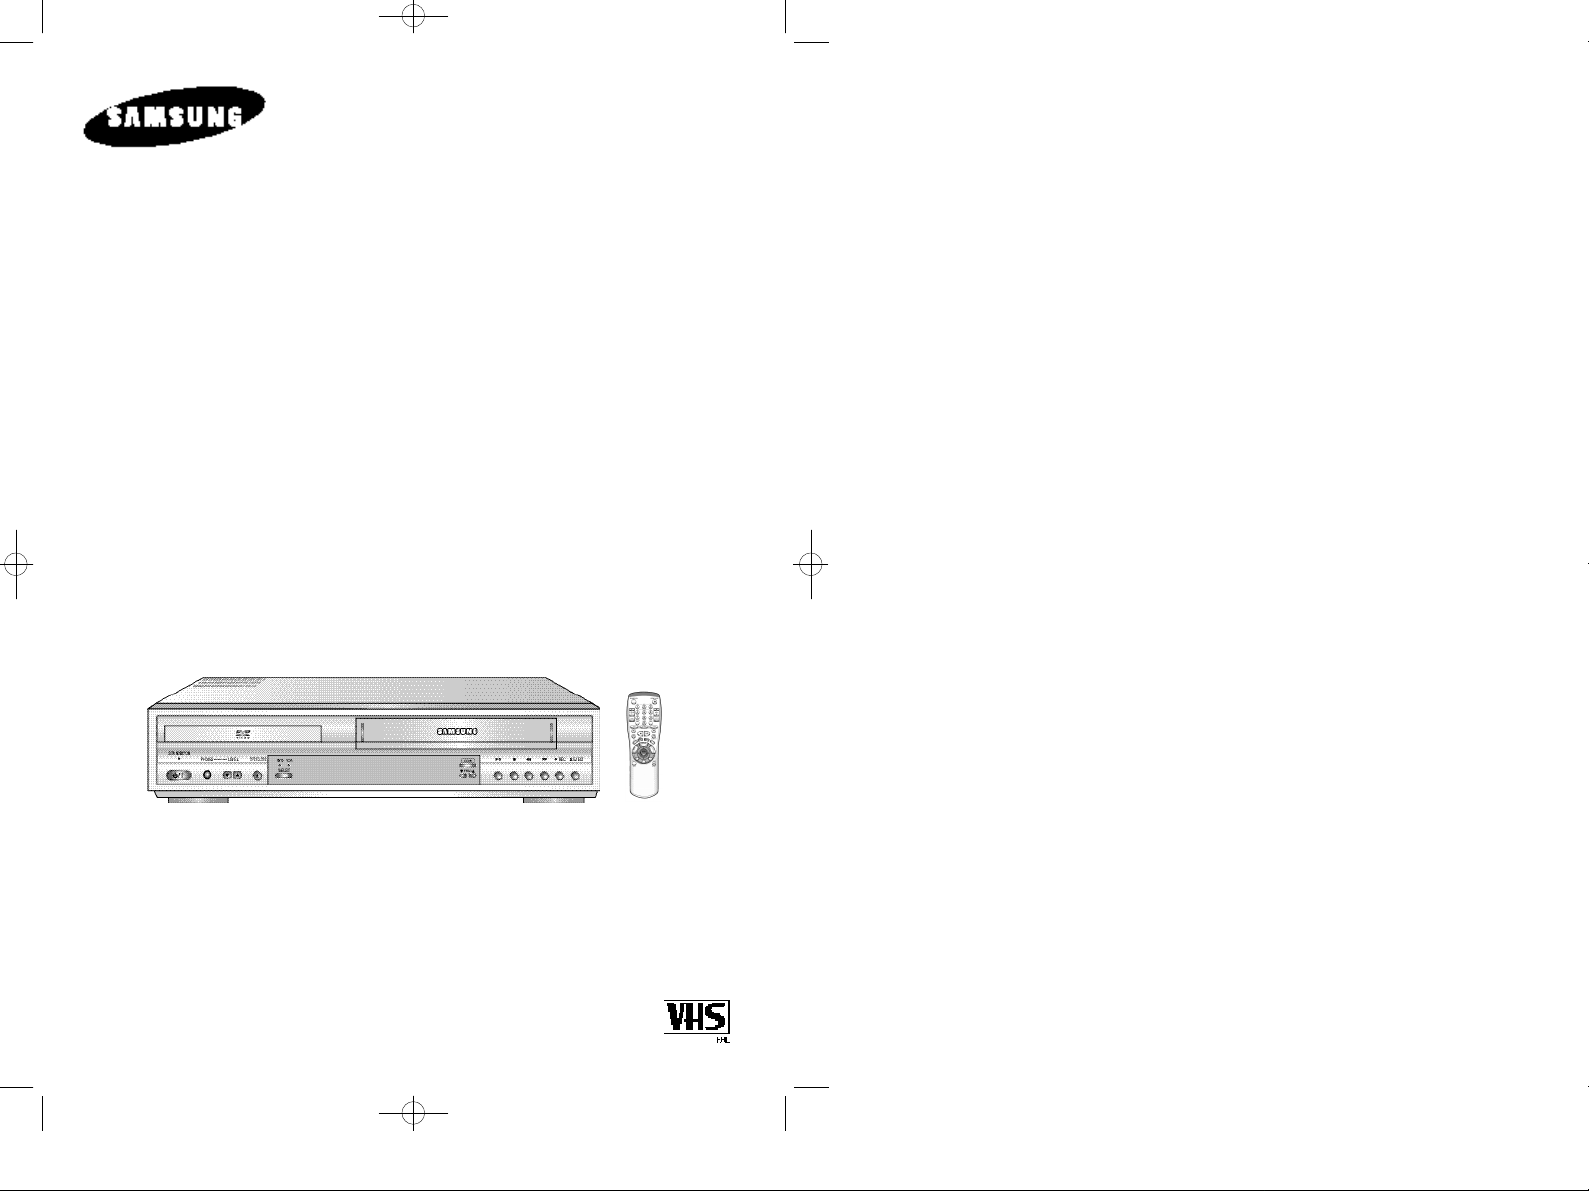
01274A SV-DVD1E/XEU-GB1 9/5/56 7:53 AM Page 1
Instruction Manual
DVD-VCR
SV-DVD1E
www.samsungvcr.com
01274A SV-DVD1E/XEU-GB1 9/5/56 7:53 AM Page 2
Safety Precautions
CAUTION
RISK OF ELECTRIC SHOCK
DO NOT OPEN
CAUTION. TO REDUCE THE RISK OF ELECTRIC
SHOCK, DO NOT REMOVE REAR COVER. NO
USER SERVICEABLE PARTS INSIDE. REFER TO
QUALIFIED SERVICE PERSONNEL.
IMPORTANT NOTE
The mains lead on this equipment is supplied with a
moulded plug incorporating a fuse. The value of the fuse is
indicated on the pin face of the plug. If it requires
replacing, a fuse approved to BS1362 of the same rating
must be used.
Never use the plug with the fuse cover omitted if the cover
is detachable. If a replacement fuse cover is required, it
must be of the same colour as the pin face of the plug.
Replacement covers are available from your dealer.
If the fitted plug is not suitable for the power points in your
house or the cable is not long enough to reach a power
point, you should obtain a suitable safety approved
extension lead or consult your dealer for assistance.
However, if there is no alternative to cutting off the plug,
remove the fuse and then safely dispose of the plug. Do
not connect the plug to a mains socket, as there is a risk of
shock hazard from the bared flexible cord.
The wires in the mains lead are coloured in accordance
with the following code: -
BLUE = NEUTRAL BROWN = LIVE
As these colours may not correspond with the coloured
markings identifying the terminals in your plug, proceed as
follows: -
The wire coloured BLUE must be connected to the
terminal marked with the letter N or coloured BLUE or
BLACK. The wire coloured BROWN must be connected to
the terminal marked with the letter L or coloured BROWN
or RED.
WARNING: DO NOT CONNECT EITHER WIRE TO THE
EARTH TERMINAL WHICH IS MARKED WITH THE
LETTER E OR BY THE EARTH SYMBOL , OR
COLOURED GREEN OR GREEN AND YELLOW.
IMPORTANT
DANGER
This symbol is intended to alert you to the
presence of dangerous voltage within the
product.
CAUTION
This symbol is intended to alert you to the
presence of important instructions
accompanying the product.
Contents
◆ FOREWORD
■ Safety Instructions......................................................................................... 6
◆ DVD-VCR O
◆ CONNECTING YOUR DVD-VCR
◆ S
ETTING UP YOUR DVD-VCR
◆ R
ECORDING TELEVISION BROADCASTS
VERVIEWS
■ Front View of the DVD-VCR.......................................................................... 7
■ Rear View of the DVD-VCR........................................................................... 7
■ Infrared Remote Control................................................................................ 8
■ Display Indicators.......................................................................................... 9
■ Accessories................................................................................................... 9
■ Deciding How to Connect DVD-VCR............................................................. 10
■ Connecting DVD-VCR to the TV using the Coaxial Cable............................ 11
■ Connecting DVD-VCR to the TV using the SCART Cable............................ 11
■ Connecting DVD-VCR to the Satellite receiver or Other Equipment............. 12
■ Connecting the Audio Output Cable.............................................................. 13
■ Plug &Auto Set Up........................................................................................ 13
■ Tuning Your Television for the DVD-VCR..................................................... 14
■ Deck Control Keys......................................................................................... 15
■ Basic TV Tuner Operations........................................................................... 16
■ Copying from DVD to VCR............................................................................ 17
■ Inserting Batteries in the Remote Control...................................................... 18
■ Setting the Date and Time............................................................................. 18
■ Displaying/Hiding On-Screen Information..................................................... 19
■ Setting the DVD-VCR Output Channel.......................................................... 19
■ Presetting the Stations Automatically............................................................ 20
■ Presetting the Stations Manually................................................................... 21
■ Clearing a Preset Station............................................................................... 22
■ Changing the Preset Station Table................................................................ 23
■ Selecting the Cassette Type.......................................................................... 24
■ Selecting the Recording Speed..................................................................... 24
■ NICAM........................................................................................................... 25
■ Switching between the TV and VCR Modes.................................................. 25
■ Protecting a Recorded Cassette.................................................................... 26
■ Recording a Programme Immediately........................................................... 26
■ Recording a Programme with Automatic Stop............................................... 27
■ Using the VIDEOPlus+ Feature..................................................................... 28
■ Modifying VIDEOPlus+ Programming........................................................... 29
■ Using the Timer Programming Feature......................................................... 30
■ Checking a Preset Recording........................................................................ 31
■ Cancelling a Preset Recording...................................................................... 31
GB
2
3
01274A SV-DVD1E/XEU-GB1 9/5/56 7:53 AM Page 4
GB
Contents (cont.)
◆ PLAYING BACK
■ Playing a Cassette......................................................................................... 32
■ Adjusting Picture Alignment Automatically.................................................... 32
■ Adjusting Picture Alignment Manually........................................................... 32
■ Intelligent Picture Control.............................................................................. 33
■ Record Source............................................................................................... 33
■ Selecting the Colour Mode............................................................................ 34
■ Selecting the Audio Output Mode.................................................................. 35
■ Selecting the Audio Mute Mode..................................................................... 35
◆ S
EARCHINGFOR A SEQUENCE
■ Playing a Cassette in Slow Motion................................................................ 36
■ Playing a Sequence Frame by Frame........................................................... 37
■ Playing a Sequence at Variable Speeds....................................................... 37
■ Searching for a Specific Sequence............................................................... 38
■ Auto Repeat Play........................................................................................... 39
■ Interval Repeat Play...................................................................................... 39
■ Using the Tape Counter................................................................................ 40
◆ A
DVANCED RECORDING FEATURES
■ Connecting an RCA Audio/Video Input Cable............................................... 41
■ Using the Assemble Edit Function................................................................. 42
■ Recording from Another VCR or Camcorder................................................. 42
■ Audio Dubbing a Pre-recorded Cassette....................................................... 43
◆ O
THER FUNCTIONS AND USEFUL RECOMMENDATIONS
■ SQPB (Super VHS Quasi PlayBack)............................................................. 44
■ Auto Power Off.............................................................................................. 44
◆ DVD FUNCTIONS
■ Disc Type and Characteristics....................................................................... 45
■ Choosing a Connection................................................................................. 46
■ Playing a Disc................................................................................................47,48
■ Using the Search & Skip Functions............................................................... 49
■ Using the Display Function (DVD)................................................................. 50
■ Using the Display Function (CD/VCD)........................................................... 50
■ Repeat Play................................................................................................... 51
■ Program Play (DVD/VCD/CD)....................................................................... 52
■ Random Playback (DVD/VCD/CD)................................................................ 52
■ Using the Disc View Function (Track View VCD).......................................... 53
■ Using the Disc View Function (Index View VCD).......................................... 53
■ Selecting the Audio Language (Using the AUDIO button)............................. 54
■ Selecting the Subtitle Language (Using the SUBTITLE button).................... 54
■ Changing the Camera Angle......................................................................... 55
■ Using the Mark Function (DVD/VCD)............................................................ 56
■ Recalling a Marked Scene............................................................................. 56
■ Clearing a Mark............................................................................................. 56
■ Using the Zoom (DVD/VCD).......................................................................... 57
■ 3D Sound Function........................................................................................ 57
Contents (cont.)
◆ DVD FUNCTIONS
■ Using the Setup Menu................................................................................... 58
■ Setting Up the Language Features................................................................ 59
■ Using the Disc Menu Language.................................................................... 59
■ Setting Up the AUDIO Language Features................................................... 60
■ Using the Subtitle Language......................................................................... 60
■ Setting Up the Parental Control..................................................................... 61
■ Setting Up the Audio Options........................................................................ 62
■ Setting Up the Display Options...................................................................... 63
◆ Technical Specifications....................................................................................... 64
◆ S
OLVING PROBLEMS
■ Problems and Solutions (VCR)...................................................................... 65
■ Troubleshooting Guide (DVD)....................................................................... 66
■ Service Centers List...................................................................................... 67
Symbols
1 1
= Step number
1
☛
➢
NoteImportantHold downPress/push
GB
4
5
01274A SV-DVD1E/XEU-GB1 9/5/56 7:53 AM Page 6
GB
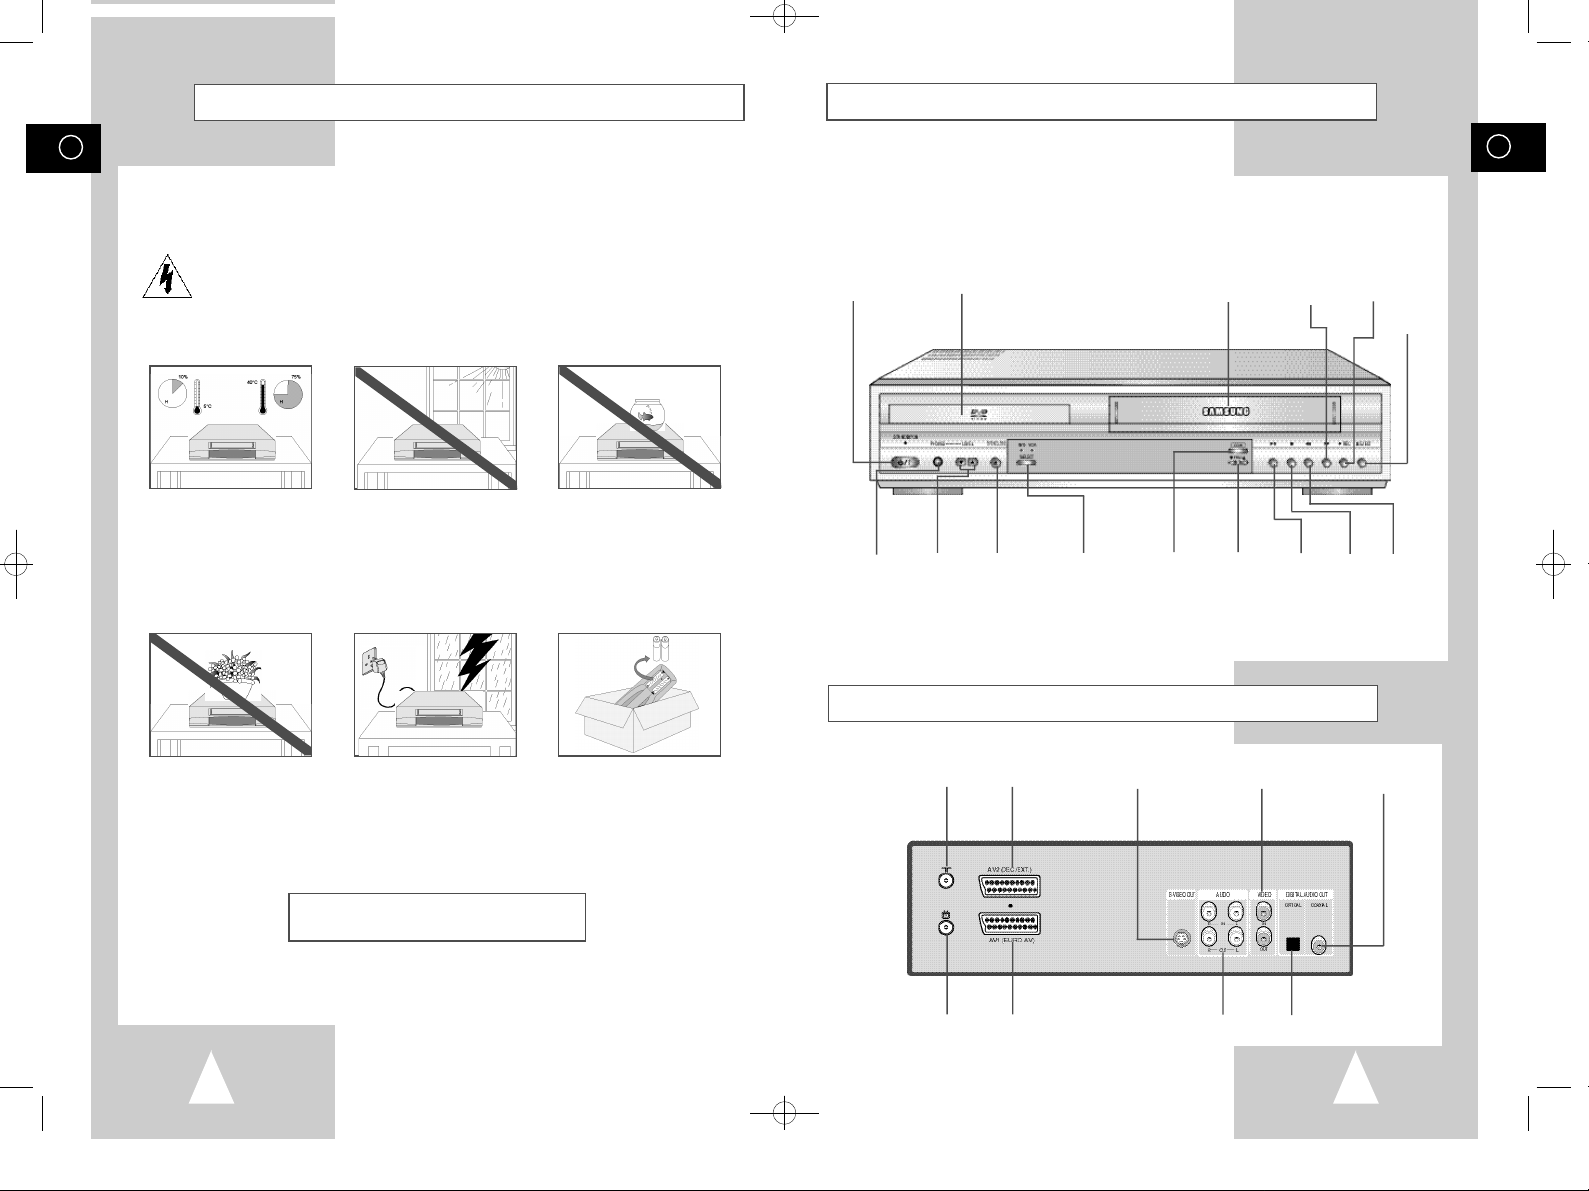
Safety Instructions
The following illustrations represent precautions.
The lightning bolt is a warning sign alerting you to dangerous voltage inside the product.
DO NOT OPEN THE DVD-VCR. Refer to service personnel.
Do NOT expose the DVD-VCR
to extreme temperature conditions (below 5°C and above
40°C) or to extreme humidity
conditions (less than 10% and
more than 75%).
Do NOT expose the DVD-VCR
to direct sunlight.
Do NOT expose the DVD-VCR
to any liquids.
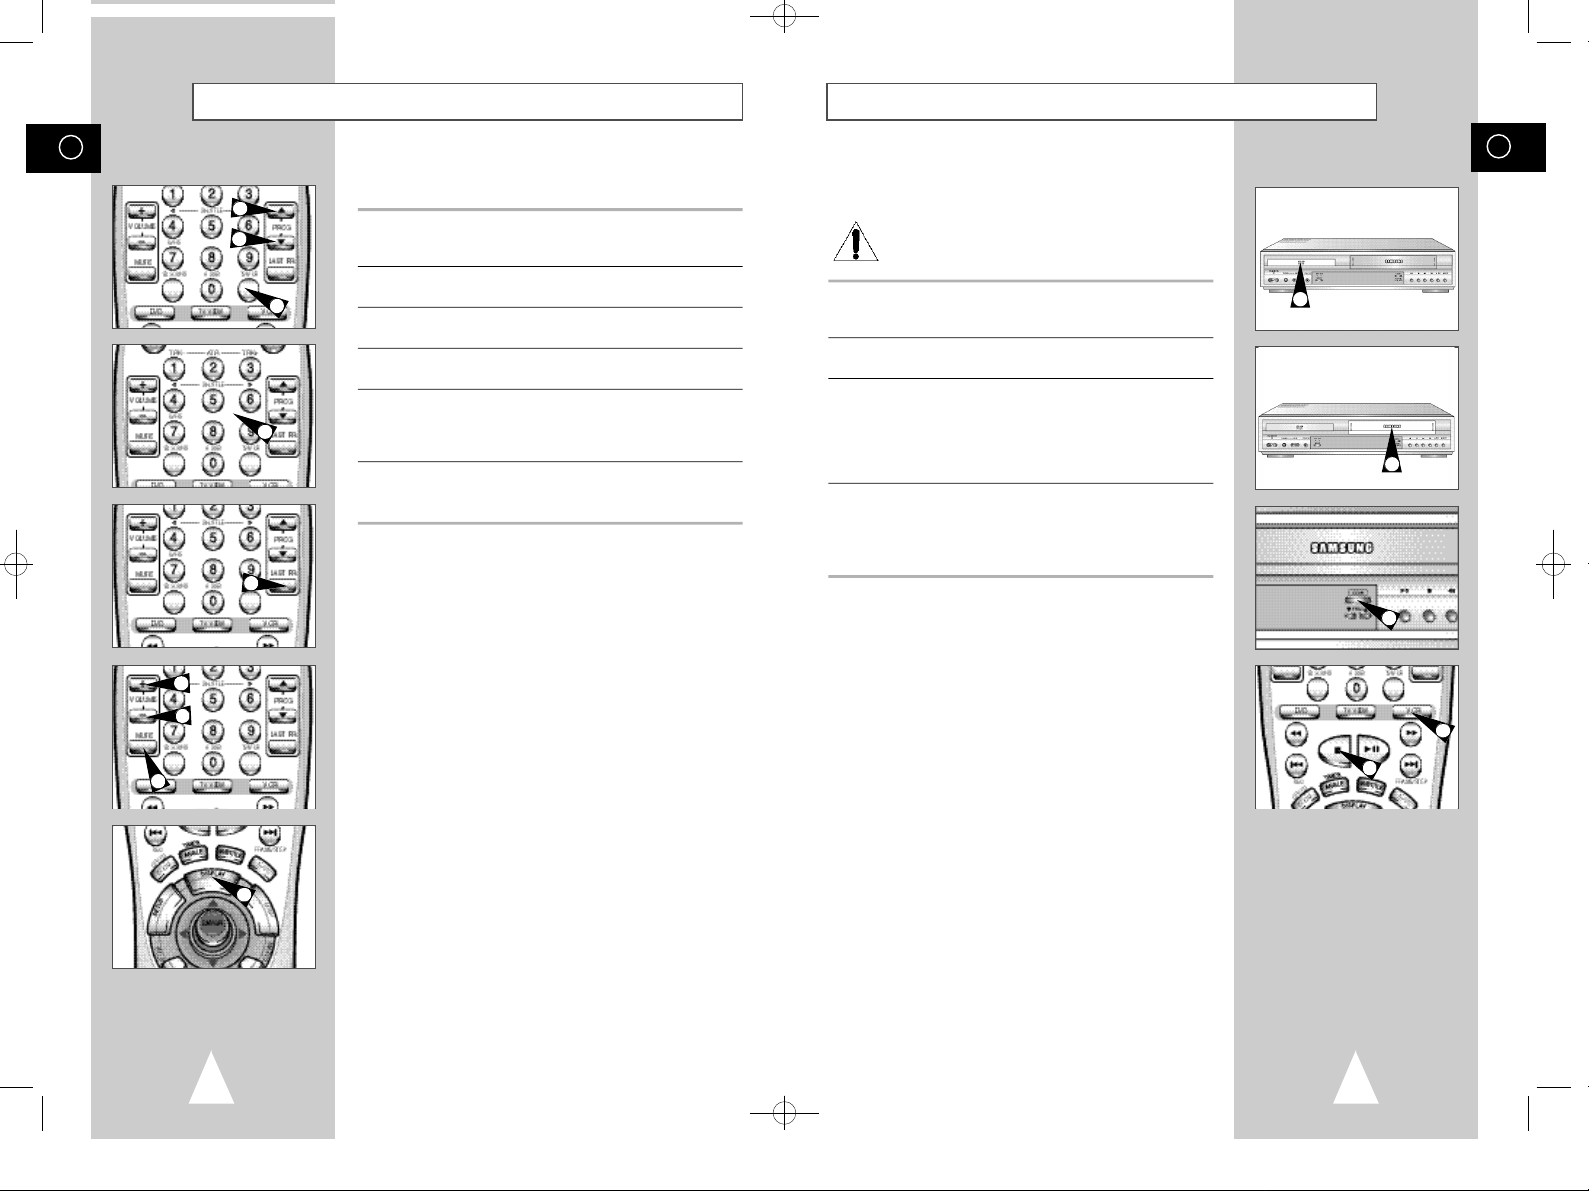
Front View of the DVD-VCR
STANDBY/ON
BUTTON
STEREO
HEADPHONE
JACK
DVD DECK
HEADPHONES
VOLUME
CONTROL
OPEN/CLOSE
BUTTON
DVD/VCR
SELECT BUTTON
COPY
BUTTON
VIDEO CASSETTE
COMPARTMENT
PROGRAMME
SELECTION
BUTTONS
F.F /
SKIP NEXT
BUTTON
PLAY/PAUSE
BUTTON
RECORD
BUTTON
STOP
BUTTON
EJECT
BUTTON
REW /
SKIP BACK
BUTTON
GB
Do NOT place any objects on
the DVD-VCR or remote
control.
THIS DEVICE IS NOT FOR USE IN INDUSTRIAL
6
During a storm and/or lightning, unplug the DVD-VCR
from the mains socket and
aerial.
ENVIRONMENTS
If the remote control is not
used for a long period of time,
remove the batteries and store
it in a cool, dry place.
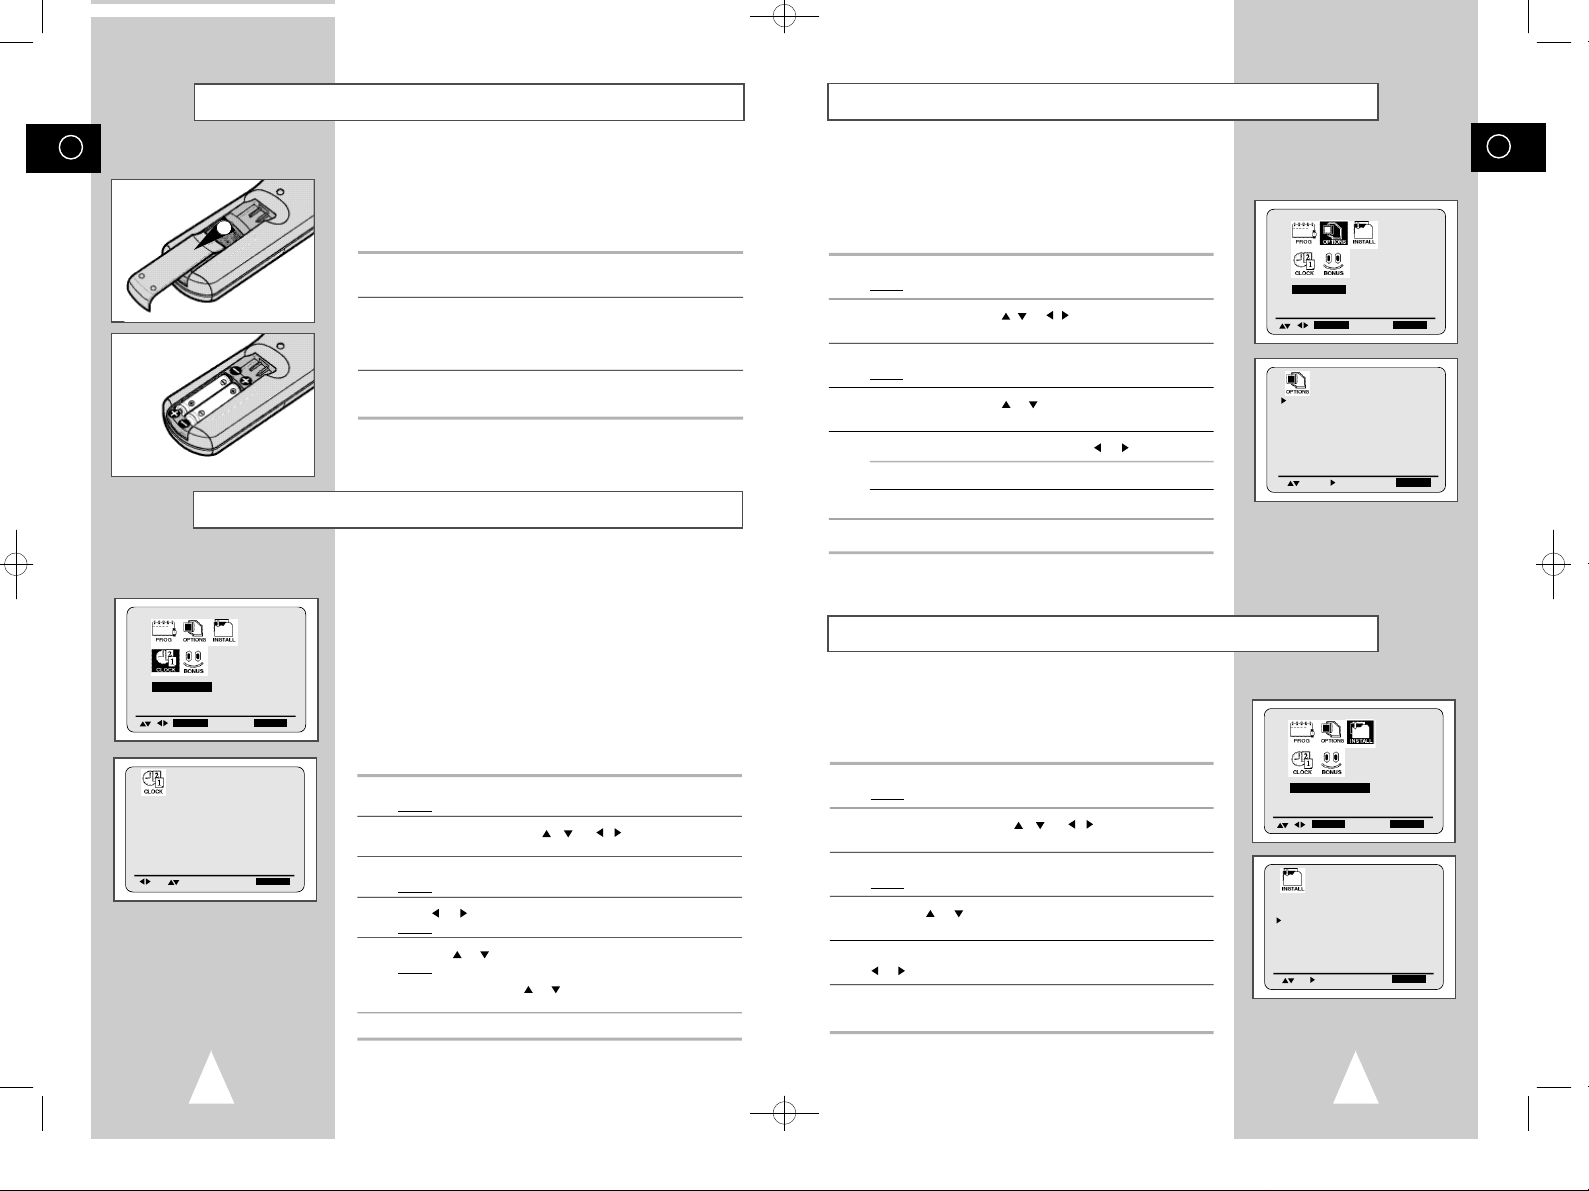
Rear View of the DVD-VCR
AERIAL IN
CONNECTOR
OUT TO TV
CONNECTOR
AV2 (DEC./EXT.) SCART
(EURO-21) SOCKET
AV1 (EURO AV) IN/OUT
SCART (EURO-21) SOCKET
S-VIDEO OUT
JACK
RCA AUDIO L, R
IN/OUT SOCKETS
VIDEO INPUT/OUTPUT
SOCKETS
DIGITAL AUDIO OUT
SOCKET (OPTICAL)
DIGITAL AUDIO OUT
SOCKET (COAXIAL)
7
01274A SV-DVD1E/XEU-GB1 9/5/56 7:53 AM Page 8
GB
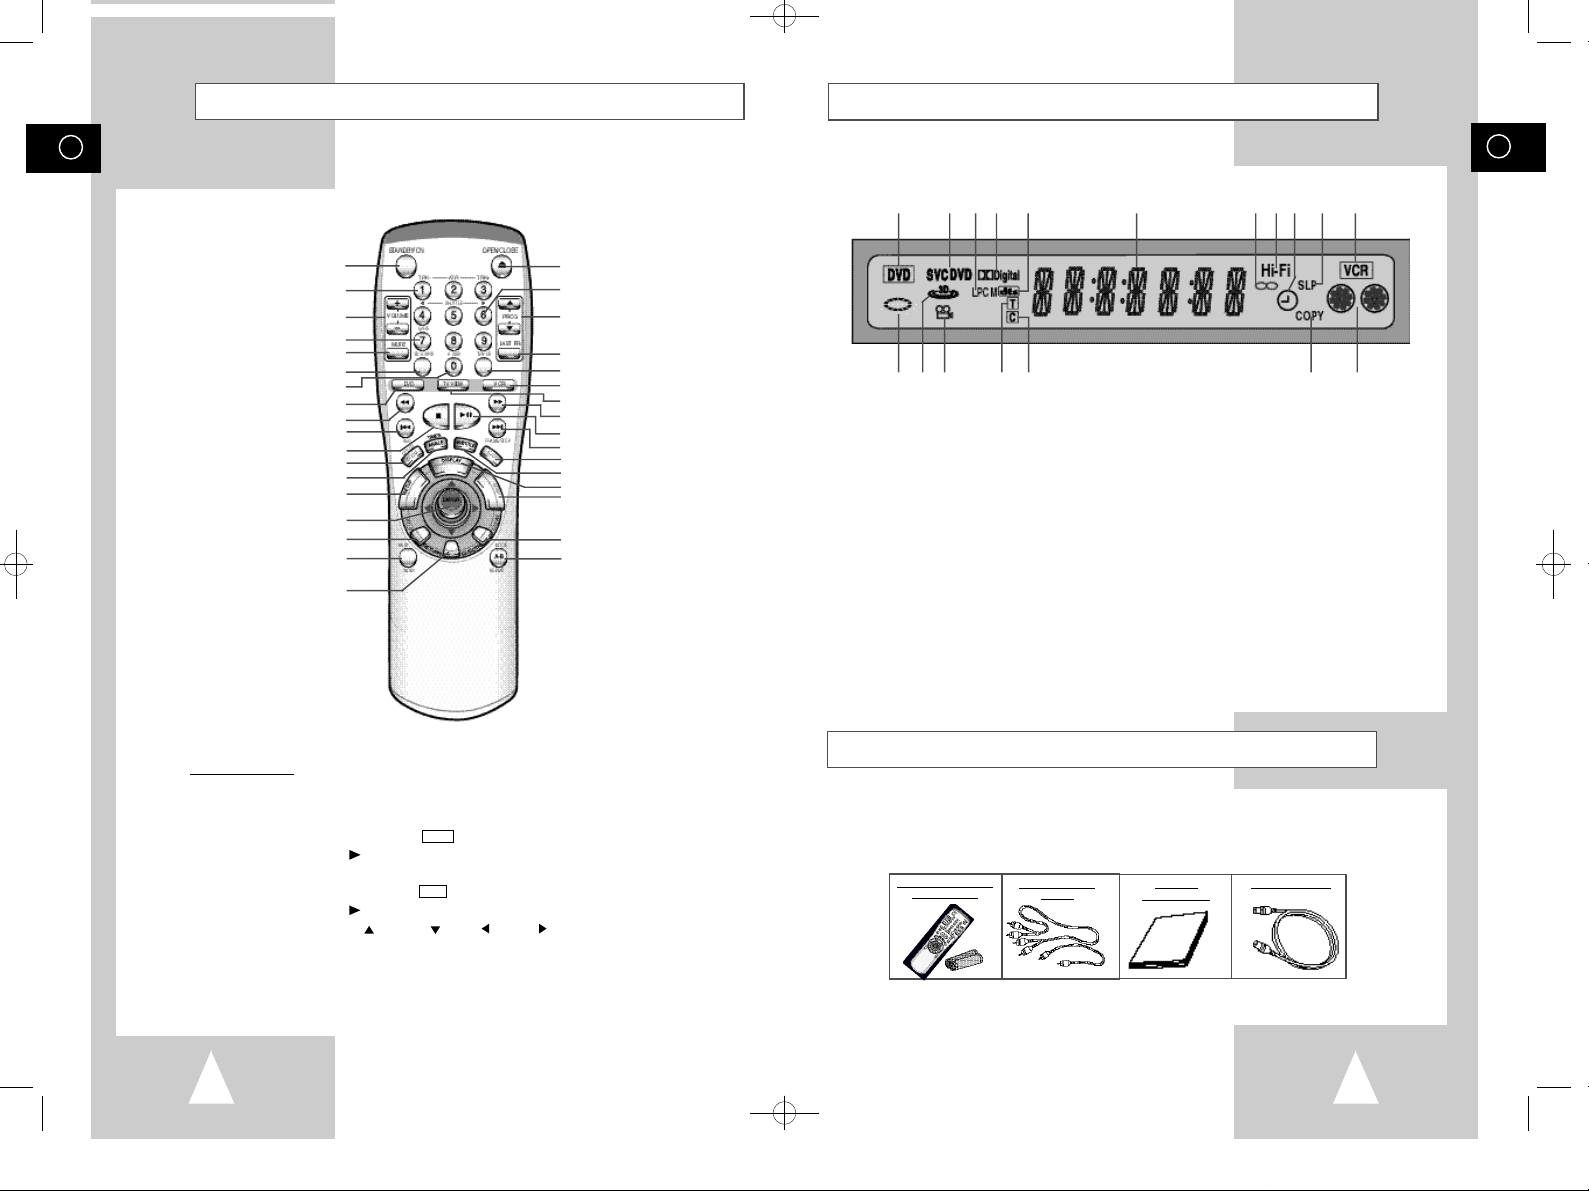
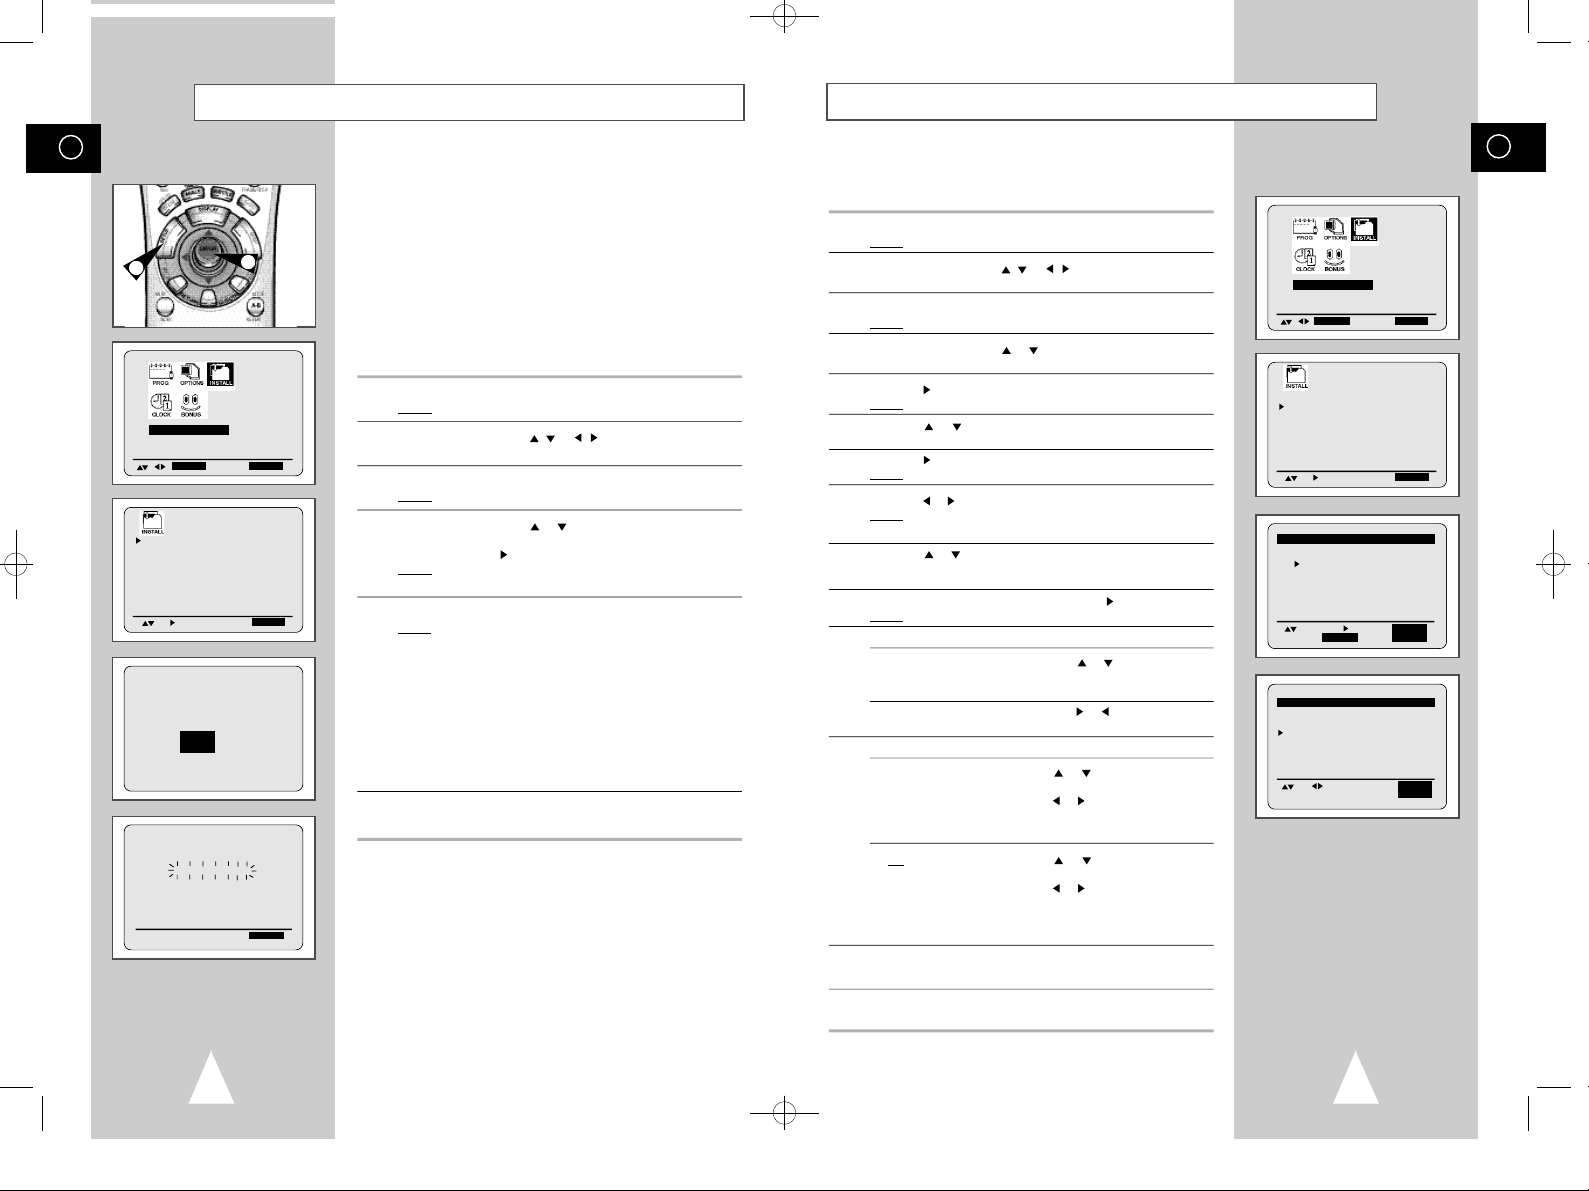
Infrared Remote Control
STANDBY/ON BUTTON
AUTO TRACKING, TRACKING +/-
VOLUME +/- BUTTONS
S-VHS BUTTON
MUTE BUTTON
3D SOUNDBUTTON
0-9 / AUDIO DUBBING BUTTON
REWIND/REVERSE PICTURE SEARCH BUTTON
ZOOM / RECORDING SPEED SELECTION BUTTON
SKIP BACK / RECORD BUTTON
RETURN / CLOCK/COUNTER BUTTON
DVD BUTTON
STOP BUTTON
ANGLE / TIMERBUTTON
SETUP BUTTON
JOYSTICK
TITLE BUTTON
MARK / SEARCH BUTTON
OPEN/CLOSE BUTTON
SHUTTLE << / >>
PROGRAM +/- BUTTONS
LAST CHANNEL BUTTON
TV/VCR BUTTON
VCR BUTTON
TV VIEW BUTTON
FAST-FORWARD/FORWARD SEARCH
BUTTON
PLAY/PAUSE BUTTON
SKIP NEXT / FRAME/STEP BUTTON
AUDIO MODE SELECTION BUTTON
SUBTITLE BUTTON
DISPLAY BUTTON
MENU BUTTON
CLEAR BUTTON
AB REPEAT / REPEAT / MODE BUTTON
Display Indicators
1 2 3 4 5 6 7 8 9 10 11
12 13 14 15 16 17 18
1 The DVD Deck is active
2 A DVD, CD, VCD or SVCD is loaded
3 A disc with LPCM (Linear Pulse Code
Modulation) audio is loaded
4 A DVD with a Dolby Digital is loaded
5 A DVD with a DTS soundtrack is loaded
6 The time, counter position, time remaining or
current deck status is displayed
7 The current TV show or video is broadcast in
Stereo
8 The Hi-Fi track of a VHS tape is playing
9 A Timer Recording is programmed or in progress.
If blinking there is an error. Also displays without the
clock hands to indicate that a recording is in progress
and blinks when the VCR is in Pause mode.
10 The VCR Record Speed is set to SP or LP
11 The VCR Deck is active
12 The status of the DVD deck is graphically displayed
13 3D Sound is active
14 The DVD has multiple angles to choose from
15 The number to the right of the “T” symbol is the
current title number
16 The number to the right of the “C” symbol is the
current title number
17 DVD to VHS copy is in progress
18 The status of the VCR deck is graphically displayed
GB
➢ Function Buttons:
◆ TV VIEW : Output selection key. Select the output that you want to see.
◆ DVD : Remote key active for DVD operation.
◆ VCR : Remote key active for VCR operation.
◆ JOYSTICK : Use for Up ( ), Down ( ), Left ( ), Right ( ), ENTER key.
◆ MENU : Use for DISC menu of DVD.
◆ SETUP : Use for SETUP menu of DVD or VCR.
If you press DVD button, the DVD is ligthining. It means DVD mode.
ex) If you press
If you press VCR button, the VCR is ligthining. It means VCR mode.
ex) If you press
8
ll (PLAY) key, the DVD will be play.
ll (PLAY) key, the VCR tape will be play.
Accessories
You have just purchased a SAMSUNG Video Cassette Recorder (DVD-VCR).
Together with your DVD-VCR, you will find the following accessories in the box.
REMOTE CONTROL
& BATTERIES
AUDIO & VIDEO
CABLE
OWNER’S
INSTRUCTIONS
COAXIAL CABLE
9
01274A SV-DVD1E/XEU-GB1 9/5/56 7:53 AM Page 10
GB
Deciding How to Connect DVD-VCR
You must take into account various factors when connecting audio or video systems:
◆ Types of connectors available on your systems
◆ Systems connected permanently to the DVD-VCR (satellite receiver for example) or
temporarily (camcorder for example)
Your DVD-VCR is equipped with the following connectors.
Connector Location Type Direction Recommended Use
AV1 (EURO AV)
AV2 IN Rear SCART In ◆ Satellite receiver
Audio input Rear Audio RCA In ◆ AUX Audio in
Audio output Audio RCA Out ◆ LINE Audio out
VIDEO input Rear RCA In ◆ AUX Video in
VIDEO output RCA Out ◆ LINE Video out
S-VIDEO Rear S-JACK Out ◆ S-Video out (DVD only)
output
Rear SCART In/Out ◆ Television
◆ Satellite receiver
◆ Other VCR
◆ CANAL/DECODER
◆ Other VCR
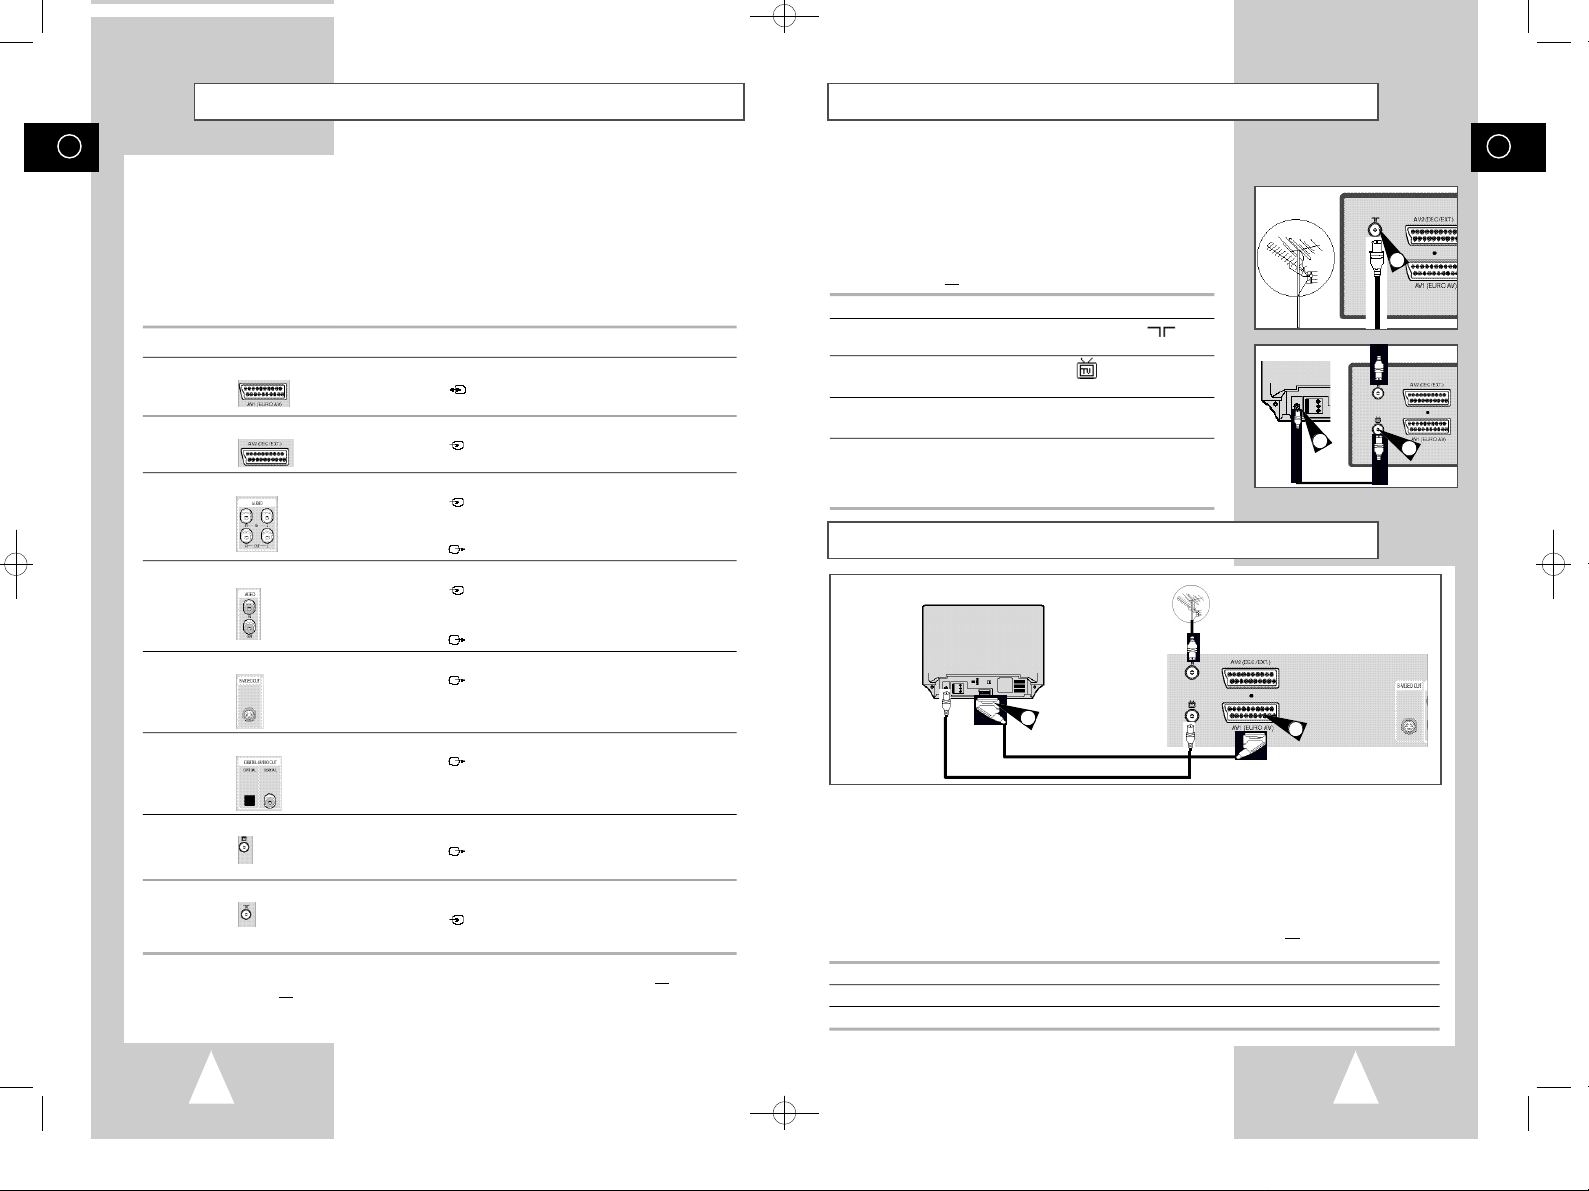
Connecting DVD-VCR to the TV using the Coaxial Cable
To receive television programmes a signal must be received from
one of the following sources:
◆ An outdoor aerial
◆ An indoor aerial
◆ A cable television network
◆ A satellite receiver
☛ Make sure that both the television and the DVD-VCR are
switched
off before connecting the cables.
1 Remove the aerial or network input cable from the television.
2 Connect this cable to the 75Ω coaxial socket marked on the
rear of your DVD-VCR.
3 Plug the coaxial cable supplied into the socket on your
DVD-VCR.
4 Plug the other end of the coaxial cable into the connector
previously used for the aerial on the television.
5 To obtain better quality pictures and sound on your television, you
can also connect your DVD-VCR to the television via the SCART
cable (see section below) if your television is equipped with this
type of connection.
TV
4
Connecting DVD-VCR to the TV using the SCART Cable
Aerial
TV
GB
2
3
Digital AUDIO Rear Optical Out ◆ Digital Audio out (DVD only)
output coaxial
OUT TO TV Rear 75 Ω Out ◆ Television
coaxial
IN FROM ANT. Rear 75 Ω In ◆ Aerial
coaxial ◆ Cable television network
☛ Whenever you connect an audio or video system to your DVD-VCR, ensure that all elements
are switched
Refer to the documentation supplied with your equipment for detailed connection instructions
and associated safety precautions.
10
off.
◆ Satellite receiver
3
SCART Cable
RF coaxial cable
You can connect your DVD-VCR to the television using the SCART cable if the appropriate input is
available on the television. You thus:
◆ Obtain better quality sound and pictures
◆ Simplify the setting up procedure of your DVD-VCR
☛ ◆ Regardless of the type of connection chosen, you must always connect the coaxial cable
supplied. Otherwise, no picture will be visible on the screen when the DVD-VCR is switched
off.
◆ Make sure that both the television and the DVD-VCR are switched
cables.
2
off before connecting the
1 Connect the coaxial cable as indicated in the above section.
2 Connect one end of the SCART cable to the AV1 (EURO AV) socket on the rear of the DVD-VCR.
3 Plug the other end into the appropriate connector on the television.
11
01274A SV-DVD1E/XEU-GB1 9/5/56 7:53 AM Page 12
GB
Connecting DVD-VCR to a Satellite Receiver or Other Equipment
You can connect your DVD-VCR to a Satellite receiver or other DVD-VCR using the SCART cable if the
appropriate outputs are available on the equipment chosen. The following illustrations give a few examples
of the connection possibilities.
1. AV1(EURO AV): By means of 21-pin Scart Cable
Plug the SCART Cable with satellite receiver or other equipment into the AV1 (EURO AV) socket on the rear of the
DVD-VCR.
After making this connection, select the source by pressing the TV VIEW button for the AV1 input sources.
2. By means of RF Coaxial Cable
After making this connection, you must preset the station received through the satellite tuner.
RF output channel of the satellite receiver should be adjusted away from channel 60, which is used by the
DVD-VCR, e.g. re-adjust to channel 65.
Satellite Receiver or other Equipment
TV
1
SCART Cable
RF coaxial cable
1. AV2 IN: By means of 21-pin Scart Cable
Plug the SCART Cable with satellite receiver or other equipment into the AV2 (DEC./EXT.) socket on the rear of
the DVD-VCR.
After making this connection, select the source by pressing the TV VIEW button for the AV2 input sources.
2. By means of RF Coaxial Cable
After making this connection, you must preset the station received through the satellite tuner.
RF output channel of the satellite receiver should be adjusted away from channel 60, which is used by the
DVD-VCR, e.g. re-adjust to channel 65.
Satellite Receiver or other Equipment
TV
Aerial Connector
2
Aerial Connector
2
Aerial
Aerial
1
Connecting the Audio Output Cable
You can connect your DVD-VCR to a Hi-Fi system.
Example: You wish to take advantage of the quality of your Hi-Fi
☛ ◆ Regardless of the type of connection chosen, you
stereo system when watching a programme or recording
via your DVD-VCR.
must always connect the coaxial cable supplied.
Otherwise, no picture will be visible on the screen
when the DVD-VCR is switched off.
◆ Make sure that both the television and the DVD-VCR
are switched
off before connecting the cables.
1 Connect the coaxial cable or SCART as indicated on page 12.
2 Plug the audio output cable into the audio connectors on the rear
of your DVD-VCR.
➢ Respect the colour coding of the left and right channels.
3 Plug the other end of the audio cable into the appropriate input
connectors on your Hi-Fi stereo system.
Plug & Auto Set Up
Your DVD-VCR will automatically set itself up when it is plugged
into the mains for the first time. TV stations will be stored in
memory. The process takes a few minutes. Your DVD-VCR will
then be ready for use.
1 Connect the coaxial cable as indicated on page 12.
(Connecting Your DVD-VCR to the TV Using the Coaxial Cable)
2 Plug the DVD-VCR into the mains. It will automatically tune itself
in and store TV stations in the memory.
3 The process will finish after a few minutes. Then the DVD-VCR
automatically switches itself off.
➢ Now, you only have to switch the DVD-VCR on and it is
ready for use.
☛ Function for “Plug & Auto Set Up” is fixed already.
So if you want to change this fixed one, you can change
it by Presetting the Stations Automatically in OSD “ Auto
Set Up” menu. (see page 20)
2
GB
1
2
TV
12
RF coaxial cable
SCART Cable
13
01274A SV-DVD1E/XEU-GB1 9/5/56 7:53 AM Page 14
GB
Tuning Your Television for the DVD-VCR
You must tune your television for the DVD-VCR only if you are not
using a Scart cable
➢ To view pictures from your DVD-VCR when a Scart cable
is used, the television must be set to the audio/video
mode (AV).
2
4
1 Switch on the television.
2 Switch on the DVD-VCR by pressing STANDBY/ON on the front of
the DVD-VCR or STANDBY/ON on the remote control.
3 Select a programme position on the television to be reserved for
use with your DVD-VCR.
4 Insert the video cassette in the DVD-VCR. Check that the
DVD-VCR starts reading the cassette; if not, press
5 Start a scan on your television or set the television to UHF
channel 60.
6 Fine tune the television until the pictures and sound are obtained
clearly.
7 If you cannot find the pictures and sound, or there is interference
from nearby channels, it may be necessary to change the setting
of the DVD-VCR output channel (see Setting the DVD-VCR
Output Channel on page 19 and Problems and Solutions on page
63).
8 When the picture and sound are perfectly clear, store this channel
at the desired programme position on the television.
Result: That programme is now reserved for use with your
DVD-VCR.
II
button
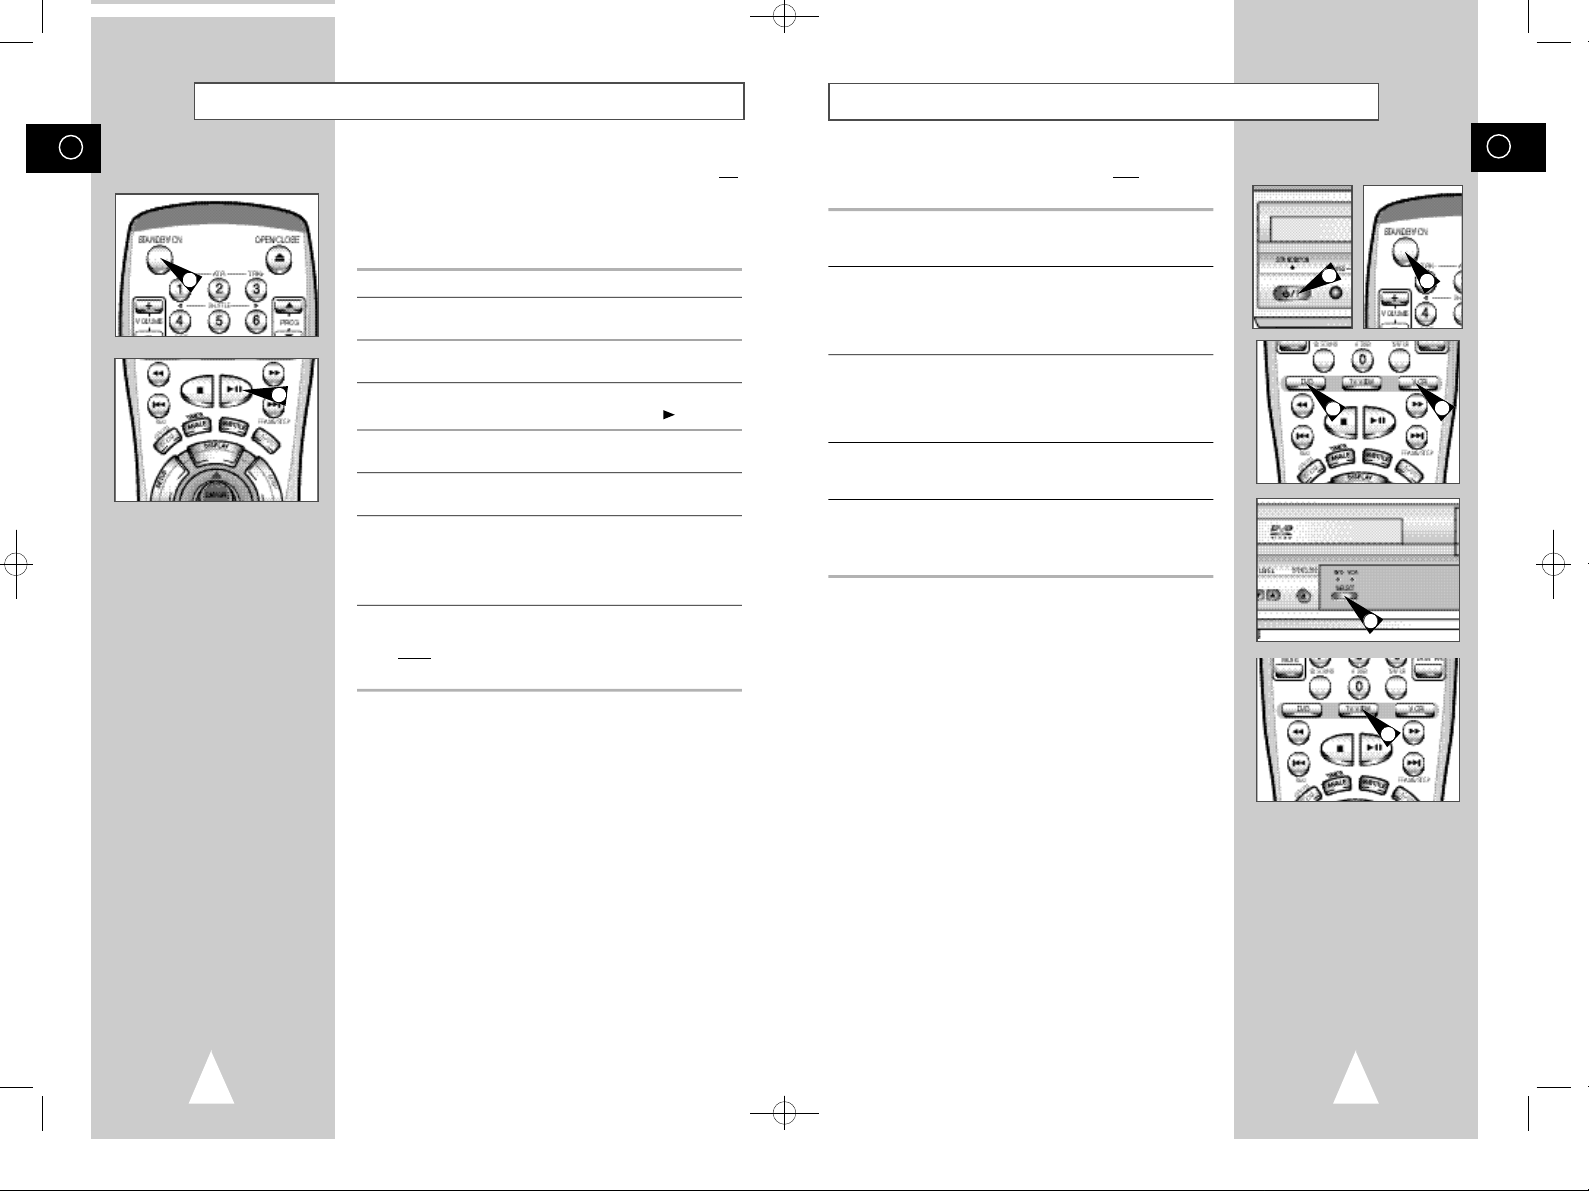
Deck Control Keys
GB
The DVD-VCR uses one set of controls to operate both decks. The
following keys are helpful in successfully controlling each deck.
1 STANDBY/ONButton
Press the STANDBY/ON button on the remote control or front
panel to turn on the DVD-VCR.
2 DVD Button
Press the DVD button on the remote control when you want to
control the DVD deck.
◆ The DVD indicator will light on the Front Panel Display to show
that the DVD deck is selected.
3 VCR Button
Press the VCR button on remote control when you want to control
the VCR deck.
.
◆ The VCR indicator will light on the Front Panel Display to show
that VHS deck is selected.
1
2
4 DVD-VCR Toggle
Press the DVD-VCR button on the front panel to toggle control
between the DVD deck and the VCR deck.
5 The TV VIEW Key
Press the TV VIEW key repeatedly to cycle through all of your
input sources, including the DVD, VCR, Tuner (PR##), AV1, AV2
and AUX.
➢ Before using the VCR operation of 14~44 pages, press
the VCR button on the remote control to select VCR
mode.
Before using the DVD operation of 45~63 pages, press
the TV VIEW button on the remote control to select and
watch DVD.
1
3
4
5
14
15
01274A SV-DVD1E/XEU-GB1 9/5/56 7:53 AM Page 16
GB
Basic TV Tuner Operations
The following buttons are used when watching television via the
DVD-VCR’s built-in TV tuner.
2
2
1
3
4
5
5
1 TV/VCRButton
Press to switch between your TV’s tuner and the VCR’s internal
tuner.
2 PROG Up/Down Button
Press to change to the next or previous channel.
3 0-9 Buttons
Press to select channels directly.
4 Last Programme
Press to jump directly to the previously viewed channel.
5 Volume/Mute
Press to adjust the volume of the programme you are watching.
Press Mute to toggle the sound on and off.
◆ Also works in DVD and VCR mode.
6 Display
Press to display the channel you are watching.
◆ Also works in DVD and VCR mode.
Copying from DVD to VCR
The DVD-VCR allows you to copy the contents of a DVD to a VHS
tape with a press of the COPY button.
If the DVD you are attempting to copy is copy
protected, you will not be able to copy the disc. It is not
permitted to copy Macrovision® encoded DVDs.
1 Insert Disc
Insert the disc you wish to copy in the DVD deck and close the
drawer.
2 Insert VHS Tape
Insert a blank VHS videotape into the VCR deck.
3 Copy the DVD to VHS Tape
Press the COPY button on the DVD-VCR front panel.
◆ The DVD will go into Play mode and the VCR will go into Record
mode.
◆ If the DVD disc menu appears, you may need to press the PLAY
button manually to begin copying.
4 Stop the Copy Process
When the DVD is finished playing, press the VCR button on the
remote control and then press the STOP button to end the copy.
◆ You must stop the Copy process manually when the DVD movie
ends or the DVD may replay and record over and over again.
☛ For NTSC DVD or VCD copy
◆ Before starting the copy process, set the Quasi PAL to
Off in Display options of DVD SETUP MENU.
(see page 63)
◆ If Quasi PAL is On, the copy process can not active.
◆ The copy is only active PAL tape system.
GB
1
2
3
4
5
6
16
4
17
01274A SV-DVD1E/XEU-GB2 9/5/56 7:54 AM Page 18
GB
Inserting Batteries in the Remote Control
You must insert or replace the batteries in the remote control when
you:
◆ Purchase the DVD-VCR
1
◆ Find that the remote control is no longer working
correctly
1 Push the tab in the direction of the arrow to release the battery
compartment cover on the rear of the remote control.
2 Insert two AA, R6 or equivalent batteries, taking care to respect
the polarities:
◆ + on the battery with + on the remote control
◆ – on the battery with – on the remote control
3 Replace the cover by aligning it with the base of the remote
control and pushing it back into place.
➢ Do not mix different battery types (manganese and
alkaline for example).
Setting the Date and Time
Your DVD-VCR contains a 24-hour clock and calendar used to:
◆ Automatically stop programme recording
◆ Preset your DVD-VCR to record a programme
automatically
◆ You purchase the DVD-VCR
◆ The power supply remains off for more than 60 minutes
broadcast signal. If the signal is weak or ghosting
occurs, the time and date may not be set automatically. In this case, they should be set manually.
◆ Do not forget to reset the time when you change
clocks from winter to summer time and vice versa.
1 Press SETUP on the remote control.
Result: The programming menu is displayed.
2 Press the corresponding
CLOCK SET option.
3 Press the ENTER button to select this option.
Result: The CLOCK SETmenu is displayed.
4 Press or to select the hour, minutes, day, month and year.
Result: The option selected flashes.
5 Press the or buttons to increase or decrease the value.
Result: The day of the week is displayed automatically.
➢ You can hold the
quickly through the values.
6 On completion, press SETUP twice to exit the menu.
CLOCK SET
E N T E R E ND:S E T U P
12:00 1/JAN/2000
AUTO CLOCK : ON
E ND:S E T U P
You must set the date and time when:
☛ ◆ The time and date are set automatically from the
S A T
,
or , buttons to select the
or buttons down to scroll more
Displaying/Hiding On-Screen Information
Your DVD-VCR displays most information both on the DVD-VCR
and the television.
You can choose to display or hide this information on the television
screen (except for the Index, Programming MENU and
Timer functions, which cannot be hidden).
1 Press SETUP on the remote control.
Result: The programming menu is displayed.
2 Press the corresponding
USER SET option.
3 Press the ENTER button to select this option.
Result: The USER SET menu is displayed.
4 Press the corresponding or buttons, until the cursor is placed
in front of the O S D option.
,
or , buttons to select the
5 To... Press or , until...
Display on-screen information O N is displayed.
Hide on-screen information O F F is displayed.
6 On completion, press SETUP twice to exit the menu.
Setting the DVD-VCR Output Channel
Your DVD-VCR output channel may need to be changed if the
pictures suffer from interference or if your TV cannot find the
pictures.
Also, you can change the DVD-VCR output channel to adjust the
frequency in which information is displayed on the screen.
1 Press SETUP on the remote control.
Result: The programming menu is displayed.
2 Press the corresponding
I N S T A L L A T I O N option.
3 Press the ENTER button to select this option.
Result: The I N S T A L L A T I O N menu is displayed.
4 Press the or buttons, until the cursor is placed in front of the
VCR OUTPUT CH option.
5 Select the required output channel (CH21~CH69) by pressing the
or buttons.
6 On completion, press SETUP twice to exit the menu.
Then tune your television again (see page 14).
,
or , buttons to select the
USER SET
E N T E R E ND:S E T U P
O S D : O N
TAPE SELECT : E 1 8 0
COLOUR SYSTEM : A U T O
I P C : O N
N I C A M
RECORD SOURCE : A U T O
I N S T A L L A T I O N
E N T E R E ND:S E T U P
AUTO SET UP
MANUAL SET UP
VCR OUTPUT CH : C H 6 0
: O N
E ND:S E T U P
E ND:S E T U P
GB
18
19
01274A SV-DVD1E/XEU-GB2 9/5/56 7:54 AM Page 20
GB
Presetting the Stations Automatically
1
I N S T A L L A T I O N
E N T E R E ND:S E T U P
AUTO SET UP
MANUAL SET UP
VCR OUTPUT CH : C H 6 0
YOUR DATA WILL BE LOST
PRESS E N T E R TO CONTINUE
S E T U P TO EXIT
AUTO SET UP
PLEASE WAIT
I - - - - - - - - - - - - - - - - - - - - I
2,3
E ND:S E T U P
2
E ND:S E T U P
Presetting the Stations Manually
GB
☛ You do not need to preset the stations if you have already
set them automatically (see Plug & Auto Set Up on
page 13).
Your DVD-VCR contains a built-in tuner used to receive television
broadcasts.
You must preset the stations received through the tuner. This can
be done:
◆ Plug & Auto Set up (see page 13)
◆ Automatically
◆ Manually (see page 21)
You can store up to 99 stations.
1 Press the SETUP button on the remote control.
Result: The programming menu is displayed.
2 Press the corresponding
I N S T A L L A T I O N option.
3 Press the ENTER button to select this option.
Result: The INSTALLATION menu is displayed.
4 Press the corresponding or buttons, until the cursor is placed
in front of the
And then press the button to select this option.
Result: A message appears, indicating that any channels
5 Press ENTER to start the auto scanning.
Result: ◆ The PLEASE WAITindication flashes on the
➢ The number of stations automatically stored by the DVD-
6 If you wish to cancel the auto scanning before the end, press the
SETUP button three times to exit the menu.
➢ ◆ The time and date are set automatically from the
%
AUTO SET UP option.
already preset on your DVD-VCR will be deleted.
television screen.
◆ The first frequency band is scanned and the first
station found is displayed and stored.
◆ The DVD-VCR then searches for the second station
and so on.
◆ When the automatic scanning procedure has
finished, the DVD-VCR switches automatically to
programme 1.
VCR depends on the number of stations that it has found.
broadcast signal. If the signal is weak or ghosting
occurs, the time and date may not be set automatically. In this case, they should be set manually (see
page 18).
◆ Once the auto scanning procedure has finished, some
stations may have been stored more than once; select
the stations with the best reception and delete the
ones no longer required (see page 22).
,
or , buttons to select the
☛ You do not need to preset the stations manually if you
have already set them automatically.
1 Press the SETUP button on the remote control.
Result: The programming menu is displayed.
2 Press the corresponding
I N S T A L L A T I O N option.
3 Press the ENTER button to select this option.
Result: The I N S T A L L A T I O N menu is displayed.
4 Press the corresponding or buttons, until the cursor is placed
in front of the MANUAL SET UP option.
5 Press the button to select a MANUAL SET UP option.
Result: The TV STATION TABLE menu is displayed.
6 Press the or buttons to select a programme number as
required.
7 Press the button to preset the station.
Result: The MANUAL SET UP menu is displayed.
8 Press the or buttons to start scanning.
Result: The frequency band is scanned and the first station
found is displayed.
9 Press the or buttons until the cursor is placed in front of the
N A M E.
The station name is set automatically from the broadcast signal.
10 To change the programme’s name, press the button.
Result: The first letter of the name flashes.
,
or , buttons to select the
11 To... Then...
Select a character Press the orbutton until the
in the name required character is displayed
Move to the next or Press the or buttons
previous character respectively.
(letters, numbers or “-” character).
12 If you... Then...
Wish to store the ◆ Press the or buttons to place the
station displayed cursor in front of the M F T.
Do notwish to ◆ Press the or buttons until the
store the station cursor is placed in front of the C H.
displayed ◆ Press the or buttons to go on
13 Repeat this procedure from Step 6 onwards, until all the required
stations have been stored.
14 On completion, press the SETUP button three times to exit the
menu.
◆ Press the
picture, if necessary.
◆ Press OK to store the station
scanning the frequency band and display
the next station
◆ Go back to the beginning of Step 12
or buttons to adjust the
I N S T A L L A T I O N
E N T E R E ND:S E T U P
AUTO SET UP
MANUAL SET UP
VCR OUTPUT CH : C H 6 0
E ND:S E T U P
** TV STATION TABLE **
P R CH NAME
1 - - - - - - 2 - - - - - - 3 - - - - - - 4 - - - - - - 5
S E T : S O R T :E N T E R
D E L E T E :C L E A R S E T U P
MANUAL SET UP
* *
P R : 1
C H : --M F T : -
N A M E : BBC1
* *
M E M O R Y :E N T E R
E N D:S E T U P
20
21
01274A SV-DVD1E/XEU-GB2 9/5/56 7:54 AM Page 22
GB
Clearing a Preset Station
I N S T A L L A T I O N
E N T E R E ND:S E T U P
AUTO SET UP
MANUAL SET UP
VCR OUTPUT CH : C H 6 0
E ND:S E T U P
** TV STATION TABLE **
P R CH NAME
1 0 2 1 - - - -
2 0 2 5 - - - -
3 0 3 0 - - - -
4 0 6 5 - - - 5 0 5 5 - - - -
S E T : S O R T :E N T E R
D E L E T E :C L E A R S E T U P
If you have stored a TV station:
◆ That you do not require
◆ At the wrong programme position
you can cancel it.
1 Press the SETUP button on the remote control.
2 Press the corresponding
I N S T A L L A T I O N option.
3 Press the ENTER button to select this option.
Result: The I N S T A L L A T I O N menu is displayed.
4 Press the corresponding or buttons, until the cursor is placed
in front of the MANUAL SET UP option.
5 Press the button to select this option.
Result: The TV STATION TABLE menu is displayed.
6 Press the corresponding or buttons, until the cursor is placed
in front of the required preset TV station. (P R)
,
or , buttons to select the
7 Press the CLEAR button.
8 Repeat the same procedure from Step 6 onwards until all the
required stations have been cleared.
9 On completion, press the SETUP button three times to exit the
menu.
Changing the Preset Station Table
You can rearrange the Station Table and give different programme
numbers to the stations listed according to your own preferences.
1 Press the SETUP button on the remote control.
2 Press the corresponding
I N S T A L L A T I O N option.
3 Press the ENTER button to select this option.
Result: The I N S T A L L A T I O N menu is displayed.
4 Press the corresponding or buttons, until the cursor is placed
in front of the MANUAL SET UP option.
5 Press the button to select this option.
Result: The TV STATION TABLE menu is displayed.
6 Press the corresponding or buttons, until the cursor is placed
in front of the required preset TV programme.
Result: The selected station is displayed at the same time on
the television screen.
7 To change the programme number assigned to a station (PR4
instead of PR1 for example):
◆ Press ENTER
◆ Press the
the programme to which the station is to be moved
◆ Press ENTER again
8 You can modify this station by repeating the same procedure from
Step 6 onwards.
9 On completion, press the SETUP button three times to exit the
menu.
or buttons until the cursor is placed in front of
,
or , buttons to select the
**
TV STATION TABLE
P R CH NAME
1 0 2 1 - - - 2 0 2 5 - - - 3 0 3 0 - - - 4 0 6 5 - - - 5
S E T : S O R T :E N T E R
D E L E T E :C L E A R S E T U P
**
TV STATION TABLE
P R CH NAME
1 0 2 1 - - - 2 0 2 5 - - - 3 0 3 0 - - - 4 (0 6 5 ---- )
5
(SORT : 4
E X E C U T E :E N T E R S E T U P
**
TV STATION TABLE
P R CH NAME
1 ( 0 6 5 ---- )
2 0 2 5 - - - 3 0 3 0 - - - 4 0 6 5 ---5
(SORT : 4
E X E C U T E :E N T E R S E T U P
➛
➛
4 )
1 )
GB
* *
* *
* *
**
TV STATION TABLE
P R CH NAME
1 0 6 5 - - - 2 0 2 1 - - - 3 0 2 5 - - - 4 0 3 0 - - - 5
S E T : S O R T :E N T E R
D E L E T E :C L E A R S E T U P
22
23
* *
 Loading...