

Page 1
VIDEO
CASSETTE RECORDER
SV-645B
SV-643B
SV-640B
Instruction Manual
PAL
www.samsungvcr.com
Page 2
GB
3
About this manual
Thank you for purchasing a Samsung Video Cassette Recorder (VCR).
Your Owner’s Instructions contain much valuable information on setting up and
using your VCR. Please take the time to read them as they will help you take full
advantage of your VCR’s features.
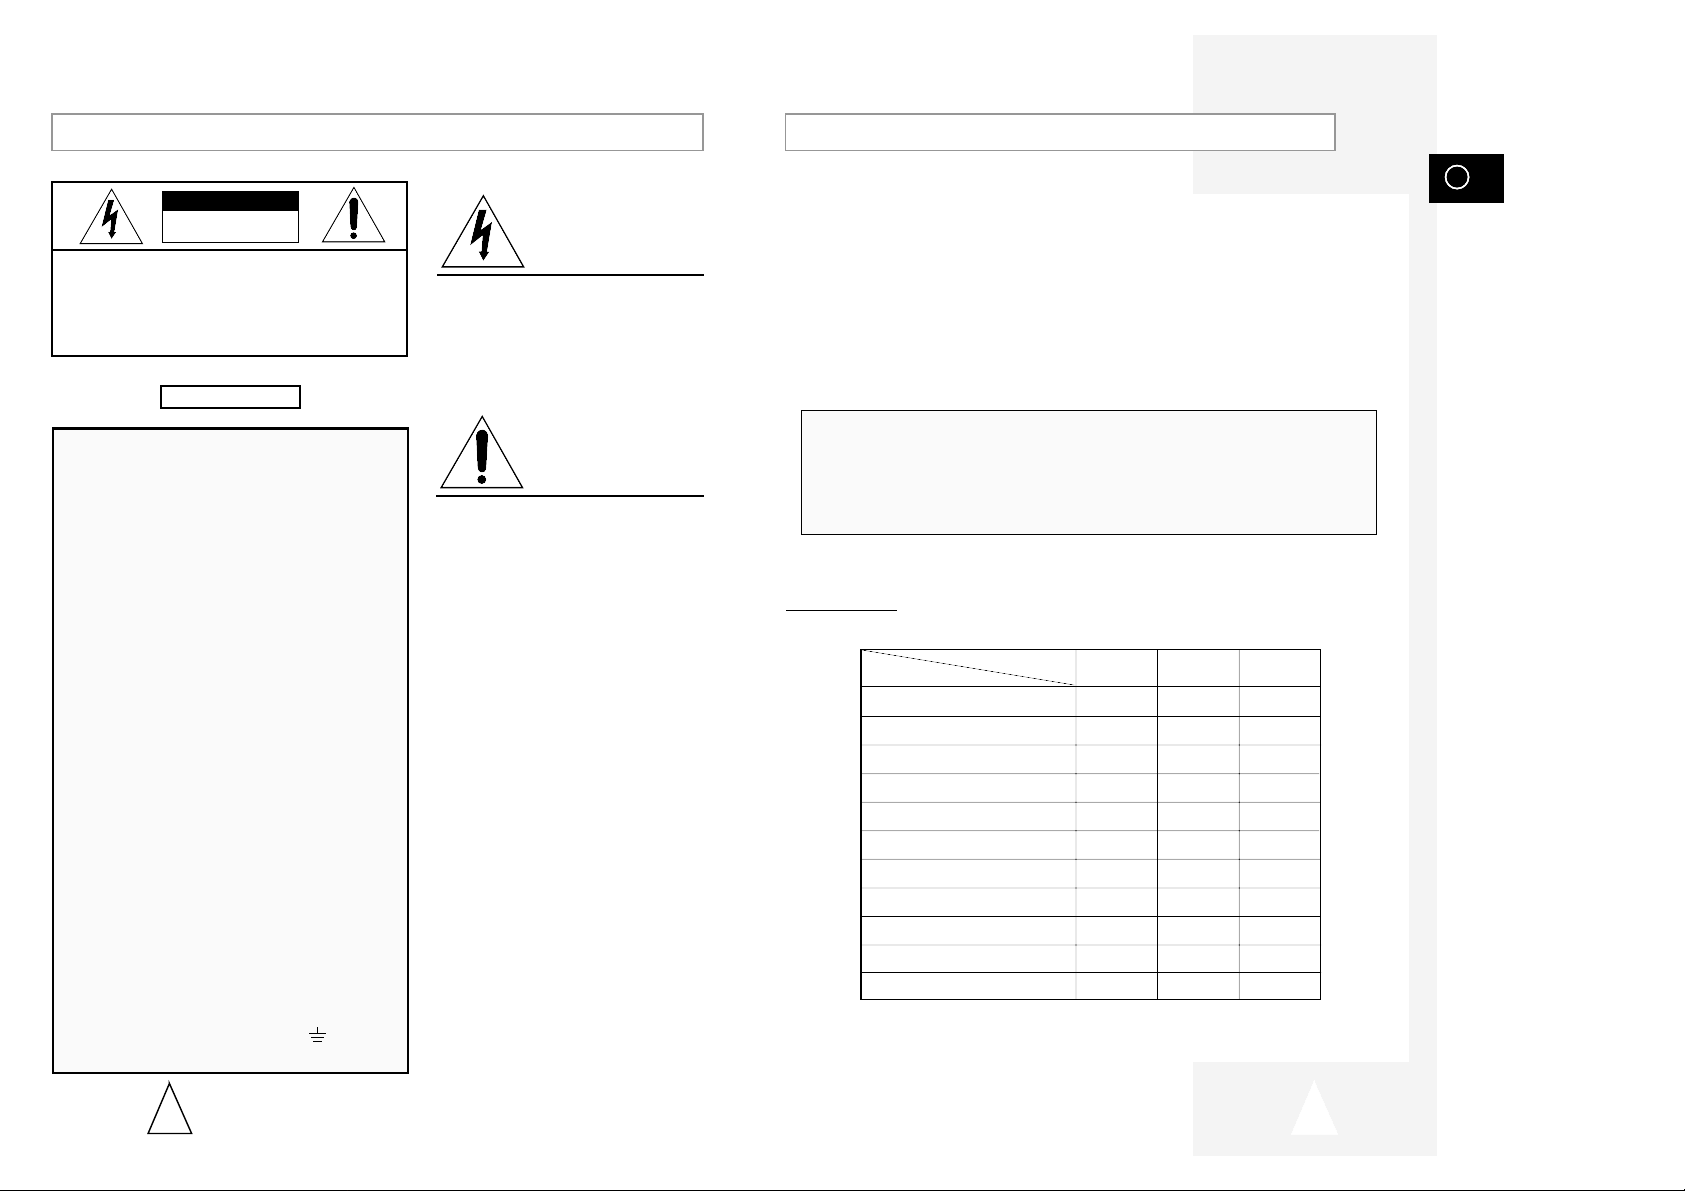
The instructions in this manual are for models, SV-645B, SV-643B and SV-640B.
Before you start reading this manual please check your model number.
It is displayed on the rear of the VCR.
Features Chart
- ★(SV-645B): Exceptions only for a certain model, for example SV-645B.
- Gray shaded areas marked with a star indicate instructions that are
only relevant to one model.
2
Safety Precautions
CAUTION. TO REDUCE THE RISK OF ELECTRIC
SHOCK, DO NOT REMOVE REAR COVER. NO
USER SERVICEABLE PARTS INSIDE. REFER TO
QUALIFIED SERVICE PERSONNEL.
The mains lead on this equipment is supplied with a
moulded plug incorporating a fuse. The value of the fuse is
indicated on the pin face of the plug. If it requires
replacing, a fuse approved to BS1362 of the same rating
must be used.
Never use the plug with the fuse cover omitted if the cover
is detachable. If a replacement fuse cover is required, it
must be of the same colour as the pin face of the plug.
Replacement covers are available from your dealer.
If the fitted plug is not suitable for the power points in your
house or the cable is not long enough to reach a power
point, you should obtain a suitable safety approved
extension lead or consult your dealer for assistance.
However, if there is no alternative to cutting off the plug,
remove the fuse and then safely dispose of the plug. Do
not connect the plug to a mains socket, as there is a risk of
shock hazard from the bared flexible cord.
IMPORTANT
The wires in the mains lead are coloured in accordance
with the following code: -
BLUE = NEUTRAL BROWN = LIVE
As these colours may not correspond with the coloured
markings identifying the terminals in your plug, proceed as
follows: -
The wire coloured BLUE must be connected to the
terminal marked with the letter N or coloured BLUE or
BLACK. The wire coloured BROWN must be connected to
the terminal marked with the letter L or coloured BROWN
or RED.
WARNING: DO NOT CONNECT EITHER WIRE TO THE
EARTH TERMINAL WHICH IS MARKED WITH THE
LETTER E OR BY THE EARTH SYMBOL , OR
COLOURED GREEN OR GREEN AND YELLOW.
This symbol is intended to alert you to the
presence of dangerous voltage within the
product.
IMPORTANT NOTE
DANGER
This symbol is intended to alert you to the
presence of important instructions
accompanying the product.
CAUTION
CAUTION
RISK OF ELECTRIC SHOCK
DO NOT OPEN
Feature
Model
SV-645B SV-643B SV-640B
VIDEOPLUS+ Recording
●●
AV2 IN socket
●●●
Format 16:9
●●●
Child Door Lock
●●
IPC (Intelligent Picture Control)
●●●
Timer Programming
●●●
Auto Clock Setting
●●●
PDC (Programme Delivery Control)
●●●
Changing recording speed (SP/LP)
●●●
Hi-Fi & NICAM
●●●
Connecting an RCA Audio/Video cable
●
Page 3
GB
54
Contents (cont.)
◆ S
EARCHING FOR A SEQUENCE
■ Playing a Cassette in Slow Motion................................................................ 33
■ Playing a Sequence Frame by Frame........................................................... 34
■ Picture Search, Fast Forward/Rewind........................................................... 34
■ Searching for a Specific Sequence ............................................................... 35
■ Auto Repeat Play........................................................................................... 36
■ Interval Repeat Play...................................................................................... 36
◆ EASY OPERATION
■ VPS/PDC Default .......................................................................................... 37
■ VIDEOPLUS+ EXTEND (SV-645B/SV-643B Only)....................................... 38
■ Using the Tape Counter ................................................................................ 38
◆ ADVANCED RECORDING FEATURES
■ Connecting an RCA Audio/Video Input cable (SV-645B Only)...................... 39
■ Using the Assemble Edit Function................................................................. 40
■ Recording from Another VCR or Camcorder................................................. 40
◆ O
THER FUNCTIONS AND USEFUL RECOMMENDATIONS
■ Auto Power Off.............................................................................................. 41
■ Child Door Lock System (SV-643B/SV-640B Only) ...................................... 41
■ ECO Mode-Reducing Standby power consumption...................................... 41
■ Technical Specifications................................................................................ 42
◆ SOLVING PROBLEMS
■ Problems and Solutions................................................................................. 43
■ Service Centers List ...................................................................................... 44
☛
➢
NoteImportantHold downPress/push
Symbols
1
1
1
= Step number
★
Option
Contents
◆ FOREWORD
■ Safety Instructions......................................................................................... 6
◆ VCR O
VERVIEWS
■ Front View of the VCR................................................................................... 7
■ Rear View of the VCR ................................................................................... 7
■ Infrared Remote Control................................................................................ 8
■ Display Indicators.......................................................................................... 9
■ Accessories................................................................................................... 9
◆ C
ONNECTING YOUR VIDEO CASSETTE RECORDER
■ Deciding How to Connect Your VCR............................................................. 10
■
Connecting Your VCR to the TV using the Coaxial Cable and SCART cable
..... 11
■ Connecting Your VCR to the Satellite receiver or Other Equipment............. 12
■ Connecting the Audio Output Cable.............................................................. 13
■ Plug & Auto Set Up........................................................................................ 13
■ Tuning Your Television for the VCR.............................................................. 14
◆ SETTING UP YOUR VIDEO CASSETTE RECORDER
■ Inserting Batteries in the Remote Control...................................................... 15
■ Setting the Date and Time............................................................................. 15
■ Displaying/Hiding On-Screen Information ..................................................... 16
■ Setting the VCR Output Channel................................................................... 16
■ Presetting the Stations Automatically............................................................ 17
■ Presetting the Stations Manually................................................................... 18
■ Clearing a Preset Station............................................................................... 19
■ Changing the Preset Station Table................................................................ 20
◆ RECORDING TELEVISION BROADCASTS
■ Selecting the Cassette Type.......................................................................... 21
■ Selecting the Recording Speed..................................................................... 21
■ NICAM........................................................................................................... 22
■ Protecting a Recorded Cassette.................................................................... 23
■ Recording a Programme Immediately........................................................... 23
■ Recording a Programme with Automatic Stop............................................... 24
■ Using the VIDEOPLUS+ Feature (SV-645B/SV-643B Only)......................... 25
■ Modifying VIDEOPLUS+ Programming (SV-645B/SV-643B Only)............... 26
■ Using the Timer Programming Feature......................................................... 27
■ Checking a Preset Recording........................................................................ 28
■ Cancelling a Preset Recording...................................................................... 28
◆ PLAYING BACK
■ Playing a Cassette......................................................................................... 29
■ Adjusting Picture Alignment Automatically.................................................... 29
■ Adjusting Picture Alignment Manually........................................................... 29
■ Intelligent Picture Control .............................................................................. 30
■ Format 16:9 (Wide Screen)........................................................................... 31
■ Selecting the Colour Mode............................................................................ 31
■ Selecting the Audio Output Mode.................................................................. 32
Page 4
GB
76
Front View of the VCR
Rear View of the VCR
The following illustrations represent precautions.
The lightning bolt is a warning sign alerting you to dangerous voltage inside the product.
DO NOT OPEN THE VCR. Refer to service personnel.
HH
5°C
40°C
10% 75%
THIS DEVICE IS NOT FOR USE IN INDUSTRIAL
ENVIRONMENTS
Safety Instructions
Do NOT expose the VCR to
extreme temperature conditions (below 5°C and above
40°C) or to extreme humidity
conditions (less than 10% and
more than 75%).
Do NOT expose the VCR to
direct sunlight.
Do NOT expose the VCR to
any liquids.
Do NOT place any objects on
the VCR or remote control.
During a storm and/or lightning, unplug the VCR from the
mains socket and aerial.
If the remote control is not
used for a long period of time,
remove the batteries and store
it in a cool, dry place.
TV
AV2 (SATELLITE) IN
AV1 (EURO AV)
R/D
L/G
AUDIO
OUT/SORTIE
AV2 (SATELLITE) IN SCART
(EURO-21) SOCKET
AV1 (EURO AV) IN/OUT
SCART (EURO-21) SOCKET
AERIAL IN
CONNECTOR
OUT TO TV
CONNECTOR
RCA AUDIO L, R OUTPUT
SOCKETS
VIDEO CASSETTE
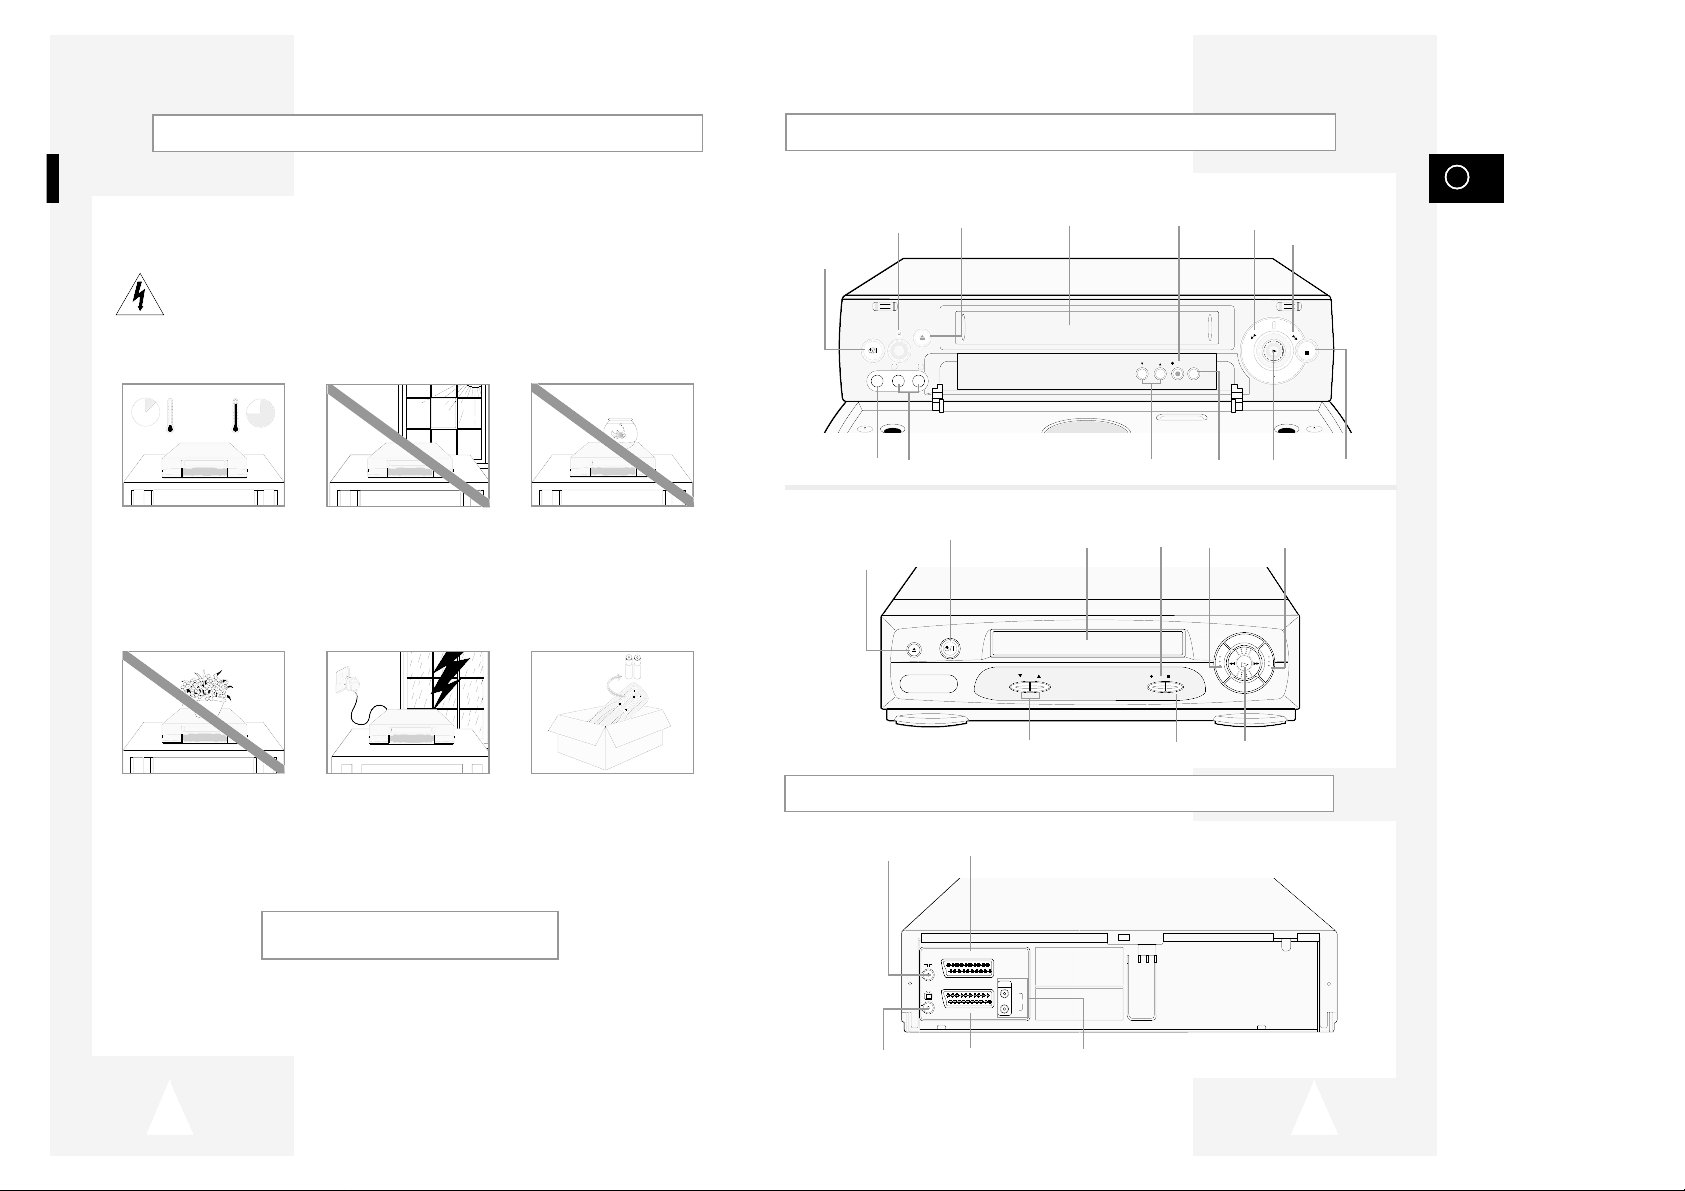
COMPARTMENT
PLAY
BUTTON
RECORD
BUTTON
EJECT
BUTTON
F.F
BUTTON
PROGRAMME SELECTION
BUTTONS
REW
BUTTON
REC STOP
PROG
EJECT
STANDBY/ON
REW F.F
PLAY
STANDBY/ON
BUTTON
STOP
BUTTON
AUX
VIDEO L- AUDIO-R
STANDBY/ON
EJECT
PROG
REC
II P/S
R
E
W
F.F
STOP
VIDEO CASSETTE
COMPARTMENT
STOP
BUTTON
REW
BUTTON
F.F
BUTTON
RECORD
BUTTON
EJECT
BUTTON
INFRARED REMOTE
SENSOR
PROGRAM SELECTION
BUTTONS
PAUSE/STILL
BUTTON
PLAY
BUTTON
STANDBY/ON
BUTTON
AUX VIDEO INPUT
SOCKET
AUX AUDIO L, R
INPUT SOCKETS
(SV-645B)
(SV-643B/SV-640B)
Page 5
GB
98
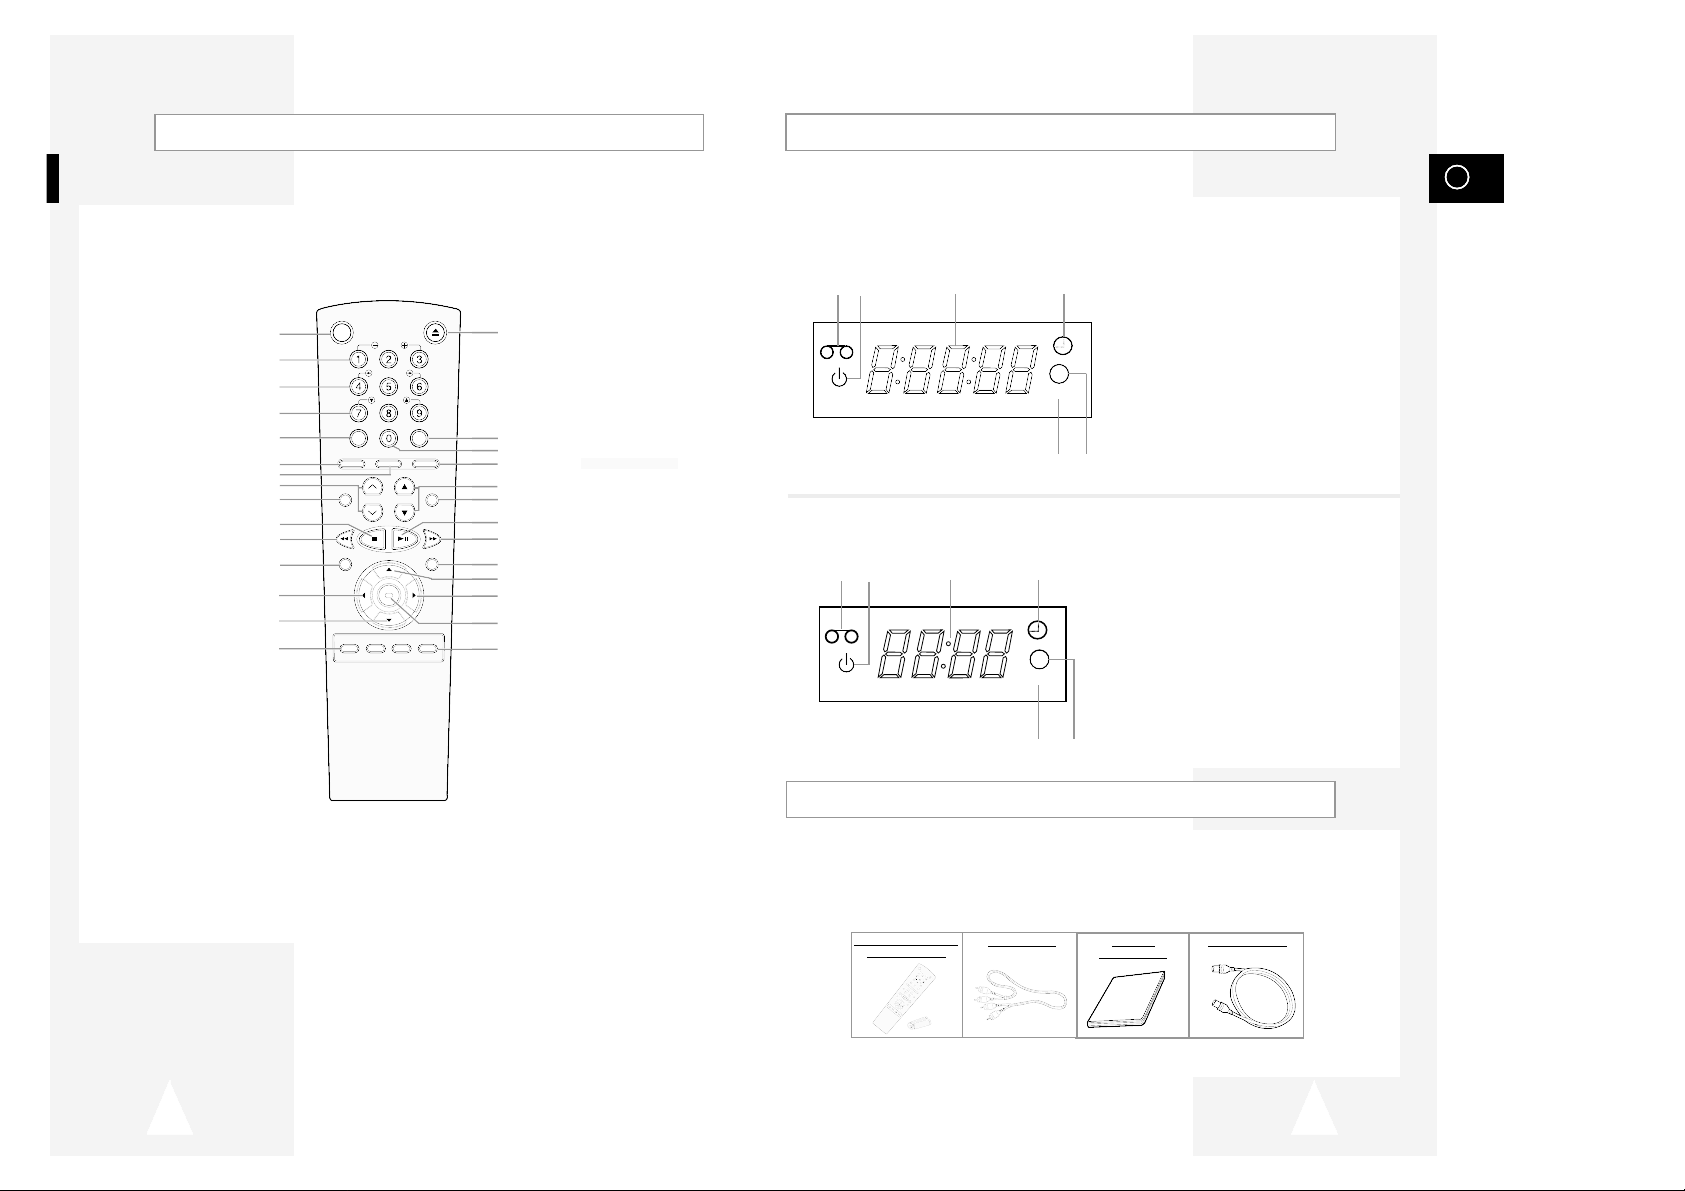
Infrared Remote Control
Display Indicators
Accessories
You have just purchased a SAMSUNG Video Cassette Recorder (VCR).
Together with your VCR, you will find the following accessories in the box.
O
K
S
T
AN
D
B
Y
/O
N
E
JEC
T
S
L
O
W
S
H
U
T
T
L
E
V
L
O
C
K
C
LR
/R
S
T F
.A
D
V
IND
EX
A.TR
K IPC
INP
U
T
RE
PEAT
T
R
K
P
R
O
G
A
U
D
I
O
R
E
C
M
E
N
U
S
P
E
E
D
D
U
B
T
V
/
V
C
R
T
I
M
E
R
D
I
S
P
L
A
Y
REMOTE CONTROL &
BATTERIES “AA”
AUDIO CABLE
OWNER’S
INSTRUCTIONS
COAXIAL CABLE
OK
STANDBY/ON EJECT
SLOW
SHUTTLE
V-LOCK
CLR/RST F.ADV INDEX
A.TRK IPC INPUT
REPEAT
TRK PROG
AUDIO
REC MENU
SPEED DUB TV/VCR TIMER
DISPLAY
STANDBY/ON BUTTON
SLOW BUTTON
SHUTTLE BUTTON
V-LOCK BUTTON
CLEAR AND RESET BUTTON
AUTO TRACKING BUTTON
IPC BUTTON
TRACKING BUTTONS
AUDIO MODE SELECTION BUTTON
STOP BUTTON
REWIND/REVERSE PICTURE
SEARCH BUTTON
RECORD BUTTON
MENU SELECTION BUTTON
MENU SELECTION DOWN BUTTON
RECORDING SPEED SELECTION BUTTON
EJECT BUTTON
INDEX BUTTON
FRAME ADVANCE BUTTON
TUNER, AV1, AV2, AUX ★(SV-645B ONLY)
SELECTION / REPEAT SELECTION BUTTON
PROGRAMME SELECTION BUTTON
DISPLAY BUTTON
PLAY/PAUSE/STILL BUTTON
FAST-FORWARD/FORWARD
SEARCH BUTTON
MENU BUTTON
MENU SELECTION UP BUTTON
MENU SELECTION BUTTON
OK BUTTON
TIMER BUTTON
1 Cassette loaded indicator
2 ECO Mode display
3 Multi-function display
4 Timer indicator
5 Hi-Fi indicator
6 Rec indicator
VCR
5 6
12 3 4
Hi-Fi
1 Cassette loaded indicator
2 ECO Mode display
3 Multi-function display
4 Timer indicator
5 Hi-Fi indicator
6 Rec indicator
VCR
5 6
12 3 4
Hi-Fi
(SV-645B)
(SV-643B/SV-640B)
Page 6
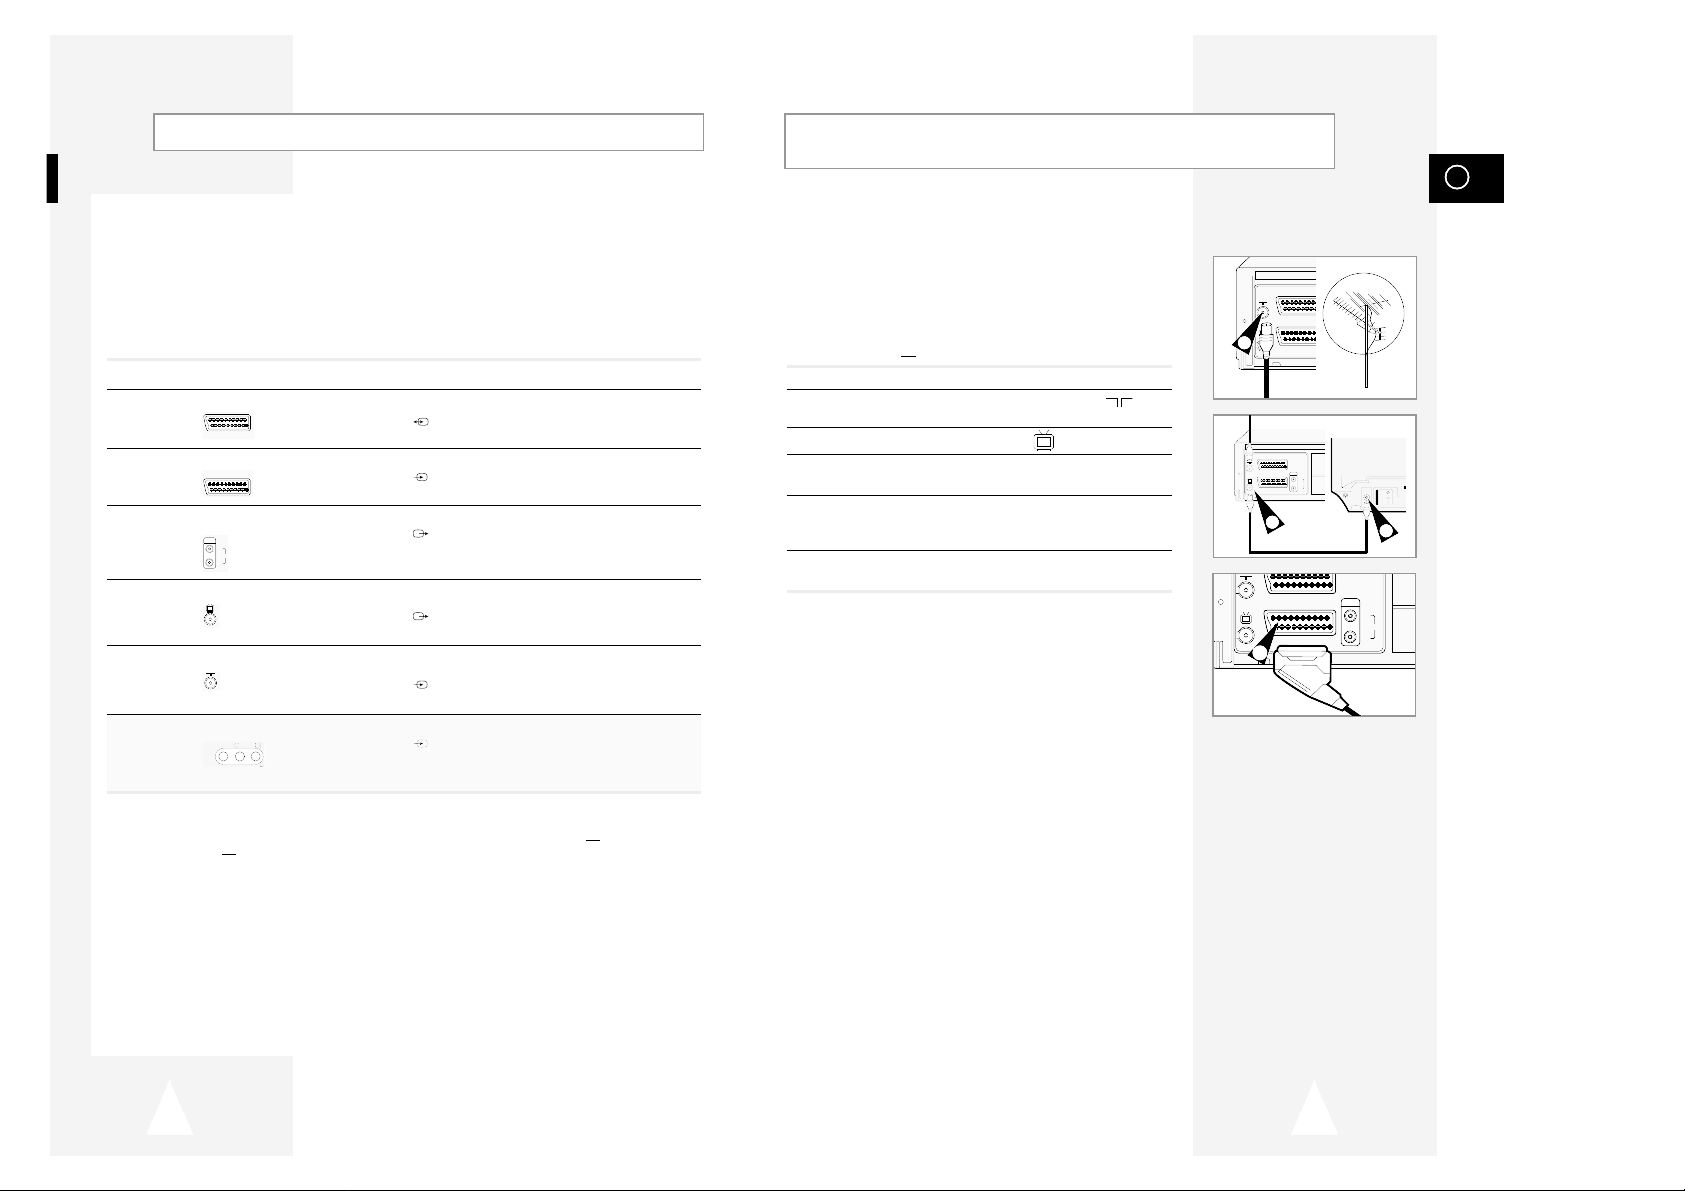
To receive television programmes a signal must be received from
one of the following sources:
◆ An outdoor aerial
◆ An indoor aerial
◆ A cable television network
◆ A satellite receiver
☛ Make sure that both the television and the VCR are
switched off
before connecting the cables.
1 Remove the aerial or network input cable from the television.
2 Connect this cable to the 75Ω coaxial socket marked on the
rear of your VCR.
3 Plug the coaxial cable supplied into the socket on your VCR.
4 Plug the other end of the coaxial cable into the connector
previously used for the aerial on the television.
5 Connect one end of the scart cable to the AV1 (EURO AV) socket
on the rear of the VCR. You must connect your VCR to the
television via the scart cable.
6 Plug the other end into the appropriate connector on the
television.
TV
GB
Connecting Your VCR to the TV using the Coaxial
Cable and SCART cable
1110
Deciding How to Connect Your VCR
5
TV
AV2 (SATELLITE) IN
AV1 (EURO AV)
R/D
L/G
AUDIO
OUT/SORTIE
4
2
TV
TV
AV2 (SATELLITE) IN
AV1 (EURO AV)
R/D
L/G
AUDIO
OUT/SORTIE
3
You must take into account various factors when connecting audio or video systems:
◆ Types of connectors available on your systems
◆ Systems connected permanently to the VCR (satellite receiver for example) or temporarily
(camcorder for example)
Your VCR is equipped with the following connectors.
Connector Location Type Direction Recommended Use
AV1 (EURO AV)
Rear SCART In/Out ◆ Television
◆ Satellite receiver
◆ Other VCR
AV2 Rear SCART In ◆ Satellite receiver
(DEC./EXT.) ◆ Other VCR
Audio output Rear Audio RCA Out ◆ Audio Hi-Fi system
OUT TO TV Rear 75 Ω Out ◆ Television
coaxial
IN FROM ANT. Rear 75 Ω In ◆ Aerial
coaxial ◆ Cable television network
◆ Satellite receiver
AUX Front Audio/Video RCA In ◆ Audio Hi-Fi system
◆ Camcorder
★
(SV-645B Only)
☛ Whenever you connect an audio or video system to your VCR, ensure that all elements are
switched off
.
Refer to the documentation supplied with your equipment for detailed connection instructions
and associated safety precautions.
AUX
VIDEO L-AUDIO -R
TV
R/D
L/G
AUDIO
OUT/SORTIE
AV2 (DEC./EXT.)
AV1 (EURO AV)
TV
AV1 (EURO AV)
OUT/SORTIE
R/D
AUDIO
L/G
Page 7
GB
1312
Plug & Auto Set Up
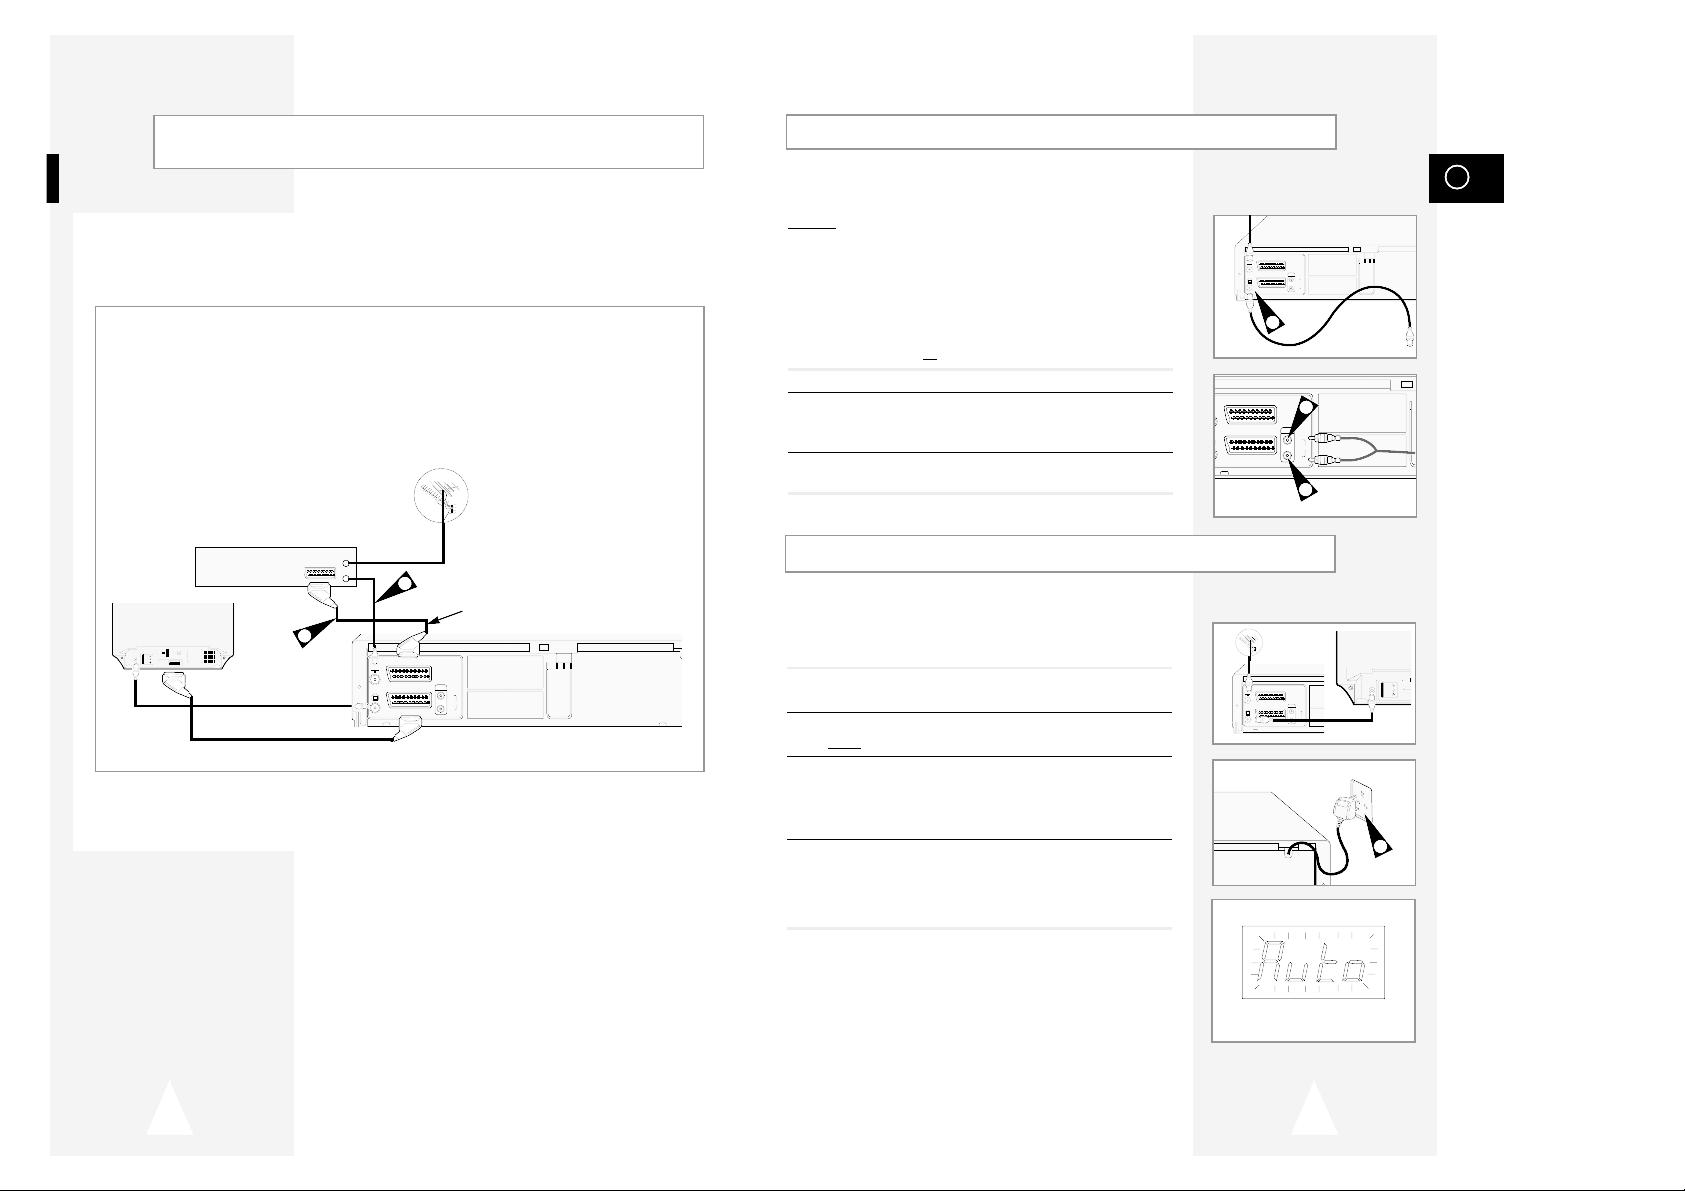
Your VCR will automatically set itself up when it is plugged into the
mains for the first time. TV stations will be stored in memory. The
process takes a few minutes. Your VCR will then be ready for use.
1 Connect the coaxial cable as indicated on page 11.
(Connecting Your VCR to the TV Using the Coaxial Cable)
2 Plug the VCR into the mains.
Result
: A message appears.
3 Press OK button to start the auto scanning
◆
The number of stations automatically stored by the VCR
depends on the number of stations that it has found.
◆
The process will finish after a few minutes.
4 The current time and date are displayed automatically.
Check the date and time.
if it is :
◆
Correct, Press MENU button twice to exit the menu.
◆
incorrect, see page 15.
➢ Now, you only have to switch the VCR on and it is ready
for use.
☛ Function for “Plug & Auto Set Up” is fixed already.
So if you want to change this fixed one, you can change
it by Presetting the Stations Automatically in OSD “ Auto
Set Up” menu. (see page 17)
You can connect your VCR to a Satellite receiver or other VCR using the SCART cable if the appropriate
outputs are available on the equipment chosen. The following illustrations give a few examples of the
connection possibilities.
1. AV2(DEC./EXT.): By means of 21-pin Scart Cable
Plug the SCART Cable with satellite receiver or other equipment into the AV2(DEC./EXT.) socket on the rear of
the VCR.
After making this connection, select the source by pressing the INPUT button for the AV2 input sources.
2. By means of RF Coaxial Cable
After making this connection, you must preset the station received through the satellite tuner.
RF output channel of the satellite receiver should be adjusted away from channel 60, which is used by the VCR,
e.g. re-adjust to channel 65.
Connecting the Audio Output Cable
You can connect your VCR to a Hi-Fi system.
Example
: You wish to take advantage of the quality of your Hi-Fi
stereo system when watching a programme or recording
via your VCR.
☛
◆ Regardless of the type of connection chosen, you
must always connect the coaxial cable supplied.
Otherwise, no picture will be visible on the screen
when the VCR is switched off.
◆ Make sure that both the television and the VCR are
switched off
before connecting the cables.
1 Connect the coaxial cable or SCART as indicated on page 11.
2 Plug the audio output cable into the audio connectors on the rear
of your VCR.
➢ Respect the colour coding of the left and right channels.
3 Plug the other end of the audio cable into the appropriate input
connectors on your Hi-Fi stereo system.
Connecting Your VCR to the Satellite receiver or Other
Equipment
Satellite Receiver or other Equipment
Aerial
Aerial Connector
2
TV
AV2 (SATELLITE) IN
AV1 (EURO AV)
R/D
L/G
AUDIO
OUT/SORTIE
SCART Cable
TV
1
SCART Cable
AV2 (SATELLITE) IN
AV1 (EURO AV)
R/D
L/G
AUDIO
OUT/SORTIE
2
2
TV
AV2 (SATELLITE) IN
AV1 (EURO AV)
R/D
L/G
AUDIO
OUT/SORTIE
1
TV
TV
AV2 (SATELLITE) IN
AV1 (EURO AV)
R/D
L/G
AUDIO
OUT/SORTIE
2
Page 8
14
Tuning Your Television for the VCR
You must tune your television for the VCR only if you are not using
a Scart cable
➢ To view pictures from your VCR when a Scart cable is
used, the television must be set to the audio/video mode
(AV).
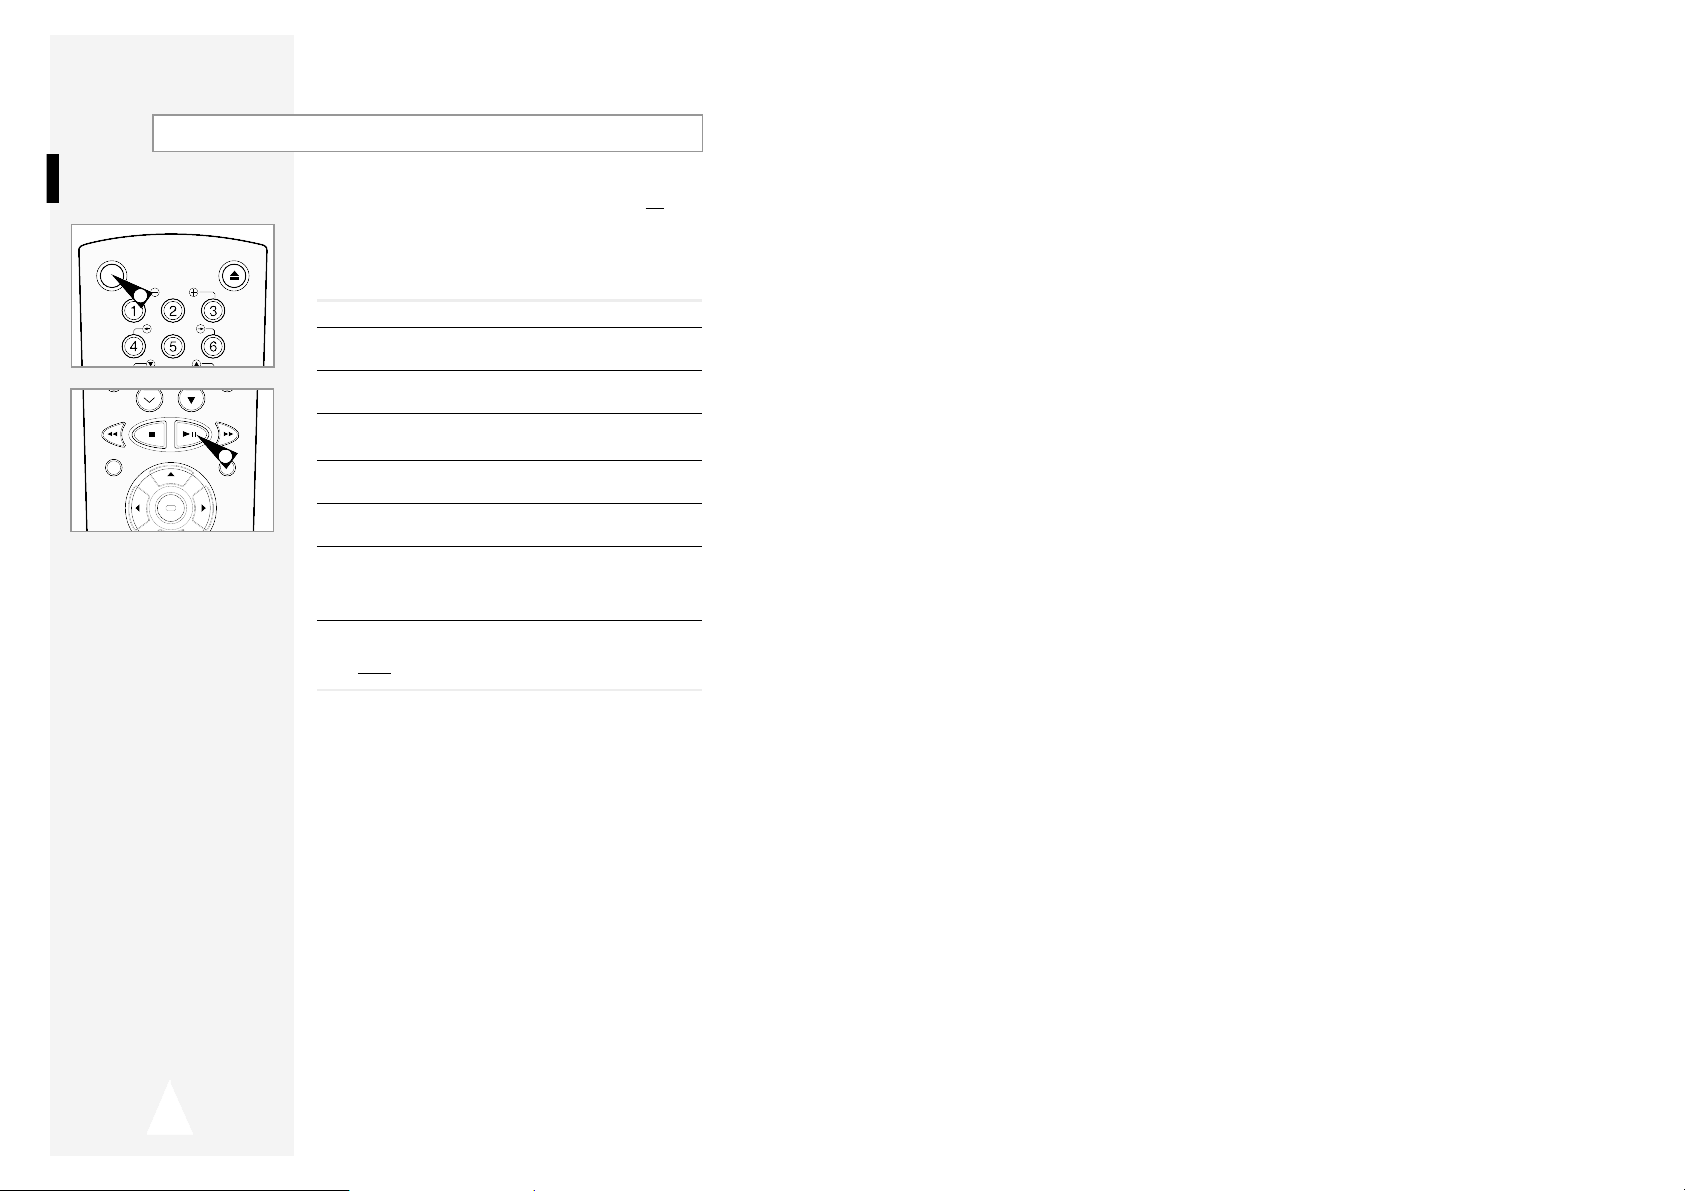
1 Switch on the television.
2 Switch on the VCR by pressing STANDBY/ON on the front of the
VCR or STANDBY/ON on the remote control.
3 Select a programme position on the television to be reserved for
use with your VCR.
4 Insert the video cassette in the VCR. Check that the VCR starts
reading the cassette; if not, press
❿
II
button
.
5 Start a scan on your television or set the television to UHF
channel 60.
6 Fine tune the television until the pictures and sound are obtained
clearly.
7 If you cannot find the pictures and sound, or there is interference
from nearby channels, it may be necessary to change the setting
of the VCR output channel (see Setting the VCR Output Channel
on page 16 and Problems and Solutions on page 43).
8 When the picture and sound are perfectly clear, store this channel
at the desired programme position on the television.
Result:
That programme is now reserved for use with your VCR.
OK
REC MENU
2
4
STANDBY/ON EJECT
SLOW
SHUTTLE
-
Page 9

GB
15
Setting the Date and Time
You must insert or replace the batteries in the remote control when
you:
◆ Purchase the video cassette recorder
◆ Find that the remote control is no longer working
correctly
1 Push the tab in the direction of the arrow to release the battery
compartment cover on the rear of the remote control.
2 Insert two AA, R6 or equivalent batteries, taking care to respect
the polarities:
◆ + on the battery with + on the remote control
◆ – on the battery with – on the remote control
3 Replace the cover by aligning it with the base of the remote
control and pushing it back into place.
➢ Do not mix different battery types (manganese and
alkaline for example).
Inserting Batteries in the Remote Control
Your VCR contains a 24-hour clock and calendar used to:
◆ Automatically stop programme recording
◆ Preset your VCR to record a programme automatically
You must set the date and time when:
◆ You purchase the video cassette recorder
☛ ◆ The time and date are set automatically from the
broadcast signal. If the signal is weak or ghosting
occurs, the time and date may not be set automatically. In this case, they should be set manually.
◆ Do not forget to reset the time when you change
clocks from winter to summer time and vice versa.
1 Press MENU on the remote control.
Result
: The programming menu is displayed.
2 Press the corresponding
",❷
or ➛, ❿buttons to select the
CLOCK SET option.
3 Press the OK button to select this option.
Result
: The CLOCK SET menu is displayed.
4 Press
➛or❿
to select the hour, minutes, day, month and year.
Result
: The option selected flashes.
5 Press the
"or❷
buttons to increase or decrease the value.
Result
: The day of the week is displayed automatically.
➢ You can hold the
"or❷
buttons down to scroll more
quickly through the values.
6 On completion, press MENU twice to exit the menu.
OK
REC MENU
2
2
2
1
3
2
CLOCK SET
PROG OPTIONS INSTALL
CLOCK BONUS LANG
MON
AUTO CLOCK : ON
12:00 1/JAN/2001
➛❿!!!!!!!!!!!
"❷
END:MENU
1
"❷!!
➛❿!!
OK END:MENU
CLOCK
CLOCK
Page 10

GB
17
16
Presetting the Stations Automatically
Displaying/Hiding On-Screen Information
Your VCR displays most information both on the VCR and the
television.
You can choose to display or hide this information on the television
screen (except for the Index, Programming MENU and
VIDEOPLUS+ functions
★
(SV-645B/SV-643B only), which cannot
be hidden).
1 Press MENU on the remote control.
Result
: The programming menu is displayed.
2 Press the corresponding
",❷
or ➛, ❿buttons to select the
USER SET option.
3 Press the OK button to select this option.
Result
: The
USER SET menu is displayed.
4 Press the corresponding
"or❷
buttons, until the OSD option is
selected.
5 To... Press
➛or❿
, until...
Display on-screen information ON is displayed.
Hide on-screen information OFFis displayed.
6 On completion, press MENU twice to exit the menu.
Your VCR output channel may need to be changed if the pictures
suffer from interference or if your TV cannot find the pictures.
Also, you can change the VCR output channel to adjust the
frequency in which information is displayed on the screen.
1 Press MENU on the remote control.
Result
: The programming menu is displayed.
2 Press the corresponding
",❷
or ➛, ❿buttons to select the
INSTALLATION option.
3 Press the OK button to select this option.
Result
: The INSTALLATION menu is displayed.
4 Press the corresponding
"or❷
buttons, until the VCR OUTPUT
CH option is selected.
5 Select the required output channel (CH21~CH69) by pressing the
➛
or ❿buttons.
6 On completion, press MENU twice to exit the menu.
Then tune your television again (see page 14).
Setting the VCR Output Channel
AUTO SET UP
PLEASE WAIT
2%
I--------------------I
END:MENU
YOUR DATA WILL BE LOST
PRESS OK TO CONTINUE
MENU TO EXIT
☛ You do not need to preset the stations if you have already
set them automatically (see Plug & Auto Set Up on
page 13).
Your VCR contains a built-in tuner used to receive television
broadcasts.
You must preset the stations received through the tuner. This can
be done:
◆ Plug & Auto Set up (see page 13)
◆ Automatically
◆ Manually (see page 18)
You can store up to 80 stations.
1 Press the MENU button on the remote control.
Result
: The programming menu is displayed.
2 Press the corresponding
",❷
or ➛, ❿buttons to select the
INSTALLATION option.
3 Press the OK button to select this option.
Result
: The
INSTALLATION menu is displayed.
4 Press the corresponding
"
or ❷buttons, until the AUTO SET
UP
option is selected. And then press the ❿button to select this
option.
Result
: A message appears, indicating that any channels
already preset on your VCR will be deleted.
5 Press OK to start the auto scanning.
Result
: ◆ The PLEASE WAIT indication flashes on the
television screen.
◆ The first frequency band is scanned and the first
station found is displayed and stored.
◆ The VCR then searches for the second station and
so on.
◆ When the automatic scanning procedure has
finished, the VCR switches automatically to programme 1.
➢ The number of stations automatically stored by the VCR
depends on the number of stations that it has found.
6 If you wish to cancel the auto scanning before the end, press the
MENU button three times to exit the menu.
➢ ◆ The time and date are set automatically from the
broadcast signal. If the signal is weak or ghosting
occurs, the time and date may not be set automatically. In this case, they should be set manually (see
page 15).
◆ Once the auto scanning procedure has finished, some
stations may have been stored more than once; select
the stations with the best reception and delete the
ones no longer required (see page 19).
INSTALLATION
PROG OPTIONS INSTALL
CLOCK BONUS LANG
"❷!!
➛❿!!
OK END:MENU
USER SET
PROG OPTIONS INSTALL
CLOCK BONUS LANG
"❷!!
➛❿!!
OK END: MENU
OSD :ON
TAPE SELECT :E180
COLOUR SYSTEM :AUTO
FORMAT 16:9 :AUTO
NICAM :ON
ECO. MODE :OFF
IPC :ON
"❷
❿
END:MENU
AUTO SET UP
MANUAL SET UP
VCR OUTPUT CH :CH60
"❷
❿
END:MENU
INSTALLATION
PROG OPTIONS INSTALL
CLOCK BONUS LANG
"❷!!
➛❿!!
OK END:MENU
AUTO SET UP
MANUAL SET UP
VCR OUTPUT CH :CH60
"❷
❿
END:MENU
OPTIONS
OPTIONS
INSTALL
INSTALL
INSTALL
INSTALL
Page 11

GB
19
18
If you have stored a TV station:
◆ That you do not require
◆ At the wrong programme position
you can cancel it.
1 Press the MENU button on the remote control.
2 Press the corresponding
",❷
or ➛, ❿buttons to select the
INSTALLATION option.
3 Press the OK button to select this option.
Result
: The INSTALLATION menu is displayed.
4 Press the corresponding
"
or ❷buttons, until the MANUAL SET
UP
option is selected.
5 Press the
❿
button to select this option.
Result
: The TV STATION TABLE menu is displayed.
6 Press the corresponding
"
or ❷buttons, until the required preset
TV station (PR) is selected.
7 Press the CLR/RST button.
8 Repeat the same procedure from Step 6 onwards until all the
required stations have been cleared.
9 On completion, press the MENU button three times to exit the
menu.
Clearing a Preset StationPresetting the Stations Manually
☛ You do not need to preset the stations manually if you
have already set them automatically.
1 Press the MENU button on the remote control.
Result
: The programming menu is displayed.
2 Press the corresponding
",❷
or ➛, ❿buttons to select the
INSTALLATION option.
3 Press the OK button to select this option.
Result
: The INSTALLATION menu is displayed.
4 Press the corresponding
"
or ❷buttons, until the MANUAL SET
UP option is selected.
5 Press the
❿
button to select a MANUAL SET UP option.
Result
: The TV STATION TABLE menu is displayed.
6 Press the
"
or ❷buttons to select a programme number as
required.
7 Press the
❿!
button to preset the station.
Result
: The MANUAL TUNING menu is displayed.
8 Press the
➛or❿
buttons to start scanning.
Result
: The frequency band is scanned and the first station
found is displayed.
9 Press the
"or❷
buttons until the cursor is placed in front of the
NAME.
The station name is set automatically from the broadcast signal.
10 To change the programme’s name, press the
❿!
button.
Result
: The first letter of the name flashes.
11
To... Then...
Select a character Press the "or❷button until the
in the name required character is displayed
(letters, numbers or “-” character).
Move to the next or Press the ❿or ➛buttons
previous character respectively.
12 If you... Then...
Wish to store the ◆
Press the corresponding"or ❷!buttons,
station displayed until the
MFT is selected.
◆ Press the
➛or❿
buttons to adjust the
picture, if necessary.
◆ Press OK to store the station
Do not wish to ◆
Press the corresponding"or ❷!buttons,
store the station until the
CH is selected.
displayed
◆ Press the
➛or❿
buttons to go on
scanning the frequency band and display
the next station
◆ Go back to the beginning of Step 12
13 Repeat this procedure from Step 6 onwards, until all the required
stations have been stored.
14 On completion, press the MENU button three times to exit the
menu.
INSTALLATION
PROG OPTIONS INSTALL
CLOCK BONUS LANG
INSTALL
"❷!!
➛❿!!
OK END:MENU
AUTO SET UP
MANUAL SET UP
VCR OUTPUT CH :CH60
"❷
❿
END:MENU
**
MANUAL TUNING
**
PR : 1
CH : ---
MFT : NAME : ----
"❷
➛❿
MEMORY: OK
END:MENU
**
TV STATION TABLE
**
PR CH NAME
1 027 CAEB
2 --- ---3 --- ---4 --- ---5 --- ----
"❷
❿
SWAPPING:OK
DELETE:CLR/RST MENU
INSTALLATION
PROG OPTIONS INSTALL
CLOCK BONUS LANG
"❷!!
➛❿!!
OK END:MENU
AUTO SET UP
MANUAL SET UP
VCR OUTPUT CH :CH60
"❷
❿
END:MENU
**
TV STATION TABLE
**
PR CH NAME
1 027 CAEB
2 --- ---3 --- ---4 --- ---5 --- ----
"❷
❿
SWAPPING:OK
DELETE:CLR/RST MENU
INSTALL
INSTALL
INSTALL
Page 12

GB
21
20
You can record a cassette at two different speeds:
◆ SP (Standard Play)
◆ LP (Long Play)
In Long Play modes:
◆ Each cassette lasts twice as long
◆ The recording is of a slightly lower quality
To record a cassette... Press the SPEED button on the
remote control, until...
In standard play mode SP is displayed.
In long play mode
LP is displayed.
Selecting the Cassette Type
If you wish to use the tape counter to display the time remaining on
a cassette, you must indicate the type of cassette inserted.
1 Press MENU on the remote control.
Result
: The programming menu is displayed.
2 Press the corresponding
",❷
or ➛, ❿buttons to select the
USER SET option.
3 Press the OK button to select this option.
4 Press the corresponding
"or❷
buttons, until the TAPE
SELECT
option is selected.
5 Press the
➛
or ❿buttons as many times as required, until the
correct cassette length is displayed.
E180 E240
E 300 E260
6 Press MENU twice to exit the menu.
Selecting the Recording Speed
T
ype Recording Time (in SP)
E-180 180 mins. or 3 hours
E-240 240 mins. or 4 hours
E-260 260 mins. or
4 hours and 20 mins.
E-300 300 mins. or 5 hours
You can rearrange the Station Table and give different programme
numbers to the stations listed according to your own preferences.
1 Press the MENU button on the remote control.
2 Press the corresponding
",❷
or ➛, ❿buttons to select the
INSTALLATION option.
3 Press the OK button to select this option.
Result
: The
INSTALLATION menu is displayed.
4 Press the
"
or ❷buttons to select MANUAL SET UP option.
And then press the
❿
button to select this option.
Result
: The TV STATION TABLE menu is displayed.
5 Press the corresponding
"
or ❷buttons, until the required preset
TV programme is selected.
Result
: The selected station is displayed at the same time on
the television screen.
6 To change the programme number assigned to a station press the
OK button on the remote control. (For example, To move a TV
station in programme 1 to programme 3)
7 Press the
"
or ❷buttons to select required position. And then
press OK again to swap the position.
8 You can modify this station by repeating the same procedure from
Step
5 onwards.
9 On completion, press the MENU button three times to exit the
menu.
Changing the Preset Station Table
INSTALLATION
PROG OPTIONS INSTALL
CLOCK BONUS LANG
"❷!!
➛❿!!
OK END:MENU
AUTO SET UP
MANUAL SET UP
VCR OUTPUT CH :CH60
"❷
❿
END:MENU
**
TV STATION TABLE
**
PR CH NAME
1 027 CAEB
2 --- ---3 --- ---4 --- ---5 --- ----
"❷
SWAPPING:OK
MENU
**
TV STATION TABLE
**
PR CH NAME
1 --- ---2 --- ----
3 027 CAEB
4 --- ---5 --- ----
"❷
SWAPPING:OK
MENU
USER SET
PROG OPTIONS INSTALL
CLOCK BONUS LANG
"❷!!
➛❿!!
OK END: MENU
OSD :ON
TAPE SELECT :E180
COLOUR SYSTEM :AUTO
FORMAT 16:9 :AUTO
NICAM :ON
ECO. MODE :OFF
IPC :ON
"❷
❿
END:MENU
INSTALL
INSTALL
OPTIONS
OPTIONS
OK
SPEED DUB TV/VCR TIMER
Page 13

GB
23
22
Recording a Programme Immediately
Protecting a Recorded Cassette
Video cassettes have a safety tab to prevent accidental erasure.
When this tab has been removed, you cannot
record on the tape.
1 If you wish to protect a cassette, break off the tab using a small
screwdriver.
2 To re-record over a protected cassette (safety tab broken), cover
the hole with adhesive tape.
NICAM
NICAM programmes are divided into 3 types. NICAM Stereo,
NICAM Mono and Bilingual (transmission in another language).
NICAM programmes are always accompanied by a standard mono
sound broadcast and you can select the desired sound.
Please refer to page 32.
1 Press MENU on the remote control.
Result
: The programming menu is displayed.
2 Press the corresponding
",❷
or ➛, ❿buttons to select the
USER SET option.
3 Press the OK button to select this option.
Result
: The USER SET menu is displayed.
4 Press the corresponding
"or❷
buttons, until the NICAM option
is selected.
5 To... Press
➛or❿
, until...
Mono mode OFF is displayed.
OFF: Only set at this position to record the
standard mono sound during a
NICAM broadcast if the stereo sound
is distorted due to inferior reception
conditions.
NICAM mode ON is displayed.
ON: Normally set at this position.
6 On completion, press MENU twice to exit the menu.
USER SET
PROG OPTIONS INSTALL
CLOCK BONUS LANG
"❷!!
➛❿!!
OK END: MENU
OPTIONS
OSD :ON
TAPE SELECT :E180
COLOUR SYSTEM :AUTO
FORMAT 16:9 :AUTO
NICAM :ON
ECO. MODE :OFF
IPC :ON
"❷
❿
END:MENU
1
REPEAT
TRK PROG
AUDIO DISPLAY
TRK
PROG
6
4
4
5
7
Before recording a programme, you must have preset the corresponding station (unless you are recording via an external video
source). If you have not done so, refer to pages 17 and 18.
1 Switch on the television.
2 To monitor the programme being recorded, select the television
channel reserved for use with your VCR (or the AV input if used).
3 Insert the cassette on which the programme is to be recorded,
with the window visible and the safety tab intact or the opening
covered with adhesive tape.
Result
: The VCR is switched on automatically.
4 Select:
◆
The station to be recorded using
the PROG ("or ❷)
buttons
or
◆ The AV1, AV2 or AUX
★
(SV-645B only) source using the
INPUT button for a satellite tuner or external video source
Result: The station number is displayed and the programme
can be seen on the television.
5 Select the recording speed by pressing the SPEED button as
many times as required (see page 21).
6 Hold REC down for a while to start recording.
Result
:
The record indicator appears on the television and VCR
display. An index is recorded on the tape (see page 35).
7 To stop recording, press
■
once.
➢ ◆ If your VCR ejects the cassette when you start
recording, check to make sure that the cassette’s
safety tab is intact or that the opening (created by a
broken safety tab) is covered with adhesive tape.
◆ If you reach the end of the tape while recording, the
cassette rewinds automatically.
OPTIONS
SPEED DUB TV/VCR TIMER
REC MENU
Page 14

24
Recording a Programme with Automatic Stop
3
LENGTH 2:30
SET LENGTH :
PRESS REC
A.TRK IPC INPUT
REPEAT
TRK PROG
AUDIO DISPLAY
6
4
4
4
SPEED DUB TV/VCR TIMER
5
This function enables you to record up to nine hours (LP) of
programmes.
Your VCR stops automatically after the requested length of time.
1 Switch on the television.
2 To monitor the programme being recorded, select the television
channel reserved for use with your VCR (or the AV input if used).
3 Insert the cassette on which the programme is to be recorded,
with the window visible and the safety tab intact or the opening
covered with adhesive tape.
Result
: The VCR is switched on automatically.
4 Select:
◆
The station to be recorded using the
PROG ("or ❷)
buttons
or
◆ The AV1, AV2 or AUX
★
(SV-645B only) source using the
INPUT button for a satellite tuner or external video source
Result: The channel number is displayed and the programme
can be seen on the television.
5 Select the recording speed by pressing the SPEED button as
many times as required (see page 21).
6 Hold the REC button down for a while to start recording.
Result
: The record indicator appears on the television screen
and VCR display. An index is recorded on the tape
(see page 35).
7 Press the REC button several times to increase the recording time
in:
◆ 30-minute intervals up to four hours
◆ 1-hour intervals up to nine hours (LP)
Result
: The length is displayed on the television displays. The
selected programme is recorded for the length of time
requested. At the end of that time, the VCR stops
recording automatically.
8 If you wish to cancel the recording before the end, press
STANDBY/ON.
☛ If the end of the tape is reached while recording:
◆ The recording stops
◆ The VCR automatically turns off
REC MENU
OK
Page 15

GB
25
Using the VIDEOPLUS+ Feature ★(SV-645B/SV-643B Only)
◆ Switch on both the television and your VCR
◆ Check that the date and time are correct
◆ Insert the cassette on which the programme is to be
recorded (safety tab intact)
1 Press the TIMER button.
Result
: The
TIMER METHOD is displayed.
2 Press the corresponding
"or❷
buttons, until the VIDEOPLUS
option is selected.
3 Press the
❿!
button to select VIDEOPLUS.
Result
: A message is displayed to allow you to enter the
VIDEOPLUS+ code.
☛ If all six programmes have been set, the message TIMER
IS FULL is displayed. Refer to page 28 if you wish to
cancel a preset recording.
4 Press the numeric buttons to enter the code opposite the
programme that you wish to record in your television magazine.
➢ If you wish to correct the VIDEOPLUS+ code that you are
entering:
◆ Press the
➛
button until the digit to be corrected is
cleared
◆ Enter the correct digit
5 Press the MENU button.
Result
:
The information concerning the programme is displayed.
☛ When using the VIDEOPLUS+ function for the first time with
stored stations, the programme number flashes. This one
time, you must enter the station number manually by
pressing the
"or❷
buttons. Refer to the following page if:
◆ The programme number or times flash
◆ You wish to modify the programme
6
If the programme and times are correct, press the MENU button.
7 Press the STANDBY/ON button to activate the timer.
8 Refer to page 28 if you wish to:
◆ Check that your VCR has been programmed correctly
◆ Cancel a preset recording
☛ The numbers next to each TV programme listing are
VIDEOPLUS+ code numbers, which allow you to
programme your videorecorder instantly with the remote
control. Tap in the VIDEOPLUS+ code for the programme
you wish to record.
system is manufactured under licence from Gemstar Development Corporation.
SPEED DUB TV/VCR TIMER
1
VIDEOPLUS
CODE ---------
CODE:0-9 CORRECT:
➛
END:MENU
**
TIMER METHOD
**
STANDARD
VIDEOPLUS
"❷
❿
END:MENU
T
PROG
1/JAN MON 21:28
PR DAY START
→
STOP V/P
1 MO 1 12:00→12:50SP ON
-- ---- --:--
→
--:---- -
-- ---- --:--
→
--:---- -
-- ---- --:--
→
--:---- -
-- ---- --:--
→
--:---- -
-- ---- --:--
→
--:---- -
"❷
➛❿
DELETE:CLR/RST MENU
7
STANDBY/ON EJEC
SHUTTLE
SLOW
Page 16

GB
2726
Using the Timer Programming Feature
Modifying VIDEOPLUS+ Programming
★
(SV-645B/SV-643B Only)
TIMER PROGRAMMING
PROG OPTIONS INSTALL
CLOCK BONUS LANG
"❷!!
➛❿!!
OK END: MENU
The Timer Programming feature allows you to preset the VCR to
record a programme up to one month before that programme is to
be broadcast. Up to six programmes can be preset.
☛ Before presetting a recording, check that the date and
time are correct.
1 - Insert the cassette. Press the TIMER button.
Press the
"or❷
buttons to select the STANDARD option and
then press the
❿!
button or,
◆ Press MENU on the remote control.
Result
: The programming menu is displayed.
◆ Press the OK button to select TIMER PROGRAMMING option.
Result
: The TIMER PROGRAMMINGmenu is displayed.
2 Press
❿!
to select the input source.
3 Select the required station by pressing the
",❷
buttons or
INPUT
to select the AV1, AV2
or AUX ★(SV-645B only) input sources.
4 Press
❿
to select the recording day.
5 Select the required day by pressing the
"or❷
buttons.
6 Press
❿
to select the recording start time.
7 Select the required hour value by pressing the
"or❷
buttons.
8 Press
❿
to select the minutes.
9 Select the required minute value by pressing the
"or❷
buttons.
10 Press
❿
to select the recording end time.
11 Select the required recording end time by pressing the
"or❷
buttons, following the same procedure as when selecting the
recording start time.
12 Press
❿
to select the recording speed.
13 Press the
"or❷
buttons to select the SP (Standard Play), LP
(Long Play), AUTO (Auto Tape Speed Select) recording speeds.
14 Press
❿
to select the PDC recording mode.
15 Press the
"
or ❷buttons to toggle between the PDC mode
(marked
ON) and the non-PDC mode (marked -).
16 When you have finished, press the MENU button.
17 Press the STANDBY/ON button to activate the timer.
Result
: Before starting recording, the VCR compares the timer
duration with the remaining time on the cassette.
➢ Auto Tape Speed Select. The VCR’s “Auto Tape Speed
Select” function compares the duration of the timer
recording to the actual recording time remaining on the
tape loaded. If there is insufficient tape to complete a
timer recording in AUTO mode, the VCR automatically
switches to LP mode to record the whole programme.
**
TIMER METHOD
**
STANDARD
VIDEOPLUS
"❷
❿
END:MENU
1/JAN MON 21:28
PR DAY START
→
STOP V/P
1 MO 1 12:00
→
12:50SP ON
-- ---- --:--→--:---- -
-- ---- --:--
→
--:---- -
-- ---- --:--
→
--:---- -
-- ---- --:--
→
--:---- -
-- ---- --:--
→
--:---- -
"❷
➛❿
DELETE:CLR/RST MENU
STANDBY/ON EJECT
SLOW
SHUTTLE
17
★
(SV-645B/SV-643B)
If you wish to correct the programme displayed or modify certain elements, such as the recording
speed, you can do so before you press MENU a second time to confirm.
If you wish to... Then...
Select an input source other ◆ Press the ➛or ❿buttons, until the PR selection flashes.
than the tuner (AV1, AV2 or
◆ Press the INPUT button one or more times to change the
AUX ★(SV-645B only)
)
input source selection.
Result
: The programme number is replaced by:
• The AV1, AV2
or AUX ★(SV-645B only) source
using the INPUT button for a satellite tuner or
external video source
➢ The input source must be selected before changing any
other value.
Record a programme every day ◆ Press the ➛or ❿buttons, until the DAY selection flashes.
(Monday to Sunday) at the same time
◆ Press the
"or❷
buttons, until the DLY (Daily) value is
displayed.
Record a programme every week ◆ Press the ➛or ❿buttons, until the DAY selection flashes.
on the same day and at the same time
◆ Press the
"or❷
buttons, until the W- (Week) value is
displayed, followed by the required day.
Example
: W-SA (Weekly Saturday)
Extend the recording time ◆ Press the ➛or ❿buttons, until the STOP selection flashes.
◆ Press the
"or❷
buttons to increase or decrease the stop
time.
Select the recording speed ◆ Press the ➛or ❿buttons, until the recording speed selection
flashes.
◆ Press the
"or❷
buttons until the correct indication is
displayed:
• AUTO (Auto Tape Speed Select) : see page 27
• SP (Standard Play)
• LP (Long Play)
Select the PDC recording ◆ Press the ➛or ❿buttons, until the V/P selection flashes.
◆ Press the
"or❷
buttons until the “ON” indication is displayed.
☛
Do not select PDC unless you are sure the programme you
wish to record is broadcast with PDC. If you do set PDC ON
(by selecting “ON” in the right - hand column on the screen),
then you must set up the start-time EXACTLY according to
the published TV schedule. Otherwise the timer recording
won’t take place.
PROG
PROG
Page 17

GB
2928
The Picture Adjustment feature allows you to adjust the alignment
manually to obtain the best possible picture.
When noise bars or streaks appear during playback, adjust alignment
manually by pressing the TRK
(
or)buttons until the picture is clear
and stable.
Result
: ◆ The tracking bar appears.
◆ The image is adjusted.
◆ The tracking bar disappears when you release the button.
Adjusting Picture Alignment Manually
This function allows you to play back any pre-recorded cassette.
1 Switch on both the television and your VCR.
2 Insert the video cassette to be played. If the safety tab on the
cassette is intact, press
❿ll
.
Otherwise, the cassette is played automatically.
➢ When a cassette is loaded, the tape position is optimized
automatically to reduce disturbance (Digital Auto Tracking).
When playing a cassette, if the end of the tape is reached,
the cassette is rewound automatically.
NTSC tapes can be played back but cannot be recorded
with this VCR.
3 To... Then press...
Stop the playback
■
(STOP).
Eject the cassette (EJECT).
Playing a CassetteChecking a Preset Recording
Cancelling a Preset Recording
PROG
1/JAN MON 21:28
PR DAY START→STOP V/P
1 MO 1 12:00→12:50SP ON
-- ---- --:--→--:---- -
-- ---- --:--→--:---- -
-- ---- --:--
→
--:---- -
-- ---- --:--→--:---- -
-- ---- --:--
→
--:---- -
"❷
SET:
❿
DELETE:CLR/RST MENU
1/JAN MON 21:28
PR DAY START→STOP V/P
1 MO 1 12:00
→
12:50SP ON
-- ---- --:--→--:---- -
-- ---- --:--
→
--:---- -
-- ---- --:--→--:---- -
-- ---- --:--→--:---- -
-- ---- --:--
→
--:---- -
"❷
SET:
❿
DELETE:CLR/RST MENU
CLR/RST F.ADV INDEX
A.TRK IPC INPUT
REPEAT
AUDIO DISPLAY
3
Adjusting Picture Alignment Automatically
The Picture Alignment feature enables you to optimize the tape
position automatically to obtain the best possible picture.
When noise bars or streaks appear during playback, adjust picture
alignment by pressing the A.TRK button.
Result
:
◆ The tracking bar appears.
◆ The picture is automatically adjusted.
◆ The tracking bar disappears when digital auto tracking has
been completed.
A.TRK IPC INPUT
REPEAT
TRK PROG
AUDIO DISPLAY
A.TRK
IPC
INPUT
3
2
You can check your preset recordings:
◆ When you have finished presetting the VCR
◆ If you have forgotten which programmes will be
recorded
1 - Insert the cassette. Press the TIMER button.
Press the
"or❷
buttons to select the STANDARD option and
then press the
❿!
button or,
◆ Press MENU on the remote control.
Result
: The programming menu is displayed.
◆ Press the OK button to select TIMER PROGRAMMING option.
Result
: The TIMER PROGRAMMINGmenu is displayed.
2 Press the
"or❷
buttons to select the required programme.
3 Press the
➛
or ❿buttons to select and change any values as
required. For more details, refer to the previous page.
4 On completion, press MENU twice.
You can cancel any programmes that are:
◆ Incorrect
◆ No longer required
1 - Insert the cassette. Press the TIMER button.
Press the
"or❷
buttons to select the STANDARD option and
then press the
❿!
button or,
◆ Press MENU on the remote control.
Result
: The programming menu is displayed.
◆ Press the OK button to select TIMER PROGRAMMING option.
Result
: The TIMER PROGRAMMINGmenu is displayed.
2 Select the programme to be cancelled by pressing the
"or❷
buttons.
3 Press the CLR/RST button to cancel the selected programme.
Result
: All the recording information is deleted and the broad-
cast will not be recorded.
4 On completion, press MENU twice.
REC MENU
PROG
REPEAT
AUDIO DISPLAY
TRK PROG
Page 18

GB
3130
Format 16:9 (Wide Screen)
Your VCR can automatically play Wide Screen format prerecorded
tapes. It can also record Wide Screen format programmes received
from sources such as a satellite receiver.
☛
Connect equipment compatible with Wide Screen to the VCR
using the 21 pin SCART cable.
1 Press MENU on the remote control.
Result
: The programming menu is displayed.
2 Press the corresponding
",❷
or ➛, ❿buttons to select the
USER SET option.
3 Press the OK button to select this option.
Result
: The USER SET menu is displayed.
4 Press the corresponding
"or❷
buttons, until the
FORMAT 16:9 option is selected.
5 Press the
❿!!
button to select AUTO
➝ ON➝
OFF.
AUTO Set when you use a wide TV. The VCR automatically
detects if programmes being played back or recorded
are in normal or Wide Screen format.
ON The VCR always plays back and records in 16:9 Wide
Screen format. Set if the VCR cannot detect Wide
Screen TV programmes with “AUTO” set.
OFF Set if you do not use a Wide Screen TV.
6 On completion, press MENU twice to exit the menu.
Before recording or playing back a cassette, you can select the
required system standard.
Otherwise, the system automatically selects the reception standard
when you select AUTO.
➢
◆ When playing back a cassette, the standard is
automatically selected by the VCR.
◆ When you playback an NTSC-recorded tape on this VCR
make a setting on the colour system according to your TV.
If your TV is a PAL system only TV, set NTPB.
If your TV is Multi System TV (NTSC 4.43 compatible), set
NT4.43 and you can record NT4.43.
1 Press MENU on the remote control.
Result
: The programming menu is displayed.
2 Press the corresponding
",❷
or ➛, ❿buttons to select the
USER SET option.
3 Press the OK button to select this option.
Result
: The
USER SET menu is displayed.
4 Press the corresponding
"or❷
buttons, until the
COLOUR SYSTEM option is selected.
5 Press the
❿
button to select AUTO
➝
PAL➝ B/W.
AUTO When playing back a cassette, the system standard is
automatically selected by the VCR.
B/W Black and White
6 On completion, press MENU twice to exit the menu.
Selecting the Colour Mode
Intelligent Picture Control
The Intelligent Picture Control Feature allows you to adjust the
sharpness of the image automatically, according to your own
preferences.
1 During playback, press the MENU button on the remote control.
Result: The programming menu is displayed.
2 Press the corresponding
",❷
or ➛, ❿buttons to select the
USER SET option.
3 Press the OK button to select this option.
Result
: The
USER SET menu is displayed.
4 Press the corresponding
"or❷
buttons, until the IPC option is
selected.
5 Press the
❿!
button to select the IPC (intelligent picture control)
option.
➢ When intelligent picture control mode is ON, the sharpness
of the image is adjusted automatically.
6 To adjust the sharpness manually, press the
❷
button to turn the
IPC mode
OFF
.
7 Press the
➛
or ❿buttons until the picture is displayed according to
your preferences.
➢ If you do not press a button within ten seconds, the
PICTURE menu disappears automatically.
8 On completion, press the MENU button again.
1 During playback, press the IPC button.
Result: The PICTURE menu is displayed.
2 Press the
❷
button to turn the IPC (Intelligent Picture Control)
option
ON and OFF.
➢ When Intelligent Picture Control mode is ON, the sharpness
of the image is adjusted automatically.
3 To adjust the sharpness manually, select Intelligent Picture
Control mode
OFF.
◆ The horizontal picture adjusting appears.
4 Press the
➛
or ❿buttons until the picture is displayed according to
your preferences.
➢ If you do not press a button within ten seconds, the
PICTURE menu disappears automatically.
5 On completion, press the IPC button again.
USER SET
PROG OPTIONS INSTALL
CLOCK BONUS LANG
"❷!!
➛❿!!
OK END: MENU
OSD :ON
TAPE SELECT :E180
COLOUR SYSTEM :AUTO
FORMAT 16:9 :AUTO
NICAM :ON
ECO. MODE :OFF
IPC :ON
"❷
❿
END:MENU
1
USER SET
PROG OPTIONS INSTALL
CLOCK BONUS LANG
"❷!!
➛❿!!
OK END: MENU
OSD :ON
TAPE SELECT :E180
COLOUR SYSTEM :AUTO
FORMAT 16:9 :AUTO
NICAM :ON
ECO. MODE :OFF
IPC :ON
"❷
❿
END:MENU
USER SET
PROG OPTIONS INSTALL
CLOCK BONUS LANG
"❷!!
➛❿!!
OK END: MENU
OSD :ON
TAPE SELECT :E180
COLOUR SYSTEM :AUTO
FORMAT 16:9 :AUTO
NICAM :ON
ECO. MODE :OFF
IPC :ON
"❷
❿
END:MENU
**
PICTURE
**
IPC : OFF
SOFTEN SHARPEN
--------
*
-----
➛❿
ON/OFF:
❷
OPTIONS
OPTIONS
CLR/RST F.ADV INDEX
A.TRK IPC INPUT
AUDIO DISPLAY
TRK PROG
REPEAT
OPTIONS
OPTIONS
OPTIONS
OPTIONS
Page 19

GB
3332
Playing a Cassette in Slow Motion
You can play a cassette in slow motion.
➢ No sound is heard when playing back a cassette in slow
motion.
1 Press:
◆
❿ll
to start playing the cassette
◆ SLOW ( ) as many times as required to decrease or
increase the speed respectively
◆
T
o return to the normal speed, press the
❿ll
button twice.
2 When playing back in slow motion, picture interference may occur.
Press the TRK
(
or)buttons to minimize this effect.
☛ When you have been using the Slow Motion function for
more than about five minutes, the VCR will automatically
play to protect the:
◆ Cassette
◆ Video heads
SLOW
When monitoring a TV programme or playing back a Hi-Fi
recorded video tape, press the AUDIO button to select a desired
sound output. As the AUDIO button is pressed, the sound output
and the indicator change as below:
Selecting the Audio Output Mode
1
1
2
2
L R
MIX
MONO
L
R
Heard in stereo.
(left channel and
right channel)
Left channel heard
from both the left
and right
speakers.
Right channel
heard from both
the left and right
speakers.
Heard in
monaural.
Channel
I (MAIN)
heard from the left
speaker, channel
II (SUB) heard
from the right
speaker.
Channel I (MAIN)
heard from both
the left and the
right speakers.
Channel II-(SUB)
heard from both
the left and the
right speakers.
Channel I (MAIN)
heard from both
the left and the
right speakers.
Heard in
monaural.
Heard in
monaural.
Heard in
monaural.
Heard in
monaural.
Sound mixed the left and right channels, and the
normal audio track.
OSD display
Sound type
Stereo sound Bilingual sound
Standard
sound
broadcast
REPEAT
AUDIO
TRK PROG
DISPLAY
SLOW
SHUTTLE
V-LOCK
A.TRK IPC INPUT
REPEAT
AUDIO DISPLAY
TRK PROG
Page 20

GB
3534
Searching for a Specific Sequence
Each time you record a cassette on this VCR, an “index” is
automatically marked on the tape when recording starts.
The Search function allows you to fast-forward or rewind to a
specific index and start playback from that point. Depending on the
direction selected, the indexes are numbered as follows:
etc.
Prev
Seq.
Seq. being
played
Next
Seq.
etc.
21 12
➞
➢ This VCR uses a standard indexing system (VISS). As a
result, it will recognize any indexes marked by other
VCRs using the same
system and vice versa.
INTRO SCAN
1 To search for a specific index, press INDEX.
2 Press the
➛➛
or ❿❿buttons depending on the direction
where your desired programme is located.
3 When an Index mark is found the VCR will playback the tape for 5
seconds, after which it will continue searching for the next Index
mark.
4 If you want to watch the tape from a particular Index, simply press
❿
II
.
Index Skip Search:
This feature will enable you to fast forward/rewind to a specific
point on a tape: E.g. if you have recorded 3 different programmes
on a tape and you have rewound the tape to the beginning, by
using this feature you can go directly to the start of programme 2
simply by pressing the INDEX button.
1 Press the INDEX to start the Index search.
2 Press the
➛➛
or ❿❿buttons twice more. This will take
you directly to the start of the desired programme is located.
3 These Index searches can be made forwards: (press
❿❿
) or
backwards: (press
➛➛
).
4
To cancel an Index search simply press the
❿
II
or ■button.
You can:
◆ Stop the cassette at a given frame (image)
◆ Advance one frame at a time
➢ No sound is heard when playing back frame by frame.
1 Press:
◆
❿ll
to start playing the cassette
◆
❿ll
to stop the tape at a given frame
◆
F.ADV ( )
to advance frame by frame
2 To return to normal playback, press
❿ll
.
☛ When you have been using the Frame-by-Frame function
for more than about five minutes, the VCR will automatically play to protect the cassette and video heads.
➢ Vertical stability: When playing back frame by frame,
interference may be seen on the screen. Press the
V-LOCK ( ) buttons to minimize this effect.
Playing a Sequence Frame by Frame
Picture Search, Fast Forward/Rewind
Picture Search enables you to Fast Forward or Rewind and look for
a particular part of a tape.
1 Press PLAY, the VCR will enter normal play mode. While in play,
press and release the
❿❿
(or ➛➛) button. The VCR will search at 5
times the normal playback speed.
2 To return to normal playback mode, press the
❿
II
button.
3 If you press and HOLD down the
❿❿
(or ➛➛) button the VCR will
search at 9 times the normal speed. Releasing the
❿❿
button will
return the VCR to search at 5 times the normal speed. To return to
normal playback mode, press the
❿
II
button.
4 Whilst in Picture Search mode, if you press the
❿❿
button again,
the VCR will enter normal Fast Forward mode.
5 Likewise, whilst in Picture Search
➛➛
mode, if you press the
➛➛
button again, the VCR will enter normal Rewind mode.
6 If, when Redwing (
➛➛
) or Fast Forwarding (❿❿), you press the
➛➛
(or ❿❿) button, the VCR will enter the Picture Search mode.
TRK PROG
REC MENU
1
V-LOCK
CLR/RST F.ADV INDEX
A.TRK IPC INPUT
REPEAT
1
INDEX:
➛➛!!!!!❿❿
INDEX SEARCH:
❿❿!!!!
+01
V-LOCK
F.ADV
Page 21

Programme VPS/PDC is a system of telling the VCR when a
programme actually starts. Typically, when you want to record a
programme you will tell the VCR to start recording, probably, five
minutes before the advertised starting time of the programme and
to finish ten minutes or so after the programme is due to finish. So
even if the programme starts early or finishes late you will normally
still get to see what you wanted to record. However when live
programmes over-run or the day’s television schedule is changed
from that advertised, you may miss the desired programme which
may have been delayed or even cancelled. With VPS/PDC the VCR
will wait until the signal is sent to confirm the programme is
starting and the VCR will record the programme even if it is two or
more, hours late.
1 Press the MENU button on the remote control.
2 Press the corresponding
$,❷
or ➛, ❿buttons to select the
EASY OPERATION option.
3 Press the OK button to select this option.
Result
: The EASY OPERATION menu is displayed.
4 Press the corresponding
$or❷
buttons, until the
PDC/VPS DEFAULT option is selected.
5 Press
❿!
button to select ON in PDC/VPS DEFAULT option.
6 On completion, press MENU twice to exit the menu.
GB
VPS/PDC Default
3736
You can set Interval Repeat Play so that the cassette is repeated a
number of times according to a specified set interval.
1 Press MENU on the remote control.
Result
: The programming menu is displayed.
2 Press the corresponding
$,❷
or ➛, ❿buttons to select the
EASY OPERATION option.
3 Press the OK button to select this option.
Result
: The EASY OPERATION menu is displayed.
4 Press the corresponding
$or❷
buttons, until the
NO. OF INTERVAL REPEAT option is selected.
5 To... Press
❿
, until...
Interval Repeat Play 5, 10, 15 is displayed.
(choose an interval repeat of
5, 10 or 15 times)
Cancel Interval Repeat Play OFF is displayed.
6 On completion, press MENU twice to exit the menu.
7 To select Interval Repeat Play during playback, press the
INPUT/REPEAT button at the desired start point.
Result
:“INTERVAL REPEAT SETTING” is displayed.
Press the INPUT/REPEAT button one more time at the desired
end point.
Result
: The tape is automatically rewound to the start point.
“
INTERVAL REPEAT” is displayed.
Interval Repeat Play
You can set repeat play to repeat the tape continuously from
beginning to end.
1 Press MENU on the remote control.
Result
: The programming menu is displayed.
2 Press the corresponding
$,❷
or ➛, ❿buttons to select the
EASY OPERATION option.
3 Press the OK button to select this option.
Result
: The EASY OPERATION menu is displayed.
4 Press the corresponding
$or❷
buttons, until the
REPEAT PLAY option is selected.
5 To... Press
➛or❿
, until...
Repeat play ON is displayed.
Do not wish to repeat play OFF is displayed.
6 On completion, press MENU twice to exit the menu.
Auto Repeat Play
PDC/VPS DEFAULT :OFF
VIDEOPLUS EXTEND :OFF
AUTO POWER OFF :OFF
REPEAT PLAY :OFF
NO. OF
INTERVAL REPEAT : 5
$❷
❿
END:MENU
BONUS
EASY OPERATION
PROG OPTIONS INSTALL
CLOCK BONUS LANG
$❷!!
➛❿!!
OK END: MENU
PDC/VPS DEFAULT :OFF
VIDEOPLUS EXTEND :OFF
AUTO POWER OFF :OFF
REPEAT PLAY :OFF
NO. OF
INTERVAL REPEAT : 5
$❷
❿
END:MENU
PDC/VPS DEFAULT :OFF
AUTO POWER OFF :OFF
REPEAT PLAY :OFF
NO. OF
INTERVAL REPEAT : 5
$❷
❿
END:MENU
BONUS
EASY OPERATION
PROG OPTIONS INSTALL
CLOCK BONUS LANG
$❷!!
➛❿!!
OK END: MENU
PDC/VPS DEFAULT :OFF
VIDEOPLUS EXTEND :OFF
AUTO POWER OFF :OFF
REPEAT PLAY :OFF
NO. OF
INTERVAL REPEAT : 5
$❷
❿
END:MENU
PDC/VPS DEFAULT :OFF
AUTO POWER OFF :OFF
REPEAT PLAY :OFF
NO. OF
INTERVAL REPEAT : 5
$❷
❿
END:MENU
BONUS
★
(SV-645B/SV-643B)
PDC/VPS DEFAULT :OFF
AUTO POWER OFF :OFF
REPEAT PLAY :OFF
NO. OF
INTERVAL REPEAT : 5
$❷
❿
END:MENU
BONUS
★
(SV-640B)
★
(SV-645B/SV-643B)
★
(SV-640B)
★
(SV-645B/SV-643B)
★
(SV-640B)
BONUS
BONUS
BONUS
BONUS
Page 22

GB
39
VIDEOPLUS+ EXTEND
★
(SV-645B/SV-643B
Only)
To prevent delays or over-runs the VCR has a function called
Videoplus EXTEND allowing you to extend the recording time by
up to 60 minutes.
➢ Only use if PDC is not available or set to OFF.
1 Press the MENU button on the remote control.
2 Press the corresponding
$,❷
or ➛, ❿buttons to select the
EASY OPERATION option.
3 Press the OK button to select this option.
Result
: The
EASY OPERATION menu is displayed.
4 Press the corresponding
$or❷
buttons, until the
VIDEOPLUS EXTEND option is selected.
5 Press
➛or❿
buttons to set the Videoplus EXTEND time by
increments of 10 minutes.
6 To turn off, press
➛or❿
buttons repeatedly until OFF shows.
38
The tape counter:
◆ Indicates the elapsed time in the play and record modes
(hours, minutes and seconds)
◆ Is reset when a cassette is inserted in the VCR
◆ Allows you to find the beginning of a sequence easily
☛ If the remaining time is to be calculated correctly, you
must indicate the type of cassette being used.
1 Insert a cassette in your VCR.
2 To set the tape counter to zero at the beginning of a sequence:
◆ Press DISPLAY twice to display the counter
◆ Press CLR/RST when you want to set the tape counter to
zero
3 When you are ready,
◆ Start playback or Recording.
◆ Press the
■
button.
◆ To fast-froward or rewind to the sequence at which the
counter was set to zero, press
➛➛
or ❿❿.
➢ Some VCR information, such as the counter, can be
displayed on the television screen (unless you have
deactivated the OSD mode; refer to page 16).
Press DISPLAY:
◆ Once to display the current function, programme
number, recording speed, date, time and counter
◆ Twice to display the counter only
◆ Three times to display the time remaining on the
cassette
◆ Four times to clear the display
Using the Tape Counter
EASY OPERATION
PROG OPTIONS INSTALL
CLOCK BONUS LANG
$❷!!
➛❿!!
OK END: MENU
PDC/VPS DEFAULT :OFF
VIDEOPLUS EXTEND :OFF
AUTO POWER OFF :OFF
REPEAT PLAY :OFF
NO. OF
INTERVAL REPEAT : 5
$❷
❿
END:MENU
0:00:00
CLR/RST F.ADV INDEX
A.TRK IPC INPUT
REPEAT
TRK PROG
AUDIO DISPLAY
2
2
Connecting an RCA Audio/Video Input Cable
★
(SV-645B
Only)
You can connect other audio/video equipment to your VCR using
audio/video cables if the appropriate outputs are available on the
equipment chosen.
Examples
: ◆ You wish to copy a video cassette with the help of a
second VCR (see page 40).
◆ You wish to play back and/or copy pictures taken
with a camcorder (see page 40).
☛
◆ Regardless of the type of connection chosen, you
must always connect the coaxial cable supplied.
Otherwise, no picture will be visible on the screen
when the VCR is switched off.
◆ Make sure that both the television and the VCR are
switched off
before connecting the cables.
1 Connect one end of the RCA audio/video cable into the VIDEO
INPUT socket on the front of the VCR.
2 Plug the other end of the audio/video cable into the appropriate
output connector on the other system (VCR or camcorder).
3 Connect one end of the RCA audio cable supplied into the AUDIO
INPUT sockets on the front of the VCR.
➢ Take care to respect the colour coding of the left and right
channels.
4 Plug the other end of the audio cable into the appropriate output
connectors on the other system (VCR, camcorder or Hi-Fi sound
system).
AUX
VIDEO L- AUDIO- R
STANDBY/ON
EJECT
1
3
3
BONUS
BONUS
STANDBY/ON
AUX
EJECT
VIDEO L- AUDIO- R
Page 23

GB
4140
Low Power Mode reduces the Standby power consumption of the
VCR when in Standby mode.
Useful, for example, when you are away from the house on holiday.
It saves actually turning the VCR off.
1 Press MENU on the remote control.
Result
: The programming menu is displayed.
2 Press the corresponding
$,❷
or ➛, ❿buttons to select the
USER SET option.
3 Press the OK button to select this option.
Result
: The USER SET menu is displayed.
4 Press the corresponding
$or❷
buttons, until the ECO. MODE
is selected.
5 Press the
❿!
button to turn LOW(3Watts) mode on. Now, when the
VCR is standby mode the front display panel will shut off.
Even the clock disappears. By pressing the STANDBY/ON button
again the display panel will reappear.
6 On completion, press MENU twice to exit the menu.
ECO Mode-Reducing Standby power consumption
Child Door Lock System
★
(SV-643B/SV-640B
Only)
With this mechanism you can prevent children from harming
themselves or the VCR. It stops fingers and small articles from
entering your VCR.
The Auto Power Off feature automatically turns off your VCR if no
signal is received and you do not press any button for the selected
time.
1 Press MENU on the remote control.
Result
: The programming menu is displayed.
2 Press the corresponding
$,❷
or ➛, ❿buttons to select the
EASY OPERATION option.
3 Press the OK button to select this option.
Result
: The EASY OPERATION menu is displayed.
4 Press the corresponding
$or❷
buttons, until the
AUTO POWER OFF option is selected.
5 Press the
❿
button, until you select the time of Auto Power off
interval.
OFF 2HOUR 3HOUR
6 On completion, press MENU twice to exit the menu.
Auto Power Off
USER SET
PROG OPTIONS INSTALL
CLOCK BONUS LANG
$❷!!
➛❿!!
OK END: MENU
OSD :ON
TAPE SELECT :E180
COLOUR SYSTEM :AUTO
FORMAT 16:9 :AUTO
NICAM :ON
ECO. MODE :OFF
IPC :ON
$❷
❿
END:MENU
PDC/VPS DEFAULT :OFF
VIDEOPLUS EXTEND :OFF
AUTO POWER OFF :OFF
REPEAT PLAY :OFF
NO. OF
INTERVAL REPEAT : 5
$❷
❿
END:MENU
BONUS
★
(SV-645B/SV-643B)
PDC/VPS DEFAULT :OFF
AUTO POWER OFF :OFF
REPEAT PLAY :OFF
NO. OF
INTERVAL REPEAT : 5
$❷
❿
END:MENU
BONUS
★
(SV-640B)
Using the Assemble Edit Function
Recording from Another VCR or Camcorder
2
6
This function allows you to start a new recording at a specific
position on the cassette while maintaining a very smooth scene
change.
1 Insert the cassette to be edited in your VCR.
2 Press the
❿ll
button to start playback.
3 When you reach the position from which you wish to start the new
recording, press the
❿ll
button.
4 Press the
F.ADV
( ) button again as often as necessary to
advance frame by frame, until the exact recording position is
located.
5 While the VCR is in still mode, hold the REC button down for a
while to activate the Assemble Edit function.
Result
: Record symbol flashes in the display.
6 Select the source from which you wish to record by pressing:
◆ The PROG (
$
or ❷) buttons for television channels
◆ The INPUT button for the AV1, AV2 or AUX
★
(SV-645Bonly)
input sources
7 Press the
❿ll
button to start recording.
8 When you have finished recording, press
■
.
You can copy a cassette to your VCR from another video source,
such as another VCR or a camcorder.
☛
It is an infringement of copyright laws to copy prerecorded
cassettes or to re-record them in any form without the
permission of the owners of the corresponding copyright.
1 Connect the VCR, from which the cassette is to be copied, to the
appropriate SCART audio and video input connectors on the rear
of your VCR.
You can also use a RCA audio and video cable to connect the
AUX input on the front of your VCR.
★
(SV-645B only)
2 Insert a blank cassette in your VCR.
3 Insert the pre-recorded cassette in the other video source (VCR or
camcorder).
4 Press the INPUT button to select the appropriate input on your
VCR:
◆ AV1 or AV2 for the SCART input
◆ AUX for the RCA input
★
(SV-645B only)
5 Start playing back the cassette to be copied.
6 Hold REC down for a while to start recording on your VCR.
7 When you have finished recording, press
■
on both VCRs.
➢ If you wish to view the cassette being copied:
◆ Your VCR must be connected as usual to the
television (see page 11 for further details)
REC MENU
OK
REC MENU
OK
F.ADV
EJECT
STANDBY/ON
OPTIONS
PROG
OPTIONS
REW F.F
PLAY
REC STOP
Page 24

GB
4342
Problems and Solutions
Before contacting the Samsung after-sales service, perform the following simple checks.
Problem Explanation/Solution
No power ◆ Check that the power plug is connected to a wall outlet.
◆ Have you pressed the STANDBY/ON button?
You cannot insert a video cassette ◆ A video cassette can only be inserted with the window
side up and the safety tab facing you.
The television programme was not recorded ◆ Check the VCR aerial connections.
◆ Is the VCR tuner properly set?
◆ Check if the safety tab is intact on the cassette.
Timer recording was unsuccessful ◆ Was the STANDBY/ON button pressed to activate the timer?
◆ Re-check the recording start/stop time settings.
◆ If there was a power failure or interruption during timer
recording, the recording will have been cancelled.
No playback picture or the picture ◆ Check to see if you are using a prerecorded tape.
is distorted
You cannot see normal broadcasts ◆ Check the TUNER/EXTERNAL setting. It should be on
TUNER.
◆ Check the TV/VCR aerial connections.
Noise bars or streaks on playback ◆ Press the TRK(or)buttons to minimize this effect.
When the
❿
II
button is pressed ◆ A still picture may have “noise bars”, depending on the
during playback, the still picture
condition of the tape. Press the
TRK ( or ) buttons during
has severe “noise bars” streaks SLOW motion to minimize this effect.
Video Head Cleaning ◆ If poor pictures appear on a variety of cassettes, the video
heads may need cleaning. This is not a common problem
and unless it appears, the heads should not be cleaned.
When cleaning the video heads, read all instructions
provided with the head cleaning cassette. Incorrect head
cleaning can permanently damage the video heads.
If when tuning in your TV to the VCR test 1. Remove the aerial input plug from the socket marked (aerial
pattern your TV does not find the test pattern symbol) on the rear of the VCR.
or the pattern when found suffers from 2. Carry out the instructions “Tuning Your Television for the VCR”
interference, it may be due to the VCR output (see page 14).
channel clashing with the normal TV 3. Carry out the instructions “Setting the VCR output Channel”
transmissions in your area. To prevent this (see page 16), move the channel number several channels
you will need to change the VCR output down from the original setting. (example: from 60 to 57).
channel in the following way 4. Replace the aerial plug into the socket marked (aerial symbol)
on the rear of the VCR.
5. Re-tune your TV to the VCR again by following instructions
“Tuning Your Television for the VCR” (page 14).
6. If the problem still exists repeat steps 1 to 5 moving several
more channels away from the original setting.
If you are unable to solve the problem after reading the above instructions, note:
◆ The model and serial number on the rear of your VCR
◆ The warranty information
◆ A clear description of the problem
Then contact your nearest SAMSUNG after-sales service.
Technical Specifications
Design and specifications are subject to change without notice.
Format VHS PAL standard
Heads Video: 4 rotary heads
Hi-Fi audio: 2 rotary heads
Audio/Control: 1 stationary head
Erase: 1 full track erase head
Television system STANDARD I-NICAM STEREO
Luminance FM azimuth recording
Colour system PAL: Down converted subcarrier phase shifted direct recording
NTSC PB on PAL TV
Tape speed SP 23.39 mm/sec
LP 11.69 mm/sec
Recording/playback time SP 3 hours (E-180 Tape)
LP 6 hours (E-180 Tape)
REW time About 60 sec in REW with E-180
VIDEO
Input 0.5 to 2.0 Vp-p; 75 ohm unbalanced
Output 1.0 ± 0.2 Vp-p; 75 ohm unbalanced
Signal-to-noise ratio Better than 43 dB (SP)
Horizontal resolution More than 240 lines
AUDIO
Input -8 dBm, 47 Kohm unbalanced
Output -8 ± 3 dBm, 1 Kohm unbalanced
Wow and flutter (WTD) 0.4% max (SP)
Signal-to-noise ratio 68 dB min (IHF A filter)
Frequency response 20Hz - 20kHz
Power requirement 230V (AC 50-60 Hz)
Power consumption Approx. 17 watts
Operation temperature 41°F-104°F (5°C-40°C)
Operation humidity 10%-75%
Weight 2.8 Kg (net)
Dimensions (WxHxD) 360 x 94 x 240 mm
Page 25

ELEC
Please ensure the form above is completed at the time of purchase and
present it to the dealer to quality for guarantee service,
otherwise your guarantee may be affected.
WARRANTY CARD
GUARANTEE
GARANZIA
GARANTI
GARANTÍA
GARANTIE
GARANTIA
ΕΕΓΓΓΓΥΥΗΗΣΣΗΗ
T AKUU
MODEL NAME
Modelnavn, Nombre de modelo, Nombre del modelo, Nome de modelo, Modellbezeichnung, Modelnaam,
Nom du modèle, II nome di modello, Montevlo proi>ovntoı, Asiakkaan puh.nro, Modelnaven, Modell
SERIAL NO.
Serienummer, No. de serie, Número serial, Seriennummer, Serie nummer, Numéro de série,
II numero di matricola, Ariqmovı kataskeuhvı, Malli, Serienummer., Serienr
DATE OF PURCHASE
Kóbetid, Købsadato, Fecha de compra, Data de compra, Kaufdatum, Datum van aankoop, Date d’achat,
La data d’acquisto, Hmeromhniva agoravı agorasthv, Asiakkaan osoite, Salgsdato, Inköpsdatumv
CUSTOMER’S NAME
Kundesnavn, Kundenavn, Nombre de cliente, Nombrre del cliente, Nome de cliente, Name des Kunden,
Naam van klant, Nom du client, il nome del clinte, Onomatepwvnumo tou agopasthv, Sarjanro, Kundens navn, Kundens namn
CUSTOMER’S TEL. NO.
Kundesadress, Kundetelefonnummer, No. de Tel. de client, No. de Tel del cliente, Número de telefone de cliente,
Telefonnummer des Kunden, Telefoon nummer van klant, Numéro de téléphone du client, il numero de telefono del client ,
Ariqmovı thlefwvnou tou agorasthv, Myyjän puh.nro, Kundens telefonnr, Kundens telefonnr.
CUSTOMER’S ADDRESS
Kundeasdress, Kundeadresse, Dirección de client, Direccion del cliente, Endereco de cliente, Adresse des Kunden,
Adres van klant, adresse du client, L’indrizzo del cliente. Dieuvqunsh tou agopasthv, Ostopäivä, Kundens adresse,
Customer’s address
DEALER’S NAME
Handlendesnavn, Forhandler, Nombre de negociante, Nombre del vendedor, Nome de vendedor, Name des Händlers,
Naam van handelaar, Nom du marchand, il nome del commerciante, Onoma tou katasthvmatoı, Jalleenmyyjan, Forhandler,
Aterforsaljare
DEALER’S TEL. NO.
Handlendestelesonnummer, Forhandlertelefonnummer, No. de Tel. de negociante, No. de Tel. del vendedor,
Número de telefone de vendedor, Telefonnummer des Handlers, Telefoon nummer van handelaar, Numéro tél´phone du
marchand, il numero di telefono del commeciante, Ariqmovı thlefwvnou tou katasthvmatoı, Myyjän osoite, Forhandlerens
tel.nr., Handlarens telefonnr.
DEALER’S ADDRESS
Handlendesadress, Forhandleradresse, Dirección de negociante, Dirección del vendedor. Endereco de vendedor,
Adresse des Händlers, Adres van handelaar, Adresse du marchand, Dieuvqunsh tou katasthmatoı, Asiakkaan nimi,
Forhandlerens adresse, Handlarens adress
SAMSUNG EUROPEAN BLOC WARRANTY
DEALER'S STAMP & SIGNATURE
CAUTION
CUSTOMER'S SIGNATURE
ELECTRONICS
SAMSUNG ELECTRONICS (UK) LTD
AUTHORISED SERVICE CENTERS
In the event of warranty service being required, please contact your retailer first. If they cannot provide service, please contact
your nearest service centre listed below. Service facilities are return to base, however some agents may provide an in-home
service (there may be a cost for call out). Please refer to your warranty card or retailer for terms and conditions of the warranty.
AVON
BRISTOL
GOGGLEBOX TV
TEL: 01275 838083
BERKSHIRE
READING
A & W SOUND & VISION
TEL: 01734 872000
MAIDENHEAD
J F ASSOCIATES
TEL: 01628 25709
WARGRAVE
J F ASSOCIATES
TEL: 01734 401525
CAMBRIDGESHIRE
DRY DRAYTON
DRAYTON ELECTRONICS
TEL: 01954 211330
PETERBOROUGH
DEEPING TV SVCS
TEL: 01778 343831
CHESHIRE
CHESTER
H & H VIDEO & TV
TEL: 01244 379579
WARRINGTON
W L ELECTRONICS
TEL: 01925 764387
CORNWALL
BUDE
H B H WOOLACOTTS
TEL: 01288 352269
LAUNCESTON
H B H WOOLACOTTS
TEL: 01566 772096
NEWQUAY
GREENBANK ELECTRONICS
TEL: 01637 880576
WADEBRIDGE
H B H WOOLACOTTS
TEL: 01208 816155
CUMBRIA
BARROW IN FURNESS
KENNETH GARDNER
TEL: 01229 821202
SEARLE AUDIO
TEL: 01229 839692
PENRITH
CANNAN & BROWN
TEL: 01768 864829
DEVON
HOLSWORTHY
H B H WOOLACOTTS
TEL: 01409 253280
NEWTON ABBOT
TELLI-SCOPE ELECTRONICS
TEL: 01626 63907
PLYMOUTH
ARGYLE TV & VIDEO
TEL: 01752 779933
CTV ELECTRONICS
TEL: 01752 350950
DORSET
BOURNEMOUTH
M & G ELECTRONICS
TEL: 01202 523771
DURHAM
DURHAM
LEE TECH SVCS
TEL: 0191 371 1300
DARLINGTON
GAZE ELECTRONICS
TEL: 01325 482344
DYFED
CARMARTHEN
ADVANCE CONSUMER
TEL: 01267 236143
ST CLEARS
BEN EVANS & SON
TEL: 01994 231015
ESSEX
BRAINTREE
GWYNNE TV & ELECTRICAL
TEL: 01376 322567
ESSEX
WICKFORD
CENTRAL SERVICE
TEL: 01268 766333
MID GLAMORGAN
BRIDGEND
BRIDGEND SERVICE
TEL: 01656 663463
GLOUCESTERSHIRE
TEWKESBURY
SWITCH ELECTRONICS
TEL: 01684 850063
WESTON-SUB-EDGE
PROFESSIONAL ELECTRONIC
TEL: 01386 841773
HAMPSHIRE
FAREHAM
SOUND & VISION
TEL: 01329 286551
FARNBOROUGH
ICTV
TEL: 01252 510118
PORTSMOUTH
ICTV
TEL: 01705 653654
SOUTHAMPTON
OLYMPIC TV & AUDIO
TEL: 01703 703401
HEREFORD
HEREFORD
J P MICRO SVCS
TEL: 01432 356353
HERTFORDSHIRE
BALDOCK
TECHNICAL REPAIR SVC
TEL: 01462 491144
MARKYATE
TELETECH SVCS
TEL: 01582 841862
NORTH HUMBERISDE
GOOLE
HEADLAND ELECTRCS
TEL: 01977 661223
SOUTH HUMBERSIDE
GRIMSBY
RAYNERS SUPERSTORE
TEL: 01472 358766
KENT
CANTERBURY
BARRETTS OF CANTERBURY
TEL: 01227 766582
DARTFORD
BUDGET REPAIR CENTRE
TEL: 01322 227668
MAIDSTONE
AVERY ELECTRONICS
TEL: 01622 682138
LANCASHIRE
BLACKPOOL
KENNETH GARDNER
TEL: 01253 824047
LANCASTER
KENNETH GARDNER
TEL: 01524 64468
ROCHDALE
CTV SERVICES
TEL: 01706 654983
LEICESTERSHIRE
LEICESTER
SOUNT & VISION CENTRE
TEL: 01162 730444
LINCOLNSHIRE
BRANSTON
STUART WALLACE
TEL: 01522 791496
LONDON
HIGH HOLBORN
BERRYS OF HOLBORN
TEL: 0171 405 1157
LONDON
ARMSTRONG SERVICES
TEL: 0181 523 0023/0051
WEST EALING
BABBER ELECTRONICS
TEL: 0181 579 6315
LONDON
WILLESDEN
ATLANTIC ELECTRIC
TEL: 0181 451 6155
MANCHESTER
ASHTON UNDER LYNE
VIDEOTECH UK
TEL: 0161 308 4092
NORTHENDEN
G H SUMNER LTD
TEL: 0161 998 2705
MERSEYSIDE
ELLESMERE PORT
H & H VIDEO & TV
TEL: 0151 357 1011
LIVERPOOL
P & A AUDIO VIDEO LTD
TEL: 0151 924 7287
MIDDLESEX
HAYES
A & A REPAIRS
TEL: 0181 561 2900/4104
NORFOLK
AYLESHAM
CORTONS ELECTRICAL
TEL: 01263 733391
WATTON
JULIAN HORN
TEL: 01953 881440
NORTHAMPTONSHIRE
KETTERING
INTEGRATED SVCS
TEL: 01536 516475
OXFORDSHIRE
BANBURY
HITECH
TEL: 01295 267415
BOTLEY
SPECTRUM ELECTRON
TEL: 01865 250199
SHROPSHIRE
TELFORD
W OWEN
TEL: 01952 613818
SOMERSET
TAUNTON
ARMTECH ELECTRONICS
TEL: 01823 279401
YEOVIL
M J THOMAS
TEL: 01935 477255
STAFFORDSHIRE
STOKE ON TRENT
TELEFAULTS (S.O.T.) LTD
TEL: 01782 813757
SUFFOLK
IPSWICH
GGN LTD
TEL: 01473 744300
SURREY
WALLINGTON
SERVICECARE
TEL: 0181 669 1145
HORLEY
D K AUDIO VISUAL SVCS
TEL: 01293 786459
EAST SUSSEX
SEAFORD
CLEARVIEW RENTAL & RELAY
TEL: 01323 898989
EASTBOURNE
STARTEC SVCS
TEL: 01323 412012
TYNE & WEAR
NEWCASTLE UPON
TYNE
M SINGH RADIO & TV
TEL: 0191 226 0446
WEST MIDLANDS
COVENTRY
D & J HENRY
TEL: 01203 431393
WEST MIDLANDS
DUDLEY
J S STOREY ELECTRICAL
TEL: 01384 455608
WALSALL
BEAVER ELECTRONICS
TEL: 01922 725554
WARLEY
MERRIVALE TV SVCS
TEL: 0121 544 6273/6350
WILTSHIRE
SWINDON
COLORITE TV LTD
TEL: 01793 641038
WORCESTERSHIRE
WORCESTER
THE HI FI CAR RADIO REPAIR
TEL: 01905 26623
SOUTH YORKSHIRE
SHEFFIELD
GRAPHIC ELECTRONIC SVCS
TEL: 0114 256 2791
BARNSLEY
ALTRA
TEL: 01226 207434
NORTH YORKSHIRE
YORK
DBS SERVICE CENTRE
TEL: 01904 789789
WEST YORKSHIRE
BRADFORD
GRAPHICK ELECTRON
TEL: 01274 862267
HUDDERSFIELD
GRAPHIC ELECTRONICS
TEL: 01484 451045
ILKLEY
R BEAUMONT
TEL: 01943 607021
CHANNEL ISLANDS
GUERNSEY
TELESKILL LTD
TEL: 01481 56508
JERSEY
ALTERNATIVE ELECT
TEL: 01534 68277
ISLE OF WIGHT
AUDIO VISION SVCS
TEL: 01983 752023
NORTHERN IRELAND
CO ARMAGH
CRAIGAVON TV SVCS
TEL: 0762 326119/322505
EIRE
CO CORK
TVAE REPAIRS
TEL: 00353 21 273457
GRAMPIANS
FRASERBURGH
RODGERS ELECTRICAL
TEL: 01346 518540
HIGHLANDS
ULLAPOOL
R & R ELECTRONICS
TEL: 01854 612608
LOTHIAN
EDINBURGH
RETEC AUDIO & VISUAL
TEL: 0131 478 7779
STRATHCLYDE
GLASGOW
DSC ELECTRONICS
TEL: 0141 941 3711
TAYSIDE
DUNDEE
ANCRUM ELECTRONICS
TEL: 01382 454511
44
Page 26

THIS APPLIANCE IS DISTRIBUTED BY
www.samsungvcr.com
AC68-01299A
ELECTRONICS
UNITED KINGDOM
REPUBLIC OF
IRELAND
This Samsung product is warranted for the period of twelve (12)
months from the original date of purchase, against defective
materials and workmanship. In the event that warranty service is
required, you should return the product to the retailer from whom
it was purchased.
However, Samsung Authorised Dealers and Authorised Service
Centres in other EC Countries will comply with the warranty on
the terms issued to purchasers in the country concerned. In case
of difficulty, details of our Authorised Service Centres are
available from:
Samsung Electronics (U.K.) Ltd.,
Euro Service Centre, Stafford Park 12,
TELFORD, Shropshire TF3 3BJ,
Tel: 01952) 292262, Fax: 01952) 292033
■ WARRANTY CONDITIONS
1. The warranty is only valid if, when warranty service is required,
the warranty card is fully and properly completed and is
presented
with the original invoice or sales slip or confirmation,
and the serial number on the product has not been defaced.
2. Samsung’s obligations are limited to the repair or, at its
discretion, replacement of the product or the defective part.
3. Warranty repairs must be carried out by Authorised Samsung
Dealers or Authorised Service Centres. No re-imbursement
will be made for repairs carried out by non Samsung Dealers
and, any such repair work and damage to the products caused
by such repair work will not be covered by this warranty.
4. This product is not considered to be defective in materials nor
workmanship by reason that it requires adaptation in order to
conform to national or local technical or safety standards in
force in any Country other than the one for which the product
was originally designed and manufactured. This warranty will
not cover, and no re-imbursement will be made for such
adaptation nor any damage which may result.
5. This warranty covers none of the following:
a) Periodic check ups, maintenance and repair or replacement
of parts due to normal wear and tear.
b) Cost relating to transport, removal or installation of the
product.
c) Misuse, including the faiure to use this product for its normal
purposes or incorrect installation.
d) Damage caused by Lightning, Water, Fire, Acts of God,
War, Public Disturbances, incorrect mains voltage, improper
ventilation or any other cause beyond the control of
Samsung.
6. This warranty is valid for any person who legally acquired
possession of the product during the warranty period.
7. The consumers statutory rights in any applicable national
legislation whether against the retailer arising from the
purchase contract or otherwise are not affected by this
warranty. Unless there is national legislation to the contrary,
the rights under this warranty are the consumers sole rights
and Samsung, its subsidiaries and distributors shall not be
liable for indirect or consequential loss or any damage to
records, compact discs, videos or audio taper or any other
related equipment or material.
SAMSUNG ELECTRONICS (U.K.) LTD.
 Loading...