

Page 1
VIDEO
CASSETTE RECORDER
SV-635X SV-435X
SV-631X SV-431X
SV-6315X SV-235X
SV-6313X SV-231X
SV-530X SV-2315X
SV-2313X
Instruction Manual
PAL
www.samsungvcr.com
Page 2
GB
3
Contents
◆ FOREWORD
■ Safety Instructions......................................................................................... 5
◆ VCR OVERVIEWS
■ Front View of the VCR................................................................................... 6
■ Rear View of the VCR ................................................................................... 6
■ Infrared Remote Control (SV-635X).............................................................. 7
■ Infrared Remote Control (SV-631X/SV-6315X/SV-6313X/SV-530X/
SV-435X/SV-431X/SV-235X/SV-231X/SV-2315X/SV-2313X)...................... 7
■ Display Indicator............................................................................................ 8
■ Accessories................................................................................................... 8
◆ CONNECTING YOUR VIDEO CASSETTE RECORDER
■ Deciding How to Connect Your VCR............................................................. 9
■ Connecting Your VCR to the TV using the Coaxial Cable............................. 10
■ Connecting Your VCR to the TV using the SCART Cable ............................ 10
■ Connecting a Decoder for scrambled PAY TV broadcasts............................ 11
■ Connecting Your VCR to the Satellite receiver or Other Equipment............. 12
■ Plug & Auto Set Up........................................................................................ 13
■ Tuning your Television for the VCR............................................................... 14
◆ S
ETTING UP YOUR VIDEO CASSETTE RECORDER
■ Inserting Batteries in the Remote Control...................................................... 15
■ Setting the Date and Time............................................................................. 15
■ Displaying/Hiding On-Screen Information ..................................................... 16
■ Choosing Your Language.............................................................................. 16
■ Setting the VCR Output Channel................................................................... 17
■ Selecting the RF OUT Sound Mode (B/G-D/K) (SV-635X/SV-631X/
SV-6315X/SV-6313X Only)........................................................................... 17
■ Presetting the Stations Automatically............................................................ 18
■ Presetting the Stations Manually................................................................... 19
■ Clearing a Preset Station............................................................................... 20
■ Changing the Preset Station Table................................................................ 21
■ Setting the AV2 Connection .......................................................................... 22
■ Switching between the TV and VCR Modes.................................................. 22
◆ RECORDING TELEVISION BROADCASTS
■ Selecting the Cassette Type.......................................................................... 23
■ Selecting the Recording Speed (SV-631X/SV-6315X/SV-6313X/SV-530X/
SV-435X/SV-431X Only)............................................................................... 23
■ NICAM (SV-635X/SV-631X/SV-6315X/SV-6313X Only)............................... 24
■ Protecting a Recorded Cassette.................................................................... 25
■ Recording a Programme Immediately........................................................... 25
■ Recording a Programme with Automatic Stop............................................... 26
■
Using the ShowView Feature (SV-635X/SV-530X/SV-435X/SV-235X Only)
............ 27
■
Modifying ShowView Programming (SV-635X/SV-530X/SV-435X/SV-235X Only)
... 28
■ Using the Quick Programming Feature......................................................... 29
■ Checking a Preset Recording........................................................................ 30
■ Cancelling a Preset Recording...................................................................... 30
2
About this manual
Thank you for purchasing a Samsung Video Cassette Recorder (VCR).
Your Owner’s Instructions contain much valuable information on setting up and
using your VCR. Please take the time to read them as they will help you take full
advantage of your VCR’s features.
The instructions in this manual are for models, SV-635X, SV-631X, SV-6315X,
SV-6313X, SV-530X, SV-435X, SV-431X, SV-235X, SV-231X, SV-2315X and SV-2313X.
Before you start reading this manual please check your model number.
It is displayed on the rear of the VCR.
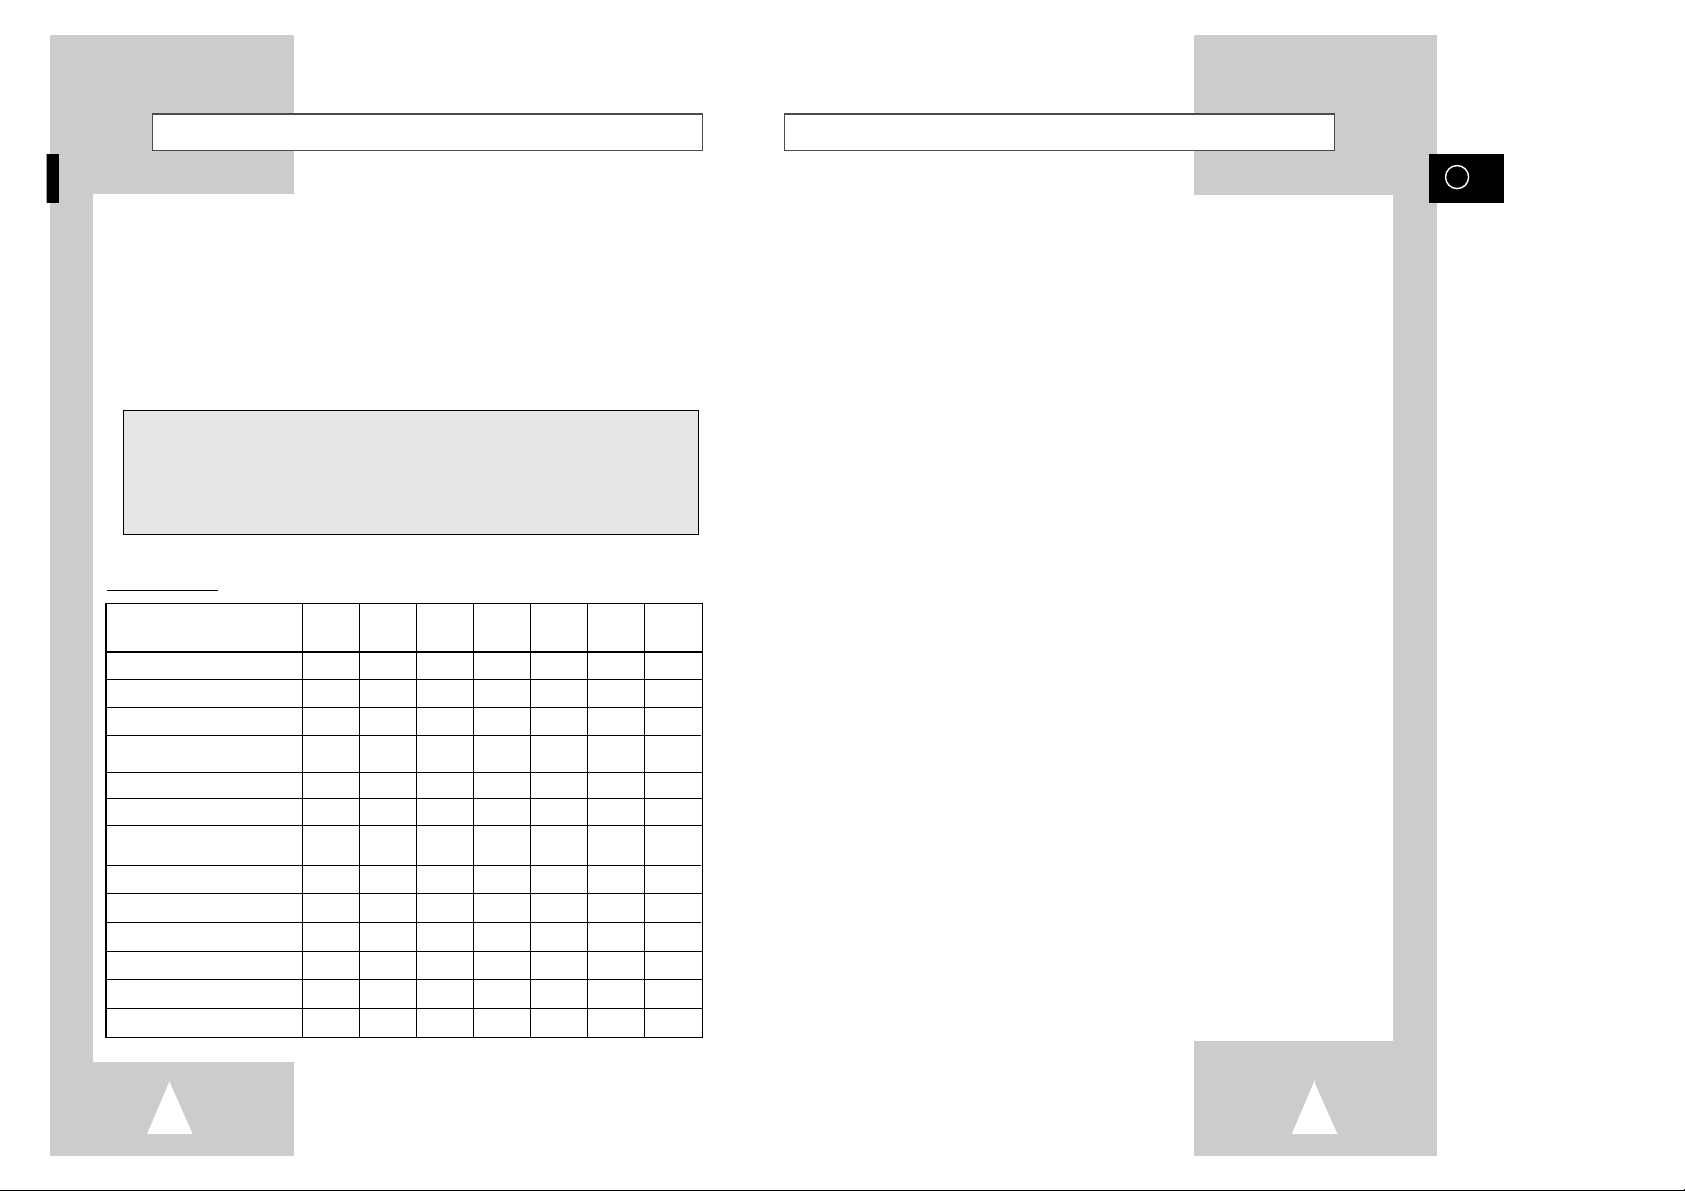
Features Chart
- ★(SV-635X): Exceptions only for a certain model, for example SV-635X.
- Gray shaded areas marked with a star indicate instructions that are
only relevant to certain models.
Feature SV-635X
SV-631X
SV-530X SV-435X SV-431X SV-235X
SV-231X
SV-6315X SV-2315X
SV-6313X SV-2313X
IPC (Intelligent Picture Control)
●●●●●●●
Format 16:9
●●●●●●●
Changing recording speed (SP/LP)
●●●●●
Connecting a Decoder for
●●●●●●●
scrambled PAY TV broadcasts
Automatic Clock setting
●●●●
SHOWVIEW recording
●●●●
VPS (Video Programme System) /
●●●●
PDC (Programme Delivery Control)
A2/NICAM
●●
Audio Dubbing
●
Dual VCR/TV remote Control
●
Child door Lock
●●●●
Connecting an RCA Audio/Video input
●●●● ●
Hi-Fi
●●●
Page 3
GB
54
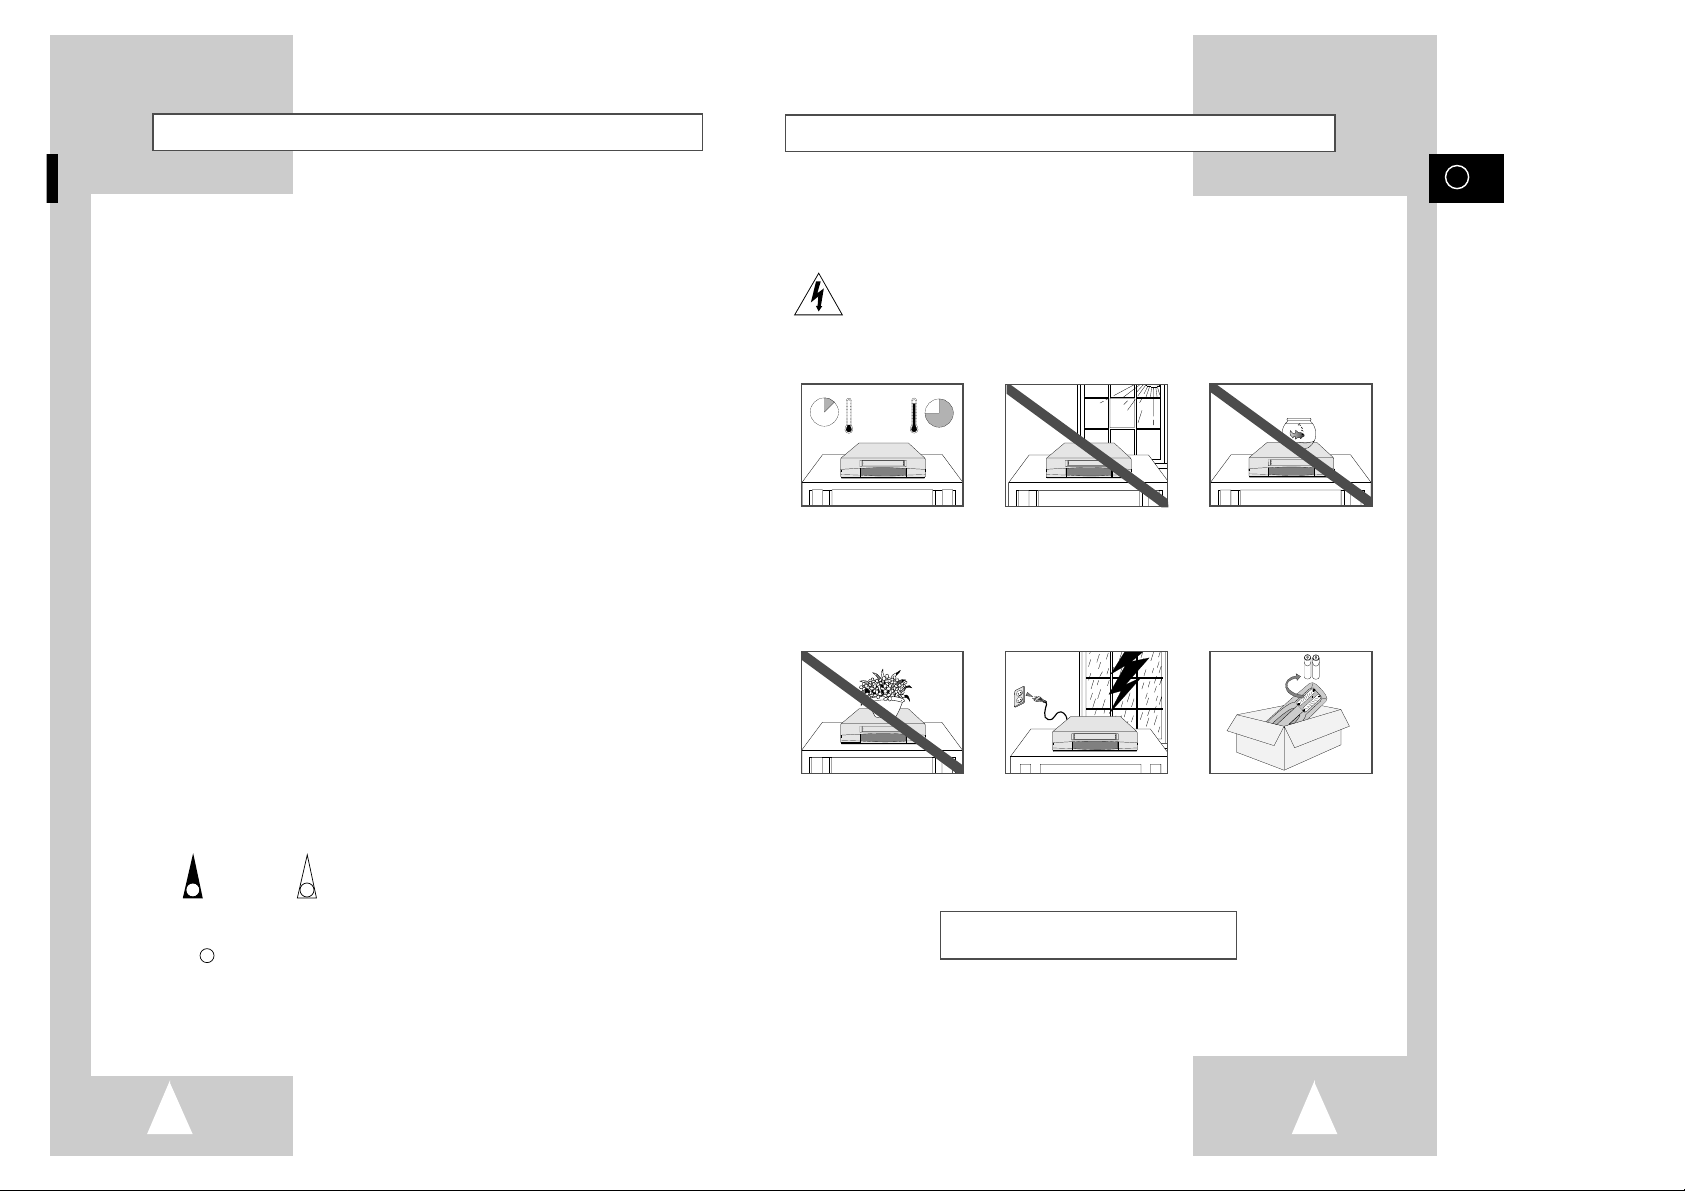
The following illustrations represent precautions.
The lightning bolt is a warning sign alerting you to dangerous voltage inside the product.
DO NOT OPEN THE VCR. Refer to service personnel.
HH
5°C
40°C
10% 75%
THIS DEVICE IS NOT FOR USE IN INDUSTRIAL
ENVIRONMENTS
Safety Instructions
Do NOT expose the VCR to
extreme temperature conditions (below 5°C and above
40°C) or to extreme humidity
conditions (less than 10% and
more than 75%).
Do NOT expose the VCR to
direct sunlight.
Do NOT expose the VCR to
any liquids.
Do NOT place any objects on
the VCR or remote control.
During a storm and/or lightning, unplug the VCR from the
mains socket and aerial.
If the remote control is not
used for a long period of time,
remove the batteries and store
it in a cool, dry place.
Contents (cont.)
◆ PLAYING BACK
■ Playing a Cassette......................................................................................... 31
■ Adjusting Picture Alignment Manually........................................................... 31
■ Intelligent Picture Control .............................................................................. 32
■ Intelligent Picture Control (SV-631X/SV-6315X/SV-6313X/SV-530X/
SV-435X/SV-431X/SV-235X/SV-231X/SV-2315X/SV-2313X Only).............. 32
■ FORMAT 16:9 (WIDE SCREEN)................................................................... 33
■ Selecting the Colour Mode............................................................................ 33
■
Selecting the Audio Output Mode (SV-635X/SV-631X/SV-6315X/SV-6313X/SV-530X)
... 34
■ Selecting the Audio Mute Mode (SV-435X/SV-431X/SV-235X/SV-231X/
SV-2315X/SV-2313X).................................................................................... 34
◆ SEARCHING FOR A SEQUENCE
■ Playing a Cassette in Slow Motion................................................................ 35
■ Playing a Sequence Frame by Frame........................................................... 35
■ Playing a Sequence at Variable Speeds....................................................... 36
■ Searching for a Specific Sequence ............................................................... 36
■ Auto Repeat Play........................................................................................... 37
■ Interval Repeat Play...................................................................................... 37
■ Using the Tape Counter ................................................................................ 38
◆ ADVANCED RECORDING FEATURES
■ Connecting an RCA Audio/Video Input Cable (SV-635X/SV-631X/
SV-6315X/SV-6313X/SV-530X/SV-435X/SV-235X Only)............................. 39
■ Using the Assemble Edit Function................................................................. 40
■ Recording from Another VCR or Camcorder................................................. 40
■ Audio Dubbing a Pre-recorded Cassette (SV-635X Only)............................. 41
◆ O
THER FUNCTIONS AND USEFUL RECOMMENDATIONS
■ Using the TV Buttons on the Remote Control (SV-635X Only)..................... 42
■ Auto Power Off.............................................................................................. 43
■ Child door Lock System (SV-635X/SV-530X/SV-435X/SV-235X Only)........ 43
■ Technical Specifications................................................................................ 44
◆ SOLVING PROBLEMS
■ Problems and Solutions................................................................................. 45
■ TV Frequency Table (System-B/G)............................................................... 46
☛
➢
NoteImportantHold downPress/push
Symbols
1
1
1
= Step number
★
Option
Page 4
GB
76
Front View of the VCR
Rear View of the VCR
AV2(DECODER/EXT.) SCART
(EURO-21) SOCKET
AV1(EURO AV) IN/OUT
SCART (EURO-21) SOCKET
AV2(DECODER/EXT.)
AV1(EURO AV)
R
L
AUDIO
OUT
TV
AERIAL IN
CONNECTOR
OUT TO TV
CONNECTOR
SV-631X/SV-6315X/SV-6313X/SV-530X
SV-635X
STANDBY/ON EJE CT
Q-PRO
SLOW
IPC
DISPLAY
SHUTTLE
V-LOCK
CLR/RST F.ADV
INPUT INDEX
TRK PROG
R
E
C
M
E
N
U
A
U
D
I
O
S
P
E
E
D
T
V
/
V
C
R
REPEAT
OK
STANDBY/ON BUTTON
SLOW BUTTON
SHUTTLE BUTTON
V-LOCK BUTTON
EJECT BUTTON
QUICK PROGRAMME BUTTON
IPC BUTTON
DISPLAY BUTTON
FRAME ADVANCE BUTTON
PROGRAMME SELECTION BUTTONS
TRACKING BUTTONS
AUDIO MODE SELECTION BUTTON
(SV-631X/SV-6315X/SV-6313X/SV-530X)
AUDIO MUTE BUTTON (SV-435X/SV-431X/
SV-235X/SV-231X/SV-2315X/SV-2313X)
SHOWVIEW
★
(SV-530X/SV-435X/SV-235X ONLY)
TV/VCR SELECTION BUTTON
FAST-FORWARD/FORWARD
SEARCH BUTTON
(MENU SELECTION BUTTON)
STOP BUTTON
(MENU SELECTION DOWN BUTTON)
OK BUTTON
CLEAR AND RESET BUTTON
INDEX BUTTON
PLAY/PAUSE/STILL BUTTON
(MENU SELECTION UP BUTTON)
REWIND/REVERSE PICTURE SEARCH BUTTON
(MENU SELECTION BUTTON)
RECORD BUTTON
MENU BUTTON
RECORDING SPEED SELECTION BUTTON
★
(SV-631X/SV-6315X/SV-6313X/SV-530X/
SV-435X/SV-431X ONLY)
RCA AUDIO L, R OUTPUT SOCKETS ★(SV-635X/
SV-631X/SV-6315X/SV-6313X/SV-530X ONLY)
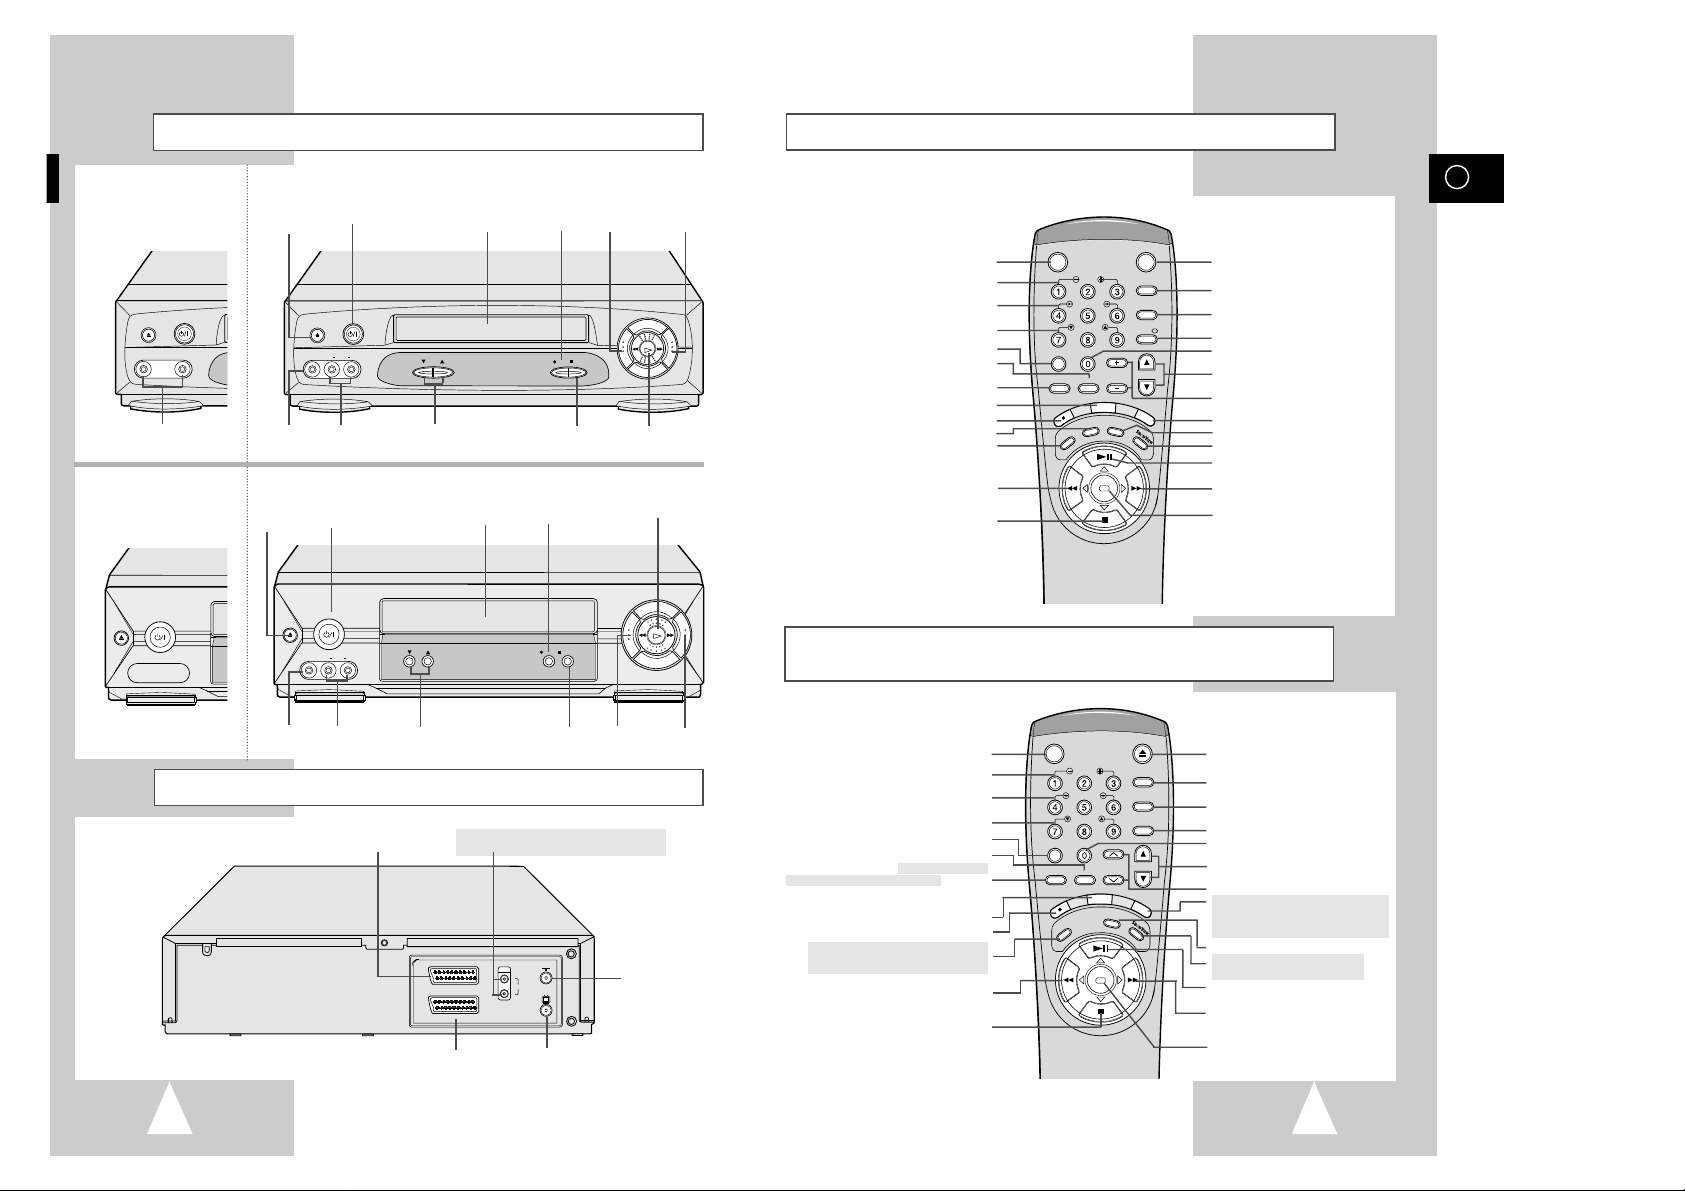
Infrared Remote Control (SV-631X/SV-6315X/SV-6313X/SV-530X/
SV-435X/SV-431X/SV-235X/SV-231X/SV-2315X/SV-2313X)
VIDEO CASSETTE
COMPARTMENT
STOP
BUTTON
RECORD
BUTTON
EJECT
BUTTON
PROGRAM
SELECTION BUTTONS
PLAY BUTTON
F.F
BUTTON
EJECT
STANDBY/ON
REW F.F
PLAY
PROG
REC STOP
VIDEO L AUDIO R
AUX
STANDBY/ON
BUTTON
REW
BUTTON
VIDEO CASSETTE
COMPARTMENT
PLAY
BUTTON
RECORD
BUTTON
EJECT
BUTTON
F.F
BUTTON
PROGRAMME
SELECTION BUTTONS
REW
BUTTON
AUX VIDEO
INPUT SOCKET
AUX AUDIO L, R
INPUT SOCKETS
REC STOP
PROG
EJECT
STANDBY/ON
VIDEO L AUDIO R
AUX
REW F.F
PLAY
STANDBY/ON
BUTTON
STOP
BUTTON
Infrared Remote Control (SV-635X)
VCR STANDBY/ON BUTTON
SLOW BUTTON
SHUTTLE BUTTON
V-LOCK BUTTON
TV STANDBY/ON BUTTON
TV BUTTON
VCR BUTTON
DISPLAY BUTTON
FRAME ADVANCE BUTTON
PROGRAMME SELECTION / TRACKING
BUTTONS
VOLUME BUTTONS
AUDIO MODE SELECTION BUTTON
FAST-FORWARD/FORWARD
SEARCH BUTTON
(MENU SELECTION BUTTON)
STOP BUTTON
(MENU SELECTION DOWN BUTTON)
SHOWVIEW BUTTON
OK BUTTON
CLEAR AND RESET BUTTON
RECORDING SPEED SELECTION BUTTON
INDEX BUTTON
PLAY/PAUSE/STILL BUTTON
(MENU SELECTION UP BUTTON)
REWIND/REVERSE PICTURE
SEARCH BUTTON
(MENU SELECTION BUTTON)
RECORD BUTTON
MENU BUTTON
AUDIO DUBBING BUTTON
TV/VCR SELECTION BUTTON
TUNER, AV1, AV2, AUX SELECTION BUTTON /
REPEAT SELECTION BUTTON
SV-435X/SV-235X
EJECT
STANDBY/ON
VIDEO AUDIO
AUX
SV-431X/SV-231X/
SV-2315X/SV-2313X
EJECT
STANDBY/ON
AUX VIDEO/AUDIO
INPUT SOCKETS
AUX VIDEO
INPUT SOCKET
AUX AUDIO L, R
INPUT SOCKETS
TUNER, AV1, AV2, AUX ★(SV-631X/SV-6315X/
SV-6313X/SV-530X/SV-435X/SV-235X ONLY) SELECTION
BUTTON /
REPEAT SELECTION BUTTON
VCR STANDBY/ON
SLOW
SHUTTLE
V-LOCK
U
D
N
E
M
B
OK
TV STANDBY/ON
DISP./
VOL PROG/TRK
U
T
V
/
V
C
R
TV
VCR
A
U
D
I
O
CLR/RST F.ADV
-/--
INPUT INDEX
REPEAT
C
E
R
D
E
E
P
S
Page 5
8
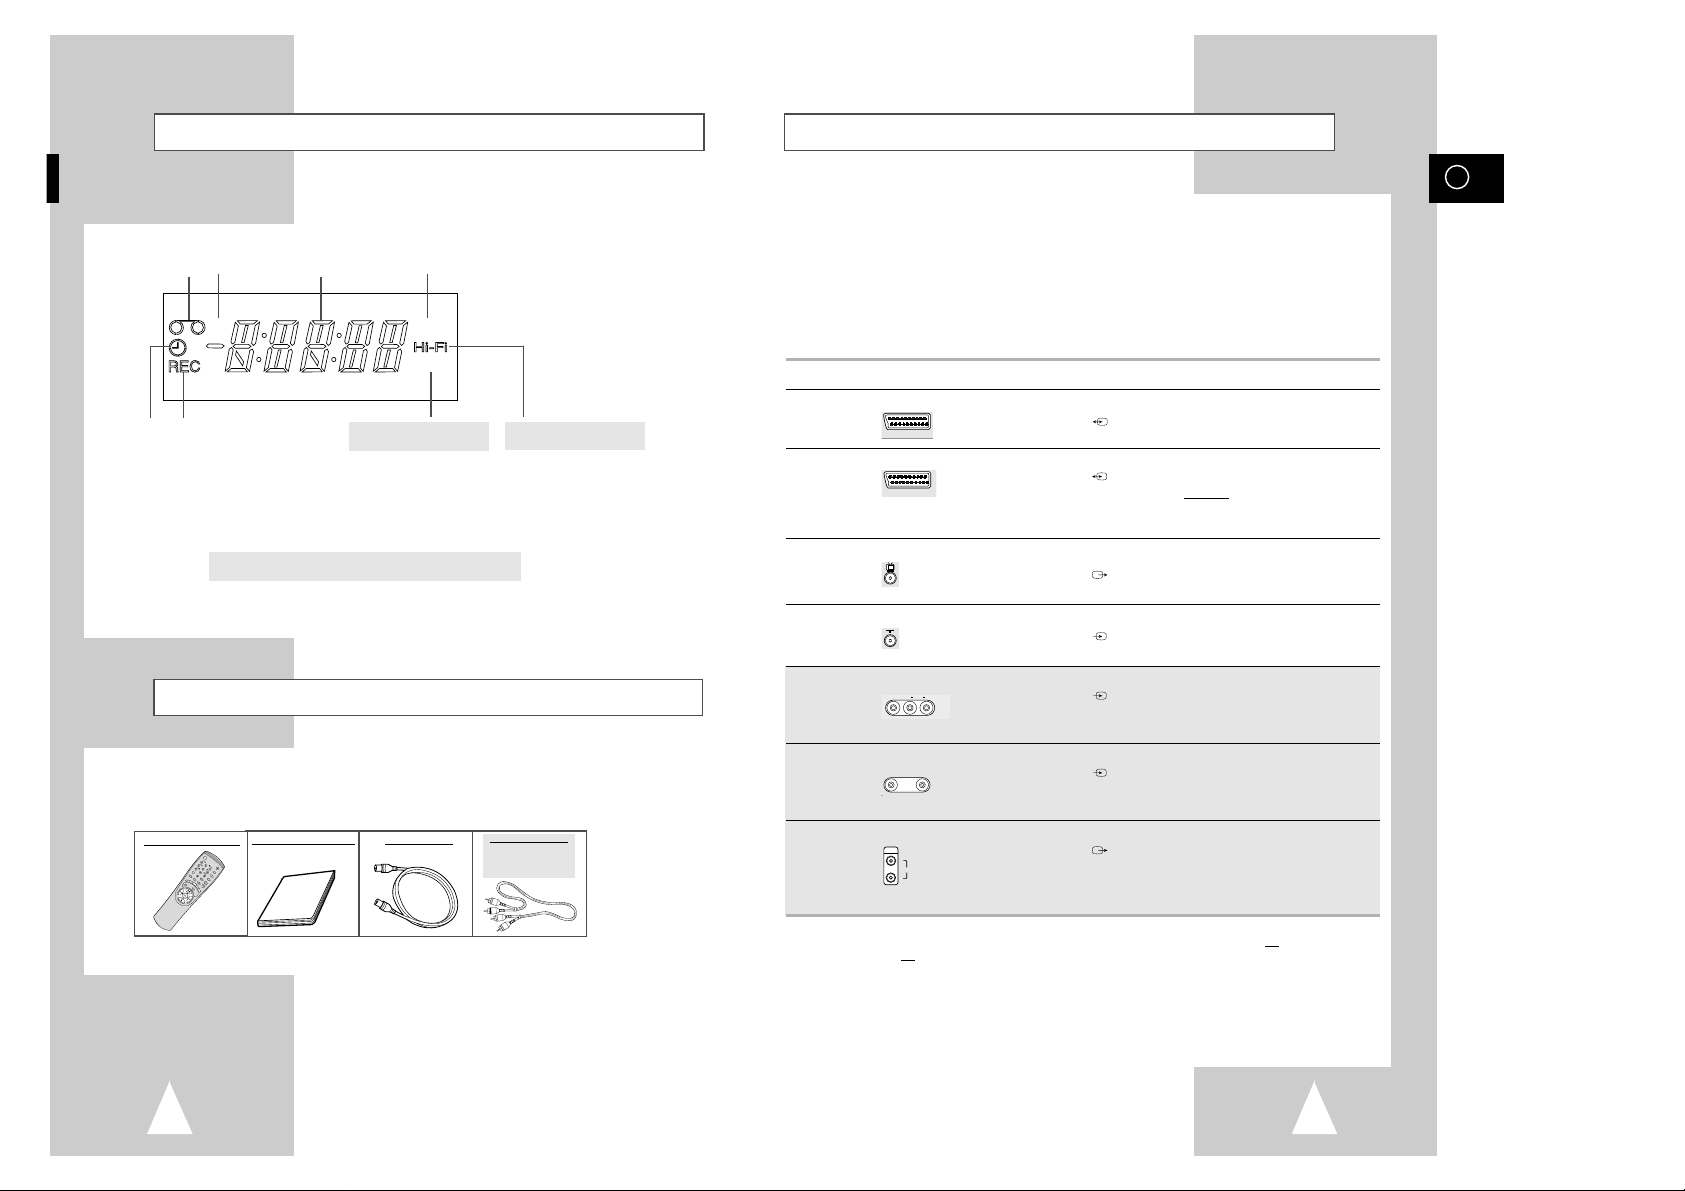
Display Indicator
Accessories
You have just purchased a SAMSUNG Video Cassette Recorder (VCR).
Together with your VCR, you will find the following accessories in the box.
STAND
BY/ON
EJEC
T
Q-PRO
S
L
O
W
IPC
D
ISPLAY
S
H
U
T
T
L
E
V
L
O
C
K
C
LR
/RST F.ADV
INPUT INDEX
TRK PROG
R
E
C
M
E
N
U
A
U
D
I
O
S
P
E
E
D
T
V
/
V
C
R
REPEAT
OK
REMOTE CONTROL
OWNER’S INSTRUCTIONS
COAXIAL CABLE
RCA AUDIO CABLE
★
(SV-635X/SV-631X/
SV-6315X/SV-6313X/
SV-530X ONLY)
GB
9
Deciding How to Connect Your VCR
V
IPC
+
NICAM
6
7
★(SV-635X/SV-631X/SV-6315X/
SV-6313X ONLY)
1
2
4
3
5
1 Cassette loaded indicator
2 VCR indicator
3 Multi-function display
4 IPC (Intelligent Picture Control) indicator
5 Timer indicator
6 Record indicator
7 NICAM indicator
★
(SV-635X/SV-631X/SV-6315X/SV-6313X ONLY)
8 Hi-Fi indicator
★
(SV-635X/SV-631X/SV-6315X/SV-6313X/SV-530X ONLY)
8
★(SV-635X/SV-631X/SV-6315X/
SV-6313X/SV-530X ONLY)
You must take into account various factors when connecting audio or video systems:
◆ Types of connectors available on your systems
◆ Systems connected permanently to the VCR (satellite receiver for example) or temporarily
(camcorder for example)
Your VCR is equipped with the following connectors.
Connector Location Type Direction Recommended Use
AV1 Rear SCART In/Out ◆ Television
◆ Satellite receiver
◆ Other VCR
AV2 Rear SCART In/Out ◆ Decoder for scrambled Pay TV
broadcasts
Example
: CANAL+.
◆ Satellite receiver
◆ Other VCR
OUT TO TV Rear 75 Ω Out ◆ Television
coaxial
IN FROM ANT. Rear 75 Ω In ◆ Aerial
coaxial ◆ Cable television network
◆ Satellite receiver
AUX Front Audio/Video RCA In ◆ Audio Hi-Fi system
◆ Camcorder
◆ Hi-Fi Stereo VCR
★
(SV-635X/SV-631X/SV-6315X/SV-6313X/SV-530X only)
AUX Front Audio/Video RCA In ◆ Audio system
◆ Camcorder
◆ Other VCR
★
(SV-435X/SV-235X only)
Audio output Rear Audio RCA Out ◆ Audio Hi-Fi system
★
(SV-635X/SV-631X/SV-6315X/SV-6313X/SV-530X only)
☛ Whenever you connect an audio or video system to your VCR, ensure that all elements are
switched off
.
Refer to the documentation supplied with your equipment for detailed connection instructions
and associated safety precautions.
R
L
AUDIO
OUT
VIDEO AUDIO
AUX
VIDEO L AUDIO R
AUX
TV
AV2(DECODER/EXT.)
AV1(EURO AV)
Page 6

GB
1110
Connecting Your VCR to the TV using the Coaxial Cable
To receive television programmes a signal must be received from
one of the following sources:
◆ An outdoor aerial
◆ An indoor aerial
◆ A cable television network
◆ A satellite receiver
☛ Make sure that both the television and the VCR are
switched off
before connecting the cables.
1 Remove the aerial or network input cable from the television.
2 Connect this cable to the 75Ω coaxial socket marked on the
rear of your VCR.
3 Plug the coaxial cable supplied into the socket on your VCR.
4 Plug the other end of the coaxial cable into the connector
previously used for the aerial on the television.
5 To obtain better quality pictures and sound on your television, you
can also connect your VCR to the television via the SCART cable
(see section below) if your television is equipped with this type of
connection.
TV
Connecting Your VCR to the TV using the SCART Cable
Aerial
SCART Cable
AV2(DECODER/EXT.)
AV1(EURO AV)
R
L
AUDIO
OUT
TV
RF coaxial cable
3
2
TV
Connecting a Decoder for scrambled PAY TV broadcasts
This VCR is fully equipped to receive scrambled Pay TV broadcasts.
Example
: CANAL+ or Premiere broadcasts.
You can:
◆ Record a scrambled programme while watching another channel
◆ Record another channel while watching a scrambled programme
☛ When the DECODER is connected to the AV2 socket, AV2 SET must be set to DEC (see page 22)
1 Connect the VCR to the television as indicated on page 10.
2 Plug the SCART cable with the decoder into the AV2(DECODER/EXT.) socket on the rear of the VCR.
3 Plug the other end into the decoder.
SCART Cable
SCART Cable
DECODER
Aerial
TV
Aerial Connector
3
2
4
D
G
AUDIO
ORTIE
TV
3
TV
4
2
You can connect your VCR to the television using the SCART cable if the appropriate input is available on
the television. You thus:
◆ Obtain better quality sound and pictures
◆ Simplify the setting up procedure of your VCR
☛ ◆ Regardless of the type of connection chosen, you must always connect the coaxial cable
supplied. Otherwise, no picture will be visible on the screen when the VCR is switched off.
◆ Make sure that both the television and the VCR are switched off
before connecting the cables.
You can connect your VCR to a Hi-Fi system.
Example
: You wish to take advantage of the quality of your Hi-Fi stereo system when watching a
programme or recording via your VCR. ★(SV-635X/SV-631X/SV-6315X/SV-6313X/SV-530X only)
1 Connect the coaxial cable as indicated in the above section.
2 Connect one end of the SCART cable to the AV1(EURO AV) socket on the rear of the VCR.
3 Plug the other end into the appropriate connector on the television.
4 Plug the RCA Audio cable with stereo system into the Audio out socket on the rear of the VCR.
★
(SV-635X/SV-631X/SV-6315X/SV-6313X/SV-530X only)
SORTIE
D
AUDIO
G
TV
AV2(DECODER/EXT.)
AV1(EURO AV)
OUT
R
AUDIO
L
TV
Page 7

GB
13
Plug & Auto Set Up
Your VCR will automatically set itself up when it is plugged into the
mains for the first time. TV stations will be stored in memory. The
process takes a few minutes. Your VCR will then be ready for use.
1 Connect the coaxial cable as indicated on page 10.
(Connecting Your VCR to the TV Using the Coaxial Cable)
2 Plug the VCR into the mains. It will automatically tune itself in and
store TV stations in the memory.
3 The process will finish after a few minutes. Then the VCR
automatically switches itself off.
2
12
Connecting Your VCR to the Satellite receiver or Other Equipment
SCART Cable
SCART Cable
Satellite Receiver or other Equipment
Aerial
TV
You can connect your VCR to the Satellite receiver or other VCR using the SCART cable if the appropriate
outputs are available on the equipment chosen. The following illustrations give a few examples of the
connection possibilities.
1
2
SCART Cable
Satellite Receiver or other Equipment
1. AV1(EURO AV): By means of 21-pin Scart Cable
Plug the SCART Cable with satellite receiver or other equipment into the AV1(EURO AV) socket on the rear of the
VCR.
After making this connection, select the source by pressing the INPUT button for the AV1 input sources.
2. By means of RF Coaxial Cable
After making this connection, you must preset the station received through the satellite tuner.
RF output channel of the satellite receiver should be adjusted away from channel 36, which is used by the VCR,
e.g. re-adjust to channel 33.
TV
Aerial
Aerial Connector
1
2
TV
TV
1. AV2 IN: By means of 21-pin Scart Cable
When the satellite receiver or other equipment is connected to the AV2 socket, AV2 SET must first be
set to EXT. (see page 22)
Plug the SCART Cable with satellite receiver or other equipment into the
AV2(DECODER/EXT.)
socket on the rear
of the VCR.
After making this connection, select the source by pressing the INPUT button for the AV2 input sources.
2. By means of RF Coaxial Cable
After making this connection, you must preset the station received through the satellite tuner.
AV2(DECODER/EXT.)
AV1(EURO AV)
OUT
R
AUDIO
L
TV
AV2(DECODER/EXT.)
AV1(EURO AV)
OUT
R
AUDIO
L
TV
Page 8

14
Tuning Your Television for the VCR
You must tune your television for the VCR only if you are not using
a Scart cable
➢ To view pictures from your VCR when a Scart cable is
used, the television must be set to the audio/video mode
(AV).
1 Switch on the television.
2 Switch on the VCR by pressing STANDBY/ON on the front of the
VCR or VCR STANDBY/ON (STANDBY/ON) on the remote
control.
3 Select a programme position on the television to be reserved for
use with your VCR.
4 Insert the video cassette in the VCR. Check that the VCR starts
reading the cassette; if not, press
❿
II
button
.
5 Start a scan on your television or set the television to UHF
channel 36.
6 Fine tune the television until the pictures and sound are obtained
clearly.
7 If you cannot find the pictures and sound, or there is interference
from nearby channels, it may be necessary to change the setting
of the VCR output channel (see Solving Problems section of this
manual).
8 When the picture and sound are perfectly clear, store this channel
at the desired programme position on the television.
Result
:
That programme is now reserved for use with your VCR.
OK
4
VCR STANDBY/ON
SLO
SHUTT
2
STANDBY/ON
SLO
SHUT
2
★
(SV-635X)
★
(SV-631X/SV-6315X/SV-6313X/
SV-530X/SV-435X/SV-431X/SV-235X/
SV-231X/ SV-2315X/SV-2313X)
Page 9
GB
15
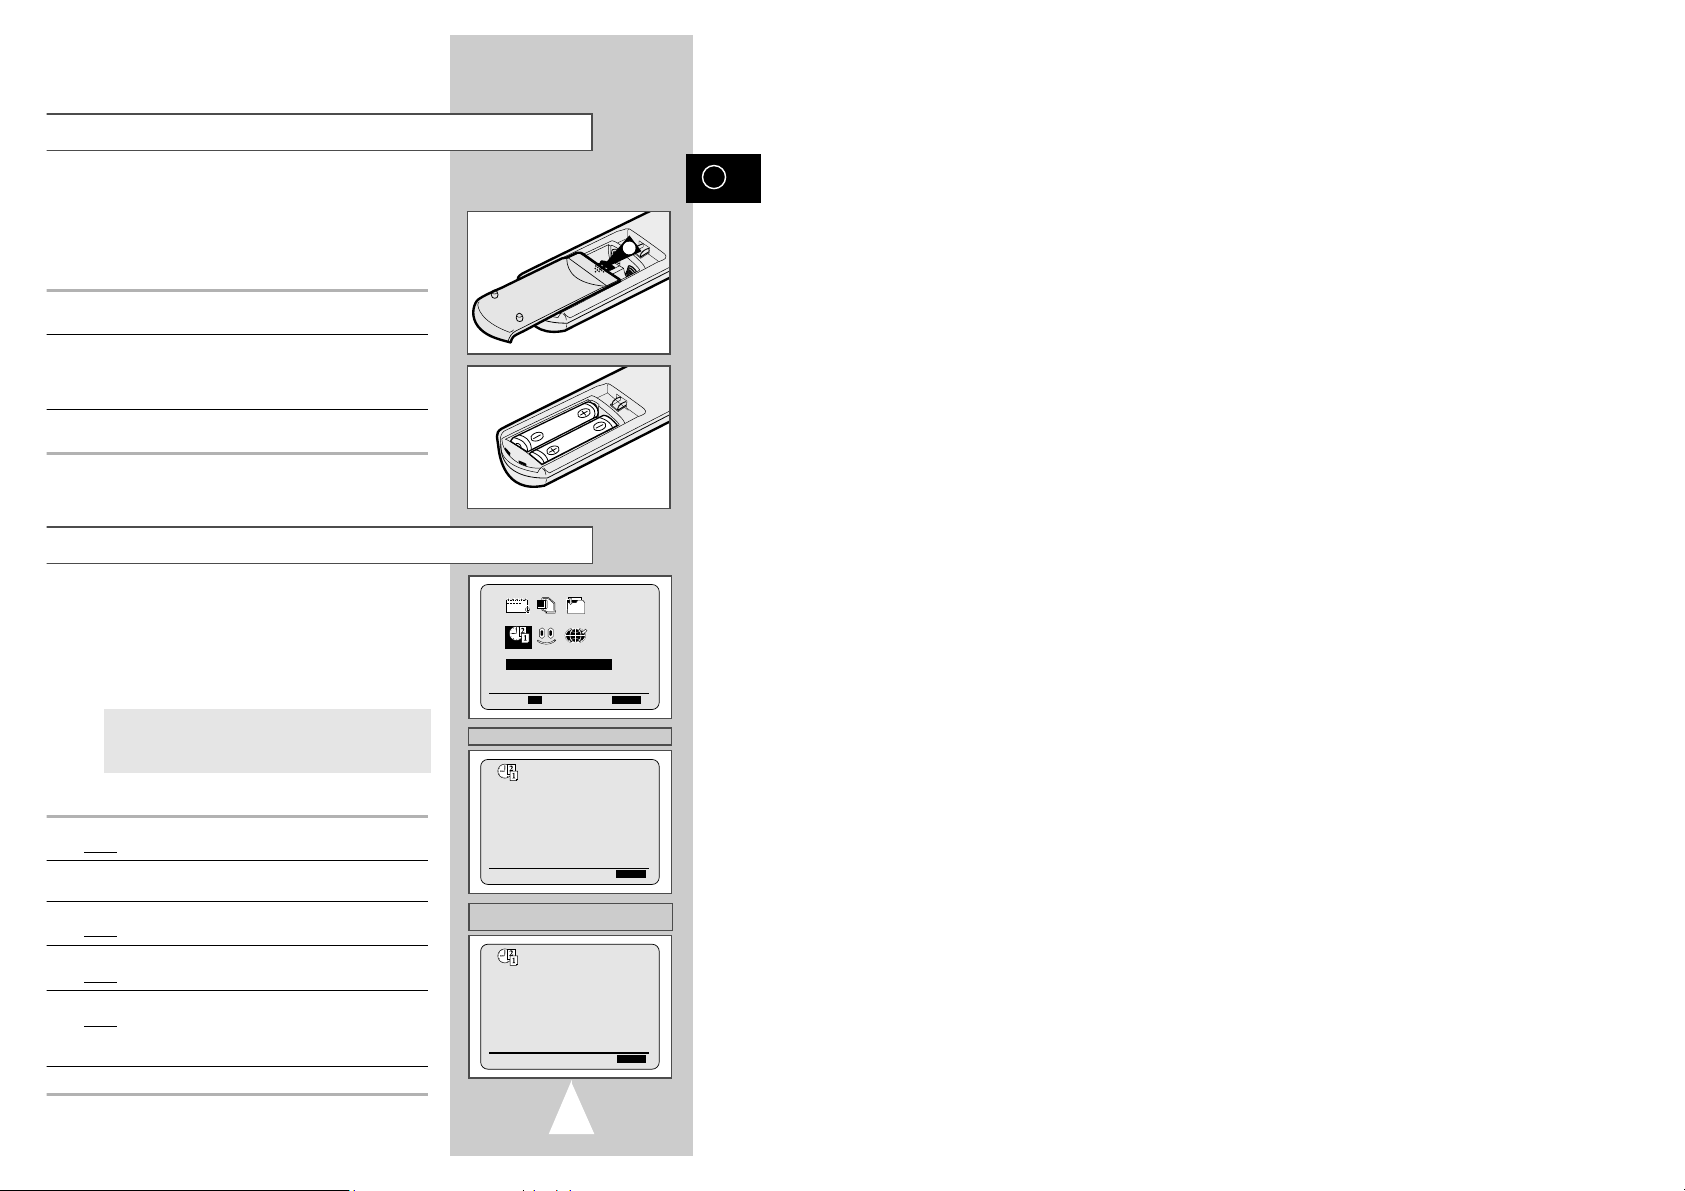
Setting the Date and Time
◆ Purchase the video cassette recorder
◆ Find that the remote control is no longer working
correctly
1 Push the tab in the direction of the arrow to release the battery
compartment cover on the rear of the remote control.
2 Insert two AA, R6 or equivalent batteries, taking care to respect
the polarities:
◆ + on the battery with + on the remote control
◆ – on the battery with – on the remote control
3 Replace the cover by aligning it with the base of the remote
control and pushing it back into place.
➢ Do not mix different battery types (manganese and
alkaline for example).
Inserting Batteries in the Remote Control
1
◆ Automatically stop programme recording
◆ Preset your VCR to record a programme automatically
◆ You purchase the video cassette recorder
◆ The power supply remains off for more than 1 hour
broadcast signal, but this function will not operate if
there is no Teletext signal.★(SV-635X/SV-530X/
SV-435X/SV-235X Only)
◆ Do not forget to reset the time when you change
clocks from winter to summer time and vice versa.
1 Press MENU on the remote control.
Result
: The programming menu is displayed.
2 Press the corresponding
",❷
or ➛, ❿buttons to select the
IMPOSTA OROLOGIO option.
3 Press the OK button to select this option.
Result
:The IMPOSTA OROLOGIO menu is displayed.
4 Press
➛or❿
to select the hour, minutes, day, month and year.
Result: The option selected flashes.
5 Press the
"or❷
buttons to increase or decrease the value.
Result
: The day of the week is displayed automatically.
➢ You can hold the
"or❷
buttons down to scroll more
quickly through the values.
6 On completion, press MENU twice to exit the menu.
★
(SV-635X/SV-530X/SV-435X/SV-235X)
★
(SV-631X/SV-6315X/SV-6313X/SV-431X/
SV-231X/SV-2315X/SV-2313X)
IMPOSTA OROLOGIO
PROG OPTIONS INSTALL
CLOCK BONUS LANG
"❷!!
➛❿!!
OK USCITA:MENU
➛❿!!!!!!!!!!!
"❷
USCITA:MENU
12:00 1/GEN/2000
SAB
AGGIORNA ORA : SI
➛❿!!!!!!!!!!!
"❷
USCITA:MENU
12:00 1/GEN/2000
SAB
CLOCK
CLOCK
CLOCK
Page 10

GB
1716
Your VCR output channel may need to be changed if the pictures
suffer from interference or if your TV cannot find the pictures.
Also, you can change the VCR output channel to adjust the
frequency in which information is displayed on the screen.
1 Press MENU on the remote control.
Result
: The programming menu is displayed.
2 Press the corresponding
",❷
or ➛, ❿buttons to select the
INSTALLAZIONE option.
3 Press the OK button to select this option.
Result
: The INSTALLAZIONE menu is displayed.
4 Press the
"
or ❷buttons, until the cursor is placed in front of the
CANALE VCR OUT option.
5 Select the required output channel (CH21~CH69) by pressing the
➛
or ❿buttons.
6 On completion, press MENU twice to exit the menu.
Then tune your television again (see page 14).
You can choose the sound mode (B/G or D/K) according to the TV
set connected to your VCR.
1 Press MENU on the remote control.
Result
: The programming menu is displayed.
2 Press the corresponding
",❷
or ➛, ❿buttons to select the
INSTALLAZIONE option.
3 Press the OK button to select this option.
Result
: The INSTALLAZIONE menu is displayed.
4 Press the corresponding
"
or ❷buttons, until the cursor is
placed in front of the
STANDARD TV option.
5
Press the ❿button to select G or K.
6 On completion, press MENU twice to exit the menu.
Selecting the RF OUT Sound Mode (B/G-D/K) ★(SV-635X/
SV-631X/SV-6315X/SV-6313X Only)
Setting the VCR Output Channel
Displaying/Hiding On-Screen Information
Choosing Your Language
You can change the language in which information is displayed on
the screen.
1 Press MENU on the remote control.
Result
: The programming menu is displayed.
2 Press the corresponding
",❷
or ➛, ❿buttons to select the
SELEZIONE LINGUA option.
3 Press the OK button to select this option.
Result
: The SELEZIONE LINGUA menu is displayed.
4 Select the required language by pressing the
"or❷
buttons.
5 Press OK to store the language selected.
6 Press MENU to exit the menu.
Result
: From now on, all the on-screen information will be
displayed in the language selected.
Your VCR displays most information both on the VCR and the
television.
You can choose to display or hide this information on the television
screen (except for the Index, Programming MENU and Showview
★
(SV-635X/SV-530X/SV-435X/SV-235X only) function, which
cannot be hidden).
1 Press MENU on the remote control.
Result
: The programming menu is displayed.
2 Press the corresponding
",❷
or ➛, ❿buttons to select the
FUNZIONI option.
3 Press the OK button to select this option.
Result
: The FUNZIONI menu is displayed.
4 Press the corresponding
"or❷
buttons, until the cursor is placed
in front of the
MENU option.
5 To... Press
➛or❿
, until...
Display on-screen information SI is displayed.
Hide on-screen information NOis displayed.
6 On completion, press MENU twice to exit the menu.
★
(SV-530X/SV-435X/SV-431X/SV-235X/
SV-231X/SV-2315X/SV-2313X)
★
(SV-635X/SV-631X/SV-6315X/SV-6313X)
O
❿
MENU :SI
DURATA NASTRO :E180
NORMA COLORE :AUTO
IPC :SI
16:9 :AUTO
NICAM :SI
"❷
❿
USCITA:MENU
O
❿
MENU :SI
DURATA NASTRO :E180
NORMA COLORE :AUTO
IPC :SI
16:9 :AUTO
"❷
❿
USCITA:MENU
R
E
C
M
E
N
U
A
U
D
I
O
S
P
E
E
D
T
V
/
V
C
R
REPEAT
OK
2
2
2
1
ENGLISH DUTCH
DEUTSCH NORSK
FRANÇAIS SVENSKA
❿
ITALIANO MAGYAR
ESPAÑOL POLSKI
"❷!!!!!!
➛❿
MEMORIA:OK
USCITA:MENU
2
SINTONIA AUTOMATICA
SINTONIA MANUALE
❿
STANDARD TV :G
CANALE VCR OUT :CH36
SELEZIONE AV2 :DEC
"❷
❿
USCITA:MENU
SINTONIA AUTOMATICA
SINTONIA MANUALE
STANDARD TV :G
❿
CANALE VCR OUT :CH36
SELEZIONE AV2 :DEC
"❷
❿
USCITA:MENU
SINTONIA AUTOMATICA
SINTONIA MANUALE
❿
CANALE VCR OUT :CH36
SELEZIONE AV2 :DEC
"❷
❿
USCITA:MENU
★
(SV-530X/SV-435X/SV-431X/SV-235X/
SV-231X/SV-2315X/SV-2313X)
★
(SV-635X/SV-631X/SV-6315X/SV-6313X)
PTIONS
PTIONS
INSTALL
INSTALL
LANG
INSTALL
Page 11

GB
1918
Presetting the Stations Manually
Presetting the Stations Automatically
☛
You do not need to preset the stations if you have already
set them automatically (see Plug & Auto Set Up on page 13)
.
Your VCR contains a built-in tuner used to receive television
broadcasts.
You must preset the stations received through the tuner. This can
be done:
◆ Plug & Auto Set up (see page 13)
◆ Automatically
◆ Manually (see page 19)
You can store up to 99 stations.
➢
To enable the VCR to decode a scrambled TV station, the
decoder must be activated after the scan (see pages 19 or 21).
1 Press the MENU button on the remote control.
Result
: The programming menu is displayed.
2 Press the corresponding
", ❷!
or ➛, ❿buttons to select the
INSTALLAZIONE option.
3 Press the OK button to select this option.
Result
: The INSTALLAZIONE menu is displayed.
4
Press the corresponding "or ❷buttons, until the cursor is placed
in front of the
SINTONIA AUTOMATICA
option. And then press
the
❿
button to select this option.
★
With SV-635X, SV-530X, SV-435X and SV-235X, you can select
your country.
a. Press the "or ❷buttons to select your country.
☛ The VCR searches for the stations according to a preset
preference list corresponding to the country that you have
selected.
b. Press OK button.
Result
: A message appears, indicating that any channels
already preset on your VCR will be deleted.
5 Press OK to start the auto scanning.
Result
: ◆ The ATTENDERE, PREGO... indication flashes
on the television screen.
◆ The first frequency band is scanned and the first
station found is displayed and stored.
◆
The VCR then searches for the second station and so on.
◆ When the automatic scanning procedure has
finished, the VCR switches automatically to programme 1.
➢ The number of stations automatically stored by the VCR
depends on the number of stations that it has found.
(country, reception conditions, etc.)
6 If you wish to cancel the auto scanning before the end, press the
MENU button three times to exit the menu.
➢ ◆
The time and date are set automatically from the
broadcast signal. If the signal is weak or ghosting
occurs, the time and date may not be set automatically.
In this case, they should be set manually (see page 15).
★
(SV-635X/SV-530X/SV-435X/SV-235X Only)
◆ Once the auto scanning procedure has finished, some
stations may have been stored more than once; select
the stations with the best reception and delete the
ones no longer required (see page 20).
INSTALLAZIONE
PROG OPTIONS INSTALL
CLOCK BONUS LANG
"❷!!
➛❿!!
OK USCITA:MENU
SELEZIONE NAZIONE
BELGIQUE ÖSTERREICH
DENMARK DEUTSCHLAND
ESPAÑA FINLAND
❿
ITALIA NETHERLANDS
NORGE SCHWEIZ
SVERIGE ALTRI
"❷
➛❿
CONFERMA:OK
ATTENZIONE: TUTTI I DATI
VERRANNO CANCELLATI
TASTO OK PER CONTINUARE
TASTO MENU PER FINIRE
SINTONIA AUTOMATICA
ATTENDERE, PREGO...
3%
I--------------------I
USCITA:MENU
☛ You do not need to preset the stations manually if you
have already set them automatically.
➢ To enable the VCR to decode a scrambled TV station, the
decoder must be switched on.
1 Press the MENU button on the remote control.
Result
: The programming menu is displayed.
2 Press the corresponding
", ❷!
or ➛, ❿buttons to select the
INSTALLAZIONE option.
3 Press the OK button to select this option.
Result
: The
INSTALLAZIONE menu is displayed.
4 Press the corresponding
"
or ❷buttons, until the cursor is
placed in front of the
SINTONIA MANUALE option.
5 Press the
❿
button to select SINTONIA MANUALE option.
Result: The INDICE PROGRAMMI menu is displayed.
6 Press the
"
or ❷buttons to select a programme number as
required.
7 Press the
❿!
button to preset the station.
Result
: The SINTONIA MANUALE menu is displayed.
8 Press the
➛
or ❿buttons to start scanning.
Result
: The frequency band is scanned and the first station
found is displayed.
If you know the number of the channel you want, press the
numeric buttons on the remote control for example, for channel
E21, first press “0” and then press “2”, “1” (see page 46).
9 Press the
❷
button to place the cursor in front of the DECODER.
10 Press the
❿
button to activate or deactivate use of the decoder for
the TV station, if necessary.
11 Press the
"
or ❷buttons until the cursor is placed in front of the
NOME.
The station name is set automatically from the broadcast signal.
★
(SV-635X/SV-530X/SV-435X/SV-235X only)
12 To change the programme’s name, press the
❿!
button.
Result
: The first letter of the name flashes.
13 To... Then...
Select a character Press the "or ❷button until the
in the name required character is displayed
(letters, numbers or “-” character).
Move to the next or Press the ❿or ➛buttons
previous character respectively.
14 If you... Then...
Wish to store the ◆ Press the corresponding "or ❷!buttons
station displayed to place the cursor in front of the
REG.
◆ Press the
➛or❿
buttons to adjust the
picture, if necessary.
◆ Press OK to store the station .
Do not wish to ◆ Press the corresponding "or ❷buttons
store the station to place the cursor in front of the CH.
displayed
◆ Press the
➛or❿
buttons to go on
scanning the frequency band and display
the next station
◆ Go back to the beginning of Step 14
15 Repeat this procedure from Step 6 onwards, until all the required
stations have been stored.
16
On completion, press the MENU button three times to exit the menu.
INSTALLAZIONE
PROG OPTIONS INSTALL
CLOCK BONUS LANG
"❷!!
➛❿!!
OK USCITA:MENU
**
INDICE PROGRAMMI
**
PR CH NOME DECODER
❿
1 --- ---- NO
2 --- ---- NO
3 --- ---- NO
4 --- ---- NO
5
"❷
CAMBIA:❿SPOSTA:OK
CANC.:CLR/RST MENU
** SINTONIA MANUALE **
PR : 1
❿!!
CH : --REG. : DECODER : NO
NOME : AAA-
"❷
➛❿
MEMORIA:OK
USCITA:MENU
SINTONIA AUTOMATICA
❿
SINTONIA MANUALE
STANDARD TV :G
CANALE VCR OUT :CH36
SELEZIONE AV2 :DEC
"❷
❿
USCITA:MENU
SINTONIA AUTOMATICA
❿
SINTONIA MANUALE
CANALE VCR OUT :CH36
SELEZIONE AV2 :DEC
"❷
❿
USCITA:MENU
★
(SV-530X/SV-435X/SV-431X/SV-235X/
SV-231X/SV-2315X/SV-2313X)
★
(SV-635X/SV-631X/SV-6315X/SV-6313X)
★
(SV-635X/SV-530X/SV-435X/SV-235X)
INSTALL
INSTALL
INSTALL
INSTALL
Page 12

GB
2120
Changing the Preset Station Table
If you have stored a TV station:
◆ That you do not require
◆ At the wrong programme position
you can cancel it.
1 Press the MENU button on the remote control.
Result
: The programming menu is displayed.
2 Press the corresponding
", ❷!
or ➛, ❿buttons to select the
INSTALLAZIONE option.
3 Press the OK button to select this option.
Result
: The INSTALLAZIONE menu is displayed.
4 Press the corresponding
"
or ❷buttons, until the cursor is
placed in front of the
SINTONIA MANUALE option.
5 Press the
❿
button to select this option.
Result
: The INDICE PROGRAMMI menu is displayed.
6 Press the corresponding
"
or ❷buttons, until the cursor is
placed in front of the required preset TV station. (PR)
7 Press the CLR/RST button.
8 Repeat the same procedure from Step 6 onwards until all the
required stations have been cleared.
9 On completion, press the MENU button three times to exit the
menu.
Clearing a Preset Station
You can rearrange the preset TV stations according to your own
preferences programme number assigned to the station.
1 Press the MENU button on the remote control.
Result
: The programming menu is displayed.
2 Press the corresponding
", ❷!
or ➛, ❿buttons to select the
INSTALLAZIONE option.
3 Press the OK button to select this option.
Result
: The INSTALLAZIONE menu is displayed.
4 Press the corresponding
"
or ❷buttons, until the cursor is
placed in front of the
SINTONIA MANUALE option.
5 Press the
❿
button to select this option.
Result
: The INDICE PROGRAMMI menu is displayed.
6 Press the corresponding
"
or ❷buttons, until the cursor is
placed in front of the required preset TV programme.
Result
: The selected station is displayed at the same time on
the television screen.
7 To change the programme number assigned to a station (PR5
instead of PR1 for example):
◆ Press OK
◆ Press the
"
or ❷!buttons until the cursor is placed in front of
the programme to which the station is to be moved
◆ Press OK again
8 Repeat this procedure from Step 6 onwards, until all the required
stations have been stored.
9 On completion, press the MENU button three times to exit the
menu.
INSTALLAZIONE
PROG OPTIONS INSTALL
CLOCK BONUS LANG
"❷!!
➛❿!!
OK USCITA:MENU
**
INDICE PROGRAMMI
**
PR CH NOME DECODER
❿
1 --- ---- NO
2 --- ---- NO
3 --- ---- NO
4 --- ---- NO
5 --- ---- NO
"❷
CAMBIA:❿SPOSTA:OK
CANC.:CLR/RST MENU
**
INDICE PROGRAMMI
**
PR CH NOME DECODER
❿
1 002 ---- NO
2 005 ---- NO
3 009 ---- NO
4 011 ---- NO
5 025 ---- NO
"❷
CAMBIA:❿SPOSTA:OK
CANC.:CLR/RST MENU
**
INDICE PROGRAMMI
**
PR CH NOME DECODER
❿
1 025 ---- NO
2 002 ---- NO
3 005 ---- NO
4 009 ---- NO
5 011 ---- NO
"❷
CAMBIA:❿SPOSTA:OK
CANC.:CLR/RST MENU
**
INDICE PROGRAMMI
**
PR CH NOME DECODER
1 002 ---- NO
2 005 ---- NO
3 009 ---- NO
4 011 ---- NO
❿
5(025 ---- NO )
(SPOSTA: 5
➛
5)
"❷
CONFERMA:OK MENU
**
INDICE PROGRAMMI
**
PR CH NOME DECODER
❿
1(025 ---- NO )
2 005 ---- NO
3 009 ---- NO
4 011 ---- NO
5 025 ---- NO
(SPOSTA: 5
➛
1)
"❷
CONFERMA:OK MENU
SINTONIA AUTOMATICA
❿
SINTONIA MANUALE
STANDARD TV :G
CANALE VCR OUT :CH36
SELEZIONE AV2 :DEC
"❷
❿
USCITA:MENU
SINTONIA AUTOMATICA
❿
SINTONIA MANUALE
CANALE VCR OUT :CH36
SELEZIONE AV2 :DEC
"❷
❿
USCITA:MENU
★
(SV-530X/SV-435X/SV-431X/SV-235X/
SV-231X/SV-2315X/SV-2313X)
★
(SV-635X/SV-631X/SV-6315X/SV-6313X)
INSTALL
INSTALL
INSTALL
Page 13

GB
2322
R
E
C
U
D
I
O
S
P
E
E
D
T
V
/
V
C
R
OK
Selecting the Cassette Type
If you wish to use the tape counter to display the time remaining on
a cassette, you must indicate the type of cassette inserted.
1 Press MENU on the remote control.
Result
: The programming menu is displayed.
2 Press the corresponding
", ❷!
or ➛, ❿buttons to select the
FUNZIONI option.
3 Press the OK button to select this option.
4 Press the corresponding
"
or ❷buttons, until the cursor is
placed in front of the
DURATA NASTRO option.
5 Press the
➛
or ❿buttons as many times as required, until the
correct cassette length is displayed.
E180 E240
E 300 E260
6 Press MENU twice to exit the menu.
Selecting the Recording Speed ★(SV-635X/SV-631X/
SV-6315X/SV-6313X/SV-530X/SV-435X/SV-431X Only)
T
ype Recording Time (in SP)
E-180 180 mins. or 3 hours
E-240 240 mins. or 4 hours
E-260 260 mins. or
4 hours and 20 mins.
E-300 300 mins. or 5 hours
You can record a cassette at two different speeds:
◆ SP (Standard Play)
◆ LP (Long Play)
In Long Play modes:
◆ Each cassette lasts twice as long
◆ The recording is of a slightly lower quality
To record a cassette... Press the SPEED button on the
remote control, until...
In standard play mode SP is displayed.
In long play mode
LP is displayed.
The TV/VCR button allows you to record one channel with the VCR
while you watch another channel on the TV.
When the VCR indicator is... Your television...
On The television receives the picture from
the VCR and you can select channels
with the PROG/TRK (
"
or ❷) / PROG
(
"
or ❷) buttons on the VCR or the
remote contro
l.
Off (or the VCR is turned off) The television receives the picture from
your home aerial or cable television
system as it did before you connected
the VCR.
You can then use the
programme("
or
❷
) buttons on your television to select
the channels.
To switch the VCR indicator on and off, simply press the TV/VCR button.
Setting the AV2 Connection
If you wish to use the AV2 socket for a PAY TV DECODER, you
must change AV2 to the required position.
1 Press MENU on the remote control.
Result
: The programming menu is displayed.
2 Press the corresponding
", ❷!
or ➛, ❿buttons to select the
INSTALLAZIONE option.
3 Press the OK button to select this option.
Result
: The
INSTALLAZIONE menu is displayed.
4 Press the corresponding
"
or ❷buttons, until the cursor is
placed in front of the
SELEZIONE AV2 option.
5 When... Press
➛
or ❿, until...
Another VCR or Satellite EXT is displayed.
receiver is connected to
the AV2(DECODER/EXT.) socket
The decoder is connected to DEC is displayed.
the AV2(DECODER/EXT.) socket
6 On completion, press MENU twice to exit the menu.
R
E
C
M
E
N
U
A
U
D
I
O
S
P
E
E
D
T
V
/
V
C
R
REPEAT
Switching between the TV and VCR Modes
SINTONIA AUTOMATICA
SINTONIA MANUALE
STANDARD TV :G
CANALE VCR OUT :CH36
❿
SELEZIONE AV2 :DEC
"❷
❿
USCITA:MENU
SINTONIA AUTOMATICA
SINTONIA MANUALE
CANALE VCR OUT :CH36
❿
SELEZIONE AV2 :DEC
"❷
❿
USCITA:MENU
★
(SV-530X/SV-435X/SV-431X/SV-235X/
SV-231X/SV-2315X/SV-2313X)
★
(SV-635X/SV-631X/SV-6315X/SV-6313X)
★
(SV-530X/SV-435X/SV-431X/SV-235X/
SV-231X/SV-2315X/SV-2313X)
★
(SV-635X/SV-631X/SV-6315X/SV-6313X)
O
MENU :SI
❿
DURATA NASTRO :E180
NORMA COLORE :AUTO
IPC :SI
16:9 :AUTO
NICAM :SI
"❷
❿
USCITA:MENU
O
MENU :SI
❿
DURATA NASTRO :E180
NORMA COLORE :AUTO
IPC :SI
16:9 :AUTO
"❷
❿
USCITA:MENU
INSTALL
INSTALL
PTIONS
PTIONS
Page 14

GB
2524
Recording a Programme Immediately
6
R
E
C
M
E
N
U
A
U
D
I
O
S
P
E
E
D
T
V
/
V
C
R
OK
★
5
Protecting a Recorded Cassette
Video cassettes have a safety tab to prevent accidental erasure.
When this tab has been removed, you cannot
record on the tape.
1 If you wish to protect a cassette, break off the tab using a small
screwdriver.
2 To re-record over a protected cassette (safety tab broken), cover
the hole with adhesive tape.
1
NICAM programmes are divided into 3 types. NICAM Stereo,
NICAM Mono and Bilingual (transmission in another language).
NICAM programmes are always accompanied by a standard mono
sound broadcast and you can select the desired sound.
Please refer to page 34.
1 Press MENU on the remote control.
Result
: The programming menu is displayed.
2 Press the corresponding
", ❷!
or ➛, ❿buttons to select the
FUNZIONI option.
3 Press the OK button to select this option.
Result
: The FUNZIONI menu is displayed.
4 Press the corresponding
"
or ❷buttons, until the cursor is
placed in front of the
NICAM option.
5 To... Press
➛or❿
, until...
Mono mode NO is displayed.
NO: Only set at this position to record the
standard mono sound during a NICAM
broadcast if the stereo sound is
distorted due to inferior reception
conditions.
NICAM mode SI is displayed.
SI: Normally set at this position.
6 On completion, press MENU twice to exit the menu.
NICAM★(SV-635X/SV-631X/SV-6315X/SV-613X Only)
O
MENU :SI
DURATA NASTRO :E180
NORMA COLORE :AUTO
IPC :SI
16:9 :AUTO
❿
NICAM :SI
"❷
❿
USCITA:MENU
DISP./
VOL PROG/TRK
A
U
D
I
O
4
4
4
4
Before recording a programme, you must have preset the corresponding station (unless you are recording via an external video
source). If you have not done so, refer to pages 18 and 19.
1 Switch on the television.
2 To monitor the programme being recorded, select the television
channel reserved for use with your VCR (or the AV input if used).
3 Insert the cassette on which the programme is to be recorded,
with the window visible and the safety tab intact or the opening
covered with adhesive tape.
Result
: The VCR is switched on automatically.
4 Select:
◆
The station to be recorded using the
PROG/TRK (
"
or ❷) /
PROG (
"
or ❷)
buttons
or
◆ The AV1, AV2 or AUX
★
(SV-635X/SV-631X/SV-6315X/
SV-6313X/SV-530X/SV-435X/SV-235X only) source using
the INPUT button for a satellite tuner or external video source
Result: The station number is displayed and the programme
can be seen on the television.
★
With SV-635X/SV-631X/SV-6315X-SV-6313X/SV-530X/SV-435X/
SV-431X, you can select the recording speed (SP/LP). Press the
SPEED button.
5 Hold REC (
●
) down for a while to start recording.
Result
:
The record indicator appears on the television and VCR
display. An index is recorded on the tape (see page 36).
6 To stop recording, press
■
once.
➢ ◆ If the cassette is ejected when you start recording,
check that the safety tab is intact or the opening is
covered with adhesive tape.
◆ If you reach the end of the tape while recording, the
cassette rewinds automatically.
★
(SV-635X)
★
(SV-631X/SV-6315X/SV-6313X/
SV-530X/SV-435X/SV-431X/SV-235X/
SV-231X/ SV-2315X/SV-2313X)
PTIONS
TRK PROG
OK
DISPLAY
A
U
D
I
O
Page 15

26
Recording a Programme with Automatic Stop
5
3
DURATA 0:00
IMPOSTA DURATA:
TASTO REC
DISP./
VOL PROG/TRK
A
U
D
I
O
4
4
4
4
★
This function enables you to record up to nine hours of
programmes. (LP)
Your VCR stops automatically after the requested length of time.
1 Switch on the television.
2 To monitor the programme being recorded, select the television
channel reserved for use with your VCR (or the AV input if used)
3 Insert the cassette on which the programme is to be recorded,
with the window visible and the safety tab intact or the opening
covered with adhesive tape.
Result
: The VCR is switched on automatically.
4 Select:
◆
The station to be recorded using the
PROG/TRK ("or ❷) /
PROG (
"
or ❷)
buttons
or
◆ The AV1, AV2 or AUX
★
(SV-635X/SV-631X/SV-6315X/
SV-6313X/SV-530X/SV-435X/SV-235X only) source using
the INPUT button for a satellite tuner or external video source
Result
: The channel number is displayed and the programme
can be seen on the television.
★
With SV-635X/SV-631X/SV-6315X-SV-6313X/SV-530X/SV-435X/
SV-431X, you can select the recording speed (SP/LP). Press the
SPEED button.
5 Hold the REC button (
●
) down for a while to start recording.
Result
: The record indicator appears on the television screen
and VCR display. An index is recorded on the tape
(see page 36).
6 Press the REC button (
●
) several times to increase the recording
time in:
◆ 30-minute intervals up to four hours
◆ 1-hour intervals up to nine hours (LP)
Result
: The length is displayed on the television displays. The
selected programme is recorded for the length of time
requested. At the end of that time, the VCR stops
recording automatically.
7 If you wish to cancel the recording before the end, press
VCR STANDBY/ON (STANDBY/ON).
☛ If the end of the tape is reached while recording:
◆ The recording stops
◆ The VCR automatically turns off
★
(SV-635X)
★
(SV-631X/SV-6315X/SV-6313X/
SV-530X/SV-435X/SV-431X/SV-235X/
SV-231X/ SV-2315X/SV-2313X)
REPEAT
C
E
R
D
E
E
P
S
TRK PROG
N
U
E
M
T
V
/
V
C
R
DISPLAY
A
U
D
I
O
A
U
D
I
O
Page 16

GB
27
Using the ShowView Feature
★
(SV-635X/SV-530X/SV-435X/SV-235X Only)
◆ Switch on both the television and your VCR
◆ Check that the date and time are correct
◆ Insert the cassette on which the programme is to be
recorded (safety tab intact)
1 Press the S
HOWVIEW
button.
Result
: A message is displayed to allow you to enter the
ShowView code.
☛ If all six programmes have been set, the message IL
TIMER E’ COMPLETO: CANCELLARE UNA
PROGRAMMAZIONE PER INSERIRNE UNA NUOVA is
displayed. Refer to page 30 if you wish to cancel a preset
recording.
2 Press the numeric buttons to enter the code opposite the pro-
gramme that you wish to record in your television magazine.
➢ If you wish to correct the ShowView code that you are
entering:
◆ Press the
➛
button until the digit to be corrected is
cleared
◆ Enter the correct digit
3 Press the MENU or Showview button.
Result
:
The information concerning the programme is displayed.
☛ When using the ShowView function for the first time with
stored stations, the programme number flashes. This one
time, you must enter the station number manually by
pressing the
#
or ❷buttons. Refer to the following page if:
◆ The programme number or times flash
◆ You wish to modify the programme
4
If the programme and times are correct, press the MENU button.
5 Press the VCR STANDBY/ON (STANDBY/ON) button to activate
the timer.
6 Refer to page 30 if you wish to:
◆ Check that your VCR has been programmed correctly
◆ Cancel a preset recording
☛ The numbers next to each TV programme listing are
ShowView code numbers, which allow you to
programme your videorecorder instantly with the remote
control. Tap in the ShowView code for the programme
you wish to record.
manufactured under licence from Gemstar Development Corporation.
R
E
D
I
O
S
P
E
E
D
T
V
/
V
C
R
OK
1
★
(SV-635X/SV-435X/SV-530X)
SHOWVIEW
CODICE ---------
CODICE:0-9 CAMBIA:
➛
USCITA:MENU
PROG
1/GEN SAB 12:01
PR GG. INIZIO
→→
FINE V/P
❿
1 SA11 20:30→21:00SP ON
-- ---- --:--→--:---- -
-- ---- --:--
→
--:---- -
-- ---- --:--→--:---- -
-- ---- --:--
→
--:---- -
-- ---- --:--→--:---- -
#❷
➛❿
ANNULLA:
CLR/RST MENU
1/GEN SAB 12:01
PR GG. INIZIO
→→
FINE V/P
❿
1 SA11 20:30→21:00 ON
-- ---- --:--→--:-- -
-- ---- --:--→--:-- -
-- ---- --:--→--:-- -
-- ---- --:--
→
--:-- -
-- ---- --:--
→
--:-- -
#❷
➛❿
ANNULLA:
CLR/RST MENU
★
(SV-235X)
O
SHUT
O
T
★
(SV-635X)
★
(SV-530X/SV-435X/SV-235X)
5
5
PROG
VCR STANDBY/ON
SL
STANDBY/ON
SL
SHU
Page 17

28
Modifying ShowView Programming
★
(
SV-635X/SV-530X/SV-435X/SV-235X
Only)
GB
29
Using the Quick Programming Feature
1/GEN SAB 12:01
PR GG. INIZIO
→→
FINE
❿
1 SA11 20:30→21:00SP
-- ---- --:--
→
--:----
-- ---- --:--
→
--:----
-- ---- --:--→--:----
-- ---- --:--→--:----
-- ---- --:--→--:----
#❷
➛❿
ANNULLA:
CLR/RST MENU
★
(SV-631X/SV-6315X/SV-6313X/SV-431X)
PROGRAMMAZIONE TIMER
PROG OPTIONS INSTALL
CLOCK BONUS LANG
#❷!!
➛❿!!
OK USCITA:MENU
★
(SV-635X/SV-530X/SV-435X)
1/GEN SAB 12:01
PR GG. INIZIO
→→
FINE V/P
❿
1 SA11 20:30→21:00SP ON
-- ---- --:--
→
--:---- -
-- ---- --:--
→
--:---- -
-- ---- --:--
→
--:---- -
-- ---- --:--
→
--:---- -
-- ---- --:--
→
--:---- -
#❷
➛❿
ANNULLA:
CLR/RST MENU
1/GEN SAB 12:01
PR GG. INIZIO
→→
FINE V/P
❿
1 SA11 20:30→21:00 ON
-- ---- --:--→--:-- -
-- ---- --:--→--:-- -
-- ---- --:--→--:-- -
-- ---- --:--
→
--:-- -
-- ---- --:--
→
--:-- -
#❷
➛❿
ANNULLA:
CLR/RST MENU
★
(SV-235X)
1/GEN SAB 12:01
PR GG. INIZIO
→→
FINE
❿
1 SA11 20:30→21:00
-- ---- --:--
→
--:--
-- ---- --:--→--:--
-- ---- --:--
→
--:--
-- ---- --:--
→
--:--
-- ---- --:--
→
--:--
#❷
➛❿
ANNULLA:
CLR/RST MENU
★
(SV-231X/SV-2315X/SV-2313X)
If you wish to correct the programme displayed or modify certain elements, such as the recording
speed, you can do so before you press MENU a second time to confirm.
If you wish to... Then...
Select an input source other ◆ Press the ➛or ❿buttons, until the PR selection flashes.
than the tuner
AV1, AV2 or AUX ◆ Press the INPUT button one or more times to change the
input source selection.
Result
: The programme number is replaced by:
•
A1, A2 or AU for a satellite tuner or external
video input (used by another VCR for example)
➢ The input source must be selected before changing any
other value.
Record a programme every day ◆ Press the ➛or ❿buttons, until the DAY selection flashes.
(Monday to Sunday) at the same time
◆ Press the
#
or ❷buttons, until the DLY (Daily) value is
displayed.
Record a programme every week ◆ Press the ➛or ❿buttons, until the DAY selection flashes.
on the same day and at the same time
◆ Press the
#
or ❷buttons, until the W- (Week) value is
displayed, followed by the required day.
Example
: W-SA (Weekly Saturday)
Extend the recording time ◆ Press the ➛or ❿buttons, until the STOP selection flashes.
◆ Press the
#
or ❷buttons to increase or decrease the stop
time.
Select PDC recording ◆ Press the ➛or ❿buttons, until the V/P selection flashes.
◆ Press the
#
or ❷buttons until the ON or “-” indication is
displayed.
☛
Do not select PDC unless you are sure the programme
you wish to record is broadcast with PDC. If you do set
PDC ON (by selecting “ON” in the right - hand column
on the screen), then you must set up the start-time
EXACTLY according to the published TV schedule.
Otherwise the timer recording won’t take place.
Select the recording speed ◆ Press the ➛or ❿buttons, until the recording speed selection
★
(SV-635X/SV-530X/SV-435X only) flashes.
◆ Press the
#
or ❷buttons until the correct indication is
displayed:
• AUTO (Auto Tape Speed Select) : see page 29
• SP (Standard Play)
• LP (Long Play)
The Quick Programming feature allows you to preset the VCR to
record a programme up to one month before that programme is to
be broadcast. Up to six programmes can be preset.
1 Press MENU on the remote control.
Result
: The programming menu
is displayed.
Press the OK button to select this option.
Result: The PROGRAMMAZIONE
TIMER menu is displayed.
Insert the cassette and press the
Q-PRO button.
2 Press
❿
to select the input source.
3 Select the required station by pressing the
#, ❷
buttons or
INPUT to select the AV1, AV2 or AUX ★(SV-635X/SV-631X/
SV-6315X/SV-6313X/SV-530X/SV-435X/SV-235X only) input sources.
4 Press
❿
to select the recording day.
5 Select the required day by pressing the
#
or ❷buttons.
6 Press
❿
to select the recording start time.
7 Select the required hour value by pressing the
#
or ❷buttons.
8 Press
❿
to select the minutes.
9 Select the required minute value by pressing the
#
or ❷buttons.
10 Press
❿
to select the recording end time.
11 Select the required recording end time by pressing the
#
or
❷!
buttons, following the same procedure as when selecting the
recording start time.
★
With SV-635X/SV-631X/SV-6315X/SV-6313X/SV-530X/SV-435X/
SV-431X, you can select the recording speed (AUTO/SP/ LP).
a.Press
❿
to select the recording speed
.
b.
Press the #or ❷buttons to switch between the AUTO,
SP (Standard Play) or LP (Long Play) recording speeds..
★
With SV-635X/SV-530X/SV-435X/SV-235X, you can select the VPS
or PDC recording mode.
a. Press ❿to select the VPS or PDC(V/P) recording mode.
b.Press the
#
or ❷buttons to toggle between the VPS or PDC
mode (marked
ON) and the non-VPS/PDC mode (marked -).
12 When you have finished, press the MENU button.
13 Press the VCR STANDBY/ON (STANDBY/ON) button to activate
the timer.
Result
: Before starting recording, the VCR compares the timer
duration with the remaining time on the cassette.
☛ Auto Tape Speed Select
★
(SV-635X/SV-631X/SV-6315X/
SV-6313X/SV-530X/SV-435X/SV-431X Only)
The VCR’s “Auto Tape Speed Select” function compares
the duration of the timer recording to the actual recording
time remaining on the tape loaded. If there is insufficient
tape to complete a timer recording in AUTO mode, the
VCR automatically switches to LP mode to record the
whole programme.
E.g. If there is a one hour Timer Recording in AUTO
mode to be started, and only 40 minutes tape
remaining, the VCR will record in SP for 20
minutes and switch to complete the remaining 40
minutes in LP mode.
SV-635X/SV-631X/SV-6315X/
SV-6313X/SV-530X/SV-435X/
SV-431X/SV-235X/SV-231X/
SV-2315X/SV-2313X
★
SV-631X/SV-6315X/SV-6313X/
SV-530X/SV-435X/SV-431X/
SV-235X/SV-231X/SV-2315X/
SV-2313X
PROG
PROG
PROG
PROG
PROG
Page 18

GB
3130
This function allows you to play back any pre-recorded cassette.
1 Switch on both the television and your VCR.
2 Insert the video cassette to be played. If the safety tab on the
cassette is intact, press
❿
II
.
Otherwise, the cassette is played automatically.
➢ When a cassette is loaded, the tape position is optimized
automatically to reduce disturbance (Digital Auto Tracking).
When playing a cassette, if the end of the tape is reached,
the cassette is rewound automatically.
NTSC tapes can be played back but cannot be recorded
with this VCR.
3 To... Then press...
Stop the playback
■
(STOP).
Eject the cassette (EJECT).
➢ One Touch Play.
For your convenience, you can playback tape with a
simple touch of the
❿
II
(PLAY) button. One Touch Play
can be used even when the power is off but a cassette is
inserted.
S
P
OK
Playing a Cassette
2
3
Adjusting Picture Alignment Manually
The Picture Alignment feature allows you to adjust the alignment
manually to obtain the best possible picture.
When noise bars or streaks appear during playback, adjust alignment
manually by pressing the PROG/TRK (
#
or ❷) / TRK ( or ) buttons
until the picture is clear and stable.
Result
: ◆ The tracking bar appears.
◆ The image is adjusted.
◆ The tracking bar disappears when you release the button.
Checking a Preset Recording
Cancelling a Preset Recording
DISPLA
G
D
I
1/GEN SAB 12:01
PR GG. INIZIO
→→
FINE
❿
1 SA11 20:30→21:00SP
-- ---- --:--→--:----
-- ---- --:--
→
--:----
-- ---- --:--→--:----
-- ---- --:--
→
--:----
-- ---- --:--
→
--:----
#❷
➛❿
ANNULLA:
CLR/RST MENU
★
(SV-631X/SV-6315X/SV-6313X/SV-431X)
PROGRAMMAZIONE TIMER
PROG OPTIONS INSTALL
CLOCK BONUS LANG
PROG
#❷!!
➛❿!!
OK USCITA:MENU
★
(SV-635X/SV-530X/SV-435X)
1/GEN SAB 12:01
PR GG. INIZIO
→→
FINE V/P
❿
1 SA11 20:30→21:00SP ON
-- ---- --:--
→
--:---- -
-- ---- --:--→--:---- -
-- ---- --:--
→
--:---- -
-- ---- --:--→--:---- -
-- ---- --:--
→
--:---- -
#❷
➛❿
ANNULLA:
CLR/RST MENU
1/GEN SAB 12:01
PR GG. INIZIO
→→
FINE V/P
❿
1 SA11 20:30→21:00 ON
-- ---- --:--
→
--:-- -
-- ---- --:--
→
--:-- -
-- ---- --:--
→
--:-- -
-- ---- --:--→--:-- -
-- ---- --:--
→
--:-- -
#❷
➛❿
ANNULLA:
CLR/RST MENU
★
(SV-235X)
1/GEN SAB 12:01
PR GG. INIZIO
→→
FINE
❿
1 SA11 20:30→21:00
-- ---- --:--→--:--
-- ---- --:--
→
--:--
-- ---- --:--
→
--:--
-- ---- --:--→--:--
-- ---- --:--→--:--
#❷
➛❿
ANNULLA:
CLR/RST MENU
★
(SV-231X/SV-2315X/SV-2313X)
★
(SV-635X)
★
(SV-631X/SV-6315X/SV-6313X/
SV-530X/SV-435X/SV-431X/SV-235X/
SV-231X/ SV-2315X/SV-2313X)
SV-635X/SV-631X/SV-6315X/
SV-6313X/SV-530X/SV-435X/
SV-431X/SV-235X/SV-231X/
SV-2315X/SV-2313X
★
SV-631X/SV-6315X/SV-6313X/
SV-530X/SV-435X/SV-431X/
SV-235X/SV-231X/SV-2315X/
SV-2313X
You can check your preset recordings:
◆ When you have finished presetting the VCR
◆ If you have forgotten which programmes will be
recorded
1 Press MENU on the remote control.
Result
: The programming menu
is displayed.
Press the OK button to select this option.
Result: The PROGRAMMAZIONE
TIMER menu is displayed.
Press Q-PRO on the remote control.
2 Press the
#
or ❷buttons to select the required programme.
3 Press the
➛
or ❿buttons to select and change any values as
required. For more details, refer to the previous page.
4 On completion, press MENU twice.
SV-635X/SV-631X/SV-6315X/
SV-6313X/SV-530X/SV-435X/
SV-431X/SV-235X/SV-231X/
SV-2315X/SV-2313X
★
SV-631X/SV-6315X/SV-6313X/
SV-530X/SV-435X/SV-431X/
SV-235X/SV-231X/SV-2315X/
SV-2313X
You can cancel any programmes that are:
◆ Incorrect
◆ No longer required
1 Press MENU on the remote control.
Result
: The programming menu
is displayed.
Press the OK button to select this option.
Result: The PROGRAMMAZIONE
TIMER menu is displayed.
Press Q-PRO on the remote control.
2 Select the programme to be cancelled by pressing the
#
or
❷
buttons.
3 Press the CLR/RST button to cancel the selected programme.
Result
: All the recording information is deleted and the broad-
cast will not be recorded.
4 On completion, press MENU twice.
PROG
PROG
PROG
PROG
DISP./
L PROG/TRK
A
U
D
I
DV
TRK PRO
EX
N
U
E
M
O
A
U
Page 19

GB
3332
Selecting the Colour Mode
Before recording or playing back a cassette, you can select the
required system standard.
Otherwise, the system automatically selects the reception standard
when you select AUTO.
➢
◆ When playing back a cassette, the standard is
automatically selected by the VCR.
◆ When you playback an NTSC-recorded tape on this VCR
make a setting on the colour system according to your TV.
If your TV is a PAL system only TV, set NTPB.
If your TV is Multi System TV (NTSC 4.43 compatible), set
NT4.43 and you can record NT4.43.
1 Press MENU on the remote control.
Result
: The programming menu is displayed.
2 Press the corresponding
#, ❷!
or ➛, ❿buttons to select the
FUNZIONI option.
3 Press the OK button to select this option.
Result
: The FUNZIONI menu is displayed.
4 Press the corresponding
#
or ❷buttons, until the cursor is
placed in front of the NORMA COLORE option.
5 Press the
❿
button to select AUTO ➝ PAL ➝ MESECAM ➝ B/W.
AUTO When playing back a cassette, the system standard is
automatically selected by the VCR.
B/W Black and White
6 On completion, press MENU twice to exit the menu.
FORMAT 16:9 (WIDE SCREEN)
Your VCR can automatically read a 16:9 signal from the AV2 input
or a prerecorded 16:9 tape. It can broadcast a 16:9 signal through
a 21 pin scart cable.
1 Press MENU on the remote control.
Result
: The programming menu is displayed.
2 Press the corresponding
#, ❷!
or ➛, ❿buttons to select the
FUNZIONI option.
3 Press the OK button to select this option.
Result
: The FUNZIONI menu is displayed.
4 Press the corresponding
#
or ❷buttons, until the cursor is
placed in front of the
16:9 option.
5 Press the
❿
button to select AUTO
➝ SI➝
NO.
AUTO Set when you use a wide TV. The VCR detects wide TV
programmes and normal TV programmes automatically
when playing back and recording.
SI The VCR always plays back and records in the mode
compatible with 16:9 wide screen. Set if the VCR cannot
detect wide TV programmes with “AUTO” set.
NO Set if you do not use a wide TV.
6 On completion, press MENU twice to exit the menu.
Intelligent Picture Control
The Intelligent Picture Control Feature allows you to adjust the
sharpness of the image automatically, according to your own
preferences.
1 During playback, press the MENU button on the remote control.
Result: The programming menu is displayed.
2 Press the corresponding
#, ❷!
or ➛, ❿buttons to select the
FUNZIONI option.
3 Press the OK button to select this option.
Result
: The
FUNZIONI menu is displayed.
4 Press the corresponding
#
or ❷buttons, until the cursor is
placed in front of the
IPC option.
5 Press the
❿
button to select the IPC (intelligent picture control)
option.
➢ When intelligent picture control mode is SI, the sharpness
of the image is adjusted automatically.
6 To adjust the sharpness manually, press the
❷
button to turn the
IPC mode
NO
.
7 Press the
➛
or ❿buttons until the picture is displayed according to
your preferences.
➢ If you do not press a button within ten seconds, the
IMMAGINE menu disappears automatically.
8 On completion, press the MENU button again.
Intelligent Picture Control ★(SV-631X/SV-6315X/SV-6313X/SV-530X/
SV-435X/SV-431X/SV-235X/SV-231X/SV-2315X/SV-2313X Only)
The Intelligent Picture Control Feature allows you to adjust the
sharpness of the image automatically according to your own
preferences.
1 During playback, press the IPC button on the remote control.
2 Press the
❷
button to turn the IPC (intelligent picture control)
option
SI and NO.
➢ When intelligent picture control mode is SI, the sharpness
of the image is adjusted automatically.
3 To adjust the sharpness manually, select intelligent picture control
mode
NO.
◆ The horizontal picture adjusting appears.
4 Press the
➛
or ❿buttons until the picture is displayed according to
your preferences.
➢ If you do not press a button within ten seconds, the
IMMAGINE menu disappears automatically.
5 On completion, press the IPC button again.
**
IMMAGINE
**
IPC : NO
SOFT NITIDA
---------
*
------
➛❿
SI/NO:
❷
Q-PRO
SLOW
IPC
DISPLAY
SHUTTLE
V-LOCK
CLR/RST F.ADV
1
**
IMMAGINE
**
IPC : NO
SOFT NITIDA
---------
*
------
➛❿
SI/NO:
❷
★
(SV-530X/SV-435X/SV-431X/SV-235X/
SV-231X/SV-2315X/SV-2313X)
★
(SV-635X/SV-631X/SV-6315X/SV-6313X)
O
MENU :SI
DURATA NASTRO :E180
NORMA COLORE :AUTO
❿
IPC :SI
16:9 :AUTO
NICAM :SI
#❷
❿
USCITA:MENU
O
MENU :SI
DURATA NASTRO :E180
NORMA COLORE :AUTO
❿
IPC :SI
16:9 :AUTO
#❷
❿
USCITA:MENU
★
(SV-530X/SV-435X/SV-431X/SV-235X/
SV-231X/SV-2315X/SV-2313X)
★
(SV-635X/SV-631X/SV-6315X/SV-6313X)
O
MENU :SI
DURATA NASTRO :E180
NORMA COLORE :AUTO
IPC :SI
❿
16:9 :AUTO
NICAM :SI
#❷
❿
USCITA:MENU
O
MENU :SI
DURATA NASTRO :E180
NORMA COLORE :AUTO
IPC :SI
❿
16:9 :AUTO
#❷
❿
USCITA:MENU
★
(SV-530X/SV-435X/SV-431X/SV-235X/
SV-231X/SV-2315X/SV-2313X)
★
(SV-635X/SV-631X/SV-6315X/SV-6313X)
O
MENU :SI
DURATA NASTRO :E180
❿
NORMA COLORE :AUTO
IPC :SI
16:9 :AUTO
NICAM :SI
#❷
❿
USCITA:MENU
O
MENU :SI
DURATA NASTRO :E180
❿
NORMA COLORE :AUTO
IPC :SI
16:9 :AUTO
#❷
❿
USCITA:MENU
PTIONS
PTIONS
PTIONS
PTIONS
PTIONS
PTIONS
Page 20

GB
35
Playing a Cassette in Slow Motion
You can play a cassette in slow motion.
➢ No sound is heard when playing back a cassette in slow
motion.
1 Press:
◆
❿
II
to start playing the cassette
◆ SLOW ( ) as many times as required to decrease or
increase the speed respectively
◆
T
o return to the normal speed, press the
❿
II
button twice.
2 When playing back in slow motion, picture interference may occur.
Press the PROG/TRK (
#
or ❷) / TRK ( or ) buttons to
minimize this effect.
☛ When you have been using the Slow Motion function for
more than about five minutes, the VCR will automatically
play to protect the:
◆ Cassette
◆ Video heads
➢ Vertical stability: When playing back slow motion,
interference may be seen on the screen. Press the
V-LOCK ( ) buttons to minimize this effect.
SLOW
SHUTTLE
V-LOCK
11
You can:
◆ Stop the cassette at a given frame (image)
◆ Advance one frame at a time
➢ No sound is heard when playing back frame by frame.
1 Press:
◆
❿
II
to start playing the cassette
◆
❿
II
to stop the tape at a given frame
◆
F.ADV ( )
to advance frame by frame
2 To return to normal playback, press
❿
II
.
☛ When you have been using the Frame-by-Frame function
for more than about five minutes, the VCR will automatically play to protect the cassette and video heads.
➢ Vertical stability: When playing back frame by frame,
interference may be seen on the screen. Press the
V-LOCK ( ) buttons to minimize this effect.
Playing a Sequence Frame by Frame
1
V-LOCK
SLOW
V-LOCK
F.ADV
Selecting the Audio Output Mode ★(SV-635X/SV-631X/
SV-6315X/SV-6313X/SV-530X Only)
You can select the mode in which the sound is reproduced on the
loudspeakers and AV outputs. The following options are available.
Option Description
L Used to listen to the sound on the left Hi-Fi channel.
R Used to listen to the sound on the right Hi-Fi channel.
MIX Used to listen to the mixed sound of the Hi-Fi and normal
channels.
MONO Used to listen to the sound on the normal mono channel.
L R Used to listen to Hi-Fi stereo sound on the left and right
channels.
➢ When playing back tapes recorded in Hi-Fi, the
sound switches to Hi-Fi after five seconds of Mono.
To select the sound mode, simply press the AUDIO button on the remote
control until the required option is displayed.
34
E
C
M
E
N
U
A
U
D
I
O
S
P
E
E
D
T
V
/
V
C
R
PEAT
L R MIX
L R MONO
You can select the mode in which the sound is mute.
To select the audio mute mode on and off, simply press the AUDIO button
on the remote control.
Selecting the Audio Mute Mode ★(SV-435X/SV-431X/
SV-235X/SV-231X/SV-2315X/SV-2313X Only)
M
E
N
U
REPEAT
X
DISP./
A
U
D
I
O
DISPLA
G
D
I
★
(SV-635X)
★
(SV-631X/SV-6315X/SV-6313X/
SV-530X/SV-435X/SV-431X/SV-235X/
SV-231X/ SV-2315X/SV-2313X)
A
C
E
R
D
E
E
P
S
U
D
I
T
V
O
/
V
C
R
DV
EX
N
E
M
OK
TRK PRO
U
A
U
Page 21

GB
3736
You can set repeat play to repeat the tape continuously from
beginning to end.
1 Press MENU on the remote control.
Result
: The programming menu is displayed.
2 Press the corresponding
",❷
or ➛, ❿buttons to select the
INSTALLAZIONE RAPIDA option.
3 Press the OK button to select this option.
Result
: The
INSTALLAZIONE RAPIDA menu is displayed.
4 Press the corresponding
"or❷
buttons, until the cursor is placed
in front of the
RIPETIZIONE PLAY option.
5 To... Press
➛or❿
, until...
Repeat play SI is displayed.
Do not wish to repeat play NO is displayed.
6 On completion, press MENU twice to exit the menu.
You can set interval repeat play to repeat the cassette several times
for special interval.
1 Press MENU on the remote control.
Result
: The programming menu is displayed.
2 Press the corresponding
",❷
or ➛, ❿buttons to select the
INSTALLAZIONE RAPIDA option.
3 Press the OK button to select this option.
Result
: The INSTALLAZIONE RAPIDA menu is displayed.
4 Press the corresponding
"or❷
buttons, until the cursor is placed
in front of the
RIPETIZ.PARZIALE option.
5 To... Press
❿
, until...
Interval repeat play 5, 10, 15 is displayed.
(choose repeat time 5 times,
10 times, 15 times)
Cancel interval repeat play NO is displayed.
6 On completion, press MENU twice to exit the menu.
7 To select interval during playback, press the INPUT/REPEAT
button at the desired start point.
Result
:
“IMPOSTA INTERVALLO DA RIPETERE” is displayed.
Press the INPUT/REPEAT button one more time at the desired
end point.
Result
: The tape is automatically rewound to the start point.
“
INTERVALLO DA RIPETERE” is displayed.
Interval Repeat Play
Auto Repeat PlayPlaying a Sequence at Variable Speeds
You can vary the playback speed using the Shuttle function (up to
nine times the normal speed).
Example
: You wish to analyze a sportsperson’s technique,
movement by movement.
The Shuttle function is available on the Remote control
➢ No sound is heard when playing a sequence at variable
speeds.
1 Press:
◆
❿
II
during playback
◆ SHUTTLE ( ) to play the cassette backwards
◆ SHUTTLE ( ) to play the cassette forwards
2 Each time you press a SHUTTLE ( ) button, the speed is
changed as shown in the following illustration.
Searching for a Specific Sequence
Each time you record a cassette on this VCR, an “index” is
automatically marked on the tape when recording starts.
The Search function allows you to fast-forward or rewind to a
specific index and start playback from that point. Depending on the
direction selected, the indexes are numbered as follows:
etc.
Prev
Seq.
Seq. being
played
Next
Seq.
etc.
21 12
➞
➢ This VCR uses a standard indexing system (VISS). As a
result, it will recognize any indexes marked by other
VCRs using the same
system and vice versa.
1 To search for a specific index, press INDEX.
2 Press the
➛➛
or ❿❿buttons depending on the direction where your
desired programme is located. Each time you press the
➛➛
or
❿❿
buttons, the number decreases or increases respectively.
Result
: The index number is displayed.
3 The VCR starts to search for the point you specified with the
➛➛
or
❿❿
buttons.
Result
: When the index is found, cassette playback starts.
➢ You can set an index number up to ±20.
SHUTTLE
SLOW
D
SHUTTLE
V-LOCK
1
1
REVERSE REVERSE REVERSE SLOW SLOW PLAY PLAY PLAY
PLAY PLAY PLAY
STILL
MOTION MOTION PLAY
X3 X7 X9
X9 X7 X3 X1/10 X1/5
INDEX : --
➛➛!!!!❿❿
INDEX : - 6
➛➛!!
INSTALLAZIONE RAPIDA
PROG OPTIONS INSTALL
CLOCK BONUS LANG
"❷!!
➛❿!!
OK USCITA:MENU
AUTO-SPEGNIMENTO :NO
❿
RIPETIZIONE PLAY :NO
RIPETIZ.PARZIALE : 5
"❷
❿
USCITA:MENU
INSTALLAZIONE RAPIDA
PROG OPTIONS INSTALL
CLOCK BONUS LANG
"❷!!
➛❿!!
OK USCITA:MENU
AUTO-SPEGNIMENTO :NO
RIPETIZIONE PLAY :NO
❿
RIPETIZ.PARZIALE : 5
"❷
❿
USCITA:MENU
CLR/RST F.ADV
INPUT INDEX
R
E
C
M
E
N
REPEAT
1
BONUS
BONUS
BONUS
BONUS
Page 22

You can connect other audio/video equipment to your VCR using
audio/video cables if the appropriate outputs are available on the
equipment chosen.
Examples
: ◆ You wish to copy a video cassette with the help of a
second VCR (see page 40).
◆ You wish to play back and/or copy pictures taken
with a camcorder (see page 40).
☛
◆ Make sure that both the television and the VCR are
switched off
before connecting the cables.
1 Connect one end of the RCA audio/video cable into the VIDEO
socket on the front of the VCR.
2 Plug the other end of the audio/video cable into the appropriate
output connector on the other system (VCR or camcorder).
3 Connect one end of the RCA audio cable into the AUDIO sockets
on the front of the VCR.
➢ Take care to respect the colour coding of the left and right
channels.
4 Plug the other end of the audio cable into the appropriate output
connectors on the other system (VCR, camcorder or Hi-Fi sound
system).
GB
Connecting an RCA Audio/Video Input Cable ★(SV-635X/SV-631X/
SV-6315X/SV-6313X/SV-530X/SV-435X/SV-235X Only)
3938
Using the Tape Counter
0:00:00
VCR
DISP./
VOL PROG/TRK
2
2
2
The tape counter:
◆ Indicates the elapsed time in the play and record modes
(hours, minutes and seconds)
◆ Is reset when a cassette is inserted in the VCR
◆ Allows you to find the beginning of a sequence easily
☛ If the remaining time is to be calculated correctly, you
must indicate the type of cassette being used.
1 Insert a cassette in your VCR.
2 To set the tape counter to zero at the beginning of a sequence:
◆ Press DISP./ or DISPLAY twice to display the counter
◆ Press CLR/RST when you want to set the tape counter to
zero
3 To fast-forward or rewind to the sequence at which the counter
was set to zero, simply press
➛➛
or ❿❿.
Result
: The VCR stops automatically when the counter
reaches zero.
➢ Some VCR information, such as the counter, can be
displayed on the television screen (unless you have
deactivated the OSD mode; refer to page 16).
Press DISP./ or DISPLAY:
◆ Once to display the current function, programme
number, recording speed
★
(SV-635X/SV-631X/
SV-6315X/SV-6313X/SV-530X/SV-435X/SV-431X only),
date, time and counter
◆ Twice to display the counter only
◆ Three times to display the time remaining on the
cassette
◆ Four times to clear the display
EJECT
STANDBY/ON
VIDEO AUDIO
AUX
1
3
★
(SV-435X/SV-235X)
★
(SV-635X)
★
(SV-631X/SV-6315X/SV-6313X/
SV-530X/SV-435X/SV-431X/SV-235X/
SV-231X/ SV-2315X/SV-2313X)
1
3
3
★
(SV-635X/SV-631X/SV-6315X/SV-6313X/SV-530X)
CLR/RST F.ADV
INPUT INDEX
IPC
DISPLAY
TRK PROG
VIDEO L AUDIO R
AUX
VIDEO L AUDIO R
AUX
Page 23

With the Audio Dubbing function, you erase the previously
recorded sound and replace it with a new soundtrack from:
◆ A CD player
◆ A microphone connected to a sound system
◆ A cassette player
Restriction
:
Audio dubbing is applicable only to the longitudinal audio track
(normal audio).
1 Connect an RCA audio cable to the appropriate output on your
sound system (CD/cassette player for example).
2 Connect the other end of the RCA audio cable to the audio input
connectors (L, R) on the front of your VCR.
3 Insert the pre-recorded cassette on which the audio track is to be
replaced, and press the
❿ll
to start playback.
4 Search for the Audio Dubbing (ending) point using the SHUTTLE,
and set the counter to 0:00:00 by pressing CLR/RST.
5 Search back slightly beyond the Audio Dub start point using the
Shuttle.
6 Press the
❿ll
button.
7 Press DUB.
Result
: Your VCR is now in the Audio dubbing Pause
mode.
8 On the sound system, locate the point on the CD or cassette at
which you wish to start playback.
Example
: The track that you wish to record on the cassette.
9 When you are ready:
◆ Start playback on the sound system
◆ Press REC (
●
) on the remote control.
Result
:
The soundtrack is replaced on the pre-recorded cassette.
10 The audio dubbing will finish when the counter reaches 0:00:00.
The VCR Aux input will remain selected. Use the input select or up
/ down programme keys as required.
➢ The new sound will be recorded on the normal sound
track of the tape, and the original sound will remain on
the Hi-Fi sound track.
To hear the new sound and original sound mixed
together, press the Audio button on the remote control
until the MIX option is displayed (see page 34).
GB
Audio Dubbing a Pre-recorded Cassette ★(SV-635X Only)
4140
Using the Assemble Edit Function
S
P
2
Recording from Another VCR or Camcorder
7
6
K
2
7
2
4
DUB
-0:05:23
This function allows you to start a new recording at a specific
position on the cassette while maintaining a very smooth scene
change.
1 Insert the cassette to be edited in your VCR.
2 Press the
❿ll
button to start playback.
3 When you reach the position from which you wish to start the new
recording, press the
❿ll
button.
4 Press the F.ADV ( ) button again as often as necessary to
advance frame by frame, until the exact recording position is
located.
5 While the VCR is in still mode, hold the REC button (
●
) down for
a while to activate the Assemble Edit function.
Result
: Record symbol flashes in the display.
6 Select the source from which you wish to record by pressing:
◆ The PROG/TRK (
"
or ❷) / PROG ("or ❷) buttons for
television channels
◆ The INPUT button for the AV1, AV2 or AUX
★
(SV-635X/
SV-631X/SV-6315X/SV-6313X/SV-530X/SV-435X/SV-235X only)
input sources
7 Press the
❿ll
button to start recording.
8 When you have finished recording, press
■
.
You can copy a cassette to your VCR from another video source,
such as another VCR or a camcorder.
☛
It is an infringement of copyright laws to copy prerecorded
cassettes or to re-record them in any form without the
permission of the owners of the corresponding copyright.
1 Connect the VCR, from which the cassette is to be copied, to the
appropriate SCART audio and video input connectors on the rear
of your VCR, as indicated on page 12.
You can also use an RCA audio and video cable to connect the
AUX input on the front of your VCR.
★
(SV-635X/SV-631X/
SV-6315X/SV-6313X/SV-530X/SV-435X/SV-235X only)
2 Insert a blank cassette in your VCR.
3 Insert the pre-recorded cassette in the other video source (VCR or
camcorder).
4 Press the INPUT button to select the appropriate input on your
VCR:
◆ AV1 or AV2 for the SCART input
◆ AUX for the RCA input
★
(SV-635X/SV-631X/SV-6315X/
SV-6313X/SV-530X/SV-435X/SV-235X only)
5 Start playing back the cassette to be copied.
6 Hold REC (
●
) down for a while to start recording on your VCR.
7 When you have finished recording, press
■
on both VCRs.
➢ If you wish to view the cassette being copied:
◆ Your VCR must be connected as usual to the
television (see page 10 for further details)
OK
F.ADV
A
C
E
R
D
E
E
P
S
U
D
I
O
T
V
/
V
C
R
OK
4 5
VIDEO EDIT
A.DUB
6
A.DUB
10
EJECT
VIDEO L AUDIO R
CLR/RST F.ADV
-/--
INPUT INDEX
REPEAT
C
E
R
B
U
D
D
E
E
STANDBY/ON
AUX
VOL PROG/TR
N
U
E
M
T
V
/
A
U
D
I
O
V
C
R
Page 24

Using the TV Buttons on the Remote Control ★(SV-635X Only)
Your VCR remote control will work with Samsung televisions and
compatible brands.
To determine whether your television is compatible, follow the instructions
below.
1 Switch your television on.
2 Point the remote control towards the television.
3 Hold down the TV button and enter the two-figure code
corresponding to the brand of your television, by pressing the
appropriate numeric buttons.
Brand Codes Brand Codes
SAMSUNG 01 to 06 PHILIPS 02, 20, 22
AKAI 09, 23 SABA 13, 14, 22 to 24
GRUNDIG 09, 17, 21 SONY 15, 16
LOEWE 02 THOMSON 13, 14, 24
PANASONIC 08, 23 to 27 TOSHIBA 07, 16 to 19, 21
Result:
If your television is compatible with the remote control, it
is switched off. It is now programmed to operate with the
remote control.
➢ If several codes are indicated for your television brand, try
each one in turn until you find one that works.
☛
When you change the batteries in the remote control, you
must reprogramme the code, following the same procedure.
You can then control the television using the following buttons.
Button Function
TV STANDBY/ON➀Used to switch the television on and off.
TV or VCR
➁
Used to switch between the TV and VCR modes.
Only the VOL
(
+ or –
)
and TV STANDBY/ON
buttons are operational in VCR mode.
-/--
➂
Used to enter a two-figure programme number.
Example
: For programme 12, press -/-- followed
by numeric buttons 1 and 2.
INPUT
➃
Used to select an external source.
VOL +or –
➄
Used to adjust the volume of the television.
PROG/TRK
➅
Used to select the required programme.
(" or❷)
DISP./
➆
Used to switch between an external source and
the television tuner.
➢
The various functions will not necessarily work on all
televisions. If you encounter problems, operate the
television directly.
42
GB
43
The Auto Power Off feature automatically turns off your VCR if no
signal is received and you do not press any button for the selected
time.
1 Press MENU on the remote control.
Result
: The programming menu is displayed.
2 Press the corresponding
",❷
or ➛, ❿buttons to select the
INSTALLAZIONE RAPIDA option.
3 Press the OK button to select this option.
Result
: The INSTALLAZIONE RAPIDA menu is displayed.
4 Press the corresponding
"or❷
buttons, until the cursor is placed
in front of the
AUTO-SPEGNIMENTO option.
5 Press the
❿
button, until you select the time of Auto Power off
interval.
NO 2HORA 3HORA
6 On completion, press MENU twice to exit the menu.
Auto Power Off
INSTALLAZIONE RAPIDA
PROG OPTIONS INSTALL
CLOCK BONUS LANG
"❷!!
➛❿!!
OK USCITA:MENU
❿
AUTO-SPEGNIMENTO :NO
RIPETIZIONE PLAY :NO
RIPETIZ.PARZIALE : 5
"❷
❿
USCITA:MENU
TV STANDBY/ON
TV
SLOW
VCR
SHUTTLE
V-LOCK
DISP./
1
2
2
6
6
7
3
5
5
4
Child door Lock System
★
(SV-635X/SV-530X/SV-435X/SV-235X Only)
With this mechanism you can prevent children from harming
themselves or the VCR. It stops fingers and small articles from
entering your VCR.
REC STOP
PROG
EJECT
STANDBY/ON
VIDEO L AUDIO R
AUX
REW F.F
PLAY
★
(SV-635X)
★
(SV-530X)
★
(SV-435X/SV-235X)
CLR/RST F.ADV
-/--
INPUT INDEX
REPEAT
C
E
R
CLR/RST F.ADV
-/--
INPUT INDEX
REPEAT
C
E
R
CLR/RST F.ADV
-/--
INPUT INDEX
E
M
SHUTTLE
V-LOCK
VOL PROG/TRK
N
U
E
M
VOL PROG/TRK
N
U
VOL PROG/TRK
DISP./
A
DISP./
A
U
D
I
O
U
D
I
O
VCR
BONUS
STANDBY/ON
EJECT
VIDEO L AUDIO R
AUX
STANDBY/ON
EJECT
VIDEO AUDIO
AUX
BONUS
PROG
PROG
PLAY
REW F.F
REC STOP
REW F.F
PLAY
REC STOP
Page 25

GB
4544
Problems and Solutions
Before contacting the Samsung after-sales service, perform the following simple checks.
Problem Explanation/Solution
No power ◆ Check that the power plug is connected to a wall outlet.
◆ Have you pressed the VCR STANDBY/ON (STANDBY/ON)
button?
You cannot insert a video cassette ◆ A video cassette can only be inserted with the window
side up and the safety tab facing you.
The television programme was not recorded ◆ Check the VCR aerial connections.
◆ Is the VCR tuner properly set?
◆ Check if the safety tab is intact on the cassette.
Timer recording was unsuccessful ◆ Was the VCR STANDBY/ON (STANDBY/ON) button pressed
to activate the timer?
◆ Re-check the recording start/stop time settings.
◆ If there was a power failure or interruption during timer
recording, the recording will have been cancelled.
No playback picture or the picture ◆ Check to see if you are using a prerecorded tape.
is distorted
You cannot see normal broadcasts ◆ Check the TUNER/EXTERNAL setting. It should be on
TUNER.
◆ Check the TV/VCR aerial connections.
Noise bars or streaks on playback ◆ Press the PROG/TRK ("or ❷)/ TRK (
or)buttons to
minimize this effect.
When the
❿
II
button is pressed ◆ A still picture may have “noise bars”, depending on the
during playback, the still picture
condition of the tape. Press the
PROG/TRK ("or ❷)/ TRK
has severe “noise bars” streaks
(
or) buttons during SLOW motion to minimize this effect.
Video Head Cleaning ◆ If poor pictures appear on a variety of cassettes, the video
heads may need cleaning. This is not a common problem
and unless it appears, the heads should not be cleaned.
When cleaning the video heads, read all instructions
provided with the head cleaning cassette. Incorrect head
cleaning can permanently damage the video heads.
If when tuning in your TV to the VCR test 1. Remove the aerial input plug from the socket marked (aerial
pattern your TV does not find the test pattern symbol) on the rear of the VCR.
or the pattern when found suffers from 2. Carry out the instructions “Tuning Your Television for the VCR”
interference, it may be due to the VCR output (see page 14).
channel clashing with the normal TV 3. Carry out the instructions “Setting the VCR output Channel”
transmissions in your area. To prevent this (see page 17), move the channel number several channels
you will need to change the VCR output down from the original setting. (example: from 36 to 33).
channel in the following way 4. Replace the aerial plug into the socket marked (aerial symbol)
on the rear of the VCR.
5. Re-tune your TV to the VCR again by following instructions
“Tuning Your Television for the VCR” (page 14).
6. If the problem still exists repeat steps 1 to 5 moving several
more channels away from the original setting.
If you are unable to solve the problem after reading the above instructions, note:
◆ The model and serial number on the rear of your VCR
◆ The warranty information
◆ A clear description of the problem
Then contact your nearest SAMSUNG after-sales service.
Technical Specifications
Design and specifications are subject to change without notice.
Format VHS PAL standard VHS PAL standard
Heads Video: 4 rotary heads
Video: 4 rotary heads (SV-435X/SV-431X)
Video: 2 rotary heads
(SV-235X/SV-231X/SV-2315X/SV-2313X)
Hi-Fi audio: 2 rotary heads
Audio/Control: 1 stationary head Audio/Control: 1 stationary head
Erase: 1 full track erase head Erase: 1 full track erase head
Receiving channel VHF-I, VHF-III, UHF, Interband/ VHF-I, VHF-III, UHF, Interband/
Hyperband Hyperband
Television system STANDARD B/G STANDARD B/G
Luminance FM azimuth recording FM azimuth recording
Colour system PAL/MESECAM/NT4.43: Down PAL/MESECAM/NT4.43: Down
converted subcarrier phase shifted converted subcarrier phase shifted
direct recording direct recording
NTSC PB on PAL TV NTSC PB on PAL TV
Tape speed SP 23.39 mm/sec SP 23.39 mm/sec
LP 11.69 mm/sec LP 11.69 mm/sec (SV-435X/SV-431X)
Recording/playback time SP 3 hours (E-180 Tape) SP 3 hours (E-180 Tape)
LP 6 hours (E-180 Tape) LP
6 hours (E-180 Tape) (SV-435X/SV-431X)
REW time About 60 sec in REW with E-180 About 100 sec in REW with E-180
VIDEO
Input 0.5 to 2.0 Vp-p; 75 ohm unbalanced 0.5 to 2.0 Vp-p; 75 ohm unbalanced
Output 1.0 ± 0.2 Vp-p; 75 ohm unbalanced 1.0 ± 0.2 Vp-p; 75 ohm unbalanced
Signal-to-noise ratio Better than 43 dB (SP) Better than 43 dB(SP)
Horizontal resolution More than 240 lines More than 240 lines
AUDIO
Input -8 dBm, 47 Kohm unbalanced -8 dBm, 47 Kohm unbalanced
Output -8 ± 3 dBm, 1 Kohm unbalanced -8 ± 3 dBm, 1 Kohm unbalanced
Wow and flutter (WTD) 0.4% max (SP) 0.4% max (SP)
Signal-to-noise ratio 68 dB min (IHF A filter) 42 dB min (IHF A filter)
Frequency response 20Hz - 20kHz
Power requirement 230V (AC 50-60 Hz) 230V (AC 50-60 Hz)
Power consumption Approx. 17 watts Approx. 15 watts
Operation temperature 41°F-104°F (5°C-40°C) 41°F-104°F (5°C-40°C)
Operation humidity 10%-75% 10%-75%
Weight 3.3 Kg (net) 3.3 Kg (net)
Dimensions (WxHxD) 360 x 94 x 285 mm 360 x 94 x 285 mm
MODEL
SV-635X/SV-631X/SV-6315X/ SV-435X/SV-431X/SV-235X/SV-231X/
SV-6313X/SV-530X SV-2315X/SV-2313X
Page 26

4746
TV Frequency Table (System-B/G)
002~012 :CCIR STD VHF 244~250 :MOROCO
013~020 :ITALY 251~255 :BELGUIM
021~069 :CCIR STD UHF
071~075 :CCIR CABLE
201~241 :CCIR STD CABLE
Germany Netherlands Belguim Moroco
Spain Denmark Greece Yugoslavia
Italy Finland Portugal
Austria Norway Slovenia
Switzerlands Sweden Croatia
DISP CH Band Fp STD
DISP CH Band Fp STD
DISP CH Band Fp STD
002 E02 V-L 48.25 CCIR
003 E03 V-L 55.25 CCIR
004 E04 V-L 62.25 CCIR
005 E05 V-H 175.25 CCIR
006 E06 V-H 182.25 CCIR
007 E07 V-H 189.25 CCIR
008 E08 V-H 196.25 CCIR
009 E09 V-H 203.25 CCIR
010 E10 V-H 210.25 CCIR
011 E11 V-H 217.25 CCIR
012 E12 V-H 224.25 CCIR
013 A V-L 53.75 Italy
014 B V-L 62.25 Italy
015 C V-L 82.25 Italy
016 D V-H 175.25 Italy
017 E V-H 183.25 Italy
018 F V-H 192.25 Italy
019 G V-H 201.25 Italy
020 H V-H 210.25 Italy
021 E21 UHF 471.25 CCIR
022 E22 UHF 479.25 CCIR
023 E23 UHF 487.25 CCIR
024 E24 UHF 495.25 CCIR
025 E25 UHF 503.25 CCIR
026 E26 UHF 511.25 CCIR
027 E27 UHF 519.25 CCIR
028 E28 UHF 527.25 CCIR
029 E29 UHF 535.25 CCIR
030 E30 UHF 543.25 CCIR
031 E31 UHF 551.25 CCIR
032 E32 UHF 559.25 CCIR
033 E33 UHF 567.25 CCIR
034 E34 UHF 575.25 CCIR
035 E35 UHF 583.25 CCIR
036 E36 UHF 591.25 CCIR
037 E37 UHF 599.25 CCIR
038 E38 UHF 607.25 CCIR
039 E39 UHF 615.25 CCIR
040 E40 UHF 623.25 CCIR
041 E41 UHF 631.25 CCIR
042 E42 UHF 639.25 CCIR
043 E43 UHF 647.25 CCIR
044 E44 UHF 655.25 CCIR
045 E45 UHF 663.25 CCIR
046 E46 UHF 671.25 CCIR
047 E47 UHF 679.25 CCIR
048 E48 UHF 687.25 CCIR
049 E49 UHF 695.25 CCIR
050 E50 UHF 703.25 CCIR
051 E51 UHF 711.25 CCIR
052 E52 UHF 719.25 CCIR
053 E53 UHF 727.25 CCIR
054 E54 UHF 735.25 CCIR
055 E55 UHF 743.25 CCIR
056 E56 UHF 751.25 CCIR
057 E57 UHF 759.25 CCIR
058 E58 UHF 767.25 CCIR
059 E59 UHF 775.25 CCIR
060 E60 UHF 783.25 CCIR
061 E61 UHF 791.25 CCIR
062 E62 UHF 799.25 CCIR
063 E63 UHF 807.25 CCIR
064 E64 UHF 815.25 CCIR
065 E65 UHF 823.25 CCIR
066 E66 UHF 831.25 CCIR
067 E67 UHF 839.25 CCIR
068 E68 UHF 847.25 CCIR
069 E69 UHF 855.25 CCIR
071 X V-L 69.25 CCIR
072 Y V-L 76.25 CCIR
073 Z V-L 83.25 CCIR
074 Z+1 V-L 90.25 CCIR
075 Z+2 V-L 97.25 CCIR
201 S01 V-L 105.25 CCIR
202 S02 V-L 112.25 CCIR
203 S03 V-L 119.25 CCIR
204 S04 V-L 126.25 CCIR
205 S05 V-L 133.25 CCIR
206 S06 V-L 140.25 CCIR
207 S07 V-H 147.25 CCIR
208 S08 V-H 154.25 CCIR
209 S09 V-H 161.25 CCIR
210 S10 V-H 168.25 CCIR
211 S11 V-H 231.25 CCIR
212 S12 V-H 238.25 CCIR
213 S13 V-H 245.25 CCIR
214 S14 V-H 252.25 CCIR
215 S15 V-H 259.25 CCIR
216 S16 V-H 266.25 CCIR
217 S17 V-H 273.25 CCIR
218 S18 V-H 280.25 CCIR
219 S19 V-H 287.25 CCIR
220 S20 V-H 294.25 CCIR
221 S21 V-H 303.25 CCIR
222 S22 V-H 311.25 CCIR
223 S23 V-H 319.25 CCIR
224 S24 V-H 327.25 CCIR
225 S25 V-H 335.25 CCIR
226 S26 V-H 343.25 CCIR
227 S27 V-H 351.25 CCIR
228 S28 V-H 359.25 CCIR
229 S29 V-H 367.25 CCIR
230 S30 V-H 375.25 CCIR
231 S31 V-H 383.25 CCIR
232 S32 V-H 391.25 CCIR
233 S33 V-H 399.25 CCIR
234 S34 V-H 407.25 CCIR
235 S35 V-H 415.25 CCIR
236 S36 V-H 423.25 CCIR
237 S37 UHF 431.25 CCIR
238 S38 UHF 439.25 CCIR
239 S39 UHF 447.25 CCIR
240 S40 UHF 455.25 CCIR
241 S41 UHF 463.25 CCIR
244 M4 V-H 163.25 Moroco
245 M5 V-H 171.25 Moroco
246 M6 V-H 179.25 Moroco
247 M7 V-H 187.25 Moroco
248 M8 V-H 195.25 Moroco
249 M9 V-H 203.25 Moroco
250 M10 V-H 211.25 Moroco
251 U1 V-H 226.25 Belguim
252 U2 V-H 234.25 Belguim
253 U3 V-H 242.25 Belguim
254 U4 V-H 250.25 Belguim
255 U5 V-H 258.25 Belguim
ECNICA AUTORIZZATI SAMSUNG TELEVISORI, VIDEO E PRODOTTI AUDIO
ELECTRONICS
CITTA’ RAGIONE SOCIALE INDIRIZZO TELEFONO LEGENDA
VALLE D’AOSTA
AOSTA C.A.T. DI D’Isanto C.SO IVREA 82/A 0165/364056 TV/VCR/AUD
PIEMONTE
ALESSANDRIA COSTA SERIO VIA ABBA CORNAGLIA 11 0131/445392 TV/VCR/AUD
NOVARA C.D. ELETTRONICA STRADA DAMINA 4/C 0321/398004 TV/VCR/AUD
ARONA (NO) CENTRO ASS. VERBANO VIA XXIV MAGGIO 34 0322/45461 TV/VCR/AUD
ASTI TELEPROGRAM CORSO SAVONA 31 0141/353182 TV/VCR/AUD
BRA’ (CN) TELETECNICA BRAIDESE VIA VITTORIO EMANUELE 84 0172/422236 TV/VCR/AUD
CUNEO BOTTASSO GIULIO VIA CADUTI SUL LAVORO 3 0171/692888 TV/VCR/AUD
FOSSANO (CN) BERTOLA E CONTRATTO Snc VIA F. SACCO 9/A 0172/693276 TV/VCR/AUD
CAVALLERMAGGIORE (CN) CANELLO FRANCESCO VIA ROMA 113 0172/381270 TV/VCR/AUD
IVREA (TO) TELE ANTENNE IVREA VIA G. DI VITTORIO 2 0125/641497 TV/VCR/AUD
TORINO DIAPASON S.N.C. C.SO SVIZZERA 185 011/7717033/46 TV/VCR/AUD
TORINO RATTI Sas LUNGO DORA SIENA 8 011/4360709 TV/VCR/AUD
CASCINE VICA-RIVOLI (TO) VIDEO TECNICA di Petrilli VIA PO 10 011/9572599 TV/VCR/AUD
SERRAVALLE SESIA (VC) A.R.T.E. s.n.c. CORSO MATTEOTTI 218 0163/450994 TV/VCR/AUD
VERCELLI ELEKTRO di Fiore Francesco VIA TRIPOLI 91 0161/250071 TV/VCR/AUD
LIGURIA
CHIAVARI (GE) EMI ELETTRONICA VIA PIACENZA 108 0185/322464 TV/VRC/AUD
GENOVA T.T.S. SNC VIA A. RIMASSA 183R 010/5536076 TV/VCR/AUD
IMPERIA P.D. ELECTRONIC VIA GARESSIO 116 0183/272495 TV/VCR/AUD
LA SPEZIA C.A.T. ELETTRONICA VIA CARRANDO 56 0187/511110 TV/VCR/AUD
SAVONA AL.FA. SERVICE SNC VIA PAGANINI 21R 019/805646 TV/VCR/AUD
LOMBARDIA
ARESE (MI) ARESE SERVICE VIA MATTEI 48 02/93581248 TV/VCR/AUD
BERGAMO MERLA CLAUDIO VIA LONGO 11 035/271959 TV/VCR/AUD
BOVISIO M.GO (MI) DITTA CAT Bersani & Morello VIA DESIO 22 0362/558421 TV/VCR/AUD
BRESCIA TRM ELETTRONICA VIA TOSCANA 65 030/221255 TV/VCR/AUD
COMO ELECTRONIC’S CENTER VIA GIULINI 9 031/279820 TV/VCR/AUD
CREMONA S.T.A.R.T. VIDEO HIFI VIA ORTI ROMANI 16/A 0372/38731 TV/VCR/AUD
LECCO IMPEL DI NOBILE & C. SNC VIA TITO SPERI 9 0341/366059 TV/VCR/AUD
MANTOVA TECNOVIDEO SNC P.ZZA DE GASPERI 28 0376/321554 TV/VCR/AUD
MELEGNANO (MI) CAT ELECTRONIC VIA P. TOGLIATTI 8 02/9834498 TV/VCR/AUD
LODI (MI) CAT ELECTRONIC VIA CADAMOSTO 21 0371/412389 TV/VCR/AUD
MILANO ELETTRONICA SERVICE VIA L. TOLSTOI 37 02/475609 TV/VCR/AUD
MILANO NUOVA TELESTEREO S.R.L. VIA PAOLO BASSI 29 02/66805833 TV/VCR/AUD
MILANO TELEMARK SRL VIA C. TACITO 6 02/55019838 TV/VCR/AUD
MILANO TELE-VIDEO SERVICE VIA P. SOTTOCORNO 52 02/70126892 TV/VCR/AUD
VIMERCATE F.G.R. ELECTRONIC SRL VIA PELLEGATTA 34/A 039/6082592 TV/VCR/AUD
PAVIA COMPTELECTRO di Mussi VIALE LIBERTA’ 63 0382/304160 TV/VCR/AUD
SONDRIO GBP ELETTRONICA VIA BRENNERO 7 0342/219466 TV/VCR/AUD
TREVIGLIO (BG) TELEVIDEO SERVICE Snc VIA C. BATTISTI 17 0363/47946 TV/VCR/AUD
BUSTO ARSIZIO (VA) S.A.R.T.E. di Marin Eligio VIA TORINO 28/A 0331/302563 TV/VCR/AUD
VARESE VARESE SERVICE SNC VIALE BORRI 146 0332/811630 TV/VCR/AUD
EMILIA ROMAGNA
BELLARIA (RN) MASINI PAOLO VIA MEDITERRANEO 24 0541/347714 TV/VCR/AUD
BOLOGNA M.C.R. VIA FACCINI 4 C/D 051/374989 TV/VCR/AUD
IMOLA COOP. ELECTRA VIA PAMBERA 8/B 0542/35814 TV/VCR/AUD
FERRARA NIKAM VIA BONAFINI 34 0532/900938 TV/VCR/AUD
FORLI’ RIVA E MAZZA VIALE BIDENTE 67 0543/781380 TV/VCR/AUD
MODENA AUDIO VIDEO CENTER SRL VIA VANDELLI 23/29 059/235219 TV/VCR/AUD
PARMA CHIAPPARINI E MELEGARI VIA SPEZIA 106 0521/982253 TV/VCR/AUD
PIACENZA SELE.NORD s.n.c. VIA NASTRUCCI 14 0523/592273 TV/VCR/AUD
RAVENNA L.M.S. SNC VIA LANCIANI 78 0544/590867 TV/VCR/AUD
REGGIO EMILIA RTE SNC VIA PREMUDA 38/V 0522/381277 TV/VCR/AUD
RICCIONE (RN) TECNOSERVICE S.N.C. VIA CORTEMAGGIORE 7 0541/641400 TV/VCR/AUD
FRIULI VENEZIA GIULIA
FELETTO (UD) CM ELETTRONICA SNC VIA G. GALILEI 2 0432/572172 TV/VCR/AUD
S. MARTINO AL CODROIPO (UD) TOP SERVICE VIA ERMINIA 57 0432/909981 TV/VCR/AUD
PORDENONE ELETTRONICA PORDENONESE VIA UNGARESCA 3/B 0434/366667 TV/VCR/AUD
TRIESTE S.A.E. s.n.c. VIA CARPINETO 8/1 040/827960 TV/VCR/AUD
UDINE M.Z. ELETTRONICA P.ZZA 1°MAGGIO 22 0432/501479 TV/VCR/AUD
VENETO
BELLUNO S & B SNC VIA FELTRE 192 0437/942070 TV/VCR/AUD
MESTRE (VE) DIGITAL SNC VIA VERDI 109 041/989407 TV/VCR/AUD
PADOVA FALCARO RENZO VIA VIGONOVESE 145 ABC 049/8702346 TV/VCR/AUD
PADOVA SETES VIA SS.FABIANO e SEBASTIANO 34 049/8686200 TV/VCR/AUD
ROVIGO A.T.I.R. di Marchetti P.I. M. VIA CONFALONIERI 15 0425/33797 TV/VCR/AUD
S. MICHELE (VR) LABORATORY CENTER VIA UNITA’ D’ITALIA 142 045/973466 TV/VCR/AUD
S. VENDEMIANO (TV) BIGNU’ SNC VIA LIBERAZIONE 13 0438/400120 TV/VCR/AUD
TREVISO MATTIAZZI ALESSANDRO V. SCUDETTO di S.Giuseppe 19 0422/430318 TV/VCR/AUD
VICENZA TODESCO ARMANDO & C. SNC VIA TORRETTI 20 0444/505470 TV/VCR/AUD
ROSA’ (VI) ELECTRONIC SERVICE SNC QUART. CREMONA 2 0424/581945 TV/VCR/AUD
TRENTINO A. ADIGE
BOLZANO TELECROM VIA MACELLO 63 0471/971178 TV/VCR/AUD
GARDOLO TRENTO ELETTRA S.N.C. VIA BASSA 2/A 0461/961255 TV/VCR/AUD
LAZIO
BRACCIANO (RM) CECCHINI GIUSEPPE VIA GARIBALDI 25/A 06/99804687 TV/VCR/AUD
CASSINO (FR) VIDEOTECNICA di Bino Russo VIA FALAISE 28/30 0776/23283 TV/VCR/AUD
CIVITAVECCHIA (RM) R.F. ELETTRONICA VIA BRAMANTE 45 0766/35489 TV/VCR/AUD
FROSINONE TELESERVICE Snc VIA ALDO MORO 134 0775/270542 TV/VCR/AUD
LATINA ELETTRONICA MURARO VIA MARCONI 38/40 0773/697960 TV/VCR/AUD
LIDO DI OSTIA (RM) ASSISTENZA TECNICA di Gregori VIA TRAGHETTI 30 06/5694642 TV/VCR/AUD
RIETI CAMPOGIANI MAURIZIO VIA CAVOUR 21 0746/482876 TV/VCR/AUD
ROMA BENCIVENNI GASTONE P.ZZA DEI CONDOTTIERI 29 06/21703043 TV/VCR/AUD
ROMA E.C.S. SNC VIA AURELIA 838 06/6636016 TV/VCR/AUD
ROMA EL.S.A.R. SNC VIA SAN SOTERO 36 06/6380516 TV/VCR/AUD
ROMA/ S. PAOLO PETROSELLI ELSA VIA A. CIALDI 35 06/5127753 TV/VCR/AUD
ROMA PETROSELLI ELSA V.LE CITTA’ D’EUROPA 817 06/5294264 TV/VCR/AUD
ROMA/VILLA ADRIANA S.C.F. SNC DI SCALISE A. VIA LAGO D’ANNONE 2/4 0774/381354 TV/VCR/AUD
VELLETRI (RM) ELETTRONICA VELITERNA sdf VIA U. MATTOCCIA 16 06/9626196 TV/VCR/AUD
VITERBO VIDEO SERVICE di Calabrese STRADA TEVERINA KM. 2 - 400 0761/251557 TV/VCR/AUD
Legenda : TV = TELEVISORI VCR = VIDEOREGISTRATORI e VIDEOLETTORI AUD = PRODOTTI AUDIO
La presente lista è aggiornata al 30/04/98 e soggetta a continue variazioni.
Page 27

UMBRIA
FOLIGNO (PG) TECNOSERVICE SNC VIA MANCINELLI 1/A 0742/344636 TV/VCR/AUD
PERUGIA VIDEOLAB dI Tomassoni VIA SILVIO PELLICO 13 075/33154 TV/VCR/AUD
TERNI NUOVA CEA DI CARLONI VIA MONTEGRAPPA 9A/B 0744/285841 TV/VCR/AUD
TOSCANA
AREZZO GIUSTINI PRIMO L.GO 2 GIUGNO 14 0575/910882 TV/VCR/AUD
FIRENZE PUNTO VIDEO di Parigi Federico VIA ZAMBRINI 21 055/416619 TV/VCR/AUD
GROSSETO VIDEOTECNICA SNC VIA C. PAGANICO 5/A 0564/491653 TV/VCR/AUD
LIVORNO CIUCCI PERLUIGI VIA MAGGI 136 0586/899721 TV/VCR/AUD
MARLIA CAPANNORI(LU) NANNINI ELETTRONICA VIALE PAOLINELLI 76 0583/308137 TV/VCR/AUD
MASSA SAEC di Coppa VIA RINCHIOSTRA NORD 34 0585/251724 TV/VCR/AUD
PIOMBINO (LI) PANNOCCHIA ANTONIO VIA A. GARIBALDI 60/62 0565/38171 TV/VCR/AUD
PISA CALONI & DE NISCO s.n.c. VIA M. NELLI 13-15 050/553081 TV/VCR/AUD
PISTOIA EMMEPI sdf di Pereira e Sforzi VIA BONELLINA 16C 0573/367363 TV/VCR/AUD
PONSACCO (PI) ELETTRONICA GTE V.LE DELLA RIMEMBRANZA 18 0587/732453 TV/VCR/AUD
PORTOFERRAIO (LI) ELBASAT LOC. CARPANI 135 0565/916494 TV/VCR/AUD
PRATO (PO) ACROMA VIA DI GALCETI 12/A 0574/462255 TV/VCR/AUD
S. MARTINO (SI) CENTRO ASSISTENZA HIFI VIA DELLA REPUBBLICA 13 0577/318420 TV/VCR/AUD
VIAREGGIO CASTALDI B. e FAVILLA M. & C. VIA AURELIA NORD 98 INT 0584/942535 TV/VCR/AUD
MARCHE
ANCONA AUDIOVIDEO SERVICE VIA BARILATTI 25 071/2802050 TV/VCR/AUD
ASCOLI PICENO PLURITECNICA s.n.c. VIA C. ULPIANI 5 0736/342635 TV/VCR/AUD
CORRIDONIA (MC) C.R.T. di Brilloni e Vecchioni VIA DELLA PORTARELLA 45 0733/433951 TV/VCR/AUD
MONTEGRANARO (AP) F.N.T. di Ferroni-Pagliari & C. VIALE ZACCAGNINI 56 0734/891995 TV/VCR/AUD
PESARO CAT SNC VIA CECCHI 25 0721/25608 TV/VCR/AUD
ABRUZZO
LANCIANO (CH) DI FLORIO ALESSANDRO VIA S. SPIRITO 40 0872/46000 TV/VCR/AUD
L’AQUILA C.E.A.C. s.n.c. VIA F.P. TOSTI 40/A 0862/413363 TV/VCR/AUD
TERAMO BELLONE VITTORIO VIA DELL’AEROPORTO 76/78 0861/415745 TV/VCR/AUD
VILLARASPA SP. (PE) D.G.M. ELETTRONICA SNC VIA ITALIA 202/204 085/414323 TV/VCR/AUD
MOLISE
AGNONE (IS) CLR ELETTRONICA VIALE V. VENETO 44 0865/79402 TV/VCR/AUD
RICCIA (CB) TELECOM AUDIO VIDEO SVC VIA VITTORIO EMANUELE 67/69 0874/716783 TV/VCR/AUD
CAMPANIA
AVELLINO L.V.E. SNC VIA TEDESCO 304 0825/74260 TV/VCR/AUD
BENEVENTO TELEART di Di Gioia V.LE PRINCIPE DI NAPOLI 161 0824/28896 TV/VCR/AUD
MONTESARCHIO (BN) EMMEDI ELETTRONICA VIA G. MATTEOTTI 3 0824/834648 TV/VCR/AUD
CAPACCIO SCALO (SA) BARRA MASSIMO VIA RETTIFILO 12 0828/723365 TV/VCR/AUD
CASERTA AUDIO SERVICE VIA CATTANEO 4/6 0823/329099 TV/VCR/AUD
ORTA DI ATELLA (CE) MASTER SERVICE SRL VIA TOSCANINI 7/9 081/5021382 TV/VCR/AUD
CASORIA (NA) TECNO SERVICE di De Rosa VIA NAZ. DELLE PUGLIE 176/A 081/5844454 TV/VCR/AUD
CAST DI STABIA (NA) MIGLIARDI LUIGI VIA PLINIO IL VECCHIO 19/29 081/8723865 TV/VCR/AUD
NAPOLI ERREDIESSE SERVICE SAS VIA MASCAGNI 74/76 081/5794825 VCR/AUD
NAPOLI RD ELETTRONICA SERVICE S.A.S. VIA CALDIERI 124/126 081/5602608 TV
LACCO AMENO (NA) TELESAT S.N.C. VIA BORBONICA 72 081/980620 TV/VCR/AUD
SALERNO F.LLI LAMBERTI A. & G. s.n.c. VIA G. DEL MERCATO 20/22/24 089/755700 TV/VCR/AUD
PUGLIA
BARI A.D. SERVICE SNC VIA STRADA CALVANI 27-29-31 080/5020006 TV/VCR/AUD
BRINDISI GUARINO COSIMO VIA PROV. SAN VITO 189 0831/451522 TV/VCR/AUD
FOGGIA PICI ANTONIO VIA G. DORSO 35 0881/617949 TV
FOGGIA VALECCE SALVATORE VIA FRACCACRETA 13 15 17 0881/686742 AUD/VCR
LECCE MICROKEY S.R.L. VIA B. MAZZARELLA 35/37 0832/344440 TV/VCR/AUD
MAGLIE (LE) CISE ELETTRONICA VIA V. EMANUELE 33 0836/423500 TV/VCR/AUD
RUVO DI PUGLIA (BA) BRUCOLI ROCCO VIA OBERDAN 70 080/813268 TV/VCR/AUD
TARANTO A.T.A. SYSTEM SRL VIA EMILIA 119 099/7375381 TV/VCR/AUD
BASILICATA
MATERA RICCARDI COSIMO VIA S. STEFANO 51 0835/333671 TV/VCR/AUD
POLICORO (MT) FINOCCHIARO PASQUALE V.LE SALERNO 28/4 0835/972838 TV/VCR/AUD
POTENZA REMOLLINO E LORUSSO VIA MESSINA 8/10 0971/444243 TV/VCR/AUD
CALABRIA
CASTROVILLARI (CS) ABENANTE ALBERICO VIA DELLA LIBERTA’ 115 0981/27648 TV/VCR/AUD
COSENZA PALADINO CARMINE VIA E. DE DONATO 15 0984/481468 TV/VCR/AUD
CARIATI MARINA (CS) FRONTERA GIUSEPPE VIA FIRENZE 10/12 —- 0347/3446302 0983/968713 TV/VCR/AUD
CROTONE (KR) BALZANO E VELLONE s.n.c. VIA 1° MAGGIO 29 0962/21173 TV/VCR/AUD
ARDORE MARINA (RC) LAB. 2000 DI G. MURDACA VIA FOSCOLO 71 0964/629608 TV/VCR/AUD
REGGIO CALABRIA RADIOTECNICA REGGINA V.LE CALABRIA 68 0965/592000 TV/VCR/AUD
CATANZARO LIDO STM ELETTRONICA TRAV. CROTONE 16 0961/34951 TV/VCR/AUD
TAURIANOVA(RC) CIANO GIUSEPPE VIA CIRCONVALLAZIONE SUD 0966/643483 TV/VCR/AUD
VIBO VALENTIA (CZ) AUDIO VIDEO SNC VIA DE GASPERI 44 0963/45571 TV/VCR/AUD
SICILIA
BAGHERIA (PA) AUDIO E VIDEO BRUNO S. VIA V. VENETO 38 091/900795 TV/VCR/AUD
CALTAGIRONE (CT) ELETTRONICA VISALCO SDF VIA SARDEGNA 33 0933/21339 TV/VCR/AUD
CALTANISSETTA AUDIO VIDEO SRL VIA DON MINZONI 52/54 0934/552111 TV/VCR/AUD
CAPO D’ORLANDO (ME) PROFESSIONAL SERVICE VIA XXVII SETTEMBRE 22/B 0941/912818 TV/VCR/AUD
CATANIA AVS AUDIO SDF VIA SASSARI 2/C 095/446696 TV/VCR/AUD
FAVARA (AG) BACCHI IGNAZIO P.ZZA ANGELO GIGLIA 40 0922/420311 TV/VCR/AUD
MENFI (AG) MESSINA G. & RIPORTELLA G. VIA MANDORLO 60 0925/75194 TV/VCR/AUD
MESSINA ROMEO GIOVANNA VIA S. GIOVANNI BOSCO 8 090/774403 TV/VCR/AUD
PALERMO E.C.S. SNC di Barrale VIA C. GIANQUINTO 52 091/409438 TV/VCR/AUD
RAGUSA RADIOFRANCO DI GOZZI I. C.SO VITTORIO VENETO 568 0932/255855 TV/VCR/AUD
SIRACUSA R.E.I. SERVICE VIA GORIZIA 43/B 0931/464429 TV/VCR/AUD
TRAPANI SURDO MARCO VIA FIRENZE 38 0923/554157 TV/VCR/AUD
SARDEGNA
CAGLIARI LABOR TVC SNC di Atzeni VIA OGLIASTRA 40 070/285292 TV/VCR/AUD
CARBONIA (CA) VIDEOELETTRONICA di Angelucci VIA SATTA 210/212 0781/660475 TV/VCR/AUD
LANUSEI (NU) IBBA TONINO VIALE EUROPA 190 0782/42878 TV/VCR/AUD
NUORO CENTRO ASS. GODDI A. VIA P. MASTINO 46 0784/33171 TV/VCR/AUD
BOLOTANA (NU) VIDEOTECNICA DI ORTU N. VIA STAZIONE 118 0785/43484 TV/VCR/AUD
OLBIA (SS) HIFI CENTER di Pintore VIA LUCANIA 15 0789/22164 TV/VCR/AUD
ORISTANO LA VIDEO ELETTRONICA snc VIA SARDEGNA 91 0783/300026 TV/VCR/AUD
SASSARI TECNOSERVICE SNC di Simula VIA GALILEO GALILEI 47 079/273155 TV/VCR/AUD
Legenda :
TV = TELEVISORI VCR = VIDEOREGISTRATORI e VIDEOLETTORI AUD = PRODOTTI AUDIO
La presente lista è aggiornata al 30/04/98 e soggetta a continue variazioni.
CITTA’ RAGIONE SOCIALE INDIRIZZO TELEFONO LEGENDA
THIS APPLIANCE IS DISTRIBUTED BY
Questo apparecchio è fabbricato in conformità al D.M.28.08.95.N.548 ed in
particolare a quanto specificato nell’ Art. 2, comma 1.
www.samsungvcr.com AC68-00458A
ELECTRONICS
48
 Loading...