

Page 1

Samsung SUR40 for Microsoft® Surface
User Manual
The color and the appearance may differ depending on the product, and the specications are subject to
change without prior notice to improve the performance.
®
BN46-00030A-05
Page 2

Chapter. 1
Before Using the Product
Copyright
The contents of this manual are subject to change without notice to improve quality.
© 2011 Samsung Electronics
Samsung Electronics owns the copyright for this manual.
Use or reproduction of this manual in parts or entirety without the authorization of Samsung Electronics is prohibited.
The SAMSUNG and SyncMaster logos are registered trademarks of Samsung Electronics.
®
Microsoft
VESA, DPM and DDC are registered trademarks of the Video Electronics Standards Association.
Surface® and Windows are registered trademarks of Microsoft Corporation.
Ownership of all other trademarks is attributed to their due owner.
• An administration fee may be charged if either.
◦ (a) an engineer is called out at your request and there is no defect in the product
(i.e. where you have failed to read this user manual).
◦ (b) you bring the unit to a repair center and there is no defect in the product
(i.e. where you have failed to read this user manual).
• The amount of such administration charge will be advised to you before any work or
home visit is carried out.
2
Page 3

Table of
Chapter. 1
BEFORE USING THE
Chapter. 3
CONNECTING AND USING A
Contents
PRODUCT
2 Copyright
5 Safety Precautions
5 Symbols
5 Electricity and Safety
6 Installation and Safety
7 Operation and Safety
9 Cleaning
Chapter. 2
PREPARATION
10 Checking the Contents
10 Removing the Packaging
11 Checking the Components
11 Parts
11 Side View
12 Rear View
12 Tidy-up the Wires
13 Samsung SUR40 for Microsoft®
Surface® Venue Readiness Guide
13 Introduction
13 Technical specications
14 Unit placement
19 Location optimization
20 Preparing for delivery
21 Checklist: Before your unit arrives
22 Installing the Wall Mount
22 Preparing before installing Wall-Mount
22 Installing the Wall Mount Kit
22 Wall Mount Kit Specications (VESA)
SOURCE DEVICE
23 Checklist before Connecting to
Source Devices
23 Pre-connection Checkpoints
24 Before using the product
25 Connecting to an External Display
26 Connecting to a Source Device
Chapter. 4
USING THE PRODUCT
28 About the Product
28 Windows and Surface Mode
29 Conguring the system
29 Creating a Windows user account
30 Selecting the system language
31 Using Bing™ for Microsoft® Surface
33 Re-installing Windows 7
34 Using the On Screen Display (OSD) Menu
®
Chapter. 5
USING THE CALIBRATION
TOOL
35 To run calibration
3
Page 4

Chapter. 6
TROUBLESHOOTING GUIDE
36 Requirements Before Contacting
Samsung Customer Service Center
36 Check the following.
Chapter. 7
SPECIFICATIONS
38 General
39 Power Consumption
39 Screen Water Ingress Conditions
40 Dimensions
Chapter. 8
APPENDIX
41 Contact SAMSUNG WORLDWIDE
44 Correct Disposal
45 Responsibility for the Pay Service
(Cost to Customers)
46 Optimum Picture Quality and
Afterimage Burn-in Prevention
46 Optimum Picture Quality
46 Prevention of Afterimage Burn-in
4
Page 5

Safety Precautions
!
!
Caution
TO REDUCE THE RISK OF ELECTRIC SHOCK, DO NOT REMOVE COVER (OR BACK).
THERE ARE NO USER SERVICEABLE PARTS INSIDE.
REFER ALL SERVICING TO QUALIFIED PERSONNEL.
Symbols
Electricity and Safety
The following images are for reference only. Real-life situations may differ from what is
shown in the images.
Warning
Do not use a damaged power cable or plug, or a loose power socket.
- An electric shock or re may result.
Warning
Caution
A serious or fatal injury may result if instructions are not followed.
Personal injury or damage to properties may result if instructions are not
followed.
Activities marked by this symbol are prohibited.
Instructions marked by this symbol must be followed.
Do not use multiple products with a single power socket.
- Overheated power sockets may cause a re.
Do not touch the power cable with wet hands. Otherwise, an electric shock
may result.
Insert the power cable all the way in so it is not loose.
- An unsecure connection may cause a re.
Ensure you connect the power cable to a grounded power socket.(type 1
insulated devices only)
- An electric shock or injury may result.
Do not bend or pull the power cable with force. Be careful not to leave the
power cord under a heavy object.
- Damage to the cord may result in a re or electric shock.
5
Page 6

Do not place the power cable or product near heat sources.
!
!
!
!
!
!
!
- A re or electric shock may result.
Installation and Safety
The following images are for reference only. Real-life situations may differ from what is
shown in the images.
Caution
Clean any dust around the pins of the power cable or the power outlet
using a dry cloth.
- A re may result.
Do not disconnect the power cable while the product is being used.
- The product may become damaged by an electric shock.
Only use the power cable provided with your product by Samsung. Do not
use the power cord with other products.
- A re or electric shock may result.
Keep the power socket where the power cable is connected unobstructed.
- The power cable must be disconnected to cut off power to the product
when an issue occurs.
Hold the plug when disconnecting the power cable from the power socket.
- A re or electric shock may result.
Warning
DO NOT PLACE CANDLES, INSECT REPELLANTS OR CIGARETTES ON TOP
OF THE PRODUCT. DO NOT INSTALL THE PRODUCT NEAR HEAT SOURCES.
- A re may result.
Have a technician install the wall-mount hanger.
- Installation by an unqualied person can result in an injury.
- Ensure you use the wall mounts kit of specied VESA size.
Do not install the product in poorly ventilated spaces such as a bookcase or
closet.
- An increased internal temperature may cause a re.
Install the product at least 10 cm (4 inches) away from the wall to allow
ventilation.
- An increased internal temperature may cause a re.
Keep the plastic packaging out of the reach of children.
- Children may suffocate.
Do not install the product on an unstable or vibrating surface (insecure
shelf, sloped surface, etc.)
- The product may fall and become damaged and/or cause an injury.
- Using the product in an area with excess vibration may damage the
product or cause a re.
6
Page 7

!
Do not install the product in a vehicle or a place exposed to dust, moisture
!
!
SAMSUNG
!
!
!
(water drips, etc.), oil, or smoke.
- A re or electric shock may result.
Do not expose the product to direct sunlight, heat, or a hot object such as
a stove.
- The product lifespan may be reduced or a re may result.
Installing the product in an unusual place (a place exposed to a lot of ne
particles, chemical substances or extreme temperatures where the product
should operate continuously for an extended period of time) may seriously
affect its performance.
- Be sure to consult Samsung Customer Service Center if you want to
install the product at such a place.
Caution
Edible oil, such as soybean oil, can damage or deform the product.
Do not install the product in a kitchen or near a kitchen counter.
Do not drop the product while moving.
- Product failure or personal injury may result.
Do not set down the product on its front.
- The screen may become damaged.
Set down the product gently
- Product failure or personal injury may result.
Operation and Safety
The following images are for reference only. Real-life situations may differ from what is
shown in the images.
Warning
There is a high voltage inside the product. Never disassemble, repair or
modify the product yourself.
- A re or electric shock may result.
- Contact Samsung Customer Service Center for repairs.
Before moving the product, turn off the power switch and disconnect the
power cable and all other connected cables.
- Damage to the cord may result in a re or electric shock.
If the product generates abnormal sounds, a burning smell or smoke,
disconnect the power cable immediately and contact Samsung Customer
Service Center.
- An electric shock or re may result.
Do not let children hang from the product or climb on top of it.
- Children may become injured or seriously harmed.
7
Page 8

If the product is dropped or the outer case is damaged, turn off the power
!
!
!
GAS
!
100
switch and disconnect the power cable. Then contact Samsung Customer
Service Center.
- Continued use can result in a re or electric shock.
Do not use or keep combustible spray or an inammable substance near
the product.
- An explosion or re may result.
Do not leave heavy objects or items that children like (toys, sweets, etc.)
on top of the product.
- The product or heavy objects may fall as children try to reach for the toys
or sweets resulting in a serious injury.
During a lightning or thunderstorm, power off the product and remove the
power cable.
- A re or electric shock may result.
Do not drop or throw objects on the product.
- A re or electric shock may result.
Do not move the product by pulling the power cable or any cable.
- Product failure, an electric shock or re may result from a damaged
cable.
If a gas leakage is found, do not touch the product or power cable. Also,
ventilate the area immediately.
- Sparks can cause an explosion or re.
Do not lift or move the product by pulling the power cable or any cable.
- Product failure, an electric shock or re may result from a damaged
cable.
Ensure the vents are not blocked by tablecloths or curtains.
- An increased internal temperature may cause a re.
Do not insert metallic objects (chopsticks, coins, hairpins, etc) or objects
that burn easily (paper, matches, etc) into the product (via the vent or
input/output ports, etc).
- Be sure to power off the product and disconnect the power cable when
water or other foreign substances have entered the product. Then
contact Samsung Customer Service Center.
- Product failure, an electric shock or re may result.
Do not place objects containing liquid (vases, pots, bottles, etc) or metallic
objects on top of the product. When liquid (water, etc.) is spilled, wipe it off
immediately with a soft dry cloth to prevent the liquid from seeping into the
product.
- Be sure to power off the product and disconnect the power cable when
water or other foreign substances have entered the product. Then
contact Samsung Customer Service Center.
- Product failure, an electric shock or re may result.
Do not climb on the product.
- You may fall from the product and hurt yourself or damage the product
while descending.
Do not put food or an object hotter than 40 degrees Celsius on top of the
product.
- Product failure, electric shock or re may result.
8
Page 9

!
Caution
-_-
!
!
!
!
!
Ensure at least two persons help when moving the product as a safety
precaution.
- The product is heavy and may cause personal injury.
Cleaning
The following images are for reference only. Real-life situations may differ from what is
shown in the images.
The panel and exterior of the cutting-edge LCD product scratch easily and require careful
attention. Clean the product according to the following steps:
Disconnect the power cable from the power socket if you do not plan on
using the product for an extended period of time (vacation, etc.).
- Dust accumulation combined with heat can cause a re, electric shock or
electric leakage.
Use the product at the recommended resolution and frequency.
- Your eyesight may deteriorate.
Do not use humidiers or stoves around the product.
- A re or electric shock may result.
Rest your eyes for more than 5 minutes for every 1 hour of product use.
- Eye fatigue will be relieved.
Store small accessories out of the reach of children.
Do not place heavy objects on the product.
- Product failure or personal injury may result.
1. Power off the product.
2. Remove the power cable from the product.
NOTE
Hold the power cable by the plug and do not touch the cable with wet
hands. Otherwise, an electric shock may result.
3. Wipe the product screen using a clean, soft and dry cloth.
- Do not use detergents that contain alcohol or solvent.
- Do not spray water or detergent directly on the product.
4. To clean the exterior of the product, use a moist soft cloth and wring
thoroughly before wiping the exterior.
5. After cleaning the product, connect the power cable to the product.
6. Power on the product to use it.
NOTE
During use, the screen can be cleaned with a soft and dry cloth to remove nger prints or
smudges.
Storage
Due to the characteristics of high-glossy products, using a ultrasonic humidier nearby may
create white-colored stains on the product.
9
Page 10

Chapter. 2
Preparation
Checking the Contents
Removing the Packaging
NOTE
The appearance of actual components may differ from the images shown.
1. Remove the black locking device at the bottom of the box.
2. Using the grooves in the box, lift and remove the top of the box.
3. Check the components and remove the styrofoam and plastic bag.
32
10
Page 11

SD
Prepara t i o n
Checking the Components
NOTE
• Contact the vendor where you purchased the product if any components are missing.
• The appearance of the components and items sold separately may differ from the image
shown.
Components
NOTE
Components may vary depending on the country.
Quick setup guide Warranty card User manual and
Administrator Guides
for CD
Power cable Jack cover Calibration board
Items sold separately
Cleaning cloth
Parts
Side View
NOTE
• The color and shape of parts may differ from what is shown. Specications are subject to
change without notice to improve quality.
• The table legs are sold separately.
• To locate the buttons and ports, detach the jack cover from the product.
SD
BUTTONS AND PORTS FUNCTIONS
NOTE
The following items can be purchased at your nearest retailer.
HDMI cable HDMI-DVI cable RCA stereo cable Optical cable
LAN cable Table legs VESA mount
SD
Power on the product.
NOTE
Pressing this button very briey when the product is turned
on will display the OSD(On-screen display) menu.
Connect to headphones.
Connect to a microphone.
Connect to a USB device (keyboard, mouse, etc.).
Connect to a memory card.
11
Page 12

Prepara t i o n
Rear View
NOTE
The color and shape of parts may differ from what is shown. Specications are subject to
change without notice to improve quality.
A
HDMI OUT
POWER INPOWER S/W
LAN
ON
USB
A
AUDIO OUT
- AUDIO -
AUDIO OUT
(OPTICAL)
PORTS FUNCTIONS
[POWER IN] Connect to the power cable.
[POWER S/W] Power switch
HDMI INDIGITAL
Tidy-up the Wires
NOTE
The table legs are sold separately.
[AUDIO OUT] Connect to external speakers.
[DIGITAL AUDIO OUT
(OPTICAL)]
[HDMI IN]
Connect to an audio output device to produce higher-quality
audio output (optical).
Connects to a source device using a HDMI cable or HDMI-DVI
cable.
[HDMI OUT] Connect to another display using the HDMI or HDMI-DVI cable.
[LAN] Connect to a network using the LAN cable.
[USB
] Connect to a USB device (keyboard, mouse, etc.).
A
Speakers
12
Page 13

Prepara t i o n
Samsung SUR40 for Microsoft®
Surface® Venue Readiness Guide
Introduction
The Samsung SUR40 for Microsoft® Surface® (“SUR40”) unit enables people to communicate,
collaborate and connect by easily interacting with digital content using touch and physical
objects. This guide helps you choose the best location for your unit within your venue and
helps you prepare your site before your unit is delivered.
This guide includes the following sections:
• Technical specications describe the basic technical capabilities, dimensions and weight of
SUR40 so you can choose a location that will support the unit.
• Unit placement describes how to assess the physical area around the device, including the
types and levels of light, air circulation, and the availability of power and other connections.
• Location optimization describes how to stage the area around SUR40 to attract people to
the unit and enhance their experience with it, including comfort and creating visual interest.
• Preparing for delivery describes what to expect when a unit is delivered, including where to
unpack a SUR40 and what you need to have ready for the installation to proceed efciently
and successfully.
• Checklist: Before your unit arrives lists the information and preparations you should have
ready when your SUR40 is delivered, including choosing the unpacking and staged locations
and creating the appropriate passwords.
For more information on the Samsung SUR40 for Microsoft Surface and Microsoft Surface 2.0
documentation and guidelines, please see the Samsung and Microsoft Surface websites.
Technical specications
Make sure that you have the right people and enough space to move a SUR40 unit around
your venue (for example, from a moving truck or loading dock through hallways, doorways,
and elevators to its nal location).
Physical and administrative technical specications
Audio out
Brightness 300 CD/m
Communications 1 Gb Ethernet / 802.11 b/g/n / Bluetooth
HDMI in / out Yes
I/O ports 4 USB, SD card reader
Operating temperature Max ambient 30° C / 86° F
Display size 40” diagonal
Power
System management
tools
HDMI / stereo RCA / SPDIF optical audio / 3.5mm audio
out jack
2
Power Supply: Max 400W SMPS / Power Consumption:
300W(Max – On Mode) / 220W (Typ – On Mode) /
3W (Standby Mode) / 0W (Off Mode)
DASH / PowerShell / Active Directory
13
Page 14

Prepara t i o n
Physical dimensions
Item Width Height Depth Weight
SUR40 unit
SUR40 legs
SUR40 unit + legs
SUR40 package
SUR40 legs
package
1095 mm /
43.1 inches
642.2 mm /
25.28 inches
1095 mm /
43.1 inches
1214 mm /
47.79 inches
981 mm /
38.6 inches
707.4 mm /
27.85 inches
736.6 mm /
29 inches
707.4 mm /
27.85 inches
832 mm /
32.75 inches
213 mm /
8.38 inches
103 mm /
4.05 inches
74.7 mm /
2.94 inches
728 mm /
28.66 inches
299 mm /
11.77 inches
906 mm /
35.67 inches
36.8 kg /
81.1 lbs
13.6 kg /
29.9 lbs
50.4 kg /
111.11 lbs
42.5 kg /
93.69 lbs
19.9 kg /
48.8 lbs
Unit placement
As you prepare your venue for a SUR40 unit, you should choose an indoor area that provides
the best experience for people and enables the unit to operate safely and reliably.
The area should meet the following qualications:
• Provides enough room for people to comfortably interact with the SUR40 on all sides. For
more information, see the Space section.
• Includes indirect lighting and avoids direct light, that does not cause glare, reection, or
interferes with the SUR40 display. For more information, see the following Lighting section.
• Is near electrical outlets and other connections (such as network) that you need.
For more information, see the following Connections and electrical power section.
• Keeps cables out of the way of people and correctly routes cables through and around the
unit.
Space
The SUR40 location must provide enough space for the unit and for people. You should
address the following questions:
• Will the area accommodate the size of the SUR40?
• Will people be able to approach the unit from all four sides? Will people be able to approach
the unit from the front and stand side-by-side if vertically mounted?
• Will people have enough space to interact with the unit from any point around the display
without impeding nearby trafc ow when horizontally mounted?
• Will the SUR40 be at the right height for people to use when vertically mounted?
NOTE
You must not place a SUR40 near, or over, any heat sources such as radiators, heat ducts,
registers, stoves, or heating appliances.
Space for people around the SUR40
Make sure that the space around a SUR40 is large enough so that people can comfortably
interact with the display on all four sides, when horizontal, or in front of the unit, when
vertical.
Many people approach a horizontal SUR40 unit in groups of two or more. You should provide
enough space for more than one person to approach and use the device. If you want to
provide seating, you should also choose a location that has enough space for the SUR40 and
the seats (if you are using them) without impeding the normal ow of people trafc. (For more
information about seating, see the Seating section later in this guide.) People can interact with
horizontal SUR40 units from any side equally, so you should provide enough space for people
to walk completely around the unit.
Whether horizontal or vertical, other people might also want to watch people interact with the
Surface experience, so we recommend that you provide space for onlookers to watch people
interact with the unit.
14
Page 15

Prepara t i o n
Environmental space around the unit
Make sure that there are no heating or air conditioning ducts immediately around the SUR40
so that people don’t experience sudden temperature changes and so they can remain
comfortable in the location.
The SUR40 device requires air to circulate through its interior, so make sure that the air intake
vents and the air exhaust vents are not blocked or impeded, whether deployed horizontally or
vertically.
Lighting considerations
You should set up the proper type and level of lighting around the unit because lighting can
affect how well the unit can detect input and how well people can see images on the SUR40
screen.
NOTE
Evaluate and plan the environment lighting for your Samsung SUR40 for Microsoft Surface
deployment.
Lighting type, intensity and direction can impact the performance of the SUR40 unit. Before
deployment, always verify lighting conditions by using the Environment Lighting Optimizer tool.
The SUR40 uses an amazing new technology called PixelSense™ to sense ngers and objects
touching the screen. This exciting capability is possible because it sees and reacts to light –
taking sixty pictures every second in a way that is similar to a movie camera or the human
eye. Those pictures are rapidly analyzed to provide the incredible interactions that are
available on SUR40.
Like anything, or anyone, that sees and reacts to light, it’s important to follow a few
guidelines to make sure that it works well. Just as you wouldn’t shine a light into a person’s
eyes, or stare at the sun without eye protection; SUR40 works best when given the similar
consideration.
Basic lighting considerations
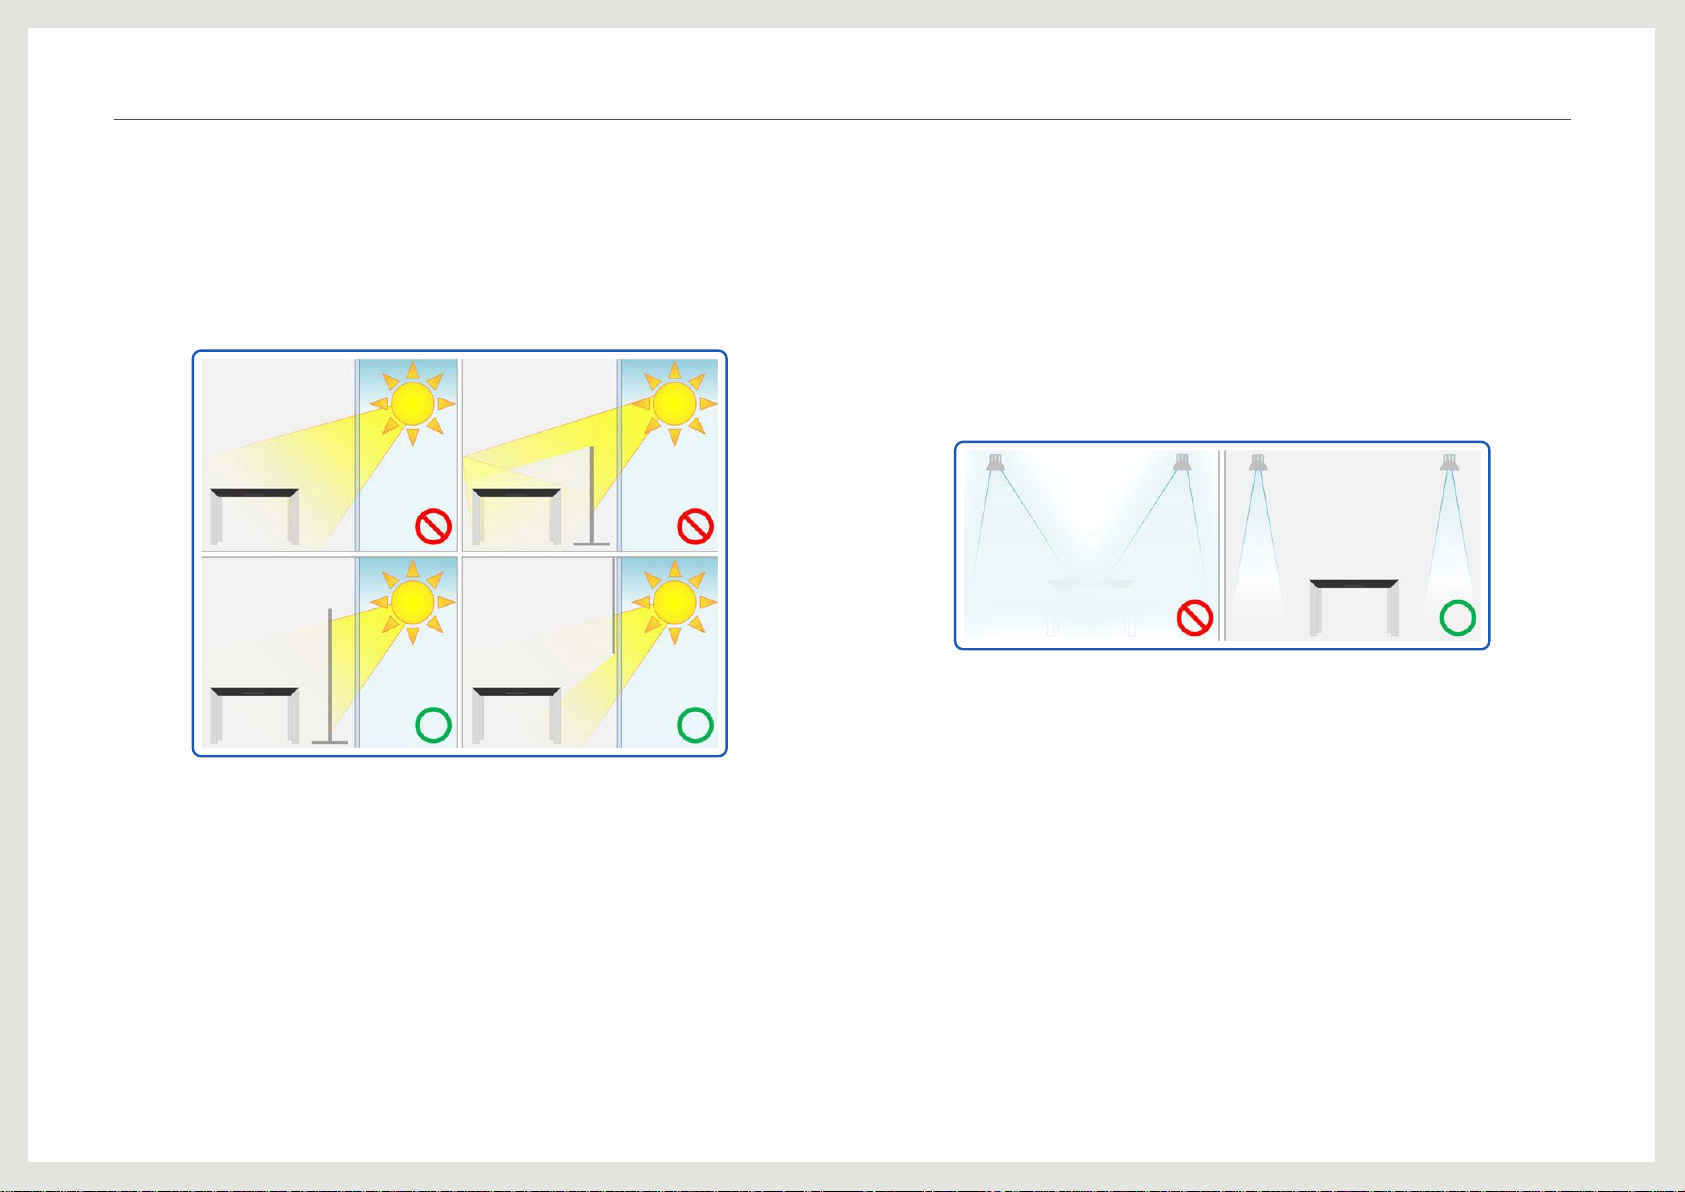
1. Ensure that no light sources shine directly onto, above, or across the SUR40 display.
Shining a light directly into people’s eyes makes it difcult for them to see. Similarly, light
shining directly on the SUR40 display makes it difcult for the device to see the touches
and objects placed on the screen. Avoid using direct lighting, and use caution when
diffused lights are pointed at the display. Indirect lighting should be used, as it is the best
option.
15
Page 16
Prepara t i o n
2. Ensure the SUR40 display does not have a direct line of sight to exterior windows. Sunlight
can be several thousand times brighter than indoor lighting and can easily overpower a
room, making electronic displays difcult to read. The Sun’s position and intensity changes
throughout the year, day, and often minute to minute – making it ne one second and not
the next. If the SUR40 is near windows, the best approach is to use shades and screens
to directly block all incoming exterior light. Also, check for objects and décor that may
redirect sunlight onto the SUR40 display, negatively impacting performance.
3. Keep lighting levels within target thresholds. Lower lighting levels are more conducive
to using the SUR40. Lighting is not always constant. Make sure you consider how light
around a SUR40 changes during the day. Many venues are open between 8 and 24 hours
a day. Natural and articial lighting in such venues can change radically from morning to
afternoon to evening, and vary with season.
Even if you design light specically for a SUR40, you may have to change or modify the
light during the day or throughout the year. For example, natural or indirect light might
darken during the evening, requiring you to turn up uorescent lighting that is installed
specically for the unit.
Evaluate changing lighting conditions over time to provide a better sense of how lighting
levels may vary. (See Evaluating lighting conditions data for threshold values.)
4. Use diffused energy efcient compact uorescent lights (CFLs) or LEDS to light the
surrounding area. Not all lights are created equal. Compact uorescent lights are widely
available, cost effective and efcient means to light an environment. That efciency
also makes them the best choice for lighting the areas around the SUR40. Tube style
uorescent lights can also work, but it’s often harder to make sure they don’t shine directly
on the display. LED lights with a cool color temperature are the next best choice.
They are the most energy efcient and increasingly cost effective lighting source available
– and they can easily replace a wider range of older style light sources. Less efcient
light sources like incandescent bulbs, metal halide, vapor lamps and halogens are not
recommended as the emitted energy can impact SUR40 performance.
16
Page 17

Prepara t i o n
Measuring environment lighting conditions
Before receiving your SUR40 you should measure the lighting conditions with a commercially
available light meter. This is the kind of device that photographers use to know how much
light is shining on something. They measure light in quantities called lux – without getting too
technical you can think of lux as the brightness at a particular point in the room.
There are a few simple things that will help you make sure your measurements are as easy
and accurate as possible.
1. Always take the light readings from the same position, angle, and height as where the
SUR40 will be placed. Light readings can vary greatly based on where the measurement is
taken. A slight change in position can sometimes produce very different results.
Evaluating lighting condition data
When you have the readings it is important to know which lighting types you have. You may
need to consult your facilities management team to get accurate data on specic lighting and
bulb types in a particular venue.
Then, match the lux value with the lighting type in the chart below. Lower numbers indicate
better expected device performance in those lighting conditions. Aim to keep your lighting
levels in the “best performance” range.
Lighting type Target performance and lux thresholds
Best performance: <600 lux
Compact Fluorescent Light
(CFL)
Cool White LED (4900K)
Vapor Lamps
Reduced performance: 600-1000 lux
Poor performance: >1000 lux
Best performance: <560 lux
Reduced performance: 560-800 lux
Poor performance: >800 lux
Best performance: <530 lux
Reduced performance: 530-900 lux
Poor performance: >900 lux
2. Improve accuracy by isolating different lighting types when operating in mixed
environments. Many places do not have a single type of light – often mixing two or more
different types. Try to take separate measurement for each light type (e.g. turn off all but
one type of light source, take readings, then switch light sources). It’s not always possible,
but it will help improve accuracy.
3. Make sure to correctly note the type of lighting you are measuring. As noted earlier, some
lights are better than others. Knowing the exact kind of light you are using will help you
determine if the environment lighting conditions exceed the maximum safe lux values.
Sunlight
(through ltered window)
Metal Halide
Best performance: <400 lux
Reduced performance: 400-600 lux
Poor performance: >600 lux
Best performance: <370 lux
Reduced performance: 370-550 lux
Poor performance: >550 lux
17
Page 18
Prepara t i o n
Lighting type Target performance and lux thresholds
Best performance: <300 lux
Warm White LED (3000K)
Sunlight (unltered)
Halogen
Incandescent
Reduced performance: 300-460 lux
Poor performance: >460 lux
Best performance: <160 lux
Reduced performance: 160-250 lux
Poor performance: >250 lux
Best performance: <60 lux
Reduced performance: 60-90 lux
Poor performance: >90 lux
Best performance: <50 lux
Reduced performance: 50-80 lux
Poor performance: >80 lux
Fine tuning lighting after setup
Once you have a SUR40 you should use the Environment Lighting Optimizer tool found on the
device to ne tune lighting. It is a helpful utility that will provide immediate feedback about
the exact lighting conditions and help you make environmental adjustments when necessary
or if lighting conditions change.
A simple green, yellow, red indication system lets you know which part of the display is being
impacted by light. Using the four lighting considerations you should be able to optimize your
environment for a great experience that your customers will enjoy. For more information on
the Environmental Lighting Optimizer please see the Microsoft Surface 2.0 Administration
Guide.
Connections and electrical power
At a minimum, a SUR40 requires a connection to electrical power. Your applications might also
require a connection to a network or accessories.
Make sure that you have all the appropriate cables and connections available and conveniently
located so that you can route all the cables efciently and safely around the SUR40 device.
NOTE
SUR40 includes a power cord, but it does not include any other connection cables.
Electrical power
SUR40 includes an AC power cord that is 300 cm / 118.1 in. Choose a location for your unit
that is close enough for this cord to plug in to an electrical outlet.
You must take appropriate precautions to avoid serious injury to people or damage to the
SUR40. These precautions include the following:
• Do not place the power cord in an area where it could become a tripping hazard or be
exposed to possible damage.
• Use only the AC power cord that is included with a SUR40 to connect to the AC power
connector.
• Do not use non-standard power sources, such as generators or inverters, even if the voltage
and frequency appear acceptable. Use only AC power that a standard wall outlet provides.
• Conrm that your electrical outlet provides the type of power that is required for the device.
If you are not sure of the type of power that is supplied to your venue, consult a qualied
electrician.
Electrical outlet placement
If you have the opportunity to congure the electrical outlet and other connections for
your site, consider the location carefully and consider a custom installation that provides all
connections that you need now or might want in the future.
The ideal electrical outlet for a SUR40 when the unit is deployed horizontally is a recessed
outlet in the oor immediately adjacent to the device.
18
Page 19
Prepara t i o n
Data and other connections
If your software applications require a network connection to run (for example, to access data
on a shared network drive), you may ensure that there is an available network connection
near the SUR40 device.
If you are doing a custom outlet installation, consider adding other types of connections that
you need now or that you might want in the future in the same location.
NOTE
The Samsung SUR40 also supports a wireless network connection.
Location optimization
After you’ve chosen where to place SUR40 you can optimize the area around the device to
highlight the unit and enhance the experience. These types of changes can affect whether
people notice the SUR40 and how long they interact with it.
This section describes how to change the general staging, manage people trafc, and arrange
seating to optimize SUR40 location.
General staging
A well-staged setting highlights a SUR40 in its surroundings and attracts people to the unit.
The staging can increase how people perceive the quality and appeal of the device and
increase how many people interact using the Surface experience.
You can change the architecture and general décor around SUR40 to dene stage settings.
For example, you can add furnishings or dividers to invite people towards the SUR40 and
clarify how they should approach and orient themselves around the unit.
Easily moveable furniture, such as stools and chairs, can enable people to arrange things to
individual taste and give them a level of privacy. Subtle changes (such as to the lighting or
color) and less tangible changes (such as different levels of complexity in the environment or
different decor styles) can help draw attention to the device.
Publicity is a common reason for people to want to interact with a SUR40 for the rst time.
Consider adding descriptive signs to help attract rst-time users.
Make sure you also consider the visibility and cleanliness of the SUR40 and what other
attractions or noise might impact whether people are attracted to a SUR40 device.
Visibility
A clearly dened area separates a SUR40 from its surroundings, highlights it as a centerpiece,
and attracts people to come closer and interact with the unit.
But before people can approach a SUR40 they must rst know that it exists. You should place
the unit in a location where people who are passing by can see the device and see other
people interacting with the experience. This sight will encourage rst-time users to approach
and try interacting with the SUR40. You can also add descriptive signs to help attract people.
Clutter and cleanliness
Clutter around a SUR40 makes people think that the device is not working or that it is simply
a table where they can temporarily place bags or boxes. Make sure that clutter does not
accumulate on, or around, the SUR40.
The cables and cords that are connected to a SUR40 might also appear to be clutter around
the unit if they are visible to people. These cables and cords might be tripping hazards and
might decrease the unit’s perceived quality.
Carefully consider how you will connect electricity and other accessories (such as a network
cable) to the device.
Poor cleanliness (such as dust, scrap paper, pen marks, used napkins, or food residue)
also deters potential users. People are less likely to approach or use a SUR40 if it is clearly
dirty. Make sure that someone regularly cleans the display and clears the surrounding area.
Consider also using this cleaning time to check device operation.
Nearby attractions
Other attractions around a SUR40 (such as a TV or arcade game) will likely compete with the
SUR40 for people’s attention, especially if the other attractions are loud or moving.
These attractions might prevent people from being attracted to and using the device.
Make sure that the area around a SUR40 is free of competing attractions, or consider moving
obvious competing attractions away from the device.
19
Page 20
Prepara t i o n
Noise
SUR40 includes speakers that play sounds when people interact with it, so ambient noise can
interfere with the Surface experience. Also, ambient noise from nearby attractions (such as a
TV or arcade game) will compete with application sounds for people’s attention, especially if
the attractions include loud noises, ashing lights, and so on.
These types of distractions can quickly divert potential users from the device.
Consider eliminating or reducing the volume of any background noise so that people can hear
the application audio.
NOTE
SUR40 includes 10W x 2 speakers. You can change the volume level by using the On Screen
Display (accessed through the power button) or in Windows Mode.
People trafc
People can interact with SUR40 from any side, so make sure that when deployed horizontally
that the unit is located away from walls or other obstructions that might prevent people from
getting close to the display on all four sides.
Also, make sure that the SUR40 is near people trafc without impeding the people. If a unit is
placed far away from where people typically walk, they are less likely to notice the device and
less likely to approach it.
Seating
Seating around SUR40 can help improve people’s comfort while they interact with the
application experience.
The best seating height depends on how long you expect people to interact with the SUR40,
from only a few minutes to 20 minutes or longer:
• If you expect people to interact with the SUR40 for short durations, people can stand next
to the device while they interact.
Seating might help them be more comfortable while they interact with the unit.
• If you expect people to interact with the SUR40 for longer durations, you should provide
seating to make the experience more comfortable for people.
You should choose seats that are lower than the height of the display (when horizontal).
This height reduces how much people have to bend from the waist and provides a more
comfortable experience.
If you provide seats, you should also consider the following factors:
• Provide enough seats for the number of people that you expect. People tend to approach a
SUR40 in groups of two or more, so multiple seats enables people to interact together.
• You can articially limit the number people you want to interact with a SUR40 at one time
by how you choose the number and placement of seats. To avoid large crowds, you should
minimize the number of seats around the SUR40.
• Choose seats that enable people to keep their knees under the edge of the SUR40 (when
horizontal). This position enables people to get close to the unit and reduces the amount of
bending and twisting required.
Preparing for delivery
To prepare for your SUR40, please address the following:
• Are all the doorways, thresholds, hallways, and elevators in your venue wide enough
and strong enough to accommodate the SUR40? Are any sharp corners wide enough to
accommodate the shipping box as it is pivoted around the corner?
• Do you want your technician to unpack the SUR40 in full view of customers? If not, you
might want the technician to unpack the SUR40 away from customers.
In this case, you need to choose a separate unpacking location and make sure that the
device can be easily moved from the unpacking location to its nal destination.
If you choose to unpack the SUR40 in a separate location, the technician can start to set up
the device in the unpacking location.
But the technician cannot completely set up the device until the unit is moved to its nal
location (because of the required connections and lighting adjustments).
For more information about how to prepare your site for a SUR40, see the following checklist.
Most people want to sit on the edge of their seats (also known as perch seating) to get closer
to the SUR40.
You should choose seats that have a rm front edge to enable this type of sitting and to make
sure that people don’t fall or tip off the seats.
20
Page 21
Prepara t i o n
Checklist: Before your unit arrives
Personnel
Choose the technical people who will set up the SUR40. The people must provide the
appropriate information from this checklist and accept the Software License Agreement.
Locations
• Choose a nal destination for the SUR40 that can support the device and that provides
enough room for people to interact with device from all sides.
• Finish any optimizations to the area around the SUR40 (such as staging or seating).
• Choose an unpacking location and make sure that the SUR40 can easily move from the
unpacking location to the nal destination.
• Make sure there is ventilation in the Surface location to expel heat away from the unit.
• Prepare security measures to keep the SUR40 safe in the venue.
Lighting
• Ensure that no light sources shine directly onto, above, or across the surface display.
• Ensure the Surface display does not have a direct line of sight to exterior windows.
• Keep lighting levels within target thresholds.
• Use diffused energy efcient compact uorescent lights (CFLs) or cool white LEDs to light
the surrounding area.
Administration
• Prepare an administrator account name and password to use when the technician sets up
the SUR40.
• Prepare a machine name for each unit.
Connections
• Make sure an electrical outlet and any other connections are prepared and ready. If you
are not able to use a oor-recessed receptacle, be sure you have a cable protector or other
solution so that cables are not a tripping hazard.
• Prepare network or accessory connections and have the cables ready to attach to the
SUR40.
Software and hardware
• Prepare your applications (and any additional software that they require) for installation.
• Prepare any security or network software that is required for your company (for example,
antivirus software or settings to connect the SUR40 to your Wi-Fi network, domain or
workgroup).
• Review the SUR40 Quick Start Guide and Microsoft Surface 2.0 Administration Guide (http://
technet.microsoft.com/en-us/library/ee692162.aspx) for more information regarding setup.
• Measure and evaluate environmental lighting conditions.
• Fine tune lighting with the Environment Lighting Optimizer after deploying SUR40.
21
Page 22
Prepara t i o n
Installing the Wall Mount
Preparing before installing Wall-Mount
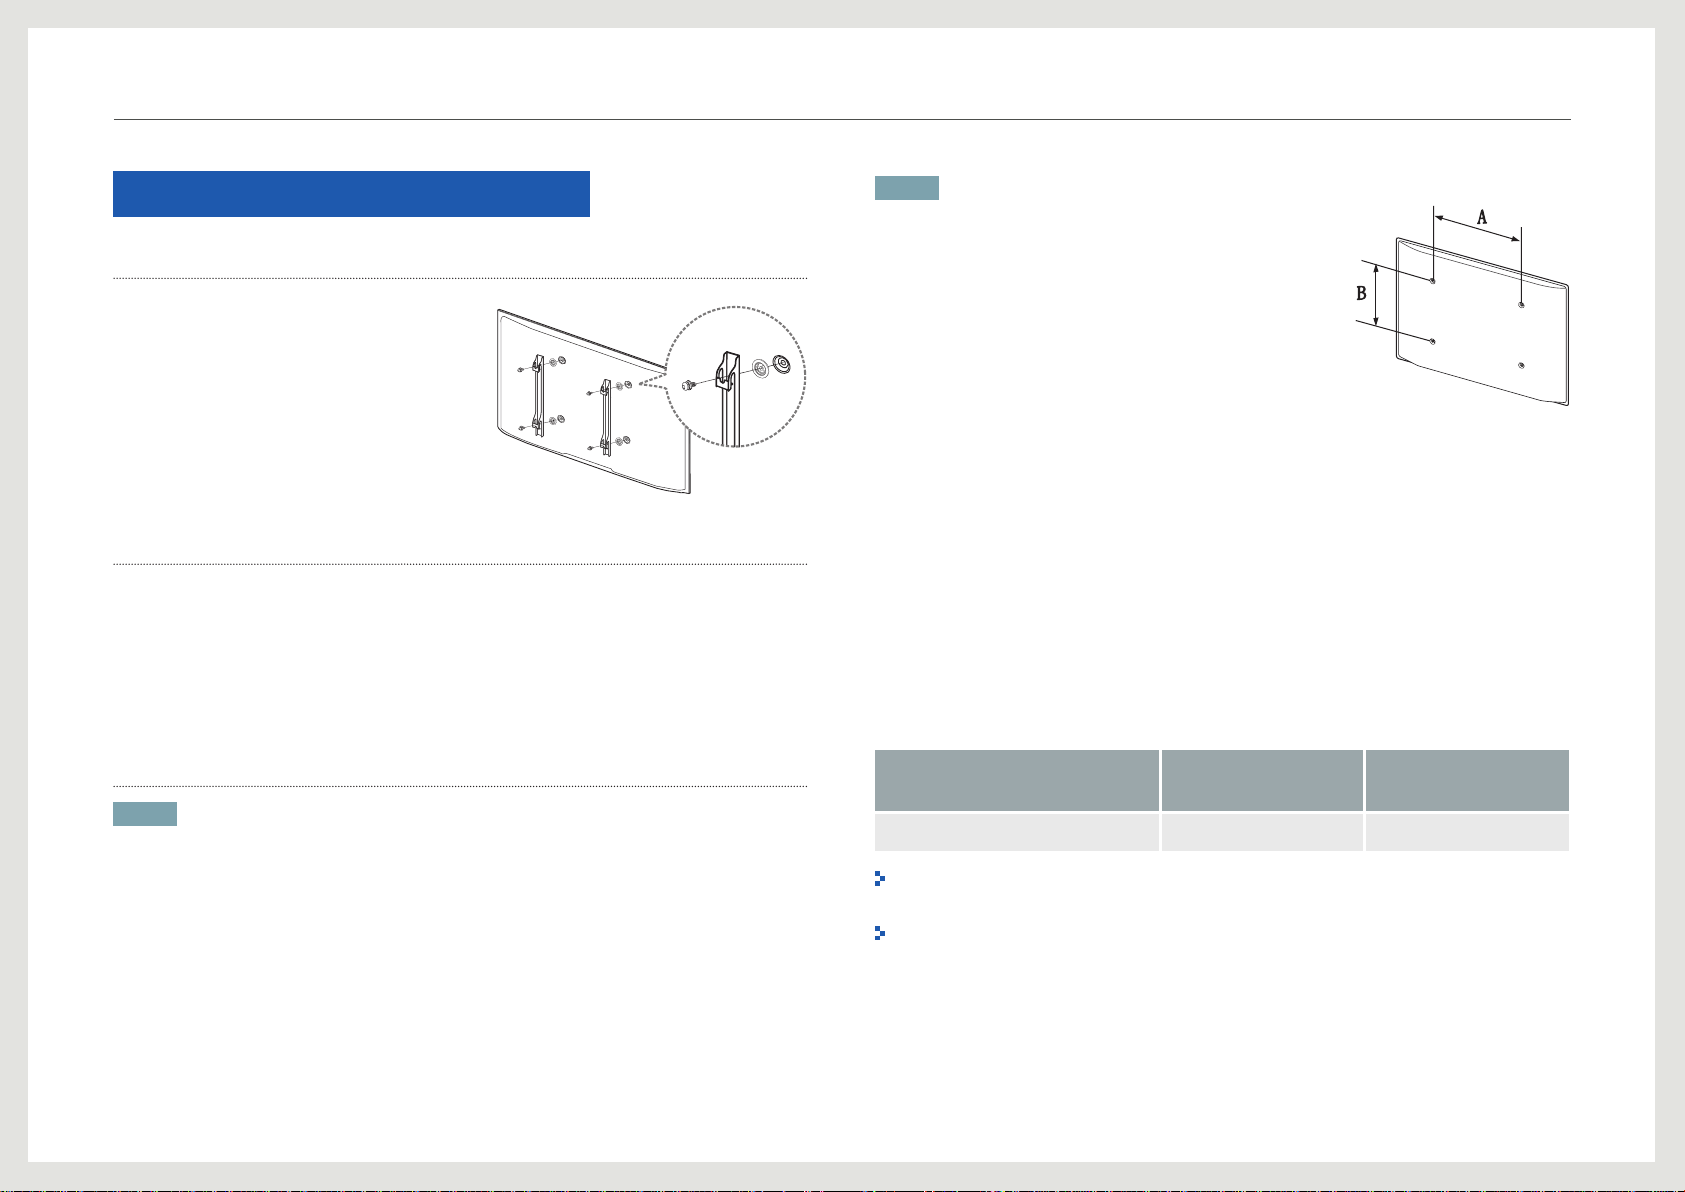
To install a wall-mount from another manufacturer,
use the Holder-Ring.
1
Installing the Wall Mount Kit
The wall mount kit (sold separately) allows you to mount the product on the wall.
For detailed information on installing the wall mount, see the instructions provided with the
wall mount. We recommend you contact a technician for assistance when installing the wall
mount bracket.
Samsung Electronics is not responsible for any damage to the product or injury to yourself or
others if you elect to install the wall mount on your own.
Wall Mount Kit Specications (VESA)
NOTE
Install your wall mount on a solid wall perpendicular to the oor. Before attaching the wall
mount to surfaces other than plaster board, please contact your nearest dealer for additional
information. If you install the product on a ceiling or slanted wall, it may fall and result in
severe personal injury.
NOTE
• Standard dimensions for wall mount kits are shown in the
table below.
• Samsung wall mount kits contain a detailed installation
manual and all parts necessary for assembly are provided.
• Do not use screws that do not comply with the VESA
standard screw specications.
• Do not use screws that are longer than the standard length or
do not comply with the VESA standard screw specications.
Screws that are too long may cause damage to the inside of
the product.
• For wall mounts that do not comply with the VESA standard
screw specications, the length of the screws may differ
depending on the wall mount specications.
• Do not fasten the screws too rmly.
This may damage the product or cause the product to fall,
leading to personal injury.
Samsung is not liable for these kinds of accidents.
• Samsung is not liable for product damage or personal injury
when a non-VESA or non-specied wall mount is used or the
consumer fails to follow the product installation instructions.
• Do not mount the product at more than a 15 degree tilt.
• Always have two people mount the product on a wall.
VESA SCREW HOLE SPECS
(A * B) IN MILLIMETERS
600 X 400 M8 4
Do not install your Wall Mount Kit while your product is turned on.
It may result in personal injury due to electric shock.
When the product is installed vertically, do not use portrait orientation.
STANDARD SCREW QUANTITY
22
Page 23
Chapter. 3
Connecting and Using a Source Device
Checklist before Connecting to
Source Devices
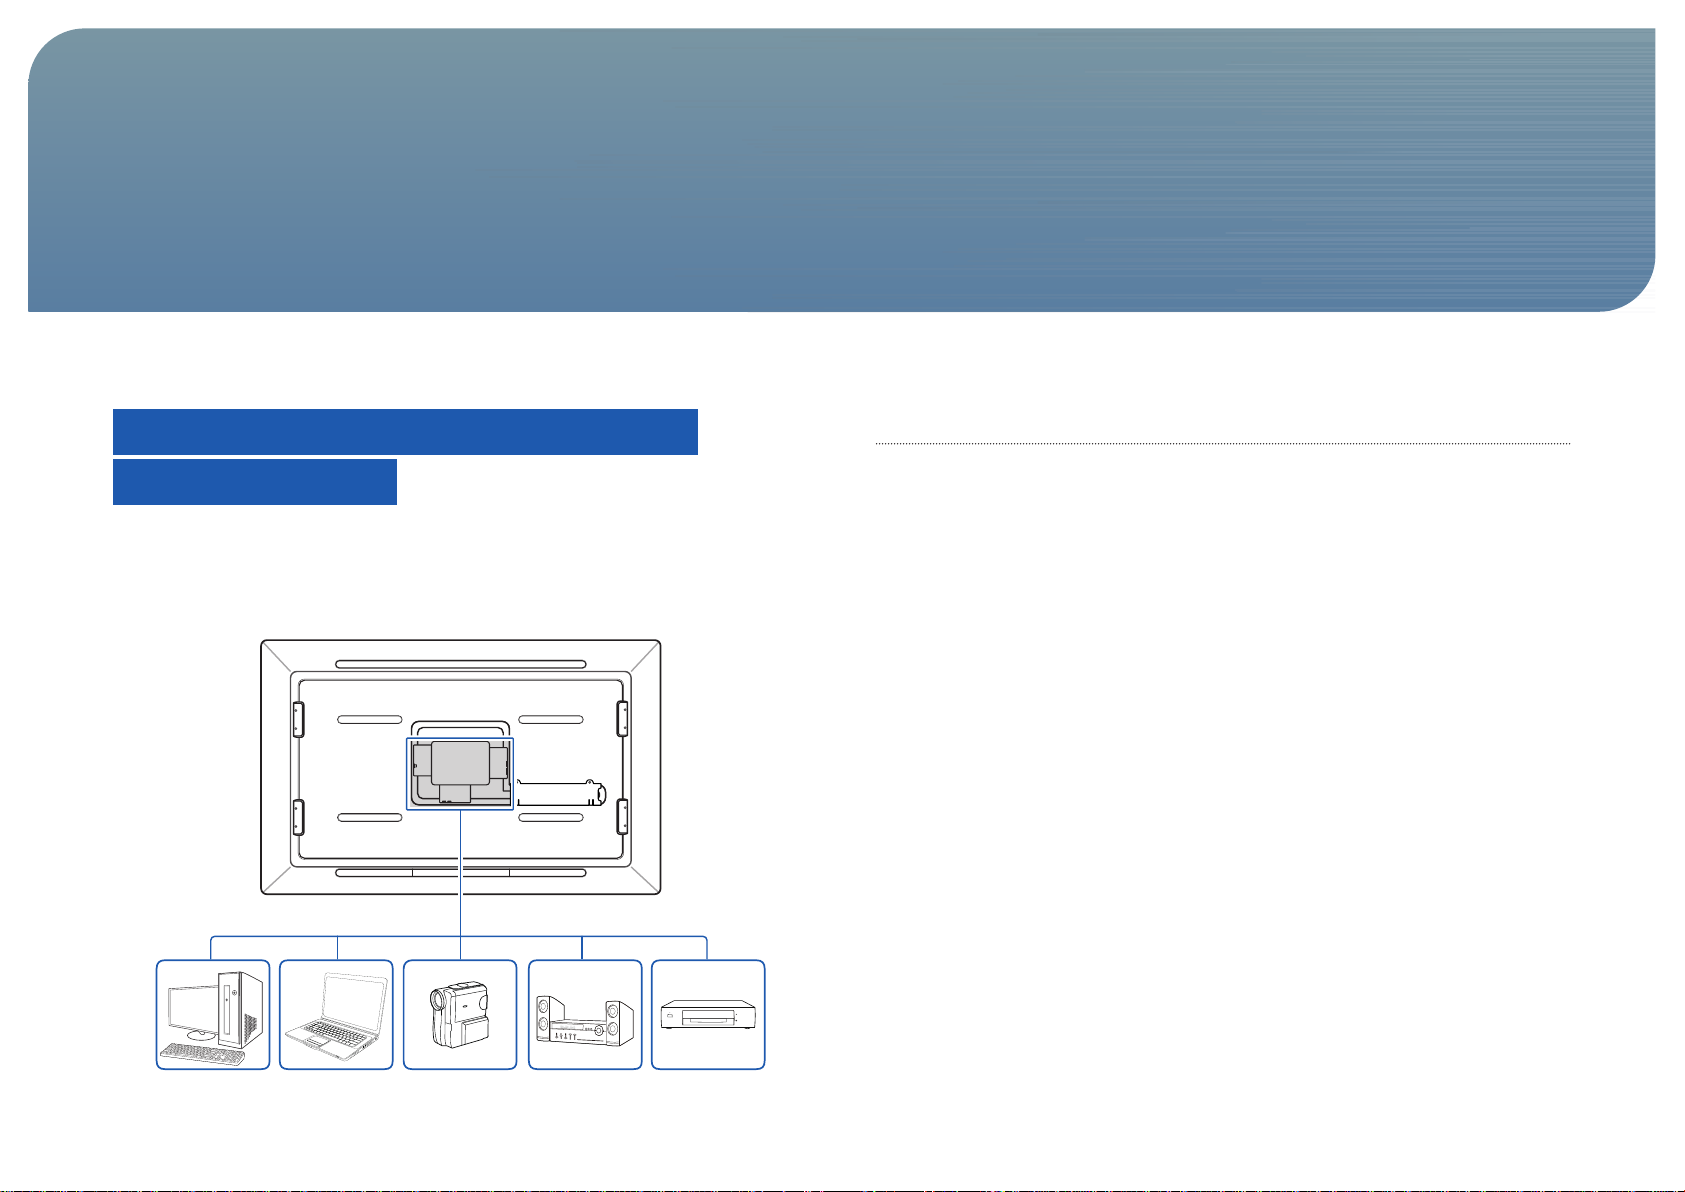
Check the following before you connect this product with other devices.
The product can connect to a camcorder, audio player, set-top box, DVD player, etc.
(Note that the optimal performance can be achieved when the resolution of the source device
is Full HD 1080p.)
Pre-connection Checkpoints
- Check the available ports on the back of the source device.
- Refer to the user manual for the source device when connecting it to the product.
The number and locations of ports can vary depending on the source device.
- Do not connect the power cable until all connections are completed.
Connecting the power cable during connection may damage the product.
23
Page 24

Connecting and Using a Source Device
Before using the product
Connecting the Power
POWER S/W POWER IN
ON
1. Connect the power cable to the product and power outlet. Next, turn on the power switch.
Connecting USB Devices
USB
1. Connect a USB device (keyboard, mouse, etc.) to a [USB ] port on the product.
NOTE
USB 2.0 devices are supported.
USB
24
Page 25

Connecting and Using a Source Device
Connecting to an External Display
Connection Using an HDMI-HDMI Cable
HDMI OUT
HDMI IN
1. Connect the HDMI cable to [HDMI OUT] on the product and HDMI IN on the external
display.
2. Connect the power cable to the product, and turn on the power switch. Next, power on
the external display.
3. After connecting the HDMI cable, set the input source for the product to HDMI.
- Press the button on the product.
Go to Input source on the on-screen display menu. Next, select HDMI.
Connection Using an HDMI-DVI Cable
HDMI OUT
AUDIO IN
1. Connect the HDMI-DVI cable to [HDMI OUT] on the product and DVI IN on the external
display.
2. Connect the RCA cable to [AUDIO OUT] on the product and AUDIO IN on the external
display.
3. Connect the power cable to the product, and turn on the power switch. Next, power on
the external display.
NOTE
The HDMI-DVI cable does not support audio. To enable the audio, connect the stereo cable.
DVI IN
25
Page 26
Connecting and Using a Source Device
Connecting to a Source Device
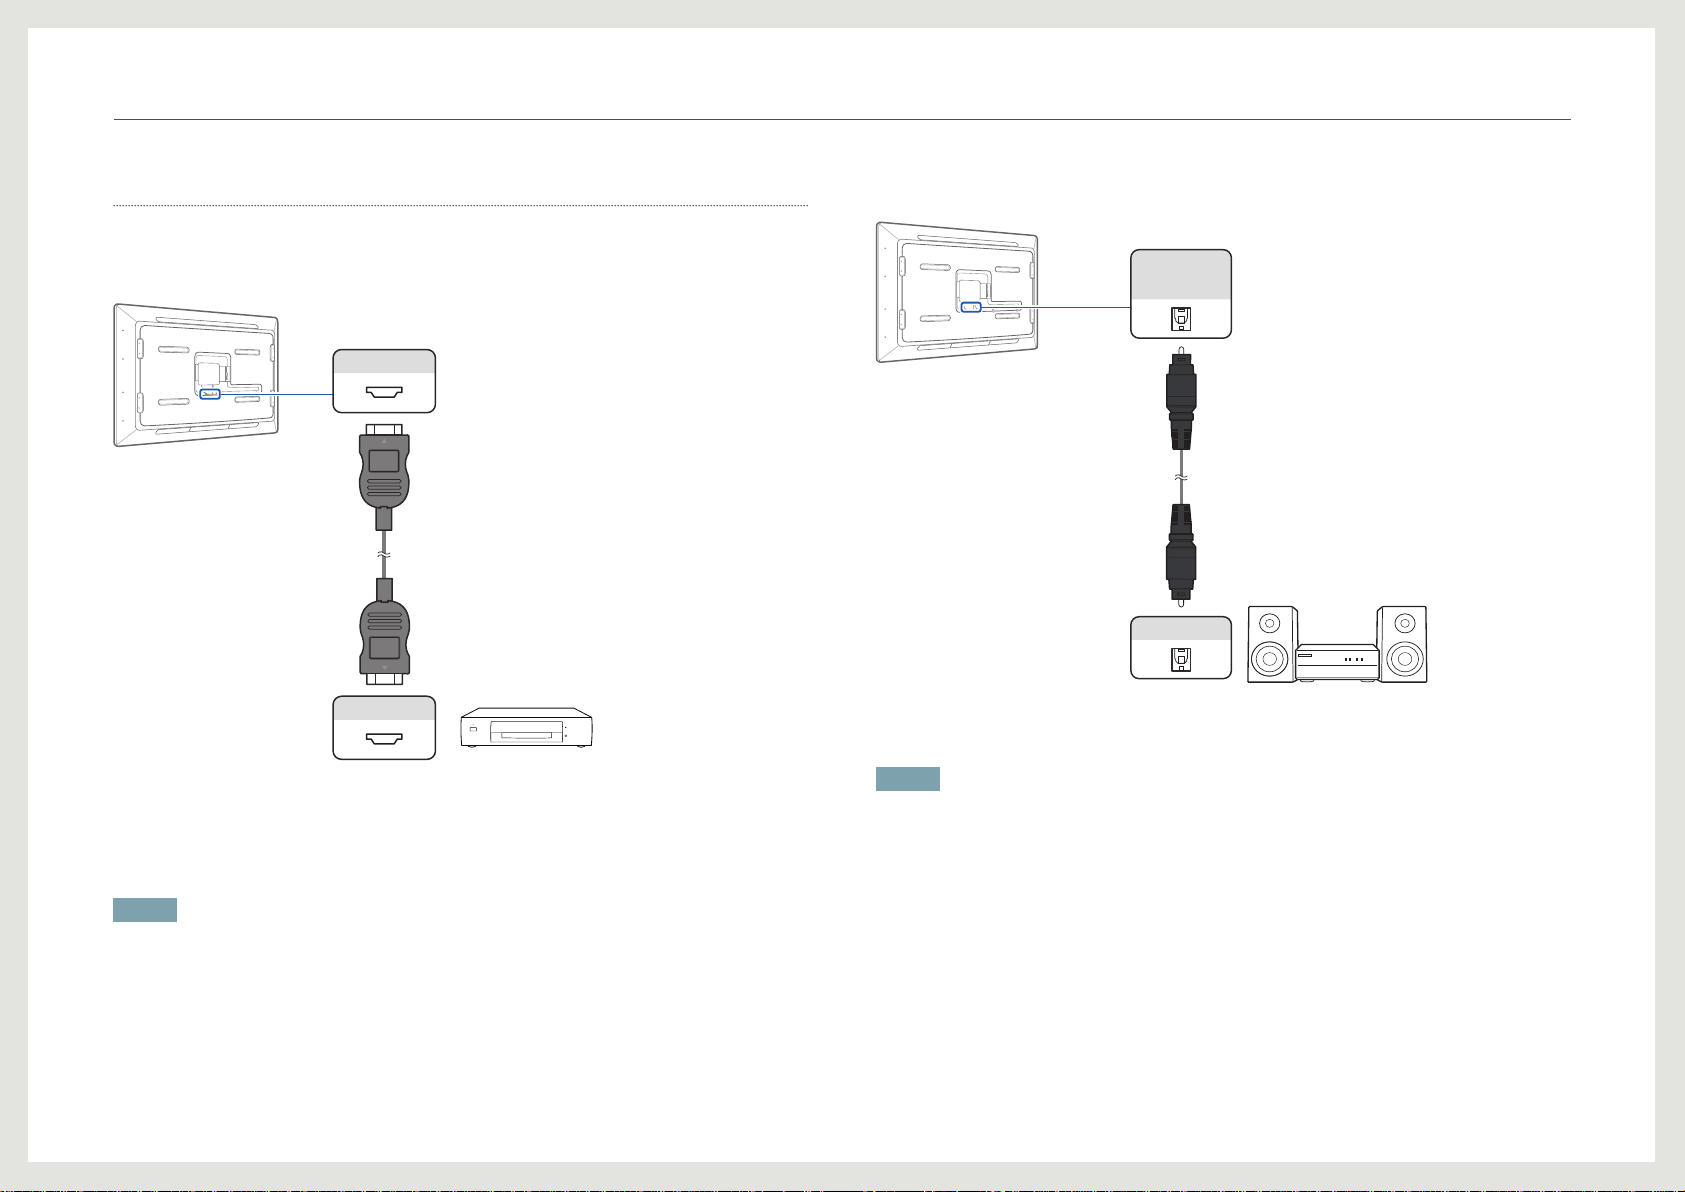
Choose an appropriate connection method to connect to the source device.
Connection Using an HDMI-HDMI Cable
HDMI IN
HDMI OUT
Connecting to an Amplier
DIGITAL
AUDIO OUT
(OPTICAL)
OPTICAL
1. Connect the [DIGITAL AUDIO OUT(OPTICAL)] port on the product to the digital audio
input port on the digital amplier using the optical cable.
1. Connect the HDMI cable to [HDMI IN] on the product and HDMI OUT on the source
device.
2. Connect the power cable to the product and power outlet. Next, turn on the power switch
on the source device.
NOTE
• The picture may not display colors properly and/or the audio may not be available if a
source device using an older version of HDMI is connected to the product using a later
version of HDMI.
If such a problem occurs, ask the manufacturer of the source device for the HDMI version.
If it is an older version, request an upgrade.
• This product does not support the Ethernet function via HDMI.
This product supports HDMI version 1.3.
• Audio output will not be supported if the audio content is protected.
NOTE
For further details on how to connect to speakers or an amplier, refer to the user manual for
the speakers (or amplier).
26
Page 27

Connecting and Using a Source Device
Connecting to Headphones or a Microphone
1. Connect the headphones and microphone to [ ] and [ ] on the product respectively.
SD (HC) Card Slot Connection
SD
Connection Using the LAN Cable
LAN
1. Connect the LAN cable to [LAN] on the product.
NOTE
• It is not supported when the network speed is below 10 Mbps.
• Ensure you use the CAT 5 (*STP type) cable.
*Shielded Twist Pair
HUB
1. Insert the memory card into [
SD
] on the product.
NOTE
The maximum external memory capacity may vary depending on the memory card.
27
Page 28

Chapter. 4
Using the Product
About the Product
The Samsung SUR40 for Microsoft® Surface® includes the Windows 7 operating system,
Surface 2.0 with PixelSense™ technology, and the Bing™ for Microsoft
Other applications and custom solutions come from the many, worldwide Surface development
partners. You can nd a Surface partner and applications on www.surface.com or use the
Surface 2.0 software development Kit (SDK) to create your own applications.
Download the Surface 2.0 SDK from www.msdn.com/windows/surface.
With this product, you can use it in a variety of ways including as a table, mounted on the
wall (satises VESA mount standards), or in a custom enclosure. Multiple people can use the
device at the same time with 52 simultaneous inputs. Objects using Surface tags (8-bit optical
tags) can trigger digital content and control an application experience.
Learn more about the unique features of Surface computing and this device at www.
samsunglfd.com or www.surface.com.
Windows and Surface Mode
NOTE
• In Surface mode, the product can only be controlled by touch input.
• Windows mode is the standard Windows 7 desktop which is used for product conguration
and administration. Surface mode is the user-facing experience that is controlled by touch
and tagged objects. Enter Surface mode for deployment using the instructions next.
®
Surface® application.
Entering the Surface Mode
1. On the Windows desktop, click the Enter Surface Mode icon.
2. When the Surface Application screen is displayed, tap the Surface icon in the middle of the
screen.
3. A list of applications available will be displayed as shown below.
4. Move left or right on the screen then tap to select the desired application.
28
Page 29
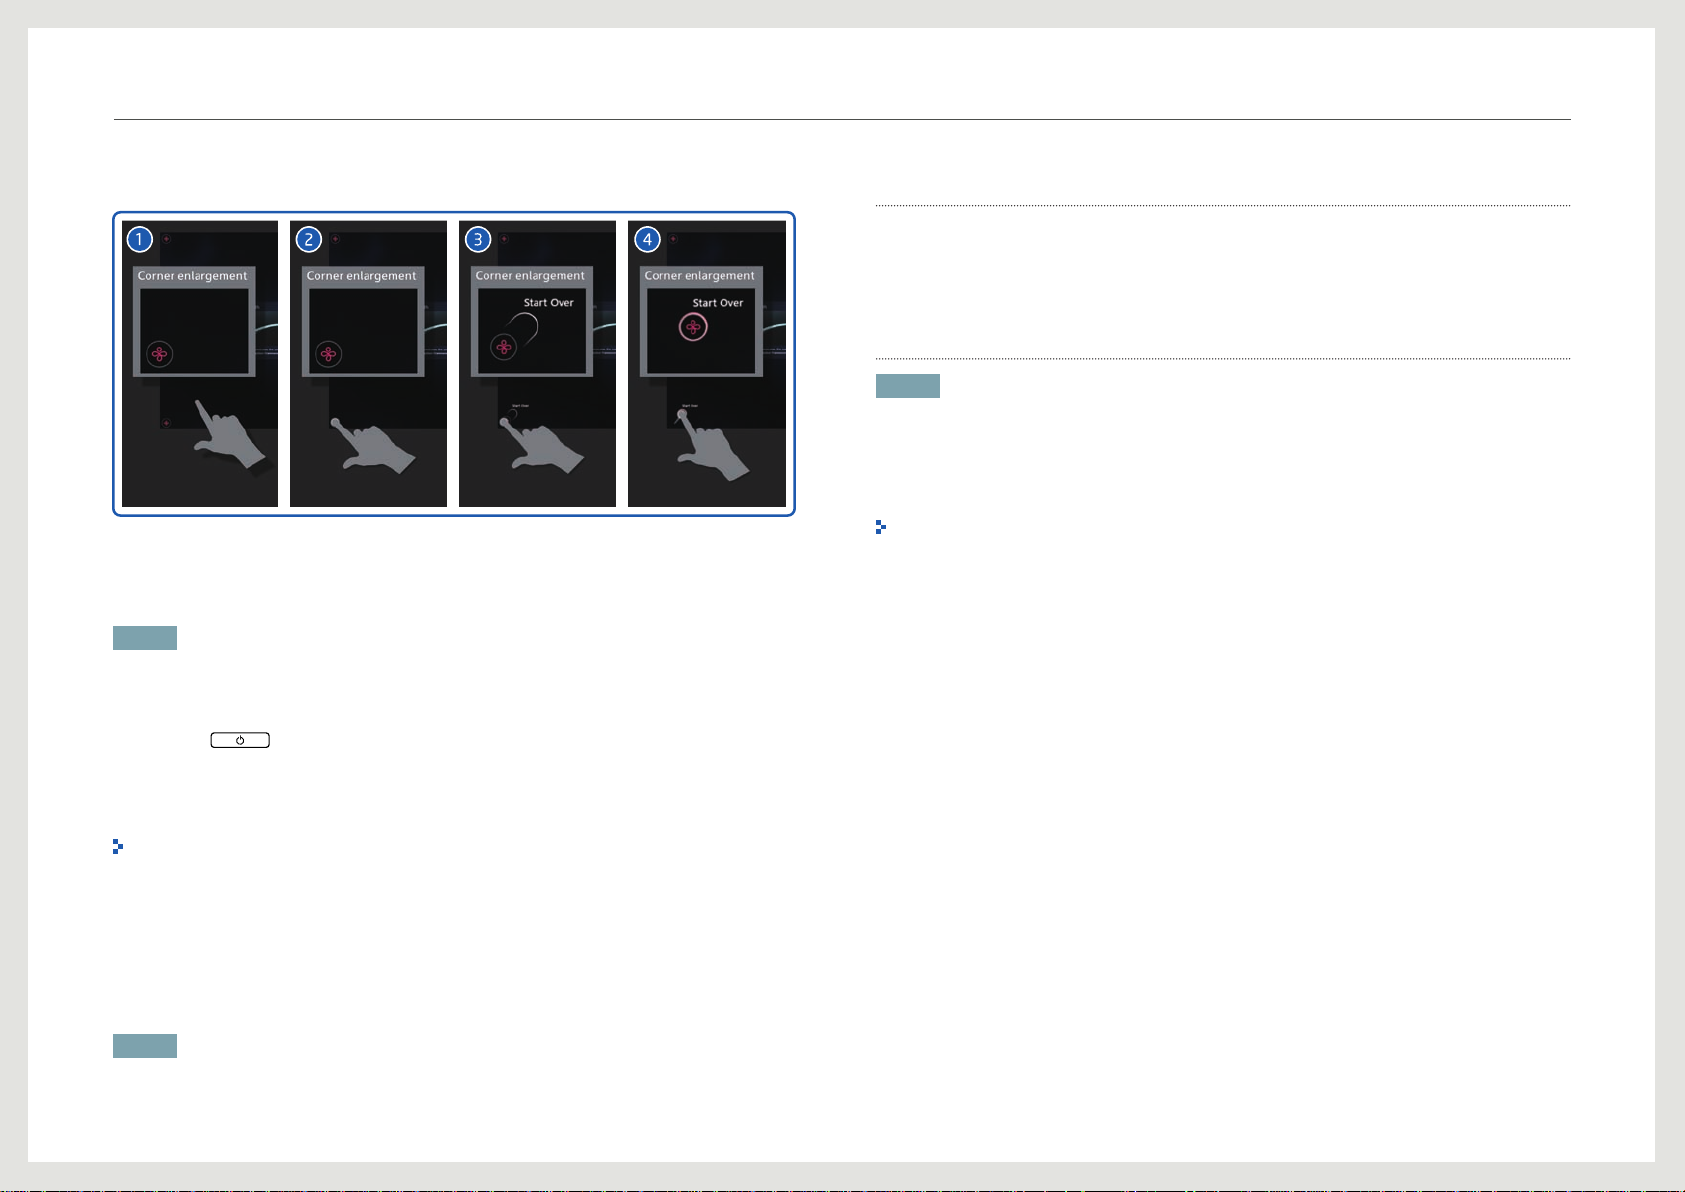
Using the product
Closing an Application
Touch and drag an Access Point in the corner diagonally towards the center of the screen.
The display will return to the screen showing the applications available.
Exiting the Surface Mode
NOTE
To close the product, you must close Surface mode to return to Windows mode.
Exiting the mode using the OSD menu
1. Press the button on the product.
Conguring the system
Please follow the instructions provided in the Microsoft® Surface® 2.0 Administrators Guide
which can be found on the CD that was included with this product, via the Start Menu in
Windows Mode, or on www.surface.com.
Creating a Windows user account
NOTE
To use the product, you must create a Windows user account during installation.
The Windows user account creation screen appears when the product powers on for the rst
time after purchase.
Create an account following the instructions on the screen before using the product.
Ensure you set the language for Windows properly when using the product for the rst time
after purchase. The language cannot be changed after initial settings are congured.
Please see the Microsoft
Microsoft
com or www.surface.com.
®
Surface® 2.0 Administrator Guide can also be downloaded from www.samsunglfd.
®
Surface® 2.0 Administrator Guide for further instruction.
2. In the OSD menu displayed, select Exit Surface Mode.
3. Enter your Windows administrator login and password, and select Exit Surface Mode.
If you don’t establish password, Exit Surface Mode can’t run.
Exiting the mode using a shortcut key
1. Connect your keyboard to a USB port on the product.
2. Press Ctrl + Alt + Delete on the keyboard.
3. Select Log off on the screen.
NOTE
You can not log back into Surface Mode from the Windows login screen.
29
Page 30

Using the product
Selecting the system language
Ensure you set the language for Windows properly when using the product for the rst time
after purchase.
NOTE
The Windows language cannot be changed after initial settings are congured.
Surface language can be changed in the Surface Conguration Editor.
1. The following screen will appear when you turn on the product for the rst time after
purchase. Specify the OS language you want to install. Then, click Next.
5. Proceed to the rest of the installation process following the on-screen instructions.
A user account will be created when the installation is complete.
6. Click the user account icon created as shown below.
7. The Windows desktop will be displayed shortly.
Windows has successfully been installed.
2. Congure the country, time and keyboard settings (Country or region, Time and currency,
Keyboard layout). Then, click Next.
3. Enter your user and computer names. Then, click Next.
4. Enter your password, and click Next.
30
Page 31
Using the product
Using Bing™ for Microsoft® Surface
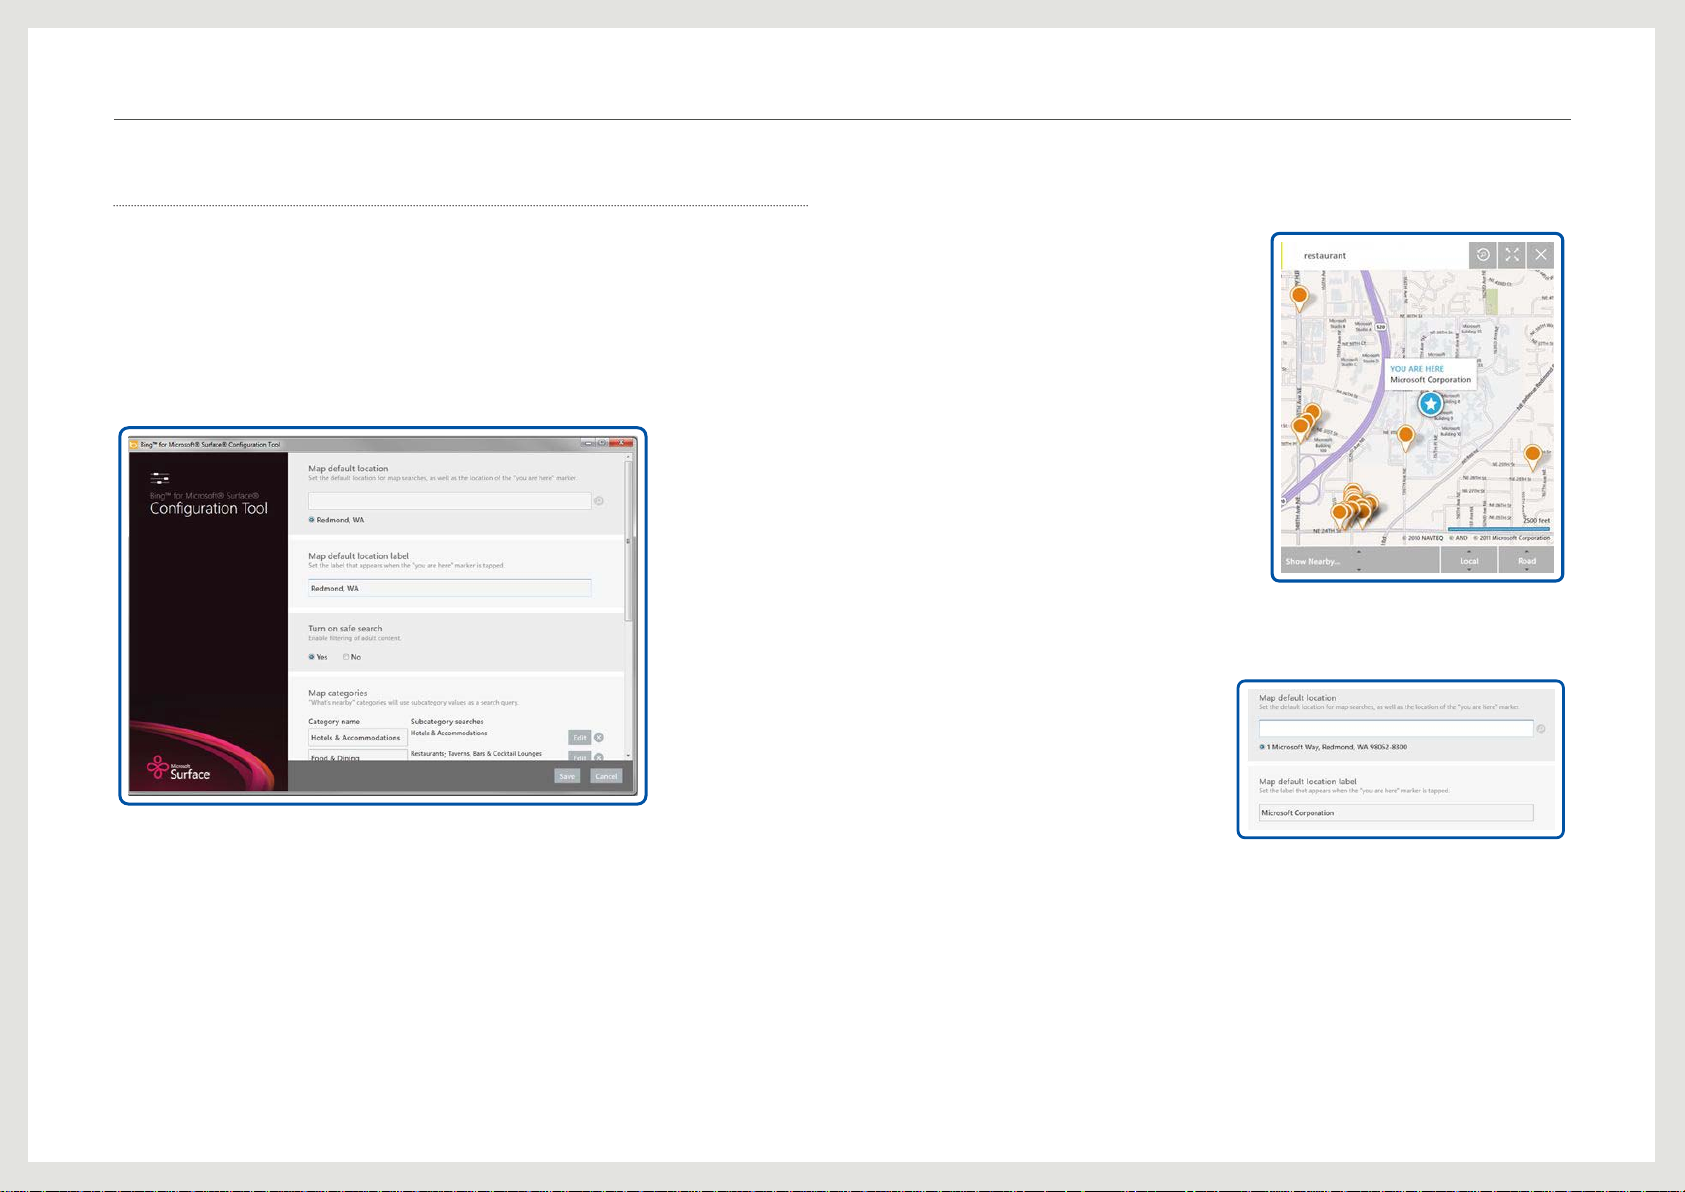
You can use the Bing™ for Microsoft® Surface® application to search for images and maps
with local category information (where available). As an administrator, you can modify some
of the settings of the application using the Bing Conguration Tool.
To open the application, on the Start menu, click All Programs, click Bing™ for Microsoft
®
Surface
, and then click Bing Conguration Tool.
®
®
The Bing Conguration Tool
Default Location
The default location that is displayed on map
searches as a star icon.
To change the default location, type the
location you are interested in, click the search
icon, and then select the radio button that best
reects the location you are interested in.
Map Default Location Label
This location is displayed when you click the
star icon that shows your current location.
The following map shows an example of the
location and label of a customized map.
You can use the Bing Conguration Tool to modify the variables described in the following
sections.
Safe Search
By default, safe search is turned on. When this lter is turned on, any queries sent to the Bing
Search APIs are set with the Adult.Strict option.
When the lter is turned off, any queries sent return unltered results.
Turning the lter off is not recommended.
31
Page 32

Using the product
Location Categories
You can use the conguration tool to modify the categories shown in the Show Nearby
section.
You can also use the conguration tool to remove, edit, and add new categories.
To add a new category, click Add a new category.
Type the category name as you want it to appear in the application, then click the Subcategory
Searches eld. This will bring up a tree view that allows you to select the Bing Categories that
will be queries for the category you created. For example, the Food & Dining category in the
application groups the Bing Categories as shown below:
Predened Searches
You can use the Bing Conguration Tool to register predened searches with tagged objects.
When a tagged object that matches the series and value specied in the conguration tool
is placed on the display, a Search button will appear that will allow a user to search for the
registered term without having to type it. Both Image and Map searches can be done as
predened searches by entering a tag series, tag value, search type and search query as
shown in the example below.
For instructions on producing byte tags, please see www.msdn.com/windows/surface.
NOTE
You must enter the tag value as it appears on the center of the tag. For byte tags, the only tag
supported in this release, the tag series is always 0.
For example, the following registration value will result in the following search experience.
When you are done using the Bing Conguration Tool, to save your changes, click Save.
That way, the next time you use Bing™ for Microsoft
you made.
®
Surface®, it will maintain the changes
32
Page 33

Using the product
Re-installing Windows 7
If the need arises, you can reinstall the Windows 7 operating system using the restore
function.
NOTE
Ensure you back up important data to a memory device (USB memory or external hard drive)
before initializing Windows 7.
1. Go to Start Control Panel System and Security Backup and Restore, and click
Recover system settings or your computer.
3. Click Reinstall Windows.
4. You will be prompted to conrm that you want to back up les as shown below. Back up
your important data. After backup, restart the system. Re-installation of Windows 7 will
start.
2. Click Advanced recovery methods.
NOTE
You can also use recovery mode on the following method.
- When boot up, press [F1] before Windows booted.
- When boot up, press [F8] and select Repair Your Computer.
33
Page 34
Using the product
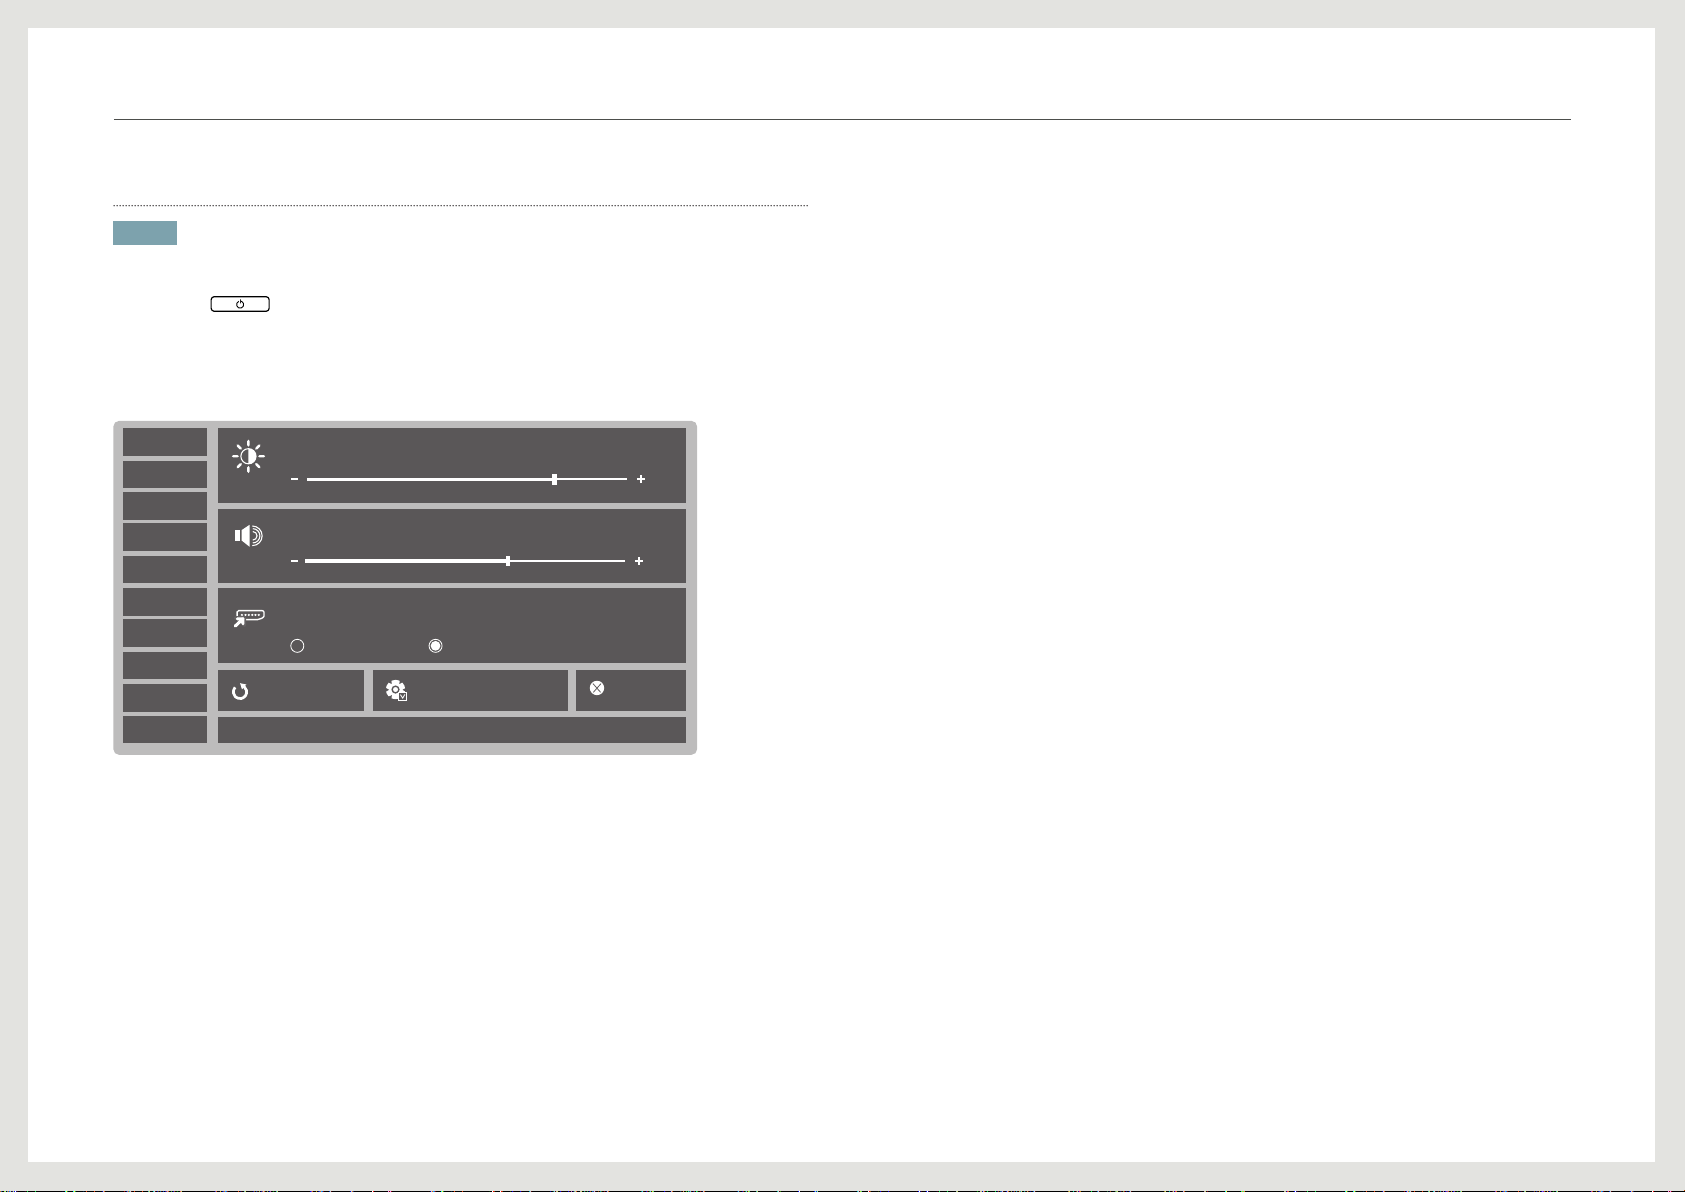
Using the On Screen Display (OSD) Menu
NOTE
The OSD menu of this product can only be controlled by touch input.
1. Press the button on the product.
2. Select a language and menu.
Conguring the OSD Menu Settings
English
Français
Deutsch
Nederlands
Dansk
Italiano
Norsk
Español
Svenska
한국어
-
Brightness
: You can adjust the general brightness of the picture. (Range: 0~100)
Brightness
78
Volume
60
Input source
HDMI PC/Surface
Reset
Version: ㅤMCU : M-SU40MWWAC-****.* ㅤFPGA: *.*.*****.** ㅤUSB:*.*.*****.**
Exit Surface Mode
Exit
A higher value will make the picture appear brighter.
-
Volume : Adjust the audio volume.
-
Input source : Select an input source.
-
Reset : Reset the menu properties to factory default value.
-
Exit Surface Mode : Switch from Surface mode to Windows mode (Windows 7 desktop).
-
Exit : Close the OSD menu.
34
Page 35

Chapter. 5
Using the Calibration Tool
When you observe touch performance starting to degrade, under consistent environmental
lighting conditions, the Samsung SUR40 for Microsoft
®
Surface® may need to be recalibrated.
To run calibration
1. Preparing Samsung SUR40 for calibration:
- To ensure optimal calibration, allow Samsung SUR40 to be powered on for at least one
hour, allowing the device to warm to normal operating temperatures.
- Clean the screen of the device. Follow the user manual for cleaning instructions. (p.09)
- Be sure to have the calibration board ready that you receive when You purchase SUR40.
If the package does not contain a calibration board, contact your dealer or a Samsung
Customer Service Center.
- Connect a keyboard to the USB port.
- Turn up the speaker volume.
Take care to ensure that the On Screen Display (the device menu activated by pressing the
device power button) does not appear during the calibration process.
This will affect the calibration accuracy; it may cause problems in the touch performance
and also display artifacts in the user interface.
2. To perform a calibration, locate the shortcut for the calibration tool on the Windows
desktop or in the Program Menu.
The tool is located in the Surface folder: C:\Program Files (x86)\Microsoft Surface\v2.0\
SUR40CalibrationTool.exe
NOTE
If a User Account Control window appears, click Allow. If the tool detects that the operating
temperature is low (less than 32°C), you will receive a warning message. To exit the tool
without running calibration, press Alt+F4.
3. Remove all items from on top of Samsung SUR40 for Microsoft
side of the calibration board so that it completely covers the screen and press Enter on the
keyboard. This step may take 30-90 seconds. When this step is complete, you will hear a
sound.
Once calibration has started, you should not exit the tool. Do not exiting the tool during the
calibration process. If you exit, it could cause touch function poorly.
4. Place the black side of the calibration board so that it completely covers the screen, press
Enter on the keyboard. This step may take 5-15 seconds. When this step is complete, you
will hear a sound.
5. Remove the calibration board. Calibration data is then analyzed and saved. You will see a
message indicating that calibration completed successfully.
6. Press Enter on the keyboard to close the tool. You have completed calibration.
In the event an error occurs during calibration, you should receive an error message.
If calibration fails more than three times, or if a catastrophic event is detected, you will be
directed to contact the SAMSUNG customer care center.
®
Surface®, place the white
35
Page 36

Chapter. 6
Troubleshooting Guide
Requirements Before Contacting
Samsung Customer Service Center
Before calling Samsung Customer Service Center, test your product as follows.
If the problem persists, contact Samsung Customer Service Center.
Check the following.
Screen issue
TROUBLESHOOTING GUIDE
The Power LED is turned
off.
The screen is blank.
The images on the
screen look distorted.
The screen is not clear.
The screen is blurry.
Make sure that the power cord is connected.
Check the cable connection to the product
Set the resolution and frequency to the recommended level.
TROUBLESHOOTING GUIDE
The screen appears
unstable and shaky.
There are shadows or
ghost images left on the
screen.
The screen is too bright.
The screen is too dark.
Check that the resolution and frequency of the PC and
graphics card are set within a range compatible with the
product. Then, change the screen settings if required by
referring to the Additional Information on the product menu.
Adjust the Brightness in the OSD.
Audio issues
TROUBLESHOOTING GUIDE
There is no sound. Check the connection of the stereo cable or adjust the volume.
Check that the device connected to the product is powered on.
The volume is too low. Adjust the volume.
If the volume is still low after turning it up to the maximum
level, adjust the volume on your PC sound card or software
program.
36
Page 37

Troubleshooting Guide
Touch input issues
TROUBLESHOOTING GUIDE
Touch input is not
working properly.
Adjust the light intensity to be as dark as possible in the area
where you are using the product.
In Windows mode, use the Environmental Lighting Optimizer
(ELO) tool to see if lighting is affecting product performance.
If necessary, adjust lighting conditions.
Power the product off and on again.
37
Page 38

Chapter. 7
Specications
General
Model Name SUR40
Panel
Synchronization
Display Color 16.7 M
Resolution
Maximum Pixel Clock 148.5 MHz (Digital)
Power Supply
Ports
Connectivity WiFi 802.11b/g/n, Bluetooth 3.0+HS
Size 40 inches (101 cm)
Display area 885.6 mm (H) x 498.15 mm (V)
HDMI Input
Optimum
Resolution
Maximum
Resolution
Side Headphone, MIC In, USB(2DOWN), SD card
Rear View
Horizontal: VESA timing is not supported
Vertical: VESA timing is not supported
1920 x 1080 60 Hz
1920 x 1080 60 Hz
This product uses 100 to 240V.
Refer to the label at the back of the product as the
standard voltage can vary in different countries.
HDMI OUT, LAN, USB(2DOWN), HDMI IN, DIGITAL
AUDIO OUT(OPTICAL), AUDIO OUT(L,R)
1080p 50/60 Hz, 720p 50/60 Hz, 576p 50 Hz,
480p 50/60 Hz
- Interlace mode is not available.
HDMI Input Resolution
HDMI Input Audio Format 2-channel L-PCM
Dimensions (W x H x D) /
Weight
Operating
Environmental
conditions
Storage
Panel Dots (Pixels)
The above specications are subject to change without notice to improve quality.
This device is a Class A digital apparatus.
- PC Timing is not available.
- The deep color feature is not available.
- Only RGB444 mode is available.
(YCbCr444 and YCbCr422 are not available.)
1095.0 x 103.0 x 707.4 mm / 36.8 Kg
43.11 x 4.06 x 27.85 inches / 81.1 lbs
Temperature : 41 °F - 86 °F (5 °C - 30 °C)
Humidity : 8 % - 85 %, non-liqueed, an altitude of
2000m or lower
Temperature : -4°F - 113°F (-20°C - 45°C)
Humidity : 5 % - 95 %, non-liqueed, an altitude of
3000m or lower
Due to the nature of the manufacturing of this
product, approximately 1 pixel per million (1ppm) may
be brighter or darker on the LCD panel. This does not
affect product performance.
38
Page 39

Specifications
(USA Only)
Dispose unwanted electronics through an approved recycler.
To nd the nearest recycling location, go to our website:
www.samsung.com/recyclingdirect or call, (877) 278 - 0799
CALIFORNIA USA ONLY (Applicable for networking models only.)
This Perchlorate warning applies only to primary CR(Manganese Dioxide) Lithium coin cells
in the product sold or distributed ONLY in California USA
“Perchloate Material - special handling may apply, See www.dtsc.ca.gov/hazardouswaste/
perchlorate.”
FCC / IC Compliance Information
This device complies with Part 15 of FCC Rules and Industry Canada ICES-003.
Operation is subject to the following two conditions:
(1) This device may not cause harmful interference, and
(2) This device must accept any interference received including interference that may cause
undesired operation.
Warnings
This equipment has been tested and found to comply with limits for a class A digital device,
pursuant to Part 15 of the FCC Rules and Industry Canada ICES-003.
These limits are designed to provide reasonable protection against harmful interference
when the equipment is operated in a commercial environmental. This equipment can
generates, uses, and radiate radio frequency energy and, if not installed and used in
accordance with the instructions, may cause harmful interference to radio communications.
Operation of this equipment in residential area is likely to cause harmful interference in
which case the user will be required to correct the interference at his own expense.
Power Consumption
NORMAL
OPERATION
Power Indicator On (white) Off Off
Power Consumption 220 Watts Less than 3 Watts 0 Watts
The power consumption level can vary in different operating conditions or when settings
are changed.
To reduce the power consumption to 0, turn off the switch at the back or disconnect
the power cord. Disconnect the power cable if you will not be using the product for an
extended period of time (during vacation, etc.).
POWER OFF
(Windows is closed)
POWER OFF
(Mechanical switch off)
Screen Water Ingress Conditions
Conditions Acceptable level
Amount of liquid 16 oz. (0.5L)
Type of liquid Water, or liquid with less than 25% ethanol concentration
Guaranteed maximum safe
hours of exposure to liquid
2 hours
[ Recommendation - EU Only ]
Hereby, Samsung Electronics, declares that this [Monitor] is in
compliance with the essential requirements and other relevant
provisions of Directive 1999/5/EC.
The ofcial Declaration of Conformity may be found at http://www.
samsung.com, go to Support > Search Product Support and enter the
model name.
In France, this equipment may only be used indoors.
This equipment may be operated in all EU countries.
39
Page 40
Specifications
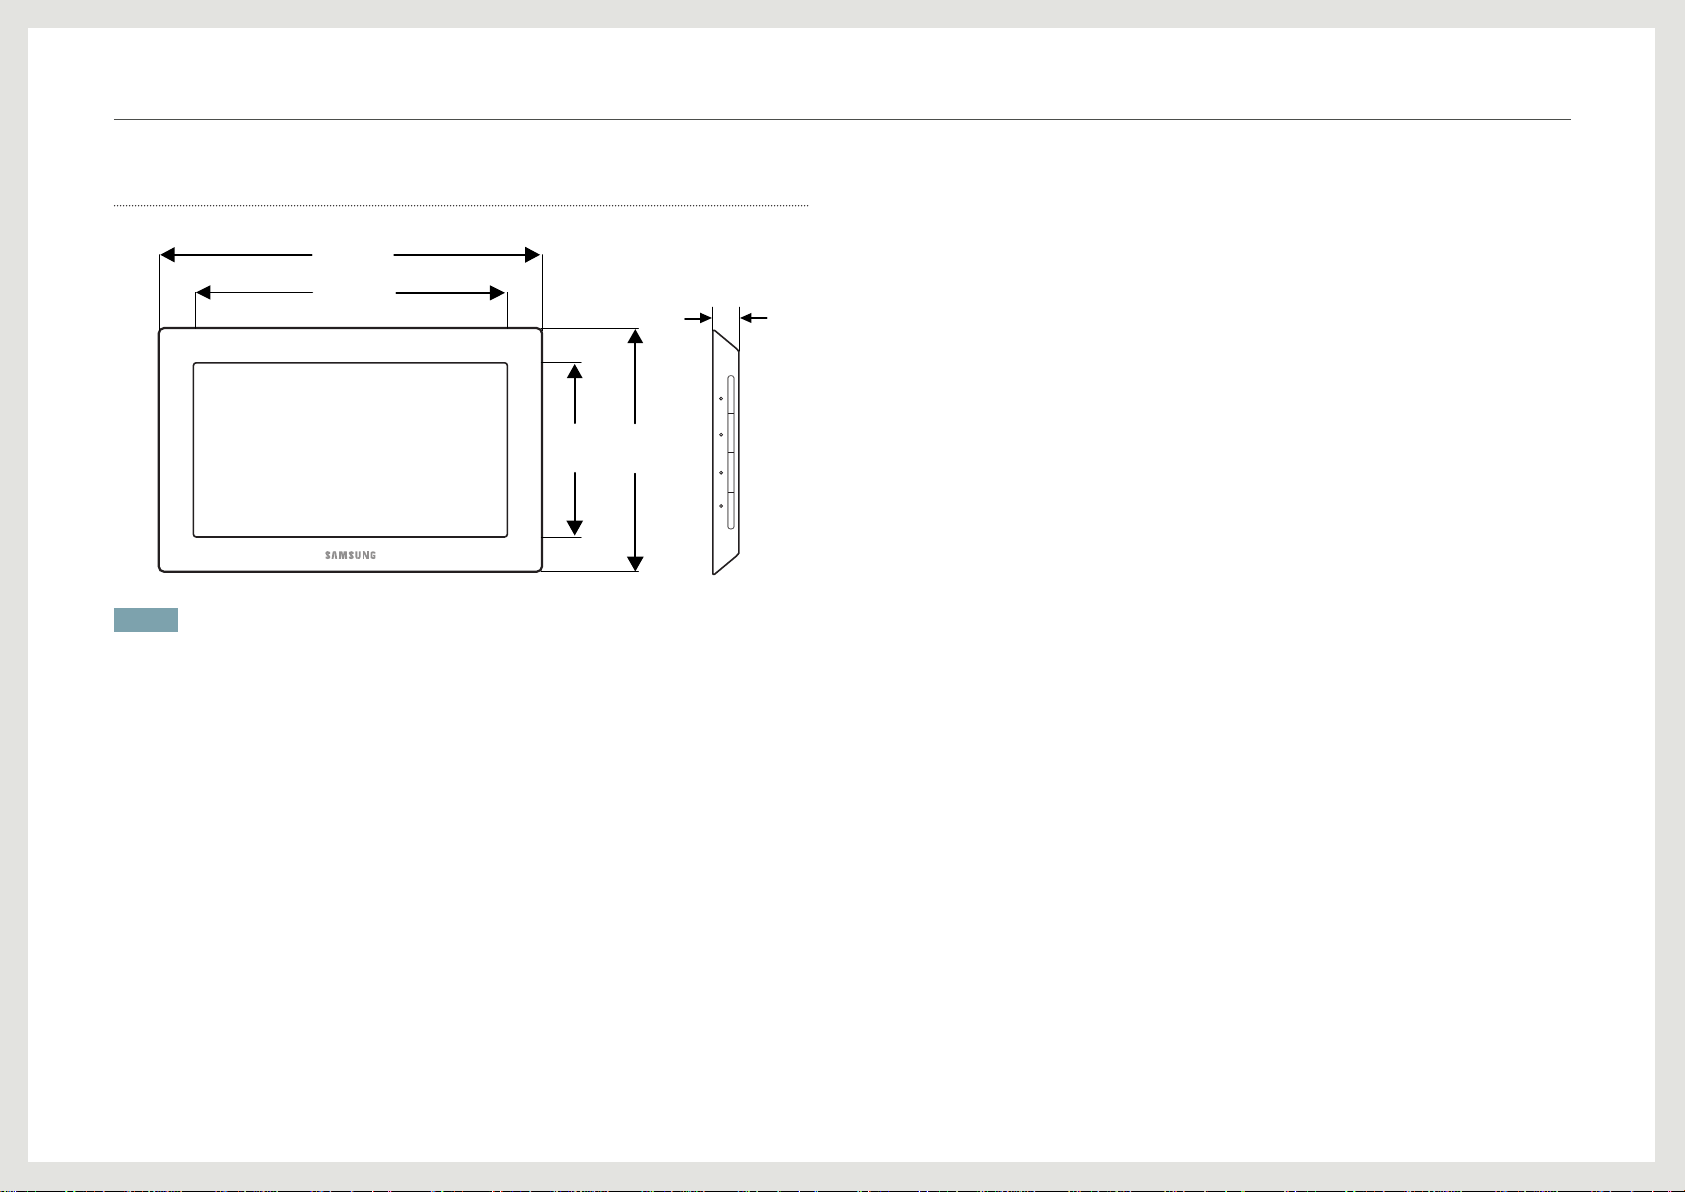
Dimensions
1095.0 mm
887.7 mm
mm 707.4 mm
500.2
103.0
mm
NOTE
All drawings are not necessarily to scale. Some dimensions are subject to change without prior
notice. Refer to the dimensions prior to performing installation of your product.
Not responsible for typographical or printed errors.
40
Page 41

Chapter. 8
Appendix
Contact SAMSUNG WORLDWIDE
NOTE
If you have any questions or comments relating to Samsung products, please contact the
SAMSUNG customer care Center.
NORTH AMERICA
U.S.A
CANADA
MEXICO 01-800-SAMSUNG (726-7864) http://www.samsung.com
ARGENTINA 0800-333-3733 http://www.samsung.com
BRAZIL
BOLIVIA 800-10-7260 http://www.samsung.com
1-800-SAMSUNG (726-7864)
1-866-SAM4BIZ (726-4249)
1-800-313-8513
1-800-SAMSUNG (726-7864)
LATIN AMERICA
0800-124-421
4004-0000
http://www.samsung.com
http://www.samsung.com/ca
http://www.samsung.com/ca_fr (French)
http://www.samsung.com
COSTA RICA 0-800-507-7267 http://www.samsung.com
DOMINICA 1-800-751-2676 http://www.samsung.com
ECUADOR 1-800-10-7267 http://www.samsung.com
EL SALVADOR 800-6225 http://www.samsung.com
GUATEMALA 1-800-299-0013 http://www.samsung.com
HONDURAS 800-27919267 http://www.samsung.com
JAMAICA 1-800-234-7267 http://www.samsung.com
NICARAGUA 00-1800-5077267 http://www.samsung.com
PANAMA 800-7267 http://www.samsung.com
PERU 0-800-777-08 http://www.samsung.com
PUERTO RICO 1-800-682-3180 http://www.samsung.com
TRINIDAD &
TO-BAGO
VENEZUELA 0-800-100-5303 http://www.samsung.com
1-800-SAMSUNG (726-7864) http://www.samsung.com
CHILE
COLOMBIA 01-8000112112 http://www.samsung.com
800-SAMSUNG (726-7864)
From mobile 02-482 82 00
http://www.samsung.com
41
Page 42

Appendix
EUROPE
ALBANIA 42 27 5755 http://www.samsung.co
AUSTRIA
BELGIUM 02-201-24-18
BOSNIA 05 133 1999 http://www.samsung.com
BULGARIA 07001 33 11 http://www.samsung.com
CROATIA 062 SAMSUNG (062 726 7864) http://www.samsung.com
CZECH
DENMARK 70 70 19 70 http://www.samsung.com
FINLAND 030 - 6227 515 http://www.samsung.com
FRANCE 01 48 63 00 00 http://www.samsung.com
GERMANY
CYPRUS From landline : 8009 4000 http://www.samsung.com
GREECE
HUNGARY 06-80-SAMSUNG (726-7864) http://www.samsung.com
ITALIA 800-SAMSUNG (726-7864) http://www.samsung.com
0810 - SAMSUNG
(7267864,€ 0.07/min)
800-SAMSUNG(800-726786) http://www.samsung.com
Samsung Electronics Czech and Slovak, s.r.o., Oasis Florenc, Sokolovská
394/17, 180 00, Praha 8
01805 - SAMSUNG
(726-7864, € 0,14/Min)
From landline : 80111-SAM-SUNG
(7267864)
From landline & mobile : (+30)
210 6897691
http://www.samsung.com
http://www.samsung.com/be (Dutch)
http://www.samsung.com/be_fr
(French)
http://www.samsung.com
http://www.samsung.com
KOSOVO +381 0113216899 http://www.samsung.com
LUXEMBURG 261 03 710 http://www.samsung.com
MACEDONIA 023 207 777 http://www.samsung.com
MONTENEGRO 020 405 888 http://www.samsung.com
NETHERLANDS
NORWAY 815-56 480 http://www.samsung.com
POLAND
PORTUGAL 808 20-SAMSUNG (808 20 7267) http://www.samsung.com
RUMANIA
SERBIA 0700 SAMSUNG (0700 726 7864) http://www.samsung.com
SLOVAKIA 0800 - SAMSUNG (0800-726786) http://www.samsung.com
SPAIN
SWEDEN 0771 726 7864 (SAMSUNG) http://www.samsung.com
SWITZERLAND
U.K 0330 SAMSUNG (7267864) http://www.samsung.com
EIRE 0818 717100 http://www.samsung.com
LITHUANIA 8-800-77777 http://www.samsung.com
0900-SAMSUNG
(0900-7267864) (€ 0,10/Min)
0 801-1SAMSUNG(172-678)
+48 22 607-93-33
From landline : 08010-SAM-SUNG
(7267864)
From landline & mobile : (+40)
21 206 01 10
902 - 1 - SAMSUNG (902 172
678)
0848 - SAMSUNG
(7267864, CHF 0.08/min)
http://www.samsung.com
http://www.samsung.com
http://www.samsung.com
http://www.samsung.com
http://www.samsung.com
http://www.samsung.com/ch_fr/
(French)
42
Page 43

Appendix
LATVIA 8000-7267 http://www.samsung.com
ESTONIA 800-7267 http://www.samsung.com
TURKEY 444 77 11 http://www.samsung.com
CIS
RUSSIA 8-800-555-55-55 http://www.samsung.com
GEORGIA 8-800-555-555 http://www.samsung.com
ARMENIA 0-800-05-555 http://www.samsung.com
AZERBAIJAN 088-55-55-555 http://www.samsung.com
KAZAKHSTAN
UZBEKISTAN 8-10-800-500-55-500 http://www.samsung.com
KYRGYZSTAN 00-800-500-55-500 http://www.samsung.com
TADJIKISTAN 8-10-800-500-55-500 http://www.samsung.com
MONGOLIA - http://www.samsung.com
UKRAINE 0-800-502-000
BELARUS 810-800-500-55-500 http://www.samsung.com
MOLDOVA 00-800-500-55-500 http://www.samsung.com
8-10-800-500-55-500
(GSM:7799)
http://www.samsung.com
http://www.samsung.com/ua
http://www.samsung.com/ua_ru
ASIA PACIFIC
AUSTRALIA 1300 362 603 http://www.samsung.com
NEW ZEALAND 0800 SAMSUNG (0800 726 786) http://www.samsung.com
CHINA 400-810-5858 http://www.samsung.com
HONG KONG (852) 3698 - 4698
1800 1100 11
INDIA
INDONESIA
JAPAN 0120-327-527 http://www.samsung.com
MALAYSIA 1800-88-9999 http://www.samsung.com
PHILIPPINES
SINGAPORE 1800-SAMSUNG (726-7864) http://www.samsung.com
3030 8282
1800 3000 8282
1800 266 8282
0800-112-8888
021-5699-7777
1-800-10-SAMSUNG (726-7864)
for PLDT
1-800-3-SAMSUNG (726-7864)
for Digitel
1-800-8-SAMSUNG (726-7864)
for Globe
02-5805777
http://www.samsung.com/hk
http://www.samsung.com/hk_en/
http://www.samsung.com
http://www.samsung.com
http://www.samsung.com
THAILAND
TAIWAN
VIETNAM 1 800 588 889 http://www.samsung.com
1800-29-3232
02-689-3232
0800-329-999
0266-026-066
http://www.samsung.com
http://www.samsung.com
43
Page 44

Appendix
MIDDLE EAST
IRAN 021-8255 http://www.samsung.com
OMAN 800-SAMSUNG (726-7864) http://www.samsung.com
KUWAIT 183-2255 http://www.samsung.com
BAHRAIN 8000-4726 http://www.samsung.com
EGYPT 08000-726786 http://www.samsung.com
JORDAN 800-22273 http://www.samsung.com
MOROCCO 080 100 2255 http://www.samsung.com
SAUDI ARABIA 9200-21230 http://www.samsung.com
U.A.E 800-SAMSUNG (726-7864) http://www.samsung.com
AFRICA
CAMEROON 7095- 0077 http://www.samsung.com
COTE D’LVOIRE 8000 0077 http://www.samsung.com
GHANA
KENYA 0800 724 000 http://www.samsung.com
NIGERIA 0800-726-7864 http://www.samsung.com
SENEGAL 800-00-0077 http://www.samsung.com
SOUTH AFRICA 0860-SAMSUNG (726-7864) http://www.samsung.com
TANZANIA 0685 88 99 00 http://www.samsung.com
UGANDA 0800 300 300 http://www.samsung.com
0800-10077
0302-200077
http://www.samsung.com
Correct Disposal
Correct Disposal of This Product
(Applicable in the European Union and other European countries with separate
collection systems)
This marking on the product, accessories or literature indicates that the product
and its electronic accessories (e.g. charger, headset, USB cable) should not be
disposed of with other household waste at the end of their working life. To prevent
possible harm to the environment or human health from uncontrolled waste
disposal, please separate these items from other types of waste and recycle them
responsibly to promote the sustainable reuse of material resources.
Household users should contact either the retailer where they purchased this
product, or their local government ofce, for details of where and how they can
take these items for environmentally safe recycling.
Business users should contact their supplier and check the terms and conditions
of the purchase contract. This product and its electronic accessories should not be
mixed with other commercial wastes for disposal.
Correct disposal of batteries in this product
(Applicable in the European Union and other European countries with separate
battery return systems.)
The marking on the battery, manual or packaging indicates that the battery in this
product should not be disposed of with other household waste. Where marked, the
chemical symbols Hg, Cd or Pb indicate that the battery contains mercury, cadmium
or lead above the reference levels in EC Directive 2006/66.
The battery incorporated in this product is not user replaceable. For information on
its replacement, please contact your service provider. Do not attempt to remove the
battery or dispose it in a re. Do not disassemble, crush, or puncture the battery. If
you intend to discard the product, the waste collection site will take the appropriate
measures for the recycling and treatment of the product, including the battery.
44
Page 45

Appendix
Responsibility for the Pay Service
(Cost to Customers)
When the service is requested, in spite of in warranty, we may charge you for a visit from a
service technician in the following cases.
Not a product defect
Cleaning of the product, Adjustment, Explanation, Re-installation and etc.
- If a service technician gives instructions on how to use TV or simply adjusts options without
disassembling product.
- If a defect is caused by external environmental factors (Internet, Antenna, Wired Signal,
etc.).
- If a product is reinstalled or devices are connected additionally after installing the purchased
product for the rst time.
- If a product is reinstalled to move to a different spot or to move to a different house.
- If customer requests instructions on how to use because of another company’s product.
- If customer requests instructions on how to use the network or another company’s program.
- If customer requests software installation and setup for the product.
- If a service technician removes/cleans dusts or foreign materials inside of the product.
- If customer requests an installation additionally after purchasing a product through home-
shopping or online.
A Product damage caused by customer’s fault
Product damage caused by customer’s mishandling or wrong repair.
If a product damage is caused by;
- external impact or drop.
- use of supplies or separatly sold product unspecied by Samsung.
- repair from a person besides an engineer of outsourcing service company or partner of
Samsung Electronics Co., Ltd.
- remodeling or repairing the product by customer.
- using it with incorrect voltage or non-authorised electrical connections.
- not following the “cautions” in User Manual.
Others
- If product fails by natural disaster (lightning, re, earthquake, ood damage, etc).
- If consumable components are all used up (Battery, Toner, Fluorescent lights, Head, Vibrator,
Lamp, Filter, Ribbon, etc.).
If customer requests a service in case the product has no defect, service fee may be
charged. So please read User Manual rst.
45
Page 46

Appendix
Black Matrix
Source Drain
Data Bus-Line
TFT
Gate
Pixel Electrode (ITO)
Storage
Capaccitor (Cs)
Color-Filter
Common
Electrode (ITO)
Optimum Picture Quality and
Afterimage Burn-in Prevention
Optimum Picture Quality
- To enjoy the optimum picture quality, go to the Control Panel in Windows Mode and adjust
the resolution and refresh rate as shown below. The picture quality of TFT-LCDs may
degrade if the optimum resolution is not selected.
RESOLUTION VERTICAL FREQUENCY
1920 x 1080 60 Hz
- Due to the nature of the manufacturing of this product, approximately 1 pixel per million
(1ppm) may be brighter or darker on the LCD panel. This does not affect product
performance.
THE NUMBER OF SUB-PIXELS BY LCD PANEL TYPE
6,220,800
- Unlike CDT monitors, TFT-LCD monitors (due to the nature of the panel) can be set to
only one resolution to obtain the optimum picture quality. Therefore, setting a resolution
other than the specied resolution may degrade the picture quality. To avoid this, it is
recommended that you select the optimum resolution specied for your monitor.
- Light leakage could be on the edge of *SIP panel caused by functionality of SIP Panel, but it
does not affect performance of the product. (*SIP : Sensor in Pixel)
- It is likely to be seen at low contrast and black screen. To minimize the effect of light
leakage, it is recommended to use a color higher than 20-grey contrast level for background
of the screen.
Prevention of Afterimage Burn-in
What is afterimage burn-in?
Such a voltage difference between electrodes increases with time and makes the liquid
crystals thinner. When this occurs, a previous image can remain on the screen when the
pattern changes. To prevent this, the accumulated voltage difference should be reduced.
46
Page 47
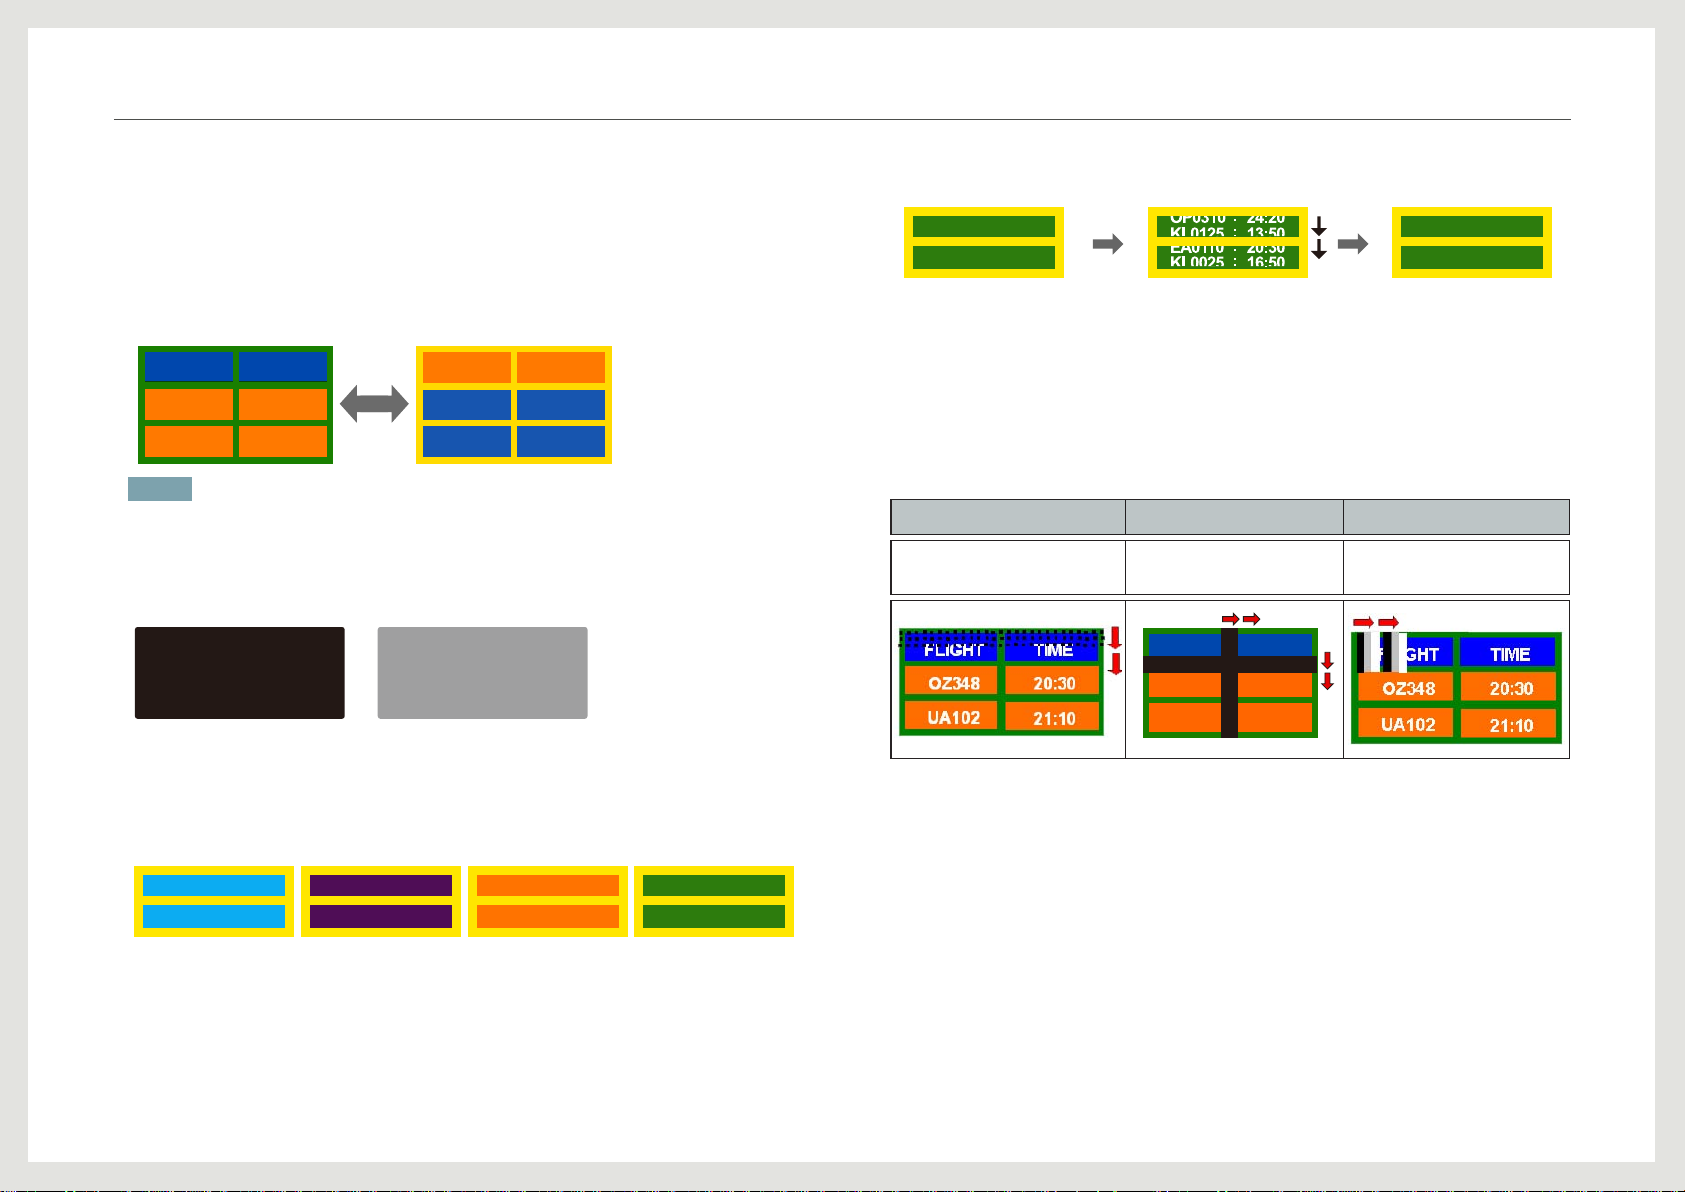
Appendix
FLIGHT
FLIGHT
TIME
TIME
OZ348
UA102
21:10
20:30
OZ348
UA102
21:10
20:30
Type 1 Type 2
- Powering Off, Screen Saver and Power Saving Mode
Ensure the product is powered off for 16 hours after it is used for 8 hours.
Set the product to power off according to the power supply specications in the display
properties of the product.
- Regular Color Change
NOTE
Switch between 2 colors every 30 minutes as shown above.
- Avoid combinations of a text color and background color of contrasting brightness.
Avoid using grey as it may contribute to afterimage burn-in.
Avoid using colors of contrasting brightness (black and white; grey).
FLIGHT
OZ348
:
:
TIME
20:30
FLIGHT
OZ348
:
:
TIME
20:30
Move and change text every 30 minutes as shown below.
:
FLIGHT
OZ348
Regularly display a moving image along with a logo.
Interval: Display a moving image along with a logo for 60 seconds after using for 4 hours.
The best way to protect the product from ghost image (image burn-in on the screen) is to
turn the power off or enable a screensaver when the product or system is not in use. Also,
Warranty service may be limited depending on instruction guide.
TIME
:
20:30
[ Step 1 ] [ Step 2 ] [ Step 3 ]
FLIGHT
OZ348
:
:
TIME
20:30
PIXEL FUNCTION BAR FUNCTION ERASER FUNCTION
Black pixels move vertically.
Two black bars move
vertically and horizontally.
FLIGHT
Horizontal bar
OZ348
UA102
TIME
20:30
21:10
A black bar moves
horizontally.
- Regular Text Color Change
Use bright colors of similar brightness.
Interval: Change text color and background color every 30 minutes
:
:
TIME
20:30
FLIGHT
OZ348
FLIGHT
OZ348
:
:
TIME
20:30
FLIGHT TIME
OZ348
:
:
20:30
FLIGHT
OZ348
:
:
TIME
20:30
47
Page 48

Index
A
Afterimage 46
B
Brightness 34
C
Components 11
Creating a Windows user
account 29
I
Items sold separately 11
Input source 34
M
Memory card 27
O
On Screen Display Menu 34
R
Rear View 12
Re-installing Windows 7 33
Reset (menu properties) 34
S
Screen resolution 38
Size 38
Sound 36
Surface Mode 28
T
Troubleshooting 36
Touch 37
V
Volume 34
48
 Loading...