

Samsung Suede Quick Reference Manual

PORTABLE
TRI-BAND
MOBILE PHONE
Quick Reference Manual
Please read this manual before operating your
phone, and keep it for future reference.

Intellectual Property
All Intellectual Property, as defined below, owned by or which is
otherwise the property of Samsung or its respective suppliers
relating to the SAMSUNG Phone, including but not limited to,
accessories, parts, or software relating there to (the “Phone
System”), is proprietary to Samsung and protected under federal
laws, state laws, and international treaty provisions. Intellectual
Property includes, but is not limited to, inventions (patentable or
unpatentable), patents, trade secrets, copyrights, software,
computer programs, and related documentation and other works of
authorship. You may not infringe or otherwise violate the rights
secured by the Intellectual Property. Moreover, you agree that you
will not (and will not attempt to) modify, prepare derivative works of,
reverse engineer, decompile, disassemble, or otherwise attempt to
create source code from the software. No title to or ownership in the
Intellectual Property is transferred to you. All applicable rights of the
Intellectual Property shall remain with SAMSUNG and its suppliers.
Samsung Telecommunications America
(STA), LLC
Headquarters: Customer Care Center:
1301 E. Lookout Drive 1000 Klein Rd.
Richardson, TX 75082 Plano, TX 75074
Toll Free Tel: 1.888.987.HELP (4357)
Internet Address:
http://www.samsungusa.com
CKT_R710_Air_English_QRM_DH25_PM_090910_D3

©2010 Samsung Telecommunications America, LLC is a registered
trademark of Samsung Electronics America, Inc. and its related
entities.
Do you have questions about your Samsung Mobile Phone?
For 24 hour information and assistance, we offer a new FAQ/ARS
System (Automated Response System) at:
www.samsungtelecom.com/support
Printed in Korea.
Nuance®, VSuite™, T9® Text Input, and the Nuance logo are
trademarks or registered trademarks of Nuance Communications,
Inc. or its affiliates in the United States and/or other countries.
Openwave® is a registered Trademark of Openwave, Inc.
RSA® is a registered Trademark RSA Security, Inc.
The Bluetooth® word mark, figure mark (stylized “B Design”), and
combination mark (Bluetooth word mark and “B Design”) are
registered trademarks and are wholly owned by the Bluetooth SIG.
microSD™, microSDHC™, and the microSD logo are Trademarks of
the SD Card Association.
All other product or service names are the property of their respective
owners.

Disclaimer of Warranties; Exclusion of
Liability
EXCEPT AS SET FORTH IN THE EXPRESS WARRANTY CONTAINED ON
THE WARRANTY PAGE ENCLOSED WITH THE PRODUCT, THE
PURCHASER TAKES THE PRODUCT "AS IS", AND SAMSUNG MAKES
NO EXPRESS OR IMPLIED WARRANTY OF ANY KIND WHATSOEVER
WITH RESPECT TO THE PRODUCT, INCLUDING BUT NOT LIMITED TO
THE MERCHANTABILITY OF THE PRODUCT OR ITS FITNESS FOR ANY
PARTICULAR PURPOSE OR USE; THE DESIGN, CONDITION OR
QUALITY OF THE PRODUCT; THE PERFORMANCE OF THE PRODUCT;
THE WORKMANSHIP OF THE PRODUCT OR THE COMPONENTS
CONTAINED THEREIN; OR COMPLIANCE OF THE PRODUCT WITH THE
REQUIREMENTS OF ANY LAW, RULE, SPECIFICATION OR CONTRACT
PERTAINING THERETO. NOTHING CONTAINED IN THE INSTRUCTION
MANUAL SHALL BE CONSTRUED TO CREATE AN EXPRESS OR
IMPLIED WARRANTY OF ANY KIND WHATSOEVER WITH RESPECT TO
THE PRODUCT. IN ADDITION, SAMSUNG SHALL NOT BE LIABLE FOR
ANY DAMAGES OF ANY KIND RESULTING FROM THE PURCHASE OR
USE OF THE PRODUCT OR ARISING FROM THE BREACH OF THE
EXPRESS WARRANTY, INCLUDING INCIDENTAL, SPECIAL OR
CONSEQUENTIAL DAMAGES, OR LOSS OF ANTICIPATED PROFITS OR
BENEFITS.

Table of Contents
Section 1: Getting Started ........................................ 4
Understanding this User Manual ......................................... 4
Your Wireless Device .......................................................... 6
Battery ..................... .......................................................... 7
Charging the Battery ........................................................10
Memory Card ................................................................... 11
Headset Jack ................................................................... 12
Turning Your Phone On or Off ........................................... 12
Locking and Unlocking your Phone ................................... 13
Locking and Unlocking your Screen .................................. 14
Understanding the Display ................................................ 15
Learning More About Your Phone .....................................20
Menu ....................... ........................................................ 20
Section 2: Call Functions ........................................ 21
Making a Call ................................................................... 21
Voicemail ................. ........................................................ 21
Voice Commands .............................................................22
Voice Service Settings ...................................................... 23
Section 3: Entering Text ......................................... 24
Entering Text .................................................................... 24
Section 4: Messages ..............................................28
Types of Messages ..........................................................28
Create and Send Text Messages ......................................28
1

Section 5: Games & Apps ....................................... 29
Shopping and Downloading ..............................................29
Changing Games & Apps Settings .....................................30
Using On-line Help ............................................................30
Section 6: Muve Music ........................................... 31
Section 7: Bluetooth ............................................... 32
Bluetooth Services ............................................................32
Turning Bluetooth On / Off ................................................32
Pairing With a New Device ................................................32
Bluetooth Settings ............................................................33
Section 8: Health and Safety Information ............. 34
Health and Safety Information ...........................................34
Please Note the Following Information When Using
Your Handset ................................................................36
Samsung Mobile Products and Recycling ..........................37
UL Certified Travel Adapter ...............................................37
Consumer Information on Wireless Phones .......................38
Road Safety ......................................................................49
Responsible Listening .......................................................51
Operating Environment .....................................................54
Using Your Phone Near Other Electronic Devices ...............55
FCC Hearing-Aid Compatibility (HAC) Regulations
for Wireless Devices .....................................................56
Potentially Explosive Environments ...................................59
Emergency Calls ...............................................................60
FCC Notice and Cautions ..................................................61
Other Important Safety Information ...................................62
Product Performance ........................................................63
2

Availability of Various Features/Ring Tones ....................... 65
Battery Standby and Talk Time ......................................... 65
Battery Precautions .......................................................... 65
Care and Maintenance .....................................................68
Section 9: Warranty Information ............................ 70
Standard Limited Warranty ............................................... 70
End User License Agreement for Software ........................ 75
Index ........................................................ ................ 84
3

Section 1: Getting Started
This section explains how to start using your Samsung Suede.
Understanding this User Manual
The chapters of this manual generally follow the features of your
phone. A robust index for features begins on page 84.
Also included is important safety information that you should know
before using yourphone. ost of this information is near the back of the
manual, beginning on page 34.
Special Text
Throughout this manual, you’ll find text that is set apart from the rest.
These are intended to point out important information, share quick
methods for activating features, to define terms, and more. The
definitions for these methods are as follows:
•
Note
: Presents alternative options within the current feature or menu.
•
Tip
: Provides quick or innovative methods for performing functions related
to the subject.
•
Important
: Points out information about the current feature that could
affect performance or your use of the phone.
•
Warning
: Brings to your attention important information to prevent loss of
data or functionality, or even prevent damage your phone.
4

Text Conventions
This manual provides condensed information about how to use your
phone. To make this possible, the following terms and icons appear in
place of often-used procedural steps:
select
Touc h a me nu it em or sc reen item to launch or sa ve
a menu item or screen field of interest.
➔
Used in place of “select” in long “drill down”
procedure steps.
Example:
“...
Settings
➔
Call Settings
➔
Answer Options
Getting Started 5
...”
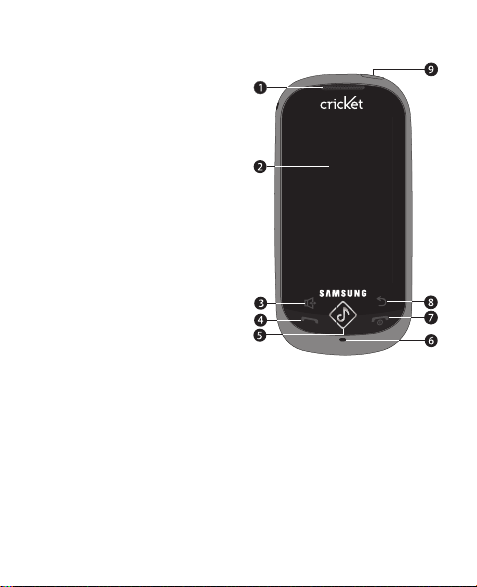
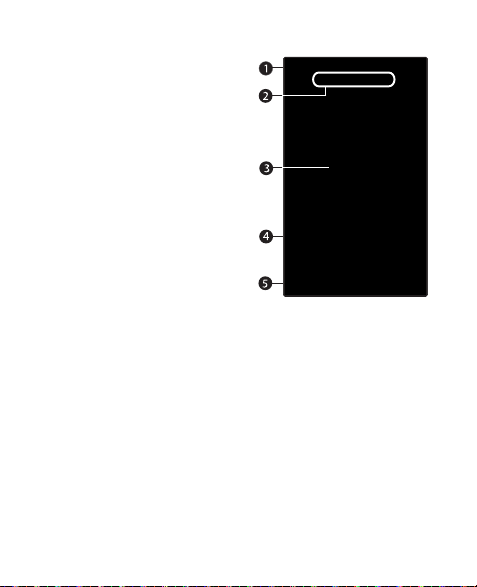
Your Wireless Device
1.
Earpiece / Speaker
: Lets
you hear tones and the
other parties to calls.
2.
Touch Screen
: Displays
your phone’s status and
touch controls.
3.
Speakerphone Key
: Touch
to enable or disable
Speakerphone mode.
4.
Send Key
: Press to place or
answer a call. In Standby
mode, press to access the
Recent Calls log.
5.
Muve Music Key
: In
Standby mode, press to
launch Muve Music.
6.
Microphone
7.
Power
: Lets the other caller hear you clearly.
/
End Key
: Press and hold to power on or off. Press to
end a call, or to return to Standby mode.
8.
Clear Key
: When entering text, press to delete characters. When
navigating, press to return to the previous menu or screen.
9.
Headset Connector
: Used to connect an optional wired headset
or TTY device to your phone.
6
Battery
Your phone is powered by a rechargeable, standard Li-Ion battery. A
Travel Adapter is included for charging the battery.
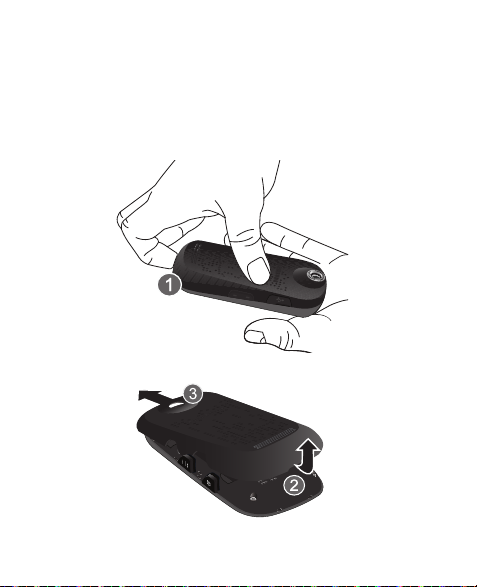
Removing the battery cover
䊳
Pull up on the slot provided (1) while lifting the cover up (2) and
away from the phone (3).
Getting Started 7
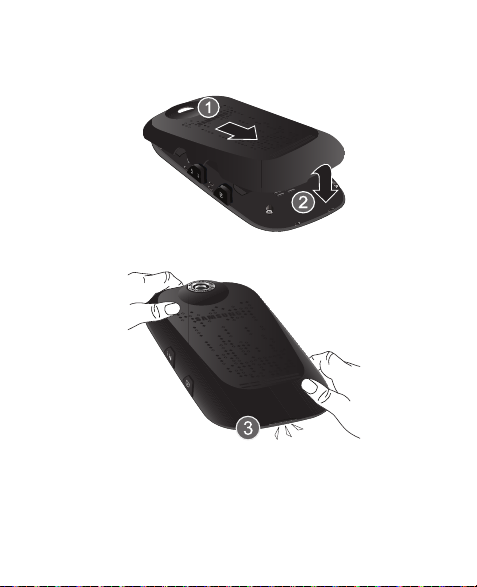
Replacing the batter y cover
䊳
Place the top end of the battery cover over the battery (1) and
press the battery cover down (2) until it clicks into place (3).
8
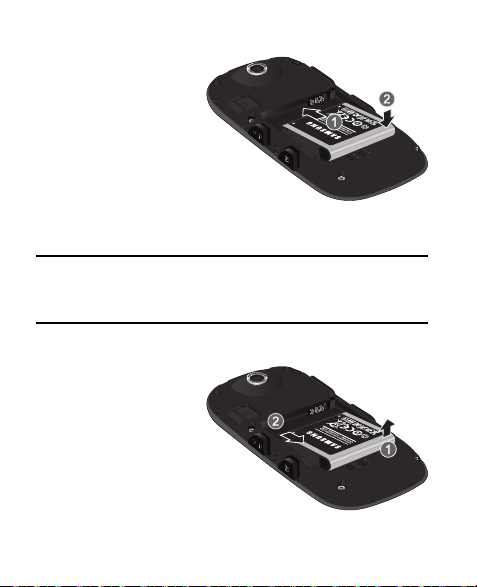
Installing the Battery
䊳
Insert the top end of
the battery,
matching the gold
contacts on the
battery to those on
the inside of the
phone (1), then
press the battery
into the phone (2)
until it slips into place.
Note:
The battery comes partially charged. You must fully charge the battery
before using your phone for the first time. A fully discharged battery
requires up to 4 hours of charge time.
After the first charge, you can use the phone while charging.
Removing the Battery
䊳
Before removing the
battery, turn the
phone off. Lift the
bottom end of the
battery up (1) and
out of the phone (2).
Getting Started 9
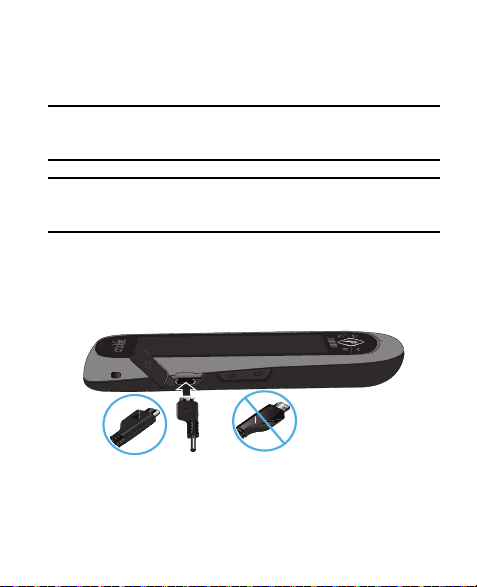
Charging the Battery
Your phone comes with a convenient, light-weight Travel Adapter for
rapidly charging the battery from any 120/220 VAC outlet.
Note:
Use only Samsung-approved charging devices and batteries. Samsung
accessories are designed to maximize battery life. Use of other
accessories may invalidate your warranty and may cause damage.
Warning!:
When connecting to an outlet outside North America, you must use the
proper adapter for the power outlet. Use of the wrong adapter could
damage your phone and void your warranty.
1.
Plug the Travel Adapter into a standard 120/220 VAC wall
outlet.
2.
Connect the Travel Adapter into the Power/Accessory
connector on the side of your phone.
Correct Incorrect
10
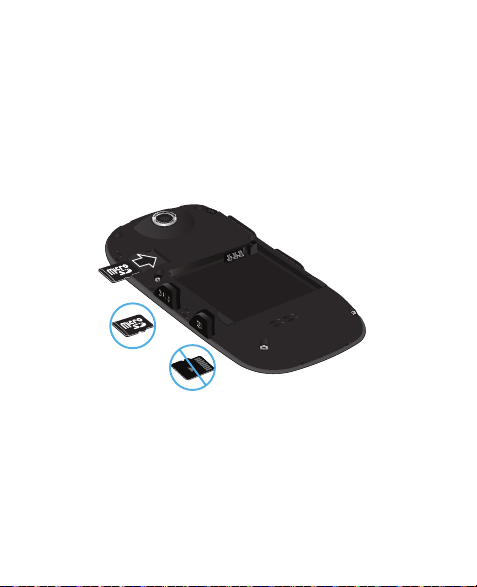
Memory Card
The microSDHCTM card (included) is already installed in your phone
for storing music, sounds, photos, and videos. Follow the procedure
below if you remove the memory card from the memory card slot.
Installing a Memory Card
1.
Remove the battery cover from the phone, as shown. For more
information, refer to “Removing the battery cover” on page 7.
There is no need to turn off the phone.
Correct
Incorrect
2.
Align the memory card as shown, with the gold contacts facing
down, then carefully slide the memory card into the card slot
until you feel the card click into place.
3.
Replace the battery cover.
Getting Started 11
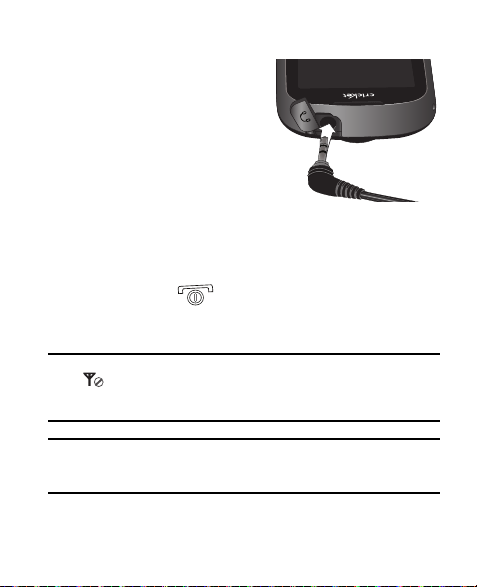
Headset Jack
Your phone includes a jack for
attaching an optional Headset or
Headphones. You can use a Headset
for hands-free telephone
conversations, or Headphones, to
listen to music or videos.
䊳
Plug the Headset or
Headphone cable into the
Headset Jack on the top of the phone.
Turning Your Phone On or Off
Turning Your Phone On
䊳
Press and hold until the display lights. The phone
searches for a network signal, and the time, date, and day
appear on the display.
Note:
If you are outside your carrier’s coverage or roaming area, the
No Service
cannot place or receive calls, try later when service is available, or at
another location.
Note:
Avoid touching the antenna while using your phone, as this can affect call
quality and can cause the phone to operate at a higher power level than
necessary.
12
icon appears at the top of the phone’s display. If you
TurningYour Phone Off
䊳
With the phone on, press and hold for two or more
seconds.
Note:
If your phone is on and you press for less than one second, the phone
will not power off. This prevents your phone from being turned off
accidentally.
Locking and Unlocking your Phone
Locking the phone prevents unauthorized access to information on
the phone. Locking and unlocking the phone requires the Lock Code.
Locking the phone
1.
From a Home screen, touch
➔
Security
.
2.
At the prompt, enter the phone’s Lock Code. The default lock
Menu
➔
Settings
➔
Phone Settings
code is the last four digits of your phone number.
3.
Select
Lock Phone
Tip:
The default Lock Code is the last four digits of your telephone number, or you
can set a custom lock code at
Security
.
➔
Lock
, then touch OK.
Menu ➔ Settings ➔ Phone Settings ➔
Getting Started 13
Unlocking the phone
Note:
You may need to unlock the screen before unlocking the phone. For more
information, For more information, refer to “Locking and Unlocking your
Screen” on page 14.
1.
Touch the screen, or press any key.
2.
At the prompt, enter the Lock Code. The default lock code is
the last four digits of your phone number.
Locking and Unlocking your Screen
By default, the phone locks automatically when the backlight goes
off, or you can lock it manually.
Note:
You can choose to disable automatic screen locking. For more information,
refer to “Phone Settings” in the User Manual.
Locking the screen manually
䊳
Press the
Lock/Voice Service key
. The lock screen
displays briefly.
Unlocking the screen
䊳
Press and hold the
14
Lock/Voice Service key
.
Understanding the Display
1.
Status Bar
: Displays icons to
indicate network status,
battery power, signal
strength, connection type,
and more. For more
information.
2.
Shortcut Bar
: Touch the arrow
at the bottom of the Status
Bar to display the Shortcut
Bar.
The indicators below the
Status Bar show the Home
screen panel.
3.
Home screen
: Shows information such as call progress
information, messages, and widgets. For more information,
see “Home Screen” on page 17.
4.
5.
Widget Tray
Soft Keys
: Touch the tab to open the Widget Tray.
: Touch to quickly access features.
Getting Started 15

Shortcut Bar
From a Home screen, touch the arrow
at the bottom of the Status Bar to
display the Shortcut Bar.
To hide Shortcut Bar, touch anywhere
on the Home screen.
The Shortcut Bar contains these
shortcuts:
•
Widget setup
: Choose Widgets to appear
in the Widget Tray.
•
Browser
: Launch your phone’s HTML
web browser.
•
Airplane Mode
: Activate or deactivate
Airplane mode.
•
Bluetooth
: Access Bluetooth. For more information, see
page 32.
16
“Bluetooth”
on

Home Screen
The Home screen is your starting point for using your phone. You can
customize home screens by placing widgets and changing wallpaper.
The Home screen consists of three panels that extend beyond the
display width to provide more space for adding widgets. Slide your
finger horizontally across the screen to scroll to the left or right side
panels. As you scroll, the indicator at the top of the display shows
your current position.
Customizing the Home Screens
Customize the Home screens to suit your preferences.
•
Place widgets
: From a Home screen, touch the widget tab ➔ touch and
drag the selected widget onto the Home screen.
•
Change wallpaper: From a Home screen, touch
Settings ➔ Display Settings ➔ Wallpaper
.
Menu
➔
Menu 1 ➔
Getting Started 17

Widgets
Widgets are links to applications,
tools, or features, which can be placed
in the Widget Tray, or on a Home
screen.
The Widget Tray, at the left of the
Home screen, provides quick access
to widgets.
Use your finger to scroll in the Widget
Tray to scroll through the widgets.
Accessing the Widget Tray
䊳
From a Home screen, touch the
the Widget Tray.
18
Widget Tray tab
to show or hide

Customizing the Widget Tray
Select widgets for display in the Widget Tray, and enable online
widgets to connect to the network.
1.
From a Home screen, display the Shortcut Bar by touching the
arrow at the bottom of the Status Bar, then touch the Widget
setup icon.
2.
Use your finger to scroll the list of widgets. Touch a widget to
select or unselect it, or touch
3.
Touch OK to save your settings and return to the Home screen.
Note:
You can also access Widget setup from Settings. For more information, refer
to “Widget” in the User Manual
Placing Widgets
Select All
or
Unselect All
.
Use these methods to customize the Widget Tray and Home screens:
•
Touch a widget in the Widget Tray to place it on a Home screen.
•
To move a widget on a Home screen, touch and drag it to a new location.
•
To return a widget to the Widget Tray, tap the Widget Tray tab to open it,
then touch and drag the widget to the tray.
Tip:
With the Widget Reset Gesture, you can move all widgets from the current
Home screen back to the Widget Tray. Simply open the Widget Tray, then
shake the phone three times.
Getting Started 19

Learning More About Your Phone
The Help widget contains information about many of the features of
your phone.
1.
From a Home screen, open the Widget Tray. For more
information, see “Widgets” on page 18.
2.
Touch the Help
3.
Tap the Help widget to view topics.
widget to place it on the Home screen.
Menu
The Menu displays applications and features.
䊳
From a Home screen, touch
Menu
.
There are two menu screens. Slide your finger horizontally across
the screen to scroll to
Main Menu 1
or
Main Menu 2
.
Touch an icon to launch the application or feature.
20
Section 2: Call Functions
Making a Call
1.
From the Home screen, touch Dialer
2.
Touch the digits of the telephone or speed dial number.
•
Touch
Contacts
•
Touch
•
Touch
•
Tou ch
3.
Press to dial the call.
Voicemail
Setting Up Voicemail
Voicemail allows callers to leave voice messages, which can be
retrieved any time.
Note:
Once your Voicemail account has been set up, you can use the
folder (under the
Voicemail box.
䊳
In Standby mode, touch the
hold , or dial your mobile number. Follow the prompts in
the new user tutorial to set up your mail box.
to find a contact.
Groups
to call member(s) of a group.
Favor ites
to call a favorite contact.
Backspace
to delete digits if you enter an incorrect number.
Message
menu) to view details of voice messages in your
Dialer soft key
, then touch and
Call Functions 21
Voicemail
Listening to Voicemail
In Standby mode, touch the
Dialer soft key
, then touch and
hold , or dial your mobile number. After connecting, you will
hear your voice greeting, and the prompt to enter your password.
Voice Commands
Your Suede includes Nuance® Voice Service, state-of-the-art voice
recognition software that recognizes your spoken commands to dial
numbers, create messages, and launch phone features.
1.
From a Home screen, press and hold the
Service key
Note:
You can launch Voice Service when you connect an optional headset to the
phone. For more information, see “Voice Service Settings” on page 23.
2.
Follow the spoken prompts to use Voice Service.
• Call <Name or #>
on the right side of your phone.
: Place a call to a saved contact or to a telephone
Lock/Voice
number.
• Send Text <Name or #>
: Create a Text message, addressed to a saved
contact or to a telephone number.
• Send picture <Name or #>
: Create a Picture message, addressed to a
saved contact or to a telephone number.
• Lookup<Name>
• Go to<Menu>
•Check<Item>
22
: Find and view contact details.
: Open a menu item.
: View details about your phone’s status.

Voice Service Settings
Customize the way Voice Service interprets your voice commands.
Tip:
When configuring Voice Service settings, touch Help for information about the
setting.
1.
From a Home screen, touch
Voice Settings
2.
Select a setting for customization:
• Confirm Choices
.
: Choose whether the phone prompts you with a list of
potential matches to your command. Select
Confirm
, or
• Adaptation
•Modes
Never Confirm
: Adapt Voice Service to your voice, for optimal recognition
accuracy. Touch
Adapt Voice
: Control the level of guidance provided by Voice Service. Choose
Menu ➔
Tools ➔
Automatic, Always
.
, then follow the prompts.
Voice Service ➔
from:
–
Expert Mode
–
Prompt Mode
–
Readout Mode
screen displays.
• Voice Launch
Only
: The system uses beeps to prompt you for commands.
: The system uses spoken prompts.
: The system prompts you for information, and reads out the
: Choose a method for launching Voice Service, from
, to launch with the Lock/Voice Service key, or
Key/Ear Mic
launch with the Lock/Voice Service key OR with headset controls when
you atttach an optional headset.
• About
: View version and build information for Nuance voice recognition
software.
Call Functions 23
Key
to

Section 3: Entering Text
Entering Text
The Suede provides convenient touch text entry with a phone-style
3x4 keypad or the virtual QWERTY keyboard.
Entering Text Using the Vir tual QWERTY Keyboard
Your phone’s virtual QWERTY keyboard offers quick and easy touch
text input, similar to a computer keyboard.
Accessing the QWERTY Keyboard
䊳
With the cursor in a text field, touch the pull-down menu at the
top right of the screen and choose
– or –
Rotate the phone counter-clockwise to automatically switch to
the QWERTY keyboard.
Tip:
The QWERTY Keyboard always displays in landscape mode. To switch back to
the 3x4 Keypad, touch or rotate the phone.
24
QWERTY
.

Changing the Text Entry Mode
While entering text with the QWERTY keyboard, choose text entry
modes to make text entry easier:
•
Abc
: Enter text characters. While entering text, touch
between Abc and ABC modes, or touch
mode until you touch
•
123 Sym
: Enter numbers or symbols. While in 123 Sym mode, touch
or
123
to switch between Symbols and Numbers.
•
Shortcuts
Caps
again.
: Insert common internet characters and phrases, such as @,
Caps
Caps
once to switch
twice quickly to lock in ABC
http://, www., or .com.
Using Abc/ABC/abc mode
Enter text in upper and lower case by pressing corresponding keys.
While entering text:
•
Press the key for each letter only once.
•
Touch
Caps
to switch to Abc (initial case) mode.
•
Tap
Caps
twice quickly to switch to ABC (upper case) mode. To switch back
to Abc mode, touch
Using 123 Sym mode
Caps
once.
Enter numbers and symbols by pressing corresponding keys.
While entering text:
•
Touch a key to enter a number.
•
Ta p
SYM
to access more symbols.
Entering Text 25
SYM

Entering Text with the 3X4 Keypad
The 3x4 Keypad provides standard text entry for phone keypads.
Accessing the 3x4 Keypad
䊳
With the cursor in a text field, touch the pull-down menu at the
top right of the screen and choose
Note:
The 3x4 Keypad is the default for most text entry fields. The 3x4 Keypad
always displays in portrait mode.
Changing the Text Entry Mode
3X4Keypad
.
Choose text entry modes to make entering text easier.
䊳
While entering text with the 3x4 Keypad, press
Entry Mode
choose Abc, abc, ABC, T9Word, T9word, T9WORD, or 123.
Tip:
The current text entry mode displays in the upper right corner of the 3x4
Keypad.
26
to
 Loading...