

Page 1
Vacuum
Cleaner
SU-8500 Series
FOR HOUSEHOLD USE ONLY
Operating
Instructions
IMPORTANT SAFETY INSTRUCTIONS .......................2
V
ACUUM CLEANER DISCRIPTION...........................3
V
ACUUM CLEANER ASSEMBLY...............................4
C
HECKING PARTS.....................................4
A
TTACHING HANDLE TO CLEANER ..............4
A
TTACH HANDLE TO DIRTCUP ....................4
A
TTACHING THE HOSE AND TOOLS.............5
O
PERATION..........................................................6
P
OWER CONTROL ....................................6
H
ANDLE RELEASE....................................6
B
RUSH ROLL SWITCH ...............................6
C
IRCUIT BREAKER....................................7
P
OWERFOOT HEIGHT ADJUSTMENT ...........7
E
DGE CLEANING FEATURE........................7
C
LEANING TOOL A TTACHMENTS.................7
P
OWER CORD ARRANGEMENT ..................8
T
RANSPORTING CLEANER.........................8
C
ARRYING CLEANER ................................8
M
AINTENANCE .....................................................9
DIRT CUP FULL OR FILTER CLOGGED INDICATOR.....
9
C
LEANING DIRT CUP.................................9
C
LEANING THE CASE FIL TER .....................9
C
LEANING THE EXHAUST HEPA FILTER .......9
C
HECK RO TATING BRUSH AND DRIVE BELT10
R
EPLACE DRIVE BEL T.............................10
C
LEANING CLOGS..................................11
H
EADLIGHT REPLACEMENT.....................11
R
EPLACE AGIT ATOR BRUSHR OLL..............12
R
EPLACE BELT.......................................12
O
PTIONAL ACCESSORIES ....................................13
T
ROUBLE SHOOTING...........................................14
W
ARRANTY........................................................15
❈
The design and specification may be diff erent depending on the models.
Page 2

Important Safety Instructions
Thank you for purchasing a Samsung v acuum cleaner. When using an electrical appliance, basic
precautions should always be f ollo wed, including the f ollowing:
PLEASE READ ALL W ARNINGS AND INSTRUCTIONS BEFORE USING THIS VA CUUM CLEANER
.
WARNING: To reduce the risk of fire, electric shock, or injury:
• Do not leave v acuum cleaner unattended when it is plugged in.
• Unplug from outlet when not in use and before servicing.
• Do not use outdoors or on wet surfaces .
• Do not allow children to operate v acuum cleaner or use as a to y.
• Close attention is necessary when used by or near children.
• Use only as described in this manual. Use only manufacturer’s recommended attachments.
• Do not use with damaged cord or plug.
• If vacuum cleaner is not working as it should, or has been dropped, damaged, left outdoors or dropped
in water , tak e it to a service center .
• Do not pull or carry by cord, use cord as a handle, close a door on cord, or pull the cord around sharp
edges or corners. Keep cord a wa y from heated surface.
• Do not unplug by pulling on the cord. To unplug, grasp the plug, not the cord.
• Do not handle vacuum cleaner or plug with wet hands .
• Do not put any object into openings. Do not use with an y opening b lock ed; k eep openings free of dust,
lint, hair and anything that may reduce air flo w.
• Keep hair, loose clothing, fingers and all parts of body awa y from openings and moving parts.
• Do not pick up anything that is b urning or smoking, such as cigarettes, matches or hot ashes .
• Do not use without dirt cup or filters in place. Empty cup and clean filter frequently when picking up ve ry
fine materials such as powder .
• Turn off all controls bef ore unplugging v acuum cleaner.
• Use extra care when cleaning on stairs .
• Do not use to pick up flammable or comb ustib le materials such as gasoline or fine wood standings or
use in areas where they ma y be present.
• Store your vacuum cleaner indoors in a cool, dry area.
• Av oid pic king up hard, sharp objects with the cleaner , the y ma y damage the cleaner.
• Always turn off this appliance bef ore connecting or disconnecting the hose , removing the bottom plate
for maintenance.
• Use only on dry , indoor surf aces , ne v er change the plug in an y way.
• Do not modify the polarized plug to fit a non-polarized outlet or extension cord.
• Do not touch the brush roller when it is rotating.
• Keep suction a way from your f ace when using nozzles and pipe .
• Do not pull the power cord around sharp corners and do not allow it to become trapped.
• Unplug before connecting turbine nozzle .(only using turbine-brush model)
SAVE THESE INSTRUCTIONS FOR FUTURE USE.
THIS VA CUUM CLEANER HAS A POLARIZED PLUG.
To reduce the risk of electrical shock, this appliance has a polarized plug (one blade wider than the
other.) This plug will fit in a polarized outlet only one wa y. If the plug does not fit fully in the outlet, reverse
the plug. If it still does not fit, contact a qualified electrician to install a proper outlet.
2
Page 3
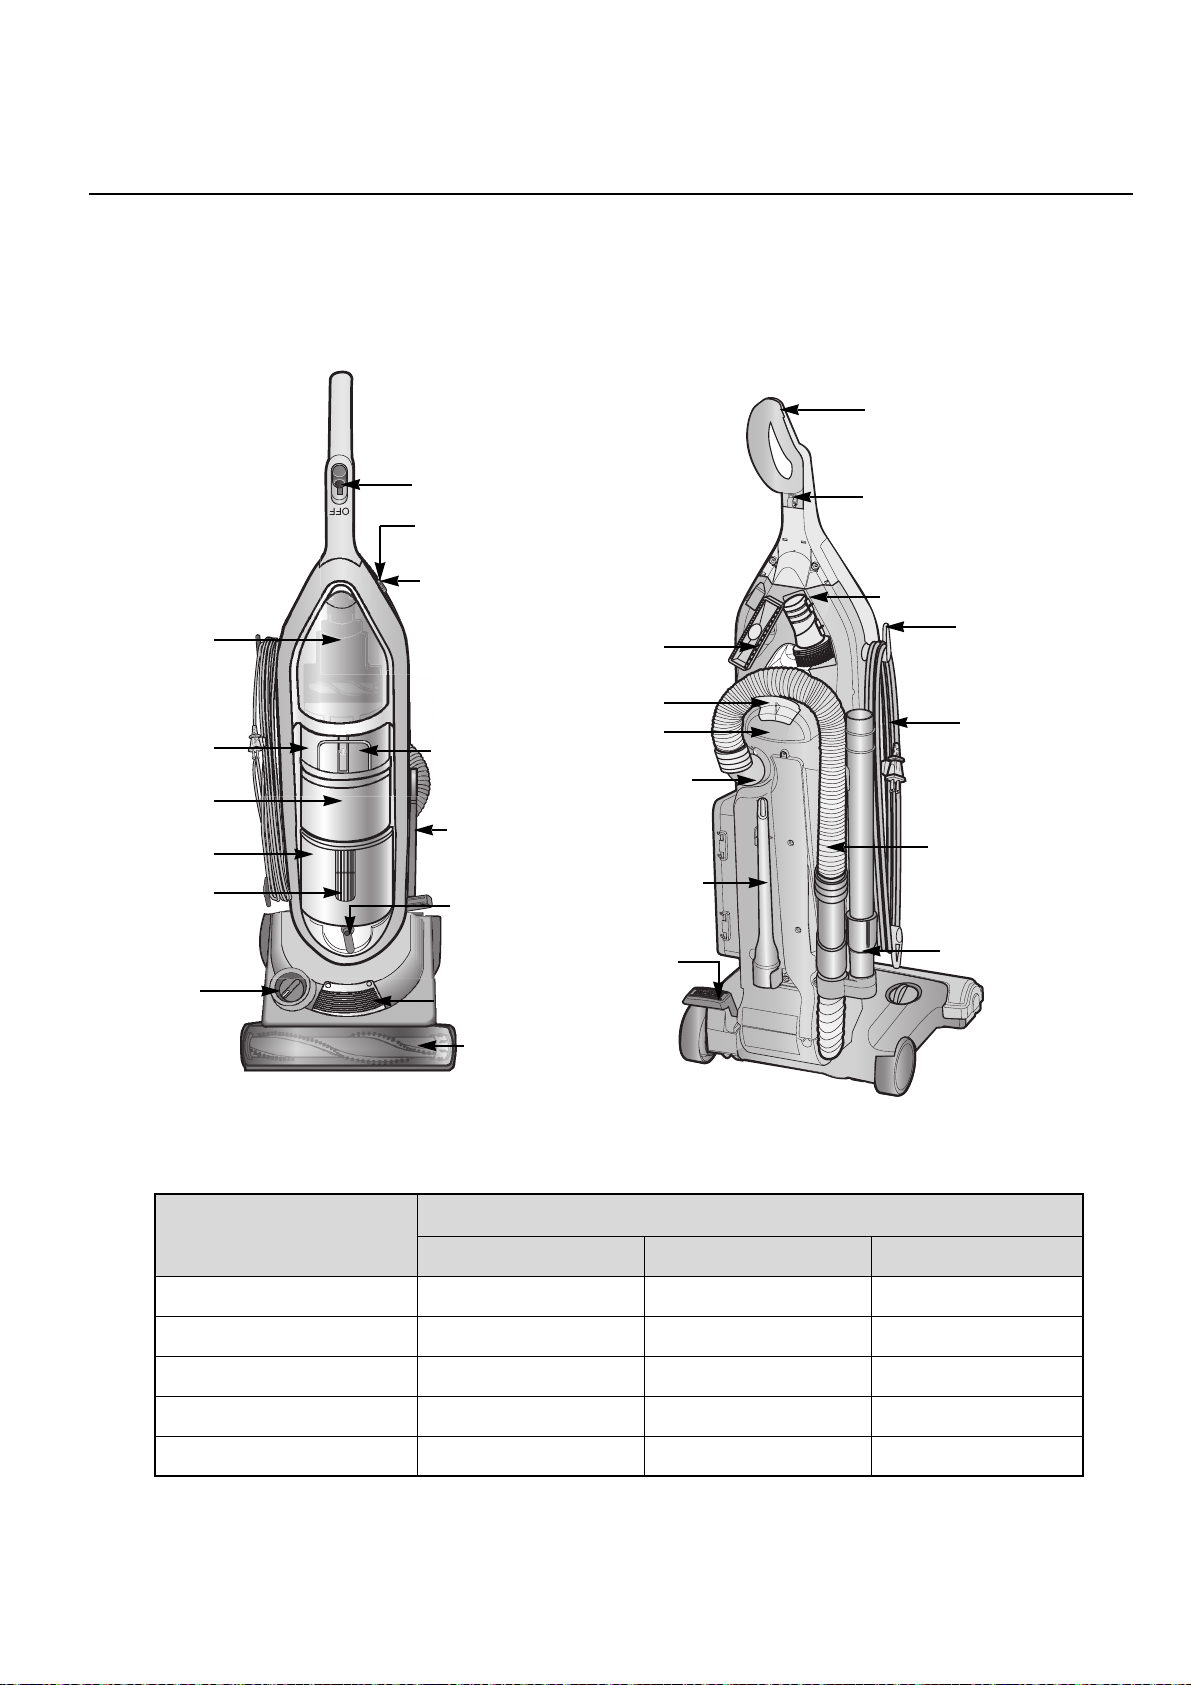
Vacuum Cleaner Description
Assembled Vacuum Cleaner Parts
3
HANDLE
EXHAUST FILTER
EXTENSION WANDS
TURBINE BRUSH
TOOL CO VER
LOOP
HEPA
TELESCOPIC
YES
YES
STICK
HEPA
TELESCOPIC
YES
YES
STICK
MICRO
FRICTION
NO
NO
DESCRIPTION
MODEL
SU8583 SU8563 SU8543
Front Back
CARPET/FLOOR
SELECTOR
ON/OFF POWER CONTROL SWITCH
DUST BAG
FULL
INDICATOR
EXHAUST
FILTER
DIRT CUP
RELEASE LEVER
HEADLIGHT
BRUSH ROLL
ON/OFF SWITCH
RESET SWITCH
HANDLE
DUSTING BRUSH
CORD CLIP
QUICK RELEASE
CORD WRAP
HOSE
EXTENSION WANDS
POWERFOOT
(BRUSH ROLL)
DIRT CUP
DIRT CUP
HANDLE
PREFILTER
CASE FILTER
UPHOLSTERY
BRUSH
HOSE CLIP
CARRYING
HANDLE
SUCTION INLET
FOR HOSE
TOOL COVER
(TURBINE BRUSH)
CREVICE TOOL
HANDLE RELEASE
PEDAL
POWER CORD
Page 4

Vacuum Cleaner Assembly
Checking Parts
You should have the f ollowing items when y ou unpack y our v acuum cleaner:
A. Owner’ s man ual
B. Handle section(with 4 screws)
C. Hose
D . Extension wands
(Telescopic, Friction)
E. Crevice tool
F. Cleaner body
G. Powered hand tool
(Turbine Brush)
H. Dusting Brush
I. Upholstery Brush
(Furniture nozzle)
Attaching Handle to cleaner
Attach Handle to Dirt cup
The dirt cup assembly consists of the following parts;
* Dirt cup (A)
* Handle (B)
1
Stand the vacuum upright and slide the base of the
handle firmly into the grooves at the top of the
vacuum body.
2
Check to be sure the handle is fitted to the cleaner
body. If there is a gap in front, continue to push
firmly until the handle is flush.
3
Insert the two screws provided into the existing
holes. Tighten the screws securely with a
screwdriver . Bef ore securing the handle, please
check that the handle is fitted to the vacuum body
and there’s no gap between them. If there is a gap
or loosen the screw , cleaner w on’t be turned on.
1
Release the dirt cup from cleaner body.
2
Insert the dirt cup handle into the dirt cup as shown
press firmly until handel locks in place.
3
Insert the dirt cup into the cleaner body.
A
AB
BCDEFGH I
4
Page 5
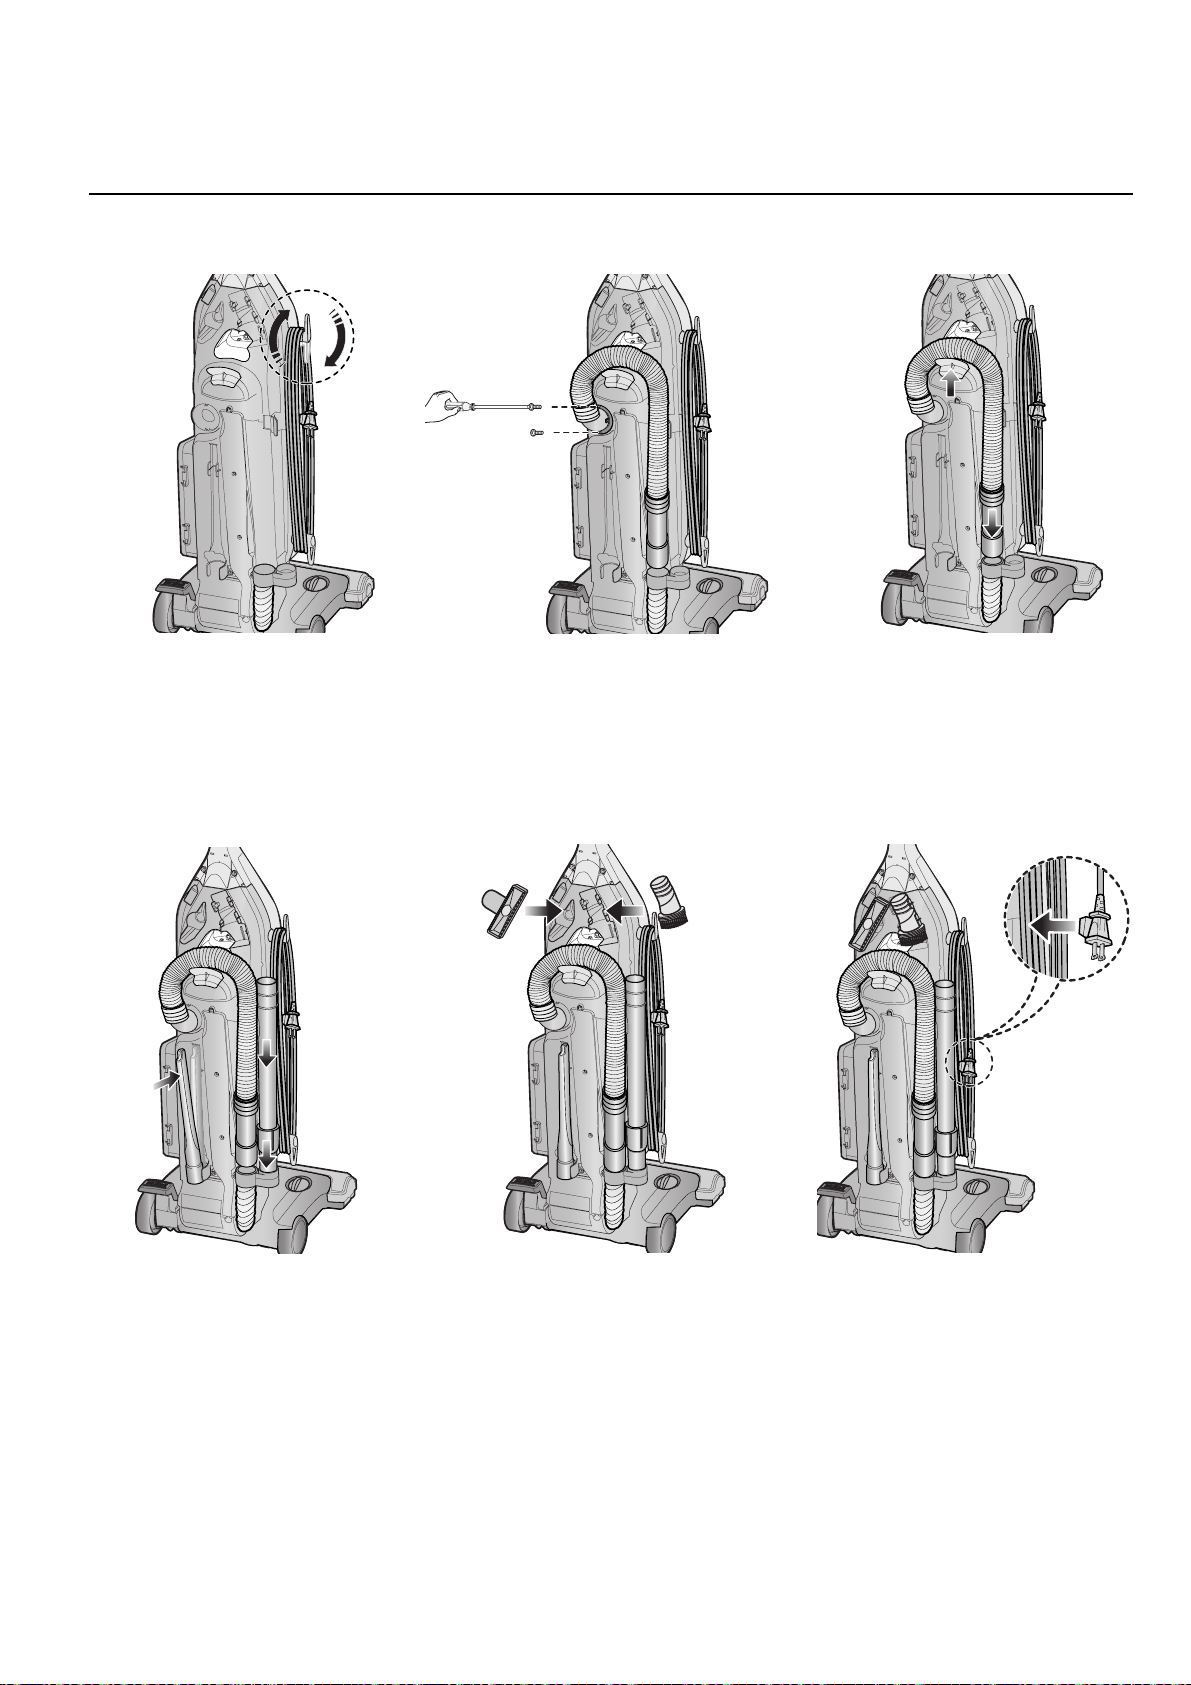
Vacuum Cleaner Assembly
Attaching the Hose and Tools
1
Wrap the cord around hooks
for storage. The top hook
rotates right or left for easy
cord release.
2
Attach the hose with two screws
from the assembly packet. Tighten
securely with a screw driver .
3
Snap the hose into the hose clip as
shown.
4
Slide the extend wand into the
storage clip. Insert the crevice tool
into the nook.
5
Snap in the Dusting brush and
insert uholstery brush into the
storage clip as shown.
6
Loop power cord around cord
wraps on side of cleaner. Then
clip molded plug to power cord to
secure.
5
Page 6

Operation
Power Control
The power control slide switch on the front of the cleaner turns the vacuum on and off .
This switch also allows y ou to control the cleaning power.
1
Plug cord into electrical outlet.
2
To turn the vacuum cleaner on, slide the po wer s witch up . To turn it off, slide the
switch down. The headlight turns on when in use.
Handle Release
Select the desired angle of the cleaner using the handle release pedal.
The handle of your cleaner has three positions.
1
Step on the handle release pedal on the back of the cleaner base.
2
Raise or lower the handle and release the pedal.
A. Upright position:
For storage and elev ated cleaning with cleaning tools.
B. Middle position:
For general operation on carpet and floors.
C. Low position:
Use for reaching under low furniture, step on handle release
lever to lo wer handle.
Brush roll switch
Turn brush roll switch off to clean hard surf ace floors .
Turn brush roll switch on to clean carpet and rugs.
The brush rolls will automatically turn off when the handle is in the
upright position.
OFFOFF
A
B
C
CIRCUIT BREAKER
(RESET SWITCH)
BRUSH ROLL
SWITCH
6
Page 7

Operation
Circuit Breaker
The Circuit breaker turns off the brush rolls if there is an obstruction in them. When tripped, the circuit breaker
button(RESET BUTT ON) will pop up , and the brush roll control button will light up .
The brush rolls will not turn, but the suction motor will continue to run. T o reset the break er, turn cleaner off and
unplug it, clear obstruction, press circuit breaker button down. Turn cleaner ON and continue cleaning.
Powerfoot Height Adjustment
1
Place Handle in Upright Position.
2
Turn Height Adjustment Knob to desired setting.
Lowest Setting - For bare floors.
Medium Settings - For short and medium pile carpets.
Highest Setting - For plush pile carpet.
NOTE : F or optimal cleaning perf ormance, adjust to the lowest
practical setting. If your cleaner is difficult to push, adjust to the next higher setting.
Edge Cleaning Feature
The Edge Cleaning Feature helps the cleaner to clean edges of rugs and floors effectively, allowing suction to
reach against walls and near furniture.
Cleaning Tool Attachments
Attachment tools can be used to clean furniture, drapes, stairs, or in corners. Place the vacuum on the floor with
the handle in the upright position while using attachment tools. Do not place the vacuum on top of furniture or
steps as the brushroller may cause damage.
1
Unhook hose (with cleaning tools attached) from the rear of the vacuum
cleaner.
2
Place desired tool on end of narrow wand. Press firmly and twist to connect the
tool to the wand.
A. Dusting Brush:
Use for hardwood furniture, table tops, books, lamps .
B. Crevice tool:
Use in corners, on stairs, baseboards, and behind furniture.
A
B
7
Page 8

Operation
C. Extension Wand:
Use with desired attachments and narrow wand for a longer
reach.
D. Turbine-Brush:
Use for upholstered furniture carpeted stairs and hard-to-reach places.
E. Upholstery Brush:
Use for upholstered furniture, draperies, mattresses, clothing, automobile
interiors, and carpeted stairs.
Power Cord Arrangement
1
Turn vacuum cleaner off .
2
Unplug power cord by gr asping the polarized plug and disconnect from outlet.
3
Loop power cord around cord wraps on side of vacuum cleaner.
4
Clip molded plug to power cord to secure.
Cord Clip
For easier handling while Vacuuming, hook the
power cord onto the power cord clip .
Transporting Cleaner
Put handle is upright position.
Tilt cleaner back on rear wheels.
Push forward.
Carrying Cleaner
Use the carrying handle to lift the cleaner.
8
CORD CLIP
POWER CORD
C
D
E
Page 9

Maintenance
Dirt-Cup Full or Filter clogged Indicator
The Dirt-Cup Full Indicator on the front of the vacuum shows a red or green display. When the Dirt-Cup displa y is green, the Dirt-Cup is not yet full or the filter is not
clogged. When the indicator
turns to red, the Dirt-Cup needs to be emptied or the filter needs to be cleaned.
If the display is still red after emptying the dust container, turn the cleaner off to
see if the hose, tube, or nozzle is clogged .
Cleaning Dirt cup
1
Unplug the Cleaner from electrical outlet.
2
The Dirt cup can be reached by removing the Dirt Container, reaching
underneath the Upper Tank and turning the rim of the Filter Frame to unlock.
Pull straight down to remov e. Brush the dirt off the Louvers and Dirt cup.
3
The foam Upper Tank Filter may be removed and hand washed in cold w ater
with mild detergent. Rinse well then air dry throughly before replacing.
Cleaning the Case-Filter
1
Unplug the Cleaner from electrical outlet.
2
The Case-Filter assembly can be reached by pulling the Case-Filter assembly
from the cleaner.
3
Remove the cov er from the Case-Filter, and the foam ma y be remo v ed and
hand-washed in cold water with mild detergent, then air dried.
4
Reposition Filters when completely dry .
Cleaning the Exhaust HEPA Filter
1
Unplug the Cleaner from electrical outlet.
2
The Exhaust HEPA Filter assists in the filtration process to return clean air to
the room. It is located behind the door on the side of the cleaner. If the filter
becomes dirty open the door, remove the filter clean. To remove this filter , open
the door on the side of the cleaner, gr asp filter and pull it straight out.
3
Reposition the exhaust filter , then loc k the door.
9
Page 10

Maintenance
Check Rotating Floor Brush and Drive Belt
1
Unplug cleaner from electrical outlet.
2
Place handle in Low position and turn vaccum cleaner
over so bottom side is up .
3
Remove the eight screws as sho wn with a scre wdriver.
4
Turn ov er the cleaner again, and lift the Cov er-Brush off .
5
Remove the eight screws , and lift the Brush Cov er off
.
6
Grasp Rotating Floor Brush at both ends and lift.
7
Clean strings, hair and other debris from Rotating Floor
Brush, paying particular attention to brush ends.
8
Clean strings, hair and other debris from Motor Pulley
and Drive Belt areas.
9
Check Drive Belt carefully for w ear, cuts or stressed
areas.
10
Check Air Passage w a y f or obstructions. Remov e debris
from this area
.
Replace Drive Belt
1
Unplug cleaner from electrical outlet.
2
With Rotating Floor Brush removed from vaccum
cleaner(Step1-6 of Check Rotating Floor and Drive Belt)
grasp old Drive Belt and remov e from Motor pully.
Discard old Drive Belt.
3
Place new Drive Belt ov er motor pulle y and stretch other
end over rotating Floor Brush in the space between the
bristles.
4
Place ends of rotating Floor Brush down into slots on
sides as shown.
5
Turn rotating Floor Brush by hand se ver al times in
direction of motor pulley, if properly installed, Drive Belt
will center itself.
6
Reposition Brush cover and eight screws. Tighten
screws securely. Snap end of Brush cov er into place .
10
Page 11

Maintenance
Clearing Clogs
Low suction or poor pickup ma y be due to a clog in the v accum cleaner . If you notice a change in the sound of the motor
or a reduction in the spinning action, check f or clogs.
1
Unplug cleaner from electrical outlet.
2
Empty Dirt Cup.
3
Check Case filter for b uild up or clogs.
4
Remove the Case filter and check the suction inlet f or a clog.
5
Grasp the Quick Reach Handle and lift Hose W and to separate from the
suction opening. Check for a clog in the Base , the W and or the Hose.
6
Remove the screw attaching the Hose Wand Base to the vaccum.
Straighten the Hose Wand Base and unclog with long, narro w object.
7
Turn the vacuum cleaner off and unplug it. Remo v e the brush cover, check the air
passagewa y f or obstructions. Remov e debris from this area. Reposition brush cover
and eight screws. Tighten screws securely, snap end of brush cover into place.
Headlight Replacement
1
Disconnect cleaner from electrical outlet.
2
Unscrew the two screws on windo w lamp . then lift window lamp off .
3
Pull old bulb straight out of sock et. Push new b ulb str aight into sock et until loc ked in
place.
4
Place tabs on window lamp into slot. Press on window lamp and secure other tab .
5
Replace and tighten two screws.
11
Page 12

Maintenance
Turbine Brush
*Replace Agitator brush roll
*Replace belt
1
Remove tool from hose and turn it so bottom face up . Push up the hook on either side of
tool and remove bottom plate.
2
Remove agitator including end plates and discard.
3
Inspect belt to ensure that it is in good condition, if belt is cracked, gouged, or broc ken.
Replace it(see following section).
4
With curved ends down, slide end plates of brush roll into slots on tool.
5
To replace bottom plate, insert the four tabs on edge of bottom plate into slots on front of
tool. Pivot bottom plate down and snap closed.
1
Grasp turbin and pull firmly to remove.
2
Remove belt from turbin pulley. Replace with new belt.
3
With flat sides of turbin retainers pointing down, slide retainers into groov es in tool
housing and snap into place.
4
Replace brush roll and bottom plate.
12
Page 13

Optional accessories
For filters, belts or other parts, please contact y our nearest SAMSUNG Dealer .
If your dealer does not stock these parts, y ou may order them b y calling 1-800-SAMSUNG.
Drum Brush
Timing Belt
Lamp-Incandescent
Exhaust Filter(HEPA Filter)
Case Filter
Turbine Brush(Turbo-Brush)
Telescopic wands
Friction wands
Crevice Pipe
Dusting Brush
Upholstery Brush
DJ66-000298
6602-001223
4713-001068
DJ63-00338
DJ61-00576
DJ67-00285A
DJ62-00113A
DJ67-50203A
DJ67-50202B
DJ67-00220
DJ67-00280A
ITEM PART DESCRIPTION PART NUMBER
①
②
③
④
⑤
⑥
⑦
⑧
⑨
⑩
⑪
13
①
④
⑦
⑩
②
⑤
⑧
⑪
③
⑥
⑨
Page 14

Troubleshooting
Check this list of possible prob lems and solutions bef ore bringing your vacuum to a service center . If you ha ve a problem
you cannot solve , please call 1-800-SAMSUNG.
Problem
C
LEANER WON’T TURN ON
• Not firmly plugged in.
• No voltage in w all plug.
• Blown fuse or tripped break er .
• On/Off s witch not turned on.
C
LEANER WON’T PICK UP
• Circuit breaker tripped.
• Agitator brush rolls worn.
• Dirt cup full.
• Incorrect carpet height setting.
• Blockage in air flo w passage .
• Pre-filter clogged.
• Dirt cup not properly installed.
• Filter assembly not assemb led properly.
• Blockage in hose .
• Broken belt.
• Hose not inserted fully.
L
IGHT WILL NOT WORK
• Burned out light bulb .
A
BNORMAL SOUND
• Strange sound lik e air rushes
Possible solution
• Plug unit in firmly.
• Check fuse or break er.
• Replace fuse or reset break er .
• Slide to on.
• Tighten the screw of the handle .
• Reset circuit breaker.
• Replace brush rolls.
• Empty dirt cup.
• Mov e nozzle control knob to lo wer settings .
• Clear HEPA cartridge filter b y eighter tapping the side
of the dirt cup.
• Clean pre-filter.
• P osition dirt cup properly.
• Ensure that filter assemb ly is positioned properly.
• Clear bloc kage .
• Replace belt.
• Clean hose or nozzle area.
• Replace light bulb.
• Check f or clogs .
14
Page 15

Limited Warranty to Original Purchaser
This Samsung brand product, as supplied and distributed by Samsung Electronics America, Inc. (SAMSUNG) and delivered new, in the original
carton to the original consumer purchaser, is warranted by SAMSUNG against manufacturing defects in materials and workmanship for the
following limited warranty period: One (1) Year Parts and Labor.
This limited warranty begins on the original date of purchase, and is valid only on products purchased and used in the Unites States, and does
not include transportation, installation, removal or reinstallation, routine maintenance and cleaning, and does not extend to accessories, belts or
consumable items such as filters and bags. Warranty repairs must be performed by Samsung’s authorized service center. To receive warranty
service, the original dated bill of sale must be presented upon request as proof of purchase to SAMSUNG or SAMSUNG's authorized service
center. Transportation to and from the service center is the responsibility of the purchaser.
SAMSUNG will repair or replace this product, at our option and at no charge with new or reconditioned parts, if found to be defective during the
limited warranty period specified above. The product must be returned during the warranty period with transportation charges prepaid to
SAMSUNG's designated service center. Prior to returning any product for warranty service, the purchaser must contact SAMSUNG for problem
determination and service procedures. SAMSUNG does not warrant uninterrupted or error-free operation of the product. All replaced parts and
products become the property of SAMSUNG and must be returned to SAMSUNG. Replacement parts and products assume the remaining original
warranty, or ninety (90) days, whichever is longer.
The limited warranty covers manufacturing defects in materials and workmanship encountered in normal, noncommercial use of this product and,
as determined by SAMSUNG, shall not apply to the following, including but not limited to: damage which occurs in shipment; applications and uses
for which this product was not intended; failures or problems which are caused by products or equipment not supplied by SAMSUNG; accidents,
misuse, abuse, neglect, misapplication, fire, water, lightning or other acts of nature; incorrect electrical line voltage, fluctuations or surges; damage
caused by improper or faulty installation; product alteration or modification; improper or unauthorized repair; cosmetic damage or product with
altered serial numbers; failure to follow operating instructions, customer adjustments, maintenance and environmental instructions that are covered
and prescribed in the instruction book; use of non-SAMSUNG or unauthorized parts, supplies, accessories or equipment which damage this
product or result in service problems.
THERE ARE NO EXPRESS WARRANTIES OTHER THAN THOSE LISTED AND DESCRIBED ABOVE, AND NO WARRANTIES WHETHER
EXPRESS OR IMPLIED, INCLUDING, BUT NOT LIMITED TO, ANY IMPLIED WARRANTIES OF MERCHANTABILITY OR FITNESS FOR A
PARTICULAR PURPOSE, SHALL APPLY AFTER THE EXPRESS WARRANTY PERIODS STATED ABOVE, AND NO OTHER EXPRESS
WARRANTY OR GUARANTY GIVEN BY ANY PERSON, FIRM OR CORPORATION WITH RESPECT TO THIS PRODUCT SHALL BE
BINDING TO SAMSUNG. SAMSUNG SHALL NOT BE LIABLE FOR LOSS OF REVENUE OR PROFITS, FAILURE TO REALIZE SAVINGS OR
OTHER BENEFITS, OR ANY OTHER SPECIAL, INCIDENTAL OR CONSEQUENTIAL DAMAGES CAUSED BY THE USE, MISUSE, OR
INABILITY TO USE THIS PRODUCT, REGARDLESS OF THE LEGAL THEORY ON WHICH THE CLAIM IS BASED, AND EVEN IF SAMSUNG
HAS BEEN ADVISED OF THE POSSIBILITY OF SUCH DAMAGES. NOR SHALL RECOVERY OF ANY KIND AGAINST SAMSUNG BE
GREATER IN AMOUNT THAN THE PURCHASE PRICE OF THE PRODUCT SOLD BY SAMSUNG AND CAUSING THE ALLEGED DAMAGE.
WITHOUT LIMITING THE FOREGOING, PURCHASER ASSUMES ALL RISK AND LIABILITY FOR LOSS, DAMAGE OR INJURY TO
PURCHASER AND PURCHASER’S PROPERTY AND TO OTHERS AND THEIR PROPERTY ARISING OUT OF THE USE, MISUSE OR
INABILITY TO USE THIS PRODUCT SOLD BY SAMSUNG NOT CAUSED DIRECTLY BY THE NEGLIGENCE OF SAMSUNG. THIS LIMITED
WARRANTY SHALL NOT EXTEND TO ANYONE OTHER THAN THE ORIGINAL PURCHASER OF THIS PRODUCT, IS
NONTRANSFERABLE AND STATES YOUR EXCLUSIVE REMEDY.
Some states do no allow limitations on how long an implied warranty lasts, or the exclusion or limitation of incidental or consequential damages,
so the above limitations or exclusions may not apply to you. This warranty gives you specific legal rights, and you may also have other rights
which vary from state to state.
To obtain warranty service, please contact SAMSUNG at:
SAMSUNG ELECTRONICS AMERICA, INC. - CONSUMER ELECTRONICS CUSTOMER SERVICE
1 SAMSUNG PLACE, LEDGEWOOD, NJ 07852
Tel: 973-691-6200, Fax: 973-691-6201
1-800-SAMSUNG (1-800-726-7864)
www.sosimple.com
Samsung Vacuum Warranty
 Loading...