

Samsung SU-8500 User Manual
Vacuum
Cleaner
SU-8500 Series
FOR HOUSEHOLD USE ONLY
Operating
Instructions
IMPORTANT SAFETY INSTRUCTIONS .......................2
V
ACUUM CLEANER DISCRIPTION ...........................3
V
ACUUM CLEANER ASSEMBLY...............................4
C
ARTON CONTENTS .................................4
A
CCESSORIES .........................................4
A
TTACH HANDLE TO VACUUM.....................4
A
TTACH HANDLE TO DIRT CUP ...................4
A
TTACH VACUUM HOSE AND TOOLS ...........5
O
PERATION..........................................................6
P
OWER SWITCH/BRUSH ROLL SWITCH
(CIRCUIT BREAKER) ..................................6
H
ANDLE POSITIONS..................................6
P
OWERFOOT HEIGHT ADJUSTMENT ...........7
E
DGE CLEANING ......................................7
C
LEANING TOOLS.....................................7
P
OWER CORD ARRANGEMENT ..................8
C
ORD CLIP..............................................8
T
RANSPORTING CLEANER .........................8
C
ARRYING CLEANER ................................8
M
AINTENANCE .....................................................9
DIRT CUP CHECK OR FILTER CLOGGED INDICATOR ..
9
C
LEANING DIRT CUP.................................9
C
LEANING THE CARTRIDGE FILTER TANK ....9
CLEANING THE HEPA MEDIA POST-MOTOR FILTER
..9
CHECK ROTATING FLOOR BRUSH AND DRIVE BELT
10
R
EPLACE DRIVE BELT.............................10
C
LEARING CLOGS ..................................11
P
OWERED HAND TOOL(TURBINE BRUSH)..12
B
RUSHBAR REPLACEMENT......................12
B
ELT REPLACEMENT...............................12
T
ROUBLE SHOOTING ...........................................13
❈
The design and specification may be different depending on the models.

Important Safety Instructions
Thank you for purchasing a Samsung vacuum cleaner. When using an electrical appliance, basic precautions
should always be followed, including the following:
PLEASE READ ALL WARNINGS AND INSTRUCTIONS BEFORE USING THIS VACUUM CLEANER
.
WARNING: To reduce the risk of fire, electric shock, or injury:
• Do not leave vacuum cleaner unattended when it is plugged in.
• Unplug from outlet when not in use and before servicing.
• Do not use outdoors or on wet surfaces.
• Do not allow children to operate vacuum cleaner or use as a toy.
• Close attention is necessary when used by or near children.
• Use only as described in this manual. Use only manufacturer’s recommended attachments.
• Do not use with damaged cord or plug.
• If vacuum cleaner is not working as it should, or has been dropped, damaged, left outdoors or dropped into water,
return it to a service center.
• Do not pull or carry by cord, use cord as a handle, close a door on cord, or pull the cord around sharp edges or
corners. Keep cord away from heated surface.
• Do not unplug by pulling on the cord. To unplug, grasp the plug, not the cord.
• Do not handle vacuum cleaner or plug with wet hands.
• Do not put any object into openings. Do not use with any opening blocked; keep openings free of dust, lint, hair and
anything that may reduce air flow.
• Keep hair, loose clothing, fingers and all parts of body away from openings and moving parts.
• Do not pick up anything that is burning or smoking, such as cigarettes, matches or hot ashes.
• Do not use without dirt cup or filters in place. Empty dirt cup and clean filter frequently when picking up very fine
materials such as powder.
• Turn off all controls before unplugging vacuum cleaner.
• Use extra care when cleaning on stairs.
• Do not use to pick up flammable or combustible materials such as gasoline or fine wood fine wood sandings or use
in areas where they may be present.
• Store your vacuum cleaner indoors, in a cool and dry area.
• Avoid picking up hard, sharp objects with the cleaner. They may damage the cleaner.
• Always turn off this appliance before connecting or disconnecting the hose, removing the bottom plate for
maintenance.
• Use only on dry, indoor surfaces, never change the plug in any way.
• Do not modify the polarized plug to fit a non-polarized outlet or extension cord.
• Do not touch the brush roller when it is rotating.
• Keep suction away from your face when using nozzles and pipe.
• Do not pull the power cord around sharp corners and do not allow it to be trapped.
• Unplug before connecting turbine nozzle.(only using turbine-brush model)
• This appliance is not intended for use by young persons or infirm persons without supervision unless they have
been adequately supervised by a responsible person to ensure that they can use the appliance safely.
• Young children should be supervised to ensure that they do not play with the appliance.
• The plug must be removed from the socket-outlet before cleaning or maintaining the appliance.
• If the supply cord is damaged, it must be replaced by the manufacturer or its service agent or a similarly qualified
person in order to avoid a hazard.
SAVE THESE INSTRUCTIONS
This vacuum cleaner is intended for household use only.
22

Vacuum Cleaner Description
3
Front Back
HEIGHT
ADJUSTMENT
KNOB
ON/OFF POWER CONTROL SWITCH
CHECK
FILTER
INDICATOR
HEPA MEDIA
POST-MOTOR FILTER
DIRT CUP
RELEASE
LEVER
BRUSH ROLL
ON/OFF
SWITCH
HANDLE
COMFORT GRIP
DUSTING BRUSH
CORD CLIP
QUICK RELEASE
CORD WRAP
HOSE
HOSE WAND BASE
EXTENSION
WAND
POWERFOOT
(BRUSH ROLL)
FURNITURE
GUARD
DIRT CUP
DIRT CUP
HANDLE
LOUVERS/FILTER
FRAME
CARTRIDGE
FILTER TANK
UPHOLSTERY
BRUSH
HOSE CLIP
CARRYING
HANDLE
SUCTION INLET
FOR HOSE
TOOL COVER
POWERED
HAND TOOL
CREVICE TOOL
HANDLE
RELEASE
PEDAL
POWER CORD
CAUTION:
Do not plug in your vacuum
cleaner until you are familiar
with all instructions and
operating procedures.
WARNING:
Plastic film can be dangerous.
To avoid danger of suffocation,
keep away from babies
and children.
Assembled Vacuum Cleaner Parts
Vacuum Cleaner Assembly
1
Stand the vacuum upright and slide the base of the
handle firmly into the grooves at the top of the
vacuum body.
2
Check to be sure the handle is fitted to the cleaner
body. If there is a gap in front, continue to push
firmly until the handle is flush.
3
Insert the two screws provided into the existing
holes. Tighten the screws securely with a
screwdriver. Before securing the handle, please
check that the handle is fitted to the vacuum body
and there’s no gap between them. If there is a gap
or the screw is loosened, cleaner won’t turn on.
1
Unlock the dirt cup from the cleaner body.
2
Insert the dirt cup handle into the dirt cup as shown.
Press firmly until it locks in place.
3
Insert the dirt cup into the cleaner body and lock.
AB
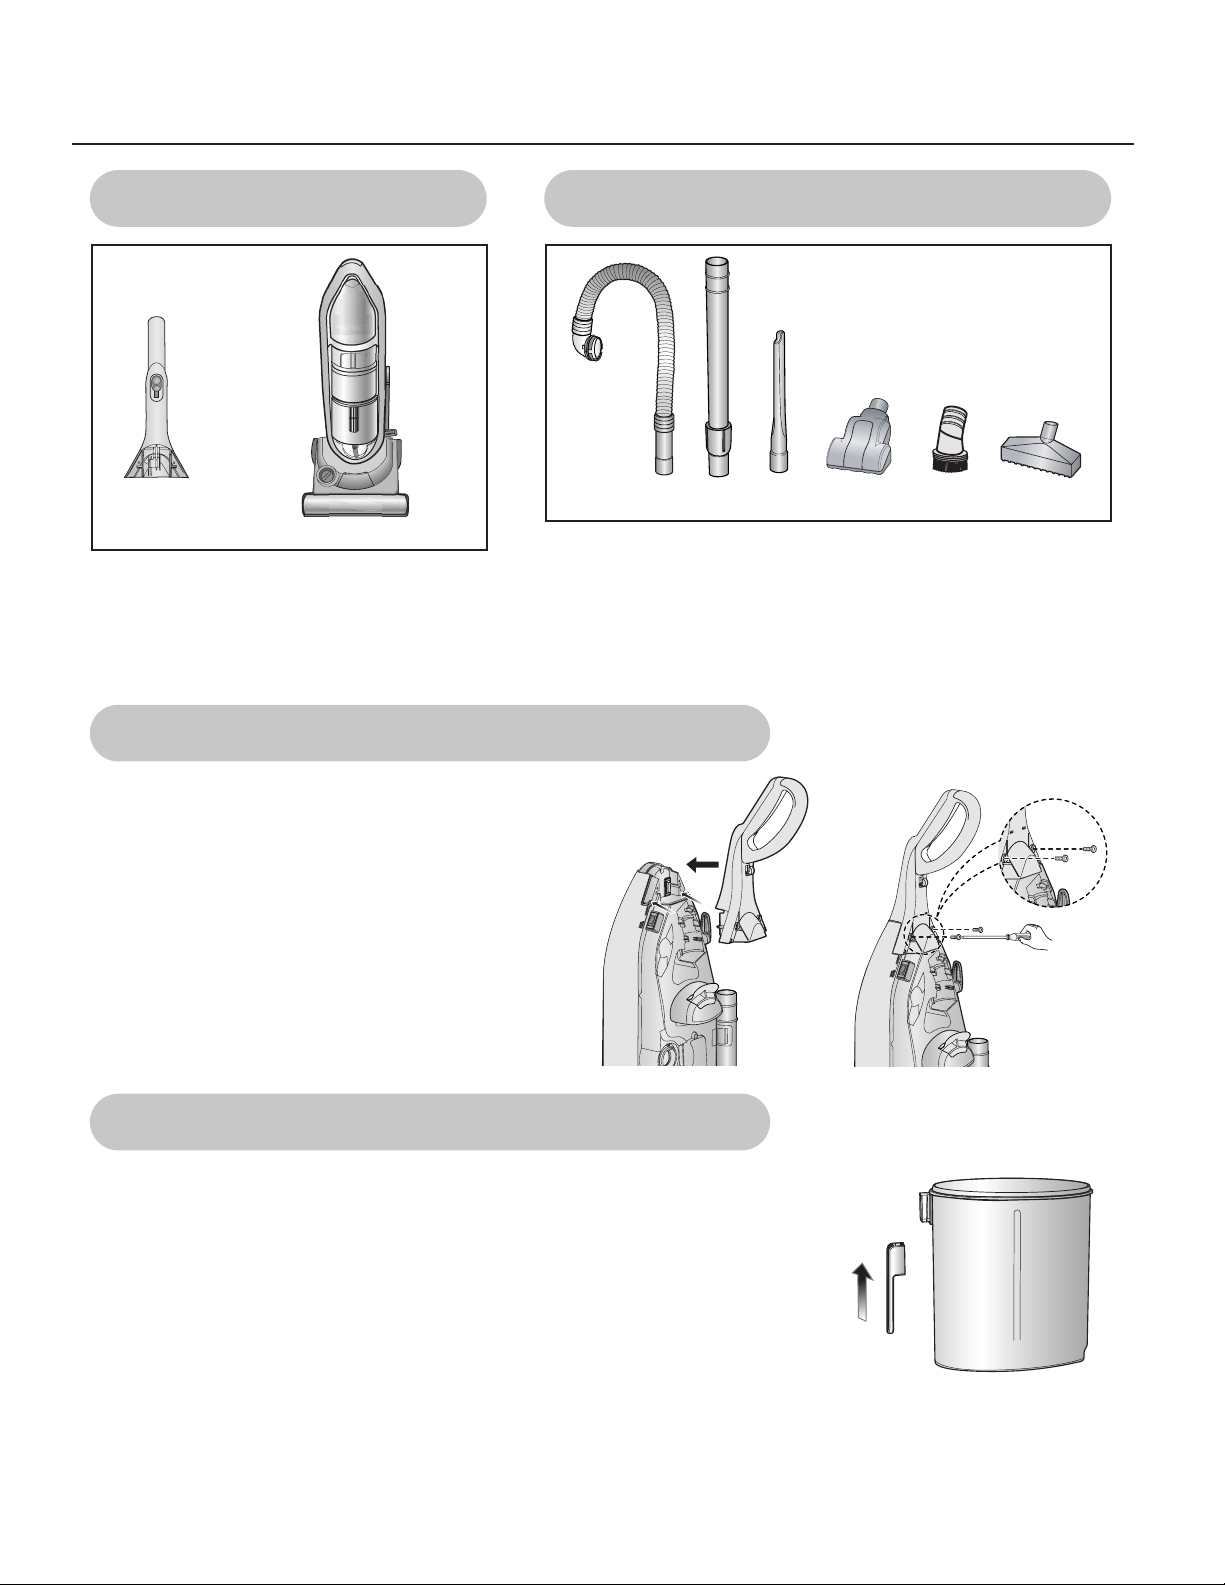
Carton contents
Attach Handle To Vacuum
Attach Handle To Dirt Cup
A
B
Empty carton. Find the parts shown above
before disposing of packing materials.
A. Handle section(with 4 screws)
B. Cleaner body
Accessories
The accessories are packed on the cleaner.
Not all accessories are included with every model.
C. Hose D. Extension wand
E. Crevice tool F. Powered hand tool
G. Dusting Brush (Turbine Brush)
H. Upholstery Brush (Furniture nozzle)
The dirt cup assembly consists of the following parts;
* Dirt Cup (A)
* Dirt Cup Handle (B)
CD E F G H
44
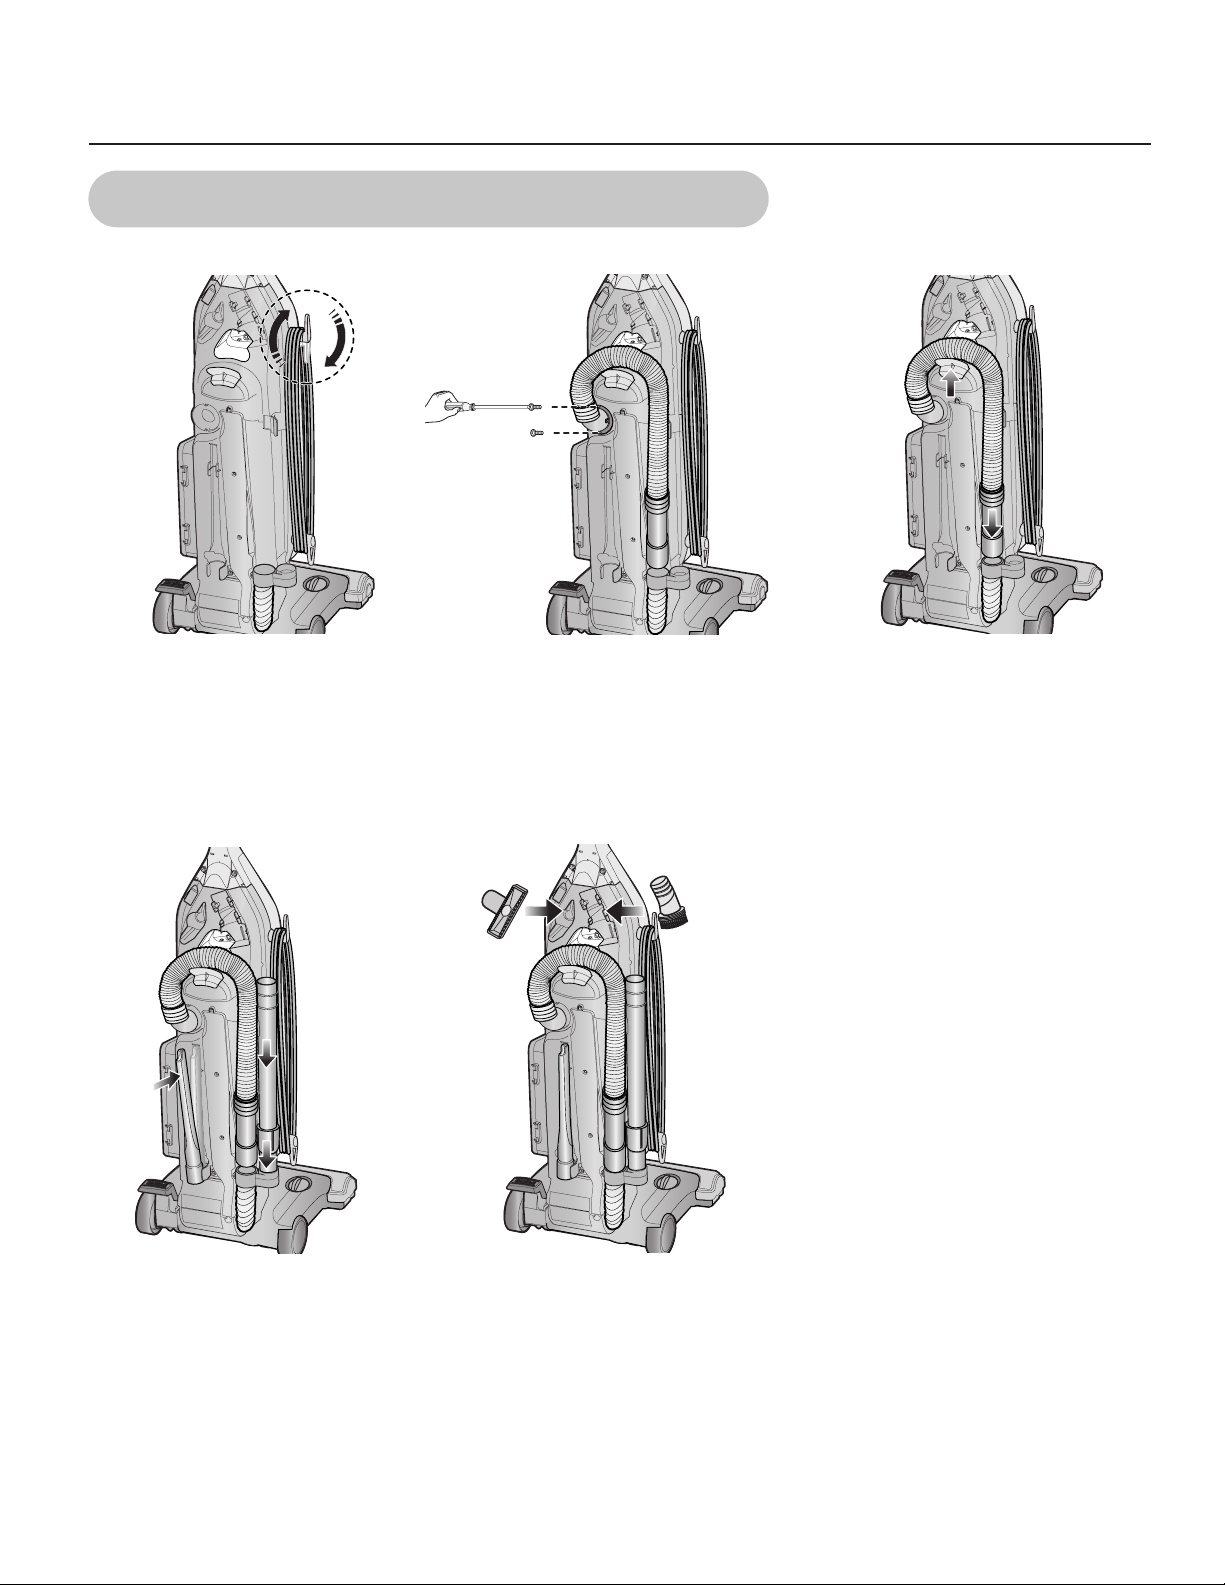
Vacuum Cleaner Assembly
1
Wrap the cord around hooks
for storage. The top hook
rotates right or left for easy
cord release.
2
Attach the hose with two screws
from the assembly packet. Tighten
securely them with a screw driver.
3
Snap the hose into the hose clip as
shown.
4
Slide the extend wand into the
storage clip. Insert the crevice tool
into the nook.
5
Snap in the Dusting brush and
insert upholstery brush into the
storage clip as shown.
55
Attach Vacuum Hose and Tools
NOTE: The powerfoot will not operate
effectively unless the Hose is firmly
attached to the base.
 Loading...