

Page 1

SCH-R330 Series
PORTABLE DUAL-BAND
MOBILE PHONE
User Manual
Please read this manual before operating your
phone, and keep it for future reference.
Page 2

R330.03_DB05_CB_021110_F4
Intellectual Property
All Intellectual Property, as defined below, owned by or which is otherwise the property of Samsung or its respective suppliers relating to
the SAMSUNG Phone, including but not limited to, accessories, parts, or software relating there to (the “Phone System”), is proprietary to
Samsung and protected under federal laws, state laws, and international treaty provisions. Intellectual Property includes, but is not limited
to, inventions (patentable or unpatentable), patents, trade secrets, copyrights, software, computer programs, and related documentation
and other works of authorship. You may not infringe or otherwise violate the rights secured by the Intellectual Property. Moreover, you
agree that you will not (and will not attempt to) modify, prepare derivative works of, reverse engineer, decompile, disassemble, or
otherwise attempt to create source code from the software. No title to or ownership in the Intellectual Property is transferred to you. All
applicable rights of the Intellectual Property shall remain with SAMSUNG and its suppliers.
Samsung Telecommunications America (STA), LLC
Headquarters: Customer Care Center:
1301 E. Lookout Drive 1000 Klein Rd.
Richardson, TX 75082 Plano, TX 75074
Toll Free Tel: 1.888.987.HELP (4357)
Internet Address:
http://www.samsungusa.com
©2010 Samsung Telecommunications America, LLC is a registered trademark of Samsung Electronics America, Inc. and its related
entities.
Do you have questions about your Samsung Mobile Phone?
For 24 hour information and assistance, we offer a new FAQ/ARS System (Automated Response System) at:
www.samsungtelecom.com/support
GH68-27735A
Page 3

Printed in Korea.
Nuance®, VSuite™, T9® Text Input, and the Nuance logo are trademarks or registered trademarks of Nuance Communications, Inc. or its
affiliates in the United States and/or other countries.
Openwave® is a registered Trademark of Openwave, Inc.
RSA® is a registered Trademark RSA Security, Inc.
The Bluetooth® word mark, figure mark (stylized “B Design”), and combination mark (Bluetooth word mark and “B Design”) are registered
trademarks and are wholly owned by the Bluetooth SIG.
Disclaimer of Warranties; Exclusion of Liability
EXCEPT AS SET FORTH IN THE EXPRESS WARRANTY CONTAINED ON THE WARRANTY PAGE ENCLOSED WITH THE PRODUCT, THE
PURCHASER TAKES THE PRODUCT "AS IS", AND SAMSUNG MAKES NO EXPRESS OR IMPLIED WARRANTY OF ANY KIND WHATSOEVER
WITH RESPECT TO THE PRODUCT, INCLUDING BUT NOT LIMITED TO THE MERCHANTABILITY OF THE PRODUCT OR ITS FITNESS FOR ANY
PARTICULAR PURPOSE OR USE; THE DESIGN, CONDITION OR QUALITY OF THE PRODUCT; THE PERFORMANCE OF THE PRODUCT; THE
WORKMANSHIP OF THE PRODUCT OR THE COMPONENTS CONTAINED THEREIN; OR COMPLIANCE OF THE PRODUCT WITH THE
REQUIREMENTS OF ANY LAW, RULE, SPECIFICATION OR CONTRACT PERTAINING THERETO. NOTHING CONTAINED IN THE INSTRUCTION
MANUAL SHALL BE CONSTRUED TO CREATE AN EXPRESS OR IMPLIED WARRANTY OF ANY KIND WHATSOEVER WITH RESPECT TO THE
PRODUCT. IN ADDITION, SAMSUNG SHALL NOT BE LIABLE FOR ANY DAMAGES OF ANY KIND RESULTING FROM THE PURCHASE OR USE OF
THE PRODUCT OR ARISING FROM THE BREACH OF THE EXPRESS WARRANTY, INCLUDING INCIDENTAL, SPECIAL OR CONSEQUENTIAL
DAMAGES, OR LOSS OF ANTICIPATED PROFITS OR BENEFITS.
Page 4

1
Table of Contents
Section 1: Getting Started .............................................. 4
Understanding this User Manual . . . . . . . . . . . . . . . . . . . . . . . . 4
Installing the Battery . . . . . . . . . . . . . . . . . . . . . . . . . . . . . . . . . 4
Charging the Battery . . . . . . . . . . . . . . . . . . . . . . . . . . . . . . . . . 5
Activating Your Phone . . . . . . . . . . . . . . . . . . . . . . . . . . . . . . . . 6
Section 2: Understanding Your Phone ...........................8
Features of Your Phone . . . . . . . . . . . . . . . . . . . . . . . . . . . . . . . 8
Closed View of Your Phone . . . . . . . . . . . . . . . . . . . . . . . . . . . . 8
Open View (Front) of Your Phone . . . . . . . . . . . . . . . . . . . . . . . . 9
Understanding the Display Screen . . . . . . . . . . . . . . . . . . . . . 11
Section 3: Menu Navigation .........................................13
Menu Navigation . . . . . . . . . . . . . . . . . . . . . . . . . . . . . . . . . . . 13
Navigation Key Shortcuts . . . . . . . . . . . . . . . . . . . . . . . . . . . . 13
Section 4: Entering Text ............................................... 15
Text Entry Modes . . . . . . . . . . . . . . . . . . . . . . . . . . . . . . . . . . 15
Using T9
®
Mode . . . . . . . . . . . . . . . . . . . . . . . . . . . . . . . . . . . 15
Using Abc/ABC Mode . . . . . . . . . . . . . . . . . . . . . . . . . . . . . . . 16
Using 123 Mode . . . . . . . . . . . . . . . . . . . . . . . . . . . . . . . . . . . 16
Entering Symbols . . . . . . . . . . . . . . . . . . . . . . . . . . . . . . . . . . 16
Section 5: Call Functions .............................................17
Making a Call . . . . . . . . . . . . . . . . . . . . . . . . . . . . . . . . . . . . . 17
Answering a Call . . . . . . . . . . . . . . . . . . . . . . . . . . . . . . . . . . . 20
Calls Logs . . . . . . . . . . . . . . . . . . . . . . . . . . . . . . . . . . . . . . . . 22
Section 6: Understanding Your Contacts .................... 25
Contacts . . . . . . . . . . . . . . . . . . . . . . . . . . . . . . . . . . . . . . . . 25
Adding a New Contacts Entry . . . . . . . . . . . . . . . . . . . . . . . . . 25
Finding a Contacts Entry . . . . . . . . . . . . . . . . . . . . . . . . . . . . 27
Editing a Contacts Entry . . . . . . . . . . . . . . . . . . . . . . . . . . . . . 29
Speed Dial . . . . . . . . . . . . . . . . . . . . . . . . . . . . . . . . . . . . . . . 31
Contacts Groups . . . . . . . . . . . . . . . . . . . . . . . . . . . . . . . . . . . 32
Deleting a Contacts Entry . . . . . . . . . . . . . . . . . . . . . . . . . . . . 35
Memory Info . . . . . . . . . . . . . . . . . . . . . . . . . . . . . . . . . . . . . . 35
Section 7: Messages .................................................... 36
Accessing the Messages Menu . . . . . . . . . . . . . . . . . . . . . . . 36
Create and Send Text Messages . . . . . . . . . . . . . . . . . . . . . . 36
Send Picture Messages in Camera Mode . . . . . . . . . . . . . . . . 36
Send Picture Messages in Standby Mode . . . . . . . . . . . . . . . . 37
Message Content and Delivery Options . . . . . . . . . . . . . . . . . . 39
Receiving Messages . . . . . . . . . . . . . . . . . . . . . . . . . . . . . . . . 39
Message Boxes . . . . . . . . . . . . . . . . . . . . . . . . . . . . . . . . . . . 40
Erase Messages . . . . . . . . . . . . . . . . . . . . . . . . . . . . . . . . . . . 44
Message Settings . . . . . . . . . . . . . . . . . . . . . . . . . . . . . . . . . . 45
Section 8: Camera ........................................................ 47
Taking Pictures . . . . . . . . . . . . . . . . . . . . . . . . . . . . . . . . . . . 47
Taking Snap Shots (Single Pictures) . . . . . . . . . . . . . . . . . . . . 47
Screen Layouts . . . . . . . . . . . . . . . . . . . . . . . . . . . . . . . . . . . 49
The Photo Gallery . . . . . . . . . . . . . . . . . . . . . . . . . . . . . . . . . . 50
Page 5

2
Section 9: easyedgeSM ..................................................51
Accessing
easy
edgeSM . . . . . . . . . . . . . . . . . . . . . . . . . . . . . 51
Launching an Application . . . . . . . . . . . . . . . . . . . . . . . . . . . . 51
Finding and Downloading Applications . . . . . . . . . . . . . . . . . . 51
Section 10: Toneroom .................................................. 52
Accessing Toneroom . . . . . . . . . . . . . . . . . . . . . . . . . . . . . . . 52
Managing Your Tones . . . . . . . . . . . . . . . . . . . . . . . . . . . . . . 52
Section 11: Multimedia ................................................ 53
Accessing Multimedia . . . . . . . . . . . . . . . . . . . . . . . . . . . . . . 53
Camera . . . . . . . . . . . . . . . . . . . . . . . . . . . . . . . . . . . . . . . . . 53
Using My Images . . . . . . . . . . . . . . . . . . . . . . . . . . . . . . . . . . 53
Using My Ringtones Gallery . . . . . . . . . . . . . . . . . . . . . . . . . . 54
Using My Sounds Gallery . . . . . . . . . . . . . . . . . . . . . . . . . . . . 54
Section 12: Bluetooth ................................................... 56
Turn Bluetooth On/Off . . . . . . . . . . . . . . . . . . . . . . . . . . . . . . 56
Registered List . . . . . . . . . . . . . . . . . . . . . . . . . . . . . . . . . . . . 56
Bluetooth Settings . . . . . . . . . . . . . . . . . . . . . . . . . . . . . . . . . 57
Section 13: Tools .......................................................... 58
Accessing Your Phone’s Tools . . . . . . . . . . . . . . . . . . . . . . . . 58
Voice SVC . . . . . . . . . . . . . . . . . . . . . . . . . . . . . . . . . . . . . . . 58
Memo Pad . . . . . . . . . . . . . . . . . . . . . . . . . . . . . . . . . . . . . . . 61
Alarm Clock . . . . . . . . . . . . . . . . . . . . . . . . . . . . . . . . . . . . . . 62
World Time . . . . . . . . . . . . . . . . . . . . . . . . . . . . . . . . . . . . . . 63
Calculator . . . . . . . . . . . . . . . . . . . . . . . . . . . . . . . . . . . . . . . 63
Stop Watch . . . . . . . . . . . . . . . . . . . . . . . . . . . . . . . . . . . . . . 64
Converter . . . . . . . . . . . . . . . . . . . . . . . . . . . . . . . . . . . . . . . . 64
Tip Calculator . . . . . . . . . . . . . . . . . . . . . . . . . . . . . . . . . . . . 66
Section 14: Calendar .................................................... 67
Section 15: Changing Your Settings ............................ 69
Display Settings . . . . . . . . . . . . . . . . . . . . . . . . . . . . . . . . . . . 69
Sounds Settings . . . . . . . . . . . . . . . . . . . . . . . . . . . . . . . . . . 70
Call and Phone Settings . . . . . . . . . . . . . . . . . . . . . . . . . . . . . 70
Location Setting . . . . . . . . . . . . . . . . . . . . . . . . . . . . . . . . . . 71
Call Settings . . . . . . . . . . . . . . . . . . . . . . . . . . . . . . . . . . . . . 71
Phone Settings . . . . . . . . . . . . . . . . . . . . . . . . . . . . . . . . . . . 72
Memory Info . . . . . . . . . . . . . . . . . . . . . . . . . . . . . . . . . . . . . 75
Phone Info . . . . . . . . . . . . . . . . . . . . . . . . . . . . . . . . . . . . . . . 75
Section 16: Health and Safety Information ................. 76
Health and Safety Information . . . . . . . . . . . . . . . . . . . . . . . . 76
Please Note the Following Information When Using
Your Handset . . . . . . . . . . . . . . . . . . . . . . . . . . . . . . . . . . 77
Samsung Mobile Products and Recycling . . . . . . . . . . . . . . . . 77
UL Certified Travel Adapter . . . . . . . . . . . . . . . . . . . . . . . . . . 78
Consumer Information on Wireless Phones . . . . . . . . . . . . . . 78
Road Safety . . . . . . . . . . . . . . . . . . . . . . . . . . . . . . . . . . . . . . 84
Responsible Listening . . . . . . . . . . . . . . . . . . . . . . . . . . . . . . 85
Operating Environment . . . . . . . . . . . . . . . . . . . . . . . . . . . . . 87
Using Your Phone Near Other Electronic Devices . . . . . . . . . . 87
FCC Hearing-Aid Compatibility (HAC) Regulations
for Wireless Devices . . . . . . . . . . . . . . . . . . . . . . . . . . . . . 88
Potentially Explosive Environments . . . . . . . . . . . . . . . . . . . . 90
Emergency Calls . . . . . . . . . . . . . . . . . . . . . . . . . . . . . . . . . . 90
FCC Notice and Cautions . . . . . . . . . . . . . . . . . . . . . . . . . . . . 91
Page 6

3
Other Important Safety Information . . . . . . . . . . . . . . . . . . . . . 91
Product Performance . . . . . . . . . . . . . . . . . . . . . . . . . . . . . . . 92
Availability of Various Features/Ring Tones . . . . . . . . . . . . . . . 93
Battery Standby and Talk Time . . . . . . . . . . . . . . . . . . . . . . . . 93
Battery Precautions . . . . . . . . . . . . . . . . . . . . . . . . . . . . . . . . 93
Care and Maintenance . . . . . . . . . . . . . . . . . . . . . . . . . . . . . . 94
Section 17: Warranty Information ...............................96
Standard Limited Warranty . . . . . . . . . . . . . . . . . . . . . . . . . . . 96
End User License Agreement for Software . . . . . . . . . . . . . . . 99
Index ............................................................................104
Page 7
Getting Started 4
Section 1: Getting Started
This section explains how to start using your SCH-r330 phone.
Understanding this User Manual
The chapters of this guide generally follow the same order as the
menus and sub-menus in your phone.
A robust index for quick reference to most features begins on
page 104.
Important safety information that you should know before using
your phone is near the back of the guide, beginning on page 76.
Notes and Tips
Throughout this manual, the following labels point out important
information, quick methods for activating features, and more:
•
Notes
: Explain alternative options within the current feature, menu, or
sub-menu.
•
Tips
: Provide quick or innovative methods for performing functions
related to the subject at hand.
•
Important
: Points out important information about the current feature
that could affect performance, or even damage your phone.
Text Conventions
To condense information in this manual, the following terms and
icon appear in procedural steps:
Installing the Battery
Note:
Your phone comes packaged with a partially charged rechargeable
standard Li-Ion battery and travel adapter.
Important!:
You must fully charge the battery the first time you use your
phone, otherwise you could damage the battery.
highlight
Use the Navigation key ( ) to move a highlighting
effect onto a menu item or screen item of interest.
select
After “highlighting” a menu item or screen item,
press the OK key to launch, access, or save a
highlighted menu item or screen field of interest.
➔ Used in place of “select” in long “drill down”
procedure steps.
Example:
“...
Settings
➔
Call Settings
➔
Call Answer
...”
Page 8
5
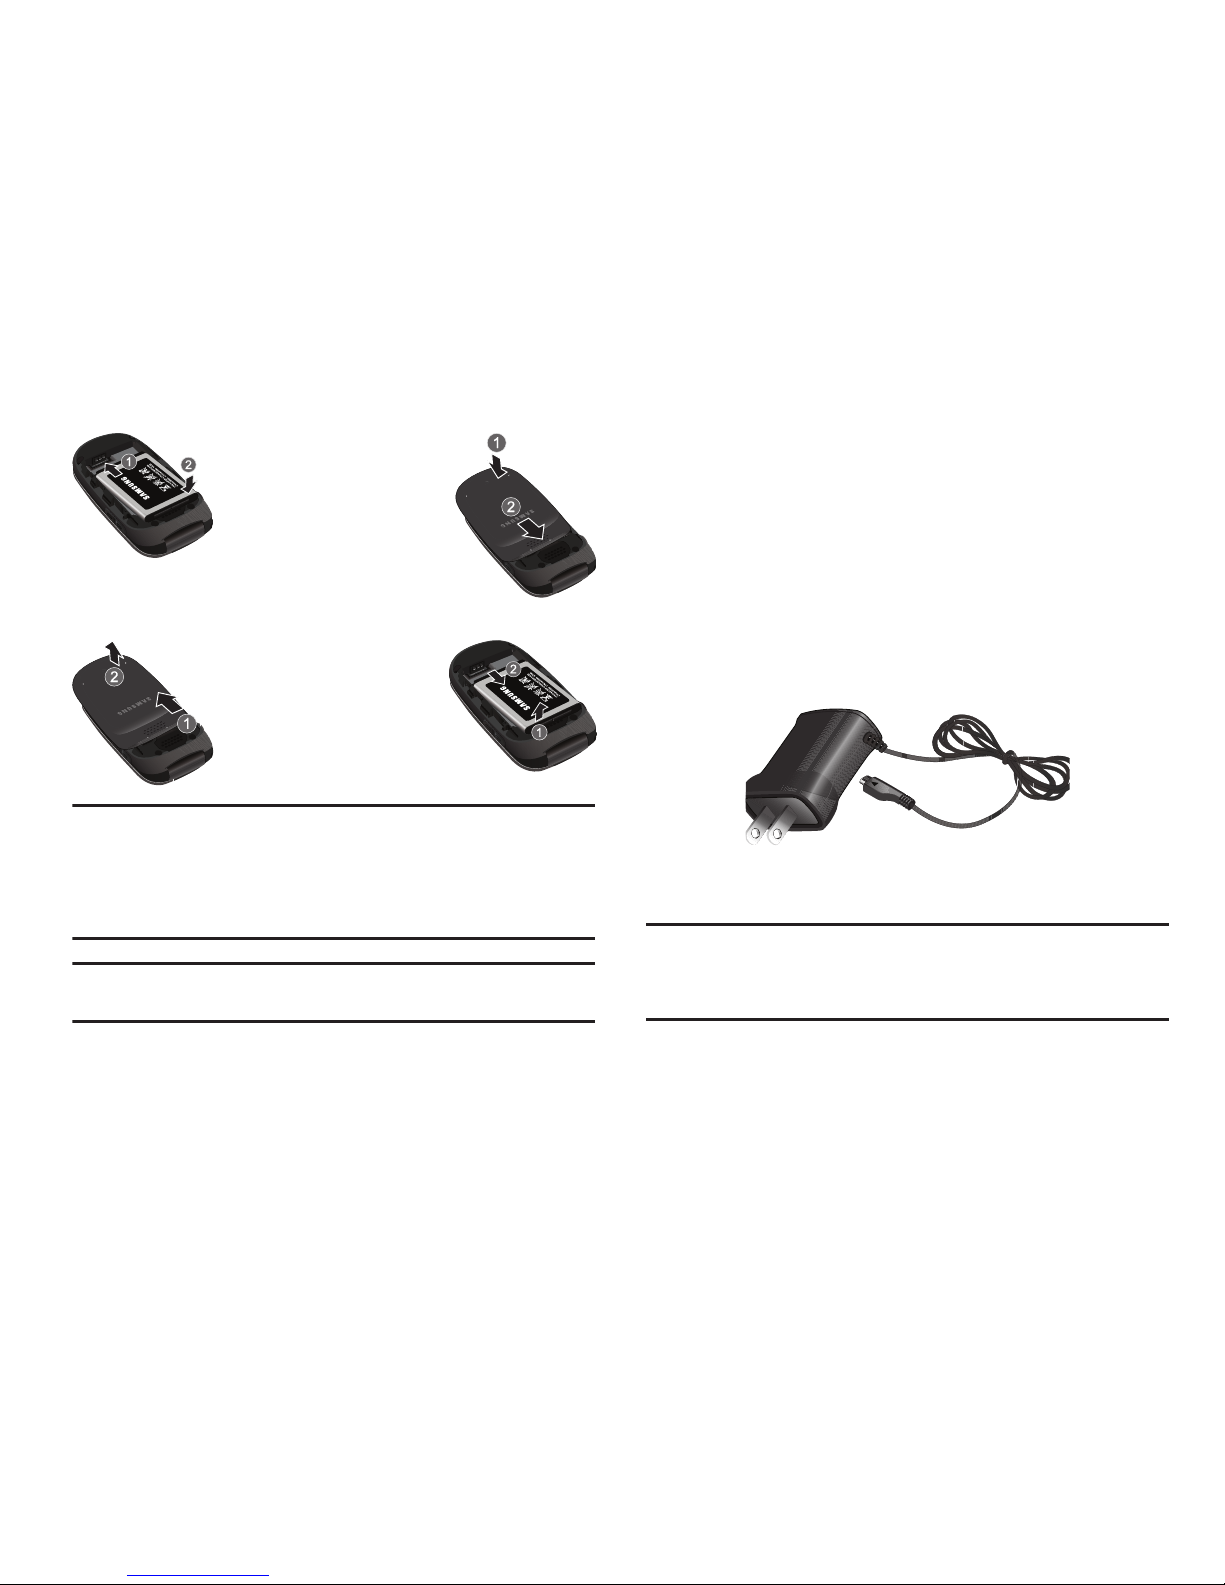
Removing the Battery
Caution!:
The display on your handset is made of glass or acrylic and could
break if your handset is dropped or if it receives significant impact
or excessive pressure, which could void the warranty (For more
information, refer to “Standard Limited Warranty” on page 96.) Do
not use if screen is broken or cracked as this could cause injury to
you.
Important!:
You must unplug the adapter before removing the battery from
the phone during charging to avoid damage.
Charging the Battery
Your phone is powered by a rechargeable standard Li-Ion battery.
Only use Samsung-approved charging devices and batteries.
Samsung accessories are designed to maximize battery life. Use
of other accessories may invalidate your warranty and may
cause damage.
Use the Travel Adapter
The travel adapter rapidly charges your phone from any 120/220
VAC outlet.
1. Plug the large end of the Travel Adapter into a standard
120 VAC or 220 VAC wall outlet.
Important!:
For connection to an electrical supply not located in North
America, you must use an adaptor of the proper configuration for
the power outlet. Use of the wrong adapter could damage your
phone and void your warranty.
Page 9
Getting Started 6
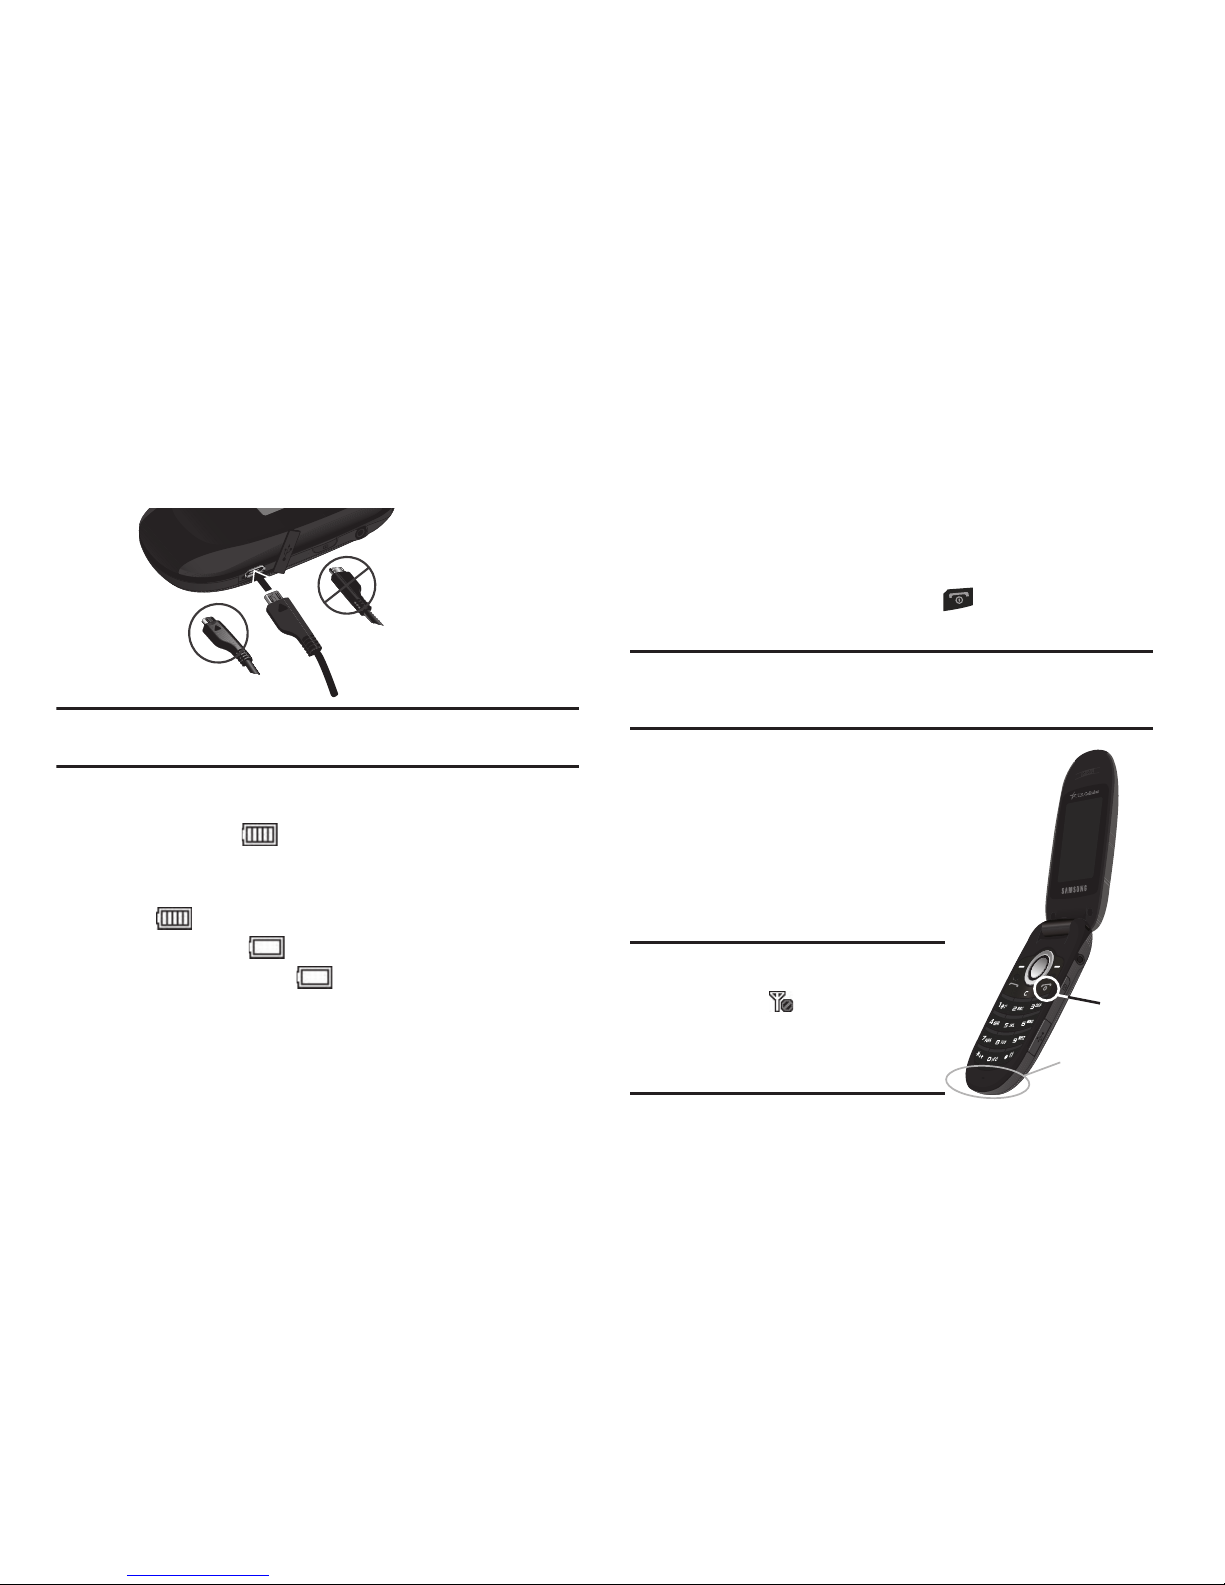
2.
Insert the smaller end of the Travel Adapter into the
charger/accessory connector on the lower right side of
your phone.
Important!:
You must unplug the adapter before removing the battery from
the phone during charging to avoid damage.
Low battery indicator
The battery indicator ( ) in the upper-right corner of the
display indicates power level. Monitor the battery strength and
ensure your battery is adequately charged.
•
Five bars ( ) indicate a full charge.
•
An empty battery icon ( ) indicates a near empty battery.
•
A blinking empty battery icon ( ) and a tone sounding indicate you
have two to three minutes before the battery is too low to operate the
phone.
If you continue to use your phone without charging its battery, the
phone will shut down.
Activating Your Phone
Contact your Wireless Carrier and follow their instructions for
obtaining service, if necessary. We suggest that you read this
guide to fully understand the services your phone supports.
Turning Your Phone On
1. With the phone open, press the key until the display
lights.
Note:
As with any other radio-transmitting device, do not touch the antenna
while using your phone as this can affect call quality and can cause the
phone to operate at a higher power level than is necessary.
2. The phone begins searching
for a network signal. Once
the phone finds a signal, the
time, date, and day appear
near the top of the display.
You’re now ready to place
and receive calls.
Note:
If you are outside of your carrier’s
coverage or roaming area, the No
Service icon ( ) appears at the
top of the phone’s display. If you
cannot place or receive calls, try
later when service is available, or at
another location.
Incorrect
Correct
Press
& Hold
Internal
Antenna
Page 10
7
Turn Your Phone Off
䊳
With the phone closed, press and hold the key for two
or more seconds. Your phone powers off.
Note:
If your phone is on and you press for less than one second, the
phone will not power off. This prevents your phone from being turned
off accidentally.
Setting Up Your Voicemail
Voicemail allows callers to leave voice messages, which can be
retrieved any time.
Note:
Once your Voicemail account has been set up, you can use the
Voicemail folder (under the Message menu) to view details of voice
messages in your Voicemail box.
1. In Standby mode, press and hold the key or dial your
own mobile number to dial Voicemail.
2. Follow the prompts in the new user tutorial to setup your
mail box.
Listen to Voicemail
1. In Standby mode, press and hold the key or dial your
own mobile number to dial Voicemail. After connecting,
you will hear your voice greeting.
2. You are prompted to enter your password.
Page 11
Understanding Your Phone 8
Section 2: Understanding Your Phone
This section lists some important features of your phone and
describes the keys and the screen format.
Features of Your Phone
•
Domestic and international voice and text messaging service (available
on participating networks).
•
Bluetooth® Stereo (v2.1) Wireless Technology (see Note)
•
Global Positioning (GPS) Technology
•
Personal Information Management (PIM) Functions
•
Picture (MMS) Messaging
•
Text (SMS) Messaging
•
Built-in 1.3 Megapixel Digital Camera
•
Voice Dial
•
Speakerphone
Note:
The SCH-r330 supports the wireless Handsfree Profile (HFP) and OBEX
profiles for Bluetooth
®
wireless technology. The SCH-r330 does not
support the Bluetooth serial port profile.
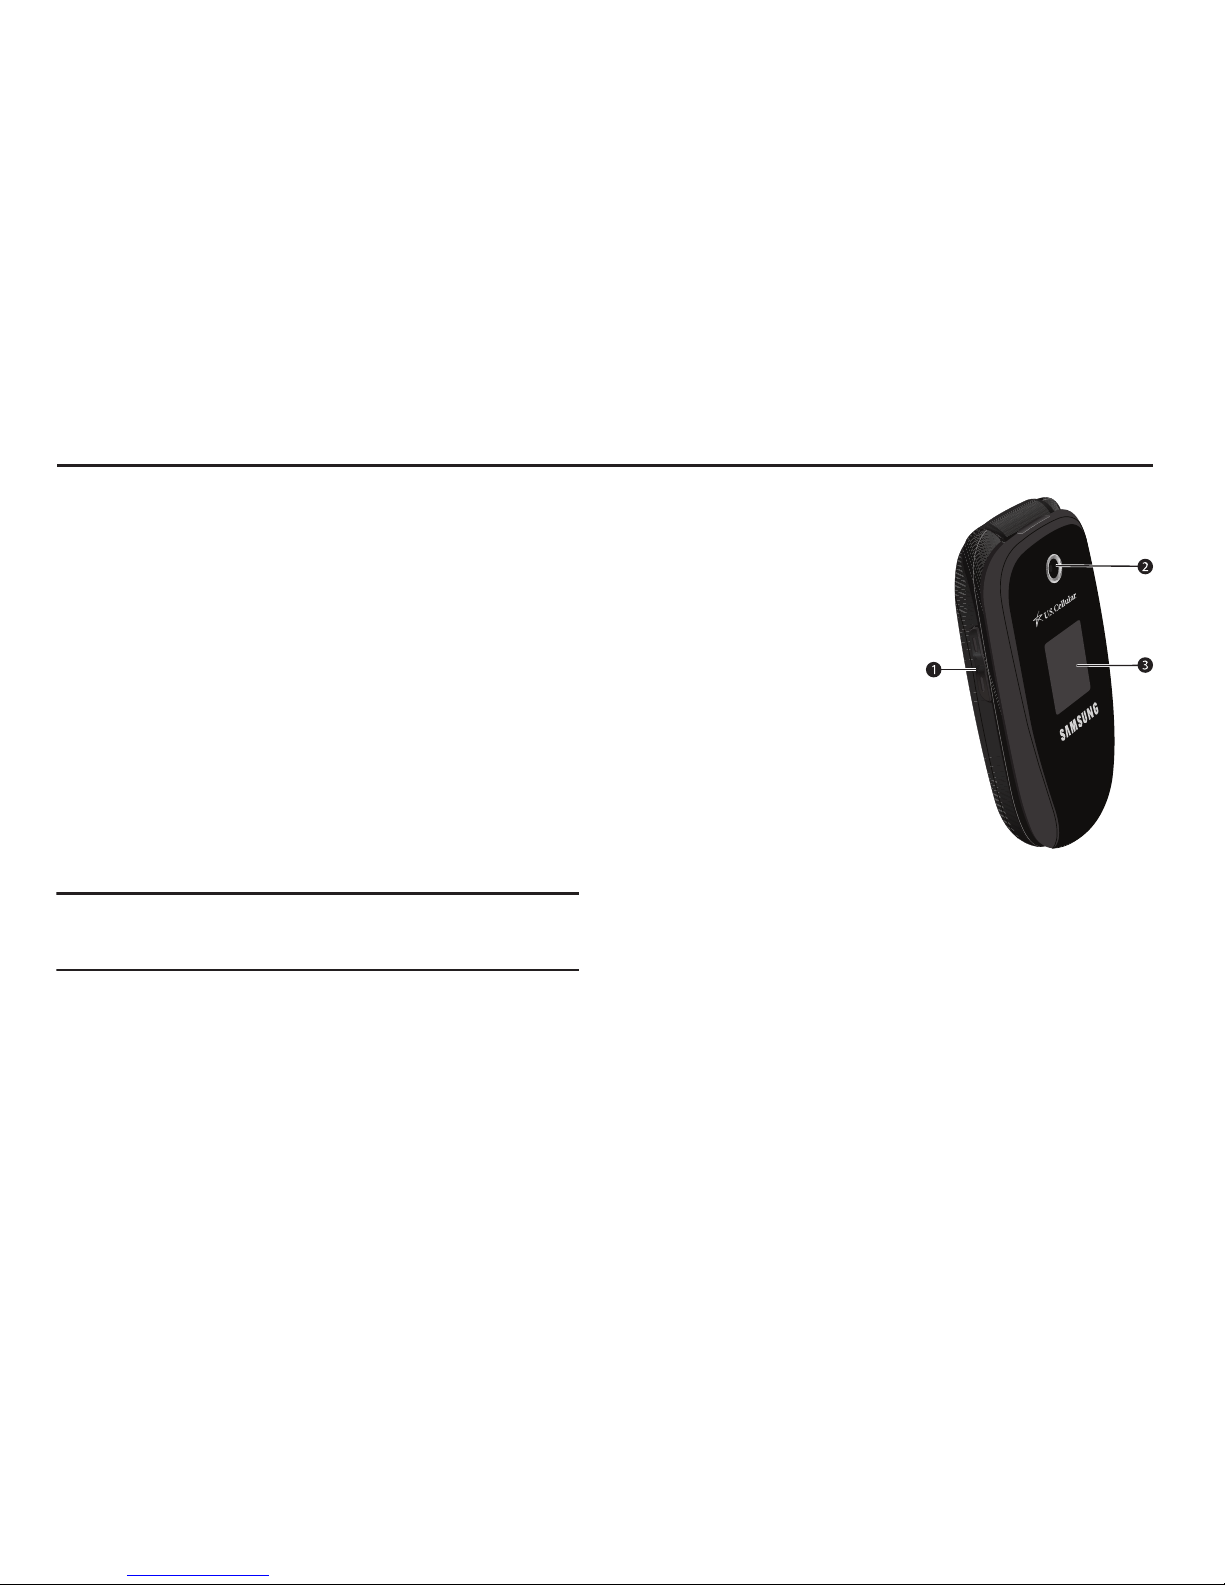
Closed View of Your
Phone
Features
1.
Volume Key
— Lets you
adjust the ring volume in
Standby mode, adjust the
voice volume during a call,
or mute the ringer during
an incoming call.
2.
Camera Lens
— The lens
of your built-in camera.
3.
Front Display
— Indicates
the status of your phone,
including status icons, message indicators, signal
strength, and so on.
Page 12
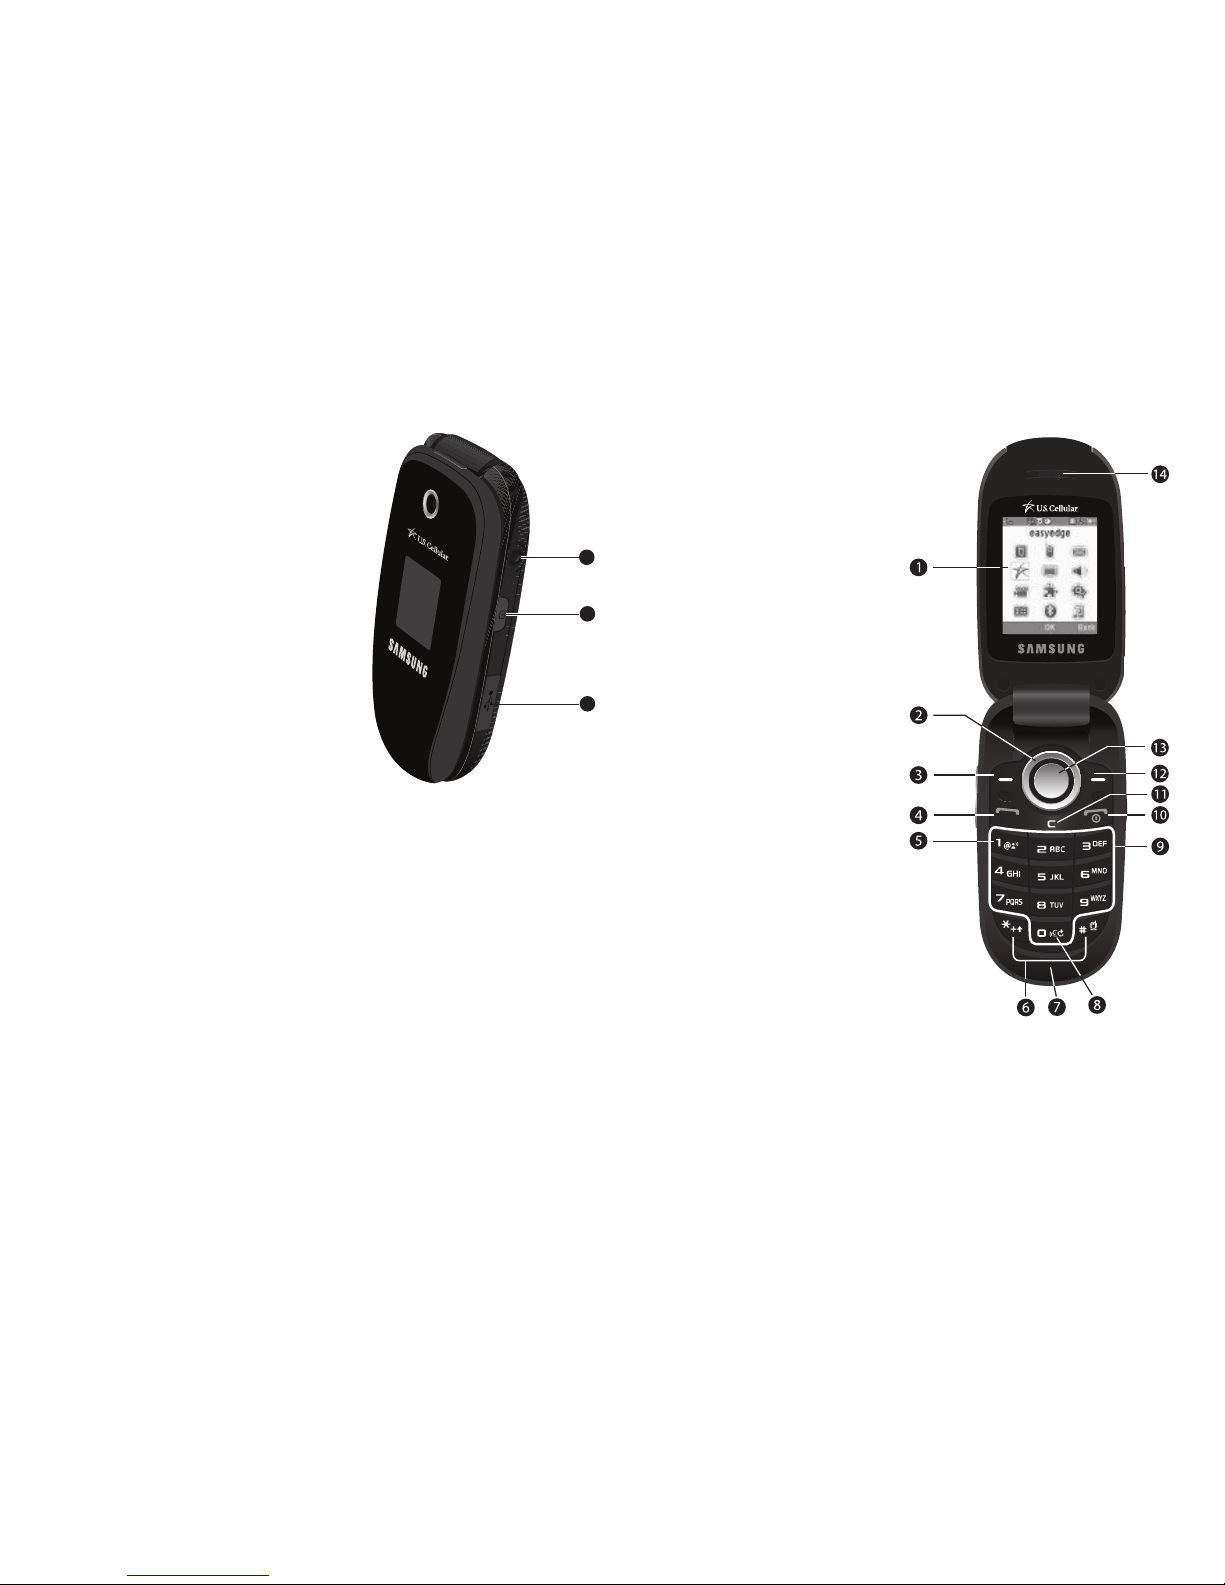
9
4.
Headset Jack
— Used to
connect an optional
headset (for hands free
operation) or optional TTY
device.
5.
Camera Key
— Launches
the Camera feature of your
phone and takes photos.
6.
Power / Accessory
Connector
— Used to
connect charging
accessories or optional
accessory cables to your
phone.
Open View (Front) of
Your Phone
Features
1.
Main Display
—
Indicates the status of
your phone, including
numbers dialed,
feature and function
screens, status icons,
message indicators
and contents, signal
strength, and so on.
2.
Navigation Key
— In
Menu mode, lets you
scroll through the
phone menu options.
In Standby mode, lets
you access preset
functions and one
user-defined function.
4
5
6
Page 13

Understanding Your Phone 10
3.
Left Soft Key
— Used
to navigate through
menus and
applications and to
select the choice
indicated at the
bottom left corner of
the Main LCD.
4.
SEND Key
— Lets you
place or receive a call.
In Standby mode,
press the key once to
access the recent calls
log.
5.
Voicemail Key
— Lets
you speed dial your
Voicemail account to
review your voice
messages.
6.
Special Function Keys
— Enter special
characters. Perform
various functions.
7.
Microphone
— Lets the other caller hear you clearly when
you are speaking to them.
8.
Voice Recognition Key
— Used to launch VoiceSignal voice
recognition system.
9.
Alpha-numeric Keys
— Use these keys to enter numbers,
letters, and characters.
10.
END Key
— Ends a call. If you press and hold the END key,
the power goes On or Off. When you receive an incoming
call, press to send the call to voicemail.
11.
CLR Key
— Deletes characters from the display when you
are in text entry mode. Press this key to return to the
previous menu or screen when navigating features on your
phone.
12.
Right Soft Key
— Used to navigate through menus and
applications and to select the choice indicated at the
bottom right corner of the Main Display.
13.
OK Key
— Pressing when navigating through a menu
accepts the highlighted choice in a menu.
14.
Earpiece / Speaker
— Lets you hear ringing and alert
tones, alarm tones, and the other parties to calls.
Page 14
11
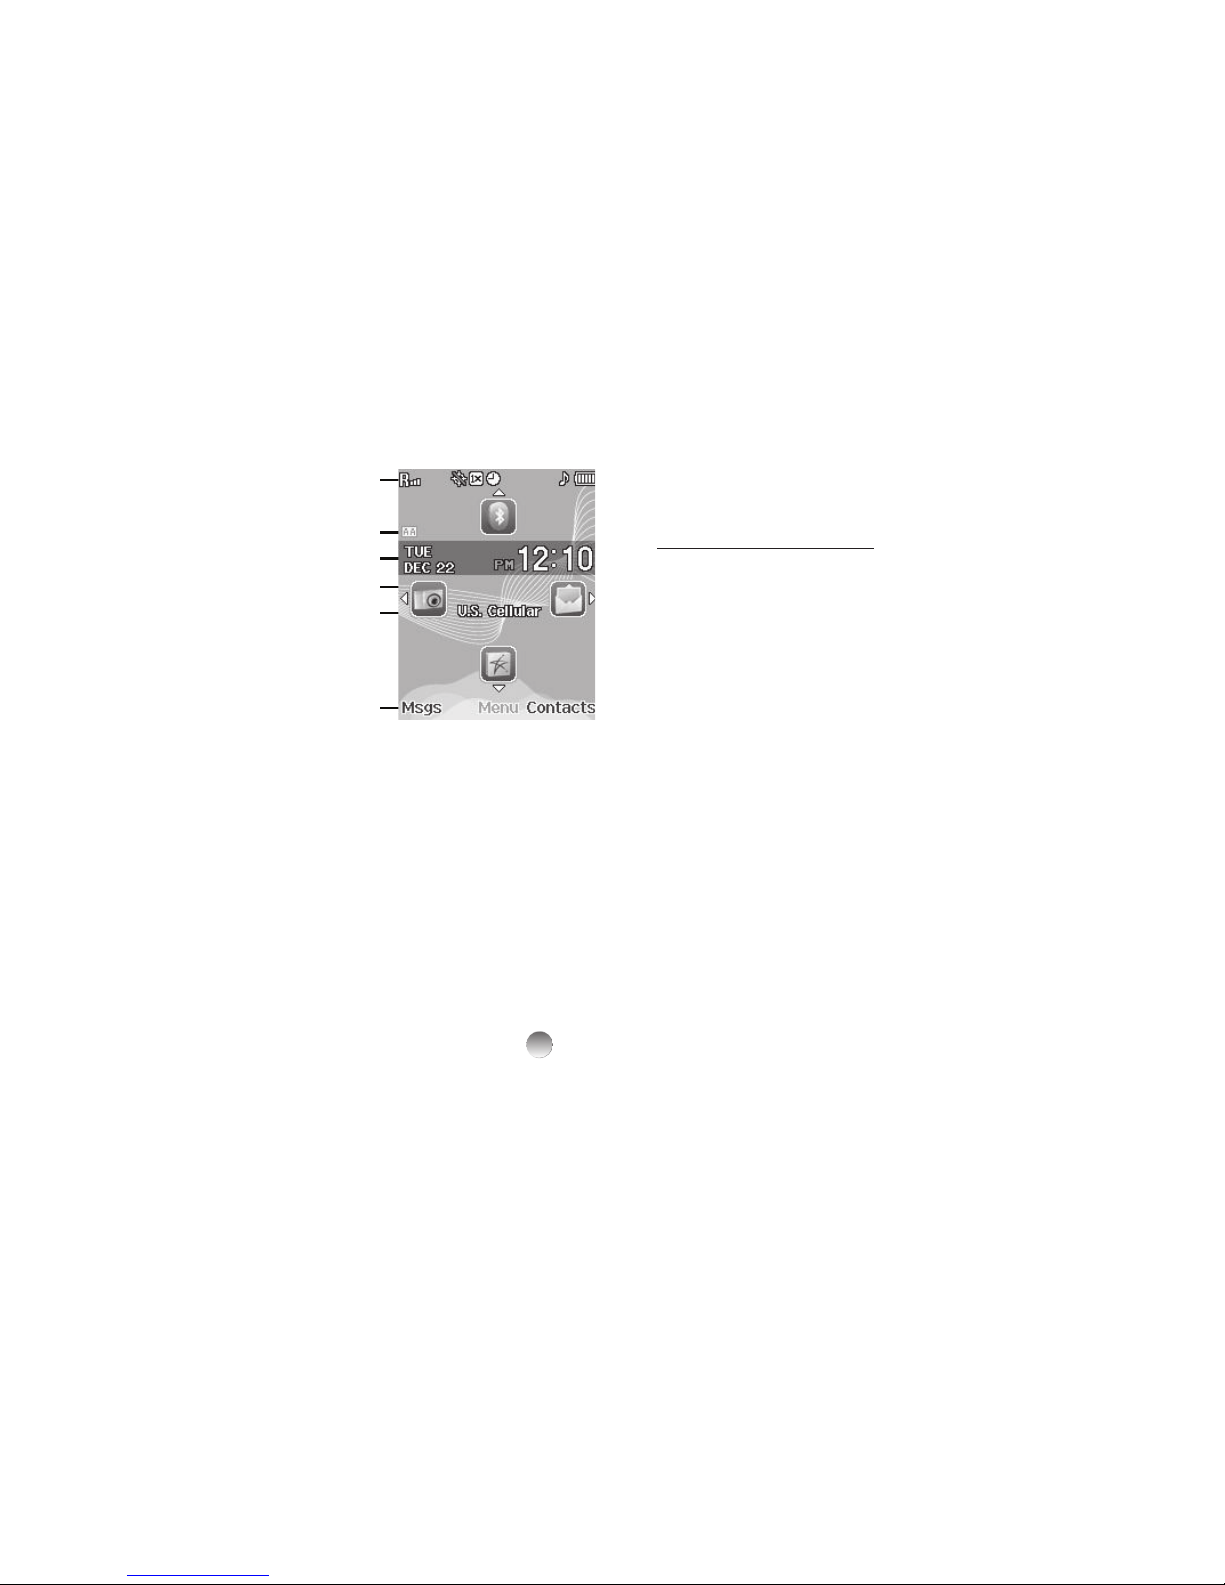
Understanding the Display Screen
1. Icons indicating network
and phone statues. (For
more information, refer to
“Display Screen Icons” on
page 11.)
2. Icon indicating that Auto
Answer function is active.
(For more information,
refer to “Auto Answer” on
page 71.)
3. Current day of the week, date, and time.
4. The center of the screen shows information such as call
progress indicators, messages, photos, and, in Standby
Mode, Navigation key shortcut icons. (For more
information, refer to “Navigation Key Shortcuts” on
page 13.)
5. This line shows the text Banner. (For more information,
refer to “Banner” on page 69.)
6. The bottom line of the display shows current soft key
functions. In sample screen, pressing the Left soft key will
show the
Messages
menu screen, pressing
Menu
( ) will
display the Main Menu screen, and pressing the Right soft
key will show the Contacts
Find
screen.
Display Screen Icons
Your SCH-r330 phone can show you definitions of the icons that
appear on the top line of the display.
To access the Icon Glossary:
䊳
In Standby mode, press
Menu
, then select Settings ➔
Phone Info ➔ Icon Glossary. A list appears showing all of
the icons that can appear on the top line of the display.
Dialogue Boxes
Dialogue boxes prompt for action, inform you of status, or warn
of situations such as low battery. Dialogue boxes and their
definitions are outlined below.
•
Choice
•
Example: “Save Message?”
•
Reconfirm
•
Example: “Erase All Messages?”
•
Performing
•
Example: “Sending...” “Connecting...”
•
Completed
•
Example: “Message Saved”
•
Information
•
Example: “New Message”
1
2
3
4
5
6
Page 15

Understanding Your Phone 12
•
Error
•
Example: “System Error!”
•
Warning
•
Example: “Low Battery,” “Memory Full!”
Backlights
Backlights illuminate the displays and the keypad. When you
press any key or open the phone, the backlights come on. They
go off when no keys are pressed within a period of time set in the
Backlight menu.
Note:
During a phone call, the display backlight turns off after 10 seconds to
conserve battery power, regardless of the Backlight setting.
For more information, refer to “Backlight” on page 70.
Page 16
13
Section 3: Menu Navigation
This section explains the menu navigation for your phone.
Menu Navigation
Access the menus and sub-menus in your phone using the
Navigation key ( ) and soft keys ( ), or use a
shortcut.
1. In Standby mode, select
Menu
. The first of several menus
appears in the display.
2. Use the Navigation key to browse through the menus.
3. Press to enter the menu or sub-menu that appears in
the display.
Menu Shortcuts
Use shortcuts to quickly access menus and sub-menus. Select
Menu
, then press the number to the left of the menu label to
jump to the desired menu, sub-menu, or feature.
Return to the Previous Menu
•
Press
Back
to return to a previous menu.
•
When
Back
does not appear in the display,
press to
return to the
previous menu.
Example:
To jump to the
Outbox
sub-menu from Standby mode, select
Menu
,
then press (for Messages) and for Outbox.
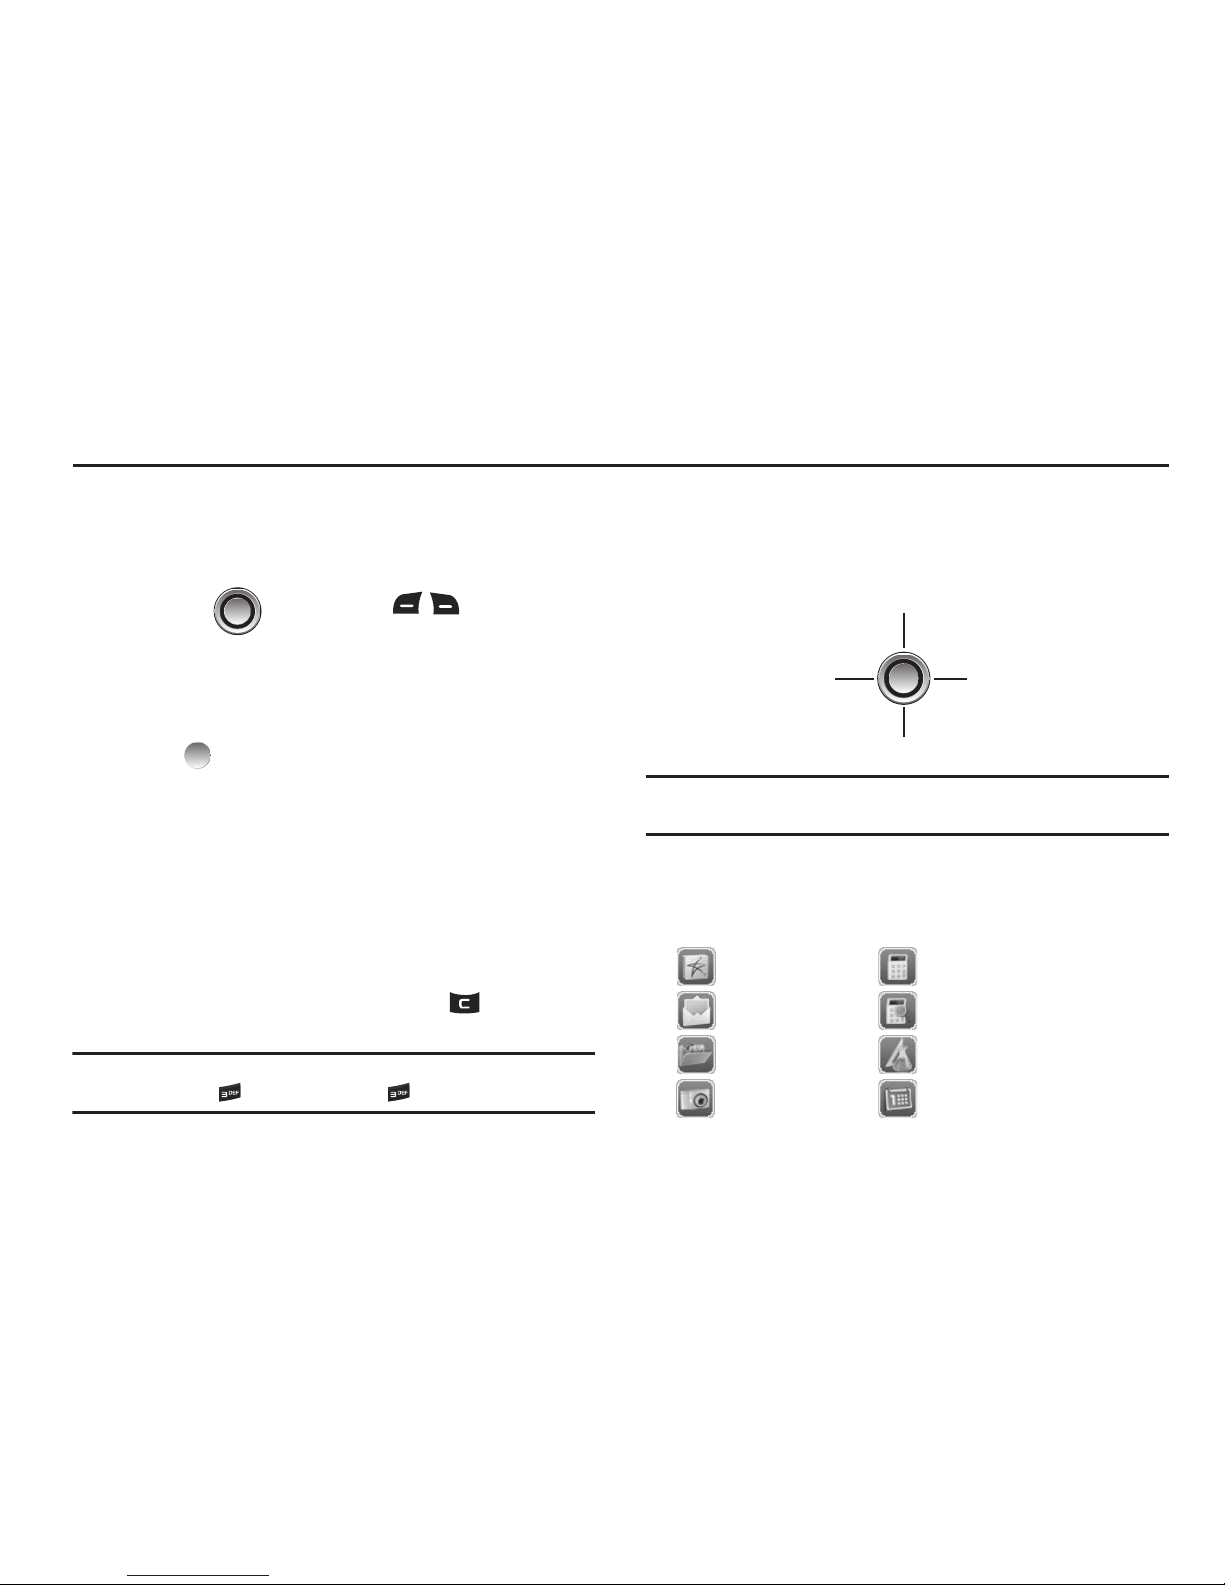
Navigation Key Shortcuts
In Standby mode, press the Navigation key Up or Down to launch
the corresponding applications in the pattern shown here.
*
These shortcuts can be customized. For more information, refer to
“Shortcut Key” on page 72.
Shortcut Icons
In Standby mode, a pattern of four of the following icons indicate
the current Shortcut Key assignments:
easy
edgeSM Calculator
Messages Tip Calculator
My Images Converter
Camera Calendar
Messages*
Bluetooth*
Camera*
easyedge
SM*
Page 17

Menu Navigation 14
My Ringtones Alarm Clock
My Sounds Stop Watch
Inbox Bluetooth
Tool s
Page 18
15
Section 4: Entering Text
This section outlines how to enter text using the phone keypad.
This section also describes how to use the T9 predictive text
entry feature to reduce the number of key strokes needed to
enter text.
Text Entry Modes
Changing the Text Entry Mode
In any text entry screen or field, the current text entry mode
(T9word, T9Word, T9WORD, abc, Abc, ABC, 123, or Symbols)
is shown in the lower left of the display. To change the text entry
mode:
䊳
Press the Left soft key to scroll through available text entry
modes.
•T9 Word
— Press each phone key only once to enter the letter of
the word that you’re spelling. The phone recognizes common
words from the keys pressed.
•Abc
— Enter letters, numbers, and symbols by repeatedly pressing
each phone key until the desired character (as shown on the key)
appears in the display.
•123
— Enter numbers by pressing the corresponding keypad keys.
•Symbols
— Using the phone keypad, enter a symbol into your
message by pressing the number next to the symbol in the Symbols
pop-up window.
Using T9® Mode
T9 Word recognizes commonly used words matching the
numeric sequence of key presses and inserts the word into your
message. Text entry using T9 Word is much faster than the
traditional method (Abc) and requires only one key press per
letter of the word.
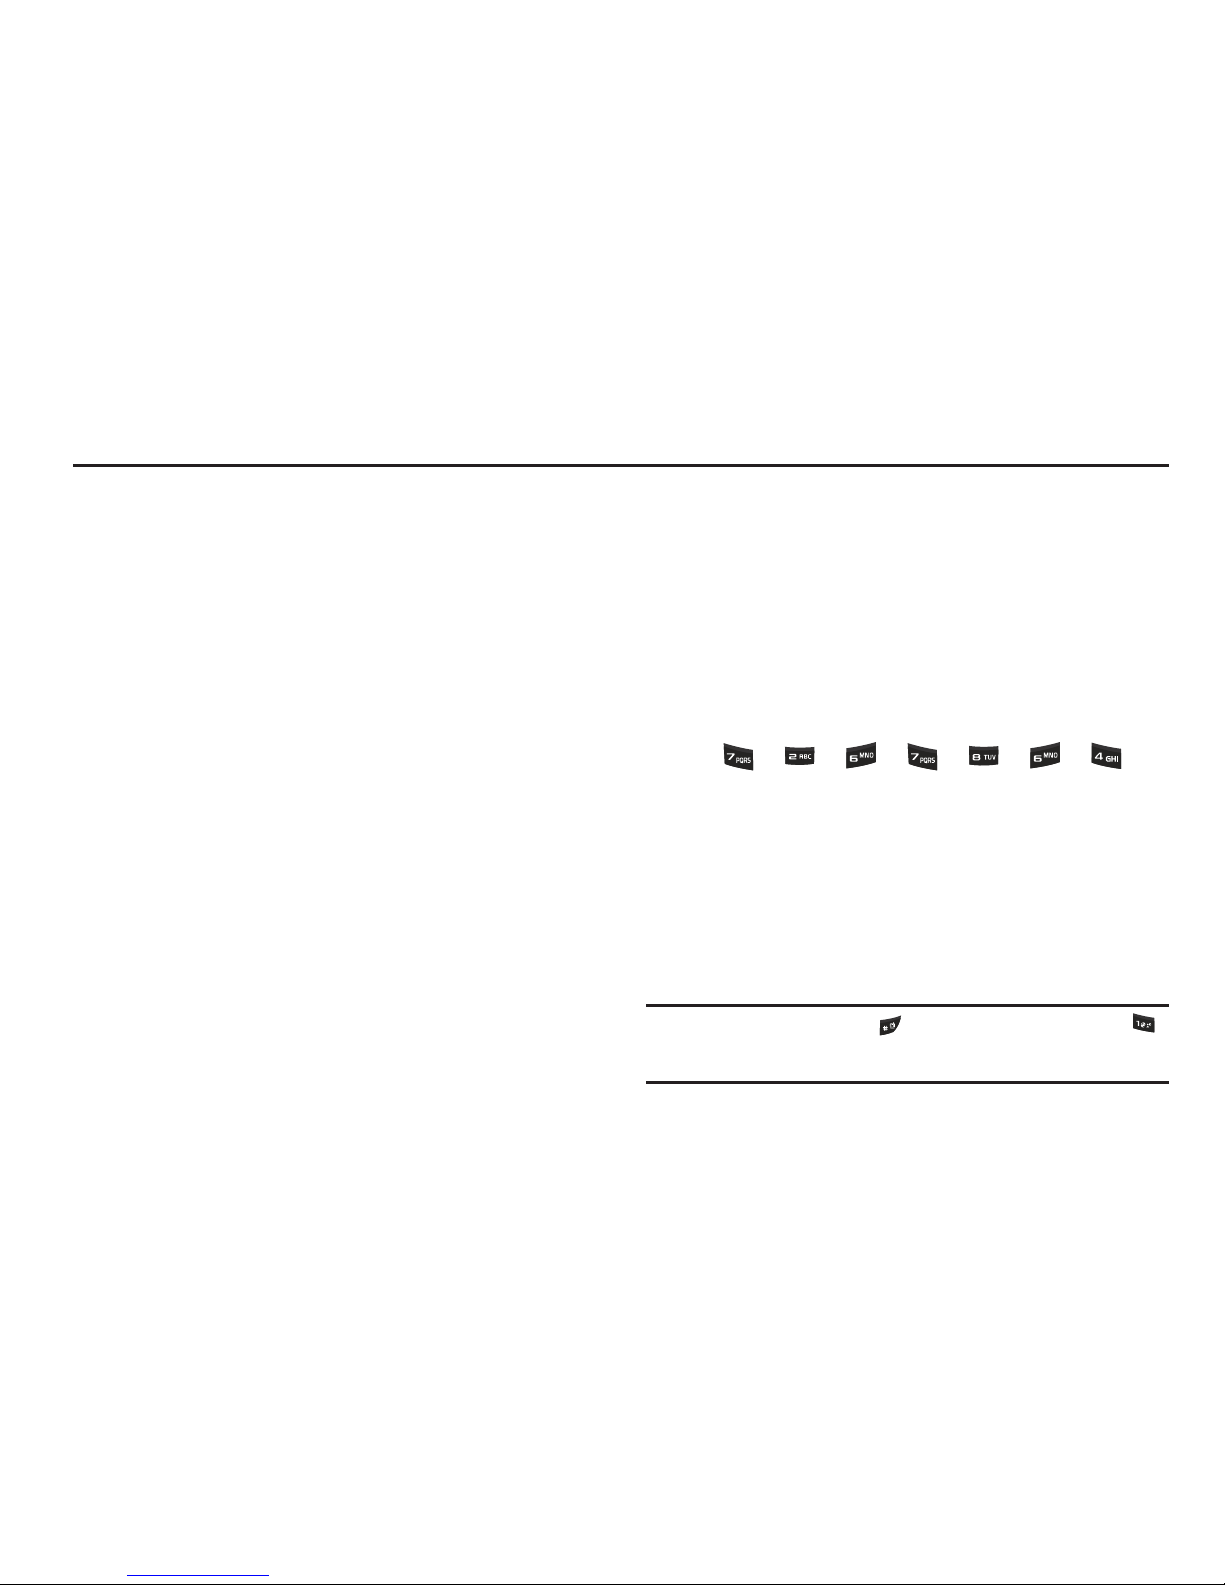
For example, to enter the word “Samsung”, press each of the
following keys only once:
If more than one word shares the same numeric sequence, T9
Word inserts the most commonly used word, and displays any
additional words in a pop-up menu where you can select the
desired word.
䊳
To switch to T9Word while composing a text message,
press the Left soft key, then select T9Word.
Note:
To enter a space, press the key. To enter a period, press the
key. These key functions apply to both T9 Word and Abc modes. (For
other symbols, see “Entering Symbols” on page 16.)
SAMSUNG
Page 19
Entering Text 16
Adding Words to the T9 Word Dictionary
If pressing the keys corresponding to a word you want to enter
does not display that word, do the following:
1. Press the Left soft key and select
Add T9 Word
.
2. Enter the word you want to add to the T9 Word dictionary,
then press . The word is added to the T9 dictionary.
Note:
In
Add T9 Word
mode, you enter a word using the same multiple
keypress method as when in Abc text entry mode.
Using Abc/ABC Mode
Abc
mode enters characters with the first character of each word
capitalized.
ABC
mode enters characters as all capitals.
1. To switc h t o abc,
Abc, or ABC
mode while composing a text
message, press the Left soft key, then select
Abc or ABC
.
2. Enter characters while in abc,
Abc, or ABC
mode by using
the keypad:
•
Press the key repeatedly until the desired character appears in the
display (for example, press once for “G” and twice for “H”).
•
Pause briefly and the displayed character is accepted and inserted
into your message.
•
Press to enter a space and press to enter a period.
Using 123 Mode
Enter numbers into a text message while in 123 mode.
1. To switch to
123
mode while composing a text message,
press the Left soft key, then select
123
.
2. Enter numbers while in 123 mode by pressing the key
labeled with the desired number.
Entering Symbols
Enter symbols such as “@” or “%” into a text message.
1. To switch to
Symbols
mode while composing a text
message, press the Left soft key, then select
Symbols
.
2. The first of three symbol screens is displayed. Use the Left
and Right soft keys and Navigation key to browse the list.
3. Select a symbol to enter it in your message text.
4. To insert additional symbols into your message, repeat
Steps 1 through 3.
Page 20
17
Section 5: Call Functions
This section provides procedures for making and answering
calls, and for reviewing your call time.
Making a Call
1. In Standby mode, enter an area code and a phone number.
2. To make the call, press . (Adjust the volume with the
Volume key.)
3. To end the call, press .
Tip:
To re-dial your last call, press twice.
To re-dial other recent calls, press , highlight a call, and press
again.
Emergency Calls
When you call an Emergency Number, such as 911, your SCHr330 phone locks itself in Emergency mode, only allowing you to
make calls to the emergency call center you originally contacted.
This lets emergency operators more easily dispatch aid, such as
police, fire fighters, and emergency medical personnel.
1. In Standby mode, enter the Emergency Number you wish
to call.
Note:
You can define up to 3 emergency numbers in your phone. (For more
information, see “Emergency #” on page 73.)
2. Press .
Tip:
If you need to make an emergency (911) call with Airplane mode
enabled, just dial the emergency number and press . (For more
information, see “Airplane Mode” on page 72.)
3. To exit Emergency mode, press . You are prompted to
confirm that you want to exit Emergency mode.
4. To confirm that you want to exit Emergency mode, press
Yes
.
Three-Way Calling
During a call, Three-Way Calling lets you call a third party and
connect them to your existing call.
1. During a call, ask the other party to remain on the line.
2. Enter a third party’s phone number and press .
3. When the third party answers, press to connect all
parties to the same call.
Page 21
Call Functions 18
Dialing International Numbers
Call Another Country — Manual Method
1. In Standby mode, enter 011 (the three-digit exit code for
the United States).
2. Enter the country code for the country that you are calling.
3. Enter the number that you wish to call, then press .
Note:
Puerto Rico and Canada are on the North American dialing plan.
Making calls to Puerto Rico and Canada is similar to making calls
within the United States, no unique country codes are necessary.
Call Another Country — Shortcut Method
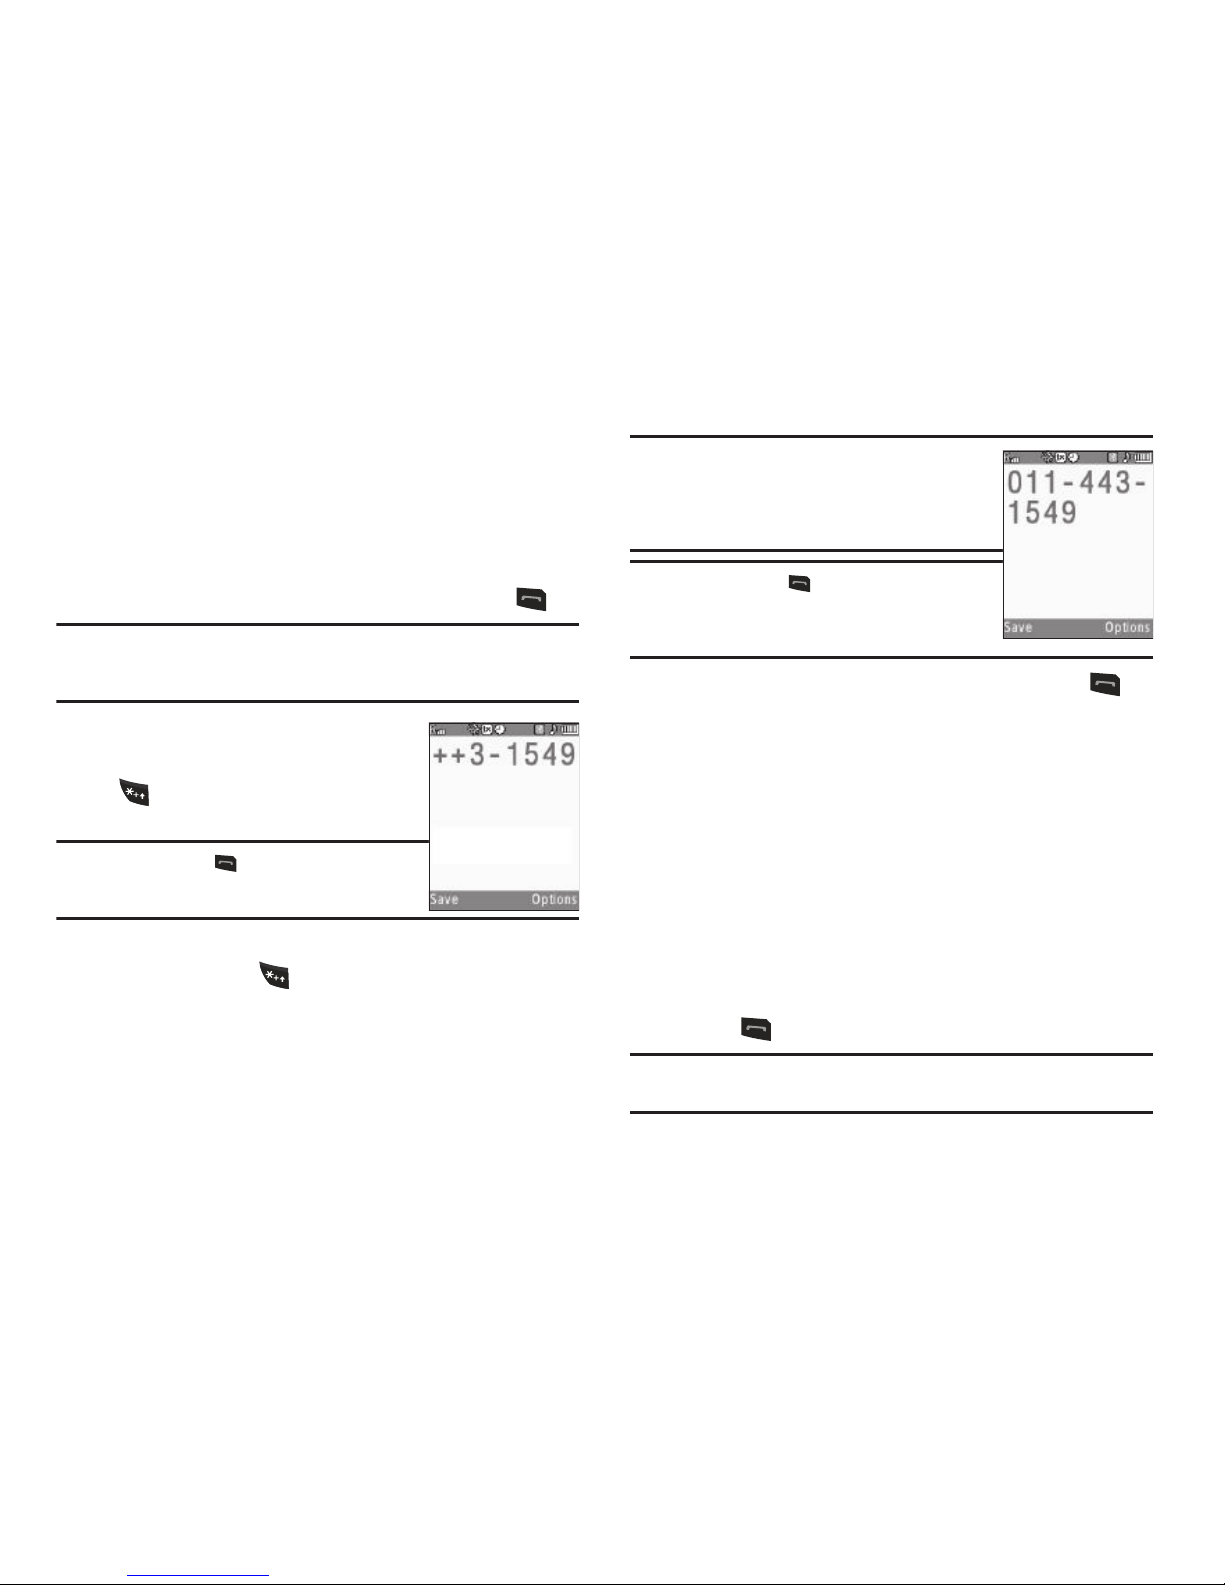
1. In Standby mode, press and hold
until a plus sign (+) appears in
the display.
Note:
When you press , your phone
automatically replaces this + with 011, the
three-digit exit code for the United States.
2. Enter the country code for the country that you are calling,
or press and hold until a second plus sign (+) appears
in the display.
Tip:
If you place most or all of your international
calls to numbers in the same country, set-up
the International Dialing shortcut to dial that
country’s code for you. (For more information,
refer to “International Dialing” on page 72.)
Note:
When you press , your phone
automatically replaces the second + with the
two-digit country code you have selected for
the International Dialing shortcut.
3. Enter the number that you wish to call, then press .
Manual Pause Calling
To manually call a number with pause(s) without storing it in your
Contacts list:
1. In Standby mode, enter the number you wish to call.
2. Press Options. The following pause options appear in the
display:
•
2-Sec Pause
— A 2-second pause after which dialing resumes.
•
Wait
— A hard pause (waits for input from you).
3. Select the desired pause to enter it into the number
sequence.
4. Press to call the number.
Tip:
Press Save to store pauses along with the number if you plan to call the
number frequently.
Page 22
19
Speed Dialing
Speed Dialing lets you place a call to any Contact stored in your
Contacts list by dialing the Contact’s Location number.
1-Touch Dialing (1 – 9)
䊳
In Standby mode, press and hold the number key (1 – 9)
corresponding to the desired Contact’s speed dial number.
Example:
To speed dial the Contact assigned speed dial 5, press and hold
.
2-Touch Dialing (10 – 99)
1. In Standby mode, enter the first digit of the desired
Contact’s speed dial number.
2. Press and hold the number key representing the second
digit.
Example:
To speed dial the Contact assigned speed dial 35, press then
press and hold .
3-Touch Dialing (100 – 999)
1. In Standby mode, enter the first two digits of the desired
Contact’s speed dial number.
2. Press and hold the number key representing the third digit.
Example:
To speed dial the Contacts entry assigned to speed dial 235, press
, press , then press and hold .
Voice Dialing
Your SCH-r330’s voice recognition let’s you speak phone
numbers and Contact names in a natural manner to call them.
Note:
End Calls Before relaunching the VoiceSignal voice recognition
software — When you use voice recognition to make a call, you must
end that call before you can use other Voice Commands. See “Voice
SVC” on page 58 for more information.
Voice Dialing Tips
•
Wait for the beep before speaking.
•
Speak clearly at a normal volume, as if you were talking to someone
on the phone.
Dialing a Contact Name
1. In Standby mode, press and hold until “Say a
command” appears in the display and plays through the
earpiece.
2. Say “Call” followed by the Contact’s first and last names.
Voice Dial repeats the name and dials the number.
Note:
If Voice Dial is unsure which name you said, it displays a choice list of
up to three names and prompts you with “
Did you say
?” followed by the
first name on the list. Say “
Yes
” to confirm the name, “No” to hear the
next name, or use the keypad to select the correct name from the list.
Page 23
Call Functions 20
3.
If the recognized name has multiple numbers stored for it,
Voice Dial displays the possible choices and prompts you
with “Which number?” Say “
Home
”, “
Work
”, or “
Mobile
”,
and Voice Dial dials the specified number.
4. Press to exit VoiceSignal without dialing.
Dialing a Number
1. In Standby mode, press and hold until “Say a
command” appears in the display and plays through the
earpiece.
2. Say “Call” followed by the telephone number of the person
you want to call. Voice Dial repeats the number and dials it.
Example:
Say “7 8 1 5 5 5 7 2 0 0."
Note:
If Voice Dial is unsure of the number, it displays a choice list of up to
three numbers and prompts you with “
Did you say
?” followed by the
first number on the list. Say “
Yes
” to confirm the number, “No” to hear
the next number, or use the keypad to select the correct number from
the list.
3. Press to exit VoiceSignal without dialing.
Answering a Call
When you receive a call, the phone rings and displays one of the
following:
•
If the caller can be identified, the caller’s number (or name if it’s in your
Contacts) appears in the display.
•
If the caller cannot be identified,
Call from unavailable #, Call from
restricted #
, or no number appears in the display.
Tip:
When you assign pictures to Contacts entries, the entry’s assigned
picture appears in the display when you receive a call from that entry.
(See “Assigning a Picture to a Contacts Entry” on page 30).
The phone continues to notify you of the call until one of the
following events occurs:
•
You answer the call.
•
The calling party ends the call.
•
The call is sent to voicemail.
Call Answer
You can set your phone to answer calls only when you press
or when you press any key except , , or . (For
more information, refer to “Call Answer” on page 71.)
Call Notification Features
Your phone notifies you of a call in a variety of ways.
Page 24
21
•
Eight ring volume settings:
Silence All, Vibrate, Low, Low/Medium
,
Medium, Medium/High
, or
High
.
•
Different ring types or melodies to distinguish callers.
•
Name display with caller ID. (If the caller’s name is programmed into
your Contacts list).
Note:
Information about the last 90 each of incoming, missed, and outgoing
calls are automatically stored to a call log.
Set Call Ringer Volume
1. In Standby mode, press the Volume key on the left side of
the phone up or down to set the call ringer volume as
desired.
2. Once you’re satisfied with the setting, press . The
phone returns to Standby mode.
Note:
The Vibrate icon ( ) appears in the display when the call ringer is
set to Vibrate. The Vibrate/Ring icon ( ) appears in the display
when you press Vibrate on.
Call Waiting
If you’re on a call, your phone beeps when you receive a second
call. Call Waiting lets you answer the second call and alternate
between both calls.
Note:
Contact your Wireless Carrier for availability.
1. Press to place the first call on hold and answer the
second call.
2. Ask the caller to remain on the line, then press to
place the second call on hold and return to the first call.
3. Press to alternate between calls.
Silence an Incoming Ring
To temporarily silence the incoming call ringer:
䊳
While your phone is ringing, press the Volume key
( ), on the left side of the phone, up or down.
Ignore an Incoming Call
Ignored calls are immediately forwarded to Voicemail.
To ignore an incoming call:
䊳
While your phone is ringing, press Ignore. The incoming
call is forwarded to Voicemail.
In-Use Menu
You can access a number of menus and features even while in a
call.
䊳
While in a call, you can:
•
Press
Mute
/
Unmute
to disable /enable your phone’s microphone.
•
Press
Options
. The following options pop-up in the display:
–
Messages
— Display the Messages menu.
–
Contacts
— Display the Contacts menu.
Page 25

Call Functions 22
–
Recent Calls
— View your recent calls log.
–
Send DTMF
— Send your phone number as DTMF tones to the other
person on the call.
–
Voice Privacy
— When set to
Enhanced
, the phone sounds an
audible beep when you loose privacy (encryption) on a CDMA
connection. [This option requires that this option is set to
Enhanced
.
(The default setting.) For more information, refer to
“Voice Privacy”
on page 71.]
–
Location
— Turn your GPS location on or set GPS location for
emergency calls only.
–
Speaker On
/
Off
— Enables / disables Speakerphone mode during
the call. (For more information, refer to
“Responsible Listening”
on page 85.)
•
With the above menu displayed, do one of the following:
–
Select a menu or feature to access the sub-menu or activate the
selected feature.
–
Press
Cancel
to exit the menu.
Calls Logs
Your phone has Call Logs that retain information about Outgoing,
Incoming, and Missed Calls for future reference, to return calls,
and to add new Contacts. You can also view times for your last
call and the total of all calls.
䊳
To access the Calls Logs, in Standby mode, press
Menu
,
then select Calls.
Tip:
To quickly view a list of your most recent calls (outgoing, incoming, and
missed), briefly press while in Standby mode. The All Calls screen,
listing up to 270 of your most recent calls, appears in the display.
Outgoing / Incoming / Missed Calls
1. From the Calls menu, select Outgoing Calls / Incoming
Calls / Missed Calls. A list of your outgoing, incoming, or
missed calls appears in the display.
2. Highlight a call. You have the following options:
•
To send a message to the caller, press
Msgs
. The
Send Message
menu appears in the display. (For more information, refer to
“Create and Send Text Messages”
on page 36 or
“Send
Picture Messages in Standby Mode”
on page 37.)
•
To view information about the call, press
OPEN
( ).
•
To access further options, press
Options
. The following options
appear in the display:
–
Save
— Save the number to your Contacts.
–
Details
— Contacts calls only — Lets you view the Contacts entry for
the originator or recipient of this call.
–
Erase
— Erase the selected call from your Outgoing calls list.
–
Lock / Unlock
— Blocks/permits erasure of the selected call from your
Outgoing, Incoming, or Missed call list.
–
Erase all
— Erase all unlocked calls from your Outgoing call list.
Page 26

23
–
View Timer
—
Call Timer
screen appears in the display listing the
number and types of calls and their total durations. (See
“Call Timer”
on page 23 for more information.)
3. Select an option to perform its function.
Data Calls
Your phone retains information about the last 10 data calls and
stores them in the Data call log. You can review the Data call log
for the time and date of the call, as well as other information.
1. From the
Calls
menu, select Data Call. A list of your
Data
calls appears in the display.
2. Highlight a data call. You have the following options:
•
To view further information about the call, press
OPEN
().
•
To access further options, press
Options
. The following options
appear in the display:
•Erase
— Erase the selected call from your Data call log.
•Lock
/
Unlock
— Blocks / permits erasure of this Call entry.
•Erase All
— Erase all calls from your Data call log.
• Data Counter
— Shows the amount of data Transmitted and
Received during this call, the Total amount of data exchanged since
the counters were last reset, and the total amount of data
exchanged since the phone was activated.
3. Select an option to perform its function.
Erase Logs
You can erase Outgoing, Incoming, Missed, or All Calls.
Erase All Calls
1. From the Calls menu, select All Calls. The All Calls list
appears in the display with the first call in the list
highlighted.
2. Press Options, then select Erase all. “Erase all entries?”
prompts you to confirm erasure of all Calls log entries.
3. To Erase all calls, press Yes. To keep the calls, press No.
Call Timer
Call Timer shows you the duration of your last call, total calls,
and calls made during the life of your phone. Call timer is not for
billing purposes.
1. From the Calls menu, select Call Timer.
2. To reset a timer, highlight it and press Reset.
To reset all of the timers except Lifetime Calls, press
Reset All.
Note:
LifeTime call timers can never be reset.
3. Press to exit the Call Timer screen.
Page 27
Call Functions 24
Data Counter
Use Data Counter to view the amount of data sent or received (or
a total of both) by the data services on your phone. The Data
Counter can help you monitor data usage, especially if your
service agreement has usage limits.
1. From the Calls menu, select Data Counter.
2. To reset a timer other than Lifetime Data Counter, highlight
it and press Reset.
3. To reset all timers except
Lifetime Data Counter
, press
Reset All.
Note:
The
Lifetime Data Counter
can never be reset.
4. Press to exit the Data Counter screen.
Store Numbers from Call Logs
You can store numbers from your Outgoing, Incoming, Missed,
and All calls logs to your Contacts list.
Tip:
In Standby mode, briefly press to display the Recent Calls list. You
can then select any call in the list to save to Contacts.
1. From the Calls menu, select Outgoing Calls / Incoming
Calls / Missed Calls /
All Calls
.
2. Select the number you wish to store in Contacts.
3. Press Options, then highlight Save and select Create New
(to add the number as a Contacts entry) or Update
Existing (to find a Contact with which to associate the new
number).
4. Follow the prompts to store the selected number to your
Contacts list.
Page 28
25
Section 6: Understanding Your Contacts
This section details how you can manage your daily contacts by
storing their names and numbers in your Contacts list.
Note:
Although the procedures in this section are written for the phone
keypad, you can also perform these procedures using the QWERTY
keypad.
Contacts
Up to 500 entries can be stored in Contacts. Each entry can have
up to five associated phone numbers and one e-mail address.
Each phone number can be up to 32 digits in length, including 2-
Sec or Wait pauses (see “Manual Pause Calling” on page 18 for
more information), and associated names can be up to 32
characters in length. You can assign the Speed Dial numbers of
your choice for each entry. You can also mark your Contacts list
as Restricted to prevent unauthorized viewing. (See “Restriction”
on page 74 for more information).
Tip:
Speed Dial One-Touch Dialing, Two-Touch Dialing, and Three-Touch
Dialing allow you to call numbers stored in Contacts faster.
Open Contacts
1. In Standby mode, press
Menu
, then select Contacts. The
following options appear in the display:
Adding a New Contacts Entry
You can use either of three methods to add an entirely new entry
to Contacts.
Dial Method
1. In Standby mode, enter the number you wish to add to
your Contacts.
2. Press Save.
The following options appear in the display:
•
Create New
— Lets you create a new Contacts entry.
•
Update Existing
— Lets you add the number you entered to an
existing Contacts entry.
3. Select Create New. The
Create New
screen appears in the
display showing the following icons:
4. Select the number type that matches your new entry.
5. Use the keypad to enter a name to associate with the
Contacts entry.
Mobile Home Work
Pager
Fax
Page 29
Understanding Your Contacts 26
6.
Press to save the new entry.
Add to an Existing Entry
1. From the
Save
screen, select Update Existing. The
Update Existing screen appears in the display showing
your Contacts list with the Go To field and the first
Contacts entry highlighted.
2. Find and select the Contacts entry to which you want to
add the new number. (See “Finding a Contacts Entry” on
page 27 for more information.)
The following number type options appear in the display:
Note:
Number types that are already assigned a number show the number
instead of the number type label.
3. Select the desired unassigned number type. The Contacts
entry information appears in the display with the new
number posted in the appropriate number type field.
4. Press to save your changes to the existing entry.
Saving a Number After a Call
Once you finish a call, you can store the caller’s number to your
Contacts list.
Note:
If the call was incoming and Caller ID information was unavailable,
then the Save option is also unavailable.
1. Press
to end your call. The call time, length of call,
phone number, and name of the party (if available) appear
in the display.
2. Press Save. The Save screen appears in the display
showing the following options:
•
Create New
— Lets you create a new Contacts entry.
•
Update Existing
— Lets you add the number you entered to an
existing Contacts entry.
3. Select the desired option, then follow the instructions in
the preceding sub-sections depending on whether the
number is a new entry or you are adding it to an existing
entry.
Menu Method
1. From the Contacts menu, select Add New Contact.
The Add New Entry screen appears in the display with the
Name field highlighted.
Mobile Home Work
Pager
Fax
Page 30

27
2.
Enter the name of the new entry using either keypad. (See
“Entering Text” on page 15 for more information.)
3. Highlight one of the following fields:
4. Enter a phone number or e-mail address in the highlighted
field.
5. Repeat steps 3 and 4 as needed.
6. Press to save the new entry.
Adding a Picture ID
To add a picture or image to a Contact that will identify that
Contact as originator of a new call, do the following:
1. In the
Add New Entry
or
Edit Entry
screen, highlight the
No
Picture
field at the top of the screen.
2. Press Set. The My Images list appears in the display. (For
more information, refer to “Using My Images” on
page 53.)
3. Select the desired picture or image. You are returned to the
Add New Entry
or
Edit Entry
screen with the selected
picture or image at the top of the screen.
Calls Log Method
1. Display the desired Calls log. (For more information, refer
to “Calls Logs” on page 22.)
2. Highlight the Call whose number you want to add to your
Contacts.
3. Press
Options
, and select
Save
.
4. Repeat Steps 2 through 6 of “Dial Method” on page 25.
Finding a Contacts Entry
Menu Method
1. From the
Contacts
menu, select
Find
. The Contacts
Find
screen appears in the display.
Tip:
You can also access the Contacts
Find
screen directly from Standby
mode, by pressing
Contacts
.
2. Enter the first few letters of the name you want. A list of
Contacts with matching names appears in the display.
3. Highlight the desired Contact.
4. To dial the Contact:
•
Press
to dial the Contact’s default number.
•
To dial another of the Contact’s numbers, press
View
, highlight the
desired number, and press .
5. To edit the Contact information, press
EDIT
( ).
•
Mobile
•
Pager
•
Ringtone
•
Home
•
Email
•
Fax
•
Work
•
Group
Page 31
Understanding Your Contacts 28
Voice Method
Use the Voice SVC Lookup command to view contact information
for any named contact stored in your Contacts list by saying the
name.
Note:
The Lookup command shows the requested contact information in the
display but does not dial any phone numbers for the contact.
1. In Standby mode, press and hold to launch Voice
SVC.
“Say a Command” appears in the display and is
pronounced through the speaker.
2. Say “Lookup”.
Voice SVC prompts you to “Say the name.”
3. Speak clearly and say the full name of the person you want
to call, exactly as it is entered in your Contacts list.
•
If VoiceSignal recognizes the name you said, the Contact
information for that name appears in the display.
•
If VoiceSignal does not recognize the name you said, a choice list of
up to three names appears in the display, and VoiceSignal prompts
you with “
Did you say?
” followed by the first name on the list.
4. Say “Yes” to confirm the name or “No” to hear the next
name, or use the keypad to select the correct name from
the list. (See “Choice Lists” on page 59, for more
information.)
•
To say the name again, press
Repeat
.
•
To exit VoiceSignal without dialing, press .
5. The contact information for the name you selected appears
in the display.
•
To dial the number associated with the name, press .
•
To erase this entry from your Contacts list, press
Erase
.
•
To add or change information for this entry, press
EDIT
().
•
For more options, press
Options
and the following options pop-up
in the display:
–
Send Txt Msg
–
Send Pic Msg
–
Call
–
Send Name Card Via Bluetooth
Quick Search Method
1. In Standby mode, and with
Quick Search
phone setting set
to On, press the numeric keys that correspond to the first
few letters of a Contact’s name.
Note:
For more information, refer to “Quick Search” on page 75.
Page 32
29
For example, to search for “Sally” you would enter
2. Press the Navigation key Up. The Contacts
Find
screen
appears in the display with the first matching Contact
name in a list and highlighted.
3. Highlight the desired Contact and press to call them.
Shortcut Key Method
If you’ve stored a name entry in Contacts, Find allows you to find
it quickly.
1. In Standby mode, press
Contacts
.
The Find screen appears in the display with the Go To field
and the first Contacts entry highlighted.
Tip:
You can also access the Find screen from the Contacts menu by
selecting Find.
2. Enter a name as entered in Contacts. For example, if you
saved the name as “Amy Smith”, begin the search by
pressing or (for “A”).
As you enter letters, the names of the closest matches
appear in the display.
3. When the desired entry is listed in the display, highlight the
entry.
•
To dial the default number associated with the name, press .
Tip:
You can select another number assigned to the name by using the Left/
Right navigation keys.
•
To add or change information for this entry, press
Edit
.
•
To show information about the entry., press
VIEW
()
•
For more options, press
Options
.
Editing a Contacts Entry
Editing Contacts Name and Numbers
1. Find the Contacts entry you wish to change. See “Finding a
Contacts Entry” on page 27 for more information.
2. Highlight the entry and press EDIT ( ). The Edit Contact
screen appears in the display.
3. Highlight the particular information you want to add or
change.
4. When you’re finished changing the contents of a field,
press . Your changes are saved and a confirmation
message appears in the display.
SAL
Page 33

Understanding Your Contacts 30
Add Pauses to Contacts Numbers
Calls to automated systems such as banking services often
require a password or account number. Instead of manually
entering these numbers, you can store them in a Contacts entry
with the phone number and with special characters called
pauses, up to a maximum of 32 digits.
1. From the Edit Contact screen, select and edit the desired
number. (See “Editing a Contacts Entry” on page 29 for
more information.)
2. Press Options. The following pause options appear in the
display:
•
Wait
— A hard pause (waits for input from you).
Note:
You can enter multiple Waits to extend the length of a pause. For
example, two consecutive Waits cause a total pause time of four
seconds. Keep in mind that pauses count as digits towards the 32-digit
maximum.
•
2-Sec Pause
— A 2-second pause after which dialing resumes.
3. Select the desired pause to add it to the number sequence.
4. When you’re finished entering information, press to
store the number to Contacts.
Pause Dial from Contacts
1. If you stored the number using 2-second pause(s), simply
recall the number from Contacts.
2. If you stored the number using Wait(s), recall the number
from Contacts and wait for the appropriate prompt from
the dialed number.
3. Press to dial the number.
Edit an Existing E-mail Address
1. From the Edit Contact screen, highlight the Email field.
(See “Editing a Contacts Entry” for more information.)
2. Use either keypad to edit the e-mail address. (See
“Entering Text” on page 15 for more information.)
3. Press
SAVE
( ) to save your changes.
Assigning a Picture to a Contacts Entry
When you assign a picture to a Contacts entry, the picture you
assign appears in the display when you receive a call from that
Contact.
1. From the Edit Contact screen, highlight the Picture ID
field (at the top of the Edit Contact screen), then press
Set.
A photo gallery screen appears in the display, showing a
series of thumbnail photos. (See “Using My Images” on
page 53 for more information.)
2. Select the picture that you wish to assign to the Contacts
entry.
Page 34

31
If there is no usable picture in the photo gallery screen:
•
Press
Camera
. The camera viewfinder screen appears in the
display.
•
Press
TAK E
( ). The picture you have taken appears in the
display.
•
Press OK ( ).
The Contacts entry screen appears in the display with a
thumbnail view of the selected picture in the Picture ID
field.
3. Press
SAVE
( ) to save your Picture ID assignment.
Assigning a Ringtone to a Contacts Entry
When you assign a ringtone to a Contacts entry, the phone plays
the ringtone that you assign when you receive a call from that
Contact instead of the Voice Calls ringtone.
1. From the Edit Contact screen, highlight the Ringtone
field, then press Set. The Contact Tone menu showing the
following options appears in the display:
•
My Ringtones
•
My Sounds
2. Select the desired option. The My Ringtones file list or the
My Sounds file list appears in the display.
3. Select the ringtone or sound that you wish to assign to the
Contacts entry. The Contacts entry screen appears in the
display with the name of the selected file in the Ringtone
field.
4. Press
SAVE
( ) to save the ringer assignment to the
selected Contacts entry.
Speed Dial
A Contacts entry’s Speed Dial number corresponds to the number
keys you press to speed dial one of that entry’s numbers. For
example:
•
To speed dial the Contacts entry assigned to Location 5, press and hold
, (1-touch dialing).
•
To speed dial the Contacts entry assigned to Location 35, press
then press and hold , (2-touch dialing).
•
To speed dial the Contacts entry assigned to Location 235, press ,
press , then press and hold , (3-touch dialing).
You can assign one or more Speed Dial numbers to a Contacts
entry during new entry creation or by editing an existing entry.
Page 35

Understanding Your Contacts 32
Assignment During Entry Creation
To assign a Speed Call number to a new Contacts entry number,
do the following:
1. Follow either of the New Contacts entry procedures (see
“Adding a New Contacts Entry” on page 25) until you enter
a name for the entry.
2. After entering the Contacts entry name, do not press .
Instead, highlight the number field to be assigned a Speed
Dial number.
3. Press Options, then select
Set Speed Dial
. The Speed Dial
screen appears in the display.
4. Highlight an Unassigned Speed Dial number or enter an
Unassigned Speed Dial number in the Go To field using
either keypad.
Important!:
Do not enter Speed Call numbers 1 or 911. These numbers are
already assigned to Voicemail (001) and to emergency use (911).
5. Press SET ( ). You are prompted to confirm your Speed
Dial number assignment.
6. Press Yes to save your Speed Dial assignment and return
to the Add New Entry screen.
Press No to discard the assignment and return to the
Speed Dial screen.
7. Press to save your changes.
Changing a Speed Dial Location
1. Find the Contacts entry you want to edit. See “Finding a
Contacts Entry” on page 27 for more information.
2. Highlight the desired entry, then press Edit.
3. Highlight the number field marked by the Speed Dial icon
().
4. Press Options, then select
Remove speed dial
. “Remove
speed dial?” prompts you to confirm your desire to
remove the entry.
5. Press Yes to remove the Speed Dial assignment. “Speed
Dial Removed” pops up in the display, and you are
returned to the Edit Contact screen.
6. Do steps 2 through 7 of the “Assignment During Entry
Creation” procedure on page 32.
Contacts Groups
Contact Groups let you easily send messages to multiple,
selected Contacts. You can also use Groups to find Contact
entries and to add/remove Contacts names in a Group or to
create or rename a Group.
Page 36

33
Add Contacts Entry to a Group
Using Add New/Edit Contact Option
To add a Contact to a Group using either the Add New Contact
option or the Edit Contact option, do the following:
1. Create a Contacts entry (see “Adding a New Contacts
Entry” on page 25 for more information) that you want to
add to a Group.
– Or –
Find a Contacts entry (see “Finding a Contacts Entry” on
page 27 for more information) that you want to add to a
Group.
2. Highlight the Group field, then press Set.
The Select Group screen appears in the display showing
Groups similar to the following:
3. Select the Group to which you want to assign the selected
Contact.
You are returned to the Add New Entry/Edit Contact
screen and the selected Group name populates the Group
field.
4. Press to save your changes.
Using Group Add Option
The Add option lets you add one or more existing Contacts to a
Group.
1. From the Contacts menu, select Group.
The Group List screen appears in the display showing
Groups similar to the following:
2. Highlight a Group, then press Options. The following
options pop-up in the display:
•
Send Message
•
Rename
•
Erase
•
Add
3. Select Add. The Add Contacts screen appears in the
display showing a list of Contacts entries.
4. Do one of the following:
•
Highlight a Contacts entry you want to add to the group, then press
MARK
( ). A check mark appears in the entry’s check box.
Repeat as needed to check all the desired Contacts.
•
Press
Options
, then select
Mark All
.
•
No Group
•
Colleague
•
Friends
•
Business
•
Family
•
No Group
•
Colleague
•
Friends
•
Business
•
Family
Page 37

Understanding Your Contacts 34
Note:
To unmark a marked Contact, highlight the Contact and press
MARK
( ) to clear the check mark.
5. When you have marked the Contacts you want to add to
the group, press Done. “Contact added to group”
appears in the display, followed by the selected Group list
including the added Contacts.
Rename a Group
The Rename option lets you change the name any of the Groups,
except No Group.
1. From the Contacts menu, select Group. The Group List
screen appears in the display.
2. Highlight a Group name (other than No Group) that you
wish to change, then press Options.
3. Select Rename.
The Rename Group screen appears in the display.
4. Enter changes to the group name using either keypad.
(See “Entering Text” on page 15 for more information.)
5. When you have completed your changes to the Group
name, press SAVE ( ).
“Group Renamed” appears in the display followed by the
Group List screen showing your renamed Group.
Add a New Group
The
New
option lets you add Groups.
1. From the Contacts menu, select Group. The Group List
screen appears in the display.
2. Press New. The New Group screen appears in the display.
3. Enter a new group name using either keypad. (See
“Entering Text” on page 15 for more information.)
4. Press SAVE ( ). “Group Saved” appears in the display
followed by the Group List screen showing your new
Group.
Erase a Group
The Erase option lets you delete a Group, thus freeing you to
reassign the Contacts formerly in the Group.
1. From the Contacts menu, select Group. The Group List
screen appears in the display.
2. Highlight the Group you wish to delete, then press
Options, and select Erase.
You are prompted to confirm the Group erasure.
3. Press Yes to confirm erasure of the highlighted Group.
Press No to retain the Group.
Note:
When you delete a Group, the assigned Contacts entries return to
No
Group
.
Page 38

35
Deleting a Contacts Entry
1. Find the Contacts entry you want to delete. (See “Finding a
Contacts Entry” on page 27 for more information.)
2. Highlight the desired entry, then press Options and select
Erase. The phone prompts you to confirm the erasure.
3. Press Yes to confirm erasure of the selected Contact. Press
No to retain the Contact.
Memory Info
The Memory Info menu option lets you view the amount of
memory you have used to store Contacts entries, as well as the
memory remaining to store more Contacts entries.
䊳
From the
Contacts
menu, select Memory Info.
The Memory Info Contacts screen appears in the display
showing the amount of memory Used and remaining (Free)
for Contacts entries.
Page 39
Messages 36
Section 7: Messages
This section explains how to use your phone to exchange Text
and Picture messages with compatible phones and devices.
Note:
Available memory is shared between all messages. You can store up to
100 messages. However, the exact number is dependent upon
message length.
Accessing the Messages Menu
䊳
In Standby mode, press
Msgs
.
– or –
Press
Menu
, then select Messages.
The Messages menu appears in the display.
Create and Send Text Messages
Text messages can be up to 160 characters in length.
1. From the Messages menu, select Send Message ➔ Tex t
Message. The Create Txt Msg screen appears in the
display showing the To: list.
Tip:
To launch the
Create Txt Msg
screen using a voice command — In
Standby mode, press and hold until the phone prompts, “
Say a
command.
” Say “
Send Text
” into the microphone. You are then prompted
to say a Contact name or a number for the first recipient of the
message.
2. Enter the phone number or e-mail address of the recipient.
Press
Add
to address your message to
Contacts, Groups
, or
Recent Calls
.
3. Press . The Tex t: appears in the display.
4. Enter your message text.
5. If needed, set message delivery options by pressing
Options
. (For more information, refer to “Message Content
and Delivery Options” on page 39.)
6. Once you’re finished entering your message, press
SEND
().
Send Picture Messages in Camera Mode
Picture messages can be sent to recipients with compatible
phones or devices. You can even accompany a Picture message
with a voice memo or other sound file.
1. In Standby mode, launch the Camera and take a picture.
(For more information, refer to “Taking Snap Shots (Single
Pictures)” on page 47.)
2. Press
Send
( ) to save the picture and begin the delivery
process. The Create Pic Msg screen then appears in the
display with the Send To: list highlighted.
Page 40
37
3.
Enter the phone number or e-mail address of the recipient
of the Picture message, then press OK ( ). The Subject:
field appears in the display.
Tip:
Press
Add
to display a pop-up menu containing:
Contacts, Groups
,
Recent Calls
, and
OnlineAlbum
. These options allow you to find and add
recipients to the
Send To:
list.
Tip:
You can send a Picture message to up to ten recipients. Enter each
recipient’s address or phone number in a separate
Send to
field of the
Picture message composer.
4. Enter a subject for the Picture message.
5. Highlight the Tex t: field, then enter the message text.
6. Your new picture is already in the Picture: field.
7. If you wish to add a sound to your Picture message,
highlight the Sound: field and do the following; otherwise,
proceed to step 8.
•
Press
Sounds
. The
My Sounds
screen appears in the display
showing the following options:
–
Record New
— Record a new memo to insert into the message.
Note:
If you record first before attaching a picture, you can record and insert
a voice memo of up to 60 seconds in length. If you attach a picture
before recording, the size of the voice memo is limited to the amount
of remaining memory.
–
Audio files list
— Select from the list of previously recorded voice
memos and preloaded audio files on your phone.
Select an option to insert a sound into your message.
Press to exit the pop-up menu without inserting a sound.
8. To complete the message text and set message delivery
options, press Options. (For more information, refer to
“Message Content and Delivery Options” on page 39.)
9. Press
SEND
( ) to send the message. “Pic Msg
Sending” appears in the display and a progress bar
indicates the send status.
Send Picture Messages in Standby Mode
Send Picture messages to recipients with a compatible phone or
other device, and accompany a Picture message with a voice
memo, ringtone, or downloaded melody.
1. From the Messages menu, select Send Message ➔
Picture Message. The Create Pic Msg screen appears in
the display with the Send To tab highlighted and showing
the To: list.
Tip:
To launch the
Create Pic Msg
screen using a voice command — In
Standby mode, press and hold until the phone prompts, “
Say a
command.
” Say “
Send Picture
” into the microphone. You are then
prompted to say a Contact name or a number for the first recipient of the
message.
2. Enter the phone number or e-mail address of the recipient.
Page 41
Messages 38
Press
Add
to address your message to
Contacts, Groups
,
Recent Calls
, and
OnlineAlbum
.
Tip:
You can send a Picture message to up to ten recipients. Enter each
recipient’s address or phone number in a separate
Send To
field of the
Picture message composer.
3. Press . The Subject: field appears in the display.
4. Enter a subject for the Picture message.
5. Highlight the Tex t: field, then enter the message text.
6. For a Picture Message, highlight the Picture: field, then
press Picture. A photo gallery of thumbnail images
appears in the display.
7. Do one of the following:
•
Select a picture to add it to your message.
To expand the highlighted picture for easier viewing, press
View
.
•
Include a new picture by doing the following:
–
Press
Camera
. The Camera viewfinder screen appears.
–
Press
TAK E
( ) or to take the picture.
–
Press
Send
().
Note:
For more information about using the Camera-Camcorder feature in
your phone, see “Camera” on page 47.
•
Press to exit the photo gallery screen without selecting a
picture.
You are returned to the Create Pic Msg screen with the
selected picture in the Picture: field.
8. For a Picture Message, to add a sound file to your
message, highlight the Sound: field, then press
Sounds
.
The My Sounds screen appears in the display.
9. Do one of the following:
•
Select a file from the list of previously recorded voice memos and
other audio files on your phone.
•
Select
Record New
and record a new voice memo, then select the
new recorded sound file to add it to the message.
Note:
If you record first before attaching a picture, you can record and insert
a voice memo of up to 60 seconds in length. If you attach a picture
before recording, the size of the voice memo is limited to the amount
of remaining memory.
•
Press to exit the
My Sounds
screen without selecting a
sound.
10. To complete the message text and set message delivery
options, press Options. (For more information, refer to
“Message Content and Delivery Options” on page 39.)
11. Press
SEND
( ) to send the message. “Pic Msg
Sending” appears in the display and a progress bar
indicates the send status.
Page 42

39
Message Content and Delivery Options
•
Edit Send To
— Text message only — Edit the recipient’s number or
email address.
•
Preview
— Picture message only — View the picture as the recipient
will see it.
•
Add Quick Text
— Insert pre-composed text in your message.
•
Save As Draft
— Save the message to your Draft folder.
•
Priority Level
— Choose
Urgent, Normal
, or
Low
(Picture message
only).
•
Validity Period
— Enter the
Date
when this message will cease to be
valid, then press the Navigation key Left or Right to choose the
Time
.
•
Deferred Delivery
— Directs that this message not be delivered until
a selected date and time.
•
(Enh.) Delivery Ack
— Choose On or
Off
— Requests confirmation
when your message is received.
•
Remove Pic
— Picture message only — Remove the picture from your
message.
•
Remove Sound
— Picture message only — Remove the sound file
from your message.
•
Add To Contacts
— Save the recipient’s number or e-mail address as a
Contacts list entry.
Receiving Messages
When you receive a message, your phone notifies you in one of
the following ways:
•
In Standby mode
— The ringer sounds (unless turned off) and
New
Message
appears in the display along with the closed envelope icon
().
•
While in a call
—
New Message
appears in the display along with
the closed envelope icon ( ).
The date and time of the message also appear in the display
along with the following options:
•
View Now
— Downloads (picture messages) and opens the message.
You have the following options:
–
Text Message
— Forward, Reply With Copy, Save Quick Text, Lock,
Add To Contacts, Message Info, or Extract.
–
Picture Message
— Reply, Forward, Delete, Save Text, Save Pic, or
Save Msg.
•
View Later
— Saves the message to your Inbox, where you can view
it later, then returns your phone to its previous mode. (For more
information, refer to
“Message Boxes”
on page 40.)
Messages and Lock Mode
Your phone can still receive messages while in Lock Mode. The
time and date of the message appear in the display, but you
cannot access the message until you enter the lock code.
Page 43

Messages 40
Voicemail
Messages in your voice mailbox are logged in the Voicemail box
of the Messages menu. Open the Voicemail box to view the
details of the Voicemail message.
When you’re notified of a new voicemail message by an alert
tone and the new message icon, the following options pop:
•
Listen Now
— Calls your voice mailbox and lets you listen to your
messages.
•
Listen Later
— Returns you to Standby mode where you can choose
to call your mailbox and review your messages at a later time.
Listen to Voicemail Now
1. In Standby mode, select
Listen Now
in the New Voicemail
pop-up. Your phone automatically calls your voice mailbox.
2. Follow the voice prompts to access your voicemail
messages.
Listen to Voicemail Later
1. From the
Messages
menu, select
Voicemail
. The
Voicemail
screen appears in the display.
2. Press
OPEN
. Your phone dials your voicemail account.
Tip:
You can also access your voicemail from Standby mode, by pressing and
holding to speed call your voice mailbox.
3. Follow the voice prompts to access your voicemail
messages.
Message Boxes
Inbox
Received messages of all types (except Voicemail) are stored in
the Inbox.
Review Messages in the Inbox
1. From the Messages menu, select Inbox. The
Inbox
appears in the display showing a list of received
messages.
Tip:
While in a call, press
Options
, then select
Messages
.
2. Highlight the message you wish to view, then press
OPEN
( ) to view contents of the highlighted message.
3. While viewing your message, you can access additional
options by pressing Options. (For more information, refer
to “Message View Options” on page 42.)
Managing Inbox Messages
1. From the Messages menu, select Inbox. The
Inbox
appears in the display showing a list of received
messages.
2. Highlight a message in the list, you have the following
options:
Page 44

41
•
To remove the highlighted message from the Inbox, press
Erase
.
•
To review the highlighted message, press
OPEN
().
•
For more options, press
Options
. (For more information, refer to
“Message List Options”
on page 44.)
Outbox
Your phone stores messages in the Outbox, regardless of
whether the message was successfully transmitted. Verify if and
when a message or e-mail was successfully received by enabling
the Enh. Delivery Ack/Delivery Ack feature.
Review Messages in the Outbox
1. From the Messages menu, select Outbox. Your list of sent
messages appear in the display.
2. Highlight the message you wish to view, then press
OPEN
( ) to view contents of the highlighted message.
3. While viewing your message, you can access additional
options by pressing Options. (For more information, refer
to “Message View Options” on page 42.)
4. Select an option to perform its function.
Managing Outbox Messages
1. From the Messages menu, select Outbox. Your list of sent
messages appear in the display.
2. Highlight a message in the list, you have the following
options:
•
To remove the highlighted message from the Inbox, press
Erase
.
•
To review the highlighted message, press
OPEN
().
•
For more options, press
Options
. (For more information, refer to
“Message List Options”
on page 44.)
Draft Box
Messages in the Draft Box are those that have been composed
and saved to the Draft Box. You can return to the Draft Box at any
time to view, edit, or send a draft message.
Create a Draft Message
1. From the
Messages
menu, select
Send Message
➔
Tex t
Message
/
Picture Message
.
The
Create Txt Msg
/
Create Pic Msg
screen appears in the
display showing the To: list.
2. Enter the phone Number or Email address of a recipient,
then press .
Tip:
Press
Add
to display a pop-up menu containing:
Contacts, Groups
,
Recent Calls
, and
OnlineAlbum
. These options allow you to find and add
recipients to the
Send To:
list.
3. Compose your message using either keypad, press
Options
, then select
Save As Draft
. “
Message saved in
drafts
” appears in the display and your message is saved
to the Drafts box.
Page 45

Messages 42
View and Edit Draft Text Messages
1. From the
Messages
menu, select
Drafts
. A list of any draft
messages that you’ve saved appears in the display.
2. Highlight a text message that you wish to view or edit, then
press
EDIT
(). The
Create Txt Msg
screen appears in the
display.
3. Enter or change the recipient’s number and/or e-mail
address and the message text.
4. Make any needed changes, then set message send
options by pressing
Options
. (For more information, refer to
“Message View Options” on page 42.)
5. When you have completed composing your message,
press
SEND
( ) to send it.
View and Edit Draft Pic. Messages
1. From the
Messages
menu, select
Drafts
. A list of any draft
messages that you’ve saved appears in the display.
2. Highlight the picture message that you wish to view, then
press EDIT key ( ). The
Create Pic Msg
screen appears
in the display.
3. Make any needed changes, then set message send
options by pressing
Options
. (For more information, refer to
“Message View Options” on page 42.)
4. When you have completed composing your message,
press
SEND
( ) to send it.
Managing Draft Messages
1. From the
Messages
menu, select
Drafts
. A list of any draft
messages that you’ve saved appears in the display.
2. Highlight a message, then do one of the following:
•
To remove the highlighted message from the
Drafts
box, press
Erase
.
•
To access other options, press
Options
. (For more information,
refer to
“Message List Options”
on page 44.)
Message View Options
INBOX
•
Forward
— Send a copy of this message to another recipient.
•
Reply With Copy
— Compose and send a reply message to the
originator of the received message and include a copy of the
original message.
•
Save Sound
— Picture Messages Only — Save the audio file
(sound) included in this message to the My Sounds folder.
•
Save Pic
— Picture Messages Only — Save the picture included
in this message to the My Images folder.
•
Save Quick Text
— Save the text in this message as a new Quick
Te xt .
•
Lock
/
Unlock
— Block/permit erasure of the highlighted
message.
Page 46

43
•
Add To Contacts
— Save the sender’s number to your Contacts.
•
Message Info
— Shows message delivery status, addressee,
size, and so on.
•
Extract
— Calls the sender of the received message.
OUTBOX
•Play Again
— Replay the sound file in a Picture message.
•
Forward
— Send the highlighted message to another recipient.
•Erase
— Picture Messages Only — Delete this message from the
Outbox, if the message is Unlocked.
•
Lock
/
Unlock
— Block/permit erasure of the highlighted
message.
•
Save Quick Text
— Save the message text as Quick Text for
insertion into other messages.
•
Add To Contacts
— Save the recipient’s number to your
Contacts.
•
Message Info
— Shows message delivery status, addressee,
size, and so on.
•Extract
— Call or send a new message to the recipient for this
message.
DRAFT Text
• Edit Send To
— Change, add, or remove recipients from this
message.
• Add Quick Text
— Insert pre-composed text into your message
text.
• Save As Draft
— Save the message to your Drafts box.
• Priority Level
— Choose
Urgent
or
Normal
.
• Validity Period
— Enter the
Date
when this message will cease to
be valid, then use the Left and Right navigation keys to choose the
Time
.
• Deferred Delivery
— Enter the
Date
and
Time
when this message
will be delivered.
• Enh. Delivery Ack
— Choose On or
Off
— Requests confirmation
when your message is received.
• Add To Contacts
— Save the recipient’s number or e-mail address
to your Contacts.
DRAFT Pic
•Preview
— Shows the message contents.
• Add Quick Text
— Insert pre-composed text into your message
text.
• Save As Draft
— Saves the changed message to the Draft Box.
•
Priority Level
— Choose
Urgent, Normal
, or
Low
.
• Validity Period
— Enter the
Date
when this message will cease to
be valid, then use the Left and Right navigation keys to choose the
Time
.
• Deferred Delivery
— Enter the
Date
and
Time
when this message
will be delivered.
• Delivery Ack
— Choose On or
Off
— Requests confirmation
when your message is received.
Page 47

Messages 44
• Remove Pic
— Remove image included in draft message.
• Remove Sound
— Remove sound file included in draft message.
• Add To Contacts
— Save the recipient’s number or e-mail address
to your Contacts.
Message List Options
INBOX
–
Reply
— Compose and send a reply message to the originator of the
received message.
–
Reply With Copy
— Compose and send a reply message to the
originator of the received message and include a copy of the original
message.
–
Forward
— Send a copy of this message to another recipient.
–
Lock
/
Unlock
— Block/permit erasure of the highlighted message.
–
Add To Contacts
— Save the sender’s number to your Contacts.
–
Erase Multiple
— Delete one or more selected Unlocked messages
from the Inbox.
–
Message Info
— Shows message delivery status, addressee, size,
and so on.
OUTBOX
–
Forward
— Send the highlighted message to another recipient.
–
Resend
— Send another copy of the highlighted message to the
original recipient
–
Lock
/
Unlock
— Block/permit erasure of the highlighted message.
–
Add To Contacts
— Save the recipient’s number to your Contacts.
–
Erase Multiple
— Erase one or more selected Unlocked messages
from the Outbox.
–
Message Info
— Shows message delivery status, addressee, size,
and so on.
DRAFT
–
Send
— Send the highlighted message to the number or e-mail
address currently included with the message.
–
Lock
/
Unlock
— Block/permit erasure of the highlighted message.
–
Add To Contacts
— Save the recipient’s number and/or e-mail
address to your Contacts.
–
Save Quick Text
— Save the message text as Quick Text for insertion
into other messages.
–
Erase Multiple
— Delete one or more selected unlocked draft
messages.
Erase Messages
You can erase all of the messages in any or all of message boxes
using one convenient sub-menu.
Note:
This function erases all messages in the selected message box. To
delete a single message, go to the respective message box, highlight
the message, and press
Erase
. (For more information, refer to
“Managing Inbox Messages” on page 40, “Managing Outbox
Messages” on page 41, or “Managing Draft Messages” on page 42.)
1. From the
Messages
menu, select
Erase Messages
➔
Inbox
/
Outbox
/
Drafts
/
All Messages
.
Page 48

45
2.
Select the message box containing the messages you
want to delete. You’re prompted to confirm the erasure of
all messages in the selected box or in all boxes.
3. To delete the messages, press
Yes
. To cancel deleting the
messages, press No.
Message Settings
Use the Msg Settings sub-menus to define settings for general,
text, and picture messages.
General Message Settings
1. From the
Messages
menu, select
Msg Settings
➔
General
.
The following options appear in the display.
•
Auto Save
— Choose whether your messages are saved
automatically when you exit them (On,
Off, Prompt
).
•
Auto Erase
—
Choose to receive (On) or not receive (
Off
) a
warning message when you delete a message.
•
Quick Text
— Edit your pre-composed messages, which can then
be inserted into new messages.
•
Voicemail #
— Edit or view your Voicemail number.
•
Entry Mode
— Choose the default method for entering text into
messages (
T9word, T9Word, T9WORD, abc, Abc, ABC, 123
).
•
Callback #
— Choose whether to include a callback phone
number with your outgoing messages, and enter the number to be
included.
•
Signature
— Choose whether to include a text signature in
outgoing message text, and enter the text to be included.
•
Reminder
— Select whether and how often you will hear and/or
feel a reminder that you have received a message (
Once, Every 2
Minutes, Every 15 Minutes, Off
).
2. Select the desired option, then select the desired setting or
enter the desired value.
Editing and Entering Quick Text
1. From the
Messages
menu, select
Msg Settings
➔
General
➔
Quick Text
. The
Quick Text
sub-menu appears in the
display.
2. Select a Quick Text you want to change.
Note:
You cannot change the pre-defined Quick Text included with your
phone.
3. To create a new Quick Text, press
New
.
Tip:
You can also create new Quick Text by viewing/editing an Outbox
message and using the
Save Quick Text
option in the
Options
menu. See
“Review Messages in the Outbox” on page 41 for more information.
4. Enter/change the text content of your Quick Text using
either keypad. (See “Entering Text” on page 15 for more
information.)
Page 49

Messages 46
5.
To save your finished Quick Text, press . The
Quick Text
menu appears in the display with your new Quick Text
highlighted.
Text Message Settings
1. From the
Messages
menu, select
Msg Settings
➔
Tex t
Message
. The following options appear in the display.
•
Auto View
— On/Off — With Auto View On, the full content of a
text message appears in the display as the messages is received.
•
Signature
— Create a signature, which can be included at the
bottom of outgoing message text.
•
Auto Scroll
— On/Off — With Auto Scroll On, the full content of a
text message automatically rolls upward on the display, one screenfull at a time.
• Message View
— Chat/Normal — With Message View set to
Chat
, multiple text messages exchanged with a single addressee
appear as a chat session.
2. Select the desired option, then select the desired setting or
enter the desired value.
Picture Message Settings
1. From the
Messages
menu, select
Msg Settings
➔
Picture
Message
. The following options appear in the display.
•
Auto Receive
— On/Off — With Auto Receive On, Picture
messages automatically download and display as they are
received. With Auto Receive
Off
, you are prompted to download
Picture messages.
•
Signature
— Create a signature, which can be included at the
bottom of outgoing Picture message text.
2. Select the desired option, then select the desired setting or
enter the desired value.
Page 50
47
Section 8: Camera
Use your r330 phone to take full color digital pictures, display
them on your phone’s vivid color display, and instantly share
them with family and friends. This section explains how you can
do the following:
•
Take pictures with your phone’s built-in digital camera.
•
Send and receive pictures taken with your phone’s camera.
•
Set the several options associated with the camera that help you take
crisp, clear pictures.
Taking Pictures
Taking pictures with the built-in
camera is as simple as launching
it, choosing a subject, pointing
the lens (located on the front of
your phone’s flip, near the hinge),
and pressing a button.
Taking Snap Shots
(Single Pictures)
To take a single picture using the
current camera settings, do the
following:
1. In Standby mode, press and hold the
Camera key ( ) on the right side
of the phone.
The camera view finder screen
appears in the display. (For more
information, refer to “Screen
Layouts” on page 49.)
Note:
You can also activate the camera by pressing
Menu
, then selecting
Multimedia
➔
Camera
.
2. Using the display as a viewfinder, point the camera at your
subject.
3. To take a photo, press the Camera key ( ) or
TAKE
. The
photo you’ve taken appears in the display.
•
To save the picture to memory, press
Save
.
•
To send the photo as part of a Picture message, press
Send
. (For
more information, refer to
“Point, Click, and Send Pictures”
on page 48.)
•
To erase the photo, press
Cancel
.
Tip:
You can change a number of the camera’s settings to suit particular
uses for your pictures. (For more information, refer to “Camera Screen
Icons” on page 49.)
Camera
Lens
Page 51
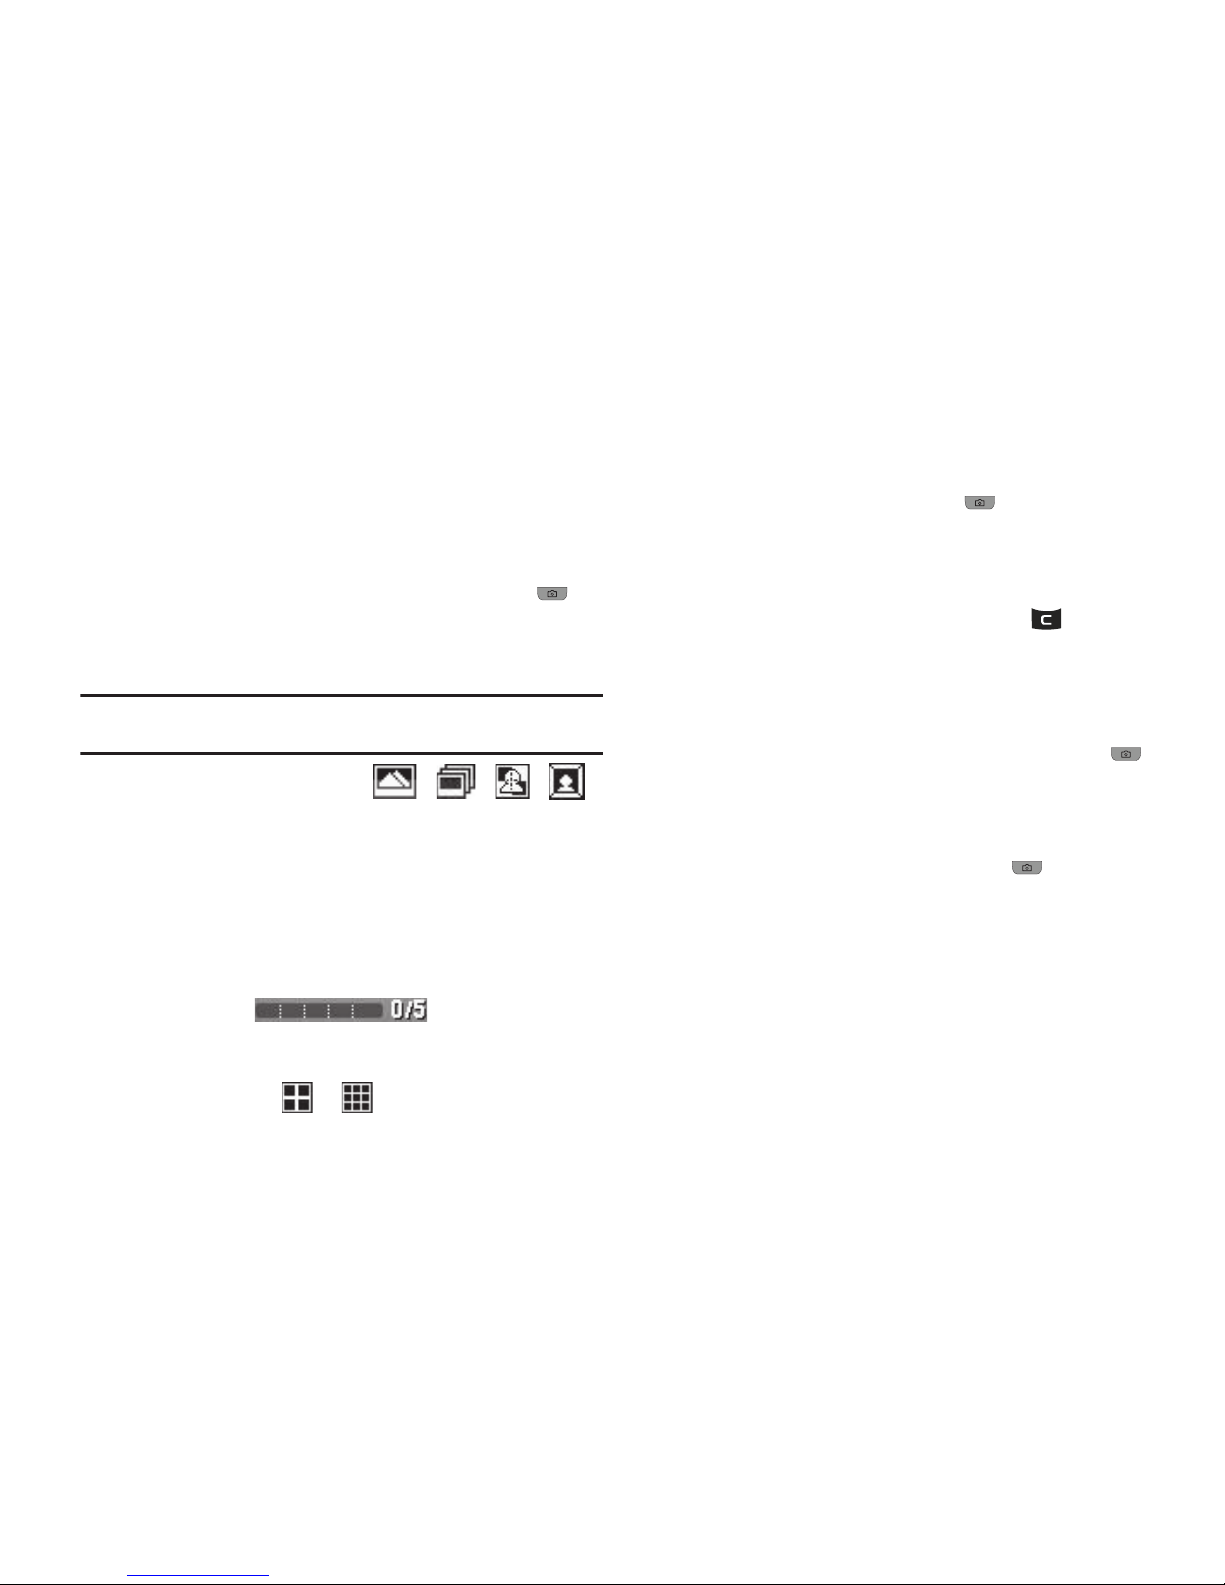
Camera 48
Taking Multi Shot Pictures
When taking pictures of moving subjects or subjects you cannot
pose, such as children and pets, the camera’s Multi Shot mode
simplifies the process of taking multiple pictures in quick
succession.
1. In Standby mode, press and hold the Camera key ( ) on
the right side of the phone. The camera view finder screen
appears in the display. (For more information, refer to
“Screen Layouts” on page 49.)
Note:
You can also activate the camera by pressing
Menu
, then select
Multimedia
➔
Camera
.
2. Press
Options
, then highlight / / / .
The following options appear in the display:
• Single Shot
— Take one photo with each press of the Camera
button.
•Series Shot
— Lets you take a series of 5 photos automatically.
• Divided Shot (2x2
/
3x3
) — Lets you take a mosaic of 1 to 9
photos.
When you select a
Series Shot
option, a Series Shot
progress bar ( ) appears in the
display.
3. When you select a
Divided Shot
option, a Divided Shot
progress matrix ( / ) appears in the display.
4. Using the display as a viewfinder, point the camera lens at
your subject.
5. Press
TAKE
or the Camera key ( ). The camera takes
one picture (
Single Shot
) or lets you take multiple pictures
(
Series Shot
or
Divided Shot 2x2
/
3x3
).
6. To save the picture(s) to memory, press
Save
/
Done
.
To discard the pictures, press
Cancel
or .
Point, Click, and Send Pictures
Take a picture and send it to anyone with a compatible device in
a few easy steps.
1. In Standby mode, press and hold the Camera key ( ) on
the right side of the phone. The camera view finder screen
appears in the display.
2. Using the display as a viewfinder, take the desired picture
by pressing
TAKE
or the Camera key ( ).
The photo review screen appears in the display.
3. Press
Send
.
4. Enter the recipient’s phone number or e-mail address
using the keypad.
5. Press
OK
to save the address(es).
6. Select other message fields as needed. (For more
information, refer to “Send Picture Messages in Camera
Mode” on page 36.)
Page 52
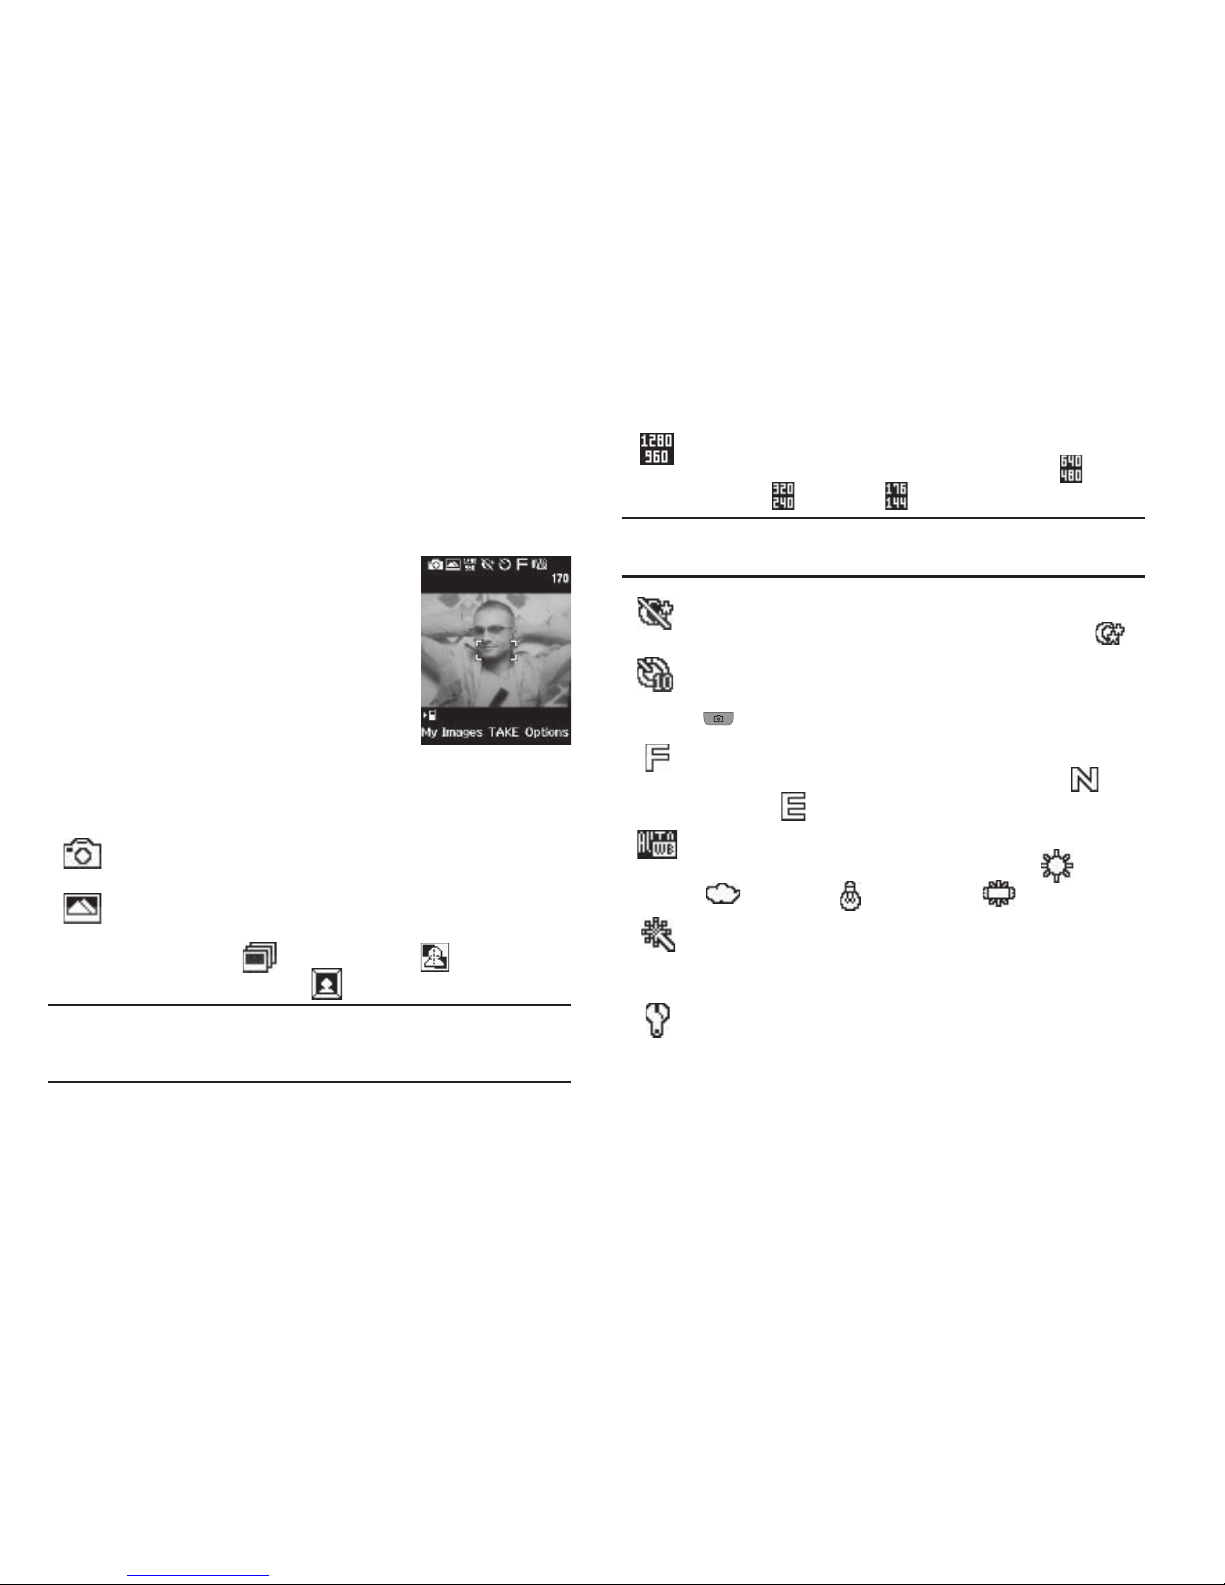
49
7.
When you are finished composing your message, press
SEND
to send the Picture message to the intended
recipient(s).
Screen Layouts
Camera Screen
When you activate your phone’s camera,
the top two lines of the display are reserved
for camera icons (when active). The center
of the display shows a viewfinder image of
the subject at which the camera is pointed.
Camera Screen Icons
The following icons appear in the Camera screen when the
Icon
Display
Camera setting is set to
Display All
.
Mode
— Indicates Camera mode is active.
Shooting Mode
— Indicates/changes Camera shooting
mode to take
Single
pictures (shown) or multiple pictures
in
Series Shot
( ) or
Divided Shot
( ) succession,
or in
Frame Shot
mode ( ).
Note:
The
Series Shot
option also sets whether the Camera takes Series Shot
or Divided Shot pictures in quick succession (
Auto
) or one each time
you press the Camera key (
Manual
).
Resolution
— Indicates/changes the Camera resolution
setting (in pixels) [
1280x960
(shown),
640x480
(),
320x240
( ),
176x144
()].
Note:
The
Size
setting affects Zoom. When Camera resolution is set to
1280x960
pixels, Zoom is not available.
Night Shot
— Indicates/changes whether your phone is
ready to take photos in low light:
Off
(shown) or On ().
Self Timer in use
— Delays the camera shutter for 2/5/10
seconds (
10 Sec.
shown) after you press the Camera key
().
Quality
— Indicates/changes camera’s picture quality
setting (
Fine
shown). Other options are:
Normal
() and
Economy
( ).
White Balance
— Indicates/changes the current photo
White Balance setting [
Auto
(shown),
Sunny
(),
Cloudy
(),
Tungsten
(),
Fluorescent
()].
Color Effects
— Replaces the natural colors with shades
of a selected color (
Normal, Black&White, Sepia, Negative
,
or
Green
).
Settings
— Displays/changes Camera Settings which let
you select
Icon Display
(Display All / Guidelines / No
Icons),
View Mode
(Landscape / Portrait),
Shutter Sound
Page 53

Camera 50
(Off / Shutter / OK / DingDong), photo
Auto Save
(On / Off),
Reset
Settings
(Yes / No).
Zoom
— Enlarges the image from x00 (normal) to x09.
Brightness
— Brightens or darkens the image from 4 to
+4.
Phone Memory
— Indicates photos will be stored in the
phone’s memory.
Photo Limit
— Indicates the available number of photos
you can take. (Depending on the camera
Resolution
and
Quality
settings.)
The Photo Gallery
Saved pictures are stored in the My Images folder. You can
browse the pictures one at a time (expanded mode), or view
several pictures at once in thumbnail format.
1. In the Camera viewfinder screen, press
My Images
. Any
pictures that you’ve saved are listed with their thumbnail
images in the display.
2. To launch the Camera and take new pictures, press
Camera
.
3. To view a picture, press
VIEW
.
4. For more options, press
Options
. The following additional
options pop-up:
•Send
— Send the currently highlighted or displayed image as part
of a Picture Message or Via Bluetooth connection.
• Online Album
— Send a copy of the currently highlighted or
displayed image to your account on your Wireless Provider’s server.
•Set As
— Assign the currently highlighted or displayed image as
the Main Wallpaper, as the Picture ID for a Contact, or the Front
Wallpaper.
•Rename
— Change the name of the picture file.
•Lock/Unlock
— Prevent/allow erasure of the currently highlighted
or displayed image.
• Erase Files
— Delete one or more marked images from the My
Images folder.
•Image Info
— View the Name, Date and Time created, Resolution,
and Size of the currently highlighted or displayed image.
5. Select the desired option to perform its function or to enter
its sub-menu.
Page 54
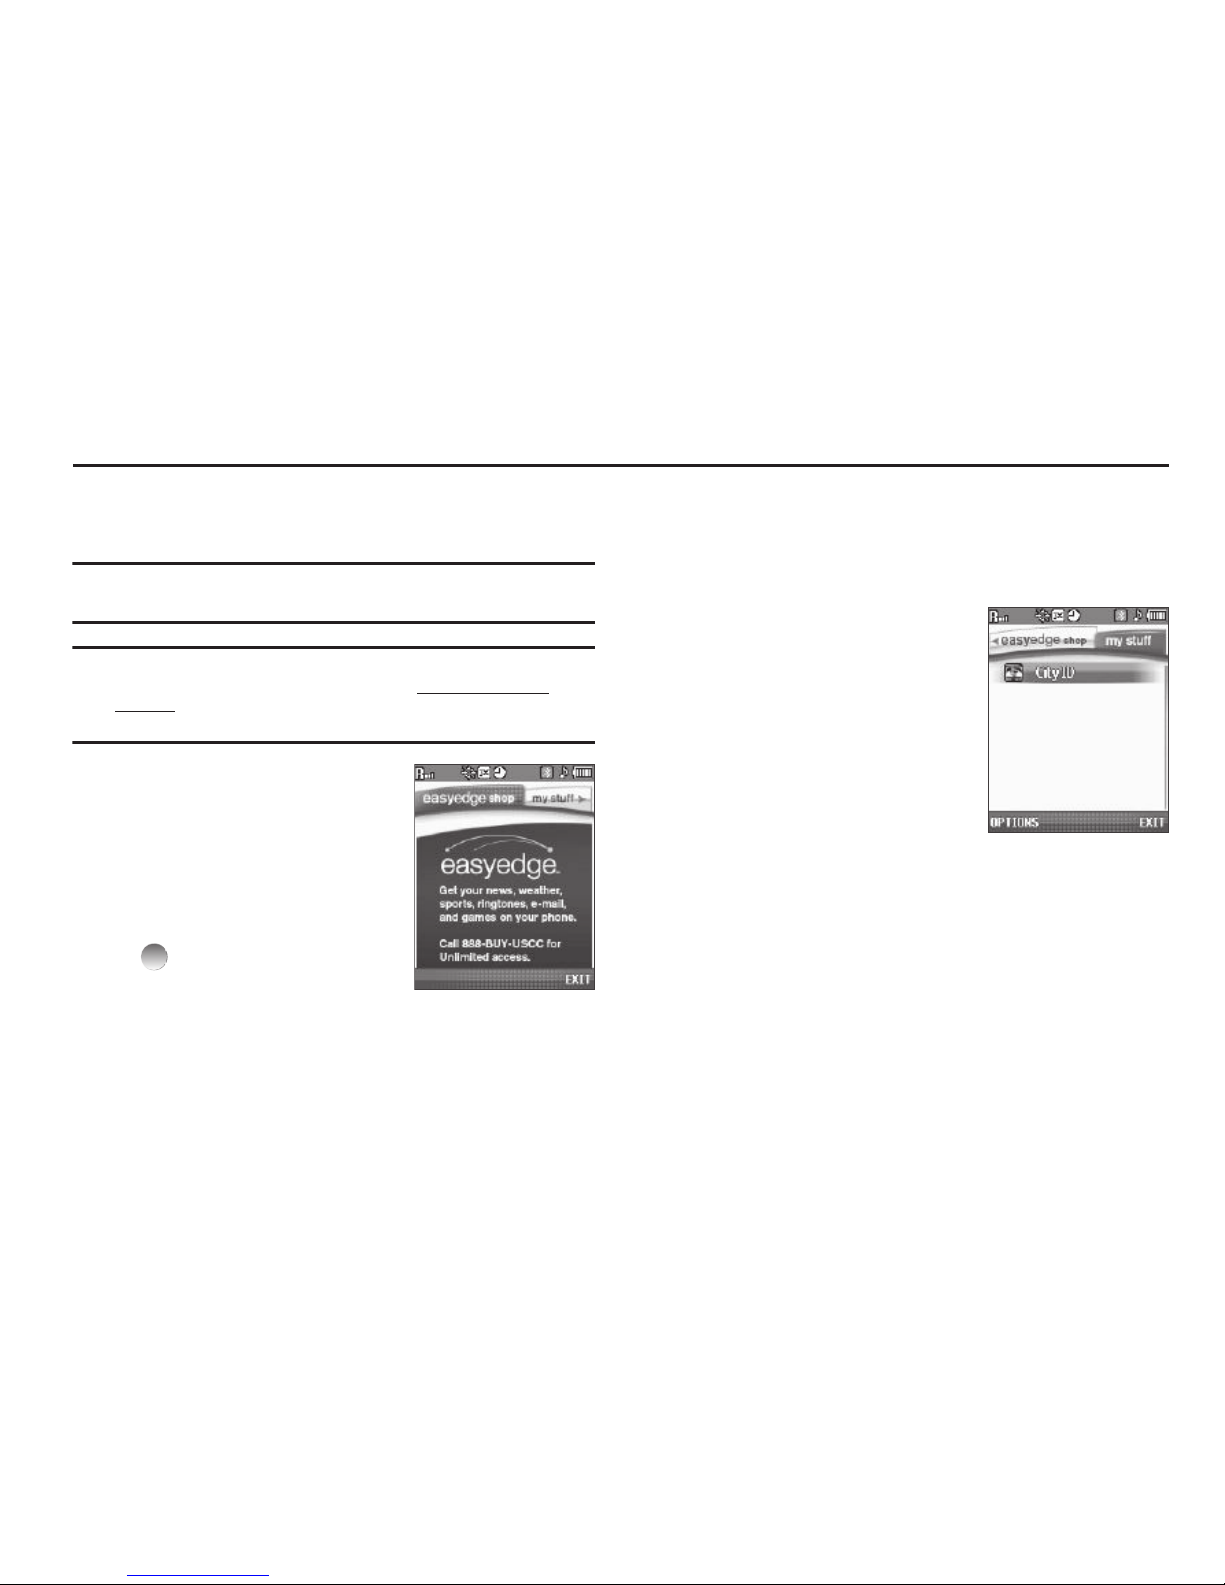
51
Section 9:
easy
edge
SM
With easyedgeSM, you can download multimedia, applications,
games, and check news and sports.
Tip:
You can access
easy
edgeSM
Games
home page directly from Standby
mode by tapping the
Menu
soft key, then selecting
Games
.
Note: easy
edgeSM from U.S. Cellular is only available on approved phones
and requires an
easy
edgeSM data plan. Visit www.uscellular.com/
easyedge or call U.S. Cellular customer service (by dialing 611 on your
phone) and ask about
easy
edgeSM.
Accessing
easy
edge
SM
With
easyedgeSM, you can download
full featured applications over the air
including games, personalized ring
tones, pictures, and more.
䊳
In Standby mode, press Menu
( ), then select
easyedge
.
– or –
Press the Navigation key Down.
The
easy
edgeSM screen appears in the display with the
easy
edgeSM shop
tab showing.
The
easy
edgeSM shop
tab lets you locate, purchase (when
required), and download an application, ringtone, or other
multimedia files.
Launching an Application
1. In the
easy
edgeSM screen, press
the Navigation key Right.
The
my stuff
tab shows, listing
any applications (apps) you have
downloaded.
2. Select the application you wish
to run.
Finding and Downloading Applications
1. In Standby mode, tap the
Menu
soft key, then select
easyedge
. The
easy
edgeSM screen appears in the display
with the
easy
edgeSM shop
tab showing.
2. Follow the prompts to locate, purchase (when required),
and download an application, ringtone, or other
multimedia files.
Page 55
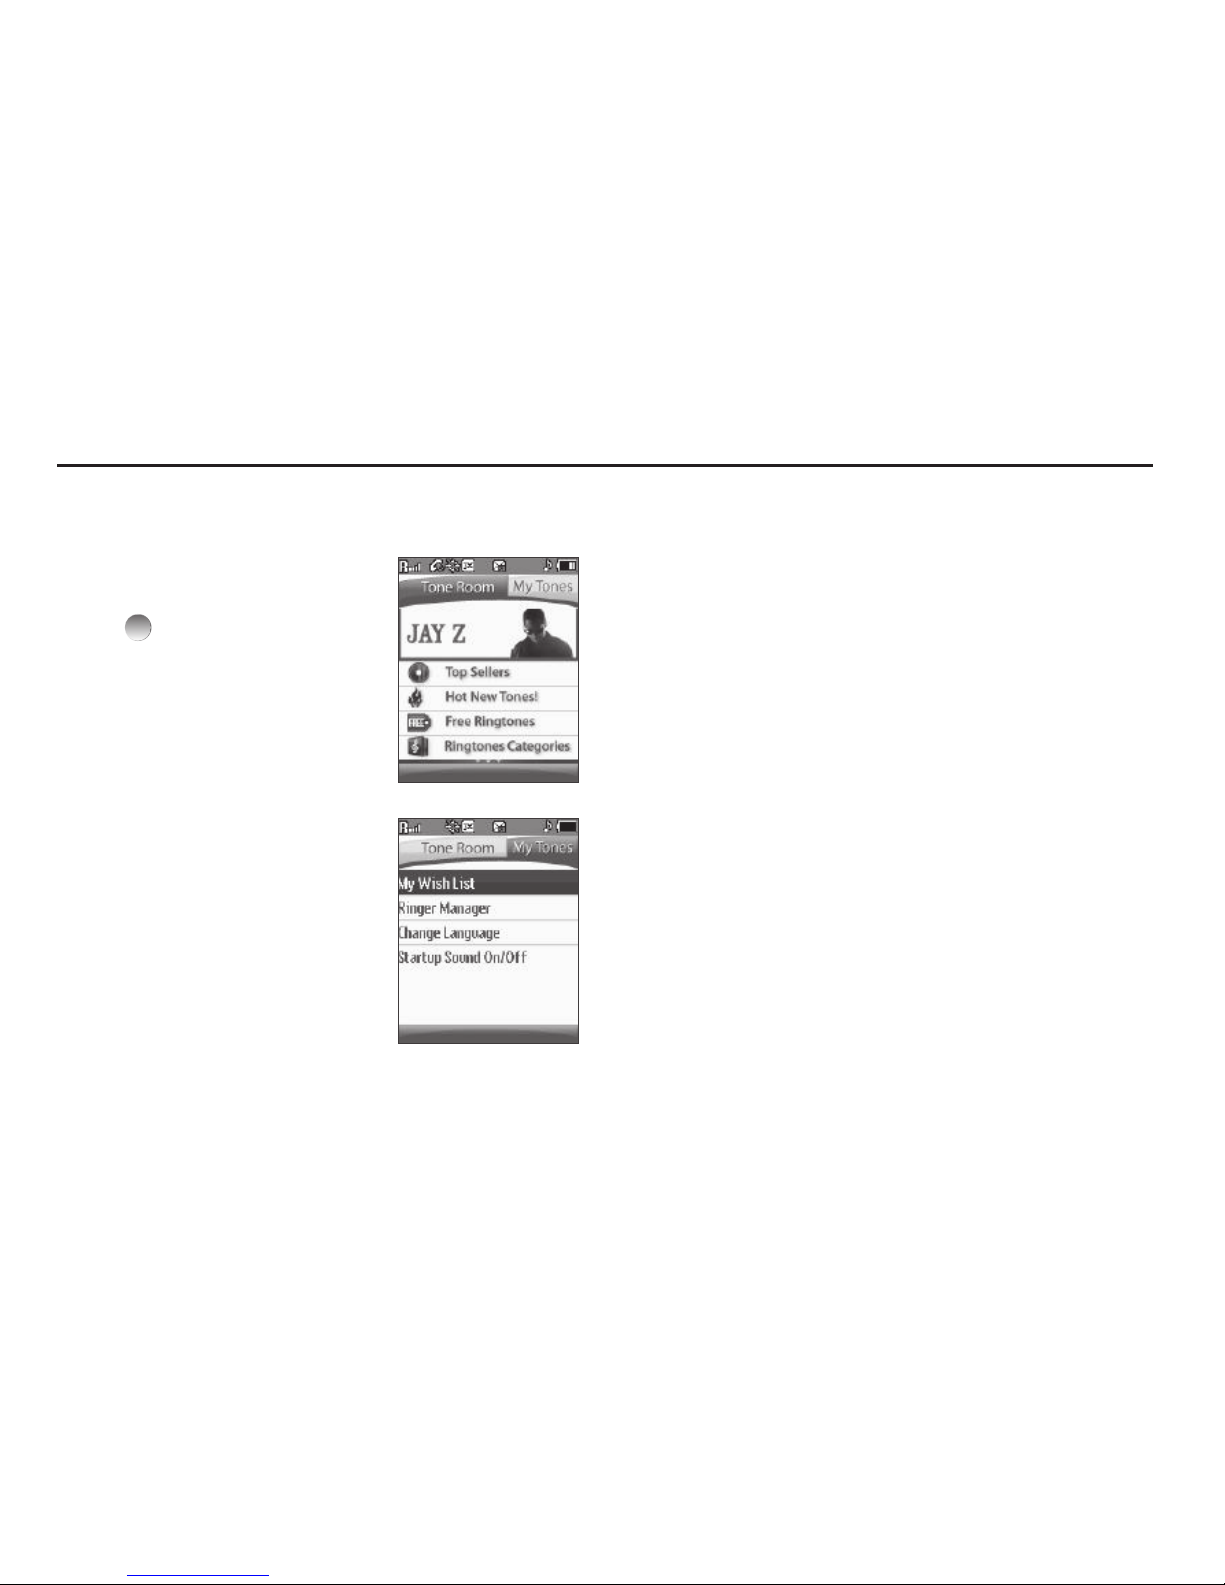
Toneroom 52
Section 10: Toneroom
Toneroom is a pre-loaded application that lets you access your
Wireless Carrier’s on-line source for real music ringtones.
Accessing Toneroom
䊳
In Standby mode, press Menu
( ), then select Toneroom.
The
Tone Room
home page
appears in the display.
Follow the links on the Tone
Room home page to find,
purchase (if needed), and
download ringtone files.
Managing Your Tones
䊳
In the
Tone Room
home page,
select the My Tones tab. The My
Tones page appears in the
display.
For more information about Tone Room,
contact your Wireless Provider.
Page 56

53
Section 11: Multimedia
Use your SCH-r330 phone’s Camera to take full color digital
pictures, display them on your phone’s vivid color display, and
instantly share them with family and friends.
With Mobile Shop, you can download personalized ringtones,
pictures, and more. For more information, contact your Wireless
Provider.
Accessing Multimedia
䊳
In Standby mode, press
Menu
, then select
Multimedia
.
The following Multimedia feature sub-menus appear in the
display.
Camera
Lets you launch and set up your phone’s camera. (For more
information, refer to “Camera” on page 47.)
Using My Images
My Images lets you manage your photos and pictures you
download, and lets you choose the pictures that appear in your
phone’s display when you turn it on or off, while in Standby mode
(wallpaper), and as image IDs for your contacts.
䊳
From the
Multimedia
menu, select My Images. A multiplepage matrix of thumbnail views of saved photos and
images appears in the display.
•
To take new photos, press
Camera
.
•
To expand an image to fill the screen, highlight it and press
VIEW
().
My Images Options
From the My Images list, access other options by pressing
Options
. The following options appear:
•
Send
— Send image as part of a Picture message or via Bluetooth
connection to another device. (See
“Send Picture Messages in
Standby Mode”
on page 37 for more information.)
•
Online Album
— Send image as part of a Picture message to your
Online Album (for more information contact your Wireless Provider).
•
Set As
— Assign a highlighted or displayed image as the Main
Wallpaper, as the Picture ID for a Contact, or the Front Wallpaper.
•
Rename
— Change the name of the picture.
•
Lock / Unlock
— Prevent/allow erasure of the currently highlighted or
displayed image.
•
Erase Files
— Delete one or more marked images from the My Images
folder.
•
Image Info
— View the Name, Date and Time created, Resolution, and
Size of the currently highlighted or displayed image.
Page 57
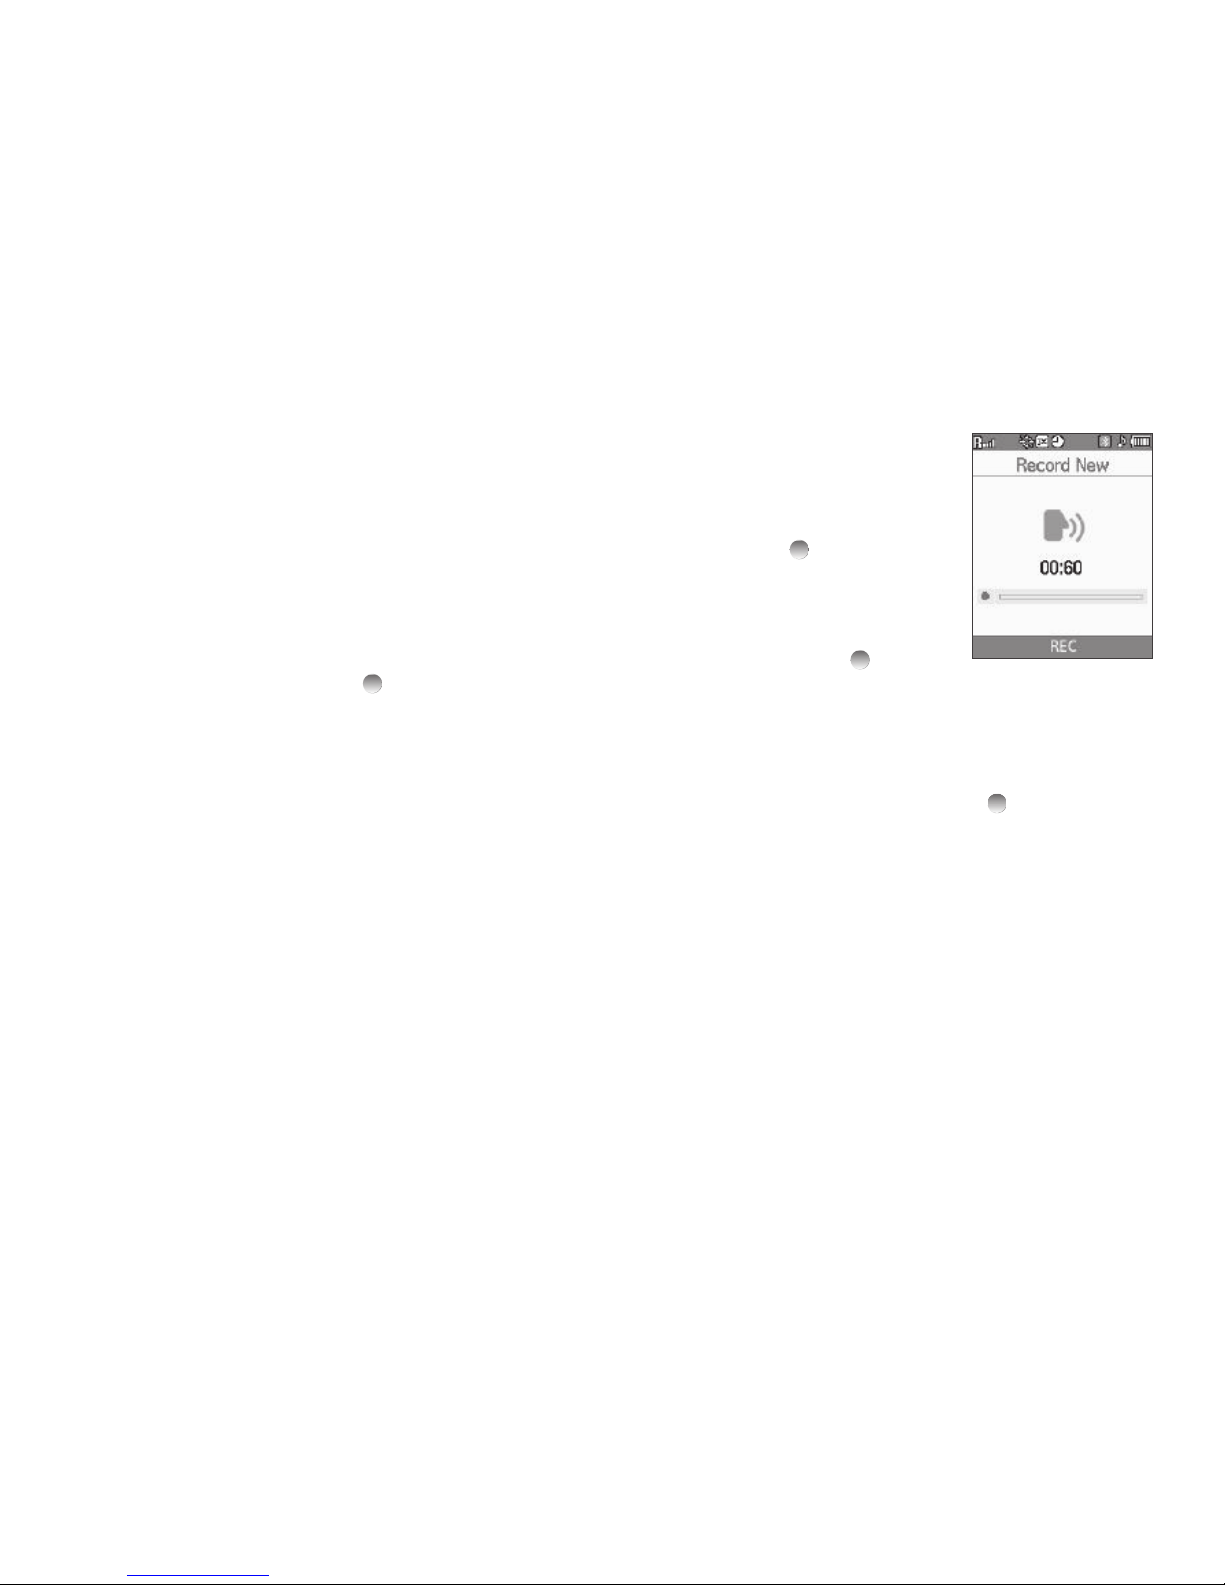
Multimedia 54
Using My Ringtones Gallery
My Ringtones lets you assign ringtones for calls, alarms, and
other alerts.
1. In Standby mode, press
Menu
, then select Multimedia ➔
My Ringtones. A list of ringtones appears in the display.
2. Highlight a ringtone. You have the following options:
•
To assign the highlighted ringtone to be used as a
Ringtone
, a
Contact ID
, or an
Alert Tone
, press
Set As
.
•
To hear the ringtone, press
PLAY
().
•
To show title and file type for the highlighted ringtone, press
Info
.
Using My Sounds Gallery
My Sounds lets you record and manage voice memo files and
assign melodies as ringers or alerts.
1. In Standby mode, press
Menu
, then select Multimedia ➔
My Sounds.
The following options appear in the display:
•
Record New
— Lets you record voice memos.
•
A list of recorded voice memo files and melodies.
2. When you select Record New,
the Record New screen appears
in the display.
•
To start recording a voice memo,
press
REC
().
•
To pause/resume recording, press
Pause
.
•
To stop recording and save the voice
memo, press
SAVE
().
3. When you highlight a saved voice memo file, you have the
following options:
•
To erase the selected voice memo file, if it is unlocked, press
Erase
.
•
To listen to the voice memo, press
PLAY
().
•
Press
Options
, and the following options appear in the display:
–
Send
— Send to someone as part of a
Picture Message
or
Via
Bluetooth
to another device. (For more information, refer to
“Send
Picture Messages in Standby Mode”
on page 37.)
–
Set As
— assign the highlighted ringtone to be used as a
Ringtone
,
Contact ID
, or as the
Alert Tone
.
–
Rename
— Change the name of the voice memo file.
–
Lock
/
Unlock
— Block/permit erasure of the highlighted voice memo.
–
Erase all
— Erase all unlocked voice memos.
–
Sound Info
— Shows the title, size, type, and date for the file.
Page 58

55
4.
When you highlight a melody file, you have the following
options:
•
To hear the ringtone, press
PLAY
().
•
Press
Options
to show the following options:
–
Send
— Send to someone as part of a Picture message. (See
“Send
Picture Messages in Standby Mode”
on page 37 for more
information.)
–
Set As
— assign the highlighted ringtone to be used as a
Ringtone
,
Contact ID
, or as the
Alert Tone
.
–
Erase all
— Erase all unlocked melodies.
–
Sound Info
— Shows the title, size, type, and date for the file.
Page 59
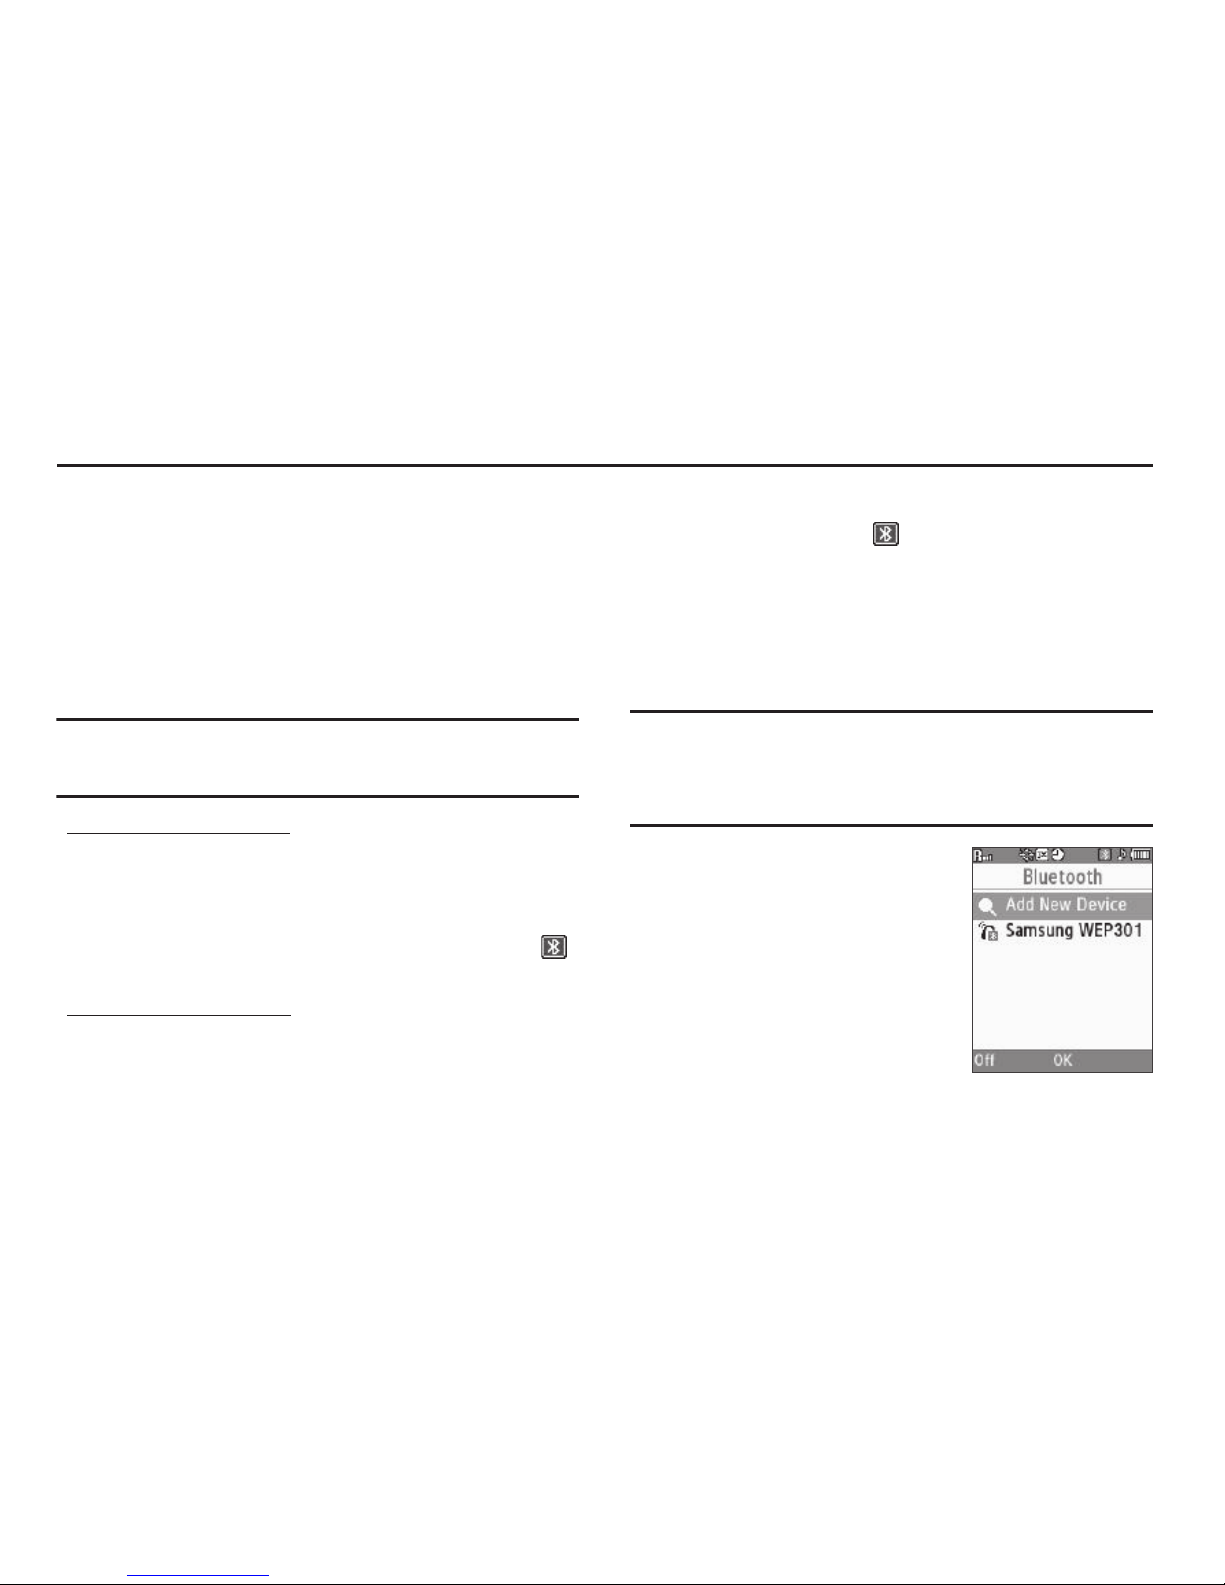
Bluetooth 56
Section 12: Bluetooth
Bluetooth wireless technology is a short-range wireless
communications technology capable of exchanging information
over a distance of about 30 feet without a physical connection.
䊳
In Standby mode, press
Menu
, then select Bluetooth.
Turn Bluetooth On/Off
When Bluetooth is turned on, you can answer and place calls and
send or receive information via Bluetooth.
Note:
To save battery life or in situations where Bluetooth use is prohibited,
such as airline traveling, you can turn off the Bluetooth wireless
technology headset.
To turn Bluetooth support on:
䊳
From the Bluetooth menu, select Bluetooth Settings ➔
Enable or select Registered List ➔ Add New Device. You
are prompted to “
Turn bluetooth on?
” by pressing
Yes
.
“Bluetooth set to on” and the red Bluetooth On icon ( )
appear in the display.
To turn Bluetooth support off:
䊳
From the Bluetooth menu, select Bluetooth Settings ➔
Disable.
“Bluetooth set to off” appears in the display and the and
the Bluetooth On icon ( ) disappears.
Registered List
This list shows all Bluetooth wireless technology devices paired
with your handset, and indicates whether any device is
connected with your handset.
䊳
From the Bluetooth menu, select Registered List.
Note:
If Bluetooth is off, you are prompted to “
Turn bluetooth on?
”. Press Yes
to turn Bluetooth on.
To leave Bluetooth off and return to the Bluetooth sub menu, press
No.
A list of registered Bluetooth
devices or the Add New Device
screen appears in the display.
Add (Pair With) a New Device
1. From the Registered List, select
Add New Device.
Page 60

57
“Place device you are connecting to in discoverable
mode” appears in the display. (See the device user manual
for more information.)
2. Press
OK
( ). Names of available devices appear in the
display.
3. Highlight the device you want and press PAIR ( ). You
are prompted to enter the passkey or PIN for the selected
device. (See the device user manual for the passkey or
PIN.)
4. Enter the device passkey or PIN and press . Once
pairing completes, you are prompted to connect with the
device.
5. To connect with the device, press
Yes
. To return to the
Bluetooth
menu without connecting to the device, press
No
.
Connecting to a Registered (Already Paired) Device
1. From the Registered List, highlight the device and press
.
2. If you are unable to connect with the device a pop-up
appears in the display. Press Yes to retry.
Disconnecting from a Bluetooth Device
䊳
From the Registered List, highlight the device and press
Off.
Managing Your Registered List
䊳
From the Registered List, highlight a device and press
Options. The Options menu lets you Remove or Rename
this device, Discover which Bluetooth profiles apply,
review the Device Information, and Send a Name Card
(Contact information) to this device.
Bluetooth Settings
The
Bluetooth Settings
menu provides the ability to view and
change the device name, show the visibility, and set the security
for the device.
To access Bluetooth settings:
䊳
From the Bluetooth menu, select Bluetooth Settings. The
following options appear in the display:
• Enable
/
Disable
— Turns Bluetooth on or off. (For more
information, see
“Turn Bluetooth On/Off”
on page 56.)
•Discovery Mode
— Select On for other devices to see your device,
or
Off
for no visibility.
• Device Name
— Shows the handset name. You can change this
name. Enter the text and press .
• Supported Profiles
— Lists and describes the Bluetooth profiles
your phone supports.
• Device Info
— Shows the Bluetooth Type, Status, and Address of
your phone.
Page 61

Tools 58
Section 13: Tools
This section explains how you can use your phone’s Personal
Information Manager (PIM) functions to view today’s calendar,
schedule appointments, set an alarm, perform simple math
calculations, and more.
Accessing Your Phone’s Tools
To launch the Tools menu:
䊳
In Standby mode, press
Menu
, then select To ol s.
Voice SVC
Voice SVC Options
Your SCH-r330 includes Nuance Vsuite, state-of-the-art voice
recognition software that lets you use your voice to dial numbers,
access your Contacts list, and open Tools. To access your
phone’s voice recognition, do the following:
1. From the Tools menu, select Voice SVC. The following
options appear in the display:
•
Voice Command
— Lets you place calls, access your Contacts
List, review your appointments, and more by speaking commands
into your phone. Also see
“Voice Dialing”
on page 19 and
“Voice Method”
on page 28 for more information.
•
Voice Settings
— Lets you tailor Vsuite to better respond to your
voice and your phone use preferences. See
“Digit Dialing”
on
page 59 for more information.
2. Select the desired sub-menu.
Voice Command
To access the Voice Command menu, do one of the following:
•
In Standby mode, press and hold .
• From the Tools menu, select
Voice SVC
➔
Voice Command
.
“
Say a Command
” appears in the display and plays through the
earpiece, followed by a list of available commands.
Note:
You can also set your phone to start VoiceSignal when you connect an
optional headset to the phone. (For more information, see “Voice
Launch” on page 61.)
The following voice commands appear in the display:
•
Call
— Call a Contact by saying the name saved in your Contacts list.
Call any telephone number, even if not saved in your Contacts list, by
saying the digits in the number. (See
“Voice Dialing”
on page 19 for
more information.)
•
Send Text
— Lets you access Create Text Message.
•
Send Picture
— Lets you access Create Picture Message.
Page 62

59
•
Lookup
— Lets you find a Contact by name and review the Contact’s
information.
•
Go to
— Lets you access the following features and functions of your
phone:
Contacts, Calls, Messages, easy
edge,
Display, Sounds
,
Multimedia, Tools, Settings, Calendar, Bluetooth
, and
Toneroom
.
•
Check
— Lets you say a single command (such as “
Status
”) to verify
your phone's:
Status, Signal, Coverage, Battery
, or
My phone #
.
Note:
Speaking clearly, say the command that you want to use. If VoiceSignal
does not recognize a command, it prompts you to repeat the
command. If VoiceSignal still does not recognized the command, it
tells you “Sorry, no match found” and cancels voice recognition.
Voice Command Tips:
•
Make sure you wait for the beep before speaking.
•
Speak clearly at a normal volume, as if you were talking on the phone.
Voice Settings
To access the Voice Settings menu:
䊳
From the Tools menu, select
Voice SVC
➔ Voice Settings.
Choice Lists
When Vsuite cannot recognize a name or number, it displays a
choice list of up to three possible choices, and prompts you to
confirm the correct one. To change the way Vsuite uses choice
lists:
䊳
From the
Voice Settings
menu, select Choice Lists. The
available options are:
•
Automatic
— Vsuite displays a choice list only when it does not
recognize a spoken name or number.
•
Always On
— Vsuite always displays a choice list, even when
there is only one choice.
•
Always Off
— Vsuite never displays a choice list.
Sensitivity
1. From the
Voice Settings
menu, select Sensitivity.
2. Use the Up and Down navigation keys to adjust the
selected Sensitivity setting incrementally between Reject
More spoken commands or names and Reject Less
spoken commands or names.
Digit Dialing
If you regularly have trouble with Vsuite not recognizing the
numbers you speak, adapting can improve the accuracy of digit
recognition, especially for people with strong regional accents.
Note:
After you adapt Digit Dial, your phone is customized to your voice, and
your voice only. Others will not be able to use it unless they Reset the
phone to factory defaults.
Tips for Adapting Digit Dialing
•
Use Adapt Digits in a quiet place.
•
Wait for the beep before starting to speak.
Page 63

Tools 60
•
Speak clearly, and say each digit distinctly.
•
If you make a mistake while recording a sequence of digits, or if there
is an unexpected noise that spoils the recording, re-record that
sequence.
•
Only adapt digits if you are regularly having problems with digit dialing.
Once you adapt, digit dialing will not work as well for other people
using your phone. (You can always Reset digit adaptation to its original
state, as described below.)
Adapt Digits
To adapt digit dialing, do the following:
1. From the
Voice Settings
menu, select Digit Dialing ➔
Adapt Digits. Your phone displays text describing the
Adapt Digits process.
2. Press . Your phone displays the first digit sequence and
“Please say” plays through the speaker followed by the
four digits appearing in the display.
3. Wait for the beep and say the digits using your normal tone
of voice. After a moment, the phone plays back the
recording and prompts “Did the recording sound ok?”
•
If the recording was good, say “
Ye s
.”
•
If you need to re-record, say “No.”
If you say “No,” the phone prompts you to pronounce the
digits again. Wait for the beep and then say the digits.
Repeat this step until you’re satisfied with the recording.
4. After confirming that the recording sounds “ok”, continue
the recording process with the next set of digits.
5. After 10 sets of digits, the phone asks whether you want to
do more adaptation.
If you answer “Yes ,” repeat steps 4 and 5 for another 10
sets of digits. After the second group of 10 sets of digits,
“Adaptation complete” plays through the speaker and
you are returned to the Digit Dialing menu.
Reset Digits
To reset digit dialing to factory default settings, do the following:
1. From the
Voice Settings
menu, select Digit Dialing ➔
Reset Digits. The phone prompts you to confirm digit
reset.
2. Press OK to reset your digit adaptation, or press Back to
cancel.
Sound
Sound lets you specify what (if any) text prompts you want your
phone to read to you through the earpiece.
1. From the
Voice Settings
menu, select Sound. The following
options appear in the display:
•
Prompts
— On/Off — Enables or disables audio prompts.
•
Digits
— On/Off — Enables or disables digit playback.
Page 64
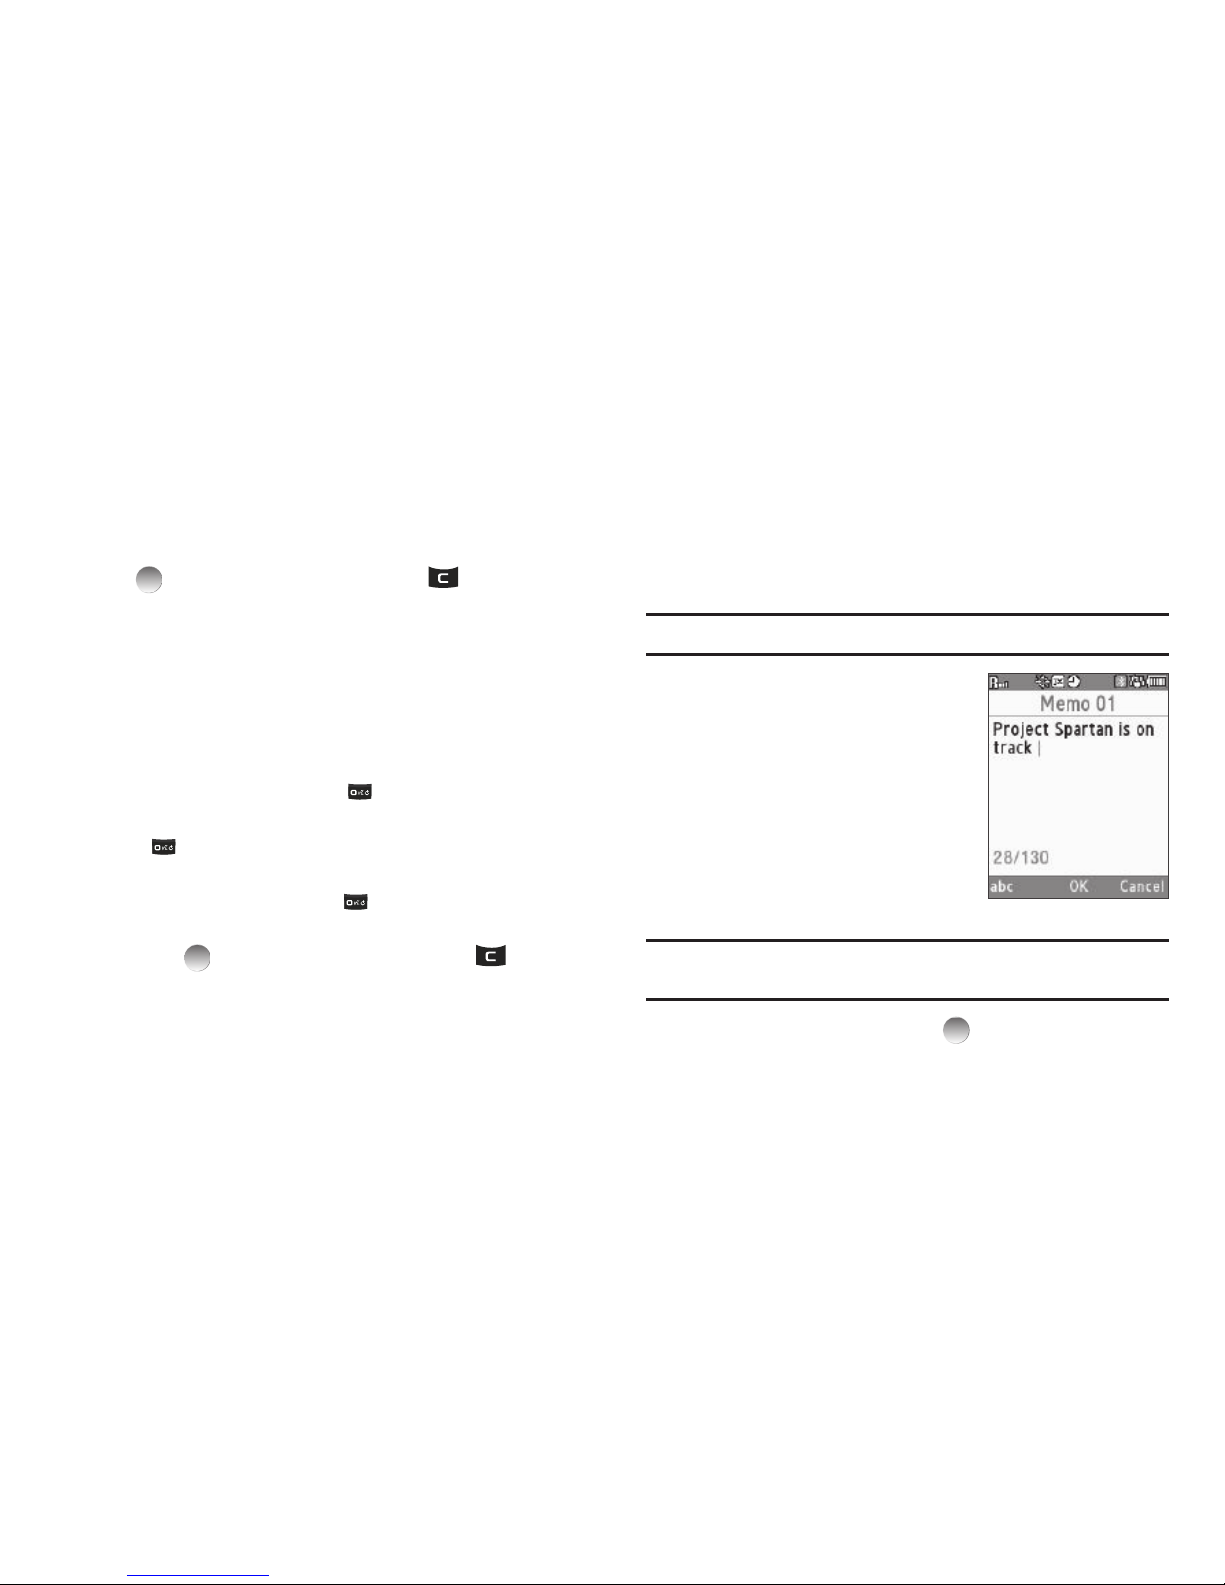
61
•
Names
— On/Off — Enables or disables name playback.
•
Name Settings
— Lets you adjust the
Speed (Faster
or
Slower
)
and
Volume (Louder
or
Softer
) of your phone’s audio name
playback.
2. Select the desired option and the desired setting, or press
to accept the new setting. Press to discard the
new setting and return to the
Sound
menu.
Voice Launch
To set the key or action that launches Nuance Vsuite, do the
following:
1. From the
Voice Settings
menu, select Voice Launch. The
following options appear in the display:
•
Key Only
— Press and hold to activate Vsuite for one call.
•
Key/Ear Mic
— Attach a headset to your phone. Press and hold
to activate Vsuite. Now, you can make and end calls using
VoiceSignal by pushing the button on the headset.
•
Key/Flip
— Press and hold or open the flip to activate Vsuite
for one call.
2. Press to accept the new setting. Press to discard
the new setting and return to the
Voice Settings
menu.
About
䊳
From the
Voice Settings
menu, select About.
The About Nuance screen appears in the display showing
the version level of the Vsuite software currently installed
on your phone.
Memo Pad
Create notes and store them in Memo Pad. Notes that you create
in Return to Memo Pad anytime to review and edit your notes.
Note:
Memo Pad can’t be prioritized or assigned an alert.
䊳
From the Tools menu, select
Memo Pad. If you have any
stored memos, they appear as a
list in the display.
Create a Memo
1. From the Memo Pad list, press
Add.
2. Enter memo text using the
keypad.
Tip:
The current mode of text entry is indicated in the lower right corner of
the display.
3. To save the memo, press
OK
( ).
Review, Edit, and Erase Memos
1. From the Memo Pad list, highlight the desired memo.
Page 65
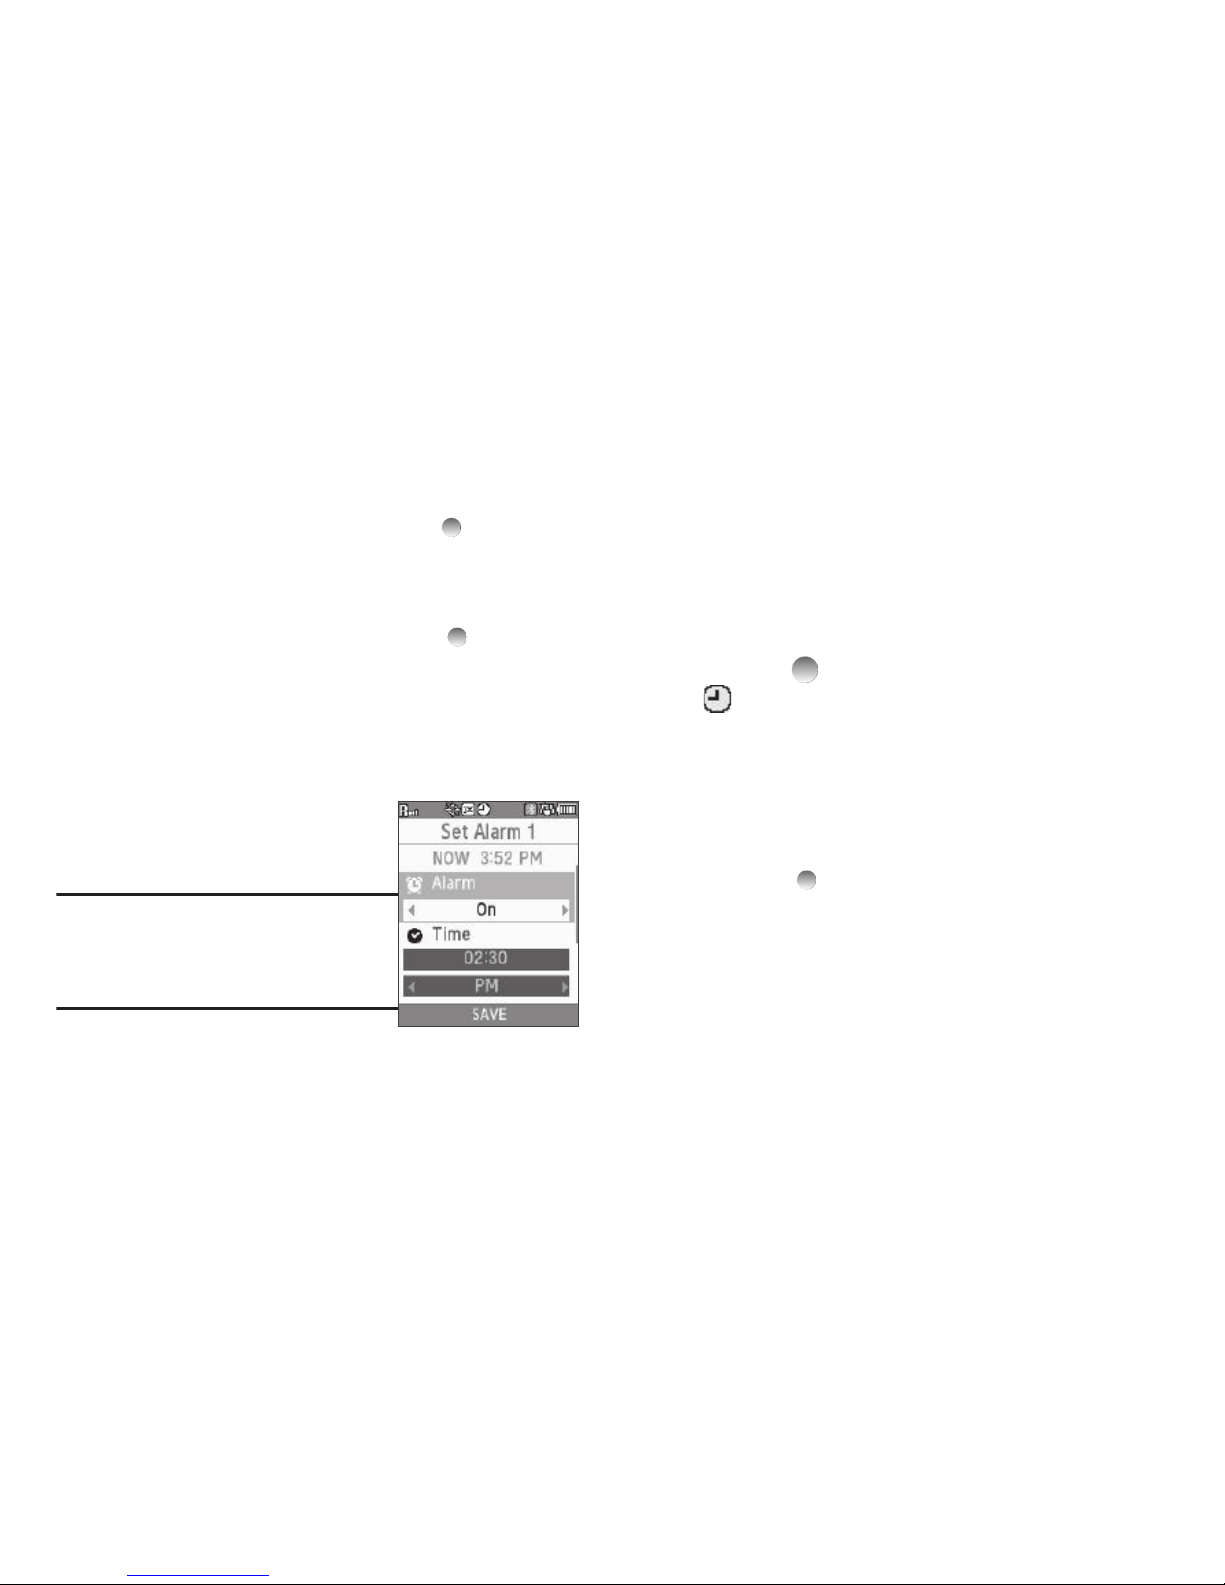
Tools 62
You have the following options:
•
To add a new memo, press
Add
. (For more information, refer to
“Create a Memo”
on page 61.)
•
To review the highlighted memo, press
VIEW
().
While viewing a memo, you can do any of the following:
–
Change the text of the memo by pressing
Edit
and using the keypad
keys. (For more information, refer to
“Entering Text”
on page 15.)
–
Return to the Memo Pad screen by pressing OK ( ).
–
Press
Options
to Erase the memo you are viewing, Add a New Memo,
or Lock/Unlock the memo you are viewing.
•
To Edit or Erase a memo, Erase all memos, or Lock / Unlock a
memo, press
Options
and select the desired options.
Alarm Clock
Your phone has three alarm clocks that
can be set to go off once, or to recur
daily at a specific time.
Note:
The alarm doesn’t function when the
phone is turned off. If the time for an
alarm that was set for Once has elapsed
while the phone is off, the alarm occurs
at the specified time on the next day.
1. From the Tools menu, select
Alarm Clock ➔ Alarm 1 / 2 / 3.
2. To set the alarm Off or On, press the Navigation key Left/
Right or use the Left/Right arrow keys.
3. Enter the time for the alarm, then use press the Navigation
key Left/Right or use the Left/Right arrow keys to select
AM or PM, the alarm Frequency (Daily, Mon.-Fri.,
Weekends, or Once), the Ringer type (Ton e, Vibrate,
Light Only), and the ringtone (from My Ringtones or My
Sounds).
4. Press
SAVE
( ). If the alarm is set to On, the alarm icon
( ) appears in the top line of the display.
When an Alarm Sounds
An animated alarm clock appears in the display along with
Snooze and Dismiss options and an alert sounds when the
specified time for the alarm arrives.
•
To silence the alarm, use the Navigation key to highlight
Snooze
or
Dismiss
and press .
•
If the alarm was set as a Daily alarm, the alarm icon remains in the top
of the display.
•
If the alarm was set as a Once only alarm, the alarm icon disappears
from the top of the display.
Turn Off the Alarm
1. From the Tools menu, select Alarm Clock.
Page 66
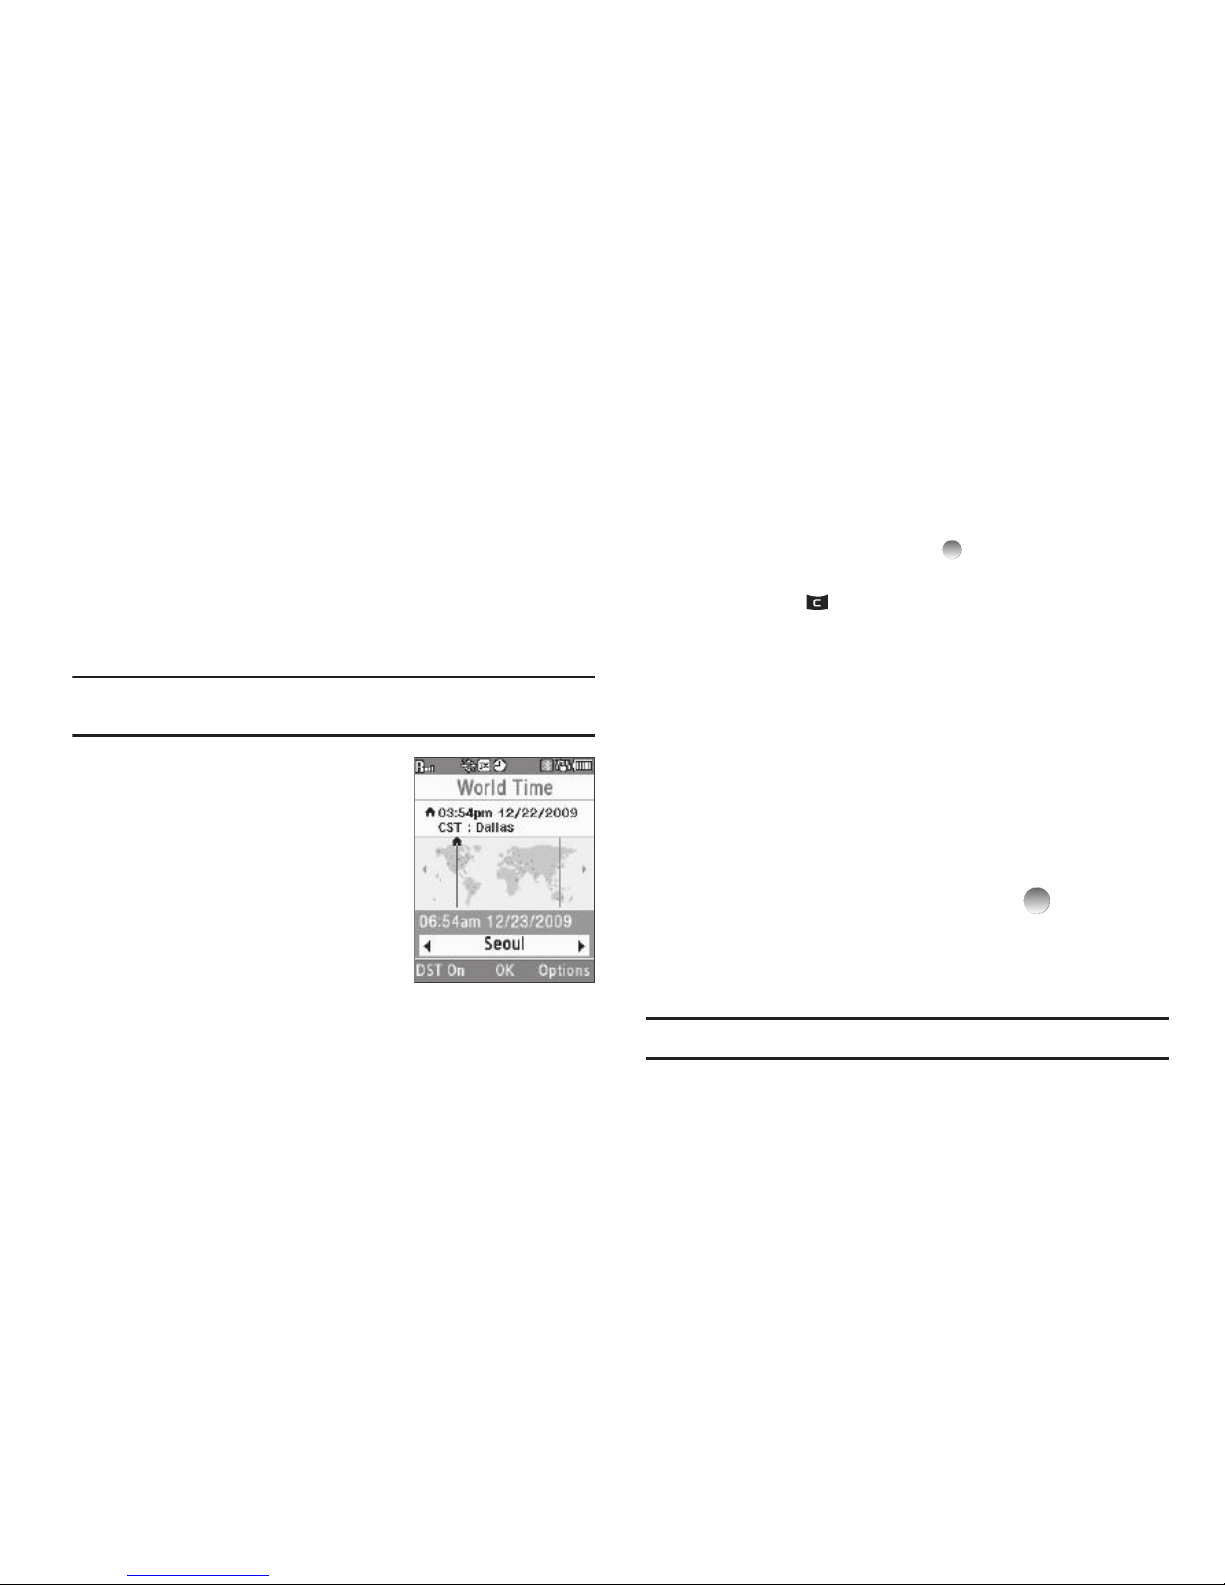
63
2.
Highlight the desired alarm (Alarm 1 / 2 / 3), then press
Options and select to turn the alarm On / Off (without
changing the settings), to Reset the Alarm and restore its
settings to default values, or to Reset All of the alarms and
their settings to default values.
World Time
World Time lets you view the time of day or night in any of the 24
different time zones around the world.
Note:
To use World Time, you need to subscribe to your Wireless Provider’s
digital service.
䊳
From the Tools menu, select
World Time. A world map
appears in the display, showing
the time and date in one or two
cities or time zones.
Selecting/Displaying Time Zones
World Time lets you view the time and
date in up to two locations or time
zones.
Viewing a Time Zone
To view the time and date in a particular time zone or location, do
the following:
䊳
Locate and view a particular time zone by pressing the
Navigation key Left or Right until the desired time zone
appears in the display.
•
To set the displayed time zone as the default time zone for the
second World Time clock, press .
•
To return to the
To ol s
menu without changing the default time
zone, press .
Selecting a Home Zone
To change home (upper) time zone or location, do the following:
1. In the
World Time
screen, display the time zone you wish to
make your Home Zone.
2. Press
Options
and select
Set as home zone
.
Enable Daylight Saving Time (DST)
1. Display the desired time zone.
2. Press DST Off / DST On.
3. To accept the highlighted setting, press .
Calculator
You can perform calculations, including addition, subtraction,
multiplication and division using your phone.
Note:
You must use the phone keypad to use the Calculator.
Page 67
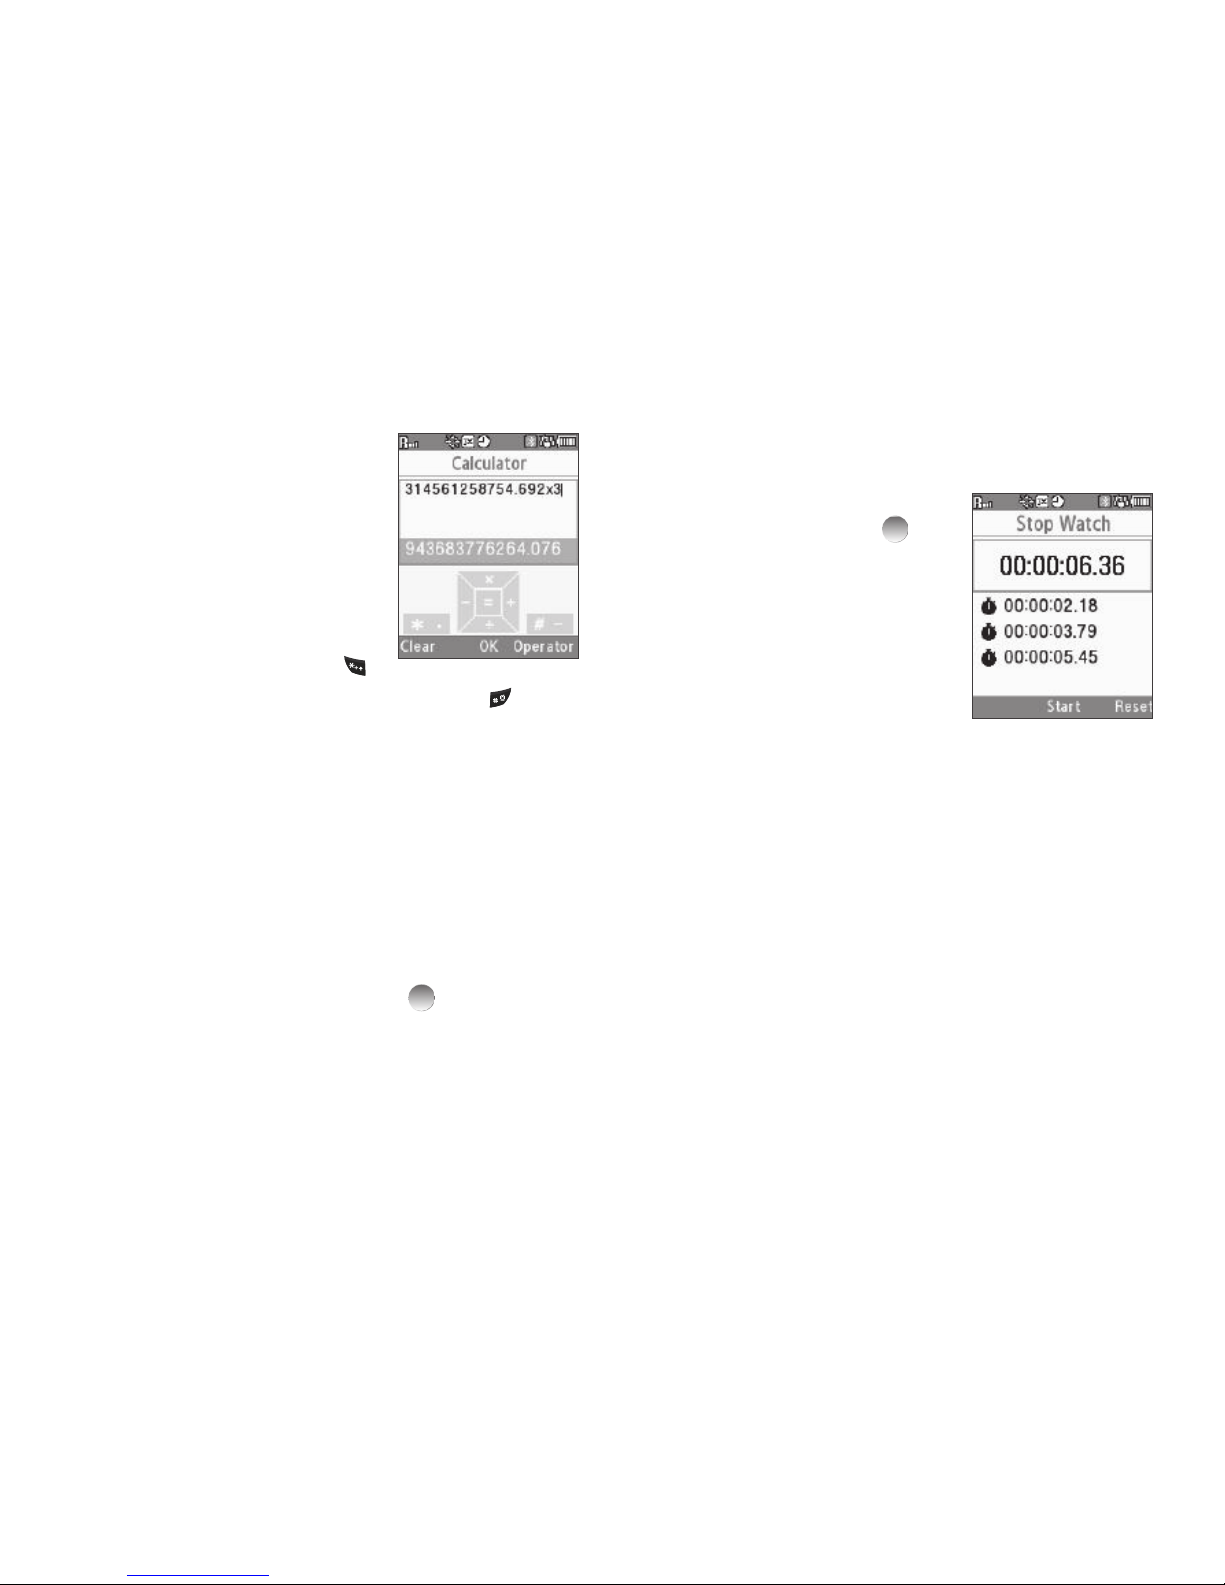
Tools 64
1.
From the Tools menu, select
Calculator. The Calculator
screen appears in the display.
2. Enter the first number in your
calculation using the keypad.
(Numbers can be up to 15 digits
long. Up to 3 of the digits can be
after a decimal point.)
•
To enter a decimal point, press .
•
To change the sign for a number to a negative, press .
•
To add parentheses [
( )
] to your calculation or to enter a
Power
exponent (^), such as, 3^2, which is the equivalent of 32, press
Operator
.
•
Press
Clear
to clear current entries.
3. Select a type(s) of calculation.
•[ x
] Multiplication — Press Navigation key Up.
•[ ÷ ] Division — Press Navigation key Down.
•[ +
] Addition — Press Navigation key Right.
•[ -
] Subtraction — Press Navigation key Left.
4. Enter the other number(s) and press to perform the
calculation and view the result.
Stop Watch
You can use this function to set a stop watch.
1. From the Tools menu, select Stop Watch. The Stop
Watch screen appears in the display.
2. To start, stop, and resume the
stopwatch count, press .
3. At the start of each succeeding
event/lap, press Record to
record the completion time for
the previous event/lap. You can
record up to eight event/lap
times.
4. To reset the stop watch and to
erase all stop watch (lap) times recorded, press Reset.
Converter
The
Converter
lets you covert one measure of the available
categories (
Currency, Length, Weight, Volume, Area
, and
Temp er at ur e
) into another.
Page 68
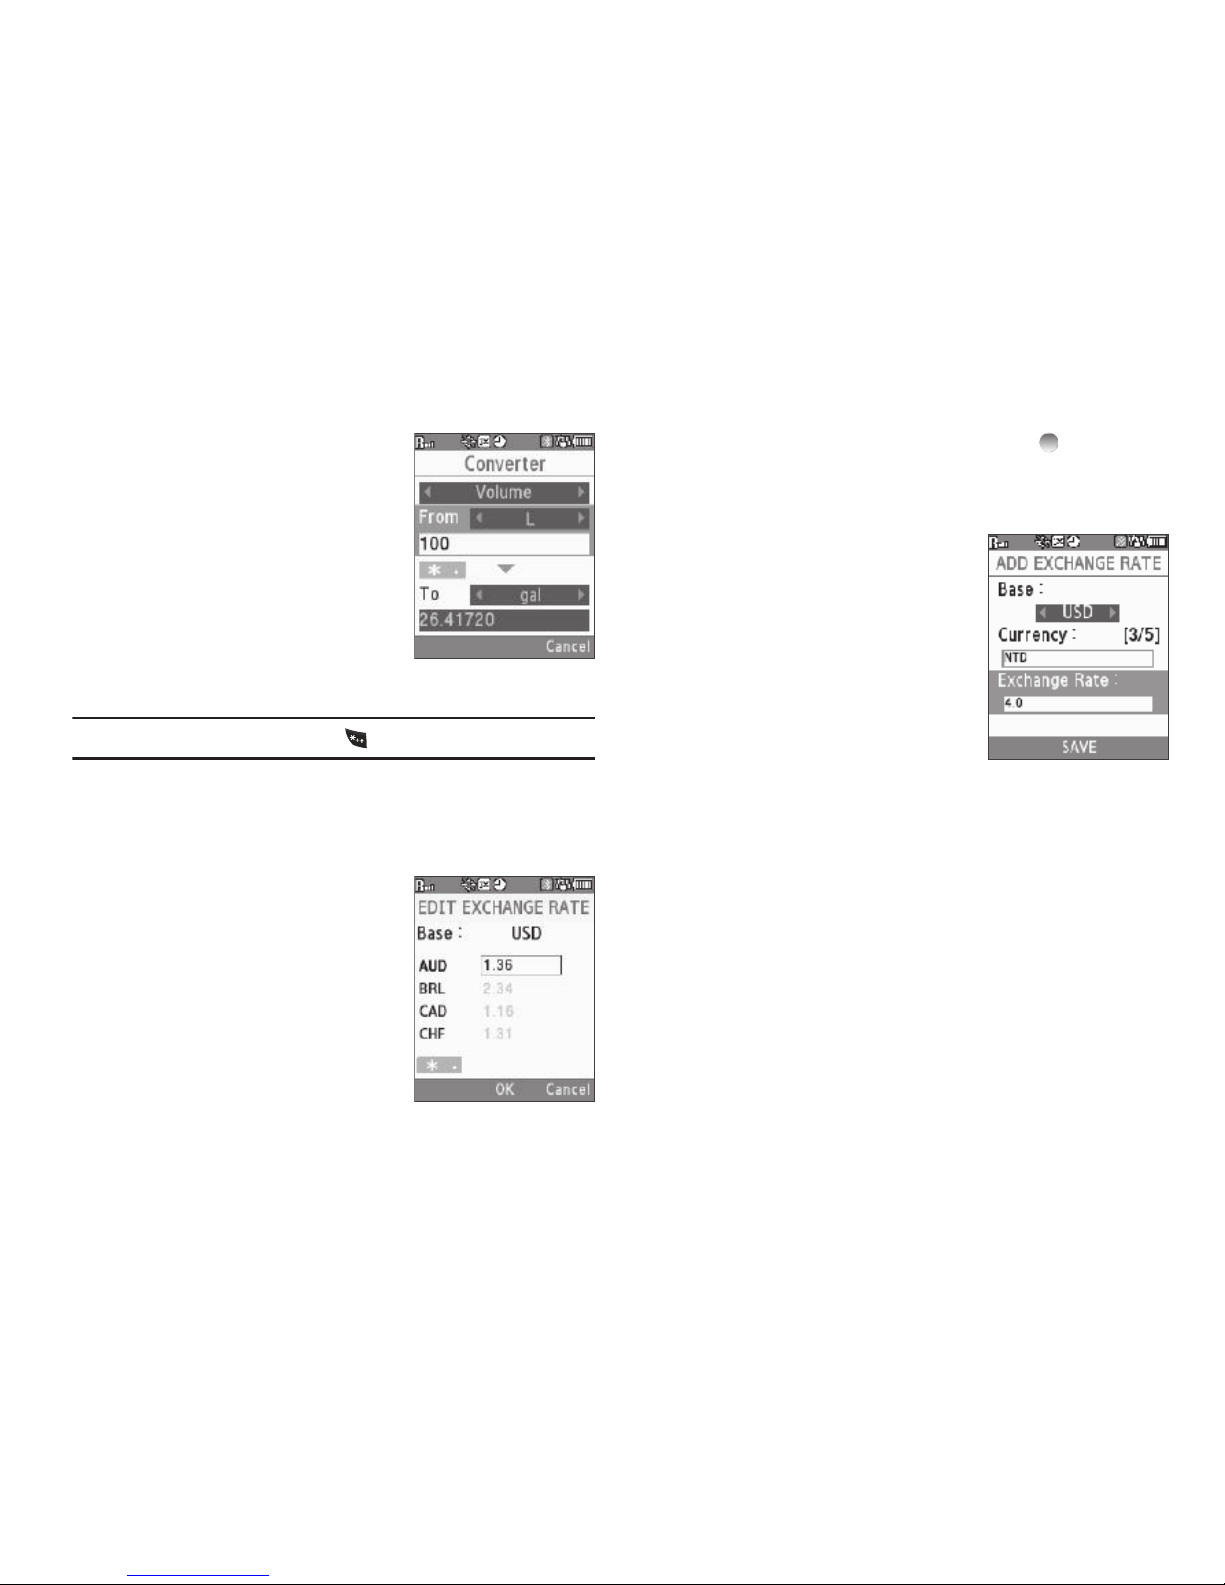
65
1.
From the Tools menu, select
Converter ➔
Currency
/
Length
/
Weight
/
Volume
/
Area
/
Te mp er a tu re
.
2. Use the Navigation/Arrow keys
to select the units to be
converted From and To.
3. Enter the quantity you want
converted in the From field. The
converted quantity appears in the To field.
Note:
To include a decimal point, press .
Currency — Reviewing/Editing Exchange Rates
The Currency Converter includes long-term average exchange
rates as default values.
1. From the Tools menu, select
Converter ➔ Currency.
2. To open the EXCHANGE RATE
list, press Rate.
3. To edit an Exchange Rate:
•
Press
Edit
.
•
Highlight an exchange rate, and
enter any changes.
•
To save the changed exchange rate, press OK ( ).
To discard the change, press
Cancel
.
Currency — Adding Exchange Rates
You can use the Currency Converter to
convert from and to obscure currencies
by adding exchange rates for these
currencies.
1. From the Tools menu, select
Converter ➔ Currency.
2. To open the EXCHANGE RATE
list, press Rate.
3. Press Add. The ADD EXCHANGE
RATE screen appears in the display with the Base field
highlighted.
4. Use the Left and Right navigation/arrow keys to select the
Base currency to be converted from.
5. Highlight the Currency field, and enter an identifier of up
to 5 characters for the new currency using either keypad.
(For more information, refer to “Entering Text” on
page 15.)
6. Highlight the Exchange Rate field, and enter a decimal
exchange rate for the new currency using either keypad.
Page 69
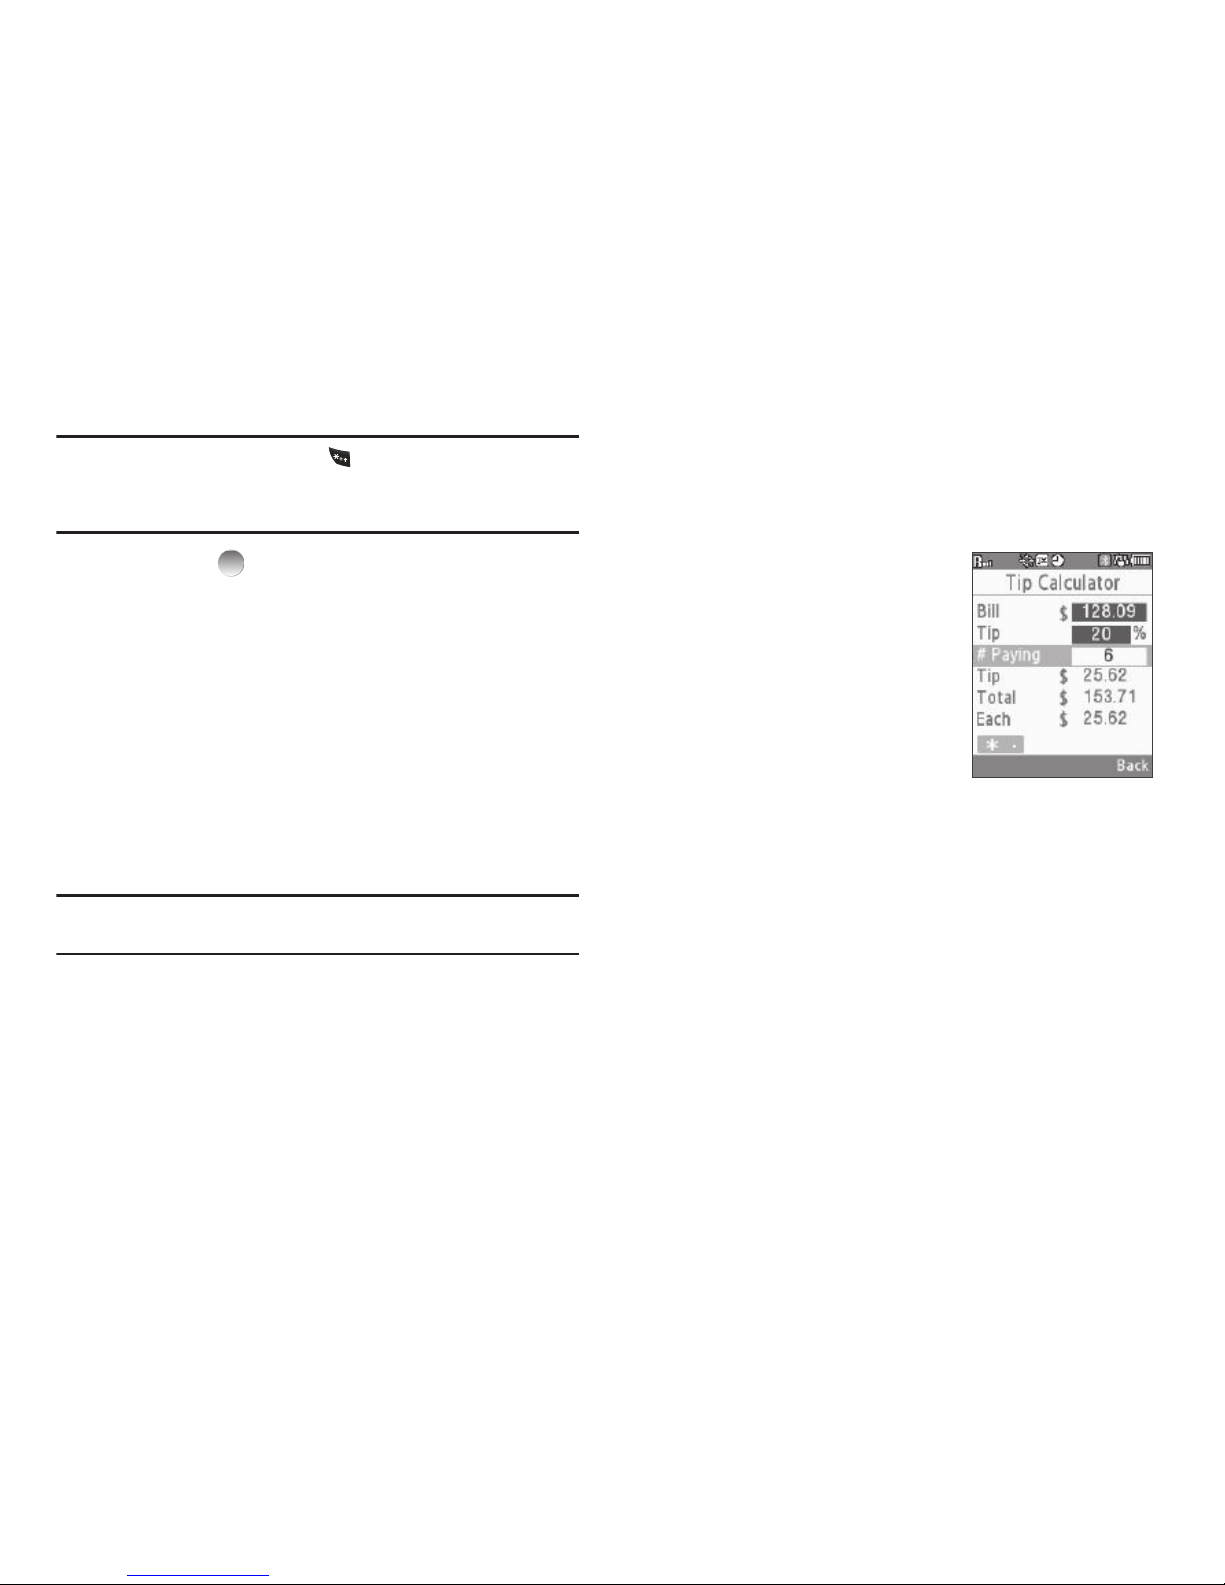
Tools 66
Note:
To enter the decimal point, press .
The Exchange Rate field only accepts up to five digits after the
decimal point.
7. Press
SAVE
( ) to save the new exchange rate.
Currency — Erasing Exchange Rates
You cannot erase the preloaded currencies from the Exchange
Rate list. You can erase a currency that you have added to the list
by doing the following:
1. From the Tools menu, select Converter ➔ Currency.
2. Press Rate. The EXCHANGE RATE list for the From
currency appears in the display.
3. Use the Up and Down navigation keys to highlight the user-
added currency exchange rate to be erased.
4. Press Erase. You are prompted to confirm the erasure.
Note:
The
Erase
soft key is undefined for preloaded Exchange Rates. This
prevents you from erasing them.
5. To erase the exchange rate, press Yes. To keep the
exchange rate, press No.
Tip Calculator
Tip Calculator automatically calculates the following amounts:
•
Gratuity (tip)
•
Individual payment (for groups)
1. From the Tools menu, select Tip Calculator. The
Tip
Calculator
screen appears in screen, with the Bill field
highlighted.
2. Use the keypad to enter the total
amount of the bill.
3. If needed, highlight the Tip field,
and enter a tip percentage.
4. If needed, highlight the # Paying
field, and enter the number of
persons paying.
5. The amount of the Tip, the final
Total, and the amount Each
person should pay appear in the lower half of the screen.
Page 70
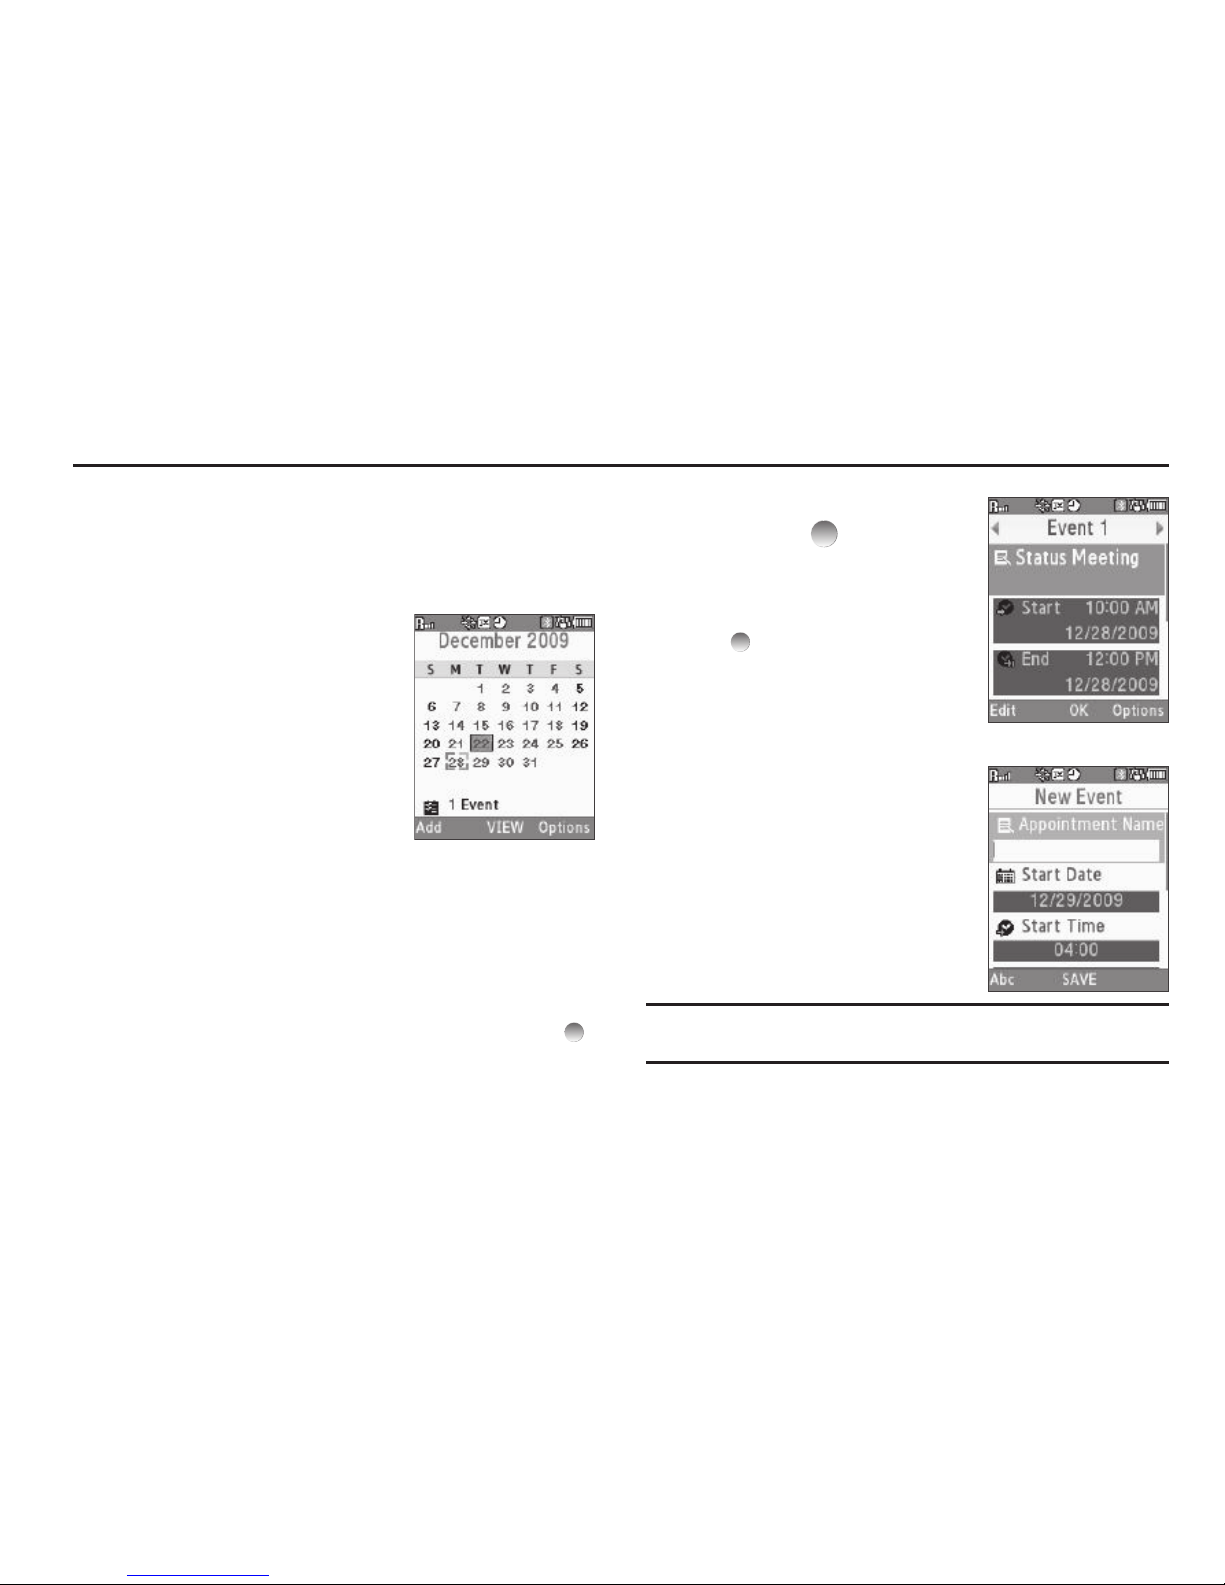
67
Section 14: Calendar
Calendar allows you to view the current, past, or future month in
calendar format. While viewing the calendar, the current date is
highlighted, and days with scheduled events are surrounded by a
box.
View an Event
1. In Standby mode, press
Menu
,
then select Calendar. A calendar
appears in the display with the
current date highlighted. The
month and year appear at the top
of the display.
2. To move around within the
calendar, use these keys:
•
To move to an individual day, one day or one week at a time, use
the Navigation key, Jog Wheel, or Arrow keys.
•
To view previous months, press the Up volume key.
•
To view future months, press the Down volume key.
•
To add an event to the highlighted date, press
Add
.
•
To call up a list of events on the highlighted date, press
VIEW ()
.
•
To access other options while viewing the calendar, press
Options
.
You can Go to a Date by entering it, return to Today’s date, Erase
one or more Old events, or all events.
3. To display the highlighted event,
press VIEW ( ).
•
To change the event details, press
Edit
. (See
“Add a New Event”
.)
•
To return to the Events list, press OK
().
•
For more options, press
Options
.
You can return to the Monthly
calendar or Erase this event from the
calendar.
Add a New Event
1. From the Calendar, press Add.
2. To highlight New Event options,
press the Navigation key Up or
Down.
3. Enter the Name of the new event.
(For more information, refer to
“Entering Text” on page 15.)
Note:
The current mode of text entry is indicated in the lower left corner of
the display.
Page 71

Calendar 68
4.
Enter the Start Date, using leading zeros (such as, 03) and
a 4-digit year (such as, 2009).
5. Enter the Start Time, using leading zeros (such as, 03).
•
Press the Navigation key Left or Right to select AM or PM.
6. Repeat Steps 4 and 5 for the
End Date
and End Time.
7. To select values for the
Alert
type,
Alert
tone,
Reminder
,
and
Alert time
options, use the Left and Right Navigation
keys or arrow keys.
8. To store the event in your calendar, press
SAVE
( ).
Tip:
An alarm will notify you prior to the event, provided you set Reminder to
a value other than Off.
Page 72

69
Section 15: Changing Your Settings
This section explains how to configure your phone’s language,
network preferences, security options, and other settings.
Display Settings
Display settings let you change your phone’s menu appearance,
display brightness and contrast, and display content to better
meet your needs.
To launch the Display menu:
䊳
In Standby mode, press
Menu
, then select Display.
The Display menu appears in the display.
Menu Style
Menu Style lets you choose whether the Main Menu appears as
an
Icon
matrix (the default value) or as a
List
of menus.
Wallpaper
Wallpaper lets you choose images to appear in the background
on your phone’s
Main Display
and
Front Display
while in Standby
mode. You can choose from downloaded images in your
My
Images
folder or from the
Preset Images
folder.
Note:
When you select
Front Display
, your Wallpaper selection automatically
changes the
Clock Format
setting for the
Front Clock
to
Off
. (For more
information, refer to “Clock Format” on page 69.)
Clock Format
Clock lets you choose whether and in what format the time and
date appear as the
Main Clock [Samsung, Digital
(default),
Analog
,
Off
] and/or the
Front Clock [Digital
(default) or
Off
] on your phone.
Note:
The
Clock Format
setting for the
Front Clock
automatically changes to
Off
when you change the
Wallpaper
setting for the
Front Display
. (For
more information, refer to “Wallpaper” on page 69.)
Theme
Theme lets you choose the color scheme [
Samsung
(the default)
or
Plush
] used to display menu screens, pop-up menus and
messages.
Dialing Font Size
Dialing Font Size lets you choose the size of the numbers [
Normal
(the default) or
Large
] that appear in the display when you place a
call.
Banner
Create your own 13-character personal greeting that appears in
the display while your phone is in Standby mode.
Page 73

Changing Your Settings 70
Tip:
Press and hold to erase an existing banner, if necessary. (For more
information, refer to “Entering Text” on page 15.)
Backlight
You can separately set the
Main Display, Keypad
, and/or
Charging
backlight to remain on for 10, 15, or 30 seconds; to be
Always On
as long as the folder is open; or to be
Always Off
. You can also set
the
Brightness
of the backlight for your displays and keypad.
Note:
Prolonged backlight use drains your battery faster.
Front Contrast
Front Contrast lets you set the Front display contrast to enhance
its readability.
Sounds Settings
Sounds settings let you customize your phone’s audio properties,
such as ringers, keypad tones, alerts, start up melody, and more.
To launch the Sounds menu:
䊳
In Standby mode, press
Menu
, then select Sounds.
The Sounds menu appears in the display.
Master Volume
Use the
Master Volume
screen to set the default volume for Voice
Calls ringers, Messages alerts, and Alarms to the desired level
(Silence All, Low, Low/Medium, Medium, Medium/High, or
High) or vibrate mode (
Vibrate
, or Vib. on / Vib. off soft key).
Ringer Type
Use the
Ringer Type
sub-menu to select ringtones, melodies, or
recorded sounds to play as ringers for
Voice Calls
and
Messages
(Text, Picture, and Voicemail) alerts. You can play each ringtone,
melody, or recorded sound before you select one.
Alerts
You can set your phone to sound an alert for each elapsed minute
during a call, whenever you enter or leave your home service
area, whenever you connect or disconnect a call, or when you
power your phone on or off.
Key Tone
Lets you adjust the volume level and duration of the tones that
the keypad generates when you press the keys.
Call and Phone Settings
The Call Settings options let you select how your phone handles
voice and data calls. The Phone Settings options let you tailor
your phones basic operations.
To launch the Settings menu:
䊳
In Standby mode, press
Menu
, then select Settings.
The Settings menu appears in the display.
Page 74

71
Location Setting
You can set your phone to pass Global Positioning System (GPS)
data to identify your location to the network continually (
Location
On
) or only when you make an emergency (911) call (
911 Only
).
Note:
Check with your Wireless Carrier to determine if/when/where locationbased services are available.
Call Settings
The Call Settings sub-menu lets you set call options such as Auto
Retry, Data rates for data calls, and more.
Call Answer
You can set your phone to answer incoming calls only when you
press ; when you press any key on the keypad except ,
, or ; or when you open the flip.
Call Alert
You can set you phone to indicate an incoming call by ringing
only, by displaying a Caller ID and ringing, or by repeating the
caller’s name (Contacts only).
Auto Answer
Auto Answer lets you set your phone to automatically answer
calls after from 1 to 5 seconds.
Auto Retry
Auto Retry automatically re-dials a number at an interval you
select, when there is no answer or the dialed party is busy.
Depending upon your location, the number of times your phone
redials a number may vary.
TTY Mode
Your phone is fully Teletypewriter (TTY)/Telecommunication
Device for the Deaf (TDD) compatible. You connect TTY/TDD
equipment to the headset connector on the top of your phone,
behind the folder hinge. You can set your phone to allow TTY/TTD
communication while you converse with the other party, or you
can limit voice communication to Talking or Hearing only.
Note:
TTY Mode must be enabled before you can use your phone with TTY/
TDD equipment.
The TTY Mode option has no effect on the phone’s earpiece,
microphone, or speaker. When you select TTY Full, all currently
enabled sound functions remain enabled.
Voice Privacy
Voice Privacy lets you choose what level of voice security
(
Standard
or
Enhanced
) your phone will use.
Page 75

Changing Your Settings 72
Tip:
You can change your Voice Privacy setting during a call by using the InUse Menu options. (See “In-Use Menu” on page 21 for more
information.)
You can set your phone to alert you when Voice Privacy support
changes. (For more information, refer to “Alerts” on page 70.)
International Dialing
International Dialing lets you choose a frequently-dialed country
code for dialing by the International Dialing shortcut. (For more
information on using the International Dialing shortcut, see “Call
Another Country — Shortcut Method” on page 18.)
Phone Settings
You can set or reset the operating characteristics of your phone
to suit your location and/or to limit access to your phone.
Airplane Mode
When set to On, Airplane Mode disables all radio functions of
your phone. This blocks you from making or receiving calls other
than Emergency (911) calls, but allows you to use other features
(such as the camera and the Tools) safely in sensitive
environments, such as on board an aircraft.
Tip:
If you need to make an emergency call with Airplane mode enabled, just
dial the emergency number and press .
Shortcut Key
Shortcut Key lets you set which feature, function, or application
launches when you press the Navigation key Up while in Standby
mode.
Language
The
Language
option lets you select the language (
English
or
Español
) of menus, sub-menus, and other user-interface
features.
Security
Use the
Security
sub-menu to lock your phone, set up emergency
numbers, enable or disable voice privacy, set restrictions, and
other security options.
To access the Security sub-menu, you are prompted to enter your
phone’s four-digit lock code.
Note:
The default lock code is the last four digits of your mobile phone
number.
Lock Phone
The
Lock Phone
option lets you Lock or Unlock your phone
immediately or set your phone to lock itself On Power Up.
Locking the r330 blocks all outgoing calls except those to 911
and to any other user-programmed emergency numbers. You can
Page 76

73
lock the phone manually, or set the phone to lock automatically
when turned on. In Lock mode, you can answer calls, but you
must unlock the phone to place calls (except to emergency
numbers). (For more information, refer to “Emergency #” on
page 73.)
Important!:
If after setting your phone to Lock itself On Power Up, you change
the NAM Selection setting from
NAM1
to
NAM2
, but there is no
number programed into NAM2, you won’t be able to access your
phone. You must call your Wireless Provider’s Service Center to
unlock your phone.
Change Lock
The
Change Lock
option lets you replace your phone’s default
lock code (the last four digits of your phone number) with one of
your own choosing.
It is advisable to change the default lock code to a secret code for
security purposes.
When you select Change Lock, your are prompted to enter the
current lock code followed by entering your new lock code, and
then re-entering it, for verification.
Note:
Your phone does not allow you to view the lock code for obvious
security reasons. If you change the lock code, be sure to write down or
memorize the new code.
Emergency #
The
Emergency #
option lets you enter and store up to three
emergency numbers in your phone. Each number can be up to 32
digits long. You can dial your emergency numbers any time, even
when your phone is locked or restricted.
Note:
Emergency number 911 is hard-coded into your phone. You can dial
this number any time, even when the phone is locked or restricted. If
you call 911 you will hear audible tone and an Emergency prompt will
appear in the display for the duration of the call.
Important!:
Because of various transmission methods, network parameters,
and user settings used to complete a call from your wireless
phone, a connection cannot always be guaranteed. Therefore,
emergency calling may not be available on all wireless networks
at all times.
Important!:
DO NOT depend on this phone as a primary method of calling
911 or for essential or emergency calls.
Remember to always turn your phone on and check for adequate
signal strength before placing an emergency call.
Note:
When you dial an emergency number, you phone locks itself to the
emergency location that answered the call and locks itself in 911-Only
mode, blocking from dialing any number but an emergency number.
Page 77
Changing Your Settings 74
•
To store emergency numbers:
Select the
Emergency #
option, then
select one of the three emergency number options, and enter and save
your new emergency number.
•
To call emergency numbers
(even in lock mode): Simply enter 911 or
one of your emergency numbers and press to place the call.
Emergency Ringback
Emergency Ringback lets you enable or disable the alert tone
your phone plays during an Emergency call.
Tip:
This feature can be valuable during emergency situations, such as, a
home invasion. Disabling the Emergency call alert tone can prevent a
home invader from locating you by means of that tone.
1. From The
Security
sub-menu, select Emergency
Ringback. The following options appear in the display:
•On — Your phone plays an audible alert tone during Emergency
calls.
•
Off
— Your phone does not play an audible alert tone during
Emergency calls, but does vibrate.
2. Select the desired Emergency Ringback setting.
Reset Phone
The
Reset Phone
option returns all settings on your phone (except
for Contacts entries) to their factory default values.
Caution!:
Before selecting Reset Phone, contact your Wireless Carrier.
Invoking Reset Phone may erase settings made by your Wireless
Carrier from your phone, resulting in loss of service.
Erase All Entries
The
Erase All Entries
option deletes all entries from the Contacts
list.
Restriction
The
Restriction
option settings let you restrict/unrestrict the use
of your phone for
Calls
(Incoming and Outgoing),
SMS
(Text)
Messages, MMS
(Picture)
Messages
, and/or restrict/unrestrict
access to your your phone’s IP (Internet Protocol)
Connection
.
Note:
All default restriction settings are Allow All (unrestricted).
NAM Selection
The
NAM Selection
option lets you select your preferred system
(
NAM 1
or
NAM 2
), provided your phone has a NAM 2 number
programmed into it. (For more information, contact your Wireless
Provider.)
Important!:
If after setting your phone to Lock itself On Power Up, you change
the NAM Selection setting from
NAM 1
to
NAM 2
, but there is no
number programed into NAM 2, you won’t be able to access your
phone. You must call your Wireless Provider’s Service Center to
unlock your phone.
Page 78

75
System Select
The System Select option lets you disable (
Home Only
) or enable
(
Automatic
) your phone’s ability to roam (that is, automatically
select a network to use when outside of your Home Area).
Set Time
Use the Set Time options to set the current time and date
displayed on your phone and used by your phone’s Tools. (For
more information, refer to “Tools” on page 58.)
Note:
In digital service mode, the Set Time feature is disabled. The network
adjusts time and date automatically.
With
Airplane Mode
set to On, the Set Time feature is enabled.
•
Enter the current Time using your keypad:
–
The hour and minute must be entered using two digits each. You must
enter the hour in 12-hour format.
–
Use the Left and Right navigation keys to select am or pm.
•
Enter the current Date using your keypad:
–
The month and day must be entered using two digits each.
–
The year must be entered with all four digits.
Quick Search
When set to On, the Quick Search option provides an easy way
to find Contacts from Standby mode.
In Standby mode, just press the number keys that correspond to
the first few letters of a Contact name, then press the Navigation
key Up (to find a matching Contact).
Memory Info
Memory Info options let you review the total phone memory
used and available, and the phone memory used to store images,
ringtones, recorded sound files, applications, and Picture
messages. Memory Info options also let you review and erase
files from your My Images, My Ringtones, and My Sounds
folders.
Phone Info
Phone Info lets you review the phone number assigned to your
phone, reference the meanings of icons that appear on your
phone’s Standby mode screen, and identify the hardware and
software versions of your phone, the
easy
edgeSM software, and
the assigned MEID and pESN numbers.
Page 79

Health and Safety Information 76
Section 16: Health and Safety Information
This section outlines the safety precautions associated with using
your phone. These safety precautions should be followed to
safely use your phone.
Health and Safety Information
Exposure to Radio Frequency (RF) Signals
Certification Information (SAR)
Your wireless phone is a radio transmitter and receiver. It is
designed and manufactured not to exceed the exposure limits for
radio frequency (RF) energy set by the Federal Communications
Commission (FCC) of the U.S. government.
These FCC exposure limits are derived from the
recommendations of two expert organizations, the National
Counsel on Radiation Protection and Measurement (NCRP) and
the Institute of Electrical and Electronics Engineers (IEEE).
In both cases, the recommendations were developed by scientific
and engineering experts drawn from industry, government, and
academia after extensive reviews of the scientific literature
related to the biological effects of RF energy.
The exposure limit set by the FCC for wireless mobile phones
employs a unit of measurement known as the Specific
Absorption Rate (SAR). The SAR is a measure of the rate of
absorption of RF energy by the human body expressed in units of
watts per kilogram (W/kg). The FCC requires wireless phones to
comply with a safety limit of 1.6 watts per kilogram (1.6 W/kg).
The FCC exposure limit incorporates a substantial margin of
safety to give additional protection to the public and to account
for any variations in measurements.
SAR tests are conducted using standard operating positions
accepted by the FCC with the phone transmitting at its highest
certified power level in all tested frequency bands. Although the
SAR is determined at the highest certified power level, the actual
SAR level of the phone while operating can be well below the
maximum value. This is because the phone is designed to
operate at multiple power levels so as to use only the power
required to reach the network. In general, the closer you are to a
wireless base station antenna, the lower the power output.
Before a new model phone is available for sale to the public, it
must be tested and certified to the FCC that it does not exceed
the exposure limit established by the FCC. Tests for each model
phone are performed in positions and locations (e.g. at the ear
and worn on the body) as required by the FCC.
For body worn operation, this phone has been tested and meets
FCC RF exposure guidelines when used with an accessory that
Page 80

77
contains no metal and that positions the handset a minimum of
1.5 cm from the body.
Use of other accessories may not ensure compliance with FCC RF
exposure guidelines.
The FCC has granted an Equipment Authorization for this mobile
phone with all reported SAR levels evaluated as in compliance
with the FCC RF exposure guidelines. The maximum SAR values
for this model phone as reported to the FCC are:
•
Head:
0.72 W/Kg.
•
Body-worn:
0.40 W/Kg.
SAR information on this and other model phones can be viewed
online at
http://www.fcc.gov/oet/ea
. To find information that
pertains to a particular model phone, this site uses the phone
FCC ID number which is usually printed somewhere on the case
of the phone.
Sometimes it may be necessary to remove the battery pack to
find the number. Once you have the FCC ID number for a
particular phone, follow the instructions on the website and it
should provide values for typical or maximum SAR for a particular
phone. Additional product specific SAR information can also be
obtained at
www.fcc.gov/cgb/sar.
Please Note the Following Information When
Using Your Handset
1.
WARNING REGARDING DISPLAY
The display on your handset is made of glass or acrylic and
could break if your handset is dropped or if it receives
significant impact. Do not use if screen is broken or
cracked as this could cause injury to you.
2.
WARRANTY DISCLAIMER: PROPER USE OF A TOUCH SCREEN
HANDSET
If your handset has a touch-screen display, please note
that a touch-screen responds best to a light touch from the
pad of your finger or a non-metallic stylus. Using excessive
force or a metallic object when pressing on the touchscreen may damage the tempered glass surface and void
the warranty. For more information, refer to “Standard
Limited Warranty” on page 96.
Samsung Mobile Products and Recycling
Samsung cares for the environment and encourages its
customers to recycle Samsung mobile phones and genuine
Samsung accessories.
Go to:
http://mobile.samsungusa.com/recycling/index.jsp
or
1-800-822-8837 for more information.
Page 81

Health and Safety Information 78
UL Certified Travel Adapter
The Travel Adapter for this phone has met applicable UL safety
requirements. Please adhere to the following safety instructions
per UL guidelines.
FAILURE TO FOLLOW THE INSTRUCTIONS OUTLINED MAY LEAD
TO SERIOUS PERSONAL INJURY AND POSSIBLE PROPERTY
DAMAGE.
IMPORTANT SAFETY INSTRUCTIONS - SAVE THESE
INSTRUCTIONS.
DANGER - TO REDUCE THE RISK OF FIRE OR ELECTRIC SHOCK,
CAREFULLY FOLLOW THESE INSTRUCTIONS.
FOR CONNECTION TO A SUPPLY NOT IN NORTH AMERICA, USE
AN ATTACHMENT PLUG ADAPTOR OF THE PROPER
CONFIGURATION FOR THE POWER OUTLET. THIS POWER UNIT IS
INTENDED TO BE CORRECTLY ORIENTATED IN A VERTICAL OR
HORIZONTAL OR FLOOR MOUNT POSITION.
Consumer Information on Wireless Phones
The U.S. Food and Drug Administration (FDA) has published a
series of Questions and Answers for consumers relating to radio
frequency (RF) exposure from wireless phones. The FDA
publication includes the following information:
What kinds of phones are the subject of this update?
The term wireless phone refers here to hand-held wireless
phones with built-in antennas, often called "cell," "mobile," or
"PCS" phones. These types of wireless phones can expose the
user to measurable radio frequency energy (RF) because of the
short distance between the phone and the user's head. These RF
exposures are limited by Federal Communications Commission
safety guidelines that were developed with the advice of FDA and
other federal health and safety agencies.
When the phone is located at greater distances from the user, the
exposure to RF is drastically lower because a person's RF
exposure decreases rapidly with increasing distance from the
source. The so-called "cordless phones," which have a base unit
connected to the telephone wiring in a house, typically operate at
far lower power levels, and thus produce RF exposures well
within the FCC's compliance limits.
Do wireless phones pose a health hazard?
The available scientific evidence does not show that any health
problems are associated with using wireless phones. There is no
proof, however, that wireless phones are absolutely safe.
Wireless phones emit low levels of radio frequency energy (RF) in
the microwave range while being used. They also emit very low
levels of RF when in the stand-by mode.
Page 82

79
Whereas high levels of RF can produce health effects (by heating
tissue), exposure to low level RF that does not produce heating
effects causes no known adverse health effects. Many studies of
low level RF exposures have not found any biological effects.
Some studies have suggested that some biological effects may
occur, but such findings have not been confirmed by additional
research. In some cases, other researchers have had difficulty in
reproducing those studies, or in determining the reasons for
inconsistent results.
What is FDA's role concerning the safety of wireless
phones?
Under the law, FDA does not review the safety of radiationemitting consumer products such as wireless phones before they
can be sold, as it does with new drugs or medical devices.
However, the agency has authority to take action if wireless
phones are shown to emit radio frequency energy (RF) at a level
that is hazardous to the user. In such a case, FDA could require
the manufacturers of wireless phones to notify users of the
health hazard and to repair, replace or recall the phones so that
the hazard no longer exists.
Although the existing scientific data do not justify FDA regulatory
actions, FDA has urged the wireless phone industry to take a
number of steps, including the following:
•
Support needed research into possible biological effects of RF of the
type emitted by wireless phones;
•
Design wireless phones in a way that minimizes any RF exposure to
the user that is not necessary for device function; and
•
Cooperate in providing users of wireless phones with the best possible
information on possible effects of wireless phone use on human
health.
FDA belongs to an interagency working group of the federal
agencies that have responsibility for different aspects of RF
safety to ensure coordinated efforts at the federal level. The
following agencies belong to this working group:
•
National Institute for Occupational Safety and Health
•
Environmental Protection Agency
•
Federal Communications Commission
•
Occupational Safety and Health Administration
•
National Telecommunications and Information Administration
The National Institutes of Health participates in some interagency
working group activities, as well.
FDA shares regulatory responsibilities for wireless phones with
the Federal Communications Commission (FCC). All phones that
are sold in the United States must comply with FCC safety
guidelines that limit RF exposure. FCC relies on FDA and other
health agencies for safety questions about wireless phones.
Page 83

Health and Safety Information 80
FCC also regulates the base stations that the wireless phone
networks rely upon. While these base stations operate at higher
power than do the wireless phones themselves, the RF
exposures that people get from these base stations are typically
thousands of times lower than those they can get from wireless
phones.
Base stations are thus not the primary subject of the safety
questions discussed in this document.
What are the results of the research done already?
The research done thus far has produced conflicting results, and
many studies have suffered from flaws in their research
methods. Animal experiments investigating the effects of radio
frequency energy (RF) exposures characteristic of wireless
phones have yielded conflicting results that often cannot be
repeated in other laboratories. A few animal studies, however,
have suggested that low levels of RF could accelerate the
development of cancer in laboratory animals. However, many of
the studies that showed increased tumor development used
animals that had been genetically engineered or treated with
cancer-causing chemicals so as to be pre-disposed to develop
cancer in absence of RF exposure. Other studies exposed the
animals to RF for up to 22 hours per day. These conditions are
not similar to the conditions under which people use wireless
phones, so we don't know with certainty what the results of such
studies mean for human health.
Three large epidemiology studies have been published since
December 2000. Between them, the studies investigated any
possible association between the use of wireless phones and
primary brain cancer, glioma, meningioma, or acoustic neuroma,
tumors of the brain or salivary gland, leukemia, or other cancers.
None of the studies demonstrated the existence of any harmful
health effects from wireless phones RF exposures.
However, none of the studies can answer questions about longterm exposures, since the average period of phone use in these
studies was around three years.
What research is needed to decide whether RF exposure
from wireless phones poses a health risk?
A combination of laboratory studies and epidemiological studies
of people actually using wireless phones would provide some of
the data that are needed. Lifetime animal exposure studies could
be completed in a few years. However, very large numbers of
animals would be needed to provide reliable proof of a cancer
promoting effect if one exists.
Epidemiological studies can provide data that is directly
applicable to human populations, but ten or more years' followup may be needed to provide answers about some health effects,
such as cancer.
Page 84

81
This is because the interval between the time of exposure to a
cancer-causing agent and the time tumors develop - if they do may be many, many years. The interpretation of epidemiological
studies is hampered by difficulties in measuring actual RF
exposure during day-to-day use of wireless phones. Many
factors affect this measurement, such as the angle at which the
phone is held, or which model of phone is used.
What is FDA doing to find out more about the possible
health effects of wireless phone RF?
FDA is working with the U.S. National Toxicology Program and
with groups of investigators around the world to ensure that high
priority animal studies are conducted to address important
questions about the effects of exposure to radio frequency
energy (RF).
FDA has been a leading participant in the World Health
Organization international Electromagnetic Fields (EMF) Project
since its inception in 1996. An influential result of this work has
been the development of a detailed agenda of research needs
that has driven the establishment of new research programs
around the world. The Project has also helped develop a series of
public information documents on EMF issues.
FDA and Cellular Telecommunications & Internet Association
(CTIA) have a formal Cooperative Research and Development
Agreement (CRADA) to do research on wireless phone safety.
FDA provides the scientific oversight, obtaining input from
experts in government, industry, and academic organizations.
CTIA-funded research is conducted through contracts to
independent investigators. The initial research will include both
laboratory studies and studies of wireless phone users. The
CRADA will also include a broad assessment of additional
research needs in the context of the latest research
developments around the world.
What steps can I take to reduce my exposure to radio
frequency energy from my wireless phone?
If there is a risk from these products - and at this point we do not
know that there is - it is probably very small. But if you are
concerned about avoiding even potential risks, you can take a
few simple steps to minimize your exposure to radio frequency
energy (RF). Since time is a key factor in how much exposure a
person receives, reducing the amount of time spent using a
wireless phone will reduce RF exposure.
•
If you must conduct extended conversations by wireless phone every
day, you could place more distance between your body and the source
of the RF, since the exposure level drops off dramatically with distance.
For example, you could use a headset and carry the wireless phone
away from your body or use a wireless phone connected to a remote
antenna.
Page 85

Health and Safety Information 82
Again, the scientific data do not demonstrate that wireless
phones are harmful. But if you are concerned about the RF
exposure from these products, you can use measures like those
described above to reduce your RF exposure from wireless phone
use.
What about children using wireless phones?
The scientific evidence does not show a danger to users of
wireless phones, including children and teenagers. If you want to
take steps to lower exposure to radio frequency energy (RF), the
measures described above would apply to children and
teenagers using wireless phones. Reducing the time of wireless
phone use and increasing the distance between the user and the
RF source will reduce RF exposure.
Some groups sponsored by other national governments have
advised that children be discouraged from using wireless phones
at all. For example, the government in the United Kingdom
distributed leaflets containing such a recommendation in
December 2000.
They noted that no evidence exists that using a wireless phone
causes brain tumors or other ill effects. Their recommendation to
limit wireless phone use by children was strictly precautionary; it
was not based on scientific evidence that any health hazard
exists.
Do hands-free kits for wireless phones reduce
risks from exposure to RF emissions?
Since there are no known risks from exposure to RF emissions
from wireless phones, there is no reason to believe that handsfree kits reduce risks. Hands-free kits can be used with wireless
phones for convenience and comfort. These systems reduce the
absorption of RF energy in the head because the phone, which is
the source of the RF emissions, will not be placed against the
head. On the other hand, if the phone is mounted against the
waist or other part of the body during use, then that part of the
body will absorb more RF energy. Wireless phones marketed in
the U.S. are required to meet safety requirements regardless of
whether they are used against the head or against the body.
Either configuration should result in compliance with the safety
limit.
Do wireless phone accessories that claim to shield
the head from RF radiation work?
Since there are no known risks from exposure to RF emissions
from wireless phones, there is no reason to believe that
accessories that claim to shield the head from those emissions
reduce risks. Some products that claim to shield the user from RF
absorption use special phone cases, while others involve nothing
more than a metallic accessory attached to the phone.
Page 86

83
Studies have shown that these products generally do not work as
advertised. Unlike "hand-free" kits, these so-called "shields"
may interfere with proper operation of the phone. The phone may
be forced to boost its power to compensate, leading to an
increase in RF absorption. In February 2002, the Federal trade
Commission (FTC) charged two companies that sold devices that
claimed to protect wireless phone users from radiation with
making false and unsubstantiated claims.
According to FTC, these defendants lacked a reasonable basis to
substantiate their claim.
What about wireless phone interference with
medical equipment?
Radio frequency energy (RF) from wireless phones can interact
with some electronic devices. For this reason, FDA helped
develop a detailed test method to measure electromagnetic
interference (EMI) of implanted cardiac pacemakers and
defibrillators from wireless telephones. This test method is now
part of a standard sponsored by the Association for the
Advancement of Medical instrumentation (AAMI). The final draft,
a joint effort by FDA, medical device manufacturers, and many
other groups, was completed in late 2000. This standard will
allow manufacturers to ensure that cardiac pacemakers and
defibrillators are safe from wireless phone EMI. FDA has tested
wireless phones and helped develop a voluntary standard
sponsored by the Institute of Electrical and Electronic Engineers
(IEEE). This standard specifies test methods and performance
requirements for hearing aids and wireless phones so that no
interference occurs when a person uses a compatible phone and
a compatible hearing aid at the same time. This standard was
approved by the IEEE in 2000.
FDA continues to monitor the use of wireless phones for possible
interactions with other medical devices. Should harmful
interference be found to occur, FDA will conduct testing to assess
the interference and work to resolve the problem.
Additional information on the safety of RF exposures from various
sources can be obtained from the following organizations
(Updated 1/1/2010):
•
FCC RF Safety Program:
http://www.fcc.gov/oet/rfsafety/
•
Environmental Protection Agency (EPA):
http://www.epa.gov/radiation/
•
Occupational Safety and Health Administration's (OSHA):
http://www.osha.gov/SLTC/radiofrequencyradiation/index.html
•
National Institute for Occupational Safety and Health (NIOSH):
http://www.cdc.gov/niosh/
•
World Health Organization (WHO):
http://www.who.int/peh-emf/
Page 87

Health and Safety Information 84
•
International Commission on Non-Ionizing Radiation Protection:
http://www.icnirp.de
•
Health Protection Agency:
http://www.hpa.org.uk/radiation
•
US Food and Drug Administration:
http://www.fda.gov/Radiation-EmittingProducts/
RadiationEmittingProductsandProcedures/
HomeBusinessandEntertainment/CellPhones/default.htm
Road Safety
Your wireless phone gives you the powerful ability to
communicate by voice, almost anywhere, anytime. But an
important responsibility accompanies the benefits of wireless
phones, one that every user must uphold.
When driving a car, driving is your first responsibility. When using
your wireless phone behind the wheel of a car, practice good
common sense and remember the following tips:
1. Get to know your wireless phone and its features, such as
speed dial and redial. If available, these features help you
to place your call without taking your attention off the road.
2. When available, use a hands-free device. If possible, add
an additional layer of convenience and safety to your
wireless phone with one of the many hands free
accessories available today.
3. Position your wireless phone within easy reach. Be able to
access your wireless phone without removing your eyes
from the road. If you get an incoming call at an
inconvenient time, let your voice mail answer it for you.
4. Let the person you are speaking with know you are driving;
if necessary, suspend the call in heavy traffic or hazardous
weather conditions. Rain, sleet, snow, ice and even heavy
traffic can be hazardous.
5. Do not take notes or look up phone numbers while driving.
Jotting down a "to do" list or flipping through your address
book takes attention away from your primary
responsibility, driving safely.
6. Dial sensibly and assess the traffic; if possible, place calls
when you are not moving or before pulling into traffic. Try
to plan calls when your car will be stationary. If you need to
make a call while moving, dial only a few numbers, check
the road and your mirrors, then continue.
7. Do not engage in stressful or emotional conversations that
may be distracting. Make people you are talking with
aware you are driving and suspend conversations that
have the potential to divert your attention from the road.
8. Use your wireless phone to call for help. Dial 9-1-1 or other
local emergency number in the case of fire, traffic accident
or medical emergencies.
Page 88

85
9.
Use your wireless phone to help others in emergencies. If
you see an auto accident, crime in progress or other
serious emergency where lives are in danger, call 9-1-1 or
other local emergency number, as you would want others
to do for you.
10. Call roadside assistance or a special non-emergency
wireless assistance number when necessary. If you see a
broken-down vehicle posing no serious hazard, a broken
traffic signal, a minor traffic accident where no one
appears injured, or a vehicle you know to be stolen, call
roadside assistance or other special non-emergency
number.
"The wireless industry reminds you to use your phone safely when
driving."
For more information, please call 1-888-901-SAFE, or visit our
web-site
www.ctia.org
.
Important!:
If you are using a handset other than a standard numeric keypad,
please call 1-888-901-7233.
Provided by the Cellular Telecommunications & Internet
Association.
Responsible Listening
Caution!:
Avoid potential hearing loss.
Damage to hearing occurs when a person is exposed to loud
sounds over time. The risk of hearing loss increases as sound is
played louder and for longer durations.
Prolonged exposure to loud sounds (including music) is the most
common cause of preventable hearing loss. Some scientific
research suggests that using portable audio devices, such as
portable music players and cellular telephones, at high volume
settings for long durations may lead to permanent noise-induced
hearing loss. This includes the use of headphones (including
headsets, earbuds, and Bluetooth or other wireless devices).
Exposure to very loud sound has also been associated in some
studies with tinnitus (a ringing in the ear), hypersensitivity to
sound and distorted hearing.
Individual susceptibility to noise-induced hearing loss and
potential hearing problem varies. Additionally, the amount of
sound produced by a portable audio device varies depending on
the nature of the sound, the device settings, and the headphones
that are used. As a result, there is no single volume setting that is
appropriate for everyone or for every combination of sound,
settings and equipment.
Page 89

Health and Safety Information 86
You should follow some commonsense recommendations when
using any portable audio device:
•
Set the volume in a quiet environment and select the lowest volume at
which you can hear adequately.
•
When using headphones, turn the volume down if you cannot hear the
people speaking near you or if the person sitting next to you can hear
what you are listening to.
•
Do not turn the volume up to block out noisy surroundings. If you
choose to listen to your portable device in a noisy environment, use
noise-cancelling headphones to block out background environmental
noise. By blocking background environment noise, noise cancelling
headphones should allow you to hear the music at lower volumes than
when using earbuds.
•
Limit the amount of time you listen. As the volume increases, less time
is required before you hearing could be affected.
•
Avoid using headphones after exposure to extremely loud noises, such
as rock concerts, that might cause temporary hearing loss. Temporary
hearing loss might cause unsafe volumes to sound normal.
•
Do not listen at any volume that causes you discomfort. If you
experience ringing in your ears, hear muffled speech or experience
any temporary hearing difficulty after listening to your portable audio
device, discontinue use and consult your doctor.
You can obtain additional information on this subject from the
following sources:
American Academy of Audiology
11730 Plaza American Drive, Suite 300
Reston, VA 20190
Voice: (800) 222-2336
Email: [email protected]
Internet:
http://www.audiology.org
National Institute on Deafness and Other Communication Disorders
National Institutes of Health
31 Center Drive, MSC 2320
Bethesda, MD 20892-2320
Email: [email protected]
Internet:
http://www.nidcd.nih.gov/
Page 90

87
Operating Environment
Remember to follow any special regulations in force in any area
and always switch your phone off whenever it is forbidden to use
it, or when it may cause interference or danger.
When connecting the phone or any accessory to another device,
read its user's guide for detailed safety instructions. Do not
connect incompatible products.
As with other mobile radio transmitting equipment, users are
advised that for the satisfactory operation of the equipment and
for the safety of personnel, it is recommended that the
equipment should only be used in the normal operating position
(held to your ear with the antenna pointing over your shoulder if
you are using an external antenna).
Using Your Phone Near Other Electronic Devices
Most modern electronic equipment is shielded from radio
frequency (RF) signals. However, certain electronic equipment
may not be shielded against the RF signals from your wireless
phone. Consult the manufacturer to discuss alternatives.
Implantable Medical Devices
A minimum separation of six (6) inches should be maintained
between a handheld wireless phone and an implantable medical
device, such as a pacemaker or implantable cardioverter
defibrillator, to avoid potential interference with the device.
Persons who have such devices:
•
Should ALWAYS keep the phone more than six (6) inches from their
implantable medical device when the phone is turned ON;
•
Should not carry the phone in a breast pocket;
•
Should use the ear opposite the implantable medical device to
minimize the potential for interference;
National Institute for Occupational Safety and Health (NIOSH)
395 E Street, S.W.
Suite 9200
Patriots Plaza Building
Washington, DC 20201
Voice: 1-800-35-NIOSH (1-800-356-4647)
1-800-CDC-INFO (1-800-232-4636)
Outside the U.S. 513-533-8328
Email: [email protected]
Internet:
http://www.cdc.gov
1-888-232-6348 TTY
Internet:
http://www.cdc.gov/niosh/topics/noise/default.html
Page 91

Health and Safety Information 88
•
Should turn the phone OFF immediately if there is any reason to
suspect that interference is taking place;
•
Should read and follow the directions from the manufacturer of your
implantable medical device. If you have any questions about using
your wireless phone with such a device, consult your health care
provider.
For more information see:
http://www.fcc.gov/oet/rfsafety/rf-faqs.html
FCC Hearing-Aid Compatibility (HAC)
Regulations for Wireless Devices
On July 10, 2003, the U.S. Federal Communications Commission
(FCC) Report and Order in WT Docket 01-309 modified the
exception of wireless phones under the Hearing Aid Compatibility
Act of 1988 (HAC Act) to require digital wireless phones be
compatible with hearing-aids.
The intent of the HAC Act is to ensure reasonable access to
telecommunications services for persons with hearing
disabilities.
While some wireless phones are used near some hearing devices
(hearing aids and cochlear implants), users may detect a
buzzing, humming, or whining noise. Some hearing devices are
more immune than others to this interference noise, and phones
also vary in the amount of interference they generate.
The wireless telephone industry has developed a rating system
for wireless phones, to assist hearing device users find phones
that may be compatible with their hearing devices. Not all phones
have been rated. Phones that are rated have the rating on their
box or a label located on the box.
The ratings are not guarantees. Results will vary depending on
the user's hearing device and hearing loss. If your hearing device
happens to be vulnerable to interference, you may not be able to
use a rated phone successfully. Trying out the phone with your
hearing device is the best way to evaluate it for your personal
needs.
M-Ratings
: Phones rated M3 or M4 meet FCC requirements and
are likely to generate less interference to hearing devices than
phones that are not labeled. M4 is the better/higher of the two
ratings.
T-Ratings
: Phones rated T3 or T4 meet FCC requirements and are
likely to generate less interference to hearing devices than
phones that are not labeled. T4 is the better/higher of the two
ratings.
Hearing devices may also be rated. Your hearing device
manufacturer or hearing health professional may help you find
this rating. Higher ratings mean that the hearing device is
relatively immune to interference noise. The hearing aid and
wireless phone rating values are then added together.
Page 92
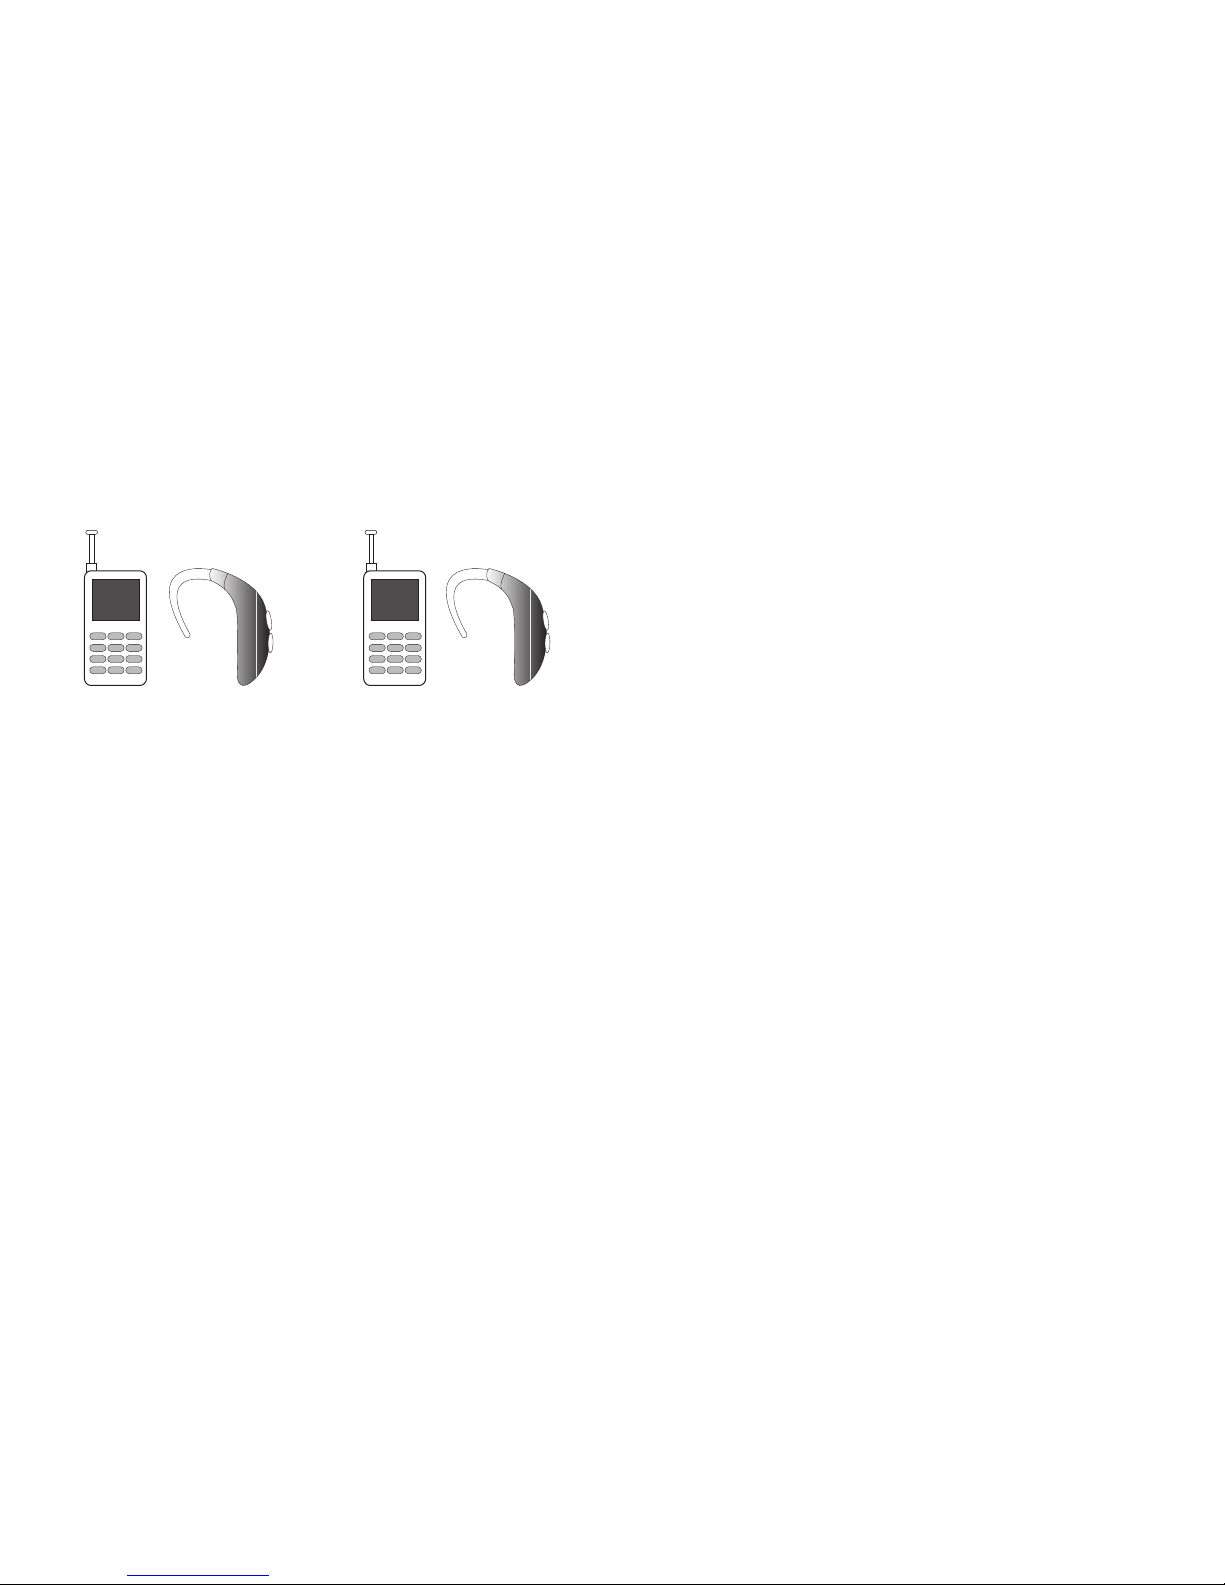
89
A sum of 5 is considered acceptable for normal use. A sum of 6
is considered for best use.
In the above example, if a hearing aid meets the M2 level rating
and the wireless phone meets the M3 level rating, the sum of the
two values equal M5. This is synonymous for T ratings. This
should provide the hearing aid user with "normal usage" while
using their hearing aid with the particular wireless phone.
"Normal usage" in this context is defined as a signal quality that
is acceptable for normal operation.
The M mark is intended to be synonymous with the U mark. The
T mark is intended to be synonymous with the UT mark. The M
and T marks are recommended by the Alliance for
Telecommunications Industries Solutions (ATIS). The U and UT
marks are referenced in Section 20.19 of the FCC Rules.
The HAC rating and measurement procedure are described in the
American National Standards Institute (ANSI) C63.19 standard.
Other Medical Devices
If you use any other personal medical devices, consult the
manufacturer of your device to determine if it is adequately
shielded from external RF energy. Your physician may be able to
assist you in obtaining this information. Switch your phone off in
health care facilities when any regulations posted in these areas
instruct you to do so. Hospitals or health care facilities may be
using equipment that could be sensitive to external RF energy.
Vehicles
RF signals may affect improperly installed or inadequately
shielded electronic systems in motor vehicles. Check with the
manufacturer or its representative regarding your vehicle. You
should also consult the manufacturer of any equipment that has
been added to your vehicle.
Posted Facilities
Switch your phone off in any facility where posted notices require
you to do so.
M3 + M2 = 5
T3 + T2 = 5
Page 93

Health and Safety Information 90
Potentially Explosive Environments
Switch your phone off when in any area with a potentially
explosive atmosphere and obey all signs and instructions. Sparks
in such areas could cause an explosion or fire resulting in bodily
injury or even death.
Users are advised to switch the phone off while at a refueling
point (service station). Users are reminded of the need to observe
restrictions on the use of radio equipment in fuel depots (fuel
storage and distribution areas), chemical plants or where blasting
operations are in progress.
Areas with a potentially explosive atmosphere are often but not
always clearly marked. They include below deck on boats,
chemical transfer or storage facilities, vehicles using liquefied
petroleum gas (such as propane or butane), areas where the air
contains chemicals or particles, such as grain, dust or metal
powders, and any other area where you would normally be
advised to turn off your vehicle engine.
Emergency Calls
This phone, like any wireless phone, operates using radio
signals, wireless and landline networks as well as userprogrammed functions, which cannot guarantee connection in all
conditions. Therefore, you should never rely solely on any
wireless phone for essential communications (medical
emergencies, for example).
Remember, to make or receive any calls the phone must be
switched on and in a service area with adequate signal strength.
Emergency calls may not be possible on all wireless phone
networks or when certain network services and/or phone
features are in use. Check with local service providers.
To make an emergency call:
1. If the phone is not on, switch it on.
2. Key in the emergency number for your present location (for
example, 911 or other official emergency number).
Emergency numbers vary by location.
3. Press the key.
If certain features are in use (call barring, for example), you may
first need to deactivate those features before you can make an
emergency call. Consult this document and your local cellular
service provider.
When making an emergency call, remember to give all the
necessary information as accurately as possible. Remember that
your phone may be the only means of communication at the
scene of an accident; do not cut off the call until given
permission to do so.
Page 94

91
Restricting Children's access to your Phone
Your phone is not a toy. Children should not be allowed to play
with it because they could hurt themselves and others, damage
the phone or make calls that increase your phone bill.
FCC Notice and Cautions
FCC Notice
The phone may cause TV or radio interference if used in close
proximity to receiving equipment. The FCC can require you to
stop using the phone if such interference cannot be eliminated.
Vehicles using liquefied petroleum gas (such as propane or
butane) must comply with the National Fire Protection Standard
(NFPA-58). For a copy of this standard, contact the National Fire
Protection Association:
Cautions
Any changes or modifications to your phone not expressly
approved in this document could void your warranty for this
equipment, and void your authority to operate this equipment.
Only use approved batteries, antennas and chargers. The use of
any unauthorized accessories may be dangerous and void the
phone warranty if said accessories cause damage or a defect to
the phone.
Although your phone is quite sturdy, it is a complex piece of
equipment and can be broken. Avoid dropping, hitting, bending
or sitting on it.
Other Important Safety Information
•
Only qualified personnel should service the phone or install the phone
in a vehicle. Faulty installation or service may be dangerous and may
invalidate any warranty applicable to the device.
•
Check regularly that all wireless phone equipment in your vehicle is
mounted and operating properly.
•
Do not store or carry flammable liquids, gases or explosive materials in
the same compartment as the phone, its parts or accessories.
•
For vehicles equipped with an air bag, remember that an air bag
inflates with great force. Do not place objects, including both installed
or portable wireless equipment in the area over the air bag or in the air
bag deployment area. If wireless equipment is improperly installed and
the air bag inflates, serious injury could result.
NFPA (National Fire Protection Agency)
1 Batterymarch Park
Quincy, Massachusetts
USA 02169-7471
Internet:
http://www.nfpa.org
Page 95

Health and Safety Information 92
•
Switch your phone off before boarding an aircraft. The use of wireless
phone in aircraft is illegal and may be dangerous to the aircraft's
operation.
•
Failure to observe these instructions may lead to the suspension or
denial of telephone services to the offender, or legal action, or both.
Product Performance
Getting the Most Out of Your Signal Reception
The quality of each call you make or receive depends on the
signal strength in your area. Your phone informs you of the
current signal strength by displaying a number of bars next to the
signal strength icon. The more bars displayed, the stronger the
signal.
If you're inside a building, being near a window may give you
better reception.
Understanding the Power Save Feature
If your phone is unable to find a signal after searching, a Power
Save feature is automatically activated. If your phone is active, it
periodically rechecks service availability or you can check it
yourself by pressing any key.
Anytime the Power Save feature is activated, a message displays
on the screen. When a signal is found, your phone returns to
standby mode.
Understanding How Your Phone Operates
Your phone is basically a radio transmitter and receiver. When it's
turned on, it receives and transmits radio frequency (RF) signals.
When you use your phone, the system handling your call controls
the power level. This power can range from 0.006 watts to 0.2
watts in digital mode.
Maintaining Your Phone's Peak Performance
For the best care of your phone, only authorized personnel should
service your phone and accessories. Faulty service may void the
warranty.
There are several simple guidelines to operating your phone
properly and maintaining safe, satisfactory service.
•
To ensure that the Hearing Aid Compatibility rating for your phone is
maintained, secondary transmitters such as Bluetooth and WLAN
components must be disabled during a call. For more information,
refer to
“Turn Bluetooth On/Off”
on page 56.
•
If your phone is equipped with an external antenna, hold the phone
with the antenna raised, fully-extended and over your shoulder.
•
Do not hold, bend or twist the phone's antenna, if applicable.
•
Do not use the phone if the antenna is damaged.
•
If your phone is equipped with an internal antenna, obstructing the
internal antenna could inhibit call performance.
•
Speak directly into the phone's receiver.
Page 96

93
•
Avoid exposing your phone and accessories to rain or liquid spills. If
your phone does get wet, immediately turn the power off and remove
the battery. If it is inoperable, call Customer Care for service.
Availability of Various Features/Ring Tones
Many services and features are network dependent and may
require additional subscription and/or usage charges. Not all
features are available for purchase or use in all areas.
Downloadable Ring Tones may be available at an additional cost.
Other conditions and restrictions may apply. See your service
provider for additional information.
Battery Standby and Talk Time
Standby and talk times will vary depending on phone usage
patterns and conditions. Battery power consumption depends on
factors such as network configuration, signal strength, operating
temperature, features selected, frequency of calls, and voice,
data, and other application usage patterns.
Battery Precautions
•
Avoid dropping the cell phone. Dropping it, especially on a hard
surface, can potentially cause damage to the phone and battery. If you
suspect damage to the phone or battery, take it to a service center for
inspection.
•
Never use any charger or battery that is damaged in any way.
•
Do not modify or remanufacture the battery as this could result in
serious safety hazards.
•
If you use the phone near the network's base station, it uses less
power; talk and standby time are greatly affected by the signal
strength on the cellular network and the parameters set by the
network operator.
•
Follow battery usage, storage and charging guidelines found in the
user’s guide.
•
Battery charging time depends on the remaining battery charge and
the type of battery and charger used. The battery can be charged and
discharged hundreds of times, but it will gradually wear out. When the
operation time (talk time and standby time) is noticeably shorter than
normal, it is time to buy a new battery.
•
If left unused, a fully charged battery will discharge itself over time.
•
Use only Samsung-approved batteries and recharge your battery only
with Samsung-approved chargers. When a charger is not in use,
disconnect it from the power source. Do not leave the battery
connected to a charger for more than a week, since overcharging may
shorten its life.
•
Do not use incompatible cell phone batteries and chargers. Some Web
sites and second-hand dealers, not associated with reputable
manufacturers and carriers, might be selling incompatible or even
counterfeit batteries and chargers. Consumers should purchase
manufacturer or carrier recommended products and accessories. If
unsure about whether a replacement battery or charger is compatible,
contact the manufacturer of the battery or charger.
Page 97

Health and Safety Information 94
•
Misuse or use of incompatible phones, batteries, and charging devices
could result in damage to the equipment and a possible risk of fire,
explosion, leakage, or other serious hazard.
•
Extreme temperatures will affect the charging capacity of your battery:
it may require cooling or warming first.
•
Do not leave the battery in hot or cold places, such as in a car in
summer or winter conditions, as you will reduce the capacity and
lifetime of the battery. Always try to keep the battery at room
temperature. A phone with a hot or cold battery may temporarily not
work, even when the battery is fully charged. Li-ion batteries are
particularly affected by temperatures below
0 °C (32 °F).
•
Do not place the phone in areas that may get very hot, such as on or
near a cooking surface, cooking appliance, iron, or radiator.
•
Do not get your phone or battery wet. Even though they will dry and
appear to operate normally, the circuitry could slowly corrode and
pose a safety hazard.
•
Do not short-circuit the battery. Accidental short-circuiting can occur
when a metallic object (coin, clip or pen) causes a direct connection
between the + and - terminals of the battery (metal strips on the
battery), for example when you carry a spare battery in a pocket or
bag. Short-circuiting the terminals may damage the battery or the
object causing the short-circuiting.
•
Do not permit a battery out of the phone to come in contact with metal
objects, such as coins, keys or jewelry.
•
Do not crush, puncture or put a high degree of pressure on the battery
as this can cause an internal short-circuit, resulting in overheating.
•
Dispose of used batteries in accordance with local regulations. In some
areas, the disposal of batteries in household or business trash may be
prohibited. For safe disposal options for Li-Ion batteries, contact your
nearest Samsung authorized service center. Always recycle. Do not
dispose of batteries in a fire.
Care and Maintenance
Your phone is a product of superior design and craftsmanship
and should be treated with care. The suggestions below will help
you fulfill any warranty obligations and allow you to enjoy this
product for many years.
•
Keep the phone and all its parts and accessories out of the reach of
small children.
•
Keep the phone dry. Precipitation, humidity and liquids contain
minerals that will corrode electronic circuits.
•
Do not use the phone with a wet hand. Doing so may cause an electric
shock to you or damage to the phone.
•
Do not use or store the phone in dusty, dirty areas, as its moving parts
may be damaged.
•
Do not store the phone in hot areas. High temperatures can shorten the
life of electronic devices, damage batteries, and warp or melt certain
plastics.
Page 98

95
•
Do not store the phone in cold areas. When the phone warms up to its
normal operating temperature, moisture can form inside the phone,
which may damage the phone's electronic circuit boards.
•
Do not drop, knock or shake the phone. Rough handling can break
internal circuit boards.
•
Do not use harsh chemicals, cleaning solvents or strong detergents to
clean the phone. Wipe it with a soft cloth slightly dampened in a mild
soap-and-water solution.
•
Do not paint the phone. Paint can clog the device's moving parts and
prevent proper operation.
•
Do not put the phone in or on heating devices, such as a microwave
oven, a stove or a radiator. The phone may explode when overheated.
•
If your phone is equipped with an external antenna, use only the
supplied or an approved replacement antenna. Unauthorized antennas
or modified accessories may damage the phone and violate
regulations governing radio devices.
•
If the phone, battery, charger or any accessory is not working properly,
take it to your nearest qualified service facility. The personnel there
will assist you, and if necessary, arrange for service.
Page 99

Warranty Information 96
Section 17: Warranty Information
Standard Limited Warranty
What is Covered and For How Long?
SAMSUNG TELECOMMUNICATIONS AMERICA, LLC ("SAMSUNG")
warrants to the original purchaser ("Purchaser") that SAMSUNG's
Phones and accessories ("Products") are free from defects in
material and workmanship under normal use and service for the
period commencing upon the date of purchase and continuing for
the following specified period of time after that date:
What is Not Covered?
This Limited Warranty is conditioned upon
proper use of Product by Purchaser. This Limited Warranty does
not cover: (a) defects or damage resulting from accident, misuse,
abuse, neglect, unusual physical, electrical or electromechanical
stress, or modification of any part of Product, including antenna,
or cosmetic damage; (b) equipment that has the serial number
removed or made illegible; (c) any plastic surfaces or other
externally exposed parts that are scratched or damaged due to
normal use; (d) malfunctions resulting from the use of Product in
conjunction with accessories, products, or ancillary/peripheral
equipment not furnished or approved by SAMSUNG; (e) defects or
damage from improper testing, operation, maintenance,
installation, or adjustment; (f) installation, maintenance, and
service of Product, or (g) Product used or purchased outside the
United States or Canada.
This Limited Warranty covers batteries only if battery capacity
falls below 80% of rated capacity or the battery leaks, and this
Limited Warranty does not cover any battery if (i) the battery has
been charged by a battery charger not specified or approved by
SAMSUNG for charging the battery, (ii) any of the seals on the
battery are broken or show evidence of tampering, or (iii) the
battery has been used in equipment other than the SAMSUNG
phone for which it is specified.
What are SAMSUNG's Obligations?
During the applicable warranty
period, SAMSUNG will repair or replace, at SAMSUNG's sole
option, without charge to Purchaser, any defective component
part of Product. To obtain service under this Limited Warranty,
Purchaser must return Product to an authorized phone service
Phone 1 Year
Batteries 1 Year
Leather Case 90 Days
Holster 90 Days
Other Phone Accessories 1 Year
Page 100

97
facility in an adequate container for shipping, accompanied by
Purchaser's sales receipt or comparable substitute proof of sale
showing the date of purchase, the serial number of Product and
the sellers' name and address. To obtain assistance on where to
deliver the Product, call Samsung Customer Care at 1-888-987-
4357. Upon receipt, SAMSUNG will promptly repair or replace the
defective Product. SAMSUNG may, at SAMSUNG's sole option,
use rebuilt, reconditioned, or new parts or components when
repairing any Product or replace Product with a rebuilt,
reconditioned or new Product. Repaired/replaced leather cases,
pouches and holsters will be warranted for a period of ninety (90)
days. All other repaired/replaced Product will be warranted for a
period equal to the remainder of the original Limited Warranty on
the original Product or for 90 days, whichever is longer. All
replaced parts, components, boards and equipment shall
become the property of SAMSUNG.
If SAMSUNG determines that any Product is not covered by this
Limited Warranty, Purchaser must pay all parts, shipping, and
labor charges for the repair or return of such Product.
WHAT ARE THE LIMITS ON SAMSUNG'S WARRANTY/LIABILITY?
EXCEPT AS SET FORTH IN THE EXPRESS WARRANTY CONTAINED
HEREIN, PURCHASER TAKES THE PRODUCT "AS IS," AND
SAMSUNG MAKES NO WARRANTY OR REPRESENTATION AND
THERE ARE NO CONDITIONS, EXPRESS OR IMPLIED, STATUTORY
OR OTHERWISE, OF ANY KIND WHATSOEVER WITH RESPECT TO
THE PRODUCT, INCLUDING BUT NOT LIMITED TO:
•
THE MERCHANTABILITY OF THE PRODUCT OR ITS FITNESS FOR ANY
PARTICULAR PURPOSE OR USE;
•
WARRANTIES OF TITLE OR NON-INFRINGEMENT;
•
DESIGN, CONDITION, QUALITY, OR PERFORMANCE OF THE PRODUCT;
•
THE WORKMANSHIP OF THE PRODUCT OR THE COMPONENTS
CONTAINED THEREIN; OR
•
COMPLIANCE OF THE PRODUCT WITH THE REQUIREMENTS OF ANY
LAW, RULE, SPECIFICATION OR CONTRACT PERTAINING THERETO.
NOTHING CONTAINED IN THE INSTRUCTION MANUAL SHALL BE
CONSTRUED TO CREATE AN EXPRESS WARRANTY OF ANY KIND
WHATSOEVER WITH RESPECT TO THE PRODUCT. ALL IMPLIED
WARRANTIES AND CONDITIONS THAT MAY ARISE BY OPERATION
OF LAW, INCLUDING IF APPLICABLE THE IMPLIED WARRANTIES
OF MERCHANTABILITY AND FITNESS FOR A PARTICULAR
PURPOSE, ARE HEREBY LIMITED TO THE SAME DURATION OF
TIME AS THE EXPRESS WRITTEN WARRANTY STATED HEREIN.
SOME STATES/PROVINCES DO NOT ALLOW LIMITATIONS ON HOW
LONG AN IMPLIED WARRANTY LASTS, SO THE ABOVE LIMITATION
MAY NOT APPLY TO YOU. IN ADDITION, SAMSUNG SHALL NOT BE
LIABLE FOR ANY DAMAGES OF ANY KIND RESULTING FROM THE
PURCHASE, USE, OR MISUSE OF, OR INABILITY TO USE THE
PRODUCT OR ARISING DIRECTLY OR INDIRECTLY FROM THE USE
 Loading...