

Samsung ST10WLR User Manual

Using Dual View Mode
Single View mode is the basic display mode which displays same view on all the
display devices connected to a system.
Dual View mode is the “Extended screen mode” supported in Windows, which
displays separate views on each display devices connected to a system.
The default setting on your system is Single View mode.
Setting Dual View Mode
To set Dual View mode on your system:
1. Connect peripheral display device such as monitor or TV to your system and start
the system.
2. Click Start > Settings > Control Panel.
3. Click Display icon . The Display Properties window appears.
4. Click the Settings tab. The Settings screen appears.
5. Check Extend my Windows desktop onto this monitor.
6. You can drag the second monitor image to position where you want your extended
screen space with respect to the primary monitor (usually the LCD).
To confirm whether the system is set properly with Dual View mode:
1. Open Display properties and click Settings tab.
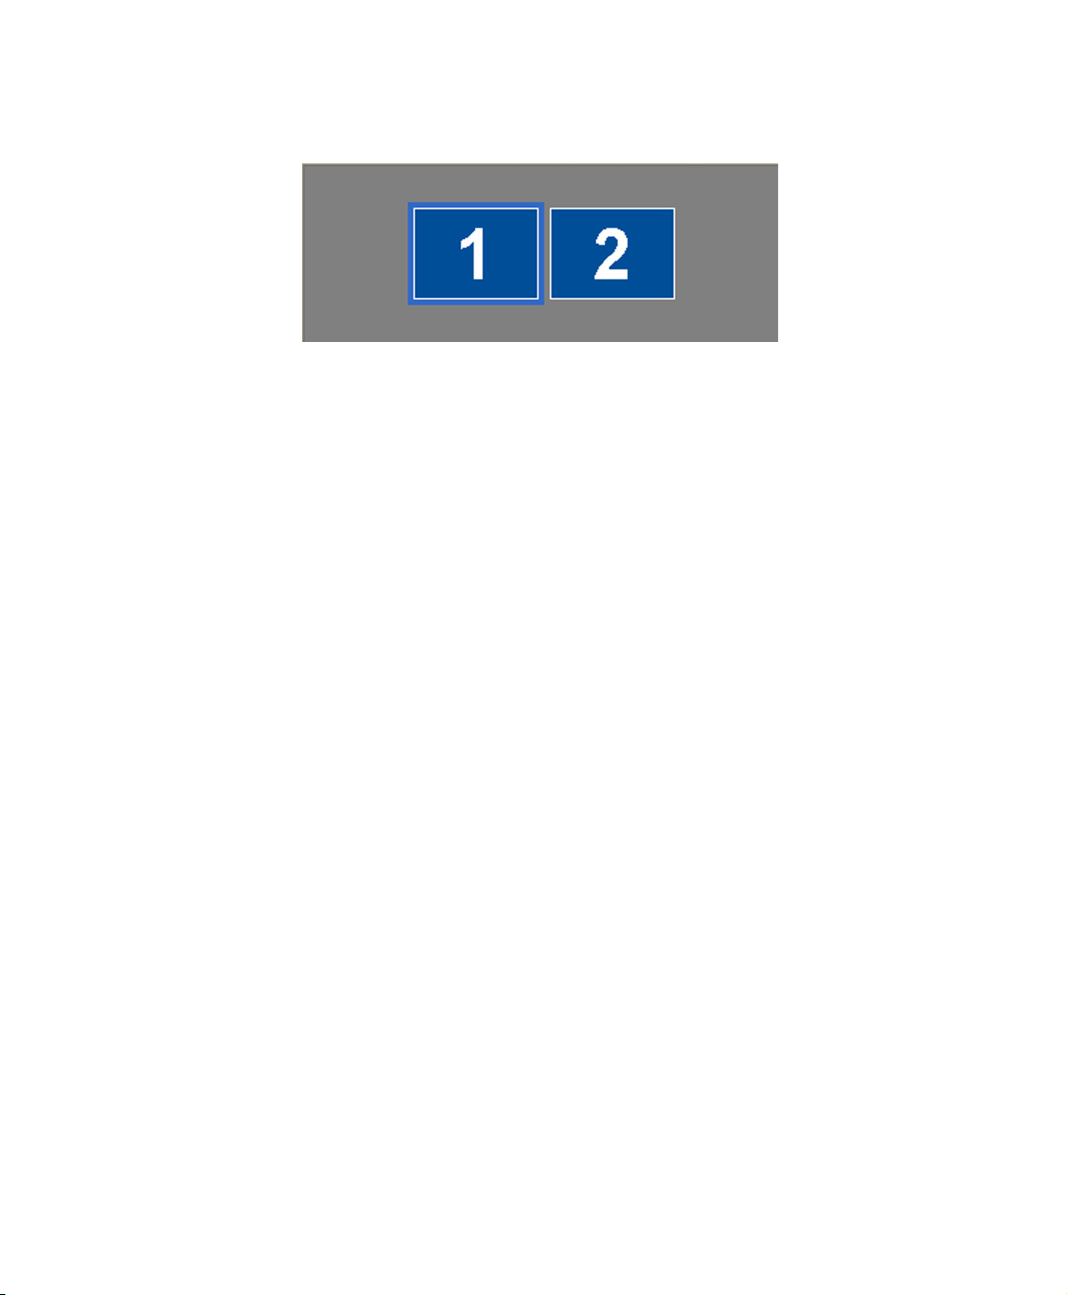
2. Place the cursor on the first monitor picture and click and hold over a second, a
number 1
the second monitor picture and click and hold over a second, then digit number 2
will be shown on the second actual monitor screen.
3. The monitor displays digit number 1 is the primary monitor and number 2 is the
secondary monitor.
In Windows explorer, the program is displayed on the primary monitor, if you can
drag it to the secondary monitor, then Duo View mode is now working properly.
will be shown on the first actual monitor screen. And place the cursor on
60 Users Manual
The secondary monitor has a display of 256 colours (colour depth) and 640x480 pixels
(resolution) at first. The colour depth and resolution of primary/secondary monitors are
separately changeable.
To reset the system to Single View mode:
1. Start Display properties.
2. Click Settings tab.
3. Click the second monitor among two monitor pictures.
4. Uncheck Extend my Windows desktop onto this monitor.
5. Click OK.
Using Dual View Mode 61

Using the TV-Out Port
Using the TV-out port, a compatible TV or other compatible display device can be
connected and an image displayed. No Audio is transmitted through the TV-Out port.
To check if and how your TV displays the TV-out signal see the documentation
included with your TV. You must also insure that (TV/Video) is changed to Video
mode using the TV remote controller or the buttons on the TV set.
To enable TV-out:
1. Connect the TV to the TV-Out port using an appropriate cable.
2. Click Start > Settings > Control Panel.
3. Click Display icon . The Display Properties window appears.
4. Click the Settings tab. The Settings screen appears.
5. Ensure Extend my Windows desktop onto this monitor box is unchecked.
6. Click Advanced > Display.
7. Click the check box to the left of the text “TV”.
8. Follow the screen prompts and the LCD screen display will be duplicated on the
television.
If the TV symbol is grayed out then the system has not detected a TV, check
that the TV standard in the System Setup is set correctly and that the TV is
turned on and connected properly. You can not use TV-out port in DOS mode.
9. Click Apply or OK.
62 Users Manual

Using Options
You can order the following options for your Notebook computer from your authorised
reseller:
• An extra AC adapter.
• An auto adapter that enables you to charge the computer’s battery and operate
the computer while in an automobile.
• An extra battery pack.
• An upgraded hard drive. Optional hard drives are available to fit in the hard
drive compartment or the Flex-Bay.
• 128, 256 and 512 MB DDR SDRAM memory modules that enable you to
upgrade your computer’s memory to a maximum of 1 GB.
• A CD-ROM drive module (CD Only or CD R/W).
• DVD/CD-RW Combo drive:
• A DVD-ROM drive module.
• A Superdisk LS-120 drive.
• Docking options that enable you to use your computer like a desktop computer.
• Wireless LAN
• IrSTICK
The options that are available may change periodically. Contact your reseller for
updated information on current and new options.
TM
Memory Modules
You can increase system memory by installing optional memory modules. You can
install a 128 256 or 512 MB modules.
To avoid possible system problems, use only approved memory modules in
your computer.
Using Options 63

Before You Install Memory
To prevent personal injury and damage to the equipment, follow the
precautions listed here before installing a memory module.
Take the following precautions when installing a memory module:
• Before you remove the memory module compartment door, turn off the
computer, unplug the power cord, and remove the battery. Also, disconnect any
peripheral devices.
• Before handling a memory module, discharge any static electricity by touching
a grounded surface or using a grounding wrist strap.
• Do not insert objects with conductive material, such as metal screwdrivers or
graphite pencils, into the memory-module compartment.
• Be careful in handling the metal plate of the memory door.
Installing a Memory Module
Handle a memory module carefully. Hold them only by the edges.
To install a memory module:
1. Turn the computer over so that the bottom faces up.
64 Users Manual

2. Using a screwdriver, remove the screw that holds the memory-module
compartment door in place.
3. Grasp the edge of the door and pull the door off the chassis.
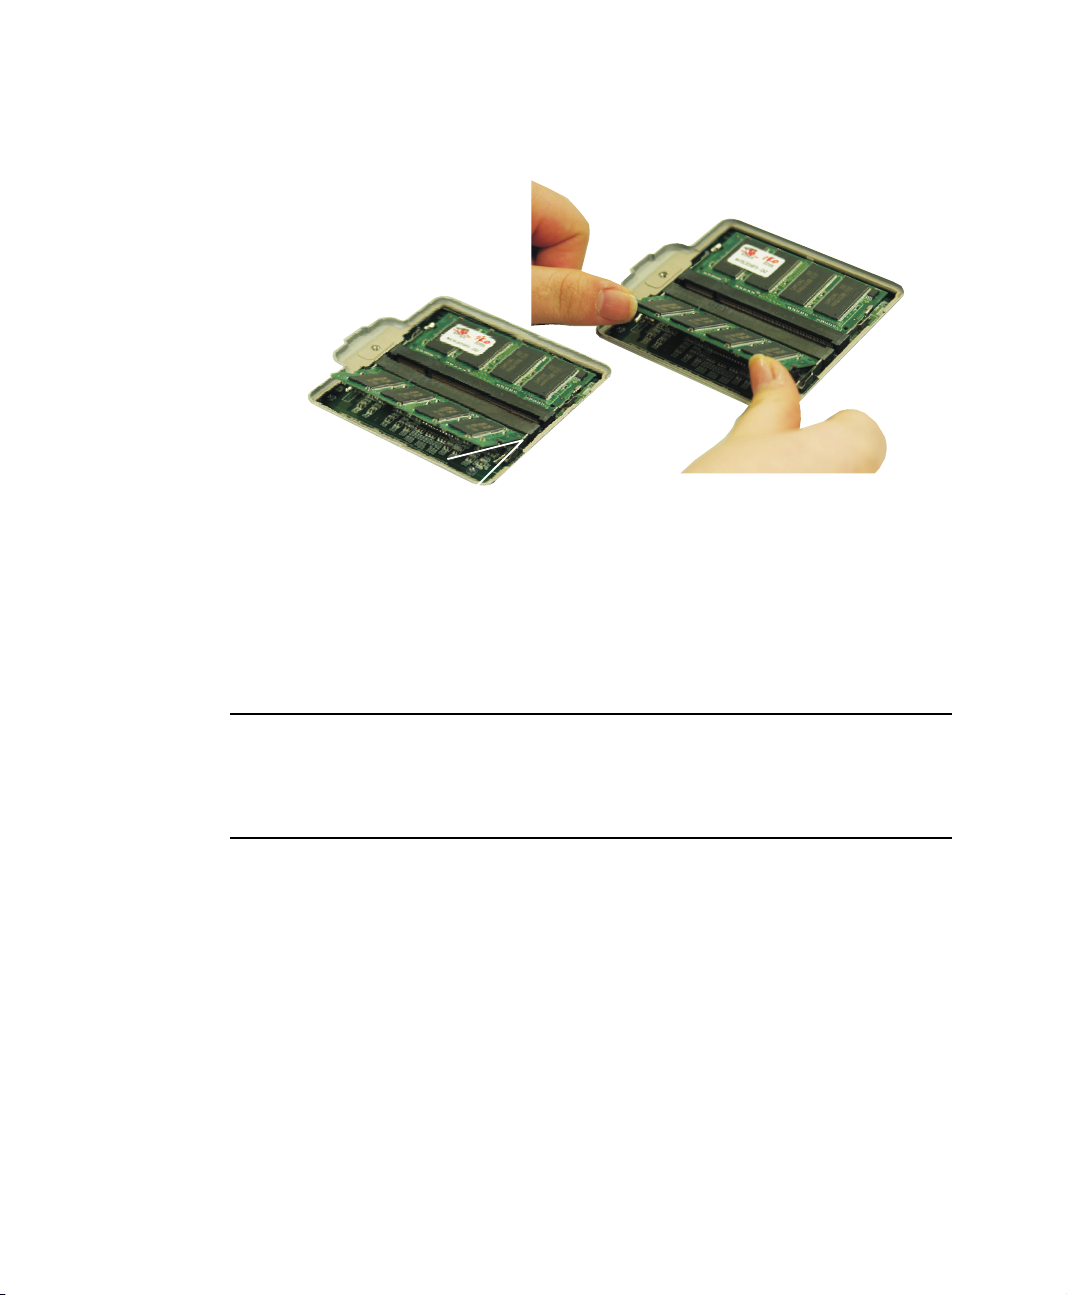
4. Remove installed modules if necessary:
Memory Module Precautions:
When removing the module, pull on the plastic portion of the connector slot
tabs only. Do not pull on the metal part of the tabs, this may damage the tabs.
a. Pull the plastic tabs on the connector slot outward slightly, until the edge of
the memory module pops up.
b. Hold the memory module by the edges and pull it carefully out of the
compartment.
5. Align the connector on the memory module with the connector of the slot.
Using Options 65
6. Push the memory module into the slot at a slight angle until the connectors are fully
engaged.
o
45
7. Push down on the edge of the memory module until the module snaps into place.
8. Align the memory module compartment door with the compartment and push the
door down until it snaps into place.
9. Reinstall the screw you removed in step 2.
10. Turn on the computer and perform a complete POST to check the memory
integrity.
Docking Options
Contact your reseller for a list of docking options available for your Notebook
computer. User’s manuals are included with the docking options.
Wireless LAN
The wireless LAN option allows easy connection to large or small office networks
while also providing freedom from the constraints of cables and sockets.
To setup and use the Wireless LAN, Please refer to the user manual provided with the
option at the time of purchase.
66 Users Manual

Troubleshooting
Complete the following in the order presented until your system is functioning
properly. If all of the steps below fail then contact your local reseller for assistance.
Questions and Answers
Please see “Questions and Answers” on page 68 for assistance in correcting any
computer operational problems.
Check the Connections
Verify all of the power and peripheral cables are securely plugged into their sockets
and that your system and power supply is on.
Norton AntiVirus
Run Norton AntiVirus to insure a virus is not affecting your computer.
To run Norton AntiVirus proceed as follows:
Click Start > Programs > Norton AntiVirus > Norton AntiVirus 2002
Windows Help and Support
Run Windows Help and Support to find problem that may be affecting your
computer.
To run Windows Help and Support proceed as follows:
Click Start > Help
Reinstalling Software
If for some reason your system crashes you may corrupt your HDD, Windows
Operating system and/or some of your device drivers. If this is the case, use System
Recovery CD to reinstall OS and System Software CD to reinstall the corrupt device
drivers.
System Recovery Precaution:
Before you start restoring your windows operating system insure you backup
all data on your hard drive.
Samsung is NOT responsible for any data loss.
Troubleshooting 67
 Loading...