

Page 1

This user manual includes detailed usage
instructions for your camera. Please read
this manual thoroughly.
Ä Click a topic
Common questions
Quick reference
User Manual
ST1000
Contents
Basic functions
Extended functions
Shooting options
Playback/Editing
Wireless network/Bluetooth
Appendixes
Index
Page 2

Health and safety information
Always comply with the following precautions and usage tips to avoid dangerous situations and ensure peak performance of your camera.
Warning—situations that could cause injury to yourself or
others
Caution—situations that could cause damage to your
camera or other equipment
Note—notes, usage tips, or additional information
Safety warnings
Do not use your camera near flammable or explosive
gases and liquids
Do not use your camera near fuels, combustibles, or flammable
chemicals. Do not store or carry flammable liquids, gases, or
explosive materials in the same compartment as the camera or its
accessories.
Keep your camera away from small children and pets
Keep your camera and all accessories out of the reach of small
children and animals. Small parts may cause choking or serious
injury if swallowed. Moving parts and accessories may present
physical dangers as well.
Prevent damage to subjects’ eyesight
Do not use the flash in close proximity (closer than 1 m/3 ft) to
people or animals. Using the flash too close to your subject’s
eyes can cause temporary or permanent damage.
Handle and dispose of batteries and chargers with care
Use only Samsung-approved batteries and chargers. t
Incompatible batteries and chargers can cause serious injuries
or damage to your camera.
Never dispose of batteries in a fire. Follow all local regulations t
when disposing of used batteries.
Never place batteries or cameras on or in heating devices, t
such as microwave ovens, stoves, or radiators. Batteries may
explode when overheated.
Avoid interference with pacemakers
Maintain a minimum of 15 cm (6 inches) between cameras and
pacemakers to avoid potential interference, as recommended by
manufacturers and the independent research group, Wireless
Technology Research. If you have any reason to suspect that your
camera is interfering with a pacemaker or other medical device,
turn off the camera immediately and contact the manufacturer of
the pacemaker or medical device for guidance.
1
Page 3

Health and safety information
Safety precautions
Handle and store your camera carefully and sensibly
Do not allow your camera to get wet—liquids can cause serious t
damage. Do not handle your camera with wet hands. Water
damage to your camera can void your manufacturer’s warranty.
Do not expose the camera to direct sunlight or high t
temperatures for an extended period of time. Prolonged
exposure to sunlight or extreme temperatures can cause
permanent damage to your camera’s internal components.
Avoid using or storing your camera in dusty, dirty, humid, or t
poorly-ventilated areas to prevent damage to moving parts and
internal components.
Remove the batteries from your camera when storing it for an t
extended period of time. Installed batteries may leak or corrode
over time and cause serious damage to your camera.
Protect your camera from sand and dirt when using it on t
beaches or in other similar areas.
Protect your camera and monitor from impact, rough handling, t
and excessive vibration to avoid serious damage.
Exercise caution when connecting cables or adapters and t
installing batteries and memory cards. Forcing the connectors,
improperly connecting cables, or improperly installing batteries
and memory cards can damage ports, connectors, and
accessories.
Do not insert foreign objects into any of your camera’s t
compartments, slots, or access points. Damage due to
improper use may not be covered by your warranty.
Protect batteries, chargers, and memory cards from
damage
Avoid exposing batteries or memory cards to very cold or very t
hot temperatures (below 0º C/32º F or above 40º C/104º F).
Extreme temperatures can reduce the charging capacity of your
batteries and can cause memory cards to malfunction.
Prevent batteries from making contact with metal objects, as t
this can create a connection between the + and – terminals
of your battery and lead to temporary or permanent battery
damage.
Prevent memory cards from making contact with liquids, dirt, or t
foreign substances. If dirty, wipe the memory card clean with a
soft cloth before inserting in your camera.
Do not allow liquids, dirt, or foreign substances to come in t
contact with the memory card slot. Doing so may cause the
camera to malfunction.
Turn off the camera when inserting or removing the memory t
card.
2
Page 4

Health and safety information
Do not bend, drop, or subject memory cards to heavy impact t
or pressure.
Do not use memory cards that have been formatted by other t
cameras or by a computer. Reformat the memory card with
your camera.
Never use a damaged charger, battery, or memory card.t
Use only Samsung-approved accessories
Using incompatible accessories may damage your camera,
cause injury, or void your warranty.
Protect your camera’s lens
Do not expose the lens to direct sunlight, as this may discolour t
the image sensor or cause it to malfunction.
Protect your lens from fingerprints and scratches. Clean your t
lens with a soft, clean, debris-free lens cloth.
Follow all safety warnings and regulations
Comply with any regulations that restrict the use of a camera in a
certain area.
Turn off the camera near medical equipment
Your camera can interfere with medical equipment in hospitals or
health care facilities. Follow all regulations, posted warnings, and
directions from medical personnel.
Turn off the camera when in an aircraft
Your camera can cause interference with aircraft equipment.
Follow all airline regulations and turn off your camera when
directed by airline personnel.
Avoid interference with other electronic devices
Your camera emits radio frequency (RF) signals that may interfere
with unshielded or improperly shielded electronic equipment,
such as pacemakers, hearing aids, medical devices, and
other electronic devices in homes or vehicles. Consult the
manufacturers of your electronic devices to solve any interference
problems you experience.
3
Page 5

Health and safety information
Important usage information
Allow only qualified personnel to service your camera
Do not allow unqualified personnel to service the camera or
attempt to service the camera yourself. Any damage that results
from unqualified service is not covered by your warranty.
Ensure maximum battery and charger life
Overcharging batteries may shorten battery life. After charging is t
finished, disconnect the cable from your camera.
Over time, unused batteries will discharge and must be t
recharged before use.
Disconnect chargers from power sources when not in use.t
Use batteries only for their intended purpose.t
Exercise caution when using the camera in humid
environments
When transferring the camera from a cold environment to a warm
and humid one, condensation can form on the delicate electronic
circuitry and memory card. In this situation, wait for at least 1 hour
until all moisture has evaporated before using the camera.
Check that the camera is operating properly before use
The manufacturer takes no responsibility for any loss of files or
damage that may result from camera malfunction or improper
use.
Use your camera in the normal position
Avoid contact with your camera’s internal antenna.
Data transferred via WLAN or Bluetooth technology could be t
leaked, so avoid transferring sensitive data in public areas or
on open networks.
The camera manufacturer is not liable for any data transfers t
that infringe on copyrights, trademarks, intellectual property
laws, or public decency ordnances.
4
Page 6

Organisation of the user manual
©2009 SAMSUNG DIGITAL IMAGING CO., LTD.
Camera specifications or contents of this manual may t
be changed without prior notice due to upgrade of
camera functions.
You can download firmwares from www.samsung.com t
or www.samsungcamera.com.
We recommend using your camera within a country t
where you purchase it.
Copyright information
Microsoft Windows and the Windows logo are t
registered trademarks of the Microsoft Corporation.
Mac is a registered trademark of the Apple Corporation.t
HDMI, the HDMI logo and the term “High Definition t
Multimedia Interface” are trademarks or registered
trademarks of HDMI Licencing LLC.
®
Bluetootht
trademarks of the Bluetooth SIG, Inc. and are used by
Samsung Digital Imaging Co., Ltd. under licence. All
other trademarks and product names are owned by their
respective owners.
Wi-Fit
registered trademarks of the Wi-Fi Alliance.
and the Bluetooth logo are registered
®
, the Wi-Fi CERTIFIED logo, and the Wi-Fi logo are
Basic functions 13
Learn about your camera’s layout, icons, and basic
functions for shooting.
Extended functions 30
Learn how to take a photo by selecting a mode and
how to record a video or voice memo.
Shooting options 41
Learn about the options you can set in Shooting mode.
Playback/Editing 64
Learn how to play back photos, videos, or voice
memos and edit photos or videos. Also, learn how
to connect your camera to your photo printer, TV, or
HDTV.
Wireless network/Bluetooth 91
Learn to use several functions using wireless local area
networks (WLANs) and the Bluetooth feature.
Appendixes 107
Refer to settings, error messages, specifications, and
maintenance tips.
5
Page 7

Indications used in this manual
Shooting mode Indication
Smart Auto
Auto
Program
Scene
DUAL IS
Movie
Shooting mode icons
These icons indicate that a function is available in the
corresponding modes. The s mode may not support functions
for all scenes.
e.g.)
S
a
p
s
d
v
Available in the
Program, DUAL IS,
and Movie modes
Icons used in this manual
Icon Function
Additional information
Safety warnings and precautions
Camera buttons; for example: [Shutter]
[]
(represents the shutter button)
()
Page number of related information
The order of options or menus you must select to perform
a step; for example: Select
(represents Select
*
Annotation
>
>
, and then )
Abbreviations used in this manual
Abbreviation Definition
ACB
AEB
AF
AP
DIS
DLNA
DPOF
EV
GPS
OIS
WB
Auto Contrast Balance
Auto Exposure Bracket
Auto Focus
Access Point
Digital Image Stabilisation
Digital Living Network Alliance
Digital Print Order Format
Exposure Value
Global Positioning System
Optical Image Stabilisation
White Balance
6
Page 8

Expressions used in this manual
Pressing the shutter
Half-press [t Shutter]: press the shutter halfway down
Press [t Shutter]: press the shutter all the way down
Half-press [Shutter] Press [Shutter]
Subject, background, and composition
Subjectt : the main object of a scene, such as a person, animal,
or still life
Backgroundt : the objects around the subject
Compositiont : the combination of a subject and background
Subject
Composition
Background
Exposure (Brightness)
The amount of light that enters your camera determines the
exposure. You can alter the exposure with shutter speed,
aperture value, and ISO speed. By altering the exposure, your
photos will be darker or lighter.
Normal exposure Overexposure (too bright)
7
Page 9

Common questions
You can get answers to common questions. Solve problems easily by setting shooting options.
The subject's eyes
appear red.
Photos have dust spots.
Photos are blurred.
Photos are blurred when
shooting at night.
Subjects come out
too dark because of
backlighting.
This is caused by a reflection from the camera flash.
Set the flash option to t
If the photo has already been taken, select t
Dust particles floating in the air may be captured in photos when using the flash.
Turn off the flash or avoid taking photos in a dusty place.t
Set ISO speed options. (p. t 47)
This may be caused by taking photos in low light conditions or holding the camera incorrectly.
Use the t
d
Press [t Shutter] halfway down to make sure the subject is focused. (p. 28)
As the camera tries to let in more light, the shutter speed slows.
This can make it difficult to steady the camera and may result in camera shake.
Turn on the flash. (p. t 46)
Select t
Set ISO speed options. (p. t 47)
Use a tripod to prevent your camera from shaking.t
When the light source is behind the subject or when there is a high contrast between the light and dark
areas, the subject may come out shaded.
Avoid shooting in front of the sun.t
Select t
Set the flash option to t
Set the Auto Contrast Balance (t ACB) option. (p. 57)
Adjust the exposure. (p. t 56)
Set the metering option to t
mode. (p. 35)
Night in the s mode. (p. 34)
Backlight in the s mode. (p. 32)
Red-eye or Red-eye Fix. (p. 46)
Fill in. (p. 46)
Spot if a bright subject is in the centre of the frame. (p. 58)
8
Red-eye Fix in the edit menu. (p. 79)
Page 10

Quick reference
Taking photos of people
s
t mode > Beauty Shot, Portrait, Children f 32
Red-eyet , Red-eye Fix (to prevent or correct red-eye)
46
f
Face Detectiont
51
f
Taking photos at night or in the dark
s
t mode > Night, Dawn, Fireworks f 32
Flash options t
ISO speed (to adjust the sensitivity to light) t
46
f
47
f
Taking action photos
Continuoust , Motion Capture f 61
Taking photos of text, insects, or
flowers
s
t mode > Close Up, Text f 32
Macrot , Auto Macro (to take close-up photos)
White Balancet (to change the colour tone)
48
f
59
f
Adjusting the exposure (brightness)
ISO speed (to adjust the sensitivity to light) t
EV (to adjust exposure) t
ACB (to compensate for subjects against bright t
backgrounds)
Meteringt f 58
AEB (to take 3 photos of the same scene with different t
exposures)
f
f
61
57
56
f
Applying a different effect
Photo styles (to apply tones) t
Image adjustment (to adjust saturation, sharpness, or t
63
contrast)
f
Reducing camera shake
Optical Image Stabilisation (OIS) t
d
t mode f 35
9
Viewing files by category in t
47
f
62
f
27
f
Smart Album
Deleting all files on the t
memory card
Viewing files as a slide show t
72
f
Viewing files on a TV or HDTV t
81
f
Connecting your camera to a t
computer
Adjusting sound and volume t
109
f
Changing the display t
language
Adjusting the brightness of t
the display
Setting the date and time t
110
f
Formatting the memory card t
110
f
Troubleshooting t
f
f
83
109
f
f
f
109
68
70
f
118
Page 11

Contents
Basic functions ...................................................................... 13
Unpacking ......................................................................... 14
Camera layout ................................................................... 15
Icons ................................................................................. 17
Inserting the battery and memory card .............................. 18
Charging the battery and turning your camera on ............. 19
Charging the battery ............................................................ 19
Turning on your camera ........................................................ 19
Performing the initial setup ................................................ 20
Using the touch screen ..................................................... 21
Selecting a shooting mode ................................................ 22
Selecting a shooting mode using motion recognition .............. 23
Setting the touch screen and sound ................................. 24
Setting the display type for the touch screen .......................... 24
Setting the sound ................................................................ 24
Taking photos .................................................................... 25
Zooming ............................................................................. 26
Reducing camera shake (OIS) .............................................. 27
Tips for getting a clearer photo .......................................... 28
Extended functions .............................................................. 30
Shooting modes ................................................................ 31
Using the Smart Auto mode ................................................. 31
Using the Scene mode ........................................................ 32
Using the Beauty Shot mode ................................................ 33
Using the frame guide .......................................................... 34
Adjusting the exposure in the Night mode .............................. 34
Using the DUAL IS mode ..................................................... 35
Using the Program mode ..................................................... 36
Taking photos with location information .................................. 36
Recording a video ............................................................... 38
Recording voice memos ................................................... 40
Recording a voice memo ..................................................... 40
Adding a voice memo to a photo .......................................... 40
Shooting options ................................................................... 41
Selecting a resolution and quality ...................................... 42
Selecting a resolution ........................................................... 42
Selecting image quality ........................................................ 43
Using the timer .................................................................. 44
10
Page 12

Contents
Shooting in the dark .......................................................... 46
Preventing red-eye .............................................................. 46
Using the flash .................................................................... 46
Adjusting the ISO speed ...................................................... 47
Changing the camera’s focus ............................................ 48
Using macro ....................................................................... 48
Using auto focus ................................................................. 48
Using smart touch focus ...................................................... 49
Using one touch shooting .................................................... 50
Adjusting the focus area ....................................................... 50
Using face detection ......................................................... 51
Detecting faces ................................................................... 51
Taking a self portrait shot ...................................................... 52
Taking a smile shot .............................................................. 52
Detecting eye blinking .......................................................... 53
Using smart face recognition ................................................ 53
Registering faces as your favourites (My Star) ......................... 54
Adjusting brightness and colour ........................................ 56
Adjusting the exposure manually (EV) .................................... 56
Compensating for backlighting (ACB) .................................... 57
Changing the metering option ............................................... 58
Selecting a light source (White balance) ................................. 59
Using burst modes ............................................................ 61
Improving your photos ...................................................... 62
Applying photo styles ........................................................... 62
Defining your own RGB tone ................................................ 62
Adjusting your photos .......................................................... 63
Playback/Editing ................................................................... 64
Playing back ...................................................................... 65
Starting Playback mode ....................................................... 65
Viewing photos ................................................................... 71
Playing a video .................................................................... 73
Playing a voice memo .......................................................... 74
Editing a photo .................................................................. 76
Rotating a photo .................................................................. 76
Resizing photos .................................................................. 76
Editing colour ...................................................................... 77
Defining your own RGB tone ................................................ 77
Applying a special effect ...................................................... 78
Correcting exposure problems ............................................. 78
Editing photos of portraits ..................................................... 79
Creating a print order (DPOF) ................................................ 80
Viewing files on a TV or HDTV ........................................... 81
11
Page 13

Contents
Transferring files to your computer (for Windows) .............. 83
Transferring files using Intelli-studio ........................................ 84
Transferring files by connecting the camera as a removable
disk
.................................................................................... 86
Disconnecting the camera (for Windows XP) .......................... 87
Transferring files to your computer (for Mac) ......................
88
Printing photos with a photo printer (PictBridge) ............... 89
Wireless network/Bluetooth ............................................... 91
Connecting to a WLAN and configuring network settings . 92
Connecting to a WLAN automatically .................................... 92
Connecting to a WLAN manually .......................................... 94
Storing your information ....................................................... 94
Storing email addresses ....................................................... 95
Setting the file size to share .................................................. 95
Configuring the WPS setting ................................................. 96
Checking information ........................................................... 96
Entering text ........................................................................ 96
Using photo or video sharing websites .............................. 97
Accessing a website ............................................................ 97
Uploading photos or videos .................................................. 98
Sending photos via email .................................................. 99
Viewing photos on the DLNA devices ............................. 100
Viewing photos on a TV screen .......................................... 100
Viewing photos on another device (renderer) ........................ 101
Sending or receiving photos with a camera ..................... 103
Sending photos to another camera ..................................... 103
Receiving photos from another camera ............................... 103
Sending photos via Bluetooth ......................................... 105
Appendixes .......................................................................... 107
Settings menu ................................................................. 108
Accessing the settings menu .............................................. 108
Sound settings .................................................................. 109
Display settings ................................................................. 109
Camera settings ................................................................ 110
Error messages ............................................................... 113
Camera maintenance ...................................................... 114
Cleaning your camera ........................................................ 114
About memory cards ......................................................... 115
About the battery ............................................................... 116
Before contacting a service centre .................................. 118
Camera specifications ..................................................... 121
Index ............................................................................... 127
12
Page 14

Basic functions
Learn about your camera’s layout, icons, and basic functions for shooting.
Unpacking …………………………………… 14
Camera layout ……………………………… 15
Icons …………………………………………… 17
Inserting the battery and memory card … 18
Charging the battery and turning your
camera on …………………………………… 19
Charging the battery …………………………… 19
Turning on your camera ……………………… 19
Performing the initial setup ………………… 20
Using the touch screen …………………… 21
Selecting a shooting mode ………………… 22
Selecting a shooting mode using motion
recognition ……………………………………… 23
Setting the touch screen and sound ……… 24
Setting the display type for the touch screen … 24
Setting the sound ……………………………… 24
Taking photos ………………………………… 25
Zooming ……………………………………… 26
Reducing camera shake (OIS) ………………… 27
Tips for getting a clearer photo …………… 28
Page 15

Unpacking
adapte
(microS
)
Check your product box for the following items.
Camera AC adapter/
User Manual CD-ROM Quick Start Manual
Optional accessories
Camera case Memory card
D
TM
USB cable
A/V cable
Basic functions
Rechargeable battery Strap
The illustrations may differ from your actual items.
Sold as a set
HDMI cable/
HDMI
r
Remote control
14
Page 16

Camera layout
Before you start, familiarise yourself with your camera's parts and their functions.
POWER button
Shutter button
Microphone
Internal antenna*
* Avoid contact
with the internal
antenna while
using the wireless
network.
Battery chamber cover
Insert a memory card and battery
USB, A/V, and HDMI port
Accepts USB cable, A/V cable,
or HDMI adapter
GPS antenna
Flash
AF-assist light/timer lamp
Lens
Tripod mount
Basic functions
15
Page 17

Camera layout
Speaker
Zoom button
Zoom in or outt
Zoom in on part of a photo or view files t
as thumbnails
Playback button
Status lamp
Blinkingt : When saving a photo or video, being read by a
computer or printer, out of focus, connecting to a WLAN,
sending a photo, or turning on the GPS mode or Bluetooth
feature
Steadyt : When connecting to a computer or in focus
Touch screen
1
2
Basic functions
16
Page 18

Icons
The icons displayed will change according to the mode you select or the options you set.
A. Status icons
Icon Description
Shooting mode
p
Aperture and shutter speed
Photo resolution
Video resolution
Metering
Optical Image Stabilisation (OIS)
Frame rate
Exposure value
ISO speed
White balance
Face detection
Burst mode
Image adjustment (sharpness,
contrast, saturation)
Icon Description
A
Photo styles
Available number of photos
Available recording time
Internal memory
Memory card inserted
t : Fully charged
B
t : Partially charged
t : Charging needed
Zoom ratio
Voice memo
Auto focus frame
Camera shake
Option set 1 (of 3)
Current date and time
Grid lines
B. Option icons (touch)
Icon Description
Flash option
Auto focus option
Timer option
Display type
Basic functions
17
Icon Description
t : Motion recognition
t : GPS options and status
l
N
t : Network and Bluetooth menus
M
t : Shooting options and
settings menu
Image setting options
t : Exposure value
t : White balance
t : ISO speed
t : Face tone
t : Face retouch
t : Focus area option
t : Face detection option
t : Photo resolution
t : Video resolution
t : Photo quality
f
t : Frame rate
t : Exposure with ACB
t : Metering option
t : Burst type
t : Photo styles
t : Image adjustment (sharpness,
contrast, saturation)
t : Long time shutter
t : Optical Image Stabilisation (OIS)
t : Audio recording
<>
t : Another row of options
Page 19

Inserting the battery and memory card
Learn to insert the battery and an optional microSDTM memory card into the camera.
Removing the battery and memory card
Memory card
Push gently until the card
disengages from the
camera and then pull it out
of the slot.
Insert a memory card with
the gold-coloured contacts
facing up.
Insert the battery with the
Samsung logo facing down.
Basic functions
Battery lock
Push the lock up to release
the battery.
Battery
The internal memory can be used as a temporary storage device when the
memory card is not inserted.
18
Page 20

Charging the battery and turning your camera on
Charging the battery
Before using the camera for the first time, you must charge the
battery. Attach the USB cable to the AC adapter and then plug
the end of cable with the indicator light into your camera.
Indicator light
Redt : Charging
Greent : Fully charged
Basic functions
Turning on your camera
Press [POWER] to turn your camera on or off.
The initial setup screen appears when you turn on the camera t
for the first time. (p. 20)
Turning on your camera in Playback mode
Press [P]. The camera turns on and accesses Playback mode
immediately.
Press and hold [P] to mute camera sounds.
19
Page 21

Performing the initial setup
The initial setup screen appears to allow you to configure the camera's basic settings.
Language.
Select
1
Select a language.
2
Select 3 Time Zone (Time Zone).
Select a time zone and select 4 .
To set the daylight-saving time, select t .
Basic functions
Select 5 Date & Time (Date & Time).
Set the date and time, select a date format, and select
6
.
Select 7 to switch to the Shooting mode.
20
Page 22

Using the touch screen
10+
Learn basic actions to use the touch screen. The touch screen works best when touched with the soft part of your finger.
Do not use other sharp objects, such as pens or pencils, to touch the screen.
Doing so may damage the screen.
When you touch or drag on the screen, discolourations will occur. It t
is not a malfunction but a characteristic of the touch screen. Touch or
drag lightly to reduce these annoying effects.
The touch screen may not recognise your touches correctly when:t
you touch multiple items at the same time you use the camera in high humidity environments you use the camera with an LCD protection film or another LCD -
accessory
If you perform no operations for few seconds, the screen will dim to t
save battery life.
Touching
Touch an icon to select a menu or option.
Basic functions
Dragging
Drag left or right to scroll horizontally.
EV
-2 -1 0 +2-2 -
2+1
Using gestures
Perform certain functions by drawing commands on the touch
screen.
Gesture Description
Draw a horizontal bar to right or left to view the
next or previous file.
Draw an X to delete a photo.
Draw a circle to rotate a photo.
Draw a diagonal to move the enlarged photo.
21
Page 23
Selecting a shooting mode
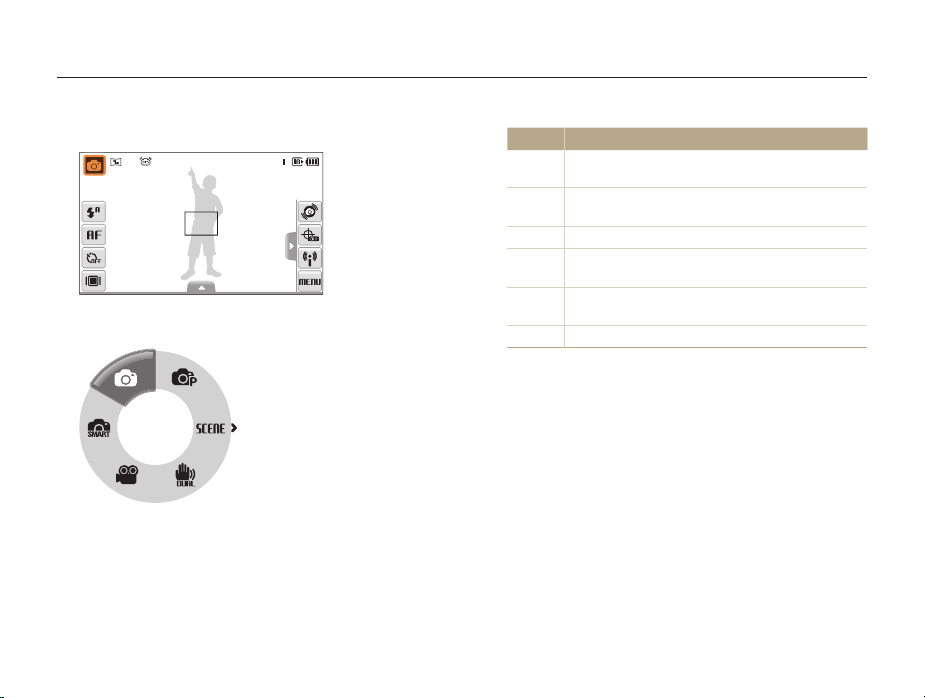
Learn how to select a shooting mode. Your camera provides you with various modes for shooting.
Select the mode icon.
1
Select a mode.
2
Mode Description
Smart Auto: Take a photo by letting the camera select
S
a scene mode as it detects. (p. 31)
Auto: Take a photo quickly and easily with minimal
a
settings. (p. 25)
p
Program: Take a photo by setting options. (p. 36)
Scene: Take a photo with options preset for a specific
s
scene. (p. 32)
DUAL IS: Take a photo with options suitable for
d
reducing camera shake. (p. 35)
v
Movie: Record a video. (p. 38)
Basic functions
22
Page 24

Selecting a shooting mode
Selecting a shooting mode using motion recognition
Your camera features a built-in motion sensor that allows you to
quickly switch the shooting mode by tilting the camera.
In Shooting mode, tilt the camera while touching and
holding
.
Access the Movie mode (p. 38)
Access the Program mode (p. 36)
Basic functions
Access the Smart Auto mode (p. 31)
Motion recognition may not work well if you hold the camera parallel to the
ground, as shown below.
23
Page 25

Setting the touch screen and sound
Learn how to change the basic settings for the touch screen and sound according to your preferences.
Setting the display type for the touch screen
In Shooting mode, select 1 .
(In Playback mode, select
Select an option.
2
Full
Option Description
Full: Display the name of an option when you select
an icon.
Basic: Display icons without the name of an option.
This option is available only in Playback mode.
Hide: Hide icons on the screen if you perform no
operations for 3 seconds (touch the screen to display
icons again).
Guide Line: Display grid lines. The grid lines are
helpful for getting the photo aligned with a surface,
such as the horizon or the edges of buildings. This
option is available only in Shooting mode.
.)
Basic functions
Setting the sound
Set whether your camera emits a specified sound when you
operate your camera.
In Shooting or Playback mode, select 1 M
Select
2
Select an option.
3
Beep Sound.
Option Description
Off
On
The camera does not emit any sounds.
The camera emits sounds.
Select 4 to return to the previous mode.
24
.
Page 26

Taking photos
Learn basic actions to take photos easily and quickly in the Auto mode.
Make sure that the camera is in the 1 a
camera’s default shooting mode.
If not, select the mode icon t a.
Align your subject in the frame.
2
mode (Auto), the
Basic functions
Half-press [3 Shutter] to focus.
A green frame means the subject in focus.t
Press [4 Shutter] to take a photo.
See page 28 for tips to get clearer photos.
25
Page 27

Taking photos
Zooming
You can shoot close-up photos by adjusting the zoom. Your
camera has a 5X optical zoom and 5X digital zoom. By using
both, you can zoom in up to 25 times.
Push [Zoom] right to zoom in on your subject. Push [Zoom] left
to zoom out.
Zoom ratio
Zoom inZoom out
The zoom ratio available for videos differs.
Basic functions
Digital zoom
If the zoom indicator is in the digital range, your camera is using
the digital zoom. The picture quality may deteriorate when you
use the digital zoom.
Zoom indicator
Digital range
Optical range
The digital zoom is not available when using t
scenes), and v modes and when used with Face Detection.
It may take longer to save a photo when using the digital zoom.t
S, d, s
(in some
26
Page 28

Taking photos
Reducing camera shake (OIS)
apsv
Reduce camera shake optically in Shooting mode.
Before correction After correction
In Shooting mode, select 1 f
Select an option.
2
Option Description
> (once or twice) .
Off: Deactivate the OIS function.
On: Activate the OIS function.
Basic functions
OIS may not function properly when:t
you move your camera to follow a moving subject you use digital zoom there is too much camera shake the shutter speed is slow (e.g., when you select - Night in the s
mode)
the battery is low -
you take a close-up shot If you use the OIS function with a tripod, your images may be blurred t
by the vibration of the OIS sensor. Deactivate the OIS function when
you use a tripod.
If the camera is impacted, the display will be blurry. In this case, turn t
off the camera and turn it on again to use the OIS function correctly.
27
Page 29

Tips for getting a clearer photo
Holding your camera correctly
Half-pressing the shutter button
Half-press [Shutter] and adjust the
focus. Focus and exposure will be
adjusted automatically.
The aperture value and shutter
speed are automatically set.
Focus frame
Press [t Shutter] to take the
photo if displayed in green.
Change the frame and t
half-press [Shutter] again if
displayed in red.
Make sure nothing is
blocking the lens.
Basic functions
Reducing camera shake
Set the Optical Image Stabilisation option to t
reduce camera shake optically. (p. 27)
Select the t
d
both optically and digitally. (p. 35)
mode to reduce camera shake
When h is displayed
Camera shake
When shooting in the dark, avoid setting the flash option to Slow
Sync or Off. The aperture remains open longer and it may be harder
to hold the camera still.
Use a tripod or set the flash option to t Fill in. (p. 46)
Set ISO speed options. (p. t 47)
28
Page 30

Preventing your subject from being out of focus
It may be difficult to get your subject in focus when:
there is little contrast between the subject and background -
(When your subject is wearing a colour of clothing that is similar to the
background)
-
the light source behind the subject is too bright
the subject is shiny -
the subject includes horizontal patterns, such as blinds -
the subject is not positioned in the centre of the frame -
Use the focus lock
Half-press [Shutter] to focus. When the subject is in focus,
you can reposition the frame to change the composition.
When you are ready, press [Shutter] to take your photo.
When you take photos in low lightt
Turn on the flash.
(p. 46)
When subjects are moving fastt
Use the continuous
or motion capture
function. (p. 61)
Basic functions
29
Page 31

Extended functions
Learn how to take a photo by selecting a mode and how to
record a video or voice memo.
Shooting modes …………………………………………… 31
Using the Smart Auto mode ……………………………… 31
Using the Scene mode ……………………………………… 32
Using the Beauty Shot mode ……………………………… 33
Using the frame guide ……………………………………… 34
Adjusting the exposure in the Night mode ………………… 34
Using the DUAL IS mode …………………………………… 35
Using the Program mode …………………………………… 36
Taking photos with location information …………………… 36
Recording a video …………………………………………… 38
Recording voice memos ………………………………… 40
Recording a voice memo …………………………………… 40
Adding a voice memo to a photo ………………………… 40
Page 32

Shooting modes
Take photos or record videos by selecting the best shooting mode for the conditions.
Using the Smart Auto mode
In this mode, your camera automatically chooses the appropriate
camera settings based on a detected type of scene. It will be
helpful if you are not familiar with the camera settings for various
scenes.
In Shooting mode, select 1 a
Align your subject in the frame.
2
The camera selects a scene automatically. An appropriate t
mode icon will appear at the top left of the screen.
Icon Description
Appears when taking photos of landscapes.
Appears when taking photos of bright backgrounds.
S.
Extended functions
Icon Description
Appears when taking photos of landscapes at night.
This is available only when the flash is off.
Appears when taking portraits at night.
Appears when taking photos of landscapes with
backlighting.
Appears when taking portraits with backlighting.
Appears when taking portraits.
Appears when taking close-up photos of objects.
Appears when taking close-up photos of text.
Appears when taking photos of sunsets.
Appears when taking photos of clear skies.
Appears when taking photos of forested areas.
Appears when taking close-up photos of colourful
subjects.
Appears when taking close-up portraits of people.
Appears when the camera and subject are stable for
a while.
Appears when taking photos of actively moving
subjects.
31
Page 33

Shooting modes
Half-press [
3
Shutter] to focus.
Press [4 Shutter] to take the photo.
If the camera does not recognise a proper scene mode, t
change and the default settings will be used.
Even if there is a face detected, the camera may not select a portrait t
mode depending on the subject's position or lighting.
The camera may not select the correct scene depending on shooting t
environments, such as camera shake, lighting and distance to the
subject.
Even if you use a tripod, the t
on the subject's movement.
mode may not be detected depending
Using the Scene mode
Take a photo with options preset for a specific scene.
In Shooting mode, select 1 a
s.
S
will not
Extended functions
Select a scene.
2
This mode allows you to choose an appropriate scene for
a variety of situations.
For the t Beauty Shot mode, see “Using the Beauty Shot
mode” on page 33.
For the t Frame Guide mode, see “Using the frame guide” on
page 34.
For the t Night mode, see “Adjusting the exposure in the Night
mode” on page 34.
Scene
Align your subject in the frame and half-press [3 Shutter]
to focus.
Press [
4
Shutter] to take the photo.
32
Page 34

Shooting modes
Using the Beauty Shot mode
Take a photo of a person with options to hide facial imperfections.
In Shooting mode, select 1 a
To make the subject's skin tone appear lighter (face
2
only), select f an option.
Select a higher setting to make skin tone appear lighter.t
Level 2
s .
Extended functions
To hide facial imperfections, select 3 f
an
option.
Select a higher setting to hide a greater number of t
imperfections.
Level 2
Align your subject in the frame and half-press [4 Shutter]
to focus.
Press [
5
Shutter] to take the photo.
The focus distance will be set to Auto Macro.
33
Page 35

Shooting modes
Using the frame guide
When you want another person to take a photo of you, you can
compose the scene with the frame guide feature. The frame
guide will help the other person take a photo of you by showing
the part of the pre-composed scene.
In Shooting mode, select 1 a
Align your subject in the frame and press [
2
Transparent guides will appear on the left and right of the t
frame.
Cancel Frame: Back
Ask another person to take a photo.
3
The person must align the subject in the frame by using the t
guides, and then press [Shutter] to take the photo.
To cancel the guides, select 4 .
s .
Shutter].
Extended functions
Adjusting the exposure in the Night mode
In the Night mode, you can catch brief flashes of light as curved
streaks by extending the exposure. Use a slow shutter speed
to extend the time until the shutter closes. Increase the aperture
value to prevent overexposure.
In Shooting mode, select 1 a
Select
f
2
Select an option.
3
Aperture.
Aperture
34
Shutter
Speed
s .
Page 36

Shooting modes
Select 4 f
Shutter Speed.
Aperture
1.0 2.0 4.0 8.0 16.0
Shutter
Speed
Select a value to adjust the shutter speed and select 5 .
Align your subject in the frame and half-press [6 Shutter]
to focus.
Press [
7
Shutter] to take the photo.
Use a tripod to prevent your photos from blurring.
Using the DUAL IS mode
Reduce camera shake and prevent blurred photos with Optical
and Digital Image Stabilisation functions.
Before correction After correction
2
3
Extended functions
In Shooting mode, select 1 a
d.
Align your subject in the frame and half-press [
to focus.
Press [
Shutter] to take the photo.
The digital zoom will not work in this mode.t
The camera will correct photos optically only when you take them with t
a light source that is brighter than fluorescent light.
If your subject is moving rapidly, the photo may be blurry.t
Set the Optical Image Stabilisation option to reduce camera shake in t
different shooting modes. (p. 27)
35
Shutter]
Page 37

Shooting modes
Using the Program mode
Set various options (except for shutter speed and aperture value)
in the Program mode.
In Shooting mode, select 1 a
Set options. (For a list of options, refer to “
2
options.”)
Align your subject in the frame and half-press [3 Shutter]
to focus.
Press [
4
Shutter] to take the photo.
p.
Shooting
Extended functions
Taking photos with location information
Learn to take photos with location information using the Global
Positioning System (GPS). The internal GPS antenna will receive
signals from GPS satellites. When location information is recorded
in the photo properties, you can later view where the photo was
taken and upload it to websites that support map services.
In Shooting mode, select 1 .
Select
2
Customise the GPS settings.
3
Option Description
GPS Valid Time
Settings
Location Display
GPS Reset
36
Sapsd
GPS Mode On.
Set the time to use the last location information
when the camera fails to receive GPS signals.
(If the camera fails to receive GPS signals after
the specified time, the location information will
not be recorded onto the photos.)
Set to display the location information on the
top right screen of Shooting mode.
(The location information will appear in English
regardless of the display language.)
Set to search for GPS satellites around the
current position.
Page 38

Shooting modes
Select 4 .
London
The location
information appears.
Align your subject in the frame and half-press [5 Shutter]
to focus.
Press [
6
Shutter] to take the photo.
A photo with the location information will be taken.t
While viewing files as thumbnails, you can see which files t
include location information. (p. 69)
29 61720
2009. 7. 1
You can also view the location information for a file with t
Intelli-studio.
In Shooting mode, the colour of indicates the GPS signal
status.
Extended functions
Colour Description
(Green)
(Red)
(Yellow)
(Gray)
The camera is receiving GPS signals.
The camera is not receiving GPS signals.
The camera has not received GPS signals and the
GPS valid time has not expired.
The GPS feature is deactivated.
37
Page 39

Shooting modes
The location information will be recorded for photos taken using t
Continuous or AEB.
The location information will not be recorded for photos taken after the t
valid time has expired while you are taking photos using Continuous
or AEB.
The location information will not be recorded for photos taken using t
Motion Capture.
It may take some time to receive GPS signals depending on GPS t
satellites.
It may be difficult to receive GPS signals in the following conditions: t
Between buildings In lowlands Near reflectors, such as mirrors -
In bad weather conditions Take photos outdoors to get GPS signals better.t
The recorded location information may have an error depending on t
the positioning environment.
The recorded location information may differ somewhat from the local t
designation, as place names are subject to change.
The time obtained the location information will not be recorded onto t
photos.
Location information cannot be recorded onto movies.t
The camera uses the World Geodetic System of 1984 (WGS 84).t
The camera receives will receive GPS signals but may not display and t
record location information, due to environmental factors.
The camera may consume more battery power when the GPS feature t
is active.
73 nations support the GPS feature including Canada, China, France, t
Germany, Great Britain, India, Italy, South Korea, Spain, and the
United States. In China, you can receive GPS signals only for cameras
purchased in China.
Extended functions
Recording a video
Record videos of up to 20 minutes in length in high definition. The
recorded video is saved as an H.264 (MPEG-4.AVC) file.
H.264 (MPEG-4 part10/AVC) is a high-compression video format t
established by international standard organisations ISO/IEC and ITU-T.
When the Optical Image Stabilisation (t
may be recorded with the OIS operation sound.
In Shooting mode, select 1 a
Select
f
2
a frame rate (the number of frames
per second).
As the number of frames increases, action appears more t
natural, but the file size is increased.
30 FPS
is available only when the video resolution is 320 X 240.
38
) is activated, your video
v.
Page 40

Shooting modes
Select 3 f
Set other options as desired. (For options, refer to
4
> a sound option.
Option Description
Off: Record a video without sound.
On: Record a video with sound.
“Shooting options.”)
Press [5 Shutter] to start recording.
Press [6 Shutter] again to stop recording.
To pause recording
The camera allows you to pause temporarily while recording a
video. With this function, you can record your favourite scenes as
a single video.
Select
Extended functions
to pause while recording. Select to resume.
Stop: Shutter
39
Page 41

Recording voice memos
Learn how to record a voice memo that you can play back at any time. You can add a voice memo to a photo as a short reminder of
shooting conditions.
You will get the best sound quality when recording 40 cm away from the camera.
apsd
Recording a voice memo
In Shooting mode, select 1 f
Record
Press [2 Shutter] to record.
Select t to pause and to resume.
The available recording time will be displayed on the top of t
the screen.
You can record voice memos of up to 10 hours in length.t
Press [3 Shutter] to stop.
Select 4 to switch to Shooting mode.
> .
Adding a voice memo to a photo
2
3
Extended functions
In Shooting mode, select 1 f
Memo
Align your subject in the frame and take a photo.
You will begin recording a voice memo right after taking the t
photo.
Record a short voice memo (10 seconds maximum).
Press [t Shutter] to stop recording a voice memo.
40
> .
Page 42

Shooting options
Learn about the options you can set in Shooting mode.
Selecting a resolution and quality ………… 42
Selecting a resolution ………………………… 42
Selecting image quality ………………………… 43
Using the timer ……………………………… 44
Shooting in the dark ………………………… 46
Preventing red-eye …………………………… 46
Using the flash ………………………………… 46
Adjusting the ISO speed ……………………… 47
Changing the camera’s focus ……………… 48
Using macro …………………………………… 48
Using auto focus ……………………………… 48
Using smart touch focus ……………………… 49
Using one touch shooting …………………… 50
Adjusting the focus area ……………………… 50
Using face detection ………………………… 51
Detecting faces ………………………………… 51
Taking a self portrait shot ……………………… 52
Taking a smile shot …………………………… 52
Detecting eye blinking ………………………… 53
Using smart face recognition ………………… 53
Registering faces as your favourites
(My Star) ……………………………………… 54
Adjusting brightness and colour ………… 56
Adjusting the exposure manually (EV) ………… 56
Compensating for backlighting (ACB) ………… 57
Changing the metering option ………………… 58
Selecting a light source (White balance) ……… 59
Using burst modes ………………………… 61
Improving your photos ……………………… 62
Applying photo styles ………………………… 62
Defining your own RGB tone ………………… 62
Adjusting your photos ………………………… 63
Page 43

Selecting a resolution and quality
Learn how to change the image resolution and quality settings.
Selecting a resolution
As you increase the resolution, your photo or video will include
more pixels, so it can be printed on larger paper or displayed on
a larger screen. When you use a high resolution, the file size will
also increase.
When taking a photo:
In Shooting mode, select 1 f
(In some modes, select
Select an option.
2
3840 X 2160
Sapsdv
> .
f
.)
Shooting options
Option Description
4000 X 3000: Print on A1 paper.
3984 X 2656: Print on A2 paper in wide ratio (3:2).
3840 X 2160: Print on A2 paper in panorama ratio
(16:9) or play back on an HDTV.
3264 X 2448: Print on A3 paper.
2560 X 1920: Print on A4 paper.
2048 X 1536: Print on A5 paper.
1920 X 1080: Print on A5 paper in panorama ratio
(16:9) or play back on an HDTV.
1024 X 768: Attach to an email.
42
Page 44

Selecting a resolution and quality
When recording a video:
In the 1 v
Select an option.
2
mode, select f .
1280 X 720 HQ
Option Description
1280 X 720 HQ: Play back high-quality files on an
HDTV.
1280 X 720: Play back on an HDTV.
640 X 480: Play back on a general TV.
320 X 240: Post on a web page.
For Sharing: Post on a website using the wireless
network (30 seconds maximum).
Shooting options
Fine
apsd
> .
f
.)
Selecting image quality
Photos you take are compressed and saved in JPEG format.
Higher quality images will result in larger sizes.
In Shooting mode, select 1 f
(In some modes, select
Select an option.
2
Option Description
Super Fine
Fine
Normal
43
Page 45

Using the timer
Learn how to set the timer to delay shooting.
Sapsdv
In Shooting mode, select 1 .
Select an option.
2
Off
Option Description
Off: The timer is not active.
10 Sec: Take a photo in 10 seconds.
2 Sec: Take a photo in 2 seconds.
Double: Take a photo in 10 seconds and take another
in 2 seconds.
Motion Timer: Detect your movement and then take
a photo. (p. 45)
The options may differ depending on the shooting mode.
Shooting options
Press [3 Shutter] to start the timer.
The AF-assist light/timer lamp blinks. The camera will t
automatically take a photo at the specified time.
Select the timer icon or press [t Shutter] to cancel the timer.
Depending on the selected face defection option, the timer is not t
available or some timer options are not available.
44
Page 46

Using the timer
Using the motion timer
In Shooting mode, select 1 .
Press [
2
3
Shutter].
Stand within 3 m from the camera within 6 seconds after
pressing [Shutter].
Make a motion, such as waving your arms, to activate
4
the timer.
The AF-assist light/timer lamp will start to blink rapidly when t
the camera detects you.
The detection range of
the motion timer
Shooting options
Pose for your photo while the AF-assist light/timer lamp
5
is blinking.
The AF-assist light/timer lamp will stop blinking just before the t
camera automatically takes a photo.
The motion timer may not work when:
you are more than 3 m away from the camerat
your movements are too subtlet
there is too much light or backlightt
45
Page 47

Shooting in the dark
Learn how to take photos at night or in low light conditions.
Preventing red-eye
If the flash fires when you take a photo of a person in the dark, a
red glow may appear in the eyes. To prevent this, select Red-eye
or Red-eye Fix.
aps
Shooting options
Using the flash
Use the flash when taking photos in the dark or when you need
more light on your photos.
Saps
In Shooting mode, select 1 .
Select an option.
2
Auto
Option Description
Off:
The flash will not fire.t
Camera shake warning (t
shooting in low light.
Auto: The camera will select a proper flash setting for
the detected scene in the
Auto: The flash fires automatically when the subject or
background is dark.
) will be displayed when
S
mode.
46
Page 48

Shooting in the dark
Option Description
Red-eye*:
The flash fires when the subject or background is t
dark.
The camera reduces red-eyes.t
Fill in:
The flash always fires.t
Light intensity is adjusted automatically.t
Slow Sync:
The flash fires and the shutter stays open longer.t
Select this when you want to capture ambient light t
to reveal more details in the background.
Use a tripod to prevent your photos from blurring.t
Red-eye Fix*:
The flash fires when the subject or background is t
dark.
The camera corrects red-eyes through its advanced t
software analysis.
The options may differ depending on the shooting mode.
* There is an interval between two bursts of the flash. Do not move until
the flash fires a second time.
Flash options are not available if you set burst options or select t Blink
Detection or Self-Portrait.
Make sure that your subjects are within the recommended distance t
from the flash. (p. 121)
If there is reflected light or much dust in the air, tiny spots may appear t
on your photo.
Shooting options
Adjusting the ISO speed
p
The ISO speed is the measure of a film’s sensitivity to light as
defined by the International Organisation for Standardisation (ISO).
The higher ISO speed you select, the more sensitive to light your
camera becomes. With a higher ISO speed, you can get a better
photo without using the flash.
In Shooting mode, select 1 f
Select an option.
2
Select t to use an appropriate ISO speed based on the
.
brightness of the subject and lighting.
Auto
The higher ISO speed you select, the more image noise you may get.
47
Page 49

Changing the camera’s focus
Learn how to adjust the camera's focus according to your subjects.
Using macro
Use macro to take close-up photos of subjects, such as flowers
or insects. Refer to macro options in “Using auto focus.”
apdv
Try to hold the camera very still to prevent blurry photos.t
Turn off the flash if the distance to the subject is less than 40 cm.t
Shooting options
Using auto focus
To take sharp photos, select the appropriate focus according to
your distance from the subject.
apdv
In Shooting mode, select 1 .
Select an option.
2
Normal (AF)
Option Description
Normal (AF): Focus on a subject farther than 80 cm.
Auto Macro: Focus on a subject farther than 5 cm
(farther than 50 cm when using zoom).
Macro: Focus on a subject 5 - 80 cm (50 - 80 cm when
using zoom).
The options may differ depending on the shooting mode.
48
Page 50

Changing the camera’s focus
Using smart touch focus
apsd
Smart Touch AF allows you to track and auto focus on your
subject, even when you are moving.
In Shooting mode, select 1 f
Touch the subject you want to track in the touch area
2
.
(indicated by a frame).
A focus frame will appear on the subject and will follow the t
subject as you move the camera.
The white frame means that your camera is tracking the t
subject.
The green frame means that your subject is in focus when you t
half-press [Shutter].
Shooting options
If you do not touch any area on the screen, the focus frame will t
appear in the centre of the screen.
Tracking a subject may fail when:t
the subject is too small or the subject moves the subject is backlit or you are shooting in a dark place colours or patterns on the subject and the background are the same
the camera shakes excessively -
In these cases, the focus frame will appear as a white single-line
frame.
If the camera fails to track the subject, you must reselect the subject t
to track.
If the camera fails to fix the focus, the focus frame will change to a red t
single-line frame.
If you use this function, you cannot set face detection and photo style t
options.
49
Page 51

Changing the camera’s focus
Using one touch shooting
You can focus on your subject and take a photo with a touch of
your finger.
In Shooting mode, select 1 f
Touch a subject to focus.
2
Touch and hold the subject to take the photo.
3
Touch and hold until the level indicator fills up. t
When you use face detection, you should touch and hold the image of
detected face. If you touch and hold any other area, the frame to detect faces
will change to a normal frame.
apsd
.
Shooting options
Adjusting the focus area
You can get clearer photos by selecting an appropriate focus
area according to your subject’s location in the scene.
In Shooting mode, select 1 f
Select an option.
2
Center AF
Option Description
Center AF: Focus on the centre (suitable when
subjects are located in the centre).
Multi AF: Focus on one or more of 9 possible areas.
One Touch Shooting: Focus on the subject by
touching the image on the screen. Touch and hold the
subject to take the photo.
Smart Touch AF: Focus on and track the subject that
you touch on the screen. (p. 49)
The options may differ depending on the shooting mode.
apsd
.
50
Page 52

Using face detection
apsd
If you use face detection options, your camera can automatically detect a human face. When you focus on a human face, the camera
adjusts the exposure automatically. Take photos quickly and easily by using Blink Detection to detect closed eyes or Smile Shot to
capture a smiling face. You can also use Smart Face Recognition to register faces and prioritise the focus on them.
In some scene modes, face detection is unavailable.t
Face detection may not be effective when:t
the subject is far from the camera (The focus frame will appear -
orange for Smile Shot and Blink Detection)
it is too bright or too dark -
the subject is not facing the camera -
the subject is wearing sunglasses or a mask -
the subject is in backlighting or the lighting condition is unstable -
the subject’s facial expression changes remarkably Face detection is not available when using a photo style.t
When you use the face detection option, the digital zoom will not t
work.
Depending on the selected face defection option, the timer is not t
available or some timer options are not available.
Depending on the selected face detection option, some burst options t
are not available.
When you take photos of detected faces, they will be registered in t
the face list.
You can view registered faces in order of priority in Playback mode. t
(p. 68) Even though faces are registered successfully, they may not be
classified in Playback mode.
The detected face in Shooting mode may not appear in the face list t
or Smart Album.
Shooting options
Detecting faces
Your camera automatically detects human faces (up to 10 human
faces).
In Shooting mode, select f . The nearest face
appears in a white focus frame and the rest of the faces appear in
gray focus frames.
The closer you are to the subject, the quicker your camera will detect t
faces.
If you want to focus faces in gray focus frames, touch them to focus.t
When you use the burst option, the detected faces may not be t
registered.
51
Page 53

Using face detection
Taking a self portrait shot
Take photos of yourself. The focus distance will be set to closeup and your camera will emit a beep.
In Shooting mode, select 1 f
When you hear a quick beep, press [
2
To turn the beep on or off, select Self-Portrait in the sound settings. (p. 109)
.
Shutter].
Shooting options
Taking a smile shot
The camera automatically releases the shutter when it detects a
smiling face.
In Shooting mode, select f . When your subject
smiles broadly, your camera can detect the smile more easily.
52
Page 54

Using face detection
Detecting eye blinking
If your camera detects closed eyes, it will automatically take 2
photos in succession.
In Shooting mode, select f .
Hold your camera still while t “Capturing” is displayed on the screen.
When blink detection fails, t “Picture taken with eyes closed.”
message appears. Take another photo.
Shooting options
Using smart face recognition
The camera automatically registers faces that you frequently
photograph. This feature will automatically prioritise the focus
on those faces and favourite faces. This feature is available only
when you use a memory card.
In Shooting mode, select f . The nearest face
appears in a white focus frame and the rest of the faces appear in
gray focus frames.
t : Indicate favourite faces
(To register favourite faces, see page 54).
t : Indicate faces that the camera automatically registers.
53
Page 55

Using face detection
The camera may recognise and register faces incorrectly depending t
on lighting conditions, remarkable changes in the subject's pose or
face, and whether or not the subject is wearing glasses.
The camera can automatically register up to 14 faces. If the camera t
recognises a new face when there are 14 registered faces, it will
replace the face in the lowest priority with the new one.
The camera can detect up to 10 faces and register 5 faces in one t
scene.
Shooting options
Registering faces as your favourites (My Star)
You can register your favourite faces to prioritise the focus and
exposure on those faces. This feature is available only when you
use a memory card.
In Shooting mode, select 1 f
Align your subject and press [
2
face.
You can register up to 5 photos for one face. For better t
recognition of the face, take photos of the left, right, and front
of the subject's face.
54
.
Shutter] to register the
Page 56

Using face detection
Select 3 to register the face as one of your favourites.
Select 4 when the face list appears.
Your favourite faces are indicated with a t on the face list.
You can register up to 6 favourite faces.t
The flash option will be set to t Off.
If you register the same face twice, you can delete one of the faces t
in the face list.
Viewing your favourite faces
In Shooting mode, select f .
Select t to change the ranking of your favourite faces.
See page 67 for more information about the face list.
Shooting options
55
Page 57

10+
Adjusting brightness and colour
Learn how to adjust the brightness and colour for better image quality.
Adjusting the exposure manually (EV)
Depending on the intensity of the ambient light, your photos
may be too bright or dark. In these cases, you can adjust the
exposure to get a better photo.
Darker (-) Neutral (0) Brighter (+)
In Shooting mode, select 1 f
Select a value to adjust the exposure.
2
+: brighter, -: darkert
EV
-2 -1 0 +2-2 -
.
2+1
pdv
Shooting options
Select 3 .
The adjusted exposure value will appear as shown below.t
Once you adjust the exposure, the setting will remain the same. You t
may need to change the exposure value later to avoid overexposure
or underexposure.
If you cannot decide on an appropriate exposure, select t AEB (Auto
Exposure Bracket). The camera takes photos with different exposures:
normal, underexposed, and overexposed. (p. 61)
56
Page 58

Adjusting brightness and colour
Compensating for backlighting (ACB)
When the light source is behind your subject or there is high
contrast between your subject and the background, your subject
is likely to appear dark in the photo. In this case, set the Auto
Contrast Balance (ACB) option.
Without ACB With ACB
In Shooting mode, select 1 f
Select an option.
2
Off
> .
p
Shooting options
Option Description
Off: ACB is off.
On: ACB is on.
The ACB feature is always on in the t
This feature is not available when t Continuous, Motion Capture, or
AEB is in use.
a
mode.
57
Page 59

Adjusting brightness and colour
Changing the metering option
The metering mode refers to the way in which a camera
measures the quantity of light. The brightness and lighting of your
photos will vary depending on the metering mode you select.
In Shooting mode, select 1 f
(In the
v
mode, select f .)
Select an option.
2
Multi
Option Description
Multi:
Your camera divides the scene into several areas, t
and then measures the light intensity of each area.
Suitable for general photos.t
pdv
> .
Shooting options
Option Description
Spot:
Your camera measures only the light intensity of the t
very centre of the frame.
If a subject is not in the centre of the scene, your t
photo may be improperly exposed.
Suitable for a subject with backlighting.t
Center-weighted:
Your camera averages the meter reading of the t
entire frame with emphasis placed on the centre.
Suitable for photos with subjects in the centre of t
the frame.
58
Page 60

Adjusting brightness and colour
Selecting a light source (White balance)
The colour of your photo depends on the type and quality of the
light source. If you want the colour of your photo to be realistic,
select an appropriate lighting condition to calibrate the white
balance, such as Auto WB, Daylight, Cloudy, or Tungsten.
Auto WB Daylight
Cloudy Tungsten
In Shooting mode, select 1 f
Select an option.
2
pdv
.
Auto WB
Icon Description
Auto WB: Use automatic settings depending on the
lighting conditions.
Daylight: Select when taking outdoor photos on a
sunny day.
Cloudy: Select when taking outdoor photos on a
cloudy day or in shadows.
Fluorescent_H: Select when shooting under a
daylight fluorescent or three-way fluorescent light.
Fluorescent_L: Select when shooting under white
fluorescent light.
Tungsten: Select when taking indoor photos under
incandescent bulbs or halogen lamps.
Custom Set: Use your pre-defined settings. (p. 60)
Shooting options
59
Page 61

Adjusting brightness and colour
Defining your own white balance
You can customise the white balance by taking photos of a white
surface, such as a piece of paper. This will help you to match
the colours in your photo with the actual scene according to your
lighting condition.
In Shooting mode, select 1 f
Aim the lens at a piece of white paper.
2
.
Press [3 Shutter].
Shooting options
60
Page 62

Using burst modes
It can be difficult to take photos of fast-moving subjects or capture natural facial expressions and gestures of your subjects in photos.
In these cases, select one of the burst modes.
In Shooting mode, select 1 f
Select an option.
2
Single
Option Description
Single: Take a single photo.
Continuous:
While you are pressing [t Shutter], the camera takes
photos continuously.
The maximum number of photos depends on the t
capacity of your memory card.
ps
> .
Option Description
Motion Capture: While you are pressing [Shutter],
the camera takes VGA photos (6 photos per second;
maximum of 30 photos).
AEB:
Take 3 photos with different exposures: normal, t
underexposed, and overexposed.
Use a tripod to prevent blurry photos.t
The options may differ depending on the shooting mode.
You can use the flash and timer and ACB only when you select t
Single.
When you select t Motion Capture, the resolution will be set to
VGA and the ISO speed will be set to Auto.
Depending on the selected face detection option, some burst t
options are not available.
Shooting options
61
Page 63

Improving your photos
Learn how to improve your photos by applying photo styles or colours, or make some adjustments.
Applying photo styles
Apply different styles to your photos, such as Soft, Vivid, or
Forest.
Soft Vivid Forest
In Shooting mode, select 1 f
Select an option.
2
Select t to define your own RGB tone.
Depending on the selected photo style, you may not set the face
detection and image adjustment options.
apsdv
> (once or twice) .
Normal
Shooting options
Defining your own RGB tone
In Shooting mode, select 1 f
.
Select a colour (R: Red, G: Green, B: Blue).
2
Adjust the amount of the selected colour.
3
Custom RGB
Select 4 .
62
> (once or twice)
Page 64

Improving your photos
-2-1
+
Adjusting your photos
Adjust the sharpness, saturation, and contrast of your photos.
In Shooting mode, select 1 f
Select an adjustment option.
2
t : Sharpness
p
> (twice) .
t : Contrast
t : Saturation
Select a value to adjust the selected item.
3
Sharpness
-2 -1 +2
Sharpness option Description
-
+
2+10
Soften the edges on your photos (suitable
for editing the photos on your computer).
Sharpen the edges to improve the clarity
of your photos. This may also increase the
noise on your photos.
Shooting options
Contrast option Description
-
+
Saturation option Description
-
+
Select 0 if you do not want to apply any effects (suitable for printing).
Decrease the colour and brightness.
Increase the colour and brightness.
Decrease the saturation.
Increase the saturation.
63
Page 65

Playback/Editing
Learn how to play back photos, videos, or voice memos and edit photos or videos. Also, learn how to
connect your camera to your photo printer, TV, or HDTV.
Playing back ………………………………… 65
Starting Playback mode ……………………… 65
Viewing photos ………………………………… 71
Playing a video ………………………………… 73
Playing a voice memo ………………………… 74
Editing a photo ……………………………… 76
Rotating a photo ……………………………… 76
Resizing photos ……………………………… 76
Editing colour ………………………………… 77
Defining your own RGB tone ………………… 77
Applying a special effect ……………………… 78
Correcting exposure problems ……………… 78
Editing photos of portraits …………………… 79
Creating a print order (DPOF) ………………… 80
Viewing files on a TV or HDTV …………… 81
Transferring files to your computer
(for Windows) ………………………………… 83
Transferring files using Intelli-studio …………… 84
Transferring files by connecting the camera
as a removable disk …………………………… 86
Disconnecting the camera (for Windows XP) … 87
Transferring files to your computer
(for Mac) ……………………………………… 88
Printing photos with a photo printer
(PictBridge) …………………………………… 89
Page 66

Playing back
Learn actions to play back photos, videos, or voice memos, and managing files.
Starting Playback mode
View photos or play videos and voice memos stored in your
camera.
Press [1 P
Draw a horizontal bar left or right to scroll through files.
2
].
The most recent file you have taken or recorded will be t
displayed.
If the camera is off, it will turn on.t
Select t
<
to view the previous file. Hold to view files quickly.
Select t
>
to view the next file. Hold to view files quickly.
Playback/Editing
You can also view files by tilting the camera. t
(Motion recognition may not work well if you hold the camera
parallel to the ground.)
To deactivate this function, select t
View Off in Playback mode.
If you want to view files stored in the internal memory, remove your t
memory card.
The camera will not properly play back files that are too large or those t
taken with cameras from other manufacturers.
M
.
Gesture
65
Page 67

Playing back
Selecting a menu using motion recognition
Your camera features a built-in motion sensor that allows you to
quickly select a menu by tilting the camera.
In Playback mode, tilt the camera while touching and
holding
.
Set the current photo as your favourite photo*
(
will appear on the top of the file.)
Lock or unlock the current file
(
will appear on the top of the file.)
* You cannot set files as favourites for:
videos or voice memos photos with errors or locked photos photos taken with cameras from other manufacturers photos taken using the motion capture option set photos that are too large for the available memory -
Start a slide show (p. 72)
Motion recognition may not work well if you hold the camera parallel to the
ground, as shown below.
Playback/Editing
66
Page 68

Playing back
Display in Playback mode
Icon Description
Photo includes a voice memo
v
Video file
Print order has been set (DPOF)
Protected file
Photo includes a registered face; Available only when you
use a memory card
Favourite file
Photo includes location information
Folder name – File name
Open the face list (p. 67); Available only when you use a
memory card
Delete files (p. 70)
Play a slide show (p. 72)
Edit photos (p. 76)
Information
Playback/Editing
Icon Description
Select a display type (p. 24)
Select a menu using motion recognition (p. 66)
Set GPS options and view signal status (p. 36)
N
Use network menus and the Bluetooth feature (p. 91)
M
Playback and settings menus
Playback time of videos or voice memos
Play videos or voice memos
(Video p. 73/Voice memo p. 74)
Ranking your favourite faces
You can change the ranking of your favourite faces or delete
them. This feature is available only when you use a memory card.
In Playback mode, select 1 .
Face List
1
2
3
4
5
6
1/2
Select t to cancel your favourite faces.
Select t
to view your favourite faces or view all faces.
67
Page 69

Playing back
Select 2 a face.
Edit Ranking
Select 3 ,
select
1
2
3
or . to change the ranking of the face and
.
4
Viewing files by category in Smart Album
View and manage files by categories, such as date, file type, or
week.
In Playback mode, select 1 a category.
You can also access Smart Album by pushing [t Zoom] left.
Type
Date
Color
Week
Favorite
29 61720
1/2
2009. 7. 1
Playback/Editing
Option Description
Type
Date
Color
Week
Favorite
Location
Face
Select a date, file type, weekday, colour, location, or
2
View files by the file type.
View files by the date they were saved.
View files by the dominant colour of the image.
View files by the weekday they were saved.
View your favourite files.
View files by recorded location information
View files by recognised faces and favourite
faces. (Up to 20 people)
It may take some time for the camera to open Smart Album or to change
the category and reorganise files.
face.
You can also touch and hold t
file types, weekdays, colours, locations, or faces.
Select 3 <
or > to scroll through files.
4
Select
to return to the normal view.
Once you select a category and a menu that displays thumbnails (such as
deleting multiple files or protecting selected files), the camera will display all files
sorted by category or only those that match the category option.
<
or > to scroll through dates,
68
Page 70

Playing back
Viewing files as thumbnails
Scan thumbnails of files.
In Playback mode, push [Zoom] left to display 9 or 16
thumbnails (push [Zoom] right to return to the previous
mode).
29 61720
2009. 7. 1
To Do this
Scroll through files
View a file
Delete files
Select a category
Select < or >.
Select a thumbnail.
Select or drag a file to . (p. 70)
Select .
Playback/Editing
Protecting files
Protect your files from accidental deletion.
To select and protect files,
In Playback mode, select 1 M
Select
2
3
Protect Select.
Select files you want to protect.
Select t to select all files.
Select t
to cancel your selection.
.
Select 4 .
69
Page 71

Playing back
To protect all files,
In Playback mode, select 1 M
Select
2
Deleting files
Delete single files or all files at once. You cannot delete protected
files.
To delete a single file,
2
To delete multiple files,
2
Protect All Lock.
In Playback mode, select a file 1 .
Select
Yes to delete the file.
In Playback mode, select 1 Multiple Delete.
Select files you want to delete.
Select t to select all files on the current screen.
Select t
to cancel your selection.
Select 3 Yes.
.
Playback/Editing
To delete all files,
In Playback mode, select 1 M
Select
2
Delete All Yes.
Alternate way to delete a file
While viewing a file in Playback mode, draw an X on the
screen.
70
.
Page 72

Playing back
Using the recycle bin
If you activate the recycle bin, files you delete will be sent to the
recycle bin instead of being deleted permanently. This applies to
single files or selected files only–if you choose to delete all files,
those files will not be sent to the recycle bin.
To activate the recycle bin,
In Playback mode, select 1 M
Select
2
To restore files from the recycle bin,
Recycle Bin On.
In Playback mode, select 1 M
Select
2
Recycle Bin Retrieve.
This function does not work for videos or voice memos.t
It may take longer to delete files when using the recycle bin function.t
If you format the internal memory, all files in the recycle folder will be t
deleted.
The recycle bin will hold up to 10 MB of files. Once you exceed the t
10 MB limit, the camera asks you whether to empty the recycle bin.
Select Yes to empty the recycle bin or No to delete only the current
file.
.
.
Playback/Editing
Copying files to the memory card
You can copy files from the internal memory to a memory card.
In Playback mode, select 1 M
Select
.
2
Copy to Card.
.
Select 3 Yes to copy files.
Viewing photos
View a photo by changing the orientation by gesture or zooming
in on part of a photo or view photos as a slide show.
Rotating a photo by gesture
While viewing a single file, drag your finger as shown below to
rotate the photo 90°.
71
Page 73

Playing back
Viewing files by rotating the photo automatically
You can view vertical photos in landscape view without rotating
your camera. Vertical photos will be automatically rotated to an
upright position in landscape view once you set this option and
take vertical photos.
To activate the automatic rotation,
In Shooting or Playback mode, select 1 M
Select
2
Auto Rotate On.
..
Select 3 .
This option may not be effective for:
photos taken when you hold the camera parallel to the ground photos taken with the motion capture option set videos -
Enlarging a photo
In Playback mode, push [Zoom] right to enlarge a
photo (push [Zoom] left to reduce a photo).
The enlarged area and zoom ratio are indicated on the top of the
screen. The maximum zoom ratio may vary depending on the
resolution. Select arrows or draw a diagonal to move the enlarged
area.
Icon Description
Delete the file.
Crop the enlarged photo (it will be saved as a new file).
Go back to the original view.
Starting a slide show
You can apply effects and audio to your slide show. This function
does not work for videos or voice memos.
In Playback mode, select 1 .
Set a slide show effect.
2
Playback/Editing
72
Page 74

Playing back
Option Description
Images: Select photos (up to 2.000) for your slide
show.
Play Mode: Select whether or not to loop the slide
show.
Interval: Set the interval between photos.
This will be available when t
Effect menu.
When used with an effect option other than t , the
interval will be set to 1 sec.
Music: Select background audio.
Effect:
Select a transition effect.t
Select t for no effects.
Select 3 to start the slide show.
Touch on the screen (except for option icons) to pause the t
slide show.
Select t
to switch to Playback mode.
is selected in the
Playback/Editing
Playing a video
You can play a video, capture an image from a video, or crop a
video.
In Playback mode, select a video 1 .
Use the following icons to control playback.
2
Icon Description
Scan backward.
Pause or resume playback.
/
Stop playback.
Scan forward.
Adjust volume or mute sound.
73
Page 75

Playing back
Trimming a video during playback
Select 1 at the point where you want the new video to
begin and select
Select
2
to resume playback.
.
Select 3 at the point where you want the new video to
end and select
.
Select 4 Yes.
The original video should be at least 10 seconds long.t
The edited video will be saved as a new file.t
Capturing an image during playback
Select 1 at the point where you want to save a still
image.
2
Select
.
Select 3 Yes.
A captured image will have the same file size as the original video file and will
be saved as a new file.
Playback/Editing
Playing a voice memo
Playing a voice memo
In Playback mode, select a voice memo 1 .
Use the following icons to control playback.
2
Icon Description
Scan backward.
Pause or resume playback.
/
Stop playback.
Scan forward.
Adjust volume or mute sound.
74
Page 76

Playing back
Adding a voice memo to a photo
In Playback mode, select a photo 1 M.
Select
2
3
Voice memo On.
Shutter] to record a short voice memo (10
Press [
seconds maximum).
Press [t Shutter] to stop recording a voice memo.
Playback/Editing
Playing a voice memo added to a photo
In Playback mode, select a photo that includes a voice
1
memo .
Use the following icons to control playback.
2
Icon Description
Pause or resume playback.
/
Stop playback.
Adjust volume or mute sound.
75
Page 77

Editing a photo
Perform photo editing tasks, such as rotating, resizing, eliminating red-eyes, and adjusting brightness, contrast, or saturation.
Edited photos will be saved as new files.t
When you edit photos that are t
resized to a lower resolution (except when rotating or resizing photos).
or larger, they will be automatically
Rotating a photo
In Playback mode, select a photo 1 .
Select
2
an option.
Left 90˚
Select 3 .
Playback/Editing
Resizing photos
In Playback mode, select a photo 1 .
Select
2
Select 3 .
76
an option.
Select t to save the photo as a start image. (p. 109)
1920 X 1080
Available options differ depending on the size of the selected photo.
Page 78

Editing a photo
Editing colour
Apply a different colour tone to the photo, such as Soft, Vivid, or
Forest.
Soft Vivid Forest
In Playback mode, select a photo 1 .
Select
2
Select 3 .
an option.
Select t to define your own RGB tone.
Soft
Playback/Editing
Defining your own RGB tone
In Playback mode, select a photo 1 .
Select a colour (R: Red, G: Green, B: Blue).
2
Adjust the amount of the colour.
3
Custom RGB
Select 4 .
77
Page 79

Editing a photo
Applying a special effect
Apply special effects to the photo, such as colour filters or noise
effects.
In Playback mode, select a photo 1 .
Select
2
Select 3 .
an option.
Elegant
Option Description
Colour Filter: Change background colours to black
and white to make the main subject stand out.
Elegant: Apply effects to the photo to make it brighter
and softer.
Add Noise: Add noise to the photo to give it an aged
look.
Playback/Editing
Correcting exposure problems
Adjust ACB (Auto Contrast Balance), brightness, contrast, or
saturation.
Adjusting an image
In Playback mode, select a photo 1 .
Select
2
t : Brightness
t : Contrast
t : Saturation
Select a value to adjust the selected item.
3
(-: less or +: more)
Select 4 .
Adjusting ACB (Auto Contrast Balance)
In Playback mode, select a photo 1 .
Select
2
Select 3 .
78
an adjustment option.
.
Page 80

Editing a photo
Editing photos of portraits
You can improve your photos by hiding facial imperfections and
removing red-eye or you can apply effects for fun. These effects
are only available for portraits.
Snow Mosaic Highlight
Hiding imperfections
In Playback mode, select a photo 1 .
Select
2
Select a level.
3
Select 4 .
Removing red-eye
In Playback mode, select a photo 1 .
Select
2
Select 3 .
.
As the number increases, more imperfections are hidden.t
.
Playback/Editing
Applying snow effect
In Playback mode, select a photo 1 .
Select
2
Select 3 to stop snowing and select .
Applying fun effects
In Playback mode, select a photo 1 .
Select
2
Select a detected face and select 3 .
Select 4 .
79
.
Snow falls around the subjects. t
or .
Your camera automatically detects faces.t
Option Description
Mosaic: Apply mosaic effects to the detected faces.
Highlight: Make the background blurry to draw
attention to the main subject.
If you select t or effect, the camera will detect up to 20 faces.
You can use the t effect even if the photo does not include people.
Page 81

Editing a photo
Creating a print order (DPOF)
Select photos to be printed and set options, such as number of
copies or paper size.
The memory card can be taken to a print shop that supports DPOF t
(Digital Print Order Format) or you can print photos directly through a
DPOF-compatible printer at home.
Wide photos may print with the left and right edges cut off, so be t
aware of the dimensions of your photos.
You cannot set the DPOF for the photos stored in the internal memory.t
In Playback mode, select 1 M
Select
.
2
Select photos to print.
3
DPOF Select.
To print all files, select t All and skip to step 5.
Select t to select all files.
Select t
to cancel your selection.
Select 4 .
.
Set DPOF options.
5
Option Description
Select whether to print the photos as thumbnails.
(Select
to print photos as thumbnails.)
Specify the size of the print.
Select 6 ,
or . to set the number of copies.
Select 7 .
If you specify the print size, you can print photos only with DPOF 1.1-compatible
printers.
Playback/Editing
80
Page 82

Viewing files on a TV or HDTV
Play back photos or videos by connecting your camera to a TV using the A/ V cable.
In Shooting or Playback mode, select 1 M
Select
2
3
4
5
6
.(twice)Video Out.
Select a video signal output according to your country or
region. (p. 111)
Turn off your camera and TV.
Connect your camera to your TV using the A/V cable.
Audio
Video
Turn on your TV and select the video output mode using
the TV remote control.
Turn on your camera and press [7 P
].
.
Playback/Editing
View photos or play videos using the touch screen on
8
your camera.
The touch screen will function as the controller for the TV t
screen. Locate the option you want on the TV screen and
touch where the option is located on the camera screen.
When a pointer appears on the option on the TV screen,
select
on the camera screen.
On some TVs, digital noise may occur or part of an image may not t
appear.
Images may not appear centred on the TV screen depending on your t
TV settings.
You can capture photos or videos while the camera is connected t
to a TV.
81
Page 83

Viewing files on a TV or HDTV
Viewing files on an HDTV
You can view high-quality and uncompressed photos or videos
on an HDTV using the optional HDMI adapter and cable. HDMI
(High Definition Multimedia Interface) is supported by most
HDTVs. For details, see the HDMI Kit manual.
In Shooting or Playback mode, select 1 M
Select
.
2
Select an HDMI resolution.
3
Turn off your camera and HDTV.
4
Connect your camera to your HDTV using an optional
5
HDMI adapter and cable.
HDMI cable
(twice) HDMI Size.
.
HDMI adapter
Playback/Editing
Turn on your camera.
6
The HDTV will be powered on automatically and the camera t
screen will be displayed.
View files using a remote control of your camera or
7
HDTV.
If your HDTV supports the Anynet+(CEC) profile, turn the Anynet+ on in the
settings menu (p. 111) to control all connected Samsung A/V devices with the
TV remote control.
82
Page 84

Transferring files to your computer (for Windows)
Transfer files to your computer using the built-in Intelli-studio program. You can also edit files or upload files to your favourite websites.
Requirements for Intelli-studio
Item Requirements
CPU
RAM
OS
Hard disk
capacity
Intel Pentium 4, 3.2 GHz or higher/AMD Athlon 64FX,
2.6 GHz or higher
Minimum 512 MB RAM
(1 GB and above recommended)
Windows XP SP2, Vista
250 MB or more (1 GB or more recommended)
DC-ROM drivert
64 MB or greater video card (nVIDIA Geforce t
7600GT or higher/ATI X1600 series or higher
Others
recommended)
1024 X 768 pixels, 16-bit colour display compatible t
monitor (1280 X 1024 pixels, 32-bit colour display
recommended)
USB port, Microsoft DirectX 9.0c or latert
Playback/Editing
Intelli-studio may not perform correctly on some computers, even t
when the computer meets the requirements.
If your computer does not meet the requirements, videos may not play t
correctly or it may take longer to edit videos.
Install DirectX 9.0c or above before you use the program.t
You must use Windows 2000/XP/Vista or Mac OS 10.3 or later to t
connect the camera as a removable disk.
Using a self-assembled PC or a PC and OS that are not supported may void
your warranty.
83
Page 85

Transferring files to your computer (for Windows)
Transferring files using Intelli-studio
Intelli-studio will start automatically when you connect the camera
to your computer with the USB cable.
The battery will be charged while the camera is connected to a computer with
the USB cable.
In Shooting or Playback mode, select 1 M
Select
.
2
Turn off the camera.
3
Connect the camera to your computer with the USB
4
cable.
(twice)PC SoftwareOn.
You must plug the end of the cable with the indicator light (S) into
your camera. If the cable is reversed, it may damage your files. The
manufacturer is not responsible for any loss of data.
.
Turn on the camera.
5
The computer recognises the camera automatically.t
Select a folder on your computer to save new files.
6
If your camera has no new files, the pop-up window for saving t
new files will not appear.
Select 7 Yes.
New files will be transferred to the computer.t
For Windows Vista, select Run iStudio.exe from the AutoPlay window.
Playback/Editing
84
Page 86

Transferring files to your computer (for Windows)
Using Intelli-studio
Intelli-studio is a built-in program that allows you to play back and edit files. You can also upload files to websites, such as Flickr or YouTube.
For details, select Menu Help in the program.
If you install Intelli-studio on your computer, the program will launch more quickly. To install the program, select t Menu Install Intelli-studio on PC.
You cannot edit files directly on the camera. Transfer files to a folder on your computer before editing.t
You cannot copy files in your computer to the camera.t
Intelli-studio supports the following formats:st
Videos: MP4 (Video: H.264, Audio: AAC), WMV (WMV 7/8/9) -
Photos: JPG, GIF, BMP, PNG, TIFF -
2 3 4
1
14
5
6
7
13
10
12
11
10
Playback/Editing
85
3
4
8
9
4
Page 87

Transferring files to your computer (for Windows)
Icon Description
1
Open menus
2
Display files in the selected folder
3
Change to the Edit mode
Change to the Sharing mode (You can send files by email
4
or upload files to websites, such as Flickr or YouTube.)
5
Enlarge or reduce the thumbnails in the list
6
Select a file type or a category
7
View files of the selected folder on your computer
8
Copy files to the computer
9
View files of the selected folder on the camera
10
View photos in a slide show/Play videos
11
Copy new files to your computer
12
Browse folders in the connected device
13
Select folders of your computer
14
Browse folders in your computer
Playback/Editing
Transferring files by connecting the camera
as a removable disk
You can connect the camera to your computer as a removable
disk.
In Shooting or Playback mode, select 1 M
Select
.
2
Connect the camera to your computer with the USB
3
(twice) PC Software Off.
cable.
You must plug the end of the cable with the indicator light (S) into
your camera. If the cable is reversed, it may damage your files. The
manufacturer is not responsible for any loss of data.
86
.
Page 88

Transferring files to your computer (for Windows)
Turn on the camera.
4
The computer recognises the camera automatically.t
If the camera fails to connect, a pop-up window will appear. Select
Computer.
On your computer, select 5 My computer Removable
Disk DCIM 100PHOTO.
Select the files you want and drag or save them to your
6
computer.
Disconnecting the camera (for Windows XP)
The way to disconnect the USB cable for Windows 2000/Vista
is similar.
If the status lamp on your camera is blinking, wait until
1
it stops.
Click
2
3
4
on the tool bar at the bottom right of your PC
screen.
Click the pop-up message.
Remove the USB cable.
The camera may not be removed safely when Intelli-studio is running.
End the program before disconnecting the camera.
Playback/Editing
87
Page 89

Transferring files to your computer (for Mac)
When you connect the camera to a Macintosh computer, the computer will recognise the device automatically. You can transfer files directly
from the camera to the computer without installing any programs.
Mac OS 10.3 or later is supported.
Connect your camera to a Macintosh computer with the
1
USB cable.
You must plug the end of the cable with the indicator light (S) into
your camera. If the cable is reversed, it may damage your files. The
manufacturer is not responsible for any loss of data.
Turn on the camera.
2
The computer recognises the camera automatically and a t
removable disk icon will be displayed.
Double-click the removable disk icon.
3
Transfer photos or videos to the computer.
4
Playback/Editing
88
Page 90

Printing photos with a photo printer (PictBridge)
Print photos with a PictBridge-compatible printer by connecting your camera directly to the printer.
With the printer on, connect your camera to the printer
1
with the USB cable.
Turn on your camera.
2
The printer recognises the camera automatically.t
If the camera fails to connect, a pop-up window will appear. t
Select Printer.
If your printer has the mass storage feature, you must first set the t
USB mode to Printer in the settings menu. (p. 112)
Playback/Editing
Select 3 to print.
Select t to set printing options. See “Configuring print
settings” on page 90.
Select an option.
4
Option Description
Current Photo
Selected Photos
All Photos
Print the currently selected photo. Skip to
step 6.
Print the photos you want.
Print all photos. Skip to step 6.
89
Page 91

Printing photos with a photo printer (PictBridge)
Select 5 <
or > to scroll to a photo to print.
Select 6 ,
or . to set the number of copies and select
.
If you selected to print the photos you want, repeat steps 5-6 t
for all photos to print.
Select 7 Yes to confirm.
Printing starts. Select t Cancel to cancel printing.
Configuring print settings
Option Description
Size: Specify the size of the print.
Layout: Create thumbnail prints.
Type: Select the type of paper.
Quality: Set the printing quality.
Option Description
Date: Set to print the date.
File Name: Set to print the name of the file.
Reset: Reset the print options.
Some options are not supported by some printers.
Playback/Editing
90
Page 92

Wireless network/Bluetooth
Learn to use several functions using wireless local area networks (WLANs) and the Bluetooth feature.
Connecting to a WLAN and configuring
network settings ……………………………… 92
Connecting to a WLAN automatically ………… 92
Connecting to a WLAN manually …………… 94
Storing your information ……………………… 94
Storing email addresses ……………………… 95
Setting the file size to share …………………… 95
Configuring the WPS setting ………………… 96
Checking information ………………………… 96
Entering text …………………………………… 96
Using photo or video sharing websites … 97
Accessing a website …………………………… 97
Uploading photos or videos …………………… 98
Sending photos via email ………………… 99
Viewing photos on the DLNA devices … 100
Viewing photos on a TV screen …………… 100
Viewing photos on another device
(renderer) …………………………………… 101
Sending or receiving photos with
a camera …………………………………… 103
Sending photos to another camera ……… 103
Receiving photos from another camera …… 103
Sending photos via Bluetooth ………… 105
Page 93

Connecting to a WLAN and configuring network settings
Learn to connect via an access point (AP) when you are in a range of a WLAN. You can also configure network settings and learn how to
enter text.
This camera uses non-harmonised frequencies and is intended for use in all European countries.
The WLAN can be operated indoors in the EU without restriction, but cannot be operated outdoors in France.
Connecting to a WLAN automatically
In Shooting or Playback mode, select 1 N
Select
2
3
AP Setting.
The camera will search for and display available AP devices.t
Select an AP device.
AP Setting
Samsung 1
Samsung 2
Samsung 3
n.
Wireless network/Bluetooth
Icon Description
WPS AP
Secured AP
Ad hoc AP
Signal strength
The camera will connect to the WLAN.t
If the selected AP device supports the WPS profile, select t
WPS on the next screen and press the WPS button or enter
a PIN on the AP device. You can configure the WPS setting
to press the WPS button or enter a PIN on to the AP device.
(p. 96)
If the selected AP device requires a password, continue with t
the next step.
92
Page 94

Connecting to a WLAN and configuring network settings
Select network profiles and options.
4
Option Description
Authentication
Data Encryption
Select the password input field.
5
Select a network authentication.
Select an encryption type.
Enter a password and select 6 OK.
For information about entering text, refer to page t 96.
Select 7 OK.
The camera will connect to the WLAN.t
On the top line of the screen, you can check the network t
signal status.
Icon Description
Signal is found.
No signal is found.
Wireless network/Bluetooth
Some AP devt ices will not allow your camera to connect to the
network.
If you are far from the AP device, it may take long to connect to the t
network.
If there is any electronic equipment nearby that uses the same radio t
frequency (RF) signals, the camera may not connect to the AP device.
If the AP device has a non-English name, it may not appear in the t
search list or the name may appear jumbled or incomplete.
For network profiles and a password, contact your network t
administrator or network service provider.
If the network requires any authentication from the service provider, t
you may not connect to it. Contact your network service provider.
The number of characters and numbers allowed for the encryption key t
differs depending on the encryption type.
A WLAN connection may not be possible depending on your t
surroundings.
When searching for networks, you may be able to find a printer that t
supports the network. However, you cannot use the printer to connect
to a network.
The camera cannot connect to the network if it is connected to t
a TV with the A/V cable. Also, when the camera is connected to
the network, you cannot view photos on a TV screen even when
connected with the A/V cable.
When connecting to the network, you will be charged according to t
your contract with your network service provider.
You can use only free WLANs with your camera. If you use free t
WLANs that require the user agreement and additional information
when you connect to a web browser, some features may be limited
when connecting to websites or sending email.
Frequency ranges allow you to connect to the network will differ t
depending on the country.
The WLAN feature of yt our camera must comply with radio
transmission laws, so use of this feature may be restricted in some
countries. We recommend that you use the WLAN feature in the
country where you purchased the camera.
93
Page 95

Connecting to a WLAN and configuring network settings
Connecting to a WLAN manually
In Shooting or Playback mode, select 1 N
Select
2
3
5
AP Setting.
The camera will search for and display available AP devices.t
Select an AP device.
Select 4 IP Setting Manual.
Select the network profiles.
Option Description
IP
Subnet Mask
Gateway
DNS
Enter the static IP address.
Enter the subnet mask.
Enter the gateway.
Enter the DNS address.
Enter values and select 6 OK.
When you are finished, select 7 OK.
The camera will connect to the WLAN.t
n.
Wireless network/Bluetooth
For network profiles and a password, contact your network t
administrator or network service provider.
Methods of configuring the network profiles may differ depending on t
the network environment.
Do not access a network that you are not allowed to use.t
Use a fully charged battery while connecting to the network.t
Storing your information
Store your name and email address to send emails or to find out
your camera on another device.
In Shooting or Playback mode, select 1 N
Select
2
3
User Setting.
Select the name input field and enter your name.
For information about entering text, refer to page t 96.
When you are finished, select 4 OK.
94
n.
Page 96

Connecting to a WLAN and configuring network settings
Select the email input file and enter your email address.
5
When you are finished, select 6 OK.
OK to save your information.
Select
7
Storing email addresses
Store up to 10 email addresses in your camera. You can use
them when you send your photos via email.
In Shooting or Playback mode, select 1 N
Select
2
Email Address.
Email Address Book
Samsung
Select t to display the recent recipient email addresses.
Select t
to edit the email address.
Select t
to delete the email address.
n.
Wireless network/Bluetooth
Select 3 .
Enter a name and email address.
4
When you are finished, select 5 OK.
Setting the file size to share
Set the file size you will share with other DLNA-authorised
devices. You can select either the original size or
In Shooting or Playback mode, select 1 N
Select
2
3
DLNA -Image Size.
Select a size.
95
.
n.
Page 97

Connecting to a WLAN and configuring network settings
Configuring the WPS setting
Configure this setting to press a WPS button or enter a PIN when
connecting to a WLAN with an AP device that supports the WPS
profile.
In Shooting or Playback mode, select 1 N
Select
.
2
WPS Type.
n.
Select 3 PBC to press the WPS button or PIN to enter a
PIN.
Checking information
Check the Mac address and serial number of your camera to
register it with the Samsung website.
In Shooting or Playback mode, select 1 N
Select
.
2
Device Information.
n.
Wireless network/Bluetooth
Entering text
To enter text when storing your information or email addresses,
select the appropriate letters, symbols, and numbers.
When you are finished, select OK.
User Setting: Name
Icon Description
Move the cursor.
Enter capital letters or small letters, and change symbols.
Enter numbers and symbols.
Enter a space.
Delete the last letter.
Store the displayed text.
You can enter text only in English, regardless of the display language.
96
Page 98

Using photo or video sharing websites
Upload your photos or videos to file sharing websites (available websites will be displayed on your camera).
Accessing a website
In Shooting or Playback mode, select 1 N
The camera automatically connects to the WLAN via the last t
connected AP device.
If the camera has not connected to the WLAN, it automatically t
searches for available AP devices. (p. 92)
Select a website.
2
Enter your login ID and password, and select 3 Login .
Create your login ID and password on a PC in advance.
.
Icons on a website
Icon Description
Wireless network/Bluetooth
Previous page
Next page
Stop
Refresh
Home
Close
97
Page 99

Using photo or video sharing websites
Uploading photos or videos
Select 1 .
Select
<
2
3
or > to scroll through files.
Drag photos or videos to the selection area or select
photos or videos, and select OK.
Date
Select t Date to categorise the files. (p. 68)
Enter a title and select an album, and then select 4 .
Wireless network/Bluetooth
The maximum photo resolution you can upload is t , and
the longest video you can upload is 30 seconds at 320 X 240
resolution or the video recorded using For Sharing.
If the selected photo resolution is higher than t
automatically resized to a lower resolution.
When the total size of all photos selected is smaller than 10 MB, t
you can upload them to a website (up to 20 photos).
Methods of uploading photos or videos may differ depending on t
the selected website.
If you cannot access a website because of firewall or user t
authentication settings, contact your network administrator or
network service provider.
When you are not able to upload photos or videos due to server t
errors, select
Titles for photos or videos you are uploading could be the date t
they are captured.
The speed of your internet connection may affect how quickly t
photos upload or web pages open.
.
98
, it will be
Page 100

Sending photos via email
In Shooting or Playback mode, select 1 N
The camera automatically connects to the WLAN via the last t
connected AP device.
If the camera has not connected to the WLAN, it automatically t
searches for available AP devices. (p. 92)
Enter email addresses for the sender and receiver.
2
Sender/ Receiver
Samsung
Samsung 1
Select t to enter or modify the email address of the sender.
Select t
to retrieve the stored email addresses.
Select t
to enter an email address manually.
.
Wireless network/Bluetooth
Select 3 OK.
Select photos, or drag photos to the selection area and
4
select OK.
The photos will be sent to the selected email addresses.t
The t Transfer completed. message will still appear, even
when photos cannot be sent or be sent as spam due to an
error with the recipient's email account.
When the total size of all photos selected is smaller than 10 MB, you t
can send them via email (up to 20 photos).
You can enter up to 10 recipients for each email.t
You may not be able to send an email due network connection or t
email account settings.
The maximum photo resolution you can send is t
selected photo resolution is higher than , it will be automatically
resized to a lower resolution.
If you cannot send an email because of firewall or user authentication t
settings, contact your network administrator or network service
provider.
When there are no photos in the camera memory, you cannot use t
this feature.
and if the
99
 Loading...