

Page 1

Vacuum Cleaner
user manual
SS7500 Series
Before operating this unit, please read the instructions carefully.
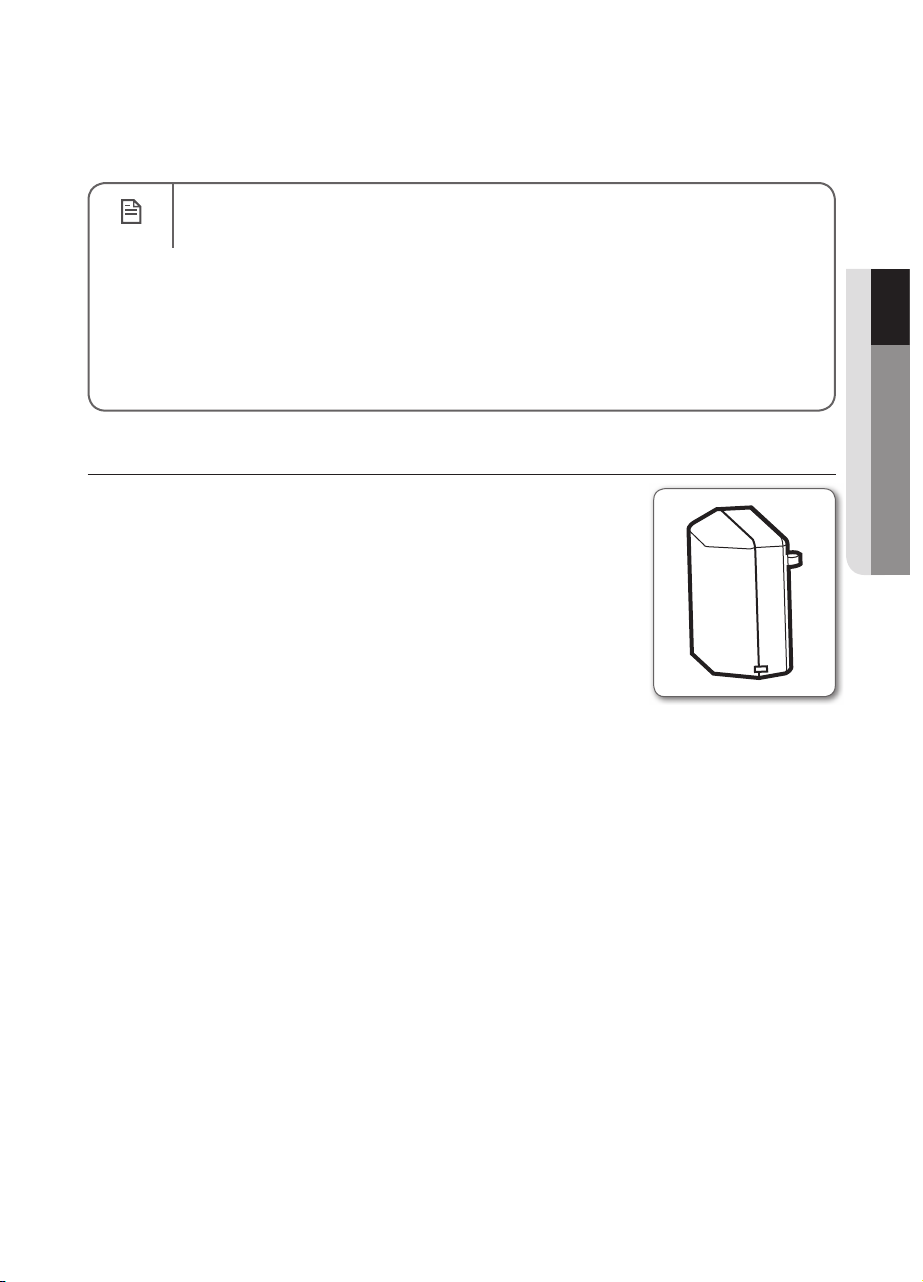
✻
For indoor use only.
✻
imagine the possibilities
Thank you for purchasing a Samsung product.
To receive a more complete service,
please register your product at
www.samsung.com/register
ENGLISH
Page 2
safety information
SAFETY INFORMATION
Before operating the appliance, please read this manual thoroughly and retain it for •
WARNING
WARNING
WARNING
CAUTION/WARNING SYMBOLS USED
your reference.
Because these following operating instructions cover various models, the •
characteristics of your vacuum cleaner may differ slightly from those described in this
manual.
This vacuum cleaner is designed for household use only. Do not use this vacuum •
cleaner to clean building waste or debris. Do not use this vacuum cleaner with any of
the fi lters removed as this could cause damage to the internal components and void
your warranty.
WARNING
CAUTION
Indicates that a danger of death or serious injury exists.
Indicates that a risk of personal injury or material damage exists.
OTHER SYMBOLS USED
Represents something you must NOT do.
Represents something you must NOT touch.
Represents something you must follow.
Indicates that you must disconnect the power plug from the socket.
02_ safety information
Page 3

safety information
IMPORTANT SAFETY INSTRUCTIONS
When using an electrical appliance, basic precautions should be observed, including the
following:
READ ALL INSTRUCTIONS BEFORE USING YOUR STICK VACUUM CLEANER.
Unplug from outlet when not in use and before conducting maintenance.
WARNING : to reduce the risk of fi re, electric shock, or injury:
GENERAL
Use only as described in this manual.•
Do not operate the STICK vacuum cleaner or charger if it has been damaged in any way.•
If the cleaner is not working as it should, has been dropped, damaged, left outdoors, or dropped in water, •
return it to a customer care center.
Do not handle the charger or STICK vacuum cleaner with wet hands.•
Use only on dry, indoor surfaces.•
This appliance is not intended for use by persons (including children) with reduced physical, sensory or •
mental capabilities, or lack of experience and knowledge, unless they have been given supervision or
instruction concerning use of the appliance by a person responsible for their safety.
Children should be supervised to ensure that they do not play with the appliance.•
BATTERY CHARGER
Do not modify the polarized plug to fi t a non-polarized outlet or extension cord.•
Do not use outdoors or on wet surfaces.•
Unplug the charger from the outlet when not in use and before servicing.•
Use only the charger supplied by the manufacturer to recharge.•
Do not use with a damaged cord or plug.•
Do not pull or carry by the cord, use the cord as a handle, close the door on the cord, or pull the cord •
around sharp edges or corners. Keep the cord away from heated surfaces.
Do not use extension cords or outlets with inadequate current carrying capacity.•
Do not unplug by pulling on the cord. To unplug, grasp the plug, not the cord.•
Do not mutilate or incinerate batteries as they will explode at high temperatures.•
Do not attempt to open the charger. Repairs should only be carried out by a qualifi ed customer care •
centre.
Do not expose the charger to high temperatures or allow moisture or humidity of any kind to come into •
contact with the charger.
STICK VACUUM CLEANER
Do not pick up hard or sharp objects such as glass, nails, screws, coins, and etc.•
Do not use without a fi lter in place. When servicing the unit, never put fi ngers or other objects into the fan •
chamber in case the unit accidentally turns on.
Do not put any objects into openings. Do not use with any openings blocked; keep openings free of dust, •
lint, hair, and anything that may reduce air fl ow.
Do not pick up toxic materials (chlorine bleach, ammonia, drain cleaner, etc.).•
Do not pick up anything that is burning or smoke, such as cigarettes, matches, or hot ashes.•
Do not use to pick up fl ammable or combustible liquids such as gasoline, nor use on areas where they •
may be present.
Do not use STICK vacuum cleaner in an enclosed space fi lled with vapours given off by oil based paint, •
paint thinner, moth proofi ng substances, fl ammable dust, or other explosive or toxic vapours.
Leaks from battery cells can occur under extreme usage or temperature conditions. If the liquid gets on •
skin, wash quickly with water. If the liquid gets into the eyes, fl ush them immediately with clean water for a
minimum of 10 minutes. Seek medical attention.
safety information _03
Page 4

contents
ASSEMBLING THE CLEANER
05
OPERATING THE CLEANER
10
MAINTAIN TOOLS AND FILTER
13
05 Assembling the cleaner
07 Assembling the handle and the main body
07 Assembling the main body and the power
brush
07 Assembling the main body and the handy
cleaner
08 Charging
09 About the battery
10 Using the stick cleaner
10 Using the power brush
10 Using the handy cleaner
11 Using the crevice / dusting
11 Emptying the dust bin
13 Cleaning the fi lter
14 Countermeasure to remove anything
clogging the cleaner
04_ contents
TROUBLESHOOTING
16
Page 5
assembling the cleaner
Power button
Front vent
Charging
terminals
Power button
Dustbin cover
Hepa fi lter
Grill fi lter
Charging lamp
The button to separate
power brush
power brush
shutter
Dustbin
Rear vent
Power brush
crevice / dusting
crevice / dusting
cradle
Dustbin
The button to separate
the handy cleaner
Handle
The button to separate
the dustbin
The button to
separate the dustbin
Charging pins
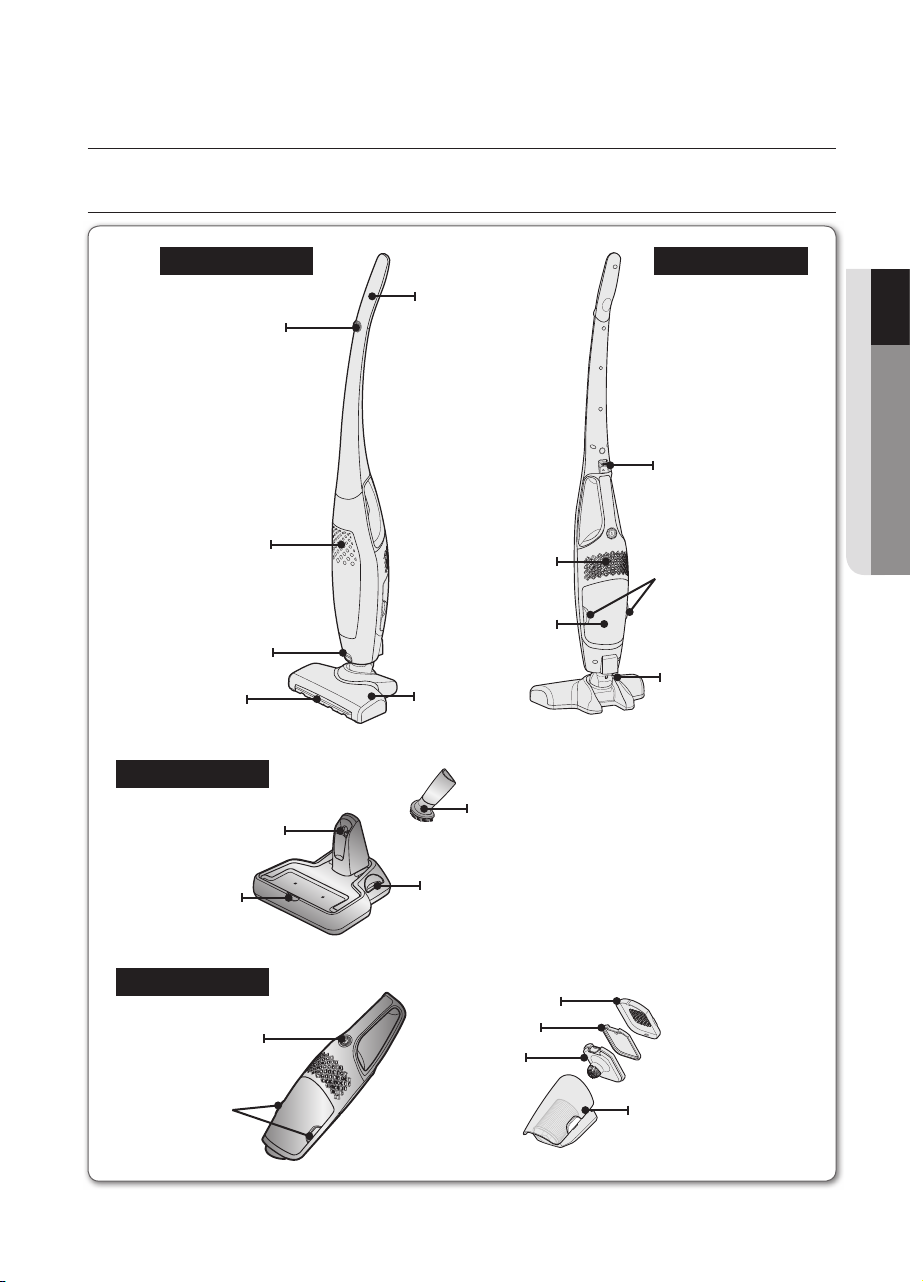
ASSEMBLING THE CLEANER
Front view
Power button
Front vent
The button to separate
power brush
power brush
shutter
Charger
Charging
terminals
Charging lamp
Handle
Power brush
crevice / dusting
crevice / dusting
cradle
Rear vent
Dustbin
Rear view
The button to separate
the handy cleaner
The button to separate
the dustbin
Charging pins
01 ASSEMBLING
Handy cleaner
Power button
The button to
separate the dustbin
Dustbin cover
Hepa fi lter
Grill fi lter
Dustbin
assembling _05
Page 6

assembling the cleaner
Screw
Guiding key
Check the contents of the package.
Handle
Handy cleaner
Screw
Guiding key
Sub items to assemble the
handle and the main body
Power brush
User manual
Main body
Charger
Crevice / Dusting
06_ assembling
Page 7
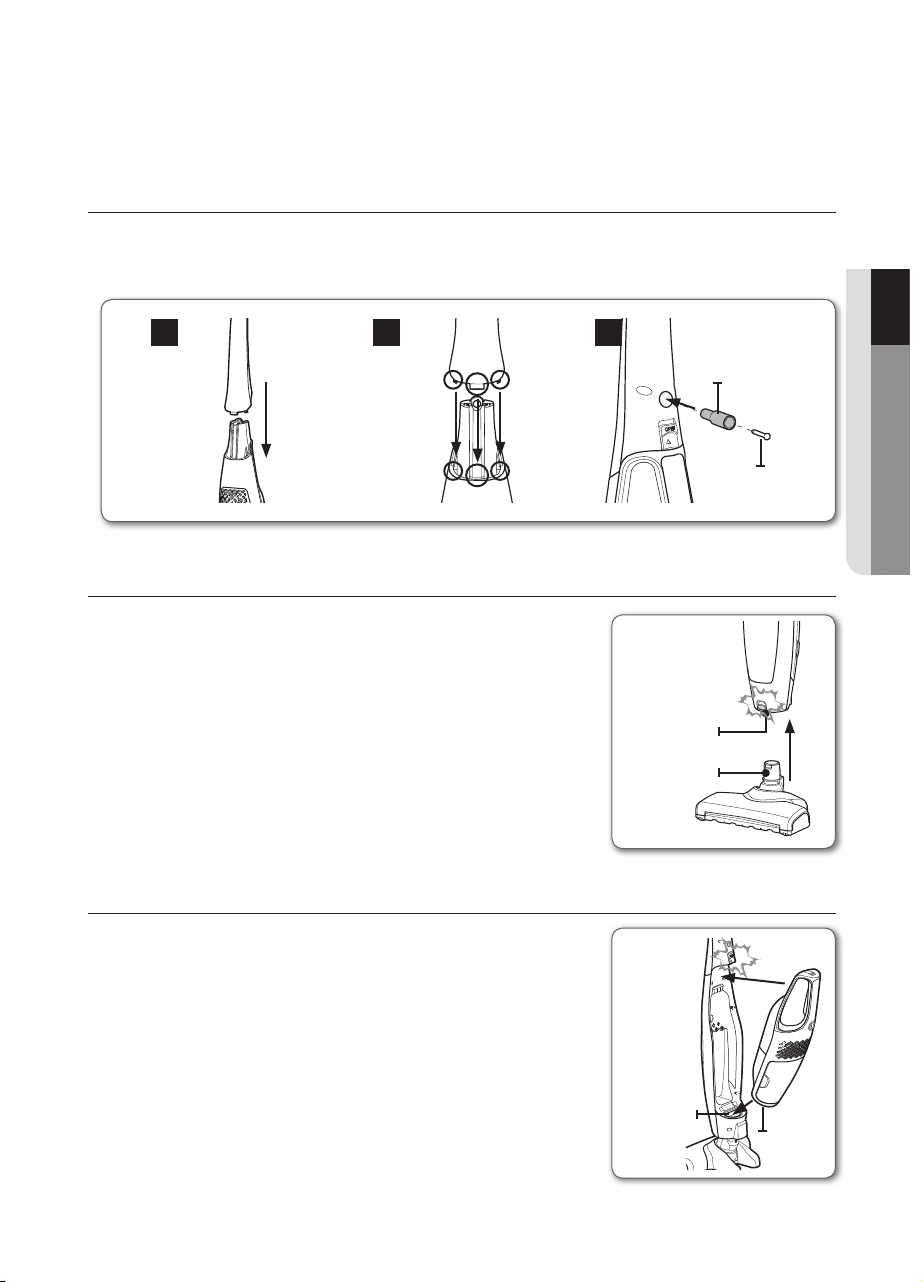
ASSEMBLING THE HANDLE AND THE MAIN BODY
Handle
Guiding parts
Guiding key
Screw
Main body
Holes on the main body
Power brush
holder
‘Click’
Pipe C/Brush
The air inlet of the
handy cleaner
‘Click’
The air inlet
of the main
body
Insert the guiding parts of the handle as far as possible into the hole of the main body, insert the
guide key into the holes of the handle and then fasten the screw with the (+) screw driver.
1 2 3
Handle
Guiding parts
Guiding key
01 ASSEMBLING
Main body
Holes on the main body
Screw
ASSEMBLING THE MAIN BODY AND THE POWER BRUSH
Insert the connector of the power brush into the hole of the main
body until it clicks into place.
Power brush
Pipe C/Brush
holder
ASSEMBLING THE MAIN BODY AND THE HANDY CLEANER
Insert the air inlet of the handy cleaner into the air inlet of the main
body and then push the handy cleaner into the main body until it
clicks into place.
‘Click’
‘Click’
The air inlet
of the main
body
The air inlet of the
handy cleaner
assembling _07
Page 8
assembling the cleaner
Charging lamp
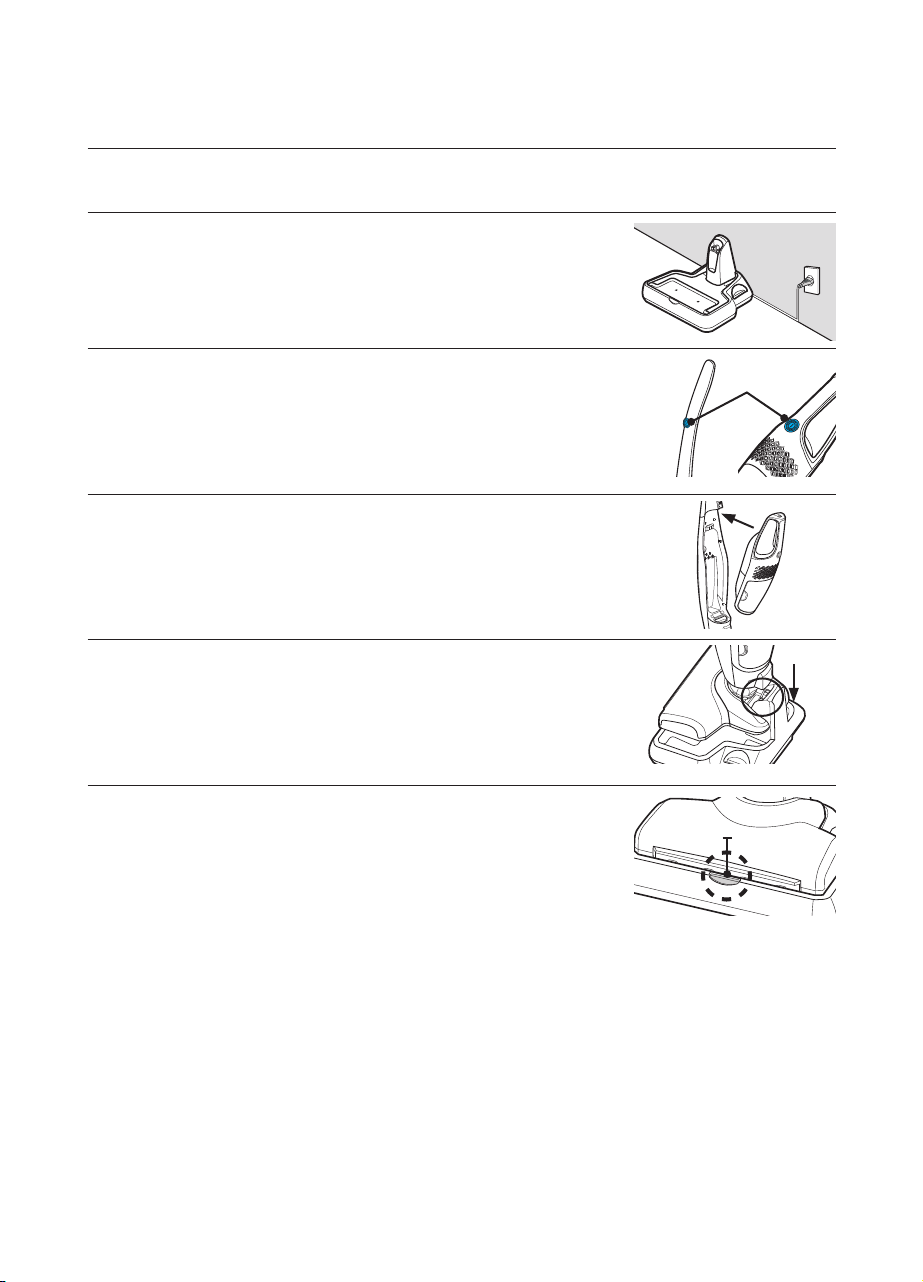
CHARGING
Install the charger on a fl at surface and then plug the power 1.
cable.
Turn the power buttons of the main body and the handy 2.
cleaner off.
The battery does not charge when the power button is •
on.
Connect the handy cleaner to the main body. (When the 3.
main body and the handy cleaner are not assembled, the
stick cleaner does not work.)
Install the cleaner with the charger aligning the charge pins 4.
of the cleaner with the charge terminals of the charger.
The charging lamp is turned on and blink regularly.•
While charging, the charge lamp is turned on. If the cleaner 5.
is separated, the lamp is turned off.
Even if charging is complete, the lamp does not turn off •
or change to brighter blue color. This is not a problem
with the product.
Make sure to turn both power buttons ‘Off’ and then •
charge the battery.
08_ assembling
Charging lamp
Page 9
Charge the product in the following cases.•
NOTE
When using the product for the fi rst time after purchasing it or after not using it for a long period.
When the battery level is low and the suction power is weak. When you charge the cleaner after purchasing or using it, charge the product for •
approximately 4 hours before using it.
To charge the battery fully when the battery is discharged takes approximately 4 hours.•
If you separate the cleaner from the charger, the battery is naturally discharged.•
It is recommended that you keep the cleaner connected to the charger. (However, if -
you are going on a business trip or holiday, disconnect the power cord of the charger
from the wall outlet.)
ABOUT THE BATTERY
The powerful Li-Ion battery• has been used.
The warranty for the battery is 6 months from the time of •
purchase.
To purchase a new battery, please contact the service center.•
Since this battery is only for this cleaner, do not use it for other •
appliances or purposes.
Do not disassemble or modify the product.•
Charge the product in a well-ventilated location.•
Do not expose the battery to heat or fi re.•
Do not connect metal objects to the (+) or (-) terminal.•
Keep the product indoors (0°C~40°C).•
When the battery is not working correctly, do not disassemble it. Contact your nearest •
Service Center.
If the battery charge and usage time have decreased after the battery has been used a •
few times, please replace the battery by contacting the Service center as the battery life
may have reached its end.
01 ASSEMBLING
assembling _09
Page 10
operating the cleaner
Power button
Normal operation
When the shutter
operates
The button to
separate the
handy cleaner
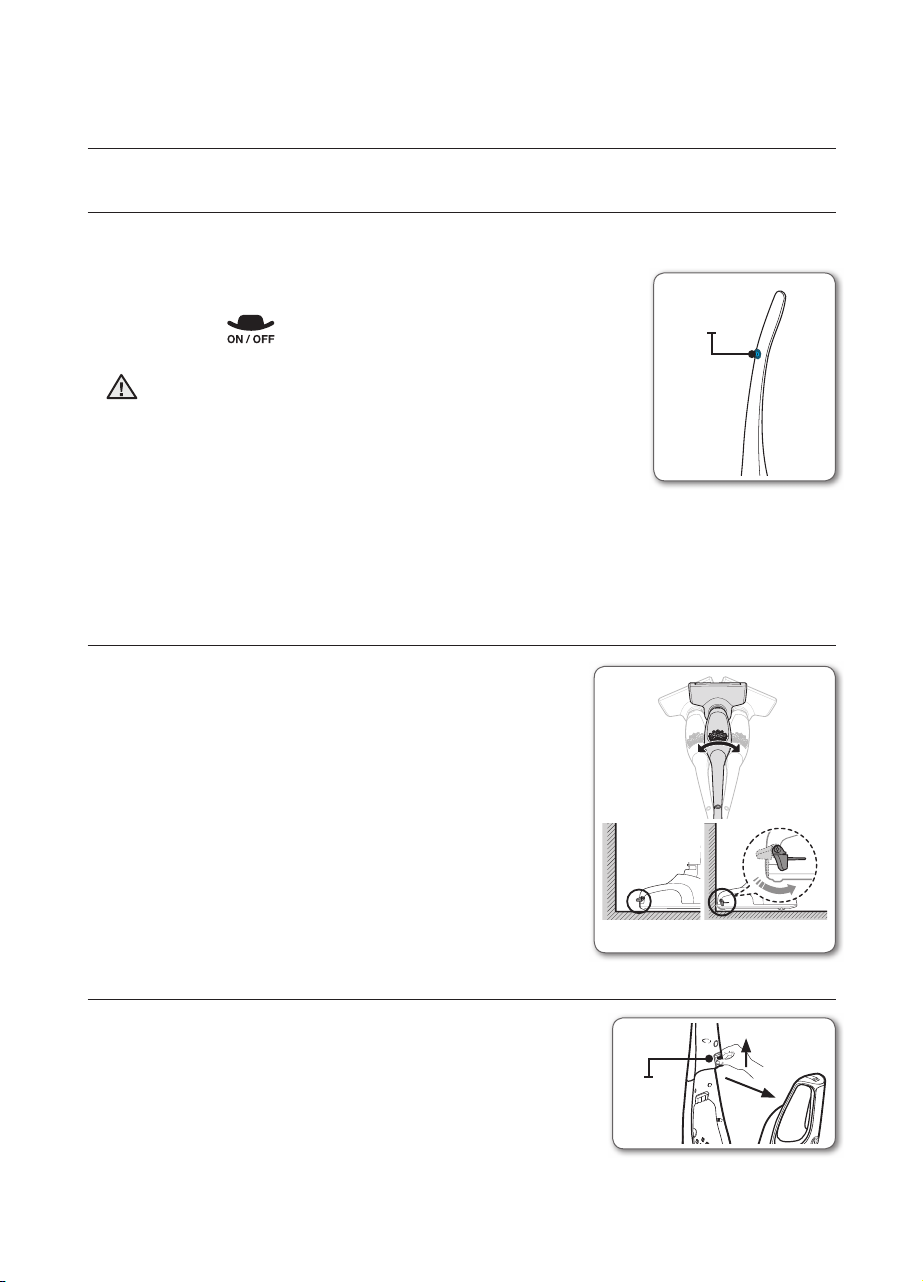
USING THE STICK CLEANER
Using the stick cleaner allows you to clean the fl oor without bending over.
Stick Cleaner On / Off
When the power button is pressed, the operation alternates •
between
Only when the handy cleaner is assembled, does the stick 1.
CAUTION
cleaner work. (For assemblying the handy cleaner: See
page 7).
When you use the stick cleaner, turn the handy cleaner 2.
power off.
Countermeasure when the stick cleaner is not turned off.
Check if the handy cleaner is on.•
You can only turn the stick cleaner on or off when the handy cleaner power is turned off.
USING THE POWER BRUSH
Since you can change the direction of the power brush •
by moving the handle of the stick cleaner left or right,
cleaning is much easier.
.
Power button
When you clean the fl oor right in front of the wall, the •
front shutter is activated so that you can clean the dust
easily.
USING THE HANDY CLEANER
Lift the button to separate the handy cleaner and 1.
separate the handy cleaner from the main body by pulling
it in the direction of the arrow.
10_ operating
Normal operation
The button to
separate the
handy cleaner
When the shutter
operates
Page 11

Handy Cleaner On / Off2.
Power button
Dusting
Crevice
When the power button is pressed, the operation •
alternates between
.
Connect the handy cleaner to the main body after 1.
CAUTION
using it. (See page 7).
When you connect the handy cleaner to the main 2.
body, make sure to turn the handy cleaner off.
USING THE CREVICE / DUSTING
Insert crevice/dusting into the end of the air inlet on the handy
cleaner to install it. To remove it, simply pull it out.
After using it, please store it in the crevice/dusting cradle •
of the charger so that you do not lose it. (See page 5).
Crevice : Use this to clean the dust from the grooves of •
window frames, corners or gaps.
Dusting : Use this to clean the dust from the grooves of •
windows, corners or gaps.
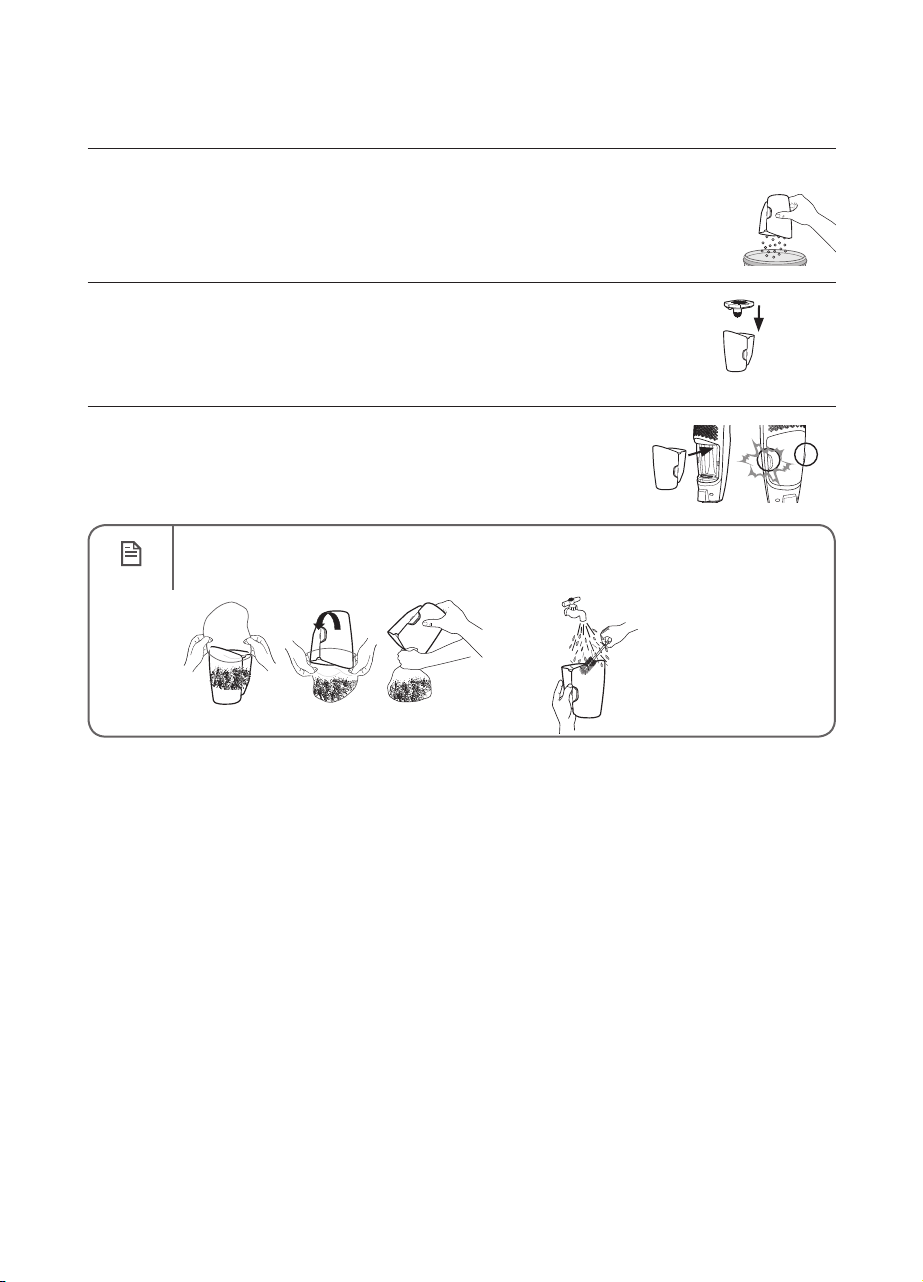
EMPTYING THE DUST BIN
If the dust bin is full or the sucking power decreases, empty 1.
the dustbin.
Power button
Dusting
Crevice
02 OPERATING
Press the [buttons to separate the dustbin] with your thumb 2.
and middle fi nger and then pull it out.
Lift the dust bin cover.3.
operating _11
Page 12
operating the cleaner
‘Click’
Empty the dust bin.4.
Close the dust bin cover.5.
Push the dust bin down until it “clicks” into place.6.
Using a plastic bag•
NOTE
This method is recommended for people with allergies or asthma.
‘Click’
Cleaning the dustbin
with cold water is also
recommended.
12_ operating
Page 13
maintain tools and fi lter
‘Click’
Hepa fi lter
Grill fi lter
Grill fi lter fi xing
hook
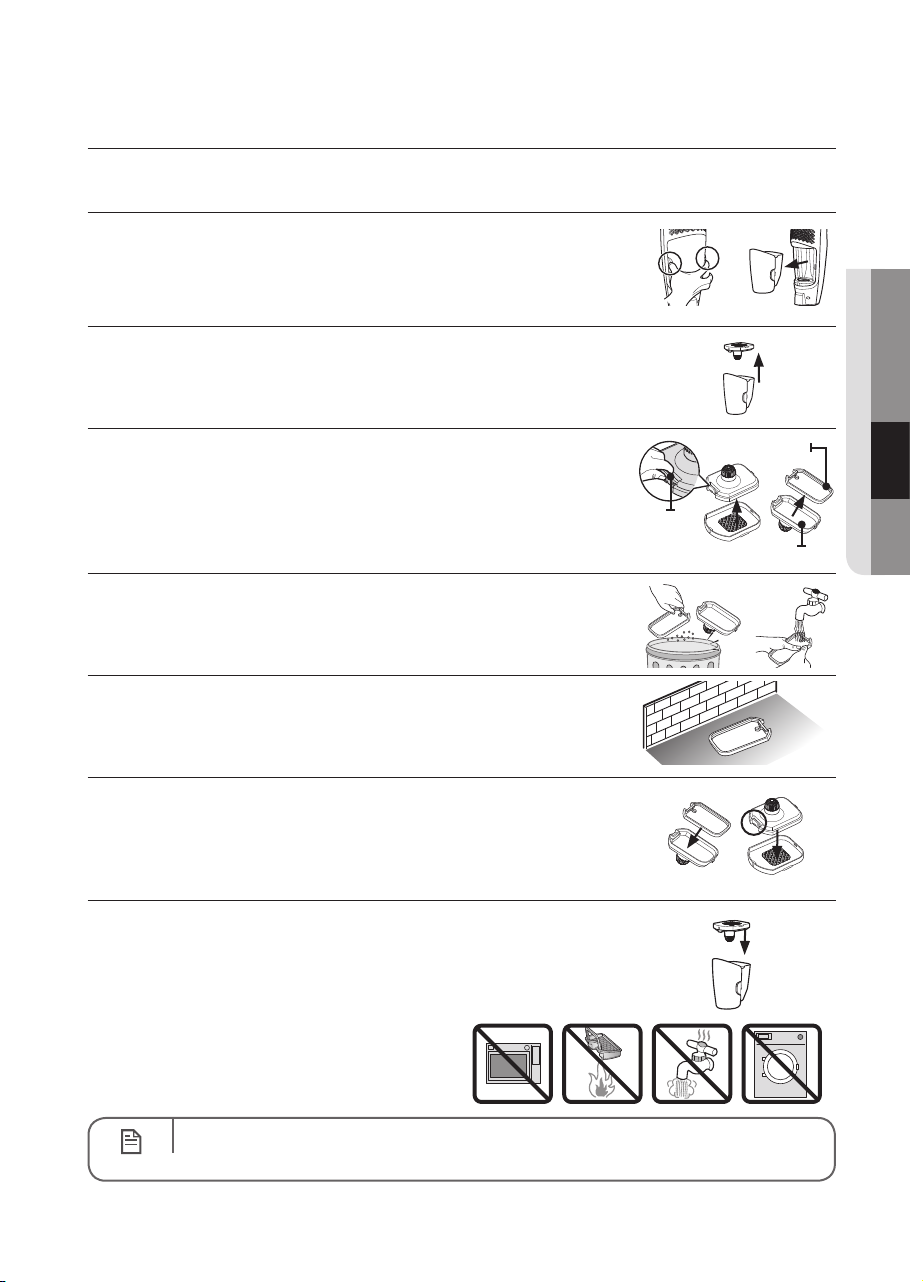
CLEANING THE FILTER
Press the [buttons to separate the dustbin] with your thumb 1.
and middle fi nger and then pull it out.
Lift the dustbin cover.2.
03 MAINTAIN
Hold the dust bin cover and separate the grill fi lter and the 3.
micro fi lter from the dust bin cover by pulling them and
pressing the grill fi lter fi xing hook.
Shake the dust from the fi lters and then wash the hepa fi lter 4.
until it is clean.
Dry the fi lter completely in a well-ventilated, shady location.5.
After assemblying the micro fi lter and the grill fi lter, hook one 6.
side of the grill fi lter and push the fi xing hook of the dust bin
cover down until it clicks into place.
Assemble the assembled dustbin cover and the dust bin.7.
Grill fi lter fi xing
hook
Hepa fi lter
Grill fi lter
‘Click’
NOTE
Add a neutral detergent and the fi lter into warm water and leave it for 30 minutes.
This will wash the fi lter more effectively.
maintain _13
Page 14
maintain tools and fi lter
Maintaining the fi lter
Do not dry it near a microwave or fi re.•
CAUTION
COUNTERMEASURE TO REMOVE ANYTHING CLOGGING THE
CLEANER
To prevent clogging while using the cleaner, avoid vaccuuming big or sharp objects such as toothpicks, •
blades, socks, etc.
If the cleaner is clogged while in use, the sucking power may decrease and a vibrating sound may be •
heard. In this case, remove the item clogging the product.
If a foreign object is caught while you use the product, the drum will not rotate. In this case, turn the •
power of the cleaner off and remove the object.
Since the safety device is activated in this case, please operate the product again after about 10 •
seconds.
Do not clean it by putting it into a washer or using an unapproved detergent. (See •
page 5).
After cleaning, dry it completely in the shade.•
If you use the fi lter when it is not completely dried Moisture or water may enter the motor and cause a problem. The dust and moisture in the inlet solidifi es and this drastically decreases the sucking power.
The fi lter may smell. Dry the part in the shade as drying it in the sun for a long time may deform or discolor •
it.
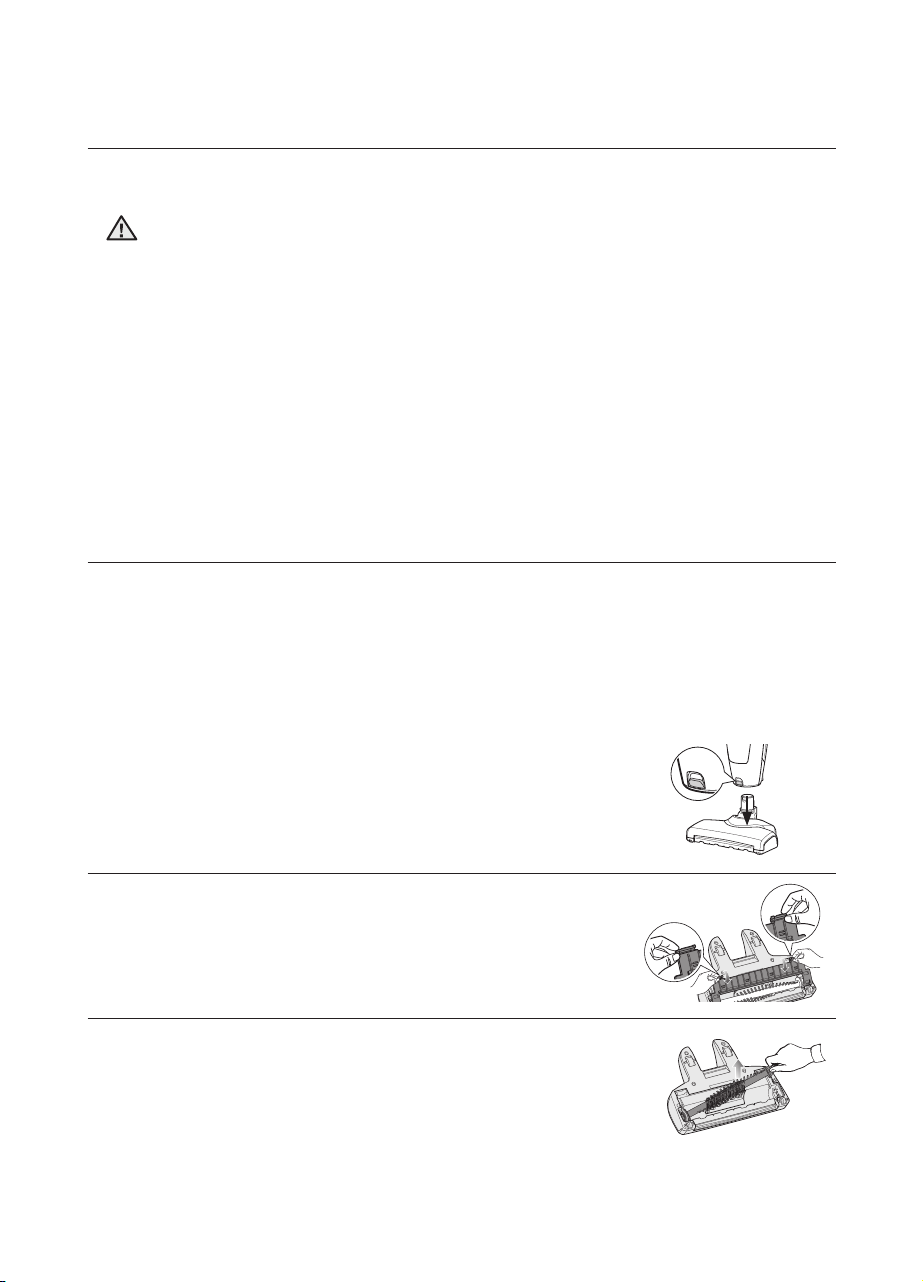
Press the button to separate the air inlet and then separate 1.
the air inlet from the main body.
Press the air inlet cover fi xing hook and separate it.2.
Hold the end of the drum where there is no belt and lift it up.3.
14_ maintain
Page 15
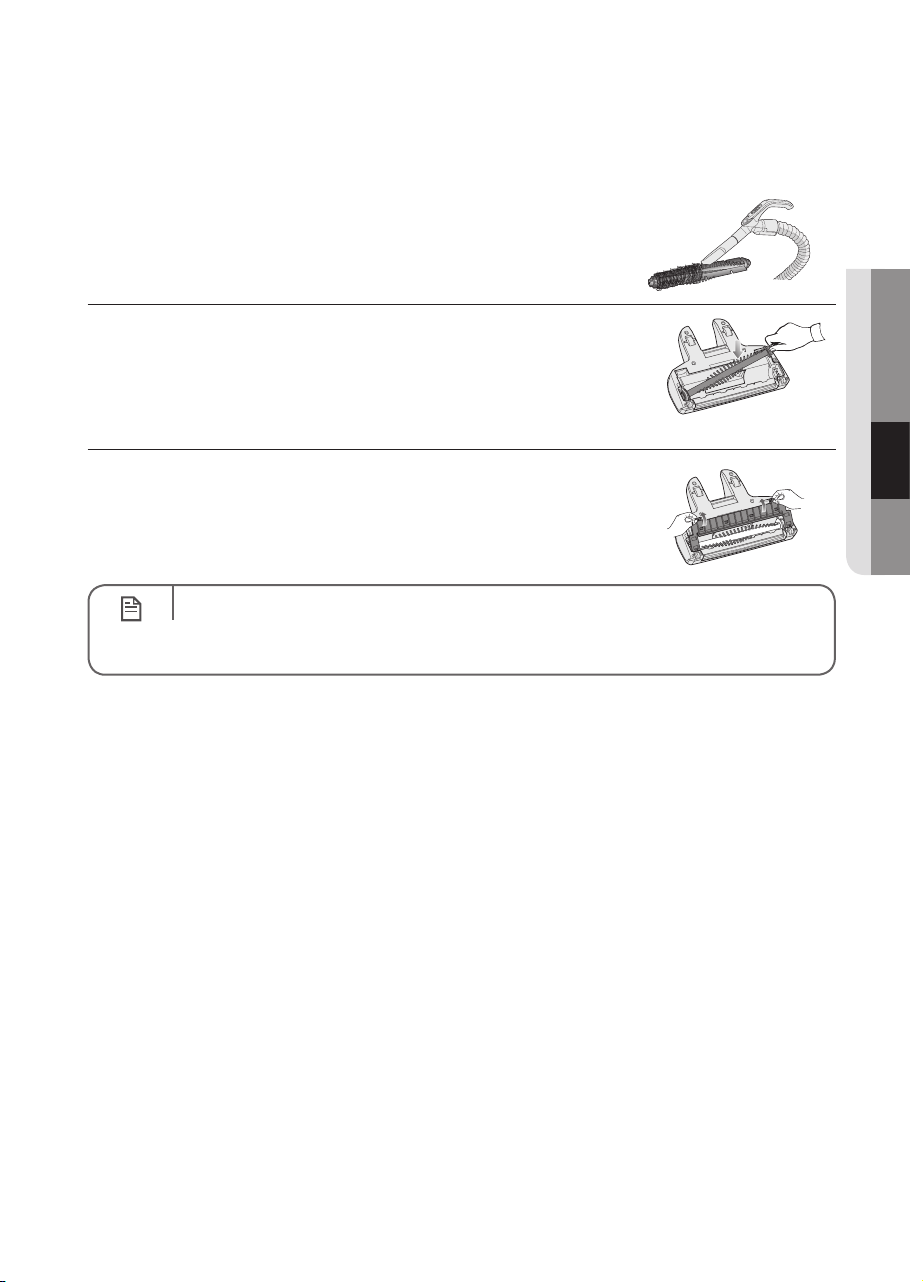
Remove any hairs and threads around the drum with a 4.
vaccuum cleaner.
Install the belt onto the drum and fi x the drum using the 5.
fi xing grooves.
After fi xing the drum, insert the air inlet cover into the groove 6.
and assemble it by slightly sliding it down.
03 MAINTAIN
NOTE
Since an oil-papered or wood-covered fl oor may be scratched by the cleaner, please •
check the type of wheels of the air inlet.
If you cannot remove foreign objects from the cleaner, please contact a service center.•
maintain _15
Page 16

troubleshooting
PROBLEM SOLUTION
Motor downs and does
not start.
Suction force is gradually
decreasing.
Check cable, plug and socket.•
Leave to cool.•
Check for blockage and remove.•
Low or decreasing
suction.
This Vacuum cleaner is approved the following.
EMC Directive : 2004/108/EEC
Low Voltage Directive : 2006/95/EC
Please check fi lters. If required clean it as illustrated in the instruction.•
16_ troubleshooting
Page 17

memo
Page 18

Page 19

Aspirateur
Manuel d’utilisation
Série SS7500
Avant d’utiliser cet appareil, veuillez lire attentivement les instructions.
✻
Utilisation intérieure uniquement.
✻
un monde de possibilités
Merci d’avoir choisi un produit Samsung.
Afi n de bénéfi cier d’un service plus complet,
veuillez enregistrer votre produit à l’adresse
www.samsung.com/register
FRANÇAIS
Page 20

consignes de sécurité
CONSIGNES DE SÉCURITÉ
Avant d’utiliser cet appareil, veuillez lire attentivement ce manuel et le conserver pour •
AVERTISSEMENT
AVERTISSEMENT
AVERTISSEMENT
SYMBOLES DANGER/ATTENTION UTILISÉS
toute référence ultérieure.
Les instructions d’utilisation suivantes concernent plusieurs modèles ; il est donc •
possible que les caractéristiques de votre aspirateur soient légèrement différentes de
celles spécifi ées dans ce manuel.
Cet aspirateur est destiné à une utilisation domestique uniquement. Ne l’utilisez •
pas pour le nettoyage de saletés ou débris provenant de la construction. N’utilisez
pas cet aspirateur avec un de ses fi ltres retiré car cela risque d’endommager les
composants internes et d’annuler la garantie.
AVERTISSEMENT
ATTENTION
Indique un danger de mort ou de blessure grave.
Indique un risque de blessure ou de dégât matériel.
AUTRES SYMBOLES UTILISÉS
Indique une action INTERDITE.
Indique une partie qui NE DOIT PAS être touchée.
Indique une action que vous devez effectuer.
Indique que vous devez débrancher la fi che d'alimentation de la
prise.
02_ consignes de sécurité
Page 21

consignes de sécurité
CONSIGNES IMPORTANTES DE SÉCURITÉ
Lors de l’utilisation d’un appareil électrique, des précautions de base doivent être prises, notamment :
LISEZ TOUTES LES INSTRUCTIONS AVANT D’UTILISER VOTRE STICK ASPIRATEUR.
Débranchez l’appareil de la prise lorsqu’il n’est pas utilisé ou avant toute opération de maintenance.
DANGER: pour limiter tout risque d’incendie, d’électrocution ou de blessure :
GÉNÉRALITÉS
Utilisez cet appareil uniquement tel qu’indiqué dans le présent manuel.•
Ne faites pas fonctionner le stick aspirateur ou le chargeur si celui-ci est endommagé de quelque manière que ce soit.•
Si l’aspirateur fonctionne anormalement, a reçu un choc, a été endommagé, laissé à l’extérieur ou plongé dans l’eau, •
retournez-le au centre d’assistance clientèle.
Ne manipulez jamais le chargeur ou le stick aspirateur avec les mains mouillées.•
Utilisez-le uniquement à l’intérieur et sur des surfaces sèches.•
Cet appareil n’est pas destiné à être utilisé par des personnes (y compris des enfants) ayant des capacités physiques, •
sensorielles ou mentales réduites, ou un manque d’expérience et de connaissances, à moins qu’elles ne soient
surveillées ou qu’elles aient reçu les instructions nécessaires concernant l’utilisation de cet appareil de la part d’une
personne responsable, et ce, pour leur propre sécurité.
Les enfants doivent être surveillés afi n de garantir qu’ils ne jouent pas avec l’appareil.•
CHARGEUR DE BATTERIE
N’utilisez pas la prise polarisée avec une prise murale ou une rallonge non-polarisée.•
N’utilisez pas l’appareil à l’extérieur ni sur des surfaces mouillées.•
Débranchez le chargeur de la prise lorsqu’il n’est pas utilisé ou avant toute opération de maintenance.•
Utilisez uniquement le chargeur fourni par le fabricant pour recharger l’appareil.•
N’utilisez jamais de cordon ou de prise endommagé(e).•
Ne tirez pas sur le cordon ; ne soulevez pas l’appareil par le cordon ; n’utilisez pas le cordon comme poignée ; ne •
fermez pas de porte sur le cordon ; ne tirez pas le cordon sur des rebords ou des angles coupants. Maintenez le
cordon éloigné des surfaces chauffées.
N’utilisez pas de rallonges ni de prises murales ayant une intensité maximale admissible inadéquate.•
Ne débranchez pas l’appareil en tirant sur le cordon. Pour débrancher, tenez la prise et non le cordon.•
Ne détériorez pas les batteries et ne les faites pas brûler car elles risquent d’exploser à des températures élevées.•
N’essayez pas d’ouvrir le chargeur. Les réparations doivent être effectuées uniquement par un technicien qualifi é du •
centre d’assistance clientèle.
N’exposez jamais le chargeur à des températures élevées et évitez tout contact avec l’humidité.•
STICK ASPIRATEUR
N’aspirez jamais d’objets pointus ou tranchants tels que des morceaux de verres, des clous, des vis, des pièces de •
monnaie, etc.
N’utilisez pas l’appareil sans fi ltre. Pour les opérations de maintenance, n’insérez jamais vos doigts ou des objets dans •
la chambre du ventilateur au cas où l’appareil se remettrait accidentellement en marche.
N’insérez aucun objet dans les ouvertures. N’utilisez pas l’appareil si l’une des ouvertures est obstruée ; nettoyez •
régulièrement les ouvertures pour éliminer toute trace de poussière, peluches, cheveux, ou toute autre chose risquant
d’empêcher le passage de l’air.
N’aspirez jamais de matière toxique (javel, ammoniaque, produit de débouchage, etc.).•
N’aspirez jamais d’objets en train de brûler ou de fumer, tels que des cigarettes, des allumettes ou des cendres chaudes.•
N’aspirez jamais de liquides infl ammables ou combustibles tels que de l’essence et n’utilisez jamais l’appareil si de tels •
liquides risquent d’être présents.
N’utilisez pas le stick aspirateur dans un espace clos rempli de vapeurs de peinture à l’huile, de diluant, de substances •
antimites, de poussières infl ammables et autres vapeurs explosives ou toxiques.
Des fuites de batterie peuvent se produire suite à un usage intensif ou à des températures extrêmes. En cas de •
contact du liquide avec la peau, rincez abondamment à l’eau. En cas de contact du liquide avec les yeux, rincez
immédiatement à l’eau claire pendant 10 minutes minimum. Consultez un médecin rapidement.
consignes de sécurité _03
Page 22

Table des matières
MONTAGE DE L’ASPIRATEUR
05
FONCTIONNEMENT DE
L’ASPIRATEUR
10
ENTRETIEN DES OUTILS ET DU
FILTRE
13
05 Montage de l’aspirateur
07 Montage de la poignée et du corps de
l’aspirateur
07 Montage du corps de l’aspirateur et de la
brosse principale
07 Montage du corps de l’aspirateur et de
l’aspirateur portable
08 En cours de charge
09 À propos de la batterie
10 Utilisation de l’aspirateur principal
10 Utilisation de la brosse principale
10 Utilisation de l’aspirateur portable
11 Utilisation du suceur plat
11 Vider le réservoir de poussière
13 Nettoyage du fi ltre
14 Mesure à suivre pour retirer un objet
obstruant l’aspirateur
04_ Table des matières
DÉPANNAGE
16
Page 23

montage de l’aspirateur
Bouton de mise
en marche
Orifi ces d’aération
frontale
Bornes de charge
Bouton de mise
en marche
Couvercle du réservoir
de poussière
Filtre HEPA
Filtre à grille
Témoin de charge
Bouton pour retirer la
brosse principale
volet de la brosse
principale
Réservoir de
poussière
Orifi ces d’aération
arrière
Brosse principale
suceur plat / brosse à
épousseter
compartiment pour le suceur
plat / la brosse à épousseter
Réservoir de
poussière
Bouton pour retirer
l’aspirateur portable
Poignée
Bouton pour retirer le
réservoir de poussière
Bouton pour retirer le
réservoir de poussière
Broches de
charge
MONTAGE DE L’ASPIRATEUR
Vue avant
Bouton de mise
en marche
Orifi ces d’aération
Bouton pour retirer la
volet de la brosse
frontale
brosse principale
principale
Chargeur
Bornes de charge
Poignée
Orifi ces d’aération
Réservoir de
Brosse principale
suceur plat / brosse à
épousseter
arrière
poussière
Vue arrière
Bouton pour retirer
l’aspirateur portable
Bouton pour retirer le
réservoir de poussière
Broches de
charge
01 MONTAGE
Témoin de charge
Aspirateur portable
Bouton de mise
en marche
Bouton pour retirer le
réservoir de poussière
compartiment pour le suceur
plat / la brosse à épousseter
Couvercle du réservoir
de poussière
Filtre HEPA
Filtre à grille
Réservoir de
poussière
montage _05
Page 24

montage de l’aspirateur
Vis
Cheville
Vérifi ez le contenu de la boîte.
Poignée
Aspirateur portable
Vis
Cheville
D'autres éléments pour le
montage de la poignée et du
corps de l'aspirateur
Brosse principale
Manuel d'utilisation
Unité principale
Chargeur
Suceur plat / Brosse à
épousseter
06_ montage
Page 25

MONTAGE DE LA POIGNÉE ET DU CORPS DE L’ASPIRATEUR
Poignée
Pièces de
guidage
Cheville
Vis
Unité principale
Trous sur l’unité
principale
Support pour la
brosse principale
« Clic »
Raccord/Brosse
Entrée d’air de
l’aspirateur portable
« Clic »
Entrée
d’air de
l’aspirateur
principal
D’abord, insérez les pièces de guidage de la poignée aussi loin que possible dans les trous du
corps de l’aspirateur, ensuite, insérez la cheville dans les trous de la poignée et enfi n serrez la vis
à l’aide d’un tournevis (+).
01 MONTAGE
1 2 3
Poignée
Unité principale
Pièces de
guidage
Trous sur l’unité
principale
Cheville
Vis
MONTAGE DU CORPS DE L’ASPIRATEUR ET DE LA BROSSE
PRINCIPALE
Insérez le connecteur de la brosse principale dans le trou du corps
de l’aspirateur jusqu’à ce qu’un petit clic se fasse entendre.
« Clic »
Support pour la
brosse principale
Raccord/Brosse
MONTAGE DU CORPS DE L’ASPIRATEUR ET DE L’ASPIRATEUR
PORTABLE
Insérez l’entrée d’air de l’aspirateur portable dans l’entrée d’air de
l’aspirateur principal et appuyer contre l’aspirateur portable pour
l’insérer dans le corps de l’aspirateur principal jusqu’à ce qu’un
petit clic se fasse entendre.
Entrée
d’air de
l’aspirateur
principal
« Clic »
Entrée d’air de
l’aspirateur portable
montage _07
Page 26

montage de l’aspirateur
Témoin de charge
EN COURS DE CHARGE
Installez le chargeur sur une surface plane et puis, branchez 1.
le cordon d’alimentation.
A l’aide des boutons de mise en marche, désactivez 2.
l’aspirateur principal et l’aspirateur portable.
La batterie ne se charge pas lorsque le bouton est activé.•
Raccordez l’aspirateur portable à l’aspirateur principal. 3.
(Lorsque l’aspirateur principal et l’aspirateur portable ne sont
pas raccordés, l’aspirateur principal ne fonctionne pas.)
Installez l’aspirateur sur le chargeur en alignant les broches 4.
de charge de l’aspirateur avec les bornes de charge du
chargeur.
Le témoin de charge s’allume et clignote régulièrement.•
Pendant la charge, le témoin de charge reste allumé. 5.
Lorsque l’aspirateur est retiré du chargeur, le témoin de
charge s’éteint.
08_ montage
Le témoin de charge ne s’éteint pas ni passe à une •
couleur bleue claire lorsque la charge est terminée. Cela
n’est pas un défaut de l’appareil.
Assurez-vous de désactiver les boutons de mise en marche, puis chargez la batterie.•
Témoin de charge
Page 27

Chargez l’appareil dans les cas suivants.•
REMARQUE
Lorsque vous utilisez l’appareil pour la première fois après avoir fait son acquisition ou après une longue période d’inutilisation.
Lorsque le niveau de la batterie est bas et la force d’aspiration est faible. Lorsque vous chargez l’aspirateur après son acquisition ou son utilisation, chargez-le •
pendant 4 heures environ avant de l’utiliser.
La charge complète de la batterie lorsque celle-ci est déchargée prend 4 heures environ.•
Lorsque vous retirez l’aspirateur du chargeur, la batterie ne se charge pas.•
Il est conseillé de laisser l’aspirateur branché au chargeur. (Cependant, si vous -
prévoyez de partir en voyage ou en vacances, débranchez le cordon d’alimentation
du chargeur de la prise mûrale.)
À PROPOS DE LA BATTERIE
Ce modèle dispose d’une puissante • batterie Lithium-ion.
La garantie de la batterie est de 6 mois à partir de la •
date d’achat.
Pour acheter une nouvelle batterie, contactez votre centre •
d’assistance.
Cette batterie est spécialement conçue pour cet aspirateur ; •
ne l’utilisez pas pour d’autres appareils ou à d’autres fi ns.
Ne démontez pas et ne modifi ez pas l’appareil.•
Chargez l’appareil dans un lieu bien aéré.•
Ne placez jamais la batterie à proximité d’un feu ou d’une •
source de chaleur.
Ne branchez pas d’objets métalliques sur les bornes (+) ou (-).•
Laissez l’appareil toujours à l’intérieur (0°C~40°C).•
Lorsque la batterie ne fonctionne pas correctement, ne la démontez pas. Contactez le •
centre d’assistance le plus proche.
Si le temps d’utilisation et de charge de la batterie est considérablement réduit après •
quelques utilisations, contactez votre centre d’assistance pour remplacer la batterie, car
celle-ci pourrait être en fi n de vie.
01 MONTAGE
montage _09
Page 28

fonctionnement de l’aspirateur
Bouton de mise
en marche
Fonctionnement
normal
Lorsque le volet est
en fonctionnement
Bouton
pour retirer
l’aspirateur
portable
UTILISATION DE L’ASPIRATEUR PRINCIPAL
L’aspirateur principal permet de nettoyer le sol sans avoir besoin de vous pencher.
Marche / Arrêt de l’aspirateur principal
Lorsque le bouton de mise en marche est actionné, il est •
possible d’activer/de désactiver l’appareil (
).
L’aspirateur principal ne fonctionne que lorsque l’aspirateur 1.
ATTENTION
portable est monté. (Pour le montage de l’aspirateur
portable, reportez-vous à la page 7)
Lorsque vous utilisez l’aspirateur principal, éteignez 2.
l’aspirateur portable.
Dépannage lorsque l’aspirateur principal ne se désactive pas.
Vérifi ez si l’aspirateur portable est activé.•
Vous ne pouvez activer ou désactiver l’aspirateur principal que lorsque l’aspirateur
portable est désactivé.
UTILISATION DE LA BROSSE PRINCIPALE
La direction de la brosse principale peut être modifi ée •
en déplaçant le lévier de l’aspirateur principal vers
la droite ou vers la gauche, ce qui rend le nettoyage
beaucoup plus facile.
Bouton de mise
en marche
Lorsque vous nettoyez le sol près du mur, la languette •
avant est activée afi n de pouvoir nettoyer la poussière
facilement.
UTILISATION DE L’ASPIRATEUR PORTABLE
Soulevez le bouton prévu pour détacher l’aspirateur 1.
portable et détachez-le du corps de l’aspirateur principal
en le tirant dans le sens de la fl èche.
10_ fonctionnement
Fonctionnement
normal
Bouton
pour retirer
l’aspirateur
portable
Lorsque le volet est
en fonctionnement
Page 29

Marche / Arrêt de l’aspirateur portable2.
Bouton de mise
en marche
Brosse à
épousseter
Suceur plat
Lorsque le bouton de mise en marche est actionné, il •
est possible d’activer/de désactiver l’appareil (
).
Raccordez l’aspirateur portable à l’aspirateur principal 1.
ATTENTION
après l’avoir utilisé. (Reportez-vous à la page 7)
Lorsque vous placez l’aspirateur portable sur 2.
l’aspirateur principal, assurez vous de désactiver
l’aspirateur portable.
UTILISATION DU SUCEUR PLAT
Insérez le suceur plat dans l’extrémité de l’entrée d’air de
l’aspirateur portable afi n de l’installer. Pour le retirer, il suffi t de
tirer.
Après l’utilisation et afi n de ne pas les perdre, stockez-•
les dans le bac du chargeur prévu à cet effet. (Reportezvous à la page 5)
Suceur plat : utilisez cet accessoire pour nettoyer la •
poussière des rainures ou des cadres des fenêtres, des
coins ou des joints.
Brosse à épousseter : utilisez cet accessoire pour •
nettoyer la poussière des rainures des fenêtres, des coins ou des joints.
VIDER LE RÉSERVOIR DE POUSSIÈRE
Si le réservoir de poussière est plein ou la force de l’aspirateur 1.
est diminuée, videz le réservoir de poussière.
Bouton de mise
en marche
Brosse à
épousseter
Suceur plat
02 FONCTIONNEMENT
Appuyez sur les [boutons qui permettent de retirer le réservoir 2.
de poussière] avec vos doigts et retirez-le.
Soulevez le couvercle du réservoir.3.
fonctionnement _11
Page 30

fonctionnement de l’aspirateur portable
« Clic »
Videz le réservoir de poussière.4.
Refermez le couvercle du réservoir.5.
Appuyez sur le réservoir de poussière jusqu’à ce qu’un petit 6.
clic se fasse entendre.
Utilisation d’un sac plastique•
REMARQUE
Cette méthode est conseillée pour les gens ayant des allergies ou de l’asthme.
Le nettoyage du
réservoir de poussière
est également
recommandé.
« Clic »
12_ fonctionnement
Page 31

entretien des outils et du fi ltre
« Clic »
Filtre HEPA
Filtre à grille
Crochet de
fi xation du fi ltre
à grille
NETTOYAGE DU FILTRE
Appuyez sur les [boutons qui permettent de retirer le réservoir 1.
de poussière] avec vos doigts et retirez-le.
Soulevez le cache du réservoir de poussière.2.
03 ENTRETIEN
Tenez le cache du réservoir de poussière et tirez du fi ltre à 3.
grille et du microfi ltre du cache du réservoir de poussière
tout en appuyant sur le crochet de fi xation du fi ltre à grille
pour les détacher.
Sécouez les fi ltres pour retirer la poussière, puis lavez le fi ltre 4.
HEPA et retirez toutes les saletés.
Séchez complètement le fi ltre dans un endroit aéré et 5.
ombragé.
Après avoir monté le microfi ltre et le fi ltre à grille, insérez un 6.
côté du fi ltre à grille et appuyez sur le crochet de fi xation du
cache du réservoir de poussière jusqu’à ce qu’un petit clic
se fasse entendre.
Montez l’ensemble du cache du réservoir de poussière et le 7.
réservoir de poussière.
Crochet de
fi xation du fi ltre
à grille
Filtre HEPA
Filtre à grille
« Clic »
REMARQUE
Mettez le fi ltre dans un bac contenant de l’eau chaude, ajoutez un nettoyant neutre
et laissez agir 30 minutes. Cela permet de laver le fi ltre de façon plus effi cace.
entretien _13
Page 32

entretien des outils et du fi ltre
Entretien du fi ltre
Ne le séchez pas à proximité d’un four microondes ou d’un feu.•
ATTENTION
MESURE À SUIVRE POUR RETIRER UN OBJET OBSTRUANT
L’ASPIRATEUR
Pour éviter l’obstruction de l’aspirateur, évitez d’aspirer des objets grands ou pointus tels que des cure-•
dents, des lames, des chaussettes, etc.
Si un objet obstrue l’aspirateur pendant le fonctionnement de celui-ci, la force d’aspiration pourrait •
diminuer et un bruit de vibration pourrait se faire entendre. Dans ce cas, retirez l’objet obstruant l’appareil.
Si un objet étranger est coincé pendant que vous utilisez l’appareil, la brosse ne peut pas tourner. Dans •
ce cas, mettez l’aspirateur hors tension et retirez l’objet.
Il est nécessaire de réutiliser l’appareil dans un délai de 10 secondes, car le système de sécurité est •
activé.
Ne le nettoyez pas à l’aide d’un lave-linge ou d’un nettoyant inapproprié. (Reportez-•
vous à la page 5)
Après le nettoyage, laissez-le sécher complètement à l’ombre.•
Si vous utilisez le fi ltre lorsqu’il n’est pas complètement sec De l’humidité ou de l’eau risquent de pénétrer dans le moteur et de provoquer une panne.
La poussière et l’humidité de l’entrée d’air se solidifi ent, ce qui réduit sensiblement la force d’aspiration.
Le fi ltre pourrait sentir mauvais. Séchez ce composant à l’ombre car au soleil il risque de se déformer ou de se •
décolorer.
Appuyez sur le bouton prévu pour retirer l’entrée d’air, puis, 1.
retirez l’entrée d’air du corps de l’aspirateur principal.
Appuyez sur la languette de fi xation du couvercle d’entrée 2.
d’air et retirez-le.
Tenez l’extrémité de la brosse ne contenant pas de courroie 3.
et soulevez-la.
14_ entretien
Page 33

Retirez les cheveux et les fi ls accrochés à la brosse avec un 4.
aspirateur.
Installez la courroie sur la brosse et fi xez celle-ci à l’aide des 5.
rainures de fi xation.
Une fois la brosse fi xée, insérez le couvercle de l’entrée 6.
d’air dans la rainure et montez-la en la faissant glisser
doucement.
Vérifi ez le type de roues de l’entrée d’air, car l’aspirateur pourrait endommager les sols •
REMARQUE
revêtus de papier peint ou de parquet.
Si vous n’arrivez pas à extraire des objets étrangers de l’aspirateur, contactez votre •
centre d’assistance.
03 ENTRETIEN
entretien _15
Page 34

dépannage
PROBLÈME SOLUTION
Le moteur s'arrête et ne
démarre pas.
La puissance d'aspiration
diminue progressivement.
Vérifi ez le câble, la fi che et la prise.•
Laissez-le refroidir.•
Vérifi ez que rien n'obstrue l'appareil et débouchez-le si nécessaire.•
Aspiration faible ou
de moins en moins
puissante.
Vérifi ez l'état des fi ltres. Si nécessaire, nettoyez-les comme indiqué •
dans les instructions.
16_ dépannage
Page 35

memo
Page 36

Page 37

Stofzuiger
gebruikershandleiding
SS7500-serie
Lees deze instructies zorgvuldig door voordat u het apparaat in
✻
gebruik neemt.
Alleen voor gebruik binnenshuis.
✻
imagine the possibilities
Hartelijk bedankt voor het aanschaffen van een Samsung-product.
Voor een uitgebreidere service
kunt u uw product registreren op
www.samsung.com/register
NEDERLANDS
Page 38

veiligheidsinformatie
VEILIGHEIDSINFORMATIE
Voordat u het apparaat gebruikt, dient u deze handleiding zorgvuldig door te lezen. •
WAARSCHUWING
WAARSCHUWING
WAARSCHUWING
WAARSCHUWINGSSYMBOLEN IN DEZE HANDLEIDING
Bewaar de handleiding ter referentie.
Omdat deze gebruiksinstructies gelden voor meerdere modellen, kunnen de •
eigenschappen van uw stofzuiger verschillen van de beschrijving in deze handleiding.
Deze stofzuiger is uitsluitend bedoeld voor huishoudelijk gebruik. Gebruik deze •
stofzuiger niet om bouwafval of puin op te zuigen. Gebruik deze stofzuiger niet
zonder een van de fi lters. Dit kan schade aan interne onderdelen veroorzaken en uw
garantie ongeldig maken.
WAARSCHUWING
VOORZICHTIG
Geeft aan dat er risico op ernstig of dodelijk letsel bestaat.
Geeft aan dat er risico op lichamelijk letsel of materiële schade
bestaat.
OVERIGE SYMBOLEN IN DEZE HANDLEIDING
Geeft aan dat u iets NIET moet doen.
Geeft aan dat u iets NIET moet aanraken.
Geeft aan dat u bepaalde instructies moet opvolgen.
Geeft aan dat u de stekker uit het stopcontact moet halen.
02_ veiligheidsinformatie
Page 39

veiligheidsinformatie
BELANGRIJKE VEILIGHEIDSAANWIJZINGEN
Bij het gebruik van elektrische apparaten moeten onder meer de volgende basisvoorzorgen in acht worden
genomen:
LEES ALLE INSTRUCTIES DOOR ALVORENS U DE ROBOTSTOFZUIGER GAAT GEBRUIKEN.
Haal de stekker uit het stopcontact wanneer u het apparaat niet gebruikt en wanneer u er onderhoud aan pleegt.
WAARSCHUWING: houd u aan het volgende om de kans op brand, elektrische schokken en
lichamelijk letsel te vermijden:
ALGEMEEN
Gebruik het apparaat alleen zoals in deze handleiding is aangegeven.•
Gebruik de robotstofzuiger of het oplaadstation niet als deze op enige wijze zijn beschadigd.•
Als de stofzuiger niet naar behoren werkt, is gevallen, buiten is blijven staan of in het water is gevallen, moet u het apparaat •
naar een klantenservicecentrum brengen.
Pak het oplaadstation en de robotstofzuiger niet met natte handen vast.•
Gebruik het apparaat alleen op droge oppervlakken binnenshuis.•
Dit apparaat is niet bedoeld voor personen (waaronder kinderen) met een verminderd fysiek, zintuiglijk of mentaal vermogen, •
of met onvoldoende ervaring en kennis, tenzij ze onder toezicht staan of instructies hebben gekregen met betrekking tot het
gebruik van het apparaat van een persoon die verantwoordelijk is voor hun veiligheid.
Kinderen dienen onder toezicht te worden gehouden om te voorkomen dat ze met het apparaat gaan spelen.•
BATTERIJOPLADER
Pas de gepolariseerde stekker niet aan om deze op een niet-gepolariseerd stopcontact of verlengsnoer te kunnen aansluiten.•
Gebruik het product niet buiten of op natte oppervlakken.•
Haal de stekker van het oplaadstation uit het stopcontact wanneer u dit niet gebruikt en wanneer u er onderhoud aan pleegt.•
Gebruik alleen het oplaadstation dat door de fabrikant is meegeleverd om het apparaat op te laden.•
Gebruik het product niet wanneer het snoer of de stekker beschadigd is.•
Trek of draag het product niet aan het snoer, gebruik het snoer niet als handvat, sluit de deur niet op of over het snoer heen •
en trek het snoer niet om scherpe hoeken of randen. Houd het snoer uit de buurt van verwarmde oppervlakken.
Gebruik geen verlengsnoeren of stopcontacten met onvoldoende stroomtransportcapaciteit.•
Trek de stekker niet aan het snoer uit het stopcontact. Pak de stekker beet en niet het snoer.•
Vermink of verbrand de batterijen niet, aangezien deze bij hoge temperaturen ontploffen.•
Probeer niet het oplaadstation te openen. Reparaties mogen alleen door een gekwalifi ceerd klantenservicecentrum worden •
uitgevoerd.
Stel het oplaadstation niet bloot aan hoge temperaturen en zorg dat het oplaadstation ook niet met enige vloeistof of vocht in •
contact komt.
ROBOTSTOFZUIGER
Zuig geen harde of scherpe voorwerpen zoals glas, spijkers, schroeven, munten enzovoorts op.•
Gebruik het apparaat niet zonder fi lter. Wanneer u onderhoud aan het apparaat pleegt, mag u uw vingers of andere •
voorwerpen niet in de ventilatorruimte steken, voor het geval het apparaat per ongeluk wordt ingeschakeld.
Steek geen voorwerpen in openingen. Gebruik het apparaat niet als er openingen geblokkeerd zijn; houd openingen vrij van •
stof, pluisjes, haren en alles wat de luchtcirculatie kan hinderen.
Zuig geen giftige stoffen op (chloor, bleekmiddel, ammonia, gootsteenreiniger, enzovoorts).•
Zuig geen zaken op die branden of waar rook vanaf komt zoals sigaretten, lucifers of hete as.•
Zuig geen vloeistoffen zoals benzine op die kunnen ontvlammen of ontploffen en gebruik het apparaat niet op plekken waar •
deze vloeistoffen aanwezig kunnen zijn.
Gebruik de robotstofzuiger niet in een afgesloten ruimte die gevuld is met dampen van verf op oliebasis, verfverdunner, •
antimottenmiddelen, ontvlambaar stof of andere explosieve of giftige dampen.
Bij extreem gebruik en onder extreme temperatuuromstandigheden kunnen er lekken in de batterijcellen ontstaan. Als deze •
vloeistof met de huid in aanraking komt, moet u deze snel met water wassen. Als de vloeistof in de ogen komt, moet u deze
onmiddellijk minimaal 10 minuten lang met schoon water spoelen. Zoek medische hulp.
veiligheidsinformatie _03
Page 40

inhoud
MONTAGE VAN DE STOFZUIGER
05
DE STOFZUIGER BEDIENEN
10
HULPMIDDELEN EN FILTER
ONDERHOUDEN
13
05 Montage van de stofzuiger
07 De handgreep aan het hoofdcompartiment
monteren
07 De zuigborstel aan het hoofdcompartiment
monteren
07 De handstofzuiger in het
hoofdcompartiment monteren
08 Opladen
09 De batterij
10 De steelstofzuiger gebruiken
10 De zuigborstel gebruiken
10 De handstofzuiger gebruiken
11 De kierenborstel/veger gebruiken
11 De stofopvangbak legen
13 Het fi lter reinigen
14 Wat moet u doen om verstopping van de
stofzuiger op te heffen?
04_ inhoud
PROBLEMEN OPLOSSEN
16
Page 41

montage van de stofzuiger
Aan/uit-knop
Luchtopening
voorzijde
Oplaadcontacten
Aan/uit-knop
Deksel van
stofopvangbak
HEPA-fi lter
Rasterfi lter
Oplaadlampje
Knop voor het losmaken
van de zuigborstel
klep van de
zuigborstel
Stofopvangbak
Luchtopening
achterzijde
Zuigborstel
kierenborstel/
veger
houder voor
kierenborstel/veger
Stofopvangbak
Knop voor het losmaken
van de handstofzuiger
Handgreep
Knop voor het losmaken
van de stofopvangbak
Knop voor het
losmaken van de
stofopvangbak
Oplaadpunten
MONTAGE VAN DE STOFZUIGER
Vooraanzicht
Aan/uit-knop
Luchtopening
voorzijde
Knop voor het losmaken
van de zuigborstel
klep van de
zuigborstel
Oplader
Oplaadcontacten
Handgreep
Zuigborstel
Luchtopening
achterzijde
Stofopvangbak
kierenborstel/
veger
Achteraanzicht
Knop voor het losmaken
van de handstofzuiger
Knop voor het losmaken
van de stofopvangbak
Oplaadpunten
01 MONTAGE
Oplaadlampje
Handstofzuiger
Aan/uit-knop
Knop voor het
losmaken van de
stofopvangbak
houder voor
kierenborstel/veger
Deksel van
stofopvangbak
HEPA-fi lter
Rasterfi lter
Stofopvangbak
montage _05
Page 42

montage van de stofzuiger
Schroef
Bevestigingspen
Controleer de inhoud van de verpakking
Handgreep
Handstofzuiger
Schroef
Bevestigingspen
Voorwerpen voor het monteren
van de handgreep aan het
hoofdcompartiment
Zuigborstel
Gebruikersaanwijzing
Hoofdcompartiment
Oplader
Kierenborstel/veger
06_ montage
Page 43

DE HANDGREEP AAN HET HOOFDCOMPARTIMENT MONTEREN
Handgreep
Geleiders
Bevestigingspen
Schroef
Hoofdcompartiment
Openingen in het
hoofdcompartiment
Houder voor de
zuigborstel
‘Klik’
Pijp C/borstel
Luchtinlaat van de
handstofzuiger
‘Klik’
Luchtinlaat van het
hoofdcompartiment
Steek de koppelingsonderdelen van de handgreep zo ver mogelijk in de opening in het
hoofdcompartiment. Steek de bevestigingspen in de opening op de handgreep en draai de
schroef aan met een kruiskopschroevendraaier.
1 2 3
Handgreep
Geleiders
Bevestigingspen
01 MONTAGE
Hoofdcompartiment
Openingen in het
hoofdcompartiment
Schroef
DE ZUIGBORSTEL AAN HET HOOFDCOMPARTIMENT MONTEREN
Steek de connector van de zuigborstel in de opening van het
hoofdcompartiment totdat deze vastklikt.
‘Klik’
Houder voor de
zuigborstel
Pijp C/borstel
DE HANDSTOFZUIGER IN HET HOOFDCOMPARTIMENT
MONTEREN
Steek de luchtinlaat van de handstofzuiger in de luchtinlaat
op het hoofdcompartiment en duw de handstofzuiger in het
hoofdcompartiment totdat deze vastklikt.
‘Klik’
Luchtinlaat van het
hoofdcompartiment
Luchtinlaat van de
handstofzuiger
montage _07
Page 44

montage van de stofzuiger
Oplaadlampje
OPLADEN
Plaats de oplader op een egaal oppervlak en steek de 1.
stekker in het stopcontact.
Zet de schakelaars op het hoofdcompartiment en op de 2.
handstofzuiger uit.
De batterij •
aan staat.
Sluit de handstofzuiger aan op het hoofdcompartiment. 3.
(Wanneer de handstofzuiger niet in het hoofdcompartiment
is gemonteerd, werkt de steelstofzuiger niet.)
Plaats de stofzuiger in de oplader. Lijn de oplaadpunten van 4.
de stofzuiger hierbij uit met de oplaadpunten op de oplader.
Het oplaadlampje gaat branden en knippert regelmatig.•
wordt niet opgeladen wanneer de schakelaar
Tijdens het opladen brandt het oplaadlampje. Wanneer de 5.
stofzuiger van de oplader wordt gehaald, gaat het lampje
uit.
08_ montage
Ook wanneer het opladen is voltooid, gaat het lampje niet •
uit en verandert het evenmin van kleur. Dit duidt niet op
een probleem met het product.
Controleer dat beide schakelaars op ‘Uit’ staan en laad de batterij op.•
Oplaadlampje
Page 45

Laad het apparaat op in de volgende gevallen.•
OPMERKING
Laad het apparaat gedurende circa 4 uur op voor gebruik wanneer u het apparaat voor •
het eerst oplaadt na aanschaf of nadat u het lange tijd niet hebt gebruikt.
Het volledig opladen van een geheel lege batterij duurt circa 4 uur.•
Als u de stofzuiger van de oplader haalt, loopt de batterij langzaam leeg.•
DE BATTERIJ
Het apparaat is voorzien van een krachtige• Li-ion-batterij.
Voor de batterij geldt een garantie van 6 maanden vanaf •
de aankoopdatum.
Neem contact op met het servicecentrum voor de aanschaf •
van een nieuwe batterij.
De batterij is uitsluitend bestemd voor deze stofzuiger. Gebruik •
de batterij daarom niet voor andere apparaten of doeleinden.
Haal het apparaat niet uit elkaar en breng geen modifi caties •
aan.
Laad het apparaat op in een ruimte met goede ventilatie.•
Stel de batterij niet bloot aan hitte of vuur.•
Raak de aansluitpunten (+) en (-) niet aan met metalen voorwerpen.•
Gebruik het apparaat uitsluitend binnenshuis (0°C~40°C).•
Demonteer de batterij niet wanneer deze niet goed werkt. Neem contact op met het •
dichtstbijzijnde servicecentrum.
Als het oplaadniveau en de gebruikstijd van de batterij na enkele malen gebruik is •
afgenomen, is de levensduur van de batterij mogelijk bijna verstreken. Neem contact op
met het servicecentrum om de batterij te vervangen.
Wanneer u het apparaat voor het eerst gebruikt na aanschaf of na een lange periode waarin u het niet hebt gebruikt.
Wanneer het batterijniveau laag is en de zuigkracht zwak is. -
01 MONTAGE
Het is raadzaam de stofzuiger altijd op de oplader aangesloten te laten. (Als u op zakenreis of vakantie gaat, moet u echter de stekker van de oplader uit het
stopcontact halen.)
montage _09
Page 46

de stofzuiger bedienen
Aan/uit-knop
Normaal bedrijf
Wanneer de klep in
werking is
Knop voor
het losmaken
van de
handstofzuiger
DE STEELSTOFZUIGER GEBRUIKEN
Met de steelstofzuiger kunt u de vloer schoonmaken zonder te hoeven bukken.
Steelstofzuiger aan/uit
Telkens wanneer u op de schakelaar drukt, wisselt de functie •
ervan tussen
.
De steelstofzuiger werkt alleen wanneer de handstofzuiger 1.
VOORZICHTIG
is gemonteerd. (Zie pagina 7 voor meer informatie over het
monteren van de handstofzuiger).
Zet de schakelaar op de handstofzuiger uit wanneer u de 2.
steelstofzuiger gebruikt.
Wat moet u doen als de steelstofzuiger niet uit gaat?
Controleer of de handstofzuiger aan staat.•
U kunt de steelstofzuiger alleen aan en uit zetten wanneer de schakelaar op de
handstofzuiger uit staat.
DE ZUIGBORSTEL GEBRUIKEN
U kunt de richting van de zuigborstel veranderen •
door de handgreep van de steelstofzuiger naar links
of rechts te bewegen. Hierdoor wordt het zuigen
aanzienlijk vergemakkelijkt.
Aan/uit-knop
Tijdens het zuigen van de vloer vlak voor de muur •
wordt de sleuf aan de voorkant geactiveerd zodat u het
stof gemakkelijk kunt opzuigen.
DE HANDSTOFZUIGER GEBRUIKEN
Trek de knop voor het losmaken van de handstofzuiger 1.
omhoog en haal de handstofzuiger los van het
hoofdcompartiment door het in de richting van de pijl te
trekken.
10_ bediening
Normaal bedrijf
Knop voor
het losmaken
van de
handstofzuiger
Wanneer de klep in
werking is
Page 47

Handstofzuiger aan/uit2.
Aan/uit-knop
Veger
Kierenborstel
Telkens wanneer u op de schakelaar drukt, wisselt de •
functie ervan tussen
.
Sluit de handstofzuiger na gebruik weer aan op het 1.
VOORZICHTIG
hoofdcompartiment. (Zie pagina 7.)
Vergeet niet de handstofzuiger uit te zetten wanneer u 2.
deze weer in het hoofdcompartiment monteert.
DE KIERENBORSTEL/VEGER GEBRUIKEN
Monteer de kierenborstel/veger door deze in de luchtinlaat van
de handstofzuiger te steken. U kunt hem weer verwijderen door
hem eruit te trekken.
Bewaar de kierenborstel/veger in de houder op de •
oplader zodat u hem niet kwijt raakt. (Zie pagina 5.)
Kierenborstel: hiermee kunt u stof verwijderen uit •
raamprofi elen, hoeken en gaten.
Veger: hiermee kunt u stof verwijderen van kozijnen, •
hoeken en gaten.
DE STOFOPVANGBAK LEGEN
Als de stofopvangbak vol is of de zuigkracht afneemt, moet u 1.
de stofopvangbak leegmaken.
Aan/uit-knop
Veger
Kierenborstel
02 BEDIENING
Druk met uw duim en middelvinger op de [knoppen voor het 2.
ontgrendelen van de stofopvangbak] en trek de opvangbak
naar buiten.
Trek het deksel van de stofopvangbak omhoog.3.
bediening _11
Page 48

operating the cleaner
‘Klik’
Maak de stofopvangbak leeg.4.
Sluit het deksel van de stofopvangbak.5.
Duw de stofopvangbak omlaag totdat deze vastklikt.6.
Met een plastic zak•
OPMERKING
Deze methode wordt aanbevolen voor mensen met allergieën of astma.
‘Klik’
Daarnaast is het
raadzaam de
stofopvangbak
schoon te maken met
koud water.
12_ bediening
Page 49

hulpmiddelen en fi lter onderhouden
‘Klik’
HEPA-fi lter
Rasterfi lter
Bevestigingshaak
rasterfi lter
HET FILTER REINIGEN
Druk met uw duim en middelvinger op de [knoppen voor het 1.
ontgrendelen van de stofopvangbak] en trek de opvangbak
naar buiten.
Open het deksel van de stofopvangbak.2.
03 ONDERHOUD
Houd het deksel van de stofopvangbak vast en haal het 3.
rasterfi lter en het microfi lter los van het deksel door eraan
te trekken en de bevestigingshaak van het rasterfi lter in te
drukken.
Schud de stof van de fi lters en spoel het HEPA-fi lter af totdat 4.
het schoon is.
Laat het fi lter geheel opdrogen op een goed geventileerde 5.
plaats in de schaduw.
Haak nadat u het microfi lter en rasterfi lter weer hebt 6.
gemonteerd een zijde van het rasterfi lter vast en druk op
de bevestigingshaak van het deksel van de stofopvangbak
totdat het geheel vastklikt.
Bevestig het gemonteerde deksel aan de stofopvangbak.7.
Bevestigingshaak
rasterfi lter
HEPA-fi lter
Rasterfi lter
‘Klik’
OPMERKING
Leg het fi lter in warm water met een neutraal reinigingsmiddel en laat het 30
minuten weken. Zo wordt het fi lter grondiger schoongemaakt.
onderhoud _13
Page 50

hulpmiddelen en fi lter onderhouden
Onderhoud van het fi lter
Droog het fi lter niet bij een magnetron of haard.•
VOORZICHTIG
WAT MOET U DOEN OM VERSTOPPING VAN DE STOFZUIGER OP
TE HEFFEN?
Vermijd het opzuigen van grote of scherpe voorwerpen, zoals tandenstokers, mesjes, sokken, en •
dergelijk om verstopping van de stofzuiger te voorkomen.
Als de stofzuiger tijdens gebruik verstopt raakt, kan de zuigkracht afnemen en is mogelijk een trillend •
geluid te horen. Verwijder in dat geval het voorwerp dat de verstopping veroorzaakt.
Als een voorwerp vast komt te zitten tijdens het gebruik van het apparaat, stopt de trommel met draaien. •
Zet de stofzuiger in dat geval uit en verwijder het voorwerp.
In dit geval wordt de veiligheidsschakeling geactiveerd. Wacht daarom circa 10 seconden alvorens u het •
apparaat weer aan zet.
Was het fi lter niet in de wasmachine en gebruik alleen goedgekeurde •
schoonmaakmiddelen. (Zie pagina 5.)
Laat het fi lter na reiniging volledig droog worden op een plaats in de schaduw.•
Als u het fi lter gebruikt wanneer het nog niet helemaal droog is kunnen vocht of water in de motor binnendringen en problemen veroorzaken. kunnen stof en vochtdeeltjes in de inlaat hard worden, waardoor de zuigkracht aanzienlijk wordt verminderd.
kan het fi lter gaan stinken. Laat het onderdeel drogen in de schaduw. Als u het langere tijd in de zon laat drogen, •
kan het vervormen of verkleuren.
Druk op de knop om de luchtinlaat los te maken en haal de 1.
luchtinlaat van het hoofdcompartiment.
Druk op de bevestigingshaak van het deksel van de 2.
luchtinlaat en maak het deksel los.
Pak het uiteinde van de trommel waar zich geen riem 3.
bevindt vast en til de trommel op.
14_ onderhoud
Page 51

Verwijder haar en draden van de trommel met een stofzuiger.4.
Bevestig de riem aan de trommel en schuif de trommel weer 5.
in de bevestigingsgroeven.
Plaats nadat u de trommel weer hebt aangebracht het 6.
deksel van de luchtinlaat in de groef en druk het zachtjes
omlaag.
De stofzuiger zou krassen kunnen veroorzaken op houten vloeren en laminaat. Controleer •
OPMERKING
daarom het type wielen op de luchtinlaat.
Neem contact op het met servicecentrum als zich voorwerpen in de stofzuiger bevinden •
die u niet kunt verwijderen.
03 ONDERHOUD
onderhoud _15
Page 52

problemen oplossen
PROBLEEM OPLOSSING
Motor schakelt uit en
start niet.
De zuigkracht neemt
geleidelijk af.
Controleer het snoer, de stekker en het stopcontact.•
Laat het apparaat afkoelen.•
Controleer op verstoppingen en verwijder deze.•
De zuigkracht is zwak of
neemt af.
Deze stofzuiger voldoet aan de volgende richtlijnen.
EMC-richtlijn: 2004/108/EEC
Laagspanningsrichtlijn: 2006/95/EC
Controleer de fi lters. Maak de fi lters zo nodig schoon zoals beschreven •
in de instructies.
16_ problemen oplossen
Page 53

aantekeningen
Page 54

Contact Samsung wereldwijd
Wanneer u suggesties of vragen heeft met betrekking tot Samsung producten,
gelieve contact op te nemen met de consumenten dienst van Samsung
COUNTRY CONTACT CENTER WEB SITE
BELGIUM 02 201 2418
NETHERLANDS
LUXEMBURG 261 03 710 www.samsung.com
0900-SAMSUNG (0900-7267864)
( € 0,10/Min)
www.samsung.com/be (Dutch)
www.samsung.com/be_fr (French)
www.samsung.com/nl
 Loading...