

Page 1

USER’S MANUAL
SRP-770II
LABEL PRINTER
ٻ
KA04-00019E
Rev. 1.02
www.samsungminiprinters.comٻ
ٻ
ڌ
Page 2
Safety Precautions
ٻ
ٻ
ٻ
ٻ
ٻ
ٻ
ٻ
In using the present appliance, please keep the following safety
regulations in order to prevent any hazard or material damage.
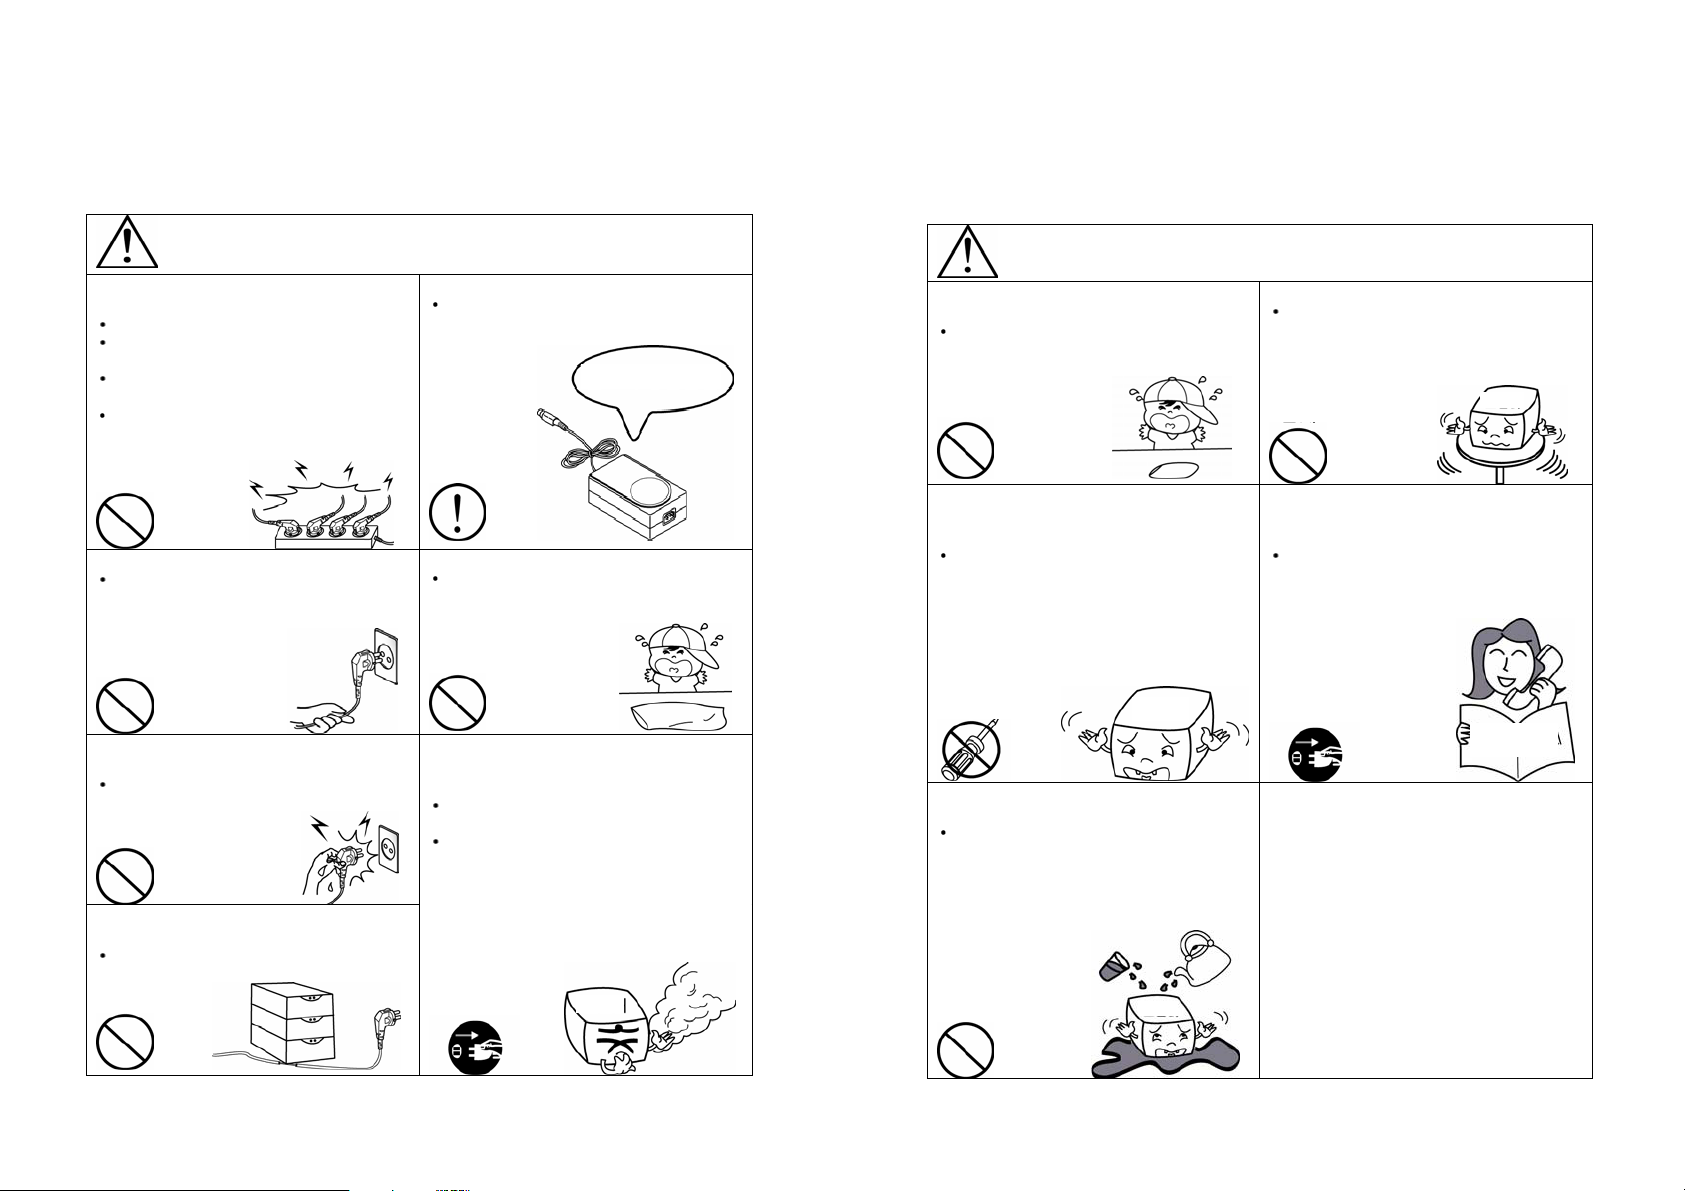
WARNING
Violating following instructions can cause serious injury or death.
Do not plug several products in one
multi-outlet.
This can provoke over-heating and a fire.
If the plug is wet or dirty, dry or wipe it
before usage.
If the plug does not fit perfectly with the
outlet, do not plug in.
Be sure to use only standardized
multi-outlets.
PROHIBITED
Do not pull the cable to unplug.
This can damage the cable, which is the
origin of a fire or a breakdown of the printer.
PROHIBITED
Do not plug in or unplug with your hands
wet.
You can be electrocuted.
PROHIBITED
You must use only the supplied adapter.
It is dangerous to use other adapters.
Keep the plastic bag out of children’s reach.
If not, a child may put the bag on his head.
PROHIBITED
If you observe a strange smoke, odor or
noise from the printer, unplug it before
taking following measures.
Switch off the printer and unplug the set
from the mains.
After the disappearance of the smoke, call
your dealer to repair it.
ONLY SUPPLIED ADAPTER
WARNING
Violating following instructions can cause slight wound or damage the appliance.
Keep the desiccant out of children’s
reach.
If not, they may eat it.
PROHIBITED
Use only approved accessories and do
not try to disassemble, repair or remodel
it for yourself.
Call your dealer when you need these
services.
DISASSEMBLING
PROHIBITED
Do not let water or other foreign objects
in the printer.
If this happened, switch off and unplug the
printer before calling your dealer.
PRINER
Install the printer on the stable surface.
If the printer falls down, it can be broken
and you can hurt yourself.
PRINTER
PROHIBITED
Do not use the printer when it is out of
order. This can cause a fire or an
electrocution.
Switch off and unplug the printer before
calling your dealer.
TO UNPLUG
PRINTER
DEALER
Do not bend the cable by force or leave it
under any heavy object.
A damaged cable can cause a fire.
PROHIBITED
ٻ
TO UNPLUG
ڍٻ
PRINTER
PROHIBITED
ٻ
PRINTER
ڎ
Page 3
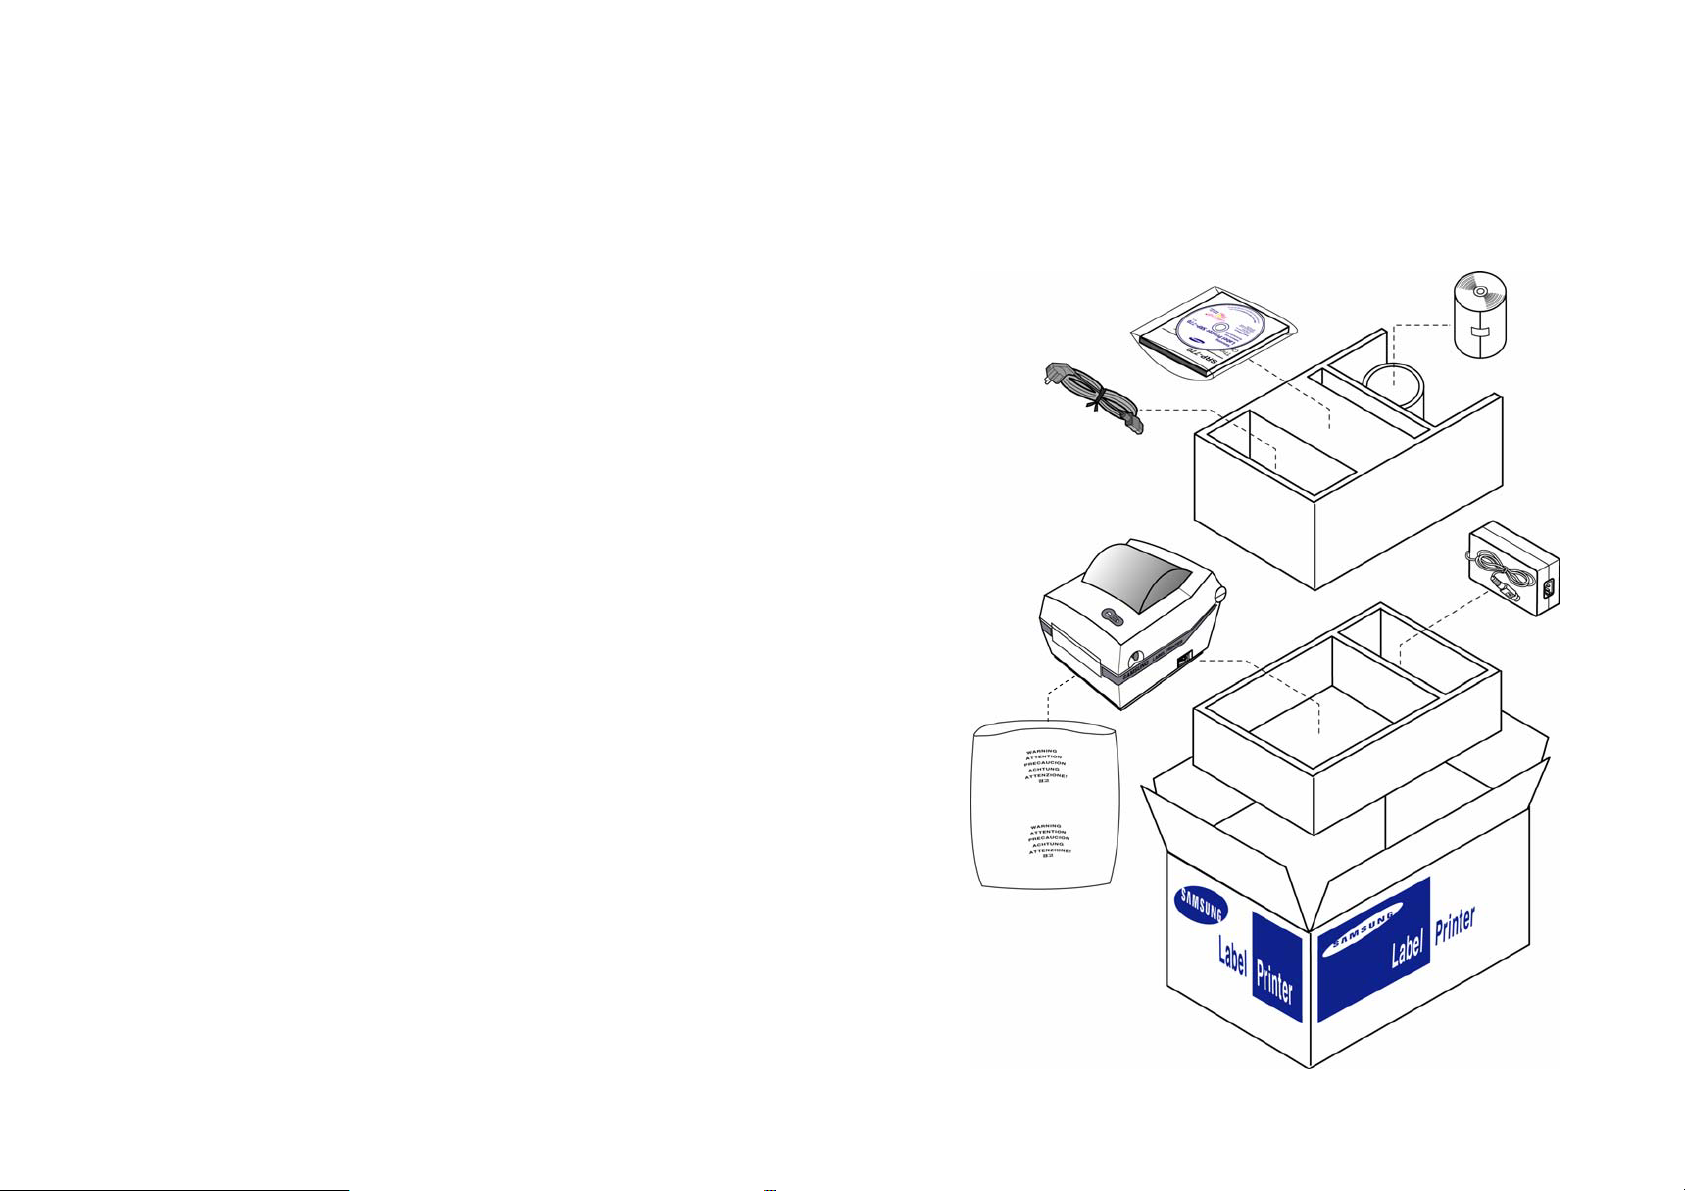
Table of Contents
(
)
(
)
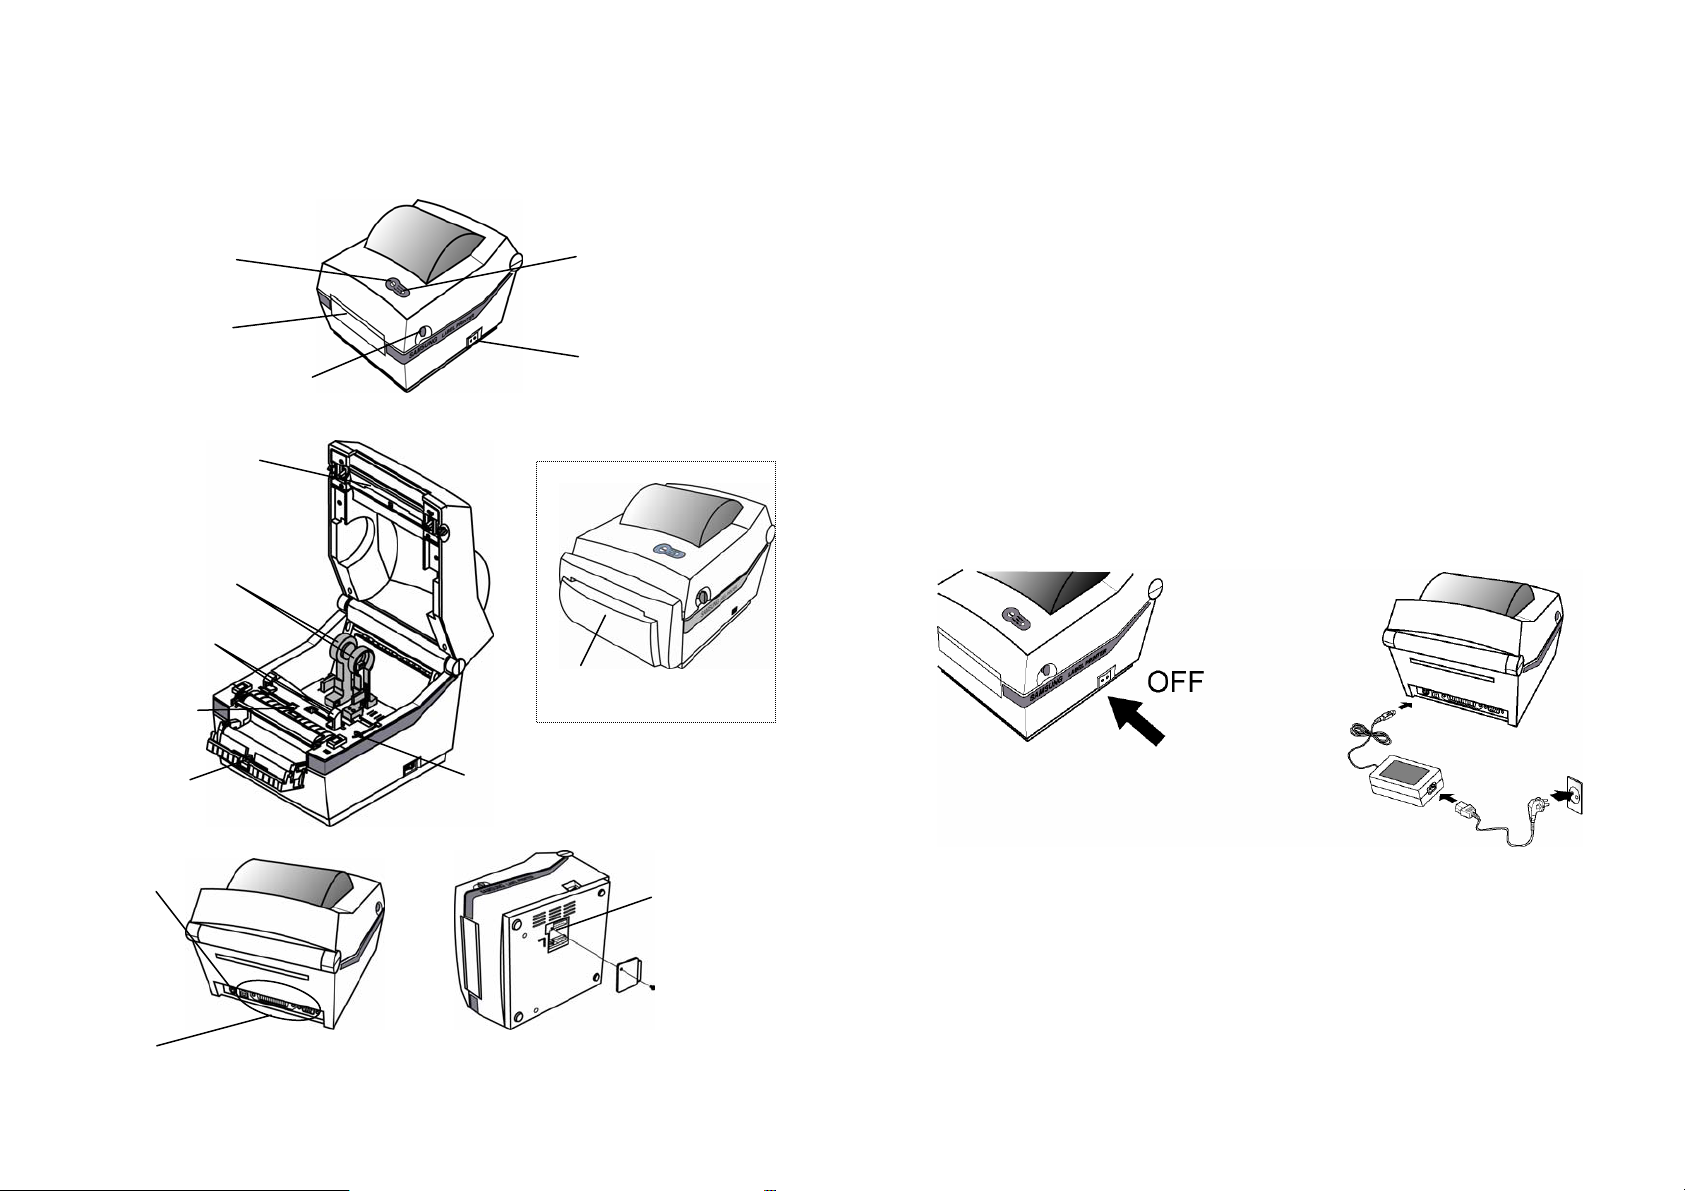
1. Unpacking & Repacking
Your printer box should include these items. If any items are damaged or missing,
please contact your dealer for assistance.
1. Unpacking & Repacking......................................................................... 5
2. Samsung Label Printer ................................................................... 6
3. Connecting the Power Supply......................................................7
4. Connecting the Interface Cable .................................................. 8
5. Installing or Replacing the Paper Roll...................................... 9
6. Setting the Dip Switches .............................................................10
7. The Self Test.....................................................................................11
8. LED Display .......................................................................................12
9. Pause / Restart ............................................................................... 12
ٻ
10. Gap sensor auto-calibration
.....................................................13
ٻ
11. The Peel-off
....................................................................................14
12. Using Fan Fold Paper ..................................................................15
Note : Please keep the packing materials(ྙ,ྚ,ྜ,ྞ) for future repacking to send
a printer for repairs.
ľ Operator’s Manual & CD
Ľ Power Cord
Ļ Printer (SRP-770)
Ŀ Label
(Paper)
ļ Cushion
TOP
Ĺ Power Supply
ĸ Cushion
Bottom
ٻ
13. Auto Cutter (Option)...................................................................16
ٻ
14. Cleaning Head
ٻ
15. Memory Switch Setting
16.
Install and Uninstall Windows Driver
ٻ
...............................................................................17
..............................................................18
...........................................20
ڏٻ
ĺ Pe-bag
ķ Printer Box
You can repack the printer package in above numeric order(ķ~Ŀ)
ٻ
ڐ
Page 4
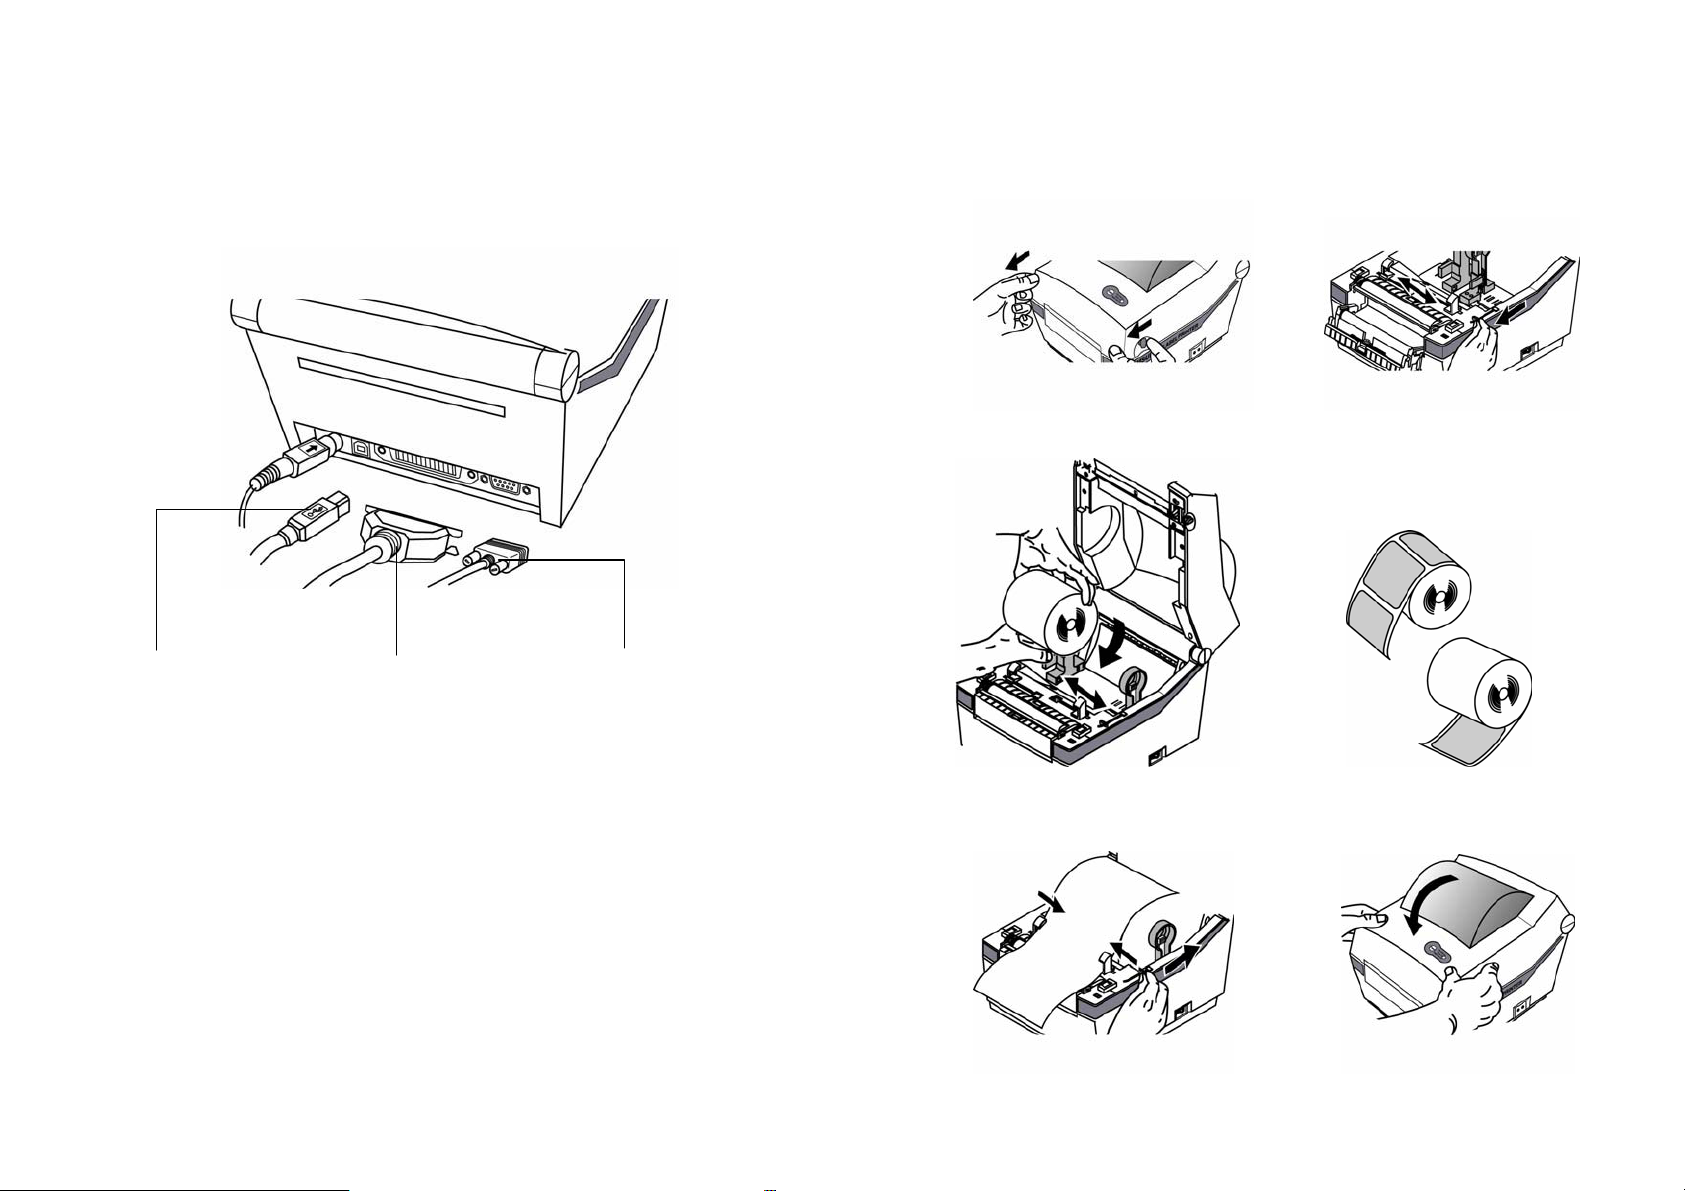
2. Samsung Label Printer
OvPG
Feed Button
Cover Peel-off
Cover Open/Close
Printer Head
Paper Holder
Paper Guide
Paper(gap) Sensor
Status Indicator
Power Switch
Auto Cutter
3. Connecting the Power Supply
CAUTIONS:
When connecting or disconnecting the power supply from the printer, make sure that
the power supply is not plugged into an electrical outlet. And the power supply’s
rated voltage and your outlet’s voltage do not match, contact your dealer for
assistance. Then do not plug in the power cord. Otherwise, you may damage the
power supply or the printer.
1. Make sure that the printer’s power switch is turned off, and the power supply’s power
cord is unplugged from the electrical outlet.
2. Check the label on the power supply to make sure that the voltage required by the
power supply matches that of your electrical outlet.
3. Plug in the power supply’s cable as shown below. Notice that the flat side of the
plug faces down.
Peel-off Sensor
Power Connector
Interface Connectors
[RS-232C, IEEE1284, USB]
ٻ
ڑٻ
Paper Adjuster
Dip Switch
ٻ
ڒ
Page 5
4. Connecting the Interface Cable
5.
Installing or Replacing the Paper Roll
1. Open Cover 2. Open Guides
3. Install Roll
Universal Serial Bus
(USB)
ٻ
ٻ
Parallel Interfaceٻ
ٻ
ړٻ
Serial Interface
RS-232 default
setting is 19200 baud,
no parity, 8 data bits
and 1 stop bit
ٻ
4. Close Guides to the Width of the paper
ٻ
5. Close Cover
ڔ
Page 6
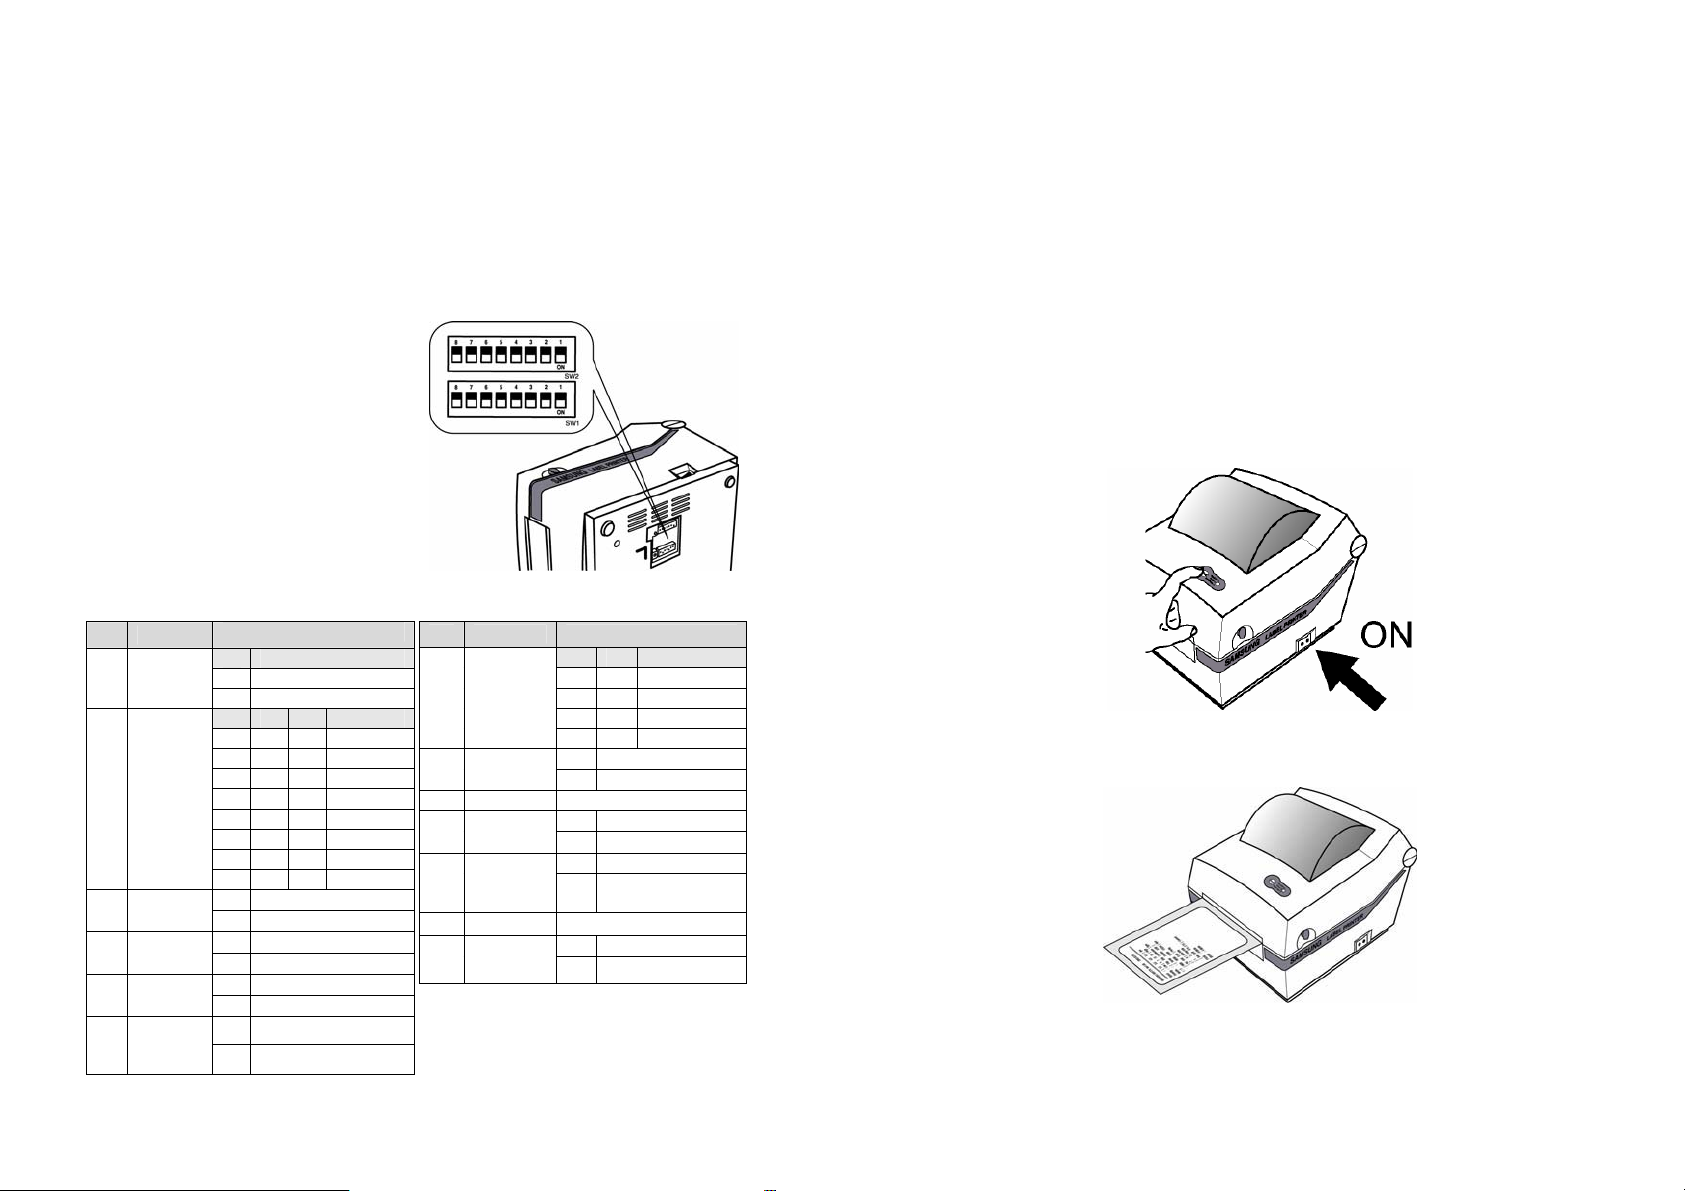
6. Setting The Dip Switches
7
. The Self Test
6-1. Setting the Dip Switches
The Dip Switches are located on the bottom of the printer. The Dip Switches are used to
set the Printer to perform various functions. Follow these steps when changing Dip
Switches setting :
1. Turn the printer power switch off.
2. Remove the screw on the bottom
of the printer and open the bracket.
3. Flip the Dip Switches using tweezers
or another narrow-ended tool.
Switches are off when up and on
when down in the Figure below.
4. The new setting takes effect
when you turn on the printer.
Note : Always change Dip Switch settings
only when the printer is turned off.
6-2. Functions of Dip Switches
6-2-1. Dip S/W 1 6-2-2. Dip S/W 2
No Functions
Speed
1
Selection
2
Density
3
Selection
4
Exhibition
5
Selection
Media
6
Selection
7 Auto Cutter
Near End
8
Sensor
Status
Details
1 Speed
Off 4.0 ips
On 5.0 ips
4 3 2 Density
Off Off Off 13
Off Off On 14
Off On Off 15
Off On On 16
On Off Off 17
On Off On 18
On On Off 19
On On On 20
Off Normal mode
On Demo mode
Off Label Paper
On
Thermal Continuous Paper
Off Without Auto Cuter
On With Auto Cutter
Off Enable
On Disable
No Functions Details
2 1 Baud Rate
1,2
Baud
Rate
Media
3
Detection
4 Reserved --
5 Emulation
Busy
6
Condition
7 Reserved --
Long label
8
Split printing
Off Off 9,600 bps
Off On 19,200 bps
On Off 57,600 bps
On On 115,200 bps
Off Detect Gap
On Detect Black-mark
Off SAMSUNG command
On Emulation
Off Receive Buffer Full
On
Off Disable
On Enable
*Offline
*Receive Buffer Full
ٻ
The self-test checks whether the printer has any problems. (You cannot perform this
procedure if using the printer’s label peel-off option) If the printer does not function
properly, contact your dealer. The self-test checks the following;
1. Make sure that paper roll has been installed properly.
2. Turn on the power while holding(2sec) down the FEED button. The self-test begins.
3. The self-test prints the current printer status, which provides the control ROM version
and the DIP switch setting.
ٻ
ڌڋٻ
ٻ
ڌڌ
Page 7

8. LED Display
10. Gap Sensor Auto-Calibration
LED display indicates the printer status.
1. Green LED on
- The printer waits for the data from Host (PC) in normal mode.
2. Orange LED on
- It means paper gap sensing error. It becomes on when the printer fails to detect the
paper or paper jam occurred. When fails to detect the paper correctly use
Auto-Calibration function.
3. Red LED on
- The printer has stopped by pressing FEED button. It restarts printing when pressed
again.
4. Green LED blinking
1) TPH (Thermal Printing Head) overheated or ;
2) The printers is waiting for the button input to run Auto-Calibration function.
5. Orange LED blinking
- No paper. Make sure the paper is loaded correctly.
6. Red LED blinking
1) The printer cover is open or ;
2) Auto cutter has error such as paper jam in case of auto cutter built-in model.
9. Pause / Restart
Gap sensor auto-calibration is used when the printer does not detect a gap on the label
paper correctly. Generally a printer is set to detect most of gap types but sometimes it fails
to detect and keep feeding the paper without a stop when special paper used. In such case,
use gap sensor auto-calibration function for a proper detection.
1. Make sure that paper roll has been installed properly.
2. Turn on the power while holding down FEED button with cover open.
Then the Green LED blinks.
O
n
3. Close the cover and guide message is printed automatically.
Then a printer waits for input with red LED on.
4. Press FEED button once to initialize gap sensor and set it back to the
factory setting. LED changes to Orange.
5. Press FEED button twice to run auto-calibration function.
LED changes first to Orange and second to Green.
It feeds 2-3 papers while auto-calibration executed.
Make sure to press a button one by one while checking LED changes.
6. Saved sensing value remains valid at power off unless otherwise above
gap sensor initialization is executed again.
Press FEED button to pause at the middle of labels printing.
1. Pause
- Press FEED once. Printer stops after on-going printing and Red LED becomes on.
2. Restart
- Press FEED once again. It restarts printing in a queue.
ٻ
ڌڍٻ
ٻ
ڌڎ
Page 8

11. The Peel-off
12. Using Fan Fold Paper
This function is used to separate label from liner automatically.
CAUTIONS:
1) Peeler is for Label Paper only.
2) When the peeler switch is on, label is not printed before when
the previous printed label is taken off from the peeler.
3) When the peeler function is not used set peeler switch off.
With this switch on printer may not work correctly.
1. Open the peel-off cover and turn on peeler switch.
(Check if Peeler LED is on.)
2. Remove the paper and 3. Adjust the paper guides and close the cover.
insert the paper through slot.
Insert paper through both the rear slot and guides.
Adjust holders and guides to the width of the paper.
Open the Dust Cover
and Insert paper
Adjust holders papers and paper Fixed Adjust Guides
ٻ
Dust Coverٻ
remove
4. Turn off and on the printer.
ٻ
ڌڏٻ
Paper Fixed
ٻ
ڌڐ
Page 9

13. Auto Cutter (Option)
䧎
14. Cleaning Head
Auto cutter should be used for continuous paper only. ( i.e. roll paper)
1. Open the Dip switch cover, and make the switch 1 number 7 “On”.
(Refer to printer mode setting at Chapter 6.)
2. Put a paper roll into the printer and close the cover.
CAUTIONS: (Partial cut)
Once the printer cut the paper, remove the receipt in order for next printing.
Otherwise the receipt could be back into the printer and the cutter would
cut it again.
Paper dust on the heating elements may lower the printer quality. In this case, clean the
print head as follows :
CAUTIONS:
1) Turn Off the printer power before cleaning.
2) Note that the thermal head becomes very hot during normal operation,
creating the danger of burn injury. Be sure to wait for about 2~3 minutes
after turning printer power off before beginning the cleaning.
1. Open the printer cover.
2. Clean the thermal element (the area which is marked a thin black line) of the thermal
head with a cotton swab moistened with a alcohol solvent (ethanol, methanol, or IPA).
3. After confirming that the alcohol solvent has been dried up completely, close the
cover-open.
Note 1) Never touch the thermal element with your hand,
then the thermal element can be damaged.
2) Don’t scratch the printer head.
Clean it up when you replace every roll of paper to prevent the quality
deterioration.
ٻ
ڌڑٻ
ٻ
ڌڒ
Page 10

15. Memory Switch Setting
1. Models : SRP-770II, SRP-780
2. Features
It helps users through the setting of code pages, serial setting, paper size and print
density as necessary.
3. How to use
ཛ Press Get Status button and it displays the current setting.
ٻ
ڌړٻ
ཛྷ Press Set Status button after changing the setting as you need.
Then it saves as default.
ٻ
ڌڔ
Page 11

16.
Install and Uninstall Windows Driver
13.1 Download install-program from Website
(1) Execute web-browser.(Ex: Internet Explorer)
(2) Type http://www.bixolon.com
(3) Connect website.
(4) In “Quick menu”, click download button.
(5) Download “SRP-770II_V3.X.X.exe” in SRP-770II section.
13.2 Install Windows Driver
13.2.1 Serial Parallel interface
(1) Double click “SRP-770II_V3.X.X.exe” file.
(2) Click “Next” Button.
(3) Click “Install” Button.
(4) Select operating system type.
ٻ
ڍڋٻ
ٻ
ڍڌ
Page 12

(5) Select interface (port) type.
(6) Please click “Continue Anyway”.
13.2.2 USB interface
A. Windows 95/98/ME
(1) Double click “SRP-770II_V3.X.X.exe” file.
(2) Click “Next” Button.
* If you can see this dialog, don’t worry comment of dialog. Printer and
driver works well. Please click “Continue Anyway” button.
(7) Please reboot computer.
ٻ
ڍڍٻ
ٻ
ڍڎ
Page 13

(3) Click “Install” Button.
(5) Select “USB” interface (port) type.
(6) Please turn-off printer and turn-on printer.
(4) Select operating system type.
ٻ
ڍڏٻ
(7) When “Add new hardware wizard” for install “USB print support” driver pops up,
click “Next” button.
ٻ
ڍڐ
Page 14

(8) Please click “Next” button three times.
(9) When “USB print support” driver is installed, your system automatically restart
after 10 seconds.
(10) After the system restart, please turn-on printer.
B. Windows NT/2000
(1) Double click “SRP-770II_V3.X.X.exe” file.
(2) Click “Next” Button.
(3) Click “Install” Button.
(4) Select operating system type.
ٻ
ڍڑٻ
ٻ
ڍڒ
Page 15

(5) Select “USB” interface (port) type.
(6) Please turn-off printer and turn-on printer.
C. Windows XP/2003 Server
(1) Double click “SRP-770II_V3.X.X.exe” file.
(2) Click “Next” Button.
(3) Click “Install” Button.
* If you can see this dialog, don’t worry comment in dialog.
Printer and driver work well. Please click “Yes” button.
ٻ
ڍړٻ
ٻ
ڍڔ
Page 16

(4) Select operating system type.
(5) Select “USB” interface (port) type.
(6) Please turn-off printer and turn-on printer.
(7) If “Add new hardware wizard” for install “SAMSUNG SRP-770II” driver pops up,
click “Next” button.
* If you can see this dialog, don’t worry comment in dialog.
Printer and driver work well. Please click “Continue Anyway” button.
ٻ
ڎڋٻ
ٻ
ڎڌ
Page 17

(8) Please click “Next” button until you can see “Finish” button.
*If you can see this dialog, don’t worry comment in dialog.
Printer and driver work well. Please click “Continue Anyway” button.
(9) Please click “Finish” button.
13.3 Uninstall Windows Driver
(1) Click on the Start button, and then click on Settings > Control Panel.
(2) Double click “Add/Remove Programs” icon.
(3) Select “BIXOLON SAMSUNG SRP-770II POS Windows Driver 3.X.X”.
(4) Click “Change/Remove” button.
(5) Select printer to remove.
(6) Click “Uninstall” Button.
(7) Please reboot computer.
ٻ
ڎڍٻ
ٻ
ڎڎ
Page 18

13.4 Printer Settings
7) Customer Paper Size
a) Add Customized Form: Create new customized form. Customer must type
“Form Name”, “Width” and “Length”. Width and Length in customized form
1) Measurement: Select measurement of “Top Margin”. (Inch or millimeters)
2) Top Margin: top margin value of paper
3) Density: Select density of printing quality. (0 ~ 20)
4) Media Type: Select paper media type. (“Black Mark” is under development)
5) Orientation: Set printing direction.
6) Speed: Set printing speed. (2.5 ~ 3.0)
ٻ
ڎڏٻ
ٻ
must be the number in the range from Minimum to Maximum size.
b) Delete Customized Form: You can delete customized form but default form
may not be deleted.
c) Exit Program: Exit utility program.
ڎڐ
Page 19

ૺ
Specification
ૻ
Printing method Thermal line printing
Dot density 203 dpi (8 dot/mm)
Printing width 25.4 ~ 101.6 mm
Paper width 38.1 ~ 104 mm
Printing speed 127 mm/sec
Receive Buffer Size 32K Byte
Note : Printing speed can be different, depending on the data transmission speed
and combination of control commands.
Input voltage 100~240V AC
Supply voltage
Environmental
conditions
LIFE Mechanism Head
MCBF Mechanism 20,000,000 lines
Frequency 50/60 Hz
Output voltage DC 24V
Temperature
Humidity
5 ~ 45 (Operating)
-25 ~ 70 (Storage)
30 ~ 80 % RH (Operating)
10 ~ 90 % RH (Storage)
; Except for paper
10,000,000 lines
5×10
7
pulse (50km)
This marking shown on the product or its literature, indicates that is should not
be disposed with other household wastes at the end of its working life, To
prevent possible harm to the environment or human health from uncontrolled
responsibly to promote the sustainable reuse of material resources. Household users should
contact either the retailer where they purchased this product, or their local government
office, for details of where and how they can take this item for environmentally safe
recycling. Business users should contact their supplier and check the terms and conditions
of the purchase contract. This product should not be mixed with other commercial wastes
for disposal.
ٻ
waste disposal, please separate this from other types of wastes and recycle it
All specifications are subjected to change without notice
ڎڑٻ
.
 Loading...