

Samsung SRP-270P, SRP-270U, SRP-270S User Manual

SRP-270
SERIES
1 STATION PRINTER
Operator’s Manual
All specifications are subjected to change without notice

Warning - U.S.
This equipment has been tested and found to comply with the limits for a Class A digital device
pursuant to Part 15 of the FCC Rules. These limits are designed to provide reasonable protection
against harmful interference when the equipment is operated in a commercial environment. This
equipment generates uses, and can radiate radio frequency energy and if not installed and used
according to the instruction manual, may cause harmful interference to radio communications.
Operation of this equipment in a residential area is likely to cause harmful interference in which
case the user will be required to correct the interference at his own expense.
Notice - Canada
This Apparatus complies with class “A” limits for radio interference as specified in the Canadian
department of communications radio interference regulations.
Get appareil est conforme aux normes class “A” d’ interference radio tel que specifier par ministre
canadien des communications dans les reglements d’ interference radio.
Caution
Some semiconductor devices are easily damaged by static electricity. You should turn the printer
“OFF”, before you connect or disconnect cables. This will help protect the printer against static
electricity. If the printer is damaged by the static electricity, you should turn the printer OFF, and
refer to your local service provider.
INTRODUCTION
The SRP-270 Roll Printers are designed for use with electronic instruments such as system ECR,
POS, banking equipment, computer peripheral equipment, etc.
The main features of the printer are as follows:
1. High speed printing : 4.6 lines per seconds.
2. 2 color dot-matrix printer.
3. RS-232C(SRP-270), RS-485 serial interface (SRP-270S), Parallel interface
(SRP-270P),USB interface(SRP-270U).
4. The data buffer allows the unit to receive print data even during printing.
5. Peripheral units drive circuit enables control of external devices such as cash
Please be sure to read the instruction in this manual carefully before using your new
SRP-270 series.
drawer.
NOTE : The power-outlet should be near the equipment and it
should be easy accessible.
2

Table of Contents
CHAPTER 1. UNPACKING............................................................ 4
1-1. CHECKING THE CONTENTS OF THE PRINTER BOX.................................. 4
1-2. LOCATING THE PRINTER .............................................................. 4
1-3. FUNCTIONS............................................................................. 5
CHAPTER 2. CONNECTING THE CABLES..................................... 6
2-1. CONNECTING THE AC ADAPTER TO THE PRINTER................................. 6
2-2. CONNECTING INTERFACE CABLE AND DRAWER ................................... 7
CHAPTER 3. INSTALLING THE ROLL PAPER............................... 8
3-1. RIBBON CASSETTE INSTALLATION .................................................. 8
3-2. ROLL PAPER INSTALLATION.......................................................... 9
CHAPTER 4. SETTING THE DIP SWITCHES...............................13
CHAPTER 5. HEXADECIMAL DUMPING.....................................16
CHAPTER 6. THE SELF TEST......................................................17
CHAPTER 7. CODE TABLE..........................................................18
CHAPTER 8. CONTROL COMMANDS LIST .................................25
APPENDIX A..............................................................................29
CONNECTORS................................................................................29
Interface Connector.................................................................30
Drawer Connector ...................................................................32
APPENDIX B..............................................................................33
SPECIFICATION..............................................................................33
APPENDIX C.............................................................................. 34
REMOVING JAMMED PAPER................................................................34
3
Chapter 1. Unpacking
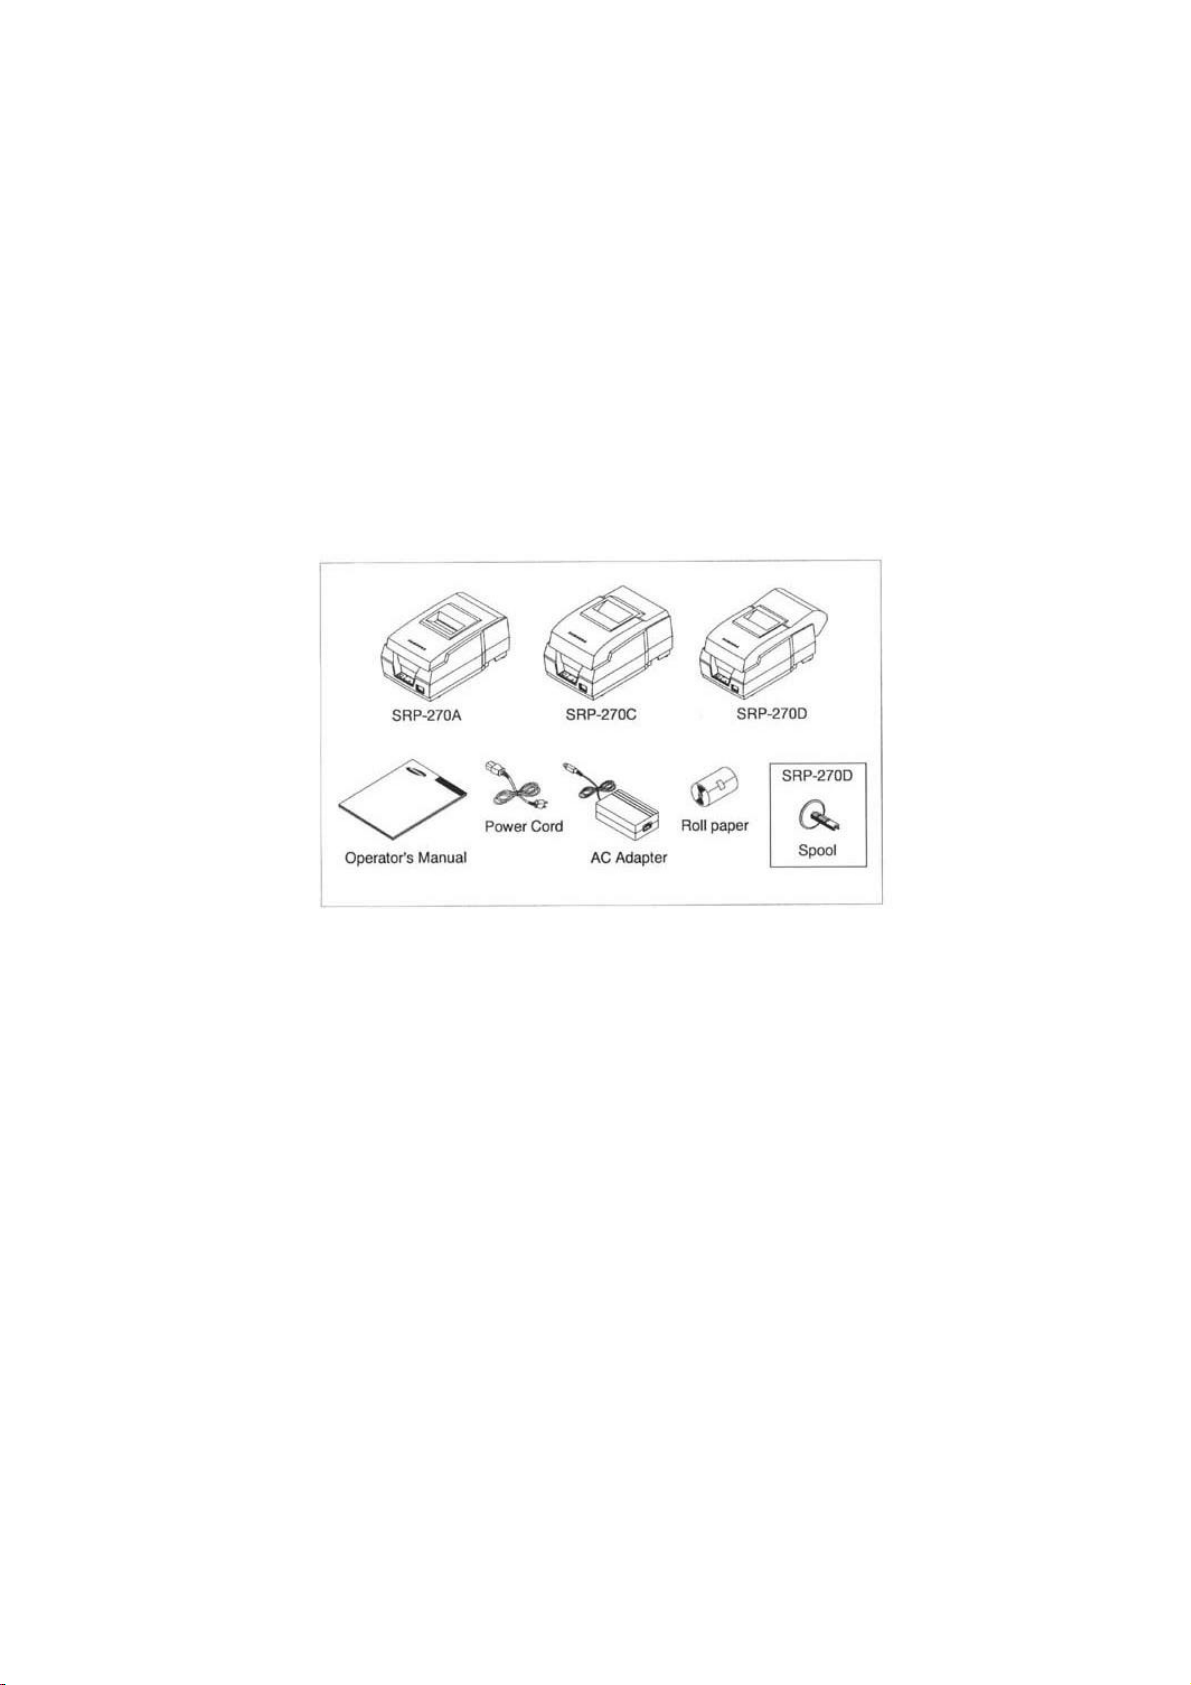
1-1. Checking the Contents of the printer box
After unpacking the unit, check that all the necessary accessories are included in the
package.
1-2. Installing the printer
l Avoid locations in direct sunlight or subject to excessive heat.
l Avoid using or storing the printer in places subject to excessive moisture.
l Do not use or store the printer in a dusty or dirty area. Avoid places subject to intense
vibration or shock.
l Choose a stable and flat place for proper use of the printer.
l Make sure that there is enough space around the printer so that it can be used easily.
4
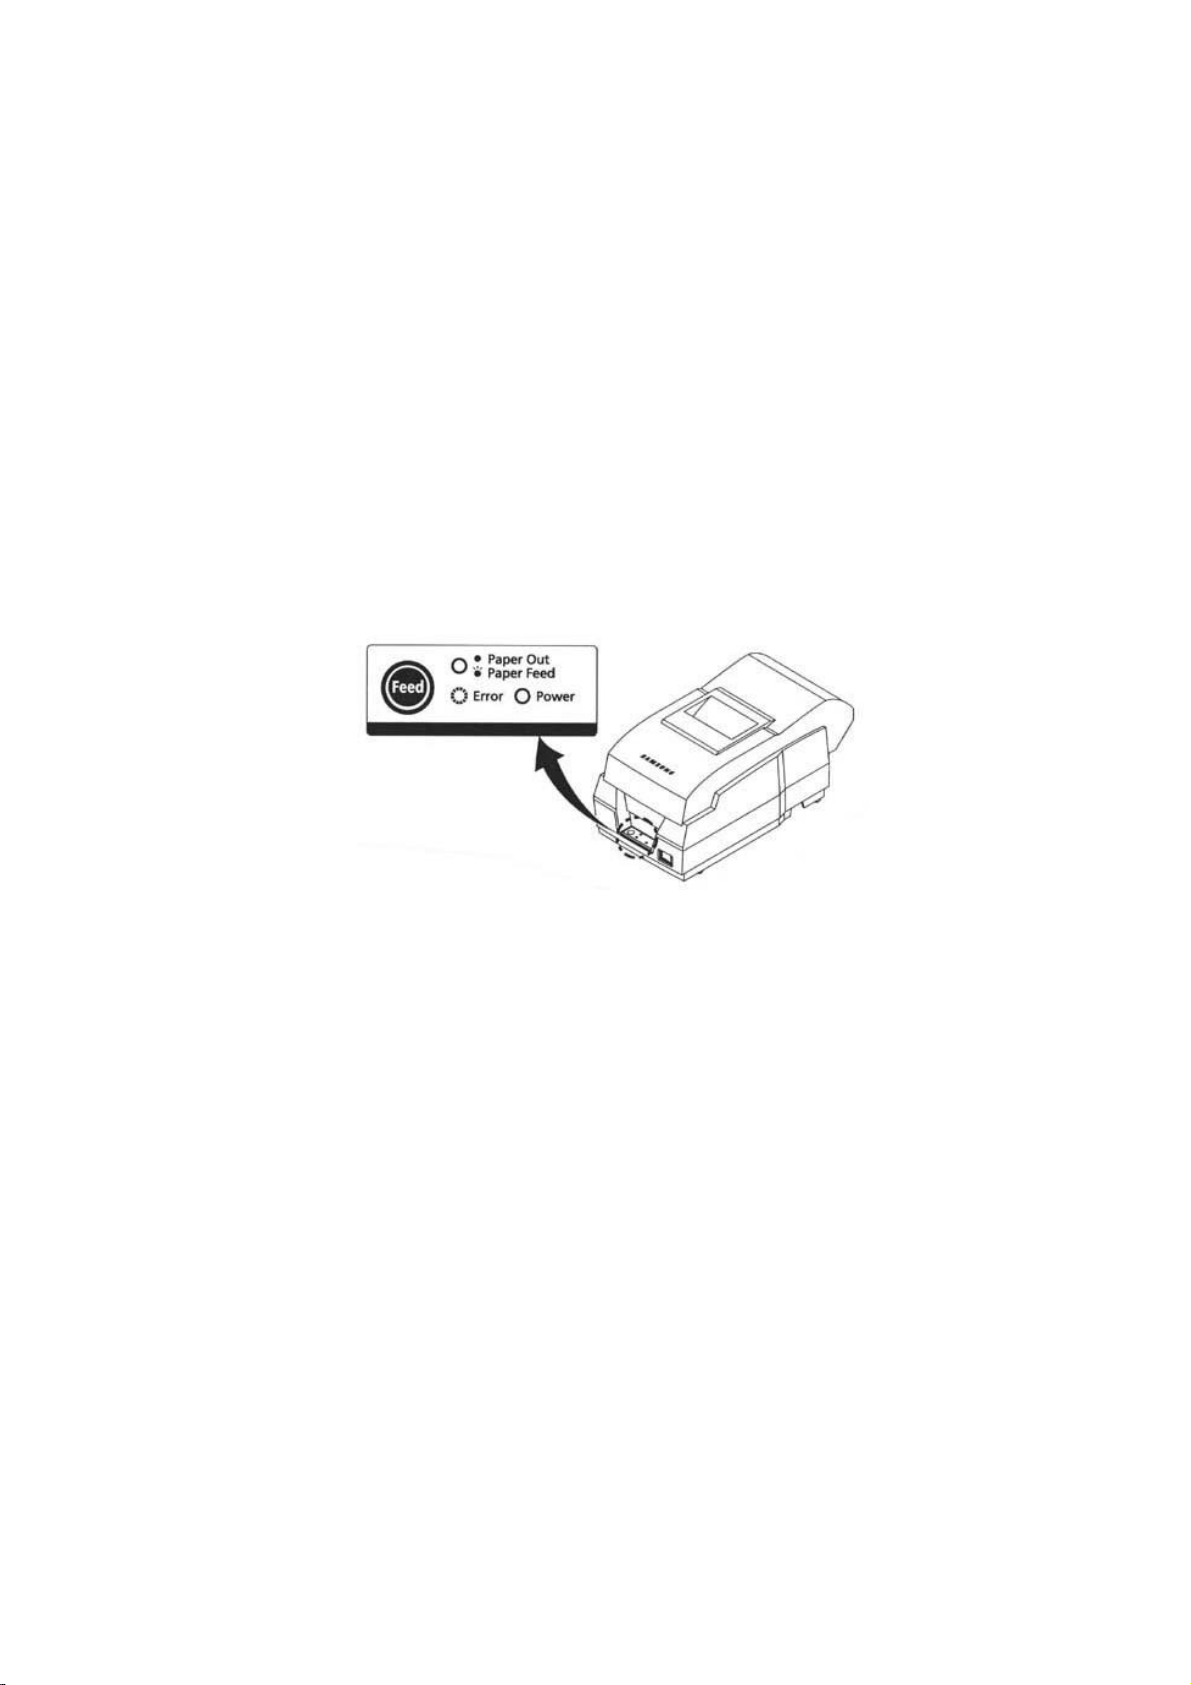
1-3. Functions
l The power switch is used to turn the printer on and off.
l The FEED button is used to feed roll paper.
l The POWER light (green) is on when the printer is turned on and is off when the
printer is turned off.
l The ERROR light (red) is on when the printer is in error state.
l The Paper Out light(red) is on when the printer is in paper end.
5
Chapter 2. Connecting the cables
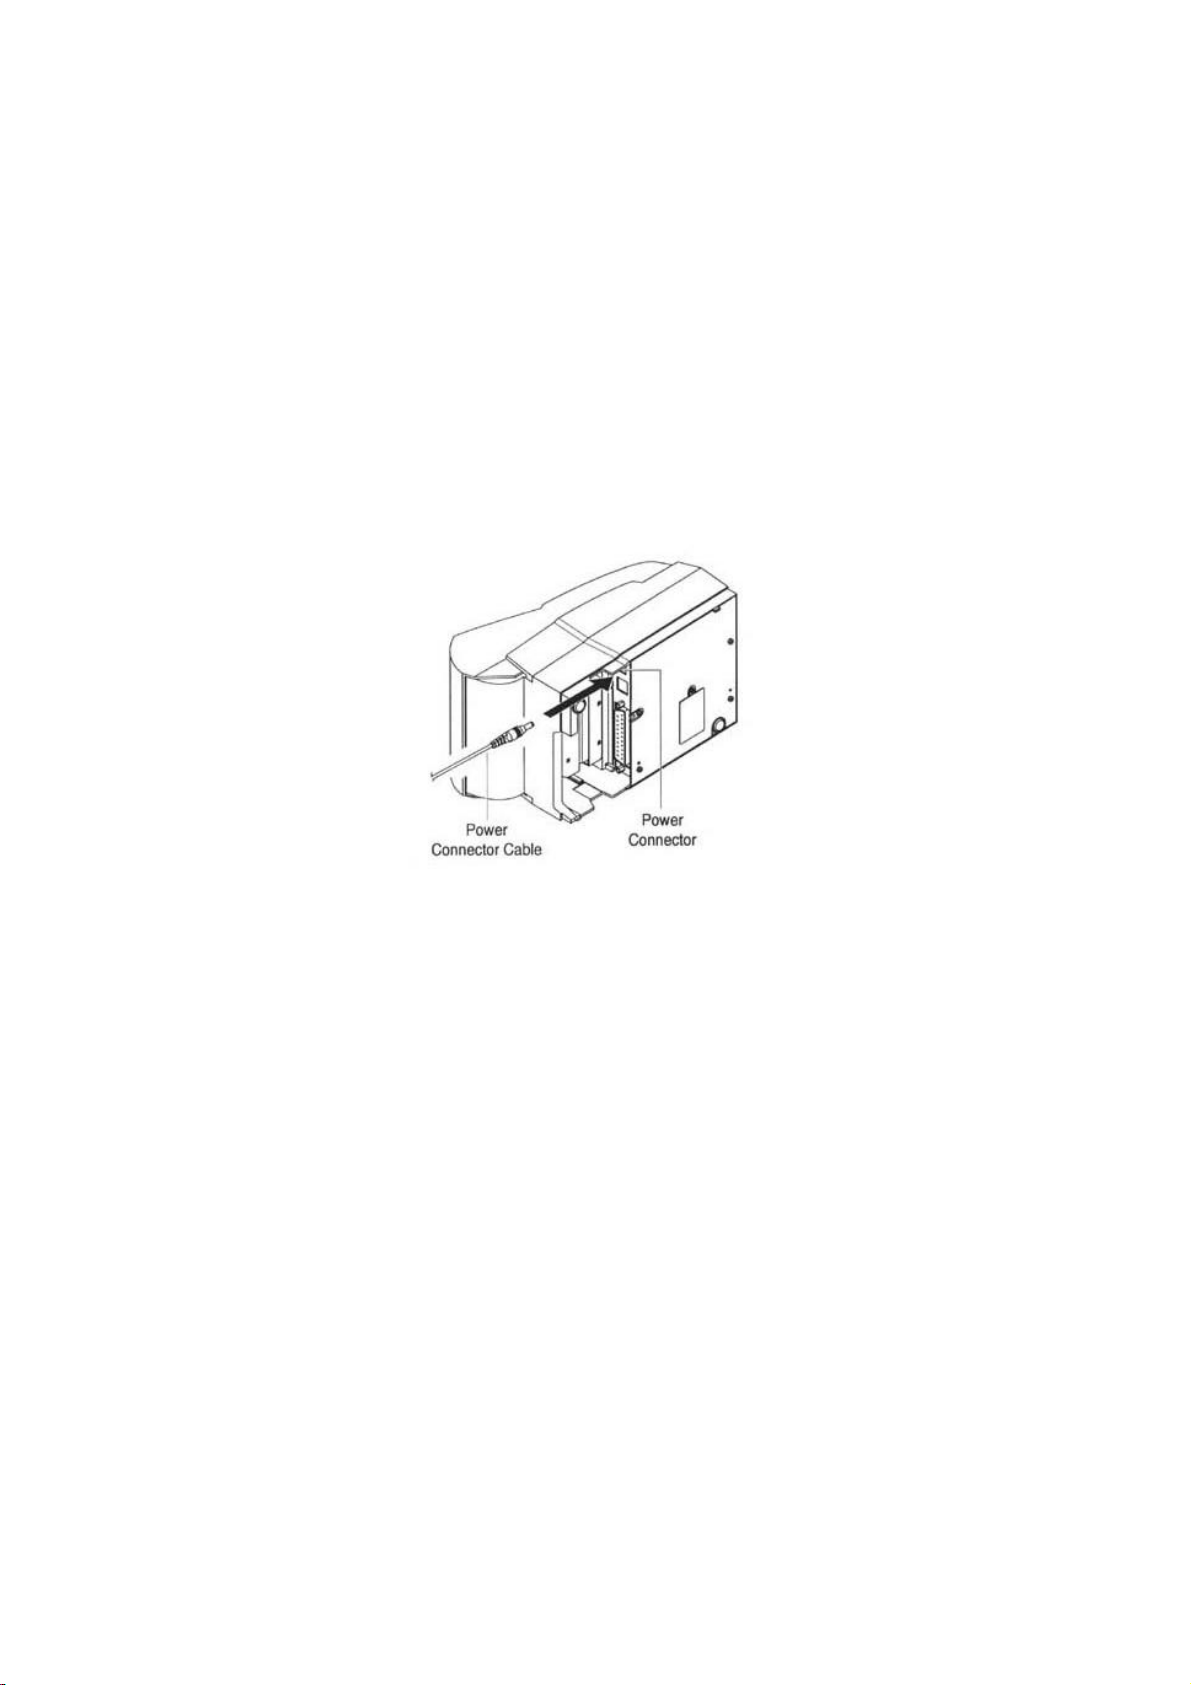
2-1. Connecting the AC adapter to the printer
1). Make sure that the printer is turned off.
2). CHECK the label on the AC adapter to make sure the voltage required by the AC
adapter matches that of your electrical outlet.
3). Plug the DC cord connector into the printer’ s power connector.
4). Plug the AC adapter power cord into the wall outlet.
6
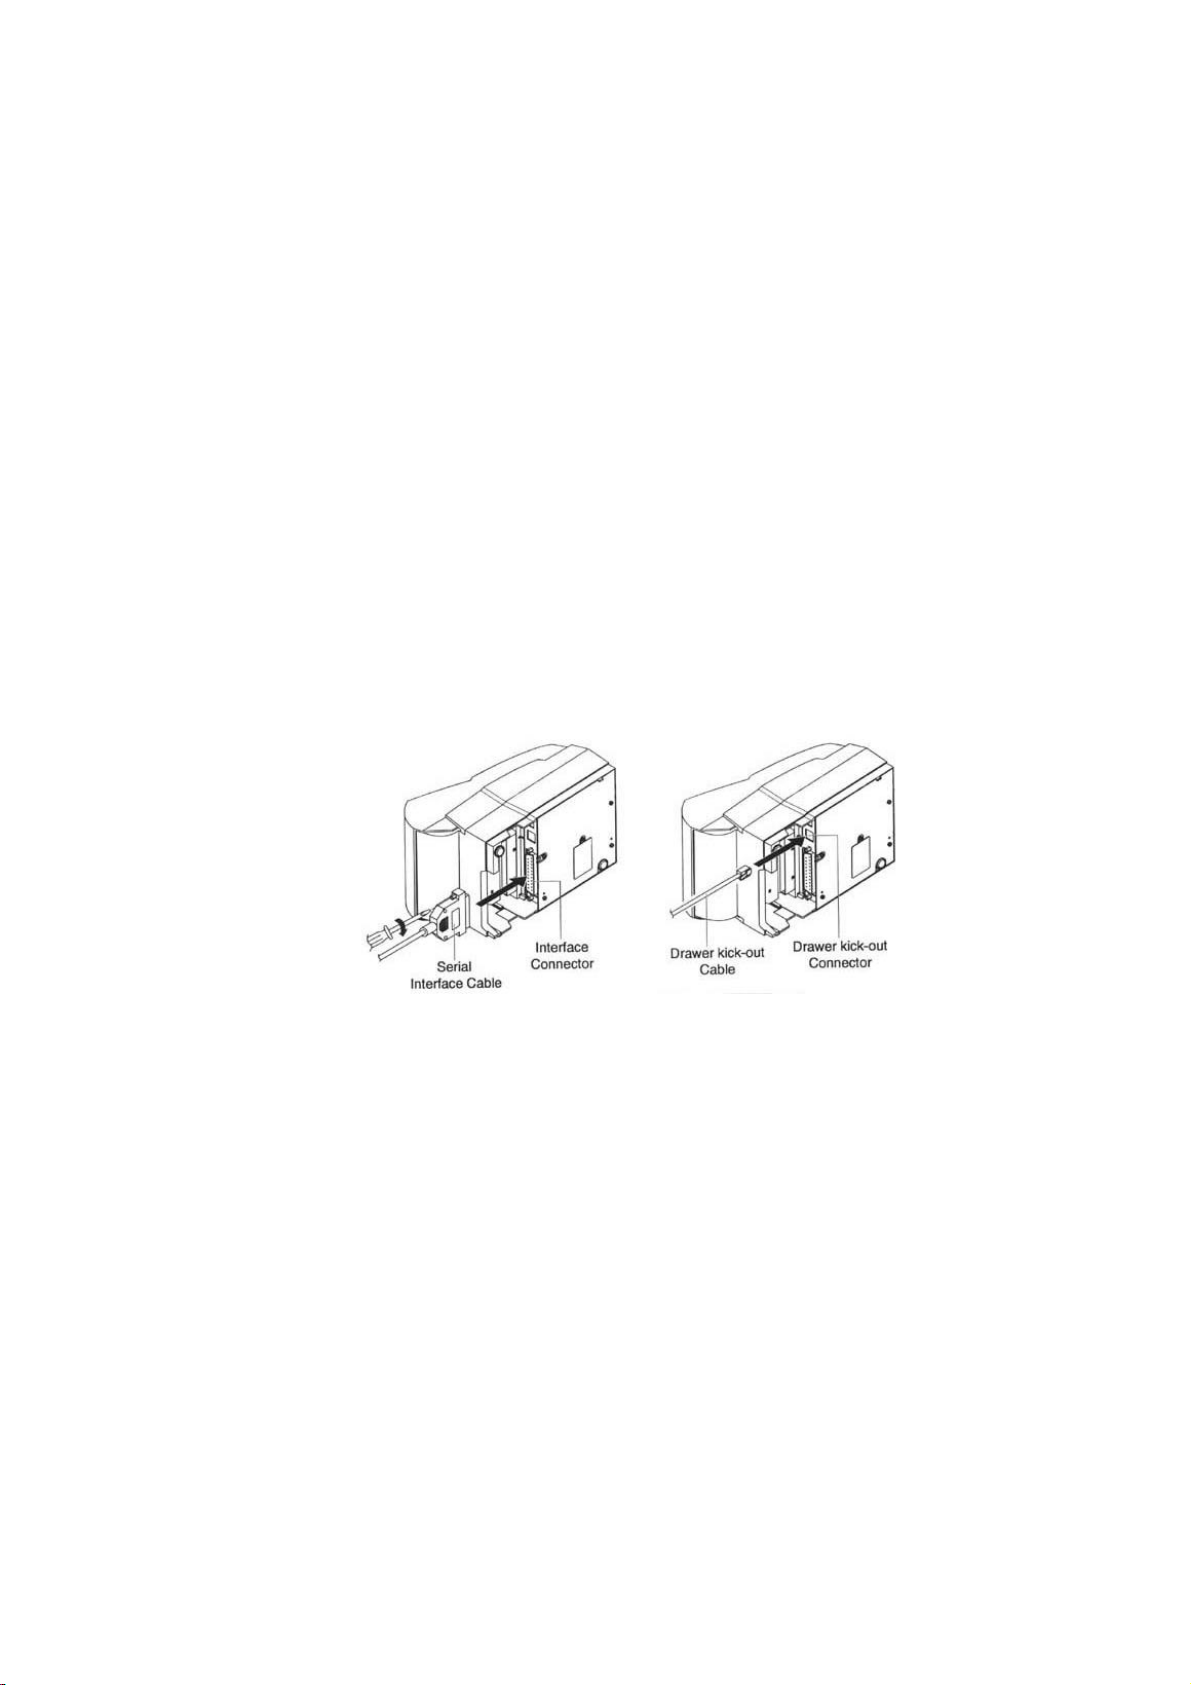
2-2. Connecting Interface Cable and Drawer
Cable to the printer
Connect the Host Computer(POS/ECR) to the printer using an interface cable that matches the
specifications of the printer and the Host computer(POS/ECR). Be sure to use a drawer that
matches the printer's specification.
1). Turn off both the printer and the Host computer(POS/ECR).
2). Plug the serial interface cable connector into the printer’ s interface connector, then
tighten the screws on both sides of the connector. In case of the parallel interface,
squeeze the wire clips on the printer together until they lock in place on both sides
of the connector.
3). Plug the drawer cable into the drawer kick-out connector on the back of the printer
next to the interface connector. Do not connect a telephone line to the drawer
kick-out connector; otherwise the printer and the telephone line may be damaged
4). Turn on the Printer and Host computer(POS/ECR).
7

Chapter 3. Installing the roll paper
3-1. Ribbon Cassette Installation
1). Before inserting the ribbon cassette, turn the knob clockwise to prevent
twisting the ribbon.
2). Insert the ribbon cassette as shown below and pay particular attention to the
placement of the ribbon behind the Print Head.
3). During inserting the ribbon cassette, turn the knob clockwise again to
make sure the ribbon moves freely in the cassette.
NOTE : Malfunctions and other problems may arise if other than specified
ribbon cassettes are used in the printer. The Warranty may be
voided if other than specified ribbon cassettes are used. Contact
your dealer or place of purchase for more information about proper
ribbon cassettes.
8
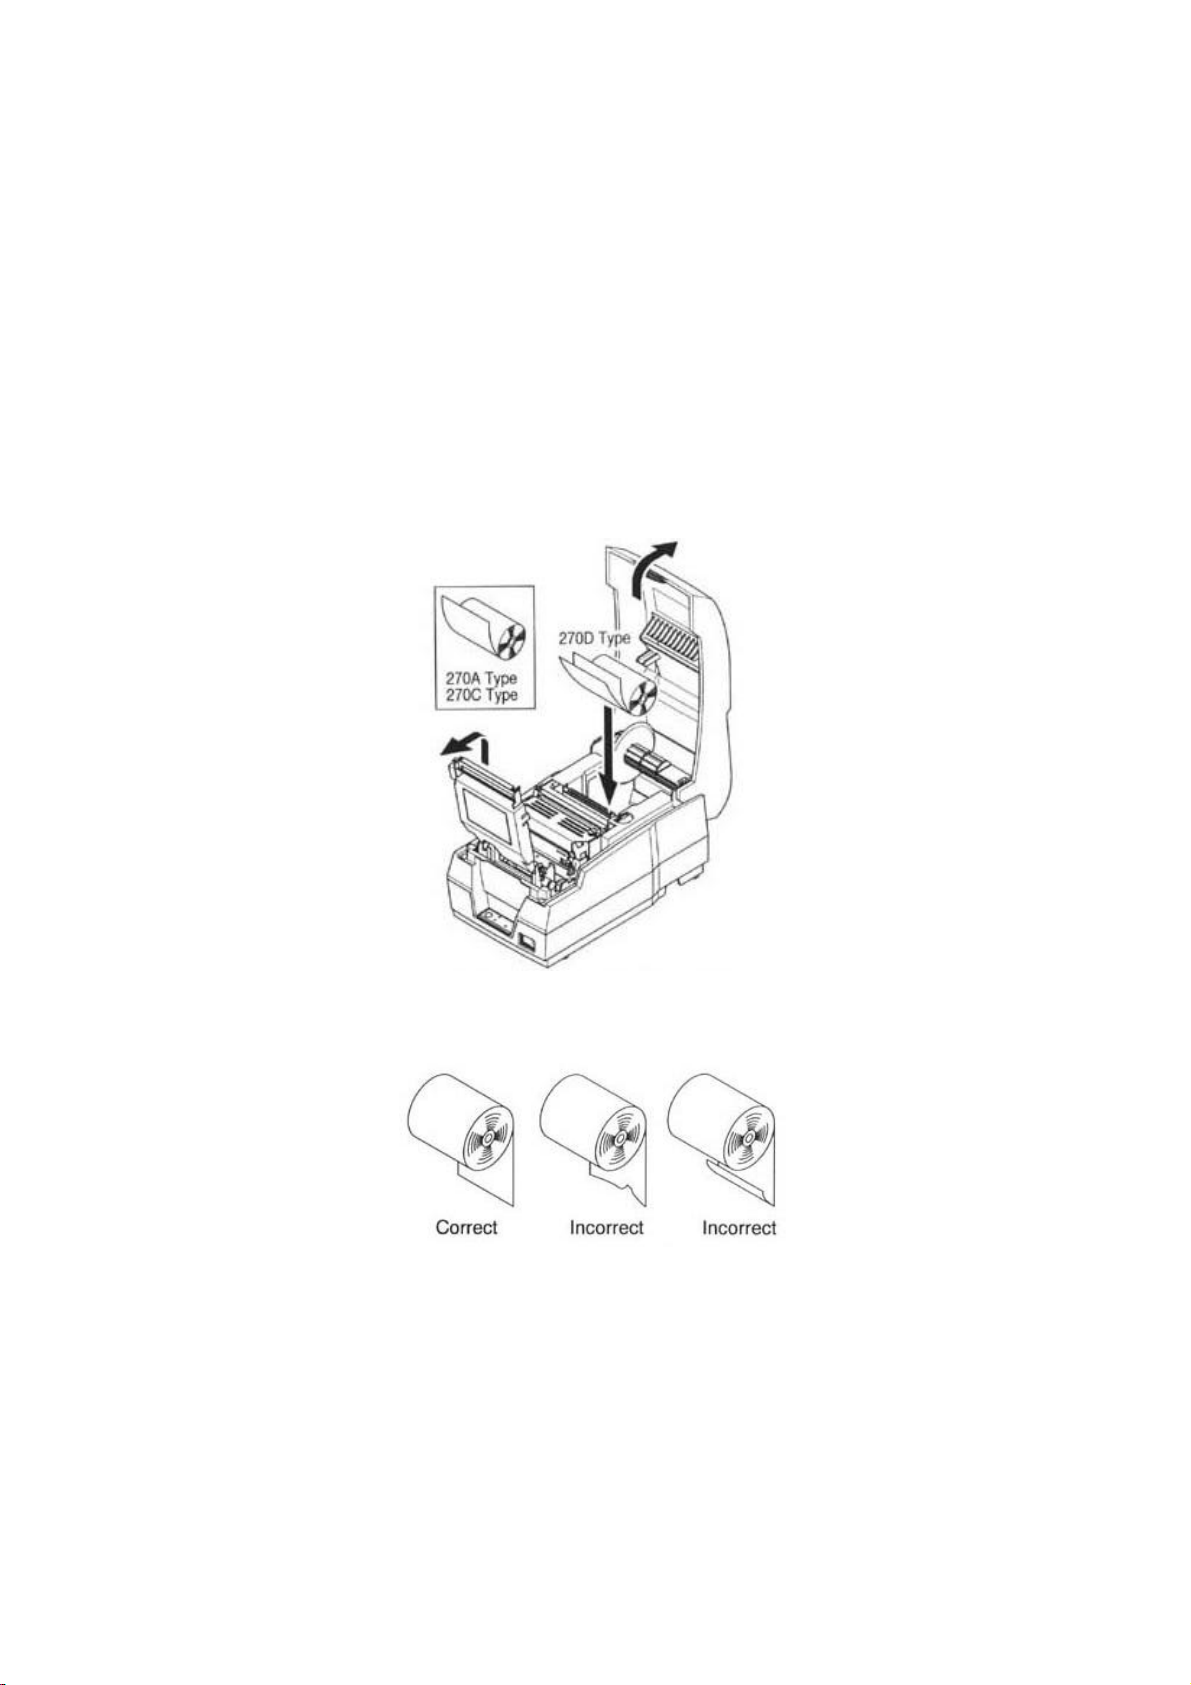
3-2. Roll Paper Installation
Be sure to use roll paper that matches the printer's specifications.
1). When possible, make sure that the printer has no un-printed data. This data may be
lost.
2). Open the printer cover and remove the used paper roll core if there is one.
" SRP-270 A/C : 1Ply Paper
# SRP-270 D : 2Ply Paper
3). To use a new roll paper, unroll the paper and tear off the end of the paper correctly.
9
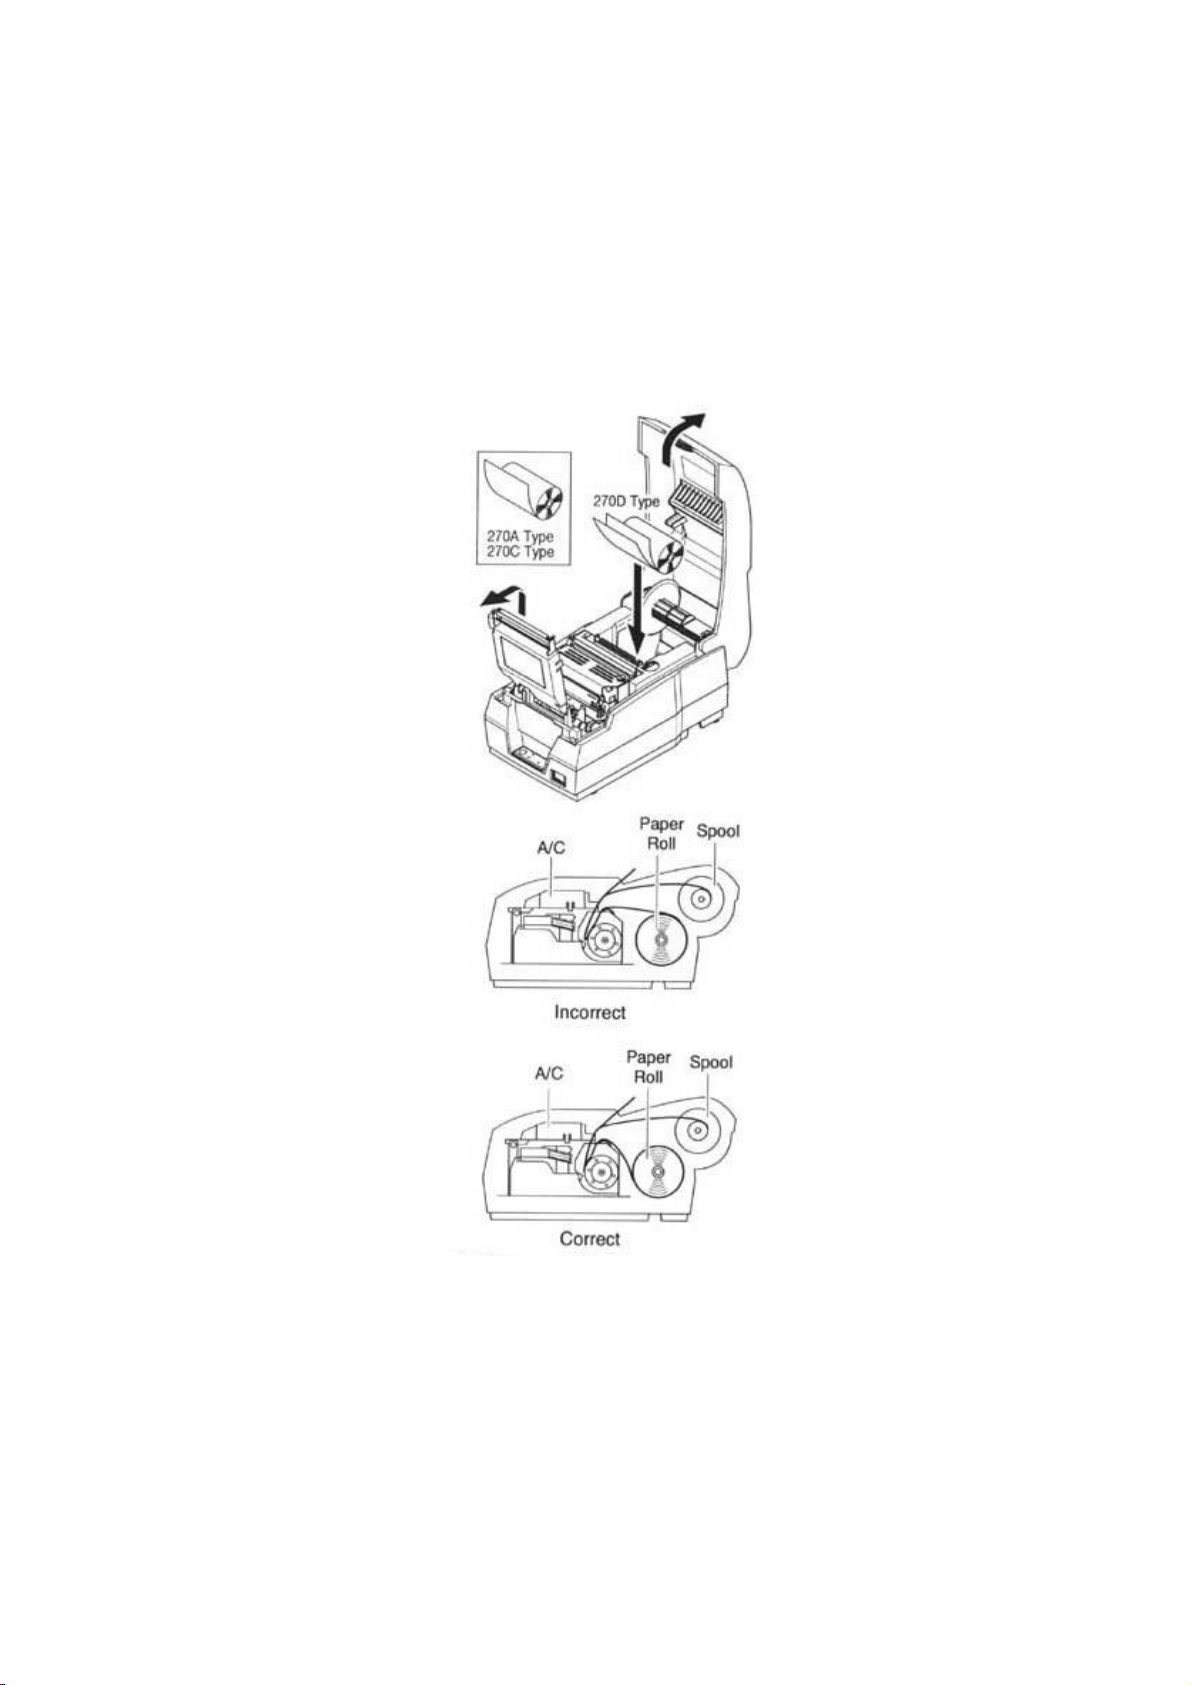
4). Put the roll paper on the paper holder and insert the paper in the printer.
" SRP-270 A/C : 1Ply Paper
# SRP-270 D : 2Ply Paper
10

5) Insert the end of the roll paper straight into the paper inlet. The printer feeds
the paper automatically and then the printer will cut the paper
automatically(SRP-270C type series and SRP-270D type series).
Refer to the attached label inside the cover.
6). Tear off the paper as shown, if necessary.
11
 Loading...