

Page 1
SR8950
Vacuum Cleaning Robot
user manual
This manual is made with 100% recycled paper.
Before operating this unit, please read the instructions carefully.
✻
For indoor use only.
✻
imagine the possibilities
Thank you for purchasing a Samsung product.
To receive a more complete service,
please register your product at
www.samsung.com/register
English
Page 2
safety information
SAFETY INFORMATION
WARNING
WARNING
Before operating the appliance, please read this manual thoroughly and retain it for your •
reference.
Because these following operating instructions cover various models, the characteristics of your •
vacuum cleaner may differ slightly from those described in this manual.
CAUTION/WARNING SYMBOLS USED
WARNING
CAUTION
Indicates that a danger of death or serious injury exists.
Indicates that a risk of personal injury or material damage exists.
OTHER SYMBOLS USED
NOTE
Indicates that a risk of personal injury or material damage exists.
02_ safety information
Page 3

IMPORTANT SAFETY INSTRUCTIONS
When using an electrical appliance, basic precautions should be observed, including the following:
READ ALL INSTRUCTIONS BEFORE USING YOUR VACUUM CLEANING
ROBOT.
Unplug from outlet when not in use and before conducting maintenance.
WARNING: to reduce the risk of fi re, electric shock, or injury:
GENERAL
Use only as described in this manual.•
Do not operate the vacuum cleaning robot or charger if it has been damaged in any way.•
If the cleaner is not working as it should, has been dropped, damaged, left outdoors, or •
dropped in water, return it to a customer care center.
Do not handle the charger or vacuum cleaning robot with wet hands.•
Use only on dry, indoor surfaces.•
This appliance is not intended for use by persons (including children) with reduced physical, •
sensory or mental capabilities, or lack of experience and knowledge, unless they have been
given supervision or instruction concerning use of the appliance by a person responsible for
their safety.
Children should be supervised to ensure that they do not play with the appliance.•
BATTERY CHARGER
Do not modify the polarized plug to fi t a non-polarized outlet or extension cord.•
Do not use outdoors or on wet surfaces.•
Unplug the charger from the outlet when not in use and before servicing.•
Use only the charger supplied by the manufacturer to recharge.•
Do not use with a damaged cord or plug.•
Do not pull or carry by the cord, use the cord as a handle, close the door on the cord, or pull •
the cord around sharp edges or corners. Keep the cord away from heated surfaces.
Do not use extension cords or outlets with inadequate current carrying capacity.•
Do not unplug by pulling on the cord. To unplug, grasp the plug, not the cord.•
Do not mutilate or incinerate batteries as they will explode at high temperatures.•
Do not attempt to open the charger. Repairs should only be carried out by a qualifi ed customer •
care centre.
Do not expose the charger to high temperatures or allow moisture or humidity of any kind to •
come into contact with the charger.
safety information _03
Page 4

safety information
VACUUM CLEANING ROBOT
Do not pick up hard or sharp objects such as glass, nails, screws, coins, and etc. •
Do not use without a fi lter in place. When servicing the unit, never put fi ngers or other objects •
into the fan chamber in case the unit accidentally turns on.
Do not put any objects into openings. Do not use with any openings blocked; keep openings •
free of dust, lint, hair, and anything that may reduce air fl ow.
Do not pick up toxic materials (chlorine bleach, ammonia, drain cleaner, etc.).•
Do not pick up anything that is burning or smoke, such as cigarettes, matches, or hot ashes.•
Do not use to pick up fl ammable or combustible liquids such as gasoline, nor use on areas •
where they may be present.
Do not use vacuum cleaning robot in an enclosed space fi lled with vapours given off by oil •
based paint, paint thinner, moth proofi ng substances, fl ammable dust, or other explosive or
toxic vapours.
Leaks from battery cells can occur under extreme usage or temperature conditions. If the liquid •
gets on skin, wash quickly with water. If the liquid gets into the eyes, fl ush them immediately
with clean water for a minimum of 10 minutes. Seek medical attention.
04_ safety information
Page 5

contents
SAFETY INFORMATION
PRODUCT FEATURES
ASSEMBLING THE CLEANER
OPERATING THE CLEANER
02
13
15
20
06 Power Related
07 Before Use
10 In Use
11 Cleaning and Maintenance
15 Components
16 Name of each part
20 Installing the vacuum cleaning robot
20 Installation order
20 Turning the Power Switch on or off
21 Installing the charger
22 Charging
23 About the Battery
24 Setting the Time
25 Installing the VIRTUAL GUARD
27 Using the vacuum cleaning robot
27 Starting/Stopping Cleaning
28 Recharging
29 Auto Cleaning
30 Spot Cleaning
31 Max Cleaning
32 Manual Cleaning
33 Timer Reservation
34 Weekly Reservation
36 Additional Functions
36 Using additional functions
MAINTAIN TOOLS AND FILTERS
37
TROUBLESHOOTING
43
PRODUCT SPECIFICATION
46
37 Cleaning the vacuum cleaning robot
37 Please keep the cleaning and maintenance
methods in mind
37 Cleaning the Sensor Window and the Camera
38 Cleaning the Dust Bin and the Filters
39 Cleaning the vacuum cleaning robot
39 Cleaning the Power Brush
41 Cleaning the Edge-Cleaning Side rotating Brush
42 Cleaning the Driving Wheel
43 Checklist before SVC Calls
45 Troubleshooting for Error Codes
contents _05
Page 6
safety information
POWER RELATED
WARNING
WARNING
WARNING
WARNING
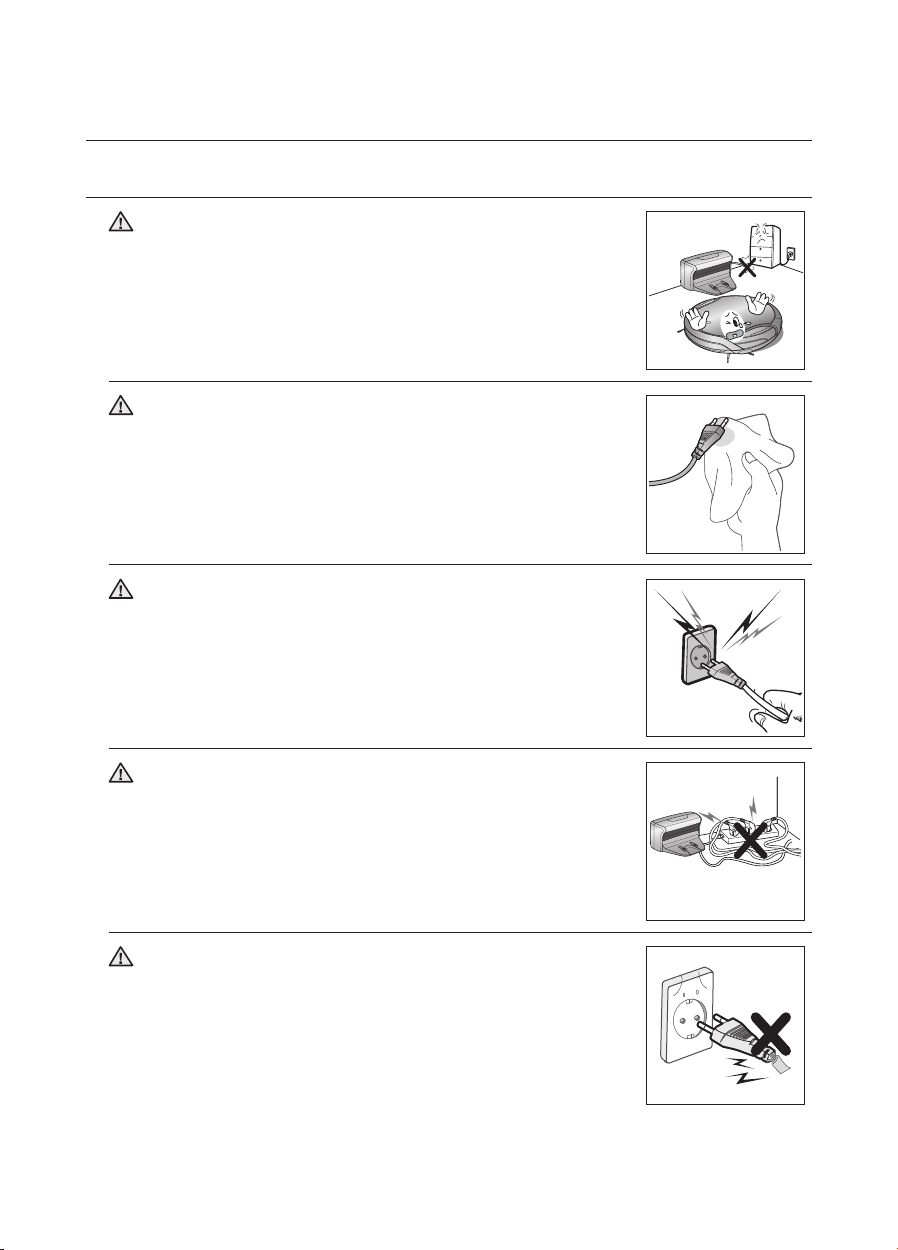
Do not bend the power cord forcefully or place a heavy object
on it that could break it.
This may result in fi re or electric shock. -
Make sure to remove any dust or water from the power plug.
Failing to do so may result in a malfunction or electric shock. -
Do not pull the power plug by the cord or touch the plug with
wet hands.
This may result in fi re or electric shock. -
Do not use multiple plugs in a single socket.
(Do not leave the cord lying exposed on the fl oor.)
This may result in fi re or electric shock. -
WARNING
06_ safety information
Do not use a damaged power cord, plug, or a loose power
outlet.
This may result in fi re or electric shock. -
Page 7

BEFORE USE
CAUTION
CAUTION
CAUTION
CAUTION
CAUTION
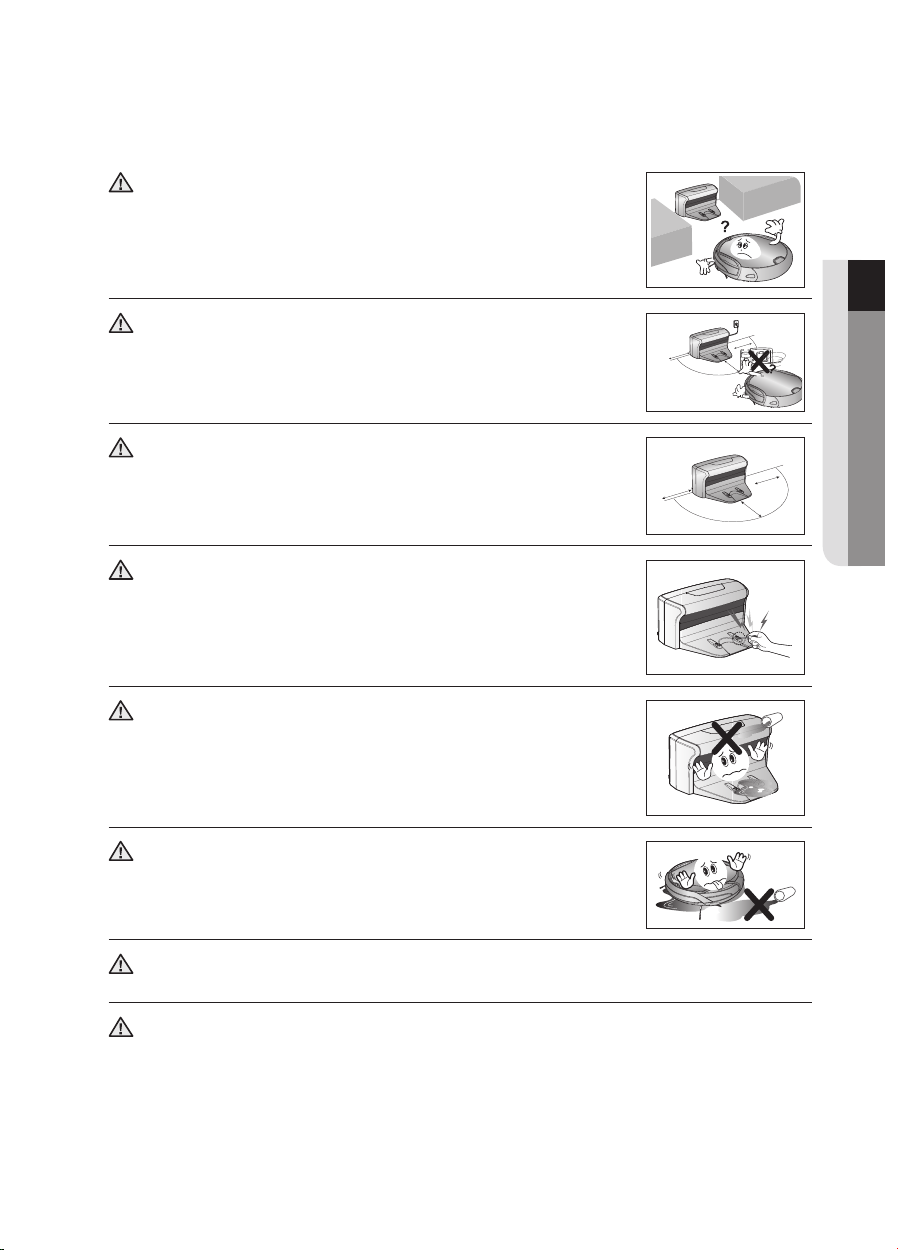
Before activating the vacuum cleaning robot, make sure that
the dust bin is assembled.
If the dust bin is not inserted, vacuum cleaning robot will not operate.
Never use vacuum cleaning robot in locations with combustible
material such as.
Locations with candles or desk lamps on the fl oor. Locations with unattended fi res (fi re or embers). Locations with gasoline, distilled alcohol, thinner, ashtrays with -
burning cigarettes, etc.
Vacuum cleaning robot is for domestic use only. Do not use it in the following
locations.
Attics, basements, warehouses, industrial buildings, separate rooms distant from the main building, locations exposed to wet or damp conditions such as bathrooms or wash
rooms, and narrow and highly situated locations such as tables or shelves. Critical damage
(abnormal operation and breakage) may occur when used in these locations.
Open all doors to clean all rooms.
When a door is closed, the vacuum cleaning robot will not be able to enter that room. However, make sure to close the doors to the main entrance, the veranda and the -
bathroom, and any other rooms where the vacuum cleaning robot may fall to a lower fl oor.
Do not use the cleaner on a black fl oor.
The vacuum cleaning robot may not run normally in this case. -
01 SAFETY INFORMATION
CAUTION
CAUTION
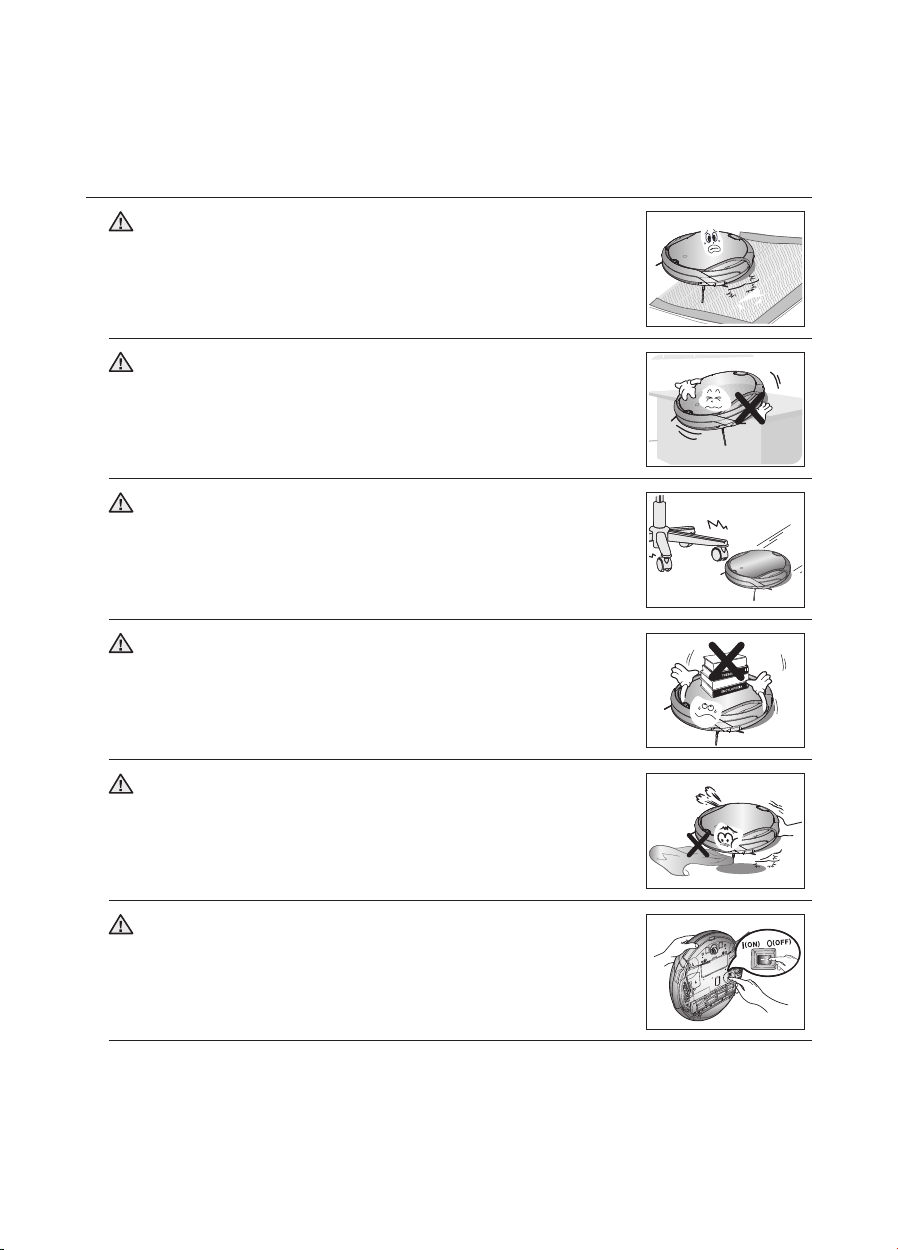
For carpets with long tassels, fold the tassels under the carpet.
Unfolded tassels may result in critical damage to the carpet and the machine itself, as they get caught in the driving wheel or the
power brush.
When the cliff sensor is polluted, the vacuum cleaning robot
may be in danger of falling down the stairs.
This may cause personal injury and critical damage to the
product.
To prevent risk, install the VIRTUAL GUARDs (Fence Mode
setting) in front of dagerous areas. Clean the sensor window
and camera.
safety information _07
Page 8

CAUTION
Remove small objects or brittle items from the area to be
cleaned in advance.
Make sure to clear any objects before cleaning. Make sure to remove fragile items such as china, glass objects, -
fl owerpots, etc.
Vacuum cleaning robot does not recognize coins, rings or other -
valuable items such as jewelry.
CAUTION
CAUTION
CAUTION
CAUTION
Remove objects scattered on the fl oor before cleaning.
Vacuum cleaning robot is designed to detect obstacles 5cm away from it.
Bath towels, pads in front of bathrooms and sinks, entrances, utility rooms, power cords, table cloths or belts can become
entangled in the driving wheel or power brush. This can cause
objects to fall from the table.
Inform all family members (or relevant parties) to be cautious
before cleaning or when using the Scheduled Cleaning Mode.
Vacuum cleaning robot may run into children, causing them to fall. -
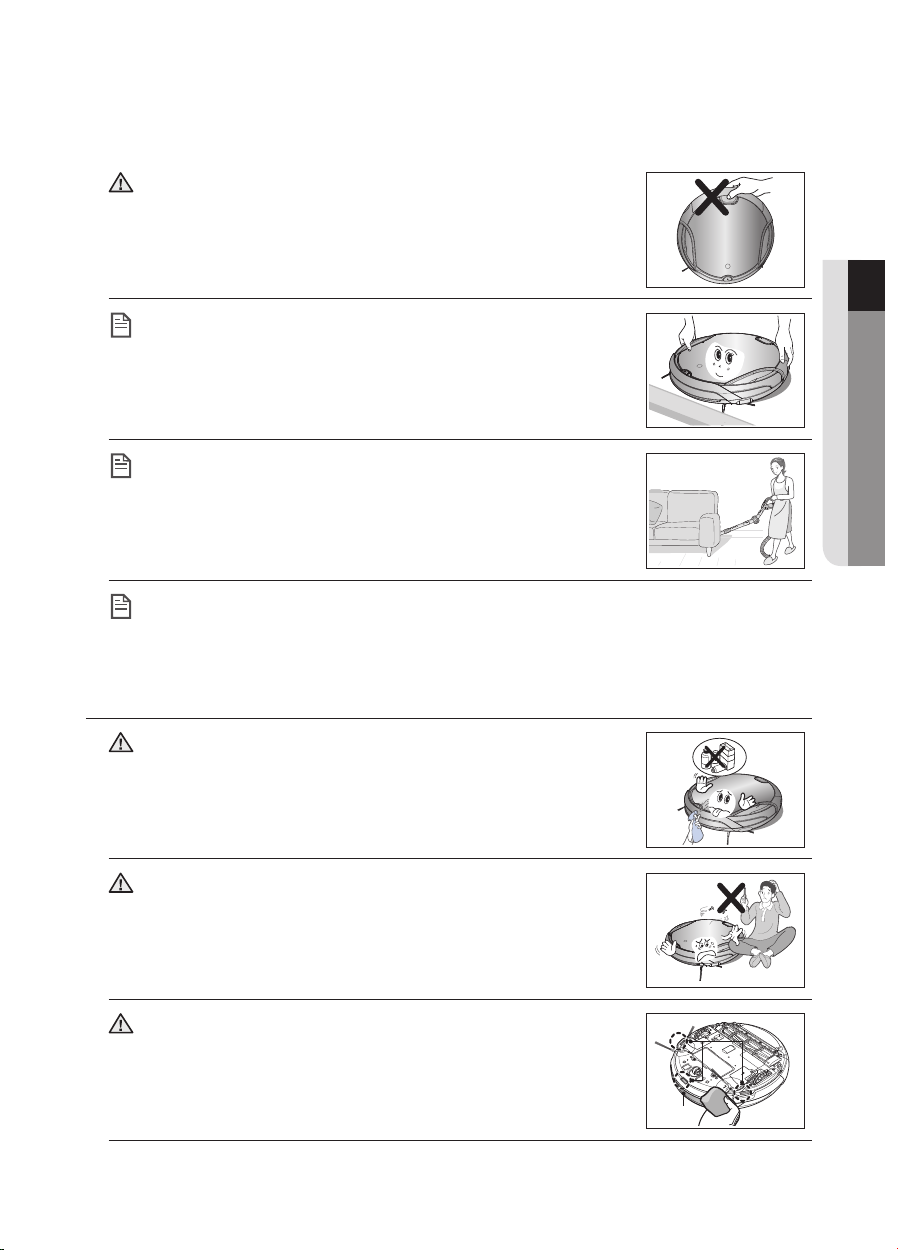
Ensure that children do not step or sit on the vacuum cleaning
robot.
Children may fall and injure themselves or critical damage may occur to the product.
When a child or pet is left alone, make sure to turn off the
Power Switch of the vacuum cleaning robot.
Vacuum cleaning robot may attract their attention. When the rotating wheel or brush catches fi ngers, feet, clothing or -
hair, this may result in injury.
If a child or pet is in the way of the vacuum cleaning robot, it may -
be identifi ed as an obstacle and the area may not cleaned.
When the Power Switch is turned off, it will cut off the power -
supply and deactivate all functions.
CAUTION
cord exposed on the fl oor.
When the vacuum cleaning robot automatically recharges or passes by the charger station, it may drag the power cord around
with it.
Always keep the power cord of the charger plugged into the
When installing the charger station, do not leave the power
CAUTION
outlet.
Although the vacuum cleaning robot has a self-charging function, if the power cord of the charger station is unplugged, it cannot
charge its battery automatically.
08_ safety information
Page 9
CAUTION
about 0.5m
about 0.5m
about 1m
about 0.5m
about 0.5m
about 1m
Install the charger in a location that can be easily accessed by
the vacuum cleaning robot.
If the charger is installed in a corner, this may cause extra movements and may disturb the automatic recharging process.
01 SAFETY INFORMATION
CAUTION
WARNING
WARNING
WARNING
WARNING
Objects in front of the charger will prevent the vacuum
cleaning robot from auto-charging itself.
Clear the area. -
There should be no obstacles and cliffs 0.5m to the left and
right and within 1m of the front.
Do not short-circuit the charge pins with metal objects such
as chopsticks, screwdrivers, and etc.
This will result in critical damage to the charger. -
Make sure that there is no trace of liquids on the charger
station.
Failing to do so may result in fi re or electric shock. -
Make sure the vacuum cleaning robot does not vacuum or
move over liquids such as water, oil or pet litter.
This may result in critical damage to the product. Liquids may spread through the wheels resulting in contamination. -
about 0.5m
about 0.5m
about 1m
about 0.5m
about 0.5m
about 1m
WARNING
WARNING
Do not use the charger for other purposes.
This may result in critical damage to the charger or cause a fi re. -
Do not install the charger station on a dark fl oor.
If the fl oor where the charger station is installed is dark, it is hard for the vacuum cleaning robot to return to it.
safety information _09
Page 10
IN USE
CAUTION
CAUTION
CAUTION
CAUTION
CAUTION
You cannot use the vacuum cleaning robot on thick carpets.
This may result in problems with the vacuum cleaning robot. This may result in damage to carpets. -
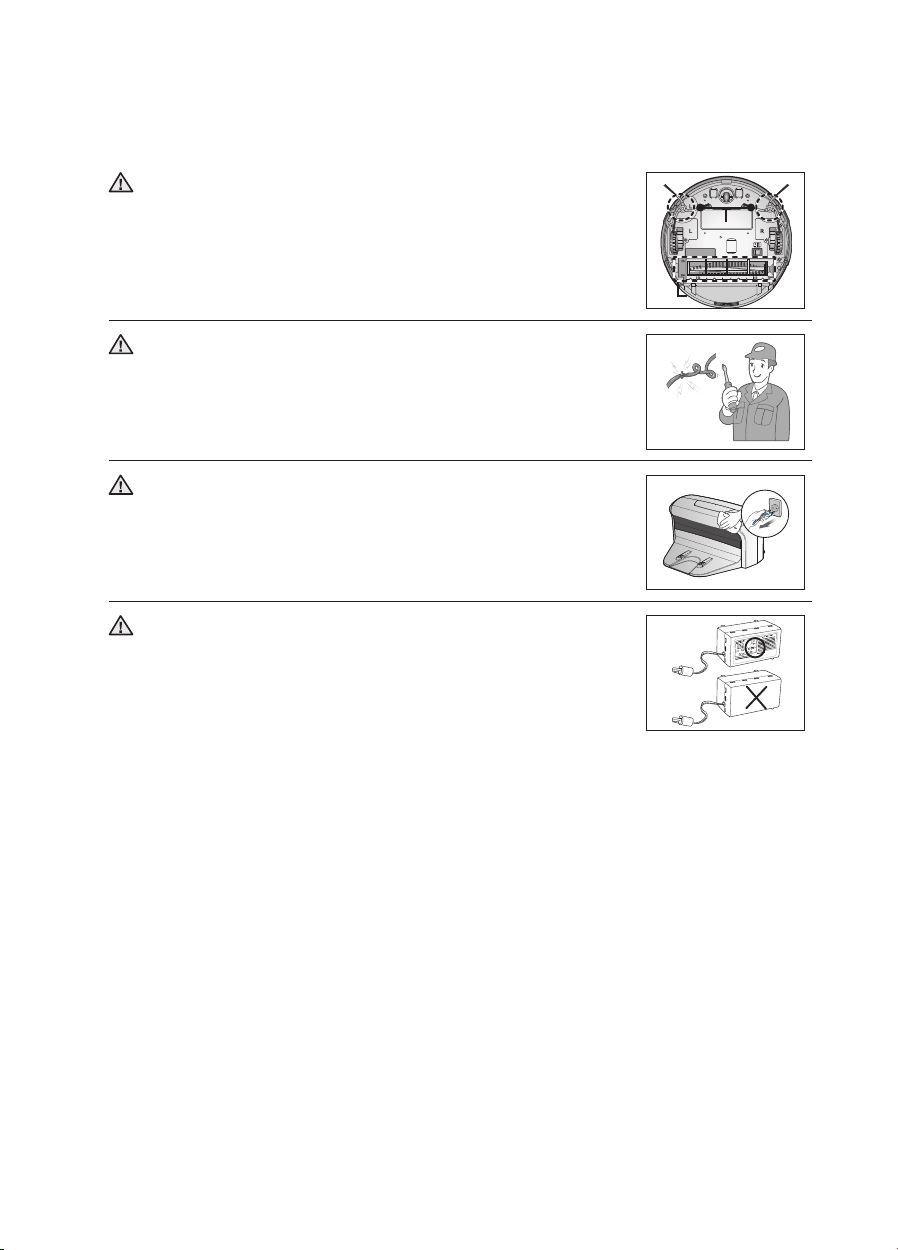
Do not use the vacuum cleaning robot on a table or other high
locations.
This may result in damage when the unit accidentally drops. -
Vacuum cleaning robot may bump into furniture such as chair
legs, table legs, thin and long furniture, etc. while operating.
For a quicker and cleaner performance, place the chairs on top of the table.
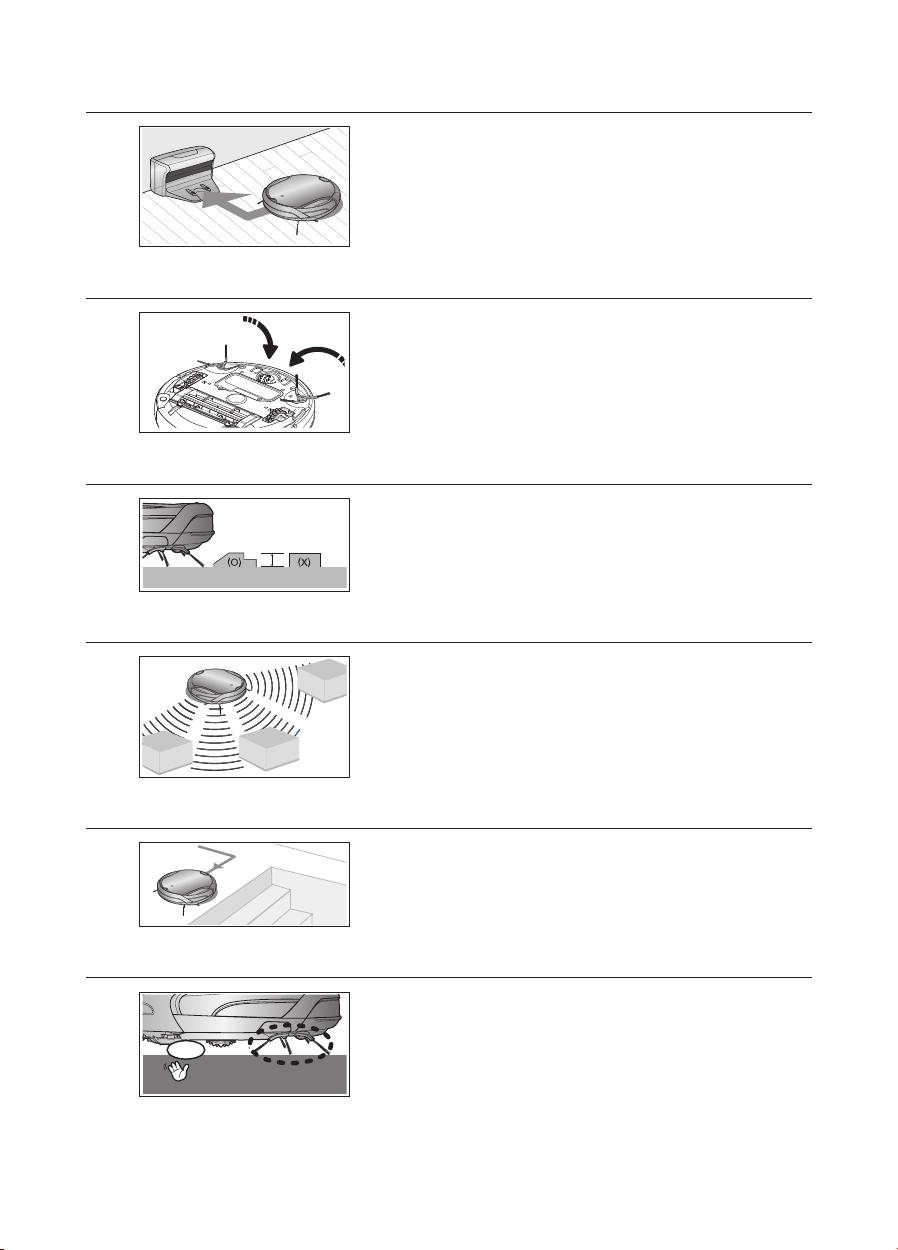
Do not place any objects on top of the vacuum cleaning robot.
This may result in malfunction. -
Immediately remove any large pieces of paper or plastic bags
from the machine while cleaning.
Using the machine for an extended period of time with its inlet port obstructed may result in critical damage to the product.
WARNING
vacuum cleaning robot, immediately turn off the Power Switch
and call the customer care center.
10_ safety information
If an unusual sound, smell or smoke is emitted from the
Page 11
CAUTION
Cliff sensor
Obstacle sensor
part.
This may cause the dustbin to separate, resulting in injury or serious damage to the product.
Vacuum cleaning robot may not be able to continue its
Do not move the robotic vacuum cleaner holding the dustbin
operation if it is stuck at the entrance or veranda doorsill.
NOTE
To resume operating, turn the Power Switch off and then on again after moving it to a location where it can continue cleaning.
Vacuum cleaning robot cannot completely clean locations that
it cannot reach, such as corners, and spaces between sofas
NOTE
and walls.
Please clean these locations occasionally. -
Dust clusters may remain after cleaning, when the vacuum cleaning robot fails to
pick up dust clusters that were formed while cleaning.
NOTE
In this case, sweep up the dust with another cleaning tool. -
CLEANING AND MAINTENANCE
01 SAFETY INFORMATION
CAUTION
CAUTION
WARNING
When cleaning the product, do not spray water directly onto
the exterior or wipe it with a volatile material such as benzene,
thinner or alcohol.
This may result in critical damage to the product. -
The unit must not be disassembled or reconstructed by anyone
other than a qualifi ed service engineer.
This may result in damage to the product. -
Remove any foreign substances accumulated on the Obstacle
and Cliff sensors on a regular basis.
Dirt accumulated on the sensors will result in inaccurate functioning of the sensors.
Cliff sensor
Obstacle sensor
safety information _11
Page 12
WARNING
Edge-cleaning side
brush
Power brush
WARNING
When removing foreign substances, always use the cleaning
brush after turning the Power Switch off.
Failing to do so may result in sudden operation of the unit and cause an injury or critical damage to the product.
If the power cord is damaged, have it replaced by a qualifi ed
service engineer from the customer care center.
Failing to do so may result in fi re or electric shock. -
Edge-cleaning side
brush
Power brush
WARNING
WARNING
Before cleaning the charger, make sure to disconnect the
power cord for safety.
Contact the Samsung Electronics customer care center to
replace the battery.
Failing to use original batteries will result in product failure. -
12_ safety information
Page 13

1
About 1.5m
About 1.5m
2
3
4
5
6
7
Mon
Tue
W
ed
Thu
Fri
Sat
Sun
~
8
product features
CONVENIENT VIRTUAL GUARD FUNCTION
You can confi ne the vacuum cleaning robot to a particular section by using the Fence (virtual wall)
mode.
What is ceiling shape recognition (Visionary •
mapping plus™)?
This function recognizes the shape of the ceiling
using the camera on top to identify the area to be
cleaned and determines the best way to pass over
and clean every section of the fl oor.
DELICATE CLEANING OF EVERY CORNER
Since the vacuum cleaning robot cleans the fl oor in a sequential way ( ) along the map
determined by the ceiling shape recognition function, it cleans every corner of the fl oor.
VARIOUS CLEANING MODES
Various cleaning modes are provided to meet all your needs.
About 1.5m
1
2
About 1.5m
3
4
5
6
7
8
Tue
Wed
Mon
Thu
Sat
~
Fri
Sun
Auto Mode :1. Cleans all rooms automatically.
Spot Mode :2. Cleans a localized area intensely. It can be used to clean bread or cookie
crumbs.
Max Mode :3. Runs until the battery is nearly depleted.
Manual Mode :4. You can clean the fl oor manually by moving the cleaning robot.
Turbo Mode :5. Since the power brush rotates at maximum speed in this mode, the product will
clean more effectively.(You can switch the mode with the remote control.)
Dust Sensor Mode :6. When dust enters the vacuum cleaner, the vacuum cleanin robot starts
to clean its surroundings intensively. (You can operate this with the remote control.)
Timer Mode :7. At the specifi ed time, the cleaning robot cleans the fl oor.
Weekly Schedule Mode :8. A scheduled cleaning operation starts from the set time of a
particular day of the week.
product features _13
Page 14
AUTO CHARGING
About 1cm
Stair type
Vertical type
stop
When the battery is low, the vacuum cleaning robot is
automatically guided to the charger to enable it to perform a
quick auto charge.
EDGE-CLEANING SIDE ROTATING BRUSH
The edge-cleaning side rotating brush cleans dust from the
edges.
DOORSILL CROSSING
The vacuum cleaning robot innovative driving system makes
it possible for it to cross over doorsills with a height of about
1cm and clean all rooms. The vacuum cleaning robot may not
be able to pass a 1cm doorsill depending on the shape of the
doorsill.
Stair type
About 1cm
Vertical type
AVOIDING OBSTACLES
When the vacuum cleaning robot encounters an obstacle while
cleaning, the obstacle sensor allows the cleaner to avoid it and
continue cleaning. (It may happen that the cleaner touches thin
or fi ne obstacles.)
ANTI-FALLING
SAFETY DEVICE
stop
14_ product features
The 3 Cliff sensors detect downward steps such as stairs or
the front door threshold to prevent vacuum cleaning robot from
falling down stairs.
When the vacuum cleaning robot is lifted up while cleaning,
the driving wheels, power brush, suction motor, and side
rotating brush are stopped autonati(all) by sensor.
Page 15

(AAA-Type Batteries)
assembling the cleaner
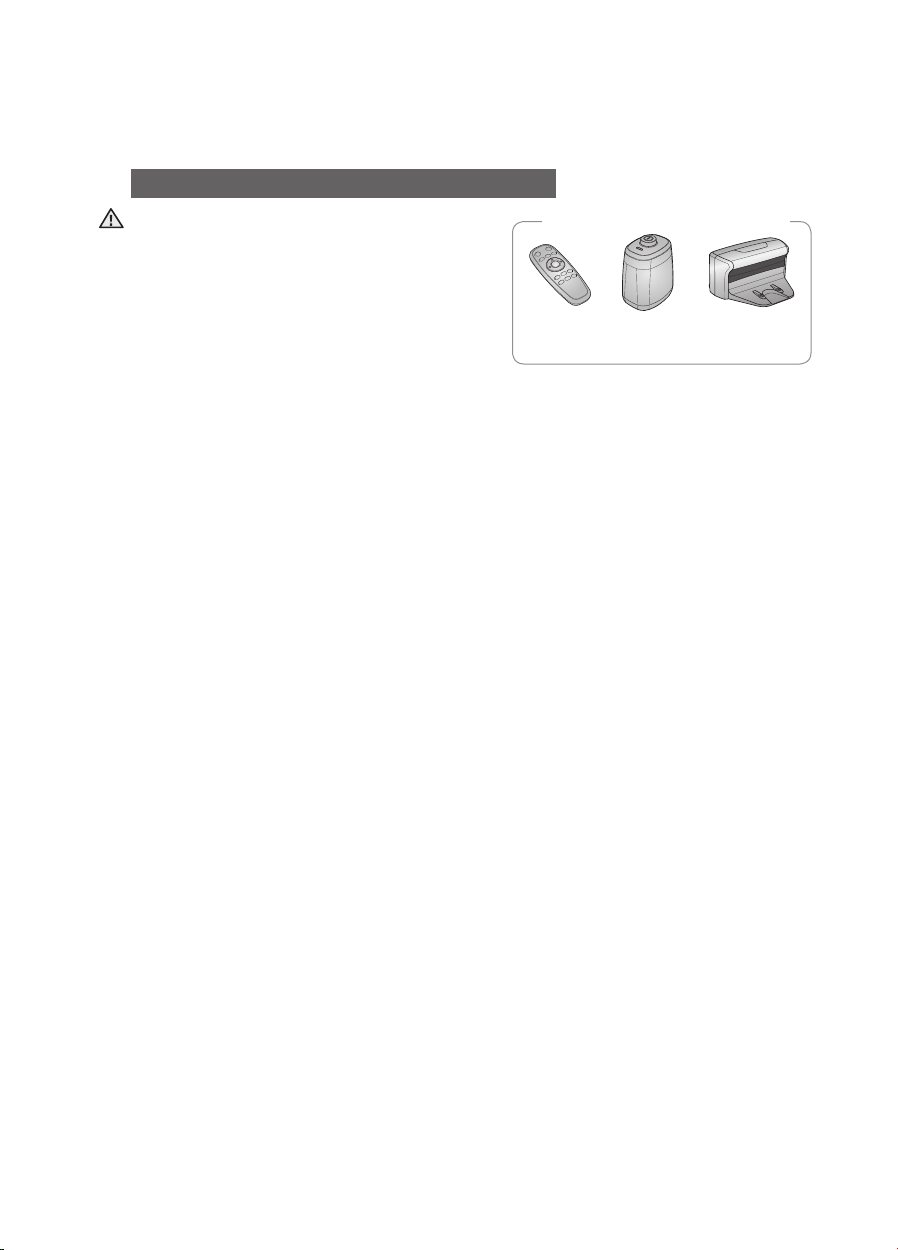
COMPONENTS
Main Body
■
Remote Control
■
Charger (Station)
■
02 ASSEMBLING
Others Components
■
(AAA-Type Batteries)
User Manual /
2 Battery
VIRTUAL GUARD Spare Filter Cleaning Brush Quick Start Guide
assembling _15
Page 16
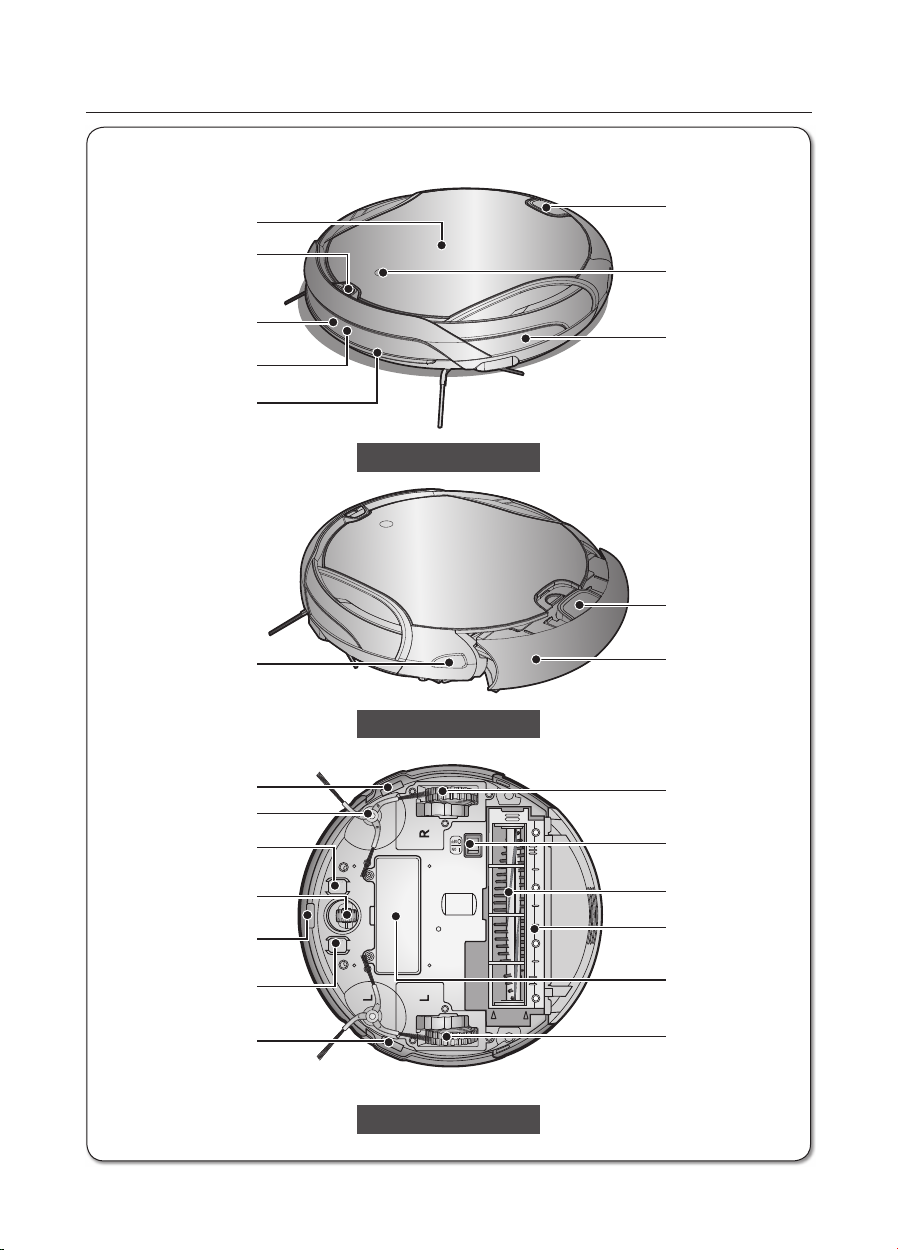
NAME OF EACH PART
Virtual Guard Sensor
Dustbin Eject Button
Camera
Obstacle Sensor
Dustbin Eject Button
Dust bin
Driving Wheel
Power Switch
Power Brush
Power Brush Cover
Battery Cover
Driving Wheel
Remote Control Sensor
Obstacle Sensor
Bumper Sensor
Remote Control Sensor
Rotating Side Brush
Cliff Sensor
Charge Pin
Roller
Cliff Sensor
Charge Pin
Cliff Sensor
Display panel
Main unit
■
Display panel
Virtual Guard Sensor
Remote Control Sensor
Obstacle Sensor
Bumper Sensor
Front
Dustbin Eject Button
Camera
Obstacle Sensor
Dustbin Eject Button
Remote Control Sensor
Rotating Side Brush
16_ assembling
Cliff Sensor
Charge Pin
Roller
Cliff Sensor
Charge Pin
Cliff Sensor
Side
Bottom
Dust bin
Driving Wheel
Power Switch
Power Brush
Power Brush Cover
Battery Cover
Driving Wheel
Page 17
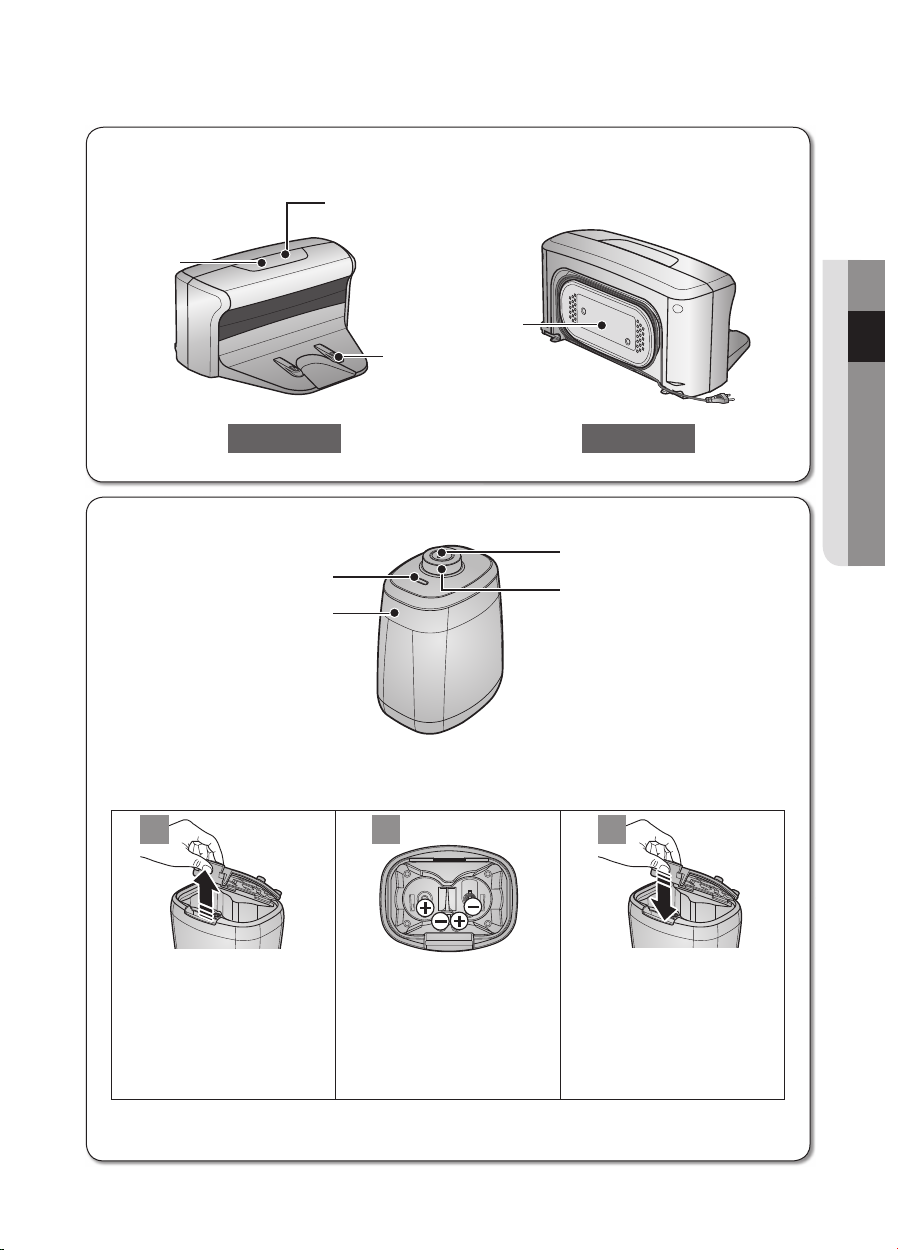
Charger (Station)
Distance Detection Sensor
Lamp
Power Button
Main Body Detection Sensor
1
2
3
Power lamp
(red)
Cord winder
Charging lamp (green)
Charging
terminals
■
Charging lamp (green)
Power lamp
(red)
Cord winder
Charging
terminals
Front Back
VIRTUAL GUARD
■
Power Button
Lamp
Distance Detection Sensor
Installing the batteries
■
Batteries are not supplied with the product. You have to purchase the batteries separately. Install
the alkaline batteries (type D) before use.
1
2
Main Body Detection Sensor
3
02 ASSEMBLING
Lift the cover of the VIRTUAL
GUARD while pressing the
locking tab.
Install the batteries into the
VIRTUAL GUARD as shown
by the fi gure below. (If the
batteries are installed with
the incorrect polarity, the
VIRTUAL GUARD will not
work.)
Specifi cation: Alkaline Type D (LR20) batteries
❈
After inserting the tip of the
cover into the slot, push the
other end to close it until it
clicks into place.
assembling _17
Page 18
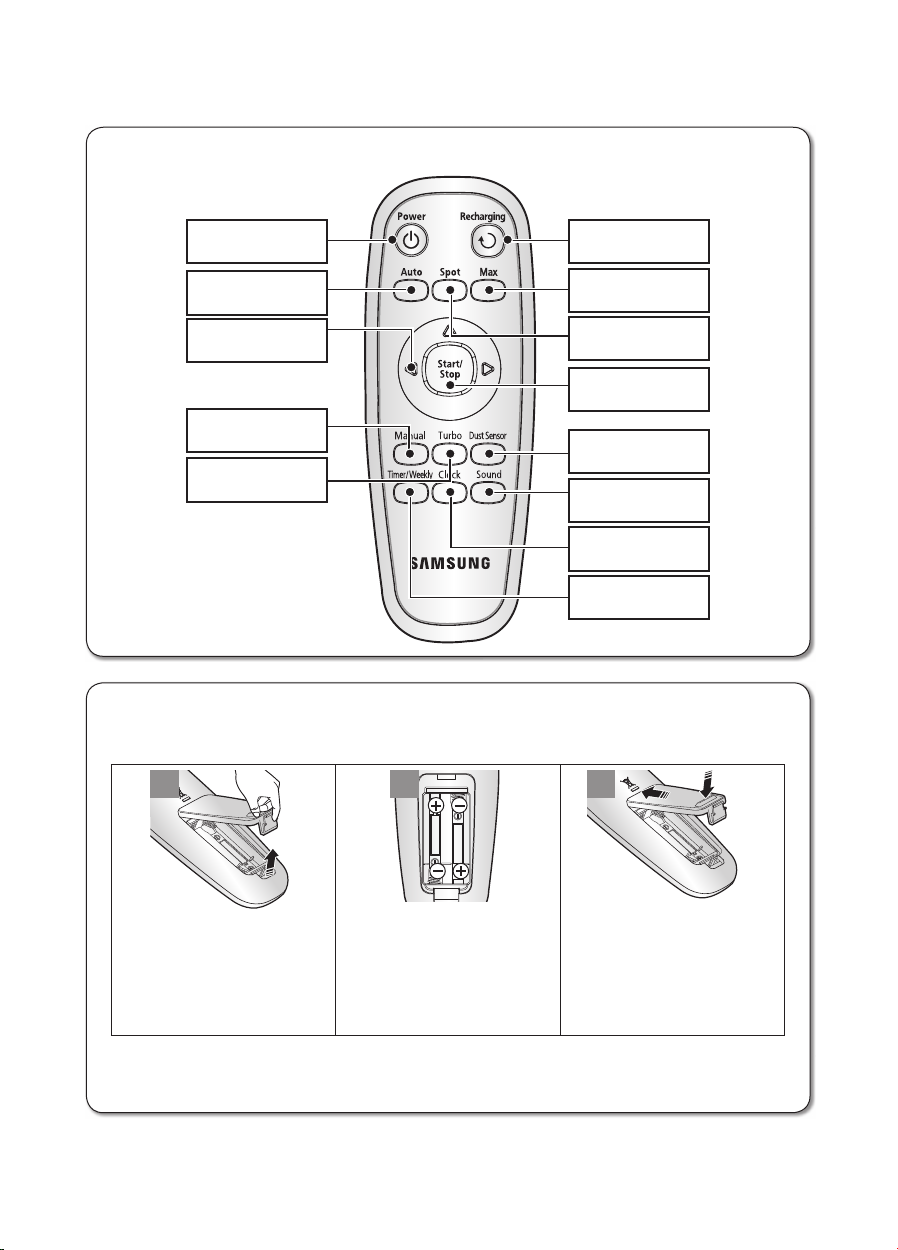
Remote Control
1
2
3
Power
Recharging
Max
Spot
Start/Stop
Dust Sensor
Sound
Clock
Timer/Weekly
Auto
Directional
Buttons
(moving backwards is
not supported.)
Manual
Turbo
■
Power
Auto
Directional
Buttons
(moving backwards is
not supported.)
Manual
Turbo
Installing the Remote Control Batterise
■
Batteries are not installed in the remote control when purchasing the product.
Install the batteries (type AAA) before use.
1
2
Recharging
Max
Spot
Start/Stop
Dust Sensor
Sound
Clock
Timer/Weekly
3
Lift the battery compartment
cover at the back of the
remote control, while
pressing the locking tab.
18_ assembling
Install the batteries into the
remote control as shown
by the fi gure below. (If the
batteries are installed with
the wrong polarity, the
remote control will not work.)
After inserting the tip of the
cover into the slot, push the
other end to close it until it
clicks into place.
Specifi cation: AAA type batteries
❈
Page 19
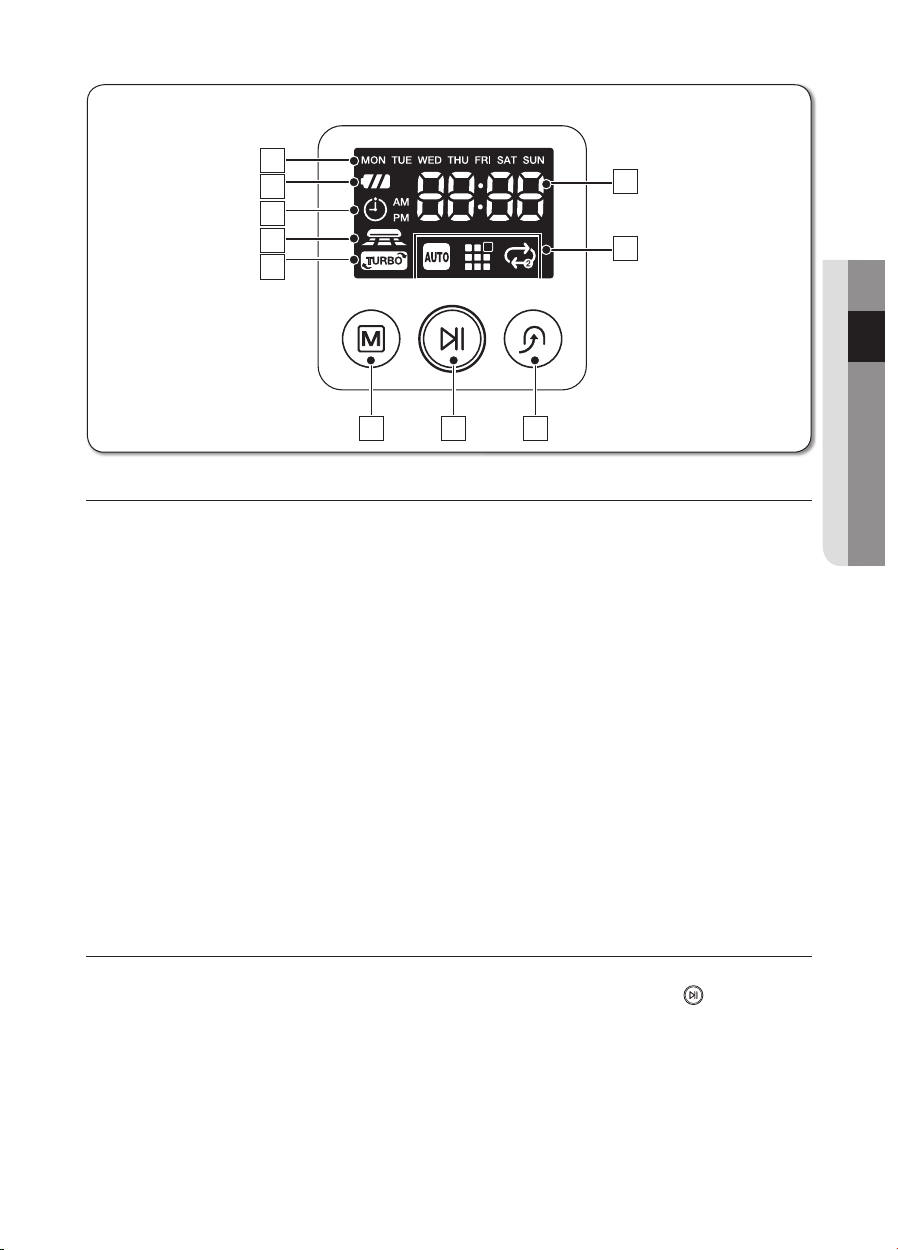
Display panel
2
1
7
3
4
5
6
8
9
10
AABBC
■
2
3
4
5
6
C
1
7
02 ASSEMBLING
DISPLAY PART
Number Display1.
Shows the timer display, progress status, and error codes using numbers, letters and graphics. -
Weekly Reservation2.
When you set a weekly reservation to start cleaning from the specifi ed time on the specifi ed day of the week, the icon for the selected day of the week is turned on.
Battery Level Indicator3.
Charging : Shows the charging progress in 3 steps. In Use : Shows the battery charge level. The battery charge level is reduced by each level from -
FULL while operating. (When the battery is fully discharged, one level will fl ash to display “Lo”.)
Timer4.
When cleaning is scheduled, the Timer icon is lit. -
Dust Sensor Mode5.
This icon turns on when Dust Sensor mode is enabled. -
Turbo Mode6.
This icon turns on when Turbo mode is enabled. -
Cleaning Mode Display7.
Each time the Cleaning Mode button is pressed, the corresponding cleaning mode is displayed. -
Auto Mode :(A) This icon turns on when Auto cleaning mode is selected.
Spot Mode :(B) This icon turns on when Spot cleaning mode is selected.
Max Mode :(C) This icon turns on when Max cleaning mode is selected.
BUTTON PART
Cleaning Mode8.
Press to select a cleaning mode. After selecting a cleaning mode, press the ( start cleaning.
Start/Stop9.
Press to start/stop cleaning. -
Recharging10.
When this button is pressed, The cleaning robot will return to the charger station to charge its battery.
8
9
10
) button to
assembling _19
Page 20

operating the cleaner
INSTALLING THE VACUUM CLEANING ROBOT
Installation order
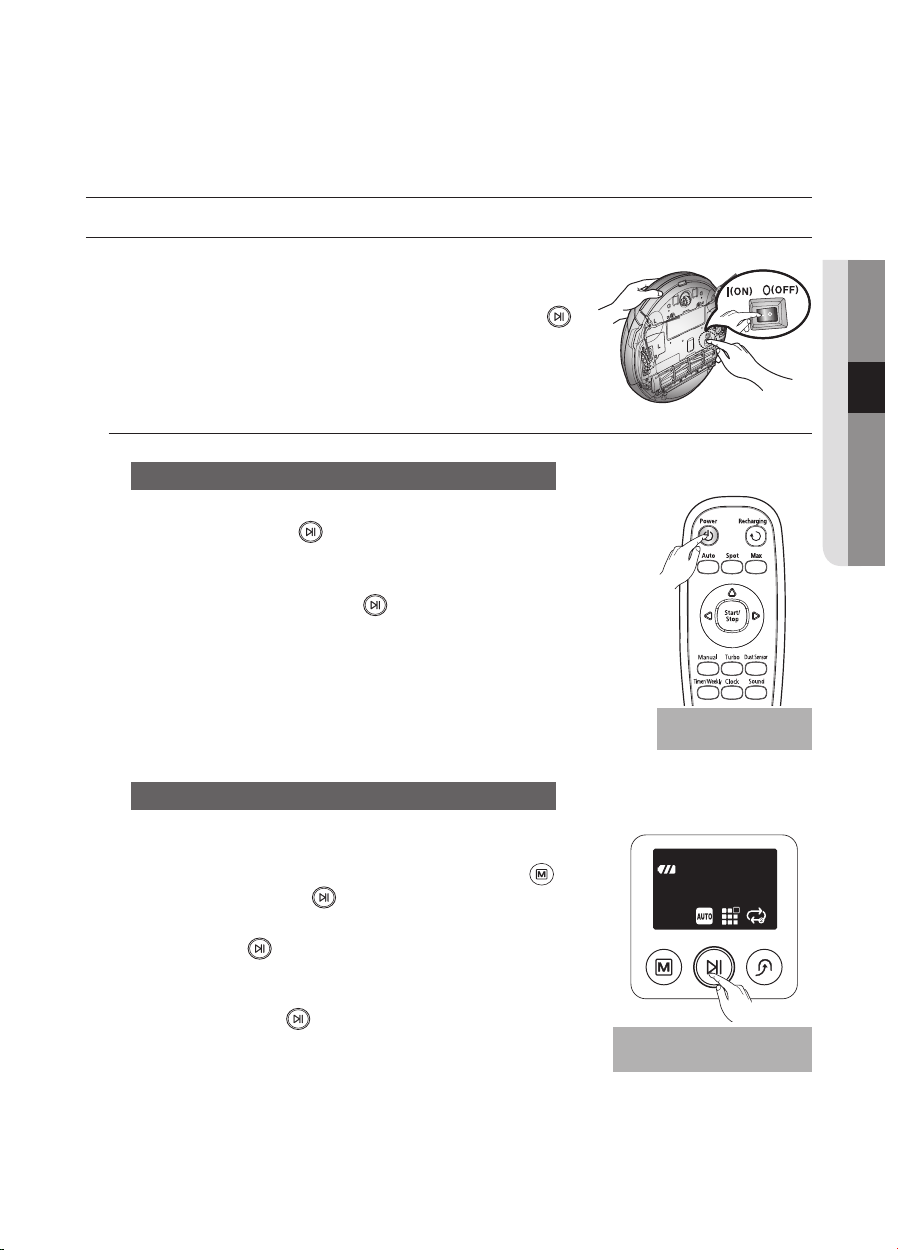
Turning the Power Switch on or off1.
To use the vacuum cleaning robot, you must turn on the Power Switch
at the bottom of the main unit.
Installing the Charger2.
To charge the vacuum cleaning robot, you must fi rst install the charger.
Since the battery is discharged when the product is purchased, you
must fully charge the battery before use.
Charging the Battery3.
You should charge the battery completely before using the vacuum
cleaning robot.
Setting the Time4.
You should set the time to use the scheduled and daily cleaning options.
Installing the VIRTUAL GUARD5.
You can confi ne the vacuum cleaning robot to a particular section by using Fence (virtual wall)
mode.
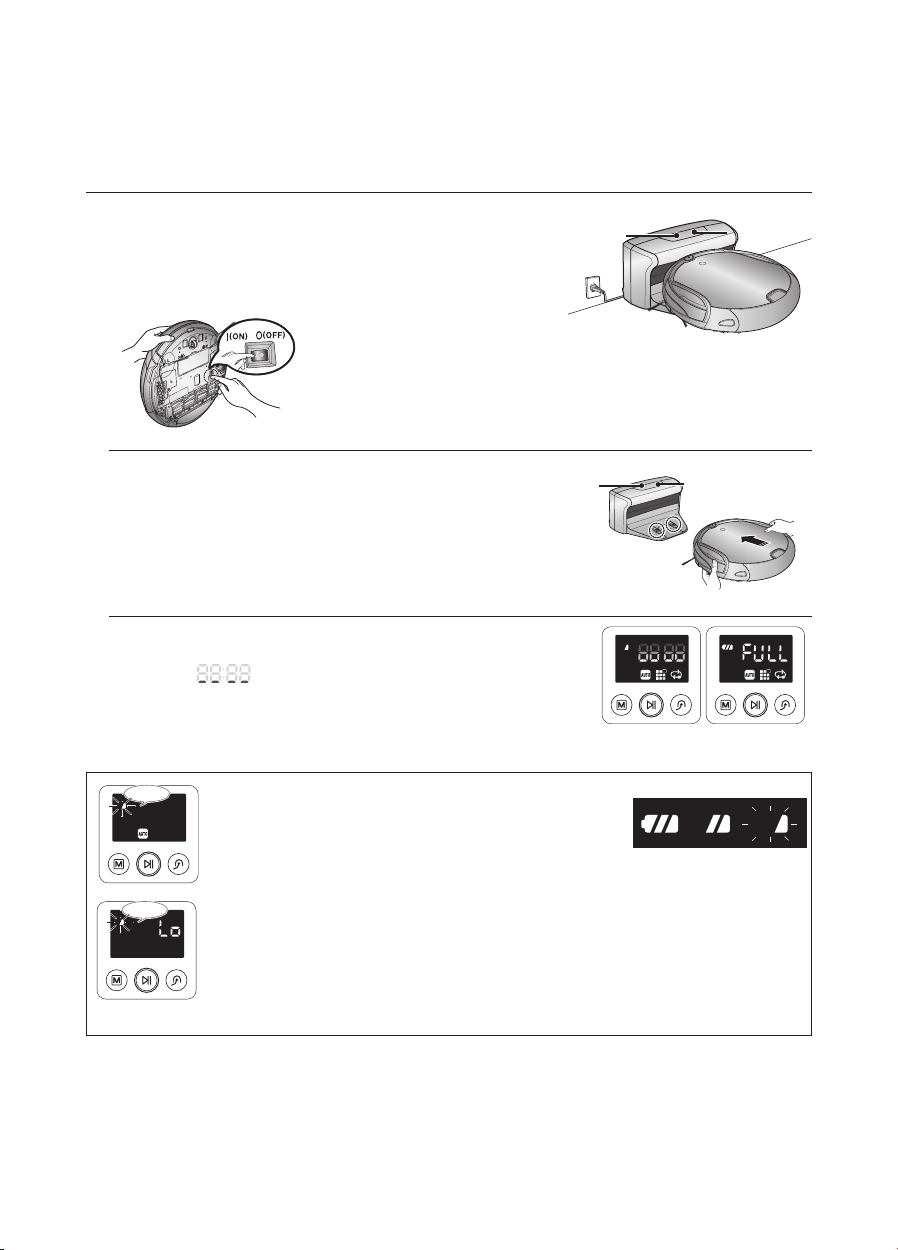
Turning the Power Switch on or off
To use the vacuum cleaning robot, you must turn the Power Switch
on.
If you turn off the Power switch, all settings except for the current
time and the Weekly reservations are reset.
If no key is pressed for approximately 1 minute after turning the
❈
power on, the power is automatically cut to prevent the battery
discharging.
To turn the power on again, press and hold the power (Start/
Stop) button on the main body.
Lift the body and turn on the power switch while making 1.
sure not to press any other button.
If the icons are not turned on, it indicates that the battery charge is depleted. In this case, dock the vacuum cleaning robot to the
charger station after turning the Power Switch on.
The confi gured time may be different from the current time. If the confi gure time is incorrect, set the time to the current time.
CAUTION
20_ operating
If the Power Switch is turned off, the vacuum cleaning robot will
not be charged even if it is docked with the charger station.
Page 21

Installing the charger
Power lamp
Charging lamp
about 1m
about 0.5m
about 0.5m
Power lamp
Install the charger on a fl at surface.1.
There should be no obstacles and cliffs 0.5m to the left and 2.
right and within 1 m of the front.
Install the charger in a location where it can be easily accessed by 3.
the vacuum cleaning robot.
Arrange the power cord along the wall.4.
Charging lamp
about 0.5m
about 0.5m
about 1m
03 OPERATING
When the fl oor is made of wood, install the charger in the same 5.
direction as the grain of the wood.
Always keep the power cord of the charger plugged
into the power outlet.
NOTE
If no power is supplied to the charger, the vacuum cleaning robot will not be able to fi nd the charger and will
not be able to charge automatically.
If the vacuum cleaning robot is separated from the charger, the battery is automatically discharged.
operating _21
Page 22
Charging
Flash
Flash
<Charge display>
Charge
complete
Charging
Required
charging
Power lamp
Charging lamp
Power lamp
Charging lamp
Charging
Fully charged
When the product is initially purchased, the battery is fully
discharged, and you must charge the vacuum cleaning
robot manually.
Turn on the Power Switch at the bottom of the product.
Power lamp
Charging lamp
After aligning the charge pins of the main unit with 1.
the charge pin of the charger station, press the main
unit until you hear a Recharging power sound from
the charger.
The Charging Lamp turns green. -
Check the charge status of the vacuum cleaning robot.2.
When charging starts, “the amount of remaining battery power” -
and “
” are displayed on the status display panel in this
sequence.
When charging is complete, the battery level indicator and -
“FULL” will be displayed in the display panel.
When the battery level display fl ashes while cleaning,
Flash
■
the vacuum cleaning robot stops vacuuming and
automatically charges itself at the charger.
If the vacuum cleaning robot starts the current cleaning
■
run at a location other than the charging station and fails
to locate the charging station while cleaning, it will stop
Flash
near the location where it started cleaning.
When the battery level fl ashes and “Lo” is displayed while
■
cleaning, vacuum cleaning robot cannot be operated by
the remote control or the buttons on the main unit. In
this case, directly carry the vacuum cleaning robot to the
charger to charge the battery. (This is when the battery is
completely discharged.)
Power lamp
Charging
<Charge display>
Charge
complete
Charging lamp
Fully charged
Charging
Required
charging
22_ operating
Page 23
When the product is initially purchased, it will take about 180 minutes to fully charge the •
NOTE
battery and will run for about 100 minutes.
When charging the battery while the battery is over-heated, the charging time can increase.•
Measures to take when charging is not smooth.•
When the vacuum cleaning robot cannot be automatically charged, check the following:
Turn the Power Switch at the bottom of the vacuum cleaning robot off and on. Re-plug the power of the charger. Check whether there are any foreign substances on the charge connector and wipe -
the charge connector on the main unit and the charger with a dry cloth.
Check whether there are objects near the charger that are strong refl ectors. -
When separating the vacuum cleaning robot from the charger, it will discharge naturally.•
Charge the vacuum cleaning robot through the charger, if possible. (When leaving your home unattended for a long period of time due to a business trip, travelling etc.,
turn off the Power Switch of the vacuum cleaning robot and unplug the power of the
charger to store them.)
About the Battery
The vacuum cleaning robot is powered by an environment-friendly Lithuim-ion (Li-ion)
■
rechargeable battery, and an over-charge prevention function guarantees an extended life time.
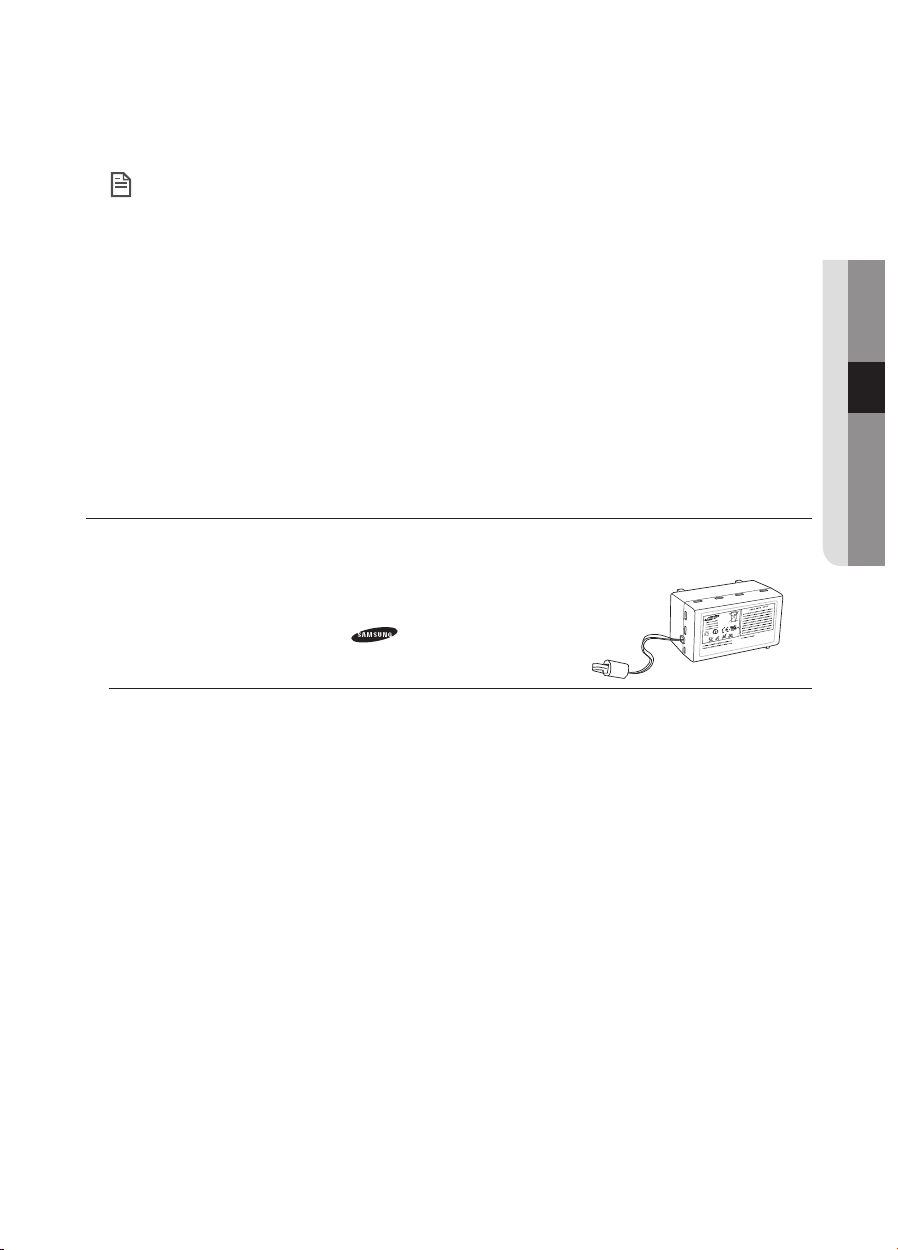
The battery warranty period is 6 months from the date
■
of purchase.
When purchasing a battery, ask the customer care center
■
for the genuine part symbol (
before purchasing it.
This battery is only for Samsung vacuum cleaning robot. It is strictly prohibited to use it for other appliances or for other purposes.
Do not disassemble or modify the battery. Charge it in a location with good ventilation. Do not expose the battery to fi re and do not heat it. Do not connect any metallic objects to the (+) or (-) terminals of the battery. Keep it indoors (0°C~40°C). Before you discard product, dispose of batteries in an environmentally safe manner. Do not discard this batteries with your regular household trash. Follow all local regulations when disposing of old batteries. -
03 OPERATING
) and model number
If the battery is out of order, do not disassemble it. Contact your nearest customer care center.
❈
An increased charging time and a shorter battery life indicates the near end of the battery life.
❈
Please contact an authorized customer care center to replace your battery.
The rechargeable battery incorporated in this product is not user replaceable.
For information on its replacement, please contact your service provider.
operating _23
Page 24

Setting the Time
Blinks
Blinks
Decrease
Increase
Blinks
Decrease
Increase
Blinks
Decrease
Increase
Blinks
The clock displays the current time. You can change the current time with the following steps.
You can only set the time using the remote control.
■
Remote Control Confi guration Sequence
Blinks
Press the Clock button.1.
The current time is displayed. -
Blinks
Blinks
Blinks
Blinks
Canceling the Settings
Remote Control
Decrease
Increase
Press the Clock button. 2.
The day of the week will blink. Press the Y or Z button to
set the day of the week.
Decrease
Increase
Press the Clock button. Press 3.
the Y or Z button to set the
hour.
Decrease
Increase
Press the Clock button. Press 4.
the Y or Z button to set the
minutes.
Press the Clock button.5.
The value you set will blink and the settings are
completed.
Press the Start/Stop button to cancel the settings and exit Time Set mode.
If there is no input for 1 minute while you are setting the time, the cleaner exits Time Set mode automatically.
24_ operating
Page 25

Installing the VIRTUAL GUARD
Power Button
Main Body
Detection
Sensor
Lamp
Distance
Detection
Sensor
A fence (virtual wall)
is formed.
Distance
Sensor
You can confi ne the vacuum cleaning robot to a
particular section by using Fence (virtual wall) mode.
Button operations
Lamp operations1.
Fence (virtual wall) Mode: The red lamp fl ashes. Off :The lamp is turned off. -
Turn the Power Button on2.
Whenever you press the Power button, Fence (virtual wall) mode ➝ Power off is selected in this sequence.
The distance of virtual wall is 2.5m at minimum and may
❈
differ depending on surroundings and movement status of
the robot.
Forming a Fence (virtual wall)
VIRTUAL GUARD creates an invisible barrier that the vacuum
cleaning robot cannot cross.
E.g. in front of pots, furniture, the front door, and so on.
Lamp
Distance
Detection
Sensor
Power Button
Main Body
Detection
Sensor
03 OPERATING
Turn the Fence (virtual wall) mode on using the Power 1.
button.
The mode lamp fl ashes red. -
Install the VIRTUAL GUARD in front of the area you 2.
want to block access from the vacuum cleaning robot.
Install the VIRTUAL GUARD so that the distance detection -
A fence (virtual wall)
is formed.
sensor can form an invisible barrier that the vacuum cleaning robot cannot cross.
Distance
Sensor
operating _25
Page 26
About the IrDA sensor
Remote
Control
Virtual
guard
Charger
[Infrared Signal Priority]
The infrared signal transmission may not be •
CAUTION
smooth in locations exposed to halogen lamps or
in outdoor locations.
Vacuum cleaning robot uses 3 types of infrared •
devices and a device may not work in front of
another device with a higher priority.
When controlling the vacuum cleaning robot •
with the remote control, the vacuum cleaning
robot may cross the virtual fence of the VIRTUAL
GUARD or run against an obstacle, because the remote control signal has a higher priority than
the VIRTUAL GUARD signal.
When using the vacuum cleaning robot in a small location or at a close distance, it may •
malfunction due to interference of the infrared signals.
Install the VIRTUAL GUARD away from the charger as auto charging may be interrupted if the •
VIRTUAL GUARD is near the charger.
If more than one vacuum cleaning robot is used simultaneously, they may malfunction due to •
interference of the infrared signals.
[Infrared Signal Priority]
> >
Remote
Control
Virtual
guard
Charger
26_ operating
Page 27
USING THE VACUUM CLEANING ROBOT
Using the main unit
buttons
Using the remote
control
Starting/Stopping Cleaning
You can run or stop all vacuum cleaning robot functions.
Each vacuum cleaning robot function only runs when the
■
Power Switch is turned on.
When the vacuum cleaning robot is operating, press the (
■
button to cancel the operation and select a function.
Turning the power on or off
Turning the power on
Main unit: Press the ( -
Turning the power off
Remote control: Press the - [Power] button.
Main unit: Press and hold the ( If no key is pressed for approximately 1 minute after turning the power
❈
on, the power is automatically cut to prevent the battery discharging.
To turn the power on again, press and hold the power (Start/Stop)
button on the main body.
) button.
) button down for 3 seconds.
03 OPERATING
)
Using the remote
control
Starting or stopping cleaning
Starting
Remote control : Press the Auto, Spot, Max, Manual button. Main unit : Select Auto, Spot, Max mode by using the ( and then pressing the (
When cleaning begins, the vacuum cleaning robot starts to move. Pressing the (
❈
to perform the Auto mode cleaning.
Stopping
To stop, press the ( When cleaning is stopped, the vacuum cleaning robot stops. -
) button without selecting cleaning mode starts
) button.
) remote control or main unit button.
) button
Using the main unit
buttons
operating _27
Page 28
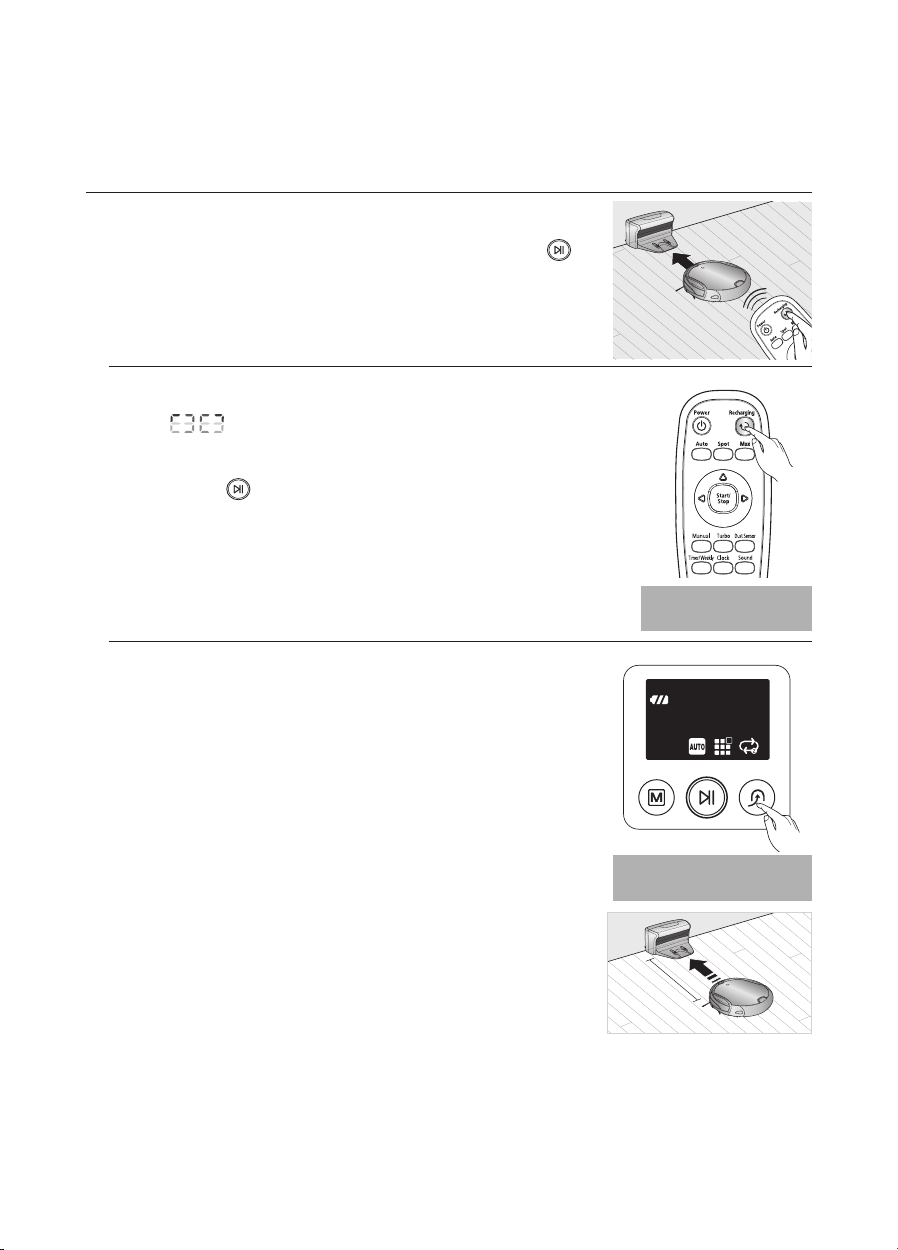
Recharging
1.5m ahead
Using the main unit
buttons
Using the remote
control
You can have the vacuum cleaning robot return to the charger
to charge the battery by using the Recharging button.
When the vacuum cleaning robot is operating, press the (
■
button to cancel the operation and press the Recharging button.
Press the Recharging button.1.
(“ cleaning robot returns to the charging station for recharging.
To stop the vacuum cleaning robot while it is returning to the charger, 2.
press the (
To test the auto charge function, press the Recharging button when 3.
the vacuum cleaning robot is less than 1.5m from the charger.
Troubleshooting when the vacuum cleaning robot does not
return to the charger
Check the installation of the charger When the charger is in a location where the charger cannot guide -
the vacuum cleaning robot to the charger.
When the charger is more than 5m away from vacuum cleaning -
robot.
: It may require a longer time for the vacuum cleaning robot to
return to the charger.
Manually charge the vacuum cleaning robot in the following cases.
■
When the charger is installed in a corner. When the battery is fully discharged. When the vacuum cleaning robot is trapped by an obstacle -
(furniture etc.)
When the vacuum cleaning robot cannot pass over the doorsill to -
the location where the charger is installed.
”) is displayed on the display panel and the vacuum
) button.
)
Using the remote
Using the main unit
1.5m ahead
control
buttons
28_ operating
Page 29

Auto Cleaning
Normal Mode
Turbo Mode
Dust Sensor Mode
Cleaning Complete
1time
The vacuum cleaning robot will move by itself and automatically
clean the house until cleaning is completed once.
If you press the Start/Stop button on the main unit or remote control
■
without selecting a cleaning mode, an automatic cleaning run starts.
If cleaning begins when the vacuum cleaning robot is docked with the
■
charger station, the time to return to the charger is decreased since the
vacuum cleaning robot remembers its original position while moving.
If the vacuum cleaning robot starts the current cleaning run at a location
■
other than the charging station and fails to locate the charging station
while cleaning, it will stop near the location where it started cleaning.
If the battery level becomes too low while cleaning, the vacuum cleaning robot will automatically
■
return to the charger station and resume cleaning after charging its battery. (Number of cleaning
operations resumed : Once)
03 OPERATING
Main unit button
Remote control
button
▶
1time
About the Resume Cleaning function
If the vacuum cleaning robot has evaluated that cleaning is •
complete, the resume cleaning function is not performed.
NOTE
If you move the vacuum cleaning robot when it is being •
charged or press a button, the vacuum cleaning robot
judges cleaning to be complete and does not resume
cleaning.
Do not move the vacuum cleaning robot when it is cleaning •
CAUTION
or press a button while it is cleaning. Otherwise, the
vacuum cleaning robot judges cleaning to be complete and
starts cleaning again from the beginning.
Each time you press the Turbo button, the Turbo icon on •
the display panel is turned on or off sequentially. When the
Turbo icon is turned on, you can start cleaning in Turbo
mode.
Each time you press the Dust Sensor button, the Dust •
Sensor icon on the display panel is turned on or off
sequentially. When the Dust Sensor icon is turned on, you
can start cleaning in Dust Sensor mode.
Confi guration
Sequence
Set the mode.1.
Cancel the mode.2.
Normal Mode
Turbo Mode
Dust Sensor Mode
Cleaning Complete
operating _29
Page 30
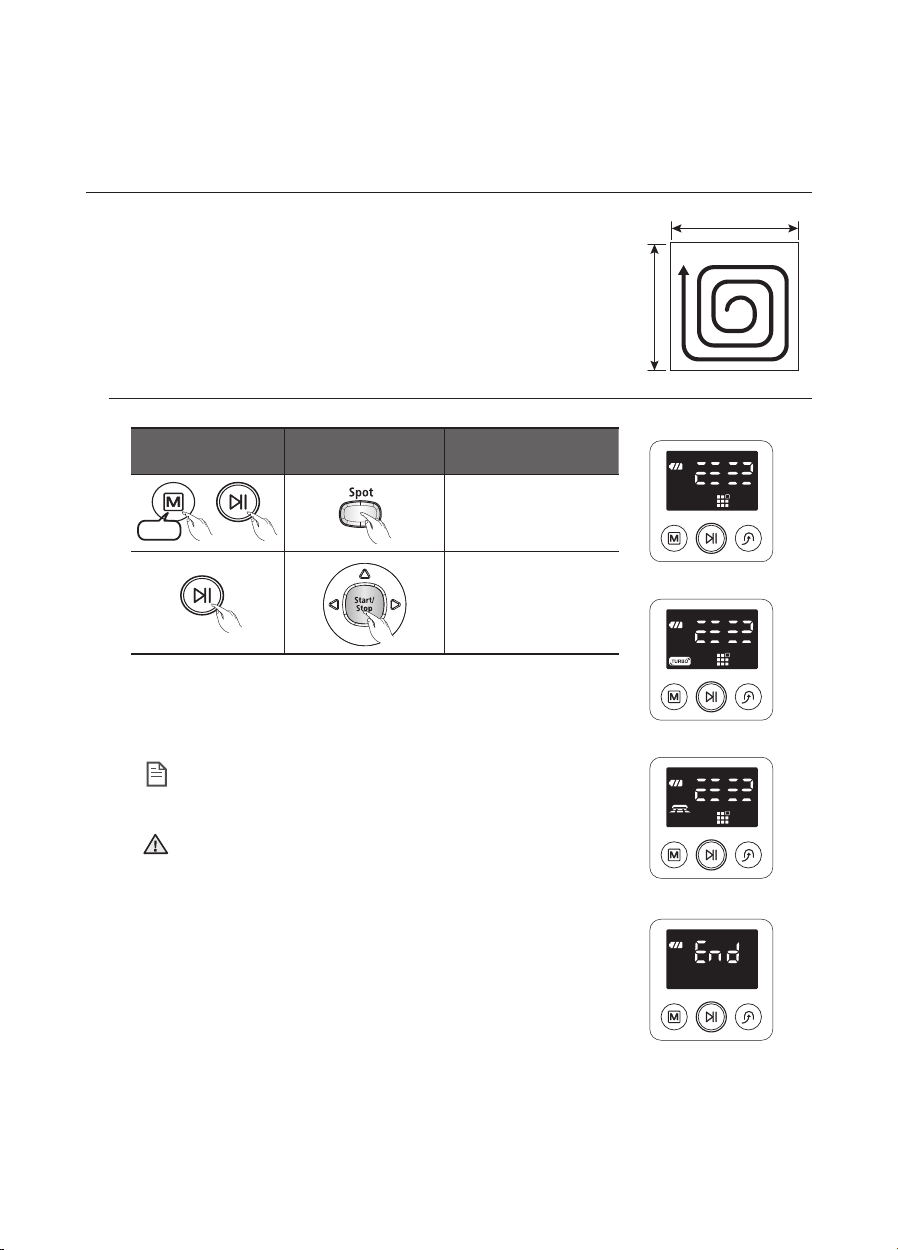
Spot Cleaning
Normal Mode
Turbo Mode
Dust Sensor Mode
Cleaning Complete
2time
About 1.5m
About 1.5m
You can conveniently clean a specifi c area that has a a lot of
cookie crumbs, dust, and etc.
Move the vacuum cleaning robot to the location where you want to
■
perform a spot clean.
About 1.5m
About 1.5m
Main unit button
Remote control
button
Confi guration
Set the mode.1.
▶
2time
Cancel the mode.2.
In Spot cleaning mode, the vacuum cleaning robot cleans an area with a length of 1.5m and a width of 1.5m.
When cleaning is completed, the vacuum cleaning robot will display End, Stop, and Stand by.
When the vacuum cleaning robot is docked with the charger
station, spot cleaning is not supported.
NOTE
Each time you press the Turbo button, the Turbo icon on •
CAUTION
the display panel is turned on or off sequentially. When the
Turbo icon is turned on, you can start cleaning in Turbo
mode.
Each time you press the Dust Sensor button, the Dust •
Sensor icon on the display panel is turned on or off
sequentially. When the Dust Sensor icon is turned on, you
can start cleaning in Dust Sensor mode.
Sequence
Normal Mode
Turbo Mode
Dust Sensor Mode
30_ operating
Cleaning Complete
Page 31

Max Cleaning
Normal Mode
Turbo Mode
Dust Sensor Mode
3time
2 times in charging mode
The vacuum cleaning robot automatically moves and cleans until
the battery runs out and the battery level fl ashes only one level.
If cleaning begins when the vacuum cleaning robot is docked with
■
the charger station, the time to return to the charger is decreased
since the vacuum cleaning robot remembers its original position while
moving.
If the vacuum cleaning robot starts the current cleaning run at
■
a location other than the charging station and fails to locate the
charging station while cleaning, it will stop near the location where it
started cleaning.
If the battery level becomes low while cleaning, the vacuum cleaning robot automatically returns
■
to the charger station and resumes cleaning after charging the battery. (Number of resumed
cleaning operations: Once)
03 OPERATING
Main unit button
Remote control
▶
3time
2 times in charging mode
About the Resume Cleaning function
If the vacuum cleaning robot judges cleaning to be •
complete, resume cleaning is not performed.
NOTE
If you move the vacuum cleaning robot while it is being •
charged or press a button, vacuum cleaning robot judges
cleaning to be complete (cleaning is not resumed).
CAUTION
Do not move the vacuum cleaning robot while it is cleaning •
or press a button while cleaning. Otherwise, the vacuum
cleaning robot judges cleaning to be complete and starts
cleaning again from the beginning.
Each time you press the Turbo button, the Turbo icon on •
the display panel is turned on or off sequentially. When the
Turbo icon is turned on, you can start cleaning in Turbo
mode.
Each time you press the Dust Sensor button, the Dust •
Sensor icon on the display panel is turned on or off
sequentially. When the Dust Sensor icon is turned on, you
can start cleaning in Dust Sensor mode.
button
Confi guration
Sequence
Set the mode.1.
Cancel the mode.2.
Normal Mode
Turbo Mode
Dust Sensor Mode
operating _31
Page 32

Manual Cleaning
Directional Buttons
(Forwards, Left, Right)
A backwards function is not
supported.
You can move the vacuum cleaning robot to clean a particular
location directly by using the remote control.
Move the vacuum cleaning robot to the location where you want to
■
perform manual cleaning.
You can manually clean using the remote control only.
■
Remote control button Confi guration Sequence
Set the mode.1.
Cancel the mode.2.
When the vacuum cleaning robot is docked with the •
NOTE
CAUTION
charger station, manual cleaning is not supported.
If there is no input for about 1 minute to switch to standby •
mode.
Each time you press the Turbo button, the Turbo icon on •
the display panel is turned on or off sequentially. When the
Turbo icon is turned on, you can start cleaning in Turbo
mode.
Each time you press the Dust Sensor button, the Dust •
Sensor icon on the display panel is turned on or off
sequentially. When the Dust Sensor icon is turned on, you
can start cleaning in Dust Sensor mode.
Directional Buttons
(Forwards, Left, Right)
A backwards function is not
supported.
32_ operating
Page 33

Timer Reservation
Blinks
Blinks
Decrease
Increase
Blinks
Blinks
Decrease
Increase
Blinks
Blinks
Decrease
Increase
Blinks
Blinks
In this mode, you can schedule the cleaner to start a once-off
cleaning run from a particular time.
A scheduled cleaning run is only performed when the cleaner is
■
docked to the charger station.
Remote Control Confi guration Sequence
Blinks
Blinks
Blinks
Blinks
Blinks
Blinks
Blinks
Blinks
Canceling the Settings
Timeout
Decrease
Decrease
Decrease
If you press the Start/Stop button while the cleaner is charging or you are setting the time, the settings are canceled.
Please take note that the settings are canceled if the cleaner is detached from the charger station.
If there is no input for 1 minute while you are setting the time, the cleaner exits Time Set mode automatically.
Increase
Increase
Increase
Press the Timer/Weekly 1.
button.
The current setting is -
displayed and blinks.
Press the Y or Z button to
set the hour.
Cleaning Mode
❈
If there is no previous reservation, the cleaning
mode is set to Auto mode. If
a reservation exists, cleaning
mode is set to the confi gured
mode.
Press the Timer/Weekly 2.
button.
The time increases/decreases by 5 minutes. Press the Y or
button to set the minutes.
Z
Press the Timer/Weekly 3.
button. Press the Y or Z
button to set the cleaning
mode.
You can select either Auto or Max cleaning mode.
Press the Timer/Weekly 4.
button.
The value you set will blink and the settings are
completed.
When the settings are completed, the confi gured
time and
are displayed.
03 OPERATING
operating _33
Page 34

Weekly Reservation
Blinks
When there is no reservation
Blinks
When there is a reservation
Decrease
Increase
Blinks
Blinks
Decrease
Increase
Blinks
Decrease
Increase
Mon
Tue
Wed
Thu
Fri
Sat
Sun
~
In this mode, you can schedule the cleaner to start a once-off
cleaning run from the specifi ed time on the specifi ed days of
the week.
A scheduled cleaning run is only performed when the cleaner is
■
docked to the charging station.
Remote Control Confi guration Sequence
Tue
Thu
Wed
Fri
Mon
Standby mode
In Standby mode, the scheduled days of the week
are displayed.
Sat
Sun
~
When there is no reservation
Blinks
When there is a reservation
Blinks
Blinks
Blinks
Blinks
Decrease
Decrease
Decrease
Increase
Increase
Increase
Hold down the Timer/Weekly 1.
button for more than 3
seconds. Press the Y or Z
buttons to set the day of the
week.
If there is no reservation set previously, the current day of
the week is displayed.
If there is no scheduled time, -
--:-- is displayed.
Press the Timer/Weekly 2.
button. Press the Y or Z
buttons to set the hour.
If there is a scheduled hour, it
❈
is displayed.
Cleaning Mode
❈
If there is no reservation set previously, the cleaning mode
is set to Auto mode. If there
is a reservation, it is set to the
confi gured mode.
Press the Timer/Weekly 3.
button.
The time increases/decreases by 5 minutes. Press the Y or
button to set the minutes.
Z
34_ operating
Page 35

Blinks
Blinks
Blinks
Decrease
Increase
Blinks
Blinks
Blinks
Blinks
Blinks
Canceling the Settings
Timeout
Remote Control Confi guration Sequence
Press the Timer/Weekly 4.
Decrease
Increase
button. Press the Y or Z
button to set the cleaning
mode.
You can select either Auto or Repeat cleaning mode.
Press the Timer/Weekly 5.
button.
The value you set blinks and the settings are completed.
After the settings are
❈
completed, the day of week
you have set blinks. At this
time you can move to step ( 2 )
and add another day of the
week.
If you press the Start/Stop button while you are making a weekly reservation, the reservation for the currently set day of
the week is canceled. Then if you press the button again, the
cleaner exits reservation setting mode.
If there is no input for 1 minute while setting the time, the cleaner exits the reservation setting mode automatically.
03 OPERATING
operating _35
Page 36

ADDITIONAL FUNCTIONS
Using additional functions
You can use the cleaning robot more easily and conveniently using various additional
functions.
You can only confi gure the additional functions with the remote control.
■
Turbo Mode
Each time you press the Turbo button, the Turbo icon on the
display panel is turned on or off sequentially.
On turbo (Turbo Mode) : The power brush rotates at
maximum speed.
Off turbo (Normal Mode) : The power brush rotates at normal
speed.
Dust Sensor Mode
Each time you press the Dust Sensor button, the Dust Sensor
icon on the display panel is turned off or on sequentially.
Dust Sensor Mode On : In Auto cleaning mode, when the
vacuum cleaner senses that dust has entered a specifi c area,
the cleaner rotates and changes direction to clean that area,
and then after cleaning that area, resumes its previous course.
In Spot, Max, Manual mode, when the vacuum cleaner senses
that dust has entered a specifi c area, the boost continues to
operate for several seconds.
Dust Sensor Mode Off : The cleaner does not sense the dust
entering and continues to drive as set in the selected cleaning
mode.
Selecting a Sound Effect
Press the Sound select button to select a sound effect.
Each time you press this button, Sound Effects
■→
selected in this sequence.
Sound Effects : - Plays sound effects.
Mute : - Plays no sound or announcements.
Mute is
36_ operating
Page 37

Front Sensor window
Camera
maintain tools and fi lters
CLEANING THE VACUUM CLEANING ROBOT
Please keep the cleaning and maintenance methods in mind
When the Power Switch is damaged, please contact the service
■
agent so that it does not cause any accidents.
Do not use any means or mechanical devices not installed by the
■
manufacturer that could accelerate the deformation of the vacuum
cleaning robot.
Always turn off the power switch at the
■
bottom of the main unit before cleaning
the vacuum cleaning robot. The vacuum
cleaning robot could operate suddenly and
cause an injury.
Cleaning the Sensor Window and the Camera
You must turn off the Power Switch at the bottom of the main
unit before cleaning the vacuum cleaning robot.
Never spray water, thinner, benzene etc. directly onto the main unit
■
of vacuum cleaning robot.
Lightly wipe the sensor window or camera
■
using a soft cloth.
04 MAINTAIN
Camera
Front Sensor window
Front Sensor Window and
Camera
Cliff Sensor Window Rear Sensor Window
maintain _37
Page 38

Cleaning the Dust Bin and the Filters
Filter
Mesh fi lter
First, empty the dust bin before cleaning it.
When separating the dust bin, take care not to spill the dust out of the
■
dust bin.
Empty the dust bin in the following cases.
■
When dust has accumulated inside the dust bin.1.
When the suction power suddenly becomes weak.2.
When the noise suddenly increases.3.
Press the Dust Bin Eject (PUSH) button and pull the dust bin to 1.
separate the dust bin.
Separate the dust bin cover by pulling it in the direction of the arrow 2.
in the fi gure.
NOTE
CAUTION
Remove the fi lter and the mesh fi lter from the dustbin.3.
Filter
Shake the dust from the fi lter, Mesh fi lter and dustbin.4.
You can clean it with water.
❈
After cleaning it with water :
Dustbin : Wipe the water off completely.1.
Filter, Mesh fi lter : Dry them completely and then 2.
reassemble them.
Reassemble the fi lter and mesh fi lter onto the dustbin.5.
Assemble the mesh fi lter while the grid side is facing downward. If the orientation is not correct, you will not be
able to assemble it.
If the dustbin is assembled without the fi lter being mounted, the error code C08 occurs.
Make sure to mount the fi lter.
Close the dust bin cover and install it into the main unit.6.
Mesh fi lter
38_ maintain
Page 39

CLEANING THE VACUUM CLEANING ROBOT
Cleaning the Power Brush
You must turn off the Power Switch at the bottom of the
main unit before cleaning the vacuum cleaning robot.
Because the dust in the dust bin may come out, separate the •
CAUTION
dust bin fi rst before cleaning the power brush.
After checking whether there are any foreign substances, press 1.
the hook that is fi xing the brush cover to separate it.
Lift the power brush up from the main unit.2.
04 MAINTAIN
Remove any foreign substances such as long hairs or strings 3.
wrapped around the power brush using a cleaning brush or a
vacuum cleaner.
maintain _39
Page 40

CAUTION
After a cleaning run, fi rst fi x the side of the power brush 4.
opposite to the Power Switch and then fi x the other side.
Insert the side into the two grooves and assemble it by 5.
slightly sliding it down until it clicks into place.
To prevent the vacuum cleaning robot from becoming clogged, be careful not to vacuum tooth •
picks or cotton swabs.
When removing foreign substances becomes diffi cult, contact a customer care center.•
Because the power brush vacuums the dust on the fl oor, long strings or hair can become •
wrapped around the brush. Check and clean the power brush regularly.
40_ maintain
Page 41

Cleaning the Edge-Cleaning Side rotating Brush
You must turn off the Power Switch at the bottom of the
main unit before cleaning the vacuum cleaning robot.
Check whether the side rotating brush is bent or whether there 1.
are any foreign substances stuck on the brush.
Wearing rubber gloves, wrap the side rotating brush with a cloth 2.
using hot water for about 10 seconds and wipe it on the cloth.
Turning the side rotating brush, repeat the procedures in Step 2.3.
04 MAINTAIN
If hair or string is wrapped between the main unit and the side 4.
rotating brush, undo the screw of the side rotating brush using
a (+) driver to remove it. When reassembling the brush, check
the “L” mark on the edge-cleaning side rotating brush and the
“L” mark on the main unit and then reassemble the side rotating
brush. (Letter “R” is carved at the right side rotating brush.)
Because the side rotating brush easily attracts hair and other foreign substances, make sure to
clean it frequently.
NOTE
Excessive foreign substances on the side rotating brush can damage the brush.
L
maintain _41
Page 42

Cleaning the Driving Wheel
You must turn off the Power Switch at the bottom of the main
unit before cleaning the robot.
If the vacuum cleaning robot suddenly starts to zigzag, there may be
■
foreign substances stuck on the driving wheel.
When cleaning the driving wheel, place a soft cloth on the fl oor and 1.
fl ip the main unit, placing it down carefully.
Check for foreign substances and remove them using a stick or a 2.
pair of blunt nippers if necessary.
42_ maintain
Page 43

troubleshooting
CHECKLIST BEFORE SVC CALLS
Symptom Checklist Measure to Take
Vacuum cleaning
robot does not
operate at all before
cleaning.
Vacuum cleaning
robot stopped
operating while
cleaning.
The suction power is
weak while cleaning.
Is the dust bin assembled?• Install the dust bin.•
Is the Power Switch turned on?• Turn on the Power Switch.•
Is cleaning mode •
panel turned on?
Is the battery level fl ashing only •
one level and is ‘Lo’ displayed in
the display panel?
Vacuum cleaning robot will not •
operate when the battery in the
remote control is depleted.
Is the battery level fl ashing only •
one level and is ‘Lo’ displayed in
the display panel?
Has the vacuum cleaning robot •
become hooked on wires on the
fl oor?
Is the vacuum cleaning robot stuck •
to the fl oor where there is a height
difference?
The driving wheel is lifted. Is there a thin towel (cloth) •
wrapped around the driving wheel?
Is the vacuum cleaning robot stuck •
on the doorsill?
Check whether the dust bin is full •
of dust.
Check whether the suction inlet is •
clogged by foreign substances.
Check whether the fi lter is clogged.• Clean the fi lter well.•
in the display
Press the •
off, press and hold the
down for 3 seconds or longer.)
Lift up the vacuum cleaning robot, •
and manually dock the vacuum
cleaning robot onto the charger to
charge it.
Replace the batteries in the remote •
control. (AAA type)
Lift up the vacuum cleaning robot, •
manually dock the robot onto the
charger to charge it.
Turn off the Power Switch and •
remove the wires.
Turn off the Power Switch and •
move the cleaning vacuum
cleaning robot to another place to
clean.
Turn off the Power Switch and •
remove the thin towel.
Turn off the Power Switch and •
move the vacuum cleaning robot
to another place to clean.
Stop the vacuum cleaning robot •
and empty the dust bin.
Turn off the Power Switch and •
remove the foreign substances on
the suction inlet.
05 TROUBLESHOOTING
button. (To turn it
button
troubleshooting _43
Page 44

Symptom Checklist Measure to Take
Vacuum cleaning
robot cannot fi nd the
charger.
Vacuum cleaning
robot passes through
the VIRTUAL GUARD.
The battery usage
time of the VIRTUAL
GUARD is too short.
The vacuum cleaning
robot suddenly
performs its cleaning
operation in the
diagonal direction.
Check whether the power plug of •
the charger is plugged correctly
into the outlet.
If there are any obstacles within a •
range of about 1m in front of the
charger and about 0.5m range to
the left and right of the charger,
you should remove the obstacles.
If there are any foreign substances •
on the change pin, wipe them off
with a dry towel.
Is the VIRTUAL GUARD installed •
near the charger?
Are the batteries of the VIRTUAL •
GUARD worn out?
Is the lamp turned off?• Check if the VIRTUAL GUARD •
Are you using manganese drycell •
batteries?
The vacuum cleaning robot may •
clean in a diagonal direction in the
following cases.
After the vacuum cleaning robot has been charged while placed at
an angle in the charger station.
When the vacuum cleaning robot moves to another area by a
shortened route after cleaning an
area.
When the angle of making contact with an obstacle is not
perpendicular (90˚).
When the fl oor is made of tiles or wood.
Move the VIRTUAL GUARD to •
another place so that the vacuum
cleaning robot can charge
automatically.
Replace the batteries.•
(2 type D (LR20) alkaline batteries)
is turned off and then turn the
VIRTUAL GUARD on.
Replace the batteries with new •
alkaline batteries.
(2 type D (LR20) alkaline batteries)
The cleaning direction is •
determined by the initial location.
Since it cleans areas by drawing a
map, it eventually covers the entire
area. (Normal operation)
Install the charging station in
the direction of the grain of the
wood, and start cleaning while the
vacuum cleaning robot is docked
with the charger station.
44_ troubleshooting
Page 45

TROUBLESHOOTING FOR ERROR CODES
ERROR CODE CAUSE SOLUTION
Vacuum cleaning robot is •
caught, stuck or trapped
while navigating.
A foreign substance (string, •
paper, toy etc.) is caught in
the power brush.
A foreign substance (string, •
paper, toy etc.) is caught in
the left driving wheel.
A foreign substance (string, •
paper, toy etc.) is caught in
the right driving wheel.
Check the Bumper sensor.• Turn off the at the bottom, and then remove •
A foreign substance (dust, •
stain etc.) is on the Obstacle
sensor window.
A foreign substance (Dust, •
stain etc.) is on the Cliff sensor
window.
Dust bin not inserted.• Insert the dust bin until you hear a “Click” •
A foreign substance (String, •
cloth etc.) is caught on the
edge-cleaning side rotating
brush.
Turn off the Power Switch at the bottom and •
move the vacuum cleaning robot to a different
location.
Turn off the Power Switch at the bottom and •
remove the foreign substance from the power
brush.
Turn off the Power Switch at the bottom and •
remove the foreign substance from the left
driving wheel.
Turn off the Power Switch at the bottom and •
remove the foreign substance from the right
driving wheel.
the obstacle from the front of the vacuum
cleaning robot or move it to a different location.
Turn off the Power Switch at the bottom and •
wipe the foreign substance from the front and
rear sensor windows using a soft cloth.
Turn off the Power Switch at the bottom and •
wipe the foreign substance on the cilff sensor
window with a soft cloth.
sound.
Turn off the Power Switch at the bottom and •
wipe the foreign substance from the edgecleaning side rotating brush.
05 TROUBLESHOOTING
If you press the Start/Stop button or turn off the Power Switch, the error code is cleared.
❈
troubleshooting _45
Page 46

80 mm (Height)
350 mm (Length)
350 mm (Width)
275 mm (Width)
161 mm (Length)
122 mm (Height)
product specifi cation
80 mm (Height)
122 mm (Height)
350 mm (Length)
350 mm (Width)
Main Body Charger(Station)
Classifi cation Item SR8950* SERIES
Diameter 350mm
Mechanical
Specifi cations
Height 80mm
Weight 3.2kg
Power voltage AC220-240V~, 50-60Hz
161 mm (Length)
275 mm (Width)
Electrical
Specifi cations
Charge power consumption 40 W
Main unit power consumption 40 W
Battery specifi cations 14.4V / 31.68Wh
Charging type Auto Charging/Manual Charging
Cleaning
Specifi cations
Cleaning mode Auto, Spot, Max, Manual, Timer, Weekly
Charging time About 180 minutes
Cleaning time
(on the basis of hard fl oor)
Cleaning method Ceiling shape recognition
Main unit button type Touch type
This Vacuum cleaner is approved the following.
Electromagnetic Compatibility Directive : 2004/108/EEC
Low Voltage Directive : 2006/95/EC
46_ product specifi cation
About 100 minutes
Page 47

OPEN SOURCE ANNOUNCEMENT
Some software components of this product incorporate source code covered under the BSD.
And this software is based in part on the work of the Independent JPEG Group.
OpenCV :
■
IMPORTANT : READ BEFORE DOWNLOADING, COPYING, INSTALLING OR USING.
By downloading, copying, installing or using the software you agree to this license.
If you do not agree to this license, do not download, install, copy or use the software.
License Agreement
For Open Source Computer Vision Library
Copyright (C) 2000-2008, Intel Corporation, all rights reserved.
Copyright (C) 2008-2010, Willow Garage Inc., all rights reserved.
Third party copyrights are property of their respective owners.
Redistribution and use in source and binary forms, with or without modifi cation, are permitted provided
that the following conditions are met:
Redistribution’s of source code must retain the above copyright notice, this list of conditions and the
following disclaimer.
Redistribution’s in binary form must reproduce the above copyright notice, this list of conditions and the
following disclaimer in the documentation and/or other materials provided with the distribution.
The name of the copyright holders may not be used to endorse or promote products derived from this
software without specifi c prior written permission.
This software is provided by the copyright holders and contributors “as is” and any express or implied
warranties, including, but not limited to, the implied warranties of merchantability and fitness for a
particular purpose are disclaimed.
In no event shall the Intel Corporation or contributors be liable for any direct, indirect, incidental, special,
exemplary, or consequential damages (including, but not limited to, procurement of substitute goods
or services; loss of use, data, or profi ts; or business interruption) however caused and on any theory of
liability, whether in contract, strict liability, or tort (including negligence or otherwise) arising in any way out
of the use of this software, even if advised of the possibility of such damage.
Copyright (c) 2006, 2008, 2009, 2010 Edward Rosten
■
All rights reserved.
Redistribution and use in source and binary forms, with or without modifi cation, are permitted provided
that the following conditions are met:
Redistributions of source code must retain the above copyright notice, this list of conditions and the
following disclaimer.
Redistributions in binary form must reproduce the above copyright notice, this list of conditions and the
following disclaimer in the documentation and/or other materials provided with the distribution.
Neither the name of the University of Cambridge nor the names of its contributors may be used to
endorse or promote products derived from this software without specifi c prior written permission.
THIS SOFTWARE IS PROVIDED BY THE COPYRIGHT HOLDERS AND CONTRIBUTORS “AS
IS” AND ANY EXPRESS OR IMPLIED WARRANTIES, INCLUDING, BUT NOT LIMITED TO, THE
IMPLIED WARRANTIES OF MERCHANTABILITY AND FITNESS FOR A PARTICULAR PURPOSE ARE
DISCLAIMED. IN NO EVENT SHALL THE COPYRIGHT OWNER OR CONTRIBUTORS BE LIABLE FOR
ANY DIRECT, INDIRECT, INCIDENTAL, SPECIAL, EXEMPLARY, OR CONSEQUENTIAL DAMAGES
(INCLUDING, BUT NOT LIMITED TO, PROCUREMENT OF SUBSTITUTE GOODS OR SERVICES;
LOSS OF USE, DATA, OR PROFITS; OR BUSINESS INTERRUPTION) HOWEVER CAUSED AND ON
ANY THEORY OF LIABILITY, WHETHER IN CONTRACT, STRICT LIABILITY, OR TORT (INCLUDING
NEGLIGENCE OR OTHERWISE) ARISING IN ANY WAY OUT OF THE USE OF THIS SOFTWARE, EVEN
IF ADVISED OF THE POSSIBILITY OF SUCH DAMAGE.
Page 48

Page 49

SR8950
Självgående dammsugare
bruksanvisning
Bruksanvisningen är tillverkad av återvunnet papper till 100%.
Läs igenom anvisningarna noggrant innan du använder den här enheten.
✻
Endast för inomhusbruk.
✻
imagine the possibilities
Tack för att du köpt en Samsung-produkt.
Vinn när du registrerar din produkt på
www.samsung.com/register
Svenska
Page 50

säkerhetsinformation
SÄKERHETSINFORMATION
VARNING
VARNING
Innan du använder enheten ska du läsa igenom bruksanvisningen noggrant och spara den för •
framtida referens.
Eftersom de här anvisningarna täcker fl era olika modeller kan egenskaperna hos din •
dammsugare variera något från de som beskrivs i den här bruksanvisningen.
VIKTIGT/VARNINGSSYMBOLER SOM ANVÄNDS
VARNING
VAR ÖRSIKTIG
Anger att det fi nns risk för dödsfall eller allvarlig skada.
Indikerar att det fi nns risk för personskada eller materiella skador.
ÖVRIGA SYMBOLER SOM ANVÄNDS
OBS
Indikerar att det fi nns risk för personskada eller materiella skador.
02_ säkerhetsinformation
Page 51

VIKTIGA SÄKERHETSFÖRESKRIFTER
När du använder en elektrisk apparat ska du beakta grundläggande säkerhetsföreskrifter, inklusive
följande:
LÄS ALLA INSTRUKTIONER INNAN DU ANVÄNDER DIN ROBOT
DAMMSUGARE
Koppla ur uttaget när det inte används och innan du utför underhåll.
VARNING: så här minskar du risken för brand, elektrisk kortslutning och skada:
GENERELLT
Används bara enligt beskrivningen i den här bruksanvisningen.•
Använd inte robotdammsugaren eller laddaren om den har skadats på något sätt.•
Om robotdammsugaren inte fungerar som den ska, har tappats, skadats, lämnats utomhus eller •
tappats i vatten ska du lämna in den till ett kundcenter.
Ta inte i laddaren eller robotdammsugaren med våta händer.•
Använd den bara på torra ytor inomhus.•
Den här enheten är inte avsedd att användas av några personer (inklusive barn) med nedsatt •
fysisk, psykisk eller mental förmåga, eller avsaknad av erfarenhet och kunskap, om personen
eller personerna inte har någon som övervakar och instruerar angående enhetsanvändningen av
en person som ansvarar för deras säkerhet.
Se till att barn inte leker med apparaten.•
BATTERILADDARE
Modifi era inte den polariserade kontakten för att passa ett uttag utan polarisering eller •
förlängningssladd.
Används inte utom hus eller på våta ytor.•
Koppla bort laddaren från uttaget när den inte används och före service.•
Använd bara laddaren som medföljer tillverkaren för att ladda.•
Använd inte med en skadad sladd eller kontakt.•
Dra inte i eller bär sladden och använd den inte som handtag, stäng ingen dörr mot sladden •
och dra den inte runt skarpa kanter eller hörn. Håll sladden på avstånd från heta ytor.
Använd inte förlängningssladdar eller uttag med inadekvat, aktuell bärförmåga.•
Koppla inte loss sladden genom att dra i sladden. Dra i kontakten och inte i sladden för att dra •
ur den.
Skada inte och utsätt inte batterierna för extrema temperaturer, eftersom de då kan explodera.•
Försök inte öppna laddaren. Reparationer ska bara utföras av ett kvalifi cerat kundcenter.•
Utsätt inte laddaren för höga temperaturer eller fukt av något slag.•
säkerhetsinformation _03
Page 52

säkerhetsinformation
ROBOTDAMMSUGARE
Plocka upp hårda eller vassa föremål som glas, spikar, skruvar, mynt osv. •
Använd inte utan fi lter på plats Vid servicearbeten på enheten, sätt aldrig i fi ngrarna eller andra •
föremål i fl äkten på enheten i fall den oavsiktligt slås på.
Placera inga föremål i öppningarna Får inte användas med några blockerade öppningar, hålla •
öppningarna fria från damm, ludd, hår och allt som kan minska luftfl ödet.
Pocka inte upp giftiga ämnen (blekmedel, ammoniak, Avloppsrens etc.).•
Plocka inte upp någonting som brinner eller ryker, t.ex. cigaretter, tändstickor eller het aska.•
Använd den inte för att plocka upp lättantändliga eller brännbara vätskor som bensin, inte heller •
användning på ytor där de kan förekomma.
Använd inte robotdammsugaren i ett stängt utrymme fyllt med ångor som avges från •
oljebaserad färg, thinner, mal ämnen, brandfarligt damm eller andra explosiva eller giftiga ångor.
Läckage från battericeller kan inträffa under extrem användning eller temperaturförhållanden. •
Om vätskan kommer i kontakt med huden, tvätta snabbt med vatten. Om vätskan kommer in i
ögonen, skölj dem omedelbart med rent vatten i minst 10 minuter. Uppsök läkare.
04_ säkerhetsinformation
Page 53

innehåll
SÄKERHETSINFORMATION
02
PRODUKTFUNKTIONER
13
MONTERING AV DAMMSUGAREN
15
ANVÄNDA
ROBOTDAMMSUGAREN
20
06 Strömrelaterad
07 Före användning
10 Under användning
11 Rengöring och underhåll
15 Komponenter
16 Namn på varje del
20 Installerar robotdammsugaren
20 Installationsordning
20 Slå på eller av strömbrytaren
21 Installera laddaren
22 Laddar
23 Om batteriet
24 Ställa in tiden
25 Installera VIRTUAL GUARD
27 Använda robotdammsugaren
27 Start/Stoppa dammsugning
28 Laddning
29 Automatisk dammsugning
30 Punktdammsugning
31 Maxdamsugning
32 Manuell dammsugning
33 Timer-reservation
34 Reservation veckovis
36 Tilläggsfunktioner
36 Använda tilläggsfunktioner
UNDERHÅLLA VERKTYG OCH
FILTER.
37
FELSÖKNING
43
PRODUKTSPECIFIKATION
46
37 Rengöring av robotdammsugaren.
37 Kom ihåg rengörings och underhållsmetoderna
37 Rengör sensorfönstret och kameran
38 Rengöra dammbehållaren och fi ltret
39 Rengöring av robotdammsugaren.
39 Rengöring av borsten
41 Rengöring av den roterande sidoborsten för
kantrengöring.
42 Rengöring av drivhjulet
43 Checklista före SVC samtal
45 Felkoder vid felsökning.
innehåll _05
Page 54

säkerhetsinformation
STRÖMRELATERAD
VARNING
VARNING
VARNING
VARNING
Böj inte strömsladden eller placera tunga föremål på den,
eftersom den kan gå sönder.
Detta kan resultera i brand eller elektrisk kortslutning. -
Se till att avlägsna damm och vatten från strömkontakten.
Om du inte gör det kan det resultera i felfunktion eller elektrisk kortslutning.
Dra inte i strömsladden eller ta i kontakten med våta händer.
Detta kan resultera i brand eller elektrisk kortslutning. -
Använd inte fl era kontakter i ett enda uttag.
(Låt inte sladden ligga exponerad på golvet).
Detta kan resultera i brand eller elektrisk kortslutning. -
VARNING
06_ säkerhetsinformation
Använd inte en skadad strömsladd, eller ett vägguttag som
sitter löst.
Detta kan resultera i brand eller elektrisk kortslutning. -
Page 55

FÖRE ANVÄNDNING
VAR ÖRSIKTIG
VAR ÖRSIKTIG
VAR ÖRSIKTIG
VAR ÖRSIKTIG
VAR ÖRSIKTIG
Innan du startar robotdammsugaren ska du kontrollera att
dammbehållaren är monterad.
Om dammbehållaren inte är införd kommer robotdammsugaren inte att fungera.
Använd aldrig robotdammsugaren på platser med antändbara
material, såsom:
Platser med stearinljus eller bordslampor på golvet. Platser med obevakade eldar (eldstad etc). Platser med bensin, destillerad alkohol, thinner, askfat med -
brinnande cigaretter etc.
Robotdammsugaren är endast för hemmabruk. Använd den inte på följande platser.
På vind, i källare, lagerlokaler, industribyggnader, separerade rum som inte är i kontakt med huvudbyggnaden, platser med exponering för våta eller fuktiga förhållanden, såsom
badrum eller tvättrum och trånga, högt belägna platser, såsom bord eller hyllor. Kritiska
skador (onormal användning och brott) kan inträffa vid användning på dessa platser.
Öppna alla dörrar för att rengöra alla rum.
När en dörr är stängd kan inte robotdammsugaren komma in i rummet. Kontrollera dock att dörrarna stängs till huvudentrén, verandan eller badrummet och andra -
rum där robotdammsugaren kan falla ned på ett lägre golv.
Använd inte rengöringsmedel på ett svart golv.
Det är möjligt att robotdammsugaren inte fungerar normalt i detta tillfälle.
01 SÄKERHETSINFORMATION
VAR ÖRSIKTIG
VAR ÖRSIKTIG
För mattor med långa fransar, vik in fransarna under mattan.
Oinvikta fransar kan resultera i kritisk skada på mattan och själva maskinen, eftersom de kan fastna i drivhjulet eller borsten.
Om fallsensorn blir smutsig kan robotdammsugaren falla ned
för trappan.
Detta kan orsaka personskada och kritisk skada på produkten.
För att förhindra sådana risker ska du installera VIRTUAL
GUARD (Fence Mode-inställning) framför farliga områden.
Rengör sensorfönstret och kameran för att inte få en felaktig
ordning.
säkerhetsinformation _07
Page 56

VAR ÖRSIKTIG
Avlägsna små och ömtåliga föremål från området som ska
dammsugas.
Se till att avlägsna alla föremål före rengöring. Se till att avlägsna ömtåliga föremål, såsom porslin, glas, -
blomkrukor etc.
Robotdammsugaren identifi erar inga mynt, ringar eller andra -
värdefulla föremål, såsom smycken.
VAR ÖRSIKTIG
VAR ÖRSIKTIG
VAR ÖRSIKTIG
VAR ÖRSIKTIG
Avlägsna föremål som ligger spridda på golvet före rengöring.
Robotdammsugaren är utformad för att upptäcka hinder 5 cm från sig.
Badhanddukar, skydd framför badkar och vask, entréer, förrådsrum, strömsladdar, bordsdukar och bälten kan trassla in sig i drivhjulet
eller borsten. Detta kan göra att föremål faller från bordet.
Informera alla familjemedlemmar (eller relevanta parter) för att
de ska vara försiktiga före rengöring och när de använder det
schemalagda dammsugningsläget.
Robotdammsugaren kan köra på barn och orsaka att de faller. -
Kontrollera att barn inte sätter sig på eller kliver på
robotdammsugaren.
Barn kan falla och skada sig själva eller så kan det inträffa kritisk skada på produkten.
När ett barn eller husdjur lämnas ensamt ska du se till att
stänga av strömbrytaren på robotdammsugaren.
Robotdammsugaren kan locka till sig deras uppmärksamhet. Om det roterande hjulet eller borsten får tag i ett fi nger, en fot, -
kläder eller hår så kan det orsaka skador.
Om ett barn eller husdjur är i vägen för robotdammsugaren så kan -
det identifi eras som ett hinder och området kanske inte blir rent.
När strömbrytaren slås av kapar den strömtillförseln och -
avaktiverar alla funktioner.
VAR ÖRSIKTIG
exponerad på golvet.
När robotdammsugaren automatiskt laddas eller passerar laddstationen kan den dra med sig strömsladden.
Förvara alltid strömsladden till laddaren inkopplad i uttaget.
Vid installation av laddstationen ska strömsladden inte lämnas
VAR ÖRSIKTIG
Trots att robotdammsugaren har en självladdningsfunktion kan den inte laddas automatiskt om strömsladden till laddstationen
kopplas ur.
08_ säkerhetsinformation
Page 57

VAR ÖRSIKTIG
Ca. 0,5m
Ca. 0,5m
Ca. 1m
Ca. 0,5m
Ca. 0,5m
Ca. 1m
Installera laddaren på en plats där den är lätt att komma åt för
robotdammsugaren.
Om laddaren installeras i ett hörn kan det orsaka extra rörelser och störa den automatiska laddningsprocessen.
01 SÄKERHETSINFORMATION
VAR ÖRSIKTIG
VARNING
VARNING
VARNING
VARNING
Föremål framför laddaren förhindrar att robotdammsugaren
automatiskt laddar sig själv.
Rengör området. -
Det ska vara fritt från hinder 0,5m åt vänster och höger och 1m
framtill.
Kortslut inte laddningsstiften med metallföremål, såsom
ätpinnar, skruvmejslar etc.
Detta resulterar i kritisk skada för laddaren. -
Se till att det inte fi nns några spår av vätskor på laddstationen.
Om du inte gör det kan det resultera i brand eller elektrisk kortslutning.
Se till att robotdammsugaren inte dammsuger eller förfl yttar
sig över vätskor, såsom vatten, olja och husdjursurin.
Detta kan resultera i kritisk skada för produkten. Vätskor kan sprida sig genom hjulen, vilket resulterar i -
kontamination.
Ca. 0,5m
Ca. 0,5m
Ca. 1m
Ca. 0,5m
Ca. 1m
Ca. 0,5m
VARNING
VARNING
Använd inte laddaren i andra syften.
Detta kan resultera i kritisk skada på laddaren eller orsaka brand. -
Installera inte laddstationen på ett mörkt golv.
Om golvet där laddstationen är installerat är mörkt är det svårt för robotdammsugaren att återvända dit.
säkerhetsinformation _09
Page 58

UNDER ANVÄNDNING
VAR ÖRSIKTIG
VAR ÖRSIKTIG
VAR ÖRSIKTIG
VAR ÖRSIKTIG
VAR ÖRSIKTIG
Du kan inte använda robotdammsugaren på tjocka mattor.
Detta kan resultera i problem med robotdammsugaren. Detta kan resultera i skada på mattorna. -
Använd inte robotdammsugaren på ett bord eller andra höga
platser.
Detta kan resultera i skada om enheten oavsiktligt faller. -
Robotdammsugaren kan stöta emot möbler, såsom stolsben,
bordsben, tunna och långa möbler etc under användningen.
För snabbare och renare resultat, placera stolarna ovanpå bordet. -
Placera inga andra föremål ovanpå robotdammsugaren.
Det kan resultera i felfunktion. -
Avlägsna omedelbart stora bitar av pappers- och plastpåsar
från maskinen under rengöringen.
Om du använder maskinen under en längre tidsperiod med inloppshålen blockerade kan det orsaka allvarlig skada på
produkten.
VARNING
robotdammsugaren ska du omedelbart stänga av den och
kontakta kundcenter.
10_ säkerhetsinformation
Om det hörs ett onormalt ljud, eller rök kommer ut ur
Page 59

VAR ÖRSIKTIG
Fallsensor
Hinderssensor
dammbehållaren.
Detta kan leda till att dammbehållaren lossnar, vilket kan leder till personskador eller allvarliga skador på produkten.
Robotdammsugaren kanske inte kan fortsätta användas om
Flytta inte robotdammsugaren genom att hålla i
den sitter fast på hall- eller verandatröskeln.
OBS
För att återuppta användningen slår du av och på strömbrytaren igen efter att du har fl yttat den till en plats där den kan fortsätta
rengöringen.
Robotdammsugaren kan inte helt rengöra alla platser där den
inte kommer åt, såsom hörn och utrymmen mellan soffor och
OBS
väggar.
Rengör sådana områden med jämna mellanrum. -
Dammtussar kan fi nnas kvar efter dammsugningen, när robotdammsugaren
misslyckas med att att plocka upp dammtussarna som bildades vid rengöring.
OBS
Vid dessa tillfällen tar du upp dammet med ett annat rengöring verktyg. -
RENGÖRING OCH UNDERHÅLL
01 SÄKERHETSINFORMATION
VAR ÖRSIKTIG
VAR ÖRSIKTIG
VARNING
Vid rengöring av produkten ska du inte spraya vatten direkt
på exteriören eller torka den med ett fl yktigt material, såsom
bensen, thinner och alkohol.
Detta kan resultera i kritisk skada för produkten. -
Enheten får inte demonteras eller rekonstrueras av någon
annan än en kvalifi cerad servicetekniker.
Detta kan resultera i kritisk skada på produkten. -
Avlägsna regelbundet alla främmande föremål som kan samlas
och hindra sensorerna.
Smuts som samlas i sensorerna resulterar i felaktig funktion för sensorerna.
Fallsensor
Hinderssensor
säkerhetsinformation _11
Page 60

VARNING
Sidoborste för kanter
Effektborste
VARNING
När du avlägsnar främmande föremål ska du alltid använda
rengöringsborsten efter att du har slagit av strömbrytaren.
Om du inte gör det kan det orsaka plötslig start av enheten och orsaka personskada eller kritisk skada på produkten.
Om strömsladden skadas skall kan den ersättas av en
kvalifi cerad servicetekniker från servicecentret.
Om du inte gör det kan det resultera i brand eller elektrisk kortslutning.
Sidoborste för kanter
Effektborste
VARNING
VARNING
Innan du rengör laddaren ska du se till att koppla ur
strömsladden av säkerhetsskäl.
Kontakta servicecentret för Samsung Electronics för att byta
batteriet.
Om du inte använder originalbatterier leder det till produktfel. -
12_ säkerhetsinformation
Page 61

1
Ca. 1,5m
Ca. 1,5m
2
3
4
5
6
7
Mån
Tis
Ons
Tors
Fr
e
Lör
Sön
~
8
produktfunktioner
BEKVÄM VIRTUAL GUARD-FUNKTION (VIRTUELL DÖRR)
Du kan begränsa robotdammsugningen till en viss del med hjälp av Fence-läget (virtuell vägg).
Vad är takformsidentifi ering (Visionary •
mapping plus™)?
Den här funktionen identifi erar formen på taket
med kameran överst för att undersöka det område
som ska rengöras och fastställer bästa sätt att
passera över och rengöra varje del av golvet.
FINRENGÖRING AV VARJE HÖRN.
Eftersom Robotdammsugaren rengör golvet sekventiellt ( ) längs med kartan som fastställs av
takformens identifi eringsfunktion, så rengörs varje hörn av golvet.
OLIKA STÄDNINGSLÄGEN
Olika Städningslägen fi nns tillgängliga för att tillgodose alla dina behov.
Ca. 1,5m
1
2
Ca. 1,5m
3
4
5
6
7
8
Tis
Ons
Mån
Tors
Lör
~
Fre
Sön
Autoläge :1. Rengör alla rum automatiskt.
Punktläge : 2. Rengör ett visst område intensivt. Det kan användas för att avlägsna bröd- eller
kaksmulor.
Maxläge : 3. Körs tills batteriet är nästan helt tömt.
Manuellt läge: 4. Du kan rengöra golvet manuellt genom att föra robotdammsugaren med en
fjärrkontroll.
Turboläge :5. Eftersom borsten roterar med maximal hastighet i det här läget rengör produkten
underlaget effektivare. (Du kan växla läge med fjärrkontrollen.)
Dammsensorläge:6. När damm kommer in i dammsugaren, börjar robotdammsugaren att
rengöra sin omgivning intensivt. (Du kan styra med fjärrkontrollen.)
Timer-läge:7. Vid den angivna tidpunkten rengör robotdammsugaren golvet.
Läge för veckoplanering:8. En schemalagd rengöring startar på den inställda tiden på en viss
dag i veckan.
produktfunktioner _13
Page 62

AUTOLADDNING
Ca. 1cm
Trapptyp:
Vertikal typ
stopp
När batteriet har låg nivå går robotdammsugaren automatiskt till
stationen för att utföra en snabb autoladdning.
ROTERANDE BORSTE FÖR SIDRENGÖRING
Den roterande borsten för sidrengöring avlägsnar damm från
kanterna.
TRÖSKELPASSAGE
Robotdammsugaren har ett innovativt drivningssystem som
gör det möjligt för den att ta sig över trösklar med en höjd
på omkring 1cm och rengöra alla rum. Robotdammsugaren
kanske inte kan passera en dörrtröskel på 1cm beroende på
dörrtröskelns form.
Trapptyp:
Ca. 1cm
Vertikal typ
UNDVIKA HINDER
När robotdammsugaren stöter på ett hinder vid rengöring,
kan hindrsensorn tillåta dammsugaren att undvika detta och
fortsätta rengöringen. (Det kan hända att dammsugaren berör
tunna eller fi na hinder.)
ANTI-FALL
SÄKERHETSENHET
stopp
14_ produktfunktioner
De 3 fallsensorerna identifi erar nedåtgående trappsteg och
dörrtrösklar för att förhindra att robotdammsugaren faller nedför
trappor.
När den självgående dammsugaren lyfts upp under rengöringen
stoppas automatiskt drivhjulen,
borsten, insugsmotorn och den roterande sidborsten av
sensorn.
Page 63

(AAA-batterier)
montering av dammsugaren
KOMPONENTER
Huvudenhet
■
Fjärrkontroll
■
Laddare (Station)
■
02 MONTERING
Andra komponenter
■
(AAA-batterier)
Användarmanual /
(2) Batteri
VIRTUAL GUARD Extra fi lter Rengöringsborste Snabbstartsguide
montering _15
Page 64

NAMN PÅ VARJE DEL
Virtual Guard- sensor
Dammbehållaren
utmatningsknapp.
Kamera
Hinderssensor
Dammbehållaren
utmatningsknapp.
Dammbehållare
Drivhjul
Strömbrytare
Effektborste
Effektborstlucka
Batterilucka
Drivhjul
Fjärrkontrollsensor
Hinderssensor
Stötfångarsensor
Fjärrkontrollsensor
Roterande sidoborste
Fallsensor
Laddningsstift
Rulle
Fallsensor
Laddningsstift
Fallsensor
Displaypanel
Huvudenhet
■
Displaypanel
Virtual Guard- sensor
Fjärrkontrollsensor
Hinderssensor
Stötfångarsensor
Fjärrkontrollsensor
Framsida
Dammbehållaren
utmatningsknapp.
Kamera
Hinderssensor
Dammbehållaren
utmatningsknapp.
Dammbehållare
Roterande sidoborste
16_ montering
Fallsensor
Laddningsstift
Rulle
Fallsensor
Laddningsstift
Fallsensor
Sidan
Undersida
Drivhjul
Strömbrytare
Effektborste
Effektborstlucka
Batterilucka
Drivhjul
Page 65

Distansidentifi eringssensor
Lägeslampa
Läge/strömknapp
Identifi eringssensor för
huvudenhet
1
2
3
Laddare (Station)
Strömlampa
(röd)
Sladdvinda
Laddningslampa (grön)
Laddningsterminaler
■
Laddningslampa (grön)
Strömlampa
(röd)
Sladdvinda
Laddningsterminaler
Framsida Baksida
VIRTUAL GUARD
■
Läge/strömknapp
Lägeslampa
Distansidentifi eringssensor
Installera batterierna
■
Batterierna medföljer inte produkten. Du måste köpa batterierna separat. Installera alkaliska
batterier (typ D) före användning.
1
2
Identifi eringssensor för
huvudenhet
3
02 MONTERING
Lyft i luckan på VIRTUAL
GUARD samtidigt som du
trycker på låsfl iken.
Installera batterierna i
VIRTUAL GUARD så som
visas på bilden nedan. (Om
batterierna är installerade
med felaktig polaritet
fungerar inte VIRTUAL
GUARD).
Specifi kation: Alkaliska batterier, typ D (LR20)
❈
Efter att du har fört in toppen
på luckan trycker du in den
andra änden tills den klickar
på plats.
montering _17
Page 66

Fjärrkontroll
1
2
3
Ström
Laddning
Max
Spot (punkt)
Start/Stopp
Dammsensor
Ljud
Klocka
Timer/veckovis
Auto
Riktnings-
knappar
(kan ej röra sig bakåt)
Manuell
Turbo
■
Ström
Auto
Riktnings-
knappar
(kan ej röra sig bakåt)
Manuell
Turbo
Installera batterierna i fjärrkontrollen
■
Batterierna är inte installerade i fjärrkontrollen när produkten inhandlas.
Installera batterier (typ AAA) före användning.
1
2
Timer/veckovis
Laddning
Max
Spot (punkt)
Start/Stopp
Dammsensor
Ljud
Klocka
3
Lyft i batteriluckan på
fjärrkontrollens baksida
samtidigt som du trycker på
låsfl iken.
18_ montering
Installera batterierna i
fjärrkontrollen så som visas
på bilden nedan. (Om
batterierna är installerade
med felaktig polaritet
fungerar inte fjärrkontrollen).
Efter att du har fört in toppen
på luckan trycker du in den
andra änden tills den klickar
på plats.
Specifi kation: AAA-batterier
❈
Page 67

Displaypanel
2
1
7
3
4
5
6
8
9
10
AABBC
■
2
3
4
5
6
C
1
7
02 MONTERING
DISPLAY DEL
Sifferskärm1.
Visar timer-display, förloppsstatus och felkoder med siffror, bokstäver och bilder. -
Reservation veckovis2.
När du ställer in reservation veckovis för att börja rengöra från den angivna tidpunkten på angiven dag i veckan, är ikonen för den valda veckodagen påslagen.
Batterinivåindikator3.
Laddar: Visar laddningsprocessen i 3 steg. Under användning: Visar batterinivån. Batterinivån minskas med varje nivå (markering) från FULL -
under användningen. (När batteriet är helt urladdat blinkar skärmen med meddelandet “Lo”).
Timer4.
När dammsugning är inplanerad lyser Timer-ikonen. -
Dammsensorläge5.
Den här ikonen tänds när Dammsensorläget har valts. -
Turboläge6.
Den här ikonen tänds när Turboläget har valts. -
Skärm för dammsugningsläge7.
Varje gång dammsugarknappen trycks in så visas överensstämmande dammsugningsläge. -
Autoläge :(A) Den här ikonen tänds när auto-rengöringsläget har valts.
Punktläge : (B) Den här ikonen tänds när punktrengöringsläget har valts.
Maxläge : (C) Den här ikonen tänds när maxrengöringsläget har valts.
KNAPP BESKRIVNING
Dammsugningsläge8.
Tryck för att välja ett dammsugningsläge. Efter att du har valt ett dammsugningsläge trycker du på knappen (
Start/Stopp9.
Tryck för att starta/stoppa dammsugningen. -
Laddning10.
När denna knapp trycks in, kommer robotdammsugaren att återvända till laddstationen för att ladda batteriet.
) för att starta dammsugningen.
8
9
10
montering _19
Page 68

använda robotdammsugaren
INSTALLERAR ROBOTDAMMSUGAREN
Installationsordning
Slå på eller av strömbrytaren1.
För att använda robotdammsugaren, måste du slå på strömbrytaren på
undersidan på enheten.
Installera laddaren2.
För att ladda robotdammsugaren måste du först installerar laddaren.
Eftersom batteriet inte är laddade när produkten köpts måste du ladda
det fullt före användning.
Ladda batteriet3.
Du bör ladda batteriet fullständigt före användning av
robotdammsugaren.
Ställa in tiden4.
Du bör ställa in tiden för att använda schemalagd och daglig dammsugning.
Installera VIRTUAL GUARD5.
Du kan begränsa robotdammsugningen till en viss del med hjälp av Hinder-läget (virtuell vägg).
Slå på eller av strömbrytaren
För att använda robotdammsugaren måste du slå på strömbrytaren.
Om du stänger av Nödstoppskontakten, återställs alla inställningar
utom aktuell tid och reservationer veckovis.
Om ingen knapp trycks in på omkring 1 minuter efter att du har
❈
slagit på strömmen så stängs strömmen automatiskt av för att
förhindra att batteriet laddas ur.
För att slå på strömmen igen, tryck och håll ner strömbrytaren
(Start/Stop) på huvudenheten.
Lyft enheten och slå på strömbrytaren, kontrollera 1.
samtidigt att inte trycka på någon annan knapp.
Om ikonerna inte slås på indikerar det att batteriet har laddats ur. I det här fallet ska du docka robotdammsugaren till laddstationen
efter att du har slagit på strömbrytaren.
Den konfi gurerade tiden kan skilja sig från den aktuella tiden. Om den konfi gurerad tiden är fel, ställa då in tiden till aktuell tid.
VAR ÖRSIKTIG
20_ funktion
Om strömbrytaren är avstängd, kommer robotdammsugaren inte
att laddas även om den är dockad med laddaren stationen.
Page 69

Installera laddaren
Ca. 1m
Ca. 0,5m
Ca. 0,5m
Strömlampa
Laddningslampa
Strömlampa
Installera laddaren på en plan yta.1.
Det ska vara fritt från hinder 0,5m åt vänster och höger och 1 2.
m framtill.
Installera laddaren på en plats där den är lätt att komma åt för 3.
robotdammsugaren.
Dra strömsladden längs med väggen.4.
Laddningslampa
Ca. 0,5m
Ca. 0,5m
Ca. 1m
03 FUNKTION
Om golvet är gjort av trä ska du installera laddaren i samma 5.
riktning som plankorna.
Förvara alltid strömsladden till laddaren inkopplad i
uttaget.
OBS
Om ingen ström tillförs laddaren kan robotodammsugaren inte söka upp laddstationen och den kan inte laddas
automatiskt.
Om robotdammsugaren är avskild från laddaren laddas batteriet automatiskt helt ur.
funktion _21
Page 70

Laddar
Blinkning
Blinkning
<Laddningsskärm>
Uppladdning
slutförd
Laddar
Uppladdning
nödvändig
Strömlampa
Laddningslampa
Laddar
Fulladdad
Strömlampa
Laddningslampa
När produkten inhandlas är batteriet helt urladdat och du
måste ladda robotdammsugaren manuellt.
Slå på strömbrytaren på produktens undersida.
Strömlampa
Laddningslampa
Efter att du har riktat in stiften på huvudenheten 1.
mot laddningsstiftet på laddstationen trycker du på
huvudenheten tills du hör ett ljud för ”laddning” från
laddaren.
Laddningslampan blir grön. -
Kontrollera laddningsstatus för robotdammsugaren.2.
När laddningen börjar, "hur mycket återstående batteriladdning" -
och "
"Visas på status displayen i denna sekvens.
När laddningen är slutförd visas batterinivåindikatorn och “FULL” visas på displayen.
När batterinivåskärmen blinkar under rengöring
Blinkning
■
slutar robotdammsugaren att dammsuga och laddar
automatiskt sig själv i laddaren.
Om robotdammsugaren börjar dagens städning på en
■
annan plats än från laddstationen och misslyckas med
att hitta laddstationen under städningen, kommer den att
Blinkning
stanna nära den plats där det började rengöring.
När batterinivån blinkar och “Lo” visas under rengöring
■
kan inte robotdammsugaren användas med fjärrkontroll
och inte eller med knapparna på huvudenheten. I det här
fallet ska du bära robotdammsugaren till laddaren för att
ladda batteriet. (Detta är när batteriet är helt urladdat).
Strömlampa
Laddningslampa
Laddar
<Laddningsskärm>
Uppladdning
slutförd
Laddar
Fulladdad
Uppladdning
nödvändig
22_ funktion
Page 71

När produkten köps tar det omkring 180 minuter att ladda batteriet helt och sedan kan den •
OBS
köras i omkring 100 minuter.
När batteriet har laddats det är överhettat kan laddningstiden öka.•
Åtgärder att vidta när laddningen inte sker smidigt.•
Kontrollera följande om robotdammsugaren inte laddas automatiskt:
När du kopplar från robotdammsugaren från laddaren laddas den ur naturligt.•
Om batteriet
Robotdammsugaren drivs av ett miljövänligt Lithuim-jon (Li-ion) laddningsbart batteri, och en
■
funktion som hindrar överladdning och som garanterar en lång livslängd.
Batteriets garantiperiod är 6 månader från inköpsdatum.
■
När du köper ett batteri ska du be kundtjänst om att få se
■
äkthetssymbolen ( ) och modellnumret innan du köper
det.
Detta batteri är endast för Samsung robotdammsugare. Det är strängt förbjudet att använda den för andra apparater eller för annat ändamål.
Ta inte isär eller modifi era batteriet. Ladda det på en plats med god ventilation. Utsätt inte batteriet för eld och inte hetta inte upp det. Anslut inga metallföremål till (+) eller (-) batteripolerna. Håll det inomhus (0°C ~ 40°C) Innan du slänger produkten, deponera batterierna på ett miljömässigt säkert sätt. Kasta inte bort batterierna med dina vanliga hushållssoporna. Följ alla lokala föreskrifter när du kasserar gamla batterier. -
Vrid strömbrytaren under botten på robotdammsugaren av och på. -
03 FUNKTION
Sätt in kontakten på laddaren. Kontrollera om det fi nns några främmande föremål på laddningskontakten och torka -
av laddningskontakten på huvudenheten och laddaren med en torr trasa.
Kontrollera om det fi nns föremål nära laddaren som ger starka refl ektioner. -
Ladda om möjligt robotdammsugaren via laddaren. (När du lämnar hemmet obevakat under en längre tid om du exempelvis ska ut och resa, ska du slå av
robotdammsugaren och kopplar från strömmen och förvara dem.)
Om batteriet är ur funktion, inte ta isär det. Kontakta närmaste servicecenter.
❈
Ökad eller kortare laddningstid indikerar att batteriet är nära slutet av sin livslängd. Vänligen
❈
kontakta ett auktoriserad servicecentern för att byta ditt batteri.
Det uppladdningsbara batteriet som ingår i denna produkt är inte utbytbart av slutanvändaren.
för information om batteribyte, kontakta ditt servicecenter.
funktion _23
Page 72

Ställa in tiden
Blinkar
Blinkar
Minska
Öka
Blinkar
Minska
Öka
Blinkar
Minska
Öka
Blinkar
Klockan visar aktuell tid. Du kan ändra den aktuella tiden med följande steg.
Du kan bara ställa in tiden genom att använda fjärrkontrollen.
■
Fjärrkontroll Inställningsfrekvens
Blinkar
Tryck Klocka-knappen.1.
Den aktuella tiden visas -
Blinkar
Blinkar
Blinkar
Blinkar
Avbryt inställningar
Fjärrkontroll
Tryck Klocka-knappen. 2.
Veckodag blinkar Tryck på -
Minska
Öka
eller Z -knappen för att ställa
in veckodag.
Minska
Öka
Tryck Klocka-knappen. Tryck 3.
på Y eller Z -knappen for att
ställa in timme.
Minska
Öka
Tryck Klocka-knappen. Tryck 4.
på Y eller Z -knappen for att
ställa in minuter.
Tryck Klocka-knappen.5.
Det värde som du anger kommer att blinka och
inställningarna är klara.
Tryck på Start/Stop knappen för att avbryta inställningarna och avsluta Tidinställningsläget.
Om det inte registreras någon data under 1 minut medan du ställer in tiden, avslutar dammsugaren läget automatiskt.
Y
24_ funktion
Page 73

Installera VIRTUAL GUARD
Distansidentifi eringssensor
Läge/
strömknapp
Identifi eringssensor
för huvudenhet
Lägeslampa
Ett stängsel [fence]
(virtuell vägg) bildas.
Distanssensor
Du kan begränsa robotdammsugningen till
en viss del med hjälp av Hinder-läget (virtuell
vägg).
Knappfunktioner
Lägeslampornas funktion1.
Hinderläge (virtuell vägg): Lägeslampan blinkar i rött. Av: Lampan slås av. -
Ställa in läget2.
När som helst när du trycker på läges-/strömknappen så väljs hinder-läget (virtuell vägg) ➝ Ström av i den här
sekvensen.
Avståndet till den virtuella väggen är minst 2,5m och
❈
kan variera beroende på omgivningen och robotens
rörelsestatus.
Skapa ett hinder(virtuell vägg)
VIRTUAL GUARD skapar en osynlig barriär som
robotdammsugaren inte kan korsa.
Exempel kan vara framför krukor, möbler, ytterdörren och så
vidare.
Välj Hinder-läge (virtuell vägg) med läges-/1.
strömknappen.
Lägeslampan blinkar i rött. -
Installera VIRTUAL GUARD framför det område du vill 2.
blockera åtkomst för robotdammsugaren.
Installera VIRTUAL GUARD så att distansidentifi eringssensorn bildar en osynlig barriär som robotdammsugaren inte kan korsa.
Lägeslampa
Distansidentifi eringssensor
Ett stängsel [fence]
(virtuell vägg) bildas.
Läge/
strömknapp
Identifi eringssensor
för huvudenhet
Distanssensor
03 FUNKTION
funktion _25
Page 74

Om IrDA-sensorn.
Fjärrkontroll
Virtual guard
(virtuell dörr)
Laddare
[Infraröd signalprioritet]
Den infraröda signalöverföringen kanske inte •
VAR ÖRSIKTIG
blir följsam på platser där den utsätts för
halogenlampor eller i utomhusmiljö.
Robotdammsugaren använder 3 typer av infraröda •
enheter och en enhet kanske inte fungerar framför
en annan enhet med högre prioritet.
När du styr robotdammsugaren med fjärrkontrollen •
kan den korsa det virtuella hindret VIRTUAL
GUARD eller köra mot ett föremål eftersom
fjärrkontrollens signal har högre prioritet än signalen för VIRTUAL GUARD.
När du använder robotdammsugaren på en trång plats eller kort avstånd kan det uppstå •
felfunktion på grund av störning från de infraröda signalerna.
Installera VIRTUAL GUARD på avstånd från laddaren, eftersom autoladdningen kan störas om •
VIRTUAL GUARD är nära laddaren.
Om mer än en självgående dammsugare används samtidigt kanske de inte fungerar korrekt på •
grund av störningar av den infraröda signalen.
[Infraröd signalprioritet]
> >
Fjärrkontroll
Virtual guard
(virtuell dörr)
Laddare
26_ funktion
Page 75

ANVÄNDA ROBOTDAMMSUGAREN
Med hjälp av knapparna
på huvudenheten
Använda
fjärrkontrollen
Start/Stoppa dammsugning
Du kan köra eller stoppa robotdammsugarens alla
funktioner.
Varje robotdammsugningsfunktion körs bara när strömbrytaren
■
slås på.
När robotdammsugaren används trycker du på knappen (
■
för att avbryta användningen och välja en funktion.
Slå på och av strömbrytaren
Slå på strömmen
Huvudenhet: Tryck på knappen ( -
Slå av strömmen
Fjärrkontroll: Tryck på strömknappen - [Power].
Huvudenhet: Tryck och håll ned knappen ( Om ingen knapp trycks in på omkring 1 minuter efter att du har slagit
❈
på strömmen så stängs strömmen automatiskt av för att förhindra att
batteriet laddas ur.
För att slå på strömmen igen, tryck och håll ner strömbrytaren (Start/
Stop) på huvudenheten.
).
) i 3 sekunder.
03 FUNKTION
)
Använda
fjärrkontrollen
Starta eller stoppa dammsugning
Starta
Fjärrkontroll: Tryck på en av knapparna Auto, Spot (Punkt), Max, Manual (Manuell) knappen.
Huvudenhet: Välj ett av lägena Auto/Punkt/Max genom att använda knappen (
När dammsugningen startar, börjar robotdammsugaren att röra sig.
Om du trycker på knappen (
❈
börjar den med läget för automatisk dammsugning.
Stoppa
För att stoppa dammsugaren trycker du på ( - ) fjärrkontrollen
eller huvudenhetens knapp.
När rengöring stoppas stannar robotdammsugaren. -
) , och sedan trycka på knappen ( ).
) utan att välja dammsugningsläge
Med hjälp av knapparna
på huvudenheten
funktion _27
Page 76

Laddning
1,5 m framfö
r
Med hjälp av knapparna
på huvudenheten
Använda
fjärrkontrollen
Du kan få robotdammsugaren att återgå till laddaren för att
ladda batteriet genom att använda laddningsknappen.
När robotdammsugaren används trycker du på knappen (
■
att avbryta användningen och tryck på laddningsknappen.
Tryck på laddningsknappen.1.
(“ laddstationen för laddning.
Om du vill stoppa robotdammsugaren när den återgår till laddaren 2.
trycker du på knappen (
Om du vill testa autoladdningsfunktionen så trycker du på 3.
laddningsknappen när robotdammsugaren är mindre än 1.5 m från
laddaren.
Felsökning när robotdammsugaren inte återgår till laddaren
Kontrollera installationen av laddaren När laddaren är på en plats där laddaren inte kan vägleda -
robotdammsugaren till laddaren.
När laddaren är mindre än 5 m från robotdammsugaren. -
Det kan ta längre tid för robotdammsugaren att återgå till
laddaren.
Ladda robotdammsugaren manuellt vid följande tillfällen.
■
När laddaren installeras i ett hörn. När batteriet är helt urladdat. När robotdammsugaren stöter på ett hinder (möbler etc.) När robotdammsugaren inte kan passera över tröskeln till den -
plats där laddaren installeras.
") Visas i displayet och robotdammsugaren återvänder till
).
) för
Använda
fjärrkontrollen
Med hjälp av knapparna
på huvudenheten
28_ funktion
1,5 m framför
Page 77

Automatisk dammsugning
Normalläge
Turboläge
Dammsensorläge
Rengöring klar
1 gång
Robotdammsugaren förfl yttar sig själv och rengör automatiskt
huset tills rengöringen är klar.
Om du trycker på Start/Stop-knappen på huvudenheten eller
■
fjärrkontrollen utan att välja en rengöring läget börjar en automatisk
rengöring.
Om rengöringen börjar när robotdammsugaren är placerad i
■
laddstationen minskar tiden för att återgå till originalpositionen, sedan
den minns ursprunglig position under drift.
Om robotdammsugaren börjar dagens städning på en annan plats än
■
från laddstationen och misslyckas med att hitta laddstationen under städningen, kommer den
att stanna nära den plats där det började rengöring.
Om batterinivån blir för låg under dammsugningen återgår dammsugaren automatiskt till
■
laddstationen och återupptar dammsugningen efter att batteriet har laddats. (Antal återupptagna
dammsugningar: en gång)
Huvudenhetsknapp Fjärrkontrollsknapp Inställningsfrekvens
Ställa in läget.1.
▶
1 gång
Avbryt läget.2.
Om funktionen för att återuppta dammsugning
Om robotdammsugaren har utvärderat att dammsugningen •
är klar så utförs inte funktionen att återuppta dammsugning.
OBS
Om du fl yttar på robotdammsugaren när den laddas •
eller trycker på en knapp fastställer robotdammsugaren
att dammsugningen är klar och återupptar inte
dammsugningen.
Normalläge
Turboläge
03 FUNKTION
VAR ÖRSIKTIG
Flytta inte på robotdammsugaren när den rengör och •
tryck inte på någon knapp under dammsugningen. Det
kan annars leda till att robotdammsugaren tolkar att
dammsugningen är klar och börjar dammsuga från början
igen.
Varje gång du trycker på Turbo-knappen slås Turbo-ikonen •
på displayen på eller av sekventiellt. När Turbo-ikonen är
påslagen, kan du börja dammsuga i Turbo-läge.
Varje gång du trycker på knappen Dammsensor slås •
dammsensor-ikonen på displayen på eller av sekventiellt.
När dammsensor-ikonen är påslagen, kan du börja
dammsuga i dammsensor-läge.
Dammsensorläge
Rengöring klar
funktion _29
Page 78

Punktdammsugning
Normalläge
Turboläge
Dammsensorläge
Rengöring klar
2 gånger
Ca. 1,5m
Ca. 1,5m
Du kan bekvämt dammsuga ett specifi kt område som innehåller
kaksmulor eller liknande.
Flytta på robotdammsugaren till den plats där du vill utföra
■
punktdammsugning.
Huvudenhetsknapp Fjärrkontrollsknapp Inställningsfrekvens
Ställa in läget.1.
▶
2 gånger
Avbryt läget.2.
I punktrengöringsläget rengör robotdammsugaren ett område med en längd på 1,5 m och en bredd på 1,5 m.
När rengöringen är klar visar robotdammsugaren meddelandena End, Stop och Stand by.
När robotdammsugaren är dockad med laddstationen fungerar
inte punktdammsugning.
OBS
Ca. 1,5m
Normalläge
Turboläge
Ca. 1,5m
VAR ÖRSIKTIG
30_ funktion
Varje gång du trycker på Turbo-knappen slås Turbo-ikonen •
på displayen på eller av sekventiellt. När Turbo-ikonen är
påslagen, kan du börja dammsuga i Turbo-läge.
Varje gång du trycker på knappen Dammsensor slås •
dammsensor-ikonen på displayen på eller av sekventiellt.
När dammsensor-ikonen är påslagen, kan du börja
dammsuga i dammsensor-läge.
Dammsensorläge
Rengöring klar
Page 79

Maxdamsugning
Normalläge
Turboläge
Dammsensorläge
3 gånger
2 gånger i laddningsläge
Robotdammsugaren förfl yttar sig automatiskt och dammsuger
tills batteriet har tagit slut och batterinivån blinkar med bara en
nivå.
Om rengöringen börjar när robotdammsugaren är placerad i
■
laddstationen minskar tiden för att återgå till originalpositionen, sedan
den minns ursprunglig position under drift.
Om robotdammsugaren börjar dagens städning på en annan plats än
■
från laddstationen och misslyckas med att hitta laddstationen under
städningen, kommer den att stanna nära den plats där det började
rengöring.
Om batterinivån blir för låg under dammsugningen återgår dammsugaren automatiskt till
■
laddstationen och återupptar dammsugningen efter att batteriet har laddats. (Antal återupptagna
dammsugningar: en gång)
Huvudenhetsknapp Fjärrkontrollsknapp Inställningsfrekvens
Ställa in läget.1.
▶
3 gånger
2 gånger i laddningsläge
Om funktionen för att återuppta dammsugning
Om robotdammsugaren bedömer att dammsugningen är •
klar så utförs inte återupptagningen av dammsugningen.
OBS
Om du fl yttar på robotdammsugaren när den laddas •
eller trycker på en knapp tolkar robotdammsugaren
att dammsugningen är klar (och återupptar inte
dammsugningen).
Avbryt läget.2.
Normalläge
Turboläge
03 FUNKTION
VAR ÖRSIKTIG
Flytta inte på robotdammsugaren när den rengör och •
tryck inte på någon knapp under dammsugningen. Det
kan annars leda till att robotdammsugaren tolkar att
dammsugningen är klar och börjar dammsuga från början
igen.
Varje gång du trycker på Turbo-knappen slås Turbo-ikonen •
på displayen på eller av sekventiellt. När Turbo-ikonen är
påslagen, kan du börja dammsuga i Turbo-läge.
Varje gång du trycker på knappen Dammsensor slås •
dammsensor-ikonen på displayen på eller av sekventiellt.
När dammsensor-ikonen är påslagen, kan du börja
dammsuga i dammsensor-läge.
Dammsensorläge
funktion _31
Page 80

Manuell dammsugning
Riktningsknappar
(Framåt, vänster, höger)
Bakåtfunktion stöds inte.
Du kan fl ytta robotdammsugaren för att dammsuga en viss plats
direkt genom att använda fjärrkontrollen.
Flytta på robotdammsugaren till den plats där du vill utföra manuell
■
dammsugning.
Du kan manuellt dammsuga genom att använda fjärrkontrollen.
■
Fjärrkontrollsknapp Inställningsfrekvens
Ställa in läget.1.
Avbryt läget.2.
När robotdammsugaren är placerad i dockningsstationen •
fungerar inte manuell dammsugning.
OBS
Om det inte fi nns någon indata under ca 1 minut för att •
växla till standby-läge.
VAR ÖRSIKTIG
Varje gång du trycker på Turbo-knappen slås Turbo-ikonen •
på displayen på eller av sekventiellt. När Turbo-ikonen är
påslagen, kan du börja dammsuga i Turbo-läge.
Varje gång du trycker på knappen Dammsensor slås •
dammsensor-ikonen på displayen på eller av sekventiellt.
När dammsensor-ikonen är påslagen, kan du börja
dammsuga i dammsensor-läge.
Riktningsknappar
(Framåt, vänster, höger)
Bakåtfunktion stöds inte.
32_ funktion
Page 81

Timer-reservation
Blinkar
Blinkar
Minska
Öka
Blinkar
Blinkar
Minska
Öka
Blinkar
Blinkar
Minska
Öka
Blinkar
Blinkar
I detta läge kan du schemalägga dammsugaren att starta en
engångsrengöring vid en viss tidpunkt.
En schemalagd städning utförs endast när dammsugaren är
■
dockad till laddstationen.
Fjärrkontroll Inställningsfrekvens
Blinkar
Blinkar
Blinkar
Blinkar
Blinkar
Blinkar
Avbryt inställningar
Timeout
Blinkar
Blinkar
Minska
Minska
Minska
Om du trycker på Start/Stop-knappen medan dammsugaren laddas eller du ställer tid, avbryts inställningarna.
Vänligen notera att inställningarna avbryts om dammsugaren är fristående från laddstationen.
Om det inte registreras någon data under 1 minut medan du ställer in tiden, avslutar dammsugaren läget automatiskt.
03 FUNKTION
Tryck på knappen Timer/1.
Weekly (Timer/veckovis).
Aktuell inställning visas och -
blinkar. Tryck på Y eller
-knappen for att ställa in
❈
Z
timme.
Dammsugningsläge
Öka
Om det inte fi nns någon tidigare reservation, är
städning inställt på Auto-läge.
Om en reservation fi nns, är
städning inställd på inställt
läge.
Tryck på knappen Timer/2.
Öka
Weekly (Timer/veckovis).
Tiden ökar/minskar med 5 minuter. Tryck på Y eller
-knappen for att ställa in
Z
minuter.
Tryck på knappen Timer/3.
Öka
Weekly (Timer/veckovis). Tryck
på Y eller Z för att ställa in
rengöringsläge.
Du kan välja rengöringsläge Auto eller Max.
Tryck på knappen Timer/4.
Weekly (Timer/veckovis).
Det värde som du anger kommer att blinka och
inställningarna är klara.
När inställningarna är klara, visas Konfi gurerad tid och
.
funktion _33
Page 82

Reservation veckovis
Blinkar
När det inte fi nns någon
reservation
Blinkar
När det fi nns en reservation
Minska
Öka
Blinkar
Blinkar
Minska
Öka
Blinkar
Minska
Öka
Mån
Tis
Ons
Tors
Fre
Lör
Sön
~
I detta läge kan du schemalägga dammsugaren att starta
en rengöring på den angivna tiden och på angivna dagar i
veckan.
En schemalagd städning utförs endast när dammsugaren är
■
dockad till laddstationen.
Fjärrkontroll Inställningsfrekvens
När det inte fi nns någon
reservation
Blinkar
När det fi nns en reservation
Blinkar
Blinkar
Blinkar
Blinkar
Minska
Minska
Minska
Tis
Ons
Mån
Tors
Fre
Lör
Sön
~
Standby-läge
I standby-läget visas schemalagda dagar i veckan.
Håll ner knappen Timer/1.
veckovis i mer än 3 sekunder.
Tryck på Y eller Z -knappen
Öka
för att ställa in veckodag.
Om ingen reservation er inställd sedan tidigare, visas
nuvarande veckodag.
Om det inte fi nns någon schemalagd tid, visas --:-- .
Tryck på knappen Timer/2.
Weekly (Timer/veckovis). Tryck
på Y eller Z -knappen for att
ställa in timme.
Om det fi nns en schemalagd
❈
Öka
timme, visas den.
Dammsugningsläge
❈
Om det inte fi nns någon reservation inställ sedan
tidigare, ställs rengöringläget
till Auto. Om det fi nns en
reservation inställd, ställs den
till inställt läge
Tryck på knappen Timer/3.
Öka
Weekly (Timer/veckovis).
Tiden ökar/minskar med 5 minuter. Tryck på Y eller
-knappen for att ställa in
Z
minuter.
34_ funktion
Page 83

Blinkar
Blinkar
Blinkar
Minska
Öka
Blinkar
Blinkar
Blinkar
Blinkar
Blinkar
Avbryt inställningar
Timeout
Fjärrkontroll Inställningsfrekvens
Tryck på knappen Timer/4.
Weekly (Timer/veckovis). Tryck
på Y eller Z för att ställa in
Minska
Öka
rengöringsläge.
Du kan välja rengöringsläge Auto eller Repetera rengöring.
Tryck på knappen Timer/5.
Weekly (Timer/veckovis).
Det värde som du anger kommer att blinka och
inställningarna är klara.
När inställningarna är klara,
❈
blinkar den veckodag du har
ställt in. Nu kan du gå till steg
( 2 ) och lägga till en annan
veckodag.
Om du trycker på Start/stop-knappen medan du gör en veckoreservation, blir reservationen för den närvarande
fastställda veckodag annullerad. Om du sedan trycker på
knappen igen, avslutar dammsugaren inställningsläget för
reservation.
Om det inte registreras någon data under 1 minut medan du ställer in tiden, avslutar dammsugaren läget automatiskt
03 FUNKTION
funktion _35
Page 84

TILLÄGGSFUNKTIONER
Använda tilläggsfunktioner
Du kan använda rengöringsmaskinen på ett enklare och bekvämare sätt med olika
tilläggsfunktioner.
Du kan bara konfi gurera tilläggsfunktionerna med fjärrkontrollen.
■
Turboläge
Varje gång du trycker på Turbo-knappen slås Turbo-ikonen på
displayen på eller av sekventiellt.
Turbo på (turbo-läge) : Borsten roterar i maximal hastighet.
Turbo av (normalläge) : Borsten roterar i normal hastighet.
Dammsensorläge
Varje gång du trycker på knappen Dammsensor slås
dammsensor-ikonen på displayen på eller av sekventiellt.
Dammsensor-läge på: I Auto Rengöringsläge, när
dammsugaren känner av att damm har gått in i ett visst
område, roterar dammsugaren och ändrar riktning för att
rengöra området och sedan efter att området är rengjort, återgå
till tidigare kurs. I Spot, Max, manuellt läge, när dammsugaren
känner av att damm har gått in i ett visst område, fortsätter
Boosten att användas i fl era sekunder.
Dammsensor-läge av: Dammsugaren känner inte av att
dammet kommer in och fortsätter att köra som anges i det
valda rengöringsläge.
Välja en ljudeffekt
Tryck på knappen Ljudeffekt för att välja en ljudeffekt.
Varje gång du trycker på knappen Ljudeffekt
■→
valt i denna sekvens.
Ljudeffekter: - Spelar ljudeffekter.
Mute (tyst): - Spelar inga ljud eller meddelanden.
är Mute (Tyst)
36_ funktion
Page 85

Främre sensorfönster
Kamera
underhålla verktyg och fi lter.
RENGÖRING AV ROBOTDAMMSUGAREN.
Kom ihåg rengörings och underhållsmetoderna
När strömknappen skadas ska du kontakta serviceombudet så att
■
det inte orsakar några olyckor.
Använd inga medel eller mekaniska enheter som inte har installerats
■
av tillverkaren som kan påskynda åldrandet av robotdammsugaren
Slå alltid av strömbrytaren på
■
enhetens undersida innan du rengör
robotdammsugaren. Robotdammsugaren
kan plötsligt starta och orsaka skador.
Rengör sensorfönstret och kameran
Slå alltid av strömbrytaren på enhetens undersida innan du
rengör robotdammsugaren.
Spraya aldrig vatten, thinner, bensen etc direkt på huvudenheten av
■
robotdammsugaren.
Torka av sensorfönstret försiktigt eller
■
kameran med en mjuk trasa.
04 UNDERHÅLL
Kamera
Främre sensorfönster
Främre sensorfönster och
kamera
Fallsensorfönster Bakre sensorfönster
underhåll _37
Page 86

Rengöra dammbehållaren och fi ltret
Filter
Skyddsfi lter
Töm först dammbehållaren innan du rengör den.
När du separerar dammbehållaren, se till att inte spilla dammet ur
■
dammbehållaren.
Töm ur dammbehållaren i följande fall.
■
När damm har samlats inuti dammbehållaren.1.
När sugseffekten plötsligt blir svag.2.
När det plötsligt hörs ljud.3.
Tryck på knappen för att mata ut dammbehållaren (PUSH) och dra 1.
ut dammbehållaren för att separera den.
Separera locket dammbehållaren genom att dra den i pilens riktning 2.
i fi guren.
❈
OBS
VAR ÖRSIKTIG
Ta bort fi ltret och skyddsfi ltret från dammbehållaren.3.
Filter
Skaka ur dammet från fi lter, skyddsfi ltret och 4.
dammbehållaren.
Du kan rengöra den med vatten.
Efter rengöring med vatten.
Dammbehållare: Torka av vattnet fullständigt.1.
Filter, skyddsfi lter: Torka av dem helt och sätt sedan ihop 2.
dem.
Monter ihop fi lter och skyddsfi lter på dammbehållaren.5.
Montera skyddsfi ltret med nätsidan riktat nedåt. Om inriktningen inte är korrekt, kommer du inte att kunna
montera det.
Om dammbehållaren monteras utan att fi ltret monteras, uppstår felkoden C08.
Var noga med att montera fi ltret.
Stäng dammbehållarlocket och montera den i huvudenheten.6.
Skyddsfi lter
38_ underhåll
Page 87

RENGÖRING AV ROBOTDAMMSUGAREN.
Rengöring av borsten
Slå alltid av strömbrytaren på enhetens undersida innan du
rengör robotdammsugaren.
Eftersom damm i dammbehållare kan komma ut, ta först bort •
VAR ÖRSIKTIG
dammbehållare innan rengöring av borsten.
Efter kontroll om det fi nns några främmande föremål, tryck på 1.
kroken som håller fast borst skyddet för att avlägsna det.
Lyft upp borsten från huvudenheten.2.
04 UNDERHÅLL
Ta bort eventuella främmande föremål såsom långa strån eller 3.
snören som är lindade runt borsten med hjälp av en borste eller en
dammsugare.
underhåll _39
Page 88

Efter rengöring, sätt först in den sida av borste som är 4.
mittemot strömbrytaren och sedan sätt sedan in den andra
sidan.
Sätt in i de två spåren och montera den genom att lätt 5.
skjuta den nedåt tills de klickar på plats.
VAR ÖRSIKTIG
För att förhindra att robotdammsugaren blir igensatt, vara noga med att inte dammsuga in •
tandpetare eller bomullspads/tops.
Om du har svårigheter att avlägsnar främmande föremål, kontakta ett servicecenter.•
Eftersom borsten dammsuger dammet på golvet,kan långa snören eller hår snurras runt i •
borsten. Kontrollera och rengör borsten regelbundet.
40_ underhåll
Page 89

Rengöring av den roterande Sidoborsten för kantrengöring.
Slå alltid av strömbrytaren på enhetens undersida innan du
rengör robotdammsugaren.
Kontrollera om den roterande sidoborsten är böjd eller om det 1.
fi nns några främmande föremål som har fastnat på borsten.
Använd gummihandskar och svep in den roterande sidborsten 2.
med en trasa indränkt i hett vatten i omkring 10 sekunder och
torka den på trasan.
Vrid den roterande sidborsten och upprepa stegen i Steg 2.3.
04 UNDERHÅLL
Om hår eller snören är lindade mellan huvudenheten och 4.
den roterande sidoborsten, lossa skruven på sidan av den
roterande borste med skruvmejsel (+) att ta bort det. När du
monterar borsten på nytt kontrollerar du markeringen “L” på den
roterande sidborsten och markeringen “L” på huvudenheten och
sedan monterar du den roterande sidborsten på nytt. (Bokstaven
“R” är ingraverad på den högra roterande sidborsten.)
Eftersom den roterande sidoborsten lätt tar in hår och andra främmande föremål, se till att rengöra
den ofta.
OBS
Överdriven mängd främmande föremål på den roterande sidoborsten kan skada borsten.
L
underhåll _41
Page 90

Rengöring av drivhjulet
Du måste alltid slå av strömbrytaren på enhetens undersida
innan du rengör robotdammsugaren.
Om robotdammsugaren plötsligt börjar gå i zikzak kan det fi nnas
■
främmande föremål som har fastnat i drivhjulet.
Vid rengöring av drivhjulet placerar du en mjuk trasa på golvet och 1.
vänder på huvudenheten och placerar den försiktigt nedåt.
Kontrollera efter främmande föremål och ta bort dem genom att 2.
använda en sticka eller en pincett som inte är vassa i ändarna vid
behov.
42_ underhåll
Page 91

felsökning
CHECKLISTA FÖRE SVC SAMTAL
Symptom Checklista Åtgärd att vidta
Robotdammsugaren
fungerar inte alls före
dammsugning.
Robotdammsugaren
slutar gå under
dammsugningen
Sugeffekten är svag
under dammsugning.
Är dammbehållaren monterad?• Installera dammbehållaren.•
Är strömbrytaren påslagen?• Slå på strömbrytaren.•
Är rengöringsläget •
displayen påslaget?
Är batterinivåindikator som blinkar •
på bara en nivå och visas "Lo” på
den?
Robotdammsugaren fungerar inte •
när batteriet i fjärrkontrollen har
tagit slut.
Är batterinivåindikator som blinkar •
på bara en nivå och visas "Lo” på
den?
Har robotdammsugaren hakats •
fast i kablar på golvet?
Har robotdammsugaren •
fastnat i golvet där det fi nns en
höjdskillnad?
Drivhjulet har lyfts upp. Är en tunn trasa virad runt •
drivhjulet?
Har robotdammsugaren fastnat på •
tröskeln?
Kontrollera om dammbehållaren är •
full av damm.
Kontrollera om insuget är tilltäppt •
av främmande föremål.
Kontrollera om fi ltret har satt igen.• Rengör fi ltret väl.•
på
Tryck på knappen •
stänga av trycker du och håller
ned knappen
längre.)
Lyft i robotdammsugaren och •
placera den i laddaren för att ladda
den.
Byt batterierna i fjärrkontrollen. •
(AAA-typ)
Lyft i robotdammsugaren och •
placera den manuellt i laddaren för
att ladda den.
Slå av strömbrytaren och ta bort •
det som har fastnat.
Stäng av strömbrytaren och fl ytta •
robotdammsugaren till en annan
plats för dammsugning.
Slå av strömbrytaren och ta bort •
det som har fastnat.
Stäng av strömbrytaren och fl ytta •
robotdammsugaren till en annan
plats för dammsugning.
Stäng av robotdammsugaren och •
töm dammbehållaren.
Stäng av strömbrytaren och •
avlägsna främmande föremål i
insuget.
05 FELSÖKNING
. (För att
i 3 sekunder eller
felsökning _43
Page 92

Symptom Checklista Åtgärd att vidta
Robotdammsugaren
kan inte hitta
laddaren.
Robotdammsugaren
passerar igenom
VIRTUAL GUARD.
Batteriets
användningstid på
VIRTUAL GUARD är
för kort.
Robotdammsugaren
utför plötsligt
sin rengöring på
snedden.
Kontrollera att stickkontakten på •
laddaren är korrekt ansluten till
uttaget.
Om det fi nns några hinder inom ett •
område på ca 1m framför laddare
och ca 0,5 m intervallet till vänster
och höger om laddaren bör du ta
bort hindren.
Om det fi nns några främmande •
föremål på laddningsstiften, torka
av dem med en torr handduk.
Är VIRTUAL GUARD installerad i •
närheten avladdaren?
Är batterierna i VIRTUAL GUARD •
tomma?
Är Lägeslampan avstängd?• Kontrollera om VIRTUAL GUARD •
Använder du mangan •
torrcellsbatterier?
Robotdammsugaren kan •
dammsuga i diagonal riktning i
följande fall.
Efter att robotdammsugaren har laddats medan den har stått på
snedden i laddstationen.
När robotdammsugaren fl yttar till ett annat område med en kortare
sträcka efter rengöring av ett
område.
När vinkeln för att få kontakt med ett hinder inte är vinkelrät (90˚).
När golvet är av kakel eller trä. -
Flytta VIRTUAL GUARD •
till en annan plats så att
robotdammsugaren kan ladda
automatiskt.
Byt ut batterierna.•
(2 st Typ D (LR20) alkaliska
batterier)
är avstängd och ställ sedan in
VIRTUAL GUARD till ett önskat
läge.
Byt ur batterierna mot nya alkaliska •
batterier.
(2 st Typ D (LR20) alkaliska batterier)
Rengöringsriktning bestäms av den •
ursprungliga platsen. Eftersom den
rengör områdena genom att rita
en karta, täcker det så småningom
hela området. (Normal funktion)
Installera laddstationen i
riktning med träets ådring,
och börja rengöra medan
robotdammsugaren är dockad
med laddstationen.
44_ felsökning
Page 93

FELKODER VID FELSÖKNING.
FELKOD ORSAK LÖSNING
Robotdammsugaren fastnar •
eller kommer i kläm under
navigeringen.
Ett främmande föremål (tråd, •
papper, leksaker etc) har
fastnat i borsten.
Ett främmande föremål (tråd, •
papper, leksaker etc) har
fastnat i vänster drivhjul.
Ett främmande föremål (tråd, •
papper, leksaker etc) har
fastnat i höger drivhjul.
Kontrollera stötfångarsensorn.• Stäng av på undersidan och sedan •
Ett främmande föremål •
(damm, fl äckar etc) sitter på
hinderssensorfönstret.
Ett främmande föremål •
(damm, fl äckar etc) sitter på
fallsensorfönstret.
Dammbehåller är inte satt in.• För in dammbehållaren tills du hör ett ”klick”-•
Ett främmande föremål (tråd, •
trasa etc) har fastnat i den
roterande sidborsten.
Stäng av strömbrytaren på undersidan och •
fl ytta robotdammsugaren till en annan plats.
Stäng av strömbrytaren längst ned och ta bort •
de främmande föremålet från borsten.
Stäng av strömbrytaren längst ned och ta bort •
främmande föremål från vänster drivhjul.
Stäng av strömbrytaren längst ned och ta bort •
det främmande föremålet från höger drivhjul.
ta bort föremålet från framsidan av
robotdammsugaren eller fl ytta den till en annan
plats.
Stäng av strömbrytaren på undersidan och •
torka av främmande ämnen från de främre och
bakre sensorfönstren med en mjuk trasa.
Stäng av strömbrytaren på undersidan •
och torka av främmande föremål från
fallsensorfönstren med en mjuk trasa.
ljud.
Stäng av strömbrytaren på undersidan och ta •
bort främmande föremål från den roterande
sidborsten.
05 FELSÖKNING
Om du trycker på Start-/stoppknappen eller stänger av strömbrytaren så återställs felkoden.
❈
felsökning _45
Page 94

80 mm (Höjd)
350 mm (Längd)
350 mm (Bredd)
275 mm (Bredd)
161 mm (Längd)
122 mm (Höjd)
produktspecifi kation
80 mm (Höjd)
350 mm (Längd)
350 mm (Bredd)
Huvudenhet Laddare (Station)
Klassifi cering Artikel SR8950* SERIEN
Diameter 350mm
Mekaniska
specifi kationer
Höjd 80mm
Vikt 3,2 kg
Nätspänning AC 220-240V~, 50-60Hz
122 mm (Höjd)
161 mm (Längd)
275 mm (Bredd)
Elektriska
specifi kationer
Strömförbrukning 40 W
Strömförbrukning för huvudenhet 40 W
Batterispecifi kationer 14,4V / 31,68Wh
Laddningstyp Autoladdning/manuell laddning
Dammsugningsläge
Rengöringsspecifi kationer
Laddningstid Omkring 180 minuter
Dammsugningstid
(på hårt golv)
Rengöringsmetod Takformsidentifi ering
Huvudenhetsknapptyp Touch typ
Dnna dammsugare är godkänd enligt följande.
EMC-direktiv: 2004/108/EEC
Direktiv för säkerhet vid lågspänning: 2006/95/EC
46_ produktspecifi kation
Auto, Spot (Punkt), Max, Manual (Manuell),
Timer, veckovis
Omkring 100 minuter
Page 95

OPEN SOURCE ANNOUNCEMENT
Some software components of this product incorporate source code covered under the BSD.
And this software is based in part on the work of the Independent JPEG Group.
OpenCV :
■
IMPORTANT : READ BEFORE DOWNLOADING, COPYING, INSTALLING OR USING.
By downloading, copying, installing or using the software you agree to this license.
If you do not agree to this license, do not download, install, copy or use the software.
License Agreement
For Open Source Computer Vision Library
Copyright (C) 2000-2008, Intel Corporation, all rights reserved.
Copyright (C) 2008-2010, Willow Garage Inc., all rights reserved.
Third party copyrights are property of their respective owners.
Redistribution and use in source and binary forms, with or without modifi cation, are permitted provided
that the following conditions are met:
Redistribution’s of source code must retain the above copyright notice, this list of conditions and the
following disclaimer.
Redistribution’s in binary form must reproduce the above copyright notice, this list of conditions and the
following disclaimer in the documentation and/or other materials provided with the distribution.
The name of the copyright holders may not be used to endorse or promote products derived from this
software without specifi c prior written permission.
This software is provided by the copyright holders and contributors “as is” and any express or implied
warranties, including, but not limited to, the implied warranties of merchantability and fitness for a
particular purpose are disclaimed.
In no event shall the Intel Corporation or contributors be liable for any direct, indirect, incidental, special,
exemplary, or consequential damages (including, but not limited to, procurement of substitute goods
or services; loss of use, data, or profi ts; or business interruption) however caused and on any theory of
liability, whether in contract, strict liability, or tort (including negligence or otherwise) arising in any way out
of the use of this software, even if advised of the possibility of such damage.
Copyright (c) 2006, 2008, 2009, 2010 Edward Rosten
■
All rights reserved.
Redistribution and use in source and binary forms, with or without modifi cation, are permitted provided
that the following conditions are met:
Redistributions of source code must retain the above copyright notice, this list of conditions and the
following disclaimer.
Redistributions in binary form must reproduce the above copyright notice, this list of conditions and the
following disclaimer in the documentation and/or other materials provided with the distribution.
Neither the name of the University of Cambridge nor the names of its contributors may be used to
endorse or promote products derived from this software without specifi c prior written permission.
THIS SOFTWARE IS PROVIDED BY THE COPYRIGHT HOLDERS AND CONTRIBUTORS “AS
IS” AND ANY EXPRESS OR IMPLIED WARRANTIES, INCLUDING, BUT NOT LIMITED TO, THE
IMPLIED WARRANTIES OF MERCHANTABILITY AND FITNESS FOR A PARTICULAR PURPOSE ARE
DISCLAIMED. IN NO EVENT SHALL THE COPYRIGHT OWNER OR CONTRIBUTORS BE LIABLE FOR
ANY DIRECT, INDIRECT, INCIDENTAL, SPECIAL, EXEMPLARY, OR CONSEQUENTIAL DAMAGES
(INCLUDING, BUT NOT LIMITED TO, PROCUREMENT OF SUBSTITUTE GOODS OR SERVICES;
LOSS OF USE, DATA, OR PROFITS; OR BUSINESS INTERRUPTION) HOWEVER CAUSED AND ON
ANY THEORY OF LIABILITY, WHETHER IN CONTRACT, STRICT LIABILITY, OR TORT (INCLUDING
NEGLIGENCE OR OTHERWISE) ARISING IN ANY WAY OUT OF THE USE OF THIS SOFTWARE, EVEN
IF ADVISED OF THE POSSIBILITY OF SUCH DAMAGE.
Page 96

Kontakta SAMSUNG
Om du har några frågor eller synpunkter om Samsungs produkter,
är du välkommen att kontakta Samsung Support.
0771 726 7864 (SAMSUNG)
www.samsung.com
Page 97

Robotstøvsuger
brugervejledning
SR8950
Denne manual er trykt p_100% genbrugspapir.
Læs brugervejledningen omhyggeligt, inden du bruger denne enhed.
✻
Må kun anvendes indendørs.
✻
imagine the possibilities
Tak fordi du har købt et Samsung produkt.
Vind når du registrerer dit produkt på
www.samsung.com/register
Dansk
Page 98

sikkerhedsoplysninger
SIKKERHEDSOPLYSNINGER
ADVARSEL
ADVARSEL
Inden du bruger dette apparat, skal du læse denne vejledning omhyggeligt og gemme den til •
senere brug.
Da følgende brugervejledning omfatter forskellige modeller, kan egenskaberne ved din støvsuger •
være lidt anderledes end det, der er beskrevet i denne vejledning.
ANVENDTE FORSIGTIG/ADVARSEL-SYMBOLER
ADVARSEL
FORSIGTIG
Indikerer, at der er fare for død eller alvorlig personskade.
Indikerer, at der er risiko for personskade eller skade på ting.
ANDRE ANVENDTE SYMBOLER
BEMÆRK
Indikerer, at der er risiko for personskade eller skade på ting.
02_ sikkerhedsoplysninger
Page 99

VIGTIGE SIKKERHEDSINSTRUKSER
Ved brug af et elektrisk apparat skal grundlæggende forholdsregler overholdes, herunder følgende:
LÆS HELE VEJLEDNINGEN, INDEN DU TAGER DIN ROBOTSTØVSUGER I
BRUG.
Fjern fra stikkontakten, når den ikke anvendes, og ved udførelse af vedligeholdelse.
ADVARSEL: For at reducere risikoen for brand, elektrisk stød eller skade:
GENERELT
Anvendelse kun som beskrevet i denne brugervejledning.•
Anvend ikke robotstøvsugeren eller opladeren, hvis de på nogen måde er beskadigede.•
Hvis støvsugeren ikke fungerer, som den skal, er blevet tabt, beskadiget, efterladt udendørs •
eller tabt i vand, skal du indlevere den til et kundeservicecenter.
Betjen ikke opladeren eller robotstøvsugeren med våde hænder.•
Brug den kun på tørre, indendørs overfl ader.•
Denne enhed må ikke bruges af personer (herunder børn) med begrænsede fysiske, motoriske •
eller mentale evner eller mangel på erfaring og viden, medmindre de overvåges eller undervises i
brugen af enheden af en person, der har ansvaret for deres sikkerhed.
Der skal altid føres tilsyn med børn for at sikre, at de ikke leger med enheden.•
BATTERIOPLADER
Undlad at ændre det polariserede stik, så det passer i en stikkontakt eller forlængerledning, der •
ikke er polariseret.
Brug den ikke udendørs eller på våde overfl ader.•
Fjern opladeren fra stikkontakten, når den ikke anvendes, og inden service.•
Brug kun den oplader, som producenten har leveret, til at oplade støvsugeren.•
Brug den ikke, hvis ledning eller stik er beskadiget.•
Træk eller bær ikke i ledningen, brug ikke ledningen som håndtag, luk ikke døren på ledningen, •
og træk ikke ledningen omkring skarpe kanter eller hjørner. Hold ledningen væk fra varme
overfl ader.
Brug ikke forlængerledninger eller stikkontakter med utilstrækkelig strømførende kapacitet.•
Sluk ikke apparatet ved at trække i ledningen. Tag fat i stikket, ikke i ledningen, når stikket skal •
ud.
Ødelæg eller brænd ikke batterierne, da disse eksploderer ved høje temperaturer.•
Undlad at åbne opladeren. Reparationer må kun udføres af et autoriseret serviceværksted.•
Udsæt ikke opladeren for høje temperaturer, og undgå, at støv eller fugtighed kommer i kontakt •
med opladeren.
sikkerhedsoplysninger _03
Page 100

sikkerhedsoplysninger
ROBOTSTØVSUGER
Opsug ikke hårde eller skarpe genstande, som f.eks. glas, nåle, skruer, mønter mv. •
Brug den ikke uden et monteret fi lter. Ved servicering af enheden: Anbring aldrig fi ngrene eller •
andre genstande i ventilatorrummet i tilfælde af, at enheden fejlagtigt tændes.
Anbring aldrig genstande i åbningerne. Brug den ikke, hvis en eller fl ere åbninger er blokerede. •
Hold åbningerne fri for støv, fnug, hår og alt, der kan reducere luftstrømmen.
Opsug ikke giftige materialer (klorin, ammoniak, afl øbsrens mv.).•
Opsug ikke noget, der brænder eller danner røg, som f.eks. cigaretter, tændstikker eller varm •
aske.
Brug den ikke til at opsuge brændbare eller letantændelige væsker, som f.eks. benzin, og •
anvend den ikke i områder, hvor disse kan være til stede.
Anvend ikke robotstøvsugeren i et lukket rum fyldt med dampe, der skyldes oliebaseret maling, •
fortynder, imprægneringsmaterialer, brændbart støv eller andre eksplosive eller giftige dampe.
Lækage fra battericeller kan forekomme ved ekstreme anvendelses- eller temperaturforhold. •
Hvis du får batterivæske på huden, vask da hurtigt huden med vand. Hvis batterivæsken
kommer i øjnene, skyl dem da straks med rent vand, og fortsæt i mindst 10 minutter. Søg
lægehjælp.
04_ sikkerhedsoplysninger
 Loading...