

Page 1
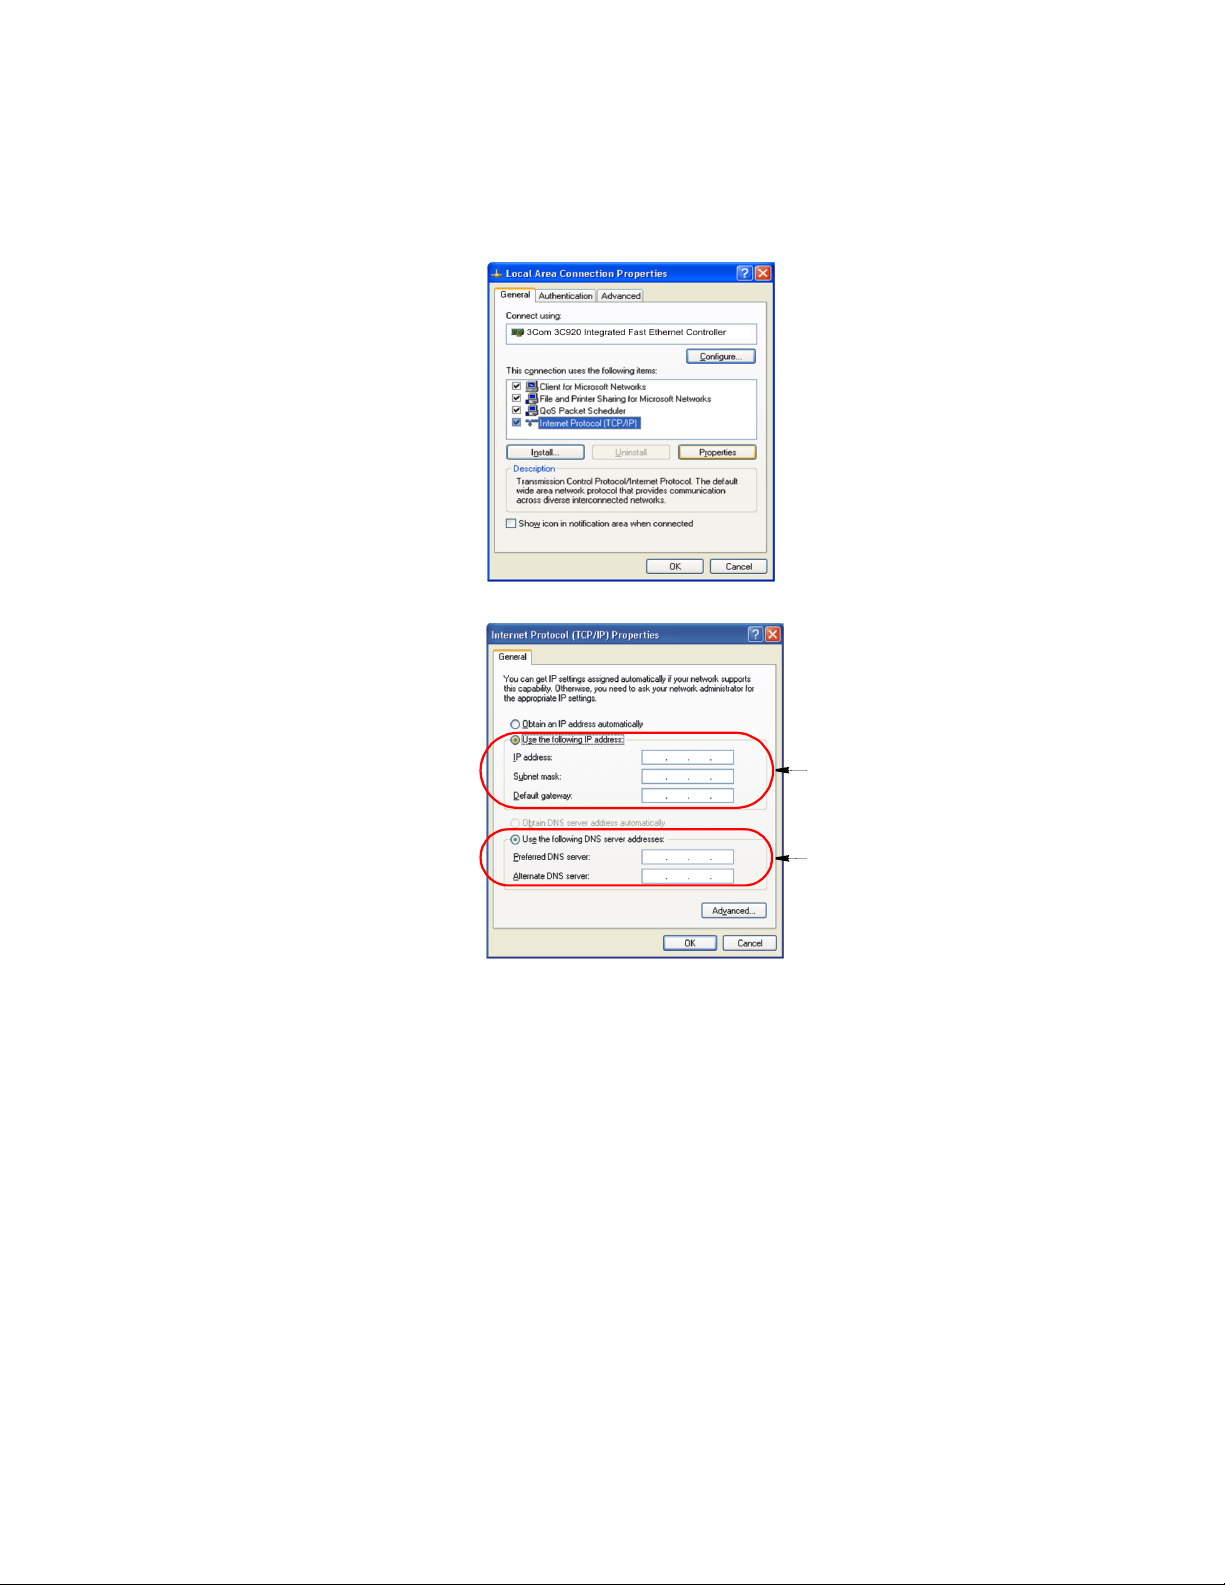
4. Select Internet Protocol (TCP/IP) in the “This connection uses the following
items:” box.
5. Click Properties. The TCP/IP Properties window opens.
Step 7
Step 8
6. Click “Use the following IP address” in the General tab
7. In the “Use the following IP address” box, enter your IP address:, subnet mask:
and Default Gateway:.
8. In the “Use the following DNS server addresses” box, Enter your Preferred DNS
server: and Alternate DNS server:.
9. Click OK when you finish the TCP/IP set-up.
Connecting to the Internet 31
Page 2
Wireless Connection (Factory Option)
Your computer’s wireless LAN adapter is ready to use for most situations, however if
your system does not have a DHCP server or you wish to personally configure your
wireless LAN connection, proceed as outlined in “Configuring Network Environment”
below.
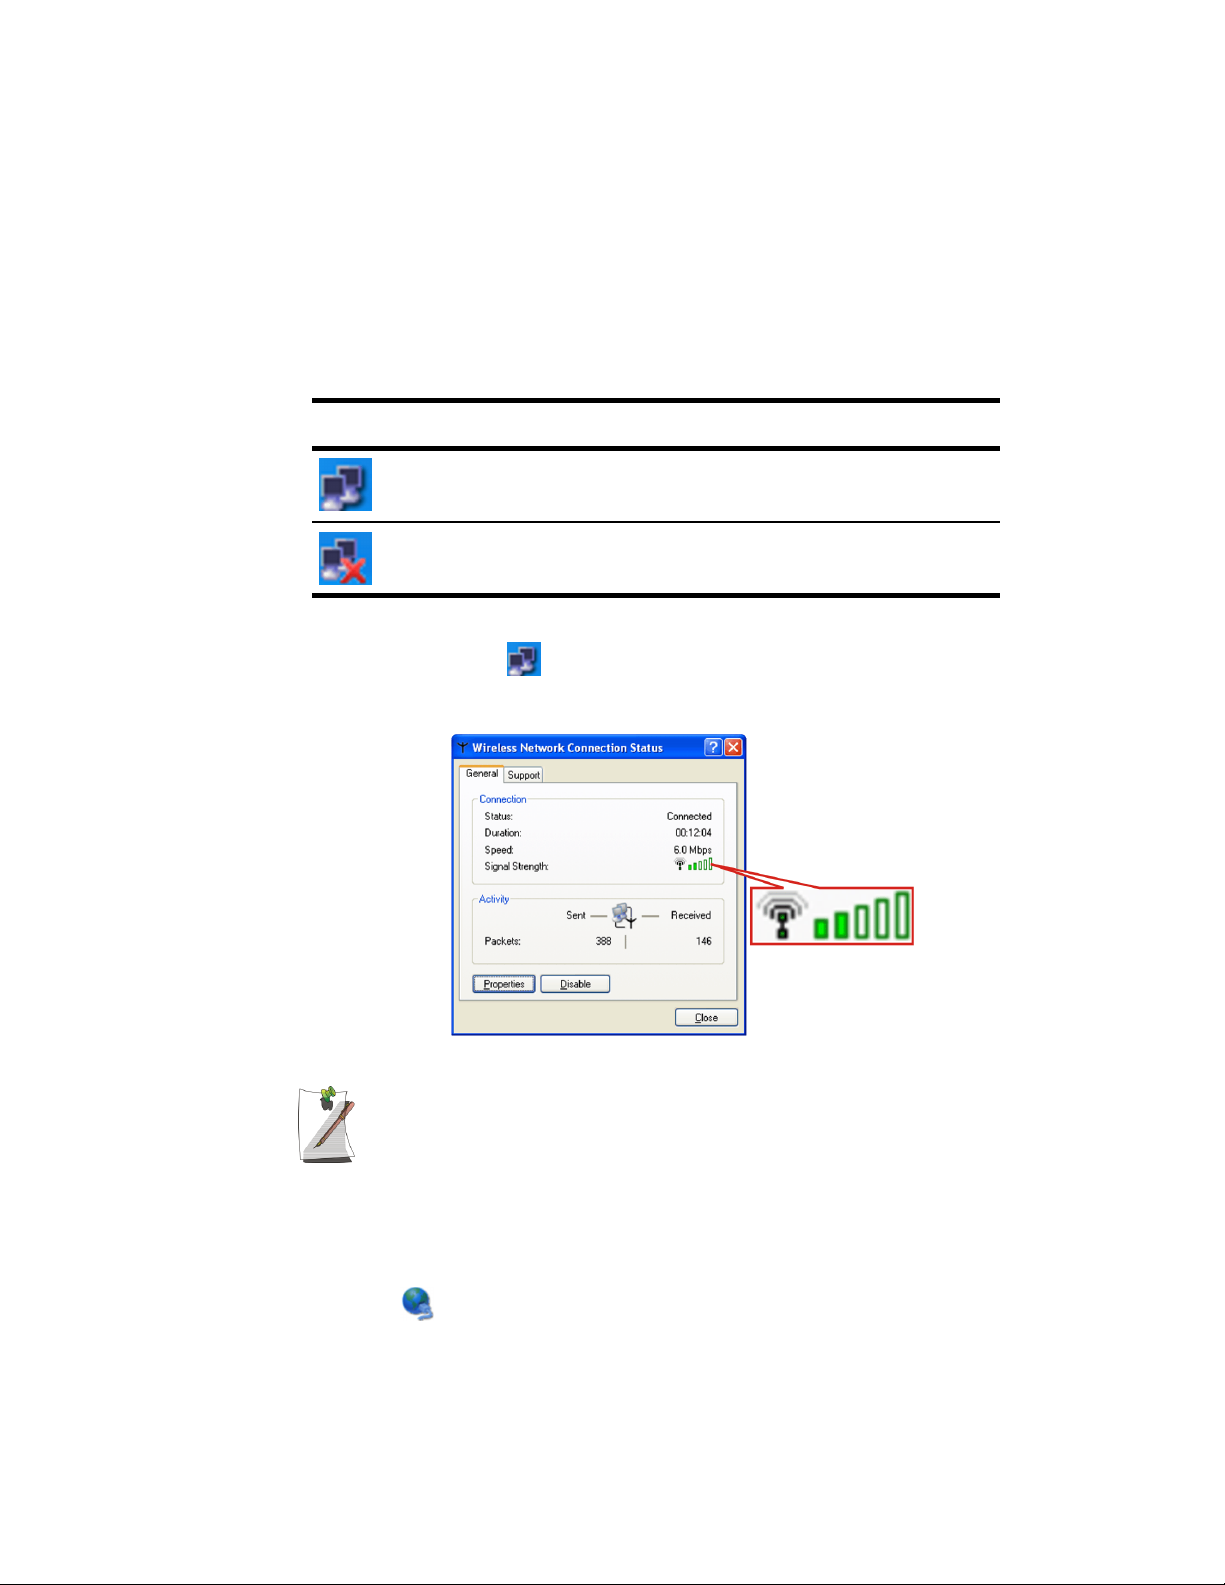
The table below shows the Windows taskbar icons for the wireless LAN.
Icon Name Description
Connection
Established
Connection
Unavailable
Displays if connection is available.
Displays if connection is unavailable.
To display relative Signal Strength:
1. Double Click the icon in the taskbar to display the Wireless Network
Connection Status window. This window also displays connection Status, Speed,
Duration and Activity.
Configuring Network Environment
Configure the Wireless Network Adapter as follows:
1. Click Start > Control Panel > Network and Internet Connections
2. Click icon (Network Connections)
32 Users Manual
Network Protocols:
You may need to consult your System Administrator if their network network
protocols and settings are required for your wireless LAN environment.
Page 3
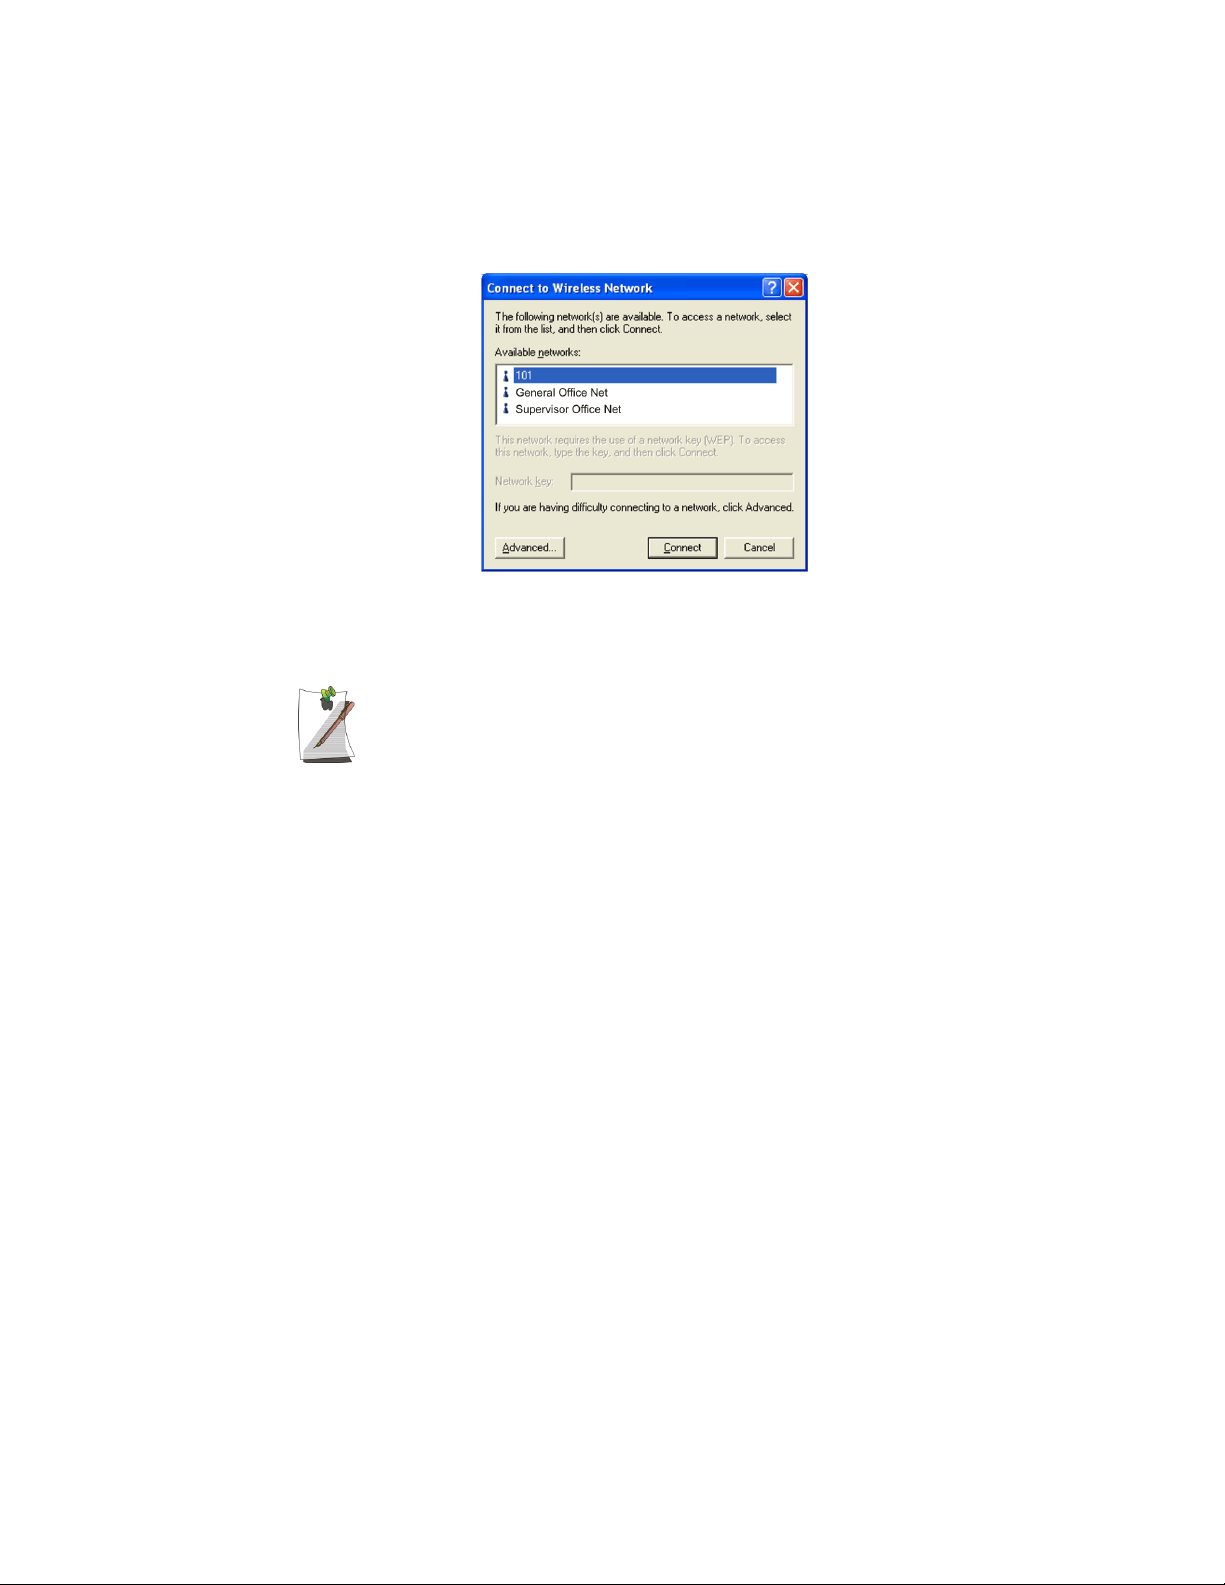
3. Double-Click the Wireless Network Connection icon. The Connect to Wireless
Network window pops up.
44 x 49
4. Select one of the available networks in the Available networks section, if
displayed.
No networks are displayed
Office - Consult your system administrator.
Home - Verify your access point is working properly.
5. Click the Connect button. The Wireless Network Connection icon in the control
panel will show your connection is Enabled. You may proceed using the network
as normal wired LAN connections.
Change Wireless Network Access Point as follows:
1. Right Click the Wireless Network Connection icon.
2. Click View Available Wireless Networks. The Connect to Wireless Network
window pops up.
3. Select the new network from the available networks in the Available networks
section, if displayed.
4. Click Connect button. The Wireless Network Connection icon in the control
panel will show your connection is Enabled. You may proceed using the network
as normal wired LAN connections
Connecting to the Internet 33
Page 4

Using the Multi-Bays in the Docking Station
Your computer includes the docking station that holds a 5.25" and a 3.5" device in the
two multi-bays. Below is a listing of the device types you may install in your docking
station.
The default system is purchased with CD-ROM and FDD devices.
5.25” Devices: CD-ROM drive DVD-ROM drive CD/DVD-Combo
CD-RW/DVD Combo 2nd HDD
3.50” Devices: FDD
Changing Devices
This section will discuss changing the 5.25" and 3.5" devices.
Changing a 5.25” Device
To change from one 5.25” device to another simply follow the steps below:
1. Turn off the system.
2. Detach the system from the docking station.
3. Slide the 5.25” multi-bay latch toward the middle of the multi-bay.
4. The device will pop out approximately 2cm.
5. Remove the device.
6. Insert the new 5.25” device into the multi-bay until the multi-bay latch clicks.
34 Users Manual
5.25" Device
Page 5

Changing a 3.5” Device
The method of changing a 3.5” device is same as changing a 5.25” device except you
have to use 3.5” multi-bay latch instead of 5.25”s.
3.5" Device
Using the Multi-Bays in the Docking Station 35
Page 6

Using the Disk Drives
Using the Floppy Disk Drive
Your computer comes with a 1.44 MB, 3.5-inch, floppy drive.
To use a floppy disk in your computer, insert it into the floppy drive.
Floppy Disk Eject Button
To remove a floppy disk, press the floppy disk eject button on the front of the floppy
drive.
To protect the data on your floppy disks, follow the manufacturers guidelines.
Using the CD/DVD-ROM Drive
Compact discs are designed so that you can easily insert one into the computer when
you need it, and then remove it.
1. Press the button on the CD-ROM or DVD-ROM drive, and the tray slides out.
36 Users Manual
DVD Notes:
A DVD player is a factory option and if you ordered this option you will have to
install the provided DVD software to view the DVD Title.
(Do not lean on the tray; because it will not support much weight.)
Page 7

CD/DVD Drive Warnings:
Do not place reflective objects other than the CD/DVD disks in the disk slot
because of possible hazardous laser emissions. The laser beam used in this
CD/DVD-ROM drive is harmful to the eyes. Do not attempt to disassemble the
CD/DVD-ROM drive. Refer servicing to your authorized service center.
Do not touch the CD/DVD lens, doing so may damage the device.
CD/DVD Precautions:
The tray may be stuck, in which case straighten out a paper clip, insert
it into the Emergency Eject hole in the front of the CD/DVD-ROM and push it
until the tray ejects.
A LED on the drive tray is on when the computer is reading from a CD. Do not
remove a disc when this LED is on.
To clean a CD/DVD, wipe from the center outwards with clean and dry cloth.
Remove the CD/DVD when the drive activity LED is off.
2. Insert a CD/DVD, label side up (or remove a disc, if you have finished using it).
3. Push the tray in gently to close the drive tray.
Eject Button
CD/DVD-ROM LED
Emergency Eject Hole
Install and/or start a CD-based program as you would run a program on a floppy disk.
See your operating system documentation for more information on running programs.
Using the Disk Drives 37
Page 8

Working with PCMCIA (PC) Cards
By installing PC Cards, you can add functions to your notebook computer similar to
those found on add-in boards for desktop computers. Available PC Cards include:
• Input/output, such as modem, network, video capture, and SCSI cards.
• Storage, such as hard drive and flash memory cards.
Your computer includes the following PC Card support:
• One PC-Card slot: You can install Type I or II cards in the slot.
• CardBus hardware and software: CardBus enables the computer to use 32-bit
PCMCIA Cards. Windows supports 32-bit and 16-bit PC Cards.
• Zoomed video: Both PC Card slots and the video chip on your computer
support zoomed video. When you install a zoom video PC Card slot, data can
be transferred directly from the PC Card to video and audio systems without
going through the microprocessor. Video conferencing and real-time
multimedia devices, such as video cameras, are supported by zoomed video.
Maintaining PC Cards
To maintain your PC Cards, follow these guidelines:
Using PC Cards
You can install PC Cards while the computer is on.
To insert a PC Card into a slot:
1. If the “Slot Guard” is in place, remove it.
2. Align the card with a slot and insert the card into the slot until it locks in place. See
38 Users Manual
• Keep cards away from excessive heat, direct sunlight, and liquids.
• Do not drop, bend, flex, or crush cards when handling.
• Keep dust, oil, water, magnets, and static electricity away from PC Cards.
• When a card is not in use, carry it in its protective carrying case.
• Some PC Cards include cables that extend from the back of the cards. Be
careful not to bend or put excessive strain on these cables.
“Using PC Cards” on page 38.
Page 9

Eject button
PC Card
Insert PC card with product
information facing up
Windows automatically assigns computer resources (such as communication ports and
memory addresses) to the PC Card installed in your computer.
To remove a PC Card from your computer:
Use the following procedures to remove PC Cards, or you may lose data that
is being stored to a card.
1. Click icon on the taskbar.
2. Select the card currently in use, and click the Stop button.
The eject button for the card slot operates in two steps, therefore to remove a PC
Card:
Eject button
3. Push the eject button once to pop it outward then push the eject button again to
eject the card.
4. Pull the card out of the PC Card slot.
Working with PCMCIA (PC) Cards 39
Page 10

Multimedia Functions/Equipment
Media Player
You can play video and audio CD files with the Windows Media Player, as well as
watching TV, video and listening to the radio through internet. The on-board audio
hardware and software of your computer enable the computer to play audio/video
compact discs. The instructions to play a video CD-ROM are the same as the
instructions for the audio CD below. If you wish to do so, you can attach external
speakers to the Headphone jack.
Playing a Audio/Multimedia CD
To play an CD follow the instructions below:
1. Insert a compact disc into your CD-ROM drive.
2. Press the button on the CD-ROM drive to open the CD-ROM device.
3. Insert a CD, label side up.
4. Carefully push the tray in to close the drive tray. The Windows Media Player
button appears on the taskbar if not already there, and the music begins to play. If
the disk does not play click Start > All Programs > Accessories >
Entertainment > Windows Media Player.
Removing the Audio/Multimedia CD
To remove the CD follow the instructions below:
1. Click Start > All Programs > Accessories > Entertainment > Windows Media
2. Click Stop in the Windows Media Player window or simply close the Windows
3. Press the button on your CD-ROM drive. The drive tray opens and you can remove
4. For more information on playing compact discs, see the Help menu in the
40 Users Manual
CD LED On:
A LED on the drive tray is on when the computer is reading from a CD. Do not
remove a disc when this LED is on.
Player to open the Windows Media Player window, if not already open.
media player.
the CD from the CD-ROM drive.
Windows Media Player window.
 Loading...