

Page 1

Contents
1 Checking Out Your Gateway 200 . . . . . . . . . . . . . . . . . . . . . . . . . . . . . . . . 1
Front . . . . . . . . . . . . . . . . . . . . . . . . . . . . . . . . . . . . . . . . . . . . . . . . . . . . . . . . . . . . . 2
Left side . . . . . . . . . . . . . . . . . . . . . . . . . . . . . . . . . . . . . . . . . . . . . . . . . . . . . . . . . . . 3
Right side . . . . . . . . . . . . . . . . . . . . . . . . . . . . . . . . . . . . . . . . . . . . . . . . . . . . . . . . . . 5
Back . . . . . . . . . . . . . . . . . . . . . . . . . . . . . . . . . . . . . . . . . . . . . . . . . . . . . . . . . . . . . . 6
Bottom . . . . . . . . . . . . . . . . . . . . . . . . . . . . . . . . . . . . . . . . . . . . . . . . . . . . . . . . . . . . 7
Keyboard area . . . . . . . . . . . . . . . . . . . . . . . . . . . . . . . . . . . . . . . . . . . . . . . . . . . . . . 8
Identifying your model . . . . . . . . . . . . . . . . . . . . . . . . . . . . . . . . . . . . . . . . . . . . . . . 10
Accessories . . . . . . . . . . . . . . . . . . . . . . . . . . . . . . . . . . . . . . . . . . . . . . . . . . . . . . . 11
2 Checking Out Your Docking Station . . . . . . . . . . . . . . . . . . . . . . . . . . . . 13
Top . . . . . . . . . . . . . . . . . . . . . . . . . . . . . . . . . . . . . . . . . . . . . . . . . . . . . . . . . . . . . . 14
Front . . . . . . . . . . . . . . . . . . . . . . . . . . . . . . . . . . . . . . . . . . . . . . . . . . . . . . . . . . . . 15
Left Side . . . . . . . . . . . . . . . . . . . . . . . . . . . . . . . . . . . . . . . . . . . . . . . . . . . . . . . . . 16
Right Side . . . . . . . . . . . . . . . . . . . . . . . . . . . . . . . . . . . . . . . . . . . . . . . . . . . . . . . . 17
Back . . . . . . . . . . . . . . . . . . . . . . . . . . . . . . . . . . . . . . . . . . . . . . . . . . . . . . . . . . . . . 18
Bottom . . . . . . . . . . . . . . . . . . . . . . . . . . . . . . . . . . . . . . . . . . . . . . . . . . . . . . . . . . . 20
3Getting Started. . . . . . . . . . . . . . . . . . . . . . . . . . . . . . . . . . . . . . . . . . . . . . . . . . 21
Connecting the AC adapter . . . . . . . . . . . . . . . . . . . . . . . . . . . . . . . . . . . . . . . . . . . 22
Protecting from power source problems . . . . . . . . . . . . . . . . . . . . . . . . . . . . . . 24
Starting your notebook . . . . . . . . . . . . . . . . . . . . . . . . . . . . . . . . . . . . . . . . . . . . . . 25
Waking up your notebook . . . . . . . . . . . . . . . . . . . . . . . . . . . . . . . . . . . . . . . . . 25
Turning off your notebook . . . . . . . . . . . . . . . . . . . . . . . . . . . . . . . . . . . . . . . . . . . . 26
Connecting to the docking station . . . . . . . . . . . . . . . . . . . . . . . . . . . . . . . . . . . . . . 27
Separating from the docking station . . . . . . . . . . . . . . . . . . . . . . . . . . . . . . . . . . . . 28
Status indicators . . . . . . . . . . . . . . . . . . . . . . . . . . . . . . . . . . . . . . . . . . . . . . . . . . . 30
Using the keyboard . . . . . . . . . . . . . . . . . . . . . . . . . . . . . . . . . . . . . . . . . . . . . . . . . 31
Key types . . . . . . . . . . . . . . . . . . . . . . . . . . . . . . . . . . . . . . . . . . . . . . . . . . . . . 32
System key combinations . . . . . . . . . . . . . . . . . . . . . . . . . . . . . . . . . . . . . . . . . 33
User buttons and keys . . . . . . . . . . . . . . . . . . . . . . . . . . . . . . . . . . . . . . . . . . . 35
Using the EZ Pad touchpad . . . . . . . . . . . . . . . . . . . . . . . . . . . . . . . . . . . . . . . . . . 36
Using the touchpad . . . . . . . . . . . . . . . . . . . . . . . . . . . . . . . . . . . . . . . . . . . . . . 37
Connecting the modem . . . . . . . . . . . . . . . . . . . . . . . . . . . . . . . . . . . . . . . . . . . . . . 38
Connecting to an Ethernet network . . . . . . . . . . . . . . . . . . . . . . . . . . . . . . . . . . . . 39
Broadband Internet connections . . . . . . . . . . . . . . . . . . . . . . . . . . . . . . . . . . . . 40
Installing a printer, scanner, or other peripheral device . . . . . . . . . . . . . . . . . . . . . 41
i
Page 2

4Getting Help. . . . . . . . . . . . . . . . . . . . . . . . . . . . . . . . . . . . . . . . . . . . . . . . . . . . .43
5 Windows Basics. . . . . . . . . . . . . . . . . . . . . . . . . . . . . . . . . . . . . . . . . . . . . . . . .45
6 Using the Internet . . . . . . . . . . . . . . . . . . . . . . . . . . . . . . . . . . . . . . . . . . . . . . .47
7 Using Multimedia . . . . . . . . . . . . . . . . . . . . . . . . . . . . . . . . . . . . . . . . . . . . . . . .49
Using drives . . . . . . . . . . . . . . . . . . . . . . . . . . . . . . . . . . . . . . . . . . . . . . . . . . . . . . .50
Using diskettes . . . . . . . . . . . . . . . . . . . . . . . . . . . . . . . . . . . . . . . . . . . . . . . . . . . . .51
Using the CD, CD-RW, or DVD drive . . . . . . . . . . . . . . . . . . . . . . . . . . . . . . . . . . .52
Inserting a CD, CD-RW, or DVD . . . . . . . . . . . . . . . . . . . . . . . . . . . . . . . . . . . .52
Using CDRW . . . . . . . . . . . . . . . . . . . . . . . . . . . . . . . . . . . . . . . . . . . . . . . . . . . . . .53
Viewing the display on a television . . . . . . . . . . . . . . . . . . . . . . . . . . . . . . . . . . . . .54
Capturing video . . . . . . . . . . . . . . . . . . . . . . . . . . . . . . . . . . . . . . . . . . . . . . . . . . . . .55
8 Sending and Receiving Faxes . . . . . . . . . . . . . . . . . . . . . . . . . . . . . . . . . . .57
9 Managing Power. . . . . . . . . . . . . . . . . . . . . . . . . . . . . . . . . . . . . . . . . . . . . . . . .59
Monitoring the battery charge . . . . . . . . . . . . . . . . . . . . . . . . . . . . . . . . . . . . . . . . . .60
Recharging the battery . . . . . . . . . . . . . . . . . . . . . . . . . . . . . . . . . . . . . . . . . . . . . . .61
Recalibrating the battery . . . . . . . . . . . . . . . . . . . . . . . . . . . . . . . . . . . . . . . . . . . . . .62
Changing batteries . . . . . . . . . . . . . . . . . . . . . . . . . . . . . . . . . . . . . . . . . . . . . . . . . .63
Extending battery life . . . . . . . . . . . . . . . . . . . . . . . . . . . . . . . . . . . . . . . . . . . . . . . .65
Conserving battery power . . . . . . . . . . . . . . . . . . . . . . . . . . . . . . . . . . . . . . . . .65
Using alternate power sources . . . . . . . . . . . . . . . . . . . . . . . . . . . . . . . . . . . . .65
Changing power modes . . . . . . . . . . . . . . . . . . . . . . . . . . . . . . . . . . . . . . . . . . .66
Changing power settings . . . . . . . . . . . . . . . . . . . . . . . . . . . . . . . . . . . . . . . . . . . . .67
Changing the power scheme . . . . . . . . . . . . . . . . . . . . . . . . . . . . . . . . . . . . . . .67
Changing alarm options . . . . . . . . . . . . . . . . . . . . . . . . . . . . . . . . . . . . . . . . . . .69
Changing advanced settings . . . . . . . . . . . . . . . . . . . . . . . . . . . . . . . . . . . . . . .70
Activating and Using Hibernate Mode . . . . . . . . . . . . . . . . . . . . . . . . . . . . . . . .71
Changing SpeedStep settings . . . . . . . . . . . . . . . . . . . . . . . . . . . . . . . . . . . . . .72
10 Travel tips . . . . . . . . . . . . . . . . . . . . . . . . . . . . . . . . . . . . . . . . . . . . . . . . . . . . . . .75
Modem . . . . . . . . . . . . . . . . . . . . . . . . . . . . . . . . . . . . . . . . . . . . . . . . . . . . . . . . . . .76
Radio frequency wireless connections . . . . . . . . . . . . . . . . . . . . . . . . . . . . . . . . . . .76
Files . . . . . . . . . . . . . . . . . . . . . . . . . . . . . . . . . . . . . . . . . . . . . . . . . . . . . . . . . . . . . .77
Security . . . . . . . . . . . . . . . . . . . . . . . . . . . . . . . . . . . . . . . . . . . . . . . . . . . . . . . . . . . 77
Power . . . . . . . . . . . . . . . . . . . . . . . . . . . . . . . . . . . . . . . . . . . . . . . . . . . . . . . . . . . .78
ii
Page 3

11 Customizing Your Notebook . . . . . . . . . . . . . . . . . . . . . . . . . . . . . . . . . . . . 79
12 Upgrading Your Notebook . . . . . . . . . . . . . . . . . . . . . . . . . . . . . . . . . . . . . . 81
Adding PC Cards . . . . . . . . . . . . . . . . . . . . . . . . . . . . . . . . . . . . . . . . . . . . . . . . . . . 82
Changing bay modules . . . . . . . . . . . . . . . . . . . . . . . . . . . . . . . . . . . . . . . . . . . . . . 84
Preventing static electricity discharge . . . . . . . . . . . . . . . . . . . . . . . . . . . . . . . . . . . 86
Installing memory . . . . . . . . . . . . . . . . . . . . . . . . . . . . . . . . . . . . . . . . . . . . . . . . . . 87
13 Networking Your Notebook . . . . . . . . . . . . . . . . . . . . . . . . . . . . . . . . . . . . . 91
The benefits of using a network . . . . . . . . . . . . . . . . . . . . . . . . . . . . . . . . . . . . . . . 92
Sharing a single Internet connection . . . . . . . . . . . . . . . . . . . . . . . . . . . . . . . . 92
Sharing drives . . . . . . . . . . . . . . . . . . . . . . . . . . . . . . . . . . . . . . . . . . . . . . . . . . 92
Sharing peripheral devices . . . . . . . . . . . . . . . . . . . . . . . . . . . . . . . . . . . . . . . . 92
Streaming audio and video files . . . . . . . . . . . . . . . . . . . . . . . . . . . . . . . . . . . . 93
Playing multi-player games . . . . . . . . . . . . . . . . . . . . . . . . . . . . . . . . . . . . . . . . 93
Example network . . . . . . . . . . . . . . . . . . . . . . . . . . . . . . . . . . . . . . . . . . . . . . . . . . . 94
Selecting a network connection . . . . . . . . . . . . . . . . . . . . . . . . . . . . . . . . . . . . . . . 95
Wired connections . . . . . . . . . . . . . . . . . . . . . . . . . . . . . . . . . . . . . . . . . . . . . . . 95
Wireless Connections . . . . . . . . . . . . . . . . . . . . . . . . . . . . . . . . . . . . . . . . . . . . 96
Assessing your connection needs . . . . . . . . . . . . . . . . . . . . . . . . . . . . . . . . . . 97
Comparing data transfer speed . . . . . . . . . . . . . . . . . . . . . . . . . . . . . . . . . . . . 98
Using a wireless network . . . . . . . . . . . . . . . . . . . . . . . . . . . . . . . . . . . . . . . . . . . 100
Using wireless Ethernet in Windows XP . . . . . . . . . . . . . . . . . . . . . . . . . . . . 101
Using wireless Ethernet in Windows 98 and Windows 2000 . . . . . . . . . . . . . 126
Purchasing additional network equipment . . . . . . . . . . . . . . . . . . . . . . . . . . . . . . 138
HPNA . . . . . . . . . . . . . . . . . . . . . . . . . . . . . . . . . . . . . . . . . . . . . . . . . . . . . . . 138
Ethernet . . . . . . . . . . . . . . . . . . . . . . . . . . . . . . . . . . . . . . . . . . . . . . . . . . . . . . 139
Wireless Ethernet . . . . . . . . . . . . . . . . . . . . . . . . . . . . . . . . . . . . . . . . . . . . . . 140
For more information . . . . . . . . . . . . . . . . . . . . . . . . . . . . . . . . . . . . . . . . . . . . . . . 140
14 Moving From Your Old Computer. . . . . . . . . . . . . . . . . . . . . . . . . . . . . . 141
15 Maintaining Your Notebook . . . . . . . . . . . . . . . . . . . . . . . . . . . . . . . . . . . . 143
16 Restoring Software . . . . . . . . . . . . . . . . . . . . . . . . . . . . . . . . . . . . . . . . . . . . 145
17 Troubleshooting . . . . . . . . . . . . . . . . . . . . . . . . . . . . . . . . . . . . . . . . . . . . . . . 147
Safety guidelines . . . . . . . . . . . . . . . . . . . . . . . . . . . . . . . . . . . . . . . . . . . . . . . . . . 148
First steps . . . . . . . . . . . . . . . . . . . . . . . . . . . . . . . . . . . . . . . . . . . . . . . . . . . . . . . 149
Software support tools . . . . . . . . . . . . . . . . . . . . . . . . . . . . . . . . . . . . . . . . . . . . . . 150
Troubleshooting . . . . . . . . . . . . . . . . . . . . . . . . . . . . . . . . . . . . . . . . . . . . . . . . . . . 151
CD, DVD, CD-RW, or DVD/CD-RW drives . . . . . . . . . . . . . . . . . . . . . . . . . . 151
iii
Page 4

Device installation . . . . . . . . . . . . . . . . . . . . . . . . . . . . . . . . . . . . . . . . . . . . . .153
Diskette drive . . . . . . . . . . . . . . . . . . . . . . . . . . . . . . . . . . . . . . . . . . . . . . . . . .154
File management . . . . . . . . . . . . . . . . . . . . . . . . . . . . . . . . . . . . . . . . . . . . . . .155
Hard drive . . . . . . . . . . . . . . . . . . . . . . . . . . . . . . . . . . . . . . . . . . . . . . . . . . . . .156
Internet . . . . . . . . . . . . . . . . . . . . . . . . . . . . . . . . . . . . . . . . . . . . . . . . . . . . . . . 156
Keyboard . . . . . . . . . . . . . . . . . . . . . . . . . . . . . . . . . . . . . . . . . . . . . . . . . . . . .158
LCD panel . . . . . . . . . . . . . . . . . . . . . . . . . . . . . . . . . . . . . . . . . . . . . . . . . . . .158
Memory . . . . . . . . . . . . . . . . . . . . . . . . . . . . . . . . . . . . . . . . . . . . . . . . . . . . . . .159
Modem . . . . . . . . . . . . . . . . . . . . . . . . . . . . . . . . . . . . . . . . . . . . . . . . . . . . . . .159
Mouse . . . . . . . . . . . . . . . . . . . . . . . . . . . . . . . . . . . . . . . . . . . . . . . . . . . . . . . .164
Networks . . . . . . . . . . . . . . . . . . . . . . . . . . . . . . . . . . . . . . . . . . . . . . . . . . . . . .164
Passwords . . . . . . . . . . . . . . . . . . . . . . . . . . . . . . . . . . . . . . . . . . . . . . . . . . . .165
PC Cards . . . . . . . . . . . . . . . . . . . . . . . . . . . . . . . . . . . . . . . . . . . . . . . . . . . . .165
Power . . . . . . . . . . . . . . . . . . . . . . . . . . . . . . . . . . . . . . . . . . . . . . . . . . . . . . . . 165
Printer . . . . . . . . . . . . . . . . . . . . . . . . . . . . . . . . . . . . . . . . . . . . . . . . . . . . . . . .166
Sound . . . . . . . . . . . . . . . . . . . . . . . . . . . . . . . . . . . . . . . . . . . . . . . . . . . . . . . .168
Video . . . . . . . . . . . . . . . . . . . . . . . . . . . . . . . . . . . . . . . . . . . . . . . . . . . . . . . . 168
Telephone support . . . . . . . . . . . . . . . . . . . . . . . . . . . . . . . . . . . . . . . . . . . . . . . . .169
Before calling Gateway Technical Support . . . . . . . . . . . . . . . . . . . . . . . . . . .169
Telephone numbers . . . . . . . . . . . . . . . . . . . . . . . . . . . . . . . . . . . . . . . . . . . . .170
Tutoring and training . . . . . . . . . . . . . . . . . . . . . . . . . . . . . . . . . . . . . . . . . . . . . . . .171
Self-help . . . . . . . . . . . . . . . . . . . . . . . . . . . . . . . . . . . . . . . . . . . . . . . . . . . . . . 171
Tutoring . . . . . . . . . . . . . . . . . . . . . . . . . . . . . . . . . . . . . . . . . . . . . . . . . . . . . .171
Training . . . . . . . . . . . . . . . . . . . . . . . . . . . . . . . . . . . . . . . . . . . . . . . . . . . . . . .171
A Safety, Regulatory, and Legal Information. . . . . . . . . . . . . . . . . . . . . .173
Index. . . . . . . . . . . . . . . . . . . . . . . . . . . . . . . . . . . . . . . . . . . . . . . . . . . . . . . . . . . . . . 191
iv
Page 5

Checking Out Your Gateway 200
Tips & Tricks To access the contents of this guide while you are traveling,
1
download an electronic copy from
www.gateway.com/support/manlib/.
Insert Gateway 200 Cover Shot
www.gateway.com
1
Page 6

Chapter 1: Checking Out Your Gateway 200
Front
Insert Gateway 200 Front Shot
Component Icon Description
LCD panel release latch Open the LCD panel by sliding the release latch to the
right.
2
www.gateway.com
Page 7
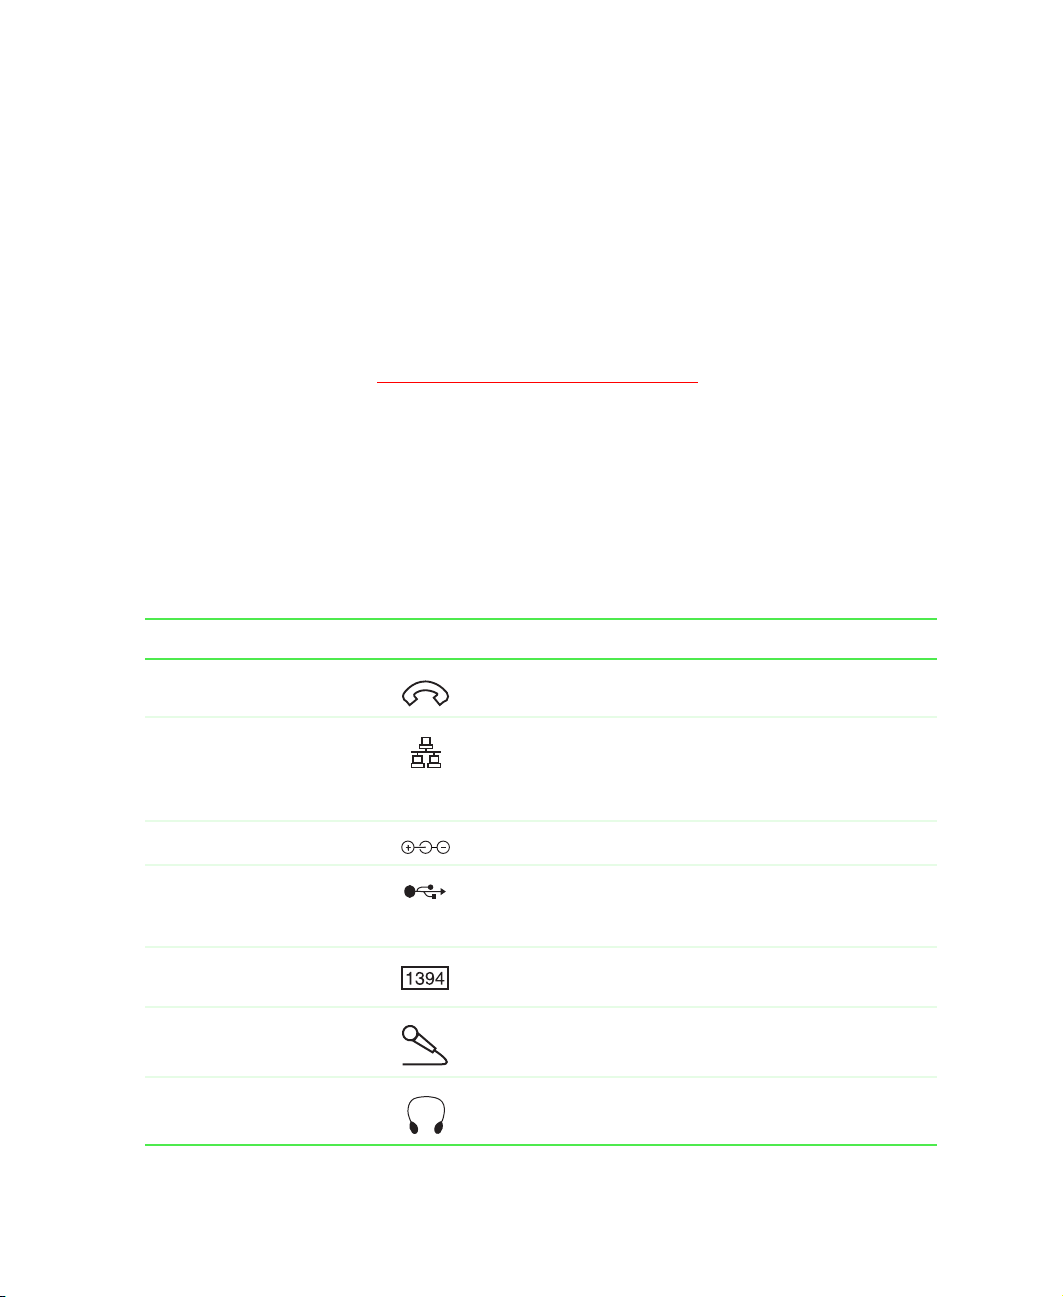
Left side
Left side
Insert Gateway 200 Left Side Shot
Component Icon Description
Modem jack Plug a modem cable into this jack.
Ethernet jack Plug a 10/100 Ethernet network cable into this jack. For
more information, see “Connecting to an Ethernet
network” on page 39 and “Networking Your Notebook” on
page 91.
Power connector Plug the AC adapter cord into this connector.
USB port Plug USB (Universal Serial Bus) devices (such as a USB
Iomega™ Zip™ drive, printer, scanner, or camera) into
this port.
®
IEEE 1394 port Plug an IEEE 1394 (also known as Firewire
cable into this jack.
Microphone jack Plug a microphone into this jack.
Headphone jack Plug amplified speakers or headphones into this jack.
www.gateway.com
or i.Link®)
3
Page 8

Chapter 1: Checking Out Your Gateway 200
Component Icon Description
PC Card eject button Press the eject button to remove a PC Card from the
PC Card slot Insert one Type I, II, or Zoom Video PC Card into this
PC Card slot.
slot. For more information, see “Adding PC Cards” on
page 82.
4
www.gateway.com
Page 9

Right side
Right side
Insert Gateway 200 Right Side Shot
Component Icon Description
Ventilation fan Helps cool internal components. Do not block or insert
objects into these slots.
USB port Plug USB (Universal Serial Bus) devices (such as a USB
Iomega™ Zip™ drive, printer, scanner, or camera) into
this port.
Monitor port Plug an analog VGA monitor into this port.
www.gateway.com
5
Page 10

Chapter 1: Checking Out Your Gateway 200
Back
Insert Gateway 200 Back Side Shot
Component Icon Description
Kensington™ lock slot Secure your computer to an object by connecting a
Kensington cable lock to this slot.
6
www.gateway.com
Page 11

Bottom
Bottom
Component Icon Description
Battery release latch Slide to release the battery.
Memory bay Install a memory module in this bay.
Battery Insert the battery into this bay.
Docking connector Connect the docking station to this connector.
Warning! Power is passed through this connection. This
docking connection is UL certified for use only with
Gateway 200 docking stations.
System identification label Find the product model number and serial number on
this label.
www.gateway.com
7
Page 12

Chapter 1: Checking Out Your Gateway 200
Keyboard area
Component Icon Description
Internet Press to open your Web browser.
Status indicators For more information, see “Status indicators” on
page 30.
8
www.gateway.com
Page 13

Keyboard area
Component Icon Description
Power button Press to turn the power on or off. For more information
on configuring the power button mode, see “Using
alternate power sources” on page 65.
Keyboard For more information, see “Using the keyboard” on
page 31.
Speakers Provide audio output when headphones or amplified
speakers are not plugged in.
Touchpad For more information, see “Using the EZ Pad touchpad”
on page 36.
www.gateway.com
9
Page 14

Chapter 1: Checking Out Your Gateway 200
Identifying your model
The labels on the bottom of your computer contain information that
identifies your notebook model and its features. Gateway Technical Support
will need this information if you call for assistance.
Important The label shown below is for informational purposes only.
Label information varies by model.
Insert Gateway 200 Label
The following label indicates your computer contains a wireless
communications device.
10
Insert Wireless Label
The Microsoft Certificate of Authenticity label includes the product key code
for your operating system.
Insert Microsoft XP Label
www.gateway.com
Page 15

Accessories
Gateway offers accessories that can help you make the most of using your
notebook.
Batteries and automobile/airplane power adapters
If you run your notebook on battery power for extended periods, you may
want to buy an additional battery so that you can swap batteries when
necessary. See “Changing batteries” on page 63 for more information about
using a second battery on your notebook.
With an automobile/airplane power adapter, you can save battery power by
plugging your notebook into an automobile cigarette lighter or an airplane
in-flight power receptacle.
Carrying cases
Gateway has large-capacity carrying cases if you need additional space for
accessories or supplies.
Docking Station
Although you can attach devices directly to your notebook, a docking station
lets you make all of those connections at once. When you travel with your
notebook, you merely disconnect from the docking station instead of
unplugging all the devices.
Accessories
A docking station also provides additional ports and other expansion features
not included with your notebook. See “Checking Out Your Docking Station”
on page 13 for more information about using a docking station with your
notebook.
Peripheral devices
You can attach devices such as a keyboard, mouse, printer, or monitor to your
notebook or docking station.
Memory
Large programs, such as multimedia games or graphics programs, use a lot of
memory. If your programs are running more slowly than you think they
should, try adding more memory.
www.gateway.com
11
Page 16

Chapter 1: Checking Out Your Gateway 200
Printers
You can attach many types of printers to your notebook. The most common
types are inkjet and laser printers, which print in color or black and white.
See “Installing a printer, scanner, or other peripheral device” on page 41 for
more information about attaching a printer to your notebook.
Inkjet printers and cartridges are relatively inexpensive, but usually they are
slower than laser printers. Using an inkjet color printer, you can print pictures,
banners, and greeting cards, as well as documents.
Laser printers and cartridges are more expensive, but usually they print much
faster than inkjet printers. Laser printers are better than inkjet printers when
you are printing large documents.
12
www.gateway.com
Page 17

Checking Out Your Docking Station
The docking station gives you access to additional drives and ports not found
on the notebook.
The docking station also gives you a convenient way to attach external devices
such as a monitor, a full-size keyboard, or an AC adapter. Although devices
can be attached directly to the ports and jacks on the notebook, the docking
station lets you make all of those connections in one step.
2
www.gateway.com
13
Page 18

Chapter 2: Checking Out Your Docking Station
Top
Insert Gateway 200 Docking Station Top
Component Description
Docking connector Connect the notebook to this connector.
Warning! Power is passed through this connection. This
docking connection is UL certified for use only with
Gateway 200 notebooks.
3.5-inch module bay release latch Slide to release the module.
5.25-inch module bay release latch Slide to release the module.
14
www.gateway.com
Page 19

Front
Front
Insert Gateway 200 Docking Station Front
Component Description
5.25-inch module bay Use this bay for a CD, CD-RW, or DVD drive.
Undock button Press this button to prepare the notebook to be undocked while the
notebook is turned on.
3.5-inch module bay Use this bay for a diskette or second hard drive.
www.gateway.com
15
Page 20

Chapter 2: Checking Out Your Docking Station
Left Side
Insert Gateway 200 Docking Station Left Side
Component Icon Description
Docking release lever Pull to release the notebook from the docking station.
TV out jack Plug a cable into this jack so that you can view your
computer screen on a television. For more information,
see “Viewing the display on a television” on page 54.
Speaker Provides audio output.
16
www.gateway.com
Page 21

Right Side
Right Side
Insert Gateway 200 Docking Station Right Side
Component Description
Speaker Provides audio output.
Docking release lever Pull to release the notebook from the docking station.
www.gateway.com
17
Page 22
Chapter 2: Checking Out Your Docking Station
Back
Insert Gateway 200 Docking Station Back
Component Icon Description
PS/2 port Plug a PS/2® (Personal System/2) device (such as a
keyboard or mouse) into this port.
USB ports Plug USB (Universal Serial Bus) devices (such as a
USB Iomega™ Zip™ drive, printer, scanner, or camera)
into these ports.
IEEE 1394 port Plug an IEEE 1394 (also known as Firewire
cable into this jack.
Serial port Plug a serial device (such as a digital camera) into this
port.
Parallel port Plug a parallel device such as a printer into this port.
Monitor port Plug an analog VGA monitor into this port.
18
www.gateway.com
®
or i.Link®)
Page 23
Component Icon Description
Ethernet jack Plug a 10/100 Ethernet network cable into this jack. For
more information, see “Connecting to an Ethernet
network” on page 39 and “Using the Internet” on
page 47.
Power connector Plug the AC adapter cord into this connector.
Kensington™ lock slot Secure your computer to an object by connecting a
Kensington cable lock to this slot.
Back
www.gateway.com
19
Page 24

Chapter 2: Checking Out Your Docking Station
Bottom
Insert Gateway 200 Docking Station Bottom
Component Description
Docking release lever Pull to release the notebook from the docking station.
System identification label Find the product model number and serial number on this label.
5.25-inch module bay Use this bay for a CD, CD-RW, or DVD drive.
3.5-inch module bay Use this bay for a diskette or second hard drive.
20
www.gateway.com
Page 25

Getting Started
This chapter provides basic information about your Gateway notebook. Read
this chapter to find out:
■ How to connect the AC adapter
■ How to start and turn off your notebook
■ How to connect to and separate from the docking station
■ How to use the keyboard
■ How to use the EZ Pad touchpad
■ How to connect the modem
■ How to connect to an Ethernet network
■ How to install peripheral devices
3
www.gateway.com
21
Page 26

Chapter 3: Getting Started
Connecting the AC adapter
You can run your notebook using an AC adapter or the notebook battery. The
battery was shipped to you partially charged. You should use the AC adapter
right away to fully charge the battery. Allow 24 hours for the battery to fully
charge.
Important If the battery is not fully charged before you use your
notebook on battery power for the first time, the battery life
may be much shorter than you expect. If the battery life
seems short even after being charged for 24 hours, the
battery may need to be recalibrated. For information on
recalibrating the battery, see “Recalibrating the battery” on
page 62.
To connect the AC adapter:
1 Connect the power cord to the AC adapter.
22
Insert power cord to adapter picture
Warning Replace the power cord if it becomes damaged. The
replacement cord must be of the same type and voltage
rating as the original cord or the notebook may be
damaged.
www.gateway.com
Page 27

Connecting the AC adapter
2 Connect the AC adapter to your notebook’s power connector.
Insert adapter to notebook picture
-OR-
Connect the AC adapter to the docking station if the docking station is
installed.
Insert adapter to docking station picture
3 Plug the power cord into a wall outlet.
The battery charging indicator light turns on. If the battery charging
indicator light does not turn on, disconnect the adapter from your
notebook or docking station and repeat Step 2. See “Status indicators”
on page 30 for the location of the battery charging indicator.
www.gateway.com
23
Page 28

Chapter 3: Getting Started
4 When you finish using your notebook for the first time, turn the
notebook off and leave the notebook connected to AC power for at least
24 hours. The battery charge meters may not show a charge for several
hours. For more information about battery meters on your model, see
“Monitoring the battery charge” on page 60.
5 If the battery meters do not show a full charge after 24 hours, contact
Gateway Technical Support at www.gateway.com/support/contact.
Warning Do not attempt to disassemble the AC adapter. The
AC adapter has no user-replaceable or user-serviceable
parts inside. The AC adapter has dangerous voltages that
can cause serious injury or death. Contact Gateway about
returning defective AC adapters.
Protecting from power source problems
During a power surge, the voltage level of electricity coming into your
computer can increase to far above normal levels and cause data loss or system
damage. Protect your computer and peripheral devices by connecting them
to a surge protector, which absorbs voltage surges and prevents them from
reaching your computer.
24
Warning High voltages can enter your computer through both the
power cord and the modem connection. Protect your
computer by using a surge protector. If you have a
telephone modem, use a surge protector that has a
modem jack. If you have a cable modem, use a surge
protector that has an antenna/cable TV jack. During an
electrical storm, unplug both the surge protector and the
modem.
www.gateway.com
Page 29

Starting your notebook
To start the notebook:
1 Open your notebook by sliding the latch on the front of your notebook
to the right and lifting the LCD panel.
2 Press the power button located above the keyboard.
Insert Power button picture
The power button is preset to On/Off mode. However, you can also set
it to function in Standby/Resume mode. For instructions on changing
the power button mode, see “Changing power settings” on page 67.
Starting your notebook
3 If you are starting your notebook for the first time, follow the on-screen
instructions to set up your notebook.
Waking up your notebook
When you have not used your notebook for several minutes, it may enter a
power-saving mode called Standby. While in Standby, the power indicator
flashes. See “Status indicators” on page 30 for the location of the power
indicator.
If your notebook is in Standby mode, “wake” it up by pressing the power
button. For more information on changing power-saving settings, see
“Changing power settings” on page 67.
www.gateway.com
25
Page 30
Chapter 3: Getting Started
Turning off your notebook
To turn off your notebook in Windows XP:
1 Click Start, then click Turn Off Computer. The Turn Off Computer dialog box
opens.
2 Click Tu r n Off . Windows shuts down and turns off your notebook.
Important If for some reason you cannot use the Turn Off Computer
option in Windows to turn off your notebook, press and
hold the power button for about five seconds, then release
it.
To turn off your notebook in Windows 98 or Windows 2000:
1 Click Start, then click Shut Down. The Shut Down Windows dialog box
opens.
2 Select Shut down.
26
3 Click OK. Windows shuts down and turns off your notebook.
Important If for some reason you cannot use the Shut Down option
in Windows to turn off your notebook, press and hold the
power button for about five seconds, then release it.
www.gateway.com
Page 31

Connecting to the docking station
Connecting to the docking station
You can dock your notebook while the notebook is on or off.
To attach your notebook to the docking station:
1 Connect external devices to the ports and jacks on the docking station.
2 Connect the AC adapter to the docking station.
3 Place the front part of the notebook on the two docking station hooks.
Insert docking picture
4 Press the back part of the notebook down until it clicks fully into the
docking station.
Caution Press down on the outside edges of the notebook. Do not
press in the middle or you may damage the LCD panel.
Important Once the docking station is connected correctly, the “Dock
Change” message may appear on your display. You can
use the system once this message disappears.
www.gateway.com
27
Page 32

Chapter 3: Getting Started
Separating from the docking station
You can separate your notebook from the docking station while the notebook
is on or off.
To separate the notebook from the docking station while the notebook is off:
1 Disconnect the AC adapter from the docking station.
2 Pull out the two docking release levers until they click. The notebook will
pop up slightly.
Insert undocking system off picture
28
3 Tilt the back of the notebook up.
4 Lift the notebook off of the station.
5 Connect the AC adapter to the notebook.
www.gateway.com
Page 33

Separating from the docking station
To separate the notebook from the docking station while the notebook is on:
Caution Do not detach the notebook if the battery charge is less
than 20%. Instead, turn off your notebook and follow the
procedure “To separate the notebook from the docking
station while the notebook is off:” on page 28.
1 Press the Undock button on front of the docking station for one second.
Insert undocking system on picture
- OR -
In Windows XP, click
Computer menu item appears in the Start menu only while the notebook
is docked.
-OR-
In Windows 98 or Windows 2000, click
Eject PC menu item appears in the Start menu only while the notebook
is docked.
The “Dock Change” message appears on the screen.
Start, then click Undock Computer. The Undock
Start, then click Eject PC. The
2 Pull out the two docking release levers until they click. The notebook will
pop up slightly.
3 Tilt the back of the notebook up.
4 Lift the notebook off of the station.
5 Disconnect the AC adapter from the docking station.
6 Connect the AC adapter to the notebook.
www.gateway.com
29
Page 34

Chapter 3: Getting Started
Status indicators
Status indicators inform you when a drive is being used or when a button
has been pressed that affects how the keyboard is used.
Insert close-up of status indicators with callouts
This light turns on... When...
Numeric keypad is turned on. For more information, see “System key
combinations” on page 33.
30
Caps Lock is turned on.
Scroll Lock is turned on.
The notebook is accessing the hard drive.
The notebook is turned on. This indicator shows the notebook power
status:
LED on - notebook is ON.
LED off - notebook is OFF.
LED flashing - notebook is in Standby.
The notebook is monitoring the battery charge:
Green - battery is fully charged or not installed
Amber - battery is being charged.
www.gateway.com
Page 35

Using the keyboard
Your notebook features a full-size keyboard that has the full functionary of a
desktop computer keyboard. Many of the keys have been assigned alternate
functions, including shortcut keys for Windows, unction keys for specific
system operations, and the Pad Lock keys for the numeric keypad.
You can attach an external keyboard to the notebook using a USB or PS/2 port.
You do not need to shut down the notebook to connect a keyboard.
Insert close-up of keyboard with callouts
Using the keyboard
www.gateway.com
31
Page 36
Chapter 3: Getting Started
Key types
Many different key types are located on the keyboard. Some keys perform
specific actions when pressed by itself and another action when pressed in
combination with another key.
Key type Icon Description
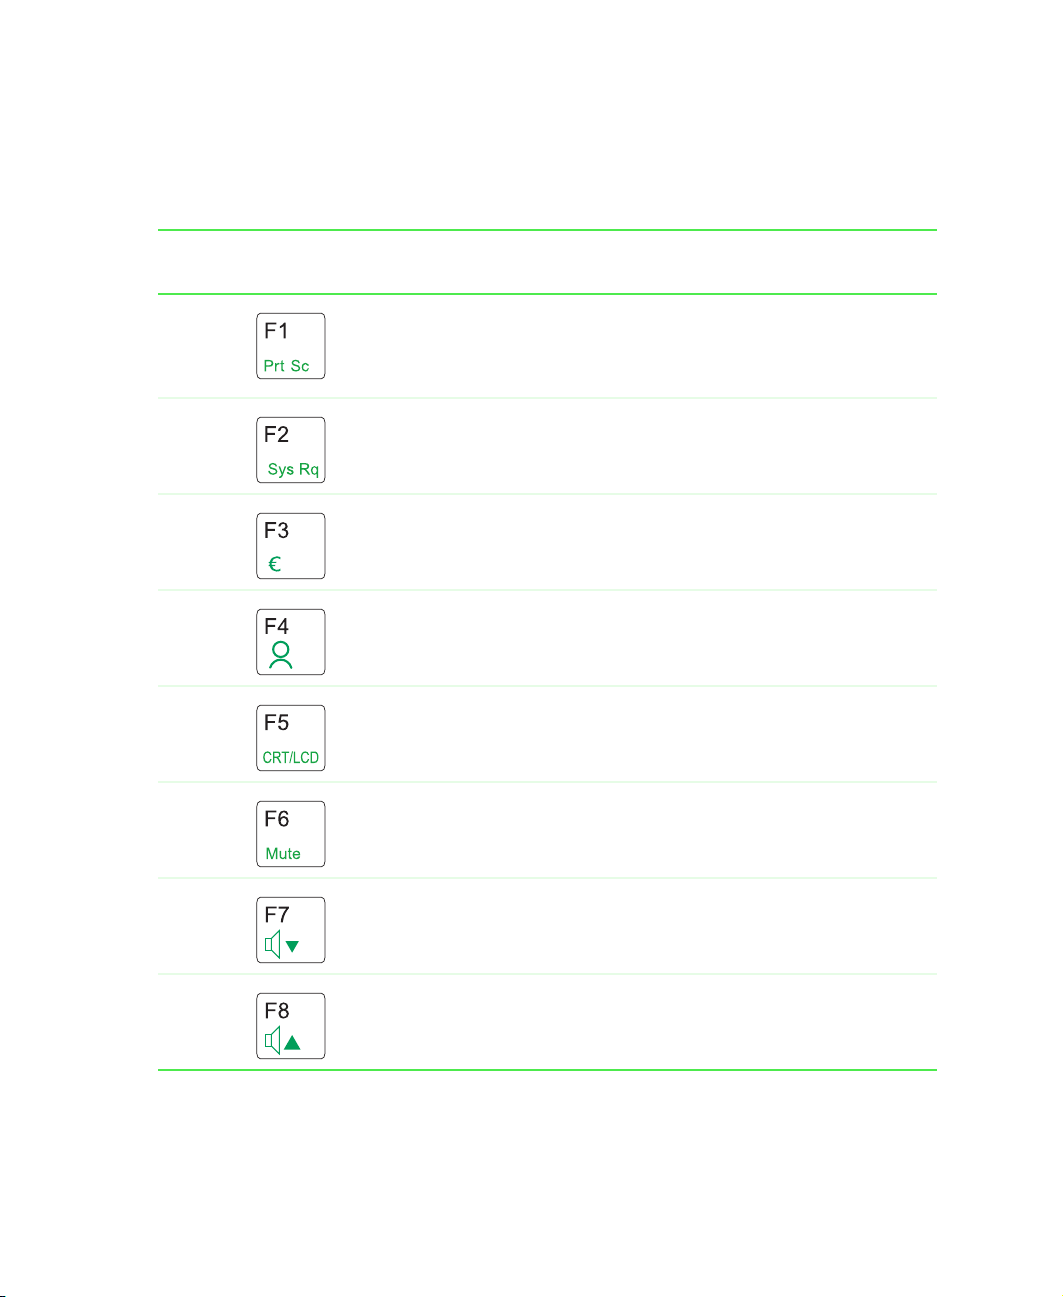
Function keys Press these keys labeled F1 to F12 to perform actions
System keys Press these green-colored keys in combination with the
Navigation keys Press these keys to move the cursor to the beginning of
N key Press the FN key in combination with a green-colored
F
in programs. For example, pressing F1 may open help.
Each program uses different function keys for different
purposes. Refer to the program documentation to find
out more about the function key actions.
N key to perform specific actions.
F
a line, to the end of a line, up the page, down the page,
to the beginning of a document, or to the end of a
document.
system key (such as R
action.
EST or PAUSE) to perform a specific
Windows key Press to open the Windows Start menu. This key can
also be used in combination with other keys to open
utilities like F (Search utility), R (Run utility), and
E (Explorer utility).
Numeric keypad Use these keys to type numbers when the numeric
keypad is turned on. Press
numeric keypad.
Application key Press for quick access to shortcut menus and help
assistants in Windows.
Arrow keys Press these keys to move the cursor up, down, right, or
left.
32
www.gateway.com
FN+PAD LOCK to turn on the
Page 37
System key combinations
When you press an Fn key and a system key at the same time, the notebook
performs the action identified by the colored text or icon on the key.
Using the keyboard
Press and hold F
N while
pressing this system key...
To.. .
Take a picture of the whole screen, which you can then paste
into a graphics program such as Paint. Pressing A
key combination takes a picture of the active window, which
you can then paste into a graphics program.
Perform an action specified by the software currently running.
(This function is only available in some programs.)
Generate the Euro mark.
Open the program you assign to this key combination. For
more information, see “Customizing Your Notebook” on
page 79.
Toggle the notebook screen between the LCD, an external
monitor, or both at the same time. A monitor must be plugged
into the monitor port on the notebook.
Mute the sound.
LT and this
Decrease the speaker volume.
Increase the speaker volume.
www.gateway.com
33
Page 38
Chapter 3: Getting Started
Press and hold FN while
pressing this system key...
To.. .
Enter Standby mode. Press the power button to leave Standby
mode.
Decrease the brightness of the LCD screen.
Increase the brightness of the LCD screen.
Pause the text scrolling in a DOS screen. The Scroll Lock
status indicator turns on when this function is turned on. Press
the key combination again to continue scrolling. (This function
is only available in some programs.)
Turn on the numeric keypad.
Pause or stop execution of a DOS program. (This function is
only available in some programs.)
34
Move the cursor to the start of the line. (This function is only
available in some programs.)
Move the cursor up one screen. (This function is only available
in some programs.)
Move the cursor down one screen. (This function is only
available in some programs.)
Move the cursor to the end of the line. (This function is only
available in some programs.)
www.gateway.com
Page 39

User buttons and keys
Insert close-up of Internet buttons with callouts
Item Icon Press...
Internet To open your Web browser.
User In combination with the FN key to open the program you
assign to this key combination.
Using the keyboard
The user buttons and keys can be assigned different functions than those
listed. For more information, see “Customizing Your Notebook” on page 79.
www.gateway.com
35
Page 40

Chapter 3: Getting Started
Using the EZ Pad touchpad
The EZ Pad™ consists of a touchpad and two buttons.
Insert graphic of touchpad
When you move your finger on the touchpad, the pointer (arrow) on the screen
moves in the same direction.
36
You can use the EZ-Pad left and right buttons below the touchpad to select
objects.
www.gateway.com
Page 41

Using the touchpad
To... Do this...
Using the EZ Pad touchpad
Move the pointer
on the screen.
Select an object
on the screen.
Start a program
or open a file or
folder.
Access a
shortcut menu or
find more
information
about an object
on the screen.
Move your finger around on the
touchpad. If you run out of space
and need to move the pointer
farther, lift your finger, move it to
the middle of the touchpad, then
continue moving your finger.
Position the pointer over the
object. Press the left button below
the touchpad once. This action is
called clicking.
Position the pointer over the
object. Press the left button below
the touchpad twice in rapid
succession. This action is called
double-clicking.
Position the pointer over the
object. Quickly press and release
the right button once. This action
is called right-clicking.
Move an object
on the screen.
www.gateway.com
Position the pointer over the
object. Press the left button and
hold it down, then use the
touchpad to move (drag) the
object to the appropriate part of
the screen. Release the button to
drop the object where you want it.
37
Page 42

Chapter 3: Getting Started
Connecting the modem
Your notebook has a modem jack for attaching your built-in 56K modem to
a telephone line.
Caution To reduce the risk of fire, use only No. 26 AWG or larger
telecommunications line cord.
To connect the modem:
1 Insert one end of the modem cable into the modem jack on the
left side of the notebook. For the location of the modem jack, see “Left
side” on page 3.
Insert picture of plugging in modem
38
2 Insert the other end of the modem cable into a telephone wall jack. The
modem will not work with digital or PBX telephone lines.
3 Start your notebook, then start your communications software.
www.gateway.com
Page 43

Connecting to an Ethernet network
Connecting to an Ethernet network
Your notebook has a network jack so you can connect it to a 10/100 Ethernet
network.
To connect to a network:
1 Insert one end of the network cable into the network jack on the
left side of the notebook.
Insert picture of plugging in ethernet on notebook
-OR-
Insert one end of the network cable into the network jack on the
back side of the docking station.
Insert picture of plugging in ethernet on docking station
2 Insert the other end of the network cable into a network wall jack. Ask
your network administrator to help you select the correct network jack.
Your notebook is now physically connected to the network. Your network
administrator can help you log onto your network.
www.gateway.com
39
Page 44

Chapter 3: Getting Started
Broadband Internet connections
You can use your notebook’s Ethernet jack for more than just networking.
Many broadband Internet connections, such as cable modems and DSL
modems, connect to your notebook’s Ethernet jack. For more information,
see “Using the Internet” on page 47 and “Networking Your Notebook” on
page 91.
40
www.gateway.com
Page 45

Installing a printer, scanner, or other peripheral device
Installing a printer, scanner, or other
peripheral device
Insert Adding Peripherals module here
www.gateway.com
41
Page 46

Chapter 3: Getting Started
42
www.gateway.com
Page 47

Getting Help
Insert Getting Help module here
4
www.gateway.com
43
Page 48

Chapter 4: Getting Help
44
www.gateway.com
Page 49

Windows Basics
Insert Windows Basics module here
Insert Working with Documents module here
5
www.gateway.com
45
Page 50

Chapter 5: Windows Basics
46
www.gateway.com
Page 51

Using the Internet
Insert Using the Internet module here
6
www.gateway.com
47
Page 52

Chapter 6: Using the Internet
48
www.gateway.com
Page 53

Using Multimedia
This chapter provides information on using the multimedia capabilities of
your notebook. Read this chapter to learn how to:
■ Use the diskette drive
■ Use the CD, CD-RW, or DVD drive
■ Adjust the volume
■ Play CDs and DVDs
■ Record and play audio files
■ Use Windows Media Player
■ Use MusicMatch
■ View the display on a television
■ Capture video using the IEEE 1394 (also known as Firewire or i.Link) port
7
www.gateway.com
49
Page 54

Chapter 7: Using Multimedia
Using drives
This section explains how to use the diskette and optical drives installed in
the docking station.
Insert picture of notebook and docking station with callouts
50
www.gateway.com
Page 55

Using diskettes
The diskette drive uses 3.5-inch diskettes (sometimes called floppy disks).
Diskettes are useful for storing files or transferring files to another computer.
Warning Do not expose diskettes to water or magnetic fields.
Exposure could damage the data on the diskette.
Important The diskette drive is a module that is used in the 5.25-inch
modular bay. If the diskette drive is not in the bay, you will
need to swap modules to use it. For more information
about swapping modules, see “Changing bay modules” on
page 84.
Using diskettes
Insert diskette drive picture
To use a diskette:
1 Insert the diskette into the diskette drive with the label facing up.
2 To access a file on the diskette in Windows XP, click Start, My Computer,
double-click the drive letter, then double-click the file name.
- OR -
To access a file on the diskette in Windows 98 or Windows 2000,
double-click the
file name.
My Computer icon, the drive letter, then double-click the
3 To remove the diskette, make sure the drive activity light is off (see “Status
indicators” on page 30), then press the diskette eject button.
www.gateway.com
51
Page 56

Chapter 7: Using Multimedia
Using the CD, CD-RW, or DVD drive
You can use your computer to enjoy a wide variety of multimedia features,
such as making recordings, listening to audio CDs, and watching DVD movies.
Important The CD, CD-RW, or DVD drive is a module that is used in
the 3.5-inch modular bay. If the drive you want to use is
not in the bay, you will need to swap modules to use it.
For more information about swapping modules, see
“Changing bay modules” on page 84.
Insert CD drive picture
Inserting a CD, CD-RW, or DVD
To insert a CD, CD-RW, or DVD:
1 Press the eject button on the CD, CD-RW, or DVD drive. After the tray
opens slightly, pull the disc tray completely open.
2 Place the disc in the tray with the label facing up, then press down
carefully on the disc until it snaps into place.
Important When you place a single-sided disc in the tray, make sure
that the label side is facing up. If the disc has two playable
sides, place the disc so that the name of the side you want
to play is facing up.
3 Push the tray in until it is closed.
52
www.gateway.com
Page 57

Using CDRW
Insert Using CDRW module here.
Insert Using Multimedia module here.
Insert MusicMatch module here.
Using CDRW
www.gateway.com
53
Page 58

Chapter 7: Using Multimedia
Viewing the display on a television
The TV out (NTSC/PAL Composite Video) jack on your notebook or port
replicator lets you view your notebook display on a television screen using a
standard RCA video cable. The S-Video out jack on your port replicator lets
you view your notebook display on a television screen using a standard
S-Video cable.
Important To turn on external video by default, connect the television
(or other external video device) before starting your
notebook.
Important Audio is not transmitted through the TV out jack. Use the
built-in speakers, a set of headphones or external powered
speakers, or connect your notebook to a stereo system to
hear sound while playing a DVD. DVD playback to a VCR
will be scrambled by copyright protection technology.
To view your notebook display on a television:
1 With your notebook off, connect one end of standard RCA video cable
to the TV out (Composite Video) jack on your docking station. For the
location of the TV out jack on your notebook, see “Left Side” on page 16.
54
2 Connect the other end of the cable to the Video in jack on your television
or VCR.
3 Turn on the television or VCR.
4 Start your notebook.
Get procedure from C sample.
www.gateway.com
Page 59

Capturing video
Capturing video
www.gateway.com
55
Page 60

Chapter 7: Using Multimedia
56
www.gateway.com
Page 61

Sending and Receiving Faxes
Insert PhoneTools module here.
8
www.gateway.com
57
Page 62

Chapter 8: Sending and Receiving Faxes
58
www.gateway.com
Page 63

Managing Power
While your notebook is running on battery power, you should manage power
consumption to get the most use out of the battery. This chapter shows you
how to:
■ Check and recharge the battery
■ Recalibrate the battery
■ Change batteries
■ Extend the life of the battery by conserving battery power and using
alternate power sources
■ Change power-saving settings
9
www.gateway.com
59
Page 64

Chapter 9: Managing Power
Monitoring the battery charge
Closely monitor the battery charge. When the battery charge gets low, change
the battery or connect to AC power immediately to prevent losing any
unsaved work.
Monitor the battery charge by:
■ Positioning the pointer over the power cord icon or battery icon
in the taskbar. A battery status window opens. Move the pointer away
from the icon to close the window.
Important If the power cord or battery icon does not appear on the
taskbar, click the show hidden icons button.
■ Pressing the battery meter buttons on the battery. The battery meter lights
indicate the percentage of battery charge remaining.
60
Insert picture of battery with finger on test meter.
■ Looking at the battery charge indicator :
■ A green light indicates the battery is fully charged
■ An orange light indicates the battery is being charged
■ Waiting for a Low Battery warning message to appear.
If your battery charge indicators display what looks like an inaccurate charge,
you may need to recalibrate the battery. For more information, see
“Recalibrating the battery” on page 62.
www.gateway.com
Page 65

Recharging the battery
The battery recharges while it is installed and your notebook is connected to
AC power. While the battery is recharging, the battery indicator turns orange
and the battery icon in the taskbar has a lightning bolt .
Important If the power cord or battery icon does not appear on the
taskbar, click the show hidden icons button.
Recharging the battery
www.gateway.com
61
Page 66

Chapter 9: Managing Power
Recalibrating the battery
If your notebook unexpectedly goes into Standby mode while you are using
it but the battery charge is not low, you may need to recalibrate your battery.
You should also recalibrate the battery once a year to maintain the accuracy
of the battery gauge.
To recalibrate the battery:
1 Get this procedure from the C sample.
62
www.gateway.com
Page 67

Changing batteries
If your notebook is plugged into an AC outlet you can change the battery
while the notebook is turned on. If your notebook it is not plugged into an
AC outlet, you must turn it off while changing the batteries.
Warning Danger of explosion if battery is incorrectly replaced.
Replace only with the Gateway 200 Li-Ion battery. Discard
used batteries according to the manufacturer’s
instructions.
The battery used in this device may present a fire or
chemical burn hazard if mishandled. Do not disassemble,
heat above 212°F (100°C), or incinerate. Dispose of used
battery promptly. Keep away from children.
To replace the battery:
1 If your notebook is on and is either plugged into an AC outlet, go to step
2.
-OR-
Changing batteries
If your notebook is on and is not plugged into an AC outlet, save your
work and turn off the notebook.
2 Close the LCD panel, undock the notebook if it is docked, and turn your
notebook over.
3 Slide the locking battery release latch to the unlock position.
Insert picture of notebook upside down with finger on release latch.
www.gateway.com
63
Page 68

Chapter 9: Managing Power
4 Slide and hold the remaining battery latch and slide the battery out of
the bay.
Insert picture of notebook upside down with hand sliding battery out.
5 Slide a recharged battery into the bay. Make sure the battery is fully
inserted into the bay.
6 Slide the locking battery latch to the locked position.
7 Turn the notebook over.
8 Dock the notebook if you are using the docking station.
9 Open the LCD panel and press the power button.
64
www.gateway.com
Page 69

Extending battery life
Conserving battery power
While using the battery to power your notebook, conserve power by:
■ Dimming the display as low as is comfortable.
■ Removing PC Cards when you do not need them. Many PC Cards use a
small amount of power while inserted, even if they are not being used.
■ Modifying the Power Management settings for maximum power savings.
For more information, see “Changing power settings” on page 67.
■ Closing the LCD panel to turn off the display while you are not using
your notebook. The display stays off until you open the panel again.
■ Using Hibernate mode for maximum power savings while the notebook
is not in use. For more information, see “Activating and Using Hibernate
Mode” on page 71.
■ Using the CD, DVD, CD-RW, or DVD/CD-RW drives only when necessary.
These drives use a large amount of power.
Extending battery life
■ Recharge the battery often, take an extra battery, and fully recharge the
batteries before traveling. For more information, see “Recharging the
battery” on page 61 and “Changing batteries” on page 63.
Using alternate power sources
To extend battery life, use alternate power sources whenever possible.
■ If traveling internationally, take electrical adapters. Save the battery for
times when you cannot use a power adapter. If you plan on taking your
AC power adapter, also take a single-plug power surge protector.
■ If you will have access to an EmPower™ in-flight power receptacle or an
automobile cigarette lighter, use an airplane/automobile power adapter.
Save the battery for times when you cannot use a power adapter.
■ To find AC power outlets in airports, look for them next to support pillars,
in large areas such as boarding gates, and under banks of telephones.
www.gateway.com
65
Page 70

Chapter 9: Managing Power
Changing power modes
You can use the following power modes to lengthen the life of your notebook’s
battery:
■ Standby - while your notebook is in Standby, it switches to a low power
state where devices, such as the display and drives, turn off.
■ Hibernate - (also called save to disk) writes all current memory (RAM)
information to the hard drive, then turns your notebook completely off.
The next time you turn on the notebook, it reads the memory
information from the hard drive and opens the programs and documents
that were open when you activated Hibernate. For more information on
using Hibernate mode, see “Activating and Using Hibernate Mode” on
page 71.
Using Standby mode
Always save your work before using Standby mode. When in Standby, your
computer reduces or turns off the power to most devices except memory.
However, the information in memory is not saved to the hard drive. If power
is interrupted, the information is lost.
When in Hibernate mode, your computer saves all memory information to
the hard drive, then turns the power completely off.
If your computer
is...
On Enter
On Enter Hibernate
In Standby or
Hibernate mode
...and you
want to...
Standby mode
mode (must be
enabled)
Exit Standby or
Hibernate mode
...then
Press FN+STANDBY.
In Windows XP, click Start,
Turn Off Comp ute r, then press and hold
SHIFT and click Hibernate.
- OR -
In Windows 98 or Windows 2000, click
Start, then click Shut Down. Click the
arrow button to open the What do you
want your computer to do list, then click
Hibernate. Click OK.
Press the power button.
66
www.gateway.com
Page 71

Changing power settings
You can change the function of the power button, Standby key, and
power-saving timers by changing power settings on your notebook.
You can customize power settings from the Windows Control Panel by
selecting power schemes, setting power alarms, adjusting advanced power
settings, and activating Hibernate mode.
Power schemes (groups of power settings) let you change power saving options
such as when the display or hard drive is automatically turned off. You can
select one of the defined power schemes or create a custom power scheme.
Alarms can alert you when the battery charge is low.
Advanced power settings let you assign different power saving modes to the
power button and Standby key. You can also select which power saving mode
is activated when you close the LCD panel.
Changing power settings
Help and
Support
For more information about changing power settings in
Windows XP, click Start, then click Help and Support.
Changing the power scheme
To change the power scheme
1 In Windows XP, click Start, then click Control Panel. The Control Panel
window opens. If your Control Panel is in Category View, click
Performance and Maintenance.
- OR -
In Windows 98 or Windows 2000, click
Panel
. The Control Panel window opens.
Start, Settings, then click Control
www.gateway.com
67
Page 72

Chapter 9: Managing Power
2 Click/Double-click the Power Options or Power Management icon. The
Power Options Properties dialog box opens.
68
3 Click the arrow button to open the Power Scheme list, then click the
power scheme you want.
- OR -
Set the timers, then save your custom power scheme by clicking
and typing a name for the scheme.
Save As
4 Click OK.
www.gateway.com
Page 73
Changing alarm options
To change the alarm options:
1 In Windows XP, click Start, then click Control Panel. The Control Panel
window opens. If your Control Panel is in Category View, click
Performance and Maintenance.
- OR -
Changing power settings
In Windows 98 or Windows 2000, click
Panel
. The Control Panel window opens.
Start, Settings, then click Control
2 Click/Double-click the Power Options or Power Management icon. The
Power Options Properties dialog box opens.
3 Click the Alarms tab.
4 Adjust the alarm settings.
5 Click OK.
www.gateway.com
69
Page 74

Chapter 9: Managing Power
Changing advanced settings
To change advanced power management settings:
1 In Windows XP, click Start, then click Control Panel. The Control Panel
window opens. If your Control Panel is in Category View, click
Performance and Maintenance.
- OR -
In Windows 98 or Windows 2000, click
Panel
. The Control Panel window opens.
Start, Settings, then click Control
2 Click/Double-click the Power Options or Power Management icon. The
Power Options Properties dialog box opens.
3 Click the Advanced tab.
70
4 Click the arrow button to open a Power buttons list, then click the power
setting mode you want to use.
5 Click OK.
www.gateway.com
Page 75

Activating and Using Hibernate Mode
To activate Hibernate mode:
1 In Windows XP, click Start, then click Control Panel. The Control Panel
window opens. If your Control Panel is in Category View, click
Performance and Maintenance.
- OR -
Changing power settings
In Windows 98 or Windows 2000, click
Panel
. The Control Panel window opens.
Start, Settings, then click Control
2 Click/Double-click the Power Options or Power Management icon. The
Power Options Properties dialog box opens.
3 Click the Hibernate tab.
4 Click the Enable hibernation check box, then click Apply. Hibernate mode
is now an option you can select on the Advanced tab in the Power Options
Properties dialog box and in the Turn Off Co mputer dialog box.
www.gateway.com
71
Page 76

Chapter 9: Managing Power
To use Hibernate mode:
■ To use hibernation as a power savings mode, open the Power Options
dialog box, click the
one of the power settings, then save the changes by clicking
■ To manually place your computer into hibernation:
■ In Windows XP, click Start, Turn Off Computer, then press and hold
S
HIFT and click Hibernate.
■ In Windows 98 or Windows 2000, click Start, then click Shut Down.
Click the arrow button to open the
to do
list, then click Hibernate. Click OK.
Power Schemes or Advanced tab, click Hibernate as
Changing SpeedStep settings
The processor installed in your notebook may use Intel® SpeedStep™
technology to conserve battery power. A SpeedStep-equipped processor can
change its operating speed according to the power source. Your notebook’s
default settings operate the processor at full speed while connected to
AC power and at reduced speed (which uses less power) while using battery
power. If you are using Windows XP, the Intel SpeedStep settings are changed
in the BIOS Setup program. If you are using Windows 98 or Windows 2000,
you can change the SpeedStep settings in Windows.
OK.
What do you want your computer
To change SpeedStep settings if your notebook has Windows XP:
Get procedure from C sample.
To change SpeedStep settings in Windows 98 and Windows 2000:
1 Click Start, Settings, then click Control Panel. The Control Panel window
opens.
2 Double-click the Power Options or Power Management icon. The Power
Options Properties dialog box opens.
72
www.gateway.com
Page 77

3 Click the Intel SpeedStep technology tab.
4 Change any of the following settings:
Changing power settings
■ To run the processor at full speed regardless of the power source,
click the arrow button to open the
click
Maximum Performance.
■ To run the processor at reduced speed (using less power) regardless
Running on batteries list, then
of the power source, click the arrow button to open the
in
list, then click Battery Optimized Performance.
■ To turn off the SpeedStep technology control, click the Advanced
tab, click the
then click
■ To remove the SpeedStep icon from the taskbar, click the Advanced
tab, click the
Disable Intel SpeedStep technology control check box,
Apply.
Remove icon from taskbar check box, then click Apply.
5 Click OK.
www.gateway.com
Plugged
73
Page 78

Chapter 9: Managing Power
74
www.gateway.com
Page 79

Travel tips
These tips can make traveling with your notebook more convenient and
trouble-free. This chapter provides information on:
■ Using the modem
■ Using your radio frequency wireless connections
■ Transferring files
■ Protecting your notebook from loss and theft
■ Managing your notebook’s power efficiently
Tips & Tricks To access the contents of this manual while you are
traveling, download an electronic copy from
www.gateway.com/support/manlib/
10
.
www.gateway.com
75
Page 80

Chapter 10: Travel tips
Modem
■ Take a telephone cord to connect the modem to telephone jacks. If you
are traveling internationally, take telephone jack adapters or an acoustic
handset coupler.
■ Take a telephone line protector.
■ Take a telephone line tester to check for unsafe lines, especially if you
are traveling internationally.
■ Take remote access information with you so you can connect to your ISP
while outside of your usual calling area. A list of country dialing codes
may be especially useful if you are traveling internationally.
Radio frequency wireless connections
■ Every country has different restrictions on the use of wireless devices. If
your notebook is equipped with a wireless device, when traveling
between countries check with the local radio approval authorities prior
to your trip for any restrictions on the use of a wireless device in the
destination country.
76
■ If your notebook came equipped with an internal embedded wireless
device, see “Safety, Regulatory, and Legal Information” on page 173 for
general wireless regulatory guidelines.
■ Wireless communication can interfere with equipment on commercial
aircraft. Current aviation regulations require wireless devices to be turned
off while traveling in an airplane. IEEE 802.11b (also known as wireless
Ethernet or Wifi) and Bluetooth communication devices are examples of
devices which use wireless to communicate. For instructions on how to
turn off your wireless device, see “Networking Your Notebook” on
page 91.
www.gateway.com
Page 81

Files
■ Copy your working files from your desktop computer to your notebook
before you travel.
■ If you need to access your desktop computer files from your notebook
while traveling, set up the desktop computer for remote access. Contact
your network system administrator for more information about remote
access.
■ Take extra diskettes for transferring files between computers and backing
up files.
Security
■ Get a locking cable for your notebook so you can attach a cable lock and
leave the notebook in your hotel room while you are away.
■ Always keep your notebook with you while waiting in airports, train
stations, or bus terminals. Be ready to claim your notebook as soon as it
passes through the x-ray machine in security checkpoints.
Files
■ Write down your notebook model number and serial number (available
on the system label) in case of theft or loss, and keep the information
in a safe place. Also, tape your business card or an address label to your
notebook and accessories.
■ Whoever sits next to you or behind you can see your notebook display.
Avoid working with confidential files until you can be sure of privacy.
■ Use a startup password to restrict access to your notebook.
Important Use a password that you can remember, but that is difficult
for someone else to guess. The password feature is very
secure, with no easy way to recover a forgotten password.
If you forget your password, you must return your notebook
to Gateway for service. Call Gateway Technical Support for
instructions.
To create a startup password:
Get procedure from C sample.
www.gateway.com
77
Page 82

Chapter 10: Travel tips
Power
■ Take your AC power adapter to recharge the battery. If you are traveling
internationally, take power plug adapters.
■ To get the best performance from your notebook, avoid using the battery
whenever possible, monitor the battery charge, and use the most efficient
power management settings.
■ For information on conserving battery power, see “Conserving
battery power” on page 65.
■ For information on using alternate power sources, see “Using
alternate power sources” on page 65.
■ For information on monitoring the battery charge, see “Monitoring
the battery charge” on page 60.
78
www.gateway.com
Page 83

Customizing Your Notebook
Insert Customizing Your Computer module here.
11
www.gateway.com
79
Page 84

Chapter 11: Customizing Your Notebook
80
www.gateway.com
Page 85

Upgrading Your Notebook
This chapter provides information about adding hardware devices to your
notebook, including:
■ PC Cards
■ Bay modules
■ Memory
12
www.gateway.com
81
Page 86

Chapter 12: Upgrading Your Notebook
Adding PC Cards
Your notebook has a PC Card slot (also known as PCMCIA card slots). This
slot accepts a single Type I, Type II, or Zoom card.
You do not need to restart your notebook when changing most cards because
your notebook supports hot-swapping. Hot-swapping means that you can
insert a PC Card while your notebook is running. If your PC Card does not
work after hot-swapping, refer to the PC Card manufacturer’s documentation
for further information.
Help and
Support
For more information about adding PC Cards in
Windows XP, click Start, then click Help and Support.
To insert a PC Card:
■ Push the card firmly into the PC Card slot label-side up until the outer
edge of the card is flush with the side of the notebook.
Insert picture of inserting PC Card.
82
www.gateway.com
Page 87

To remove a PC Card:
1 Click the remove hardware icon in the taskbar, then select the
PC Card name and click
-OR-
Turn off the notebook.
Important If the remove hardware icon does not appear on the
taskbar, click the show hidden icons button.
Stop.
2 Release the eject button by pressing the PC Card eject button once.
3 Eject the PC Card by pressing the eject button again.
Adding PC Cards
Insert picture of ejecting PC Card.
www.gateway.com
83
Page 88

Chapter 12: Upgrading Your Notebook
Changing bay modules
Your docking station’s modular bay supports different bay modules, such as a
CD, DVD, CD-RW, or combination DVD/CD-RW drive, a second hard drive,
or a diskette drive.
Insert picture of notebook and docking station with
bays called out.
To change bay modules:
1 Make sure your notebook is off.
2 Detach the notebook from the docking station.
3 Slide the bay module latch that corresponds to the bay you are changing
(5.25-inch or 3.5-inch) toward the middle of the docking station. The
module will pop out slightly.
4 Slide the bay module out.
84
Insert picture of docking station with fingers on
latch/button.
www.gateway.com
Page 89

Changing bay modules
5 Firmly push the new bay module straight into the bay until the latch
clicks into place.
6 Place notebook back on the docking station.
7 Turn the notebook on.
www.gateway.com
85
Page 90

Chapter 12: Upgrading Your Notebook
Preventing static electricity discharge
The components inside your computer are extremely sensitive to static
electricity, also known as electrostatic discharge (ESD).
Caution ESD can permanently damage electrostatic
discharge-sensitive components in the computer. Prevent
ESD damage by following ESD guidelines every time you
open the computer case.
Warning To avoid exposure to dangerous electrical voltages and
moving parts, turn off your computer and unplug the power
cord and modem cable before opening the case.
Before installing memory, follow these guidelines:
■ Turn off the computer power.
■ Wear a grounding wrist strap (available at most electronics stores) and
attach it to a bare metal part of the computer.
86
Warning To prevent risk of electric shock, do not insert any object
into the vent holes of the notebook.
■ Touch a bare metal surface on the back of the computer.
■ Unplug the power cord and modem and network cables.
■ Remove the battery.
Before working with computer components, follow these guidelines:
■ Avoid static-causing surfaces such as carpeted floors, plastic, and packing
foam.
■ Remove components from their antistatic bags only when you are ready
to use them. Do not lay components on the outside of antistatic bags
because only the inside of the bags provide electrostatic protection.
www.gateway.com
Page 91

Installing memory
Your notebook uses memory modules called SO-DIMMs (Small Outline Dual
Inline Memory Modules). The modules are available in various capacities and
any module can be placed in any available slot. Use only memory modules
designed for the Gateway 200 for upgrading your memory.
To add or replace memory modules:
1 Follow the instructions under “Preventing static electricity discharge” on
page 86.
2 Shut down your notebook, then disconnect the power adapter and
modem and network cables.
3 Turn the notebook over, then remove the battery.
Warning Disconnect the power adapter, disconnect the modem and
network cables, and remove the battery before you remove
the memory bay cover. Replace the cover before you
restore power or reconnect the modem and network
cables.
Installing memory
Insert picture of notebook upside down with memory
bay called out.
4 Remove the memory bay cover screw, then remove the memory bay
cover.
www.gateway.com
87
Page 92

Chapter 12: Upgrading Your Notebook
5 If you are removing a module, gently press outward on both clips at either
end of the memory module until the module tilts upward.
88
6 Pull the memory module out of the slot.
www.gateway.com
Page 93

Installing memory
7 Hold the new or replacement module at a 30-degree angle and press it
into the empty memory slot. This module is keyed so that it can only
be inserted in one direction. If the module does not fit, make sure the
notch in the module lines up with the tab in the memory bay.
Important Use only memory modules designed for the Gateway 200.
8 Gently push the module down until it clicks in place.
9 Replace the memory bay cover and cover screw, insert the battery,
connect the power adapter and modem and network cables, and turn on
your notebook.
www.gateway.com
89
Page 94

Chapter 12: Upgrading Your Notebook
90
www.gateway.com
Page 95

Networking Your Notebook
Connecting your home, small office, or home office computers lets you share
drives, printers, and a single Internet connection among the connected
computers.
This chapter contains information about:
■ Benefits of using a network in your home, small office, or home office
■ Types of network connections
■ Using a wireless network
■ Purchasing additional network equipment
13
www.gateway.com
91
Page 96

Chapter 13: Networking Your Notebook
The benefits of using a network
A network lets you:
■ Share a single Internet connection
■ Share computer drives
■ Share peripheral devices
■ Stream audio and video files
■ Play multi-player games
Sharing a single Internet connection
A network makes sharing the Internet easy. Each computer that is connected
to the network can share the same modem and telephone line or broadband
connection and access the Internet at the same time. This saves on the cost
of installing another telephone line for your second computer and paying for
a second Internet Service Provider (ISP) account.
Important Most ISPs allow multiple users at the same time. If you use
America Online as your ISP, you can log onto America Online
through one of your screen names and the other computers
can access the Internet using an Internet browser.
Sharing drives
With a network, you can copy files from computer to computer by copying
and pasting or dragging and dropping. You will no longer waste your time
transferring files by using diskettes. In addition, you can map a drive from a
computer on the network to a drive on another computer, and access the file
as if it were located on the hard drive of the computer you are using.
Sharing peripheral devices
Each computer that is connected to the network can share the same peripheral
devices, such as a printer. Select print from the computer you are currently
using and your file is automatically printed on your printer no matter where
it is located on your network.
92
www.gateway.com
Page 97

Streaming audio and video files
With a network, you can store audio files (such as the popular .MP3 files) and
video files on any networked computer, then play them on any of the other
computers or devices connected to your network, a process called streaming.
Playing multi-player games
With a home network, you can play multi-player games. Load a game like
Microsoft Midtown Madness 2 on your computers, and in minutes, you and your
friends can race in competing cars through the streets of San Francisco.
The benefits of using a network
www.gateway.com
93
Page 98

Chapter 13: Networking Your Notebook
Example network
A network connects all your computers and other devices so that you can
share files, programs, peripheral devices, and much more from any computer
in your home or office. The picture below shows an example of a home
network.
94
www.gateway.com
Page 99

Selecting a network connection
Selecting a network connection
One of the biggest decisions you will need to make when creating your
network is what type of connection you will use. Gateway supports both wired
and wireless connections.
Wired connections
HPNA (Home Phoneline Networking Alliance) and Ethernet are two popular
types of wired networks.
HPNA
Creating an HPNA network is as easy as knowing where your telephone jacks
and computers are located. HPNA uses your home's standard telephone lines
and telephone jacks instead of special cabling to connect computers. You can
use your networked computers at the same time as you connect to your ISP,
send a fax, or talk on your telephone. For the best performance, your
computers should have HPNA 2.0 network cards or jacks for connecting to
your network.
Important If you have more than one telephone line in your home or
office, make sure that all the computers in your network are
connected to jacks that share the same telephone number.
Ethernet or Fast Ethernet
Ethernet is a type of connection commonly used in offices around the world.
This type of connection can also be used to build small computer networks
in the home. Ethernet is available at two different speeds: standard Ethernet,
which runs at the same speed as HPNA 2.0, and Fast Ethernet, which runs
up to ten times faster. To create an Ethernet network, you or your electrician
must install special cables in your home or office. Your computers must have
Ethernet cards or jacks for connecting to a 10 or 10/100 Ethernet switch or
hub. If you are connecting just two computers, you can eliminate the switch
or hub and use a special crossover cable.
Important Check local code requirements before installing Ethernet
cable or other wiring in your home or office. Your municipality
may require you to obtain a permit and hire a licensed installer.
www.gateway.com
95
Page 100

Chapter 13: Networking Your Notebook
Broadband Internet connections
You can use your computer’s Ethernet or USB jack for more than just
networking. Many broadband Internet connections, such as cable modems
and DSL modems, connect to your computer’s Ethernet or USB jack. Typically,
if one computer is connected to the Internet, other networked computers can
access the Internet through the shared Internet connection. A broadband,
versus dial-up, connection adds speed and an “always on” connection to your
home network.
Wireless Connections
Instead of connecting your computers with wires, you can consider a wireless
network. Wireless Ethernet is ideal for creating a home or office network.
Warning Radio frequency wireless communication can interfere
with equipment on commercial aircraft. Current aviation
regulations require wireless devices to be turned off while
traveling in an airplane. IEEE 802.11b (also known as
wireless Ethernet or WiFi) communication devices are
examples of devices that provide wireless communication.
Important If your notebook came equipped with an internal radio
Wireless Ethernet
A wireless Ethernet network (also known as IEEE 802.11b or WiFi) exceeds
the speed of either HPNA 2.0 or standard Ethernet. In addition, this type of
network allows you the freedom to move about your home or office with your
computer. For example, you can take your notebook from your home office
to your patio without having a telephone or Ethernet jack available.
96
frequency wireless device, see “Safety, Regulatory, and
Legal Information” on page 173 for general wireless
regulatory and safety guidelines. To find out if your
notebook has an internal wireless device, check the label
(see “Identifying your model” on page 10).
www.gateway.com
 Loading...