

Page 1

SPH-i700 Series
Portable Digital Telephone
User’s Guide
Please read this manual before operating your
phone, and keep it for future reference.
Page 2

Important Safety Precautions
Read these guidelines before using your wireless
phone. Failure to comply with them may be
dangerous or illegal.
Road Safety at All Times
Do not use a hand-held phone while driving; park
the vehicle first.
Switching Off When Refuelling
Do not use the phone at a refuelling point (service
station) or near fuels or chemicals.
Switching Off in an Aircraft
Wireless phones can cause interference. Using
them in an aircraft is both illegal and dangerous.
Switching Off in Hospitals
Switch your phone off near medical equipment.
Follow any regulations or rules in force.
Interference
All wireless phones may be subject to interference,
which could affect their performance.
Page 3

Special Regulations
Meet any special regulations in force in any area
and always switch off your phone whenever it is
forbidden to use it, or when it may cause
interference or danger (in a hospital for example).
Sensible Use
Use only in the normal position (held to the ear).
Avoid unnecessary contact with the antenna when
the phone is switched on.
Emergency Call
Ensure the phone is switched on and in service. Key
in the emergency number for your present location,
then press the key. You must deactivate any
unnecessary features before you can make an
emergency call. Give all the necessary information
as accurately as possible. Do not cut off the call
until given permission to do so.
Water Resistance
Your phone is not water-resistant. Keep it dry.
Accessories and Batteries
Use only Samsung-approved accessories and
batteries. Use of any unauthorized accessories
could damage your phone and may be dangerous.
Page 4

Qualified Service
Only qualified service personnel may repair your
phone.
For more detailed safety information, see “Health
and Safety Information” on page 173.
Page 5

Table of Contents
Chapter 1 - Getting Started ........................................ 13
Turning the i700 On ................................................................14
Entering the Owners Information ......................................14
Setting up Voicemail ...............................................................15
Chapter 2 - Understanding your Phone .....................17
Front View of the I700 .............................................................18
Viewing the Phone Screen Icons ...........................................19
Features of the i700 ................................................................21
Battery and Charger Accessories ..........................................22
Battery Capacity ..................................................................22
Installing the Battery ...........................................................23
Removing the Battery .........................................................23
Charging the Battery ...........................................................24
Displaying your Phone Number ............................................25
Making and Answering Calls .................................................25
Making Calls ........................................................................25
One Handed Dialing ............................................................26
Answering Calls ...................................................................27
Chapter 3 - Personal Settings .....................................29
Personal Settings ....................................................................30
Buttons .................................................................................31
Input .....................................................................................32
Menus ...................................................................................38
Password ..............................................................................39
Phone ...................................................................................40
5
Page 6

6
Chapter 4 - Windows Applications and Text Entry .. 47
Navigating your PDA ..............................................................48
Start Menu ...........................................................................48
Shortcuts ..................................................................................49
New Command ....................................................................49
Time & Appointments .........................................................49
Chapter 5 - Phone Settings .........................................51
Setting the Volume Levels .....................................................52
Voice Volume .......................................................................52
Record Volume ....................................................................53
Ring Volume ........................................................................53
System Volume ...................................................................54
Setting the Tone Length .........................................................55
Alert Sounds & Notifications .................................................56
Selecting a Ringer for Incoming, Missed Calls,
or Voice Mail ........................................................................56
Turning the Ringer Off ........................................................58
Chapter 6 - Security Settings .....................................59
Accessing the Security Options .............................................60
Emergency Numbers ..........................................................60
Locking the i700 ...................................................................61
Unlocking the i700 ...............................................................61
Chapter 7 - Understanding Roaming ......................... 63
Roaming ..................................................................................64
Roaming Options ................................................................64
Page 7

7
Chapter 8 - Messaging ................................................65
Message Types .......................................................................66
Voicemail .............................................................................66
Text Messaging ...................................................................67
E-mail Messages .................................................................68
Message Options .................................................................69
My Text Messages ..............................................................69
Editing My Text Messages .................................................70
Performing a Spell Check ...................................................71
Language .............................................................................71
Cancel a Message ................................................................71
SMS Message .........................................................................72
SMS Inbox ...........................................................................72
SMS Outbox ........................................................................72
SMS Sent Items ...................................................................73
SMS Drafts ...........................................................................73
SMS Deleted Items ..............................................................74
ActiveSync Mail ......................................................................74
ActiveSync Inbox .................................................................74
ActiveSync Outbox ..............................................................75
ActiveSync Sent Items ........................................................75
ActiveSync Drafts ................................................................76
ActiveSync Deleted Items ...................................................76
Inbox Tools ..............................................................................77
Options .................................................................................78
Page 8

8
Chapter 9 - Call Logs ...................................................81
Call Logs ..................................................................................82
Making a Call from the Call Log .........................................82
Call Log Options ..................................................................83
Creating a New Contact from the Call Log ........................83
Deleting Call Log Entries ....................................................84
Sending a SMS Message from a Call Log Entry ...............84
Chapter 10 - Call Features ...........................................85
Caller ID ................................................................................85
Call Waiting ..........................................................................86
Call Forwarding ...................................................................86
Three Way Calling ...............................................................87
Chapter 11 - Contacts ..................................................89
Contacts ...................................................................................90
Adding a New Contact ........................................................91
Finding a Contact ................................................................91
Editing a Contact .................................................................92
Deleting a Contact ...............................................................92
Adding a Note ......................................................................93
Deleting a Note ....................................................................93
Making a Call from Contacts ..............................................94
Speed Dialing ......................................................................94
Beaming Contacts ...............................................................95
Page 9

9
Chapter 12 - Calendar ..................................................97
Today .......................................................................................98
Date and Time Settings ......................................................98
Scheduling an Alarm ..........................................................99
Owner Information ..............................................................99
Data Call State ...................................................................100
Calendar .................................................................................101
Scheduling an Appointment ............................................101
Scheduling a Timed Appointment ...................................102
Changing the Calendar View ............................................103
Calendar Options ...............................................................104
Tasks ......................................................................................105
Creating a new Task ..........................................................105
Marking a Task Complete .................................................106
Task Options ......................................................................107
Task Entry Bar ....................................................................107
Editing a Task ....................................................................108
Beaming a Task .................................................................108
Adding a Note to a Task ...................................................109
Deleting a Task ..................................................................109
Chapter 13 - Notes .....................................................111
Notes ......................................................................................112
Recording a Note ...............................................................112
Recording During a Call ....................................................113
Recording a Personal Note ...............................................113
Writing a new Note ...........................................................113
Deleting a Note ..................................................................114
Note Options ......................................................................114
Page 10

10
Chapter 14 - ActiveSync ............................................117
ActiveSync .............................................................................118
Installing the ActiveSync Software ..................................118
Creating a New Partnership .............................................119
Performing ActiveSync using IR ......................................120
Scheduling an ActiveSync ................................................121
Chapter 15 - Microsoft Pocket Applications ............ 123
Pocket Word ..........................................................................124
Creating a New Document ...............................................124
Pocket Word Options ........................................................125
Attaching a Recording ......................................................126
Deleting a Document ........................................................126
Beaming a Document .......................................................127
Pocket Excel ...........................................................................127
Creating a new Workbook ................................................128
Deleting a Workbook .........................................................128
Beaming a Workbook ........................................................129
Chapter 16 - Other Applications ...............................131
Program Application .............................................................132
File Explorer .......................................................................132
Microsoft Reader ...............................................................133
MSN Messenger ................................................................134
Terminal Services Client ...................................................135
Games ................................................................................135
Calculator ...........................................................................136
Infrared Receive .................................................................138
Find .....................................................................................139
Help ....................................................................................140
Page 11

11
Chapter 17 - Managing Applications .......................141
Application Management .....................................................142
Installing New Applications ..............................................142
Deleting an Application ....................................................143
Memory Allocation ............................................................143
Chapter 18 - Internet Explorer .................................. 145
Pocket Internet Explorer .......................................................146
Launching Internet Explorer .............................................146
Saving Favorites ................................................................147
Internet Pass Through .......................................................147
Chapter 19 - Camera ..................................................149
Camera ...................................................................................150
Launching the Camera Application .................................150
Camera Settings ................................................................151
Sleep Mode ........................................................................152
Timer ..................................................................................152
Viewing Pictures ................................................................153
Still View Navigation .........................................................153
Thumbnail View ................................................................157
Adaptive Sensitivity (AS Mode) .......................................162
Beaming Pictures ..............................................................163
Continuous Picture Mode .................................................164
Page 12

12
Chapter 20 - Windows Media Player ........................ 165
Media Player ..........................................................................166
Launching the Media Player .............................................166
Media Player Controls .......................................................166
Loading Media Player Files ..............................................167
Playlist ................................................................................167
Chapter 21 - Troubleshooting and Safety ............... 169
Troubleshooting ....................................................................170
Resetting Your Handheld ..................................................170
Health and Safety Information .............................................173
Page 13

Chapter 1 - Getting Started
The following topics are discussed in this Chapter:
•
Turning the Phone On
•
Entering the Owner Information
•
Setting up Voicemail
Page 14

Turning the i700 On
To power up the i700, press located on the upper
right side of the phone. Follow the steps on the
display screen to align or calibrate the device. This
procedure insures that when you press the screen
using the stylus, the desired action occurs properly.
Entering the Owners Information
The owners information identifies the owner or
user of the device. Name, company, address, phone
number , email address, and note information fields
are available. To enter the owners information:
1. From the Today screen, use the stylus and tap on
Owner
.
2. Tap the
3. Use the stylus to tap the correct letters and spaces
using the on-screen keyboard. (To select the
keyboard, tap the up arrow located in the lower right
corner of the screen and select .)
4. Tap the other desired information boxes and enter
the information using the stylus and on-screen
keyboard.
5. When you are finished entering all the desired
information, tap in the upper right corner of the
screen.
Name
box in the Owner Information screen.
Chapter 1 - Getting Started
14
Page 15

Setting up Voicemail
All unanswered calls to your phone are sent to
voicemail, even if your phone is in use or turned
off. Therefore, you will want to set up your
voicemail and personal greeting as soon as your
phone is activated.
To set up voicemail:
1. Press the button located on the bottom front
of the phone to display the phone screen.
2. Tap and hold to dial the voicemail system.
Note:
One has been automatically reserved in speed dial
for your voicemail. To dial voicemail without using speed
dial, simply dial your own phone number and when the
system answers, press and enter your password.
3. When the system answers, tap and enter your
password.
4. Follow the system prompts to setup your voicemail.
Chapter 1 - Getting Started
15
Page 16

Chapter 1 - Getting Started
16
Page 17

Chapter 2 - Understanding
your Phone
The following topics are discussed in this Chapter:
•
Front View of the i700
•
Viewing the Phone Screen Icons
•
Features of the i700
• Battery and Charger Accessories
• Displaying your Phone Number
• Making/Answering Calls
Page 18
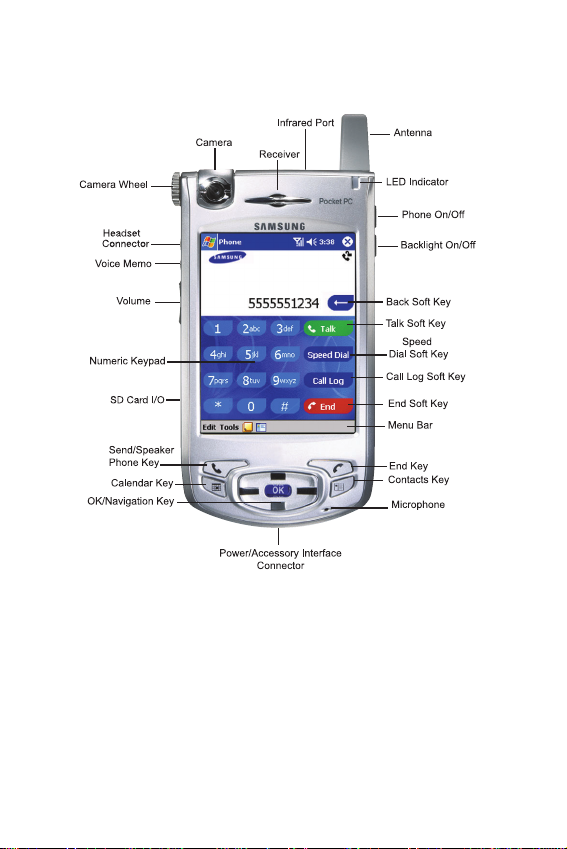
Front View of the I700
Chapter 2 - Understanding your Phone
18
Page 19

Viewing the Phone Screen Icons
Icon Definition
This icon represents the signal strength.
The more bars displayed, the better the
signal.
This icon is displayed when the phone is
Off.
Indicates that initial programing is
required before operating your new
phone.
Indicates that the ringer is On.
Indicates that the ringer is Off.
Indicates that the vibrate function is
turned On.
Indicates that the i700 supports the 1X
high speed data transfer protocol.
This icon displays when two or more
message icons are being displayed.
Chapter 2 - Understanding your Phone
19
Page 20
Indicates missed calls. If you tap the icon
a window is displayed indicating the
amount of call missed. It also gives you
the ability to view the missed call
information.
Indicates that a new voicemail messages.
If you tap this icon a window is displayed
that allows you to listen to new voicemail
messages.
Indicates that a new SMS text message is
available. If you tap this icon, a window
is displayed that allows you to access the
Inbox.
Chapter 2 - Understanding your Phone
20
Page 21

Features of the i700
The i700 uses the Microsoft Pocket PC operating
system, which supports thousands of applications.
Using the ActiveSync operation, you can keep your
PC and your i700 synchronized at all times. Some of
the i700 features are:
• Large 240x320 pixel, 65k color Transflective TFT
screen
• Built in Camera
• CDMA 2000 1X Technology
• Microsoft Pocket PC 2002 Phone Edition Software
• 2 way SMS Messaging
• Voice Dialing
• Voice Memo
• Wireless Internet Capability
• Multi Media Card (MMC) / Secure Digital (SD)
Expansion Card Capability
• 16 Polyphonic Ringers.
Chapter 2 - Understanding your Phone
21
Page 22

Battery and Charger Accessories
Your i700 comes with a standard battery, charger,
and headset. It is very important to use only
Samsung approved accessories to avoid damage to
your phone.
Battery Capacity
Your phone is equipped with a standard
rechargeable battery. The battery can be recharged
before it is fully drained without causing battery
damage.
When the battery becomes low, a warning window
is displayed and the unit automatically turns off the
LCD. When there are approximately two minutes of
talk time left, the phone sounds an audible alert
every 30 seconds and then powers down.
Note: Long backlight settings, searching for service,
vibrate mode and browser use affect the battery’s talk
and standby times.
Chapter 2 - Understanding your Phone
22
Page 23
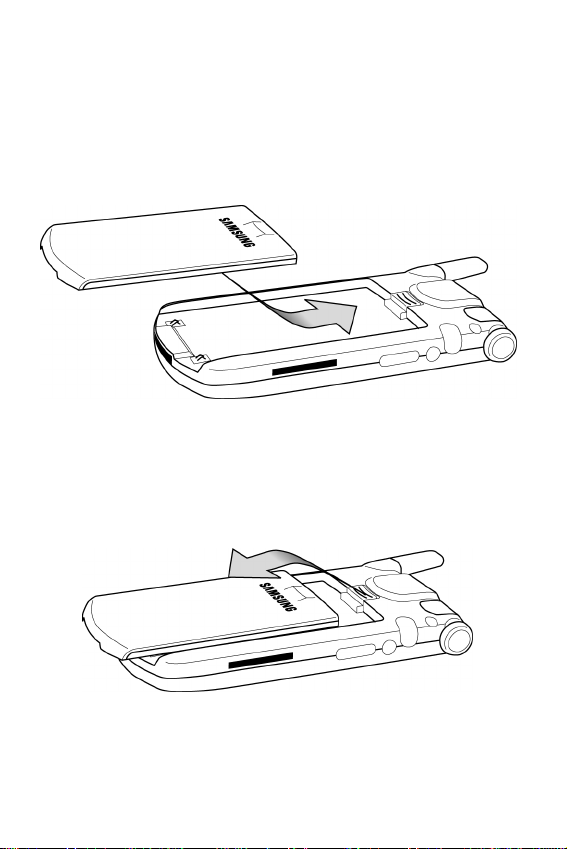
Installing the Battery
1. Place the battery on the back of the phone, making
sure that the plastic tabs are aligned with the
corresponding holes in the phone.
2. Gently push the battery up until it snaps into place.
Removing the Battery
1. Push the battery release latch and slide the battery
down from the phone.
Chapter 2 - Understanding your Phone
23
Page 24

Charging the Battery
Your cellular Phone comes with a rechargeable
battery. You should charge the battery as soon as
possible so you can begin using your phone.
Keeping track of your battery’ s charge is important.
If your battery level becomes too low, your phone
automatically turns off and you’ll lose everything
you were just working on. For a quick check of your
phone’s battery level, tap the time located in the
upper right corner of the screen. A battery icon is
displayed in the Time and Next Appointment
window.
To perform a battery check using the drop down
menu:
1. Tap Start located in the upper left corner of the
screen.
2. Tap
3. Tap
4. Tap
There is also an internal backup battery that saves
all the settings in the phone when the regular
battery is discharged. An internal backup battery
needs to be charged initially for 24 hours.
Settings.
System.
Power.
Chapter 2 - Understanding your Phone
24
Page 25

The internal battery will maintain data for about
4 hours. You should perform ActiveSync
operations or a backup utility frequently to
avoid loosing any information if the battery is
fully discharged. For more information see
“Scheduling an ActiveSync” on page 121.
Displaying your Phone Number
To display your phone number:
1. Press to display the phone screen.
2. Tap
3. The Settings screen is displayed. Y our phone number
4. Tap to exit.
Tools and select Options.
is displayed at the top of the screen.
Making and Answering Calls
Making Calls
There are several different options that allow you to
make calls on your new i700. You can use speed
dial, voice dial, call history, or simply enter the
desired number and tap .
Making a Call using the Keypad
1. Press to display the phone screen.
Chapter 2 - Understanding your Phone
25
Page 26

2. Tap the desired number using the stylus. If you make
a mistake while dialing, tap . Tap and hold
to clear all the digits and start over.
Note: Always use the stylus when touching the screen to
avoid scratching or damage caused by other instruments.
3. Tap
.
One Handed Dialing
One handed dialing allows you to make a call while
using just one hand. To make a call:
1. Press the Contacts button.
2. Press the OK/Navigation key up or down to select the
desired address book entry.
Note: If you press and hold the OK/Navigation key down,
letters are displayed that will automatically display the
first entry beginning with that letter.
3. Press the OK/Navigation key to display the entry
information and phone number.
Note: To return to the Contacts screen, press the OK/
Navigation button while the entry is displayed.
4. Press to display the number in the phone
screen.
5. Press again to dial the number.
Chapter 2 - Understanding your Phone
26
Page 27

Answering Calls
1. Make sure that the phone is turned On.
2. When you receive an incoming call, the Phone
Incoming screen is displayed. Tap
answer the call or
let the call go to voicemail.
Note: When you receive an incoming call, you can silence
the ringer by tapping .
Ignore to silence the ringer and
Answer to
Chapter 2 - Understanding your Phone
27
Page 28

Chapter 2 - Understanding your Phone
28
Page 29

Chapter 3 - Personal
Settings
The following topics are discussed in this Chapter:
• Buttons
• Input
• Menus
• Password
• Phone
• Sounds & Notifications
Page 30

Personal Settings
The personal settings allow you to set the following
options on your i700:
• Buttons
• Input
• Menus
• Password
• Phone
• Sounds and Notifications
• Today
• Owner Information
These settings allow you to control the look and
feel of the i700.
To access the Personal Settings:
1. Tap Start located in the upper left corner of the
screen.
2. Tap
3. Tap the
Settings.
Personal tab.
Chapter 3 - Personal Settings
30
Page 31

Buttons
The Buttons setting allows you to configure which
application launches when the record, contacts, or
calendar buttons are pressed. The following table
gives you the default settings and available
applications for each button:
To access the Button settings:
1. Tap Start located in the upper left corner of the
screen.
2. Tap
3. Tap the
4. Tap the
Settings.
Personal tab.
Buttons icon.
Button Applications
Input Panel
None
Scroll Down
Scroll Left
Scroll Right
Scroll Up
Start Menu
Today
ActiveSync
Calculator
Calendar
Camera
Contacts
File Explorer
Inbox
Infrared Receive
Internet Explorer
Microsoft Reader
MSN Messenger
Notes
Phone
Pocket Excel
Pocket Word
Record (default)
Solitaire
Tasks
Terminal Services
Client
Windows Media
Chapter 3 - Personal Settings
31
Page 32

(Same list as
above)
Contacts (default)
(Same list as
above)
Calendar (default)
Input
There are four different character input methods
available. They are:
• Block Recognizer
• Keyboard
• Letter Recognizer
• Transcriber
Each of these methods allow you to input
alphanumeric characters and symbols into the i700.
In addition to the input methods, there is Word
Completion and other options associated with the
input selected.
To access the Input settings:
1. Tap Start located in the upper left corner of the
screen.
2. Tap
3. Tap the
4. Tap the
Settings.
Personal tab.
Input icon.
Chapter 3 - Personal Settings
32
Page 33

Block Recognizer
This input method uses the traditional writing area
box split in the middle. The left side is used to write
letters and the right side is for number entry.
Symbols and common functions are located in
other smaller boxes located to the right of the
writing box area. There are no options associated
with this type of input method.
Keyboard
This input method displays an on-screen keyboard
that can be used to input characters by tapping the
screen using the stylus. The keyboard entry method
has the following options:
• Large Keys
• Small Keys
• Use Gestures to Remove Keys from the Keyboard
To select larger or smaller keys, simply tap the
button next to the desired option.
The gestures feature allows you to replace keys
used on the keyboard for space, backspace,
shift+key, and enter by drawing a gesture or
motion. The large key option must be selected for
this option to be available.
Chapter 3 - Personal Settings
33
Page 34

Letter Recognizer
This option allows you to enter text using your own
handwriting. The screen is divided into three
different areas. A capitol letter area, small letter
area, and a number area. Characters are entered by
printing letters in each area. The character is then
analyzed and typed on the screen automatically.
The following options are associated with this
method:
• Quick Stroke
• Right to Left Crossbar
• Allow Accented Characters
Transcriber
The transcriber option is similar to the letter
recognizer, except instead of entering characters
into a designated area, you can enter entire words
and sentences using your own handwriting.
Transcriber supports both printing and cursive
writing styles and then automatically types the
information on the screen. The following general
options are associated with this method:
• Sound On - Turns the sound On or Off.
• Show intro screen - Displays the help or
introduction screen whenever the transcriber
option is selected.
• Show iconbar - Displays the iconbar.
• Inking Color - Allows you to select the color and
size of the stroke line.
Chapter 3 - Personal Settings
34
Page 35

There are also some transcriber recognizer options.
They are:
• Add space after - Automatically adds a space after
each writing.
• Separate letters mode
• Speed of recognition vs Quality - Determines the
speed at which the writing sample is analyzed.
The faster the setting the less likely to get all
words correct. Better quality is achieved with
longer processing.
• Recognition start time - Allows you to set the time
of recognition between new writings.
Word Completion
The word completion settings determine if words
automatically display after entering a defined
number of characters on the screen. The following
options are available:
• Suggest words when entering text
• Suggest after entering 1-7 letters.
• Suggest 1-4 words.
• Add a space after suggest word.
To select the desired number of letters or words,
simply tap the drop down arrow associated with
each option.
Chapter 3 - Personal Settings
35
Page 36

Options
The options settings only apply when writing or
recording is supported. In the options tab, you can
select:
• Voice Recording Format
PCM
8,000 Hz, 8 Bit, Mono (8 KB/s)
8,000 Hz, 8 Bit, Stereo (16 KB/s)
8,000 Hz, 16 Bit, Mono (16 KB/s)
8,000 Hz, 16 Bit, Stereo (31 KB/s)
11,025 Hz, 8 Bit, Mono (11 KB/s)
11,025 Hz, 8 Bit, Stereo (22 KB/s)
11,025 Hz, 16 Bit, Mono (22 KB/s)
11,025 Hz, 16 Bit, Stereo (43 KB/s)
22,050 Hz, 8 Bit, Mono (22 KB/s)
22,050 Hz, 8 Bit, Stereo (43 KB/s)
22,050 Hz, 16 Bit, Mono (43 KB/s)
22,050 Hz, 16 Bit, Stereo (86 KB/s)
44,100 Hz, 8 Bit, Mono (43 KB/s)
44,100 Hz, 8 Bit, Stereo (86 KB/s)
44,100 Hz, 16 Bit, Mono (86 KB/s)
44,100 Hz, 16 Bit, Stereo (172 KB/s)
Chapter 3 - Personal Settings
36
Page 37

GSM 6.10
8,000 Hz, Mono (2KB/s)
• Default zoom level for writing
- 75%
- 100%
- 150%
- 200%
- 300%
• Default zoom level for typing
- 75%
- 100%
- 150%
- 200%
- 300%
• Capitalize the first letter of a sentence
• Scroll upon reaching the last line
Chapter 3 - Personal Settings
37
Page 38

Menus
There are two menus available in the i700 menu
options. They are:
• Start Menu
• New Menu
The Start menu options allow you to configure
what is displayed when you tap the Start menu
located in the upper left corner of the screen.
The New menu options allow you to configure what
is displayed when you tap on the New menu
located in the bottom left corner of the screen.
Start Menu
To access the Start menu:
1. Tap Start located in the upper left corner of the
screen.
2. Tap
3. Tap the
4. Tap the
5. Tap the
6. Check the items that you want to be displayed in the
7. Press to exit.
Settings.
Personal tab.
Menus icon.
Start Menu tab.
Start menu. Items that are not checked are displayed
in the Programs menu.
Chapter 3 - Personal Settings
38
Page 39

New Menu
To access the New menu options:
1. Tap Start located in the upper left corner of the
screen.
2. Tap
3. Tap the
4. Tap the
5. Tap the
Settings.
Personal tab.
Menus icon.
New Menu tab.
Password
The password option allows you to enable or
disable a password. The available settings are:
• No password - This setting disables the password.
• Simple 4-digit password - Allows you to set a four
digit password using the on-screen keypad.
• Strong alphanumeric password - Allows you to
enter a password that contains letters, numbers,
or both.
When a password is configured, there is a “prompt
if device unused” option that allows a length of
time range from 0 minutes - 24 hours. When this
option is set, you can continue to use the i700 until
the screen turns off due to inactivity. If the device is
inactive for a greater amount of time than specified
in the unused setting, a password must be entered
when you turn the device back on. To set the
password:
Chapter 3 - Personal Settings
39
Page 40

1. Tap Start located in the upper left corner of the
screen.
2. Tap
3. Tap the
4. Tap the
5. Tap the desired password option and enter the
6. If desired, set the “Prompt if device unused” time by
7. Tap .
8. Confirm the password setting by tapping
Settings.
Personal tab.
Password icon.
password.
tapping the drop down arrow and selecting the
proper time increment.
Yes in the
Password dialog box.
Phone
The phone options displays all the available options
for the phone. The options are divided into the
following tabs:
• Phone - Allows you to configure a voicemail phone
number. V iew your existing phone number. Select
the desired sounds associated with the phone.
Volume notification settings are also included.
• Option - Allows you to configure the Roaming,
Answer, and Data/Fax settings.
• Sound - Allows you to turn on or off the minute
beep, connect tone, or disconnect tone.
Chapter 3 - Personal Settings
40
Page 41

• Security - Allows you to set emergency numbers,
change the password, or reset the phone to the
factory default settings.
• Etc - Allows you set the time to auto or manual.
Displays the current hardware and software
version of the i700.
Phone Tab
These options allow you to configure several
different settings that are specific to the phone
including:
• Changing the Voicemail Dialup Number
• System Volume
• Notifications
• System Sounds
Voicemail settings
To access the voicemail settings:
1. Tap Start located in the upper left corner of the
screen.
2. Tap
3. Tap the
4. Tap the
5. Tap the
Settings.
Personal tab.
Phone icon.
Phone tab.
Chapter 3 - Personal Settings
41
Page 42

6. The number to call your voicemail is displayed in the
Voicemail box. To change the number, tap the box
and enter the desired number.
Note: This number is automatically setup when you
receive your phone. Y ou will probably not need to change
it unless otherwise instructed by your carrier.
Option Tab
The option tab allows you to configure the
following settings:
• Answer Options - Allows you to set up how the
phone is answered. The Talk key or Any Key on
the keypad can be used to answer an incoming
call.
• Auto (Carkit/Headset) - This option can only be
used with the optional carkit accessory. When
using the carkit, the phone is automatically
answered after 3, 5, or 10 seconds. The setting is
independent of the carkit and can be set up before
connecting.
• Data/Fax - The i700 can be used to receive an
incoming fax or data call.
• Roaming - Allows you to select a desired roaming
option. For more information, see “Roaming
Options” on page 64.
Chapter 3 - Personal Settings
42
Page 43

To access the option settings:
1. Tap Start located in the upper left corner of the
screen.
2. Tap
3. Tap the
4. Tap the
5. Tap the
Sounds
Settings.
Personal tab.
Phone icon.
Option tab.
These options allow you to configure the sounds
for the i700. These include the ring type, ring tone,
keypad sounds, and other sound settings. T o access
the sound settings:
1. Tap Start located in the upper left corner of the
screen.
2. Tap
3. Tap the
4. Tap the
5. Tap the
6. Tap the
Settings.
Personal tab.
Phone icon.
Phone tab.
Ring Type drop down arrow and select one
of the following ring types:
• Ring
• Increasing Ring
• Ring Once
• Vibrate
• Vibrate and ring
Chapter 3 - Personal Settings
43
Page 44

• Vibrate then ring
• None
7. Tap the
of the following ring tones:
Note: To hear the ring tone, use the player controls
located to the right of the ring tone box. Tap the arrow to
play the tone and then tap the square to stop.
8. Tap the
Ring Tone drop down arrow and select one
• BellDitty
• Chime
• DefaultRing
• Digital
• Guitar
• OldPhone
• RoaringGuitar
• Trio
• Welcome
• Hopmix
• Nobeat
• Scratch
• Solo
• SpanishGuitar
• Techie
• Voice
Keypad drop down arrow and select:
• Short Tones - When the on-screen keypad for the
phone is tapped, a short tone is played.
• Long Tones - When the on-screen keypad for the
phone is tapped, a long tone is played.
Chapter 3 - Personal Settings
44
Page 45

• Off - No tones are played when the on-screen
keyboard for the phone is tapped.
9. Tap to exit.
Other Sound Settings
The other settings box located in the phone tab
contains the settings for volume and notifications.
The volume settings control the system volume and
enable sounds for common functions.
The notification settings allow you to select an
individual event and then add a sound to the
function. You can also select how to be notified
when the event occurs or performs the intended
function. To change the volume and select an event
with notification:
1. Tap Start located in the upper left corner of the
screen.
2. Tap
3. Tap the
4. Tap the
5. Tap the
6. Tap the
7. Tap the
8. Tap the slider and select the desired System volume
Settings.
Personal tab.
Phone icon.
Phone tab.
Other Settings box.
Volume tab.
between Silent and Loud.
Chapter 3 - Personal Settings
45
Page 46

9. Tap the desired check boxes under “Enable
sounds for”.
Note: Some choices are greyed out unless the proper
check box is selected above the item.
10. Tap the
11. Tap the event drop down arrow and select the
desired event.
12. Tap the check box next to Play Sound to designate a
notification sound for that event.
13. Tap the drop down arrow next to the available
sounds and select the desired sound.
Note: Use the player controls to listen to the sounds.
14. Select the other desired choices by tapping the check
boxes. When finished, tap to exit.
Notifications tab.
Chapter 3 - Personal Settings
46
Page 47

Chapter 4 - Windows
Applications and Text Entry
The following topics are discussed in this Chapter:
• Navigating your PDA
• Shortcuts
Page 48

Navigating your PDA
Your i700 provides the power of a personal
computer with exceptional portability and
integration. Unlocking its power begins with
customizing the i700 so that it becomes an
extension of your desktop or laptop computer.
The i700 is Pocket PC 2002 Windows Powered,
providing the power and familiarity of Windows
that you are used to. Pocket versions of popular
Microsoft applications such as Word, Excel,
Windows Media Player
the need to learn new software.
Start Menu
The start menu contains links to all the applications
and settings information, similar to a Windows
based PC system. To access the start menu, simply
use the stylus to tap in the upper left corner of the
screen on the word Start. An immediate menu list is
displayed. From the pull down menu, all
applications and settings can be accessed.
Launching an Application
®
and Outlook® eliminate
To launch an application:
1. Tap Start located in the upper left corner of the
screen.
2. Look for the desired application listed in the Recent
Program list. If it is not found, tap
Chapter 4 - Windows Applications and Text Entry
48
Programs.
Page 49

3. Tap the desired program icon to launch the
application.
Shortcuts
New Command
The New command located in the bottom left side
of the screen allows you to create a new:
• Appointment
• Contact
• E-mail Message
• Excel Workbook
• Note
• Task
• Word Document
To access the new command:
1. Tap New located in the bottom left corner of the
screen.
2. Select any of the choices to launch the application.
Time & Appointments
To view the next upcoming appointment and
battery indicator without launching the calendar or
today screen:
1. Tap the time in the upper right corner of the screen.
2. The
Time and Next Appointment screen is
displayed.
Chapter 4 - Windows Applications and Text Entry
49
Page 50

Chapter 4 - Windows Applications and Text Entry
50
Page 51

Chapter 5 - Phone Settings
The following topics are discussed in this Chapter:
• Setting the Desired Volume Level
• Tone Length
• Alerts Sounds & Notifications
• Turning the Ringer Off
Page 52

Setting the Volume Levels
There are several different volume levels that can
be configured on the i700. They are:
• Voice Volume
• Record Volume
• Ring Volume
• System Volume
Voice Volume
The voice volume determines the volume setting of
the incoming caller. This setting can be set quickly
by pressing the up or down volume button located
on the side of the phone. To access the voice
volume settings in the phone:
1. Tap Start located in the upper left corner of the
screen.
2. Tap
3. Tap the
4. Tap
5. Using the stylus, tap the desired level on the slider
Note: You can also press and hold the slider tab and
move it back and forth along the slider using the stylus.
6. Tap to exit.
Settings.
System tab.
Volume.
located under
Voice Volume.
Chapter 5 - Phone Settings
52
Page 53

Record Volume
The record volume determines the recording levels
for voice memo’ s, notes, or recorded conversations.
The higher the setting, the more sensitive the
microphone. To access the record volume settings:
1. Tap Start located in the upper left corner of the
screen.
2. Tap
3. Tap the
4. Tap
5. Using the stylus, tap the desired level on the slider
6. Tap to exit.
Settings.
System tab.
Volume.
located under
Record Volume.
Ring Volume
The ring volume determines the volume setting for
the ringer associated with the phone. You can also
set the ringer silent if needed to avoid disturbing
others in a quiet setting. To access the ring volume
settings:
1. Tap Start located in the upper left corner of the
screen.
2. Tap
3. Tap the
4. Tap
Settings.
System tab.
Volume.
Chapter 5 - Phone Settings
53
Page 54

5. Using the stylus, tap the desired level on the slider
located under
6. Tap to exit.
Ring Volume.
System Volume
The system volume determines the volume settings
for the operating system installed on the i700. A
beep or other sound is heard while navigating
through the menus. To access the system volume
setting:
1. Tap Start located in the upper left corner of the
screen.
2. Tap
3. Tap the
4. Tap
5. Using the stylus, tap the desired level on the slider
6. Tap to exit.
Settings.
Personal tab.
Sounds & Notifications.
located under
System Volume.
Chapter 5 - Phone Settings
54
Page 55

Setting the Tone Length
When dialing a phone number, tones are emitted
each time a key is tapped. These tones can be set
up to be short, long, or turned off. In some cases,
longer tone lengths may be required for accessing
automated systems or voicemail. To set the tone
length:
1. Tap Start located in the upper left corner of the
screen.
2. Tap
3. Tap the
4. Tap
5. Tap the drop down arrow next to
6. Tap to exit.
Settings.
Personal tab.
Phone.
Keypad and select
Short Tones, Long Tones, or Off.
Chapter 5 - Phone Settings
55
Page 56

Alert Sounds & Notifications
Alert sounds can be configured for the following
events:
• ActiveSync: Begin sync
• ActiveSync: End sync
• Beam: Autoreceive
• Inbox: New e-mail message
• Inbox New SMS message
• MSN Messenger: Contact online
• MSN Messenger: New message
• Phone: Incoming call
• Phone: Missed call
• Phone: Voice mail
• Reminders
Selecting a Ringer for Incoming, Missed Calls, or Voice Mail
To select a ringer for incoming calls:
1. Tap Start located in the upper left corner of the
screen.
2. Tap
3. Tap the
4. Tap
5. Tap
Settings.
Personal tab.
Phone.
Other Settings.
Chapter 5 - Phone Settings
56
Page 57

6. Tap the drop down arrow under Select an event
and select
Missed Calls, or Phone: Voice Mail
7. If you selected Phone: Incoming Calls, tap the drop
down arrow next to
following:
• Ring
• Increasing Ring
• Ring Once
• Vibrate
• Vibrate and ring
• Vibrate then ring
• None
8. If you selected Ring, Increasing ring, or Ring Once,
tap the drop down arrow next to
select the desired ringer.
Note: To play the selected ringer, tap the play button
arrow located under the ring tone box.
9. Tap to exit.
Note: If you save .wav files in the windows/rings
directory, the file can be selected as a Ring Tone.
Phone: Incoming Calls, Phone:
.
Ring Type and select one of the
Ring Tone and
Chapter 5 - Phone Settings
57
Page 58

Turning the Ringer Off
In some cases, it may be necessary to turn off the
ringer to avoid causing a problem for those around
you. To turn off the ringer or set it to vibrate:
1. Tap Start located in the upper left corner of the
screen.
2. Tap
3. Tap the
4. Tap
5. Tap the drop down arrow next to Ring Type and
6. Tap to exit.
Note: You can also change the setting quickly by pressing
the volume key up or down when the phone screen is
displayed.
Settings.
Personal tab.
Phone.
select:
• Vibrate
• None
Chapter 5 - Phone Settings
58
Page 59

Chapter 6 - Security
Settings
The following topics are discussed in this Chapter:
• Accessing the Security Options
• Emergency Numbers
• Locking the i700
• Unlocking the i700
Page 60

Accessing the Security Options
The i700 has several security options associated
with the phone that help guard against
unauthorized usage. The security options allow you
to configure emergency numbers, change the
password, and reset the phone.
Emergency Numbers
Emergency numbers are numbers that can be
called when the phone is placed in lock mode. Up
to 10 numbers can be assigned in the emergency
numbers dialog box. To set up the emergency
numbers:
1. Tap Start located in the upper left corner of the
screen.
2. Tap
3. Tap the
4. Tap
5. Tap the Security tab.
6. Tap the
7. Double tap on one of the entries to edit or enter a
8. Tap to exit.
Settings.
Personal tab.
Phone.
Emegency Number box.
new number.
Chapter 6 - Security Settings
60
Page 61

Locking the i700
When you lock your phone, it requires a password
to return to normal operation. When a password is
set up, the phone can be locked immediately or
configured to lock when the screen blanks out. To
lock the phone:
1. Tap Start located in the upper left corner of the
screen.
2. Tap
3. Tap the
4. Tap
5. Select one of the following options:
6. Tap the drop down arrow and select the desired
7. Enter the password and tap .
8. Tap to confirm.
Settings.
Personal tab.
Password.
• Simple 4 digit password
• Strong alphanumeric password
unused time.
Unlocking the i700
To unlock your phone:
1. Tap Start located in the upper left corner of the
screen.
2. Tap
3. Tap the
4. Tap
Settings.
Personal tab.
Password.
Chapter 6 - Security Settings
61
Page 62

5. Enter your password.
6. Select No Password and tap .
7. Tap
Yes to confirm.
Chapter 6 - Security Settings
62
Page 63

Chapter 7 - Understanding
Roaming
The following topics are discussed in this Chapter:
• Roaming Overview
• Roaming Options
Page 64

Roaming
Roaming occurs when you travel outside the
designated coverage area. Your phone
automatically switches to roaming and the roaming
icon is displayed on the screen. Your phone can
roam on other digital networks. When you are
roaming, extra charges may apply when making or
receiving a call.
When you are roaming, some of the phone’s
features may not be available. When you are
roaming, your phone requires additional power
from the battery and may need to be recharged
more frequently.
Roaming Options
The following roaming options are available:
• Home only - Your phone seeks only designated
home systems and will prevent roaming on other
systems.
• Standard - Automatically seeks the most
preferred digital service. When such service is
unavailable, it searches for an alternative system.
Note: Contact your service provider for information
regarding preferred systems.
Chapter 7 - Understanding Roaming
64
Page 65

Chapter 8 - Messaging
The following topics are discussed in this Chapter:
• Message Types
• Voicemail
• Text Messaging
Page 66

Message Types
Your phone can send and receive the following
types of messages:
• Voicemail
• SMS Text Messages
• E-mail messages
• Numeric Pages
Messages are received at all times, even when the
phone is powered off or locked. When a new
message is received, a notification is displayed and
a tone is sounded.
Voicemail
If a new voicemail is received, a notification screen
is displayed alerting you that a new message is
available. If multiple voicemail messages are
received, the notification screen displays the
number of new messages received.
Connecting to the Voicemail System
To connect to voicemail:
1. Tap the alert icon at the top of the screen.
Note: The alert icon is displayed when more than one
alert is available.
2. Tap the voice mail icon .
Note: You can also tap and hold to speed dial
voicemail.
Chapter 8 - Messaging
66
Page 67

3. Tap the Voice Mail button to connect.
4. When the voicemail system connects, tap .
5. Enter your password.
6. Press to listen to your messages.
Text Messaging
The i700 allows you to create and send text
messages to other users with SMS capability. Text
messaging, also known as SMS (Short Message
Service) allows short text messages to be received
and displayed on your phone. 2-Way Text
Messaging, also known as MO-SMS (MobileOriginated Short Message Service,) allows
messages to be sent from your phone. Messages
can be sent from one phone to another by
addressing the message to the recipient's phone
number.
Creating a New Message
1. From the phone screen, tap Tools and select Send
SMS
.
2. Enter the phone number of the message recipient(s)
in the
To: field.(Up to ten people can be sent the
same SMS message at one time. For multiple
numbers, use a semi-colon).
Note: To select a number from contacts, tap . Tap the
icon again to display the text area.
3. Tap the
Subj: field and enter a title for the message.
Chapter 8 - Messaging
67
Page 68

4. T ap the message area and enter the desired message
using the desired input method. When finished, tap
the double drop down arrows to the right of the
Subj: field.
5. Tap the drop down arrow next to
sure that
6. If you would like a delivery confirmation that the
message was delivered, tap
SMS is selected.
Service and make
Edit and select
Options. Tap the check box next to Request SMS
text message delivery notification
7. Tap
Send to send the message.
.
E-mail Messages
E-mail messages can be sent and received using
Microsoft Outlook and ActiveSync. Messages are
sent and received using the desktop/laptop
computer during an ActiveSync operation. To send
an e-mail message:
1. From the phone screen, tap Tools and select Send
SMS
.
2. Enter the e-mail address in the
people can be sent the same SMS message at one
time. For multiple e-mail addresses, use a semicolon).
Note: To select an e-mail address from contacts, tap .
Tap the icon again to display the text area.
3. Tap the
Subj: field and enter a title for the message.
To: field.(Up to ten
Chapter 8 - Messaging
68
Page 69

4. T ap the message area and enter the desired message
using the desired input method. When finished, tap
the double drop down arrows to the right of the
Subj: field.
5. Tap the drop down arrow next to
sure that
6. Tap
7. Perform an ActiveSync operation to send the e-mail
message. For more information on performing an
ActiveSync operation, see “ActiveSync” on
page 118.
ActiveSync is selected.
Send.
Service and make
Message Options
Several options are associated with sending an
SMS message. They are:
• Edit My Text Messages
• Spell Check
• Language
• Cancel Message
My Text Messages
My Text Messages are default text messages that
can be used quickly to send common text (SMS)
messages without having to type the message. A
total of 10 messages can be saved. The default
messages are:
• Yes.
• No.
Chapter 8 - Messaging
69
Page 70

• I can’t talk right now.
• I’ll be right there.
• I’m running late.
• Where are you?
• Hi.
• Goodbye.
• Call me later.
• I love my Pocket PC!
Using My Text Messages
1. Create a new SMS Message.
2. Tap My Text and select the desired message from
the list.
3. Tap
Send to send the message.
Editing My Text Messages
To edit My Text Messages:
1. Open an SMS Message.
2. Tap Edit and select Edit My Text Messages.
3. Select the message that you would like to edit.
4. Delete the old message from the box and enter the
new message.
5. Tap to save and exit.
Chapter 8 - Messaging
70
Page 71

Performing a Spell Check
To perform a spell check:
1. Create a new SMS Message.
2. Tap Edit and select Spell Check.
3. When the spell check is finished, tap .
4. Tap
Send to send the message.
Language
There are several different languages available
when creating a new message. T o select the desired
language:
1. Create a new message from the Inbox.
2. Tap
3. Select the desired language from the list.
Edit and select Language.
Cancel a Message
To cancel a message:
1. From the new message screen, tap Edit and select
Cancel Message.
Chapter 8 - Messaging
71
Page 72

SMS Message
SMS Inbox
SMS messages are saved in the SMS Inbox. If the
memory is full, new messages are rejected. Older
messages can be deleted to free up space for the
incoming messages. To access the SMS Inbox:
1. Tap Start located in the upper left corner of the
screen.
2. Tap
3. Tap the drop down arrow next to
Note: The i700 does not support the alert function when a
repeated message is received. If a duplicate message is
received, “New Message” instead of “Duplicate
Message” is displayed on screen.
SMS Outbox
When you send a message, it is stored in the SMS
Outbox until sent. Messages are sent using the i700
and the SMS Outbox is cleared.
To access the SMS Outbox:
Inbox.
Inbox and select
Inbox under the SMS directory.
1. Tap Start located in the upper left corner of the
screen.
2. Tap
3. Tap the drop down arrow next to
Inbox.
Inbox and select
Outbox under the SMS directory.
Chapter 8 - Messaging
72
Page 73

SMS Sent Items
Sent Items keeps a record of all the SMS messages
sent from your phone.
To access sent items:
1. Tap Start located in the upper left corner of the
screen.
2. Tap
3. Tap the drop down arrow next to
Inbox.
Inbox and select
Sent Items under the SMS directory.
SMS Drafts
SMS Drafts contain all the SMS messages that
were not completed and saved to send at a later
time. These messages are accessed from the drafts
folder in the SMS Inbox. To access the stored
folder:
1. Tap Start located in the upper left corner of the
screen.
2. Tap
3. Tap the drop down arrow next to
Inbox.
Inbox and select
Drafts under the SMS directory.
Chapter 8 - Messaging
73
Page 74

SMS Deleted Items
SMS Deleted items keeps a copy of all the
messages that were deleted. Once the messages
are removed from the SMS deleted items folder,
they are permanently erased. To access the SMS
deleted folder:
1. Tap Start located in the upper left corner of the
screen.
2. Tap
3. Tap the drop down arrow next to
Inbox.
Inbox and select
Deleted Items under the SMS directory.
ActiveSync Mail
ActiveSync Inbox
E-mail messages are saved in the ActiveSync Inbox.
If the memory is full, new messages are rejected.
Older messages can be deleted to free up space for
the incoming messages. To access the ActiveSync
Inbox:
1. Tap Start located in the upper left corner of the
screen.
2. Tap
3. Tap the drop down arrow next to
Inbox.
Inbox and select
Inbox under the ActiveSync directory.
Chapter 8 - Messaging
74
Page 75

ActiveSync Outbox
When you send a message, it is stored in the
ActiveSync Outbox until sent. When an ActiveSync
is performed, the messages are sent using the
desktop machine and the ActiveSync Outbox is
cleared.
To access the ActiveSync Outbox:
1. Tap Start located in the upper left corner of the
screen.
2. Tap
3. Tap the drop down arrow next to
Inbox.
Inbox and select
Outbox under the ActiveSync directory.
ActiveSync Sent Items
Sent Items keeps a record of all the messages sent
from your phone.
To access sent items:
1. Tap Start located in the upper left corner of the
screen.
2. Tap
3. Tap the drop down arrow next to
Inbox.
Inbox and select
Sent Items under the ActiveSync directory.
Chapter 8 - Messaging
75
Page 76

ActiveSync Drafts
ActiveSync Drafts contain all the e-mail messages
that were not completed and saved to send at a
later time. These messages are accessed from the
drafts folder in the ActiveSync Inbox. To access the
stored folder:
1. Tap Start located in the upper left corner of the
screen.
2. Tap
3. Tap the drop down arrow next to
Inbox.
Inbox and select
Drafts under the ActiveSync directory.
ActiveSync Deleted Items
Deleted items keeps a copy of all the messages that
were deleted. Once the messages are removed
from the deleted items folder , they are permanently
erased. To access the deleted folder:
1. Tap Start located in the upper left corner of the
screen.
2. Tap
3. Tap the drop down arrow next to
Inbox.
Inbox and select
Deleted Items under the ActiveSync directory.
Chapter 8 - Messaging
76
Page 77

Inbox Tools
The Inbox Tools menu displays status information
and allows you to manage the Inbox settings. The
following options are available in the Inbox Tools
menu:
• Manage Folders - Allows you to organize the
folders in the Inbox.
• Empty Deleted Items - Deletes the messages in the
Deleted Items folder.
• Edit My Text Messages - Edits the canned text
messages.
• Status - Displays a list of how many messages
sent, copied, to be copied, or deleted.
• Options - Displays the services, message, address,
and storage options of the phone.
To access the Inbox Tools menu:
1. Tap Start located in the upper left corner of the
screen.
2. Tap
3. Tap
Inbox.
Tools at the bottom of the display.
Chapter 8 - Messaging
77
Page 78

Options
The options menu allows you to display
configuration settings for:
• Services - Allows you to create a new service of
modify the settings for an existing service.
• Message - Displays the message configuration
settings.
• Address - Displays the address options.
• Storage - Allows you to view the amount of space
free space left in memory or on the optional
storage card.
Services
The Services tab allows you to create a new service
or configure an exiting one. When creating a new
service, you will need to know the type of email
account, incoming and outgoing servers, and login
information before going through the service set
up. To access the service options:
1. Tap Start located in the upper left corner of the
screen.
2. Tap
3. Tap
4. Tap the
Inbox.
Tools and select Options.
Services tab.
Chapter 8 - Messaging
78
Page 79

Creating a new Service
To create a new Service:
1. Tap Start located in the upper left corner of the
screen.
2. Tap
3. Tap
4. Tap the
5. Tap the
6. Enter e-mail address in the space provided and tap
Inbox.
Tools and select Options.
Services tab.
New button.
Next.
7. Allow the Auto-Configuration application to attempt
to automatically configure your e-mail settings and
tap
Next.
8. Enter Your Name, User Name, and Password and tap
Next.
Note: Tap the check box next to Save Password to allow
you to enter the e-mail account without having to enter a
password each time.
9. Select the service type and enter a name for the
service. Tap
10. Enter the Incoming and Outgoing server information.
Enter the Domain name and tap
Next.
Finish.
Chapter 8 - Messaging
79
Page 80

Message Options
To access the message options:
1. Tap Start located in the upper left corner of the
screen.
2. Tap
3. Tap
4. Tap the
Inbox.
Tools and select Options.
Message tab.
Address Options
To access the message options:
1. Tap Start located in the upper left corner of the
screen.
2. Tap
3. Tap
4. Tap the
Inbox.
Tools and select Options.
Address tab.
Storage Options
To access the message options:
1. Tap Start located in the upper left corner of the
screen.
2. Tap
3. Tap
4. Tap the
Inbox.
Tools and select Options.
Storage tab.
Chapter 8 - Messaging
80
Page 81

Chapter 9 - Call Logs
The following topics are discussed in this Chapter:
• Call Logs
Page 82

Call Logs
When a call is received, made, or missed a record
of the call is saved with all the available information
in a call log. The call logs are:
• All - Displays all call received, sent, or missed.
Missed - Displays any missed calls.
•
Outgoing - Displays all outgoing calls made from
•
your phone.
•
Incoming - Displays all incoming calls that were
answered.
•
By Caller - Allows you to select an entry from the
contacts and then displays any call information
related to the contact.
If you tap the entry, the time, date, and duration of
the call is displayed.
Making a Call from the Call Log
To make a call:
1. From the phone screen, tap .
2. Tap the drop down arrow in the upper left corner and
select the desired call log list.
3. Tap the phone icon located to the left of the entry to
make a call.
4. When finished, tap .
Chapter 9 - Call Logs
82
Page 83

Call Log Options
Call log options allows you to view the call times
for all calls and recent calls. You can also set the
amount of time to keep call log items before they
are deleted. To access the call log options:
1. From the phone screen, tap .
2. Tap
3. Tap the drop down arrow under
4. Tap to exit.
Tools and select Options.
items older than
• 1 week
• 1 month
• 2 months
• 3 months
• 6 months
• 1 year
• never
and select one of the following:
Delete call log
Creating a New Contact from the Call Log
To create a new contact from a call log entry:
1. From the phone screen, tap .
2. Tap the drop down arrow in the upper left corner and
select the desired call log list.
3. Tap and hold on the desired entry. Select
Contact
4. Enter the contact information. When finished, tap
from the menu.
.
Chapter 9 - Call Logs
New
83
Page 84

Deleting Call Log Entries
To delete the call log entries:
1. From the phone screen, tap .
2. Tap the drop down arrow in the upper left corner and
select the desired call log list to delete.
Note: To delete all call log entries, select All Calls.
3. Tap
4. Tap
5. Tap to exit.
Tools and select Delete All Calls.
Yes to confirm the deletion.
Sending a SMS Message from a Call Log Entry
SMS or Short Messages can be sent to other users
that support SMS capabilities.
Note: Contact your service provider for more information
on SMS messaging services.
To send a new SMS message from a call log entry:
1. From the phone screen, tap .
2. Tap the drop down arrow in the upper left corner and
select the desired call log list.
3. Tap and hold on the desired entry. Select
SMS
from the menu.
4. Enter the subject and message in the spaces
provided. When finished, tap .
Note: Make sure that SMS is selected in the Services field
or else the message cannot be sent.
Send
Chapter 9 - Call Logs
84
Page 85

Chapter 10 - Call Features
The following topics are discussed in this Chapter:
• Caller ID
• Call Waiting
• Call Forwarding
• Three-Way Calling
Caller ID
Caller ID alerts you to who’s calling by displaying
the phone number of the person calling when you
receive an incoming call. Similarly, if you call
someone who has this feature, your phone number
displays on their phone. If the caller’s name and
number are already stored in your Internal Phone
Book, the corresponding name appears with the
number.
To block caller ID from displaying when you call
another user:
1. Tap and then dial the phone
number.
#
Page 86

Call Waiting
You can answer an incoming call while on an
existing call. If you are on an existing call and
another call is received, a tone is heard and a call
waiting message is displayed on the screen. If the
caller is stored in the address book, their name is
also displayed.
Answering a Waiting Call
1. Tap the Answer button. The phone connects to the
other call while placing the existing caller on hold.
2. Tap the button again to switch back over to
the original caller.
Call Forwarding
Call Forwarding allows you to forward all your
incoming calls to another phone number - even
when your phone is turned off. You can still make
calls from your phone with Call Forwarding
activated.
To activate call forwarding:
1. Tap .
2. Enter the area code and phone number where the
incoming calls are forwarded.
3. Tap . A confirmation recording confirms the
feature change.
Chapter 10 - Call Features
86
Page 87

To deactivate call forwarding:
1. Tap .
2. A confirmation recording confirms the feature
change.
Three Way Calling
Three way calling allows you to talk to two different
people at the same time. When using this feature,
normal airtime rates apply for each of the two calls.
To use three way calling:
1. Enter the number you wish to call and tap .
2. During the conversation, tap .
3. Dial the second person and tap .
4. When the person answers, tap again to
connect all three parties.
If one of the people you called hangs up, you and
the remaining caller stay connected. If you initiated
the call and are the first one to hang up, all three
calls are disconnected.
Chapter 10 - Call Features
87
Page 88

Chapter 10 - Call Features
88
Page 89

Chapter 11 - Contacts
The following topics are discussed in this Chapter:
• Contacts
• Notes
• Making calls from Contacts
• Speed Dialing
• Beaming Contacts
Page 90

Contacts
Contacts is used to save important information
regarding your friends, colleagues, or business
acquaintances. The contacts screen allows you to
save the persons:
• Name
• Job Title
• Department
• Company
• Work Number, Fax, & Address
• E-mail
• Mobile Number
• Web Page
• Office Location
• Home Number, Address, & Fax
• Categories
• Other Addresses
• Pager
• Car Telephone
• Birthday
• Anniversary
• Spouse
• Children
• Assistant
• Assistant Telephone
• Radio Telephone
Chapter 11 - Contacts
90
Page 91

In addition to all the information available in the
contacts, you can also record or write a note
associated with the contact. All of this information
can be synchronized with a PC or Laptop using the
Microsoft ActiveSync application. For more
information on ActiveSync, see “ActiveSync” on
page 118.
Adding a New Contact
To add a new contact:
1. Tap Start located in the upper left corner of the
screen and select
Note: You can also press the Contacts button
located in the front on the bottom right corner of the i700.
2. Tap
3. Enter the desired information in the spaces provided.
New.
When finished, tap .
Contacts.
Finding a Contact
To locate a specific contact, you can use the find
feature. Find allows you to enter the first few letters
of the contact entry and then have the results
displayed on the screen. The Find box is located in
the upper right corner of the contact screen. To find
a contact:
1. Press to open Contacts.
2. Tap the Find box and enter the first few letters of the
desired entry.
Chapter 11 - Contacts
91
Page 92

3. Tap the entry from the list of possible matches to
view the summary screen
4. If the entry is not the one your looking for, tap to
return to the list of possible matches.
Editing a Contact
To edit an existing contact entry:
1. Press to open Contacts.
2. Locate the desired contact using find or scrolling
through the contact list with the navigation key.
3. Tap the desired contact to view the summary screen.
4. Tap
5. Change or update the desired information.
6. Tap to save and exit.
Edit.
Deleting a Contact
To delete a contact:
1. Press to open Contacts.
2. Tap the desired contact from the list.
3. Tap
4. Tap
Tools and select Delete Contact.
Yes to confirm the deletion.
Chapter 11 - Contacts
92
Page 93

Adding a Note
The notes feature allows you to record or write a
note that is attached and saved with the contact
entry. When you view the summary screen on the
contact, you can view or listen to any notes that are
associated with the contact. T o access the note for a
contact:
1. Press to open Contacts.
2. Tap the desired contact from the list.
3. Tap the
4. To record a note, tap record icon located in the
command bar. Tap to begin the voice recording.
Tap when finished.
5. To write a note, tap the pen icon and enter the
note using the desired entry method.
6. To exit and save, tap .
Notes tab.
Deleting a Note
To delete a note:
1. Press to open Contacts.
2. Tap the desired contact from the list.
3. Tap the
4. Tap
5. Tap Edit and select Clear.
Notes tab.
Edit and select Select All.
Chapter 11 - Contacts
93
Page 94

Making a Call from Contacts
To make a call from the contacts screen:
1. Press to open Contacts.
2. Tap the desired contact from the list.
3. From the summary screen, tap the phone number.
4. The call is dialed automatically. To end the call, tap
the
End button in the Phone-Connected screen.
Note: If you tapped the Hide button, you can display the
phone main screen by tapping the phone signal strength
icon located in the top right of the screen.
Speed Dialing
Speed dial can be used to the dial contacts that you
talk to the most. Speed dial allows you to press
either one or two keys and connect to the contact.
Memory locations 2-99 are available for speed
dialing. To speed dial:
1. Press to open Contacts.
2. Tap the desired contact from the list.
3. Tap
4. Tap the up or down arrows next to
5. To save, tap .
6. To exit the contact summary screen, tap again.
Tools and select Add Speed Dial.
Location to
select the desired memory location.
Chapter 11 - Contacts
94
Page 95

Beaming Contacts
Your i700 is equipped with an infrared port (IR)
which allows you to send and receive information
wirelessly between two IR Pocket PC devices. To
beam a contact:
1. Press to open Contacts.
2. Tap the desired contact from the list to view the
summary screen.
3. Tap
4. Align the ports between the two devices.
5. When the contact has been successfully transferred,
Tools and select Beam Contact.
tap to exit.
Chapter 11 - Contacts
95
Page 96

Chapter 11 - Contacts
96
Page 97

Chapter 12 - Calendar
The following topics are discussed in this Chapter:
• Today
• Scheduling an Alarm
• Calendar
• Scheduling an Appointment
• Changing the Calendar View
• Calendar Options
• Tasks
Page 98

Today
The Today screen is used as a default information
screen on the Pocket PC. When the i700 is powered
on, the Today screen is displayed. Information
displayed relates to the current day. The today
screen displays the following information on the
screen:
• Current Date and Time
• Owner Information
• Current Appointments
• Message Status
• Data Call State
• Enhanced Roaming Indicator
• Current Tasks
Date and Time Settings
The clock settings can be accessed from the Today
screen by tapping the clock icon next to the day and
date entry on the screen. The Clock settings allow
you to set the time zone, time, and date for your
home or a visiting location. To access the clock
screen:
1. From the Today screen, tap the clock icon .
2. Select either
3. Set the time zone using the drop down arrow.
4. Tap the up or down arrow to set the correct time.
Note: You can also tap the clock face and set the desired
time.
Chapter 12 - Calendar
98
Home or Visiting.
Page 99

5. Tap the drop down arrow to set the correct date.
6. Tap to save and exit.
Scheduling an Alarm
Your phone has four programable alarm clocks that
can be configured to ring daily at a desired time. To
set up the alarm clock:
1. From the Today screen, tap the clock icon .
2. Tap the
3. Tap the box next to the desired alarm.
4. Tap the day of the week.
5. Tap the time to display the time settings. Tap the up
or down arrows to select the desired time.
Note: Tap the AM or PM to cycle between them.
6. Tap when finished.
7. Tap again to save and exit.
Alarms tab.
Owner Information
The owner information contains the personal
information about the individual that uses the
device on a constant basis. This information should
be set up when you first use your i700. For more
information on setting up the owner information,
see “Entering the Owners Information” on page 14.
Chapter 12 - Calendar
99
Page 100

Data Call State
The data call state indicates the progress of a data
transmission. There are three states associated
with the data call:
• Green - Connecting to the network for
transmission.
• Dark Grey with Light On - Dormant state. No
activity.
• Dark Grey with Light Off - Disconnected.
There are RX (Receiving) and TX (Transmitting)
status bars located on the Today screen. If you tap
on the RX or TX status bar, you can select the
desired USB path. The available choices are:
• External Data Call
• ActiveSync
Chapter 12 - Calendar
100
 Loading...