

Page 1

900 D S P Phone
GG68-00433A
03/04. Rev.1.0
АЯ 46
Page 2
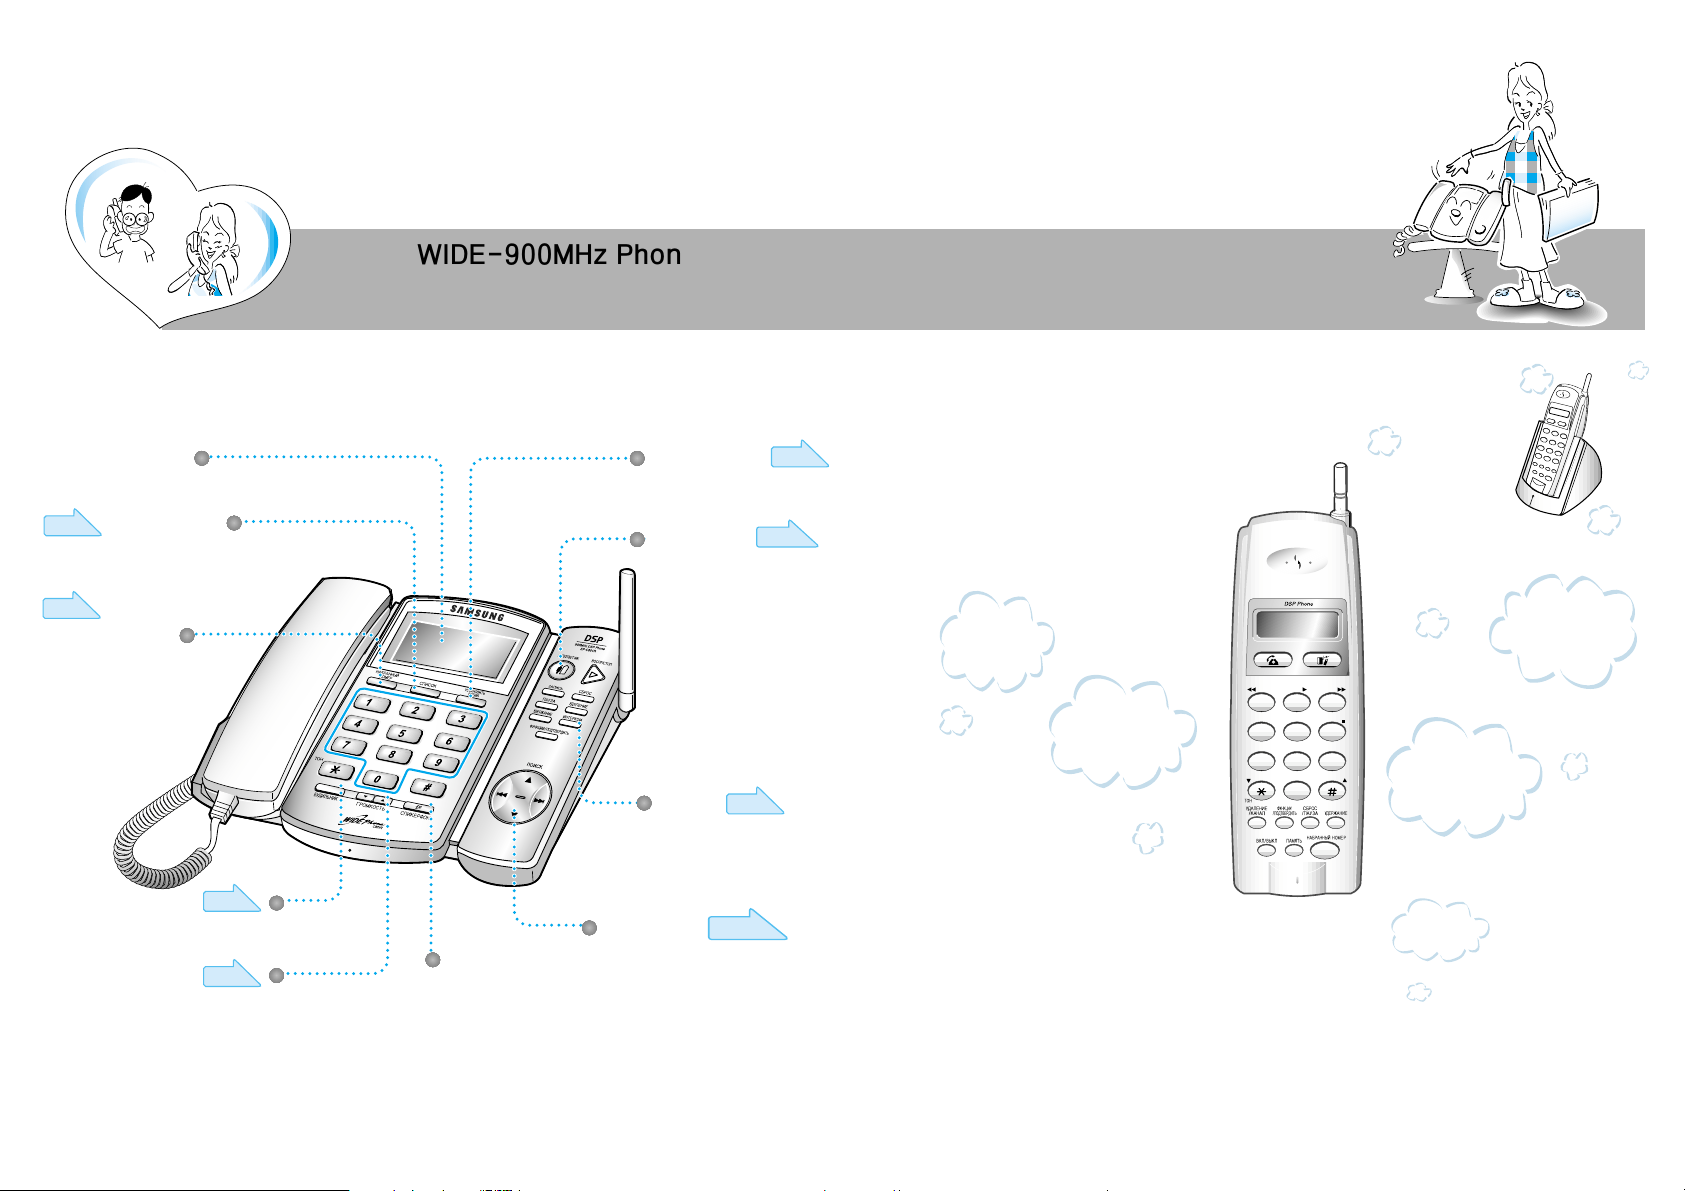
WIDE-900MHz Phone
Experience the following various
functions.
Page 20~2 3
Overview of Main Features
456
789
0
231
Page 27
Screen
Easy to see with wide display
Recent call function
You can easily redial the
recently dialed number
without looking it up.
You can set the date and time.
You can enable auto answering
and voice recording.
You can communicate between
the base set and the Remote set.
You can easily carry
the Remote set when
moving around.
You can additionally
purchase and add up to
two Remote sets to attach
onto the base set.
You can check the
recorded voice through
the Remote set.
An illuminated dial pad
adds to your convenience.
It allows you to dial
phone numbers even in
dark places.
You can use various other
functions including the volume
control function for the base set
and the blocking function for long
distance calls.
Page 17
Page 12
Page 24~ 25
Page 18~19
Page 15
Phone directory
search function
You can easily search the
phone directory.
Morning call function
Date/Time setting
Auto-answering
function
Intercom
function
Other functions
Page
14,34,35
Volume Control
You can adjust the speaker and
the handset volumes.
Two-way
Speakerphone
Two-way speakerphone will
provide you with high speech
quality.
32
Page 3
Reference
Convenient features
Basic features
Preparation and installation
Functions used in auto-answering
Checking caller voice
Using the auto-answering from a remote
location (Remote control)
Selecting ringing number for remote control
Function table for remote controlling
Function table for Remote set
Major functions
Table of contents/Components
Product information
Phone installation
2
4
6
8
Making/receiving calls
Date/Time setting (setting current time)
Selecting pulse/tone dial type
Making intercom
Adjusting ring volume for base set
Transferring calls
Adjusting ring volume for Remote set
Morning call setting
Auto answering
Phone directory
The numbers that were most recently dialed
Transferring to another call during calls (Flash)
Speed dial for Remote set
Blocking long distance calls (call control)
Low voltage warning
Flash time adjustment
Music selection for hold function
Initializing the phone
Purchasing additional Remote sets
Recording calls (Base set)
Pause function during calls
10
12
12
13
14
16
17
18
20
24
Convenient features for making calls
Help functions
Convenient features during calls
27
27
28
29
30
31
31
32
32
33
33
Convenient features for auto-answering
34
34
34
34
35
36
38
40
41
42
43
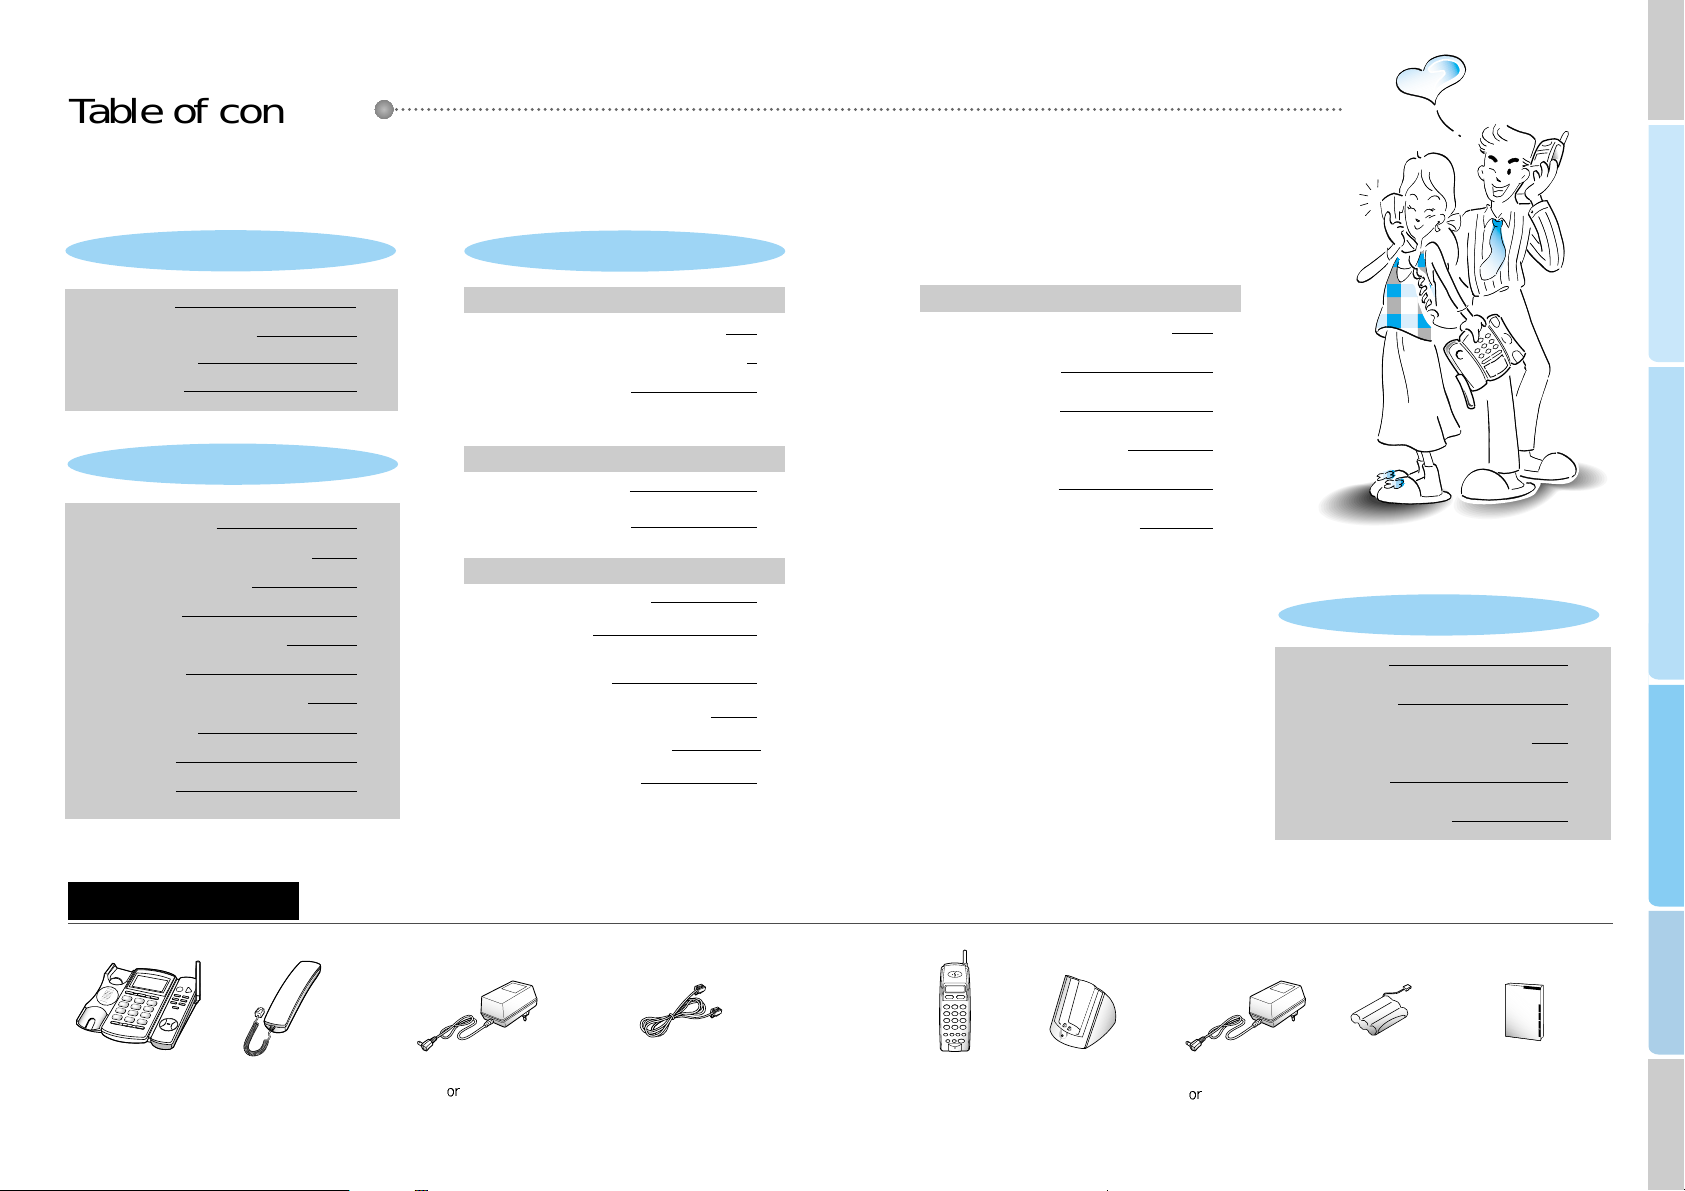
Components
Table of contents
Preparation & Installation
Basic features
Convenient features
Base set Base adapter
(11V
12V DC 500mA)
Charger adapter
(11V
12V DC 500mA)
Base handset
Remote set Charger
Battery
Tel line cord
User's manual
Reference
Troubleshooting
Safety precautions
Cleaning method and initial state of phone
Product standard
Summary table of functions
54
Page 4
Preparation and installation
456
789
0
231
Product introduction
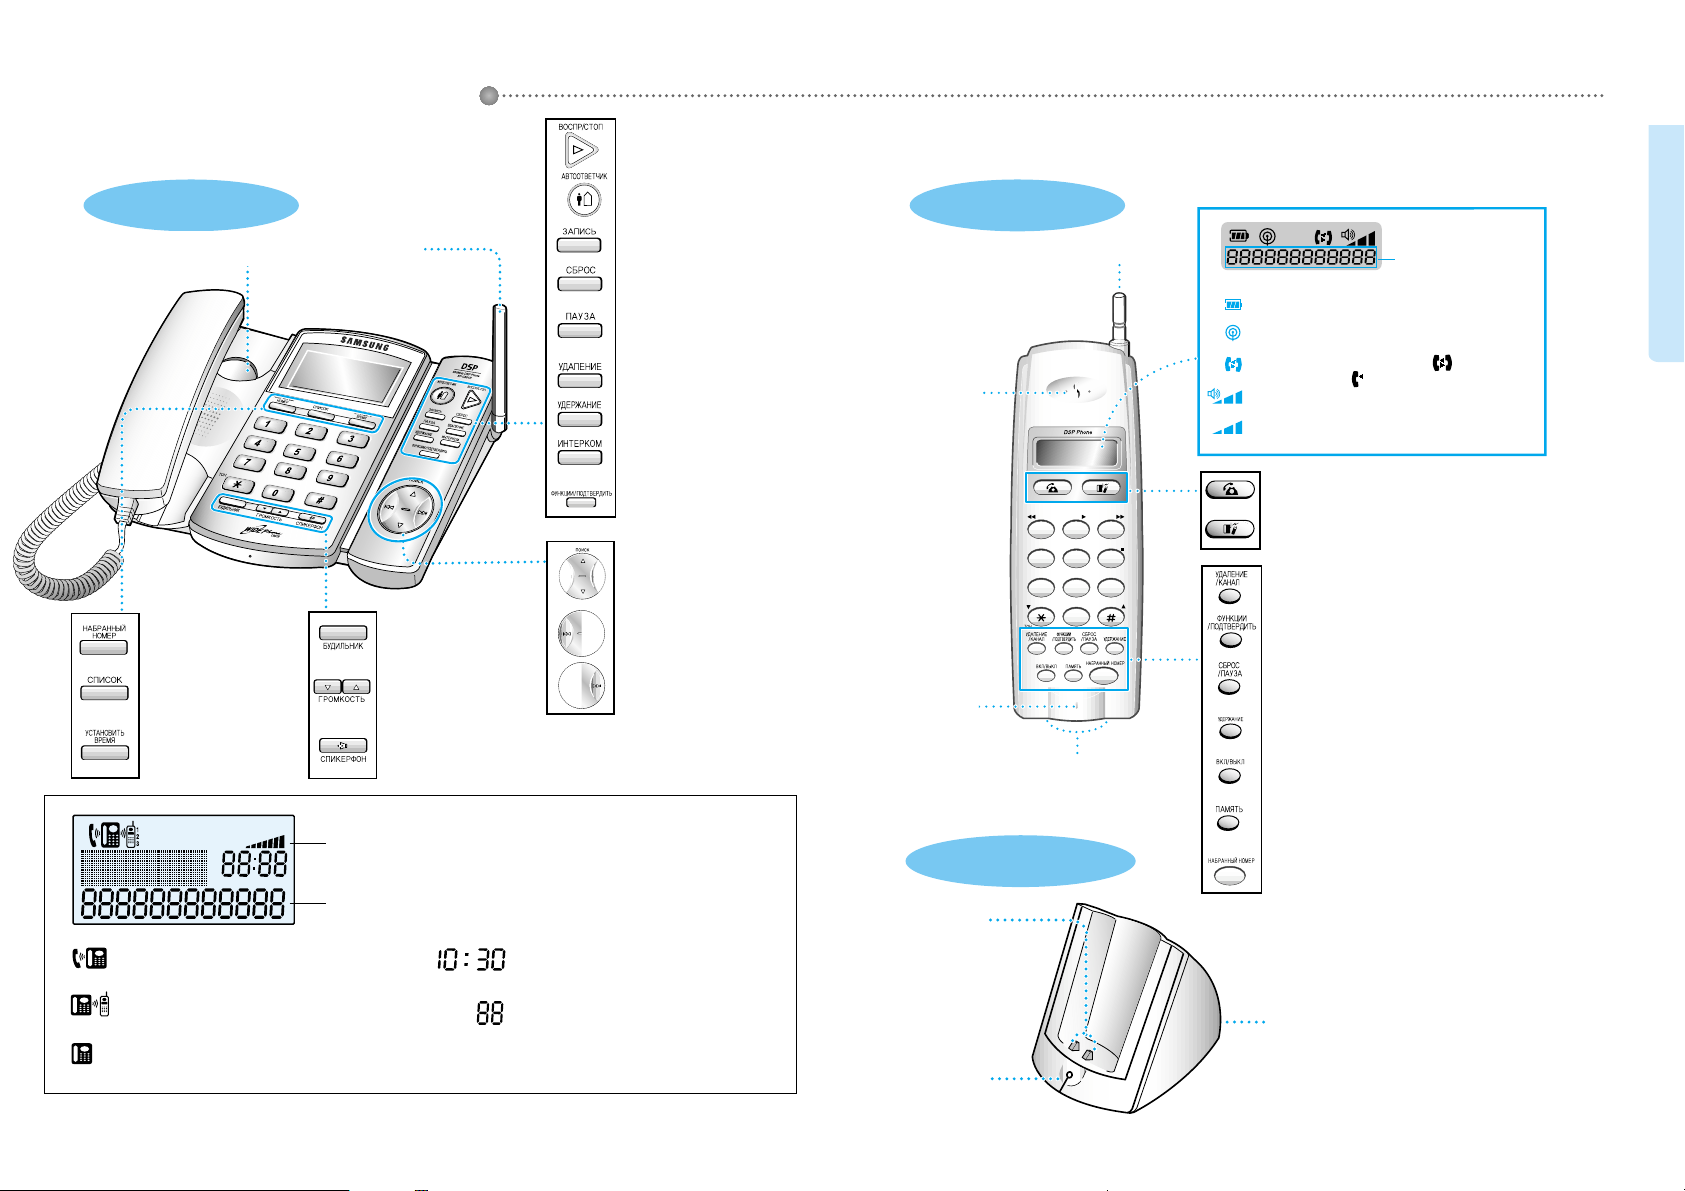
Base set
Remote set
Charger
This is used for playing and stopping
a recorded message or for stopping
the recording. In addition, this is used
for exiting from other functions.
This is used for setting or
canceling the auto-answering.
This is used for holding a call.
This is used for intercom or for
transferring a call.
This is used for setting or saving
various functions.
This is used for searching the phone
directory.
This is used for moving to the prior
message during a message playback.
This is used for moving to the next
message during a message playback.
This is used for setting up a recorded
message or recording a call.
This is used for registering the
number to the directory.
This is used for deleting a message or
a registered phone number.
This is used for transferring the call
during a call.
Screen
Hook switch
Screen to indicate
phone number of
function
Battery status
When out of range from the base set
When the line is busy with a call ( ) or
an extension call ( )
Volume of current voice volume
Volume of phone ring volume
This is used for calling, receiving or hanging up.
This is used for making an intercom or transferring a call.
This is used for deleting the phone number from the directory or
reducing the noise
This is used for setting or saving various functions
This is used for holding the call.
This is used for turning on or off the power of the Remote set.
This is used for registering or searching for a memory dial.
This is used for calling the last or most recent number.
This is used for transferring a call during the call (The flash function
can only be used when the AIC/PBX is connected to the commercial
switchboard). Pause is used for registering a phone number to the
directory.
Adaptor cable connector
LED lamp for
recharging
status
Charger
contact
�Volume is indicated
�Recorded messages are
indicated
When the base handset or the
speakerphone is being used.
When the Remote set is being used.
When standby mode
Current time
Number of recorded messages.
This is used for redialing the
last or the most recently diald
number.
This is used for setting the
month, day, hour and minute.
This is used for setting the
morning call.
This adjusts the volume of
the phone's ring, recorded
voice or speaker.
This is used when using
the speakerphone.
This helps you search the
registered phone number.
Antenna
Antenna
Speaker
Mic
Charger contact
76
Page 5
● To turn on the power: Press button until you hear the beeping sound.
● If it does not turn on when you press button, then you probably need to
recharge the Remote set. It should automatically turn on. Please recharge for 1
day before using.
● To turn off the power : Press button until you hear the beeping sound.
456
789
0
231
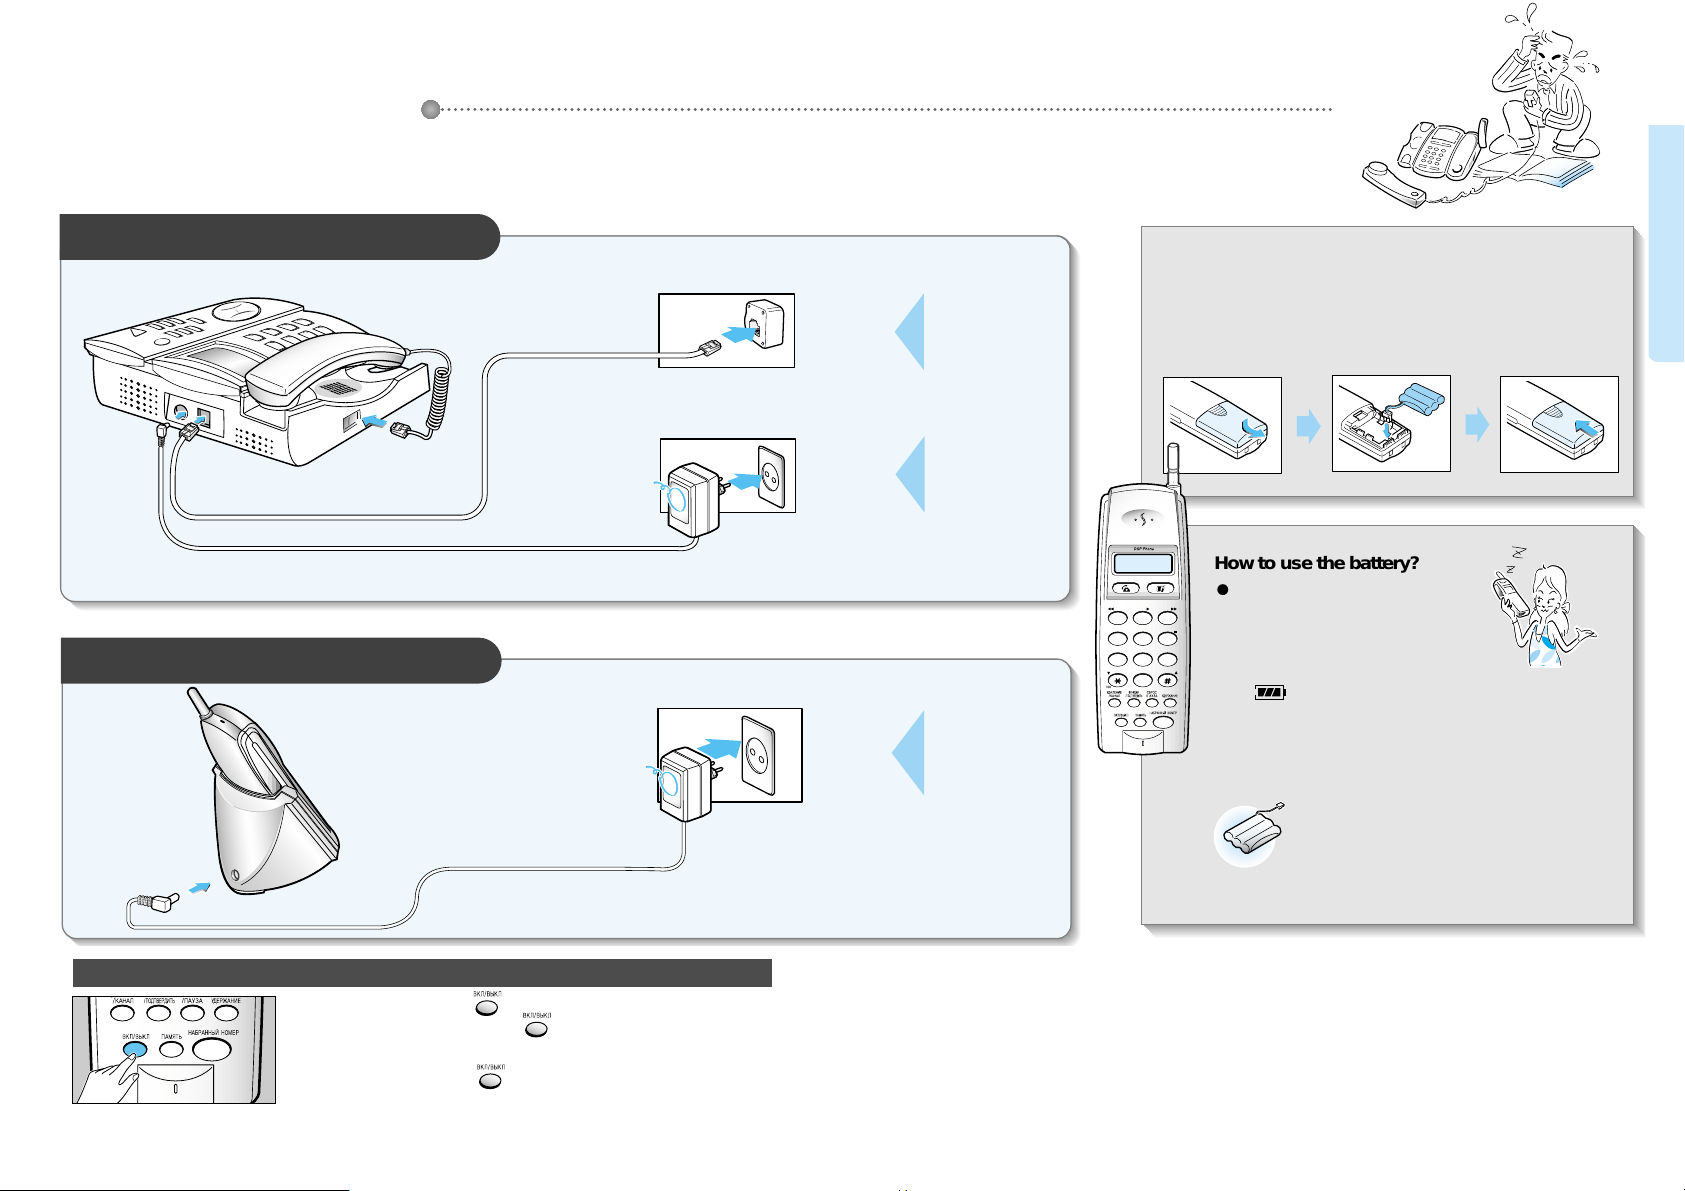
Installing the base set
11V or 12V DC 500mA
11V or 12V DC 500mA
Open the
battery cover.
Place the battery as
shown in the
picture and
rearrange the line.
Close the
battery cover.
Installing the Remote set
1
23
Loading the battery to the Remote set
Phone installation
Battery life
●
The battery life has a 6 months warrantee after purchase.
●
As time goes by, there will be a reduction in the battery's
power. When it is reduced by half, then purchase a new
one and replace it.
How to use the battery?
● Charge the battery for 24 hours before using.
● When you are not using the Remote set for a
long time, always remove the battery from
the handset.
● It is best to charge the battery until you see
the sign on the screen.
Turning on or off the power of Remote set
Connect the
phone line.
Connect the
power to 220V.
Connect the
power to 220V.
Preparation and installation
98
Page 6

1110
Pick up the base-handset and dial the
number you want to call.
Press button and dial the
number you want to call.
Making a call with the base set
Making a call with a Remote set
Pull out the handset from
the charger and press
button to receive
the call.
Press button to receive the call.
Pick up the handset to receive the call.
When the
phone rings
When the
phone rings
Press button to receive the
call.
When the Remote set is placed
on the charger
When the Remote set is not
placed on the charger (standby)
Using the base-handset Using the speakerphone
When using the base-handset
When using the speaker phone
Receiving a call with the base set
Receiving a call with a Remote set
Receiving calls
Making calls
● When the handset is not placed on the charger, you can
dial the number first and then press button.
● The screen will display the call time.
● If you have incorrectly dialed the number in standby
mode, you can delete the number by shortly pressing
button and then press button.
Place the handset down on
its position or press
button to hang up.
When hanging up the
phone
Pull out the handset from
the charger and press
button dial the number
you want to call.
Press button and dial the
number you want to call.
(Standby)
Place the Remote set to the
charger or press button.
When the Remote set is
placed on the charger
When the Remote set is not
placed on the charger
When hanging up the
phone
● You can dial the number, either by pressing the
telephone number first and then picking up the handset
or by pressing button.
● Call duration is displayed during the call.
● Adjust the volume using buttons.
If you see a mark on the screen
and hear beeping sounds.
� This happens when you are out of range of
the base set. Move closer to the base set.
If you hear a lot of noise during the
call,
�
Press button to reduce the
noise.
Basic features
Page 7
1312
● If the Remote set is not
placed on the charger,
just press button.
Press button and hang up the handset.
Press button and hang up the Remote set.
When you hear the
intercom ringing
When you hear the
intercom bell
Pull out the
Remote set from
the charger and
press
button.
How to transfer from to during a call.
How to transfer from to during a call.
● Or you can press
button to receive the call.
Pick up the handset in the
base set to receive the call.
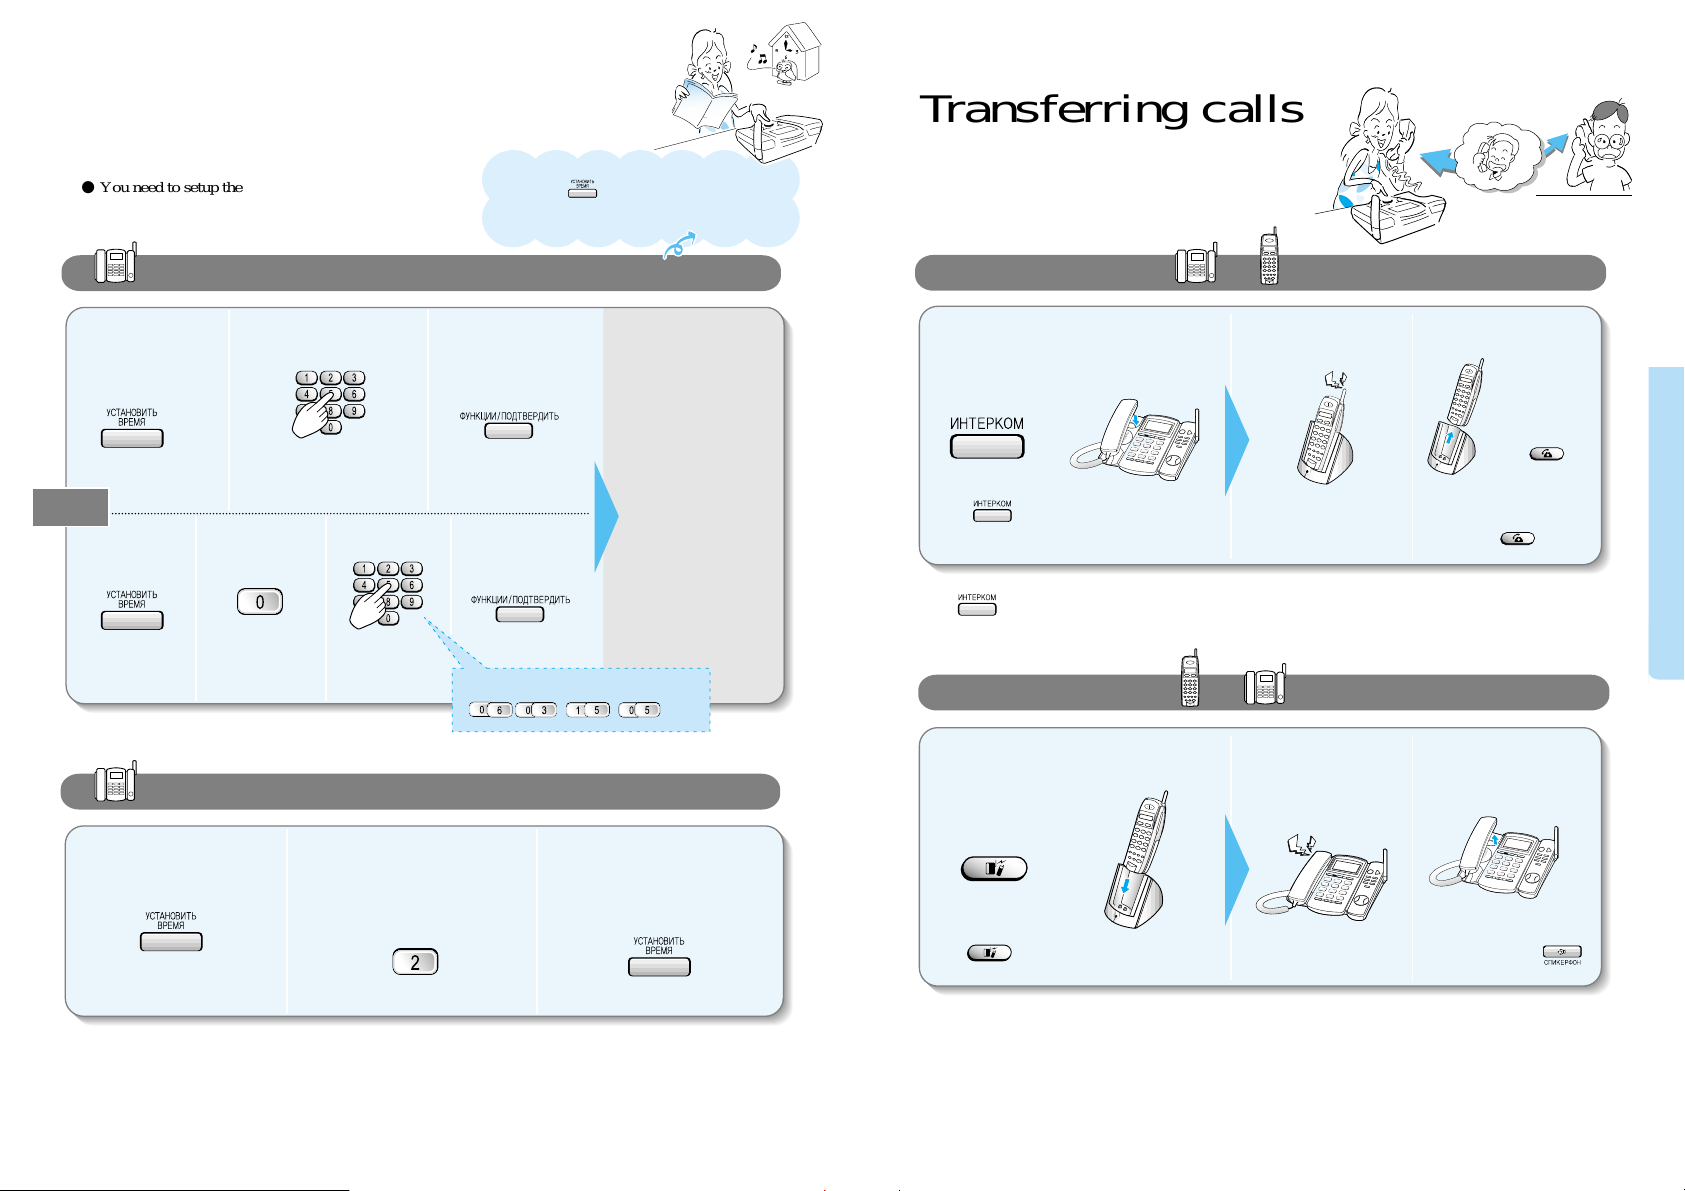
Transferring calls
● You need to setup the current time in order to see the
message recorded time and to use the morning call
function.
Date/Time setting
(setting the current time)
23
123
123
1
2341
Press 8 digits in the
order of day, month,
hour and minute.
Press 8 digits in the
order of day, month,
hour and minute.
Ex) March 6th, 15:05
When the date and
time has been set,
you can hear the
currently set date
and time in a
recorded voice.
Operating procedure
(press the following buttons in ordered sequence)
When additional Remote sets are registered
You can transfer calls among Remote sets. Press the Intecom button and press the intercom number you wish the
transfer to go.
When the Intercom transfer does not work
If nobody answers the call, on the base set within 15 seconds, then the call will be transferred back to the Remote
set. Furthermore, if this call is not answered for another 15 seconds, the call will automatically be hung up.
When additional Remote sets are registered
Press button and then press the internal number you wish the transfer to go.
(If you do not designate a particular number, then all the registered Remote sets will ring.)
231
Selecting pulse/tone dial type
�
�
●To see the currently set time, place the handset in the base
set and press button. In case of a power shutdown, it
will erase the date and time. Therefore, you will have to set
it up once again.
● The number 2 will blink on the screen and the recorded voice will tell you the current type.
● You can toggle between the two types by pressing 2.
Or
Basic features
Page 8

1514
To reduce sound
To increase sound
You can hear the
selected ring type.
1 2
3 4
You can set from low, medium to high.
● The default setting is medium.
● This is the currently set
ring type.
● Press from to to hear and chose the
ring type.
● Press button : Bell off :
- Base/Remote set Bell off.
● You can reduce the volume by
pressing again
● You can increase the volume by
pressing again.
Adjusting ring volume for the base set
● There are 10 kinds of ring types.
Selecting a type of ring
Adjusting the ring volume
Adjust the ring type and
volume with the handset
hung up.
(press the following buttons in order)
To reduce sound
To increase sound
● You can adjust in 7 levels. ● You can adjust in 7 levels.
To reduce sound
To increase sound
When the phone is ringing or when in standby mode
Adjusting the speakerphone volume
(in speakerphone mode)
● You can adjust in 4 levels.
Adjusting the base-handset volume
(in base-handset talk mode)
Adjusting the recorded voice volume
(in recorded voice mode or message
playback mode)
To reduce sound
To increase sound
Basic features
Page 9

Making intercom
1716
To reduce :
To increase :
Adjusting ring volume
for Remote set
Adjusting the ring volume
�
�
When adjusting the volume, you can
check out the change of volume
from the bar graph on the screen.
To reduce :
To increase :
�
�
● Press in the above order
�
�
�
�
● Press in the above order
To do so, do the following.
▼
You can adjust the voice to either high, medium or low.
Adjusting the handset receiving volume (during a call)
Selecting a ring type
You can hear
the selected
ring type.
It will return to
standby mode
after a beep
sound.
1 2
On the screen is
displayed 1, 2 or 3
3
Select the
number you
want.
● There are 3 different kinds of ring types.
�
�
● You can switch to the handset in the
base set by picking up the handset.
● You can switch to the handset in
the base set by picking up the
handset.
When you hear the bell and
press button from the
Remote set, the call will be
connected with the speaker
phone in the base set.
● If you press , or do not press
any button for 2 seconds, all Remote
sets will then begin to ring.
Press the number of the
Remote set.
Calling from to
123
When you hear it ringing, press button
from the base set, the call will then be connected
to the Remote set.
12
● Separate from external calls, you can make intercom between the handset or speakerphone of the base
set and the Remote set. In this particular case the calls are not charged.
(press the following buttons in order)
Calling from to
(press the following buttons in order)
When an external call is coming during an internal call, it will not ring. However, if you happen to
hear the ringing coming from the additionally registered Remote set, then you may end the internal
call and receive the external call.
∙Press the Intercom button
in standby mode.
∙Press the Intercom button
in standby mode.
NOTE
You can set between low and high.
● The default setting is high.
Basic features
Page 10

1918
Ex: 06:45
Time setting
Morning call setting
1 2 3 4
● You must first set the Date/Time. (page 12)
Follow the same procedure to change the set time.
The morning call rings
for 2 minutes.
● When the morning call
(alarm) is ringing, to turn it
off, simply press any button
in either the base set or the
Remote set.
●If you cancel it from the
base set, then it will
automatically be canceled
in the Remote set as well.
●When a call is coming
during the morning call,
the morning call will
automatically stop and the
phone will ring.
● When you cancel and reset the morning call, the time that was set
before will be effective.
● You can toggle between setting and canceling using the button.
● When set : Morning call LED will be on
● When canceled: Morning call LED will be off
Setting or canceling the morning call (alarm)
Setting the time (in standby mode)
NOTE
Basic features
Page 11

2120
The following buttons can be used during message playback.
(Press during playback)
The following buttons can be used during message playback.
(Press during playback)
Auto answering
● If you have a new message, the number of recorded
messages will be displayed and button will blink.
Number of recorded messages
● The messages that have not been played (listened to) will not be deleted.
● When the total length of the recorded messages exceeds the possible capacity, a recorded message will play,
saying, "Please call again later". In this case, listen to the messages and delete them.
To delete all messages
To delete only some messages
● When the auto-answering is set, the
auto-answering button lamp will be
on and the recorded message will
be able to play.
● Press one more time to cancel.
● This function is convenient when you are not available to answer your phone.
(delete all messages after listening to them)
After listening to all the messages, press button.
In addition, when you hear the message that you want to
delete, press button.
Setting up auto-answering
Playing back the messages
Deleting the recorded message
When you want to move to the prior message
When you want to move to the next message
When you want to stop the message playback
�
�
��
�
You can record your voice for play back.
(Page 22)
Playing back the messages in the Remote set
456
789
0
231
When you want to move to the prior message
When you want to move to the next message
When you want to stop the message playback
NOTE
Basic features
Page 12

2322
Auto answering
(continued)
● Press and hold down
until you hear a
beep.
● Record your voice (your ongoing message).
(25 seconds)
● Press the Play/stop
button to end the
recording.
● It will then repeat the
ongoing message once.
● This is used only in the base set.
You will then hear a beep
tone along with a recorded
voice.
To end
▶ If you have not recorded your voice, it will play the default message in the phone.
▶ This means that the message is too short (less then 3 seconds).
In this case, please try again.
▶ If the quality of the recorded voice is not good, it thus means
that you have recorded either too close to or too far away from
the mike. Try to keep about 30 cm from the mike.
Selecting an active message from some recorded messages.
1 2 3 4
I am not
available
Please call
around 8.
When the recording does not work
To record your voice for auto-answering (in standby mode)
�
�
If you press button shortly after recording your voice, the
message will be selected as shown.
Designated message
on phone
Directly recorded
message
Mike
Basic features
Page 13

2524
Phone directory
1 2
2
4
4
● You can register phone numbers in the phone directory.
● You can register up to 20 phone numbers.
Registering a phone number using the Base set
Making a call from the phone director
3
Enter the number you want to
register
∙ Enter no more than 20 digits.
Keep the base-handset
hung up and press the
search button.
1
Select the desired phone number and
pick up the handset or press the speaker
phone.
The call will then be connected.
3
Phone directory search
1 . Press button in standby mode.
2. Press button to move in order.
Basic features
Page 14

Convenient features
2726
Or
Or
Hang-up position
● It will dial the last number.
● It will dial the last number.
● Presses the buttons until you
find the number you want.
You can call the recently
dialed numbers without
having to redial.
To dial to the recently dialed number (recent number)
���
�
�
�
�
Transferring to anther call during calls (flash)
■ Convenient features for making calls
Dialing a recent number /
Transferring to another call during calls (flash) /
Speed dial for Remote set /р
убке
■ Convenient call features
Recording calls (Base set) /
Hold function during calls /
■ Convenient features for auto-answering
Functions used in auto-answering /
Checking caller voice /
Using auto-answering from a remote location (remote control) /
Selecting ringing number for remote control /
Function table for remote controlling /
Function table for Remote set /
■ Help functions
Blocking long distance calls (call control) /
Flash time adjustment /
Initializing the phone /
Purchasing additional Remote sets /
※ It will automatically remember phone numbers that are under 20 digits.
● 10 recent numbers are
memorized.
● 10 recent numbers are
memorized.
● Presses the buttons until
you find the number you
want.
▶
1
▶
2
▶
1
▶
2
Hang-up position
Convenient features
Convenient features
27
29
31
34
Convenient features for making calls
● You may only use the flash function when connected to the internal switchboard.
1
2
3
Base set
during call
Remote set
during call
��
Dial the number to transfer.
Dial the number to transfer.
Hang up the handset or
press button.
Press button to
hang up.
��
Page 15

2928
Speed dial for Remote set
If you setup the speed dial,
you can make calls just by
pressing the speed dial
number.
To program the speed dial (in standby mode)
1
To call using the speed dial number
2
Press button.
● You can press the button and the speed dial number in standby mode to make the call.
※ For the phone number to be programmed into the phone, it has to be no more than 20 digits.
��
�
�
�
�
�
Enter the phone number
To record
The recording will
automatically stop
when you hang up
the call.
To stop
To playback the
recorded call
Play back the recorded call and press button while playing it.
To playback the recorded call,
press button in standby mode and to delete the recorded call, press button during playback.
Recording calls (base set)
You can record and play
back a call.
To delete the recorded call
To delete the speed dial number
(in standby mode)
�
�
Select the speed dial
number to check from
to .
To check the speed dial number
(in standby mode)
● You cannot record a call while using the speakerphone.
● If you want to cancel during the procedure, press button.
During a call
In standby
mode
�
Press the speed dial
number to dial.
You will see the
phone number on the
screen.
Select the speed dial
number from to .
Select the speed dial
number to check from
to .
Convenient features for making calls
Convenient features during calls
Convenient features
Page 16

3130
Hold function during calls
The person
on hold will
hear music.
During a call
To return to the call
When using the
base-handset
To return to the call
When you hang up
the handset,
button will
blink.
Pick up the handset or
press button.
�
�
�
�
�
1. The recorded length of the message
● The length of the message the caller can leave is set to 3 minutes.
● The current time must be set.
2 . The number of rings for auto-answering (the number of times the phone will ring
before automatically transferring to a machine- signifying that messages are waiting).
● The phone will ring 3 times if there is a new message waiting and 6 times if there aren't any.
Auto-answering function
During a recording in
auto-answering function,
you can check the caller's
voice through the speaker.
The basic functions set for
auto-answering
��
Press 6 to toggle between set and cancel.
You will hear the voice accordingly.
To put a call on hold, simply press button.
To return to the call press button once more.
During a call while using a Remote set
● If you do not return to
the call after 3 minutes,
it will automatically
disconnect the caller.
●
When there is no sound for 6 seconds during auto-answering, it will automatically disconnect.
Checking caller voice
Convenient features during calls
Convenient features for auto-answering
Convenient features
Page 17

3332
Using the auto-answering from a remote location
(remote control)
How to change the password
How to use the auto-answering function from a remote location
※ If you do not set the auto-answering when leaving your home, the remote ringer will ring
8 times before playing the recorded message.
You will hear a
voice saying that
the currently set
password is 0000.
You will hear a voice
saying the newly set
password.
Enter in the
new password
(4 digits).
Leave the
auto-answering on
before you leave your
home.
Call your home
from a remote
location.
When you hear the
recorded message
Enter the password
(0000 when purchased)
Press the button you want referring to the
function table in page 33.
You can control the
auto-answering function
from a remote location.
The initially set password
is 0000. You may change
the password by following
these simple directions.
�
��
��
�� �
Function table for remote controlling
Function table for Remote set
A voice will tell you the number
of new messages you have before
they are played back.
You can toggle between setting and
canceling auto-answering by pressing .
(during playback)
(during playback)
(during playback)
(during playback)
To play the new messages
To play the next message
To play the prior message
To stop playing the message
To delete the message in play
To end the remote control (call)
To set or cancel auto-answering
Message playback function
Other functions
To use this function
Press the button
Remarks
● If you do not set the auto-answering when leaving your home, the remote ringer will ring
according to the set number of times.
Selecting the number of rings for
remote control
� ��
� 8 times � 10 times � 12 times � Continue
(Until the handset is picked up)
Prior message :
To stop the recording,
press
Next message :
To play the message from the Remote set
To stop playing the message
�
Convenient features for auto-answering
To use this function
Press the button
Remarks
Convenient features
Page 18

Flash time adjustment
Press the number
you want to choose.
● It is set to 0.1 seconds.
You can adjust the flash
time.
�� �
~
: 0.1 seconds : 0.2 seconds : 0.3 seconds : 0.4 seconds : 0.5 seconds
: 0.6 seconds : 0.7 seconds : 0.8 seconds : 0.9 seconds : 1.0 seconds
34
Blocking a user from making long distance calls
(call control)
Music selection for hold function
Low voltage warning
�
Immediately recharge
your Remote set.
When a battery needs
recharging
.
You will hear a
warning sound with
the marks
blinking.
When the battery
voltage of the
Remote set falls
below a certain level,
a warning is given.
��
Press 4 to toggle between set and cancel.
You will hear the voice accordingly.
● You can hear the music by
pressing the hold button.
● You can select from 2
different kinds of music.
When you enable the blocking function in the base set, no one will be able to make long distance calls.
This is true for using the Remote set only.
● Even though you do not get a warning in the standby mode, you can still get a
warning sound during a call. This is because it requires more battery during
calls. In this case, immediately hang up the phone and recharge your battery.
Help functions
NOTE
��
35
Help functions
While pressing down on
the three buttons connect
the power and then release
the buttons after 2 seconds.
Hold down the three
buttons for a few seconds.
Initializing the phone
This is to initialize the
phone to its initial setting.
(Refer to page 35 for initial
setting)
�
�
While in
standby mode
● It will not delete the recorded messages.
You will hear a
beeping sound.
● Flash time : 0.1 seconds
● Ring type : 1
● Blocking long distance call :
Cancel
● Auto-answering : Cancel
● Recent redial number : None
● Phone directory : None
● Dialing mode : Pulse dialing
● Password (remote control) : 0000
● Caller voice ID check : Set
● Morning (alarm) call time : 06:00
(cancel)
● Current time : None
● Ring volume : Medium
● Speaker volume : Level 5
● Number of rings for
remote control : 3 (12 times)
● Ring volume : High
● Phone volume : Medium
● Screen : 1 (standby 1)
● Memory dial : None
● Ring type : 1
● Recently dialed numbers : None
Base set
Remote set
Initial state of the phone
Convenient features
Page 19

37
Reference
■ Troubleshooting
■ Safety precaution
■ Cleaning method and initial state of phone
■ Product standard
■ Summary table of functions
Reference
38
40
41
42
43
36
Purchasing additional Remote sets
Registering additional
Remote sets to the
base set
Designating the
Remote sets
(internal number)
Press the following buttons while not recharging or calling.
From the Remote set
From the base set
Enter the two-digit
registration number
You can select a number
from 00~99.
If it is , press.
Enter the same
two-digits as the Remote
set.
Press , if you
have selected 00 in the
Remote set.
To set as 2
To set as 1
To set as 3
If you press the buttons too slowly, they might not be entered. So enter the
numbers rapidly. Press the following buttons while not recharging or calling.
The first Remote set is set as 1.
1
2
��� �
�� �
��� �
Remote set number
(internal number)
Help functions
Page 20

Troubleshooting
The phone does not
work at all.
I cannot hear the tone
when I press button.
Intercom and
transferring calls are
not working.
Even though the auto-answering
has been turned on, no
messages are being recorded
The morning call (alarm)
is not working
● Check if the phone has been
correctly installed
(Refer to page 8)
● Check if the power is correctly
connected to the appropriate
voltage (Refer to page 8)
●
Check if the batteries are correctly
inserted to the Remote set (Refer to
page 9)
●
Check if the batteries are adequately
charged (Refer to page 9)
● Check if the power is on
(Refer to page 8)
● This means that the message is
full. Please delete the messages
that you have already checked.
(Refer to page 21)
● Check if you have installed the
phone correctly (Refer to page 8)
● Try re-registering the Remote set
to the base set
(Refer to page 36)
● If you additionally purchased the
Remote sets, check if you have
correctly registered the
additionally Remote sets to the
base set (Refer to page 36)
● Check if the batteries are correctly
inserted (Refer to page 9)
● Check if the batteries are
adequately charged
(Refer to page 9)
● Check if the power of the Remote
set is on (Refer to page 8)
● Check if the phone is correctly
connected (Refer to page 8)
● Check if the power is correctly
connected (Refer to page 8)
● Try adjusting the speakerphone
volume (Refer to page 10)
● Check if the current time is set
(Refer to page 12)
● Check if the morning call time is
set (Refer to page 18~19)
● Check if the morning call function
is set (Refer to page 18~19)
I hear a warning sound and
cannot make any calls.
I have purchased an
additional Remote set but
it's not working.
I hear many noises while
using the Remote set.
The phone does not ring
in the Remote set.
I cannot recharge the
Remote set.
I hear beeping warning
sounds in the Remote
set.
3938
● Check if the long distance call is
blocked (Refer to page 34)
● Check if the charging connector is
clean
● If the charging connector is not
clean, use a cotton tip or an eraser
to wipe it clean. (Refer to page 41)
● Check if the power voltage is
appropriate (Refer to page 8)
● If you have cleaned the charging
connector but it still does not
work, please contact your local
service center and purchase new
batteries (Refer to page 9)
● Check to see if you are too far
away from the base set. If yes,
move closer to the base set
(Refer to page 11)
● If you see the mark on the
screen, hang up the phone and
adequately charge your Remote
set (Refer to page 9)
● Check if the phone is installed
correctly (Refer to page 8)
● Check if the batteries are
adequately charged
(Refer to page 9)
● Check if the Remote set is
correctly registered to the base set
(Refer to page 36)
● Check if the power of the Remote
set is on (Refer to page 8)
● Press the button to reduce
the noise (Refer to page 11)
● Check if the distance is too far
from the base set
(Refer to page 11)
● Pull out the antenna of the
Remote set
● Try installing the base set to a
different location
Reference
Page 21

When cleaning the outer
side of the phone.
When cleaning the Remote
set or charger
Apply neutral washer liquid and wipe
it with a cloth.
●
Do not use benzene, thinner, etc.
Safety precautions
How to Clean
The following is to ensure the user's safety and to minimize any damages.
Carefully read the following guidelines and use caution to follow them correctly.
Do not use damaged power
lines or loose plugs.
● It can cause electric shock or fire.
Do not pull out the power (plug)
by pulling the line or when your
hands are wet.
● It can cause electric shock or fire.
Do not fold the power line or
leave it under heavy objects.
● It can cause electric shock or fire.
Plug it into a power jack
(wall unit).
● This product is only for 220V.
Do not use for any other voltages.
It can cause fire.
Use only the designated
adapter.
● It can cause fire.
Always disconnect from the
power supply when cleaning.
Do not spray water, benzene,
thinner or alcohol into the phone.
● It can cause fire
Do not disassemble
or repair.
● If it needs repairing,
please contact our local
service center.
Do not pour water or
any liquid on the
phone.
● It can cause electric shock
or fire.
Do not dispose
batteries into a fire.
● It can cause an explosion.
If you hear any weird or
unusual noises or smell
anything weird, immediately
disconnect the power line
and call the service center.
● It can cause electric shock or
fire.
4140
PowerPower and cleaning
Others
Frequently wipe the charging
connector.
Reference
Page 22

43
Product Specification
SP-C801R
Base set
1. Flash
2. Ring type
3. Ring volume
4. Hold music type
5. Dial type
1. Search
6. Blocking long
distance call
1. Morning call
2. Phone
function
3. Phone
directory
Summary table of functions
▲/▼
(Search)
1. Check
2. Set
3. Cancel
4. Register
1.Pulse
2.Tone
1.Set
1.Phone
directory
2.Cancel
42
Enter time
Reference
Model Name: SP-C801R
Items
Modulation
Frequency TX Range
Frequency RX Range
Power
RF Power Output 10mW or less
Temperature
Humidity
Items RemoteBase Chager
Weight (g) 204862 120
Sizw (mm)
Adaptor Input
Adaptor Output
Battery Power
904.0125Mhz ~ 904.9875Mhz 814.0125Mhz ~ 814.9875Mhz
814.0125Mhz ~ 814.9875Mhz 904.0125Mhz ~ 904.9875Mhz
Base Remote
FM
DC 12V / 500mA
(Adaptor)
220V / 60mAc 50Hz
DC12V / 500mA
DC3.6V / 600mA
DC 3.6V / 600Ma
(Battery)
Page 23

Enter phone
number
Do you want to delete?
Do you want to delete?
Do you want to
delete?
4. Register
Remote
set
Enter the same two digit
registration number as
entered in Remote set
5. Auto
-answering
Enter 4 digit
password
6. Initial
setting
Enter month, day,
hour and minute
2.Initializing
Remote set
Check recorded
message
Select ring type
Adjust ring volume
Register Remote set
To reduce
To
increase
P.33
P. 16
Enter the same two-digit
registration number as the
base set.
Register to base set
P. 28
Register speed dial
(Memory dial)
Enter a speed
dial location
number
Enter the phone
number
44 45
▲/▼
(Search)
Hold down at the same time.
Connect power
++
2. Register
3. Delete all
4. Delete each
2. Select
number of
rings
3. Set remote
control
password
4. Check
caller's voice
1. Date
/ Time
set
1. Set
2. Cancel
1. Delete
message
P. 16
P. 36
P. 36
Reference
 Loading...