

Samsung SP-C801RSL, SP-C801RGL, SP-C801RBL User Manual [en, en, ru]

900 D S P Phone
GG68-00433A
03/04. Rev.1.0
АЯ 46
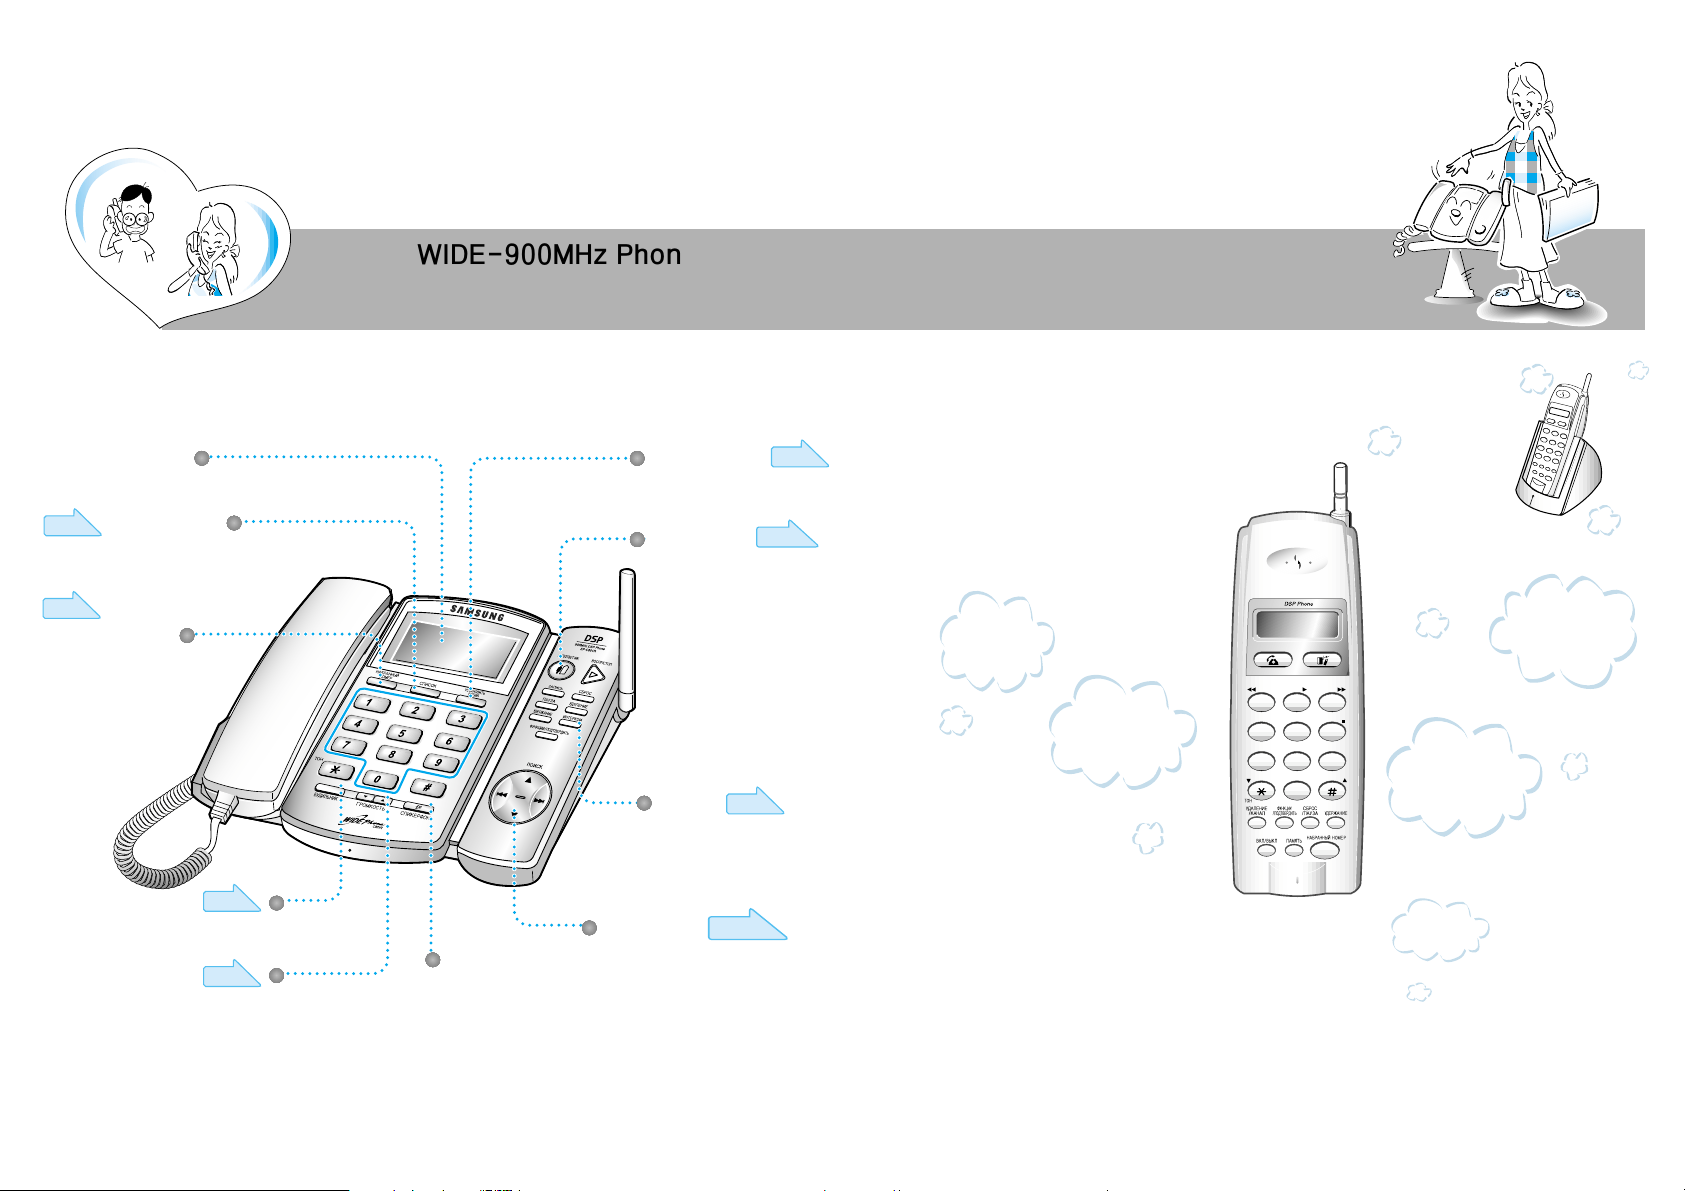
WIDE-900MHz Phone
Experience the following various
functions.
Page 20~2 3
Overview of Main Features
456
789
0
231
Page 27
Screen
Easy to see with wide display
Recent call function
You can easily redial the
recently dialed number
without looking it up.
You can set the date and time.
You can enable auto answering
and voice recording.
You can communicate between
the base set and the Remote set.
You can easily carry
the Remote set when
moving around.
You can additionally
purchase and add up to
two Remote sets to attach
onto the base set.
You can check the
recorded voice through
the Remote set.
An illuminated dial pad
adds to your convenience.
It allows you to dial
phone numbers even in
dark places.
You can use various other
functions including the volume
control function for the base set
and the blocking function for long
distance calls.
Page 17
Page 12
Page 24~ 25
Page 18~19
Page 15
Phone directory
search function
You can easily search the
phone directory.
Morning call function
Date/Time setting
Auto-answering
function
Intercom
function
Other functions
Page
14,34,35
Volume Control
You can adjust the speaker and
the handset volumes.
Two-way
Speakerphone
Two-way speakerphone will
provide you with high speech
quality.
32
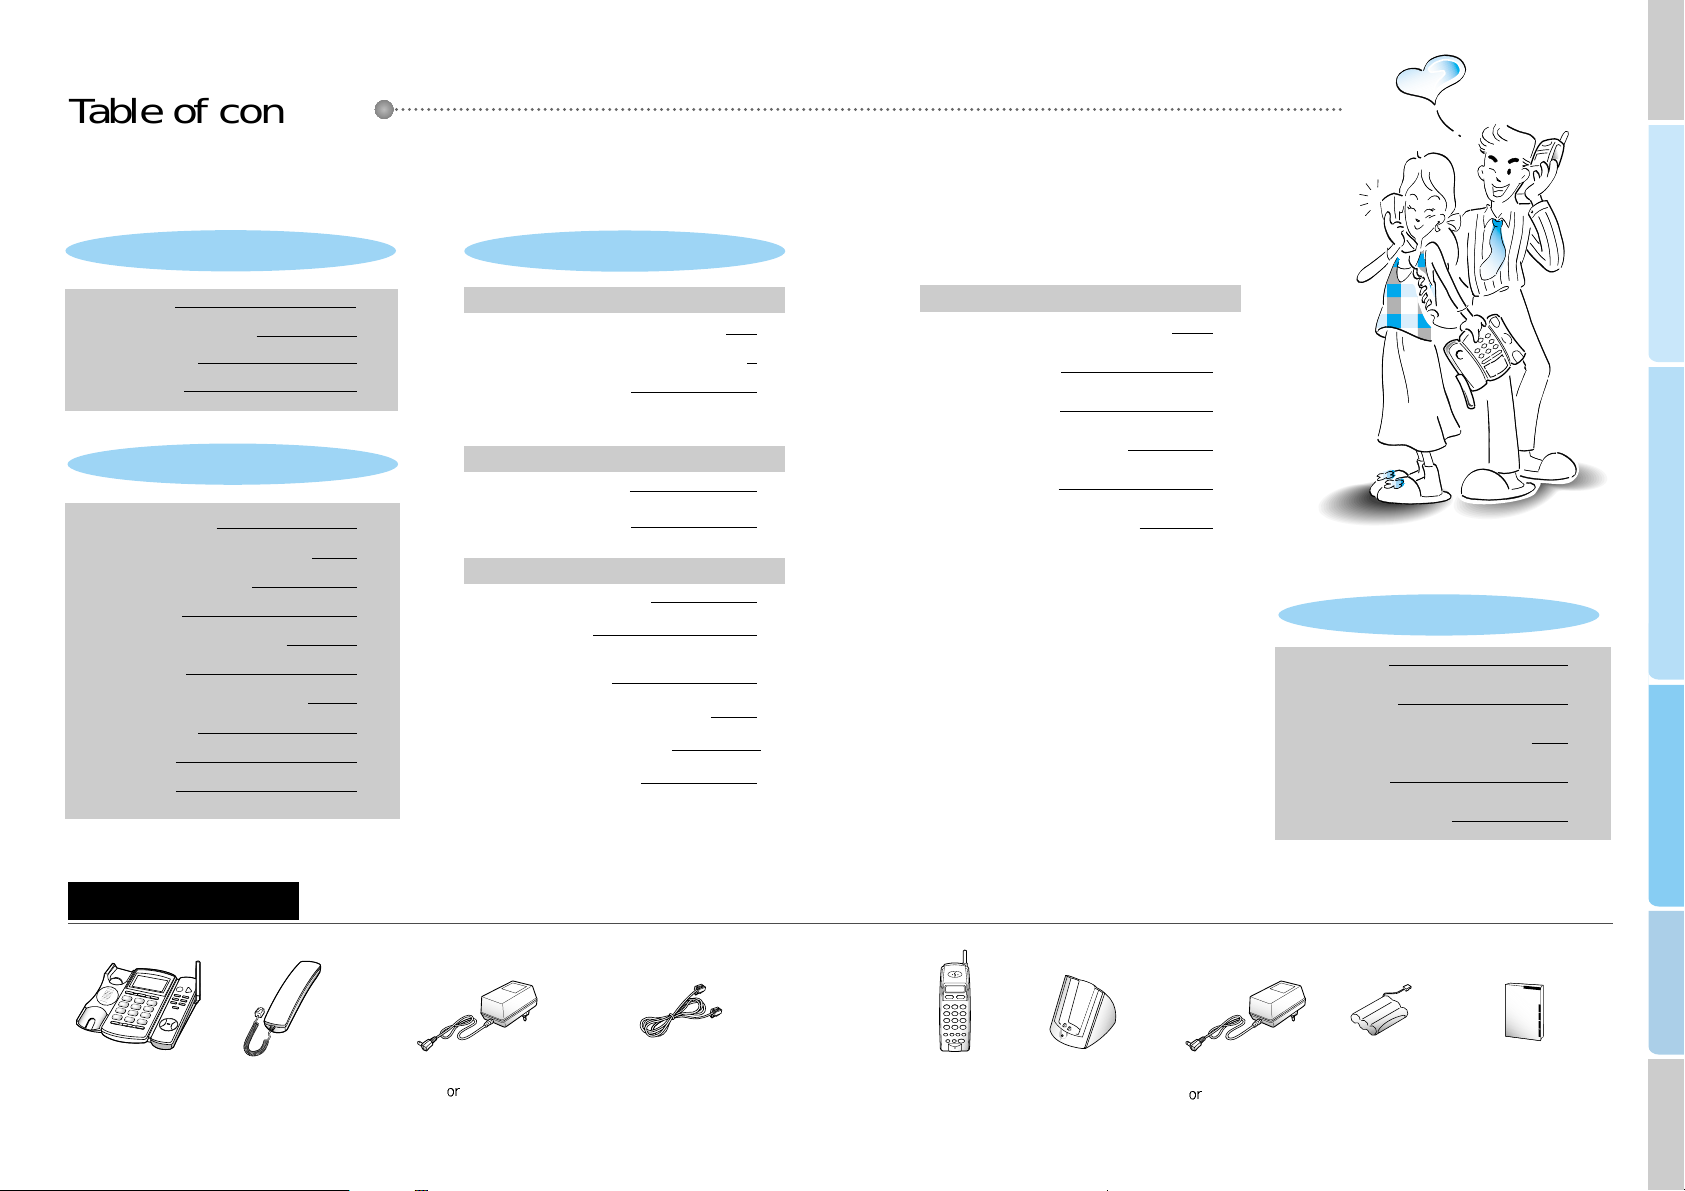
Reference
Convenient features
Basic features
Preparation and installation
Functions used in auto-answering
Checking caller voice
Using the auto-answering from a remote
location (Remote control)
Selecting ringing number for remote control
Function table for remote controlling
Function table for Remote set
Major functions
Table of contents/Components
Product information
Phone installation
2
4
6
8
Making/receiving calls
Date/Time setting (setting current time)
Selecting pulse/tone dial type
Making intercom
Adjusting ring volume for base set
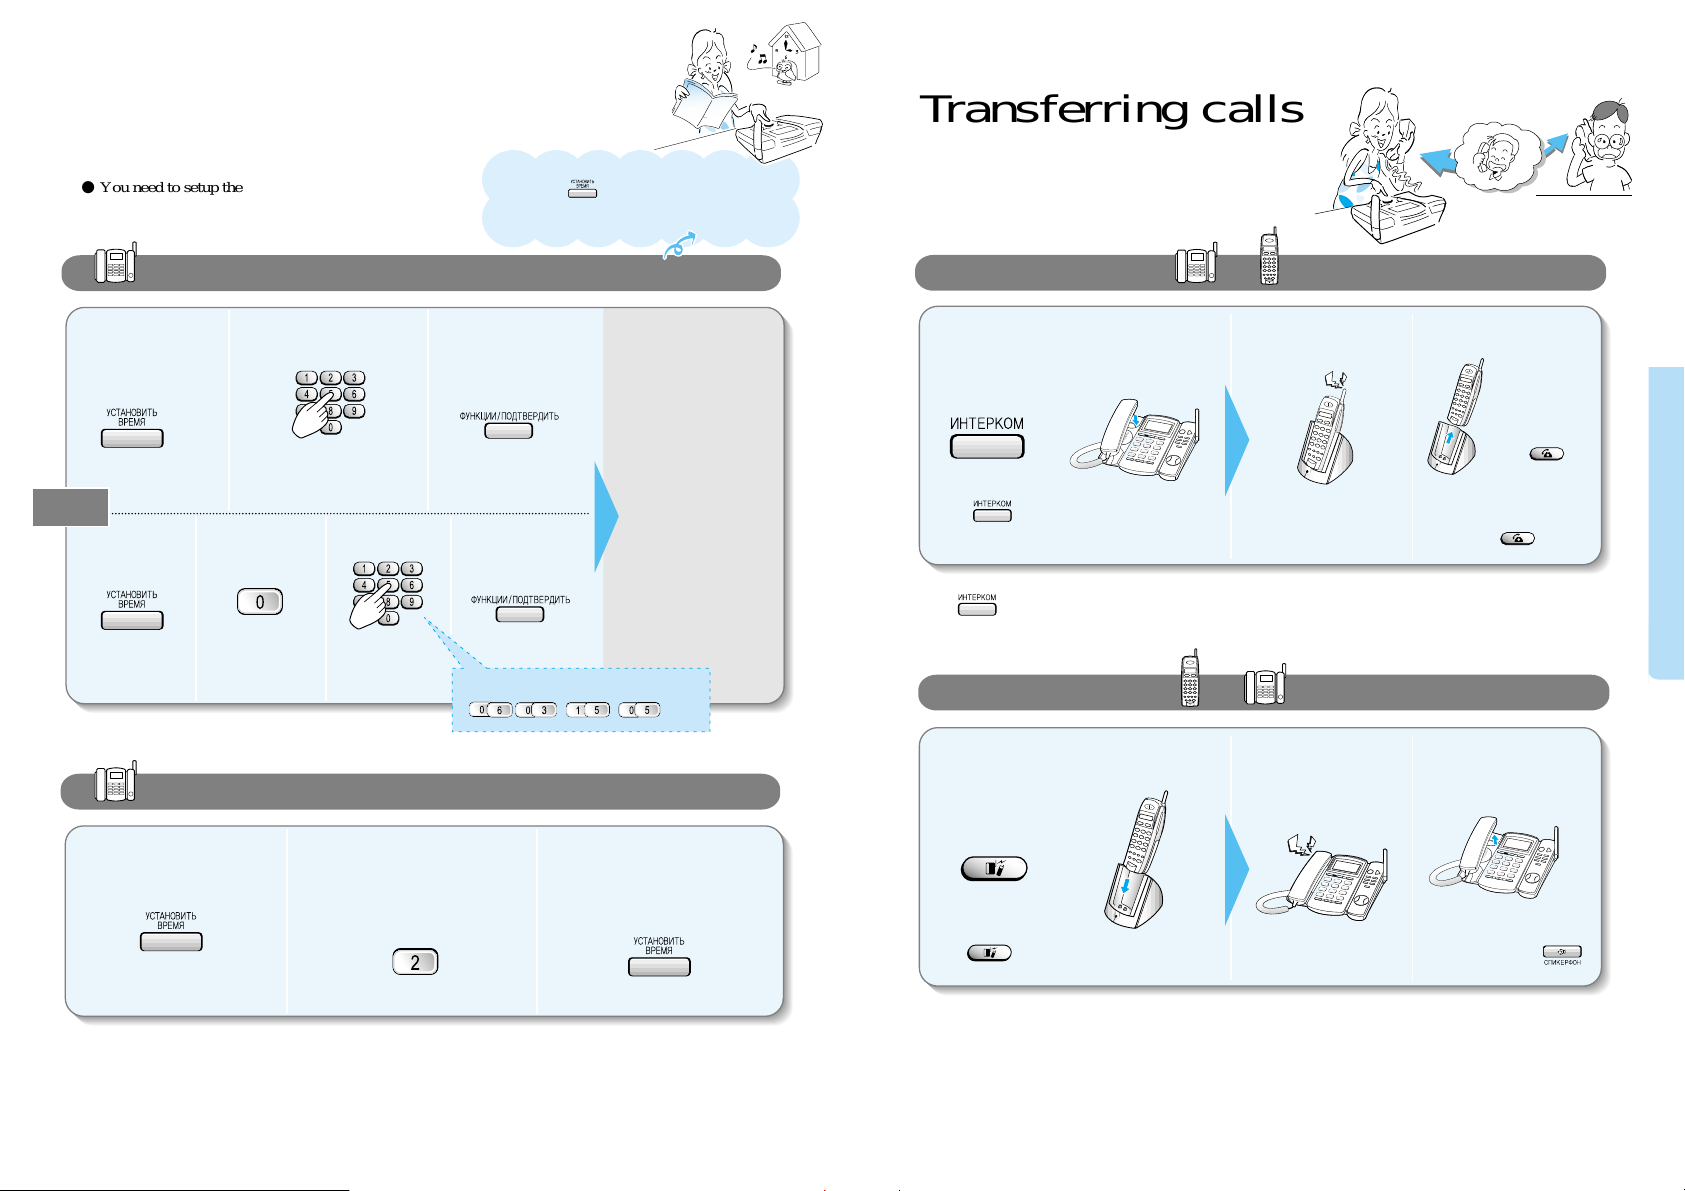
Transferring calls
Adjusting ring volume for Remote set
Morning call setting
Auto answering
Phone directory
The numbers that were most recently dialed
Transferring to another call during calls (Flash)
Speed dial for Remote set
Blocking long distance calls (call control)
Low voltage warning
Flash time adjustment
Music selection for hold function
Initializing the phone
Purchasing additional Remote sets
Recording calls (Base set)
Pause function during calls
10
12
12
13
14
16
17
18
20
24
Convenient features for making calls
Help functions
Convenient features during calls
27
27
28
29
30
31
31
32
32
33
33
Convenient features for auto-answering
34
34
34
34
35
36
38
40
41
42
43
Components
Table of contents
Preparation & Installation
Basic features
Convenient features
Base set Base adapter
(11V
12V DC 500mA)
Charger adapter
(11V
12V DC 500mA)
Base handset
Remote set Charger
Battery
Tel line cord
User's manual
Reference
Troubleshooting
Safety precautions
Cleaning method and initial state of phone
Product standard
Summary table of functions
54
Preparation and installation
456
789
0
231
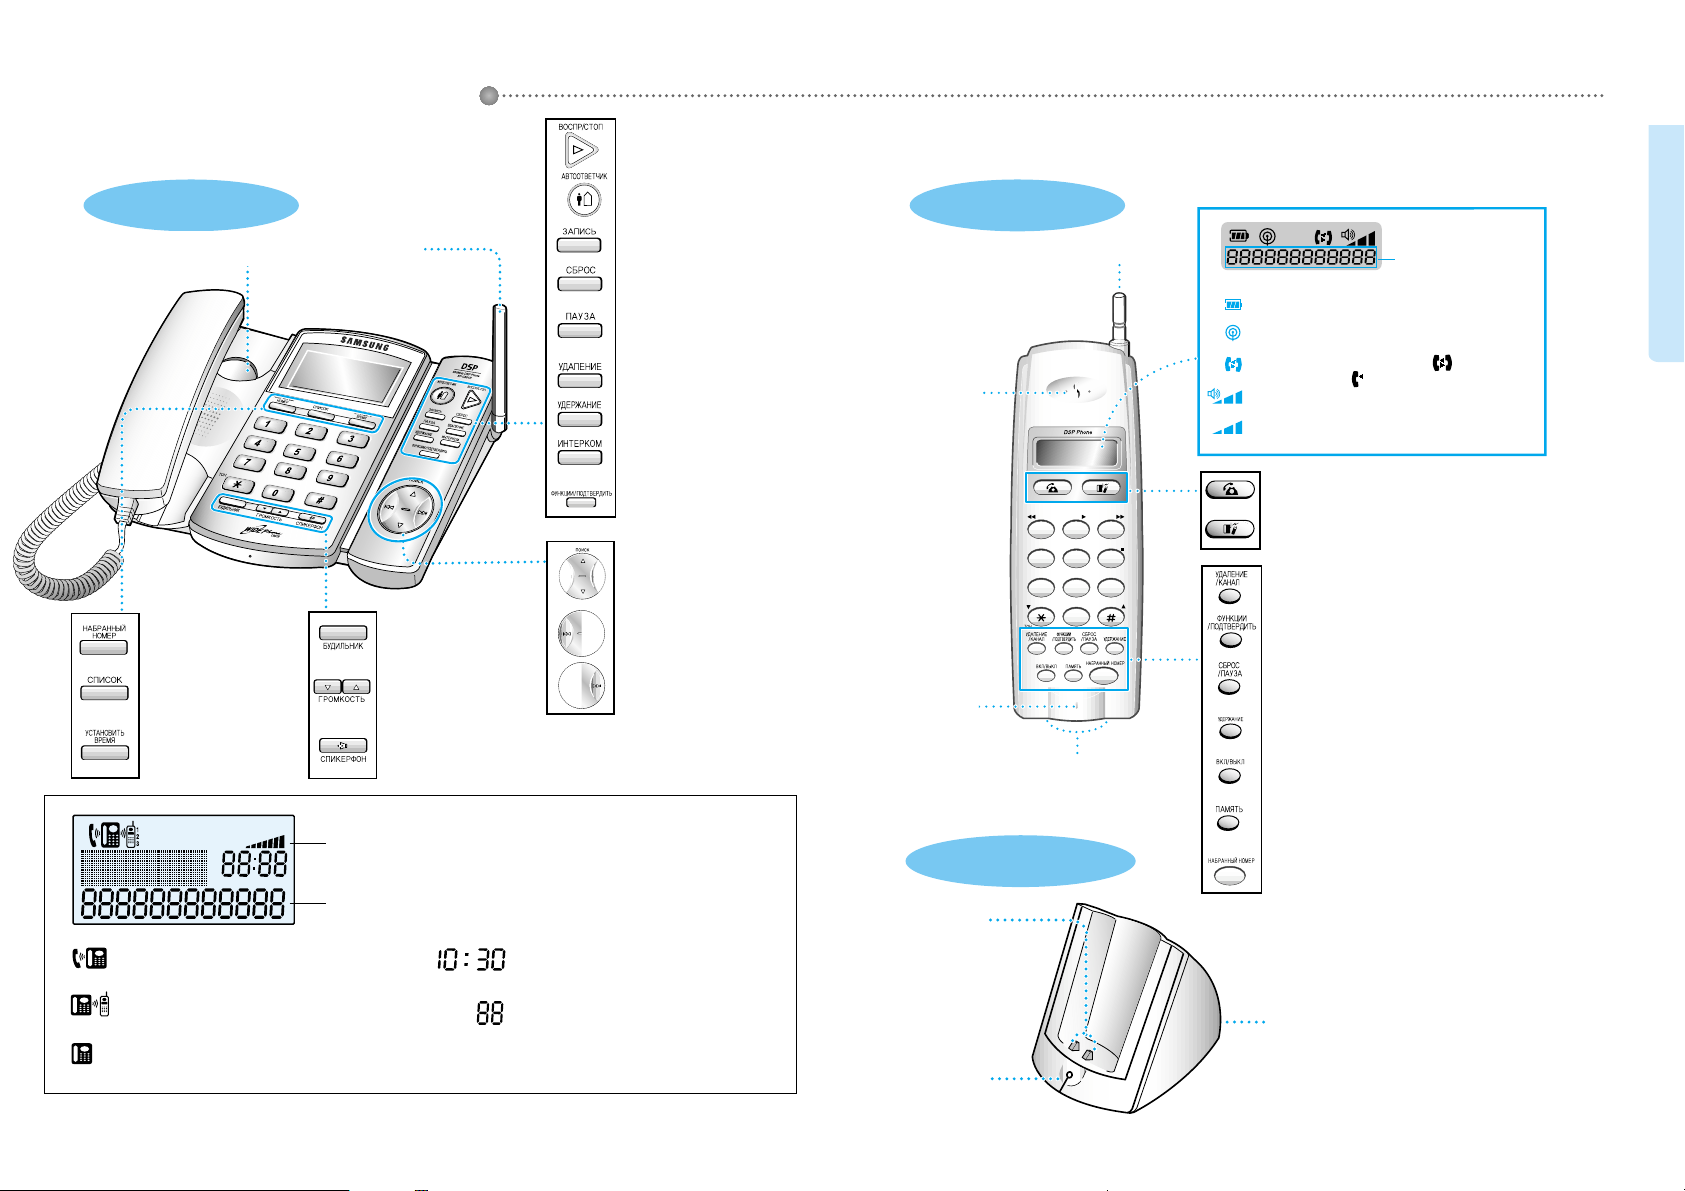
Product introduction
Base set
Remote set
Charger
This is used for playing and stopping
a recorded message or for stopping
the recording. In addition, this is used
for exiting from other functions.
This is used for setting or
canceling the auto-answering.
This is used for holding a call.
This is used for intercom or for
transferring a call.
This is used for setting or saving
various functions.
This is used for searching the phone
directory.
This is used for moving to the prior
message during a message playback.
This is used for moving to the next
message during a message playback.
This is used for setting up a recorded
message or recording a call.
This is used for registering the
number to the directory.
This is used for deleting a message or
a registered phone number.
This is used for transferring the call
during a call.
Screen
Hook switch
Screen to indicate
phone number of
function
Battery status
When out of range from the base set
When the line is busy with a call ( ) or
an extension call ( )
Volume of current voice volume
Volume of phone ring volume
This is used for calling, receiving or hanging up.
This is used for making an intercom or transferring a call.
This is used for deleting the phone number from the directory or
reducing the noise
This is used for setting or saving various functions
This is used for holding the call.
This is used for turning on or off the power of the Remote set.
This is used for registering or searching for a memory dial.
This is used for calling the last or most recent number.
This is used for transferring a call during the call (The flash function
can only be used when the AIC/PBX is connected to the commercial
switchboard). Pause is used for registering a phone number to the
directory.
Adaptor cable connector
LED lamp for
recharging
status
Charger
contact
�Volume is indicated
�Recorded messages are
indicated
When the base handset or the
speakerphone is being used.
When the Remote set is being used.
When standby mode
Current time
Number of recorded messages.
This is used for redialing the
last or the most recently diald
number.
This is used for setting the
month, day, hour and minute.
This is used for setting the
morning call.
This adjusts the volume of
the phone's ring, recorded
voice or speaker.
This is used when using
the speakerphone.
This helps you search the
registered phone number.
Antenna
Antenna
Speaker
Mic
Charger contact
76
● To turn on the power: Press button until you hear the beeping sound.
● If it does not turn on when you press button, then you probably need to
recharge the Remote set. It should automatically turn on. Please recharge for 1
day before using.
● To turn off the power : Press button until you hear the beeping sound.
456
789
0
231
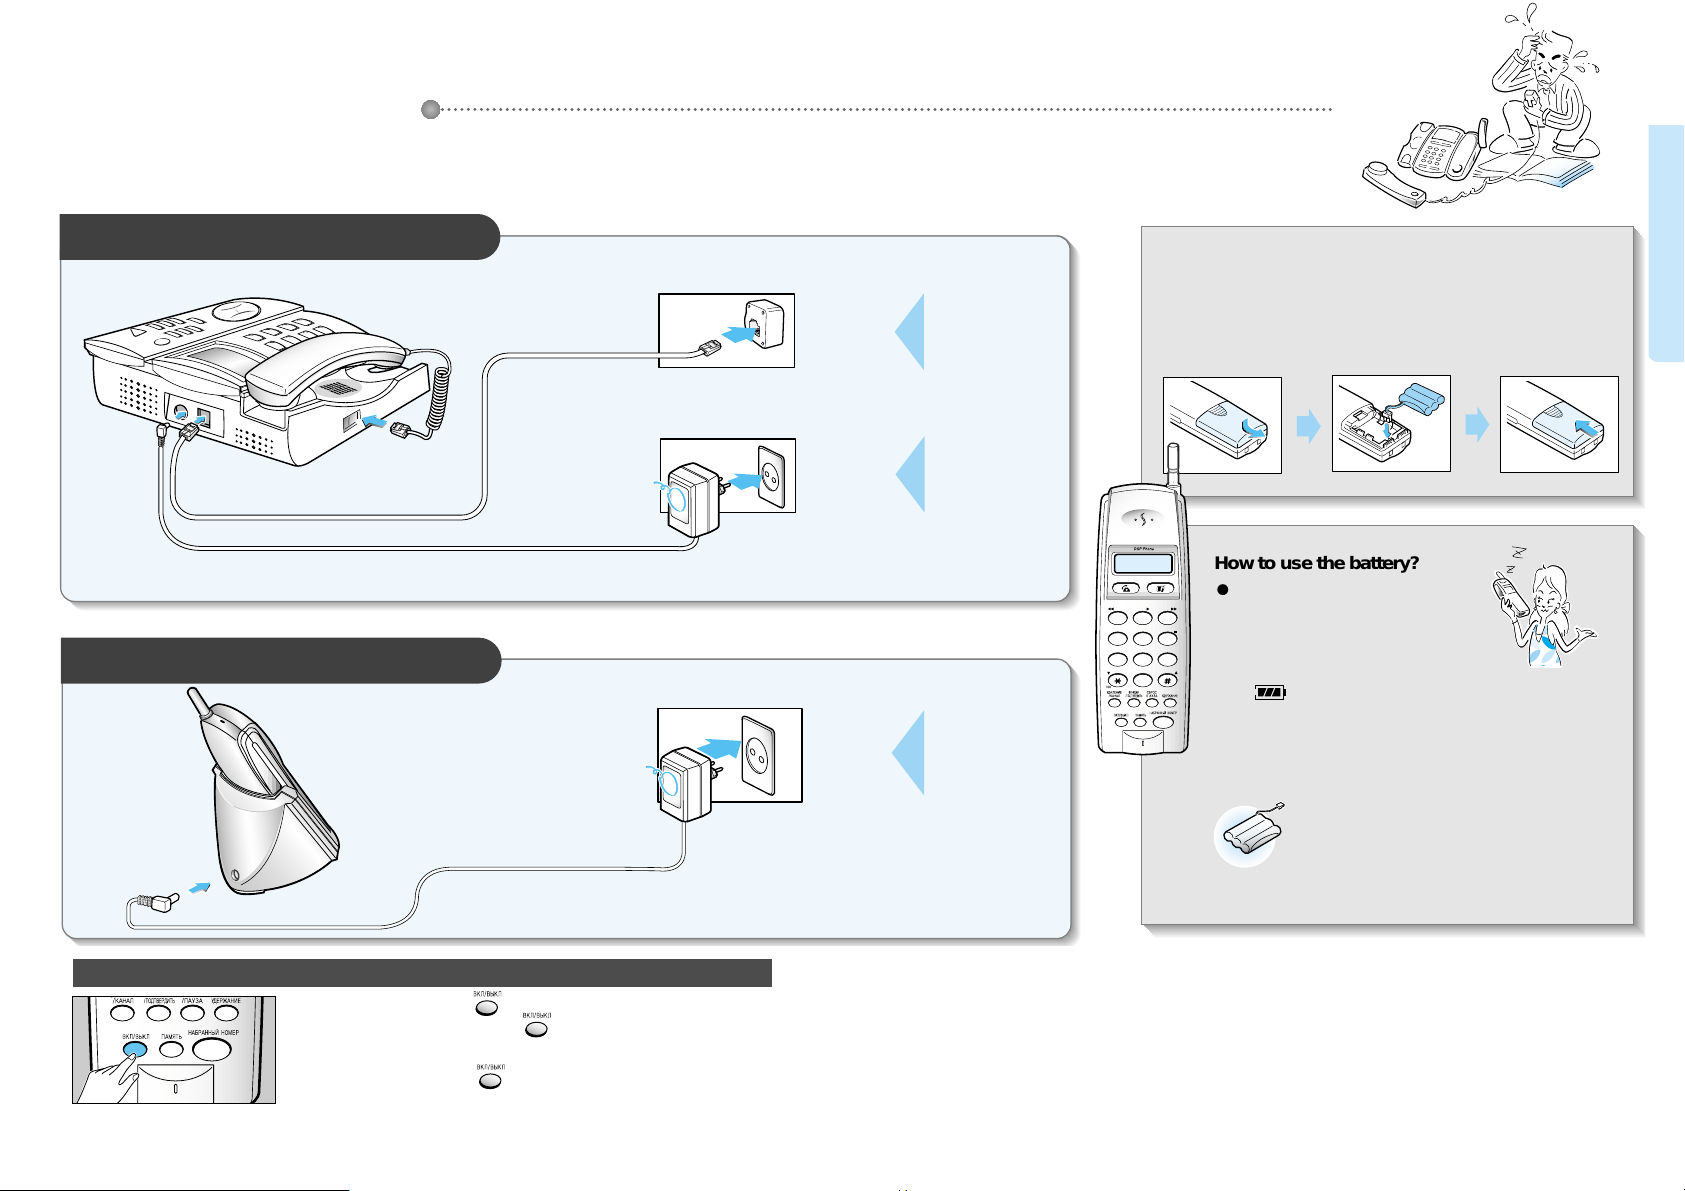
Installing the base set
11V or 12V DC 500mA
11V or 12V DC 500mA
Open the
battery cover.
Place the battery as
shown in the
picture and
rearrange the line.
Close the
battery cover.
Installing the Remote set
1
23
Loading the battery to the Remote set
Phone installation
Battery life
●
The battery life has a 6 months warrantee after purchase.
●
As time goes by, there will be a reduction in the battery's
power. When it is reduced by half, then purchase a new
one and replace it.
How to use the battery?
● Charge the battery for 24 hours before using.
● When you are not using the Remote set for a
long time, always remove the battery from
the handset.
● It is best to charge the battery until you see
the sign on the screen.
Turning on or off the power of Remote set
Connect the
phone line.
Connect the
power to 220V.
Connect the
power to 220V.
Preparation and installation
98

1110
Pick up the base-handset and dial the
number you want to call.
Press button and dial the
number you want to call.
Making a call with the base set
Making a call with a Remote set
Pull out the handset from
the charger and press
button to receive
the call.
Press button to receive the call.
Pick up the handset to receive the call.
When the
phone rings
When the
phone rings
Press button to receive the
call.
When the Remote set is placed
on the charger
When the Remote set is not
placed on the charger (standby)
Using the base-handset Using the speakerphone
When using the base-handset
When using the speaker phone
Receiving a call with the base set
Receiving a call with a Remote set
Receiving calls
Making calls
● When the handset is not placed on the charger, you can
dial the number first and then press button.
● The screen will display the call time.
● If you have incorrectly dialed the number in standby
mode, you can delete the number by shortly pressing
button and then press button.
Place the handset down on
its position or press
button to hang up.
When hanging up the
phone
Pull out the handset from
the charger and press
button dial the number
you want to call.
Press button and dial the
number you want to call.
(Standby)
Place the Remote set to the
charger or press button.
When the Remote set is
placed on the charger
When the Remote set is not
placed on the charger
When hanging up the
phone
● You can dial the number, either by pressing the
telephone number first and then picking up the handset
or by pressing button.
● Call duration is displayed during the call.
● Adjust the volume using buttons.
If you see a mark on the screen
and hear beeping sounds.
� This happens when you are out of range of
the base set. Move closer to the base set.
If you hear a lot of noise during the
call,
�
Press button to reduce the
noise.
Basic features
1312
● If the Remote set is not
placed on the charger,
just press button.
Press button and hang up the handset.
Press button and hang up the Remote set.
When you hear the
intercom ringing
When you hear the
intercom bell
Pull out the
Remote set from
the charger and
press
button.
How to transfer from to during a call.
How to transfer from to during a call.
● Or you can press
button to receive the call.
Pick up the handset in the
base set to receive the call.
Transferring calls
● You need to setup the current time in order to see the
message recorded time and to use the morning call
function.
Date/Time setting
(setting the current time)
23
123
123
1
2341
Press 8 digits in the
order of day, month,
hour and minute.
Press 8 digits in the
order of day, month,
hour and minute.
Ex) March 6th, 15:05
When the date and
time has been set,
you can hear the
currently set date
and time in a
recorded voice.
Operating procedure
(press the following buttons in ordered sequence)
When additional Remote sets are registered
You can transfer calls among Remote sets. Press the Intecom button and press the intercom number you wish the
transfer to go.
When the Intercom transfer does not work
If nobody answers the call, on the base set within 15 seconds, then the call will be transferred back to the Remote
set. Furthermore, if this call is not answered for another 15 seconds, the call will automatically be hung up.
When additional Remote sets are registered
Press button and then press the internal number you wish the transfer to go.
(If you do not designate a particular number, then all the registered Remote sets will ring.)
231
Selecting pulse/tone dial type
�
�
●To see the currently set time, place the handset in the base
set and press button. In case of a power shutdown, it
will erase the date and time. Therefore, you will have to set
it up once again.
● The number 2 will blink on the screen and the recorded voice will tell you the current type.
● You can toggle between the two types by pressing 2.
Or
Basic features
 Loading...