

Samsung SP42W5, SP47W1, SP47W3, SP54T6, SP54T8 User Manual
...
COLOUR
TELEVISION
SP42W4/42W5
SP43T6/43T7/43T8/43W6
SP47Q7/47W1/47W3
SP48T6
SP52Q7
SP54T6/54T8
SP55W3
SP62T6/62T8
SP65W3
Owner’s Instructions
Before operating the unit,
please read this manual thoroughly,
and retain it for future reference.
ON-SCREEN MENUS
PICTURE IN PICTURE
TELETEXT

2
Important Warranty Information Regarding Television
Format Viewing
ENG
Standard screen format televisions (4:3, the aspect ratio of the screen width to height) are
primarily designed to view standard format full-motion video. The images displayed on them
should primarily be in the standard 4:3 ratio format and constantly moving. Displaying stationary
graphics and images on screen, such as the dark top and bottom letterbox bars (wide screen
pictures), should be limited to no more than 15% of the total television viewing per week.
Wide screen format televisions (16:9, the aspect ratio of the screen width to height) are
primarily designed to view wide screen format full-motion video. The images displayed on them
should primarily be in the wide screen 16:9 ratio format, or expanded to fill the screen if your
model offers this feature, and constantly moving. Displaying stationary graphics and images on
screen, such as the dark side-bars on non-expanded standard format television video and
programming, should be limited to no more than 15% of the total television viewing per week.
Additionally, viewing other stationary images and text such as stock market reports, video
game displays, station logos, web sites or computer graphics and patterns, should be limited as
described above for all televisions. Displaying any stationary images that exceed the above
guidelines can cause uneven aging of picture tubes (CRTs) that leave subtle, but permanent
burned-in ghost images in the television picture. To avoid this, vary the programming and
images, and primarily display full screen moving images, not stationary patterns or dark bars.
On television models that offer picture sizing features, use these controls to view the different
formats as a full screen picture.
Be careful in the selection and duration of television formats used for viewing. Uneven CRT
aging as a result of format selection and use, as well as other burned-in images, is not covered by
your Samsung limited warranty.
3
Safety Instructions
ENG
◆ Do not expose the television to extreme temperature conditions or to extreme humidity conditions.
◆ Do not expose the television to direct sunlight and other sources of heat.
◆ Do not expose the television to any liquids.
◆ Never put objects of any kind into the television, and do not place a water-containing vessel on the
television.
◆ During a storm conditions (especially when there is lightning) unplug the television from the mains
socket and aerial.
◆ Do not step on or twist the power cord.
◆ Do not overload wall outlets or extension cords as this can result in a risk of fire or electric shock.
◆ Please use a soft and dry cloth (not containing volatile matter) when you clean the TV.
◆ If the television is broken, do not try to repair it yourself. Contact qualified service personnel.
◆ If the remote control is not used for a long period of time, remove the batteries and store it in a
cool, dry place.
◆ Do not drop the remote control.
☛
Displaying any stationary images that exceed the long time, it can cause uneven aging of
picture tubes that leave subtle, but permanent burned-in ghost images in the television
picture. To avoid this, vary the programming and images, and primarily display full
screen moving images, not stationary patterns or dark bars.
This device is not for use in industrial environments.
Caution
WARNING: TO PREVENT DAMAGE WHICH MAY RESULT
IN FIRE OR SHOCK HAZARD. DO NOT EXPOSE THIS
APPLIANCE TO RAIN OR MOISTURE.
CAUTION: TO PREVENT ELECTRICAL SHOCK,
DO NOT REMOVE REAR COVER, NO USER
SERVICEABLE PARTS INSIDE. REFER SERVICING TO
QUALIFIED SERVICE PERSONNEL.
RISK OF ELECTRIC SHOCK
DO NOT OPEN
CAUTION
The lightning flash and arrow head
within the triangle is a warning sign
alerting you of “dangerous voltage”
inside the product.
The exclamation point within the
triangle is a warning sign alerting
you of important instructions
accompanying the product.
☛
The main voltage is indicated on the
rear of the TV set and the frequency is
50 or 60Hz.

4
ENG
Contents (continued)
◆ FOREWORD
■ Important Warranty Information Regarding Television Format Viewing ........ 2
■ Safety Instructions......................................................................................... 3
■ Caution .......................................................................................................... 3
◆ CONNECTING AND PREPARING YOUR TELEVISION
■ Control Panels ............................................................................................... 6~7
■ Connection Panels ........................................................................................ 8
■ Using a Display Deck .................................................................................... 9
■ Infrared Remote Control ................................................................................ 10
■ Inserting the Batteries in the Remote Control................................................ 11
■ Connecting to an Aerial or Cable Television Network ................................... 11
■ Switching Your Television On and Off........................................................... 12
■ Placing Your Television in Standby Mode..................................................... 12
■ Becoming Familiar with the Remote Control ................................................. 13
■ Plug and Play Feature................................................................................... 14~15
■ Viewing the Demonstration............................................................................ 16
■ Choosing Your Language.............................................................................. 16
■ Adjusting Convergence ................................................................................. 17
◆ SETTING THE CHANNELS
■ Storing Channels Automatically..................................................................... 18
■ Sorting the Stored Channels ......................................................................... 19
■ Storing Channels Manually............................................................................ 20~21
■ Assigning Names to Channels ...................................................................... 22
■ Activating the Child Lock and Skipping Unwanted Channels........................ 23
■ Selecting a Channel by Informations............................................................. 24
◆ USING YOUR TELEVISION (continued)
■ Changing the Picture Standard ..................................................................... 24
■ Adjusting the Picture Settings........................................................................ 25
■ Freezing the Current Picture ......................................................................... 25
■ Extra Picture Settings .................................................................................... 26
- Scan Mode
- Digital NR
- Blue screen
- LNA (Low Noise Amplifier)
■ Selecting the Picture Size (depending on the model).................................... 27
■ Changing the Sound Standard ...................................................................... 28
■ Adjusting the Sound Settings ........................................................................ 28
■ Adjusting the Volume Automatically .............................................................. 29
■ Setting the Melody Sound ............................................................................. 29
■ Setting the Dolby Digital ................................................................................ 30
■ Adjusting Your Dolby Preferences................................................................. 31
The page numbers are changed.
5
ENG
Contents
◆ USING YOUR TELEVISION
■ Setting the External Sound............................................................................ 32
■ Selecting the Sound Mode (depending on the model) .................................. 33
■ Setting the Sleep Timer ................................................................................. 34
■ Setting and Displaying the Current Time....................................................... 34
■ Switching the Television On and Off Automatically ....................................... 35
■ Viewing the Picture In Picture (PIP) .............................................................. 36~37
◆ USING THE TELETEXT FEATURE
■ Teletext Feature ............................................................................................ 38
■ Displaying the Teletext Information ............................................................... 39
■ Selecting Display Options.............................................................................. 40
■ Selecting a Teletext Page.............................................................................. 41
◆ ADDITIONAL INFORMATION ON CONNECTIONS
■ Connecting to the External Input/Outputs...................................................... 42
■ Connecting to the Audio Output .................................................................... 43
■ Connecting to the RCA Input......................................................................... 43
■ Connecting to the S-Video Input.................................................................... 44
■ Connecting Additional Speakers ................................................................... 44
■ Viewing Pictures From External Sources ...................................................... 45
■ Redirecting an Input to the External Output .................................................. 46
◆ RECOMMENDATIONS FOR USE
■ Programming the Remote Control for Other Components ............................ 47
- TV Remote Control Codes ......................................................................... 48
- VCR Remote Control Codes ...................................................................... 49
- Cable Box (CATV) Remote Control Codes ................................................ 50
- DVD Remote Control Codes ...................................................................... 50
■ SCART Connector Wiring (EXT1, EXT2 or EXT3) ........................................ 51
■ Troubleshooting: Before Contacting Service Personnel................................ 52
■ Wiring the Mains Power Supply Plug (UK Only)............................................ 53
☛
➢
Press Important Note
Symbols
The page numbers are changed.

6
ENG
Control Panels (depending on the model)
➢
The actual configuration on your TV may be different, depending on
your model.
( a ) Input Source Selection
( b ) Temporary Sound Switch Off
( c ) Menu Display
( d ) Volume Adjustment
( e ) Channel Selection
( f ) Remote Control Sensor
( g ) Standby & Timer Indicator
( h ) Power On/Off

7
ENG
Control Panels (depending on the model)
➢
The actual configuration on your TV may be different, depending on
your model.
( a ) Input Source Selection
( b ) Temporary Sound Switch Off
( c ) Menu Display
( d ) Volume Adjustment
( e ) Channel Selection
( f ) Remote Control Sensor
( g ) Standby & Timer Indicator
( h ) Power On/Off

8
ENG
Connection Panels (depending on the model)
Auto Convergence
Video Input
S-Video Input
Audio Input
Side of the TV
Rear of the TV
Audio Output
75Ω Coaxial Connector for Aerial or Cable Network
SCART Audio/Video Input/Output
Auto Convergence
Video Input
Audio Input
S-Video Input
Front of the TV
Rear Speaker Connectors
Center Speaker Connectors (Option)
➢
The actual configuration on your TV may be different, depending on
your model.
9
ENG
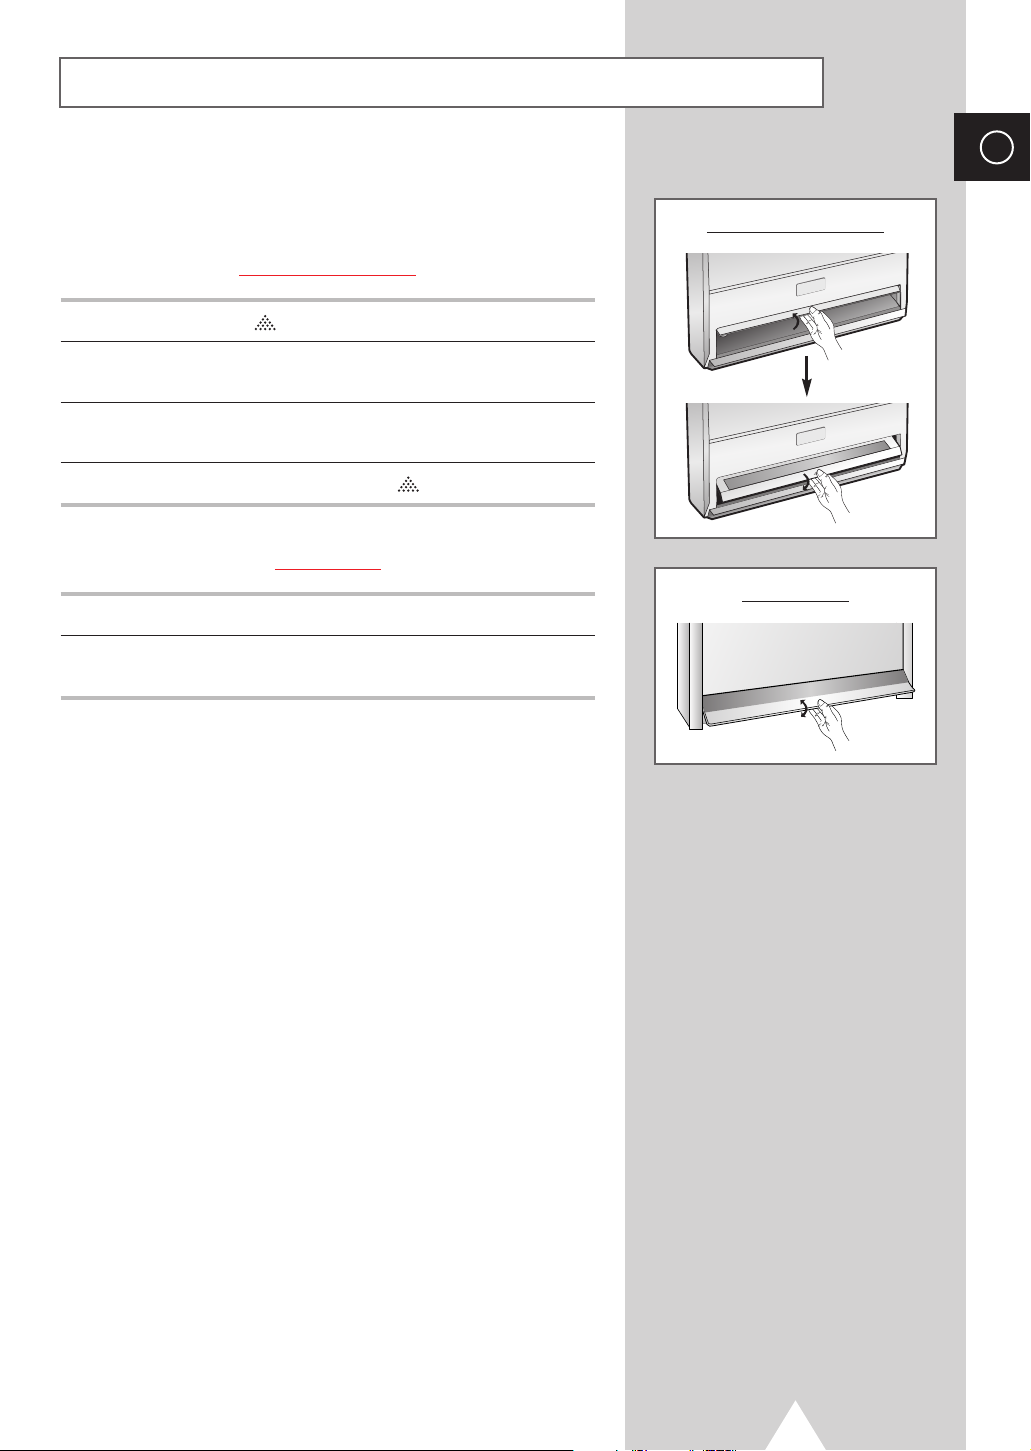
Using a Display Deck (depending on the model)
You can display a VCR or DVD Player, etc. by using the display
deck.
SP47W3/55W3/65W3
1 Press the symbol “ ” at the center of the display deck.
2 Hold the center of the door and lift it up in the direction of arrow till
a ‘ttok’ sound sounds.
3 After placing a component you have in the display deck, hold the
center of the door and pull it down.
4 Shut the door by pressing the symbol “”.
SP54T8/62T8
1 Hold the center of the door and lift it up in the direction of arrow.
2 After placing a component you have in the display deck, hold the
center of the door and pull it down.
➣
You should display only the component that is within
126mm high. When displaying a component in the
display deck, please space it out 30mm from the front,
20mm from either end.
SP47W3/55W3/65W3
SP54T8/62T8
10
ENG
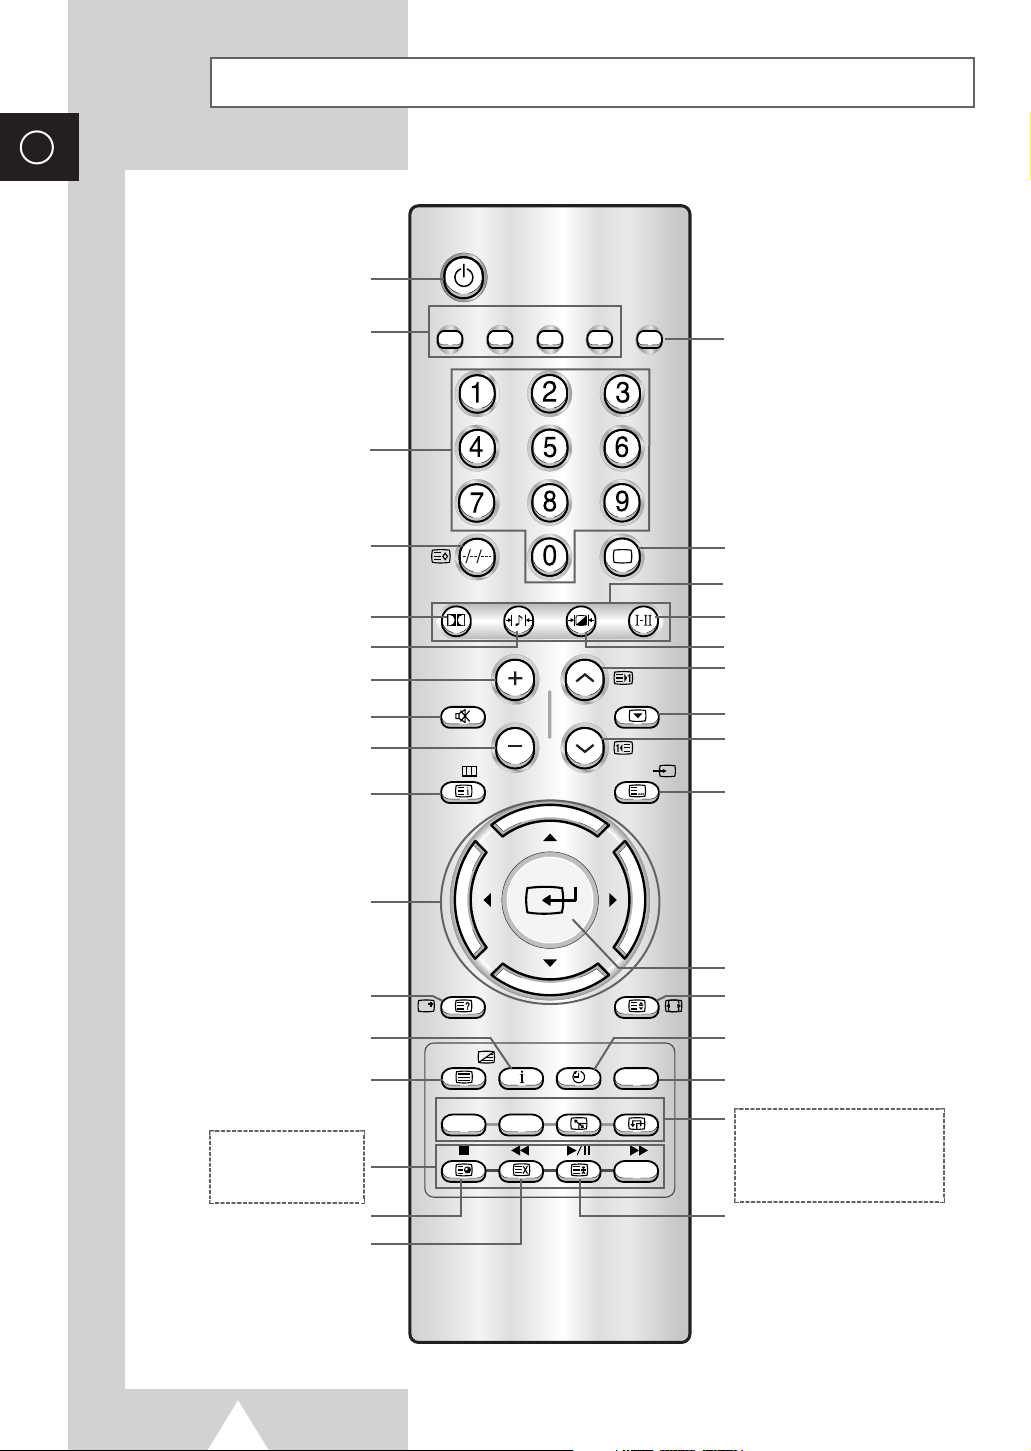
TELEVISION STANDBY
MAKE THE REMOTE CONTROL
WORKS FOR TV, VCR, CABLE,
DVD PLAYER
ONE, TWO, OR THREE-DIGIT
CHANNEL SELECTION
(DEPENDING ON THE MODEL)/
TELETEXT STORE (OPTION)
SURROUND ON/OFF DIRECTLY
TEMPORARY SOUND SWITCH OFF
MENU DISPLAY/
PROGRAMME SELECTION BY NAME
ON-SCREEN MENUS DISPLAY/
TELETEXT REVEAL
AINFORMATION DISPLAY
TELETEXT DISPLAY/
MIX BOTH TELETEXT INFORMATION
AND THE NORMAL BROADCAST
VCR/DVD FUNCTIONS;
- STOP
- REWIND
- PLAY/PAUSE
- FAST FORWARD
TELETEXT SUB-PAGE
TELETEXT CANCEL
TELETEXT PAGE HOLD
AUTOMATIC ADJUST THE
CONVERGENCE
AUTOMATIC SWITCH-OFF
PICTURE SIZE/TELETEXT SIZE
PREVIOUS CHANNEL/
TELETEXT PREVIOUS PAGE
PICTURE FREEZE
SOUND MODE SELECTION
TUNER/CABLE NETWORK SELECTION
VOLUME INCREASE
➢
The performance of the
remote control may be
affected by bright light.
PIP FUNCTIONS;
- PIP ON/OFF
- CHANNEL SCAN
- INTERCHANGE THE MAIN AND
SUB PICTURE
- LOCATION SELECTION
REMOTE CONTROL SETUP
NEXT CHANNEL/
TELETEXT NEXT PAGE
EXTERNAL INPUT SELECTION/
TELETEXT MODE (LIST/FLOF)
SELECTION (OPTION)
PICTURE EFFECT SELECTION
SOUND EFFECT SELECTION
VOLUME DECREASE
CONTROL THE CURSOR IN THE
ON-SCREEN MENU
CHANGE CONFIRMATION
NUMERIC BUTTONS FOR
DIRECT ACCESS
(CHANNEL/TELETEXT PAGE)
FASTEXT TOPIC SELECTION
Infrared Remote Control
Power
SET
DVDCable
S.Mode
Surround
VCRTV
S.STD
P.STD
StillMute
VOL P
Menu Video
TV
Display P.Size
Text/Mix Info. Sleep
Perfect Focus
PIP Scan Swap Locate
ON
11
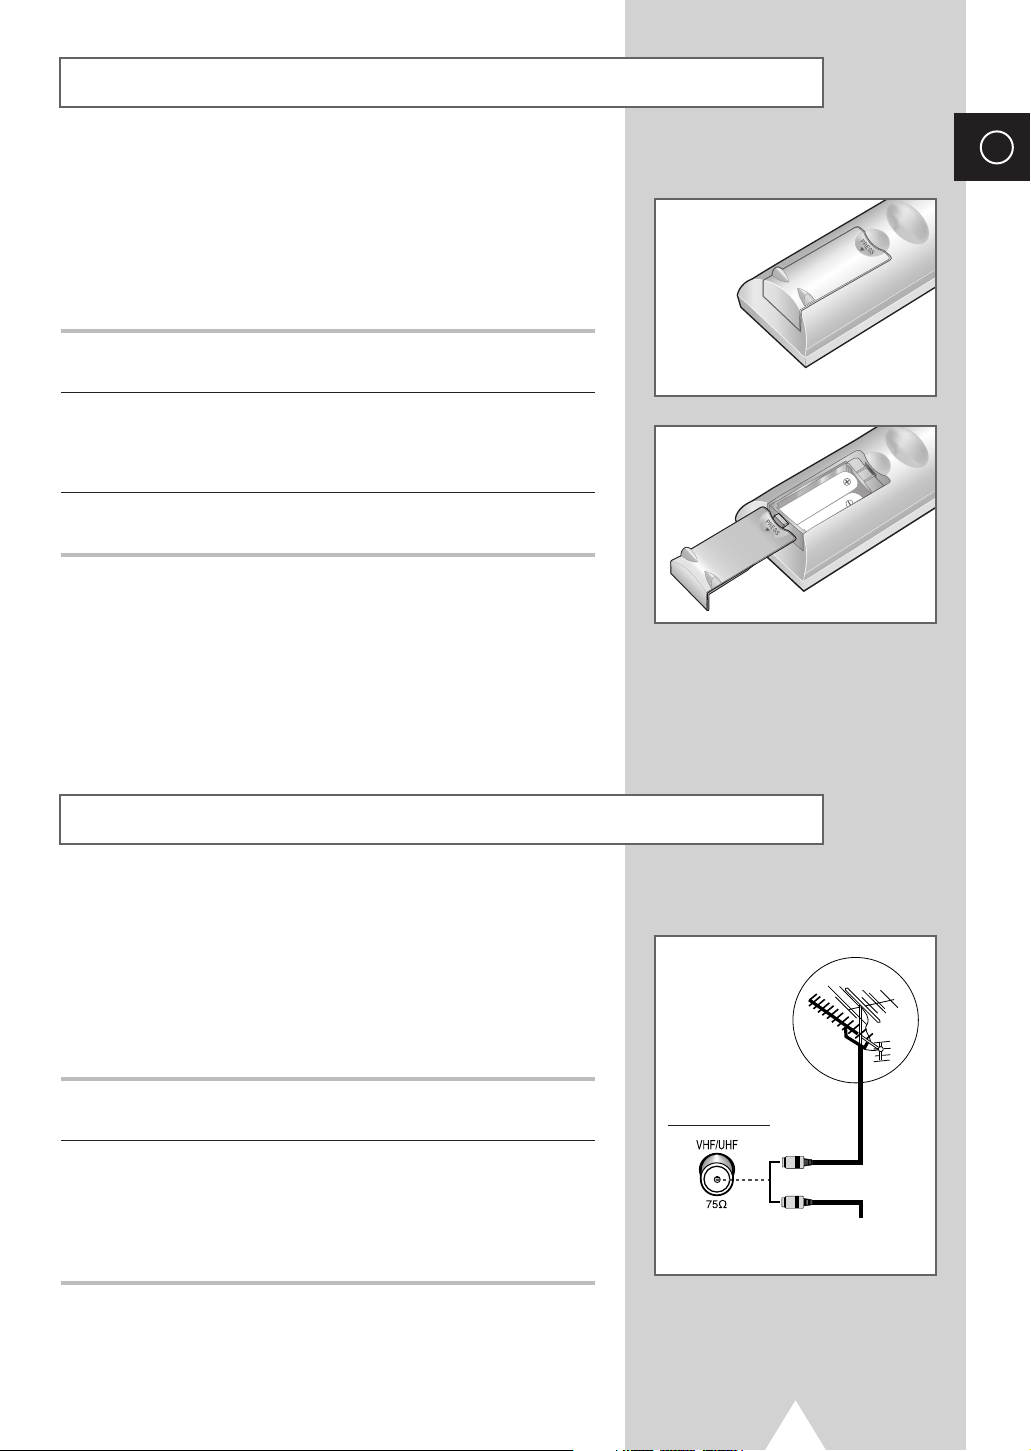
To view television channels correctly, a signal must be received by
the set from one of the following sources:
◆ An outdoor aerial
◆ A cable television network
◆ A satellite network
1 In the first three cases, connect the aerial or network input cable to
the 75Ω coaxial socket on the rear of the television.
2 If you are using an indoor aerial, you may need to turn it when
tuning your television until you obtain a picture that is both sharp
and clear.
For further details, refer to:
◆ “Storing Channels Automatically” on page 18
◆ “Storing Channels Manually” on page 20
Connecting to an Aerial or Cable Television Network
ENG
Inserting the Batteries in the Remote Control
Rear of the TV
Cable Television
Network
or
You must insert or replace the batteries in the remote control when
you:
◆ Purchase the television
◆ Find that the remote control is no longer operating
correctly
1 Remove the cover on the rear of the remote control by pressing
the symbol downwards and then pulling firmly to remove it.
2 Insert two R03, UM4, “AA” 1.5V or equivalent batteries taking care
to respect the polarities:
◆+on the battery against +on the remote control
◆-on the battery against -on the remote control
3 Replace the cover by aligning it with the base of the remote
control and pressing it back into place.

12
ENG
The mains lead is attached to the rear of your television.
☛
If you have purchased this television in the United
Kingdom, refer to page 53 for further instructions on
plug wiring.
1 Plug the mains lead into an appropriate socket.
➣
The main voltage is indicated on the rear of the television
and the frequency is 50 or 60Hz.
2 Press the “ I ” button (On/Off) on the front of the television.
Result
: The Standby indicator on the front of the television
lights up.
3 Press the Power ( ) button on the remote control to switch the
television on.
Result
: The programme that you were watching last is re-
selected automatically.
➣
If you have not yet stored any channels, No clear picture
appears. Refer to “Storing Channels Automatically” on page
16 or “Storing Channels Manually” on page 18.
4 To switch your television off, press the “ I ” button (On/Off) again.
Placing Your Television in Standby Mode
Your television can be placed in Standby mode, in order to reduce
the power consumption.
The Standby mode can be useful when you wish to interrupt
viewing temporarily (during a meal, for example).
1 Press the Power ( ) button on the remote control.
Result
: The screen is turned off and the Standby indicator on
the front of the television lights up in red.
2 To switch the television back on, simply press the Power ()
button again.
☛
Do not leave your television in Standby mode for long
periods of time (when you are away on holiday, for
example). Turn your television off by pressing the “
I “
button (On/Off) on the front of the television. It is best to
unplug the set from the mains and aerial.
Switching Your Television On and Off
Power
VCRTV
SET
DVDCable
Power
VCRTV
SET
DVDCable

13
The remote control is used mainly to:
◆ Change channels and adjust the volume
◆ Set up the television using the on-screen menu system
The following table presents the most frequently used buttons and
their functions.
Button Viewing Function Menu Function
Used to display the next stored channel.
P
Used to display the previous stored channel.
to Used to display the corresponding channels.
-/--/---
Used to select a channel numbered ten or over.
Press this button, and enter the two or three-digit channel
number (depending on the model).
+
Used to increase the volume.
VOL
-
Used to decrease the volume.
Mute Used to switch the sound off temporarily.
➣
To turn the sound back on, press this button again, or
VOL-or VOL+button.
Menu Used to display the Used to return to the previous
on-screen menu system. menu or normal viewing.
▲
-
Used to...
➛❿ ◆ Display a submenu
▼
containing selections for
the current menu option.
◆ Increase/reduce a menu
option value.
-
Used to confirm your choice.
TV Used to switch the Used to exit from the menu
television on when it is system and return to normal
in Standby mode. viewing directly.
Becoming Familiar with the Remote Control
ENG
Power
VCRTV
SET
DVDCable
TV
Surround
Menu Video
Display P.Size
Text/Mix Info. Sleep
PIP Scan Swap Locate
ON
P.STD
S.STD
VOL P
S.Mode
StillMute
Perfect Focus

14
ENG
When the television is initially powered on, several basic customer
settings proceed automatically and subsequently. The following
settings are available.
1 If the television is in Standby mode, press the Power ( ) button
on the remote control.
Result
: The message Plug & Play is displayed. It flickers for
a little while and then
Language menu is automatically
displayed.
2 Select the appropriate language by pressing the ▼ or ▲ button.
Press the
Menu button to enter the language.
Result
: The message Antenna input check is displayed.
➣
If any language is not selected on the Language menu, the
Language menu will disappear about 30 seconds later.
3 Make sure that the antenna is connected to the TV.
Press the
➛ or ❿button.
Result
: The ATM menu is displayed.
4 Select your country by pressing the ➛ or ❿ button.
5 To search the channels, press the button.
Result
: The channels are stored in an order which reflects
their positions in the frequency range. Finally, the
search will end automatically. When the channels
have been stored, the
Time menu is displayed with
Clock is selected.
➢ To stop the search before it has finished, press the Menu
button.
6 Press the ➛ or ❿button to move to the hour or minute.
Set the hour or minute by pressing the
▼ or ▲ button.
➣
Refer to “Setting and Displaying the Current Time” on page
34.
7 When you have finished, press the Menu button.
Result
: The message Enjoy viewing your new TV is
displayed, and then the channel which has been
stored will be activated.
Plug and Play Feature
English
ЬА
Hrvatski
Čeština
Netherland
Français

15
If you want to reset this feature...
1 Press the Menu button.
Result
: The main menu is displayed.
2 Press the ▼ or ▲ button to select Function.
Result
: The options available in the Function group are
displayed.
3 Press the button.
4 Press the ▼ or ▲ button to select Plug & Play. Press the
button.
Result
: This feature starts with the message Plug & Play is
displayed.
Plug and Play Feature
ENG

16
ENG
To become familiar with the various menus provided by your
television, you can view the inbuilt demonstration.
1 Press the Menu button.
Result
: The main menu is displayed.
2 Press the ▼ or ▲ button to select Function.
Result
: The options available in the Function group are
displayed.
3 Press the button.
4 Press the ▼ or ▲ button to select Demonstration. Press the
button.
Result
: Each of the menu options is displayed in turn.
➣
When you wish to exit from the demonstration, press the TV
button on the remote control.
Choosing Your Language
When you start using your television for the first time, you must
select the language which will be used for displaying menus and
indications.
1 Press the Menu button.
Result
: The main menu is displayed.
2 Press the ▼ or ▲ button to select Function .
Result
: The options available in the Function group are
displayed.
3 Press the button.
Result
: The Language is selected.
4 Press the button again.
Result
: The languages available are listed.
5 Press the ▼ or ▲ button to select the appropriate language.
Viewing the Demonstration
English
ЬА
Hrvatski
Čeština
Netherland
Français
Menu Video
Display P.Size
17
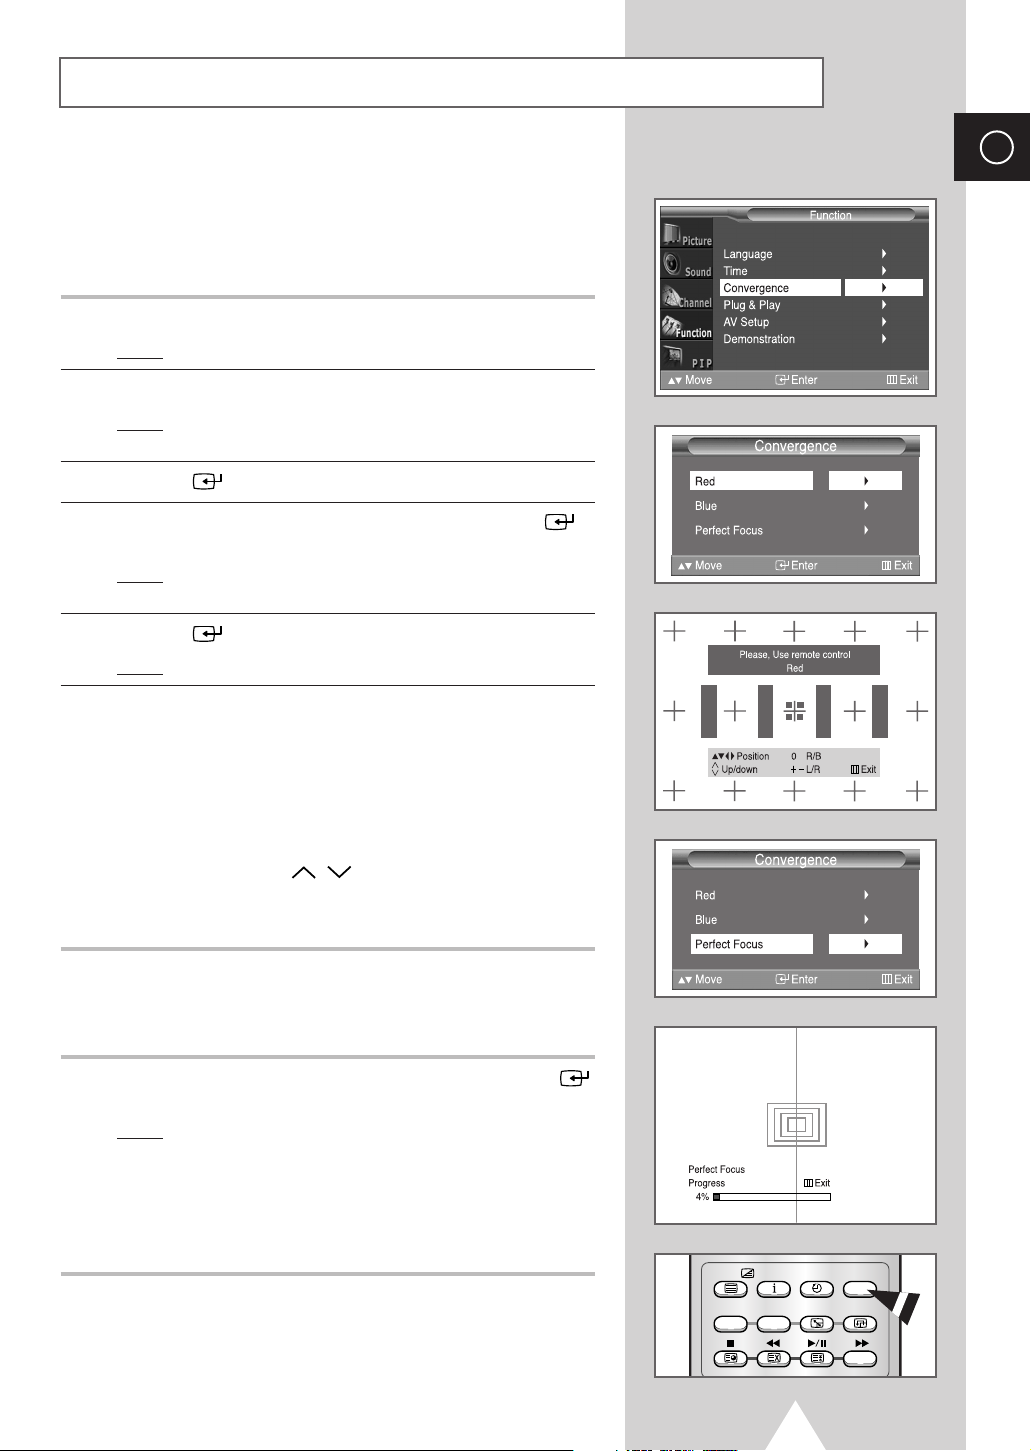
If the color appears spread out or “smeared” on the screen, the
convergence probably needs alignment. Be sure to use the remote
control for the convergence adjustments. (The Convergence
Adjustment can not be made by using the control buttons on the
front panel.)
1 Press the MENU button.
Result
: The main menu is displayed.
2 Press the ▼ or ▲ button to select Function.
Result
: The options available in the Function group are
displayed.
3 Press the button.
4 Press the ▼ or ▲ button to select Convergence. Press the
button.
Result
: The options available in the Convergence group are
displayed with
Red is selected.
5 Press the button again.
Result
: A crosshair pattern is appeared.
6 Adjust convergence by using your remote control.
◆
Use the ▼/▲/➛/❿ buttons to all directions for select the
position.
◆
Press the “0” button to select red or blue convergence.
◆
To move the line so that it is superimposed on the horizontal
or vertical center-line, use the volume up/down (
VOL +/-
) and
channel up/down (
P
/
) buttons (i.e., make a signal
horizontal or vertical line that is as white as possible).
◆
Press the Menu button to exit.
You can adjust convergence automatically for the optimum in the
factory.
7 Select Perfect Focus in the Function group, then press the
button.
Result
: Perform Perfect Focus in the following sequence:
green
➞ red ➞ blue.
After the cursor flickers for one second, the perfect
focus feature ends.
➣
You can also adjust simply by pressing the Perfect Focus
button.
➣
When the size of the sub picture is selected to the “12 PIP”
or “
3 PIP” mode, the Perfect Focus feature does not work.
Adjusting Convergence
ENG
Text/Mix Info. Sleep
Perfect Focus
PIP Scan Swap Locate
ON
 Loading...