

Samsung 521, SP434, 524 User Manual

COLOUR
TELEVISION
SP434/521/524
Owner’s Instructions
Before operating the unit,
please read this manual thoroughly,
and retain it for future reference.
REMOTE CONTROL
MENU CONTROL
PICTURE IN PICTURE (OPTION)
TELETEXT FUNCTION
ENG
ENG
!
Feature
15
15
23~26
The number on this symbol represents
the reference page.
Mutual responsive dialogic picture
By adopting dialogic method (if you
select one menu, another picture is
displayed) everybody can easily execute
the next operation and verify optional
conditions.
One method makes every operation easy
By identifying operating methods of the
remote control, if you learn one method,
you can learn another method naturally.
Various pictures and sound functions
With various pictures and sound
functions, you can adjust the condition
of picture and sound to your taste.
• You can select one of five picture
modes (Custom, Standard, Dynamic,
Movie, Mild) you want to view.
• You can select one of five sound
modes (Custom, Standard, Music,
Movie, Speech) you want to hear.
27~28
29
30~31
Time saving function
You can use this TV set with the function
of automatic turning on or off to the time
you set.
Extra Function
You can easily adjust the menu.
They are as follows;
• Language
• Blue screen
• Noise Reducer
• Low noise AMP
• Demonstration
Picture in Picture (PIP) Operation
With this advanced digital feature,
you can use your VCR to enjoy a movie
while still keeping up with the latest
news. You actually see two sources at the
same time: one on the main screen,
the other inset on a subscreen.
Main and subscreen images may be
interchanged instantly, and the subscreen
image can be shifted to any position of
the main screen by remote control.
Caution
CAUTION
RISK OF ELECTRIC SHOCK
DO NOT OPEN
CAUTION: TO PREVENT ELECTRICAL SHOCK,
DO NOT REMOVE REAR COVER. NO USER SERVICEABLE
PARTS INSIDE. REFER SERVICING TO QUALIFIED
SERVICE PERSONNEL.
WARNING: TO PREVENT DAMAGE WHICH MAY
RESULT IN FIRE OR SHOCK HAZARD, DO NOT EXPOSE
YOUR TELEVISION TO RAIN OR MOISTURE.
2
The lightning flash and arrow head
within the triangle is a warning sign
alerting you of “dangerous voltage”
inside the product.
The exclamation point within the
triangle is a warning sign alerting
you of important instructions
accompanying the product.
The main voltage is indicated on the rear
☛
of the TV set and the frequency is 50Hz
or 60Hz.
!

You have just purchased
a SAMSUNG television.
Please take the time to read these instructions,
as they will enable you to set up your
television easily.
Contents
◆ CONNECTING AND PREPARING YOUR TELEVISION
■
Feature........................................................................................................................ 2
■
Caution........................................................................................................................ 2
■
Safety Instructions....................................................................................................... 4
■
Inserting the Batteries in the Remote Control ............................................................. 5
■
Connecting the Aerial (or Cable Television Network) ................................................. 5
■
How to Use this Manual .............................................................................................. 6
■
Quick reference guide for your TV set ........................................................................ 6
■
Antenna Connections.................................................................................................. 7
■
Video Connections ...................................................................................................... 8
■
S-VIDEO Connections ................................................................................................ 10
■
Camcorder Connections ............................................................................................. 12
■
Audio Connections ...................................................................................................... 12
■
Front Control ............................................................................................................... 13
■
AV Connection ............................................................................................................ 13
■
Remote Controls ......................................................................................................... 14
■
Switching your Television On and Off ......................................................................... 15
■
Remote Control ........................................................................................................... 15
◆ USING YOUR TELEVISION
■
Tuning Procedure (Auto store).................................................................................... 16
■
Tuning Procedure (Manual store) ............................................................................... 18
■
Tuning Procedure (Channel skip) ............................................................................... 20
■
Tuning Procedure (Fine tune) ..................................................................................... 21
■
Tuning Procedure (Sort).............................................................................................. 22
■
Picture Adjustment ...................................................................................................... 23
■
Picture Menu Adjustment ............................................................................................ 24
■
Sound Adjustment....................................................................................................... 25
■
Sound Adjustment (Surround)..................................................................................... 26
■
Stereo Mode Functions ............................................................................................... 26
■
Setting the Timer......................................................................................................... 27
■
Setting the Clock ......................................................................................................... 27
■
Setting the On/Off Timer ............................................................................................. 28
■
Extra Functions ........................................................................................................... 29
■
Picture in Picture (Option) ........................................................................................... 30
■
Convergence Adjustment............................................................................................ 32
■
Teletext Operation (Option) ........................................................................................ 33
◆ RECOMMENDATIONS FOR USE
■
Specification................................................................................................................ 36
■
Trouble Shooting......................................................................................................... 38
■
Cleaning the TV .......................................................................................................... 38
ENG
Symbols
☛
Press Push Important Note
➢
3
ENG
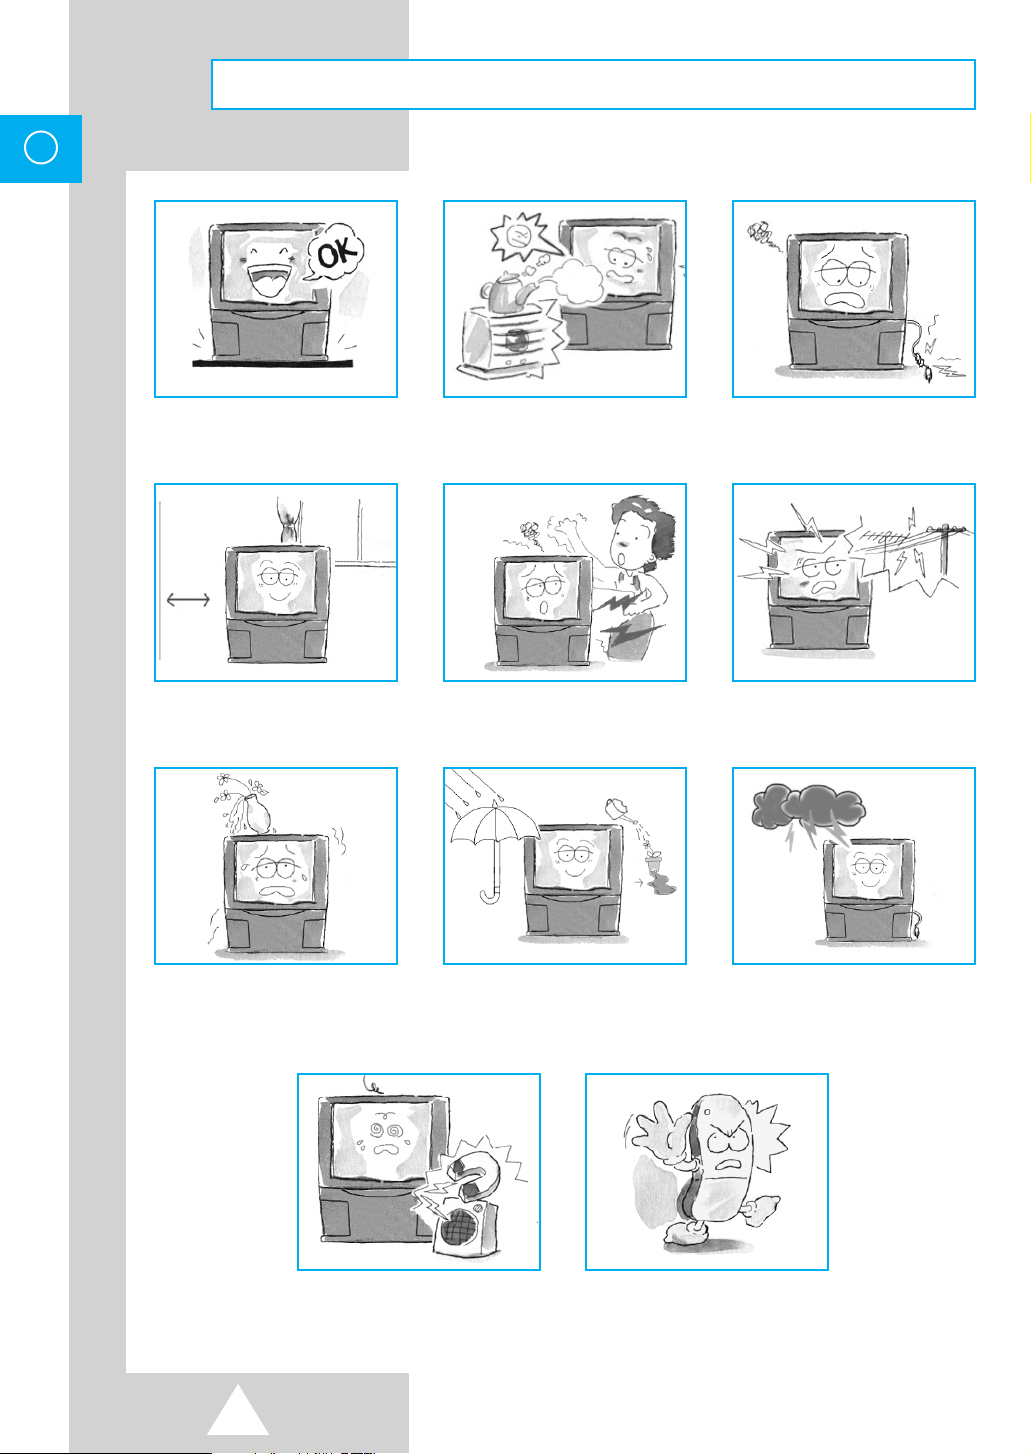
Safety Instructions
Place this TV on a stable stand or
table.
Adequate ventilation is essential
to prevent failure of electrical
components.
Never put objects of any kind
into the TV set, and do not place
a water-containing vessel on the
set.
Avoid exposing the TV set to
direct sunlight and other sources
of heat.
Do not attempt to disassemble
this TV set yourself.
To prevent damage which may
result in fire or shock hazard, do
not expose this TV set to rain or
excessive moisture.
Do not step on or twist the
power cord.
Do not overload wall outlets or
extension cords as this can result
in a risk of fire or electric shock.
If it is not being used for a long
time or if there is a lightning
storm, unplug the TV set.
Keep the vacuum cleaner, etc.
away from the TV as far as
possible.
4
Avoid dropping the remote
control.

Inserting the Batteries in the Remote Control
You must insert or replace the batteries in the remote control when
you :
◆ Purchase the television.
◆ Find that the remote control is no longer operating
correctly.
1 Remove the cover on the underside of the remote control by sliding it off
with your thumb.
2 Insert two AAA or equivalent batteries placing the “–” end of the batteries
against the springs in the remote control.
3 Replace the cover by aligning it with the remote control and sliding it until it
clicks into place.
If the remote control is not operating, check the list below.
➣
1. Check the polarity of the batteries.
2. Check if the batteries are weak.
3. Check for interruption of electric power.
4. Check if the power plug is connected to the electrical
outlet of the television set.
ENG
Connecting the Aerial (or Cable Television Network)
To view television channels correctly, a signal must be received
by the set from one of the following sources:
◆ An outdoor aerial
◆ An indoor aerial
◆ A cable television network
1 Plug the aerial or cable network input cable into the socket at the bottom of
the television’s rear panel.
2 If you are using an indoor aerial, insert the bottom of the aerial into the
support bracket on the top of the television.
75Ω
VHF/UHF
Rear of TV
Cable
Television
Network
5

ENG
How to Use this Manual
1 Check the Model Number of your TV set; the Model Number is shown on
the rear cover name plate on the set. Use the table below to confirm which
features your particular Model is equipped with. This will help you to know
which sections of the manual apply to your set.
2 Check the Part Number on the rear of your Remote Control handpiece,
and note the functions available, as shown on the following pages.
Quick reference guide for your TV set
Please check the model number of your TV set.
This Manual applies to several Models and there are slight
differences among them.
Please check the table below to see what your TV is equipped with
before you begin using these Operating Instructions. Instructions
are given for all functions, please disregard those which do not
apply to your TV.
MODEL NAME
109cm 132cm NICAM A2
SP434JMF SP521/ 524JMF O O O
SP434PTR SP521/ 524PTR O O O
Function available refer to:
➣
TELETEXT
STEREO
PIP
33~35
26
30~31
TTX
STEREO
6
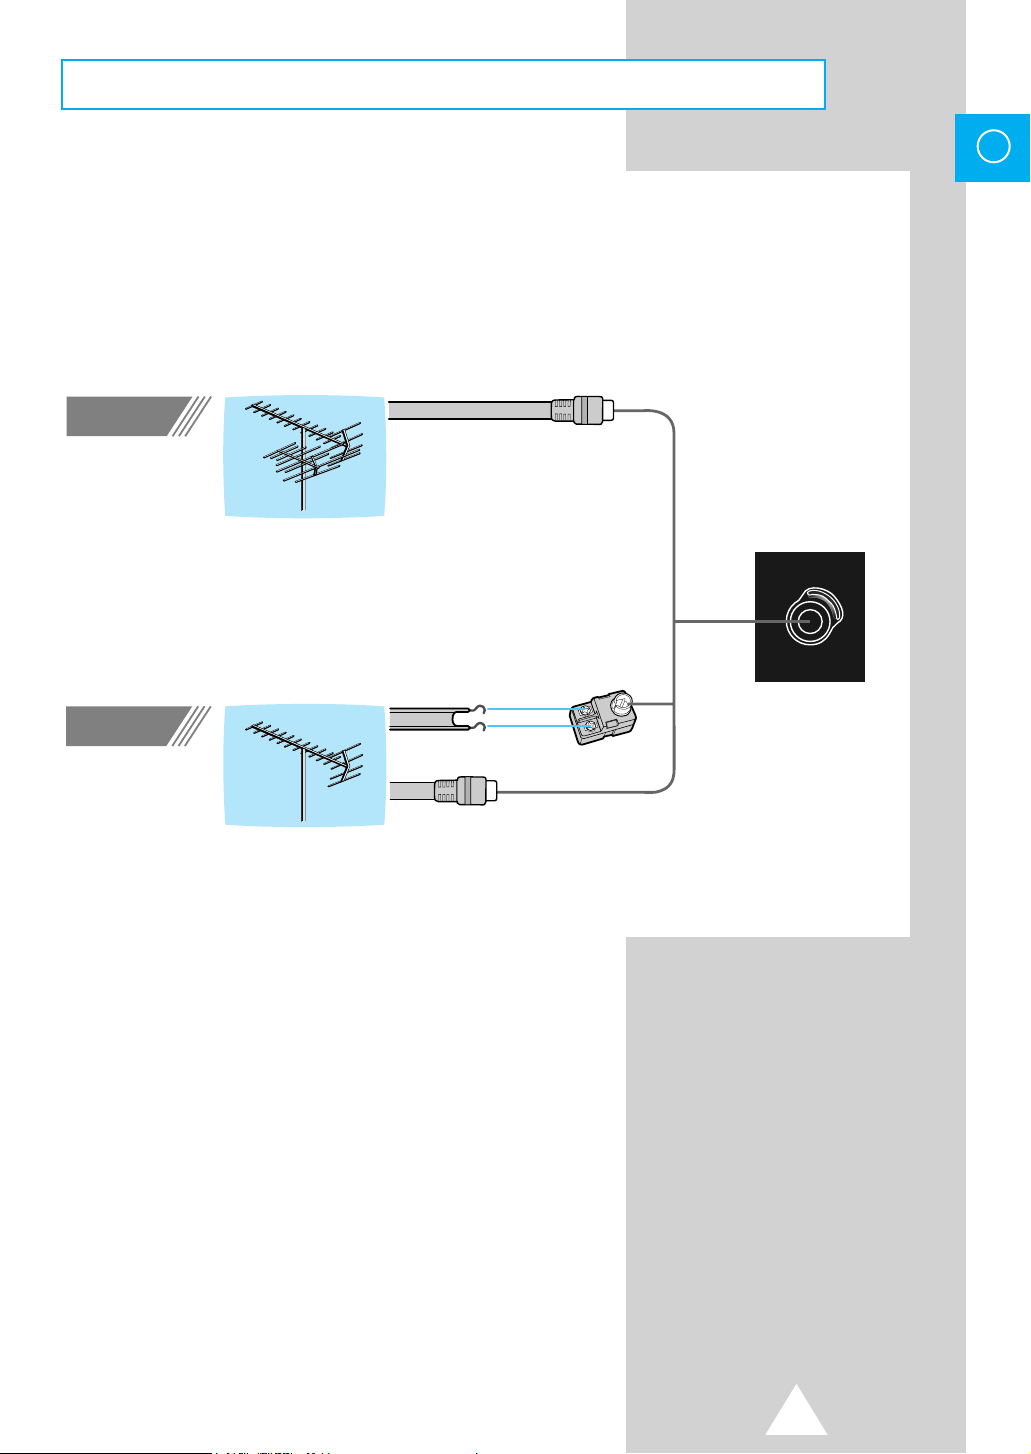
Antenna Connections
Outdoor Antenna Connections
ENG
VHF/UHF Antenna
Method 1
VHF Antenna
Method 2
Round 75-ohm coaxial cable
Flat 300-ohm twin lead cable
Round 75-ohm coaxial cable
75Ω
VHF/UHF
Rear of TV
7
ENG
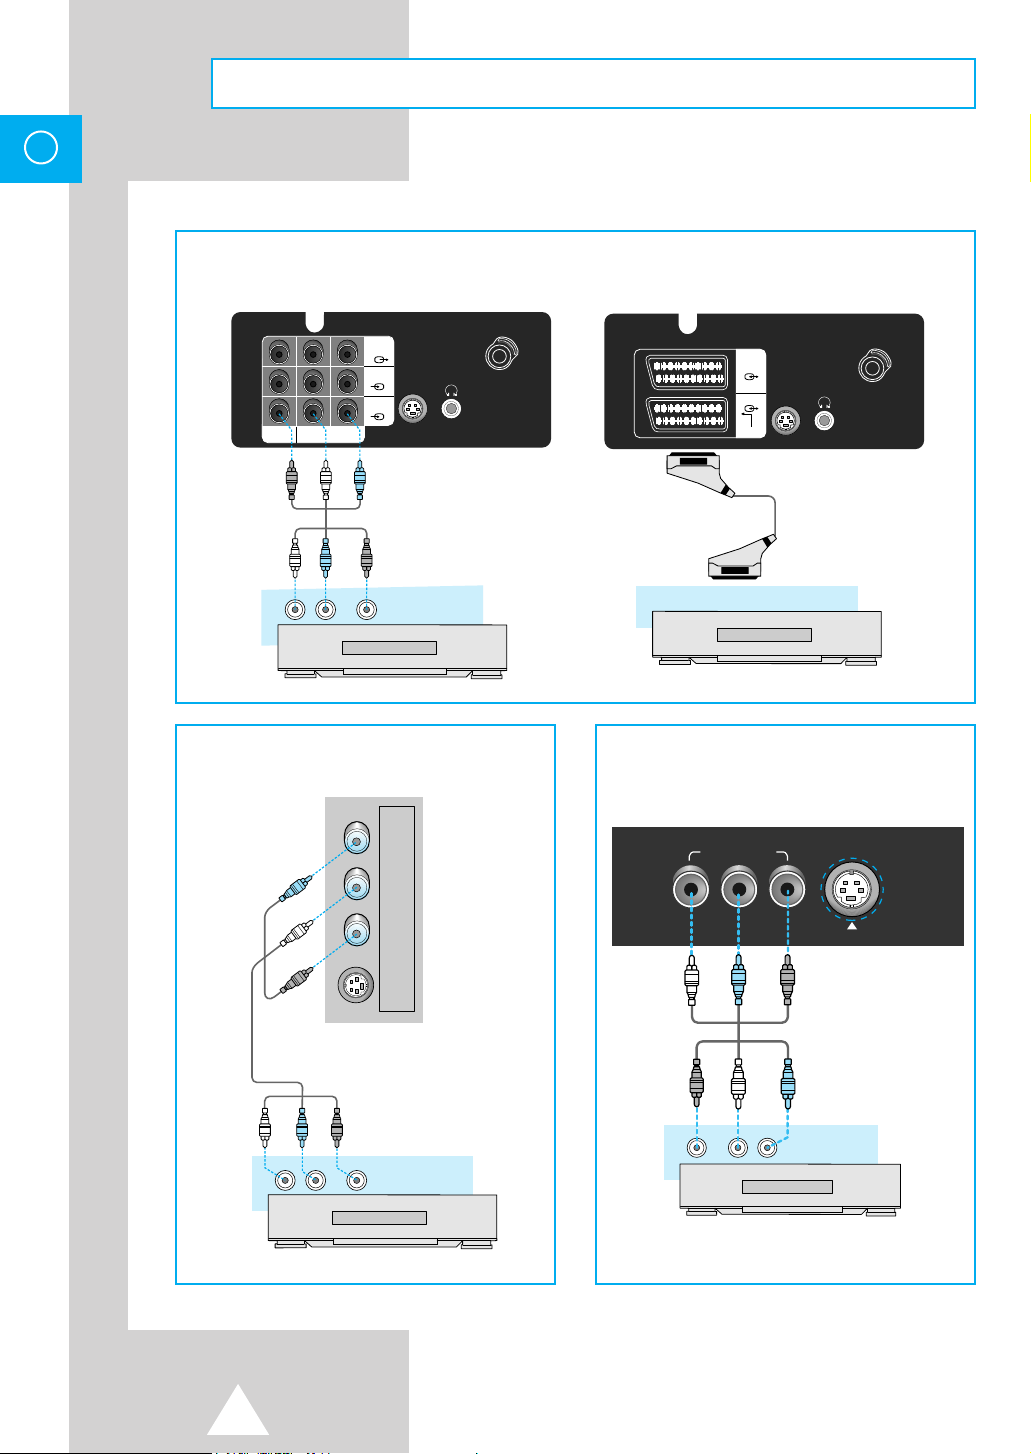
Video Connections
Rear of TV (Option)
MONITOR
VIDEO
(L)
(
)
MONO
L-AUDIO-R
AUDIO OUT
-OUT
AV-2
AV-1
VIDEO OUT
(R)
S-VIDEO1
VCR
WIRELESS
HEADPHONE
Side of TV (SP434/SP524)
R
I
AUDIO
I
L
(MONO)
VIDEO3
INPUT
75Ω
VHF/UHF
75Ω
AV-2
AV-1
RGB
S-VIDEO1
WIRELESS
HEADPHONE
VHF/UHF
VCR
Front of TV (SP521)
VIDEO IN 3
VIDEO(MONO) L-AUDIO-R
S-VIDEO 2
INPUT
S-VIDEO2
INPUT
AUDIO OUT
VIDEO OUT
(L)
AUDIO OUT
VIDEO OUT
(R)
(L)
VCR
(R)
VCR
8

Video Connections (cont.)
1 Connect an optional AUDIO/VIDEO cable from the VIDEO OUT jack on the rear of the VCR to the VIDEO IN jack on
the rear of the TV.
2 Connect another optional audio/video cable from the AUDIO OUT jacks on the rear of the VCR to the AUDIO IN jacks
on the rear of the TV.
◆ If you have a VCR with 21 pin scart jack, connect scart cable to the rear of TV (Option).
3 Press the TV/VIDEO button to select “AV”.
◆ As you press the button, TV, AV1, AV2, AV3, S-VIDEO1, and S-VIDEO2 are repeated alternately.
TV ➞S-VIDEO1 ➞S-VIDEO2 ➞AV1 ➞AV2 ➞AV3
➞
4 Playback a tape in the VCR.
(See owner’s Manual for VCR)
Self Checkup Function
☛
if connected
ENG
◆
When all front and rear jack of this TV are disconnected, the video mode changes as
below.
TV
➞
AV3
(When only AV1 Jack is connected)
TV
➞
AV1
➞
TV/Video Selection
☛
◆
Press the TV/VIDEO button repeatedly to select the desired input.
◆
Whenever the TV/VIDEO button is pressed, the mode changes as below.
TV
➞
S-VIDEO1 ➞ S-VIDEO2
➞
AV3 AV2 AV1
(when all input jacks are connected)
◆
➣
When video mode is selected and that AV mode has no input picture signal, the
background colour of the TV screen will change to blue regardless of whether the BLUESCREEN function is set.
◆
Teletext displays on screen will not be output at the Monitor output terminal and Scart
output terminal.
◆ AV mode isn’t selected when VCR wasn’t operating, so you must check VCR status before
selecting AV mode.
➞
➞➞
9

ENG
S-VIDEO Connections
Rear of TV (Option)
MONITOR
-OUT
(R)
S-VIDEO1
VCR
WIRELESS
HEADPHONE
VIDEO
S-VIDEO OUT
(
MONO
)
L-AUDIO-R
AUDIO OUT
(L)
AV-2
AV-1
Side of TV (SP434/SP524)
R
I
AUDIO
I
L
(MONO)
VIDEO3
INPUT
75‰
VHF/UHF
75‰
AV-2
AV-1
RGB
S-VIDEO OUT
S-VIDEO1
WIRELESS
HEADPHONE
VHF/UHF
VCR
Front of TV (SP521)
VIDEO IN 3
VIDEO(MONO) L-AUDIO-R
S-VIDEO 2
INPUT
10
S-VIDEO OUT
(L)
AUDIO OUT
S-VIDEO2
INPUT
AUDIO OUT
(R)
VCR
S-VIDEO OUT
(L)
(R)
VCR
S-VIDEO Connections (cont.)
1 Connect an optional S-VIDEO cable from the S-VIDEO OUT jack on the rear of the VCR to the S-VIDEO IN jack on
the rear of the TV.
2 Connect an optional AUDIO/VIDEO cable from the AUDIO OUT jacks on the rear of the VCR to the AUDIO IN jacks
on the rear of the TV.
3 Press the TV/VIDEO button to select “S-VIDEO”.
◆ As you press the button, TV, S-VIDEO1 and S-VIDEO2 are repeated alternately.
TV ➞S-VIDEO1➞S-VIDEO2
➞
(if all S-VIDEO inputs are connected)
4 Playback a tape in the VCR (See owner’s Manual for VCR)
ENG
◆ You can enjoy a more clear and distinct picture if you connect cable to S-
➣
case of playing high quality Video.
◆ For video signal in Colour System SECAM, connect to the video terminal because there
is no standard on S-
VIDEO
terminal.
VIDEO
Jack in
11
ENG
S-VIDEO1
VHF/UHF
75Ω
WIRELESS
HEADPHONE
MONITOR
-OUT
AV-2
VIDEO
AV-1
L-AUDIO-R
(
MONO
)
AUDIO
(AUX IN)
(R)
(L)
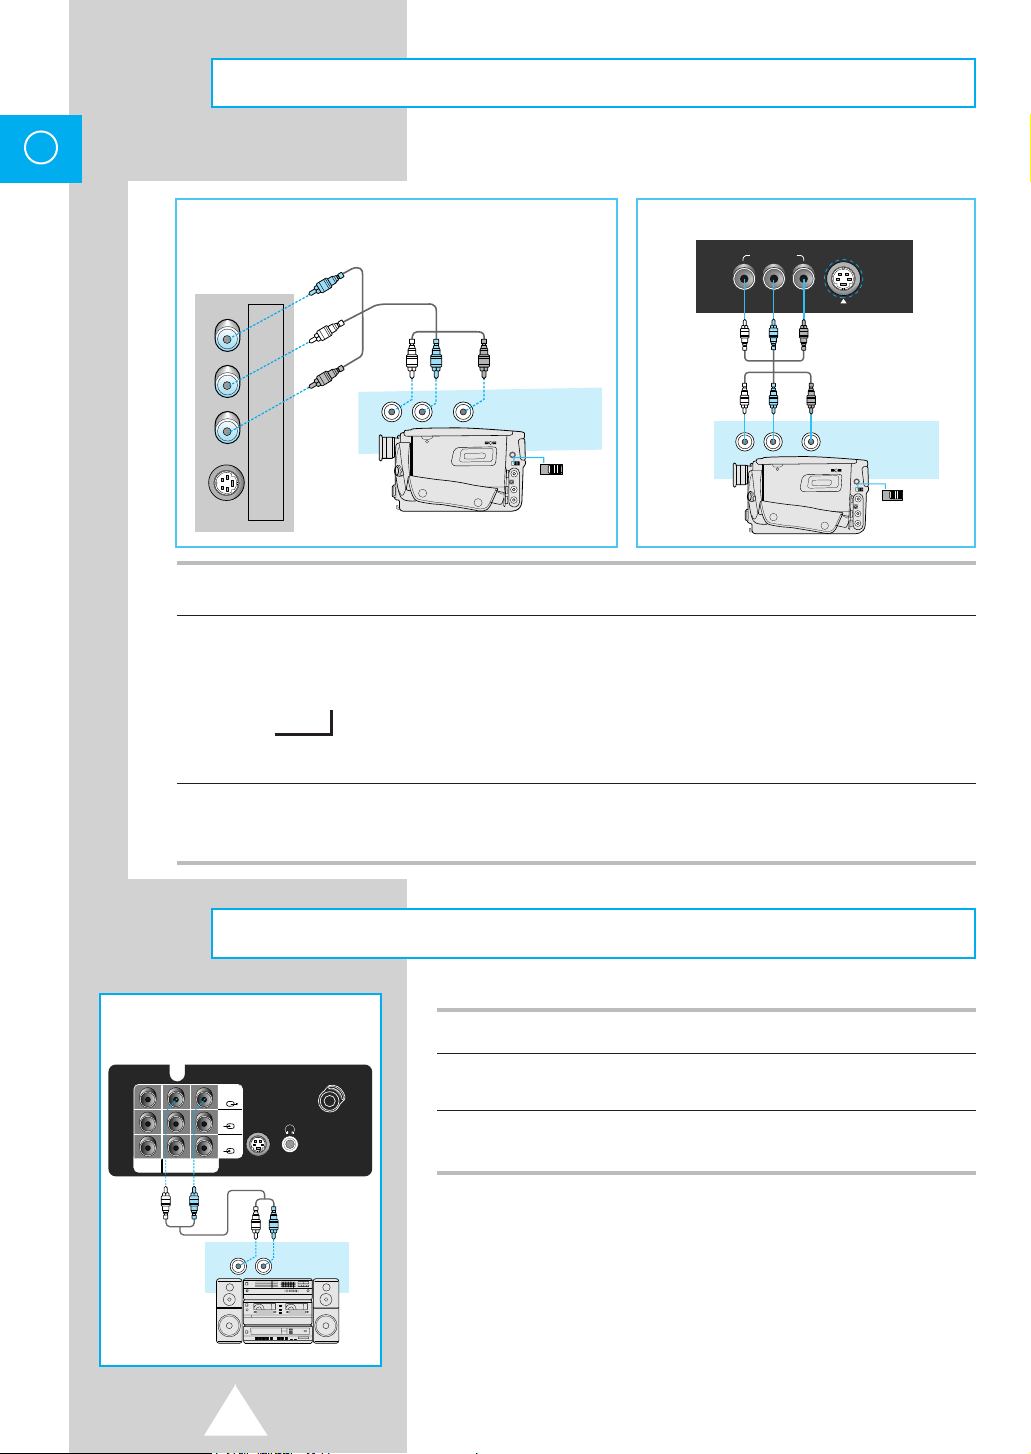
Camcorder Connections
Side of TV (SP434/SP524)
R
I
AUDIO
I
L
(MONO)
VIDEO3
INPUT
S-VIDEO2
INPUT
(L)
AUDIO OUT
VIDEO OUT
(R)
CAMCORDER
IN
OUT
IN OUT
Front of TV (SP521)
(L)
VIDEO IN 3
AUDIO OUT
VIDEO(MONO) L-AUDIO-R
VIDEO OUT
(R)
S-VIDEO 2
INPUT
CAMCORDER
IN
OUT
IN OUT
1 Connect an optional audio/video cable from the VIDEO OUT jack on the camcorder to the VIDEO IN jack on the
front of the TV.
2 Press the TV/VIDEO button to select “AV3”.
◆ As you press the button TV, AV1, AV2 (S-VIDEO) and AV3 are repeated alternately.
TV ➞AV3
➞
if, only AV3 input was connected.
3 Slide the VIDEO IN/OUT switch to OUT.
Rear of TV (Option)
◆ Play back a tape in the camcorder.
(see owner’s manual for camcorder.)
Audio Connections
1 Adjust the volume of the TV to minimum.
2 Connect an optional audio/video cable from the Audio out jacks on the rear
3 Position the INPUT SELECTION switch on the audio to AUX and adjust
➣
of the TV to the AUDIO IN jacks on the AUDIO.
the volume.
◆ You can hear a more vivid stereo sound through an
audio system.
◆ It may be convenient for you, if you connect together
the jacks using the following colour code.
(Video:Yellow, Audio(left): White, Audio(right): Red)
12
 Loading...