

Page 1
SMT-i5210 Quick Reference Guide
Version 1.2 May 2015
SCM Default Feature Codes
While the most frequently used features appear as dedicated buttons on your phone, there are a
host of additional features that can be used by dialing the default codes listed in the table below.
Some feature codes require an extension, group number or orbit number. When using these
codes, replace the letter X with the appropriate digits. For example; to pick up a ringing call at
extension 2205, us the Direct Call Pickup code *0X# where X is 2205. User dials *02205#
Feature
Code
Feature
Code
All Feature Clear
*99#
Call Park Extension
*11#
Auto Answer Mode - Cancel
*430#
Call Park Orbit
*10X#
Auto Answer Mode - Set
*431#
Conference
*89#
Auto Retry of Busy Number - Cancel
*170#
Conference on Answer
*81X#
Auto Retry of Busy Number - Set
*171#
Direct Call Pickup
*0X#
Barge-In with Tone
*23X#
DND - Cancel
*400#
Barge-In without Tone
*24X#
DND - Set
*401#
Callback - Cancel
*160#
DND Override
*25#
Callback - Set
*161#
Group Call Pickup
**#
Call Forward All - Cancel
*610#
Group Call Forward - Cancel
*680X#
Call Forward All - Set
*611X#
Group Call Forward - Set
*681X#
Call Forward Busy - Cancel
*620#
In/Out of Hunt Group - In
*531X#
Call Forward Busy - Set
*621X#
In/Out of Hunt Group - Out
*530#
Call Forward Busy/No Answer - Cancel
*640#
Station Paging
*55#
Call Forward Busy/No Answer - Set
*641X#
Voice Mail Access
*88#
Call Forward No Answer - Cancel
*630#
Voice Mail Memo
##
Call Forward No Answer - Set
*631X#
Voice Mail Transfer
*87#
Call Forward Clear All
*60#
Note: The system administrator may have set your system up so users do not need to
dial the #. If so you can ignore the # in the code.
Condition
Phone Status Indicator
Busy
Steady RED
Ringing
Flashing RED
Voice
Message
Flashing GREEN
SMT-i5210 IP Phone Quick Reference Guide
For more information on your phone settings and features see the SMT-i5210 User Guide
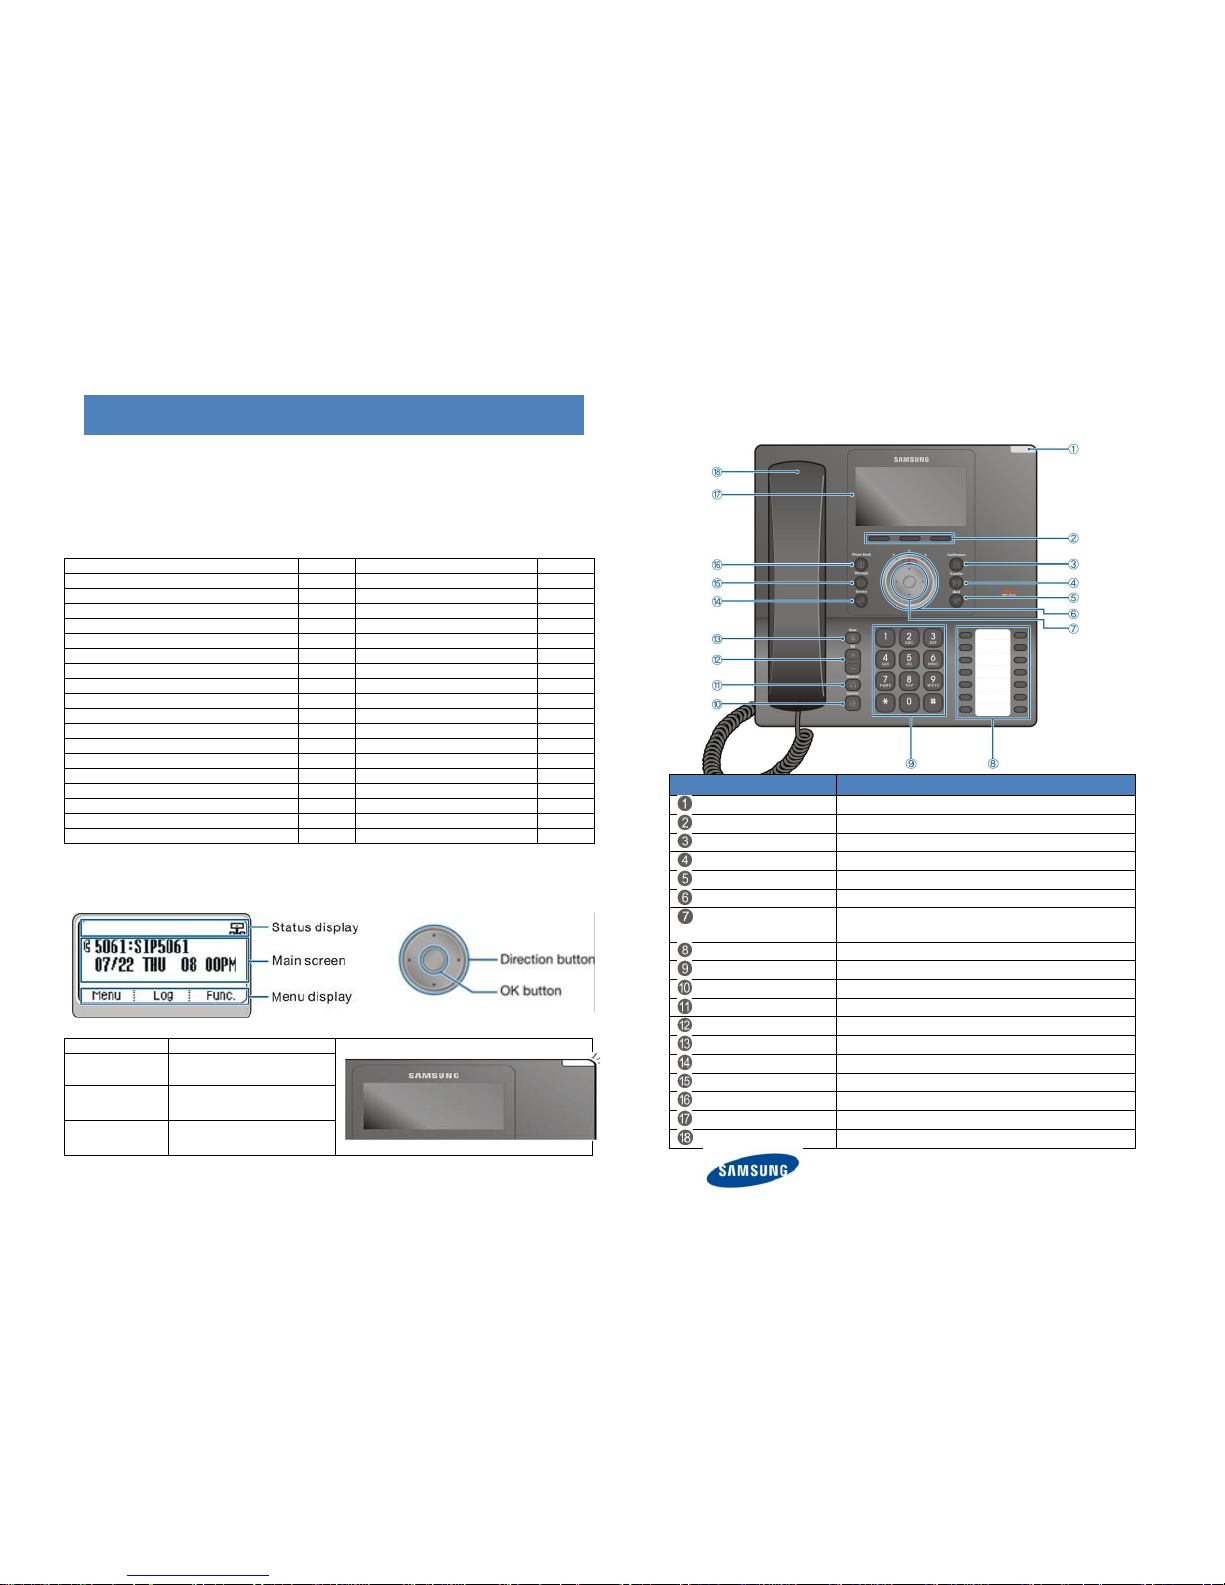
Name
Function
Phone status indicator
Shows the phone’s status
Soft button
Selects function from the LCD soft menus
Conference button
Makes a conference call
Transfer button
Transfer calls
Hold button
Holds a call temporarily without hanging up
UC dial
L> Call Forward C>idle position R >DND
Navigation Ring &
OK Button
Move Left/Right/Up/Down in the display
Press center OK button to make a selection
14 Programmable buttons
Can assign various features with LED indication
Dial button
Enters numbers and characters
Speaker button
Toggles the Speaker on or off
Headset button
Toggles the Headset on or off
Volume button
Set Volume for Ringing, Handset, Speaker
Mute button
Toggles the microphone on or off
Service button
Displays the UC service menus
Message button
Displays the message menu
Phonebook button
Displays phone book lists
LCD screen
Shows call info, menus and status icons
Handset
Use for private conservations
SCM Samsung Communication Manager
SCM Default Feature Codes
Page 2

SMT-i5210 Quick Reference Guide
Version 1.2 May 2015
Answering a Call
Pick up the Handset or press the Speaker button to use the speakerphone
Making an outside call (local or long distance)
Pick up the Handset or press the Speaker button to use the speakerphone
Dial 9 plus the 10/11 digit telephone number
To hang up, replace the handset, or press END soft-key or press the Speaker button
Making an internal call (intercom)
Pick up the Handset or press the Speaker button to use the speakerphone
Dial the extension number or group number
To hang up, replace the handset, or press END soft-key or press the Speaker button
Using the Hold feature
Press the Hold button or HOLD soft-key.
To retrieve a call from hold, press Hold button or RESUME soft-key or press the flashing
green Call button
Transfer a call (Blind Transfer)
Press the Transfer button while on a call (this will place the call on hold)
Dial the extension number you would like to transfer to.
Press Transfer again or simply hang up to complete the transfer.
Transfer a call (Screened Transfer)
Press the Transfer button while on a call (this will place the call on hold)
Dial the extension number you would like to transfer to
When they answer speak privately.
Press Transfer again or simply hang up to complete the transfer
Making Conference Calls
Call the first person (internal or outside number) you would like to conference with
When connected, press the Conference button, then dial the second internal or outside
number
Once the second person answers, press Conference button again
Now everyone is joined together
Repeat to continue adding up to 3 additional parties. (max 5, you plus 4 others)
If the party you dialed is unavailable, press CANCEL soft-key to disconnect and return to
the conference
Do Not Disturb
Dial *401# to set, dial *400# to cancel
Call Forwarding
Press [Menu] scroll to Call Forward/DND
Scroll to call forward type then select by pressing the OK button
Change the Mode to Enable or Disable as desired
Type the number to forward to (EX: 9+telephone number or extension number)
Press [Save] [OK] [END]
Setting up your Voice Mail Box
Dial your extension.
When prompted, enter your password (The default password is 0000).
The following options can be used when inside the voice mail menu:
Dial [#][7] for Personal Administration Menu
o Dial [1] to assign a new password (1 ~ 8 digits)
o Dial [2] to record your name (speak your name)
o Dial [3] to enter Your Dial-By-Name for the system Directory.(use dial pad)
Dial [#][5] for Personal Greetings Menu
o Dial [1] to record your Primary No Answer Greeting
o Dial [7] to record your Mailbox Greeting
Retrieving message from your Voice Mail Box
Press the Message button
Voice Mail option will display the number of messages [0]
Scroll to Voice Mail and select by pressing the OK button
Use options in the phone display or follow voice mail prompts
Mute Handset or Microphone
Press the Mute button while using the handset to mute your voice
Press the Mute button while using the speakerphone to mute the microphone
Assign a Programmable Key (Button)
Press an unassigned key or press and hold an assigned key for 3 seconds.
Unassigned Key Display Shows: [Programmable Key] Press the OK button.
Assigned Key Display Shows: [Current Assigned Key]
Cursor L or R to change Mode to Enable.
Move down then cursor L or Right to select key type. AME Enable is the first choice.
Move down to Name, then use the dial pad to enter characters.
Some keys require a value, like Ext. or Tel. number. If required, move down to Value,
then use the dial pad to enter the numbers.
Move down to Line, then cursor L or R to select the Line number you want to assign this
key to. You may have one or more lines assigned to your phone.
Press Save to complete the process. Then press the soft key showing OK.
 Loading...