

Page 1

User Guide
[Sprint UG template version 15b]
Sprint_Samsung_T237P_UG_EN_102715_FINAL
Page 2

Table of Contents
Get Started 1 ....................................................................................................................................................
13
Your Tablet at a Glance
Set Up Your Tablet ................................................................................................................................
Turn Your Tablet On .....................................................................................................................
Activate Your Tablet ..............................................................................................................................
Complete the Setup ..............................................................................................................................4
Tablet Basics .................................................................................................................................................5
Your Tablet’s Layout
Key Functions ...............................................................................................................................5
Turn Your Tablet On and Off ................................................................................................................6
Turn Your Screen On and Off ...............................................................................................................6
Touchscreen Navigation .......................................................................................................................7
Your Home Screen ..............................................................................................................................13
Create Shortcuts .........................................................................................................................
Add and Remove Widgets ..........................................................................................................13
Extended Home Screens ............................................................................................................14
........................................................................................................................
.............................................................................................................................5
1
1
3
3
Recent Apps................................................................................................................................14
Wallpapers ..................................................................................................................................14
Status Bar ...................................................................................................................................14
Notification Panel ................................................................................................................................16
Quick Settings .............................................................................................................................17
Multi Window .......................................................................................................................................18
Enable Multi Window ..................................................................................................................18
Display Multi Window ..................................................................................................................18
Using Multi Window ....................................................................................................................19
Customize the Multi Window Apps .............................................................................................
Features ..............................................................................................................................................20
Screen Capture ...........................................................................................................................20
Smart Screen ..............................................................................................................................20
Enter Text ............................................................................................................................................21
Touchscreen Keyboards .............................................................................................................21
Text Input Methods .....................................................................................................................21
Google Voice Typing ...................................................................................................................22
20
TOC
i
Page 3

Samsung Ke
yboard
....................................................................................................................
22
Swype .........................................................................................................................................23
Tips for Editing Text ....................................................................................................................
Contacts ......................................................................................................................................................
Get Started with Contacts ...................................................................................................................
Add a Contact .....................................................................................................................................
Edit a Contact ......................................................................................................................................
Add or Edit Information ...............................................................................................................
Assign a Photo to a Contact .......................................................................................................
Link a Contact .............................................................................................................................
Delete a Contact .........................................................................................................................27
Add Contacts to Your Favorites ..........................................................................................................27
Share a Contact ..................................................................................................................................27
Groups ................................................................................................................................................28
Accounts and Messaging ............................................................................................................................30
Google .................................................................................................................................................30
Create a Google Account ............................................................................................................30
Sign In to a Google Account .......................................................................................................30
24
25
25
25
26
26
26
27
Access Gmail ..............................................................................................................................30
Send a Gmail Message ...............................................................................................................31
Read and Reply to Gmail Messages ..........................................................................................31
Email ...................................................................................................................................................32
Add an Email Account .................................................................................................................32
Add a Microsoft Exchange ActiveSync Account .........................................................................32
Compose and Send Email ..........................................................................................................33
View and Reply to Email .............................................................................................................33
Manage Your Email Inbox ...........................................................................................................34
Edit Email Settings ......................................................................................................................
Remove an Email Account ..........................................................................................................
Samsung Account ...............................................................................................................................
Social Networking Accounts ...............................................................................................................
Facebook ....................................................................................................................................36
Google+ ......................................................................................................................................37
Hangouts .....................................................................................................................................37
YouTube ......................................................................................................................................37
35
36
36
36
Apps and Entertainment ..............................................................................................................................38
Google Play Store ...............................................................................................................................38
TOC
ii
Page 4

Find and I
Open an I
nstall an App
nstalled App
...............................................................................................................38
................................................................................................................38
Uninstall an
Google Play Books
Google Play Games
Google Play Newsstand
Google Play Movies &
Google Play Musi
Google Maps .......................................................................................................................................40
Music Player
NextRadio
Spotify
Sprint Music Plus
World Clock
Web and Data
Internet
Chrome
Data Services General Infor
.................................................................................................................................................41
.............................................................................................................................................43
................................................................................................................................................43
...............................................................................................................................................43
4G LTE
App
..........................................................................................................................39
..............................................................................................................................39
............................................................................................................................39
......................................................................................................................39
...................................................................................................................39
TV
c ..............................................................................................................................40
........................................................................................................................................40
...........................................................................................................................................41
................................................................................................................................41
.........................................................................................................................................42
mation (Sprint 4G LTE and 3G Networks)
........................................................................................................................................43
.............................................43
Your User Name
Data Connect
Wi-Fi
....................................................................................................................................................44
Turn Wi-Fi on
Wi-Fi Direct
Bluetooth .............................................................................................................................................46
Turn Bluetooth On or Off
Pair with a Bluetooth Device
Reconnect to a Bluetooth Device
Disconnect or Unpair from a Bluetooth
Send Information Using B
Receive Information Using
Virtual Private Networks (
Prepare Your Tablet for VPN Connection
Add a VPN
Connect to a
Memory Card ......................................................................................................................................50
.........................................................................................................................................46
.........................................................................................................................44
ion Status and Indicators ......................................................................................44
and Connect to a Wi-Fi Network
.............................................................................................................46
.......................................................................................................46
...............................................................................................47
Device
luetooth
Bluetooth
VPN) ...........................................................................................................49
..................................................................................................................................50
.......................................................................................................................50
VPN
..............................................................................................48
.........................................................................................49
..........................................................................45
...........................................................................47
...................................................................................49
Install a Mem
TOC
ory Card
.................................................................................................................50
iii
Page 5

Re
move
a Memor
y Card
............................................................................................................. 51
View the Memory Card’s Available Memory............................................................................... 52
Format a Memory Card...............................................................................................................
Unmount a Memory Card............................................................................................................
Camera and Video......................................................................................................................................
Camera ...............................................................................................................................................
Take Pictures..............................................................................................................................
Record Videos ............................................................................................................................
Camera Settings.........................................................................................................................
Gallery.................................................................................................................................................
View Photos and Videos.............................................................................................................
Zoom In or Out on a Photo......................................................................................................... 58
Working with Photos................................................................................................................... 58
Share Photos and Videos...........................................................................................................
Video Player........................................................................................................................................
Tools and Calendar.....................................................................................................................................
Alarm...................................................................................................................................................
Calculator ............................................................................................................................................61
52
52
53
53
53
54
55
56
57
59
60
61
61
Calendar ..............................................................................................................................................62
Add an Event to the Calendar.....................................................................................................
Add a Task to the Calendar........................................................................................................
View Events................................................................................................................................
Delete Events.............................................................................................................................. 63
Drive.................................................................................................................................................... 64
Dropbox...............................................................................................................................................
Hancom Office 2014...........................................................................................................................
Google Search....................................................................................................................................
Google Settings...................................................................................................................................
Google Voice Search..........................................................................................................................
1Weather .............................................................................................................................................
BaconReader......................................................................................................................................
eBay....................................................................................................................................................
Help.....................................................................................................................................................
Lookout Security .................................................................................................................................
Memo.................................................................................................................................................. 67
62
63
63
64
65
65
65
65
66
66
66
66
66
68
iv
My Files ............................................................................................................................................... 67
NASCAR Mobile..................................................................................................................................
TOC
Page 6

Peel Smart
Remote
.............................................................................................................................
68
S Voice................................................................................................................................................
Samsung Apps....................................................................................................................................
Sprint Zone
Transfer Files Between Your Tablet and
Settings
Settings Tabs......................................................................................................................................
Wi-Fi Settings......................................................................................................................................
Hotspot................................................................................................................................................
Bluetooth Settings...............................................................................................................................
Tethering.............................................................................................................................................
Airplane Mode.....................................................................................................................................
Data Usage Settings...........................................................................................................................
Location Settings.................................................................................................................................
More Networks....................................................................................................................................
..........................................................................................................................................
a Computer
.......................................................................................................................................................
Printing........................................................................................................................................
Mobile Networks .........................................................................................................................
VPN Settings...............................................................................................................................
........................................................................
68
69
69
69
71
71
71
72
73
73
74
74
75
76
76
77
77
Ethernet.......................................................................................................................................
Roaming......................................................................................................................................
Nearby Devices...................................................................................................................................
Screen Mirroring..................................................................................................................................
Sounds and Notifications....................................................................................................................
Volume........................................................................................................................................
Sound Mode................................................................................................................................
Notification Ringtone...................................................................................................................
Other Sounds..............................................................................................................................
Do Not Disturb ............................................................................................................................
Notifications on Lock Screen ......................................................................................................
Application Notifications..............................................................................................................
Adapt Sound...............................................................................................................................
Display Settings ..................................................................................................................................
Brightness...................................................................................................................................
Screen Timeout...........................................................................................................................
Daydream....................................................................................................................................
77
78
78
78
79
79
79
79
80
80
80
80
81
81
81
81
81
Auto Rotate Screen.....................................................................................................................
Show Battery Percentage...........................................................................................................
TOC
82
82
v
Page 7

Multi Window Settings
......................................................................................................................... 82
Lock Screen Settings .......................................................................................................................... 83
Wallpaper............................................................................................................................................
Font Style............................................................................................................................................
Notification Panel Settings..................................................................................................................
Accessibility Settings...........................................................................................................................
Language and Input Settings.............................................................................................................. 88
Configure Vision Accessibility
Configure Hearing Accessibility Settings....................................................................................
Configure Dexterity and Interaction Settings..............................................................................
Configure Other Accessibilit
Configure Accessibility S
Choose a Default Language....................................................................................................... 88
Default Input Method...................................................................................................................
Samsung Keyboard Settings......................................................................................................
Swype Settings...........................................................................................................................
Google Voice Typing Settings.....................................................................................................
Voice Input Settings....................................................................................................................
Settings
y Settings
ervices
.......................................................................................
........................................................................................
.................................................................................................
84
84
85
85
85
86
86
87
88
88
88
90
91
92
Text-to-Speech Options ..............................................................................................................
Pointer Speed.............................................................................................................................
Palm Motion Settings..........................................................................................................................
Smart Screen Settings ........................................................................................................................
Accounts Settings ............................................................................................................................... 93
Add an Account........................................................................................................................... 93
Cloud...................................................................................................................................................
Back Up and Reset Settings...............................................................................................................
Factory Data Reset.....................................................................................................................
Date and Time Settings ......................................................................................................................
Accessories.........................................................................................................................................
Application Manager...........................................................................................................................
Manage Applications...................................................................................................................
Running Services........................................................................................................................
Memory Use................................................................................................................................
Default Applications............................................................................................................................
Users................................................................................................................................................... 97
92
92
92
93
93
94
94
95
95
96
96
96
96
97
98
vi
Battery Settings................................................................................................................................... 98
Power Saving Mode............................................................................................................................
TOC
Page 8

Storage Settings..................................................................................................................................
99
Security Settings.................................................................................................................................
Device Administration.................................................................................................................
Encryption.................................................................................................................................
Make Passwords Visible...........................................................................................................
Security Update Service ...........................................................................................................101
Credential Storage
Advanced Security Sett
Activate This Device ..........................................................................................................................102
System Update Settings
About Device
Copyright Information
Intellectual Property
Open Source Software
Disclaimer of Warranties; Exclusion of Liability
Modification of Software
Samsung KNOX
Samsung Electronics America (SE
....................................................................................................................101
ings ......................................................................................................102
...................................................................................................................102
.....................................................................................................................................103
........................................................................................................................104
..................................................................................................................104
..............................................................................................................104
........................................................................104
............................................................................................................105
........................................................................................................................105
A), Inc.
...............................................................................105
99
99
100
100
Do you have questions about
Legal Information
For Assistance
Sprint Account Information and Help
Index..........................................................................................................................................................109
..........................................................................................................................................107
Sprint Account Passwo
Manage Your Account
......................................................................................................................106
..............................................................................................................108
your Samsung Mobile Device? .................................................105
................................................................................................107
rds
........................................................................................................107
TOC
vii
Page 9
Get Started
The following topics give you all the information you need to set up your tablet the first time.
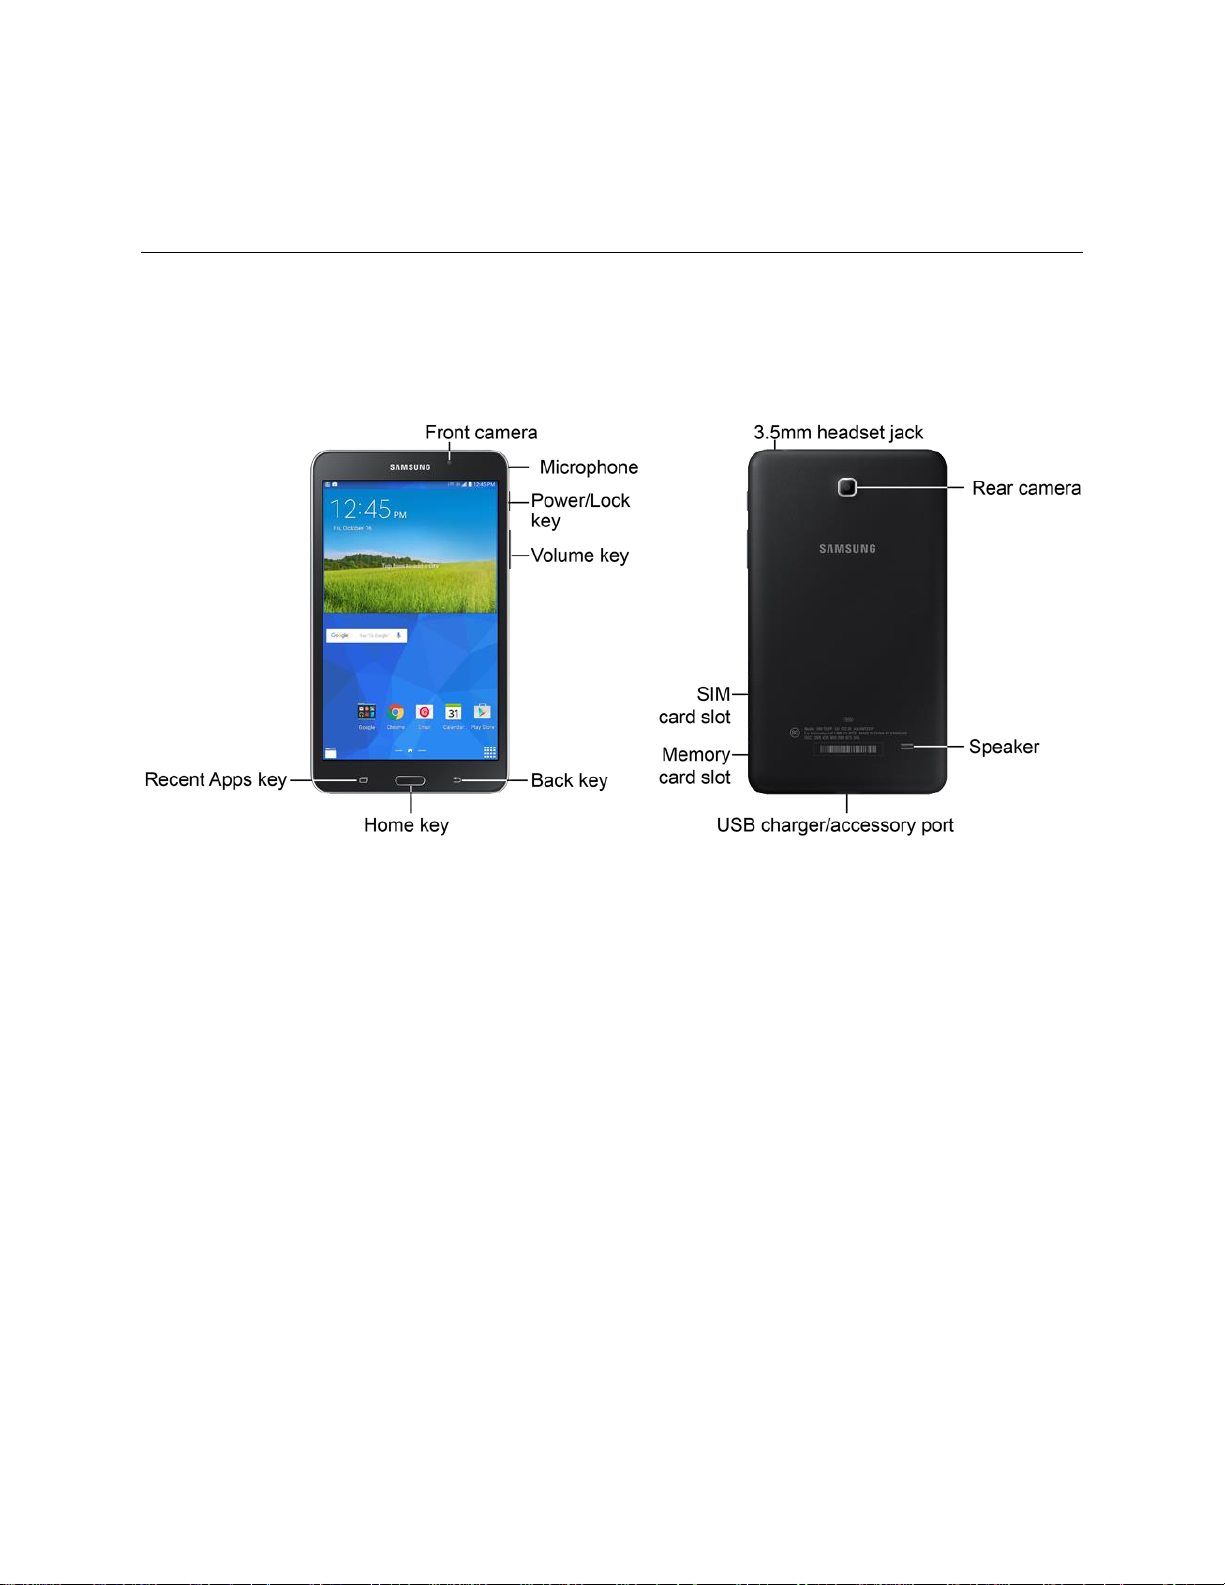
Your Tablet at a Glance
The following illustration outlines your tablet’s primary external features and buttons.
Set Up Your Tablet
Prior to using your new tablet, it is necessary to charge the battery. An optional microSD ™ memory card
(not included) can also be installed at this time.
SIM Card Information
Your tablet comes with a preinstalled SIM card for service with your Sprint account. If there is a need to
uninstall or reinstall the SIM card, follow the instructions below.
Important: Only perform SIM card maintenance if instructed to do so by a Sprint representative. The
preinstalled SIM card is required for Sprint service.
Use the following procedure to a SIM card in your tablet.
1. Open the SIM card slot cover and turn to expose the slot.
2. With the gold contacts facing down, carefully slide the SIM card into the slot, pushing gently until
it clicks into place.
Get Started
1
Page 10
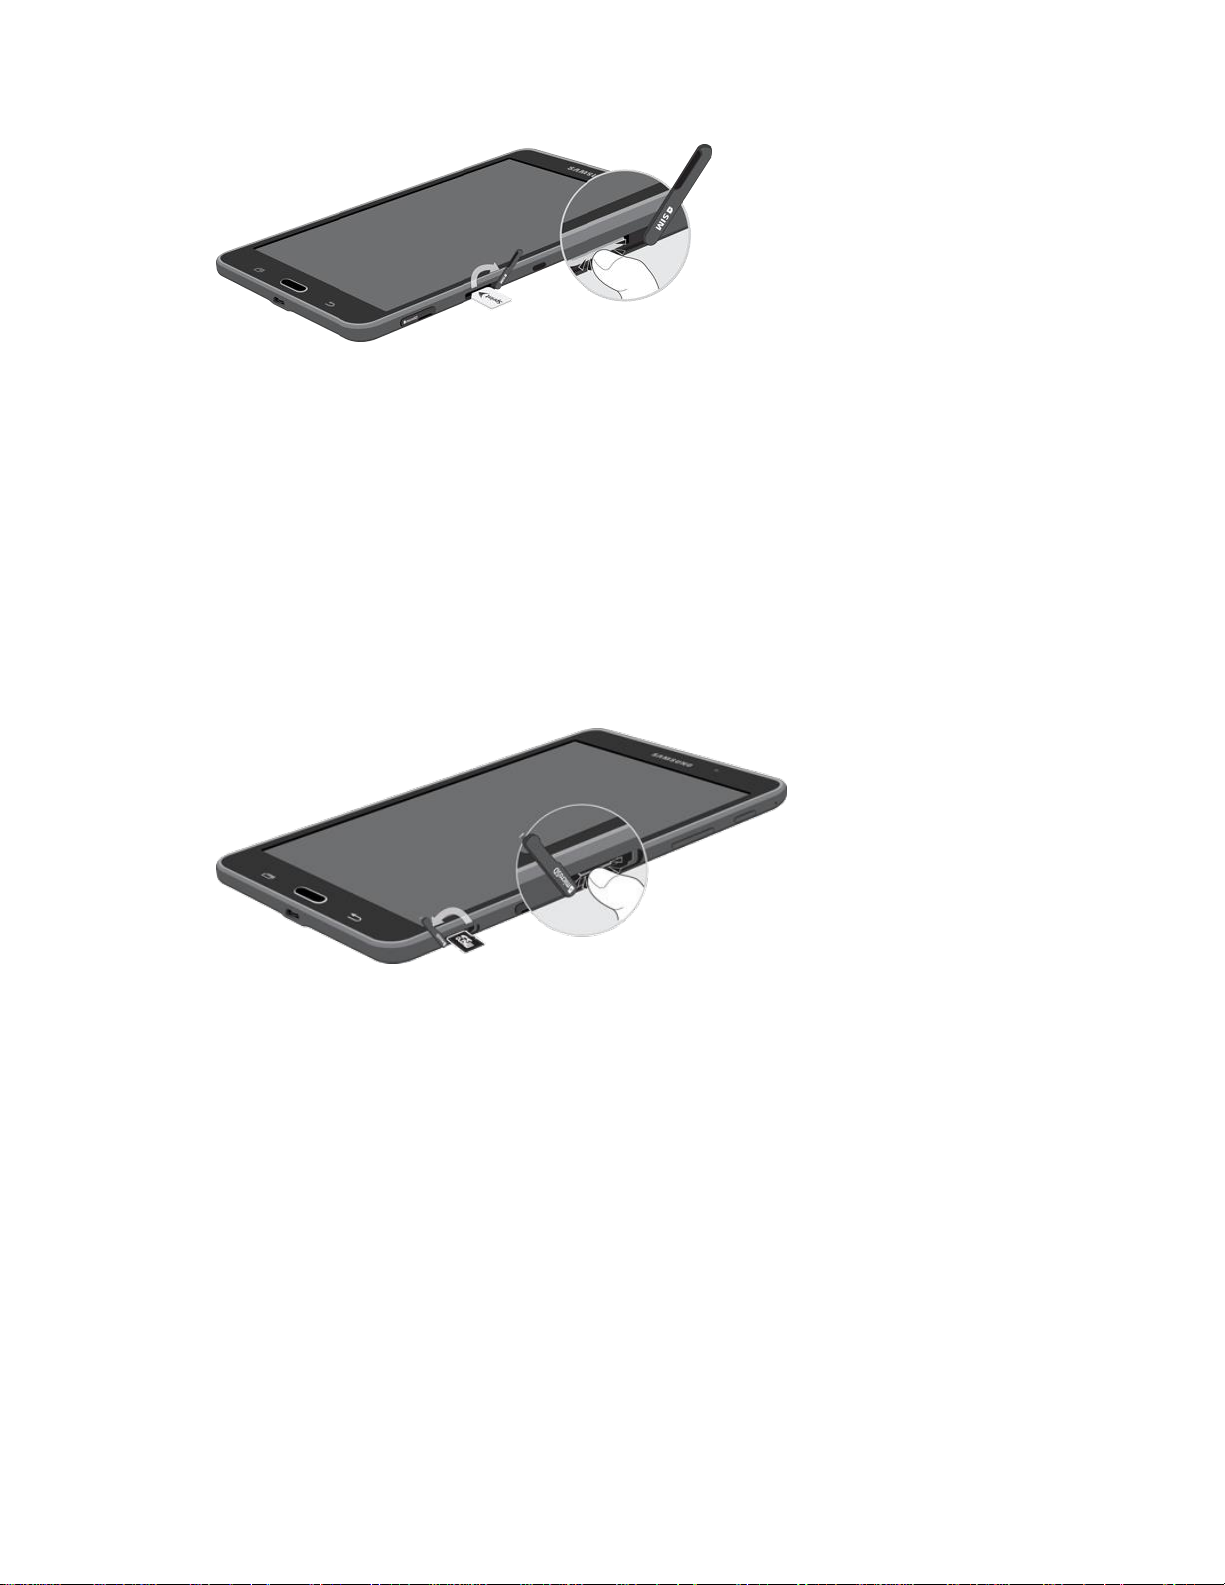
3. Replace the SIM card slot cover.
Important: You can
when inserting, removing, or handling it. Do not over-insert the card as this can damage the contact pins.
easily damage the SIM card and card slot by improper operation. Please be careful
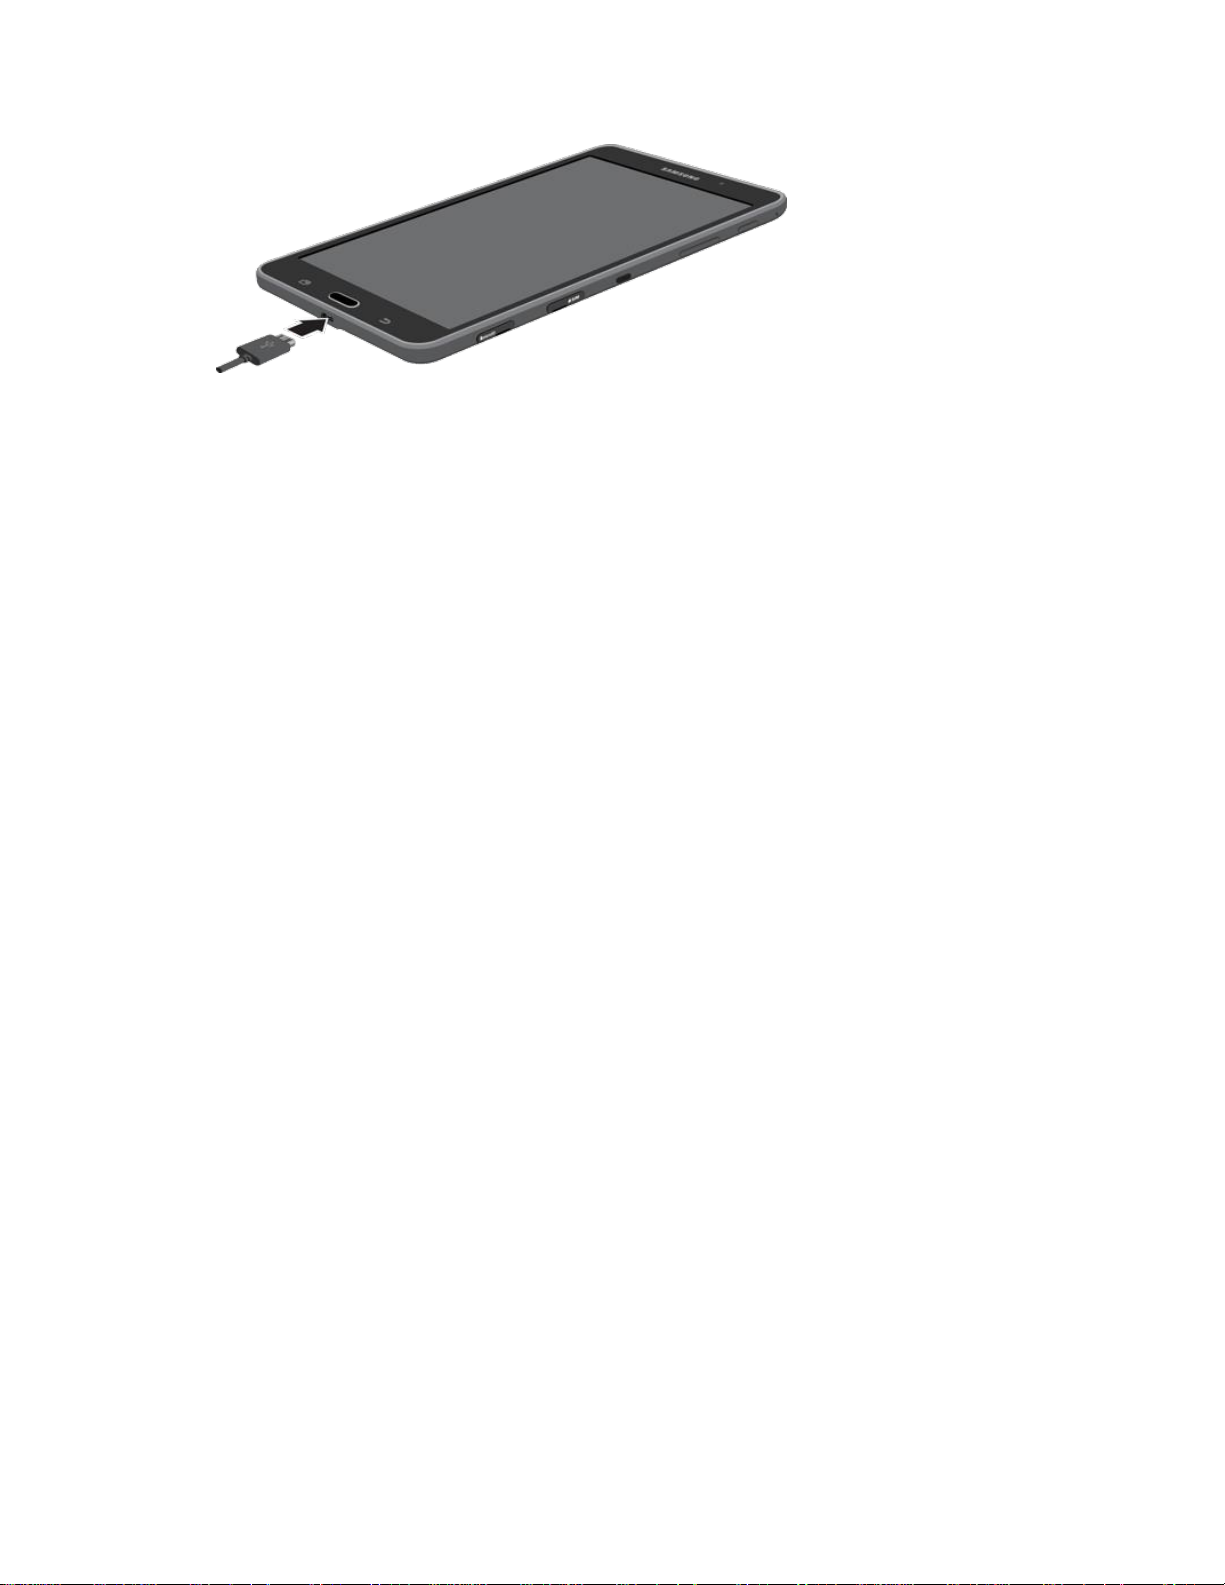
Install a Memory Card
Use the following procedure to install an optional memory card (not included) in your tablet. For more
information, see Storage Settings.
1. Open the microSD card slot cover and turn to expose the slot.
2. With the gold contacts facing down, carefully slide the memory card into the slot, pushing gently
until it clicks into place.
3. Replace the memory card slot cover
Important: You can easily damage the memory card and card slot by improper operation. Please be
careful when inserting, removing, or handling it. Do not over-insert the card as this can damage the
contact pins.
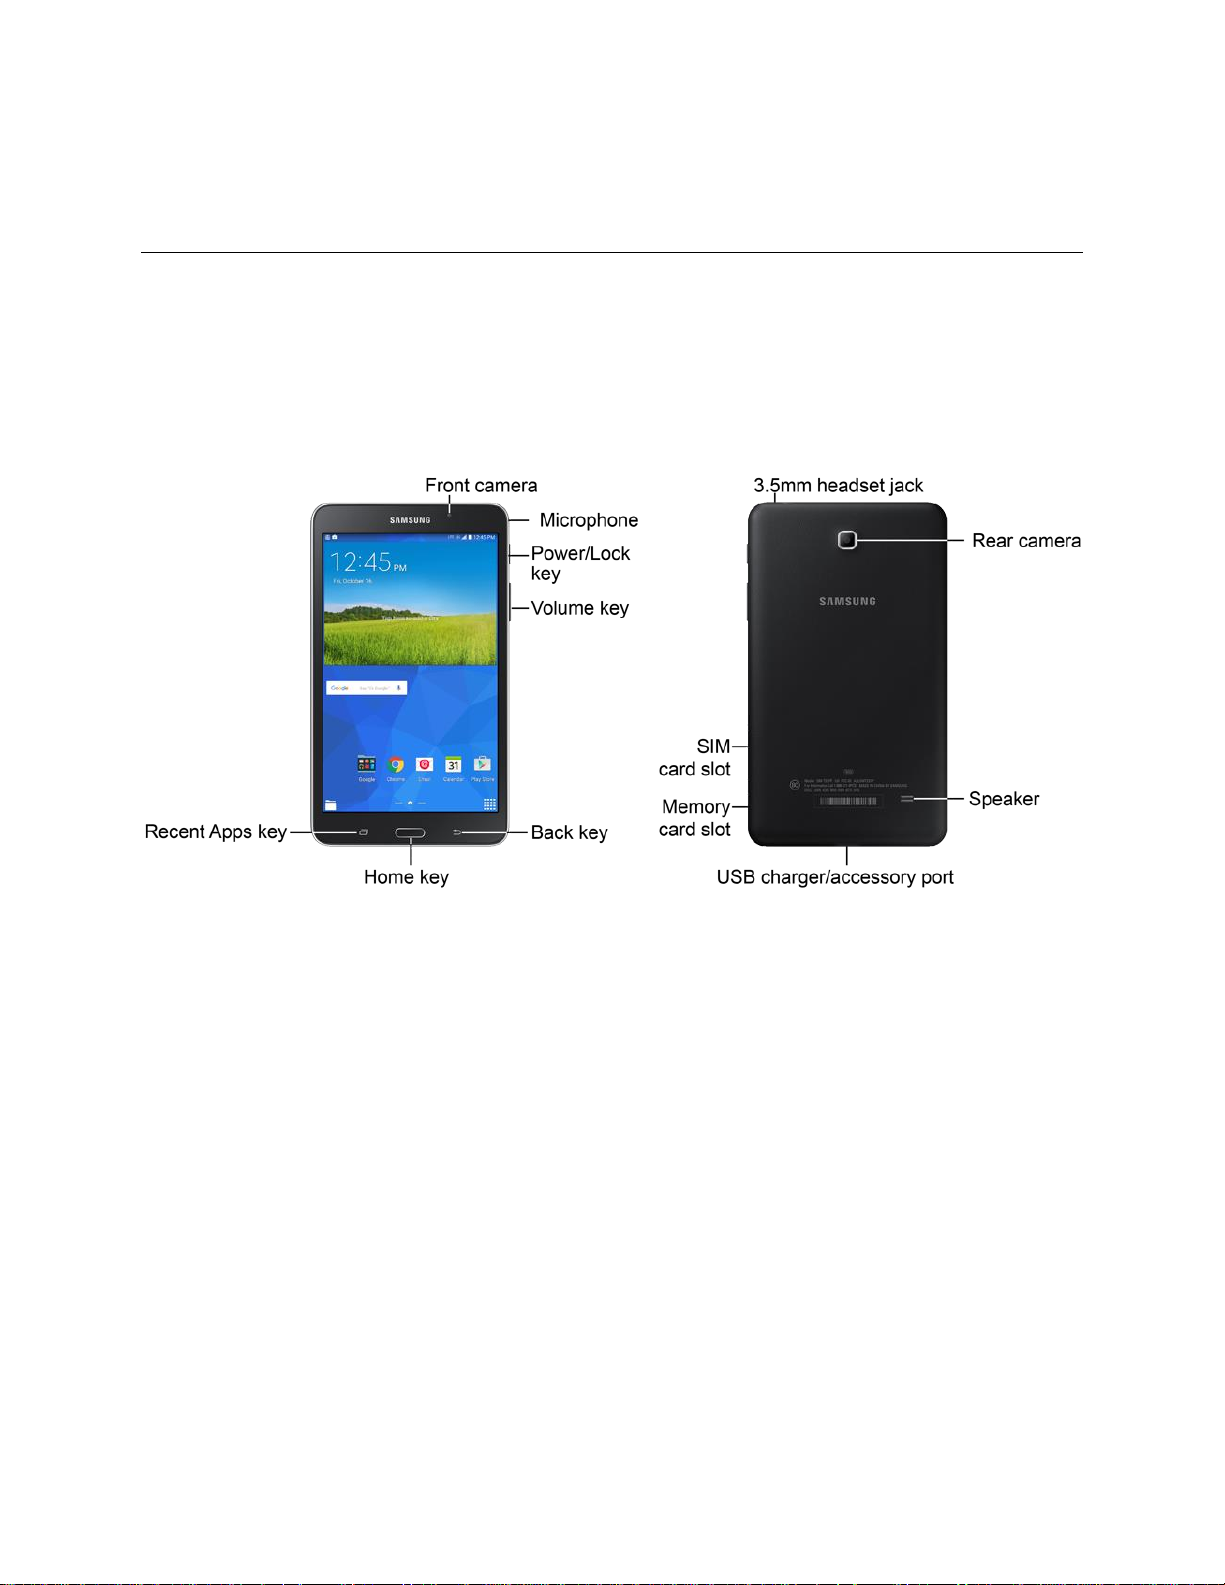
Charge the Battery
You will need to charge the battery before using your tablet.
1. Plug the USB cable into the USB Charger/Accessory Port on the bottom of the tablet.
Get Started
2
Page 11
2. Plug the USB cable into the charging head, and then plug the charging head into an electrical
outlet.
Turn Your Tablet On
Use the Power/Lock Key to turn your tablet on.
■ Press and hold the Power/Lock key to turn the tablet on.
If your tablet is activated, it will turn on, search for Sprint service, and begin the setup
application.
If your tablet is not yet activated, see Activate Your Tablet for more information.
Activate Your Tablet
Follow the instructions below to activate your tablet if it has not already been activated. Depending on
your account or how and where you purchased your tablet, it may be ready to use or you may need to
activate it on your Sprint account.
● If you purchased your tablet at a Sprint Store, it is probably activated and ready to use.
● If you received your tablet in the mail and it is for a new Sprint account or a new line of service, it
is designed to activate automatically.
When you turn the tablet on for the first time, you should see a Hands Free Activation
screen, which may be followed by a PRL Update screen and a Firmware Update screen.
Follow the instructions to continue.
● If you received your tablet in the mail and you are activating a new tablet for an existing number
on your account, you can activate on your computer online or directly on your tablet.
Activate on your computer:
Activate on your tablet:
Get Started
• Go to sprint.com/activate and complete the online instructions to activate your tablet.
• Turn on your new tablet. Your tablet will automatically attempt Hands Free Activation.
• Tap Activate to override auto-activation and start the manual activation wizard.
• Follow the prompts to complete the activation process.
3
Page 12

If your tablet is still
Internet, call Sprint Customer Service at 1-888-211-4727.
not activat
ed, visit sprint.com/support
for assistance. If you do not have access to the
Tip: Do
cancels the activation process.
Note: If you are having any difficulty with activation, visit sprint.com/support.
not press the Power/Lock key while the tablet is being activated. Pressing the Power/Lock key
Complete the Setup
After you turn on your tablet and activate it, your tablet displays a welcome screen. From the
welcome screen follow the prompts to set up features and preferences on your tablet.
Note: In some cases, you may be able to complete the setup process before your device has been
activated on your Sprint account.
During setup and activation, you may see Sprint Connections Optimizer notice. Read the notice and tap I
agree to use Sprint Connections Optimizer, or tap Settings and uncheck the option if you do not wish to
use the Sprint Connections Optimizer.
1. At the Welcome screen, follow the instructions to configure your tablet’s basic options, such as
language, date and time, Wi-Fi connections, location settings, etc.
Google Account: Many of your tablet’s applications, such as Gmail, Google Maps, Google
Talk, and the Google Play store, require a Google Account. To use these applications, you
must set up your Google Account on your tablet. Complete the steps to sign in to your current
Google Account, or sign up for a new Google Account.
Samsung Account: Your Samsung Account is used for access to Samsung apps and
services, such as Samsung Hub, Samsung Apps, Samsung Link, and much more.
Complete the steps to sign in to your current Samsung Account, or sign up for a new
Samsung Account.
2. Tap Finish to complete setup.
Get Started
4
Page 13
Tablet Basics
Your tablet is packed with features that simplify your life and expand your ability to stay connected to the
people and information that are important to you. The following topics will introduce the basic functions
and features of your tablet.
Your Tablet’s Layout
The following illustration outlines your tablet’s basic layout.
Key Functions
The following list defines the features listed in the above illustrations.
● Front camera allows you to take pictures and videos of yourself.
● Microphone records voice and other sounds.
● Power/Lock key lets you turn the device on or off, turn the screen on or off, or lock the screen.
Press and hold for a Device options menu, where you can turn the tablet off or restart it, or for
easy access to Airplane mode, and to Mute and Sound modes.
●
●
●
●
ume key adjusts
Vol
master volume.
Ba
ck key lets you
notification panel, or keyboard.
Home key returns
Task Manager and Google Now.
cent Apps key displays
Re
the volume of your tablet’s sounds. From the home screen, press to adjust
return to the previous screen, or close a dialog box, options menu, the
you to the home screen. Press and hold to see recent apps, and access
apps you have.
5
Tablet Basics
Page 14

● 3.5 mm Headset Jack allows you t
● Rear camera lets you take pictures and record videos.
o plug in an optional headset.
●
Speaker pl
USB ch
●
optional accessories (not included).
Memor
●
SI
●
M card slot stores the tablet’s
CAUTION: Inserting an accessory into the incorrect jack may damage the tablet.
ays notification tones and sou
arger/accessory port allows y
y card slot uses microS
D to add additional storage to your tablet.
preinstalled SIM card.
nds.
ou to connect the charger/USB cable (included) and other
Turn Your Tablet On and Off
The instructions below explain how to turn your tablet on and off.
Turn Your Tablet on
■ Press and hold the Power/Lock key.
Turn Your Tablet off
1. Press and hold the Power/Lock key to open the Device options menu.
2.
Tap Po
the battery is charging).
wer off to turn t
he tablet off. Your screen remains blank while your tablet is off (unless
Turn Your Screen On and Off
Your tablet allows you to quickly turn the screen off when not in use and to turn it back on and unlock it
when you need it.
Turn the Screen Off When Not in Use
■ To quickly turn the screen off, press the Power/Lock key.
To save battery power, the tablet automatically turns off the screen after a certain period of time when
you leave it idle. You will still be able to receive messages while the tablet’s screen is off.
Note: For information on how to adjust the time before the screen turns off, see
Turn the Screen On and Unlock It
3. To turn the screen on, press the Power/Lock key.
Swipe t
4.
he screen in any direction to unlock the screen.
you have set up a screen lock, you will be prompted to draw the pattern or enter the
If
passwor
d or PIN. For more information, see Lock Screen.
Screen T
imeout
.
Tablet Basi
cs
6
Page 15
Touchscreen Navigation
Your tablet’s touchscreen lets you control actions through a variety of gestures.
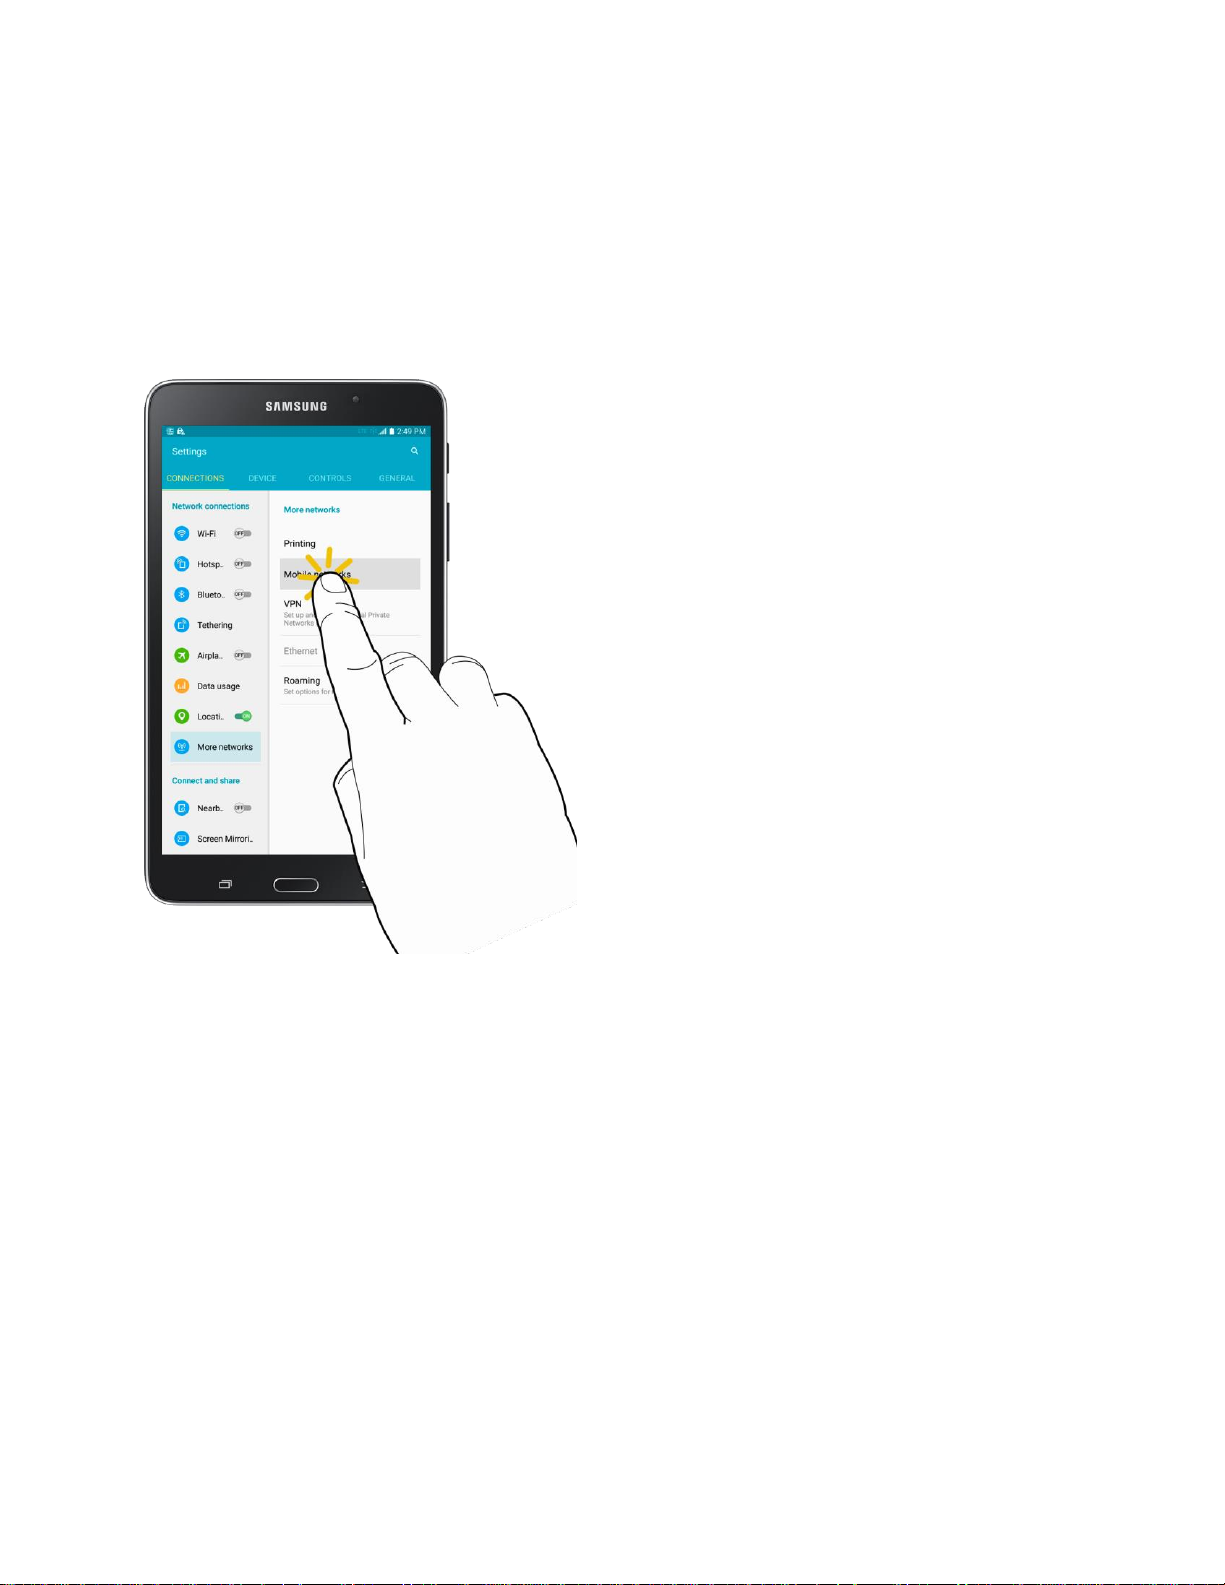
Tap
When you want to type using the keyboard, select items such as application and settings icons, or press
buttons, simply tap them with your finger.
7
Tablet Basics
Page 16
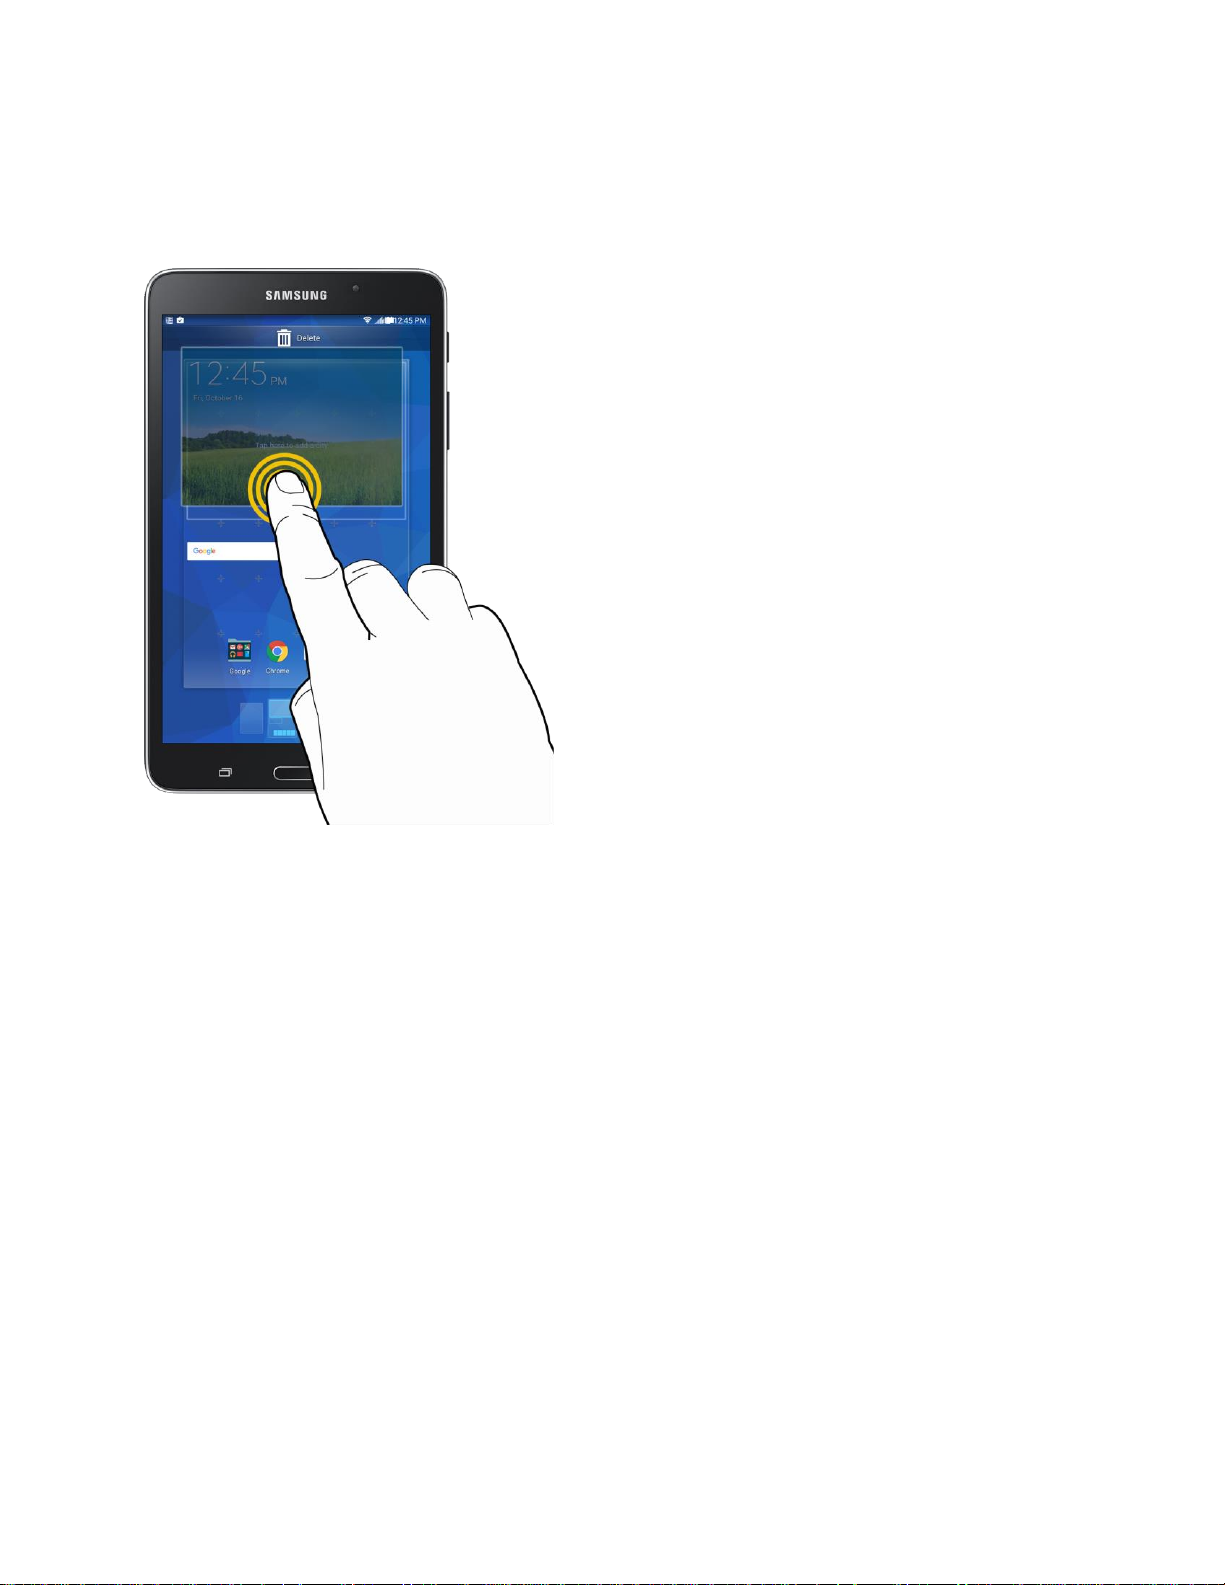
Touch and Hold
To open the available options for an item (for example, a contact or link in a Web page), touch and hold
the item.
8
Tablet Basics
Page 17
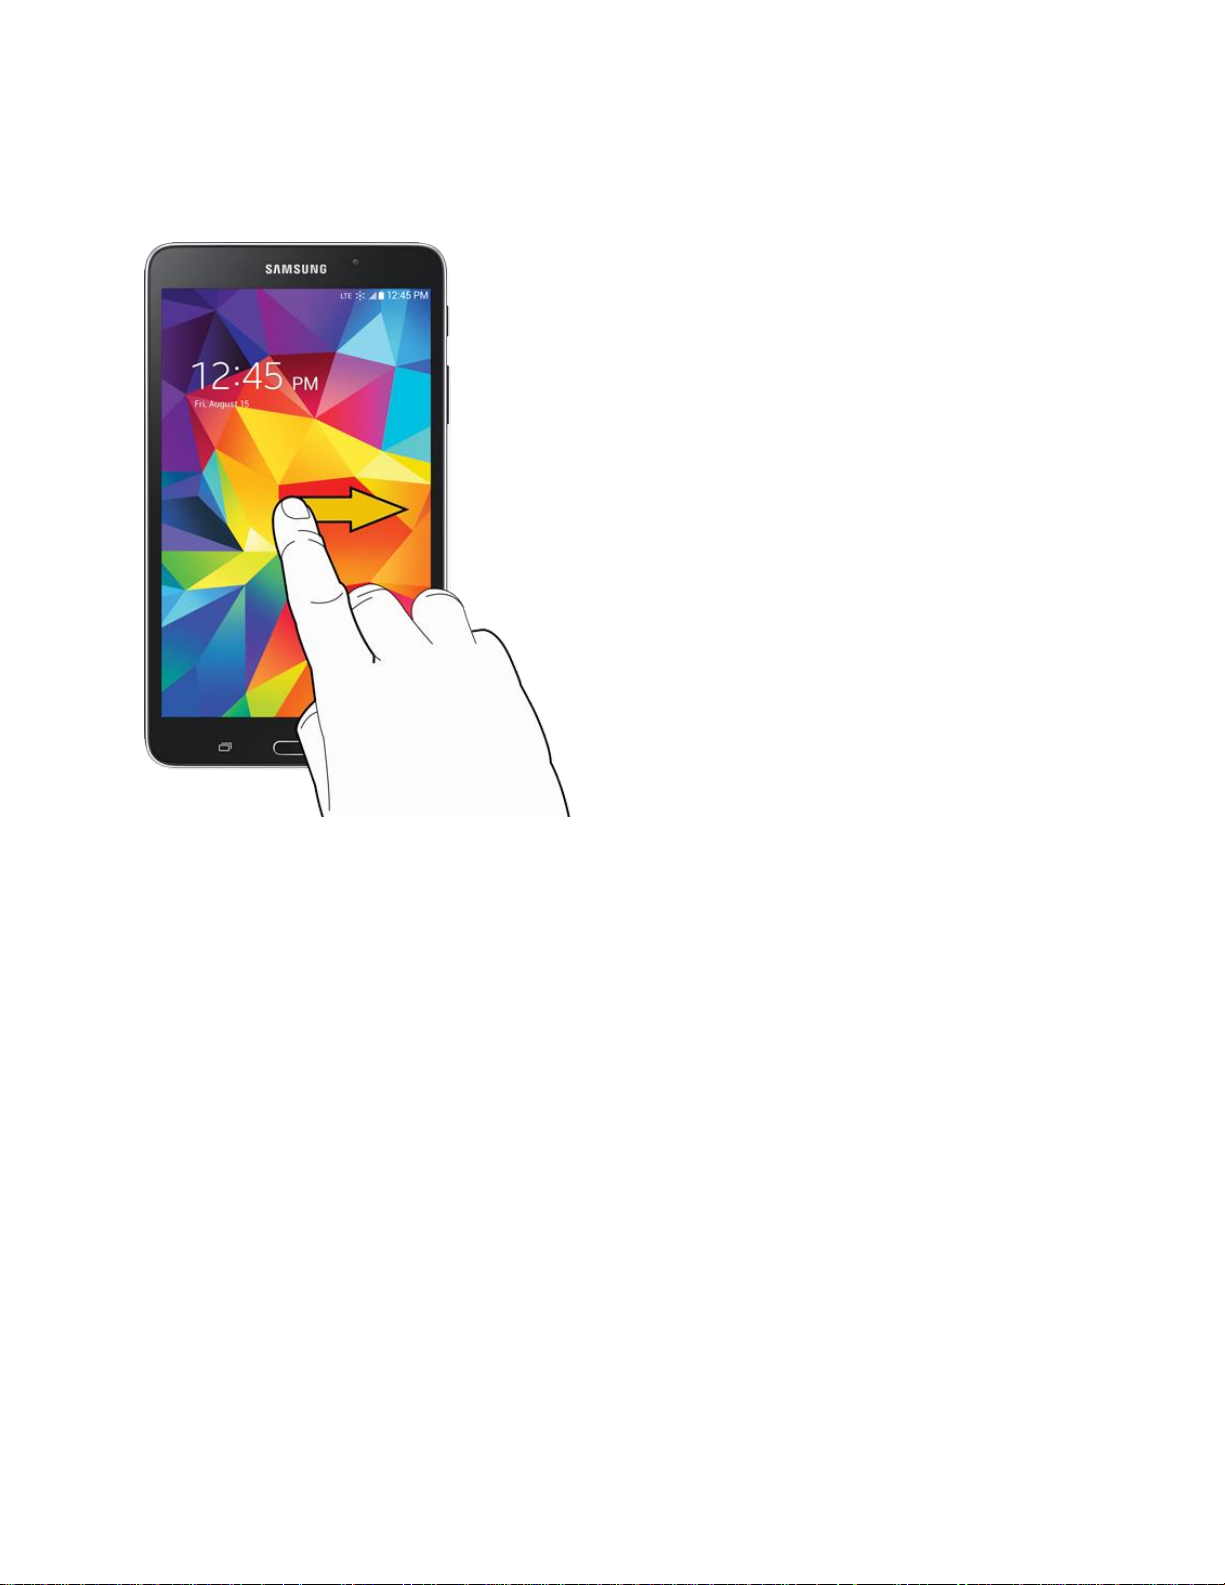
Swipe or Slide
To swipe or slide means to quickly drag your finger vertically or horizontally across the screen.
9
Tablet Basics
Page 18
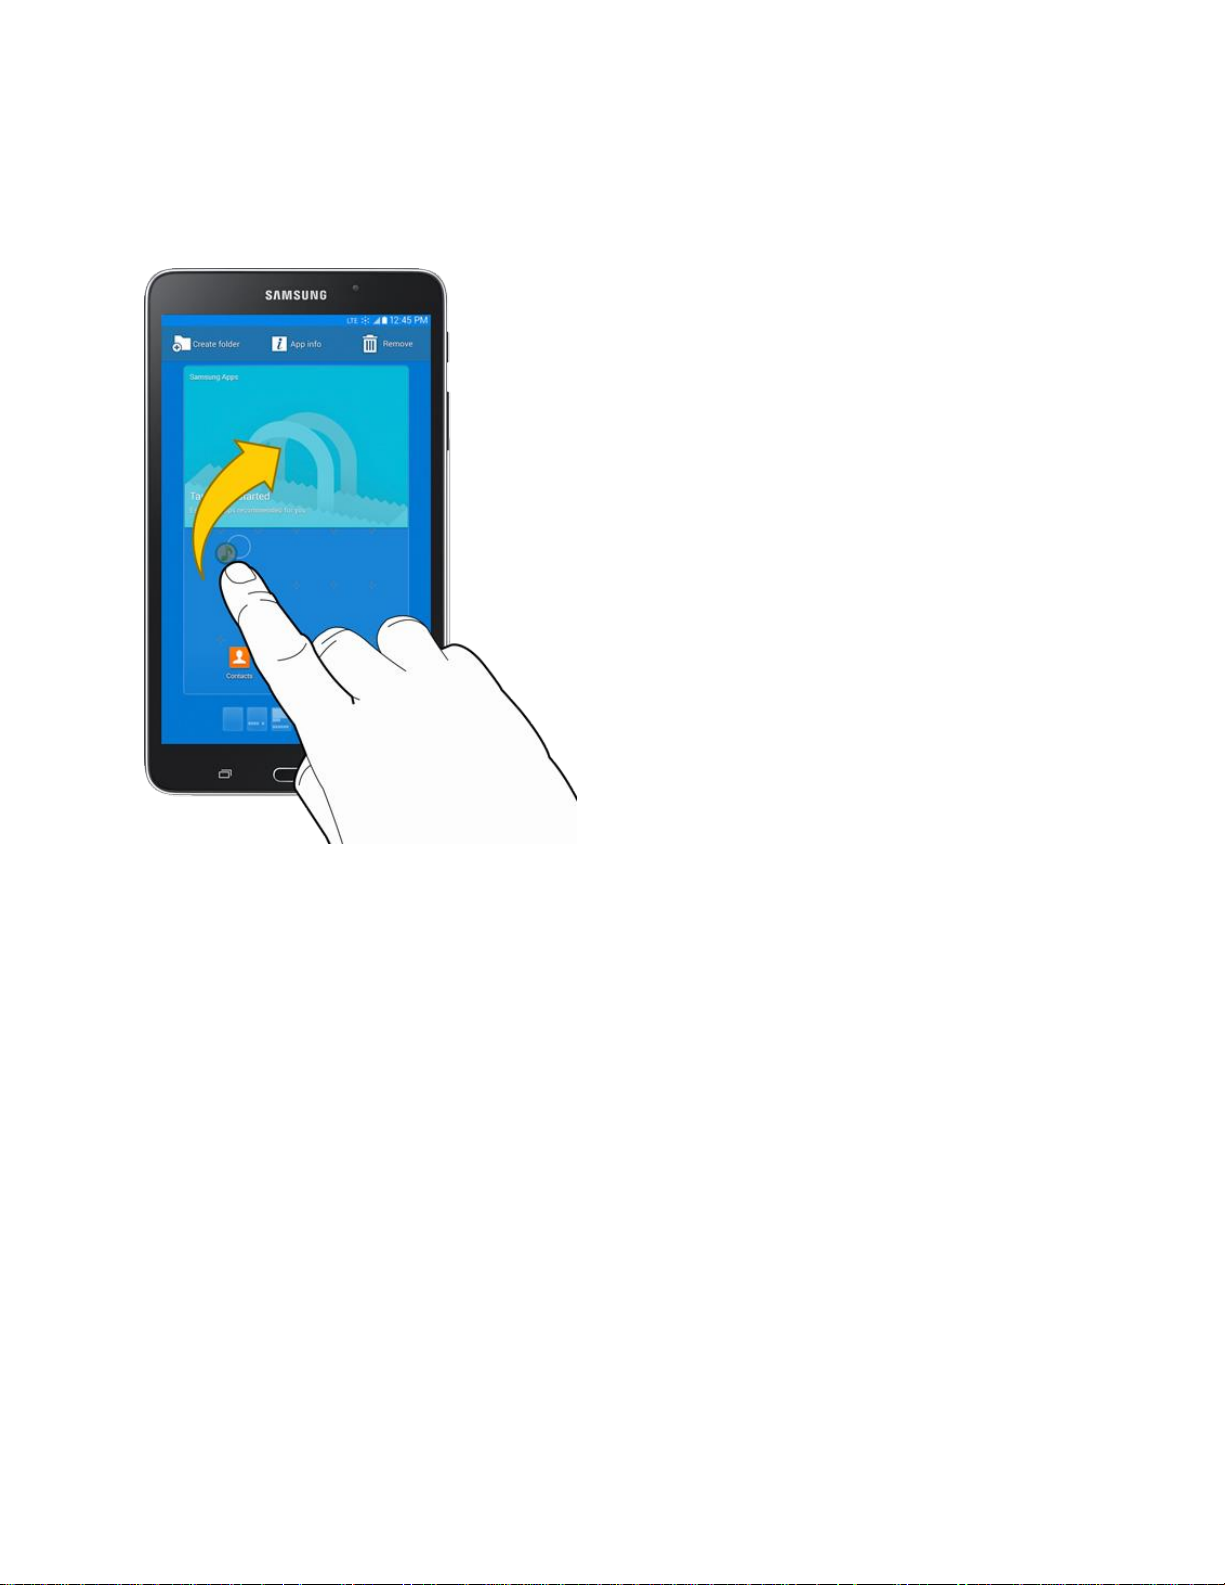
Drag
To drag, touch and hold your finger with some pressure before you start to move your finger. While
dragging, do not release your finger until you have reached the target position.
10
Tablet Basics
Page 19
Flick
Flicking the screen is similar to swiping, except that you need to swipe your finger in light, quick strokes.
This finger gesture is always in a vertical direction, such as when flicking the contacts or message list.
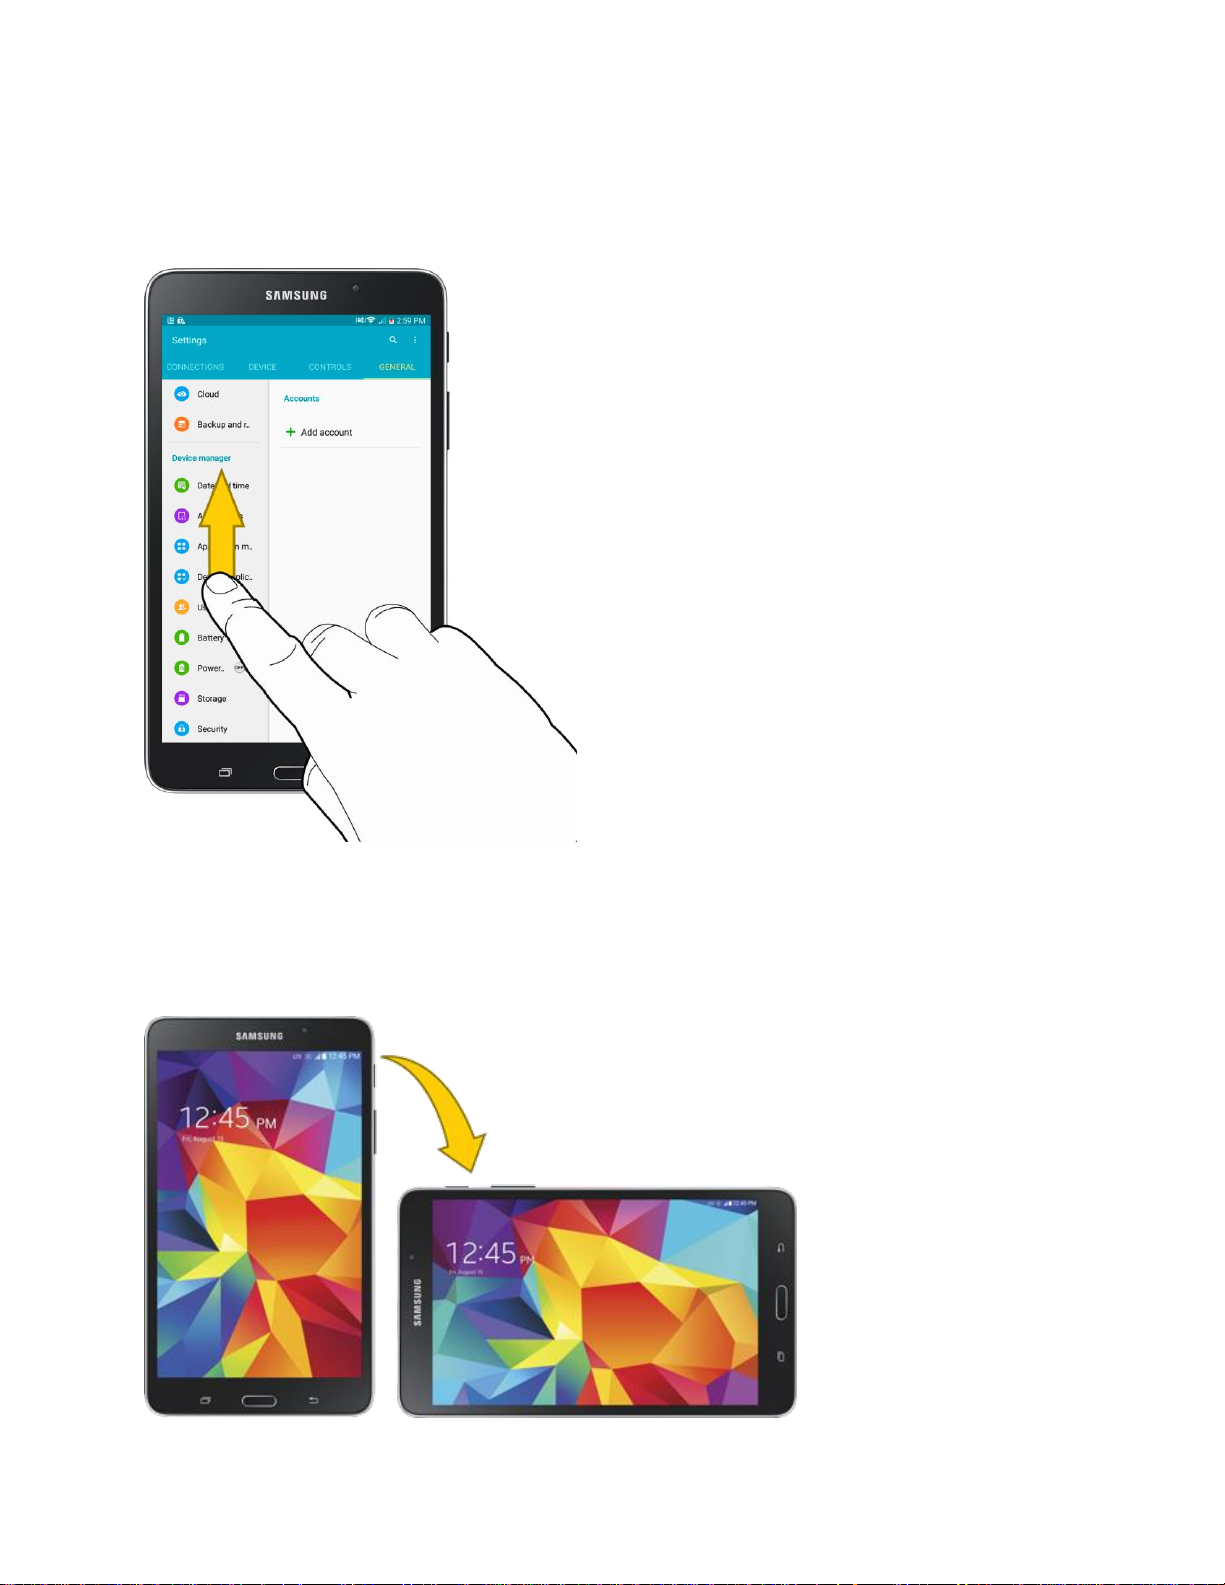
Rotate
For most screens, you can automatically change the screen orientation from portrait to landscape by
turning the tablet sideways. When entering text, you can turn the tablet sideways to bring up a bigger
keyboard.
11
Tablet Basics
Page 20
Note: Screen rotation nee
drag down the notification panel, and then tap Screen rotation.
ds to be enabled for the screen orientation to automatically change. Touch and
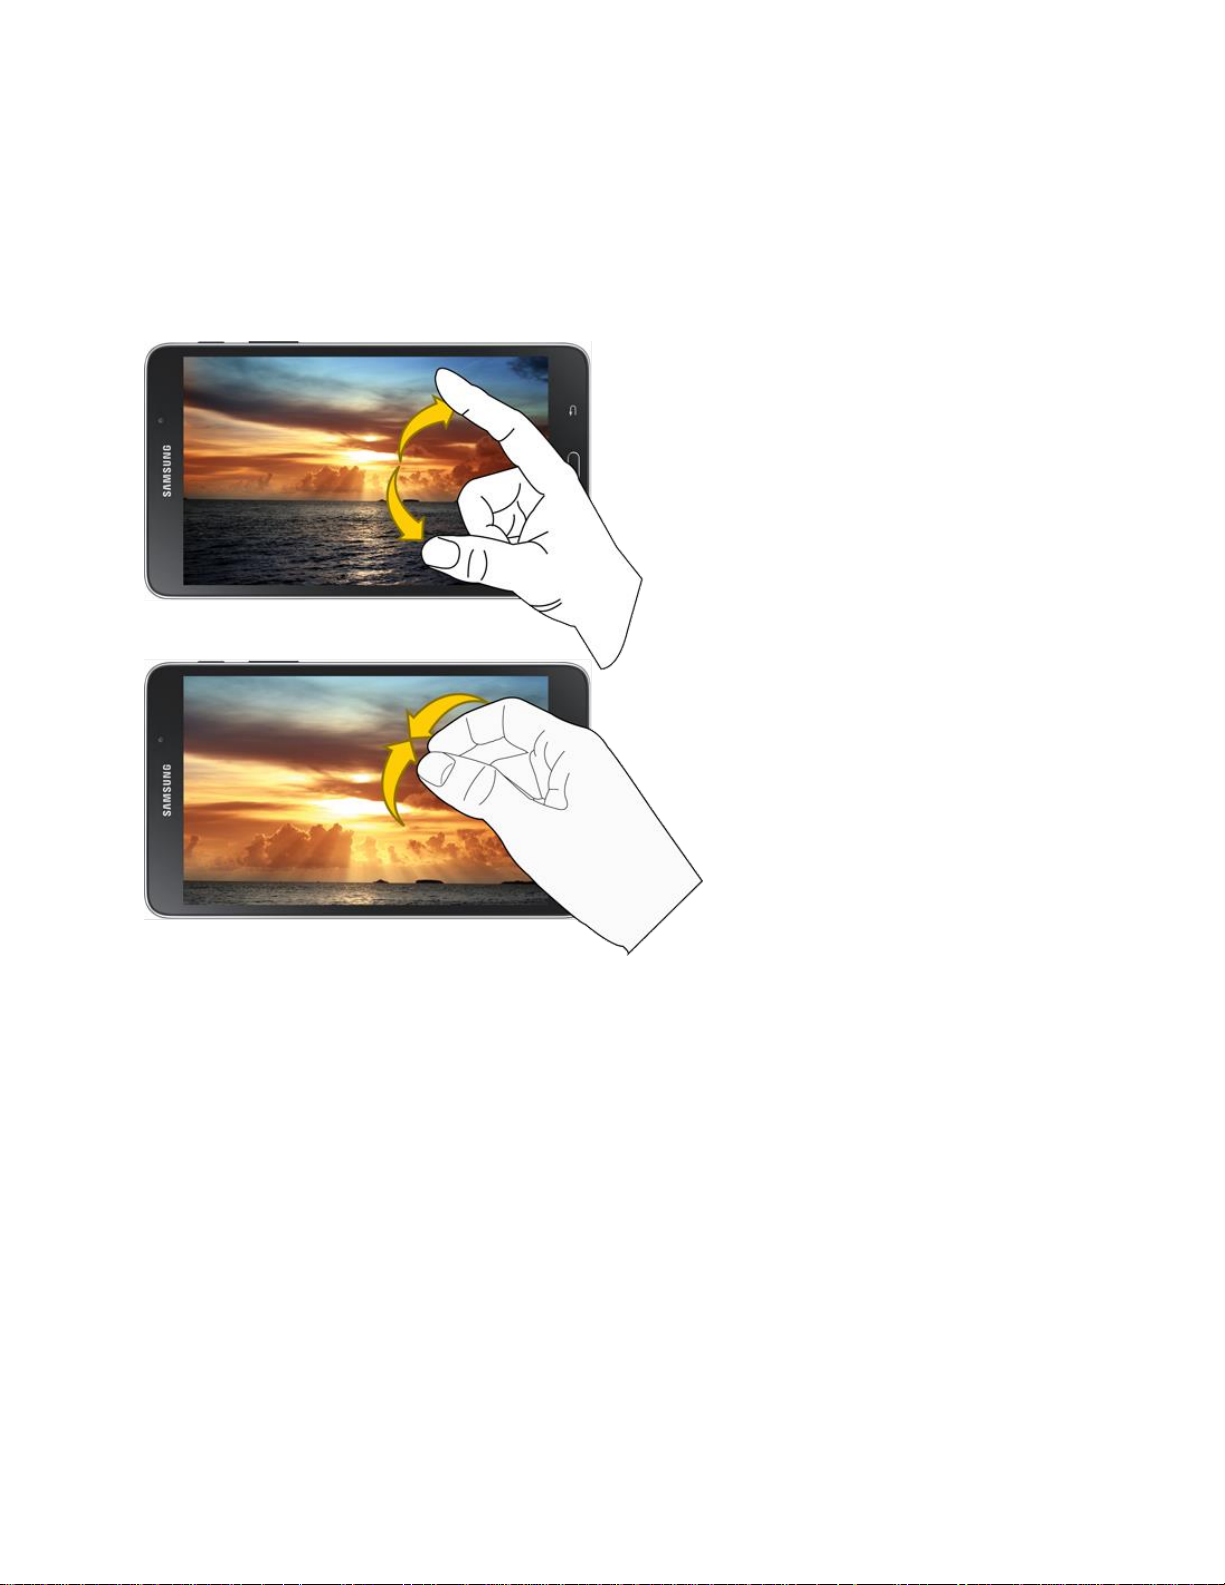
Pinch and Spread
Pinch the screen using your thumb and forefinger to zoom out, or spread the screen to zoom in when
viewing a picture or a Web page. (Move fingers inward to zoom out and outward to zoom in.)
Tip: Pinching any home screen will let you see thumbnails of all home screens. Tap a thumbnail to go
straight to another home screen.
Tablet Basics
12
Page 21

Your Home Screen
The home screen is the starting point for your tablet’s applications, functions, and menus. You can
customize your home screen by adding application icons, shortcuts, folders, widgets, and more. Your
home screen extends beyond the initial screen. Swipe the screen left or right to display additional
screens.
Note: You can keep swiping in one direction and make it back to the main home screen. The small circles
toward the bottom of the screen let you know your current screen position.
Tip: Press the
Home key to return to the main home screen from any other screen.
Create Shortcuts
Learn how to add, move, or remove items from the home screen.
Add Shortcuts from Apps
1. From home, tap Apps.
2. Touch and hold an application icon, and then drag it to a home screen.
3. Release the icon to lock it into its new position on the home screen.
Remove a Shortcut
1. Press the Home key to display the home screen.
Touch
2.
Note: This action does not delete the application; it simply removes the shortcut from the home screen.
and hold the desired shortcut, and then drag it to the Delet
e icon and release it.
Add and Remove Widgets
Widgets are self-contained applications that reside either in your Widgets tab or on the main or extended
home screens. Unlike a shortcut, the Widget works like application on a home screen. Widgets can
include Contacts shortcuts, bookmarks, music playlists, Gmail and email accounts, and many other types
of apps.
Add Widgets from the Home Screen
1. From home, touch and hold an empty area of the home screen, and then tap Widgets.
Touch
2.
and hold a widget, and then drag it to a home screen. Release the widget to lock it on the
n.
scree
Remove a Widget
■ From home, touch and hold the desired widget, and then drag it to the Delete icon.
Note: This action does not delete the widget; it simply removes it from the current screen.
Tablet Basics
13
Page 22
Extended Home Screens
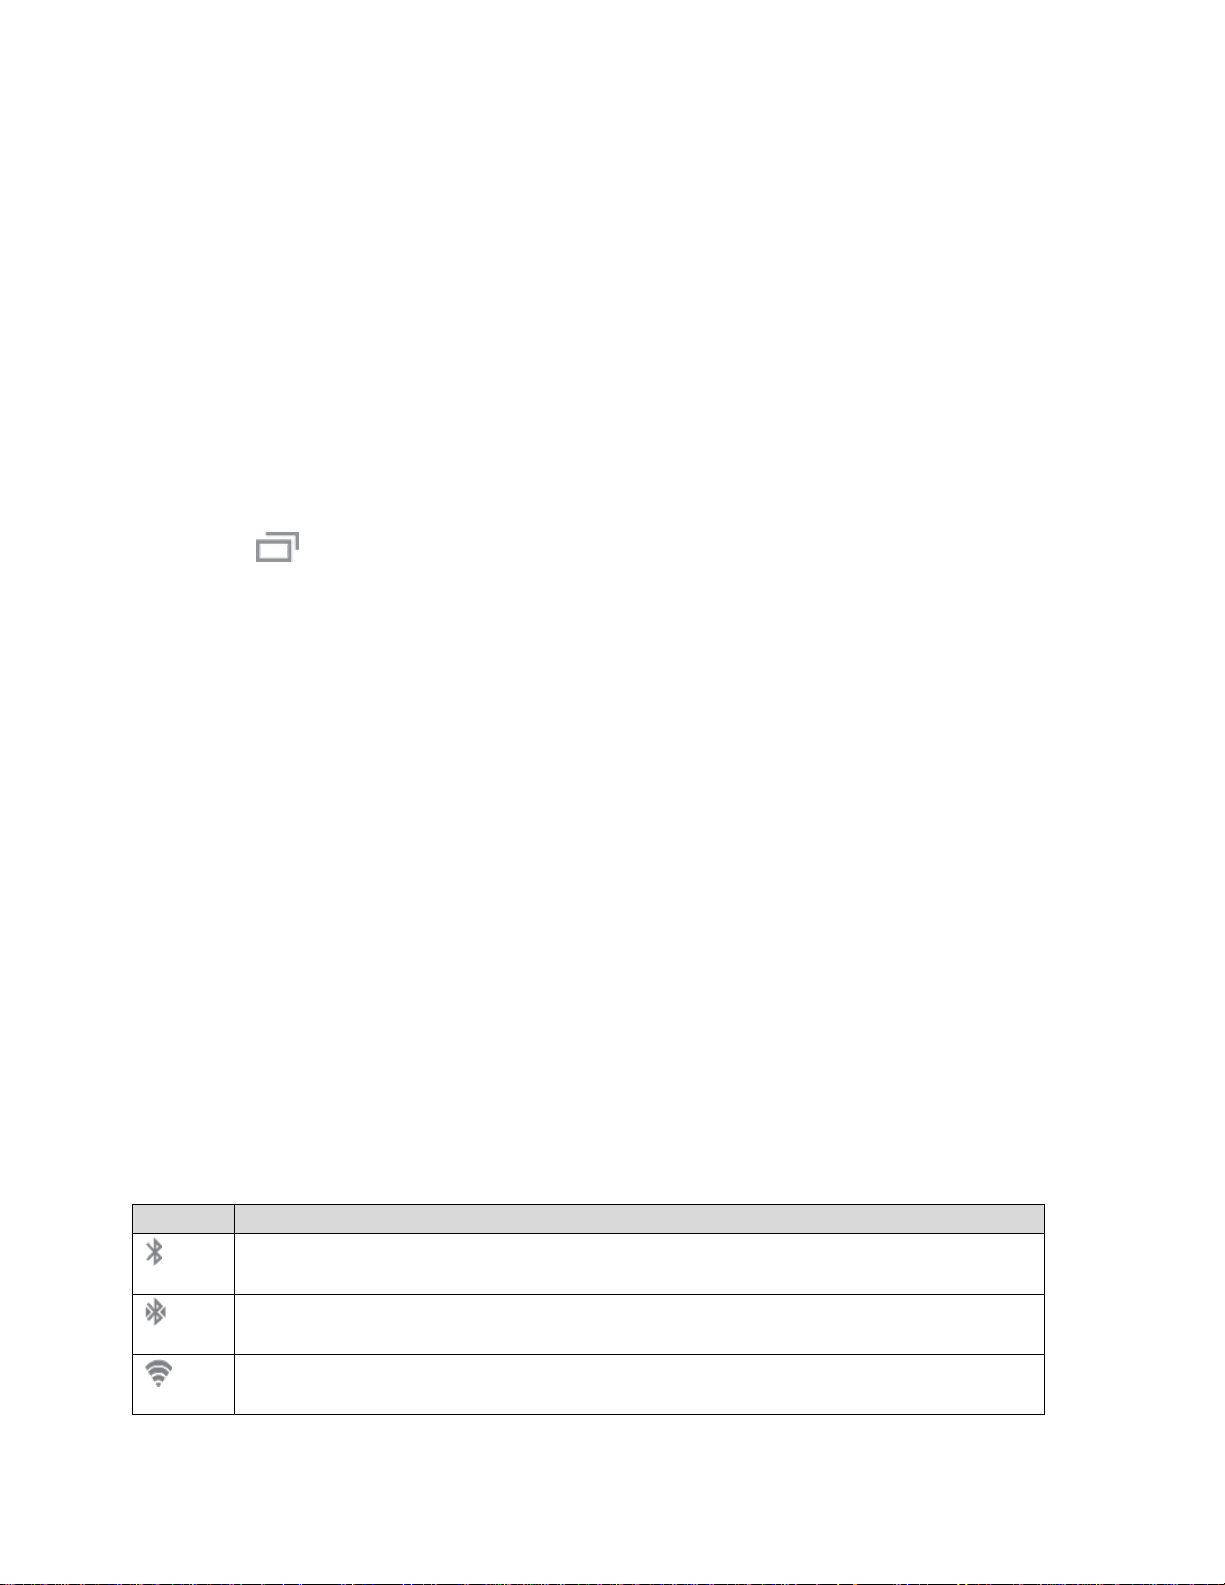
Icon
Description
Bluetooth: Bluetooth is active.
Bluetooth Connected: The tablet is connected to another Bluetooth device.
Wi-Fi: Wi-Fi is active.
In addition to the main home screen, your tablet can have up to six extended home screens to provide
more space for adding icons, widgets, and more. Touch and hold the icon or widget and then drag across
the screen to move from the main screen to an extended screen.
To go directly to a particular screen:
1. From any home screen, pinch the screen to display thumbnail images of all screens.
2. Tap the
screen you want to open.
Recent Apps
You can access recently used applications through a display of shortcuts to the applications themselves.
1. Tap
2. Tap a preview to open the application.
from any screen to display recently used apps.
Wallpapers
You can choose a picture to display on the home screen, home screen, or on both the home and lock
screens. Choose from preloaded wallpaper images or select a photo you have downloaded or taken with
the camera.
1. From any home screen, touch and hold on an empty area of the screen, and then tap
2. Tap Home screen, Lock scree
Wallpapers.
n,
or Home and lock screen.
3. Select a wallpaper, and then tap Set as wallpap
4. The wallpaper is set.
er.
Status Bar
The status bar at the top of the home screen provides device and service status information on the right
side and notification alerts on the left. To view notification alerts, touch and hold the status bar and drag it
down.
Status Icons
14
Tablet Basics
Page 23
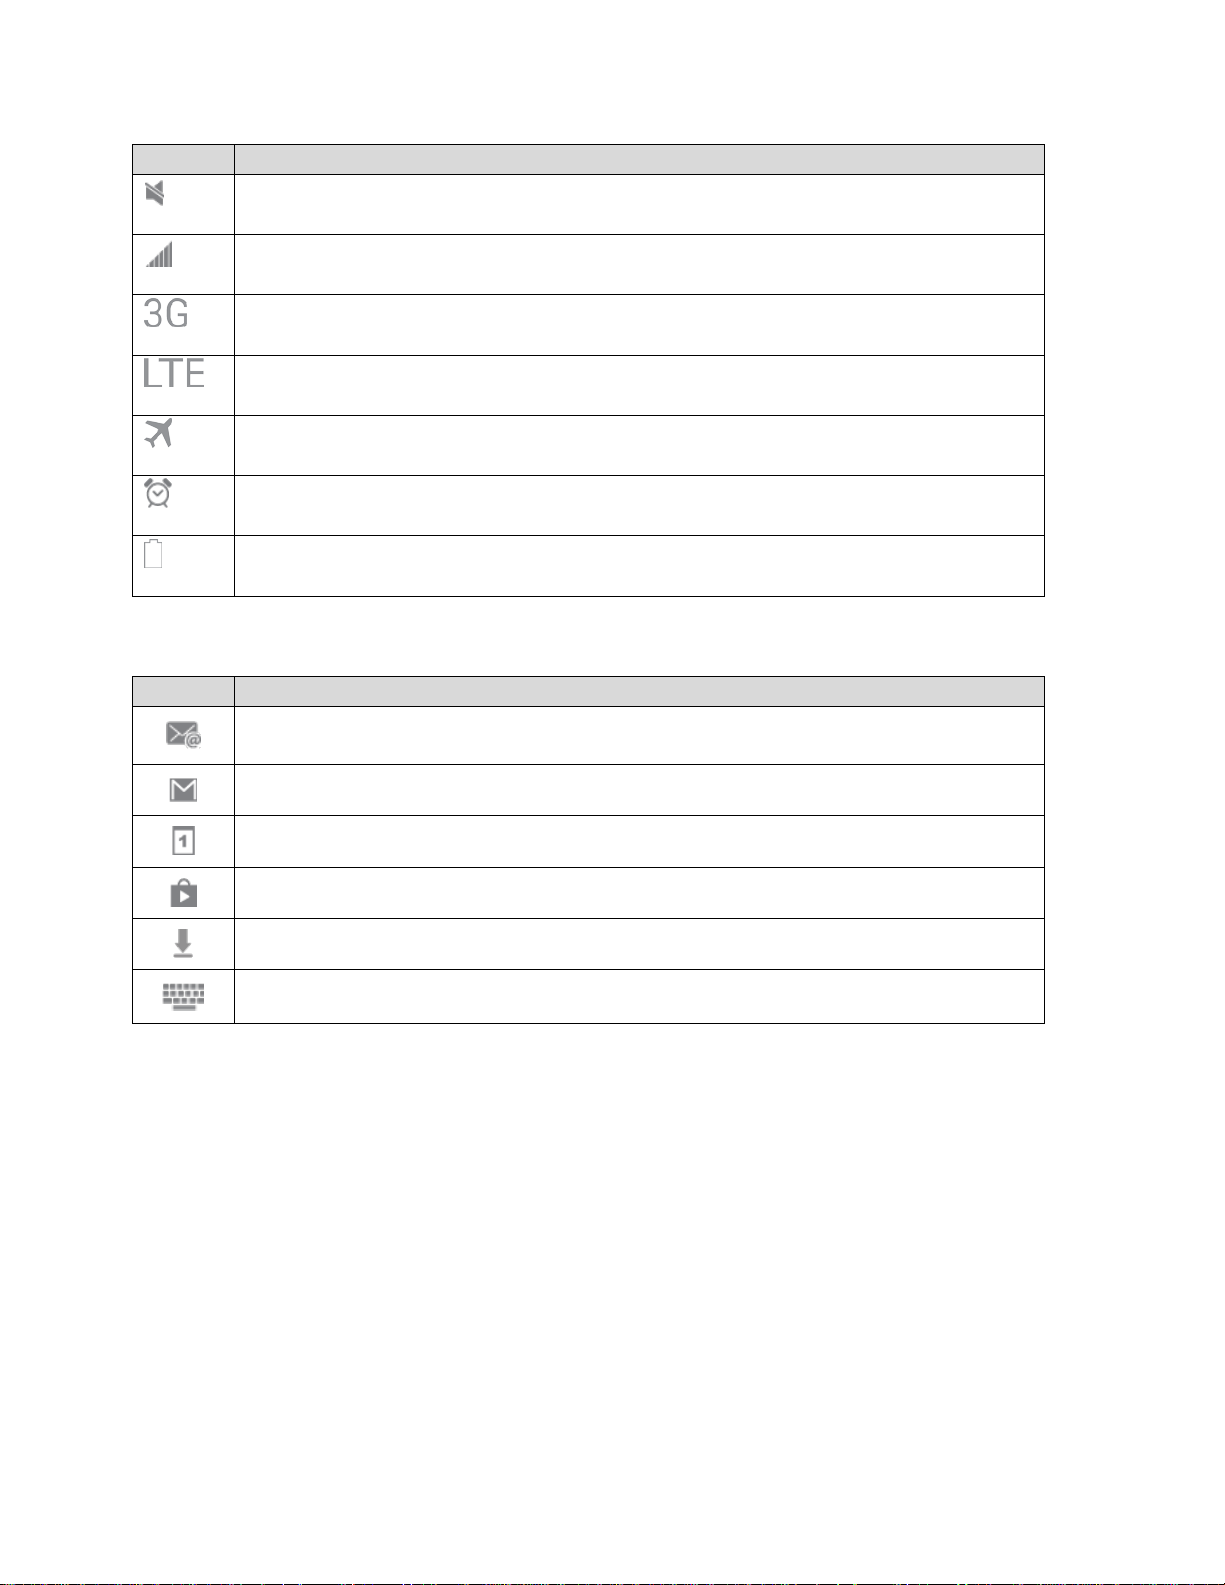
Icon
Description
Mute: All sounds are muted.
Network: The tablet has full signal strength.
3G data service: The tablet is connected to a 3G data network.
4G LTE data service. The tablet is connected to a 4G LTE data network.
Airplane mode: Airplane mode is active.
Alarm set: An alarm is close to sounding.
Full battery: The battery is fully charged.
Icon
Description
New email: New email has arrived.
New Gmail: New Gmail has arrived.
Event: An event has occurred.
Updates: Software or app updates are available.
Downloading: Data is currently being downloaded.
Keyboard: A keyboard is active.
Notification Icons
15
Tablet Basics
Page 24
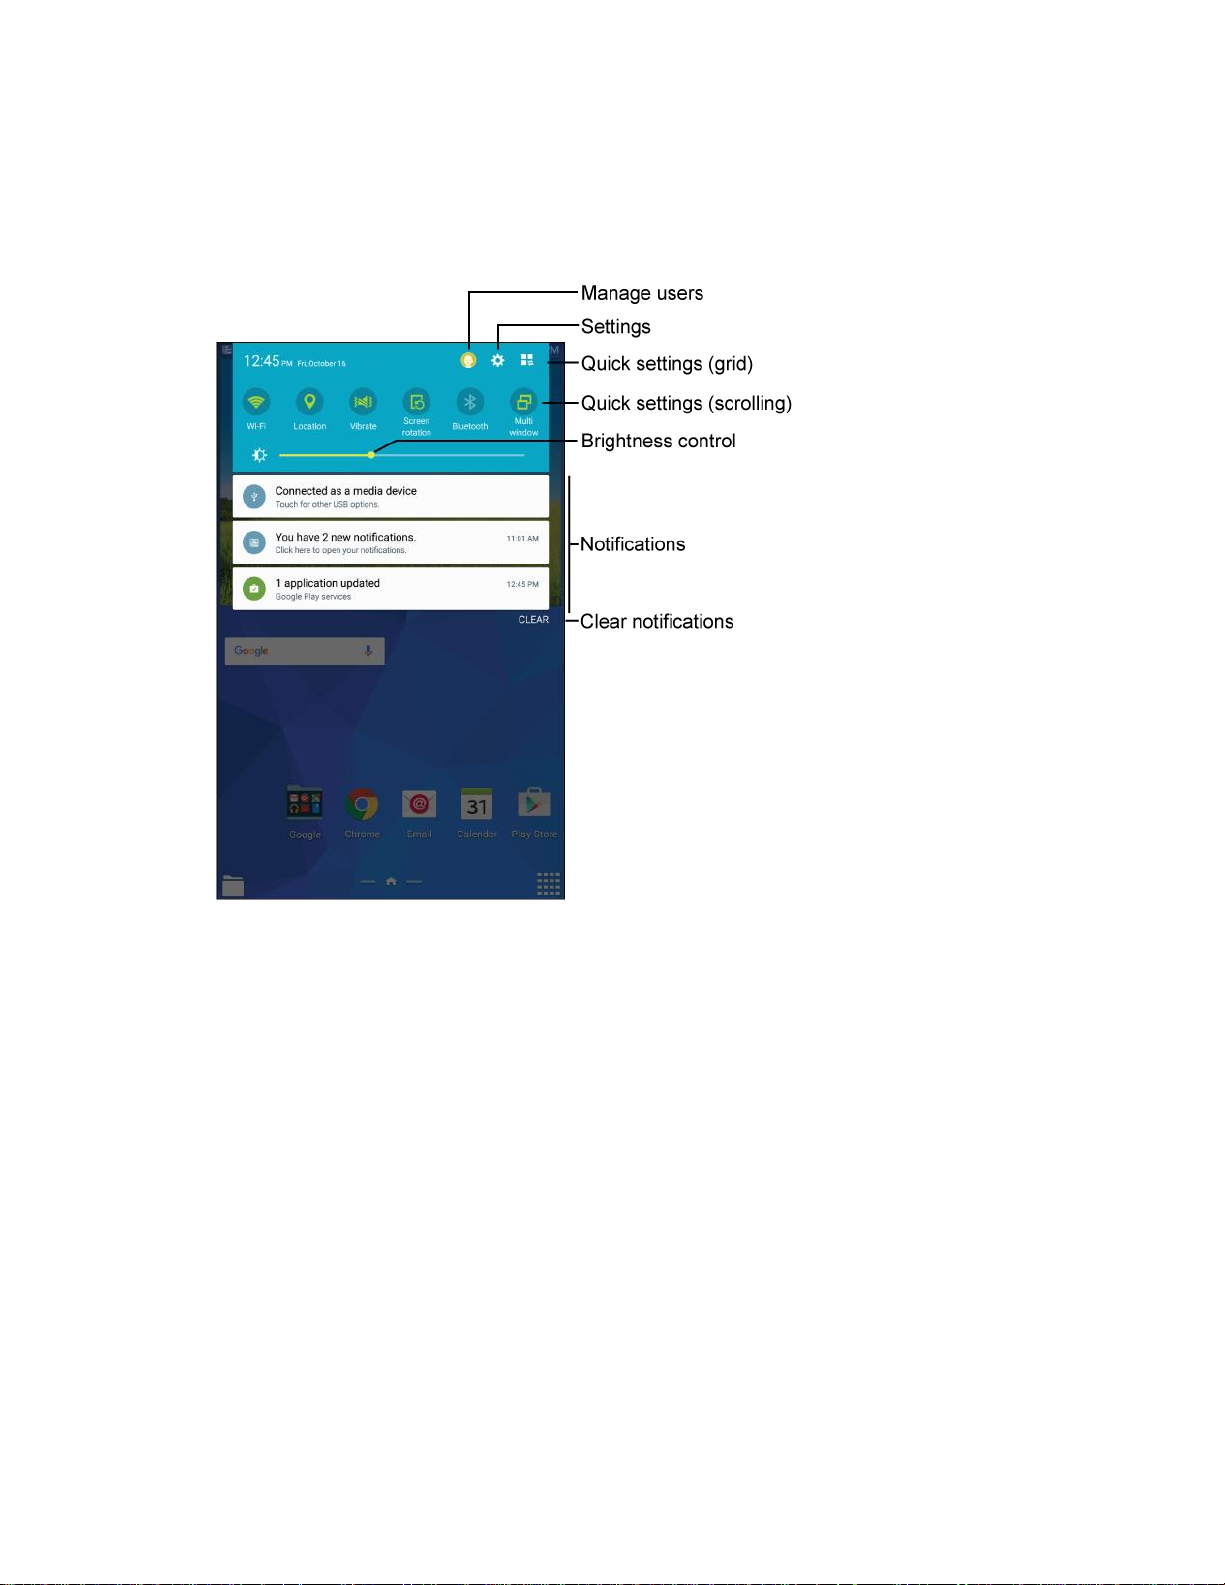
Notification Panel
The notification panel displays information about connections, alerts, new messages, and more. It also
has Quick settings buttons which allow you to quickly access and change common system settings.
● Manage users: Add, remove, or configure user accounts.
Sett
●
●
●
● Brightness control: Adjust the brightness of the display.
●
●
ings: Access sett
Quick s
Quick
see all the Quick settings.
Not
Clear
ettings (grid):
settings (scrolling): Displ
ifications: View notifications, s
notifications: Remove all notifications.
ings. For more information, see Settings.
Display Quick setting buttons in a grid.
ay Quick setting buttons in a scrollable list. Swipe right or left to
uch as new email and software updates.
Access the Notification Panel
1. Touch and slide downward from the top of the screen to display the notification panel. Slide the
notification panel upward to close it.
Tap a notif
2.
ication to vi
ew details or to launch the related app or feature.
Tablet Basics
16
Page 25

Clear Notifications
■ Touch and slide an item left or right to clear it.
– or –
Tap Clear to remove all notifications.
Quick Settings
Quickly enable/disable common system settings for your tablet.
1. Touch and slide downward from the top of the screen to display the notifica
2. Tap a Quick setting button to turn on (lit) or turn off
buttons, tap
Wi-Fi: Turn Wi-Fi conne
Location
Sound/Vibrate/Mute: Turn on or m
Screen rotation: Automatically rotate the screen from landscape to portrait and vice versa
when the t
Bluetooth: Turn Bluetooth on. For more information, see Bluetooth.
Multi w
Screen Mirroring: Share your devi
AllShare Cast accessory (not included). For more information, see Screen Mirroring.
: Turn location services on. For more information, see Location Settings.
indow: Turn Multi window on. For more
(dim) settings. (To view all Quick setting
, or scroll the Quick setting buttons to the left.)
ctions on. For more information, see Wi-Fi Settings.
ute system sounds, or turn on haptic feedback (vibration).
ablet is tilted.
information, see Multi Window.
ce’s screen with another device using an optional
tion panel.
Sync: Synchronize contacts, email, etc. with the network.
Smart stay: Turn
Po
wer saving: Turn Power sa
Do not di
Airplane mode: Turn A
Tablet Basics
sturb: Turn Do not disturb mode on. For more information, see Do Not Disturb.
Smart st
ay on. For more information, see Smart Screen.
ving mode on. For more information, see Power Saving Mode.
irplane mode on. For more information, see Airplane Mode.
17
Page 26
Multi Window
Multi window allows you to use two apps on the same screen, in separate, resizable windows.
Note: Only applications found within the Apps tray can be active atop another current application on the
screen. When launching applications that contain multimedia files (music or video), audio from both files
will be played simultaneously.
Enable Multi Window
Enable Multi window in the Display settings.
1. From home, tap Apps > Settings > D
2. Tap ON/OFF beside Multi window to enable or disable the option.
Tip: You can also enable or disable Multi window from Quick settings. Touch and slide downward from
the top of the screen to display the notification panel, and then tap Multi window in the Quick settings
list.
evice tab.
Display Multi Window
The Multi window tray normally automatically hides itself with not in use.
■ Swipe from the right side of the screen to display the Multi window Apps tray.
Tablet Basics
18
Page 27
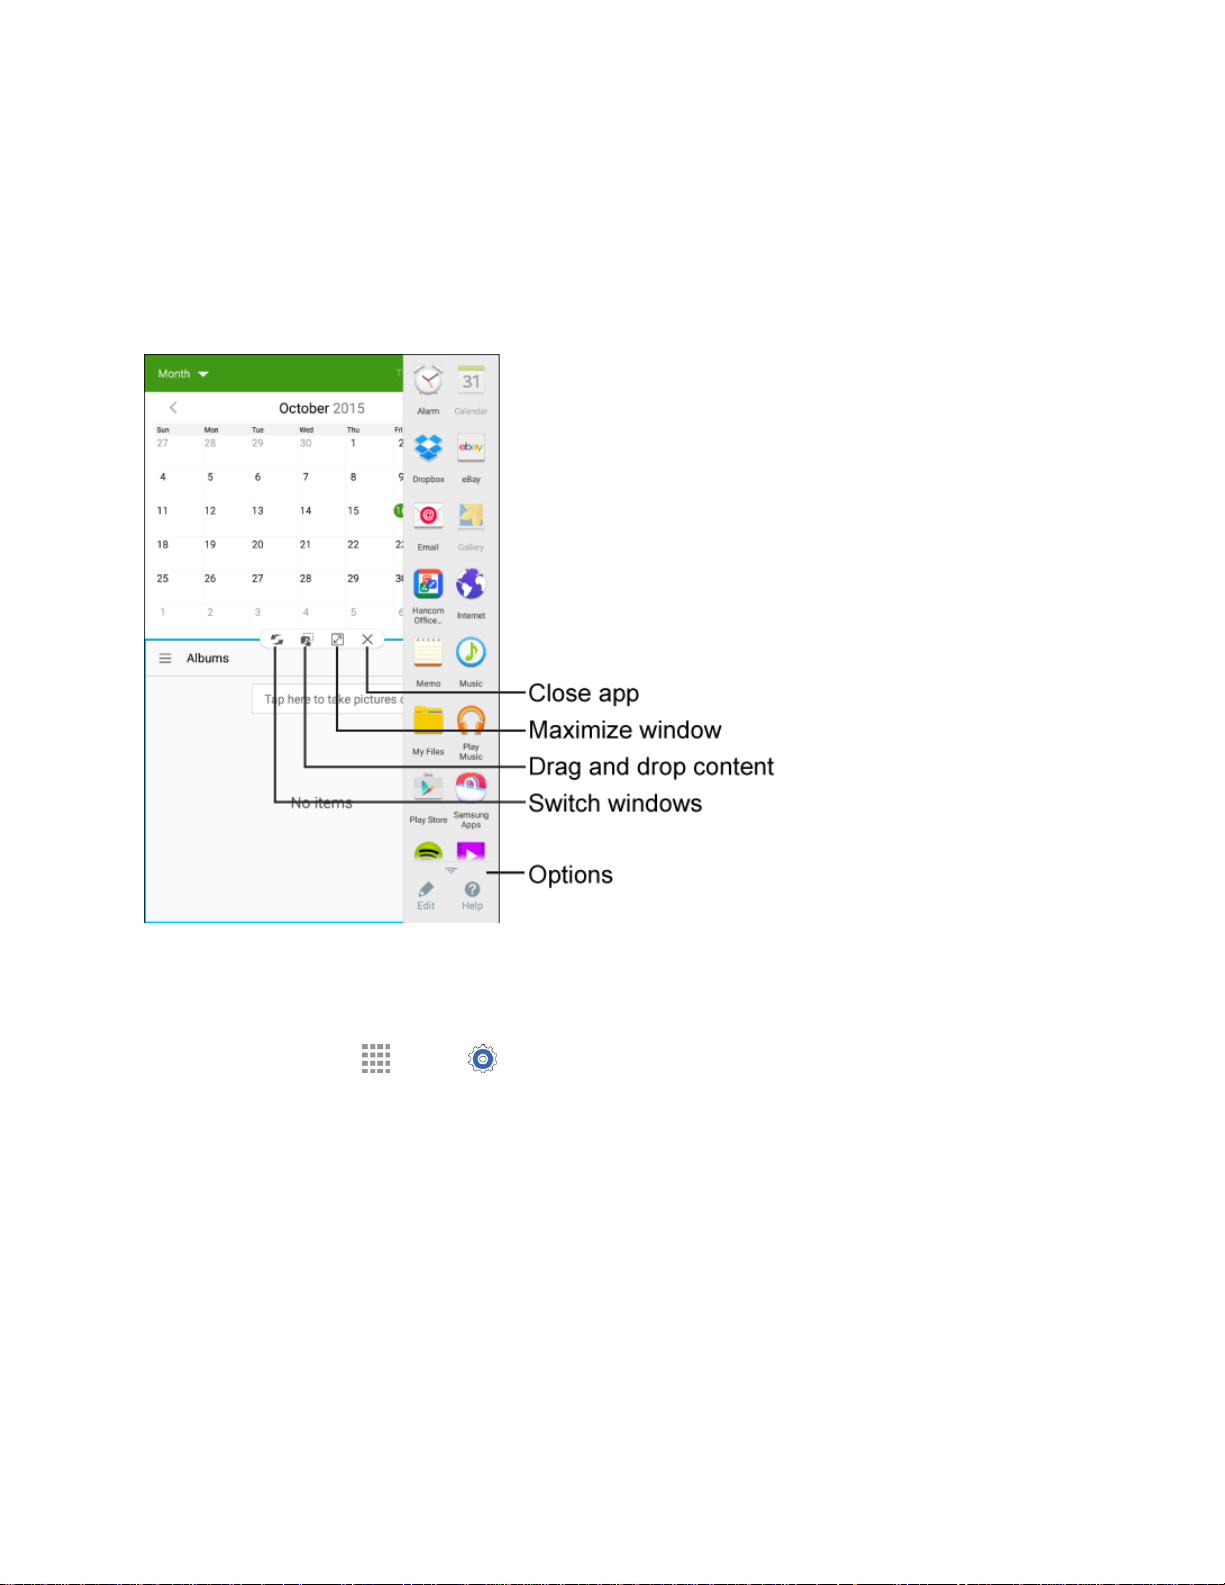
Using Multi Window
After enabling Multi window, you can use it to run two apps at the same time. You can launch apps from
Multi window, or drag an app to the screen to run multiple apps at the same time.
The apps display together on a split screen. You can switch between the apps, adjust the size of their
display on the screen.
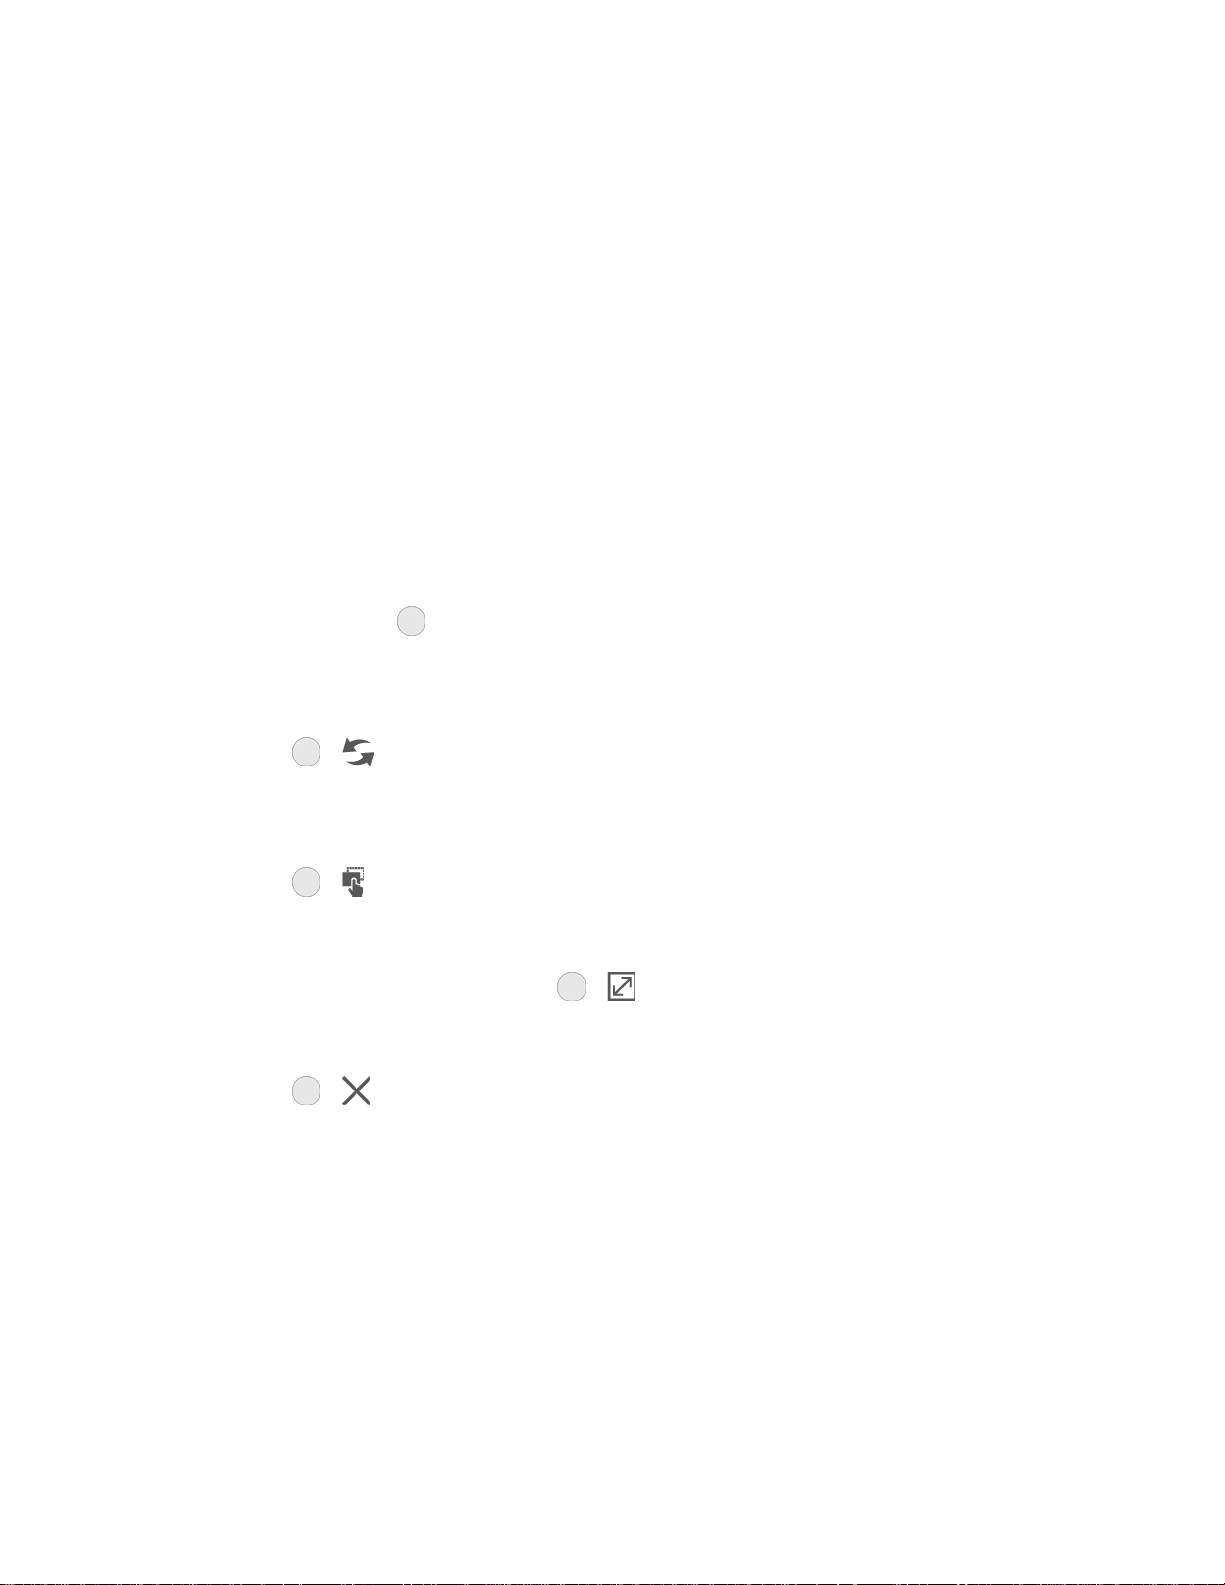
You can also use these Multi window options:
● Launch multiple apps: When you drag an app f
apps display in a split window.
While using one app, tap the tab to display Multi window, and then touch and drag an app to
the screen.
● Adjust the size of apps in multi windo
the two apps on the screen.
Touch and drag
● Swit
● Drag content from one app to the other: In selecte
ch multi window app positions:
the app windows on the screen.
Tap
between apps.
Tap
>
>
.
to select
to a new position.
content and drag it to the other app.
w: While using Multi window, you can adjust the size of
While using Multi window, you can switch the position of
rom Multi window on top of an open app, both
d apps, you can you can drag text or images
● Make a multi window app full-screen: Expand one of the apps to display in the full screen.
Tap one of the apps, and t
● Close an app: Close one app, and make the other full-screen.
Tap
19
Tablet Basics
>
.
hen tap
>
to make t
he app display full-screen.
Page 28

Customize the Multi Window Apps
The apps on the multi window apps tray can be organized by either being rearranged or removed.
1. With Multi window turned on (see Enable Multi Window), swipe from the right side of the screen
to dis
play the Multi window apps tray.
2. In the apps tray,
To change the order of apps in the tray, touch and hold an app until it detaches, and then
drag it to a new location in the apps tray.
Tap > Edit for options:
To remove an app, touch and hold an app icon until it detaches, and then carefully drag it
•
off the
• To restore an app, touch and hold an app icon until it detaches from the storage tray, and
then drag it ont
Features
Discover new features for controlling and interacting with your tablet.
Screen Capture
Capture an image of the current screen at any time.
■ Press and hold the Pow
image of the current screen. A white border flashes briefly around the edge of the screen
indicating a screen capture.
you can use these options:
apps tray and onto the storage area.
o the apps tray.
er/Lock key and the Home key simultaneously to create an
The screen capture is automatically saved to the Gallery in an album labeled Screenshots.
A copy of the screen capture is also saved to the clipboard.
Smart Screen
Smart screen features allow you to have your tablet automatically detect when you are looking at the
screen.
■ Smart stay: The screen will not time out as long as you are looking at it. Smart screen uses the
front camera to detect when you are facing the screen. Some factors that may affect the ability of
the front camera to detect your face are:
When the tablet is not docked or hel
When the front camera cannot detect your face and eyes.
When the front camera is being used for the current application.
When the source of light is behind you, or when using the tablet in the dark.
Tablet Basi
cs
d upright, for example when placed on a table.
20
Page 29

Configure Smart Stay
Enable smart stay, and learn about using it.
From home, tap Apps > Settings >
■
Tap Smart stay to set the screen to stay on as long as you are looking at it.
Tap
>
Help for more information.
Controls tab > Smart screen.
Enter Text
You can type on your tablet using the available touchscreen keyboards.
Touchscreen Keyboards
Touchscreen keyboard entry can be done in either Portrait or Landscape orientations. The Landscape
orientation provides more space and results in slightly bigger keys. If you find that you prefer to enter text
via the keyboard, and need bigger keys, use this orientation.
Text Input Methods
Your tablet offers several text input methods.
● Google voice typing: Enter tex
t by speaking.
● Samsung keyboard: Ente
keyboard includes optional Predictive text, which matches your key touches to common words so
you can select a word to insert it into your text.
● Swype keyboard: Ent
r text by tapping keys on a virtual QWERTY keyboard. Samsung
er text by sliding your finger across letters to spell words.
Select a Default Text Input Method
You can select a default Text Input Method from Settings, or choose one at any time while entering text.
From Settings:
■ From home, tap
then choose a text entry method.
While entering text:
1. From a screen where you can enter text, dr
notification panel.
2. Tap Select k
Apps > Setting
eyboard, and then choose a text entry method.
s > Controls tab > Language and input > Default, and
ag down from the top of the screen to open the
Tablet Basics
21
Page 30
Google Voice Typing
This feature uses Google voice recognition to convert your spoken words into text.
Use Google Voice Typing to Enter Text
1. From a screen where you can enter text, drag down from the top of the screen to open the
notification panel, and then tap Select keyboard > Google voice typing.
– or –
Tap
2. Speak and watch your text being entered on the screen.
3. If the text is incorrect, tap
4. Once you have completed entering your text, tap . The keyboard will reappear.
Note: Tap
Configure Google Voice Typing
Set Google voice typing options.
on the Sa
to ass
msung k
ign a ne
eyboard or on the S
.
w language via the Google voice typing menu.
wype keyboard.
■ From home, tap Apps > Settings > Controls tab > Language and input > Google
voice typing.
Samsung Keyboard
With Samsung keyboard, it's easy to enter text, symbols, and numbers.
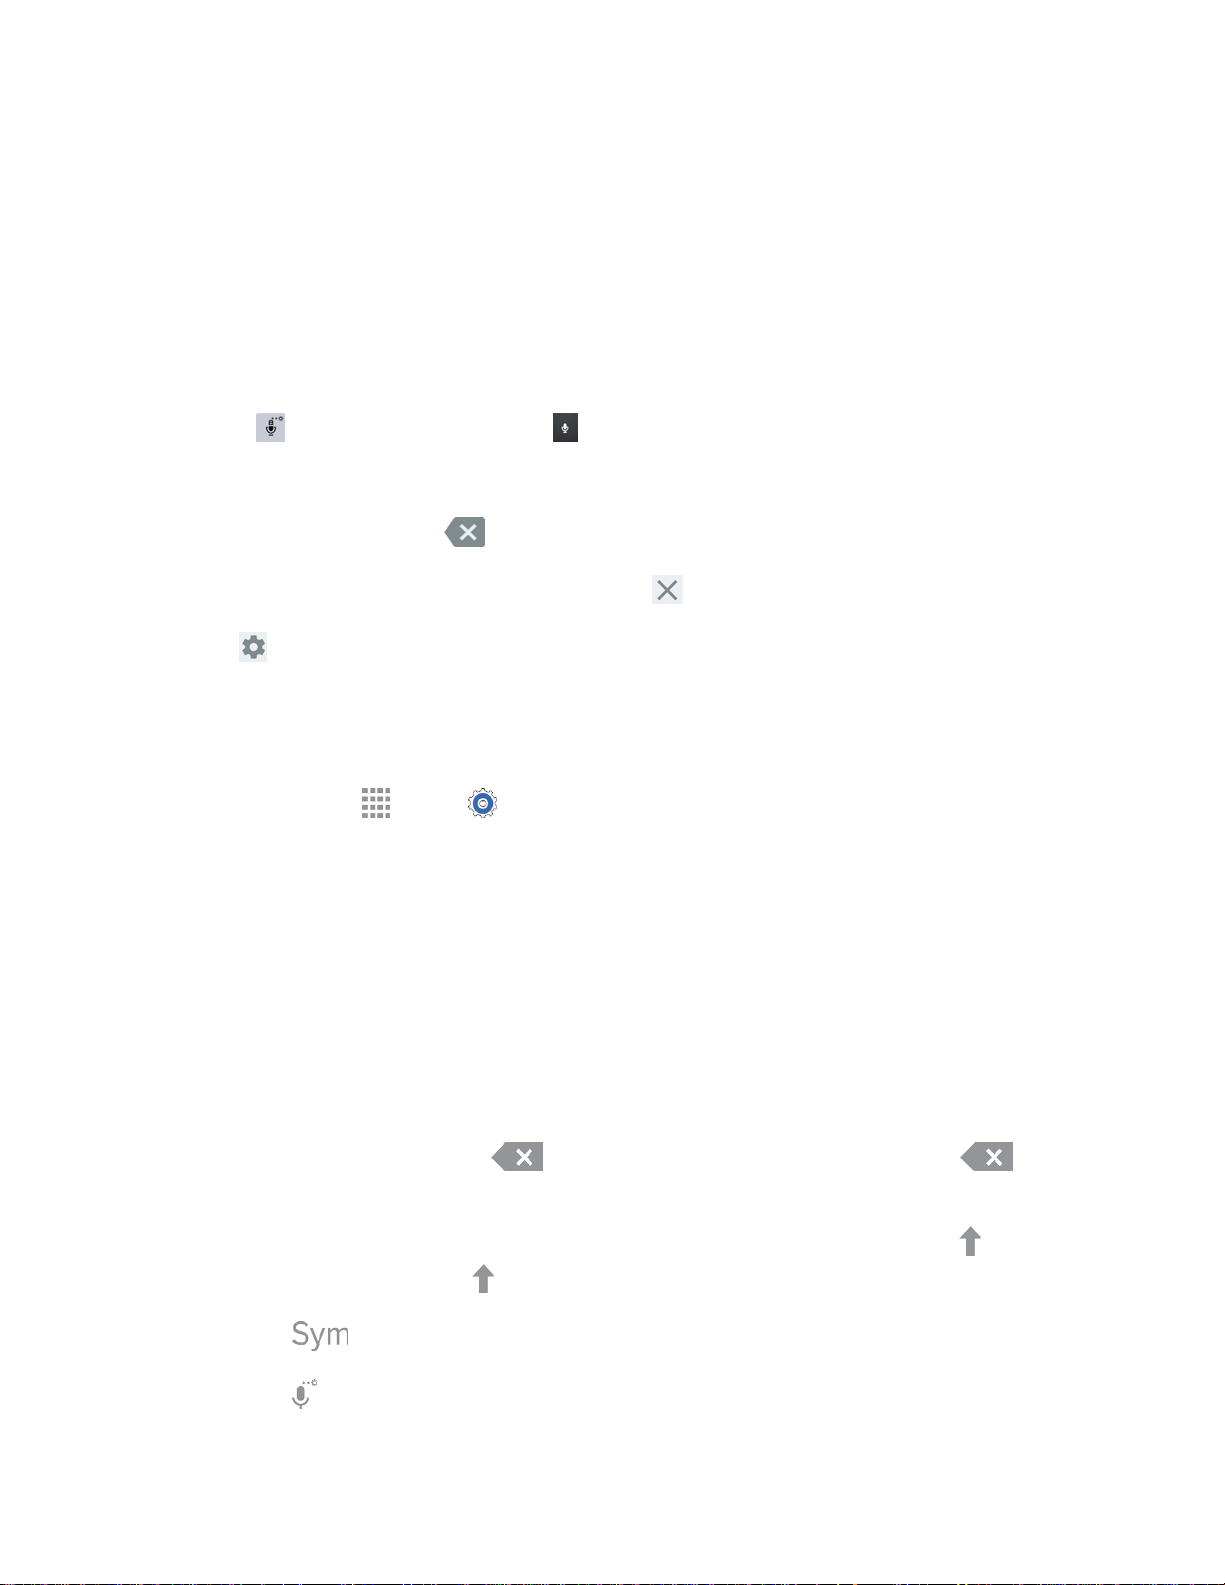
Use Samsung Keyboard to Enter Text
1. From a screen where you can enter text drag down from the top of the screen to open the
notification panel, and then tap Select input method > Samsung keyboard.
2. Tap keys to enter text. While entering text, use these options:
If you make a mistake, tap
delete a whole word or field.
By default, Samsung keyboard starts with a capital at the beginning of text. Tap
the case of the text. Tap
Tap
to sw
itch to a symbols keyboard. There are two symbol keyboards.
to delete incorrect characters. Touch and hold
twice to switch to all capitals.
to
to change
Tap
Tablet Basics
22
to sw
itch to Google voice typing and to enter text by speaking.
Page 31

Touch and hold
for additional options:
Switch to Google voice ty
•
•
•
•
•
•
Display
write, suggestions are offered in the word options area in case the correct letters were
not recognized. (To properly recognize the written characters, do not use script.)
View and selec
View Samsu
Insert an em
Choose
be moved around the screen.
a handwriting pa
t content
ng keyboard
oticon.
between the standard QWERTY keyboard or a floating keyboard, which can
ping.
d. Use your finger tip to write out each character. As you
from your clipboard.
settings.
Using Predictive Text
By using predictive text, you can have next-letter prediction and regional error correction, which
compensates for tapping the wrong keys on the QWERTY keyboard.
While entering characters, potential word matches display in the predictive text area above the keyboard.
Tap a word to insert it into your text. Tap
■
to display
more words.
Configure Samsung Keyboard
You can configure options for Samsung keyboard. For more information, see Samsung Keyboard
Settings
.
■ From home, tap
Samsung keyboard.
Apps > Settings > Controls tab > Language and input, and then tap
Swype
Swype lets you enter words by tracing over the letters on the virtual QWERTY keyboard. Instead of
tapping each key, use your finger to trace over each letter of a word. You can also tap letters to enter
words.
Swype provides next-letter prediction and regional error correction, which can compensate for tapping the
wrong keys on the virtual QWERTY keyboards.
Tablet Basics
23
Page 32

Use Swype to Enter Text
1. From a screen where you can enter text drag down from the top of the screen to open the
notification panel, and then tap Select keyboard > Swype.
2. Swipe your finger continuously over the lett
matching your pattern display at the top of the Swype keyboard. To enter a word, lift your finger,
or tap a word at the top of the keyboard.
3. While entering text, use these options:
If you make a mistake, tap
delete an entire word or field.
By default, Swype starts with a capital at the beginning of text. Tap
or tap
letter,
Tap
Tap
to switch to a symbols keyb
to switch to Google voice typing
twice to enter all capitals.
ers to form a word. As you swipe over letters, words
to delete a single character. Touch and hold
to start with a capital
oard, and then tap keys to enter symbols.
to enter text by speaking. See Google Voice Typing.
Configure Swype
You can configure options for Samsung keyboard. For more information, see Swype Settings.
■ From home, tap Apps > Settings > Controls tab > Language and input, and then tap
Swype.
to
Tips for Editing Text
Your tablet gives you many options to make entering text easier, including copying, cutting, and pasting
text, using voice-to-text input, customizing the user dictionary, using predictive text, and more.
■ Double-tap text to highlight it, and then select from the following options:
Note: Text
Select all: Highlight all the text in the field.
Cut: Remove the selected text and save it to the clipboard.
Copy: Copy the selected text to the clipb
Paste: Insert the last copied or cut text into the cu
Clipboard: Display the clipboard to choose previously cut
Dictionary: Access your personal dictionary.
editing options and ic
ons may differ depending on which app you are using.
oard.
rrent field.
or copied text.
Tablet Basics
24
Page 33

Contacts
The Contacts application lets you store and manage contacts from a variety of sources, including
contacts you enter and save directly in your tablet as well as contacts synchronized with your Google
Account, your PC, compatible email programs (including Exchange Server), and your Facebook friends.
Get Started with Contacts
Before using Contacts, it is best to learn a few basics.
● Your tablet automat
● Contacts can
account—such as a Google contact or a Corporate (Microsoft Exchange ActiveSync) contact.
When you create a new contact, you will be asked where you want to store the contact. Some
options are:
Device contacts are stored in device memory.
Google contac
your tablet after you have created a Google Mail account.
Samsung account conta
account, if you have a Samsung account set up on your tablet.
Microsoft Exchange ActiveSync contacts a
Access Contacts
■ From home, tap Apps > Contacts.
ically sorts the Contacts entries alphabetically.
be stored in device memory. You can also create contacts that sync with an
ts are shared with your existing Google Account and can also be imported to
cts are synchronized between your tablet and your Samsung
re shared with a Microsoft Exchange account.
Add a Contact
You can add contacts directly into the Contacts application. Enter details such as name, tablet numbers,
email addresses, mailing addresses, and more.
1. From home, tap
2. Tap
3. Tap contact fields to enter information. While entering information, tap
and tap
Picture: Tap
Contacts
25
, and then choose a storage account, if you have multiple accounts set up on your tablet.
to choose a label.
Apps > Con
to as
sign a picture to the new entry.
tacts.
to add another field,
Page 34

Name: Use the keyboard to enter the name. Tap
additional name fields.
Phone: Enter a phone number
Email: Enter an email addres
Groups: Assign the contact to a group.
.
s.
next to the Name field to display
Add another field: Add
4. Tap Save to save the
new contact.
ield(s) for the contact.
new f
Edit a Contact
Once you have added a contact, you can add or edit any of the information in the entry.
Add or Edit Information
You can modify existing contact information to keep your information up-to-date.
1. From home, tap Apps > Contacts.
2. Tap a contact to display it, and then tap
3. Tap any field you want to change or add.
4. Add or edit
the information, and then tap Save.
Assign a Photo to a Contact
Adding a photo to a contact entry creates a more personal and easily recognized entry. For example,
when receiving messages from one of your contacts, the associated picture will display.
.
1. From home, tap Apps > Contacts.
2. Tap a contact to display it, and then tap
3. Choose an image. Options are:
Images: Select a photo from the Gallery.
Tagged pict
Take picture: Take a ne
4. Follow the prompts to crop the picture, and then tap Done.
cts
Conta
ures: Select photos from the Galle
w photo of the contact.
.
ry which been tagged with people’s names.
26
Page 35

Link a Contact
When you have contacts from various sources (Gmail, device, Facebook, etc.), you may have multiple
similar entries for a single contact. Your tablet’s Contacts application lets you link multiple entries into a
single contact.
1. From home, tap
2. Tap a contact to display it, and then tap
3. Tap another entry to link it to the original contact.
Apps > Contacts.
> Link contact.
Delete a Contact
You can delete a contact from the contacts details page.
1. From home, tap Apps > Contacts.
2. Tap
3. Tap one or more contacts to delete, and then tap Done.
4. Tap OK.
Tip: You can
> Delete contacts.
also tou
ch and hold the contact and then tap
Delete > OK.
Add Contacts to Your Favorites
The Favorites tab is a listing that can help you quickly access your most used or preferred Contacts
entries. Favorite Contacts display an orange star .
1. From home, tap Apps > Contacts.
2. Tap a contact to display it, and then tap
Note: To remove a Contact from your Favorites tab, tap
.
.
Share a Contact
You can quickly share contacts using Bluetooth, Drive, Email, Gmail, or Wi-Fi Direct.
1. From home, tap Apps > Contacts.
2. Tap a contact to display it, and then tap
3. Tap to sele
Add to Drop
Contacts
27
ct one of the following sharing methods:
box: Save or share the name card v
> Share name card via.
ia Dropbox.
Page 36

Bluetooth: S
end the
name card via Bluetooth. See Bluetooth for more inf
ormation.
Drive: Send the name card to your Google Drive a
Email: Send the name card as an email
information.
Gmai
information.
Wi-Fi Direct: Send the name card via a device-to-device connection. See Wi-Fi Direct for
more information.
Groups
This feature allows you to add a new or existing contact to a group. This group can be one of the already
present groups (Family, Friends, or Work) or a user-created group.
l: Send the name card as a Gm
attachment. See Compose and Send E
ail attachment. See Send a Gmail Message for more
ccount. See Drive for more informatio
mail for more
n.
Create a New Group
You can create new groups and add members.
1. From home, tap Apps > Contac
2. Tap
.
ts > Groups tab.
3. Enter information about the group:
Tap the Group name field
Tap Add member and selec
4. Tap Done wh
en you are finished adding members, and then tap Save.
and enter a name for the new group.
t a member or members to add to the new Group list.
Add a Contact to a Group
You can add new members to a group from your Contacts.
1. From home, tap Apps > Contacts > Groups tab.
2. Tap a group to display it, and then tap > Add member.
3. From the list of contacts, tap the contact
4. Tap Done to add the
contact to the group.
(s) you want to add.
Contacts
28
Page 37

Send an Email or Gmail to Group Members
You can send an email or Gmail to all or selected members of a group.
1. From home, tap Apps > Conta
2. Tap an existing group and then tap
3. Select the recipients of the new message and then tap Done.
4. Tap Email or Gmail,
once to be asked each time which service to use.
5. Compose and send your email. For more inf
Gmail Message.
and then tap Always to use this as the default sending method, or Just
cts > Groups tab.
> Send email.
ormation, see Compose and Send E
mail or
Send
a
Co
ntacts
29
Page 38

Accounts and Messaging
Set up accounts on your tablet, to synchronize information between your tablet and accounts.
Many of your tablet’s applications, such as Gmail, Google Hangouts, and the Google Play store, require a
Google Account. To use these applications, you must set up your Google Account on your tablet. Setting
up your account on your tablet syncs your tablet and your online Google Account.
Create a Google Account
If you do not already have a Google Account, you can create one using your tablet.
Note: Although you need a Gmail account to use certain features of your tablet, such as Google Play
store, you do not need to use Gmail as the default account for your tablet.
1. From home, tap
2. Tap Add account > Google > Or create a new account.
3. Follow the prompts to create your free account.
Apps > Settings >
General tab > Accounts.
Sign In to a Google Account
If you have a Google Account but have not yet signed in on your tablet, follow these instructions to sign
in.
1. From home, tap
2. Tap Add account > Google.
3. Tap Enter your email, enter the Gmail address for your account, and then tap Next.
4. Follow the prompts to enter your password, and then choose options for your account.
Apps > Settings > General tab > Accounts.
Access Gmail
Below are procedures for accessing your Gmail account.
1. From home, tap Apps > Gmail.
2. Do any of the following:
View more emai
more messages and conversations.
Accounts and Messaging
l messages: If the Inbox is full, swipe your finger up the screen to view
30
Page 39

Read a new email messa
message (just-arrived items display in bold).
ge: Tap the unread message or the conversation with an unread
Select messages and conversations: Tap the circl
View the Inbox of another Gmail account: Tap
the inbox of
the Gmail account you want to view.
e to the left of the email or conversation.
at the top of the screen and then tap
Send a Gmail Message
Below are procedures for sending a Gmail.
1. From home, tap Apps > Gmail.
2. From the Inbox, tap
Enter the message recipient’s email address in the To field. You can add multiple rec
Note: To send a carbon copy (CC) or a blind carbon copy (BCC) of the email to other recipients, tap
Tap Subject and enter the
Tap Compose email and compose your message.
To add an attachm
.
ent, tap
email subject.
.
ipients.
.
3. To send the message, tap
To save the current email as a draft, tap
messages, from the Inbox, tap Drafts.
To delete the current email message, tap
.
> Save draft. To later view your draft email
> Discard.
Read and Reply to Gmail Messages
Below are procedures for reading and replying to Gmail messages.
1. From home, tap Apps > Gmail.
2. Tap a message to display its contents.
Tip: You can also access new messages through the notification panel. When a new Gmail message
arrives, you will see the icon in the status bar. Touch, hold, and drag the bar down to display notifications.
Tap a message to display it.
3. At the top of the message, tap
4. To send the message, tap
Re
ply, Forward, or
.
> Reply all.
Accounts and Messaging
31
Page 40

Use the Email application to send and receive email from your webmail or other accounts. You can also
access your Exchange ActiveSync email on your tablet.
Add an Email Account
Email allows you to send and receive email using various email services. You can also receive text
message alerts when you receive an important email.
1. From home, tap
2. Tap Add account > Email.
3. Follow the prompts to set up and configure your account.
Apps > Sett
ings > General tab.
Add a Microsoft Exchange ActiveSync Account
The Email application also provides access to your Microsoft Exchange account from your tablet. If your
company uses Microsoft Exchange Server 2003, 2007, or 2010 as the corporate email system, you can
use this email application to wirelessly synchronize your email, Contacts, and Task information directly
with your company’s Exchange server.
Use the following procedure to synchronize your tablet with a corporate email account.
Note: You can set up multiple Microsoft Exchange ActiveSync accounts on your tablet.
1. From home, tap
2. Tap
3. Follow the prompts to set up and configure your account.
Add account > Microsoft Exchange ActiveSync.
Apps > Sett
ings > General tab.
Note: Consult your network administrator for assistance in configuring your account.
unts and Messaging
Acco
32
Page 41

Compose and Send Email
Compose and send email using any account you have set up on your tablet. Increase your productivity by
attaching files such as pictures, videos, or documents to your email messages.
1. From home, tap
Apps > Em
ail.
2. From the Inbox, tap .
Tap the To
message recipients as you want.
To send a carbon copy (Cc) or a blind carbon copy (Bcc) of the current email to other
re
cipients, add their email addresses in the Cc/Bcc field. To view Cc or Bcc fields, tap
Tap the Subject field and enter the email subject.
3. Tap the text area to compose your email.
To add an attachment, tap
Video, Record video, Audio, Memo, Calendar, Contacts, or Maps.
4. To send the message, tap
field and e
nter the recipient’s email address in the To field. You can add as many
. Choose from the following: My Files, Images, Take picture,
.
View and Reply to Email
Reading and replying to email on your tablet is as simple as on your computer.
1. From home, tap Apps > Email.
.
2. From the email account Inbox, tap a message to view it.
3. Tap
the message to new recipient(s) in the To field.
4. Enter a message (if desired) and then tap
Accounts and Messaging
Reply, Reply All to reply to the original recipient list, or tap
.
33
Forward to forward
Page 42

Manage Your Email Inbox
The following procedures allow you to view, refresh, sort, and delete your email messages.
View Your Email Inbox
1. From home, tap Apps > Email.
2. If you have more than one account set up on your tablet, tap the list at the top of the screen and
choose an account.
Refresh an Email Account
Whatever your automatic synchronization settings are, you can also synchronize your sent and received
email messages manually at any time.
1. From home, tap Apps > Email.
2. Select an email account.
If you are already in an email account, tap the acco
your email accounts.
Select an available email account.
unt name field (top left corner) to list all of
3. Tap
Refre
sh.
Filter Email Messages
1. From home, tap Apps > Email.
2. From the email account Inbox, tap > Filter by.
3. Select from the options to filter email messages by: date received (most recent or oldest), by
se
nder, read/unread status, attachments, starred favorites, priority, subject, flag, request, meeting
requests, or size. (Not all options are available for all email accounts.)
Delete an Email Message
1. From home, tap Apps > Email.
2. From the email account Inbox, tap the email message you want to delete.
3. Tap
Delete > De
lete.
Accounts and Messaging
34
Page 43

Edit Email Settings
You can edit general preferences, which apply to all email accounts, or configure settings for specific
email accounts, such as email address and password, name display and signature, frequency of retrieval,
and more.
Note: Available settings depend on the type of email account.
Edit General Preferences
Configure options that affect all of your email accounts.
1. From home, tap Apps > Email.
2. Tap
> Settings > General settings to configure settings. Available settings depend on the
type of email account, and may include:
Display: Set how emails are shown in the email list and when you open them.
Composing and sending: Set
emails.
Auto advance: Ch
Confirm deletions: Choo
mark emails for deletion.
Priority sender settings: Maintain
addresses receive priority handling.
Spam addresses: Edit the list of senders and domains reported as spam.
oose how the email list displays after you delete or move an email.
what functions are available while composing and sending
se whether the tablet prompts you to confirm the action when you
a list of email addresses to ensure that emails from the
Edit Account Settings
You can edit settings for your individual email accounts, such as email address and password, name
display and signature, frequency of retrieval, and more.
Note: Available settings depend on the type of email account.
1. From home, tap
2. Tap
Accounts a
nd Messaging
Apps > Em
> Settings, and then tap an account to configure settings.
35
ail.
Page 44

Remove an Email Account
If you no longer want an email account on your tablet, you can delete it through the email settings menu.
1. From home, tap Apps > Email.
2. Tap > Settings.
3. Tap the account to delete.
4. Tap Remove account > Remove.
Samsung Account
Create a Samsung account for access to Galaxy Apps and much more.
When you sign in to your Samsung account on your tablet, you can access Samsung-specific content and
features.
1. From home, tap
2. Tap Samsung account, and then tap Create account with Google ID, Create account, or
Sign in.
3. Follow the prompts to sign into your account, or create a new account.
Note: Tap Help for more information about Samsung accounts, or for help with your account.
Apps > Settings > General tab > Accounts > Add account.
Social Networking Accounts
Stay in touch on the go with all your social networking accounts.
Post updates, read what your friends are up to, upload pictures and check-ins, and more with on-the-go
Facebook access.
Download and Install Facebook
Before using Facebook on your tablet, you will have to download and install the app from the Google Play
store. See
Find and Install an App for details.
1.
2. Tap the Google play search field at the top, and then search for Facebook.
3. Tap Facebook from the results, tap Install, and follow the prompts to download and install the
app.
Accounts and Messaging
From home, tap
Apps > Play Store.
36
Page 45

Use Facebook on Your Tablet
1. From home, tap Apps > Facebook.
2. Follow the prompts to enter your Facebook account details and sign in to your account.
Google+
Google+ makes messaging and sharing with your friends a lot easier. You can set up Circles of friends,
visit the Stream to get updates from your Circles, use Hangouts for chatting with everyone in your Circles,
or use Instant Upload to automatically upload videos and photos to your own private album on Google+.
Visit
google.com/mobile/+/
Google+ uses your Google Account. If you don’t already have a Google Account set up on your tablet,
you can set one up. For more information, see
for more information.
Create a Google Account.
■ From home, tap
Apps > Google+.
Hangouts
Hangouts is an online place to meet friends and family, share photos, and host video calls. Conversation
logs are automatically saved to a Chats area in your Gmail account.
Hangouts uses your Google Account. If you don’t already have a Google Account set up on your tablet,
you can set one up. For more information, see
From home, tap
■
Apps > Hangouts.
Create a Google Account.
YouTube
YouTube is a video sharing website on which users can upload and share videos. The site is used to
display a wide variety of user-generated video content, including movie clips, TV clips, and music videos,
as well as video content such as video blogging, informational shorts, and other original videos.
Note: YouTube is a data-intensive feature. Check your data plan to avoid additional data charges.
■ From home, tap
Apps > YouTube.
Accounts and Messaging
37
Page 46

Apps and Entertainment
All your tablet’s features are accessible through the Apps list.
Google Play Store
The Google Play store is the place to go to find new Android apps, games, movies, music, and books for
your tablet. Choose from a wide variety of free and paid apps ranging from productivity apps to games.
When you find an app you want, you can easily download and install it on your tablet.
To access the Google Play store you must have a Google Account set up on your tablet.
Important: Third-party applications may access your personal information or require your service provider
to disclose your customer information to the third-party application provider. To find out how a third-party
application will collect, access, use, or disclose your personal information, check the application
provider’s policies, which can usually be found on their website. If you aren’t comfortable with the third-
party application’s policies, don’t use the application.
Find and Install an App
When you install apps from the Google Play store app and use them on your tablet, they may require
access to your personal information (such as your location, contact data, and more) or access to certain
functions or settings of your tablet. Download and install only apps that you trust.
Note: You need a Google Wallet account to purchase items from the Google Play store app.
1. From home, tap
2. Browse through the categories, find an app you are interested in, and tap the name.
3. Follow the prompts to download and install the app.
Warning: R
functions or a significant amount of your data. Once you tap OK on this screen, you are responsible for
the results of using this item on your tablet.
ead the notification carefully! Be especially cautious with apps that have access to many
Apps > Play
Store.
Open an Installed App
Open a newly installed app via the apps menu.
■ From home, tap Apps and
Apps and Entertainment
38
then tap the app icon.
Page 47

Uninstall an App
You can uninstall any app that you have downloaded and installed from Google Play. You cannot
uninstall apps that are preloaded on your tablet.
1. From home, tap Apps > Settings > General tab > Application manager > Downloaded
tab.
2. Tap the app you want to uninstall, and then tap Uninstall.
3. Follow the prompts to complete the uninstall.
Google Play Books
With Google Play Books, you can find more than 3 million free e-books and hundreds of thousands more
to buy in the Google Play store. Visit
■
From home, tap
Apps > Pl
play.
google.com/about/books
ay Books.
to learn more.
Google Play Games
Google Play Games is the easiest way for you to discover new games, track achievements and scores,
and play with friends around the world. It brings all your gaming on Google Play together in a unified
Android experience. Visit play.google.com/about/games to learn more.
■
From h
ome, tap
Apps > Pla
y Games.
Google Play Newsstand
Formally Google Play Magazines, Play Newsstand combines Play Magazines and Google Currents to
bring you free and paid news, magazine subscriptions, and much more all in one place. Visit
google.com/store/newsstand
play.
■ From h
ome, tap
to learn more.
Apps >
Pla
y Newsstand.
Google Play Movies & TV
The Google Play Movies & TV application allows you to connect to the Google Play store and download a
movie or TV show to watch instantly. Choose from thousands of movies and TV shows, including new
releases and HD titles in Google Play and stream them instantly on your Android tablet. Previously rented
movies are automatically added to your My Movies library across your devices. Visit
google.com/about/movies
play.
■ From h
ome, tap
to learn more.
Apps >
Play
Movies & TV.
Apps and Entertainment
39
Page 48

Google Play Music
Google Play Music lets you browse, shop, and play back songs purchased from the Google Play store
app, as well as songs you have loaded from your own music library. The music you choose is
automatically stored in your Google Music library and instantly ready to play or download. Visit
play.google.com/store/music to learn more.
Note: For information about loading music onto your tablet, see Transfer Files Between Your Tablet and
a Computer.
■ From home, tap
Apps > Play Music.
Google Maps
Use the Google Maps application to find directions, location information, business addresses, etc.
Determine your current location with or without GPS, get driving and transit directions and get tablet
numbers and addresses for local businesses.
Note: Google Maps may require you to turn on Location. For more information about location settings,
see
Location Settings.
■ From home, tap
Apps > Maps.
Music Player
The Music player is an application that can play music files. Launching the Music player allows you to
navigate through your music library, play songs, and create playlists (music files bigger than 300 KB are
displayed).
Note: For information about loading music onto your tablet, see Transfer Files Between Your Tablet and
a Computer.
1. From home, tap
2. Tap a libr
to view the available music files.
3. Scroll through the list of songs and tap an entry to begin playback.
Apps and Entertainment
Apps > Music.
ary category on the top of the screen (Playlists, Tracks, Albums, Artists, or Folders)
40
Page 49

NextRadio
NextRadio is an FM tuner application that receives FM radio broadcasts in your local area. NextRadio
also provides a data service for radio broadcasters to share information about their station and their
broadcast content so that listeners can receive real-time updates as they listen.
■ From home, tap
Note: To listen to radio from your tablet, you must plug in either headphones or a speaker cable to the
headphone jack on top of the tablet. To listen through the tablet's speaker (after plugging in headphones),
tap
More options > Output to speaker.
Apps > NextRadio.
Spotify
Spotify gives you millions of songs at your fingertips. The artists you love, the latest hits, and new
discoveries just for you. Hit play to stream anything you like.
1. From home, tap
2. Follow t
account from your tablet.
he prompts to update the app and then log in to your Spotify account or sign up for a new
Apps > Spotif
y.
Sprint Music Plus
With Sprint Music Plus and the Music Store, you can purchase, download, and play music on your tablet.
Access Sprint Music Plus
1. From home, tap Apps > Sprint Music Plus.
2. The firs
3. Tap a store option from the main page or tap
t time you launch the app, tap Accept to accept the Terms and Conditions.
> Music (under Library) to access your music.
Tap the navigation tools to skip ahead or rewind. Tap
options.
For more information, tap
> Settings > About or Help.
at any time to see additional
Purchase and Download Music from the Sprint Music Plus Store
From the Sprint Music Plus Store, you can shop for songs to purchase and download to your tablet.
1. From home, tap Apps > Spri
2. Enter
Apps and Entertainment 41
a song or artist in the search field or browse through options in the tabs in the center of the
screen.
nt Music Plus > Music Store.
Page 50

3. Tap a s
ong to sele
ct it. (The song information screen is displayed.)
4. Follow the instructions to preview or purchase the song. Tap
Musi
c Plus menu.
Note: If you have loaded music on to your tablet from your computer (see Transfer Files Between Your
Tablet and a Computer), you will need to sync your music to listen to it through Sprint Music Plus. From
the Sprint Music Plus app, tap
see your music in the library.
> Settings > Synchronize your music library. Once s
at any time to display the Sprint
ynced, you will
World Clock
View the date and time in any time zone.
1. From home, tap Apps > World Clock. A map of the world displays with the locations you
have added flagged.
2. Tap
city name to add it
3. Configure list options:
to add a city. Search for or swipe through the list to find a city to add, and then tap the
to the list.
To change the order of the cities,
to move it to a new position in the list. Tap Done to save changes.
Menu > Change order. Touch and drag
on an entry
To delete citi
Delete.
es, tap
Menu > Select. Select each city you want to delete, and then tap
Apps and Entertainment 42
Page 51

Web and Data
The following topics address your tablet’s data connections and the built-in Web browser. Additional datarelated features can be found in
ndar.
Cale
Your tablet’s data capabilities let you wirelessly access the Internet or your corporate network through a
variety of connections, including:
Account
s and Messaging
Internet
Your tablet’s Web browser gives you full access to both mobile and traditional websites on the go, using
your tablet’s 3G, 4G, or Wi-Fi data connections.
, Apps a
nd Entertainment
, and
Tools and
■ From home, tap Apps > Intern
et.
Chrome
Use Chrome for Mobile to browse fast and sign in to bring your Chrome experience from your computer,
anywhere you go.
For more information, visit google.com/intl/en/chrome/browser/mobile.
■ From home, tap
Apps > Chrome.
Data Services General Information (Sprint
4G LTE and 3G Networks)
The following topics will help you learn the basics of using your data services, including managing your
user name, launching a data connection, and navigating the Web with your tablet.
4G LTE
The Sprint 4G LTE network provides your tablet with wireless Internet access over greater distances than
Wi-Fi and delivers data transfer rates of up to 60 Mbps. To connect your tablet to Sprint 4G LTE, you
need to be in an area covered by the Sprint 4G LTE network.
For more information about the availability of Sprint 4G LTE in your
Note: The availability and range of the network depends on a number of factors, including your distance
to the
base station and infrastructure and other objects through which the signal passes.
Web and Data 43
location, visit sprint.
com/coverage.
Page 52

Set Your Network Options
Icon
Description
1. From home, tap Apps > Settings > Connections tab > More networks > Mobile
networks > Network mode.
2. Select LTE/CDMA or CDMA. The tablet will scan for the best available Sprint network and will
automatically connect to it.
When your device is connected to the Sprint 4G LTE network, the
the status bar.
Note: The 4G network is self-discoverable, which means no additional steps are required for your tablet
to connect to it.
Sprint
4G LTE icon app
ears in
Your User Name
When you buy your tablet and sign up for service, you are automatically assigned a user name, which is
typically based on your name and a number, followed by “@sprintpcs.com”. (For example, the third John
Smith to sign up for Sprint data services might have jsmith003@sprintpcs.com as his user name.)
When you use data services, your user name is submitted to identify you to the Nationwide Sprint
Network. Your user name is automatically programmed into your tablet. You don’t have to enter it.
Update Your User Name
If you choose to change your user name and select a new one online, or make any changes to your
services, you must then update the profile on your tablet.
1. From home, tap Apps >
2. Tap
Update Profile.
Settings
>
General tab > System Update.
Data Connection Status and Indicators
Your tablet displays the current status of your data connection through indicators at the top of the screen.
The following symbols are used:
3G data: The tablet is connected to a 3G data network.
4G LTE data: The tablet is connected to a 4G LTE network.
Wi-Fi
Wi-Fi provides wireless Internet access over distances of up to 300 feet. To use your tablet’s Wi-Fi
features, you need access to a wireless access point or “hotspot.”
The availability and range of the Wi-Fi signal depends on a number of factors, including infrastructure and
other objects through which the signal passes.
Web and Data
44
Page 53

For information about configuring Wi-Fi settings, see Wi-Fi Settings.
Note:
Turn Wi-Fi on and Connect to a Wi-Fi Network
Turning on Wi-Fi allows your tablet to discover and connect to compatible in-range Wi-Fi networks (or
WAPs—wireless access points).
When Wi-Fi is turned on, your tablet will notify you of available Wi-Fi networks, and you can connect to
the Wi-Fi networks. Turn Wi-Fi off when not in use, to conserve battery power.
Turn Wi-Fi on or off
1. From home, tap Apps > Settings > Connections tab > Wi-Fi.
2. Tap the ON/OFF switch to turn Wi-Fi on or off.
Note: You can also turn Wi-Fi on or off from the notification panel. Drag down from the top of the screen,
and then tap the Wi-Fi Quick settings button.
Scan and Connect to a Wi-Fi Network
1. From home, tap Apps > Settings > Connections tab > Wi-Fi.
2. Tap the ON/OFF switch to turn Wi-Fi on.
3. Wi-Fi a
4. The netw
When
When
utomatically begins scanning for available networks. Tap
to the network. Enter the password and tap Connect. You can tap the Show password
option to display the password as you enter it.
ork names of detected Wi-Fi networks are displayed.
you select an open network, you will be automatically connected to the network.
you select a secured network, you will need to enter the wireless password to connect
> Scan to begin a new scan.
Manually Add a New Wi-Fi Connection
1. From home, tap Apps > Settings > Connections tab > Wi-Fi.
2. Tap the ON/OFF switch to turn Wi-Fi on.
3. Tap Ad
option.
4. Tap the Enter SSID field to enter the Network SSID. This is the name of your Wi-Fi network.
5. Tap the Secu
on your target network.
6. Tap Co
d Wi-Fi network. You may need to swipe to the bottom of the networks list to find the
rity field and select a security option. This must match the current security setting
nnect to store the new information and connect to the Wi-Fi network.
Note: The next time your
need to enter the details again unless you reset your tablet's settings.
Web and Data
tablet detects a known Wi-Fi network, it will connect automatically. You won't
45
Page 54

Wi-Fi Direct
Wi-Fi Direct allows devices to connect to each other directly via Wi-Fi, without a Wi-Fi network or hotspot,
and without having to set up the connection. For example, your tablet can use Wi-Fi Direct to share
photos, contacts and other content with other Wi-Fi Direct devices.
1. From home, tap
2. Tap the ON/OFF swit
>
3. Tap
tap Scan to begin a new scan.
4. After sc
connection.
Wi-Fi Direct. Your tablet automatically scans for nearby Wi-Fi Direct devices, or you can
anning for devices, select a device, and then follow the prompts to complete the
Apps > Settings > Connections tab > Wi-Fi.
ch to turn Wi-Fi on. Wi-Fi must be on to configure Wi-Fi Direct settings.
Bluetooth
Bluetooth is a short-range communications technology that allows you to connect wirelessly to a number
of Bluetooth devices, such as headsets and hands-free car kits, and Bluetooth-enabled handhelds,
computers, printers, and wireless devices. The Bluetooth communication range is usually approximately
30 feet.
Note: For information about configuring Bluetooth settings, see Bluetooth Settings.
Turn Bluetooth On or Off
The following procedures will guide you through turning on and turning off Bluetooth.
1. From home, tap Apps > Setting
2. Tap the Bluetooth
Tip: You
down and tap the Bluetooth Quick settings button.
Note: Turn off Bluetooth when not in use to conserve battery power, or in places where using a wireless
device is prohibited, such as aboard an aircraft and in hospitals.
can also turn Bluetooth on and off through the notification panel. Drag the notification panel
ON/OFF slider to turn Bluetooth on or off.
s > Connections tab > Bluetooth.
Pair with a Bluetooth Device
Pairing initiates a connection between your tablet and the target device, usually by using a passcode or
PIN. After pairing, your tablet and the target device recognize each other and exchange information
without having to enter a passcode or PIN.
1. From home, tap
2. Tap the ON/OFF slider t
Web and D
ata 46
Apps > Sett
o turn Bluetooth on.
ings > Connections tab > Bluetooth.
Page 55

Make sure that the target device is discoverable, so that your tablet can find it. Refer to the
3.
instructions that came with the target device to find out how to set it to discoverable mode.
Tap Scan. Your tablet will
4.
When you see the name of the target device displayed in the Bluetooth devices section, tap the
5.
name. Your tablet then automatically tries to pair with the target device.
If automatic pairing fails, enter the passcode supplied with the target device.
The pairing and connection status is displayed below the target device in the Bluetooth devices section.
When you are co
Note: Due to different specifications and features of other Bluetooth-compatible devices, display and
operations may be different, and functions such as transfer or exchange may not be possible with all
Bluetooth-compatible devices.
mmunicating with the target device,
start to scan for Bluetooth devices within range.
(Bluetooth connected) displays in the status bar.
Reconnect to a Bluetooth Device
When you have paired your tablet with another device, you should be able to reconnect it automatically
by turning on Bluetooth on your tablet.
1. From home, tap
2. Tap the ON/OFF slider to turn B
3. Make sure that the target device is discoverable.
Apps > Settings >
luetooth on.
Connections tab > Bluetooth.
4. Tap the targe
5.
If prompted to enter a passcode, try 0000 or 1234, or consult the target device’s documentation to
find the passcode.
you still cannot reconn
If
Device, and then follow the instructions in Pair with a Bluetooth Device.
t device’s name in the Bluetooth devices section.
ect, follow the instructions in
Disconnect or Unpair from a Bluetooth
Disconnect or Unpair from a Bluetooth Device
Follow these instructions to disconnect or unpair your tablet from a Bluetooth device.
Disconnect from a Bluetooth Device
1. From home, tap Apps > Settings > Connections tab > Bluetooth.
2. Tap the ON/OFF slider to turn Bluetooth on.
3. Tap the connected device, and then tap OK to disconnect.
Web and Data 47
Page 56

Unpair from a Bluetooth Device
You can make your tablet forget its pairing connection with another Bluetooth device. To connect to the
other device again, you may need to enter or confirm a passcode again.
From h
1.
Tap the ON/OFF
2.
In the Bluetooth devices section, tap
3.
ome, tap Apps > Settings > Connections tab > Bluetooth.
slider to turn Bluetooth on.
next to the device, and then tap Unpair.
Send Information Using Bluetooth
You can use Bluetooth to transfer information between your tablet and another Bluetooth-enabled device
such as a tablet or notebook computer. The first time you transfer information between your tablet and
another device, you need to enter or confirm a security passcode. After that, your tablet and the other
device are paired, and you will not need to exchange passcodes to transfer information in the future.
You can send the following types of information, depending on the device you are sending to:
●
Images and videos
●
Calendar events
●
Contacts
●
Audio files
The location where the information is saved depends on the type of information and the receiving device.
1.
Set the receiving device to discoverable mode. You may also need to set it to “Receive Beams”
or “Receive Files”. Refer to the device’s documentation for instructions on receiving information
over Bluetooth.
2.
On your tablet, open the application that contains the information or file you want to send.
3.
Follow the steps for the type of item you want to send:
Photos and videos (in Galler
Share via > Bluetooth.
Calendar event: In the Calendar’s Day view, Agenda view, or Week view, tap the event and
then tap
Music track: This feature is available through the Music Player. With the track displayed on
the Now playing screen, tap
4.
Tap the name of the receiving device.
5.
If prompted, accept the connection on the receiving device, and enter the same passcode on both
your tablet and the other device, or confirm the auto-generated passcode.
y). On the Albums tab, tap an album, tap an item, and then tap
Menu > Share via > Bluetooth.
Menu > Listen via Bluetooth.
Web and D
ata 48
Page 57

Receive Information Using Bluetooth
Your tablet is capable of receiving a wide variety of file types with Bluetooth, including photos, music
tracks, and documents such as PDFs.
1.
From home, tap
Apps > Settings > Connections tab > Bluetooth.
2.
Tap the O
3.
On the other device, send one or more files to your tablet. Refer to the device’s documentation for
instructions on sending information over Bluetooth.
4.
Your device will display a notification that a file is being sent. Tap Accept.
5.
To see your new file, tap
N/OFF slider to turn Bluetooth on.
Menu > Received files.
Virtual Private Networks (VPN)
From your tablet, you can add, set up, and manage virtual private networks (VPNs) that allow you to
connect and access resources inside a secured local network, such as your corporate network.
Prepare Your Tablet for VPN Connection
Depending on the type of VPN, you may be required to enter your login credentials or install security
certificates before you can connect to your company’s local network. You can get this information from
your network administrator.
To connect to a VPN, you must have Mobile data enabled, or your tablet must be connected to a Wi-Fi
network. For information about setting up and using these connections on your tablet, see Mobile
Networks and .
Turn Wi-Fi on and Connect to a Wireless Network
Set a Screen Lock
Before setting up a VPN, you must set a screen lock to prevent access to your tablet by unauthorized
users. PIN or password screen locks provide sufficient security to set up trusted credential storage.
1. From home, tap Apps > Settings > Device tab > Lock screen > Screen lock.
2. Choose a screen lock, from PIN or Password.
3. Follow the prompts to configure the screen lock. For more information, see Lock Screen.
Web and Data
49
Page 58

Add a VPN
The following procedures outline the method to use when adding a VPN connection.
1. From home, tap Apps > Settings > Connections tab > More networks > VPN.
2. Tap Add, and then enter the information for the VPN you want to add. The information you
need to enter includes Name, Type, and Server address. Other information for your VPN
network may be required, depending on its configuration. Consult your network administrator for
more details.
3. When finished, tap Sav
e.
Connect to a VPN
The following describes how to connect to a VPN.
1. From home, tap Apps > Settings >
2. In the VPNs section, tap a
3. Follow the prompts to enter your login credentials and connect. When you are connected, t
VPN connected icon appears in the status bar.
VPN.
Connections tab > More networks > VPN.
Memory Card
You can install an optional microSD memory card (not included), to add storage for images, videos,
music, documents, and other files on your tablet. This tablet supports microSD, microSDHC , and
microSDXC
™
cards of up to 64GB capacity.
Install a Memory Card
Use the following procedures to install an optional memory card (not included) in your tablet.
™
he
1. Open the memory card slot cover
2. With the gold conta
until it clicks into place.
Web and Data 50
cts facing down, carefully slide the memory card into the slot, pushing gently
and turn to expose the slot.
Page 59

3. Re
Important: You can easily damage the memory card and card slot by improper operation. Please be
careful when inserting, removing, or handling it.
place the memory card slot cover.
Warning: Do not over-insert the card as this can damage the contact pins.
Remove a Memory Card
Use the following procedures to remove an optional installed memory card (not included) from your tablet.
Important: When you need to remove an optional installed memory card, you must unmount the card first
to prevent corrupting the data stored on it or damaging the card.
1. From home, tap
2. Tap Unmo
3. Open the
4.
Gently
the card out.
unt SD card, and then tap OK.
memory card slot cover and turn to expose the slot.
press in on the memory card so that it pops out from the slot, and then carefully pull
Apps > Settings > General tab > Storage.
5. Replace the memory card slot cover.
Warning: Yo
careful when inserting, removing, or handling it.
Web a
u can easily damage the memory card and card slot by improper operation. Please be
nd Data
51
Page 60

View the Memory Card’s Available Memory
Use the following procedure to view used and available memory on an optional installed memory card
(not included).
See Storage Settings
■ From home, tap
for more information.
Apps > Settings > General tab > Storage.
Format a Memory Card
Formatting permanently removes all files stored on an optional installed memory card (not included).
Note: The formatting procedure erases all the data on an installed card, after which the files cannot be
retrieved. To prevent the loss of important data, please check the contents before you format a card.
1. From home, tap
2. Tap Forma
Apps > Settings > General tab > Storage.
t SD card > Format SD card > Delete all.
Unmount a Memory Card
When you need to remove an optional installed memory card, you must unmount the card first to prevent
corrupting the data stored on it or damaging the card.
1. From home, tap
2. Tap Unmo
Apps > Settings > General tab > Storage.
unt SD card, and then tap OK.
Web a
nd Data
52
Page 61

Camera and Video
Camera
Use the Camera to take and share pictures and videos.
Take Pictures
Launch the Camera app to take pictures.
Important:
Do not take photos of people without their permission.
Do not
take photos in places where cameras are not allowed.
Do not take photos in places where you may interfere with another person’s privacy.
1. From home, tap
2. Slide t
3. Usi
he Camera Mode button to .
ng the display as a viewfinder, compose your picture by aiming the lens at the subject. You
can rotate the tablet to any position, and the screen controls rotate to make taking pictures easy.
Apps > Camera.
4. As you com
5. To tak
Camera
and Video 53
pose a picture, you can:
“Pinch” or “stretch” the screen, or press the Volume key, to zoom in or out.
Configure Camera options. For more information, see Camera Settings.
e the picture, tap the Capture button.
Page 62

Record Videos
Use the Camera to record video.
Important:
Do not take videos of people without their permission.
Do not t
Do not take videos in places where you may interfere with another person’s privacy.
ake videos in places where cameras are not allowed.
1. From home, tap
2. Slide the Cam
3. Using the display as a viewfinder, compose your video by aiming the lens at the subject. You can
rotate the tablet to any position, and the screen controls rotate to make video recording easy.
Apps > Ca
era Mode button to .
mera.
4. Tap
While recording, you
●
● Tap the Pause button to temporarily stop recording.
● Tap the Stop button to stop recording.
Camera and Video 54
Record to
can use these options:
“Pinch” or “spread” the
begin recording.
screen to zoom in or out.
Page 63

Camera Settings
Set options for the Camera.
1. From home, tap Apps > Camera.
2. Tap Settings to configure options:
Camera
• Photo siz
• Metering: Select a method for measuring light.
Video S
• Video si
Camera Settings
• Location
• Review: Review each photo or video after it is created.
• Volume key: Use the volume key as either a zoom key or camera/recording key.
• Timer: Set a delay time to wait between tapping the Camera button and taking a photo.
• White balance: Set the light source.
• Brightness: Use the slider to set the brightness value.
• Guidelines: Enable or disable a grid to aid in photo composition.
Settings
e: Choose a resolution/file size for the photo.
ettings
ze: Choose a resolution/file size for the photo.
tag: Set the GPS tag on or off.
• Voice control: Tap to access voice control settings, for using voice commands to take
pictures and record video.
• Contextual filename: When enabled, filenames include GPS information. GPS tag must
be enabled to use contextual filenames.
• Save as flipped: Save the captured picture as a mirror image. The option is available for
the front camera only.
• Storage: Set whether to store your photos on your tablet or on your memory card, if one
is installed.
• Reset: Set all Camera settings to the defaults.
• Help: View additional information about using the Camera and Camcorder.
Camera and Video
55
Page 64

Gallery
Using the Gallery application, you can view pictures and watch videos that you have taken with your
tablet’s camera, downloaded, or copied to an optional memory card (not included).
For pictures stored on an optional memory card, you can do basic editing such as rotating and cropping.
You can also set a picture as your contact picture or wallpaper and share pictures with your friends.
While viewing pictures in the Gallery, scroll up the screen to view more albums. Simply tap an album to
view the photos or videos in that album.
If you have pictures or videos stored on an optional memory card (not included), they will be displayed in
the folders they are stored in, and folders are treated as albums. The folder names will be used as the
album names. If you have downloaded any photos and videos, these will be placed in the All downloads
album.
1. From home, tap
2. Browse f
included). From the main Gallery screen, you have these options:
iles stored in your tablet’s memory, or on an optional installed memory card (not
Tap a pictu
Tap
Tap
only.)
Tap
Tap
• Sel
• Sl
• Sort b
Menu at top to display files by Albums, All, Time, Locations, People, or Favorites.
to
for options (options vary depending on the view):
ect album/Select item: Depending on the view, tap albums or items to select them.
After sele
ideshow: Choose options to create a slideshow for viewing your pictures and videos.
Apps > Gallery.
re or video to display it in full screen view.
create a new album to organize photos and videos. (Available from Albums view
to launch the Camera.
ction, you can tap
y oldest/latest: Sort items by date (Time view only).
again for options you can use with the selected item.
Came
• Con
• Scan for nearby devices: Scan for Wi-Fi devices to share photos and videos with.
• Sho
• Sett
• He
ra and Video
tent to display: Select which content to display. Options are All content, Content in
device, Content in Dropbox, Content in Facebook, and Content in Picasa.
w/Hide nearby devices: Show nearby devices that can be connected.
ings: Configure Gallery settings.
lp: Get help using Gallery.
56
Page 65

View Photos and Videos
You can browse the photos and videos, and then tap a photo or video to view it in full screen.
1. From home, tap Apps > Gallery.
2. Tap a t
3. Tap
Favorite
Slideshow: View a slideshow of your photos and videos.
Photo frame: Add a decorative frame to the photo.
Write on image: Write a note on the ‘back’ of the photo.
Copy to clipboard: Place the photo on the clipboard for pasting into other apps.
humbnail to view the photo or video. While viewing, you can use these options:
nge player: Send the photo or video to a nearby device (photos only).
Cha
Share via: Choose a method for sharing the photo or video.
Remove the beginning and ending frames of a video (video only).
Trim:
Delet
e: Delete the photo or video.
Camera: Take a new picture or record a new video.
for more options:
: Mark the photo or video as a favorite.
Print: Print the photo to any Samsung printer (not included).
Rename: Rename the photo or video.
Buddy photo share: Share the photo with people tagged in the photo.
Rotate left: Rotate the photo 90 degree to the left.
Rotate right: Rotate the photo 90 degree to the right.
Crop: Crop the photo.
Set as: Set the photo as a Contact photo, or as wallpaper for the home screen and lock
screen.
Details: View file details about the photo or video.
Camera and Video
57
Page 66

Settings: Configure Gallery settings:
• Acco
• SNS data management: Enable Sy
• Tags:
• Sound & shot: Play t
unts: Manage y
when connected to a Wi-Fi network.
Enable Tag buddy and Face tag. Tag buddy identifies each photo with
information such as the weather, location, people in the photo, or date created. Face tag
scans each photo to detect people’s faces, which you can then tag with their name.
mode.
our Google Account information.
nc only via Wi-Fi to only sync photos and videos
he recorded sound when viewing pictures taken in Sound & shot
Zoom In or Out on a Photo
There are two ways you can zoom in or out of a photo.
■ Tap the
– or –
You can al
screen twice quickly to zoom in and then tap the screen twice quickly again to zoom out.
so use pinch and spread to zoom in or out. See Pinch and Spre
Working with Photos
ad.
Tap a photo you are viewing to open a selection menu and choose what to do with it. You can choose to
delete the photo, rotate or crop it, and more.
Rotate and Save a Photo
To rotate or save your photo, follow the procedures below.
1. From home, tap Apps > Gallery.
2. Tap an image t
3. Tap
> Rotate left or Rotate right.
o display the picture.
Crop a Photo
The crop your photos, follow the procedures below.
1. From home, tap Apps > Galler
2. Tap an image t
3. Tap
> Crop.
o view your picture.
y.
4. To adjust the crop box size, touch and hold the edge of the box. When directional arrows appear,
drag your finger inward to or outward to resize the crop box.
Camera and Video 58
Page 67

5. To move t
desired position.
he crop box to the part of the photo that you want to crop, drag the crop box to the
6. Tap Do
The cro
pped picture is saved along with the original copy in your default storage location.
ne to apply the changes to the picture.
Share Photos and Videos
The Gallery application lets you send photos and videos using Gmail or email. You can share photos on
your social networks (such as Facebook, Picasa, and Twitter) and share videos on YouTube. You can
also send them to another device or your computer using Bluetooth.
Send Photos or Videos by Gmail or Email
You can send several photos, videos, or both in a Gmail or email message. They are added as file
attachments in your email.
1. From home, tap
2. Tap the
3. Tap the photos or videos you want to send.
4. Tap the screen and then tap
5. Comp
Message.
album that contains the photos or videos you want to share.
ose your email. For more information, see Compose and Send Email or Send a Gmail
Apps > Gallery.
> Gmail or Email.
: If you selected Email and you have multiple email accounts, the default email account will be used.
Note
Send Photos or Videos Using Bluetooth
You can select several photos, videos, or both and send them to someone’s device or your computer
using Bluetooth.
1. From home, tap
2. Tap the
3. Select the photos or videos you want to send.
4. Tap the screen and then tap
In the next few steps, you will be asked to turn on Bluetooth on your tablet and connect to the receiving
Bluetooth device so the files can be sent. For more information, see Bluetooth.
album that contains the photos or videos you want to send.
Apps > Gallery.
> Bluetooth.
Came
ra and Video
59
Page 68

Share Photos or Videos on Google+
1. From home, tap Apps > Gallery.
2. Tap the albu
3. Tap the photo or video you want to send.
4. Tap the screen and then tap
5. Follow t
m that contains the photos or videos you want to send.
> Google+.
he prompts to share the photo or video.
Share Videos on YouTube
You can share your videos by uploading them to YouTube. Before you do this, you must create a
YouTube account and sign in to that account on your tablet.
1. From home, tap
2. Tap the albu
3. Select the video you want to share.
4. Tap the screen and then tap
5. Enter
6. Tap Upload.
the prompted information, such as description and tags, and select a privacy option.
Apps > Gallery.
m that contains the videos you want to share.
> YouTube.
Video Player
The Video Player application plays video files stored on your tablet, or on an optional installed memory
card (not included).
■ From home, tap
Apps > Video.
Camera
and Video
60
Page 69

Tools and Calendar
Learn how to use many of your tablet’s productivity-enhancing features.
Alarm
Use Alarm to remind yourself of important events.
Create an Alarm
1. From home, tap Apps > Alarm.
2. Tap Create alarm, and then enter information for the alarm.
3. Tap Save to store the new
alarm event.
Turn an Alarm On or Off
Once you set and save an alarm, you can turn it on or off from the Clock menu without deleting the
settings.
1. From home, tap Apps > Alarm.
2. Tap the alarm clock icon next to a saved alarm. The icon is green when the alarm is turned on
(set), and gray when it is turned off.
Delete an Alarm
1. From home, tap Apps > Alarm.
2. Touch and hold an alarm, and then tap Delete.
Tip: From the Alarm app, you can also access Stopwatch and Timer functions. Tap the Stopwatch or
Timer tab at the top of the screen.
Calculator
Your tablet comes with a built-in calculator.
1. From home, tap
2. Tap the keypad t
Tap
Tap Clear histor
Tools and Calendar 61
Apps > Calculator.
o enter your equation.
lear to clear all numbers.
C
y to clear the calculator history.
Page 70

Calendar
Use Calendar to create and manage events, meetings, and appointments. Your Calendar helps organize
your time and reminds you of important events. Depending on your synchronization settings, your tablet’s
Calendar stays in sync with your Calendar on the Web, Exchange ActiveSync calendar, and Outlook
calendar.
Add an Event to the Calendar
Add events to your Calendar to help you organize your time and remind you of important events.
Note: To synchronize calendar events among your Google and Corporate accounts, make sure they are
being managed by your tablet. See Accounts and Messaging for more information.
1. From home, tap
2. Double-tap a day on the calendar or tap
Tap the
Enter a title for the event. Tap the color swatch next to the Title field to tag this event with a
color.
Enter a location for the event in the Location field or tap
Select Start
the month, day, and year. If the event lasts all day, tap the All day check box.
Select an alarm time by tapping the Reminder field.
Tap View more options to view other event settings.
Enter participants in the Participants field.
Tap Show me as to choose how the event shows on your calendar to other event organizers.
Tap Privacy to select who is allowed to see this event. Private allows only the participants to
see the event. Public allows anyone with access to your calendar to see the event.
Calendar field to assign the new event to an account, or save it to the device.
Apps > Calendar.
and End times for the event by tapping the corresponding fields, and adjusting
to add an event.
to select the location on a map.
Select a recurrence cycle for the event by tapping the Repeat field.
Enter a description for the event in the Description field.
Tap a sticker to add it to the event.
Tap Time zone to adjust the time zone.
3. Tap Done to save the new event.
Tools and Calendar
62
Page 71

Add a Task to the Calendar
Add tasks to your Calendar to help you organize your time and remind you of important activities.
Note: To synchronize calendar tasks among your Google and Corporate accounts, make sure they are
being managed by your tablet. See Accounts and Messaging for more information.
1. From home, tap
2. Double-tap a day on the calendar or tap
Tap the Task field to
Enter a Title for t
Select a due date for the task by tapping the corresponding fields and adjusting the month,
day,
and year. If the task is ongoing, tap the No due date check box.
Tap View more options to
• Reminder:
• Description: Enter a description for the task.
• Priority: Set the task’s priority to High, Medium, or Low.
3. Tap Done to
Apps > Ca
assign the new task to an account, or save it to the device.
he task.
Select an alarm time.
save the new task.
lendar.
to add an event, and then tap Task.
view other task settings.
View Events
The following procedure helps you view your calendar events.
1. From home, tap Apps > Ca
2. If desired, change the calendar view by tapping
3. Tap the day
4. To display an event’s details, tap it from the current screen.
for which you would like to view events.
lendar.
and selecting a view.
Delete Events
The following procedures show you how to delete your calendar events.
1. From home, tap
2. In any Ca
– or –
While viewing the event, tap
Tools a
nd Calendar
lendar view, touch and hold the event, and then tap Delete.
Apps > Calendar.
> Delete.
63
Page 72

Drive
With the Google Drive application, everything that you add to your Drive from work or home is also
available on your device. You can create and edit documents on your device and the changes are saved
everywhere.
For more information, visit drive.google.com.
Note
: You will need to set up your Google Account on your tablet to use Drive.
■
From home, tap
Apps > Drive.
Dropbox
Dropbox works to provide access to your desktop files directly from your tablet. This app allows you to
bring your files with you when you are on the go, edit files in your Dropbox from your tablet, upload
photos and videos to Dropbox, and share your selected files freely with family and friends.
The app works in conjunction with a partner program placed on a target computer using an active Internet
connection.
Dropbox creates a folder that automatically synchronizes its contents across all of your connected
devices on your account. Update a file to your Dropbox on your computer, and it’s automatically updated
to the same folder on your other devices.
1. From home, tap
2. Follow the prompts to set up and use Dropbox.
Apps > Dropbox.
Manually Upload a Picture to Dropbox
Follow the below procedures to manually upload pictures to the Dropbox app.
1. From home, tap Apps > Camera, take a picture, and then tap the Image Viewer box at
the bottom right. This previews the current image.
– or –
From home, tap Apps > Gall
2. Tap the imag
3. Tap
Note: If
that a new image was uploaded to your shared Dropbox folder.
your share folder is located on your computer, you will momentarily receive a popup notifying you
e to reveal the image options at the top of the screen.
> Add to Dropbox,
select a folder location, and tap Add.
ery.
Tools and C
alendar
64
Page 73

Hancom Office 2014
Hancom Office 2014 includes a word processor program (Hanword), a spreadsheet program (Hancell),
and a presentation program (Hanshow). In addition to opening, editing, and saving MS Office documents,
Hancom Office 2014 supports standard ODF files and quick and easy conversion to the PDF file format.
■ From home, tap
Apps > Hancom Office 2014.
Google Search
Use Google Search to search the Internet.
■ From home, tap
Apps > Google.
Google Settings
Use Google Settings to manage your Google apps and account settings.
■ From home, tap
Apps > Google Settings.
Google Voice Search
Use Google Voice Search to search the Web by speaking commands.
1. From home, tap Apps > Voi
2. When
the Google Voice Search screen displays, say “OK Google” or tap the microphone icon,
and then speak your command.
ce search.
3. Scroll
Tools and Calendar
down the Voice Search screen to learn about using Voice Search and hear examples,
including:
Get directions
Send messages
Set reminders
Ask questions
Schedule meetings
Play music and movies
Set alarms
Try more voice actions
65
Page 74

1Weather
Check weather and forecasts with 1Weather: Widget Forecast Radar, which combines a groundbreaking
UI with a power set of weather tools.
■ From home, tap
Apps > 1Weath
er.
BaconReader
BaconReader serves up Reddit content in a stylish package with powerful features like subreddit
grouping, domain filtering, full user profile access, and much more.
■ From home, tap Apps > Ba
conReader.
eBay
The eBay app is packed full of features that make it easy to browse, buy, sell, and manage your eBay
experience whenever and wherever you are.
1. From home, tap
2. Follow t
new account to get started.
he prompts to update the app, and then sign in with your eBay account or register for a
Apps > eB
ay.
Help
Help provides online information to help with your questions.
■ From home, tap
Apps > Help.
Lookout Security
Lookout Security provides mobile device-specific security features that are coupled with a minimal
performance hit. Lookout Mobile Security provides key security options that are unique to the mobile
market. Along with the antivirus and anti-malware tech, there’s a lost and stolen tablet locator service, an
application privacy adviser, and a backup service.
■ From home, tap
Tools and C
alendar
Apps > Lookou
t.
66
Page 75

Memo
The Memo application allows you to create and share text memos.
1. From home, tap Apps > Memo.
2. In Memo, you can u
Add to
Menu for available Memo categories and to Manage categories.
Search to enter key words to find a memo.
More options and select one of the following options:
•
Select: Choose m
•
Delete: Select memo(s) to erase.
•
Account: Access your Samsung account, to sync memos with your account.
se these options:
create a new
emo(s), to delete them or for other options like sharing or printing.
memo.
My Files
My files allows you to manage your manage sounds, images, videos, Bluetooth files, Android files, and
files stored on your tablet, or on an optional installed memory card (not included). You can open a file if
the associated app is already on your tablet.
1. From home, tap Apps > My Files.
2. The following f
Timeline: View recently accessed files.
Favorite folder: Drag your favorite folders to this category.
Device storage: View the files saved in your tablet’s internal memory.
Images: View image files.
Videos: View video files.
Audio: View audio files.
Documents: View document files.
Downloaded apps: View downloaded apps.
Download history: View all apps and files that have been downloaded to the tablet.
Apps: View storage apps.
Note: Different folders may appear depending on how your tablet is configur
olders display:
ed.
Tools and Calendar 67
Page 76

NASCAR Mobile
NASCAR MOBILE is designed to bring you what you, the fans, want directly to your Android device.
Follow NASCAR News, Video Highlights, and immerse yourself even further into the NASCAR experience
with driver informational stats, plus more.
1. From home, tap
2. Follow t
drivers, notification options, and more.
he prompts to update the app, and then customize your experience with your favorite
Apps > NASCAR Mobile.
Peel Smart Remote
Use your tablet to control your TV, Set-top box, DVR, Stereos, and other electronic devices.
1. From home, tap Apps
2. Follow t
up your TV and cable/satellite box, etc.
he prompts to configure the service, including selecting your TV service provider, setting
> Peel Smart Remote.
S Voice
Your tablet’s S Voice is a voice recognition application used to activate a wide variety of functions on your
tablet. This is a natural language recognition application.
This goes beyond the Google Search Voice Actions feature that simply recognizes Google commands
and search terms. You can ask it questions (Is it raining in Dallas?) or give it commands (Show me where
to find cheap gas).
1. From home, tap
2. Navi
3. Wake up the application by saying, “Hi Galaxy.”
Note: The wake-up command/phrase can be changed from “Hi Galaxy” to anything else.
4. Tap the
Tools and C
gate through the following tutorial screens by reading the information and tapping Next, or
tap Skip to continue without reading the information.
alendar
Apps > S Voice.
Microphone button if the tablet does not hear you or to give it a command.
68
Page 77

Samsung Apps
Connect to Samsung Apps and make your tablet even smarter. Simply and easily download an
abundance of applications to your tablet such as games, news, reference, social networking, navigation,
and more.
Note: Access to this feature requires that you already be logged in to your Samsung account application.
1. From home, tap
2. Follow the do
wnload and installation instructions.
Apps > Samsung Ap
ps.
Sprint Zone
Access your Sprint account, get tablet information and help, find recommended apps, and more.
1. From home, tap Apps > Sprint Zone.
2. Tap My Account to sign
device or service, Sprint News to learn the latest Sprint information, or Network to see or test
your current data connectivity.
Note: Sprint Zone categories and options are subject to change. Check back frequently for new content
and update
s.
in to and manage your Sprint account, Support to get help with your
Transfer Files Between Your Tablet and a
Computer
You can use the supplied USB connector to connect your tablet directly to your computer and transfer
music, pictures, and other content files.
For example, if you have a music album stored on your computer that you want to listen to on your tablet
with any of the music apps, just attach your tablet to the computer and copy the files to the music folder.
1. Connect your tablet to your computer using the supplied USB/charging cable.
Insert the larger end of the cable to the charger/accessory port at the bottom of the tablet.
Insert the USB end of the cable into an available USB port on your computer. You may need
to remove the USB cable from the charging head to access it.
2. Drag the status bar down to display the notification panel.
You will see either Connected as a media device or Connected as a camera.
•
For most transfers, you will want to use Connected as a media device.
•
To change the option, tap the notification in the notification panel to open the USB
computer connection window, and then tap the desired option.
and Calendar 69
Tools
Page 78

3. On your computer, navigate to the detected device (such as through the My Computer menu) and
open it.
4. Select Tablet for internal tablet storage.
5. Select a folder (for example, Music for songs and albums) and copy files to it from your
computer.
6. When you are done, disconnect your tablet from your computer.
Note: You can also copy files from your tablet to your computer, for example, if you want to save pictures
or videos from your tablet on your computer.
Tools
and Calendar
70
Page 79

Settings
The following topics provide an overview of items you can change using your tablet’s Settings menus.
Settings Tabs
Your tablet's settings are divided into four tabs, accessible by tapping the tab name at the top of the
screen.
Connections: The Connections tab contains network connection settings such as Wi-Fi, Hotspot,
Bluetooth, Tethering, Airplane mode, Data usage, and more.
Device: This tab contains device settings such as Sound, Display, Multi window, Lock screen, Wallpaper,
Font Style, Notification Panel, Accessibility, and Blocking mode.
Controls: This tab contains control settings such as Language and Input, Palm motion, and Smart
screen.
General: This tab contains general settings such as Accounts, Cloud, Backup and Reset, Date and time,
information about your tablet, and more.
Wi-Fi Settings
Wi-Fi provides wireless Internet access over distances of up to 300 feet. To use your tablet’s Wi-Fi, you
need access to a wireless access point or “hotspot.”
For more information about using Wi-Fi, see Wi-Fi.
1. From home, tap
2. Tap the ON/OFF switch to t
3. Tap
to configure these settings:
Scan: Scan for av
Wi-Fi Direct: Connect wirelessly to nearby devices using Wi-Fi.
Advanced:
• Network notification: Send a notification when an open Wi-Fi network is available.
• Passpoint: Connect to passpoint-enabled Wi-Fi networks automatically.
• Sort by: Choose a sorting order for Wi-Fi networks on the Wi-Fi screen.
• Keep Wi-Fi on during sleep: Specify when to switch from Wi-Fi to mobile data for data
communications, when the tablet goes to sleep (when the backlight goes out). This
Apps > Settings > Connections tab > Wi-Fi.
ailable Wi-Fi networks.
urn Wi-Fi on. Wi-Fi must be on to configure settings.
Settings 71
Page 80

ing can affect data usage, since the data connection will remain active even when the
sett
tablet screen is off.
• Always allow scanning: Allow Google location service and other apps to scan for
networks, even when Wi-Fi is turned off.
• Smart network switch: Automatically switch between Wi-Fi networks and mobile
networks to maintain a stable Internet connection.
• Install certificates: Install certificates stored on an optional memory card (not included).
• Wi-Fi timer: Automatically connect or disconnect from a Wi-Fi network, using the Starting
time and Ending times you set.
• MAC address: View your tablet’s MAC address, needed for connecting to some secured
networks. (Not configurable)
• IP address: View your tablet’s IP address. (Not configurable)
WPS push button: Set up a connection to a WPS (Wi-Fi Protected Setup) router or other
equipment.
WPN PIN entry: (Not configurable) View the PIN used by your tablet to set up a PIN-secured
connection to a Wi-Fi router or other equipment.
Share Wi-Fi profile: Share a saved Wi-Fi connection with another connected device through
Wi-Fi Direct.
Help: Get help using Wi-Fi.
Hotspot
Use your tablet as an Internet Access Point (AP) using Hotspot. This allows other devices (maximum of 8)
to connect to the AP via a Wi-Fi network—giving the connected devices access to the Internet.
Connect a Device
1. From home, tap Apps > Settings > Connections tab > Hotspot.
2. Tap the O
3. On the target device, activate Wi-Fi. Then scan for Wi-Fi hotspots. Select the name of your tablet
to connect.
4. On your tablet, follow the prompts to connect the target device.
Settings 72
N/OFF switch to enable Sprint Hotspot.
Page 81

Bluetooth Settings
Bluetooth is a short-range communications technology that allows you to connect wirelessly to a number
of Bluetooth devices, such as headsets and hands-free car kits, and Bluetooth-enabled handhelds,
computers, printers, and wireless devices.
For more information about using Bluetooth, see Bluetooth.
1. From home, tap
2. Tap the ON/OFF swit
3. From the Bluetooth screen, configure these settings:
Tap your tablet’s name to enable or disable visibility to other Bluetooth devices. When your
tablet is visible, other devices can find your tablet during a Bluetooth scan. Your tablet
remains visible for the period of time set in the Visibility timeout setting.
Tap a paired device to connect to it, or tap
Tap
• Visibili
turn on visibility.
• Received files: View files transferred to your tablet via Bluetooth.
• Rename device: Change the name your tablet uses to identify itself when you make your
tablet visible to other Bluetooth devices.
Apps > Sett
ch to turn Bluetooth on. Bluetooth must be on to configure settings.
for more settings:
ty timeout: Set the length of time your tablet is visible to other devices when you
ings > Connections tab > Bluetooth.
beside a device to change its settings.
• Help: View information about using Bluetooth.
Tethering
Share your tablet’s mobile data connection via USB or Bluetooth.
1. From home, tap Apps > Setting
2. Tap Tetherin
Tap USB tethering to share your mobile data connection via USB.
Tap Bluetooth tethering to share your mobile data connection via Bluetooth.
Settings 73
g for options:
s > Connections tab.
Page 82

Airplane Mode
Enabling Airplane mode turns off data network features. It also turns off other connectivity features—such
as Wi-Fi and Bluetooth.
While in Airplane mode, you can use other features of your tablet, such as playing music, watching
videos, or other applications.
While in Airplane mode, the
1. From home, tap Apps > Sett
2. Tap the ON/OFF swit
Note: You can also turn Airplane mode on or off from Notifications. Drag down from the top of the screen,
and then tap the Airplane mode Quick settings button.
icon displays in the status bar.
ings > Connections tab > Airplane mode.
ch to turn Airplane mode on or off.
Data Usage Settings
Monitor data usage, and control your tablet’s connection to mobile data service.
Note: Data is measured by your tablet. Your service provider may account for data usage differently.
1. From home, tap
2. Tap Data usage to configur
Mobile data: Enable or disable Mobile data. You can also control Mobile data via the
notification panel.
Limit mobile data usage: When enabled, your mobile data connection will be disabled when
the specified limit is reached. After enabling the setting, drag the red limit line on the graph
below to set the data usage limit.
Apps > Sett
e options:
ings > Connections tab.
Alert me about data usage: When enabled, your tablet will alert you when mobile data
usage reaches the warning limit you set. After enabling the setting, drag the orange warning
line on the graph below to set the data usage warning limit.
Data usage cycle: Tap the menu, and then choose a time period for data usage. Data usage
for the period displays on the graph, along with usage by application below.
3. Tap
Settings 74
to set options:
Restrict
background, for synchronization or other services. When enabled, background connections
will not occur.
Show Wi-Fi usage: When turned on, a separate tab displays data usage while connected to
Wi-Fi.
background data: Your tablet is capable of connecting to the network in the
Page 83

Mobile hotspots:
using these networks, and you can configure apps to warn you before using these networks
for large downloads.
Select Wi-Fi networks that are mobile hotspots. You can restrict apps from
Mobile networks: Ope
details.
n the Mobile networks settings page. See Mobile Networks
for mo
Location Settings
Control apps’ access to your location, and configure location sources. Some apps may require one or
more location services be turned on for full app functionality. GPS signals may be affected by your
surroundings, including:
● Buildings
● Tunnels or underground structures
● Weather conditions
● High-voltage or electromagnetic fields
● Tinted windows
1. From home, tap Apps > Settings > Connections tab.
2. Tap Locatio
Tap the ON/OFF switch to turn location services on or off. When on, you are allowing
Google’s location service to collect anonymous location data. Some data may be stored on
your device, and collection may occur even when no apps are running. After you turn
Location on, you can configure settings:
n for options:
re
Mode: Choose the method your device uses to determine your location.
• High accuracy: When enabled, your device uses GPS information, Wi-Fi, and mobile
networks to estimate your location.
• Power saving: When enabled, your device uses Wi-Fi and mobile networks to estimate
your location.
• GPS only: When enabled, your device only uses GPS information to estimate your
location.
Recent location requests: View services or apps that have recently accessed your location
information.
Location services: View the current location service. Tap a service to configure options, if
available.
Location sources: Tap My places to save your favorite locations, allowing your device to
provide relevant information by recognizing saved locations.
Settings 75
Page 84

• Tap Home
the location.
• Tap
to set up a new location
, Work, o
r Car, and then follow the prompts to configure options for identifying
More Networks
The More networks menu provides additional wireless and network options.
Printing
You can print from your device, via Wi-Fi, to an optional compatible printer (not included). Your device
and the optional printer must be connected to the same Wi-Fi network.
Turn Print Services on or off
Before you can print from your device, a print service must be turned on. The print service communicates
with the printer when you select something to print.
1. From home, tap Apps > Settings > Connections tab.
2. Tap More net
Service Plugin is available by default. Additional print services may be downloaded from the
Google Play store.
3. Tap the ON/OFF switch to turn the service on or off. The service must be on to configure settings
or print.
works > Printing, and then choose a print service from the list. The Samsung Print
Add a Printer
Before you can print to a printer, you must set it up on your device. You will need to know the IP address
of the printer; consult the printer’s documentation for this information.
1. From home, tap Apps > Settings > Connections tab.
2. Tap More networks > Printing.
3. Choose a print service from the list, and then tap the ON/OFF switch to turn the service on or off.
The service must be on to add a printer.
4. Tap > Add printer > Add printer,
and then enter a name and the IP address of the printer.
Configure Print Settings
Choose options for printing from your device.
Note: These settings are examples only. Available settings will differ depending on the type of print
service and printer you are using.
1. From home, tap Apps > Settings.
2. Tap More net
Settings 76
works > Printing.
Page 85

3. Cho
ose a print service from the list, and then tap the ON/OFF switch to turn the service on or off.
The service must be on to add a printer.
4. Tap a printing service, and then tap
depending on the type of printer.
> Settings to conf
igure options. Available options vary
Mobile Networks
Control your tablet’s access to networks, including mobile data service.
1. From home, tap
2. Tap More n
3. Configure options:
Mobile data: When enabled, your tablet connects to the mobile data network.
Network mode: Choose a preferred network mode.
Connections optimizer: When enabled, helps you manage and enhance your data
experience by finding and connecting to remembered Wi-Fi networks on your tablet, and, if
applicable, to 4G network service.
etworks > Mobile networks.
Apps > Settings > Connections tab.
VPN Settings
Set up and manage Virtual Private Networks (VPN).
Note: VP
password screen lock before setting up a VPN.
For more information, see Virtual Private
N settings include storage of login credentials on your tablet. You must configure a PIN or
1. From home, tap
2. Tap More net
3. Tap Save to save your VPN settings.
Tap
traffic will only be allowed when connected to this VPN.
Menu > Always-on VPN and select a VPN profile to always stay connected. Network
Apps > Settings > Connections tab.
works > VPN >
, and enter your log in information.
Networks (VPN).
Ethernet
Manage your Ethernet connection.
1. From home, tap
2. Tap More ne
3. Follow the instructions to connect to an Ethernet network.
Apps > Settings > Connections tab.
tworks > Ethernet.
Settings 77
Page 86

Roaming
Set options for roaming, network, and APNs.
1. From home, tap Apps > Settings > Connections tab.
2. Tap More n
Tap Roaming network to select a roaming network (Home or Automatic).
Tap Roaming guard to enable or disable roaming alerts (Domestic and International).
Tap ON/OFF next to the Data entries to restrict data roaming (Domestic and International).
etworks > Roaming for options:
Nearby Devices
Share files with devices via Wi-Fi, Wi-Fi Direct, or Mobile Hotspot.
Note: Use care when enabling file sharing. When enabled, other devices can access data on your tablet.
1. From home, tap
2. Tap ON/OFF to turn
Tap File sharing to enable or disable file sharing.
Tap options to control how content is shared from your tablet:
• Content to share: Choose the type of content to share, from Videos, Photos, or Music.
Apps > Sett
Nearby devices (file sharing) on.
ings > Connections tab > Nearby devices.
• Allowed devices: View and manage a list of devices allowed to connect to your tablet.
• Denied devices: View and manage a list of devices restricted from connecting to your
tablet.
• Download to: Choose a location to save downloaded content.
• Receive files from other devices: Choose how to handle incoming files from other
devices.
Screen Mirroring
With Screen mirroring, you can share your device’s screen with another device, using an optional
AllShare Cast accessory (not included).
1. From home, tap Apps > Sett
Mirroring.
2. Tap an available devic
e and follow the prompts to connect.
ings > Connections tab > Screen
Settings 78
Page 87

Sounds and Notifications
Use sound and notification settings to control your tablet’s audio, alerts, and notifications.
Volume
You can adjust the volume settings to suit your needs and your environment.
Note: You can quickly adjust the volume by pressing the Volume key.
1. From home, tap
2. Tap Sounds and notifi
3. Touch and drag the sliders to assign volume level settings for:
Notifications
Media
System
Apps > Sett
cations.
ings > Device tab.
Sound Mode
You can switch between sound modes, while preserving the individual sound settings you have made.
Note: Sound modes are also available from the Device options menu. Press and hold the Power/Lock
key, and then choose Mute, Vibrate, or Sound from the Device options.
1. From home, tap
2. Tap Sounds and notifi
Sound: Your tablet uses the sounds, vibrations, and volume levels you have chosen in
Sound settings for notifications and alerts.
Apps > Settings > Device tab.
cations > Sound mode, and then choose a mode:
Vibrate: Your tablet vibrates for notifications and alerts. This uses the Vibration intensity you
choose in Sound settings.
Mute: Your tablet plays no sounds or vibrations. Reminders will still occur.
Notification Ringtone
Choose a sound for notifications, such as for new messages and event reminders.
1. From home, tap Apps > Settings > Device tab.
2. Tap Sounds and notifi
3. Tap a ringtone to select it. When you tap ringtones, a sample plays.
4. Tap OK to assign the ringtone.
Settings 79
cations > Notification ringtone.
Page 88

Other Sounds
Set sound settings for other system functions, such as tapping the keypad.
1. From home, tap Apps > Settings > Device tab.
2. Tap Sounds and notifi
Screen lock sound: Play tones when you touch the screen to lock or unlock it.
Touch sounds: Play tones when you tap or touch the screen to make selections.
Emergency tone: Play a tone periodically during an emergency call.
Sound when tapped: Play a tone when tapping the Samsung keyboard.
Email: Configure email sounds.
Calendar: Configure calendar sounds.
cations > Other sounds for options:
Do Not Disturb
Mute all calls and alerts, except for those that you choose to allow.
1. From home, tap
2. Tap Sounds and notifi
on. Select options as desired:
Turn on as scheduled: Configure scheduled times to turn Do not disturb mode on and off.
Apps > Sett
ings > Device tab.
cations > Do not disturb, and then tap Turn on now to turn the feature
Allow exceptions: Tap the checkbox to reveal the kinds of calls and alerts that you can
choose to allow even when your tablet is muted. Tap the check box to allow the call or alert
type when the tablet is in Do not disturb mode.
Notifications on Lock Screen
Choose whether to display sensitive content and notifications when the screen is locked.
1. From home, tap Apps > Setting
2. Tap Sounds and notifi
cations > Notifications on lock screen and set options.
s > Device tab.
Application Notifications
Set applications as priority, allowing them to interrupt with notifications.
1. From home, tap Apps > Setting
2. Tap Sounds and notifi
3. Tap an application to set notification options.
cations > Application notifications.
s > Device tab.
Settings 80
Page 89

Adapt Sound
Find the best sound for you during calls and media playback.
Note: This set
earphones (not included) to the tablet to configure this setting.
1. From home, tap
2. Tap Sound > Adapt Soun
3. Tap Start, and then follow the prompts.
ting uses earphones to ensure the best sound during setup. You must connect optional
Apps > Settings > Device tab.
d.
Display Settings
Configure settings for your tablet’s display.
Brightness
Adjust your screen’s brightness to suit your surroundings.
1. From home, tap
2. Tap Display > Brightness.
3. Touch and d
rag the Brightness level slider to adjust the screen brightness.
Apps > Settings > Device tab.
Screen Timeout
Screen timeout lets you select how long the display screen remains lit after you press any key.
1. From home, tap Apps > Sett
2. Tap Display > Screen timeout
ings > Device tab.
, and then tap a time setting.
Daydream
Use Daydream to control what the screen displays when the tablet is docked or charging. Choose to
display Colors, Flipboard, or photos.
1. From home, tap
2. Tap Display > Day
3. Tap the ON/OFF switch to turn Daydream on.
4. Tap each setting for options:
Colors: Display colorful screens.
1Weather: Display weather information.
Apps > Sett
dream.
ings > Device tab.
Settings 81
Page 90

Desk hom
e screen: Customize the screen when the tablet when using a docking station (not
included). Tap
Google Photos
es.
pictur
Photo frame: Display pictures in a photo frame. Tap
Photo table:
5. Tap
for options:
Preview:
Select when to daydream: Set when Daydream mode occurs. Select from While docked,
While charging, or Both.
Tap to see a preview of the Daydream type selected.
for options.
: Display pictures from your Google+ Photos account. Tap
to choose pictures.
Display pictures in a grid. Tap
to choose pictures.
to choose
Auto Rotate Screen
When screen rotation is turned on, the screen automatically updates when you rotate the tablet.
1. From home, tap Apps > Setting
2. Tap Display > Auto rot
ate screen to enable the option.
s > Device tab.
Show Battery Percentage
When Display battery percentage is enabled, the percentage of remaining battery power displays beside
the battery icon in the status bar.
1. From home, tap Apps > Setting
2. Tap Display > Show ba
ttery percentage to enable the option.
s > Device tab.
Multi Window Settings
Multi window allows you to use two apps on the same screen, in separate, resizable windows.
Tip: You can also turn Multi window on and off through the notification panel. Drag the notification panel
down and tap the Multi window Quick settings button.
1. From home, tap
2. Tap the ON/OFF swit
3. Tap Open in Multi window view to automatically open supported apps in Multi window view.
For more information, see Multi Windo
Apps > Sett
ch to turn Multi window on.
ings > Device tab.
w.
Settings 82
Page 91

Lock Screen Settings
Configure settings for locking the screen to improve security.
1. From home, tap Apps > Setting
2. Tap Lock screen > Scre
screen lock.
Swipe: Unlock the tablet by swiping your finger across the screen. This is the default screen
lock, and offers no security.
• Clock widget options: Customize your clock.
• Personal message: Display a personal message.
• Owner information: Display the device’s owner information on the lock screen.
• Unlock effect: Select the effect on the lock screen when you slide your finger over the
screen.
• Help text: Show help information on the lock screen.
Pattern: Draw a pattern, which you create, on the screen to unlock the tablet.
• Clock widget options: Customize your clock.
• Personal message: Display a personal message.
• Owner information: Display the device’s owner information on the lock screen.
en lock to select a new screen lock. Then configure the options for that
s > Device tab.
• Make pattern visible: Display the pattern as you draw it.
• Vibration feedback: Set the tablet to vibrate when the pattern is entered incorrectly.
• Lock automatically: Choose whether the screen will lock automatically immediately after
the screen turns off (dims), or choose a time interval to delay locking. During the time
interval, your device will still be unlocked, but the screen will be dim.
• Lock instantly with power key: Pressing the Power/Lock key locks the screen
instantly.
PIN: Enter a numeric PIN (Personal Identification Number) to unlock the tablet.
• Clock widget options: Customize your clock.
• Personal message: Display a personal message.
• Owner information: Display the device’s owner information on the lock screen.
• Lock automatically: Choose whether the screen will lock automatically immediately after
the screen turns off (dims), or choose a time interval to delay locking. During the time
interval, your device will still be unlocked, but the screen will be dim.
• Lock instantly with power key: Pressing the Power/Lock key locks the screen instantly.
Settings 83
Page 92

Passw
ord: Enter an alphanumeric password to unlock the tablet.
• Clock widget options: Customize your clock.
• Personal message: Display a personal message.
• Owner information: Display the device’s owner information on the lock screen.
• Lock automatically: Choose whether the screen will lock automatically immediately after
the screen turns off (dims), or choose a time interval to delay locking. During the time
interval, your device will still be unlocked, but the screen will be dim.
• Lock instantly with power key: Pressing the Power/Lock key locks the screen instantly.
None: Disable all screen lock settings.
Wallpaper
Customize the background of the home and lock screens. Choose from preloaded wallpapers or select a
photo you have downloaded or taken with the Camera.
1. From home, tap
2. Tap Wall
and lock screen.
paper, and then tap a screen to customize: Home screen, Lock screen, or Home
Apps > Settings > Device tab.
4. Tap a wallpaper to see a preview, or tap a source for other wallpaper images.
5. Tap Set as wallpaper to set the new wallpaper.
Font Style
You can set the font style and size for all text that displays on the screen.
1. From home, tap
2. Tap Font for option
Font style: Choose a font style. Tap Download to access new fonts in the
Google Play store.
Font size: Choose a text size.
Apps > Settings > Device tab.
s:
Settings 84
Page 93

Notification Panel Settings
Customize the notification panel.
1. From home, tap
2. Tap Notificat
Brightness adjustment: Display the screen brightness slider on the notification panel.
Recommended apps: Display a selection of app shortcuts on the notification panel
according to your actions. For example, when you connect a headset, Music and other
entertainment apps shortcuts will be displayed. Tap the ON/OFF switch to turn the option on,
and then tap Recommended apps to choose which apps to display.
Set quick setting buttons: Quick setting buttons display at the top of the notification panel,
allowing you to set frequently used options quickly.
• Touch and hold a button, and then drag it into a new position in the list.
For more information, see Notif
Apps > Settings > Device tab.
ion panel for options:
icatio
n Panel.
Accessibility Settings
Your tablet offers features to make using the tablet easier for those with certain physical disabilities. Use
Accessibility settings to configure these features.
Configure Vision Accessibility Settings
Your tablet offers many features to assist users who are blind or low-vision.
1. From home, tap Apps > Setting
2. Tap Accessibili
Switch Access: Control your device using configurable key combinations. You can move
focus to clickable items and select them.
TalkBack: TalkBack speaks descriptions of items you touch or activate on your tablet, to help
blind and low-vision users. When TalkBack is turned on, you may need to use a double-tap to
select items, because a single tap is used to trigger TalkBack.
Rapid key input: When TalkBack is on, you can enable Rapid key input, to allow you to
release your finger to enter a selection, instead of double-tapping it. By default, when you
have TalkBack turned on, you must double-tap items on the screen to select them. If you turn
on Rapid key input, you can tap and release your finger to select and item instead of doubletapping.
Speak passwords: When Explore by touch is turned on, you can enable Speak passwords
to have your tablet read out characters entered in password fields.
ty > Vision to configure options:
s > Device tab.
Settings 85
Page 94

Note: Use caution with this feature because others near you will be able to hear your passwords.
Font size: C
Magnification gestures: Use special magnification gestures.
Negative colors: Screen colors are reversed.
Color adjustment: Adjust the color of the screen if you have difficulty reading the screen
because of the color.
Accessibility shortcut: Quickly turn on accessibility features by performing a special
gesture.
Text-to-
information, see Text-t
hoose the size of text for your tablet’s screens.
speech options: Configure options for converting text to speech. For more
o-speech Options.
Configure Hearing Accessibility Settings
Your tablet offers many features to assist users who are deaf or hearing-impaired.
1. From home, tap
2. Tap Accessibi
Turn off all sounds: Sounds made by the tablet during taps, selections, notifications, etc. is
muted.
Apps > Sett
lity > Hearing to configure options:
ings > Device tab.
Samsung subtitles (CC): Displays Samsung subtitles where available. Tap the ON/OFF
switch to turn the option on or off, and then tap Samsung subtitles to configure options.
Google subtitles (CC): Displays Google subtitles where available. Tap the ON/OFF switch
to turn the option on or off, and then tap Google subtitles to configure options like
Language, Text size, and Caption style.
Sound balance: Adjust the sound sent to the left and right when using earphones.
Mono audio: Enable the compression of stereo audio into a single mono audio stream for
use with a single earphone.
Configure Dexterity and Interaction Settings
Your tablet offers many features to improve accessibility related to the way you interact with touch and
movement.
1. From home, tap
2. Tap Accessibi
Assistant menu: Assistant menu can improve tablet accessibility by providing quick access
to important functions. A shortcut appears on all screens to give you access to the Assistant
menu. Tap Assistant menu to configure options:
lity > Dexterity and interaction to configure options:
Apps > Sett
ings > Device tab.
Settings 86
Page 95

• Tap the
turn on Assistant menu, Single tap mode is also enabled.
• Dominant hand: Choose whether the Assistant menu displays on the left or right side of
the screen
• Edit: Re-order or remove items from the Assistant menu.
• Assistant plus: When turned on, Assistant plus displays contextual menu options for
some apps in Assistant menu. Not all apps support this option. Tap Assistant plus, and
then tap the ON/OFF switch to turn the option on or off. After you turn on Assistant plus,
enable apps to use with Assistant plus.
ON/OFF switch beside Assistant menu to turn the feature on or off. When you
• Touchpad size: Choose a size for touchpads for use in your tablet’s screens.
• Cursor size: Choose the size of cursors, to display on the screen.
• Cursor speed: Choose a speed for cursor blinks.
Press and hold delay: Choose how long your tablet waits during a tap and hold gesture on
the screen, before continuing with the tap and hold action.
Interaction control: Control how your tablet interprets motions and screen touches. To turn
Interaction control on or off at any time, press and hold the Home key and the down Volume
key at the same time. When Interaction control is on, you can use motions to control your
tablet, and screen timeout is turned on. You can also block areas of the screen from touch
interaction. Automatic screen rotation and hard-key functions (Power/Lock key, Volume key,
etc.) will be turned off, and app notifications will only be shown in the notification panel and
status bar.
Configure Other Accessibility Settings
Your tablet offers many features to improve tablet accessibility.
1. From home, tap Apps > Sett
2. Tap Accessibi
lity to configure options:
ings > Device tab.
Direct access: When turned on, you can access common accessibility settings from any
screen by pressing the Home key rapidly 3 times in a row. Tap the ON/OFF switch to turn the
feature on, and then enable options to display with direct access.
Notification reminder: Tablet beeps at set intervals to remind you of unread notifications.
Single tap mode: When enabled, you can use a single tap to dismiss or snooze alarms,
notifications and alerts, and answer or reject calls.
Manage accessibility: Choose settings for exporting, updating, and sharing the accessibility
settings as a file.
Settings 87
Page 96

Configure Accessibility Services
If you have installed any accessibility-related services on your tablet, you can access their settings from
the main Accessibility settings menu.
1. From home, tap
2. Tap Accessibility.
Service
s you have installed display under the Services heading.
Apps > Settings > Dev
ice tab.
Language and Input Settings
Use Language and input settings to choose a default language for your tablet’s operations, plus settings
for text entry and other inputs.
Choose a Default Language
Choose the language for operating your tablet.
1. From home, tap
2. Tap Language to select a
Apps > Settings > C
language.
Default Input Method
The following procedure allows you to select and set the default method to use when entering text.
ontrols tab > Language and input.
1. From home, tap Apps > Settings >
2. Tap Default to sele
Note: You can change the input method while you are entering text.
status bar to display Notifications, and then tap Select keyboard.
ct a text entry method.
Controls tab > Language and input.
Swipe your finger down from the
Samsung Keyboard Settings
The Samsung keyboard is a QWERTY keyboard, so you can enter text by “typing” on the keyboard.
Samsung keyboard is enabled by default, and you can choose options for using it.
1. From home, tap
2. Tap Samsung keyboard t
Select input languages: Choose language(s) for use with Samsung keyboard. When you
have more than one language enabled, you can slide your finger on the space bar while
entering text to switch languages.
Predictive text: Predictive text suggests words matching your text entries, and optionally,
complete common words automatically. Tap the ON/OFF switch to turn predictive text on.
Tap Predictive text to configure options:
Apps > Settings >
Controls tab > Language and input.
o configure these options:
Settings 88
Page 97

• Live word update: When enabled, Samsung keyboard automatically updates with
popular new words every day.
• Personalized data: When enabled, predictive text uses personal language data you
have entered to make better predictions.
• Learn from Contacts: Allow your tablet to learn from your Contacts entries.
• Clear personal data: Remove all personalized data you have entered.
Auto replace: Complete or replace the word you are typing with the most probable word
when you tap the Space bar or a punctuation mark.
Auto capitalize: Automatically capitalize words in your text based on common usage, such
as at the beginning of sentences.
Auto spacing: Automatically insert spaces between words.
Auto punctuate: Automatically enter a period and space to end a sentence when you tap the
space bar twice.
Keyboard swipe: Configure options for entering text by swiping your finger over the letters,
instead of tapping each letter individually.
• None: Do not recognize swipes on the keyboard as text.
• SwiftKey Flow: Enter text by sliding your finger across the keys on the keyboard.
• Cursor control: Slide your finger across the keyboard to move the cursor to begin
entering text.
Key-tap feedback: Choose options for the keyboard to indicate your entries.
• Sound: Play a sound for your key touches.
• Character preview: Display a big character bubble as you tap each key.
More settings:
• Reset settings: Return settings to the defaults.
Settings 89
Page 98

Swype Settings
Swype is a new way to enter text on touch screens. Instead of tapping each key individually, use your
finger to trace over the letters of a word. For each word, place your finger on the first letter and glide to
the subsequent letters, lifting on the last letter.
1. From home, tap
2. Tap Sw
ype to configure these options:
Settings:
• Vibrate on keypress: The device will vibrate when you tap a key.
• Sound on keypress: The device will play a sound when you tap a key.
• Pop-up on keypress: Display characters above key when typing.
• Long-press delay: Choose a period for the keyboard to wait before interpreting a tap as
• Show complete trace: Display the trace of each word until you start the next word.
• Auto-capitalization: Automatically capitalize the first word of sentences.
• Auto-spacing: Automatically insert spaces between words as you complete them.
• Next word prediction: Predict the next word based on the previous word.
• Show Voice key: Display a voice input key on the Swype keyboard.
a press and hold.
Apps > Settings > Controls tab > Language and input.
• Recognition speed: Set handwriting recognition speed.
Themes: Configure options for the look and position of the keyboard.
• Keyboard height: Choose how tall the keyboard is, when the tablet is in Portrait (upright)
and Landscape (on its side) position.
• Word choice list font size: Set the size of the text for the words Swype suggests as you
enter text.
• Bold font on keys: Bold the characters on the Swype keyboard.
My Words: Choose options for customizing Swype based on your text entries.
• Backup & Sync: Use Swype Connect to back up your words.
• Import recent contacts: Automatically import recent contacts from the call log.
• Living Language: Automatically update with popular new words.
• Personalization: Sign in to your favorite social networking sites to use your entries there
to update Swype.
Settings 90
Page 99

• Edit my
dictionary: Modify words added to Swype.
• Clear language data: Delete all the words you have added to the Swype dictionary.
• Contribute usage data: Allow Nuance to collect usage data to provide better text
prediction.
• Cellular data: When enabled, Swype can use your tablet’s connection to the wireless
data network for updates, language downloads, and other Swype Connect features.
Languages: Choose the current language for Swype, and download new languages to use
with Swype.
Gestures: Learn about shortcuts you can use on the keyboard to quickly accomplish
common tasks.
Help: Learn about using Swype.
• How to Swype: Learn about using Swype.
• Show helpful tips: Display tips on the screen as you enter text.
• Version: Tap to see version information and Nuance Communications copyright.
Google Voice Typing Settings
Google voice typing allows you to speak your entries. When you enable Google voice typing, it is
available for use when you tap a field to enter text.
1. From home, tap
2. Tap Google v
Languages: Choose language(s) for use with Google voice typing.
“Ok Google” detection: Configure settings for voice
Hands-free: Allow Bluetooth and wired headset requests when the tablet is locked.
Speech output: Set this feature to On or Hands-free only.
Offline speech recognition: Download and install speech recognition engines, to allow you
to use voice input while not connected to the network, such as during Airplane mode.
Block offensive words: Tap the check box to control whether Google displays words
generally recognized as offensive.
Bluetooth headset: Record audio through Bluetooth headset, if available.
oice typing to configure options:
Apps > Settings > Controls tab > Language and input.
detection when you say “OK Google.”
Settings 91
Page 100

Voice Input Settings
The Voice input feature is a voice-activated application that allows you to tell the tablet what to search for
and then the tablet activates a Google search based on what you said.
1. From home, tap
2. Tap Voice
Enhanced Google services: Tap for full voice interaction services.
Basic Google recognition: Tap for simple voice recognition services.
input for these options:
Apps > Settings > Controls tab > Language and input.
Text-to-Speech Options
Text-to-speech (TTS) provides audible readout of text.
1. From home, tap
2. Tap Text
Preferred TTS engine: Select Google Text-to-speech engine. Tap
Speech rate:
Listen to an example: Play an example of speech used for readouts.
Default language status: See the status of the current default language.
Apps > Settings > Controls tab > Language and input.
-to-speech options to configure:
Choose a rate for text readouts.
to configure options.
Pointer Speed
Adjust the speed of the pointer, when you use your finger to enter text.
1. From home, tap
2. Tap Pointer speed,
Apps > Settings > Controls tab > Language and input.
and then drag the slider to set the pointer speed.
Palm Motion Settings
Use the palm and side of your hand to control your device.
1.
From home, tap
2. Tap the O
3. Tap the ON/OFF switch to turn each option on:
Capture screen: Take screen captures by swiping the screen from right to left or vice versa
with the side of your hand.
Mute/pause: Mute or pause sounds by covering the screen.
Apps > Settings > Controls tab > Palm motion.
N/OFF switch to turn Palm motion on.
Settings 92
 Loading...