

Page 1
ANDROID TABLET
User Manual
Please read this manual before operating your
device and keep it for future reference.
Page 2

Intellectual Property
All Intellectual Property, as defined below, owned by or which is otherwise the property of Samsung or its respective suppliers
relating to the SAMSUNG Galaxy Tab, including but not limited to, accessories, parts, or software relating there to (the “Galaxy Tab
System”), is proprietary to Samsung and protected under federal laws, state laws, and international treaty provisions. Intellectual
Property includes, but is not limited to, inventions (patentable or unpatentable), patents, trade secrets, copyrights, software,
computer programs, and related documentation and other works of authorship. You may not infringe or otherwise violate the
rights secured by the Intellectual Property. Moreover, you agree that you will not (and will not attempt to) modify, prepare
derivative works of, reverse engineer, decompile, disassemble, or otherwise attempt to create source code from the software. No
title to or ownership in the Intellectual Property is transferred to you. All applicable rights of the Intellectual Property shall remain
with SAMSUNG and its suppliers.
Open Source Software
Some software components of this product incorporate source code covered under GNU General Public License (GPL), GNU Lesser
General Public License (LGPL), OpenSSL License, BSD License and other open source licenses. To obtain the source code covered
under the open source licenses, please visit:
http://opensource.samsung.com
.
Disclaimer of Warranties; Exclusion of Liability
EXCEPT AS SET FORTH IN THE EXPRESS WARRANTY CONTAINED ON THE WARRANTY PAGE ENCLOSED WITH THE PRODUCT, THE
PURCHASER TAKES THE PRODUCT "AS IS", AND SAMSUNG MAKES NO EXPRESS OR IMPLIED WARRANTY OF ANY KIND
WHATSOEVER WITH RESPECT TO THE PRODUCT, INCLUDING BUT NOT LIMITED TO THE MERCHANTABILITY OF THE PRODUCT OR
ITS FITNESS FOR ANY PARTICULAR PURPOSE OR USE; THE DESIGN, CONDITION OR QUALITY OF THE PRODUCT; THE
PERFORMANCE OF THE PRODUCT; THE WORKMANSHIP OF THE PRODUCT OR THE COMPONENTS CONTAINED THEREIN; OR
COMPLIANCE OF THE PRODUCT WITH THE REQUIREMENTS OF ANY LAW, RULE, SPECIFICATION OR CONTRACT PERTAINING
SM-T2105_UM_English_MI5_CH_092713_F2
Page 3

THERETO. NOTHING CONTAINED IN THE INSTRUCTION MANUAL SHALL BE CONSTRUED TO CREATE AN EXPRESS OR IMPLIED
WARRANTY OF ANY KIND WHATSOEVER WITH RESPECT TO THE PRODUCT. IN ADDITION, SAMSUNG SHALL NOT BE LIABLE FOR
ANY DAMAGES OF ANY KIND RESULTING FROM THE PURCHASE OR USE OF THE PRODUCT OR ARISING FROM THE BREACH OF
THE EXPRESS WARRANTY, INCLUDING INCIDENTAL, SPECIAL OR CONSEQUENTIAL DAMAGES, OR LOSS OF ANTICIPATED PROFITS
OR BENEFITS.
Modification of Software
SAMSUNG IS NOT LIABLE FOR PERFORMANCE ISSUES OR INCOMPATIBILITIES CAUSED BY YOUR EDITING OF REGISTRY SETTINGS,
OR YOUR MODIFICATION OF OPERATING SYSTEM SOFTWARE.
USING CUSTOM OPERATING SYSTEM SOFTWARE MAY CAUSE YOUR DEVICE AND APPLICATIONS TO WORK IMPROPERLY. YOUR
CARRIER MAY NOT PERMIT USERS TO DOWNLOAD CERTAIN SOFTWARE, SUCH AS CUSTOM OS.
Samsung Electronics America (SEA), Inc
Address:
85 Challenger Road
Ridgefield Park,
New Jersey
07660
Toll Free
Telephone:
Internet
Address:
1-800-SAMSUNG
http://www.samsung.com
Page 4

©
2013 Samsung Electronics America, Inc. All rights reserved.
Do you have questions about your Samsung Mobile Device?
For 24 hour information and assistance, we offer a new FAQ/ARS System (Automated Response System) at:
www.samsung.com/us/support
Nuance®, VSuite™, T9® Text Input, XT9® Smart Input, and the Nuance logo are trademarks or registered trademarks of Nuance
Communications, Inc., or its affiliates in the United States and/or other countries.
®
The Bluetooth
word mark, figure mark (stylized “B Design”), and combination mark (Bluetooth word mark and “B Design”) are
registered trademarks and are wholly owned by the Bluetooth SIG.
TM
microSD
, microSDHCTM, and the microSD logo are Trademarks of the SD Card Association.
Google, the Google logo, Android, the Android logo, Google Play, Gmail, Google Latitude, Google Local, Google Maps, Google Play
Books, Google Play Magazines, Google Play Movies & TV, Google Play Music, Google Talk, Hangout, Picasa, and YouTube and other
marks are trademarks of Google Inc.
Wi-Fi is a registered trademark of the Wireless Fidelity Alliance, Inc.
Polaris Office and the Polaris Office logo are marks owned by Infraware and may be trademarks or registered trademarks.
Page 5

DivX®, DivX Certified® and associated logos are trademarks of Rovi Corporation or its subsidiaries and are used under license.
®
DivX Certified
to play DivX® video up to HD 720p, including premium content.
ABOUT DIVX VIDEO: DivX® is a digital video format created by DivX, LLC, a subsidiary of Rovi Corporation. This is an official DivX
Certified® device that has passed rigorous testing to verify that it plays DivX video. Visit divx.com for more information and
software tools to convert your files into DivX videos. Visit
www.divx.com
for more information and software tools to convert your
files into DivX videos.
ABOUT DIVX VIDEO-ON-DEMAND: This DivX Certified® device must be registered in order to play purchased DivX Video-on-
Demand (VOD) movies. To obtain your registration code, locate the DivX VOD section in your device setup menu. (
> About device > Legal information > License settings > DivX® VOD > Register
). Go to
vod.divx.com
for more information on how to
Apps > Settings
complete your registration.
Page 6

Table of Contents
Section 1: Getting Started ...........................5
Understanding This User Manual . . . . . . . . . . . .5
Battery . . . . . . . . . . . . . . . . . . . . . . . . . . . . . . . 6
Memory Card . . . . . . . . . . . . . . . . . . . . . . . . . .8
Turning Your Device On and Off . . . . . . . . . . . . . 9
Initial Device Configuration . . . . . . . . . . . . . . . 10
Standard Mode Instructions . . . . . . . . . . . . . . . 11
Galaxy Tab Accessories . . . . . . . . . . . . . . . . . .12
Securing Your Device . . . . . . . . . . . . . . . . . . .12
Section 2: Understanding Your Device .....14
Features . . . . . . . . . . . . . . . . . . . . . . . . . . . . . 14
Front View . . . . . . . . . . . . . . . . . . . . . . . . . . . . 15
Section 3: Kids Mode ................................17
Getting Started in Kids Mode . . . . . . . . . . . . . . 17
Kids Mode Home Screen . . . . . . . . . . . . . . . . .17
Navigating the Device . . . . . . . . . . . . . . . . . . . 18
Date and Time . . . . . . . . . . . . . . . . . . . . . . . . . 19
Primary Shortcuts . . . . . . . . . . . . . . . . . . . . . .19
Accessing Kids Mode Applications . . . . . . . . . . 20
Kids Mode Applications . . . . . . . . . . . . . . . . . .21
Create! . . . . . . . . . . . . . . . . . . . . . . . . . . . . . . 21
1
Dolphin Readers . . . . . . . . . . . . . . . . . . . . . . .22
Fruit Ninja . . . . . . . . . . . . . . . . . . . . . . . . . . . .22
Hair Salon 2 . . . . . . . . . . . . . . . . . . . . . . . . . . .22
Inventions . . . . . . . . . . . . . . . . . . . . . . . . . . . .23
Inventions 2 . . . . . . . . . . . . . . . . . . . . . . . . . . .23
Kids Camera . . . . . . . . . . . . . . . . . . . . . . . . . .23
Kids Gallery . . . . . . . . . . . . . . . . . . . . . . . . . . .23
Kids Planet Discovery . . . . . . . . . . . . . . . . . . .24
Kids' Store . . . . . . . . . . . . . . . . . . . . . . . . . . . .24
Kids Video . . . . . . . . . . . . . . . . . . . . . . . . . . . .24
Kids World . . . . . . . . . . . . . . . . . . . . . . . . . . . .25
Ocean! . . . . . . . . . . . . . . . . . . . . . . . . . . . . . . .25
Toca Train . . . . . . . . . . . . . . . . . . . . . . . . . . . .25
Toy story Smash It . . . . . . . . . . . . . . . . . . . . . .26
Where's My Perry? . . . . . . . . . . . . . . . . . . . . .26
Wipeout . . . . . . . . . . . . . . . . . . . . . . . . . . . . . .26
Kids Mode Settings . . . . . . . . . . . . . . . . . . . . .27
Quick Settings . . . . . . . . . . . . . . . . . . . . . . . . .27
Volume Settings . . . . . . . . . . . . . . . . . . . . . . .28
Configure the Home screen . . . . . . . . . . . . . . .29
Edit cards . . . . . . . . . . . . . . . . . . . . . . . . . . . .30
Passwords . . . . . . . . . . . . . . . . . . . . . . . . . . . .30
Page 7

Parental Controls . . . . . . . . . . . . . . . . . . . . . . 31
Section 4: Standard Mode ........................ 35
Home Screen . . . . . . . . . . . . . . . . . . . . . . . . . 35
Navigating Your Device . . . . . . . . . . . . . . . . . 38
Notifications . . . . . . . . . . . . . . . . . . . . . . . . . . 40
Status Details . . . . . . . . . . . . . . . . . . . . . . . . 40
Quick Settings . . . . . . . . . . . . . . . . . . . . . . . . 40
Status Bar . . . . . . . . . . . . . . . . . . . . . . . . . . . 43
Primary Shortcuts . . . . . . . . . . . . . . . . . . . . . 44
Other App Shortcuts . . . . . . . . . . . . . . . . . . . . 44
Widgets . . . . . . . . . . . . . . . . . . . . . . . . . . . . . 45
App Shortcuts . . . . . . . . . . . . . . . . . . . . . . . . 46
Folders . . . . . . . . . . . . . . . . . . . . . . . . . . . . . 47
Wallpapers . . . . . . . . . . . . . . . . . . . . . . . . . . . 48
Apps Screen . . . . . . . . . . . . . . . . . . . . . . . . . 49
Entering Text . . . . . . . . . . . . . . . . . . . . . . . . . 50
Using Google Voice Typing . . . . . . . . . . . . . . . 54
Task Manager . . . . . . . . . . . . . . . . . . . . . . . . 55
Contacts and Accounts . . . . . . . . . . . . . . . . . 56
Accounts . . . . . . . . . . . . . . . . . . . . . . . . . . . . 56
Contacts . . . . . . . . . . . . . . . . . . . . . . . . . . . . 57
Groups . . . . . . . . . . . . . . . . . . . . . . . . . . . . . . 61
Favorites . . . . . . . . . . . . . . . . . . . . . . . . . . . . 63
Messaging . . . . . . . . . . . . . . . . . . . . . . . . . . . 64
Types of Messages . . . . . . . . . . . . . . . . . . . . 64
Gmail . . . . . . . . . . . . . . . . . . . . . . . . . . . . . . . 64
Google+ . . . . . . . . . . . . . . . . . . . . . . . . . . . . . 65
Hangouts . . . . . . . . . . . . . . . . . . . . . . . . . . . . 66
Messenger . . . . . . . . . . . . . . . . . . . . . . . . . . . 66
Internet and Social Networking . . . . . . . . . . . . 67
Using the Chrome Browser . . . . . . . . . . . . . . . 67
Google Search . . . . . . . . . . . . . . . . . . . . . . . . 67
Google+ . . . . . . . . . . . . . . . . . . . . . . . . . . . . . 68
Maps . . . . . . . . . . . . . . . . . . . . . . . . . . . . . . . 68
Play Books . . . . . . . . . . . . . . . . . . . . . . . . . . . 69
Play Magazines . . . . . . . . . . . . . . . . . . . . . . . 70
YouTube . . . . . . . . . . . . . . . . . . . . . . . . . . . . . 70
Music . . . . . . . . . . . . . . . . . . . . . . . . . . . . . . . 71
Listening to Music . . . . . . . . . . . . . . . . . . . . . 71
Play Music App . . . . . . . . . . . . . . . . . . . . . . . 71
Music Player . . . . . . . . . . . . . . . . . . . . . . . . . 74
Photos and Video . . . . . . . . . . . . . . . . . . . . . . 79
Camera . . . . . . . . . . . . . . . . . . . . . . . . . . . . . 79
Camcorder . . . . . . . . . . . . . . . . . . . . . . . . . . . 82
Video Player . . . . . . . . . . . . . . . . . . . . . . . . . . 87
Gallery . . . . . . . . . . . . . . . . . . . . . . . . . . . . . . 88
Connections . . . . . . . . . . . . . . . . . . . . . . . . . . 93
Wi-Fi . . . . . . . . . . . . . . . . . . . . . . . . . . . . . . . 93
2
Page 8

Wi-Fi Direct . . . . . . . . . . . . . . . . . . . . . . . . . . . 95
Bluetooth . . . . . . . . . . . . . . . . . . . . . . . . . . . .96
Managing Downloads . . . . . . . . . . . . . . . . . . . 98
Kies Via Wi-Fi . . . . . . . . . . . . . . . . . . . . . . . . 100
Memory Card . . . . . . . . . . . . . . . . . . . . . . . .101
Synchronizing with Windows Media Player . .102
Connecting as a Mass Storage Device . . . . . . 102
Applications . . . . . . . . . . . . . . . . . . . . . . . . .103
Updating Applications . . . . . . . . . . . . . . . . . . 103
Accessing Applications . . . . . . . . . . . . . . . . . 104
Applications . . . . . . . . . . . . . . . . . . . . . . . . .104
Alarm . . . . . . . . . . . . . . . . . . . . . . . . . . . . . . 104
Calculator . . . . . . . . . . . . . . . . . . . . . . . . . . . 106
Calendar . . . . . . . . . . . . . . . . . . . . . . . . . . . .106
Camera . . . . . . . . . . . . . . . . . . . . . . . . . . . . . 109
Chrome . . . . . . . . . . . . . . . . . . . . . . . . . . . . . 109
Contacts . . . . . . . . . . . . . . . . . . . . . . . . . . . . 110
Downloads . . . . . . . . . . . . . . . . . . . . . . . . . . 110
Dropbox . . . . . . . . . . . . . . . . . . . . . . . . . . . .111
Gallery . . . . . . . . . . . . . . . . . . . . . . . . . . . . . .112
Gmail . . . . . . . . . . . . . . . . . . . . . . . . . . . . . .112
Google . . . . . . . . . . . . . . . . . . . . . . . . . . . . . .112
Google Settings . . . . . . . . . . . . . . . . . . . . . . . 112
Google+ . . . . . . . . . . . . . . . . . . . . . . . . . . . . 112
3
Hangouts . . . . . . . . . . . . . . . . . . . . . . . . . . . .113
Kids Mode . . . . . . . . . . . . . . . . . . . . . . . . . . .113
Maps . . . . . . . . . . . . . . . . . . . . . . . . . . . . . . .113
Messenger . . . . . . . . . . . . . . . . . . . . . . . . . .113
Music Player . . . . . . . . . . . . . . . . . . . . . . . . .113
My Files . . . . . . . . . . . . . . . . . . . . . . . . . . . . .114
Play Books . . . . . . . . . . . . . . . . . . . . . . . . . . .115
Play Games . . . . . . . . . . . . . . . . . . . . . . . . . .115
Play Magazines . . . . . . . . . . . . . . . . . . . . . . .115
Play Movies & TV . . . . . . . . . . . . . . . . . . . . . .116
Play Music . . . . . . . . . . . . . . . . . . . . . . . . . . .116
Play Store . . . . . . . . . . . . . . . . . . . . . . . . . . .116
Samsung Apps . . . . . . . . . . . . . . . . . . . . . . .117
Screen Saver . . . . . . . . . . . . . . . . . . . . . . . . .117
Settings . . . . . . . . . . . . . . . . . . . . . . . . . . . . .118
Video Player . . . . . . . . . . . . . . . . . . . . . . . . . .118
Voice Search . . . . . . . . . . . . . . . . . . . . . . . . .118
YouTube . . . . . . . . . . . . . . . . . . . . . . . . . . . .118
Settings . . . . . . . . . . . . . . . . . . . . . . . . . . . . .119
Accessing Settings . . . . . . . . . . . . . . . . . . . .119
Wireless and Network . . . . . . . . . . . . . . . . . .119
Device . . . . . . . . . . . . . . . . . . . . . . . . . . . . . .127
Personal . . . . . . . . . . . . . . . . . . . . . . . . . . . .134
Accounts . . . . . . . . . . . . . . . . . . . . . . . . . . . .142
Page 9

System . . . . . . . . . . . . . . . . . . . . . . . . . . . . 144
About Device . . . . . . . . . . . . . . . . . . . . . . . . 148
Section 5: Health and Safety
Information ........................................... 149
Exposure to Radio Frequency (RF) Signals . . 149
Specific Absorption Rate (SAR) Certification
Information . . . . . . . . . . . . . . . . . . . . . . . . 154
FCC Part 15 Information to User . . . . . . . . . . 156
Smart Practices While Driving . . . . . . . . . . . 156
Battery Use and Safety . . . . . . . . . . . . . . . . . 157
Samsung Mobile Products and Recycling . . . 159
UL Certified Travel Charger . . . . . . . . . . . . . 159
Display / Touch-Screen . . . . . . . . . . . . . . . . 159
GPS . . . . . . . . . . . . . . . . . . . . . . . . . . . . . . . 160
Care and Maintenance . . . . . . . . . . . . . . . . . 161
Responsible Listening . . . . . . . . . . . . . . . . . 162
Operating Environment . . . . . . . . . . . . . . . . 164
Children's Access to this Mobile Device . . . . 166
FCC Notice and Cautions . . . . . . . . . . . . . . . 166
Other Important Safety Information . . . . . . . 166
Section 6: Warranty Information ............ 169
Standard Limited Warranty . . . . . . . . . . . . . . 169
End User License Agreement for Software . . 174
Index ........................................................ 182
4
Page 10

Section 1: Getting Started
This section helps you to quickly start using your device.
Understanding This User Manual
The sections of this manual generally follow the features of
your device. A robust index for features begins on page 182.
Also included is important Warranty information, beginning
on page 169, that you should know before using your device.
This manual gives navigation instructions according to the
default display settings. If you select other settings,
navigation steps may be different.
Unless otherwise specified, all instructions in this manual
assume that you are starting from a Home screen. To get to a
Home screen, you may need to unlock the device. For more
information, refer to “Securing Your Device” on page 12.
Note:
Instructions in this manual are based on default settings
and may vary from your device depending on the
software version on your device and any changes to the
device’s settings.
5
Note:
Unless stated otherwise, instructions in this user manual
start with the device unlocked, at the Home screen.
All screen images in this manual are simulated. Actual
displays may vary depending on the software version of
your device and any changes to the device’s settings.
Special Text
In this manual, some text is set apart from the rest. This
special text is intended to point out important information,
share quick methods for activating features, define terms,
and more. The definitions for these methods are as follows:
•
Notes
: Presents alternative options for the current feature, menu,
or sub-menu.
•
Tips
: Provides quick or innovative methods or useful shortcuts.
•
Important
: Points out important information about the current
feature that could affect performance.
•
Warning
: Brings important information to your attention that can
help to prevent loss of data or functionality or damage to your
device.
Page 11
Text Conventions
This manual provides condensed information about how to
use your device. To make this possible, the following text
conventions are used to represent often-used steps:
➔
Arrows are used to represent the sequence of selecting
successive options in longer, or repetitive, procedures. For
example:
From a Home screen, touch
➔
Display
➔
Screen timeout
Apps
➔
Settings
.
Battery
Your device is powered by a rechargeable, standard Li-Ion
battery. A Wall/USB Charger (Charging Head and USB cable)
are included with the device for charging the battery.
Warning!
Use only approved charging devices. Approved
accessories are designed to maximize battery life.
Using other accessories may invalidate your
warranty and may cause damage.
Battery Indicator
The Battery icon in the Status Bar shows the battery
power level. When battery power is 15% or less, your device
prompts you to charge the battery. If you continue to operate
the device without charging, the device powers off. For
battery use information, see “About Device” on page 148.
Tip:
Touch the Time field to display battery charge status.
Charging the Battery
Your device comes with a Wall/USB Charger (Outlet
Connector, Charging Head, and USB cable) to charge your
device from any standard AC power outlet.
Note:
The battery comes partially charged. You must fully
charge the battery before using your device for the first
time.
After the first charge, you can use the device while
charging.
Getting Started 6
Page 12

1. Insert the USB cable into the Charging Head.
2. Insert the USB cable into the device’s Charger/
Accessory Port.
7
Warning!
While the device is charging, if the touch screen
does not function due to an unstable power supply,
unplug the USB power adapter from the power outlet
or unplug the USB cable from the device.
3. Plug the Charging Head into a standard AC power
outlet.
Note:
You cannot charge the battery using the USB cable and
your PC.
4. When charging is complete, unplug the Charging Head
from the power outlet and remove the USB cable from
the device.
Note:
If the battery is completely discharged, you cannot turn
on the device, even with the USB power adapter
connected. Allow a depleted battery to charge for a few
minutes before you try to turn on the device.
Page 13
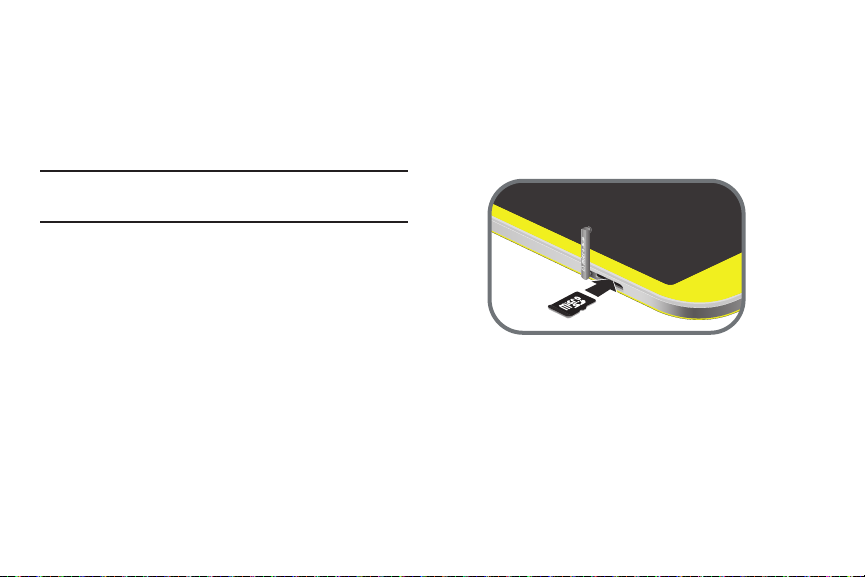
Memory Card
Your device supports removable microSD or microSDHC
memory cards with maximum capacities of 64 GB
(depending on the memory card manufacturer and type).
Memory cards are used to store music, photos, videos, and
other files.
Note:
You can only store music files that you own (from a CD
or purchased with the device) on a memory card.
Installing a Memory Card
1. Open the Memory Card Slot cover and turn to expose
the slot.
2. With the gold contacts facing down, carefully slide the
memory card into the slot, pushing gently until it clicks
into place.
3. Replace the Memory Card Slot cover.
Getting Started 8
Page 14

Removing a Memory Card
Important!
To prevent damage to information stored on the
memory card, unmount the card before removing it
from the device.
Apps
➔
1. From a Home screen, touch
➔
Storage
.
SD card
2. Under
touch
3. Open the Memory Card Slot cover and turn to expose
the slot.
4. Gently press down on the memory card, so that it pops
out from the slot, and carefully pull the card out.
5. Replace the Memory Card Slot cover.
For more information, refer to “Memory Card” on page 101.
9
, touch Unmount SD card
OK
.
Settings
and then
Turning Your Device On and Off
Turning Your Device On
Press and hold the
For more information, refer
to “Locking and Unlocking
the Device” on page 13.
Note: Note
: Your device’s internal antenna is located along the
top back of the device. Do not block the antenna; doing
so may affect signal quality and may cause the device to
operate at a higher power level than is necessary.
Power/Lock Key
.
Page 15

Turning Your Device Off
1. Press and hold the
2. At the
3. At the
Device options
Power off
Power/Lock Key
prompt, touch
prompt, touch OK.
.
Power off
.
Initial Device Configuration
When you first turn on your device, you are asked to set up a
few things. To complete setup, read and follow the
instructions on the screen. You can touch
screens, while others require reading or other information
(touch
Next
). Touch
Back
to re-display the information. Some
screens display depending on the options you choose.
Welcome!
1. Select a language and tap
2. If required, touch
accessibility settings.
3. Tap the ON/OFF slider to activate Wi-Fi and tap
4. If prompted, assign the
Next
.
Accessibility
Date and time
Next
.
to change the
Skip
on some
Next
settings and tap
5. Understand and agree to the terms and conditions of
Next
the EULA and tap
6. At the Samsung account screen, select
Create new account
Ye s
7. Ta p
8. At the
9. Select
10. Enter a
11. At the
12. Tap to select
.
at the
continue.
Make it Google
or
account
Google & location
First
Dropbox
Disclaimer
Finish
.
Not now
and
, or tap
.
, or tap
Got Google?
screen, select either
to continue.
services and tap
Last
name and tap
screen, select
Skip
.
Kids mode
or
Sign in account
Skip
.
screen to login, or No to
Get an
Next
Next
.
Create account, Sign in
Standard mode
Getting Started 10
and tap
,
.
,
Page 16

Standard Mode Instructions
If you selected Kids mode after initial setup, change the Kids
default password, see “Getting Started in Kids Mode” on
page 17; otherwise continue to “Understanding Your Device”
page 14 and “Standard mode” page 35.
Important!
If you selected Kids Mode, we recommend you
change the default password to protect your child's
safety. Otherwise, your child could use the default
password to access the Standard Mode features
and apps, as well as the Parental Control settings,
and could purchase applications from the Kids
Store. For more information, refer to “Changing the
Password” on page 31.
11
Wi-Fi
Make sure the Wi-Fi OFF / ON icon is set to ON and
choose one of the following options:
1. Tou ch
2. Tou ch
3. Touch one of the Wi-Fi networks in the list, enter the
4. Tou ch
Add Wi-Fi network
is not listed.
Scan
to make sure you have an accurate list of
Wi-Fi networks.
password, and touch
another Wi-Fi network or touch Next to continue.
Next
to perform this task later.
to enter a Network SSID that
Connect
. Touch and connect to
Samsung Account
Sign in to your Samsung account to use Samsung services.
1. Tou ch
2. Tou ch
3. Tou ch
4. Tou ch
variety of services
Create new account
account.
Sign in
Restore
Tou ch
Skip
to learn more.
to create a Samsung
if you already have a Samsung account.
and
Auto backup
to perform this task later.
, if desired. Touch
Next
.
Page 17

Galaxy Tab Accessories
To find accessories for your Galaxy Tab:
1. Go to
http://www.samsung.com/us/mobile/galaxy-tab-
accessories
Galaxy Tab accessories display.
2. Use your model number to find compatible
accessories.
.
Securing Your Device
By default, the device locks automatically when the screen
times out or you can lock it manually. You can unlock the
device using one of the default Unlock screens or, for
increased security, use a personal screen unlock pattern.
For more information about creating and enabling a Screen
unlock pattern, see “Lock Screen” on page 134.
For other settings related to securing your device, see
“Location Services” on page 134.
Note:
Unless stated otherwise, instructions in this User Manual
start with the device unlocked, at the Home screen.
Getting Started 12
Page 18

Locking and Unlocking the Device
1. Press the
screen.
The Lock screen displays.
2. Swipe your finger across the screen in any direction to
unlock it.
The last screen accessed displays.
3. Press the
Note:
You can customize the Lock screen and set the type of
Screen Unlock you want to use (Face unlock, Pattern,
PIN, or Password). For more information, refer to “Lock
Screen” on page 134.
13
Power/Lock Key
Power/Lock Key
once to display the Lock
again to lock the screen.
Page 19

Section 2: Understanding Your Device
This section outlines key features on the device on the Kids
tablet tat are easy to use and kid friendly. It also describes
the screen and the icons that display when the device is in
use.
Features
•
7.0-inch WSVGA (1024x600) TFT (PLS) LCD touch screen
•
Android Version 4.1.2
•
Wi-Fi, 1.2 GHz dual-core processor
•
Android Chrome browser
•
Bluetooth 3.0 Wireless technology. For more information, refer to
“Bluetooth”
•
Built-in Wi-Fi technology (802.11 a/b/g/n)
•
3 megapixel camera and camcorder, plus 1.3 megapixel
forward-facing camera for video chat
•
Full integration of Google applications (Gmail, YouTube,
Google Maps, and Voice Search)
•
Photo gallery that supports BMP, GIF, JPEG, PNG, and WBMP
formats
on page 96.
•
Messaging Features:
–
Gmail
–
Google Talk (Instant Messaging and Video Chat)
•
HD Video Player (1080p)
–
Codec: H.263, H.264, and MPEG4
–
Format: MP4
•
DivX Certified® to play DivX® video up
premium content
•
Music playback supporting the following formats: AAC, AAC+,
AMR, AMR-NB, MP3, and WMA
•
Support for microSD and microSDHC memory cards
•
Preloaded applications such as Samsung Apps: Alarm, Calculator,
Camera, Chrome, Contacts, Dropbox, Gallery, Music Player,
My Files, Calendar, Samsung Apps, Settings, Video Player.
Warning!
This device does not support some USB storage
media devices. For more information, refer to
“Galaxy Tab Accessories” on page 12.
Understanding Your Device 14
to HD 720p
, including
Page 20
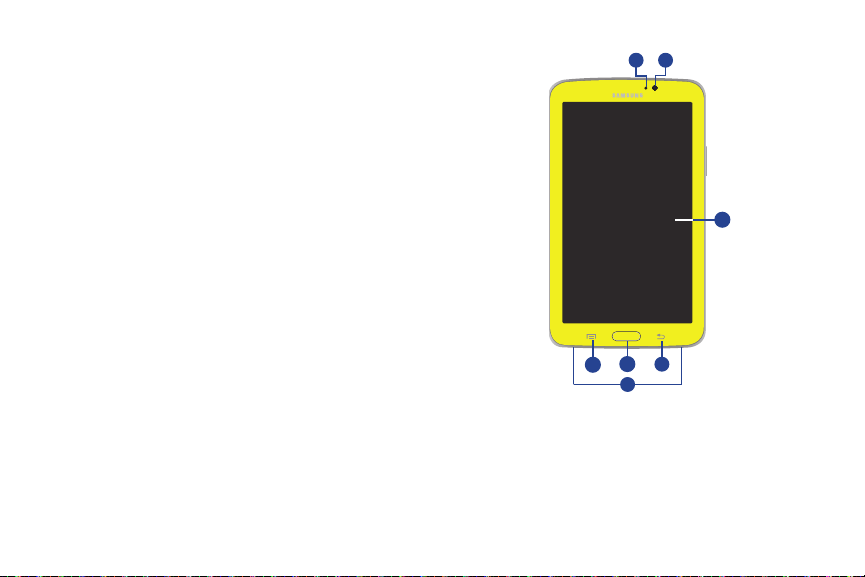
Front View
The following items can be found on the front of your device
as illustrated.
Light Sensor
1.
automatically when taking photos with the front-facing
Camera.
2.
Front-facing Camera Lens
recording videos.
Display Screen
3.
rotates with the tablet as you turn it. You can turn this
feature on and off. For more information, refer to
“System” on page 128.
Back
4.
Home
5.
to display recent apps that have been accessed.
Menu
6.
External Speakers
7.
notification tones, and for other sounds.
15
: Used to control screen brightness
: Used when taking photos or
: The orientation of the display screen
: Return to the previous screen or option.
: Display the central Home screen. Press and hold
: Display a list of options.
: Used in music or video playback,
2
1
3
1
4
5
6
7
Page 21

Back View
1.
3.5mm Headset Jack
Front Facing Camera Lens
2.
recording videos.
Power/Lock Key
3.
off. Press to lock the device or to wake the screen for
unlocking.
Volume Key
4.
Master Volume. During music playback, press
volume.
Charger/Accessory Port
5.
charging or to sync music and files.
Memory Card Slot
6.
files.
: Plug in for headphones.
: Used when taking photos or
: Press and hold to turn the device on or
: From a Home screen, press to adjust
: Plug in a USB cable for
: Install a memory card for storage of
to adjust
1
2
3
4
6
5
Understanding Your Device 16
Page 22

Section 3: Kids Mode
Enter your name
Menu
Primary
Shortcuts
Apps
Date &
Time
This section introduces you to the Kids mode tablet and all
it’s functions.
Getting Started in Kids Mode
Kids Mode Home Screen
The Kids Mode Home screen is the starting point for using
the device in Kids mode.
Note:
Unless stated otherwise, instructions in this user manual
start with the device unlocked, at the Kids Mode Home
screen.
Name
: Tap to personalize your tablet with a name and
1.
photo.
Menu icon
2.
controls.
Primary Shortcuts
3.
applications and features from the Kids Mode Home
screen. For more information, refer to “Primary
Shortcuts” on page 19.
Apps
4.
17
: Tap to display Settings and Parental
: These are shortcuts that the
: Displays the Apps panel.
5.
Date and Time
For more information, refer to “Date and Time” on
page 144.
: The current time and date display.
Page 23

Navigating the Device
Use command buttons and the touch screen to navigate.
Command Buttons
Back
Touch Back
Home
Touch
Menu
The menu key is not active in Kids Mode.
to return to the previous screen or option.
Home
to display the Kids Mode Home screen.
Screen Capture
Touch and hold the
to capture and save an image of the current screen.
Note:
A copy of the screenshot is automatically saved to the
clipboard. In Kids Mode a screenshot cannot be used for
any of the Kids applications.
To view the screen shots:
1. Switch to Standard mode. Touch
Parental controls
2. Enter your password then touch
3. From a Standard Mode Home screen, touch
➔
My Files
4. To uch
5. Touch a screen capture file to display it.
sdcard0
Power/Lock Key
.
.
➔
Pictures
and
Menu
Standard home screen
➔
Screenshots
Kids Mode 18
Home
➔
.
Apps
.
Page 24
Screen Navigation
Tap / Touch
Tap or touch items to select or launch them.
For example:
Tap / Touch a card on the Kids Mode Home screen to
open the application.
Date and Time
The current time and date displays in the upper-right portion
of the Kids Mode Home Screen but is not configurable from
this mode. You can modify the time and date from Standard
Mode in the Settings menu. For more information, refer to
“Date and Time” on page 144.
19
Primary Shortcuts
Primary Shortcuts are the cards that display in the middle of
the Kids Mode Home screen.
Touch and slide a card left or right to view additional cards.
Touch and Hold a card to open the application associated
with this card.
Adding Cards to the Kids Mode Home screen
1. From the Kids Mode Home screen, touch
Settings
➔
Edit cards
.
Add card
Accept
.
icon.
2. Tou ch
3. Tap the card to add to the Home screen and then touch
the
Menu
➔
Page 25

Removing Cards from the Kids Mode Home
Tou ch
to
display
Apps
Screen
1. From the Kids Mode Home screen, touch
Settings
➔
Edit cards
.
Remove
2. Touch the
of a card to remove the card from the Kids Mode Home
screen.
Note:
This action does not actually delete the Card, it just
removes it from the current Home screen.
icon in the upper-right corner
Menu
Accessing Kids Mode Applications
The
Apps
➔
screen displays all applications installed for
children on your wireless device. Applications that you
download and install from the Kids Store are also referred to
as Cards and display on both the Apps and Home screens.
1. From the Home screen, tap a preloaded App.
– or –
To uch
Apps
to display the Applications screen.
Kids Mode 20
Page 26

Tap
an icon
to
open
2. Touch the application icon to open it.
– or –
Apps
From the Home screen, touch
<App icon>
Note:
The instructions on the following page begin access to
each App from the Apps screen, and not the Home page.
21
.
➔
Kids Mode Applications
The following are the applications that display when you
touch
Apps
from the Kids Mode Home screen.
You can activate other Kids apps to display on the Home
screen. For more information, refer to “Application manager”
on page 34.
Create!
Filimundus Creative corner is a powerful drawing application
where kids use their own creative skills to combine
drawings, add stickers and create cutouts.
The free version contains 8 black-and-white pictures,
18 stickers and a several papers to cut.
From the Home screen, touch
Create!
.
Apps
➔
Page 27
Dolphin Readers
Dolphins are interactive books designed for different grades
of reading and are designed to make developing language
skills fun for younger learners.
Dolphin Reader display full-color illustrations and crosscurricular content that keep your childs interest and
attention, while English introduces them to new language
points in a fun context.
There are integrated activities for every page of story text
that encourage students to practise new language skills.
From the Home screen, touch
Dolphin Readers
.
Apps
➔
Fruit Ninja
Fruit Ninja is a juicy action game with squishy, splatty and
satisfying fruit carnage! Become the ultimate bringer of
sweet, tasty destruction with every slash.
Fruit Ninja features Classic, Zen and the amazing new Arcade
mode, along with online multi-player for Game Centerenabled devices! It also has awesome global leader boards
and achievements to unlock.
From the Home screen, touch
Fruit Ninja
.
Apps
➔
Hair Salon 2
Cut, curl, color and style – any way you want! This version
offers new characters, new tools, new accessories and even
more hairstyling fun!
From the Home screen, touch
Hair Salon 2
.
Apps
➔
Kids Mode 22
Page 28

Inventions
Help old man Pettson build challenging inventions. Figure out
which items to use and where they fit while you drag and
drop parts to their right spot and watch the invention as it’s
created.
From the Home screen, touch
Inventions
.
Apps
➔
Inventions 2
Help old man Pettson and his cat Findus build 37 different
inventions. Figure out which items to use and where they fit
while you drag and drop parts to their right spot and watch
the invention being created. As usual, there’s a secret to
unlock for those who manage to complete everything. This
app teaches logic and stimulates creativity.
From the Home screen, touch
Inventions 2
23
.
Apps
➔
Kids Camera
Take pictures, using the front or back camera. Apply stickers
such as a hat, bowtie, crown, sunglasses, silly faces, and
other items that make your child look like they wearing those
items in their picture.Then view your fun and creative
pictures from the Kids Gallery.
From the Home screen, touch
Kids Camera
.
Apps
➔
Kids Gallery
Your child can view the photos and videos they took from the
Kid’s Gallery.
From the Home screen, touch
Kids gallery
.
Apps
➔
Page 29
Kids Planet Discovery
This app challenges critical thinking skills through puzzles
and games that teach about different continents, music,
animals, and videos about the world and different cultures.
From the Home screen, touch
Kids Planet Discovery
Apps
➔
.
Kids' Store
Download paid or free apps and games for learning, play,
stories, and other types of apps.
Important!
During initial configuration by changing the 4-digit
PIN code, you can restrict a child or other user
(using the tablet in Kids mode) from purchasing
paid applications. To do this, change the default
PIN code.
From the Home screen, touch
Kids’ Store
.
Apps
➔
Kids Video
Your child can record a video that automatically saves to the
Kid’s Gallery.
From the Home screen, touch
.
video
Apps
➔
Kids Mode 24
Kids
Page 30
Kids World
Kids World is a Multimedia app portal that has Korean and
international characters where children are entertained and
learn through interactive play.
1. From the Home screen, touch
Kids World
2. Touch a region,
Important!
You can only set the region once during initial
setup. After setup you must reset the device if you
want to change the region.
3. Touch
use.
4. Read the Kids world Service User Agreement, touch
, and then touch OK.
Agree
5. Begin playing.
25
.
USA, UK
, or
Ye s
at the prompt if this is the region you want to
Korea
.
Apps
➔
Ocean!
Match pairs of ocean animals quickly and with the least
mistakes to achieve the highest score.
From the Home screen, touch
Ocean!
.
Toca Train
Your child plays the train driver in this fun and friendly train
simulator. The controls are intuitive and there are no written
instructions. Just pull the levers, push the buttons and start
exploring the island with your train!
From the Home screen, touch
Toc a Tra in
.
I
Apps
Apps
➔
➔
Page 31

Toy story Smash It
Toy Story: Smash it!” is an all-new, 3D physics-based puzzle
game featuring your favorite “Toy Story” characters. The free
version offers levels not found in the full game.
From the Home screen, touch
Toy story Smash I t
.
Apps
➔
Where's My Perry?
Help Agent P get to headquarters for mission briefing by
guiding water or steam to power his secret transportation
tubes! Transform water in cool forms like ice, steam and
solids to solve all sorts of mind-bending puzzles!
From the Home screen, touch
Where’s My Perry?
.
Apps
➔
Wipeout
In this game your player has to reach the finish line in the
shortest period of time. You can control your hero using
gestures and make your hero run, jump, retreat, or bend
down. If you fail during the game, the new game starts
where you stopped. Earn reward money and spend it to
purchase costumes or other protective gear.
From the Home screen, touch
Wipeout
.
Apps
➔
Kids Mode 26
Page 32

Kids Mode Settings
Quick Settings
This section explains Settings for customizing your device.
Accessing Kids Mode Settings
To access Settings:
From the Kids Mode Home screen, touch
Settings
.
The Settings Screen
The Settings screen displays the Quick settings menu, as
well as the brightness, Lock screen, Home screen, and Edit
cards options.
27
Menu
Quick Settings
You can activate Wi-Fi, Bluetooth, Screen rotation, Sound,
and Power saving from the Kids’ settings screen. You can
also lock the screen, set a new wallpaper for the Home
➔
screen, or edit cards from this menu. These features are all
referred to as Quick Settings.
1. From the Kids Home screen, touch
Note:
2. Tap one of the Quick Settings to turn it on or off.
Menu
➔
Settings
.
The Quick Settings display.
This screen displays both Status Details and Quick
Settings and is referred to by both names in this manual.
Page 33

3. The Quick Settings are:
•Wi-Fi
: Touch to enable or disable Wi-Fi. For more information,
refer to
“Wi-Fi”
on page 93.
• Bluetooth
• Screen rotation
• Sound
• Power saving
4. Touch the
the brightness or touch
automatically set the brightness based on available
light and battery charge status. For more information,
refer to “Brightness” on page 129.
: Touch to enable or disable Bluetooth. For more
information, refer to
from landscape to portrait and vice versa. When Off the screen
is fixed in the current mode, either portrait or landscape. For
more information, refer to
: Touch to enable or disable sound mode.
analyzes the screen and adjusts the brightness to conserve
battery power. For more information, refer to
page 145.
“Wi-Fi”
on page 93.
: When On the screen rotates automatically
“System”
on page 145.
: When enabled, your device automatically
Brightness
slider and drag it right or left to set
Auto
to allow the device to
“System”
on
5. To uch
6.
Lock screen, Home screen
For more information, refer to “Configure the Home
screen” on page 29.
Edit cards
Add or remove cards from the Kids mode
Home screen. See “Adding Cards to the Kids Mode
Home screen” on page 19 or see “Removing Cards
from the Kids Mode Home Screen” on page 20.
, or
Edit cards
.
Volume Settings
Any time you need to increase or decrease the volume while
in Kids mode:
1. Navigate to the Kids Mode Home screen.
2. Touc h th e
3. Slide the Volume slider left to decrease or right to
increase volume.
Volume
icon.
Kids Mode 28
Page 34

Configure the Home screen
Changing the Lock Screen Wallpaper
1. Navigate to the Kids Mode Home screen.
Menu
➔
Settings
2. Touch
3. Touch
4. Touch a photo or wallpaper, then touch and hold a blue
5. Touch the
29
Lock screen
wallpaper (Kids gallery or Wallpapers).
diamond in the corner and drag the blue box to crop
the area of the photo or wallpaper you want to display
on the screen.
the way you want it.
This photo or wallpaper displays on the Home screen.
and then touch the source of the
Accept
icon when the screen is cropped
.
Changing Wallpaper on the Kids Mode Home
screen
1. Navigate to the Kids Mode Home screen.
Menu
➔
Settings
2. Tou ch
3. Tou ch
4. Touch a background to select it or touch the
5. Touch the
6. Touch a photo or wallpaper, then touch and hold a blue
7. Tou ch t he
Home screen
background from the Kids gallery or Kids camera
folder.
A red check mark displays on the right upper corner of
the selected background.
surrounds the background (if desired).
diamond in the corner and drag the blue box to crop
the area of the photo or wallpaper you want to display
on the screen.
the way you want it.
This photo or wallpaper displays on the Lock screen.
then touch the
Frames
tab, and then touch a frame that
Accept
icon when the screen is cropped
.
Background
tab.
+
to add a
Page 35

Inserting Frames
You can change the frames that surround the Cards
displayed on the Kids mode Home screen.
1. Navigate to the Kids Mode Home screen.
2. Touch
3. Touch
4. Touch a frame to view a sample of what the cards look
like using this frame selection.
5. Press
display using the newly selected frame.
Menu
➔
Settings
Home screen
then touch the
Back
or the Home key icon until the cards
.
Frames
tab.
Edit cards
The Edit cards option allows you to add or remove cards from
the Kids mode Home screen.
Adding and Removing Cards
1. From the Kids Mode Home screen, touch
Settings
➔
Edit cards
.
Add card
2. Touch
3. Touch the red
remove the card from the Kids Mode Home screen.
and touch a card name to add.
X
in the upper-right corner of a card to
Menu
Important!
Passwords
Default Password
The default password for Kids Mode is set to 0000. This
password allows you to access the Parental Controls screen,
where you can change the password for Kids Mode. You can
use the Parental Controls to keep your child safe.
Changing the default password for the Kids Mode can
prevent your child from using the default password to access
the Parental Controls settings and the features and apps in
the Standard Mode, and from purchasing paid applications.
➔
Removing a card from the Kids Mode Home screen
does not permanent delete the application from the
tablet.
Kids Mode 30
Page 36

Changing the Password
1. From the Kids Mode Home screen, touch
Parental controls
2. Enter the default 4-digit password (PIN code) and then
tap
Change PIN
3. Enter the 4-digit password again to confirm.
4. Enter the new password.
5. Enter the new password to confirm.
Note:
Once the password is changed, you must enter this new
password to access parental controls or purchase paid
applications from the Kids Store.
31
.
.
Menu
Parental Controls
➔
Parental controls allow adults to protect their children by
selecting the folders of media content you want shared with
your child, blocking menus or keys in Kids mode, and
whether new applications are automatically downloaded to
the Kids apps section. You can also restrict the amount of
time children can use the tablet, and applications they can
access.
Page 37

Settings
1. From the Kids Mode Home screen, touch
Parental controls
2. Enter the password.
Settings
3. Ta p
.
.
Menu
➔
5. Tap th e
6. Ta p
Kids mode.
7. Ta p
add all downloaded apps to the Kids mode.
Note:
If
Add apps to Kids mode
manually add each app.
Accept
icon to confirm your selections.
Block keys
Add apps to Kids mode
to block the menu and back keys in
is not selected you must
if you want to automatically
Kids content
4. Ta p
right of each type of content to allow in Kids mode.
A green checkmark displays when selected.
, then tap the checkbox on the top
Kids Mode 32
Page 38

Time manager
Use the Time manager to set limits on the amount of time
your child uses the tablet. You can set limits in ten minute
increments, set a time period for use, or select No time limit
for unlimited use.
1. From the Kids Mode Home screen, touch
Parental controls
2. Enter the password.
Time manager
3. Tap
33
.
.
Menu
➔
4. Tap one of the following options’ radio buttons:
• Always lock
you to enter the password before use.
• Set time limits for use
increment up to 1 hour and 20 minutes of use.
• Set time period for use
time use.
• No time limit
: automatically locks the Kids mode and requires
: tap one space for each ten minute
: enter the starting time and ending
: the tablet operates without time restrictions.
Page 39

Application manager
The Application manager controls the apps that display on
the Apps screen.
When you first access this screen, the apps that display a red
check mark in the upper-right corner of the app are enabled
and display on the Apps screen.
To add additional Apps to the Kids Mode Home screen:
1. From the Kids Mode Home screen, touch
Parental controls
2. Enter the password.
Application manager
3. Ta p
.
.
Menu
4. Tap each app that you want to display on the
Kids mode Apps screen, then tap the
to confirm your selection(s).
5. Tap an app with a check mark displayed to deselect
the app. This app will not display on the Kids mode
Apps screen until selected again.
Switching to Standard Home Screen Mode
➔
1. From the Kids Mode Home screen, touch
Parental controls
2. Enter the 4-digit password.
Standard home screen
3. Ta p
.
.
Accept
Menu
Kids Mode 34
icon
➔
Page 40

Section 4: Standard Mode
This section outlines key features of your device and
describes the screen and the icons that appear when the
device is in use. It also shows how to navigate through the
device.
Home Screen
The Home screen is the starting point for using your device.
Note:
Unless stated otherwise, instructions in this user manual
start with the device unlocked, at the Home screen.
System Bar
1.
screen where you can find navigation buttons and
icons that show notifications, battery power, and
connection details.
Status Icons
2.
the Time / Status Icons area to display the Status
Details panel. For more information, refer to “Status
Bar” on page 43.
35
: The area along the bottom of the Home
: Indicate the status of your tablet. Touch
Time
: The current time. For more information, refer to
3.
“Date and Time” on page 144.
Apps
: Display the Apps screen.
4.
Primary Shortcuts
5.
These shortcuts are found on all Home screens by
default. For more information, refer to “Primary
Shortcuts” on page 44.
Current screen
6.
displayed. For more information, refer to “Extended
Home Screen” on page 36.
: Shortcuts to common features.
: Indicates which Home screen is being
Page 41

9
8
7
6
5
7.
Current screen
displayed.
1
2
: Indicates which Home screen is being
8.
Home screen
: The starting point for using your device.
Place shortcuts, widgets, and other items to customize
3
your device to your needs.
Google Search
9.
: Search the web by typing or speaking.
For more information, refer to “Google Search” on
page 67.
Widgets
10.
: Applications that run on the Home screen.
Some widgets are found on the Home screen by
default. For more information, refer to “Widgets” on
page 45.
Extended Home Screen
The Home screen consists of the Home panel plus additional
panels that extend beyond the display width to provide more
space for adding shortcuts and widgets. For more
information, refer to “Adding and Removing Home Screen
Panels” on page 37.
4
Slide your finger horizontally across the screen to scroll to
the left or right side panels. As you scroll, the indicator at the
top of the display shows your current position.
Note:
The center panel displays when you touch
Home
Standard Mode 36
.
Page 42

Customizing the Home Screens
To customize the Home screens to suit your preferences:
1. Navigate to one of the Home screen panels.
2. Touch and hold on the screen until the
pop-up displays.
3. Touch
Set wallpaper
wallpaper. For more information, refer to “Wallpapers”
on page 48.
– or –
Add to Home screen
Under
• Apps and widgets
Home screen.
•Folder
to add a folder on a Home screen. For more
information, refer to
•Page
to add a Home screen.
to change the Home screen
touch:
to add app or widget shortcuts on the
“Folders”
Home screen
on page 47.
Display Settings
You can customize display screen settings to your
preferences. For more information, refer to “Display” on
page 129.
37
Adding and Removing Home Screen Panels
Your device comes with seven Home screen panels. You can
customize the Home screen by removing or adding panels.
Note:
The panel in the center position displays when you touch
Home
.
From a Home screen, pinch the screen from the left
and right side to the center to display the editing
screen.
Tip:
Touch and hold on the screen until the
pop-up displays. Under
add a Home screen.
Use these controls to configure panels:
1.
Default Home Page
set it as the default home screen.
Add
: Touch to add a new panel, up to a total of seven.
2.
This option is available when less than seven panels
have been added.
Remove
3.
: Touch and drag a panel to the Trash Can to
remove the panel from the Home screen.
Add to Home screen
: Touch the Home icon on a panel to
Home screen
, touch
Page
to
Page 43

To rearrange the order of panels:
Touch and drag a panel to a new location.
To return to the Home screen:
Tou ch Back
.
Navigating Your Device
Use command buttons and the touch screen to navigate.
1
2
3
Command Buttons
Back
To uch Back
step.
Home
To uch
Touch and hold to open a list of thumbnail images of apps
you have worked with recently. Touch an App to open it.
Touch to display the Task Manager.
To launch Google Search, touch .
Touch to clear all thumbnail images.
Context-Sensitive Menus
Context-sensitive menus offer options for features or
screens. To access context-sensitive menus:
• Touch
• Touch an option in the list.
to return to the previous screen, option, or
Home
to display the center Home screen.
Menu
to display a list of options.
Standard Mode 38
Page 44

Screen Capture
Touch and hold the
to capture and save an image of the current screen.
Note:
A copy of the screenshot is automatically saved to the
clipboard.
To view the screen shots:
1. From a Home screen, touch
➔
My Files
2. Touch
3. Touch a screen capture file to display it.
storage
Power/Lock Key
.
➔
sdcard0
➔
Apps
Pictures
and
➔
Home
Screenshots
Application Bar
The Application Bar is the area along the top of various
application screens. It usually contains the Search and Menu
icons, as well as other icons that are used to display options
and settings.
39
Screen Navigation
Touch
Touch items to select or launch them. For example:
•
Touch the on-screen keyboard to enter characters or text.
•
Touch a menu item to select it.
•
Touch an application’s icon to launch the application.
Touch and Hold
Activate on-screen items. For example:
•
Touch and hold a widget on the Home screen to move it.
•
.
Touch and hold on a field to display a pop-up menu of options.
Swipe, Flick, or Slide
Swipe, flick, or slide your finger vertically or horizontally
across the screen. For example:
•
Unlocking the screen.
•
Scrolling the Home screens or a menu.
Pinch
Use two fingers, such as your index finger
and thumb, to make an inward pinch
motion on the screen, as if you are picking
something up, or an outward motion by
sweeping your fingers out.
Page 45

For example:
•
Pinch a photo in Gallery to zoom in.
•
Pinch a webpage to zoom in or out.
Notifications
When you receive a notification, the Notification icon displays
in the System Bar, to the left of the Time. Notifications
indicate the arrival of Gmail, alarms, and more.
Status Details
To display the current date and time, battery status, and
Wi-Fi connectivity status, open Status Details.
1. Touch the top of the screen and swipe downward.
The Status Details screen displays. If you have any
current notifications, their summaries are listed below
the Notifications title.
2. Touch a notification summary to respond to it.
3. Press
close the Status Details screen.
Home, press
Back
, or swipe up to
Quick Settings
To view and control the most common settings for your
tablet, as well as accessing the complete Settings
application, open the Quick Settings panel.
1. Touch the top of the screen and swipe downward.
The Quick Settings screen displays.
Note:
This screen displays both Status Details and Quick
Settings and is referred to by both names in this manual.
Standard Mode 40
Page 46

2. The Quick Settings are:
•Wi-Fi
: Touch to enable or disable Wi-Fi. For more information,
refer to
“Wi-Fi”
on page 93.
•Sound / Mute
• Screen rotation
from landscape to portrait and vice versa. When Off the screen
is fixed in the current mode, either portrait or landscape. For
more information, refer to
•Bluetooth
information, refer to
• Power saving
analyzes the screen and adjusts the brightness to conserve
battery power. For more information, refer to
page 145.
Sweep the pop-up to the left to see additional settings.
• Blocking mode
features will be disabled.
41
: Touch to enable or disable sound mode.
: When On the screen rotates automatically
“System”
on page 145.
: Touch to enable or disable Bluetooth. For more
“Bluetooth”
: When enabled, your device automatically
: When enabled, notifications for selected
on page 96.
“System”
on
•Sync
: Synchronizes your device with the network.
Synchronizes contacts, time, and a variety of accounts.
• Driving mode
• Airplane mode
3. Touch
For more information, refer to “Settings” on page 119.
4. Touch the
brightness or touch
brightness automatically based on available light and
battery charge status. For more information, refer to
“Brightness” on page 129.
Notifications
5.
notification entry to display the details. Touch
remove Notification Icons from the System Bar.
For more information, refer to “Notifications” on
page 40.
6. Touch
the Status Details screen.
: New notifications are read aloud when enabled.
: All wireless communications are disabled.
Settings
to open the Settings application.
Brightness
slider and drag it to set the
Auto
to allow the device to set
displays system notifications. Touch a
Home
,
Back
, or swipe up to close
Clear
to
Page 47

Notifications display in the System Bar and, in some cases,
under the Notifications heading in the Quick Settings to alert
you to activity on the tablet such as new messages,
application downloads, software updates, and more. The
following table lists those icons.
System Alert
in the Quick Settings for alerts.
Download
downloaded or has been downloaded to the device.
Download Successful
or update completed successfully.
New Gmail Message
icon for additional information.
Hangouts Invitation
chat using Google Hangouts. For more information,
refer to “Hangouts” on page 66.
Music player
Details to see the song title and music player
controls. For more information, refer to “Music
Player” on page 74.
: Check under the Notifications heading
: An application or file is being
: A recent application download
: You have new Gmail. Touch the
: Someone has invited you to
: Music is playing. Display the Status
Music App
: A song is playing in the Music app.
Touch the Music icon or touch the Status Details to
see the song title and music player controls. For
more information, refer to “Play Music App” on
page 71.
GPS Active
Software update
available for this device. For more information, refer
to “Software Update” on page 148.
Updates Available
have downloaded are available.
Choose input method
displayed, open the Quick Settings screen to display
a menu of quick keyboard settings. For more
information, refer to “Text Input Methods” on
page 50.
Wi-Fi Direct
and your tablet is connected to another device. For
more information, refer to “Wi-Fi Direct” on
page 95.
: Displays when GPS is active.
: There may be a software update
: Updates to the applications you
: When the keyboard is being
: Displays when Wi-Fi Direct is active
Standard Mode 42
Page 48

Screenshot Captured
captured.
Nearby Devices
enabled. For more information, refer to “Nearby
Devices” on page 126.
Blocking Mode
are disabled. For more information, refer to
“Blocking Mode” on page 127.
Event
: This is a notification for one or more events.
For more information, refer to “Creating an Event or
Tas k” on page 108.
Navigation Active
USB Connected
using a USB cable.
43
: A screenshot has been
: The Nearby devices setting is
: Notifications for selected features
: The Navigation App is active.
: Device is connected to a computer
Status Bar
The Status Bar is part of the System Bar and displays icons
to show network status, battery power, and other details.
Battery Level
Charging Indicator
Device Power Critical
power remaining. At about 15 percent power
remaining, a pop-up is displayed to remind you to
charge immediately.
USB Connection Indicator
to a computer using a USB cable, but it is not
charging. The battery is only charged while
connected to a computer, if the device is turned off.
When the device is off, press the Power/Lock key to
see the battery charging indicator.
: Shown fully charged.
: Battery is charging.
: Battery has only three percent
: The device is connected
Page 49

Battery Fully Charged
charged, this indicator is displayed.
Airplane Mode
active, which allows you to use many of your
device’s features, but it cannot access online
information or applications.
Bluetooth Active
information, refer to “Bluetooth” on page 96.
Wi-Fi Active
communicating with a Wireless Access Point (WAP).
Alarm Set
: Displays when you set an alarm to ring at
a specified time. For more information, refer to
“Alarm” on page 104.
: When the battery is fully
: Indicates that the Airplane Mode is
: Bluetooth is turned on. For more
: Wi-Fi is connected, active, and
Primary Shortcuts
Primary Shortcuts display at the bottom of the Home
screens.
Tip:
The main Home screen is usually the center Home screen.
The default Primary Shortcuts are: Contacts, Calendar,
Camera, Settings, and Apps.
Other App Shortcuts
There are also other application shortcuts on the Home
screens, such as Kids mode, Alarm, Gallery, Dropbox,
Samsung Apps, and Play Store.
For more information, refer to “More Application Information”
on page 50.
Application shortcuts can be added to any Home screen. For
more information, refer to “App Shortcuts” on page 46.
Standard Mode 44
Page 50

Widgets
When you first turn on your tablet, there are various widgets
on the center Home screen. They can also appear on the
Home screens to the left and right of the center Home
screen.
Widgets are self-contained applications that you can place
on the Home screens to access your favorite features.
For more information, refer to “Applications” on page 103.
Adding Widgets to a Home screen
1. Navigate to the Home screen on which you want to
Apps
place the Widget and touch
Widgets
2. Touch the
Note:
Swipe across the screen horizontally to view all Widgets.
3. Touch and hold the widget’s icon until the Home screen
displays, then slide your finger where you want to
place the icon and release it.
Note:
There must be room on the screen where you want to
place the widget, otherwise the widget will not add to
the Home screen.
45
tab.
.
Removing Widgets
Touch and hold the Widget until the
displays, then drag the widget to the
Note:
This action does not actually delete the Widget, it just
removes it from the current Home screen.
Remove
Remove
icon.
icon
Page 51

App Shortcuts
Use App Shortcuts for quick access to applications or
features.
1. Navigate to the Home screen on which you want to
place the App Shortcut.
Apps
2. Touch
– or –
Touch and hold on the screen until the
options pop-up displays and then touch
widgets
3. Touch the
4. Touch and hold the application icon until the Home
screen displays, then slide your finger where you want
to place the icon and release it.
For more information, refer to “Apps Screen” on
page 49.
5. Touch and hold the App Shortcut and then drag the
application icon to reposition it on the Home screen.
.
Home screen
Apps and
.
Apps
tab.
Removing App Shortcuts
Touch and hold the App Shortcut until
displays, then drag the App Shortcut to the
icon.
Remove
Remove
Standard Mode 46
Page 52

Folder s
Place Folders on a Home screen to organize items together.
Adding Folders
To create a folder on a Home page:
1. Navigate to the desired Home screen.
Folder
Home screen
.
OK
.
2. Touch and hold on the screen until the
pop-up displays and then touch
The Create folder pop-up displays.
3. Touch the
enter a name for the folder, and touch
A new folder displays on the Home screen.
47
Unnamed folder
field, use the keyboard to
Managing Folders
To rename a folder:
To add an App shortcut to a folder:
1. Add the App shortcut to the Home screen that the
2. Touch and hold the App shortcut, drag it to the folder,
To remove an App shortcut from a folder:
1. Touch the folder to view the contents.
2. Touch the App shortcut, drag it out of the folder, and
Removing a Folder
Note:
Touch the folder, touch the current name, and use the
keyboard to enter a new name for the folder.
folder is on.
and drop it.
drop it on the Home screen.
Touch and hold the folder until the
displays, then drag the folder to the
Any App shortcuts in the folder are also removed.
Remove
Remove
icon
icon.
Page 53

Wallpapers
You can choose a picture to display on the Home Screen,
Lock screen, or on both the Home and Lock screens. Choose
from preloaded wallpaper images or select a photo you have
downloaded or taken with the Camera.
1. From a Home screen, touch and hold on the screen.
The
Home screen
2. Touch
3. Touch
Set wallpaper
The Set wallpaper pop-up displays.
Home screen, Lock screen
screens
Select wallpaper from
The
following options:
•Gallery
select it. Crop and resize the picture, if desired. Touch
save the picture as wallpaper. Touch
options pop-up displays.
.
, or
Home and lock
.
pop-up displays the
: Access the Gallery to select a photo. Touch a photo to
Done
Cancel
to cancel.
• Live wallpapers
wallpapers. Touch a wallpaper to see an example. If available,
touch
wallpaper
the Live wallpapers menu.
• Wallpapers
an image to view it. Touch
wallpaper. Touch
Note:
Live wallpapers is not available for the Lock screen.
to
: Choose from pre-loaded interactive animated
Settings
to view options for the selection. Touch
to save your choice. Touch Back
: Choose from pre-loaded wallpaper images. Touch
Set wallpaper
Back
to return to the Home screen.
to save it as
Standard Mode 48
Set
to return to
Page 54

Apps Screen
The
Apps
screen displays all applications installed on your
wireless device. Applications that you download and install
from Google Play or from the web are also added to a Home
screen.
The Apps icons are arranged in a customizable grid. To
arrange the Apps icons in alphabetical order:
1. From a Home screen, touch
Menu
2. Touch
3. Touch
To manually change the order of the icons on the Apps
screen:
1. From a Home screen, touch
2. Touch
3. Touch and hold an icon and drag it to a new position.
4. Touch
You can place shortcuts to applications on the Home screen
for quick access to the application. For more information,
refer to “App Shortcuts” on page 46.
49
Alphabetical grid
Save
➔ View type
.
Menu
➔ Edit
to save the changes.
Apps
.
.
Apps
.
.
To view your downloaded applications:
Apps
1. From a Home screen, touch
2. Tou ch
downloaded apps.
3. Touch an icon on the
to launch the application.
– or –
Add an App Shortcut to a Home screen by dragging the
App icon onto the Home Screen. For more information,
refer to “App Shortcuts” on page 46.
Downloaded applications
Downloaded applications
.
to view
screen
Page 55

Application Information
To view information about an App, such as the amount of
storage it uses, force the App to stop, uninstall updates, and
clear data:
1. From a Home screen, touch
➔
Application manager
All
2. Touch the
touch the app to open a screen with details about the
App.
tab, scroll through the apps list, and
Apps
➔
Settings
.
More Application Information
For more information, refer to “Applications” on page 103.
In that section, each application that is available on the
Applications screen is listed and described. If the application
is also described in another section of this user manual, then
a cross reference to that particular section is provided.
Various widgets are also described.
Entering Text
This section describes how to select the desired text input
method when entering characters into your tablet. This
section also describes the predictive text entry system that
reduces the amount of key strokes associated with entering
text.
Your tablet comes equipped with an orientation detector that
can tell if the tablet is being held in an upright (Portrait) or
sideways (Landscape) orientation. This is useful when
entering text.
Text Input Methods
Your device offers two text input methods.
•
Google voice typing and
•
Samsung keyboard.
You can set a default text entry method in Settings. For more
information, refer to “Keyboards and Input Methods” on
page 138.
Standard Mode 50
Page 56

To choose a text input method while entering text:
1. Touch the top of the screen and swipe downward.
The Quick Settings screen displays.
Touch
The Choose input method pop-up displays.
2. Touch an input method to activate it.
For more information, refer to “Keyboards and Input
Methods” on page 138.
Choose input method
.
Using the Samsung Keyboard
The Samsung keyboard is a custom virtual QWERTY
keyboard, featuring optional predictive text or continuous
input. Input characters by touching the on-screen keys with
your finger or use speech recognition.
You can enable predictive text, to have the Samsung
keyboard match your key touches to common words and
displays them. The Personalization option learns from GMail,
Facebook, and Twitter. Log into these applications to enable
the Samsung keyboard to learn from your text input.
51
Keyboard Types
In addition to the default QWERTY keyboard, there is also a
Floating keyboard.
To change the keyboard type:
1. Access the QWERTY keyboard.
2. Touch and hold on the keyboard and then select
from the pop-up menu
3. Touch the tab at the top of the Floating keyboard to
move it.
Configuring the Samsung Keyboard
You can configure the Samsung keyboard to your
preferences. While entering text:
Touch and hold
touch
The Samsung keyboard settings screen displays.
For more information, refer to “Configuring the Samsung
Keyboard” on page 138.
Settings
.
Options
on the keyboard and then
.
Page 57

Entering Upper and Lower Case Letters
The default case is lower case (abc). Enter upper and lower
case alphabet letters by touching the Shift key to toggle
the case, before touching the letter key(s).
•
Touch once to switch from abc to Abc mode.
•
Touch twice to switch to ABC mode. When ABC mode is enabled,
the Shift key background turns blue.
Entering Symbols and Numbers
The number keys are displayed at the top of the keyboard
and are always available.
To enter common symbols, touch to switch to symbol
mode, then touch the corresponding key.
There are two pages of symbols. Touch to switch to the
next page.
Touch and hold a vowel key (A, E, I, O, U, or Y) or the C, N, or
S key to open a small window where you can chose an
accented vowel or other alternate letter. Slide to the letter
until it is highlighted, and release.
Touch and hold the Period key ( . ) to open a small window
with a set of common symbols.
Using Predictive Text
By using Predictive text, you can have next-letter prediction
and regional error correction, which compensates for
touching the wrong keys on the QWERTY keyboard.
Note:
Enable Predictive text in Samsung keyboard settings.
For more information, refer to “Configuring the Samsung
Keyboard” on page 138.
While entering characters, potential word matches display in
the Predictive text area above the keyboard.
Touch a word to insert it into your text.
Tip:
Touch to display more words.
Using Google Voice Typing from the Samsung
Keyboard
When you enable the Google voice typing setting, you can
use your voice to enter text instead of the keyboard.
For more information about enabling Voice input, see “Using
Google Voice Typing” on page 54.
Standard Mode 52
Page 58

Editing Text
You can edit the text you enter in text fields by cutting,
copying, or pasting text. These operations can be performed
within and across apps. However, some apps do not support
editing some or all of the text displayed while others may
offer their own way to select text.
Editing Existing Text
To edit text that you have entered:
1. Touch the text at the point you want to edit.
Cursor
The
2. Touch and drag the
necessary.
3. Enter additional text or delete text by repeatedly
touching the
Copying, Deleting, or Replacing Text
To select and copy, delete, or replace text:
1. Touch and hold the text or word you want to select.
The selected text is highlighted with a tab at
each end of the selection.
53
displays at the point you touched.
Cursor
to a better position, if
Delete
key.
2. Touch and drag either tab to select more or less text.
Tip:
Tou ch
Select all
in the Application bar to select all text in
the field. Touch on another area of the screen or touch
Done
to deselect the text.
3. Depending on the action you want to take for the
selected text, in the Application bar touch:
•Select all
to highlight all text in the field.
•Cut
to remove the selected text.
•Copy
to save the selected text to the clipboard.
•
Touch
–
– or –
Enter text by typing or speaking to replace the
selection with what you type.
– or –
Tou ch the
More options
Paste
to paste previously copied text.
Delete
key to delete the selected text.
to display:
Page 59

Pasting Text
To paste previously copied text:
1. Touch the text at the point you want to paste the copied
text.
Cursor
The
2. Touch the Cursor.
A pop-up displays.
3. Touch
To paste text directly from the clipboard:
1. Touch the
to the clipboard.
2. Touch a text block to paste that text where the
positioned.
displays at the point you touched.
Paste
in the pop-up.
Clipboard
key to display the text saved
Cursor
Closing the Keyboard
To close the keyboard:
Tou ch
Close Keyboard
.
Using Google Voice Typing
You can use your voice to enter text using the Google voice
typing feature.
While entering text:
1. Touch on the keyboard.
For more information, refer to “Keyboards and Input
Methods” on page 138.
2. At the
is
3. Keep speaking to add more text.
4. Touch to display the Samsung keyboard.
Tap to speak
clearly and distinctly into the microphone.
The software converts your voice to text, which is
displayed in the message.
prompt, touch and speak
Standard Mode 54
Page 60

Task Manager
Your device can run applications simultaneously and some
applications run in the background.
Use Task Manager to see which applications are running on
your device and to end running applications to extend battery
life. You can also uninstall applications from your device and
see how much memory is used by applications.
Task Manager Application
The Task Manager application provides information about
applications, including
RAM manager, Storage
To access the Task Manager:
1. Add the Active apps manager widget to a Home screen
and then touch
manager widget. For more information, refer to
“Widgets” on page 45.
– or –
Press and hold the
Task manager
55
Active applications, Downloaded
, and
Help
.
Active applications
Home
icon.
on the Active apps
key, and then touch the
,
2. Tou ch
3. Tou ch
4. Tou ch
5. Tou ch
6. Tou ch
For more information, refer to “Apps Screen” on page 49.
Active applications
on your device. Touch
End all
to end all running applications.
Downloaded
Google Play. Touch
from your device.
RAM manager
Access Memory (RAM) currently in use. Touch
memory
to clear inactive and background processes.
Storage
to view internal (System storage) and
external (SD card) storage memory statistics.
Help
to view useful tips for extending battery life.
to view applications running
End
to end an application or
to view applications installed from
Uninstall
to remove an application
to display the amount of Random
Clear
Page 61

Contacts and Accounts
This section explains how to manage contacts and accounts.
Accounts
Your device can synchronize with a variety of accounts. With
synchronization, information on your device is updated with
any information that changes in your accounts.
•
Samsung account
information, refer to
on page 143.
•
Dropbox
to
“Dropbox”
•
Facebook
•
Google
and Gmail. For more information, refer to
•
Server
: Add your Samsung account. For more
“Signing In to your Samsung Account”
: Add your Dropbox account. For more information, refer
on page 111.
: Add your Facebook account to sync Contacts.
: Add your Google account to sync your Contacts, Calendar,
“Gmail”
on page 64.
: Add a server to sync and access your data.
Setting Up Your Accounts
Set up and manage your synchronized accounts with the
Accounts
setting.
1. From a Home screen, touch
➔ Add account
2. Touch the account type.
3. Follow the prompts to enter your account credentials to
complete the set-up process.
Your tablet communicates with the appropriate account
servers to set up your account. When complete, your
account displays in the
screen.
.
Accounts
Standard Mode 56
Apps
➔
Settings
area of the Settings
Page 62

Contacts
Store contact information for your friends, family, and
colleagues to quickly access information or to send a
message.
To access Contacts:
From a Home screen, touch
Contacts
.
Creating Contacts
1. Touch
The Save contact to pop-up displays.
2. Touch
– or –
Touch Add new account to add a different account. For
more information, refer to “Setting Up Your Accounts”
on page 56.
3. Touch the
the contact.
4. Touch contact fields to display the keyboard and enter
information:
57
Contacts
➔
Device
or an account.
Contact photo to set up a photo to identify
Create
Apps
.
➔
•
Some fields have preset values. Touch the field and touch the
desired value. For example, touch the Label tab and
touch a label for the field.
•
Other fields have to be input. Touch the field and use the
on-screen keyboard to input information.
•
Touching the check box next to some fields may make
additional fields available.
•
Touch to add additional fields.Touch to remove an
unused field. Also, touch
•
Touch the screen and swipe up or down to display additional
fields or touch
5. Touch
6. When you finish entering information, touch
– or –
Tou ch
changes.
Tip:
Display a contact’s record and touch the
display the address on a map, or the
to the website.
Back
Cancel
Add another field
Next
on the keyboard to move to the next field.
to remove the keyboard.
➔ OK to cancel and discard
to add other fields.
Address
Website
Save
field to
field to link
.
Page 63

Updating Contacts
To update an existing contact:
1. Touch
2. Touch a contact in the Contacts list to view its
information.
3. Touch
4. Continue entering contact information.
Contacts
Edit
.
.
Deleting Contacts
To delete a contact:
1. Touch
2. Touch a contact in the
information.
3. Touch
4. At the prompt, touch
Contacts
Delete
.
.
Contacts
OK
list to view its
.
Managing Photo IDs
To remove or update a contact’s Photo ID:
1. Touch
2. Touch a contact in the
information.
3. Touch
Contacts
Edit
.
.
Contacts
list to view its
4. Touch the Contact photo, then touch
Take picture
, or
Pictures by people
Remove, Image
.
Contacts Display Options
There are various ways to display your Contacts and general
Contacts settings.
1. Touc h
2. To uch
Contacts List, to view contacts various ways:
•Groups
•Favorites
•Contacts
Contacts
.
Groups, Favorites
: Displays the possible Groups, such as Not assigned,
Co-workers, Family, Friends, and so on. The number of
contacts in the group is displayed next to the group name.
Touch a group name to show only contacts in that group. For
more information, refer to
page 61.
: Show only your favorite, or starred, contacts. For
more information, refer to
: Show all your contacts. Touch the
enter a keyword to list contacts that contain that keyword.
, or
Contacts
, above the
“Creating a New Group”
“Favorites”
on page 63.
Search
Standard Mode 58
on
field and
,
Page 64

3. From the
4. From the
Groups, Favorites
to display the options for each grouping.
Menu
Contacts
display and manage Contacts settings.
, or
Contacts
list, touch
list, touch
Menu ➔ Settings
Linked Contacts
Your device can synchronize with multiple accounts,
including your Samsung account, Google, or the Server.
When you synchronize contacts from these accounts with
your device, you may have multiple contacts for one person.
Linking, or joining, imported contact records allows you to
see all the contact’s numbers and addresses together in one
contact entry. Linking also helps you keep your contacts
updated, because any changes that your contacts make to
their information in the respective accounts is automatically
updated the next time you synchronize with the account.
59
Joining Contacts
1. Touch
to
2. Touch a contact in the
3. Tou ch
4. Touch the contact you want to Join.
5. Repeat Steps 3 and 4 to join other contacts.
Separating Contacts
1. Touch
2. Touch a contact in the
3. Tou ch
4. Touch ➔
Contacts
.
Contacts
list to view its
information.
Menu
➔
Join contact.
The joined contact’s information is displayed with the
original contact’s information.
Contacts
.
Contacts
list to view its
information.
Menu
➔
Separate contact
A list of Joined contacts displays.
OK
to separate a joined contact.
The contact is removed from the list.
.
Page 65

Sharing Contact Information
You can send a contact’s information by way of Bluetooth to
other Bluetooth devices or in Gmail as an attachment.
Note:
Not all Bluetooth devices accept contacts and not all
devices support transfers of multiple contacts. Check
the target device’s documentation.
Contacts
Menu
➔
.
Share namecard via
.
1. Touch
2. Touch
Tip:
Set up a contact record for yourself to share your
information with others.
3. At the prompt, choose a sending method such as
Bluetooth.
4. Follow the prompts to send the contact information.
Importing and Exporting Contacts
To back up and restore your contacts information, you can
export your contacts list to a storage device, such as a PC, or
import your contacts list (previously exported) from a storage
device.
1. Use the USB cable to connect your device to the
storage device.
2. Touc h
3. To uch
The Import/Export contacts pop-up displays.
4. Touch an option and then follow the prompts to
complete the operation.
Contacts
Menu
.
➔
Import/Export
.
Standard Mode 60
Page 66

Groups
Assign contacts to Groups to make searching for contacts
faster or to quickly send messages to group members.
Creating a New Group
Create a new group when you add or edit a contact.
1. Touch
2. Touch
3. Touch
4. Touch the
enter a new Group name.
5. Touch
Tip:
Contacts can belong to more than one group. Just touch
the contact’s
Once you create a new group, the Contacts List can be set to
display only the contacts in that group. For more information,
refer to “Contacts Display Options” on page 58.
61
Contacts
.
Groups
above the Contacts List.
Create
.
Group name
Save
Groups
field and use the keyboard to
to save the new group name.
field and touch each group.
Renaming a Group
To rename a group that you created:
1. Touch
2. Tou ch
rename.
3. Tou ch
4. Touch the
enter a new Group name.
5. Touch
Contacts
.
Groups
and then touch the group you want to
Menu
➔
Edit
.
Group name
Save
field and use the keyboard to
to save the new group name.
Deleting Groups
To delete a group that you created:
Contacts
1. Touch
2. Tou ch
3. Tou ch
4. Tou ch
5. Touch Delete to delete the groups. Choose from
Groups
delete.
Delete groups
The groups that can be deleted display.
Select all
Group only or Group and group members.
.
and then touch any group you want to
.
or the name of each group to delete.
Page 67

Adding Group Members
To add a contact to a group, just Edit a contact’s Group field.
For more information, refer to “Updating Contacts” on
page 58.
To add multiple contacts to a group:
Contacts
1. Touch
2. Touch
3. Tou ch
4. Touch
5. Touch Done to add the contacts to the group.
Groups
want to add members.
Menu
The contacts that can be added display.
Select all
.
and then touch the group to which you
➔
Add member
or the name of each contact to add.
.
Removing Group Members
To remove contacts from a group:
1. Touc h
2. To uch
want to remove members.
3. To uch
4. To uch
5. Touc h Done to remove the contacts.
Contacts are removed from the group and the group
name is removed from each contact’s
Contacts
.
Groups
and then touch the group from which you
Menu
Select all
➔
Remove member
or the name of each contact to remove.
Standard Mode 62
.
Group
field.
Page 68

Favorites
Mark contact records with a gold star to identify them
as favorites.
Adding Favorites
To add a contact to the Favorites list:
1. Touch
2. Touch a contact to display it.
3. Touch the
that it turns gold .
Tip:
You do not have to edit the contact to change the Starred
status.
Accessing Favorites
You can view your favorites two ways for fast viewing or
messaging.
To view your favorites list:
1. Touch
2. Touch
Only your starred contacts display.
63
Contacts
Star
Contacts
Favorites
above the Contacts List.
.
next to the contact name so
.
Note:
Tou ch
Groups
Starred in Android
saved on your Google account.
above the Contacts List and then touch
to list the Favorites that are being
Removing Favorites
To remove one or more contacts from your favorites list:
1. Touch
2. Tou ch
3. Tou ch
4. Tou ch
5. Touch Done to remove the contacts.
To remove one contact from your favorites list:
1. Touch
2. Touch a contact to display it.
3. Touch the
that it is no longer gold .
Contacts
.
Favorites
above the Contacts List.
Menu
Select all
➔
Remove from favorites
or the name of each contact to remove.
Contacts
.
Star
next to the contact’s name so
.
Page 69

Messaging
This section describes how to send and receive messages
and other features associated with messaging.
Types of Messages
Your device supports these types of messages:
•
Gmail Messages
•
Google Hangouts
•
Google+
•
Google Messenger
Note:
Your Wi-Fi-only device does NOT support voice calling
and messaging services. Please disregard any “dial”
and “message” related menus because some Gmail
options are identically set in all Android devices.
Gmail
Send and receive email with Gmail, Google’s web-based
email.
To access Gmail:
From a Home screen, touch
Setting Up Your Gmail Account
If you did not set up a Google account during the initial
configuration, the first time you launch Gmail, your device
prompts you to set up your Google account.
1. Touc h
The Add a Google Account screen displays.
2. Follow the prompts to sign in or create a new account.
The device communicates with the Google server to set
up your account and synchronize your email. When
complete, your Gmail displays in the Inbox.
Note:
You can use more than one Google account on your
device. To add another account, touch
Settings
Gmail
➔
ADD ACCOUNT
.
Apps
.
Standard Mode 64
➔
Menu
Gmail
➔
.
Page 70

Refreshing Your Gmail Account
Refresh your account to update your device from the Gmail
servers.
1. Touch
2. Touch
Gmail
.
Menu ➔ Refresh
.
Gmail Settings
Use the Gmail Settings to configure your Gmail preferences.
Gmail
Menu
Menu
.
➔ Settings
➔ Help
for more information.
for settings.
1. Touch
2. Touch
Tip:
Tou ch
Composing and Sending Gmail
1. Touch
2. Tou ch
the message. While composing a message, touch
3. Touch
– or –
Touch
message.
65
Gmail
.
Compose
Menu
for options.
SEND
to send this message.
Menu
, then touch fields to compose
➔ Save draft
to save a draft of this
Google+
Google+ makes messaging and sharing with your friends a
lot easier. You can set up Circles of friends, visit the Stream
to get updates from your Circles, use Messenger for fast
messaging with everyone in your Circles, or use Instant
Upload to automatically upload videos and photos to your
own private album on Google+.
1. Sign in to your Google account. For more information,
refer to “Setting Up Your Gmail Account” on page 64.
2. From a Home screen, touch
3. Follow the on-screen instructions to use Google+.
Menu
➔
Menu
➔
Settings
Help
4. Touch
Google+ preferences.
5. Touch
information.
Apps
➔
Google+
to configure your
to display additional help
.
Page 71

Hangouts
Hangouts is Google’s instant messaging and audio and video
chat service. You can use it to communicate, in real time,
with other people who also use Hangouts on another Android
tablet or phone or on a computer.
Tip:
Hangouts requires that you have a Google account. To set
up your Google account on your device use
settings. For more information, refer to “Accounts” on
page 142.
Open Hangouts and Sign In
1. From a Home screen, touch
Hangouts
.
If you are not signed in to a Google account, the Add a
Google Account screen displays.
Note:
If you have already set up your Google account, you are
automatically logged in. Just touch the account.
Once sign in is complete, the Hangouts main screen
displays.
Apps
Accounts
➔
Messenger
With Google Messenger, you can bring groups of friends
together into a simple group conversation, putting everyone
on the same page. When you get a new conversation in
Messenger, Google+ sends an update to your device.
To get started:
1. Login to your Google account.
to
“Gmail” on page 64.
2. From a Home screen, touch
Messenger
The Messenger screen displays.
3. Touch Add to invite friends to connect.
You can invite anyone with a Google Account to
become your friend in Google Hangouts, so you can
chat with each other and view each other’s online
status.
.
For more information, refer
Apps
➔
Standard Mode 66
Page 72

Internet and Social Networking
This section describes the various Internet and social
networking applications available on your device such as
Google and Voice Search, Google+, Maps, Google Play
Books, Play Magazines, and YouTube.
Using the Chrome Browser
Use Chrome to browse the internet and bring your open tabs,
bookmarks and omnibox data from your computer to your
device.
1. From a Home screen, touch
2. Follow the on-screen instructions.
67
Apps
➔
Chrome
Google Search
Search the internet using the Google search engine.
Tip:
The Google Search widget displays by default on the main
Home screen. For information about displaying widgets on
the Home screen, see “Adding Widgets to a Home screen”
on page 45.
1. From the main Home screen, touch
.
– or –
From a Home screen, touch
.
Apps
➔
Google
.
Page 73

2. Use the keyboard to enter search criteria to display
matching searches.
– or –
Touch and speak the search criteria slowly and
clearly. Google searches for the information and
displays results.
Suggestions display below the text entry area.
3. Touch a suggestion to search for that term.
– or –
Touch on the keyboard to start the search.
A browser window displays the search results.
To use Voice Search directly:
1. From a Home screen, touch
Voice Search
2. Speak the search criteria slowly and clearly. Google
searches for the information and displays results or
displays
search words.
.
Retry
. Touch the to retry speaking the
Apps
➔
Google+
Share updates and see what is going on around you with
Google+ for mobile.
To get started:
Apps
1. From a Home screen, touch
Google+
.
2. For more information, refer to “Google+” on page 65.
➔
Maps
Use Google Maps to find your current location, get directions,
and other location-based information.
Note:
You must enable location services to use Maps. Some
features require Standalone or Google location services.
For more information, refer to “Location Services” on
page 134.
From a Home screen, touch
Apps
➔
Maps
Standard Mode 68
.
Page 74

Navigating the Map
Zooming
•
Double-tap on the screen to zoom in.
•
Use two fingers, such as your index finger and
thumb, to zoom out by making an inward pinch
motion on the screen. To zoom in, make an
outward motion by sweeping your fingers out.
Tip:
Rotate the device to landscape mode for convenient
browsing.
Scrolling
•
Touch and drag on the screen to reposition the map in the display.
Touch
•
Touch an icon on the map to display information about the
location. For example, your location is indicated by a flashing
icon.
69
Play Books
Use the Play Books app to read eBooks from the Internetbased Google Play Books service. Google eBooks is a new
way to discover, buy, and enjoy your favorite books online
and offline.
From a Home screen, touch
Play Books
The Google Play Books main screen displays.
Note:
You may be asked to create or sign on to your Google
account. For more information, refer to “Setting Up Your
Gmail Account” on page 64.
.
Play Books Menu
From the Play Books main screen:
Tou ch
To configure Play Books settings:
Tou ch
Follow the on-screen instructions.
For more information touch
Menu
for options.
Menu ➔ Settings
.
Menu
➔
Apps
Help
➔
.
Page 75

Play Magazines
Google Play Magazines helps you subscribe to your favorite
magazines so you can have them available to read on your
tablet at your leisure.
Play Magazines requires that you log on to your Google
account. For more information, refer to “Accounts” on
page 142.
From a Home screen, touch
Play Magazines
The Play Magazines Welcome screen displays.
.
Play Magazines Menu
From the Play Magazines main screen:
Tou ch Menu
To configure Play Magazines settings:
Tou ch Menu ➔ Settings
Follow the on-screen instructions.
For more information touch
for options.
Menu
Apps
➔
.
➔
Help
.
YouTube
View and upload YouTube videos right from your device.
From a Home screen, touch
You Tub e
.
Note:
After initial access to YouTube the icon displays as .
To find a YouTube video.
Tou ch
keyword or phrase. Touch on the keyboard to
initiate the search.
Search
and use the keyboard to enter a
YouTube Menu
From the YouTube main screen:
Tou ch
To configure YouTube settings:
Tou ch
Follow the on-screen instructions.
For more information touch
Menu
for options.
Menu ➔ Settings
Apps
➔
.
Menu ➔ Help
Standard Mode 70
.
Page 76

Music
This section explains how to use the music features of your
device including the Music app, the Music Player, and the
Music Hub.
Listening to Music
You can listen to music by using your device’s built-in
speakers, through a wired headset, or through a wireless
Bluetooth stereo headset.
For more information, refer to “Bluetooth” on page 96.
Volume Key
Press the
screen volume control, then touch and drag on the scale to
set volume. You can also press the Volume Key to adjust
playback volume.
on the side of the device to activate on-
Play Music App
The Play Music app contains a music player that plays
and other audio files that you copy from your computer or store
online.
Note:
Some options described in this manual may not be
available until you sign in to your Google account.
71
music
Google Play Music
Google Play Music is a new service from Google that gives
you instant access to your personal music collection on the
Internet and your compatible Android devices without the
hassle of wires or syncing. For more information, visit
music.google.com
.
Accessing the Music App
1. From a Home screen, touch
Play Music
2. Follow the prompts to set up the application.
The Play Music app searches your online library and
your device’s internal storage for music and playlists.
This can take from a few seconds to several minutes,
depending on the amount of new music added since
you last opened the application.
The screen displays Listen Now, My Library, Playlists,
Instant Mixes, and Shop.
.
Apps
➔
Page 77

Changing Library View
You can change the way you view the contents of your
library.
1. Tou ch
2. Touch an option to set how you view your library.
The choices are:
Play Music
.
GENRES, ARTISTS, ALBUMS
Play Music Menu
While viewing a Play Music main screen:
Tou ch
to use the following options:
•Refresh
•Settings
•Help
Menu
and follow the on-screen instructions
: Refreshes the screen.
: Configure Play Music settings.
: Get more information about the Play Music app.
, or
SONGS
Play Music Options
Options are available for playing songs, albums, or playlists:
1. To uch
Play Music
2. Touch an album or song.
3. Touc h
.
To play a song:
1. To uch
2. Touc h
3. Touch a song in your library to listen to it.
Menu
Options display depending on the item view.
Play Music
Menu
.
to display options:
.
and select
All music
Standard Mode 72
or
On device
.
Page 78

Shopping for Music at the Play Store
To visit the Google Play Store where you can find and buy
music:
1. From a Home screen, touch
Play Store
.
Music
2. Touch
The Google Play Store music section displays.
To view information about finding and buying music:
1. Touch
2. Touch
The Google Play Music help screen displays.
73
.
Play Music
Menu
➔
.
Help
Apps
➔
.
Making Online Music Available Offline
In addition to playing the music that you add to your online
library, you can play music stored on your device’s internal
storage. Then you can listen to music when you have no
Internet connection. To do this, make some of your online
music available offline.
Tip:
You can also copy music directly from your computer to
your device. For more information, refer to “Synchronizing
with Windows Media Player” on page 102.
To make your online music available offline on your device:
Menu
Play Music
➔
1. Touch
2. If you have signed in to your Google account, touch
you want to make available offline.
3. Touch
listening to music offline.
On device
Menu
.
and touch the album or playlist
➔
Help
to view information about
Page 79

Music Player
Music Player plays songs stored on your tablet or an installed
memory card.
To access Music Player:
1. From a Home screen, touch
Music Player
The Music Player application searches your device’s
internal storage or on an installed memory card for
music and playlists. This can take from a few seconds
to several minutes, depending on the amount of new
music added since you last opened the application. It
then displays your music in several ways.
2. Touch a tab, such as
on, to change the way you view the contents of your
library.
3. Touch the Music application icon at the top-left of
the Application bar to return to the previous Music
screen.
.
Songs, Playlists, Albums
Apps
➔
, and so
Searching for Music
To find music in your library:
1. To uch
2. Touc h
name of an artist, album, or song.
Music Player
Search
.
and use the keyboard to type the
Music Player Options and Settings
To use Music Player options and configure settings:
1. To uch
2. Touc h
• Delete
• Set as alarm tone
• Scan for nearby devices
Music Player
Menu
: Delete a song, an album, or every song or album.
song as an alarm tone.
nearby devices.
.
to display the following options:
: Choose a song and touch
: Discover and connect directly to
Standard Mode 74
Set
to use the
Page 80

• Settings
: The following settings display:
Advanced
–
SoundAlive
: View and set SoundAlive options.
–
Play speed
: Decrease or increase play speed.
–
Lyr ics
: Display the lyrics of the song, if available.
–
Music auto off
automatically by touching one of the time values.
Music menu
–
Music menu
appear on the main music screen. A check mark
an option means that it is enabled.
•End
: Close the Music Player app.
: Set the option Off or set your music to turn off
: Enable or disable the music display options that
Managing Playlists
To create, manage, or delete a playlist:
To uch
Creating a Playlist
To uch
keyboard to enter a name for the playlist.
75
Music Player
Add to playlist
.
➔ Create playlist
next to
and use the
Renaming a Playlist
1. Touch the
2. Touch a playlist, touch
Adding Songs to or Removing Songs from Playlists
1. Tou ch
2. Tou ch
3. Touch
Playlists
tab.
Menu
➔ Rename playlist
and use the keyboard to enter a new name for the
playlist.
Add to playlist
– or –
Tou ch
Playlists
, touch a playlist, and then touch
Add music
Add music
(portrait mode).
All songs are displayed.
next to each song you want to add or next
to
Add all
to add all songs to the playlist.
– or –
Tou ch
to remove a song from the playlist.
Done
and touch a playlist.
(landscape mode) or
to save the playlist.
Menu
➔
Page 81

Changing the Order of a Playlist
1. Touch the
2. Touch
Menu
3. Touch the grid for an entry and drag the entry to a
new position in the list.
4. Touch
Playing a Playlist
1. Touch the
2. Touch
touch a playlist title that you created.
3. Touch a song to start playing the playlist at that song.
Deleting a Playlist
1. Touch the
2. Touch
3. Touch the box next to a playlist title, touch
Remove
Playlists
tab and touch a playlist.
Change order
➔ Change order
Done
to change the order and save the playlist.
Playlists
Favorites, Most played
Playlists
Remove
, and then touch OK.
(landscape mode) or
(portrait mode).
tab.
, or
Recently added
tab and touch a playlist.
in the Application bar.
, or
Playing Music
To play a song:
1. To uch
2. Touch a song or touch an album or genre and then
touch a song in the list of songs on the album.
The song you touch starts to play. The tracks in the
current list play in order until you reach the end of the
list (unless you choose a repeat option). Otherwise,
playback stops only if you stop it, even when you
switch applications.
Accessing the Music Player
If you navigate away from the Music Player application and
music is playing, the Music notification icon is displayed
in the System Bar.
You can change songs or easily return to the Music Player:
1. Touch the top of the screen and swipe downward.
The Status Details screen displays.
2. Touch the song thumbnail to display the Music Player.
You can also pause and resume playback and skip to
the next or previous song in the panel. For more
information, refer to “Notifications” on page 40.
Music Player
.
Standard Mode 76
Page 82

Music Player Controls
When a song is playing, the Music Player screen displays
various controls are available.
1. Tou ch
2. Touch a song or playlist to begin playback.
The music player displays below (portrait mode) or to
the right (landscape mode) of the music listing.
3. Touch the song thumbnail to enlarge the music player.
77
Music Player
.
Music Player Screen
and
During playback, use the sound and playlist controls:
Volume
1.
2.
3.
4.
5.
6.
7.
: Touch to toggle Silent and Sound mode, then
touch and drag on the scale to set volume. You can
also press the Volume Key on the side of the device to
adjust playback volume.
Info
: Touch to view information about the current song.
List Mode
: Touch to switch to the list of songs.
SoundAlive
: Touch to view and set SoundAlive options.
Repeat
: Touch to repeat the current song, repeat all
songs, or disable repeat mode.
Time Indicators
length in minutes and seconds.
Playback Controls
of songs:
•
Touch to advance to the next song. Touch and hold
to scan forward through the current song.
•
Touch to go back to the previous song. Touch and hold
•
Touch to pause playback. Touch to resume
playback.
: Indicates elapsed time and total song
: These buttons control the playback
to scan backward through the current song.
Page 83

8.
9
8
7
6
5
4
3
1
2
11
10
Shuffle
: When enabled, songs play in random order.
When disabled, songs play in the order they appear in
List view.
Progress Bar
9.
: Touch and drag the end of the progress
bar to scan forward or backward through the current
song.
Song Title
/
Artist
/
Album
10.
: Identifies the song, artist,
and album.
11.
Favorite
: Touch the star to mark the current song
as a favorite.
Options While Playing a Song
There are various options and controls available while a song
is playing:
1. To uch
Music Player
, touch a song or an album,
and then a song.
2. Touch the music player to enlarge it.
Standard Mode 78
Page 84

Menu
3. Touch
• Add to playlist
playlist.
• Via Bluetooth
device.
• Set as alarm tone
• Scan for nearby devices
nearby devices.
• Settings
refer to
page 74.
•End
: This option returns you to the home screen.
to display the following options:
: Add the song to a new playlist or an existing
: Play the current song by using a Bluetooth
: Use the current song as an alarm tone.
: Discover and connect directly to
: Displays Music Player settings. For more information,
“Music Player Options and Settings”
on
Photos and Video
This section explains how to use your device’s built-in
camera and camcorder, the Video Player app to view and
manage videos, and the Gallery app to view, capture, and
manage photos and videos. It also contains an overview of
the Video Player and Gallery apps.
79
Camera
Use your device’s built-in camera and camcorder to take
photos and record videos.
To access the Camera:
Apps
1. From a Home screen, touch
If a memory card is inserted, the Storage location
pop-up displays.
OK
2. Tou ch
Note:
If memory card storage is used, photos are stored in the
/storage/extSdcard0/DCIM/Camera folder as jpg files.
For more information, refer to “My Files” on page 114.
to change the storage location to memory
card.
– or –
Cancel
Tou ch
pictures and videos.
The Camera screen displays.
to use the device storage for storing
➔
Camera
.
Page 85

Camera Screen
The following items can be found on the Camera screen as
illustrated:
1. Settings Shortcuts
2. GPS Active (displays when connected to the computer)
3. Storage Indicator
4. Mode
5. Camera Button
6. Image Viewer
7. Settings
1
7
2
3
4
5
6
Taking Photos
To take a photo:
1. To uch
2. Using the display as a viewfinder, compose your photo
by aiming the lens at the subject.
To configure settings, see “Camera Settings” on
page 81.
3. To take the photo, touch the
4. Touc h
previous screen.
Important!
Camera
.
Camera
button.
Back
to leave the Camera and display the
Do not take photos of people without their
permission.
Do not take photos in places where cameras are
not allowed.
Do not take photos in places where you may
interfere with another person’s privacy.
Standard Mode 80
Page 86

Camera Settings
Before you start taking photos, use the camera settings to
configure the camera for best results. Camera settings are
represented by icons on the left side of the screen.
Editing Camera Settings Shortcuts
The first five icons are actually shortcuts to camera settings.
These five shortcuts can be customized to fit your
preference.
Self-portrait
Effects
shortcuts.
To customize these shortcuts:
1. Touch
– or –
Touch and hold any of the shortcut icons to edit them.
2. Touch and hold a setting, then drag and drop it on one
of the five settings shortcuts to the left. The replaced
setting shortcut displays in the edit list.
81
, and
,
Shooting mode, Timer
Brightness
Settings
are default settings
➔
Edit shortcuts
.
Configuring Camera Settings
To configure Camera settings:
While in Camera mode, touch a settings shortcut or
touch
settings:
• Edit shortcuts
•Self-portrait
Warning!
• Shooting mode
Settings
to configure the following camera
: Customize your settings shortcuts. For more
information, refer to
Shortcuts”
and take a photo of yourself.
If the battery is low, the flash is not available. For
more information, refer to “Charging the Battery” on
page 6.
–
Single shot
–
Panorama
the on-screen guideline to move the viewfinder and take the
next 7 shots automatically.
–
Share shot
Wi-Fi Direct connection is required.
“Editing Camera Settings
on page 81.
: Touch to switch to the front-facing camera lens
: Choose an automatic shooting mode, from:
: Take a single photo.
: Touch the Camera button to take a photo, then use
: Share photos with other users via Wi-Fi Direct. A
Page 87

–
Smile shot
: Touch the Camera button to automatically focus on
the subject’s face and take the photo.
• Effects
: Apply an effect to photos.
•Scene mode
you want to take.
•Brightness
•Timer
button and taking a photo.
•Resolution
• White balance
• Metering
• Guidelines
composition.
• Image quality
•Storage
your memory card, if one is installed.
• Reset
: Choose a mode to match the kind of pictures
: Use the slider to set the brightness value.
: Set a delay time to wait between touching the Camera
: Choose a size for the photo.
: Set the light source.
: Select a method for measuring light.
: Enable or disable an on-screen grid to aid in photo
: Choose a quality setting for photos.
: Set whether to store your photos on your device or on
: Set all Camera settings to the defaults.
Camcorder
Use your device’s built-in Camcorder to record highdefinition video in 1080p resolution.
Camera
Mode
.
button to the
Standard Mode 82
Camcorder
1. To uch
2. Slide the
setting.
The Camcorder screen displays.
Page 88

Camcorder Screen
7
1
6
5
4
2
3
The following items can be found on the Camcorder screen
as illustrated:
1. Settings Shortcuts
2. GPS Active (displays when connected to the computer)
3. Storage Indicator
4. Camcorder mode
5. Record Button
6. Image Viewer
7. Settings
Recording Videos
1. Tou ch
2. Slide the
setting.
3. Using the display as a viewfinder, compose your shot
by aiming the lens at the subject.
To configure settings, see “Camcorder Settings” on
page 84.
4. To start recording, touch
During recording, the
5. To pause recording, touch
6. To stop recording, touch
7. Touch
the previous screen.
Camera
.
Mode
button to the
Record
Recording Indicator
Pause.
Stop
.
Back
to leave the Camcorder and display
Camcorder
.
flashes.
Important!
Do not take videos of people without their
permission.
Do not take videos in places where cameras are
not allowed.
Do not take videos in places where you may
interfere with another person’s privacy.
83
Page 89

Camcorder Settings
Before you start taking videos, use the camcorder settings to
configure the camcorder for best results. Camcorder settings
are represented by icons on the left side of the screen.
Editing Camcorder Settings Shor tcuts
As with the camera, the first five icons are actually shortcuts
to camcorder settings. These five shortcuts can be
customized to fit your preference.
Self-recording
Effects
shortcuts.
To customize these shortcuts, see “Editing Camera Settings
Shortcuts” on page 81.
Configuring Camcorder Settings
To configure Camcorder settings:
While in Camcorder mode, touch a settings shortcut or
touch
Camcorder settings:
• Edit shortcuts
information, refer to
Shortcuts”
,
Recording mode, Timer
, and
Brightness
Settings
: Customize your settings shortcuts. For more
on page 81.
are default settings
to configure the following
“Editing Camera Settings
• Self-recording
lens and record a video of yourself.
• Recording mode
Normal and Limit for email, which limits the size of the video to
50 megabytes.
• Effects
•Brightness
•Timer
starting recording.
•Resolution
• White balance
• Guidelines
composition.
• Video quality
•Storage
your memory card.
• Reset
: Touch to switch to the front-facing camera
: Set a recording mode. Options are:
: Apply an effect to videos.
: Use the slider to set the brightness value.
: Set a delay to wait between touching Record and
: Set a size for the video.
: Set the light source.
: Enable or disable an on-screen grid to aid in video
: Choose a quality setting for videos.
: Set whether to store your videos on your device or on
: Set all Camera settings to the defaults.
Standard Mode 84
Page 90

Using the Image Viewer
After taking a photo or recording a video, use the Image
Viewer to view or play, share, delete, or edit your photos and
videos.
1. Touch
2. Touch the screen to show or hide Image Viewer
3. For photos, touch the screen with two fingers or
4. Sweep across the screen to display the next or
Tip:
5. To set the photo or video as a favorite, touch
85
Image Viewer
options.
double-tap on the screen to zoom all the way in or out.
For more information, refer to “Pinch” on page 39.
previous photo or video. (Videos are indicated by the
Play
button.)
The current photo or video is outlined in the thumbnails at
the bottom of the screen. Touch a thumbnail to view the
photo or video it represents.
Favorites
to view the photo and videos.
.
6. Touch
option, such as Bluetooth, and follow the on-screen
instructions. After using this option, the most recent
Share option is displayed in the Application Bar.
7. Touch
available pictures and videos.
8. To delete the photo or the video being displayed, touch
9. Touch
Contact photo or a Home screen, Lock screen, or Home
and lock screens wallpaper.
For more information, refer to “Viewing Photos and
Videos” on page 90.
Note:
Photos and videos are stored in the /storage/sdcard0/
DCIM/Camera folder as jpg and mp4 files. For more
information, refer to “My Files” on page 114.
Delete
Share
to share the photo or video. Touch an
Slideshow
to display a slide show of the
.
Menu
to select
Set as
to assign a photo as a
Page 91

10. To play a video, touch
pause the video and touch
playing the video.
Touch the icon ( , , or ) in the lower left
corner of the display screen while the video is playing
to change the Display Mode from original size to full
screen in ratio or full screen.
Touch and drag the white dot on the progress
bar to fast forward or rewind the video. Touch the left
end of the progress bar to restart the video. Touch the
right end of the progress bar to end the video playback.
– or –
Touch
Rewind
Fast Forward
Play
. Touch
Resume
to restart the video or
to end the video.
to resume
Pause
to
11. Touc h
pop-up while viewing another screen. Touch and drag
the pop-up video to the desired location on the screen.
Double-tap the pop-up to return to full screen mode.
12. While the video is playing, touch
mark your favorite areas of the video. A yellow mark
displays on the progress bar.
13. Touc h
screen.
Pop up play
Back
to play a video as a small
Bookmark
to return to the Camera or Camcorder
Standard Mode 86
to
Page 92

Video Player
Use Video Player to view and manage videos stored on your
tablet.
1. From a Home screen, touch
➔
Video Player
2. Touch the
3. Touch
search term. The current folder is searched and results
are displayed. Touch
4. While viewing the list, touch
•List by
: Display videos by Name (default), Date, Size, or Type.
•Share via
Bluetooth, and follow the on-screen instructions.
•Delete
: Touch videos to select them for deletion or touch
Select all
• Auto play next
videos in the order they appear.
• Scan for nearby devices
nearby devices.
87
.
Thumbnails, List
Search
and use the keyboard to enter a
X
to clear the search field.
: Share the video. Touch an option, such as
to delete all videos.
: Touch to enable or disable automatic playing of
Apps
, or
Folders
tab.
Menu
for options:
: Discover and connect directly to
5. Touch a video to play it. While playing a video, touch
the screen to display or hide on-screen playback
controls.
6. Touch the icon ( , , or ) in the lower left
corner of the display screen while the video is playing
to change the Display Mode from original size to full
screen in ratio or full screen.
7. Touch
pop-up while viewing another screen. Touch and drag
the pop-up video to the desired location on the screen.
Double-tap the pop-up to return to full screen mode.
8. While the video is playing, touch
mark your favorite areas of the video. A yellow mark
displays on the progress bar.
Pop up play
to play a video as a small
Bookmark
to
Page 93

9. During playback, touch
•Share via
•Trim
• Via Bluetooth
• Video auto off
• Scan for nearby devices
•Settings
•Details
For more information, refer to “Playing Videos” on page 92.
: Share the video. Touch an option, such as
Bluetooth, and follow the on-screen instructions.
: Use the sliders at the bottom of the screen to trim the
video.
: Turn Bluetooth on to use Bluetooth services.
: Set the option Off or set your video to turn off
automatically by touching one of the time values.
nearby devices.
: Touch this option to view the following:
–
Play speed
: Touch and drag the slider to decrease or increase
play speed.
–
Subtitles
: View subtitles for the video, if available.
–
Auto play next
–
Capture
Resolution, and so on.
: Enable or disable auto play of the next video.
: Captures a frame of the video and saves it as a photo.
: Provides details about the video, such as Name, Size,
Menu
for options:
: Discover and connect directly to
Gallery
Use Gallery to view, capture, and manage photos and videos.
Note:
Photos and videos are stored in the /storage/sdcard0/
DCIM/Camera folder, photos as jpg files and videos as
mp4 files. For more information, refer to “My Files” on
page 114.
To access Gallery:
From a Home screen, touch
Selecting Photos and Videos to View
1. To uch
All albums display.
2. Choose items to display by making selections from the
menus in the Application bar:
Group
3. To launch the Camera app, touch
4. Touch the icon next to Camera to change the way your
albums are displayed (
, and
Gallery
Favorites
.
.
Grid, Timeline
Apps
➔
Gallery
Albums, Time, Person
Camera
.
, or
Spiral
).
Standard Mode 88
.
,
Page 94

5. Touch
•Slideshow
•New album
•Hidden Items
•View by
• Select album:
• Scan for nearby devices
• Settings
89
Menu
: View a slideshow of the available pictures and
videos.
: Create a new album. Use the keyboard to enter a
name for the album.
: Touch this icon to show items that have been
hidden.
: View content from all sources or set a single source,
such as in your device.
Touch one or more albums or groups that you
want to share, share, or delete.
nearby devices.
: Set your account sync settings.
to display the following options:
: Discover and connect directly to
Viewing Groups of Photos and Videos
1. Touch
2. Touch a category and then a group to view it.
Thumbnails for each photo and video in the group
display.
3. To launch the Camera app, touch
4. Touch
available pictures and videos.
5. Touch
keyboard to enter a name for the album.
6. Tou ch
• Select item:
• Hidden items
Gallery
.
Slideshow
to view a slideshow of the
New album
Menu
delete, or use for a slideshow.
to create a new album. Use the
for these options:
Touch one or more items that you want to share,
: View hidden photos or videos.
Camera
.
Page 95

Viewing Photos and Videos
1. Tou ch
2. Touch a category and then a group to view it, and then
touch a photo or video thumbnail.
3. Touch the screen to show or hide Gallery options.
4. Sweep across the screen to display the next or
previous photo or video. (Videos are indicated by the
Tip:
The current photo or video is outlined in the thumbnails at
the bottom of the screen. Touch a thumbnail to view the
photo or video it represents.
5. Touch to assign this photo or video as a Favorite.
6. Touch
an option, such as Bluetooth, and follow the on-screen
instructions.
7. Touch the to choose from Start slideshow and
Slideshow settings.
8. To delete the photo or video being displayed, touch
Play
Delete
Gallery
button.)
Share via
.
.
to share the photo or video. Touch
9. Touc h
photos:
• Face tag
•Copy to clipboard
•Rotate left
•Rotate right
•Crop
•Edit
•Set as
•Print
•Rename
• Scan for nearby devices
•Details
Menu
to display the following options for
: Set whether to look for a face in this picture.
: Copy the current photo to the clipboard.
: Allows you to rotate the photo counterclockwise
90 degrees.
: Allows you to rotate the photo clockwise
90 degrees.
: Allows you to crop the image. Touch and drag the crop
box or the sides or corners of the crop box to create the crop
area, then touch
photo.
: Use Photo Editor or Paper Artist to edit your photo.
Lock screen, or Home and lock screens wallpaper.
: Print the current photo to a Samsung printer.
nearby devices.
taken, size, and so on.
Done
. Touch X to stop without cropping the
: Assign the photo as a Contact photo or a Home screen,
: Enter an new file name.
: Discover and connect directly to
: Provides details about the photo, such as title, time
Standard Mode 90
Page 96

The options for videos that are not playing are:
•Rename
: Enter an new file name.
• Scan for nearby devices
nearby devices.
•Details
: Provides details about the video such as Title, Time,
Duration, and so on.
For menu options while a video is playing and other
video options, see “Video Player” on page 87.
10. Touch
91
Back
: Discover and connect directly to
to return to the category screen.
Setting a Picture As
You can use the photos you take as a contact’s photo or as
wallpaper for the Home or Lock screen:
1. Tou ch
2. Touch a category and then a group to view it, and then
touch a photo to select it.
3. Touch
4. Tou ch
– or –
Tou ch
screen
A crop photo screen displays.
5. Touch and drag the crop box or the sides or corners of
the crop box to create the crop area, then touch
to save the cropped photo as the contact’s icon or
wallpaper. Touch
photo.
Tip:
To remove a contact photo, see “Updating Contacts” on
page 58.
To change wallpaper, see “Wallpapers” on page 48.
Gallery
.
Menu
➔ Set as
.
Contact photo
Home screen, Lock screen,
.
and then touch a contact entry.
Cancel
to stop without cropping the
or
Home and lock
Done
Page 97

Playing Videos
1. Tou ch
2. Touch a category and then a group to view it, and then
touch a video thumbnail to play the video.
Note:
Videos are marked with a
3. Touch
4. To resume playing the video, touch
5. To fast forward or rewind the video, touch and drag the
video, touch the left end of the progress bar. To end the
video playback, touch the right end of the progress bar.
– or –
To restart the video, touch
video touch
For more information, refer to “Video Player” on
page 87.
Gallery
.
Play
button.
Pause
to pause the video.
Resume
white dot on the progress bar. To restart the
Rewind
or to end the
Fast Forward
.
Sharing Photos and Videos
Share photos and videos with your friends.
1. To uch
2. Touch a category and then a group to display
thumbnails.
3. Touc h
4. Touch one or more photos and videos to highlight them
.
for sharing.
5. Touc h
6. Touch an option, such as Gmail, and follow the
on-screen instructions.
Gallery
Menu
➔ Select item
Share via
.
.
.
Standard Mode 92
Page 98

Connections
Your device includes features to connect to the internet and
to other devices by using Wi-Fi, Bluetooth, or a USB cable.
Wi-Fi
Wi-Fi is a wireless networking technology that provides
access to local area networks. Use your device’s Wi-Fi
feature to:
•
Access the internet for browsing or to send and receive email.
•
Access your corporate network.
•
Use hotspots provided by hotels or airports while traveling.
Wi-Fi communication requires access to an existing Wireless
Access Point (WAP). WAPs can be Open (unsecured, as with
most hotspots) or Secured (requiring you to provide login
credentials). Your device supports the 802.11 a/b/g/n
Wi-Fi protocol.
Configuring Wi-Fi Settings
For more information about configuring your device’s
Wi-Fi settings, see “Wi-Fi” on page 119.
93
Finding Wi-Fi Networks
You can have your device automatically notify you of
available networks. For more information, refer to “Advanced
Settings” on page 120.
Turning Wi-Fi On or Off
Turn your device’s Wi-Fi service on or off. When you turn
Wi-Fi service on, your device automatically searches for
available, in-range WAPs (Wireless Access Points).
Turning Wi-Fi On
1. From any screen, touch the top of the screen and
swipe downward.
The Status Details screen displays.
Wi-Fi
2. Tou ch
Turning Wi-Fi Off
1. From any screen, touch the top of the screen and
swipe downward.
The Status Details screen displays.
2. Tou ch
to turn Wi-Fi On.
Wi-Fi
to turn Wi-Fi Off.
Page 99

Scanning and Connecting to a Wi-Fi Network
When you turn on Wi-Fi, your device searches for available
Wi-Fi connections, then displays them on screen.
1. From any screen, touch the top of the screen and
swipe downward.
The Status Details screen displays.
2. Touch
3. When the scan is complete, touch a Wi-Fi network to
Wi-Fi
to turn Wi-Fi On. Your device automatically
scans for available Wireless Access Points.
connect. If the Wi-Fi network is open, your device
automatically connects. If the Wi-Fi network is
secured, enter the password at the prompt to connect.
Adding a Wi-Fi Network Manually
1. From a Home screen, touch
Settings.
➔
2. Under
3. To uch
Note:
Wireless and network
OFF / ON
icon to turn Wi-Fi on.
Add Wi-Fi network
information:
• Network SSID
Point (WAP).
•Security
: Select the type of security used by the WAP.
Depending on the Security protocol used by the WAP,
additional network information may be required, such as
a Password.
, then enter network
: Enter the name of the Wi-Fi Wireless Access
Apps
, on the Wi-Fi tab, touch the
•Password
key.
4. To uch
: If the WAP is secured, enter the password or hex
Save
to save the settings.
Standard Mode 94
Page 100

Wi-Fi Direct
Wi-Fi Direct allows device-to-device connections so you can
transfer large amounts of data over a Wi-Fi connection.
Apps
➔
1. From a Home screen, touch
➔
Wi-Fi
.
OFF / ON
2. Touch the
Wi-Fi Direct
3. Tou ch
Your device begins to search for other devices enabled
with Wi-Fi direct connections.
4. Enable Wi-Fi Direct (similar to Steps 1, 2, and 3) on the
device to which you want to connect.
95
icon to turn Wi-Fi on.
to display available devices.
Settings
5. Once the device you want to connect to is displayed,
touch on it.
An Invitation to connect displays on the device to which
you want to connect.
6. On that device, touch
You have 30 seconds to touch
which you want to connect for the connection to be
made.
Once connected, the other device will show as
Connected
in your list of Wi-Fi Direct devices and the
icon will display in the System Bar.
Accept
.
Accept
on the device to
 Loading...