

Page 1
Electric Range
User manual
NE63*871*** / NE63**871*****
Page 2
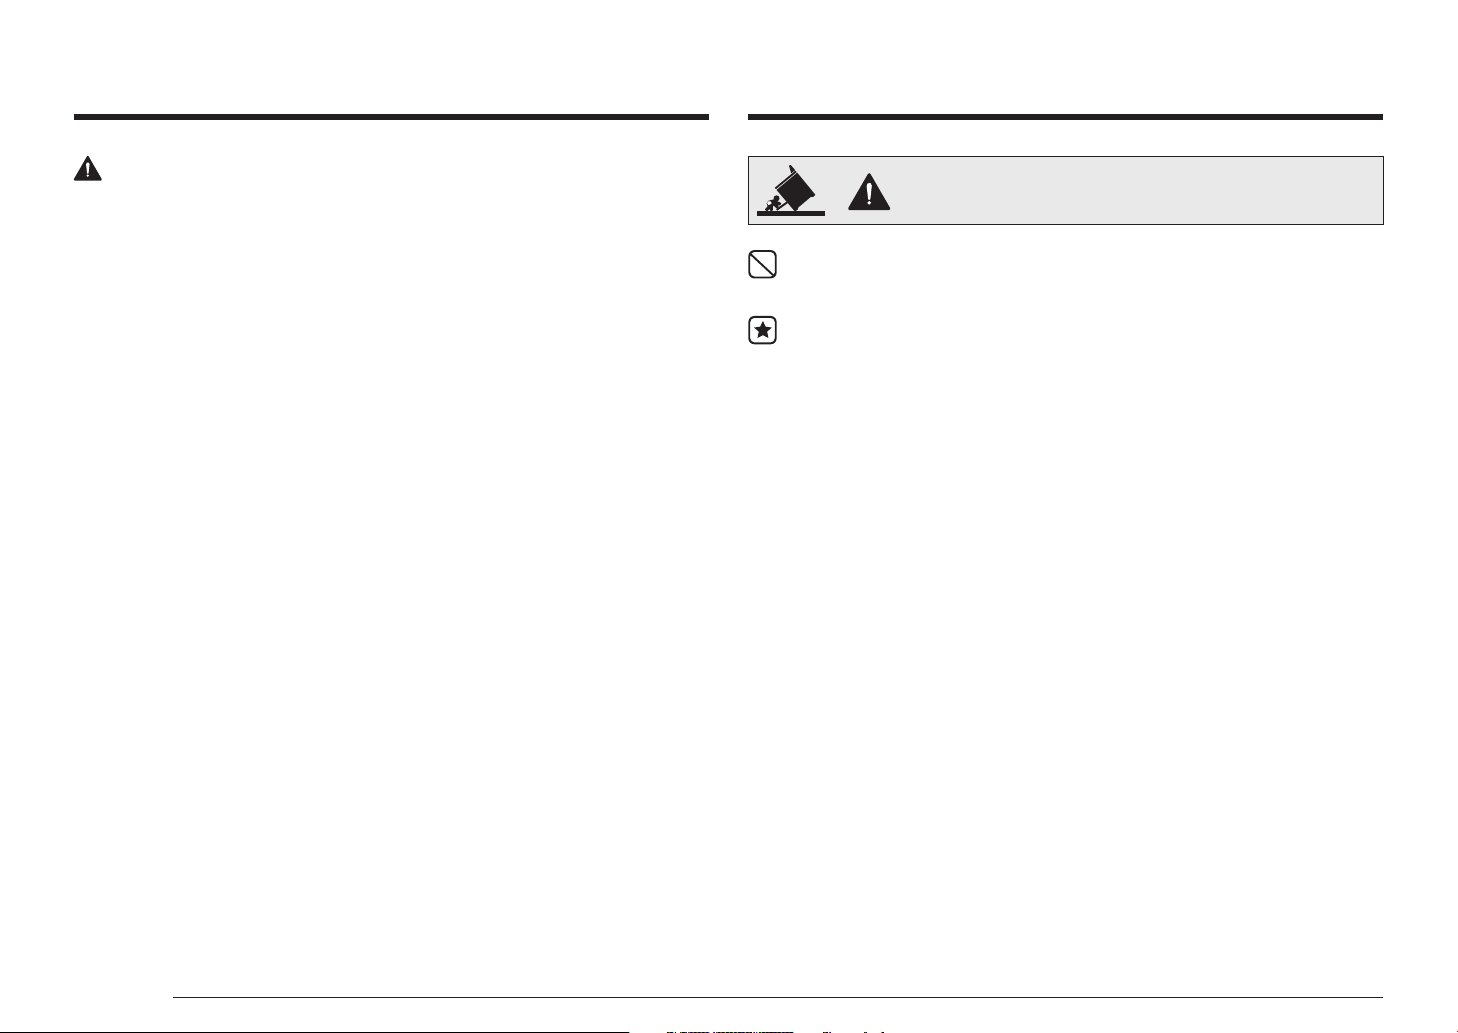
Anti-tip device
WARNING
To reduce the risk of tipping the range, the range must be secured
by a properly installed Anti-Tip device. AFTER THE RANGE HAS
BEEN INSTALLED, CONFIRM THAT THE ANTI-TIP DEVICE HAS BEEN
PROPERLY INSTALLED AND VERIFY THAT THE ANTI-TIP DEVICE IS
PROPERLY ENGAGED. Refer to the installation manual for instructions.
a) If the Anti-Tip device is not installed, a child or adult can tip the
range and be killed.
b) Verify that the Anti-Tip device has been properly installed and
engaged at the rear right (or rear left) of the range bottom.
c) If you move the range and then move it back into place, ensure
the Anti-Tip device is re-engaged at the right or left rear of the
range bottom.
d) Do not operate the range without the Anti-Tip device in place and
engaged.
e) Failure to do so can result in death or serious burns to children
or adults.
WARNING
Do not step, lean, or sit on the doors of the range. You can cause the
range to tip, resulting in burns or serious injuries.
Conrm that the Anti-Tip device is installed properly. Then, to verify
that the Anti-Tip device is engaged, grasp the top rear edge of the
range and carefully attempt to tilt it forward. The Anti-Tip device
should prevent the range from tilting forward more than a few inches.
If you pull the range out from the wall for any reason, make sure the
Anti-Tip device is properly engaged when you push the range back
against the wall. If it is not, there is a risk of the range tipping over
and causing injury if you or a child stand, sit, or lean on the open door.
Never completely remove the leveling legs. If you remove the leveling
legs, the range will not be secured to the Anti-Tip device properly.
2 English
Page 3

Regulatory Notice
1. FCC Notice
CAUTION
FCC CAUTION: Any changes or modications not expressly approved
by the party responsible for compliance could void the user’s
authority to operate the equipment.
This device complies with part 15 of FCC Rules. Operation is Subject
to following two conditions:
1) This device may not cause harmful interference, and
2) This device must accept any interference received including
interference that cause undesired operation.
For products sold in the US and Canadian markets, only channels
1–11 are available. You cannot select any other channels.
FCC STATEMENT:
This equipment has been tested and found to comply within the
limits for a Class B digital device, pursuant to part 15 of the FCC
Rules. These limits are designed to provide reasonable protection
against harmful interference in a residential installation.
This equipment generates, uses, and can radiate radio
frequency energy and, if not installed and used in accordance
with the instructions, may cause harmful interference to radio
communications. However, there is no guarantee that interference
will not occur in a particular installation. If this equipment does
cause harmful interference to radio or television reception, which
can be determined by turning the equipment off and on, the user is
encouraged to try to correct the interference by one or more of the
following measures:
• Reorienting or relocating the receiving antenna
• Increasing the separation between the equipment and receiver
• Connecting the equipment to an outlet that is on a different
circuit than the radio or TV.
• Consulting the dealer or an experienced radio/TV technician for
help.
English 3
Page 4

Regulatory Notice
FCC RADIATION EXPOSURE STATEMENT:
This equipment complies with FCC radiation exposure limits set
forth for an uncontrolled environment. This equipment should be
installed and operated so there is at least 8 inches (20 cm) between
the radiator and your body. This device and its antenna(s) must not
be co-located or operated in conjunction with any other antenna or
transmitter.
2. IC Notice
The term “IC” before the radio certication number only signies
that Industry Canada technical specications were met. Operation
is subject to the following two conditions: (1) this device may not
cause interference, and (2) this device must accept any interference,
including interference that may cause undesired operation of the
device.
This Class B digital apparatus complies with Canadian ICES-003.
For products sold in the US and Canadian markets, only channels
1–11 are available. You cannot select any other channels.
IC RADIATION EXPOSURE STATEMENT:
This equipment complies with IC RSS-102 radiation exposure limits
set forth for an uncontrolled environment. This equipment should be
installed and operated so there is at least 8 inches (20 cm) between
the radiator and your body. This device and its antenna(s) must not
be co-located or operated in conjunction with any other antenna or
transmitter.
4 English
Page 5
Contents
Important safety instructions 6
Introducing your new range 21
Overview 21
What’s included with your range 21
Before you begin 22
Energy saving tips 22
Surface cooking 22
About surface cooking 22
How to set the appliance for surface cooking 24
Using the proper cookware 26
Choosing the proper cookware 27
Protecting the cooktop 27
Operating the oven 28
The oven control panel 28
How to use dial knob 28
Display mode 29
Turning the oven light on and off 29
Clock 29
Oven cooking 30
Cooking mode 30
Using the oven racks 31
Recipe guide 33
Temperature probe 37
Cooking options 39
Special features 40
More functions 41
System Settings 43
Smart control 45
Voice control 46
Maintaining your appliance 48
Self-cleaning 48
Steam-cleaning 49
Care and cleaning of the oven 50
Care and cleaning of the glass cooktop 52
Removing and reinstalling the oven door 54
Removing and reinstalling the storage drawer 56
Changing the oven light 56
Troubleshooting 57
Troubleshooting 57
Information codes 61
Warranty (U.S.A) 63
Warranty (CANADA) 64
Appendix 66
Open Source Announcement 66
Contents
English 5
Page 6
Important safety instructions
Important safety instructions
Important safety instructions
Read and follow all instructions before using your range to prevent
the risk of re, electric shock, personal injury, or damage when using
the range. This guide does not cover all possible conditions that may
occur. Always contact your service agent or the manufacturer about
problems that you do not understand.
WHAT YOU NEED TO KNOW ABOUT
SAFETY INSTRUCTIONS
Warnings and Important safety instructions in this manual do not
cover all possible conditions and situations that may occur. It is
your responsibility to use common sense, caution, and care when
installing, maintaining, and operating your oven.
Important safety symbols and precautions
What the icons and signs in this user manual mean:
WARNING
Hazards or unsafe practices that may result in severe personal injury
or death.
CAUTION
CAUTION
To reduce the risk of re, explosion, electric shock, or personal injury
when using your range, follow these basic safety precautions.
Do NOT attempt.
Do NOT disassemble.
Do NOT touch.
Follow directions explicitly.
Unplug the power plug from the wall socket.
Make sure the machine is grounded to prevent electric shock.
Call a Samsung service center for help.
Note
These warning signs are here to prevent injury to you and others.
Please follow them explicitly.
After reading this section, keep it in a safe place for future reference.
CALIFORNIA PROPOSITION 65 WARNING
Hazards or unsafe practices that may result in minor personal injury
or property damage.
SAVE THESE INSTRUCTIONS
6 English
WARNING
Cancer and Reproductive Harm - www.P65Warnings.ca.gov
Page 7
FOR YOUR SAFETY
When using electrical appliances, you should follow basic safety
precautions, including the following:
CAUTION
• Use this appliance only for its intended purpose as described in
this Owner’s Manual.
• Potentially hot surfaces include the cooktop, areas facing the
cooktop, the oven vent opening, surfaces near the opening, and
crevices around the oven door.
Be sure your appliance is properly installed and grounded by a
qualied technician.
User servicing - Do not repair or replace any part of the
appliance unless specically recommended in this manual. All
other servicing should be referred to a qualied technician.
Always disconnect the power to the appliance before servicing
by removing the fuse or switching off the circuit breaker.
• Do not enter the oven.
• Do not store items of interest to children in cabinets above
the range or on the back guard of the range. Children
climbing on the range to reach items could be seriously
injured.
• Do not leave children alone. Never leave children alone or
unattended in an area where this appliance is in use. They
should never be allowed to sit or stand on any part of the
appliance.
• Never use your appliance for warming or heating the room.
• Do not use water on grease res. Turn off the oven to avoid
spreading the ames. Smother the re or ames by closing
the door or use a dry chemical, baking soda, or foam-type
extinguisher.
• Avoid scratching or striking the glass doors, the cooktop, or
the control panel. Doing so may lead to glass breakage. Do
not cook on a product with broken glass. Shock, re, or cuts
may occur.
Important safety instructions
SAVE THESE INSTRUCTIONS
English 7
Page 8
Important safety instructions
Important safety instructions
Important safety instructions
• If there is a re in the oven during self-cleaning, turn the
oven off and wait for the re to go out. Do not force the
door open. The introduction of fresh air at self-cleaning
temperatures may lead to a burst of ame from the oven.
Failure to follow these instructions may result in severe
burns.
• If the oven is heavily soiled with oil, self-clean the oven
before using the oven again. Leaving the oil in place creates
a risk of re.
• Wipe up heavy soil on the oven bottom with a paper towel
or rag before self-cleaning. Self-cleaning the oven when
there is heavy soil on the oven bottom requires longer
cleaning cycles and produces more smoke.
• Storage in or on the appliance. Do not store ammable
materials in the oven or near the surface units. Be sure all
packing materials are removed from the appliance before
operating it. Keep plastics, clothes, and paper away from
parts of the appliance that may become hot.
• Wear proper apparel. Never wear loose-tting or hanging
garments while using the appliance.
• Use only dry potholders. Placing moist or damp potholders
on hot surfaces may result in burns from steam. Do not
let the potholder touch hot heating elements. Do not use a
towel or other bulky cloth.
• Teach children not to play with the controls or any other
part of the range.
• For your safety, do not use high-pressure water cleaners or
steam jet cleaners to clean any part of the range.
• If the power cord is damaged, it must be replaced by
the manufacturer, its service agent, or similarly qualied
persons to avoid creating a hazard.
• The appliance is not intended for use by persons (including
children) with reduced physical, sensory or mental
capabilities, or lack of experience and knowledge, unless
they have been given supervision or instruction concerning
use of the appliance by a person responsible for their safety.
• Do not lean on the range as you may turn the control knobs
inattentively.
SAVE THESE INSTRUCTIONS
8 English
Page 9
SURFACE COOKING UNITS
• Never leave surface units unattended at high heat settings.
Boilovers cause smoking and greasy spillovers that may
ignite.
• Protective Liners – Do not use aluminum foil to line surface
unit drip bowls or oven bottoms, except as suggested in the
manual. Improper installation of these liners may result in a
risk of electric shock or re.
• To avoid oil spillover and re, use a minimum amount of oil
when shallow pan-frying and avoid cooking frozen foods
that have excessive amounts of ice.
• Do not lift the cooktop. Lifting the cooktop can damage the
range and cause the range to malfunction.
• Do not operate the cooktop without cookware. If the
cooktop operates without cookware, the control knobs will
become hot.
• Never use the glass cooktop surface as a cutting board.
• Use care when touching the cooktop. The glass surface of
the cooktop will retain heat after the controls have been
turned off.
• Do not move the container and bowl in a horizontal position
on cooktop surface.
• Be careful when placing spoons or other stirring utensils
on the glass cooktop surface when it is in use. They may
become hot and could cause burns.
• Use proper pan sizes. This appliance is equipped with
surface units of different size. Select pots and pans that
have at bottoms large enough to cover the surface area of
the heating element. Using undersized cookware will expose
a portion of the heating element to direct contact and may
result in the ignition of clothing. Matching the size of the
pot or pan to the burner will also improve efciency.
• Cookware Handles Should Be Turned Inward and Not
Extend Over Adjacent Surface Units – To reduce the risk
of burns, ignition of ammable materials, or spillage due
to unintentional contact with cookware, position cookware
handles so that they are turned inward and do not extend
over adjacent surface units.
• Glazed cookware. Only certain types of glass, glass/ceramic,
ceramic, earthenware, or other glazed cookware can be
used for rangetop service without breaking due to sudden
changes in temperature.
• Cleaning. Read and follow all instructions and warnings on
the cleaning cream labels.
Important safety instructions
SAVE THESE INSTRUCTIONS
English 9
Page 10
Important safety instructions
Important safety instructions
Important safety instructions
• Be sure you know which control knob operates each surface
unit. Make sure you turned on the correct surface unit.
• Always turn the surface units off before removing cookware.
• When preparing aming foods under the hood, turn the fan on.
• Keep an eye on foods being fried at high or medium high
heat settings.
• Do not store heavy items above the cooktop surface that
could fall and damage it.
• Do not use decorative surface element covers – If an element
is accidentally turned on, the decorative cover will become
hot and possibly melt. Burns will occur if the hot covers are
touched. Damage may also be done to the cooktop.
ELECTRICAL SAFETY
• Proper Installation - Be sure your appliance is properly
installed and grounded by a qualied technician.
• The appliance should be serviced only by qualied service
personnel. Repairs carried out by unqualied individuals
may cause injury or a serious malfunction. If your appliance
is in need of repair, contact a Samsung authorized service
center. Failure to follow these instructions may result in
damage and void the warranty.
• Flush-mounted appliances may be operated only after they
have been installed in cabinets and workplaces that conform
to the relevant standards. This ensures that the appliances
are installed in compliance with the appropriate safety
standards.
• If your appliance malfunctions or if fractures, cracks, or
splits appear:
- switch off all cooking zones
- unplug the range from the AC wall outlet
- contact your local Samsung service center.
WARNING
If the surface is cracked, switch off and unplug the appliance to avoid
the possibility of electrical shock. Do not use your cooktop until the
glass surface has been replaced.
WARNING
• Ensure that the appliance is switched off before replacing the
lamp to avoid the possibility of electric shock.
• The range should not be placed on a base.
SAVE THESE INSTRUCTIONS
10 English
Page 11
CHILD SAFETY
OVEN
Important safety instructions
WARNING
• This appliance is not intended for use by young children or inrm
persons without the adequate supervision of a responsible adult.
• Young children should be supervised to ensure that they do not
play with the appliance.
• Keep children away from the door when opening or closing it as
they may bump themselves on the door or catch their ngers in
the door.
• The cooking zones will become hot when you cook. To keep small
children from being burned, always keep them away from the
appliance while you are cooking.
• During self-cleaning, the surfaces may get hotter than usual.
Keep small children away from the range when it is in the selfcleaning mode.
WARNING
Accessible parts may become hot during use. To avoid burns, young
children should be kept away.
• DO NOT TOUCH THE HEATING ELEMENTS OR INTERIOR
SURFACES OF THE OVEN. Heating elements may be hot even
though they are dark in color. Interior surfaces of an oven
become hot enough to cause burns. During and after use,
do not touch or let clothing or other ammable materials
contact the heating elements or interior surfaces of the oven
until they have had sufcient time to cool. Other surfaces
of the appliance may become hot enough to cause burns.
Among these surfaces are oven vent openings and surfaces
near these openings, the oven door, and the window of the
oven door.
• Do not heat unopened food containers. The build-up of
pressure may cause the container to burst and result in
injury.
• Do not use the oven to dry newspapers. If overheated,
newspapers can catch on re.
• Do not use the oven for a storage area. Items stored in an
oven can ignite.
SAVE THESE INSTRUCTIONS
English 11
Page 12
Important safety instructions
Important safety instructions
Important safety instructions
• Use care when opening the door. Let hot air or steam escape
before you remove food from or put food into the oven.
• Protective liners. Do not use aluminum foil to line the oven
bottoms, except as suggested in the manual. Improper
installation of these liners may result in a risk of electric
shock or re.
• Keep oven vent ducts unobstructed. The oven vent is
located above the right rear surface unit. This area could
become hot during oven use. Never block this vent or place
plastic or heat-sensitive items on it.
• Placement of oven racks. Always place oven racks in the
desired location while the oven is cool. If the rack must be
moved while the oven is hot, use potholders. Do not let the
potholders come in contact with the hot heating element in
the oven.
• Do not allow aluminum foil or a meat probe to contact the
heating elements.
• During use, the appliance becomes hot.
Care should be taken to avoid touching heating elements
inside the oven.
• Do not use harsh abrasive cleaners or sharp metal scrapers
to clean the oven door glass. They can scratch the surface,
which may result in the glass shattering.
CAUTION
Do not attempt to operate the oven during a power failure. If the
power fails, always turn the oven off. If the oven is not turned off
and the power returns, the oven may begin to operate again. Food
left unattended could catch re or spoil.
REMOTE OPERATION
This appliance is congurable to allow remote operation at any time.
• Do not store any ammable materials or temperature
sensitive items inside, on top or near surface units of the
appliance.
SAVE THESE INSTRUCTIONS
12 English
Page 13
SELFCLEANING OVENS
Do not clean the door gasket. The door gasket is essential for
a good seal. Care should be taken not to rub, damage, or move
the gasket.
• Never keep pet birds in the kitchen. Birds are extremely
sensitive to the fumes released during an oven self-clean
cycle. Fumes may be harmful or fatal to birds. Move birds to
a well-ventilated room.
• Clean only the parts listed in this manual in the self-clean
cycle. Before self-cleaning the oven, remove the partition,
rack, utensils, and any food.
• Before operating the self-clean cycle, wipe grease and food
soils from the oven. Excessive amounts of grease may
ignite, leading to smoke damage to your home.
• Do not use any commercial oven cleaner or oven liner
protective coating of any kind in or on the outside of the
oven.
• Remove the nickel oven shelves from the oven before you
begin the self-cleaning cycle or they may discolor.
• If the self-cleaning mode malfunctions, turn the oven off
and disconnect the power supply. Have it serviced by a
qualied technician.
• Excess spillage must be removed before you run the selfcleaning cycle.
VENTILATING HOOD
Important safety instructions
• Clean ventilating hoods frequently. Do not let grease
accumulate on the hood or lter.
• When aming foods under the hood, turn the fan on.
SAVE THESE INSTRUCTIONS
English 13
Page 14
Important safety instructions
Important safety instructions
Important safety instructions
GLASS/CERAMIC COOKING SURFACES
• DO NOT TOUCH SURFACE UNITS OR AREAS NEAR UNITS.
Surface units may be hot even though they are dark in color.
Areas near surface units may become hot enough to cause
burns. During and after use, do not touch, or let clothing or
other ammable materials contact the surface units or areas
near the units until they have had sufcient time to cool.
Among these areas are the cooktop and the facing of the
cooktop.
• Do not cook on a broken cooktop. If the cooktop should
break, cleaning solutions and spillovers may penetrate the
broken cooktop and create a risk of electric shock. Contact a
qualied technician immediately.
Clean the cooktop with caution. If a wet sponge or cloth is used
to wipe spills on a hot cooking area, be careful to avoid steam
burns. Some cleaners can produce noxious fumes if applied to a
hot surface.
CRITICAL INSTALLATION WARNINGS
WARNING
• This appliance must be installed by a qualied technician or
service company.
- Failing to have a qualied technician install the range
may result in electric shock, re, an explosion, problems
with the product, or injury.
• Unpack the oven, remove all packaging material and
examine the oven for any damage, such as dents on the
interior or exterior of the oven, broken door latches, cracks
in the door, or a door that is not lined up correctly. If there
is any damage, do not operate the oven and notify your
dealer immediately.
• Plug the power cord into a properly grounded outlet with
the proper conguration. Your oven should be the only item
connected to this circuit.
• Keep all packaging materials out of the reach of children.
Children may use them for play and injure themselves.
SAVE THESE INSTRUCTIONS
14 English
• Install your appliance on a hard, level oor that can support
its weight.
- Failing to do so may result in abnormal vibrations, noise,
or problems with the product.
Page 15
• This appliance must be properly grounded.
• Do not ground the appliance to a gas pipe, plastic water
pipe, or telephone line.
- This may result in electric shock, re, an explosion, or
problems with the product.
• Do not cut or remove the ground prong from the power
cord under any circumstances.
• Connect the oven to a circuit that provides the correct
amperage.
• Do not install this appliance in a humid, oily or dusty
location, or in a location exposed to direct sunlight or water
(rain drops).
- This may result in electric shock or re.
• Do not use a damaged power cord or loose wall socket.
- This may result in electric shock or re.
• Do not pull or excessively bend the power cord.
• Do not twist or tie the power cord.
• Do not hook the power cord over a metal object, place a
heavy object on the power cord, or insert the power cord
between objects.
- This may result in electric shock or re.
CRITICAL USAGE WARNING
CAUTION
• If the appliance is ooded by any liquid, please contact your
nearest Samsung service center. Failing to do so may result
in electric shock or re.
• If the appliance produces a strange noise, a burning smell,
or smoke, unplug the power plug immediately and contact
your nearest Samsung service center.
- Failing to do so may result in electric shock or re
• In the event of a gas leak (such as propane gas, LP gas, etc.),
ventilate the area immediately. Do not touch the power
cord. Do not touch the appliance.
- A spark may result in an explosion or re.
Important safety instructions
If the power cord is damaged, contact your nearest Samsung
service center.
SAVE THESE INSTRUCTIONS
English 15
Page 16
Important safety instructions
Important safety instructions
Important safety instructions
• Take care not to contact the oven door, heating elements, or
any of the other hot parts with your body while cooking or
just after cooking.
- Failing to do so may result in burns.
• If materials inside the oven should ignite, keep the oven
door closed, turn the oven off and disconnect the power
cord, or shut off power at the fuse or circuit breaker panel.
If the door is opened, the re may spread.
• Always observe safety precautions when using your
oven. Never try to repair the oven on your own - there is
dangerous voltage inside. If the oven needs to be repaired,
contact an authorized Samsung service center near you.
• If you use the appliance when it is contaminated by foreign
substance, such as food waste, it may result in a problem
with the appliance.
• Take care when removing the wrapping from food taken out
of the appliance.
- If the food is hot, hot steam may be emitted abruptly
when you remove the wrapping and this may result in
burns.
• Do not attempt to repair, disassemble, or modify the
appliance yourself.
- Since a high voltage current enters the product chassis,
it may result in electric shock or re.
- When a repair is needed, contact your nearest Samsung
service center.
• If any foreign substance, such as water has entered the
appliance, contact your nearest Samsung service center.
- Failing to do so may result in electric shock or re.
• Do not touch the power cord with wet hands.
- This may result in electric shock.
• Do not turn the appliance off while an operation is in
progress.
- This may cause a spark and result in electric shock or
re.
• Keep all packaging materials well out of the reach of
children, as packaging materials can be dangerous to
children.
- If a child places a plastic bag over its head, the child can
suffocate.
SAVE THESE INSTRUCTIONS
16 English
Page 17
• Do not let children or any person with reduced physical,
sensory, or mental capabilities use this appliance
unsupervised.
• Make sure that the appliance’s controls and cooking areas
are out of the reach of children.
- Failing to do so may result in electric shock, burns, or
injury.
• Do not touch the inside of the appliance immediately after
cooking. The inside of the appliance will be hot.
- Failing to do so may result in burns.
• Do not use or place ammable sprays or objects near the
oven.
- Flammable items or sprays can cause res or an
explosion.
• Do not insert ngers, foreign substances, or metal objects,
such as pins or needles into inlets, outlets, or holes. If
foreign substances are inserted into any of these holes,
contact your product provider or nearest Samsung service
center.
• Do not tamper with or make any adjustments or repairs to
the door. Under no circumstances should you remove the
door or outer shell of the oven.
• Do not store or use the oven outdoors.
• Never use this appliance for purposes other than cooking.
- Using the appliance for any purpose other than cooking
may result in re.
• Open the cap or stopper of sealed containers (herb tonic tea
bottle, baby bottle, milk bottle and so on) before heating
them. Make a hole in food items that have shells (eggs,
chestnuts, etc) with a knife before cooking them.
- Failing to do so may result in burns or injury.
• Never heat plastic or paper containers and do not use them
for cooking.
- Failing to do so may result in re.
• Do not heat food wrapped in paper from magazines,
newspapers, etc.
- This may result in re.
• Do not open the door when the food in the oven is burning.
- If you open the door, it causes an inow of oxygen and
may cause the food to ignite.
Important safety instructions
SAVE THESE INSTRUCTIONS
English 17
Page 18
Important safety instructions
Important safety instructions
Important safety instructions
• Do not apply excessive pressure to the door or the inside
of the appliance. Do not strike the door or the inside or the
appliance.
- Hanging on to the door may result in the product falling
and cause serious injury.
- If the door is damaged, do not use the appliance. Contact
a Samsung service center.
• Do not hold food in your bare hands during or immediately
after cooking.
- Use cooking gloves. The food may be very hot and you
could burn yourself.
- As the handle and oven surfaces may be hot enough to
cause burns after cooking, use cooking gloves to protect
your hands from burns.
USAGE CAUTIONS
CAUTION
• If the surface is cracked, turn the appliance off.
- Failing to do so may result in electric shock.
• Dishes and containers can become hot. Handle with care.
• Hot foods and steam can cause burns. Carefully remove
container coverings, directing the steam away your hands
and face.
• Remove lids from baby food jars before heating. After
heating baby food, stir well to distribute the heat evenly.
Always test the temperature by tasting before feeding the
baby. The glass jar or the surface of the food may appear to
be cooler than the interior, which can be hot enough to burn
an infant’s mouth.
• Take care as beverages or food may be very hot after
heating.
- Especially when feeding a child. Check that it has cooled
sufciently.
SAVE THESE INSTRUCTIONS
18 English
Page 19
• Take care when heating liquids, such as water or other
beverages.
- Make sure to stir during or after cooking.
- Avoid using a slippery container with a narrow neck.
- Wait at least 30 seconds after heating before removing
the heated liquid.
- Failing to do so may result in an abrupt overow of the
contents and cause burns.
• Do not stand on top of the appliance or place objects (such
as laundry, an oven cover, lighted candles, lighted cigarettes,
dishes, chemicals, metal objects, etc.) on the appliance.
- Items, such as a cloth, may get caught in the door.
- This may result in electric shock, re, problems with the
product, or injury.
• Do not operate the appliance with wet hands.
- This may result in electric shock.
• Do not spray volatile substances, such as insecticide onto
the surface of the appliance.
- As well as being harmful to humans, it may also result in
electric shock, re, or problems with the product.
• Do not put your face or body close to the appliance while
cooking or when opening the door just after cooking.
- Take care that children do not come too close to the
appliance.
- Failing to do so may result in children burning
themselves.
• Do not place food or heavy objects over the edge of the
oven door.
- If you open the door, the food or object may fall and this
may result in burns or injury.
• Do not abruptly cool the door, the inside of the appliance, or
a dish by pouring water over it during or just after cooking.
- This may result in damage to the appliance. The steam
or water spray may result in burns or injury.
• Do not operate while empty except for self-cleaning.
• Do not defrost frozen beverages in narrow-necked bottles.
The bottles can break.
• Do not scratch the glass of the oven door with a sharp
object.
- This may result in the glass being damaged or broken.
• Do not store anything directly on top of the appliance when
it is in operation.
Important safety instructions
SAVE THESE INSTRUCTIONS
English 19
Page 20
Important safety instructions
Important safety instructions
Important safety instructions
• Do not use sealed containers. Remove seals and lids before
cooking. Sealed containers can explode due to the build up
of pressure even after the oven has been turned off.
• Take care that food you are cooking in the oven does not
come into contact with the heating element.
- This may result in re.
• Do not overheat food.
- Overheating food may result in re.
CRITICAL CLEANING WARNINGS
CAUTION
• Do not clean the appliance by spraying water directly on to
it.
• Do not use benzene, thinner, or alcohol to clean the
appliance.
- This may result in discoloration, deformation, damage,
electric shock, or re.
• Take care not to hurt yourself when cleaning the appliance
(externally or internally).
- You may hurt yourself on the sharp edges of the
appliance.
• Do not clean the appliance with a steam cleaner.
- This may result in corrosion.
• Keep the inside of the oven clean. Food particles or
spattered oils stuck to the oven walls or oor can cause
paint damage and reduce the efciency of the oven.
SAVE THESE INSTRUCTIONS
20 English
Page 21
Introducing your new range
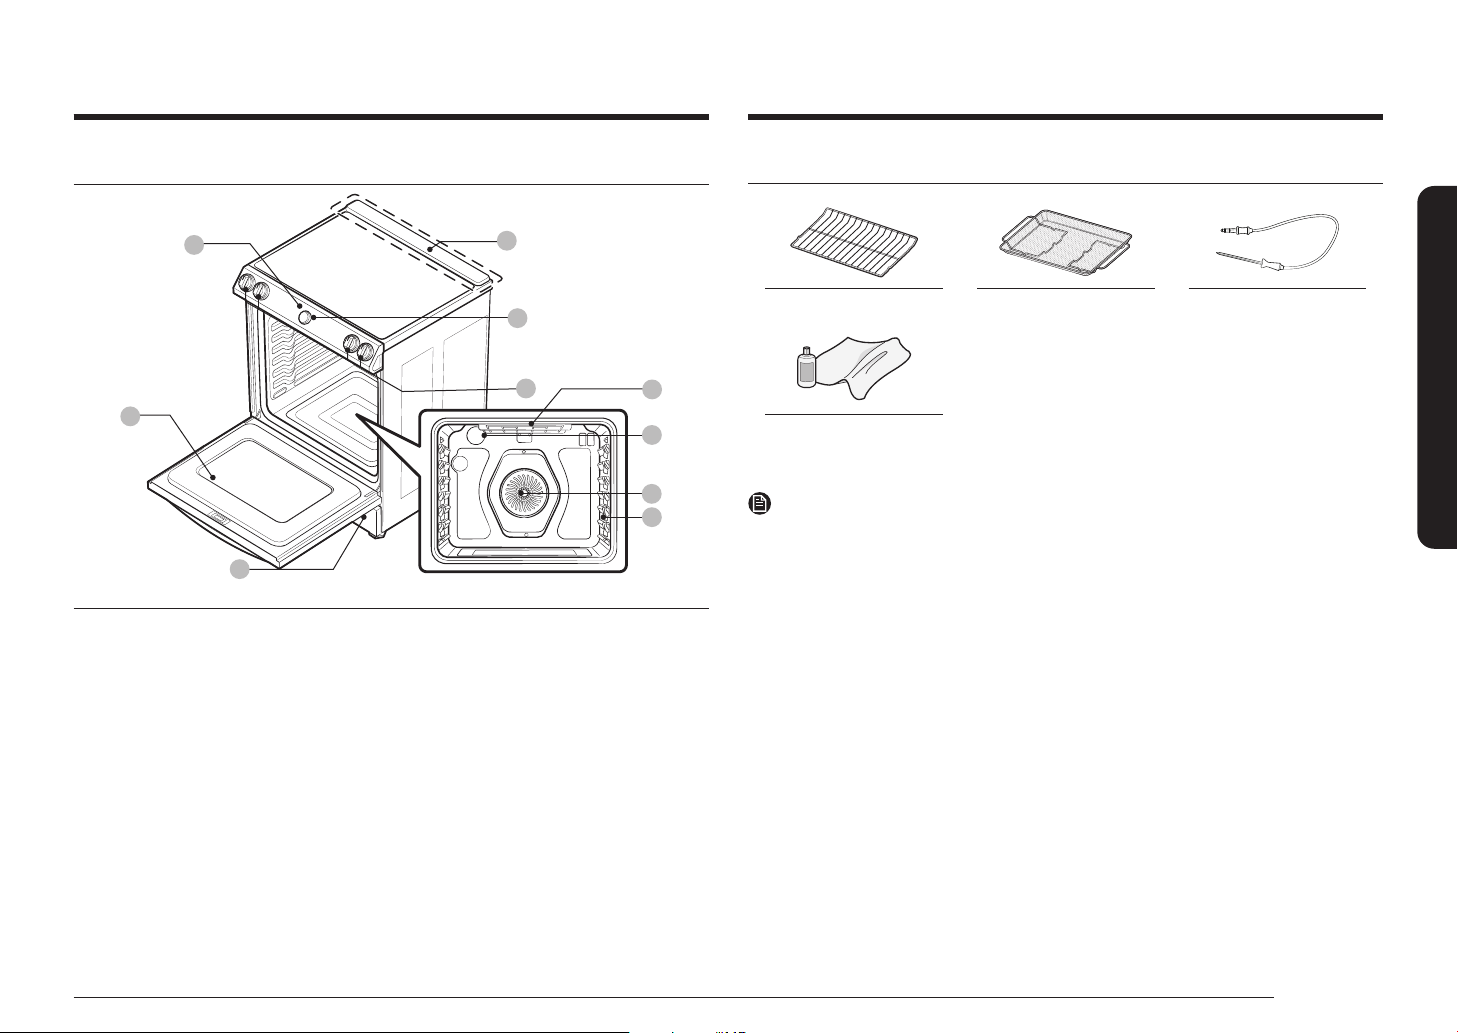
Overview
01
05
06
01 Control panel 02 Surface control
knobs (See page
23 for more
information.)
04 Vent 05 Oven door 06 Storage drawer
04
03
02
03 Dial knob (See
page 28 for more
information.)
What’s included with your range
Introducing your new range
Wire racks (2) * Air fry tray (1) * Temperature probe (1) *
07
08
09
10
If you need an accessory marked with a *, you can buy it from the Samsung
Contact Center (1-800-726-7864).
Cleaner &
cleaning pad (1)
NOTE
07 Broil oven heater 08 Oven light 09 Convection system
10 Shelf position
English 21
Page 22
Before you begin Surface cooking
Before you begin
Before you begin
Clean the oven thoroughly before using it for the rst time. Then, remove the
accessories, set the oven to bake, and then run the oven at 400 °F for 1 hour. There
will be a distinctive odor. This is normal.
Ensure your kitchen is well ventilated during this conditioning period.
Energy saving tips
• During cooking, the oven door should remain closed except when you turn
food over.
Do not open the door frequently during cooking to maintain the oven
temperature and to save energy.
• If cooking time is more than 30 minutes, you can switch the oven off
5-10 minutes before the end of the cooking time to save energy. The residual
heat will complete the cooking process.
• To save energy and reduce the time needed for reheating the oven, plan oven
use to avoid turning the oven off between cooking one item and the next.
• Whenever possible, cook more than one item at a time.
About surface cooking
CAUTION
BEFORE COOKING
• Do not use the glass cooktop surface as a cutting board.
• Do not place or store items that can melt or catch re on the glass cooktop,
even when it is not being used.
• Turn the surface units on only after placing cookware on them.
• Do not store heavy items above the cooktop surface. They could fall and
damage it.
CAUTION
DURING COOKING
• Do not place aluminum foil or plastic items, such as salt and pepper shakers,
spoon holders, or plastic wrappings on the range when it is in use. The hot air
from the vent could melt plastics or ignite ammable items.
• Make sure the correct surface unit is turned on.
• Never cook directly on the glass. Always use cookware.
• Always place the pan in the center of the surface unit you are cooking on.
• Never leave surface units unattended while using a high heat setting.
Boilovers cause smoking and greasy spillovers that may catch on re.
• Turn the surface units off before removing cookware.
• Do not use plastic wrap to cover food. Plastic may melt onto the surface and
be very difcult to remove.
• The cooling fan can be operated during cooktop cooking.
22 English
Page 23
CAUTION
AFTER COOKING
• Do not touch the surface units until they have cooled down.
• The surface may still be hot and burns may occur if you touch the glass
surface before it has cooled down sufciently.
• Immediately clean spills on the cooking area to prevent a tough cleaning
chore later.
• If cabinet storage is provided directly above the cooking surface, make sure
that the items are infrequently used and can be safely stored in an area
subjected to heat. Temperatures may be unsafe for items, such as volatile
liquids, cleaners, or aerosol sprays.
About the radiant surface elements
The temperature rises gradually and evenly. As the temperature rises, the radiant
element will glow red. To maintain the selected setting, the element will cycle
on and off. The heating element retains enough heat to provide a uniform and
consistent heat during the off cycle. For efcient cooking, turn off the element
several minutes before cooking is complete. This will allow residual heat to
complete the cooking process.
NOTE
Radiant elements have a limiter that allows the element to cycle ON and OFF, even
at the HI setting. This helps to prevent damage to the ceramic cooktop. Cycling at
the HI setting is normal and can occur if the cookware is too small for the radiant
element or if the cookware bottom is not at.
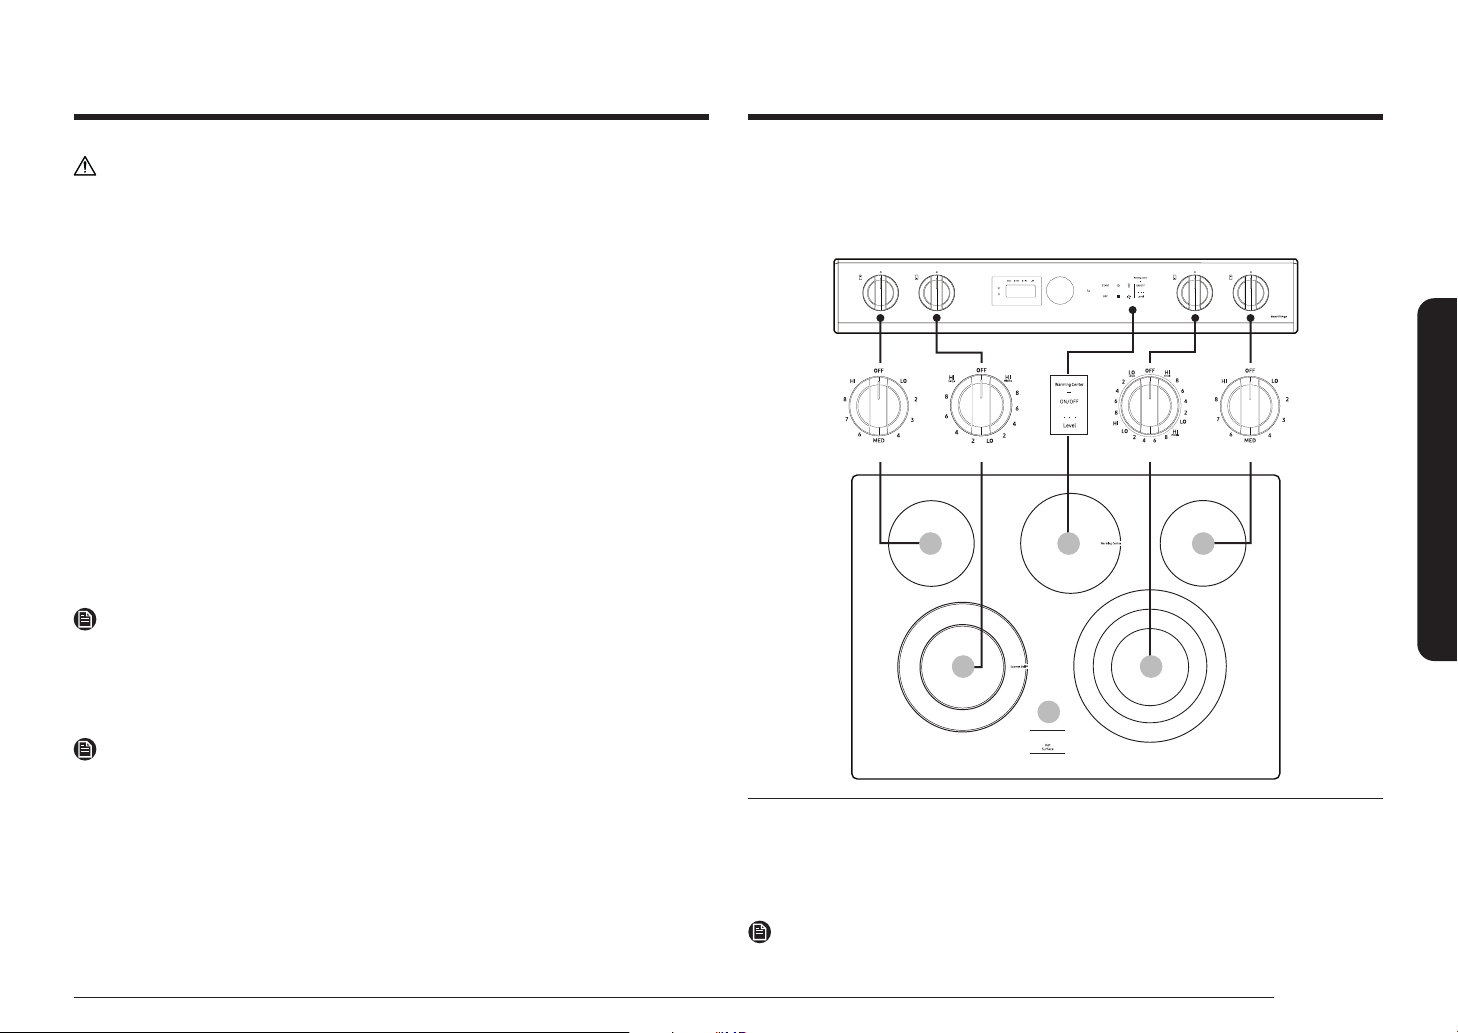
Location of the radiant surface elements and controls
The radiant control knobs operate the radiant surface elements on the cooktop as
shown below. When reassembling the knobs after cleaning, check the knob print
and assemble them in the correct position before using cooktop.
Single SingleDual Triple
01 05
02
03
04
06
Surface cooking
NOTE
When you operate the knob, beep sounds once.
01 Left Rear:
6", 1200 W
04 Right Front:
6"/9"/12", 3000 W
02 Left Front:
6"/9", 3600 W
05 Right Rear:
6", 1200 W
03 Warming Center:
100 W
06 Hot surface
indicator
NOTE
The knob illumination around the knob turns on when the knob is turned on.
English 23
Page 24
Surface cooking
Surface cooking
Hot surface indicator
• Comes on when the unit is turned on or hot to the touch.
• Stays on even after the unit is turned off.
• Glows until the unit is cooled to approximately 150 °F.
Cooking areas
• The cooking areas on your range are identied by permanent circles on the
glass cooking surface. For the most efcient cooking, t the pan size to the
element size.
• Pans should not extend more than ½˝ to 1˝ beyond the cooking area.
• When a control is turned on, you can see a glow through the glass cooking
surface. The element will cycle on and off to maintain the preset heat setting,
even at high settings.
• For more information on selecting proper types of cookware, refer to the
section "Using the proper cookware" on page 26.
How to set the appliance for surface cooking
CAUTION
• The surface elements may be hot even when off and burns can occur. Do not
touch the surface elements until they have cooled down sufciently.
• At high or medium-high settings, never leave food unattended. Boilovers
cause smoking and greasy spillovers may catch on re.
• Be sure you turn the control knob to OFF when you nish cooking.
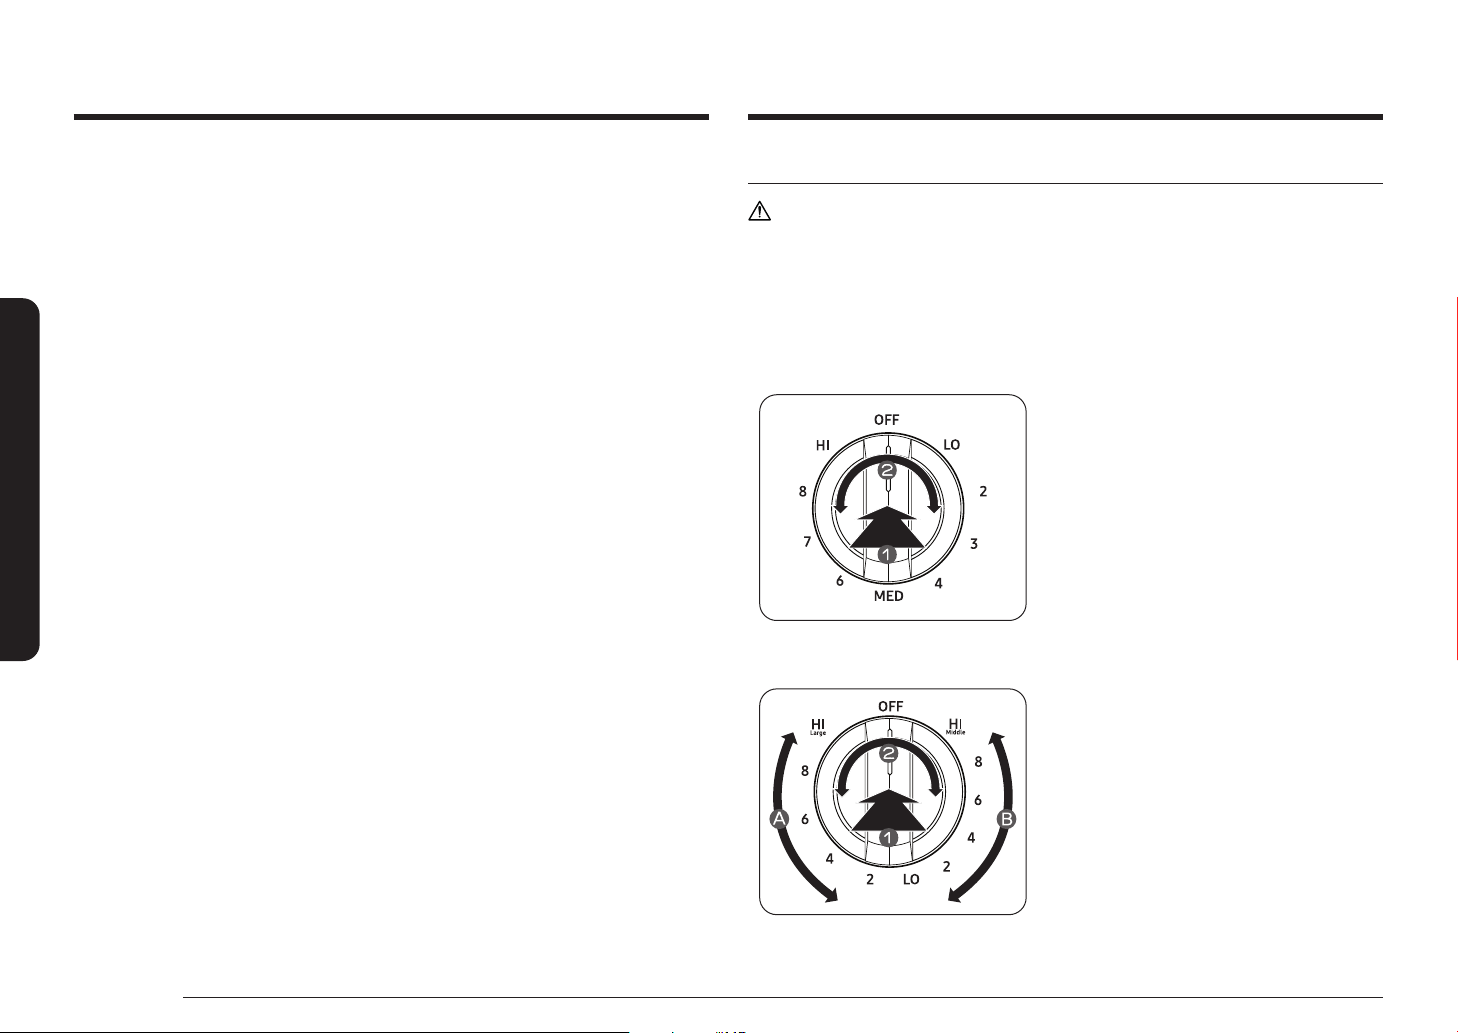
Single surface unit control knob (Left Rear, Right Rear)
1. Push the knob in.
2. Turn in either direction to the setting
you want.
• At both the off and high settings,
the knob clicks into position.
Dual surface unit control knob (Left Front)
1. Push the knob in.
2. Turn in either direction to the setting
you want.
• To use the large surface unit,
turn the control knob to the large
burner (A) setting.
• To use the middle surface unit,
turn the control knob to the middle
burner (B) setting.
24 English
Page 25
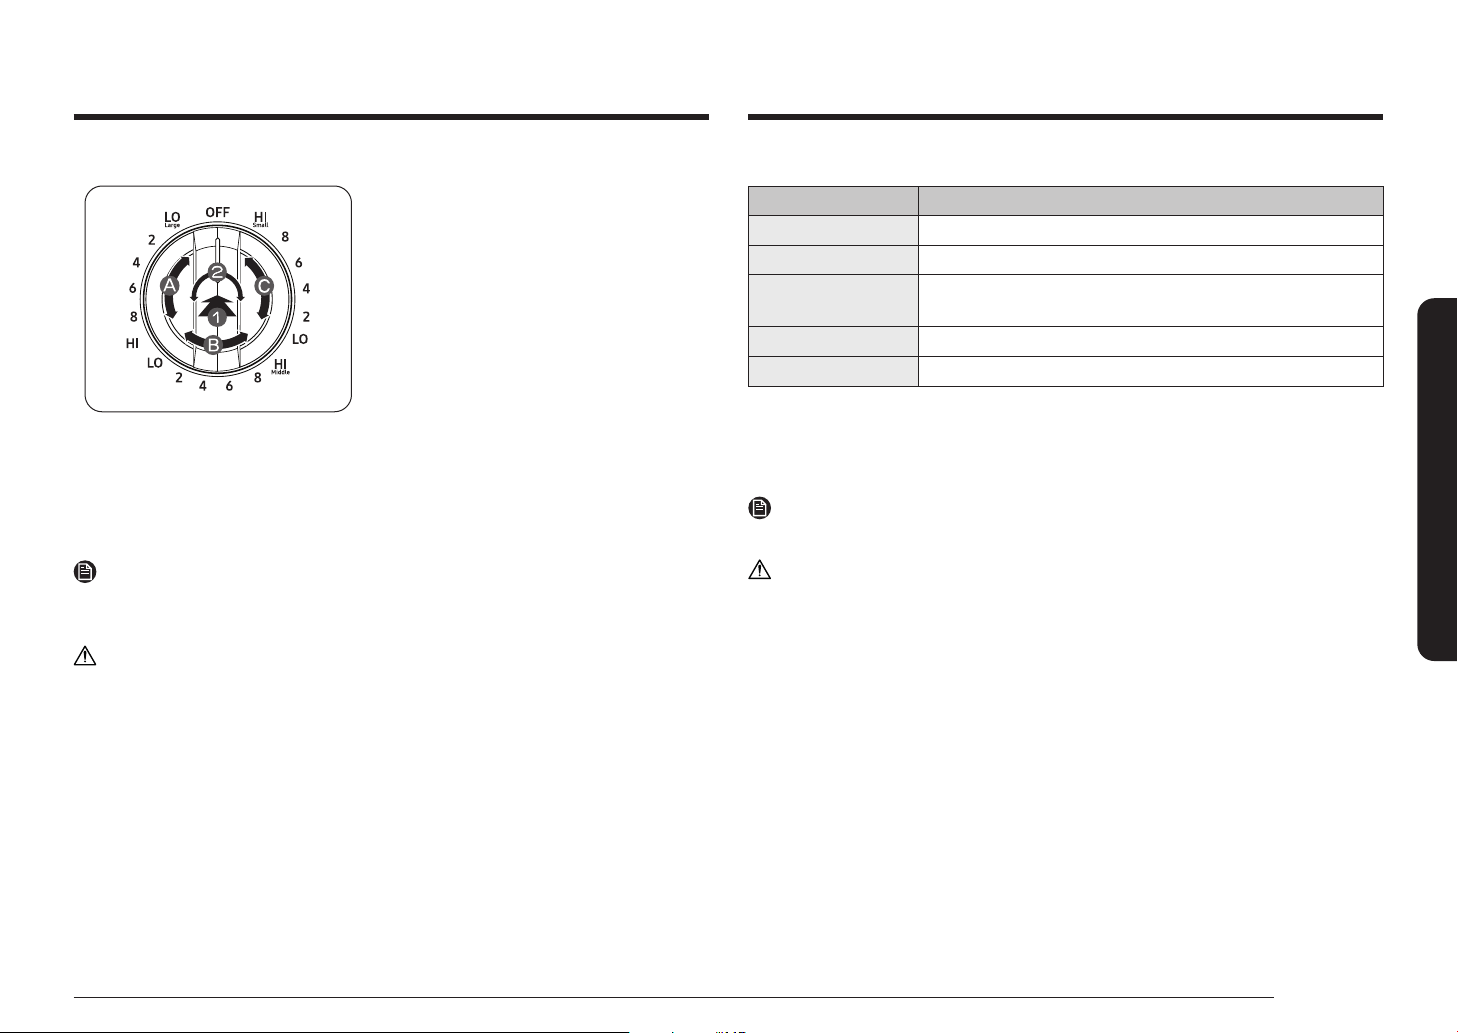
Triple surface unit control knob (Right Front)
The triple surface unit has 3 cooking sizes
to select from so you can match the size of
the cooking area to the size of the cookware
you are using.
1. Push the knob in.
2. Turn in either direction to the setting
you want.
• To use the large surface unit,
turn the control knob to the large
burner (A) settings.
• To use the middle surface unit,
turn the control knob to the middle
burner (B) settings.
• To use the small surface unit,
turn the control knob to the small
burner (C) settings.
Recommended settings
SETTING TYPE OF COOKING
HIGH Starting most foods, bringing water to a boil, pan broiling
MEDIUM HIGH Continuing a rapid boil, frying, deep fat frying
MEDIUM Maintaining a slow boil, thickening sauces and gravies,
steaming vegetables
MEDIUM LOW Keeping foods cooking, poaching, stewing
LOW Keeping foods warm, melting, simmering
Using the warming center
The warming center, located in the back center of the glass surface, will keep hot,
cooked food at serving temperature.
NOTE
The surface warmer will not glow red like the cooking elements.
Surface cooking
NOTE
If you remove the knob for cleaning, make sure to reattach it in the correct
orientation. (Refer to the illustration above.)
CAUTION
• Please note, operation of lighting knob may not synchronize with the actual
operation of the radiant heater when there is a problem with the product.
• The area on the knob between the high and off settings is not appropriate for
cooking.
CAUTION
• Do not warm food on the warming center for more than two hours.
• Use only cookware and dishes recommended as safe for oven and cooktop
use.
• Always use potholders or oven mitts when removing food from the warming
center as cookware and plates will be hot.
• When warming pastries and breads, use covers that have an opening to allow
moisture to escape.
• Do not use plastic wrap to cover foods. Plastic may melt onto the surface and
be very difcult to clean off.
• Food should be kept in its container and covered with a lid or aluminum foil to
maintain food quality.
• Always start with hot food. Eating uncooked or cold food placed on the
warming center could result in illness.
English 25
Page 26
Surface cooking
Surface cooking
1. To turn the warming center on, press the Warming Center On/Off pad.
2. Select the power setting you want. Press the Warming Center Level pad once
for Low, twice for Medium, or three times for High.
3. To turn the warming center off, press the Warming Center On/Off pad.
NOTE
• Pressing OFF does not turn the warming center off.
• For best results, all foods on the warming center should be covered with a lid
or aluminum foil. When warming pastries or breads, the lid or foil should be
vented to allow moisture to escape.
Recommended settings
LEVEL TYPE OF FOOD
Low Breads/pastries, casseroles, gravies, eggs
Medium Dinner plate with foods, soups (cream), vegetables, sauces, stews,
meats
High Fried foods, soups (liquid), hot beverages
Using the proper cookware
Using the right cookware can prevent many problems, such as uneven cooking or
extended cooking times. Using the proper pots and pans will reduce cooking times
and cook food more evenly.
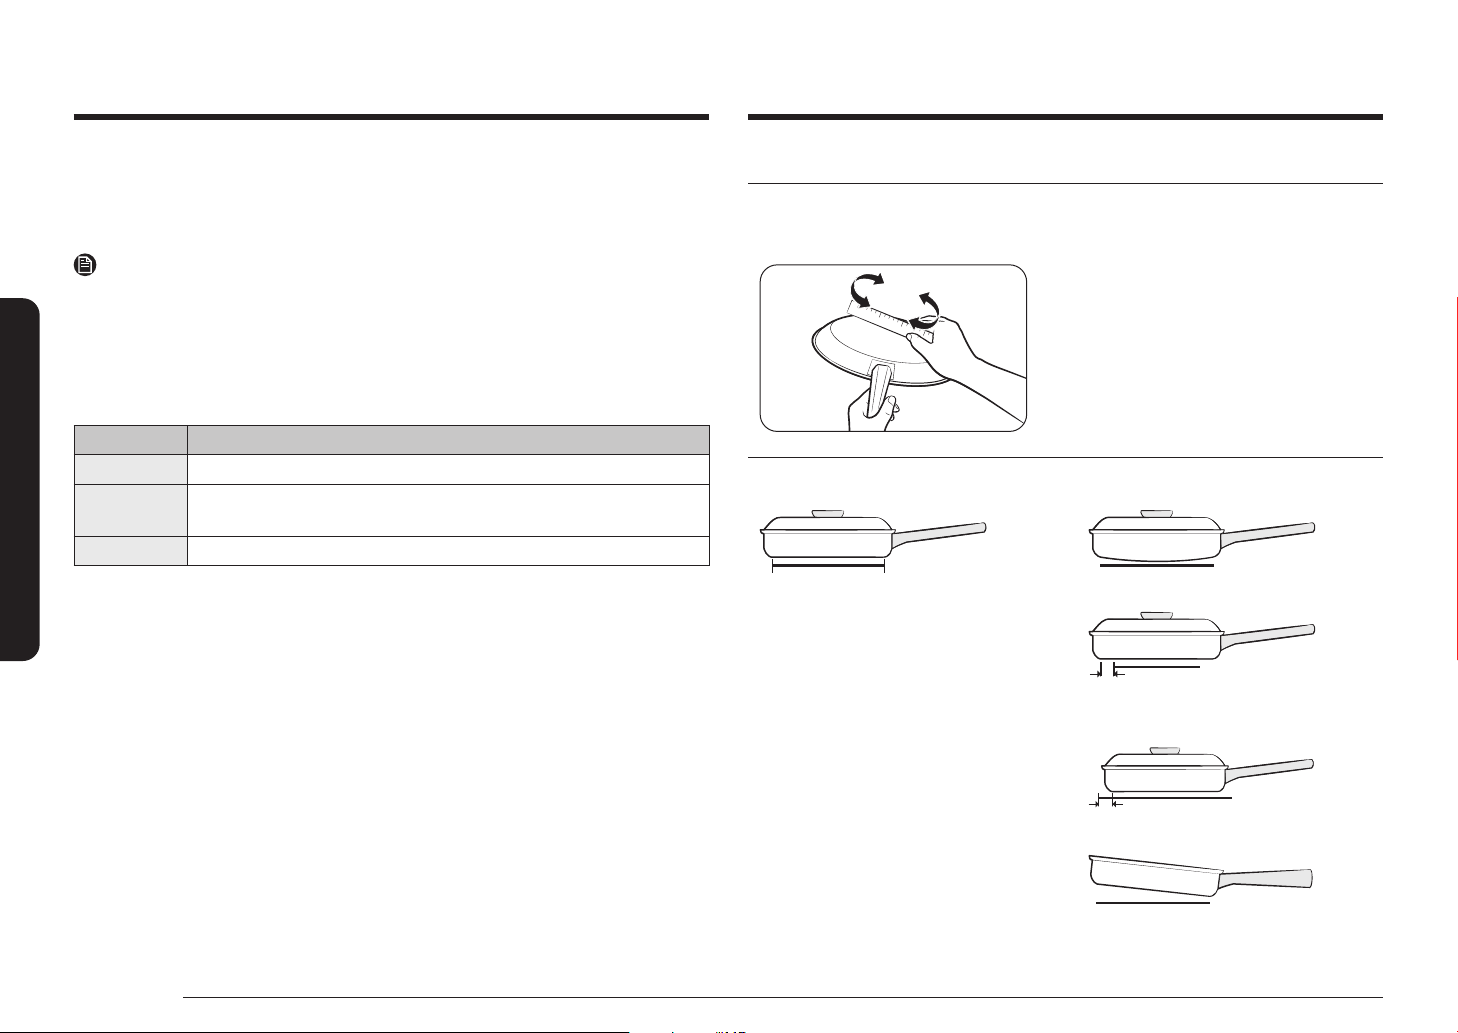
Check for atness by rotating a ruler across
the bottom of the cookware.
CORRECT INCORRECT
Flat bottom and straight sides.
• Tight tting lids.
• Weight of handle does not tilt
pan.
• Pan is well balanced.
• Pan size matches the amount of
food to be prepared and the size
of the surface element.
• Made of a material that
conducts heat well.
Always match pot diameter to
element surface diameter.
Curved and warped pan bottoms.
Pan overhangs element by more
than one-half inch.
Pan is smaller than element.
26 English
Heavy handle tilts pan.
Page 27

Choosing the proper cookware
What your cookware is made of determines how evenly and quickly heat is
transferred from the surface element to the pan bottom.
• ALUMINUM - Excellent heat conductor. Some types of food will cause the
aluminum to darken. (Anodized aluminum cookware resists staining & pitting).
If aluminum pans are slid across the ceramic cooktop, they may leave metal
marks that resemble scratches. Remove these marks as soon as the cooktop
cools down.
• COPPER - Excellent heat conductor but discolors easily. May leave metal
marks on ceramic glass (to remove, see above.)
• STAINLESS STEEL - Slow heat conductor with uneven cooking results. Is
durable, easy to clean, and resists staining.
• CAST IRON - A poor conductor; retains heat very well. Cooks evenly once
cooking temperature is reached. Not recommended for use on ceramic
cooktops.
• ENAMELWARE - Heating characteristics will vary depending on the base
material. Porcelain enamel coating must be smooth to avoid scratching
ceramic cooktops.
• GLASS - Slow heat conductor. Not recommended for ceramic cooktop surfaces
because it may scratch the surface.
Protecting the cooktop
Cleaning
• Clean the cooktop before using it for the rst time.
• Clean your cooktop daily or after each use. This will keep your cooktop
looking good and can prevent damage.
• If a spillover occurs while you are cooking, immediately clean the spill from
the cooking area while it is hot to prevent a tough cleaning chore later. Using
extreme care, wipe the spill with a clean, dry towel.
• Do not allow spills to remain on the cooking area or the cooktop trim for a
long period of time.
• Do not use abrasive cleansing powders or scouring pads, which will scratch
the cooktop.
• Do not use chlorine bleach, ammonia, or other cleansers not specically
recommended for use on a glass-ceramic surface.
Preventing marks and scratches
• Do not use glass cookware. It may scratch the cooktop.
• Do not place a trivet or wok ring between the cooktop and the pan. These
items can mark or scratch the cooktop.
• Make sure the cooktop and the pan bottom are clean.
• Do not slide metal pans across the cooktop.
Preventing stains
• Do not use a soiled dish cloth or sponge to clean the cooktop surface. A lm
will remain, which may cause stains on the cooking surface after the area is
heated.
• Continuously cooking on a soiled surface can result in a permanent stain.
Surface cooking
Preventing other damage
• Do not allow plastic, sugar, or foods with high sugar content to melt onto the
hot cooktop. Should this happen, clean immediately.
• Do not let a pan boil dry as this will damage the cooktop and the pan.
• Do not use the cooktop as a work surface or cutting board.
• Do not cook food directly on the cooktop. Always use the proper cookware.
English 27
Page 28
Operating the oven
Operating the oven
Operating the oven
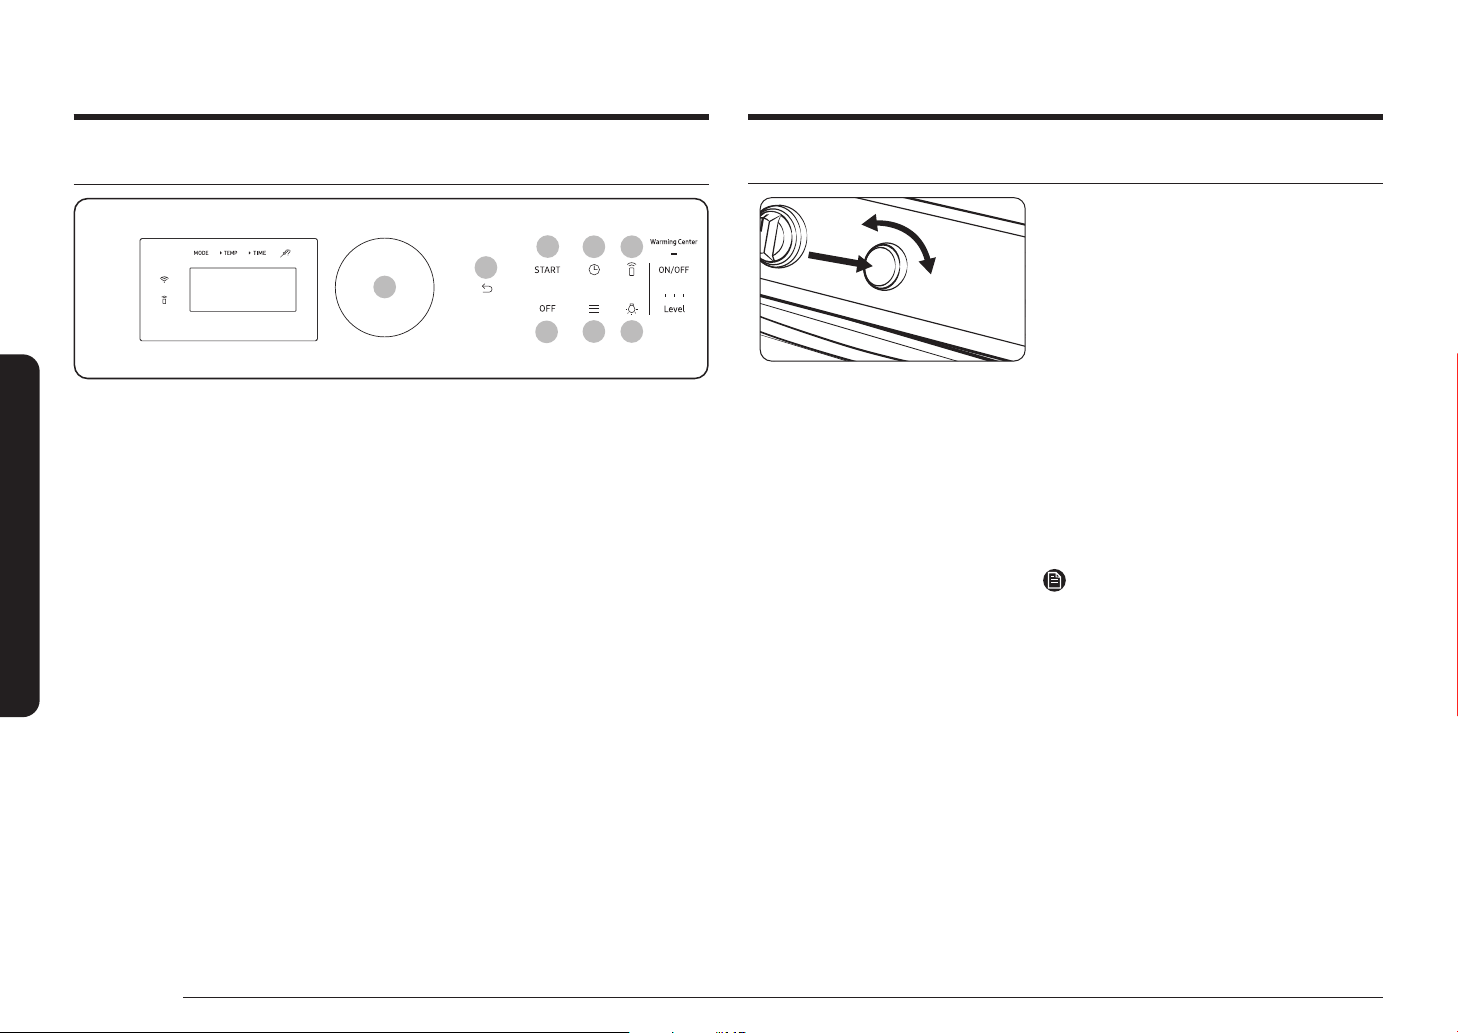
The oven control panel
01
03 05
07
01 START: Press to start oven operation.
02 OFF: Delete all information entered, return to the rst step. Stop the oven
operation.
03 Time Option: Go to set time options. (Cook time, Delay start)
04 Options: Go to set options. (Timer, Cleaning, Favorite, My mode list, Lock,
Screen timeout, Set time, Time format, 12hr energy saving, Sound, Sabbath,
System settings)
05 Smart Control: Set Smart Control function On/Off.
06 Light: Tap to turn oven light On/Off.
07 Dial Knob: Turn Clockwise - Move focus to next / increase value.
Turn Counterclockwise - Move focus to previous / decrease value.
Push - Select the current value.
08 Back: Go to upper depth, previous page, etc.
08
02
04 06
How to use dial knob
TurningTurning
PushingPushing
The dial knob can be used in the following
ways:
1. Turning
• Turning the dial knob clockwise or
counterclockwise will show next or
previous mode when selecting the
cooking mode.
• Turning the dial knob clockwise or
counterclockwise will increase or
decrease the value when selecting the
cooking temperature or time.
2. Pushing
By pushing the dial knob, current value will
be entered.
NOTE
Dial knob cannot be disassembled. Do not
pull it forcibly.
28 English
Page 29
Display mode
Set time
12:00PM
2
1
Set Date
Dec 31, 2020
2
1
Time format
24hr
2
1
Sleep mode
The control panel enters Sleep mode if the oven is not used for a while.
In Sleep mode, the control panel is inactive, displaying only the time, until it is
reactivated by the user.
NOTE
You can adjust the control panel timeout. (See more information on page 43.)
Wake-Up
To activate the control panel, turn or
Push the Dial Knob. User preferences are
available in this mode including the timer,
oven light, and/or control lock.
Turning the oven light on and off
• The oven light turns on automatically when the door is opened.
• The oven light turns off automatically when the door is closed.
• You can turn the oven light on and off manually by pressing the pad.
Clock
You must set the clock correctly to ensure the automatic features work properly.
This product supports two time formats: 12-hour (default) and 24-hour.
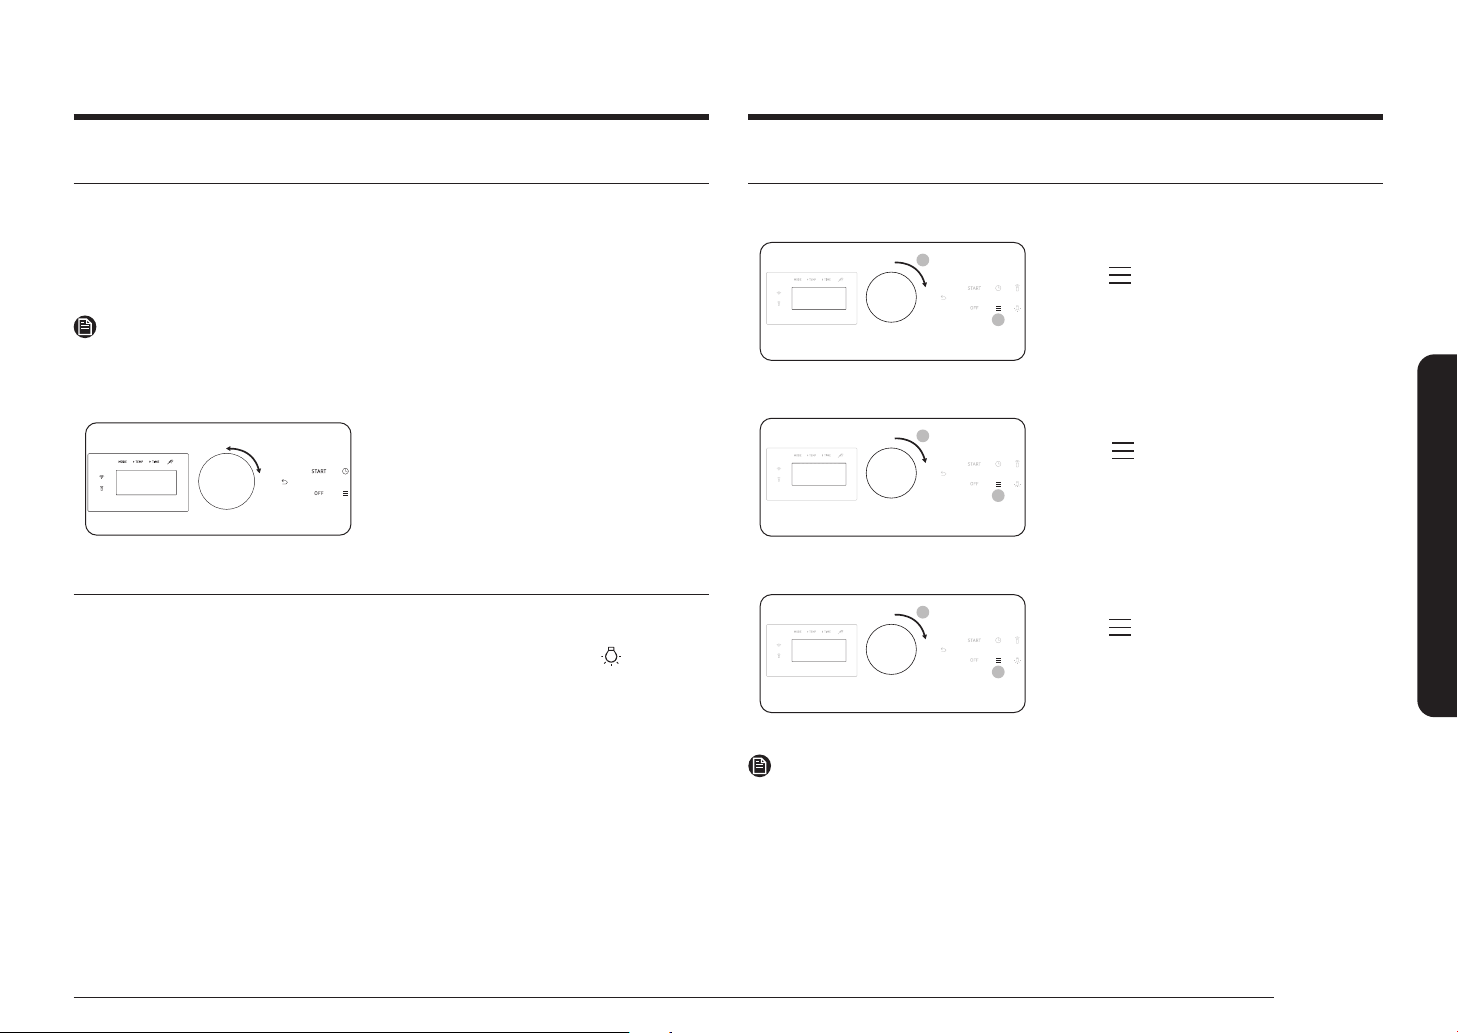
To set the clock time
1. Tap .
2. Select Set time using the dial knob.
3. Enter the current time using the dial
knob.
4. Push the dial knob to conrm the
settings.
To set the Date
1. Tap .
2. Select Set Date using the dial knob.
3. Enter the current Date using the dial
knob.
4. Push the dial knob to conrm the
settings.
To change the time format (12hr/24hr)
1. Tap .
2. Select Time format using the dial knob.
3. Turn the dial knob to select 12hr or
24hr.
4. Push the dial knob to save the changes.
Operating the oven
NOTE
You can set/change the clock or the kitchen timer before you start a cooking mode
or while most cooking modes are operating. However, you cannot set or change
the time if a time based function is operating (Time Bake, for example) or the
Sabbath feature is enabled.
English 29
Page 30
Operating the oven
Operating the oven
Oven cooking
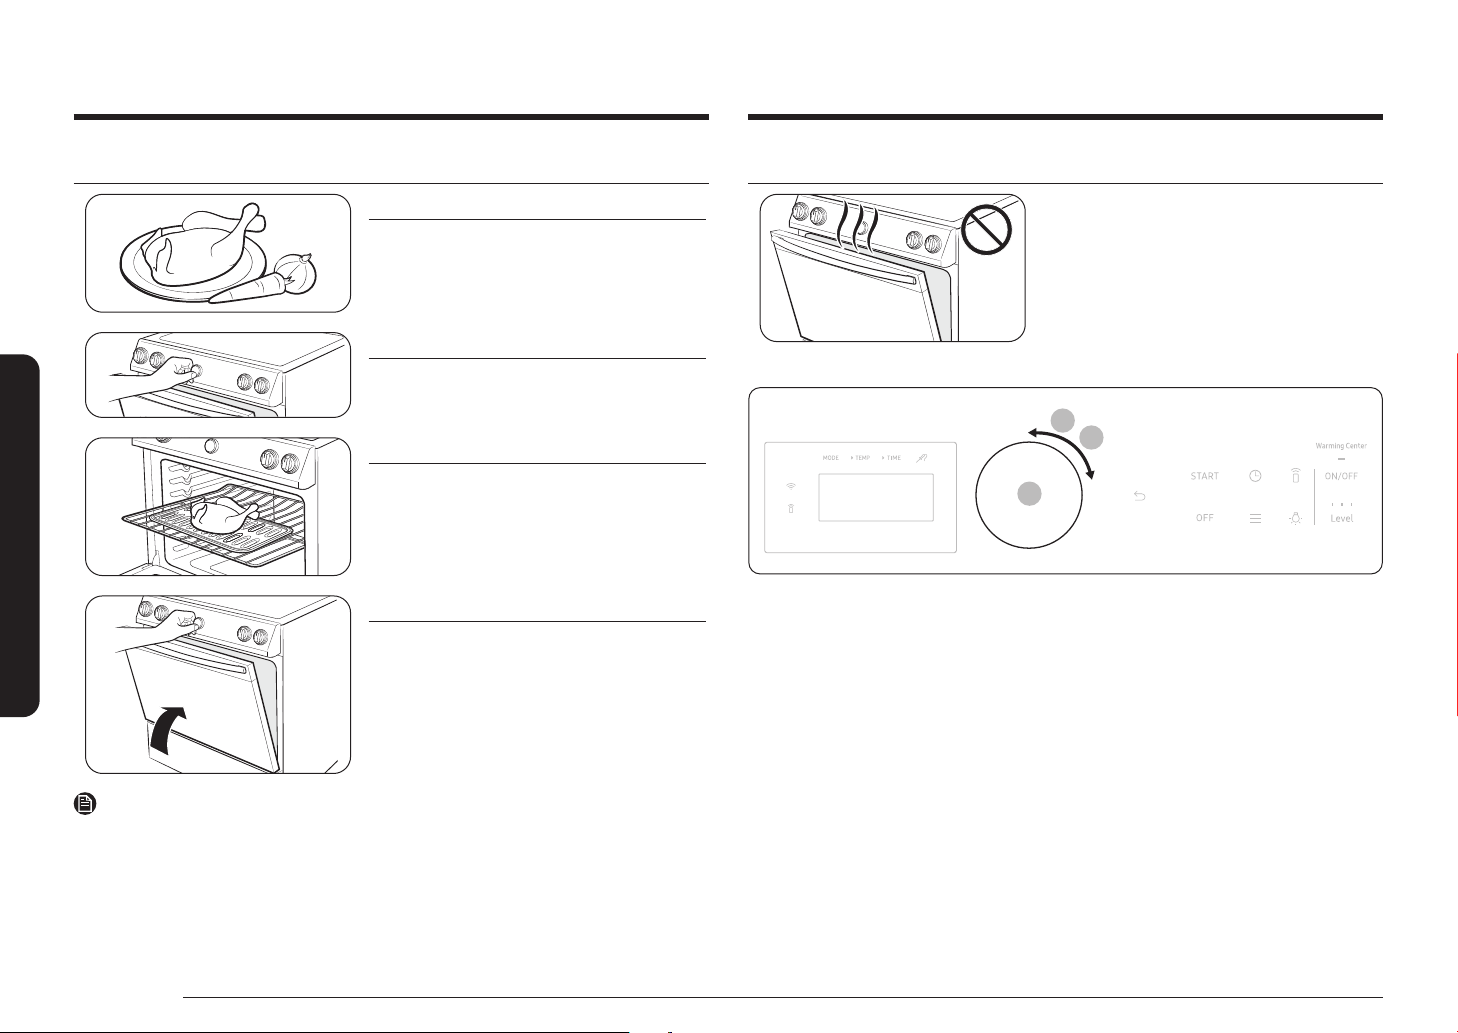
STEP 1
Put all ingredients in a heat-safe container.
STEP 2
Select a cooking mode, and then start
preheating.
STEP 3
Place the container on a rack.
STEP 4
Close the door and start cooking.
NOTE
The cooling fan automatically runs for a certain amount of time after cooking is
complete.
Cooking mode
• Make sure to close the door before you
start cooking.
• If you leave the door open for about
2 minutes
convection baking/roasting, baking, or
broiling modes, the oven burner shuts
off. To restart the burner, close the
door.
1
2
3
1. Use the Dial Knob to select a mode (Bake, Convection Bake, Convection Roast,
Air Fry, Broil, etc.).
2. If necessary, use the dial knob to change the default temperature. You can set
the oven to any temperature.
3. Push the dial knob, if necessary, you can set the Cook Time and Delay Start
when the "Start" Message displays.
Tap START or push the dial knob.
• The oven preheats until it reaches the temperature you set.
• It beeps several times when it reaches the set temperature.
• When preheating is complete, place the food in the oven, and then close
the door.
4. When cooking is complete, off the oven and then take out the food.
while the oven is in
30 English
Page 31
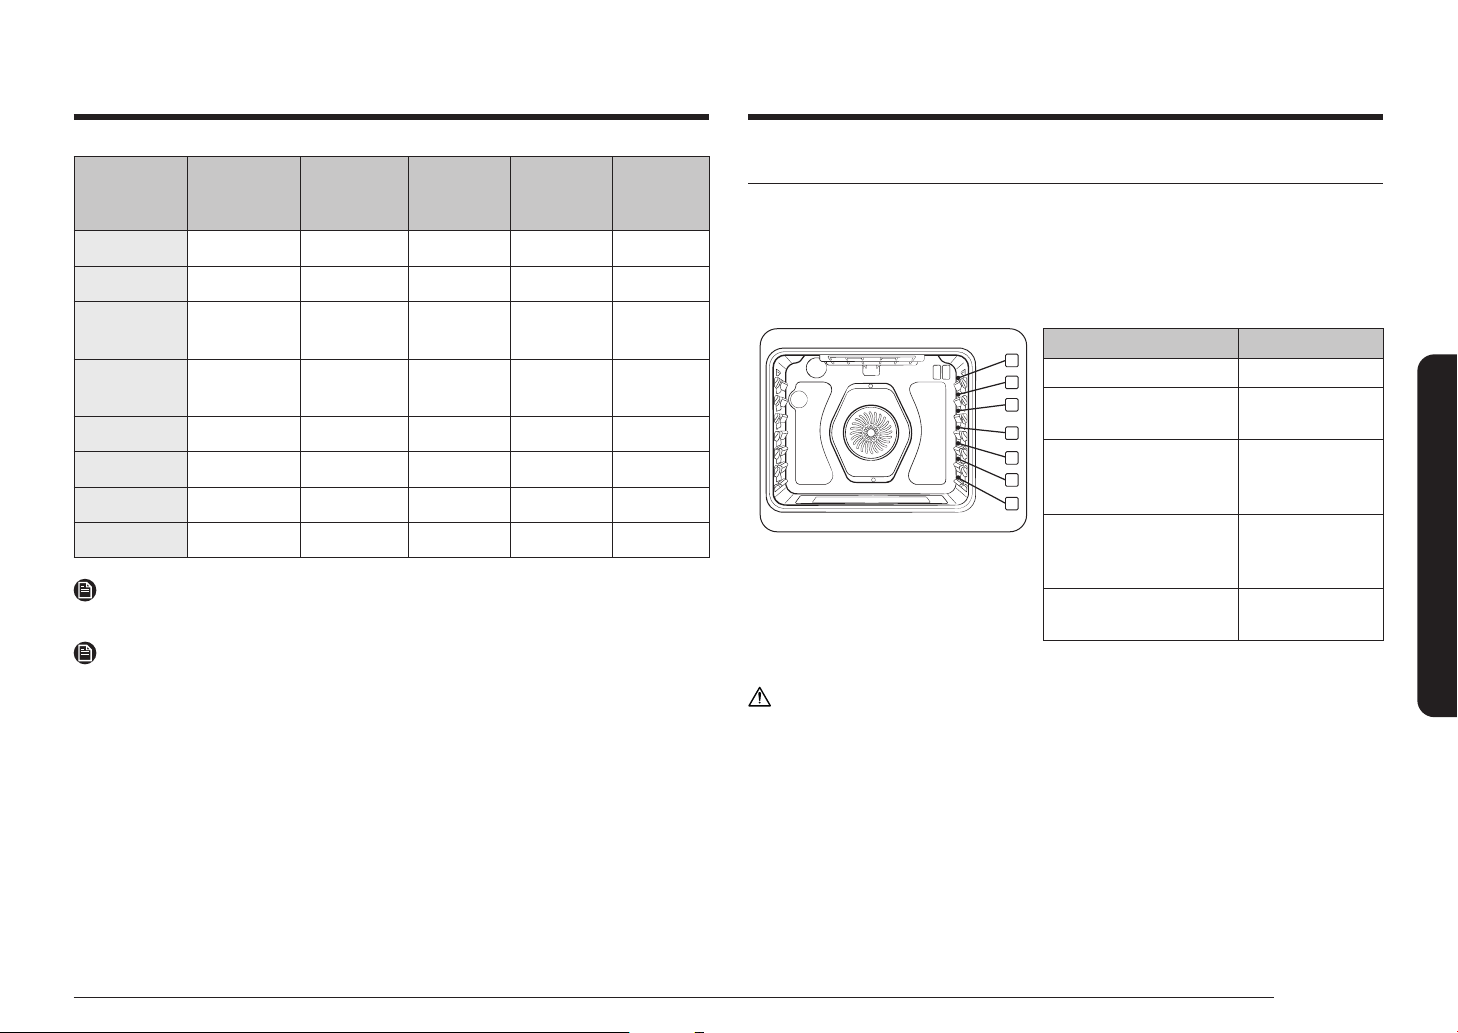
Default
temperature
(°F)
Temp.
Probe
Set Cook
Time
Delay Start
Mode
Temperature
range (°F)
Bake 175-550 350 O O O
Broil Hi-Lo Hi X X X
Convection
Bake
Convection
Roast
175-550 325 O O O
175-550 325 O O O
Air Fry 350-500 425 X O O
Dehydrate 100-225 150 X O O
Keep Warm - 175 X X X
Bread Proof - 95 X X X
NOTE
To change the temperature during cooking, repeat steps 1 through 3 above.
NOTE
If the 12hr energy saving feature is disabled, those modes will operate until
canceled. (12hr energy saving's default setting : on)
See page 22 for more information.
Using the oven racks
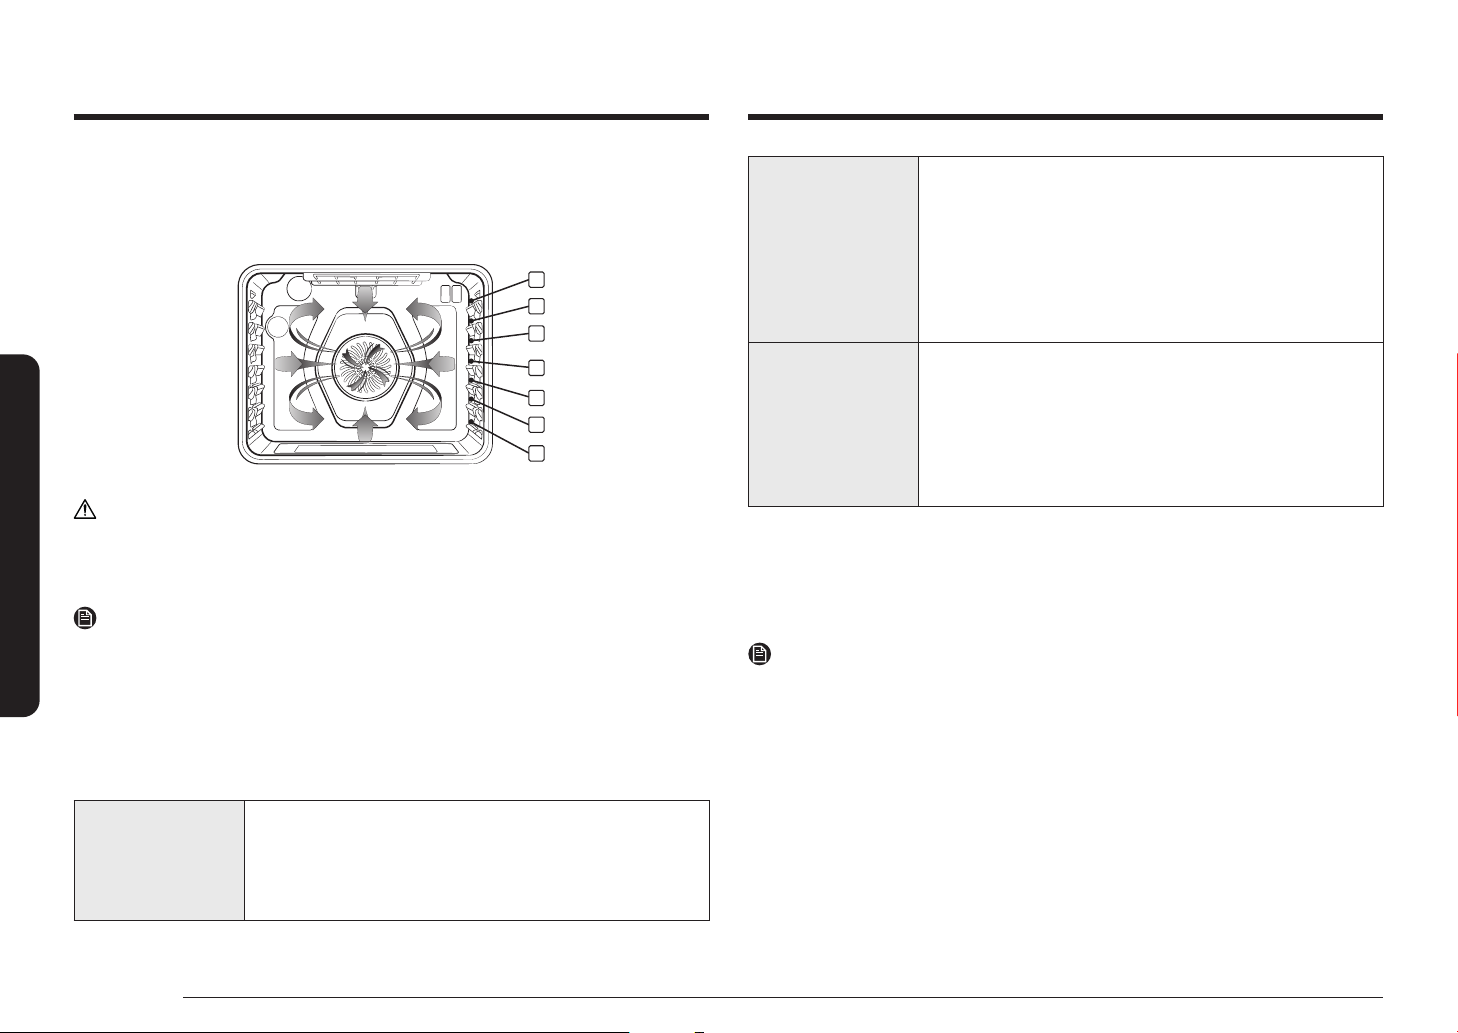
Your oven range comes with 2 racks and 7 rack positions. The rack positions are
delineated by rack guides which support the racks. Each rack guide has a stop
that prevents the rack from loosening during the oven's operation. Each rack has
stoppers that need to be placed correctly on the rack guides. The stoppers prevent
the racks from accidently coming out of the oven completely when you pull the
racks out.
7
6
5
4
3
2
1
CAUTION
• Do not cover an oven rack with aluminum foil. This will hamper heat
circulation, resulting in poor baking.
• Do not place aluminum foil on the oven bottom. The aluminum can melt and
damage the oven.
• Arrange the oven racks only when the oven is cool.
• When placing an oven rack in the top-most rack position (position 7), make
sure the rack is situated stably on the embossed stop.
Type of food Rack position
Broiling hamburgers 7
Broiling meats or small
cuts of poultry, sh
Bundt cakes, Pound
cakes, Frozen pies,
Casseroles
Angel food cakes,
Small roats, Fresh and
Frozen pizza
Turkey, Large roasts,
Hams
This table is for reference only.
4-6
3 or 4
2
1
Operating the oven
English 31
Page 32
Operating the oven
2
5
Operating the oven
Inserting and removing an oven rack
To insert an oven rack
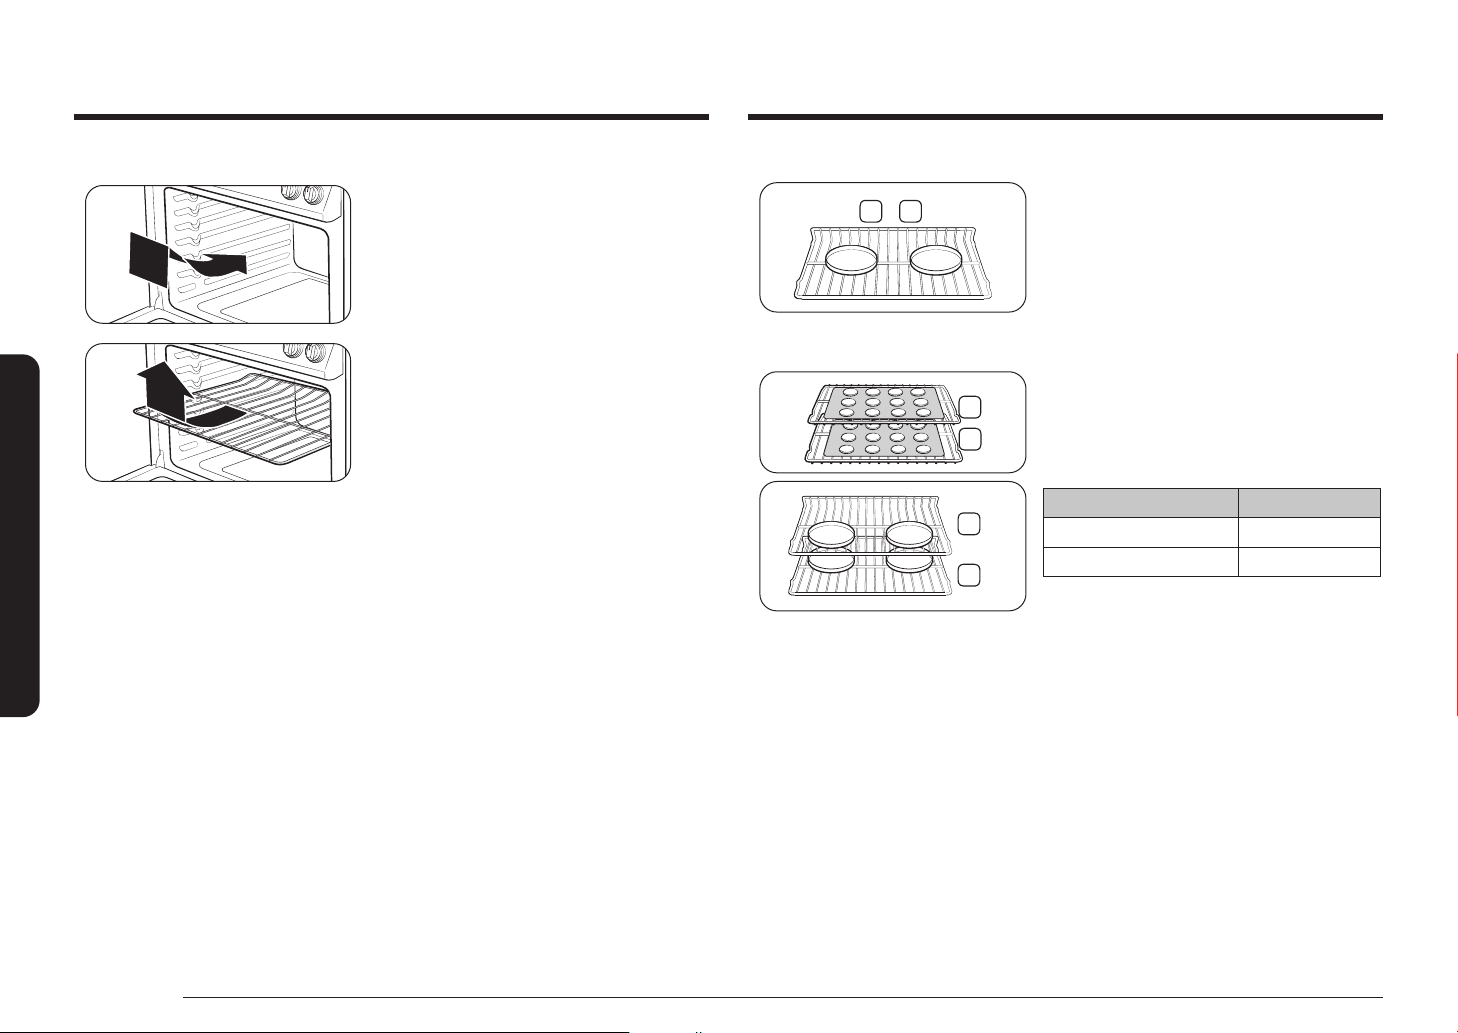
1. Place the rear end of the rack on a rack
guide.
2. Slide the rack into the rack guide while
holding the front end of the rack.
To remove an oven rack
1. Pull out the rack until it stops.
2. Pull up the front end of the rack and
remove it from the rack guide.
Rack and Pan placement
3 4
Single Oven Rack
Multiple Oven Rack
Centering the baking pans in the oven as
much as possible will produce better results.
If baking with more than one pan, place the
pans so each has at least 1˝ to 1½˝ of air
space around it.
When baking on a single oven rack, place
the oven rack in position 3 or 4.
See the gure on the left.
Cakes place the oven racks in positions 3
and 5, Cookies place the racks in positions
2 and 5.
Using Multiple Oven Racks
Type of Baking Rack Positions
5
3
Cookies 2 and 5
Cakes 3 and 5
32 English
Page 33
Before using the racks
The oven has two racks.
Each rack has stops that need to be placed correctly on the supports. These stops
will keep the rack from coming completely out.
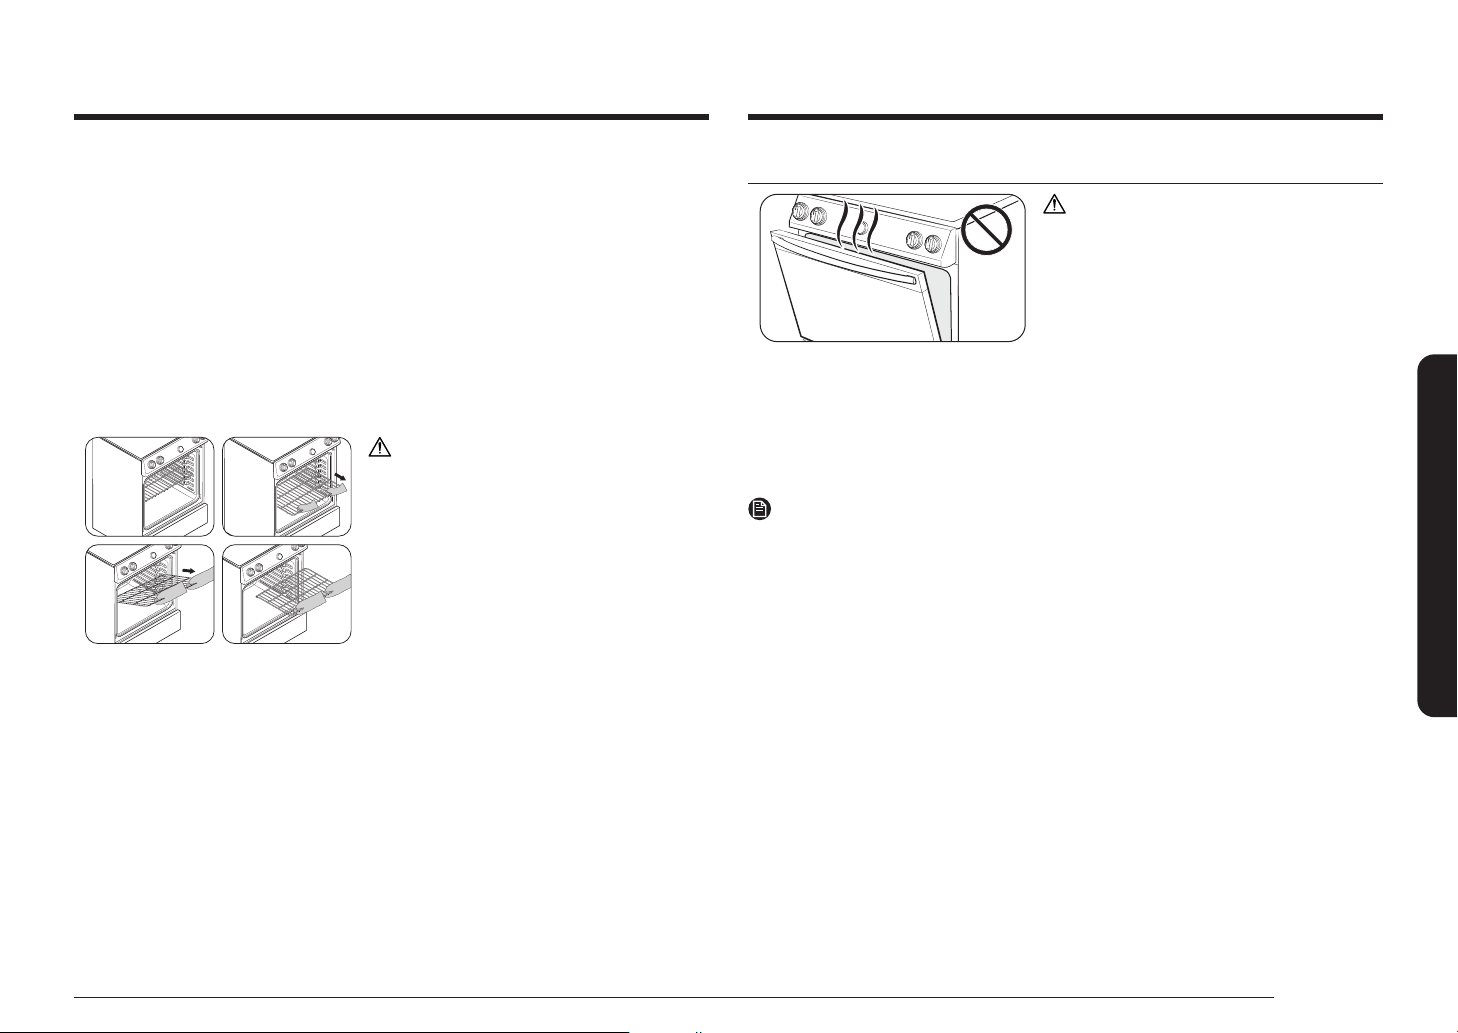
REMOVING THE RACKS
1. Pull the rack straight out until it stops.
2. Lift up the front of the rack, and then pull it out.
Recipe guide
CAUTION
Always use this cooking mode with the
oven door closed.
Use care when opening the door. Let hot air
or steam escape before you remove food
from or put food into the oven.
REPLACING THE RACKS
1. Place the end of the rack on the support.
2. Tilt the front end up and push the rack in.
CAUTION
• Do not cover a rack with aluminum
foil or place aluminum foil on the
oven bottom. This will hamper heat
circulation, resulting in poor baking,
and may damage the oven bottom.
• Arrange the oven racks only when the
oven is cool.
Baking
Bake is used to cook cakes, cookies, and casseroles. Always preheat the oven rst.
Baking temperatures and times will vary depending on the ingredients and the
size and shape of the baking pan used. Dark or nonstick coatings may cook faster
with more browning.
NOTE
• Place food in the oven after preheating if the recipe calls for it.
• Preheating is very important for good results when baking cakes, cookies,
pastry, and breads. After the oven has reached the desired temperature, the
oven will beep several times.
• If you are using an oven thermometer in the oven cavity, the temperature
registered by the thermometer may differ from the actual set oven
temperature.
• For performance reasons, the convection fan may be turned on or off during
the operation.
Operating the oven
English 33
Page 34
Operating the oven
Operating the oven
Convection cooking
The convection fan at the back of the oven circulates hot air evenly throughout the
oven cavities so that food is evenly cooked and browned in less time than with
regular heat.
7
6
5
4
3
2
1
CAUTION
• The convection oven fan shuts off when the oven door is opened.
• DO NOT leave the door open for long periods of time while using convection
cooking or you may shorten the life of the convection heating element.
NOTE
• When using convection cooking, always preheat the oven for the best results.
• If you leave the oven door open for more than 2 minutes when the oven is on,
all heating elements will shut off automatically.
• When you have nished cooking, the cooling fan will continue to run until the
oven has cooled down.
• For performance reasons, the convection fan may be turned on or off during
the operation.
Convection baking • Ideal for foods being cooked using multiple racks.
• Good for large quantities of food.
• Provides the best performance for cookies, biscuits,
brownies, cupcakes, cream puffs, sweet rolls, angel
food cake, and bread.
Convection baking • Cookies bake best when cooked on at cookie sheets.
• When convection baking using a single rack, place the
rack in rack position 3 or 4. (In Twin mode, position A
or 1.)
• When convection baking using two racks, place the
racks in positions 3 and 5 (Cakes, Cookies).
• The oven automatically adjusts the temperature for
convection baking.
Convection roasting • Good for larger, tender cuts of meat, uncovered.
• For best performance, place a broiler pan and grid
under the meat or poultry. The pan catches grease
spills and the grid prevents grease spatters.
• Heated air circulates over, under, and around the
food. Meat and poultry are browned on all sides as if
they were cooked on a rotisserie.
Broiling
Broiling uses the oven broil burner at the top of the oven to cook and brown food.
Meat or sh must be put on a broiling grid in a broiling pan. Preheating for
4 minutes before broiling is recommended.
NOTE
• This oven is designed for closed door broiling. While broiling, keep the door
closed.
Only open the door to put food in, turn food over, or take food out.
• Use the Broil Rack for the best results.
• Use the Broil LO for poultry or thick cuts of meat to prevent overbroiling.
• Use caution when you open the oven door to turn over the food. The air
escaping from the oven will be very hot.
• If you leave the oven door open for more than 2 minutes when the oven is on,
all heating elements will shut off automatically.
• When you have nished cooking, the cooling fan will continue to run until the
oven has cooled down.
34 English
Page 35
Broiling guide
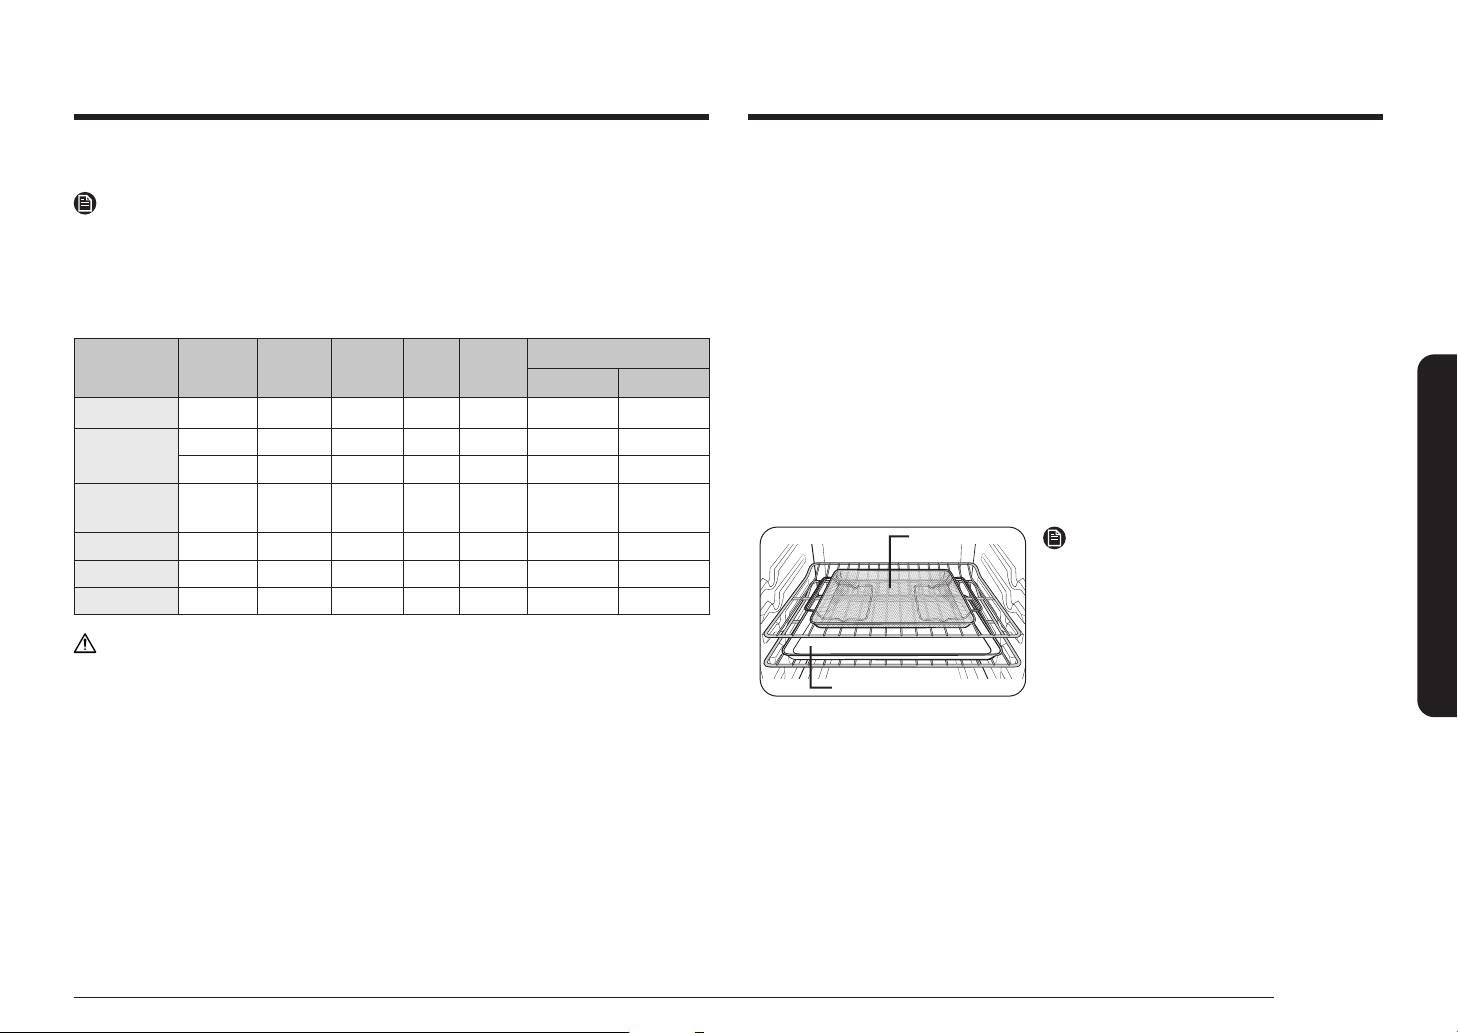
NOTE
• This is for reference only.
• Preheating for 4 minutes before broiling is recommended.
• The size, weight, thickness, starting temperature, and your doneness
preference will affect broiling times.
• This guide is based on meats at refrigerator temperature.
Food Doneness Size
Hamburgers
Beef steak
Chicken
pieces
Pork chops
Lamb chops
Salmon steak
Medium 9 patties 1" HI 7 3:20-3:40 2:20-2:40
Medium - 1" HI 5 7:00-8:00 6:00-7:00
Medium - ¾" HI 5 6:00-7:00 5:00-6:00
Well done 2-2½ lbs. ¾"-1" HI 4 15:00-16:00 13:00-14:00
Well done 1 lb. ½" LO 5 15:00-16:00 13:00-14:00
Well done 1 lb. ¾"-1" HI 5 5:00-6:00 4:00-5:00
Well done 3 pcs. ¾"-1" HI 5 4:00-7:00 3:00-6:00
Thickness
Broil
setting
Rack
position
Cooking time
1st side
CAUTION
Make sure to close the door after turning over the food.
2nd side
Air fry
This feature uses hot air for crispier and healthier frozen or fresh foods without or
less oil than normal convection modes. For best results, use this mode on a single
oven rack and place the Air fry tray on the position 3. The temperature can be
set between 350 °F and 500 °F. Preheating is not necessary for this mode. Follow
recipe or package directions for set temperature, time or quantity.
How to set the oven for Air fry mode
1. Place the tray on rack position 3.
2. Select Air fry mode using the dial knob.
3. Use the dial knob to change the default temperature. Enter the suggested
temperature for your food as recommended cooking guide. The default
temperature is 425 °F.
4. Push the dial knob and set the Cook Time or Delay Start, if necessary.
5. Tap START or push the dial knob.
6. When cooking is complete, tap OFF and take out the food.
Air fry trayAir fry tray
NOTE
• Place a baking sheet or tray on the
rack below the Air fry tray for getting
any drippings. This will help to reduce
splatter and smoke.
• Before using a baking sheet, check the
Tray or Baking sheetTray or Baking sheet
Air Fry Tray recommended
placement
maximum allowable temperature of
baking sheet.
• Air fry is designed for a single oven
rack. Place food on rack position 3 for
best results.
• For cooking fresh or homemade foods,
spread the oil over a larger area more
evenly, crisping up the food more
effectively.
Operating the oven
English 35
Page 36
Operating the oven
Operating the oven
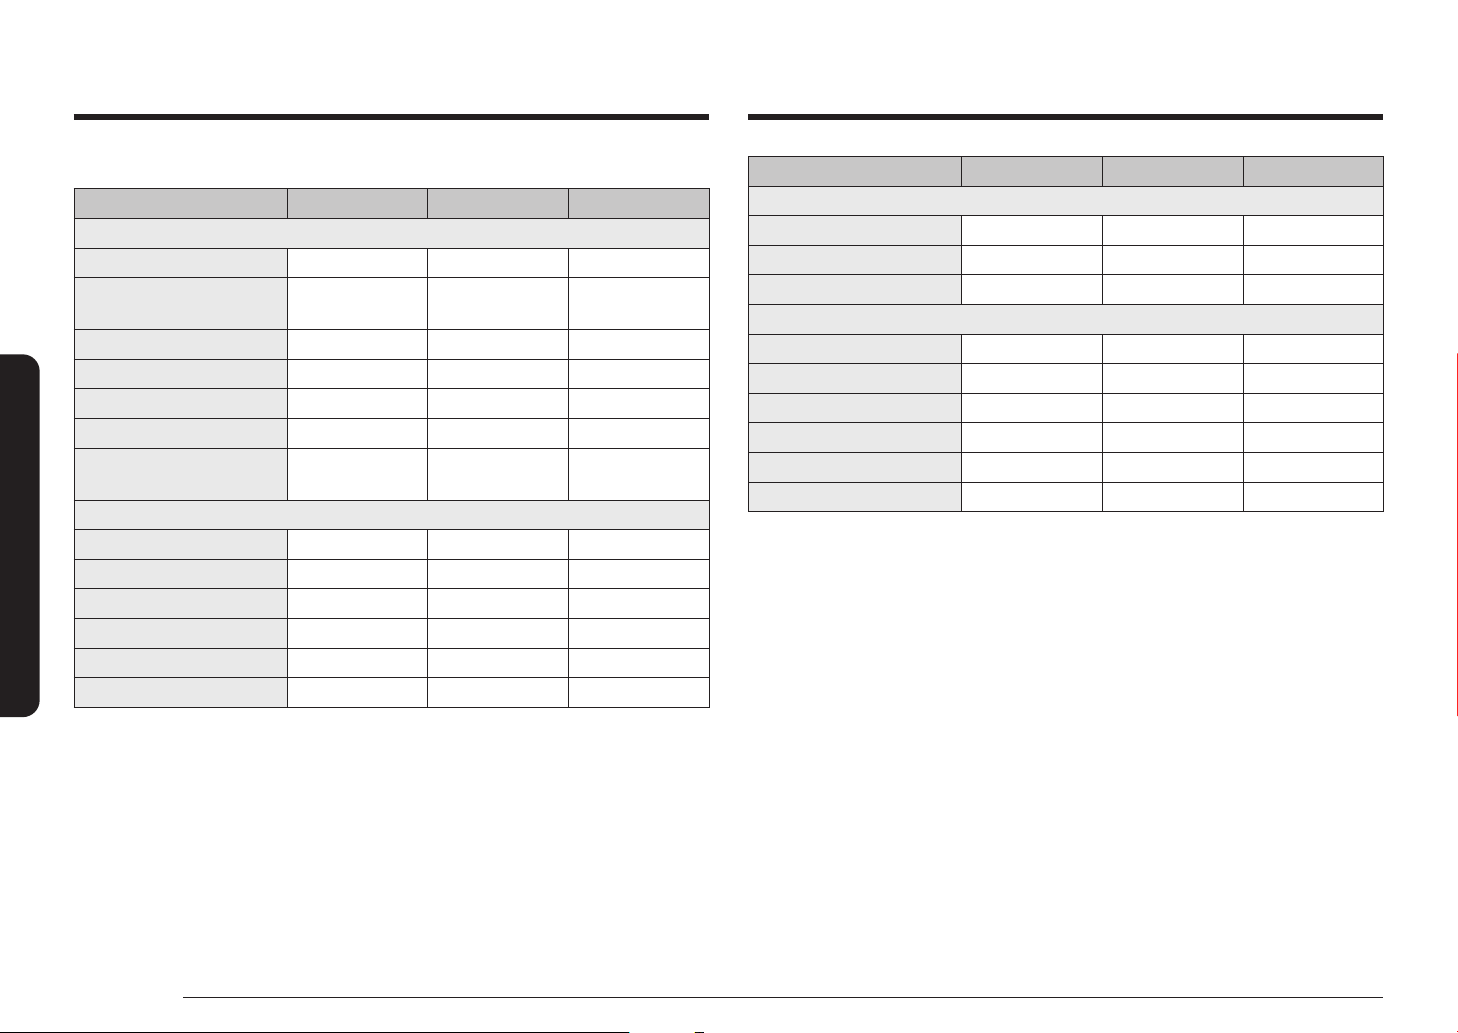
Air fry cooking guide
Item Amount Temperature Time
Potatoes
Frozen French Fries 30-35 oz 425 °F-450 °F 25-30 min
Frozen French Fries,
Seasoned
Frozen Tater Tots 40-45 oz 450 °F 20-25 min
Frozen Hash Brown 25-30 oz 425 °F-450 °F 20-25 min
Frozen Potato Wedges 30-35 oz 425 °F-450 °F 20-25 min
Homemade French Fries 25-30 oz 400 °F-425 °F 25-30 min
Homemade Potato
Wedges
Frozen
Frozen Chicken Nuggets 24-28 oz 400 °F-425 °F 15-25 min
Frozen Chicken Wings 30-35 oz 425 °F-450 °F 20-30 min
Frozen Onion Rings 20-25 oz 400 °F-425 °F 15-20 min
Frozen Fish Fingers 20-25 oz 425 °F 18-22 min
Frozen Chicken Strips 25-30 oz 425 °F-450 °F 20-30 min
Frozen Churros 20-25 oz 425 °F 18-22 min
25-30 oz 425 °F-450 °F 20-25 min
40-45 oz 425 °F-450 °F 25-30 min
Item Amount Temperature Time
Poultry
Fresh Drumsticks 40-45 oz 425 °F-450 °F 30-35 min
Fresh Chicken Wings 30-35 oz 425 °F-450 °F 27-32 min
Chicken Breasts, Breaded 25-30 oz 450 °F 25-30 min
Vegetables
Asparagus, Breaded 15-20 oz 425 °F 20-25 min
Egg Plants, Breaded 20-25 oz 425 °F 20-25 min
Mushroom, Breaded 18-22 oz 425 °F 20-25 min
Onions, Breaded 18-22 oz 425 °F 20-25 min
Cauliowers, Breaded 40-45 oz 400 °F-425 °F 20-25 min
Vegetable Mix, Breaded 30-35 oz 425 °F 20-25 min
36 English
Page 37
Dehydrate
Dehydrate dries food or removes moisture from food via heat circulation. After
drying the food, keep it in a cool and dry place. For fruit, adding lemon (or
pineapple) juice or sprinkling sugar on the fruit helps the fruit retain sweetness.
NOTE
• There is no preheating before dehydrating.
• Place the rack in rack position 3 or 4.
Bread Proof
The Bread Proof function automatically provides the optimum temperature for the
bread proof process and, therefore does not have a temperature adjustment.
If you press Bread Proof when the oven temperature is above 95 °F, Hot will
appear in the display. Because these functions produce the best results when
started while the oven is cool, we recommend that you wait until the oven has
cooled down and Hot disappears from the display.
NOTE
• There is no preheating before bread proof.
• Place the rack in rack position 3.
Keep Warm
Keeps cooked food warm at a low temperature up to 3 hours.
NOTE
• Place the rack in rack position 3 or 4.
• If turn off the 12hr energy saving feature, this modes will operate until
canceled. (12hr energy saving's default setting : on)
See page 43 for more information.
Temperature probe
The temperature probe lets you cook roasts and poultry to the exact internal
temperature you want, taking the guess work out of determining whether a piece
of meat is done or not.
You can use the temperature probe with the oven set to Bake, Convection Bake, or
Convection Roast. When you use the temperature probe, the internal temperature
is shown on the display when it reaches 100 °F.
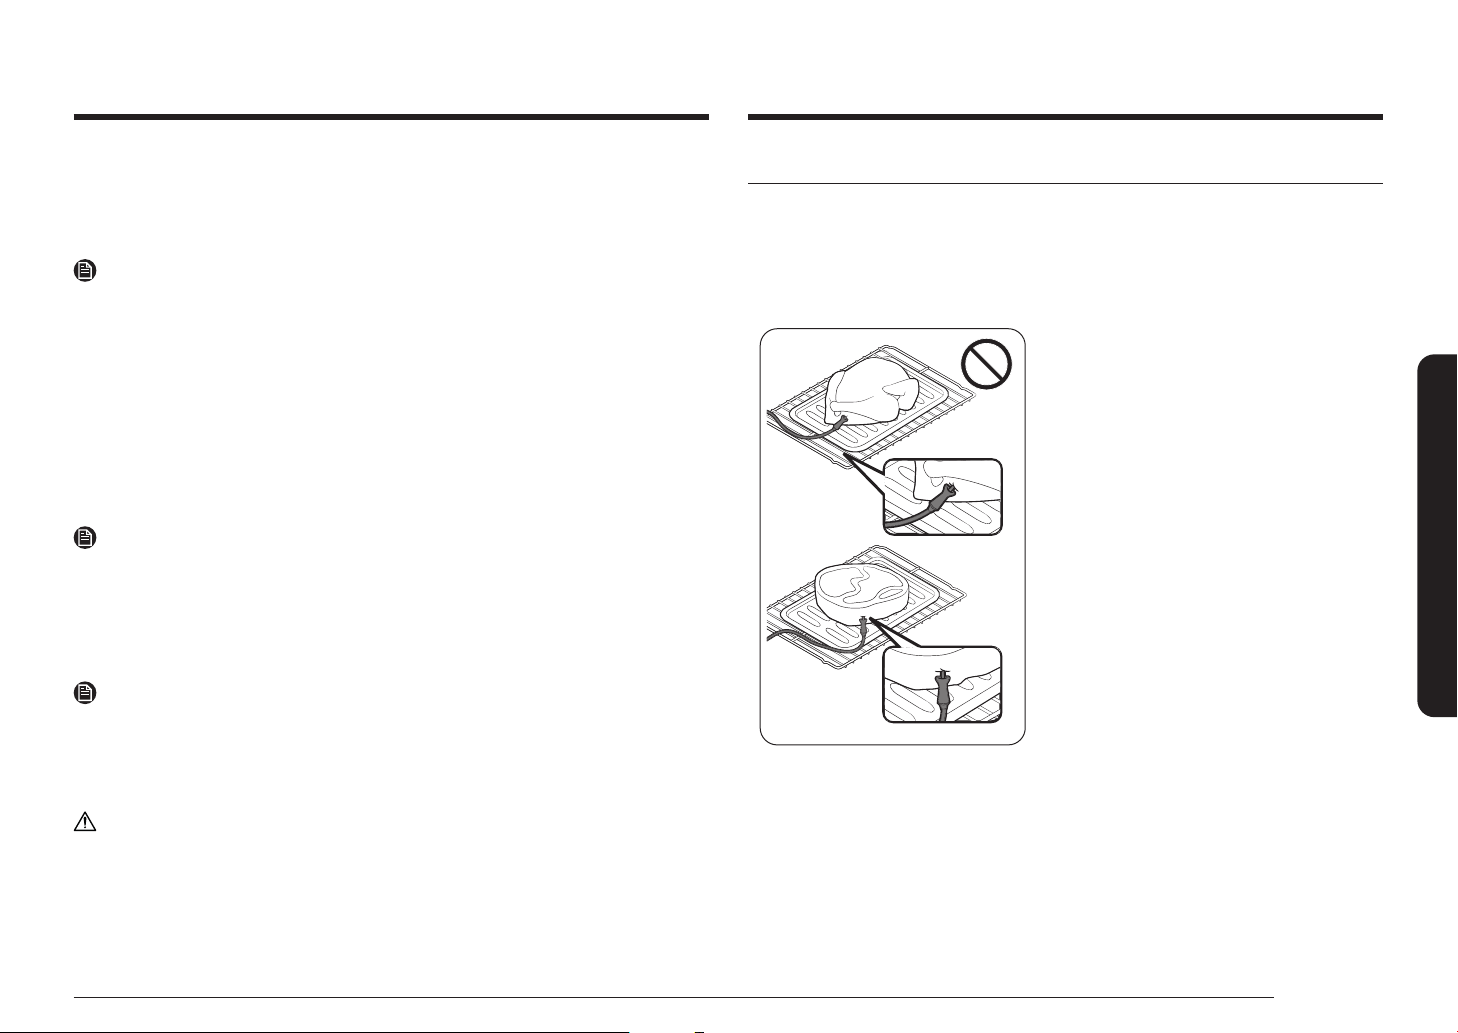
1. Push the temperature probe into the
meat so that the tip of the probe
reaches the center of the meat.
• When you insert the temperature
probe, make sure it does not
contact bone, fat, or gristle.
• For bone-in meats, insert the probe
into the center of the lowest and
thickest portion of the piece.
• For whole poultry (turkey, large
chickens, etc.), insert the probe into
the thickest part of the inner thigh,
parallel to the leg.
• If you remove the temperature
probe while cooking is in process,
the oven shuts off in 60 seconds.
• The temperature probe may not
function properly if inserted into
frozen food. (The temperature
probe icon doesn’t appear.)
Operating the oven
CAUTION
You should not use this feature to reheat cold food.
English 37
Page 38
Operating the oven
Operating the oven
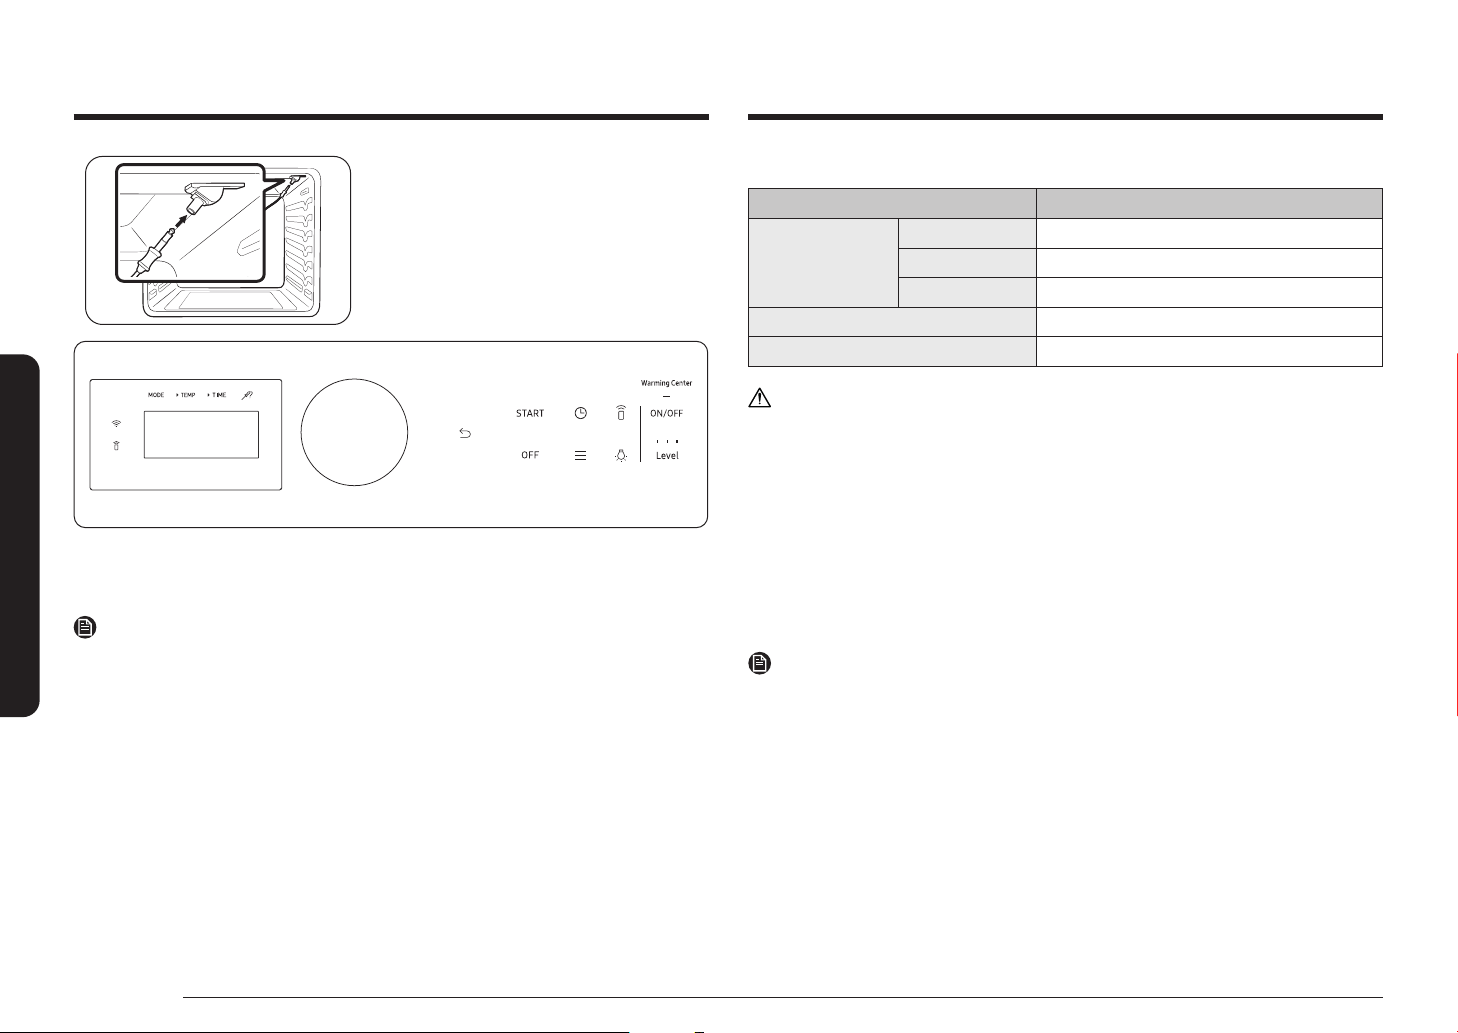
2. Insert the temperature probe plug into
the socket on the top side wall of the
oven.
3. Select the cooking operation
(Convection Bake, Convection Roast, or
Bake) and the temperature.
4. Set the internal temperature between
100 °F to 200 °F using the dial knob.
5. Set an option (Cooking Time, Delay Start, or Keep Warm) if necessary.
6. Tap START. When the food reaches the set internal temperature, the oven
automatically shuts off, and then beeps.
NOTE
Temperature probe operation will shut off either :
• When cooking time is over.
• When the temperature reaches the temperature you set.
Temperature table
Type of Food Internal temperature (°F)
Rare 140-150
Beef / Lamb
Pork 170-180
Poultry 165-185
CAUTION
• To protect the temperature probe, be careful not to insert the probe so that it
comes out of the meat. Make sure that the probe is inserted around the center
of the meat.
• Do not store the probe in the oven.
• Do not leave the probe inside the oven during the Self-Cleaning or Broiling
cycle. This will cause permanent damage to the probe.
• To avoid damage to the probe, defrost food in advance.
• Do not use tongs when inserting or removing the probe. Tongs can damage
the probe.
• Use the temperature probe only for the applicable cooking operations.
NOTE
If you have covered the meat with aluminum foil and you let it stand covered
for 10 minutes after cooking is complete, the internal temperature increases by
5-10 °F degrees.
Medium 160-170
Well done 170-180
38 English
Page 39

Cooking options
CAUTION
Food that can easily spoil, such as milk, eggs, sh, poultry, and meat, should be
chilled in a refrigerator before they are placed in the oven. Even when chilled,
they should not stand for more than 1 hour before cooking begins and should be
removed promptly when cooking is completed.
Cook Time
Timed cooking sets the oven to cook foods at a set temperature for a set length of
time. The oven automatically turns off when it nishes.
Mode: Bake / Convection Bake / Convection Roast / Air Fry / Dehydrate
1. Start a desired cooking mode, such as Bake.
2. If necessary, change the temperature using the dial knob.
3. When "Start" displays, select Set Cook Time using the dial knob.
4. Set the cooking time between 1 minute and 9 hours and 59 minutes (9:59)
using the dial knob.
5. Use the dial knob to select one of the following options you want to run at the
end of cooking.
• Oven Off: The oven turns off at the end of cooking. (Default setting)
• Keep temp: Keep running the oven at the current cooking temperature at
the end of cooking.
• Keep warm: Activate Keep warm function at the end of cooking.
6. Tap "Start". The oven will automatically turn on and start preheating. The
temperature will increase until it reaches the temperature you set.
The oven starts cooking for the amount of time you set.
7. When preheating is complete, put the container with the food on a rack, and
then close the door.
8. When the cooking time has elapsed, the oven will automatically shut off and
then beep.
Delay Start
The Delay Start function lets you use the kitchen timer to automatically start
and stop another cooking program. You can set Delay Start so that it delays the
automatic start of a cooking operation you select by up to 12 hours.
Mode: Bake / Convection Bake / Convection Roast / Air Fry / Dehydrate / Self-clean
1. Place the container with the food on a rack, and then close the door.
2. Start a desired cooking mode, such as Bake.
3. If necessary, change the temperature using the dial knob.
4. When "Start" displays, select Set Delay Start using the dial knob.
5. Set the starting time using the dial knob.
6. When "Delay Start" displays, press START or push the dial knob to start.
7. The oven starts cooking at the set time.
NOTE
To change the starting time, press the , or use the dial knob.
Operating the oven
NOTE
To change the programmed cooking time, press the or use the dial knob.
English 39
Page 40
Operating the oven
2
3
4
Operating the oven
Special features
The Sabbath feature
(For use on the Jewish Sabbath and Holidays)
Use this option only for baking on the Jewish Sabbath and Holidays.
K
For more information, visit the website at http://www.star-k.org
With the Sabbath feature
• The oven temperature can be set higher or lower after you have set this
option.
• The display doesn’t change and no beep sounds when you change the
temperature.
• Once the oven is properly set for baking with the Sabbath feature active, the
oven will remain continuously on until the Sabbath feature is cancelled. This
will override the factory preset 12 hour energy saving feature.
• If the oven light is needed during the Sabbath, press the pad before
activating the Sabbath feature. Once the oven light is turned on and the
Sabbath feature is active, the oven light will remain on until the Sabbath
feature is turned off.
• If you want the oven light off, be sure to turn it off before activating the
Sabbath feature.
• Do not use the surface cooktop when the Sabbath feature is on.
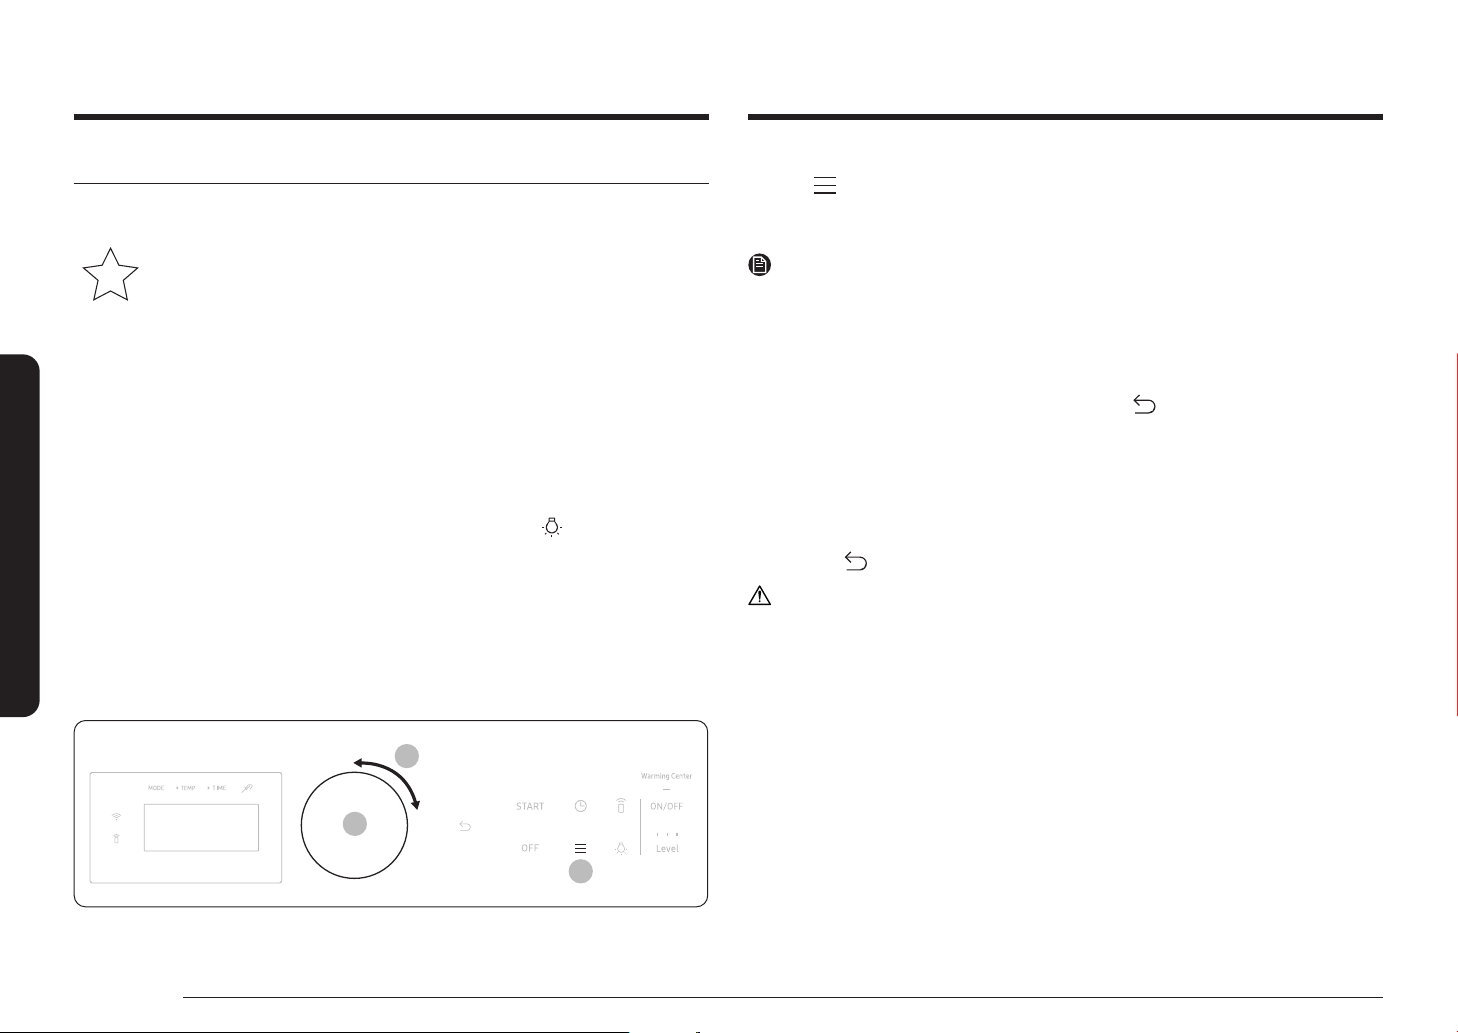
To enable the Sabbath feature
1. Start a Bake Mode.
2. Tap , and select the Sabbath feature.
3. Turn the dial knob to select On/Off.
4. Push the dial knob to save the changes.
NOTE
• You can change the oven temperature once baking starts, but the display
will not change or beep. After changing the temperature, it takes 15 seconds
before the oven recognizes the change.
• You can turn off the oven at any time by tapping OFF. However, this doesn’t
deactivate the Sabbath feature.
• To deactivate the Sabbath feature, hold down for 3 seconds.
• You can set the cooking time before activating the Sabbath feature.
• After a power failure, the oven will not resume operation automatically.
“Sabbath” will appear in the control panel, but the oven will not go back on.
Food can be safely removed from the oven, but you should not turn off the
Sabbath feature and turn the oven back on until after the Sabbath/Holidays.
• After the Sabbath observance, turn off the Sabbath feature by pressing and
holding for at least 3 seconds.
CAUTION
• Do not attempt to activate any other functions except for Bake when the
Sabbath feature is on. Only the following functions will function properly:
Bake, Oven Start/Set, and Oven Off.
• Do not open the oven door or change the oven temperature for about
30 minutes after you have started the Sabbath feature. Let the oven reach
the set temperature. The oven fan operates only when the oven temperature
increases.
40 English
Page 41
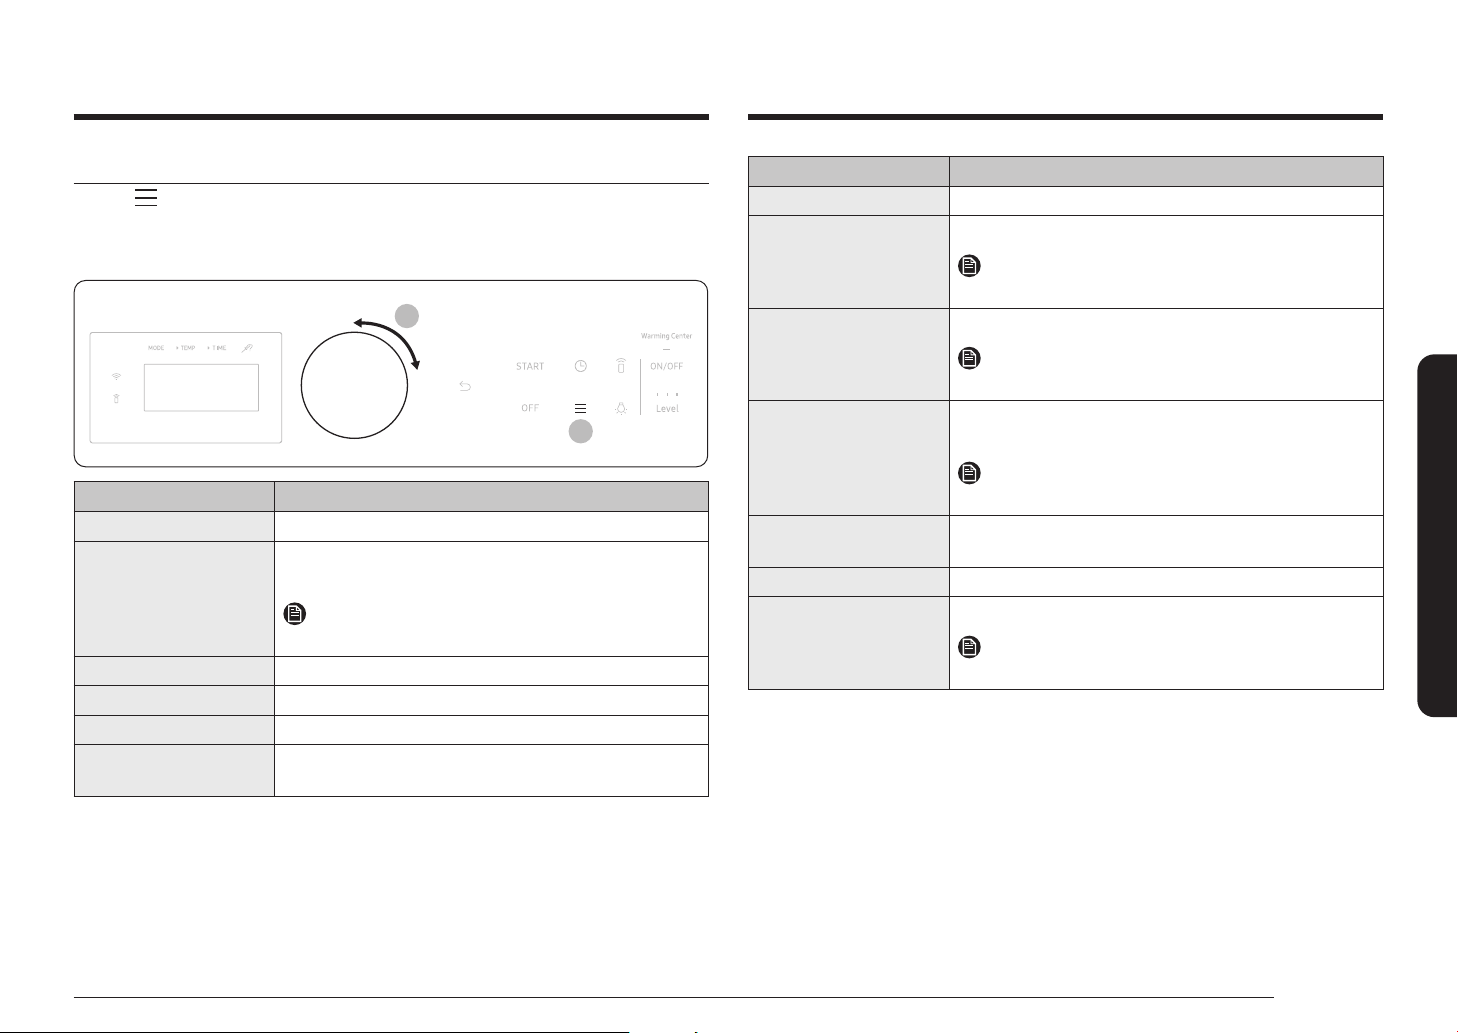
More functions
1
2
Tap the button on the control panel, and then turn the dial knob to change
various settings for your oven. Please refer to the following table for detailed
descriptions.
The Options menu is available only when the oven is off.
Setting Description
Timer Set the timer.
Cleaning Burn off leftover grease and residue completely or
reduce them.
NOTE
See page 48.
Favorite Save the cooking mode and value frequently used.
My Mode List Edit cooking mode list.
Lock Lock the control panel and the door.
Auto Conversion Automatically lower the temperature by 25 °F (15 °C)
when using Convection Bake.
Setting Description
Screen Timeout Adjust the display timeout.
Set time Set the clock to display the current time.
NOTE
See page 29.
Set Date Set the clock to display the current date.
NOTE
See page 29.
Time format Set the clock to display the time in the 12-hour or
24-hour format.
NOTE
See page 29.
12hr energy saving Automatically turns off the oven 12 hours after
baking starts or 3 hours after broiling starts.
Sound Turn the oven's sound (beeps) on or off.
Sabbath Setting Sabbath mode. ON/Off.
NOTE
See page 40.
Operating the oven
English 41
Page 42
Operating the oven
Operating the oven
Timer
The timer gives you an extra timer you can use to time cooking tasks, such as
boiling eggs. It does not, however, start or stop any cooking operation. You can set
the timer from 1 minute to 9 hours and 59 minutes.
1. Tap . To select Timer using the dial knob.
2. Enter a desired time using the dial knob.
3. When done, push the dial knob.
4. To cancel the Timer settings, push or turn the dial knob. To select cancel using
the dial knob.
5. When the set time elapses, the oven beeps and displays the “Time is up.”
message. Count up timer starts after nishing Timer, it lasts for only 10 mins.
Push the dial knob, count up timer will be disappeared.
Favorite
You can add up to 10 frequently used cook settings to the Favorites list to easily
apply them in the future.
Adding the new cook settings to the Favorites
1. Tap , and select Favorite using the dial knob.
2. Set the cook setting (Mode, Temperature, Cook Time, Probe Temp).
3. If necessary, select option (Cook Time and Probe Temp).
NOTE
Alternatively, you can simply tap Add to Favorite that appears when the oven
completes cooking.
Editing the favorite cook settings
1. Tap , and select Favorite using the dial knob.
2. Select Edit.
3. Change the cook settings. Items appear on the list may change upon what you
select. (Cook mode, temperature, Cook Time, etc.)
Deleting the favorite cook settings
1. Tap , and select Favorite using the dial knob.
2. Select Delete.
3. Select the favorite cook setting you want to delete.
Using the favorite cook settings
1. To select Favorite Mode using the dial knob.
2. Select the favorite cook setting you want to start.
3. Tap START.
My Mode List
You can edit the mode lists.
1. Tap , and select My Mode List using the dial knob.
2. Turn the dial knob to select or unselect modes.
3. Select Save to save the changes.
Lock
Lock the control panel and the door to prevent accidental operations or product
tipping.
Tap , and select Lock using the dial knob to lock both the control panel and the
door. When the Oven Lock is on, the oven panel does not operate and the oven
door is locked and cannot be opened. Tap and hold for 3 sec to unlock the
oven.
Auto Conversion
Auto Conversion automatically converts regular baking temperatures to convection
baking temperatures. For example, if you enter a regular recipe temperature of
350 °F and tap START, the oven displays the converted temperature of 325 °F.
1. Tap , and select Auto Conversion using the dial knob.
2. Turn the dial knob to select On/Off. (Default setting is “Off”.)
3. Push the dial knob to save the changes.
42 English
Page 43
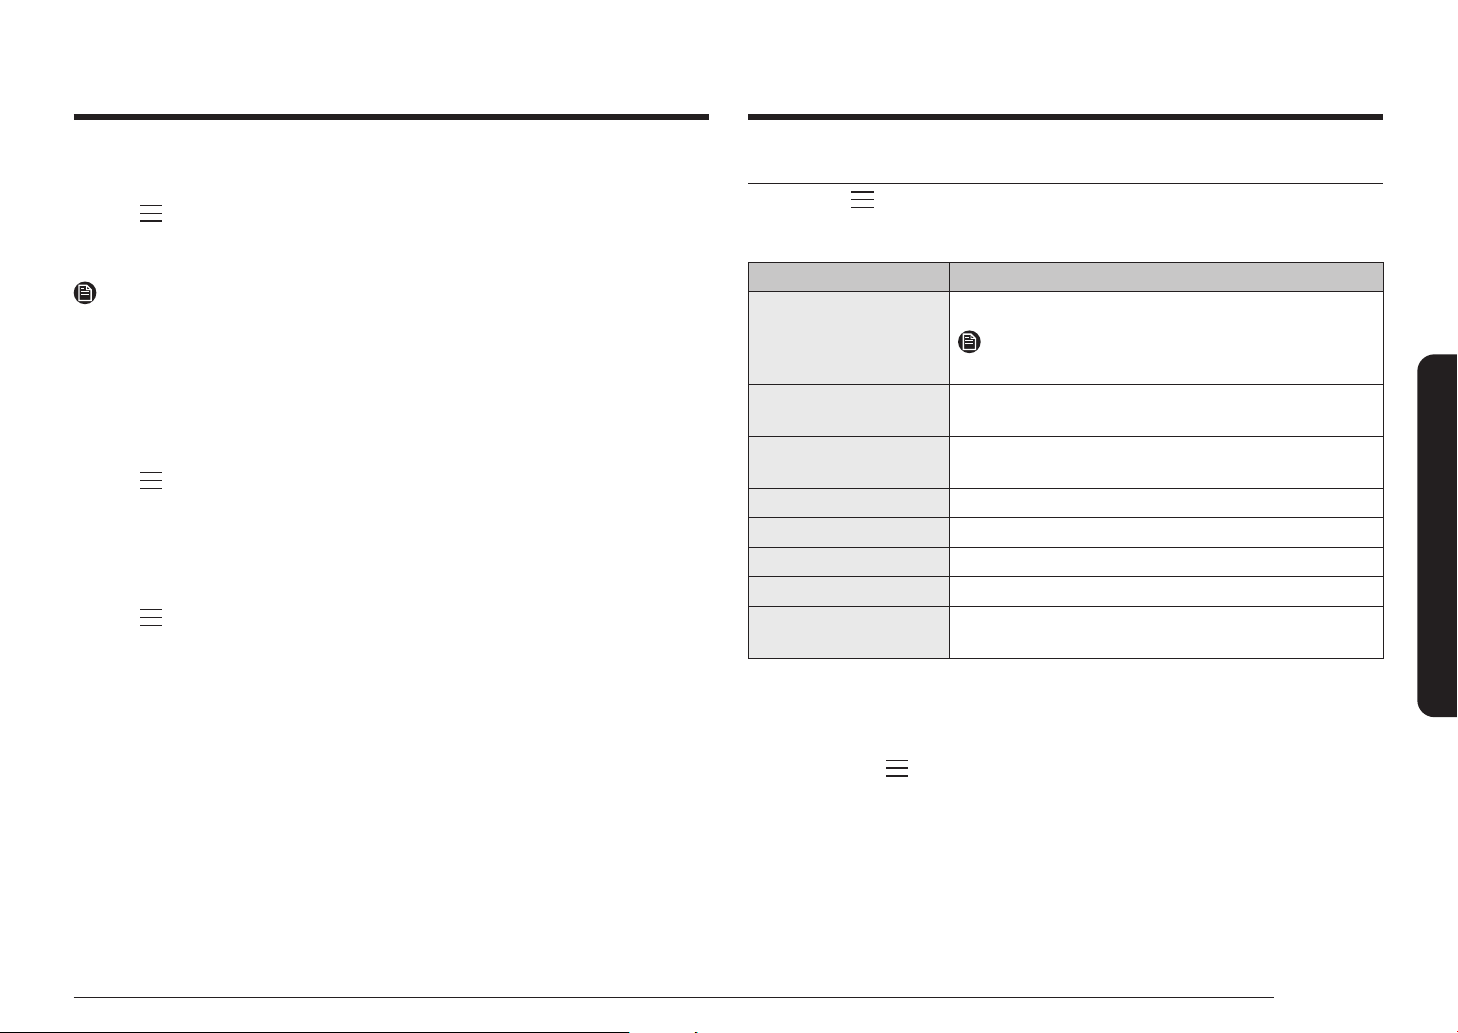
Screen Timeout
You can set the length of time before the screen saver turns on.
1. Tap , and select Screen Timeout using the dial knob.
2. Turn the dial knob to select setting time.
3. Push the dial knob to save the changes.
NOTE
Energy consumption may increase depending on your setting.
When the timeout setting is set to "Always on", the brightness of the LCD
automatically changes to level 2 if there is no action for 3 minutes.
12hr energy saving
This will automatically turn off the oven 12 hours after baking starts or 3 hours
after broiling starts.
1. Tap , and select 12hr energy saving using the dial knob.
2. Turn the dial knob to select On/Off.
3. Push the dial knob to save the changes.
Sound
Turn sound (beeps) On/Off.
1. Tap , and select Sound using the dial knob.
2. Turn the dial knob to select On/Off.
3. Push the dial knob to save the changes.
System Settings
Tap and hold for 3 sec, on the control panel, and then Turn the dial knob to
change various settings for your oven.
Please refer to the following table for detailed descriptions.
System Setting Description
Wi-Fi Set the WI-FI mode to On/Off.
NOTE
See page 46.
Language Select a preferred language from English, French, or
Spanish.
Temp. Unit Set the oven control to display temperatures in
Fahrenheit or Centigrade.
Calibrate Temp Recalibrate the oven temperature.
My Pattern This function remembers and stores the cook settings.
Welcome Lighting Set the Welcome Lighting mode to On/Off.
Demo mode Used by retailers for display purposes only.
Reset Reset the your setting. (More Functions, Systerm
settings)
Language
Select a preferred language from English, French, or Spanish. You can not change
the language during cooking.
1. Tap and hold for 3 sec.
2. Select the Language using the dial knob.
3. Turn the dial knob to select the Language and push to save the changes.
Operating the oven
English 43
Page 44
Operating the oven
Operating the oven
Temp. Unit (°F / °C)
Change the temperature format of the oven to Fahrenheit or Centigrade. The
default is Fahrenheit.
1. Tap and hold for 3 sec.
2. Select Temp. Unit using the dial knob.
3. Turn the dial knob to select unit and push to save the changes.
Calibrate Temp
The oven temperature has been calibrated at the factory. When rst using the
oven, follow the recommended recipe times and temperatures. If it appears that
the oven is too hot or too cool, you can recalibrate the oven temperature. Before
recalibrating, test a recipe by using a temperature setting that is higher or lower
than recommended. The baking results should help you decide how much of an
adjustment is needed. The oven temperature can be adjusted by ±35 °F (±19 °C).
1. Tap and hold for 3 sec.
2. Select Calibrate Temp using the dial knob.
3. Turn the dial knob to adjust temperature value.
4. Push the dial knob to save the changes.
NOTE
This adjustment does not affect the broiling or the self-cleaning temperature, and
is retained in memory after a power failure.
My Pattern
This function remembers and stores the cook settings frequently used by the user.
1. Tap and hold for 3 sec.
2. Select My Pattern using the dial knob.
3. Turn the dial knob to select On/Off and push to save the changes.
Welcome Lighting
When you wake up the oven (such as using the dial knob, using the touch pad,
open the door), the knob lights blink each to welcome you.
Set the Welcome Lighting mode to On/Off. The default is on.
1. Tap and hold for 3 sec.
2. Select Welcome Lighting using the dial knob.
3. Turn the dial knob to select On/Off and push to save the changes.
NOTE
Welcome light only comes on when waking up from completely blank display in
sleep mode.
Demo mode
This is used by retailers for display purposes only. In this mode, the heating
element does not operate.
1. Tap and hold for 3 sec.
2. Select Demo mode using the dial knob.
3. Turn the dial knob to select On/Off and push to save the changes.
Reset
You can reset your oven setting(More functions, System settings).
1. Tap and hold for 3 sec.
2. Select Reset using the dial knob.
3. Turn the dial knob to select Cancel/Reset.
CAUTION
Before reset the oven settings, turn off all oven and cooktop functions.
44 English
Page 45
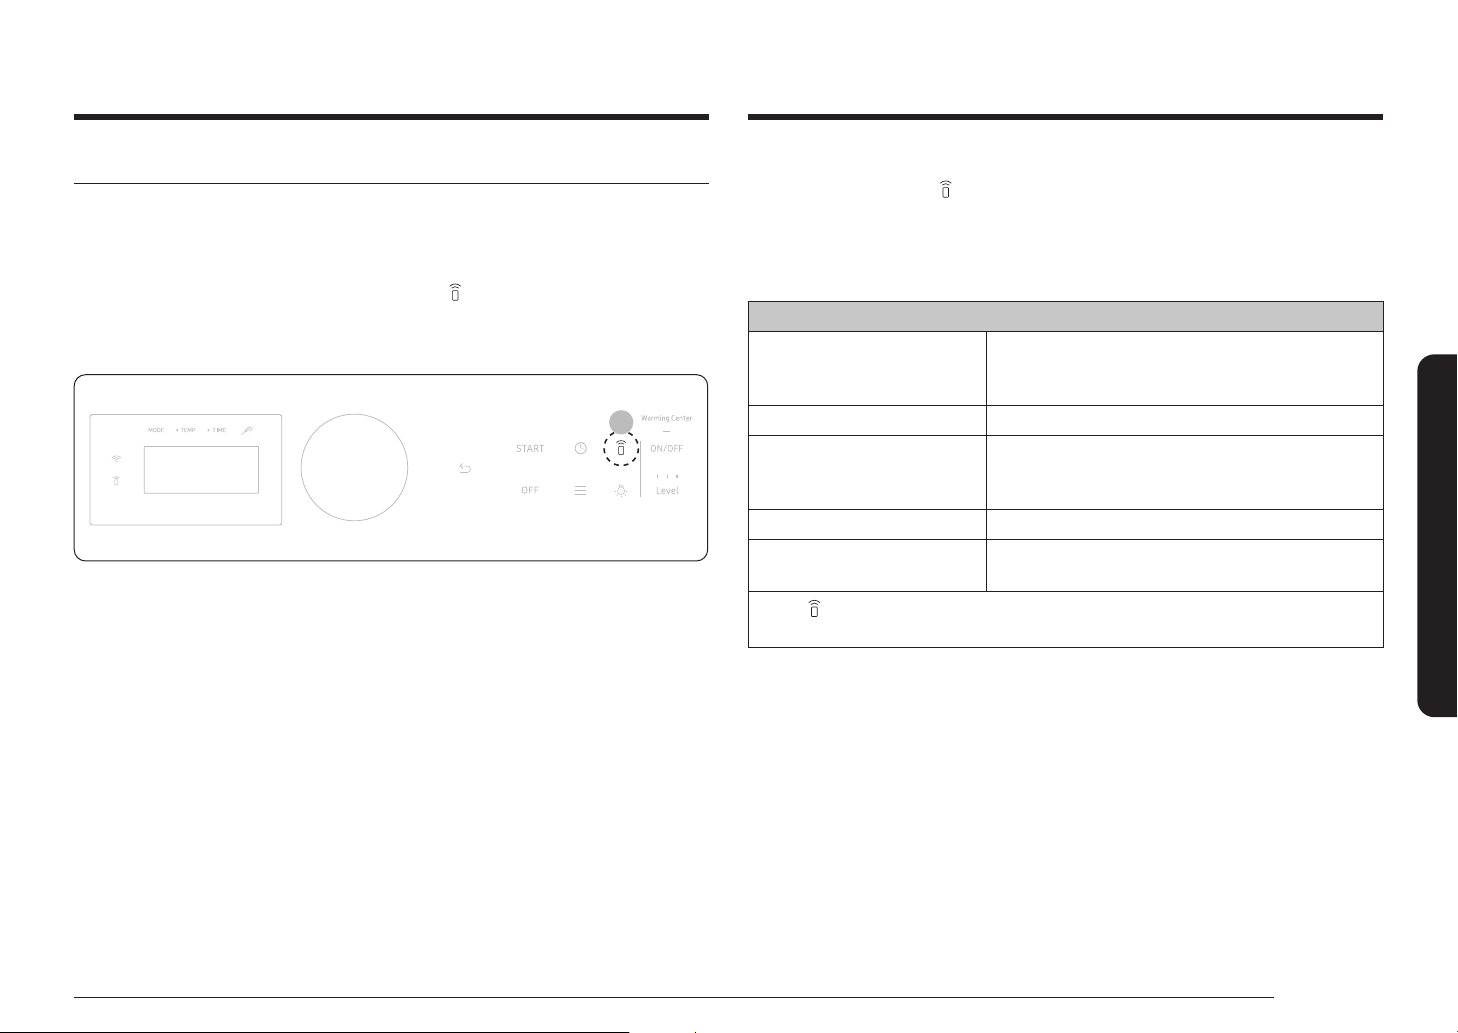
Smart control
1
How to connect the oven
1. Download and open the SmartThings app on your smart device.
2. Follow the app's on-screen instructions to connect your range.
3. Once the process is complete, the connected icon located on your range
displays and the app will conrm you are connected.
4. If the connection icon does not turn on, follow the instruction on the app to
reconnect.
To control the oven remotely
1. Press Smart Control appears in the display. The oven can now be controlled
remotely with a connected remote device.
2. Select the oven icon on the SmartThings app to open the Oven Control app.
When the app is connected to the oven, you can perform the following
functions through the application:
Oven remote control using the SmartThings app
• Check the status of the oven
Oven/ Cooktop Monitoring
Oven Remote Control • Set or adjust oven settings remotely.
My Cooking
Error Check • Automatically recognize errors.
Temp. Probe
• If is not shown in the display, you are still able to monitor the oven and
cooktop status and turn the oven off.
• Monitor the on/off status of each cooktop
burner.
• Turn the oven off remotely.
• Once cooking starts, change the set cooking
time and temperature remotely.
• Monitor the current temperature and reset
the probe setting.
Operating the oven
English 45
Page 46
Operating the oven
Operating the oven
WI-FI On/Off
If you set the WI-FI mode to Off, mobile devices cannot connect to the range.
1. Tap and hold for 3 sec.
2. Select Wi-Fi mode using the dial knob.
3. Turn the dial knob to select On/Off and push to save the changes.
NOTE
• Pressing Smart Control will delete from the display and prevent most of the
remote functions from operating.
• When oven cooking is nished or cancelled, is removed from the display.
• For safety reasons, you must specify the cooking time to enable remote
control.
• The oven continues operating even if the Wi-Fi connection is lost.
• Smart Control will not work properly if the Wi-Fi Connection is unstable.
• See the SmartThings app manual for detailed information.
Voice control
To use the Range’s Voice Control function, you need Bixby / Amazon Alexa App /
Google Assistant App on your mobile device.
Refer to the table below for all available functions.
Bixby
Start conversation with Bixby on SAMSUNG mobile by saying “Hi Bixby” or by
pressing the side key.
Function “Hi Bixby”
Start/Preheat
Turn Off/Stop
Check Temp
Check Time
Check Mode (States)
Temp Control
Oven Light
Oven Timer (Cook Time)
• Preheat the range(oven).
• Start the range(oven) in convection bake mode[Mode]
at 325 degrees[Temp] for 1 hour[Time].
• Convection bake[Mode] in the range[Device Name] at
325 degrees[Temp].
• Cancel the range(oven).
• Turn off the range(oven).
• Stop baking in the range(oven).
• What is the temperature of the range(oven)?
• Check the range(oven) temperature.
• Check the remaining time of the range(oven).
• How much range(oven) time is left on the timer?
• How much time is left on the range timer?
• Check the range status.
• Check the status of the range(oven).
• Set the temperature of the range(oven) to 300.
• Increase the temp of the range(oven) by 20.
• Decrease the temp of the range(oven) by 20.
• Turn the range(oven) temperature up to 100 degrees.
• Turn the range(oven) temperature down to 50 degrees.
• Turn on the oven light (lamp).
• Turn on the range oven light.
• Turn off the oven light (lamp).
• Turn off the range oven light.
• Set the timer on the range(oven) to 1 hour.
46 English
Page 47
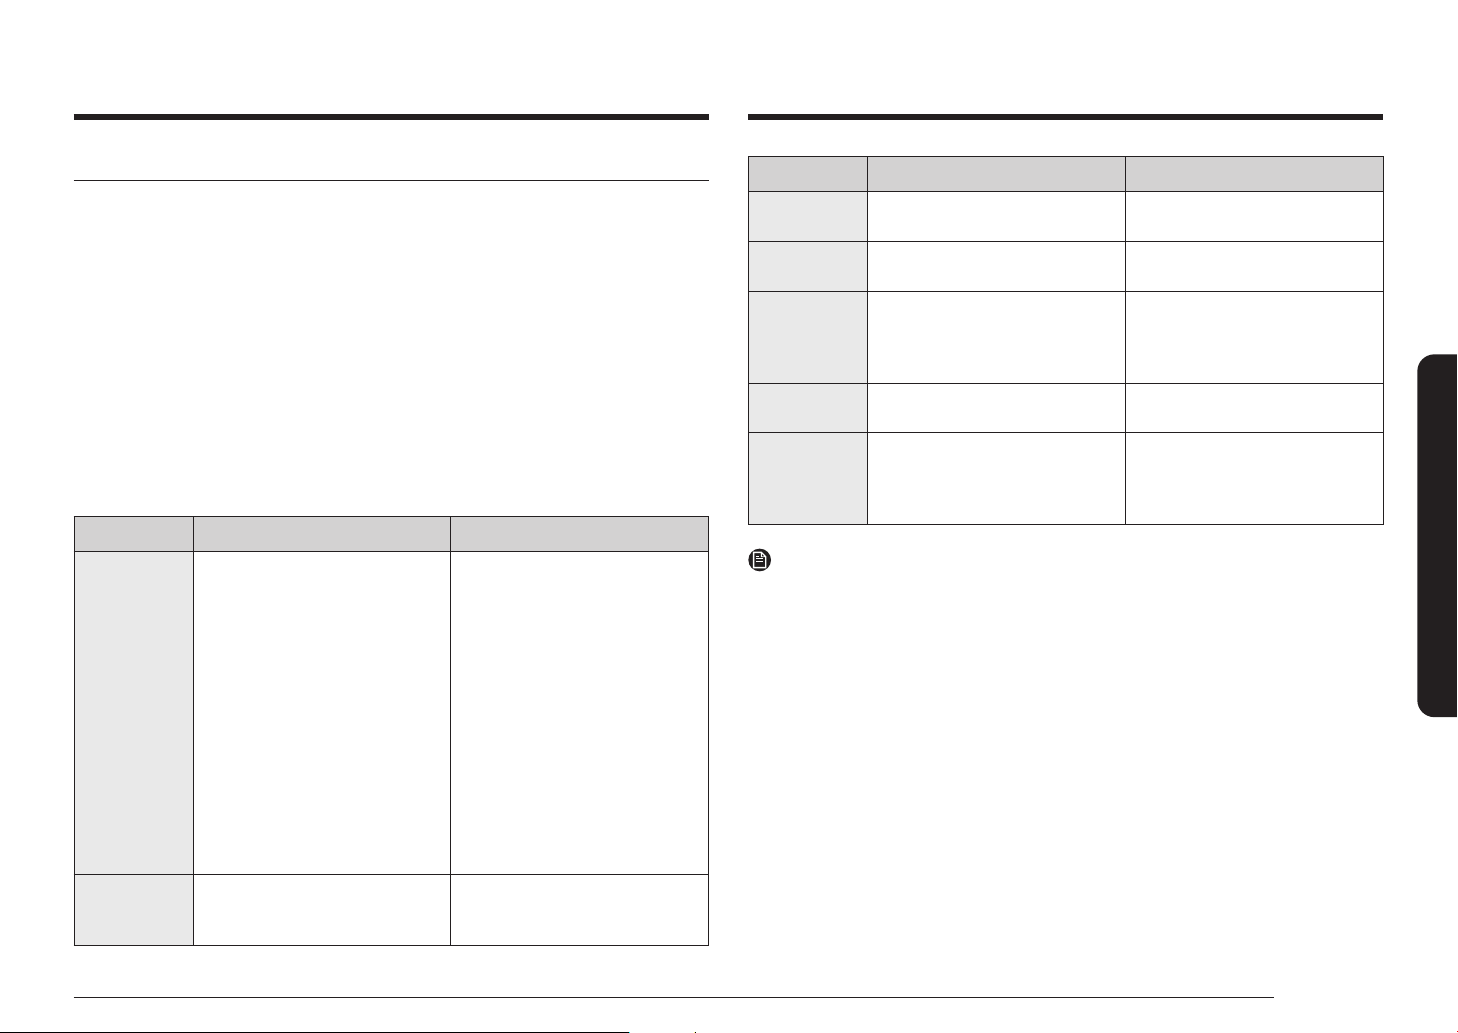
Amazon Alexa & Google Assistant
Samsung smart home appliances are supported by SmartThings skill in Alexa &
action in Google Assistant.
Installation Guide
Here’s how to link SmartThings account into Amazon Alexa or Google Assistant.
SmartThings App and Alexa App(or Google Assistant App) Should be installed on
your phone.
1. Setup the supported devices to SmartThings.
2. After device setup, tap + button on the screen.
3. Tap ‘Voice assistant’ and link your Samsung account to Amazon Alexa.
(or Google Assistant)
4. Check the devices are visible on Amazon Alexa app. Then account linking is
complete. (Check the devices are visible and set the location(home&room) of
devices in Google home app. Then account linking is complete.)
Function “Alexa”
Start/Preheat
Turn Off/Stop
• Preheat the oven[Device
name].
• Start the oven[Device name].
• Turn on the oven[Device
name].
• Set the oven[Device name] to
bake [Mode].
• Set the oven[Device name] to
bake [Mode] for 1hour [Time]
at 350 degrees[Temp].
• Set the oven[Device name]
to bake [Mode] at 350
degrees[Temp].
• Set the oven[Device name] to
bake [Mode] for 1hour [time].
• Turn off the oven[Device
name].
• Stop the oven[Device name].
• Preheat the oven[Device
• Start the oven[Device name].
• Turn on the oven[Device
• Set the oven[Device name] to
• Turn off the oven[Device
• Stop the oven[Device name].
“Ok Google”
name].
name].
bake [Mode].
name].
Function “Alexa”
Check Temp
• What is the temperature of
the oven[Device name]?
Check Time
Check Mode
(States)
Temp Control
Oven Timer
(Cook Time)
• Is the oven[Device name]
running?
• Is the oven[Device name]
on?
• Set oven[Device name] to
300 degrees [Temp].
• Set oven[Device name] to 3
hours[Time].
• Add 10 minutes/hours[Time]
to the oven[Device name].
• What is the temperature of
-
• What time is left on the
• Is the oven[Device name]
• What mode is the
• Set oven[Device name] to
• Set oven[Device name] to 3
• Add 10 minutes/hours[Time]
“Ok Google”
the oven[Device name]?
oven[Device name]?
running?
oven[Device name] set to?
300 degrees [Temp].
hours[Time].
to the oven[Device name].
NOTE
On/Off spec of smart control is same as guided in SmartThings app.
Operating the oven
English 47
Page 48
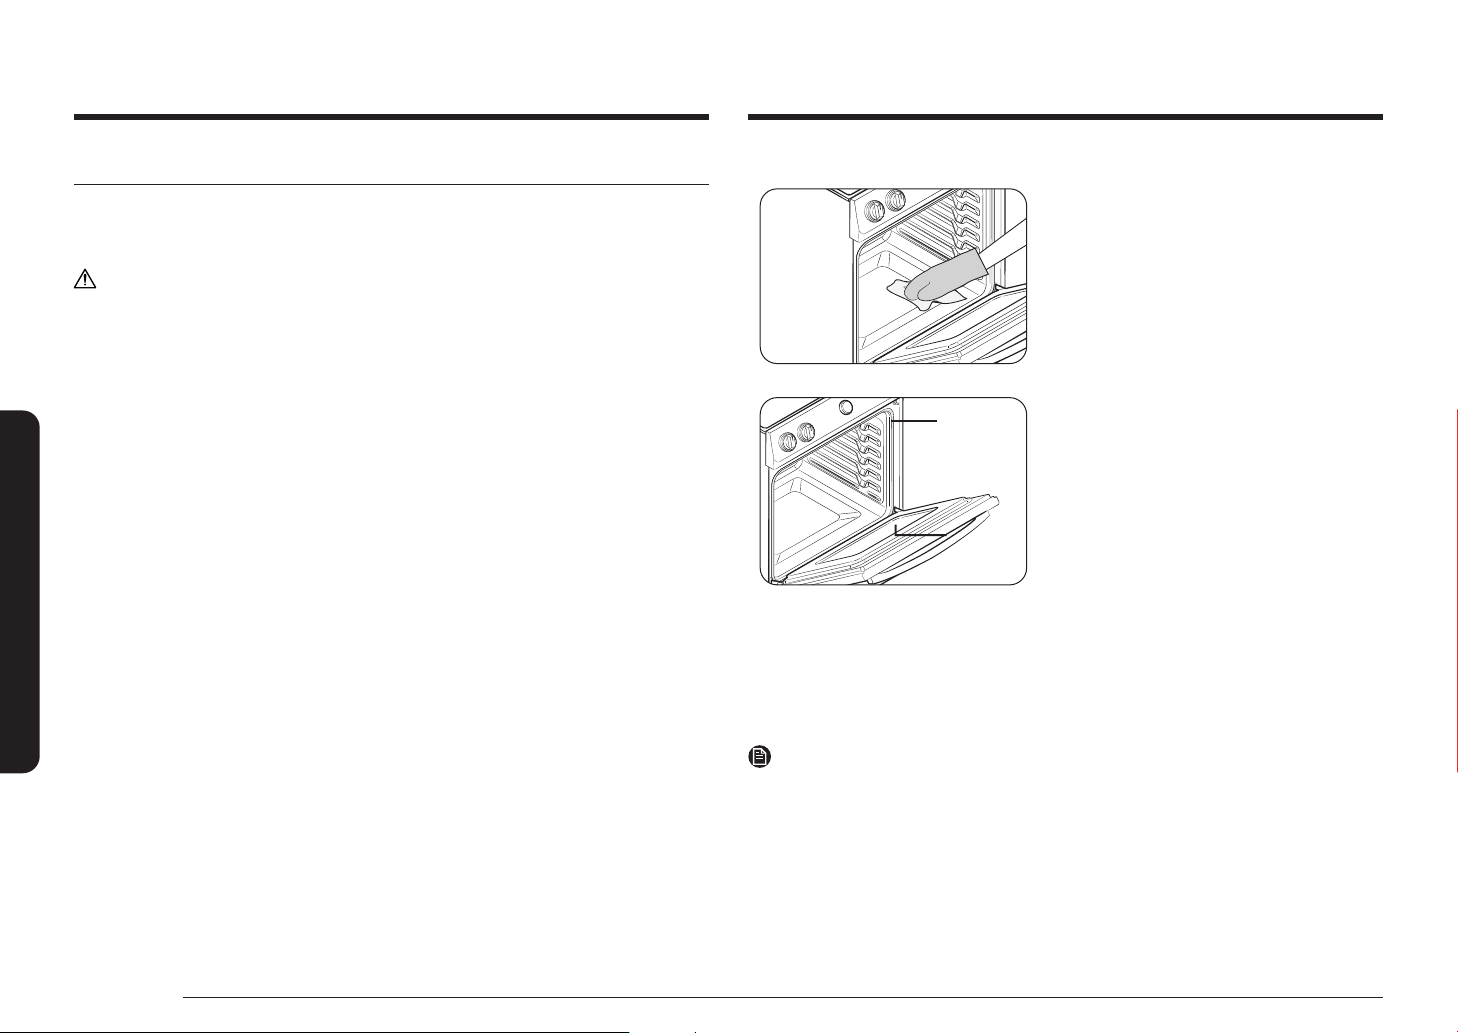
Maintaining your appliance
Self-cleaning
This self-cleaning oven uses high temperatures (well above cooking temperatures)
to burn off leftover grease and residue completely or reduce them to a nely
powdered ash that you can wipe away with a damp cloth.
CAUTION
• During the self-cleaning cycle, the outside of the range will become very hot
to the touch. Do not leave small children unattended near the appliance.
• Some birds are extremely sensitive to the fumes given off during the selfcleaning cycle of any range. Move birds to another well-ventilated room.
• Do not line the oven walls, racks, bottom, or any other part of the range with
aluminum foil. Doing so will result in poor heat distribution, poor baking
results, and cause permanent damage to the oven interior. Aluminum foil will
Maintaining your appliance
melt and adhere to the interior surface of the oven.
• Do not force the oven door open. This can damage the automatic door locking
system. Use care when opening the oven door after the self-cleaning cycle is
complete. Stand to the side of the oven when opening the door to allow hot
air or steam to escape. The oven may still be VERY HOT.
• Wear the glove during cleaning.
Before a self-cleaning cycle
Fig. 1Fig. 1
Don’t hand Don’t hand
clean the clean the
oven door oven door
gasket.gasket.
Fig. 2Fig. 2
You may You may
hand clean hand clean
the door.the door.
• We recommend venting your kitchen
with an open window or using a
ventilation fan or hood during the selfcleaning cycle.
• Remove the wire rack, broil pan, broil
pan insert, all cookware, and any
aluminum foil from the oven.
• Wipe up debris from the oven bottom.
(Fig. 1)
• Residue on the front frame of the range
and outside the gasket on the door
will need to be cleaned by hand. Clean
these areas with hot water, soap-lled
steel-wool pads, or cleansers, such as
Soft Scrub. Rinse well with clean water
and dry.
• Do not clean the gasket. The berglass
material of the oven door gasket cannot
withstand abrasion. It is essential for
the gasket to remain intact. If you
notice it becoming worn or frayed, have
it replaced. (Fig. 2)
• Make sure the oven light bulb cover is
in place and the oven light is off.
48 English
NOTE
Remove oven racks and accessories before starting the self-clean mode.
Page 49
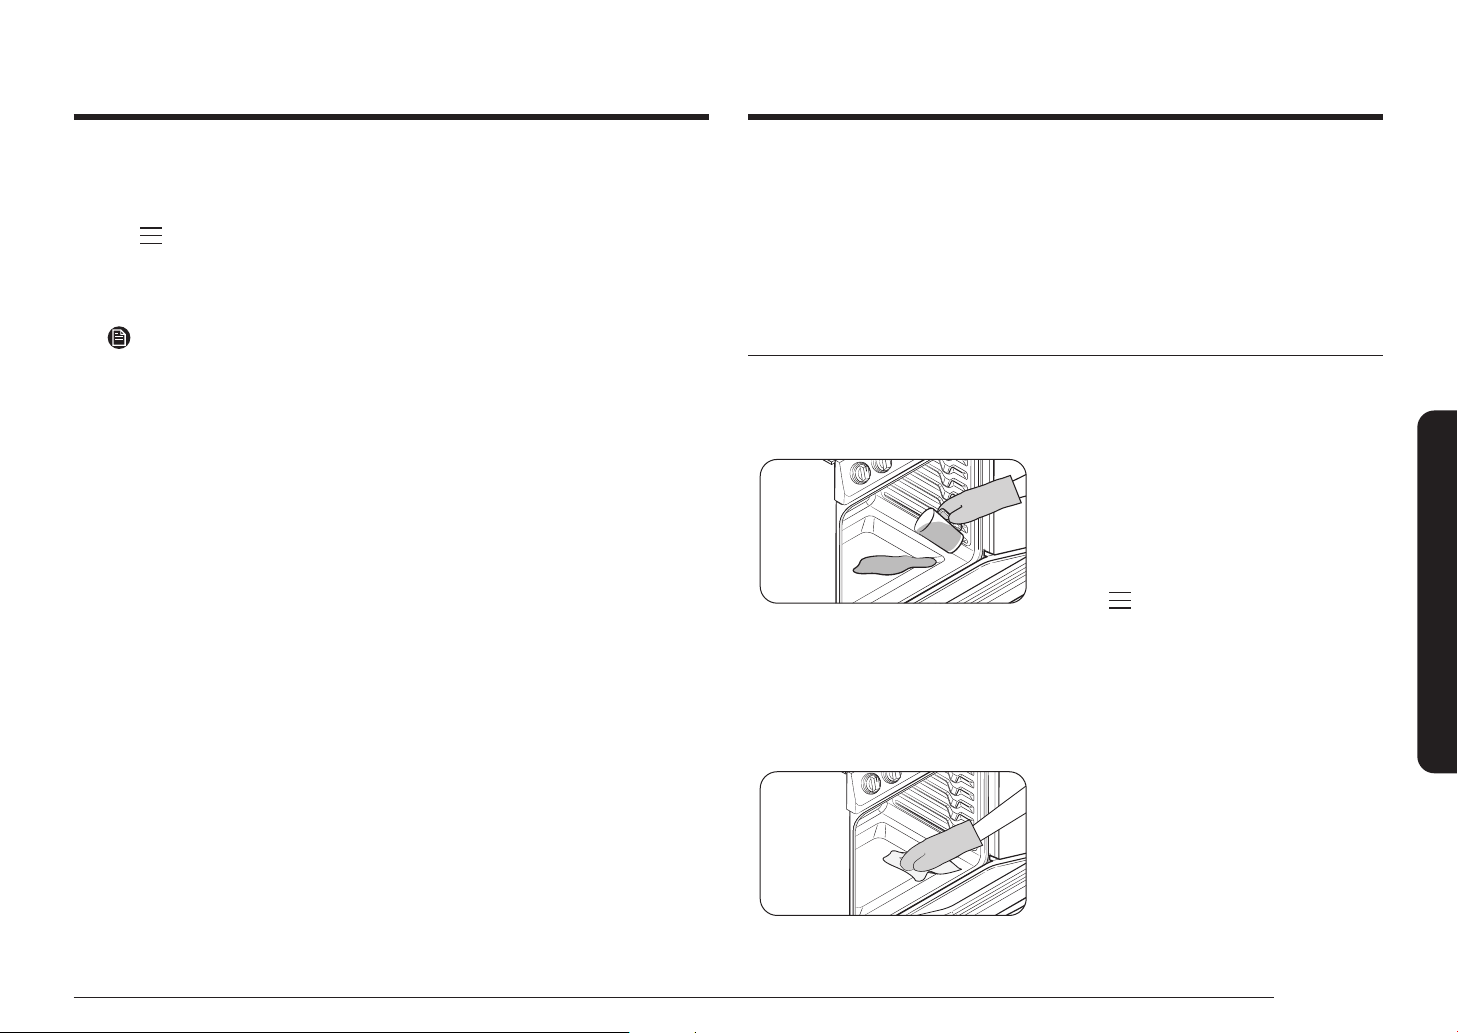
How to run a self-cleaning cycle
1. Make sure the oven door is closed completely and unlocked. And turn off all
oven and cooktop function.
2. Tap , and select Cleaning > Self Clean using the dial knob.
Then, select the cleaning time. (2 hour / 3 hour / 5 hour)
3. Tap START/SET.
The oven door is locked automatically and the oven begins to heat up.
After a self-cleaning cycle
• You may notice some white ash in the oven. Wipe it up with a damp cloth
after the oven cools. (If white spots remain, remove them with a soap-lled
steel wool pad and rinse thoroughly with a vinegar and water mixture.)
• If the oven is not clean after one cycle, repeat the cycle.
• You cannot set the oven for cooking until the oven is cool enough for the door
to unlock.
NOTE
• You will not be able to start a self-cleaning cycle if the oven lock feature
is activated or if the oven’s temperature is too hot.
• The oven door locks automatically. The display will show the cleaning
time remaining. It is not be possible to open the oven door until the
temperature drops to a safe/cool temperature.
• The self-cleaning feature will not operate when the warming center is on.
4. When the self-cleaning cycle is done, End will appear in the display and the
range will beep several times.
How to delay the start of self-cleaning
1. Repeat steps 1 and 2 on 'How to run a self-cleaning cycle'.
2. Select Set Delay Start.
3. Set the time you want the oven to start self-cleaning using the dial knob.
4. Tap START/SET.
The oven will start self-cleaning at your specied time.
How to turn off the self-cleaning feature
You may nd it necessary to stop or interrupt a self-cleaning cycle due to smoke in
the oven.
1. Press OFF.
2. You will be able to open the oven door once the oven has cooled down for
approximately 1 hour.
Steam-cleaning
How to set the oven for steam-cleaning
For light cleaning, the steam-cleaning function saves time and energy. For heavierduty cleaning, use the self-cleaning function.
1. Remove all accessories from the oven.
2. Pour approximately 10 oz. (300 ml) of
water onto the bottom of the empty
oven and then close the oven door.
Use normal water only, not distilled
water.
3. Tap , and select Cleaning > Steam
Clean using the dial knob.
4. Tap START/SET.
The oven door is locked automatically
and the oven begins to heat up.
When the operation is complete, the
display will blink and a beep will sound.
5. Press OFF.
6. Clean the oven’s interior.
There will be a signicant amount of
water remaining on the bottom of the
oven after a steam-cleaning cycle.
Remove the residual water with a
sponge or soft dry cloth.
Maintaining your appliance
English 49
Page 50
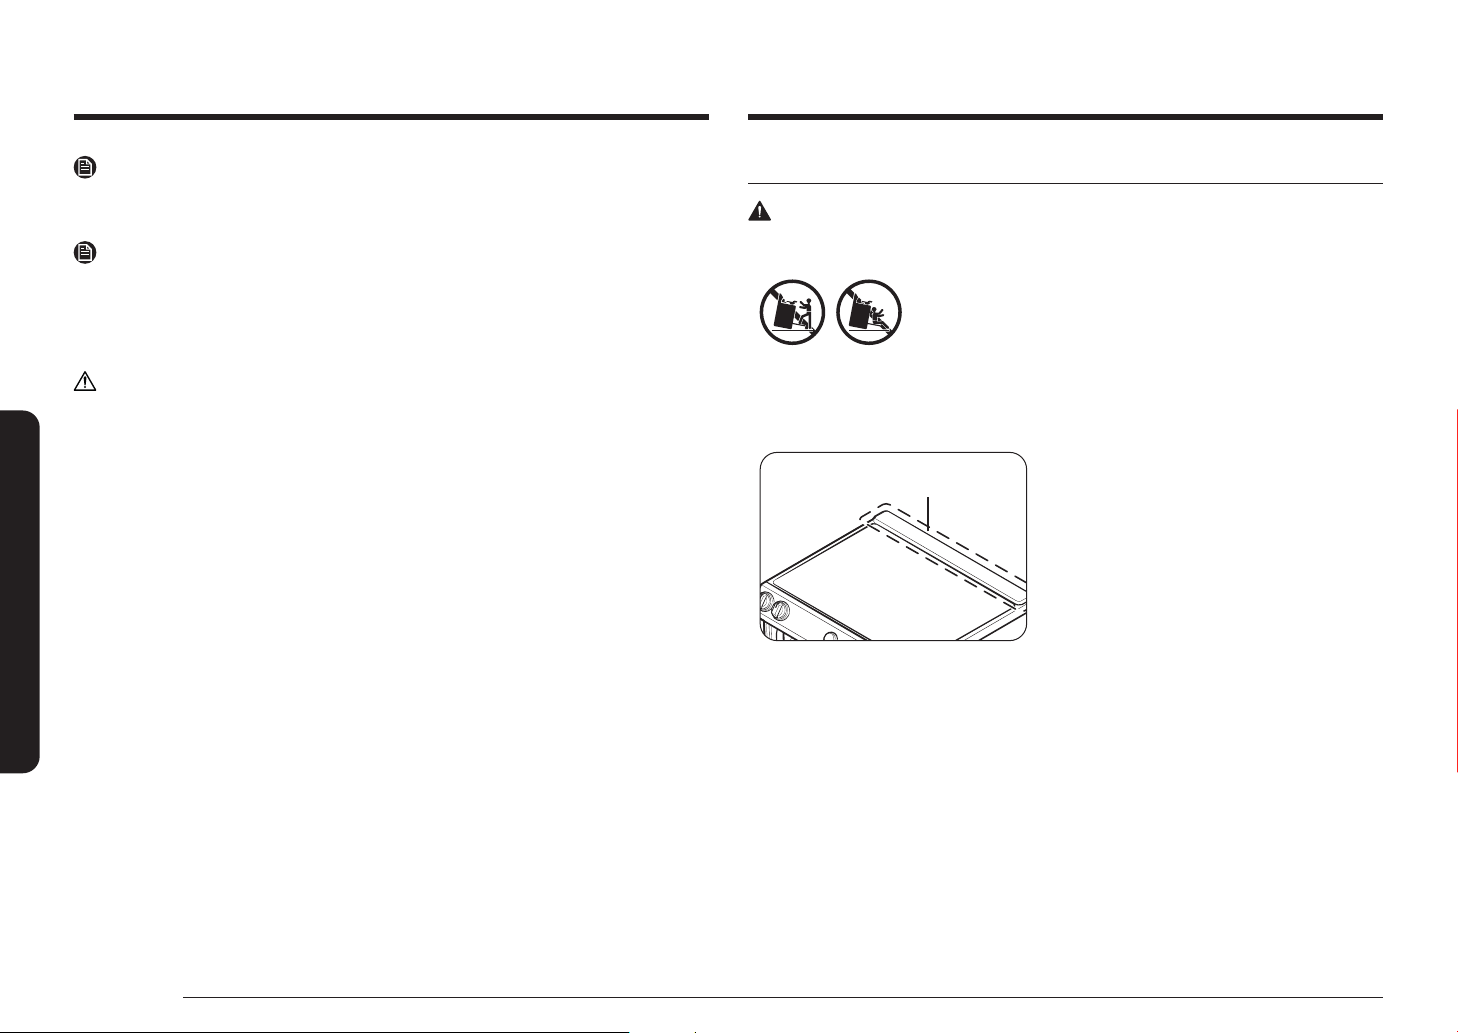
Maintaining your appliance
NOTE
When steam-cleaning, use exactly 10 oz. of water since this produces the best
results.
NOTE
If you press Steam Clean when the oven temperature is above 100˚F, Hot will
appear in the display. Because this function produces the best results when started
while the oven is cool, we recommend that you wait until the oven has cooled
down and Hot disappears from the display.
CAUTION
Wear the glove during cleaning.
After a steam-cleaning cycle
Maintaining your appliance
• Take care when opening the door before a steam-cleaning procedure has
ended. The water on the bottom is hot.
• Open the oven door and remove the remaining water with a sponge. Do not
leave the residual water in the oven for any length of time. Wipe the oven
clean and dry with a soft cloth. Do not forget to wipe under the oven door
seal.
• Use a detergent-soaked sponge, a soft brush, or a nylon scrubber to wipe the
oven interior. Remove stubborn residue with a nylon scourer. You can remove
lime deposits with a cloth soaked in vinegar.
• If the oven remains dirty, you can repeat the procedure once the oven has
cooled.
• For heavy residue, such as grease left over from roasting, we recommend
that you rub detergent into the residue before activating the steam-cleaning
function.
• After cleaning, leave the oven door ajar at a 15° angle to allow the interior
enamel surface to dry thoroughly.
Care and cleaning of the oven
WARNING
• Be sure all controls are OFF and all surfaces are COOL before cleaning any part
of the range.
• If your range is moved for cleaning, servicing, or any
reason, be sure the Anti-Tip device is re-engaged
properly when the range is replaced. If you fail to reengage the Anti-Tip device, the range could tip and cause
serious injury.
Vent
• The cooling vents are located at the
VentVent
Cleaning painted parts and decorative trim
• For general cleaning, use a cloth with hot, soapy water.
• For more difcult residue and built-up grease, apply a liquid detergent directly
onto the area and leave for 30 to 60 minutes. Wipe with a damp cloth and dry.
Do not use abrasive cleaners on any of these surfaces. They can scratch.
back of the oven range.
• This area could become hot during oven
use.
• It is normal for steam to come out of
the vent.
• The vent is important for proper air
circulation. Never block this vent.
50 English
Page 51
Cleaning stainless steel surfaces
1. Shake the bottle of Stainless Steel Appliance Cleaner or Polish well.
2. Place a small amount of stainless steel appliance cleaner or polish on a damp
cloth or damp paper towel.
3. Clean a small area, rubbing with the grain of the stainless steel if applicable.
4. Dry and buff with a clean, dry paper towel or soft cloth.
5. Repeat as necessary.
NOTE
• Do not use a steel-wool pad. It will scratch the surface.
• If a mineral oil-based stainless steel appliance cleaner has been used before to
clean the appliance, wash the surface with dishwashing liquid and water prior
to using the Stainless Steel Appliance Cleaner or Polish.
Oven racks
• If the racks are left in the oven during a self-cleaning cycle, their color will
turn slightly blue and the nish will be dull. After the self-cleaning cycle is
complete and the oven has cooled, rub the sides of the racks with wax paper
or a cloth containing a small amount of oil. This will help the racks glide more
easily on their tracks.
• Gliding racks may be cleaned by hand with an abrasive cleaner or steel wool.
During cleaning, be careful not to allow water or cleaner to enter the slides on
the sides of rack.
NOTE
• Do not clean in a dishwasher.
• If the rack becomes hard to remove or replace, lightly wipe the oven rack
guides with cooking oil. Do not wipe cooking oil on the slides.
• If the rack becomes difcult to slide, the rack may need to be lubricated using
a graphite lubricant.
Air fry tray
To keep the Air fry tray clean, remove them from the cavity, and soak them in
Lukewarm soapy water. Then, scour soil off of the Air fry tray using a plastic
scouring pad.
NOTE
The air fry tray is dishwasher-safe.
CAUTION
Do not leave the air fry tray in the oven during the self-cleaning cycle. The
extreme heat generated in this cycle can permanently peel off the air fry coating,
their color will turn slightly blue and nish will be dull.
NOTE
• To order graphite lubricant., call Samsung customer care at 1-800-SAMSUNG
(726-7864) or visit our homepage (www.samsung.com/us/support, www.
samsung.com/ca/support, or www.samsung.com/ca_fr/support) and reference
part number DG81-01629A.
• If you want to buy directly, connect to http://www.samsungparts.com/Default.
aspx.
Maintaining your appliance
English 51
Page 52
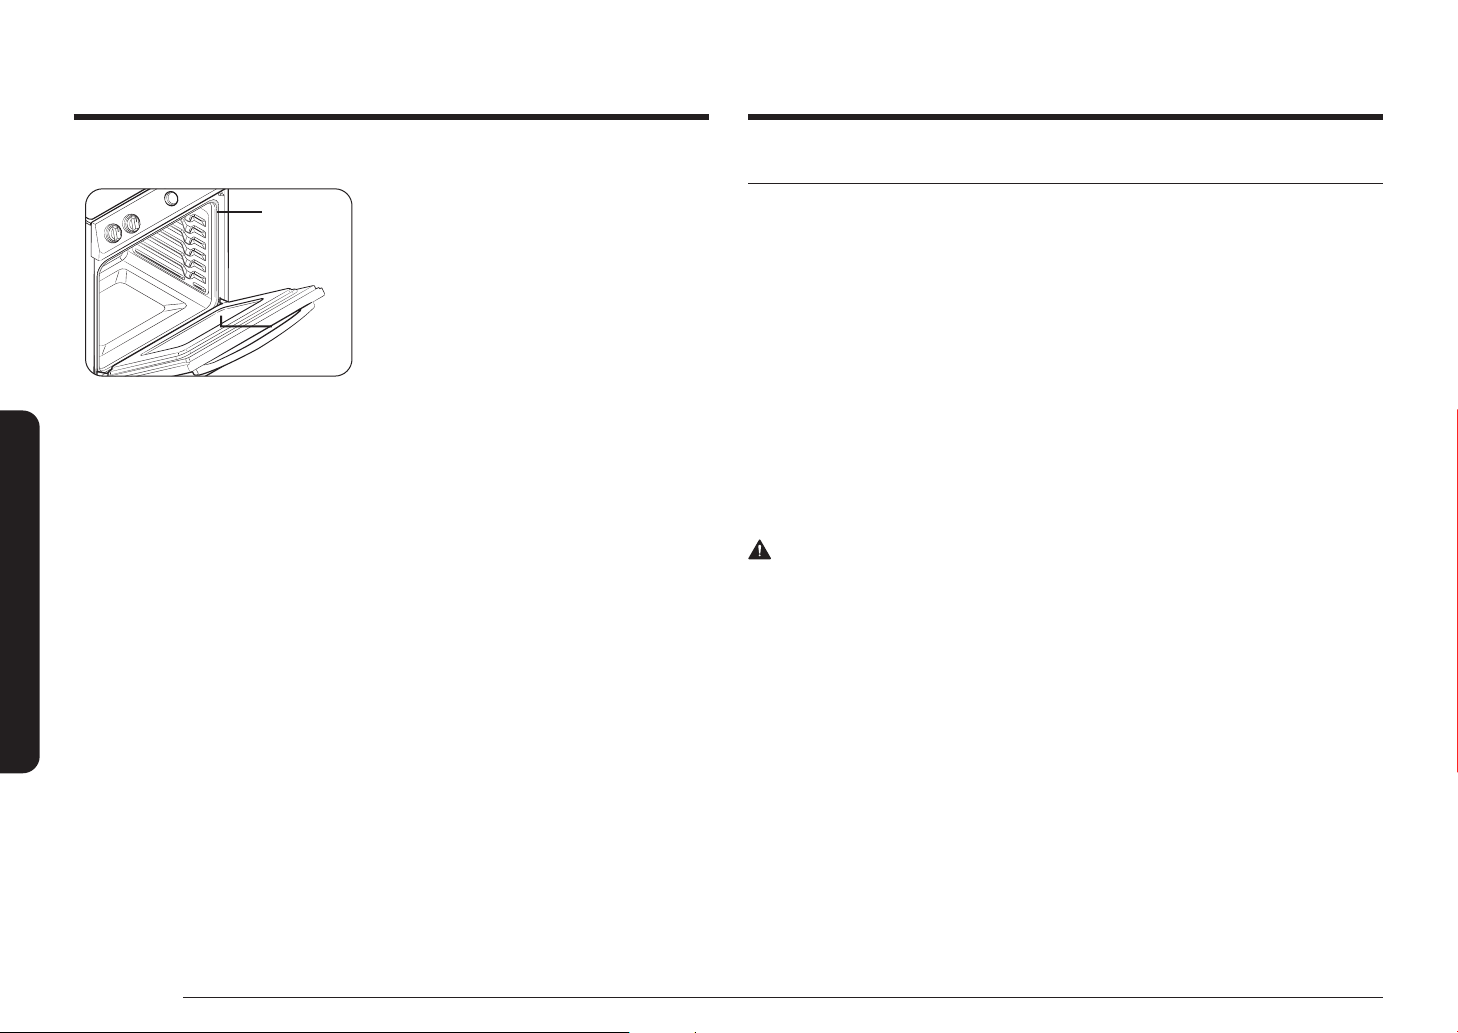
Maintaining your appliance
Oven door
Don’t hand Don’t hand
clean the clean the
oven door oven door
gasket.gasket.
You may You may
hand clean hand clean
the door.the door.
Maintaining your appliance
• Use soap and water to thoroughly
clean the top, sides, and front of the
oven door. Rinse well. You may use a
glass cleaner on the outside glass of
the oven door. DO NOT immerse the
door in water. DO NOT spray or allow
water or the glass cleaner to enter the
door vents. DO NOT use oven cleaners,
cleaning powders, or any harsh
abrasive cleaning materials on the
outside of the oven door.
• DO NOT clean the oven door gasket.
The oven door gasket is made of a
woven material which is essential for a
good seal. Care should be taken not to
rub, damage, or remove this gasket.
Care and cleaning of the glass cooktop
Normal daily use cleaning
Use only a ceramic cooktop cleaner. Other creams may not be as effective.
By following these steps, you can maintain and protect the surface of your glass
cooktop.
1. Before using the cooktop for the rst time, clean it with a ceramic cooktop
cleaner.
This helps protect the top and makes cleanup easier.
2. Daily use of a ceramic cooktop cleaner will help keep the cooktop looking new.
3. Shake the cleaning cream well. Apply a few drops of cleaner directly to the
cooktop.
4. Use a paper towel or a cleaning pad for ceramic cooktops to clean the entire
cooktop surface.
5. Use a dry cloth or paper towel to remove all cleaning residue. No need to
rinse.
WARNING
DAMAGE to your glass surface may occur if you use scrub pads other than those
recommended.
52 English
Page 53
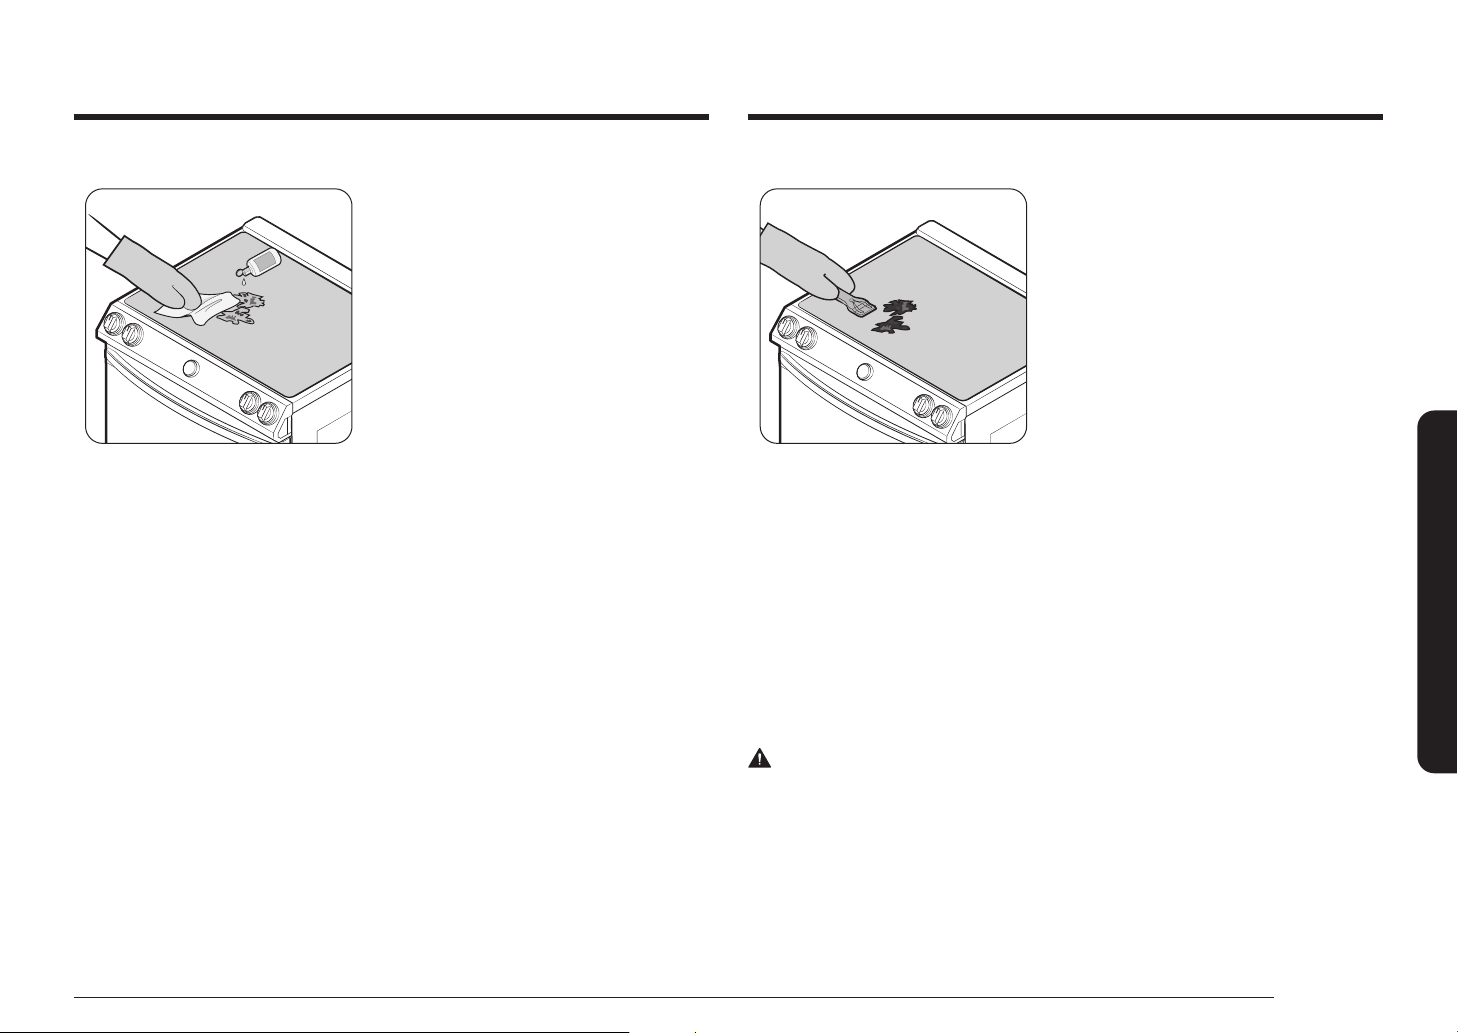
Removing burned-on residue
1. Allow the cooktop to cool.
2. Spread a few drops of ceramic cooktop
cleaner on the entire burned residue
area.
3. Using a cleaning pad for ceramic
cooktops, rub the residue area, applying
pressure as needed.
4. If any residue remains, repeat the steps
listed above as needed.
5. For additional protection, after all
residue has been removed, polish the
entire surface by applying ceramic
cooktop cleaner with a paper towel.
Removing heavy, burned-on residue
1. Allow the cooktop to cool.
2. Use a single-edge razor-blade scraper
at approximately a 45° angle against
the glass surface and scrape the soil. It
will be necessary to apply pressure to
remove the residue.
3. After scraping with the razor scraper,
spread a few drops of ceramic cooktop
cleaner on the entire burned residue
area. Use a cleaning pad to remove any
remaining residue. (Do not scrape the
seal.)
4. For additional protection, after all
residue has been removed, polish the
entire surface by applying ceramic
cooktop cleaner with a paper towel.
Removing metal marks and scratches
1. Be careful not to slide pots and pans across your cooktop. It will leave marks
on the cooktop surface. You can remove these marks by applying ceramic
cooktop cleaner with a cleaning pad for ceramic cooktops.
2. If pots with a thin overlay of aluminum or copper are allowed to boil dry, the
overlay may leave black discoloration on the cooktop. You should remove this
discoloration immediately or it may become permanent.
Maintaining your appliance
WARNING
Carefully check the bottoms of pans for roughness that may scratch the cooktop.
English 53
Page 54
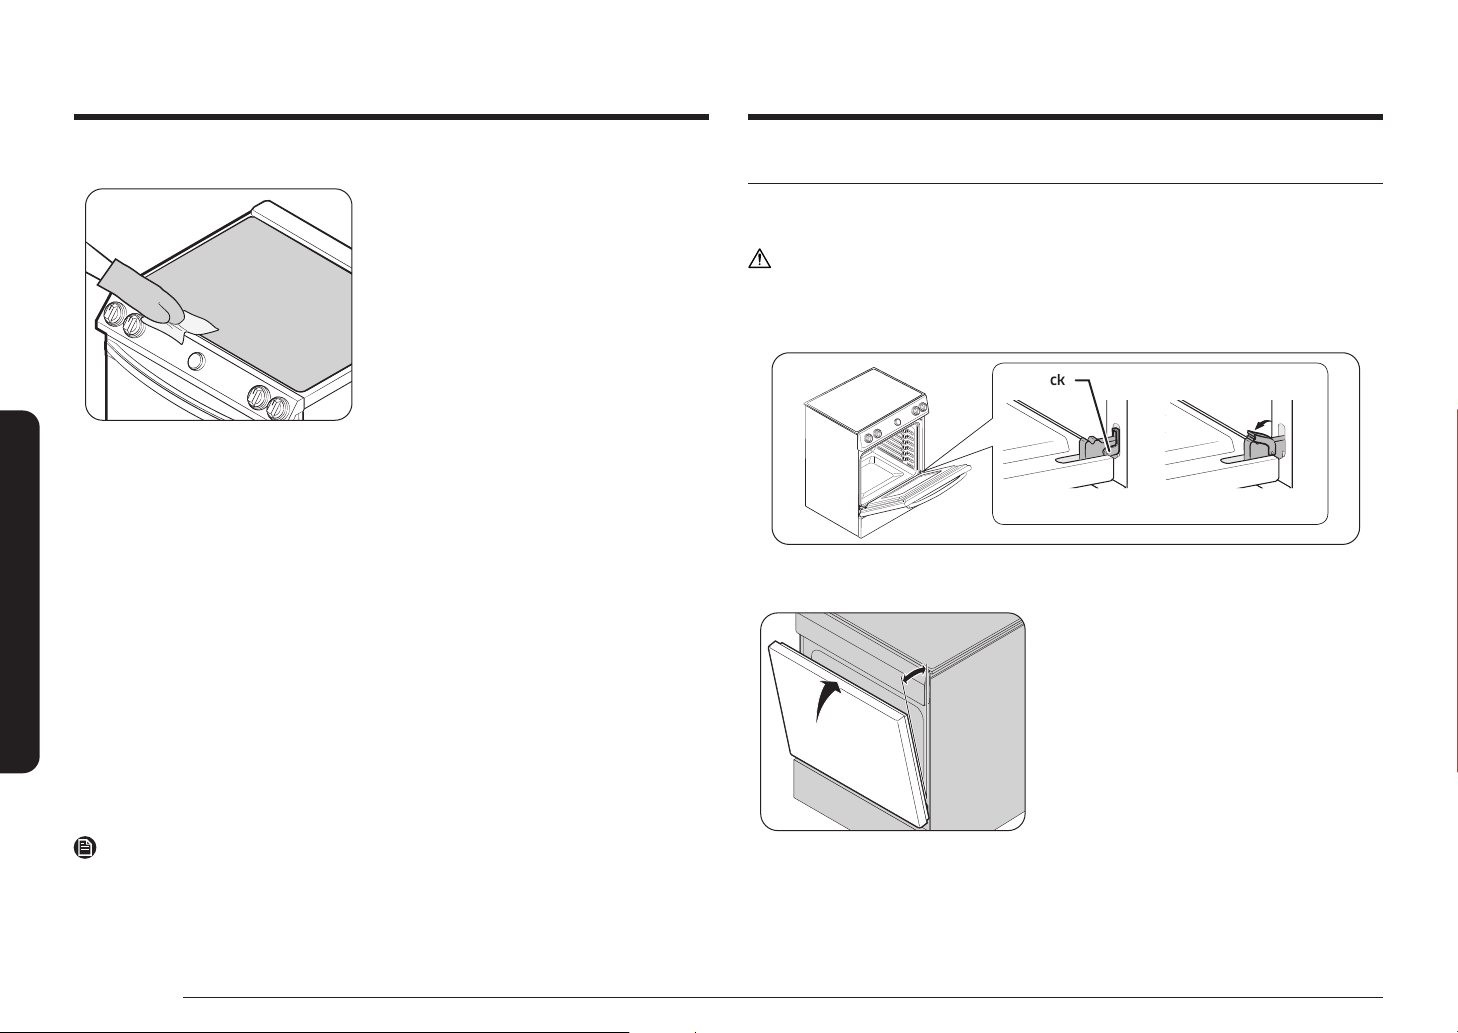
Maintaining your appliance
Cleaning the cooktop seal
To clean the seal around the edges of
the glass, lay a wet cloth on it for a few
minutes, then wipe clean with a nonabrasive
cleaner.
Maintaining your appliance
Potential for permanent damage to the glass surface
• Sugary spillovers (such as jellies, fudge, candy, syrups) or melted plastics can
cause pitting of the surface of your cooktop. This is not covered under the
warranty. You should clean the spill while it is still hot. Take special care when
removing hot substances. Refer to the section below.
• When using a scraper, be sure it is new and the razor blade is still sharp. Do
not use a dull or nicked blade.
Cleaning sugary spills and melted plastic
1. Turn off all surface units. Remove hot pans.
2. Wearing an oven mitt, use a single-edge razor-blade scraper to move the spill
to a cool area of the cooktop. Remove the spill with paper towels.
3. Any remaining spillover should be left until the surface of the cooktop has
cooled.
4. Don’t use the surface units again until all of the residue has been completely
removed.
Removing and reinstalling the oven door
How to remove the door
CAUTION
• The door is very heavy. Be careful when removing and lifting the door.
Do not lift the door by the handle.
• Turn the power OFF before removing the door.
Hinge lockHinge lock
Locked positionLocked position Unlocked positionUnlocked position
1. Open the door completely.
2. Pull the hinge locks down toward the door frame to the unlocked position.
3. Firmly grasp both sides of the door at
about 5°about 5°
the top.
4. Close the door to the door removal
position, which is approximately
5 degrees from vertical (Fig. 1).
NOTE
If pitting or indentations in the glass surface have already occurred, the cooktop
glass will have to be replaced. In this case, service will be necessary.
54 English
Fig. 1
Page 55
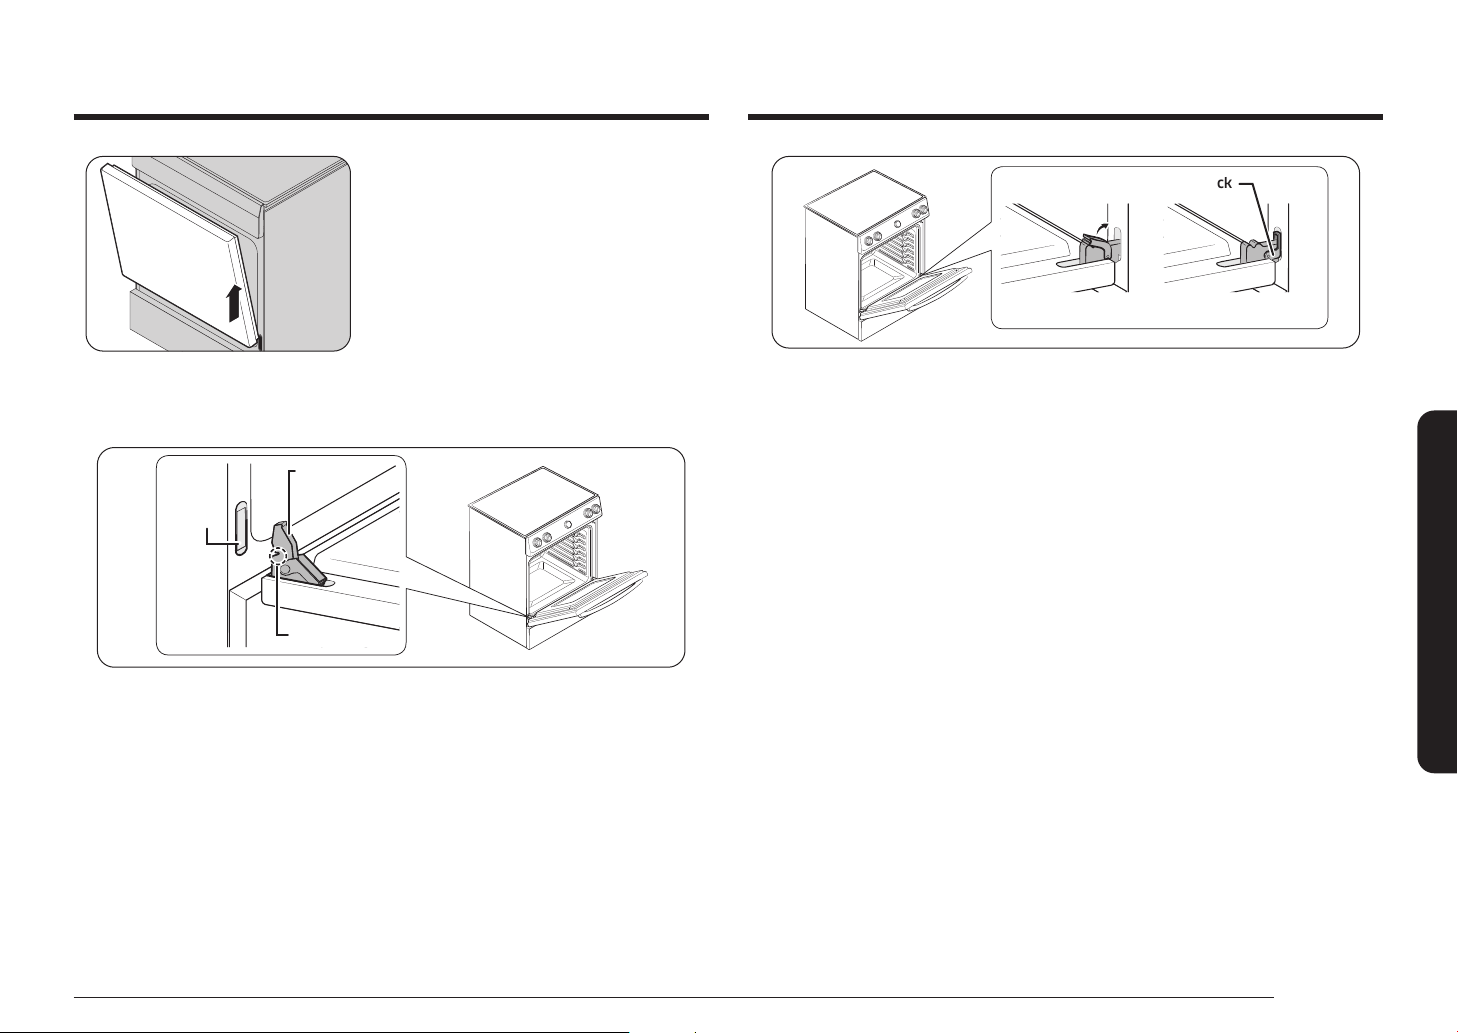
5. Lift door up and out until the hinge arm
is clear of the slot (Fig. 2).
Hinge lockHinge lock
Locked positionLocked positionUnlocked positionUnlocked position
Fig. 2
How to re-install the door
Bottom Bottom
edge of edge of
slotslot
Hinge armHinge arm
IndentationIndentation
1. Firmly grasp both sides of the door at the top.
2. With the door at the same angle as the removal position, slide the indentation
of the hinge arm into the bottom edge of the hinge slot. The notch in the
hinge arm must be fully inserted into the bottom of the slot.
3. Open the door fully. If the door will not open fully, the indentation is not
inserted correctly in the bottom edge of the slot.
4. Push the hinge locks up against the front frame of the oven cavity to the
locked position.
5. Close the oven door.
Maintaining your appliance
English 55
Page 56
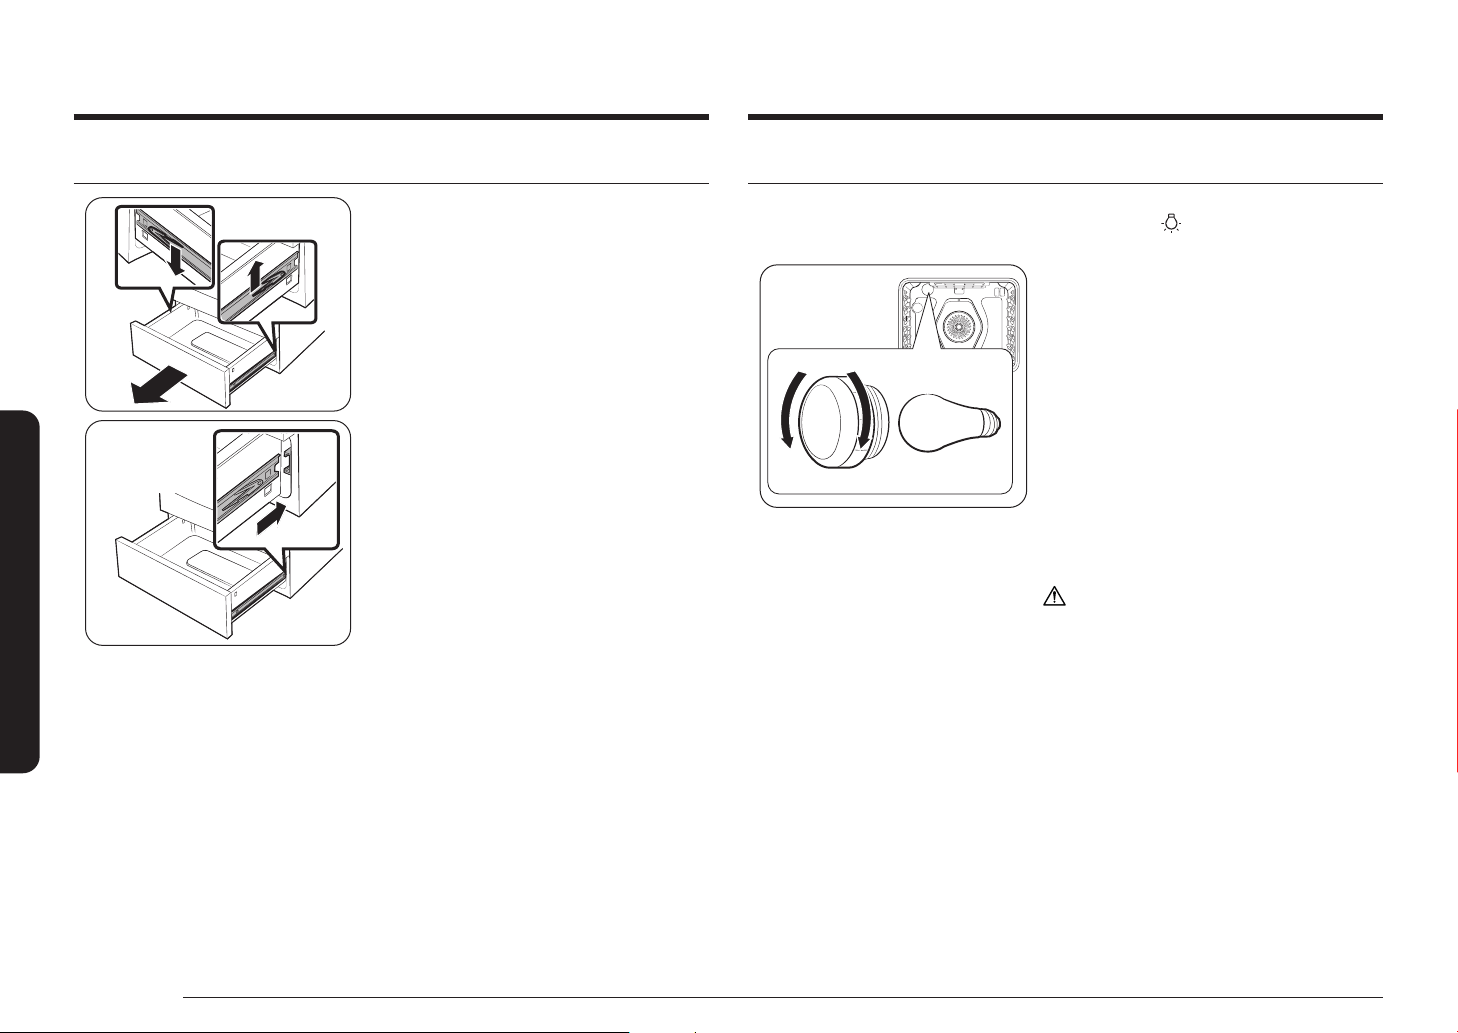
Maintaining your appliance
Removing and reinstalling the storage drawer
1. Slide open the drawer until it stops.
2. Locate the roller guide clips on either
side. Using both hands, pull down the
left clip while lifting the right clip, and
then remove the drawer.
3. Clean the drawer in warm, soapy water
using a cloth or soft brush. Then, rinse
and dry it thoroughly.
4. Put the drawer in the roller guides on
either side, and then snap the clips into
Maintaining your appliance
place.
Changing the oven light
The oven light is a standard 40-watt appliance bulb. It will come on when the oven
door is open. When the oven door is closed, press the pad to turn it on or off. It
will not work during a self-cleaning cycle.
1. Make sure the oven and the bulb are
cool.
2. Unplug the range or disconnect the
power.
RemoveRemove
Glass bulb coverGlass bulb cover BulbBulb
ReplaceReplace
3. Turn the glass bulb cover in the back of
the oven counterclockwise to remove.
4. Turn the bulb counterclockwise to
remove it from its socket.
5. Insert a new 40-watt appliance bulb,
and then turn it clockwise to tighten.
Replace the bulb cover by turning
clockwise.
6. Plug in the range or reconnect the
power.
CAUTION
Before changing your oven light bulb,
disconnect the electrical power to the range
at the main fuse or circuit breaker panel.
Make sure the oven and the bulb are cool.
56 English
Page 57
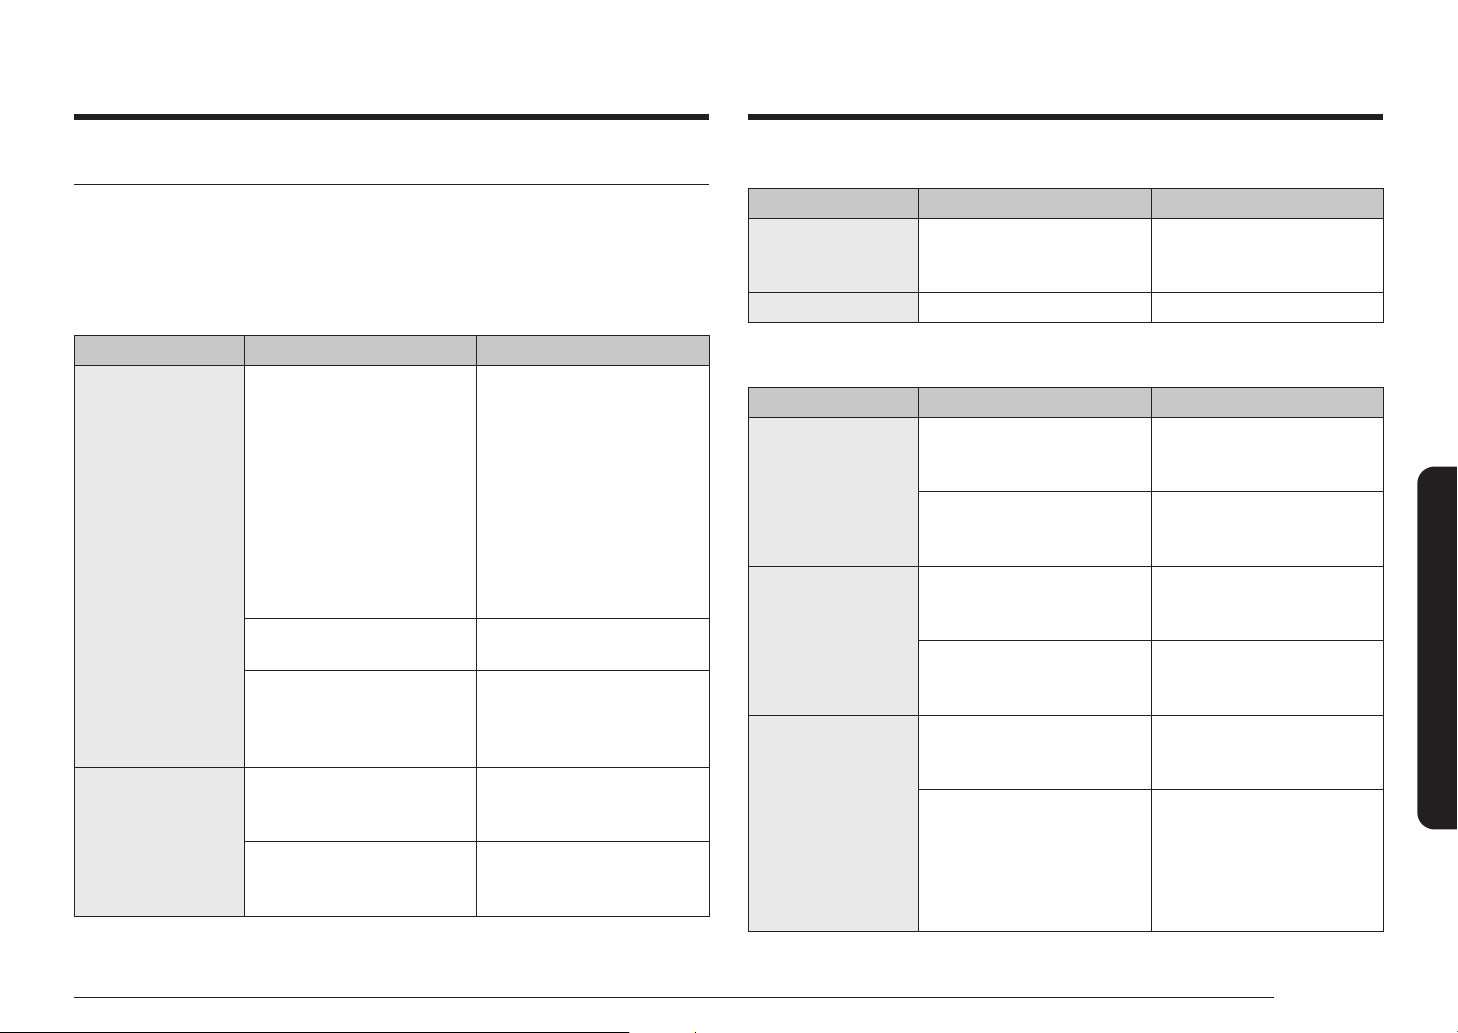
Troubleshooting
Troubleshooting
Samsung works hard to ensure that you don’t have problems with your new
electric range. If you run into unexpected trouble, look rst for a solution in the
tables below. If you’re still having trouble after trying the suggested solution, call
Samsung at 1-800-SAMSUNG (1-800-726-7864).
Installation
Problem Possible cause Solution
The range is not
level.
The appliance
must be accessed
for servicing and
cannot be moved
easily.
The appliance has been
installed improperly.
The oor is sagging or
sloping.
The kitchen cabinets are not
properly aligned and make
the range appear to be not
level.
The kitchen cabinets are not
square and too close to the
appliance.
Carpet is interfering with
movement of the range.
• Place the oven rack
in the center of the
oven. Place a level on
the oven rack. Adjust
the leveling legs at the
base of the range until
the oven rack is level.
• Insure the oor is level
and strong and stable
enough to adequately
support the range.
Contact a carpenter to
correct the situation.
Insure the cabinets are
square and provide
sufcient room for
installation.
Contact a builder or
installer to make the
appliance accessible.
Provide sufcient space so
the range can be lifted over
the carpet.
CONTROL DISPLAY
Problem Possible cause Solution
The display goes
blank.
The display ashes. There was a power failure. Reset the clock.
COOKTOP
Problem Possible cause Solution
The surface units
will not maintain
a rolling boil or
will not cook fast
enough.
The surface units
will not turn on.
Areas of
discoloration on the
cooktop.
A fuse in your home may
be blown or the circuit
breaker tripped.
You may be using
inappropriate cookware.
In some areas, the power
(voltage) may be low.
A fuse in your home may
be blown or a circuit
breaker may have tripped.
The cooktop controls are set
improperly.
Food spillover was not
cleaned.
The surface is hot and the
model features a lightcolored cooktop.
Replace the fuse or reset
the circuit breaker.
Use pans that are at and
match the diameter of the
surface unit selected.
Cover the pan with a lid
until the desired heat is
obtained.
Replace the fuse or reset
the circuit breaker.
Check if the correct control
is set for the surface unit
you are using.
Refer to the section on the
care and cleaning of the
glass cooktop on page 52.
This is normal. The surface
may appear discolored
when it is hot. This is
temporary and will
disappear as the glass
cools.
Troubleshooting
English 57
Page 58
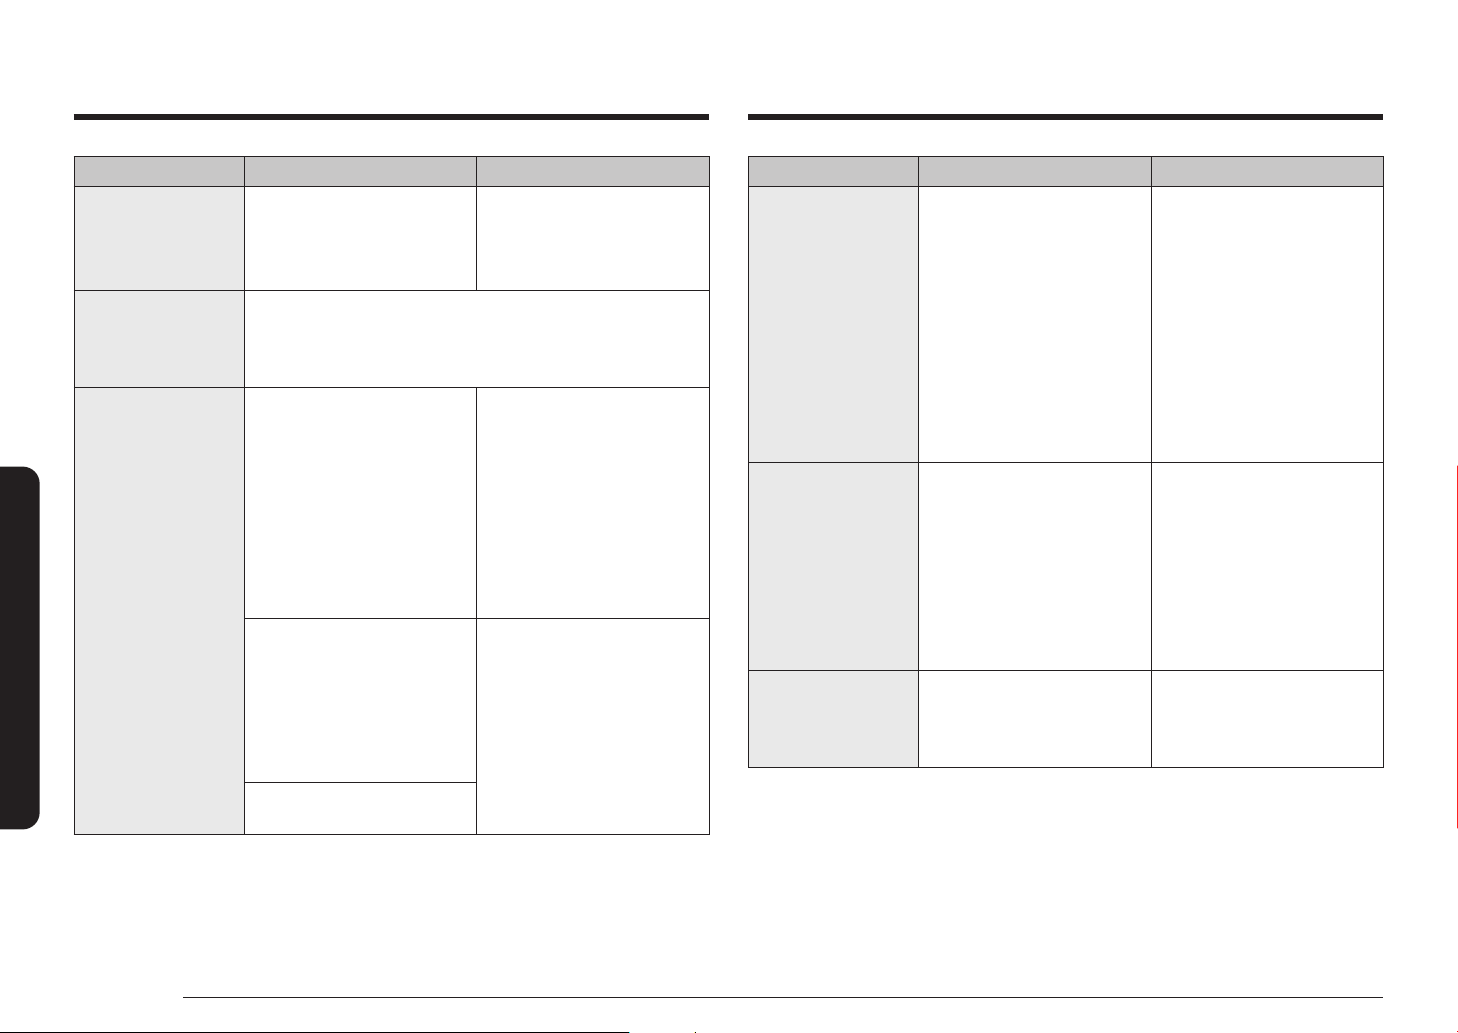
Troubleshooting
Troubleshooting
Problem Possible cause Solution
The surface unit
frequently cycles
on and off.
The surface unit
stops glowing when
changed to a lower
setting.
Scratches or
abrasions on the
cooktop surface.
The element will cycle on
and off to maintain the
power setting.
This is normal. The unit is still on and hot.
The cooktop is being
cleaned improperly.
Cookware with rough
bottoms was used on the
cooktop or there were
coarse particles (e.g., salt or
sand) present between the
cookware and the surface
of the cooktop.
Cookware has been slid
across the cooktop surface.
This is normal operation,
and not a system failure.
Use the range as usual.
Scratches are not
removable. Tiny scratches
will become less visible in
time as a result of cleaning.
Use ceramic glass top
cleaning cream. Do not
use chemical or corrosive
agents. These agents may
damage the surface of the
product.
To avoid scratches, follow
the recommended cleaning
procedures. Make sure
cookware bottoms are
clean before use, and use
cookware with smooth
bottoms.
Problem Possible cause Solution
Brown streaks or
specks.
Areas of
discoloration with
metallic sheen.
"Cracking" or
"popping" sound.
Boilovers have been cooked
onto the surface.
Mineral deposits from
water and food have been
left on the surface of the
cooktop.
This is the sound of the
metal heating and cooling
during both the cooking
and self-cleaning functions.
• Wait until the surface
cools down. Then,
use a single-edge
razor-blade scraper at
approximately a 45°
angle against the glass
surface to remove the
soil.
• See the section on the
care and cleaning of
the glass cooktop on
page 52.
• Remove using a
ceramic-glass cooktop
cleaning cream.
• Use cookware with
clean, dry bottoms.
Clean the cooktop with
a ceramic cleaning
agent regularly every
week.
This is normal operation,
and not a system failure.
Use the range as usual.
58 English
Page 59
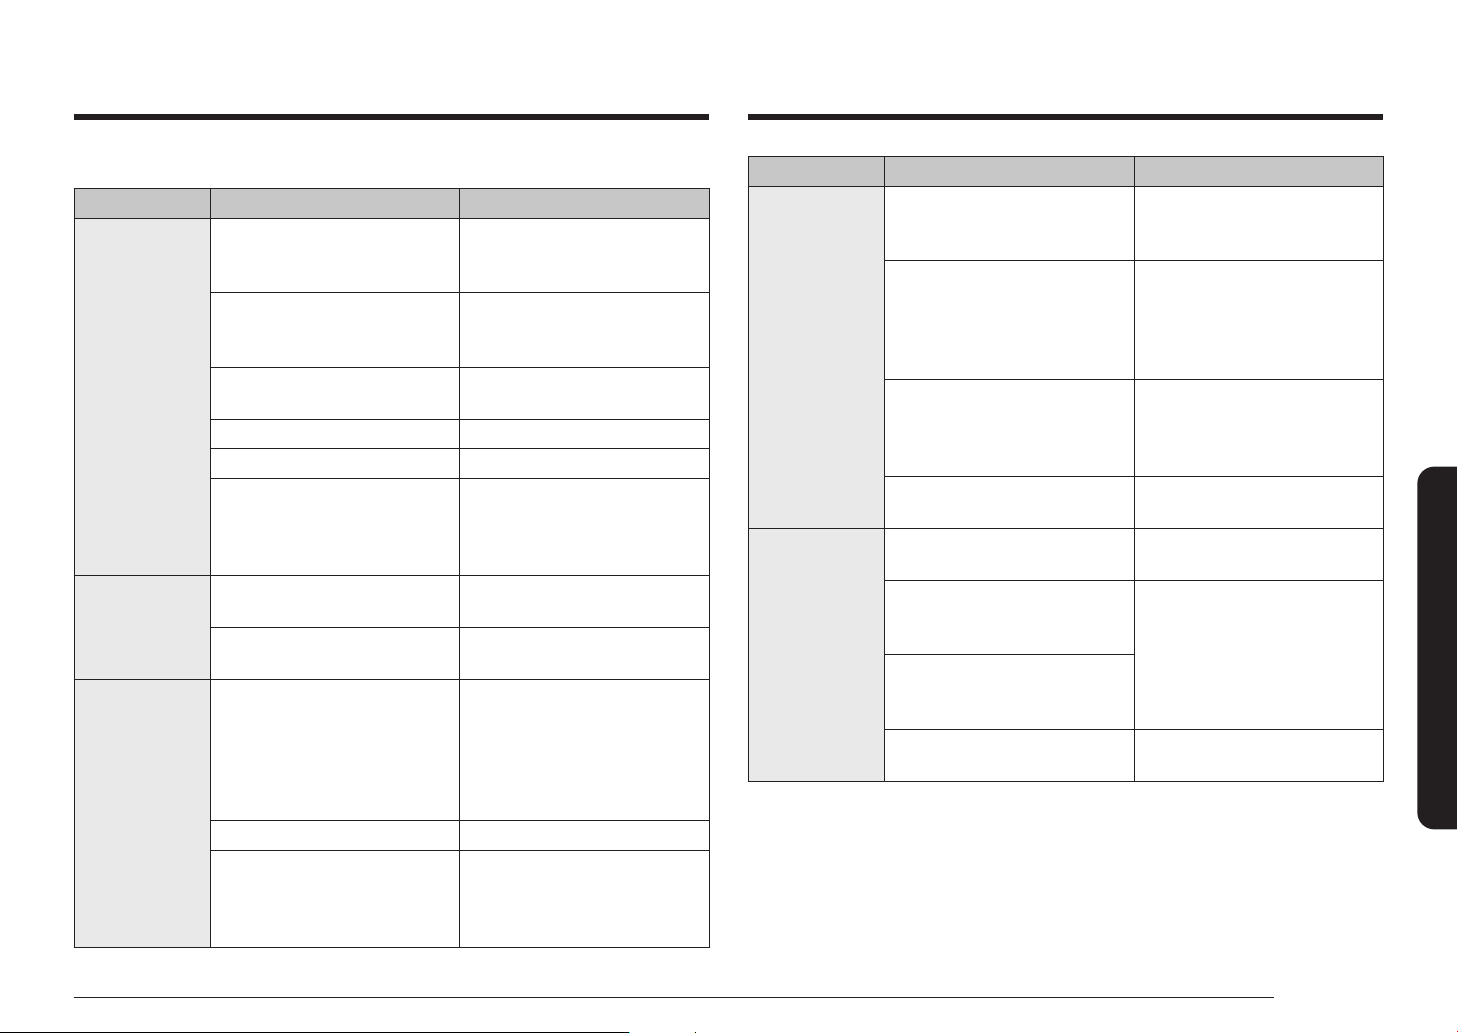
OVEN
Problem Possible cause Solution
The oven will
not turn on.
The oven light
will not turn
on.
The appliance
will not turn
on.
The range is not completely
plugged into the electrical
outlet.
A fuse in your home may be
blown or a circuit breaker
may have tripped.
The oven controls have been
set improperly.
The oven is too hot. Allow the oven to cool.
Incomplete service wiring. Call for service.
Power outage. Check to see if the house
The light bulb is loose or
defective.
The switch operating the light
is broken.
The appliance is not
completely plugged into the
electrical outlet or a fuse in
your home may be blown or
a circuit breaker may have
tripped.
Incomplete service wiring. Call for service.
Power outage. Check to see if the house
Make sure the electrical
plug is inserted into a live,
properly grounded outlet.
Replace the fuse or reset the
circuit breaker.
See the chapter on operating
the oven starting on page 28.
lights will turn on. If
necessary, call your local
electric company for service.
Tighten or replace the bulb.
Call for service.
Make sure the power cord is
plugged into a live, properly
grounded outlet. Check the
fuse and circuit breakers.
lights will turn on. If
necessary, call your local
electric company for service.
Problem Possible cause Solution
The oven
smokes
excessively
during broiling.
Food does not
bake or roast
properly.
The oven controls have not
been set properly.
The meat has been placed too
close to the element.
The meat has not been
properly prepared.
Grease has built up on oven
surfaces.
The oven controls have not
been set correctly.
The oven rack has been
positioned incorrectly or is
not level.
Incorrect cookware or
cookware of improper size is
being used.
The oven sensor needs to be
adjusted.
Refer to the section on using
the broiler starting on page
34.
Reposition the rack to provide
proper clearance between
the meat and the element.
Preheat the broil element for
searing.
Remove the excess fat from
the meat. Cut away fatty
edges that may curl, leaving
the lean intact.
Regular cleaning is necessary
when broiling frequently.
See the chapter on operating
the oven starting on page 28.
See the section on using the
oven racks on page 31.
See the section on adjusting
the thermostat on page 44.
Troubleshooting
English 59
Page 60
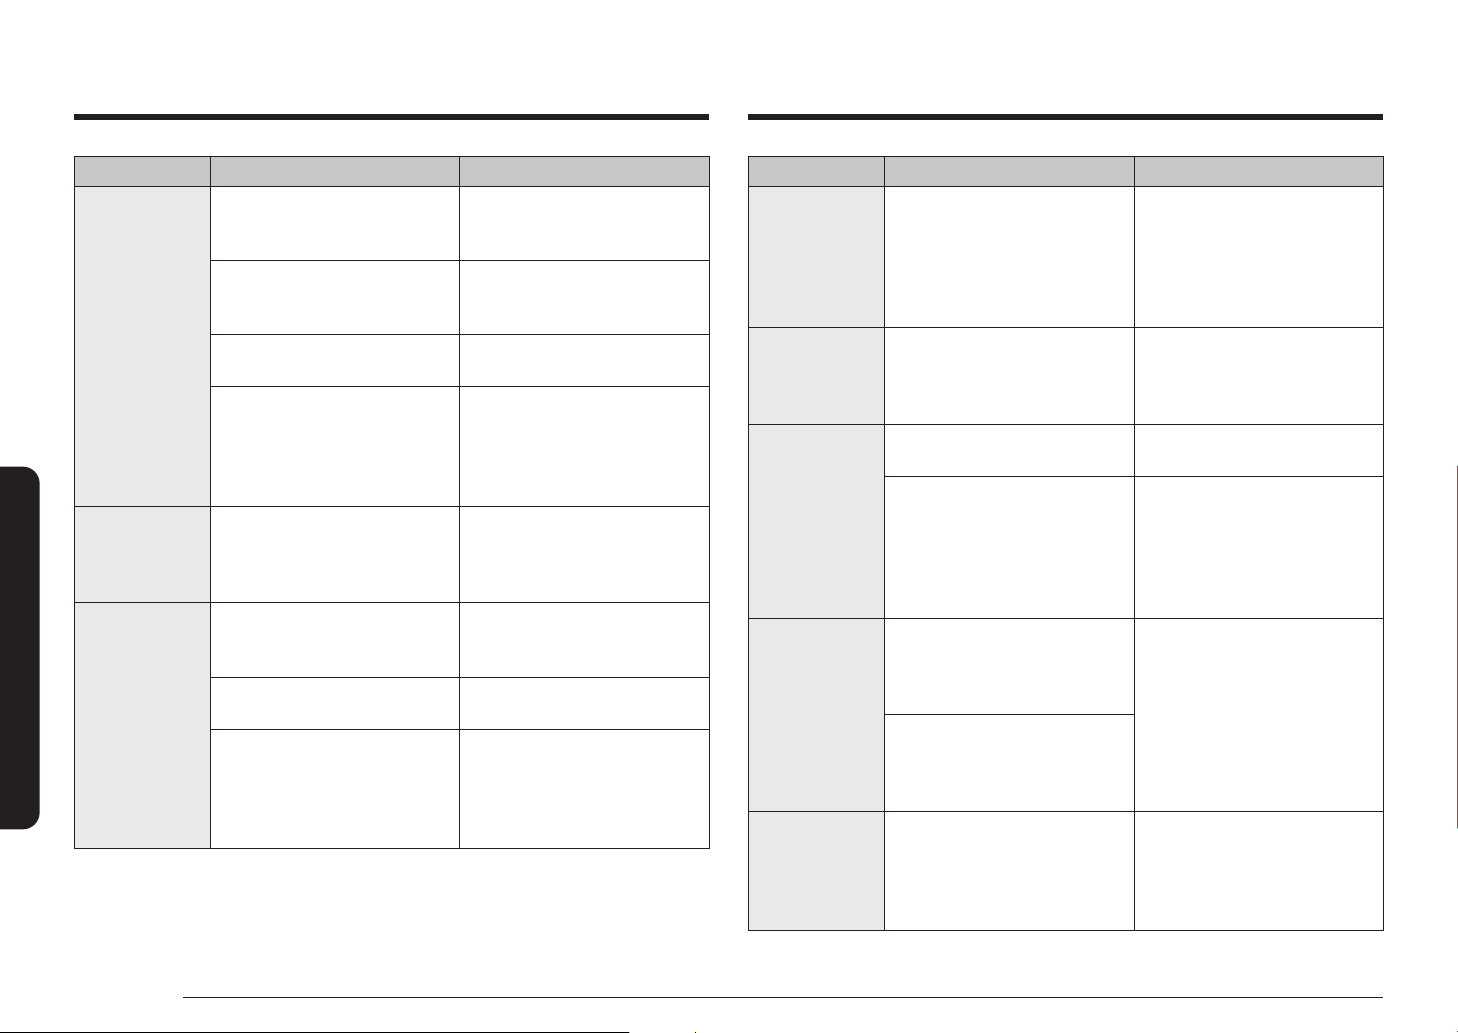
Troubleshooting
Troubleshooting
Problem Possible cause Solution
Food does not
broil properly.
The oven
temperature is
too hot or too
cold.
The oven will
not self-clean.
The serving size may not be
appropriate.
The rack has not been
properly positioned.
The cookware is not suited for
broiling.
In some areas, the power
(voltage) may be low.
The oven sensor needs to be
adjusted.
The oven temperature is
too high to start a self-clean
operation.
The oven controls have been
set incorrectly.
A self-cleaning cycle cannot
be started if the oven lock
feature has been activated or
if a radiant surface element
is on.
Refer to the cooking guide for
serving sizes on page 35, and
then try again.
See the broiling
recommendation guide on
page 35.
Use suitable cookware.
• Preheat the broil element
for 10 minutes.
• See the broiling
recommendation guide
on page 35.
See the section on adjusting
the thermostat on page 44.
Allow the range to cool and
then reset the controls.
See the section on selfcleaning on page 48.
Deactivate the oven lock
(see page 42). Make sure all
surface elements are turned
off.
Problem Possible cause Solution
Excessive
smoking during
a self-cleaning
cycle.
The oven door
will not open
after a selfcleaning cycle.
The oven is not
clean after a
self-cleaning
cycle.
Steam is
coming out of
the vent.
A burning or
oily odor is
coming from
the vent.
There is excessive soiling in
the oven.
The oven is too hot. Allow the oven to cool.
The oven controls were not
set correctly.
The oven was heavily soiled. Wipe up heavy spillovers
When using the convection
feature, it is normal to see
steam coming out of the oven
vent.
As the number of racks or
amount of food being cooked
increases, the amount of
visible steam will increase.
This is normal in a new oven
and will disappear in time.
Press OFF. Open the windows
to rid the room of smoke.
Wait until the self-cleaning
cycle is cancelled. Wipe up the
excessive soil and then start
the self-cleaning cycle again.
See the section on selfcleaning on page 48.
before starting the selfcleaning cycle. Heavily soiled
ovens may need to be selfcleaned again or for a longer
period of time.
This is normal operation and
not a system failure.
Use the range as usual.
• To speed the process, set
a self-cleaning cycle for a
minimum of 3 hours.
• See the section on selfcleaning on page 48.
60 English
Page 61
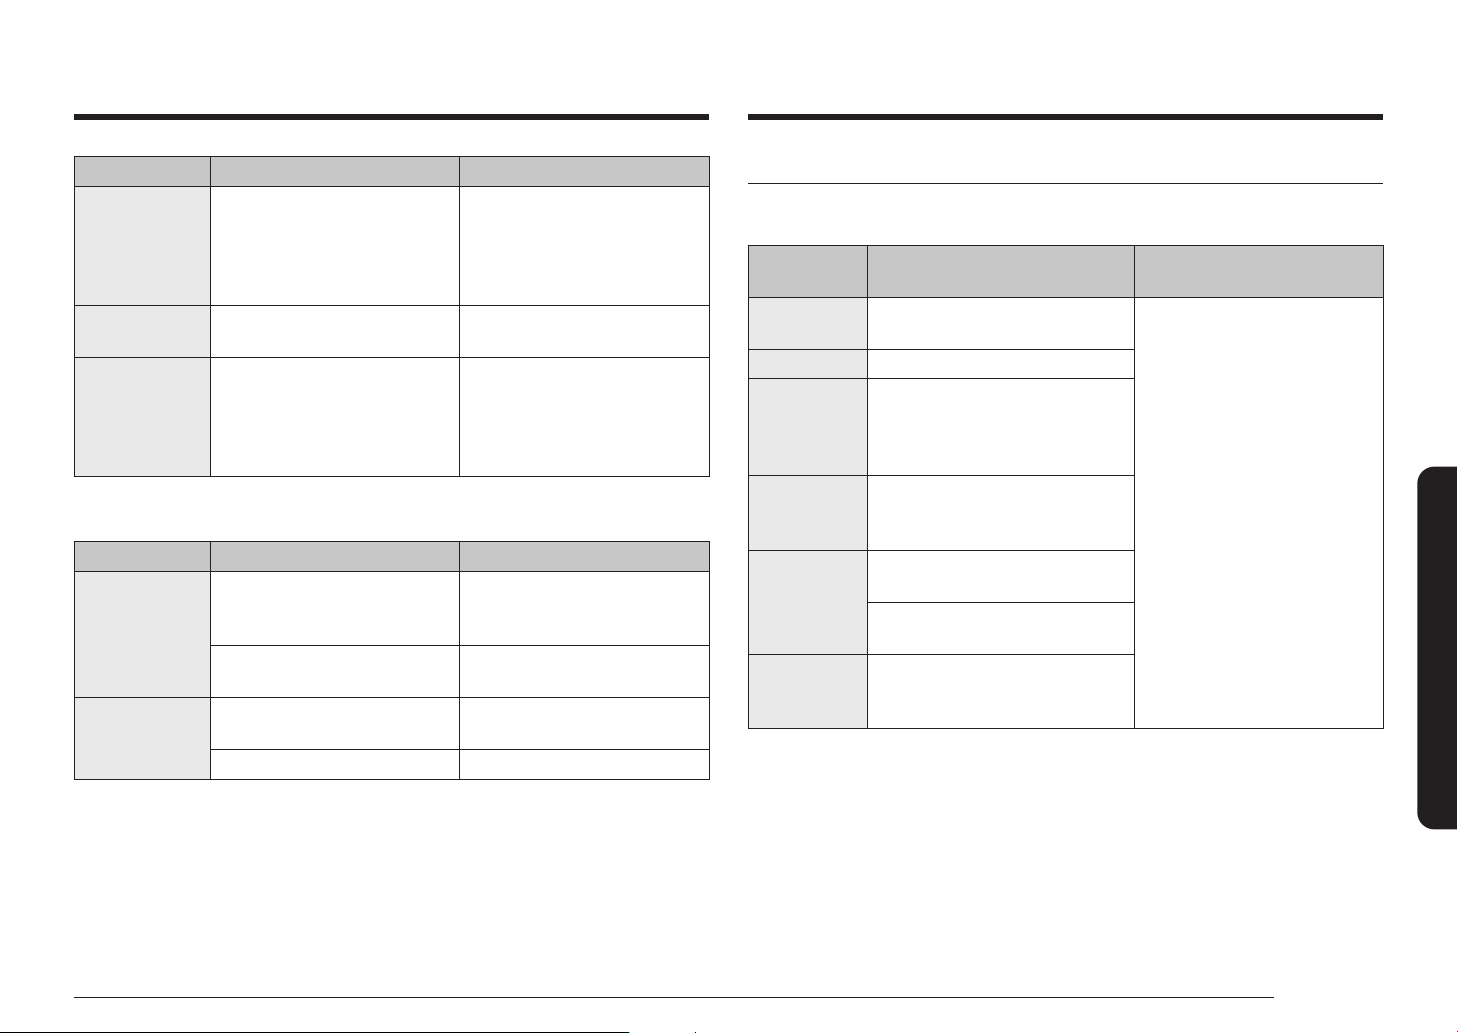
Problem Possible cause Solution
Strong odor. An odor coming from the
insulation around the inside
of the oven is normal for the
rst few times the oven is
used.
Fan noise. A convection fan may
automatically turn on and off.
Oven racks
are difcult to
slide.
DRAWER
Problem Possible cause Solution
The drawer
does not slide
smoothly or
drags.
Excessive
condensation
in the drawer.
The shiny, silver-colored
racks were cleaned in a selfcleaning cycle.
The drawer is out of
alignment.
The drawer is overloaded or
the load is unbalanced.
There is liquid present in the
drawer.
Uncovered foods. Cover food with a lid.
Operate the oven empty on
the bake setting at 400 °F for
1 hour.
This is not a system failure
but normal operation.
Apply a small amount of
vegetable oil to a paper towel,
and then wipe the edges of
the oven racks with the paper
towel.
Fully extend the drawer and
push it all the way in. See
page 56.
Reduce weight. Redistribute
drawer contents.
Remove the liquid.
Information codes
OVEN
Displayed
code
C-d0
C-d1 The door lock is misaligned.
C-F0
C-F2
C-20
C-21
There is a short in the control
key.
This code occurs if
communication between
the Main and Sub PBA is
interrupted.
This code occurs if
communication between the
Main and Touch is interrupted.
The oven sensor is open when
the oven is operating.
There is a short in the Oven
sensor.
This code occurs if the internal
temperature rises abnormally
high.
Possible cause Solution
Press OFF, and then restart
the oven. If the problem
persists, disconnect all power
to the range for at least 30
seconds and then reconnect
the power. If this does not
solve the problem, call for
service.
Troubleshooting
English 61
Page 62
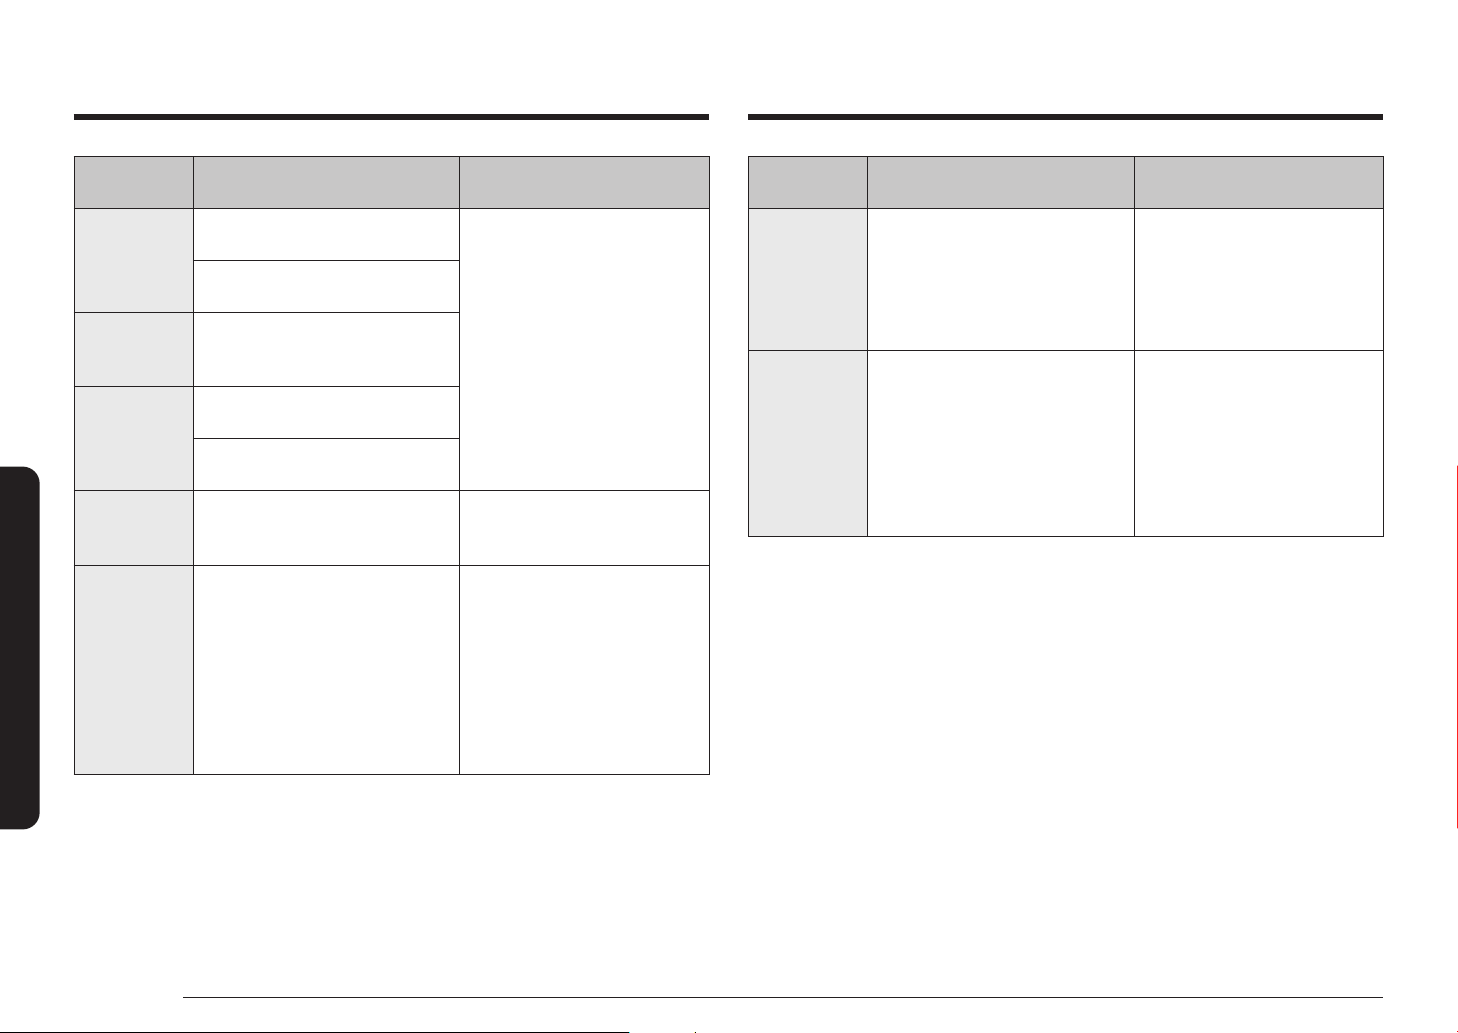
Troubleshooting
Troubleshooting
Displayed
code
The sub PCB sensor is open
C-22
C-23
C-30
C-31
-dC- This code appears if the divider
when the oven is operating.
There is a short in the sub PCB
sensor.
The temperature probe sensor
is short when the oven is
operating.
The main PCB sensor is open
when the oven is operating.
There is a short in the main PCB
sensor.
This code occurs if the PCB
temperature rises abnormally
high.
is inserted or removed while the
oven is operating.
Possible cause Solution
Press OFF, and then restart
the oven. If the problem
persists, disconnect all power
to the range for at least 30
seconds and then reconnect
the power. If this does not
solve the problem, call for
service.
Call for service
Make sure the divider is
inserted properly, and then
restart the oven.
If the problem persists,
disconnect all power to the
range for at least 30 seconds
and then reconnect the power.
If this does not solve the
problem, call for service.
Displayed
code
Bad line This error message appears
if the power cord is installed
improperly.
C-A2 This code occurs if the sub PCB
temperature rises abnormanlly
high.
Possible cause Solution
If the power connection is
plugged in improperly, that
code appears on the display.
Reconnect the power
connection properly, and the
message disappears.
Press OFF.
Check the oven vent and
cooling vent. If the vent is
closed, never block the vent
by anything. After cooling the
oven, restart the oven.
If this does not solve the
problem, call for service.
62 English
Page 63

Warranty (U.S.A)
PLEASE DO NOT DISCARD. THIS PAGE REPLACES THE WARRANTY PAGE IN THE
USE & CARE GUIDE
SAMSUNG ELECTRIC RANGE
LIMITED WARRANTY TO ORIGINAL PURCHASER WITH PROOF OF PURCHASE
This SAMSUNG brand product, as supplied and distributed by SAMSUNG
ELECTRONICS AMERICA, INC. (SAMSUNG) and delivered new, in the original
carton to the original consumer purchaser, is warranted by SAMSUNG against
manufacturing defects in materials or workmanship for the limited warranty
period, starting from the date of original purchase, of:
One (1) Year Parts and Labor
This limited warranty is valid only on products purchased and used in the United
States that have been installed, operated, and maintained according to the
instructions attached to or furnished with the product. To receive warranty service,
the purchaser must contact SAMSUNG at the address or phone number provided
below for problem determination and service procedures. Warranty service can
only be performed by a SAMSUNG authorized service center. The original dated
bill of sale must be presented upon request as proof of purchase to SAMSUNG or
SAMSUNG’s authorized service center to receive warranty service.
SAMSUNG will provide in-home service within the contiguous United States
during the warranty period at no charge, subject to availability of SAMSUNG
authorized servicers within the customer’s geographic area. If in-home service is
not available, SAMSUNG may elect, at its option, to provide transportation of the
product to and from an authorized service center. If the product is located in an
area where service by a SAMSUNG authorized servicer is not available, you may
be responsible for a trip charge or required to bring the product to a SAMSUNG
authorized service center for service.
To receive in-home service, product must be unobstructed and accessible to the
service agent.
During the applicable warranty period, a product will be repaired, replaced, or
the purchase price refunded, at the sole option of SAMSUNG. SAMSUNG may use
new or reconditioned parts in repairing a product, or replace the product with
a new or reconditioned product. Replacement parts and products are warranted
for the remaining portion of the original product’s warranty or ninety (90) days,
whichever is longer. All replaced parts and products are the property of SAMSUNG
and you must return them to SAMSUNG.
This limited warranty covers manufacturing defects in materials or workmanship
encountered in normal household, noncommercial use of this product and shall
not cover the following: damage that occurs in shipment, delivery, installation, and
uses for which this product was not intended; damage caused by unauthorized
modication or alteration of the product; product where the original factory
serial numbers have been removed, defaced, changed in any way, or cannot
be readily determined; cosmetic damage including scratches, dents, chips, and
other damage to the product’s nishes; damage caused by abuse, misuse, pest
infestations, accident, re, oods, or other acts of nature or God; damage caused
by use of equipment, utilities, services, parts, supplies, accessories, applications,
installations, repairs, external wiring or connectors not supplied or authorized by
SAMSUNG; damage caused by incorrect electrical line current, voltage, uctuations
and surges; damage caused by failure to operate and maintain the product
according to instructions; in-home instruction on how to use your product; and
service to correct installation not in accordance with electrical or plumbing codes
or correction of household electrical or plumbing (i.e., house wiring, fuses, or water
inlet hoses). In addition, damage to the glass cooktop caused by (i) use of cleaners
other than the recommended cleaners and pads or (ii) hardened spills of sugary
materials or melted plastic that are not cleaned according to the directions in the
use and care guide are not covered by this limited warranty.
The cost of repair or replacement under these excluded circumstances shall be the
customer’s responsibility.
Visits by an authorized servicer to explain product functions, maintenance or
installation are not covered by this limited warranty.Please contact SAMSUNG at
the number below for assistance with any of these issues.
Warranty (U.S.A)
English 63
Page 64

Warranty (U.S.A)
Warranty (CANADA)
Warranty (U.S.A)
EXCLUSION OF IMPLIED WARRANTIES
IMPLIED WARRANTIES, INCLUDING THE IMPLIED WARRANTIES OF
MERCHANTABILITY OR FITNESS FOR A PARTICULAR PURPOSE, ARE LIMITED TO
ONE YEAR OR THE SHORTEST PERIOD ALLOWED BY LAW. Some states do not allow
limitations on how long an implied warranty lasts, so the above limitations or
exclusions may not apply to you. This warranty gives you specic rights, and you
may also have other rights, which vary from state to state.
LIMITATION OF REMEDIES
YOUR SOLE AND EXCLUSIVE REMEDY IS PRODUCT REPAIR, PRODUCT
REPLACEMENT, OR REFUND OF THE PURCHASE PRICE AT SAMSUNG’S OPTION,
AS PROVIDED IN THIS LIMITED WARRANTY. SAMSUNG SHALL NOT BE LIABLE
FOR SPECIAL, INCIDENTAL OR CONSEQUENTIAL DAMAGES, INCLUDING BUT NOT
LIMITED TO TIME WAY FROM WORK, HOTELS AND/OR RESTAURANT MEALS,
REMODELING EXPENSES, LOSS OF REVENUE OR PROFITS, FAILURE TO REALIZE
SAVINGS OR OTHER BENEFITS REGARDLESS OF THE LEGAL THEORY ON WHICH
THE CLAIM IS BASED, AND EVEN IF SAMSUNG HAS BEEN ADVISED OF THE
POSSIBILITY OF SUCH DAMAGES. Some states do not allow exclusion or limitation
of incidental or consequential damages, so the above limitations or exclusions may
not apply to you. This warranty gives you specic rights, and you may also have
other rights, which vary from state to state.
SAMSUNG does not warrant uninterrupted or error-free operation of the product.
No warranty or guarantee given by any other person, rm, or corporation with
respect to this product shall be binding on SAMSUNG.
To obtain warranty service, please contact SAMSUNG at:
PLEASE DO NOT DISCARD. THIS PAGE REPLACES THE WARRANTY PAGE IN THE
USE & CARE GUIDE
SAMSUNG ELECTRIC RANGE
LIMITED WARRANTY TO ORIGINAL PURCHASER
This SAMSUNG brand product, as supplied and distributed by SAMSUNG
ELECTRONICS CANADA, INC. (SAMSUNG) and delivered new, in the original carton to
the original consumer purchaser, is warranted by SAMSUNG against manufacturing
defects in materials and workmanship for a limited warranty period of:
One (1) Year Parts and Labor, One (1) Year Parts Warranty
For Glass Cooktop and Radiant Heater
This limited warranty begins on the original date of purchase, and is valid only
on products purchased and used in the CANADA. To receive warranty service,
the purchaser must contact SAMSUNG for problem determination and service
procedures. Warranty service can only be performed by a SAMSUNG authorized
service center. The original dated bill of sale must be presented upon request as
proof of purchase to SAMSUNG or SAMSUNG’s authorized service center. Samsung
will provide in-home service during the warranty period at no charge subject to
availability within the contiguous CANADA. In home service is not available in all
areas. To receive in home service product must be unobstructed and accessible
to the service agent. If service is not available Samsung may elect to provide
transportation of the product to and from an authorized service center.
1-800-SAMSUNG (726-7864) and www.samsung.com/us/support
64 English
Samsung Electronics America, Inc.
85 Challenger Road
Ridgeeld Park, NJ 07660
Page 65

SAMSUNG will repair or replace this product, at our option and at no charge
as stipulated herein, with new or reconditioned parts or products if found to
be defective during the limited warranty period specied above. All replaced
parts and products become the property of SAMSUNG and must be returned
to SAMSUNG. Replacement parts and products assume the remaining original
warranty, or ninety (90) days, whichever is longer. This limited warranty covers
manufacturing defects in materials and workmanship encountered in normal,
noncommercial use of this product and shall not apply to the following: damage
which occurs in shipment; delivery and installation; applications and uses for
which this product was not intended; altered product or serial numbers; cosmetic
damage or exterior nish; accidents, abuse, neglect, re, water, lightning or
other acts of nature; use of products, equipment, systems, utilities, services,
parts, supplies, accessories, applications, installations, repairs, external wiring or
connectors not supplied or authorized by SAMSUNG which damage this product or
result in service problems; incorrect electrical line voltage, uctuations and surges;
customer adjustments and failure to follow operating instructions, maintenance
and environmental instructions that are covered and prescribed in the instruction
book; product removal and reinstallation; problems caused by pest infestations,
and overheating or overcooking by user. This limited warranty shall not cover
cases of incorrect electric current, voltage or supply, light bulbs, house fuses,
house wiring, cost of a service call for instructions, or xing installation errors.
Furthermore, damage to the glass cooktop caused by the use of cleaners other
than the recommended cleaners and pads, damage to the glass cook top caused
by hardened spills of sugary materials or melted plastic that are not cleaned
according to the directions in the use and care guide are not covered. SAMSUNG
does not warrant uninterrupted or error-free operation of the product.
EXCEPT AS SET FORTH HEREIN THERE ARE NO WARRANTIES ON THIS
PRODUCT EITHER EXPRESS OR IMPLIED AND SAMSUNG DISCLAIMS ALL
WARRANTIES INCLUDING, BUT NOT LIMITED TO, ANY IMPLIED WARRANTIES OF
MERCHANTABILITY, INFRINGEMENT OR FITNESS FOR A PARTICULAR PURPOSE. NO
WARRANTY OR GUARANTY GIVEN BY ANY PERSON, FIRM OR CORPORATION WITH
RESPECT TO THIS PRODUCT SHALL BE BINDING ON SAMSUNG. SAMSUNG SHALL
NOT BE LIABLE FOR LOSS OF REVENUE OR PROFITS, FAILURE TO REALIZE SAVINGS
OR OTHER BENEFITS, OR ANY OTHER SPECIAL, INCIDENTAL OR CONSEQUENTIAL
DAMAGES CAUSED BY THE USE, MISUSE OR INABILITY TO USE THIS PRODUCT,
REGARDLESS OF THE LEGAL THEORY ON WHICH THE CLAIM IS BASED, AND EVEN
IF SAMSUNG HAS BEEN ADVISED OF THE POSSIBILITY OF SUCH DAMAGES. NOR
SHALL RECOVERY OF ANY KIND AGAINST SAMSUNG BE GREATER IN AMOUNT
THAN THE PURCHASE PRICE OF THE PRODUCT SOLD BY SAMSUNG AND CAUSING
THE ALLEGED DAMAGE. WITHOUT LIMITING THE FOREGOING, PURCHASER
ASSUMES ALL RISK AND LIABILITY FOR LOSS, DAMAGE OR INJURY TO PURCHASER
AND PURCHASER’S PROPERTY AND TO OTHERS AND THEIR PROPERTY ARISING
OUT OF THE USE, MISUSE OR INABILITY TO USE THIS PRODUCT. THIS LIMITED
WARRANTY SHALL NOT EXTEND TO ANYONE OTHER THAN THE ORIGINAL
PURCHASER OF THIS PRODUCT, IS NONTRANSFERABLE AND STATES YOUR
EXCLUSIVE REMEDY.
Some states do not allow limitations on how long an implied warranty lasts, or
the exclusion or limitation of incidental or consequential damages, so the above
limitations or exclusions may not apply to you. This warranty gives you specic
legal rights, and you may also have other rights which vary from state to state.
To obtain warranty service, please contact SAMSUNG at:
Samsung Electronics Canada Inc.
2050 Derry Road West, Mississauga, Ontario L5N 0B9 Canada
1-800-SAMSUNG (726-7864) and www.samsung.com/ca/support (English)
www.samsung.com/ca_fr/support (French)
Warranty (CANADA)
English 65
Page 66
AppendixAppendix
Open Source Announcement
The software included in this product contains open source software.
The following URL http://opensource.samsung.com/opensource/SMART_TP2_0/
seq/0 leads to open source license information as related to this product.
Memo
Appendix
66 English
Page 67

Memo
Page 68
Scan the QR code* or visit
www.samsung.com/spsn
to view our helpful
How-to Videos and Live Shows
* Requires reader to be installed on your
smartphone
Please be advised that the Samsung warranty does NOT cover service calls to explain product operation, correct improper installation, or perform normal cleaning or
maintenance.
QUESTIONS OR COMMENTS?
COUNTRY CALL OR VISIT US ONLINE AT
U.S.A
Consumer Electronics
CANADA 1-800-SAMSUNG (726-7864)
1-800-SAMSUNG (726-7864) www.samsung.com/us/support
www.samsung.com/ca/support (English)
www.samsung.com/ca_fr/support (French)
DG68-01209A-07
Page 69
Estufa eléctrica
Manual del usuario
NE63*871*** / NE63**871*****
Page 70
Dispositivo antivuelco
ADVERTENCIA
Para reducir el riesgo de inclinación o vuelco de la estufa, ésta debe estar
asegurada mediante un dispositivo antivuelco correctamente instalado.
DESPUÉS DE INSTALAR LA ESTUFA, CONFIRME QUE EL DISPOSITIVO
ANTIVUELCO ESTÉ CORRECTAMENTE INSTALADO Y BIEN ACOPLADO.
Consulte el manual de instalación donde se brindan las instrucciones
correspondientes.
i) Si el dispositivo antivuelco no está instalado, un niño o un adulto
podrían inclinar la estufa y morir
j) Verique que el dispositivo antivuelco haya sido instalado y conectado
correctamente en la parte posterior derecha (o posterior izquierda) de la
base de la estufa.
k) Si desplaza la estufa y luego vuelve a colocarla en su lugar, asegúrese
de que el dispositivo antivuelco esté acoplado en la parte posterior
derecha o izquierda de la base de la estufa.
l) No opere la estufa sin el dispositivo antivuelco en su lugar y acoplado.
m) No hacerlo puede provocar la muerte o quemaduras serias a niños o
adultos.
ADVERTENCIA
No se pare sobre las puertas de la estufa, ni se apoye o siente sobre
ellas. Puede causar que la estufa se incline o vuelque, produciendo
quemaduras o lesiones severas.
Conrme que el dispositivo antivuelco se encuentre instalado
correctamente. Luego, para vericar que dicho dispositivo
esté conectado, tome el borde superior trasero de la estufa y
cuidadosamente intente inclinarla hacia adelante. El dispositivo
antivuelco debería prevenir que la estufa se incline hacia adelante más
de unas pocas pulgadas.
Si, por cualquier razón, hala la estufa alejándola de la pared, asegúrese
de que el dispositivo antivuelco encaje correctamente cuando empuje
la estufa a su lugar contra la pared. De lo contrario, si usted o un niño
se paran, sientan o apoyan sobre la puerta abierta, la estufa podría
inclinarse o volcar y causar lesiones.
Nunca retire completamente las patas niveladoras. De lo contrario, la
estufa no quedará bien sujeta con el dispositivo antivuelco.
2 Español
Page 71

Aviso sobre regulaciones
1. Aviso de la FCC
PRECAUCIÓN
PRECAUCIÓN DE LA FCC: Todos los cambios y las modicaciones que no
cuenten con la aprobación expresa de la parte responsable del cumplimiento
invalidará la autoridad del usuario para operar el equipo.
Este dispositivo cumple con la sección 15 de las Normas de la FCC. El
funcionamiento se encuentra sujeto a las siguientes dos condiciones:
1) Este dispositivo no puede causar interferencia dañina, y
2) Este dispositivo debe aceptar la recepción de cualquier interferencia,
incluidas aquellas que puedan causar un funcionamiento indeseado.
En los productos vendidos en los mercados de Estados Unidos y Canadá,
solo están disponibles los canales 1–11. No se pueden seleccionar otros
canales.
DECLARACIÓN DE LA FCC:
Este equipo ha sido sometido a pruebas y se ha determinado que se
encuentra dentro de los límites para los dispositivos digitales clase B, de
acuerdo con la sección 15 de las Normas de la FCC. Estos límites están
destinados a ofrecer una protección razonable contra interferencias
perjudiciales en una instalación residencial.
Este equipo genera, utiliza y puede irradiar energía de radiofrecuencia y, si
no se lo instala y utiliza de acuerdo con las instrucciones, puede provocar
interferencia perjudicial a las comunicaciones de radio. Sin embargo, no se
garantiza que no habrá interferencia en alguna instalación determinada.
Si este equipo causa interferencia perjudicial con la recepción de radio o
televisión, lo que puede determinarse apagando y encendiendo el equipo,
se recomienda que el usuario intente corregir la interferencia de una de las
siguientes maneras:
• Reorientar o reubicar la antena receptora
• Aumentar la separación entre el equipo y el receptor
• Conectar el equipo a una toma de un circuito distinto de aquel al que
están conectados la radio o el televisor.
• Consultar al distribuidor o a un técnico de radio/TV experimentado para
obtener ayuda.
Español 3
Page 72

Aviso sobre regulaciones
DECLARACIÓN DE LA FCC SOBRE LA EXPOSICIÓN A LA RADIACIÓN:
Este equipo cumple con los límites de exposición a la radiación establecidos
por la FCC para un entorno no controlado. Este equipo debe ser instalado
y operado a una distancia mínima de 8 pulgadas (20 cm) entre su cuerpo
y el radiador. Este dispositivo y su(s) antena(s) no deben ubicarse cerca ni
utilizarse junto con ninguna otra antena o transmisor.
2. Aviso de IC
El término “IC” antes del número de certicación de radio indica que
se cumplieron las especicaciones técnicas de Industry Canada. El
funcionamiento se encuentra sujeto a las siguientes dos condiciones: (1)
este dispositivo no puede causar interferencias, y (2) este dispositivo debe
aceptar cualquier interferencia, incluidas aquellas que puedan provocar un
funcionamiento no deseado.
Este aparato digital de Clase B cumple con la norma ICES-003 de Canadá.
En los productos vendidos en los mercados de Estados Unidos y Canadá,
solo están disponibles los canales 1–11. No se pueden seleccionar otros
canales.
DECLARACIÓN DE IC SOBRE LA EXPOSICIÓN A LA RADIACIÓN:
Este equipo cumple con los límites de exposición a la radiación IC RSS-102
establecidos para un entorno no controlado. Este equipo debe ser instalado
y operado a una distancia mínima de 8 pulgadas (20 cm) entre su cuerpo
y el radiador. Este dispositivo y su(s) antena(s) no deben ubicarse cerca ni
utilizarse junto con ninguna otra antena o transmisor.
4 Español
Page 73
Contenido
Instrucciones de seguridad importantes 6
Introducción a su nueva estufa 21
Descripción general 21
Elementos incluidos con su estufa 21
Antes de comenzar 22
Sugerencias para ahorrar energía 22
Supercie de cocción 22
Acerca de la supercie de cocción 22
Como regular el electrodoméstico para la cocción en supercie 24
Utilización de los recipientes de cocción correctos 26
Selección de los recipientes de cocción correctos 27
Protección de la cubierta 27
Funcionamiento del horno 28
Panel de control del horno 28
Cómo utilizar la perilla de disco 28
Modo de visualización 29
Cómo encender y apagar la luz del horno 29
Reloj 29
Cocción del horno 30
Modo de cocción 30
Uso de las parrillas del horno 31
Guía de recetas 33
Sonda de temperatura 37
Opciones de cocción 39
Funciones especiales 40
Más funciones 41
Ajustes del sistema 43
Smart Control 45
Control por voz 46
Mantenimiento de su electrodoméstico 47
Autolimpieza 47
Limpieza con vapor 48
Cuidado y limpieza del horno 49
Cuidado y limpieza de la cubierta de vidrio 51
Cómo retirar y volver a instalar la puerta del horno 53
Cómo retirar y volver a instalar el cajón de almacenamiento 55
Recambio de la luz del horno 55
Resolución de problemas 56
Resolución de problemas 56
Códigos de información 60
Garantía (EE.UU.) 62
Garantía (CANADÁ) 63
Apéndice 65
Anuncio de código abierto 65
Contenido
Español 5
Page 74
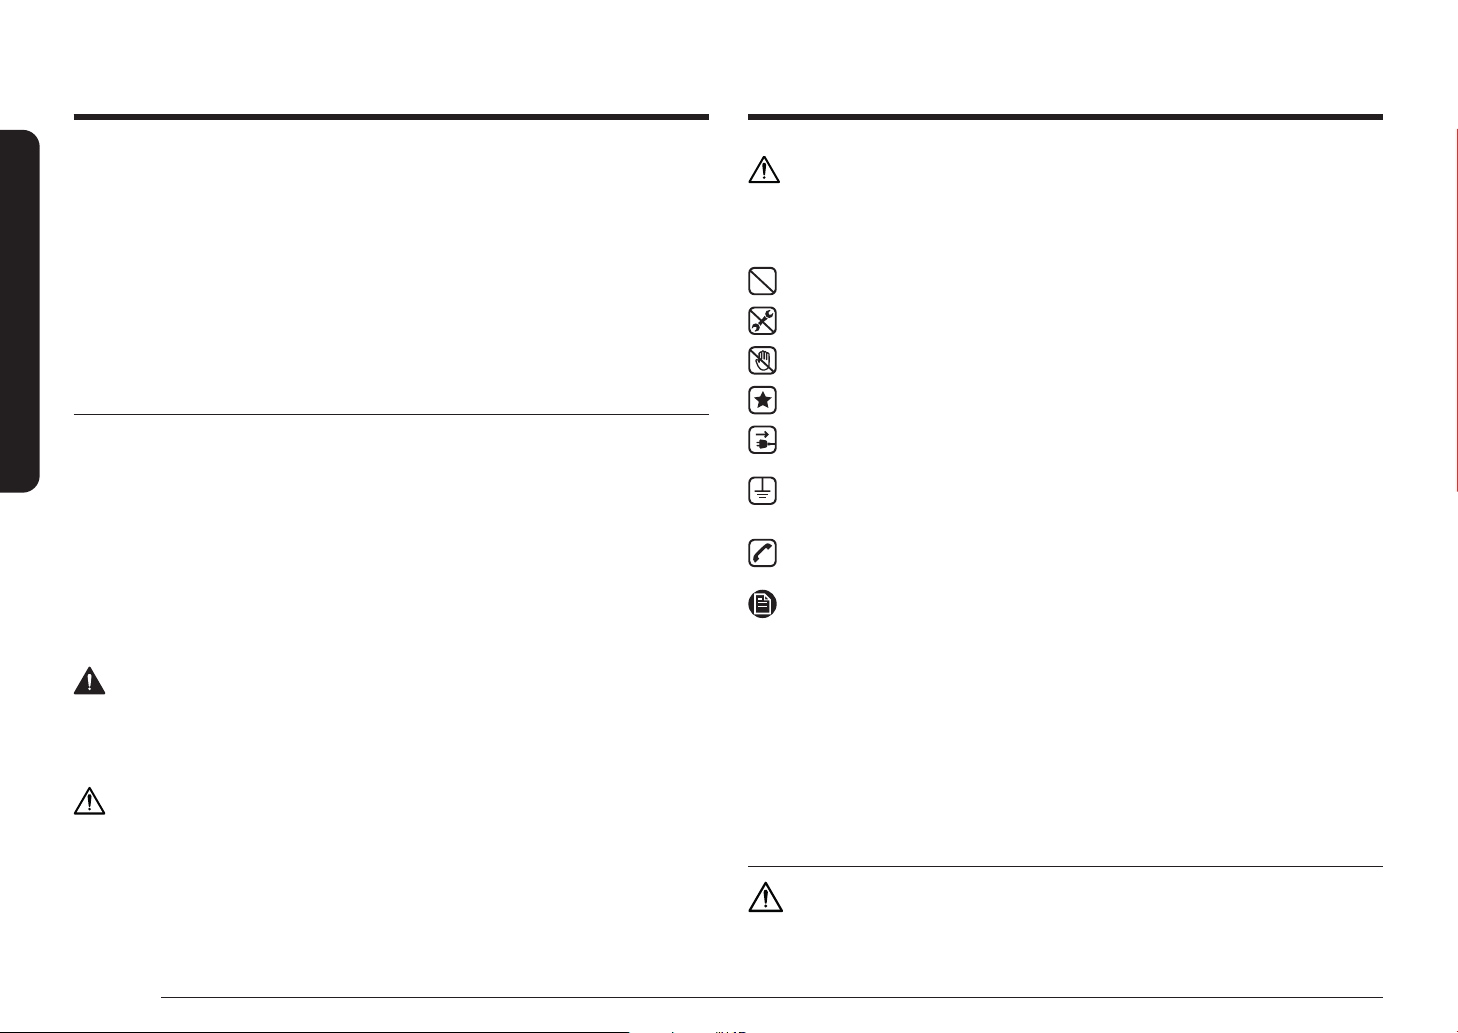
Instrucciones de seguridad importantes
Instrucciones de seguridad importantes
Instrucciones de seguridad importantes
Lea y siga todas las instrucciones antes de utilizar su estufa con el n de
evitar riesgos de incendio, descargas eléctricas, lesiones personales o daños
al utilizar su estufa. Esta guía no cubre todas las situaciones que podrían
ocurrir. Siempre tome contacto con su agente de servicio o con el fabricante
para consultar sobre cualquier problema que usted no comprenda.
LO QUE NECESITA SABER SOBRE LAS
INSTRUCCIONES DE SEGURIDAD
Las advertencias y las instrucciones de seguridad importantes de este
manual no cubren todos los problemas y situaciones que podrían ocurrir.
Usted tiene la responsabilidad de usar el sentido común, de ser precavido y
cuidadoso al instalar, mantener y manejar su horno.
Símbolos y precauciones de seguridad importantes
Signicado de iconos y símbolos en este manual del usuario:
ADVERTENCIA
Prácticas peligrosas o inseguras que pueden provocar lesiones graves o la
muerte.
PRECAUCIÓN
Para reducir el riesgo de incendio, explosión, descarga eléctrica o lesiones
personales cuando utilice la estufa, siga estas instrucciones básicas de seguridad.
NO intentar.
NO desensamblar.
NO tocar.
Siga las instrucciones elmente.
Desenchufe el enchufe de alimentación eléctrica del tomacorriente de la pared.
Asegúrese de que la máquina tenga buena conexión a tierra para evitar
descargas eléctricas.
Comuníquese con un centro de servicio técnico de Samsung para
obtener ayuda.
Nota
Estas señales de advertencia se incluyen para evitar lesiones a usted y a
otras personas. Sígalos explícitamente.
Una vez que haya leído esta sección, consérvela en un lugar seguro para
consultas futuras.
PRECAUCIÓN
Prácticas peligrosas o inseguras que pueden provocar lesiones leves o daños
a la propiedad.
CONSERVE ESTAS INSTRUCCIONES
6 Español
ADVERTENCIA DE LA PROPOSICIÓN 65 DEL
ESTADO DE CALIFORNIA
ADVERTENCIA
Cáncer y Daño Reproductivo - www.P65Warnings.ca.gov
Page 75
PARA SU SEGURIDAD
Cuando utilice electrodomésticos, debe seguir precauciones de seguridad
básicas, a saber:
PRECAUCIÓN
• Utilice este electrodoméstico solo para el uso para el que fue destinado,
tal como se describe en este Manual del propietario.
• Las supercies que podrían estar calientes incluyen la cubierta, las
áreas enfrente de la cubierta, la abertura de ventilación del horno, las
supercies cercanas a dicha abertura y las hendeduras alrededor de la
puerta del horno.
Asegúrese de que su electrodoméstico sea correctamente instalado y
conectado a tierra por un técnico calicado.
Mantenimiento del usuario - No repare ni reemplace ninguna pieza
de este electrodoméstico salvo que esto se encuentre especícamente
recomendado en este manual. Todas las demás tareas de reparación o
mantenimiento deben ser encomendadas a un técnico calicado.
Antes de realizar tareas de mantenimiento o reparación, siempre
desconecte la alimentación eléctrica al electrodoméstico quitando el
fusible o accionando el disyuntor.
• No se introduzca en el horno.
• Ningún artículo que pueda resultar de interés para los niños debe
almacenarse en gabinetes arriba de la estufa o en su anaquel
posterior. Los niños que se trepasen a la estufa para alcanzar los
elementos podrían resultar seriamente lesionados.
• No deje solos a los niños. Los niños nunca deben quedar solos o sin
vigilancia en el lugar donde se utiliza este electrodoméstico. Nunca
se les debe permitir sentarse o pararse sobre ninguna parte del
electrodoméstico.
• Nunca utilice su electrodoméstico para entibiar o calentar el
ambiente.
• No eche agua sobre grasas en llamas. Apague el horno para evitar
que las llamas se extiendan. Ahogue el fuego o las llamas cerrando
la puerta, o bien utilice un producto químico seco, bicarbonato de
sosa o un extintor de incendio a base de espuma.
• Evite rayar o impactar las puertas de vidrio, la cubierta o el panel
de control. Hacerlo puede producir rotura de vidrios. No cocine
sobre un producto con vidrios rotos. Se pueden producir descargas
eléctricas, un incendio o cortes.
Instrucciones de seguridad importantes
CONSERVE ESTAS INSTRUCCIONES
Español 7
Page 76
Instrucciones de seguridad importantes
Instrucciones de seguridad importantes
Instrucciones de seguridad importantes
• Si se produce un incendio en el horno durante la autolimpieza,
apague el horno y espere a que se extinga el fuego. No fuerce la
apertura de la puerta. La entrada de aire fresco a las temperaturas
de autolimpieza puede avivar las llamas en el horno. No cumplir
con estas instrucciones puede dar como resultado quemaduras
graves.
• Si el horno está muy sucio de aceite, realice una autolimpieza del
mismo antes de usarlo nuevamente. Dejar el aceite crea un riesgo
de incendio.
• Friegue la suciedad resistente de la parte baja del horno con
un trapo o una toalla de papel antes de la autolimpieza. Hacer
autolimpieza del horno cuando hay aceite pesado en el interior
requiere ciclos de limpieza más largos y produce más humo.
• Almacenamiento en o sobre el electrodoméstico. No almacene
materiales inamables en el horno o cerca de las unidades de
supercie. Asegúrese de que todos los materiales de empaque
hayan sido retirados del electrodoméstico antes de ponerlo en
funcionamiento. Mantenga materiales plásticos, indumentaria y
papeles alejados de las partes del electrodoméstico que podrían
calentarse.
• Utilice la indumentaria apropiada. Nunca use prendas amplias o
colgantes mientras utiliza el electrodoméstico.
• Utilice solamente agarradores aislantes secos. Colocar agarradores
aislantes mojados o húmedos sobre supercies calientes podría
producir quemaduras por vapor. No permita que el agarrador entre
en contacto con los elementos calentadores cuando están calientes.
No utilice una toalla o cualquier otra tela voluminosa.
• Enseñe a los niños que no deben jugar con los controles ni con
ninguna otra parte de la estufa.
• Para su seguridad, no use limpiadores de agua a alta presión ni
limpiadores a chorro de vapor para limpiar ninguna pieza de la
estufa.
• Si el cable de alimentación está dañado, deberá ser reemplazado
por el fabricante, su agente de servicio técnico o personas con una
calicación similar a n de evitar riesgos.
• El uso de este electrodoméstico no es apto para personas
(incluidos los niños) con capacidades físicas, sensoriales o mentales
reducidas, o que no tengan experiencia y conocimientos, a menos
que sean supervisados o hayan recibido instrucción sobre el uso
del electrodoméstico por parte de una persona responsable de su
seguridad.
• No se apoye sobre la estufa ya que podría girar las perillas de
control sin darse cuenta.
CONSERVE ESTAS INSTRUCCIONES
8 Español
Page 77
UNIDADES DE SUPERFICIE DE COCCIÓN
• Nunca deje sin atención unidades de supercie reguladas a altas
temperaturas. Los derrames por exceso de hervor producen humo
y los derrames de sustancias grasas pueden arder en llamas.
• Revestimientos protectores – No utilice papel de aluminio para
revestir los boles recogegotas o el fondo del horno, salvo de la
manera sugerida en el manual. La instalación incorrecta de estos
revestimientos puede causar riesgos de descarga eléctrica o incendio.
• Para evitar derrame de aceite e incendio, use una cantidad
mínima de aceite cuando haga frituras y evite cocinar alimentos
congelados que tengan cantidades excesivas de hielo.
• No levante la cubierta. Levantar la cubierta puede dañar la estufa
y generar un funcionamiento defectuoso.
• No haga funcionar la cubierta sin utensilios de cocina. Si se hace
funcionar la cubierta sin un recipiente de cocción, se calentarán las
perillas de control.
• Nunca utilice la supercie de la cubierta de vidrio como tabla para
cortar.
• Sea precavido al tocar la cubierta. La supercie de vidrio de la
cubierta retendrá el calor aún después de que se hayan apagado
los controles.
• No mueva el recipiente ni el bol a una posición horizontal de la
supercie de la cubierta.
• Tenga cuidado cuando coloque cucharas u otros utensilios para revolver
sobre la supercie de vidrio de la cubierta mientras se encuentre en
uso. Podrían calentarse y causar quemaduras.
• Utilice recipientes de cocción del tamaño adecuado. Este
electrodoméstico se encuentra equipado con unidades de supercie
de diferentes tamaños. Seleccione ollas y sartenes que tengan bases
planas lo sucientemente grandes para cubrir la supercie del elemento
calentador. Si se utilizan recipientes demasiado pequeños, una porción
del elemento calentador quedará expuesta al contacto directo y podría
causar que sus ropas ardieran. Hacer coincidir el tamaño de la olla o
sartén con el quemador también mejorará la eciencia.
• Las manijas de los recipientes de cocción deben estar posicionadas
hacia adentro y sin proyectarse sobre unidades de supercie
adyacentes – Para reducir el riesgo de quemaduras, encendido de
materiales inamables y derrames causados por contactos accidentales
con los recipientes de cocción, posicione las manijas de estos hacia
adentro y sin proyectarse sobre unidades de supercie adyacentes.
• Utensilios recubiertos. Solamente ciertos tipos de utensilios para cocinar
de vidrio, vitro-cerámico o cerámica, o con supercies esmaltadas o
con otros tratamientos pueden usarse en la supercie de cocción sin
romperse por bruscas diferencias de temperatura.
• Limpieza. Lea y siga todas las instrucciones y advertencias de las
etiquetas de las cremas de limpieza.
Instrucciones de seguridad importantes
CONSERVE ESTAS INSTRUCCIONES
Español 9
Page 78
Instrucciones de seguridad importantes
Instrucciones de seguridad importantes
Instrucciones de seguridad importantes
• Asegúrese de saber cuál de las perillas controla cada unidad de
supercie. Asegúrese de que encendió la unidad de supercie correcta.
• Siempre apague las unidades de supercie antes de retirar los
recipientes de cocción.
• Cuando prepare platillos ambeados debajo de la campana, encienda el
ventilador.
• Vigile las frituras que se realicen con regulaciones de temperatura altas
o medianas.
• No almacene objetos pesados sobre la supercie de cocción que
pudieran caerse y dañarla.
• No utilice fundas decorativas sobre los elementos de la supercie:
si accidentalmente se enciende un elemento, la funda decorativa se
calentará y, posiblemente, se derretirá. Si toca las fundas calientes,
podría quemarse. También se puede dañar la cubierta.
• Los electrodomésticos montados a nivel pueden operarse solo
después de que fueron instalados en gabinetes y lugares de
trabajo que cumplen con las normas pertinentes. Esto asegura que
los electrodomésticos sean instalados cumpliendo con las normas
de seguridad adecuadas.
• Si su electrodoméstico funciona mal o si aparecen roturas,
rajaduras o grietas:
- apague todas las zonas de cocción
- desenchufe la estufa del tomacorriente CA de la pared
- comuníquese con su centro de servicio local de Samsung.
ADVERTENCIA
Si la supercie está rajada, apague y desenchufe el electrodoméstico para
evitar la posibilidad de una descarga eléctrica. No utilice su cubierta hasta
que la supercie de vidrio haya sido reemplazada.
SEGURIDAD ELÉCTRICA
ADVERTENCIA
• Instalación adecuada- Asegúrese de que su electrodoméstico sea
correctamente instalado y conectado a tierra por un técnico calicado.
• El electrodoméstico debe ser reparado únicamente por personal técnico
calicado. Las reparaciones realizadas por personas no calicadas pueden
causar lesiones o fallas graves. Si necesita reparar su electrodoméstico,
comuníquese con un centro de servicio autorizado de Samsung. No seguir
estas instrucciones puede resultar en daños y anular la garantía.
• Asegúrese de que el electrodoméstico esté apagado antes de reemplazar
la bombilla de luz para evitar la posibilidad de una descarga eléctrica.
• La estufa no debe colocarse sobre una base.
CONSERVE ESTAS INSTRUCCIONES
10 Español
Page 79
SEGURIDAD DE LOS NIÑOS
HORNO
Instrucciones de seguridad importantes
ADVERTENCIA
• Este electrodoméstico no está previsto para ser utilizado por niños
o personas enfermas sin la adecuada supervisión de un adulto
responsable.
• Los niños deben ser supervisados para garantizar que no jueguen con el
electrodoméstico.
• Mantenga a los niños alejados de la puerta cuando la abra o la cierre ya
que podría golpearlos o pillarles los dedos.
• Las zonas de cocción se calentarán cuando usted cocine. Para evitar
que los niños pequeños se quemen, siempre manténgalos alejados del
electrodoméstico cuando cocina.
• Durante la autolimpieza, las supercies pueden calentarse más de lo
normal. Mantenga los niños pequeños alejados de la estufa cuando está
en el modo de autolimpieza.
ADVERTENCIA
Las partes accesibles pueden calentarse durante el uso. Los niños pequeños
deben mantenerse alejados para evitar quemaduras.
• NO TOQUE LOS ELEMENTOS CALENTADORES NI LAS SUPERFICIES
INTERIORES DEL HORNO. Los elementos calentadores pueden estar
calientes aun cuando su color sea oscuro. Las supercies interiores
de un horno se calientan lo suciente como para producir
quemaduras. Durante y después del uso, no toque los elementos
calentadores ni las supercies interiores del horno y tampoco
permita que sus ropas ni otros materiales inamables entren en
contacto con ellos hasta que haya transcurrido tiempo suciente
como para que se enfríen. Otras supercies del electrodoméstico
pueden calentarse lo suciente como para producir quemaduras.
Entre ellas se encuentran las aberturas de ventilación del horno
y supercies cercanas a estas aberturas, la puerta del horno y la
ventana de la puerta del horno.
• No caliente envases de alimentos que no hayan sido abiertos. La
acumulación de presión puede hacer que el envase explote y cause
lesiones.
• No utilice el horno para secar periódicos. Si se recalientan, pueden
arder en llamas.
• No utilice el horno para almacenar objetos ni alimentos. Los
elementos almacenados en un horno pueden prenderse fuego.
CONSERVE ESTAS INSTRUCCIONES
Español 11
Page 80
Instrucciones de seguridad importantes
Instrucciones de seguridad importantes
Instrucciones de seguridad importantes
• Cuando abra la puerta, hágalo con precaución. Permita la salida
del vapor o aire caliente antes de retirar o volver a colocar los
alimentos en el horno.
• Revestimientos protectores. No utilice papel de aluminio para
revestir el fondo del horno, salvo de la manera sugerida en el
manual. La instalación incorrecta de estos revestimientos puede
causar riesgos de descarga eléctrica o incendio.
• Mantenga los conductos de ventilación del horno libres de
obstrucciones. La abertura de ventilación se encuentra ubicada
por sobre la unidad de supercie trasera derecha. Esta área podría
calentarse durante el uso del horno. Nunca tapone esta abertura
de ventilación ni coloque elementos de plástico o sensibles al calor
sobre dicha abertura.
• Colocación de las parrillas del horno. Siempre coloque las parrillas
del horno en la posición deseada mientras el horno esté frío. Si es
imprescindible mover la parrilla mientras el horno se encuentra
caliente, use agarradores aislantes. No deje que los agarradores
aislantes entren en contacto con el elemento calentador caliente en
el horno.
• No permita que papel de aluminio o una sonda para carne entren
en contacto con los elementos calentadores.
• Durante el uso, el electrodoméstico se calienta.
Se debe tener la precaución de evitar tocar los elementos
calentadores del interior del horno.
• No utilice limpiadores abrasivos ni espátulas de metal losas para
limpiar el vidrio de la puerta del horno. Podrían rayar la supercie,
lo cual puede provocar que el vidrio se haga añicos.
PRECAUCIÓN
No intente hacer funcionar el horno durante un corte de energía eléctrica.
Si se produce un corte de energía, siempre apague el horno. Si no se apaga
el horno y se restablece el suministro de energía, el horno puede empezar
a funcionar nuevamente. Los alimentos que quedaron desatendidos podrían
arder en llamas o arruinarse.
OPERACIÓN REMOTA
Este electrodoméstico puede congurarse para operarlo de manera remota
en cualquier momento.
• No almacene ningún material inamable ni elementos sensibles a
la temperatura dentro, sobre ni cerca de unidades de supercie del
electrodoméstico.
CONSERVE ESTAS INSTRUCCIONES
12 Español
Page 81
HORNOS AUTOLIMPIANTES
No limpie la junta selladora de la puerta. La junta de la puerta es
esencial para lograr que el horno quede bien sellado. Se debe tener
cuidado de no frotar, dañar o mover la junta.
• Nunca tenga aves mascota en la cocina. Las aves son
extremadamente sensibles a las emanaciones gaseosas que
se producen durante el ciclo de autolimpieza del horno. Tales
emanaciones pueden resultar dañinas o mortales para las aves.
Lleve las aves a una habitación bien ventilada.
• Aplique el ciclo de autolimpieza únicamente a las piezas
enumeradas en este manual. Antes de la autolimpieza del horno,
quite la partición, la parrilla, los utensilios y los alimentos.
• Antes de hacer funcionar el ciclo de autolimpieza, limpie la grasa y
los restos de comida del horno. Unas cantidades excesivas de grasa
podrían encenderse y generar daños por el humo en su hogar.
• No use ningún producto limpiador de hornos ni revestimiento
protector dentro del horno ni sobre sus supercies exteriores.
• Retire los estantes niquelados del horno antes de comenzar el ciclo
de autolimpieza, de lo contrario pueden sufrir alteraciones de color.
• Si el ciclo de autolimpieza funciona mal, apague el horno y
desconecte la alimentación eléctrica. Hágalo reparar por un técnico
calicado.
• Los derrames excesivos deben eliminarse antes de ejecutar el ciclo
de autolimpieza.
CAMPANAS DE VENTILACIÓN
• Limpie con frecuencia las campanas de ventilación. No deje que se
acumule grasa en la campana o el ltro.
• Cuando ambee alimentos debajo de la campana, encienda el
ventilador.
Instrucciones de seguridad importantes
CONSERVE ESTAS INSTRUCCIONES
Español 13
Page 82
Instrucciones de seguridad importantes
Instrucciones de seguridad importantes
Instrucciones de seguridad importantes
SUPERFICIES DE COCCIÓN VITROCERÁMICAS
• NO TOQUE LAS UNIDADES DE SUPERFICIE NI LAS ÁREAS CERCANAS
A LAS UNIDADES.
Las unidades de supercie pueden estar calientes aun cuando su
color sea oscuro. Las áreas cercanas a las unidades de supercie
pueden calentarse lo suciente como para producir quemaduras.
Durante y después del uso, no toque las unidades de supercie
ni las áreas cercanas ni tampoco permita que sus ropas ni otros
materiales inamables entren en contacto con ellas hasta que haya
transcurrido tiempo suciente como para que se enfríen. Entre
estas áreas se cuentan la cubierta y su revestimiento.
• No cocine sobre una cubierta quebrada. Si la cubierta se quebrase,
las soluciones de limpieza y sustancias derramadas podrían
penetrar la cubierta quebrada y generar riesgos de descarga
eléctrica. Comuníquese inmediatamente con un técnico calicado.
Limpie la cubierta con precaución. Si utiliza una esponja o un paño
húmedo para limpiar derrames en una supercie de cocción caliente,
cuídese de posibles quemaduras por vapor. Algunos productos de
limpieza pueden producir emanaciones nocivas si se aplican sobre una
supercie caliente.
ADVERTENCIAS FUNDAMENTALES PARA LA
INSTALACIÓN
ADVERTENCIA
• La instalación de este electrodoméstico debe estar a cargo de un
técnico o una compañía de servicio calicados.
- Si la estufa no es instalada por un técnico calicado, pueden
producirse descargas eléctricas, incendios, explosiones,
problemas con el producto o lesiones.
• Desembale el horno, quite todo el material de embalaje y examine
el horno para determinar si hay daños tales como abolladuras
en el interior o exterior del electrodoméstico, pestillos de la
puerta rotos, rajaduras en la puerta o una puerta que no esté
correctamente alineada. Si hay algún daño, no ponga el horno en
funcionamiento y notique de inmediato al distribuidor.
• Enchufe el cable de alimentación en un tomacorriente conectado
a tierra con la conguración adecuada. Su horno debe ser el único
elemento conectado en este circuito.
• Mantenga todos los materiales de empaque fuera del alcance de
los niños. Podrían utilizarlos para jugar y lastimarse.
CONSERVE ESTAS INSTRUCCIONES
14 Español
• Instale el electrodoméstico en un piso nivelado y resistente que
pueda soportar el peso.
- De no hacerlo así, se pueden producir vibraciones anormales,
ruidos o problemas con el producto.
Page 83
• Este electrodoméstico debe conectarse a tierra correctamente.
• No conecte el electrodoméstico a una tubería de gas, una tubería
plástica de agua o un cable de teléfono.
- Esto puede provocar descarga eléctrica, incendio, explosión o
problemas con el producto.
• No corte ni retire el pin de conexión a tierra del cable de
alimentación bajo ninguna circunstancia.
• Conecte el horno a un circuito que proporcione el amperaje
correcto.
• No instale este electrodoméstico en un lugar húmedo, engrasado o
cubierto de polvo, ni en un lugar expuesto a la luz solar directa o
al agua (gotas de lluvia).
- Se puede producir una descarga eléctrica o un incendio.
• No utilice un cable de alimentación dañado ni un tomacorriente de
pared ojo.
- Se puede producir una descarga eléctrica o un incendio.
• No jale ni doble excesivamente el cable de alimentación.
• No retuerza ni ate el cable de alimentación.
ADVERTENCIA FUNDAMENTAL PARA EL USO
PRECAUCIÓN
• Si el electrodoméstico se inunda con cualquier líquido,
comuníquese con el centro de servicio técnico Samsung más
cercano. No hacerlo puede provocar una descarga eléctrica o un
incendio.
• Si el electrodoméstico produce un ruido extraño, olor a quemado o
humo, desenchufe de inmediato la alimentación y comuníquese con
el centro de servicio técnico Samsung más cercano.
- No hacerlo puede provocar una descarga eléctrica o un
incendio
• En caso de producirse una fuga de gas (como gas propano,
gas LP, etc.), ventile el área de inmediato. No toque el cable de
alimentación. No toque el electrodoméstico.
- Una chispa puede causar una explosión o un incendio.
Instrucciones de seguridad importantes
• No enganche el cable de alimentación de un objeto metálico, ni
coloque un objeto pesado sobre el cable de alimentación, ni inserte
el cable de alimentación entre objetos.
- Se puede producir una descarga eléctrica o un incendio.
Si se daña el cable de alimentación, comuníquese con el centro de
servicio técnico Samsung más cercano.
CONSERVE ESTAS INSTRUCCIONES
Español 15
Page 84
Instrucciones de seguridad importantes
Instrucciones de seguridad importantes
Instrucciones de seguridad importantes
• Tenga cuidado de no entrar en contacto con la puerta del horno,
los elementos calentadores o cualquier otra pieza caliente con su
cuerpo mientras cocina o justo después de cocinar.
- No hacerlo puede provocar quemaduras.
• Si los materiales en el interior del horno se encendieran, mantenga
la puerta cerrada, apague el horno y desconecte el cable de
alimentación o corte la alimentación en el panel del disyuntor o
fusible. Si abre la puerta, el fuego puede expandirse.
• Siempre respete las precauciones de seguridad cuando utilice su
horno. Nunca intente reparar el horno: contiene voltaje peligroso
en el interior. Si se debe reparar el horno, comuníquese con un
centro de servicio técnico Samsung autorizado cercano.
• Si utiliza el electrodoméstico cuando está contaminado por
sustancias extrañas, como restos de comida, pueden surgir
problemas.
• Tenga cuidado al quitar el envoltorio cuando retira comida del
electrodoméstico.
- Si la comida está caliente, puede salir vapor caliente cuando
retira el envoltorio y esto puede provocar quemaduras.
• No intente reparar, desarmar ni modicar el electrodoméstico.
- Como ingresa corriente de alta tensión en el chasis del
producto, esto puede provocar una descarga eléctrica o un
incendio.
- Cuando sea necesaria una reparación, comuníquese con el
centro de servicio técnico Samsung más cercano.
• Si alguna sustancia extraña, como agua, ingresa en el
electrodoméstico, comuníquese con el centro de servicio técnico
Samsung más cercano.
- No hacerlo puede provocar una descarga eléctrica o un
incendio.
• No toque el cable de alimentación con las manos húmedas.
- Se puede producir una descarga eléctrica.
• No apague el electrodoméstico cuando hay una operación en
progreso.
- Esto puede provocar chispas y causar una descarga eléctrica o
un incendio.
• Mantenga todos los materiales de empaque fuera del alcance de
los niños, ya que pueden ser peligrosos para ellos.
- Si un niño se coloca una bolsa de plástico en la cabeza, puede
asxiarse.
CONSERVE ESTAS INSTRUCCIONES
16 Español
Page 85
• No deje que los niños ni ninguna persona con capacidades físicas,
sensoriales o mentales reducidas utilice el electrodoméstico sin
supervisión.
• Asegúrese de que los controles del electrodoméstico y las áreas de
cocción estén fuera del alcance de los niños.
- No hacerlo puede provocar una descarga eléctrica, quemaduras
o lesiones.
• No toque el interior del electrodoméstico inmediatamente después
de cocinar. El interior del electrodoméstico estará caliente.
- No hacerlo puede provocar quemaduras.
• No utilice ni coloque objetos ni aerosoles inamables cerca del
horno.
- Los elementos inamables o aerosoles pueden causar
incendios o una explosión.
• No introduzca los dedos, sustancias extrañas ni objetos metálicos,
como alleres o agujas, en las entradas, tomacorrientes u oricios.
Si se introducen sustancias extrañas en alguno de estos oricios,
comuníquese con el distribuidor del producto o con el centro de
servicio técnico Samsung más cercano.
• No altere ni haga ajustes ni reparaciones en la puerta. Bajo
ninguna circunstancia debe quitar la puerta o la coraza externa del
horno.
• No almacene ni utilice el horno al aire libre.
• Nunca use este electrodoméstico con otros nes que no sean
cocinar.
- El uso de este electrodoméstico para otro n que no sea
cocinar puede provocar un incendio.
• Abra la tapa o el tapón de recipientes sellados (botellas de té
tónico de hierbas, mamaderas, botellas de leche, etc.) antes de
calentarlos. Haga un oricio en alimentos que tiene cáscaras
(huevos, castañas, etc.) con un cuchillo, antes de cocinarlos.
- No hacerlo puede provocar quemaduras o lesiones.
• Nunca caliente en recipientes de plástico ni papel y no los utilice
para cocinar.
- Podría provocar un incendio.
• No caliente comida envuelta en papel de revistas, periódicos, etc.
- Se podría provocar un incendio.
• No abra la puerta cuando los alimentos en el horno se están
quemando.
- Si lo hace, esto provoca una entrada de oxígeno que puede
causar que los alimentos se prendan fuego.
Instrucciones de seguridad importantes
CONSERVE ESTAS INSTRUCCIONES
Español 17
Page 86
Instrucciones de seguridad importantes
Instrucciones de seguridad importantes
Instrucciones de seguridad importantes
• No aplique presión excesiva a la puerta o al interior del
electrodoméstico. No golpee la puerta o la parte interior del
electrodoméstico.
- Colgarse de la puerta puede provocar fallas en el producto y
causar lesiones graves.
- Si la puerta está dañada, no use el electrodoméstico.
Comuníquese con un centro de servicio técnico Samsung.
• No sostenga alimentos con los manos durante o inmediatamente
después de cocinar.
- Use guantes de cocina. Los alimentos pueden estar muy
calientes y podría quemarse.
- Use guantes de cocina para protegerse las manos, ya
que la manija y las supercies del horno pueden estar lo
sucientemente calientes como para causar quemaduras.
PRECAUCIONES PARA EL USO
PRECAUCIÓN
• Si la supercie está rajada, apague el electrodoméstico.
- No hacerlo puede provocar una descarga eléctrica.
• La vajilla y los envases pueden calentarse. Manipúlelos con
cuidado.
• Los alimentos calientes y el vapor pueden provocar quemaduras.
Retire cuidadosamente las tapas de los envases, dirigiendo el
vapor lejos de las manos y la cara.
• Retire las tapas de los frascos de alimentos para bebé antes de
calentarlos. Después de calentar los alimentos para bebé, revuelva
bien para distribuir el calor en forma pareja. Siempre pruebe
los alimentos para corroborar la temperatura antes de alimentar
al bebé. Los frascos de vidrio o la supercie de los alimentos
pueden parecer más fríos que el interior, el cual puede estar lo
sucientemente caliente como para quemar la boca de un niño.
• Tenga cuidado dado que las bebidas o los alimentos pueden estar
muy calientes después de calentarlos.
- Especialmente cuando alimenta a un niño. Compruebe que se
enfrió lo suciente.
CONSERVE ESTAS INSTRUCCIONES
18 Español
Page 87
• Tenga cuidado al calentar líquidos tales como agua u otras bebidas.
- Asegúrese de revolver durante o después de cocinar.
- Evite utilizar un recipiente resbaladizo con cuello angosto.
- Espere al menos 30 segundos después del calentamiento antes
de quitar el líquido calentado.
- No hacerlo puede provocar el derrame del contenido y causar
quemaduras.
• No se pare sobre el electrodoméstico ni coloque sobre él objetos
(como ropa sucia, fundas para hornos, velas encendidas, cigarrillos
encendidos, platos, productos químicos, objetos metálicos, etc.).
- Artículos tales como paños pueden quedar enganchados en la
puerta.
- Se pueden producir descargas eléctricas, incendios, problemas
con el producto o lesiones personales.
• No haga funcionar el electrodoméstico con las manos húmedas.
- Se puede producir una descarga eléctrica.
• No rocíe sustancias volátiles como insecticidas en la supercie del
electrodoméstico.
- Además de ser perjudiciales para las personas, pueden
producirse descargas eléctricas, un incendio o problemas en el
producto.
• No acerque el rostro ni el cuerpo al electrodoméstico mientras está
cocinando o al abrir la puerta inmediatamente después de la cocción.
- Asegúrese de que los niños no se acerquen demasiado al
electrodoméstico.
- No hacerlo puede provocar quemaduras en los niños.
• No coloque alimentos ni objetos pesados sobre el borde de la puerta
del horno.
- Si abre la puerta, los alimentos o el objeto podrían caerse y
provocar quemaduras o lesiones.
• No enfríe abruptamente la puerta, el interior del electrodoméstico ni
el plato vertiendo agua sobre estas partes durante o después de la
cocción.
- Esto puede provocar daños en el electrodoméstico. El vapor o el
rocío de agua pueden provocar quemaduras o lesiones.
• No haga funcionar el horno mientras está vacío excepto para
autolimpieza.
• No descongele bebidas congeladas en botellas de cuello angosto. Las
botellas pueden romperse.
• No raye el vidrio de la puerta del horno con un objeto puntiagudo.
- Esto puede provocar que el vidrio se dañe o se rompa.
• No almacene nada directamente encima del electrodoméstico cuando
está en funcionamiento.
Instrucciones de seguridad importantes
CONSERVE ESTAS INSTRUCCIONES
Español 19
Page 88
Instrucciones de seguridad importantes
Instrucciones de seguridad importantes
Instrucciones de seguridad importantes
• No utilice recipientes sellados. Quíteles los sellos y las tapas antes
de cocinar. Los recipientes sellados pueden explotar debido a la
acumulación de presión incluso después de que el horno se ha
apagado.
• Tenga cuidado de que los alimentos que está cocinando en el horno
no entren en contacto con el elemento calentador.
- Se podría provocar un incendio.
• No caliente en exceso los alimentos.
- El sobrecalentamiento podría provocar un incendio.
ADVERTENCIAS FUNDAMENTALES PARA LA
LIMPIEZA
PRECAUCIÓN
• No rocíe agua directamente sobre el electrodoméstico para
limpiarlo.
• No utilice benceno, diluyente ni alcohol para limpiar el
electrodoméstico.
- Esto puede provocar decoloración, deformación, daños,
descarga eléctrica o incendio.
• Tenga cuidado de no lastimarse cuando limpia el electrodoméstico
(exterior/interior).
- Puede lastimarse con los bordes puntiagudos del
electrodoméstico.
• No limpie el electrodoméstico con un limpiador a vapor.
- Esto puede provocar corrosión.
• Mantenga limpia la parte interna del horno. Las partículas de
alimentos o los aceites salpicados que se adhieren a las paredes o
al piso pueden causar daños en la pintura y reducir la eciencia del
horno.
CONSERVE ESTAS INSTRUCCIONES
20 Español
Page 89
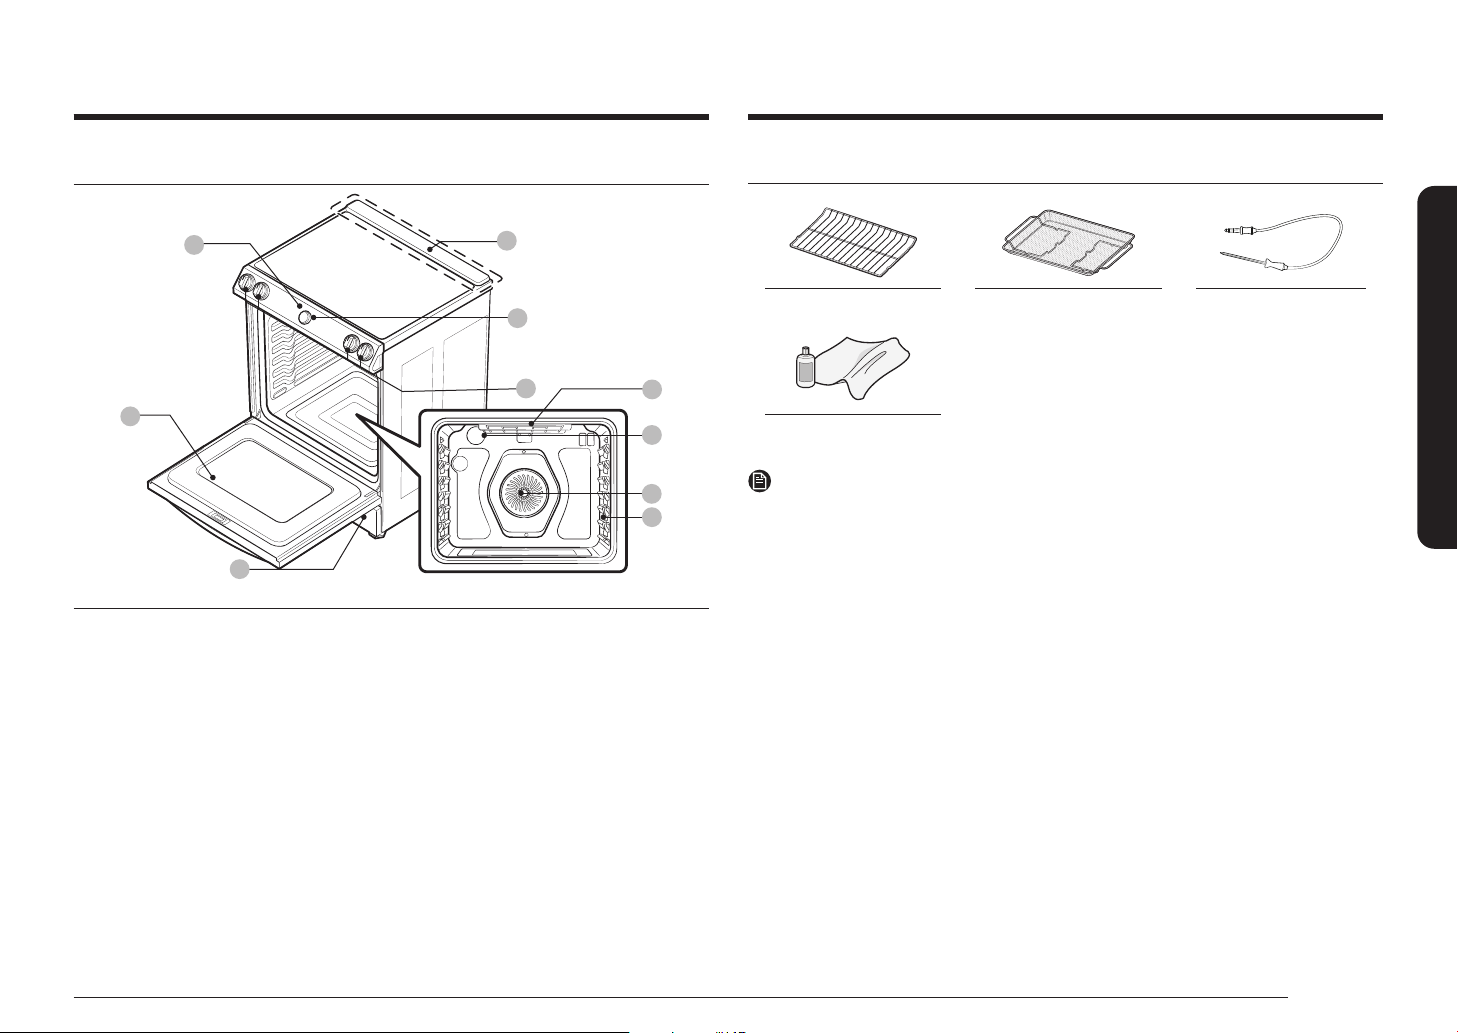
Introducción a su nueva estufa
Descripción general
01
05
06
01 Panel de control 02 Perillas de control de la
supercie (consulte la
página 23 para obtener
más información.)
04 Ventilación 05 Puerta del horno 06 Cajón de
04
03
02
03 Perilla de disco
(consulte la página
28 para obtener más
información.)
almacenamiento
Elementos incluidos con su estufa
Introducción a su nueva estufa
Parrillas de alambre (2) * Bandeja de la freidora de aire (1) * Sonda de temperatura (1) *
07
08
09
10
Limpiador y paño de limpieza (1)
NOTA
Si necesita un accesorio marcado con un *, puede adquirirlo en el Centro de contacto de Samsung
(1-800-726-7864).
07 Calentador del horno
para asar a la parrilla
10 Posición del estante
08 Luz del horno 09 Sistema de cocción por
convección
Español 21
Page 90
Antes de comenzar Supercie de cocción
Antes de comenzar
Antes de comenzar
Limpie el horno a fondo antes de utilizarlo por primera vez. Luego, retire los accesorios, programe
el horno para hornear y luego haga funcionar el horno a 400 °F durante 1 hora. Se notará un olor
característico. Esto es normal.
Asegúrese de que su cocina se encuentre bien ventilada durante el período de acondicionamiento.
Sugerencias para ahorrar energía
• Durante la cocción, la puerta del horno debe permanecer cerrada excepto para dar la vuelta a
los alimentos.
No abra la puerta con frecuencia durante la cocción para mantener la temperatura del horno y
ahorrar energía.
• Si el tiempo de cocción supera los 30 minutos, puede apagar el horno 5-10 minutos antes
del n del tiempo de cocción para ahorrar energía. El calor residual completará el proceso de
cocción.
• Para ahorrar energía y reducir el tiempo necesario para volver a calentar el horno, planique el
uso del horno para evitar tener que apagarlo entre la cocción de un alimento y el siguiente.
• Cuando sea posible cocine más de un alimento a la vez.
Acerca de la supercie de cocción
PRECAUCIÓN
ANTES DE COCINAR
• No utilice la supercie de vidrio de la cubierta como tabla para cortar.
• No coloque ni almacene sobre la cubierta de vidrio elementos susceptibles de derretirse o
prenderse fuego, aun cuando no se encuentre en uso.
• Encienda las unidades de supercie solamente después de colocar recipientes de cocción sobre
ellas.
• No almacene objetos pesados por encima de la supercie de la cubierta. Podrían caerse y
dañar tal supercie.
PRECAUCIÓN
DURANTE LA COCCIÓN
• Mientras la estufa esté en uso, no coloque sobre ella papel de aluminio ni elementos plásticos
tales como saleros y pimenteros, apoyacucharas o envoltorios plásticos. El aire caliente
que sale por la abertura de ventilación podría derretir plásticos o hacer arder elementos
inamables.
• Asegúrese de que se encuentre encendida la unidad de supercie correcta.
• Nunca cocine directamente sobre el vidrio. Siempre utilice recipientes.
• Siempre coloque la cacerola o sartén en el centro de la unidad de supercie sobre la cual está
cocinando.
• Nunca deje las unidades de supercie sin atención mientras las utiliza reguladas a altas
temperaturas. Los derrames por exceso de hervor producen humo y los derrames de sustancias
grasas pueden arder en llamas.
• Apague las unidades de supercie antes de retirar los recipientes de cocción.
• No utilice películas plásticas para tapar los alimentos. El plástico podría derretirse, caer sobre la
supercie y resultar muy difícil de quitar.
• El ventilador de enfriamiento puede hacerse funcionar durante la cocción en la cubierta.
22 Español
Page 91
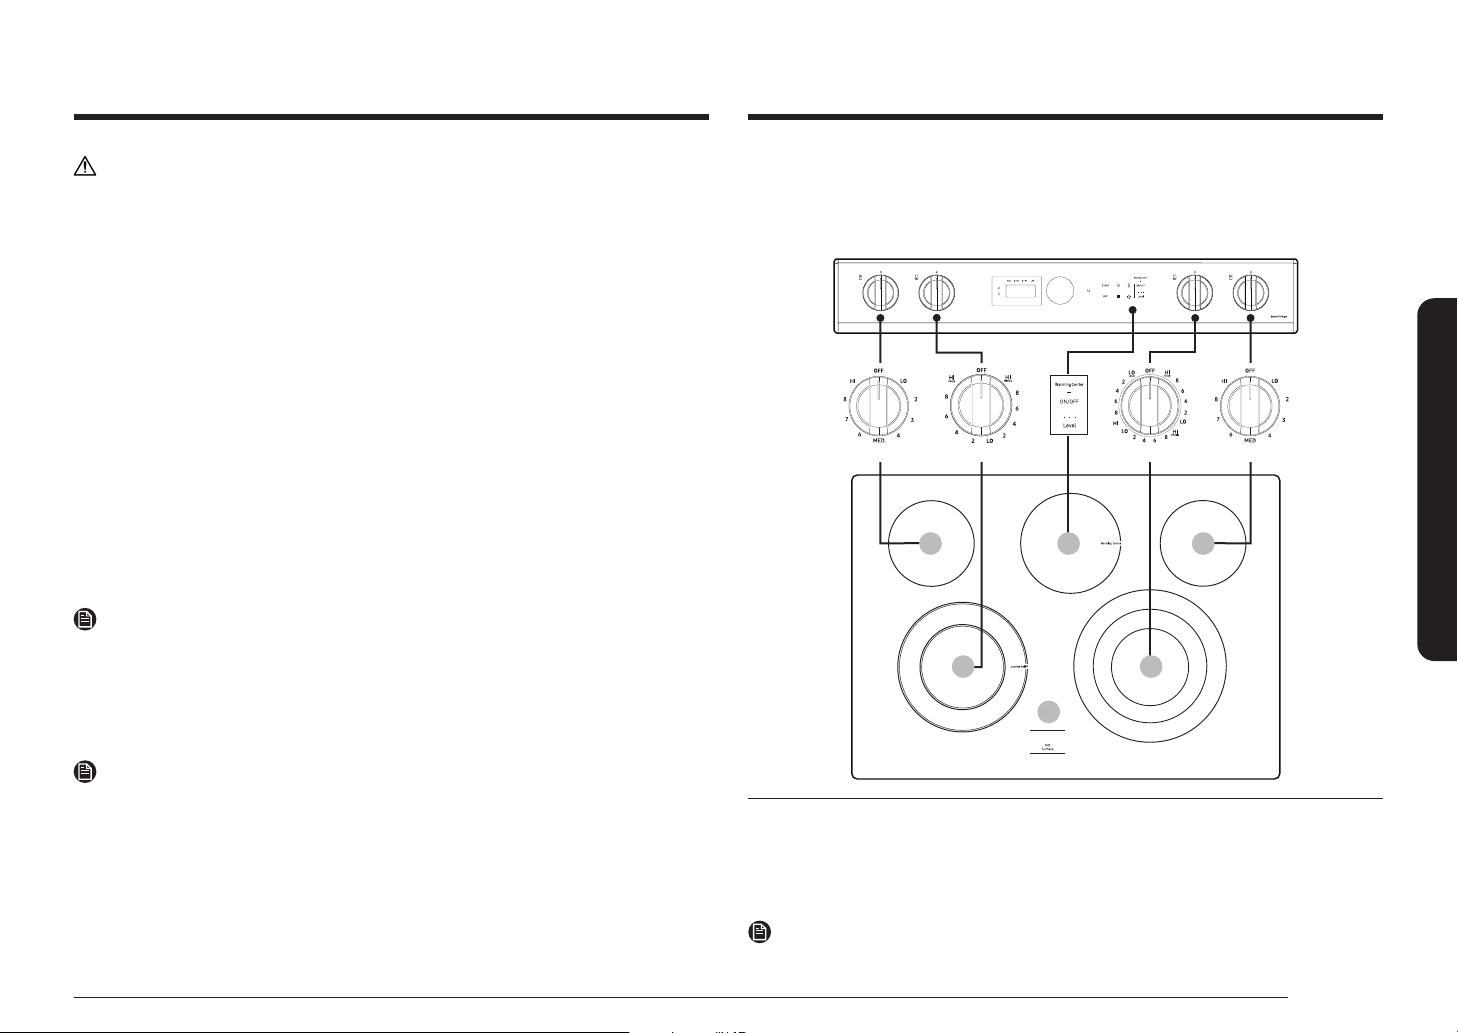
PRECAUCIÓN
DESPUÉS DE COCINAR
• No toque las unidades de supercie hasta que se hayan enfriado.
• La supercie podría estar caliente aún y producirle quemaduras si toca la supercie de vidrio
antes de que se haya enfriado lo suciente.
• Limpie inmediatamente los derrames sobre las áreas de cocción, a n de evitar un duro trabajo
de limpieza más adelante.
• Si hay gabinetes de almacenamiento instalados directamente sobre la supercie de limpieza,
procure que sean elementos de uso infrecuente y asegúrese de que puedan ser almacenados
con seguridad en un lugar que reciba calor. Las temperaturas alcanzadas pueden resultar
inseguras para elementos tales como líquidos volátiles, agentes limpiadores o spray en aerosol.
Ubicación de los elementos radiantes de la supercie y los controles
Las perillas controlan los elementos radiantes de la supercie de cocción tal como se indica a
continuación. Cuando vuelva a montar las perillas después de la limpieza, compruebe la marca de la
perilla y móntela en la posición correcta antes de usar la placa de cocción.
Supercie de cocción
Sobre los elementos radiantes de la supercie
La temperatura se eleva en forma gradual y pareja. Al elevarse la temperatura, el elemento irradiará
un color rojo. Para mantener la regulación seleccionada, el elemento alternará ciclos de encendido
y apagado. El elemento calentador retiene calor suciente como para suministrar calor suciente
y uniforme durante su ciclo de apagado. Para mejorar la eciencia de cocción, apague el elemento
varios minutos antes de que se complete la cocción. Esto permitirá que el calor residual complete el
proceso de cocción.
NOTA
Los elementos radiantes tienen un dispositivo limitante que les permite alternar en ciclos ON
(de encendido) y OFF (de apagado) aun en la regulación HI (ALTO). Esto ayuda a evitar daños a
la cubierta vitrocerámica. La alternancia en ciclos en la regulación HI (ALTO) es normal y puede
ocurrir si el recipiente de cocción es demasiado pequeño para el elemento radiante o si la base del
recipiente no es plana.
NOTA
Al girar la perilla, se oye una señal sonora.
Simple SimpleDual Triple
01 05
02
03
04
06
01 Trasero izquierdo:
6", 1200 W
04 Delantero derecho:
6"/9"/12", 3000 W
02 Delantero izquierdo:
6"/9", 3600 W
05 Trasero derecho:
6", 1200 W
03 Centro de
calentamiento: 100 W
06 Indicador de supercie
caliente
NOTA
La iluminación alrededor de la perilla se enciende cuando se enciende la perilla.
Español 23
Page 92
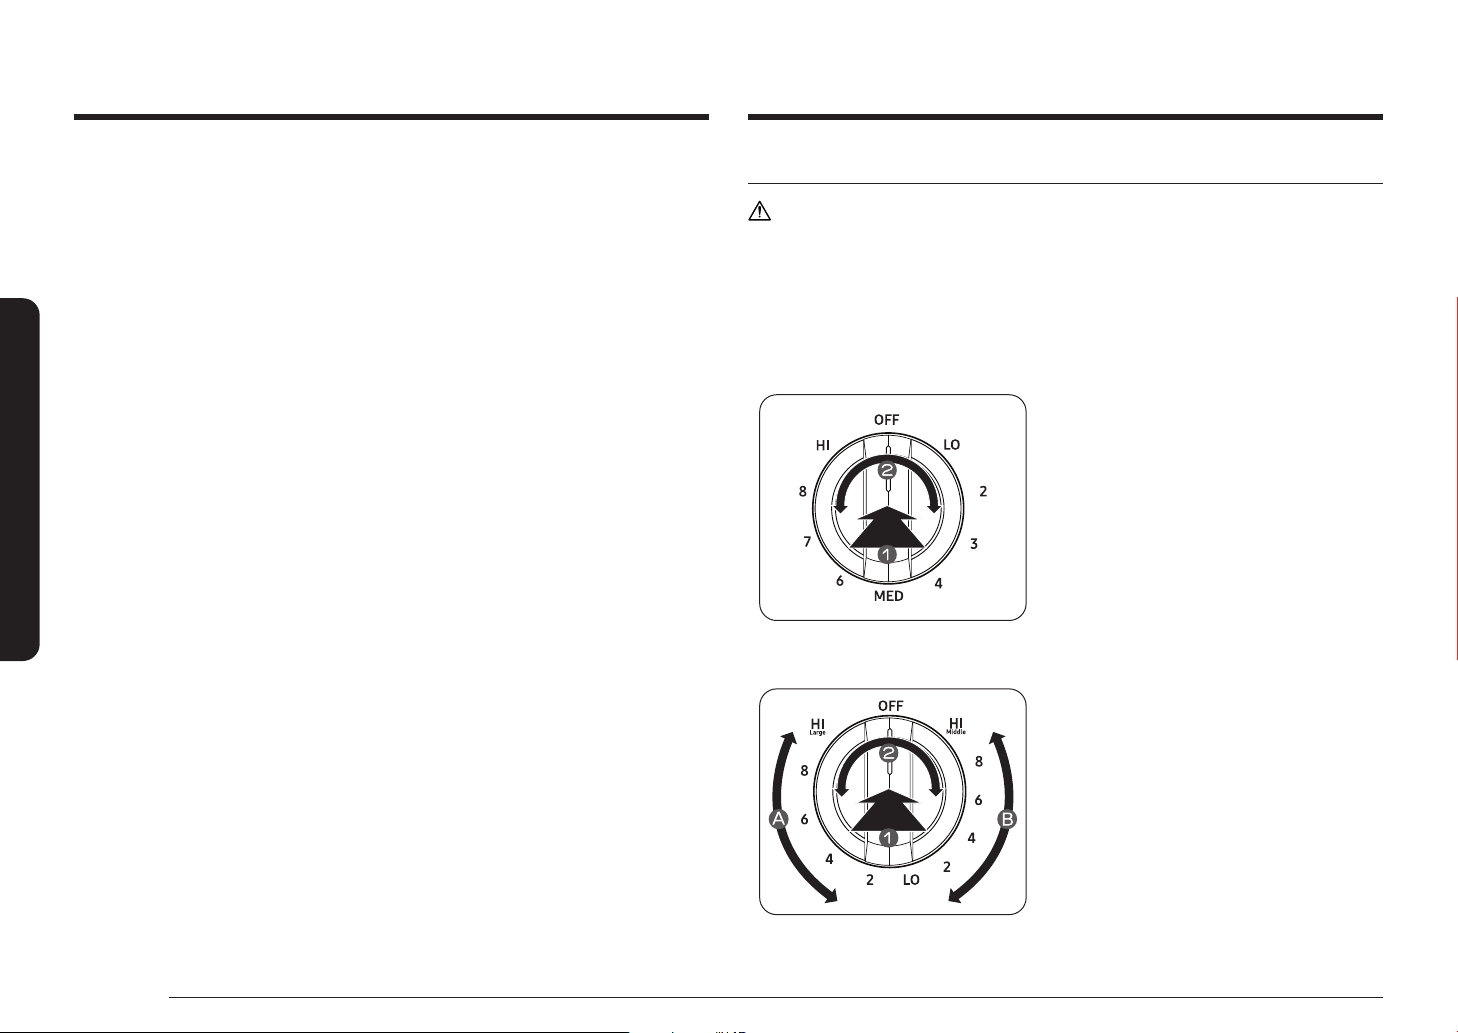
Supercie de cocción
Supercie de cocción
Indicador de supercie caliente
• Se ilumina cuando la unidad se encuentra encendida o caliente al tacto.
• Permanece encendido aún después de que se haya apagado la unidad.
• Emite luz hasta que la unidad se haya enfriado hasta aproximadamente 150 °F.
Áreas de cocción
• Las áreas de cocción de su estufa están señaladas por círculos permanentes sobre la supercie
de cocción de vidrio. Para lograr la máxima eciencia de cocción, seleccione un tamaño de
recipiente adecuado con relación al elemento calentador.
• Los recipientes de cocción no deben extenderse más de ½" a 1" más allá del área de cocción.
• Cuando un control se encuentra encendido, puede ver una luz tenue a través de la supercie
de cocción de vidrio. El elemento alternará ciclos de encendido y apagado para mantener
la regulación de temperatura seleccionada previamente, aun cuando se hayan regulado
temperaturas altas.
• Para obtener más información sobre la selección de los tipos correctos de recipientes de
cocción, consulte la sección "Utilización de los recipientes de cocción correctos" en la página 26.
Como regular el electrodoméstico para la cocción en supercie
PRECAUCIÓN
• Los elementos de supercie pueden estar calientes incluso cuando están apagados y pueden causar
quemaduras. No toque los elementos de supercie hasta que se hayan enfriado lo suciente.
• Nunca deje la comida desatendida, cuando haya regulado temperaturas altas o medio altas. Los
derrames por exceso de hervor producen humo y los derrames de sustancias grasas pueden arder.
• Asegúrese de girar la perilla de control a OFF (APAGAR) cuando termine de cocinar.
Perilla de control de unidades de supercie simples (trasera izquierda, trasera derecha)
1. Empuje la perilla hacia adentro.
2. Gire en cualquier dirección hasta la regulación
deseada.
• Tanto en la posición de apagado como en
la regulación alta, la perilla se asienta en la
posición con un "clic".
Perilla de control de la unidad de supercie dual (delantera izquierda)
1. Empuje la perilla hacia adentro.
2. Gire en cualquier dirección hasta la regulación
deseada.
• Para utilizar la unidad de supercie
grande, gire la perilla a la posición de
regulación quemador grande (A).
• Para utilizar la unidad de supercie
mediana, gire la perilla a la posición de
regulación quemador mediano (B).
24 Español
Page 93
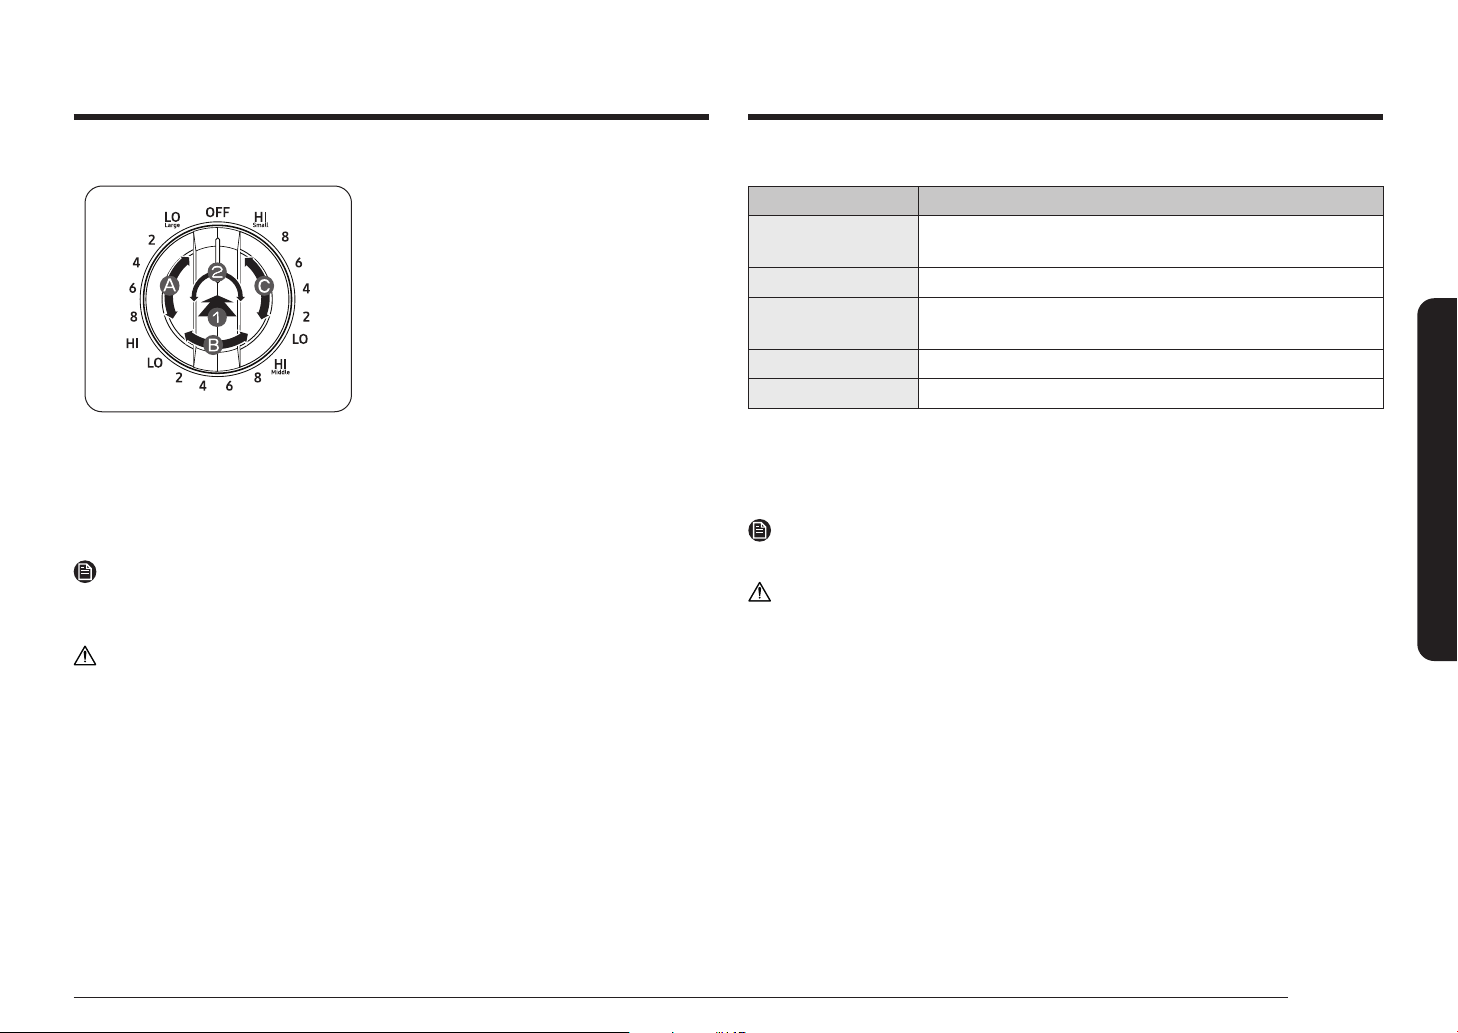
Perilla de control de la unidad de supercie triple (delantera derecha)
La unidad de supercie triple ofrece 3 tamaños de
cocción para seleccionar para que usted pueda hacer
coincidir el tamaño del área de cocción con el tamaño
de los recipientes que está utilizando.
1. Empuje la perilla hacia adentro.
2. Gire en cualquier dirección hasta la regulación
deseada.
• Para utilizar la unidad de supercie
grande, gire la perilla a la posición de
regulación quemador grande (A).
• Para utilizar la unidad de supercie
mediana, gire la perilla a la posición de
regulación quemador mediano (B).
• Para utilizar la unidad de supercie
pequeña, gire la perilla a la posición de
regulación quemador pequeño (C).
NOTA
Si quita la perilla para limpiarla, asegúrese de volver a insertarla en la dirección correcta. (Consulte
la ilustración anterior).
PRECAUCIÓN
• Tenga en cuenta que si hay algún problema con el producto, es posible que la perilla de la luz
no se sincronice con el funcionamiento real del calentador radiante.
• La zona en la perilla entre las regulaciones Alta y Apagada no es apropiada para cocinar.
Regulaciones recomendadas
REGULACIÓN TIPO DE COCCIÓN
ALTO Cocción inicial de la mayoría de las comidas, hacer hervir agua, asar
en cacerola
MEDIO ALTO Mantener un hervor rápido, frituras, frituras sumergidas en grasa
MEDIO Mantener un hervor lento, reducir salsas y jugos de cocción, cocción al
vapor de vegetales
MEDIO BAJO Mantener el proceso de cocción, escalfado, cocer guisados
BAJO Mantener alimentos calientes, derretir, hervir a fuego lento
Uso del centro de calentamiento
El centro de calentamiento, ubicado en la parte posterior central de la supercie de vidrio
mantendrá calientes los alimentos ya cocidos, a temperatura apta para servir.
NOTA
El calentador de supercie no se pondrá al rojo como los demás elementos de cocción.
PRECAUCIÓN
• No mantenga alimentos sobre el centro de calentamiento por más de dos horas.
• Utilice únicamente recipientes y vajilla recomendada como segura para uso en horno y sobre
supercies de cocción.
• Siempre utilice agarradores o guantes aislantes cuando retira los alimentos del centro de
calentamiento ya que los recipientes y los platos estarán calientes.
• Cuando se calientan pasteles y panes, use tapas que tengan una abertura para permitir que
escape la humedad.
• No utilice películas plásticas para tapar la comida. El plástico podría derretirse sobre la
supercie y ser muy difícil de limpiar.
• Los alimentos deben mantenerse en su recipiente y cubrirse con una tapa o papel de aluminio
para mantener su calidad.
• Siempre comience con alimentos calientes. Consumir alimentos que fueron colocados sobre el
centro de calentamiento crudos o fríos podría causar enfermedades.
Supercie de cocción
Español 25
Page 94
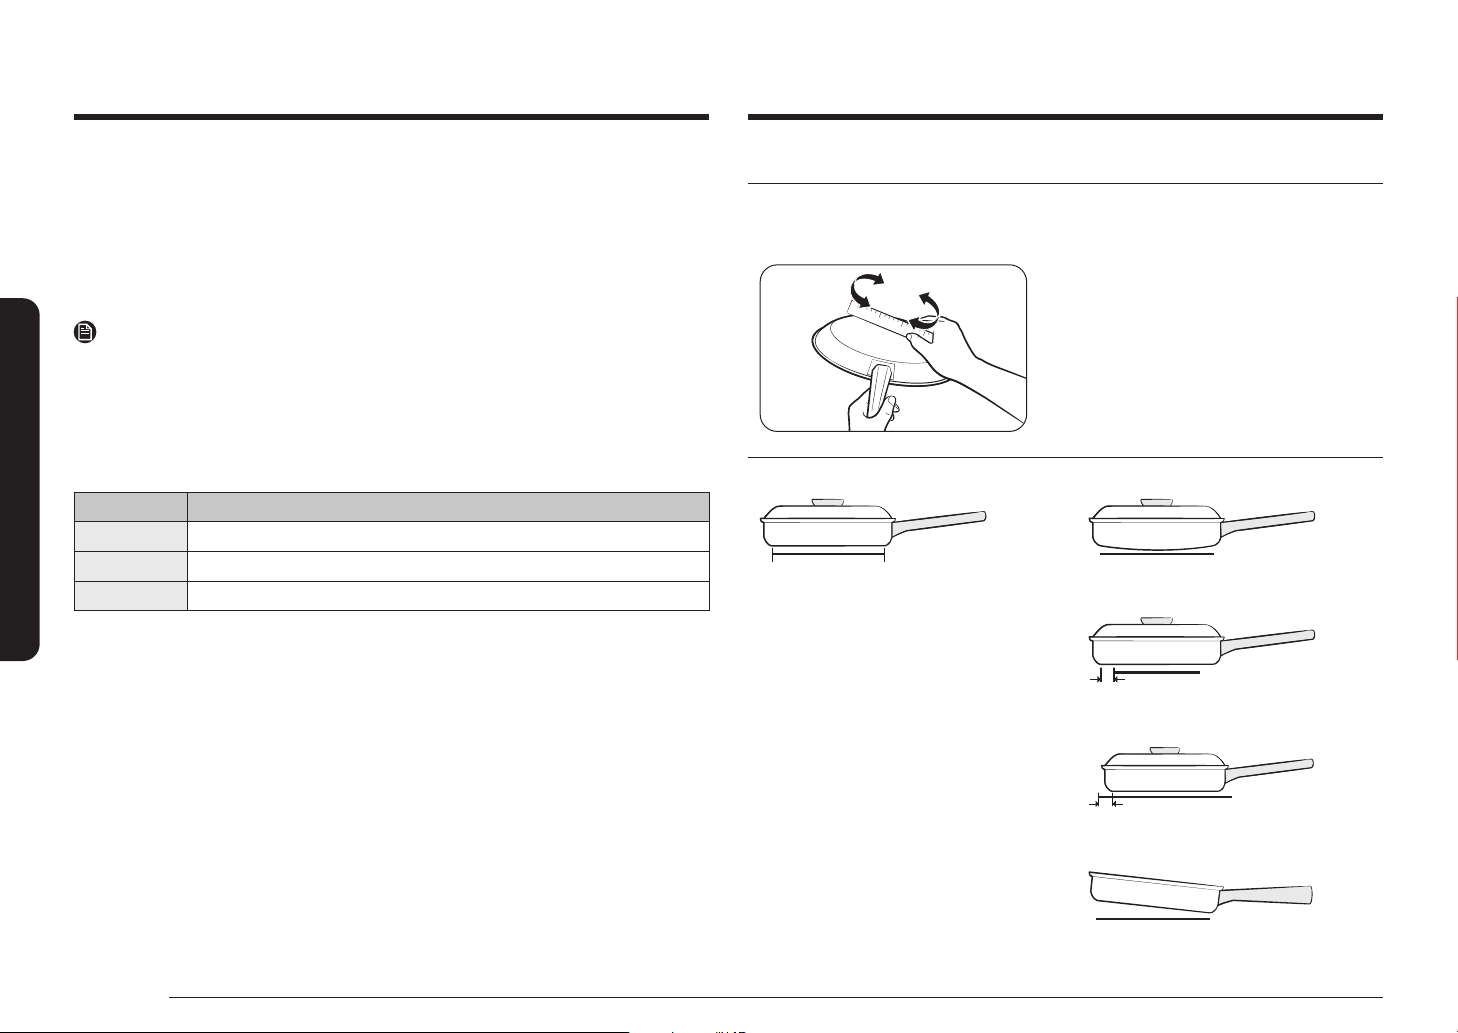
Supercie de cocción
Supercie de cocción
1. Para encender el centro de calentamiento, presione la tecla Warming Center On/Off (Centro de
calentamiento Encender/Apagar).
2. Regule la potencia al nivel deseado. Presione la tecla Warming Center Level (Centro de
calentamiento Nivel) una vez para el nivel Bajo, dos veces para el nivel Medio o 3 veces para
el nivel Alto.
3. Para apagar el centro de calentamiento, presione la tecla Warming Center On/Off (Centro de
calentamiento Encender/Apagar).
NOTA
• Presionar OFF (APAGAR) no apaga el centro de calentamiento.
• Para obtener óptimos resultados, todas las comidas en el centro de calentamiento deben
cubrirse con una tapa o papel de aluminio. Cuando se calientan pasteles o panes, la tapa o
papel de aluminio debe tener una abertura para permitir que escape la humedad.
Regulaciones recomendadas
NIVEL TIPO DE ALIMENTO
Bajo Panes y pasteles, guisados, reducciones de cocción, huevos
Medio Plato de mesa con alimentos, sopas crema, vegetales, salsas, guisos, carnes
Alto Comidas fritas, sopas líquidas, bebidas calientes
Utilización de los recipientes de cocción correctos
Utilizar los recipientes de cocción correctos puede evitar muchos problemas, tales como cocción
despareja o tiempos de cocción demasiado largos. Utilizar las cacerolas y sartenes adecuadas
redundará en menor tiempo de cocción y los alimentos se cocinarán en forma más pareja.
Controle que el fondo sea plano haciendo girar una
regla sobre la base del recipiente.
CORRECTO INCORRECTO
Fondo plano y lados verticales.
• Tapas bien ajustadas.
• El peso del mango no inclina el
recipiente.
• El recipiente está bien equilibrado.
• El tamaño del recipiente guarda
adecuada relación con la cantidad de
alimento que se preparará y con el
elemento calentador.
• Hecho de un material que es buen
conductor del calor.
Siempre haga corresponder el diámetro del
recipiente con el diámetro del elemento
calentador.
Recipientes cuyos fondos están curvados o
deformados.
El recipiente sobresale del elemento en más
de media pulgada.
El recipiente es más pequeño que el
elemento calentador.
26 Español
Mango demasiado pesado causa inclinación
del recipiente.
Page 95

Selección de los recipientes de cocción correctos
El material del que están hechos sus recipientes de cocción determina que tan rápida y parejamente
se transere el calor del elemento calentador de la supercie al fondo del recipiente.
• ALUMINIO - Excelente conductor de calor. Algunos tipos de alimentos causarán el
oscurecimiento del aluminio. (Los recipientes de aluminio anodizado son resistentes a las
manchas y a las picaduras). Si se deslizan recipientes de aluminio sobre la cubierta de cocción
cerámica, podrían quedar marcas de metal semejantes a rayaduras. Retire estas marcas ni bien
la cubierta se enfríe.
• COBRE - Excelente conductor de calor pero su color se altera con facilidad. Puede dejar marcas
de metal sobre la supercie vitrocerámica (para eliminarlas, ver arriba).
• ACERO INOXIDABLE - Lento conductor de calor, los resultados de cocción pueden ser
disparejos. Es duradero, fácil de limpiar y resistente a las manchas.
• HIERRO FUNDIDO - Mal conductor del calor; retiene el calor muy bien. Una vez alcanzada
la temperatura necesaria, produce cocción uniforme. Se desaconseja su uso en cubiertas
vitrocerámicas.
• UTENSILIOS ESMALTADOS - Las características de conducción de calor dependerán del material
base. Los revestimientos de porcelana deben ser lisos para evitar rayaduras en las cubiertas
vitrocerámicas.
• VIDRIO - Lento conductor de calor. Se desaconseja su uso en supercies de cubiertas de
cerámica porque puede causar rayaduras.
Protección de la cubierta
Limpieza
• Limpie la cubierta antes de utilizarla por primera vez.
• Limpie su cubierta diariamente o después de cada uso. Esto mantendrá la buena apariencia de
la cubierta y puede evitar daños.
• Si durante la cocción ocurre un derrame, límpielo inmediatamente del área de cocción mientras
esté caliente para evitar tener que hacer un duro trabajo de limpieza más adelante. Con
extremo cuidado, limpie el derrame con una toalla limpia y seca.
• No permita que los derrames permanezcan mucho tiempo en el área de cocción o las
terminaciones de la cubierta.
• No utilice polvos limpiadores abrasivos, paños abrasivos ni esponjas metálicas, porque
producirán rayaduras en la cubierta.
• No utilice cloro, amoníaco ni otros productos limpiadores no especícamente recomendados
para ser usados en supercies vitrocerámicas.
Cómo evitar marcas y rayaduras
• No utilice recipientes de cocción de vidrio. Pueden causar rayaduras en la cubierta.
• No coloque un trébedes o un aro para wok entre la cubierta y el recipiente. Estos elementos
pueden marcar o rayar la cubierta.
• Asegúrese de que la cubierta y el fondo del recipiente se encuentren limpios.
• No deslice recipientes metálicos sobre la cubierta.
Prevención de manchas
• No utilice paños ni esponjas sucias para limpiar la supercie de la cubierta. Quedará una
película que podría causar manchas sobre la supercie de cocción cuando se caliente el área.
• La cocción continuada sobre una supercie sucia puede causar manchas permanentes.
Supercie de cocción
Prevención de otros daños
• No permita que plásticos, azúcar o alimentos con alto contenido de azúcar se derritan sobre la
cubierta. Si esto ocurriese, limpie inmediatamente.
• No permita que un recipiente quede seco por hervor prolongado, ya que esto dañará la
cubierta y el recipiente.
• No utilice la cubierta como mesada ni como tabla para cortar.
• No cocine alimentos directamente sobre la cubierta. Use siempre los recipientes de cocción
adecuados.
Español 27
Page 96
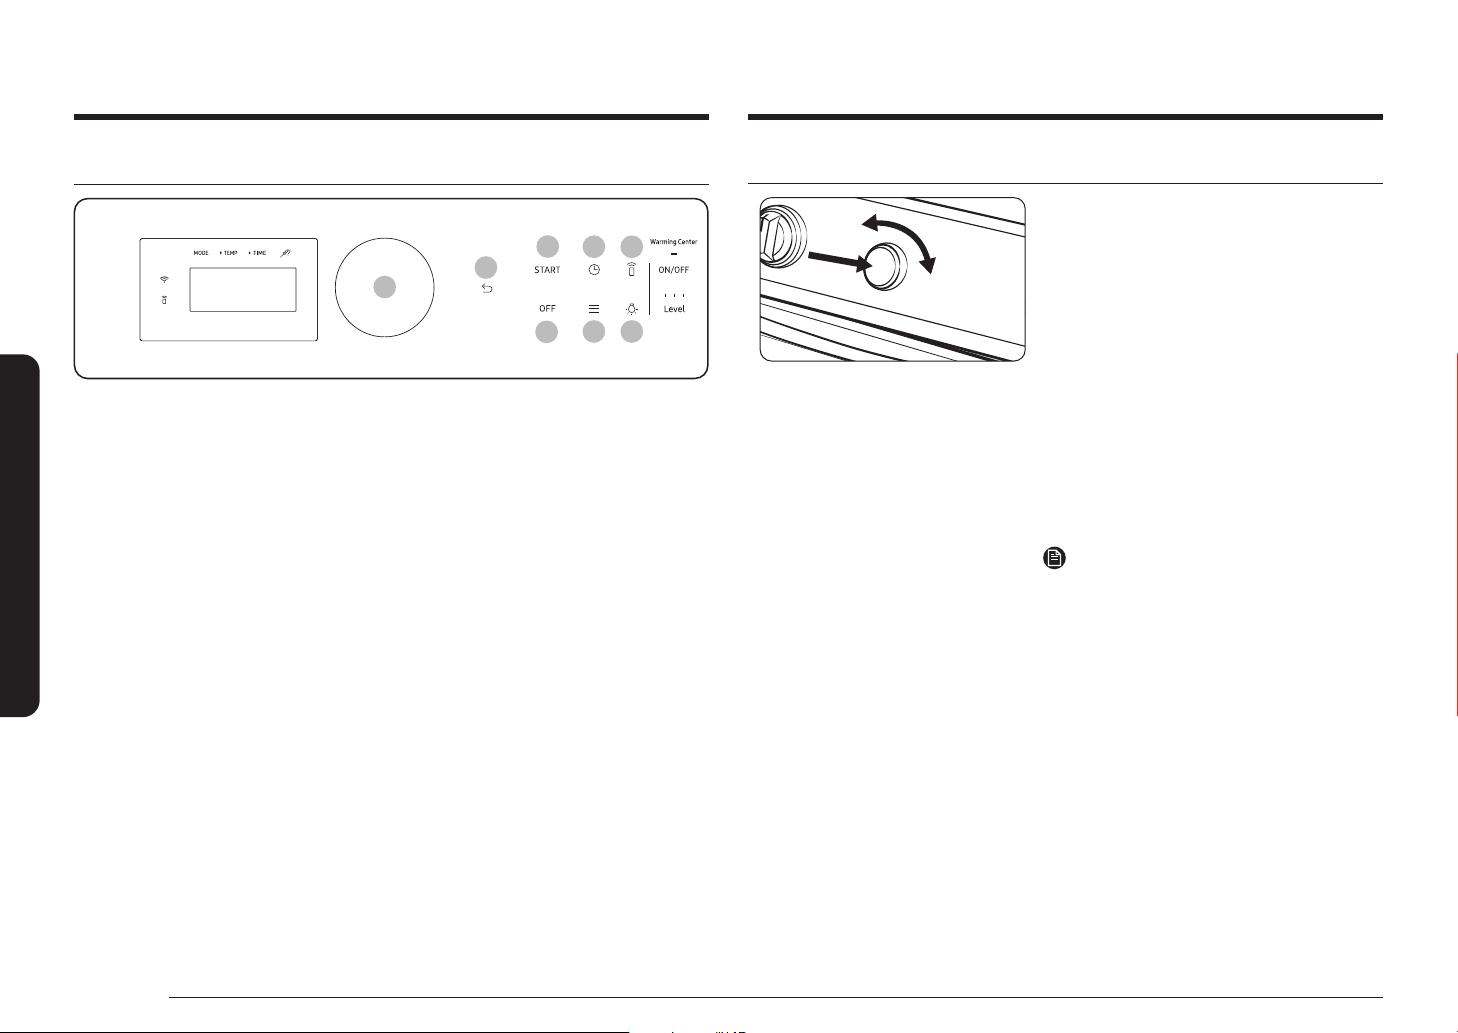
Funcionamiento del horno
Funcionamiento del horno
Panel de control del horno
01 START (INICIO): Se utiliza para poner el horno en funcionamiento.
02 OFF (APAGAR): Borra la información ingresada, vuelve al primer paso. Detiene el
Funcionamiento del horno
03 Opción de tiempo: Permite ajustar las opciones de tiempo. (Tiempo de cocción, Retrasar el
04 Opciones: Permite ajustar las opciones. (Temporizador, Limpieza, Favoritos, Mi lista de modos,
05 Smart Control: Permite activar/desactivar la función de control inteligente.
06 Luz: Permite encender o apagar la luz del horno.
07 Perilla de disco: Giro hacia la derecha - Desplaza la selección a la siguiente opción/aumenta el
08 Volver: Regresa al nivel superior, página anterior, etc.
01
03 05
07
funcionamiento del horno.
inicio)
Bloquear, Tiempo de espera de pantalla, Ajustar hora, Formato de hora, Ahorro de energía de
12 horas, Sonido, Sabbat, ajustes del sistema)
valor.
Giro hacia la izquierda - Desplaza la selección a la opción anterior/disminuye
el valor.
Presión - Selecciona el valor actual.
08
02
04 06
Cómo utilizar la perilla de disco
GirarGirar
PresionarPresionar
La perilla de disco puede utilizarse de las siguientes
maneras:
1. Girar
• Al seleccionar el modo de cocción, girar la
perilla de disco a la derecha o a la izquierda,
mostrará el siguiente modo de cocción o el
anterior.
• Al seleccionar la temperatura o el tiempo de
cocción, girar la perilla de disco a la derecha o a
la izquierda, aumentará o disminuirá el valor.
2. Presionar
Para establecer el valor actual, presione la perilla de
disco.
NOTA
La perilla de disco no se puede desarmar. No la fuerce
jalando de ella.
28 Español
Page 97
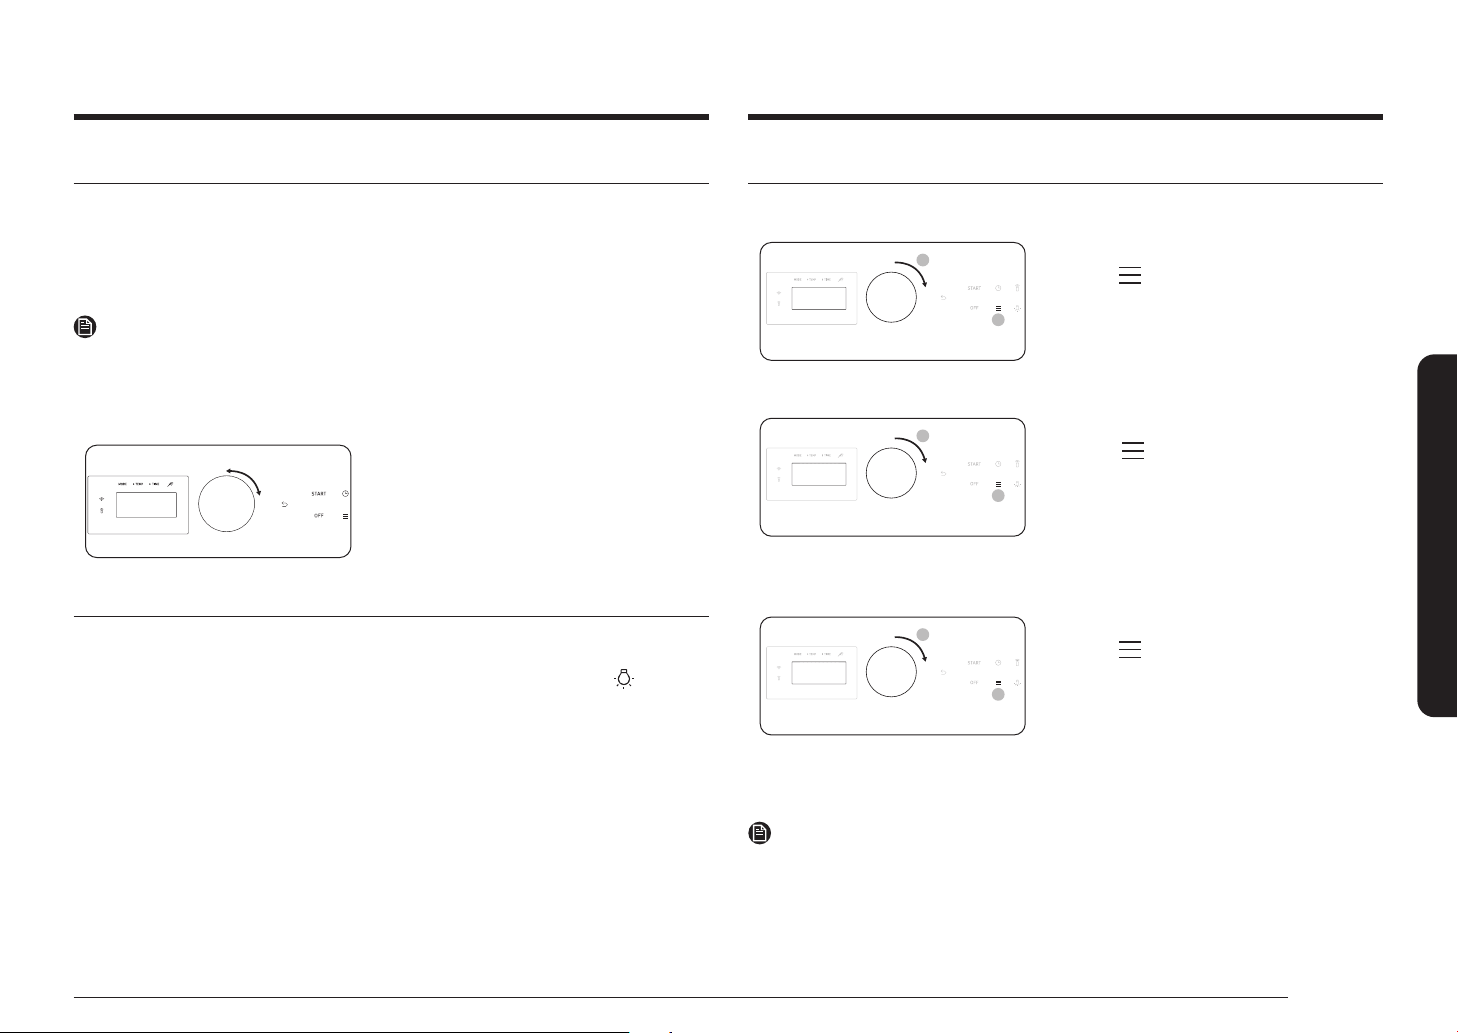
Modo de visualización
Set time
12:00PM
2
1
Set Date
Dec 31, 2020
2
1
Time format
24hr
2
1
Modo de reposo
Si el horno no se utiliza por un tiempo, el panel de control ingresa en modo de reposo.
En el modo de reposo, el panel de control está inactivo, mostrando solo la hora, hasta que es
reactivado por el usuario.
NOTA
Puede ajustar el tiempo de espera del panel de control. (Para obtener más información, consulte la
página 43).
Activación
Para activar el panel de control, presione o gire la
perilla de disco. En este modo están disponibles las
preferencias de usuario, como el temporizador, la luz
del horno y/o el bloqueo de los controles.
Cómo encender y apagar la luz del horno
• La luz del horno se enciende automáticamente cuando se abre la puerta.
• La luz del horno se apaga automáticamente cuando se cierra la puerta.
• La luz del horno se puede encender y apagar manualmente presionando la tecla .
Reloj
Debe congurar correctamente el reloj para asegurar que las funciones automáticas funcionen
correctamente. Este producto admite dos formatos de hora: 12 horas (predeterminado) y 24 horas.
Para congurar la hora del reloj
1. Toque .
2. Seleccione Set time (Ajustar hora) usando la
perilla de disco.
3. Ingrese la hora actual usando la perilla de disco.
4. Presione la perilla de disco para conrmar el
ajuste.
Para congurar la hora.
1. Toque .
2. Seleccione Set Date (Ajustar fecha) usando la
perilla de disco.
3. Ingrese la fecha actual usando la perilla de
disco.
4. Presione la perilla de disco para conrmar el
ajuste.
Para cambiar el formato de hora (12 h/24 h)
1. Toque .
2. Seleccione Time format (Formato de hora)
usando la perilla de disco.
3. Gire la perilla de disco para seleccionar 12hr
(12 h) o 24hr (24 h).
4. Presione la perilla de disco para guardar los
cambios.
Funcionamiento del horno
NOTA
Puede congurar/cambiar el reloj o el temporizador de cocina antes de iniciar un modo de cocción
o mientras la mayoría de los modos de cocción están funcionando. Sin embargo, no se puede
congurar o cambiar la hora si hay una función basada en el tiempo en funcionamiento (horneado
programado, por ejemplo) o si la opción Sabbat está activada.
Español 29
Page 98
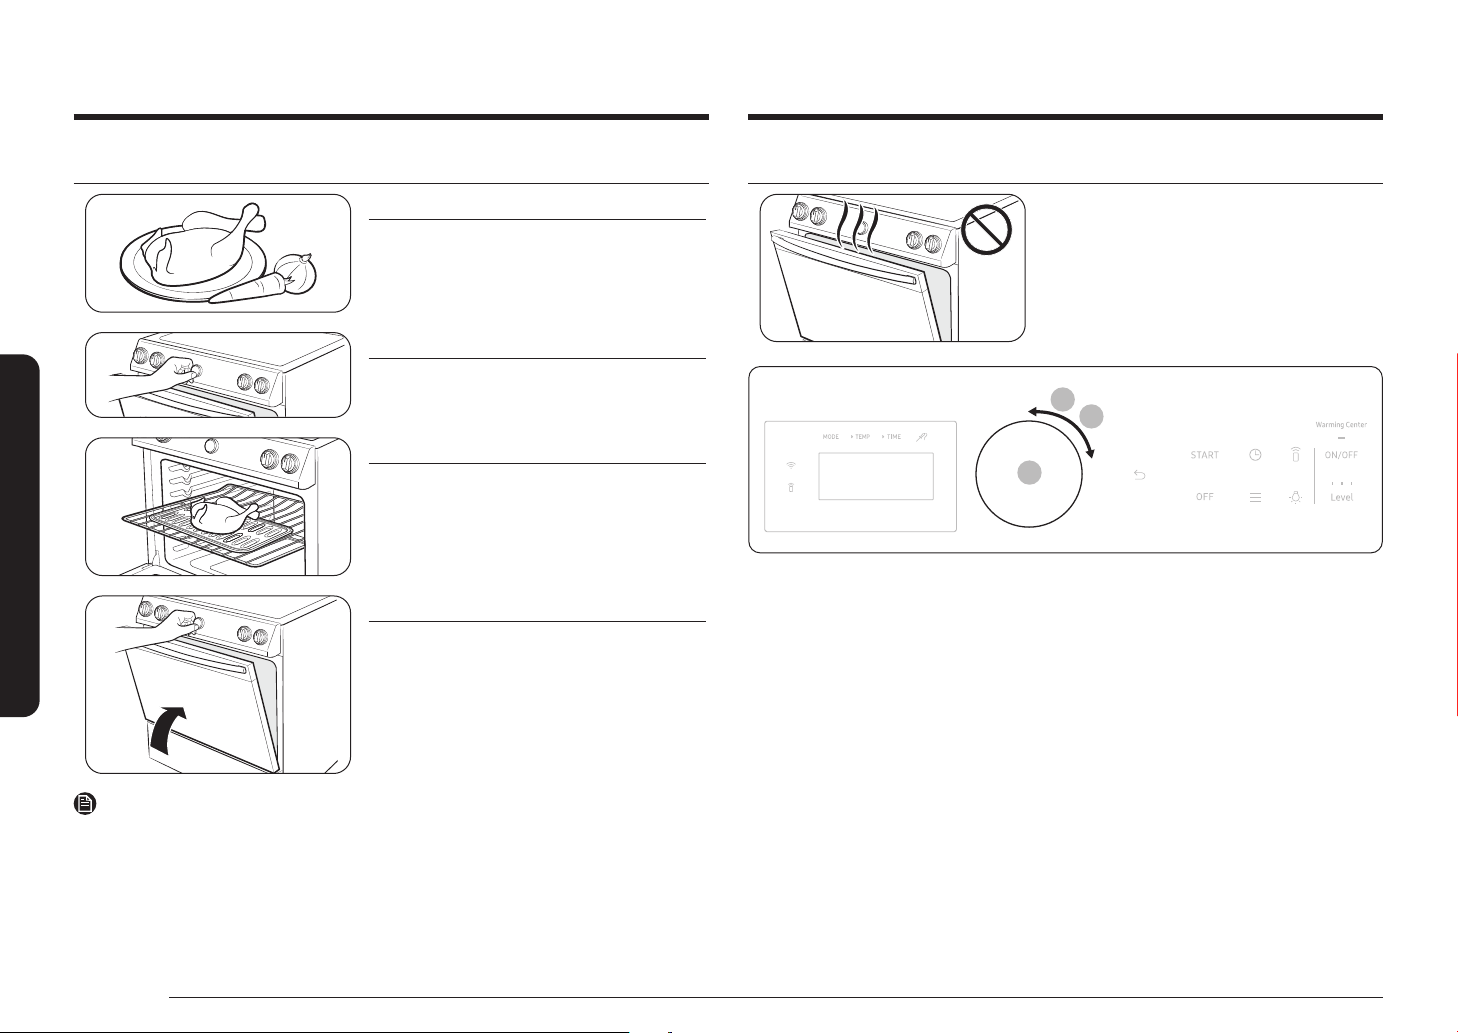
Funcionamiento del horno
Cocción del horno
Funcionamiento del horno
El ventilador de enfriamiento comienza a funcionar automáticamente durante un tiempo después de
terminar la cocción.
NOTA
PASO 1
Ponga todos los ingredientes en un recipiente
resistente a la temperatura.
PASO 2
Seleccione un modo de cocción y luego comience el
precalentamiento.
PASO 3
Coloque el recipiente en una parrilla.
PASO 4
Cierre la puerta y comience la cocción.
Modo de cocción
• Asegúrese de cerrar la puerta antes de empezar
a cocinar.
• Si deja la puerta abierta durante unos 2 minutos
mientras el horno está en los modos de
hornear/asar por convección, hornear o asar
a la parrilla, el quemador del horno se apaga.
Para reiniciar el quemador, cierre la puerta.
1
2
3
1. Use la perilla de disco para seleccionar un modo (Hornear, Hornear por convección, Asar por
convección, Freidora de aire, Asar, etc.).
2. De ser necesario, use la perilla de disco para cambiar la temperatura predeterminada. Puede
congurar el horno en cualquier temperatura.
3. Presione la perilla de disco, de ser necesario, cuando aparezca el mensaje “Start” (Inicio),
congure las opciones Tiempo de cocción y Retrasar el inicio.
Toque START (INICIO) o presione la perilla de disco.
• El horno se precalienta hasta que alcanza la temperatura que usted ha congurado.
• Cuando alcanza la temperatura congurada, emite una señal sonora varias veces.
• Al nalizar el precalentamiento, coloque los alimentos en el horno y, luego, cierre la
puerta.
4. Al nalizar la cocción, apague el horno y retire los alimentos.
30 Español
Page 99
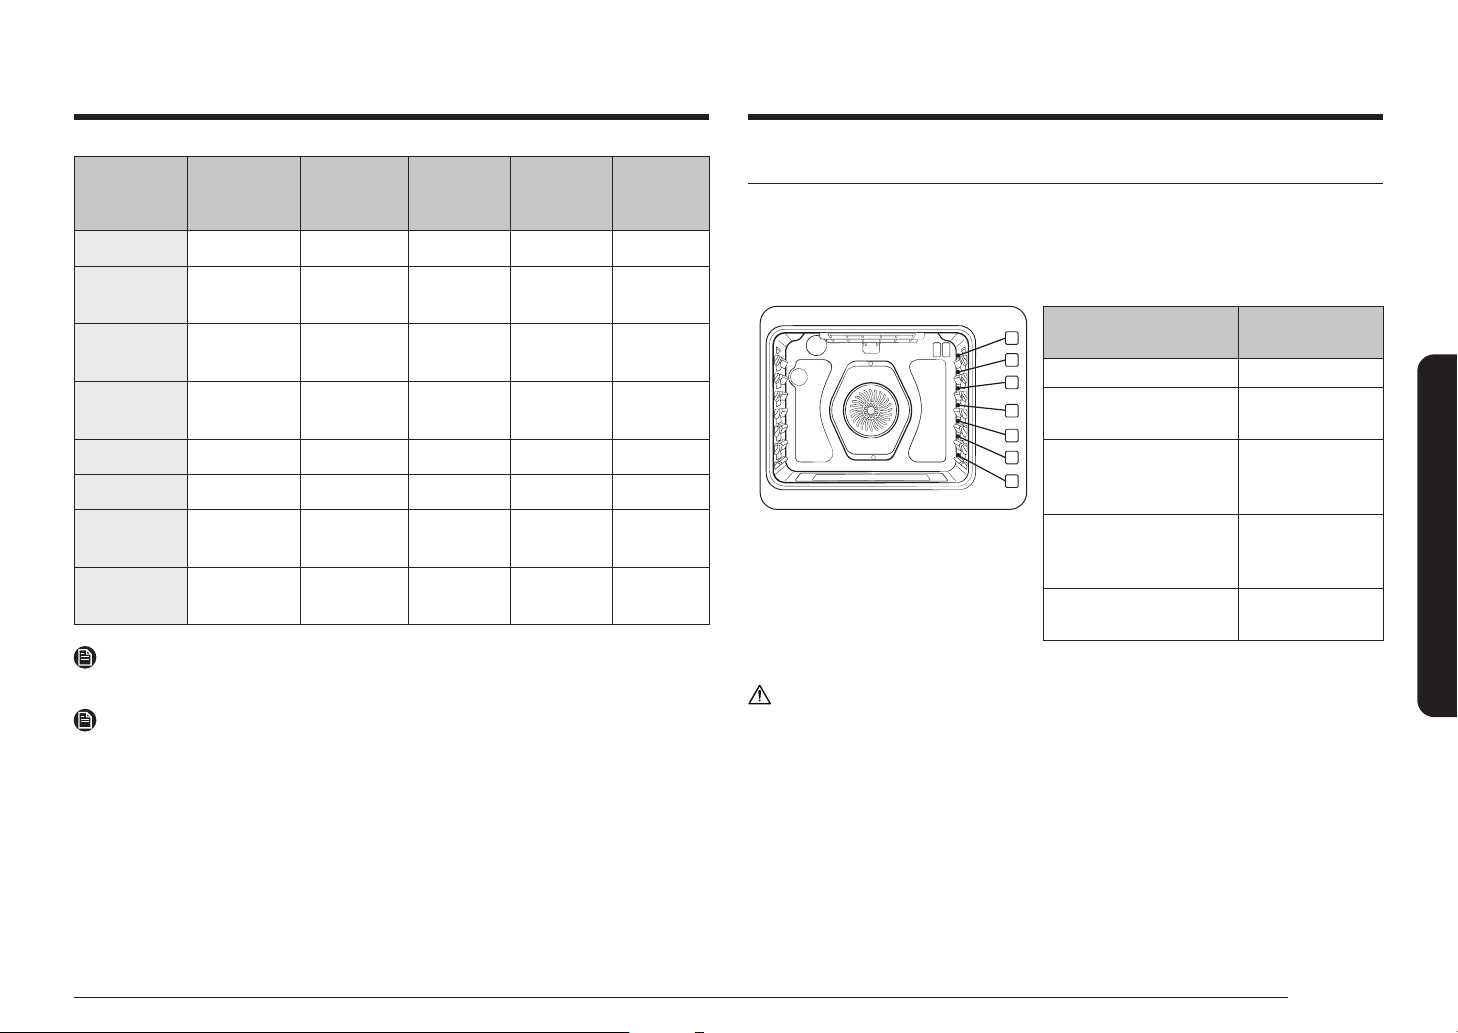
Modo
Rango de
temperatura (°F)
Temperatura
predeterminada
(°F)
Sonda de
temperatura
Programar
tiempo de
cocción
Retrasar el
inicio
Hornear 175-550 350 O O O
Asar a la
parrilla
Hornear por
convección
Asar por
convección
Alto-Bajo Alta X X X
175-550 325
O O
175-550 325 O O O
Freidora de aire 350-500 425 X O O
Deshidratar 100-225 150 X O O
Mantener
caliente
Levantamiento
del pan
- 175 X X X
- 95 X X X
NOTA
Para cambiar la temperatura durante la cocción, repita los pasos 1 a 3 anteriores.
NOTA
Si desactiva la función Ahorro de energía de 12 horas, esos modos funcionarán hasta que los
cancele. (Ajuste predeterminado del Ahorro de energía de 12 horas: on (activado))
Consulte la página 22 para obtener más información.
Uso de las parrillas del horno
Su horno viene con 2 parrillas y 7 posiciones. Las posiciones de las parrillas están delineadas por las
guías sobre las que se apoyan. Cada una de las guías de las parrillas tienen un tope que evita que
se aojen durante el funcionamiento del horno. Cada parrilla tiene topes que requieren colocación
correcta sobre las guías. Los topes evitan que las parrillas se salgan accidentalmente del horno por
completo al retirarlas.
O
7
6
5
4
3
2
1
Tipo de alimento
Hamburguesas a la parrilla 7
Carnes o cortes pequeños
de ave, pescado, a la parrilla
Panqués, pasteles molde
savarín, tartas congeladas,
guisos
Pasteles de ángel, carnes
asadas de pequeño tamaño,
pizzas frescas y congeladas
Pavo, carnes asadas de gran
tamaño, jamones
Esta tabla es para referencia solamente.
PRECAUCIÓN
• No cubra una parrilla del horno con papel de aluminio. Esto entorpecerá la circulación del calor
y creará problemas en el proceso de horneado.
• No coloque papel de aluminio sobre la parte inferior del horno. El aluminio puede derretirse y
causar daños en el horno.
• Coloque las parrillas en la distribución deseada solamente cuando el horno se encuentre frío.
• Cuando coloque una parrilla en la posición superior (posición 7), asegúrese de que la parrilla se
apoye en forma estable en el tope incorporado.
Posición de la
parrilla
4-6
Funcionamiento del horno
3 o 4
2
1
Español 31
Page 100
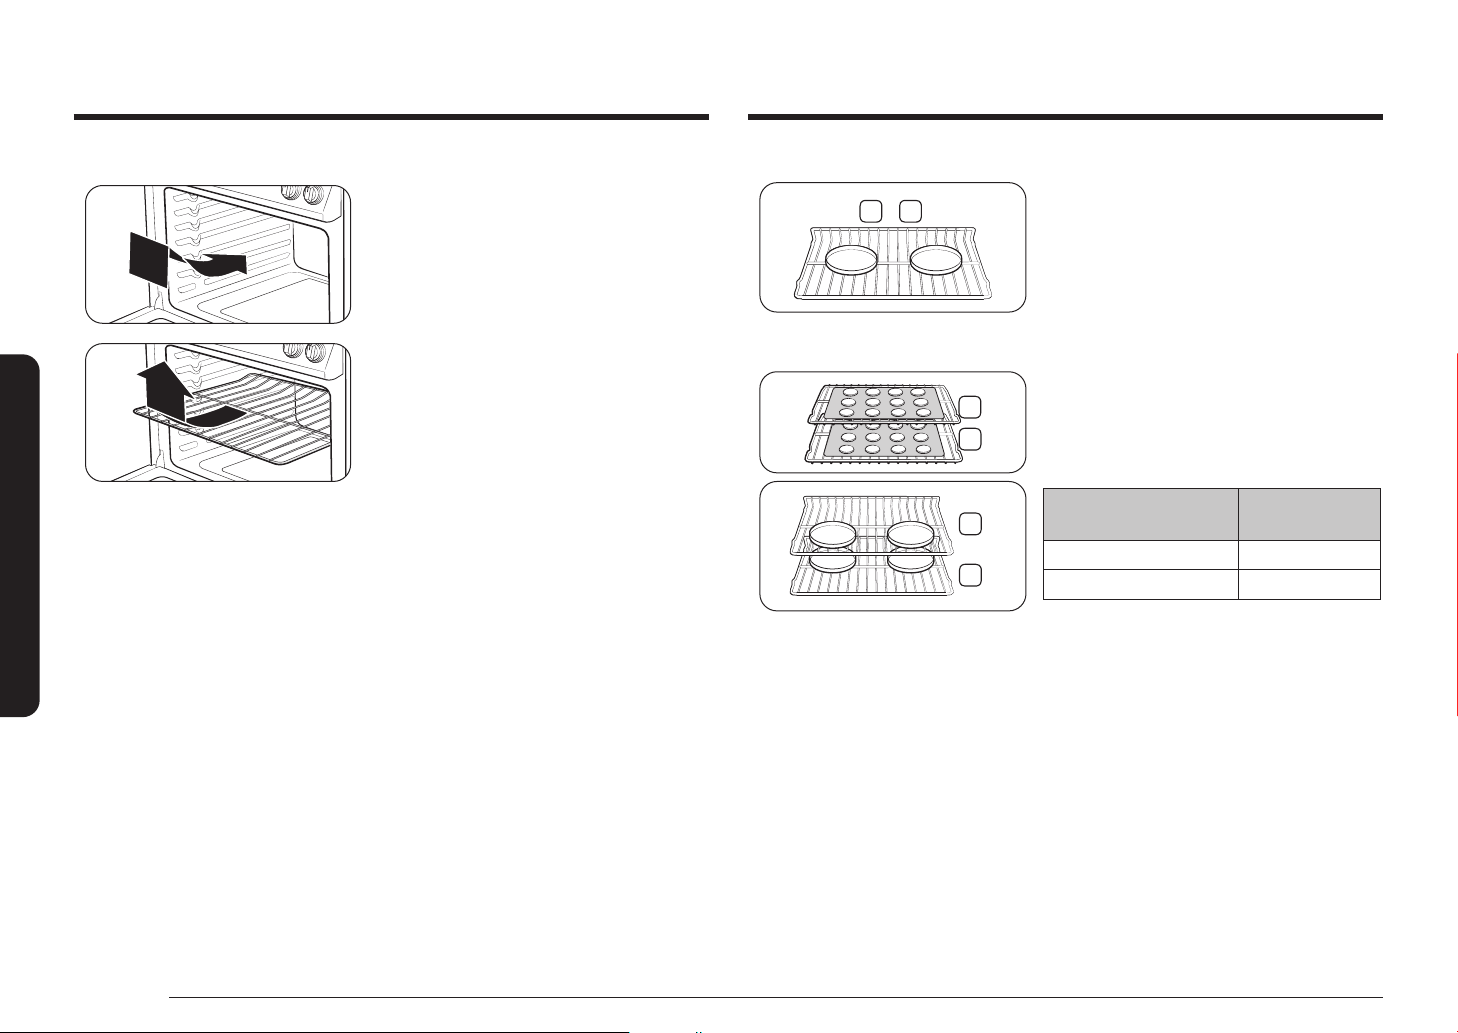
Funcionamiento del horno
2
5
Inserción y retirada de una parrilla del horno
Funcionamiento del horno
Para insertar una parrilla del horno
1. Coloque el extremo trasero de la parrilla sobre
una guía.
2. Deslice la parrilla sobre la guía mientras
sostiene el extremo delantero de la parrilla.
Para retirar una parrilla del horno
1. Jale de la parrilla hasta que haga tope.
2. Levante el extremo delantero de la parrilla y
retírela de la guía.
Colocación de parrillas y recipientes
3 4
Única parrilla de horno
Múltiples parrillas de horno
Colocar los moldes o las charolas lo más cerca posible
del centro del horno producirá los mejores resultados.
Si hornea con más de un recipiente, colóquelos de
manera tal que cada uno tenga 1" a 1½" de espacio
libre a su alrededor.
Cuando hornea en una única parrilla, coloque la
parrilla del horno en la posición 3 o 4.
Consulte la gura de la izquierda.
Cuando hornee pasteles, coloque las parrillas en las
posiciones 3 y 5; cuando hornee galletas, coloque las
parrillas en las posiciones 2 y 5.
Uso de múltiples parrillas de horno
5
3
Tipo de horneado
Galletas 2 y 5
Pasteles 3 y 5
Posiciones de las
parrillas
32 Español
 Loading...