

Samsung SMN915P Users Manual

DRAFT
FOR INTERNAL USE ONLY
User Guide
This document is watermarked because certain important information in the document has not yet been verified.
This document has been sent to you as a draft and for informational purposes only.
The document should only be used for internal purposes and may not be distributed outside of the company.
Distributing the document outside of the company could result in legal exposure to the company if the preliminary,
unverified information in the draft turns out to be inaccurate.
(UG template version 14a)
SPT_SM-N915P_UG_Eng_NH5_TN_091714_R2

DRAFT
FOR INTERNAL USE ONLY
Table of Contents
Get Started .................................................................................................................................................... 1
Your Device at a Glance ....................................................................................................................... 1
Set Up Your Device ............................................................................................................................... 1
Remove the Back Cover ............................................................................................................... 2
Install a Memory Card ................................................................................................................... 2
Install the Battery .......................................................................................................................... 3
Replace the Back Cover ............................................................................................................... 3
Activate Your Device ............................................................................................................................. 5
Complete the Setup .............................................................................................................................. 6
Set Up Voicemail ................................................................................................................................... 7
Sprint Account Information and Help .................................................................................................... 7
Sprint Account Passwords ............................................................................................................ 7
Manage Your Account .................................................................................................................. 8
Sprint Support Services ................................................................................................................ 9
Device Basics .............................................................................................................................................. 10
Your Device’s Layout .......................................................................................................................... 10
Features ...................................................................................................................................... 10
Turn Your Device On and Off ............................................................................................................. 12
Turn Your Screen On and Off ............................................................................................................. 12
Features .............................................................................................................................................. 12
Edge Screen ....................................................................................................................................... 12
Basic Gestures ............................................................................................................................ 13
Customize App Shortcuts ........................................................................................................... 13
Quick Tools ................................................................................................................................. 13
S Pen Overview .................................................................................................................................. 13
Removing S Pen from Your Device ............................................................................................ 14
Use S Pen ................................................................................................................................... 14
S Pen Settings ............................................................................................................................ 16
Motions and Gestures ................................................................................................................. 16
Air View ....................................................................................................................................... 17
Multi Window ............................................................................................................................... 17
Touchscreen Navigation ..................................................................................................................... 19
TOC i

DRAFT
FOR INTERNAL USE ONLY
Your Home Screen .............................................................................................................................. 25
Customize Your Home Screen ................................................................................................... 26
Extended Home Screens ............................................................................................................ 27
Status Bar and Notification Panel ....................................................................................................... 28
Status Bar ................................................................................................................................... 28
Notification Panel ........................................................................................................................ 30
Enter Text ............................................................................................................................................ 31
Text Input Methods ..................................................................................................................... 31
Google Voice Typing ................................................................................................................... 32
Samsung Keyboard .................................................................................................................... 32
Swype ......................................................................................................................................... 33
Tips for Editing Text .................................................................................................................... 34
Phone Calls ................................................................................................................................................. 35
Make Phone Calls ............................................................................................................................... 35
Call Using the Keypad ................................................................................................................ 35
Call from Logs ............................................................................................................................. 35
Call from Contacts ...................................................................................................................... 35
Call a Number in a Text Message .............................................................................................. 36
Call a Number in an Email Message .......................................................................................... 36
Make an Emergency Call ............................................................................................................ 36
Receive Phone Calls ........................................................................................................................... 37
Phone Call Options ............................................................................................................................. 38
Dialing Options ............................................................................................................................ 38
Caller ID ...................................................................................................................................... 38
Call Waiting ................................................................................................................................. 39
Three-way Calling ....................................................................................................................... 39
Call Forwarding ........................................................................................................................... 39
In Call Options ............................................................................................................................ 40
Voicemail ............................................................................................................................................. 41
Voicemail Setup .......................................................................................................................... 41
Retrieve Your Voicemail Messages ............................................................................................ 42
Voicemail Notification .................................................................................................................. 42
Visual Voicemail .................................................................................................................................. 43
Set Up Visual Voicemail .............................................................................................................. 43
Review Visual Voicemail ............................................................................................................. 43
TOC ii

DRAFT
FOR INTERNAL USE ONLY
Visual Voicemail Options ............................................................................................................ 44
Configure Visual Voicemail Settings ........................................................................................... 44
Change Your Main Greeting ....................................................................................................... 45
Edit the Display Name ................................................................................................................ 45
Logs .................................................................................................................................................... 45
Access Call Settings ........................................................................................................................... 47
Contacts ...................................................................................................................................................... 48
Get Started with Contacts ................................................................................................................... 48
Access Contacts ......................................................................................................................... 48
Find a Contact ............................................................................................................................. 48
Contacts Settings ........................................................................................................................ 49
Add a Contact ..................................................................................................................................... 49
Save a Phone Number ........................................................................................................................ 50
Edit a Contact ...................................................................................................................................... 50
Add or Edit Information for a Contact ......................................................................................... 50
Assign a Picture to a Contact ...................................................................................................... 51
Assign a Ringtone to a Contact .................................................................................................. 51
Link Contacts .............................................................................................................................. 51
Delete Contacts .......................................................................................................................... 51
Save a Business Card as a Contact ................................................................................................... 52
Merge Contacts ................................................................................................................................... 52
Speed Dials ......................................................................................................................................... 53
Favorites ............................................................................................................................................. 53
Groups ................................................................................................................................................ 54
Share Contacts ................................................................................................................................... 56
Import and Export Contacts ................................................................................................................ 57
Accounts and Messaging ............................................................................................................................ 58
Google Account ................................................................................................................................... 58
Create a Google Account ............................................................................................................ 58
Sign In to Your Google Account ................................................................................................. 58
Access Gmail .............................................................................................................................. 58
Send a Gmail Message ............................................................................................................... 59
Read and Reply to Gmail Messages .......................................................................................... 59
Samsung Account ............................................................................................................................... 60
Email ................................................................................................................................................... 60
TOC iii

DRAFT
FOR INTERNAL USE ONLY
Add an Email Account ................................................................................................................. 60
Add a Microsoft Exchange ActiveSync Account ......................................................................... 61
Compose and Send Email .......................................................................................................... 62
Reply To or Forward Email ......................................................................................................... 62
Manage Your Email Inbox ........................................................................................................... 62
Edit Email Settings ...................................................................................................................... 64
Delete an Email Account ............................................................................................................. 64
Text and Multimedia Messaging ......................................................................................................... 65
Send a Text Message (SMS) ...................................................................................................... 65
Send a Multimedia Message (MMS) ........................................................................................... 65
Save and Resume a Draft Message ........................................................................................... 66
New Messages Notification ......................................................................................................... 66
Managing Conversations ............................................................................................................ 66
Access Messages Settings ......................................................................................................... 68
Messaging Plus ................................................................................................................................... 68
Social Networking Accounts ............................................................................................................... 69
Facebook .................................................................................................................................... 69
YouTube ...................................................................................................................................... 69
Google+ ...................................................................................................................................... 70
Hangouts ..................................................................................................................................... 70
Apps and Entertainment .............................................................................................................................. 71
Google Play Store ............................................................................................................................... 71
Find and Install an App ............................................................................................................... 71
Create a Google Wallet Account ................................................................................................ 72
Open an Installed App ................................................................................................................ 72
Uninstall an App .......................................................................................................................... 72
Navigation ........................................................................................................................................... 72
Google Maps ............................................................................................................................... 72
Scout ........................................................................................................................................... 73
Music Apps .......................................................................................................................................... 73
Google Play Music ...................................................................................................................... 73
Music ........................................................................................................................................... 74
Sprint Music Plus ........................................................................................................................ 77
NextRadio ................................................................................................................................... 78
Spotify ......................................................................................................................................... 78
TOC iv

DRAFT
FOR INTERNAL USE ONLY
Google Play Movies & TV ................................................................................................................... 78
Google Play Books .............................................................................................................................. 78
Google Play Games ............................................................................................................................ 78
Google Play Newsstand ...................................................................................................................... 79
PEN.UP ............................................................................................................................................... 79
Sprint Zone .......................................................................................................................................... 79
Sprint TV & Movies ............................................................................................................................. 79
NASCAR Mobile 2014......................................................................................................................... 80
NBA Game Time ................................................................................................................................. 80
eBay .................................................................................................................................................... 80
Eureka Offers ...................................................................................................................................... 80
Web and Data ............................................................................................................................................. 81
Wi-Fi .................................................................................................................................................... 81
Turn Wi-Fi On or Off ................................................................................................................... 81
Turn Wi-Fi On and Connect to a Wireless Network .................................................................... 81
Internet ................................................................................................................................................ 83
Chrome ............................................................................................................................................... 83
Data Services General Information (Sprint Spark LTE and 3G Networks) ......................................... 83
Sprint Spark LTE ......................................................................................................................... 83
Your User Name ......................................................................................................................... 84
Data Connection Status and Indicators ...................................................................................... 84
Hotspot ................................................................................................................................................ 84
Turn Hotspot On or Off ............................................................................................................... 85
Connect a Device to Your Device’s Hotspot ............................................................................... 85
Virtual Private Networks (VPN) ........................................................................................................... 85
Prepare Your Device for VPN Connection .................................................................................. 85
Add a VPN .................................................................................................................................. 86
Connect to a VPN ....................................................................................................................... 87
Disconnect from a VPN ............................................................................................................... 88
Pictures and Video ...................................................................................................................................... 89
Camera ............................................................................................................................................... 89
Open the Camera ....................................................................................................................... 89
Take a Picture ............................................................................................................................. 90
Record Videos ............................................................................................................................ 90
Review Pictures and Videos from the Camera ........................................................................... 91
TOC v

DRAFT
FOR INTERNAL USE ONLY
Configure the Camera ................................................................................................................. 92
Gallery ................................................................................................................................................. 94
View Photos and Videos ............................................................................................................. 95
Working with Photos ................................................................................................................... 97
Share Photos and Videos ........................................................................................................... 98
Video ................................................................................................................................................. 100
Tools and Calendar ................................................................................................................................... 101
Bluetooth ........................................................................................................................................... 101
Turn Bluetooth On or Off ........................................................................................................... 101
Connect a Bluetooth Headset or Car Kit ................................................................................... 101
Reconnect a Headset or Car Kit ............................................................................................... 102
Disconnect or Unpair from a Bluetooth Device ......................................................................... 102
Send Information Using Bluetooth ............................................................................................ 103
Send Information from Your Device to Another Device ............................................................ 103
Receive Information Using Bluetooth ....................................................................................... 104
Calendar ............................................................................................................................................ 104
Add an Event to the Calendar ................................................................................................... 104
Event Alerts ............................................................................................................................... 106
View Events .............................................................................................................................. 106
Delete Events ............................................................................................................................ 107
Calculator .......................................................................................................................................... 108
Clock ................................................................................................................................................. 108
Dropbox ............................................................................................................................................. 110
Drive .................................................................................................................................................. 110
Evernote ............................................................................................................................................ 110
GALAXY Apps ................................................................................................................................... 110
Google Now ...................................................................................................................................... 110
Google Search .................................................................................................................................. 111
Hancom Office 2014 ......................................................................................................................... 111
Lumen Toolbar .................................................................................................................................. 111
My Files ............................................................................................................................................. 111
S Health ............................................................................................................................................ 112
Before You Start Exercising ...................................................................................................... 112
S Note ............................................................................................................................................... 113
Create a Note ............................................................................................................................ 113
TOC vi

DRAFT
FOR INTERNAL USE ONLY
Edit a Note ................................................................................................................................ 113
Note Tools ................................................................................................................................. 113
S Voice .............................................................................................................................................. 114
Scrapbook ......................................................................................................................................... 115
Using the Smart Select and Image Clip Tools .......................................................................... 115
Sprint Framily Wall ............................................................................................................................ 115
Smart Remote ................................................................................................................................... 115
Configure Smart Remote .......................................................................................................... 115
Customize Your Smart Remote ................................................................................................ 116
Use Your Smart Remote to Control Your TV ............................................................................ 116
Voice Recorder ................................................................................................................................. 117
Voice Search ..................................................................................................................................... 119
microSD Card .................................................................................................................................... 119
Install a microSD Card .............................................................................................................. 120
Remove a microSD Card .......................................................................................................... 120
View microSD Card Memory ..................................................................................................... 120
Format a microSD Card ............................................................................................................ 120
Unmount a microSD Card ......................................................................................................... 121
Transfer Files Between Your Device and a Computer ..................................................................... 121
Update Your Device .......................................................................................................................... 122
Before Updating Your Firmware ............................................................................................... 122
Update Your Device .................................................................................................................. 122
Sprint Worldwide Wireless Service ........................................................................................................... 124
Activate Sprint Worldwide Service on Your Account ........................................................................ 124
Your Device’s SIM Card for International Roaming .......................................................................... 124
Set Network Mode Options ............................................................................................................... 124
Make and Receive Worldwide Calls ................................................................................................. 125
Sprint International Voicemail Service .............................................................................................. 126
Set Up Your Voicemail Access Number for International Use .................................................. 126
Access Your Voicemail Internationally ...................................................................................... 126
International Voicemail Troubleshooting ................................................................................... 127
International Data Roaming .............................................................................................................. 127
Get Started With Sprint Worldwide Data Services.................................................................... 127
Access Email and Data Services Internationally on GSM/UMTS Networks ............................. 127
Access Email and Data Services on Internationally on CDMA Networks ................................ 128
TOC vii

DRAFT
FOR INTERNAL USE ONLY
International Roaming Status Messages .......................................................................................... 128
Contact Sprint for Assistance with International Service .................................................................. 130
Settings ..................................................................................................................................................... 132
Using Settings ................................................................................................................................... 132
Access Settings ........................................................................................................................ 132
Search Settings ......................................................................................................................... 132
Settings Options ........................................................................................................................ 132
Wi-Fi Settings .................................................................................................................................... 133
Configure Wi-Fi Settings ........................................................................................................... 133
Advanced Wi-Fi Settings ........................................................................................................... 133
Wi-Fi Direct Settings ................................................................................................................. 134
Hotspot Settings ................................................................................................................................ 135
Turn Hotspot On or Off ............................................................................................................. 135
Configure Hotspot ..................................................................................................................... 135
Allowed Devices ........................................................................................................................ 136
Bluetooth Settings ............................................................................................................................. 136
Tethering Settings ............................................................................................................................. 137
Airplane Mode ................................................................................................................................... 138
Data Usage Settings ......................................................................................................................... 138
Location Settings ............................................................................................................................... 139
More Networks Settings .................................................................................................................... 140
Default Messaging App Settings ............................................................................................... 140
Mobile Networks Settings ......................................................................................................... 140
VPN Settings ............................................................................................................................. 141
Roaming Settings ...................................................................................................................... 142
NFC Settings ..................................................................................................................................... 142
Turn NFC On or Off .................................................................................................................. 142
Android Beam Settings ............................................................................................................. 142
S Beam Settings ....................................................................................................................... 143
Tap and Pay .............................................................................................................................. 143
Nearby Devices Settings ................................................................................................................... 144
Printing Settings ................................................................................................................................ 144
Screen Mirroring Settings ................................................................................................................. 145
MirrorLink .......................................................................................................................................... 146
Sound Settings .................................................................................................................................. 146
TOC viii

DRAFT
FOR INTERNAL USE ONLY
Sound Mode .............................................................................................................................. 146
Volume ...................................................................................................................................... 146
Vibration Intensity ..................................................................................................................... 147
Ringtones .................................................................................................................................. 147
Vibrations .................................................................................................................................. 147
Notifications............................................................................................................................... 148
Vibrate When Ringing ............................................................................................................... 148
Dialing Keypad Tone ................................................................................................................. 148
Touch Sounds ........................................................................................................................... 148
Screen Lock Sound ................................................................................................................... 148
Haptic Feedback ....................................................................................................................... 149
Emergency Tone ....................................................................................................................... 149
Samsung Applications Sound Settings ..................................................................................... 149
Display Settings ................................................................................................................................ 152
Brightness ................................................................................................................................. 152
Font ........................................................................................................................................... 152
Screen Rotation ........................................................................................................................ 152
Smart Stay ................................................................................................................................ 152
Screen Timeout ......................................................................................................................... 153
Screen Mode ............................................................................................................................. 153
Auto Adjust Screen Tone .......................................................................................................... 153
Daydream .................................................................................................................................. 153
LED Indicator Settings .............................................................................................................. 154
Touch Key Light Duration ......................................................................................................... 154
Increase Touch Sensitivity ........................................................................................................ 155
Wallpaper Settings ............................................................................................................................ 155
Lock Screen Settings ........................................................................................................................ 155
Screen Lock .............................................................................................................................. 155
Set a Swipe Screen Lock .......................................................................................................... 155
Set a Pattern Screen Lock ........................................................................................................ 156
Set a PIN Screen Lock .............................................................................................................. 157
Set a Password Screen Lock .................................................................................................... 158
Set a Fingerprint Screen Lock .................................................................................................. 159
Multi Window Settings ....................................................................................................................... 159
Notification Panel Settings ................................................................................................................ 160
TOC ix

DRAFT
FOR INTERNAL USE ONLY
Edge Screen Settings ....................................................................................................................... 160
Add Widgets to the Edge Screen .............................................................................................. 160
Add Wallpaper to the Edge Screen .......................................................................................... 161
Use Night Mode ........................................................................................................................ 161
One-Handed Operation Settings ....................................................................................................... 161
Easy Mode Settings .......................................................................................................................... 161
Accessibility Settings......................................................................................................................... 162
Configure Vision Accessibility Settings ..................................................................................... 162
Configure Hearing Accessibility Settings .................................................................................. 163
Configure Dexterity and Interaction Settings ............................................................................ 164
Configure Other Accessibility Settings ...................................................................................... 165
Configure Accessibility Services ............................................................................................... 165
Blocking Mode Settings .................................................................................................................... 166
Private Mode Settings ....................................................................................................................... 167
Finger Scanner .................................................................................................................................. 167
Register a Fingerprint ............................................................................................................... 167
Set or Change Your Backup Password .................................................................................... 167
Additional Settings .................................................................................................................... 168
Motions and Gestures Settings ......................................................................................................... 168
Air View ............................................................................................................................................. 169
S Pen Settings .................................................................................................................................. 169
Air Command .................................................................................................................................... 170
Accounts Settings ............................................................................................................................. 170
Cloud Settings ................................................................................................................................... 171
Backup and Reset Settings ............................................................................................................... 171
Language And Input Settings ............................................................................................................ 172
Choose a Default Language ..................................................................................................... 172
Set a Default Input Method ....................................................................................................... 172
Samsung Keyboard Settings .................................................................................................... 173
Swype Settings ......................................................................................................................... 175
Google Voice Typing Settings................................................................................................... 176
Handwriting Recognition ........................................................................................................... 176
Speech Settings ........................................................................................................................ 177
Mouse/Trackpad Settings ......................................................................................................... 178
Date and Time Settings .................................................................................................................... 178
TOC x

DRAFT
FOR INTERNAL USE ONLY
Safety Assistance .............................................................................................................................. 179
Accessories Settings ......................................................................................................................... 180
Battery Settings ................................................................................................................................. 180
Power Saving Settings ...................................................................................................................... 180
Storage Settings ................................................................................................................................ 181
Security Settings ............................................................................................................................... 181
Device Administration ............................................................................................................... 181
Encryption ................................................................................................................................. 182
Passwords ................................................................................................................................. 182
Security Update Service ........................................................................................................... 183
Credential Storage .................................................................................................................... 183
Help ................................................................................................................................................... 183
Activate This Device .......................................................................................................................... 184
System Update Settings ................................................................................................................... 184
About Device Settings ....................................................................................................................... 184
Application Manager Settings ........................................................................................................... 185
Default Applications Settings ............................................................................................................ 186
Calendar Settings .............................................................................................................................. 186
Call Settings ...................................................................................................................................... 187
Call Rejection ............................................................................................................................ 187
Answering and Ending Calls ..................................................................................................... 188
Call-Related Status Pop-Ups .................................................................................................... 188
Show Caller Information ............................................................................................................ 188
Call Alerts .................................................................................................................................. 189
Call Accessories ....................................................................................................................... 189
Additional Settings .................................................................................................................... 189
Ringtones and Keypad Tones................................................................................................... 190
Personalize Call Sound ............................................................................................................. 191
Noise Reduction ........................................................................................................................ 191
US Dialing ................................................................................................................................. 191
International Dialing .................................................................................................................. 191
DTMF Tones ............................................................................................................................. 192
Voicemail Settings .................................................................................................................... 192
Voice Privacy ............................................................................................................................ 192
Contacts Settings .............................................................................................................................. 192
TOC xi

DRAFT
FOR INTERNAL USE ONLY
Email Settings ................................................................................................................................... 193
Gallery Settings ................................................................................................................................. 196
Internet Settings ................................................................................................................................ 197
Messages Settings ............................................................................................................................ 197
S Voice Settings ................................................................................................................................ 200
Copyright Information ................................................................................................................................ 201
Index .......................................................................................................................................................... 202
TOC xii
DRAFT
FOR INTERNAL USE ONLY
Get Started
The following topics give you all the information you need to set up your device and Sprint service the first
time.
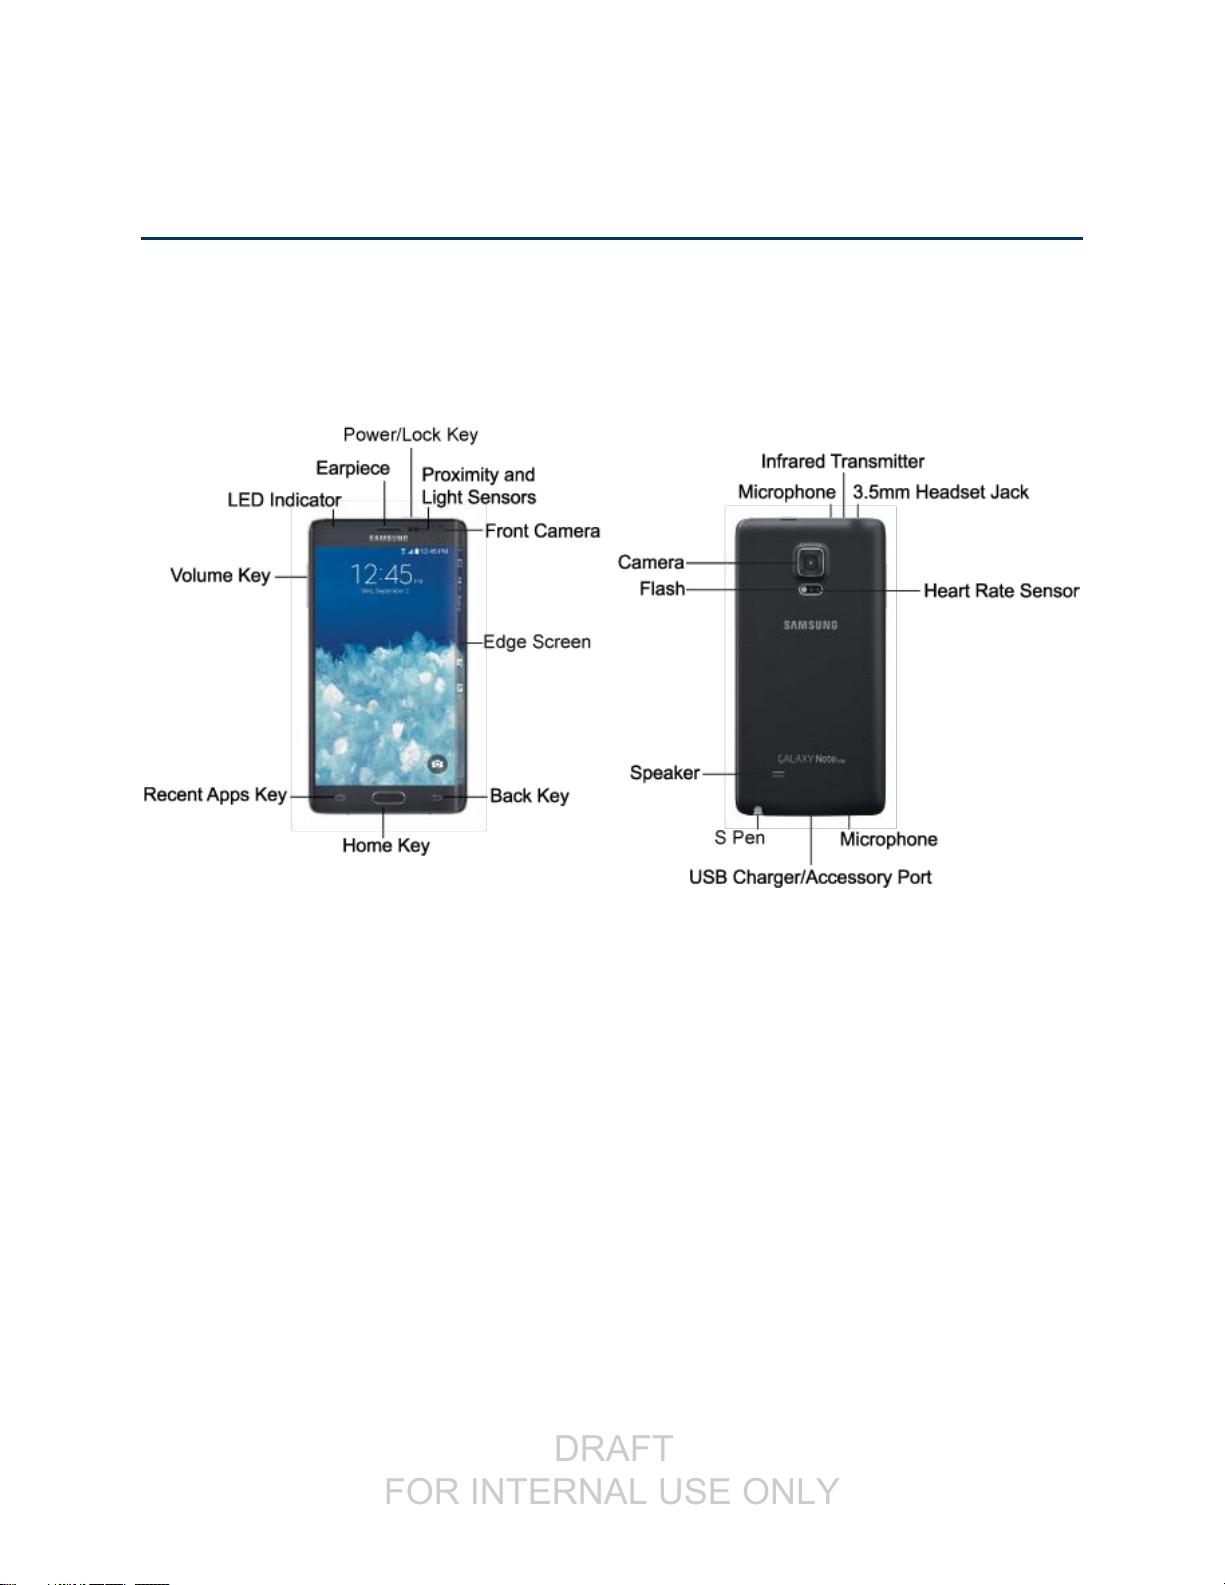
Your Device at a Glance
The following illustration outlines your device’s primary features.
Set Up Your Device
Prior to use, it is necessary to install an optional memory card (not included) and the battery.
Note: Your device’s battery should have enough charge to turn the device on and find a signal, complete
the setup wizard, set up voicemail, and make a call. You should fully charge the battery as soon as
possible.
Get Started 1
DRAFT
FOR INTERNAL USE ONLY
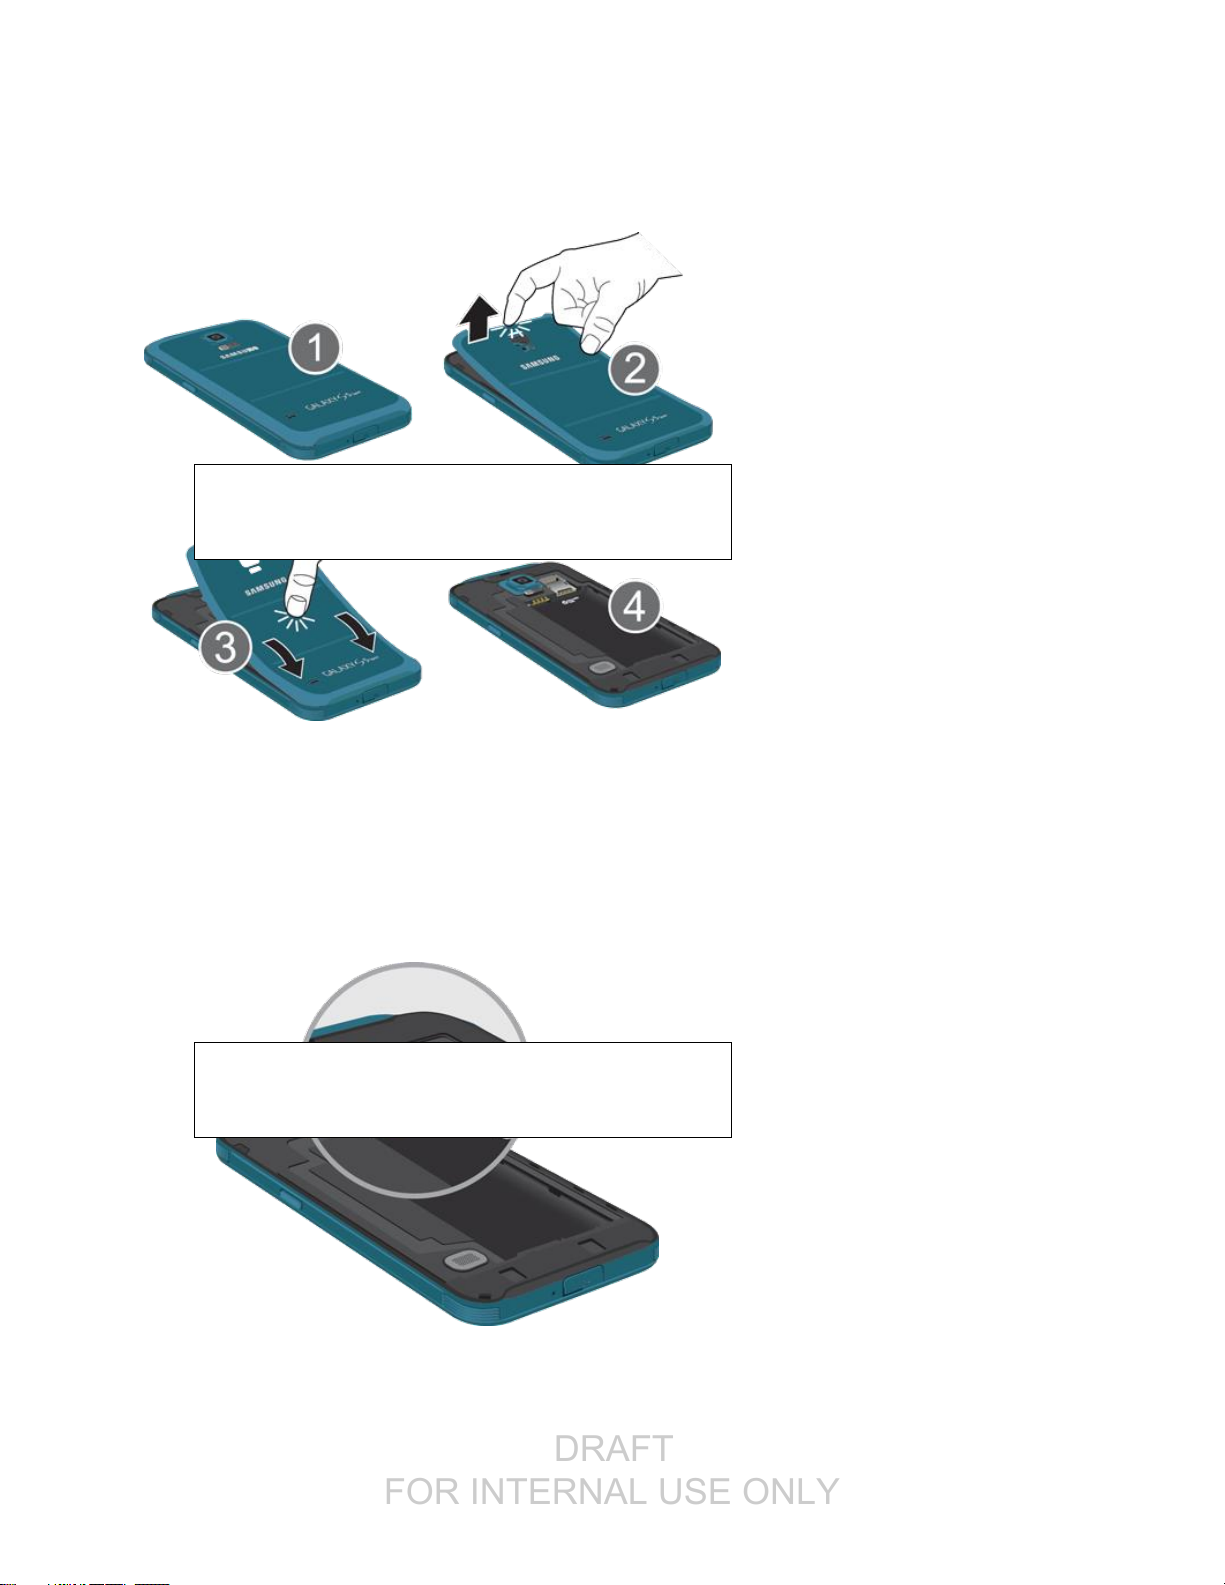
Remove the Back Cover
FPO
FPO
Carefully remove the back cover from the device.
1. Remove the back cover using the slot on the top of your device.
2. Carefully lift the cover.
Warning: Do not bend or twist the back cover excessively. Doing so may damage the cover.
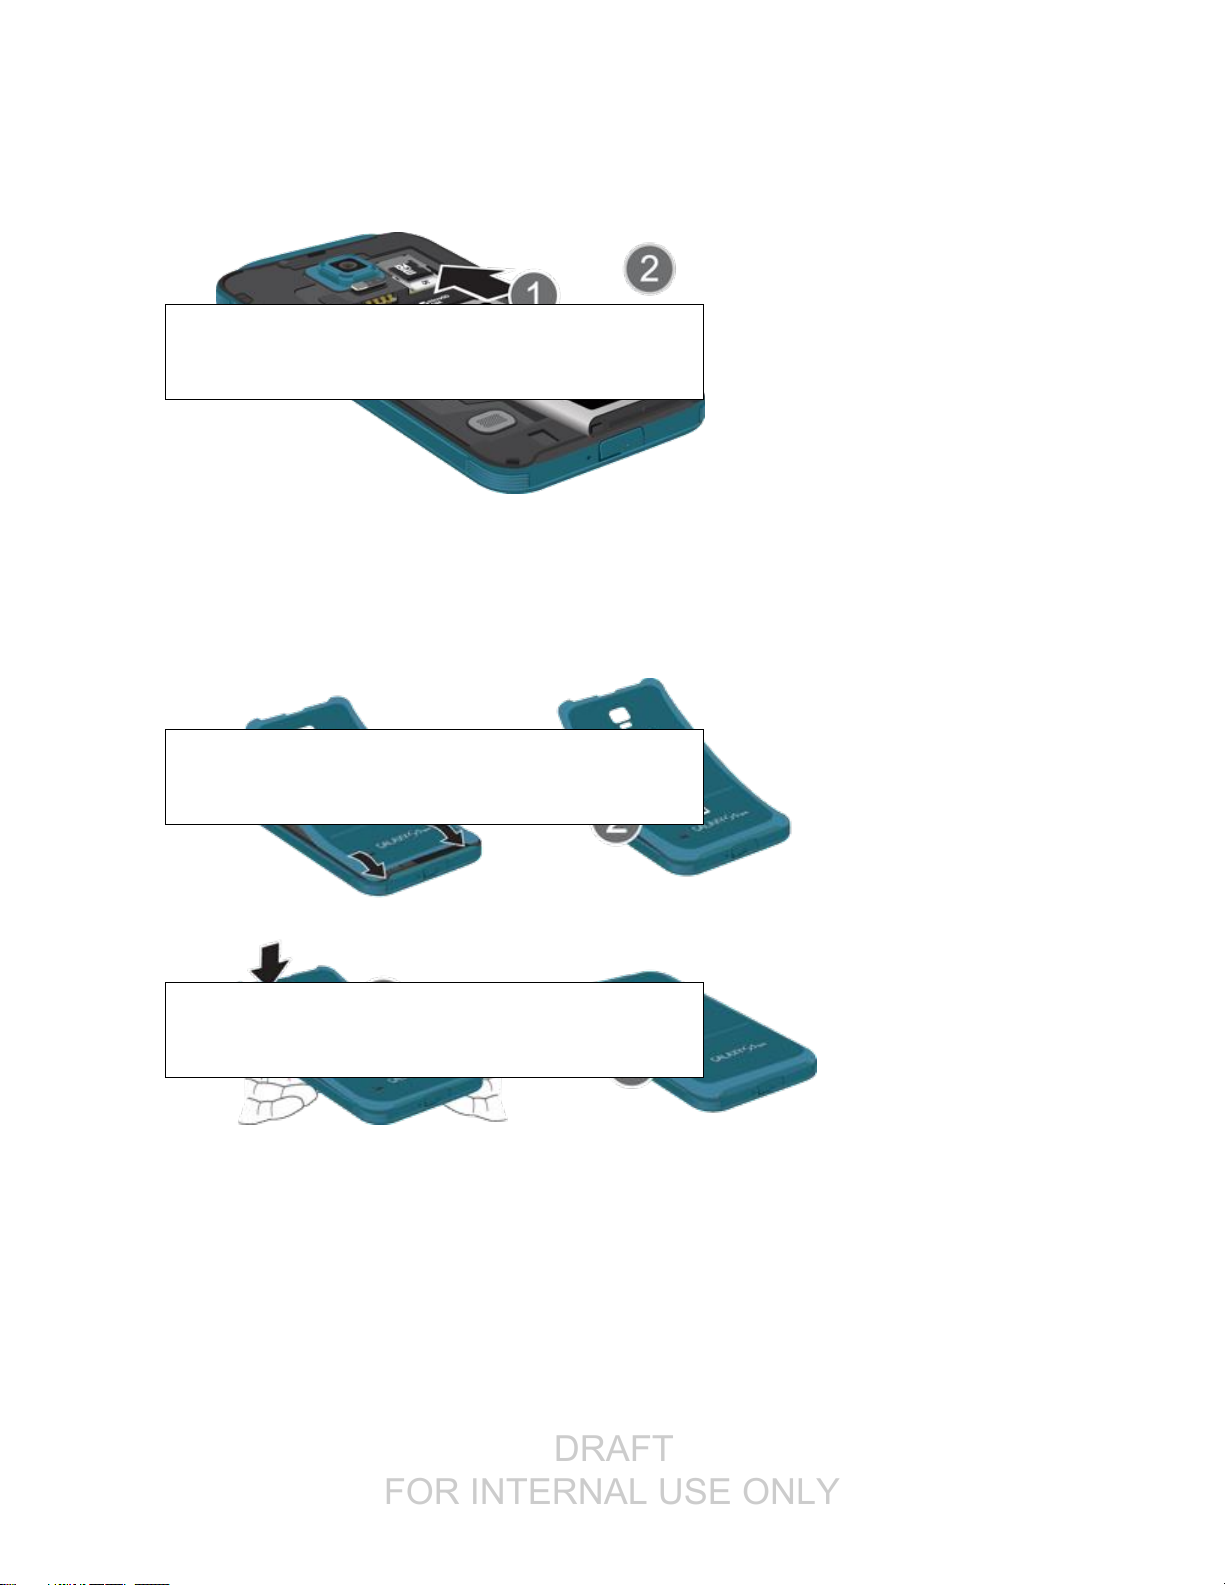
Install a Memory Card
You can use an optional microSD or microSDHC memory card (not included) to expand available memory
space.
■ Carefully slide the memory card into the memory card socket (as shown) until the card locks into
place. Make sure that the card’s gold contacts face into the device and that the card is positioned
as shown.
Get Started 2
DRAFT
FOR INTERNAL USE ONLY
Install the Battery
FPO
FPO
FPO
Follow these instructions for installing the battery.
■ Insert the battery, aligning the gold contacts on the battery with the gold contacts on the device,
and gently press the battery into place.
Replace the Back Cover
Follow these instructions for replacing the back cover.
■ Replace the battery compartment cover, making sure all the tabs are secure and there are no
gaps around the cover.
Important: Before closing the cover, check to see if there is any foreign substance such as dust or sand
between the rubber on the back of the cover and the sealing area.
Note: Water-resistant and dustproof based on IP67 rating, which tests submersion up to 1 meter for up to
30 minutes. Not shockproof. Covers must be tightly closed.
Get Started 3

DRAFT
FOR INTERNAL USE ONLY
Maintaining Water and Dust Resistance
This device is rated IP67 using the Ingress Protection rating system. The dust rating is 6 (highest level of
protection) and the water resistance rating is 7 (water resistant up to 1 meter for up to 30 minutes).
Despite this classification, your device is not impervious to water damage in any situation. It is important
that all compartments are closed tightly.
Follow these tips carefully to prevent damage to the device.
● Whenever your device gets wet, dry it thoroughly with a clean, soft cloth.
● Do not expose the device to salt water or ionized water, or to water over 1 meter deep for more
than 30 minutes. If your device is exposed to salt water, wash the device with fresh water then
dry thoroughly with a clean, soft cloth. Otherwise, when it dries, salt may accumulate and block
the microphone, earpiece, and speaker.
● When drying off your device, be sure to pat the earpiece (top front of device), microphone (bottom
of device), and speaker (rear of device) with a clean, soft cloth to remove as much water as
possible.
● When making a call immediately after your device is wet, the microphone may have water in it
which may lower the volume that the other person will hear. After drying off the device, allow the
device to air-dry before making a call.
● The back and USB/Accessory Port covers may be loosened slightly if the device is dropped or
receives an impact. Ensure that all the covers are properly aligned and tightly closed. Otherwise,
they may not provide protection from water and dust.
● Always keep the USB/Accessory Port cover clean and be careful to avoid damaging it.
Note: The touchscreen may not be active in water.
Get Started 4
DRAFT
FOR INTERNAL USE ONLY
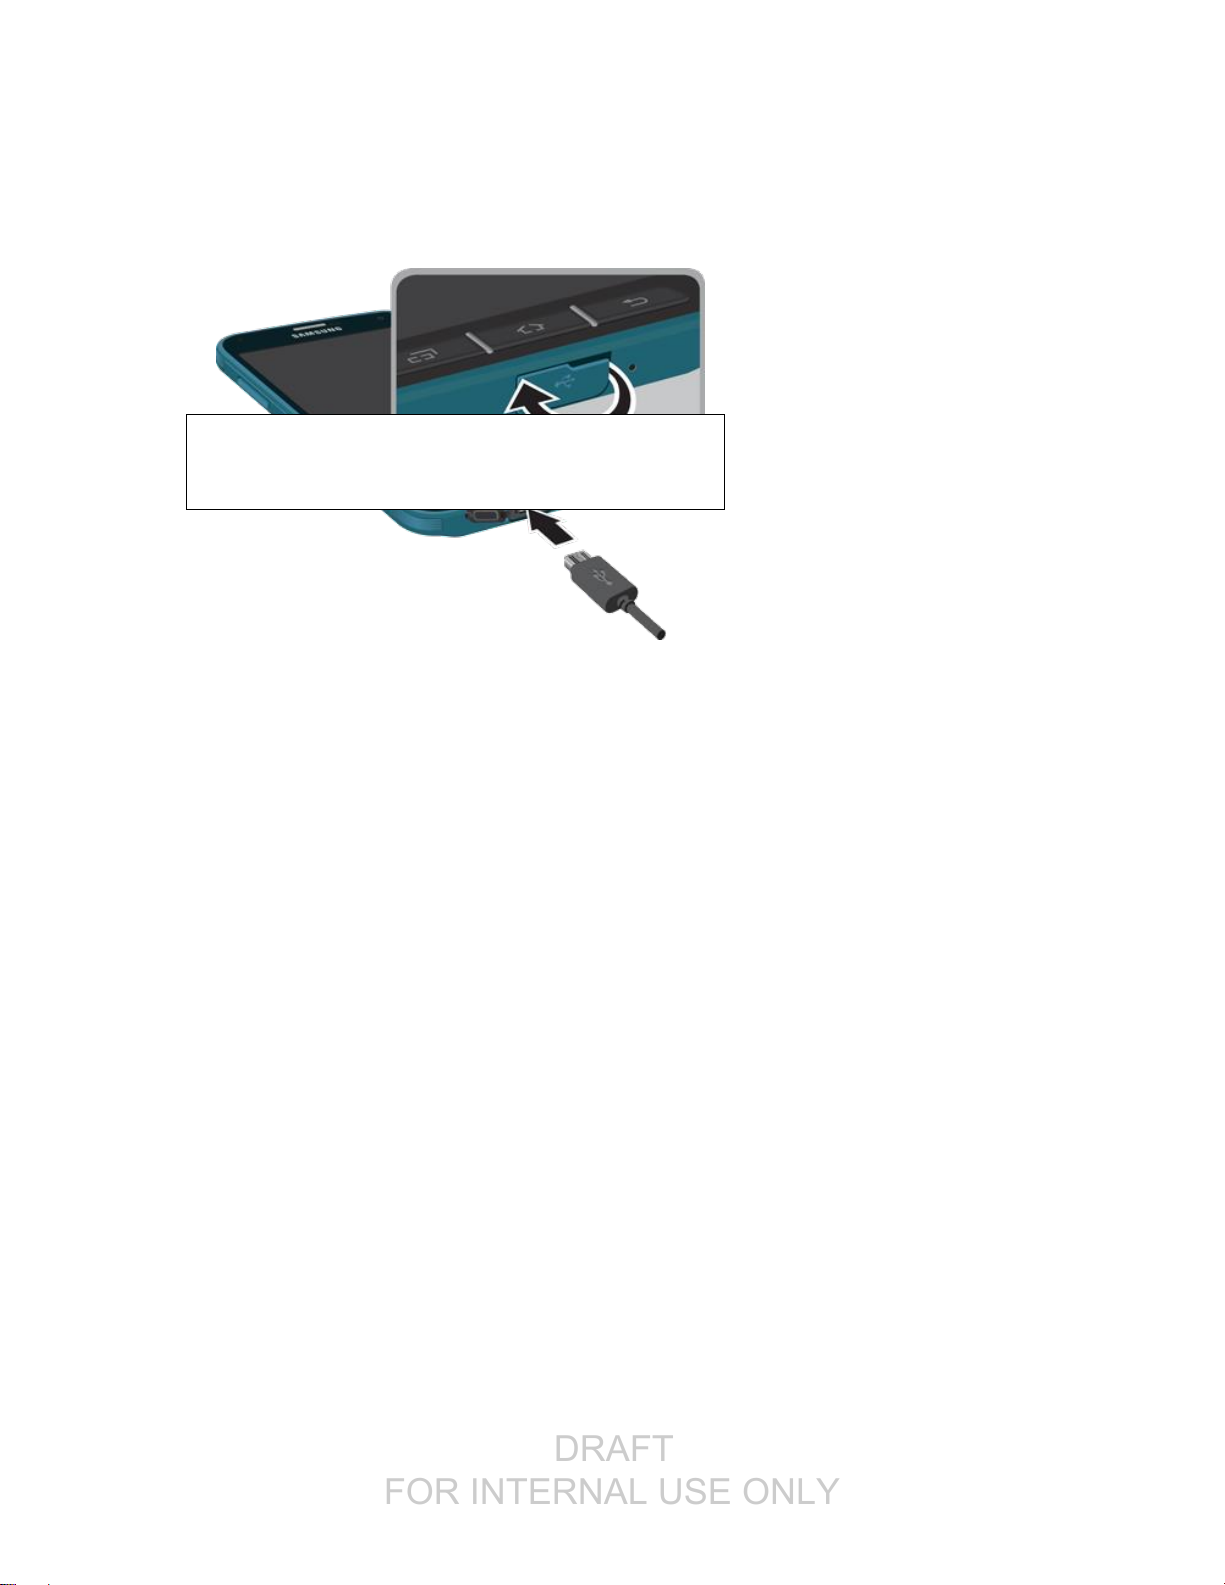
Charge the Battery
FPO
1. On the bottom of the device, gently lift the multipurpose jack cover to reveal the USB
Charger/Accessory Port.
2. Plug the USB cable into the Charger/Accessory Port on the bottom of the device.
3. Plug the other end of the USB cable into the Charging Head, and then plug the Charging Head
into an electrical outlet to charge your battery. Fully charging a battery may take up to three
hours.
Activate Your Device
Follow the instructions below to activate your device if it has not already been activated. Depending on
your account or how and where you purchased your device, it may be ready to use or you may need to
activate it on your Sprint account.
● If you purchased your device at a Sprint Store, it is probably activated and ready to use.
● If you received your device in the mail and it is for a new Sprint account or a new line of service, it
is designed to activate automatically.
When you turn the device on for the first time, you should see a Hands Free Activation
screen, which may be followed by a PRL Update screen and a Firmware Update screen.
Follow the onscreen instructions to continue.
● If you received your device in the mail and you are activating a new device for an existing number
on your account (you’re swapping devices), you can activate on your computer online or directly
on your device.
Activate on your computer:
• Go to sprint.com/activate and complete the online instructions to activate your device.
Get Started 5

DRAFT
FOR INTERNAL USE ONLY
Activate on your device:
• Turn on your new device. (Make sure the old one is turned off.) Your device will
automatically attempt Hands-Free Activation.
• Tap Activate to override auto-activation and start the manual activation wizard.
• Follow the onscreen prompts to complete the activation process.
To confirm activation, make a device call. If your device is still not activated, visit sprint.com/support for
assistance. If you do not have access to the Internet, call Sprint Customer Service at 1-888-211-4727
from another device.
Note: Do not press the Power/Lock key while the device is being activated. Pressing the Power/Lock
key cancels the activation process.
Complete the Setup
After you turn on your device and activate it, your device displays a Welcome screen. From the Welcome
screen follow the prompts to set up features and preferences on your device.
Note: In some cases, you may be able to complete the setup process before your device has been
activated on your Sprint account.
During setup and activation, you may see Sprint Connections Optimizer notice. Read the notice and tap I
Agree to use Sprint Connections Optimizer, or tap Settings and uncheck the option if you do not wish to
use the Sprint Connections Optimizer.
1. At the Welcome screen, follow the onscreen instructions to configure your device’s basic
options, such as language, date and time, Wi-Fi connections, location settings, etc.
Google Account: Many of your device’s applications, such as Gmail, Google Maps, Google
Talk, and the Google Play Store, require a Google Account. To use these applications, you
must set up your Google Account on your device. Complete the steps to sign in to your
current Google Account, or sign up for a new Google Account.
Samsung Account: Your Samsung Account is used for access to Samsung apps and
services, such as Samsung Hub, Samsung Apps, Samsung Link, and much more. Complete
the steps to sign in to your current Samsung Account, or sign up for a new Samsung
Account.
2. Tap Finish to complete setup.
You may see a series of informational or update screens. Follow the prompts to continue.
Note: During or after setup, you may see a Sprint Connections Optimizer notice. Read the notice and
then tap I Agree to allow your device to connect automatically to the best available data network,
including Wi-Fi. To turn Connections Optimizer off at any time, from home tap Apps >
Settings > More networks > Mobile networks > Connections optimizer and uncheck the box.
See Mobile Networks Settings for details.
Get Started 6
DRAFT
FOR INTERNAL USE ONLY
Set Up Voicemail
Your device automatically transfers all unanswered calls to voicemail, even if your device is in use or
turned off. You should set up your Sprint Voicemail and personal greeting as soon as your device is
activated. Always use a password to protect against unauthorized access.
Note: Voicemail Password – Sprint strongly recommends that you create a password when setting up
your voicemail to protect against unauthorized access. Without a password, anyone who has access to
your device is able to access your voicemail messages.
1. From a Home screen, tap Phone.
If your screen is locked, press the Power/Lock key to turn on the display and then swipe your
screen in any direction. See Turn Your Screen On and Off.
2. Touch and hold
3. Follow the system prompts to:
Create your password.
Record your name announcement.
Record your greeting.
Tip: You can also access and set up voicemail with the Visual Voicemail app. From a Home screen, tap
Apps > Voicemail, and then tap Personalize now.
to dial your voicemail number.
Sprint Account Information and Help
Find out about account passwords and information about managing your account and finding help.
Sprint Account Passwords
As a Sprint customer, you enjoy unlimited access to your personal account information, your voicemail
account, and your data services account. To ensure that no one else has access to your information, you
will need to create passwords to protect your privacy.
Account User Name and Password
If you are the account owner, you will create an account user name and password when you sign on to
sprint.com/mysprint. (Click Sign in/Sign up and then click Sign up now. to get started.) If you are not the
account owner (if someone else receives the bill for your Sprint service), you can get a sub-account
password at sprint.com/mysprint.
Voicemail Password
You’ll create your voicemail password when you set up your voicemail. See Set Up Voicemail for more
information on your voicemail password.
Get Started 7
DRAFT
FOR INTERNAL USE ONLY
Data Services Password
With your Sprint device, you may elect to set up an optional data services password to control access and
authorize Premium Service purchases.
For more information, or to change your passwords, sign on to sprint.com/mysprint.
Manage Your Account
Manage your Sprint account from your computer, your Sprint device, or any other device.
Online: sprint.com/mysprint
● Access your account information.
● Check your minutes used (depending on your Sprint service plan).
● View and pay your bill.
● Enroll in Sprint online billing and automatic payment.
● Purchase accessories.
● Shop for the latest Sprint devices.
● View available Sprint service plans and options.
● Learn more about data services and other products like games, ring tones, screen savers, and
more.
From Your Sprint Device
1. From a Home screen, tap Phone.
2. Do any of the following:
Tap
answers to other questions.
Tap
Tap
Note: For additional account information, you can access Sprint Zone from your device. From a Home
screen, tap Apps > Sprint Zone.
to access a summary of your Sprint service plan or to get
to make a payment.
to check minute usage and account balance.
Get Started 8
DRAFT
FOR INTERNAL USE ONLY
Sprint Support Services
Sprint 411 and Sprint Operator Services let you easily access information and calling assistance from
your Sprint device.
Sprint 411
Sprint 411 gives you access to a variety of services and information, including residential, business, and
government listings; movie listings or show times; driving directions, restaurant reservations, and major
local event information. You can get up to three pieces of information per call, and the operator can
automatically connect your call at no additional charge.
There is a per-call charge to use Sprint 411, and you will be billed for airtime.
1. From a Home screen, tap Phone.
2. Tap .
Sprint Operator Services
Sprint Operator Services provides assistance when you place collect calls or when you place calls billed
to a local telephone calling card or third party.
1. From a Home screen, tap Phone.
2. Tap .
Note: For more information or to see the latest in products and services, visit us online at
sprint.com/mysprint.
Get Started 9
DRAFT
FOR INTERNAL USE ONLY
Device Basics
Your device is packed with features that simplify your life and expand your ability to stay connected to the
people and information that are important to you. The following topics will introduce the basic functions
and features of your device.
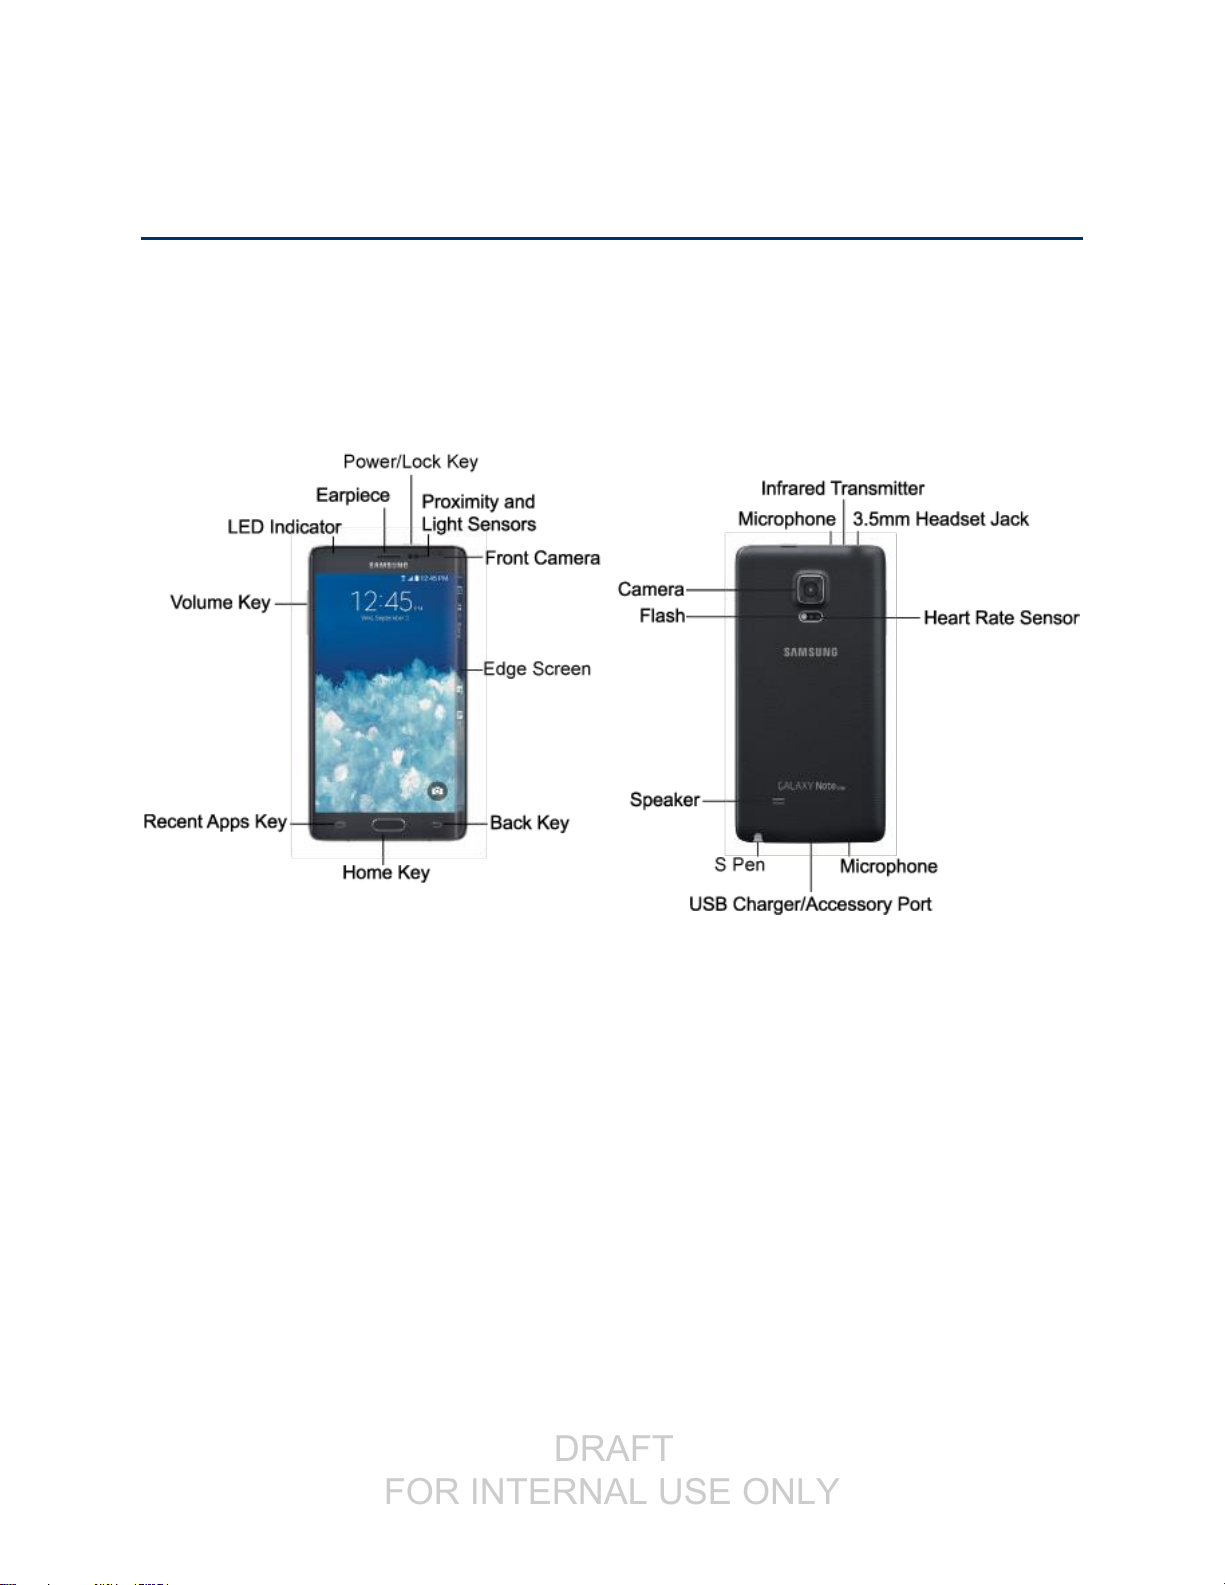
Your Device’s Layout
This illustration outlines your device’s basic layout.
Features
The following list defines the features listed in the above illustrations.
● Edge Screen: The Edge screen provides convenient access to shortcuts, widgets, and features
that are most useful to you. Select and customize panels to make the Edge screen work for you.
● LED Indicator: Glows or blinks in different colors to show status when the screen is turned off.
The LED glows red when charging, and blinks red when the battery is low; blinks blue when
there’s a new notification, or when you are recording voice with the screen turned off; and glows
green when the battery is fully charged and the device is attached to a charger.
● Earpiece: Lets you hear the caller and automated prompts during calls.
● Proximity Sensor: Detects the presence of objects near the device, such as when using air
gesture or motion settings. For example, while talking on the device the sensor detects when it’s
near your ear and turns off the screen to prevent accidental key presses.
● Light Sensor: Detects the ambient light level, such as when setting screen brightness when
Automatic brightness is enabled, and when using the Camera.
Device Basics 10

DRAFT
FOR INTERNAL USE ONLY
● Front Camera: Allows you to take pictures and videos of yourself.
● Power/Lock Key: Turns the device on or off, turn the screen on or off, or lock the screen. Press
and hold for a Device options menu, where you can turn the device off or restart it, or for easy
access to Airplane mode, Emergency Mode, and to Mute, Vibrate, and Sound modes.
● Back Key: Returns to the previous screen, or close a dialog box, options menu, the Notification
Panel, or onscreen keyboard.
● Home Key: Returns to the Home screen.
● Recent Apps: Displays a list of apps you’ve used recently. Press and hold to configure the home
screen.
● Volume Key: Adjusts the volume of your device’s sounds. From the home screen, press to adjust
master volume. During calls or playback, press to adjust volume. Press to mute the ringtone of an
incoming call.
● 3.5 mm Headset Jack: Allows you to plug in either a stereo headset or an optional headset for
convenient, hands-free conversations.
● Microphones: Allow other callers to hear you when you are using the speakerphone, and
captures sound during recording.
● Temperature and Humidity Sensor: Monitors both temperature and humidity conditions. This is
used to calculate calories burned within S Health.
● Infrared Transmitter: Controls other devices, such as a TV.
● Heart Rate Sensor: Measures your heart rate when you hold your finger over the sensor, for use
with apps like S Health®.
● USB Charger/Accessory Port: Connects the charger/USB cable (included) and other optional
accessories (not included).
● Speaker: Plays ringtones and sounds. The speaker also lets you hear the caller’s voice in
speakerphone mode.
● Flash: Helps illuminate subjects in low-light environments when the camera is focusing and
capturing a photo or video.
● Camera: Takes pictures and record videos.
Caution: Inserting an accessory into the incorrect jack may damage the device.
Device Basics 11

DRAFT
FOR INTERNAL USE ONLY
Turn Your Device On and Off
Use the Power/Lock key to turn the device on or off.
Turn the Device On
■ Press and hold the Power/Lock key.
Turn the Device Off
1. Press and hold the Power/Lock key to display the Device options menu.
2. Tap Power off > OK to turn the device off.
The screen remains blank while your device is off. If the device is off during charging, the screen displays
a charging animation.
Turn Your Screen On and Off
Your device allows you to quickly turn the screen off when not in use and to turn it back on and unlock it
when you need it.
Turn the Screen Off When Not in Use
■ To quickly turn the screen off, press the Power/Lock key. Pressing the Power/Lock key again
will turn on the screen and display the lock screen.
To save battery power, the device automatically turns off the screen (times out) after a certain period of
time when you leave it idle. You will still be able to receive messages and calls while the device’s screen
is off.
Note: For information on how to adjust the time before the screen turns off, see Screen Timeout.
Turn the Screen On and Unlock It
1. To turn the screen on, press the Power/Lock key.
2. Unlock the screen:
If you are using the default screen lock, swipe the screen in any direction to unlock it.
If you have set up a screen lock, use your screen lock. See Screen lock.
Features
Your device offers new features for using gestures to interact with your device.
Edge Screen
The Edge screen provides a variety of useful tools, shortcuts, and widgets. Panels for the Edge screen
can be added, removed, and customized to your preferences. The following sections describe basic
functionality. For details on configuring the Edge screen, see Edge Screen Settings.
Device Basics 12

DRAFT
FOR INTERNAL USE ONLY
Basic Gestures
The Edge screen responds to basic gestures as follows:
Swipe right or left to switch between panels.
Swipe down to view the Quick Tools.
Swipe up to access settings (only when the screen is unlocked).
Customize App Shortcuts
You can choose the apps you want to display in the Edge Screen.
■ Tap Favorite Apps to display the apps tray on the main screen to edit your Edge Screen.
To remove an app from the Edge Screen, tap and drag it off of the tray.
To add an app to the Edge Screen, tap and drag it to the tray.
To relocate an app, tap and drag it to a new location.
Quick Tools
You can quickly use preset tools on your Edge Screen without disrupting your activity on the main screen.
1. Swipe down from the top of the Edge screen.
2. Select from the following tools:
Flashlight: Use the camera flash as a flashlight. Tap on to use the flashlight. Tap off when
you are done.
Ruler: Use the Edge screen as a ruler. Tap cm to change from centimeters to inches.
Stopwatch: Count down with the Edge screen. Tap Start to begin the countdown. Tap Stop
to end the time, or Lap to keep the record and immediately start a new record.
Timer: Use your Edge screen as a timer. Tap the plus and minus signs to set the length of
time. Tap Start to begin the timer.
Voice recorder: User your Edge screen as a voice recorder. Use the Record, Cancel, Stop,
and Pause options to edit your recording. Recordings are saved to the Audio file.
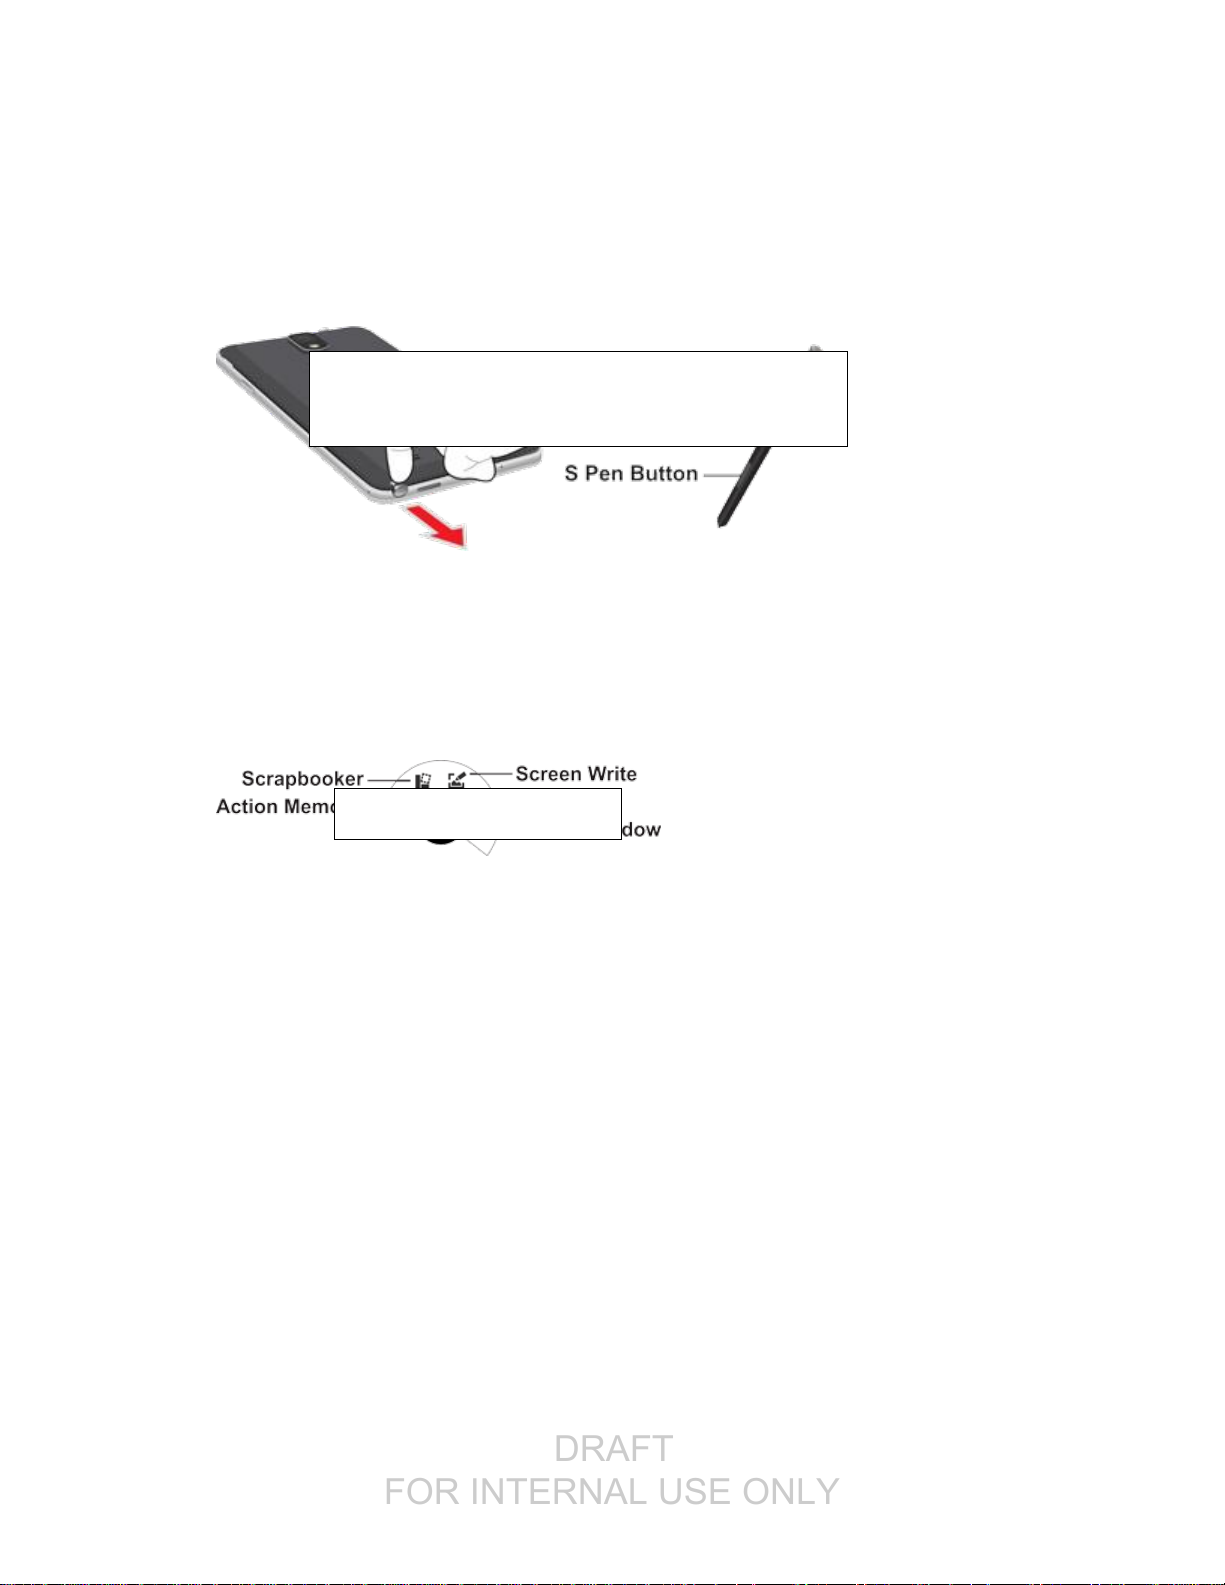
S Pen Overview
Use S Pen and your device to create and collaborate. With S Pen, you can:
● Write directly into a Gmail message.
● Write directly on the calendar.
● Annotate documents (Word, Excel, PPT, PDF).
● Quickly open S-Note from any screen.
Device Basics 13
DRAFT
FOR INTERNAL USE ONLY
Removing S Pen from Your Device
FPO
S Pen is stored in your device to keep it protected and easy to locate.
■ Slide S Pen from your device using the notch on the end of the S Pen.
Use S Pen
There are several different functions you can perform by using the S Pen.
Air Command
Air command allows you to quickly activate frequently used applications or perform actions.
■ To launch the Air command menu, remove the S Pen from the S Pen slot, hold the S Pen near
the screen so that the pointer appears, and press the S Pen button once.
Action Memo: Launch a memo and link it to actions. Action Memos are saved in the S Note
app.
Smart select: Draw around an area of the screen to collect it for later use.
Image clip: Outline and crop images on the screen, in any shape, to share or paste.
Screen write: Capture screenshots and write or draw on them.
Action Memo
An Action Memo is a special type of note that turns your written text into actions on your device.
To open an Action Memo:
■ Remove the S Pen from the S Pen slot, hold the S Pen near the screen so that the pointer
appears, and press the S Pen button once. Select Action Memo.
– or –
Device Basics 14

DRAFT
FOR INTERNAL USE ONLY
Press and hold the S Pen button and double-tap the screen with the pen.
Note: To view your Action Memos, from a Home screen, tap Apps > S Note. See S Note for
more information.
Smart Select
Smart select provides a capture tool to select content on a screen and add it to your Scrapbook app.
To use the Smart select tool:
1. Remove the S Pen from the S Pen slot, hold the S Pen near the screen so that the pointer
appears, and press the S Pen button once. Select Smart select.
2. To capture an item on the screen, simply draw around the item. The captured item appears on
the screen and can be saved to the Scrapbook. You can add a title, text, a handwritten memo,
and tags.
Image Clip
Outline and crop images from the screen, in any shape, to share or paste. You can edit the cropped
content, or personalize it with your handwriting.
To use Image Clip:
1. Remove the S Pen from the S Pen slot, hold the S Pen near the screen so that the pointer
appears, and press the S Pen button once. Select Image Clip.
2. Use the S Pen to draw around the content you wish to capture.
The selected clip is centered on the screen. To refine your selection, use the Transform
buttons. You can choose your hand drawn shape, regular shapes, or a magnetic auto shape.
Once you decide on a shape, select an app from the scrolling tray at the bottom of the
screen. Drag the tray right or left to see which apps can use or save the clip.
Screen Write
Screen write allows you to capture a screen shot and then write notes on the screen shot.
To use Screen write:
■ Remove the S Pen from the S Pen slot, hold the S Pen near the screen so that the pointer
appears, and press the S Pen button once. Select Screen write.
The current screen is captured, and a pen tool appears. The following editing tools are provided:
Pen: Write on the screen shot. Press the Pen icon a second time to change the pen tip, size,
color, and to save presets.
Eraser: Erase the writing or drawings on the screen shot. Tap the Eraser icon a second time
to change the size of the eraser area and to see the Clear all option.
Device Basics 15

DRAFT
FOR INTERNAL USE ONLY
Crop: Crop the screenshot. Tap the Crop icon a second time to change the shape to either
Lasso or Rectangle.
When you are finished writing, either tap the check mark to save the screen shot or tap the
Share icon to share the image using another app. The screen shot is saved in the Gallery app.
Air View
Air View delivers more functionality with less clicks, making you more productive. Hover S Pen over the
screen to preview content, or view information about an item on the screen. For example:
● Hover over an email in a list to preview the message before opening it.
● Hover over a photo album to preview the contents, or see a picture enlarged.
● Hover over the timeline during video playback to preview and navigate to specific scenes.
● In Calendar, hover over dates and events to see details
● Hover over an icon or screen button to view the item’s title
S Pen Settings
Configure S Pen settings, including options for gestures and sounds, and for tracking S Pen when it’s not
stored in your device.
■ To access S Pen Settings, tap Apps > Settings > S Pen.
Note: For more information about S Pen settings, see S Pen Settings.
Motions and Gestures
Control your device by making specific gestures with your hand above the device’s screen.
● Air browse: Scroll through pages, or move to the previous or next item, by moving your hand up
and down, or left and right, over the screen.
● Direct call: Call the contact whose recent call log, message, or contact details are displayed by
lifting the device to your ear.
● Smart alert: Device vibrates to alert you to missed calls and notifications that occurred since the
last time you picked up your device.
● Mute/pause: Mutes incoming calls and pause playback by turning the device screen-side down,
or by covering the screen with your hand. You can also use Smart pause, to have the device
pause video playback when you look away from the screen.
● Palm swipe to capture: Creates a copy of the current screen by swiping the side of your hand
across the screen, from left to right or right to left. The screen shot is saved to the clipboard, and
to the Screenshots folder.
Device Basics 16

DRAFT
FOR INTERNAL USE ONLY
Enable Motions and Gestures
■ From a Home screen, tap Apps > Settings > Motions and gestures.
Air View
Hover your finger over items on the screen to display more information.
● Information preview: Hover over items to display information previews, extended text, or
enlarged images, depending on the type of item. For example, you can hover your finger over an
event in Calendar to see event details, or hover over an album in Gallery to view the pictures in
the album. You can also hover your finger over a progress bar when playing a video, to preview a
scene and see elapsed time.
● Webpage magnifier: Hover over a webpage to magnify the content under your finger.
Configure Air View
Enable Air View features, and learn about using them.
■ From a Home screen, tap Apps > Settings > Air View > Air View finger options.
Multi Window
Use two apps on the same screen, in separate, resizable windows.
Turn Multi Window On or Off
Turn Multi window on or off in Settings.
1. From a Home screen, tap Apps > Settings > Multi window.
2. Tap the ON/OFF switch to turn Multi window on or off.
Note: You can also turn Multi window on and off from the Notification Panel. See Notification Panel for
more information.
Display Multi Window
After you turn Multi window on in Settings, you can control whether the Multi window tray displays on the
screen, for easy access to its features.
By default, the Multi window tray tab displays on the left side of the screen. You can drag the tab along
the side of the screen, or tap the tab to open Multi Window, and then drag Multi window to the right side
of the screen, or the bottom.
■ To display the Multi window tab, touch and hold Back.
Device Basics 17
 Loading...