

Samsung SMN900V Users Manual
ANDROID SMARTPHONE
SM-N900V “H”
This document is watermarked because certain important information in the document has not yet been verified. This document has been sent to you as
a draft and for informational purposes only. The document should only be used for internal purposes and may not be distributed outside of Samsung,
except to Samsung's carrier customer for testing purposes. Distributing the document outside of Samsung, except to Samsung's carrier customer for
testing purposes could result in legal exposure to the company if the preliminary, unverified information in the draft turns out to be inaccurate.
DRAFT
FOR INTERNAL USE ONLY
User Manual
Please read this manual before operating your
phone and keep it for future reference.
GH68_XXXXXX Printed in Korea

Intellectual Property
DRAFT
FOR INTERNAL USE ONLY
All Intellectual Property, as defined below, owned by or which is otherwise the property of Samsung or its respective suppliers
relating to the SAMSUNG Phone, including but not limited to, accessories, parts, or software relating there to (the “Phone
System”), is proprietary to Samsung and protected under federal laws, state laws, and international treaty provisions. Intellectual
Property includes, but is not limited to, inventions (patentable or unpatentable), patents, trade secrets, copyrights, software,
computer programs, and related documentation and other works of authorship. You may not infringe or otherwise violate the
rights secured by the Intellectual Property. Moreover, you agree that you will not (and will not attempt to) modify, prepare
derivative works of, reverse engineer, decompile, disassemble, or otherwise attempt to create source code from the software. No
title to or ownership in the Intellectual Property is transferred to you. All applicable rights of the Intellectual Property shall remain
with SAMSUNG and its suppliers.
Open Source Software
Some software components of this product, including but not limited to 'PowerTOP' and 'e2fsprogs', incorporate source code
covered under GNU General Public License (GPL), GNU Lesser General Public License (LGPL), OpenSSL License, BSD License and
other open source licenses. To obtain the source code covered under the open source licenses, please visit:
http://opensource.samsung.com
.
Disclaimer of Warranties; Exclusion of Liability
EXCEPT AS SET FORTH IN THE EXPRESS WARRANTY CONTAINED ON THE WARRANTY PAGE ENCLOSED WITH THE PRODUCT, THE
PURCHASER TAKES THE PRODUCT "AS IS", AND SAMSUNG MAKES NO EXPRESS OR IMPLIED WARRANTY OF ANY KIND
WHATSOEVER WITH RESPECT TO THE PRODUCT, INCLUDING BUT NOT LIMITED TO THE MERCHANTABILITY OF THE PRODUCT OR
ITS FITNESS FOR ANY PARTICULAR PURPOSE OR USE; THE DESIGN, CONDITION OR QUALITY OF THE PRODUCT; THE
PERFORMANCE OF THE PRODUCT; THE WORKMANSHIP OF THE PRODUCT OR THE COMPONENTS CONTAINED THEREIN; OR
COMPLIANCE OF THE PRODUCT WITH THE REQUIREMENTS OF ANY LAW, RULE, SPECIFICATION OR CONTRACT PERTAINING
VZW_GT-N900V_UM_Eng_MHV_CB_090513_D3

THERETO. NOTHING CONTAINED IN THE INSTRUCTION MANUAL SHALL BE CONSTRUED TO CREATE AN EXPRESS OR IMPLIED
DRAFT
FOR INTERNAL USE ONLY
WARRANTY OF ANY KIND WHATSOEVER WITH RESPECT TO THE PRODUCT. IN ADDITION, SAMSUNG SHALL NOT BE LIABLE FOR
ANY DAMAGES OF ANY KIND RESULTING FROM THE PURCHASE OR USE OF THE PRODUCT OR ARISING FROM THE BREACH OF
THE EXPRESS WARRANTY, INCLUDING INCIDENTAL, SPECIAL OR CONSEQUENTIAL DAMAGES, OR LOSS OF ANTICIPATED PROFITS
OR BENEFITS.
Modification of Software
SAMSUNG IS NOT LIABLE FOR PERFORMANCE ISSUES OR INCOMPATIBILITIES CAUSED BY YOUR EDITING OF REGISTRY SETTINGS,
OR YOUR MODIFICATION OF OPERATING SYSTEM SOFTWARE.
USING CUSTOM OPERATING SYSTEM SOFTWARE MAY CAUSE YOUR DEVICE AND APPLICATIONS TO WORK IMPROPERLY. YOUR
CARRIER MAY NOT PERMIT USERS TO DOWNLOAD CERTAIN SOFTWARE, SUCH AS CUSTOM OS.
IF YOUR CARRIER PROHIBITS THIS, IF YOU ATTEMPT TO DOWNLOAD SOFTWARE ONTO THE DEVICE WITHOUT AUTHORIZATION,
YOU WILL BE NOTIFIED ON THE SCREEN THAT THE PHONE WILL NO LONGER OPERATE AND BE INSTRUCTED TO POWER DOWN
THE DEVICE. YOU MUST THEN CONTACT YOUR CARRIER TO RESTORE THE DEVICE TO THE CARRIER AUTHORIZED SETTINGS.
SAFE™ (Samsung Approved For Enterprise)
SAFE™: "SAFE™" (Samsung for Enterprise) is a mark for a Samsung device which has been tested against Samsung's own
internal criteria for interoperability with certain third party security-related solutions for MDM and VPN. The testing includes field
testing with local network connection and menu tree testing which tests functionality of the solutions in conjunction with the
Samsung device. During the testing, the device is tested with the security solutions to see if the solutions work with the device as
described by the third party security solution providers. The testing, for example, includes field testing with local network
connection and menu tree testing which tests functionality of the solutions in conjunction with the Samsung device. For more
information about Samsung's SAFE™ program, please refer to
Disclaimer of Warranties: EXCEPT AS OTHERWISE PROVIDED IN THEIR STANDARD END USER LICENSE AND WARRANTY, TO THE
FULL EXTENT PERMITTED BY LAW SAMSUNG ELECTRONICS CO., LTD., SAMSUNG TELECOMMUNICATIONS AMERICA, LLC, AND
www.samsung.com/us/safe
.

THEIR AFFILIATES (COLLECTIVELY REFERRED TO HEREIN AS THE "SAMSUNG ENTITIES") EXPRESSLY DISCLAIM ANY AND ALL
DRAFT
FOR INTERNAL USE ONLY
WARRANTIES, EXPRESS OR IMPLIED, INCLUDING ANY WARRANTY OF MERCHANTABILITY, FITNESS FOR A PARTICULAR PURPOSE,
INTEROPERABILITY OR NON-INFRINGEMENT, WITH RESPECT TO INFORMATION TECHNOLOGY SECURITY PROTECTION, SAFE™
DEVICES AND APPLICATIONS TESTED WITH SAFE™ DEVICES. IN NO EVENT SHALL THE SAMSUNG ENTITIES BE LIABLE FOR ANY
DIRECT, INDIRECT, INCIDENTAL, PUNITIVE, OR CONSEQUENTIAL DAMAGES OF ANY KIND WHATSOEVER WITH RESPECT TO
INFORMATION TECHNOLOGY SECURITY PROTECTION, SAFE™ DEVICES OR APPLICATIONS TESTED WITH SAFE™ DEVICES. In
addition, information technology security protection will be affected by features or functionality associated with, among other
things the e-mail platform, master data management, and virtual private network solutions selected by the software provider,
solution provider or user. Choice of an e-mail, master data management, and virtual private network solution is at the sole
discretion of the software provider, solution provider or user and any associated effect on information technology security
protection is solely the responsibility of the software provider, solution provider or user. For complete statement of limited
warranty, please refer to
devices are sold. [101212]
www.samsung.com/us/safe
, available on the web and where Samsung smartphone and Galaxy Tab™

Samsung Telecommunications America (STA), LLC
DRAFT
FOR INTERNAL USE ONLY
Headquarters:
1301 E. Lookout Drive
Richardson, TX 75082
Customer Care Center:
1000 Klein Rd.
Plano, TX 75074
Toll Free Tel: 1.888.987.HELP (4357)
Internet Address:
http://www.samsung.com
©2013 Samsung Telecommunications America, LLC. Samsung is a registered trademark of Samsung Electronics Co., Ltd.
Do you have questions about your Samsung Mobile Phone?
For 24 hour information and assistance, we offer a new FAQ/ARS System (Automated Response System) at:
www.samsung.com/us/support

The Bluetooth® word mark, figure mark (stylized “B Design”), and combination mark (Bluetooth word mark and “B Design”) are
DRAFT
FOR INTERNAL USE ONLY
registered trademarks and are wholly owned by the Bluetooth SIG.
®
, VSuite™, T9® Text Input, and the Nuance logo are trademarks or registered trademarks of Nuance Communications,
Nuance
Inc., or its affiliates in the United States and/or other countries.
Swype and the Swype logos are trademarks of Swype, Inc.
microSD™, microSDHC™ and the microSD logo are Trademarks of the SD Card Association.
®
, the Wi-Fi CERTIFIED logo, and the Wi-Fi logo are registered trademarks of the Wi-Fi Alliance.
Wi-Fi
LTE is a trademark of ETSI.
Google, Google Play and other marks are trademarks of Google, Inc.
©Samsung Telecommunications America, LLC (“Samsung”). Samsung, Super AMOLED, and AllShare are all trademarks of
Samsung Electronics Co., Ltd. and/or its related entities. Other company names, product names and marks mentioned herein are
the property of their respective owners and may be trademarks or registered trademarks. Appearance of device may vary.
©Verizon Wireless. Verizon Wireless, the Verizon Wireless logos, and Convoy™ are trademarks of Verizon Trademark Services
LLC. All company names, trademarks, logos and copyrights not property of Verizon Wireless are the property of their respective
owners.

Table of Contents
DRAFT
FOR INTERNAL USE ONLY
Section 1: Getting Started .......................... 5
Understanding this User Manual . . . . . . . . . . . . 5
Setting Up Your device . . . . . . . . . . . . . . . . . . . 7
Turning the Device On and Off . . . . . . . . . . . . 11
Your Google Account . . . . . . . . . . . . . . . . . . . 11
Your Samsung Account . . . . . . . . . . . . . . . . . 11
Setup Wizard . . . . . . . . . . . . . . . . . . . . . . . . . 12
Help . . . . . . . . . . . . . . . . . . . . . . . . . . . . . . . . 12
Your Phone Number . . . . . . . . . . . . . . . . . . . . 12
Voice Mail . . . . . . . . . . . . . . . . . . . . . . . . . . . 12
TTY Mode . . . . . . . . . . . . . . . . . . . . . . . . . . . 12
Roaming . . . . . . . . . . . . . . . . . . . . . . . . . . . . 13
Task Manager . . . . . . . . . . . . . . . . . . . . . . . . 13
Memory Card . . . . . . . . . . . . . . . . . . . . . . . . . 14
Securing Your Device . . . . . . . . . . . . . . . . . . . 15
Section 2: Understanding Your Device .... 16
Features . . . . . . . . . . . . . . . . . . . . . . . . . . . . 16
Front . . . . . . . . . . . . . . . . . . . . . . . . . . . . . . . 17
Side . . . . . . . . . . . . . . . . . . . . . . . . . . . . . . . . 19
Back . . . . . . . . . . . . . . . . . . . . . . . . . . . . . . . 20
S Pen . . . . . . . . . . . . . . . . . . . . . . . . . . . . . . . 21
Home Screen . . . . . . . . . . . . . . . . . . . . . . . . . 26
Navigation . . . . . . . . . . . . . . . . . . . . . . . . . . . 28
Multi Window . . . . . . . . . . . . . . . . . . . . . . . . . 30
Notifications . . . . . . . . . . . . . . . . . . . . . . . . . . 32
LED Indicator . . . . . . . . . . . . . . . . . . . . . . . . . 33
Status Bar . . . . . . . . . . . . . . . . . . . . . . . . . . . 34
Primary Shortcuts . . . . . . . . . . . . . . . . . . . . . 36
Widgets . . . . . . . . . . . . . . . . . . . . . . . . . . . . . 37
Shortcuts . . . . . . . . . . . . . . . . . . . . . . . . . . . . 37
Folders . . . . . . . . . . . . . . . . . . . . . . . . . . . . . . 38
Wallpaper . . . . . . . . . . . . . . . . . . . . . . . . . . . . 38
Apps . . . . . . . . . . . . . . . . . . . . . . . . . . . . . . . 39
Entering Text . . . . . . . . . . . . . . . . . . . . . . . . . 39
Section 3: Contacts and Accounts ...........43
Accounts . . . . . . . . . . . . . . . . . . . . . . . . . . . . 43
Contacts . . . . . . . . . . . . . . . . . . . . . . . . . . . . . 44
Speed Dials . . . . . . . . . . . . . . . . . . . . . . . . . . 54
1

Section 4: Calling ......................................56
DRAFT
FOR INTERNAL USE ONLY
Making Calls . . . . . . . . . . . . . . . . . . . . . . . . . .56
Multi-party Calling . . . . . . . . . . . . . . . . . . . . . . 58
Answering Calls . . . . . . . . . . . . . . . . . . . . . . .59
Ending a Call . . . . . . . . . . . . . . . . . . . . . . . . . . 60
Recent Calls . . . . . . . . . . . . . . . . . . . . . . . . . . 60
Call Settings . . . . . . . . . . . . . . . . . . . . . . . . . .62
Section 5: Messaging ................................69
Types of Messages . . . . . . . . . . . . . . . . . . . . .69
Text and Multimedia Messaging . . . . . . . . . . .70
Emergency Alerts . . . . . . . . . . . . . . . . . . . . . . 74
Email . . . . . . . . . . . . . . . . . . . . . . . . . . . . . . . . 74
Gmail . . . . . . . . . . . . . . . . . . . . . . . . . . . . . . .77
Voicemail . . . . . . . . . . . . . . . . . . . . . . . . . . . .78
Google Hangouts . . . . . . . . . . . . . . . . . . . . . . . 79
Section 6: Applications .............................80
Managing Applications . . . . . . . . . . . . . . . . . .80
Amazon folder . . . . . . . . . . . . . . . . . . . . . . . . . 82
Google folder . . . . . . . . . . . . . . . . . . . . . . . . . . 83
Samsung folder . . . . . . . . . . . . . . . . . . . . . . . .86
Verizon folder . . . . . . . . . . . . . . . . . . . . . . . . 113
Calendar . . . . . . . . . . . . . . . . . . . . . . . . . . . .115
2
Camera . . . . . . . . . . . . . . . . . . . . . . . . . . . . .118
Clock . . . . . . . . . . . . . . . . . . . . . . . . . . . . . . .139
Contacts . . . . . . . . . . . . . . . . . . . . . . . . . . . .142
Email . . . . . . . . . . . . . . . . . . . . . . . . . . . . . . .142
Gallery . . . . . . . . . . . . . . . . . . . . . . . . . . . . . .142
Help . . . . . . . . . . . . . . . . . . . . . . . . . . . . . . . .144
Maps . . . . . . . . . . . . . . . . . . . . . . . . . . . . . . .145
Messages . . . . . . . . . . . . . . . . . . . . . . . . . . .146
Music . . . . . . . . . . . . . . . . . . . . . . . . . . . . . .147
Phone . . . . . . . . . . . . . . . . . . . . . . . . . . . . . .151
Play Store . . . . . . . . . . . . . . . . . . . . . . . . . . .152
S Note . . . . . . . . . . . . . . . . . . . . . . . . . . . . . .154
Settings . . . . . . . . . . . . . . . . . . . . . . . . . . . . .154
Video . . . . . . . . . . . . . . . . . . . . . . . . . . . . . . .155
YouTube . . . . . . . . . . . . . . . . . . . . . . . . . . . .157
Section 7: Connections ...........................158
Wi-Fi . . . . . . . . . . . . . . . . . . . . . . . . . . . . . . .158
Wi-Fi Direct . . . . . . . . . . . . . . . . . . . . . . . . . .160
Mobile Hotspot . . . . . . . . . . . . . . . . . . . . . . .161
Bluetooth . . . . . . . . . . . . . . . . . . . . . . . . . . . .163
VPN . . . . . . . . . . . . . . . . . . . . . . . . . . . . . . . .164
Tethering . . . . . . . . . . . . . . . . . . . . . . . . . . . .165

NFC and Beaming . . . . . . . . . . . . . . . . . . . . 166
DRAFT
FOR INTERNAL USE ONLY
S Beam . . . . . . . . . . . . . . . . . . . . . . . . . . . . 166
Nearby devices . . . . . . . . . . . . . . . . . . . . . . 167
Connecting to a Computer . . . . . . . . . . . . . . 168
Memory Card . . . . . . . . . . . . . . . . . . . . . . . . 169
Section 8: Settings .................................171
Accessing Settings . . . . . . . . . . . . . . . . . . . . 171
Wireless and network . . . . . . . . . . . . . . . . . 171
Device . . . . . . . . . . . . . . . . . . . . . . . . . . . . . 172
More Wireless and Network Settings . . . . . . 177
Device . . . . . . . . . . . . . . . . . . . . . . . . . . . . . 183
Personal . . . . . . . . . . . . . . . . . . . . . . . . . . . 194
Security . . . . . . . . . . . . . . . . . . . . . . . . . . . . 201
One-handed operation . . . . . . . . . . . . . . . . . 204
Language and input . . . . . . . . . . . . . . . . . . . 205
Back up and reset . . . . . . . . . . . . . . . . . . . . 211
Accounts . . . . . . . . . . . . . . . . . . . . . . . . . . . 212
System . . . . . . . . . . . . . . . . . . . . . . . . . . . . 213
S Pen . . . . . . . . . . . . . . . . . . . . . . . . . . . . . . 215
Accessory . . . . . . . . . . . . . . . . . . . . . . . . . . 217
Date and time . . . . . . . . . . . . . . . . . . . . . . . 217
Accessibility . . . . . . . . . . . . . . . . . . . . . . . . . 218
About phone . . . . . . . . . . . . . . . . . . . . . . . . . 225
Section 9: Health and Safety
Information ............................................226
Exposure to Radio Frequency (RF) Signals . . 226
Specific Absorption Rate (SAR) Certification
Information . . . . . . . . . . . . . . . . . . . . . . . . 231
FCC Part 15 Information to User . . . . . . . . . . 233
Commercial Mobile Alerting System
(CMAS) . . . . . . . . . . . . . . . . . . . . . . . . . . . 233
Smart Practices While Driving . . . . . . . . . . . 233
Battery Use and Safety . . . . . . . . . . . . . . . . . 235
Samsung Mobile Products and Recycling . . . 237
UL Certified Travel Charger . . . . . . . . . . . . . . 238
Display / Touch-Screen . . . . . . . . . . . . . . . . 238
GPS . . . . . . . . . . . . . . . . . . . . . . . . . . . . . . . 239
Emergency Calls . . . . . . . . . . . . . . . . . . . . . 239
Care and Maintenance . . . . . . . . . . . . . . . . . 240
Responsible Listening . . . . . . . . . . . . . . . . . 241
Operating Environment . . . . . . . . . . . . . . . . . 243
FCC Hearing Aid Compatibility (HAC)
Regulations for Wireless Devices . . . . . . . 245
3

Restricting Children's Access to
DRAFT
FOR INTERNAL USE ONLY
Your Mobile Device . . . . . . . . . . . . . . . . . . 247
FCC Notice and Cautions . . . . . . . . . . . . . . . . 247
Other Important Safety Information . . . . . . . .248
Section 10: Warranty Information ..........250
Standard Limited Warranty . . . . . . . . . . . . . . 250
End User License Agreement for Software . . . 255
Index .........................................................263
4

Section 1: Getting Started
DRAFT
FOR INTERNAL USE ONLY
Understanding this User Manual
The sections of this manual generally follow the features of
your device. A robust index for features begins on page 263.
Also included is important safety information beginning on
page 226, that you should know before using your device.
This manual gives navigation instructions according to the
default display settings. If you select other settings,
navigation steps may be different.
Unless otherwise specified, all instructions in this manual
assume that you are starting from the Home screen. To get to
the Home screen, you may need to unlock the device. For
more information, see “Securing Your Device” on page 15.
Note:
Instructions in this manual are based on default settings,
and may vary from your device, depending on the
software version on your device, and any changes to the
device’s Settings.
Unless stated otherwise, instructions in this User
Manual start with the device unlocked, at the Home
screen.
All screen images in this manual are simulated. Actual
displays may vary, depending on the software version of
your device and any changes to the device’s Settings.
Getting Started 5

Special Text
DRAFT
FOR INTERNAL USE ONLY
In this manual, you’ll find text that is set apart from the rest.
These are intended to point out important information, share
quick methods for activating features, to define terms, and
more. The definitions for these methods are as follows:
•
Notes
: Presents alternative options for the current feature or
menu.
•
Tips
: Provides quick or innovative methods, or useful shortcuts.
•
Important
: Points out important information about the current
feature that could affect performance.
•
Warning
: Brings to your attention important information to
prevent loss of data or functionality, or even prevent damage to
your device.
Text Conventions
This manual provides condensed information about how to
use your device. To make this possible, the following text
conventions are used to represent frequently-used steps:
➔
6
Arrows are used to represent the sequence of
selecting successive options in procedures. For
example:
“From the Home screen, touch
Settings
➔
Wi-Fi
.”
Many settings use an On/Off switch. Touch the
On/Off switch to turn a setting On or Off. This
graphic is used to represent the On/Off switch.
Apps
➔

Setting Up Your device
DRAFT
FOR INTERNAL USE ONLY
Install the 4G LTE SIM (Subscriber Identity Module) card,
battery, and optional memory card, then charge the battery
to begin using your device.
Back Cover
The battery, SIM card, and optional memory card are
installed under a removable cover on the back of the device.
Installing the battery cover
Align the cover and press it firmly into place, making
sure it snaps into place.
Note:
The battery cover is flexible. Take care to avoid bending
or twisting the cover when removing and installing, to
prevent damage to the cover.
Removing the battery cover
Pull up using the slot provided, while lifting the cover
off the device.
Getting Started 7
SIM Card
DRAFT
FOR INTERNAL USE ONLY
Your device uses a 4G LTE SIM (Subscriber Identity Module).
The 4G LTE SIM is a small, rectangular plastic card that
stores your phone number, information about your wireless
service, and other information such as messages.
If you purchased your device at a Verizon Wireless store, the
SIM card is activated and ready to use. If you ordered a new
device, the card may need to be activated before you can use
it. For more information about activating the SIM card, visit:
http://www.verizonwireless.com/4GSIM
Caution!
Turn the device off before installing or removing the
SIM card. Do not bend or scratch the SIM card. Take
care when handling, installing, or removing the SIM
card, and avoid exposing the SIM card to static
electricity, water, or dirt. Keep the SIM card out of
reach of small children.
8
.
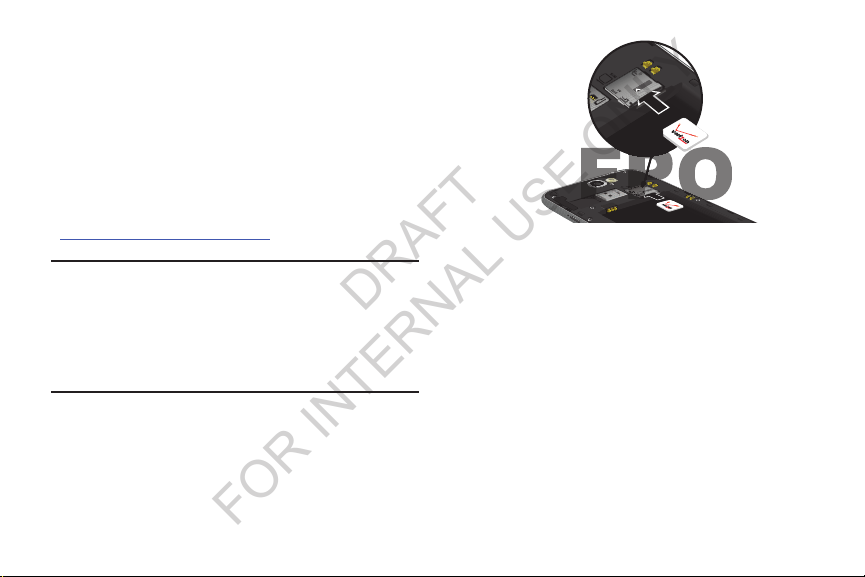
Installing the 4G LTE SIM Card
1. Remove the back cover.
2. With the Verizon Wireless logo facing up, carefully
insert the 4G LTE SIM Card into the slot, pressing gently
until it locks into place.
3. Install the back cover.
Removing the 4G LTE SIM Card
1. Turn off the device, then remove the back cover.
2. Press the 4G LTE SIM Card in gently to release the lock,
then carefully slide the 4G LTE SIM Card out of the slot.
3. Install the back cover.
Battery
DRAFT
FOR INTERNAL USE ONLY
Your device is powered by a rechargeable, standard Li-Ion
battery. A Wall/USB Charger (Charging Head and USB cable)
is included with the device, for charging the battery.
The battery comes partially charged. You must fully charge
the battery before using your device for the first time. A fully
discharged battery requires up to 4 hours of charge time.
After the first charge, you can use the device while charging.
Warning!
Use only Samsung-approved charging devices and
batteries. Samsung accessories are designed to
maximize battery life. Using other accessories may
invalidate your warranty and may cause damage.
Battery Indicator
The battery icon in the Status Bar shows battery power
level. Before the battery becomes too low to operate, the
battery icon flashes and a tone plays. If you continue using
the device without charging, the device will power off.
Tip:
Task Manager provides helpful information about
extending battery life. For more information, see “Task
Manager” on page 13.
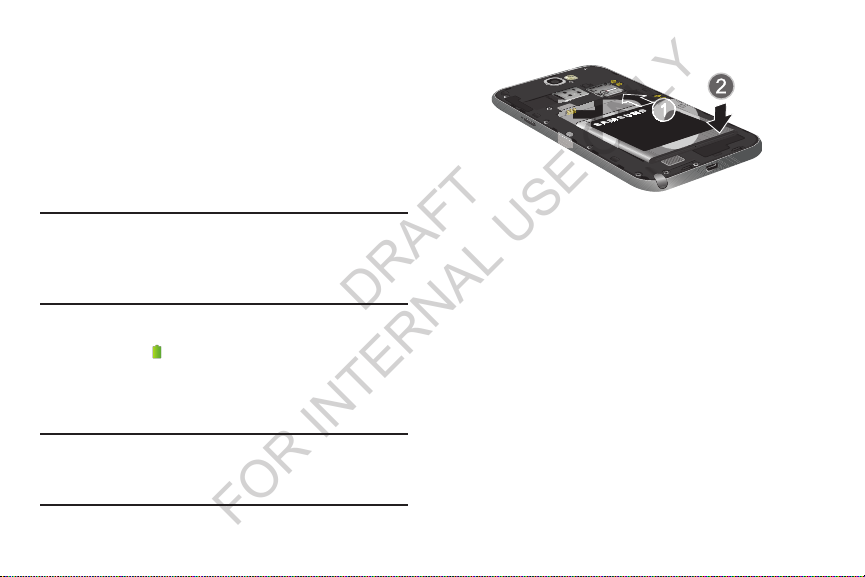
Installing and Removing the Battery
Installing the battery
1. Remove the battery cover.
2. Insert the battery into the device, aligning the gold
contacts on the battery with the gold contacts in the
device.
3. Replace the battery cover.
Removing the Battery
1. Remove the battery cover.
2. Lift the battery up and out of the device, using the slot
provided.
3. Replace the battery cover.
Getting Started 9
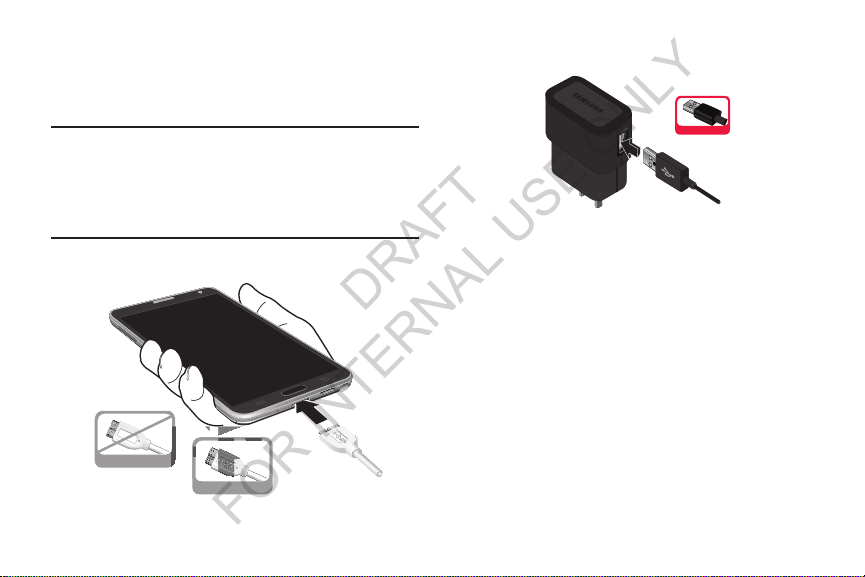
Charging the Battery
DRAFT
FOR INTERNAL USE ONLY
Your device comes with a Wall/USB Charger (charging head
and USB cable) to charge your device from any 110/220 VAC
outlet.
Note:
The battery comes partially charged. You must fully
charge the battery before using your device for the first
time. A fully discharged battery requires up to 4 hours of
charge time. After the first charge, you can use the
device while charging.
1. Insert the USB cable into the port.
2. Connect the USB cable to the charging head, then plug
the charging head into a standard AC power outlet.
3. When charging is complete, unplug the charging head
from the power outlet and remove the USB cable from
the device.
Incorrect
Correct
10
Incorrect

Turning the Device On and Off
DRAFT
FOR INTERNAL USE ONLY
Turning the Device On
Press and hold the
device vibrates and starts up.
Turning the Device Off
1. Press and hold the
device vibrates and the Device Options menu displays.
2. At the prompt, tap
Power off
Power/Lock Key
Power/Lock Key
.
until the
until the
Your Google Account
Your new device uses your Google account to fully utilize its
Android features, including Gmail, Google Talk and the Play
Store. When you turn on your device for the first time, set up
a connection with your existing Google account, or create a
new Google account.
To create a Google account, or set up your Google account on
your device, use Accounts and sync settings (see “Accounts”
on page 212).
Your Samsung Account
Create a Samsung account, for access to Samsung apps on
your device, including Media Hub, Music Hub, and AllShare
Play. For more information, see “Accounts” on page 212.
Getting Started 11
Setup Wizard
DRAFT
FOR INTERNAL USE ONLY
The first time you turn your device on, Setup Wizard will
guide you through the basics of setting up your device.
Follow the prompts to choose a default language, set up
accounts, choose location services, and learn more about
your device.
You can also use the Setup Wizard to quickly configure your
device at any time.
From any unlocked screen, press the
Home Key
Setup Wizard
, then touch
.
Apps
➔
Help
Get information about using your device, including videos,
useful tips, and other information.
From any unlocked screen, press the
Home Key
12
, then touch
Apps
➔
Help
Your Phone Number
From any unlocked screen, press the
Voice Mail
All unanswered calls to your device are sent to voicemail,
even if your device is turned off, so you’ll want to set up your
voicemail and personal greeting as soon as you activate your
device.
For more information, see “Voicemail” on page 78.
TTY Mode
Your device is TTY-compatible, allowing you to connect a TTY
device to the device’s headset jack. Before you can use your
device with a TTY device, you’ll need to enable TTY Mode.
For more information about enabling TTY mode, see “Call
.
Settings” on page 62.
Home Key
, then touch Apps
Settings ➔ About phone ➔ Status
➔
.

Roaming
DRAFT
FOR INTERNAL USE ONLY
When you travel outside your home network’s coverage area,
your device can use roaming to acquire service on other
compatible digital networks. When roaming, the
Roaming
icon displays in the Status bar.
Tip:
You can set your device’s roaming behavior. For more
information, see “Mobile networks” on page 177.
During roaming, some services may not be available.
Depending on your coverage area and service plan, extra
charges may apply when making or receiving calls,
connecting to the Internet, or using data services. Contact
Verizon Wireless for more information about your coverage
area and service plan.
Task Manager
Your device can run apps simultaneously, with some apps
running in the background. Use Task Manager to see which
apps are running on your device, and to end running apps to
extend battery life. You can also uninstall apps from your
device and check memory usage.
1. From any unlocked screen, press and hold the
2. Touch t he
on your device. Touch
3. Touch t he
apps you’ve installed on your device. Touch
remove an app from your device.
4. Touch t he
(Random Access Memory) in use. Touch
to clear processes to increase available RAM.
5. Touch t he
SD card memory statistics.
6. Touch t he
RAM, and tips for extending battery life.
Tip:
Touch and drag your finger on the tabs to scroll the tabs.
Home Key
, then select
Active applications
Downloaded
RAM
tab to display the amount of RAM
Storage
tab for internal system storage and
Help
tab to view information about managing
Task manager
tab to view apps running
End
, or
End all
to close apps.
tab to view information about
Getting Started 13
.
Uninstall
Clear memory
to
Memory Card
DRAFT
FOR INTERNAL USE ONLY
Your device supports optional, removable, microSD™ or
microSDHC™ memory cards of up to 64GB capacity (not
included), for storage of music, pictures, and other files.
For more information about using memory cards, see
“Memory Card” on page 169.
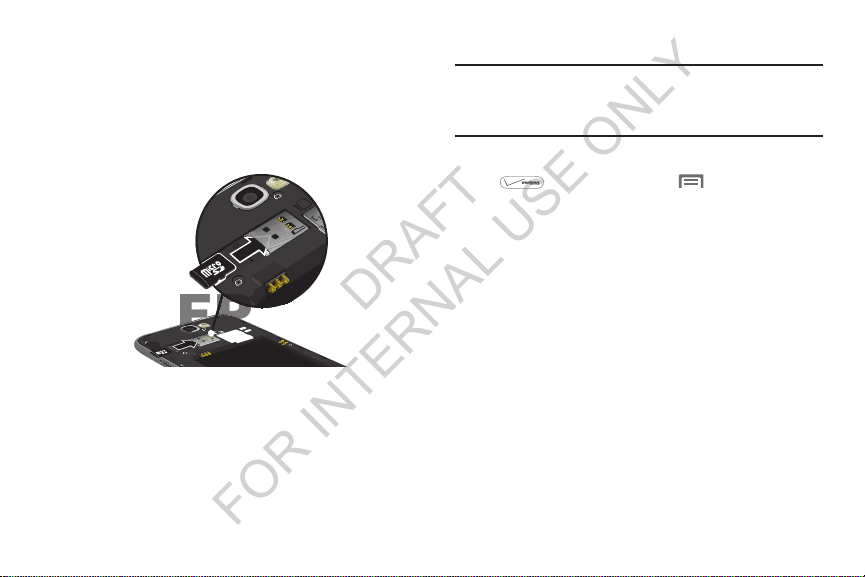
Installing a Memory Card
1. Remove the back cover.
2. With the gold contacts facing down, slide the memory
card into the slot, pushing gently until it locks into
place.
3. Install the back cover.
14
Removing a Memory Card
Important!
1. From any unlocked screen, press the
Storage
2. At the prompt, read the warning and select
continue. Wait for
the Status bar and Notifications.
3. Remove the back cover.
4. Gently press on the memory card to release the lock,
then carefully pull the card out.
5. Install the back cover.
To prevent damage to data stored on the memory
card, unmount the card before removing it from the
device.
Home Key
, then touch Menu ➔ Settings
➔ Unmount SD card
.
SD card safe to remove
OK
to
to appear in
➔

Securing Your Device
DRAFT
FOR INTERNAL USE ONLY
Use your device’s screen lock features to secure your device.
Note:
Unless stated otherwise, instructions in this User Manual
start with the device unlocked, at the Home screen.
Unlocking the Device
Unlock the device using one of the default unlock screens, or
use Screen lock options for increased security.
Press the
drag your finger across the screen.
Power/Lock Key
, then touch and
To set a personal screen lock, use the Screen lock option
under Security settings. For more information, see “Screen
lock” on page 196.
For other settings related to securing your device, see
“Security” on page 201.
Locking the Device
By default, the device locks automatically when the
screen times out.
– or –
Press the
Tip:
When the device is locked, the Emergency call feature is
available on the lock screen, to allow you to make
emergency calls even while the device is locked.
Power/Lock Key
.
Tip:
Special notification icons display for missed calls or new
messages. Drag a missed call or message icon to view
the message or call log.
Getting Started 15

Section 2: Understanding Your Device
DRAFT
FOR INTERNAL USE ONLY
•
Features
•
Touch screen with virtual (on-screen) QWERTY keyboard
•
Brilliant 4.99XX??” HD Super AMOLED® screen (1920 x 1080)
•
1.9XX?? gigahertz quad-core processor
•
Delivering data speeds faster than the current 3G network
technology by using 4G LTE and High Speed Packet Access Plus
(HSPA+).
•
Android 4.3, Jelly Bean Platform
•
USB 3.0 connector for fast transfer speeds
•
Smart Switch™ compliant. For more information, see
www.samsungsmartswitch.com
•
Support for Air View® and Air Gestures®.
•
S Pen functionality
•
Wi-Fi ® Capability
•
WatchON® – Rich TV experience with Infrared (IR) remote
•
Apps available to download from the Google Play™ Store and
Samsung Apps
•
Access Movies, TV Shows, Music, Games, and Books with
Samsung Hub™
16
Samsung Link™ to share your media content across connected
devices. Cloud connectivity is achieved using an external Web
storage service
•
Compliant with AllShare Cast Hub®
•
13 Megapixel Camera and Camcorder with autofocus and digital
zoom XX??
•
2 Megapixel Front Facing camera for Video Chat XX??
•
Share Shot picture sharing functionality, Camera sharing over
multi-connect Wi-Fi Direct connection
•
S-Beam file transfer technology
•
Bluetooth enabled
•
NFC-compatible
•
Full Integration of Google Mobile™ Services (Gmail, YouTube,
Google Maps, Google Voice Search)
•
Multiple Messaging Options: Text/Picture/Video Messaging and
Google Hangouts™
•
Corporate and Personal Email
•
Music Player with multitasking features

•
FPO
DRAFT
FOR INTERNAL USE ONLY
Pre-loaded e-reader applications such as: Play Books™ and Play
Magazines™
•
Assisted GPS (Google Navigation)
•
Webkit-based browser
•
Expandable memory slot - supports up to 64GB microSD
•
Mobile HotSpot and USB Tethering-capability
•
Video Chat using Google Hangouts
•
Google Play™ Music
•
Wi-Fi ® Calling using a micro SIM card
•
HD Video Player 1080p
– Codec: MPEG4, H.264, H.263, VC-1, WMV7/8, VP8, MP43
– Format: 3GP (MP4), WMV (ASF), and AVI
•
Video Player support for PIP (Picture in Picture) viewing
Front
Understanding Your Device 17

Indicator light
DRAFT
FOR INTERNAL USE ONLY
1.
colors and flashing patterns to indicate different
notifications and statuses. Events include Charging,
Low battery, and Missed event:
•
Powering on -
•
Battery Charging -
•
Battery Fully Charged -
•
Low Battery or Charging Error-
•
Missed Notification (Call or Messaging) -
For more information, refer to “LED Indicator” on page
187.
illuminates with a series of distinct
blue
blinks/animates
red
remains on
green
remains on.
red
blinks/animates
blue
blinks/animates
18
2.
Light (RGB) Sensor
to adjust the screen brightness/contrast. This sensor
decreases screen brightness in dim light.
•
In a bright light condition (outdoors), the sensors cause the
device to increase the brightness and contrast for better
viewing.
•
In dim light conditions, the device decreases the screen
brightness to compensate.
3.
Menu key
current screen. From the Home screen it displays
Add apps and widgets, Create folder, Set wallpaper,
Edit page, Search, and Settings options.
4.
Home
key displays the Home screen when pressed.
Press and hold to display your recent apps, Task
manager, and Remove all option.
Double-press to activate S Voice.
Microphones
5.
other callers to hear you clearly when you are speaking
to them. There are two microphones on the device:
•
Bottom microphone: used during handset mode.
lets you use the ambient light level
displays a list of options available for the
are used during phone calls and allow

•
FPO
DRAFT
FOR INTERNAL USE ONLY
Top microphone: used while an active call is in the
speakerphone mode and assists in noise cancellation
(2 microphone solution).
6.
USB Power/Accessory connector
a power cable or optional accessories such as a USB/
data cable.
7.
Back key
redisplays the previous screen or clears
entries.
S Pen
8.
9.
10.
11.
12.
provides a stylus that assists you in performing
different functions.
Display
shows all the information needed to operate
your phone, such as the connection status, received
signal strength, phone battery level, and time.
Front Facing Camera
facing the screen and allows you to video conference.
Gestures Sensor
motions.
Proximity Sensor
surface of the screen. This is typically used to detect
when your face is pressed up against the screen, such
as during a phone call.
allows you to take pictures while
used to detect Air View and Air Gesture
detects how close an object is to the
allows you to connect
•
While talking on the phone, the sensor detects talk activity and
locks the keypad to prevent accidental key presses.
13.
Receiver
Side
allows you to hear the other caller.
Understanding Your Device 19

•
FPO
DRAFT
FOR INTERNAL USE ONLY
Volume
: From the Home screen, press to adjust master volume.
During calls or media playback, press
mute the ringtone of an incoming call.
•
Power/Lock
access a device options menu. Press to lock the device, or to
wake the screen for unlocking.
: Press and hold to turn the device on or off, and to
to adjust volume. Press to
Back
20

1.
S Pen button
FPO
DRAFT
FOR INTERNAL USE ONLY
Flash
is used to take photos in low-light conditions.
External speaker
2.
other sounds offered by your device.
3.
micro SIM Card Slot
SIM card.
microSD Card Slot
4.
card to expand the memory of your device.
S Pen
Create and collaborate with S Pen.
allows you to hear ringers, music, and
(internal) Installation location for
(internal) allows you use a microSD
Removing S Pen
S Pen stores inside your device, for convenient access.
Slide S Pen from your device using the notch on the
end of the S Pen.
S Pen Settings
Configure S Pen settings, including options for sounds and
for tracking S Pen when it’s not stored in your device.
For more information about S Pen, and to configure settings,
touch
page 215.
Apps ➔
Settings ➔ S Pen
, or see “S Pen” on
Understanding Your Device 21

Easy Clip
DRAFT
FOR INTERNAL USE ONLY
Instantly outline and crop images on the screen, in any
shape, to share or paste. You can edit the cropped content,
or personalize it with your own handwriting.
To use Easy Clip:
1. Press and hold the S Pen button, then draw around the
image you want to clip, making sure to close the
shape.
2. Tap the app you want to paste the image into, or if you
do nothing, the image is pasted to Clipboard.
22
Air View
Hover S Pen over the screen to preview content, or view
information about an item on the screen. For example:
•
Hover over an email in a list to preview the message before
opening it.
•
Hover over a photo album to preview the contents, or see a
picture enlarged.
•
Hover over the timeline during video playback to preview and
navigate to specific scenes.
•
In S Planner, hover over dates and events to see details
•
Hover over an icon or screen button to view the item’s title
For more information about Air View, and to configure
settings, touch
, or see “Air view” on page 216.
View
Apps ➔
Settings ➔ S Pen ➔ Air

Quick Command
DRAFT
FOR INTERNAL USE ONLY
Multitask like never before. Launch Quick Command pad
from any screen, to hand-write tasks. Use S Pen to draw a
Quick Command to launch a feature, or draw a Quick
Command followed by a keyword to personalize the
command. For example, draw a question mark “?” to search
the Internet, or draw a question mark followed by a search
term to search on the term.
For more information about Quick Command, and to
configure settings, touch
➔
Quick Command settings
settings” on page 216.
To launch Quick Command:
Press and hold the S Pen button and swipe upwards on
the screen.
Apps ➔
, or see “Quick Command
Settings ➔ S Pen
Idea Sketch
Express your ideas with an image. Add illustrations by handwriting keywords on the Idea Sketch pad.
To use Idea Sketch:
1. From the Home screen, touch
2. From the toolbar, select the
Idea Sketch
3. Write a search term for something you want to draw or
insert into your S Note. Or, select
category.
4. S Note displays images matching your search term.
Select an image to insert it into your S Note. You can
edit the image, or draw on it, and changes are saved in
the note.
Apps ➔
Insert
tool, then choose
from the menu.
List
Understanding Your Device 23
S Note
and choose a
.

Photo Notes
DRAFT
FOR INTERNAL USE ONLY
Hand-write a note on the back of pictures to add detail to
your memories.
To add a Photo Note:
1. From the Home screen, touch
Gallery
.
2. Select a picture, then select
3. Use S Pen to write a note on the back of the picture,
then select
Note:
Photo notes are saved with the picture on your device,
but are not transferred when you share the picture.
Done
to save the note with the picture.
Apps
➔
Menu ➔ Draw on image
.
Popup Note
Multitask with Popup Note - open an S Note instantly in a
popup window to jot down a quick note during a meeting, or
write down information from another area of the screen.
To use Popup Note:
1. From any screen, press and hold the S Pen button and
double-tap on the screen.
2. Use S Pen to write your note, then save it for later. You
can move the popup window around the screen.
24
 Loading...