

Samsung SMH7185BG-XAA User Manual

Microwave Oven
user manual
SMH7185
SMH7187
imagine the possibilities
Thank you for purchasing this Samsung
product. Please register your product at
www.samsung.com/global/register

2_ features of your new microwave oven
features of your new microwave oven
• Professional Design
The new Stainless Steel Samsung Over The Range (OTR) oven has a clean, professional look
that matches your other kitchen appliances perfectly, providing a harmonious and complete
kitchen solution.
• Turbo vent
With 400 CFM of ventilation power, your new Over The Range (OTR) oven offers optimal
cooking conditions by absorbing smoke and odor from the cook-top. It is also as silent as
other OTRs with much lower ventilation power.
Experience maximum power with no additional noise!
• Large Interior capacity
With its 1.8 cu.ft capacity, your OTR oven delivers plenty of space for all your cooking needs.
A big capacity combined with 1,100 watts of output guarantees superior cooking results.
• Auto Louver (SMH7187STG Only)
The Motorized Louver opens automatically only when the OTR is working. Therefore, you can
prevent contamination and also easily and speedily cleans the OTR.
• Sensor Cooking
Don’t know how to cook? Samsung’s new OTR sensor technology offers preset functions
resulting in perfectly cooked dishes every time. Simply select a cooking menu, and the
cooking results will astound you.
• VFD display
With an informative VFD (Vacuum Fluorescent Display), your OTR lets you easily use all
available functions.
important safety instruction _3
important safety instruction
Throughout this manual, you’ll see Warning and Caution notes.
These warnings, cautions, and the important safety instructions that follow do not
cover all possible conditions and situations that may occur.
It’s your responsibility to use common sense, caution, and care when installing,
maintaining, and operation your microwave oven. Samsung is not liable for
damages resulting from improper use.
What the icons and signs in this manual mean:
WARNING
CAUTION
WARNING: Hazards or unsafe practices that may result in severe personal injury or death.
CAUTION: Hazards or unsafe practices that may result in minor personal injury or property
damage.
Do not attempt or use.
Do not repair.
Do not touch.
Be careful
Follow directions explicity.
Unplug the power plug from the wall socket.
Make sure the machine is grounded to prevent electric shock.
Call the service center for help.
Note
PRecautions to aVoid PossiBle eXPosuRe to
eXessiVe micRoWaVe eneRgy:
Do not attempt to operate this microwave oven with the door open since opendoor operation can result in harmful exposure to microwave energy. It is important
not to defeat or tamper with the safety interlocks.
Do not place any object between the microwave oven front face and the door or
allow soil or cleaner residue to accumulate on sealing surfaces.
saVe these instRuctions
4_ important safety instruction
important safety instruction
Do not operate the microwave oven if it is damaged. It is particularly important that
the microwave oven door close properly and that there is no damage to the
• Door (bent or dented),
• Hinges and latches (broken or loosened),
• Door seals and sealing surfaces.
The microwave oven should not be adjusted or repaired by anyone except
properly qualified service personnel.
imPoRtant safety instRuctions
When using any electrical appliance, basic safety precautions should be followed,
including the following:
WaRning
WARNING
Always observe Safety Precautions when using your oven. Never try to repair the
oven on your own - there is dangerous voltage inside. If the oven needs to be
repaired, call 1-800-SAMSUNG (7267864) for the name of an authorized service
center near you.
to Reduce Risk of BuRns, electRic shock, fiRe,
PeRsonal injuRy oR eXPosuRe to eXcessiVe
micRoWaVe eneRgy:
Read all safety instructions before using the appliance.
Read and follow the specific “PRECAUTIONS TO AVOID EXPOSURE TO
EXCESSIVE MICROWAVE ENERGY” on page 3.
This appliance must be grounded. Connect only to properly grounded outlets. See
“IMPORTANT GROUNDING INSTRUCTIONS” on page 7 of this manual.
Install or place this appliance only in accordance with the installation instructions
provided.
Use this appliance only for its intended use as described in the manual. Do
not use corrosive chemicals or vapors in this appliance. This type of oven is
specifically designed to heat, cook, or dry food. It is not designed for industrial or
laboratory use.
As with any appliance, close supervision is necessary when used by children.
Keep the inside of the oven clean. Food particles or spattered oils stuck to the
oven walls or floor can cause paint damage and reduce the efficiency of the oven.
Keep the power cord away from heated surfaces.
saVe these instRuctions

important safety instruction _5
When cleaning the door and oven surfaces, use only mild, nonabrasive soaps or
detergents applied with a sponge or soft cloth.
Remove lids from baby food before heating. After heating baby food, stir well and
test temperature by tasting before serving.
This over-the-range oven was designed for use over ranges no wider than 36
inches. It may be installed over both gas and electric cooking equipment.
Liquids, such as water, coffee, or tea are able to be overheated beyond the
boiling point without appearing to be boiling. Visible bubbling or boiling when
the container is removed from the microwave oven is not always present. THIS
COULD RESULT IN VERY HOT LIQUIDS SUDDENLY BOILING OVER WHEN THE
CONTAINER IS DISTURBED BY A SPOON OR OTHER UTENSILS, INSERTED
INTO THE LIQUID.
Carefully remove container coverings, directing steam away from your hands and
face.
Some items, like whole eggs and food in sealed containers, may explode if heated
in this oven.
Do not operate this appliance if it has a damaged cord or plug, if it is not working
properly, or if it has been damaged.
Do not cover or block any of the openings on this appliance.
Do not store this appliance outdoors. Do not use near water - for example, near a
kitchen sink, in a wet basement, or near a swimming pool, etc.
Do not immerse the power cord or plug in water.
Do not let the power cord hang over edge of table or counter.
Do not try to preheat the microwave oven or operate it while empty.
Do not cook without the glass tray in place on the oven floor. Food will not cook
properly without the tray in place.
Do not defrost frozen beverages in narrow-necked bottles. The containers can
break.
Dishes and containers may become hot. Handle with care.
Do not mount unit over or near any portion of a heating or cooking appliance.
Do not mount over a sink.
Do not store anything directly on top of the appliance when it is in operation.
This appliance should be serviced only by qualified service personnel. Contact the
nearest authorized service facility for examination, repair, or adjustment.
saVe these instRuctions
6_ important safety instruction
important safety instruction
to Reduce the Risk of fiRe in the oVen:
Remove wire twist-ties from plastic cooking bags before placing bags in oven.
Do not use the oven compartment for storage purposes. Do not leave paper
products, cooking utensils, or food in the oven when not in use.
Do not overcook food. Watch appliance carefully if paper, plastic, or other
combustible materials are inside.
If materials inside the oven ignite, keep the oven door closed, turn the oven off,
disconnect the power cord, or shut off the power at the fuse or circuit breaker
panel. If the door is opened, the fire may spread.
to Reduce the Risk of injuRy to PeRsons:
Stir the liquid both before and halfway through heating it.
After heating, allow the container to stand in the microwave oven for a short time
before removing the container.
Do not use straight-sided containers with narrow necks.
Do not overheat liquids.
Use extreme care when inserting a spoon or other utensils into the container.
saVe these instRuctions
important safety instruction _7
imPoRtant gRounding instRuctions
This appliance must be grounded. In the event of an electrical short circuit,
grounding reduces the risk of electric shock by providing an escape wire for the
electrical current. This appliance is equipped with a power cord that includes a
grounding wire and a grounding plug. The plug must be plugged into an outlet
that is properly installed and grounded. Plug the three-prong power cord into a
properly grounded outlet of standard 115-120 voltage, 60 Hz. Your oven should
be the only appliance on this circuit.
WaRning
WARNING
Improper use of the grounding plug can result in a risk of electric shock. Consult a
CAUTION
qualified electrician or servicer if you do not understand the grounding instructions
or if you are not sure if the appliance is properly grounded.
Do not use an extension cord with this appliance. If the power cord is too short,
have a qualified electrician or service technician install an outlet near the appliance.
Do not cut or remove the third (ground) prong from the power cord under any
circumstances.
Connect the oven only to a 15A dedicated circuit.
the Vent fan
The fan will operate automatically under certain conditions.Take care to prevent
the starting and spreading of accidental cooking fires while the vent fan is in use.
In the event of a grease fire on the surface units below the microwave oven,
smother a flaming pan on the surface unit by covering the pan completely with a
lid, a cookie sheet or a flat tray.
Clean Ventilating Hoods Frequently - Grease should not be allowed to accumulate
on the ventilating hood.
When flaming foods under the hood, turn the fan on.
Use care when cleaning the vent-hood filter. A corrosive cleaning agent, such as
lyebased oven cleaner, may damage the filter.
Never leave surface units beneath your microwave oven unattended at high
heat settings. Boilovers cause smoking and greasy spillovers that may ignite
and spread if the microwave vent fan is operating. To minimize automatic fan
operation, use adequate sized cookware and use high heat on surface units only
when necessary.
saVe these instRuctions

8_ contents
contents
SETTING UP YOUR NEW
MICROWAVE OVEN
10
USING YOUR MICROWAVE OVEN
16
10 Checking the parts
11 Warranty and service information
11 Setting up your microwave oven
12 Turning on the power for the first tim
12 My Choic
13 Setting the tim
13 Help butto
13 Child loc
14 Checking the control pane
16 Using the Kitchen Timer button
16 Using the One Minute+ butto
16 Using the More/Less button
16 Using the Turbo Vent butto
16 Using the Light butto
17 Using the Turntable On/Off butto
17 Using the metal shel
18 Using the Sensor Cook button
20 Using the Sensor Reheat butto
21 Using the Auto/Power Defrost butto
22 Using the Handy Helper button
23 Using the Kids Meals button
24 Using the Snack Bar button
25 Microwave cooking times & power levels
26 Using the Custom Cook button
e
e
n
k
l
s
n
n
f
e
n
n
s
n
n
COOKWARE GUIDE
27
COOKING GUIDE
29
27 Microwave-safe utensils
29 General microwave tips
30 Cooking mea
31 Cooking poultr
31 Cooking seafood
32 Cooking eggs
32 Cooking vegetables
33 Recipes
t
y

contents _9
CLEANING AND MAINTAINING YOUR
MICROWAVE OVEN
35
35 Cleaning the exterior
35 Cleaning the interior
35 Cleaning the turntable and roller rings
36 Storing and repairing your microwave oven
36 Replacing the cooktop/night light
36 Replacing the oven light
37 Cleaning the grease filter
38 Replacing the charcoal filter
TROUBLESHOOTING
39
APPENDIX
40
WARRANTY
41
39 Check these points if your microwave oven…
40 Specifications
10_ setting up your new microwave oven
setting up your new microwave oven
Be sure to follow these instructions closely so that your new microwave oven works
properly.
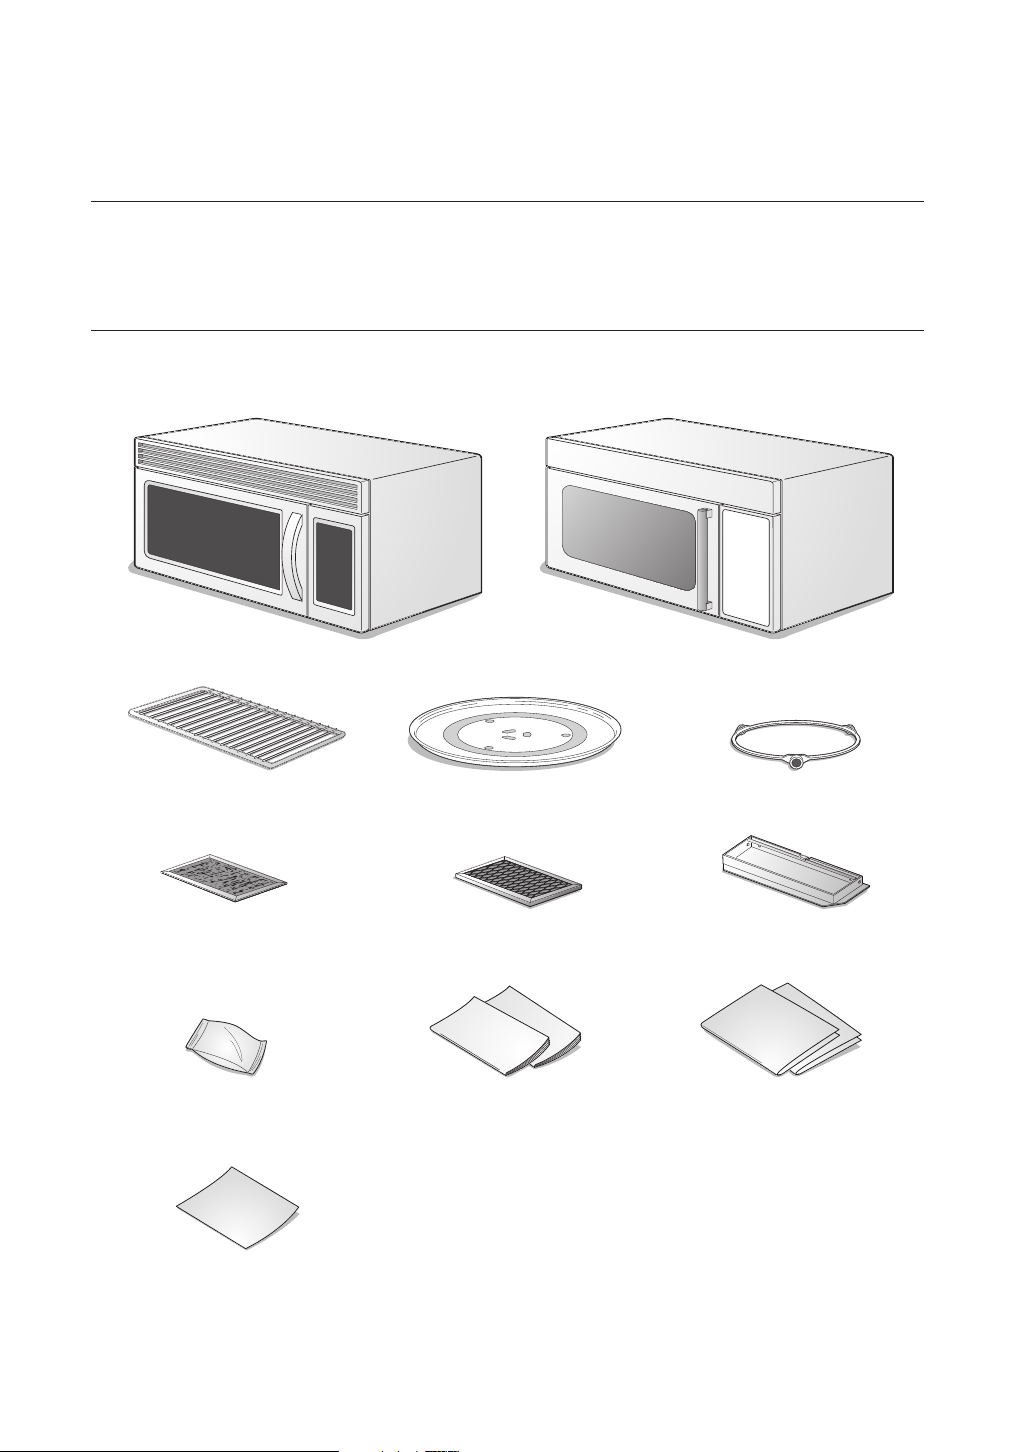
CHECKING THE PARTS
Carefully unpack your microwave oven, and make sure you’ve received all the parts shown below. If your
microwave oven was damaged during shipping, or if you do not have all the parts, contact Samsung
Customer Service. (Refer to the “WARRANTY AND SERVICE INFORMATION” on page 11.)
Microwave oven (SMH7185) Microwave oven (SMH7187)
Shelf
DE75-00036A
Grease Filters (2ea)
DE63-00196A
Hardware kit (Screws &
Brackets)
DE92-90505E
Registration Card
6801-001581
Glass Tray
DE74-20002C
Charcoal filter
DE63-00367D
Manuals
(User DE68-00356W &
Installation DE68-00357N)
Roller Guide Ring
DE97-00368A
Exhaust adaptor
DE92-90242D
Templates
(Top DE68-03144B & Wall
DE68-03142B)
setting up your new microwave oven _11
01 SETTING UP YOUR MICROWAVE OVEN
WARRANTY AND SERVICE INFORMATION
To help us to serve you better, please complete the enclosed registration card and promptly
return it by mail. If the registration card is missing, you can call Samsung Electronics, Inc., at
1-800-SAMSUNG (726-7864) or register online at www.samsung.com/global/register.
When contacting Samsung, please provide the specific model and serial number information
which is usually located on the back or bottom of the product. Please record these numbers
below, along with the other requested information. Keep this information in a safe place as a
permanent record of your purchase to aid in identification in case of theft or loss, and a copy of
your sales receipt as a proof of purchase if warranty service is needed.
MODEL NUMBER
SERIAL NUMBER
DATE PURCHASED
PURCHASED FROM
Warranty service can only be performed by a Samsung Authorized Service Center. If you should
require warranty service, provide the above information with a copy of your sales receipt to the
Samsung Authorized Service Center.
For service assistance and the location of the nearest service center, please call 1-800-
SAMSUNG (7267864).
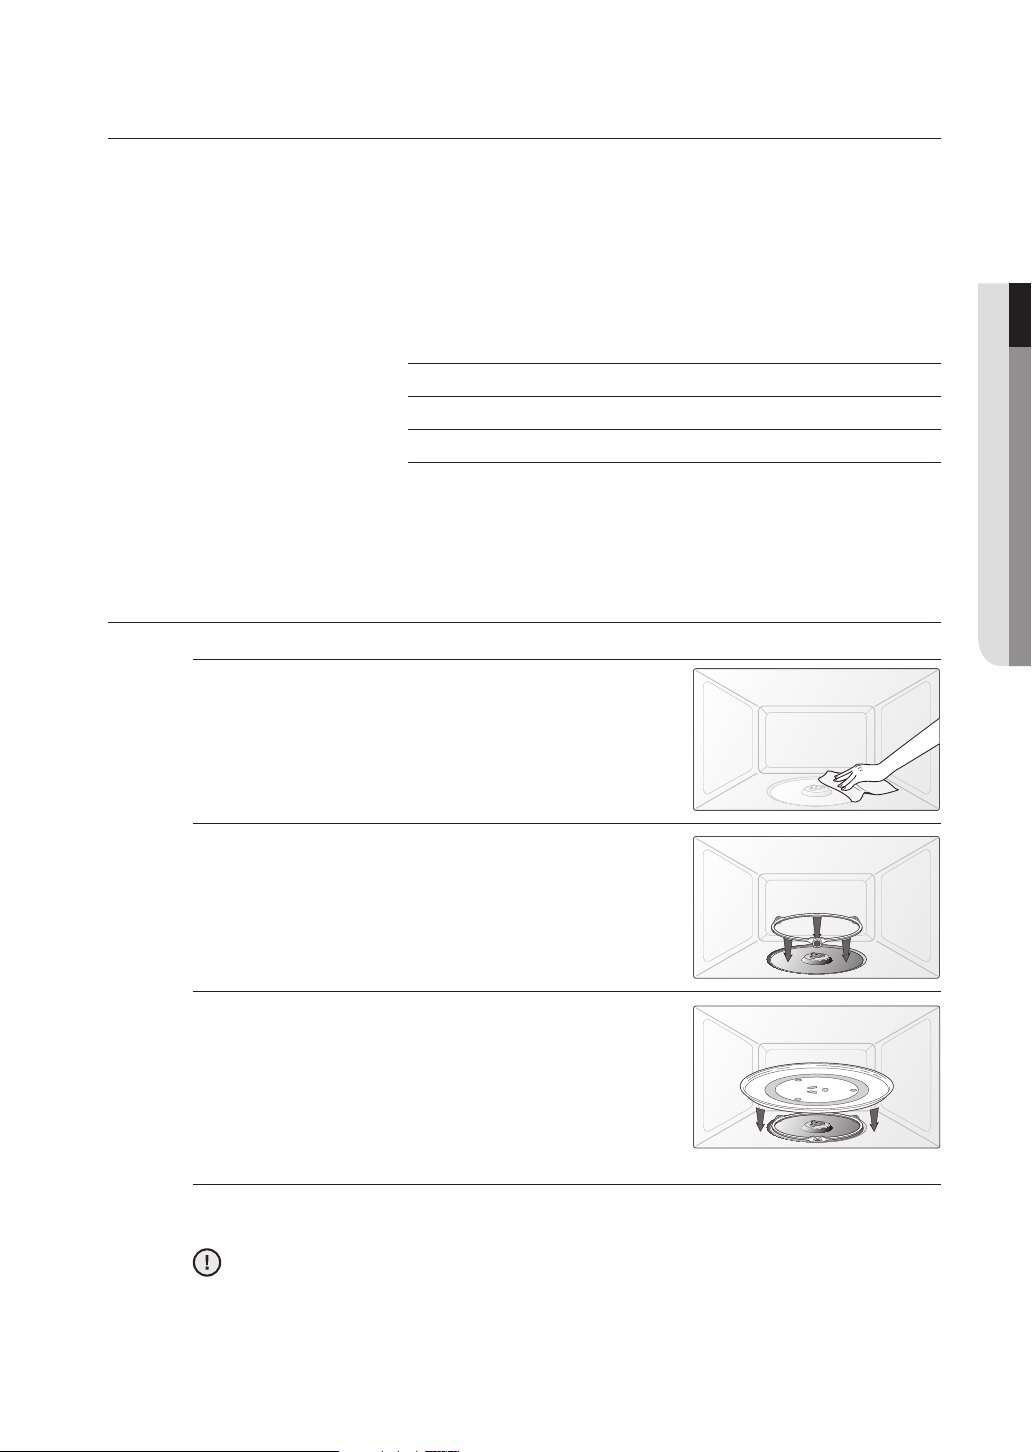
SETTING UP YOUR MICROWAVE OVEN
1. Open the door by pulling the handle on the right side of the door.
Wipe the inside of the oven with a damp cloth.
2.
3.
Install the pre-assembled ring into the indentation at the
center of the microwave oven.
4.
Place the glass tray securely in the center of the preassembled roller ring.
Installing the metal shelf
When you need to use the Metal Shelf, place it on the plastic hooks inside your oven and make
sure it is positioned properly to avoid arcing and damaging your oven.
Make sure the shelf is positioned properly inside the microwave to prevent damage to the
oven from arcing.
CAUTION
12_ setting up your new microwave oven
setting up your new microwave oven
TURNING ON THE POWER FOR THE FIRST TIME
The first time you plug the power cord into an outlet the display turns on after four seconds with: ENJOY
YOUR COOKING -- -- -- PRESS MY CHOICE FOR PERSONAL OPTIONS
This will also occur after a power interruption
MY CHOICE
Your new microwave oven can be customized to suit your personal preferences. Simply press the My
Choice button to configure the following options. The options are summarized in the following table:
NUMBER MY CHOICE OPTIONS DESCRIPTION
1 Language choice
2 Display weight Select either pounds or kilograms.
3 Remind end signal The remind end signal can be turned on and off.
4 Daylight savings time adjustment
The language options are English, French or
Spanish.
The time can be increased/decreased by selecting
Daylight Savings Time.
The time needs to be set to use this function.
Selecting the display language
1. Press the My Choice button immediately after plugging in your microwave and then press
the number 1 button. The display will show: LANGUAGE CHOICE PRESS MY CHOICE
2.
Press the My Choice button. The display will show: ENGLISH PRESS START
Press the My Choice button repeatedly to cycle through the language options: ENGLISH,
3.
FRENCH, SPANISH
Press the Start button to select your language.
4.
Selecting the weight units
You can choose between pounds (LBS) and kilograms (KG).
Press the My Choice button and then press the number 2 button. The display shows: LBS
1.
OR KG PRESS MY CHOICE.
2. Press the My Choice button. The display shows: LBS.
3. Press the My Choice button repeatedly to select the weight measurements you wish to use.
4. Press the Start button to select the weight units.
Setting the remind end signal
The Remind End Signal can be turned On or Off.
Press the My Choice button and then press the number 3 button. The display shows:
1.
REMIND END SIGNAL ON/OFF PRESS MY CHOICE.
2. Press the My Choice button repeatedly to select either ON or OFF. The display will display
your selection.
3. Press the Start button to make your selection.
setting up your new microwave oven _13
01 SETTING UP YOUR MICROWAVE OVEN
SETTING THE TIME
Your microwave oven is equipped with a built-in clock. Set the clock when first installing your microwave
oven and after a power failure. The time is displayed whenever the microwave oven is not being used.
Press the Clock button.
1.
2. The display will show SELECT AM/PM. Use the Clock button to select AM/PM.
Use the number buttons to enter the current time. You need to press at least three numbers
3.
to set the clock. For example, if the current time is 5:00, press 5, 0, 0. The display will show:
500.
4. Press the Clock button again.
5. A colon appears indicating that the time is set.
To check the time while cooking, press the Clock button.
Adjusting for Daylight Saving Time
1. Press the My Choice button and then the number 4 button. The display will show:
DAYLIGHT SAVING TIME ON/OFF PRESS MY CHOICE.
2. Press the My Choice button repeatedly to toggle between ON and OFF.
3. Press the Start button. The time of day will either increase (ON) or decrease by one hour
(OFF).
If the clock is set to standard time, this function allows convenient time changes without
needing to reset the clock. Daylight Saving Time begins for most of the United States at 2
a.m. on the second Sunday of March, and reverts to Standard time at 2 a.m. on the first
Sunday in November.
HELP BUTTON
Your microwave offers helpful instructions for many of the procedures of your microwave.
When you need information on features as well as helpful hints, press the Help button followed by the
button for which you require information on. Help information is available in 3 languages (English, French
and Spanish).
CHILD LOCK
The Child Lock function allows you to lock the buttons so that the microwave oven cannot be operated
accidentally. The oven can be locked at any time.
Activating/Deactivating
If you want to activate or deactivate the child lock function, press the My Choice button and the 5 button
at the same time for 3 seconds.
The display will show CHILD LOCK ON when the oven is locked and then returns to displaying the time.
14_ setting up your new microwave oven
setting up your new microwave oven
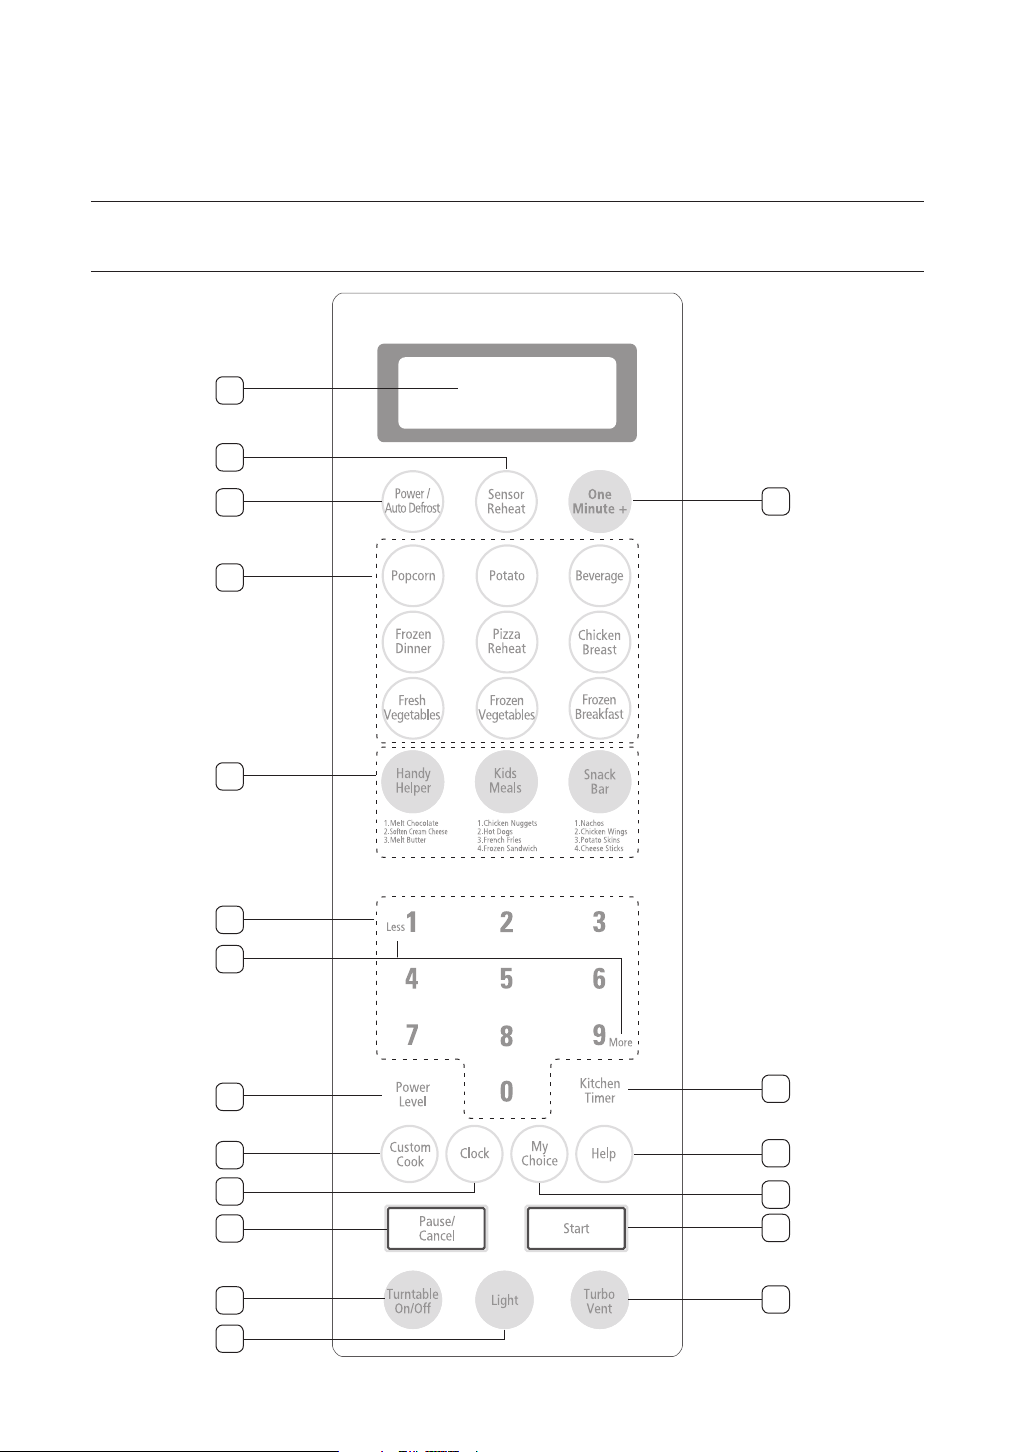
CHECKING THE CONTROL PANEL
1
2
3
4
5
6
7
19
8
9
10
11
12
13
18
17
16
15
14
 Loading...