

Page 1
SMH3150
Code No. : DE68-00356U-01
Page 2
Safety
(A) Do not attempt to operate this oven with the door open
since open-door operation can result in harmful exposure
to microwave energy. It is important not to defeat or tamper
with the safety interlocks.
(B) Do not place any object between the oven front face and
the door or allow soil or cleaner residue to accumulate on
sealing surfaces.
(C) Do not operate the oven if it is damaged. It is particularly
important that the oven door close properly and that there is
no damage to the
(1) Door (bent or dented),
(2) Hinges and latches (broken or loosened),
(3) Door seals and sealing surfaces.
(D) The oven should not be adjusted or repaired by anyone
except properly qualified service personnel.
Always observe Safety Precautions when using your oven.
Never try to repair the oven on your own - there is dangerous
voltage inside. If the oven needs to be repaired, call 1-800-3613400 CANADA for the name of an authorized service center
near you.
When using any electrical appliance, basic safety precautions
should be followed, including the following:
To reduce risk of burns, electric shock, fire, personal injury or
exposure to excessive microwave energy:
• Read all safety instructions before using the appliance.
• Read and follow the specific “Precautions to Avoid
Exposure to Excessive Microwave Energy” on this page.
• This appliance must be grounded. Connect only to properly
grounded outlets. See “Important Grounding Instructions”
on page 4 of this manual.
• Install or place this appliance only in accordance with the
installation instructions provided.
• Some items, like whole eggs and food in sealed containers,
may explode if heated in this oven.
• Use this appliance only for its intended use as described
in the manual. Do not use corrosive chemicals or vapors in
this appliance. This type of oven is specifically designed to
heat, cook, or dry food. It is not designed for industrial or
laboratory use.
• As with any appliance, close supervision is necessary when
used by children.
• Do not operate this appliance if it has a damaged cord or
plug, if it is not working properly, or if it has been damaged.
• This appliance should be serviced only by qualified service
personnel. Contact the nearest authorized service facility for
examination, repair, or adjustment.
• Do not cover or block any of the openings on this appliance.
2
Page 3
3
Safety
Important Safety Instructions, continued
• Do not store this appliance outdoors. Do not use near water
- for example, near a kitchen sink, in a wet basement, or
near a swimming pool, etc.
• Keep the inside of the oven clean. Food particles or
spattered oils stuck to the oven walls or floor can cause
paint damage and reduce the efficiency of the oven.
• Do not immerse cord or plug in water.
• Keep cord away from heated surfaces.
• Do not let cord hang over edge of table or counter.
• When cleaning door and oven surfaces, use only mild,
nonabrasive soaps or detergents applied with a sponge or
soft cloth.
• To reduce the risk of fire in the oven:
a. Do not overcook food. Watch appliance carefully if paper,
plastic, or other combustible materials are inside.
b. Remove wire twist-ties from plastic cooking bags before
placing bags in oven.
c. If materials inside the oven ignite, keep the oven door
closed, turn the oven off, disconnect the power cord, or
shut off the power at the fuse or circuit breaker panel. If
the door is opened, the fire may spread.
d. Do not use the oven compartment for storage purposes.
Do not leave paper products, cooking utensils, or food in
the oven when not in use.
• Do not try to preheat oven or operate while empty.
• Do not cook without the glass tray in place on the oven
floor. Food will not cook properly without the tray.
• Do not defrost frozen beverages in narrow-necked bottles.
The containers can break.
• Dishes and containers can become hot. Handle with care.
• Carefully remove container coverings, directing steam away
from hands and face.
• Remove lids from baby food before heating. After heating
baby food, stir well and test temperature by tasting before
serving.
• Do not operate any other heating or cooking appliance
beneath this appliance.
• Do not mount unit over or near any portion of a heating or
cooking appliance.
• Do not mount over a sink.
• Do not store anything directly on top of the appliance when
it is in operation.
• This over-the-range oven was designed for use over ranges
no wider than 91.44 cm(36 inches). It may be installed over
both gas and electric cooking equipment.
• Liquids, such as water, coffee, or tea are able to be
overheated beyond the boiling point without appearing to
be boiling. Visible bubbling or boiling when the container is
removed from the microwave oven is not always present.
THIS COULD RESULT IN VERY HOT LIQUIDS SUDDENLY
BOILING OVER WHEN THE CONTAINER IS DISTURBED
OR A SPOON OR OTHER UTENSIL IS INSERTED INTO
THE LIQUID.
To reduce the risk of injury to persons:
1. Do not overheat the liquid.
2. Stir the liquid both before and halfway through heating it.
3. Do not use straight-sided containers with narrow necks.
4. After heating, allow the container to stand in the microwave
oven for a short time before removing the container.
5. Use extreme care when inserting a spoon or other utensil
into the container.
Page 4
Safety
This appliance must be grounded. In the event of an electrical
short circuit, grounding reduces the risk of electric shock
by providing an escape wire for the electrical current. This
appliance is equipped with a cord that includes a grounding wire
and a grounding plug. The plug must be plugged into an outlet
that is properly installed and grounded. Plug the three-prong
power cord into a properly grounded outlet of standard 115-120
voltage, 60 Hz. Your oven should be the only appliance on this
circuit.
Improper use of the grounding plug can result in a risk of
electric shock. Consult a qualified electrician or servicer if you
do not understand the grounding instructions or if you are not
sure if the appliance is properly grounded.
Do not use an extension cord with this appliance. If the
power cord is too short, have a qualified electrician or service
technician install an outlet near the appliance.
The fan will operate automatically under certain conditions (see
page 14).Take care to prevent the starting and spreading of
accidental cooking fires while the vent fan is in use.
• In the event of a grease fire on the surface units below the
microwave oven, smother a flaming pan on the surface unit
by covering the pan completely with a lid, a cookie sheet or
a flat tray.
• Never leave surface units beneath your microwave oven
unattended at high heat settings. Boilovers cause smoking
and greasy spillovers that may ignite and spread if the
microwave vent fan is operating. To minimize automatic fan
operation, use adequate sized cookware and use high heat
on surface units only when necessary.
• Clean Ventilating Hoods Frequently - Grease should not be
allowed to accumulate on hood of filter.
• When flaming foods under the hood, turn the fan on.
• Use care when cleaning the vent-hood filter. Corrosive
cleaning agent, such as lye-based oven cleaner, may
damage the filter.
Do not cut or remove the third (ground) prong from the power
cord under any circumstances.
Note
Connect the oven only to a 15A dedicated circuit.
4
Page 5

5
Contents
Safety . . . . . . . . . . . . . . . . . . . . . . . . . . . . . . . . . . . . . . . . . . . . . . . . . .2
Contents . . . . . . . . . . . . . . . . . . . . . . . . . . . . . . . . . . . . . . . . . . . . . . . .5
Your New Microwave Oven . . . . . . . . . . . . . . . . . . . . . . . . . . . . . . . . .6
Checking Parts . . . . . . . . . . . . . . . . . . . . . . . . . . . . . . . . . . . . . . . . . .6
Warranty and Service Information . . . . . . . . . . . . . . . . . . . . . . . . . . .6
Setting up your Microwave Oven . . . . . . . . . . . . . . . . . . . . . . . . . . . .6
Control Panel . . . . . . . . . . . . . . . . . . . . . . . . . . . . . . . . . . . . . . . . . . .7
Operation . . . . . . . . . . . . . . . . . . . . . . . . . . . . . . . . . . . . . . . . . . . . . . .8
Child Lock . . . . . . . . . . . . . . . . . . . . . . . . . . . . . . . . . . . . . . . . . . . . .8
Clock . . . . . . . . . . . . . . . . . . . . . . . . . . . . . . . . . . . . . . . . . . . . . . . . .8
Demonstration Mode . . . . . . . . . . . . . . . . . . . . . . . . . . . . . . . . . . . . .8
Kitchen Timer . . . . . . . . . . . . . . . . . . . . . . . . . . . . . . . . . . . . . . . . . . .8
One Minute + . . . . . . . . . . . . . . . . . . . . . . . . . . . . . . . . . . . . . . . . . . .8
Sound On/off . . . . . . . . . . . . . . . . . . . . . . . . . . . . . . . . . . . . . . . . . . .8
Using the Instant cook pads . . . . . . . . . . . . . . . . . . . . . . . . . . . . . . . .9
Reheat . . . . . . . . . . . . . . . . . . . . . . . . . . . . . . . . . . . . . . . . . . . . . . .10
Auto Defrost . . . . . . . . . . . . . . . . . . . . . . . . . . . . . . . . . . . . . . . . . . .11
Using the microwave setting cooking times & Power levels . . . . . . . 12
More/less . . . . . . . . . . . . . . . . . . . . . . . . . . . . . . . . . . . . . . . . . . . . .14
Vent Hi/Lo/Off . . . . . . . . . . . . . . . . . . . . . . . . . . . . . . . . . . . . . . . . . .14
Light Hi/Lo/Off . . . . . . . . . . . . . . . . . . . . . . . . . . . . . . . . . . . . . . . . .14
Cooking Instructions . . . . . . . . . . . . . . . . . . . . . . . . . . . . . . . . . . . . . 15
Cooking Utensils . . . . . . . . . . . . . . . . . . . . . . . . . . . . . . . . . . . . . . .15
Testing Utensils . . . . . . . . . . . . . . . . . . . . . . . . . . . . . . . . . . . . . . . .15
Cooking Techniques . . . . . . . . . . . . . . . . . . . . . . . . . . . . . . . . . . . . .16
General microwave tips . . . . . . . . . . . . . . . . . . . . . . . . . . . . . . . . . .17
Appendix . . . . . . . . . . . . . . . . . . . . . . . . . . . . . . . . . . . . . . . . . . . . . .18
Troubleshooting Guide . . . . . . . . . . . . . . . . . . . . . . . . . . . . . . . . . . .18
Care and Cleaning . . . . . . . . . . . . . . . . . . . . . . . . . . . . . . . . . . . . . .19
Cleaning the Grease filter . . . . . . . . . . . . . . . . . . . . . . . . . . . . . . . .19
Charcoal filter Replacement . . . . . . . . . . . . . . . . . . . . . . . . . . . . . . .20
Cooktop/Night light Replacement . . . . . . . . . . . . . . . . . . . . . . . . . . . 20
Oven light Replacement . . . . . . . . . . . . . . . . . . . . . . . . . . . . . . . . . .21
Specifications . . . . . . . . . . . . . . . . . . . . . . . . . . . . . . . . . . . . . . . . . .21
Warranty . . . . . . . . . . . . . . . . . . . . . . . . . . . . . . . . . . . . . . . . . . . . . . .22
Quick Reference . . . . . . . . . . . . . . . . . . . . . . . . . . . . . . . . . . . . . . . .23
Page 6
Your New Microwave Oven
Checking Parts
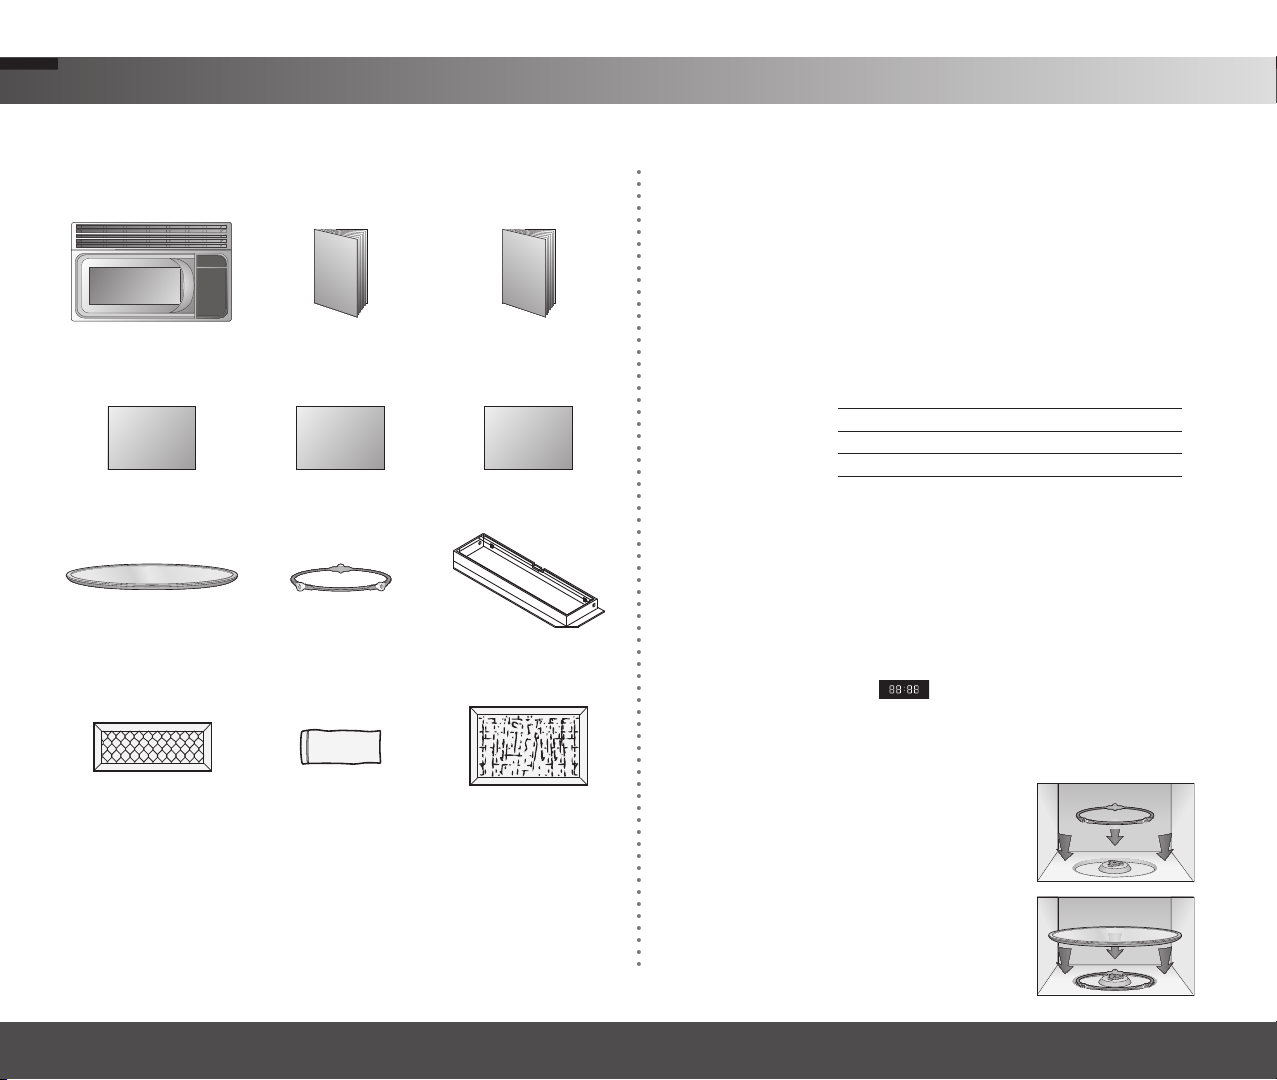
Unpack your microwave oven and check to make sure that you have all
the parts shown here. If any part is missing or broken, call your dealer.
Microwave oven Installation
Instructions
Registration Card Top Template Wall Template
Glass Tray Roller Guide Ring Exhaust adaptor
Charcoal filter
(Part No. : DE63-00367E)
Hardware-kit
(Part No. : DE92-90505G)
Owner’s Manual
(Part No. : DE92-90242A)
Grease Filter
(Part No. : DE63-00196A)
Warranty and Service Information
To help us to serve you better, please complete the enclosed registration card
and promptly return it by mail. If the registration card is missing, you can call
Samsung Electronics Canada, Inc., at 1-800-SAMSUNG (1-800-726-7864), or
register on-line at www.samsung.ca (*Fax no.: 905-542-1199)
When contacting Samsung, please provide the specific model and serial
number information which is usually located on the back or bottom of the
product. Please record these numbers below, along with the other requested
information. Keep this information in a safe place as a permanent record of your
purchase to aid in identification in case of theft or loss, and a copy of your sales
receipt as a proof of purchase if warranty service is needed.
MODEL NUMBER
SERIAL NUMBER
DATE PURCHASED
PURCHASED FROM
Warranty service can only be performed by a Samsung Authorized Service
Center. If you should require warranty service, provide the above information
with a copy of your sales receipt to the Samsung Authorized Service Center.
For service assistance and the location of the nearest service center, please call
1-800-SAMSUNG (1-800-726-7864).
Setting up your Microwave Oven
1 Plug the cord into a grounded outlet. Once plugged in, the display
on your oven will show:
2 Open the oven door by pulling the handle on the right side of the
door.
3 Wipe the inside of the oven with a damp cloth.
4 Place the pre-assembled ring in the
indentation in the center of the oven.
5 Place the glass tray securely in the
center of the pre-assembled roller
guide.
6
Page 7

7
Your New Microwave Oven
Control Panel
1 DISPLAY
The Display includes a clock and indicators to tell you time of day, cooking
time settings and cooking functions selected.
2 POPCORN . . . . . . . . . . . . . . . . . . . . . . . . . . . . . . . . . . . . . . . . . . . . . . P. 9
Touch this pad when popping popcorn in your microwave oven.
3 BAKED POTATO . . . . . . . . . . . . . . . . . . . . . . . . . . . . . . . . . . . . . . . . . P. 9
Touch this pad to cook potatoes.
4 REHEAT . . . . . . . . . . . . . . . . . . . . . . . . . . . . . . . . . . . . . . . . . . . . . . . . p. 10
Touch this pad to reheat dinner plate, casserole, and pasta.
5 COOK . . . . . . . . . . . . . . . . . . . . . . . . . . . . . . . . . . . . . . . . . . . . . . . . . . p. 9
Touch this pad to cook beverage, bacon, frozen dinner, frozen breakfast.
6 VEGETABLES . . . . . . . . . . . . . . . . . . . . . . . . . . . . . . . . . . . . . . . . . . . p. 9
Touch this pad to cook fresh vegetables, frozen vegetables.
7 PIZZA SLICE . . . . . . . . . . . . . . . . . . . . . . . . . . . . . . . . . . . . . . . . . . . . p. 9
Touch this pad to reheat pizza.
8 MORE . . . . . . . . . . . . . . . . . . . . . . . . . . . . . . . . . . . . . . . . . . . . . . . . . . p. 14
Touch this pad to add more cooking time.
9 LESS . . . . . . . . . . . . . . . . . . . . . . . . . . . . . . . . . . . . . . . . . . . . . . . . . . . p. 14
Touch this pad to subtract the cooking time.
10 AUTO DEFROST . . . . . . . . . . . . . . . . . . . . . . . . . . . . . . . . . . . . . . . . . p. 11
Touch this pad to defrost food by weight.
11 NUMBER
Touch number pads to enter cooking time, power level, quantities, or
weights.
12 POWER LEVEL . . . . . . . . . . . . . . . . . . . . . . . . . . . . . . . . . . . . . . . . . . p. 12
Touch this pad to select a cooking power level.
13 STOP/CLEAR
Touch this pad to stop the oven or to clear all entries.
14 ENTER/START
Touch this pad to start a function. If you open the door after oven begins to
cook, close door and touch ENTER/START again.
15 SOUND ON/OFF . . . . . . . . . . . . . . . . . . . . . . . . . . . . . . . . . . . . . . . . . . P. 8
Touch this pad to turn off the sound. OFF will appear in the display.
16 One Minute + . . . . . . . . . . . . . . . . . . . . . . . . . . . . . . . . . . . . . . . . . . . . p. 8
Touch this pad to set and start quickly at 100% power level.
17 CLOCK . . . . . . . . . . . . . . . . . . . . . . . . . . . . . . . . . . . . . . . . . . . . . . . . . p. 8
Touch this pad to enter the time of day.
18 KITCHEN TIMER . . . . . . . . . . . . . . . . . . . . . . . . . . . . . . . . . . . . . . . . . p. 8
Touch this pad to set the kitchen timer.
19 VENT HI/LO/OFF . . . . . . . . . . . . . . . . . . . . . . . . . . . . . . . . . . . . . . . . . p. 14
Touch this pad to turn the fan on or off.
20 LIGHT HI/LO/OFF . . . . . . . . . . . . . . . . . . . . . . . . . . . . . . . . . . . . . . . . . p. 14
Touch this pad to turn on the cooktop light.
Page 8

Operation
Child Lock
You may lock the control panel to prevent the microwave from being
accidentally started or used by children.
The Child Lock feature is also useful when cleaning the control panel.
Child Lock prevents accidental programming when wiping the control
panel.
Example: To set the child lock.
1 Touch and hold ENTER/START pad more than 3 seconds. L will
appear in the display window with one beep.
Example: To cancel the child lock.
1 Touch and hold ENTER/START pad more than 3 seconds. L will
disappear and you hear one beep.
Clock
Example: To set 8:00.
1. Touch Clock pad.
2. Enter the time by using the number pads.
3. Touch ENTER/START pad.
Demonstration Mode
You can use the Demonstration mode to see how your microwave oven
operates without the oven heating.
1 Touch 0 pad and 1 pad at the same time.
To turn demo mode off, repeat step 1 above.
Kitchen Timer
You can use your microwave oven as a timer. Use the Kitchen Timer for
timing up to 99 minutes, 99 seconds.
Example: To set for 3 minutes.
1. Touch Kitchen Timer pad.
2. Enter the time by using the number pads.
3. Touch ENTER/ START pad.
When the time is over, you will hear beeps and End will display.
One Minute +
This button offers a convenient way to heat food in one-minute
increments at the High power level.
1 Touch the One Minute + pad once for each minute you wish to
cook the food. For example, touch it twice for two minutes. The
time will display, and the oven starts automatically.
2. Add minutes to a program in progress by touching the One Minute
+ pad for each minute you want to add.
Sound On/off
1. Touch Sound On/off pad. The display shows On.
2. Touch Sound On/off pad. The display shows OFF.
3. Touch ENTER/START pad. The display returns to the time of day.
8
Page 9

9
Operation
Using the Instant cook pads
1 Touch the Popcorn pad corresponding to the food you are cooking
(Popcorn, for example).
The display shows: 3.5 OZ
2 Touch the pad repeatedly to select the serving size you want. The
display will cycle through all available serving sizes. Once you
select the correct serving size, the microwave will begin cooking
automatically.
Cook
Cook pad provides four preset categories for cooking.
Example: To Cook 8 ozs of Frozen Dinner.
1 Touch Cook pad three times.
2 Touch number pads to enter quantity, serving size or package
weight.
3 Touch ENTER/START pad.
When the cook time is over, you will hear four beeps and End will
display.
Category Times to touch Display
Beverage once Ac-1
Bacon twice Ac-2
Frozen Dinner three times Ac-3
Frozen Breakfast four times Ac-4
Auto cook table
Category Directions Amount
Use only one microwave-only bag of popcorn at
Popcorn
Potato
(Fr-1)
Fresh
Vegetables
VEGETABLES
(Fr-2)
Frozen
Vegetables
Pizza Slice
(Ac-1)
Beverage
COOK
a time. Use caution when removing and opening
the hot bag from oven. Let oven cool for at least 5
minutes before using again.
Prick each potato several times with fork. Place
on turntable in spoke-like fashion. Let stand 3-5
minutes. Let oven cool for at least 5 minutes before
using again. Use More(9) pad when cooking larger
potatoes.
Place fresh vegetables in microwave-safe
ceramic, glass or plastic dish and add 2-4 Tbs.
water. Cover with lid or vented plastic wrap during
cooking and stir before standing. Let oven cool for
at least 5 minutes before using again. Use More(9)
pad when cooking dense vegetables such as
carrots or broccoli spears.
Place frozen vegetables in microwave-safe
ceramic, glass or plastic dish and add 2-4 Tbs.
water. Cover with lid or vented plastic wrap during
cooking and stir before standing. Let oven cool for
at least 5 minutes before using again. Use More(9)
pad when cooking dense vegetables such as
carrots or broccoli spears.
Put 1-3 slices of pizza on a microwave-safe plate
with wide end of slice toward the outside edge of
the plate. Do not let slices overlap. Do not cover.
Let oven cool for at least 5 minutes before using
again. Use More(9) pad to increase reheat time for
thick crust pizza.
Use measuring cup or mug; do not cover. Place
the beverage in the oven. After heating, stir well.
Let oven cool for at least 5 minutes before using
again.
Note:
• Reheat times based on an 8 ounce cup.
• Beverage heated with the beverage
feature may be very hot.
• Remove container with care.
3.0-3.5 oz
1 package
1 to 4
potatoes
1 to 4
servings
1 to 4
servings
1 to 3
slices
0.5 cup
1 cup
2 cups
Page 10

Operation
Auto cook table
Category Directions Amount
Place 2 paper towels on plate and arrange bacon
(Ac-2)
Bacon
(Ac-3)
Frozen
Dinner
(Ac-4)
Frozen
Breakfast
on towels, do not overlap.
Cover with additonal paper towel. Remove paper
towel immediately after cooking.
Use More(9)/Less(1) pads for desired crispness.
Remove food from outer wrapping and follow box
instructions for covering and standing. Let oven
cool for at least 5 minutes before using again.
Follow package instructions for covering and
standing. Use this pad for frozen sandwich,
breakfast entree, etc. Let oven cool for at least 5
minutes before using again.
2 to 6
slices
8 to 14 oz.
4 to 8 oz.
Note
Desired food temperature varies from person to person.
Use the More(9)/Less(1) pads to fit your temperature
preference.
Reheat
Reheat pad provides three preset categories for reheating.
Example: To reheat 3 servings of Casserole.
1 Touch Reheat pad 2 times.
2 Touch number pads to enter quantity/servings.
3 Touch ENTER/START pad.
When the cook time is over, you will hear four beeps and End will
display.
Reheat table
Category Directions Amount
Use only pre-cooked, refrigerated foods. Cover
plate with vented plastic wrap or waxed paper,
tucked under plate. If food is not as hot as you
prefer after heating with REHEAT, continue
Dinner Plate
Casserole
Pasta
heating using time and power.
Contents:
• 3-4 oz. meat, poultry or fish (up to 6 oz.
with bone)
• 1/2 cup starch (potatoes, pasta, rice, etc.)
• 1/2 cup vegetables (about 3-4 oz.)
Cover plate with lid or vented plastic wrap. If
food is not as hot as you prefer after heating
with REHEAT, continue heating using time and
power. Stir foods once before serving.
Contents:
• Casserole-refrigerated foods. (Examples:
Beef stew, Lasagna)
• Pasta-Canned spaghetti and ravioli,
refrigerated foods.
1 serving
Note
• Desired food temperature varies from person to person.Use
the More(9)/Less(1) pads to fit your temperature preference.
• Allow food to stand 1 to 5 minutes before serving.
(1 plate)
1 to 4
servings
Category Times to touch Display
Dinner Plate once rh-1
Casserole twice rh-2
Pasta 3 times rh-3
10
Page 11

11
Operation
Auto Defrost
Defrost choices are preset in the oven. The defrost feature provides
you with the best defrosting method for frozen foods, because the oven
automatically sets the defrosting times according to the weight you
enter. For added convenience, the AUTO DEFROST beeps to remind
you to check or turn over the food during the defrost cycle.
After touching the Auto Defrost pad once, select the food weight.
Available weight ranges are 0.1 to 6.0 lbs.
Example : To defrost 1.2 lbs of meat.
1 Touch Auto Defrost pad.
2 Enter the weight.
3 Touch ENTER/START pad.
Note
• After you touch ENTER/ START pad, the display counts
down the defrost time. The oven will beep twice during the
Defrost cycle. At this time, open the door and turn the food as
needed. Remove any portions that have thawed then return
frozen portions to the oven and touch ENTER/START pad to
resume the defrost cycle.
• The oven will not stop during the BEEP unless the door
is opened.
a lower food weight.
• The shape of the package alters the defrosting time. Shallow
rectangular packets defrost more quickly than a deep block.
• Separate pieces as they begin to defrost. Separated pieces defrost
more easily.
• Shield areas of food with small pieces of foil if they start to become
warm.
• You can use small pieces of alu-minum foil to shield foods like
chicken wings, leg tips, and fish tails, but the foil must not touch
the side of the oven. Foil causes arcing, which can damage the
oven lining.
Auto defrosting guide
Follow the instructions below when defrosting different types of food.
Category
Roast Beef,
Pork
Steaks,
Chops, Fish
Standard
Amount
2.5-6.0 lbs. Start with the food placed fat side down. After
each stage, turn the food over and shield any
warm portions with narrow strips of aluminum
foil.
0.5-3.0 lbs. After each stage, rearrange the food. If there
are any warm or thawed portions of food, shield
them with narrow flat pieces of aluminum foil.
Remove any pieces of food that are nearly
defrosted. Let stand, covered, for 5-10 minutes.
Procedure
Defrost Tips
• When using AUTO DEFROST, the weight to be entered is the net
weight in pounds and tenths of pounds (the weight of the food
minus the container).
• Use AUTO DEFROST only for raw food. AUTO DEFROST
gives best results when food to be thawed is a minimum of 0°F
(taken directly from a true freezer). If food has been stored in
a refrigerator-freezer that does not maintain a temperature of
5°F or below, always program a lower food weight (for a shorter
defrosting time) to prevent cooking the food.
• If the food is stored outside the freezer for up to 20 minutes, enter
Ground Meat 0.5-3.0 lbs. After each stage, remove any pieces of food
Whole
Chicken
2.5-6.0 lbs. Remove giblets before defrosting poultry. Start
that are nearly defrosted. Let stand, covered
with foil, for 5-10 minutes.
defrosting with the breast side down. After the
first stage, turn the chicken over and shield any
warm portions with narrow strips of aluminum
foil. After the second stage, again shield any
warm portions with narrow strips of aluminum
foil. Let stand, covered, for 30-60 minutes in the
refrigerator.
Page 12
Operation
Auto defrosting guide
Category
Chicken
Pieces
Bread 0.1-2.0 lbs. Arrange rolls in a circle horizontally on kitchen
Standard
Amount
0.5-3.0 lbs. After each stage, rearrange or remove any
pieces of food that are nearly defrosted. Let
stand for 10-20 minutes.
paper in the middle of turntable.
Turn over after half of defrosting time!
Procedure
Note
Check foods when the oven signals. After the final stage, small
sections may still be icy; let them stand to continue thawing. Do
not defrost until all ice crystals have thawed. Shielding roasts and
steaks with small pieces of foil prevents the edges from cooking
before the center of the food has defrosted. Use narrow, flat,
smooth strips of aluminum foil to cover the edges and thinner
sections of the food.
Using the microwave setting cooking times &
Power levels
Your oven allows you to set up three different stages of cooking, each
with its own time length and power level. The power level lets you
control the heating intensity from Warm (1) to High (10/Power level).
Cooking at high power levels
Example: To cook food for 8 minutes 30 seconds at 100%
power.
1 Enter the cook time.
2 Touch ENTER/ START pad.
When the cook time is over, you will hear four beeps and End will
display.
Cooking at lower power levels
HIGH power cooking does not always give you the best results with
foods that need slower cooking, such as roasts, baked goods, or
custards. Your oven has 9 power settings in addition to HIGH.
Example: To cook food for 7 minutes 30 seconds at 70%
power.
1 Enter the cook time.
2 Touch Power Level pad.
3 Enter the power level.
4 Touch ENTER/ START pad.
When the cook time is over, you will hear four beeps and End will
display.
See cooking guide for Power levels, page 13.
12
Page 13

13
Operation
Cooking with more than one cook cycle
For best results, some recipes call for one Power Level for a certain
length of time, and another Power Level for another length of time.Your
oven can be set to change from one to another automatically, for up to
three cycles at the first cycle is defrost.
Example: To cook food for 3 minutes at 90% power and
then 70% power for 7 minutes 30 seconds.
1 Enter the first cook time.
2 Touch Power Level pad.
3 Enter the power level.
4 Enter the second cook time.
5 Touch Power Level pad.
6 Enter the power level.
7 Touch ENTER/ START pad.
When the cook time is over, you will hear four beeps and End will
display.
Cooking guide for power levels
The 9 power levels in addition to HIGH allow you to choose the best
power level for the food you are cooking. Below are listed all the power
levels, examples of foods best cooked at each level, and the amount of
microwave power you are using.
POWER LEVEL MICROWAVE
OUTPUT
10 High 100% • Boil water.
• Cook ground beef.
• Make candy.
• Cook fresh fruits and vegetables.
• Cook fish and poultry.
• Preheat browning dish.
• Reheat beverages.
• Bacon slices.
9 90% • Reheat meat slices quickly.
• Saute onions, celery, and green
pepper.
8 80% • All reheating.
• Cook scrambled eggs.
7 70% • Cook breads and cereal products.
• Cook cheese dishes, veal.
• Cook cakes, muffins, brownies,
cupcakes.
6 60% • Cook pasta.
5 50% • Cook meats, whole poultry.
• Cook custard.
• Cook whole chicken, turkey, spare
ribs, rib roast, sirloin roast.
4 40% • Cook less tender cuts of meat.
• Reheat frozen convenience foods.
3 30% • Thaw meat, poultry, and seafood.
• Cook small quantities of food.
• Finish cooking casserole, stew,
and some sauces.
2 20% • Soften butter and cream cheese.
• Heat small amounts of food.
1 10% • Soften ice cream.
• Raise yeast dough.
USE
Page 14
Operation
More/less
The More(9)/Less(1) pads allow you to adjust pre-set cooking times.
They only work in the Reheat, Auto Cooking, One Minute +, Time Cook
modes. Use the More(9)/Less(1) pads only after you have already
begun cooking with one of these procedures.
1 To ADD more time to an automatic cooking procedure: Touch the
More(9) pad.
2 To REDUCE the time of an automatic cooking procedure: Touch
the Less(1) pad.
Vent Hi/Lo/Off
The VENT moves steam and other vapors from the cooking surface.
The vent will operate at low speed whenever the oven is on.
1 To operate the vent manually: Touch Vent pad once for High fan
speed, twice for Low fan speed, or three times to turn the fan off.
Note
If the temperature gets too hot around the microwave oven,
the fan in the vent hood will automatically turn on at the LOW
setting to cool the oven. The fan will automatically turn off when
the internal parts are cool. When this occurs, the vent cannot be
turned off.
Light Hi/Lo/Off
1 Touch Light Hi/Lo/Off pad once for bright light, twice for night
light, or three times to turn the light off.
14
Page 15
15
Cooking Instructions
Cooking Utensils
Recommended Use
• Glass and glass-ceramic bowls and dishes - Use for heating or
cooking.
• Microwavable plastic wrap -
for some steam to escape and avoid placing it directly on the food.
• Wax paper - Use as a cover to prevent spattering.
• Paper towels and napkins - Use for short-term heating and
covering; they absorb excess moisture and prevent spattering. Do
not use recycled paper towels, which may contain metal and can
catch fire.
• Paper plates and cups - Use for short-term heating at low
temperatures. Do not use recycled paper, which may contain metal
and can catch fire.
• Thermometers -
follow all directions. Check the food in several places. Conventional
thermometers may be used once the food has been removed from
the oven.
Use only those labeled “Microwave-Safe” and
Limited Use
• Aluminum foil - Use narrow strips of foil to prevent overcooking of
exposed areas. Using too much foil can damage your oven, so be
careful.
• Ceramic, porcelain, and stoneware - Use these if they are
labeled “Microwave-Safe”. If they are not labeled, test them to
make sure they can be used safely. Never use dishes with metallic
trim.
• Plastic - Use only if labeled “Microwave-Safe”. Other plastics can
melt.
• Straw, wicker, and wood - Use only for short-term heating, as
they can be flammable.
Not Recommended
• Glass jars and bottles - Regular glass is too thin to be used in a
microwave, and can shatter.
• Paper bags -These are a fire hazard, except for popcorn bags
that are designed for microwave use.
Use to cover. Leave a small opening
• Styrofoam plates and cups -
unhealthy residue on food.
• Plastic storage and food containers - Containers such as
margarine tubs can melt in the microwave.
These can melt and leave an
Testing Utensils
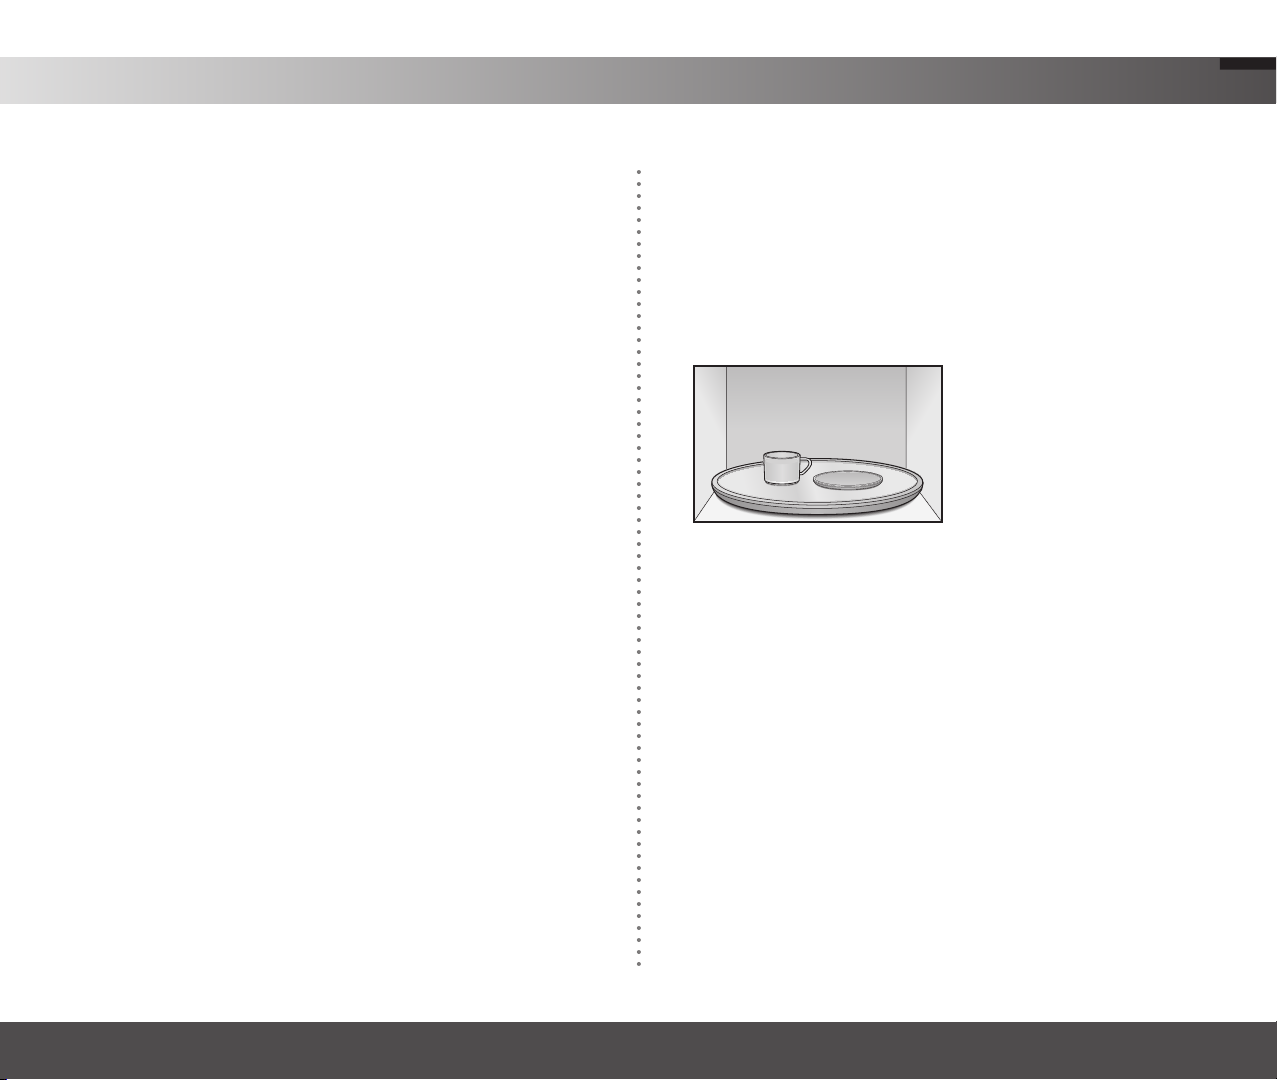
If you are not sure whether a dish is microwave-safe or not, you can
perform this test:
1 Fill 1 cup of glass measuring cup with water and put it inside your
oven, next to the dish you want to test.
2 Touch the One Minute + pad once to heat them for one minute at
High power.
The water should be warm and the dish you are testing should be cool.
If the dish is warm, then it is absorbing microwave energy and is not
acceptable for use in the microwave.
Recommended Use
• Metal Pans - Use for all types of baked products, but especially
where browning is important. Dark or dull finish metal pans are
best for breads and pies because they absorb heat and produce
crisper crust.
• Shiny aluminum pans - Use for cakes, cookies or muffins
because they reflect heat and help produce a light tender crust.
• Glass or Gladd-Ceramic - Casserole or baking dishes are best
suited for egg and cheese recipes due to the cleanability of glass.
Page 16

Cooking Instructions
Cooking Techniques
Stirring
Stir foods such as casseroles and vegetables while cooking to
distribute heat evenly. Food at the outside of the dish absorbs more
energy and heats more quickly, so stir from the outside to the center.
The oven will turn off when you open the door to stir your food.
Arrangement
Arrange unevenly shaped foods, such as chicken pieces or chops, with
the thicker, meatier parts toward the outside of the turntable where they
receive more microwave energy. To prevent overcooking, place thin or
delicate parts toward the center of the turntable.
Shielding
Shield food with narrow strips of aluminum foil to prevent overcooking.
Areas that need shielding include poultry wing-tips, the ends of poultry
legs, and corners of square baking dishes. Use only small amounts of
aluminum foil. Larger amounts can damage your oven.
Turning
Turn foods over midway through cooking to expose all parts to
microwave energy. This is especially important with large items such as
roasts.
Standing
Foods cooked in the microwave build up internal heat and continue
to cook for a few minutes after the oven stops. Let foods stand
to complete cooking, especially foods such as roasts and whole
vegetables. Roasts need this time to complete cooking in the center
without overcooking the outer areas. All liquids, such as soup or hot
chocolate, should be shaken or stirred when cooking is complete. Let
liquids stand a moment before serving. When heating baby food, stir
well and test the temperature before serving.
Adding Moisture
Microwave energy is attracted to water molecules. Food that is uneven
in moisture content should be covered or allowed to stand so that the
heat disperses evenly. Add a small amount of water to dry food to help
it cook.
Venting
After covering dish with plastic wrap, you vent plastic wrap by turning
back one corner so excess steam can escape.
16
Page 17

17
Cooking Instructions
General microwave tips
• Dense foods, such as potatoes, take longer to heat than lighter
foods. Foods with a delicate texture should be heated at a low
power level to avoid becoming tough.
• Altitude and the type of cookware you are using can affect cooking
time. When using a new recipe, use the minimum cooking time
and check the food occasionally to prevent overcooking.
• Foods with a non-porous skin such as potatoes or hot dogs,
should be pierced to prevent bursting.
• Frying with heating oil or fat is not recommended. Fat and oil can
suddenly boil over and cause severe burns.
• Some ingredients heat faster than others. For example a jelly
doughnut will be hotter than the dough. Keep this in mind to avoid
burns.
• Home canning in the microwave oven is not recommended
because all harmful bacteria may not be destroyed by the
microwave heating process.
• Although microwaves do not heat the cookware, the heat from the
food is often transferred to the cookware. Always use pot holders
when removing food from the microwave and instruct children to
do the same.
• Making candy in the microwave is not recommended as candy can
be heated to very high temperatures. Keep this in mind to avoid
injury.
Guide for Cooking Eggs in Your Microwave
• Never cook eggs in the shell, and never warm hard-cooked eggs
in the shell; they can explode.
• Always pierce whole eggs to keep them from bursting.
• Cook eggs just until set; they become tough if overcooked.
Guide for Cooking Vegetables in Your Microwave
• Vegetables should be washed just before cooking. Often, no extra
water is needed. If dense vegetables such as potatoes, carrots
and green beans are being cooked, add about ¼ cup of water.
• Small vegetables (sliced carrots, peas, lima beans, etc.) can be
cooked faster than larger ones.
• Whole vegetables, such as potatoes, acorn squash or corn on
the cob, should be arranged in a circle on the turntable before
cooking. They will be cooked more evenly if turned over after half
the cooking time.
• Always place vegetables like asparagus and broccoli with the stem
ends pointing towards the edge of the dish and the tips toward the
center.
• When cooking cut vegetables, always cover the dish with a lid or
vented microwavable plastic wrap.
• Whole, unpeeled vegetables such as potatoes, squash, eggplant,
etc., should have their skin pricked in several spots before cooking
to prevent them from bursting.
• For more even cooking, stir or rearrange whole vegetables halfway
through the cooking time.
• Generally, the denser the food, the longer the standing time.
(Standing time refers to the time necessary for dense, large
foods and vegetables to finish cooking after they come out of the
oven.) A baked potato can stand on the counter for five minutes
before cooking is completed, while a dish of peas can be served
immediately.
Page 18

Appendix
Troubleshooting Guide
Before you call a repair person for your oven, check this list of possible
problems and solutions.
Neither the oven’s display nor the oven operate.
• Properly insert the plug into a grounded outlet.
• If the outlet is controlled by a wall switch, make sure the wall
switch is turned on.
• Remove the plug from the outlet, wait ten seconds, then plug it in
again.
• Reset the circuit breaker or replace any blown fuse.
• Plug another appliance into the outlet; if the other appliance
doesn’t work, have a qualified electrician repair the outlet.
• Plug the oven into a different outlet.
The oven’s display works, but the power won’t come on.
• Make sure the door is closed securely.
• Check to see if packing material or other material is stuck to the
door seal.
• Check for door damage.
• Touch Cancel twice and re-enter all cooking instructions.
The power goes off before the set time has elapsed.
• If there has not been a power outage, remove the plug from the
outlet, wait ten seconds, then plug it in again. If there was a power
outage, the time indicator will display:
You see sparks or arcing.
• Remove any metallic utensils, cookware, or metal ties. If using foil,
use only narrow strips and allow at least one inch between the foil
and interior oven walls.
The turntable makes noises or sticks.
• Clean the turntable, roller ring and oven floor.
• Make sure the turntable and roller ring are positioned correctly.
Using your microwave causes TV or radio interference.
• This is similar to the interference caused by other small
appliances, such as hair dryers. Move your microwave further
away from other appliances, like your TV or radio.
Note
If the oven is set to cook for more than 25 minutes, it will
automatically adjust itself to 70 percent power after 25 minutes to
avoid overcooking.
• Reset the clock and any cooking instructions.
• Reset the circuit breaker or replace any blown fuse.
The food is cooked too slowly.
• Make sure the oven is on its own 15 amp circuit line. Operating
another appliance on the same circuit can cause a voltage drop. If
necessary, move the oven to its own circuit.
18
Page 19

19
Appendix
Care and Cleaning
• Follow these instructions to clean and care for your oven.
• Keep the inside of the oven clean. Food particles and spilled
liquids can stick to the oven walls, causing the oven to work less
efficiently.
• Wipe up spills immediately. Use a damp cloth and mild soap. Do
not use harsh detergents or abrasives.
• To help loosen baked on food particles or liquids, heat two cups of
water (add the juice of one lemon if you desire to keep the oven
fresh) in a four-cup measuring glass at High power for five minutes
or until boiling. Let stand in the oven for one or two minutes.
• Remove the glass tray from the oven when cleaning the oven
or tray. To prevent the tray from breaking, handle it carefully and
do not put it in water immediately after cooking. Wash the tray
carefully in warm sudsy water or in the dishwasher.
• Clean the outside surface of the oven with soap and a damp cloth.
Dry with a soft cloth. To prevent damage to the operating parts of
the oven, don’t let water seep into the openings.
• Wash the door window with very mild soap and water. Be sure to
use a soft cloth to avoid scratching.
• If steam accumulates inside or outside the oven door, wipe with a
soft cloth. Steam can accumulate when operating the oven in high
humidity and in no way indicates microwave leakage.
• Never operate the oven without food in it; this can damage the
magnetron tube or glass tray. You may wish to leave a cup of water
in the oven when it is not in use to prevent damage if the oven is
accidentally turned on.
Cleaning the Grease filter
The grease filter should be removed and cleaned often, at least once a
month.
CAUTION
To avoid risk of personal injury or property damage, do not
operate oven hood without filters in place.
1 To remove grease filter, slide filter to the side. Pull filter downward
and push to the other side. The filter will drop out.
2 Soak grease filter in hot water and a mild detergent. Rinse
well and shake to dry. Do not use ammonia or place in a
dishwasher. The aluminum will darken.
3 To reinstall the filter, slide it into the side slot, then push up and
toward oven center to lock.
Page 20

Appendix
Charcoal filter Replacement
If your oven is vented to the inside, the charcoal filter should be
replaced every 6 to 12 months, and more often if necessary. The
charcoal filter cannot be cleaned. To order a new charcoal filter, contact
the Parts Department at your nearest Authorized Service Center or
call: 1-800-361-3400
1 Unplug oven or turn off power at the main power supply.
2 Open the door.
3 Remove the vent grille mounting screws. (3 middle screws)
4 Slide the grille to the left, then pull straight out.
5 Push the hook and remove old filter.
Cooktop/Night light Replacement
CAUTION
To avoid personal injury or property damage, wear gloves when
replacing light bulb.
1 Unplug the oven or turn off power at the main power supply.
2 Remove the bulb cover mounting screws.
3 Replace bulb with 40 watt appliance bulb.
4 Replace bulb cover, and mounting screws.
5 Turn the power back on at the main power supply.
6 Slide a new charcoal filter into place. The filter should rest at the
angle shown.
7 Replace the grille and 3 screws and close the door. Turn the power
back on at the main power supply and set the clock.
20
Page 21

21
Appendix
Oven light Replacement
1 Unplug oven or turn off power at the main power supply.
2 Open the door.
3 Remove the vent cover mounting screws. (3 middle screws)
4 Slide the grille to the left, then pull straight out.
5 Remove the charcoal filter, if present.
6 Touch and hold the center snap while lifting the tab on the left
corner. Remove the cover. Remove the bulb by turning gently.
Specifications
Model Number SMH3150
Oven Cavity 1.5 cuft
Controls 10 power levels, including defrost
Timer 99 minutes, 99 seconds
Power Source 120 VAC, 60 Hz
Power Consumption 1500 Watts
Power Output 900 Watts(IEC 705 TEST)
Oven Cavity Dimensions 20
Outside Dimensions 29
Shipping Dimensions 33
Net/Gross Weight 45.4/54.2 lbs
3/32
”(W) X 9
7/8
”(W) X 16
3/8
”(W) X 19
3/8
”(H) X 14
1/2
”(H) X 15
31/32
”(H) X 19
3/8
15/16
”(D)
13/32
”(D)
”(D)
7 Replace bulb with a 40 watt appliance bulb.
8 Replace the bulb holder.
9 Replace the grille and 3 screws. Turn the power back on at the
main power supply.
Page 22

Warranty
SAMSUNG OVER-THE-RANGE(OTR) MICROWAVE OVEN
LIMITED WARRANTY TO ORIGINAL PURCHASER
This SAMSUNG brand product, as supplied and distributed by Samsung
Electronics Canada, Inc. and delivered new, in the original carton to the original
consumer purchaser, is warranted by SAMSUNG against manufacturing defects
in materials and workmanship for a limited warranty period of:
ONE (1) YEAR PARTS AND LAbOR, TEN (10) YEARS PARTS
WARRANTY FOR MAGNETRON
This limited warranty begins on the original date of purchase, and is valid
only on products purchased and used in the Canada. To receive warranty
service, the purchaser must contact SAMSUNG for problem determination and
service procedures. Warranty service can only be performed by a SAMSUNG
authorized service center. The original dated bill of sale must be presented upon
request as proof of purchase to SAMSUNG or SAMSUNG’s authorized service
center.
SAMSUNG will repair or replace this product, at our option and at no charge
as stipulated herein, with new or reconditioned parts or products if found to
be defective during the limited warranty period specified above. All replaced
parts and products become the property of SAMSUNG and must be returned
to SAMSUNG. Replacement parts and products assume the remaining original
warranty, or ninety (90) days, whichever is longer.
In-home service will be provided during the warranty labor period subject to
availability within the Canada. In-home service is not available in all areas. To
receive in-home service, the product must be unobstructed and accessible to
service personnel. If during in-home service repair can not be completed, it may
be necessary to remove, repair and return the product. If in-home service is
unavailable, SAMSUNG may elect, at our option, to provide for transportation
of our choice to and from a SAMSUNG authorized service center. Otherwise,
transportation to and from the SAMSUNG authorized service center is the
responsibility of the purchaser.
This limited warranty covers manufacturing defects in materials and
workmanship encountered in normal, noncommercial use of this product and
shall not apply to the following, including, but not limited to: damage which
occurs in shipment; delivery and installation; applications and uses for which this
product was not intended; altered product or serial numbers; cosmetic damage
or exterior finish; accidents, abuse, neglect, fire, water, lightning or other acts of
nature; use of products, equipment, systems, utilities, services, parts, supplies,
accessories, applications, installations, repairs, external wiring or connectors
not supplied or authorized by SAMSUNG which damage this product or result in
service problems; incorrect electrical line voltage, fluctuations and surges;
customer adjustments and failure to follow operating instructions, cleaning,
maintenance and environmental instructions that are covered and prescribed in
the instruction book; problems caused by pest infestations, and overheating or
overcooking by user; glass tray or turntable; reduced magnetron power output
related to normal aging. SAMSUNG does not warrant uninterrupted or error-free
operation of the product.
THERE ARE NO EXPRESS WARRANTIES OTHER THAN THOSE LISTED
AND DESCRIBED ABOVE, AND NO WARRANTIES WHETHER EXPRESS OR
IMPLIED, INCLUDING, BUT NOT LIMITED TO, ANY IMPLIED WARRANTIES
OF MERCHANTABILITY OR FITNESS FOR A PARTICULAR PURPOSE,
SHALL APPLY AFTER THE EXPRESS WARRANTY PERIODS STATED
ABOVE, AND NO OTHER EXPRESS WARRANTY OR GUARANTY GIVEN
BY ANY PERSON, FIRM OR CORPORATION WITH RESPECT TO THIS
PRODUCT SHALL BE BINDING ON SAMSUNG. SAMSUNG SHALL NOT
BE LIABLE FOR LOSS OF REVENUE OR PROFITS, FAILURE TO REALIZE
SAVINGS OR OTHER BENEFITS, OR ANY OTHER SPECIAL, INCIDENTAL
OR CONSEQUENTIAL DAMAGES CAUSED BY THE USE, MISUSE OR
INABILITY TO USE THIS PRODUCT, REGARDLESS OF THE LEGAL
THEORY ON WHICH THE CLAIM IS BASED, AND EVEN IF SAMSUNG
HAS BEEN ADVISED OF THE POSSIBILITY OF SUCH DAMAGES. NOR
SHALL RECOVERY OF ANY KIND AGAINST SAMSUNG BE GREATER IN
AMOUNT THAN THE PURCHASE PRICE OF THE PRODUCT SOLD BY
SAMSUNG AND CAUSING THE ALLEGED DAMAGE. WITHOUT LIMITING
THE FOREGOING, PURCHASER ASSUMES ALL RISK AND LIABILITY
FOR LOSS, DAMAGE OR INJURY TO PURCHASER AND PURCHASER’S
PROPERTY AND TO OTHERS AND THEIR PROPERTY ARISING OUT
OF THE USE, MISUSE OR INABILITY TO USE THIS PRODUCT SOLD BY
SAMSUNG NOT CAUSED DIRECTLY BY THE NEGLIGENCE OF SAMSUNG.
THIS LIMITED WARRANTY SHALL NOT EXTEND TO ANYONE OTHER THAN
THE ORIGINAL PURCHASER OF THIS PRODUCT, IS NONTRANSFERABLE
AND STATES YOUR EXCLUSIVE REMEDY.
Some province do not allow limitations on how long an implied warranty lasts, or
the exclusion or limitation of incidental or consequential damages, so the above
limitations or exclusions may not apply to you. This warranty gives you specific
legal rights, and you may also have other rights which vary from state to state.
To obtain warranty service, please contact SAMSUNG at:
1-800-SAMSUNG (7267864) and www.samsung.com/ca
22
Page 23

23
Quick Reference
Feature Operation
Set Clock
One Stage Cooking
One minute + Cooking
Auto Defrost
Set Cooking Time and Power
Levels
1 Touch CLOCK.
2 Use number Pads to enter the current time.
3 Touch CLOCK again.
1 Use function Pads to set cooking time.
2 Touch ENTER/START.
1 Touch One Minute + Pad once for each minute of cooking.
2 The time will be displayed and the oven will start.
1 Touch AUTO DEFROST.
2 Enter weight of food by touching AUTO DEFROST Pad repeatedly or using the number Pads.
3 Touch ENTER/START.
4 When the oven beeps, turn food over. Touch ENTER/START to resume defrosting cycle.
1 Use function Pads to set cooking time.
2 To set higher power level, touch POWER LEVEL and use the number Pads to enter the power level.
3 Touch ENTER/START to begin cooking.
Page 24

QUESTIONS OR COMMENTS?
Samsung Electronics Co., Ltd.
Printed in Malaysia
Country CALL OR VISIT US ONLINE AT
IN CANADA 1-800-SAMSUNG (7267864) www.samsung.com/ca
Page 25

SMH3150
Code n° : DE68-00356U-01
Page 26

Sécurité
Lorsque vous utilisez des appareils électriques, des précautions de sécurité de
base comme celles ci-dessous devraient être suivies :
(A) Ne pas tenter de faire fonctionner cet appareil lorsque la porte est ouverte
puisque ceci pourrait résulter en une exposition à l’énergie micro-ondes
excessive et dommageable. Il est important de ne pas contourner ou
modifier le système de sécurité.
(B) Ne pas placer d’objets entre la façade du four et la porte, et ne pas laisser
s’accumuler des éclaboussures ou résidus de produits nettoyants sur les
parois du four.
(C) Ne pas faire fonctionner le four s’il est endommagé. Il est très important
que la porte se referme complètement et que les parties suivantes ne
soient pas endommagées :
1) Porte (pliée ou bosselée)
2) Charnières et serrures (brisées ou lâches)
3) Joints de la porte et surfaces de scellement
(D) La porte ne devrait pas être ajustée ou réparée par une autre personne
qu’un technicien de service qualifié.
Toujours suivre ces précautions de sécurité lorsque vous vous servez de votre
micro-ondes. Ne jamais tenter de le réparer vous-même - il y a une tension
dangereuse à l’intérieur. Si votre four doit être réparé, VEUILLEZ composer le
1-800-361-3400 (CANADA) pour obtenir le nom du Centre de Service autorisé
le plus près de chez vous.
Pour réduire le risque de brûlures, chocs électriques, feux, blessures
personnelles ou exposition à l’énergie micro-ondes excessive.
• Veuillez lire toutes les instructions avant de vous servir de l’appareil.
• Lire et suivre toutes les “PRÉCAUTIONS DE SÉCURITÉ POUR ÉVITER
• Cet appareil doit être mis à la terre. Connecter l’appareil à une prise
• Placer ou installer cet appareil de façon conforme aux instructions
• Certains articles comme les oeufs et les contenants scellés peuvent
• Se servir de cet appareil seulement pour l’usage pour lequel il a été conçu
• Comme avec n’importe quel appareil électrique, une supervision est
• Ne pas utiliser cet appareil si le cordon électrique ou la prise ont été
UNE EXPOSITION À L’ÉNERGIE MICRO-ONDES EXCESSIVE” sur cette
page.
secteur bien mise à la terre. Voir “INSTRUCTIONS IMPORTANTES DE
MISE À LA TERRE” à la page 28 de ce guide.
fournies.
exploser lorsque réchauffés dans ce four.
tel que décrit dans ce guide. Ne pas utiliser de produits chimiques corrosifs
ou vapeurs dans cet appareil. Ce genre de four a été conçu dans le but de
réchauffer, cuire ou sécher de la nourriture. Il n’a pas été conçu pour un
usage industriel ou de laboratoire.
requise lorsque cet appareil est utilisé par des enfants.
endommagés, s’il ne fonctionne pas bien ou s’il a subi des dommages.
26
Page 27

27
Sécurité
Consignes de sécurité importantes (suite)
• Seul un technicien qualifié devrait effectuer la réparation de cet appareil.
Contacter votre service autorisé le plus près de chez vous pour en faire
l’examen, la réparation ou l’ajustement.
• Ne pas couvrir ni bloquer les ouvertures de ventilation de cet appareil.
• Ne pas installer l’appareil à l’extérieur. Ne pas utiliser près de l’eau, par
exemple à côté d’un évier de cuisine, dans un sous-sol humide ou encore
près d’une piscine, etc...
• Garder l’intérieur du four propre. Les particules de nourriture ou les
éclaboussures d’huile collées sur les parois du four peuvent endommager
la peinture et réduire l’efficacité du four.
• Ne pas plonger le cordon ou la fiche dans l’eau.
• Ne pas exposer le cordon à une source de chaleur.
• Ne pas laisser le cordon pendre sur le bord d’une table ou d’un comptoir.
• Lors du nettoyage de la porte ou des parois intérieures, utiliser des savons
et agents nettoyants très doux et les appliquer avec une éponge ou un
linge doux.
• Pour réduire les risques de feu dans le four :
a. Ne pas trop cuire les aliments. Surveiller l’appareil si vous y placez du
papier, du plastique ou tout autre matériel combustible.
b. Toujours enlever les attaches de métal des sacs de cuisson en plastique
avant de les mettre dans le four.
c. Si un plat prend feu à l’intérieur du four, garder la porte fermée, éteindre
le four, débrancher le cordon d’alimentation ou couper le courant à
partir du fusible ou du panneau électrique. Si vous ouvrez la porte, les
flammes risquent de se propager.
d. Ne pas utiliser l’intérieur du four comme espace de rangement. Ne
pas y laisser du papier, des ustensibles ou de la nourriture lorsqu’il ne
fonctionne pas.
• Ne pas essayer de faire fonctionner le four lorsqu’il est vide.
• Ne pas essayer de faire fonctionner le four sans le plateau de verre. Les
aliments ne cuiront pas bien si le plateau n’y est pas.
• Ne pas dégeler des boissons dans des bouteilles à cou allongé, les
contenants peuvent briser.
• La vaisselle et les contenants peuvent devenir chauds. Manipuler avec
soin.
• Soulever les couvercles des contenants en dirigeant la vapeur loin des
mains et du visage.
• Enlever les couvercles des pots de nourriture pour bébés avant de les
faire réchauffer. Après les avoir fait réchauffer, brasser le contenu du pot et
vérifier la température avant de servir.
• Ne pas placer le four au-dessus d’un évier.
• Ce four a été conçu pour être installé au-dessus de cuisinières dont la
largeur n’excède pas 91,44 cm (36 po). Il peut être installé au-dessus de
cuisinières électriques et à gaz.
• Les liquides comme l’eau, le café ou le thé peuvent être chauffés au-delà
du point d’ébullition sans que cela soit visible. Le liquide ne bouillonne
pas toujours lorsqu’on retire le contenant du four à micro-ondes. LES
LIQUIDES TRÈS CHAUDS RISQUENT DONC DE SE RENVERSER
LORSQUE LE CONTENANT EST SECOUÉ OU LORSQU’ON INSÈRE
UNE CUILLER OU UN AUTRE USTENSILE DANS LE LIQUIDE.
Pour réduire les risques de blessures :
1. Ne pas trop réchauffer les liquides.
2. Brasser le liquide avant de le faire chauffer et à la moitié du temps de
réchauffement.
3. Ne pas utiliser de contenants sans rebord ou à col étroit.
4. Après l’avoir réchauffé, laisser reposer brièvement le contenant dans le
four à micro-ondes avant de l’en retirer.
5. Procéder avec grande prudence lorsqu’on insère une cuiller ou un autre
ustensile dans le contenant.
Page 28

Sécurité
Cet appareil doit être mis à la terre. Dans le cas d’un court-circuit électrique,
le fait d’être mis à la terre réduit le risque de chocs électriques en déviant
le courant électrique. Cet appareil est muni d’un cordon qui comprend une
troisième lame pour mise à la terre. et une fiche polarisée. La fiche doit
être branchée dans une prise de courant qui est installée et mise à la terre
correctement. Brancher le cordon d’alimentation tripolaire dans une prise de
courant correctement mise à la terre de 115-120 volts et de 60 Hz standards.
Votre four devrait être le seul appareil branché à cette prise.
Une utilisation incorrecte de la fiche polarisée peut causer un risque de chocs
électriques. Consulter un électricien qualifié ou un centre de service si vous ne
comprenez pas les instructions de mise à la terre ou si vous n’êtes pas certain
que l’appareil est correctement mis à la terre.
Ne jamais, en aucun cas, couper ou enlever la troisième lame de la fiche
polarisée.
Le ventilateur est mis en marche automatiquement dans certaines conditions
(voir page 38). Faites très attention aux feux de cuisson lorsque le ventilateur
fonctionne.Nettoyez le dessous du four à micro-ondes aussi souvent que
nécessaire. Ne laissez pas la graisse s’accumuler sur les surfaces du four ni sur
les filtres du ventilateur.
• Dans le cas d’un feu causé par de la graisse déversée en surface des
éléments chauffants sous le four à micro-ondes, recouvrir le poêlon
enflammé de façon très étanche en utilisant un couvercle, une tôle à
biscuit ou un plateau plat.
• Ne jamais laisser les éléments chauffants qui se trouvent sous le four à
micro-ondes, réglés à une chaleur élevée sans surveillance. S’il y a un
débordement, des liquides pourraient causer un incendie et se propager
si le ventilateur du four à micro-ondes est en fonction. Pour minimiser
l’activation automatique de la ventilation, utilisez des contenants de format
adéquat et utilisez l’intensité de chaleur maximale seulement lorsque
nécessaire.
• Nettoyez les conduits du système de ventilation fréquemment - La graisse
ne devrait pas s’accumuler sur le filtre de la hotte.
• Lorsque les aliments s’enflamment sous la hotte, activez la ventilation.
• Faites attention lorsque vous nettoyez le filtre de la hotte du ventilateur.
Des produits abrasifs et corrosifs tels que les nettoyeurs à four puissants,
peuvent endommager le filtre.
Remarque
Ce four doit être branché à un circuit électrique dédié de 15 A.
28
Page 29

29
Sommaire
Sécurité . . . . . . . . . . . . . . . . . . . . . . . . . . . . . . . . . . . . . . . . . . . . . . . . . . . . . . . . . . . . .26
Sommaire . . . . . . . . . . . . . . . . . . . . . . . . . . . . . . . . . . . . . . . . . . . . . . . . . . . . . . . . . . . . 29
Votre nouveau four à micro-ondes . . . . . . . . . . . . . . . . . . . . . . . . . . . . . . . . . . . . . . .30
Vérification des éléments du four . . . . . . . . . . . . . . . . . . . . . . . . . . . . . . . . . . . . . . . . 30
Garantie et informations sur le service . . . . . . . . . . . . . . . . . . . . . . . . . . . . . . . . . . . . 30
Installation du four à micro-ondes . . . . . . . . . . . . . . . . . . . . . . . . . . . . . . . . . . . . . . . . 30
Panneau de commande . . . . . . . . . . . . . . . . . . . . . . . . . . . . . . . . . . . . . . . . . . . . . . . 31
Fonctionnement . . . . . . . . . . . . . . . . . . . . . . . . . . . . . . . . . . . . . . . . . . . . . . . . . . . . . . . 32
Child Lock (Sécurité Enfant) . . . . . . . . . . . . . . . . . . . . . . . . . . . . . . . . . . . . . . . . . . . . 32
Clock (Horloge) . . . . . . . . . . . . . . . . . . . . . . . . . . . . . . . . . . . . . . . . . . . . . . . . . . . . . .32
Mode de Démonstration . . . . . . . . . . . . . . . . . . . . . . . . . . . . . . . . . . . . . . . . . . . . . . . 32
Kitchen Timer (Minuteur de Cuisson) . . . . . . . . . . . . . . . . . . . . . . . . . . . . . . . . . . . . . 32
Utilisation du bouton One minute + (Une minute +) . . . . . . . . . . . . . . . . . . . . . . . . . .32
Sound On/Off (Son activé/désactivé) . . . . . . . . . . . . . . . . . . . . . . . . . . . . . . . . . . . . . 32
Utilisation des boutons Instant Cook (Cuisson instantanée) . . . . . . . . . . . . . . . . . . . . 33
Reheat (Réchauffage) . . . . . . . . . . . . . . . . . . . . . . . . . . . . . . . . . . . . . . . . . . . . . . . . . 34
Auto Defrost (Décongélation Automatique) . . . . . . . . . . . . . . . . . . . . . . . . . . . . . . . . .35
Utilisation des temps de cuisson au four à micro-ondes et des niveaux de puissance
More/less (Plus/moins) . . . . . . . . . . . . . . . . . . . . . . . . . . . . . . . . . . . . . . . . . . . . . . . . 38
Vent Hi/Lo/Off (Ventilation forte/faible/arrêt) . . . . . . . . . . . . . . . . . . . . . . . . . . . . . . . . 38
Light Hi/Lo/Off (Lumière forte/faible/arrêt) . . . . . . . . . . . . . . . . . . . . . . . . . . . . . . . . . .38
Instructions de cuisson . . . . . . . . . . . . . . . . . . . . . . . . . . . . . . . . . . . . . . . . . . . . . . . . 39
Ustensiles de cuisine. . . . . . . . . . . . . . . . . . . . . . . . . . . . . . . . . . . . . . . . . . . . . . . . . . 39
Test des ustensiles . . . . . . . . . . . . . . . . . . . . . . . . . . . . . . . . . . . . . . . . . . . . . . . . . . . 39
Techniques de cuisson . . . . . . . . . . . . . . . . . . . . . . . . . . . . . . . . . . . . . . . . . . . . . . . . 40
Conseils généraux. . . . . . . . . . . . . . . . . . . . . . . . . . . . . . . . . . . . . . . . . . . . . . . . . . . . 41
Annexes . . . . . . . . . . . . . . . . . . . . . . . . . . . . . . . . . . . . . . . . . . . . . . . . . . . . . . . . . . . . . 42
Guide de dépannage . . . . . . . . . . . . . . . . . . . . . . . . . . . . . . . . . . . . . . . . . . . . . . . . . .42
Entretien et nettoyage . . . . . . . . . . . . . . . . . . . . . . . . . . . . . . . . . . . . . . . . . . . . . . . . . 43
Nettoyage du filtre à graisse . . . . . . . . . . . . . . . . . . . . . . . . . . . . . . . . . . . . . . . . . . . . 43
Remplacement du filtre à charbon . . . . . . . . . . . . . . . . . . . . . . . . . . . . . . . . . . . . . . .44
Remplacement de l’éclairage de nuit/de la zone de cuisson . . . . . . . . . . . . . . . . . . .44
. . . . . . . .36
Remplacement de l’Éclairage du four . . . . . . . . . . . . . . . . . . . . . . . . . . . . . . . . . . . . .45
Spécifications . . . . . . . . . . . . . . . . . . . . . . . . . . . . . . . . . . . . . . . . . . . . . . . . . . . . . . . 45
Garantie . . . . . . . . . . . . . . . . . . . . . . . . . . . . . . . . . . . . . . . . . . . . . . . . . . . . . . . . . . . . . 46
Aide-mémoire . . . . . . . . . . . . . . . . . . . . . . . . . . . . . . . . . . . . . . . . . . . . . . . . . . . . . . . . . 47
Page 30

Votre nouveau four à micro-ondes
Vérification des éléments du four
Sortez le four à micro-ondes de son emballage et vérifiez si toutes les pièces indiquées
sont présentes. Si une ou plusieurs pièces sont manquantes ou endommagées,
contactez votre revendeur.
Four à micro-ondes Instructions d’installation Guide d’utilisation
Carte d’enregistrement Guide supérieur Guide pour paroi
Garantie et informations sur le service
Pour nous permettre de mieux vous servir, veuillez poster la carte d’enregistrement dûment remplie
le plus tôt possible. Si la carte d’enregistrement est manquante, contactez Samsung Electronics
Canada, Inc., au 1- 800- SAMSUNG (1- 800- 726- 7864), ou enregistrez- vous en ligne sur le site
www.samsung.ca (*Fax n° : 905-542-1199)
Lorsque vous devez contacter Samsung, ayez en main le numéro de modèle et le numéro de
série du four, qui sont habituellement inscrits derrière ou sous l’appareil. Inscrivez ces numéros
ci- dessous avec les autres informations requises. Rangez ces informations en lieu sûr pour faciliter
l’identification de l’appareil en cas de vol ou de sinistre, ainsi qu’une copie du reçu de caisse à titre
de preuve d’achat aux fins de service sous garantie.
NUMÉRO DE MODÈLE
NUMÉRO DE SÉRIE
DATE D’ACHAT
LIEU DE L’ACHAT
Le service découlant de la garantie ne peut être effectué que par un centre de service SAMSUNG
autorisé. Pour obtenir du service en vertu de la garantie, vous devez fournir au centre de service
Samsung autorisé les informations ci- dessus et une copie du reçu de caisse. Pour obtenir de
l’assistance ou connaître l’emplacement du centre de service de votre région, composez le 1- 800-
SAMSUNG (1- 800-726-7864).
Installation du four à micro-ondes
Plateau en verre Anneau de guidage du
plateau
Adaptateur d’évacuation
(Référence : DE92-90242A)
1 Branchez le cordon d’alimentation à une prise de mise à la terre. Une fois le four
2 Ouvrez la porte du four en tirant sur la poignée à droite de la porte.
3 Nettoyez l’intérieur du four à l’aide d’un chiffon humide.
4 Placez l’anneau pré-assemblé dans la rainure
branché, l’afficheur indiquera :
prévue à cet effet, au centre du four.
Filtre à charbon
(Référence : DE63-00367E)
Kit - matériel
(Référence : DE92-90505G)
Filtre à graisse
(Référence : DE63-00196A)
5 Placez le plateau de verre au centre de l’anneau
de guidage pré-assemblé.
30
Page 31

31
Votre nouveau four à micro-ondes
Panneau de commande
1. CADRAN D’AFFICHAGE
Le cadran d’affichage comporte une horloge et des indicateurs de l’heure, des réglages du
temps de cuisson et des fonctions de cuisson sélectionnées.
2. POPCORN (POP-CORN) . . . . . . . . . . . . . . . . . . . . . . . . . . . . . . . . . . . . . . . . . . . . . . . . . p. 33
Appuyez sur ce bouton lorsque vous faites du pop-corn dans votre four à micro-ondes.
3. BAKED POTATO (POMME DE TERRE AU FOUR) . . . . . . . . . . . . . . . . . . . . . . . . . . . . . p. 33
Appuyez sur ce bouton pour cuire des pommes de terre.
4. REHEAT (RÉCHAUFFAGE) . . . . . . . . . . . . . . . . . . . . . . . . . . . . . . . . . . . . . . . . . . . . . . . p. 34
Appuyez sur ce bouton pour réchauffer un plat cuisiné, un plat en sauce et des pâtes.
5. COOK (CUISSON) . . . . . . . . . . . . . . . . . . . . . . . . . . . . . . . . . . . . . . . . . . . . . . . . . . . . . . p. 33
Appuyez sur ce bouton pour cuire un liquide, du bacon, un plat surgelé, un petit-déjeuner
surgelé.
6. VEGETABLES (Légumes) . . . . . . . . . . . . . . . . . . . . . . . . . . . . . . . . . . . . . . . . . . . . . . . . p. 33
Appuyez sur ce bouton pour cuire des légumes frais ou surgelés.
7. PIZZA SLICE (Pointe de pizza) . . . . . . . . . . . . . . . . . . . . . . . . . . . . . . . . . . . . . . . . . . . . p. 33
Appuyez sur ce bouton pour réchauffer de la pizza.
8. MORE (PLUS) . . . . . . . . . . . . . . . . . . . . . . . . . . . . . . . . . . . . . . . . . . . . . . . . . . . . . . . . . . p. 38
Appuyez sur ce bouton pour augmenter le temps de cuisson.
9. LESS (MOINS) . . . . . . . . . . . . . . . . . . . . . . . . . . . . . . . . . . . . . . . . . . . . . . . . . . . . . . . . . p. 38
Appuyez sur ce bouton pour diminuer le temps de cuisson.
10. AUTO DEFROST (Décongélation Automatique) . . . . . . . . . . . . . . . . . . . . . . . . . . . . . . p. 35
Appuyez sur ce bouton pour décongeler les aliments en fonction du poids entré.
11. NUMBER (CHIFFRE)
Appuyez sur les boutons du pavé numérique pour entrer un temps de cuisson, un niveau de
puissance, des quantités ou des poids.
12. POWER LEVEL (NIVEAU DE PUISSANCE) . . . . . . . . . . . . . . . . . . . . . . . . . . . . . . . . . . p. 36
Appuyez sur ce bouton pour sélectionner un niveau de puissance de cuisson.
13. STOP/CLEAR (STOP/ANNULER)
Appuyez sur ce bouton pour arrêter le four ou annuler toutes les entrées.
14. ENTER/START (Entrée/Départ)
Appuyez sur ce bouton pour lancer une fonction. Si vous ouvrez la porte après le début de la
cuisson, appuyez à nouveau sur ENTER/START (Entrée/Départ).
15. SOUND ON/OFF (Son activé/désactivé) . . . . . . . . . . . . . . . . . . . . . . . . . . . . . . . . . . . . p. 32
Appuyez sur ce bouton pour désactiver le son. OFF (Arrêt) apparaît dans le cadran d’affichage.
16. One Minute + (Une minute +) . . . . . . . . . . . . . . . . . . . . . . . . . . . . . . . . . . . . . . . . . . . . . p. 32
Appuyez sur ce bouton pour régler et lancer rapidement la cuisson au niveau de puissance
maximal.
17. CLOCK (HORLOGE) . . . . . . . . . . . . . . . . . . . . . . . . . . . . . . . . . . . . . . . . . . . . . . . . . . . . p. 32
Appuyez sur ce bouton pour entrer l’heure.
18. KITCHEN TIMER (MINUTEUR DE CUISSON) . . . . . . . . . . . . . . . . . . . . . . . . . . . . . . . . p. 32
Appuyez sur ce bouton pour régler le minuteur de cuisson.
19. VENT HI/LO/OFF (Ventilation forte/faible/arrêt) . . . . . . . . . . . . . . . . . . . . . . . . . . . . . . p. 38
Appuyez sur ce bouton pour mettre en marche ou arrêter le ventilateur.
20. LIGHT HI/LO/OFF (Lumière forte/faible/arrêt) . . . . . . . . . . . . . . . . . . . . . . . . . . . . . . . p. 38
Appuyez sur ce bouton pour allumer l’éclairage de la zone de cuisson.
Page 32

Fonctionnement
Child Lock (Sécurité Enfant)
Vous pouvez verrouiller le panneau de commandes pour empêcher que le micro-ondes
ne soit accidentellement activé ou utilisé par des enfants.
La fonction Child Lock (Sécurité enfant) est également utile pour nettoyer le panneau
de commandes. La fonction Child Lock (Sécurité enfant) empêche toute programmation
accidentelle lorsque vous essuyez le panneau de commandes.
Exemple : Pour activer la sécurité enfant.
1 Appuyez sur le bouton ENTER/START (Entrée/Départ) et maintenez-le enfoncé
pendant plus de 3 secondes. L s’affiche dans le cadran et un bip est émis.
Exemple : Pour désactiver la sécurité enfant.
1 Appuyez sur le bouton ENTER/START (Entrée/Départ) et maintenez-le enfoncé
pendant plus de 3 secondes. L disparaît et un bip est émis..
Kitchen Timer (Minuteur de Cuisson)
Vous pouvez utiliser votre four à micro-ondes comme minuteur. Utiliser le minuteur pour
minuter jusqu’à 99 minutes, 99 secondes.
Exemple : Pour régler 3 minutes.
1. Appuyez sur le bouton KITCHEN TIMER (MINUTEUR DE CUISSON).
2. Entrez l’heure en utilisant le pavé numérique.
3. Appuyez sur le bouton ENTER/START (Entrée/Départ).
Lorsque le temps s’est écoulé, vous entendez plusieurs bips et End (Fin) s’affiche.
Utilisation du bouton One minute + (Une minute +)
Ce bouton très pratique permet de réchauffer des aliments par périodes d’une minute, à
la puissance Maximum.
1 Appuyez une fois sur le bouton One minute + (Une minute +) pour chaque
Clock (Horloge)
Exemple : Pour régler 8h00.
1. Appuyez sur le bouton CLOCK (HORLOGE).
minute de cuisson souhaitée. Par exemple, appuyez deux fois sur le bouton
pour deux minutes de cuisson. Le temps de cuisson s’affiche et le four démarre
automatiquement.
2. Ajoutez des minutes au programme en cours en appuyant une fois sur le bouton
One minute + (Une minute +) pour chaque minute supplémentaire souhaitée.
2. Entrez l’heure en utilisant le pavé numérique.
3. Appuyez sur le bouton ENTER/START (Entrée/Départ).
Mode de Démonstration
Vous pouvez utiliser le Mode de démonstration pour voir comment fonctionne le four,
sans qu’une cuisson soit lancée.
1 Appuyez simultanément sur les boutons 0 et 1.
Pour désactiver le mode de démonstration, répétez l’étape 1 ci-dessus.
Sound On/Off (Son activé/désactivé)
1. Appuyez sur le bouton Sound On/Off (Son activé/désactivé). Le cadran affiche
On (Activé).
2. Appuyez sur le bouton Sound On/Off (Son activé/désactivé). Le cadran affiche
OFF (Désactivé).
3. Appuyez sur le bouton ENTER/START (Entrée/Départ). Le cadran affiche de
nouveau l’horloge.
32
Page 33

33
Fonctionnement
Utilisation des boutons Instant Cook (Cuisson instantanée)
1 Appuyez sur le bouton Popcorn (pop-corn) correspondant à l’aliment que vous
Tableau de cuisson automatique
Catégorie Instructions Quantité
souhaitez réchauffer (par exemple pop-corn).
L’afficheur indique : 3,5 oz
2 Utilisez le clavier numérique pour sélectionner la taille de portion souhaitée.
L’afficheur fait défiler toutes les tailles de portion disponibles. Lorsque vous avez
sélectionné la taille de portion souhaitée, le four lance automatiquement la cuisson.
Cook (Cuisson)
La fonction COOK (CUISSON) propose quatre catégories de cuisson prédéfinies.
Exemple : Pour cuire un plat surgelé de 225 g.
1. Appuyez 3 fois sur le bouton Cook.
2. Les touches numériques permettent d’entrer la quantité, la taille de portion ou le
poids.
Légumes frais
VEGETABLES (Légumes)
Légumes
surgelés
3. Appuyez sur le bouton ENTER/START (Entrée/Départ).
Lorsque le temps de cuisson s’est écoulé, vous entendez quatre bips et End (Fin)
s’affiche.
Catégorie Appuyez sur le bouton Affichage
Boissons une fois Ac-1
Bacon deux fois Ac-2
Plat surgelé 3 fois Ac-3
Petit déjeuner surgelé 4 fois Ac-4
Tableau de cuisson automatique
Catégorie Instructions Quantité
Faites chauffer un seul sachet de pop-corn à la fois (sachet
Pop-corn
Pommes de terre
spécial four à micro-ondes). Faites attention lorsque vous sortez
le sachet chaud du four et lorsque vous l’ouvrez. Laissez le
four refroidir pendant 5 minutes au moins avant de l’utiliser de
nouveau.
Piquez les pommes de terre plusieurs fois à l’aide d’une
fourchette. Placez-les en étoile sur le plateau tournant. Laissez
reposer 3 à 5 minutes. Laissez le four refroidir pendant 5 minutes
au moins avant de l’utiliser de nouveau. Utilisez la touche
(Plus) (9
) lorsque vous cuisez de grosses pommes de terre.
More
80 à 100 g, 1
sachet
1 à 4 pommes
de terre
Pointes de pizza
Boissons
COOK (CUISSON)
(Fr-1)
(Fr-2)
(Ac-1)
(Ac-2)
Bacon
Placez les légumes frais dans un plat en céramique, en verre
ou en plastique, Utilisable au four micro-ondes, et ajoutez 2 à 4
cuillères à soupe d’eau. Durant la cuisson, couvrez-le à l’aide
d’un couvercle ou d’un film plastique percé, puis mélangez avant
de laisser reposer. Laissez le four refroidir pendant 5 minutes au
moins avant de l’utiliser de nouveau. Utilisez la touche
(Plus)
lorsque vous cuisez des légumes denses tels que des
carottes ou des brocolis.
Placez les légumes surgelés dans un plat en céramique, en verre
ou en plastique, Utilisable au four micro-ondes, et ajoutez 2 à 4
cuillères à soupe d’eau. Durant la cuisson, couvrez-le à l’aide
d’un couvercle ou d’un film plastique percé, puis mélangez avant
de laisser reposer. Laissez le four refroidir pendant 5 minutes au
moins avant de l’utiliser de nouveau. Utilisez la touche
(Plus)
lorsque vous cuisez des légumes denses tels que des
carottes ou des brocolis.
Placez 1 à 3 pointes de pizza dans un plat Utilisable au four
micro-ondes, en plaçant la partie large vers l’extérieur du plat.
Les pointes ne doivent pas dépasser du plat. Ne couvrez pas.
Laissez le four refroidir pendant 5 minutes au moins avant de
l’utiliser de nouveau. Utilisez le bouton
d’augmenter le temps de réchauffage pour une pizza épaisse et
croustillante.
Utilisez une tasse ou une chope pour mesurer les ingrédients; ne
couvrez pas. Placez la boisson dans le four. Mélangez bien après
le réchauffage. Laissez le four refroidir pendant 5 minutes au
moins avant de l’utiliser de nouveau.
Remarque :
• Temps de réchauffage basé sur une tasse de 230 g.
• Les boissons réchauffées avec cette fonction peuvent
être très chaudes.
• Manipulez le récipient avec précaution.
Placez deux feuilles d’essuie-tout sur une assiette et posez y
les tranches de bacon, sans qu’elles se chevauchent. Couvrez
le bacon avec l’essuie-tout. Retirez les feuilles de papier essuietout juste après la cuisson. Utilisez les boutons
Less(1) (Plus ou Moins)
à souhait.
More(9) (Plus)
pour que le bacon soit croustillant
More(9)
More(9)
afin
More(9) ou
1 à 4 portions
1 à 4 portions
1 à 3 pointes
0,5 tasse
1 tasse
2 tasses
2 à 6 parts
Page 34

Fonctionnement
Tableau de cuisson automatique
Catégorie Instructions Quantité
(Ac-3)
Plat surgelé
(Ac-4)
Petit déjeuner
COOK (CUISSON)
surgelé
Retirez le plat de son emballage et observez les instructions
fournies sur la boîte (couvercle et temps de repos). Laissez le
four refroidir pendant 5 minutes au moins avant de l’utiliser de
nouveau.
Observez les instructions fournies sur l’emballage (couvercle et
temps de repos). Utilisez ce bouton pour les sandwichs surgelés,
les petits déjeuners, etc. Laissez le four refroidir pendant 5
minutes au moins avant de l’utiliser de nouveau.
230 à 400 g
115 à 230 g
Remarques
Chaque personne a ses propres préférences en ce qui concerne la
température des aliments. Utilisez les boutons More(9)/Less(1) (Plus/
Moins) pour adapter la température à vos besoins.
Reheat (Réchauffage)
La fonction REHEAT (Réchauffage) propose quatre catégories de réchauffage
prédéfinies.
Exemple : Pour réchauffer 3 parts de plat en sauce.
1. Appuyez 2 fois sur le bouton Reheat (Réchauffage).
2. Les touches numériques permettent d’entrer la quantité/les portions.
3. Appuyez sur le bouton ENTER/START (Entrée/Départ).
Lorsque le temps, de cuisson s’est écoulé, vous entendez quatre bips et End (Fin)
s’affiche.
Catégorie Appuyez sur le bouton Affichage
Assiette une fois rh-1
Plat en sauce deux fois rh-2
pâtes 3 fois rh-3
Tableau de réchauffage
Catégorie Instructions Quantité
Utilisez uniquement des aliments précuits réfrigérés. Couvrez
l’assiette à l’aide d’un film plastique percé ou de papier paraffiné,
maintenu sous l’assiette.Si les aliments ne sont pas assez chauds
après avoir utilisé la fonction REHEAT (Réchauffage), continuez
la cuisson en définissant le temps et le niveau de puissance
Assiette
Plat en sauce
Pâtes
souhaités.
Ingrédients
• 85 à 115 g de viande, de volaille ou de poisson
(jusqu’à 170 g avec os)
• ½ tasse de féculents (pommes de terre, pâtes, riz,
etc.)
• ½ tasse de légumes (entre 85 et 115 g)
Couvrez le plat à l’aide d’un couvercle ou d’un film
plastique percé. Si les aliments ne sont pas assez chauds
après avoir utilisé la fonction AUTO REHEAT (Réchauffage
Automatique), continuez la cuisson en définissant le temps
et le niveau de puissance souhaités. Mélangez une fois
avant de servir.
Ingrédients
1 à 4 portions
• Plats préparés à réchauffer (Exemples : ragoût de
bœuf, lasagnes)
• Spaghetti et ravioli, aliments réfrigérés en conserves
Remarques
• Chaque personne a ses propres préférences en ce qui concerne la
température des aliments. Utilisez les boutons More/Less (Plus/Moins) pour
adapter la température à vos besoins.
• Laissez les aliments reposer 1 à 5 minutes avant de servir.
1 portion
(1 assiette)
34
Page 35

35
Fonctionnement
Auto Defrost (Décongélation Automatique)
Le four dispose d’options de décongélation prédéfinies. La fonction décongélation
vous propose la meilleure méthode de décongélation pour les aliments surgelés, car
le four règle automatiquement le temps de décongélation en fonction du poids entré.
Pour encore plus de confort, la fonction AUTO DEFROST (Décongélation Automatique)
repose sur un mécanisme intégré de signal sonore qui vous rappelle de vérifier ou de
retourner les aliments pendant le cycle de décongélation.
Après avoir appuyé une fois sur le bouton AUTO DEFROST (Décongélation
Automatique), sélectionnez le poids des aliments. Fourchette de poids disponible :
45 g à 2,725 kg.
Exemple : Pour décongeler 545 g de viande.
1. Appuyez sur le bouton AUTO DEFROST (Décongélation Automatique).
2. Entrez le poids.
3. Appuyez sur le bouton ENTER/START (Entrée/Départ).
Remarques
• Après avoir appuyé sur ENTER/ START (Entrée/Départ), le cadran
décompte le temps de décongélation. Le four émet deux bips pendant
le cycle de décongélation. Ouvrez alors la porte du four et retournez les
aliments si nécessaire. Retirez toutes les parties décongelées, puis remettez
les parties surgelées dans le four et appuyez sur ENTER/START (Entrée/
Départ) pour reprendre le cycle de décongélation.
• Le four ne s’arrête pas pendant le BIP, sauf si vous ouvrez la porte.
Conseils de Décongélation
• Lors de l’utilisation de la fonction AUTO DEFROST (Décongélation Automatique),
le poids à entrer est le poids net en livres et en dixièmes de livres (poids de
l’aliment moins le récipient).
• Utilisez la fonction AUTO DEFROST (Décongélation Automatique) uniquement
pour des aliments crus. La fonction AUTO DEFROST (Décongélation Automatique)
donne d’excellents résultats lorsque les aliments à décongeler sont au minimum à
– 18 °C (sortis directement d’un vrai congélateur). Si les aliments ont été stockés
dans un réfrigérateur-congélateur ne maintenant pas la température à – 15 °C au
moins, programmez toujours un poids inférieur (pour une durée de décongélation
moins longue), afin d’éviter de cuire les aliments.
• Si les aliments restent en dehors du congélateur pendant au plus 20 minutes,
entrez un poids inférieur.
• La forme de l’emballage modifie le temps de décongélation. Les paquets
rectangulaires et peu profonds décongèlent plus vite qu’un morceau épais.
• Séparez les morceaux lorsqu’ils commencent à décongeler. Les morceaux
détachés décongèlent plus facilement.
• Couvrez certaines parties des aliments avec de petits morceaux de papier s’ils
commencent à être chauds.
• Vous pouvez utiliser de petits morceaux de papier aluminium pour couvrir les
aliments comme les ailes et des cuisses de poulet ou des queues de poisson, mais
le papier ne doit pas toucher l’intérieur du four. Le papier aluminium peut créer des
arcs électriques susceptibles d’endommager le revêtement du four.
Guide de Décongélation
Observez les instructions ci-dessous lors de la décongélation de différents types
d’aliments.
Plat
Rôti de bœuf
ou de porc
Steaks,
côtelettes,
poissons
Viande
hachée
Quantité
standard
1,2 à 2,8 kg
(2,5 à 6 livres)
200 g à 1,5 kg Après chaque étape, repositionnez les
200 g à 1,5 kg Après chaque étape, retirez les morceaux
Placez le côté gras de la viande vers le bas.
Après chaque étape, retournez la viande et
protégez les parties chaudes à l’aide de fines
bandelettes de papier aluminium.
aliments. Si certaines zones sont chaudes ou
décongelées, protégez-les à l’aide de fines
bandelettes de papier aluminium. Retirez les
morceaux presque décongelés. Laissez reposer
5 à 10 minutes en couvrant.
presque décongelés. Laissez reposer 5 à 10
minutes en couvrant avec de l’aluminium.
Procédure
Page 36

Fonctionnement
Guide de Décongélation
Plat
Poulet entier 1,2 à 2,8 kg
Morceaux de
poulet
Pain 50 g à 1 kg Placez les tranches horizontalement en cercle,
Quantité
standard
Retirez les abats avant de décongeler de la
(2,5 à 6 livres)
200 g à 1,5 kg Après chaque étape, repositionnez ou retirez les
volaille. Commencez la décongélation en plaçant
le côté blanc vers le bas. Après la première
étape, retournez le poulet et protégez les parties
chaudes à l’aide de fines bandelettes de papier
aluminium. Après la deuxième étape, recouvrez
d’aluminium les nouvelles zones chaudes.
Laissez reposer 30 à 60 minutes.
morceaux presque décongelés. Laissez reposer
10 à 20 minutes.
sur du papier essuie-tout au centre du plateau
tournant. Retournez-les à la moitié du temps de
décongélation!
Procédure
Remarques
Vérifiez la cuisson des aliments lorsque le four émet un signal sonore. Lorsque la
décongélation est terminée, il est possible que certaines petites portions soient
toujours congelées; laissez-les reposer pour terminer le processus. Ne continuez
pas la décongélation jusqu’à ce que toutes les particules de glace aient fondu.
Protégez les bords des steaks et des rôtis à l’aide de fines bandelettes de papier
aluminium pour éviter qu’ils ne cuisent avant que le centre ne soit décongelé.
Utilisez des bandes plates et fines d’aluminium pour protéger les bords et les
portions fines des aliments.
Utilisation des temps de cuisson et des niveaux de puissance
du four à micro-ondes
Ce four à micro-ondes vous permet de définir jusqu’à trois différentes étapes de cuisson,
chacune ayant une durée et un niveau de puissance spécifiques. Le niveau de puissance
vous permet de contrôler l’intensité de la cuisson, de Chaud (1) à Maximum (10/niveau
de puissance).
Cuisson aux niveaux de puissance élevés
Exemple : Pour cuire des aliments pendant 8 minutes et 30 secondes à
la puissance maximum.
1 Entrez le temps de cuisson.
2 Appuyez sur le bouton ENTER/START (Entrée/Départ).
Lorsque le temps de cuisson s’est écoulé, vous entendez quatre bips et End (Fin)
s’affiche.
Cuisson aux niveaux de puissance inferieurs
La cuisson à la puissance MAXIMUM n’offre pas toujours des résultats optimaux
pour les aliments demandant une cuisson plus lente, comme les rôtis, les produits de
boulangerie et pâtisserie ou les crèmes. Votre four dispose de 9 réglages de puissance
en plus de HIGH (MAXIMUM).
Exemple : Pour cuire des aliments pendant 7 minutes et 30 secondes à
une puissance de 70 %.
1 Entrez le temps de cuisson.
2 Appuyez sur le bouton POWER LEVEL (NIVEAU DE PUISSANCE).
3 Entrez le niveau de puissance.
4 Appuyez sur le bouton ENTER/START (Entrée/Départ).
Lorsque le temps de cuisson s’est écoulé, vous entendez quatre bips et End (Fin)
s’affiche.
Voir le Guide de cuisson pour les Niveaux de puissance, page 37.
36
Page 37

37
Fonctionnement
Cuisson avec plus d’un cycle de cuisson
Pour des résultats optimaux, certaines recettes exigent un certain niveau de puissance
pendant un laps de temps défini, puis un autre Niveau de puissance pendant un autre
laps de temps. Votre four peut être réglé pour passer automatiquement de l’un à l’autre et
enchaîner ainsi jusqu’à trois cycles, si le premier cycle de cuisson est la décongélation.
Exemple : Pour cuire des aliments pendant 3 minutes à une puissance de 90 %,
puis pendant 7 minutes et 30 secondes à une puissance de 70 %.
1 Entrez le premier temps de cuisson.
2 Appuyez sur le bouton POWER LEVEL (NIVEAU DE PUISSANCE).
3 Entrez le niveau de puissance.
4 Entrez le deuxième temps de cuisson.
5 Appuyez sur le bouton POWER LEVEL (NIVEAU DE PUISSANCE).
6 Entrez le niveau de puissance.
7 Appuyez sur le bouton ENTER/START (Entrée/Départ).
Lorsque le temps de cuisson s’est écoulé, vous entendez quatre bips et End (Fin)
s’affiche.
Guide de cuisson pour les niveaux de puissance inferieurs
Les 9 niveaux de puissance en plus de HIGH (MAXIMUM) vous permettent de choisir
le niveau de puissance le plus adapté à l’aliment en cours de cuisson. Le tableau
ci-dessous répertorie tous les niveaux de puissance, des exemples d’aliments dont la
cuisson est optimale pour chaque niveau et la puissance micro-ondes utilisée.
NIVEAU DE
PUISSANCE
10 100 %
9 90 %
8 80 %
7 70 %
6 60 % • Faire cuire des pâtes.
5 50 %
4 40 %
3 30 %
2 20 %
1 10 %
PUISSANCE
MICRO-ONDES
• Faire bouillir de l’eau.
• Faire cuire du bœuf haché.
• Faire du caramel.
• Faire cuire des fruits et légumes frais.
• Faire cuire du poisson et de la volaille.
• Préchauffer un plat à gratin.
• Réchauffer des boissons.
• Faire cuire des tranches de bacon.
• Réchauffer rapidement des tranches de
viande.
• Faire sauter des oignons, du céleri et du
poivron vert.
• Tout réchauffer.
• Faire cuire des œufs brouillés.
• Faire cuire du pain et des produits
céréaliers.
• Faire cuire des plats au fromage, du veau.
• Faire cuire des gâteaux, des muffins, des
brownies, des gâteaux individuels.
• Faire cuire de la viande, une volaille entière.
• Faire cuire une crème.
• Faire cuire un poulet ou une dinde
entier(ère), des côtes levées, un carré
d’agneau, un rôti de surlonge.
• Faire cuire des morceaux de viande moins
tendres.
• Réchauffer des plats surgelés
• Décongeler de la viande, de la volaille et
des fruits de mer.
• Faire cuire des aliments en petite quantité.
• Terminer la cuisson d’un plat en sauce, d’un
morceau de bœuf et de certaines sauces.
• Ramollir du beurre et du fromage à tartiner.
• Chauffer des aliments en petite quantité.
• Ramollir de la crème glacée.
• Faire lever une pâte à la levure.
UTILISATION
Page 38

Fonctionnement
More/less (Plus/moins)
Les boutons More(9)/Less(1) (Plus/Moins) vous permettent d’ajuster les temps de
cuisson prédéfinis. Ils ne fonctionnent qu’en mode Reheat (Réchauffage), Kitchen Timer
(Minuteur de cuisson), One Minute + (Une minute +) ou Time Cook (Cuisson avec
minuterie). Utilisez les boutons More(9)/Less(1) (Plus/Moins) uniquement lorsque vous
avez déjà commencé la cuisson avec l’une des procédures suivantes.
1 Pour AUGMENTER le temps de cuisson d’une procédure de cuisson automatique :
Appuyez sur le bouton More (Plus) (9).
2 Pour DIMINUER le temps de cuisson d’une procédure de cuisson automatique :
Appuyez sur le bouton Less (Moins) (1).
Vent Hi/Lo/Off (Ventilation forte/faible/arrêt)
La ventilation élimine la vapeur d’eau et les autres vapeurs provenant de la surface de
cuisson. La ventilation fonctionne en vitesse lente à chaque utilisation du four.
1 Pour faire fonctionner manuellement la ventilation : Appuyez sur VENT
(VENTILATION) une fois pour obtenir une vitesse élevée du ventilateur, deux fois
pour une vitesse lente ou trois fois pour désactiver le ventilateur.
Remarques
Si la température monte trop autour du four à micro-ondes, le ventilateur de
l’évacuation est automatiquement activé sur le réglage LOW (FAIBLE) pour
refroidir le four. Il s’arrête de lui-même lorsque les parois internes du four sont
froides. Dans ce cas, le ventilateur ne peut pas être éteint.
Light Hi/Lo/Off (Lumière forte/faible/arrêt)
1 Appuyez sur le bouton LIGHT HI/LO/OFF (LUMIÈRE FORTE/FAIBLE/ARRÊT) une
fois pour un éclairage intense, deux fois pour l’éclairage de nuit ou trois fois pour
éteindre l’éclairage.
38
Page 39

39
Instructions de cuisson
Ustensiles de cuisine
Utilisation recommandée
• Saladiers, bols et plats en verre ou en céramique : à utiliser pour le réchauffage
ou la cuisson.
• Pellicule plastique Utilisable au four micro-ondes :
aliments. Laissez une petite ouverture pour permettre à la vapeur de s’échapper un
peu et évitez de placer la pellicule directement sur les aliments.
• Papier paraffiné : à utiliser pour recouvrir les aliments afin d’éviter les
éclaboussures.
• Essuie-tout et serviettes en papier :
durée et en couverture; ils permettent d’absorber l’humidité en excès et évitent
les éclaboussures. N’utilisez pas de papier recyclé, qui peut contenir du métal et
s’enflammer.
• Assiettes et verres en papier :
basse température. N’utilisez pas de papier recyclé, qui peut contenir du métal et
s’enflammer.
• Thermomètres : utilisez uniquement les thermomètres classés “Utilisable au four
à micro-ondes” et respectez les instructions fournies. Vérifiez la température des
aliments en plusieurs endroits. Vous pouvez utiliser un thermomètre traditionnel
une fois que vous avez sorti les aliments du four.
à utiliser lors des cuissons de courte
à utiliser lors des cuissons de courte durée, à
Utilisation restreinte
• Papier aluminium : utilisez des bandes étroites de papier aluminium pour éviter
de trop cuire certaines zones exposées. Attention! Vous risquez d’endommager le
four si vous utilisez une trop grande quantité de papier aluminium.
• Céramique, porcelaine et grès : utilisez uniquement les récipients classés
“Utilisable au four à micro-ondes”. Testez les récipients ne possédant pas cette
mention afin de vous assurer qu’ils peuvent être utilisés en toute sécurité. N’utilisez
jamais des récipients dotés d’une bordure métallique.
• Plastique : utilisez uniquement les modèles classés “Utilisable au four à micro-
ondes”. Tous les autres plastiques risquent de fondre.
• Paille, osier et bois : à utiliser uniquement pour les cuissons de courte durée, car
ils peuvent être inflammables.
Utilisation déconseillée
• Bocaux et bouteilles en verre : le verre traditionnel est trop fin pour pouvoir être
utilisé au four à micro-ondes, où il risquerait de se briser.
à utiliser pour couvrir les
• Sachets en papier :
l’exception des sachets de pop-corn spécialement conçus pour une utilisation au
four à micro-ondes.
• Assiettes et verres en polystyrène expansé : ces contenants peuvent fondre et
laisser des résidus toxiques sur les aliments.
• Contenants en plastique et emballages alimentaires : les emballages
alimentaires (par exemple, raviers de margarine) peuvent fondre s’ils sont chauffés
au four à micro-ondes.
Test des ustensiles
Lorsque vous ne savez pas si un ustensile peut ou non être utilisé dans un four à microondes, effectuez ce test :
1 Remplissez d’eau un verre gradué et placez-le dans le four, à côté de l’ustensile
que vous souhaitez tester.
2 Appuyez une fois sur le bouton One Minute + (Une minute +) pour les chauffer
pendant une minute à la puissance maximum.
L’eau doit être chaude et l’ustensile testé doit rester froid. Si l’ustensile est chaud, cela
signifie qu’il absorbe l’énergie des micro-ondes et ne peut donc être utilisé dans ce four.
Utilisation recommandée
• Plats en métal : à utiliser pour tout type d’aliment, mais surtout lorsqu’il faut faire
dorer. Les plats en métal sombres ou usés sont recommandés pour la cuisson du
pain et de tartes parce qu’ils absorbent la chaleur et permettent l’apparition d’une
croûte bien croustillante.
• Nouveaux plats en aluminium : à utiliser pour la cuisson de gâteaux, de biscuits
ou de muffins car ils reflètent la chaleur et permettent l’apparition d’une fine croûte
tendre.
• Plats en verre et en vitrocéramique : les cocottes et plats de cuisson sont mieux
adapté à la préparation de recettes à base d’oeufs et de fromages, car ils sont
faciles à nettoyer.
ce type de sachet présente un danger d’incendie, à
Page 40

Instructions de cuisson
Techniques de cuisson
Mélange
Mélangez les aliments au cours de la cuisson, notamment les ragoûts et les légumes,
afin de répartir correctement la chaleur. Les aliments situés vers le bord du plat
absorbent davantage d’énergie et chauffent plus rapidement, vous devez donc mélanger
de l’extérieur vers l’intérieur. Le four s’arrête si vous ouvrez la porte pour mélanger les
aliments.
Disposition
Disposez les aliments de forme différente, tels que des morceaux de poulet ou des
côtelettes, en plaçant la partie la plus épaisse vers l’extérieur du plateau tournant, où
ils recevront davantage de micro-ondes. Pour éviter de trop les cuire, placez les parties
fines ou délicates vers le centre du plateau tournant.
Protection
Protégez les aliments à l’aide de fines bandelettes de papier aluminium, afin de ne pas
trop les cuire. Les zones à protéger incluent notamment le bout des ailes et des cuisses
pour la volaille et les coins des plats en gratin. Utilisez uniquement de petites quantités
d’aluminium. Une trop grande quantité de papier aluminium peut endommager le four.
Temps de pause
Les aliments cuits dans un four à micro-ondes accumulent de la chaleur intérieurement
et continuent à cuire pendant plusieurs minutes après l’arrêt du four. Laissez reposer les
plats cuisinés afin de terminer correctement la cuisson, tout particulièrement les rôtis et
les légumes entiers. Ce temps de pause est indispensable pour les viandes rôties, afin
que l’intérieur continue de cuire sans que l’extérieur ne brûle. Mélangez ou secouez les
liquides (soupe, chocolat chaud, etc.) à la fin de la cuisson. Laissez le liquide reposer un
moment avant de servir. Lorsque vous réchauffez un petit pot de bébé, remuez et testez
sa température en le goûtant, avant de servir.
Humidification
L’énergie micro-ondes est attirée par les molécules d’eau. Couvrez ou laissez reposer
les aliments dont la teneur en eau est variable suivant les zones, afin que la chaleur se
répartisse de manière régulière. Ajoutez un peu d’eau aux aliments trop secs afin de
faciliter la cuisson.
Ventilation
Après avoir couvert un plat d’une pellicule plastique, retirez-le en retournant l’un des
coins afin de laisser s’échapper la vapeur excessive.
Rotation
Retournez les aliments à mi-cuisson afin qu’ils soient exposés aux micro-ondes de
manière homogène, sur toute la surface. Ceci est particulièrement important avec les
plats de grande taille, tels que les rôtis.
40
Page 41

41
Instructions de cuisson
Conseils généraux
• Les aliments denses, tels que les pommes de terre, mettent plus longtemps à cuire
que les aliments plus légers. Les aliments ayant une texture délicate doivent être
chauffés à faible puissance pour éviter de les durcir.
• La hauteur et le type de plat utilisé peuvent influencer le temps de cuisson.
Lorsque vous essayez une nouvelle recette, utilisez le temps de cuisson minimum
et vérifiez régulièrement les aliments pour éviter de trop les cuire.
• Piquez les aliments à peau non poreuse, comme les pommes de terre ou les
saucisses, afin d’éviter qu’ils n’éclatent.
Guide de cuisson des œufs
• Ne faites jamais cuire des œufs ni réchauffez des œufs durs dans leur coquille; ils
• Percez toujours les œufs entiers pour éviter qu’ils n’éclatent.
• Faites cuire les œufs à votre convenance. Attention, ils peuvent durcir s’ils sont trop
Guide de cuisson des légumes
• Lavez les légumes avant de les faire cuire. Il n’est pas toujours nécessaire d’ajouter
• Il n’est pas recommandé de frire des aliments en chauffant de l’huile ou de la
graisse. L’huile et la graisse peuvent se mettre à bouillir brusquement et engendrer
de graves brûlures.
• Certains ingrédients chauffent plus vite que d’autres. Par exemple, un beignet
fourré sera plus chaud qu’un beignet nature. Gardez ceci en mémoire pour éviter
les brûlures.
• Il n’est pas recommandé de faire des conserves à l’aide du four à micro-ondes, car
celui-ci ne permet pas de détruire toutes les bactéries nocives lors de la cuisson.
• Bien que les micro-ondes ne chauffent pas les plats de cuisson, la chaleur leur est
souvent transmise. Utilisez toujours un gant de protection lorsque vous retirez un
plat du four et demandez aux enfants utilisant le four de faire de même.
• Il n’est pas recommandé de cuisiner des bonbons au four à micro-ondes, car ils
peuvent atteindre des températures très élevées. Gardez ceci en mémoire pour
éviter les blessures.
• Les légumes de petite taille (carottes en rondelles, petits pois, etc.) cuisent plus
• Les légumes entiers, notamment les pommes de terre, les courges ou les épis
• Pour les légumes de type brocoli ou asperge, placez la pointe au centre du plat et
• Lors de la cuisson de légumes coupés, couvrez toujours le plat avec un couvercle
• Piquez la peau des légumes entiers non pelés avant la cuisson, notamment des
• Pour une cuisson plus régulière, mélangez ou repositionnez les légumes entiers en
• D’une manière générale, plus l’aliment à cuire est dense, plus le temps de repos
risqueraient d’exploser.
cuits.
de l’eau. Pour la cuisson de légumes de forte densité, par exemple des pommes de
terre, des carottes et des haricots verts, ajoutez environ ¼ tasse d’eau.
vite que ceux de grande taille.
de maïs, doivent être placés en cercle sur le plateau tournant avant la cuisson.
Retournez-les à la moitié du temps prévu pour une cuisson plus régulière.
le pied vers l’extérieur.
ou une pellicule plastique percé (Utilisable au four à micro-ondes).
pommes de terre, des courges ou des aubergines, pour éviter qu’ils éclatent.
milieu de cuisson.
requis est long. Le temps de repos est la durée nécessaire pour terminer la
cuisson des aliments et des légumes denses ou de grande taille, une fois qu’ils ont
été sortis du four. Une pomme de terre cuite peut reposer pendant cinq minutes
avant que la cuisson soit terminée, tandis qu’un plat de petits pois peut être servi
immédiatement.
Page 42

Annexes
Guide de dépannage
Avant d’appeler un réparateur pour votre four, vérifiez les éléments indiqués dans la liste
des problèmes courants et leurs solutions.
Le four et l’écran d’affichage ne fonctionnent pas.
• Branchez correctement le cordon d’alimentation sur une prise de courant à contact
de mise à la terre.
• Si la prise est contrôlée par un interrupteur mural, assurez-vous que celui-ci est
allumé.
• Débranchez la fiche, attendez dix secondes, puis rebranchez-la.
• Réarmez le disjoncteur ou remplacez tout fusible grillé.
• Branchez un autre appareil sur cette prise; s’il ne fonctionne pas, contactez un
électricien qualifié pour réparer la prise.
Des étincelles ou des arcs électriques apparaissent.
• Retirez du four tout ustensile, plat ou toute attache métallique. Si vous utilisez
Le plateau tournant fait du bruit ou est collé.
• Nettoyez le plateau, l’anneau du guidage et la paroi inférieure du four.
• Assurez-vous que le plateau tournant et l’anneau de guidage sont correctement
L’utilisation de votre four à micro-ondes entraîne des interférences avec
un téléviseur ou une radio.
• Il s’agit du même type d’interférences que celles produites par d’autres petits
• Branchez le four sur une prise différente.
L’écran d’affichage fonctionne, mais le four ne se met pas en marche.
• Assurez-vous que la porte est correctement fermée.
• Vérifiez qu’aucun morceau d’emballage ou d’un autre matériau n’est coincé dans
le joint de la porte.
• Vérifiez que la porte n’est pas endommagée.
• Appuyez deux fois sur Cancel (Annuler) et entrez de nouveau les instructions de
cuisson.
Le four s’arrête avant que le temps de cuisson soit terminé.
• Si aucune coupure de courant n’a eu lieu, débranchez la fiche, attendez dix
secondes, puis rebranchez-la. Si une coupure de courant a eu lieu, l’afficheur
indique le message :
du papier aluminium, servez-vous uniquement de fines bandelettes et laissez un
espace d’au moins 3 cm entre le papier et les parois intérieures du four.
mis en place.
appareils ménagers, tels qu’un sèche-cheveux. Déplacez votre four à micro-ondes
afin de l’éloigner des autres appareils électriques (téléviseur ou radio).
Remarques
Si le four est réglé pour un temps de cuisson supérieur à 25 minutes, il se règlera
de lui-même sur une puissance à 70 pour cent après 25 minutes afin de ne pas
trop cuire les aliments.
• Réinitialisez l’horloge et entrez vos instructions de cuisson.
• Réarmez le disjoncteur ou remplacez tout fusible grillé.
Les aliments cuisent trop lentement.
• Assurez-vous que le four est branché sur une ligne de 15 ampères. L’utilisation
d’un autre appareil sur le même circuit peut entraîner une chute de potentiel. Si
nécessaire, utilisez un circuit dédié pour le four.
42
Page 43

43
Annexes
Entretien et nettoyage
• Observez les instructions suivantes pour nettoyer et assurer l’entretien de votre
four.
• Nettoyez régulièrement l’intérieur du four pour qu’il soit toujours propre. Les résidus
d’aliment et les éclaboussures de liquides collés sur les parois du four peuvent
diminuer l’efficacité du four.
• Nettoyez immédiatement tout liquide ou aliment renversé. Utilisez un chiffon
humide et un détergent doux. N’utilisez pas de produits détergents corrosifs ou
abrasifs.
• Pour détacher plus facilement les résidus d’aliments ou de liquides collés à
l’intérieur du four, versez deux verres d’eau (ajoutez le jus d’un citron pour obtenir
un parfum frais) dans un saladier en verre et faites chauffer à la puissance
Maximum pendant 5 minutes ou jusqu’à ce que l’eau bouille. Laissez reposer à
l’intérieur du four pendant 1 à 2 minutes.
• Sortez le plateau tournant en verre pour le laver ou pour nettoyer le four. Pour
éviter de casser le plateau en verre, manipulez-le avec précaution et évitez de
verser de l’eau dessus immédiatement après une cuisson. Lavez soigneusement le
plateau dans de l’eau savonneuse chaude ou au lave-vaisselle.
• Nettoyez l’extérieur du four à l’aide de savon et d’un chiffon humide. Séchez avec
un chiffon doux. Pour éviter d’endommager les pièces maîtresses du four, ne
laissez pas d’eau rentrer par les orifices de ventilation.
• Lavez la vitre de la porte avec de l’eau et un produit détergent doux. Utilisez
toujours une éponge ou un chiffon doux pour éviter de rayer les surfaces.
• Si de la vapeur a laissé des traces à l’intérieur ou à l’extérieur de la porte du four,
nettoyez-les à l’aide d’un chiffon doux. La vapeur peut se concentrer lorsque le four
est en marche et engendre un fort taux d’humidité; cela n’implique absolument pas
une fuite du four à micro-ondes.
• Ne mettez jamais le four en marche lorsqu’il est vide; ceci pourrait endommager
le magnétron ou le plateau en verre. Vous pouvez laisser en permanence un verre
d’eau dans le four, afin d’éviter tout risque d’endommagement si le four est mis en
marche accidentellement.
Nettoyage du filtre a graisse
Le filtre à graisse doit être retiré et nettoyé souvent, au moins une fois par mois.
ATTENTION
Afin d’écarter tout risque de dommages corporels ou matériels, ne faites pas
fonctionner la ventilation du four sans les filtres.
1 Pour retirer le filtre à graisse, faites-le glisser sur le côté. Tirez le filtre vers le bas
et poussez-le de l’autre côté. Le filtre tombe.
2 Trempez le filtre à graisse dans une solution d’eau chaude et de détergent
doux. Rincez-le abondamment et secouez-le pour le sécher. N’utilisez pas
d’ammoniaque; ne mettez pas le filtre au lave-vaisselle. L’aluminium risque
de noircir.
3 Pour remettre le filtre en place, faites-le glisser dans la fente latérale, puis poussez-
le vers le haut et vers le centre du four pour le verrouiller.
Page 44

Annexes
#ROCHET
Remplacement du filtre à charbon
Si votre four est ventilé à l’intérieur, le filtre à charbon doit être remplacé tous les 6 à 12
mois, vérifiez-le plus souvent si nécessaire. Le filtre à charbon ne peut pas être nettoyé.
Pour commander un filtre à charbon neuf, contactez le service pièces détachées du
centre de service agréé le plus proche de chez vous ou appelez le : 1-800-361-3400
1 Débranchez le four ou coupez l’Alimentation.
2 Ouvrez la porte.
3 Retirez les vis de fixation de la grille de ventilation (3 vis moyennes).
Remplacement de l’éclairage de nuit/de la zone de cuisson
Pour écarter tout risque de dommages corporels ou matériels, portez des gants
lorsque vous remplacez l’ampoule.
1 Débranchez le four ou coupez l’Alimentation.
2 Retirez les vis de fixation de la protection de l’ampoule.
4 Faites coulisser la grille vers la gauche, puis tirez-la tout droit vers l’extérieur.
3 Remplacez l’ampoule par un modèle identique de 40 watts.
5 Retirez le filtre usagé.
4 Replacez la protection de l’ampoule et les vis de fixation.
5 Rétablissez l’Alimentation.
6 Insérez un nouveau filtre à charbon. Le filtre doit reposer avec l’angle indiqué.
ATTENTION
7 Remplacez la grille et les 3 vis, puis fermez la porte. Rétablissez l’Alimentation et
réglez l’horloge.
44
Page 45

45
Annexes
Remplacement de l’Éclairage du four
1 Débranchez le four ou coupez l’Alimentation.
2 Ouvrez la porte.
3 Retirez les vis de fixation du couvercle de la ventilation (3 vis moyennes).
4 Faites coulisser la grille vers la gauche, puis tirez-la tout droit vers l’extérieur.
5 Retirez le filtre à charbon actif si l’appareil en est équipé.
6 Maintenez enfoncé le fermoir central tout en soulevant la languette au niveau
du coin gauche. Retirez le couvercle. Retirez l’ampoule en la faisant tourner
doucement.
Spécifications
Numéro du modèle
Cavité du four
Commandes
Minuterie
Alimentation
Consommation
Puissance restituée
Dimensions cavité (L x H x P)
Dimensions extérieures
(L x H x P)
Dimensions de transport
(L x H x P)
Poids net/brut
SMH3150
1,5 pied cube
10 niveaux de puissance, y compris un fonction
de décongélation
99 minutes, 99 secondes
120 V c.a. , 60 Hz
1500 Watts
900 Watts (TEST IEC 705)
50,96 cm (20
36,51 (14
75,88 cm (29
40,48 cm (15
84,77 cm (33
49,29 cm (19
20,6 kg / 24,6 kg
3/32
po) X 23, 81 cm (9
3/8
po)
7/8
po) X 41,91 cm (16 ½ po) X
15/18
po)
3/9
po) X 50,72 cm (19
13/32
po)
3/8
po) X
31/32
po) X
7 Remplacez l’ampoule par un modèle identique de 40 watts.
8 Replacez le support de l’ampoule.
9 Replacez la grille et les 3 vis. Poussez le haut du couvercle pour qu’il reprenne sa
place avec un claquement. Replacez les vis de fixation. Rétablissez l’Alimentation.
Page 46

Garantie
FOUR MICRO-ONDES À HOTTE INTÉGRÉE DE SAMSUNG
GARANTIE LIMITEE DE L’ACQUEREUR D’ORIGINE
Ce produit de la marque SAMSUNG, fourni et distribué par Samsung Electronics Canada, Inc.,
livré en état neuf dans son carton d’origine et acheté par le consommateur et acquéreur d’origine,
s’accompagne d’une garantie de SAMSUNG contre tout défaut de fabrication concernant les pièces
et la main d’œuvre pour une période limitée de :
UN AN (1) POUR LES PIÈCES ET LA MAIN D’ŒUVRE, DIX ANS (10) POUR LES
PIÈCES DU MAGNÉTRON
Cette limite de garantie s’applique à compter de la date d’acquisition et couvre uniquement les
produits achetés et utilisés au Canada. Pour effectuer des réparation dans le cadre de ladite
garantie, l’acquéreur doit contacter la société SAMSUNG afin qu’elle détermine l’origine du
problème et une procédure d’entretien. Les services de garantie peuvent être pris en charge
uniquement par un centre de service SAMSUNG agréé. Lors de la remise d’un produit défectueux
à SAMSUNG ou à un centre de service SAMSUNG agréé, l’acquéreur est tenu de présenter le
coupon d’achat d’origine à la demande des intéressés à titre de preuve d’achat.
La société SAMSUNG prendra en charge, à sa convenance, la réparation ou le remplacement du
produit à ses frais tel que stipulé dans les présentes conditions et procèdera au remplacement ou
au changement des pièces ou des produits si ces derniers s’avèrent défectueux dans la limite de
la période de garantie mentionnée précédemment. Le cas échéant, toutes les pièces et tous les
produits remplacés deviennent la propriété de SAMSUNG et doivent être retournés à SAMSUNG.
La période de garantie qui s’applique aux pièces et produits remplacés est la période restante de la
garantie initiale ou une période de quatre-vingt-dix (90) jours. Dans tous les cas, la période la plus
longue des deux périodes susmentionnées s’applique.
En fonction des disponibilités sur le territoire canadien, un service à domicile est proposé dans
la limite de la période de garantie. Le service à domicile n’est pas disponible sur l’ensemble du
territoire canadien. Pour bénéficier du service à domicile, l’appareil doit être facilement accessible
à notre personnel. Dans le cas où il serait impossible de réparer l’appareil au cours du service à
domicile, il se peut que l’appareil doive être emporté, réparé et retourné. En cas d’indisponibilité du
service à domicile, SAMSUNG pourra choisir le moyen de transport de son choix pour acheminer
ou renvoyer l’appareil vers et depuis un centre de service agréé de SAMSUNG. Dans le cas
contraire, la responsabilité du transport vers et depuis le centre de service agréé de SAMSUNG
incombera à l’acquéreur.
Cette garantie limitée couvre les défauts de fabrication pour les pièces et la main d’œuvre
rencontrés lors d’une utilisation normale et non commerciale de ce produit et ne s’applique pas
aux problèmes ci-après, incluant mais non limité à : un endommagement survenant au cours de
l’expédition, la livraison et l’installation ; une utilisation de l’appareil contraire au but auquel il était
destiné ; un numéro de produit ou de série effacé ; un endommagement du revêtement extérieur ou
de l’aspect du produit ; un accident, un abus, une négligence, un incendie, une inondation, la foudre
ou tout autre catastrophe naturelle ; l’utilisation de tout produit, équipement, système, appareil,
service, de toute pièce, de toute fourniture, de tout accessoire, de toute application, installation,
réparation, de tout câblage externe ou de connecteurs non fournis ou autorisés par SAMSUNG
et susceptibles d’endommager ledit appareil ou de nuire à son fonctionnement ; une surtension,
fluctuation ou tension de ligne électrique incorrecte ;
tout réglage effectué par l’acquéreur et un non-respect des instructions de fonctionnement, de
nettoyage, d’entretien et de respect de l’environnement couvertes ou prescrites dans le présent
carnet d’instructions ; tout problème résultant d’une prolifération d’insectes nuisibles, une surchauffe
ou un plat trop cuit par l’utilisateur ; tout problème relatif au plateau en verre, au plateau tournant ou
à une puissance réduite du magnétron en raison d’une usure normale. SAMSUNG ne garantit en
aucun cas que l’appareil sera exempt de tout problème ou qu’il pourra fonctionner sans interruption.
SAMSUNG NE FOURNIT AUCUNE AUTRE GARANTIE AUTRE QUE CELLES MENTIONNEES
ET DECRITES CI-DESSUS, ET, AUCUNE GARANTIE, EXPRESSE OU IMPLICITE, Y COMPRIS,
MAIS SANS S’Y LIMITER, LES GARANTIES IMPLICITES DE QUALITE COMMERCIALE OU
D’APTITUDE A UN USAGE PARTICULIER, NE DOIT S’APPLIQUER APRES EXPIRATION DES
PERIODES DE GARANTIE EXPRESSES CONSIDEREES CI-DESSUS, ET AUCUNE AUTRE
GARANTIE EXPRESSE RELATIVE AU PRESENT PRODUIT, QU’ELLE SOIT DONNEE PAR
UNE TIERCE PERSONNE, UNE ENTREPRISE OU UNE PERSONNE MORALE NE POURRA
ETRE CONSIDEREE COMME UN ENGAGEMENT DE LA PART DE SAMSUNG. SAMSUNG
N’ENDOSSE AUCUNE RESPONSABILITE EN CAS DE PERTE DE REVENU, DE MANQUE
A GAGNER, D’INCAPACITE A REALISER DES ECONOMIES OU TOUT AUTRE AVANTAGE
FINANCIER, OU EN CAS DE DOMMAGE RESULTANT DE L’UTILISATION, D’UNE MAUVAISE
UTILISATION DE CET APPAREIL OU D’UNE INCAPACITE A UTILISER CET APPAREIL,
QUELLE QUE SOIT LA BASE LEGALE SUR LAQUELLE REPOSE LA PLAINTE, ET MEME
SI SAMSUNG A ETE AVERTI DE L’EVENTUALITE DE TELS DOMMAGES. LES INDEMNITES
FINANCIERES D’AUCUNE SORTE NE POURRONT ETRE D’UN MONTANT SUPERIEUR AU
PRIX D’ACHAT DE L’APPAREIL VENDU PAR SAMSUNG ET QUI CAUSE LES DOMMAGES
DONT IL EST QUESTION. SANS LIMITER CE QUI SUIT, L’ACQUEREUR PREND EN CHARGE
TOUS LES RISQUES ET RESPONSABILITES CONCERNANT LA PERTE, LES DOMMAGES
OU LES BLESSURES INFLIGEES A L’ACQUEREUR ET AUX BIENS DE CELUI-CI ET A TOUTE
AUTRE PERSONNE ET BIEN RESULTANT DE L’UTILISATION, LA MAUVAISE UTILISATION DE
L’APPAREIL ET L’INCAPACITE A UTILISER LE PRESENT APPAREIL VENDU PAR SAMSUNG ET
QUI NE SERAIT PAS LIEE DIRECTEMENT A UNE NEGLIGENCE DE LA PART DE SAMSUNG. LA
PRESENTE GARANTIE LIMITEE NE PEUT¨S’ETENDRE A AUCUNE PERSONNE AUTRE QUE
L’ACQUEREUR D’ORIGINE DE CET APPAREIL, N’EST PAS TRANSFERABLE ET PRECISE VOS
DROITS DE RECOURS EXCLUSIFS.
Certains pays ne tiennent pas compte des exclusions ou des limitations de dommages accidentels
ou induits ou bien en tiennent compte pendant la durée de la garantie tacite, si bien que les
limitations ou les exclusions mentionnées ci-dessus peuvent ne pas s’appliquer à vous. Cette
garantie vous confère des droits légaux spécifiques, vous pouvez également avoir d’autres droits
qui varient d’un Etat à l’autre.
Pour bénéficier du service de garantie, contactez SAMSUNG au :
1-800-361-3400
www.samsung.ca
46
Page 47

47
Aide-mémoire
Fonction Fonctionnement
Réglage de l’horloge
Cuisson à une étape
One Minute + Cuisson
Power/Auto Defrost (Marche/
Décongélation automatique)
Réglage du temps de cuisson et du
niveau de puissance
• Appuyez sur CLOCK (Horloge).
• Utilisez le clavier numérique pour entrer l’heure.
• Appuyez de nouveau sur CLOCK (Horloge).
• Utilisez les boutons de fonction pour entrer le temps de cuisson souhaité.
• Appuyez sur ENTER/START (entrée/départ).
• Appuyez une fois sur le bouton One Minute + pour chaque minute de cuisson souhaitée.
• Le temps de cuisson s’affiche et le four démarre.
• Appuyez sur AUTO DEFROST (Marche/Décongélation automatique).
• Entrez le poids des aliments à décongeler en appuyant plusieurs fois sur le bouton AUTO DEFROST (Marche/Décongélation
automatique) ou en utilisant le pavé numérique.
• Appuyez sur ENTER/START (entrée/départ).
• Lorsque le four émet un bip, retournez les aliments. Appuyez sur ENTER/START (entrée/départ) pour reprendre la
décongélation.
• Utilisez les boutons de fonction pour entrer le temps de cuisson souhaité.
• Pour définir un niveau de puissance plus élevé, appuyez sur POWER LEVEL (Niveau de puissance) et utilisez le clavier
numérique pour entrer le niveau souhaité.
• Appuyez sur ENTER/START (entrée/départ) pour lancer la cuisson.
Page 48

UNE QUESTION ? UN COMMENTAIRE ?
Samsung Electronics Co., Ltd.
Imprimé en Malaisie
PAYS TELEPHONE SITE INTERNET
AU CANADA 1-800-SAMSUNG (7267864) www.samsung.com/ca
 Loading...