

Samsung SM-G930PZKAVMU User Manual

User Guide
[UG template version 16a]
[VMU-Samsung-G930P-ug-en-051616-FINAL]

Table of Contents
Getting Started 1 ..............................................................................................................................................
Introduction 2
About the User Guide 2
Access Instructions on Phone 2
Set Up Your Phone 5
Parts and Functions 5
Charge the Battery 7
SIM Card 9
SD Card 11
Turn Your Phone On and Off 13
Use the Touchscreen 14
...........................................................................................................................................
...................................................................................................................
.......................................................................................................
Access Help 2
Get Support from My Account 3
.......................................................................................................................................
......................................................................................................................................
Insert an SD Card 11
Unmount an SD Card 12
Remove an SD Card 12
Format an SD Card 12
..........................................................................................................................
..............................................................................................
...............................................................................................................................
......................................................................................................................
........................................................................................................................
...............................................................................................................
..........................................................................................................
...........................................................................................................
.............................................................................................................
......................................................................................................
..................................................................................................................
Activation and Service 17
Complete the Setup Screens 18
Basic Operations 20
Basics 20
Home Screen and Applications (Apps) List 20
Phone Settings Menu 21
Portrait and Landscape Screen Orientation 21
Capture Screenshots 22
Applications 22
Launch Applications 22
Apps List 23
Phone Number 26
Airplane Mode 27
Enter Text 27
Samsung Keyboard 27
.................................................................................................................................
..........................................................................................................................................
.................................................................................................................................
.............................................................................................................................
............................................................................................................................
.............................................................................................................................
....................................................................................................................................
................................................................................................................
......................................................................................................
........................................................................
..........................................................................................................
.......................................................................
..........................................................................................................
............................................................................................................
............................................................................................................
TOC i

Google Voice Typing 29...........................................................................................................
Tips for Editing Text 29
Google Account 30
Create a Google Account 30
Sign In to Your Google Account 32
Factory Reset Protection 32
Google Play Store 33
Find and Install an App 33
Request a Refund for a Paid App 34
Update an App 35
Uninstall an App 36
Get Help with Google Play 37
Lock and Unlock Your Screen 37
Update Your Phone 38
Update Your Phone Software 38
Update Your Profile 41
Update Your PRL 42
..........................................................................................................................
.......................................................................................................................
............................................................................................................
...................................................................................................
.........................................................................................
....................................................................................................
.......................................................................................................
.......................................................................................
....................................................................................................................
..................................................................................................................
..................................................................................................
....................................................................................................
....................................................................................................................
.............................................................................................
.............................................................................................................
................................................................................................................
Your Phone's Home Screen 43
Home Screen Basics 43
Home Screen Layout 43
Extended Home Screens 44
Status Bar and Notification Panel 44
Status Bar 44
Notification Panel 47
S Finder 50
Quick Connect 51
Multi Window 52
Customize the Home Screen 53
Change the Wallpaper 54
Add Shortcuts to the Home Screen 55
Add Widgets to the Home Screen 55
Add Folders to the Home Screen 56
Making Connections 57
...........................................................................................................................
..............................................................................................................................
...............................................................................................................................
....................................................................................................................................
................................................................................................................
..................................................................................................................
..........................................................................................................
....................................................................................................
...............................................................................................
................................................................................................................
....................................................................................................................
......................................................................................................
........................................................................................................
....................................................................................
......................................................................................
.......................................................................................
Phone Calls and Voicemail 58
Place and Answer Calls 58
TOC ii
.................................................................................................................
..............................................................................................................

Call Using the Phone Dialer 59................................................................................................
Call Emergency Numbers 60...................................................................................................
Answer Phone Calls 60............................................................................................................
In-Call Screen Layout and Operations 63................................................................................
Place a Call from Contacts 65.................................................................................................
Call from Call Log 66...............................................................................................................
Voicemail 67.....................................................................................................................................
Voicemail Setup 67..................................................................................................................
Visual Voicemail Setup 68.......................................................................................................
Review Visual Voicemail 69.....................................................................................................
Listen to Multiple Voicemail Messages 70...............................................................................
Visual Voicemail Options 70....................................................................................................
Configure Visual Voicemail Settings 72...................................................................................
Optional Calling Services 73............................................................................................................
Caller ID Blocking 73...............................................................................................................
Call Waiting 74.........................................................................................................................
Conference Calling 75.............................................................................................................
Call Forwarding 76...................................................................................................................
Call Settings 76................................................................................................................................
Contacts 80..............................................................................................................................................
Add a Contact 80.............................................................................................................................
View Contacts 83.............................................................................................................................
Contacts Screen Layout 84..............................................................................................................
Edit a Contact 85..............................................................................................................................
Delete a Contact 86.........................................................................................................................
Favorites 86.....................................................................................................................................
Groups 87........................................................................................................................................
Share a Contact 88..........................................................................................................................
Profile Sharing 91....................................................................................................................
Import Contacts 92...........................................................................................................................
Back Up Contacts 93.......................................................................................................................
Messaging 94...........................................................................................................................................
Text and Multimedia Messaging 94.................................................................................................
Send a Text Message 94.........................................................................................................
Send a Multimedia Message (MMS) 95...................................................................................
TOC iii

Use Enhanced Messaging 97..................................................................................................
Save and Resume a Draft Message 100.................................................................................
New Messages Notification 100..............................................................................................
Manage Message Conversations 100.....................................................................................
Gmail 102.........................................................................................................................................
Create and Send a Gmail Message 103..................................................................................
Check Received Gmail Messages 104....................................................................................
Use Gmail Labels 106..............................................................................................................
Archive Gmail Threads 106.....................................................................................................
Mute Gmail Threads 107.........................................................................................................
Delete Gmail Threads 107.......................................................................................................
Search Gmail Messages 107...................................................................................................
Report Spam or Phishing Gmail 107.......................................................................................
Add Another Google (Gmail) Account 108..............................................................................
Switching between Gmail Accounts 108..................................................................................
Gmail Settings 109...................................................................................................................
Email 110.........................................................................................................................................
Set Up an Email Account 110..................................................................................................
Add an Email Account 111.......................................................................................................
Add an Exchange ActiveSync Account 113.............................................................................
Create and Send an Email Message 113................................................................................
Open Email Messages 115......................................................................................................
Delete an Email Account 116..................................................................................................
Manage Your Email Inbox 117................................................................................................
Exchange ActiveSync Email Features 118..............................................................................
Internet and Social Networking 120.........................................................................................................
Browser 120.....................................................................................................................................
Use the Browser 121...............................................................................................................
Add a Bookmark 122...............................................................................................................
View Browser History 122........................................................................................................
Open New Browser Tabs 123..................................................................................................
Chrome Browser 124.......................................................................................................................
Facebook 125..................................................................................................................................
Hangouts 125...................................................................................................................................
Instagram 126..................................................................................................................................
TOC iv

Messenger 126................................................................................................................................
Connectivity 127.......................................................................................................................................
Transfer Files between Your Phone and a Computer 127..............................................................
Wi-Fi 129..........................................................................................................................................
Turn Wi-Fi On and Connect to a Wireless Network 129..........................................................
Wi-Fi Settings 130....................................................................................................................
Disconnect Wi-Fi 130...............................................................................................................
Wi-Fi Direct 131.......................................................................................................................
Hotspot 131......................................................................................................................................
Bluetooth 133...................................................................................................................................
Bluetooth Information 133........................................................................................................
Enable the Bluetooth Feature 133...........................................................................................
Pair Bluetooth Devices 135......................................................................................................
Connect to a Paired Bluetooth Device 136..............................................................................
Send Information Using Bluetooth 137....................................................................................
Receive Information via Bluetooth 138....................................................................................
Tethering 139...................................................................................................................................
Apps and Entertainment 140............................................................................................................................
Camera and Video 141............................................................................................................................
Camera Overview 141.....................................................................................................................
Take Pictures and Record Videos 143............................................................................................
Take a Picture 143...................................................................................................................
Record Videos 144..................................................................................................................
View Pictures and Videos Using Gallery 144..................................................................................
Edit Pictures 146..............................................................................................................................
Share Pictures and Videos 150.......................................................................................................
Send Pictures or Videos by Email 150....................................................................................
Send a Picture or Video by Multimedia Message 151.............................................................
Send Pictures or Videos Using Bluetooth 152.........................................................................
Share Pictures or Videos via Additional Apps or Social Media 153........................................
Share Videos on YouTube 154................................................................................................
Camera Options 155........................................................................................................................
Switch Cameras 155................................................................................................................
Set Camera Functions 156......................................................................................................
Live Broadcast 157..................................................................................................................
TOC v

Productivity 160........................................................................................................................................
Calculator 160..................................................................................................................................
Calendar 160....................................................................................................................................
Add an Event to the Calendar 161...........................................................................................
View Calendar Events 163.......................................................................................................
Sync Calendars 163.................................................................................................................
Synchronize an Exchange ActiveSync Calendar 164.............................................................
Call Watch 165.................................................................................................................................
Clock 165.........................................................................................................................................
Set Alarms 165........................................................................................................................
Additional Clock Features 166.................................................................................................
Drive 167..........................................................................................................................................
Gadget Guardian 167......................................................................................................................
Google Maps 167.............................................................................................................................
Google Search 169..........................................................................................................................
Memo 170........................................................................................................................................
My Files 170.....................................................................................................................................
Photos 171.......................................................................................................................................
S Voice 172......................................................................................................................................
Samsung Gear 172..........................................................................................................................
Samsung Pay 172............................................................................................................................
Entertainment and Activities 174.............................................................................................................
Amazon 174.....................................................................................................................................
Amazon Kindle 174..........................................................................................................................
Amazon Music 174..........................................................................................................................
Amazon Photos 174.........................................................................................................................
Galaxy Apps 174..............................................................................................................................
Google Play Music App 174.............................................................................................................
Play Music with Google Play 175............................................................................................
Google Play Music Screen Layout 176....................................................................................
Create Playlists in Google Play Music 177..............................................................................
NextRadio 178.................................................................................................................................
S Health 178....................................................................................................................................
Samsung+ 180.................................................................................................................................
Samsung Milk Music 180.................................................................................................................
TOC vi

Virgin Fun & Games 180..................................................................................................................
YouTube 180....................................................................................................................................
Settings 182.....................................................................................................................................................
Connections Settings 183........................................................................................................................
Basic Settings 183...........................................................................................................................
Wi-Fi Settings Menu 186..................................................................................................................
Bluetooth Settings 188.....................................................................................................................
Airplane Mode 189...........................................................................................................................
Hotspot Settings 190........................................................................................................................
Tethering Settings 192.....................................................................................................................
Data Usage Settings 193.................................................................................................................
Mobile Networks Settings 194.........................................................................................................
NFC and Payment 195....................................................................................................................
More Connection Settings 197.........................................................................................................
Nearby Device Scanning 199..................................................................................................
Printing 199..............................................................................................................................
MirrorLink 201..........................................................................................................................
Virtual Private Networks (VPN) 201.........................................................................................
Device Settings 208.................................................................................................................................
Smart Manager 208.........................................................................................................................
Applications Settings 210.................................................................................................................
Application Manager 211.........................................................................................................
Default Applications 213..........................................................................................................
Application Settings 214..........................................................................................................
Calendar Settings 214.............................................................................................................
Camera Settings 215...............................................................................................................
Contacts Settings 216..............................................................................................................
Email Settings 217...................................................................................................................
Internet Settings 219................................................................................................................
Messages Settings 220............................................................................................................
Phone Settings 222..................................................................................................................
S Voice Settings 224................................................................................................................
Weather Settings 225..............................................................................................................
Google Settings 226................................................................................................................
Sounds and Vibration Settings 227..................................................................................................
TOC vii

Sound Mode 229......................................................................................................................
Vibrate While Ringing 230.......................................................................................................
Volume 231..............................................................................................................................
Vibration Intensity 232.............................................................................................................
Ringtones and Sounds 233......................................................................................................
Vibration Pattern 235...............................................................................................................
Notification Sound 236.............................................................................................................
Do Not Disturb 237..................................................................................................................
System Sounds 239.................................................................................................................
Key-tap Feedback 240.............................................................................................................
Sound Quality and Effects 241................................................................................................
Display Settings 242........................................................................................................................
Advanced Features 244...................................................................................................................
Personal Settings 246..............................................................................................................................
Wallpaper 246..................................................................................................................................
Themes 247.....................................................................................................................................
Home Screen Settings 248..............................................................................................................
Lock Screen and Security Settings 248...........................................................................................
Lock Screen and Security Overview 249.................................................................................
Screen Lock 250......................................................................................................................
Disable the Screen Lock 252...................................................................................................
Device Security 252.................................................................................................................
Privacy and Safety 253....................................................................................................................
Location 255............................................................................................................................
App Permissions 258...............................................................................................................
Private Mode 259.....................................................................................................................
Report Diagnostic Info 259......................................................................................................
Send SOS Message 260.........................................................................................................
Easy Mode 261................................................................................................................................
Accessibility Settings 262................................................................................................................
Vision Accessibility Settings 263.............................................................................................
Hearing Accessibility Settings 264...........................................................................................
Dexterity and Interaction Settings 265.....................................................................................
Configure Other Accessibility Settings 266..............................................................................
Accounts 267...................................................................................................................................
TOC viii

Backup and Reset 268.....................................................................................................................
Smart Switch 270.....................................................................................................................
Samsung Account 270.............................................................................................................
Google Account 271................................................................................................................
Auto Restart 272......................................................................................................................
Reset 273.................................................................................................................................
Factory Data Reset 274...........................................................................................................
System Settings 276................................................................................................................................
Language and Input Settings 276....................................................................................................
Battery Settings 278.........................................................................................................................
Power Saving Mode 279..........................................................................................................
Ultra Power Saving Mode 280.................................................................................................
Storage Settings 281.......................................................................................................................
microSD Card 282...................................................................................................................
Date and Time Settings 284............................................................................................................
Help 286...........................................................................................................................................
Activate This Device 287.................................................................................................................
System Update 288.........................................................................................................................
About Device 288.............................................................................................................................
Getting Help 291..............................................................................................................................................
For Assistance 292..................................................................................................................................
Troubleshooting 292........................................................................................................................
Virgin Mobile Account Information and Help 293.............................................................................
Manage Your Account 293......................................................................................................
Top-Up Your Account 294.......................................................................................................
Copyright Information 294................................................................................................................
Intellectual Property 294..........................................................................................................
Open Source Software 294......................................................................................................
Disclaimer of Warranties; Exclusion of Liability 295................................................................
Modification of Software 295....................................................................................................
Samsung KNOX 295................................................................................................................
Samsung Electronics America (SEA), Inc. 295.......................................................................
Do you have questions about your Samsung Mobile Device? 296.........................................
Legal Information 296......................................................................................................................
Index 297..........................................................................................................................................................
TOC ix

Getting Started
The following set of topics will introduce you to your phone, help you get set up with service, provide an
overview of the phone screen, and get you started with basic phone operations.
1

Introduction
The following topics describe the basics of using this guide and your new phone.
About the User Guide
Thank you for purchasing your new Samsung Galaxy S7. The following topics explain how best to use
this guide to get the most out of your phone.
Before Using Your Phone
Read the Get Started guide and Important Information booklet that were packaged with your phone
thoroughly for proper usage.
Accessible services may be limited by subscription contract conditions.
Descriptions in the User Guide
Note that most descriptions in this guide are based on your phone's setup at the time of purchase.
Unless otherwise noted, instructions begin from the phone's home screen, which is displayed by
pressing Home . Some operation descriptions may be simplified.
Screenshots and Key Labels
Screenshots and other illustrations in this user guide may appear differently on your phone. Key labels in
the user guide are simplified for description purposes and differ from your phone's display.
Other Notations
In the user guide, the phone may be referred to either as "phone," "device," or "handset." A microSD™ or
microSDHC™ card is referred to as an "SD card" or a "memory card."
Access Instructions on Phone
These topics will help you find help on your new phone and will introduce the basics of using your phone's
touchscreen if you are a new user.
Access Help
Use the phone's Help menu to learn about your phone.
Introduction
2
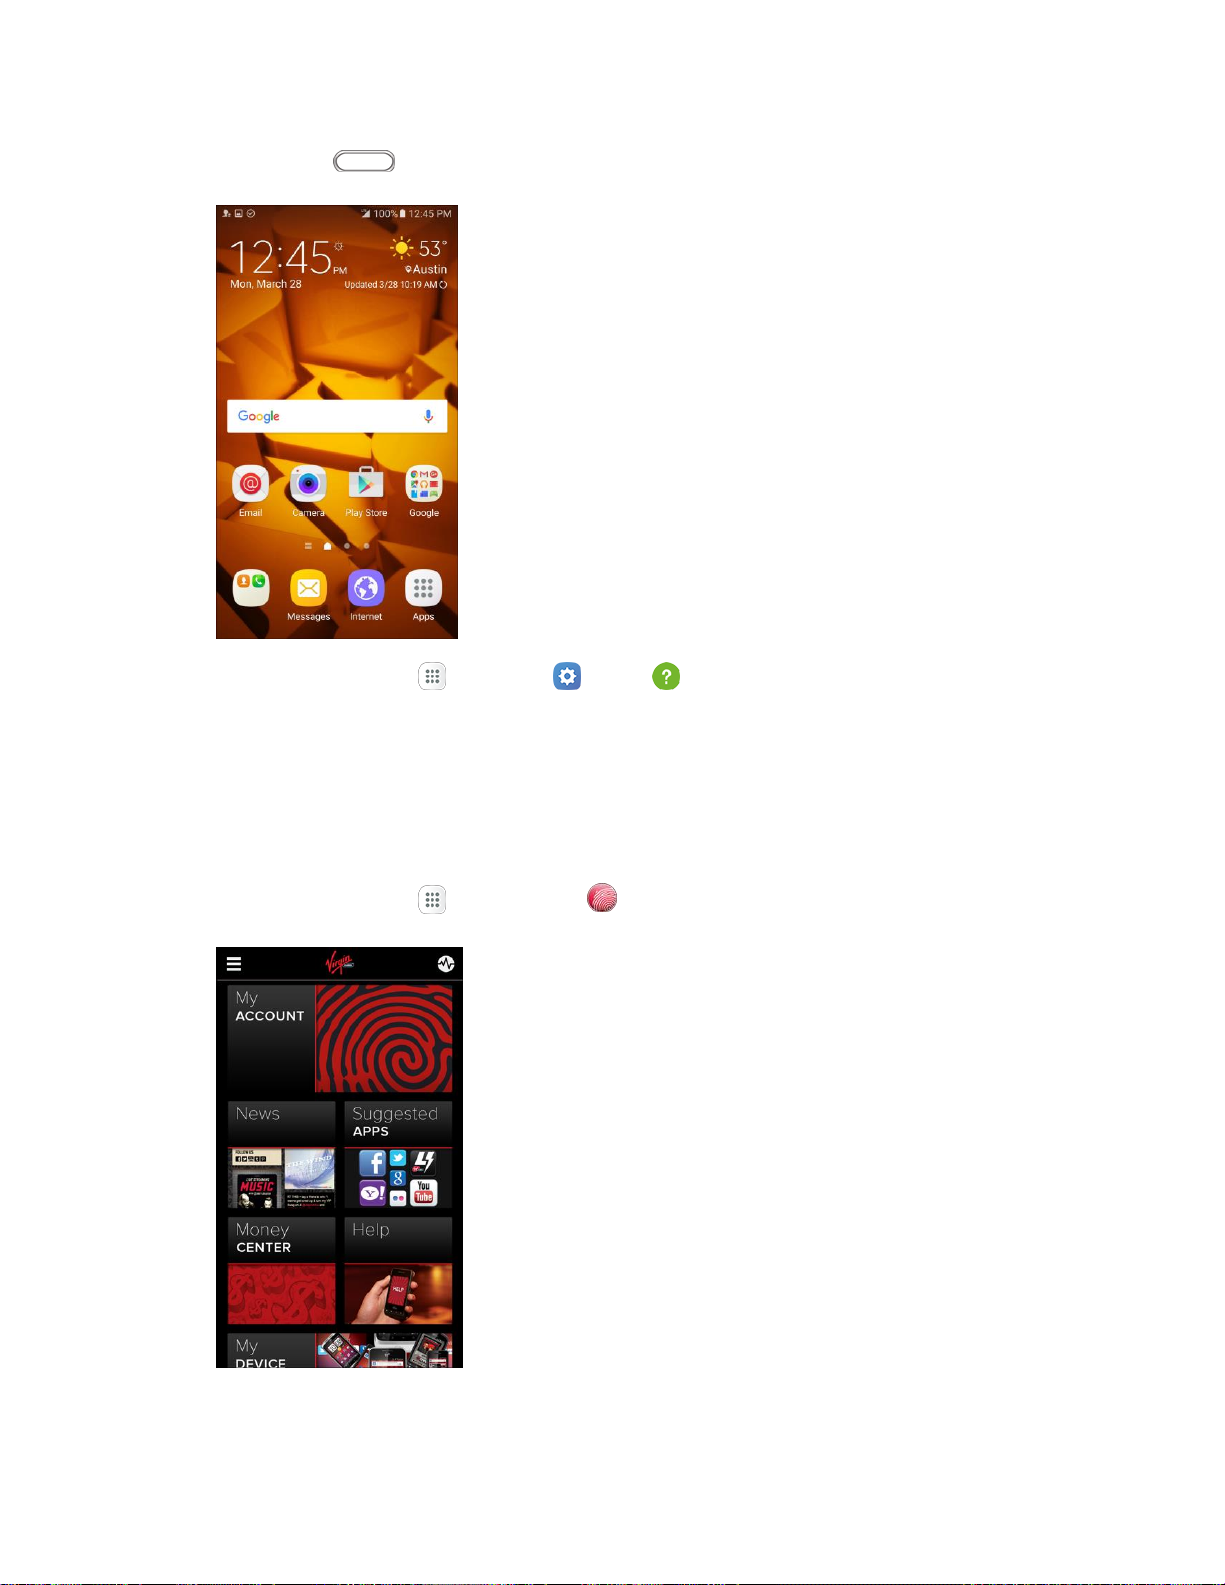
1. Press Home to display the home screen.
2. From home, tap Apps > Settings > Help .
3. Tap a topic to view its contents, or tap Search to search for a topic.
Get Support from My Account
In addition to your phone's built-in Help menu, you can also access support for your phone and service
through the preloaded My Account app.
1. From home, tap Apps > My Account .
Introduction
3
2. From the My Account main page, tap Support.
3. Tap a topic to view its contents.
Introduction 4
Set Up Your Phone
Part
Description
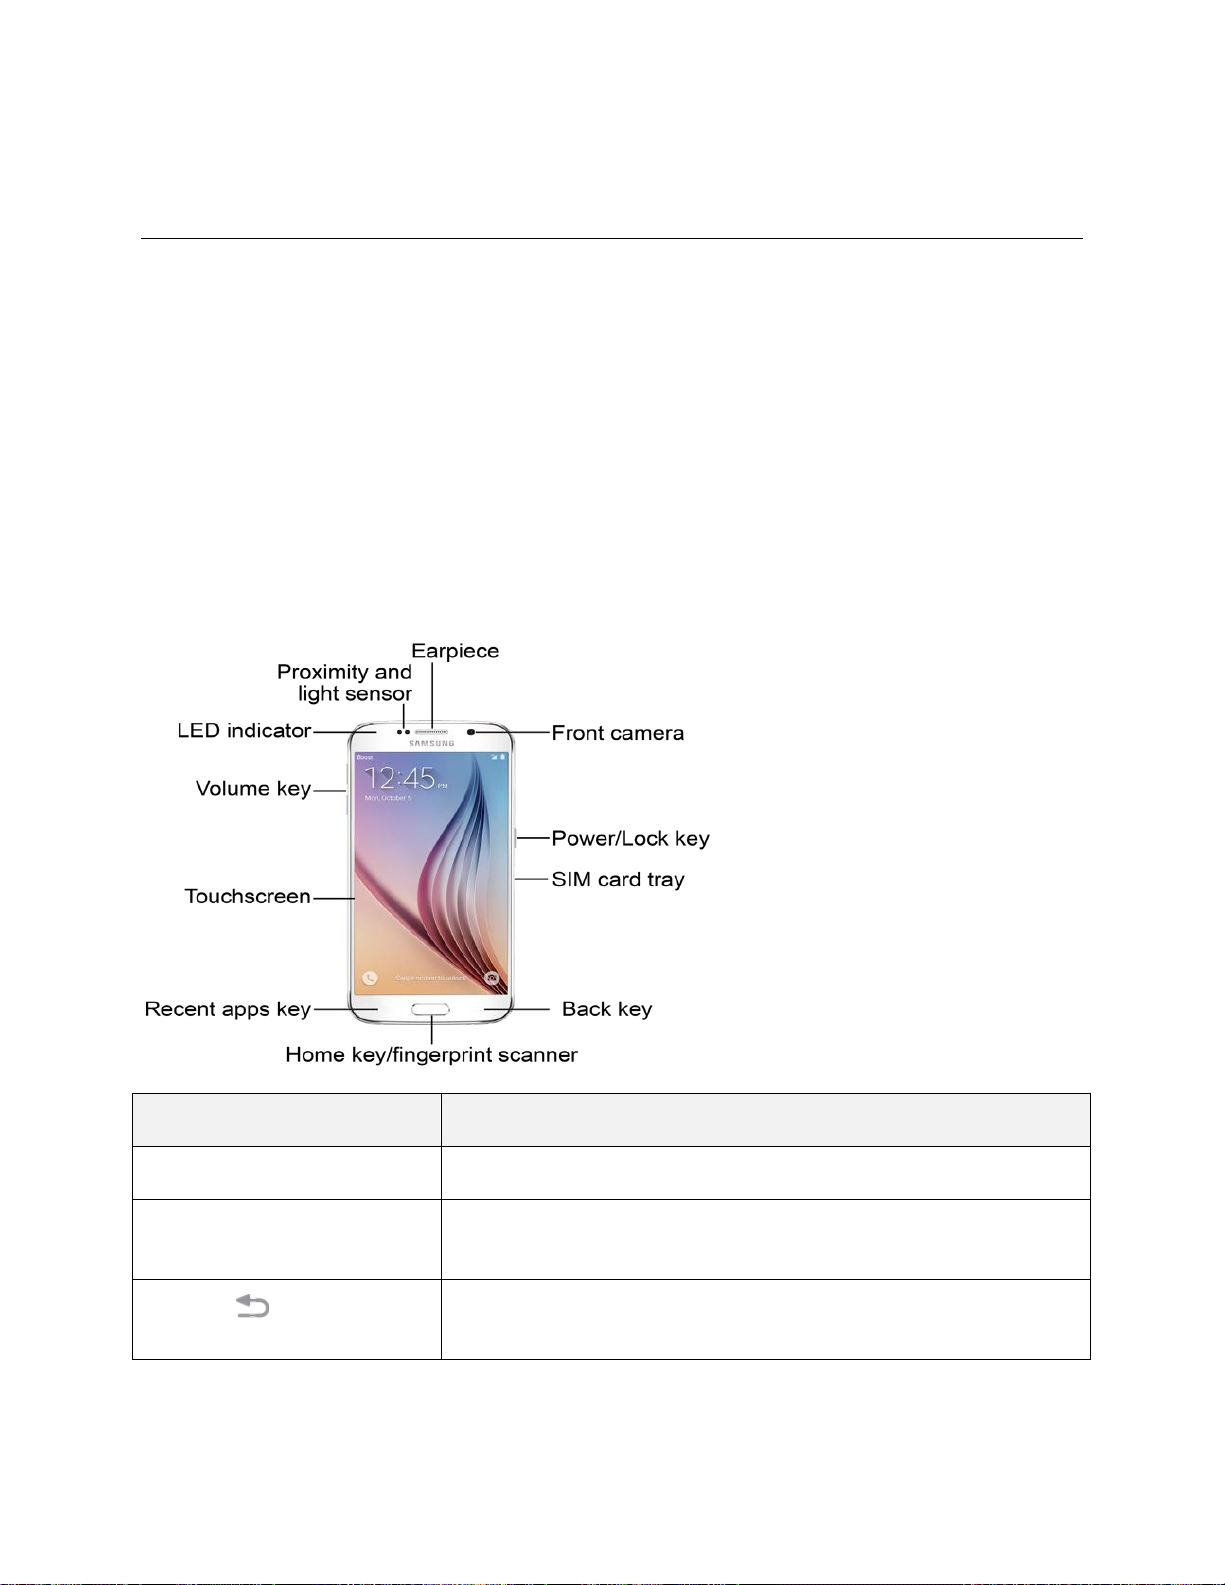
Earpiece
Listen to calls and automated prompts when using the phone.
Front camera
Takes pictures and records videos while facing the screen, and allows
you to video conference.
Back key
Return you to the previous screen, or close a dialog box, options
menu, the notification panel, or keyboard.
The following topics give you all the information you need to set up your Samsung™ phone and wireless
service the first time.
Parts and Functions
These topics illustrate your phone’s primary parts and key functions.
Note: Your phone's screens and apps layouts are subject to change. This user guide uses sample
images only.
Phone Layout
The following illustration outlines your phone’s primary external features and keys.
Front View
Set Up Your Phone 5
Part
Description
Home key/fingerprint sensor
Return you to the home screen. Press and hold to open Google™
Search/Google Now™. Use to register fingerprints for security.
Access recently used apps.
Touchscreen
Display information needed to operate your phone, such as the call
status, the Contacts list, and the date and time. Also provides one-tap
access to all of your features and applications.
Volume keys
Adjust the ringtone or media volume or adjust the voice volume during
a call.
LED indicator
The LED indicator blinks or glows when charging, to indicate low
battery, to announce new notifications, and when voice recording.
Proximity sensors
Detect when objects are close to the screen. For example, when you
hold the phone to your ear while on a phone call, the sensors
temporarily lock the screen to prevent accidental screen touches.
Recent apps key
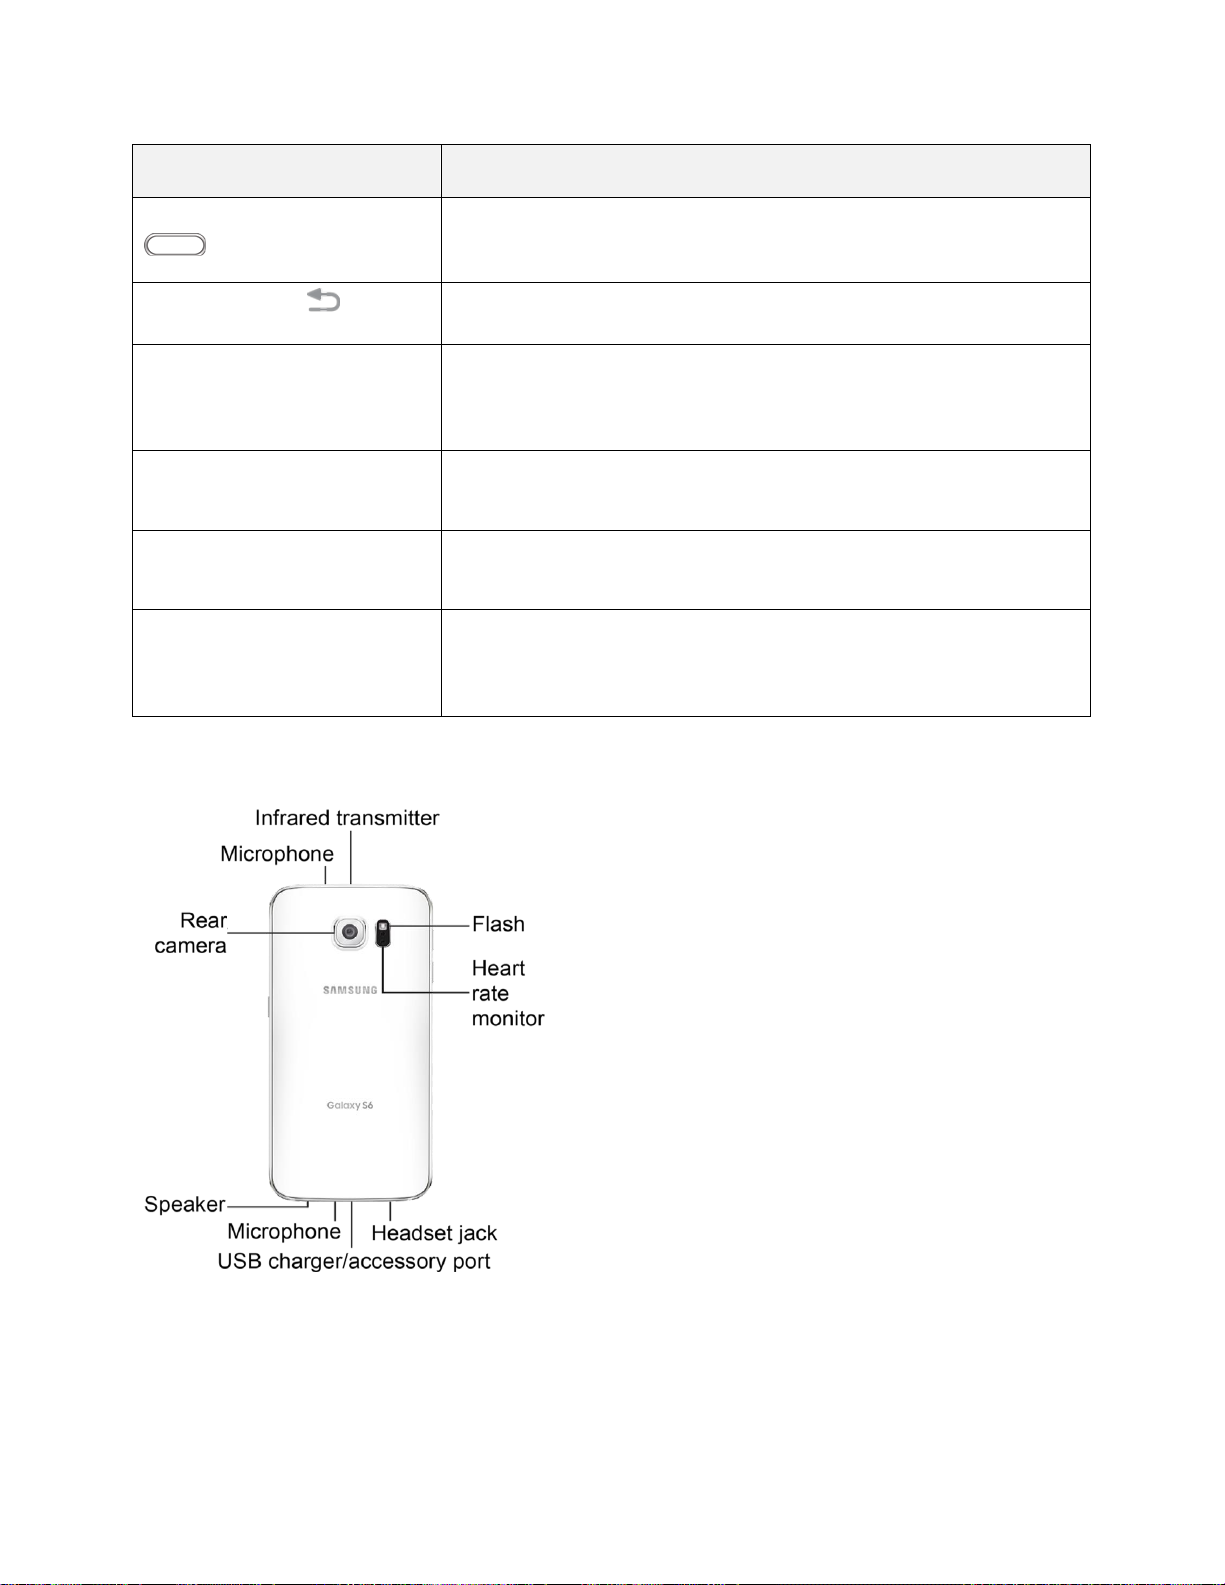
Back View
Set Up Your Phone 6

Part
Description
SIM card/Memory card tray
Location of the SIM card and memory card (not included).
Flash
Help illuminate subjects in low-light environments when the camera is
focusing and capturing a picture or video.
Heart rate monitor
Measure your heart rate using your fingertip when using the S Health
app. For more information, see S Health.
Headset jack
Plug in a headset for convenient, hands-free conversations.
USB charger/accessory port
Connect the phone to the charger using a USB cable.
Microphone
Transmit your voice for phone calls or record your voice or ambient
sounds for voice recordings and videos.
Power/Lock key
Turn the phone or screen on or off, or switch your phone to
Emergency mode.
Speaker
Play ringtones and sounds. The speaker also lets you hear the caller’s
voice in speakerphone mode.
Rear camera
Take pictures and videos.
Caution: Inserting an accessory into the incorrect jack may damage the phone.
Charge the Battery
Follow these instructions to charge your phone’s battery using either the included charging head and USB
cable or using a USB connection on your computer.
Tip: This device is also compatible with Samsung-approved wireless charging devices (sold separately).
Note: This phone has an integrated battery that cannot be removed by the user.
Battery Cautions
Caution: Recharge your battery only with Samsung-approved chargers which are specifically
designed for your phone. Using other accessories may invalidate your warranty and may cause
damage.
Storage: Avoid storing or leaving the phone with no battery charge remaining. Saved information and
settings may become lost or changed, or the phone may become unusable. Charge once every six
months before storing or leaving unused for a long period.
Set Up Your Phone 7
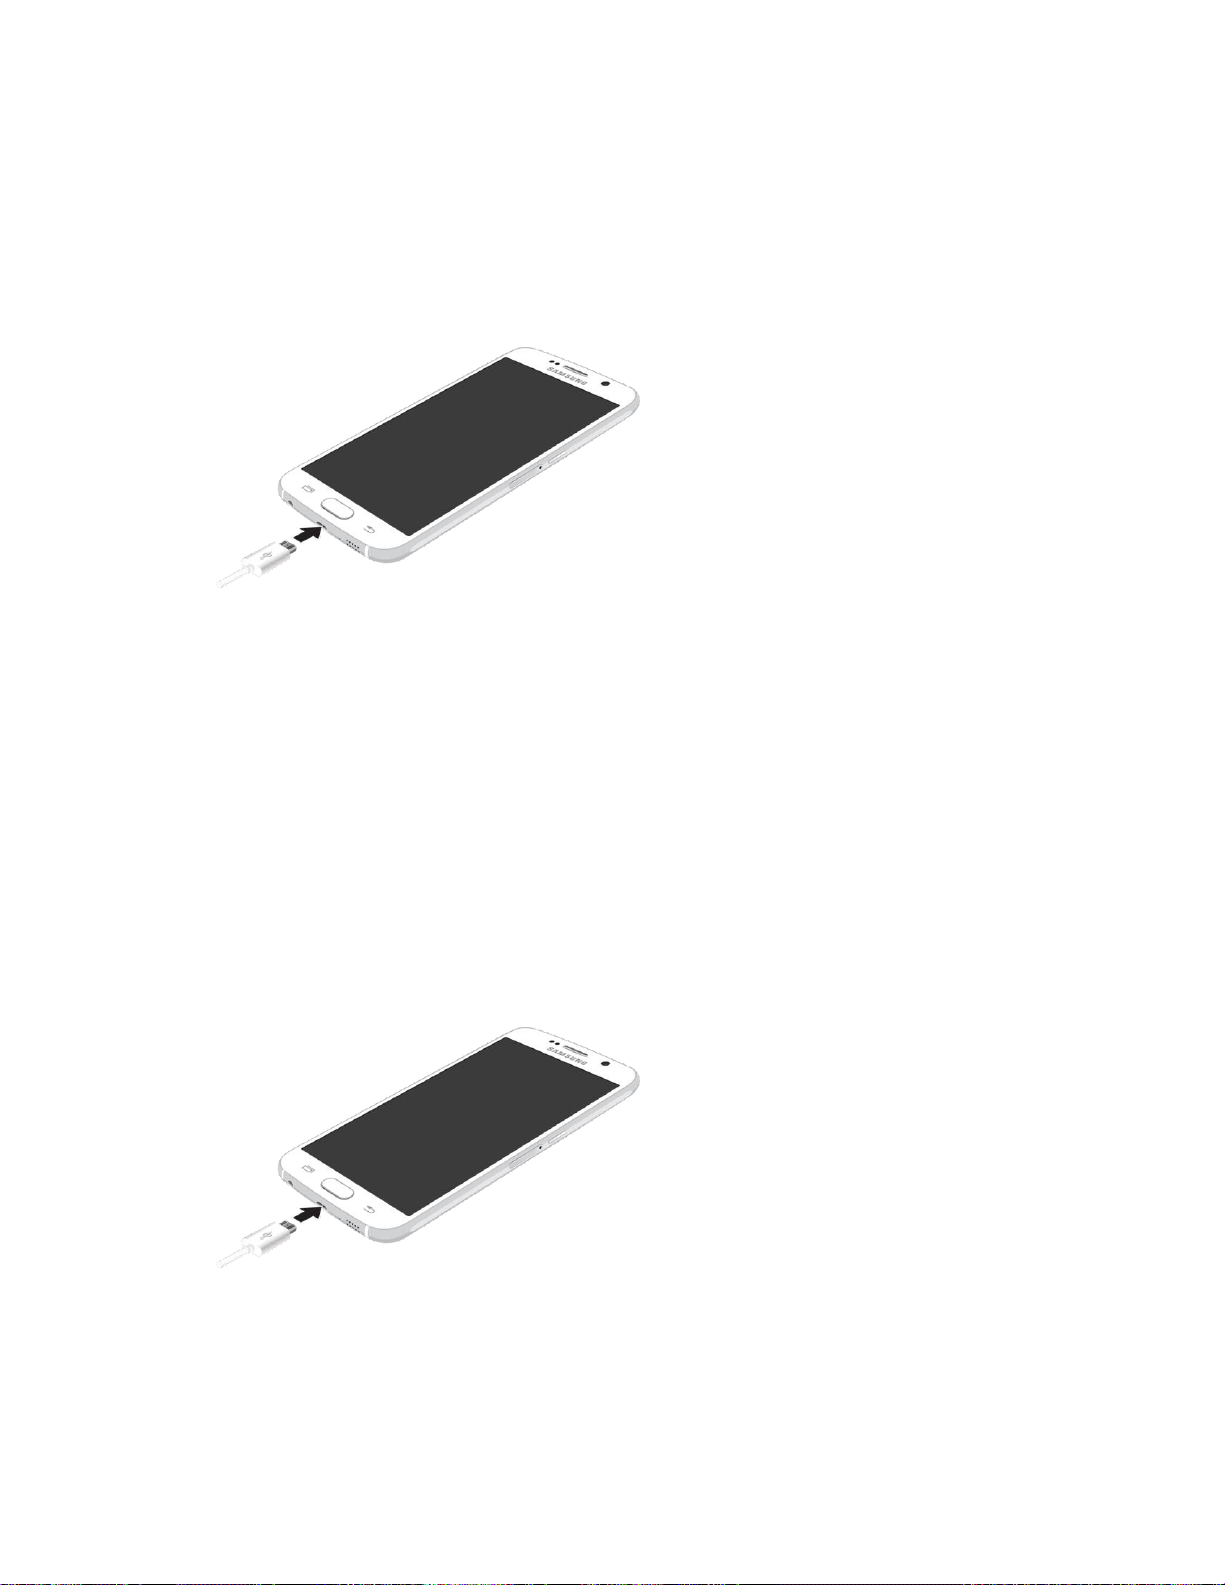
Charge Using the AC Adapter
It is recommended you fully charge the battery before using your device for the first time. For fastest
charging times, use the Adaptive Fast Charging charger that came with your device. This charger
provides faster charging only when connected to devices that support Adaptive Fast Charging.
1. Plug the USB cable into the USB charger/accessory port on the bottom of your phone.
2. Plug the other end of the USB cable into the charging head.
3. Plug the charging head into an electrical outlet.
4. After charging, disconnect the phone from the charger.
Unplug the charging head from the outlet, and remove the micro USB cable from the phone
and the charging head.
Charge Using a PC Connection
Before using a PC connection to charge your phone, ensure that the computer is turned on. Depending
on the type of connection, your phone’s battery may not charge.
1. Insert the small end of the USB cable into the USB charger/accessory port on the bottom of your
phone.
2. Insert the large end of the USB cable into a USB port on your computer.
3. After charging, remove the USB cable from both the phone and the computer.
Set Up Your Phone 8

SIM Card
The SIM card is an IC card containing phone number and other customer information. Your phone’s SIM
card is preinstalled and should only be accessed if directed by a customer service representative.
Handling a SIM Card
Keep the following in mind when handling a SIM card:
● You are responsible for any damage caused by inserting the SIM card in another brand IC card
reader, etc. Virgin Mobile is not responsible in such a case.
● Always keep the IC chip clean.
● Wipe clean with a dry, soft cloth.
● Avoid applying labels. May damage SIM card.
● See instructions included with SIM card for handling.
● The SIM card is the property of Virgin Mobile.
● The SIM card is replaceable (at cost) in case of loss/damage.
● Return the SIM card to Virgin Mobile when canceling subscription.
● Returned SIM cards are recycled for environmental purposes.
● Note that SIM card specifications and performance may change without notice.
● It is recommended that you keep a separate copy of information that is stored on SIM card. Virgin
Mobile is not responsible for damages from stored information that is lost.
● Always follow emergency procedures to suspend service if your SIM card or phone (SIM card
inserted) is lost or stolen. For details, contact Customer Service.
● Always power off the phone before inserting/removing the SIM card.
Insert SIM Card
Follow these instructions to insert a SIM card. Remember to power off your phone before inserting a SIM
card.
Note: Your phone’s SIM card is preinstalled. These instructions are for reference only.
Caution: Exercise care when using the removal tool to eject the internal SIM card/Memory card tray.
1. Insert the removal tool into the hole on the SIM card/Memory card tray, and push until the tray
pops out.
Set Up Your Phone 9

2. Place the SIM card on the tray.
Make sure that the card’s gold contacts face down into the device and that the card is
positioned as shown.
3. Slide the SIM card/Memory card tray back into the slot.
Important: To prevent water and dust from entering the device, remove any dust on the O-Ring and
ensure the SIM card/Memory card tray is closed tightly.
Caution: If the SIM card is not inserted correctly, the device cannot detect it. Reorient the card and place
it back into the slot if the SIM card is not detected.
Maintaining Water and Dust Resistance
Note: Water-resistant and dustproof based on IP68 rating, which tests submersion up to 5.0 feet for up to
30 minutes.
This device is rated IP68 using the Ingress Protection rating system.
Your device has been tested in a controlled environment and shown to be water and dust resistant in
certain circumstances (meets requirements of classification IP68 as described by the international
standard IEC 60529 - Degrees of Protection provided by Enclosures [IP Code]; test conditions: 15‑35°C,
86‑106 kPa, 5.0 feet, for 30 minutes). Despite this classification, your device is not impervious to water
damage in any situation. It is important that all compartments are closed tightly.
Follow these tips carefully to prevent damage to the device.
● Whenever your device gets wet, dry it thoroughly with a clean, soft cloth.
● Do not expose the device to salt water or ionized water, or to water over 5.0 feet deep for more
than 30 minutes. If your device is exposed to fresh water, dry it thoroughly with a clean, soft cloth.
If the device is exposed to any liquid other than fresh water, rinse the device with fresh water
immediately and dry it thoroughly with a clean, soft cloth. Failure to rinse the device in fresh water
and dry it as instructed may cause the device to suffer from operability or cosmetic issues.
● Do not expose the device to water at high pressure.
● If the device is dropped or receives an impact, the water and dust resistant features of the device
may be damaged.
● The touchscreen and other features may not work properly if the device is used in water or in
other liquids. [040616]
Set Up Your Phone 10

SD Card
Your phone supports the use of an optional SD card (not included) to expand its storage capacity. Some
cards may not operate properly with your phone.
SD Card Cautions
Data: Information stored on an SD card can become lost or changed accidently or as a result of
damage. It is recommended that you keep a separate copy of important data. Virgin Mobile is not
responsible for damages from data that is lost or changed.
Reading/Writing Data: Never power off or remove the battery while reading or writing data.
Battery Level: A low battery charge may prevent reading/writing to an SD card.
Handling SD Card: Use/store SD cards away from the reach of infants. SD cards may cause choking
if swallowed.
Insert an SD Card
Follow these steps to insert an optional SD card (not included). Make sure to power your phone off before
inserting or removing an SD card.
Note: To improve performance and reliability with High-definition video recording and playback, it is
recommended you use a memory card (SD card) that is both rated as at least a Class 10 and provides a
high read speed.
Caution: Exercise care when using the removal tool to eject the internal SIM card/Memory card tray.
1. Insert the removal tool into the hole on the SIM card/Memory card tray, and push until the tray
pops out.
2. Place the memory card on the tray with the gold contacts facing down.
3. Slide the SIM card/Memory card tray back into the slot.
Set Up Your Phone 11

Unmount an SD Card
Always unmount an SD card before removing it from your phone.
1. From home, tap Apps > Settings .
2. Tap Storage .
3. Tap SD card > Unmount.
The menu option name changes from Unmount SD Card to Mount SD Card. The card is now
unmounted.
Remove an SD Card
Follow these instructions to remove an SD card. Always power the phone off before inserting or removing
an SD card.
Caution: Exercise care when using the removal tool to eject the internal SIM card/Memory card tray.
1. Insert the removal tool into the hole on the SIM card/Memory card tray, and push until the tray
pops out.
2. Slide the tray out and remove the memory card.
3. Slide the SIM card/Memory card tray back into the slot.
Format an SD Card
When you insert an optional SD card for the first time, it is recommended that you format it.
Caution: Formatting an SD card permanently deletes all data on it.
1. From home, tap Apps > Settings .
2. Tap Storage .
3. Tap SD Card > Format.
4. Tap Format to confirm.
All data on the SD card is erased, and the card is formatted for use on your phone.
Set Up Your Phone
12

Turn Your Phone On and Off
The instructions below explain how to turn your phone on and off.
Turn Your Phone On
■ Press and hold the Power/Lock key.
Your phone will power on. Depending on the settings, you may see the lock screen.
See Lock and Unlock Your Screen and Screen Lock for information about using the screen
lock.
The first time you turn the phone on, you will see the startup screens. See Complete the
Setup Screens for details.
If your phone is not yet activated, see Activate Your Phone for more information.
Turn Your Phone Off
1. Press and hold the Power/Lock key to display the device options menu.
2. Tap Power off to turn the phone off.
Your phone will power off.
Your screen remains blank while your phone is off (unless the battery is charging).
Set Up Your Phone 13
Use the Touchscreen
Your phone’s touchscreen lets you control actions through a variety of touch gestures.
Tap
When you want to type using the keyboard, select items such as application and settings icons, or press
buttons, simply tap or touch them with your finger.
Touch and Hold
To open the available options for an item (for example, a contact or link in a Web page), touch and hold
the item.
Set Up Your Phone
14
Swipe or Slide
To swipe or slide means to quickly drag your finger vertically or horizontally across the screen.
Drag
To drag, press and hold your finger with some pressure before you start to move your finger. While
dragging, do not release your finger until you have reached the target position.
Set Up Your Phone
15
Flick
Flicking the screen is similar to swiping, except that you need to swipe your finger in light, quick strokes.
This finger gesture is always in a vertical direction, such as when flicking the contacts or message list.
Rotate
For most screens, you can automatically change the screen orientation from portrait to landscape by
turning the phone sideways. When entering text, you can turn the phone sideways to bring up a bigger
keyboard. See Touchscreen Keyboards for more details.
Note: Auto rotate needs to be enabled for the screen orientation to automatically change. Pull down the
status bar to display the notification panel, and then tap Auto rotate to enable the option.
Set Up Your Phone
16

Pinch and Spread
Pinch the screen using your thumb and forefinger to zoom out or spread the screen to zoom in when
viewing a picture or a Web page. (Move fingers inward to zoom out and outward to zoom in.)
Activation and Service
Before using your phone, you must set up your service with Virgin Mobile. You will need your phone’s
serial numbers (MEID and ICC ID). These numbers can be found on the phone's packaging.
For more information about your Virgin Mobile account, see Virgin Mobile Account Information and Help.
Create Your Account and Pick Your Plan
Set up your Virgin Mobile account.
1. From your computer, visit virginmobileusa.com and click Activate.
2. Choose an activation option and click Next. Then enter your zip code and click Next.
3. When prompted, enter the serial number (MEID) printed on the sticker located on the back of
your phone in the battery compartment. This number can also be found on the bottom panel of
the phone’s package.
4. Follow the remaining instructions to choose your plan and select a payment method.
5. Follow the activation instructions below and you’ll be able to start using your phone.
Set Up Your Phone
17

Activate Your Phone
After setting up your account on virginmobileusa.com, simply turn your device on. Your device is
designed to activate automatically. If you are swapping from another Virgin Mobile device to a new one,
be sure to turn off the old device before swapping the serial number (MEID). Once the MEID swap is
complete, turn on the new device and the programming information will be pushed to your device
automatically.
You can also start the activation process manually.
■ From home, tap Apps > Settings > Activate this device .
Complete the Setup Screens
The setup screens help you set up certain features and preferences on your phone. Once your phone has
been turned on, you will see a Welcome message. You can then complete the setup process.
Note: You may be able to complete the setup screens before your phone has been activated on your
account.
1. From the Welcome screen, select a language and tap Start to get started.
To skip any section, tap Next or Skip.
Note: On the Welcome screen, there may also be an Accessibility button. If you are visually impaired or
hard of hearing, tap Accessibility to change the accessibility settings.
2. Follow the prompts to complete each section. For each topic, you will have the option to skip it
and continue to the next screen.
Wi-Fi – If prompted, follow the prompts to sign in to an available Wi-Fi network. For secured
Wi-Fi networks, you will need to enter a password. See Wi-Fi for more details.
Terms and Conditions – Read any applicable End User License Agreements or Terms and
Conditions for using your phone, and tap Next > Agree to continue.
Got another device – If you have another Android phone, you can quickly transfer you setup
to this phone.
Google (Add your account) – Tap Enter your email and complete the steps to sign in to
your current Google Account, or tap Or create a new account to set up a new Google
Account. Tap Skip to skip Google setup. The following options may apply depending on your
selection:
Note: When you sign in to a Google Account on your device, Factory Reset Protection is turned on.
Factory Reset Protection (FRP) prevents other people from using your device if it is reset to factory
settings without your permission. See Factory Reset Protection for more information.
• Enter your email – Enter your Gmail address and password and tap Accept to agree to
the terms of service and privacy policy and sign in to your current Google Account.
Set Up Your Phone
18

• Or create a new account – Follow the instructions to sign up for a new Google Account.
There will be screens to enter your first and last names, create an email address (Gmail),
create a password, enter recovery information (including a backup email address and
recovery question), an option to join Google+, and an option to enable purchases from
the Google Play store app. Tap Next between each screen.
• Set up payment info – Select billing options for purchases made through Google Play.
Select Remind me later to skip this step.
• Get your apps & data – If you are using a Google Account you had set up on a previous
Android™ device, you can choose to use that device's backup information to restore
backed-up apps, data, system settings, Wi-Fi passwords, etc., from the previous device
to your new phone. Tap Set up as a new device to skip this step.
Personalize your phone – If applicable, enter your first and last name and tap Next. This
information is used by the phone to personalize certain apps.
Set up email – Set up an email account.
Google services – Select your Google location and service options and then tap Next.
Samsung account – Enter your email account and password to sign in to your current
Samsung account, or tap Create account to set up a new Samsung account.
Date & time – Adjust the date and time, if necessary.
Smart Switch – Transfer content from your old device to this device.
Easy mode – Switch between the default screen layout and a simpler layout. The Easy mode
layout has larger text and icons, making for a more straightforward visual experience
3. Tap Finish. Your setup is now complete. Follow the prompts to learn about basic tap menu
navigation, view tutorials, or just get started.
Your phone is now set up for use. If you skipped any part of the setup, you can access
additional options through the Apps screen or through Settings.
Note: You do not need to sign up for a Google Account to use your phone. However, to download apps
from Google Play™, you must link your phone to a Google Account.
Set Up Your Phone 19
Basic Operations
The following topics outline basic features and operations of your phone.
Basics
The following topics offer an overview of your phone’s basic operations.
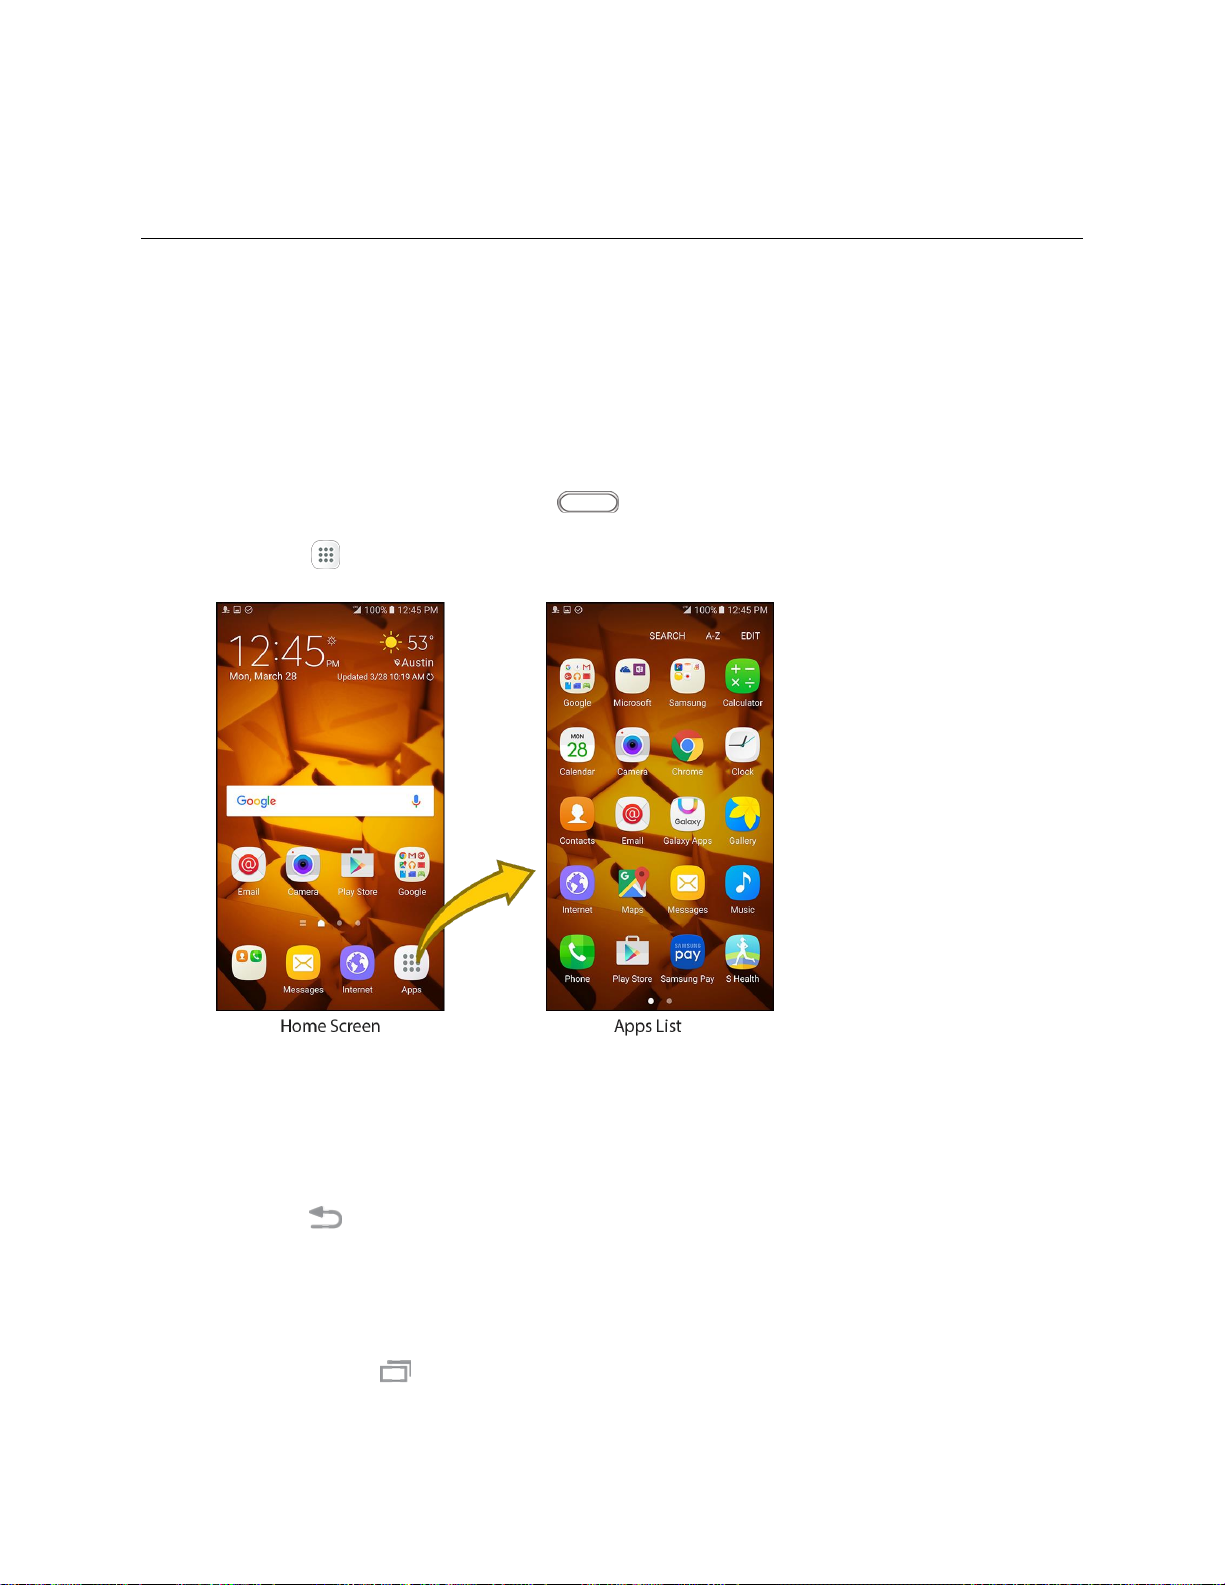
Home Screen and Applications (Apps) List
Most of your phone’s operations originate from the home screen or the Apps list.
1. From any screen press the Home key to display the home screen.
2. Tap Apps to display the Apps list.
For information about using the home screen, see Home Screen Basics.
Select Options and Navigate Screens
Tap icons, keys, and other items to open or activate the assigned function.
■ Tap Back to return to the previous screen.
Recent Applications
You can display a list of recently used applications using the Recent apps key.
■ Tap Recent apps to view a list of recently used applications.
Basic Operations
20
 Loading...