

Samsung SM-G925RZKAUSC User Manual
SMARTPHONE
User Manual
Please read this manual before operating your device
and keep it for future reference.

Legal Notices
Warning: This product contains chemicals known
to the State of California to cause cancer and
reproductive toxicity. For more information, please call
1-800-SAMSUNG (726-7864).
Intellectual Property
All Intellectual Property, as defined below, owned
by or which is otherwise the property of Samsung
or its respective suppliers relating to the SAMSUNG
Phone, including but not limited to, accessories,
parts, or software relating there to (the “Phone
System”), is proprietary to Samsung and protected
under federal laws, state laws, and international
treaty provisions. Intellectual Property includes,
but is not limited to, inventions (patentable or
unpatentable), patents, trade secrets, copyrights,
software, computer programs, and related
documentation and other works of authorship. You
may not infringe or otherwise violate the rights
secured by the Intellectual Property. Moreover,
you agree that you will not (and will not attempt
to) modify, prepare derivative works of, reverse
engineer, decompile, disassemble, or otherwise
attempt to create source code from the software.
No title to or ownership in the Intellectual Property
is transferred to you. All applicable rights of the
Intellectual Property shall remain with SAMSUNG
and its suppliers.
Open Source Software
Disclaimer of Warranties;
Exclusion of Liability
EXCEPT AS SET FORTH IN THE EXPRESS
WARRANTY CONTAINED ON THE WARRANTY
PAGE ENCLOSED WITH THE PRODUCT, THE
PURCHASER TAKES THE PRODUCT “AS IS”, AND
SAMSUNG MAKES NO EXPRESS OR IMPLIED
WARRANTY OF ANY KIND WHATSOEVER WITH
RESPECT TO THE PRODUCT, INCLUDING BUT
NOT LIMITED TO THE MERCHANTABILITY OF THE
PRODUCT OR ITS FITNESS FOR ANY PARTICULAR
PURPOSE OR USE; THE DESIGN, CONDITION OR
QUALITY OF THE PRODUCT; THE PERFORMANCE
OF THE PRODUCT; THE WORKMANSHIP OF THE
PRODUCT OR THE COMPONENTS CONTAINED
THEREIN; OR COMPLIANCE OF THE PRODUCT
WITH THE REQUIREMENTS OF ANY LAW, RULE,
SPECIFICATION OR CONTRACT PERTAINING
THERETO. NOTHING CONTAINED IN THE
INSTRUCTION MANUAL SHALL BE CONSTRUED
TO CREATE AN EXPRESS OR IMPLIED WARRANTY
OF ANY KIND WHATSOEVER WITH RESPECT TO
THE PRODUCT. IN ADDITION, SAMSUNG SHALL
NOT BE LIABLE FOR ANY DAMAGES OF ANY KIND
RESULTING FROM THE PURCHASE OR USE OF
THE PRODUCT OR ARISING FROM THE BREACH
OF THE EXPRESS WARRANTY, INCLUDING
INCIDENTAL, SPECIAL OR CONSEQUENTIAL
DAMAGES, OR LOSS OF ANTICIPATED PROFITS
OR BENEFITS.
Some software components of this product
incorporate source code covered under GNU
General Public License (GPL), GNU Lesser
GeneralPublic License (LGPL), OpenSSL
License, BSD License and other open source
licenses. Toobtain the source code covered
under the opensource licenses, please visit:
http://opensource.samsung.com.
Legal Notices
Modification of Software
SAMSUNG IS NOT LIABLE FOR PERFORMANCE
ISSUES OR INCOMPATIBILITIES CAUSED BY
YOUR EDITING OF REGISTRY SETTINGS, OR
YOUR MODIFICATION OF OPERATING SYSTEM
SOFTWARE.
USING CUSTOM OPERATING SYSTEM SOFTWARE
MAY CAUSE YOUR DEVICE AND APPLICATIONS
TO WORK IMPROPERLY. YOUR CARRIER MAY
NOT PERMIT USERS TO DOWNLOAD CERTAIN
SOFTWARE, SUCH AS CUSTOM OS.
i
USC_G925R4_ENG_UM_OCB_TN_032515_R7

Samsung KNOX™
Samsung Knox™ is Samsung’s security platform
and is a mark for a Samsung device tested for
security with enterprise use in mind. Additional
licensing fee may be required. For more information
about Knox, please refer to:
www.samsung.com/us/knox. [030115]
Samsung Electronics America
(SEA), Inc
Address:
85 Challenger Road
Ridgefield Park,
New Jersey 07660
Phone:
1-800-SAMSUNG (726-7864)
Google, the Google logo, Android, the Android logo,
Google Play, Gmail, Google Maps, Google Music,
Google Hangouts, Picasa, Play Newsstand, YouTube,
and other marks are trademarks of Google Inc.
Wi-Fi is a registered trademark of the
WirelessFidelity Alliance, Inc.
LTE is a trademark of ETSI.
Swype and the Swype logos are trademarks of
Swype, Inc.
Online Legal Information
The online version of the Health/Safety and
Warranty guide for your device can be found at:
English
www.samsung.com/us/Legal/Phone-HSGuide
Spanish
www.samsung.com/us/Legal/Phone-HSGuide-SP
Internet Address:
www.samsung.com
©2015 Samsung Electronics America, Inc.
Samsung, Galaxy, Multiwindow, and SHealth are
registered trademarks of SamsungElectronics Co.,
Ltd.
Do you have questions about your
Samsung Mobile Device?
For 24 hour information and assistance, we offer
a new FAQ/ARS System (Automated Response
System) at: www.samsung.com/us/support
The actual available capacity of the internal memory
is less than the specified capacity because the
operating system and default applications occupy
part of the memory. The available capacity may
change when you upgrade the device.
Nuance
logo are trademarks or registered trademarks of
Nuance Communications, Inc., or its affiliates in the
United States and/or other countries.
®
, VSuite™, T9® Text Input, and the Nuance
The online version of the End User Licensing
Agreement for your device can be found online at:
www.samsung.com/us/Legal/SamsungLegal-EULA2.
The Bluetooth
Design”) , and combination mark (Bluetooth word
mark and “B Design”) are registered trademarks and
are wholly owned by the Bluetooth SIG.
Legal Notices
®
word mark, figure mark (stylized “B
ii

Table of Contents
Getting Started .................................................................1
Front View ........................................................................... 2
Back View ........................................................................... 3
Assemble Your Device ............................................... 4
Set Up Your Device ......................................................6
Set Up Accounts on Your Device ........................ 7
Set Up and Access Voicemail ............................... 8
Know Your Device .........................................................9
Home Screen..................................................................10
Status Bar .........................................................................14
Navigation, Motions, and Gestures ..................15
Edge Screen ...................................................................16
Notification Panel .........................................................18
Multi Window ..................................................................20
Enter Text ..........................................................................22
Memo ..................................................................................53
Messages .........................................................................54
Music Player ....................................................................56
My Files ..............................................................................57
S Health .............................................................................59
S Voice ...............................................................................60
Video Player ....................................................................61
Voice Recorder ..............................................................62
Settings .................................................................................. 63
How to Use Settings ..................................................64
Wi-Fi Settings ..................................................................65
Bluetooth ...........................................................................67
Airplane Mode ...............................................................69
Wi-Fi hotspot and tethering ....................................70
Data Usage ......................................................................73
Calling...................................................................................... 24
Make and Answer Calls ...........................................25
Applications ...................................................................... 28
Apps Screen ...................................................................29
Google Applications ..................................................31
U.S. Cellular Applications .......................................33
Other Applications ......................................................34
Calculator ..........................................................................36
Calendar ............................................................................37
Camera and Video ......................................................39
Clock ....................................................................................42
Contacts .............................................................................43
Email ....................................................................................47
Galaxy Apps ...................................................................48
Gallery ................................................................................. 49
Internet ................................................................................51
Mobile Networks ...........................................................74
NFC and Payment .......................................................75
More Connection Settings ......................................76
Sounds and Notifications ........................................78
Display Settings ............................................................81
Edge Screen Settings ...............................................83
Motions and Gestures...............................................84
Applications Settings .................................................85
Wallpaper Settings ......................................................88
Themes ...............................................................................89
Lock Screen and Security ......................................90
Privacy and Safety .......................................................94
Easy Mode .......................................................................96
Accessibility .....................................................................97
Accounts ............................................................................99
Backup and Reset.................................................... 100
Language and Input Settings ............................ 101
iii
Table of Contents

Battery .............................................................................. 103
Storage Settings ........................................................ 104
Date and Time Settings ........................................ 105
Help ................................................................................... 106
About Your Device ................................................... 107
iv
Table of Contents

Getting Started
Learn about your mobile
device hardware, assembly
procedures, and how to
get started using your new
device.
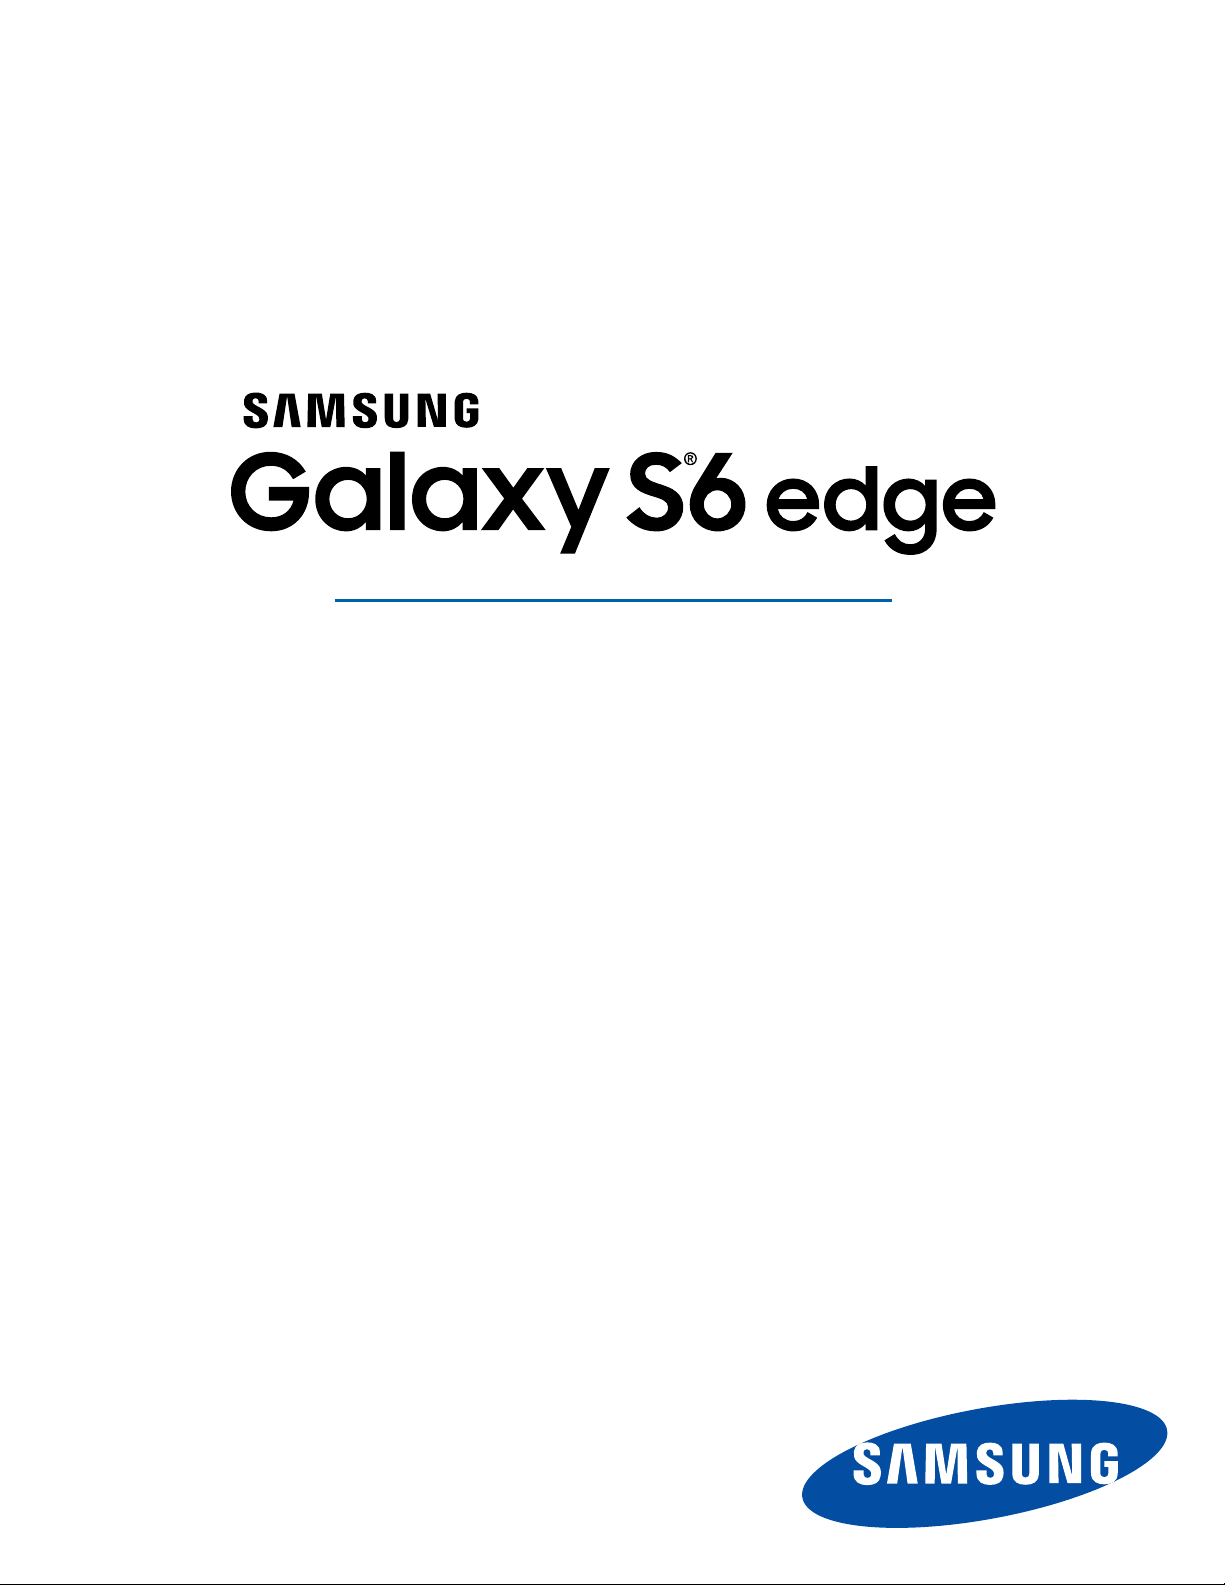
Front View
Proximity and light
sensors
Status light
Volume keys
Earpiece
Front camera
Power/Lock key
Recent apps
Home/Finger scanner key
Back: Tap to return to the previous screen, or to
•
close a dialog box, menu, or keyboard.
Earpiece: Listen to a call.
•
Front camera: Take self-portraits and record
•
videos of yourself.
Home/Finger scanner key: Tap to return to the
•
Home screen. Activate the Fingerprint security
feature.
Power/Lock key: Press and hold to turn the
•
device on or off. Press to lock or wake up the
screen. Press and hold to turn the device off or
restart it, or for quick access to Airplane Mode
and Emergency Mode.
Back
Proximity and light sensors: Detects the
•
presence of objects near the device.
Recent apps: Tap to display recent apps or touch
•
and hold for home screen options.
Status light: Displays red when charging or the
•
battery is low, blue when a notification has arrived
or you are voice recording, and green when fully
charged.
Volume keys: Press to adjust the volume of your
•
device’s sounds and audio.
2
Front ViewGetting Started
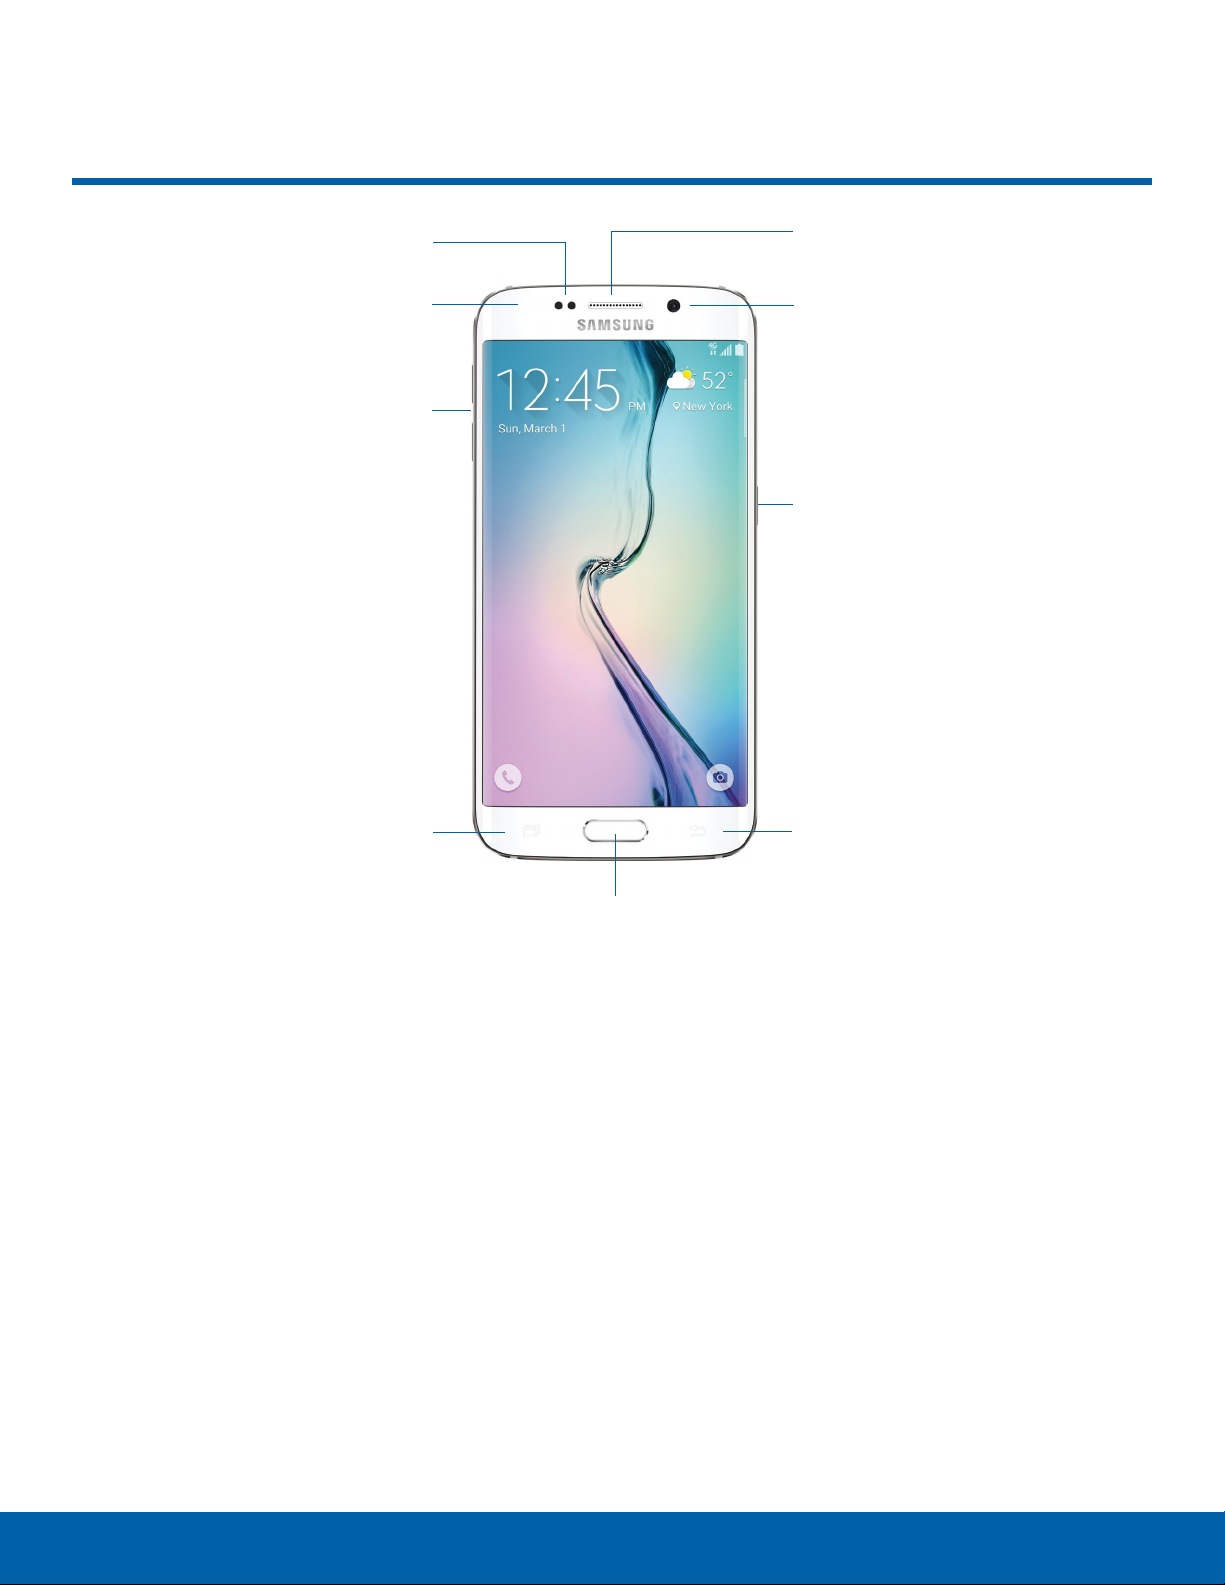
Back View
Infrared transmitter
Microphone
Rear camera
Heart rate sensor
SIM tray
Flash
Speaker
Microphone
USB charger/Accessory port
Flash: Illuminate subjects in low-light
•
environments when taking a photo or recording
video.
Headset jack: Connect an optional headset
•
(notincluded).
Heart rate sensor: When using the S Health app,
•
this sensor measures your heart rate via your
fingertip.
Infrared transmitter: Controls external devices
•
using infrared light.
Headset jack
Microphone: Records audio and detects voice
•
commands.
Rear camera: Take pictures and record videos.
•
SIM tray: The tray that holds the SIM card.
•
Speaker: Plays music and other sounds.
•
USB charger/Accessory port: Connect the
•
Charger/USB cable (included), and other optional
accessories (not included) .
3
Back ViewGetting Started
Assemble Your Device
This section helps you to
assemble your device.
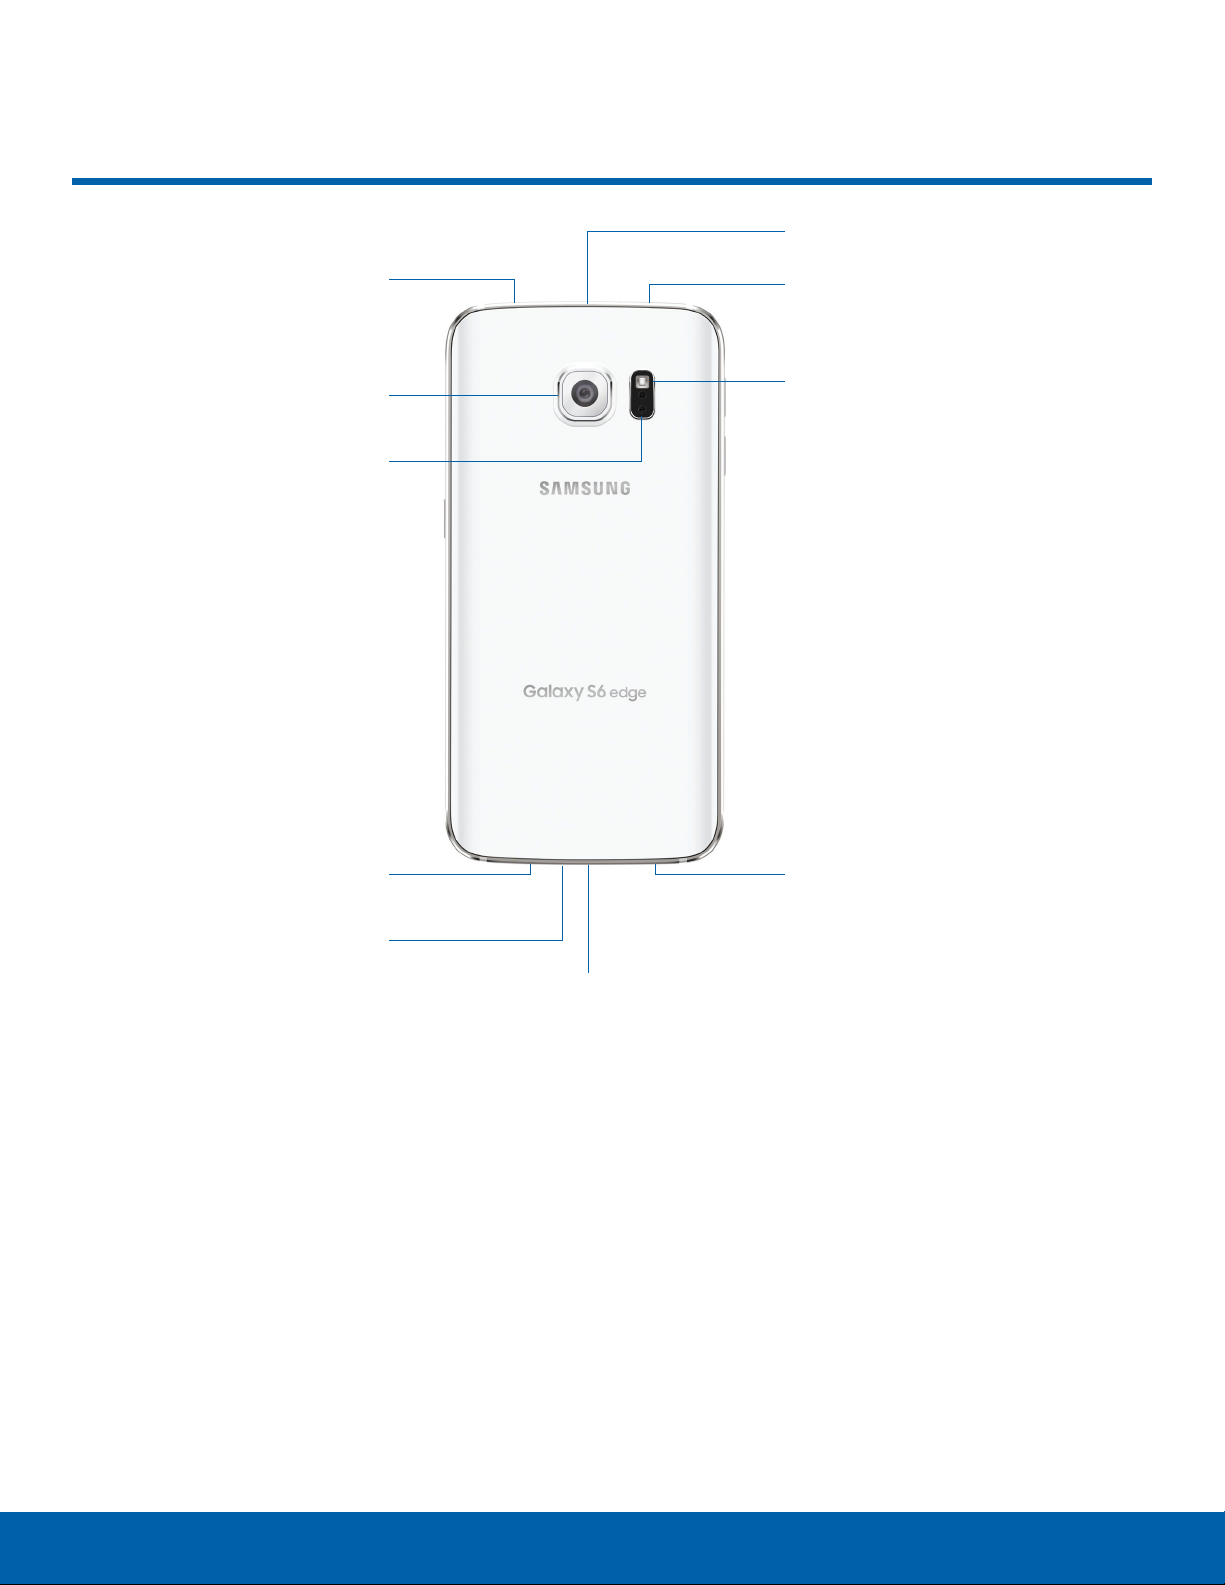
Install the SIM Card
When you subscribe to a cellular network, you are
provided with a plug-in SIM card. During activation,
your SIM card will be loaded with your subscription
details, such as your PIN, available optional
services, and other features.
Warning: Please be careful when handling the SIM
card to avoid damaging it. Keep all SIM cards out of
reach of small children.
Charge the Battery
Note: For fastest charging times, use the Adaptive
Fast Charging charger that came with your phone.
This charger provides faster charging only when
connected to devices that have Adaptive Fast
Charging.
Caution: Use only Samsung-approved charging
devices. Samsung accessories are designed to
maximize battery life. Using other accessories may
invalidate your warranty and may cause damage.
1. Insert the USB cable into the port.
Caution: Exercise care when using the metallic
removal tool to eject the internal SIM card slot.
1. Insert the removal tool into the hole on the SIM
tray, and push until the tray pops out.
2. Place the SIM card on the tray, and slide the tray
back into the slot.
Caution: If the card is not inserted correctly, the
device will not detect the SIM card. Re-orient the
card and place it back into the slot if the SIM is
notdetected.
2. Connect the USB cable to the charging head,
and then plug the charging head into a standard
outlet.
3. When charging is complete, unplug the charging
head from the outlet and remove the USB cable
from the device.
4
Assemble Your DeviceGetting Started

When to Charge the Battery
When the battery is weak and only a few minutes of
operation remain, the device sounds a warning tone
at regular intervals.
In this condition, your device conserves its
remaining battery power by dimming the screen.
When the battery level becomes too low, the device
automatically turns off.
► For a quick check of your battery level, view the
battery charge indicator located in the upper
right corner of your device’s display. A solid
color (
You can also choose to display a percentage
value. Viewing a percentage value can provide
a better idea of the remaining charge on the
battery. For more information, see Battery.
) indicates a full charge.
5
Assemble Your DeviceGetting Started

Set Up Your Device
Turn Your Device On or Off
Turn the Device On
► Press and hold the Power/Lock key until the
device starts up.
Turn the Device Off
1. Press and hold the Power/Lock key until the
device vibrates and the Device options menu
displays.
2. Tap Power off.
Configure your Phone
When you first turn on your phone, you will need to
set up a few things.
1. As each screen is displayed, follow the
instructions on each screen to set up that
particular feature.
2. Tap NEXT, SKIP, or L ATER to progress to the
next screen.
Secure Your Device
Use your device’s screen lock features to secure
your device.
Lock the Device
By default, the device locks automatically when the
screen times out.
► To lock the device, press the Power/Lock key.
Unlock the Device
The default Screen lock on your device is Swipe.
► To unlock your device, press the Power/Lock
key or Home key, and then touch and drag your
finger across the screen.
Set Up a Secure Screen Lock
The default Screen lock is Swipe, which offers no
security. To choose a more secure screen lock,
see Set a Screen Lock.
6
Set Up Your DeviceGetting Started

Set Up Accounts on Your Device
Google Account
Your new device uses your Google Account to
fully utilize its Android features, including Gmail,
GoogleHangouts, and the Google Play Store.
When you turn on your device for the first time, set
up your existing Google Account, or create a new
GoogleAccount.
– or –
To create a new Google Account or set up your
Google Account on your device at any time, use
Accounts settings. Formore information,
see Accounts.
► From a Home screen, tap
Settings > Accounts > Add account >
Google.
Apps >
Samsung Account
Create a Samsung account, for access to Samsung
content and apps on your device. When you turn on
your device for the first time, set up your existing
Samsung account, or create a new Samsung
account.
– or –
To create a new Samsung account or set up your
Samsung account on your device at any time, use
Accounts settings. Formore information,
see Accounts.
► From a Home screen, tap
Settings > Accounts > Add account >
Samsungaccount.
Apps >
7
Set Up Accounts on Your DeviceGetting Started
Set Up and Access Voicemail
Set Up Your Voicemail
1. From the Home screen, tap Phone, then tap
Voicemail.
2. Follow the tutorial to create a password, record a
greeting, and record your name.
Note: These steps may be different depending on
your network.
Access Your Voicemail
1. From the Home screen, tap Phone, then tap
Voicemail.
You may be prompted to enter a password.
2. When connected, follow the voice prompts from
the voice mail center.
Access Your Voicemail From
Another Phone
1. Dial your wireless phone number.
2. When you hear your voicemail greeting, press
the asterisk key on the phone you are using.
3. Enter your password and you are connected to
your Voicemail.
8
Set Up and Access VoicemailGetting Started

Know Your Device
Learn some of the key
features of your mobile
device, including the screens
and icons, as well as how to
navigate the device and enter
text using the keyboard.
Warning: Please note that a touch screen
responds best to a light touch from the pad
of your finger or a non-metallic stylus. Using
excessive force or a metallic object when
pressing on the touch screen may damage the
tempered glass surface and void the warranty.

Home Screen
Notifications icons
Widget
Home screen indicator
Status icons
Status Bar
People edge tab
App folders
Apps screen
App shortcuts
App folders: For your convenience, there are
•
several applications that are grouped into a folder
on the main Home screen.
App shortcuts: Shortcuts to your favorite
•
applications.
Apps screen: Allows quick access to all of your
•
applications.
Home screen indicator: Indicates which
•
Homescreen is presently displayed. Swipe across
the screen to the right to open Flipboard Briefing.
Notification icons: Display new messages and
•
emails, notifications, available software updates,
and so on.
People edge tab: Swipe the tab at the upper
•
edge to the center of the screen to reveal the
People edge.
Note: This can appear on either side of the screen
according to your Edge screen settings.
Status Bar: Displays device status icons (right)
•
and notification icons (left).
Status icons: Display information about the
•
device, such as the network signal strength,
battery level, the time, and more.
Widget: Self-contained application that runs on
•
the Home screen (not shortcuts) .
10
Home ScreenKnow Your Device

The Home screen is the starting
Wallpapers
point for using your device.
Customize your Home screen
by adding application shortcuts,
widgets, folders, andusing
wallpapers.
Manage Home Screens
Your device comes with multiple Home screens to
hold apps and widgets. You can rearrange the Home
screens in a different order.
1. From a Home screen, pinch the screen.
– or –
Touch and hold an empty space on the screen.
2. Use these options to manage screens:
Add a screen: Scroll to the end of the
•
screens, and then tap Add.
Remove a screen: Touch and hold on a
•
screen, and then drag it to
Set a screen as the main Home screen:
•
Tap
screen. This screen displays when you press
the Home Key.
Change the order of screens: Touch and
•
hold on a screen, and then drag to a new
position.
Main Home screen at the top of a
Remove.
Change the look of the Home and Lock screens
with wallpaper. You can display a favorite picture or
choose from preloaded wallpapers.
1. From a Home screen, pinch the screen.
– or –
Touch and hold an empty space on the screen.
2. Tap Wallpapers.
For details on viewing and changing wallpapers,
see Wallpaper Settings.
To access Wallpaper settings:
► From a Home screen, tap
Settings > Wallpaper.
Apps >
Widgets
Widgets are self-contained apps that run on a
Homescreen. There are all kinds of widgets,
including links to a specific contact, Internet
bookmarks, Gmail and email accounts, and
manyothers.
Add a Widget to a Home Screen
1. Touch and hold an empty space on the screen,
and then tap Widgets.
2. Touch and hold a widget, drag it to a
Homescreen, and then release it.
Remove a Widget
Flipboard Briefing: Scroll to the left of the
•
screens to find the Flipboard Briefing screen.
To activate this feature, tap the checkbox at
the top center of the screen.
1. From a Home screen, touch and hold a widget to
releaseit.
2. Drag the widget to
Note: Removing a widget does not delete the widget,
it just removes the widget from the Home screen.
11
Remove and releaseit.
Home ScreenKnow Your Device

Themes
App Shortcuts
Set visual themes for all system screens and icons
on your phone.
1. From a Home screen, pinch the screen.
– or –
Touch and hold an empty space on the screen.
2. Tap Themes.
For details on viewing and changing themes,
see Themes.
To access Theme settings :
► From a Home screen, tap
Settings > Themes.
Apps >
Screen Grid
Change the number of icons that can be placed on
each Home screen by changing the Screen grid
dimensions.
You can use app shortcuts to launch an app from
any Home screen.
Add a Shortcut to a Home Screen
1. From a Home screen, tap Apps.
2. Touch and hold an app shortcut, drag it to a
Home screen, and then release it.
Remove a Shortcut
1. Touch and hold an app shortcut to releaseit.
2. Drag the app shortcut to
releaseit.
Note: Removing a shortcut does not delete the app, it
just removes the shortcut from the Home screen.
Remove and
Folders
Place folders on a Home screen to organize items.
1. From a Home screen, pinch the screen.
– or –
Touch and hold an empty space on the screen.
2. Tap Screen grid.
3. Tap a dimension option (4 x 4, 4 x 5, or 5 x 5)
to preview its appearance. The numbers indicate
how many icons can be placed horizontally by
how many icons can be placed vertically.
4. Tap APPLY to apply the selected dimensions.
Create a Folder
You can create app folder on a Home screen.
1. Touch and hold an app icon and drag it on top of
another app until a highlighted box appears.
2. Release the app icon to create the folder.
3. Tap the line to enter a name for the folder.
4. Tap the
(if desired).
5. Tap anywhere outside of the folder to close it.
6. To add more apps, touch and hold an app icon
and drag it to the folder.
Palette icon to change the color
12
Home ScreenKnow Your Device

Add a Folder to a Home Screen
Folders created on an Apps screen can be added to
a Home screen
1. From an Apps screen, touch and hold an app
folder.
2. Drag the folder onto a Home screen and
releaseit.
Remove a Folder from a Home Screen
1. Touch and hold the folder until it detaches.
2. Drag the folder to
Remove and release it.
13
Home ScreenKnow Your Device

Status Bar
The Status Bar at the top of the
Home screen provides device
information (such as network
status, battery charge, and time)
on the right side and notification
alerts on the left.
Status Icons
Battery is fully charged.
Battery is low. The yellow area turns red
as the charge level becomes critical.
Battery is charging.
Vibrate mode is enabled.
Mute mode is enabled.
Notification Icons
Missed call.
Call in progress.
Call is on hold.
Call is using speakerphone.
New email has arrived.
New Gmail has arrived.
New voicemail message has been
received.
New text or multimedia message has
arrived.
Download of a file or app is in progress.
The device is connected to a 4G LTE
wireless network.
Signal strength.
Wi-Fi is active.
No wireless network is available.
NFC (Near-Field Communication) is
enabled.
File is being uploaded or sent.
Location service (GPS) is active.
App updates are available from the
Google Play Store.
App updates are complete.
Keyboard is in use.
14
Status BarKnow Your Device

Navigation, Motions, and Gestures
Touchscreen Navigation
Tap
Lightly tap items to select or launch them.
Tap the on screen keyboard to enter characters
•
ortext.
Tap an item to select it.
•
Tap an app icon to launch the application.
•
Touch and Hold
Activate onscreen items by a touch and hold
gesture. For example:
Touch and hold a widget on the Home screen to
•
move it.
Touch and hold a field to display a pop-up menu
•
of options.
Pinch and Spread
Pinch the screen using your thumb and forefinger or
spread by moving your fingers apart.
Pinch or spread the screen to zoom in or out while
•
viewing a picture or a webpage.
Pinch or spread the screen to zoom in or out while
•
taking a picture.
Motions and Gestures
Control your device by making specific gestures
with your hand above the device’s screen.
For details see Motions and Gestures.
To access the Motions and Gestures settings:
► From a Home screen, tap
Settings > Motions and Gestures.
Apps >
Swipe or Slide
To swipe, lightly drag your finger vertically or
horizontally across the screen.
Swipe the screen to unlock the device.
•
Swipe the screen to scroll through the
•
Homescreens or menu options.
Drag
To drag, touch and hold on an item, and then move
it to a new location.
Drag an app shortcut to add it to a Home screen.
•
Drag a widget to a place it in a new location on a
•
Homescreen.
15
Navigation, Motions, and GesturesKnow Your Device
Edge Screen
The Edge screen provides
a variety of useful tools for
notifications, information feeds,
and timekeeping.
Notification Options
You can configure which notifications appear
on the Edge screen, Edge lighting options, and
prioritycontacts.
Edge Lighting and Quick Reply
Edge lighting and Quick reply are features
that activate when your phone is turned over
(display side down). Edge lighting illuminates the
Edge screen when a notification is received. If
Peopleedge is also on, the color of the indicator
will be that assigned to the contact who is calling
ormessaging.
Quick reply allows you to reject an incoming phone
call with a text message by placing your finger on
the heart rate sensor for two seconds. The call is
rejected, and a preset message is sent to thecaller.
To turn on Edge lighting:
People Edge
People edge allows you to set important contacts for
custom notifications on the Edge screen.
1. From a Home screen, tap
Settings> Edge screen > People edge.
– or –
Swipe the People edge tab to the center of the
screen, and tap
2. Tap the ON/OFF switch to turn on the feature.
3. Ta p My people to add contacts to the My people
list.
Tap Add contact to add a person from
-
your contact list. Notifications from that
person appear in the color assigned.
Tap EDIT to rearrange the order contacts
-
appear on the screen, or to remove
contacts.
4. Ta p Alert when picking up to enable or disable
alerts from your My people contacts when you
pick up your phone.
Settings.
Apps >
Select Notifications
You can choose which kinds of notifications appear
on the Edge screen.
1. From a Home screen, tap
Settings> Edge screen > Edge lighting.
2. Tap the ON/OFF switch to turn on the feature.
To turn on and configure Quick reply:
1. From a Home screen, tap
Settings> Edge screen > Edge lighting.
2. Tap Quick reply.
3. Tap the ON/OFF switch to enable Quick reply.
4. Tap the message to edit the text reply.
5. When finished, tap the
savechanges.
Apps >
Apps >
Back arrow to
1. From a Home screen, tap
Settings> Edge screen > Select
notifications.
2. Tap the ON/OFF switch next to each of the
following notification types to activate or
deactivate alerts on the Edge screen:
Missed call
•
Messages
•
Email
•
3. When finished, tap the
savechanges.
16
Apps >
Back arrow to
Edge ScreenKnow Your Device

More Features
In addition to contacts and notifications, the Edge
screen can be configured for news, time, and can
even be moved to the opposite side of the screen.
Night Clock
Set up a clock that displays on the Edge screen
when the phone screen is off. Night mode is
available for a maximum of 12 hours.
Information Stream
The Information stream feature displays feeds that
you select on the Edge screen.
To view the Information stream:
► When the main screen is turned off, quickly
swipe your finger along the Edge screen in
one direction, and then back in the opposite
direction.
To configure the Information stream:
1. From a Home screen, tap
Settings> Edge screen > Information
stream.
2. Tap the ON/OFF switch to activate the
Information stream feature.
3. Ta p Manage feeds to configure the following:
Tap the checkbox on each feed that you want
•
to appear on the Edge screen.
Apps >
1. From a Home screen, tap
Settings> Edge screen > Night clock.
2. Tap the ON/OFF switch to activate the Night
clock feature.
3. Tap the numbers on the Start time clock to set
the time for the Night clock to activate.
4. Tap the numbers on the End time clock to set
the time for the Night clock to deactivate.
5. When finished, tap the
savechanges.
Apps >
Back arrow to
Edge Screen Position
You can select either the left or right side of the
display for the Edge screen.
1. From a Home screen, tap
Settings> Edge screen > Edge screen
position.
2. Tap either Right side or Left side to set which
side the Edge screen appears on.
Apps >
To edit a feed, tap the Settings icon
•
(if available).
To download more feeds, swipe to the right
•
and tap the Download feeds bar.
To change the order of the feeds, tap
•
REORDER and drag the selected feeds into
the order you prefer.
4. Ta p Edge screen timeout to configure how long
the Edge screen stays on when activated.
5. Ta p Weather to configure weather settings,
as well as select which screens and apps that
weather information appears on.
3. When finished, tap the
savechanges.
Back arrow to
17
Edge ScreenKnow Your Device
Notification Panel
Edit Notification Panel
Quick settings
Adjust screen
brightness
Tap notification
to launch app or
view detail
Settings
Clear all notifications
Notification icons on the Status
Bar display calendar events,
device status, and more. For
details, open the Notification
Panel.
View the Notification Panel
1. Swipe down on the Status Bar to display the
Notification Panel.
2. Scroll down the list to see notification details.
Tap an item to open it.
•
To clear a single notification, drag the
•
notification left or right. Tap Clear to clear
all notifications.
3. To close the Notification Panel, swipe upward
from the bottom of the screen or tap
Back.
Quick Settings
In addition to notifications, the Notification Panel
also provides quick access to device functions such
as Wi-Fi, allowing you to quickly turn them on or off.
To view additional Quick settings:
► On the Notification Panel, swipe left or right
across the visible icons.
To customize the Quick settings that appear:
► On the Notification Panel, tap EDIT.
18
Notification PanelKnow Your Device

S Finder
Search your device for apps, contacts, messages,
email, files, settings, and more.
1. Swipe down on the Status Bar to display the
Notification Panel.
2. Tap S Finder.
3. Tap the Search bar and type what you are
searching for.
You can narrow the search by tapping Category,
Time, Location or Tag and using preset search
options. Items that match your search will appear
below,
4. Tap items to open them.
Quick Connect
Search for nearby devices automatically to connect
to them quickly and easily.
1. Swipe down on the Status Bar to display the
Notification Panel.
2. Tap Quick connect. Your device automatically
scans for compatible devices.
Tap REFRESH to manually scan.
•
3. Tap a device from a list, and select an option:
Share content: Choose a file to share with the
•
device.
Share Wi-Fi profile: Share available Wi-Fi
•
profiles with the device.
Customize Your Quick Connect
1. Swipe down on the Status Bar to display the
Notification Panel.
2. Tap Quick connect.
3. Tap MORE > Set device visibility, and choose
an option.
19
Notification PanelKnow Your Device
Multi Window
Window controls
Multi-task by using multiple
applications at the same time.
Use Multi Window
Apps that support Multi window display together on
a split screen. You can switch between the apps,
adjust the size of their display on the screen, and
copy information from one app to the other.
Note: Multi window is not available for all apps.
1. From any screen, touch and hold
Recentapps.
2. If you are currently using an app that supports
Multi window, tap an app to add in split screen,
or tap two new apps to open in split view.
You can also launch recently used apps directly into
Multiwindow view:
1. Tap the
2. Recently used apps that support Multiwindow
have a
the Multiwindow icon in the title bar to launch
the application in Multiwindow view.
3. Other recently used apps that support
Multiwindow appear below the launched app.
Tap the app icon to add it to the Multiwindow
view.
Note: Only applications that support Multi window
have the Multi window icon.
Recentapps key.
Multiwindow icon in the title bar. Tap
20
Multi WindowKnow Your Device
Window Controls
Select an application window and tap Control in
the middle of the window border.
Control Buttons
Switch windows: Switch locations between
Multi window applications.
Drag and drop content: Move items
between the application windows. Drag an
item to share from one window to another.
Some applications may not support this
feature.
Minimize window: Minimize the selected
app window. This turns the app into a
circular, movable icon that can be opened
by tapping on it.
Maximize window: Open the selected
window in full screen view.
Close app: Close the selected application.
21
Multi WindowKnow Your Device
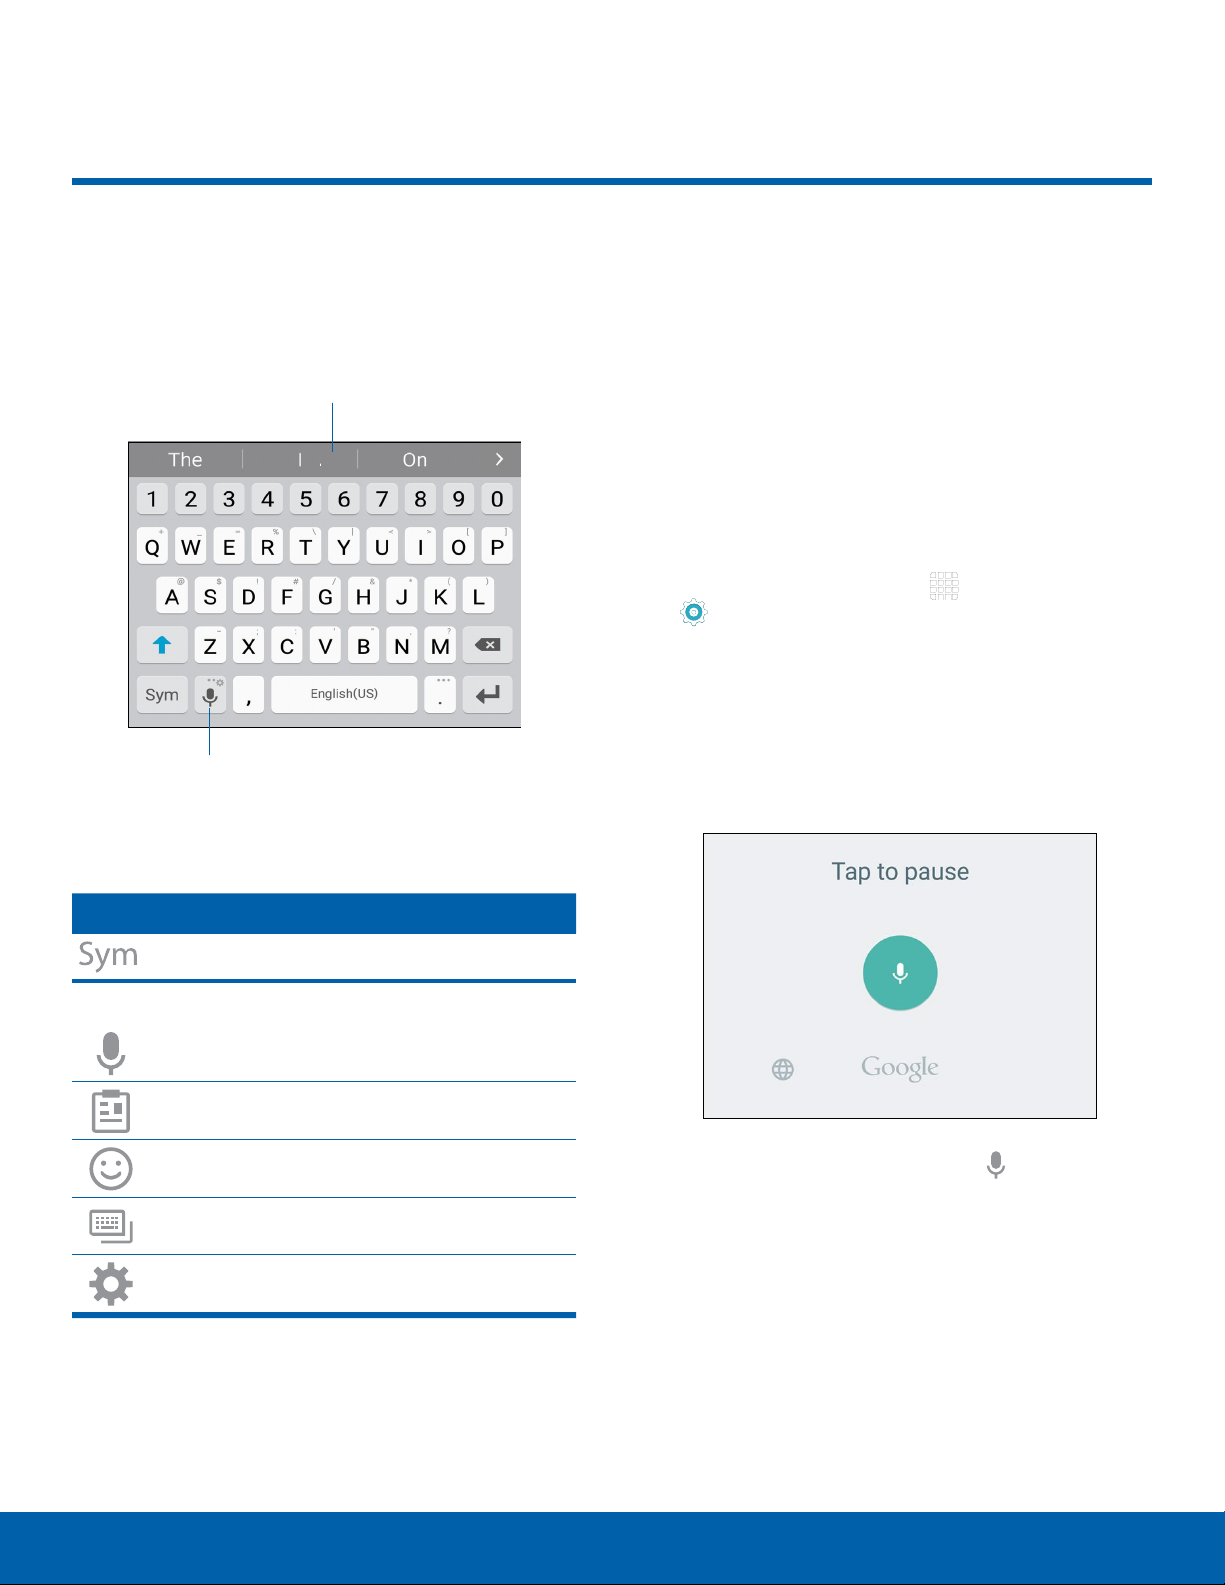
Enter Tex t
Use the SamsungKeyboard
Type your text input using a QWERTY keyboard.
Predictive Text
Options key
Predic tive Tex t
Predictive text suggest words matching your text
entries, and, optionally, completes common words
automatically. Predictive text can learn your personal
writing style from your contacts, messages, email,
and social networking sites — improving its accuracy
of predicting your text entries.
Configure the Samsung Keyboard
To customize the Samsung Keyboard:
1. From a Home screen, tap
Settings > Language and input.
2. Tap Samsung keyboard for options.
Apps >
Using Google Voice Typing
Instead of typing, speak your text input.
Special Keys
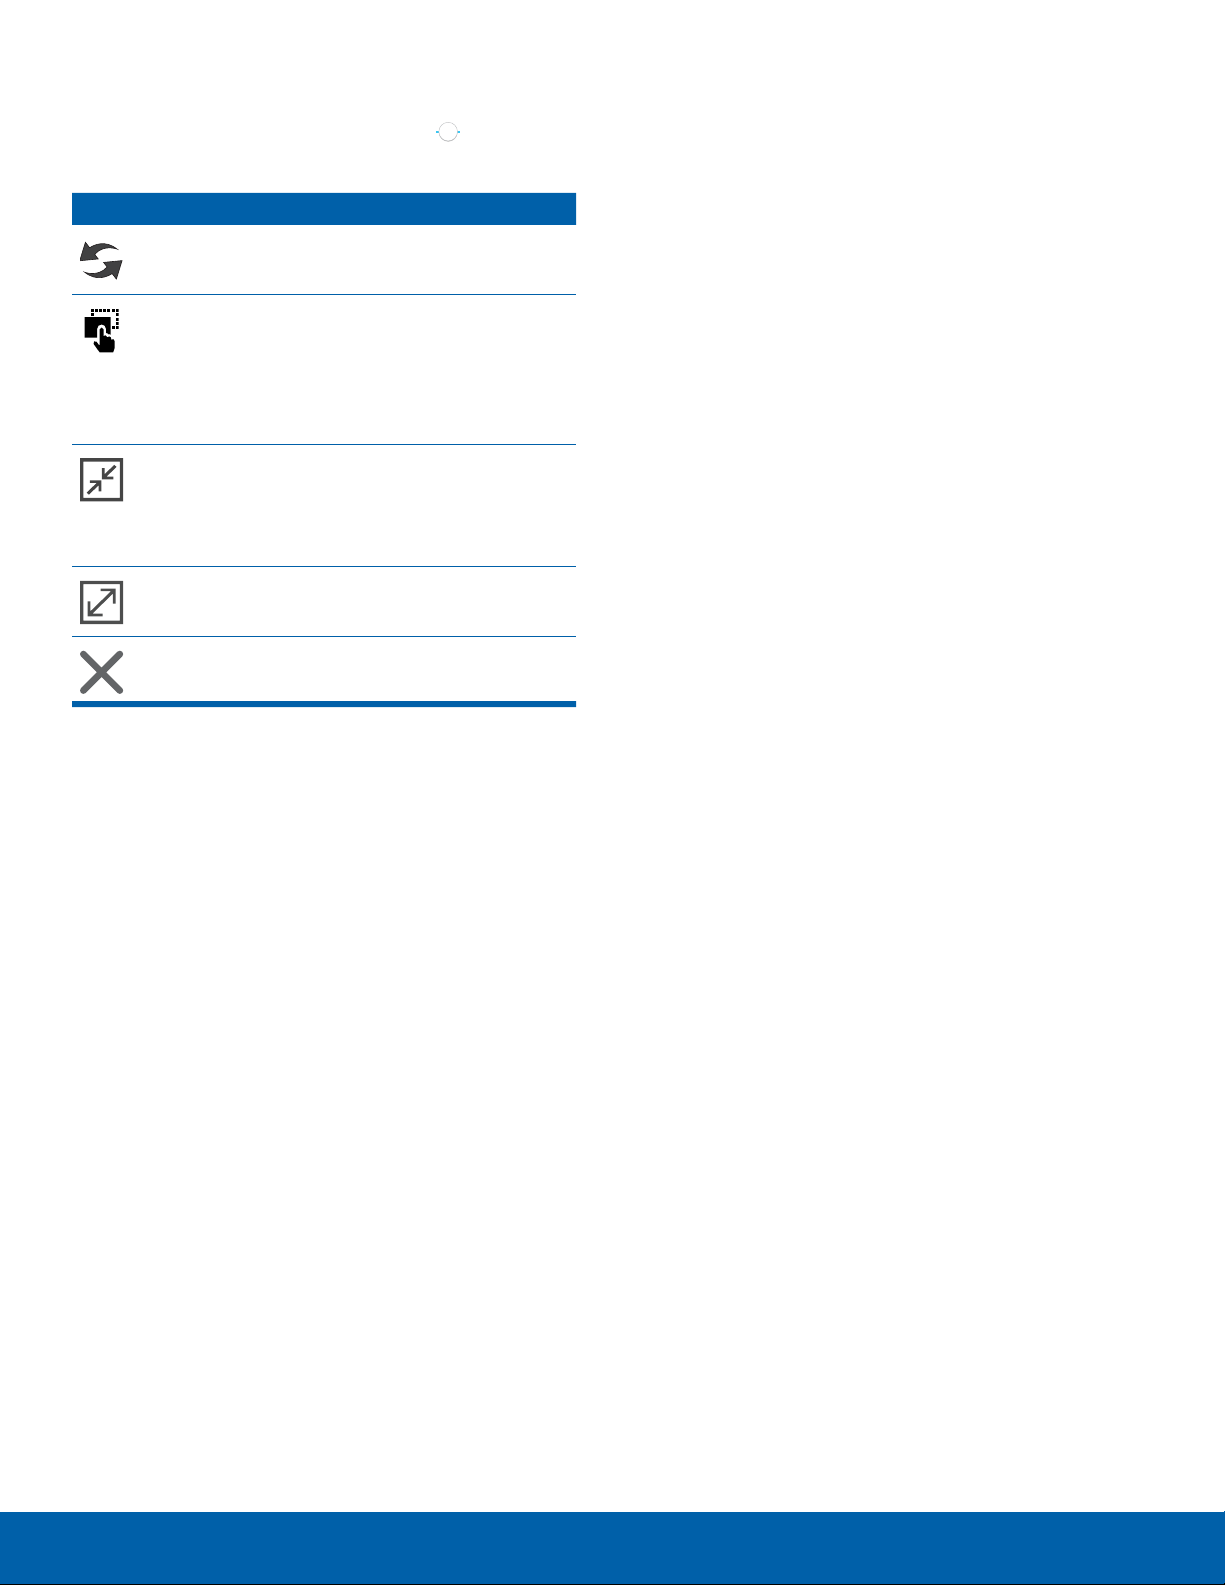
Tap to insert numbers and symbols.
Touch and hold the Options key to:
Use Google Voice Typing.
Access the clipboard.
Insert emoticons.
Change the layout of the keyboard.
Access keyboard settings.
1. On the Samsung Keyboard, tap Google Voice
Typing. You may need to touch and hold the
Options key (left of the Space key) to find it.
2. Speak your text.
22
Enter TextKnow Your Device
Configure Google Voice Typing
To customize Google Voice Typing:
1. From a Home screen, tap
Settings > Language and input.
2. Tap Google voice typing for options.
Apps >
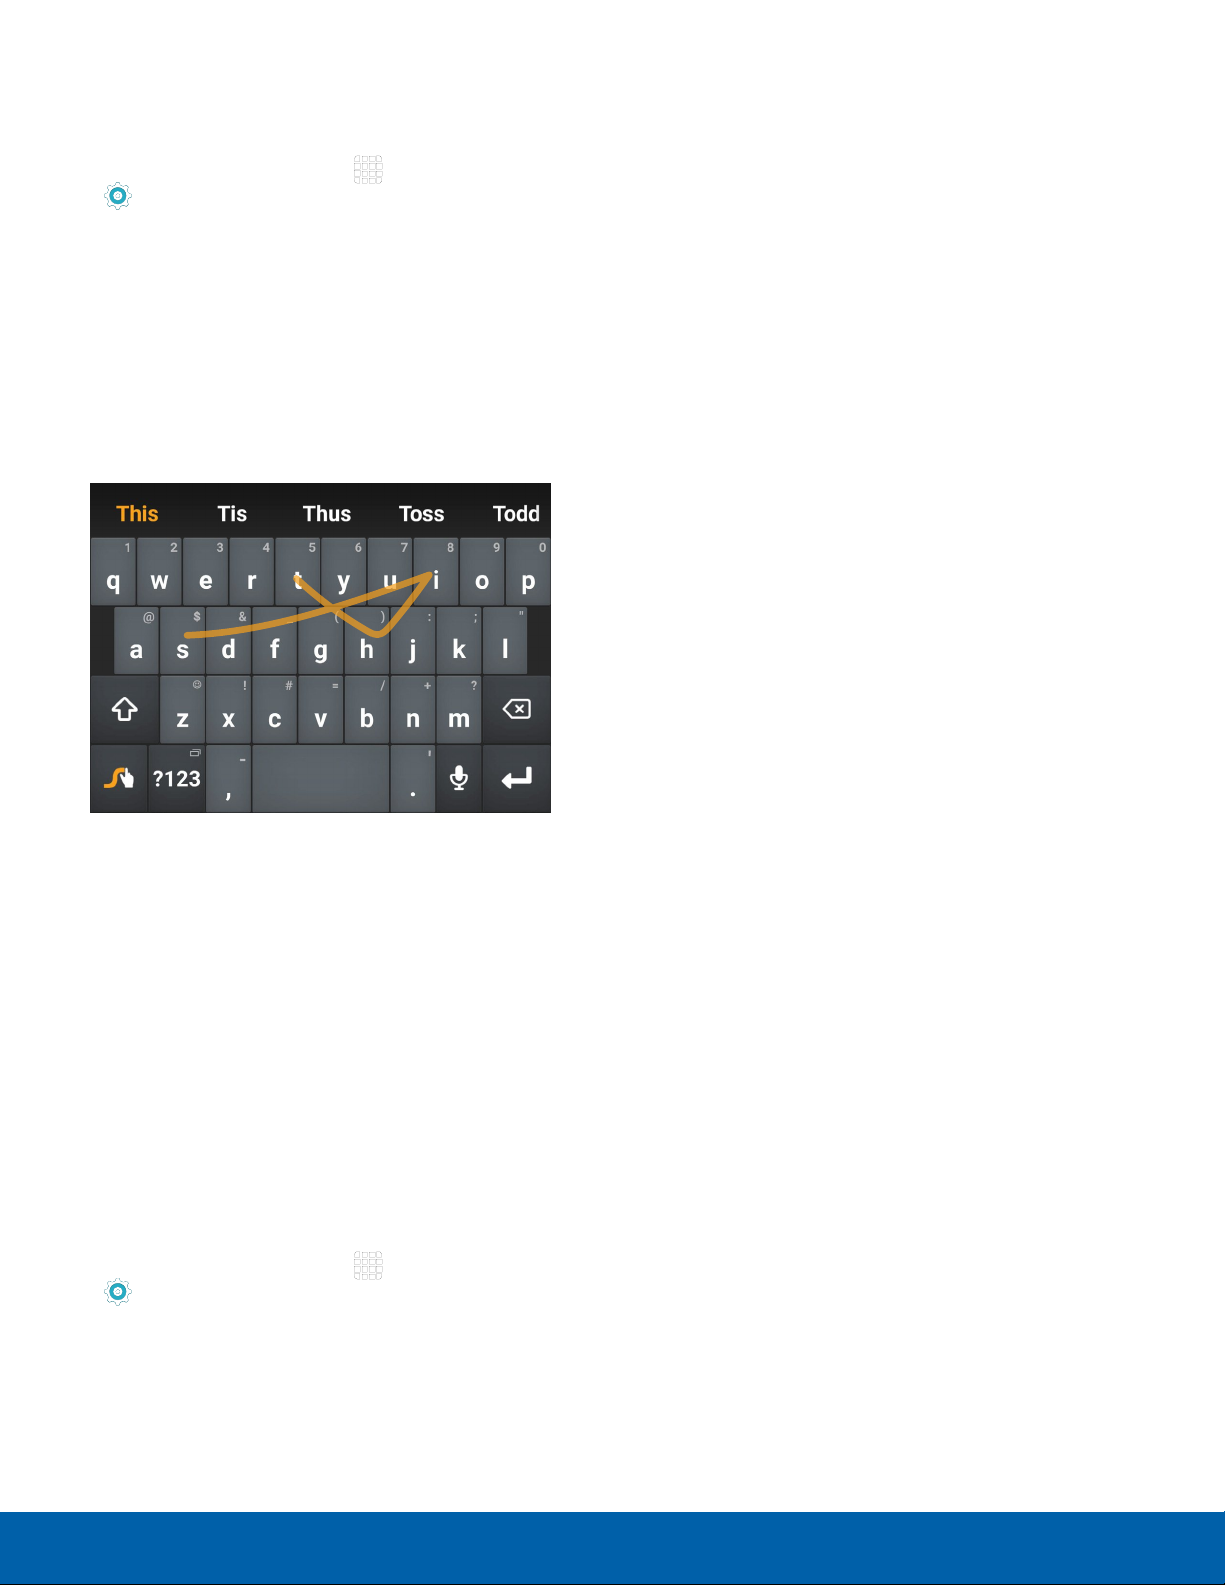
Use Swype
Swype is a text input method that makes it possible
to enter a word by sliding your finger or stylus from
letter to letter, lifting your finger between words.
Enable and Configure Swype
To enable the Swype keyboard while entering
text:
1. Touch the top of the screen and swipe downward
to display the Notification Panel.
2. Touch Select keyboard.
3. Tap Swype.
Configure Swype
To customize Swype:
1. From a Home screen, tap
Settings > Language and input.
2. Tap Swype for options.
Apps >
23
Enter TextKnow Your Device

Calling
Make telephone calls using a
variety of calling features and
services.
Make and Answer Calls
Learn how to make or answer
a call. Explore features and
functionality associated with
making or answering a call.
Make a Call
1. From a Home screen, tap Phone.
2. Enter a number on the keypad and tap
Note: If the keypad does not appear, tap the
Keypad icon.
Quickly Dial a Number from
YourContactList
1. From a Home screen, tap Apps >
Contacts
– or –
From a Home screen, tap
CO NTACTS .
2. While viewing your contact list, swipe your finger
across a contact to the right to call the contact.
Phone >
Dial a Recent Number
Dial.
End a Call
► When you are ready to end your call, tap End.
Answer a Call
When a call is received the phone rings and
displays the caller’s phone number, or name if
stored in the contacts list.
► At the incoming call screen:
Touch and drag Answer to the right to
•
answer the call.
Touch and drag Reject to the left to reject
•
the call and send it to your voicemail.
Touch and drag REJECT CALL WITH
•
MESSAGE upward, and select a message.
If you are using an app, a popup screen appears for
the incoming call.
► On the incoming call popup screen:
Tap Answer to answer the call.
•
Tap Reject to reject the call and send it to
•
your voicemail.
Tap REJECT CALL WITH MESSAGE, and
•
select a message.
All incoming, outgoing, and missed calls are
recorded in the Call log. If the number or caller is
listed in your contacts list, the associated name is
also displayed.
1. From a Home screen, tap
2. Tap LOG. A list of recent calls is displayed.
3. Tap a contact, and then tap
Phone.
Call.
25
Tap Expand to exit the app, and view the
•
main incoming call screen.
Make and Answer CallsCalling
 Loading...