

Samsung SmartThings Wifi ET-WV525 User Manual

User Manual
www.samsung.com08/2018. Rev.1.0
SmartThings Wifi
ET-WV525

Table of Contents
English (USA)
Español (Castellano)
Français (Canada)

3
Getting started
Read me first
Please read this manual before using the device to ensure safe and proper use.
•
Images may differ in appearance from the actual product. Content is subject to change
without prior notice.
•
Before using the Wi-Fi hub, make sure it is compatible with your device.
•
The Wi-Fi hub’s performance may differ depending on the environment.
•
This product includes certain free/open source software. To see the instructions for
viewing the open source license, go to the Samsung website (opensource.samsung.com).
Instructional icons
Warning: situations that could cause injury to yourself or others
Caution: situations that could cause damage to your device or other equipment
Notice: notes, usage tips, or additional information
English (USA)
1
Getting started
4
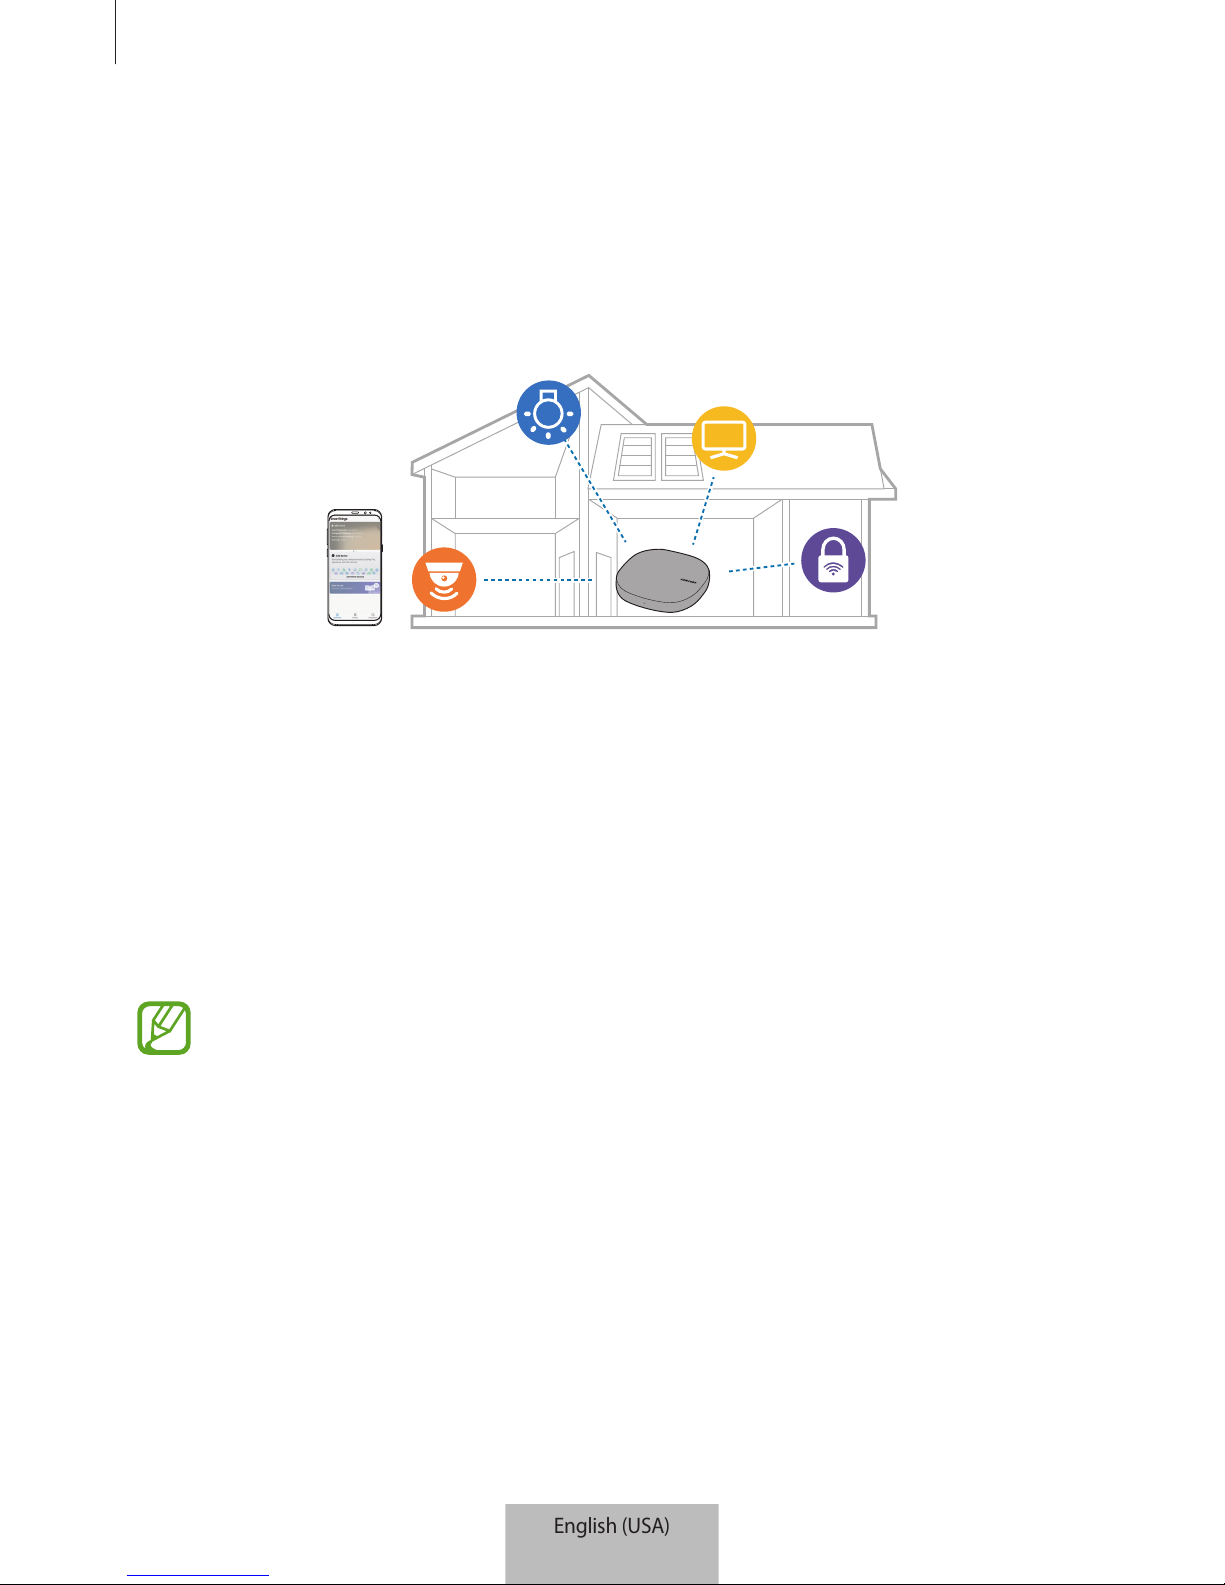
About SmartThings Wifi
The SmartThings Wifi is a Wi-Fi router that can connect your smartphone to your smart home
appliances via Wi-Fi. You can also connect Internet of Things (IoT) devices to this Wi-Fi hub via
the Samsung SmartThings Hub feature.
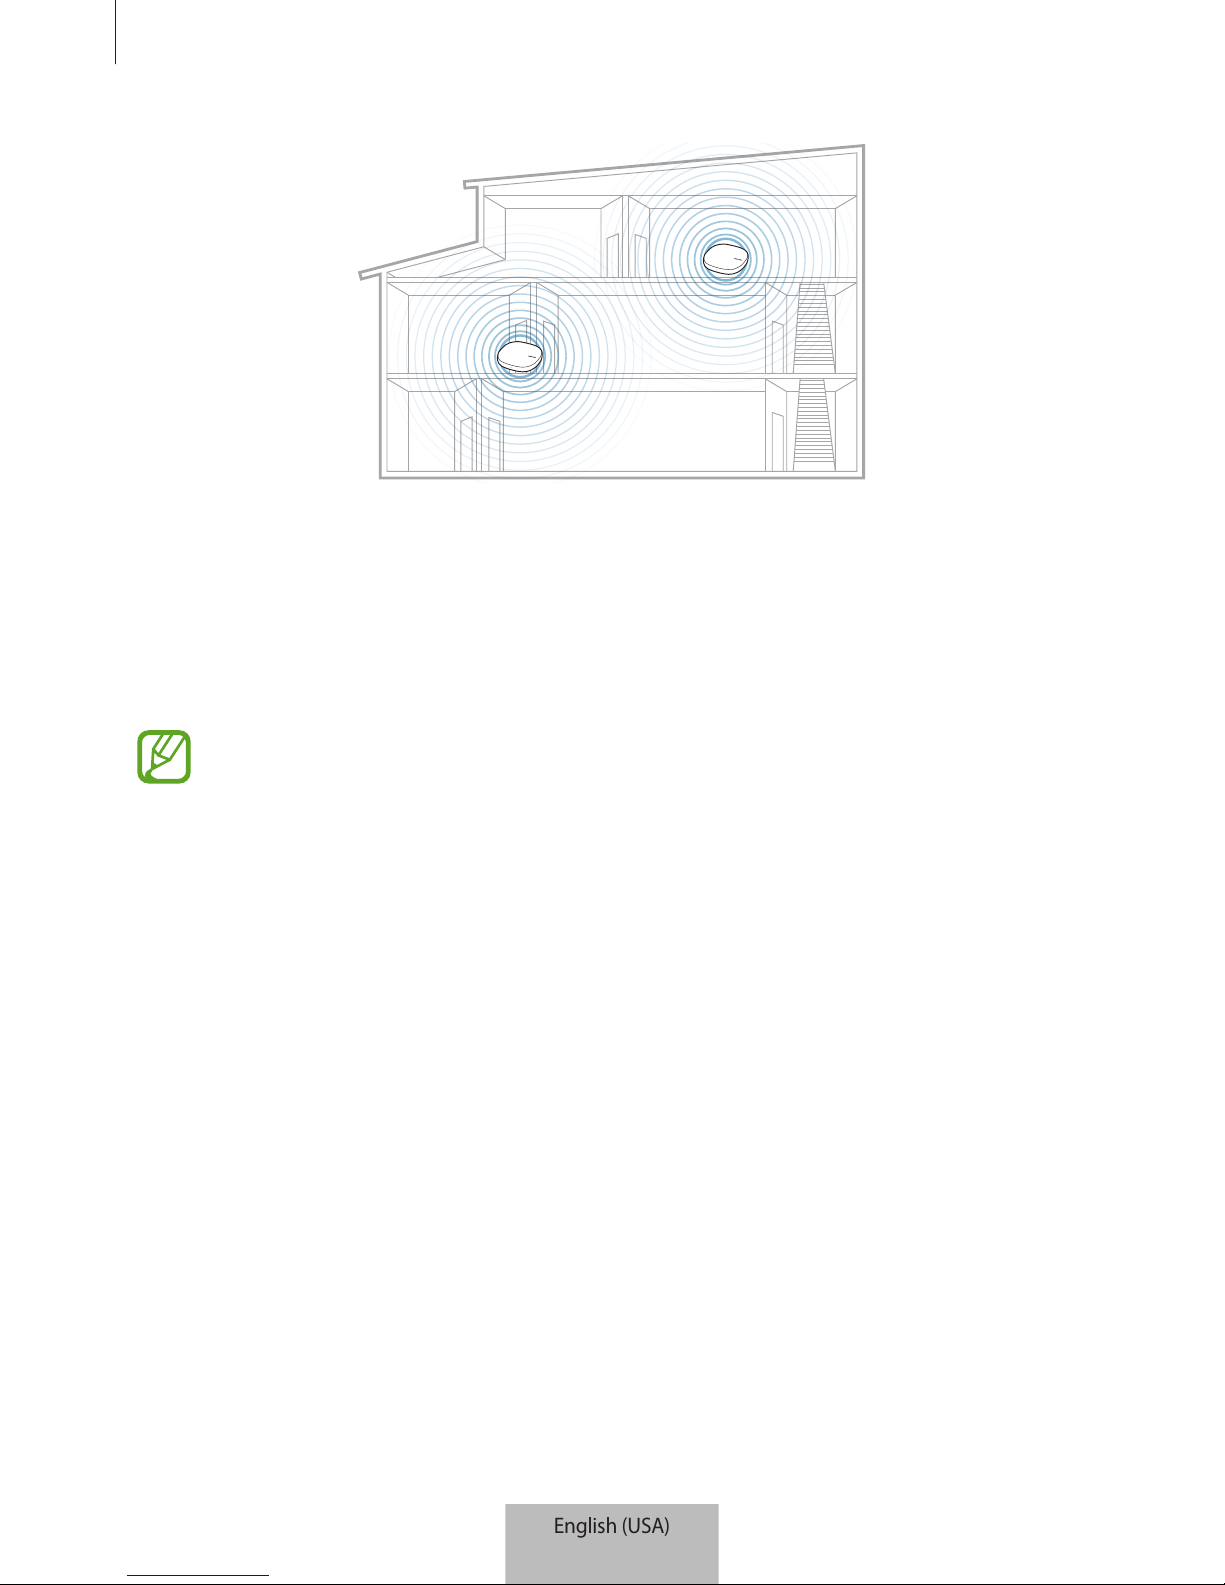
For larger homes, you can connect more Wi-Fi hubs.
Package contents
Check the product box for the following items:
•
Wi-Fi hub
•
Ethernet cable
•
AC/DC adapter (hereafter “adapter”)
•
Quick start guide
•
The items supplied with the device and any available accessories may vary
depending on the region or service provider.
•
The supplied items are designed only for this device and may not be compatible
with other devices.
•
Appearances and specifications are subject to change without prior notice.
•
You can purchase additional accessories from your local Samsung retailer. Make
sure they are compatible with the device before purchase.
•
Use only Samsung-approved accessories. Using unapproved accessories may cause
the performance problems and malfunctions that are not covered by the warranty.
•
Availability of all accessories is subject to change depending entirely on
manufacturing companies. For more information about available accessories, refer
to the Samsung website.
English (USA)
2

Getting started
5
Device layout
AC/DC adapter
connector
WAN port (IN)
LAN port (OUT)
Reset hole
Vent
Indicator light
Ethernet cable
AC/DC adapter
The appearance and internal structure of the product may vary depending on the
model.
English (USA)
3
Getting started
6
Indicator light
The indicator light alerts you to the Wi-Fi hub status.
Color Status
Green Power on, Working
Flashes green Booting/resetting the system
Flashes green and red Waiting for devices to connect
Flashes red Function error
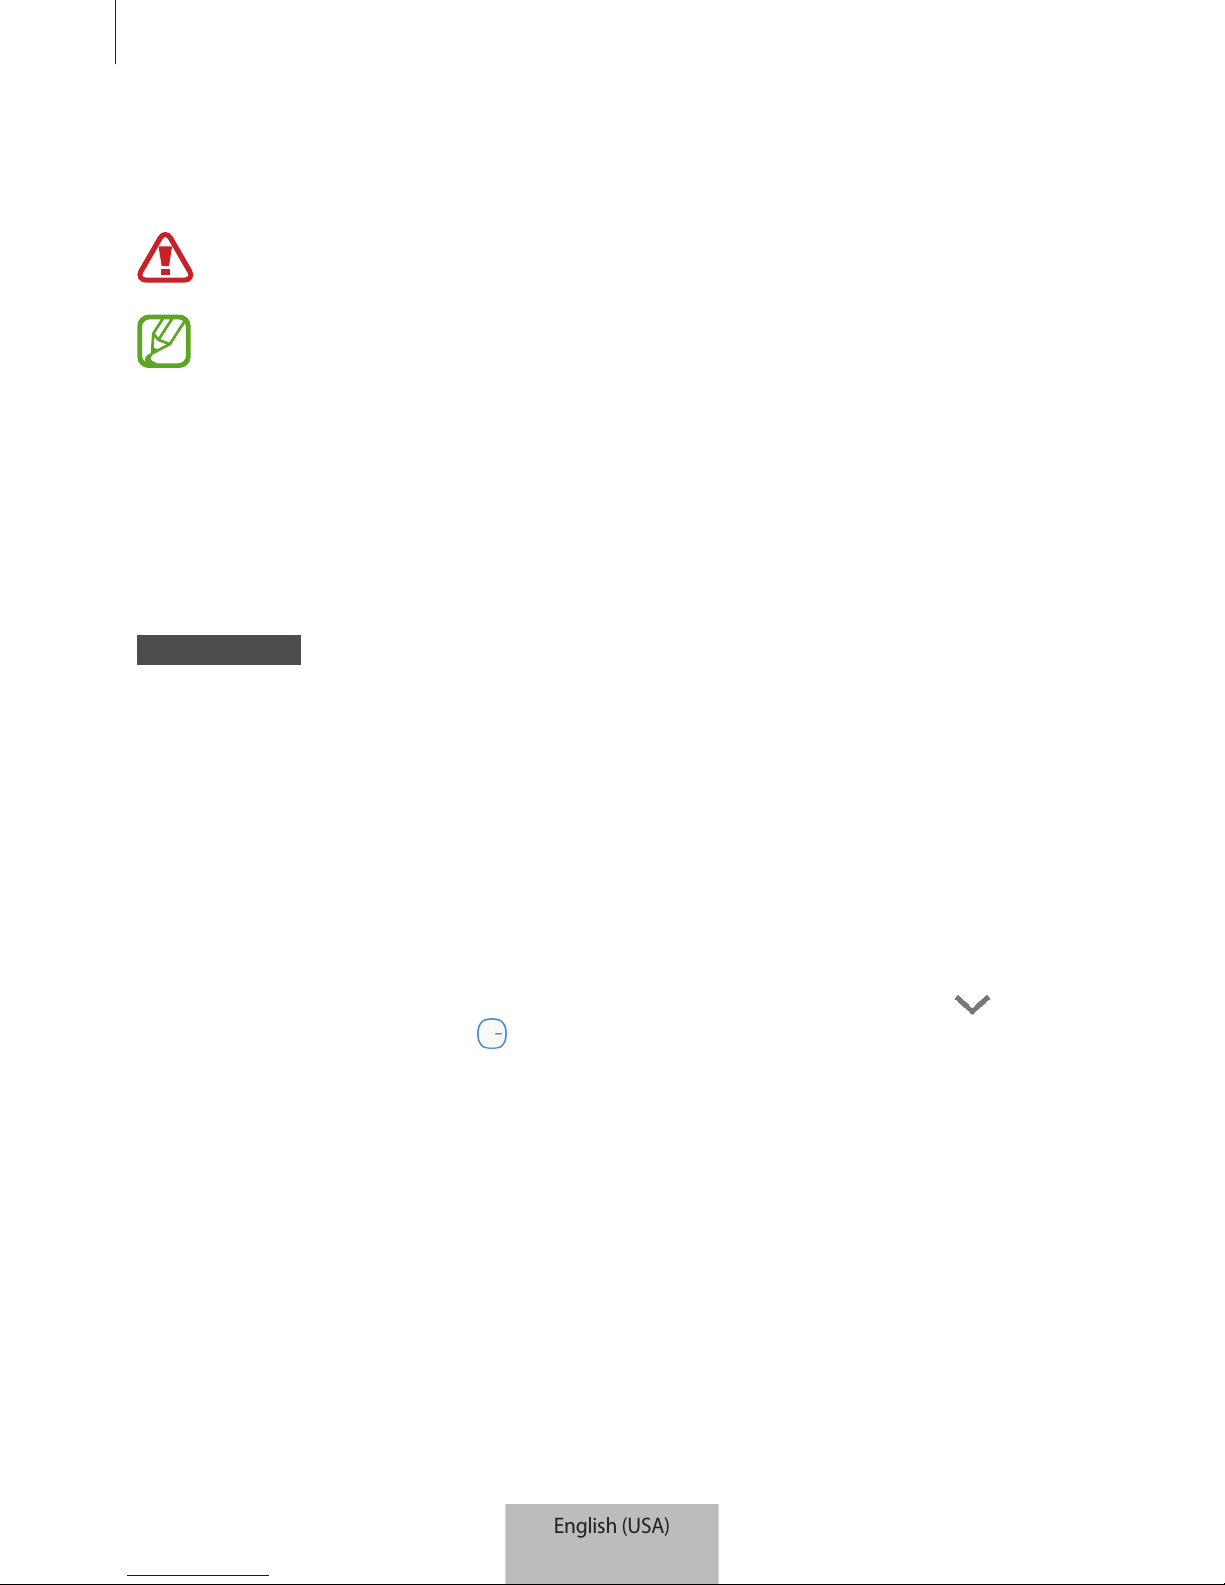
Connecting the Wi-Fi hub with a mobile device
To connect the Wi-Fi hub with a mobile device, you must install the SmartThings app on the
mobile device. You can download the app from
Galaxy Apps, Play Store
, or
App Store
.
•
You must register and sign in to your Samsung account to use the SmartThings
app.
•
Supported features may vary depending on your mobile device and its operating
system.
Wi-Fi hub
1
Connect one end of the Ethernet cable to the hub’s WAN port (IN) and the other end to
the modem’s LAN port.
English (USA)
4
Getting started
7
2
Connect the adapter to the Wi-Fi hub.
The Wi-Fi hub will turn on and the indicator light will flash green.
Use only Samsung-approved adapters (12 V/2.1 A or higher).
•
You can use the Wi-Fi hub only when you connect the Wi-Fi hub to an adapter.
•
If the Wi-Fi hub overheats for a prolonged period, the Wi-Fi hub may automatically
turn off or reset. When this happens continually, disconnect the adapter from the
Wi-Fi hub and contact a Samsung Service Center.
•
To save energy, unplug the adapter when not in use. The adapter does not have a
power switch, so you must unplug the adapter from the electric socket when not in
use to avoid wasting power. The adapter should remain close to the electric socket
and be easily accessible while using it.
Mobile device
3
Launch the
SmartThings
app on the mobile device.
4
Follow the pop-up window’s instructions to turn on the Wi-Fi and Bluetooth auto on
feature.
When you launch the
SmartThings
app, the Wi-Fi and Bluetooth features will be
automatically activated.
5
The Wi-Fi hub will be detected automatically. Tap
ADD NOW
.
If the Wi-Fi hub is not detected, tap
Add device
on the dashboard. Then, tap under
ADD DEVICE MANUALLY
→
Wi-Fi Hub
, and tap your Wi-Fi hub’s name.
During setup, get within 15 ft of the hub.
6
Enter a network name and password to assign to the Wi-Fi hub.
To connect the Internet of Things (IoT) devices via the Wi-Fi hub, select the Wi-Fi hub
under devices and make sure the SmartThings Hub is switched on.
English (USA)
5
Getting started
8
7
Follow the on-screen instructions to complete the connection.
When the connection is completed, the following screen appears.
The SmartThings Wifi is a single product but it is registered as two separate devices according
to their respective features, the Wi-Fi router feature and the Samsung SmartThings Hub
feature.
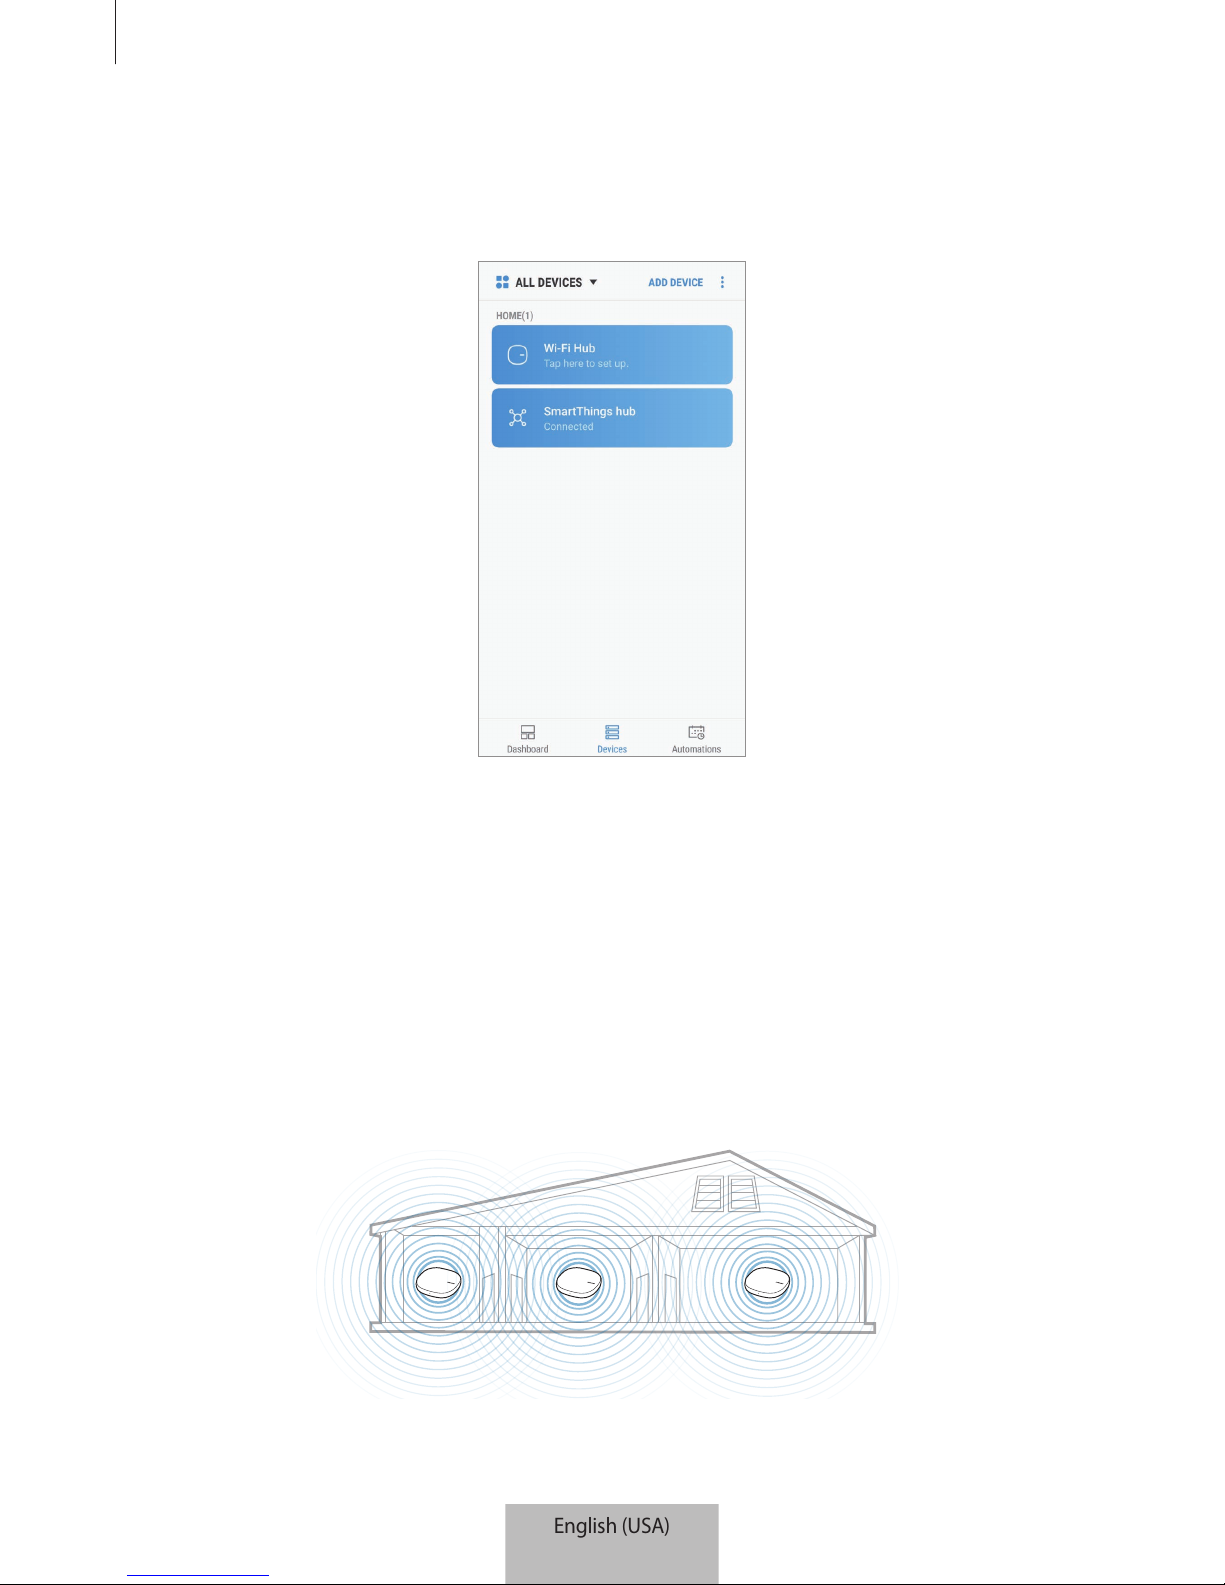
Adding additional Wi-Fi hubs
One Wi-Fi hub can cover a 140 m2 connection range (based on timber buildings) but can
differ depending on the usage environment.
Install an additional Wi-Fi hub to connect to a larger area beyond the connection range with a
Wi-Fi network.
English (USA)
6
Getting started
9
1
Connect the AC/DC adapter to the additional Wi-Fi hub.
2
On the mobile device, launch the
SmartThings
app and follow the on-screen instructions
to complete the connection.
During setup, get within 15 ft of the hub.
You can connect up to 31 additional Wi-Fi hubs.
Notices for connecting a Wi-Fi hub
•
Install a Wi-Fi hub near the devices to be registered.
•
When you add additional Wi-Fi hubs, install them within the connection range.
•
Do not place obstacles between the Wi-Fi hub and the devices to be registered.
•
Obstacles such as the human bodies, walls, corners, or fences can weaken the signals.
•
When using the Wi-Fi hub, it should be connected via the Ethernet cable.
English (USA)
7

Getting started
10
Notices for using Bluetooth
•
To avoid problems when connecting your Wi-Fi hub to another device, place the devices
close to each other.
•
Ensure that your Wi-Fi hub and the other Bluetooth device are within the maximum
Bluetooth range (5 m). The distance may vary depending on the environment the devices
are used in.
•
Ensure that there are no obstacles between the Wi-Fi hub and a connected device,
including human bodies, walls, corners, or fences.
•
Bluetooth uses the same frequency as some industrial, scientific, medical, and low power
products and interference may occur when making connections near these types of
products.
•
Some devices, especially those that are not tested or approved by the Bluetooth SIG, may
be incompatible with your Wi-Fi hub.
English (USA)
8

11
Registering Internet of Things
(IoT) devices and smart home
appliances
Using the SmartThings app
Register Internet of Things (IoT) devices and smart home appliances to the SmartThings
app on your mobile device, and check their status or control them. To control the devices by
location, such as your home or office, create a location and assign registered devices to it.
You can also set a scene to control many devices at the same time or set an automation to
perform actions automatically at a preset time.
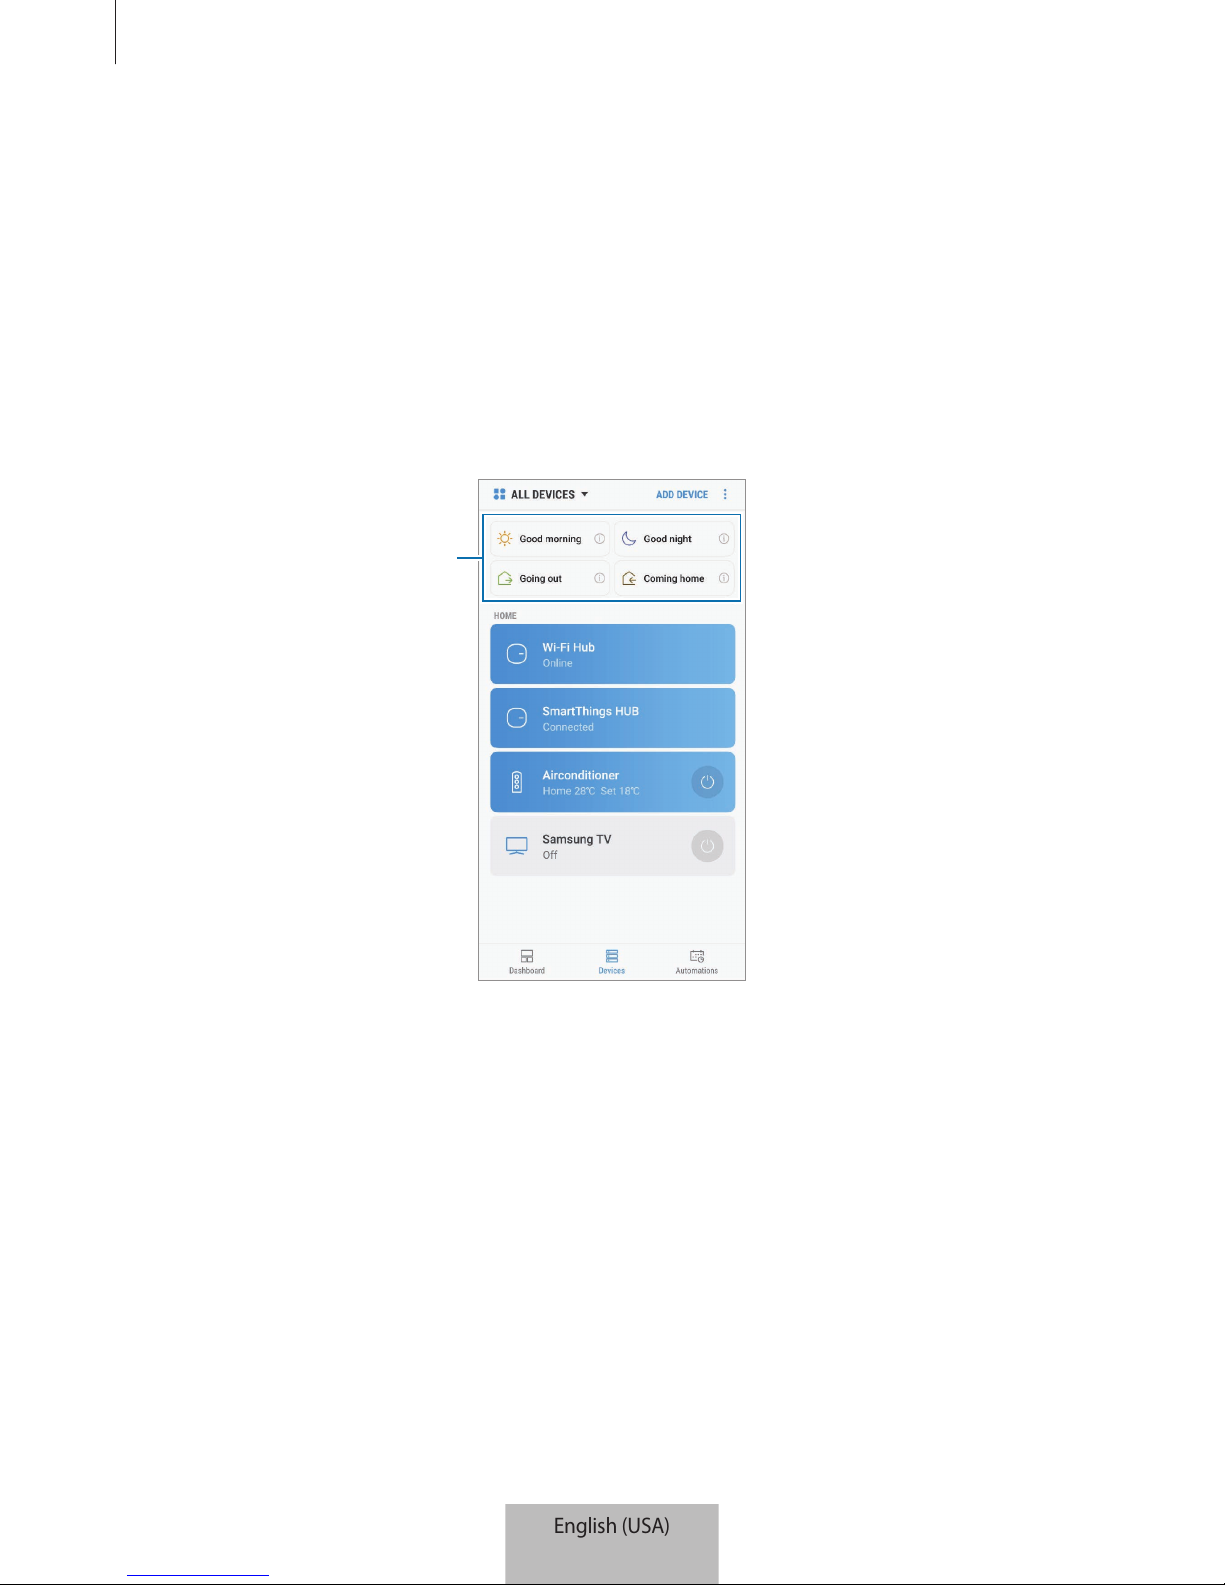
Access additional options.
SmartThings tips
Dashboard
Supported devices
Search for and register nearby
devices.
Manage locations and devices.
Manage automations.
English (USA)
9

Registering Internet of Things (IoT) devices and smart home appliances
12
Configuring the dashboard and the SmartThings app
Configure the dashboard and the SmartThings app settings. On the dashboard, tap and use
the following options.
•
Manage dashboard
: Set the items to show on the dashboard.
•
Notifications
: View the notifications from the SmartThings app. You can also change the
notification settings.
•
Settings
: Access information about the SmartThings app and Samsung account
information. You can also set the SmartThings panel to be displayed on the notification
panel.
•
Notices
: View the notices from the SmartThings service.
•
Contact us
: Ask questions or view frequently asked questions.
Registering devices
Registering smart home appliances via Wi-Fi
Register smart home appliances that support Wi-Fi to the SmartThings app and control them.
For instructions on how to register devices, refer to the other devices’ user manuals.
•
To view the supported devices, tap
SUPPORTED DEVICES
on the dashboard.
•
Connected devices’ own errors or defects are not covered by the Samsung
warranty. When errors or defects occur on the connected devices, contact the
device’s manufacturer.
English (USA)
10
Registering Internet of Things (IoT) devices and smart home appliances
13
Registering IoT devices via the Samsung SmartThings Hub
feature
Register the Internet of Things (IoT) devices that support Z-Wave, zigbee, LAN, or Cloud-toCloud to the SmartThings app and control them.
1
On the dashboard, tap
Add device
.
2
Tap under
ADD DEVICE MANUALLY
.
3
Select a category of the device to register.
Alternatively, enter the device’s name in the search input field and tap
ADD
next to your
device.
4
Follow the on-screen instructions to complete the registration.
•
The Samsung SmartThings Hub feature may not be available depending on the
region. Visit www.samsung.com for details.
•
You can only register the IoT devices approved by Samsung. Download the
SmartThings app to see a list of supported devices.
•
Refer to the other devices’ user manuals for instructions on how to pair with them.
•
To learn more about the Samsung SmartThings Hub feature, visit
support.smartthings.com.
English (USA)
11

Registering Internet of Things (IoT) devices and smart home appliances
14
Controlling the registered devices
1
On the SmartThings screen, tap
Devices
.
2
On the registered devices list, tap a device.
The controller for the device will be downloaded.
3
With the downloaded controller, remotely control the registered devices via the
SmartThings app.
Creating locations
You can register devices by location and manage them.
1
On the SmartThings screen, tap
Devices
.
2
Tap
ALL DEVICES
→
Add location
.
3
Enter a location name and select an icon for the location.
4
Tap
Geolocation
to select a location on the map and tap
DONE
.
5
Tap
SAVE
.
Your location will be added.
6
Tap
ADD DEVICE
to register devices.
If you want to manage the location room by room, tap
→
Add room
, and set the room and
devices for it.
English (USA)
12

Registering Internet of Things (IoT) devices and smart home appliances
15
Inviting members to the created location
Invite other members to the created location to control the devices and scenes assigned to
that location.
1
On the SmartThings screen, tap
Devices
.
2
Tap
ALL DEVICES
and scroll up or down to select a location.
3
Tap →
Invite member
.
4
Tap
Enter Samsung account ID
, enter the Samsung account for the person you want to
invite, and then tap
.
You can invite users by scanning the QR code. Tap
CREATE QR CODE
and invite other
users to scan it.
•
You can only invite the users login the Samsung account via SmartThings app.
•
To accept the invitation, on the SmartThings screen, tap the invitation pop-up and
tap
ACCEPT
. To accept the invitation by scanning the QR code, on the dashboard,
tap
→
Settings
→
Accept invitation (QR code)
and then scan the QR code.
5
Follow the on-screen instruction to complete the invitation.
English (USA)
13
Registering Internet of Things (IoT) devices and smart home appliances
16
Setting and running scenes
Set a scene to operate multiple devices at once. To set a scene, you should create locations.
Refer to Creating locations for more information.
1
On the SmartThings screen, tap
Devices
.
2
Tap
ALL DEVICES
and scroll up or down to select a location.
3
Tap →
Add scene
.
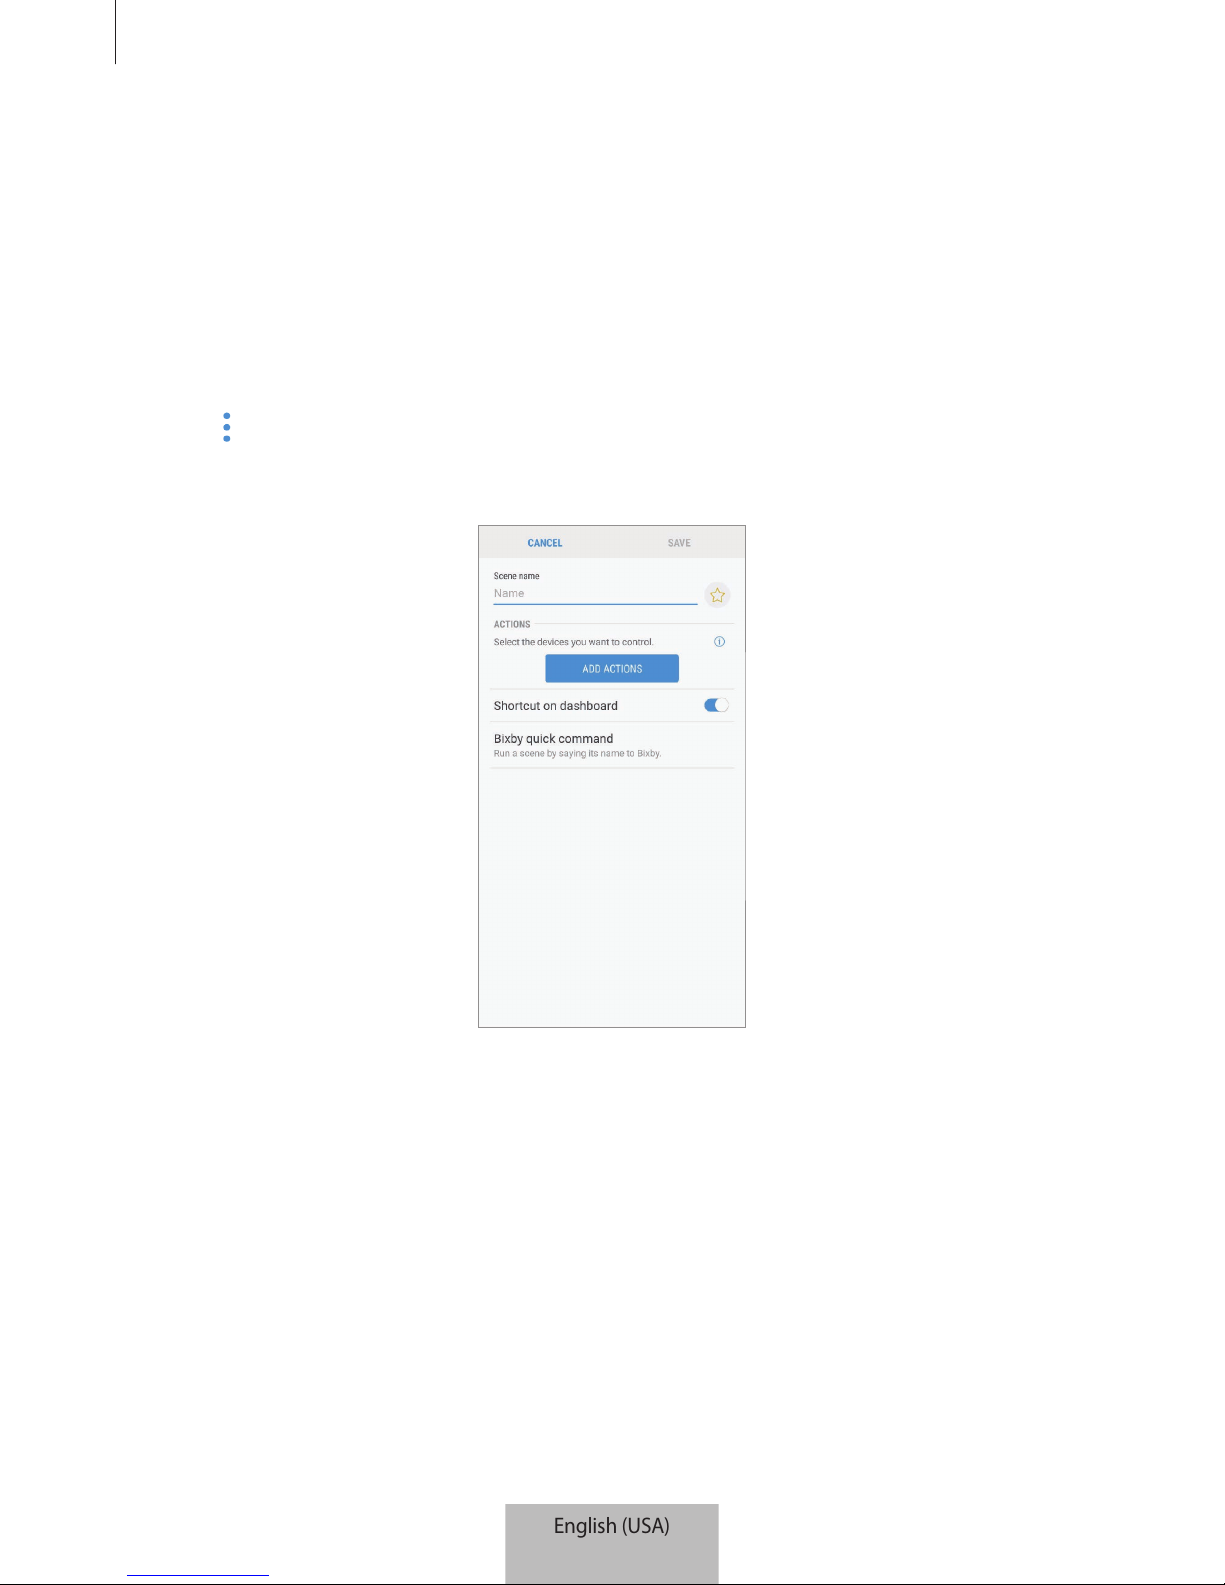
The screen for setting scenes will appear.
4
Enter the scene’s title, select an icon for the scene, and then tap
ADD ACTIONS
.
English (USA)
14
Registering Internet of Things (IoT) devices and smart home appliances
17
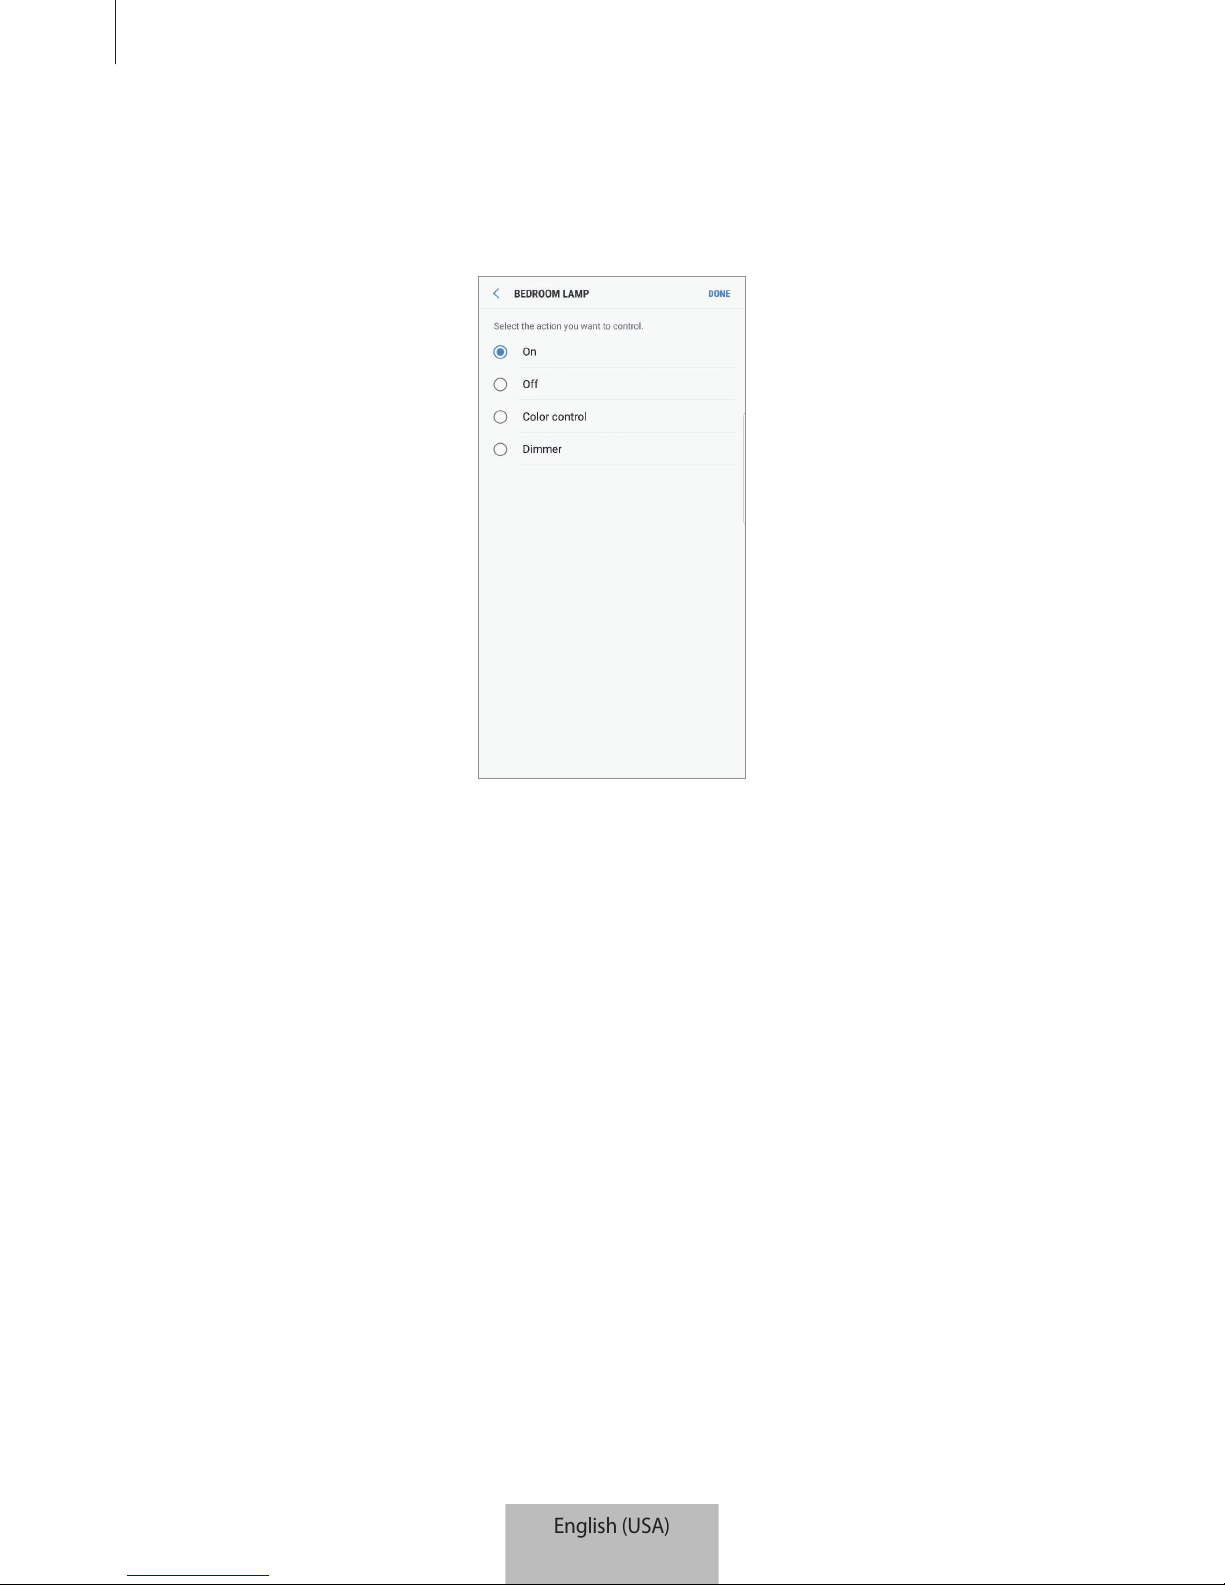
5
Select a device and an action to be operated, and then tap
DONE
.
For example, select a TV and a robot vacuum cleaner and the corresponding actions to
be operated.
6
Tap the
Shortcut on dashboard
switch to view the scene on the dashboard.
7
Tap
Bixby quick command
to run the scene by saying the scene name to Bixby and tap
SAVE
.
8
Tap
SAVE
.
The scene is set. You can view the set scene on the designated location screen.
English (USA)
15
Registering Internet of Things (IoT) devices and smart home appliances
18
Activating scenes
1
On the SmartThings screen, tap
Devices
.
2
Tap
ALL DEVICES
and scroll up or down to select a location that has the scene you want
to activate.
3
Select a scene to activate.
The devices you set will operate in accordance with the scene.
Set scenes
English (USA)
16

Registering Internet of Things (IoT) devices and smart home appliances
19
Managing devices and locations
You can manage locations and their assigned devices and scenes.
1
On the SmartThings screen, tap
Devices
.
2
Tap
ALL DEVICES
and scroll up or down to select a location.
3
Tap →
Edit
and use the following options.
•
Location name
: Change the location name and its icon.
•
Geolocation
: View or change the location on the map.
•
Show location summary on dashboard
: Set to show the location card on the
dashboard.
•
SCENES
: Change the scene information or delete the scene.
•
DEVICES
: Change the device information or delete the device from the assigned
location.
•
MEMBERS
: View the members to share the location. You can also invite others.
•
REMOVE LOCATION
: Delete the location.
•
To connect a Z-Wave device to another device, on the currently connected mobile
device, remove the device from the SmartThings app to exclude it. When you
remove the device from the SmartThings app, the instructions for exclusion will
be provided via a URL. Follow the instructions to exclude the Z-Wave device. If
you reset the Wi-Fi hub, you should exclude the Z-Wave device and reconnect
(re-include) it. For instructions on how to exclude Z-Wave devices, refer respective
Z-Wave device’s user manual or contact the device’s manufacturer.
•
For additional Z-Wave network utility functions, visit www.smartthings.com.
•
The Wi-Fi hub automatically sends an Association Set for Lifeline/group1 for
4 nodes after adding a device that supports Association.
English (USA)
17
Registering Internet of Things (IoT) devices and smart home appliances
20
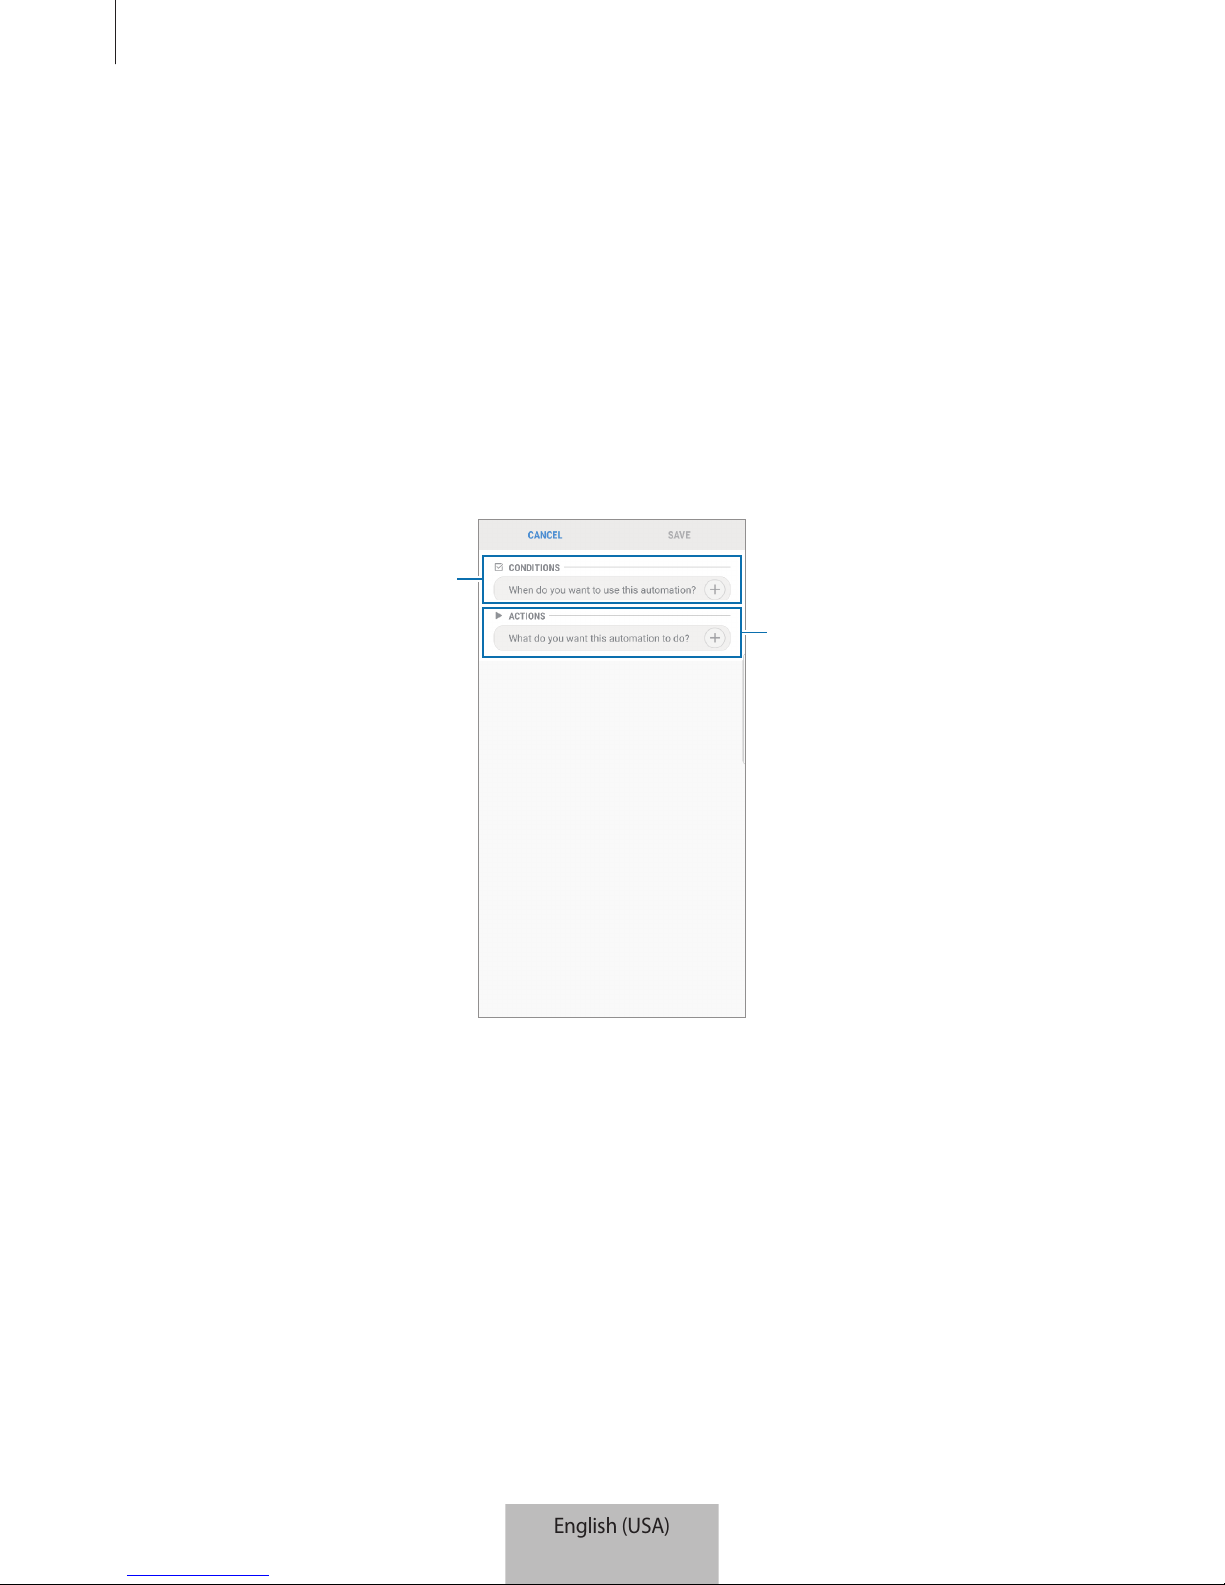
Setting automations
Set an automation for devices assigned to a location to automatically perform actions at a
specific time.
1
On the SmartThings screen, tap
Automations
.
2
Tap
ADD AUTOMATION
.
If an automation already has set, tap
ADD
.
The screen for setting automation will appear.
Set conditions.
Set devices and actions.
3
Tap
When do you want to use this automation?
4
Tap
Based on the time of day
and set days and time.
Or, tap
Based on a device status
to set the device’s condition.
5
Tap
DONE
.
English (USA)
18
Registering Internet of Things (IoT) devices and smart home appliances
21
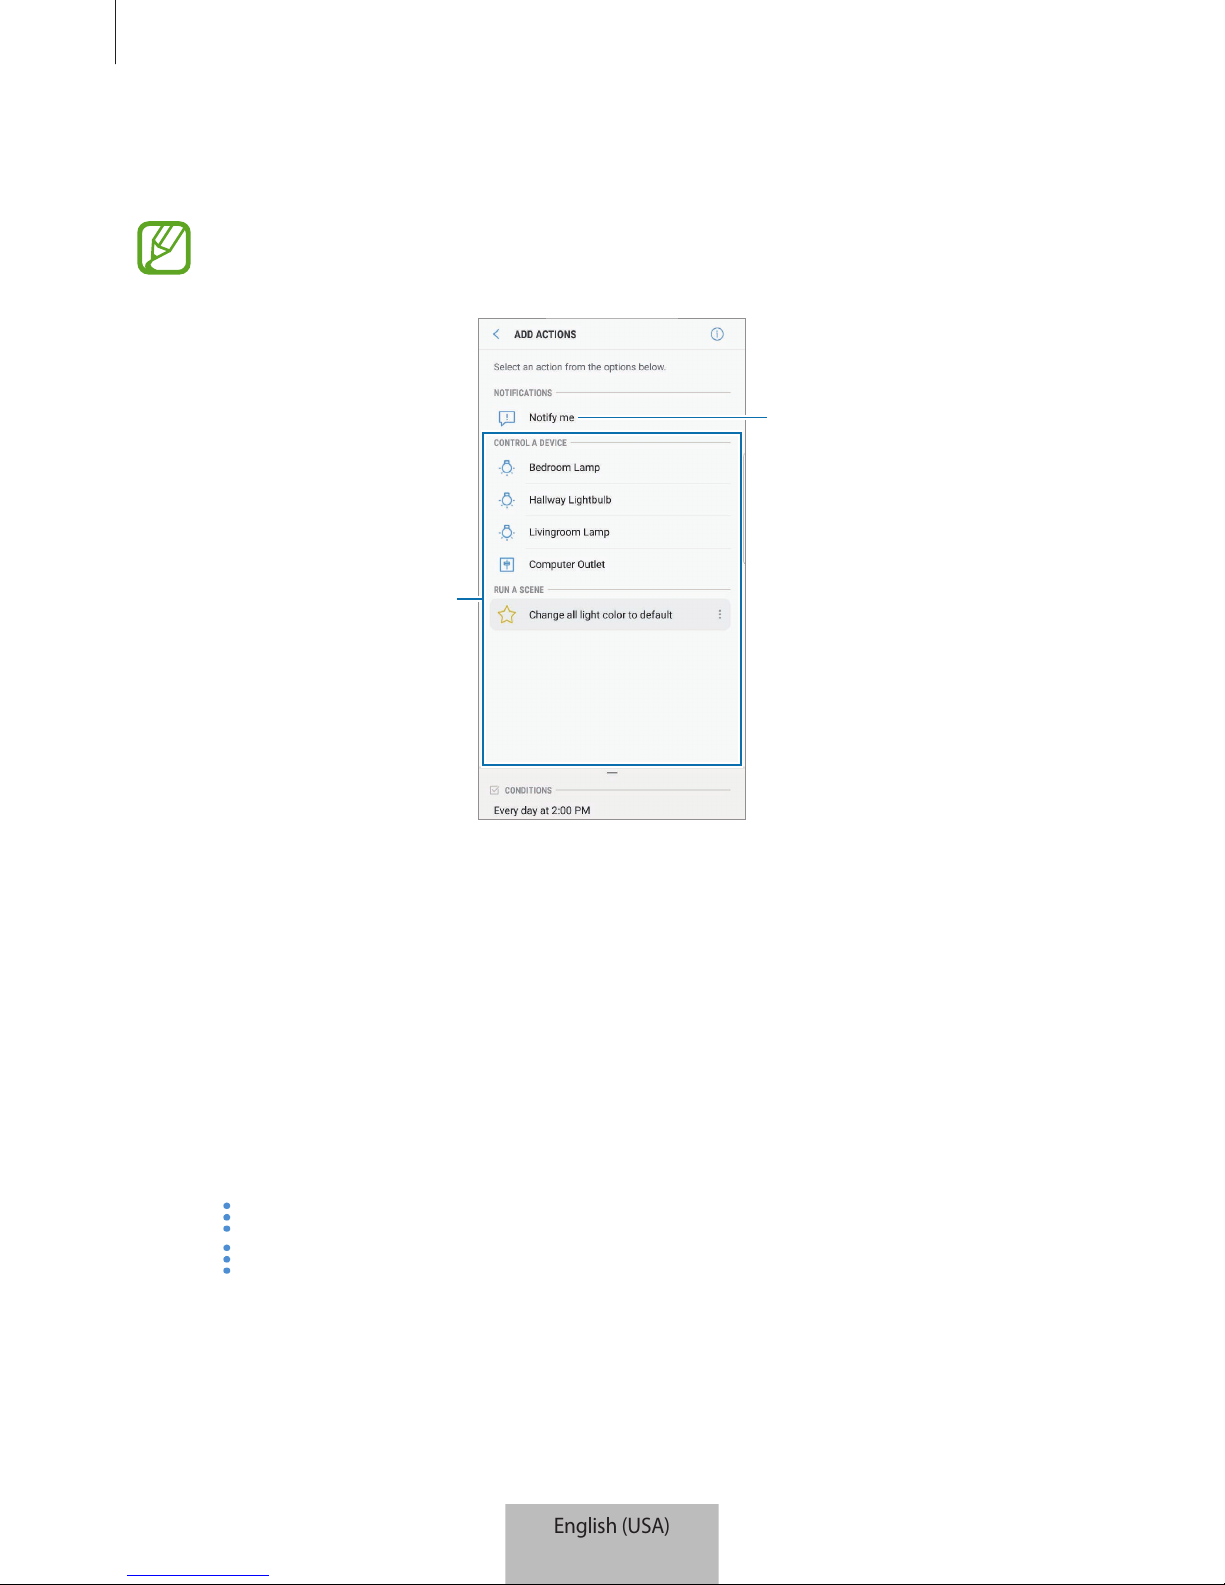
6
Tap
What do you want this automation to do?
, select devices and conditions, or scenes,
and then tap
DONE
.
To receive a notification when devices perform an action according to the
automation, tap
Notify me
and enter a message.
Select a device or a scene.
Enter a notification message.
7
Tap
SAVE
.
The assigned devices will operate in accordance with the set automation.
Managing automations
You can view the set automations and manage them.
On the SmartThings screen, tap
Automations
.
•
Tap the switch next to the automation to activate or deactivate it.
•
Tap the automation to change its details.
•
Tap →
Automation name
to change the automation’s name.
•
Tap →
Delete
to delete the automation.
English (USA)
19

Registering Internet of Things (IoT) devices and smart home appliances
22
Configuring the Samsung SmartThings Hub
feature
You can configure the detailed settings of the Samsung SmartThings Hub feature of the Wi-Fi
hub.
1
On the SmartThings screen, tap
Devices
.
2
On the registered devices list, tap the SmartThings hub.
3
Select an option and configure the Samsung SmartThings Hub feature.
Set to whether to prevent
automatic reconnection of
Zigbee devices.
View the Wi-Fi hub information
or exclude Z-Wave devices.
Set to whether to allow
automatic firmware updates.
English (USA)
20

Registering Internet of Things (IoT) devices and smart home appliances
23
Practical usage of the SmartThings app
Use the SmartThings app to make your life easier and more comfortable. Create automations
based on your routine, or easily control the registered devices from anywhere.
•
If you want to ensure that the office is cool when you arrive on a hot summer’s day, turn
on the connected air conditioner via the SmartThings app before you arrive.
•
If you want to come home to a clean house, turn on the connected robot vacuum cleaner
via the SmartThings app before you get home.
•
If you want to improve your home security, create an automation for motion sensors to
operate at bedtime and activate the notification feature. When the motion sensors detect
unexpected movements, they will notify you.
English (USA)
21
24
Using the Wi-Fi router feature
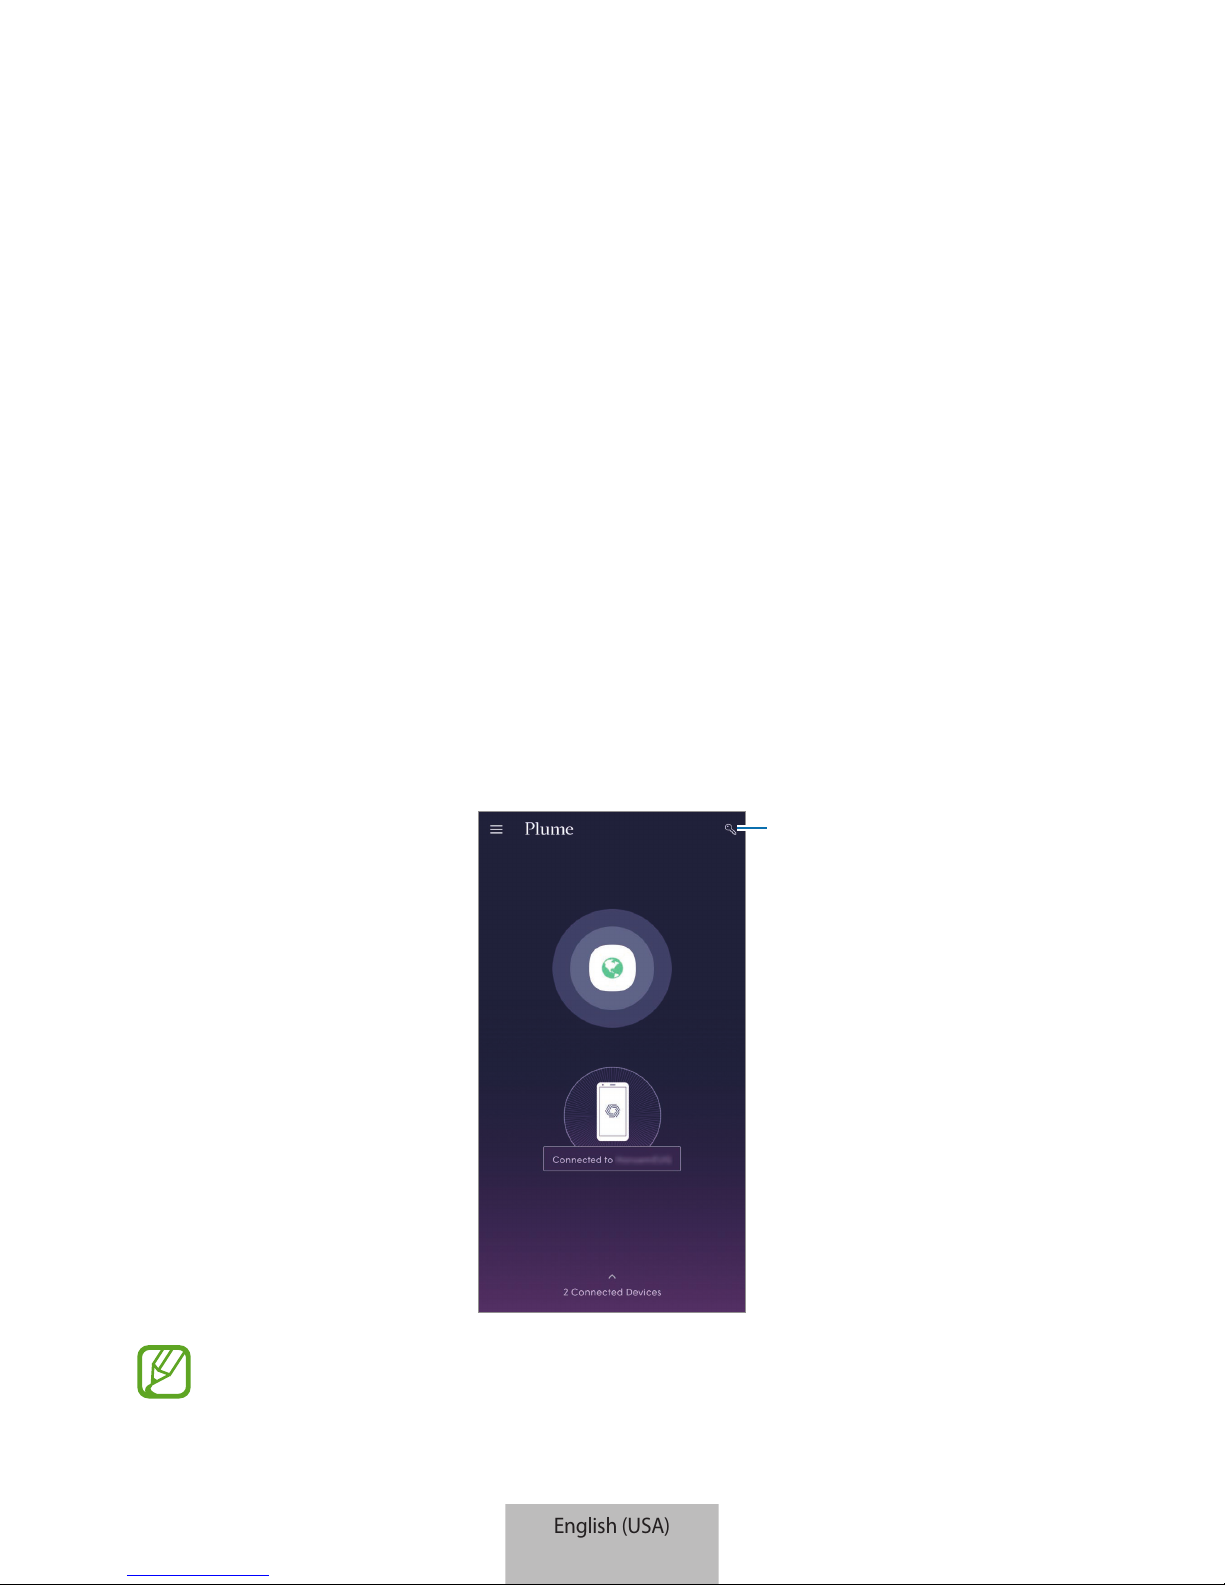
Using the Plume app
You can configure the detailed settings of the Wi-Fi hub’s Wi-Fi router feature. To use the Wi-Fi
router feature, you must install the Plume app on the mobile device. You can download the
app from
Galaxy Apps, Play Store
, or
App Store
.
1
Launch the
SmartThings
app and tap
Devices
.
2
On the registered devices list, tap the Wi-Fi hub.
When you use the Wi-Fi router feature of the Wi-Fi hub for the first time, tap the Wi-Fi hub
to download the controller for it.
3
Tap
Manage Wi-Fi with Plume
.
The
Plume
app will appear.
Manage the Wi-Fi hub’s Wi-Fi
network.
Once you have entered the
Plume
app through the
SmartThings
app, you can
launch the
Plume
app right away and manage the Wi-Fi network without using the
SmartThings
app.
English (USA)
22
Using the Wi-Fi router feature
25
Configuring the Wi-Fi router feature
You can manage the Wi-Fi hub’s Wi-Fi network by assigning authorities and adding different
passwords.
Assigning full authority to connected smartphones
You can give authority to the connected smartphone to use the Wi-Fi hub’s Wi-Fi network and
to control the registered devices and scenes without any restrictions.
1
Launch the
Plume
app and tap .
2
Tap on the
Home
tab to add a password for using the Wi-Fi hub’s Wi-Fi network
without any restrictions.
You can add more than one password.
3
Enter a password and tap .
4
The connected smartphone can use the Wi-Fi hub’s Wi-Fi network.
Assigning limited authority to connected smartphones
You can add a guest network to use the Wi-Fi hub’s Wi-Fi network. You can select the
connected smartphones to control the registered devices and scenes.
1
Launch the
Plume
app and tap .
2
Tap on the
Guest
tab to add a password for a guest network.
You can add more than one password.
English (USA)
23
Using the Wi-Fi router feature
26
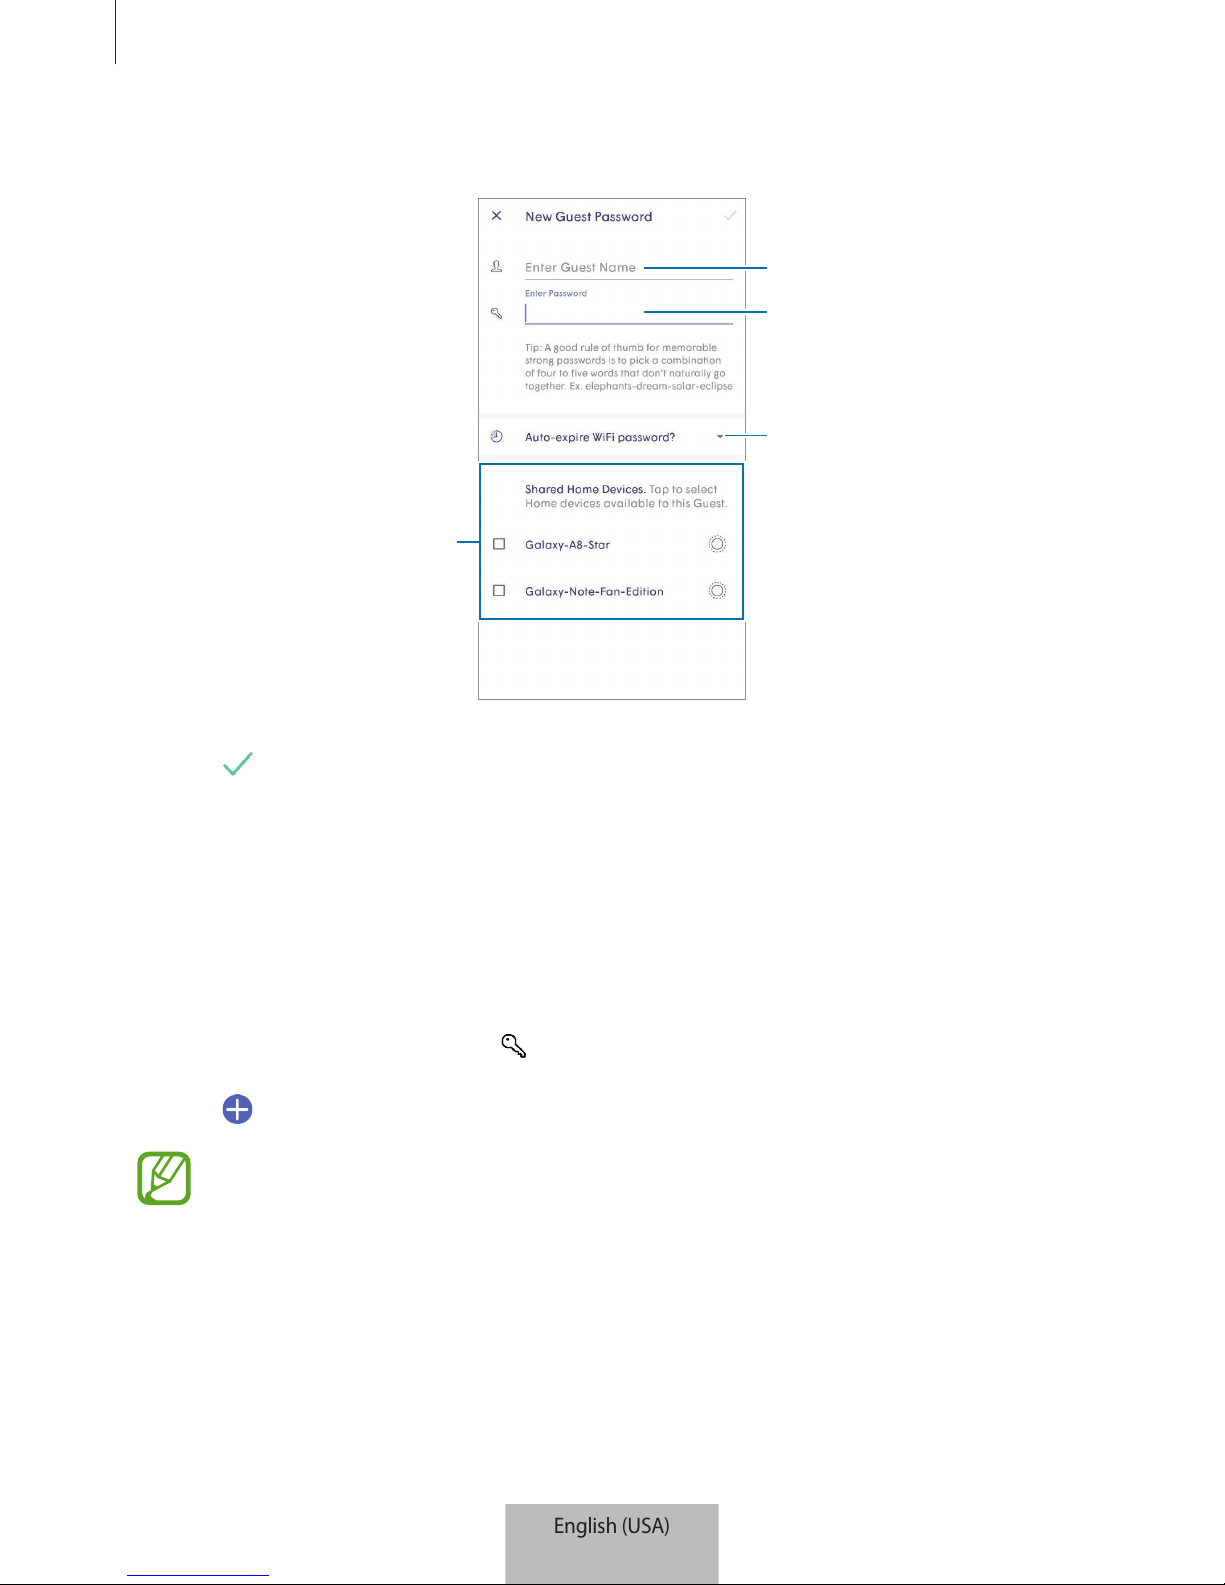
3
Enter details.
Select connected smartphone to
control the registered devices
and scenes.
Enter guest name.
Enter password.
Select period for password.
4
Tap .
5
The connected smartphone can use the Wi-Fi hub’s Wi-Fi network.
Restricting authority to connected smartphones
You can allow the connected smartphone to use the Wi-Fi hub’s Wi-Fi network. However, the
connected smartphones cannot control the registered devices and scenes.
1
Launch the
Plume
app and tap .
2
Tap on the
Internet Only
tab to add a password to use the Wi-Fi network.
You can add more than one password.
English (USA)
24

Using the Wi-Fi router feature
27
3
Enter a password and select a period for the password.
4
Tap .
5
The connected smartphone can use the Wi-Fi hub’s Wi-Fi network.
English (USA)
25
 Loading...