

Page 1
User Manual
www.samsung.com02/2018. Rev.1.0
ET-WV523
ET-WV533
Page 2

Table of Contents
English (UK)
Deutsch
Italiano
Español
Português
Page 3
3
Getting started
Read me first
Please read this manual before using the device to ensure safe and proper use.
•
Some content may differ from your device depending on the device’s software version,
the app’s version, or model specifications. Content is subject to change without prior
notice.
•
Before using the SmartThings Wifi/Hub, make sure it is compatible with your device.
•
The SmartThings Wifi/Hub’s performance may differ depending on the environment.
•
This product includes certain free/open source software. To see the instructions for
viewing the open source licence, go to the Samsung website (opensource.samsung.com).
Instructional icons
Warning: situations that could cause injury to yourself or others
Caution: situations that could cause damage to your device or other equipment
Notice: notes, usage tips, or additional information
English (UK)
1
Page 4
Getting started
4
About SmartThings Wifi/Hub
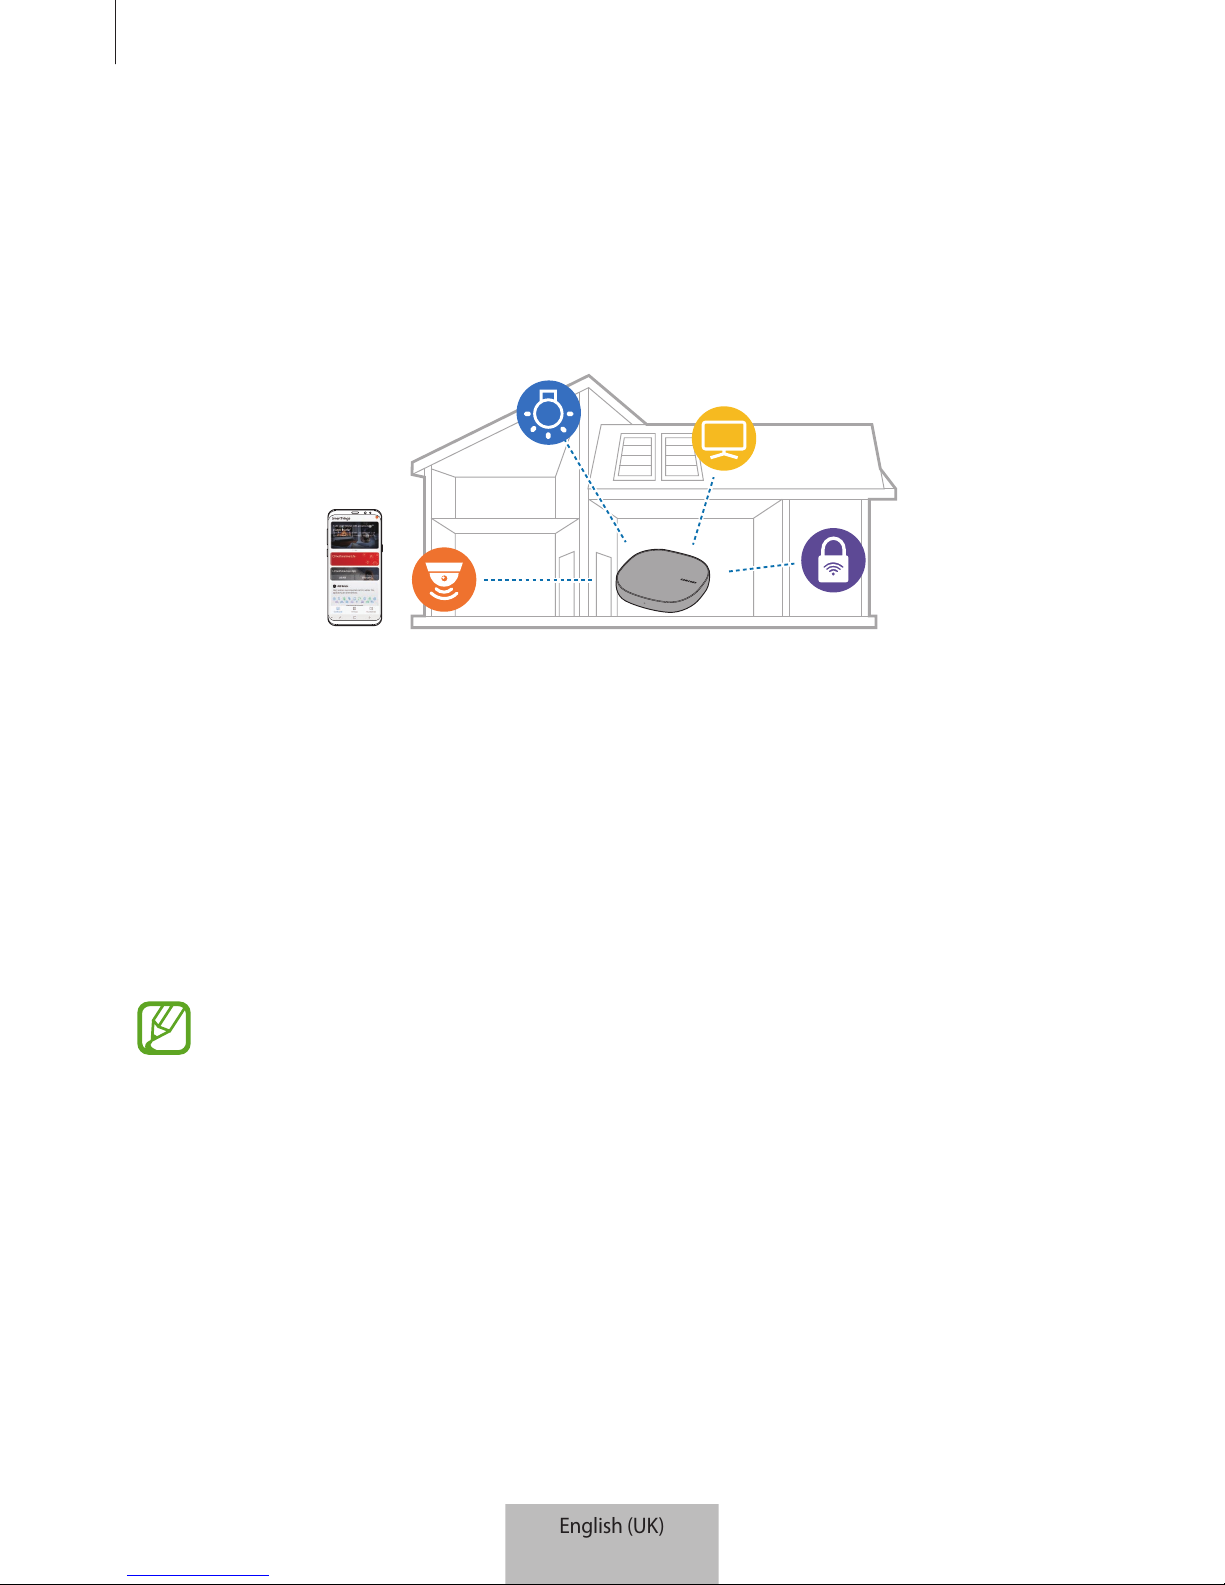
The SmartThings Wifi/Hub is a Wi-Fi router that can connect your smartphone to your smart
home appliances via Wi-Fi. You can also connect Internet of Things (IoT) devices to this
SmartThings Wifi/Hub via the Samsung SmartThings Hub feature.
For larger homes, you can connect more SmartThings Wifi/Hubs.
Package contents
Check the product box for the following items:
•
SmartThings Wifi/Hub
•
Ethernet cable
•
AC/DC adapter (hereafter “adapter”)
•
Quick start guide
•
The items supplied with the device and any available accessories may vary
depending on the region or service provider.
•
The supplied items are designed only for this device and may not be compatible
with other devices.
•
Appearances and specifications are subject to change without prior notice.
•
You can purchase additional accessories from your local Samsung retailer. Make
sure they are compatible with the device before purchase.
•
Use only Samsung-approved accessories. Using unapproved accessories may cause
the performance problems and malfunctions that are not covered by the warranty.
•
Availability of all accessories is subject to change depending entirely on
manufacturing companies. For more information about available accessories, refer
to the Samsung website.
English (UK)
2
Page 5
Getting started
5
Device layout
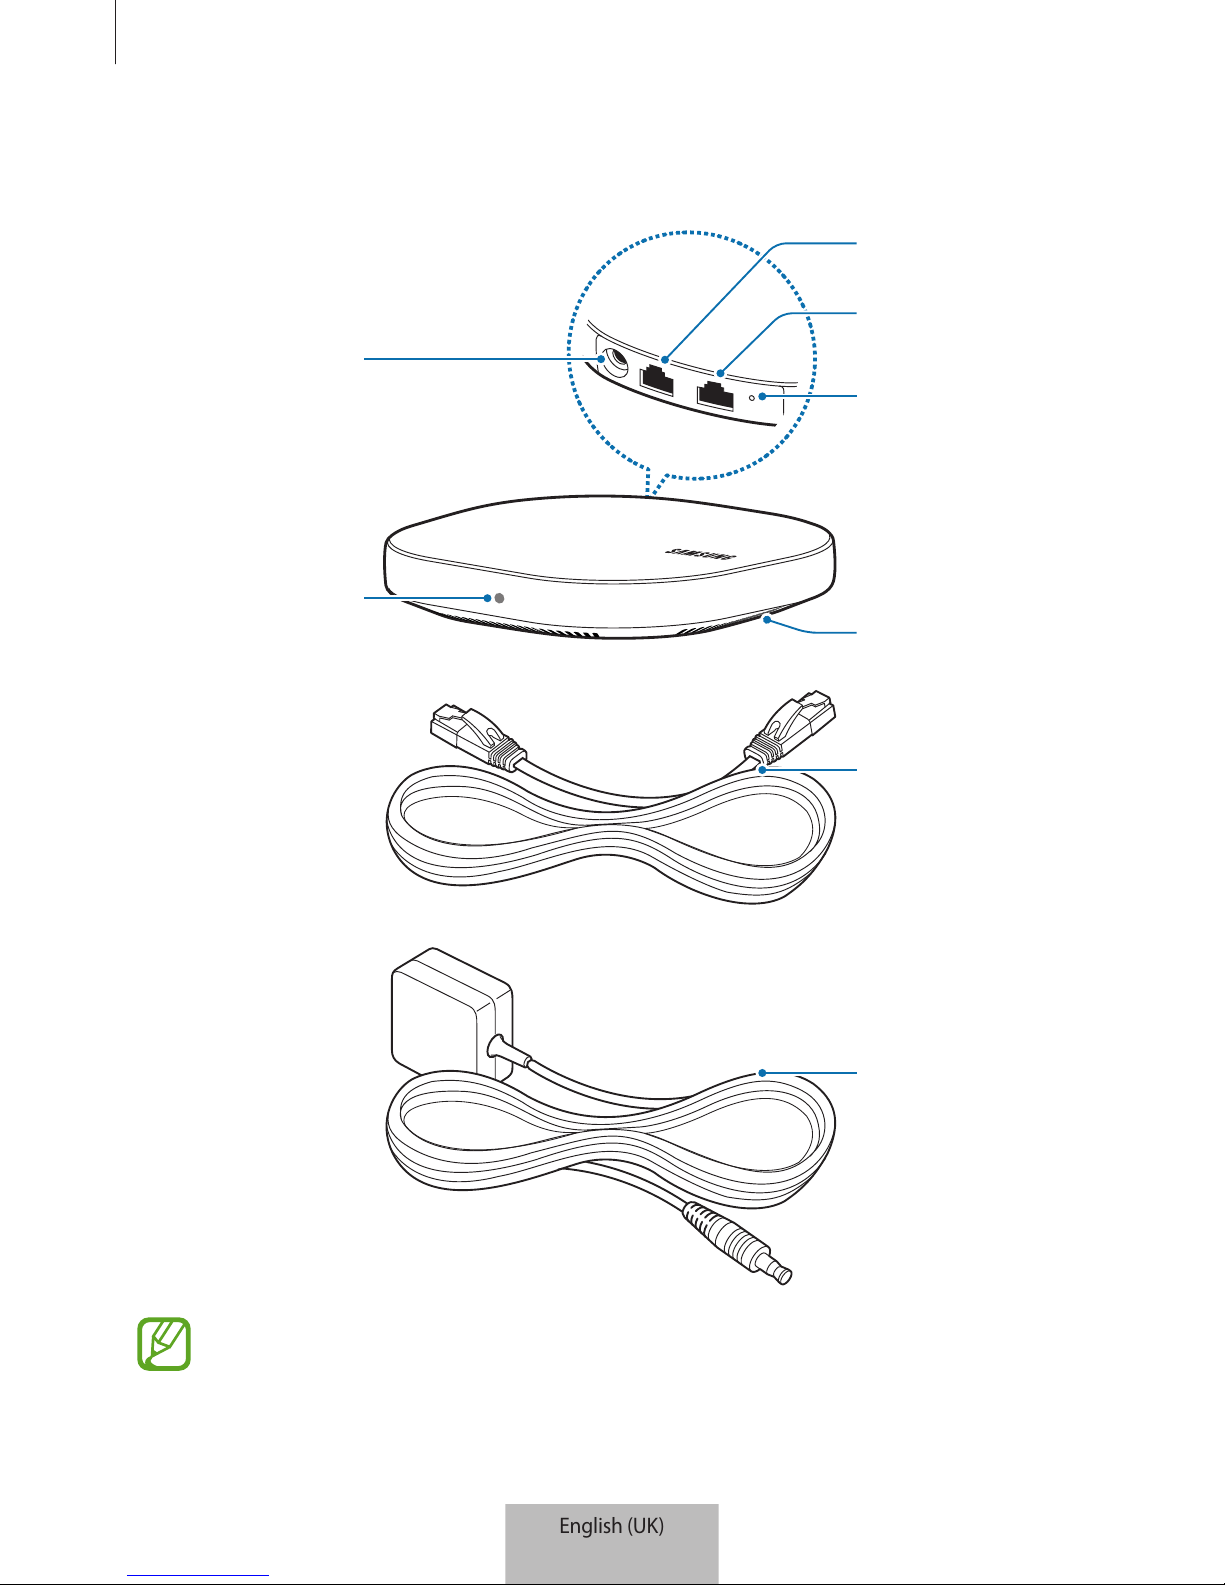
AC/DC adapter
connector
WAN port (IN)
LAN port (OUT)
Reset hole
Fan vent
Indicator light
Ethernet cable
AC/DC adapter
The appearance and internal structure of the product may vary depending on the
model.
English (UK)
3
Page 6
Getting started
6
Indicator light
The indicator light alerts you to the SmartThings Wifi/Hub status.
Colour Status
Green Power on, Working
Flashes green Booting/resetting the system
Flashes green and red Waiting for devices to connect
Flashes red Function error
Power consumption
•
Overall standby power consumption (when all network ports are turned on: 4.5 W
English (UK)
4
Page 7
7
Using the SmartThings Wifi/
Hub
Connecting with a mobile device
To connect the SmartThings Wifi/Hub with a mobile device, you must install the SmartThings
app on the mobile device. You can download the app from
Galaxy Apps, Play Store
, or
App
Store
.
•
Visit www.samsung.com to see compatible devices with the SmartThings app.
•
You must register and sign in to your Samsung account to use the SmartThings
app.
•
Supported features may vary depending on your mobile device and its operating
system.
•
The SmartThings Wifi/Hub’s Bluetooth feature is automatically turned on to
establish a connection. When the connection is complete, the Bluetooth feature
will turn off automatically.
English (UK)
5
Page 8
Using the SmartThings Wifi/Hub
8
SmartThings Wifi/Hub
1
Connect one end of the Ethernet cable to the hub’s WAN port (IN) and the other end to
the modem’s LAN port.
2
Connect the adapter to the SmartThings Wifi/Hub.
The SmartThings Wifi/Hub will turn on and the indicator light will flash green.
Use only Samsung-approved adapters (12 V/2.1 A or higher).
•
You can use the SmartThings Wifi/Hub only when you connect the SmartThings
Wifi/Hub to an adapter.
•
If the SmartThings Wifi/Hub temperature exceeds 55 °C, the internal fan will
automatically activate (ET-WV533 only).
•
If the SmartThings Wifi/Hub overheats for a prolonged period, the SmartThings
Wifi/Hub may automatically turn off or reset. When this happens continually,
disconnect the adapter from the SmartThings Wifi/Hub and contact a Samsung
Service Centre.
•
To save energy, unplug the adapter when not in use. The adapter does not have a
power switch, so you must unplug the adapter from the electric socket when not in
use to avoid wasting power. The adapter should remain close to the electric socket
and be easily accessible while using it.
•
The socket-outlet shall be installed near the equipment and shall be easily
accessible.
Mobile device
3
Launch the
SmartThings
app on the mobile device.
4
Follow the pop-up window’s instructions to turn on the Wi-Fi and Bluetooth auto on
feature.
When you launch the
SmartThings
app, the Wi-Fi and Bluetooth features will be
automatically activated.
English (UK)
6
Page 9
Using the SmartThings Wifi/Hub
9
5
The SmartThings Wifi/Hub will be detected automatically. Tap
ADD NOW
.
If the SmartThings Wifi/Hub is not detected, tap
Add device
on the dashboard. Then, tap
under
ADD DEVICE MANUALLY
→
Wi-Fi Hub
, and tap your SmartThings Wifi/
Hub’s name.
6
Enter a network name and password to assign to the SmartThings Wifi/Hub.
To register IoT devices via the Samsung SmartThings Hub feature, confirm the
Set up
SmartThings Hub
feature is activated.
7
Follow the on-screen instructions to complete the connection.
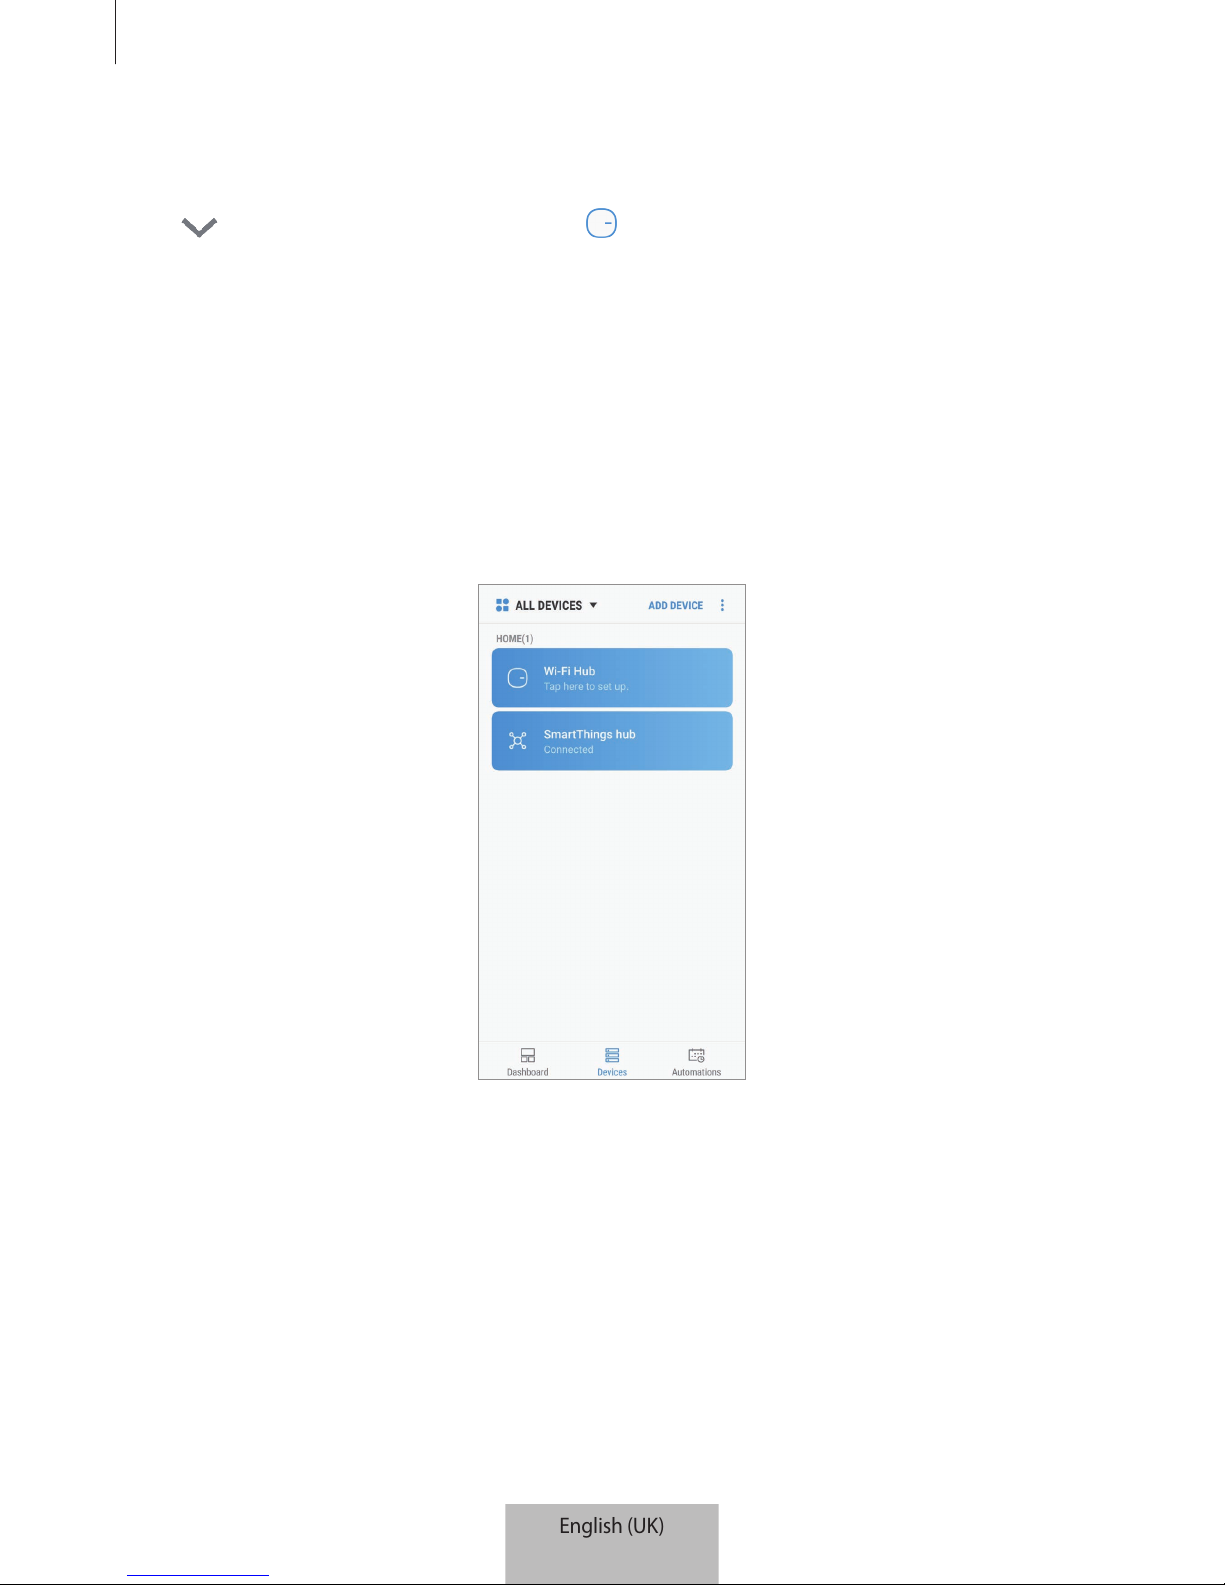
When the connection is completed, the following screen appears.
The SmartThings Wifi/Hub is a single product but it is registered as two separate devices
according to their respective features, the Wi-Fi router feature and the Samsung SmartThings
Hub feature.
English (UK)
7
Page 10
Using the SmartThings Wifi/Hub
10
Adding additional SmartThings Wifi/Hubs
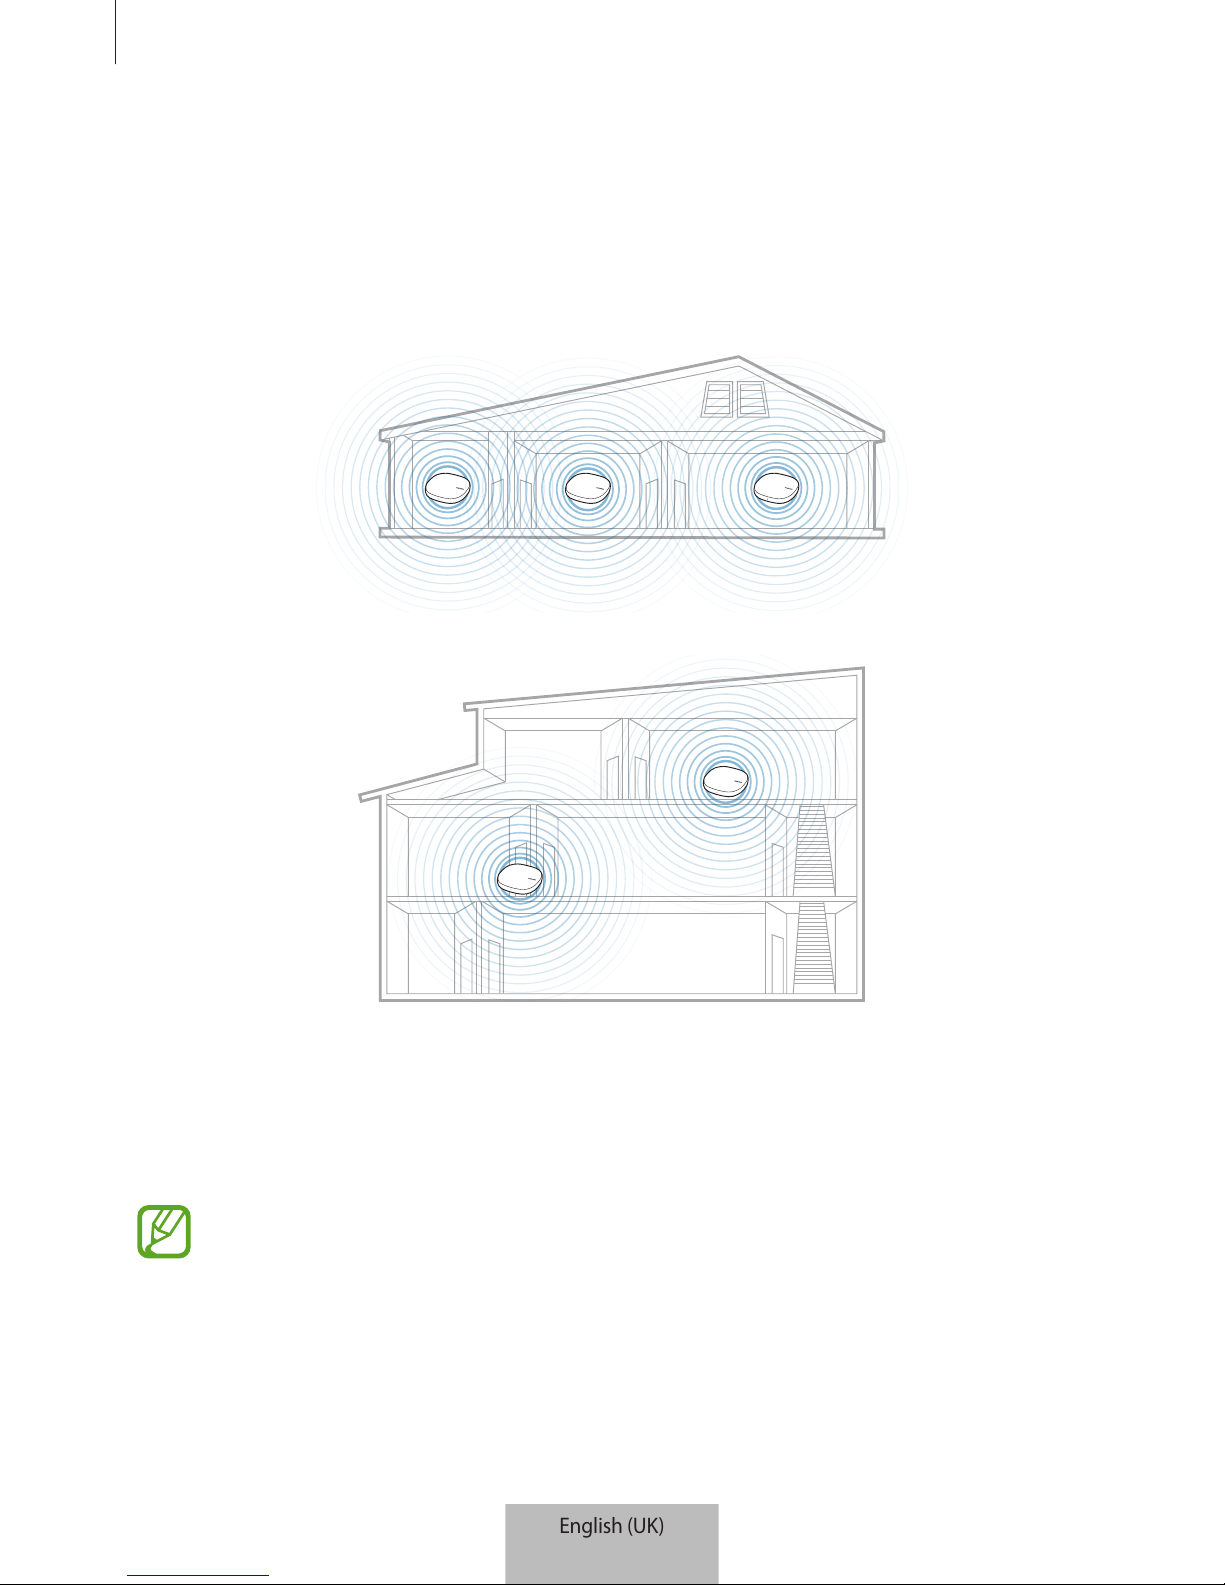
One SmartThings Wifi/Hub can cover a 140 m2 connection range (based on timber buildings)
but can differ depending on the usage environment.
Install an additional SmartThings Wifi/Hub to connect to a larger area beyond the connection
range with a Wi-Fi network.
1
Connect the AC/DC adapter to the additional SmartThings Wifi/Hub.
2
On the mobile device, launch the
SmartThings
app and follow the on-screen instructions
to complete the connection.
You can connect up to four additional SmartThings Wifi/Hubs.
English (UK)
8
Page 11

Using the SmartThings Wifi/Hub
11
Notices for connecting a SmartThings Wifi/Hub
•
Install a SmartThings Wifi/Hub near the devices to be registered.
•
When you add additional SmartThings Wifi/Hubs, install them within the connection
range.
•
Do not place obstacles between the SmartThings Wifi/Hub and the devices to be
registered.
•
Obstacles such as the human bodies, walls, corners, or fences can weaken the signals.
•
When using the SmartThings Wifi/Hub, it should be connected via the Ethernet cable.
Notices for using Bluetooth
•
To avoid problems when connecting your SmartThings Wifi/Hub to another device, place
the devices close to each other.
•
Ensure that your SmartThings Wifi/Hub and the other Bluetooth device are within the
maximum Bluetooth range (5 m). The distance may vary depending on the environment
the devices are used in.
•
Ensure that there are no obstacles between the SmartThings Wifi/Hub and a connected
device, including human bodies, walls, corners, or fences.
•
Do not touch the Bluetooth antenna of a connected device.
•
Bluetooth uses the same frequency as some industrial, scientific, medical, and low power
products and interference may occur when making connections near these types of
products.
•
Some devices, especially those that are not tested or approved by the Bluetooth SIG, may
be incompatible with your SmartThings Wifi/Hub.
•
Do not use the Bluetooth feature for illegal purposes (for example, pirating copies of files
or illegally tapping communications for commercial purposes).
English (UK)
9
Page 12
Using the SmartThings Wifi/Hub
12
Configuring the Wi-Fi router feature
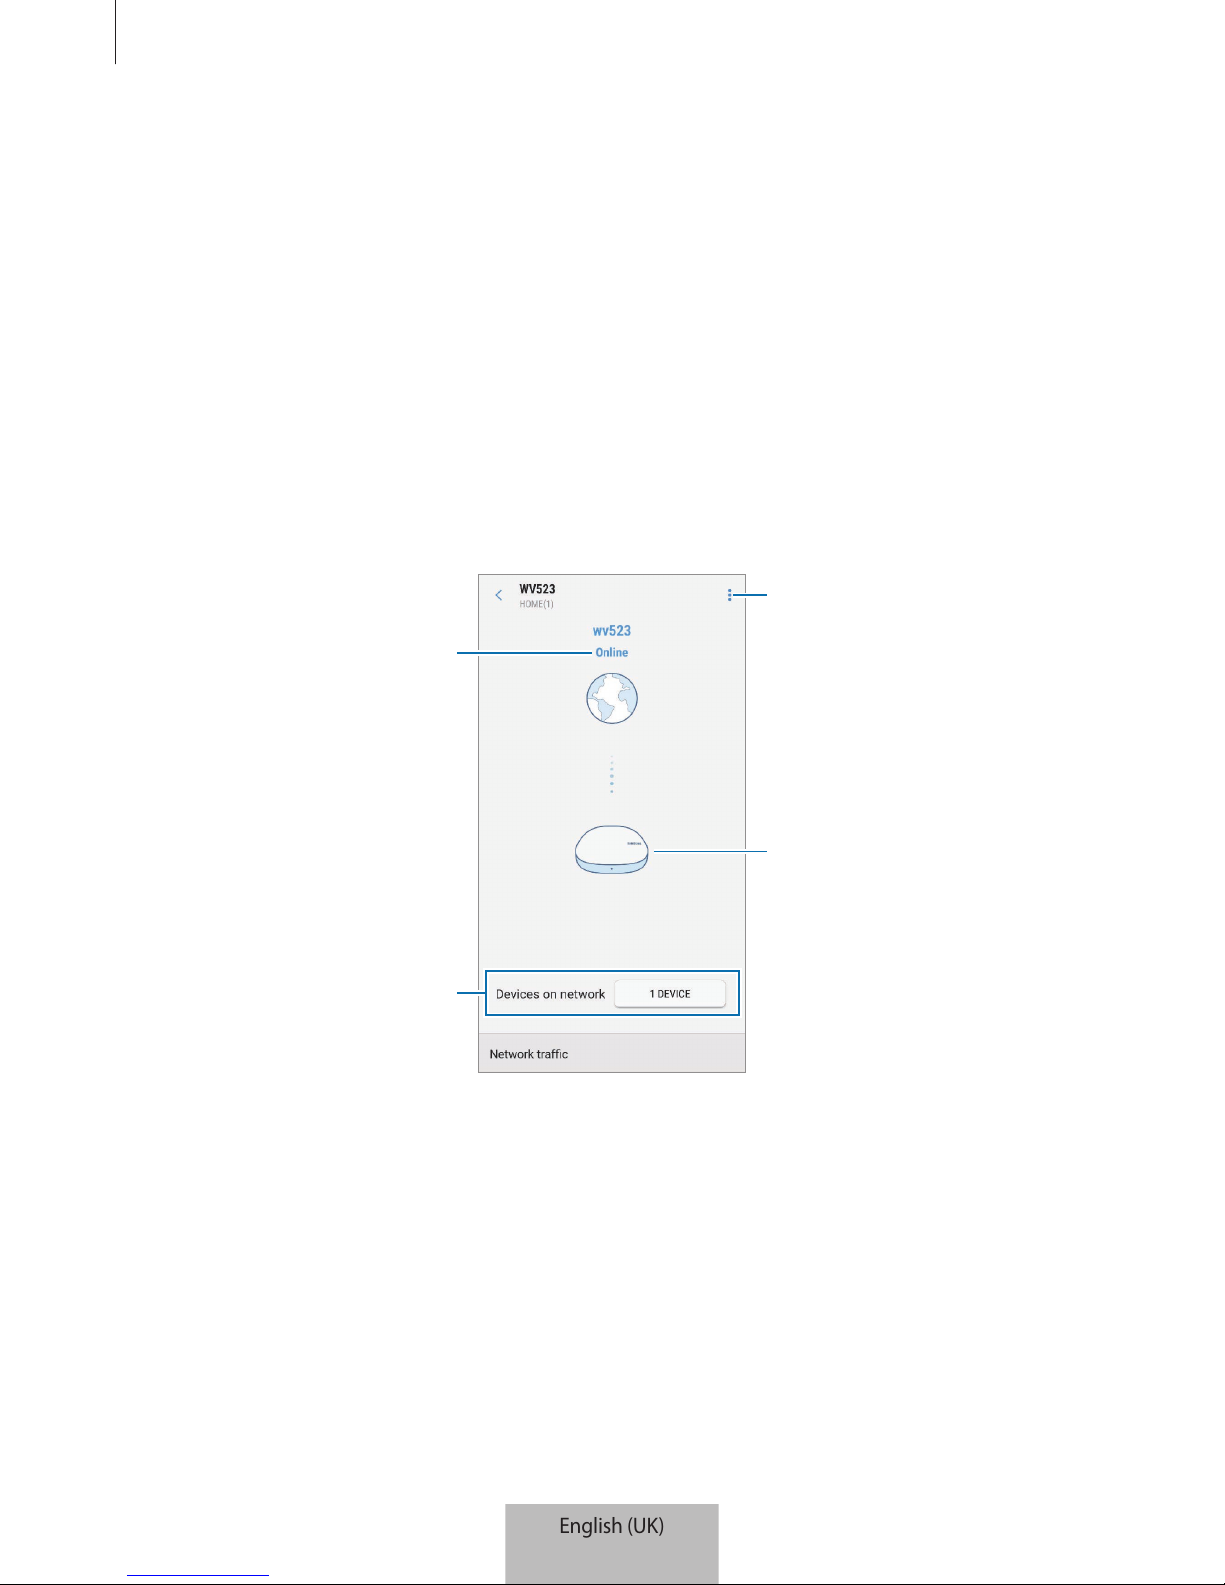
You can configure the detailed settings of the Wi-Fi router feature of the SmartThings Wifi/
Hub.
1
On the SmartThings screen, tap
Devices
.
2
On the registered devices list, tap the Wi-Fi hub.
When you use the Wi-Fi router feature of the SmartThings Wifi/Hub for the first time, tap
the Wi-Fi hub to download the controller for it.
3
Select an option and configure the Wi-Fi router feature.
Wi-Fi network status
Devices connected to the
SmartThings Wifi/Hub's Wi-Fi
network
Access additional options.
Registered SmartThings
Wifi/Hub. Tap to view its
information.
English (UK)
10
Page 13

Using the SmartThings Wifi/Hub
13
Assigning priority to a connected device
You can set the prior connection for the specified devices connected to the SmartThings Wifi/
Hub’s Wi-Fi network.
1
Tap the button next to
Devices on network
.
2
On the connected devices list, select a device to give priority to the SmartThings Wifi/
Hub’s Wi-Fi network.
3
Tap the
Highest bandwidth priority
switch to activate it.
Restricting time for using the Wi-Fi network
You can restrict the time for the connected devices to use the SmartThings Wifi/Hub’s Wi-Fi
network.
1
Tap the button next to
Devices on network
.
2
On the connected devices list, select a device to restrict the time to use the SmartThings
Wifi/Hub’s Wi-Fi network.
3
Tap
Restrict usage time
→
Add restricted time
.
4
Set days and time, and then tap
ADD
.
Adding guest network
You can add a guest network separated from the main Wi-Fi network.
1
Tap →
Guest access
→
Add guest network
.
2
Enter a network name and password and tap
DONE
.
English (UK)
11
Page 14
Using the SmartThings Wifi/Hub
14
Activating or deactivating the Wi-Fi router feature
1
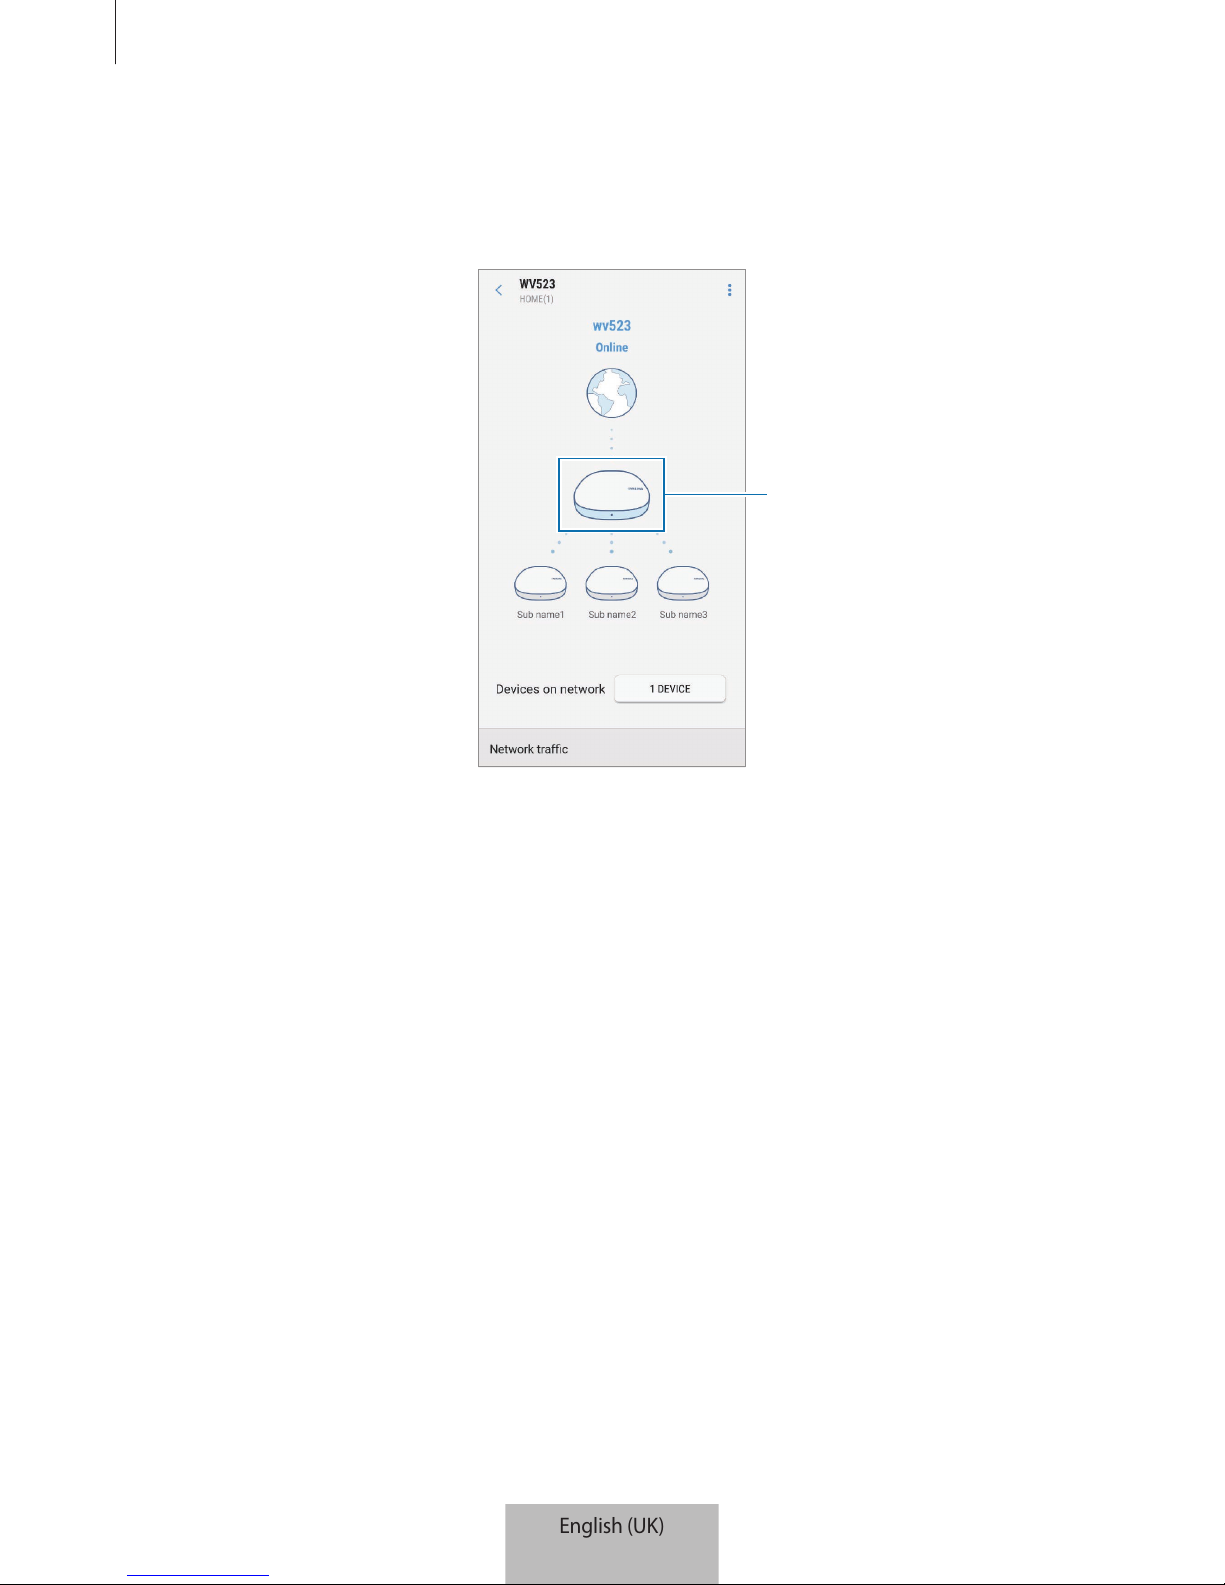
Tap the main SmartThings Wifi/Hub among the registered SmartThings Wifi/Hubs.
Main hub
2
Tap the
Wi-Fi
switch to activate or deactivate the Wi-Fi router feature.
English (UK)
12
Page 15
Using the SmartThings Wifi/Hub
15
Configuring the Samsung SmartThings Hub
feature
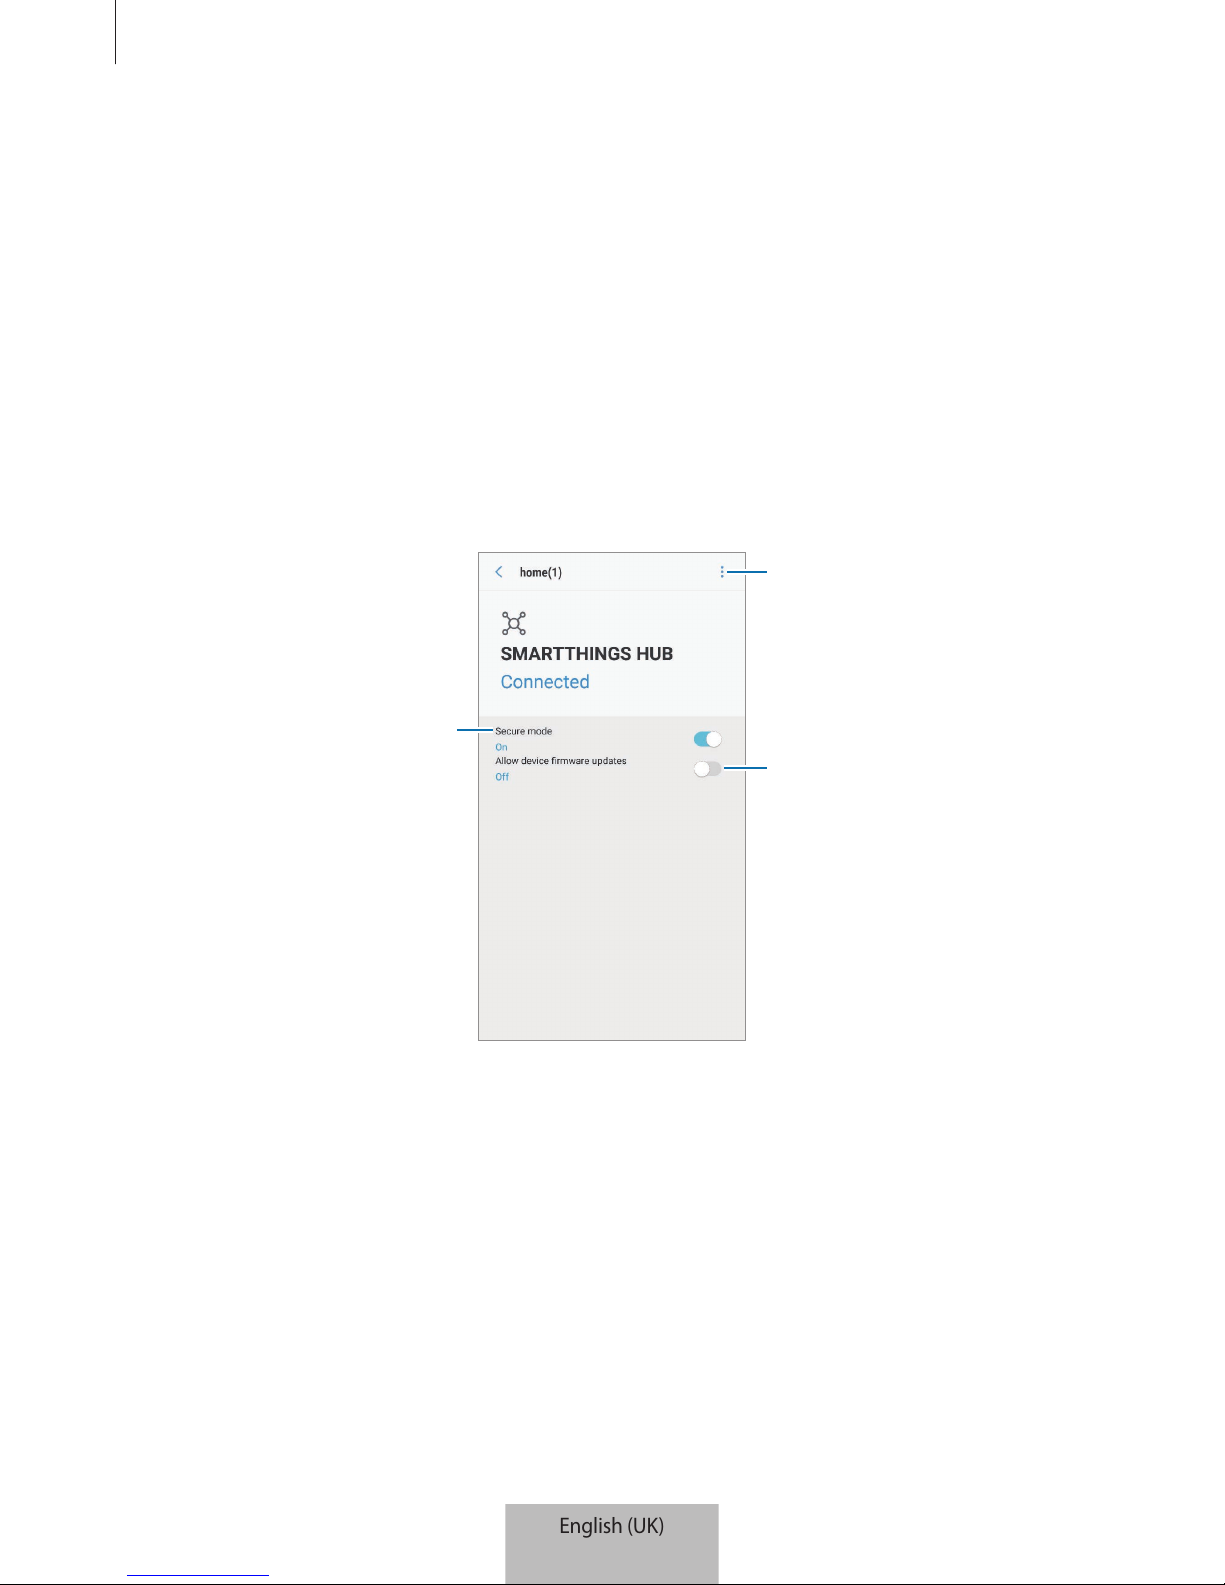
You can configure the detailed settings of the Samsung SmartThings Hub feature of the
SmartThings Wifi/Hub.
1
On the SmartThings screen, tap
Devices
.
2
On the registered devices list, tap the SmartThings hub.
3
Select an option and configure the Samsung SmartThings Hub feature.
Set to whether to prevent
automatic reconnection of
Zigbee devices.
View the SmartThings hub
information or exclude Z-wave
devices.
Set to whether to allow
automatic firmware updates.
English (UK)
13
Page 16
16
SmartThings app
Introduction
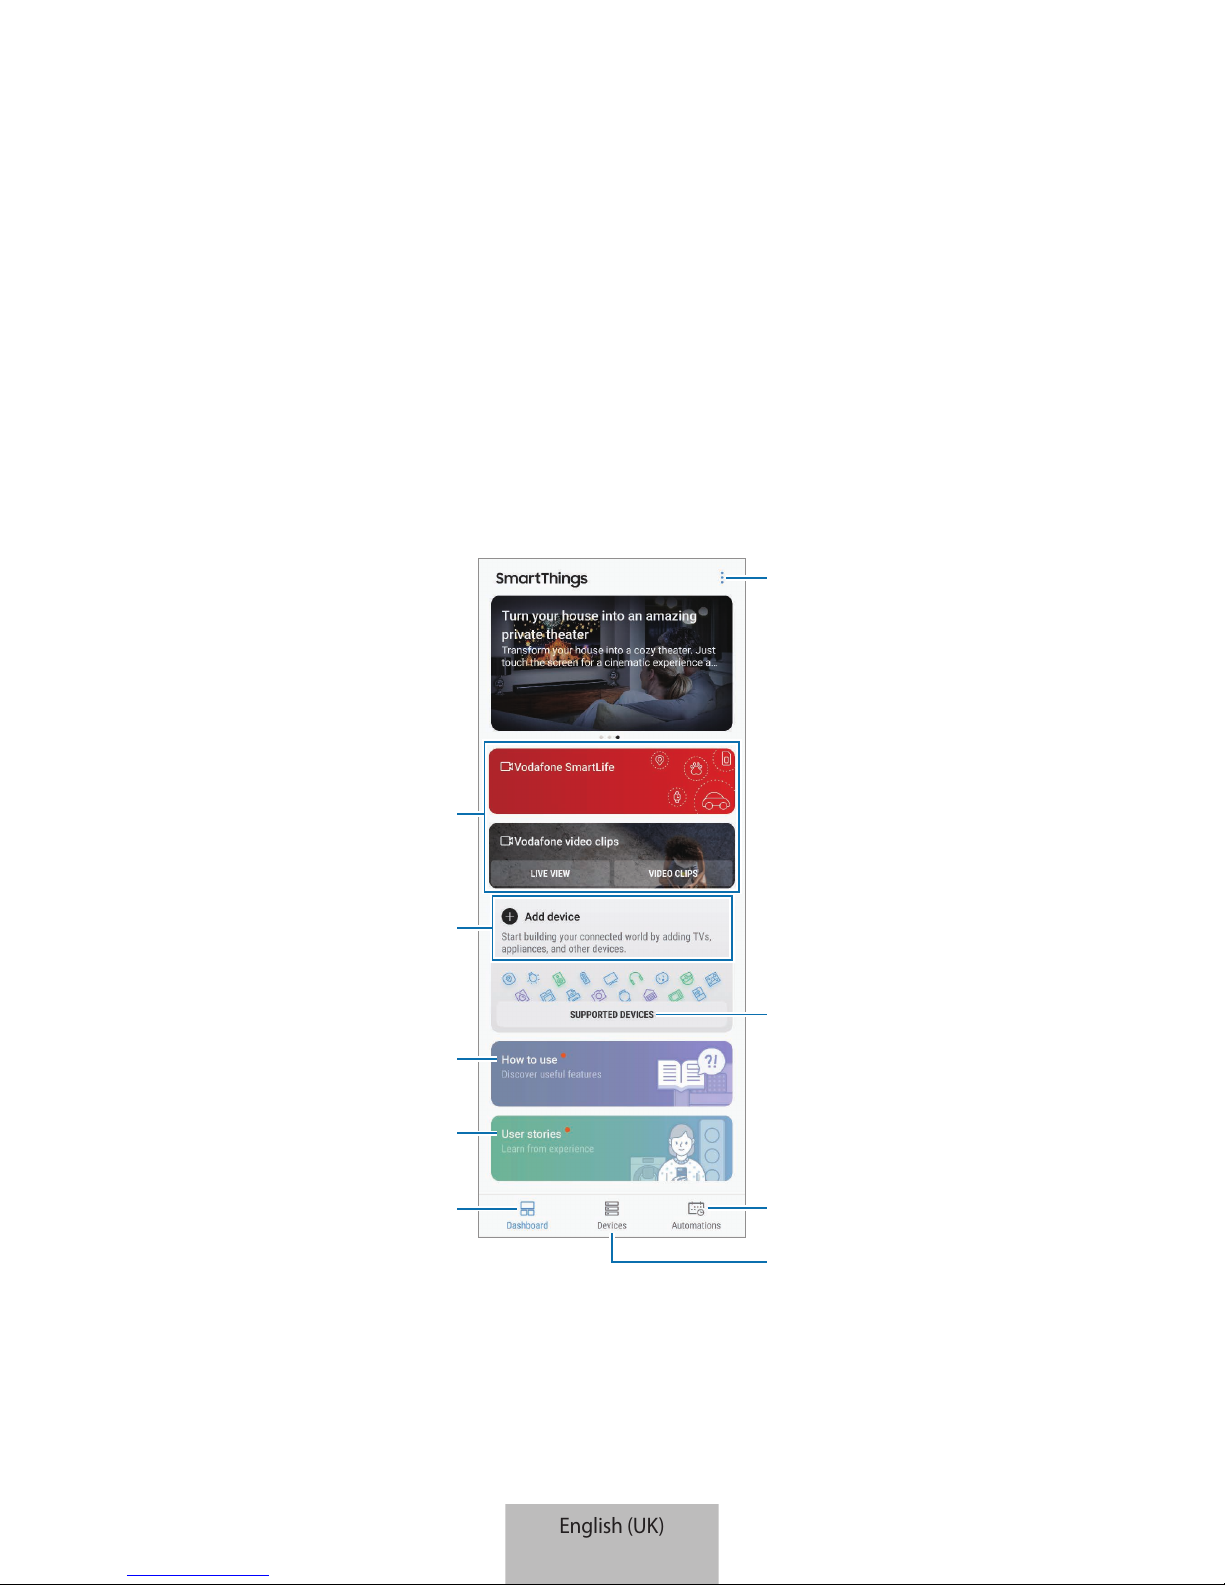
Register Internet of Things (IoT) devices and smart home appliances to the SmartThings
app on your mobile device, and check their status or control them. To control the devices by
location, such as your home or office, create a location and assign registered devices to it.
You can also set a scene to control many devices at the same time or set an automation to
perform actions automatically at a preset time.
Access additional options.
SmartThings tips
User stories
Dashboard
Supported devices
Search for and register nearby
devices.
Vodafone apps
Manage locations and devices.
Manage automations.
English (UK)
14
Page 17
SmartThings app
17
Configuring the dashboard and the SmartThings app
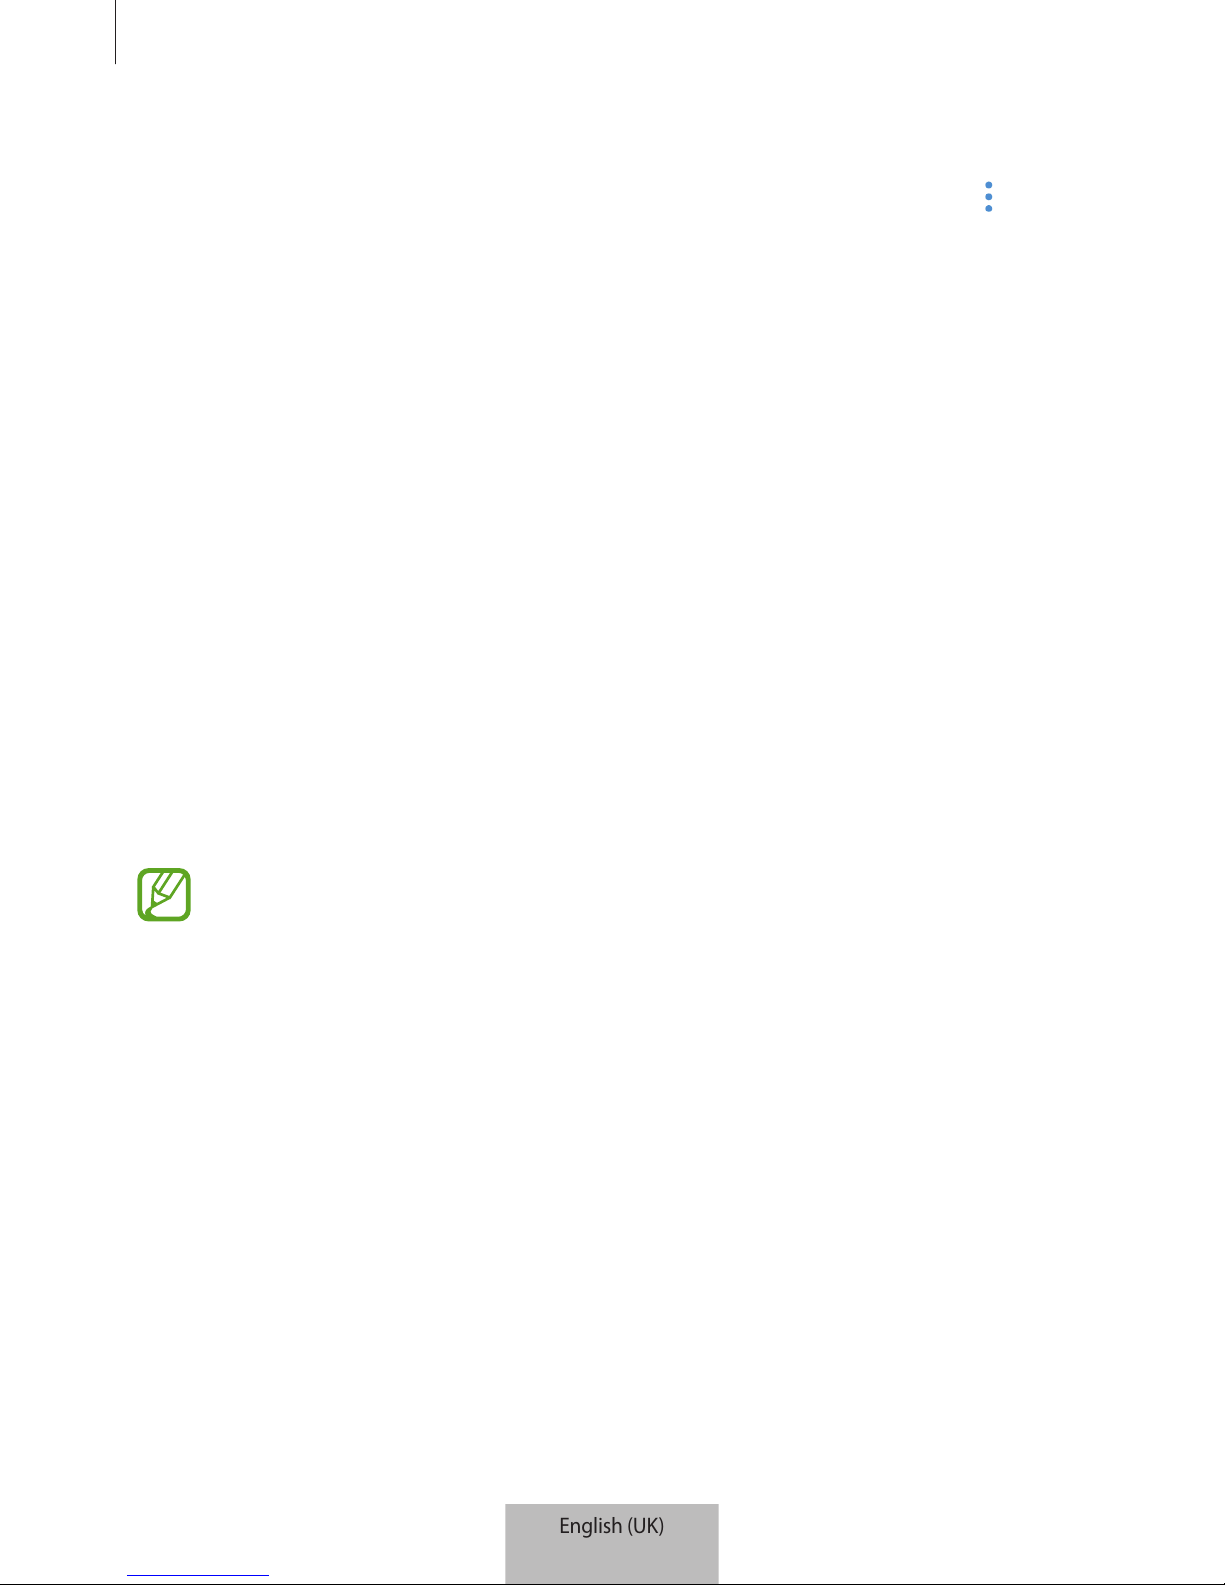
Configure the dashboard and the SmartThings app settings. On the dashboard, tap and use
the following options.
•
Manage dashboard
: Set the items to show on the dashboard.
•
Notifications
: View the notifications from the SmartThings app. You can also change the
notification settings.
•
Settings
: Access information about the SmartThings app and Samsung account
information. You can also set the SmartThings panel to be displayed on the notification
panel.
•
Notices
: View the notices from the SmartThings service.
•
Contact us
: Ask questions or view frequently asked questions.
Registering devices
Registering smart home appliances via Wi-Fi
Register smart home appliances that support Wi-Fi to the SmartThings app and control them.
For instructions on how to register devices, refer to the other devices’ user manuals.
•
To view the supported devices, tap
SUPPORTED DEVICES
on the dashboard.
•
Connected devices’ own errors or defects are not covered by the Samsung
warranty. When errors or defects occur on the connected devices, contact the
device’s manufacturer.
English (UK)
15
Page 18
SmartThings app
18
Registering IoT devices via the Samsung SmartThings Hub
feature
Register the Internet of Things (IoT) devices that support Z-Wave, zigbee, LAN, or Cloud-toCloud to the SmartThings app and control them.
1
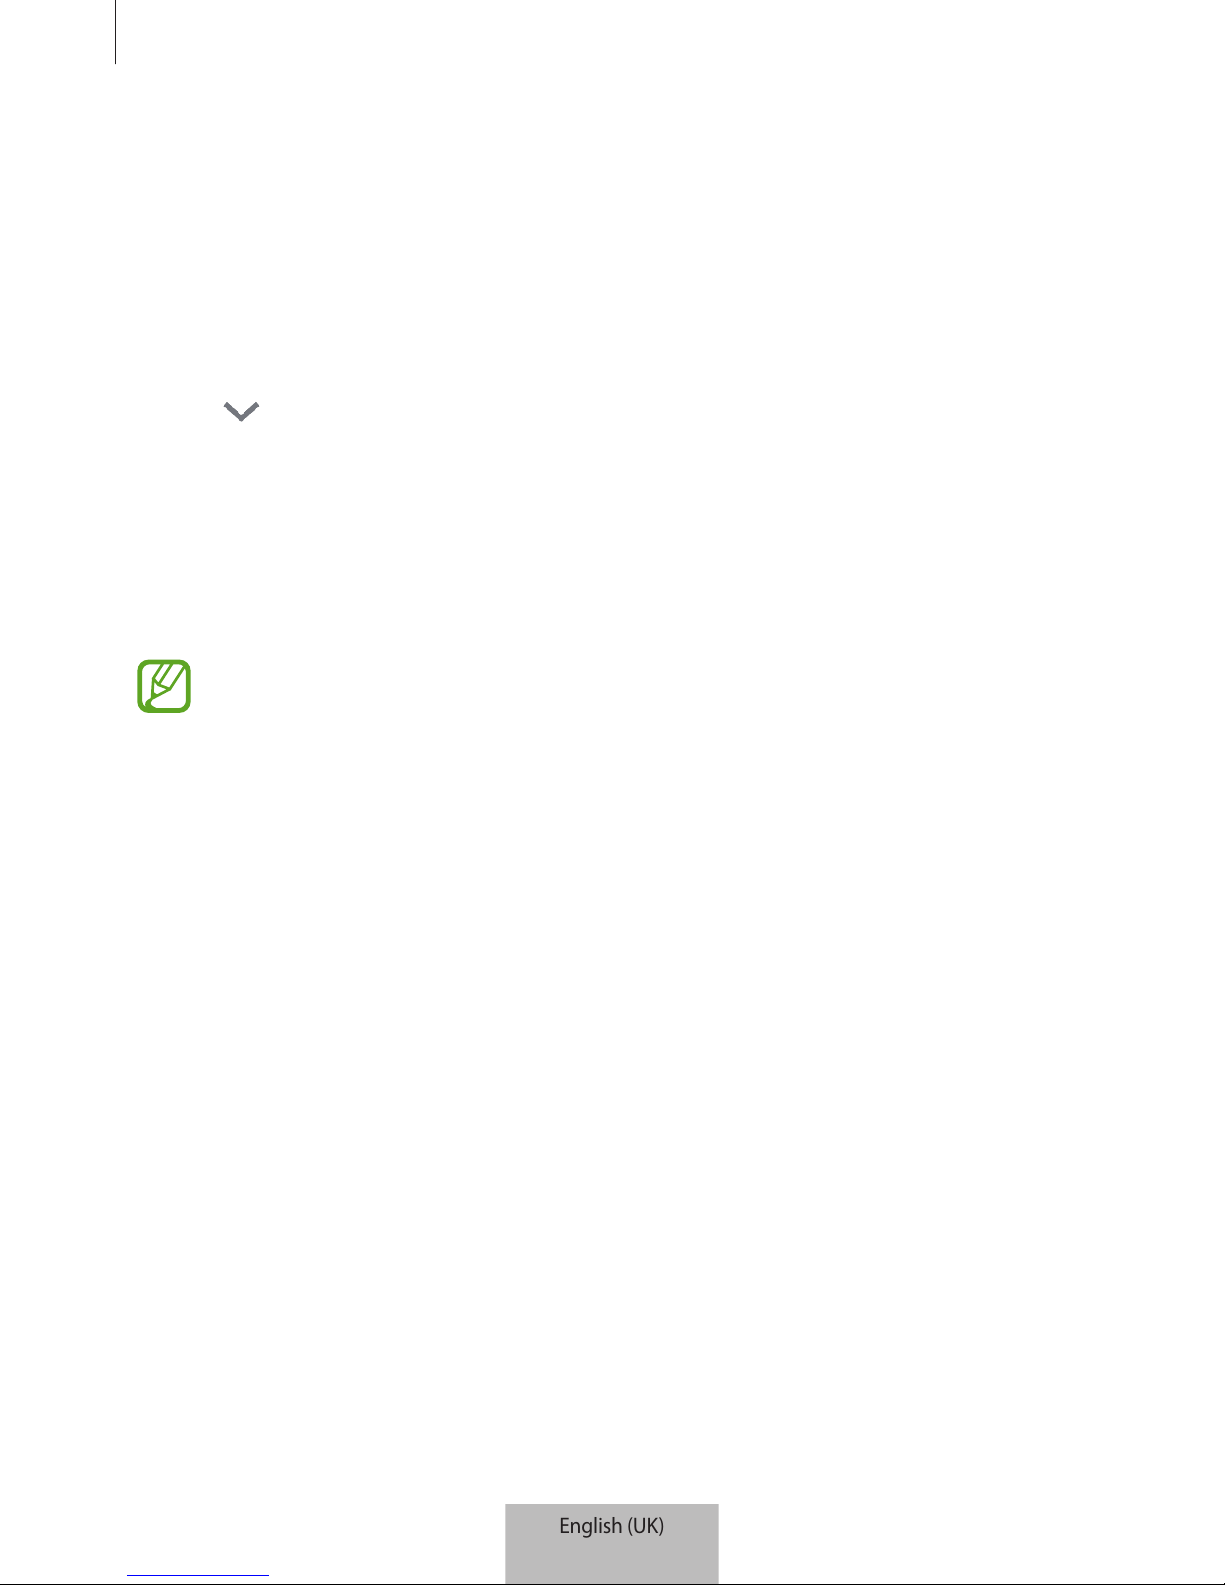
On the dashboard, tap
Add device
.
2
Tap under
ADD DEVICE MANUALLY
.
3
Select a category of the device to register.
Alternatively, enter the device’s name in the search input field and tap
ADD
next to your
device.
4
Follow the on-screen instructions to complete the registration.
•
The Samsung SmartThings Hub feature may not be available depending on the
region. Visit www.samsung.com for details.
•
You can only register the IoT devices approved by Samsung. Visit
www.samsung.com to see a list of compatible devices.
•
Refer to the other devices’ user manuals for instructions on how to pair with them.
English (UK)
16
Page 19

SmartThings app
19
Controlling the registered devices
On the SmartThings screen, tap
Devices
.
On the registered devices list, tap a device.
The controller for the device will be downloaded.
With the downloaded controller, remotely control the registered devices via the SmartThings
app.
Creating locations
You can register devices by location and manage them.
1
On the SmartThings screen, tap
Devices
.
2
Tap
ALL DEVICES
→
Add location
.
3
Enter a location name and select an icon for the location.
4
Tap
Geolocation
to select a location on the map and tap
DONE
.
5
Tap
SAVE
.
Your location will be added.
6
Tap
ADD DEVICE
to register devices.
If you want to manage the location room by room, tap
→
Add room
, and set the room and
devices for it.
English (UK)
17
Page 20
SmartThings app
20
Inviting members to the created location
Invite other members to the created location to control the devices and scenes assigned to
that location.
1
On the SmartThings screen, tap
Devices
.
2
Tap
ALL DEVICES
and scroll up or down to select a location.
3
Tap →
Invite member
.
4
Tap
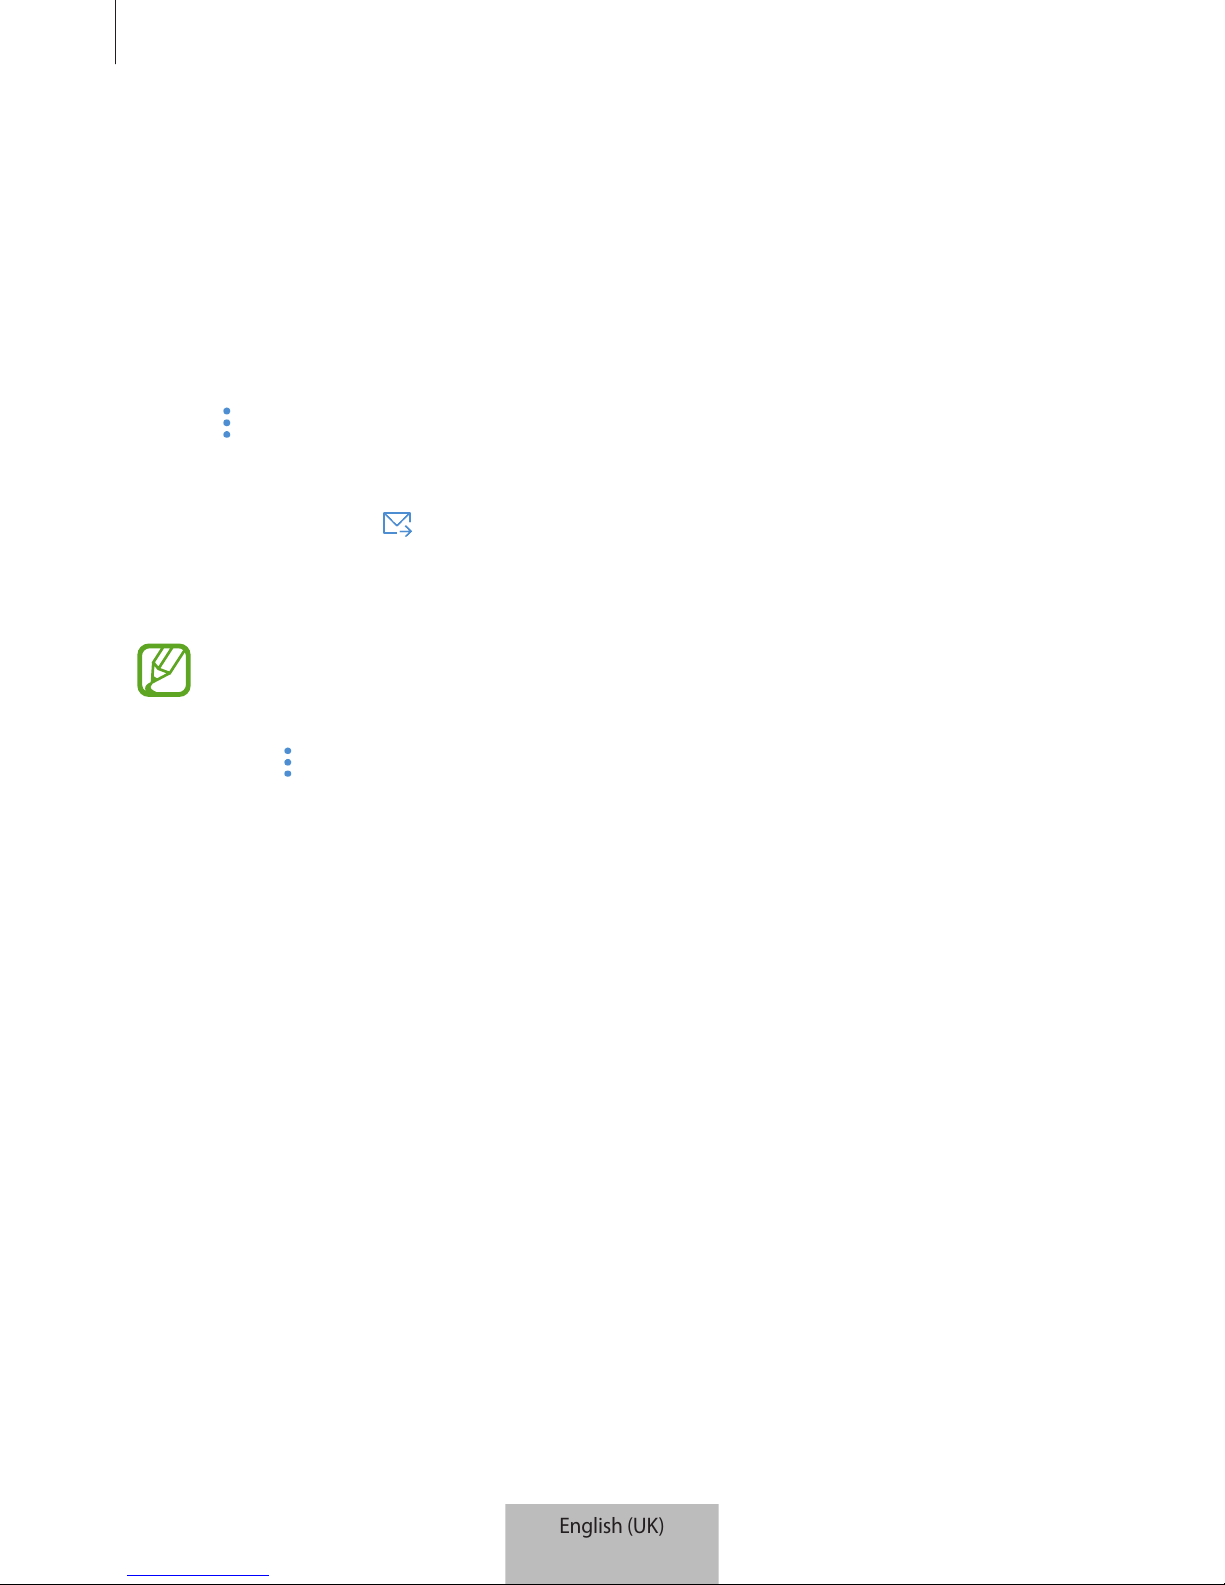
Enter Samsung account ID
, enter the Samsung account for the person you want to
invite, and then tap
.
You can invite users by scanning the QR code. Tap
CREATE QR CODE
and invite other
users to scan it.
•
You can only invite the users login the Samsung account via SmartThings app.
•
To accept the invitation, on the SmartThings screen, tap the invitation pop-up and
tap
ACCEPT
. To accept the invitation by scanning the QR code, on the dashboard,
tap
→
Settings
→
Accept invitation (QR code)
and then scan the QR code.
5
Follow the on-screen instruction to complete the invitation.
English (UK)
18
Page 21
SmartThings app
21
Setting and running scenes
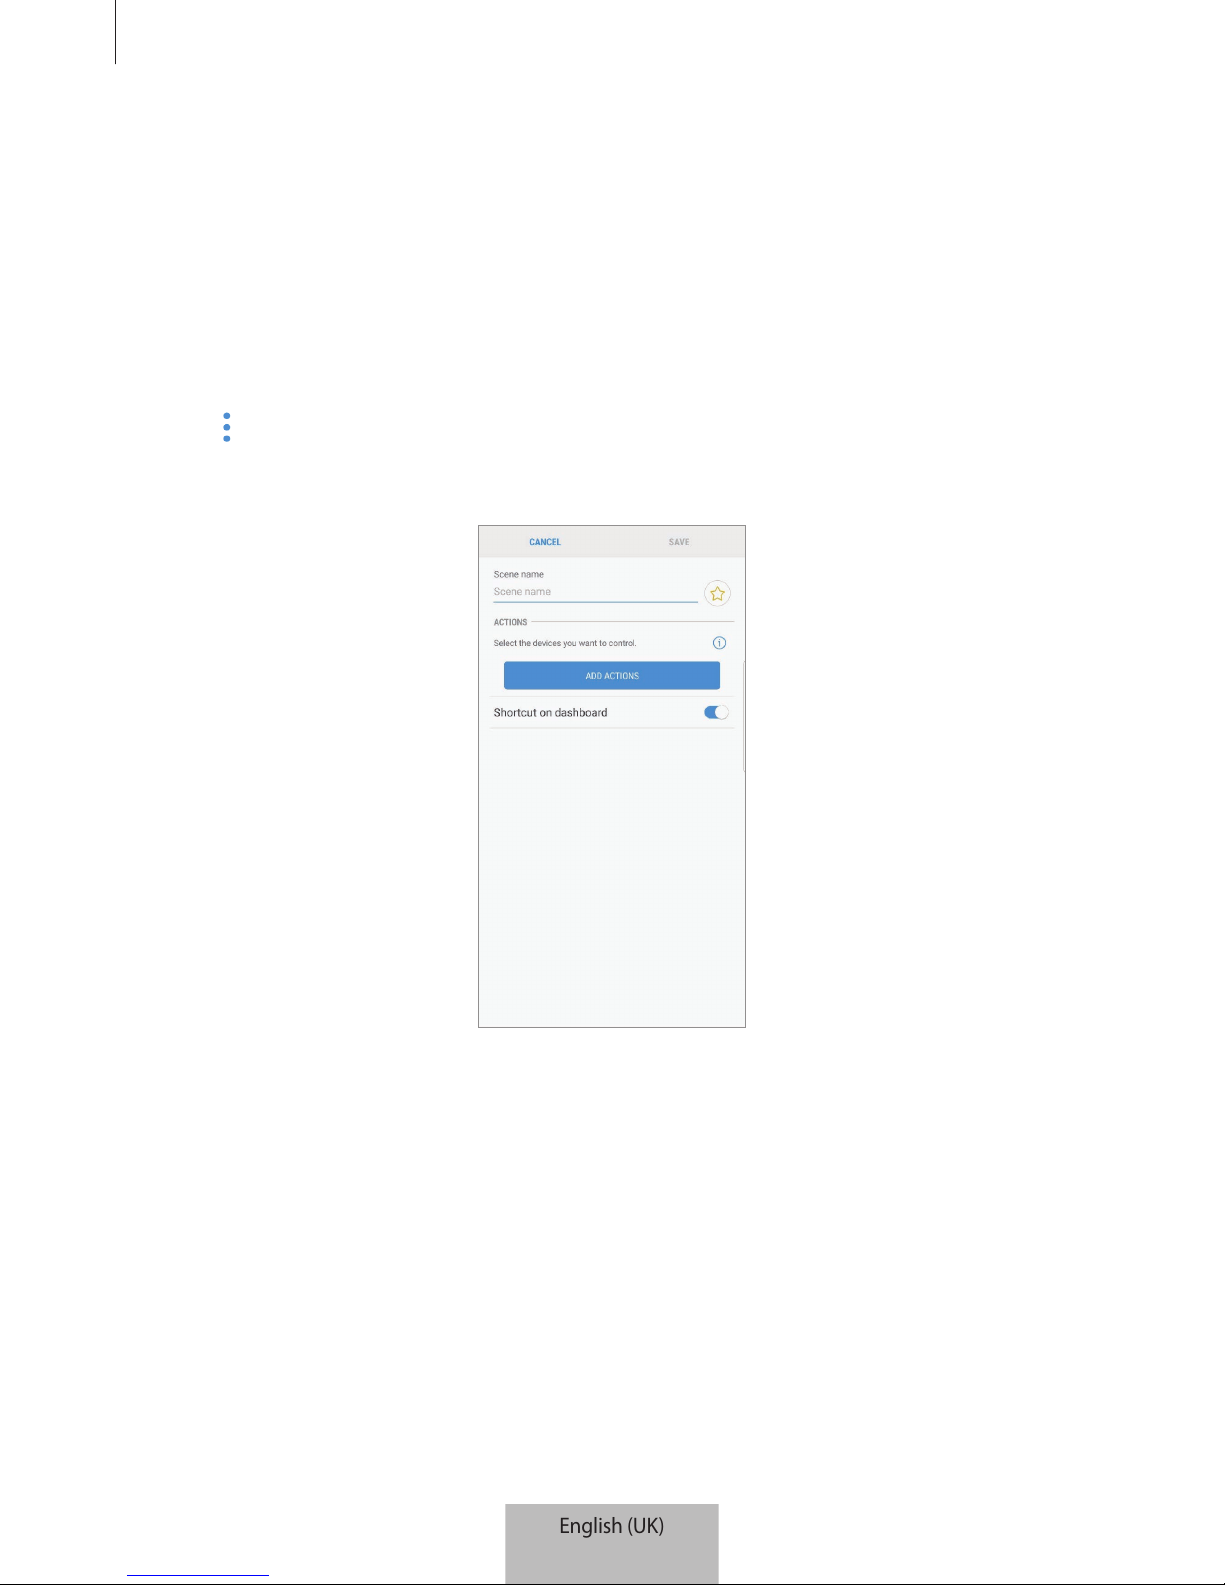
Set a scene to operate multiple devices at once. To set a scene, you should create locations.
Refer to Creating locations for more information.
1
On the SmartThings screen, tap
Devices
.
2
Tap
ALL DEVICES
and scroll up or down to select a location.
3
Tap →
Add scene
.
The screen for setting scenes will appear.
4
Enter the scene’s title, select an icon for the scene, and then tap
ADD ACTIONS
.
English (UK)
19
Page 22
SmartThings app
22
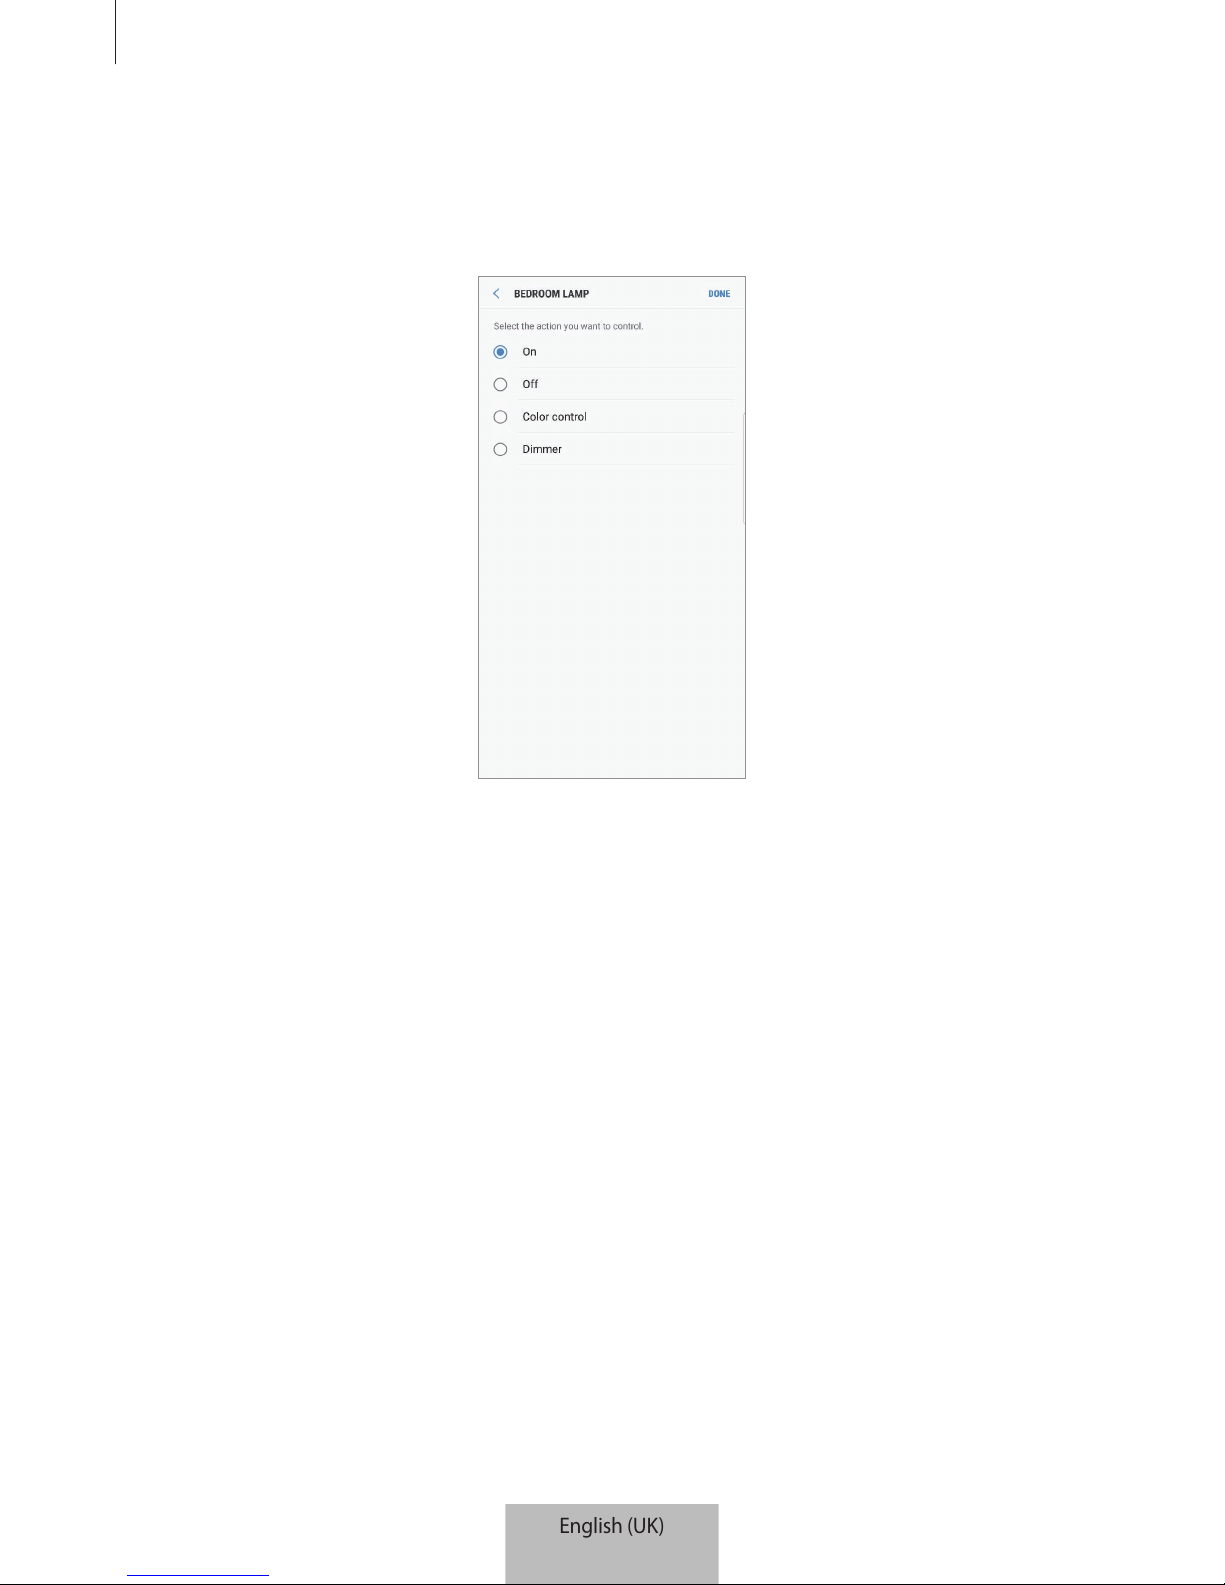
5
Select a device and an action to be operated, and then tap
DONE
.
For example, select a TV and a robot vacuum cleaner and the corresponding actions to
be operated.
6
Tap the
Shortcut on dashboard
switch to view the scene on the dashboard.
7
Tap
SAVE
.
The scene is set. You can view the set scene on the designated location screen.
English (UK)
20
Page 23
SmartThings app
23
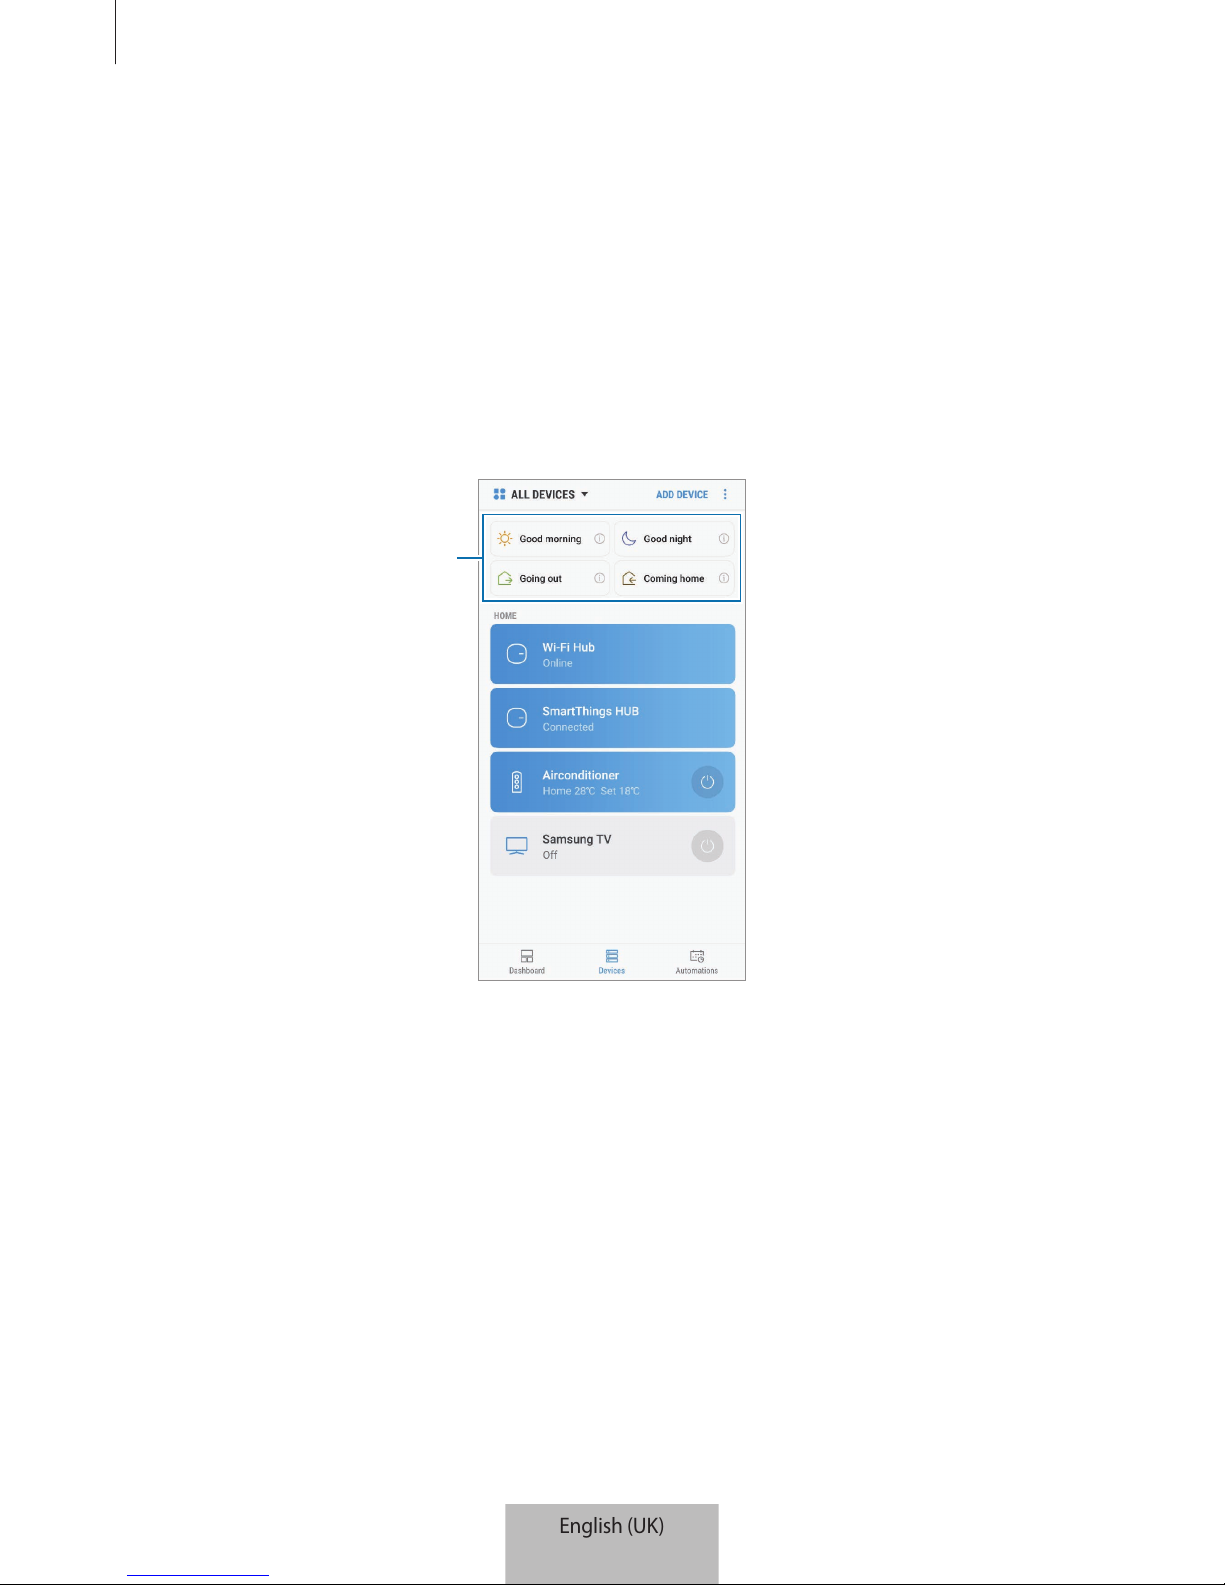
Activating scenes
1
On the SmartThings screen, tap
Devices
.
2
Tap
ALL DEVICES
and scroll up or down to select a location that has the scene you want
to activate.
3
Select a scene to activate.
The devices you set will operate in accordance with the scene.
Set scenes
English (UK)
21
Page 24

SmartThings app
24
Managing devices and locations
You can manage locations and their assigned devices and scenes.
1
On the SmartThings screen, tap
Devices
.
2
Tap
ALL DEVICES
and scroll up or down to select a location.
3
Tap →
Edit
and use the following options.
•
Location name
: Change the location name and its icon.
•
Geolocation
: View or change the location on the map.
•
Show location summary on dashboard
: Set to show the location card on the
dashboard.
•
SCENES
: Change the scene information or delete the scene.
•
DEVICES
: Change the device information or delete the device from the assigned
location.
•
MEMBERS
: View the members to share the location. You can also invite others.
•
REMOVE LOCATION
: Delete the location.
•
To connect a Z-Wave device to another device, on the currently connected mobile
device, remove the device from the SmartThings app to exclude it. When you
remove the device from the SmartThings app, the instructions for exclusion will
be provided via a URL. Follow the instructions to exclude the Z-Wave device. If
you reset the SmartThings Wifi/Hub, you should exclude the Z-Wave device and
reconnect (re-include) it. For instructions on how to exclude Z-Wave devices, refer
respective Z-Wave device’s user manual or contact the device’s manufacturer.
•
For additional Z-Wave network utility functions, visit www.smartthings.com.
•
The SmartThings Wifi/Hub automatically sends an Association Set for Lifeline/
group1 for 4 nodes after adding a device that supports Association.
English (UK)
22
Page 25
SmartThings app
25
Setting automations
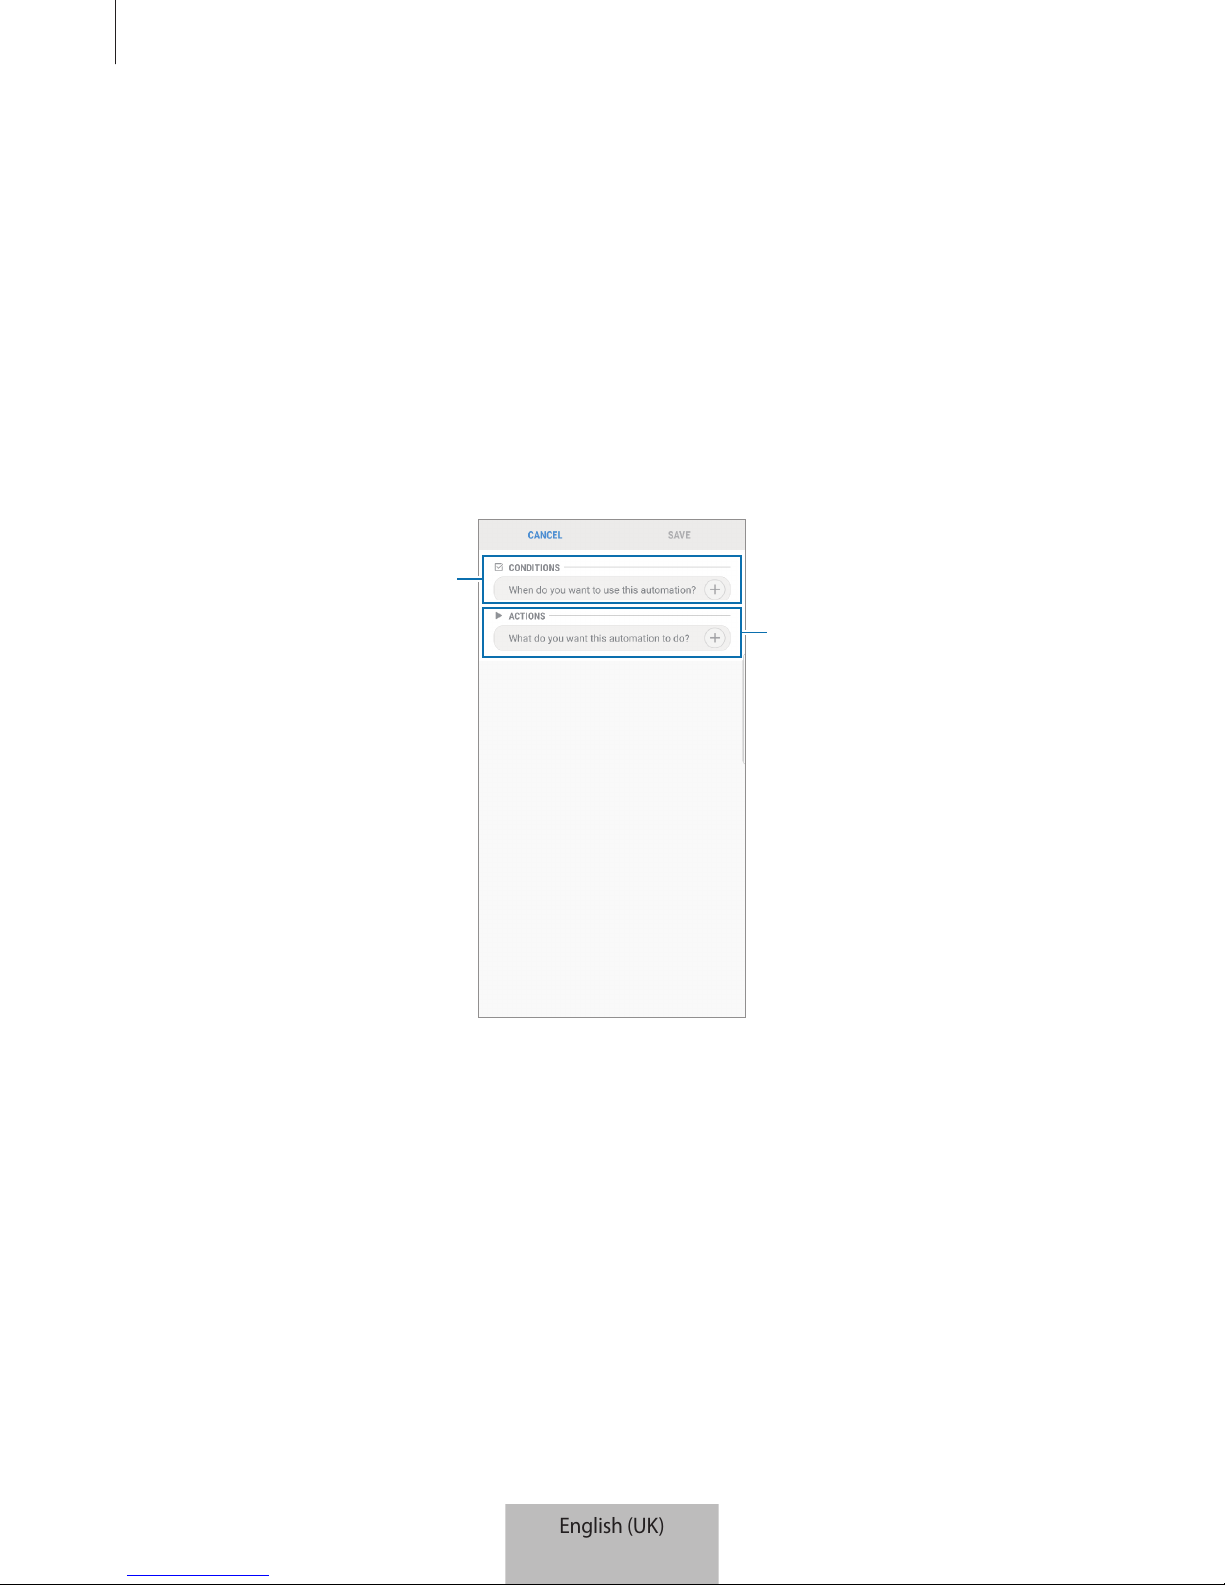
Set an automation for devices assigned to a location to automatically perform actions at a
specific time.
1
On the SmartThings screen, tap
Automations
.
2
Tap
ADD AUTOMATION
.
If an automation already has set, tap
ADD
.
The screen for setting automation will appear.
Set conditions.
Set devices and actions.
3
Tap
When do you want to use this automation?
4
Tap
Based on the dime of day
and set days and time.
Or, tap
Based on a device status
to set the device’s condition.
5
Tap
DONE
.
English (UK)
23
Page 26
SmartThings app
26
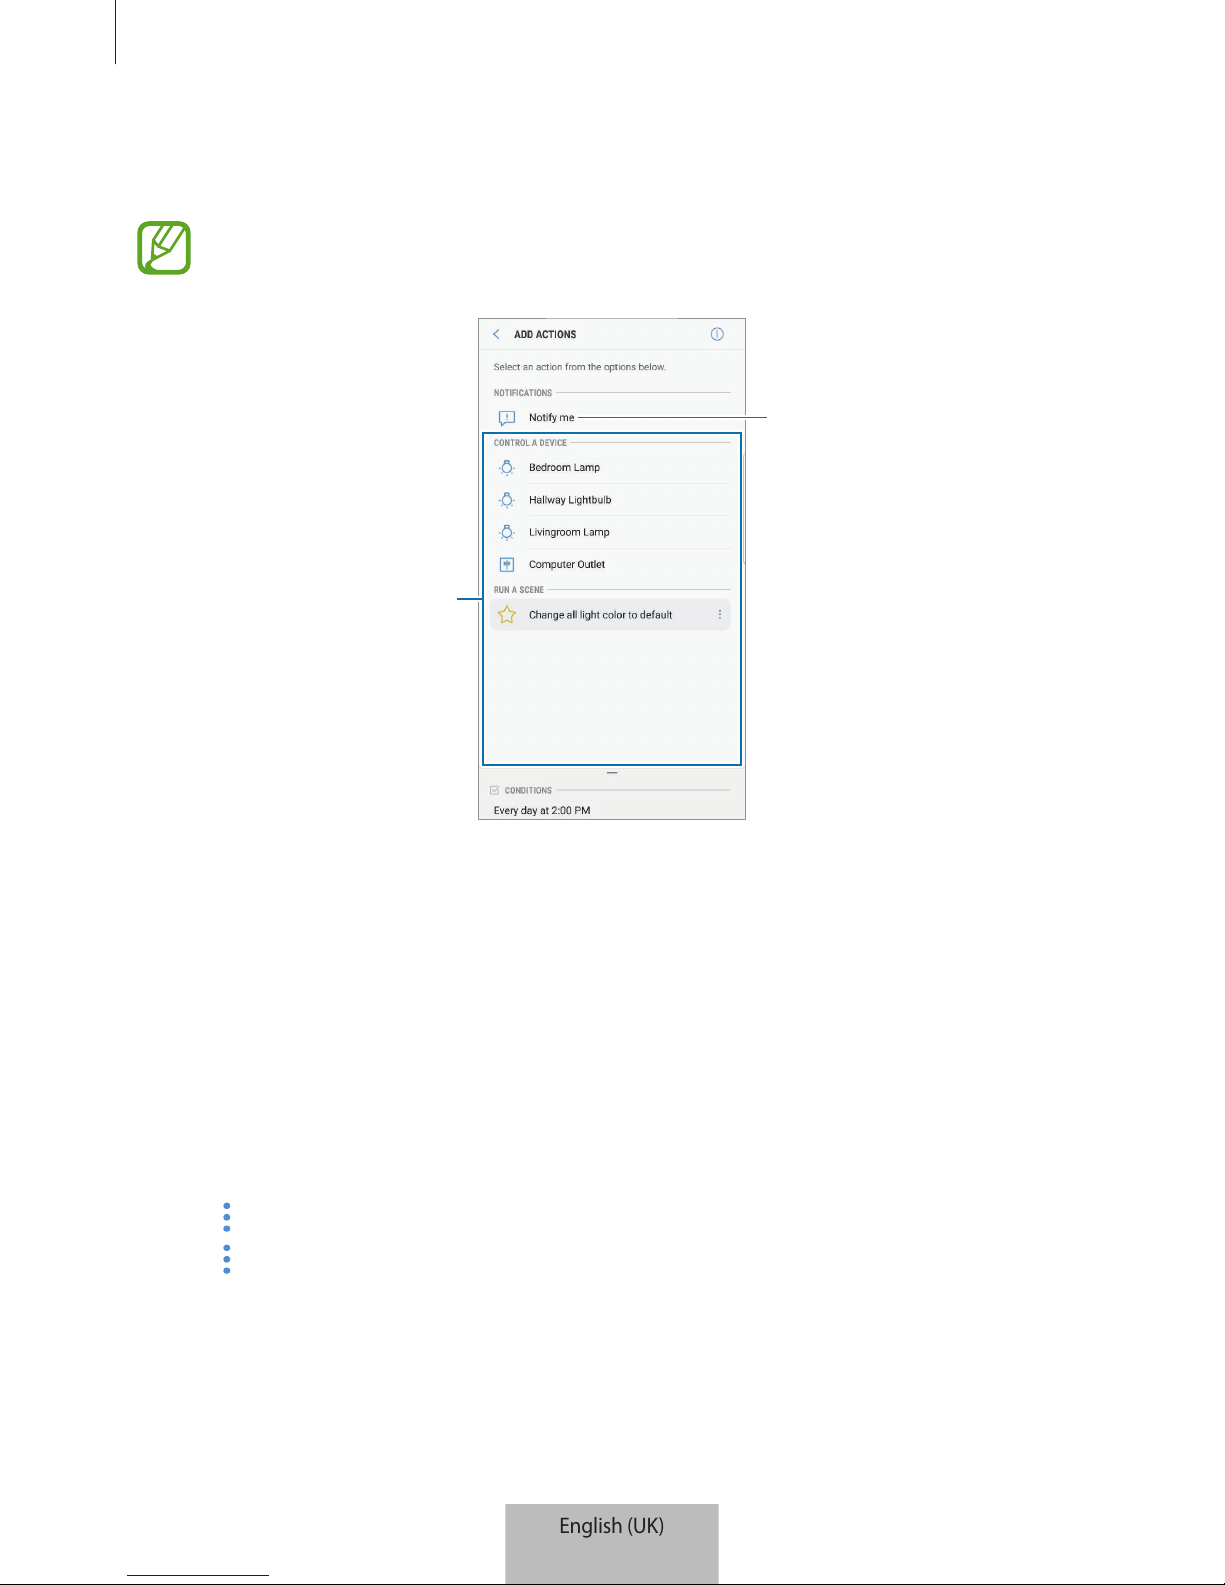
6
Tap
What do you want this automation to do?
, select devices and conditions, or scenes,
and then tap
DONE
.
To receive a notification when devices perform an action according to the
automation, tap
Notify me
and enter a message.
Select a device or a scene.
Enter a notification message.
7
Tap
SAVE
.
The assigned devices will operate in accordance with the set automation.
Managing automations
You can view the set automations and manage them.
On the SmartThings screen, tap
Automations
.
•
Tap the switch next to the automation to activate or deactivate it.
•
Tap the automation to change its details.
•
Tap →
Edit name
to change the automation’s name.
•
Tap →
Delete
to delete the automation.
English (UK)
24
Page 27

SmartThings app
27
Practical usage of the SmartThings app
Use the SmartThings app to make your life easier and more comfortable. Create automations
based on your routine, or easily control the registered devices from anywhere.
•
If you want to ensure that the office is cool when you arrive on a hot summer’s day, turn
on the connected air conditioner via the SmartThings app before you arrive.
•
If you want to come home to a clean house, turn on the connected robot vacuum cleaner
via the SmartThings app before you get home.
•
If you want to improve your home security, create an automation for motion sensors to
operate at bedtime and activate the notification feature. When the motion sensors detect
unexpected movements, they will notify you.
To view other usage examples, tap
User stories
on the dashboard.
English (UK)
25
Page 28

28
Appendix
Troubleshooting
Before contacting a Samsung Service Centre, please attempt the following solutions.
Your SmartThings Wifi/Hub freezes
If the SmartThings Wifi/Hub freezes or hangs, disconnect the adapter from the SmartThings
Wifi/Hub and reconnect it.
Close the SmartThings app completely on your mobile device and restart it.
If your SmartThings Wifi/Hub is frozen and unresponsive, insert a pin into the Reset hole more
than 8 seconds.
If the tips above do not solve the problem, contact a Samsung Service Centre.
Your SmartThings Wifi/Hub is not connected with a router
The SmartThings Wifi/Hub only supports the SmartThings Wifi/Hub. Connect only the
SmartThings Wifi/Hub.
Your SmartThings Wifi/Hub is not detected by the SmartThings app
•
If the SmartThings Wifi/Hub freezes or hangs, disconnect the adapter from the
SmartThings Wifi/Hub and reconnect it.
•
Close the SmartThings app completely on your mobile device and restart it.
•
If your SmartThings Wifi/Hub is frozen and unresponsive, insert a pin into the Reset hole.
•
Ensure that the other devices are within the maximum connection range.
If the tips above do not solve the problem, contact a Samsung Service Centre.
English (UK)
26
Page 29

Appendix
29
Other devices cannot connect to the SmartThings app
•
On the other device, disconnect from the Wi-Fi network and reconnect to it.
•
Turn the device off and turn it on.
The connection is often disconnected
•
If there are obstacles between the devices, the operating distance may be reduced.
•
Ensure that the other devices are within the maximum connection range.
•
When using the SmartThings Wifi/Hub with other devices, the connection may be
affected by electromagnetic waves. Use the SmartThings Wifi/Hub in environments with
fewer wireless devices present.
The SmartThings Wifi/Hub works differently as described in the manual
Available functions may differ depending on the connected device.
English (UK)
27
Page 30

Copyright
Copyright © 2018 Samsung Electronics
This manual is protected under international copyright laws.
No part of this manual may be reproduced, distributed, translated, or transmitted in any form
or by any means, electronic or mechanical, including photocopying, recording, or storing
in any information storage and retrieval system, without the prior written permission of
Samsung Electronics.
Trademarks
•
SAMSUNG and the SAMSUNG logo are registered trademarks of Samsung Electronics.
•
Bluetooth® is a registered trademark of Bluetooth SIG, Inc. worldwide.
•
Wi-Fi®, Wi-Fi CERTIFIED™, and the Wi-Fi logo are registered trademarks of the Wi-Fi
Alliance.
•
Z-Wave and Z-Wave Plus are registered trademarks of Sigma Designs and its subsidiaries
in the United States and other countries.
•
All other trademarks and copyrights are the property of their respective owners.
English (UK)
28
Page 31
1
Erste Schritte
Vor Inbetriebnahme lesen
Lesen Sie dieses Handbuch vor der Verwendung des Geräts aufmerksam durch, um seine sichere und
sachgemäße Verwendung zu gewährleisten.
•
Einige Inhalte weichen je nach Software- und Anwendungsversion sowie Gerätespezifikationen
möglicherweise von Ihrem Gerät ab. Die Inhalte können ohne vorherige Ankündigung geändert
werden.
•
Stellen Sie vor Verwendung des SmartThings Wifi/Hub sicher, dass er mit Ihrem Gerät kompatibel ist.
•
Die Leistung des SmartThings Wifi/Hubs variiert je nach Umgebung.
•
Dieses Produkt enthält bestimmte freie Software sowie Open-Source-Software. Eine
Anleitung zum Anzeigen der Open-Source-Lizenz finden Sie auf der Website von Samsung
(opensource.samsung.com).
Hinweissymbole
Warnung: Situationen, die zu Verletzungen führen könnten
Vorsicht: Situationen, die zu Schäden an Ihrem oder anderen Geräten führen könnten
Hinweis: Hinweise, Verwendungstipps oder zusätzliche Informationen
Deutsch
1
Deutsch
1
Page 32
Erste Schritte
2
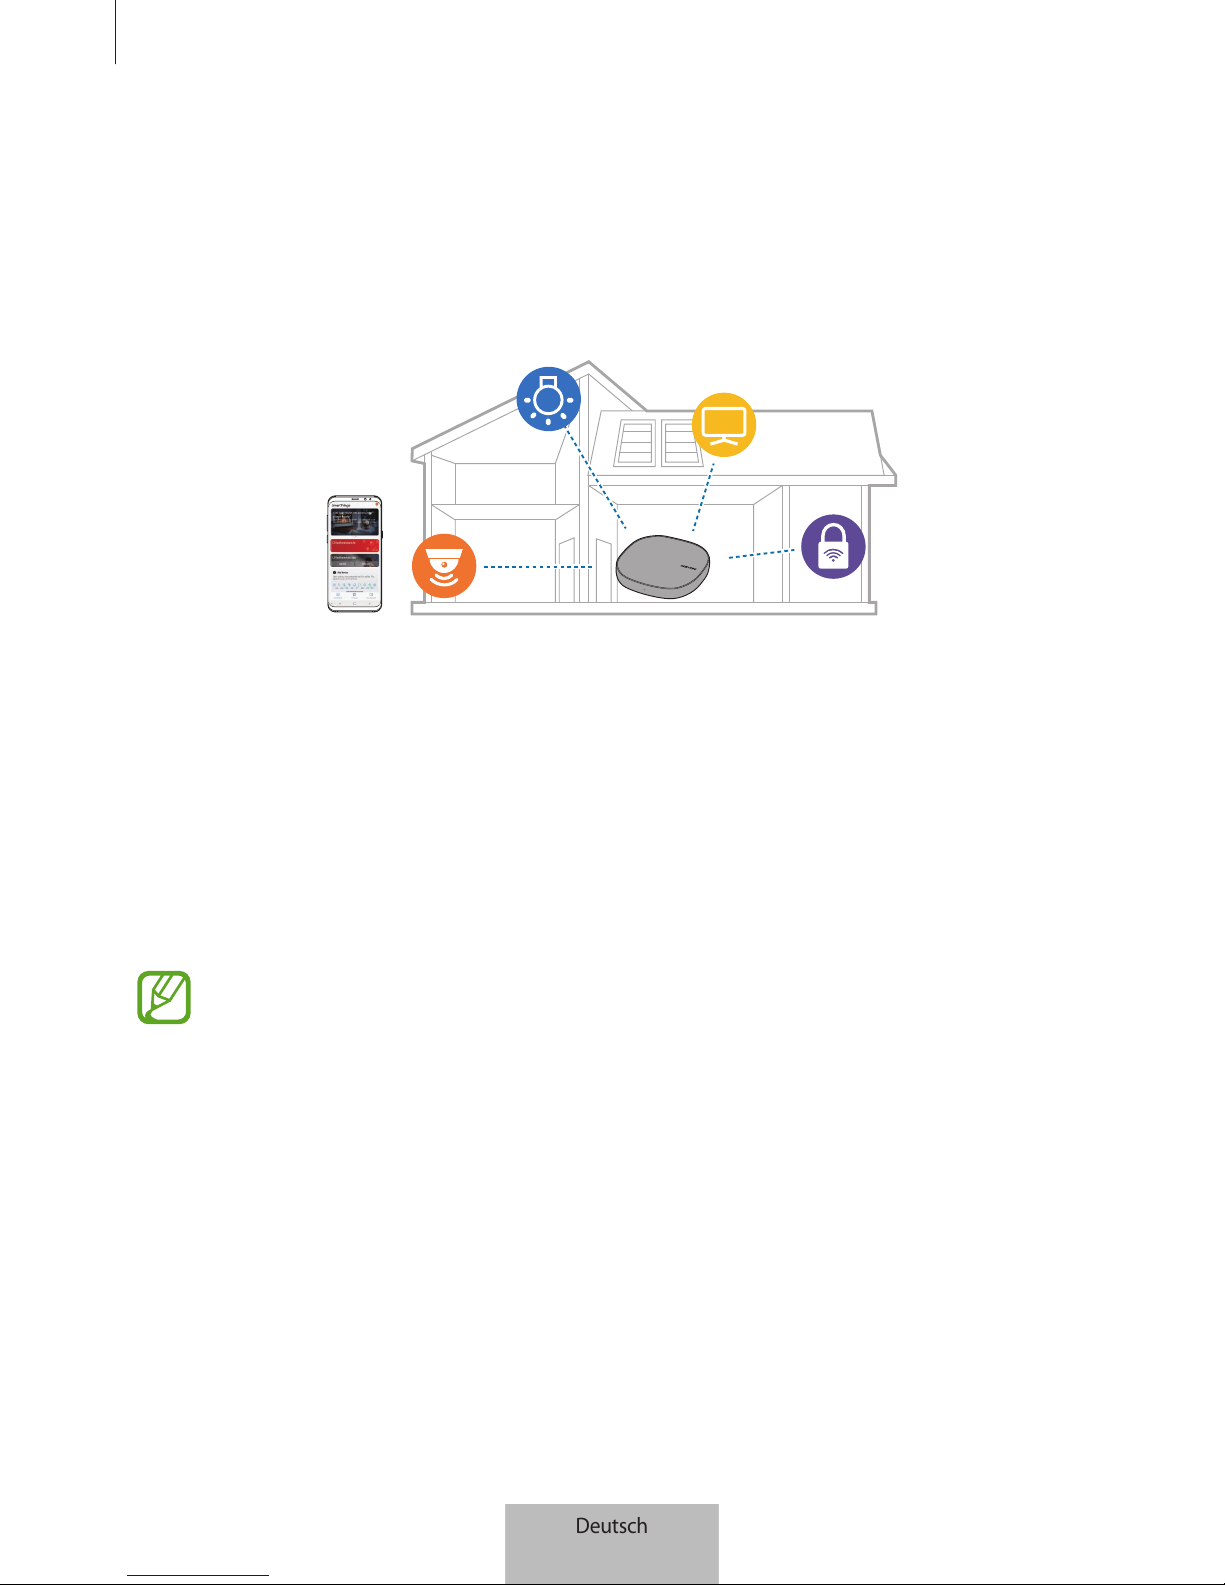
Informationen zum SmartThings Wifi/Hub
Der SmartThings Wifi/Hub ist ein WLAN-Router, über den Ihr Smartphone über WLAN mit Ihren smarten
Heimgeräten verbunden werden kann. Sie können auch Geräte im Internet der Dinge über die Samsung
SmartThings Hub-Funktion mit diesem SmartThings Wifi/Hub verbinden.
Sollen viele Geräte verbunden werden, können Sie mehrere SmartThings Wifi/Hubs nutzen.
Lieferumfang
Vergewissern Sie sich, dass der Produktkarton die folgenden Artikel enthält:
•
SmartThings Wifi/Hub
•
Ethernet-Kabel
•
Netzteil
•
Kurzanleitung
•
Die mit dem Gerät und anderen verfügbaren Zubehörteilen bereitgestellten Artikel können
je nach Region oder Dienstanbieter variieren.
•
Die mitgelieferten Artikel sind nur für die Verwendung mit diesem Gerät vorgesehen und
sind möglicherweise nicht mit anderen Geräten kompatibel.
•
Änderungen am Aussehen und an den technischen Daten sind ohne vorherige
Ankündigung vorbehalten.
•
Weitere Zubehörteile können Sie bei Ihrem örtlichen Samsung-Händler erwerben. Stellen Sie
vor dem Kauf sicher, dass sie mit dem Gerät kompatibel sind.
•
Verwenden Sie ausschließlich von Samsung zugelassene Zubehörteile. Bei Verwendung
nicht zugelassener Zubehörteile können Leistungsbeeinträchtigungen und Fehler auftreten,
die nicht von der Garantie gedeckt sind.
•
Die Verfügbarkeit der Zubehörteile ist vollständig von den entsprechenden Herstellern
abhängig. Weitere Informationen zu verfügbarem Zubehör finden Sie auf der Website von
Samsung.
Deutsch
2
Deutsch
2
Page 33
Erste Schritte
3
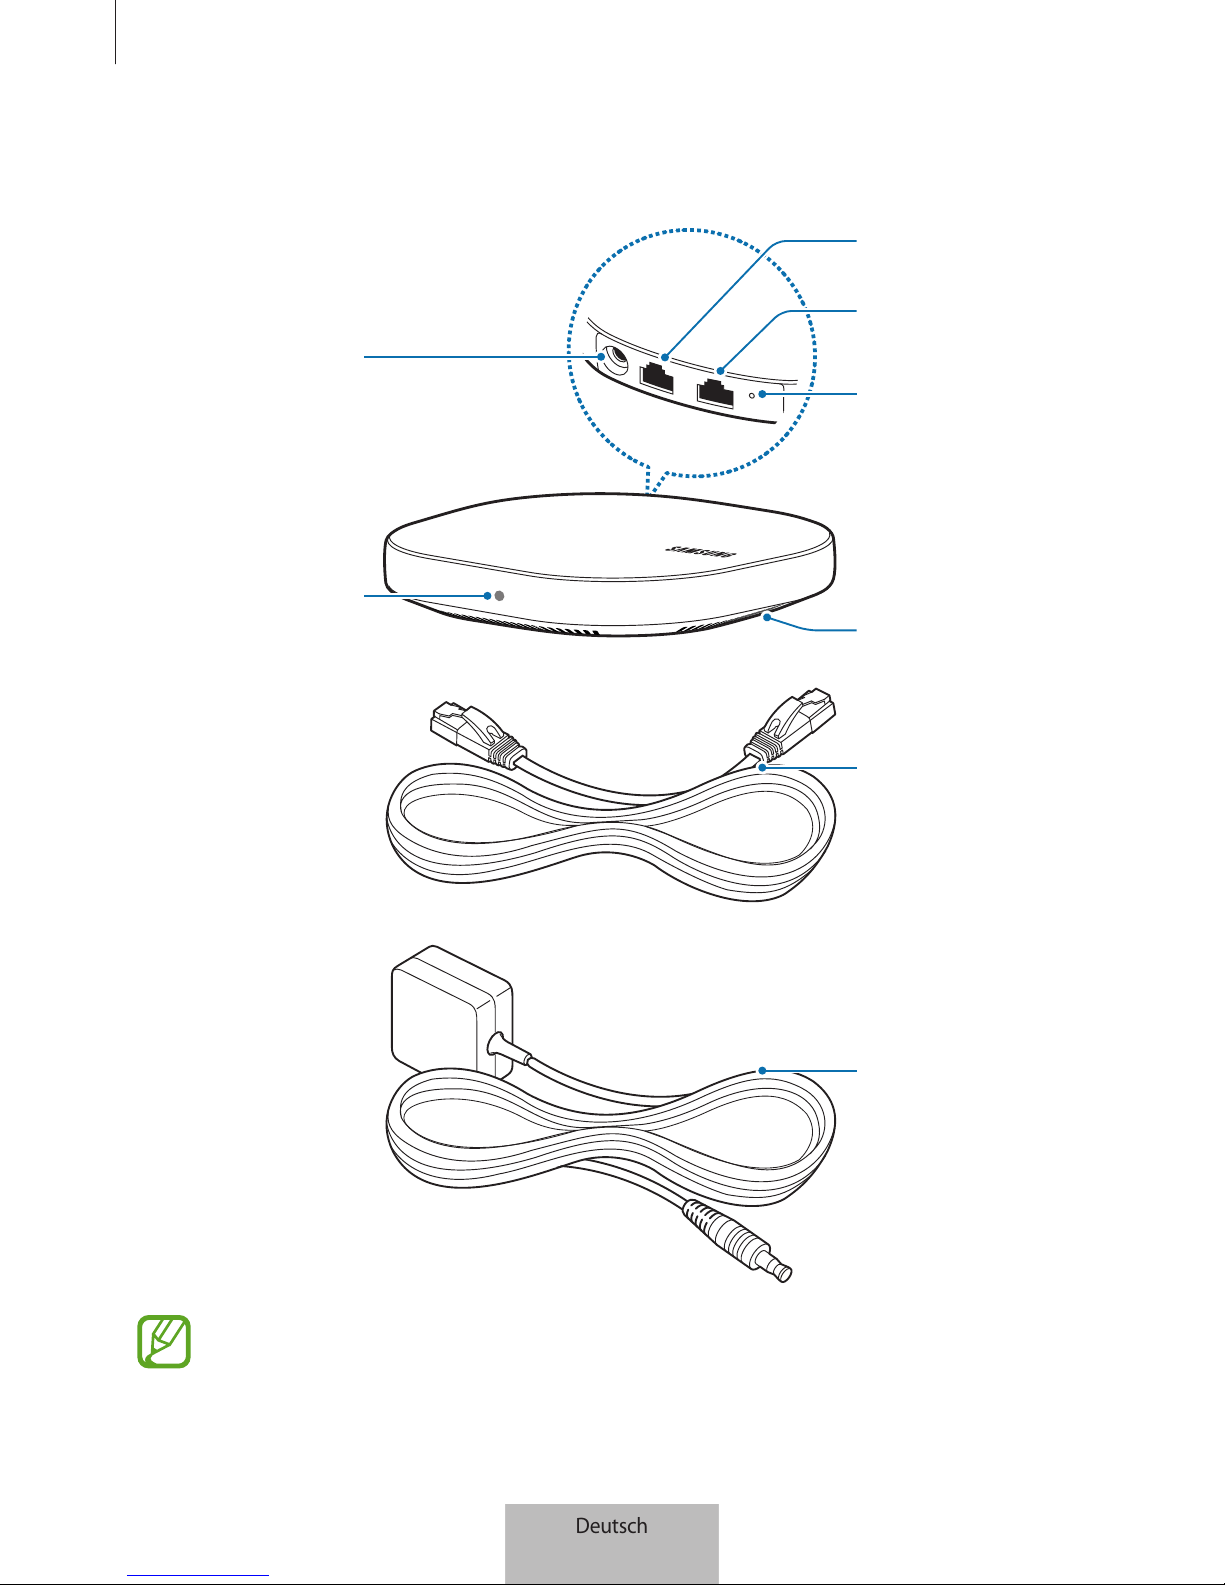
Geräteaufbau
Netzteilanschluss
WAN-Anschluss (IN)
LAN-Anschluss (OUT)
Reset-Taste
Lüftungsöffnung
Status-LED
Ethernet-Kabel
Netzteil
Das Erscheinungsbild und der interne Aufbau des Produkts kann je nach Modell unterschiedlich
sein.
Deutsch
3
Deutsch
3
Page 34
Erste Schritte
4
Status-LED
Die Status-LED zeigt den Status des SmartThings Wifi/Hubs an.
Farbe Status
Grün Einschalten, in Betrieb
Blinkt grün System wird gestartet/zurückgesetzt
Blinkt grün und rot Auf Geräte zum Verbinden warten
Blinkt rot Funktionsfehler
Leistungsaufnahme
•
Allgemeine Leistungsaufnahme im Standby-Modus (wenn alle Netzwerkschnittstellen aktiv sind:
4,5W
Deutsch
4
Deutsch
4
Page 35

5
SmartThings Wifi/Hub
verwenden
Verbindung mit einem Mobilgerät herstellen
Zum Verbinden des SmartThings Wifi/Hub mit einem Mobilgerät müssen Sie die SmartThingsAnwendung auf dem Mobilgerät installieren. Sie können die Anwendung aus den
Galaxy Apps
, dem
Play Store
oder dem
App Store
herunterladen.
•
Auf www.samsung.com sehen Sie, welche Geräte mit der SmartThings-Anwendung
kompatibel sind.
•
Für die Verwendung der SmartThings-Anwendung müssen Sie sich registrieren und in Ihrem
Samsung Account anmelden.
•
Welche Funktionen unterstützt werden, hängt vom verwendeten Mobilgerät und
Betriebssystem ab.
•
Die Bluetooth-Funktion des SmartThings Wifi/Hubs ist automatisch aktiviert, um eine
Verbindung herzustellen. Wenn die Verbindung hergestellt ist, schaltet sich die BluetoothFunktion automatisch aus.
Deutsch
5
Deutsch
5
Page 36
SmartThings Wifi/Hub verwenden
6
SmartThings Wifi/Hub
1
Stecken Sie ein Ende des Ethernet-Kabels am WAN-Anschluss (IN) des Hubs und das andere Ende
am LAN-Anschluss des Modems ein.
2
Schließen Sie das Netzteil am SmartThings Wifi/Hub an.
Der SmartThings Wifi/Hub wird eingeschaltet und die Status-LED blinkt grün.
Verwenden Sie nur von Samsung zugelassene Netzteile (mindestens 12V/2,1A).
•
Sie können den SmartThings Wifi/Hub nur nutzen, wenn Sie ihn an das Netzteil anschließen.
•
Falls die Temperatur des SmartThings Wifi/Hubs über 55°C steigt, wird die interne Lüftung
automatisch eingeschaltet (nur bei ET-WV533).
•
Falls der SmartThings Wifi/Hub über einen längeren Zeitraum hinweg sehr heiß ist, schaltet
sich der SmartThings Wifi/Hub möglicherweise automatisch aus oder er wird unter
Umständen automatisch zurückgesetzt. Ist dies öfter der Fall, trennen Sie das Netzteil vom
SmartThings Wifi/Hub und wenden Sie sich an ein Servicecenter von Samsung.
•
Um Energie zu sparen, können Sie das Netzteil bei Nichtgebrauch von der Stromversorgung
trennen. Das Netzteil verfügt über keinen Ein-/Ausschalter. Um Energie zu sparen, müssen
Sie das Netzteil bei Nichtgebrauch von der Stromversorgung trennen. Das Netzteil sollte sich
während der Verwendung in der Nähe der Stromversorgung befinden und leicht zugänglich
sein.
Mobilgerät
3
Starten Sie auf dem Mobilgerät die Anwendung
SmartThings
.
4
Anhand der Anweisungen im Pop-up-Fenster können Sie einstellen, dass die WLAN- und BluetoothFunktion automatisch aktiviert sind.
Beim Starten der
SmartThings
-Anwendung werden WLAN und Bluetooth dann automatisch
aktiviert.
Deutsch
6
Deutsch
6
Page 37
SmartThings Wifi/Hub verwenden
7
5
Der SmartThings Wifi/Hub wird automatisch erkannt. Tippen Sie auf
JETZT HINZUFÜGEN
.
Sollte der SmartThings Wifi/Hub nicht erkannt werden, tippen Sie auf dem Dashboard
Gerät
hinzufügen
an. Tippen Sie anschließend unter
MANUELLES HINZUFÜGEN EINES GERÄTS
→
Wi-Fi Hub
an und wählen Sie den Namen Ihres SmartThings Wifi/Hubs aus.
6
Vergeben Sie einen Netzwerknamen und ein Passwort für den SmartThings Wifi/Hub.
Wenn Sie Geräte im Internet der Dinge über die Samsung SmartThings Hub-Funktion registrieren
möchten, muss die Funktion
SmartThings-Hub einrichten
aktiviert sein.
7
Befolgen Sie die Anweisungen auf dem Bildschirm, um die Verbindung herzustellen.
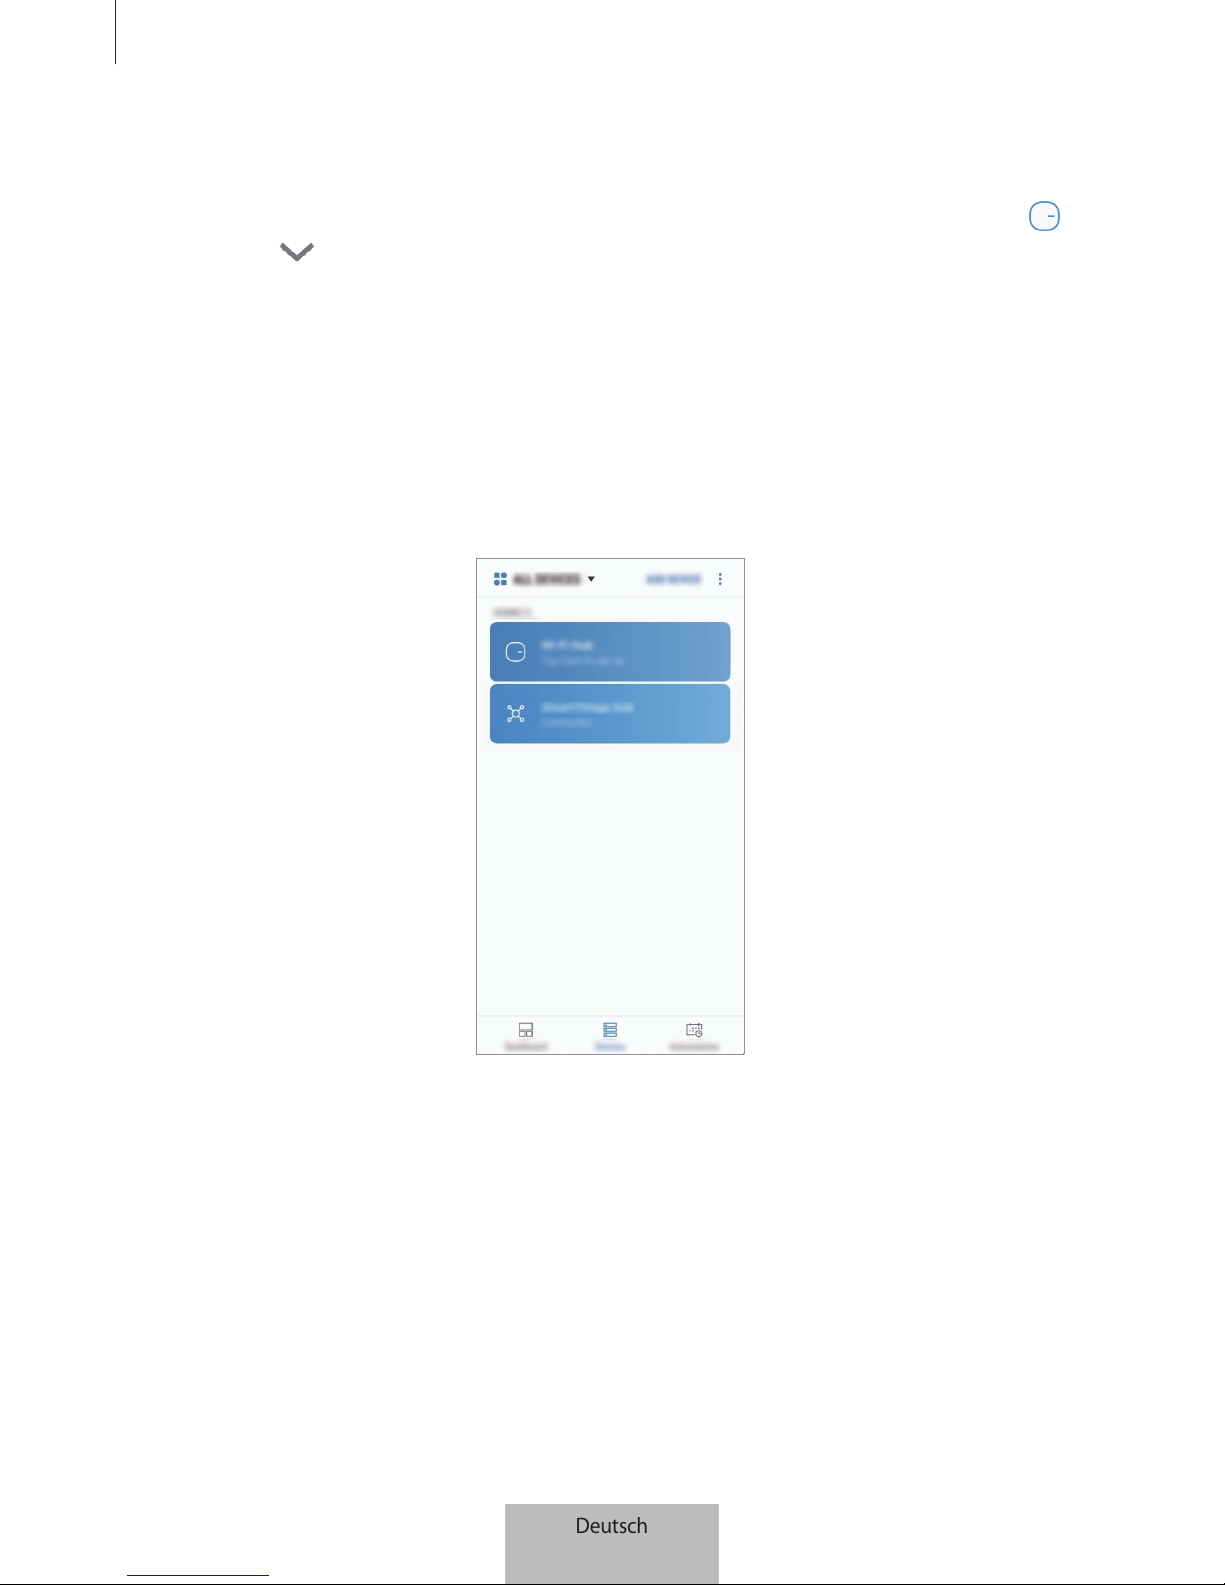
Sobald die Verbindung hergestellt wurde, wird der folgende Bildschirm angezeigt:
Der SmartThings Wifi/Hub ist ein einziges Produkt, das jedoch auf Grundlage der unterschiedlichen
Funktionen als zwei separate Gerät registriert ist, nämlich der WLAN-Routerfunktion und der Samsung
SmartThings Hub-Funktion.
Deutsch
7
Deutsch
7
Page 38
SmartThings Wifi/Hub verwenden
8
Weitere SmartThings Wifi/Hubs hinzufügen
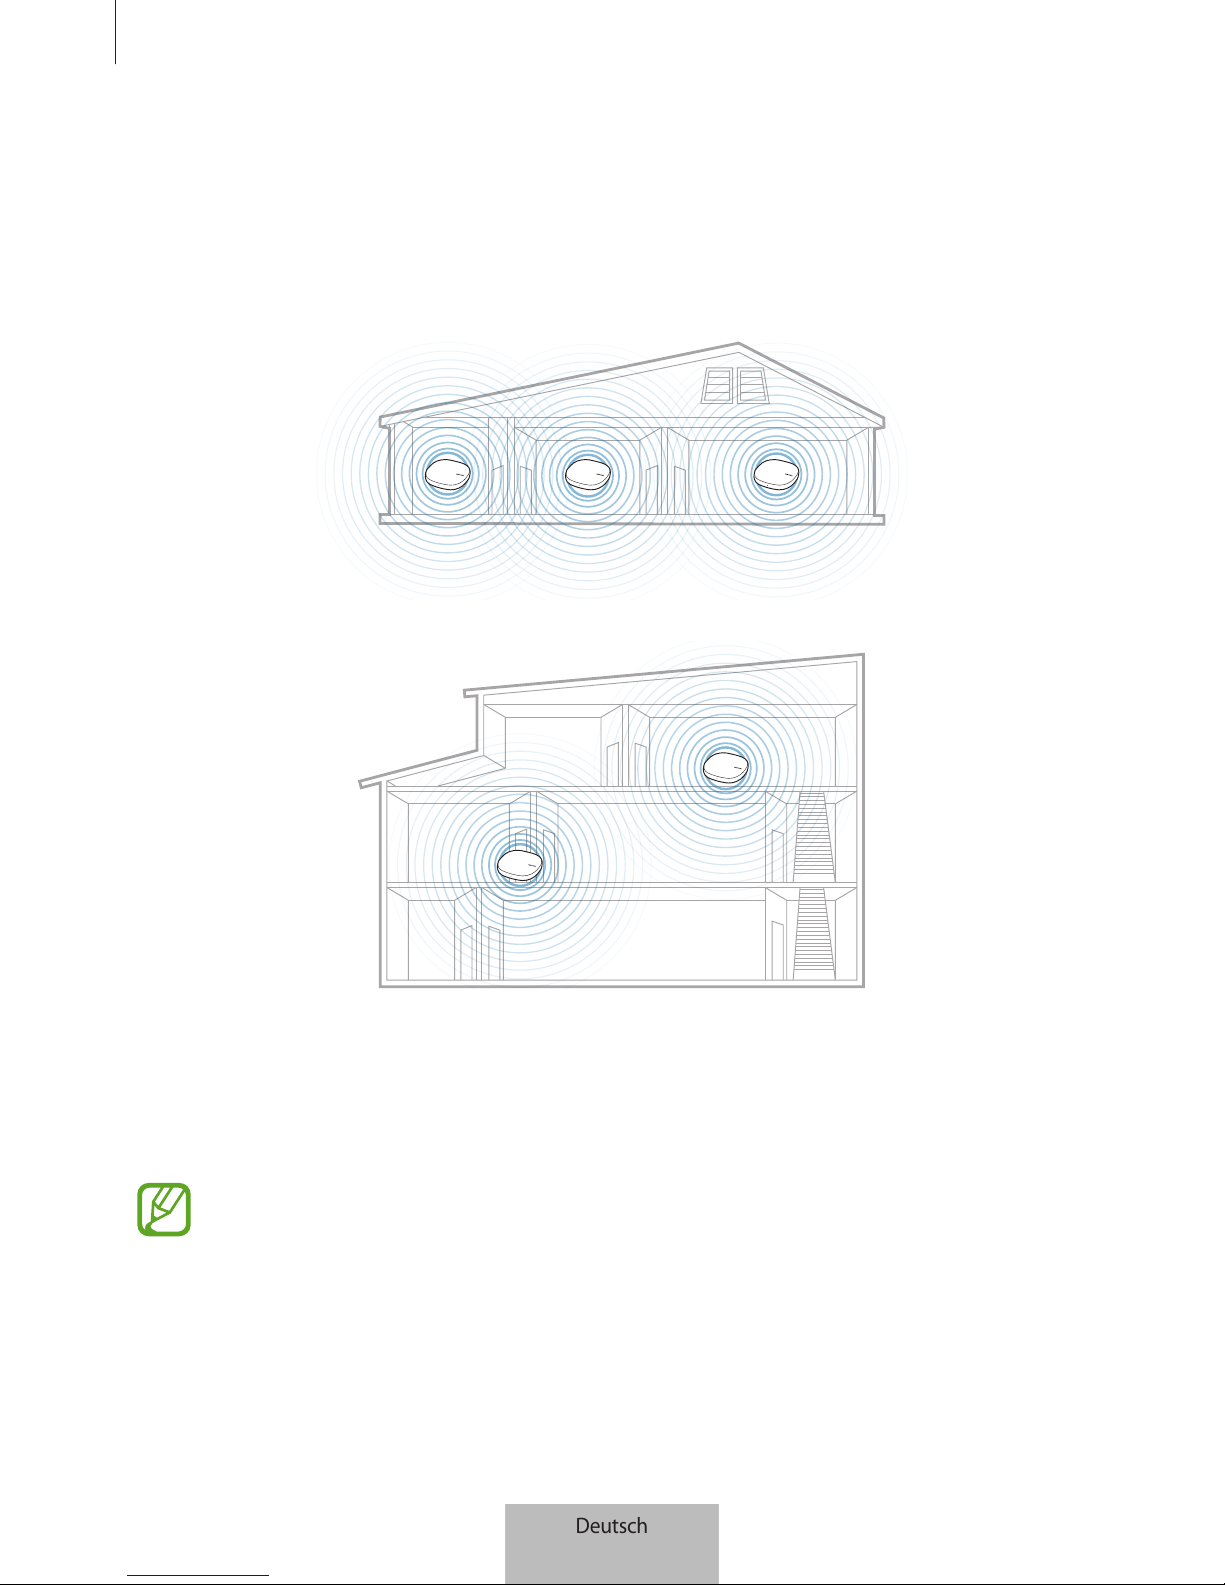
Ein SmartThings Wifi/Hub kann einen Anschlussbereich von etwa 140m2 abdecken (ausgehend von
Gebäuden aus Holz), wobei dieser Wert je nach Betriebsumgebung abweichen kann.
Installieren Sie einen weiteren SmartThings Wifi/Hub, um Geräte außerhalb der Verbindungsreichweite
über ein WLAN miteinander zu verbinden.
1
Schließen Sie das Netzteil am zusätzlichen SmartThings Wifi/Hub an.
2
Starten Sie auf dem Mobilgerät die Anwendung
SmartThings
und befolgen Sie die Anweisungen
auf dem Bildschirm, um die Verbindungsherstellung abzuschließen.
Sie können bis zu vier zusätzliche SmartThings Wifi/Hubs nutzen.
Deutsch
8
Deutsch
8
Page 39

SmartThings Wifi/Hub verwenden
9
Hinweise zum Anschließen eines SmartThings Wifi/Hubs
•
Installieren Sie einen SmartThings Wifi/Hub in der Nähe der zu registrierenden Geräte.
•
Wenn Sie zusätzliche SmartThings Wifi/Hubs hinzufügen möchten, müssen Sie diese innerhalb der
Verbindungsreichweite installieren.
•
Achten Sie darauf, dass sich keine Hindernisse zwischen dem SmartThings Wifi/Hub und den zu
registrierenden Geräten befinden.
•
Hindernisse wie Personen, Wände, Hausecken oder Zäune können die Signale abschwächen.
•
Für den Betrieb sollte der SmartThings Wifi/Hub mit einem Ethernet-Kabel angeschlossen werden.
Hinweise zur Verwendung von Bluetooth
•
Platzieren Sie die Geräte nahe beieinander, um Probleme bei der Verbindungsherstellung zwischen
dem SmartThings Wifi/Hub und einem anderen Gerät zu vermeiden.
•
Stellen Sie sicher, dass sich der SmartThings Wifi/Hub und das andere Bluetooth-Gerät innerhalb der
maximalen Bluetooth-Reichweite (5m) befinden. Die Reichweite kann je nach Umgebung, in der die
Geräte verwendet werden, variieren.
•
Zwischen dem SmartThings Wifi/Hub und dem verbundenen Gerät dürfen sich keine Hindernisse
wie Personen, Wände, Hausecken oder Zäune befinden.
•
Die Bluetooth-Antenne des verbundenen Geräts darf nicht berührt werden.
•
Bluetooth verwendet dieselbe Frequenz wie einige Produkte mit geringer Sendeleistung in der
Industrie, Wissenschaft und Medizin, weshalb Interferenzen entstehen können, wenn in der Nähe
derartiger Produkte eine Bluetooth-Verbindung hergestellt wird.
•
Einige Geräte, insbesondere solche, die nicht von Bluetooth SIG getestet und zugelassen wurden,
sind möglicherweise nicht mit Ihrem SmartThings Wifi/Hub kompatibel.
•
Verwenden Sie die Bluetooth-Funktion nicht zu illegalen Zwecken (z. B. zum Nutzen von
Raubkopien oder zum illegalen Aufzeichnen von Gesprächen zu gewerblichen Zwecken).
Deutsch
9
Deutsch
9
Page 40
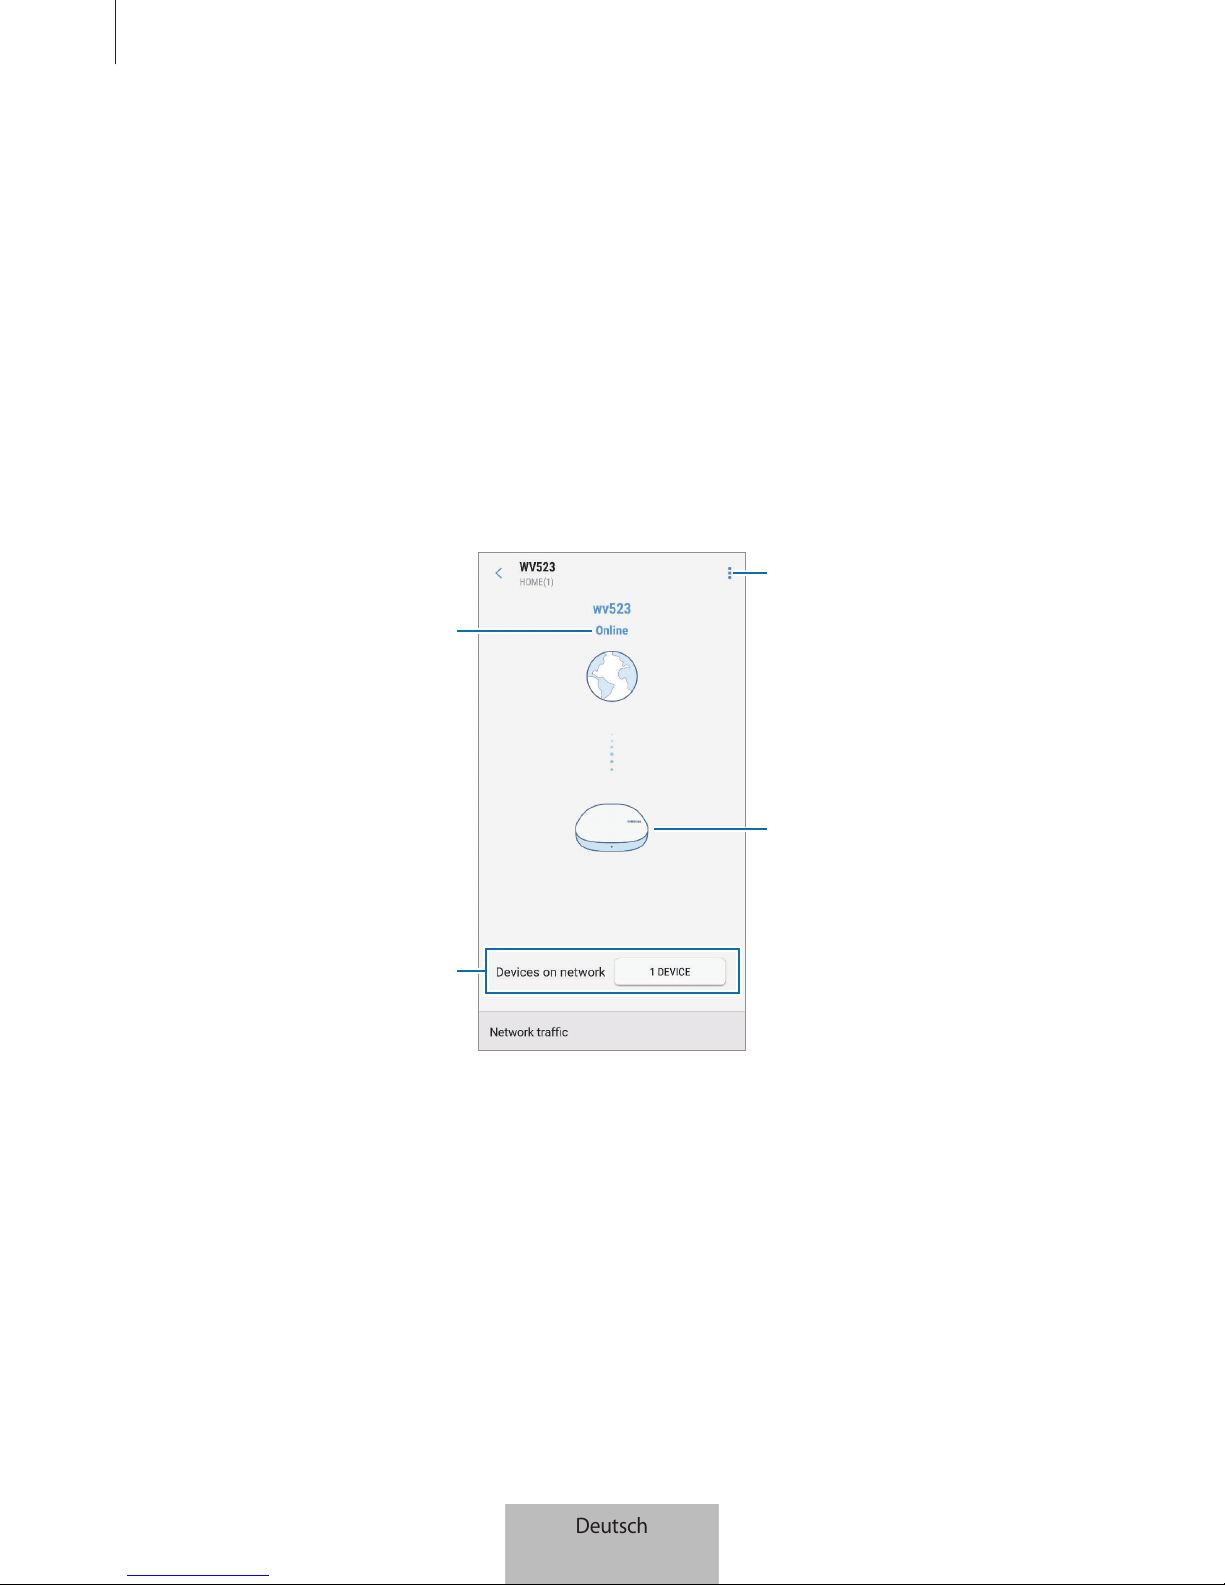
SmartThings Wifi/Hub verwenden
10
WLAN-Routerfunktion konfigurieren
Sie können die Detaileinstellungen für die WLAN-Routerfunktion des SmartThings Wifi/Hubs
konfigurieren.
1
Tippen Sie auf dem SmartThings-Bildschirm
Geräte
an.
2
Tippen Sie in der Liste der registrierten Geräte auf den WLAN-Hub.
Tippen Sie bei der ersten Verwendung der WLAN-Routerfunktion des SmartThings Wifi/Hubs den
WLAN-Hub an, um den entsprechenden Controller herunterzuladen.
3
Wählen Sie eine Option aus und konfigurieren Sie die WLAN-Routerfunktion.
WLAN-Status
Mit dem WLAN des SmartThings
Wifi/Hubs verbundene Geräte
Auf zusätzliche Optionen zugreifen.
Registrierter SmartThings Wifi/Hub.
Zum Anzeigen der Informationen
antippen.
Deutsch
10
Deutsch
10
Page 41

SmartThings Wifi/Hub verwenden
11
Einem verbundenen Gerät Priorität einräumen
Sie können die vorherigen Verbindungseinstellungen für die angegebenen Geräte übernehmen, die mit
dem WLAN des SmartThings Wifi/Hubs verbunden sind.
1
Tippen Sie auf die Schaltfläche neben
Geräte im Netzwerk
.
2
Wählen Sie in der Liste der verbundenen Geräte ein Gerät aus, um ihm Priorität im WLAN des
SmartThings Wifi/Hubs einzuräumen.
3
Tippen Sie zum Aktivieren auf den Schalter
Höchste Bandbreitenpriorität
.
Nutzungsdauer des WLAN-Netzwerks beschränken
Sie können die Nutzungsdauer für die verbundenen Geräte beschränken, die das WLAN des SmartThings
Wifi/Hubs nutzen.
1
Tippen Sie auf die Schaltfläche neben
Geräte im Netzwerk
.
2
Wählen Sie in der Liste der verbundenen Geräte ein Gerät aus, für das Sie die Nutzungsdauer des
WLANs des SmartThings Wifi/Hubs beschränken möchten.
3
Tippen Sie auf
Nutzungszeit einschränken
→
Zeitbeschränkung hinzufügen
.
4
Legen Sie Datum und Uhrzeit fest und tippen Sie anschließend auf
HINZUFÜGEN
.
Gast-Netzwerk hinzufügen
Sie können ein Gast-Netzwerk hinzufügen, das vom WLAN-Hauptnetzwerk getrennt ist.
1
Tippen Sie auf
→
Gastzugriff
→
Gastnetzwerk hinzufügen
.
2
Geben Sie einen Netzwerknamen und ein Kennwort ein und tippen Sie auf OK.
Deutsch
11
Deutsch
11
Page 42
SmartThings Wifi/Hub verwenden
12
WLAN-Routerfunktion aktivieren oder deaktivieren
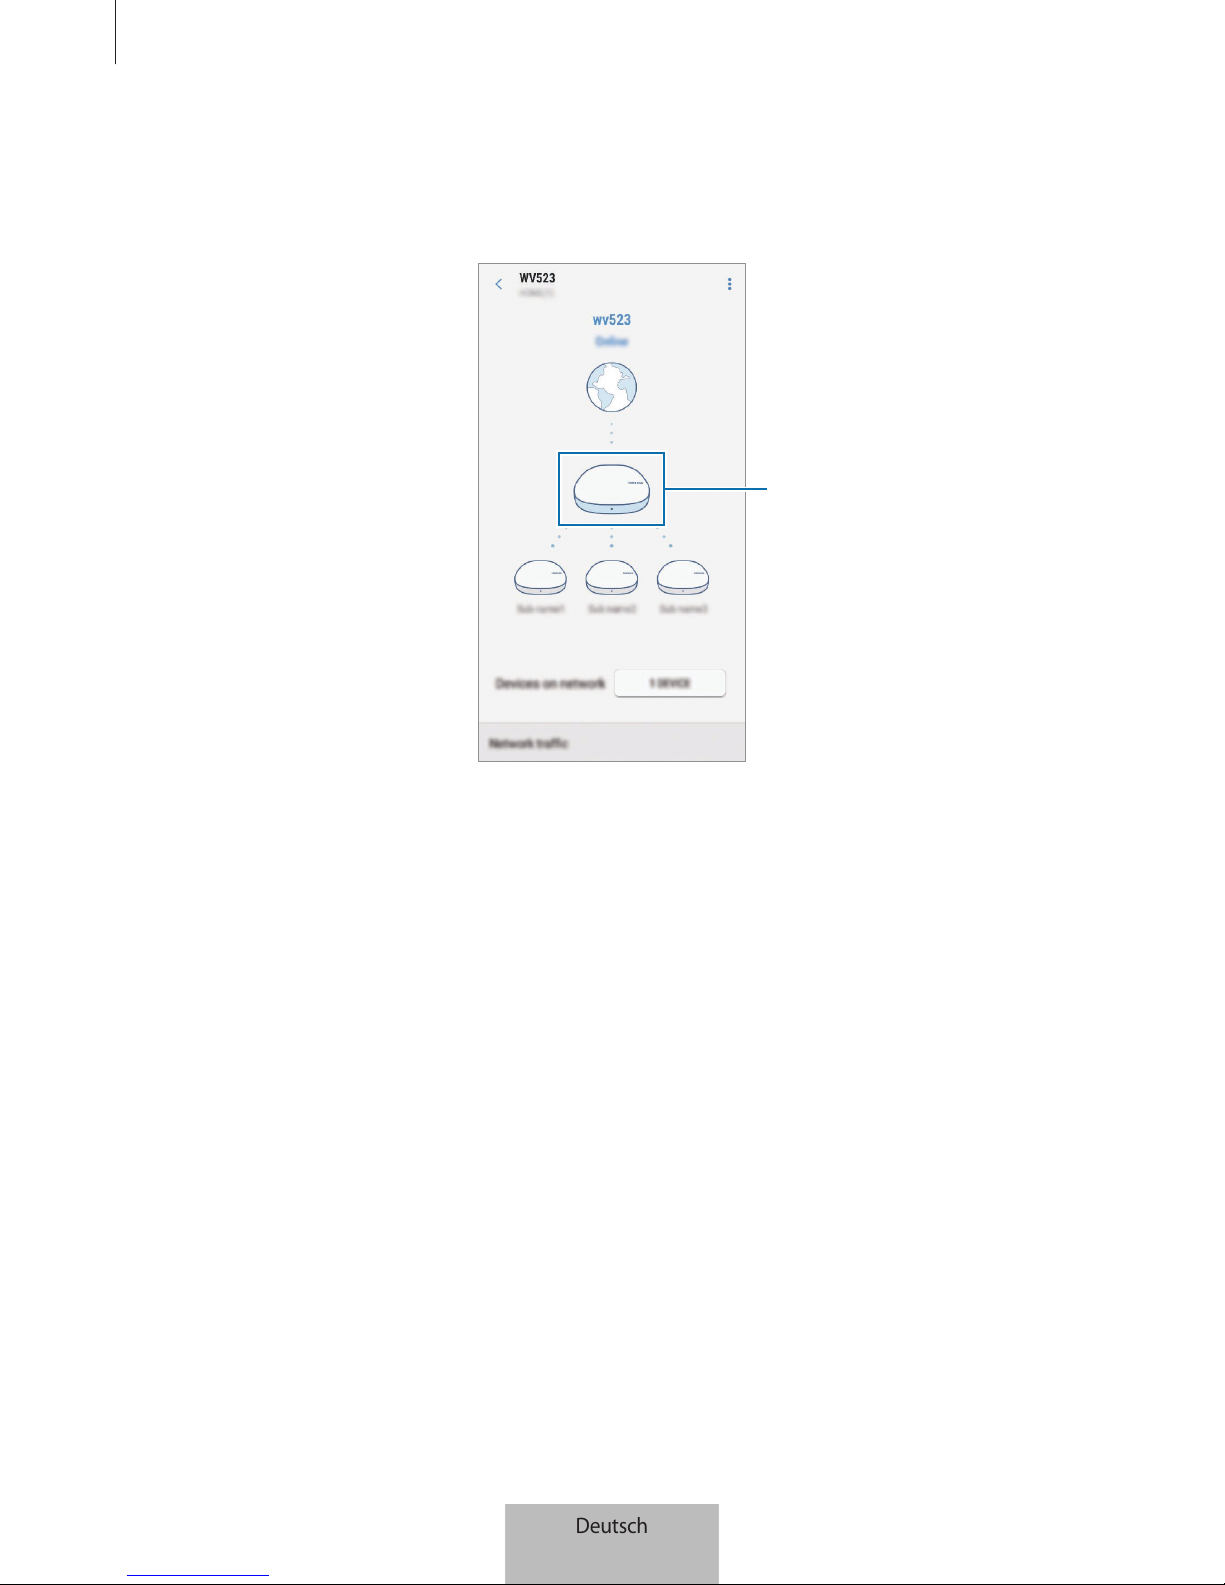
1
Tippen Sie unter den registrierten SmartThings Wifi/Hubs den primären SmartThings Wifi/Hub an.
Primärer Hub
2
Tippen Sie den
WLAN
-Schalter an, um die WLAN-Routerfunktion zu aktivieren bzw. zu deaktivieren.
Deutsch
12
Deutsch
12
Page 43
SmartThings Wifi/Hub verwenden
13
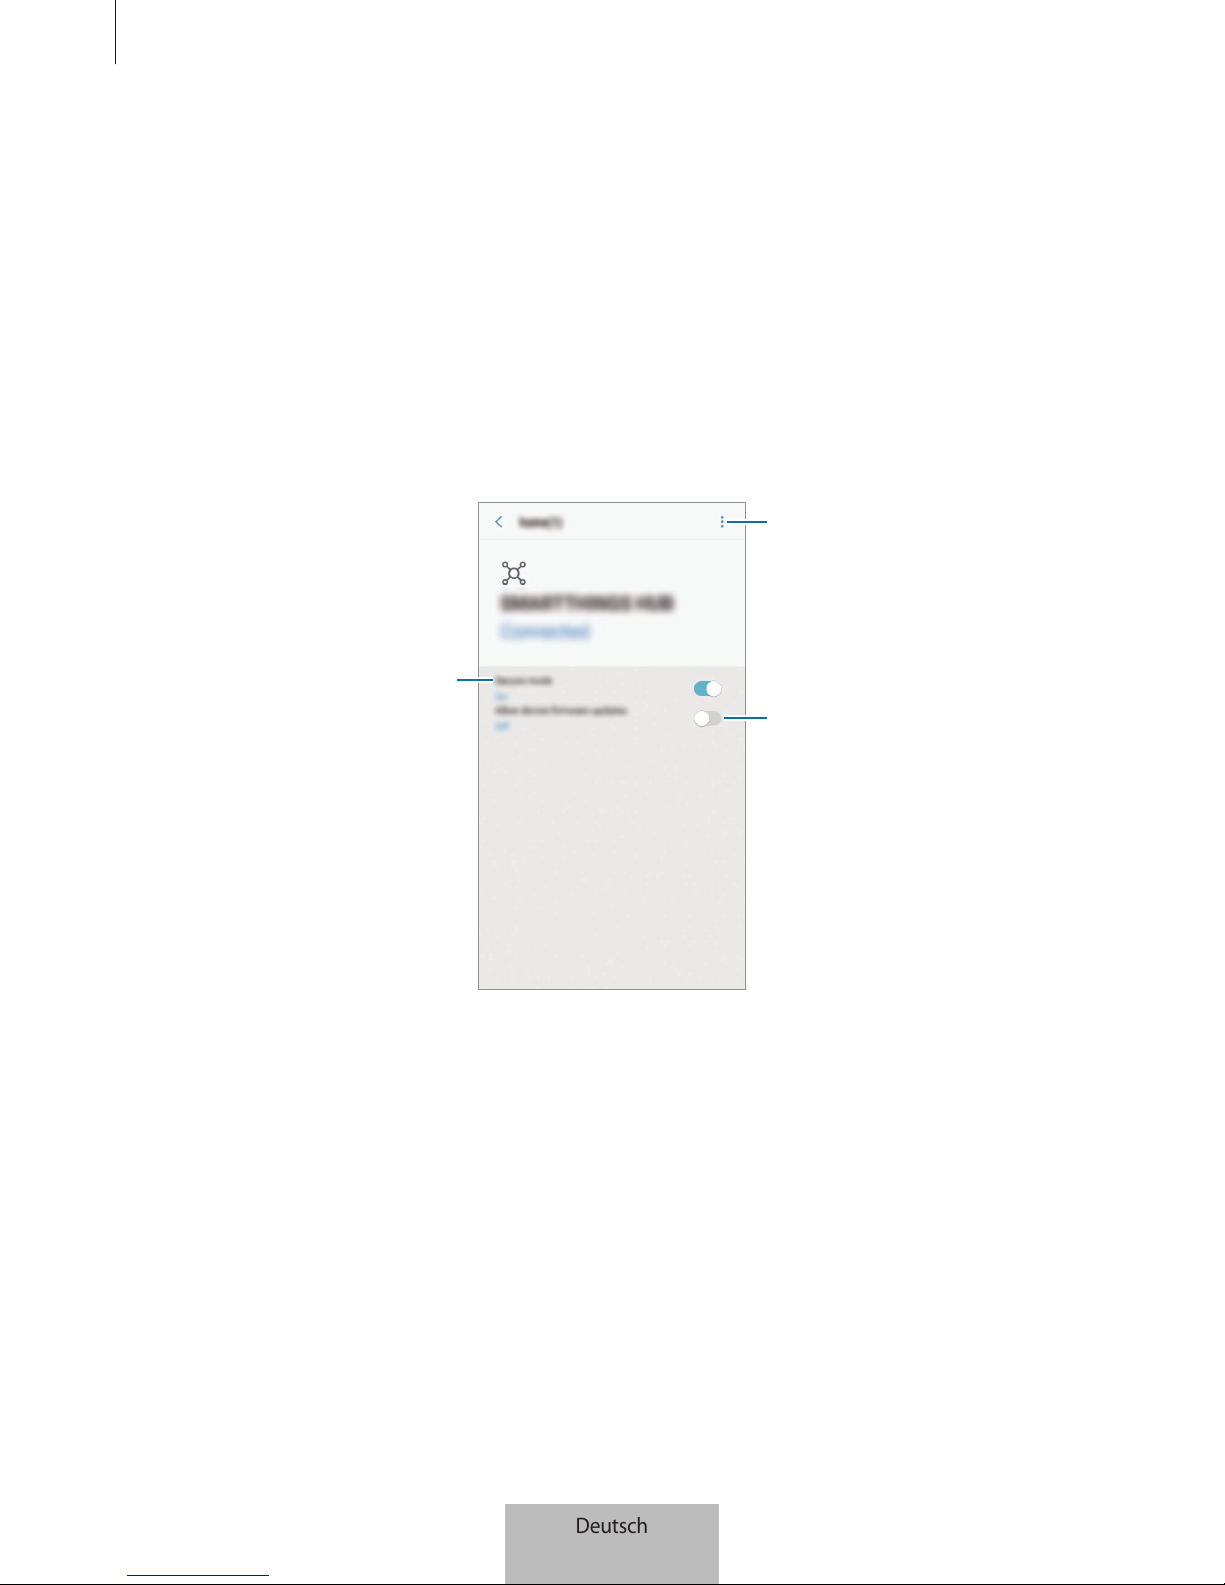
Samsung SmartThings Wifi/Hub-Funktion
konfigurieren
Sie können die Detaileinstellungen für die Samsung SmartThings Wifi/Hub-Funktion konfigurieren.
1
Tippen Sie auf dem SmartThings-Bildschirm
Geräte
an.
2
Tippen Sie in der Liste der registrierten Geräte den SmartThings Hub an.
3
Wählen Sie eine Option aus und konfigurieren Sie die Samsung SmartThings Wifi/Hub-Funktion.
Festlegen, ob die automatische
Wiederverbindung von
Zigbee-Geräten verhindert werden
soll.
SmartThings Hub-Informationen
anzeigen oder Z-Wave-Geräte
ausschließen.
Einstellen, ob automatische
Firmware-Updates zugelassen
werden sollen.
Deutsch
13
Deutsch
13
Page 44
14
SmartThings-Anwendung
Einführung
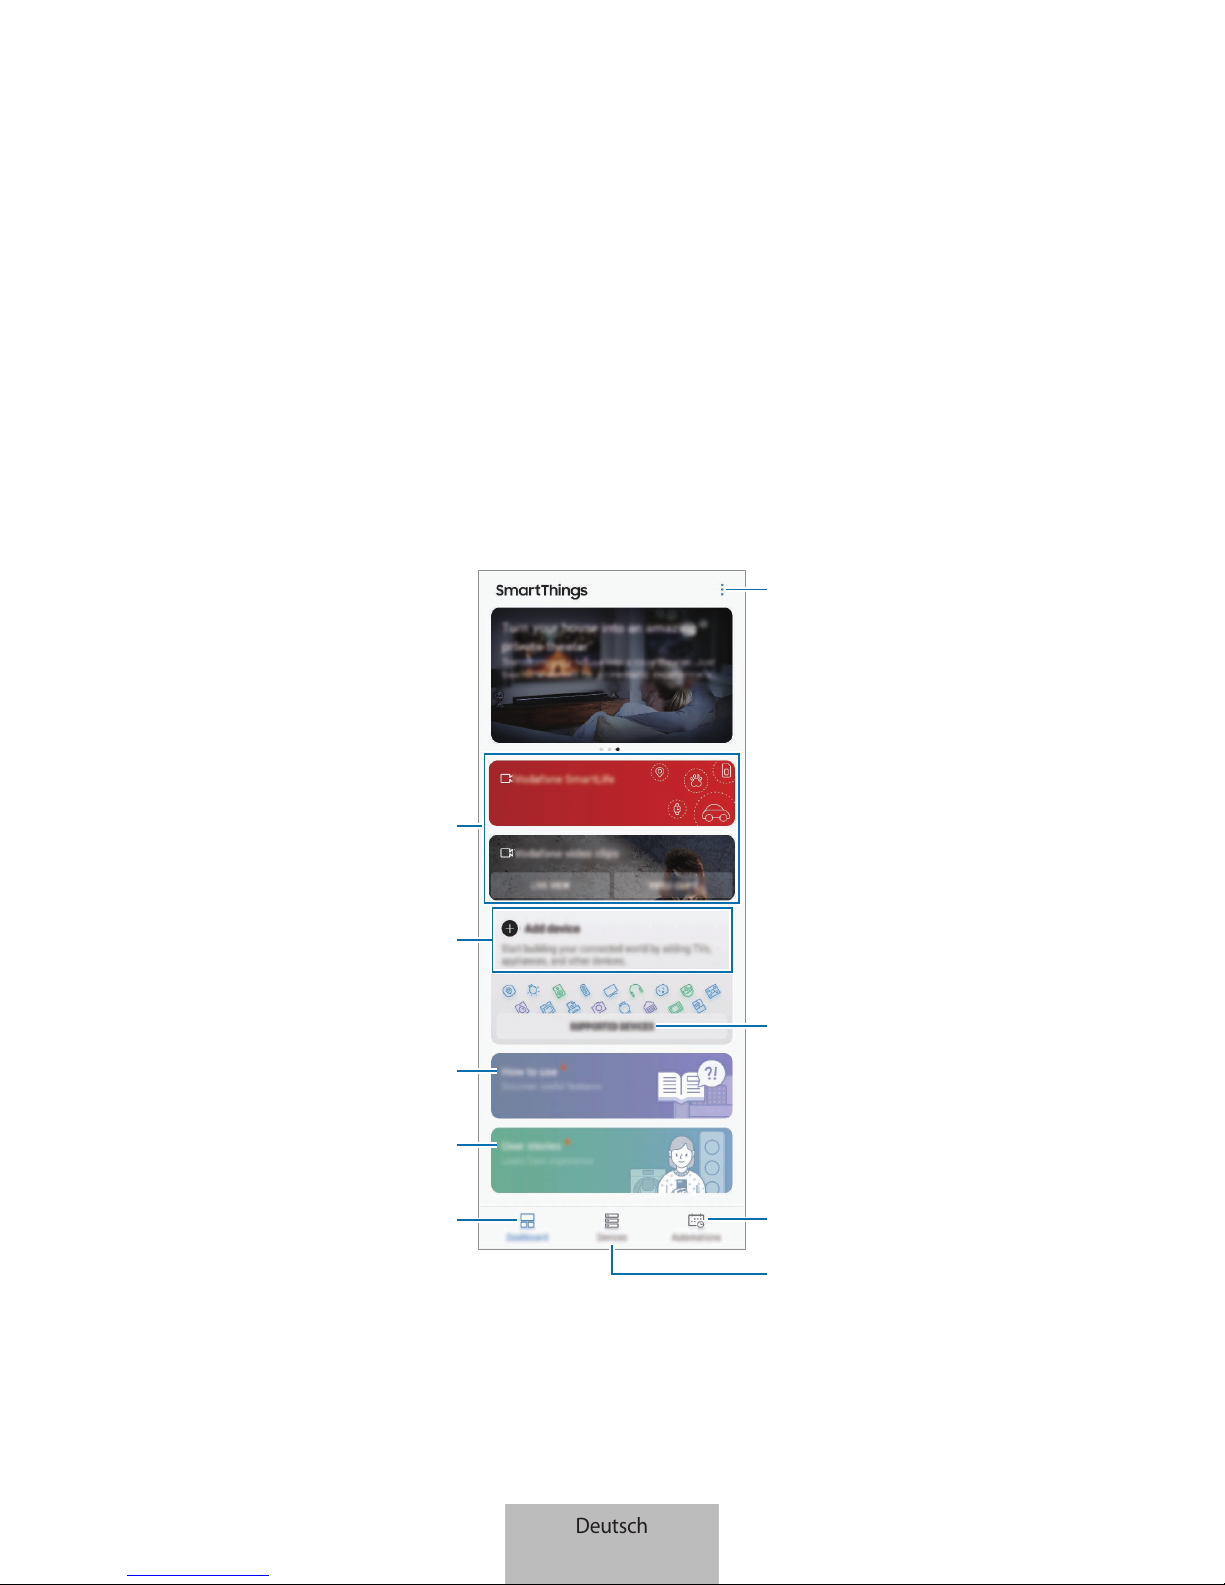
Registrieren Sie Smart-Home-Haushaltsgeräte und Geräte im Internet der Dinge in der SmartThingsAnwendung auf Ihrem Mobilgerät, um sie zu steuern oder ihren Status zu überwachen. Um Geräte nach
Standort steuern zu können, z.B. in Ihrem Büro oder zu Hause, müssen Sie einen Standort erstellen und
die registrierten Geräte diesem Standort zuweisen. Sie können auch eine Szene festlegen, mit der Sie
mehrere Geräte gleichzeitig steuern können. Alternativ können Sie eine Automatisierung erstellen, um
bestimmte Aktionen automatisch zu einem bestimmten Zeitpunkt auszuführen.
Auf zusätzliche Optionen zugreifen.
SmartThings-Tipps
User Stories
Dashboard
Unterstützte Geräte
Nach Geräten in der Nähe suchen
und diese registrieren.
Standorte und Geräte verwalten.
Automatisierungen verwalten.
Vodafone-Anwendungen
Deutsch
14
Deutsch
14
Page 45
SmartThings-Anwendung
15
Dashboard und SmartThings-Anwendung konfigurieren
Konfigurieren Sie das Dashboard und die SmartThings-Anwendung. Tippen Sie auf dem Dashboard an
und verwenden Sie die folgenden Optionen:
•
Dashboard verwalten
: Legen Sie fest, welche Elemente auf dem Dashboard angezeigt werden
sollen.
•
Benachrichtigungen
: Rufen Sie die Benachrichtigungen von der SmartThings-Anwendung auf. Sie
können die Benachrichtigungseinstellungen auch ändern.
•
Einstellungen
: Dient zum Abrufen von Samsung-Kontoinformationen sowie von Informationen
über die SmartThings-Anwendung. Sie können auch einstellen, dass das SmartThings-Feld im
Benachrichtigungsfeld angezeigt wird.
•
Hinweise
: Zeigen Sie die Hinweise des SmartThings-Dienstes an.
•
Kontaktieren Sie uns
: Stellen Sie Fragen oder zeigen Sie häufig gestellte Fragen an.
Geräte registrieren
Smart-Home-Haushaltsgeräte per WLAN registrieren
Registrieren Sie Smart-Home-Haushaltsgeräte mit WLAN-Unterstützung in der SmartThingsAnwendung, um sie zu steuern. Wie Sie Ihre Geräte registrieren können, erfahren Sie in den
Benutzerhandbüchern der entsprechenden Geräte.
•
Tippen Sie zum Anzeigen der unterstützten Geräte auf dem Dashboard
UNTERSTÜTZTE
GERÄTE
an.
•
Fehler oder Fehlfunktionen der verbundenen Geräte werden nicht von der Samsung
Garantie abgedeckt. Wenn bei den verbundenen Geräten Fehler oder Fehlfunktionen
auftreten, wenden Sie sich bitte an den entsprechenden Gerätehersteller.
Deutsch
15
Deutsch
15
Page 46

SmartThings-Anwendung
16
Geräte im Internet der Dinge über die Samsung SmartThings HubFunktion registrieren
Registrieren Sie die Geräte im Internet der Dinge, die Z-Wave-, Zigbee-, LAN- oder Cloud-to-CloudVerbindungen unterstützen, in der SmartThings-Anwendung, um sie zu steuern.
1
Tippen Sie auf dem Dashboard
Gerät hinzufügen
an.
2
Tippen Sie unter
MANUELLES HINZUFÜGEN EINES GERÄTS
die Option an.
3
Wählen Sie eine Kategorie für das zu registrierende Gerät aus.
Alternativ dazu können Sie im Sucheingabefeld den Gerätenamen eingeben und neben dem Gerät
HINZUFÜGEN
antippen.
4
Befolgen Sie die Anweisungen auf dem Bildschirm, um die Registrierung abzuschließen.
•
Die Samsung SmartThings Hub-Funktion ist je nach Region möglicherweise nicht verfügbar.
Details finden Sie auf www.samsung.com
•
Sie können nur die Geräte im Internet der Dinge registrieren, die von Samsung zugelassen
wurden. Eine Liste der kompatiblen Geräte finden Sie unter www.samsung.com
•
In den Benutzerhandbüchern der anderen Geräte finden Sie Informationen zum Koppeln
dieser Geräte.
Deutsch
16
Deutsch
16
Page 47

SmartThings-Anwendung
17
Registrierte Geräte steuern
Tippen Sie auf dem SmartThings-Bildschirm
Geräte
an.
Tippen Sie in der Liste der registrierten Geräte auf ein Gerät.
Der Controller für das Gerät wird heruntergeladen.
Mit dem heruntergeladenen Controller können Sie die registrierten Geräte über die SmartThingsAnwendung fernsteuern.
Standorte erstellen
Sie können Geräte nach Standort registrieren und verwalten.
1
Tippen Sie auf dem SmartThings-Bildschirm
Geräte
an.
2
Tippen Sie
ALLE GERÄTE
→
Standort hinzufügen
an.
3
Geben Sie einen Standortnamen ein und wählen Sie ein Symbol aus.
4
Tippen Sie
Standortinformationen
an, wählen Sie einen Ort auf der Karte aus und tippen Sie
anschließend OK an.
5
Tippen Sie auf
SPEICHERN
.
Der ausgewählte Standort wird hinzugefügt.
6
Tippen Sie
GERÄT HINZUFÜGEN
an, um ein Gerät zu registrieren.
Wenn Sie den Standort zimmerweise verwalten möchten, tippen Sie
→
Raum hinzufügen
an und
legen Sie den Raum und die jeweiligen Geräte fest.
Deutsch
17
Deutsch
17
Page 48
SmartThings-Anwendung
18
Mitglieder an einen erstellten Standort einladen
Laden Sie andere Mitglieder an den erstellten Standort ein, um die Geräte und Szenen zu steuern, die
diesem Standort zugeordnet sind.
1
Tippen Sie auf dem SmartThings-Bildschirm
Geräte
an.
2
Tippen Sie
ALLE GERÄTE
an und scrollen Sie nach oben oder unten, um einen Standort
auszuwählen.
3
Tippen Sie auf →
Mitglied einladen
.
4
Tippen Sie auf
Samsung Account-ID eingeben
, geben Sie das Samsung-Konto für die Person ein,
die Sie einladen möchten, und tippen Sie anschließend auf .
Sie können Benutzer auch einladen, indem Sie den entsprechenden QR-Code scannen. Tippen Sie
auf
QR-CODE ERSTELLEN
und laden Sie andere Benutzer zum Scannen des Codes ein.
•
Sie können nur Benutzer einladen, die über die SmartThings-Anwendung in ihrem SamsungKonto angemeldet sind.
•
Tippen Sie zum Annehmen der Einladung auf dem SmartThings-Bildschirm auf das
Einladungs-Pop-up und tippen Sie auf
ANNEHMEN
. Tippen Sie zum Annehmen der
Einladung durch Scannen des QR-Codes auf dem Dashboard →
Einstellungen
→
Annehmen der Einladung (QR-Code)
an und scannen Sie anschließend den QR-Code.
5
Befolgen Sie die Anweisungen auf dem Bildschirm, um die Einladung abzuschließen.
Deutsch
18
Deutsch
18
Page 49
SmartThings-Anwendung
19
Szenen festlegen und ausführen
Legen Sie eine Szene fest, um mehrere Geräte gleichzeitig zu bedienen. Um eine Szene festzulegen,
sollten Sie Standorte erstellen. Weitere Informationen finden Sie unter Standorte erstellen.
1
Tippen Sie auf dem SmartThings-Bildschirm
Geräte
an.
2
Tippen Sie
ALLE GERÄTE
an und scrollen Sie nach oben oder unten, um einen Standort
auszuwählen.
3
Tippen Sie →
Szenario hinzufügen
an.
Der Bildschirm zum Festlegen der Szenen wird angezeigt.
4
Geben Sie einen Titel für die Szene ein, wählen Sie ein Symbol aus und tippen Sie anschließend
AKTIONEN HINZUFÜGEN
an.
Deutsch
19
Deutsch
19
Page 50
SmartThings-Anwendung
20
5
Wählen Sie ein Gerät und eine auszuführende Aktion aus und tippen Sie anschließend auf OK.
Wählen Sie z.B. einen Fernseher und einen Saugroboter sowie die entsprechenden Aktionen aus,
die ausgeführt werden sollen.
6
Aktivieren Sie den Schalter
Shortcut auf dem Dashboard
, um die Szene auf dem Dashboard
einzublenden.
7
Tippen Sie auf
SPEICHERN
.
Die Szene ist festgelegt. Sie können die festgelegten Szenen auf dem Bildschirm des
entsprechenden Standorts anzeigen.
Deutsch
20
Deutsch
20
Page 51
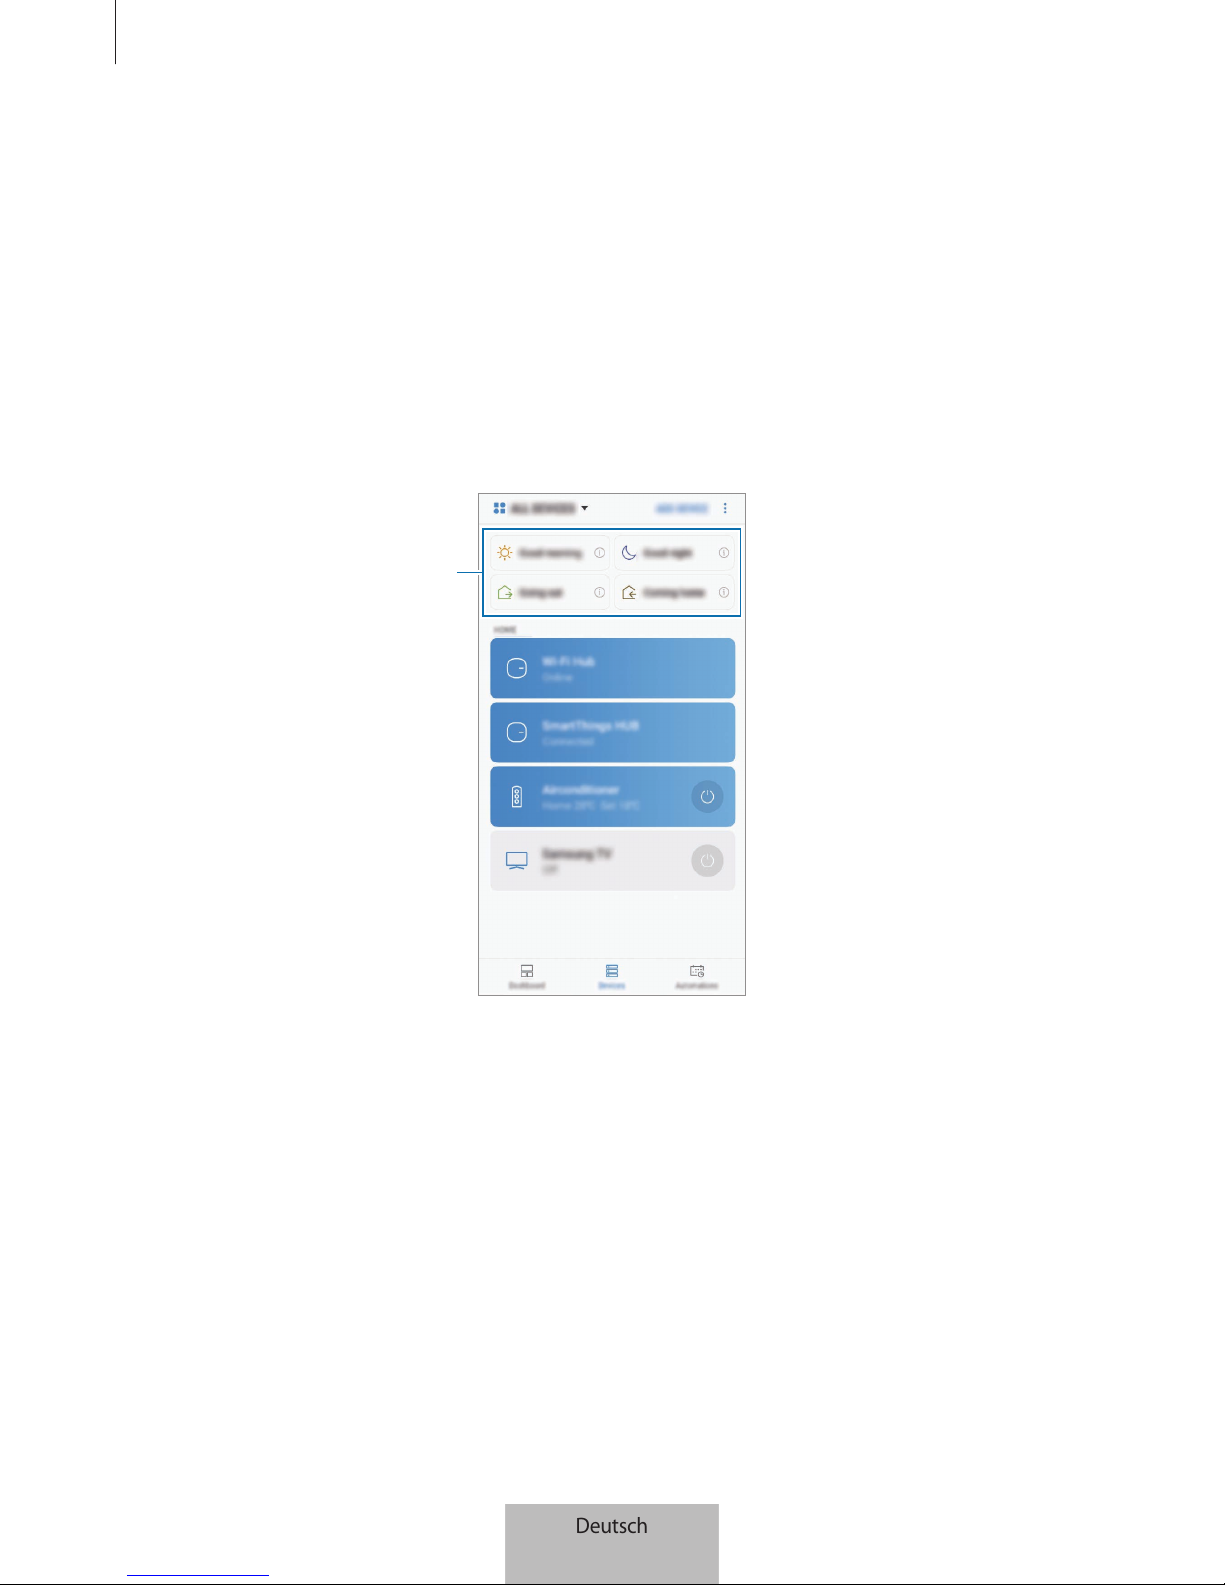
SmartThings-Anwendung
21
Szenen aktivieren
1
Tippen Sie auf dem SmartThings-Bildschirm
Geräte
an.
2
Tippen Sie
ALLE GERÄTE
an und scrollen Sie nach oben oder unten, um einen Standort
auszuwählen, für den Sie eine Szene aktivieren möchten.
3
Wählen Sie eine zu aktivierende Szene aus.
Die Geräte, die Sie hier festlegen, führen die Aktionen aus, die Sie für die entsprechende Szene
festgelegt haben.
Szenen festlegen
Deutsch
21
Deutsch
21
Page 52
SmartThings-Anwendung
22
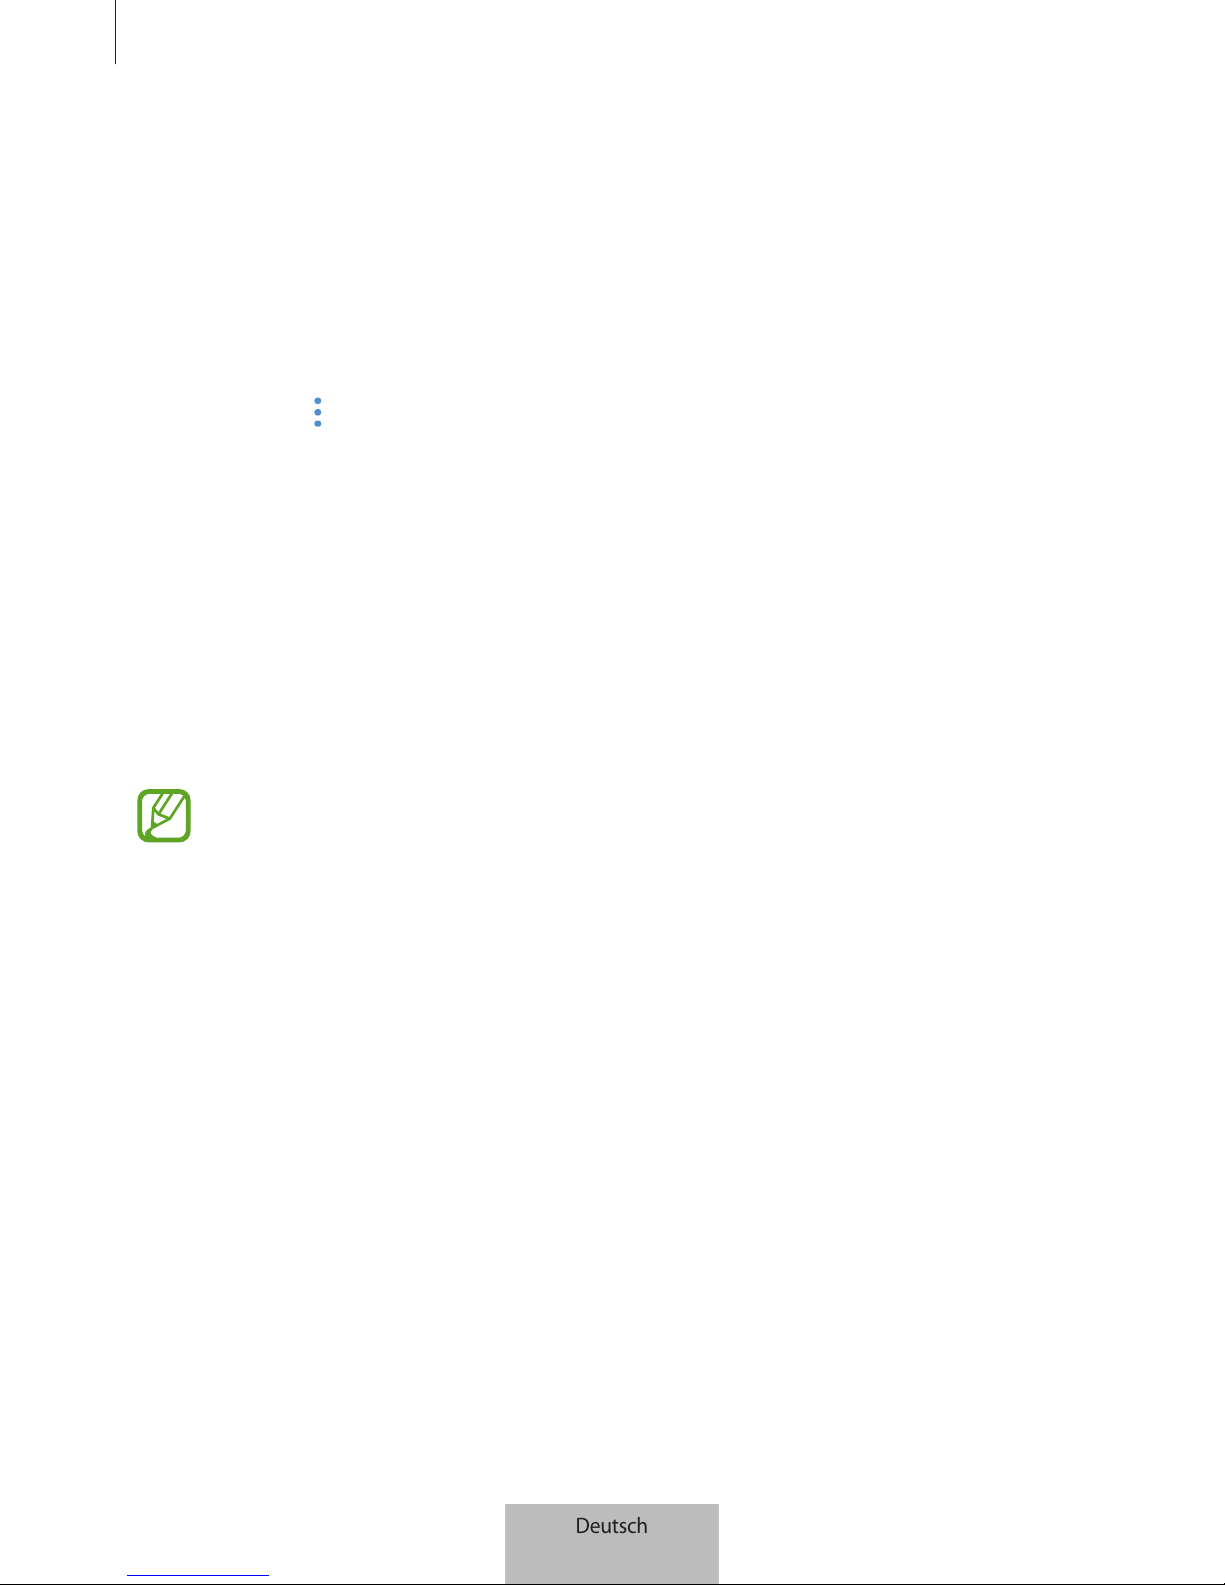
Geräte und Standorte verwalten
Sie können Standorte und deren zugewiesene Geräte und Szenen verwalten.
1
Tippen Sie auf dem SmartThings-Bildschirm
Geräte
an.
2
Tippen Sie
ALLE GERÄTE
an und scrollen Sie nach oben oder unten, um einen Standort
auszuwählen.
3
Tippen Sie auf →
Bearbeiten
und verwenden Sie die folgenden Optionen.
•
Standortname
: Ändern Sie den Standortnamen und das zugehörige Symbol.
•
Standortinformationen
: Zeigen Sie den Ort auf der Karte an oder ändern Sie ihn.
•
Standortübersicht auf dem Dashboard
: Zeigen Sie die Standortkarte auf dem Dashboard an.
•
SZENARIO
: Ändern Sie die Szenenangaben oder löschen Sie die Szene.
•
GERÄTE
: Dient zum Ändern der Geräteinformationen und zum Entfernen des Geräts vom
zugewiesenen Standort.
•
MITGLIEDER
: Dient zum Anzeigen der Mitglieder für die Freigabe des Standorts. Sie können
auch andere Benutzer einladen.
•
STANDORT ENTFERNEN
: Zum Löschen des Standorts.
•
Um ein Z-Wave-Gerät mit einem anderen Gerät verbinden zu können, müssen Sie das
entsprechende Gerät auf dem aktuell verbundenen Mobilgerät aus der SmartThingsAnwendung entfernen, um es auszuschließen. Wenn Sie das Gerät aus der SmartThingsAnwendung entfernen, erhalten Sie die Anweisungen zum Ausschließen per URL. Folgen
Sie den Anweisungen, um das Z-Wave-Gerät auszuschließen. Wenn Sie den SmartThings
Wifi/Hub zurücksetzen, sollten Sie das Z-Wave-Gerät ausschließen und wieder anschließen
(neu einbinden). Anweisungen zum Ausschließen von Z-Wave-Geräten finden Sie im
Benutzerhandbuch des entsprechenden Z-Wave-Geräts bzw. erhalten Sie beim jeweiligen
Gerätehersteller.
•
Weitere Informationen zur Funktionsweise von Z-Wave-Netzwerkdienstprogrammen
erhalten Sie unter www.smartthings.com
•
Der SmartThings Wifi/Hub sendet automatisch ein „Association Set“ für Lifeline/Group1 für
4Knoten, nachdem ein Gerät hinzugefügt wurde, das die Zuordnung unterstützt.
Deutsch
22
Deutsch
22
Page 53
SmartThings-Anwendung
23
Automatisierungen einstellen
Legen Sie eine Automatisierung für Geräte fest, die einem Standort zugeordnet sind, damit diese
automatisch zu einem bestimmten Zeitpunkt bestimmte Aktionen ausführen.
1
Tippen Sie auf dem SmartThings-Bildschirm
Regeln
an.
2
Tippen Sie
HINZUFÜGEN VON REGEL
an.
Falls bereits eine Automatisierung festgelegt wurde, tippen Sie
HINZUFÜGEN
an.
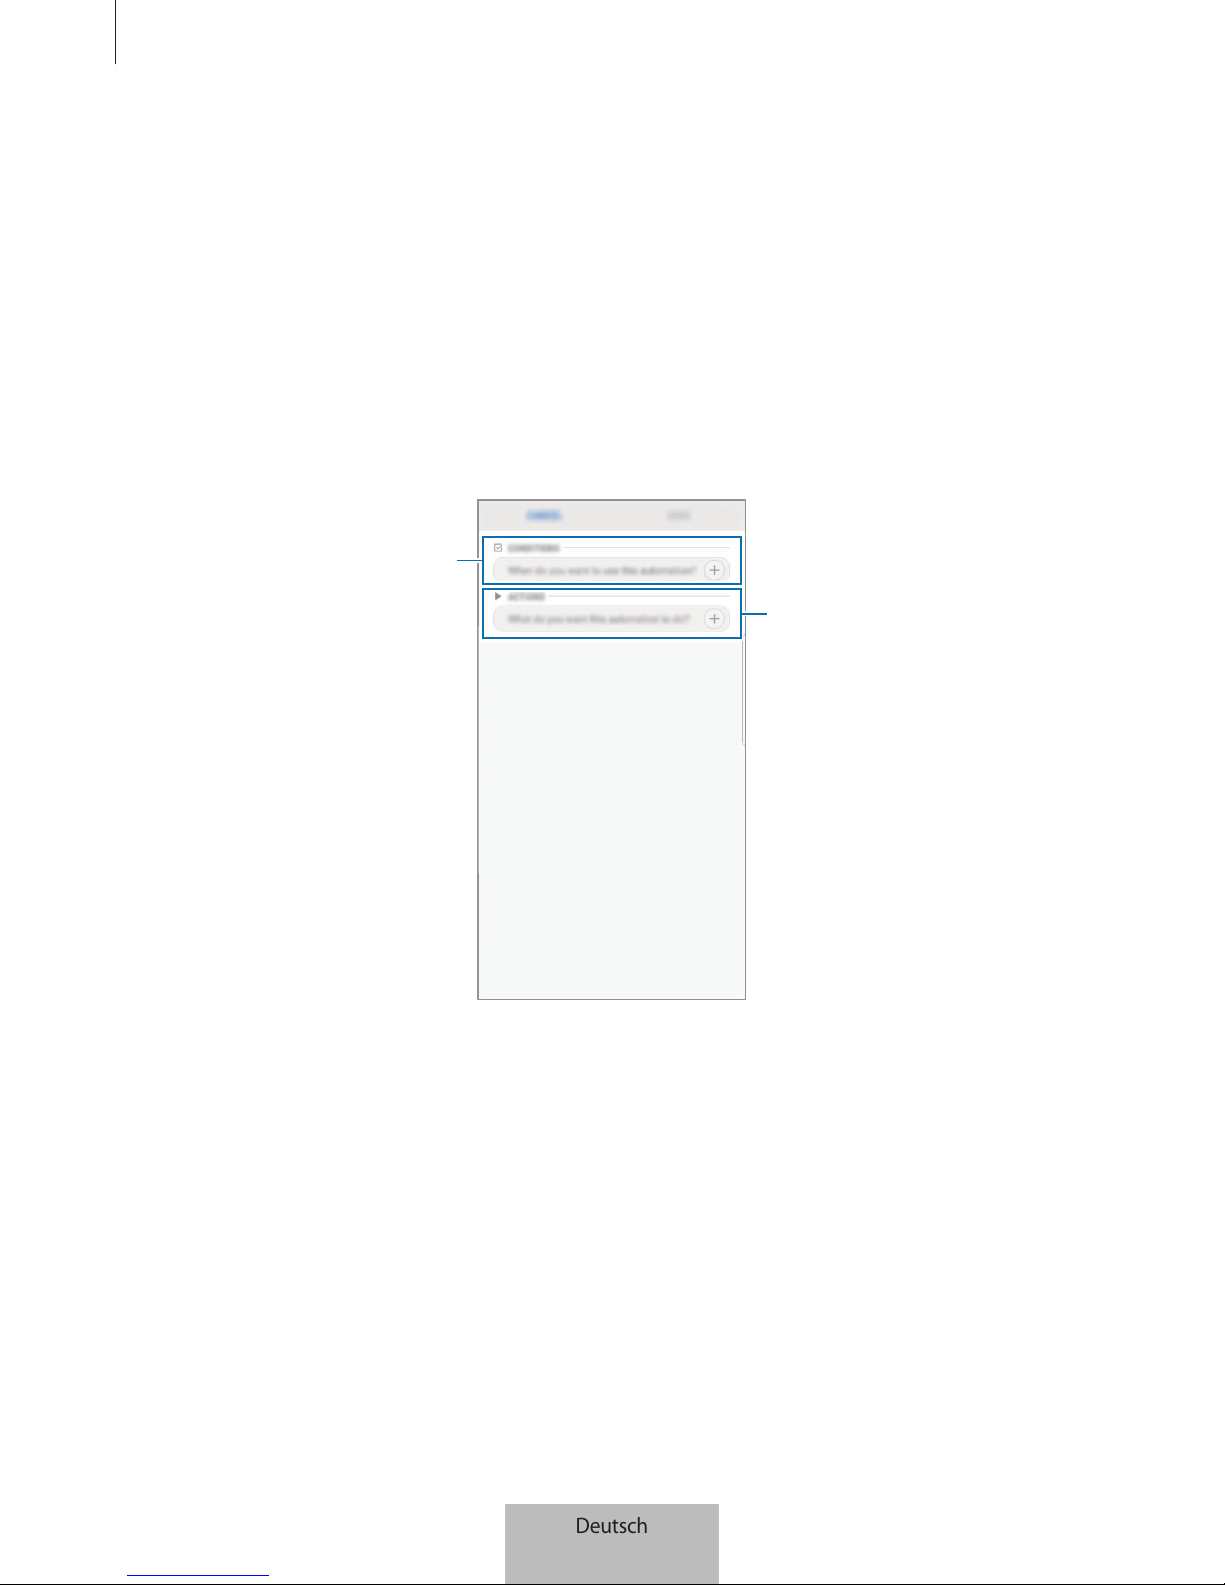
Der Bildschirm zum Festlegen der Automatisierung wird angezeigt.
Bedingungen festlegen.
Geräte und Aktionen festlegen.
3
Tippen Sie
Wann soll diese Regel verwendet werden?
an.
4
Tippen Sie
Basierend auf der Tageszeit
an und legen Sie Tage und Uhrzeiten fest.
Alternativ dazu können Sie
Basierend auf Gerätestatus
antippen, um die Gerätebedingungen
festzulegen.
5
Tippen Sie OK an.
Deutsch
23
Deutsch
23
Page 54
SmartThings-Anwendung
24
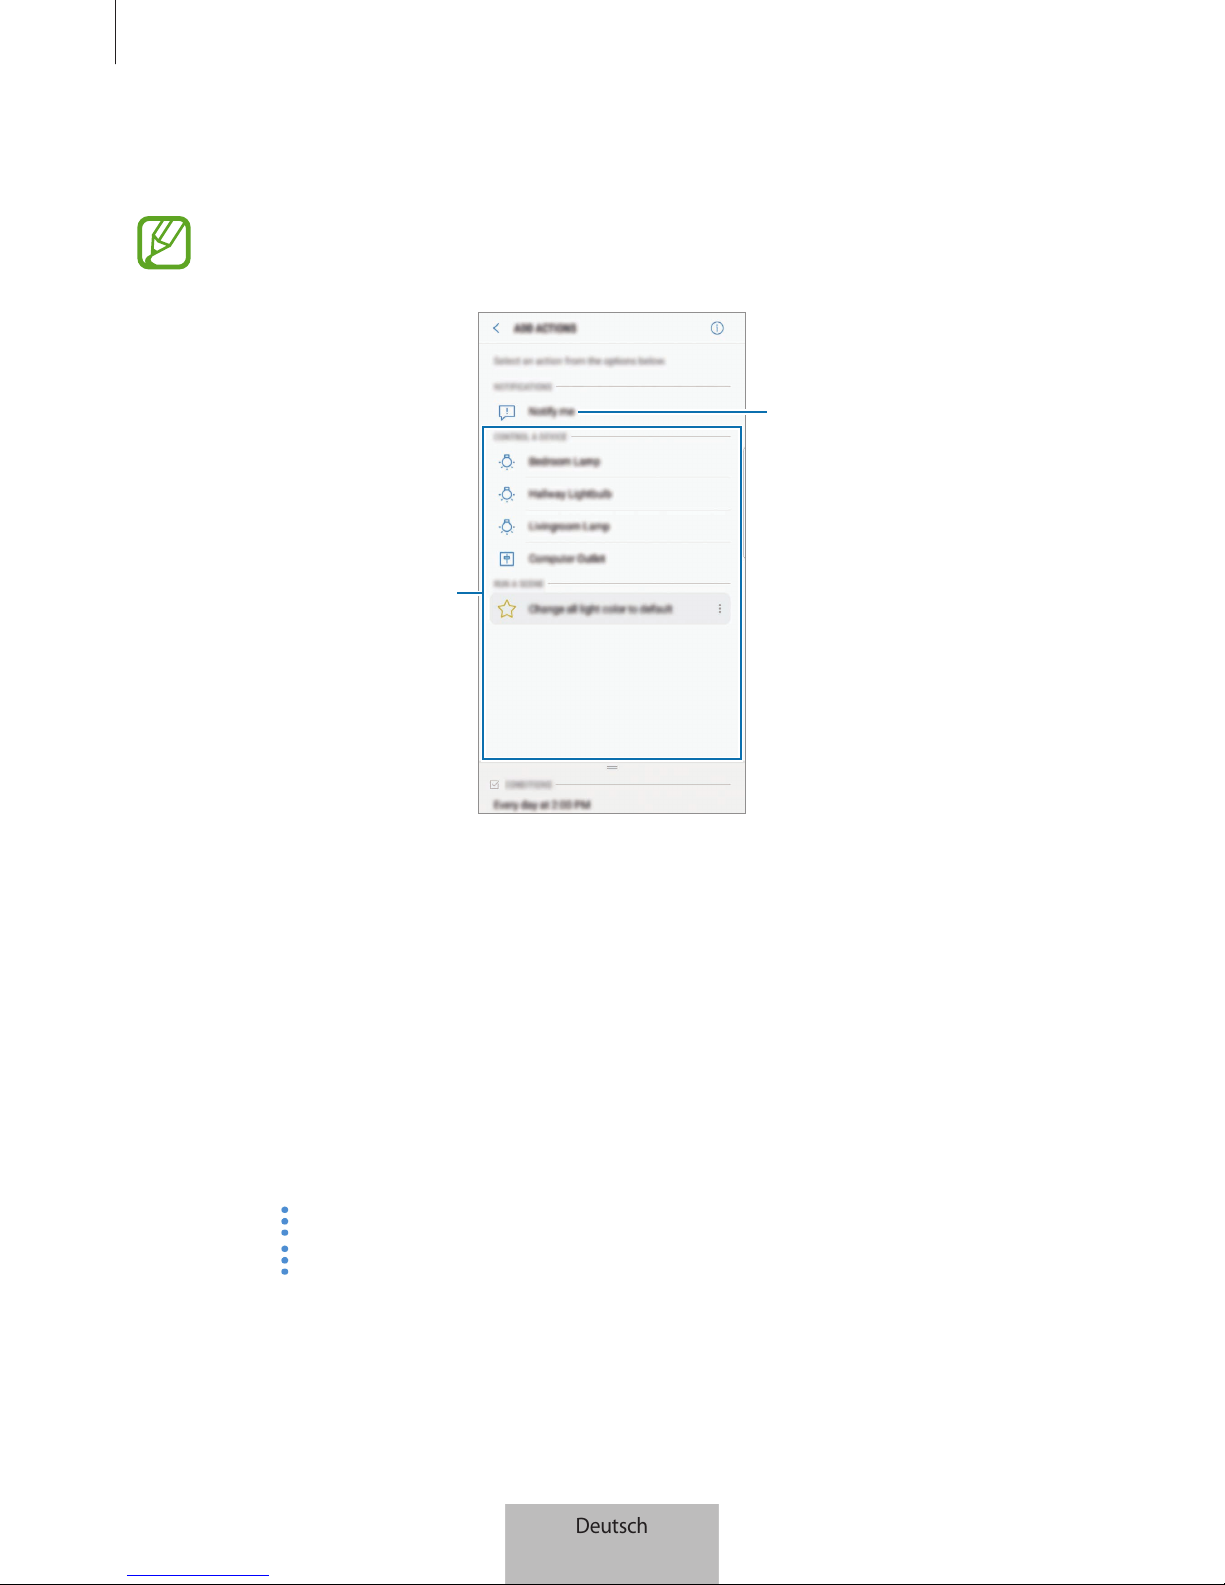
6
Tippen Sie
Was soll diese Regel tun?
an, wählen Sie die gewünschten Geräte und Bedingungen
bzw. Szenen aus und tippen Sie anschließend OK an.
Wenn Sie Benachrichtigungen erhalten möchten, sobald ein Gerät eine Aktion ausführt, tippen
Sie den Schalter
Benachrichtigen
an.
Gerät oder Szene auswählen.
Benachrichtigungstext eingeben.
7
Tippen Sie auf
SPEICHERN
.
Die zugewiesenen Geräte führen die entsprechenden Aktionen gemäß den festgelegten
Automatisierungen aus.
Automatisierungen verwalten
Sie können die festgelegten Automatisierungen einsehen und verwalten.
Tippen Sie auf dem SmartThings-Bildschirm
Regeln
an.
•
Tippen Sie den Schalter neben der Automatisierung an, um diese zu aktivieren bzw. zu deaktivieren.
•
Tippen Sie eine Automatisierung an, um die Angaben zu ändern.
•
Tippen Sie →
Name bearbeiten
an, um die Bezeichnung der Automatisierung zu ändern.
•
Tippen Sie →
Löschen
an, um die Automatisierung zu löschen.
Deutsch
24
Deutsch
24
Page 55

SmartThings-Anwendung
25
Praktische Verwendung der SmartThingsAnwendung
Nutzen Sie die SmartThings-Anwendung, um Ihr Leben einfacher und komfortabler zu gestalten.
Erstellen Sie Automatisierung, die Ihrer täglichen Routine entsprechen, und steuern Sie die registrierten
Geräte ganz einfach von dort, wo Sie gerade sind.
•
Wenn Sie sicher gehen möchten, dass Ihr Büro kühl ist, wenn Sie an einem heißen Sommertag dort
eintreffen, können Sie die verbundene Klimaanlage mithilfe der SmartThings-Anwendung vor Ihrer
Ankunft einschalten.
•
Möchten Sie in ein sauberes Haus zurückkehren, können Sie den verbundenen Saugroboter über
die SmartThings-Anwendung vor Ihrer Rückkehr einschalten.
•
Wenn Sie die Sicherheit Ihres Hauses verbessern möchten, können Sie eine Automatisierung für
Bewegungssensoren erstellen, um diese zur Schlafenszeit zu aktivieren. Außerdem können Sie die
Benachrichtigungsfunktion einschalten. Wenn die Bewegungssensoren unerwartete Bewegungen
feststellen, werden Sie darüber informiert.
Tippen Sie zum Anzeigen anderer Verwendungsbeispiele auf dem Dashboard
Benutzer-Storys
an.
Deutsch
25
Deutsch
25
Page 56

26
Anhang
Rat und Hilfe bei Problemen
Bevor Sie sich an ein Samsung Servicezentrum wenden, versuchen Sie folgende Lösungen.
Der SmartThings Wifi/Hub reagiert nicht
Falls der SmartThings Wifi/Hub nicht mehr reagiert oder abstürzt, ziehen Sie das Netzteil vom
SmartThings Wifi/Hub ab und schließen Sie es wieder an.
Schließen Sie die SmartThings-Anwendung auf Ihrem Gerät vollständig und starten Sie sie neu.
Sollte Ihr SmartThings Wifi/Hub nicht oder nur sehr langsam reagieren, drücken Sie mit einem schmalen
Gegenstand länger als 8Sekunden auf die Reset-Taste.
Kann das Problem anhand der beschriebenen Tipps nicht behoben werden, wenden Sie sich an ein
Samsung Servicezentrum.
Der SmartThings Wifi/Hub ist nicht mit dem Router verbunden
Der SmartThings Wifi/Hub unterstützt ausschließlich den SmartThings Wifi/Hub. Verbinden Sie daher
auch nur den SmartThings Wifi/Hub.
Der SmartThings Wifi/Hub wird von der SmartThings-Anwendung
nicht erkannt
•
Falls der SmartThings Wifi/Hub nicht mehr reagiert oder abstürzt, ziehen Sie das Netzteil vom
SmartThings Wifi/Hub ab und schließen Sie es wieder an.
•
Schließen Sie die SmartThings-Anwendung auf Ihrem Gerät vollständig und starten Sie sie neu.
•
Sollte Ihr SmartThings Wifi/Hub nicht oder nur sehr langsam reagieren, drücken Sie die Reset-Taste
mit einem schmalen Gegenstand.
•
Stellen Sie sicher, dass sich die anderen Geräte innerhalb der maximalen Verbindungsreichweite
befinden.
Kann das Problem anhand der beschriebenen Tipps nicht behoben werden, wenden Sie sich an ein
Samsung Servicezentrum.
Deutsch
26
Deutsch
26
Page 57

Anhang
27
Es können keine weiteren Geräte mit der SmartThings-Anwendung
verbunden werden
•
Trennen Sie das andere Gerät vom WLAN und stellen Sie die Verbindung anschließend wieder her.
•
Schalten Sie das Gerät aus und wieder ein.
Die Verbindung wird häufig unterbrochen
•
Wenn sich Hindernisse zwischen den Geräten befinden, kann sich die Reichweite reduzieren.
•
Stellen Sie sicher, dass sich die anderen Geräte innerhalb der maximalen Verbindungsreichweite
befinden.
•
Bei Verwendung des SmartThings Wifi/Hubs mit anderen Geräten kann die Verbindung durch
elektromagnetische Wellen beeinträchtigt werden. Verwenden Sie den SmartThings Wifi/Hub in
einer Umgebung mit weniger Drahtlosgeräten.
Der SmartThings Wifi/Hub funktioniert nicht wie in der Anleitung
beschrieben
Die verfügbaren Funktionen können je nach angeschlossenem Gerät variieren.
Deutsch
27
Deutsch
27
Page 58

Copyright
Copyright © 2018 Samsung Electronics
Diese Anleitung ist durch internationale Urheberrechtsgesetze geschützt.
Diese Anleitung darf weder als Ganzes noch in Teilen ohne vorherige schriftliche Genehmigung von
Samsung Electronics reproduziert, vertrieben, übersetzt oder in anderer Form oder mit anderen
Mitteln elektronischer oder mechanischer Art übertragen werden. Dazu zählt auch das Fotokopieren,
Aufzeichnen oder Speichern in jeglicher Art von Informationsspeicher- und -abrufsystem.
Marken
•
SAMSUNG und das SAMSUNG-Logo sind eingetragene Marken von Samsung Electronics.
•
Bluetooth® ist eine weltweit eingetragene Marke von Bluetooth SIG, Inc.
•
Wi-Fi®, Wi-Fi CERTIFIED™ und das Wi-Fi-Logo sind eingetragene Marken der Wi-Fi Alliance.
•
Z-Wave und Z-Wave Plus sind eingetragene Marken von Sigma Designs und dessen
Tochtergesellschaften in den USA und anderen Ländern.
•
Alle weiteren Marken und Copyrights sind Eigentum ihrer jeweiligen Besitzer.
Deutsch
28
Deutsch
28
Page 59
1
Operazioni preliminari
Leggere prima dell'utilizzo
Leggete il presente manuale prima di utilizzare il dispositivo per garantirne un uso sicuro e corretto.
•
Alcuni contenuti potrebbero variare dal dispositivo in base alla versione del software del
dispositivo, alla versione dell'applicazione o alle specifiche del modello. Il contenuto è soggetto
a modifiche senza preavviso.
•
Prima di utilizzare il Wifi/Hub SmartThings, assicuratevi che sia compatibile con il dispositivo.
•
Le prestazioni del Wifi/Hub SmartThings potrebbero variare in base all'ambiente.
•
Il presente prodotto include alcuni software gratuiti/open source. Per consultare le istruzioni per
visualizzare la licenza open source, visitate il sito Web di Samsung (opensource.samsung.com).
Icone informative
Avvertenza: indica situazioni che potrebbero causare lesioni alle persone
Attenzione: indica situazioni che potrebbero causare danni al vostro dispositivo o ad altri
apparecchi
Nota: indica note, suggerimenti per l'uso o informazioni aggiuntive
Italiano
1
Italiano
1
Page 60
Operazioni preliminari
2
Info sul Wifi/Hub SmartThings
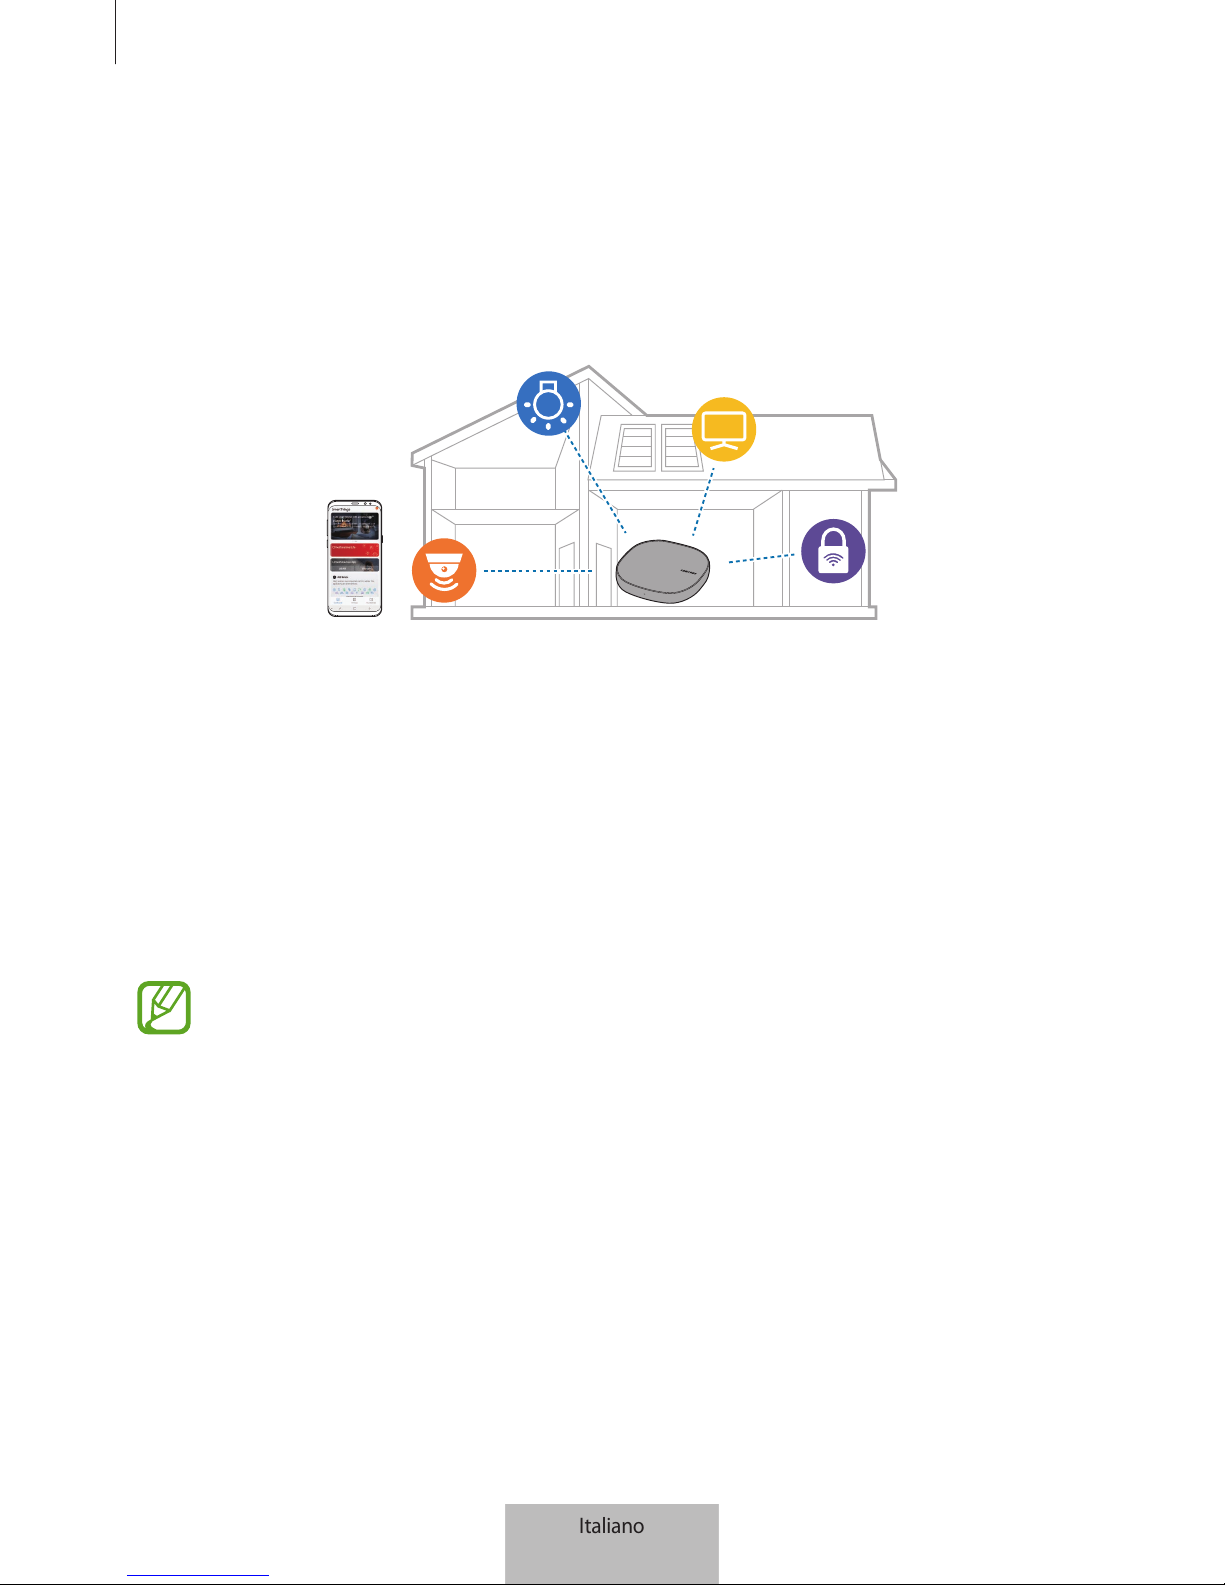
Il Wifi/Hub SmartThings è un router Wi-Fi in grado di connettere il vostro smartphone ai vostri
elettrodomestici intelligenti tramite Wi-Fi. Inoltre, potete connettere al Wifi/Hub SmartThings i
dispositivi IoT (Internet delle cose) tramite la funzionalità Samsung Hub SmartThings.
Per abitazioni più grandi, potete connettere altri Wifi/Hub SmartThings.
Contenuto della confezione
Accertatevi che nella confezione siano presenti i seguenti elementi:
•
SmartThings Wifi/Hub
•
Cavo Ethernet
•
Alimentatore AC/DC (di seguito “alimentatore”)
•
Guida di riferimento rapido
•
Gli elementi forniti con il dispositivo e gli accessori disponibili potrebbero variare in base
al Paese o al gestore telefonico.
•
Gli elementi forniti sono stati creati soltanto per il presente dispositivo e potrebbero non
essere compatibili con altri dispositivi.
•
L'aspetto e le specifiche sono soggette a modifiche senza preavviso.
•
Potrete acquistare accessori aggiuntivi dal rivenditore Samsung di zona. Accertatevi che
siano compatibili con il dispositivo prima di acquistarli.
•
Utilizzate solo accessori approvati da Samsung. L'utilizzo di accessori non approvati
potrebbe causare problemi di prestazione e malfunzionamenti non coperti dalla
garanzia.
•
La disponibilità di tutti gli accessori potrebbe variare in base alle aziende produttrici. Per
maggiori informazioni sugli accessori disponibili, fate riferimento al sito Web di Samsung.
Italiano
2
Italiano
2
Page 61
Operazioni preliminari
3
Componenti del dispositivo
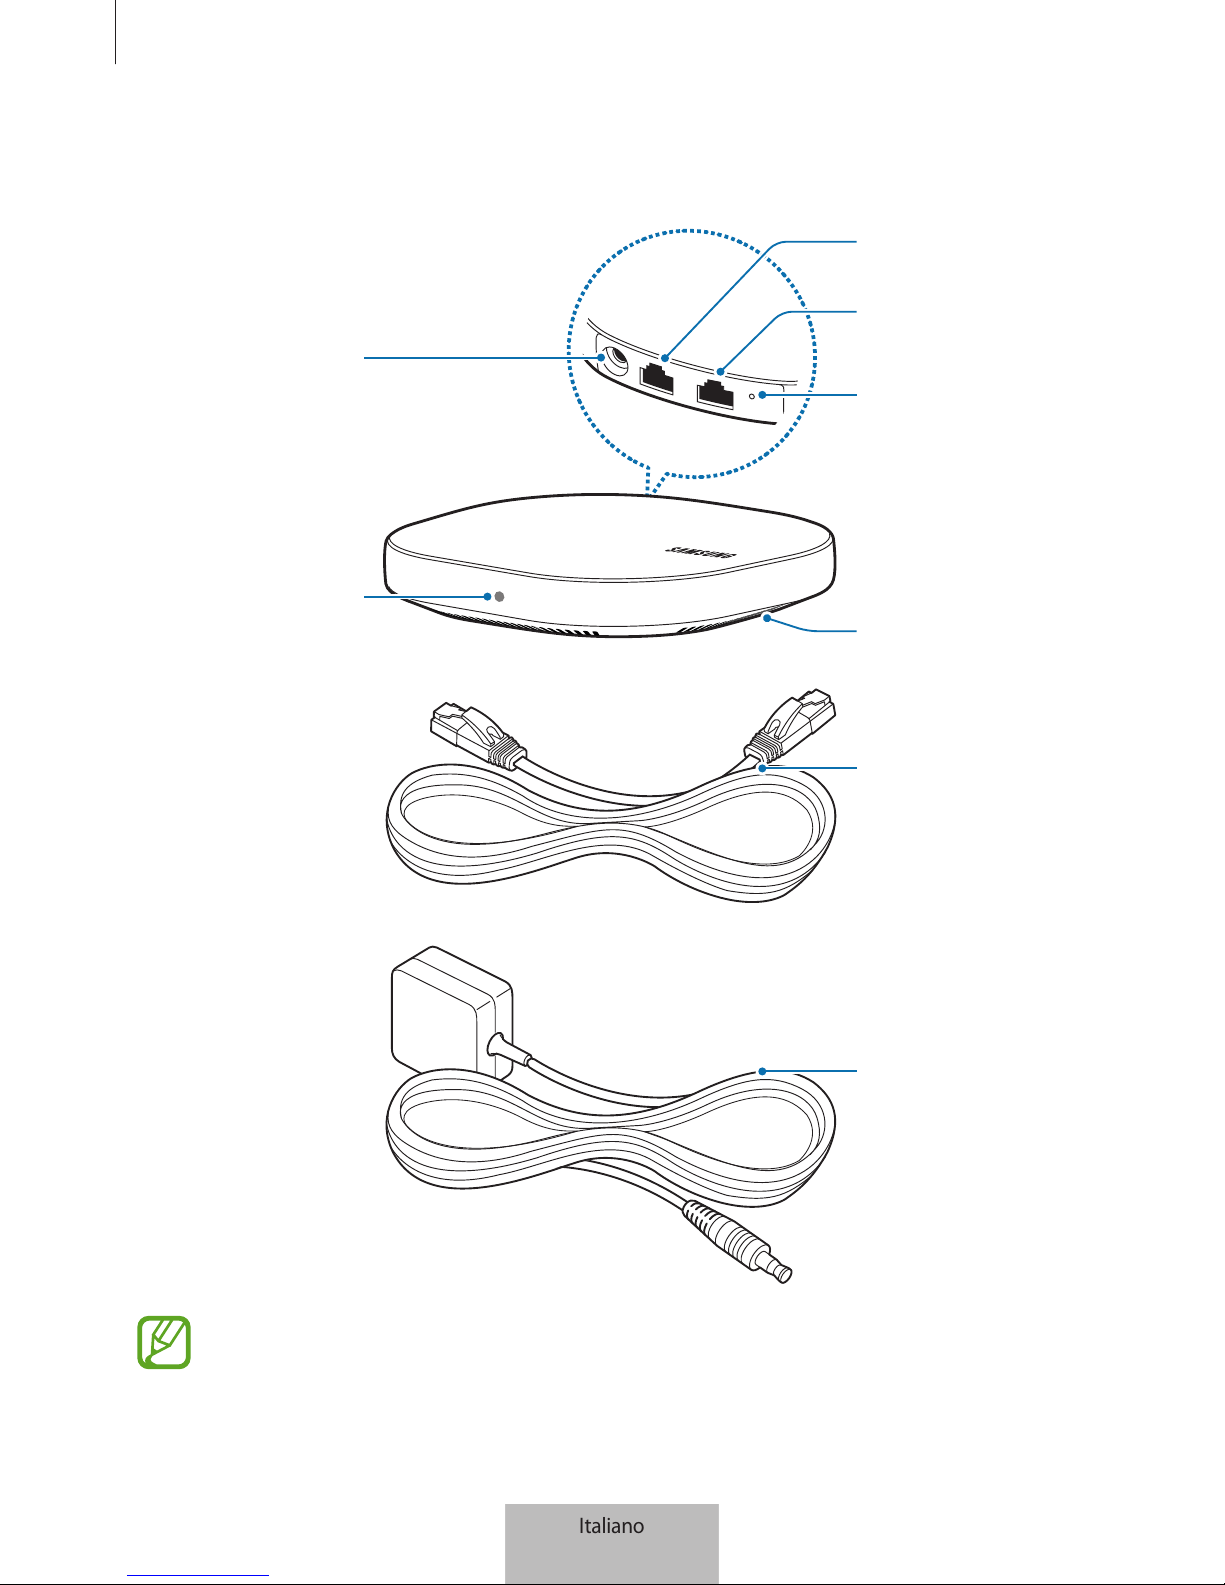
Connettore
alimentatore AC/DC
Porta WAN (INGRESSO)
Porta LAN (USCITA)
Foro di ripristino
Ventola
Spia luminosa
Cavo Ethernet
Alimentatore AC/DC
L'aspetto e la struttura interna del prodotto potrebbero variare in base al modello.
Italiano
3
Italiano
3
Page 62
Operazioni preliminari
4
Spia luminosa
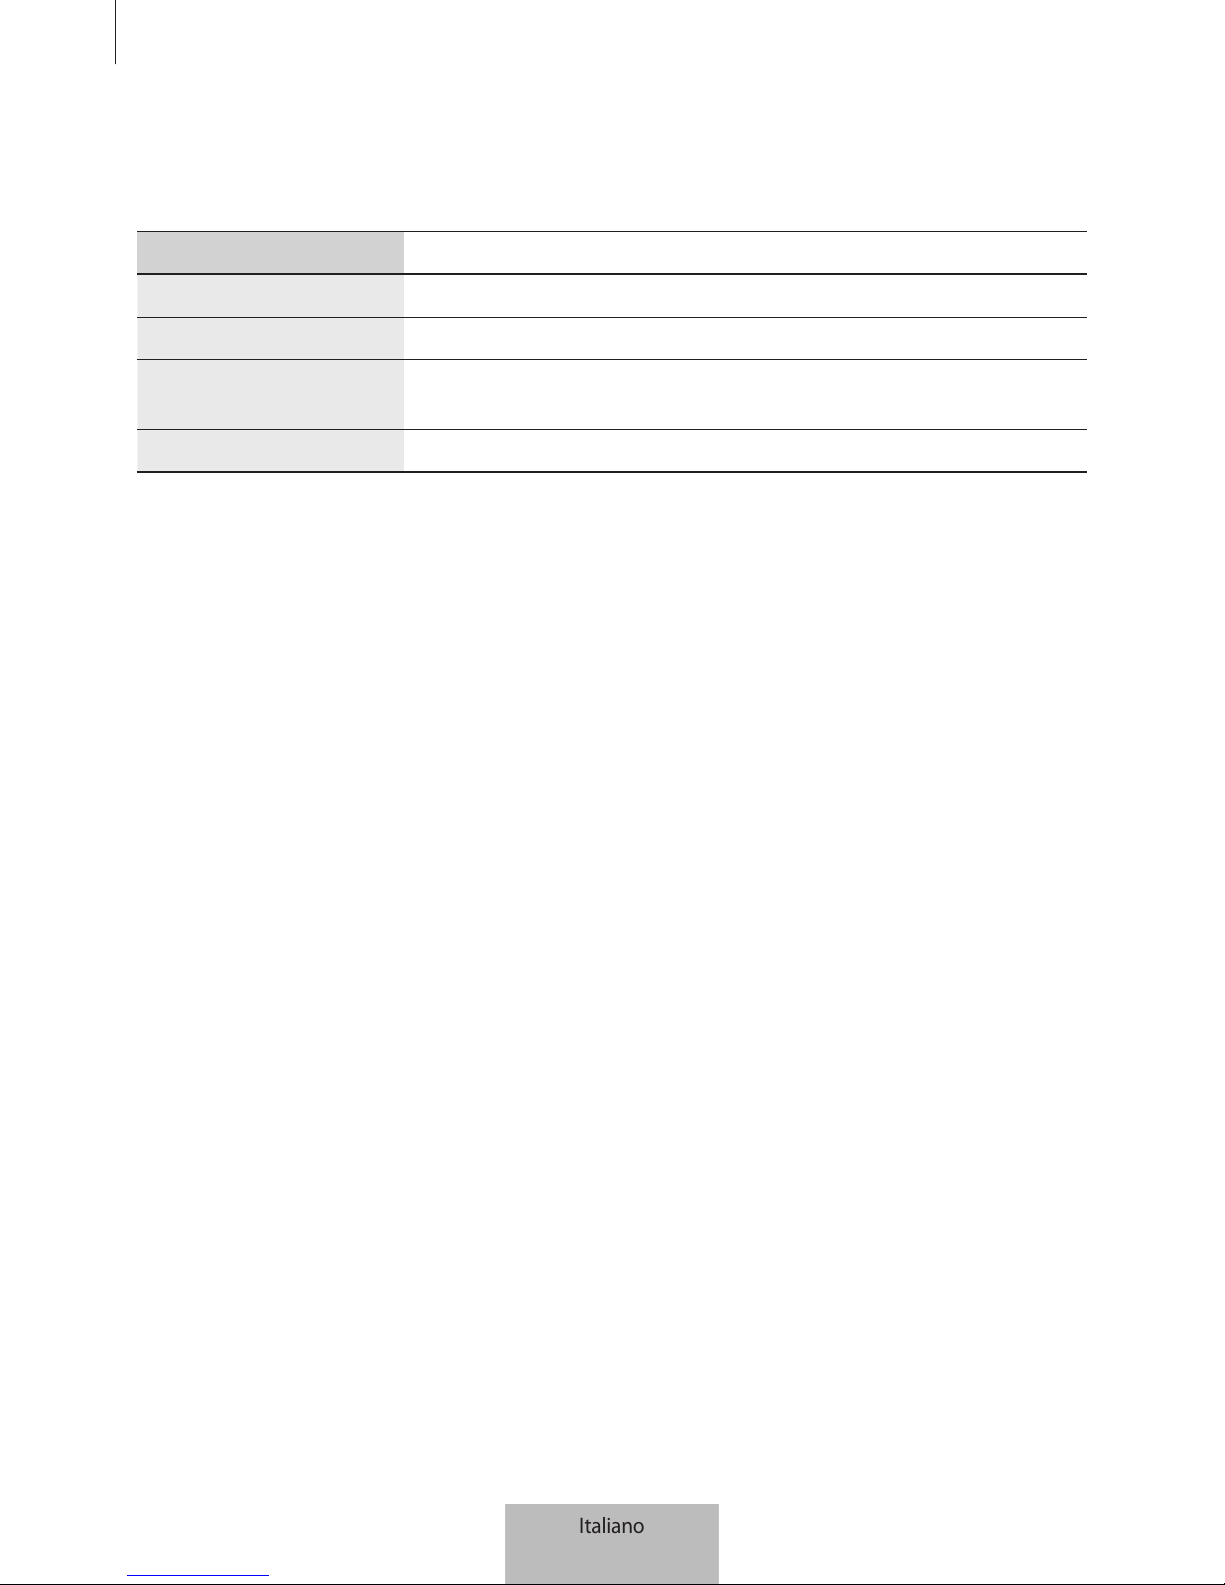
La spia luminosa vi fornisce informazioni sullo stato del Wifi/Hub SmartThings.
Colore Stato
Verde Acceso, in funzione
Lampeggia in verde Riavvio/reset del sistema
Lampeggia in verde e
rosso
In attesa della connessione dei dispositivi
Lampeggia in rosso Errore di funzione
Consumo energetico
•
Consumo energetico totale in standby (con tutte le porte di rete attive): 4,5 W
Italiano
4
Italiano
4
Page 63

5
Utilizzo del Wifi/Hub
SmartThings
Connessione con un dispositivo mobile
Per connettere il Wifi/Hub SmartThings a un dispositivo mobile, dovete installare l'applicazione
SmartThings sul dispositivo mobile. Potete scaricare l'applicazione da
Galaxy Apps, Play Store
oppure
App Store
.
•
Visitate il sito www.samsung.com per conoscere i dispositivi compatibili con
l'applicazione SmartThings.
•
Per utilizzare l'applicazione SmartThings, dovete registrarvi e accedere al vostro account
Samsung.
•
Le funzionalità supportate potrebbero variare in base al dispositivo mobile e al suo
sistema operativo.
•
Il Bluetooth del Wifi/Hub SmartThings si attiva automaticamente per stabilire
una connessione. Quando la connessione è completa, il Bluetooth si disattiva
automaticamente.
Italiano
5
Italiano
5
Page 64
Utilizzo del Wifi/Hub SmartThings
6
Wifi/Hub SmartThing
1
Collegate un'estremità del cavo Ethernet alla porta WAN (INGRESSO) dell'hub e l'altra estremità
alla porta LAN del modem.
2
Collegate l'alimentatore al Wifi/Hub SmartThings.
Il Wifi/Hub SmartThings si accende e la spia luminosa lampeggia in verde.
Utilizzate solo alimentatori approvati da Samsung (12 V/2,1 A o superiore).
•
Potete utilizzare il Wifi/Hub SmartThings solo quando collegate il Wifi/Hub SmartThings a
un alimentatore.
•
Se la temperatura del Wifi/Hub SmartThings supera 55 °C, la ventola interna si attiva
automaticamente (solo ET-WV533).
•
Se il Wifi/Hub SmartThings si surriscalda per un lungo periodo di tempo, il Wifi/
Hub SmartThings potrebbe spegnersi o resettarsi automaticamente. Se ciò accade
ripetutamente, scollegate l'alimentatore dal Wifi/Hub SmartThings e contattate un Centro
Assistenza Samsung.
•
Quando la batteria è carica, scollegate l'alimentatore dalla presa della corrente.
L'alimentatore non è dotato di un interruttore di accensione o spegnimento, pertanto
dovete scollegarlo dalla presa di corrente quando non è in uso per evitare di consumare
energia. Durante l'uso, l'alimentatore dovrebbe rimanere vicino alla presa di corrente
appropriata ed essere facilmente accessibile.
Dispositivo mobile
3
Avviate l'applicazione
SmartThings
sul dispositivo mobile.
4
Seguite le istruzioni della finestra a comparsa per attivare il Wi-Fi e il Bluetooth.
Quando avviate l'applicazione
SmartThings
, il Wi-Fi e il Bluetooth si attivano automaticamente.
Italiano
6
Italiano
6
Page 65
Utilizzo del Wifi/Hub SmartThings
7
5
Il Wifi/Hub SmartThings viene rilevato automaticamente. Toccate
AGGIUNGI ORA
.
Se il Wifi/Hub SmartThings non viene rilevato, toccate
Aggiungi dispositivo
sul pannello di
controllo. Successivamente, toccate
sotto
AGGIUNGI DISPOSITIVO MANUALMENTE
→
Wi-Fi Hub
e toccate il nome del Wifi/Hub SmartThings.
6
Inserite un nome e una password di rete da assegnare al Wifi/Hub SmartThings.
Per registrare i dispositivi IoT tramite la funzionalità hub SmartThings Samsung, confermate che
la funzionalità
Configura hub SmartThings
sia attiva.
7
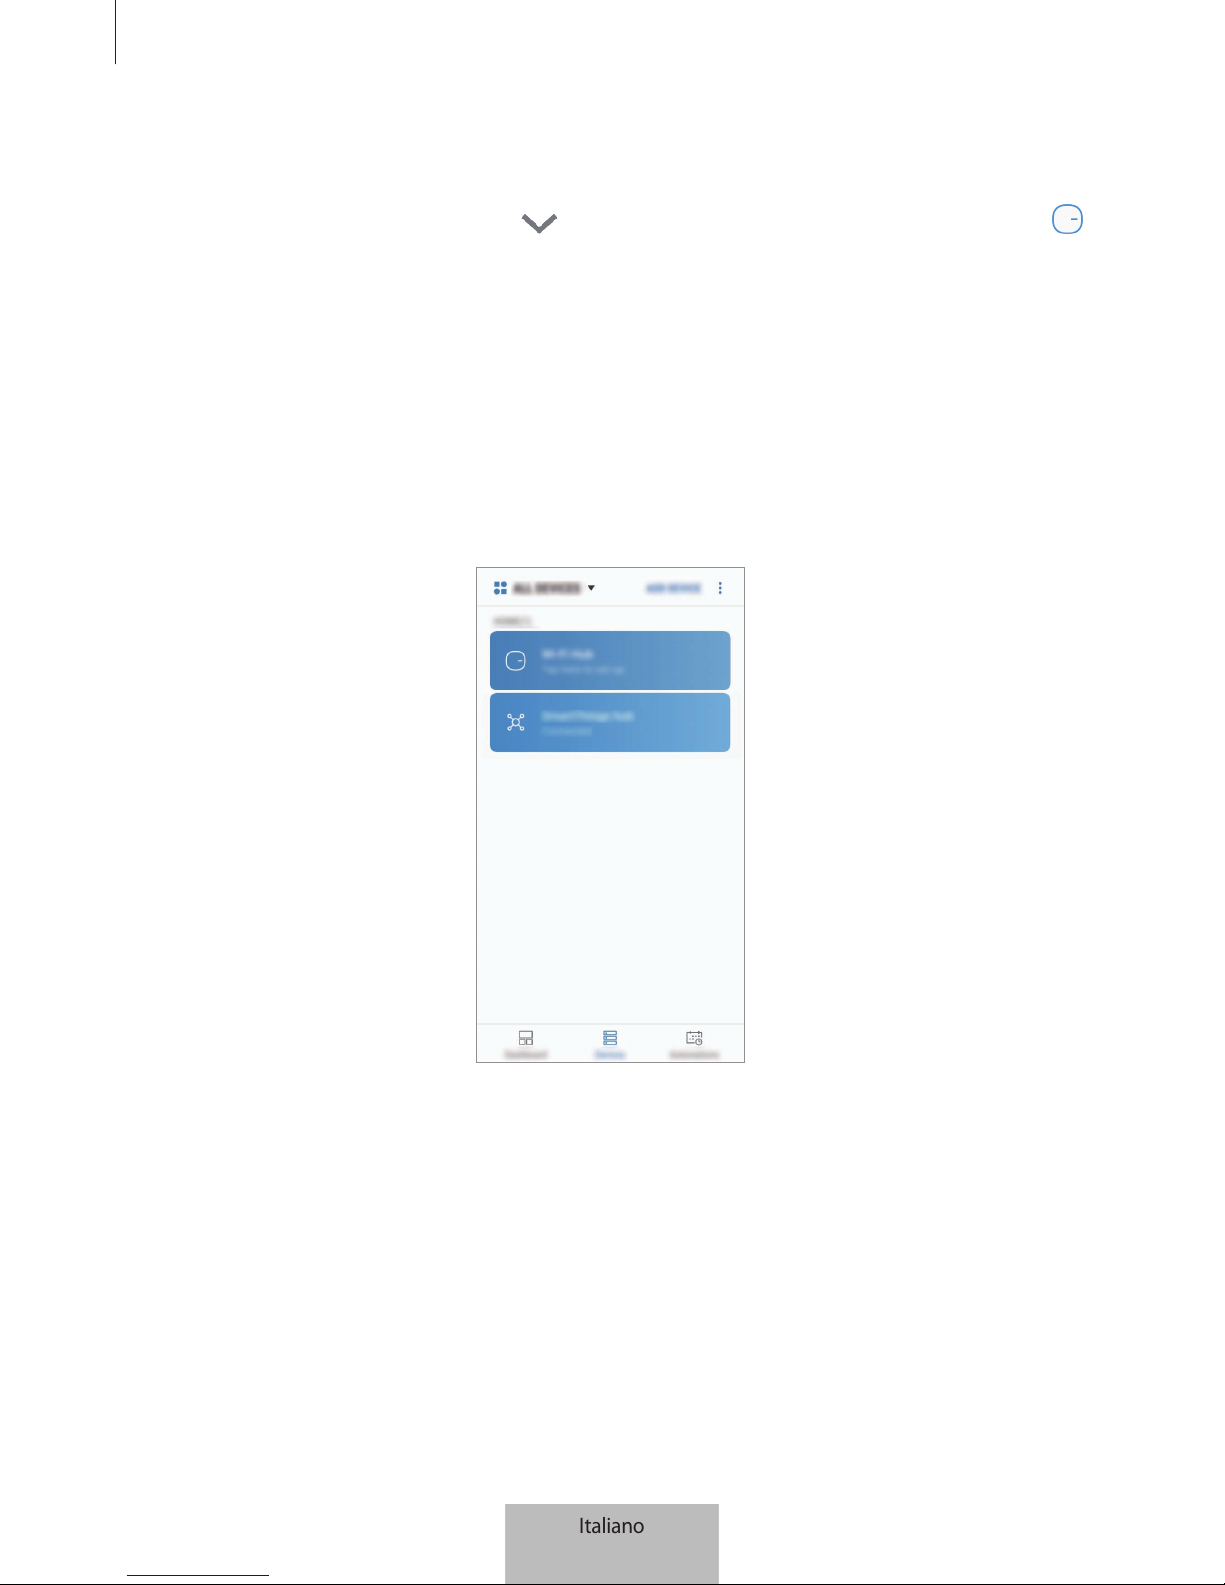
Seguite le istruzioni visualizzate per completare la connessione.
A connessione stabilita, compare la seguente schermata.
Il Wifi/Hub SmartThings è un unico prodotto, ma è registrato come due dispositivi separati in base
alle rispettive funzionalità, il router Wi-Fi e Samsung Hub SmartThings.
Italiano
7
Italiano
7
Page 66
Utilizzo del Wifi/Hub SmartThings
8
Aggiunta di altri Wifi/Hub SmartThings
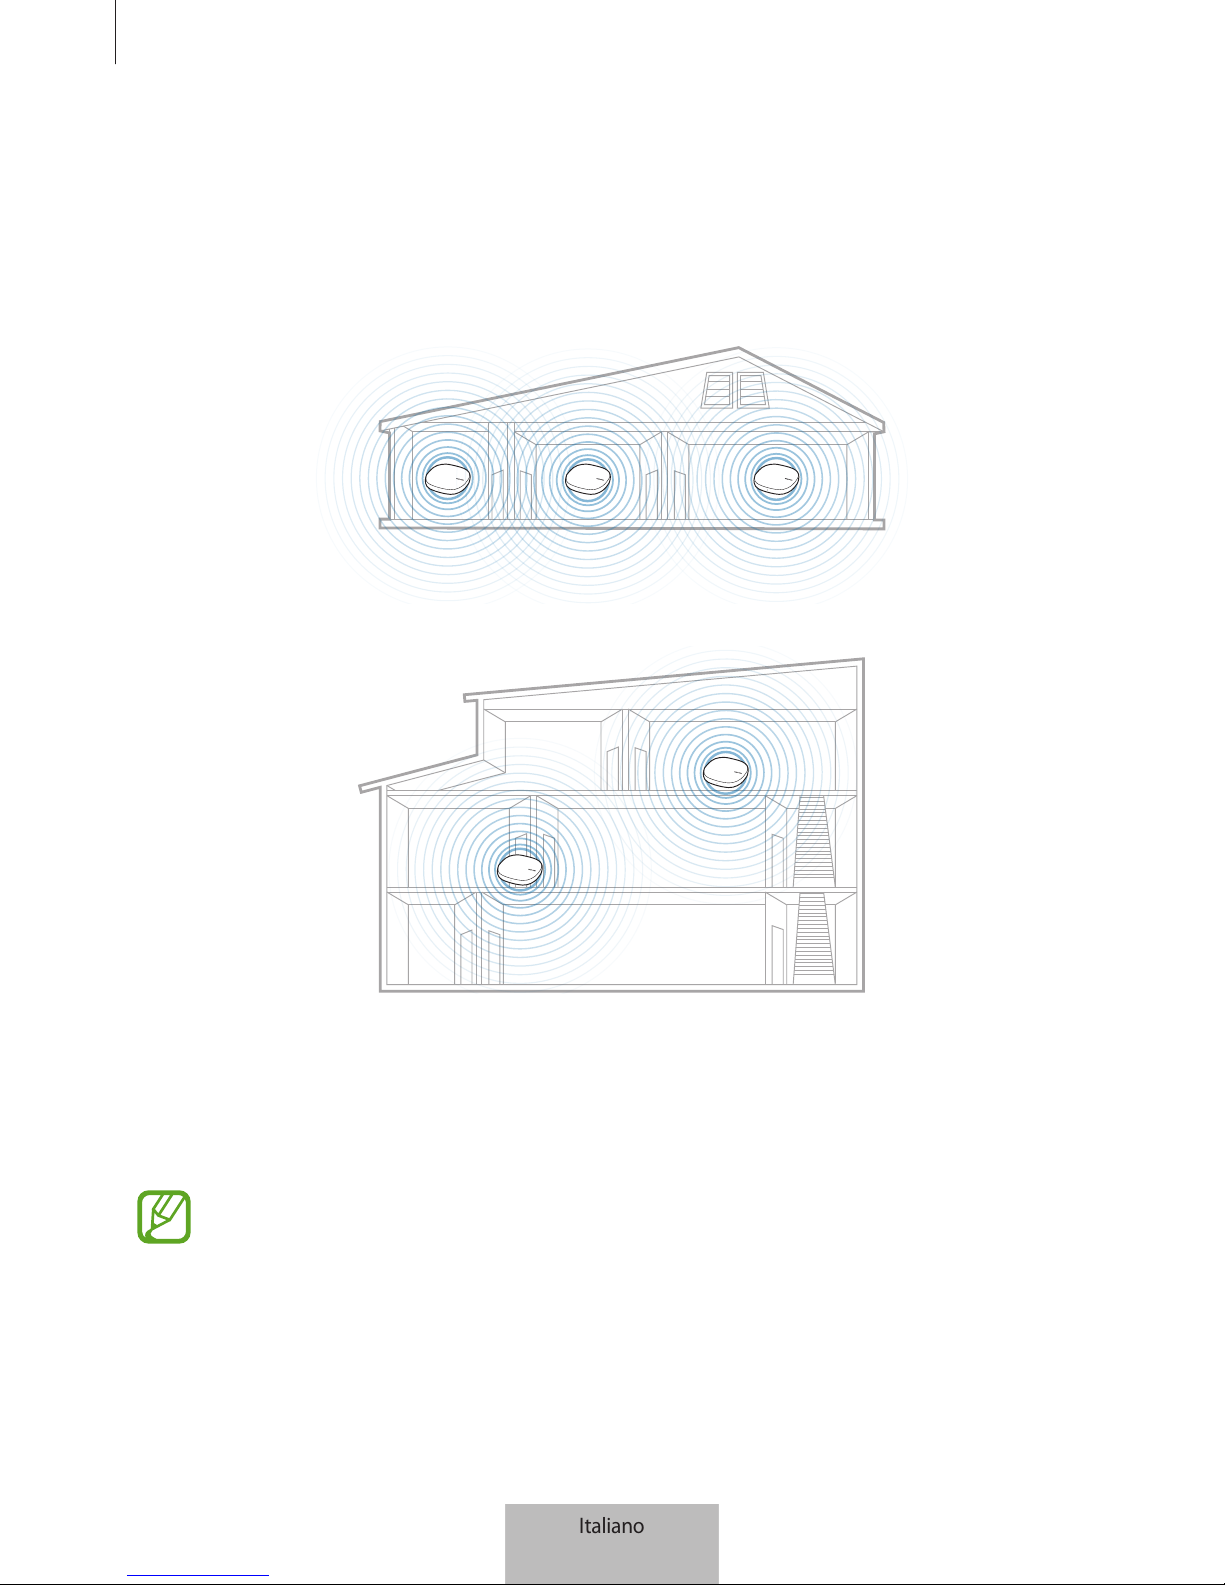
Un Wifi/Hub SmartThings può coprire un raggio di connessione fino a 140 m2 (dato riferito agli edifici
in legno) ma può variare in base all'ambiente di utilizzo.
Per connettere un'area superiore al raggio di connessione tramite rete Wi-Fi, installate un Wifi/Hub
SmartThings aggiuntivo.
1
Collegate l'alimentatore AC/DC al Wifi/Hub SmartThings aggiuntivo.
2
Sul dispositivo mobile, avviate l'applicazione
SmartThings
e seguite le istruzioni visualizzate per
completare la connessione.
Potete connettere fino a un massimo di quattro Wifi/Hub SmartThings aggiuntivi.
Italiano
8
Italiano
8
Page 67

Utilizzo del Wifi/Hub SmartThings
9
Avvisi sulla connessione di un Wifi/Hub SmartThings
•
Installate un Wifi/Hub SmartThings vicino ai dispositivi da registrare.
•
Quando aggiungete altri Wifi/Hub SmartThings, installateli entro il raggio di connessione.
•
Evitate la presenza di ostacoli tra il Wifi/Hub SmartThings e i dispositivi da registrare.
•
Ostacoli come persone, pareti, angoli o recinzioni possono indebolire i segnali.
•
Quando utilizzate il Wifi/Hub SmartThings, è necessario collegarlo tramite cavo Ethernet.
Avvisi sull'utilizzo del Bluetooth
•
Per evitare problemi durante la connessione del Wifi/Hub SmartThings a un altro dispositivo,
posizionate i dispositivi l'uno vicino all'altro.
•
Assicuratevi che il Wifi/Hub SmartThings e l'altro dispositivo Bluetooth si trovino entro il raggio
di connessione massimo del Bluetooth (5 m). La distanza potrebbe variare in base all'ambiente
in cui vengono utilizzati i dispositivi.
•
Assicuratevi che non ci siano ostacoli tra il Wifi/Hub SmartThings e un dispositivo connesso,
comprese persone, muri, angoli o recinzioni.
•
Non toccate l'antenna Bluetooth del dispositivo connesso.
•
Il Bluetooth utilizza la stessa frequenza di alcuni prodotti industriali, scientifici, medicali e a bassa
potenza, il che potrebbe causare interferenze nella connessione se nelle vicinanze sono presenti
questo tipo di prodotti.
•
Alcuni dispositivi, specialmente quelli non testati o non approvati da Bluetooth SIG, potrebbero
essere incompatibili con il Wifi/Hub SmartThings.
•
Non utilizzate il Bluetooth per scopi illegali (ad esempio: copie pirata di file o registrazione
illegale di comunicazioni a scopo commerciale).
Italiano
9
Italiano
9
Page 68
Utilizzo del Wifi/Hub SmartThings
10
Configurazione della funzionalità router Wi-Fi
Potete configurare in dettaglio le impostazioni della funzionalità router Wi-Fi del Wifi/Hub
SmartThings.
1
Nella schermata SmartThings, toccate
Dispositivi
.
2
Nell'elenco dei dispositivi registrati, toccate l'hub Wi-Fi.
Quando utilizzate la funzionalità router Wi-Fi del Wifi/Hub SmartThings per la prima volta,
toccate l'hub Wi-Fi per scaricare il relativo controller.
3
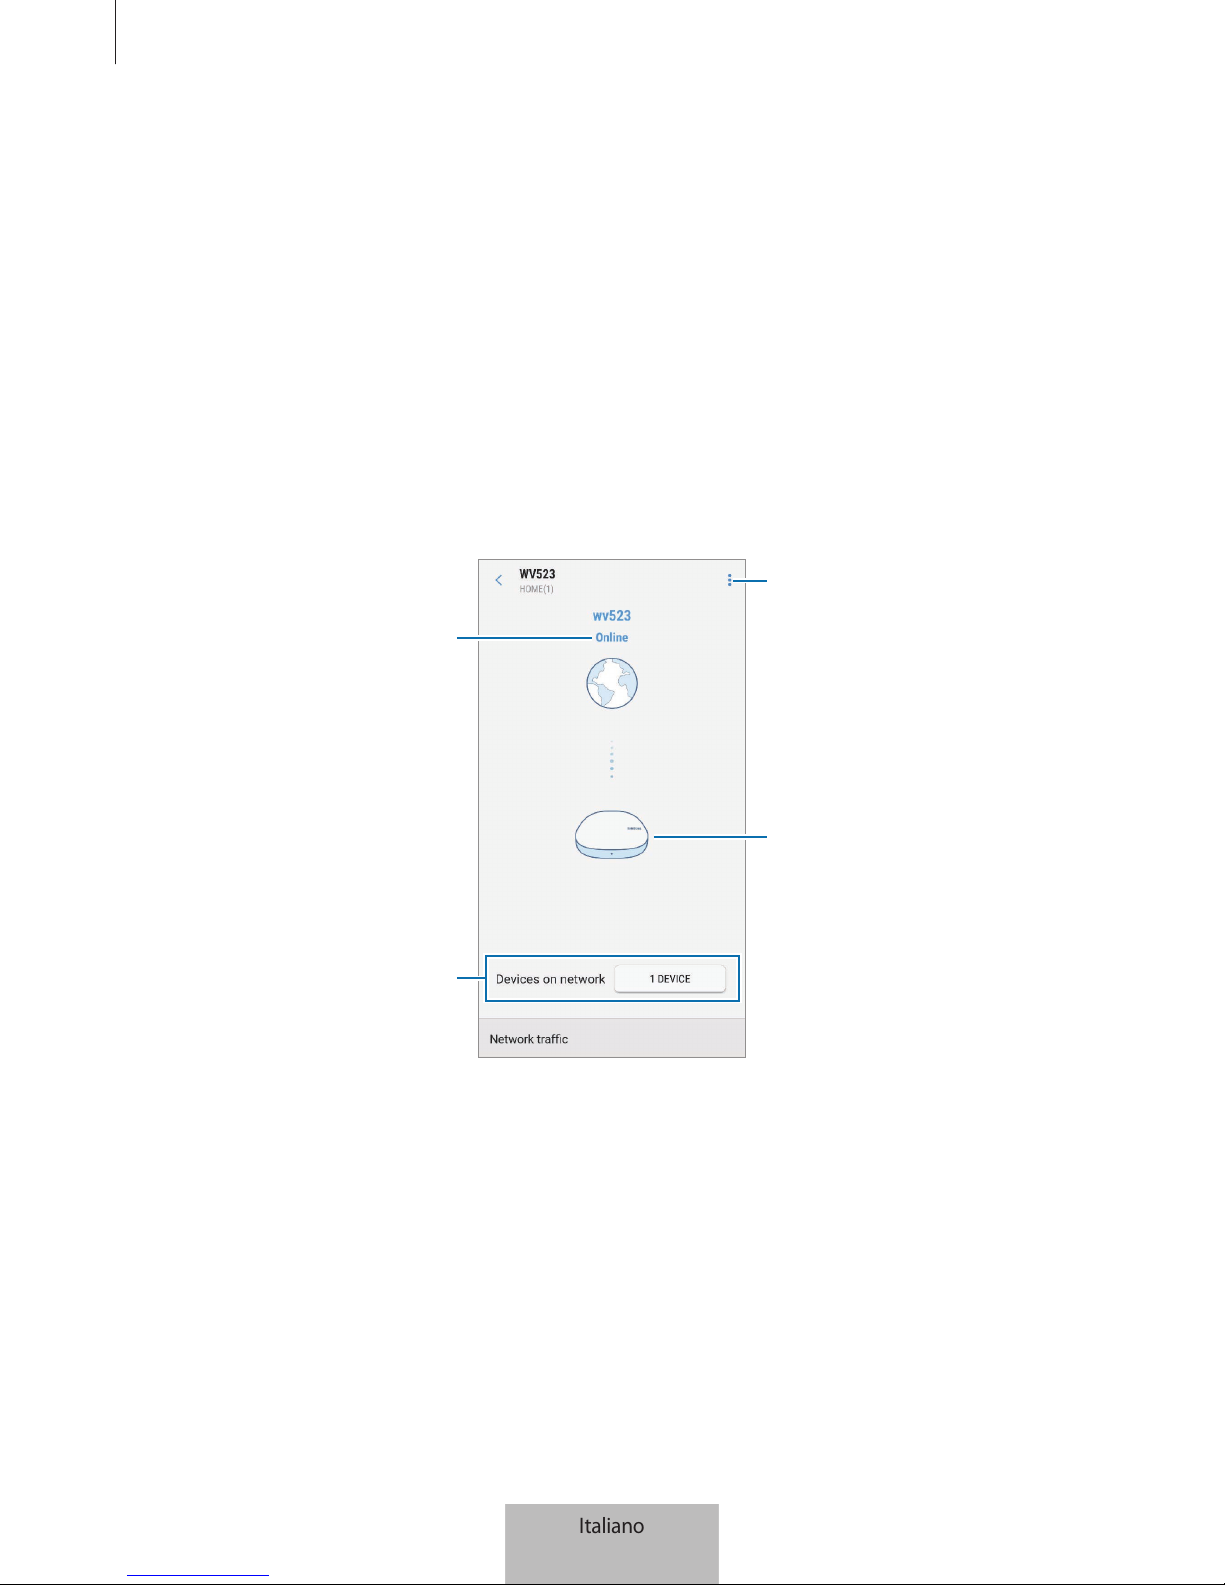
Selezionate un'opzione e configurate la funzionalità router Wi-Fi.
Stato della rete Wi-Fi
Dispositivi connessi alla rete Wi-Fi
del Wifi/Hub SmartThings
Consente di accedere alle opzioni
aggiuntive.
Wifi/Hub SmartThings registrato.
Toccate per visualizzarne le
informazioni.
Italiano
10
Italiano
10
Page 69

Utilizzo del Wifi/Hub SmartThings
11
Assegnazione della priorità ad un dispositivo connesso
Potete impostare la connessione prioritaria per i dispositivi specificati connessi alla rete Wi-Fi del Wifi/
Hub SmartThings.
1
Toccate il tasto accanto a
Dispositivi sulla rete
.
2
Nell'elenco dei dispositivi connessi, selezionate un dispositivo per assegnare la priorità alla rete
Wi-Fi del Wifi/Hub SmartThings.
3
Toccate il cursore
Priorità massima larghezza di banda
per attivare questa funzione.
Limiti di tempo per l'utilizzo della rete Wi-Fi
Potete limitare la durata di connessione dei dispositivi alla rete Wi-Fi del Wifi/Hub SmartThings.
1
Toccate il tasto accanto a
Dispositivi sulla rete
.
2
Nell'elenco dei dispositivi connessi, selezionate un dispositivo per limitare la durata di utilizzo
della rete Wi-Fi del Wifi/Hub SmartThings.
3
Toccate
Limita tempo di utilizzo
→
Aggiungi orario con restrizioni
.
4
Impostate i giorni e l'ora, quindi toccate
AGGIUNGI
.
Aggiunta di una rete ospiti
Potete aggiungere una rete ospiti separata dalla rete Wi-Fi principale.
1
Toccate →
Accesso guest
→
Aggiungi rete guest
.
2
Inserite nome e password di rete e toccate
FATTO
.
Italiano
11
Italiano
11
Page 70
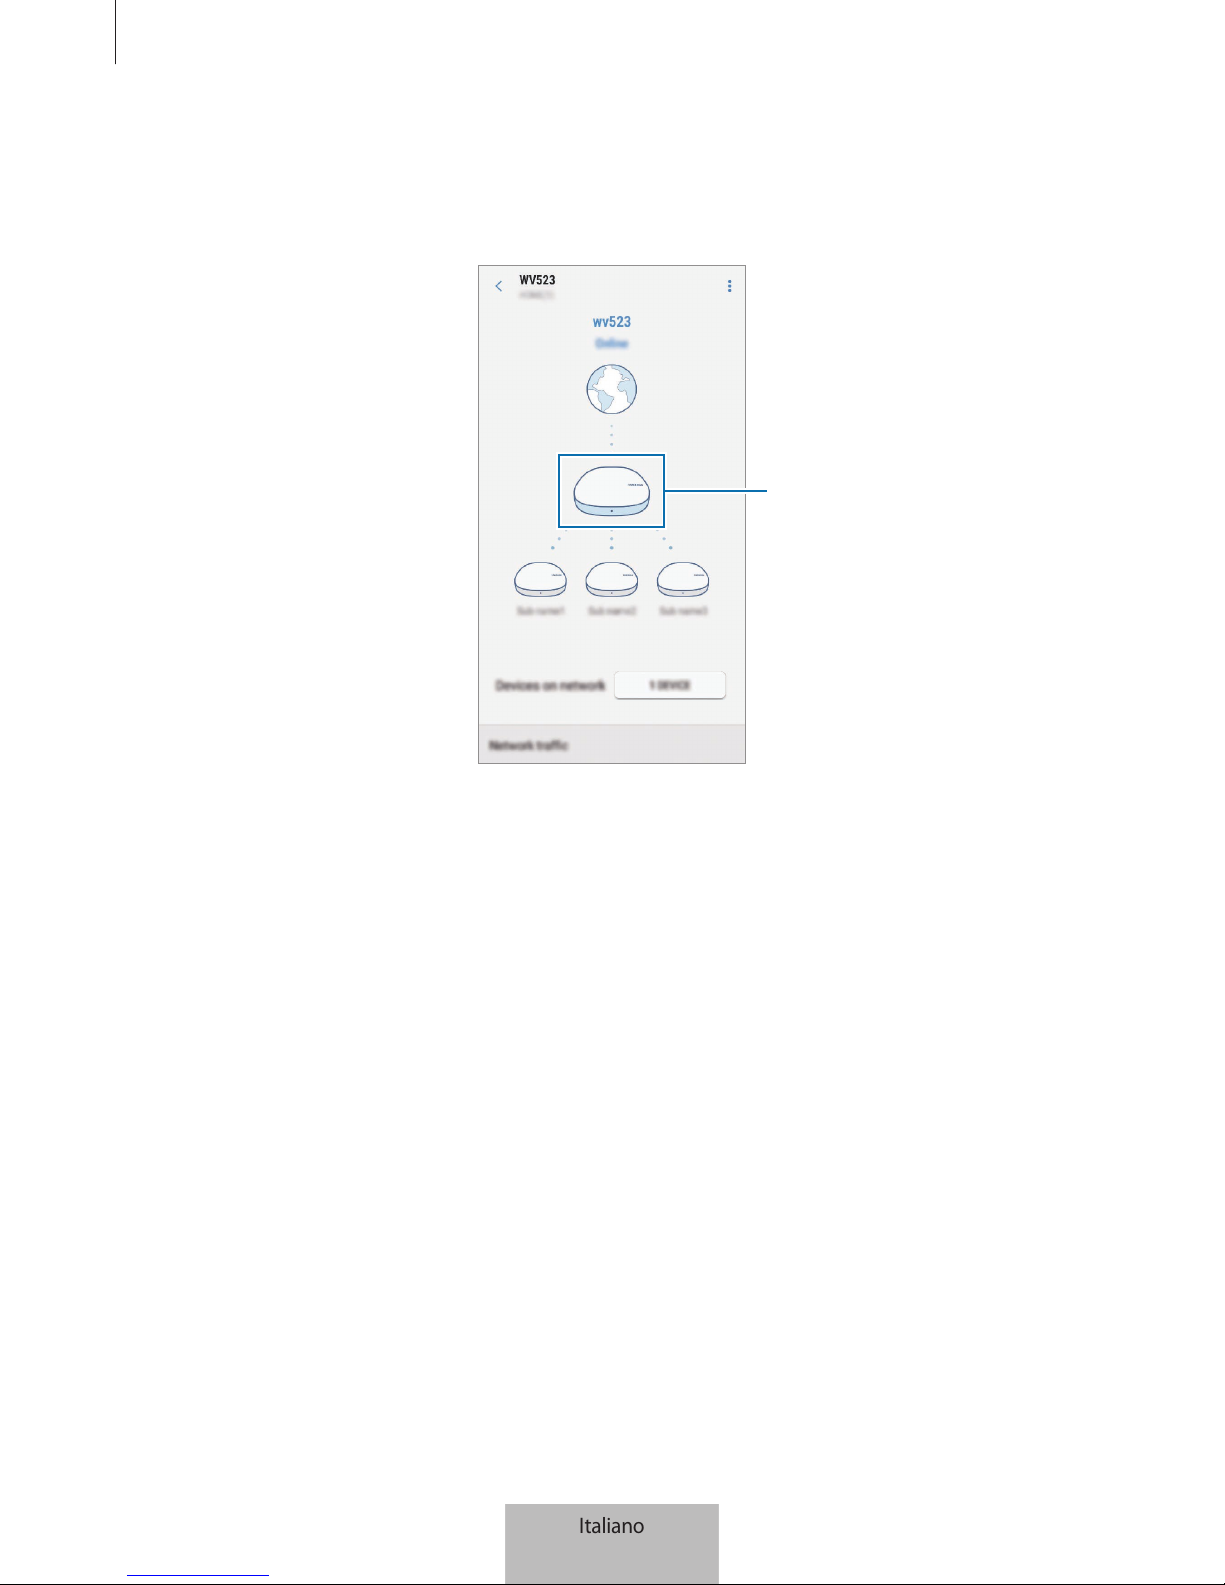
Utilizzo del Wifi/Hub SmartThings
12
Attivazione o disattivazione della funzionalità router Wi-Fi
1
Toccate il Wifi/Hub SmartThings principale tra i Wifi/Hub SmartThings registrati.
Hub principale
2
Toccate il cursore
Wi-Fi
per attivare o disattivare la funzionalità router Wi-Fi.
Italiano
12
Italiano
12
Page 71
Utilizzo del Wifi/Hub SmartThings
13
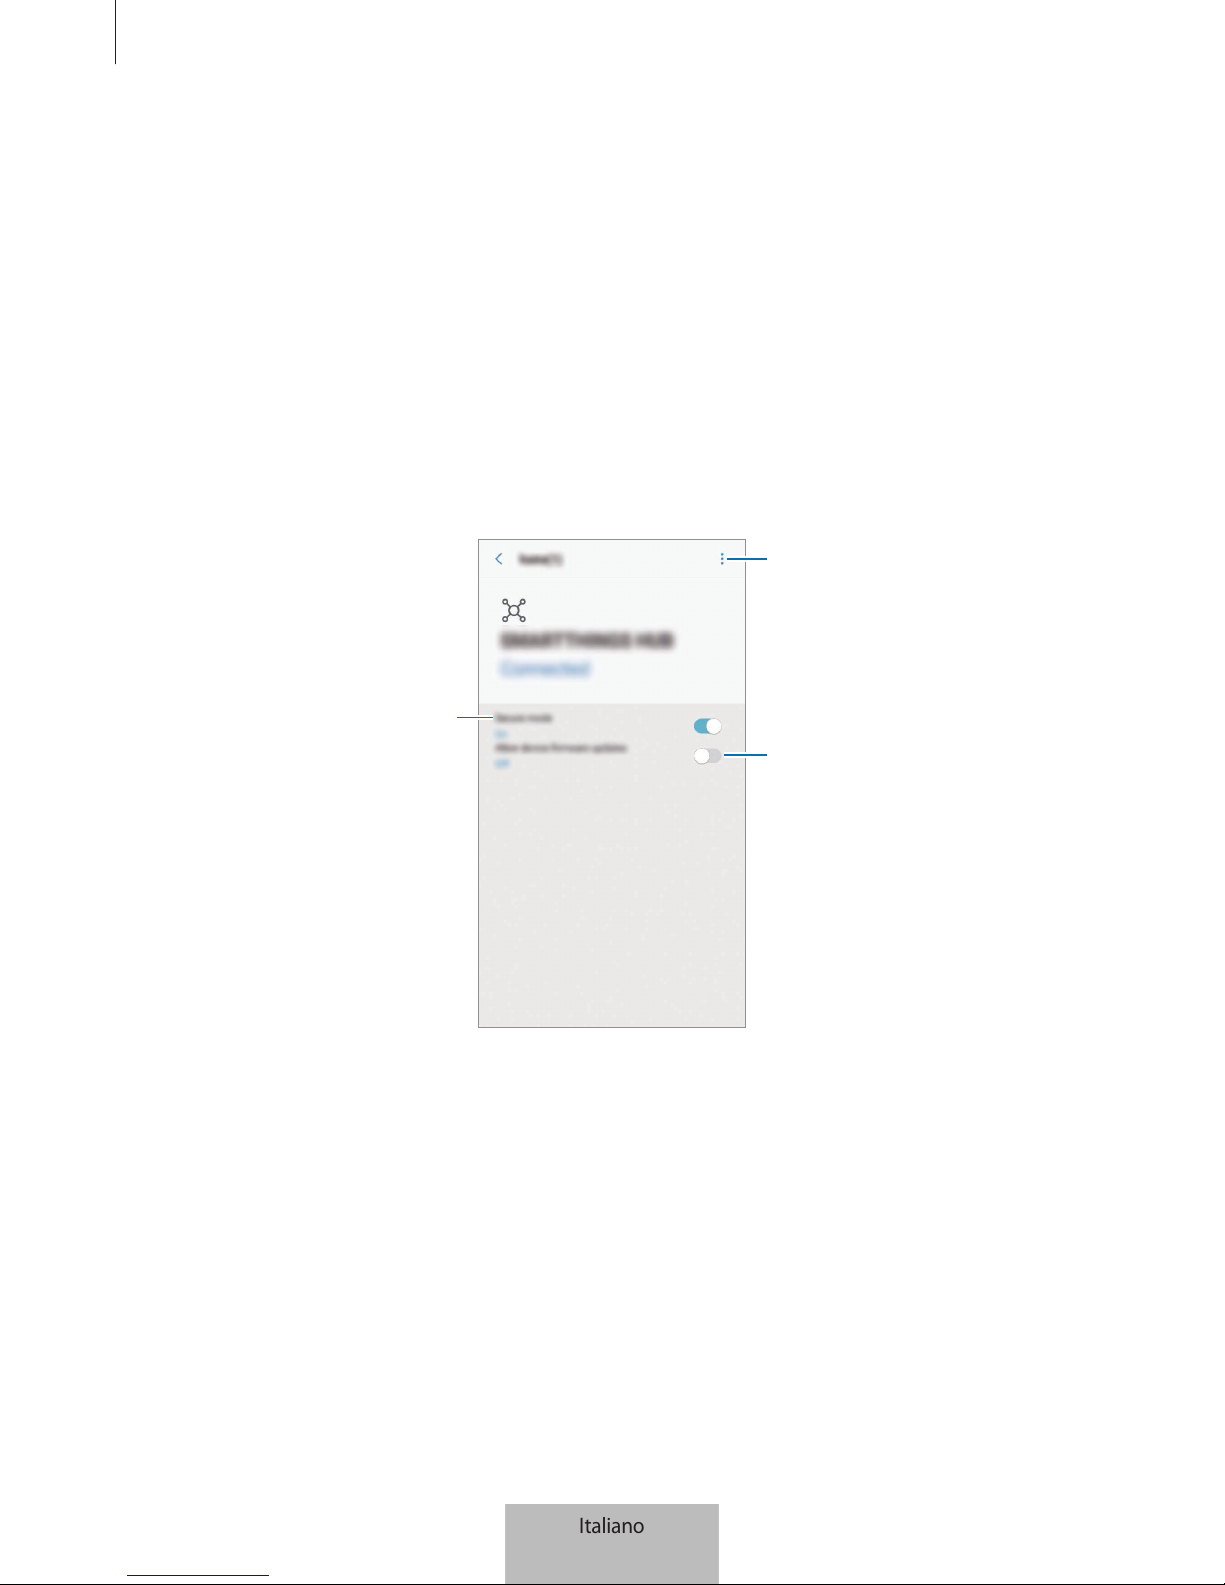
Configurazione della funzionalità Samsung Hub
SmartThings
Potete configurare in dettaglio le impostazioni della funzionalità Samsung Hub SmartThings del Wifi/
Hub SmartThings.
1
Nella schermata SmartThings, toccate
Dispositivi
.
2
Nell'elenco dei dispositivi registrati, toccate l'hub SmartThings.
3
Selezionate un'opzione e configurate la funzionalità Samsung Hub SmartThings.
Consente di impedire o meno la
riconnessione automatica dei
dispositivi Zigbee.
Consente di visualizzare le
informazioni sull'hub SmartThings
o di escludere i dispositivi Z-wave.
Consente di impostare se
consentire gli aggiornamenti
automatici del firmware.
Italiano
13
Italiano
13
Page 72
14
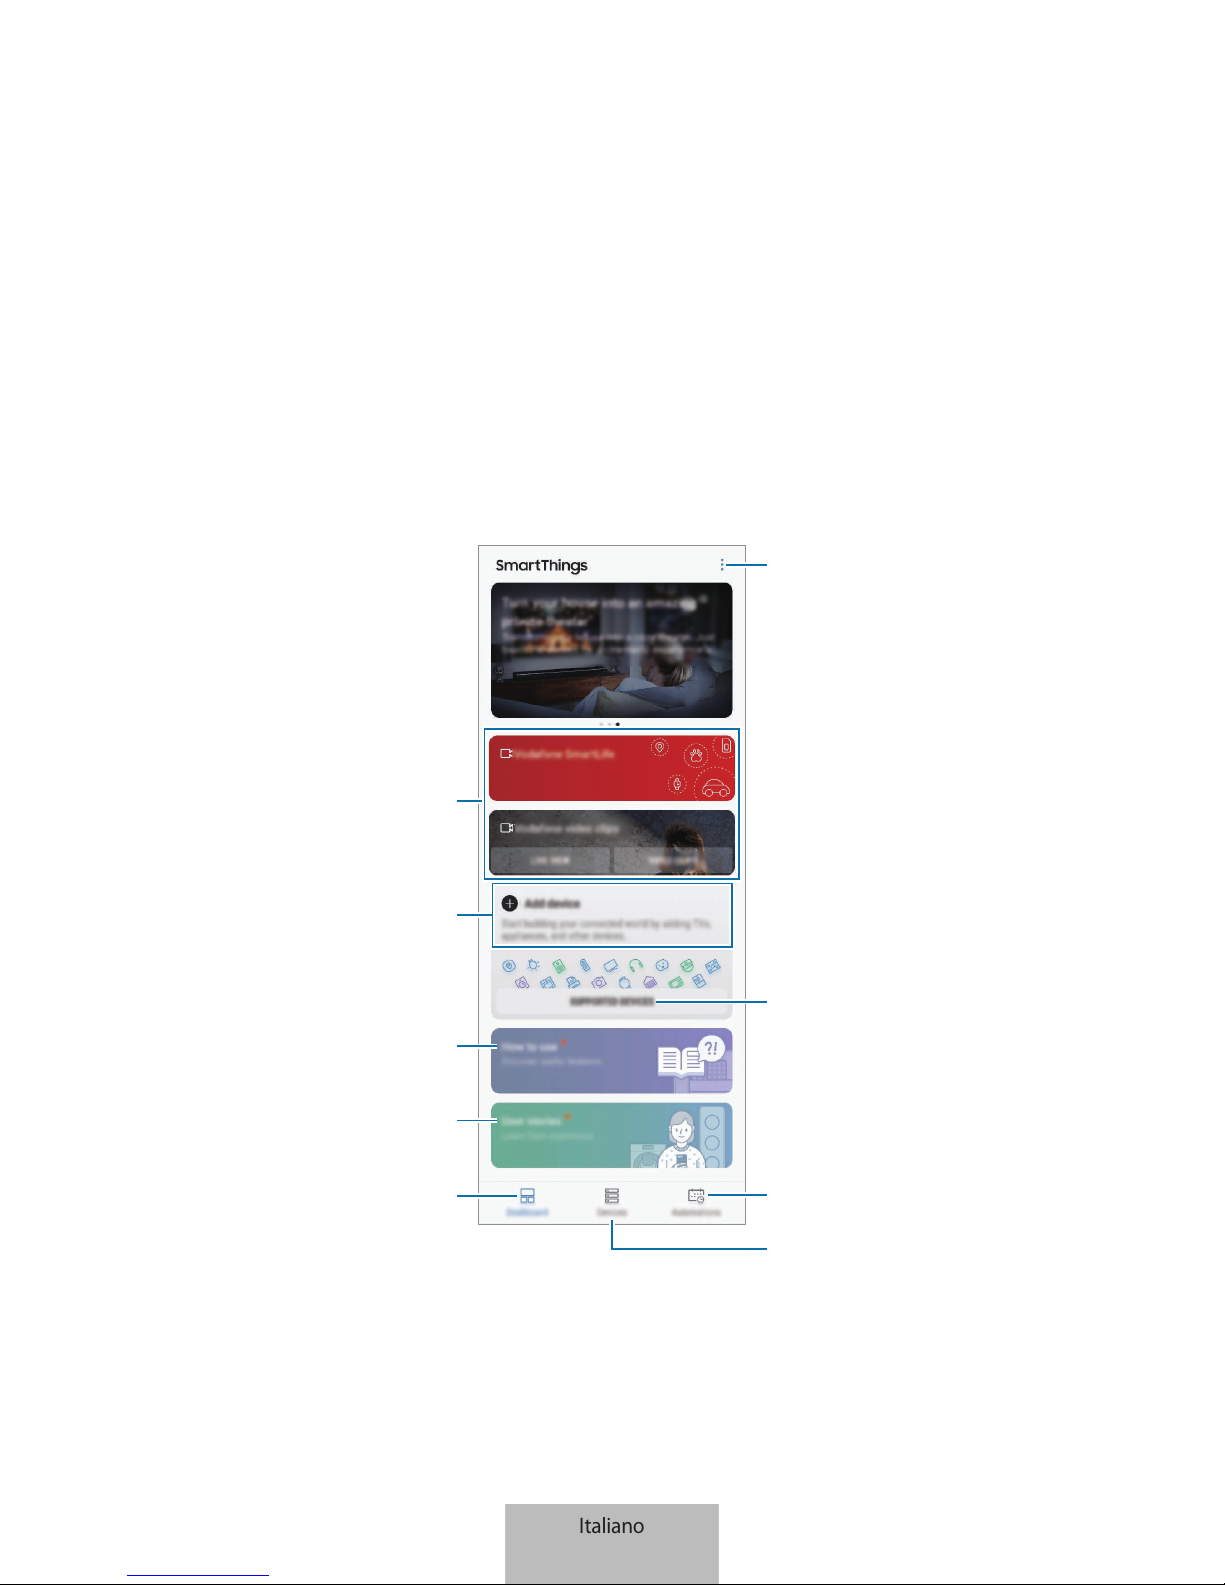
Applicazione SmartThings
Introduzione
Registrate dispositivi Internet delle cose (IoT) ed elettrodomestici intelligenti all'applicazione
SmartThings del dispositivo mobile, verificatene lo stato e controllateli. Per controllare i dispositivi
in base al luogo, a casa o in ufficio, create un luogo e assegnate a questo i dispositivi registrati.
Inoltre, potete impostare una scena per controllare molti dispositivi contemporaneamente oppure
impostare un'automazione per eseguire delle azioni automaticamente ad una data ora.
Consente di accedere alle opzioni
aggiuntive.
Suggerimenti SmartThings
Storie degli utenti
Pannello di controllo
Dispositivi supportati
Consente di cercare e registrare i
dispositivi nelle vicinanze.
Consente di gestire i luoghi e i
dispositivi.
Consente di gestire le automazioni.
Applicazioni Vodafone
Italiano
14
Italiano
14
Page 73

Applicazione SmartThings
15
Configurazione del pannello di controllo e dell'applicazione SmartThings
Configurate le impostazioni del pannello di controllo e dell'applicazione SmartThings. Sul pannello
di controllo, toccate
e utilizzate le seguenti opzioni.
•
Gestisci dashboard
: consente di impostare gli elementi da mostrare sul pannello di controllo.
•
Notifiche
: consente di visualizzare le notifiche dall'applicazione SmartThings. Inoltre, potete
modificare le impostazioni delle notifiche.
•
Impostazioni
: consente di accedere alle informazioni relative all'applicazione SmartThings e
alle informazioni dell'account Samsung. Inoltre, potete impostare la visualizzazione della pagina
SmartThings sul pannello delle notifiche.
•
Avvisi
: consente di visualizzare gli avvisi ricevuti dal servizio SmartThings.
•
Contattateci
: consente di fare domande oppure di consultare le domande frequenti.
Registrazione dei dispositivi
Registrazione di elettrodomestici intelligenti tramite Wi-Fi
Registrate gli elettrodomestici intelligenti che supportano il Wi-Fi all'applicazione SmartThings
e controllateli. Per conoscere le istruzioni di registrazione dei dispositivi, consultate i manuali
dell'utente degli altri dispositivi.
•
Per visualizzare i dispositivi supportati, toccate
DISPOSITIVI SUPPORTATI
sul pannello di
controllo.
•
Errori o difetti propri dei dispositivi connessi non sono coperti dalla garanzia Samsung. Se
i dispositivi connessi presentano errori o difetti, contattate il produttore del dispositivo.
Italiano
15
Italiano
15
Page 74

Applicazione SmartThings
16
Registrazione di dispositivi IoT tramite Samsung SmartThings Hub
Registrate i dispositivi IoT (Internet delle cose) che supportano Z-Wave, zigbee, LAN, o Cloud-toCloud sull'applicazione SmartThings per controllarli.
1
Sul pannello di controllo, toccate
Aggiungi dispositivo
.
2
Toccate sotto
AGGIUNGI DISPOSITIVO MANUALMENTE
.
3
Selezionate la categoria del dispositivo da registrare.
In alternativa, inserite il nome del dispositivo nel campo di ricerca e toccate
AGGIUNGI
in
corrispondenza del vostro dispositivo.
4
Seguite le istruzioni visualizzate per completare la registrazione.
•
La disponibilità di Samsung SmartThings Hub potrebbe variare in base al Paese. Per i
dettagli, visitate il sito www.samsung.com.
•
Potete registrare solo i dispositivi IoT approvati da Samsung. Visitate il sito
www.samsung.com per consultare un elenco dei dispositivi compatibili.
•
Consultate i manuali dell'utente degli altri dispositivi per conoscere le istruzioni su come
effettuare gli abbinamenti.
Italiano
16
Italiano
16
Page 75

Applicazione SmartThings
17
Controllo dei dispositivi registrati
Nella schermata SmartThings, toccate
Dispositivi
.
Nell'elenco dei dispositivi registrati, toccate un dispositivo.
Viene scaricato il controller per il dispositivo.
Il controller scaricato vi permette di controllare in remoto i dispositivi registrati tramite l'applicazione
SmartThings.
Creazione dei luoghi
Potete registrare i dispositivi in base al luogo e gestirli.
1
Nella schermata SmartThings, toccate
Dispositivi
.
2
Toccate
TUTTI I DISPOSITIVI
→
Aggiungi posizione
.
3
Inserite il nome del luogo e selezionate un'icona da associare.
4
Toccate
Posizione geografica
per selezionare un luogo sulla mappa e toccate
FATTO
.
5
Toccate
SALVA
.
Il luogo verrà aggiunto.
6
Toccate
AGG. DISP.
per registrare i dispositivi.
Per gestire un luogo, stanza per stanza, toccate
→
Aggiungi stanza
, quindi impostate la stanza e i
dispositivi ad essa associati.
Italiano
17
Italiano
17
Page 76
Applicazione SmartThings
18
Invito di membri nel luogo creato
Invitate altri membri nel luogo creato per controllare i dispositivi e le scene assegnate a quel luogo.
1
Nella schermata SmartThings, toccate
Dispositivi
.
2
Toccate
TUTTI I DISPOSITIVI
e scorrete in alto o in basso per selezionare un luogo.
3
Toccate →
Invita membro
.
4
Toccate
Inserisci ID Samsung account
, inserite l'account Samsung della persona da invitare,
quindi toccate
.
Potete invitare gli utenti facendo la scansione del codice QR. Toccate
CREA CODICE QR
e invitate
gli altri utenti a farne la scansione.
•
Potete invitare gli utenti ad accedere all'account Samsung solo tramite l'applicazione
SmartThings.
•
Per accettare l'invito, nella schermata SmartThings, toccate il pop-up dell'invito e toccate
ACCETTA
. Per accettare l'invito eseguendo la scansione del codice QR, sul pannello di
controllo, toccate
→
Impostazioni
→
Accetta invito (codice QR)
, quindi eseguite la
scansione del codice QR.
5
Seguite le istruzioni visualizzate per completare l'invito.
Italiano
18
Italiano
18
Page 77
Applicazione SmartThings
19
Impostazione ed esecuzione delle scene
Impostate una scena per gestire più dispositivi alla volta. Per impostare una scena, è necessario
creare dei luoghi. Fate riferimento a Creazione dei luoghi per maggiori informazioni.
1
Nella schermata SmartThings, toccate
Dispositivi
.
2
Toccate
TUTTI I DISPOSITIVI
e scorrete in alto o in basso per selezionare un luogo.
3
Toccate →
Aggiungi scena
.
Compare la schermata di impostazione delle scene.
4
Inserite un titolo per la scena, selezionate un'icona, quindi toccate
AGGIUNGI AZIONI
.
Italiano
19
Italiano
19
Page 78
Applicazione SmartThings
20
5
Selezionate un dispositivo e un'azione da eseguire, quindi toccate
FATTO
.
Ad esempio, selezionate un TV e un robot aspirapolvere e le rispettive azioni da eseguire.
6
Toccate il cursore
Collegamento sul dashboard
per visualizzare la scena sul pannello di
controllo.
7
Toccate
SALVA
.
La scena è stata impostata. Potete visualizzare la scena impostata sulla schermata dei luoghi
dedicata.
Italiano
20
Italiano
20
Page 79
Applicazione SmartThings
21
Attivazione delle scene
1
Nella schermata SmartThings, toccate
Dispositivi
.
2
Toccate
TUTTI I DISPOSITIVI
e scorrete in alto o in basso per selezionare il luogo con la scena da
attivare.
3
Selezionate una scena da attivare.
I dispositivi impostati funzioneranno in base alla scena.
Scene impostate
Italiano
21
Italiano
21
Page 80
Applicazione SmartThings
22
Gestione di dispositivi e luoghi
Potete gestire un luogo insieme alle scene e ai dispositivi relativi.
1
Nella schermata SmartThings, toccate
Dispositivi
.
2
Toccate
TUTTI I DISPOSITIVI
e scorrete in alto o in basso per selezionare un luogo.
3
Toccate →
Modifica
e utilizzate le seguenti opzioni.
•
Nome posizione
: consente di modificare il nome e l'icona del luogo.
•
Posizione geografica
: consente di visualizzare o modificare il luogo sulla mappa.
•
Mostra riepilogo posiz. su dashboard
: consente di mostrare la scheda del luogo sul
pannello di controllo.
•
SCENE
: consente di cambiare le informazioni relative alla scena oppure di eliminare la scena.
•
DISPOSITIVI
: consente di modificare le informazioni sul dispositivo oppure di eliminare il
dispositivo dal luogo assegnato.
•
MEMBRI
: consente di visualizzare i membri per condividere il luogo. Inoltre, potete invitarne
altri.
•
RIMUOVI POSIZIONE
: consente di eliminare il luogo.
•
Per connettere un dispositivo Z-Wave a un altro dispositivo, rimuovete il dispositivo
dall'applicazione SmartThings per escluderlo. Quando rimuovete il dispositivo
dall'applicazione SmartThings, le istruzioni per l'esclusione vengono fornite tramite
URL. Seguite le istruzioni per escludere il dispositivo Z-Wave. Se resettate il Wifi/Hub
SmartThings, è necessario escludere il dispositivo Z-Wave e riconnetterlo (includerlo
nuovamente). Per le istruzioni su come escludere i dispositivi Z-Wave, fate riferimento al
manuale dell'utente relativo al dispositivo Z-Wave oppure contattate il produttore del
dispositivo.
•
Per maggiori funzioni utility della rete Z-Wave, visitate www.smartthings.com.
•
Dopo aver aggiunto un dispositivo che supporta l'Associazione, il Wifi/Hub SmartThings
invia automaticamente un Set di associazione per Lifeline/gruppo1 per 4 nodi.
Italiano
22
Italiano
22
Page 81
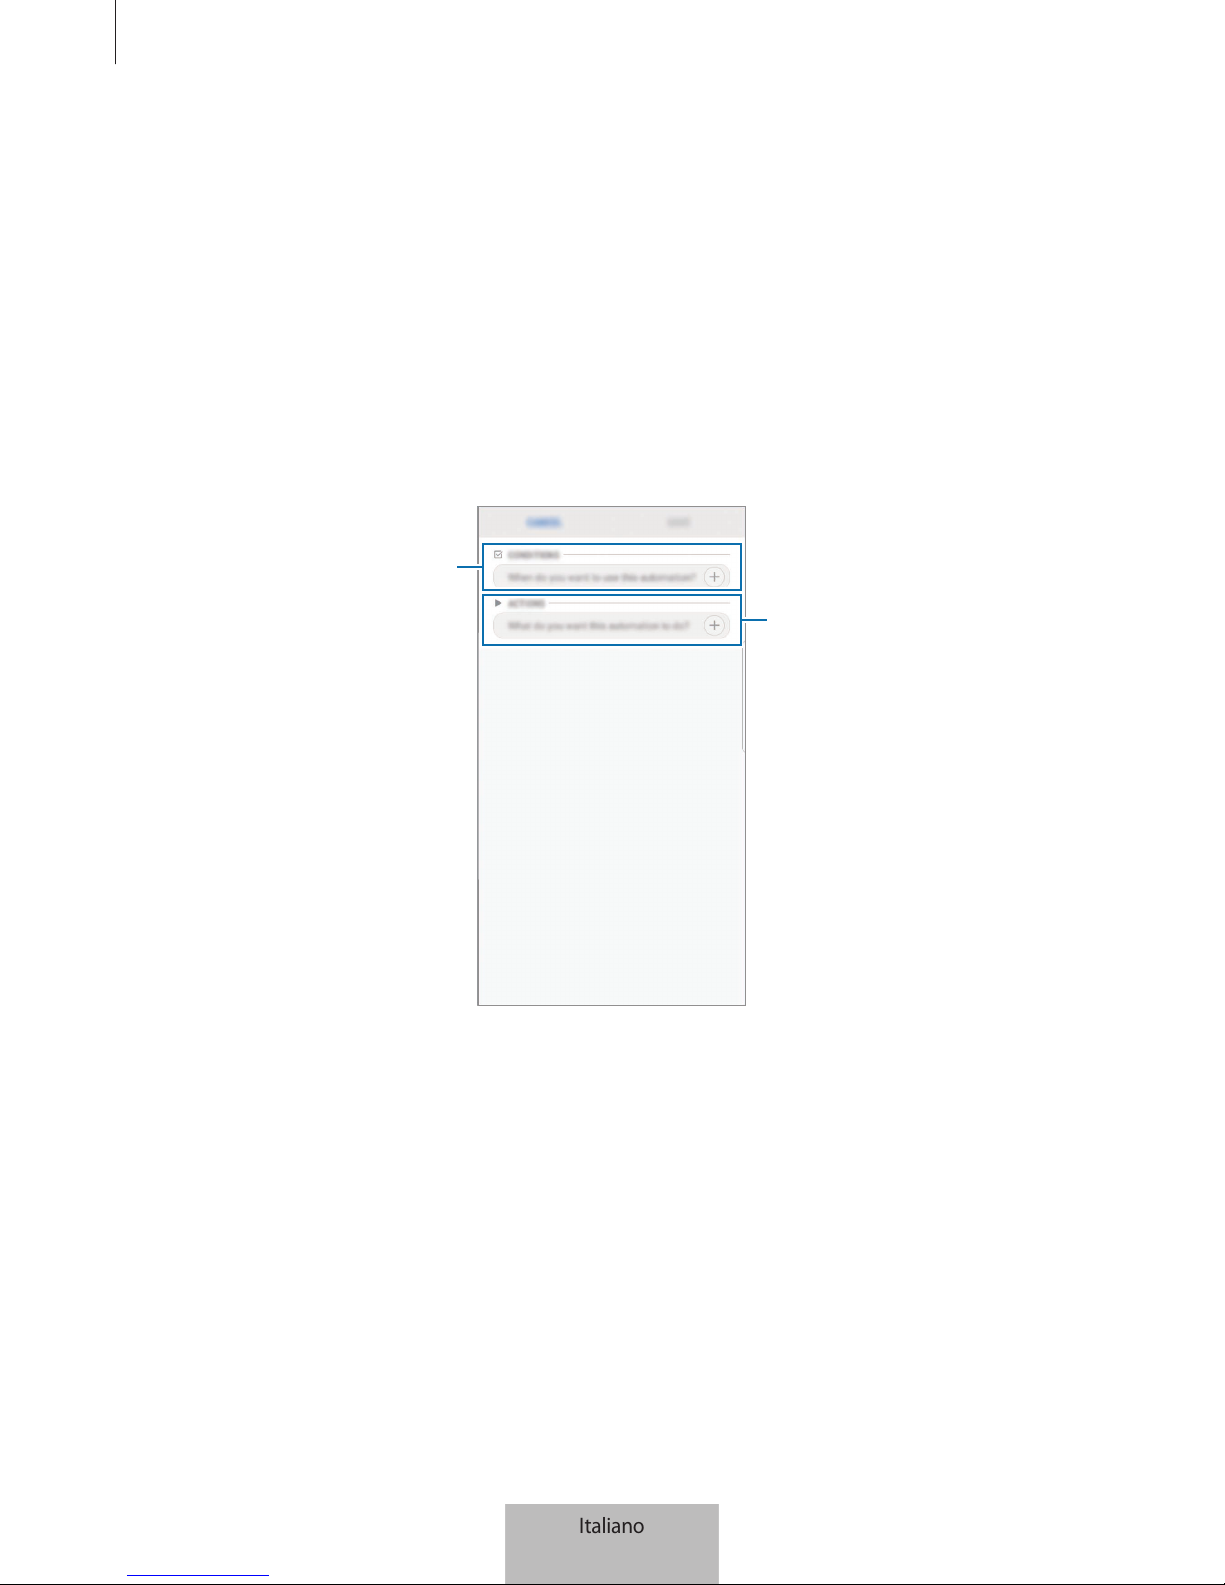
Applicazione SmartThings
23
Impostazione delle automazioni
Impostate un'automazione per i dispositivi assegnati ad un luogo per eseguire automaticamente
delle azioni a una data ora.
1
Nella schermata SmartThings, toccate
Automazioni
.
2
Toccate
AGGIUNGI AUTOMAZIONE
.
Se è già stata impostata un'automazione, toccate
AGGIUNGI
.
Compare la schermata di impostazione delle automazioni.
Consente di impostare le
condizioni.
Consente di impostare i dispositivi e
le azioni.
3
Toccate
Quando volete utilizzare questa automazione?
4
Toccate
Basata sull'ora del giorno
e impostate i giorni e l'ora.
In alternativa, toccate
In base a stato del disp.
per impostare la condizione del dispositivo.
5
Toccate
FATTO
.
Italiano
23
Italiano
23
Page 82
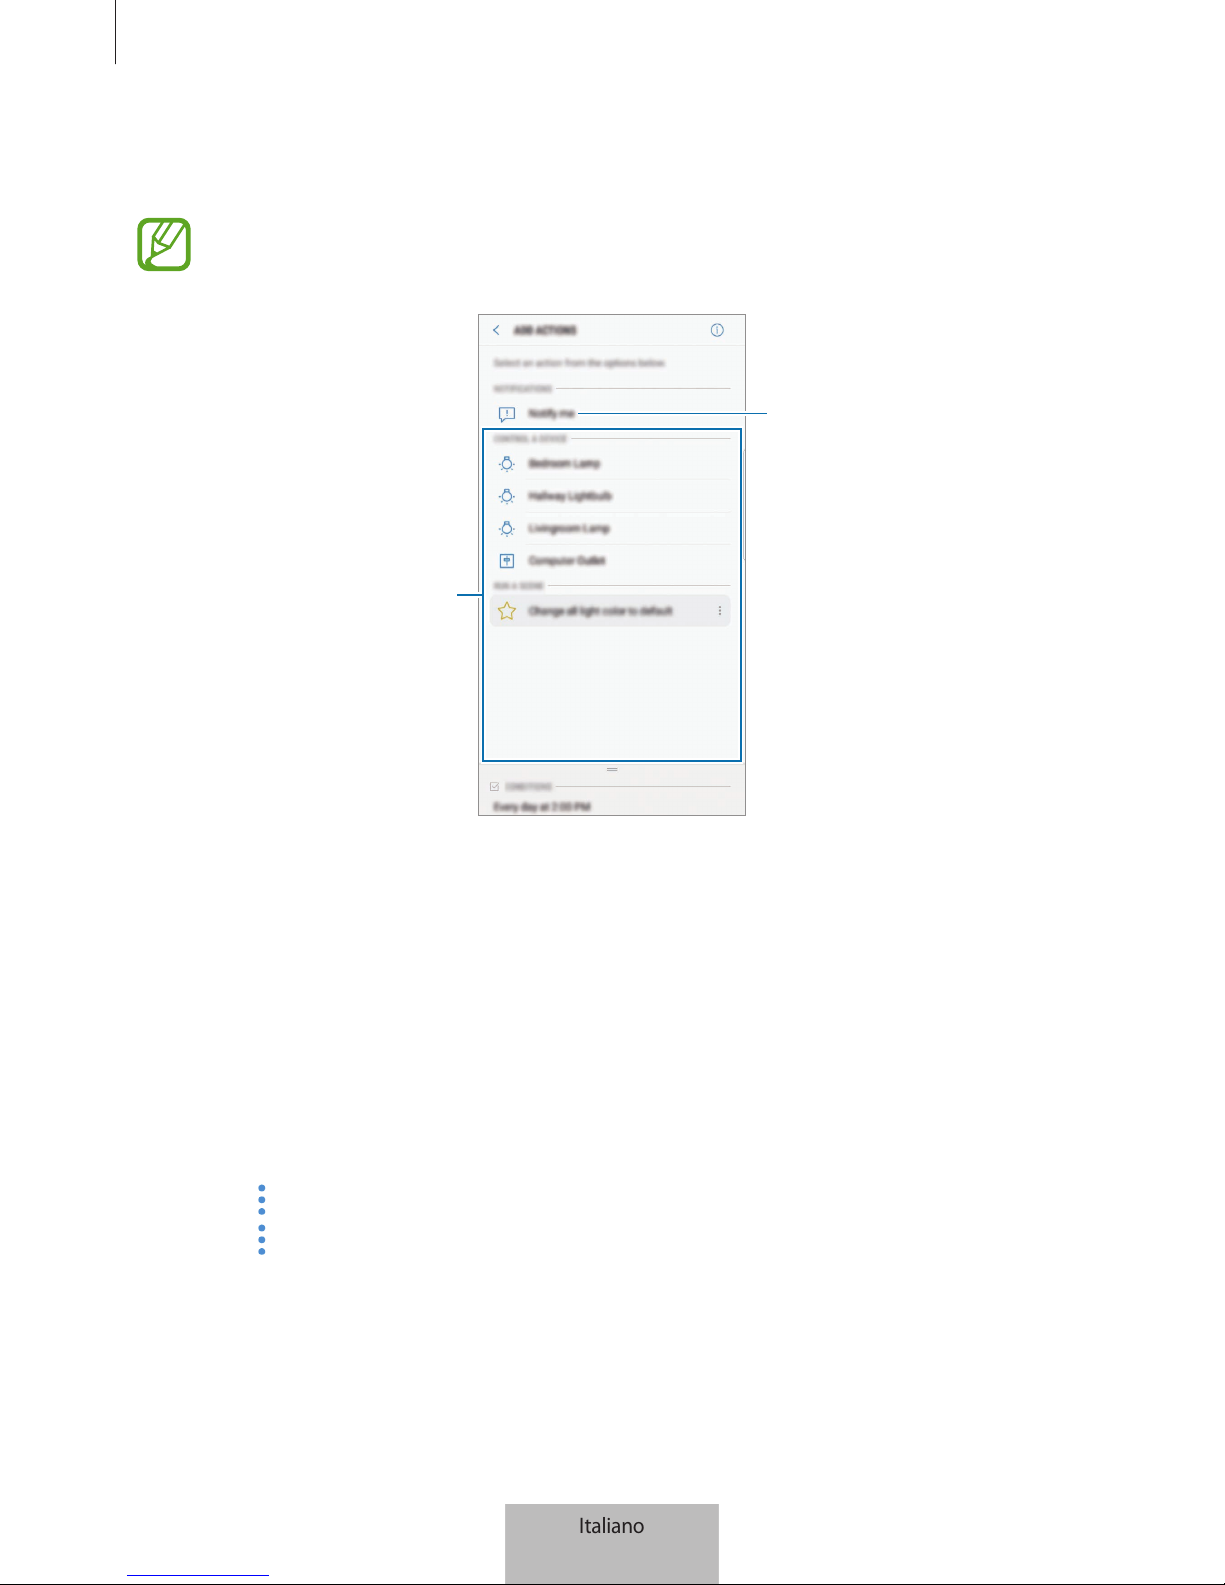
Applicazione SmartThings
24
6
Toccate
Quali azioni volete assegnare a questa automazione?
, selezionate i dispositivi e le
condizioni, oppure le scene, quindi toccate
FATTO
.
Per ricevere una notifica quando il dispositivo esegue un'azione in base all'automazione,
toccate
Avvisami
e inserite un messaggio.
Consente di selezionare un
dispositivo o una scena.
Consente di inserire un messaggio
di notifica.
7
Toccate
SALVA
.
Il dispositivo assegnato esegue l'azione in base all'automazione impostata.
Gestione delle automazioni
Potete visualizzare le automazioni impostate e gestirle.
Nella schermata SmartThings, toccate
Automazioni
.
•
Toccate il cursore accanto all'automazione per attivarla o disattivarla.
•
Toccate l'automazione per modificarne i dettagli.
•
Toccate →
Modifica nome
per cambiare il nome dell'automazione.
•
Toccate →
Elimina
per eliminare l'automazione.
Italiano
24
Italiano
24
Page 83

Applicazione SmartThings
25
Uso pratico dell'applicazione SmartThings
Utilizzate l'applicazione SmartThings per rendervi la vita più semplice e agevole. Create delle
automazioni in base alle vostre abitudini, oppure controllate facilmente i dispositivi registrati
ovunque vi troviate.
•
Se volete assicurarvi che l'ufficio sia fresco in una calda giornata d'estate, attivate il
condizionatore d'aria connesso tramite l'applicazione SmartThings prima del vostro arrivo.
•
Se desiderate che la casa sia pulita al vostro ritorno, attivate il robot aspirapolvere connesso
tramite l'applicazione SmartThings prima di arrivare a casa.
•
Se volete aumentare la sicurezza della vostra casa, create un'automazione per far funzionare
i sensori di movimento quando andate a dormire e attivate le notifiche. Quando i sensori di
movimento rilevano movimenti inaspettati, vi inviano una notifica.
Per consultare altri esempi di utilizzo, toccate
Storie utente
sul pannello di controllo.
Italiano
25
Italiano
25
Page 84

26
Appendice
Risoluzione dei problemi
Prima di rivolgervi ad un centro di assistenza Samsung, provate le seguenti soluzioni.
Il vostro Wifi/Hub SmartThings si blocca
Se il Wifi/Hub SmartThings si blocca o non risponde, scollegate l'alimentatore dal Wifi/Hub
SmartThings e ricollegatelo.
Chiudete completamente l'applicazione SmartThings sul vostro dispositivo mobile e riavviatela.
Se il Wifi/Hub SmartThings è bloccato e non risponde, inserite una graffetta nel foro di ripristino per
più di 8 secondi.
Se i suggerimenti sopra indicati non risultassero utili per la risoluzione del problema, contattate un
centro assistenza Samsung.
Il Wifi/Hub SmartThings non è connesso a un router
Il Wifi/Hub SmartThings supporta solo il Wifi/Hub SmartThings. Connettete solo il Wifi/Hub
SmartThings.
Il Wifi/Hub SmartThings non viene rilevato dall'applicazione
SmartThings
•
Se il Wifi/Hub SmartThings si blocca o non risponde, scollegate l'alimentatore dal Wifi/Hub
SmartThings e ricollegatelo.
•
Chiudete completamente l'applicazione SmartThings sul vostro dispositivo mobile e riavviatela.
•
Se il Wifi/Hub SmartThings è bloccato e non risponde, inserite una graffetta nel foro di ripristino.
•
Assicuratevi che gli altri dispositivi si trovino entro il raggio di connessione massimo.
Se i suggerimenti sopra indicati non risultassero utili per la risoluzione del problema, contattate un
centro assistenza Samsung.
Italiano
26
Italiano
26
Page 85

Appendice
27
Impossibile connettere altri dispositivi all'applicazione SmartThings
•
Sull'altro dispositivo, disconnettetevi dalla rete Wi-Fi e riconnettetevi ad essa.
•
Spegnete e riaccendete il dispositivo.
La connessione si interrompe spesso
•
Se ci fossero degli ostacoli tra i dispositivi, la distanza di funzionamento potrebbe ridursi.
•
Assicuratevi che gli altri dispositivi si trovino entro il raggio di connessione massimo.
•
Quando utilizzate il Wifi/Hub SmartThings con altri dispositivi, la connessione potrebbe essere
disturbata da onde elettromagnetiche. Utilizzate il Wifi/Hub SmartThings in ambienti con una
minore presenza di dispositivi wireless.
Il funzionamento del Wifi/Hub SmartThings è diverso da quello
descritto nel manuale
Le funzioni disponibili potrebbero variare in base al dispositivo connesso.
Italiano
27
Italiano
27
Page 86

Il dispositivo e gli accessori illustrati in questo manuale potrebbero variare in base al Paese nel quale
i prodotti vengono distribuiti.
Copyright
Copyright © 2018 Samsung Electronics
Questo manuale è protetto dalle leggi internazionali sul copyright.
Nessuna parte di questo manuale può essere riprodotta, distribuita, tradotta o trasmessa in
alcuna forma o tramite alcun mezzo, elettronico o meccanico, compresi fotocopie, registrazione o
salvataggio in qualsiasi archivio di informazioni o sistema di recupero, senza previa autorizzazione
scritta da parte di Samsung Electronics.
Marchi commerciali
•
SAMSUNG e il logo SAMSUNG sono marchi commerciali registrati di Samsung Electronics.
•
Bluetooth® è un marchio commerciale registrato in tutto il mondo di Bluetooth SIG, Inc.
•
Wi-Fi®, Wi-Fi CERTIFIED™ e il logo Wi-Fi sono marchi commerciali registrati di Wi-Fi Alliance.
•
Z-Wave e Z-Wave Plus sono marchi commerciali registrati di Sigma Designs e delle sue affiliate
negli Stati Uniti e in altri Paesi.
•
Tutti gli altri marchi commerciali e copyright sono proprietà dei rispettivi proprietari.
Italiano
28
Italiano
28
Page 87
1
Primeros pasos
Antes de empezar
Lea este manual antes de usar el dispositivo para garantizar un uso correcto y seguro.
•
Parte del contenido puede ser distinto de su dispositivo en función de la versión de software
del dispositivo, la versión de la aplicación o las especificaciones del modelo. El contenido se
encuentra sujeto a cambios sin previo aviso.
•
Antes de usar el Wifi/Hub SmartThings, asegúrese de que sea compatible con su dispositivo.
•
El rendimiento del Wifi/Hub SmartThings puede variar en función del entorno.
•
Este producto incluye software de código abierto/gratuito. Si desea consultar las
instrucciones sobre cómo ver la licencia de código abierto, diríjase al sitio web de Samsung
(opensource.samsung.com).
Iconos instructivos
Advertencia: situaciones que podrían producirle lesiones a usted o a otras personas.
Precaución: situaciones que podrían causar daños a su dispositivo o a otros equipos.
Aviso: notas, consejos de uso o información adicional.
Español
1
Español
1
Page 88
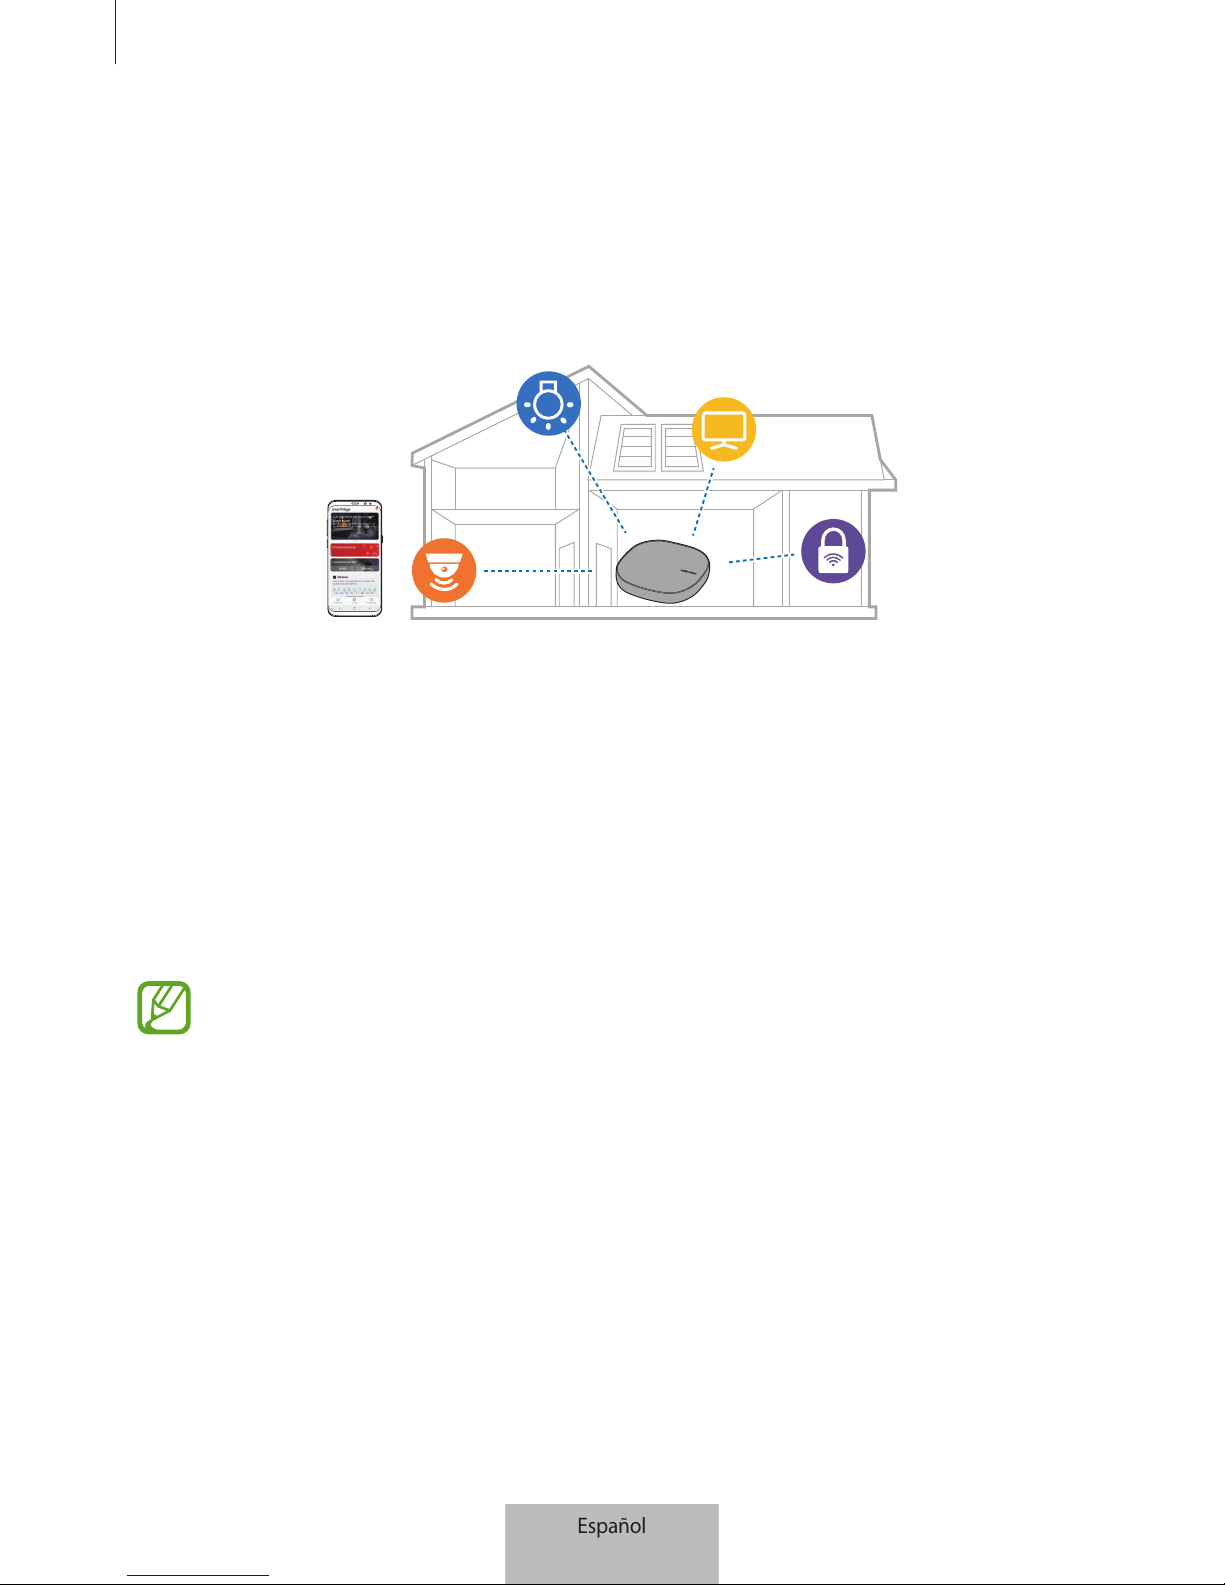
Primeros pasos
2
Acerca del Wifi/Hub SmartThings
El Wifi/Hub SmartThings es un router Wi-Fi capaz de conectar su smartphone a dispositivos
domésticos inteligentes mediante Wi-Fi. También puede conectar dispositivos del Internet de las
cosas (IoT) a este Wifi/Hub SmartThings mediante la función Hub Samsung SmartThings.
Si su casa es grande, puede conectar más Wifi/Hubs SmartThings.
Contenido de la caja
Compruebe que la caja del producto contiene los siguientes artículos:
•
SmartThings Wifi/Hub
•
Cable Ethernet
•
Adaptador de CA/CC (en lo sucesivo “adaptador”)
•
Guía de inicio rápido
•
Es posible que los artículos incluidos con el dispositivo y los accesorios disponibles varíen
dependiendo de la región o el proveedor de servicios.
•
Los artículos incluidos están diseñados solo para este dispositivo y es posible que no sean
compatibles con otros.
•
La apariencia y las especificaciones están sujetas a cambios sin previo aviso.
•
Puede adquirir accesorios adicionales en su distribuidor local de Samsung. Asegúrese de
que sean compatibles con el dispositivo antes de comprarlos.
•
Utilice únicamente accesorios aprobados por Samsung. De lo contrario, podría causar
problemas de rendimiento y fallos de funcionamiento que no están cubiertos por la
garantía.
•
La disponibilidad de todos los accesorios se encuentra sujeta a cambios y depende
enteramente de los fabricantes. Para obtener más información sobre los accesorios
disponibles, consulte el sitio web de Samsung.
Español
2
Español
2
Page 89
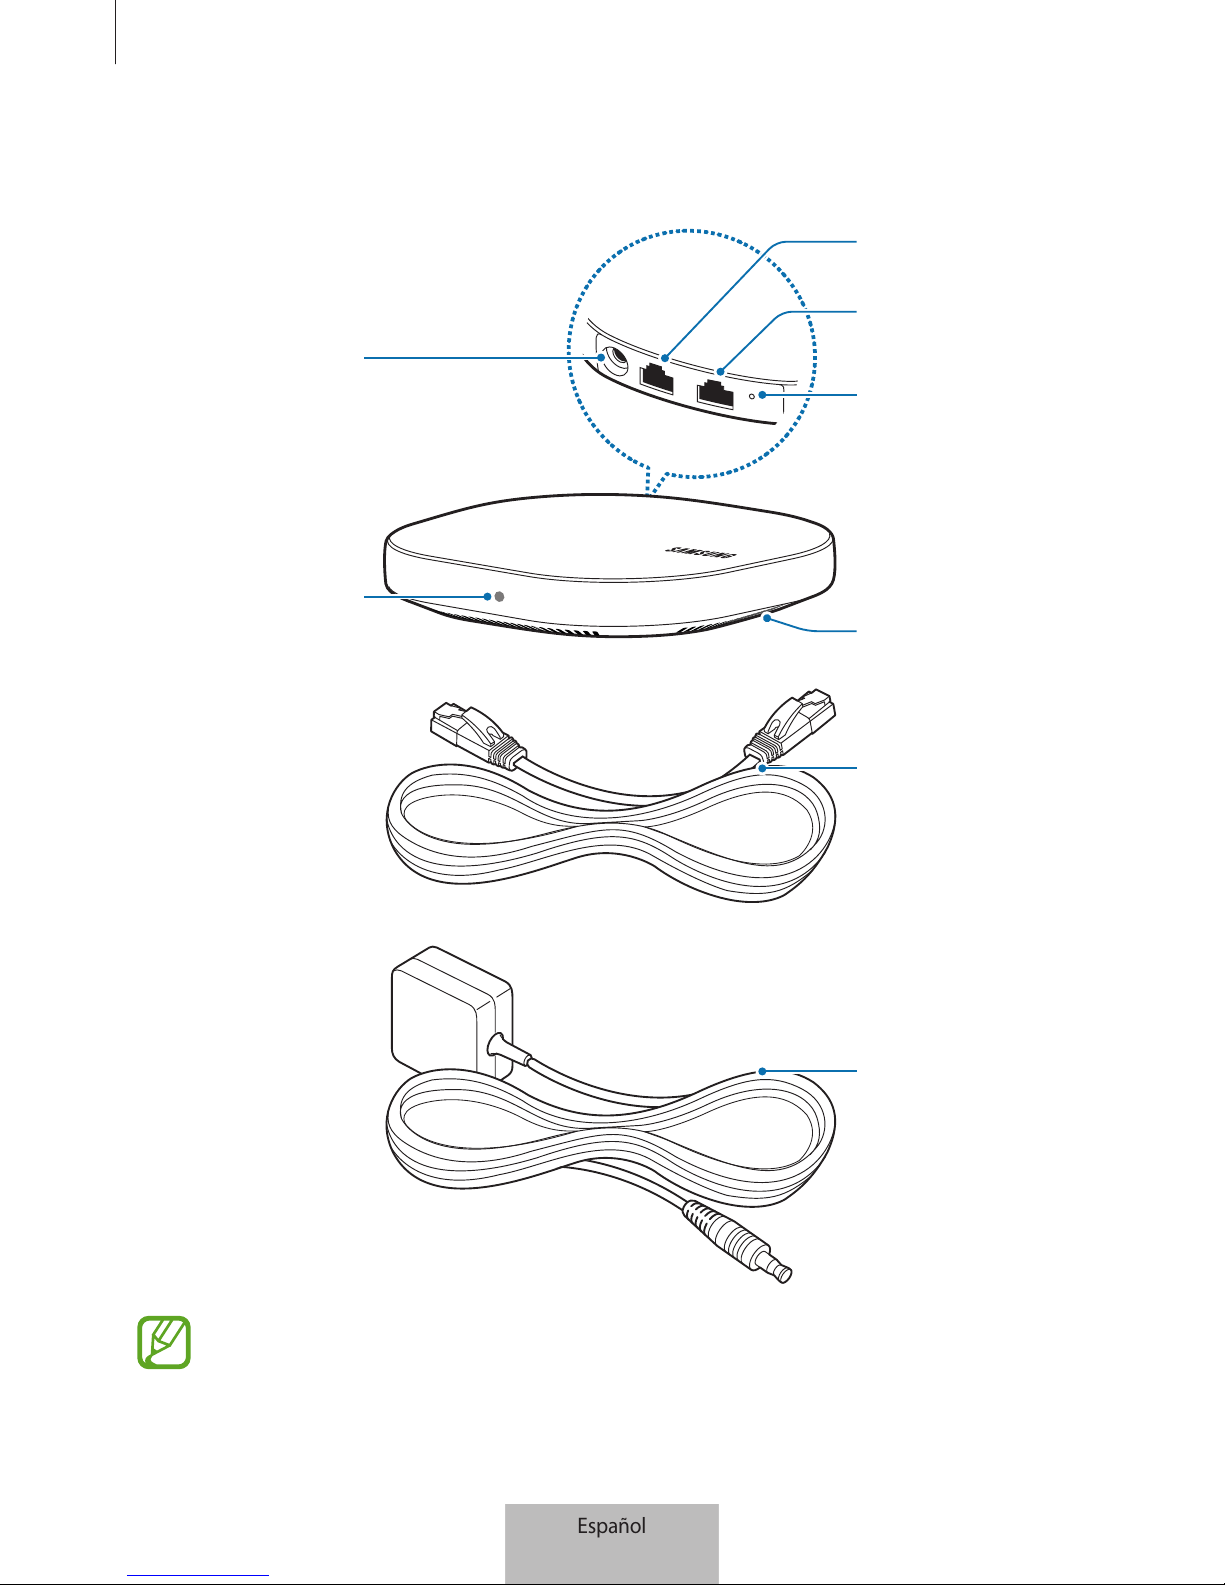
Primeros pasos
3
Diseño del dispositivo
Conector del adaptador
de CA/CC
Puerto WAN (ENTRADA)
Puerto LAN (SALIDA)
Orificio de reinicio
Ranuras de ventilación
Luz indicadora
Cable Ethernet
Adaptador de CA/CC
El aspecto y la estructura interna del producto pueden variar en función del modelo.
Español
3
Español
3
Page 90
Primeros pasos
4
Luz indicadora
La luz indicadora le informa del estado del Wifi/Hub SmartThings.
Color Estado
Verde Encendido, operativo
Parpadea en verde Iniciando o restableciendo el sistema
Parpadea en verde y rojo A la espera de dispositivos para conectarse
Parpadea en rojo Error de funcionamiento
Consumo eléctrico
•
Consumo eléctrico total en estado de espera (con todos los puertos de red activos): 4,5W
Español
4
Español
4
Page 91

5
Utilizar el Wifi/Hub SmartThings
Conectarlo a un dispositivo móvil
Para conectar el Wifi/Hub SmartThings a un dispositivo móvil, deberá instalar la aplicación
SmartThings en el dispositivo móvil. Puede descargarla de
Galaxy Apps, Play Store
o
App Store
.
•
Visite www.samsung.com para consultar los dispositivos compatibles con la aplicación
SmartThings.
•
Deberá registrarse e iniciar sesión en su cuenta de Samsung para poder usar la aplicación
SmartThings.
•
Las funciones compatibles pueden variar según el dispositivo móvil y el sistema
operativo.
•
La función Bluetooth del Wifi/Hub SmartThings se activa automáticamente para
establecer una conexión. Cuando la conexión finalice, la función Bluetooth se desactivará
automáticamente.
Español
5
Español
5
Page 92
Utilizar el Wifi/Hub SmartThings
6
Wifi/Hub SmartThings
1
Conecte un extremo del cable Ethernet al puerto WAN (ENTRADA) del hub, y el otro extremo al
puerto LAN del módem.
2
Conecte el adaptador CA/CC al Wifi/Hub SmartThings.
El Wifi/Hub SmartThings se encenderá y la luz indicadora parpadeará en verde.
Utilice únicamente adaptadores aprobados por Samsung (12V/2,1A o superior).
•
Solo podrá utilizar el Wifi/Hub SmartThings cuando lo conecte a un adaptador.
•
Si la temperatura del Wifi/Hub SmartThings supera los 55 °C, el ventilador interno se
activará automáticamente (solo en el caso del ET-WV533).
•
Si el Wifi/Hub SmartThings se sobrecalienta durante un periodo de tiempo prolongado,
podría apagarse o reiniciarse automáticamente. Cuando esto ocurra de forma continua,
desconecte el adaptador del Wifi/Hub SmartThings y póngase en contacto con un
Servicio de Atención Técnica (SAT) de Samsung.
•
Para ahorrar energía, desenchufe el adaptador cuando no lo esté utilizando. El adaptador
no tiene interruptor de encendido, por tanto, para evitar desperdiciar energía, el usuario
debe desenchufar el adaptador de la red cuando no lo esté utilizando. El adaptador debe
permanecer cerca de la toma de corriente eléctrica y poder accederse a él fácilmente
mientras se usa.
Dispositivo móvil
3
Abra la aplicación
SmartThings
en el dispositivo móvil.
4
Siga las instrucciones de la ventana emergente para activar la función de activación automática
de Wi-Fi y Bluetooth.
Cuando abra la aplicación
SmartThings
, las conexiones Wi-Fi y Bluetooth se activarán
automáticamente.
Español
6
Español
6
Page 93
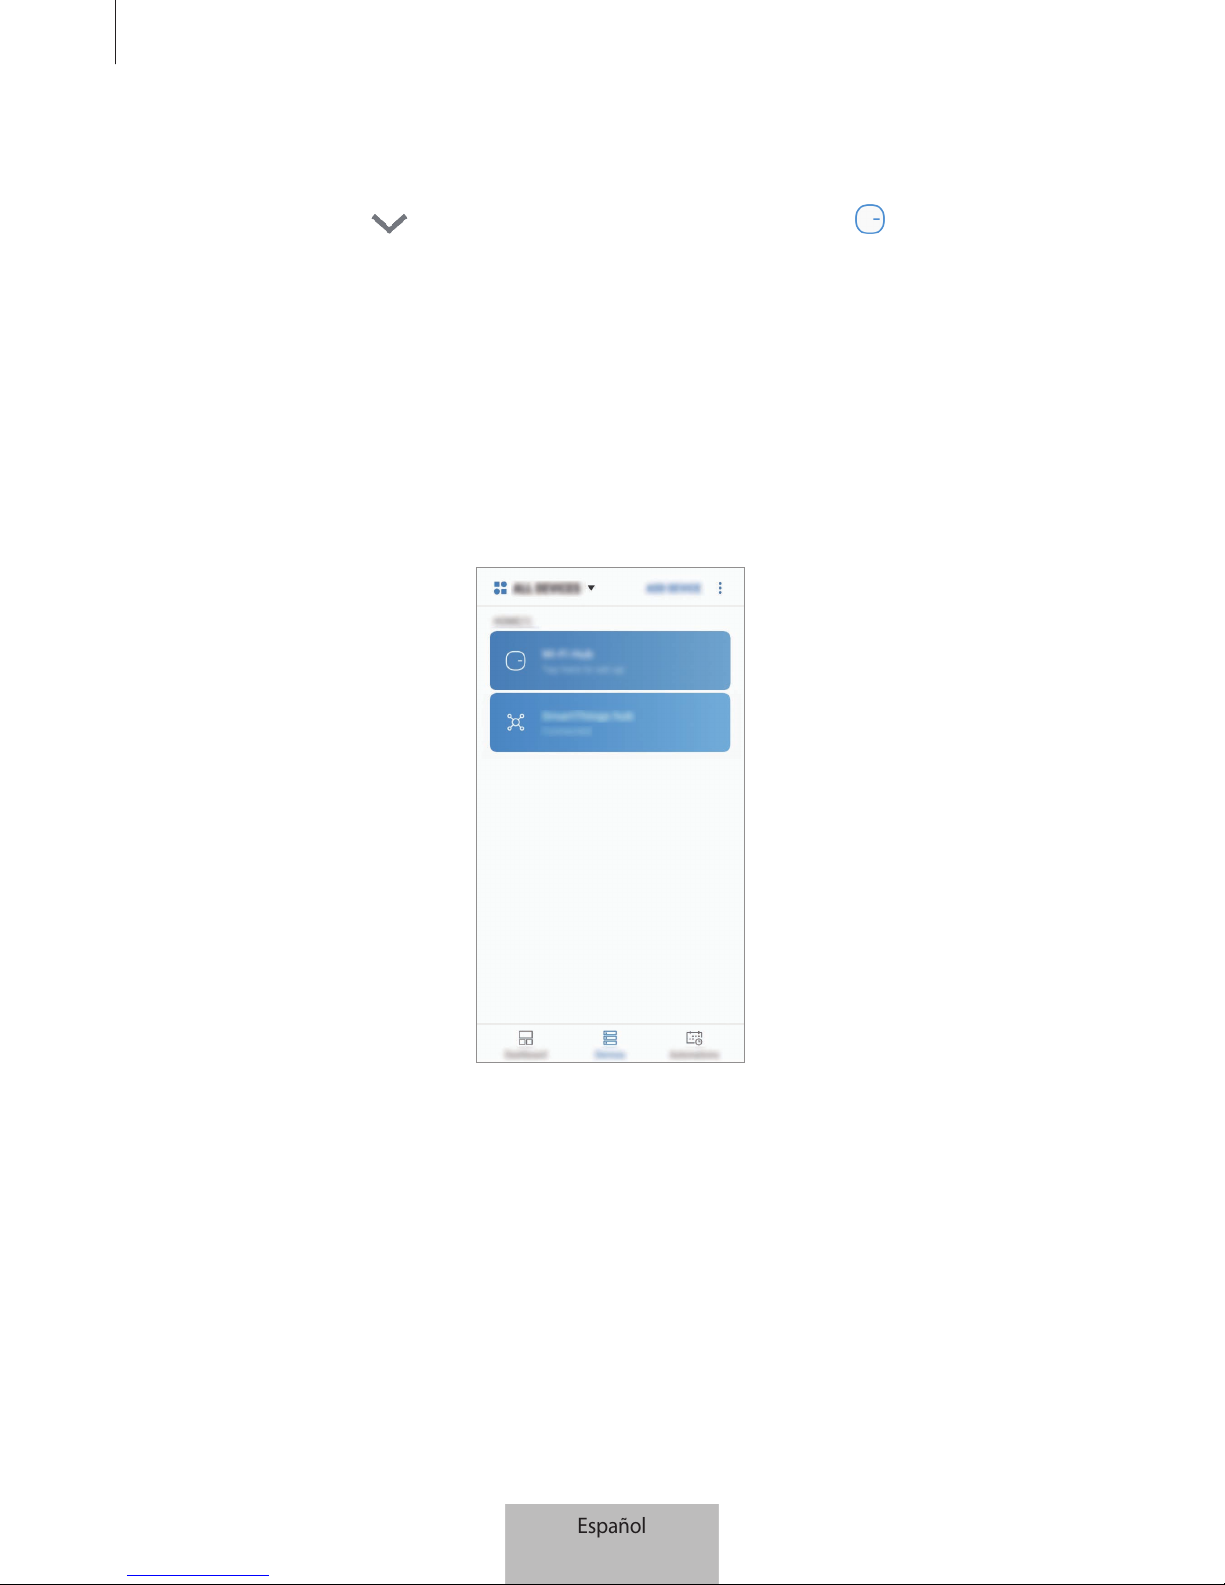
Utilizar el Wifi/Hub SmartThings
7
5
El Wifi/Hub SmartThings se detectará automáticamente. Pulse
AÑADIR AHORA
.
Si no se detecta el Wifi/Hub SmartThings, pulse
Añadir dispositivo
en el panel de control. A
continuación, pulse
en
AÑADIR DISPOSITIVO MANUALMENTE
→
Wi-Fi Hub
y pulse el
nombre del Wifi/Hub SmartThings.
6
Introduzca el nombre y la contraseña de la red para asignarla al Wifi/Hub SmartThings.
Para registrar dispositivos del IoT mediante la función Hub Samsung SmartThings, asegúrese de
que la función
Configurar Concentrador de SmartThings
se encuentra activada.
7
Siga las instrucciones que aparecen en la pantalla para completar la conexión.
Cuando se establezca la conexión aparecerá la siguiente pantalla.
El Wifi/Hub SmartThings es un único producto pero que se registra como dos dispositivos
independientes según sus funciones: la función de router Wi-Fi y la función de Hub SmartThings de
Samsung.
Español
7
Español
7
Page 94
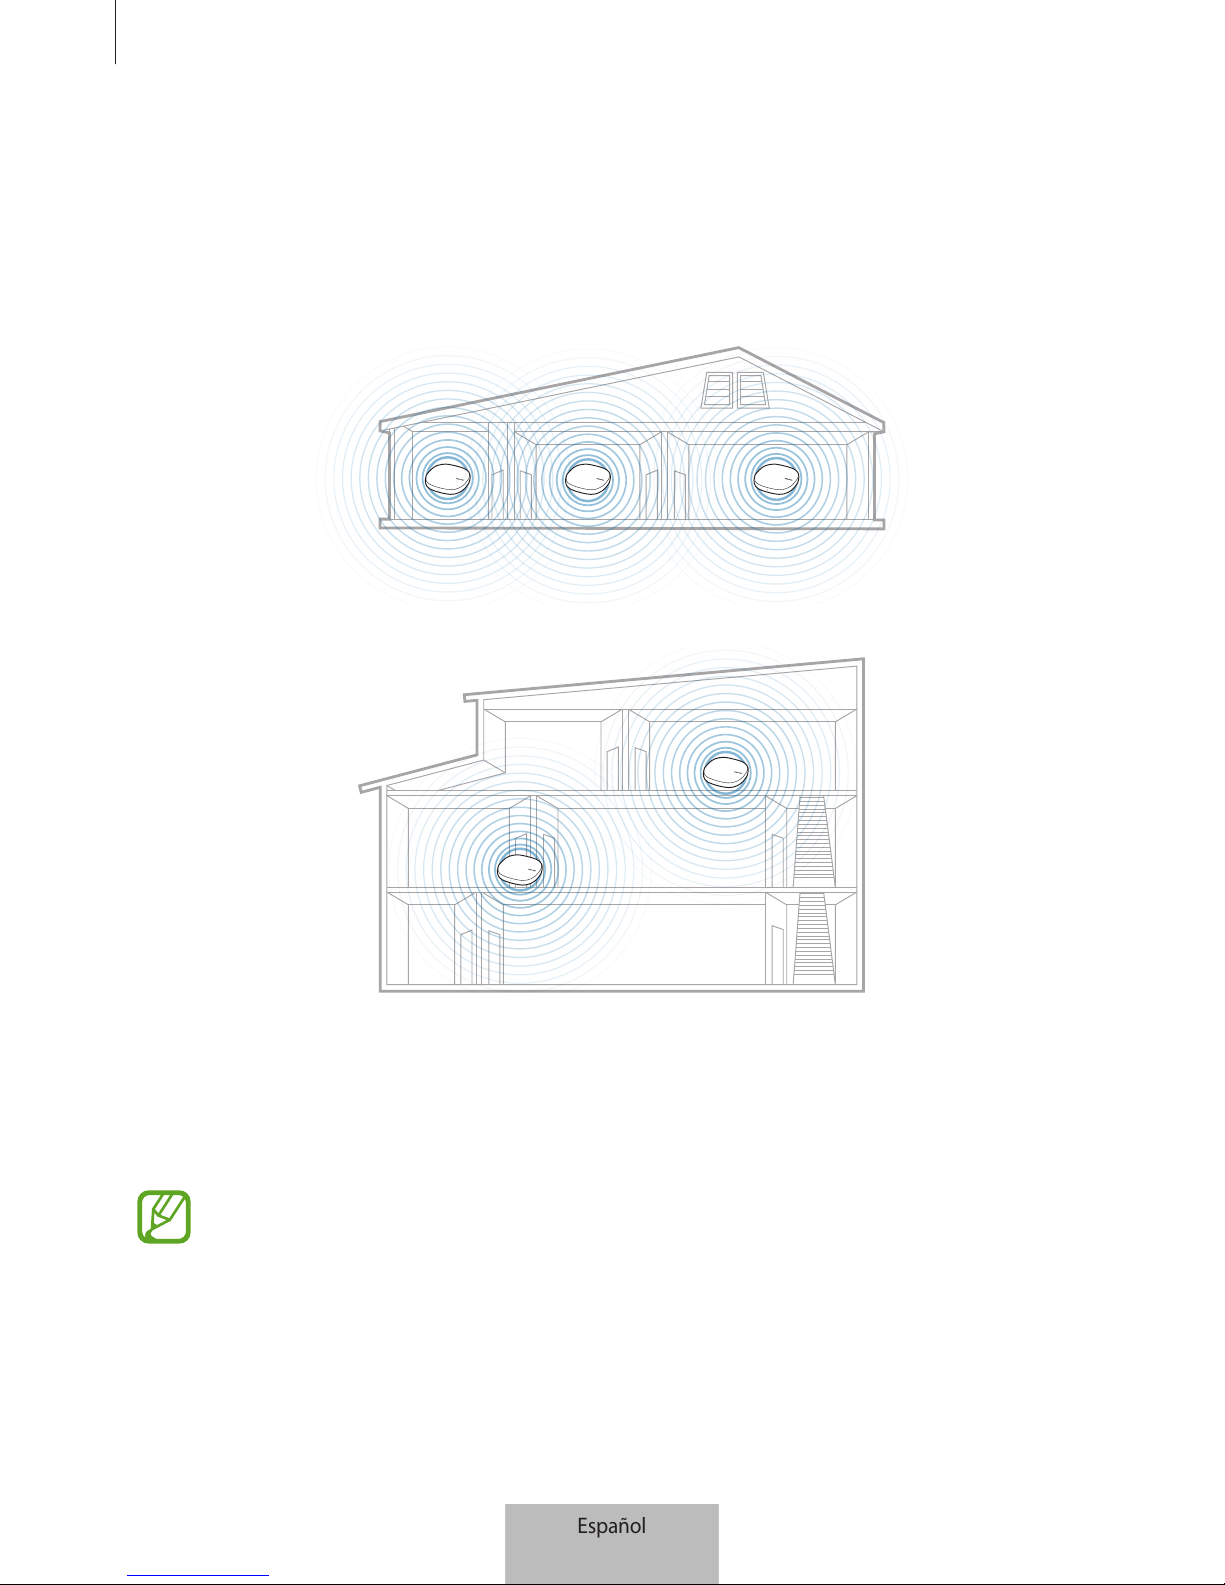
Utilizar el Wifi/Hub SmartThings
8
Añadir Wifi/Hubs SmartThings adicionales
Un Wifi/Hub SmartThings puede cubrir un alcance de conexión de 140m2 (cobertura basada en
edificios con vigas de madera), aunque la cobertura puede variar en función del entorno de uso.
Instale un Wifi/Hub SmartThings adicional para conectar a una red Wi-Fi una zona más grande que
esté fuera del alcance de conexión.
1
Conecte el adaptador de CA/CC al Wifi/Hub SmartThings adicional.
2
Abra la aplicación
SmartThings
en el dispositivo móvil y siga las instrucciones que aparecen en
la pantalla para completar la conexión.
Puede conectar hasta cuatro Wifi/Hubs SmartThings adicionales.
Español
8
Español
8
Page 95

Utilizar el Wifi/Hub SmartThings
9
Avisos a la hora de conectar un Wifi/Hub SmartThings
•
Instale el Wifi/Hub SmartThings cerca de los dispositivos que desea registrar.
•
Cuando añada Wifi/Hub SmartThings adicionales, instálelos dentro del alcance de conexión.
•
No coloque obstáculos entre el Wifi/Hub SmartThings y los dispositivos que desea registrar.
•
Obstáculos tales como cuerpos humanos, paredes, esquinas o vallas pueden debilitar las
señales.
•
Al utilizar el Wifi/Hub SmartThings, se debe conectar con un cable Ethernet.
Advertencias sobre el uso de Bluetooth
•
Para evitar problemas a la hora de conectar el Wifi/Hub SmartThings a otro dispositivo, coloque
los dispositivos uno cerca del otro.
•
Asegúrese de que el Wifi/Hub SmartThings y el otro dispositivo Bluetooth se encuentren dentro
del alcance máximo de la conexión Bluetooth (5m). La distancia puede variar en función del
entorno en el que se usen los dispositivos.
•
Asegúrese de que no haya obstáculos entre el Wifi/Hub SmartThings y el dispositivo conectado,
incluidas personas, paredes, esquinas o vallas.
•
No toque la antena Bluetooth de un dispositivo conectado.
•
La función Bluetooth usa la misma frecuencia que algunos productos industriales, científicos,
médicos o de bajo consumo de energía, por lo que podría haber interferencias al establecer
conexiones cerca de este tipo de productos.
•
Algunos dispositivos, en especial aquellos que no han sido probados o aprobados por Bluetooth
SIG, podrían no ser compatibles con el Wifi/Hub SmartThings.
•
No use la función Bluetooth con fines ilegales, por ejemplo, para piratear copias de archivos o
interceptar comunicaciones de manera ilegal con propósitos comerciales.
Español
9
Español
9
Page 96
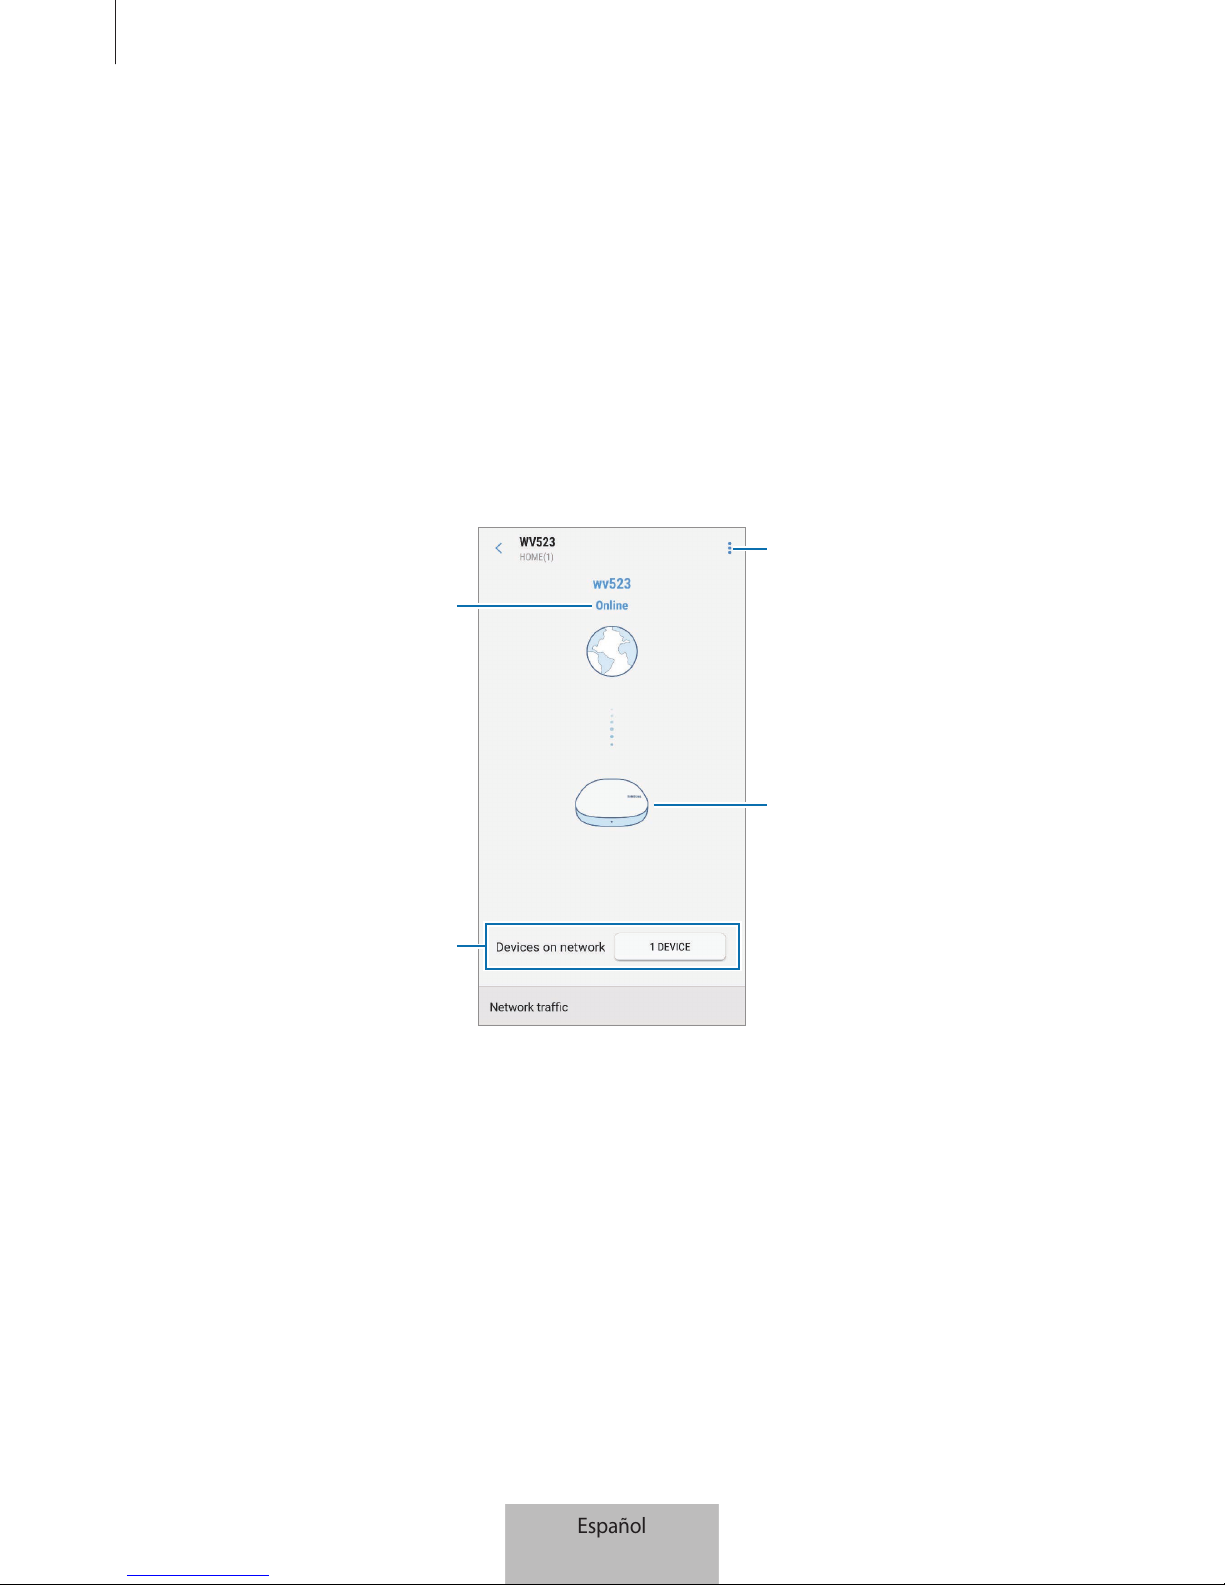
Utilizar el Wifi/Hub SmartThings
10
Configurar la función Wi-Fi del router
Es posible configurar los ajustes detallados de la función de router Wi-Fi del Wifi/Hub SmartThings.
1
Pulse
Dispositivos
en la pantalla de SmartThings.
2
Pulse el hub Wi-Fi en la lista de dispositivos registrados.
Cuando utilice por primera vez la función de router Wi-Fi del Wifi/Hub SmartThings, pulse el Wifi/
Hub Wi-Fi para descargar el controlador en él.
3
Seleccione una opción y configure la función de router Wi-Fi.
Estado de la red Wi-Fi
Dispositivos conectados a la red
Wi-Fi del Hub SmartThings
Accede a opciones adicionales
Wifi/Hub SmartThings registrados.
Pulse para ver su información.
Español
10
Español
10
Page 97

Utilizar el Wifi/Hub SmartThings
11
Asignar prioridad a un dispositivo conectado
Puede configurar la prioridad de conexión de los dispositivos especificados conectados a la red Wi-Fi
del Wifi/Hub SmartThings.
1
Pulse el botón situado junto a
Dispositivos en red
.
2
En la lista de dispositivos conectados, seleccione un dispositivo para conceder prioridad a la red
Wi-Fi del Wifi/Hub SmartThings.
3
Pulse el interruptor
Mayor prioridad ancho de banda
para activarlo.
Restringir el tiempo de uso de la red Wi-Fi
Puede restringir el tiempo durante el que los dispositivos conectados pueden usar la red Wi-Fi del
Wifi/Hub SmartThings.
1
Pulse el botón situado junto a
Dispositivos en red
.
2
En la lista de dispositivos conectados, seleccione un dispositivo para restringir el tiempo de uso
de la red Wi-Fi del Wifi/Hub SmartThings.
3
Pulse
Restringir tiempo de uso
→
Añadir tiempo restringido
.
4
Configure los días y el tiempo, y pulse
AÑADIR
.
Añadir una red para invitados
Es posible añadir una red para invitados independiente de la red Wi-Fi principal.
1
Pulse →
Acceso de invitados
→
Añadir red invitada
.
2
Escriba el nombre y la contraseña de la red, y pulse
HECHO
.
Español
11
Español
11
Page 98
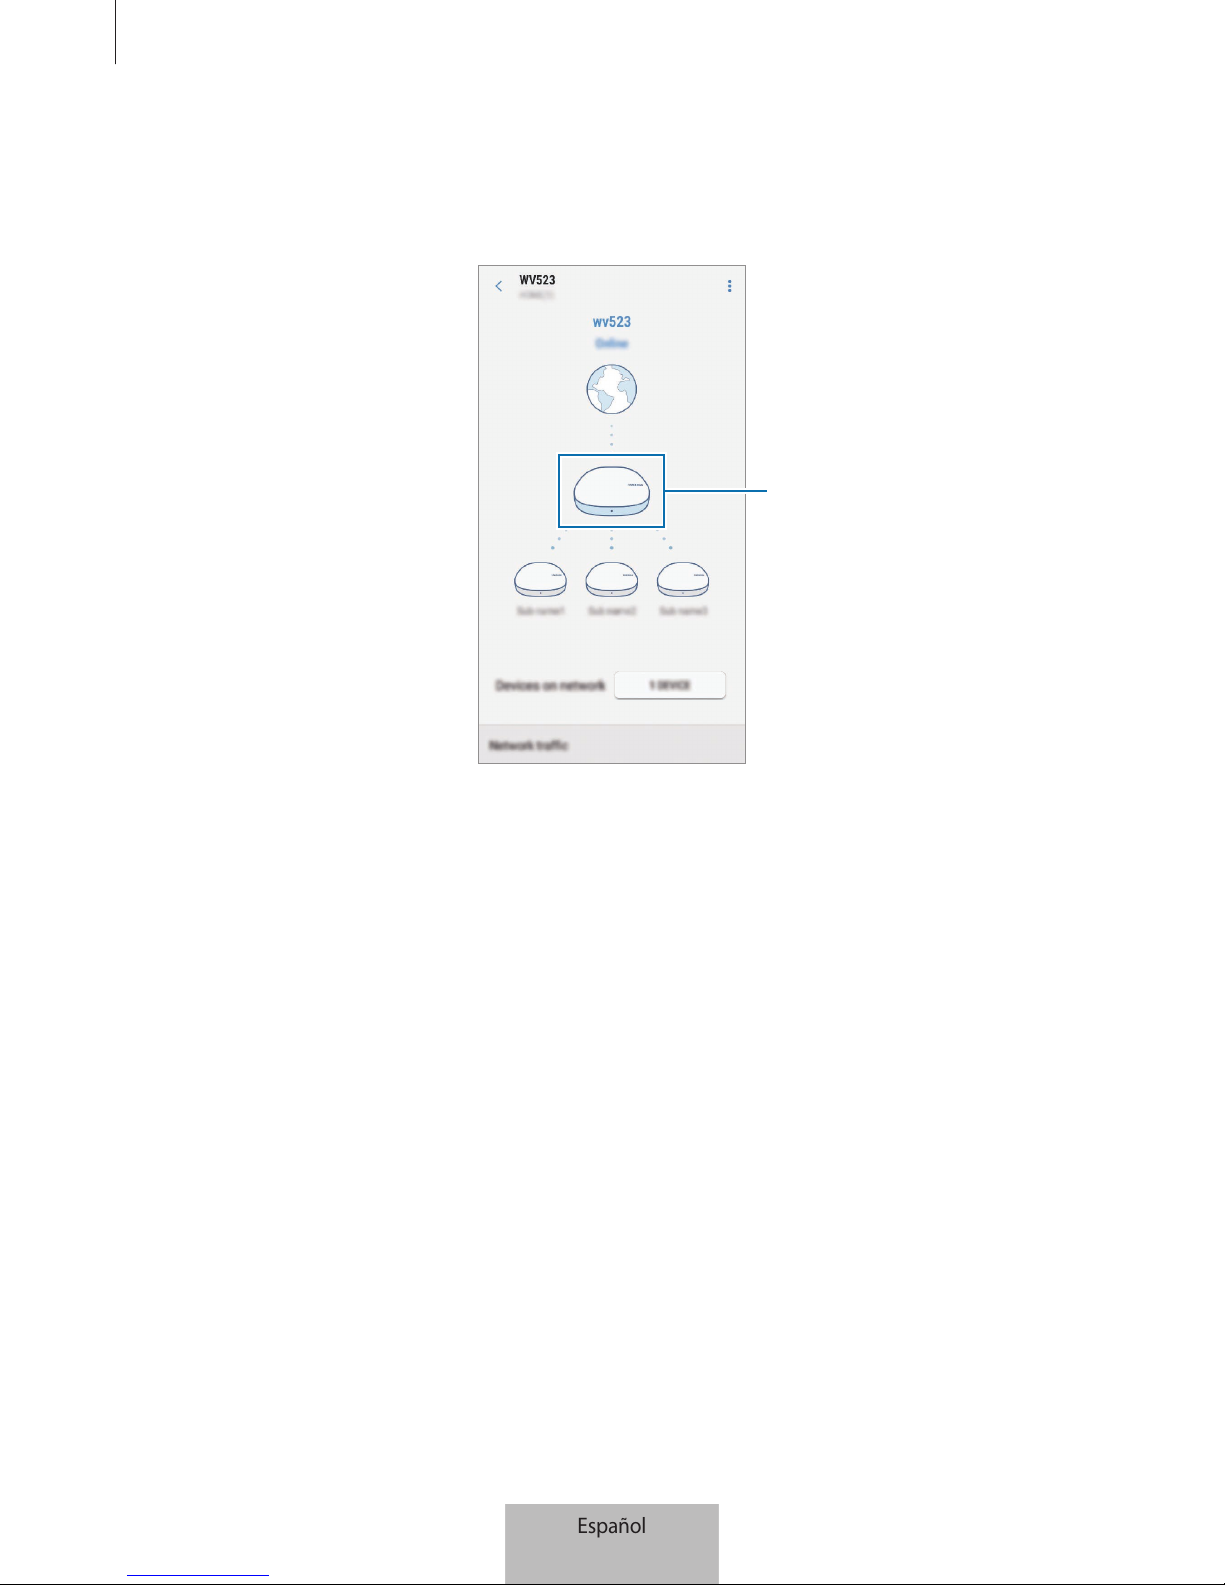
Utilizar el Wifi/Hub SmartThings
12
Activar o desactivar la función de router Wi-Fi
1
Pulse el Wifi/Hub SmartThings principal entre los Wifi/Hub SmartThings registrados.
Hub principal
2
Pulse el interruptor
Wi-Fi
para activar o desactivar la función de router Wi-Fi.
Español
12
Español
12
Page 99
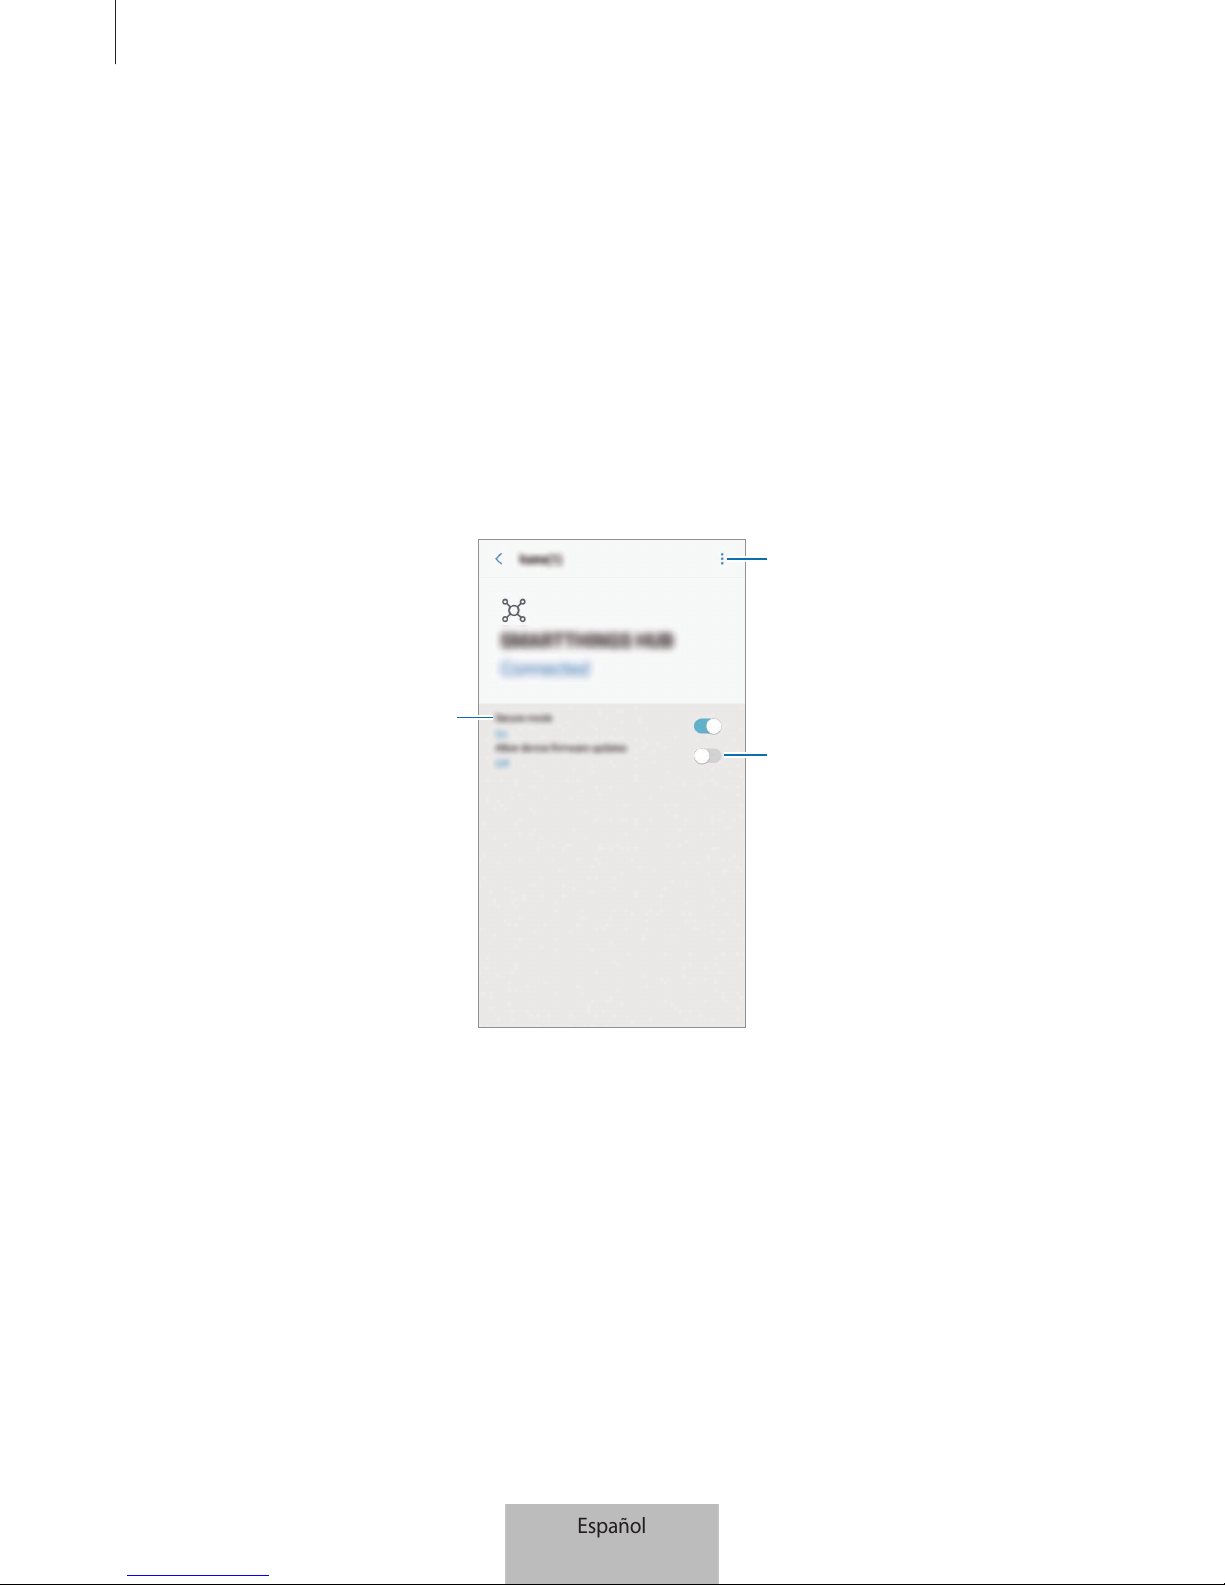
Utilizar el Wifi/Hub SmartThings
13
Configurar la función Hub SmartThings de
Samsung
Es posible configurar los ajustes detallados de la función de Hub SmartThings de Samsung del Wifi/
Hub SmartThings.
1
Pulse
Dispositivos
en la pantalla de SmartThings.
2
Pulse el hub SmartThings en la lista de dispositivos registrados.
3
Seleccione una opción y configure la función de Hub SmartThings de Samsung.
Ajusta si desea evitar la reconexión
automática de los dispositivos
ZigBee
Muestra la información del hub
SmartThings o excluye los
dispositivos Z-wave
Ajusta si desea permitir las
actualizaciones de firmware
automáticas
Español
13
Español
13
Page 100
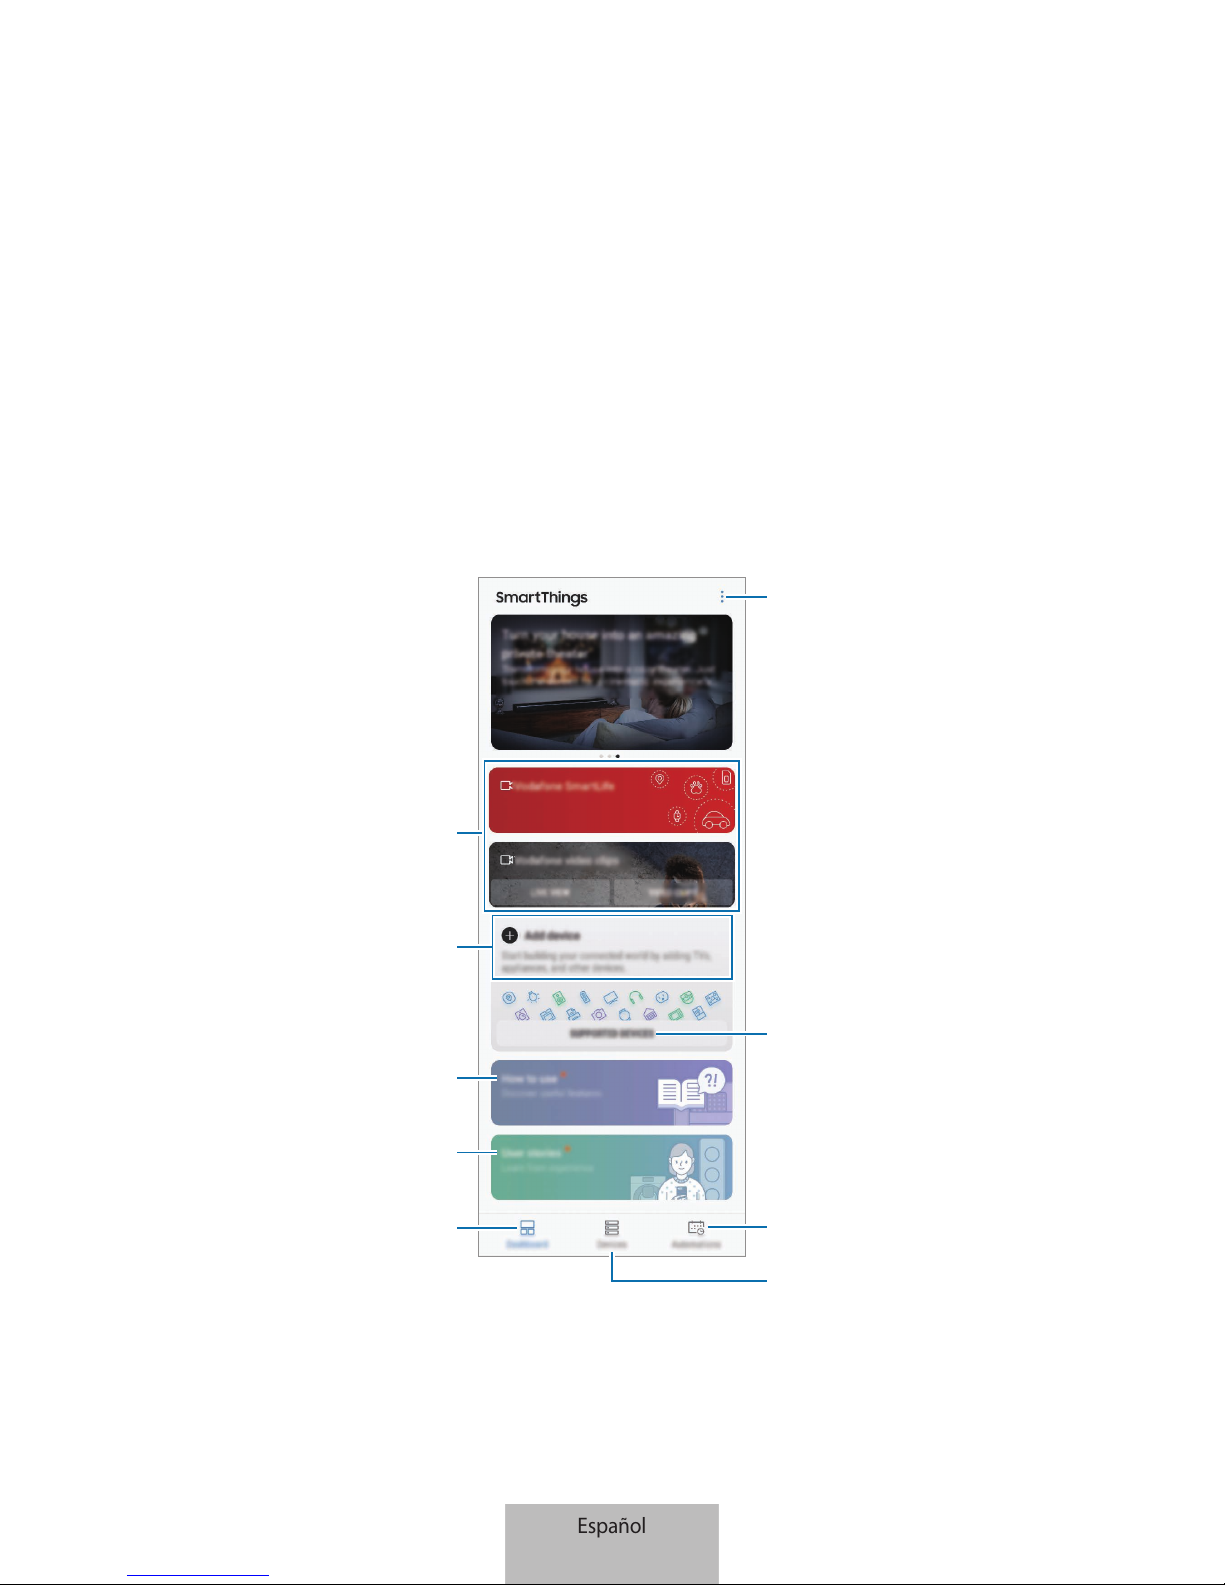
14
Aplicación SmartThings
Introducción
Registre dispositivos del Internet de las Cosas (IoT) y de domótica en la aplicación SmartThings de
su dispositivo móvil, y podrá consultar su estado o controlarlos desde la misma. Si desea controlar
los dispositivos por ubicación, como por ejemplo su casa u oficina, cree una ubicación y asígnele
los dispositivos registrados. También puede configurar una escena con la que controlar varios
dispositivos a la vez o configurar una automatización para realizar acciones automáticamente a una
hora previamente establecida.
Accede a opciones adicionales
Consejos sobre SmartThings
Historias de usuario
Panel de control
Dispositivos compatibles
Busca y registra dispositivos
cercanos
Gestiona ubicaciones y dispositivos
Gestiona las automatizaciones
Aplicaciones de Vodafone
Español
14
Español
14
 Loading...