

Page 1
Page 2

Smart Operator
USER GUIDE
SAMSUNG DCS 400si SYSTEM
January 2001
Samsung Telecommunications America, reserves the right without prior notice to revise information in this guide for any reason. Samsung Telecommunications
America also reserves the right without prior notice to make changes in design or components of equipment as engineering and manufacturing may warrant.
Samsung Telecommunications America disclaims all liabilities for damages arising from the erroneous interpretation or use of information presented in this guide.
Software copyright 1999-2001, XpertCTI, LLC. All rights reserved.
Page 3

TABLE OF CONTENTS
ABOUT THIS BOOK
THINGS YOU SHOULD KNOW
...............................................................................................................................1
................................................................................................. 2-5
OUTSIDE CALLS
Making an Outside Call ...........................................................................................................................................6
Answering an Outside Call ......................................................................................................................................7
Flash.........................................................................................................................................................................7
INTERCOM CALLS
Calling Other Stations..............................................................................................................................................8
Answering Intercom Calls........................................................................................................................................9
Answer Modes .........................................................................................................................................................9
Busy Station Camp-on ...................................................................................................................................... 9-10
CALL PROCESSING
Holding Calls ................................................................................................................................................... 11-12
Transferring Calls...................................................................................................................................................12
Transfer with Camp-On .........................................................................................................................................13
Transfer to Voice Mail ............................................................................................................................................13
Conference Calls ...................................................................................................................................................13
DIRECTORY/SPEED DIALING
Speed Dialing with Directory .................................................................................................................................14
PAGING AND MESSAGING
Making an Internal Page........................................................................................................................................15
Making an External Page.......................................................................................................................................15
All Page..................................................................................................................................................................15
ADVANCED FEATURES
Scheduled Announcements ....................................................................................................................16
Changing Do Not Disturb Status for other Stations..............................................................................................16
Flexible Forwarding ...............................................................................................................................................17
911 Alert .................................................................................................................................................................17
CONVENIENCE FEATURES
Call Record ............................................................................................................................................................18
Mute .......................................................................................................................................................................18
Headset Operation ................................................................................................................................................18
Page 4

ABOUT THIS BOOK
Your Smart Operator is one of the most visible parts of the DCS 400si Digital Communications System. The Smart Operator
provides several additional conveniences that are not available when using only a telephone keyset. These are noted
throughout this guide.
Please take the time to study this guide and to become familiar with the operation of your Smart Operator. Keep this guide
handy. You may need to look up instructions for infrequently used features.
Learning to use your Smart Operator correctly will make everyday telephone communications a breeze.
1
Page 5
THINGS YOU SHOULD KNOW
USER ORIENTATION
The Smart Operator uses the PC keyboard to provide most of the standard features supported by the telephone keyset,
while also providing several enhanced features. The PC keyboard has keys with the original labels plus the additional labels
that reflect the appropriate feature on your office phone system. Depressing these keys will access or activate the many
features of your office phone system. Pressing the key on the telephone instrument or PC keyboard for the desired result is
acceptable, as either may be used.
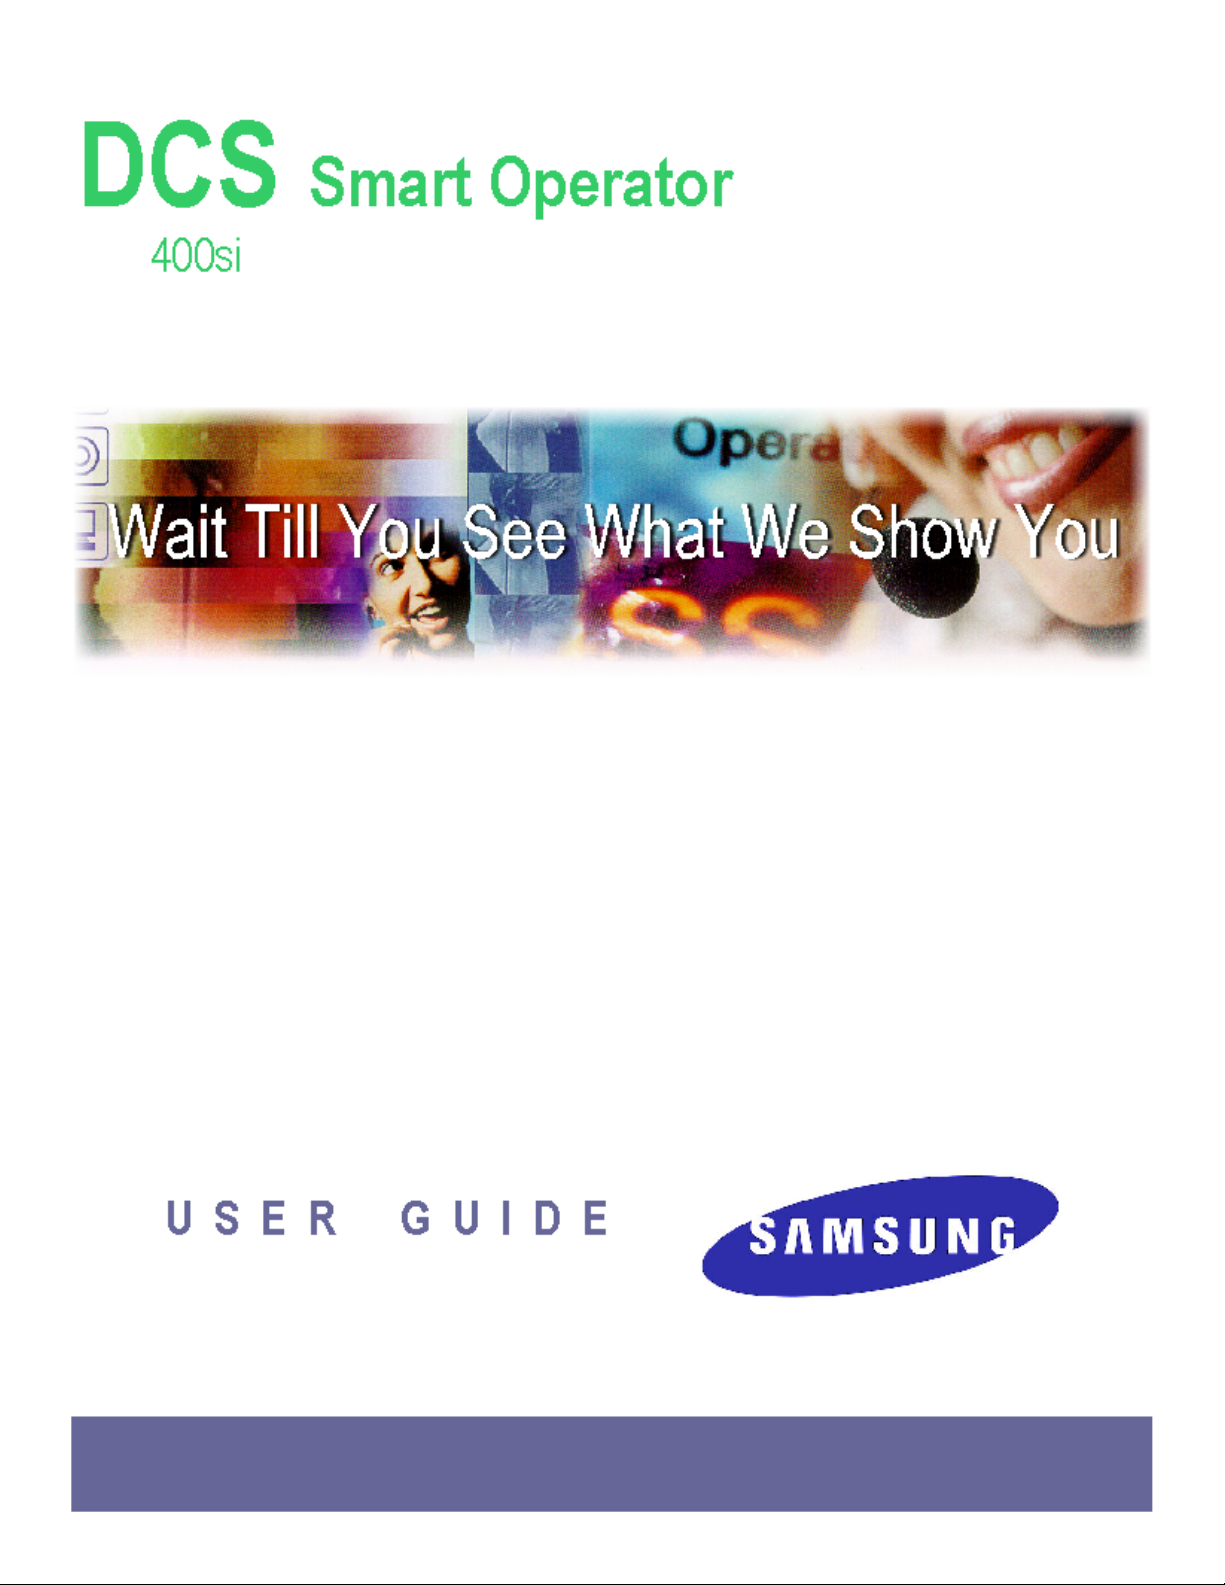
The computer screen will be the most valuable tool of the Smart Operator. The screen will provide the operator with
information that is not available from a keyset. Each area of the screen will be discussed in this user guide.
FILE MENU
A pull down File Menu is available at the top left hand of the Smart Operator screen and provides the user with a list of Menu
items.
Selecting any one of the available options will allow the user to edit or add entries in each
section. Each menu item provides clear menus for entering information. Details on each
selection is available later is this User Guide.
DIRECTORY
2
Page 6

A complete Directory of internal extensions is located in the top half of your computer screen that includes Status indicator,
Last name, First name, Extension number, Department, Mobil 1, Mobil 2, Alternate, User 1 and User 2. Double clicking the
left mouse button on any one of these labels will sort the directory in alphabetical order for that particular column.
Status indications are located just to the left of the names in the Directory. These indications will provide the status of all
keysets on your office phone system. The status indication will light green when that station is idle, red when busy and
yellow when ringing. The labeling will also change to reflect additional information that indicates Free, Ringing, DND,
Unplugged, etc,
EXTENSIONS WINDOW
The Extensions window is available by selecting the Extensions button near the top left of your computer screen. This
window can display up to 100 extensions at a time, providing the same color and text labels as the Status Column of the
Directory. Buttons at the bottom of this window will indicate what extensions are assigned in your telephone system by
groups of 100. These buttons will vary depending on how your phone system is configured. Clicking the left mouse button
once on these buttons will display the assigned extensions in that group. The active button will appear white while
displaying every extension in that range.
3
Page 7
ACTIVE SCREEN
While on a call, information about that call will be present in the Active Screen. The following information can be available
depending on configuration. Information will vary depending on whether the call is Internal, External, Transferred or an
Outgoing call. Examples are shown.
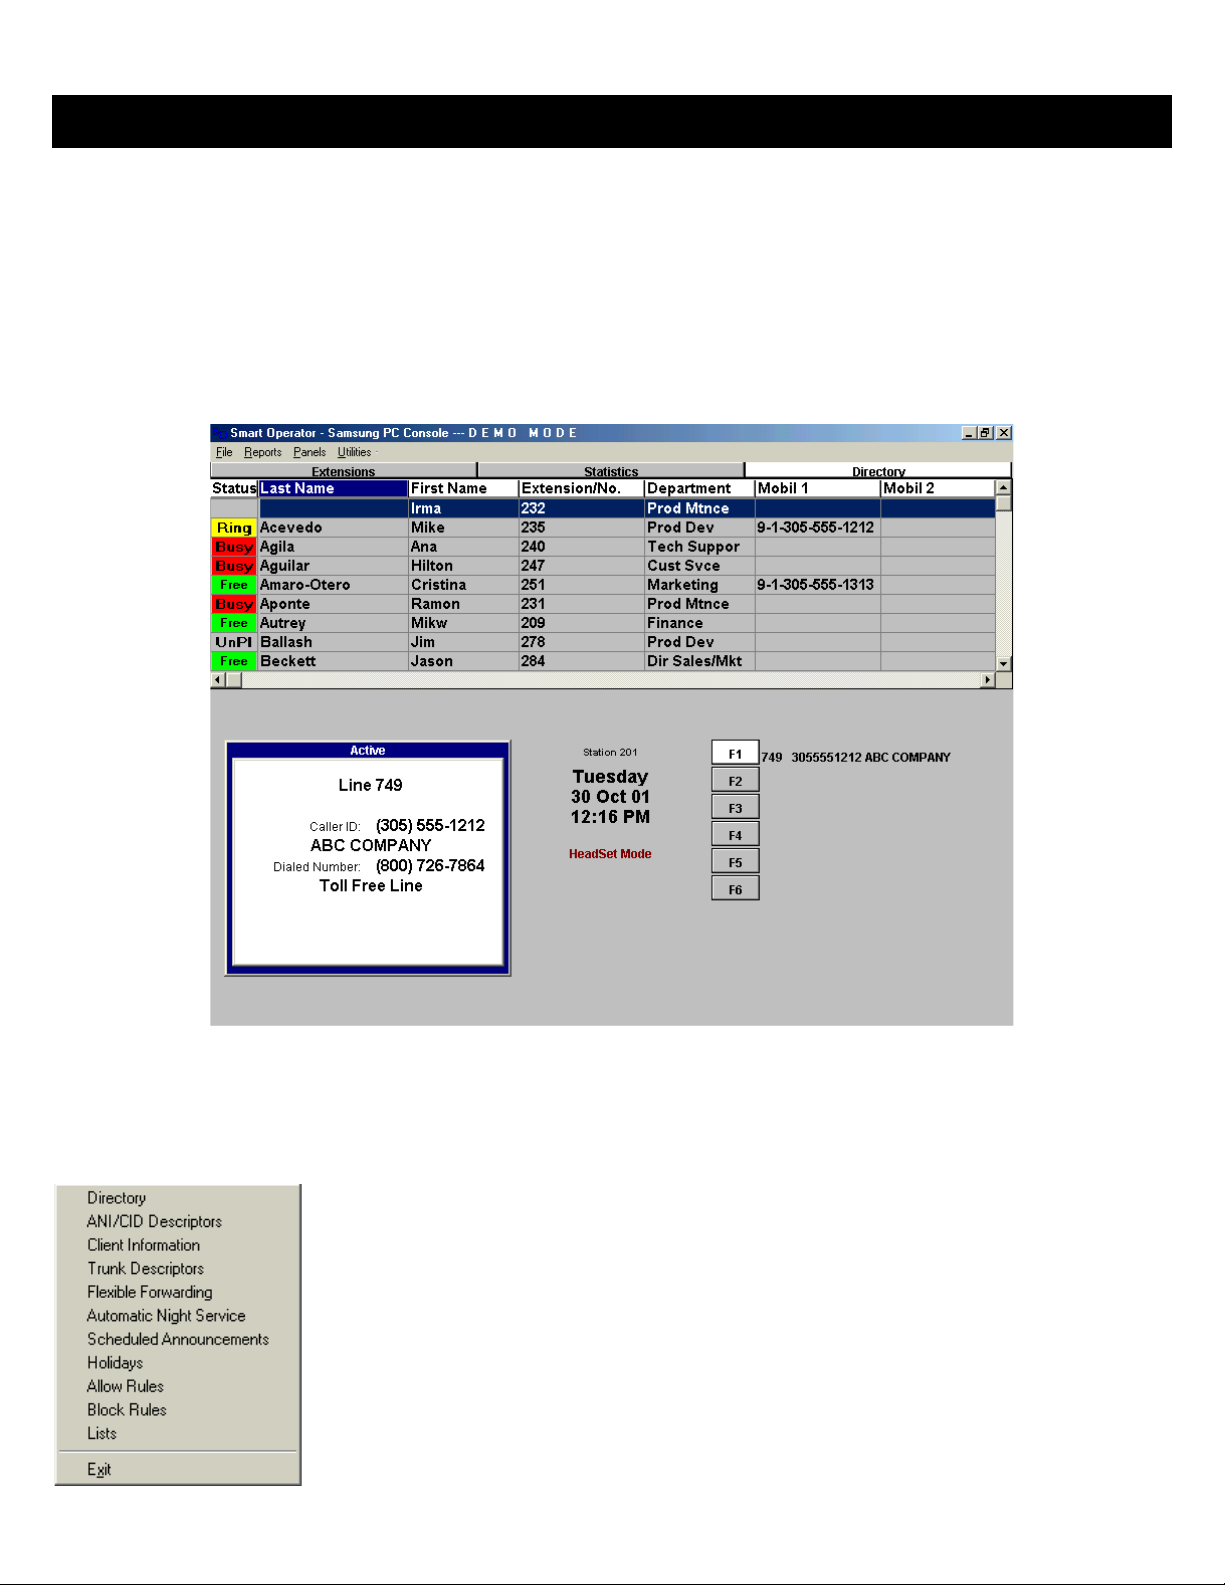
The window to the left indicates that the operator is on an internal call with
Extension 202. This screen will also display First and Last name when
listed in the Directory.
The window to the right indicates that the operator is on an answered
External call on Line 701. This line is labeled as a “Local ISDN Line” in the
Smart Operator. This window can show Caller-ID and the number dialed
by the caller along with a name description of each.
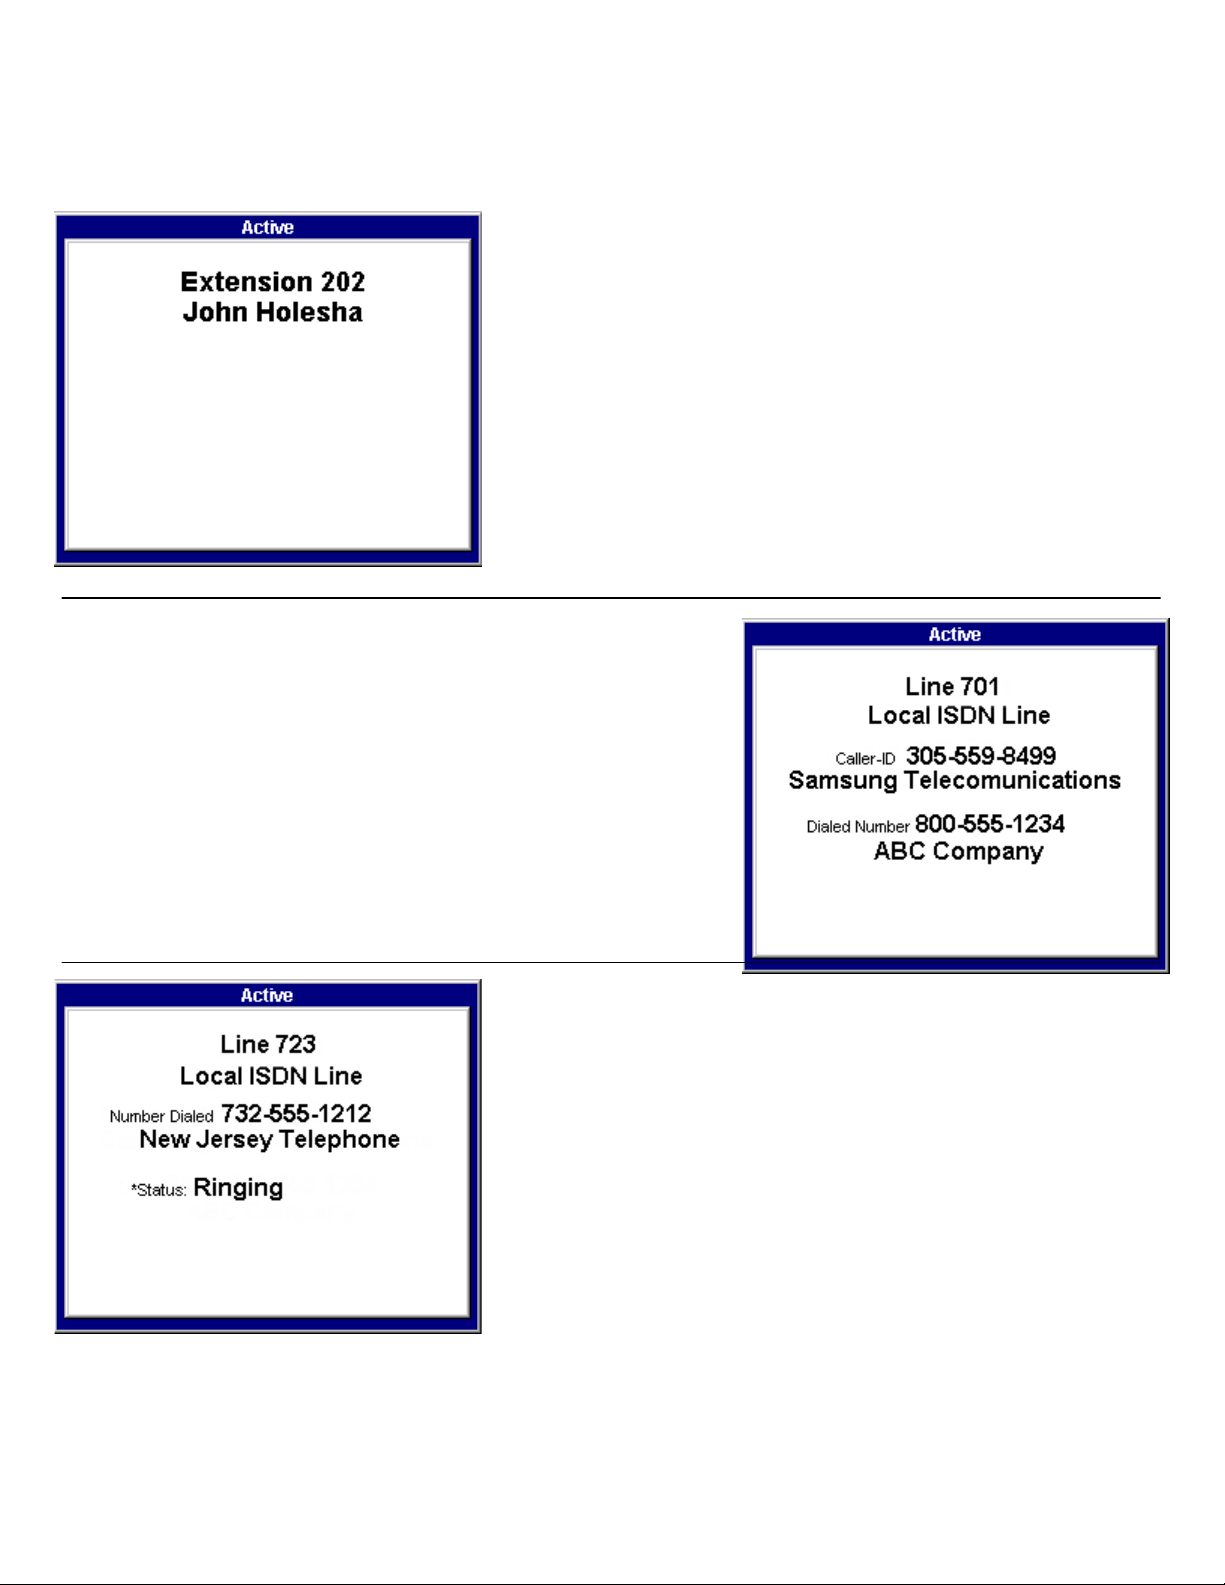
The window to the left indicates that the operator has made an outgoing
call. The call is on Line 723 and is labeled as a “Local ISDN Line” in the
Smart Operator. The screen shows the number dialed by the operator and
a name descriptor is shown if a match is present in the Directory.
The Status indicator may display several possible conditions:
Dialing - Indicates that the telephone system is dialing the number
•
entered.
Ringing - Indicates the number dialed is ringing at the distant end.
•
Answered - Indicates that the call has been answered in some manner
•
at the distant end.
Busy - Indicates the number dialed is busy.
•
NOTE: These indications may not always be accurate, depending on the dial tone provider. This information is only
available when using ISDN lines.
4
Page 8

INFORMATION WINDOW
The Information window is located in the lower center half of the Smart Operator Screen. This window provides
miscellaneous information that will change based on the status of events.
This window can provide the following information:
Station Number
•
Day of Week
•
Month, Day and Year
•
Time
•
Headset/Handset Status
•
Mute On/Off Status
•
Page Zone active, showing Station origination page
•
Recording Call
•
Transfer in progress
•
Conferencing
•
CALL INDICATIONS
The CALL keys are located on the lower right hand section of the Smart Operator. The CALL keys on the screen are labeled
as Function keys just as they appear on the PC keyboard.
Green indicates a ringing external call
•
Red indicates a ringing internal call
•
Yellow indicates a Transfer or Hold recall
•
White indicates the current active call
•
Grey indicates not in use
•
The CALL keys provide Trunk ID, Caller-ID Number or Name. Calls that are originated or received will appear on your CALL
buttons and appear in different colors based on type and status of call. You can have up to eight
two are required.
buttons, but at least
CALL
PC KEYBOARD BUTTON LAYOUT
*Standard Smart Operator keyboard*
5
Page 9

OUTSIDE CALLS
MAKING AN OUTSIDE CALL
From the PC number keypad
On the Number keypad of the PC keyboard, dial the line access code (usually “9”) followed
•
by the complete telephone number you wish to call. If entered incorrectly, use the backspace
to edit and retype the correct number.
Press the Connect (Enter) key to place the call.
•
Finish the call by replacing the handset or pressing the Answer/Release (Space bar) key.
•
From the Directory
Begin typing the person’s last name and Smart Operator will alpha search as you type the name. The up and down
•
arrow keys on your keyboard may also be used at any time during your search.
Once the name of the person you desire is highlighted you may press the CONNECT (Enter) key or you may also
•
double click the left mouse button on any other number listed for that name.
Finish the call by replacing the handset or pressing the
•
Answer/Release
(Space bar) key.
NOTE: To perform search based on first name, double click the left mouse button on the “First Name” label and proceed
with the above instructions.
Your call will appear in the Active
Active Screen as pictured to the left.
ActiveActive
Information in this screen may vary depending on how your Smart
Operator is configured.
NOTE: You will receive “No More Calls” tone when you attempt to make a
call and there is no key available for that line.
6
Page 10

ANSWERING AN OUTSIDE CALL
Answering the first ringing call
Press the Answer/Release (Space bar) key to be connected to the first ringing caller.
•
The CALL key will turn white to indicate call in progress
•
•
Finish the call by replacing the handset or pressing the Answer/Release
Answering a specific ringing call with the CALL keys
Press the specific CALL (Function) key or left mouse click the key on the
•
screen in order to answer the specific call.
Finish the call by replacing the handset or pressing the Answer/Release
•
(Space bar) key.
While on the call, information will appear in the Active Screen as pictured
to the left. Information in this screen may vary depending on how your
Smart Operator is configured.
Answer/Release (Space bar) key.
Answer/ReleaseAnswer/Release
SENDING A FLASH
While on an outside call, press the FLASH (“/” forward slash on keyboard) key to send a flash to the telephone company.
This is required for some custom calling features or CENTREX use.
NOTE: Flash is not available on an ISDN circuit.
7
Page 11

INTERCOM CALLS
CALLING OTHER STATIONS
Dialing using the PC number keypad
Dial the extension number or group number on the PC number keypad.
•
Wait for the party to answer. If you hear a brief tone burst instead of ringback tone, the station
•
you called is set for Voice Announce or Auto Answer. Begin speaking immediately after the tone.
Finish the call by replacing the handset or pressing the Answer/Release (Space bar) key.
•
Dialing using the Directory
If not already highlighted, double click the left mouse button to select either the Last or First name column label to
•
search by name. This will select and sort that particular column alphabetically.
Start to spell the person’s last or first name. System will alpha search as you type the name. The up and down arrow
•
keys on your keyboard may also be used at any time during your search.
Once the name of the person you desire is highlighted, press the
•
Finish the call by replacing the handset or pressing the
•
Answer/Release
Connect
(Enter) key to be connected.
(Space bar) key.
Dialing using the Extension screen
Click the left mouse button once on the desired 100-group button at the bottom of the Extensions Window.
•
•
Click the left mouse button once on the extension button to be connected.
8
Page 12

•
Finish the call by replacing the handset or pressing the Answer/Release
Answer/Release (Space bar) key.
Answer/ReleaseAnswer/Release
ANSWERING INTERCOM CALLS
Answering the first ringing call
Press the Answer/Release (Space bar) key to be connected to the first ringing caller.
•
Finish the call by replacing the handset or pressing the Answer/Release (Space bar) key.
•
Answering a specific ringing call with the CALL keys
Press the specific CALL (Function) key or left mouse click the key on the screen
•
to answer the call.
Finish the call by replacing the handset or pressing the Answer/Release (Space
•
bar) key.
VOICE ANNOUNCE MODE
(INTERCOM CALLS ONLY)
Voice Announce Mode is not recommended when using Smart Operator.
AUTO ANSWER MODE
(INTERCOM CALLS ONLY)
When another station calls you, your keyset will sound a brief attention tone and then automatically answer the call.
Your microphone and speaker are turned on and you can speak handsfree. For privacy, use the handset.
•
Finish the call by replacing the handset or pressing the
•
Answer/Release
(Space bar) key.
BUSY STATION CAMP-ON
When you call another station and receive a busy signal but you do not want to wait for a callback:
MANUAL CAMP-ON
Press the CAMP-ON (decimal point on number keypad).
•
The called station will receive off-hook ring tone repeated every few seconds and its first available
•
green to indicate your call is waiting.
Wait for the called party to answer.
•
The called station must release its first call or place it on hold before answering your camp-on.
•
NOTE: If you receive “No More Calls” tone, that station has no available key to accept your call. Hang up or leave a
message.
button will flash
CALL
9
Page 13

AUTO CAMP-ON
When you want to automatically Camp-On to a busy station without pressing the Camp-On button every time you call a busy
station, you can set your phone for Auto Camp-On.
With the handset on-hook, press TRSF on the keyset and then dial 110.
•
Dial 081 to turn on auto camp-on or 080 to turn it off.
•
Press TRSF to store your selection.
•
10
Page 14

CALL PROCESSING
SYSTEM HOLD
When you are connected to any call, press HOLD (“/” on number keypad). The CALL key on the screen will turn blue to
•
indicate the call is on hold and flash green at your keyset.
To take the caller off hold, press the CALL (Function) key and the blue button on the screen will turn white and the green
•
flashing light will go steady green on the keyset. Resume the conversation.
NOTE: While on a call, pressing another active CALL
connect you to the new call.
EXCLUSIVE HOLD
To place outsides call on hold at your phone so that other users cannot get it:
Press the
•
show a steady red light on other keysets.
To take the caller off hold, press that CALL (Function) key and the blue button on the screen will turn white and the
•
green flashing light will go steady green on the keyset. Resume the conversation.
NOTES:
1. Intercom calls will always be placed on exclusive hold.
2. If you are on an outside call and immediately answer another ringing call without first putting the first caller on
Hold, the first call will automatically be placed on Exclusive Hold.
(“/ “ on the number keypad) key twice. The call will appear as described in
HOLD
CALL (Function) key will automatically put your first call on hold and
CALLCALL
SYSTEM HOLD
; this line will
REMOTE HOLD
When you wish to place a call on hold at another station:
Press TRANSFER (“+” on the number keypad) key and dial the station number.
•
Press the HOLD (“/” on the number keypad) key.
•
This will place the call on System Hold on an available
tone.
NOTES:
1. If the destination station does not have any free CALL
and must return to the original party by pressing the TRANSFER
2. Intercom calls cannot be remote held.
button or Line key at the remote station and return you to dial
Call
CALL buttons or line keys, you will hear “No More Calls” tone
CALLCALL
TRANSFER (“+” on the number keypad).
TRANSFERTRANSFER
HOLD RECALL
If you leave a call on hold longer than the Hold Timer, it will recall your station. The CALL (Function) key on which the call
appears will be amber in color.
When your phone rings, lift the handset or press the Answer/Release (Space bar) key or press the amber CALL
•
(Function) key directly to answer the recall.
11
Page 15

CONSULTATION HOLD
When you are talking on an outside line and it is necessary to consult with another extension:
Press the Transfer (“+” on the number keypad) key; you will receive transfer dial tone. Your call is placed on transfer
•
hold.
Dial the extension number.
•
Consult with the internal party.
•
Press Transfer to return to the outside party or hang up to transfer the call.
•
NOTE: Repeatedly pressing the Transfer
Transfer key will toggle between the outside party and internal extension.
TransferTransfer
TRANSFERRING CALLS
Transfer is used to send any call to another extension in one of two ways. You can perform a screened transfer by informing
the other extension who is calling or you can perform a blind transfer without notification.
Transferring using the Number keypad
While on a call, press the TRANSFER (“+” on the number keypad) key and dial an extension number or group number.
•
Your call is automatically put on transfer hold.
Press the CONNECT (Enter) key to connect the caller (this is an unscreened or blind transfer).
•
OR
Wait for the called party to answer and advise him/her of the call and press the CONNECT (Enter) key. If the transfer is
•
refused, you will be reconnected to the outside line when the called station hangs up or you can press TRANSFER to
return to the outside party.
Transferring using the Directory (Unscreened or Blind)
Transferring using the Directory (Unscreened or Blind)
Transferring using the Directory (Unscreened or Blind)Transferring using the Directory (Unscreened or Blind)
While on a call, begin to type the person’s last name. The Directory will begin to alpha search as you type each letter of
•
the name. When you see the name you desire, place the Highlight bar on the name.
Press the CONNECT (Enter) key to connect the caller.
•
Transferring using the Directory (Screened or Supervised)
While on a call, begin to type the person’s last name. The Directory will begin to alpha search as you type each letter of
•
the name. When you see the name you desire, place the Highlight bar on the name.
Press the
•
Wait for the called party to answer and advise him/her of the call and press the CONNECT (Enter) key to hang up. If the
•
DIRECTORY SUPERVISED TRANSFER
transfer is refused, you will be reconnected to the outside line when the called station hangs up or you can press
TRANSFER
(“+” on the number keypad) to return to the outside party.
When you are transferring a call to a keyset set for Voice Announce or Auto Answer, the transferred call will always ring.
NOTES:
1. After the inside party answers, you may alternate back and forth between the parties by pressing the
(“+” on the number keypad) key.
2. If you receive No More Calls tone, that station has no key available to receive another call. Press TRANSFER (“+”
on the number keypad) key to return to the other party.
(“-“ on the number keypad) key.
This key has an abbreviated label.
TRANSFER
12
Page 16

TRANSFER WITH CAMP-ON
When you are transferring a call to another station and you receive a busy signal, you may camp the call on to this station.
Simply hang up when you hear the busy signal. The called party will be alerted that a call is waiting for them.
NOTE: If you receive No More Calls tone, that station has no key available to receive another call. Press TRANSFER to
return to the outside caller.
TRANSFER TO VOICE MAIL
This feature is used to send a call directly to a voice mailbox. To transfer a call directly to a voice mailbox:
While on a call, begin to type the person’s last name. The Directory will begin to alpha search as you type each letter of
•
the name. When you see the name you desire, place the Highlight bar on the name.
Press the Voice Trans (F9) key.
•
CONFERENCE CALLS
Smart Operator provides a quick and easy way to perform a three party conference.
While engaged in a conversation, press the CONF (F12) key and receive conference tone.
•
Make another call, either intercom or outside.
•
Press the CONF (F12) key and everyone is connected.
•
NOTE: To leave the conference, press the ANSWER/RELEASE
ANSWER/RELEASE (Space bar) key.
ANSWER/RELEASEANSWER/RELEASE
13
Page 17

DIRECTORY/SPEED DIALING CALL
SPEED DIALING WITH THE DIRECTORY
You can enter and dial a virtually unlimited quantity of numbers with the Directory.
If not already highlighted, double click the left mouse button to select either the Last or First name column label to
•
search by name. This will select and sort that particular column alphabetically.
Start to spell the person’s last or first name. System will alpha search as you type the name. The up and down arrow
•
keys on your keyboard may also be used at any time during your search.
Once the name of the person you desire is highlighted, press the Connect (Enter) key to be connected to the number
•
listed in the Extension field.
OR
Double click the left mouse button on the field containing the desired phone number.
•
The telephone number is automatically dialed for you.
•
14
Page 18

PAGING AND MESSAGING
MAKING AN INTERNAL PAGE
To make an announcement through the keyset speakers:
Press the PAGE (“*” on the number keypad) key.
•
Dial the desired zone number 1, 2, 3 or 4.
•
OR
Dial 0 to page all internal zones.
•
After the attention tone, make your announcement.
•
Press the ANSWER/RELEASE (Space bar) key when done.
•
MAKING AN EXTERNAL PAGE
To make an announcement through the external paging speakers:
Press the
•
Dial the desired zone number 5, 6, 7 or 8.
•
OR
Dial 9 to page all external zones.
•
After the attention tone, make your announcement.
•
Press the ANSWER/RELEASE (Space bar) key when done.
•
(“*” on the number keypad) key.
PAGE
ALL PAGE
To page all designated keysets and external speakers at the same time:
Press the PAGE (“*” on the number keypad) key.
•
Dial “*”✎
•
After the attention tone, make your announcement.
•
Press the ANSWER/RELEASE (Space bar) key when done.
•
15
Page 19

ADVANCED FEATURES
SCHEDULED ANNOUNCEMENTS
The Smart Operator may have prerecorded announcements automatically played over any paging zone based on time of
day, day of week or holiday.
•
Enter Station Group/ID number
•
Select Page zone from pull down menu.
•
Enter Announcement Description.
•
Enter start time, number of intervals and time between
intervals.
•
Check which days to be active.
Page announcements will be made according the
announcement schedule. These announcements can be
Voice or any sound that is recorded on the Samsung 400si
Auto Attendant or Voice Mail system.
NOTE: Holidays are defined in the File Menu.
CHANGE DND STATUS OF OTHER STATIONS
You may change the DO NOT DISTURB status at other stations. An indication on the Directory window will provide you with
the current status.
Changing DND from the Directory Window
• Search for the station in the Directory window.
• Right mouse click on the Status indicator or the name
for the station and a small window appears that will
indicate the current Do Not Disturb Status.
• Left mouse click the Do Not Disturb option to
change status.
• Extensions and Directory window will update
indicating the changed status.
Changing DND from the Extensions Window
Changing DND from the Extensions Window
Changing DND from the Extensions WindowChanging DND from the Extensions Window
• Left mouse click on the proper “100” group button to display
the proper range of extensions.
• Right mouse click on the DSS/BLF button and a small window
appears that will indicate the current Do Not Disturb Status.
• Left mouse click the Do Not Disturb option to change status.
• Extensions and Directory window will update indicating the
changed status.
Page 20

FLEXIBLE FORWARDING
Forwarding of any station or group can be activated based on time of day, day of week or holiday.
•
Enter Station/Group number or List to be forwarded.
• Enter start time of desired forward condition.
• Select Forwarding type from pull down menu.
• Enter forwarding destination.
• Check whether or not you wish to always enforce this forwarding
condition. If selected, this prevents the station user from changing
the forwarding status of the telephone while the particular
forwarding is in effect.
• Check which days to be active.
The above example will forward Extension 302 under a No Answer condition to Group 500 starting at 8:00am. At 5:00pm
the forwarding condition will remain the same but the destination will change to Group 549. This Flexible Forwarding
application will be in effect Monday thru Friday and will be enforced by Smart Operator, preventing the user from
changing the forwarding condition.
NOTES:
1. Holidays are defined in the File Menu.
2. Groups can only have “Forward All Calls” selected.
3. Lists are created in the File Menu. These lists are created in case you have a group of station numbers that need
to have the same forwarding type set.
911 ALERT
Smart Operator will alert the operator when someone on the telephone system dials “911”. The system will display the name
from the Smart Operator directory along with extension number. If more than one name is listed for a particular extension,
Smart Operator will show only the first name it finds for that extension number. Smart Operator can also be programmed to
alert the operator when other numbers have been dialed as well. Please contact your service company to program and
test this feature correctly.
NOTES:
1. Smart Operator is not alerted until the SMDR Start/DTMF timer expires.
Page 21

CONVENIENCE FEATURES
CALL RECORD
You can record your conversation at anytime by pressing the Call Record (F11) key. Recording is stored in your Voice Mail
box as a new message.
While on a conversation, press the Call Record (F11) key.
•
Conversation will be recorded into your Voice Mail box.
•
•
Press the Call Record
OR
OR
OROR
•
Pressing the Answer/Release
NOTE: Call Record requires the use of Cadence/SVMi Voice Mail.
MUTE
You can mute the handset transmitter or microphone during any conversation:
Press the MUTE (Delete) key. The word “MUTE” will appear in the middle of the Smart Operator screen.
•
To resume speaking, press the MUTE button again. The word “MUTE” will clear.
•
Call Record again to stop recording.
Call RecordCall Record
Answer/Release (Space bar) will disconnect call and stop recording.
Answer/ReleaseAnswer/Release
HEADSET OPERATION
Smart Operator automatically sets your phone for Headset mode upon startup. To change this setting, perform the following
procedures.
Left mouse click the “Utilities” label on the Menu bar located at the top of the Smart Operator screen.
•
Left mouse click the Headset/Handset option to select Headset or Handset operation.
•
NOTE: Headset Mode is recommended, but not required when using Smart Operator.
18
Page 22

WHAT IS CALLER ID?
Caller ID is the name given to the telephone company-provided feature that delivers the telephone number and sometimes
the name of the person calling your phone. There are two types of Caller ID; the first delivers the calling party’s telephone
number only and the second (sometimes referred to as “Deluxe” Caller ID) delivers both the calling party’s telephone
number and name as listed in the telephone directory.
The DCS 400si system can handle both types of Caller ID; in fact, in the case of number only delivery, the system can be
programmed to insert a name for a specific telephone number (up to a maximum of 1500 numbers). However, even though
you are paying to receive Caller ID information, there are some circumstances that mean you will not receive this information.
The six most common reasons are listed below along with the display information that the DCS 400si will provide.
PRIVATE The caller does not wish his/her name or number to be revealed to you. This type of call can be
stopped at the telephone company by dialing an access code on your outside lines. This will redirect
these PRIVATE calls to an announcement that states that you do not wish to receive calls that have
had Caller ID blocked. The code to block these calls can usually be found in the front section of the
telephone directory.
OUT OF AREA The caller is calling from an area that cannot provide Caller ID information (for example, international
calls) or he/she is calling from a type of circuit that cannot provide Caller ID information, for example,
some outbound WATS lines.
PAYPHONE The caller is calling from a coin-operated telephone. The telephone company will send this
information, as there are no directory listings for pay phones. The number will be delivered as usual.
INVALID CID INFO This is a message that will be displayed when CID information is sent on the line but was somehow
corrupted.
NO CID RECEIVED This is a message that will be displayed when there was no CID information sent on the line.
NO CID DSP Caller ID Digital Signal Processors (CIDDSP’s) are resources in the DCS 400si required for receiving
CID data. If there are no CIDDSP’s available at the time a call comes in, this is the message you will
see on your display.
19
 Loading...