

Samsung SmarThru 2
Guide

Trademarks
• SmarThru 2, MailBox, Image Manager, Scan Manager, Copy Manager, Image Viewer, and
AnyPage are trademarks of Samsung Electronics.
• Acrobat Reader is a trademark of Adobe Systems Inc.
• Windows, Windows 95, Windows 98, Windows NT are trademarks of Microsoft corporation.
• Other names and trademarks mentioned in this manual are trademarks of their respective
holders.
About User’s Guide
Your machine is packaged with two User Guides:
• User ’s Guide, which provides you with all of the detailed information you will
need to install, and use the machine. This Guide also provides information to
maintain and troubleshoot your machine.
• This SmarThru 2 Guide provides the basic description on using the supplied
multi-function application, Samsung SmarThru 2, allowing you to scan and edit
images, scan to copy, PC fax, and send e-mail on your computer. You will also
find a brief description on the automatic text recognition program; AnyPage Lite.
I
Introducing Samsung SmarThru 2
––––––––––––––––––––––––
1.1
R unning Scan Wizard
––––––––––––––––––––––––––––––––––
1.3
R unning SmarThru 2
–––––––––––––––––––––––––––––––––––
1.5
Getting Help in the SmarThru 2 Progra m
––––––––––––––––––
1.7
Contents
Getting Started
Scanning
O verview
–––––––––––––––––––––––––––––––––––––––––––––
2.1
Loading Documents for Scanning
––––––––––––––––––––––––
2.2
Scanning a Document with the Scan Manager
––––––––––––––
2.4
Features of the Scan Manager Window
––––––––––––––––––––
2.7
Selecting Scan Manager Options
–––––––––––––––––––––––––
2.8
Samsung TWAIN for Scan Window
–––––––––––––––––––––––
2.9
Copying
Copying a Document
––––––––––––––––––––––––––––––––––
2.10
Scanning to PC Fax
Scanning a Document, then Sending it by PC Fax
––––––––––
2.14
Scanning to E-mail
Scanning a Document, then Sending it by E-mail
––––––––––
2.18
Scanning to OCR
Scanning for Automatic Text Recognition
–––––––––––––––––
2.21
Configuring Automatic Text Recognition
––––––––––––––––––
2.24
1
Working with Image Manager
O verview –––––––––––––––––––––––––––––––––––––––––––––– 3.1
Opening the Image Manager Window ––––––––––––––––––––– 3.2
Using Programs Bar in the Image Manager ––––––––––––––––– 3.4
Image Manager Toolbar Overview –––––––––––––––––––––––– 3.6
Editing Images ––––––––––––––––––––––––––––––––––––––––– 3.8
W orking with Images In Browse Mode –––––––––––––––––––– 3.12
SmarThru 2
3
2
Scan Wizard

II
O verview
–––––––––––––––––––––––––––––––––––––––––––––
4.1
R unning AnyPage Lite
––––––––––––––––––––––––––––––––––
4.2
How To Recognize a Text or Table
––––––––––––––––––––––––
4.3
A ny Page Lite Window Overview
–––––––––––––––––––––––––
4.10
Index
Using AnyPage Lite
OCR Application
4
Image Viewer
O verview –––––––––––––––––––––––––––––––––––––––––––––– 3.16
Associating File Types with the Image Viewer ––––––––––––– 3.16
Viewing Images with the Image Viewer ––––––––––––––––––– 3.18
Mailbox
O verview ––––––––––––––––––––––––––––––––––––––––––––– 3.19
Features of the Mailbo x Window ––––––––––––––––––––––––– 3.20
Working with Fax Messages
O verview –––––––––––––––––––––––––––––––––––––––––––––– 3.22
Creating and Sending a PC Fax –––––––––––––––––––––––––– 3.23
Browsing Fax Messages ––––––––––––––––––––––––––––––––– 3.29
Sending a PC Fax from a Windows Application –––––––––––– 3.31
R eading Incoming Fax Messages ––––––––––––––––––––––––– 3.32
Using Fax Cover Page Editor ––––––––––––––––––––––––––––– 3.35
Working with E-mail Messages
Creating and Sending E-mail Messages ––––––––––––––––––– 3.38
New Message Toolbars –––––––––––––––––––––––––––––––––– 3.41
Deliv ering a Mail ––––––––––––––––––––––––––––––––––––––– 3.42
Browsing E-mail Messages –––––––––––––––––––––––––––––– 3.43
Finding Messages –––––––––––––––––––––––––––––––––––––– 3.45
Using Address Book
O verview –––––––––––––––––––––––––––––––––––––––––––––– 3.46
Opening the Address Book –––––––––––––––––––––––––––––– 3.47
Adding Contact Information to Your Address Book ––––––––– 3.48
Organizing Address Book Items –––––––––––––––––––––––––– 3.50
SmarThru Configuration
Opening the SmarThru Configuration Dialog Bo x –––––––––– 3.51
Configuring the Fax Gate –––––––––––––––––––––––––––––––– 3.53
Configuring the Internet Gate ––––––––––––––––––––––––––– 3.54
Configuring Service ––––––––––––––––––––––––––––––––––––– 3.55
chapter
1
1
Samsung SmarThru 2 is a companion software of y our
machine. This chapter introduces you to the Samsung
SmarThru 2. Topics included in this chapter are:
◆ Introducing Samsung SmarThru 2
◆ R unning Scan Wizard
◆ R unning SmarThru 2
◆ Getting Help in SmarThru 2 Progra m
Note
To use the Samsung SmarThru 2, you must have
installed the SmarThru CD-ROM that was shipped
with your machine. For information on installing the
SmarThru CD-ROM, refer to the Product User’s
Guide.

1.1
Getting Started
Introducing Samsung SmarThru 2
Your machine is a Multi-Function Product (MFP) which combines a printer,
scanner and copier in a single machine with a footprint smaller than
most single function desktop printers. It concentrates all document
processing in a single workplace.
Samsung SmarThru 2 provides you with:
Message center (MailBox) that can send, receive and store
e-mail and fax messages.
¥ SmarThru operates as an SMTP (Single Mail Transfer Protocol)/POP3
(Post Office Protocol) electronic mail client, so you can create,
modify, receiv e and store e-mail messages. In addition, SmarThru
supports IMAP (Internet Message Access Protocol) mail servers so
you can operate on IMAP messages the same you do it with
SMTP/POP3 e-mails.
¥ You can create your fax cov er page. Extensiv e image support makes
it conv enient and easier to make your faxes look good. For details,
see page 3.35.
¥ Using the Message List and Quick Preview pane on the Mailbox
window, you can view a list of messages and read individual
messages at the same time. Extensive colouring makes it easier for
you to differentiate between different kinds of messages. The Folder
List contains folders and you can easily switch between them. Faxes
and mails can be located in the same folder. For details, see page
3.43.
¥ You can save names and addresses in your Address Book either by
importing them from other programs, t yping them in or adding them
from messages you receive. You can organize a group of contacts
(addresses) into logical groups that make it easier for y o u t o send
messages simultaneously to a number of people by just clicking a
button!
¥ SmarThru is able to send signed and encrypted e-mails. You can now
be sure the mail y ou are receiving is safe. Use the encryption feature
to mak e sure that only chosen recipients read your mail message.

1.2
Getting Started
Image Manager supports operations on images.
¥ You can scan images directly to the Image Manager or import them
from HDD or network. Just drag-and-drop the image of the supported
format into the Image Manager window to import images from
Windows Explorer or even your browser! Images stored can be
exported to HDD in a variet y o f image formats. Images stored in the
Image Manager are always at your fingertips!
¥ Image Manager is a powerful image editor that allows you to perform
a lot of oper ations on images; applying various visual effects,
changing colours, adding annotations, etc.
Scan Manager supports scanner operations.
¥ You can scan images and documents into the Image Manager.
¥ Scan Manager lets y ou create fax messages or e-mail messages by
passing the scanned image to the SmarThru Mailbox.
¥ You can also recognize a scanned document and save the text in a
file with the help of the supplied OCR software; AnyPage Lite.
Copy Manager allows you to control the copying process.
With Copy Manager you control the copier feature of y our machine.
Besides just copying a document, Copy Manager optionally stores the
image in the Image Manager.
Image Viewer that allows you to view images in a variety
of graphical formats.
You can associate different file types with the Image Viewer so that
you can open files in the Image Viewer by double-clicking.
AnyPage, OCR software, included in the package, that gives
you the possibility to convert scanned images into text
documents suitable for editing in your favorite text editor.
Using AnyPage, you can automatically recogniz e all incoming fax
messages.

1.3
Getting Started
Running Scan Wizard
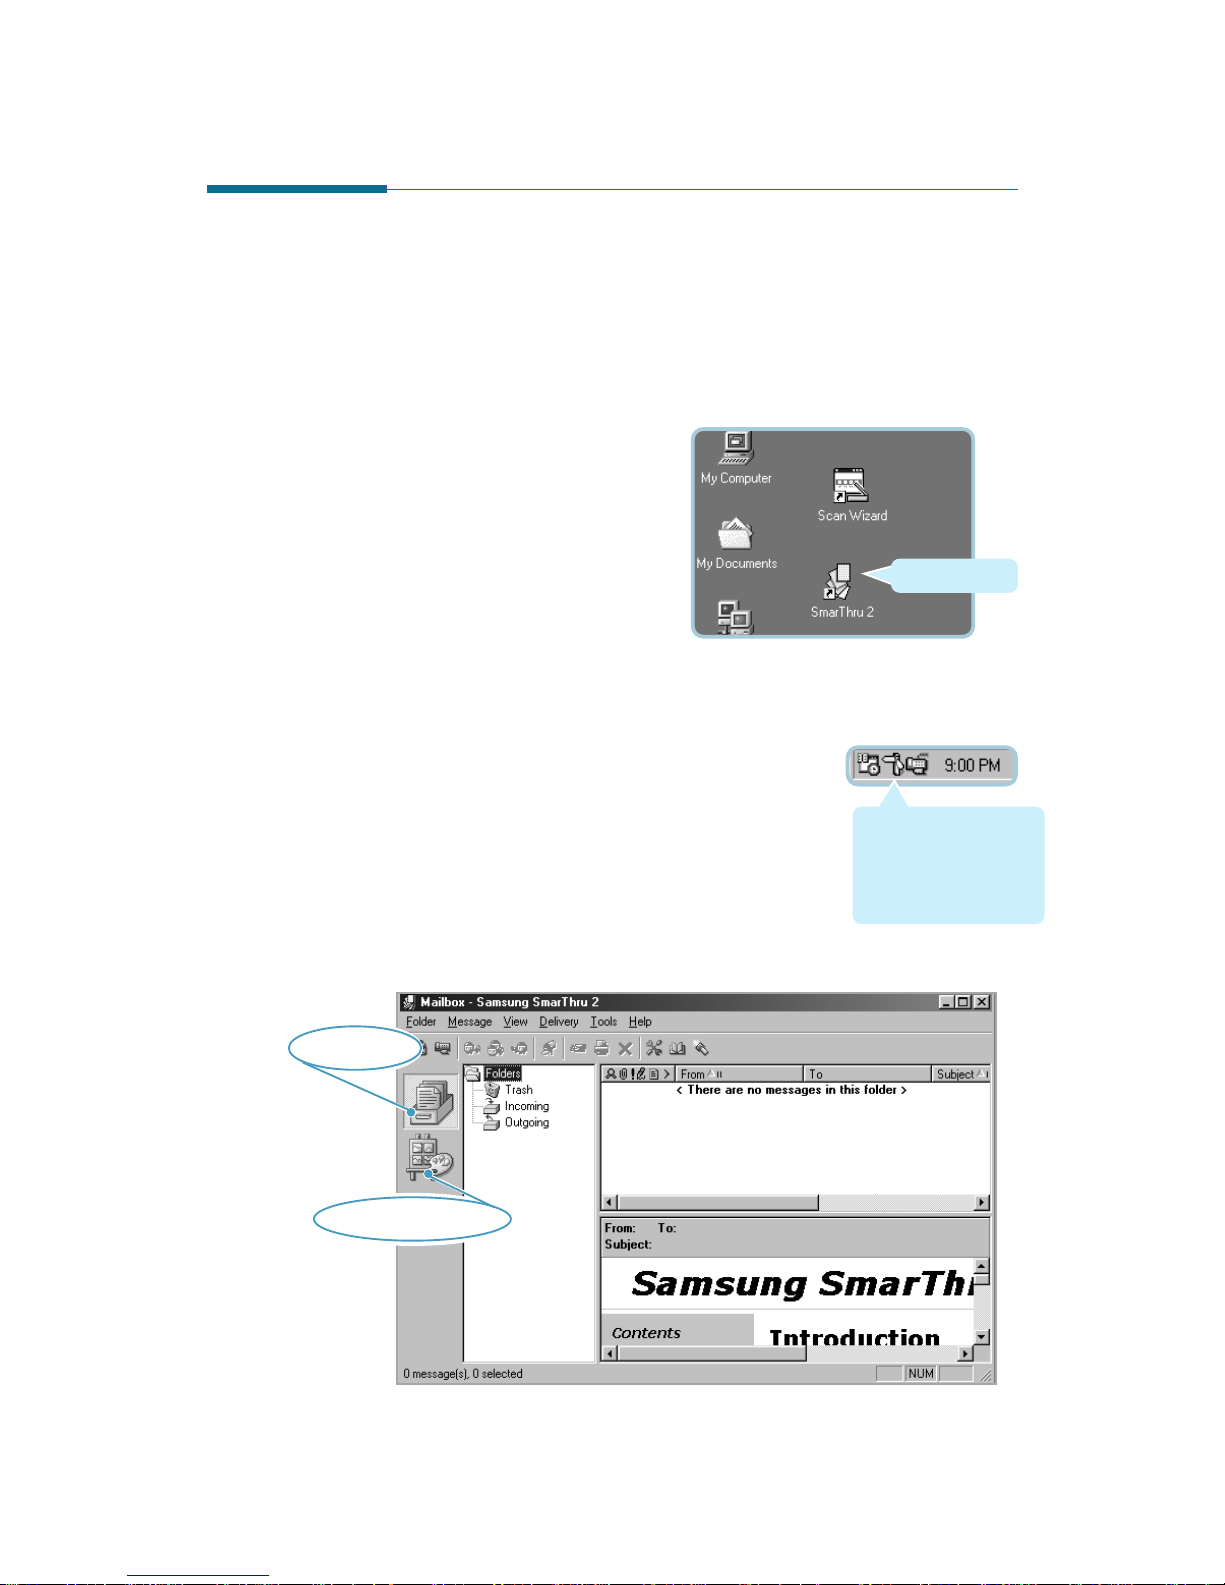
After y ou have in stalled the Samsung SmarThru 2, you will find the Scan
Wizard icon and the SmarThru 2 icon on the desktop window.
Scan Wizard is an easy—to-use, convenient tool to manage your scan
needs. To run the Scan Wizard:
¥ From the desktop window, double-click the Scan Wizard icon.
¥ From the Start menu, click Programs and select Samsung
SmarThru, and then Scan Wizard.
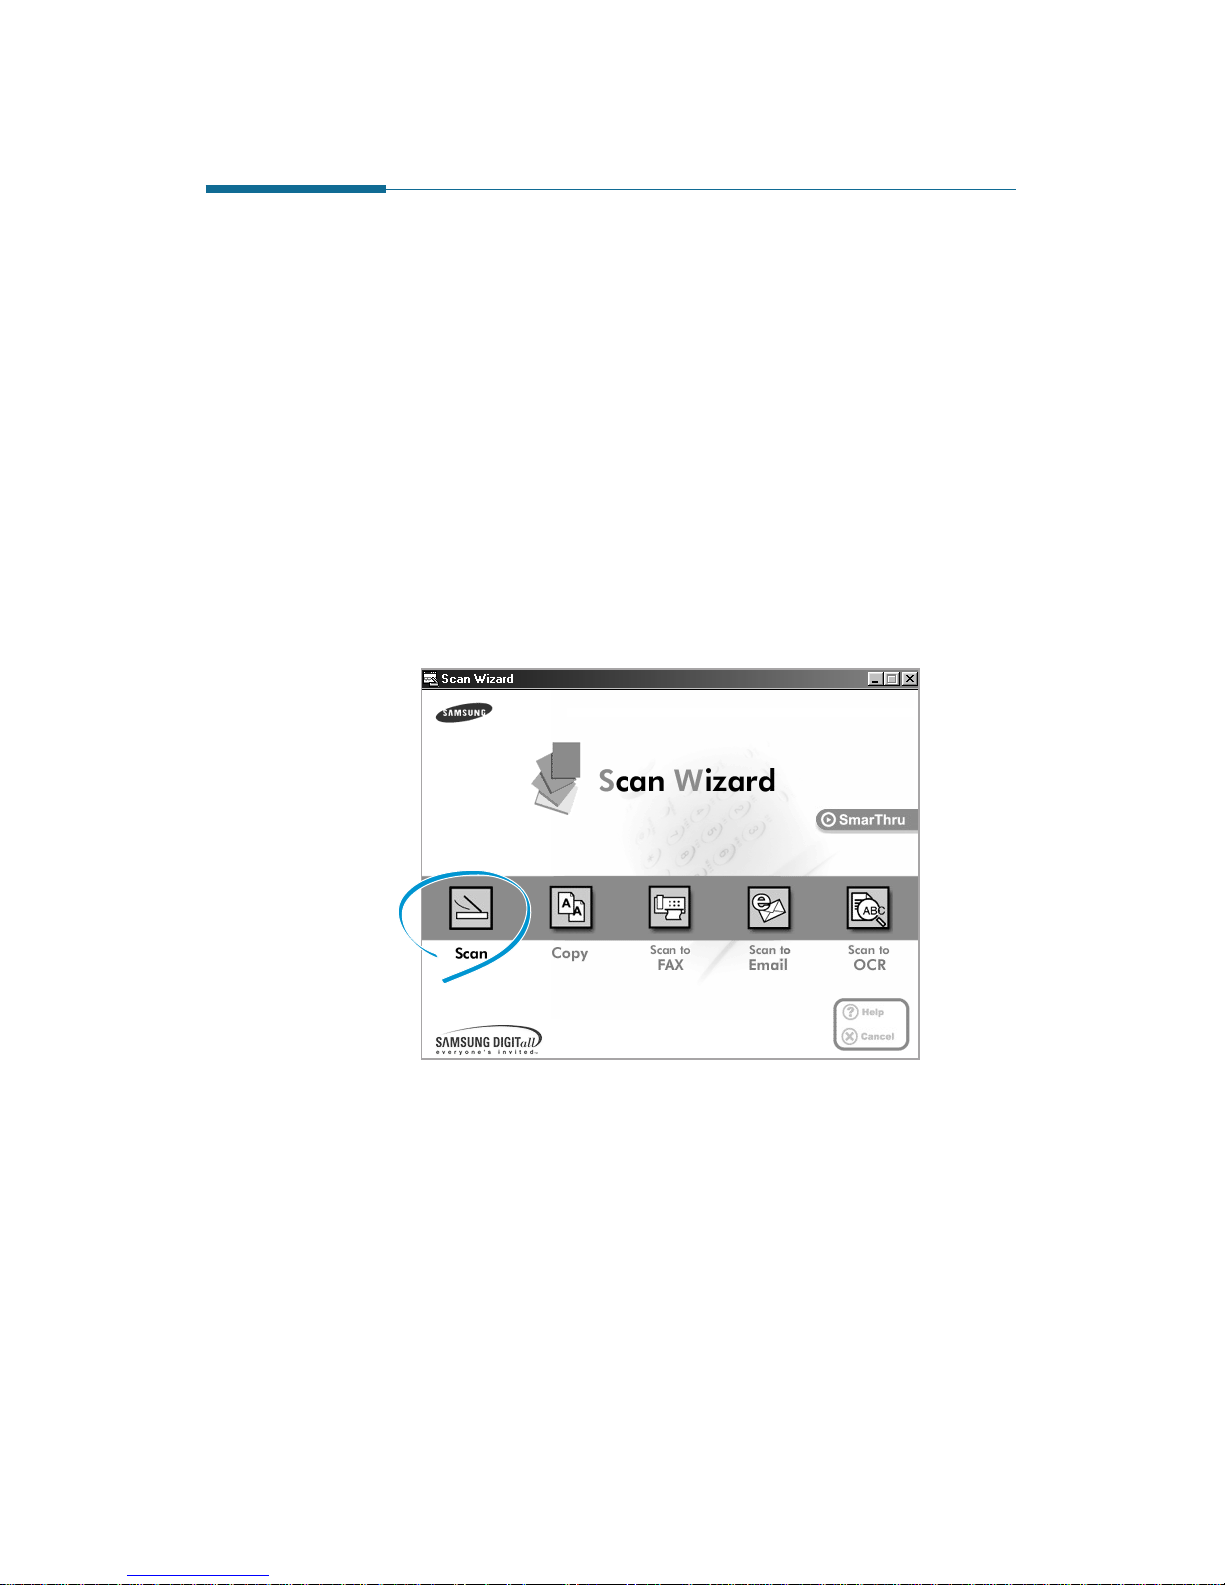
The Scan Wizard window appears.
Opens the
SmarThru 2 window.
Displays on-line help.
Closes this window.
1.4
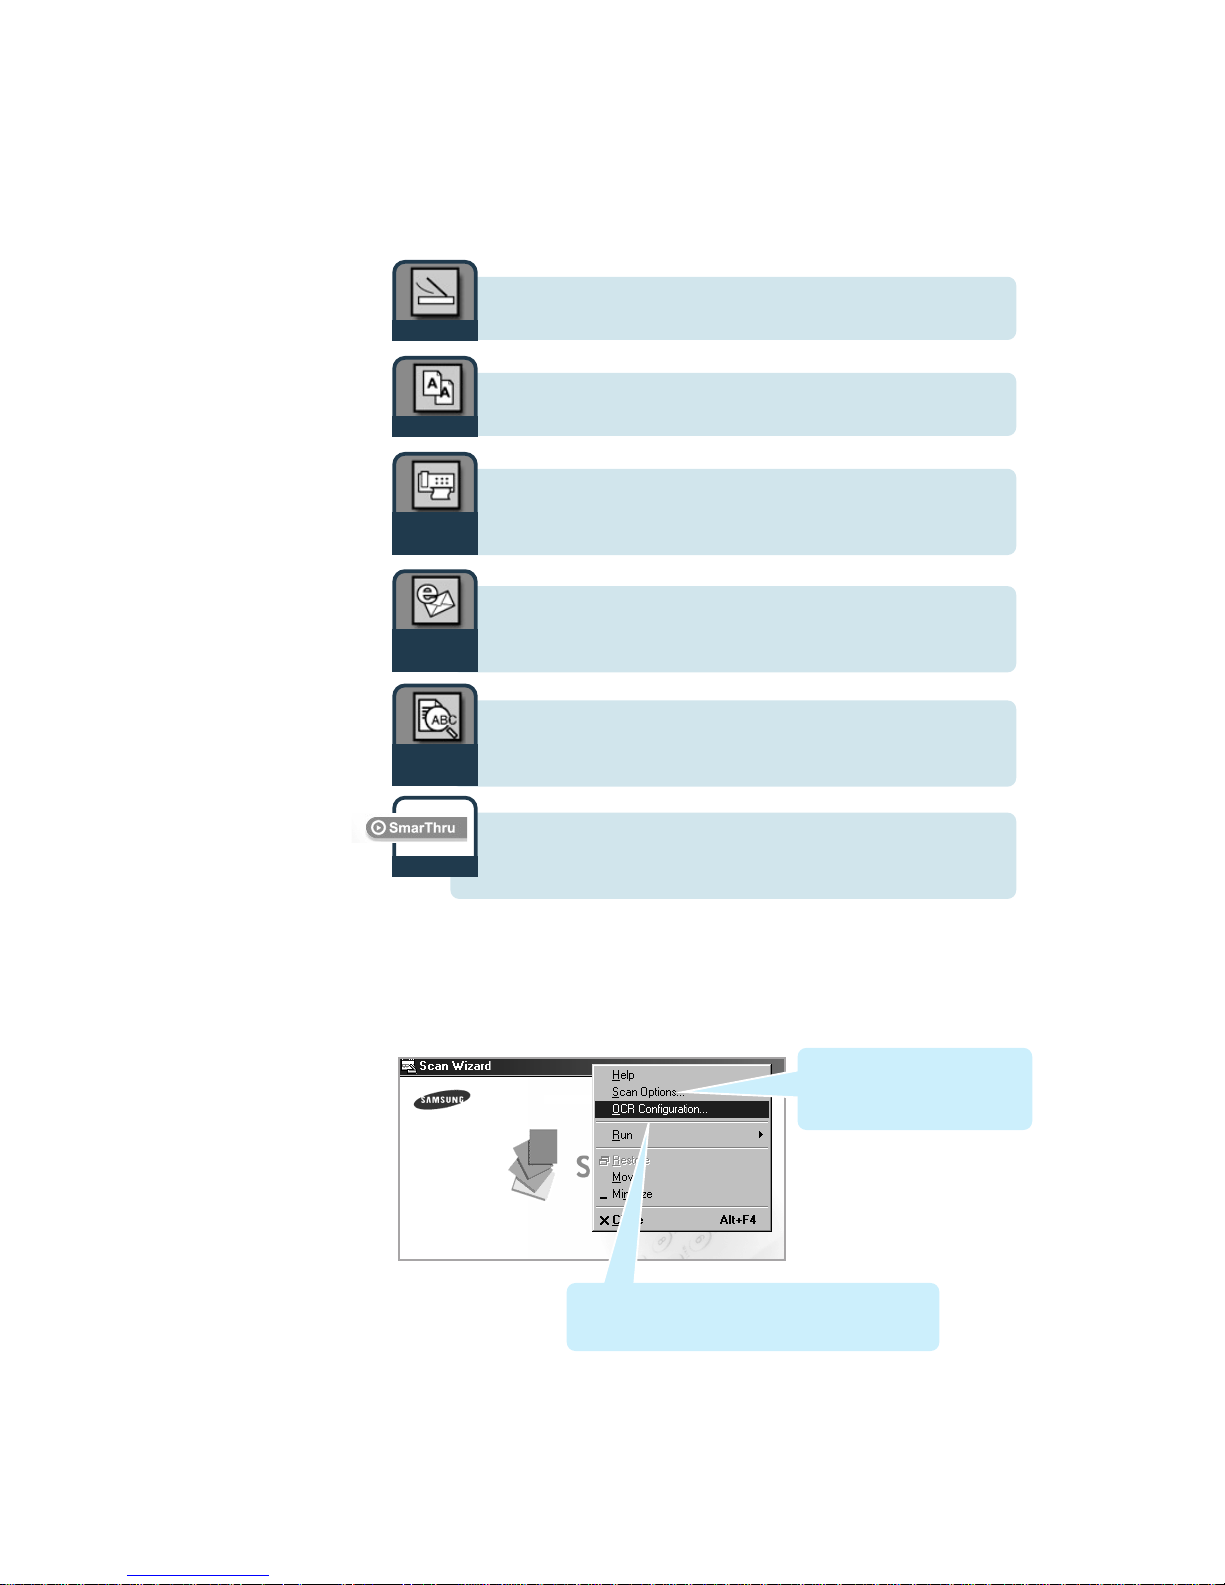
The Scan Wizard window gives you access to the following features:
Additionally, the Scan Wizard system menu provides access to the
following items. To bring up the system menu, right-click on the title bar
of the Scan Wizard window.
lets y o u scan documents and images quickly and easily.
For details, see page 2.4.
Getting Started
Scan
lets y o u use your scanner and printer as a copier device.
For details, see page 2.10.
Copy
lets y o u scan documents and then launches New Fax
which helps you send electronic faxes. For details, see page
2.14.
Scan to
Fax
lets y o u scan documents and then launches Message
Form to send just scanned document attached to a new
mail. For details, see page 2.18.
Scan to E-
mail
if the scanned document should be automatically passed to
the OCR program for text recognition, click Scan to OCR.
For details, see page 2.21.
Scan to
OCR
launches Samsung SmarThru 2 program to manage your
mails, fax documents and images.
For details, see page 1.5.
SmarThru
Shows the Scan Manager
Options dialog box which allows
you to select scan source, etc.
For details, see page 2.8.
Inv ok es the Automatic Recognition Configur ation
dialog box that lets y ou change the text recognition
parameters. F or details, see page 2.21.
1.5
Getting Started
Running SmarThru 2
Samsung SmarThru Mailbox and Image Manager are integrated in the
Samsung SmarThru 2 window.
To open the Mailbox window or Image Manager window, run SmarThru 2
in the following ways:
¥ From the desktop window,
double-click the SmarThru 2
icon.
¥ From the Start menu, click Programs and select Samsung
SmarThru, and then SmarThru 2.
¥ From the taskbar at the bottom right corner of
the desktop window, right -click on the SmarThru
mail engine icon and select Mailbox from the
pop-up menu.
¥ In the Scan Wizard window, click SmarThru.
The Samsung SmarThru 2 window opens.
Double click
SmarThru Mail Engine
icon. The SmarThru Mail
Engine runs in the
background to check
incoming and outgoing
messages.
Mailbox icon
Image Manager icon
1.6
Getting Started
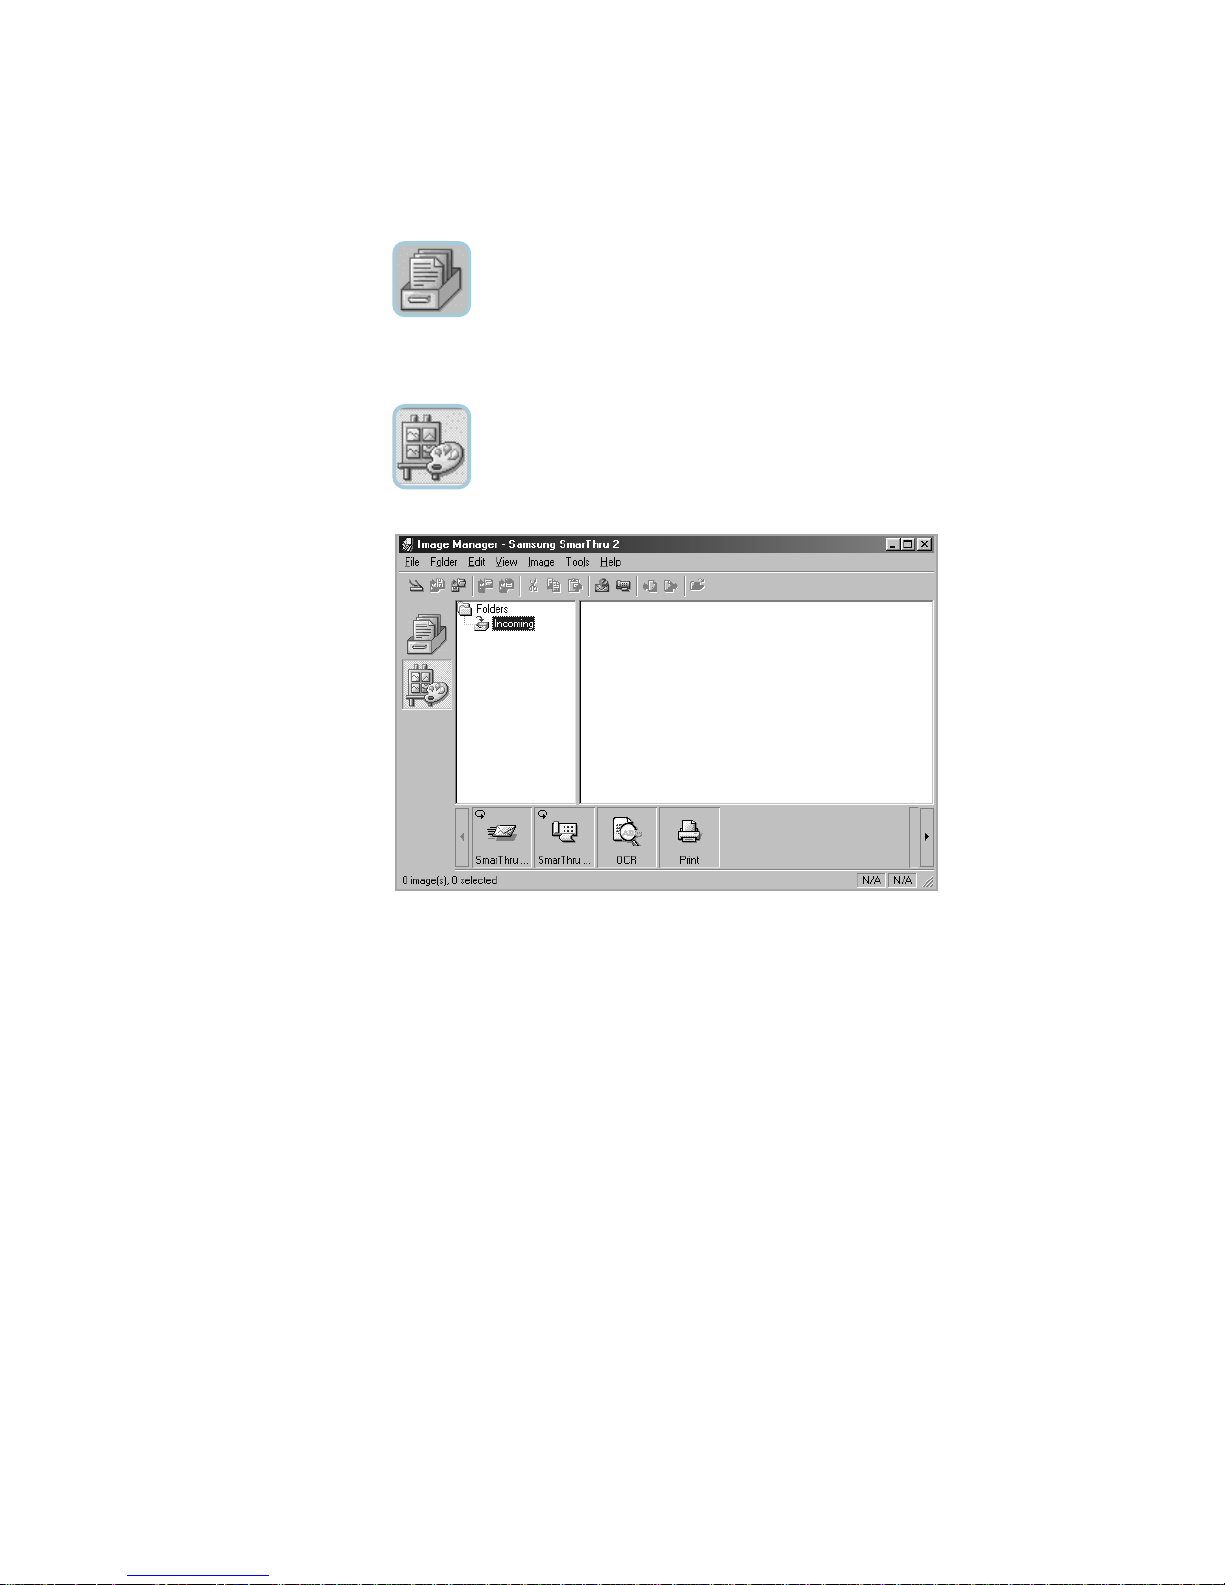
To open the Mailbox window:
Click the Mailbox icon on the Samsung SmarThru 2 window.
For further information on the Mailbo x window, see page 3.19.
To open the Image Manager window:
Click the Image Manager icon on the Samsung SmarThru 2
window.
For further information on the Image Manager window, see page 3.1.
1.7
Getting Started
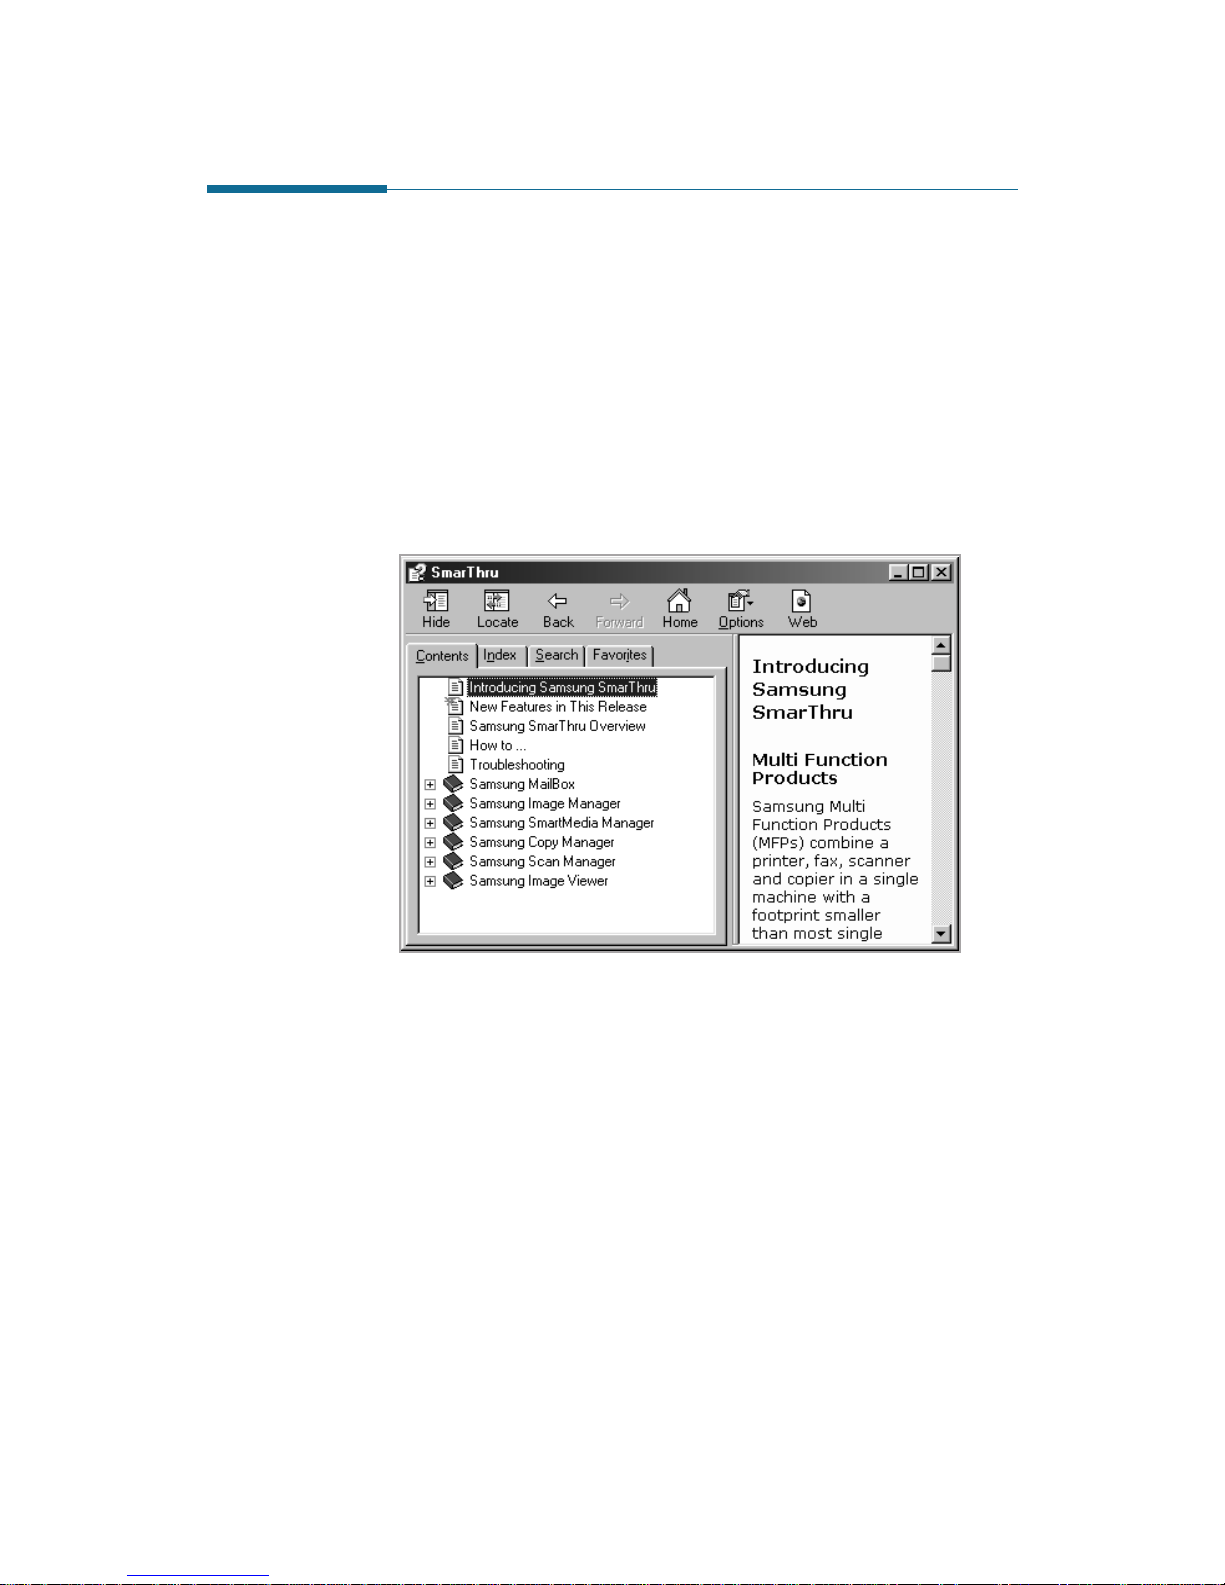
Getting Help in the SmarThru 2 Program
Samsung SmarThru contains a detailed on-line help document. If yo u
encounter problems while using SmarThru, please consult the on-line
help. SmarThru Help is accessible from all windows and dialog boxes
using the SmarThru program.
Click Help on the menu bar or in the windows and dialog boxes while
using the SmarThru progra m .
When you access the SmarThru Help, you can further select Contents
view, Index view or Search view to find the desired item quickly.
Note that the content of the help is variable depending on your
machine.
chapter
2
2
Scan Wizard is an easy-to-use and con venient tool to
manage your scan work. This chapter provides
information on the following topics:
Scanning
◆ O verview
◆ Loading Documents for Scanning
◆ Scanning a Document with the Scan Manager
◆ Features of the Scan Manager Window
◆ Selecting Scan Manager Options
◆ Samsung TWAIN for Scan Window
Copying
◆ C o pying a Document
Scanning to PC Fax
◆ Scan a document and then send it by PC Fax
Scanning to E-mail
◆ Scan a document and then send it by e-mail
Scanning to OCR
◆ Scanning for Automatic Text Recognition
◆ Configuring Automatic Text Recognition

2.1
Scan Wizard
Overview
Scanning is the process of converting an image into computer-usable
information that digitiz es the image. Scanners and digital cameras are
devices that have the technology to transfer an external image to digital
information which can then be saved as a file, printed, fax ed, or
otherwise manipulated on your computer.
With Scan Manager in the supplied Samsung SmarThru 2 program, yo u
can scan images directly into the image editing application Image
Manager .
The type of documents you can scan include photos, drawings, magazine
pages, newspaper articles, and any type of single page image.
You can also scan printed text to recogniz e editable text.
Scanning
2.2
Scan Wizard
Loading Documents for Scanning
There may be serveral wa ys to load documents for scanning. For
examples, two methods of loading documents are provided. If y o ur
machine is equipped with different methods, please refer to its User s
Guide.
F or Flat -bed type: Place your documents on the scanner bed and close
the scanner top cover.
For Automatic Document Feeder (ADF) type: Load documents, as many
as your machine can hold, into the feeding slot.
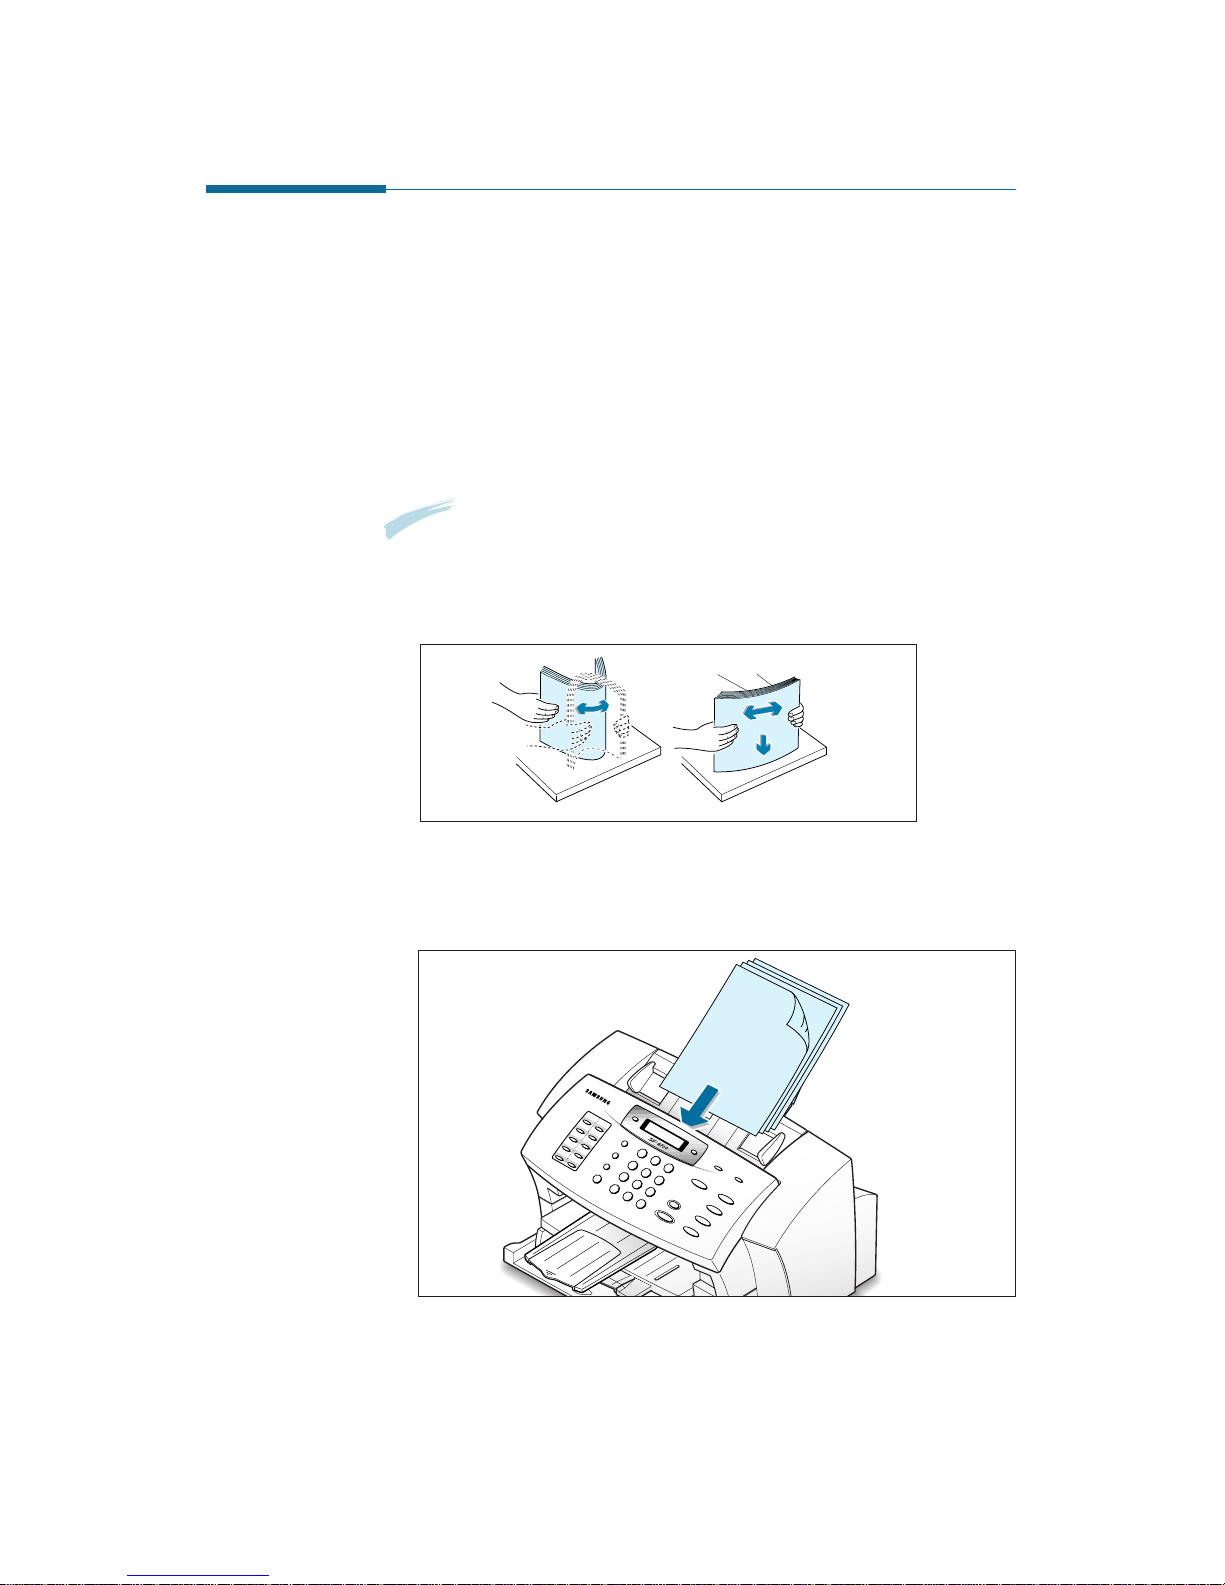
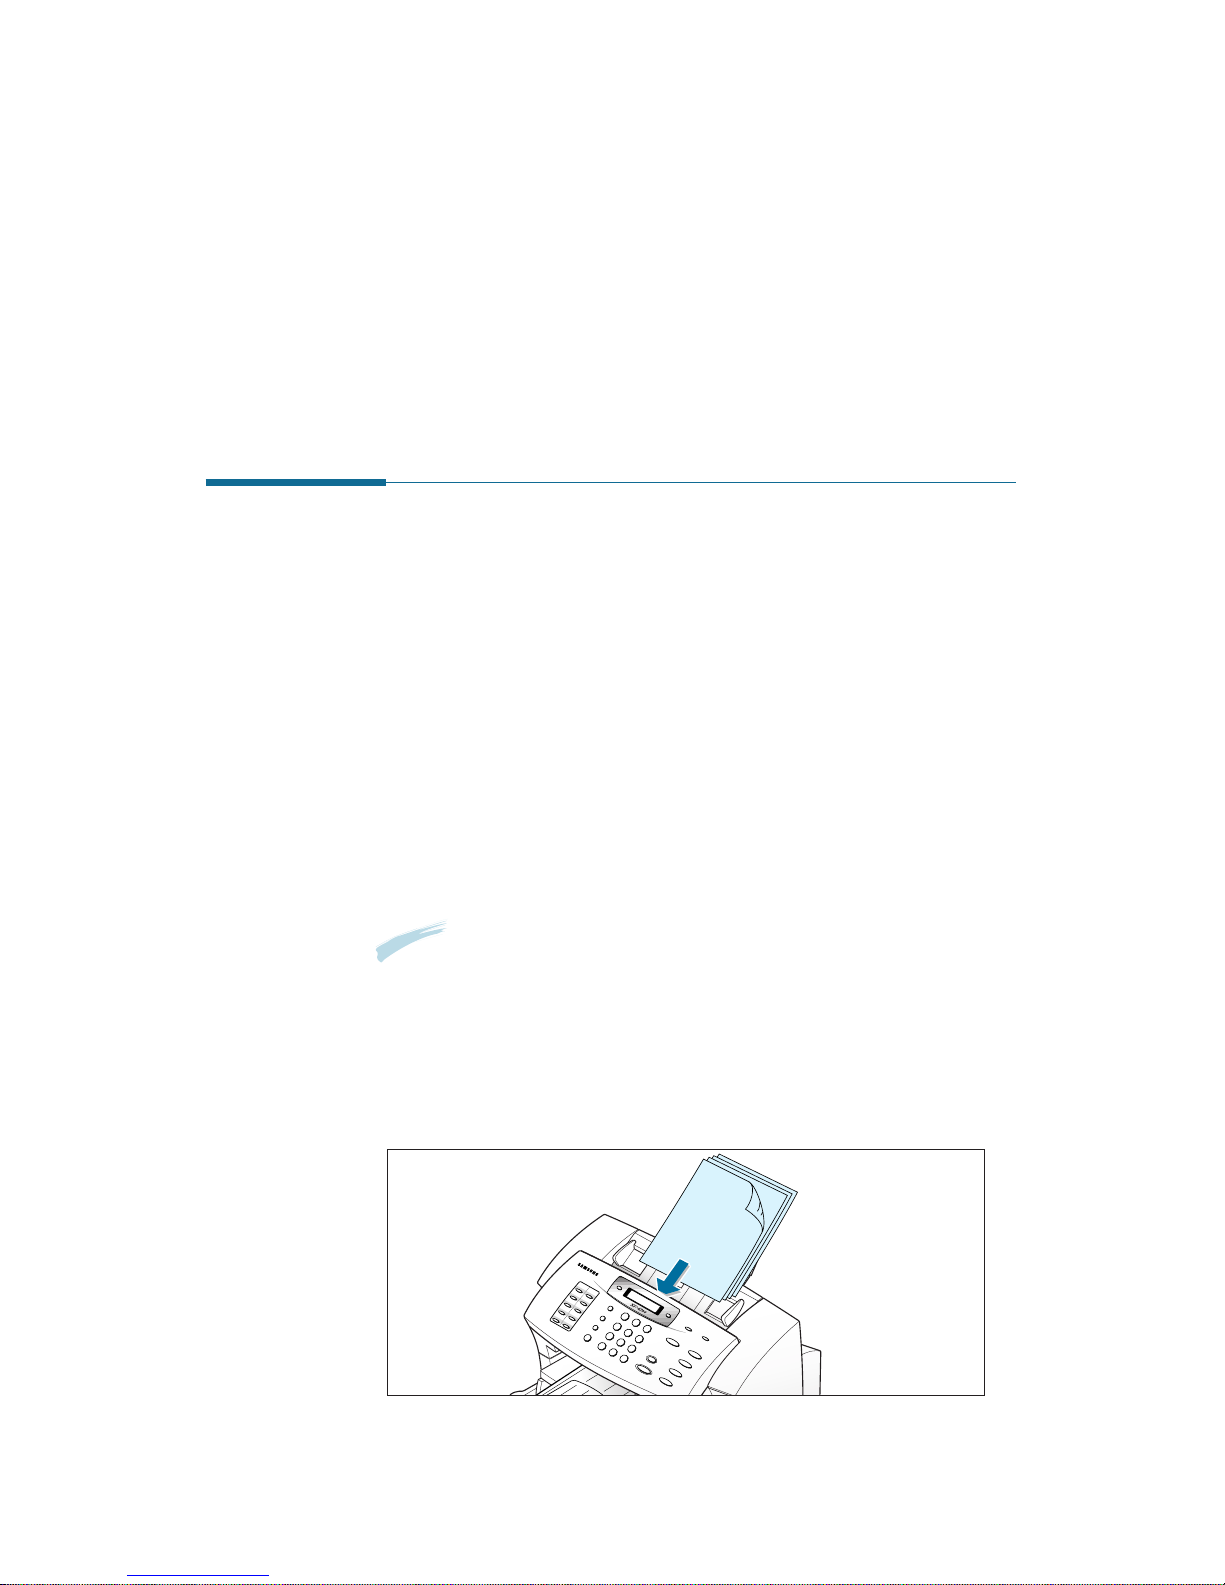
Following instructions especially show how to place documents
into the feeding slot:
1. For multiple-page documents, fan the sheets and tap the documents
on a flat surface to ev en the stack.
2. Place the documents Face Down (or Up) with the top edge going
into the document feeder first.
2.3
Scan Wizard
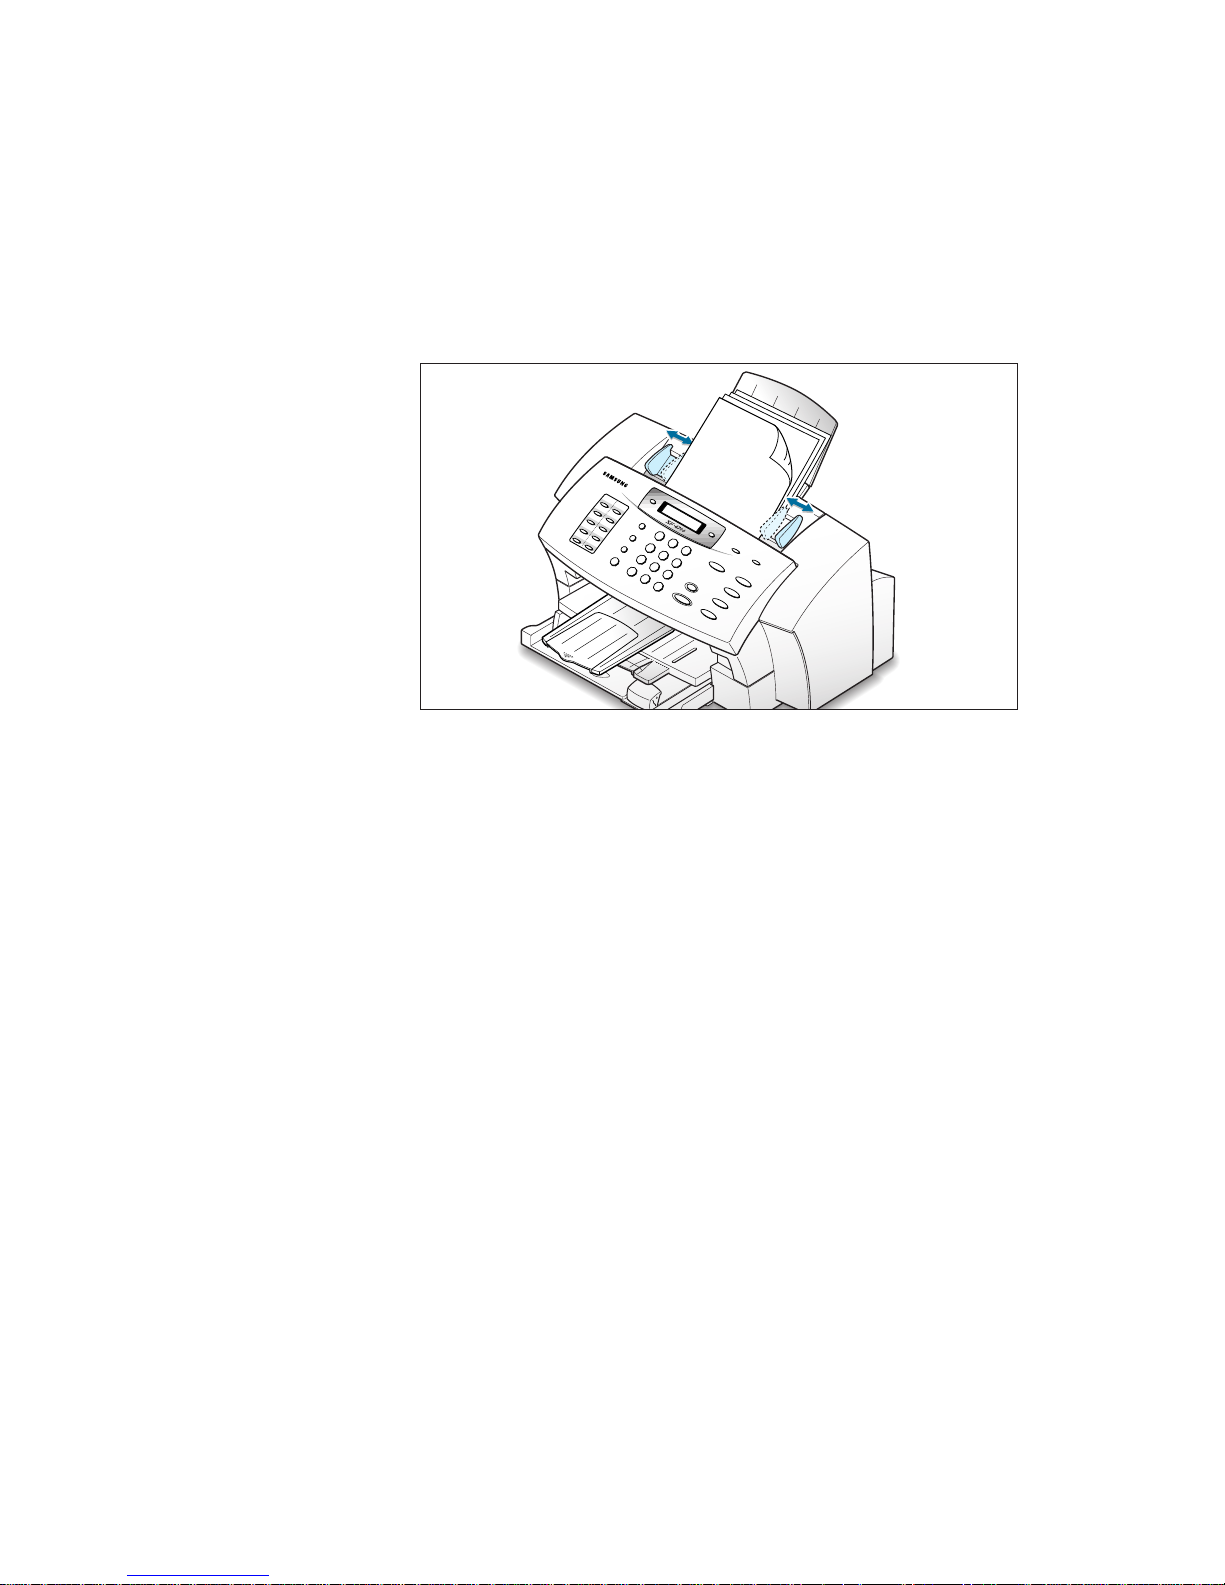
4. Insert the documents into the ADF until it stops.
The document is ready for scanning. The machine automatically feeds
the pages one by one from the bottom of the stack.
3. Slide the document guide lightly against the side of the documents.
2.4
Scan Wizard
Scanning a Document with the Scan Manager
The Scan Manager can convert a photo or paper document into a
computer image. To scan a document with Scan Manager, use the
following steps:
1. Load a document as described in User s Guide.
2. To run Scan Wizard, double-click on the Scan Wizard icon on the
desktop window.
For further information, refer to R unning Scan Wizard on page 1.3.
3. When the Scan Wizard window opens, select Scan.

2.5
Scan Wizard
4. Choose the scan settings and then click Scan. For more information
on the scan settings, refer to Features of the Scan Manager Window
on page 2.6.
5. A progress bar informs you of the scan progress. When the scan is
complete, the scanned image is briefly displayed in the preview area.
Choose appropriate scan settings.
Preview area
2.6
Scan Wizard
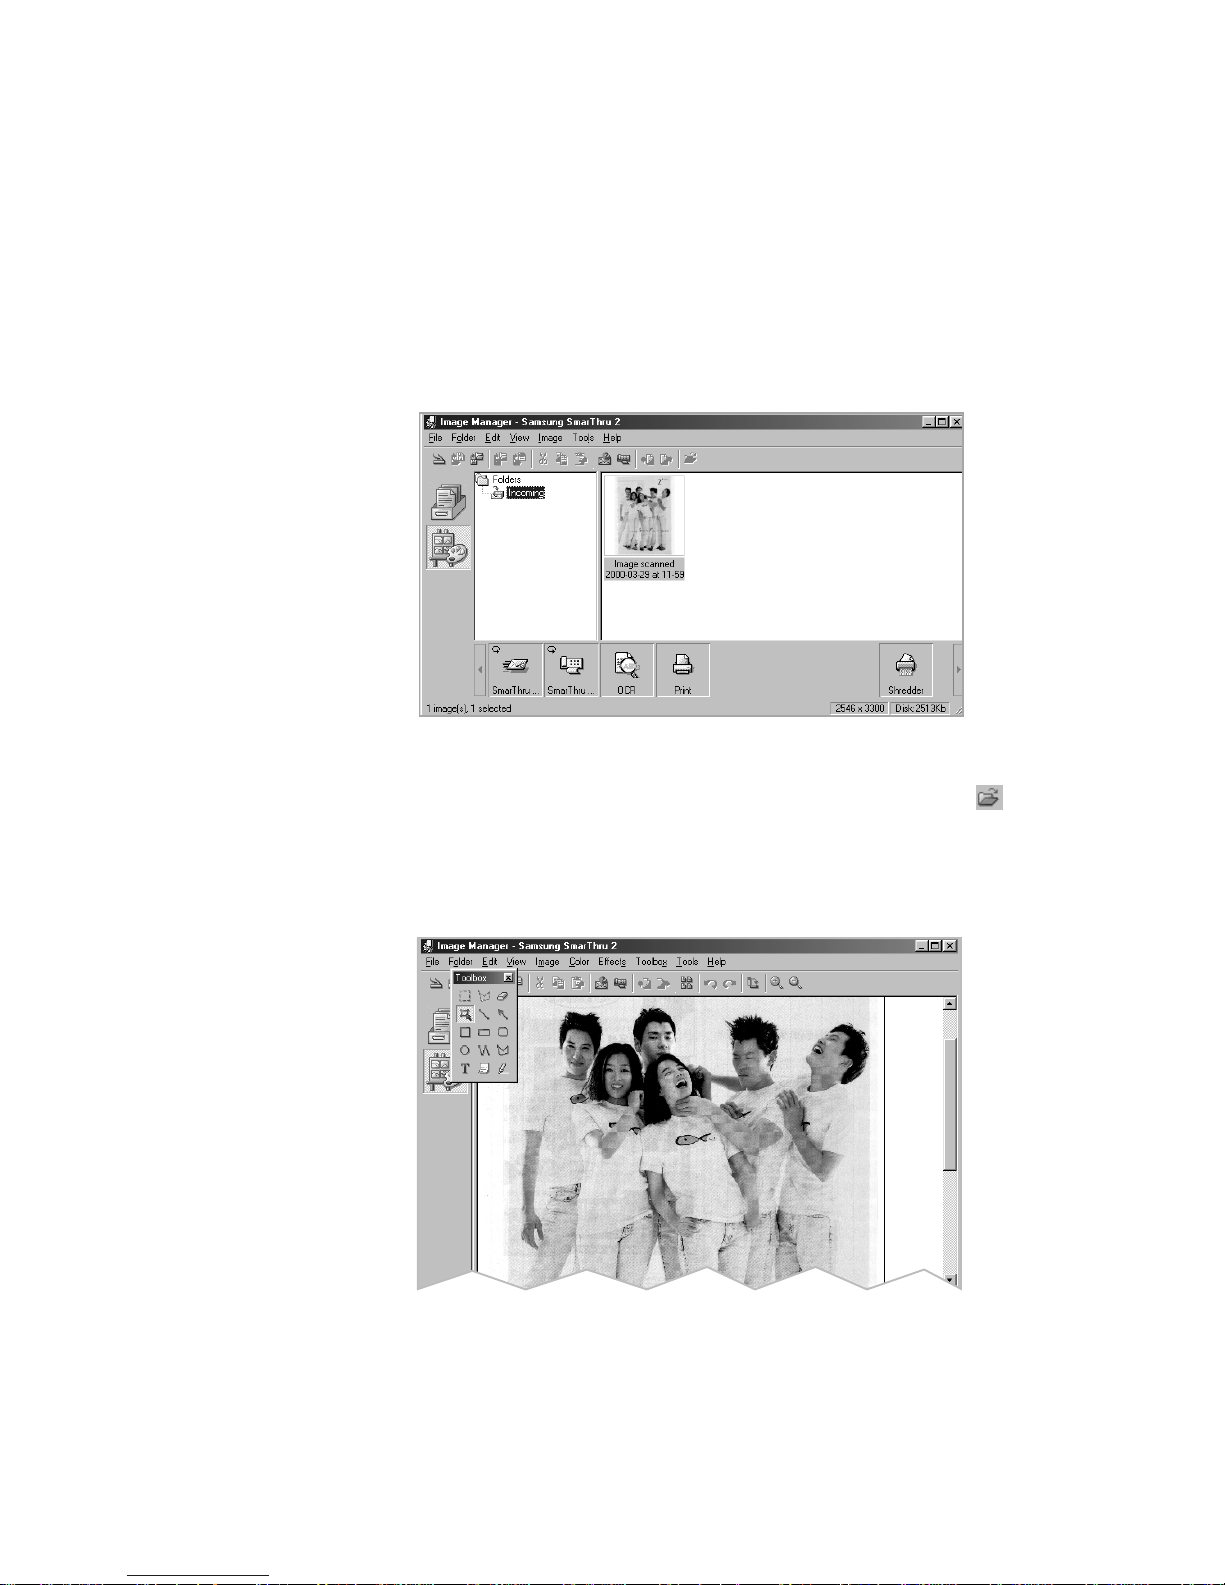
6. The Scan Manager window closes automatically and Samsung
SmarThru automatically launches the Image Manager.
The scanned image is saved in the Incoming folder of the Image
Manager with a system-assigned name.
For information on working with the images in this browse mode, see
page 3.12.
7. To open the image for editing, double-click on the image, or click
on the toolbar. The opened image will replace the contents of the
current folder.
For information on editing images with the Image Manager, refer to
Working with Image Manager on page 3.1.
2.7
Scan Wizard
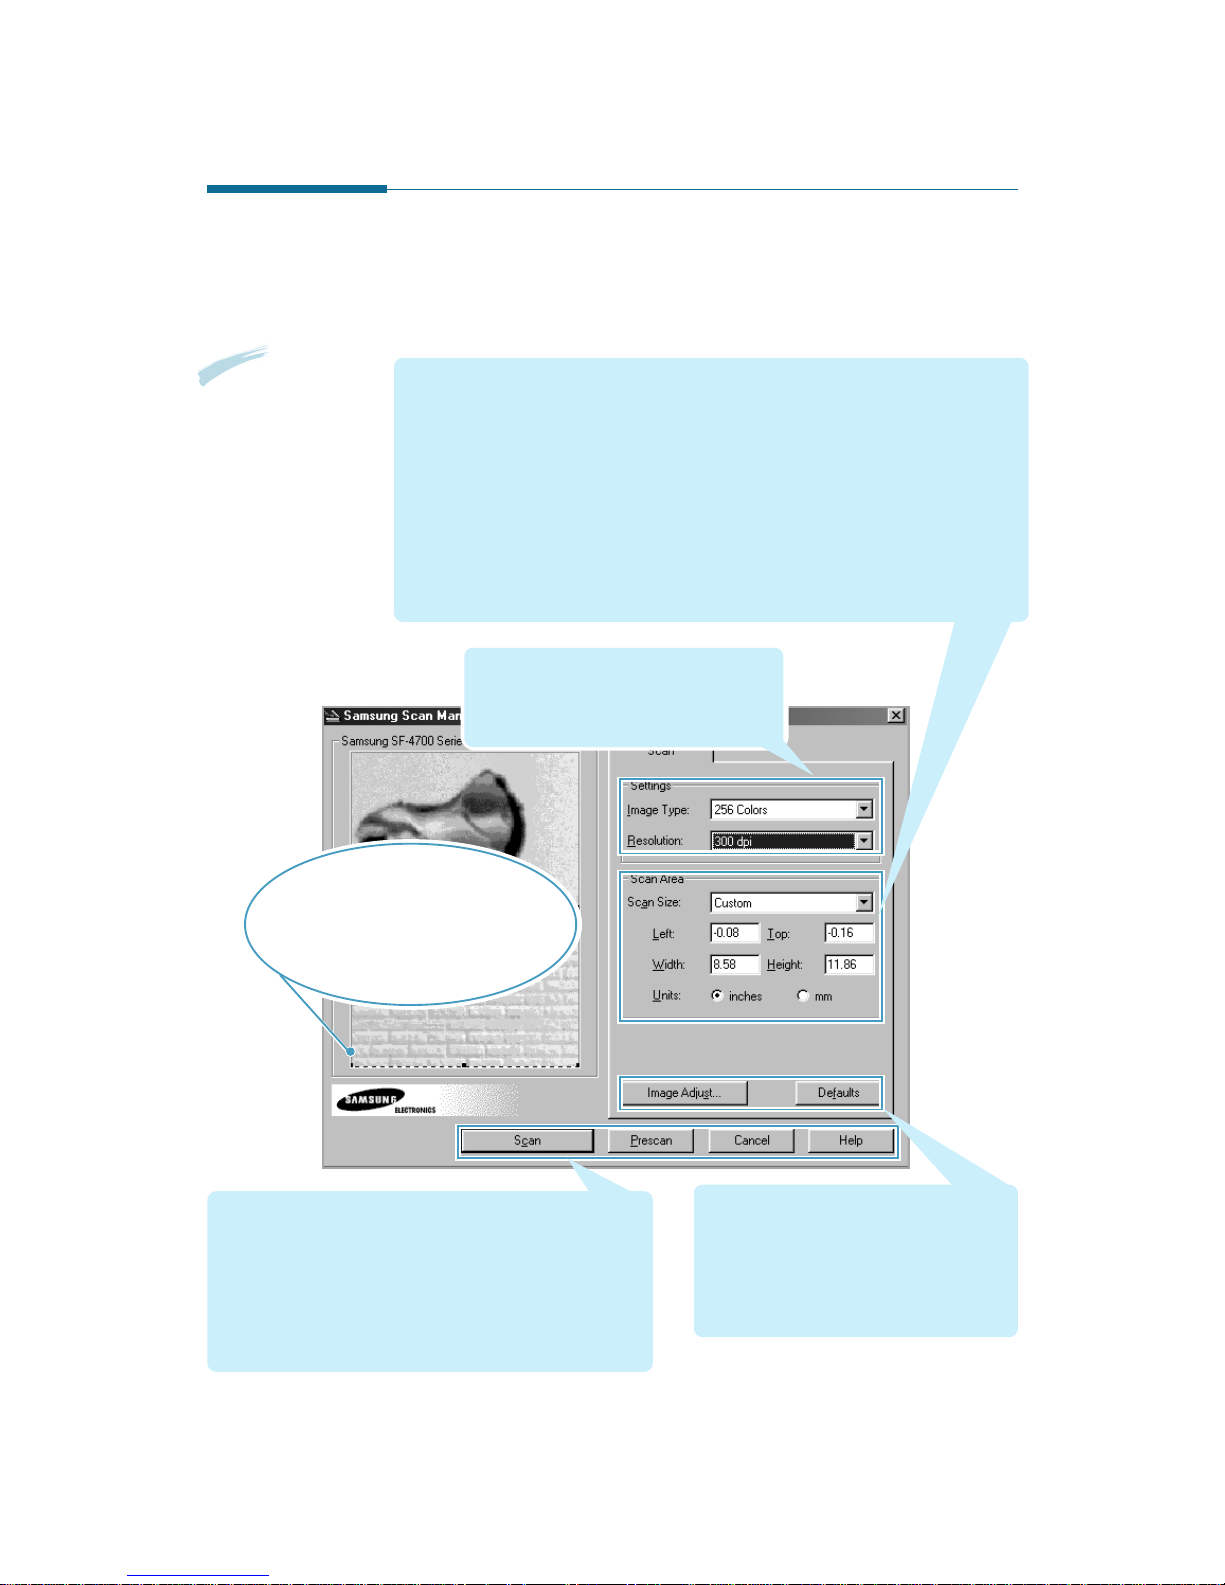
Features of the Scan Manager Window
The Samsung Scan Manager window is used to preview and scan
images. The controls of the Samsung Scan Manager window are
described below.
Preview area: Contains a sample
picture or the prescanned image. It also
contains a dotted rectangle that defines the size
and position of the image area where the
scanned picture should appear. The heading of
this area displa ys the name of the currently
selected scanner.
Scan size: Selects the siz e of the image being scanned. Yo u m ay select one of the
predefined sizes, or Custom to enter the dimensions manually. You may also change the
scan area using the mouse: drag one of the marquee handles (small black squares) to resize
the marquee, or place the mouse cursor inside the marquee (the cursor turns into a fourheaded arrow) and drag it to change the marquee position. If you change the dimensions
after selecting one of the predefined sizes, this setting automatically changes to Custom.
Left, Top: These settings define a position of the top left corner of the scan area.
Width, Height: These settings define the siz e of the scan area.
Units: Lets you select a measurement unit that will be used for specifying scan area
dimensions.
Image Adjust...: Click this button to
bring up the Image Adjust window to
adjust image brightness and contrast.
Defaults: Click this button to return all
the settings to their default values.
Scan: Click this button to start scanning.
Prescan: Click this button to scan an image at low
resolution. This is useful for preliminary testing of scanner
setup etc.
Cancel: Click this button to exit Samsung Scan Manager.
Help: Click this button to bring up the help system.
Image type: Selects a colour setting to
be used for scanning.
Resolution: Selects a colour setting to
be used for scanning.
NNoottee::
If you define
the scan size too
small, multi-page
scanning cannot be
properly mode.
2.8
Scan Wizard
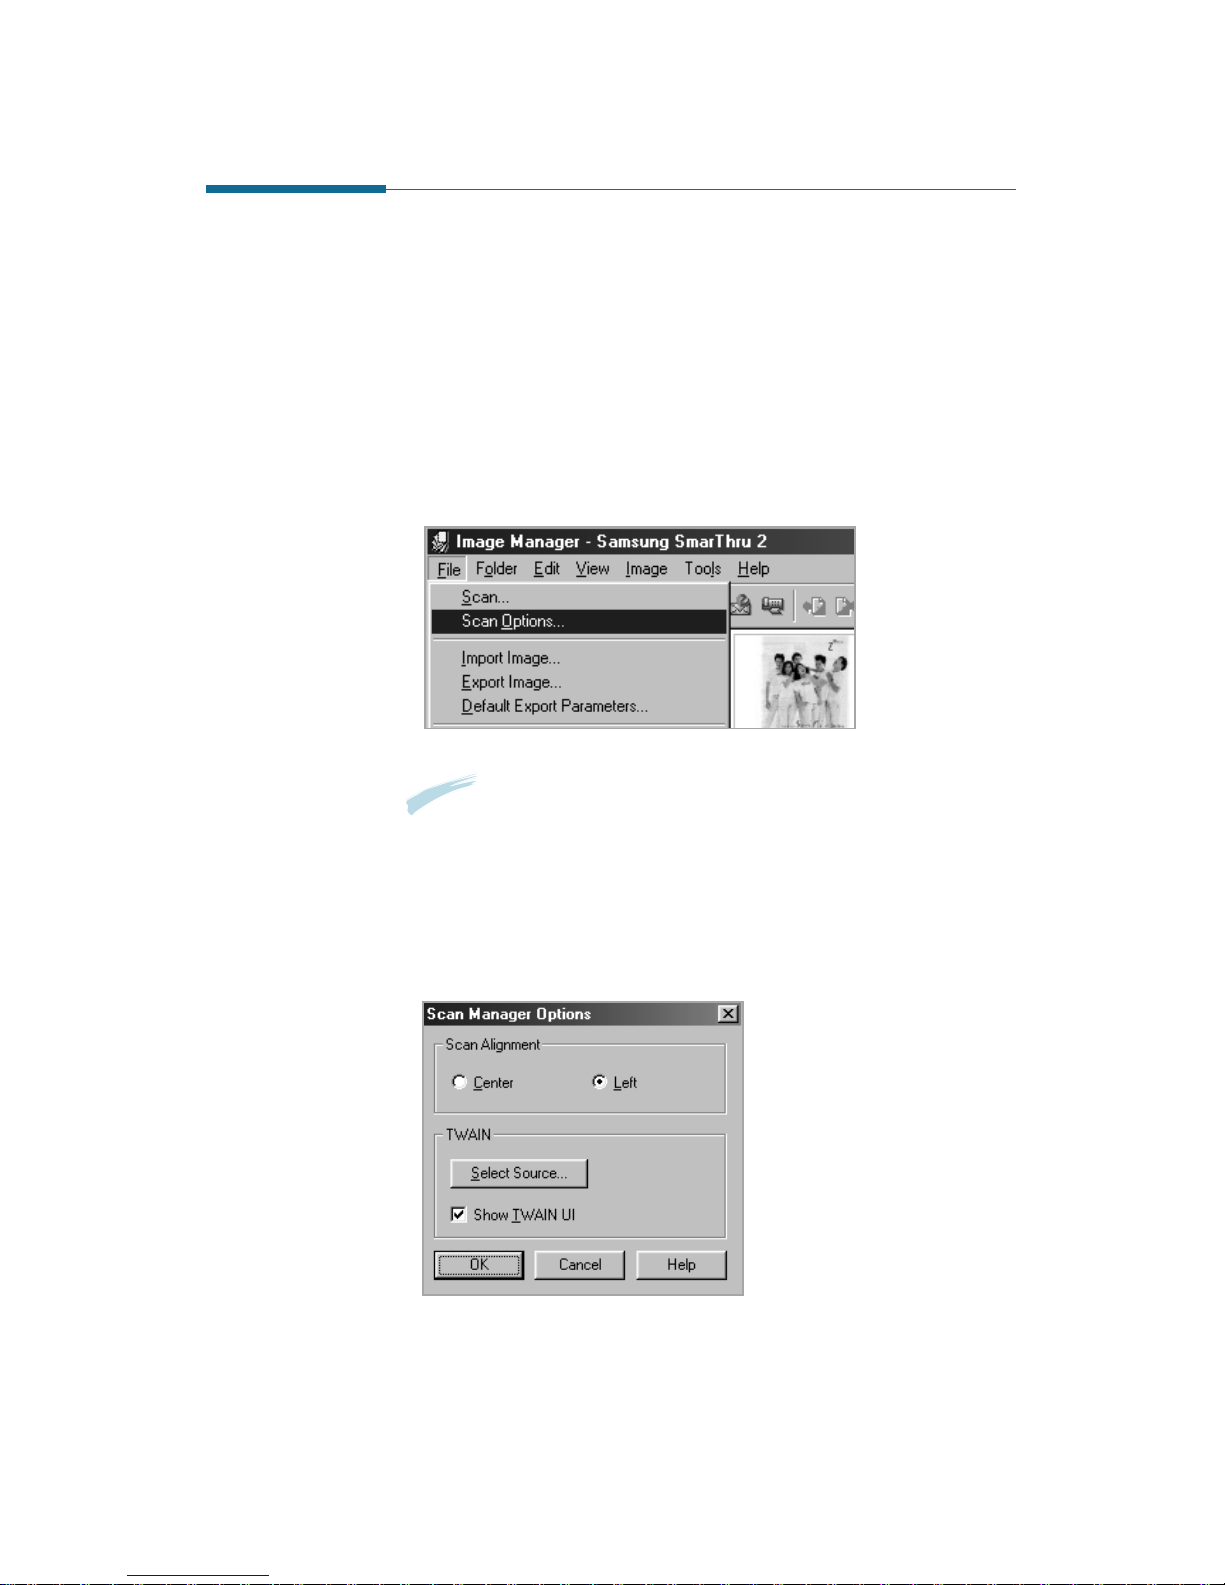
Selecting Scan Manager Options
You can use the supplied Samsung TWAIN for Scan driver instead of the
Samsung Scan Manager to scan an image. Also, if you hav e another
scanner driver installed on your computer, you can select the desired
driv er.
1. Open the Image Manager window. F or details, see page 1.5.
2. Select Scan Options from the File menu.
3. Check the Show TWAIN UI box. To use another scanner driver, press
Select Source button, then select the desired driv er from the Select
Source list.
4. Click the O K button.
NNoottee::
You can access the
SSccaann OOppttiioonnss
menu by right-clicking on the
title bar on the Scan Wizard window.

2.9
Scan Wizard
Samsung TWAIN for Scan Window
Brief descriptions for the controls of the Samsung TWAIN for Scan
window are provided below.
Preview area
Settings Tabs: Each tab (Basic, Image
quality, Filters , and the About tab) contains
settings to adjust the scan image.
Use help for further details on
SmarThru.
2.10
Scan Wizard
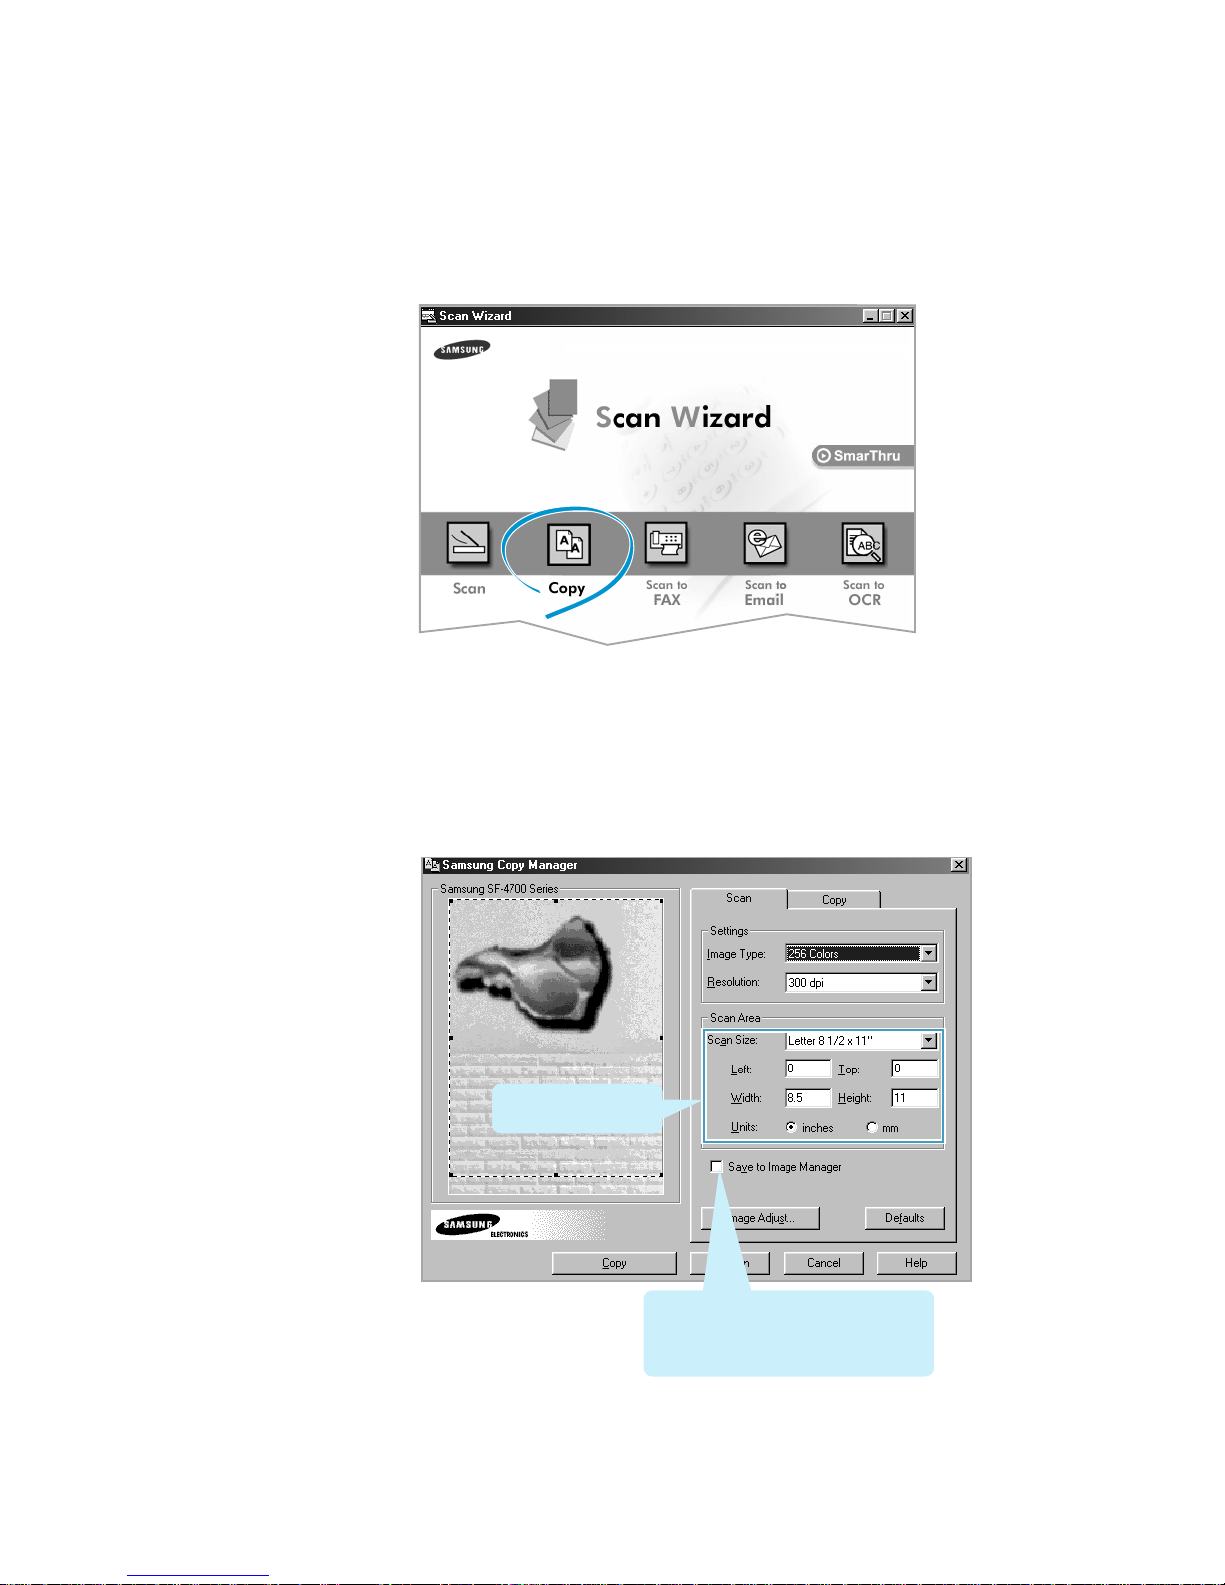
Copying
Copying a Document
With Samsung Copy Manager, you can
¥ Quickly make copies of the scanned images.
¥ Adjust the brightness and contrast of the resulting image.
¥ Change the resolution and the color mode used for copying.
¥ Set the number of copies.
¥ Scale the resulting image.
To copy a document using the Samsung Copy Manager:
There may be serveral wa ys to load documents for scanning. For
examples, two methods of loading documents are provided. If y o ur
machine is equipped with different methods, please refer to its User s
Guide.
F or Flat -bed type: Place your documents on the scanner bed and close
the scanner top cover.
For Automatic Document Feeder (ADF) type: Load documents, as many
as your machine can hold, into the feeding slot.
Following instructions especially show an example of ADF type:
1. Load a document as shown.
2.11
Scan Wizard
3. Adjust scan settings when the Samsung Copy Manager window opens..
Selects the siz e of the
image being copied.
Check this box if you want the scanned
image to be sav ed into the Incoming
folder of the Image Manager database
for future reference.
2. Open the Scan Wizard window and select Copy.
For information on opening the Scan Wizard window, see page 1.3.
2.12
Scan Wizard
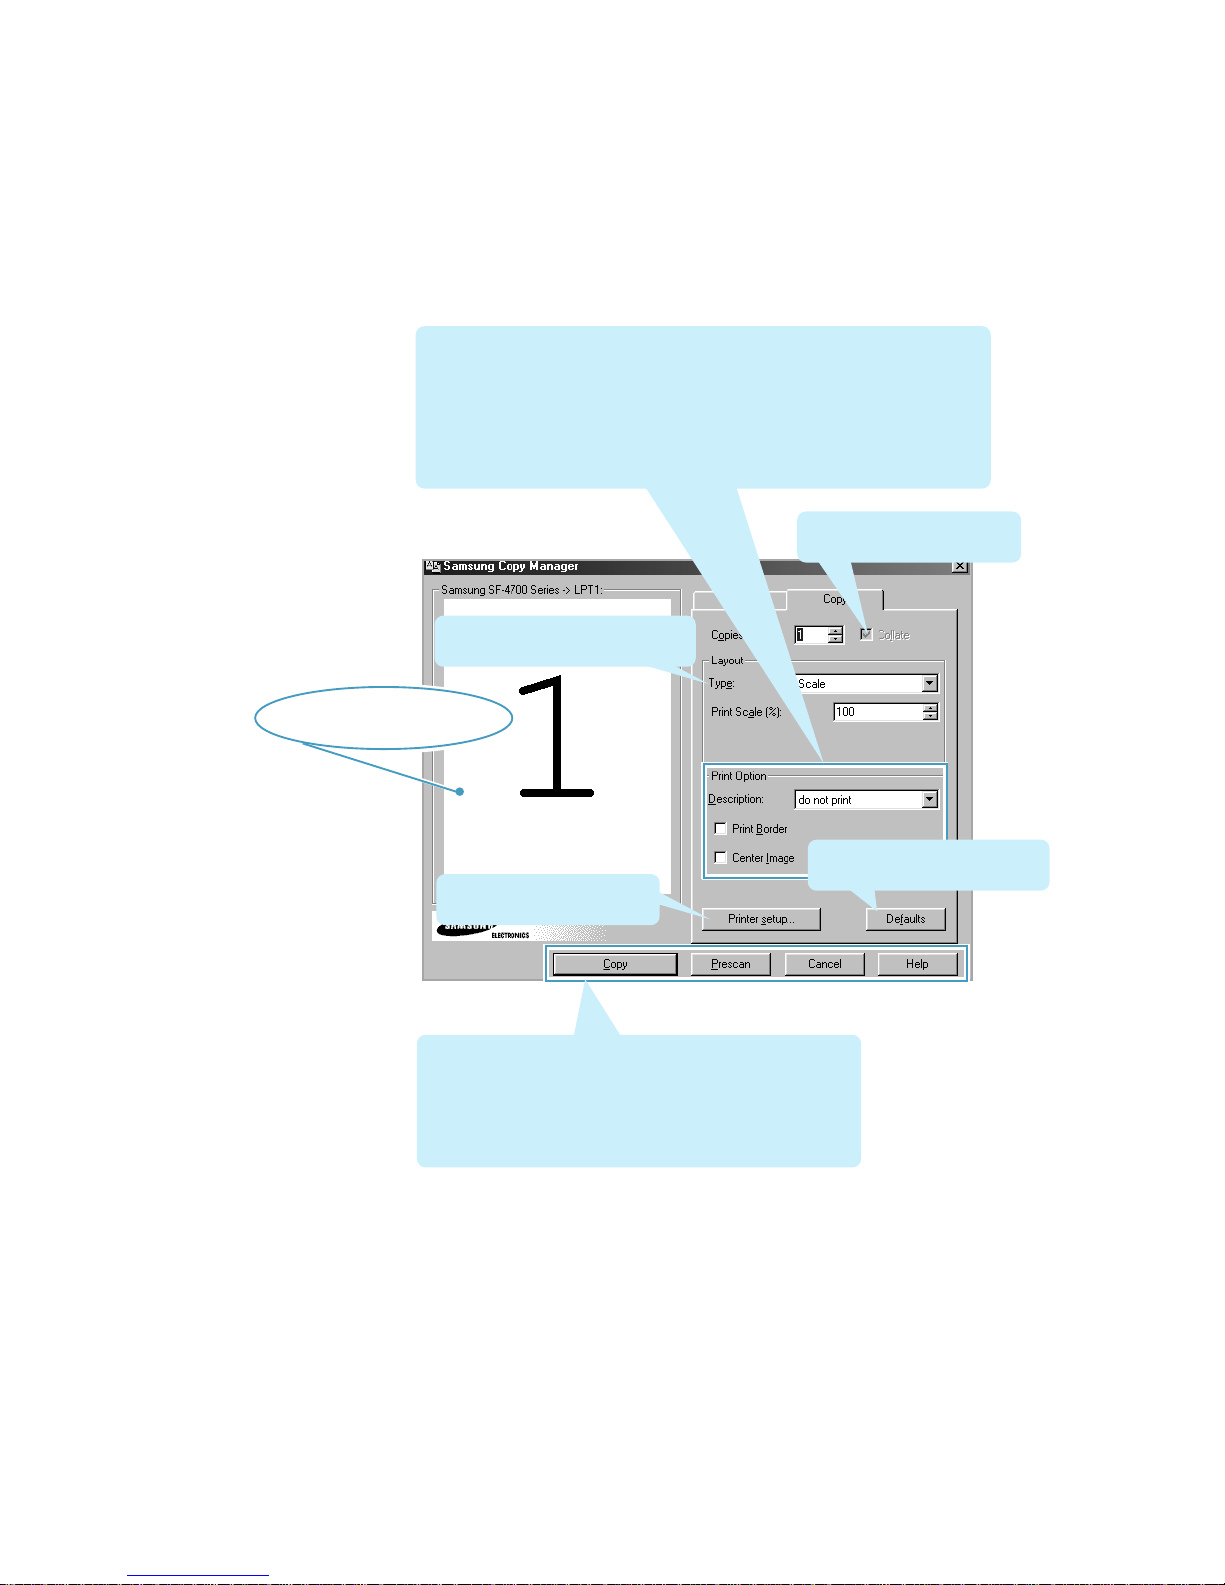
4. To select printing mode, click the Copy tab on the top of the Samsung
Copy Manager window.
Copy: Click this button to start the cop ying process.
Prescan: Click this button to scan an image at low resolution.
Cancel: Click this button to exit Samsung Cop y Manager.
Help: Click this button to bring up this help system.
Ch eck this bo x if the copies
should be collated.
Description: Choose to print image descriptions above or below images, and
to turn printing image descriptions off.
Print Border: Check this bo x to print a border around images.
Center Image: Check this bo x to center printed images. If the image is
larger than one page, the image will be centered across all the pages it spans.
Lets you choose one of five printing
methods. For details, see below.
Brings up the standard printer
setup dialog box.
Click this button to return all
settings to their default v alues.
Preview area: This area shows
image(s) that will be printed.

2.13
Scan Wizard
5. To configure y our printer, click Printer Setup on this window to bring
up a standard printer setup dialog box.
6. Press Copy to start the cop ying process. The document will be
scanned and scaled, and the desired number of copies printed.
Your Samsung MFP provides the following five printing method:
Scale The printed image will be scaled. Enter the scaling
factor in the Print Scale(%) field.
Fit to Page Selecting this option will result in scaling the printed
image to fill the entire page. Yo u m a y select the desired
page size using the Fit to Paper drop-down list box.
Multiple Page If your scanner supports successive scanning of
per Side multiple images, you may use this option to print
several images on a single page. The images will be
successively placed on a page one by one; when the
page is filled, the progr am will proceed to the next
page, and so on. The Images per Sheet option defines
the number of images to be placed on each page.
Clone This option is used for printing sever al copies of the
same image on a single page. The Images per Sheet
option defines the number of images to be placed on
each page.
2.14
Scan Wizard
Scanning a Document and then Sending it by
PC Fax
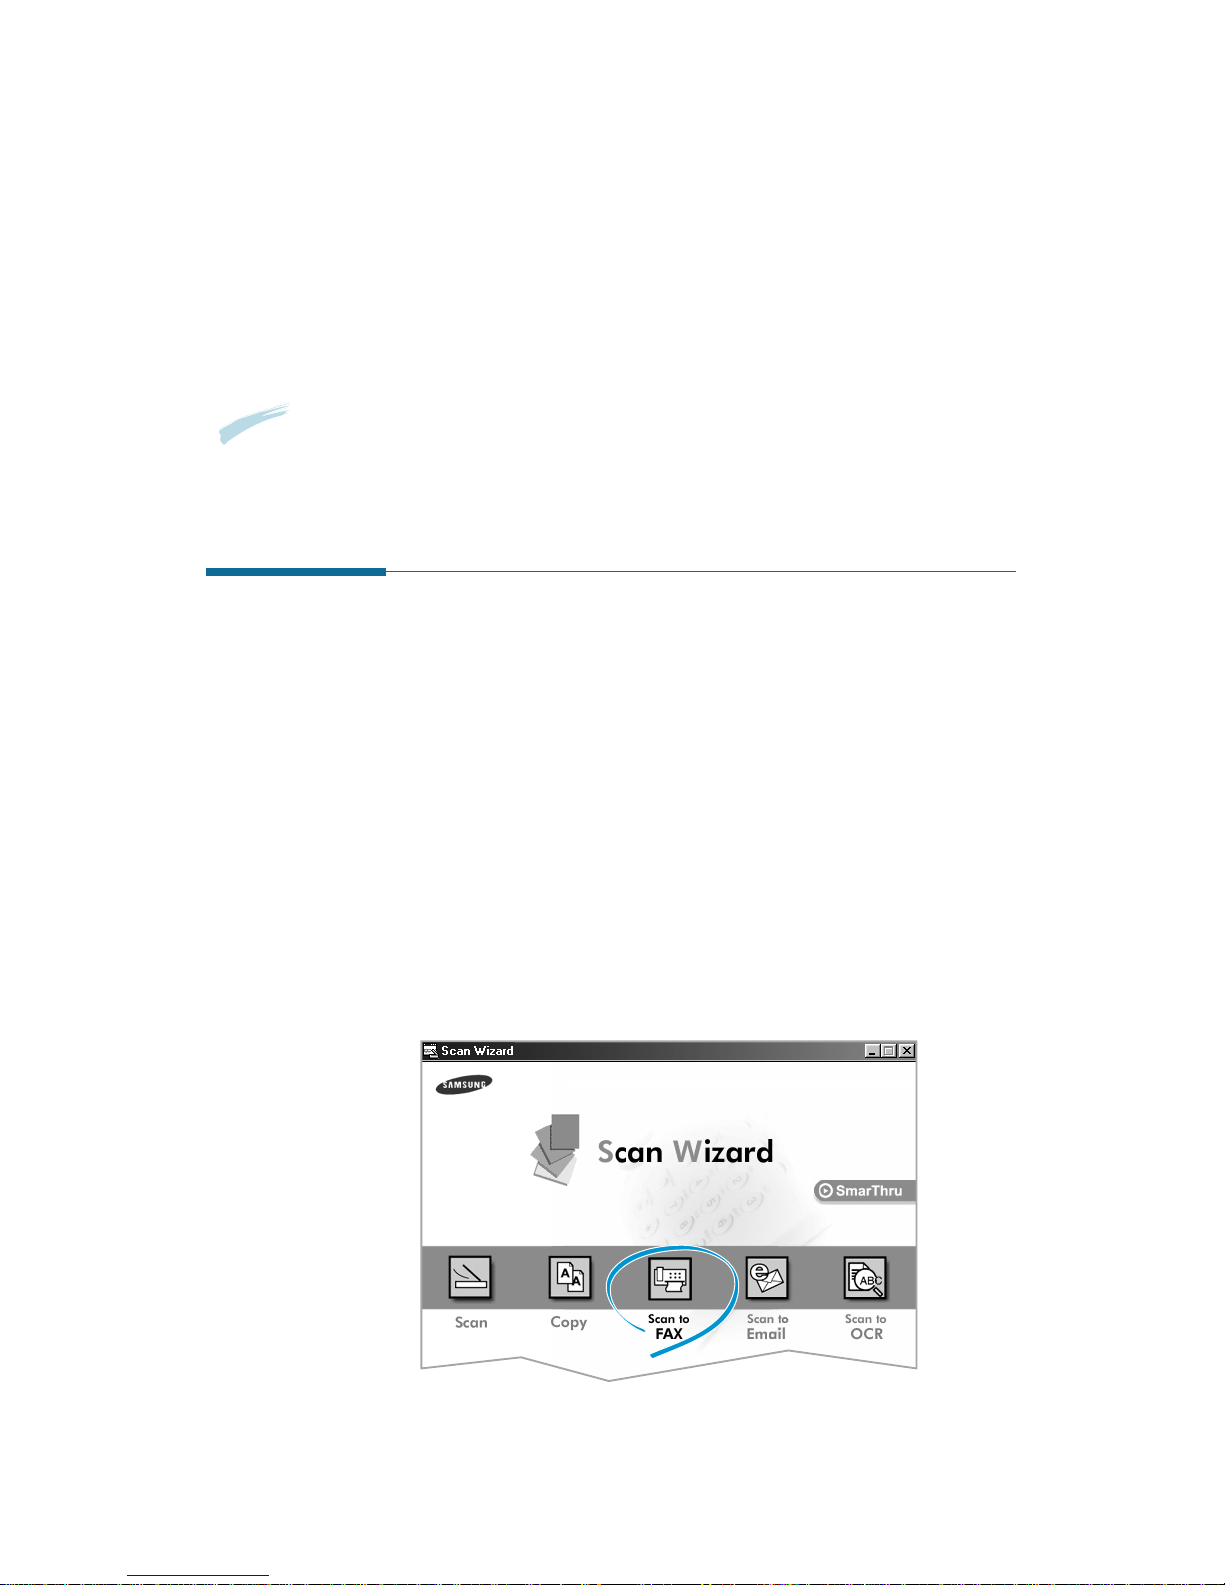
The Scan Wizard window contains the Scan to FAX service which lets
you scan documents, and then launch the Fax Manager to send
electronic fax es.
To scan to fax, tak e the following steps:
1. Load a document as described in User s Guide.
2. Open the Scan Wizard window and select Scan to Fax.
To open the Scan Wizard window, double-click the Scan Wizard icon
on the desktop window. For further details, see page 1.3.
Scanning to PC Fax
NNoottee::
To send a fax using the Samsung SmarThru system, you must configure the Fax Gate.
Configuring the Fax Gate was started when you first installed the SmarThru program.
You can change or configure it later by selecting
SSmmaarrTThhrruu CCoonnffiigguurraattiioonn
from the
TToooollss
menu in the Samsung SmarThru Mailbox window. For details, see page 3.53.

2.15
Scan Wizard
3. The Samsung Scan Manager for Fax window opens. Select the scan
settings if necessary. For more information on the scan settings, see
page 2.7.
If you check the Save to Image
Manager box, the scanned image will
be sa v ed in the Incoming folder of
the Image Manager database.
4. Click the Scan button.
When scanning is completed, the scanned document is displayed in
the preview area, and passed to the Samsung Fax Manager.
5. The Samsung Fax Manager—Select Mode dialog box appears. Select
the desired mode to run the fax wizard, then click Next.
If you select Advanced Mode, you can
further select the time for the fax to
be sent, and select the fax cover page.
For details, see page 3.25.
Preview area
Choose scan settings.
2.16
Scan Wizard
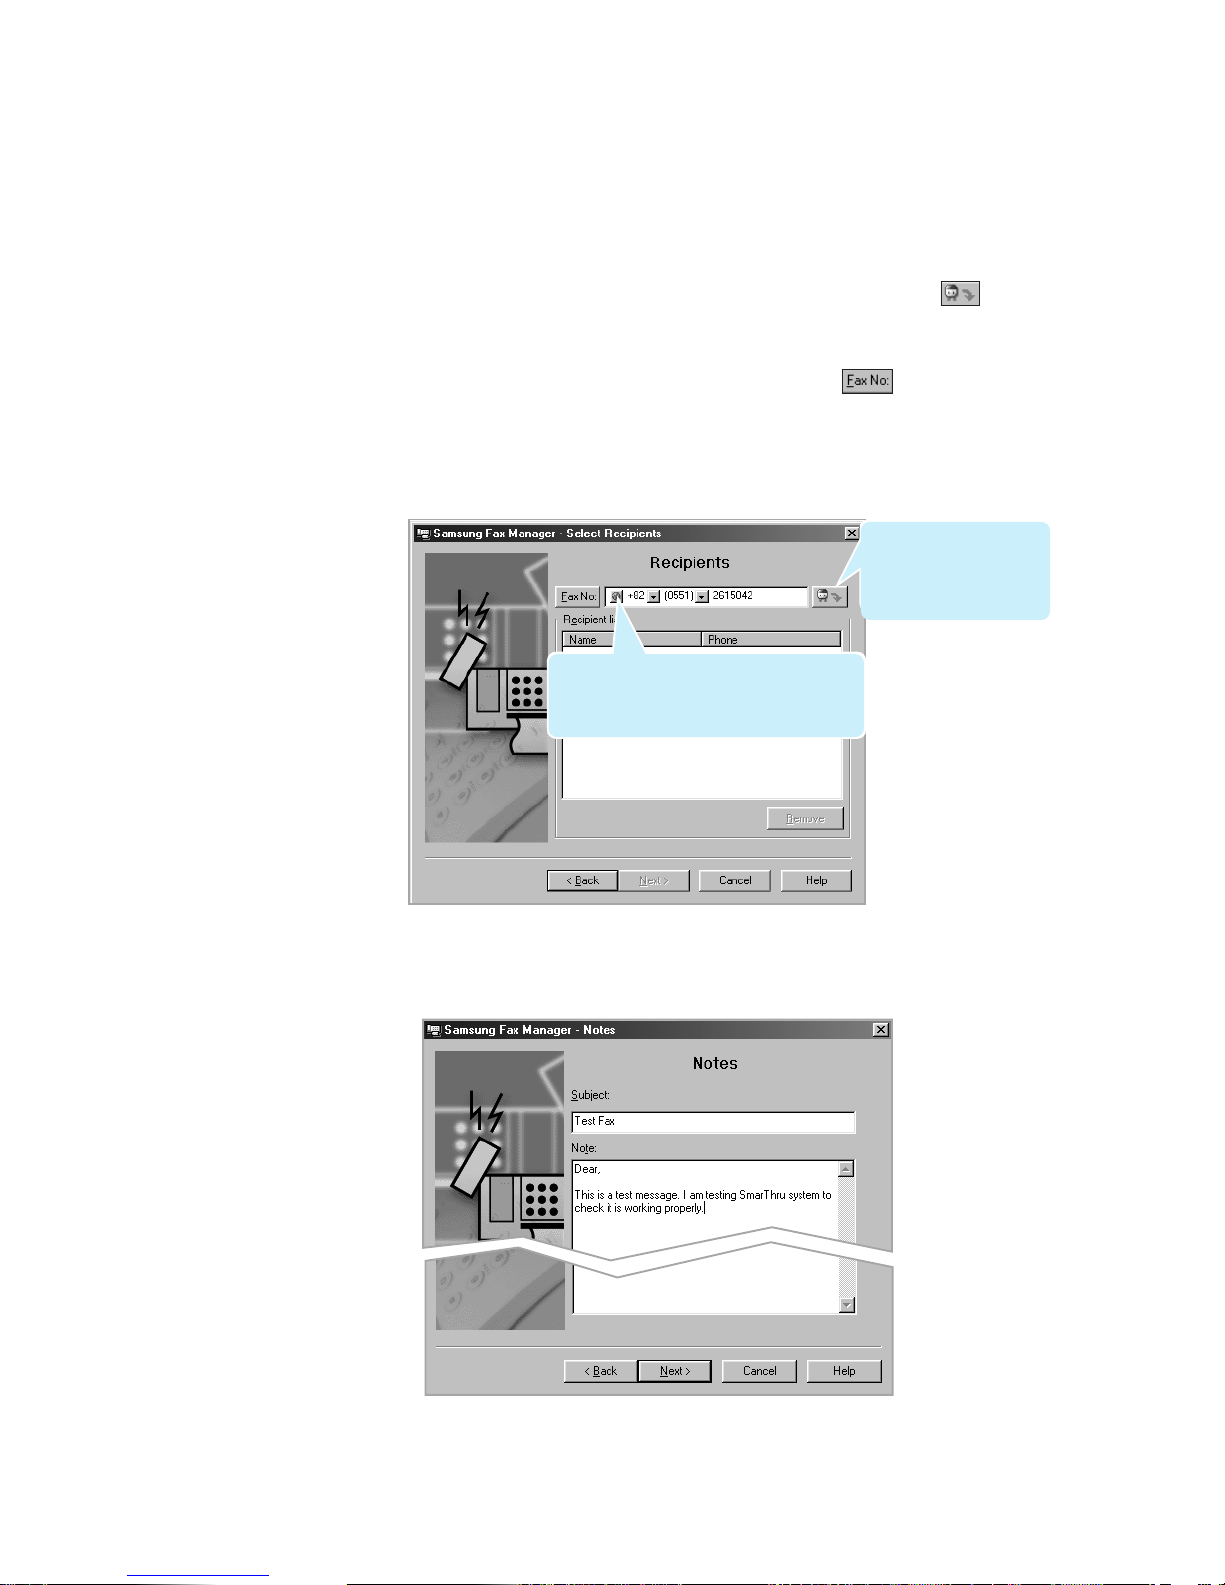
6. Enter contacts manually and/or select contacts from the Address
Book, and then click Next.
¥ To enter a contact manually, fill the F ax N o field. Then click
after the fax number description. The new address will appear in the
R ecipient list.
¥ To select a contact from the address book, click in front of
the field. Then select the desired contact from the Peek Address
window.
¥ To remove a contact from the Recipients list, select the desired
contact in the Recipient list, and then click Remove.
7. Enter the subject in the Subject field and your message in the Note
field, and then click Next.
Click this icon to switch between international
and direct mode. International mode allows
you to select Country or City code by clicking
after the number description.
After y ou h ave filled in
the Fa x No . field, click
button to enter the
number into the Recipient
list.
2.17
Scan Wizard
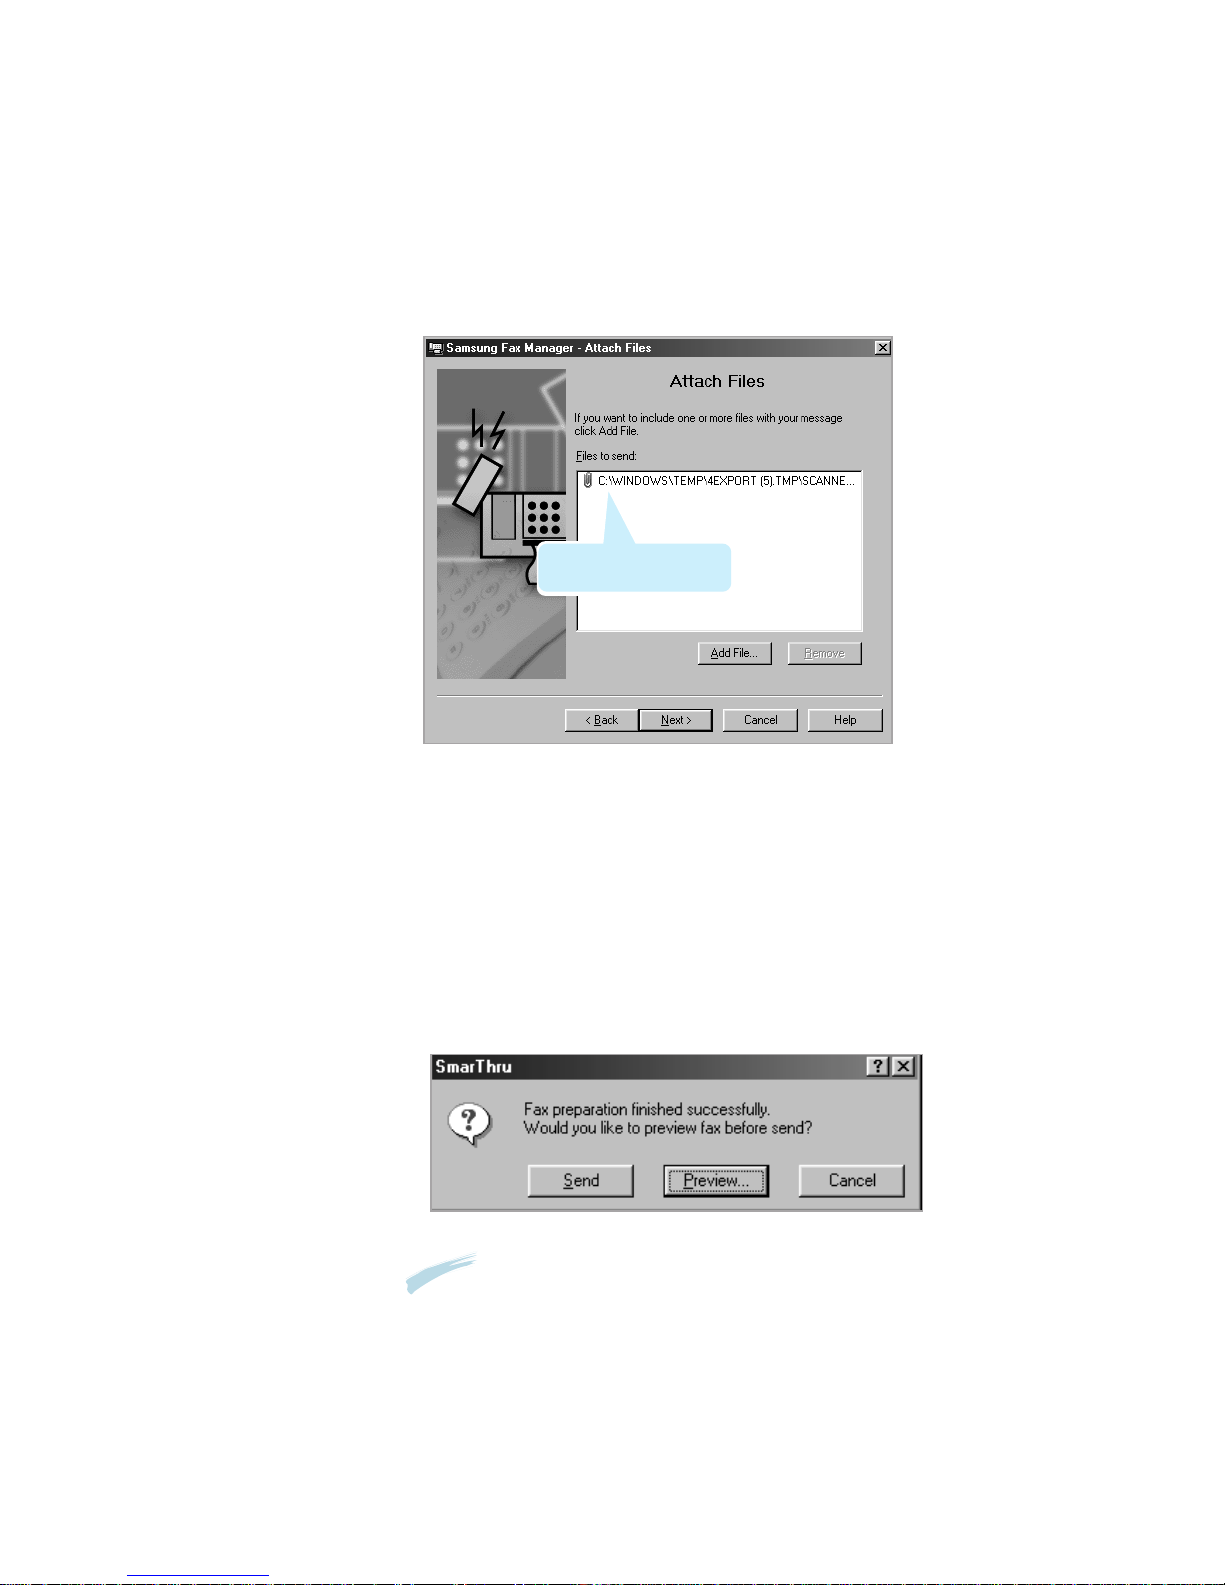
9. When have finished adding files, click Next. The dialog bo x prompts
you that the fax is ready, click Finish.
10. To preview the fax before sending, click Preview. The Preview— Fax
Viewer window opens. For information on the Preview—Fax Viewer
window, see page 3.29.
To start sending immediately, click Send.
8. In the A ttach Files window, you can attach files to your fax message.
You will find that the scanned document is already attached as an
image file. To include more, click Add File, and select the desired file.
You can attach as many files as necessary.
Just scanned document is
already attached.
NNoottee::
The messages are automatically saved in the
OOuuttggooiinngg
folder of
the Samsung SmarThru 2 Mailbox. In the Mailbox window, if you
open the
OOuuttggooiinngg
folder, you will see a copy of the message and
the message status; Sent, Queued for sending and Retry....
For details, see page 3.20.

2.18
Scan Wizard
Scanning a Document and then Sending it by
E-mail
The Scan Wizard window contains the Scan to E-mail service which lets
you scan documents, and then launch the Message Form to send the just
scanned documents attached to a new mail.
To scan to e-mail, tak e the following steps:
There may be serveral wa ys to load documents for scanning. For
examples, two methods of loading documents are provided. If y o ur
machine is equipped with different methods, please refer to its User s
Guide.
F or Flat -bed type: Place your documents on the scanner bed and close the
scanner top cover.
For Automatic Document Feeder (ADF) type: Load documents, as many as
your machine can hold, into the feeding slot.
Following instructions especially show an example of ADF type:
1. Load a document as shown.
Scanning to E-mail
NNoottee::
To send e-mail using the Samsung SmarThru system, you must configure the Internet
gate. Configuring the Internet gate was started when you first installed the SmarThru
program. Change or configure later by selecting
SSmmaarrTThhrruu CCoonnffiigguurraattiioonn
from the
TToooollss
menu in the Samsung SmarThru Mailbox window. For details, see page 3.54.

2.19
Scan Wizard
2. Open the Scan Wizard window and select Scan to E-mail.
To open the Scan Wizard window, double-click the Scan Wizard icon
on the desktop window. For further details, see page 1.3.
3. The Samsung Scan Manager for E-mail window opens. Select the scan
settings if necessary. For more information on the scan settings, see
page 2.7.
If you check this box, the scanned
image will be saved into the Incoming
folder of the Image Manager database.
Preview area
Choose scan settings.

2.20
Scan Wizard
4. Click the Scan button.
When scanning is complete, the scanned document is display ed in the
preview area. Then the Message Form is then automatically launched.
5. Fill in each field. F o r details on the controls of this window, see page
3.38.
6. When you are ready to send, click .
The message is automatically saved in the Outgoing folder of the
Mailbox-Samsung SmarThru 2 window.
For further details about working with e-mail messages, see page
3.38.
You ll find the scanned
document is attached as an
image file format to the mail.

2.21
Scan Wizard
Scanning for Automatic Text Recognition
Using the Scan to OCR button in the Scan Wizard window allows you to
scan a document and send it to the OCR program for text recognition.
The scanned image is converted to editable text and sent to the
acquiring application in y our computer.
Before using the automatic recognition feature, you can set the
recognition configuration to improv e the recognition result. See page
2.24.
To scan a document to an OCR progra m :
1. Load a document as described in User s Guide.
2. Open the Scan Wizard window, and select Scan to OCR.
To open the Scan Wizard window, double-click the Scan Wizard icon
on the desktop window. For further details, see page 1.3.
Scanning to OCR

2.22
Scan Wizard
4. Click the Scan button.
When scanning is completed, the scanned document is briefly
displa y ed in the preview area.
If y ou selected the Save to Image Manager checkbox, the Image
Manager window opens and you see the saved image in the window.
5. The system asks you to specif y the file name and the destination
path. Enter the file name and select the file t ype, and then specify the
destination.
3. The Samsung Scan Manager for OCR window opens. Select the scan
settings if necessary. For more information on the scan settings, see
page 2.7.
If you click the checkbox, the scanned
image will be saved in the Image Manager
before conv erting to an editable text.

2.23
Scan Wizard
6. When the recognition is completed, a prompt asks you if y ou wish to
view it. Click Y e s .
7. The recognized text will be displayed in your text editor application.
Check and edit the text if necessary. F or details, refer to the
documentation of your text editor application.
NNootteess::
• For details on the OCR procedure, refer to chapter 4 ‘Using AnyPage
Lite.’
• If you want to recognize a batch of documents at once, see page 4.3.
• If you want to recognize a table which does not have horizontal or
vertical lines, you will need to analyze the table manually before the
recognition begins to achieve good recognition results. See page 4.7.

2.24
Scan Wizard
Configuring Automatic Text Recognition
You can configure several parameters of automatic text recognition in the
A utomatic Recognition Configur ation window.
To bring up the Automatic Recognition Configuration window, take the
following steps:
1. Open the Scan Wizard window. For details, see page 1.3.
2. Right —click on the title bar.
3. Select OCR Configuration from the pop-up menu.
4. The Automatic Recognition Configuration dialog bo x appears. Select
the proper settings. Descriptions are provided on the following page.
Place the mouse on the
title bar to bring up
the system menu.

Language This drop-down list box lets y o u select the language of
the text being recognized.
Text Type If you select Auto, the OCR program will detect the
type of the text automatically. The next two options
supply information about the type of text; this
information helps the OCR programto properly recogniz e
text.
Page This group of r adio buttons defines how the page is
Formatting formatted. This also helps the OCR program recognize
properly.
Text Layout Lets you indicate the la y out of y our text. If y ou select
Auto, the OCR program will detect the la yout
automatically. Select Single Column if your text is
formatted as a single column.
Tables This group of checkboxes lets y ou define the formatting
of tables.
Keep Pictures If this bo x is check ed, any pictures in the text will be
in Text kept.
Text Saving If you select Organized, the text files will be sa v ed in
Parameters a folder according to toda y s date inside the base folder.
Files are named with consequent numbers. You can set
the path to the base folder using the Base Folder edit
field. Y ou can also click Browse... to point the folder
using the browse window.
If y ou select Always Ask, you will be prompted for the
file name each time the program needs to save a new
file.
5. When you have finished, click O K .
2.25
Scan Wizard

chapter
3
3
The Samsung SmarThru 2 contains the Image Manager
which stores, edits, and manages images and the Mailbox
which stores fax and e-mail messages.
This chapter provides information on the following topics:
◆ W orking with Image Manager
◆ Image Viewer
◆ Mailbox
◆ W orking with Fax Messages
◆ W orking with E-mail Messages
◆ Using Address Book
◆ SmarThru Configuration

3.1
SmarThru 2
Overview
After documents are scanned, the resulting image is available in the
Image Manager.
The Image Manager is an image database and image editor progra m .
With the Image Manager, you can:
¥ Organize the images in the database hierarchy using a tree of folders.
¥ Search the database for images by descriptions, dates, etc.
¥ Perform basic editing of images such as copying and pasting parts of
an image, rotating, cropping, resampling, etc.
¥ Adjust parameters of an image such as brightness, contrast, and
saturation.
¥ Conv ert images to different colour modes.
¥ Apply different effects such as sharpening, embossing, posterizing,
mosaicking, etc.
¥ Send images by PC fax or e-mail.
¥ Pass images to external programs using the Programs bar.
¥ Import, export, scan, and print images.
Working with
Image Manager

3.2
SmarThru 2
Opening the Image Manager Window
When you scan an image with the Scan Manager, the Image Manager is
automatically launched and opens a window with the scanned image.
To open the Image Manager window manually, follow this procedure:
1. Open the Samsung SmarThru 2 window and click the Image Manager
icon on the left edge of the window.
To open the Samsung SmarThru 2 window, double-click the SmarThru 2
icon on the desktop window. For further details, see page 1.5.
2. The Image Manager-Samsung SmarThru 2 window opens to browse
images. For more information on functions in the Browse mode, see
page 3.12.
Programs bar
You can drag images and drop them onto the Programs bar buttons
to have them the processed b y the selected application. For
details, see page 3.4.
Menu bar and Tool bar
See page 3.14 for more information
about these buttons.
Folder area
¥ You can create new folders, rename folders,
or delete them using the Folder menu or
right -clicking on this area.
¥ The first folder is a special folder named
Incoming. The images scanned with the
Scan Manager will be sav ed in this folder
unless otherwise specified. You cannot
rename, delete, or change the position of
this giv en folder.
¥ For further details on working with folders,
use the Help menu.
Image area
Thumbnails of images in the folder
currently open. For information on working
with images, use Help on the menu bar.
Click here to bring
up the Image Manager
window.

3.3
SmarThru 2
3. To open a selected image for editing from the Browse mode, doubleclick on the thumbnail of the desired image, or click on the toolbar.
The selected image will replace the thumbnails, occupying the entire
image area.
4. You can enlarge or reduce the image displayed by using the View
menu or icons on the toolbar. Now you can perform editing. For
more information about the editing functions, see Editing Images on
page 3.8.
5. To quit editing, click button on the toolbar or select Browse Mode
from the Image menu. You will be prompted to save the changes.
To sa v e the image without quitting the editing mode, click button
on the toolbar or select Save from the File menu.
While working in the editing mode,
you can still use the Programs bar.
The opened image
will replace contents of
current folder.
Toolbox
Contains the buttons to select a
region and add annotations
to the image. Similar to the
Toolbox menu.
Current
zoom factor
Memory
taken by
the image
Image
dimension
(in pix el)

3.4
SmarThru 2
Using the Programs Bar in the Image Manager
The Programs bar is located at the bottom part of the Samsung Image
Manager window. The Programs bar is a powerful tool that lets y o u
configure multiple buttons for performing common operations and
accessing external applications.
You can drag images onto the Programs bar buttons to ha ve them
processed by the appropriate applications. When you drag an image onto
the Programs bar button, you will see that a small icon changes. It
indicates that the application is ready to process your request. Yo u m a y
also click a Progr ams bar button to process selected images.
The Programs bar supports fiv e types of buttons. They are described
below.
Drag an image to this button or select an image and click this
button to send the image by e-mail using Samsung SmarThru.
Drag an image to this button or select an image and click this
button to send the image by fax using Samsung SmarThru.
SmarThru
Fax
SmarThru
Message
Drag an image to this button or select an image and click this
button to send the image to the optical text recognition
progra m .
OCR

3.5
SmarThru 2
Drag an image to this button or select an image and click this
button to print the image.
Print
Drag an image to this button or select an image and click this
button to delete the image.
Shredder
You can change the layout and functions of the Progr ams bar buttons.
1. Right-click on the empty area of the Progr ams bar. This brings up
the Programs Bar Setup dialog box.
2. Click the Search... button in the Programs Bar Setup dialog.
3. After clicking Next in the Programs Search Wizard welcome screen,
you will see a list of applications known to the wizard that have
been fouond in your system.
4. Select the desired applications to be added to the Progr ams bar,
then click Finish.
Customizing the Programs Bar
5. When you are done, click O K . Your Programs bar will be updated
accordingly. F or further details, see the on-line help.
Application
newly added.
Defines the parameters
that will be passed to the
program.
If the par ameters are not
defined properly, images
will be exported according
to the default export
settings. Select Default
Export Parameters...
from the File menu to
access the default settings
in the Image Manager
window.

3.6
SmarThru 2
Image Manager Toolbar Overview
In Browse mode, the toolbar contains the following buttons:
This button brings up the Scan Manager that is used for
scanning images. Similar to File ➝ Scan.. menu.
This button is used for exporting images. Similar to File ➝
Export menu. For details, see page 3.15.
This button is used for importing images. Similar to File ➝
Import menu. For details, see page 3.15.
Click this button to cut selected part from a selected image and
place its contents on the clipboard. The page will be deleted from
the source image. Similar to Edit ➝ Cut menu.
Click this button to cop y selected parts from selected images and
place their contents on the clipboard. The page will be also kept
in the source image. Similar to Edit ➝ Copy menu.
Click this button to paste images from the clipboard into the
current folder as a new image. Similar to Edit ➝ Paste menu.
This button opens the New Message window that is used for
sending an e-mail from the SmarThru system. Similar to the
Tools ➝ New Message.. menu.
This button opens the New Fax window that is used for sending a
fax from the SmarThru system. Similar to the Tools ➝ New
Fax.. menu.
This button opens the previous page of the selected multi-page
document.
This button opens the next page of the selected multi-page
document.
This button opens the current image for editing.

In the selected image editing mode, the toolbar contains several
additional buttons as described below:
S aves images without switching to the Browse mode. Similar to
Image ➝ Save Image menu.
In the Edit mode, is used for cutting a selected region and
placing its contents on the clipboard. Similar to Edit ➝ Cut
menu.
In the Edit mode, is used for copying the contents of a region to
the clipboard. Similar to Edit ➝ Copy menu.
In the Edit mode, is used for pasting clipboard contents into the
image. Similar to Edit ➝ Paste menu.
Quits editing and switches to the Browse mode. Similar to
Image ➝ Browse Mode menu.
Undoes the last action. Similar to Edit ➝ Undo menu.
R edoes the last undone action. Similar to Edit ➝ Redo menu.
R otates the current image or region 90 degrees clockwise.
Similar to Image ➝ Rotate ➝ 90 Degrees Clockwise menu.
Is used to z oom in the current image. Similar to View ➝ Zoom
In menu.
Is used to z oom out the current image. Similar to View ➝ Zoom
Out menu.
3.7
SmarThru 2

3.8
SmarThru 2
Editing Images
To Enlarge or Reduce the Image Displayed
This may be necessary to take a closer look at some parts of the image
or see the entire image. Select a proper submenu from the View menu.
Note: Changing the zoom factor does not change the image, only the way
the image is viewed. To change the size of the image, perform
Resizing or Resampling.
Erasing Parts of an Image
To erase a part of an image, choose the tool from the toolbo x. Yo u
can change the size of the er aser. The erased areas will be replaced with
a selected background color. For further details on er asing parts of an
image, use the on-line help.
Transforming Images
The bottom part of the Image menu contains commands for
transforming images. All commands (except for Resize, Resample, and
Crop) work with either a whole image or with a selected region. The
Resize and Resample commands work with the whole image only. The
Crop command works only if a region is selected.
Rotate: To rotate the image or a selected region.
Flip: Flips the image v ertically or horiz ontally.
Shear: To shear (skew) the
image by an arbitrary angle.
Crop: To cut a part off the image. The contents of the selected part will
replace the whole image.
Resize: To resize the image. It works only with the whole image. Choose
new dimensions in the Width and Height fields.
Resample: Is similar to Resize, but the results of the functions differ
slightly. While Resize function simply stretches pixels when enlarging
the image, the Resample function interpolates the changes. This results
in smooth images with anti-aliased color transitions.
For further details on transforming images, use the on-line help.
➜
➜

3.9
SmarThru 2
Changing Color Mode
You can change the image s colour mode using the Color menu. These
commands do not work with regions. They are always applied to the
entire image. The result of the changes will be immediately shown in
the preview area.
Halftone: M a kes the image look like simulated grayscales using different
combinations of 1-bit black and white pixels. Because this image type is
only 1-bit, the file siz e is smaller than grayscale.
Grayscale: Converts the image into a gra yscale mode. All color
information will be removed from the image and the image will be blackand-white.
Resolution: Changes the color depth of an image. Color depth is defined
as the number of bits per one pix el of image. The more bits that are
used to represent one pixel, the more colours y ou can have in one
image. If you reduce the color depth, the number of a vailable colours is
also reduced.
For further details on changing colour modes, use the on-line help .

3.10
SmarThru 2
Adjusting Image Attributes
You can adjust a number of image attributes for an image being edited
by using the Color menu. The following submenus are available:
Brightness, Contrast, Hue, Saturation, Gamma Correct, Invert and
Stretch Intensity. For details on adjusting the image attributes, use the
on-line help.
Working within a Region of an Image
Operations can be applied to a region of an image instead of the whole
image. Region (also called selection) is an area of the image that can be
used as the target for most operations (with the exception of R esizing,
R otating and Shearing).
Toolbox contains the buttons to work with regions. You can also use the
Toolbox menu.
Selects a rectangular region. Click on the image and drag.
To see a marquee rectangle that defines the region.
Selects a free hand region. Click on the image and drag while
holding the mouse button. You will see your region contour
enclosed into a rectangular marquee. This marquee is used for
resizing.
To change the position of region marquee, place the cursor inside the
marquee and drag. To change the siz e, place the cursor onto one of the
rectangular marquee handles and drag.
You can cut, copy, and paste regions using the Edit menu.
For further details on working with regions, use the on-line help .

3.11
SmarThru 2
Working with Annotations
In the Edit mode, you can add annotations to the image using the tools
in the toolbox or in the Toolbox menu. Annotations are used for adding
comments and emphasizing parts of an image.
The annotation objects include the following types;
To select an annotation to move, delete, resize, cut, cop y, or
paste.
To draw a straight line, and a one-headed or two-headed
arrow.
To draw a square, rectangle, a rectangle with
rounded corners, or an ellipse.
To draw a line consisting of several segments (polyline). Start
clicking in the image where you want the polyline vertices to be
placed. You can also hold the mouse button and dra w a freehand
contour. To indicate the last v ertex of the polyline, click the right
mouse button.
To draw closed contours consisting of sev eral segments
(polygon).
To create a fr ame with text fr agments. To change the text,
access the text frame properties and enter a new text on the
Text tab .
To create a fr ame with text fr agments. The note object differs
slightly from the text object; while you can set the siz e of the
text fr ame, the note fr ame size is adjusted automatically
according to the entered text.
To emphasize parts of the image. This object does not co ver the
image content; it only changes the hue. It is similar to using a
text marker on paper.
Each of these objects has a set of properties associated with it. Use
Properties from the Edit menu, or double-click on the annotation. Yo u
will see a tabbed window with the annotation properties.
You can find details for creating specific types of annotations in the
respective topics of the on-line help.
The annotations are independent objects floating above the image.
To merge annotations with the image, use Apply Annotations
command from the Image menu.
Note: Afterwards y ou cannot edit these annotations.

3.12
SmarThru 2
Applying Effects
The Effects menu in the Edit mode contains a number of effects that
can be applied to images. These can have dramatic effects on the
images.
All effects can be applied to the entire image or to the selected region
only. To apply the effect only to a region of an image, select the region
before invoking the effects.
Most effects have several parameters that can be changed. You can see
the result of changing parameters in the preview area of the Effect
window.
For further details on applying effects, use the on-line help.
Working with Images In Browse Mode
Printing Images
To print images from the Browse mode, select one or more of the images
and click the Print button in the Programs bar, or drag them onto the
Print button.

3.13
SmarThru 2
Finding an Image
To find images quickly, use the Find command. This is useful when your
image database is large. Select Find... from the Edit menu.
For further details on finding images, use the on-line help .
Renaming an Image
Select the image and choose Rename from the Image menu, or rightclick on the image and select Rename from the pop-up menu.
Moving an Image To a Different Folder
To m o v e an image to a different folder, simply drag it into the desired
folder.
Deleting Images
Select the image and press the Delete key, or select Delete from the
Edit menu, or drag the image onto the Shredder button in the
Programs bar.

3.14
SmarThru 2
Creating a Multi-page Image
You can create multi-page images, i.e. images that contain more than
one page. Each page of such an image is a separate image, however,
making them multi-page may help you to apply all the oper ations that
can be applied to several images at once.
You can distinguish multi-page images by the page curls at the lower
right corner of the image thumbnail.
To create a multi-page image, there are two wa ys:
¥ If your machine is equipped with ADF, load multi-page document in the
A utomatic Document Feeder. They are scanned at a time and saved as
a multi-page image in the Image Manager.
¥ In the Image Manager, select an image you w ant to use as a new page
and drag it onto another image. Repeat as necessary. The image will
be added to the multi-page document as the last page.
Most operations can be performed either with current page of multi-page
image, or with all its page. If y o u w ant an operation to be performed
with single page, drag it b y thumbnail image. If y ou want an operation
to be performed with all pages, drag the multi-page image by title.
Current page
number of the total
number of pages
P age curl. Use it to select
pages. Click the lower triangle
to select the next page and
upper triangle to select the
previous page.

3.15
SmarThru 2
Importing Images
To import image files for use in the Image Manager.
Select Import image... from the File menu, or click the button on
the toolbar. The Import window appears prompting you to select a file for
importing.
The Image Manager supports a number of file formats. You can view the
list of images in all supported formats, or select certain format using List
Files of Type drop-down list box. Then choose a directory and select the
desired image.
If the Show Preview option is checked, you will see a preview of the
selected file in the preview box. Remember that building previews for
images that have no thumbnail saved m ay take some time, so y ou ma y
w ant to disable this option.
Select the desired image and click Import. The image will be imported
into the Image Manager and will appear in the currently selected folder.
By default, the imported image has its name Imported from the file
name . Later y ou can rename the image or move it to a different folder.
Exporting Images
You can export images from the Image Manager for processing in
external applications or for other purposes. Select Export
image... from File menu, or click the button on the toolbar, or
select Export... from the pop-up menu. The Export window appears
prompting a file name for exporting.
Samsung Image Manager supports a number of file formats. Select the
appropriate file format from the Format drop-down list box. For certain
file types, y ou can select additional options using Subformat, Quality,
and Progressive drop-down list boxes. Choose a directory and enter the
file name and then click Export.
To export a multi-page image, choose the current page only or all pages.
If you export all the pages, each page will be sa ved in a separate file. T o
export only one page, check the Current page box. To export all pages,
check this box.
To select sev eral images and invo ke the export operation, y ou will be
prompted for the directory only. The image files will be named
automatically according to the image names in the Image Manager.
You can also dr ag an image from the Image Manager window into
another application on the Programs bar. See page 3.4.

3.16
SmarThru 2
Overview
The Image Viewer is an image view program. With the Image Viewer,
you can:
¥ View images stored on the hard disk or other drives.
¥ Import images to the Image Manager database
¥ Print images
¥ Associate file t ypes with the Image Viewer to open files in the Image
Viewer by double-clicking.
Associating File Types with the Image Viewer
You can associate different file types with the Image Viewer.
To open these files in the Image Viewer, double-click in Windows
Explorer. The File Format Associations dialog box is used for establishing
these associations. The dialog box appears when you first bring up the
Image Manager-Samsung SmarThru 2 window.
To bring up this dialog bo x manually, take the following steps:
1. R un SmarThru 2 and open the Image Manager-Samsung SmarThru 2
window. For details, see page 3.2.
Image Viewer

3.17
SmarThru 2
3. The File Format Associations dialog box appears. You will see a list of
file types that y o u m a y associate with the Image Viewer.
4. Select the file t ypes that y ou w ant to associate with the Image Viewer
by checking the boxes that appear alongside each t ype. You can also
uncheck file types to restore old associations. Click Select All to
select all file t ypes for association. Click Select Unused to select the
file types that are not registered to any application. Click Unselect
All to uncheck all file t ypes.
5. When complete, click O K to perform associating.
2. From the File menu, select Association.

3.18
SmarThru 2
Viewing Images with the Image Viewer
After y ou associated different file t ypes with the Image Viewer, you ll find
the appearance of the image file as below which is associated with the
Image Viewer on the desktop window.
Double-click the image to view it.
For further details on the Image Viewer, use the on-line help.

3.19
SmarThru 2
Overview
Mailbox is a messaging center that supports message sending, receiving
and storing in SmarThru. Once you send and receiv e a PC fax or e-mail,
the resulting document is available in the Mailbo x. You can perform a
v ariet y of tasks on documents in the Mailbox.
The main components of the Mailbox are:
Mailbox
Message Form To prepare, modif y and send outgoing messages; and
browse incoming e-mail messages.
New Fax To prepare and send outgoing electronic faxes.
Address Book A convenient place to store contact information.
SmarThru Address Book stores both e-mail and fax
addresses. Address Book can be used to look up
personal address.
Configuration To change Mailbox configuration and beha viour.

3.20
SmarThru 2
Features of the Mailbox Window
To open the Mailbox window, run SmarThru 2 and click the Mailbox icon
on the left (or click the View menu, and then select Mailbox from the
Switch to).
Folder Tree
The Folder Tree contains a list of folders to place mails. Y ou can create,
rename and remove folders. There are three System folders in
SmarThru: Trash, Incoming and Outgoing.The Incoming folder
stores all incoming faxes and e-mails received b y the SmarThru system.
The Outgoing folder consists of fax es or mails to be sent. The Trash
holds any documents that you deleted.
S ystem folders always exist in the system and their predefined setting
cannot be changed. You can create any number of folders to organize
your message. User folder properties and beha viour can be customized
to suit y our needs.
For further details, refer to the on-line help.
Message List
Message List shows a list of messages and provides brief information
about e-mail and fax messages. The information in the Message List is
divided into several columns and can be different for incoming and
outgoing messages. You can customize column number and order, as
well as message appearance in the O p t i o n s menu from the Tools menu.
Folder Tr ee
Quick Preview
Click here to bring
up this Mailbox
window.
Message List

3.21
SmarThru 2
Quick Preview
Quick Preview shows the content of a selected e-mail message or lets you
quick browse fax messages. Click a message to see in the Quick Preview
area.
¥ To Expand the quick preview pane so it occupies the whole MailBox
window area, press Ctrl+E or click View menu, and then click Preview
Only.
¥ To Collapse the quick preview pane, press Ctrl+E again.
¥ To Hide Quick Preview, click Tools menu, and then select Opti ons.
¥ To Hide Quick Preview Message Header, right -click o v e r message header
and in the pop-up menu select Hide, or in View menu clear Preview
Header option.
Mailbox Toolbar Overview
The mailbox toolbar pro vides you with quick access to the Mailbox
components used most often:
Open the New Message form to prepare a new e-mail message.
Open the New Fax form to create a new fax message.
R eply to the sender.
R eply to all persons mentioned in the incoming message.
Forward message to a new address.
Deliv er the mail manually.
Send the outgoing mail.
Print the selected message.
Delete the selected message.
Open the SmarThru Configuration window.
Open the Address Book window to add contact information to your
Address Book.
Open the Find Message window to find a message.

3.22
SmarThru 2
Overview
You can send and receive a fax using the Samsung SmarThru system,
and organize your fax work. The SmarThru system provides y ou with
these convenient tools:
¥ With the Samsung Fax Manager, you can create a fax message and
send it by electronic fax. If necessary, you can insert files from other
editor programs to y our fax messages.
¥ With the Samsung Fax Viewer, you can browse a fax before sending.
You can save the fax to disk, load the fax from disk, print the fax,
recognize the fax and save the text as an A SCII file, or edit the fax
with the Fax Viewer.
¥ With the Fax Cover Editor, y ou can create a co ver page for your fax
message. The Samsung SmarThru system provides pre—defined cover
pages. You can edit the pages with the Fax Cov er Editor for your own
needs.
Note: To manage fax messages with Samsung SmarThru, you must set up
your modem and its dial properties. See page 3.53.
Working with Fax
Messages

3.23
SmarThru 2
Creating and Sending a PC Fax
The Samsung Fax Manager guides you through all the steps necessary to
create and send electronic fax messages.
To create a new fax, there are two ways available:
¥ From the Mailbox-Samsung SmarThru 2 window, click on the
toolbar or click the Message menu and select N e w, then F a x .
¥ From any application, print to the Samsung SmarThru Fax printer
that is a v ailable from the list of printers. F or details, see page 3.31.
1. R un the SmarThru 2 and open the Mailbox-Samsung SmarThru 2
window. For details, see page 1.5.
2. Click on the toolbar, or click the Messages menu, and select
N e w , and then F a x .
Click it to bring up
the Fa x Manager.

3.24
SmarThru 2
3. Samsung Fax Manager provides two modes: Simple Mode and
Advanced Mode. Advanced mode gives full control o v er fax creating
and sending. Simple mode is the quickest way to send a fax message.
Select the desired mode, and then click Next.
4. Enter a fax number manually and/or select one from the Address
Book, and then click Next.
¥ To enter a contact manually, fill the Fax No field. Click after
the fax number description. The address will appear in the
Recipient list.
¥ To select a contact from the address book, click Fax No. in front of
the field. Select the desired contact from the Peek Address window.
¥ To remove a contact from the recipients list, select the desired
contact in the Recipient list, and then click Remove.
Click this icon to switch between international
and direct mode. International mode allows
you to select Country or City code by clicking
after the number description.
Click this button to
enter the fax number
into the Recipient list.
Click this button to
select contacts from
the Address Book.

3.25
SmarThru 2
5. Select the appropriate fax options, and then click Next. The General
Options window appears in the Advanced mode only.
Specifies when a message should
be sent by the SmarThru system.
To specif y message priority, click
appropriate button.
6. Select the co v er page, if y o u w ant, and then click Next.
The Cover Page is the title page of a fax sent. You can select an
existing co ver pages with the Browse button or create your own with
the N e w button. You can edit the cover pages with the Fax Cover
Page Editor to suit your needs. When this box is unchecked, no cov er
page will be sent.
This Select Cover Page window appears in the Advanced mode only.
For details on editing or creating a fax cov er page, see page 3.35.
Browse
Allows you to customize page options.

3.26
SmarThru 2
7. Select appropriate fax options, and then click Next. This F a x Options
window appears in the Advanced mode only.
You can select the following options:
Use the Fax message options from the Address
Book. In this case different settings for different
contacts are possible. If this option is switched
off specified par ameters are used for all contacts
in a message.
If your fax es are more than one page, you can
skip pages at the beginning. Specify the page
number that you want to begin your fax from
here.
Select this option to send a fax at a time when
the price of the phone call will be discounted.
Set the number of sending attempts if there is
an error during transmission or the line was
busy.
Time interval between retries.
Use options
defined for
recipients
Send starting
from page
Send at cheap
time
Number of
retries
Time between
retries
(minutes)

3.27
SmarThru 2
8. Enter the subject in the Subject field and your message in the Note
field, and then click Next.
If you send multi-page fax and an error occurs
after some pages have been transmitted, you can
resend only the remaining pages, not the entire
fax. To resend fax pages beginning with the page
where an error occurred, check this option. If yo u
w ant to resend the entire fax, clear the checkbo x.
In case of an error, the destination fax can request
a resend of the bad fax. This parameter together
with Number of retries on page determines
whether the page will be resent on the remote
request. Check this option to allow page
resending.
Determines the number of retries when a page is
resent.
S a ve the specified Fax message options as default.
Default options are used in a new fax message.
Send from last
good page on
retry
Resend page
on remote
request:
Number of
retries on page
Save As
Default:

3.28
SmarThru 2
10. When you have finished adding files, click Next. When the dialog
box prompts you that the fax is ready, click Finish.
11. To preview the fax before sending, click Preview. The Preview— Fax
Viewer window opens. For information on the Preview—Fax Viewer
window, see page 3.29.
To send immediately, click Send.
9. In the A ttach Files window, you can attach files to your fax message.
If y o u w ant to include files, click Add File, and select the desired file.
You can attach as many files as necessary.

3.29
SmarThru 2
To view the fax message, you can use command buttons available in
the Fax Viewer as follows:
Next Shows the next page (or a page set in N-UP view) if
a v ailable.
Previous Shows the previous page (or a page set in N-UP view)
if a v ailable.
Normal view Cancels rotation, colour inversion and zoom.
N-UP view Every fax message in the SmarThru system is an
image that uses a special internal format (.fax
extension). These images can only be viewed using
the SmarThru Fax Viewer.
¥ To use N-UP view, click the View menu, and then
click N-UP View and select the number of rows and
columns to be displayed.
¥ Click icon on the toolbar and select the desired
number of rows and columns. Click Enter or
double—click sizes as needed.
Zoom Allows you to zoom the fax image.
To zoom fax image use the Zoom list on the toolbar.
You can set the percent r atio , view whole page, stretch
fax to fit page width or make fax original size.
Starts sending
immediately.
Cancels fax
sending
Browsing Fax Messages
After completing work with Samsung Fax Manager, you can preview the
fax before sending by clicking the Preview button when the dialog box
prompts.
N-up view
In vert color
R otate Zoom
Preview area

3.30
SmarThru 2
Every fax message in the SmarThru system is an image in a special
internal format ( .fax extension) and may be viewed only by means of
the SmarThru Fax Viewer feature.
You can:
¥ View faxes in SmarThru *.fax or TIFF file formats.
¥ Save faxes in a SmarThru *.fax or TIFF file formats.
¥ Print faxes and Preview fax before printing.
¥ P u t fax contents into Clipboard.
NNoottee::
Fax Viewer is used any time the SmarThru system needs to show a
fax. This occurs, for instance, when you preview a fax before
sending or preview mail as a fax message.
Invert colors Inverts fax colour. Black becomes white and white
becomes black.
To invert fax colour, click the Effects menu then click
Invert Colors. Or click on the toolbar.
Rotate Rotates fax image.
¥ To rotate fax clockwise 90ß, click the Effects menu
and then select Rotate and Right from the submenu.
Or click .
¥ To rotate fax counter-clockwise 90ß, click the Effects
menu and then select Rotate and Left from the
submenu.
Or click .
¥ To rotate fax 180ß, click the Effects menu and then
select Rotate and Flip Over from the submenu.
Or click .

3.31
SmarThru 2
Sending a PC Fax from a Windows Application
You can create and send a PC fax from any Windows application that
supports printing.
1. Open the Windows application. Create and save the document.
2. From the File menu, select Print.
3. In the Print dialog box, select Samsung SmarThru Fax as the current
printer in the Printer list, and then click O K .
4. The Samsung Fax Manager is automatically launched.
Follow the instructions beginning on page 3.24.
Select Samsung
SmarThru Fax.

3.32
SmarThru 2
Reading Incoming Fax Messages
You can set the SmarThru system to pick up incoming faxes when a call
comes in. You can also set the SmarThru system to receive faxes
automatically. Using these ways, y o u can read the fax messages on your
computer screen.
Receiving Faxes on the SmarThru System
When an incoming ring sounds, right-click the fax engine icon in the right
corner of the taskbar on the desktop window, and select Answer now
from the pop-up list.
The fax engine on the SmarThru system activates and receives the fax
automatically. To read the message, see page 3.34.
Setting the Automatic Receiving Mode
1. In the Mailbo x-Samsung SmarThru 2 window, click the Tools menu
and select SmarThru Configuration.
If the Automatic
Receiving mode is
set on the SmarThru
system, you cannot
use your machine as
a printer or scanner.
WWAARRNNIINNGG!!
Fax
engine icon

3.33
SmarThru 2
3. The Fax Gate configuration dialog bo x appears. Click Modems.
4. Select the Auto answer incoming calls after checkbox.
5. If necessary, set the additional options, then click O K .
NNoottee::
If the PC is off when a fax is received the unit will receive the fax
according to the receiving mode set through the fax machine.
2. In the SmarThru Configuration window, select F a x G a t e , and click
Options.
Click here to be checked.

3.34
SmarThru 2
Reading a Fax Message
1. When a new fax message comes in, the notification window appears.
2. Click icon to view the message in a separate window.
Incoming faxes are automatically stored in the Incoming folder of
the Mailbox-Samsung SmarThru 2 window.
You can open the fax messages in the Mailbox window at any time.
See page 3.43.
Opens the latest
message.
Closes this
notification window.
Opens the SmarThru 2

3.35
SmarThru 2
Using Fax Cover Page Editor
You can attach a co ver page to y our fax. The Samsung SmarThru 2
S ystem contains a libr ary of predefined fax cover pages designed with
different st yle s and suggested uses.
In addition to the set of predefined fax cover pages y ou can design your
own fax cover page or edit any existing co ver page by using the Fa x
C over Page Editor.
To Open the Fax Cover Page Editor
The Fax Cover Page Editor appears automatically when you select this
option when creating a fax message. To open the Fax Cov er Page Editor
manually follow these steps:
1. In the Mailbo x-Samsung SmarThru 2 window, click the Message
menu and select N e w, then E-mail/Fax.
2. When New Message window opens, click the O pt ions menu, and
select F a x .
3. In Fax dialog bo x, select the F a x P r e paration tab.
4. To edit an existing co ver page, select one from the Cover page options
b o x, and then click Edit. To create a new Cover page, click N e w .

3.36
SmarThru 2
5. The Fax Co ver Page Editor window opens.
To Edit or Create a Fax Cover Page
There are two kinds of pages in the Fax Co ver Page Editor: First Page
and Second Page. The First P age is a real co v er for your fax, and the
Second Page layout is used for second and further pages.
You can select a page in a v ariet y of w a ys:
¥ Click the View menu, then click First Page to select the first page or
Second Page to select the second page.
¥ Click button on the toolbar to select the first page or to
select the second page.
¥ Click to sw a p page contents.

3.37
SmarThru 2
The Fax Cover Page Editor allows y ou to customize the appearance of
your fax message by placing the fax co ver objects on the page(s). Insert
the variable fields yo u w ant to include with the fax. Position the fields in
the desired locations on the background.
¥ To place an object on a page:
1. Select the page to place an object on.
2. Click Tools, Insert and then click an object you need or click the
object s button on the toolbar.
3. Click and hold the left mouse button to enter the first corner of the
object s binding rectangle.
4. M o ve the button to the opposite corner of the object and release
the mouse button.
5. Note the appearance of the object on the page.
You can align objects on a page and relativ ely to one another. You can
also control object visibilit y if one object covers another.
¥ To align object:
1. Select the object to be aligned.
2. Click Tools menu, and click Align Objects and then select required
alignment, or use the Formatting toolbar to select the required
alignment.
¥ To control object s visibilit y:
1. Select the object to be operated on.
2. Click Tools menu and select required visibility or use the
Formatting toolbar the same way.
To Modify Object’s Properties
¥ Select the desired object, right-click and select Properties... from the
pop-up menu. Customize the object s properties as needed.
¥ Double-click the desired object. Customize the object s properties as
needed.
For further details on the fax cov er page editor objects, and options,
refer to the on-line help .

3.38
SmarThru 2
Creating and Sending E-mail Messages
1. R un the SmarThru 2 and open the Mailbox-Samsung SmarThru 2
window. For details, see page 1.5.
2. Click button on the toolbar, or click the Message menu, and then
select New Message.
NNoottee::
For sending and receiving e-mail on your SmarThru system, you must enable Internet
Gate Service and configure your Internet account. See page 3.54.
Working with E-mail
Messages
Header
Message Text
Attachment Field
Shows files attached
to the message.

3.39
SmarThru 2
3. Type the e-mail addresses in the T o, C c , and B c c (Blind Carbon Copy)
field.
To send to more than one person, type the address of each recipient,
separated b y a comma or semicolon(;).
To use an e-mail addresse from the Address Book, click the T o , Cc,
a n d B c c buttons. For more information on Address Book, see page
3.46.
You can hide or show the C c or Bcc field with View menu. Bcc field
means the message will be sent to the addresses but the persons in
the T o and C c fields will not know .
To send the message as a fax, enter the fax number in the address
field. The message will be translated to fax and sent to the fax
address specified.
Notes:
• To hide/show Toolbars, clear/set the corresponding toolbar option in
the
VViieeww
menu.
• To expand the text pane so it occupies whole
MMeessssaaggee FFoorrmm
window
area, press
CCttrrll++EE
or click
VViieeww
menu and then click
TTeexxtt OOnnllyy
.
• To Restore the text pane size, press
CCttrrll++EE
again.
• To show/hide the attachment pane, set/clear
AAttttaacchhmmeenntt
option in
VViieeww
menu.
4. Type the message title in the Subject box, and then type your
message in the Note box.
You can define several text messages (for example, y our title) and use
as a message signature. Use the icon on the toolbar to create
signature. To insert a message signature, select the desired one from
the list and click the button on the toolbar.
5. To attach files, select Attached Files... from the Message menu, or
use the button on the toolbar. You will find the selected files in
the Attachment field. You can also drag and drop for file attachment.
6. Click the button on the toolbar or select Send from the
Message menu. The outgoing message is automatically saved in the
Outgoing folder of the Mailbox.

3.40
SmarThru 2
7. If the message contains any misspelled words, after pressing Send,
the check spelling dialog box will appear.
8. Correct the spelling, and then click O K . The Select Recipient Name
dialog box allows you to enter a name of the address you entered.
9. If the addresses are not sa ved in the Address Book, the Resolve
Address dialog box appears. To resolv e the address, click O K .
10. The mail sends to the destinations(s).
Click here to sa ve
the address in the
Address Book.

3.41
SmarThru 2
New Message Toolbars
The New Message window contains the following toolbars:
New Message Toolbars: Main
Send
R eply to all recipients.
Save
Print Cut P aste
Copy Undo
A ttach file(s)
Fo r ward a
message.
R eply to sender.
Check spelling.
New Message Toolbars: Tools
Pr o vides quick access to utilities.
R esolve address(es)
Call the MailBox.
Call the Address Book.
Call the Find
Message.
Mark message as
having low importance.
Mark message as having
high importance.
Digitally sign an e-mail.
Encrypt an e-mail
Specify the time to send.
Insert signature.
New Message Toolbars:
Signature
Edit signature.
New Message Toolbars: Options
Lets you modify Message options.
Format current or
selected paragraph with
a predefined style.
New Message Toolbars: HTML Formatting
If your message is in HTML format, the toolbar provides quick access
to editor functions.
Bold Set text colour.
Increase text indent
( m o ve text right).
Insert a h yperlink.
Align right.
Italic
Set back colour.
Align left.
Create ordered list.
Decrease text indent
( m o v e text left).
Set background sound.
R e m ove background sound if any.
Underline
Create unordered list.
Center left.
Insert a picture.

3.42
SmarThru 2
Delivering E-Mail
The SmarThru system automatically sends outgoing e-mails and checks
for incoming e-mails at regular intervals specified at the Internet Gate
configuration.
1. To deliver messages manually before (or between) the system
automatic delivery session, open the Mailbox-Samsung SmarThru 2
window, and then:
¥ Click on the toolbar.
¥ Click the Delivery menu and then click Send and Receive All.
¥ To send e-mail from a specified account from the Delivery menu,
select Send Using... and then select the desired account.
The Send and Receive Mail dialog box reflects Internet mail
sending/receiving process and allows you to interrupt ( Abort button),
if necessary.
2. After connecting to the remote server, if there is new incoming mail,
the notification window appears.
For details on reading messages, see the following page.
Opens the latest
message.
Click it to deliv er mail.
Closes this
notification window.
Opens the SmarThru 2

3.43
SmarThru 2
Browsing E-mail Messages
After the SmarThru system receives your message, the message is
stored in the Incoming folder of the SmarThru system Mailbox.
To read incoming messages:
1. R un the SmarThru 2 and open the Mailbox-Samsung SmarThru 2
window.
2. To read incoming messages, select the Incoming folder.
Message list
Contains brief information about the e-mail
and fax messages in the selected folder.
number of newly
arriv e d messages
Folder area
¥ Contains the list of folders y ou can place mails in. Yo u c an
create, remove, and organize the folder with the Folder
menu.
¥ Fa xes and e-mails can be located in the same folder.
¥ Trash, Incoming, and Outgoing folder are the system
folders. Their properties cannot be changed.
Preview pane
Shows the contents of a selected e-mail
message or the delivery information
regarding a selected fax message.

3.44
SmarThru 2
3. To view the message in the preview pane, click the message in the
message list.
To view the message in a separate window, double-click the message
in the message list.
4. The incoming mail message form consists of
¥ Toolbar
¥ Header pane
¥ Text pane
¥ Attachment field
Toolbar
Header pane
Text pane
Attachment field
To open the attachment file, double-click
on the file, or right -click and then select
Open.

3.45
SmarThru 2
Finding Messages
As time passes, you may find that y o u h a v e accumulated a large number of
messages and that locating a specific message is therefore difficult.
To retriev e messages easily, bring up the Find Message dialog box.
To find messages:
1. In the Mailbo x-Samsung SmarThru window, click on the toolbar, or
click the Tools menu and then select Search....
2. Select the folder that you want to search for your message in. To
select the folder click Browse... and select a folder from the tree.
Select All folders to search for a messages in all folders.
3. Specify the fields to search. To specif y more accurately, use the
A ttributes and Size/Time tabs.
4. Select logical criteria grouping.
¥ All conditions match: searches for messages which meet all of the
fields
¥ Any condition match: searches for messages which only meets
a n y of fields
5. Click Find Now.
6. Note messages being retrieved.
Click it to find a
message.

3.46
SmarThru 2
Overview
The Address Book provides a convenient place to store contact
information for easy retrieval by SmarThru programs such as N e w
Message. The following features will help organize your contact
information.
¥ Store important information about people and groups
With your address book, you have a place to store e-mail addresses,
phone and fax numbers, home and work addresses, and other personal
information. You can also store a set of individual and business
Internet or fax addresses, linked directly to the address book.
¥ Create groups of contacts
You can create groups of contacts to send e-mail or fax es to a set of
people, such as business associates or relatives. To send e-mail to
everyone in the group, use the group name. Creating groups is a
convenient way to organize a large address book.
¥ Share your address book with other users
You can export any contact information (person or group) to a separate
file and send it to other people. It is easy to import contact information
from another SmarThru Address Book.
¥ Import names from your other address books
You can import your personal address books from old versions of
SmarThru, numerous popular e-mail programs including Microsoft
Outlook Express, Eudora Light, Netscape Messenger, and any progra m
that exports comma-separated values (CSV) text files or DBF files,
such as Microsoft Outlook.
Using Address Book

3.47
SmarThru 2
Opening the Address Book
You can open Address Book in a variet y o f w a y s from the Mailbox and
the message form when you send e-mail or fax.
To open the address book:
¥ In the Mailbox-Samsung SmarThru 2, click button on the toolbar
or click the Tools menu and then select Address Book....
¥ In the message form window which opens when you write an e-mail
message, click button on the toolbar, or click the Tools menu and
then select Address Book....
NNoottee::
When you create a fax or e-mail message, you can open the
address book to pick up your contacts by clicking
FFaaxx NNoo, TToo, CCcc
,
BBcccc
button. The
PPeeeekk AAddddrreessss
dialog box will appear. Providing a
convenient tool to select your contact, not all address book
functions can be accessed in this mode.
Object view:
Select an object to
customize properties
for.
Properties view:
Shows the properties of the
object selected in the Object
view and allows you to edit
the properties.

3.48
SmarThru 2
2. In a Hierarchical view, select a contact location.
3. Click Add person. The Person Properties window opens.
You can also click Add New in the Edit menu and then select P e r s o n,
or click button on the toolbar.
4. Enter contact information.
Adding Contact Information to Your Address
Book
To add contact information to your address book directly, do the
following:
1. Open the Address Book window. For details, see page 3.47.
Use to copy or mo ve the selected content
to another location. When Select Target
window opens, select the desired location
and click O K .
Fill in the desired fields in
each tab for the address
information.
Click to delete
the selected
content.
Click to see properties of the
selected content.

3.49
SmarThru 2
5. To add an Internet e-mail address, click Add internet..., type the
e-mail address and then customize options as necessary.
T o a d d F a x , click Add fax..., enter a fax address and then customize
as necessary.
6. Fill in other desired fields. Note sev eral tabs in a dialog.
7. Click O K .
NNootteess::
• Person information added to Incoming E-mail Message is put into Post
Office and set as the default.
• Person name participated in address resolution.
• You can leave the address blank. However, SmarThru 2 cannot send the
message to the contact. Contact is also excluded from address
resolution. To use the contact, add internet e-mail and/or fax addresses
to the person.
To add Internet e-mail or fax address to an existing person
1. Select the desired person in the Address Book window.
2. Click Add internet... or Add fax....
O r, in the Edit menu, click Add New and then click Internet
Address or Fax Address. You can also use or button on
the toolbar.
3. Enter the internet or fax address.
4. Customize the internet e-mail or fax options as necessary.
5. Click O K .
NNootteess::
• Person can have multiple internet e-mail or fax addresses.
• The only address (internet e-mail or fax) can be default. Default address
is displayed in bold and cannot be deleted or moved.

3.50
SmarThru 2
To create a Group object:
1. Select the desired group location in the Address Book window.
2. Click Add group. You can see the new group under the selected
location.
O r, in the Edit menu, click Add New and then click Group,
or click button on the toolbar.
3. Type in a new group name in place of New Group .
4. Click outside new group name.
5. Add items to the new group folder by cop ying and moving address
book items or by creating new items.
NNoottee::
Group can contain other groups, persons and aliases.
Organizing Address Book Items
A large address book can be organized in several ways to make it easy
to retriev e contacts. You can sort names alphabetically in ascending or
descending order. You can also view items in a Hierarchical or
Alphabetical view allowing you to view persons as a list combining them
with aliases and groups.
For further details, click Help and refer to the on-line help.
A new group is
created.

3.51
SmarThru 2
Opening the SmarThru Configuration Dialog
Box
You can configure the Samsung SmarThru 2 system including the Fax
and Internet Gate to suit your requirements in the SmarThru
Configuration dialog bo x.
To open the SmarThru Configuration dialog box:
1. Run SmarThru 2 and open the Mailbo x-Samsung SmarThru 2
window. For details, see page 1.5.
2. From the Tools menu, select SmarThru Configuration.
To access this menu from the pop-up menu list, right-click on the
SmarThru mail engine icon on the bottom right corner of the
desktop window. Select SmarThru Configuration.
SmarThru
Configuration

3.52
SmarThru 2
3. The SmarThru Configuration window appears. Select the option to
configure, and then click O p tions.
For details on customizing each option, refer to the on-line help .
To customize the following items in the SmarThru configuration dialog
box:
Default Message To customize the default message
Options option.
Agent To perform a set of actions (scenarios) in
return to variet y of ev ents.
System Options To customize Samsung SmarThru system
properties.
Service To turn on/off SmarThru service such as
Internet or Fax Gates.
Fax Gate To configure the Fax Gate.
Internet Gate To configure the Gnternet Gate.
Security To acquire, import, export, and configure
securit y certificates.

3.53
SmarThru 2
Configuring the Fax Gate
The Fax Gate can be configured to send and receive messages via your
system fax modem.
When SmarThru was first installed, y ou were promoted to configure the
Fax Gate. If y ou did not configure the Fax Gate or y ou w ant to make
changes, take the following steps:
1. In the SmarThru Configuration dialog box, select F a x G a t e , and click
Option....
To open the SmarThru Configuration dialog box, see page 3.51.
2. The Fax gate configuration dialog bo x appears. Configure the Fax Gate
options as needed. To configure y our fax modem, click Modems.
For details on configuring the Fax Gate, refer to the on-line help.

3.54
SmarThru 2
Configuring the Internet Gate
To configure the Internet Gate for internet mail exchange, you must
define your connection type and configure at least one internet account.
When you first installed the SmarThru 2 progr am o n y our computer, yo u
were prompted to configure the Internet Gate. If you did not configure
the Internet Gate, or you w ant to change the configuration, follow these
steps:
1. In the SmarThru Configuration dialog box, select Internet Gate, and
click Option... .
To open the SmarThru Configuration dialog box, see page 3.51.
2. The Internet gate configuration dialog box appears. Configure the
Internet Gate options as necessary. To configure your internet
accounts, click Accounts.
For details on configuring the internet gate, refer to the on-line help.

3.55
SmarThru 2
Configuring Service
This feature allows you to enable or disable SmarThru services such as
Internet or Fax Gates.
1. In the SmarThru Configuration dialog box, select Service, and click
Option....
To open the SmarThru Configuration dialog box, see page 3.51.
2. The SmarThru Services dialog box appears.
3. To activate a particular service, select the desired service from the
Services list and check Enable or double-click the desired service in
the Services list.
To turn off a particular service, select the desired service from the
Services list and uncheck Enable or double-click the desired service in
the Services list.
4. Click O K , and then close the SmarThru Configuration dialog box.

chapter
4
4
This chapter briefly describes the main features of AnyP a g e
Lite. F o r more information and step-by-step instructions,
refer to the on-line help .
◆
O verview
◆ R unning AnyPage Lite
◆ How To Recognize a Text or Table
◆ A nyPage Lite Window Overview

4.1
Using AnyPage Lite
Overview
A n y Page Lite is an Optical Character R ecognition (OCR) program. It
con v erts a scanned text image into digitized text. AnyP age Lite can be
used after the Samsung SmarThru program has been installed.
A nyPage Lite system performs the following operations to recogniz e text:
1. Open a scanned image of a document. AnyPage Lite can load image files
with BMP, PCX, DCX, JPEG, or TIFF extensions.
2. Page lay out analysis. The system segments and analyzes the image and
marks blocks as texts, pictures, and tables on the image.
3. Recognition.
4. Checks and edits the recognition results. When the recognition is
completed, you can check the recognized text with a built-in spelling
check system and edit the text if necessary.
5. S a v e the results. You can save the recognized results to a file, to a
Clipboard, or send it b y e-mail or fax using Samsung Mail Manager or
Samsung Fax Manager.

4.2
Using AnyPage Lite
Running AnyPage Lite
From the Start menu, select Programs→Samsung SmarThru
→
AnyPage.
Tips
Using Samsung Scan Manager you can scan and recognize the document
automatically with the help of the AnyP age Lite system. Refer to
Scanning to OCR on page 2.21.
If you place an image onto the OCR button, SmarThru runs AnyPage Lite
and loads the image file in the AnyPage Lite window. When the AnyPa ge
window opens, click button on the toolbar to open and read the file
with Any Page Lite.

4.3
Using AnyPage Lite
How To Recognize a Text or Table
1. Scan the document and save it as one of the supported image files;
B M P, PCX, DCX, JPEG, TIFF.
To improve the recognition qualit y, set the proper brightness and
resolution.
If y ou use Scan Manager for scanning, you must export the scanned
image saved in the Image Manager to change the file format: From the
File menu in the Image Manager window, select Export Image.
Select the location to sa ve the file and specif y the extension of the file.
For details on scanning documents with the Scan Manager, see page
2.4.
2. Run AnyPage Lite. For information on starting AnyP age Lite, see page
4.2.
Choose the file format
supported by the
A nyPage Lite system.

4.4
Using AnyPage Lite
4. Click button on the toolbar, and then select the image file(s) in
the Open dialogue box. The AnyPage Lite loads the file(s), then the
image of the document(s) appears in the Image window. F or the
A nyPage Lite Window Overview, see page 4.10.
3. You will see the main window of AnyPage Lite and the Tip dialogue.
This dialogue box contains useful information. To see the next tip ,
click Next Tip. If you do not want to see the next tip, click Close.
Click here to open a file.
Image window

4.5
Using AnyPage Lite
5. You can rotate, in v ert, or clean the image, using the menu, or the
buttons on the toolbar. See page 4.12.
6. To analyze the image, click button on the toolbar. AnyPage Lite
analyzes the open page (or the selected pages or all pages depending
on the button mode.) and marks blocks as texts, pictures, and tables on
this particular image. For details on the button mode, see page 4.11.
If you are not satisfied with the result, edit the blocks using the buttons
on the toolbar. See page 4.13.
NNoottee::
You can skip this step. When you click button without
analyzing the image, AnyPage Lite automatically analyzes the image
and then starts recognition.
7. To start recognition, click button on the toolbar.
A n yPage Lite recogniz es the open page (or selected pages or all pages
depending on the button mode.). During recognition, AnyPage Lite
highlights the recognized part in the Image window.
The system may displa y a w arning message (for example; Resolution is
too low). This kind of messages helps you check parameters, and can
be disabled if y ou wish (From the Tools menu, select Options
→
Recognition →Show tips during recognition).
The number in the upper left corner
of the block indicates the sequence
that they will appear in the output
text.
The block type is identified with
color; green (text), red (picture),
brown (table). To change the color;
select Options from the Tools
menu. In the Options dialogue box,
select the General tab and change
the color.
 Loading...