

Page 1
SmartCentre
User Guide
May 2001
Samsung Telecommunications America reserves the right without prior
notice to revise information in this guide for any reason. Samsung
Telecommunications America also reserves the right without prior notice to
make changes in design or components of equipment as engineering and
manufacturing may warrant. Samsung Telecommunications America disclaims all liabilities for damages arising from the erroneous interpretation or
use of information presented in this guide.
Page 2

Produced and distributed under license from Sension Limited, UK.
Copyright 2000 Sension Limited, UK. Licensed material. Unauthorized
use, duplication or distribution strictly prohibited.
Page 3

Table of Contents
Introduction 1
Getting Started ...........................................................................2
Real Time Management 4
How to Edit a Real Time Window ....................................................5
How to Create a Composite Real Time Screen ...................................5
Historical Reporting Package 7
The Reporter ...............................................................................7
How to Create a Report Template ....................................................7
How to Compile a New Report ........................................................9
How to Export Data ....................................................................10
Configuration Application 11
The Configurator ........................................................................11
How to Configure Lines, DIDs, Extensions and Agents .......................11
How to Define a Shift, Set Call Thresholds, and Password ..................12
Wallboards 13
How to Access the Wallboard Help Guide ........................................13
How to Configure the Wallboard Port .............................................14
How to Create and Configure a New Wallboard Template ....................15
How to Create a Schedule to Configure a Wallboard ..........................15
How to Send a Temporary Message to a Wallboard ............................16
Glossary 18
Page 4

Welcome to SmartCentre, a CALL CENTER Management tool which provides real time status information, cumulative performance statistics and a
range of historical reports to help you manage the people in the CALL
CENTER and the level of service you provide to your customers. The system uses the Windows Graphical User Interface (GUI) giving it a look and
feel which is consistent with other Windows products you may use.
SmartCentre is comprised of three main applications combined to provide
a management product that is both flexible and easy to use. In addition,
external devices such as wallboards can be driven by SmartCentre. The main
components are:
• Real Time Management Information System.
• Historical Reporting Package - Reporter.
• Configuration Interface - Configurator.
• Wallboards.
A full context sensitive help file is an integral part of the system and covers
all areas of use and can be accessed by clicking on the Help icon on the toolbar, selecting "Help" from the menu bar or pressing the F1 key at any time.
This User Guide is recommended for use in conjunction with the General
Description, which documents exactly which features apply to your product.
1
INTRODUCTION
Page 5
Getting Started
Set the Windows taskbar to be permanently visible so the SmartCentre
Alarm icon can be seen.
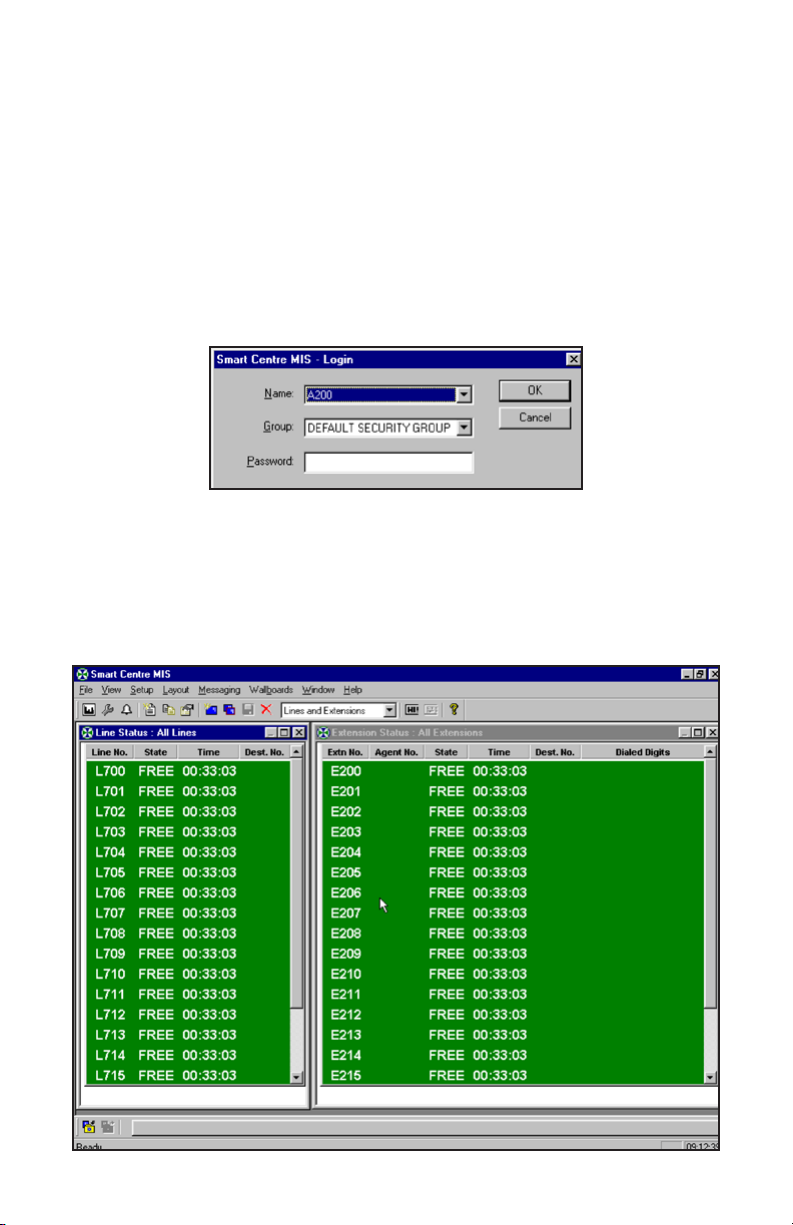
Once SmartCentre has been installed, start the program by following these
instructions:
• Select Start, Programs Menu and select the “SmartCentre MIS {US}”
program.
• Select “SmartCentre MIS” to run the real time management program.
• If the system has not been programmed with security groups and passwords, click OK.
SmartCentre will start to display details of calls in the CALL CENTER as
soon as it is started up.
2
Page 6

NOTE: If the PC has been switched off prior to running SmartCentre, the
current status of the Agents in the CALL CENTER may be incorrect. It is
advisable to Log Off then Log back On This will ensure the correct status of
the Agents is reported for the rest of the day. Real time statistics for the day
will also be reset to '0' if the PC has been reset.
3
Page 7
SmartCentre provides real time information, which can be viewed in a
Windows environment on a PC monitor and displayed on wallboards.
SmartCentre is delivered with a collection of predefined real time screen
templates to give you a feel for the type of screens, which can be created. In
a typical CALL CENTER environment a number of real time screens would
be combined to provide a composite view of important parameters to monitor.
There are four types of real time windows available to select from. Each window type has many options which can be combined and saved as a template.
These types are as follows:
• Status display - lines, extensions and agents can be monitored.
• Statistics displays - lines, DIDs, extensions agents and their corresponding groups can be displayed.
• Calls in Queue Graph - five options are available.
• Wait Time Graph - five options are available.
4
REAL TIME MANAGEMENT
Page 8

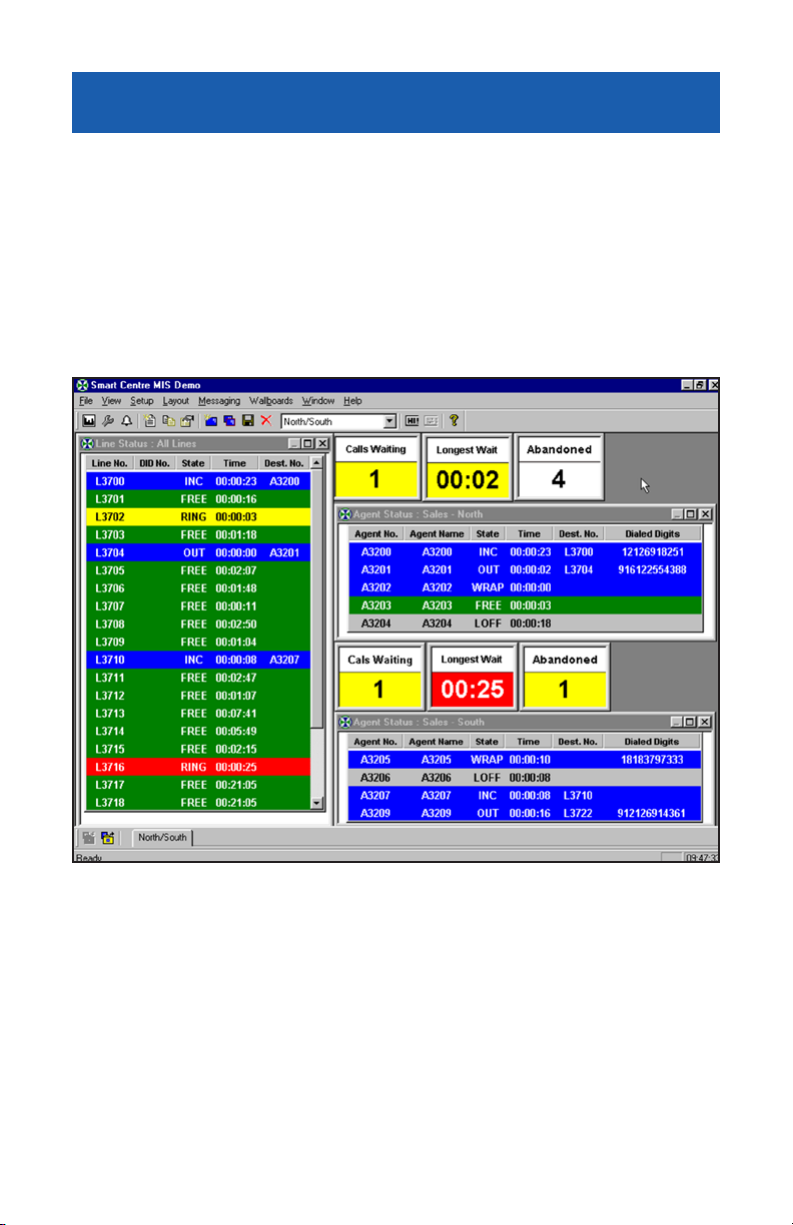
Color-coding is used to highlight the current state of a device.
• Green - device is free (agent available, line free, etc.)
• Blue - device is busy (agent on a call, in wrap-up, etc.)
• Yellow - device is ringing
• Red - device alarmed (waiting time threshold exceeded, etc.)
• Gray - device logged off.
How to Edit a Real Time Window
Each real time window has properties that can be viewed and changed by
using a mouse.
STEP
ACTION
1 Select the window to be edited by clicking anywhere within the
window with the left mouse button.
2 View the window properties by clicking the right mouse button. A
dialog box will appear with the current settings for the selected window.
3 Edit the properties using drop down list boxes, radio buttons and
check boxes as appropriate. Click OK to view the updated window.
TIP: If you are creating multiple windows of the same type or size, edit them
and size them first before creating a new one. Using this method, only the
device, device name and parameter will need to be changed. (When a new
window is created it defaults to the same properties and size of the last selected window.)
How to Create a Composite Real Time Screen
The easiest way to create a composite screen is to start with one of the default
templates within the system, copy it and change the copy by adding new
windows to match your requirements.
STEP
ACTION
1 Start by selecting the template you wish to copy from the drop
down list box on the toolbar.
5
Page 9

STEP A
CTION
2 Using the mouse select the template you wish to copy.
3 Click on the “copy layout” icon and enter a name for the
new template.
4 Edit any windows within the default template as described above in
"How to edit a real time window".
5 Click on the "new" icon on the toolbar and select a new
window of the appropriate type from the list contained
in the dialog box.
6 Windows can be maneuvered as in any other Windows application,
moving, resizing and minimizing as necessary.
7 Save the template by clicking the down arrow by the drop down list
box on the toolbar and select the template name you are using. The
option to save or not will then be given on the screen.
8 Press F1 for on-screen help at any time.
TIP. The windows should be laid out logically and should only display rel-
evant information. Too many windows and too much information will lead
to confusion.
6
Page 10

The Reporter
SmartCentre Reporter uses data from the Samsung telephone system that is
continually collected by SmartCentre and presents it in user-definable historical report format. The reports can be viewed on screen or printed.
Reports can be compiled using data originating as far back as the installation
date of SmartCentre system, even if upgrades have since been installed.
You can filter out irrelevant data, generated at times of the day or week in
which you are not interested, first by creating a shift. Shifts are created using
SmartCentre Configurator, explained later on in this document. Shifts can
be defined to reflect working times of different groups but can also be used
to define a period of time during which there are always problems, such as
Monday mornings and Friday afternoons.
Once a shift has been created you can compile a report that uses data collected only during that shift. This is particularly useful for a manager who
needs to find out what happened during a particular shift when they were
not there.
Before compiling a report, a report template must be created to define the
information required over the specified period.
How to Create a Report Template
STEP ACTION
1 First enter SmartCentre Reporter by clicking on the “Reporter” icon
on the toolbar, or from the menu bar select "Start,
Programs, SmartCentre MIS {US}" followed by
"SmartCentre Reporter". The first time the application is
selected it will take a few seconds to open, thereafter the toggle between the two is immediate by
means of the icons, or selection from the menu bar.
2 To create a new report template select the Report
Template icon on the toolbar (or from the menu bar
choose "Set-up" followed by "Report Templates").
7
HISTORICAL REPORTING PACKAGE
Page 11

STEP A
CTION
3 Enter a new template name in the Report Template dialog box by
typing over the existing name. Notice the Change button becomes
an Add button when a new name is entered. Click on the Add button to register the new template name.
4 The template name may not be the one you wish to be displayed on
the printed report, you may want a fuller title. Enter the report title
in the Print Name box.
5 The report items default to those of the last selected report tem-
plate. You may choose to delete these items and add some of your
own. To delete an item, select it and click the Delete Items button.
To add an item, click on the Add Item button and select an item
from the drop down list which appears.
6 Notice when a new item is added to the Report Items list, it appears
on the line above the one that is highlighted. The Cut, Copy and
Paste Item buttons can be used to change the order of the report
items so they are printed in the order you require.
7 Once the item has been selected to appear in the report you need to
edit it to ensure it is going to show you exactly what you want. To
edit a selected item, click on the Edit Item button and use the drop
down lists and check boxes to define the parameters of the report
item.
8 Remember you can press F1 for on-screen help at any time.
9 Once you are happy with your report items click OK and close the
Report Templates window. You are now ready to compile your
report.
TIP: If you have to create a number of Report Items which need to be identical except for the device name it is best to create the first one and edit it.
Next use the Copy Items and Paste Items buttons to create multiple copies
of the report item and then edit each one in turn to change the device name.
8
Page 12

How to Compile a New Report
Before you can create a new report you need to prepare a suitable report template as described above.
STEP
ACTION
1 To compile the report click on the New icon on the tool-
bar or from the menu bar select "File" followed by
"New".
2 Define the period over which you want to run the report. Enter the
shift which the report is monitoring and select the report template
you require (you may wish to use the template you just created)
3 When all details have been entered, click OK and wait a few
moments for your report to be compiled.
On your newly compiled report notice the header contains information such
as the shift name, the start and stop time and date, the creation date, the site
name and the template name. Also shown is the number of pages in the
report which is very useful to know before you print a report.
The toolbar allows you to scroll through the pages and zoom into the details
of the report using the magnification buttons. You can print the whole
report or some selected pages.
On your report, notice the parameters which have exceeded your alarm
thresholds appear in red. If the printer is not color, these are printed in bold
type for clarity.
To view existing reports click on the Open Report icon on the toolbar in the Reporter.
You may notice there are two main types of report, Traffic Reports and Event
Reports. The traffic reports provide general information about a large proportion of the CALL CENTER and are useful for spotting trends in work
and areas for improvement. The event reports give detailed information
about an individual or a group (of agents, lines, extensions or DIDs) and
provide a valuable investigative tool to pinpoint a problem.
For more information on SmartCentre reports, please refer to "SmartCentre
Reports."
9
Page 13

How to Export Data
SmartCentre (VAR) allows the export of reports in text format for use in a
spreadsheet such as Microsoft™ Excel. To do this:
STEP
ACTION
1 Click on the Export icon and save the file in a suitable folder.
2 To import the file into Excel, select Open from the File menu,
choose "files of type", to be "text files". Find the file you previously saved and click OK.
3 Ensure that the data type is delimited, select comma as the delim-
iter, click finish. The data should now appear on the spreadsheet.
To aid your calculations it is important to know that the number in row 6
represents the total number of seconds over which the report was run.
SmartCentre also allows ODBC (Open Database Connectivity) export to
any ODBC compliant database. Full details are available in the help file
(F1).
10
Page 14

The Configurator
The Configurator allows you to set up SmartCentre to match the way your
CALL CENTER is organized. The way that the lines, extensions, DIDs and
agents are grouped on your ACD is mirrored by SmartCentre so that information displayed by SmartCentre relates directly to elements of your CALL
CENTER.
How to Configure Lines, DIDs, Extensions and Agents
STEP ACTION
1 Enter SmartCentre Configurator by clicking on the
Configurator icon on the toolbar or from the menu bar
select "File" followed by "SmartCentre Configurator".
2 If the Configurator is password protected a dialog box will appear
and you will need to enter a password.
3 Once in the Configurator there are a number of buttons which
allow you to edit objects from the following list:
• Lines
• Line Groups
• Line Supergroups
• DIDs
• DID Groups
• DID Supergroups
• Extensions
• Extension Groups
• Extension Supergroups
• Agents
• Agent Groups
• Agent Supergroups
4 If you choose to edit any of these objects, three buttons allow you
to create, delete or edit the properties of the object by following the
on-screen options.
11
CONFIGURATION APPLICATION
Page 15

STEP A
CTION
5 If you need to create more than one new object, multiple objects
can be created simultaneously by configuring new objects from the
options in the appropriate dialog box.
6 If you are creating an object you can choose the position of the new
object in relation to the current objects by choosing an insertion
point of the new object. This is done by highlighting the point
above which the new object will be inserted.
NOTE: Creating or deleting objects will cause SmartCentre to reset. Any
cumulative real time data showing on the screen will be lost and the agents
will have to log off and back on again. Therefore, when first setting up
SmartCentre, it is a good idea to create spare objects of each type which can
then be edited and brought into use as and when required.
TIP: If you are naming objects remember that each object must have a
unique identity. For example, 305 592 2900 is acceptable but if there is more
than one line on this number the line should have a suffix, e.g. 305 592
2900/1.
How to Define a Shift, Set Call Thresholds, and Password
STEP ACTION
1 To define a new shift, click the Shift button and type the new name
for the shift over the original highlighted shift name. Notice the
Add button replaces the Change button. Click the Add button.
2 Enter the print name for the shift and define the period of the shift
using the time chart. Click OK and close the shift window.
3 Call Thresholds are designed to ensure that only real calls are regis-
tered in SmartCentre database. Calls which are too short to be real
calls can be filtered by setting the Call Threshold values to a few seconds. An example of a call which should be filtered is one where the
phone rings once and the caller hangs up.
4 To set call thresholds click the Call Thresholds button. Enter values
you wish to establish for each type of call to be registered. Press the
OK button.
5 To set the password for the Configurator, click the Password button,
enter the password and press OK.
12
Page 16

Wallboards can be extremely powerful management tools in a CALL CENTER. The main function of wallboards is to provide performance statistics
in real time to the agents operating the CALL CENTER and thereby motivate them to improve their performance if necessary.
Up to six wallboards may be driven from each SmartCentre supervisor position. Each wallboard can be programmed individually to show different
parameters.
The information on each wallboard can be directed at individuals or groups.
Up to six parameters from a choice of over 250 can be displayed at once and
can be set to stay on a wallboard for a specified time before displaying the
next set of parameters. In addition to parameters, the supervisor can send
text messages to the wallboard, enabling easy distribution of important
information. Audible alarms are available to alert staff to alarmed parameters
and/or messages.
Wallboards are available as an option with SmartCentre VAR. This section
shows how to configure a wallboard and is intended to give you some idea
of the power and flexibility of wallboards. To appreciate this we suggest you
also look at the help-file, where there is an illustrated guide on managing
wallboards.
How to Access the Wallboard Help Guide
STEP ACTION
1 Click on the help icon or from the menu bar select
"Help" followed by "Contents and Index".
2 Click on “Step by Step Instructions”, then "Managing Wallboards"
to view the illustrated guide.
However, if you do have a wallboard, the first thing you need to do is to configure your port for a wallboard.
WALLBOARDS
13
Page 17

How to Configure the Wallboard Port
Each SmartCentre workstation can drive up to six wallboards via one serial
port connection. To select the serial port you wish to use take the following
steps:
STEP
ACTION
1 From the menu bar select "Wallboard" followed by "Ports". In the
drop down list box that appears select the port you wish to use.
2 Click the OK button.
The first stage in setting up the wallboard is to define a template. You can
create as many wallboard templates as you need to manage the wallboards.
You can program each wallboard separately, even those driven by the same
SmartCentre workstation.
How to Create and Configure a New Wallboard Template
A wallboard template defines what should be displayed on a wallboard. This
includes defining the position and types of real time parameters to be displayed, along with the position and text of any associated labels. A template
can also define the contents of a scrolling message if required.
STEP
ACTION
1 Click on the Wallboard Configuration icon from the
toolbar, or from the menu bar select "Wallboard" followed by "Configure".
2 Click the Templates button to see a drop down list box with all pre-
viously prepared template names.
3 To create a new template, enter the new template name in the
Template dialog box by typing over the existing name. This actually creates a copy of the existing (selected) template so it is helpful if
you first select the template which is most like the one you wish to
create.
4 Click on the Add button. You are now ready to configure the wall-
board template to your requirements.
5 Select an insertion point in the drop down list box above where you
want a new wallboard item added.
14
Page 18

6 Click the Add Item button. Note that if you choose to add a mes-
sage to a template this should be the only item contained within the
template.
7 In the dialog box that appears select the item type you require and
click the OK button.
8 Now click the Edit Item button to edit the newly inserted item.
9 Use the dialog boxes and check boxes to define the item.
10 Press F1 to invoke the on-screen help facility which will explain in
more detail what each box means.
11 Once you have finished configuring the wallboard template click
the OK button to commit the changes to the template.
TIP: When adding parameters and labels to a wallboard template you have
to define the position and width of these items on the wallboard display. To
avoid this time-consuming process use the Automatic Parameter Layout buttons. Just click on the appropriate button for 1, 2 and 4 parameters.
Once a number of wallboard templates have been created and configured,
you need to arrange a schedule which defines the sequence of wallboard
templates that should be displayed on a wallboard. The schedule defines the
length of time each template is displayed before moving to the next one.
When the schedule has finished displaying the last template in the sequence
the schedule starts at the first template again.
How to Create a Schedule to Configure a Wallboard
You can create as many wallboard schedules as you need to manage the wallboards connected to SmartCentre workstation. You configure a wallboard by
attaching a series of wallboard schedules each associated with a different
shift.
STEP
ACTION
1 From the Wallboard Configuration window click on the Schedule
button.
2 To create a new schedule enter the new name in the Schedule dia-
log box. As usual, this creates a copy of the last selected schedule for
you to change.
3 Press the Add button.
15
Page 19

SET A
CTION
4 Clicking on the Add Template button presents you with a drop
down list box from which you can select one of the new templates
you have just created.
5 Enter the duration you want to display the selected template on the
wallboard before flicking to the next template. Press OK
6 Add and delete other templates as you require.
7 When the schedule is complete, click on OK and then the Close
button.
8 Now click on the Configure button from the Wallboard
Configuration window.
9 Delete any schedules you do not require and click on the Add
Schedule button to select the ones you want to add.
10 Select the shift during which you wish to run the schedule. Press the
OK button. (Each wallboard schedule is only active during the shift
that is associated with it.)
11 Select whether or not you wish an alarm to sound when one of the
alarm thresholds is reached.
12 Remember to press F1 for help whenever you need it.
13 Press OK when completed and close the wallboard configuration.
At this point the wallboard will be advancing through the schedule
of templates.
How to Send a Temporary Message to a Wallboard
SmartCentre provides a facility for sending temporary messages to the wallboards. This facility acts as an override to the normal operation of the wallboards. You can control the amount of time the temporary messages stay on
the wallboards before they resume their normal operation.
STEP
ACTION
1 Click the Wallboard Messages icon on the toolbar, or
from the menu bar select "Wallboards" followed by
"Messages".
2 A dialog box will appear for you to type in your message or select an
existing message.
16
Page 20

3 Enter the length of time for which you want the message displayed.
4 Select on which wallboard you want the message to appear and
whether you want the wallboard to beep on display.
5 Click on Send Message button, and close.
6 If you have chosen to display the message for an indefinite amount
of time, you will need to click the Clear Message button to remove
the message from the wallboard.
TIP: You can queue up messages for display on a wallboard or series of wallboards using the above procedure. In this case you should click the Clear All
Messages if you need to remove all the messages queued up on the wallboard(s).
17
Page 21

Agent - An agent is the telephone operative who handles calls at an extension. Each Agent is identified by the extension they log in and out of group.
Agent Contention - A situation where there are not enough agents available
to take calls within the named agent group.
Agent Group - An agent group is a collection of agents monitored by
SmartCentre. Agents can belong to multiple agent groups if necessary. For
each agent configured in the system you can make one of the groups that it
belongs to its default group. In this case the agent inherits its configuration
from the chosen default group. This facility allows you to configure the
attributes of a set of agents by simply configuring the attributes of the corresponding default agent group.
Agent Super Group - An agent super group is a collection of agent groups
monitored by SmartCentre. By making reference to a single agent super
group, SmartCentre collects a set of agent groups together for real time display or historical reporting purposes.
Alarms Window - This is a separate window from SmartCentre application
window that provides a list of alarms in chronological order (most recent
first) that are currently active in the system. Each item in the alarms list presents the following information:
• Type of device that is causing the alarm.
• Name of the device that is causing the alarm.
• Type of alarm.
Application Window - A window that contains a running application. Both
SmartCentre and SmartCentre Reporter have their own application window
with menu, toolbar and workspace area for moveable and sizeable data windows used within the application. The application window shares its borders
and title bar with display windows that are fully enlarged.
Call Line Identity (CLI) - The Call Line Identity (CLI) of an incoming call
is the telephone number of the caller. When the caller is using a direct
exchange line the CLI will usually identify the caller correctly. In cases where
the caller is dialing out from a PBX, the CLI will normally only identify the
organization who made the call and not the individual caller.
18
GLOSSARY
Page 22

Contention Report - A contention report provides the percentage of time a
variable number of members in a group were simultaneously free/busy. The
statistics are presented either as non-cumulative or cumulative.
Device - A line, DID number, extension or agent.
Device Numbers - Lines, DID numbers, extensions, agents, and their asso-
ciated groups and super groups are all given up to a 9 digit device number
during the configuration progress. Device numbers are how the above elements are uniquely identified. For example it is possible to change the name
for a device and still reference it correctly. However if you change the device
number for a device it effectively becomes a new device and hence any previous references to the old device will not be accessible, particularly when
you collate a historical report.
DID Group - A DID group is a collection of DID numbers monitored by
SmartCentre. DID numbers can belong to multiple DID groups if necessary. For each DID number configured in the system you can make one of
the groups it belongs to its default group. This facility allows you to configure the attributes of a set of DID numbers by simply configuring the attributes of the corresponding default DID group.
DID Numbers - A Direct Inwards Dial (DID) number is a dynamic numeric attribute assigned to a line on an incoming call. A DID call can be routed to groups of extensions/agents or to individual extensions/agents depending on how the call routing software within the switch has been programmed. SmartCentre can monitor in real time and historically, the activity of inbound calls associated with DID numbers.
DID Super Group - A DID Super Group is a collection of DID groups
monitored by SmartCentre. By making reference to a single DID super
group, SmartCentre collects a set of DID groups together for real time display or historical reporting purposes.
Dialog box - A box that displays command options and configuration
parameters for you to review or change.
Drag - To hold down the left mouse button while moving the mouse.
Exporting data - Use this command to export the data contained in the
report displayed in the currently selected data window. The data is exported
in comma delimited ASCII format. This exported data file can be read into
most commercial spreadsheet and database programs.
19
Page 23

Extension - An extension is the physical telephone handset at which an
agent can receive incoming calls, make outgoing calls or handle other forms
of internal telephony traffic.
Extension Contention - Not enough extensions are available to take calls
within the named extension group.
Extension Group - An extension group is a collection of extensions monitored by SmartCentre. Extensions can belong to multiple extension groups
if necessary. For each extension configured in the system you can make one
of the groups that it belongs to its default group. In this case the extension
inherits its configuration from the chosen default group. This facility allows
you to configure the attributes of a set of extensions by simply configuring
the attributes of the corresponding default extension group.
Extension Super Group - An extension super group is a collection of extension groups monitored by SmartCentre. By making reference to a single
extension super group, SmartCentre can quickly collect a set of extension
groups together for real time display or historical reporting purposes.
GOS - Grade Of Service.
GUI - SmartCentre uses the Windows Graphical User Interface (GUI),
giving it a look and feel which is consistent with other Windows products.
Line - In the context of SmartCentre, a line represents either one of your
external trunks connected to the switch being monitored or one of your network tie lines connecting the monitored switch to some other external
switch. Each line can handle only one telephone call at any one time. These
calls are denoted as incoming or outgoing calls depending on whether the
call originated outside or inside the monitored switch.
Line Contention - Not enough lines are free for new calls. Applicable to line
groups, DIDs and DID groups.
Line Group - A line group is a collection of lines monitored by SmartCentre.
Lines can belong to multiple line groups if necessary. For each line configured in the system you can make one of the groups that it belongs to its
default group. In this case the line inherits its configuration from its chosen
default group. This facility allows you to configure the attributes of a set of
lines by simply configuring the attributes of the corresponding line group.
Long Call - Extension /Agent has been on a call for too long. Useful for
monitoring performance and identifying training needs of agents.
Long Free - Extension /Agent has been free to take calls for too long.
20
Page 24

Long Queue - Too many calls are waiting to be answered in the queue group.
Applicable to line groups, DIDs, DID groups, extension groups and agent
groups.
Long Ring On - Extension /Agent has been ringing for too long.
Long Unavailable - Extension /Agent has been unavailable to take calls for
too long.
Long Wait - Call has been waiting to be answered for too long. Applicable
to lines, line groups, DIDs, DID groups, extension groups and agent groups.
Long Wrap-Up - Extension/Agent has been in wrap-up for too long.
Longest Wait - Length of time the longest waiting call has been waiting for.
Message - Extension/Agent has sent a message to the supervisor. In this case
the text associated with the message is displayed on the alarms window.
MIS - Management Information System.
Maximize button - Applicable to windows that are not fully enlarged. When
you click the maximize button, the following occurs:
• The application window enlarges to fill the screen.
• A data window enlarges to fill the workspace area of SmartCentre application window.
Note: Maximized windows have no borders.
Minimize button - Clicking the minimize button is the same as choosing
minimize from a Control Menu: The window shrinks to an icon.
ODBC - Open Database Connectivity (ODBC) is a standard application
interface for accessing data in both relational and non-relational Database
Management Systems (DBMS). By using the ODBC interface, applications
can access and update a variety of databases / data sources using the same
commands or language as if they were one, providing a relevant driver is
available. By using ODBC a user is able to configure data sources to specific databases. This collection of data sources is then accessed using the same
commands, hence shielding the complexity of individual databases.
Real Time Display - Once operational, SmartCentre can provide immediate visual feedback of the activity on your switch.
Report Template - Report Templates are used by SmartCentre Reporter to
define the contents of a collated historical report. You can create any number of report templates and thereby produce a library of report types which
can be quickly accessed when you collate a new historical report.
21
Page 25

Restore Button - Clicking the Restore button is the same as choosing
Restore from a Control Menu: the window returns to its previous size.
Sizing a Window - You can make a window smaller to view more than one
window at a time, or make it larger to see more of the window's contents.
You cannot move or size a window that has been enlarged to its maximum
size.
Status Color - Many of the real time data windows use color to present the
real time status of devices and device groups. A small number of colors have
been used to avoid confusing the screen with an excess of colors. The colors
used are as follows:
• Green is used to indicate no activity on a device or device group.
• Yellow is used to indicate ringing or queuing telephone calls.
• Blue is used to indicate a device that is active on a call.
• Red is used to indicate an alarm condition. Red can occur in many contexts within the real time displays.
• Gray is used to indicate a non-functioning device such as an agent who
is not logged on.
Voice Mail - Extensions which have been voice mail enabled are treated
slightly differently by SmartCentre. When a normal extension is rung on by
a line and subsequently connects to that line, the displays the extension as
being connected to the line and the line being connected to the extension.
Statistics are then calculated accordingly.
Wallboards - A real time display for agents. If you have purchased the wallboard option, you can use the to display real time call status and statistics
parameters on up to six wallboards simultaneously. You can also send messages to selected wallboards as necessary.
Wrap-Up - When an agent finishes a call, a wrap-up time may be set on the
agents' extension for a pre-determined time set in the Samsung switch. This
will leave the agent in the wrap-up state thereby stopping further incoming
calls being targeted at the agent. The time for Wrap-up can be set per UCD
group or can be disabled if required. SmartCentre tracks wrap-up in real
time and also provides historical analysis of how much wrap-up time each
call required on a per agent basis.
22
 Loading...