

Samsung SMARTCAMERA WB152F, SMARTCAMERA WB150, SMARTCAMERA WB150F, SMARTCAMERA WB151, SMARTCAMERA WB152 User Manual
...
SamsungSMARTCAMERA
UAI_
WB150/WB150F/WB151/WB152/WB152F
Ttiis tis®r manual iT_clude,sd®taiJedusage
instructions for }/our O8['[/@1"F_ J')I@F;/S@..!@8([I
tiqis manual tho_oughlx/
Click a topic
HIIII} II}I SaleII III'I0[III111011
r_ways C }rrlpy /Vlll tile to owing precasllOnS al [ usage T DS I0 SVOIQ as geroL/s SltUallofI8 aficl @ SL/fe DeSK Derformarlce of our car-@er]t
Warning--stuat c-_smat cou a cause to yoursef or
ljury
others
Do not disassemble or attempt to repair your camera.
Ths may resu t r e ecTrc SNOOKor aamage TOme camera.
Do not use your camera near flammable or explosive gases and
liquids.
-his may cause a t re or exolos o
Prevent damage to subjects' eyesight,
Do not Jse the rash Jncose }ro) slty (closer than 1 m/3 lt/to
Deolole or SrlffNals Ify )u use me Tash toe c ose to ycur suoject s
eyes, _nIs cab cause te['¢}orD.ryor DermArlerl[ eyeslgn[ aar-nage
Keep your camera away from small children and pets.
F\eep youI _ camera 81 61al a( 3essorles out of the "each of sN'-ia
}Nlaren and an rns.Is. Sma i}8[[8 Yqay 3aJse cnoF, r _ DI" sel'lou8
nju% if swal owed. Mov r"£ Da_sana _ccessones _-_y presen_
}nysioa ]angers as we
Do not insert flammable materials into the camera or store these
materials near the camera.
Ths may 3ause _ ire or e]ectr s sn )ok
Do not handle your camera with wet hands.
Th s may resu_ in eectr c snock
Do not expose the camera to direct sunlight or high
temperatures for an extended period of time.
U_-, ongea exposure to 8Jrl ]NY or extreme ier@ Derail res ca
3suse oermaneN_ aamage to yoL/r cameras [rlYerNal OR O( /enIs
1

Avoid covering the camera or charger with blankets or clothes.
The camera r ay }verneau wr _'nmay _Jstorrthe carnera o
cause a fir÷.
If liauid or foreign objects enter your camera, immediately
disconnect all power sources, such as the battery or charger.
and then contact a Samsung service center.
Comply with any regulations that restrict the use of a camera in
a certain area.
* /_vc d nterfer÷noe wt[ otner electronic aevloes
. Turn offthe samera wrlen [r an aircratt. Your camera car] cause
interfere_lce With arcratt 6 ]u [ ent, Fo OW a airline regJlatlons
stria turn i)ff_bur carnerawnen alreotea D_ r-lrllne Dersonne
. Turn offthe camera near qqenlcal enulr-r'nent. 'four camera can
interfere wtl rnenloa enulomer_ in nosr tal8 c heath care
fao/t es. Follow al regulat ons, DosIeo warn rigs, ann n_recrlons
frorn ned cal oersonne
Avoid interference with pacemakers.
Maintain a mnits-Jm of 15 crrl 6 inches Dewveen in s
camera ann 8 bacernaKers to avon }otentla interference
as recornmen sen D the manufacturer ana IHe JnGS}en®en_
researcr" _rou }. Wireless Technolcgy Research. It'you nave
an} "eason to sus }eCTtna_your carnef;_ _s _terfering w[rr
a }acemaKer or other mec }al @evce. tu n off the camera
mnqen ate y ann COnTactthe manJfacturer ot the pacemaker ol
Tleo cal ®e_,ce for guidance
2
/_ Caution--situations Tna_cou a cause aarnage to yc _rcamera Use the battery only for its intended purpose.
o/ }ther eauiernent M sus rg TheE_ery may _'ausea fire or e ectr c snoc_
Remove the batteries from your camera when storing it for an
extended period of time.
/sIa ea oatTerles rr/ay eaK or corrode over TJr13e s_na cause
serous oa['rlage IO '}/OUr c_Yrler_-t
Use only authentic, manufacturer-recommended, Lithium-ion
replacement batteries. Do not damage or heat the battery.
/aairleHi c. aamagea, or neaie8 Da_erles may cause cafire c
persona_ J{_ju_
Do qot touch the flash while it fires.
Theflast s eryno_whentredanamayDurr )ursKin
When you use the AC charger, turn off the camera before you
aisconnect the power to the AC charger.
Fa ing TO ao s D ['38 9SU I • "e or eleclr c s 1( b_,
Disconnect the charger from the wall socket when not in use.
Fa ing to ao so _av "esu t in t re or electrc shoc
Use only Samsung-approved batteries, chargers, cables and Do not use a damaged power supply cord. plug, or loose outlet
accessories, when you charge batteries.
This may cause a tire or eectr c snc s_
" USrlc_ JnaulrlorlzeG DaIIeH@8C[ _.rgers, caoles or accessories
ea_ sasse batteries tc eXDIOC9, aamage your careens or cause
i@ury. Do not allow the AC charger to come in contact with the +/-
* Sar sung Jsnot r÷sponsible 1ordamage }r njJres caused Dy terminals on the battery.
unapprovea Das:eres, chargers, capes or aooessores. This may cause a tire or eectr _"snoo_
3
Donotforcethecamera'spartsorapplypressuretothe
camera.
ThsrlaycaLse}uroarT/enstornafunetor
Exercisecautionwhenyouconnectcablesoradaptersand
installbatteriesandmemorycards.
f_eLIorcetheconnectors,improper@'connec_ca}es,Jr
xqr}roDer_ns_alea_enes aria memory caress,yo_ cs qc _rnage
DO re. coN[/eotore, aNG socessol @8
Keep cards with magnetic strips away from the camera case.
qtomqaton stor_a orq trqe c_).r_ may De aamagea or eras®c
Never use a damaged charger, battery, or memory card.
Th 8 may r@su t [1 electr c SNOOK or carlq@'a mafJ lot on c cause
atr÷
Check that the camera is operating properly before use.
]he manufacturer takes no r÷seonsD ty tot ar% Dss of files or
®amage mat may r_sult from _amera malfunction or im_bro_ber
use,
You must plug the small end of the USB cable into your camera.
t the cable is r÷versea, t may aarT _ge /curt es. The
manutactur÷r is no_r÷ssonsibb for a }ss of data
Avoid interference with other electronic devices.
our cam@ _em ts radio tr÷®uen :y (RF) s gnals that may nterfer÷
&'lTnuns e@e@or Ir_"}roper 5 sne@eq elec_roHc eau }met1{
BUCHas pacemakers, neanng a@s, me@cs ]evloes. an@
Krler eleotroH c aev 3es in nor'ties or ven cles. Co 8ut the
T/anutactur÷rs of bur electronc 8evlcee to solve a _ interterer se
xoDlems you expen÷nce. To x÷ven_ urqwsnlee nterfer÷nce, use
bny Samsung ae )rove@oevces }r access bres
Use your camera in the normal position.
Ave]@ CONta( _Wl_N your car'@®ras INIeRqs srqt@ Ra
• Datatransterr÷c /la WLAN coulc : DleaKea, so avola
tmrIsf_ g seNs tlve a_a i[/ DUe C a_as or oN eDeN NelWOrKS
• The cam@ s _la utaetur÷r is no_ is Ne tot any aa_a Transferstl a_
nfrnge on copyrgrxs, traaer-narKs, r%@lectua }roper[y awe, }F
Duello GeceNcy or_KlaNC®S
4
Copyright information
• Microsoft Windows and the Windows logo are
registered trademarks of the Microsoft Corporation.
• Mac is a registered tradernark of the Apple Corporation,
• Wi Fi®,the Wi Fi CERTIFIED logo, and the Wi Fi logo are
registered tradernarks of the Wi Fi Alliance.
• Trademarks and trade names used in this manual are
the property of their respective owners.
• Camera speoifioations or contents ot this manual may
be changed without pnor notice due to upgrade of
camera functions.
• We reoomrnend using your camera within the country
where you purehased it.
• You are not allowed to reuse or distnbute any part of
this manual without prior permission.
• For Open Souree License intormation, refer to the
'OpenSoureelnfo.pdf' in the provided CD ROM.
_8_t{ G U[_G St[
_earnaDou]yourcameras ayout, cot 3.aria DasJc
functions for shoot ng
....... £(J IL_ [_C[ O[l_
_earnnow to CaDTU[S a D[lOIO ana recora a vlas ) o
3eectlng a rnoae
_earnn<w to se__[leOPTIonsIr ShootHlgmoae
_earr low to play oaeK prloto8 C ]eos, aria ealt
Dr/oIos or vlaeos /%18o. learD [low to con[lest your
camera to yoL 3OmDUleK DROIC printer, or 7
................ }t 50_/WM152_ on
_eal how t( CO[lRect to wireless local area De94 DrK,c
'VVLANs]an Jsetu[lctons
"4
34
53
76
99
Sefer to c xlo[ls IC sontgure } }ur carneras sesl gs
120
_nd.;e_ _ ×es 126
Get informati} about error messages sDeefieatlons
ar]a ma lisps[lee
5

Smart Auto SMART
Program P
Aperture Priority, Shutter Priority, Manual A'S'M
Scene SCN
Magic Plus
Wi-Fi WB150F/WB152F on WFFi
Live Panorama WB150/WB151NVB152 ony) _]
Settings
Movie b_
[]
Additlona ntormatio
Safety warnings ana )reca.]tlons
]arnera butters. Forexampe, [Shutter] represents rne
snu_er DUlTON,
Page number ot related intom_ator
The order of oetons or menus you rnusl seect to
Dertorr a step: for examele: Seect Face Detection
Normal teeresentsSelect Face Detection anatnen
select Normal
Annotator
Shooting mode icons
]]'/@S@ iCODS aDD@at i[/tD@ tex_ wrleri a tunoti[ "l is aval aD @ n a
r'r]oae, See the example }elOW,
dote: The SCN or _ moae may not support tunctions for a
scenes or r-noaes.
For exam pie:
_,qfJS[F/(_ uta _X SHr_:_ m_K_a_ _v
Avalable in Rrogran
Depend ng on the nt_ls ty ot the alrb _lt I ght you photos Aperture Priority,
m_y De 1o_ br gn_ or clark r _nese _ases you can aal J._l ln_
o/, t........ g .............. SkJtter Prority, a/c
3 e moaes
A Ddrf, er _, Neut_ 0 A Brgh_r(+)
6
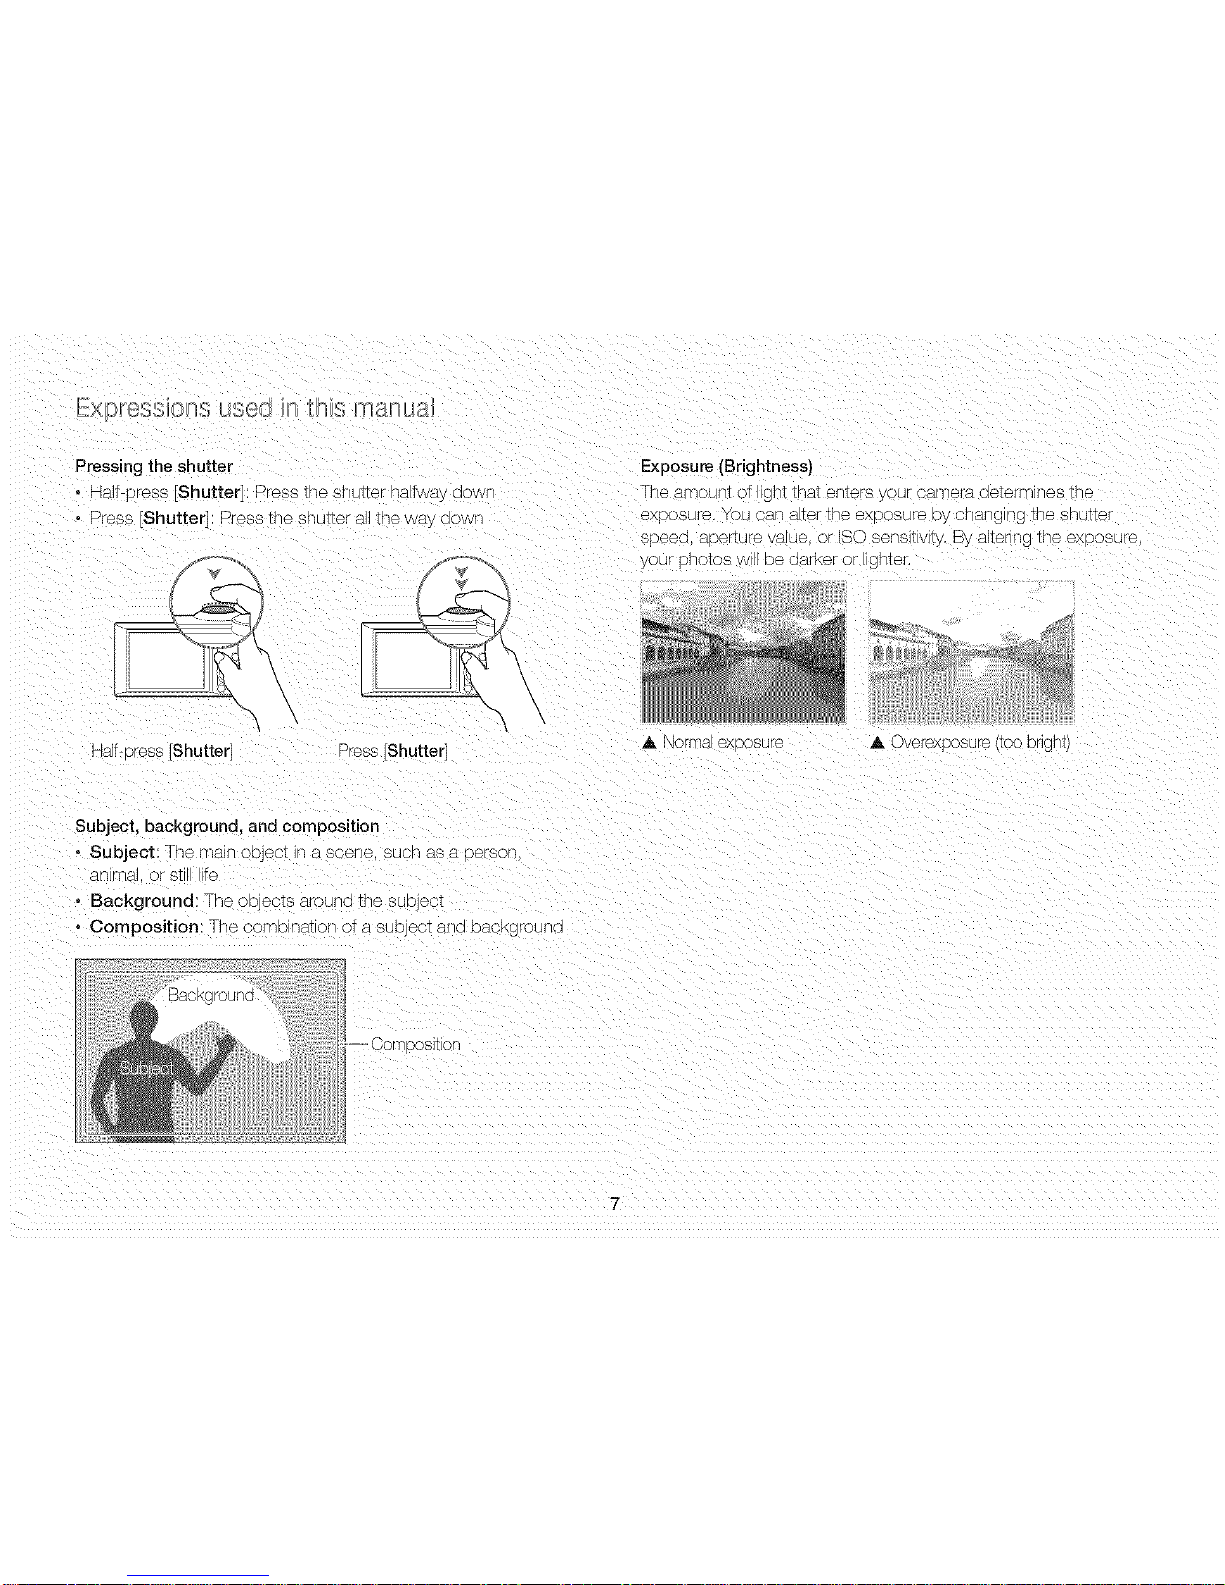
Pressingtheshutter
• Halt r r÷ss [Shutter] Press the sh J_Ternaltwa, aowr
• Press [Shutter]: Press the snu_er E the way aowr"
Half-Dress [Shutter] Sress Shutte(
Exposure (Brightness)
TI'/@ _l['nOU[qt C" _[qI trlat @rlt_Fs _ c uF ca[-q@ra cl@t_r[-nlrl@s frle
exoosure, rou can at_er_Heex }osur÷ aycrlarlg ng _le shutter
s_Deea,aDerzurs /aJe. }r ISO sensitivity. By alt÷rng _neexposL -e
Jr r notos W H De aarKer or [ig %@r
A i_orma exeo8ure
A Overexposure/TOODngn_
Subject. background, and composition
• Subject The main object in ascene, such as a person
antnr- Drstl fe
• Background: The oqects arounG the suoject
° Composition The combinat o_ ol a suDjec_ a_G eacKgrounra
-= CornDositio
7
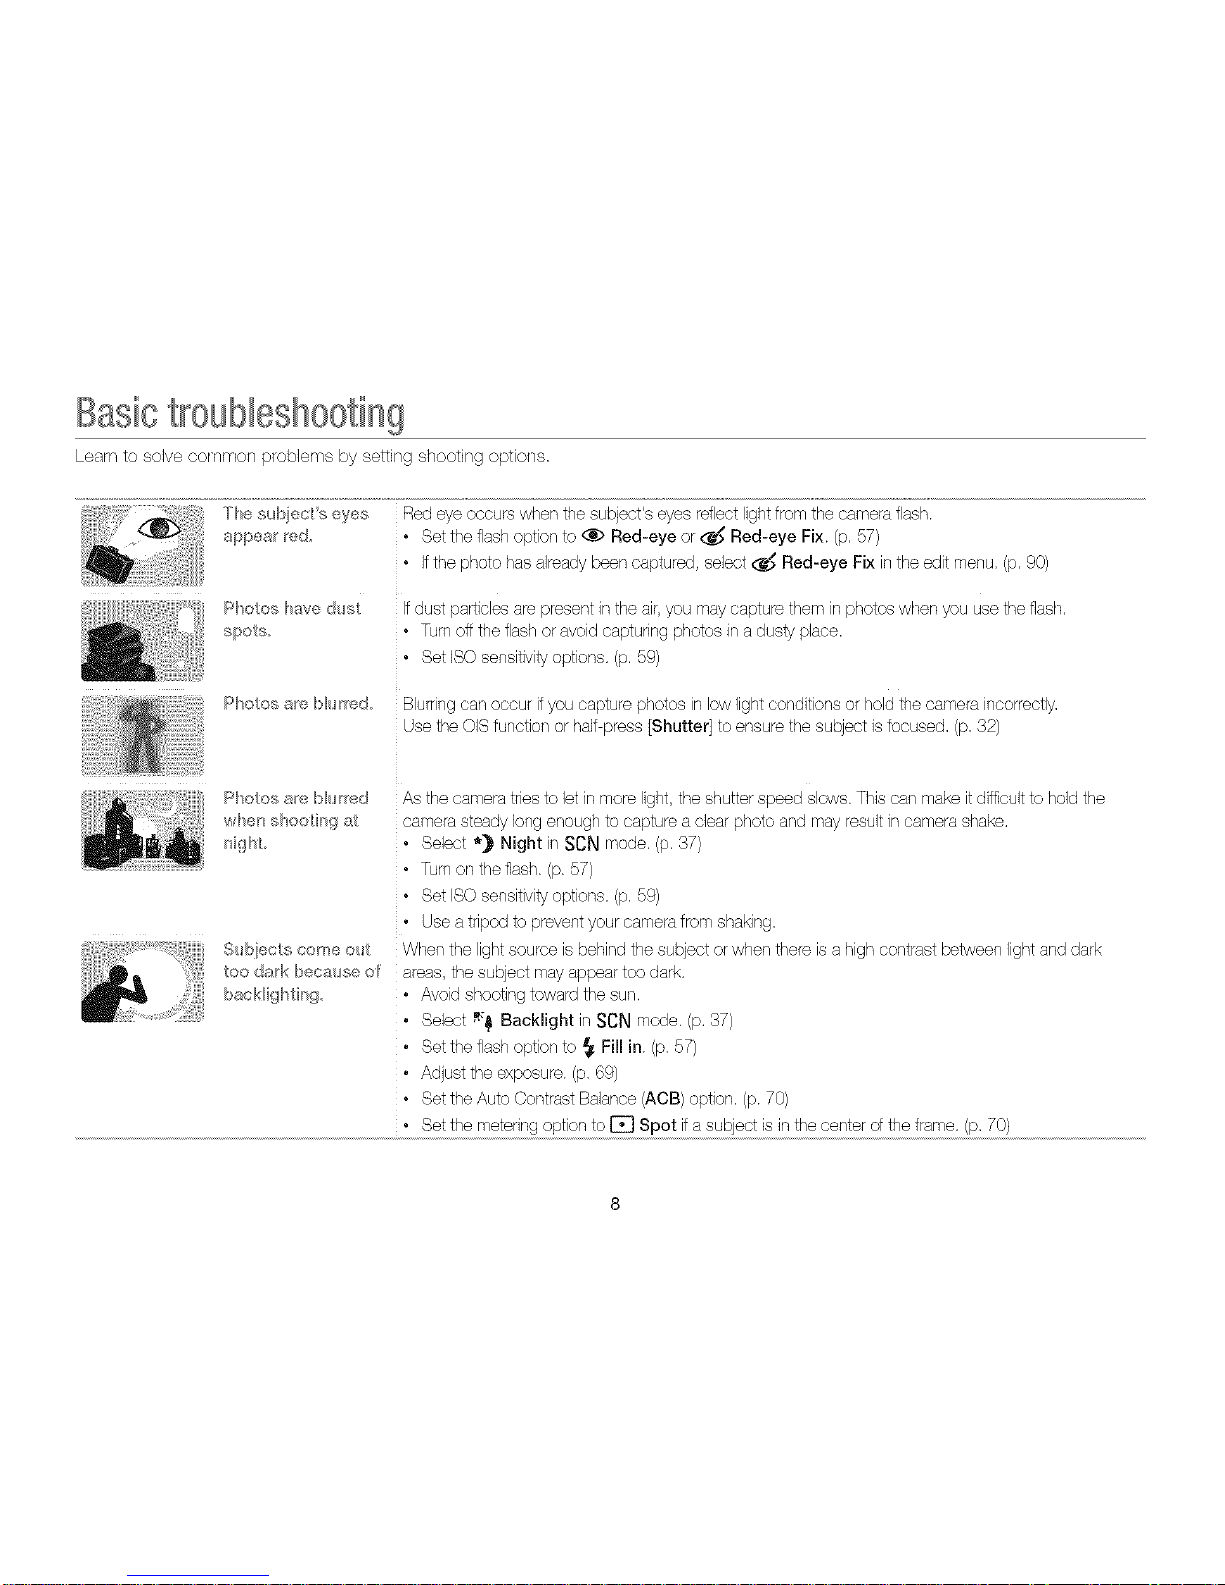
Basictrosbleshoeting
Learn to solve common problems by setting shooting options,
Tile subjec_ s eyes
#:@pear red
Photos are bhrred
Red eye occurs when the subject's eyes retlect lightfrom the camera flash.
• Set the flash option to _ Red-eye or___ Red-eye Fix. (p,57)
• Ifthe photo has alreadybeen captured, select ,_ Red-eye Fix in the edit menu, (p,90)
If dust particles are present in the air,you maycapture them inphotos when you use the flash,
• Turnoffthe flashor avoid capturing photos in a dusty place,
• Set ISO sensitivityoptions. (p. 59)
Blurring can occur if you capture photos in low light conditions or hold the camera incorrectly,
Use the OISfunction or half press [Shutter] to ensure the subject isfocused, (p, 32)
Photos are blurred
when shoo@/g at
nigh_
Subiec_e come ou_
too dark because of
backNghting
As the camera triesto let inmore light,the shutter speed slows. This can make it difficultto hold the
camera steady long enough to capture a clear photo and may result in camera shake,
• Select *) Night inSCN mode. (p. 37)
• Turnon the flash. (p. 57)
• Set ISO sensitivityoptions, (p, 59)
• Use a tripod to preventyour camerafrom shaking,
When the lightsource is behindthe subject or when there is a high contrast between lightand dark
areas, the subject may appear too dark,
• Avoid shootingtoward the sun.
• Select _:_ Backlight in SCN mode. (p, 37)
• Set the flash option to _ Fill in. (p, 57)
• Adjust the exposure. (p, 69)
• Set the Auto Contrast Balance (ACB) option, (p. 70)
• Set the metering option to [] Spot ifa subject is inthe center d the frame, (p,70)
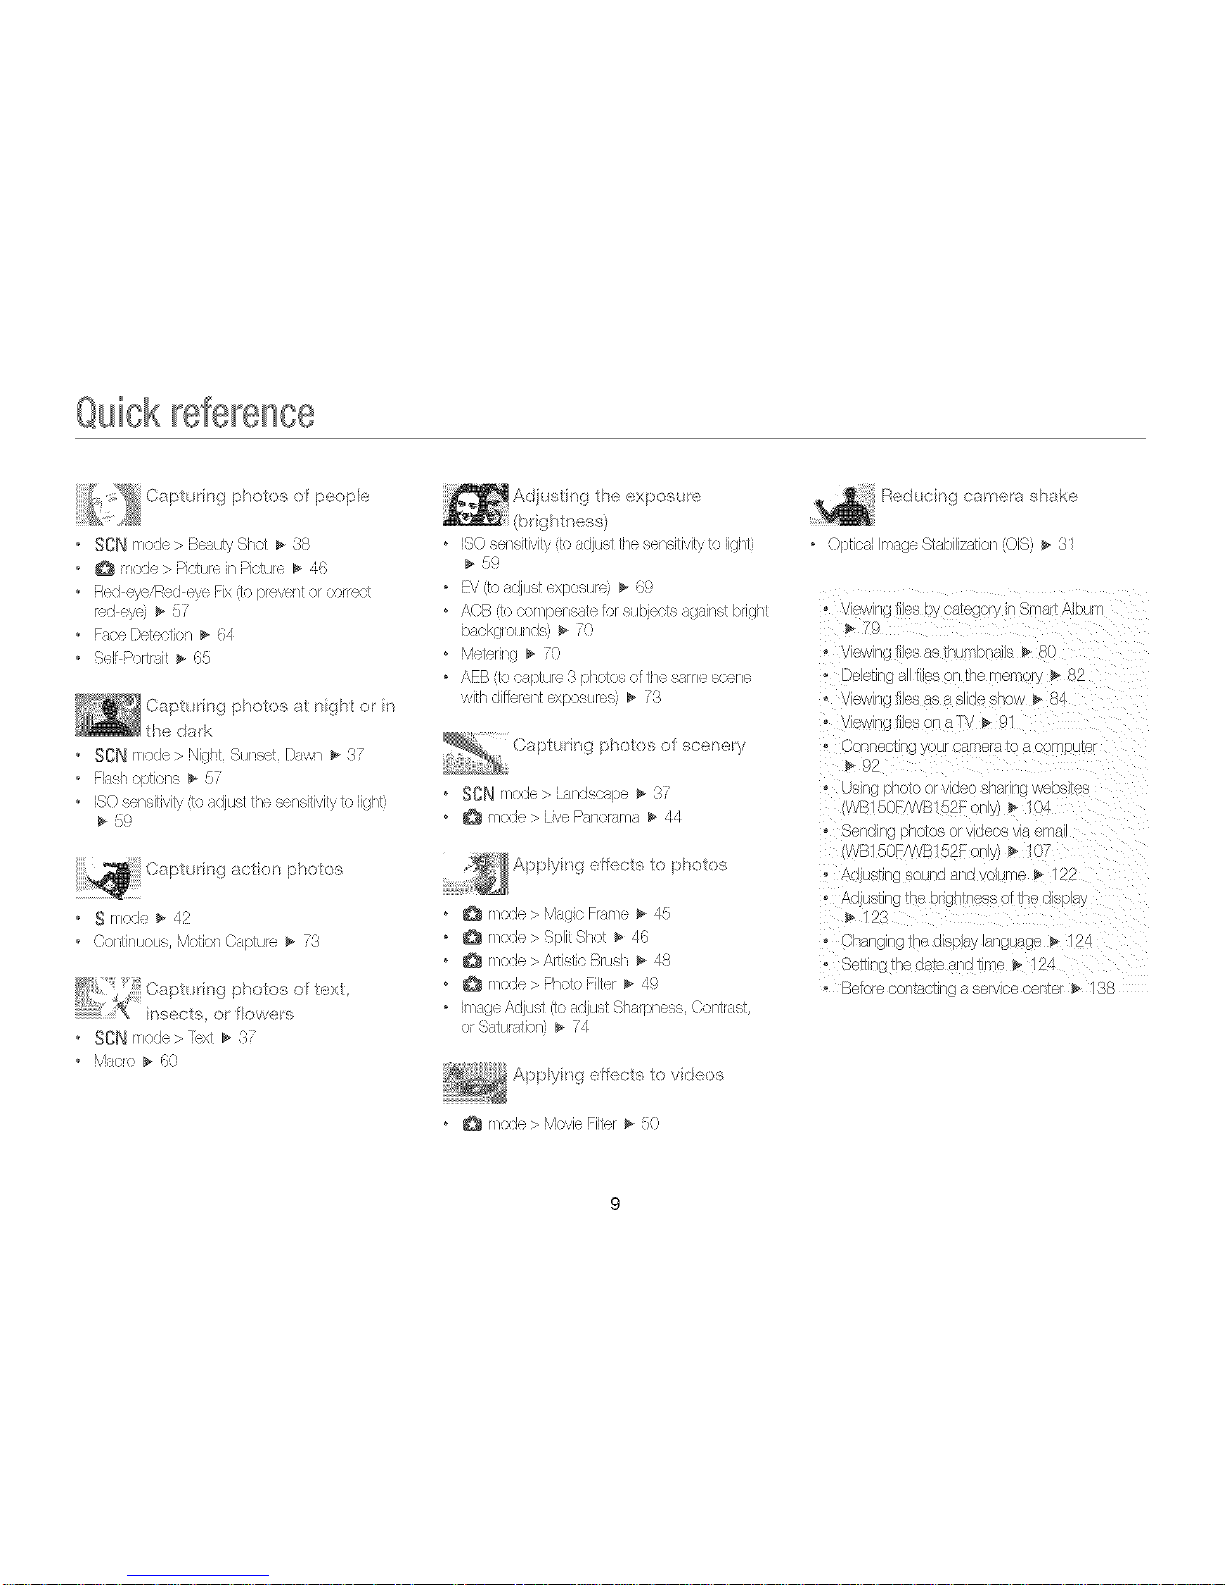
quick reference
l:eop le
° sen mole > BeaiD, Shet _ 38
@ rno:_e > Pictt£- in Pk tu_e _ 46
° R_J cjc/% d eye,FIx(topu,ve!_toru,._c<-c
re_ e><, _ 5,
° Face Detedior_ _ 64
Se/h;%4n it _ 65
C @b_dng phot ::_s ngh_ or i_
the dark
° SeN rllode> Night,Sun,_.et,Dawn_ 8.
° Flash)ptiens _ 57'
° iSOsensitivity'Teaojustthesensitivityto iighO
59
S rrL :_e_ 42
Oondn _xi8, Motkn Capture _ 73
SON mode > %xt l_ 3i
° Mae!o _ 60
iSO set/sidvity (b adjust ti_e senqtivity to ii©i/t,
5!?'
• FV it,>adiuet cxpes_,e,_ 89
$\cr} ',recernperlsate _,,r sul_ect>>against brk jh!
bacl<grxlnds) _ YO
lVlet<.:r,nd_ ,O
° AEB (to captur< S pbSos ef the same scene
wiP diPercnt cxposurus} _ 73
° SON mode > [andsca!ae _ 31
• _ reed(, > [ ire Panorama _ ,i
-t
@ mode >/V_agic Fr, ine _ 45
• _ me/e> Split Shot _ 46
° _ mole >Artistic Brush _ 48
° _ mo_e > Photo Filter _ 49
° image Adjqst lie adjqst Sharpness, Cot/trast,
or 8atuc4ion) _ 74
t:fleets to videos
° _ mo:le > blevie Filter _ SO
_ F_e:JL( qq coH_er8 shako
I
)bto_ sage StaJr_Jzutio' ) S _ S
Ve\ /g lies L)}/08 egory r 8F]AI/Dt
29
dlewf _rilesd_s/?c:u_ui _dJJS_ eL
U_la[ _ 81 rilesoil rne opqop _ 4Z
vewGjt@aC s{ v _d
oo/lr:oou • _ )L_rCa/iqOP40 a O/qDU or
92
J_-qP )/]OLOOf video s _r/]{/weosIte8
WB 50WWB/5Pf on y)
,'el ),/]_ 3r:eosorvIOeosvae/]qa
3 50F/WBI'. _Yony) _ 0/
_t_JL_Sr_t_©UDGa/]GVOIL le _ "_
_dJUA[ingrr;e o_@ntnes_sof he d 8p ay
(_}ris g_nf/[noc splsyla_guage _ IZ
f_E _ne_Jare'c2/]( i/_qo i_
o Be%re co_]tAoYi a uurvlce eerl er' _ 1_]_-
Basic [_nc'fions ................................................................. 14
Unpacking 15
Camera layout 16
hlserting the battery and memory card ................ 19
Chargblg the battery and turning on your camera ...... 20
Charging t_e battery .................................................. 20
rdmi_g c_ v'ourectr-@ra ............................................ 20
Performing the inidal setup ......................................... 21
Learning icons ....................................................... 23
Selecting options or menus ........................................ 24
Settingthe displayand sound ....................................26
Scxing t_e display lyp_ ...............................................26
Seq'g tn<_sound .......................................................27
Captunng photos .........................................................28
/(;omir_g ....................................................................29
Redudng camerasha<e¢OlCSb.....................................31
Tips for getting a clearer photo ...................................32
Exk}nd,:_dfunctions...................................34
Using the Smart Auto mode ........................................85
Using the Scene mode ................................................37
Using tse Beauty Sh<;tmode ..................................38
Using the Program mode 39
Using the Aperture Priority, Shutter Priority,
or Manual mode 40
Using t_e Ar_e,tur_ePrloq,ymede 1
Using tse Shc,LterRe',y mode 42
Using tse Manua mode 43
Using the Magb Plus mode 4
Using the Uve P,_u_o'amamerle 4
Using tse Magic Framemode 5
Using tse Sr_,tShot mode 6
Usiqg tS(? F_ctur(? in _csLtJr(e r /(;(Je 6
Using tse A,1st'c Brash mode 48
Using t]e Pheto ;-Jtermode 49
Using t]e M<;vbR_ermode 50
Using the Moqe mode ........ 51
Using t_e Smar, Scene DolecJon mode ............ 52
10
Shoc,_ingopqbns 5s
Sebeting a r'esoLitien and quaB:y ...............................54
Se ectinga rosoluton ..................................................54
S_eetng ar_image qu:qty ...........................................55
Using the timer' . 56
Shooting inthe dark 57
R'<:vr;_U'_gr<:deye 57
U,qngthe F'a,_i_ 57
Aqusfing the ISO sensNqLy 59
Changing tile camera's focus 60
Ubng m_._x_o 60
U_ng auk_ ?_cus 60
Focusing on a seected a'_.a 62
Using tracking auto _<;cus 62
/\d,ust'ng t_ce*<xsusat( ,a ...................... 63
Using Face Detection 64
DeLe(t,_ _ es 64
Caplufing a s_f 'x)t'a,t shet 65
Caplunng a sink: sh<;t ..... 65
Deb.<_"g rye r)in_ng ................................................66
_JsingSms_rtFa(e _'>c(;gnWeq ....................................66
P¢,gis*e_ng *o_;esas yodrFay(:'ix, CVy%w! .................67
Adjusting brightness and eoJor ...................................69
Advsting t_e ex_x_sur<:ms_k_Jy (FR/............................69
Co n'),?ns_tng *<;rL)_}x:_{.Ir_@ (/v.)r-_ 70
Changing !r_emetering optbn 70
Stetting aWh_e F_alru_cosert'ng 71
Using burst modes ........ 73
Adjusting images 74
Reducing the sound of the zoom 75

(}0iii_ilts
Playback/Edi ir_g 76
Viewing photos or videos in Playback rnode 77
StarUngPhqyb,qckmode 77
View'ng phc_los 83
Raying a video 85
Editing a photo 87
Resizing photos 87
Rolating a photo 87
Applying Smart Filterc/'ects 88
AdjusUr!gyourphotes 89
Creating a print order (DPOF) 90
Viewing files on a TV ................. 91
Transferring files to your Windows computer 92
"a/s'orring files with Intellistudio ........ 93
"a/s'erring files r)yconnec£ing the carne!s
,qsa rornov,qbledisk 95
Discer_r_ecUngthe camera (ferWi/_dows XP) 96
Transferring flies to your Mac computer 97
Printing photos with a PictBridge photo pnnter 98
Wire!ess network (NB150F/WB152F o/_ly) 99
Connecting to a WL.AN and configuring
network settings 100
©er_r_ocUr_gt<aW/AN 100
USJ/hgthe Iogir!brows_er..... 101
IXJcKuorkeonr!ec:tion Ups ........................................ 102
Er_teringte_ ........................................................ 103
Using photo or video sharing websites .................... 104
Aceessing a wobsite ............................................... 104
Upleadir_gphotos or videos .................................. 104
Sending photos or videos via email .......................... 106
Cl'_angir!gemailsettings ............................................ 106
Sending phetos er videos via email 107
Sending photos or videos to a smart phone 10g
Using a smart phone as a remote shutter release 110
Uploading photos to a cloud server 112
Using Auto Backup to send photos or videos 113
Installingthe r)r<;grr_mfor Auto Backup on your PC 113
Sending phetos er videos tea PC} ..... 113
Viewing photos or videos on a
TV Link-enabbd TV ............... 115
Sending photos using Wi-Fi Direct ..................... 117
About the Wakeup on L.AN (WOL) feature ......... 118
12
Setfi/_gs 120
Settingsmenu 121
Accessingthesettingsmenu 121
Sour/d 122
Display 122
Connectivity 123
General 124
Appendixes 126
Errormessages......................................................127
Cameramaintenance................................................129
Cleaningyeurcarte_a...............................................129
Usingorstoringthecamerr_ 180
Aboutmemorycards 131
Aboutthebatl:ery 184
Beforecontactingaservicecenter 188
Cameraspecifications 141
Glossary................ 145
FCCnotice 150
Declarationsentenceinofficiallanguages 153
Index 155
13
Basi :ions
Lea "- about your camera's layout, icons, and basic functions fo snooting
Unpacking 5 Selecting opttons or menus .....
Camera layoJt _ lf. Setting the display and sound .............. _:
Inserting the battery and memory card 19 belling the alsu_y Lype 20
Charging the battery and turning on .,_,L_du_esoun_ Z/'
your camera .............. 20 Capturing photos ..... 28
_n_rg ,. 1he D81[ery 2( Looming ,, 2{i
UHI Ig OILVO@FcL_me£a 26 _£1U6_ ca['_lerasllsKe = 81
Performing the initial setup 21 Tips for getting a clearer photo ........... 82
Learning icons .......... {:
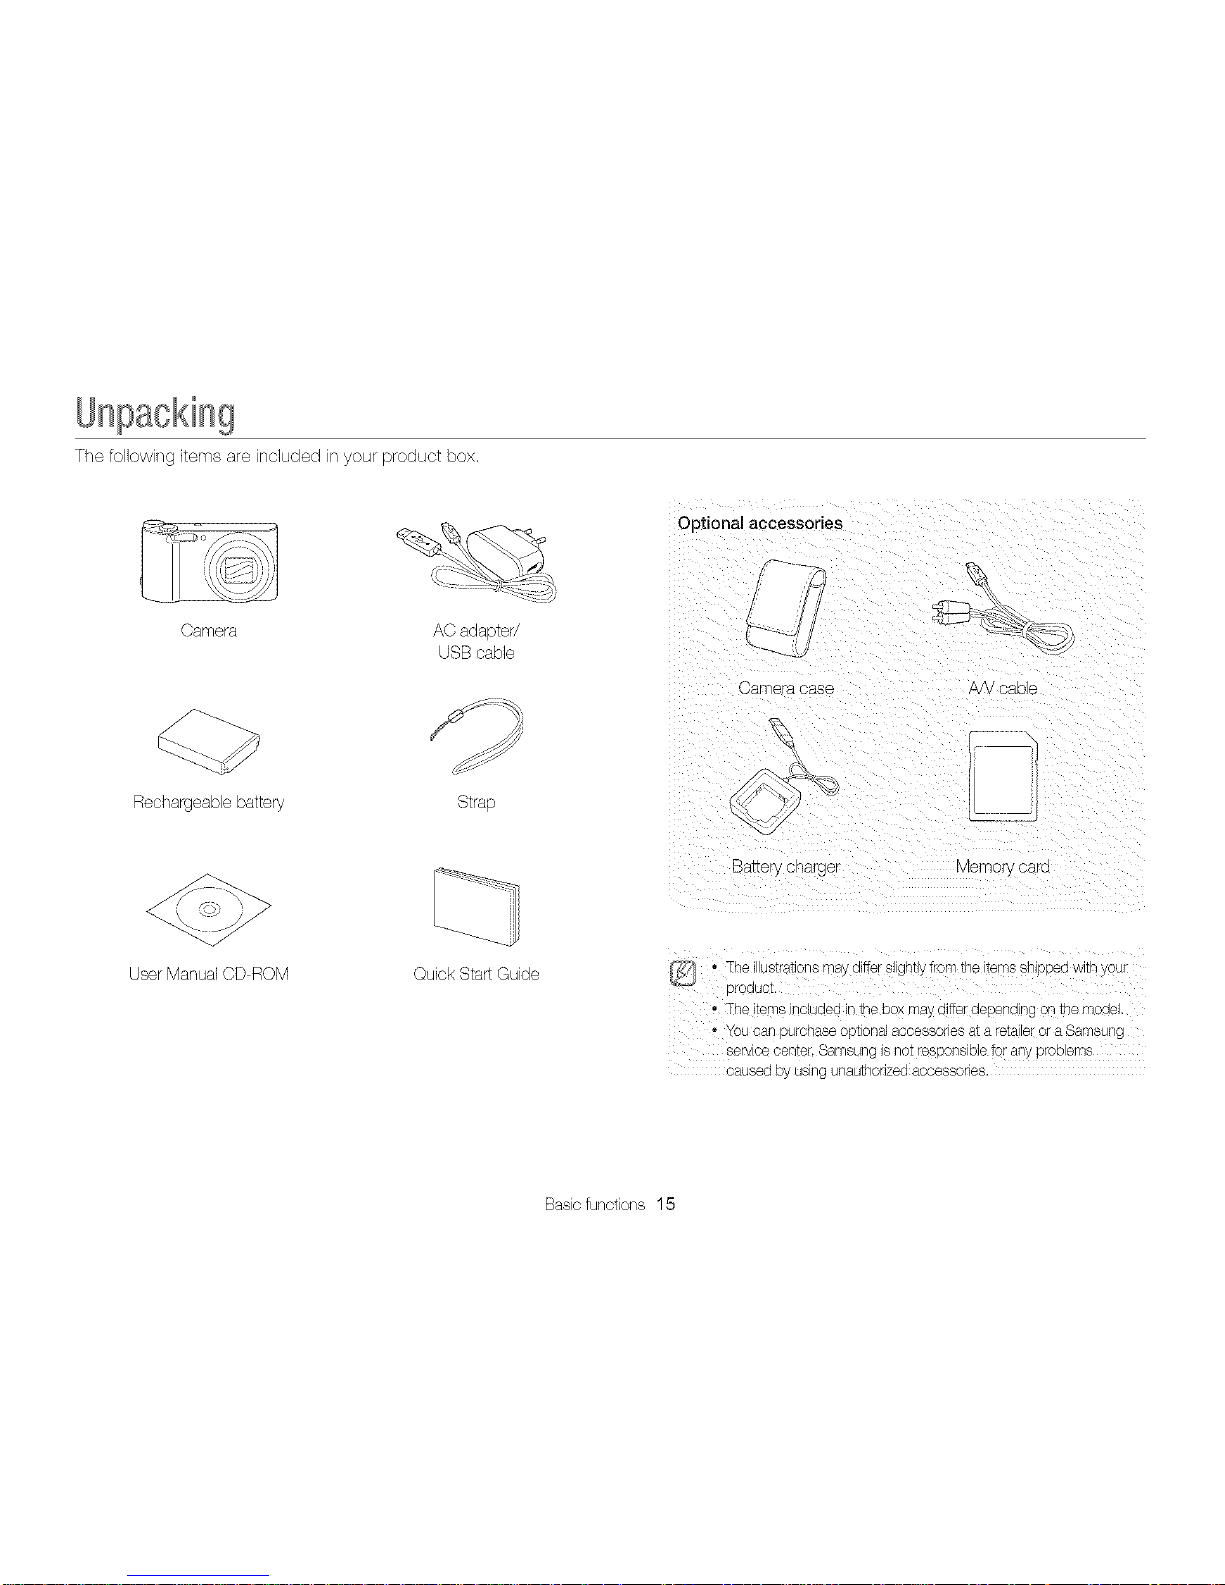
Thefollowingitemsareincludedinyourproductbox.
Camera ACadapter/
USBcable
Rechargeablebattery Strap
User Manual CD ROM Quick Start Guide
Optional accessories
_ Jj
Camera case A/V cable
Battery cnargel e non/cara
I{¢'/_ • The i ustratTonsmay differ slghtly ire n _ne _ems snlppea w trl youl
oroduct,
, The _ems lauaea in _-ieDo may differdependng on _nemoae
- _oucan surcnase oct ona1accessories aTa fetale or a Samsun{
ser oe oenteL Samsung is no_respons Dieor any prod ems
oausea By usng unau_nonzeaacoessones
Basicfunctions 15

Cameralayout
Before you start, tarT%anzeyourself with your camera% parts and their functions.
Shutter button
POWER button
Microphone
Speaker
AF-assist light/Timer lamp -------------Internal antenna*
* Avoidcontact with the internal antenna
while using the wireless network.
(WB150FANB152F only)
Tripod mount
Battery chamber cover
Inserta memory card and battery
Basicfunctions 16
-- USB and A/V port
Accepts USB cable andA/V cable
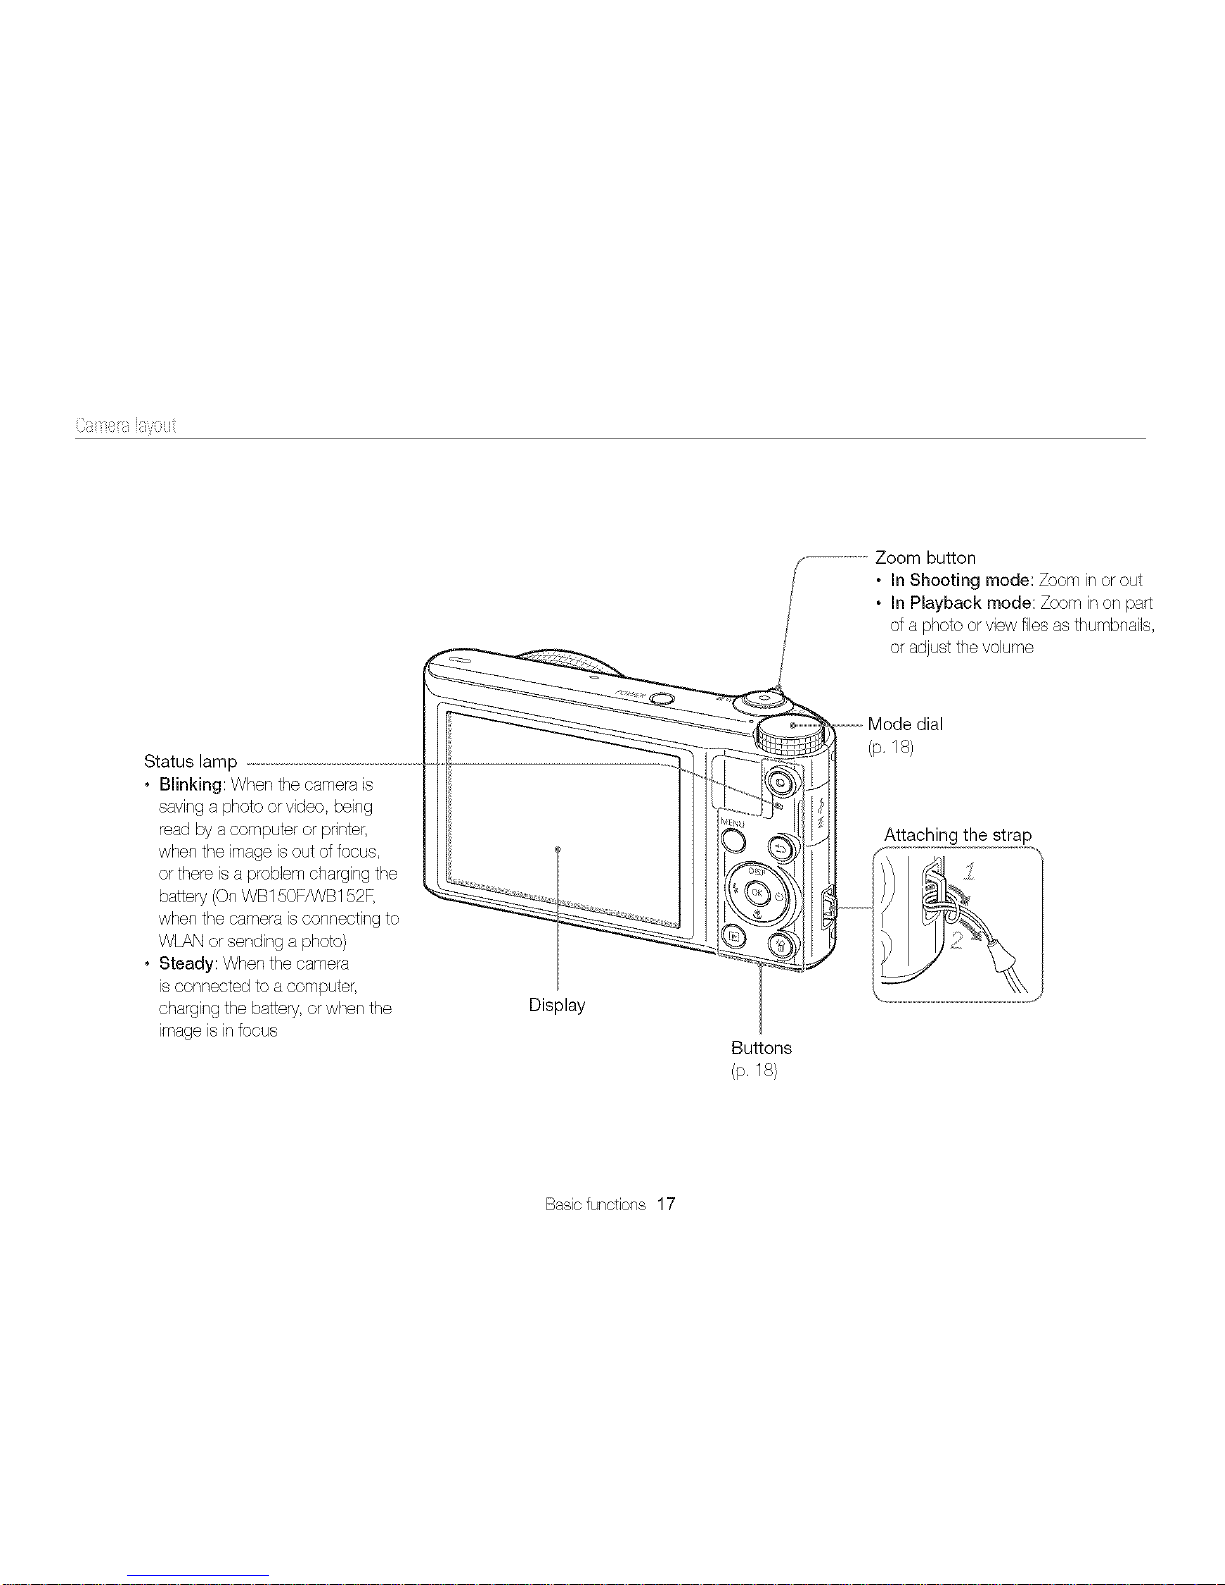
•InShootingmode:Zoominorout
•InPlaybackmode:Zoominonpart
ofaphotoorviewfilesasthumbnaib,
oradjustthevolume
Statuslamp
•Blinking:Whenthecamerais
savingaphotoorvideo,being
readbyacomputerorprater,
whentheimageisoutoffocus,
orthereisaproblemchargingthe
battery(OnWB150FANB152F,
whenthecameraisconnectingto
WLANorsendingaphoto)
•Steady:Whenthecamera
isconnectedtoacomputer,
chargingthebattery,orwhenthe
imageisinfocus
Display
Buttons
(p.18)
(p,18)
Attachingthestrap
Basicfunctions17
Modedial Buttons
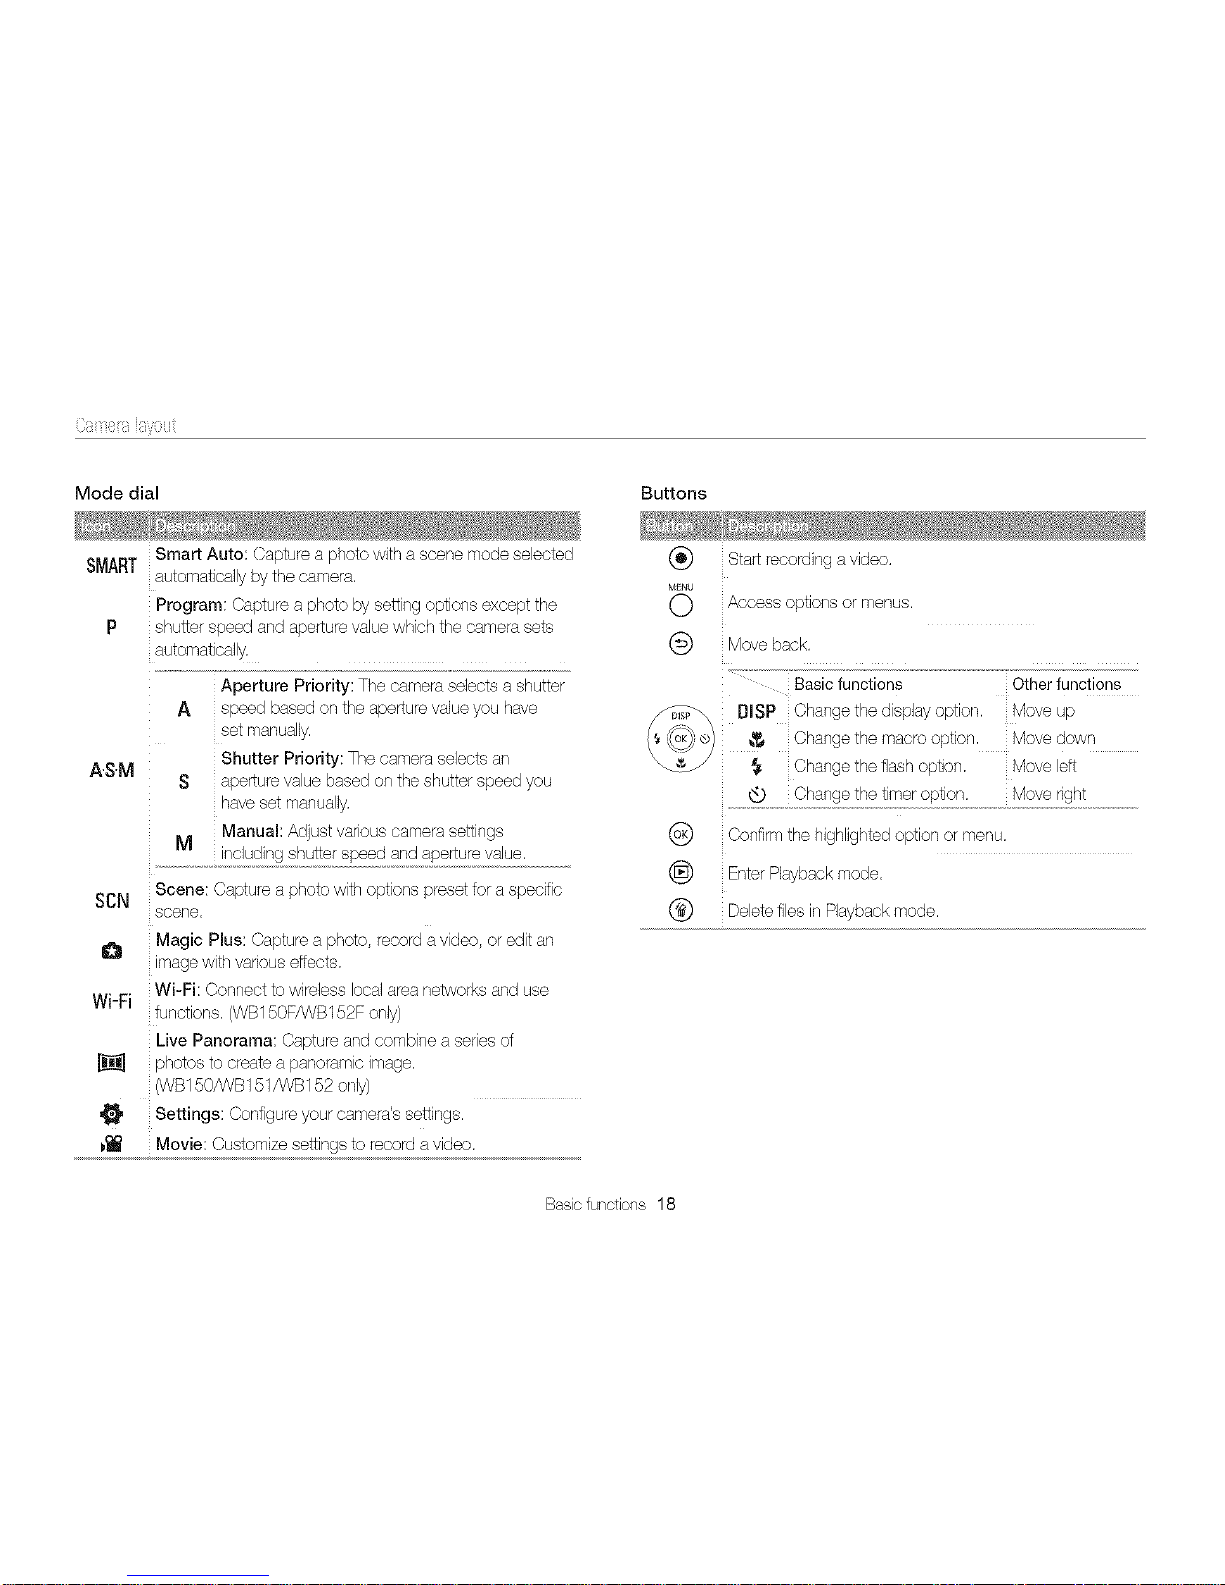
SmartAuto:Captureaphotowithascenemodeselected
SMARTautomaticallybythecamera,
Program:Captureaphotobysettingoptionsexceptthe
P shutterspeedandaperturevaluewhichthecamerasets
automatically,
A.SM
Aperture Priority: The camera selects a shutter
A speed based on the aperture value you have
set manually,
Shutter Priority: The camera selects an
S aperture value based on the shutter speed you
haveset manually.
M Manual: Adjust various camera settings
including shutter speed andaperture value.
SCN Scene: Capture a photo withoptions preset for a specific
scene.
O Magic Plus: Capture a photo, record a video, or edit an
image with variouseffects,
Wi-Fi: Connect to wireless localarea networks and use
Wi-Fi
functions. (WB150FANB152F only)
Live Panorama: Capture and combine a seriesof
_] photos to create a panoramic image,
(WB150AR/B151ANB152only)
,_ Settings: Configure your camera's settings.
_ Movie: Customize settings to record avideo,
(_) Startrecording avideo,
M_U
O Access options or menus.
Q Move back.
Basic functions Otherfunctions
_i_ [lISP Change the display option. Move up
_ Change the macro option, Move down
Change the flash option, Move left
Change the timer option,
(_ Confirm the highlighted option or menu,
(_) EnterPlayback mode,
(_) Deletefiles in Playback mode,
Basic functions 18

Inse£ingthebaSer7andmemorycard
Learnhowto insertthe batteryandanoptionalmemorycarolintothecamera.
Push the card gently until it
disengages from the camera,
and then pull itout ofthe slot.
Insert a memory card with the
gold-colored contacts facing
up.
Rechargeable baltery
Insert the battery with the
Samsung logo facing up
Rechargeable baltery
Slidethe lock down to release
the battery.
Basicfunctions 19
Chargingthe baSer7andturningon70urcamera
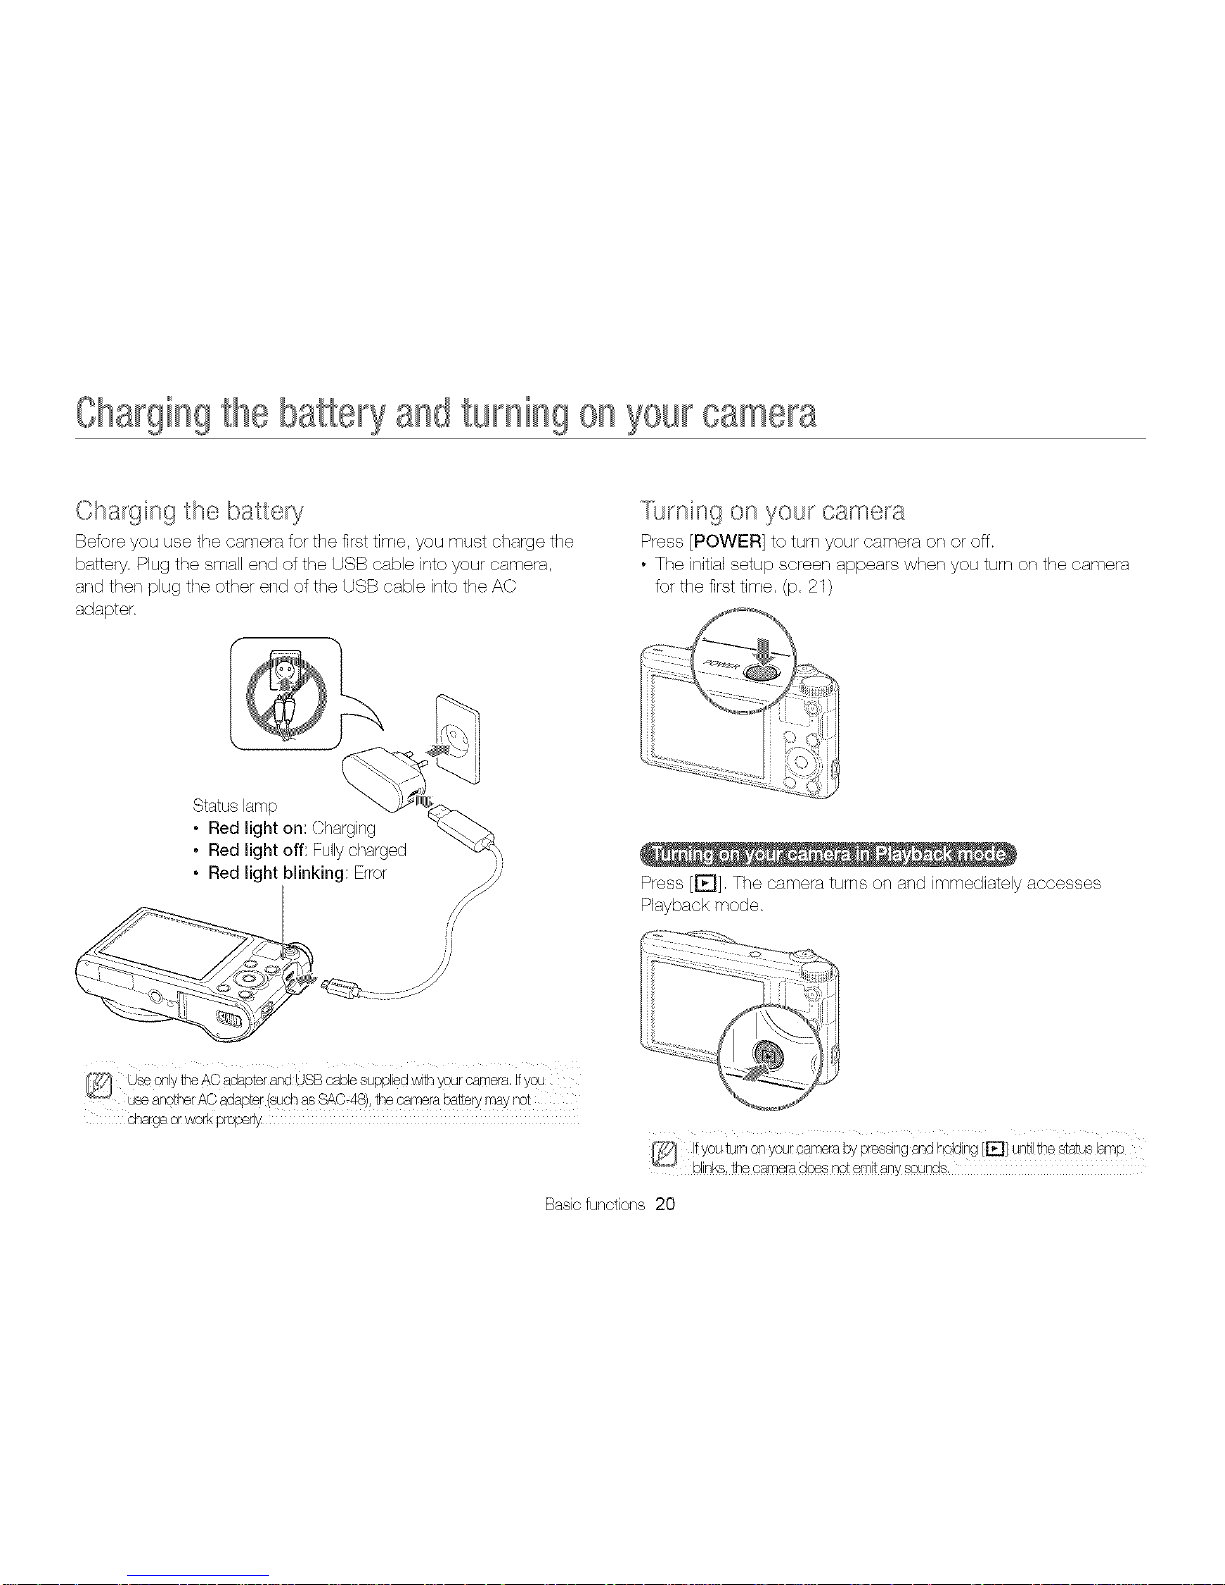
Charging the batte_%_
Before you use the camera for the first time, you must charge the
battery. Plug the small end of the USB cable into your camera,
and then plug the other end of the US8 cable into the AC
adapter.
Status lamp
• Red light on: Charging
• Red light off: Fullycharged
Turning on your camera
Press [POWER] to turn your camera on or off.
• The initialsetup screen appears when you turn on the carnera
for the first time. (p, 21)
Press [_], The camera turns on and irnrnediatel, accesses
Playback mode.
Chargeorworkprop_r_y
Basic functions 20
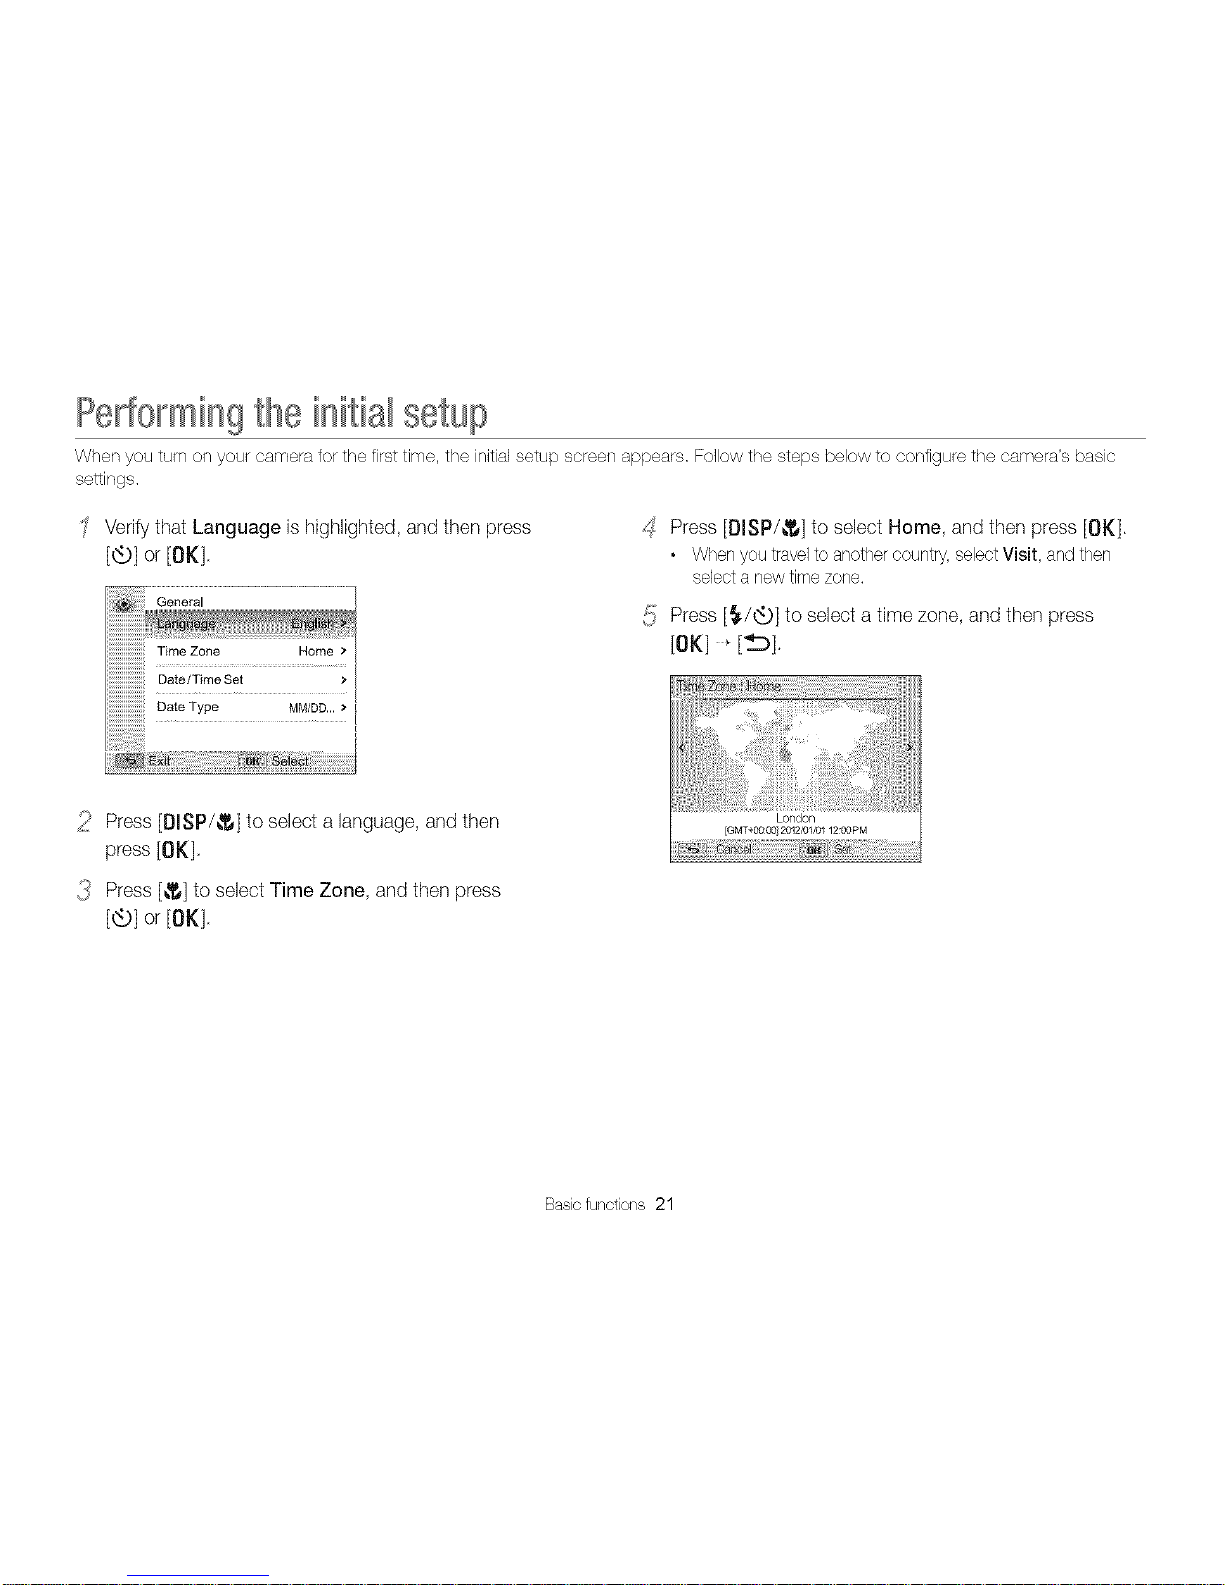
Pe erming theinitial setup
Whenyouturnon yourcameraforthefirsttime,the initialsetupscreenappears,Followthe stepsbelowto configurethe camera'sbasic
settings.
Verifythat Language is highlighted, and then press
[®}or[OK]
d Press [DISP/_] to select Home, and then press [OK].
• When you travel to another country, select Visit, and then
select a new time zone.
:; Press [_/_t_)]to select a time zone, and then press
_J
3
Press [DISP/_] to select a language, andthen
press [OK].
Press [_] to select Time Zone, and then press
[®}or[OK].
Basicfunctions 21
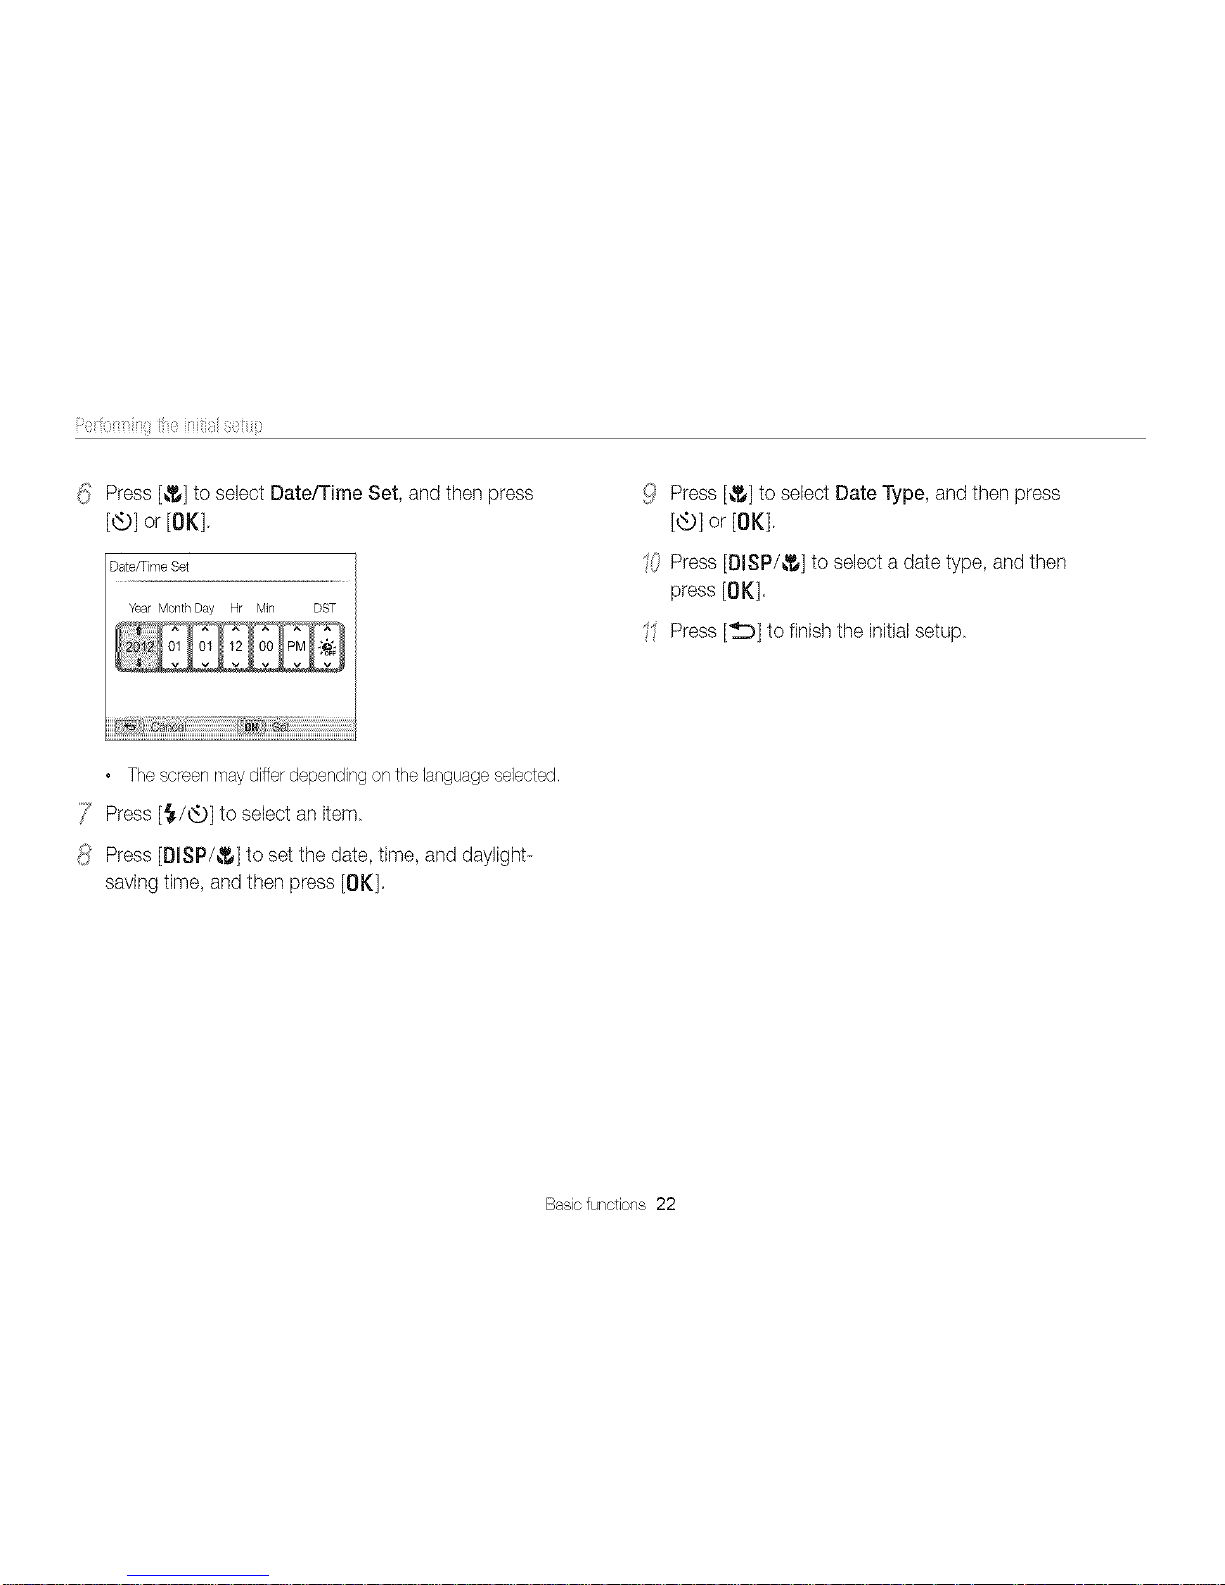
_!_Press [_] to select Date/Time Set, and then press
DST
[®] or[OK].
Date/Time Set
Year Month Day Hr Min
!!!!_11i_!_!_!i_i!iiii!iiii!i_!!!!!_!_!i_i_!i_i_!i_i_i_i_i_i_i_i_i_i_i_i_i_i_i_i_i_i_i_i_i_i_i_i_i_i_i_i_
• Thescreenmaydifferdependingon thelanguageselected.
/7 Press [_./@] to select an item
_:4Press [I]ISP/_] to set the date, time, and daylight-
saving time, and then press [OK].
!'i# Press [_] to select Date Type, and then press
[®] or[OK],
'i/ Press [BISP/_] to select a date type, and then
press [OK],
' Press [_] to finish the initialsetup
Basic functions 22
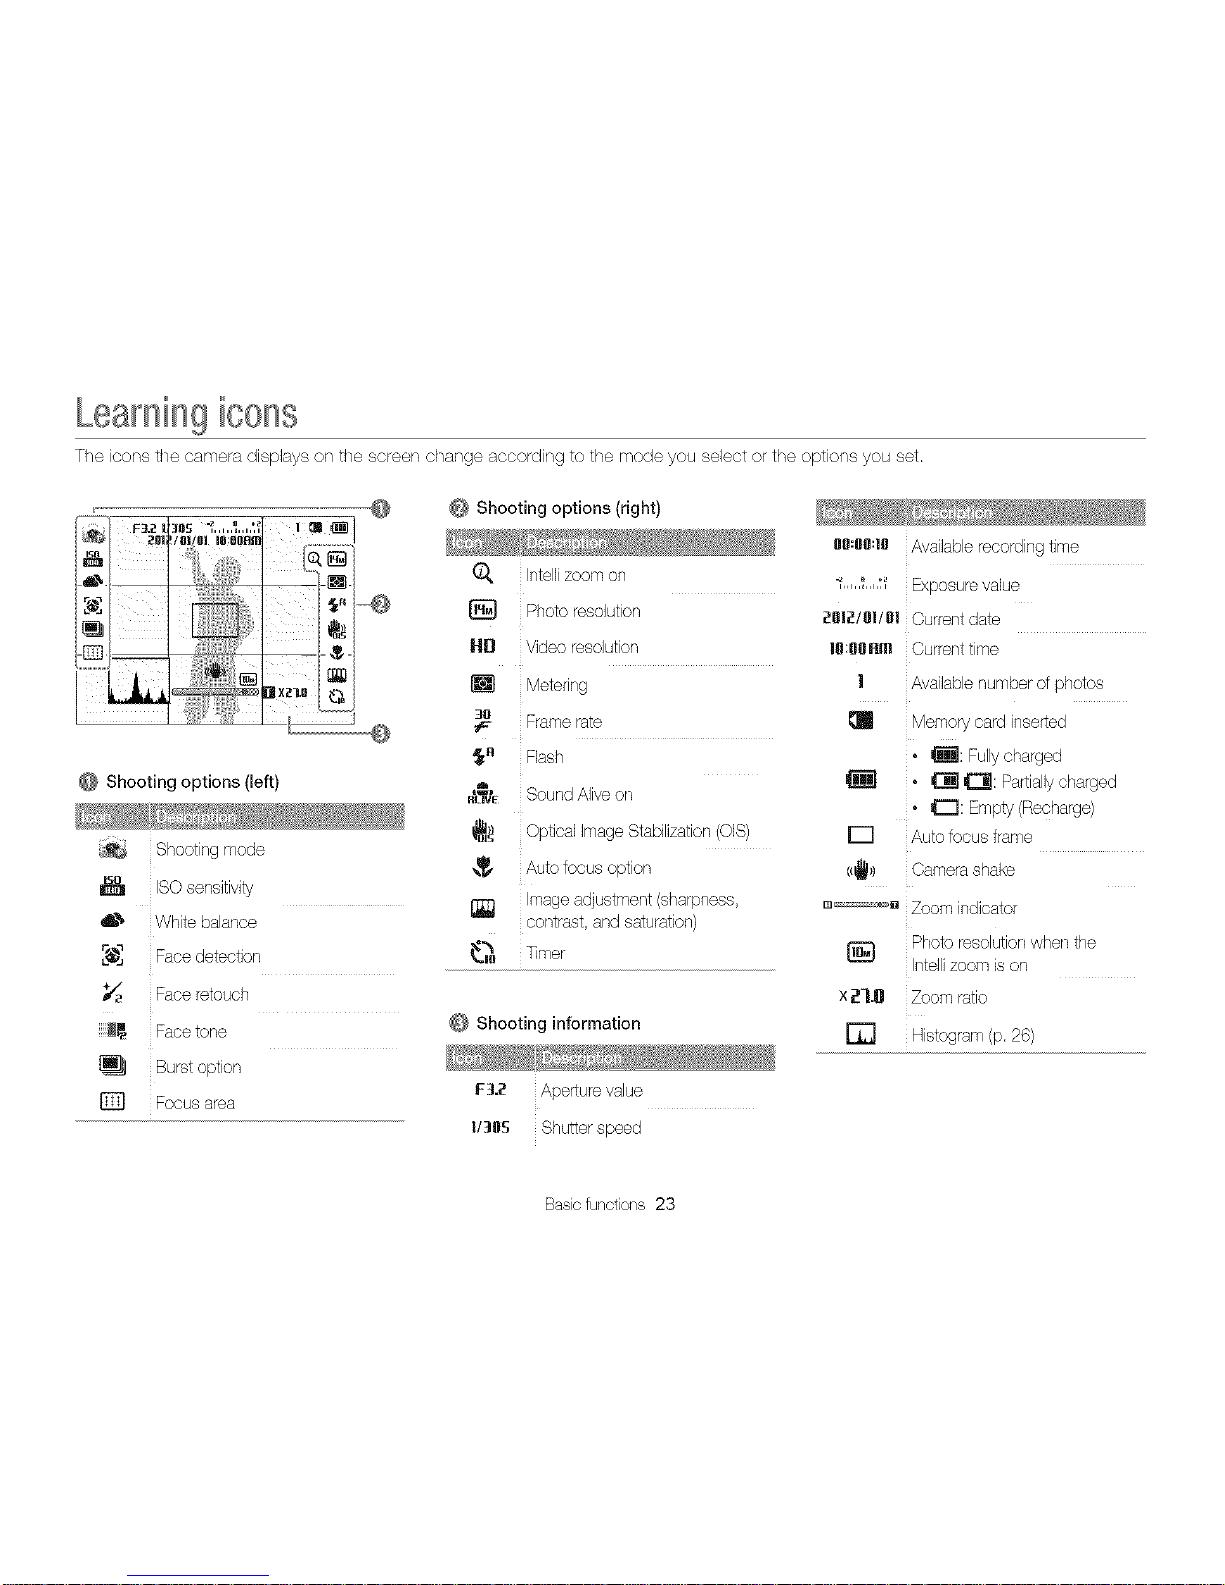
Learningicons
The icons the camera displays on the screen change according to the mode you select or the options you set
0 0 Shooting options (right)
/ii
Shooting options (left)
_ Shooting mode
I_ ISO sensitivity
6 _' White balance
,'_ Face detection
Face retouch
Facetone
Burstoption
D Focus area
Q
lid
[]
3[I
f
¢,a
Intellizoom on
Photo resolution
Video resdution
Metering
Frame rate
Flash
Sound Aliveon
Optical Image Stabilization(OIS)
Auto focus option
Image adjustment (sharpness,
contrast, and saturation)
Timer
Shooting information
F_t2 Aperture value
I/lOS Shutter speed
011:00:111Availablerecording time
_,,,,,';,,,,tf Exposure value
_81_/01/1111Current date
1090R_ Currenttime
| Availablenumber of photos
Memory card inserted
_: Fully charged
° _ _: Partiallycharged
° C[]: Empty (Recharge)
r-1
(_) Camera shake
.... _ Zoom indicator
Photo resdution when the
Intelli zoom is on
x ;_1.0 Zoom ratio
[] Histogram (p. 26)
Basic functions 23
 Loading...